Время на прочтение
10 мин
Количество просмотров 137K
Этот туториал предназначен в первую очередь для новичков в разработке под андроид, но может быть будет полезен и более опытным разработчикам. Тут рассказано как создать простейшую 2D игру на анроиде без использования каких-либо игровых движков. Для этого я использовал Android Studio, но можно использовать любую другую соответствующее настроенную среду разработки.
Шаг 1. Придумываем идею игры
Для примера возьмём довольно простую идею:
Внизу экрана — космический корабль. Он может двигаться влево и вправо по нажатию соответствующих кнопок. Сверху вертикально вниз движутся астероиды. Они появляются по всей ширине экрана и двигаются с разной скоростью. Корабль должен уворачиваться от метеоритов как можно дольше. Если метеорит попадает в него — игра окончена.

Шаг 2. Создаём проект
В Android Studio в верхнем меню выбираем File → New → New Project.

Тут вводим название приложения, домен и путь. Нажимаем Next.

Тут можно ввести версию андроид. Также можно выбрать андроид часы и телевизор. Но я не уверен что наше приложение на всём этом будет работать. Так что лучше введите всё как на скриншоте. Нажимаем Next.
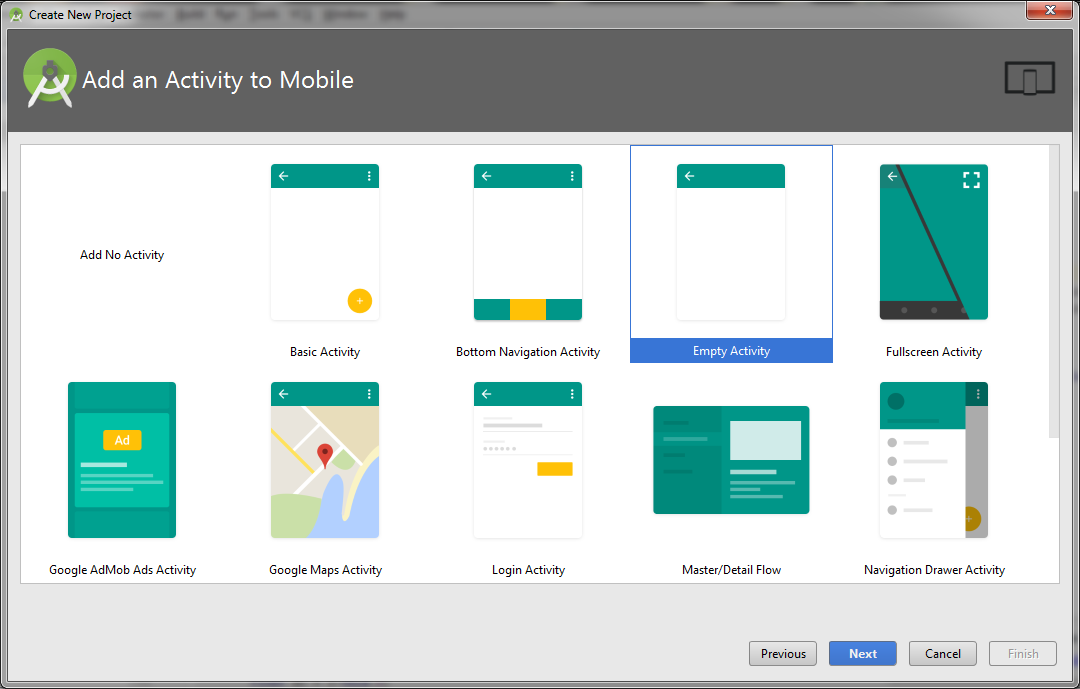
Тут обязательно выбираем Empty Activity. И жмём Next.

Тут оставляем всё как есть и жмём Finish. Итак проект создан. Переходим ко третьему шагу.
Шаг 3. Добавляем картинки
Скачиваем архив с картинками и распаковываем его.
Находим папку drawable и копируем туда картинки.

Позже они нам понадобятся.
Шаг 4. Создаём layout
Находим activity_main.xml, открываем вкладку Text и вставляем туда это:
<?xml version="1.0" encoding="utf-8"?>
<LinearLayout xmlns:android="http://schemas.android.com/apk/res/android"
    xmlns:tools="http://schemas.android.com/tools"
    android:layout_width="match_parent"
    android:layout_height="match_parent"
    android:orientation="vertical"
    tools:context="com.spaceavoider.spaceavoider.MainActivity">
    <LinearLayout
        android:id="@+id/gameLayout"
        android:layout_width="match_parent"
        android:layout_height="match_parent"
        android:orientation="vertical"
        android:layout_weight="100"/>
    <LinearLayout
        android:layout_width="match_parent"
        android:layout_height="wrap_content"
        android:orientation="horizontal">
        <Button
            android:id="@+id/leftButton"
            android:layout_width="match_parent"
            android:layout_height="wrap_content"
            android:layout_weight="50"
            android:text="Left" />
        <Button
            android:id="@+id/rightButton"
            android:layout_width="match_parent"
            android:layout_height="wrap_content"
            android:layout_weight="50"
            android:text="Right" />
    </LinearLayout>
</LinearLayout>
На вкладке Design видно как наш layout будет выглядеть.

Сверху поле в котором будет сама игра, а снизу кнопки управления Left и Right. Про layout можно написать отдельную статью, и не одну. Я не буду на этом подробно останавливаться. Про это можно почитать тут.
Шаг 5. Редактируем MainActivity класс
В первую очередь в определение класса добавляем implements View.OnTouchListener. Определение класса теперь будет таким:
public class MainActivity extends AppCompatActivity implements View.OnTouchListener {Добавим в класс нужные нам статические переменные (переменные класса):
public static boolean isLeftPressed = false; // нажата левая кнопка
public static boolean isRightPressed = false; // нажата правая кнопка
В процедуру protected void onCreate(Bundle savedInstanceState) {
добавляем строки:
GameView gameView = new GameView(this); // создаём gameView

LinearLayout gameLayout = (LinearLayout) findViewById(R.id.gameLayout); // находим gameLayout
gameLayout.addView(gameView); // и добавляем в него gameView

Button leftButton = (Button) findViewById(R.id.leftButton); // находим кнопки
Button rightButton = (Button) findViewById(R.id.rightButton);

leftButton.setOnTouchListener(this); // и добавляем этот класс как слушателя (при нажатии сработает onTouch)
rightButton.setOnTouchListener(this);
Классы LinearLayout, Button и т.д. подсвечены красным потому что ещё не добавлены в Import.
Чтобы добавить в Import и убрать красную подсветку нужно для каждого нажать Alt+Enter.
GameView будет подсвечено красным потому-что этого класса ещё нет. Мы создадим его позже.
Теперь добавляем процедуру:
public boolean onTouch(View button, MotionEvent motion) {
    switch(button.getId()) { // определяем какая кнопка
        case R.id.leftButton:
            switch (motion.getAction()) { // определяем нажата или отпущена
                case MotionEvent.ACTION_DOWN:
                    isLeftPressed = true;
                    break;
                case MotionEvent.ACTION_UP:
                    isLeftPressed = false;
                    break;
            }
            break;
        case R.id.rightButton:
            switch (motion.getAction()) { // определяем нажата или отпущена
                case MotionEvent.ACTION_DOWN:
                    isRightPressed = true;
                    break;
                case MotionEvent.ACTION_UP:
                    isRightPressed = false;
                    break;
            }
            break;
    }
    return true;
}
Если кто-то запутался ― вот так в результате должен выглядеть MainActivity класс:
package com.spaceavoider.spaceavoider;
import android.support.v7.app.AppCompatActivity;
import android.os.Bundle;
import android.view.MotionEvent;
import android.view.View;
import android.widget.Button;
import android.widget.LinearLayout;
public class MainActivity extends AppCompatActivity implements View.OnTouchListener {
    public static boolean isLeftPressed = false; // нажата левая кнопка
    public static boolean isRightPressed = false; // нажата правая кнопка
    @Override
    protected void onCreate(Bundle savedInstanceState) {
        super.onCreate(savedInstanceState);
        setContentView(R.layout.activity_main);
        GameView gameView = new GameView(this); // создаём gameView
        LinearLayout gameLayout = (LinearLayout) findViewById(R.id.gameLayout); // находим gameLayout
        gameLayout.addView(gameView); // и добавляем в него gameView
        Button leftButton = (Button) findViewById(R.id.leftButton); // находим кнопки
        Button rightButton = (Button) findViewById(R.id.rightButton);
        leftButton.setOnTouchListener(this); // и добавляем этот класс как слушателя (при нажатии сработает onTouch)
        rightButton.setOnTouchListener(this);
    }
    public boolean onTouch(View button, MotionEvent motion) {
        switch(button.getId()) { // определяем какая кнопка
            case R.id.leftButton:
                switch (motion.getAction()) { // определяем нажата или отпущена
                    case MotionEvent.ACTION_DOWN:
                        isLeftPressed = true;
                        break;
                    case MotionEvent.ACTION_UP:
                        isLeftPressed = false;
                        break;
                }
                break;
            case R.id.rightButton:
                switch (motion.getAction()) { // определяем нажата или отпущена
                    case MotionEvent.ACTION_DOWN:
                        isRightPressed = true;
                        break;
                    case MotionEvent.ACTION_UP:
                        isRightPressed = false;
                        break;
                }
                break;
        }
        return true;
    }
}
Итак, класс MainActivity готов! В нём инициирован ещё не созданный класс GameView. И когда нажата левая кнопка — статическая переменная isLeftPressed = true, а когда правая — isRightPressed = true. Это в общем то и всё что он делает.
Для начала сделаем чтобы на экране отображался космический корабль, и чтобы он двигался по нажатию управляющих кнопок. Астероиды оставим на потом.
Шаг 6. Создаём класс GameView
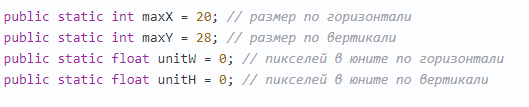
Теперь наконец-то создадим тот самый недостающий класс GameView. Итак приступим. В определение класса добавим extends SurfaceView implements Runnable. Мобильные устройства имею разные разрешения экрана. Это может быть старенький маленький телефон с разрешением 480×800, или большой планшет 1800×2560. Для того чтобы игра выглядела на всех устройствах одинаково я поделил экран на 20 частей по горизонтали и 28 по вертикали. Полученную единицу измерения я назвал юнит. Можно выбрать и другие числа. Главное чтобы отношение между ними примерно сохранялось, иначе изображение будет вытянутым или сжатым.
public static int maxX = 20; // размер по горизонтали
public static int maxY = 28; // размер по вертикали
public static float unitW = 0; // пикселей в юните по горизонтали
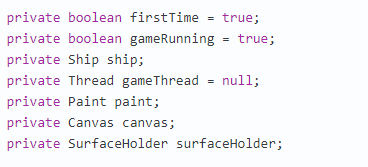
public static float unitH = 0; // пикселей в юните по вертикалиunitW и unitW мы вычислим позже. Также нам понадобятся и другие переменные:
private boolean firstTime = true;
private boolean gameRunning = true;
private Ship ship;
private Thread gameThread = null;
private Paint paint;
private Canvas canvas;
private SurfaceHolder surfaceHolder;
Конструктор будет таким:
public GameView(Context context) {
    super(context);
    //инициализируем обьекты для рисования
    surfaceHolder = getHolder();
    paint = new Paint();

    // инициализируем поток
    gameThread = new Thread(this);
    gameThread.start();
}
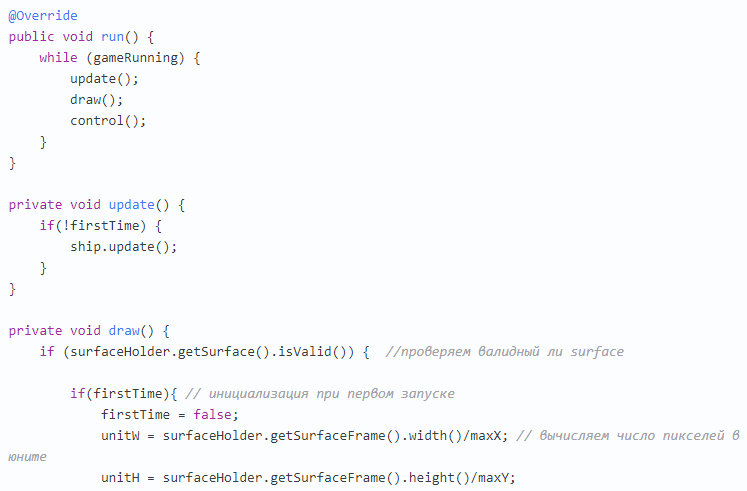
Метод run() будет содержать бесконечный цикл. В начале цикла выполняется метод update()
который будет вычислять новые координаты корабля. Потом метод draw() рисует корабль на экране. И в конце метод control() сделает паузу на 17 миллисекунд. Через 17 миллисекунд run() запустится снова. И так до пока переменная gameRunning == true. Вот эти методы:
@Override
public void run() {
while (gameRunning) {
update();
draw();
control();
}
}
private void update() {
if(!firstTime) {
ship.update();
}
}
private void draw() {
if (surfaceHolder.getSurface().isValid()) { //проверяем валидный ли surface
if(firstTime){ // инициализация при первом запуске
firstTime = false;
unitW = surfaceHolder.getSurfaceFrame().width()/maxX; // вычисляем число пикселей в юните
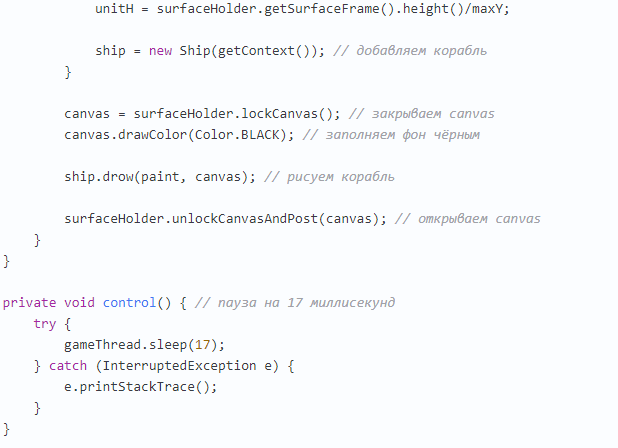
unitH = surfaceHolder.getSurfaceFrame().height()/maxY;
ship = new Ship(getContext()); // добавляем корабль
}
canvas = surfaceHolder.lockCanvas(); // закрываем canvas
canvas.drawColor(Color.BLACK); // заполняем фон чёрным
ship.drow(paint, canvas); // рисуем корабль
surfaceHolder.unlockCanvasAndPost(canvas); // открываем canvas
}
}
private void control() { // пауза на 17 миллисекунд
try {
gameThread.sleep(17);
} catch (InterruptedException e) {
e.printStackTrace();
}
}Обратите внимание на инициализацию при первом запуске. Там мы вычисляем количество пикселей в юните и добавляем корабль. Корабль мы ещё не создали. Но прежде мы создадим его родительский класс.
Шаг 7. Создаём класс SpaceBody
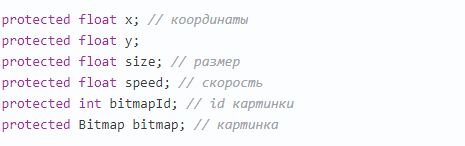
Он будет родительским для класса Ship (космический корабль) и Asteroid (астероид). В нём будут содержаться все переменные и методы общие для этих двух классов. Добавляем переменные:
protected float x; // координаты
protected float y;
protected float size; // размер
protected float speed; // скорость
protected int bitmapId; // id картинки
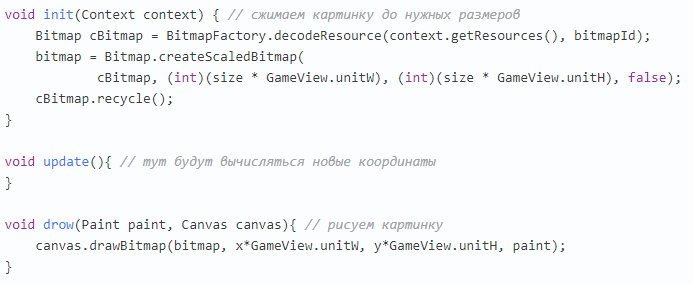
protected Bitmap bitmap; // картинкаи методы
void init(Context context) { // сжимаем картинку до нужных размеров
Bitmap cBitmap = BitmapFactory.decodeResource(context.getResources(), bitmapId);
bitmap = Bitmap.createScaledBitmap(
cBitmap, (int)(size * GameView.unitW), (int)(size * GameView.unitH), false);
cBitmap.recycle();
}
void update(){ // тут будут вычисляться новые координаты
}
void drow(Paint paint, Canvas canvas){ // рисуем картинку
canvas.drawBitmap(bitmap, x*GameView.unitW, y*GameView.unitH, paint);
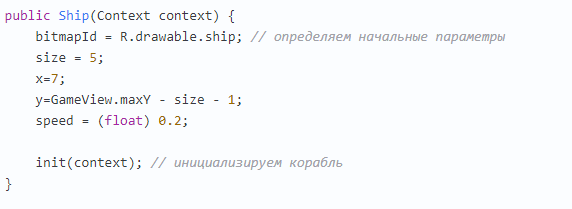
}Шаг 8. Создаём класс Ship
Теперь создадим класс Ship (космический корабль). Он наследует класс SpaceBody поэтому в определение класа добавим extends SpaceBody.
Напишем конструктор:
public Ship(Context context) {
bitmapId = R.drawable.ship; // определяем начальные параметры
size = 5;
x=7;
y=GameView.maxY - size - 1;
speed = (float) 0.2;
init(context); // инициализируем корабль
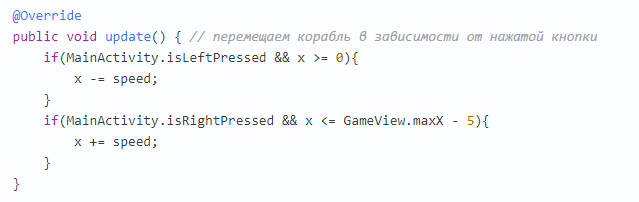
}и переопределим метод update()
@Override
public void update() { // перемещаем корабль в зависимости от нажатой кнопки
    if(MainActivity.isLeftPressed && x >= 0){
        x -= speed;
    }
    if(MainActivity.isRightPressed && x <= GameView.maxX - 5){
        x += speed;
    }
}
На этом космический корабль готов! Всё компилируем и запускаем. На экране должен появиться космический корабль. При нажатии на кнопки он должен двигаться вправо и влево. Теперь добавляем сыплющиеся сверху астероиды. При столкновении с кораблём игра заканчивается.
Шаг 9. Создаём класс Asteroid
Добавим класс Asteroid (астероид). Он тоже наследует класс SpaceBody поэтому в определение класса добавим extends SpaceBody.
Добавим нужные нам переменные:
private int radius = 2; // радиус
private float minSpeed = (float) 0.1; // минимальная скорость
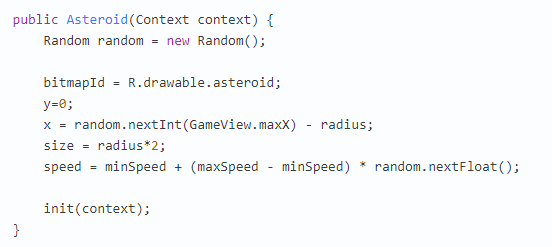
private float maxSpeed = (float) 0.5; // максимальная скоростьАстероид должен появляться в случайной точке вверху экрана и лететь вниз с случайной скоростью. Для этого x и speed задаются при помощи генератора случайных чисел в его конструкторе.
public Asteroid(Context context) {
Random random = new Random();
bitmapId = R.drawable.asteroid;
y=0;
x = random.nextInt(GameView.maxX) - radius;
size = radius*2;
speed = minSpeed + (maxSpeed - minSpeed) * random.nextFloat();
init(context);
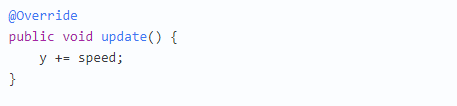
}Астероид должен двигаться с определённой скорость вертикально вниз. Поэтому в методе update() прибавляем к координате x скорость.
@Override
public void update() {
    y += speed;
}
Так же нам нужен будет метод определяющий столкнулся ли астероид с кораблём.
public boolean isCollision(float shipX, float shipY, float shipSize) {
    return !(((x+size) < shipX)||(x > (shipX+shipSize))||((y+size) < shipY)||(y > (shipY+shipSize)));
}
Рассмотрим его поподробнее. Для простоты считаем корабль и астероид квадратами. Тут я пошёл от противного. То есть определяю когда квадраты НЕ пересекаются.
((x+size) < shipX) — корабль слева от астероида.
(x > (shipX+shipSize)) — корабль справа от астероида.
((y+size) < shipY) — корабль сверху астероида.
(y > (shipY+shipSize)) — корабль снизу астероида.
Между этими четырьмя выражениями стоит || (или). То есть если хоть одно выражение правдиво (а это значит что квадраты НЕ пересекаются) — результирующие тоже правдиво.
Всё это выражение я инвертирую знаком!. В результате метод возвращает true когда квадраты пересекаются. Что нам и надо.
Про определение пересечения более сложных фигур можно почитать тут.
Шаг 10. Добавляем астероиды в GameView
В GameView добавляем переменные:
private ArrayList<Asteroid> asteroids = new ArrayList<>(); // тут будут харанится астероиды
private final int ASTEROID_INTERVAL = 50; // время через которое появляются астероиды (в итерациях)
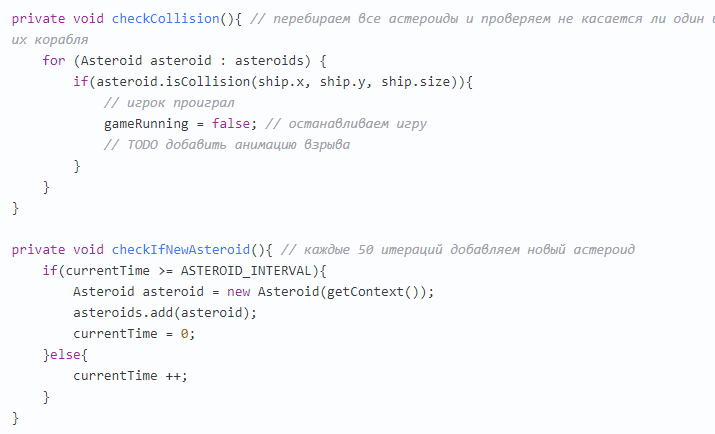
private int currentTime = 0;также добавляем 2 метода:
private void checkCollision(){ // перебираем все астероиды и проверяем не касается ли один из них корабля
for (Asteroid asteroid : asteroids) {
if(asteroid.isCollision(ship.x, ship.y, ship.size)){
// игрок проиграл
gameRunning = false; // останавливаем игру
// TODO добавить анимацию взрыва
}
}
}
private void checkIfNewAsteroid(){ // каждые 50 итераций добавляем новый астероид
if(currentTime >= ASTEROID_INTERVAL){
Asteroid asteroid = new Asteroid(getContext());
asteroids.add(asteroid);
currentTime = 0;
}else{
currentTime ++;
}
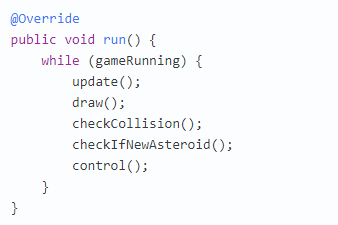
}И в методе run() добавляем вызовы этих методов перед вызовоом control().
@Override
public void run() {
while (gameRunning) {
update();
draw();
checkCollision();
checkIfNewAsteroid();
control();
}
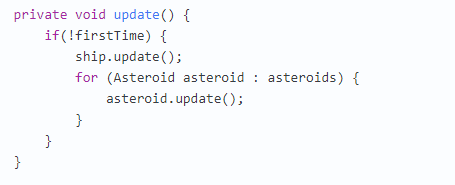
}Далее в методе update() добавляем цикл который перебирает все астероиды и вызывает у них метод update().
private void update() {
if(!firstTime) {
ship.update();
for (Asteroid asteroid : asteroids) {
asteroid.update();
}
}
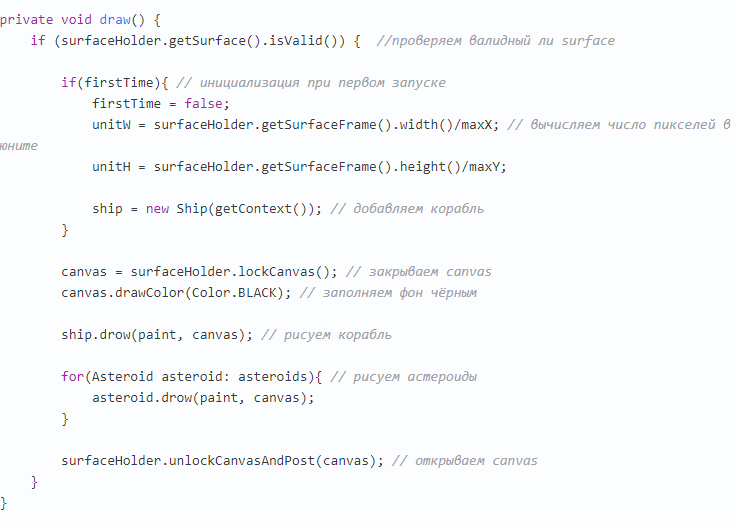
}Такой же цикл добавляем и в метод draw().
private void draw() {
    if (surfaceHolder.getSurface().isValid()) {  //проверяем валидный ли surface

        if(firstTime){ // инициализация при первом запуске
            firstTime = false;
            unitW = surfaceHolder.getSurfaceFrame().width()/maxX; // вычисляем число пикселей в юните
            unitH = surfaceHolder.getSurfaceFrame().height()/maxY;

            ship = new Ship(getContext()); // добавляем корабль
        }

        canvas = surfaceHolder.lockCanvas(); // закрываем canvas
        canvas.drawColor(Color.BLACK); // заполняем фон чёрным

        ship.drow(paint, canvas); // рисуем корабль

        for(Asteroid asteroid: asteroids){ // рисуем астероиды
            asteroid.drow(paint, canvas);
        }

        surfaceHolder.unlockCanvasAndPost(canvas); // открываем canvas
    }
}
Вот и всё! Простейшая 2D игра готова. Компилируем, запускаем и смотрим что получилось!
Если кто-то запутался или что-то не работает можно скачать исходник.
Игра, конечно, примитивна. Но её можно усовершенствовать, добавив новые функции. В первую очередь следует реализовать удаление вылетевших за пределы экрана астероидов. Можно сделать чтобы корабль мог стрелять в астероиды, чтобы игра постепенно ускорялась, добавить таймер, таблицу рекордов и прочее. Если это будет вам интересно — напишу продолжение, где всё это опишу.
На этом всё. Пишите отзывы, вопросы, интересующие вас темы для продолжения.
Содержание
- Начало
- Типичный сценарий
- Import Android
- Пример разработки простой 2D-игрушки Андроид
- MainActivity, GameView, SpaceBody
Android Studio – официальная среда разработки приложений под ОС Андроид. Также она доступна пользователям Windows, Linux и Mac OS X. Мы расскажем, как создать в этой среде простую 2D-игру без применения специальных движков. Однако прежде чем приступать к работе, нужно в достаточной степени изучить саму программу.
Начало
Пользователи среды могут программировать на языках Java, C++ и Kotlin. Планируется, что последний со временем полностью заменит привычный Java, который пока остается основным. Для работы потребуется от 3 (минимум) до 8 Гб (желательно) оперативной памяти плюс дополнительный гигабайт для Android Emulator. Свободного места на жестком диске должно быть не меньше, чем 2 Гб.
Процесс установки Андроид Студио мало чем отличается от других программ
Если используется Microsoft Windows, подойдут версии 2003, Vista, 7–10. Для OS X нужен Mac от 10.8.5 до 10.13 / 10.14 (High Sierra/Mojave). Для Linux – KDE или GNOME. Изготовление приложения проходит в несколько этапов:
- создаем новый проект;
- разрабатываем пользовательский интерфейс;
- добавляем навигацию, действия, дополнительные опции;
- тестируем программу в эмуляторе.
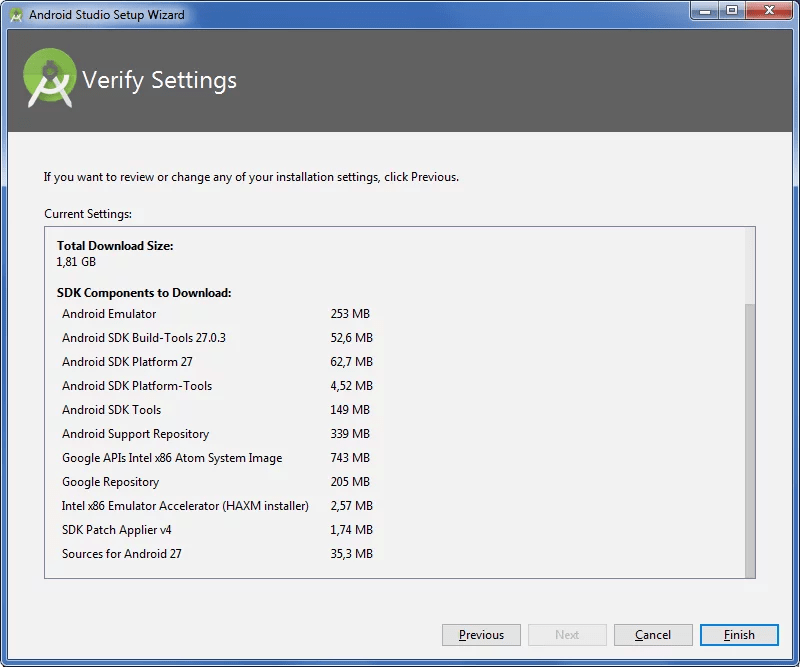
Если собираетесь работать с Java, обязательно установите последнюю версию JDK. Скачать ее можно на официальном сайте. Помимо главной программы, для работы также потребуются элементы Андроид SDK – скрипты, библиотеки, документы, файлы. Эти компоненты будут скачаны автоматически. В установочный комплект также входит Андроид Emulator.
Проверяйте количество свободного места на диске
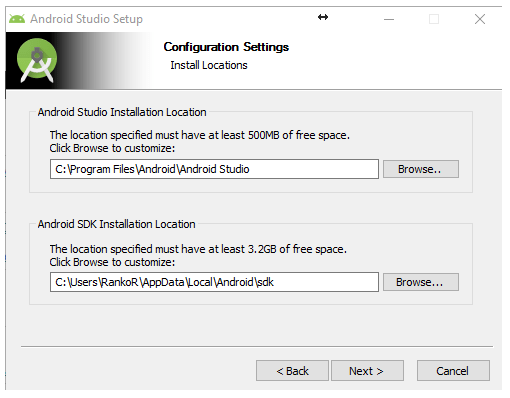
Следующим шагом станет определение адресов Студио и СДК. Их предлагается установить в отдельные папки. Перед началом инсталляции стоит убедиться, что на выбранном диске достаточно места. Сама Studio требует не так много свободного пространства, а вот элементы SDK занимают больше 3 Гб. Это минимум, так как затем потребуется дополнительная площадь для обновлений.
Каждое приложение, сделанное под Андроид, должно состоять из четырех точек входа:
- Service. Компонент, обеспечивающий работу в фоновом режиме. Он отвечает за выполнение удаленных и длительных операций при выключенном визуальном интерфейсе.
- Activity. Элементы интерактивного управления. Через класс Intent передается информация о намерениях пользователя. Активности устроены по подобию веб-страниц. Intent выполняет функцию ссылок между ними. Запускается приложение посредством activity Main.
- Broadcast receiver. «Широковещательный приемник» передает намерения одновременно разным участникам.
- Content provider. «Поставщик содержимого» передает нужную информацию из БД SQLite, файловой системы и других хранилищ.
Разработка приложения начинается с нового проекта. В меню последовательно выбираем Tools, Android, SDK Manager. В нашем примере последней версией является Андроид API 26. Выбирайте новейшую версию, поставив напротив нее галочку, и приступайте к скачиванию.
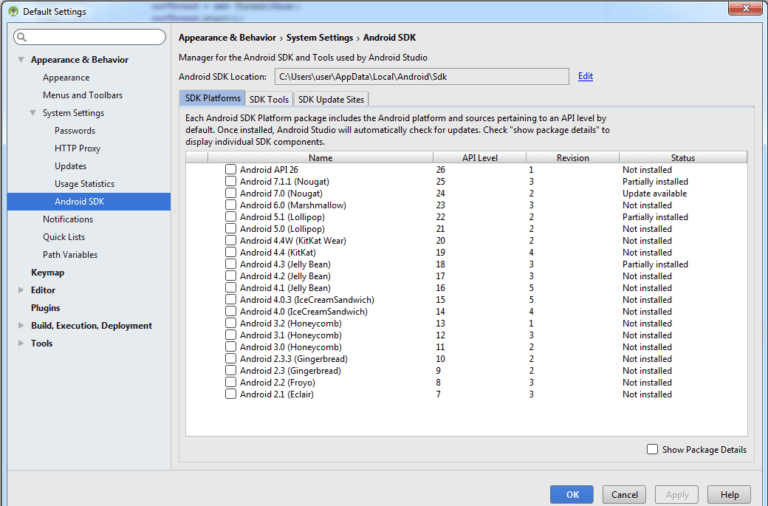
Выбирайте новейшую версию Андроид SDK
После нажатия New project появится форма нового проекта. В поле Application name выбираем FirstGame, Company domain – оставим без изменения. Путь к проекту Project location должен быть целиком на английском языке. В следующем окне оставьте галочку только напротив Phone and Tablet.
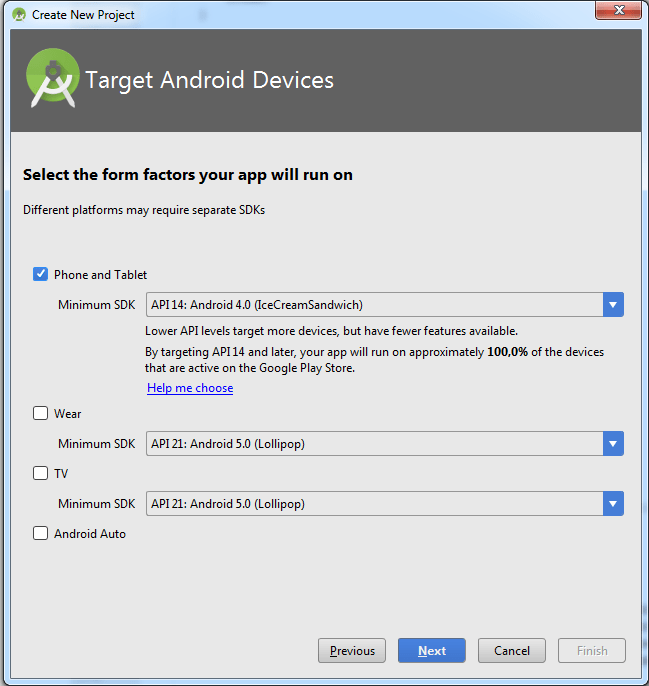
В этом окне определяется версия ОС для мобильных и планшетов
Теперь выберем версию ОС, с которой сможет запускаться игра. Чем ниже она будет, тем больше пользователей получат доступ к приложению. С другой стороны, разработчику тогда доступно меньше опций. Поочередно выбираем Empty Activity, Next, Next, Finish. Проект готов к работе.
С каждым запуском Студио открывается вкладка «Совет дня» (Tip of the day). Для начинающих программистов от этой опции мало толку, но по мере знакомства со средой рекомендации начнут казаться интересными и полезными. Вообще, для новичков многое будет выглядеть таинственно и даже страшновато. Не стоит бояться трудностей. Накапливайте опыт и непонятное быстро станет простым и ясным. В конце концов, это не изучение языка программирования.
Типичный сценарий
Простая игра строится по определенной схеме. Для взаимодействия с пользователем предусмотрены следующие элементы:
- Основной дисплей. На нем разворачиваются события. По завершении процесса рекомендуется реализовать переход к таблице рекордов, если результат оказался достойным этой «доски почета».
- Меню. С помощью этого инструмента выбирают действия и делают настройки. Он обеспечивает переход к другим элементам. Меню обычно появляется сразу после заставки. Пользователю предлагается выбор дальнейших действий: приступить к игровому процессу, ознакомиться с инструкцией и правилами, просмотреть текущие рекорды и т. д.
- Заставка. Представляет собой краткий анонс или рекламу с изображением логотипа. Демонстрируется в начале или во время пауз. Приветствуется использование хотя бы простой анимации.
- Справка. В этом разделе меню описывают правила. Если текст не помещается в окне целиком, необходимо обеспечить возможность прокрутки.
- Счет. Здесь отображаются текущие рекорды участников. В данном разделе можно просмотреть список в любой момент, не дожидаясь, когда сам там окажется. Также здесь бывает доступна информация о текущем игровом счете, но последний обычно можно наблюдать на основном дисплее.
- Настройки. Пользователь должен иметь возможность поменять игровые параметры, свой аватар и логин или зарегистрироваться в качестве нового участника.
Это основные инструменты стандартного игрового сценария. При разработке приложения какие-то можно убирать или добавлять дополнительные. Чтобы обеспечить появление этих шести экранов, нужно реализовать соответствующее число активностей.
В MenuActivity будут содержаться кнопки и другие элементы, запускающие остальные подпрограммы. SplashActivity потребуется для вывода заставки. Через несколько секунд автоматически запустится MenuActivity. Остальные активности: GameActivity (основной), SettingsActivity (настройки), ScoresActivity (счет) и HelpActivity (справка с возможностью прокрутки).
Рекомендуется также задать базовый class BaseActivity, включающий общедоступные компоненты. Для каждой Activity требуется отдельный разметочный файл с набором нужных элементов. Первоначальной задачей разработчика является освоение работы с активностями. Для получения доступа к ресурсам и настройкам, используемым Activity, нужно сделать контекст приложения. Здесь прибегают к помощи метода getApplicationContext().
Import Android
Import Android – опция, позволяющая автоматически обновлять библиотеки (public static, public void, public class, override public void и др). Такая потребность часто возникает при использовании фрагментов кода. Можно воспользоваться традиционной комбинацией Import Android – Alt + Enter.
Этим простым методом обновления импорта public static, override public void, public void и прочих нужных для работы вещей воспользоваться несложно. Однако существует и более интересный вариант – автоматический Import Android. Для его реализации нужно последовательно выбрать в меню File, Settings, Edito, AutoImport. Остается поставить флажки напротив нужных пунктов. Теперь Import Android будет обновляться самостоятельно.
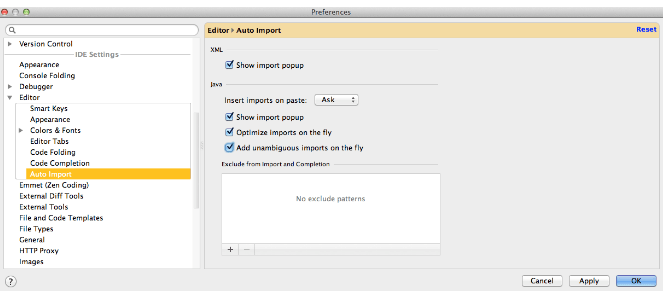
Автоматический Import Android позволяет быстро обновлять public static, public void и другие инструменты
Пример разработки простой 2D-игрушки Андроид
Наша игра Android Studio развивается по известному сюжету. Пользователь управляет космическим кораблем, уворачивающимся от метеоритов (астероидов). Последние падают с верхней части экрана, корабль – движется внизу вправо или влево, в зависимости от решений участника. При столкновении аппарата с космическим объектом объявляется Game Over.
Начнем с открытия проекта. Для этого последовательно выберем в меню программы File, New, New Project. Придумываем проекту название, вводим домен и место, где будет храниться папка. Окно, появившееся после нажатия Next, лучше оставить без изменений. В следующем выбираем Empty Activity и движемся дальше. Кликнув по клавише Finish, мы получим готовый проект.
Следующим шагом станет скачивание необходимых картинок и копирование их в папку drawable. Это изображения корабля и метеоров. После этого нужно создать layout. Открываем Text в activity_main.xml и вставляем следующий код:
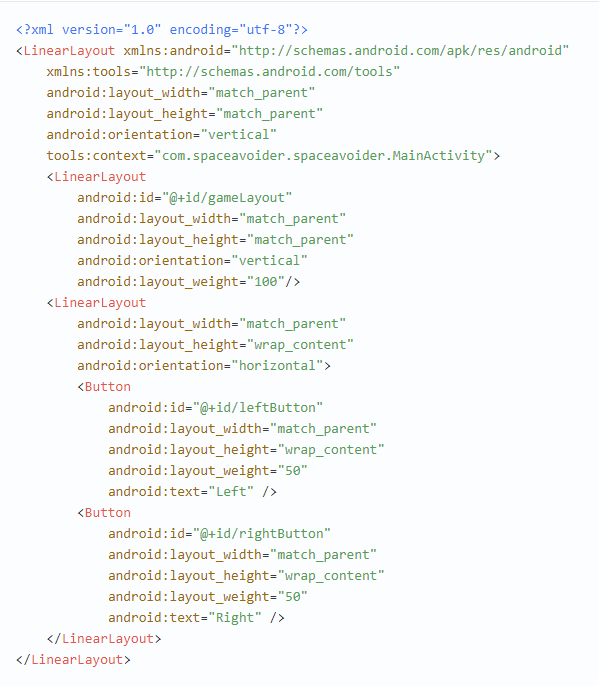
Код для layout
MainActivity, GameView, SpaceBody
Для редактирования класса MainActivity меняем определение, придав ему следующий вид: public class MainActivity extends AppCompatActivity implements View.OnTouchListener {. После этого нужно задать перемены для нажатия левой (public static boolean isLeftPressed = false) и правой (public static boolean isRightPressed = false) кнопок. Следующие действия мы расписывать не будем. В итоге MainActivity должен принять следующий вид:
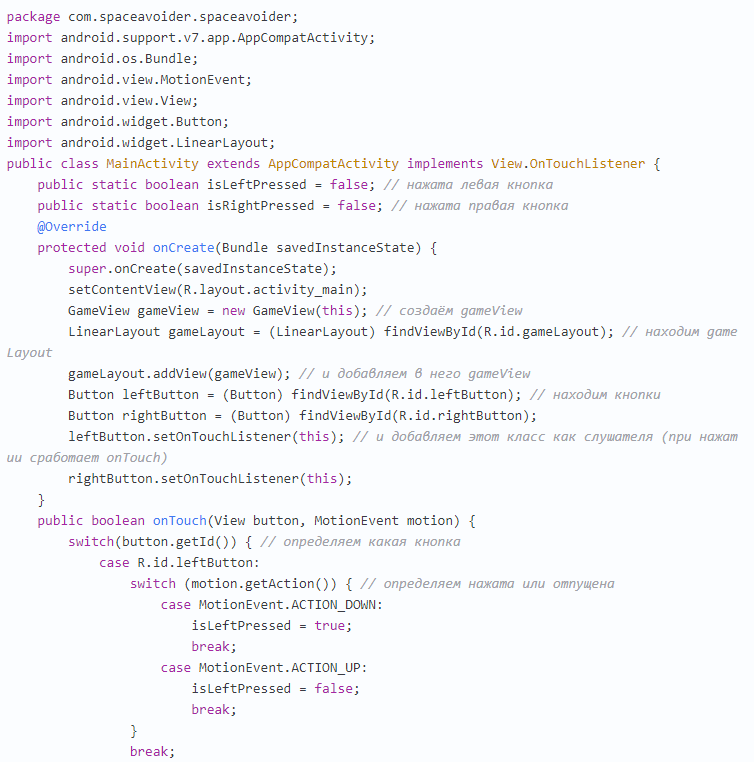
Код для MainActivity
Разобравшись с классом MainActivity, переходим к GameView. В определение добавляем extends SurfaceView implements Runnable. Теперь нужно задать разрешение. У современных гаджетов разные параметры. Дисплей старого мобильника не может сравниться с новым большим планшетом.
Чтобы добиться одинакового изображения на любом устройстве, поделим монитор на одинаковые «клетки» 20х28 (первый показатель – горизонталь). Если эти части будут распределены неравномерно, картинка получится сжатой или растянутой. Задаем переменные:

Переменные для «уравнивания» графики
Для метода run() устанавливается бесконечный цикл, стартующий с update(). Задачей последнего является вычисление новых координат космического корабля. По окончании расчетов на экране будет сформирован сам аппарат (draw()). Control() завершает цикл, обеспечивая паузу на 17 миллисекунд. Затем снова запускается run(). Выглядеть это будет так:
Бесконечный цикл для run()
Чтобы появился сам корабль и астероиды, нужен родительский class SpaceBody. Зададим переменные и методы:
Код для родительского класса SpaceBody
Теперь отдельный класс Ship для корабля:
Код космического корабля
После этого останется произвести компиляцию и запуск программы. На дисплее Android Studio должен возникнуть корабль, который можно кнопками перемещать вправо и влево. Следующим шагом станет добавление астероидов. Для этого разработаем class Asteroid, тоже являющийся дочерним для SpaceBody. Зададим переменные:


Код для метеоров
Суть в том, чтобы астероиды произвольно возникали в разных точках «потолка» экрана и двигались с непредсказуемой скоростью. Мы задали код, определяющий столкновение метеоров с кораблем. Добавим астероиды в GameView:


Вписываем астероиды в GameView
На этом изготовление элементарной 2D-игры можно считать завершенным. Остается скомпилировать и запустить программу. Ничто не мешает добавлять в нее новые опции. Например, стрельбу по метеорам или постоянное ускорение их движения. Но это уже тема отдельного разговора.

Недавно мы делали веб-игру про сбор пирамиды. Там мы использовали 3Д-движок и симуляцию физики. И в целом получилась залипательная веб-игра. Вот предыдущие этапы:
- Сделали трёхмерную браузерную игру, где нужно ставить блоки друг на друга и набрать как можно больше очков.
- Адаптировали игру под мобильные телефоны, чтобы тачскрин нормально обрабатывал все нажатия и жесты.
Ключевое слово — веб: игра работает только в браузере и только при наличии интернета. На этот раз мы превратим страницу с игрой в полноценное приложение для Android. При этом мы не будем пользоваться онлайн-конструкторами, а сделаем всё по-настоящему — в среде разработки и с кодом на Java.
Наш план таков:
- Подготовить файлы для упаковки в игру: скачать скрипты из интернета, перепривязать их к нашей игре на компьютере.
- Сделать новый проект в Android Studio.
- В проекте сделать WebView — это виртуальное окно браузера внутри приложения. В нём будет работать игра.
- Настроить WebView так, чтобы он поддерживал нашу игру и все нужные функции.
- Упаковать получившийся проект в виде приложения для Android.
Результат можно скачать сразу: вот приложение, которое получилось у нас таким нехитрым способом:
⭐️ Скачать apk
Подготовка
Главное, что нам понадобится из инструментов, — официальная среда разработки Android Studio. У нас есть про неё отдельная статья: что это такое, зачем нужно и как установить. Качаем с официального сайта и устанавливаем.
Так как наша игра должна работать без интернета, то это значит, что все ресурсы тоже должны быть доступны локально, прямо с телефона. В HTML-файле мы подключаем два внешних скрипта — их тоже нужно будет скачать:
<!-- подключаем Three.js -->
<script src='https://cdnjs.cloudflare.com/ajax/libs/three.js/r124/three.min.js'></script>
<!-- подключаем Cannon.js -->
<script src='https://cdnjs.cloudflare.com/ajax/libs/cannon.js/0.6.2/cannon.min.js'></script>
<!-- подключаем наш скрипт -->
<script src="./script.js"></script>
Для этого копируем адрес скрипта из кода страницы, вставляем в браузер и сохраняем то, что открылось, как js-файл.
Скрипты кладём в ту же папку, что и остальные файлы с игрой. Вот что должно по итогу у нас получиться с файлами:

После этого исправляем пути к скриптам в html-файле, чтобы они подтягивались из той же папки, а не из интернета:
<!-- подключаем Three.js -->
<script src='three.min.js'></script>
<!-- подключаем Cannon.js -->
<script src='cannon.min.js'></script>
<!-- подключаем наш скрипт -->
<script src="script.js"></script>
Сохраняем страницу и открываем её в браузере. Если мы всё сделали правильно, то «Пирамида» запустится как обычно — с красивой графикой и реакцией на нажатия.
Создаём новый проект в Android Studio
Запускаем Android Studio и выбираем Empty Activity:

После этого выбираем язык Java, а всё остальное оставляем без изменений:

Если это ваш первый запуск, программа начнёт качать разные служебные файлы — это нормально, нужно просто немного подождать.

Когда всё загрузится и запустится, перед нами появится окно с новой программой в Android Studio.
Добавляем файлы
Чтобы программа смогла загрузить в себя все файлы от игры, нам нужно создать в проекте специальную папку — assets — и скопировать в неё всё, что у нас есть. Для этого нужно пройти несколько неочевидных шагов:
- Создать папку внутри проекта в Android Studio.
- Найти папку на диске.
- Скопировать в папку все нужные файлы.
Создаём папку так: в левой верхней части щёлкаем правой кнопкой мыши по папке app и в появившемся меню выбираем New → Folder → Assets Folder:

Перед нами появится окно, которое спрашивает, к чему будет относиться папка. Ничего не меняем и просто нажимаем Finish:

Теперь щёлкаем правой кнопкой мыши на появившейся папке и выбираем Open in → Explorer:

Перед нами появится окно проводника с нашей папкой assets. Заходим в неё и копируем туда все игровые файлы, которые мы собрали в самом начале:

Смотрим в панель файлов Android Studio, чтобы убедиться, что всё получилось и система увидела наши файлы:

Пишем код
Нам было бы здорово видеть и дизайн, и код, поэтому выбираем слева в колонке файлов res → layouts → activity_main.xml и переключаем вид в режим Split в правом верхнем углу:

В этом же файле activity_main.xml есть блок, который начинается с команды <TextView — удаляем весь блок (название и 7 команд ниже) и вместо него пишем <WebView>. Среда разработки умная, поэтому, как только мы начнём писать код, она автоматически предложит нам создать новый блок. Нажимаем энтер, когда появится подсказка:

Вот команды, которые нужно добавить в этот файл:
<WebView
android:layout_width="match_parent"
android:layout_height="match_parent"
android:id="@+id/webview"></WebView>
В итоге у нас должен получиться такой блок:

Нажимаем ⌘+S или Ctrl+S, чтобы всё сохранить .
Теперь переходим к другому файлу — MainActivity.java — и добавляем в него такой код:

setContentView(R.layout.activity_main);
WebView webView=findViewById(R.id.webview);
webView.getSettings().setJavaScriptEnabled(true);
webView.loadUrl("javascript:addLayer(x, z, width, depth, direction)");
webView.loadUrl("javascript:generateBox(x, y, z, width, depth, falls)");
webView.loadUrl("javascript:addOverhang(x, z, width, depth)");
webView.loadUrl("javascript:cutBox(topLayer, overlap, size, delta)");
webView.loadUrl("javascript:init()");
webView.loadUrl("javascript:startGame()");
webView.loadUrl("javascript:eventHandler()");
webView.loadUrl("javascript:splitBlockAndAddNextOneIfOverlaps()");
webView.loadUrl("javascript:missedTheSpot()");
webView.loadUrl("javascript:animation(time)");
webView.loadUrl("javascript:updatePhysics(timePassed)");
webView.loadUrl("javascript:window.addEventListener()");

webView.loadUrl("file:///android_asset/index.html");
Смысл тут в том, что мы сначала создаём новый элемент — просмотрщик веб-контента, потом разрешаем ему выполнять скрипты, а затем перечисляем все функции, которые у нас объявлены в основном скрипте вместе с параметрами вызова. Это нужно для того, чтобы Java знала, что это можно выполнять.
Нажимаем Shift+F10, чтобы запустить приложение в эмуляторе, — видим, что справа появился виртуальный телефон с началом нашей игры, но ничего не двигается. Это связано с тем, что встроенный эмулятор плохо работает с трёхмерной графикой и не может показать всё, что мы от него хотим. Главное, зачем нам это было нужно, — убедиться, что программа нашла все наши файлы, загрузила их и скрипт тоже заработал.

Компилируем приложение
Если нам нужен apk-файл, который можно установить на телефон, чтобы проверить игру по-настоящему, нам надо скомпилировать весь проект. Для этого выбираем в верхнем меню Build → Build Bundle(s) / APK(s) → Build APK(s):

Когда всё будет готово, внизу появится уведомление, что файл готов. Нажимаем на locate, чтобы перейти к файлу в проводнике:


Этот файл можно скачать себе на телефон с Android, установить его и поиграть в «Пирамиду» даже без интернета.
Вёрстка:
Кирилл Климентьев
There are plenty of ways to create a game for Android and one important way is to do it from scratch in Android Studio with Java. This gives you the maximum control over how you want your game to look and behave and the process will teach you skills you can use in a range of other scenarios too – whether you’re creating a splash screen for an app or you just want to add some animations. With that in mind, this tutorial is going to show you how to create a simple 2D game using Android Studio and the Java. You can find all the code and resources at Github if you want to follow along.
Setting up
In order to create our game, we’re going to need to deal with a few specific concepts: game loops, threads and canvases. To begin with, start up Android Studio. If you don’t have it installed then check out our full introduction to Android Studio, which goes over the installation process. Now start a new project and make sure you choose the ‘Empty Activity’ template. This is a game, so of course you don’t need elements like the FAB button complicating matters.
The first thing you want to do is to change AppCompatActivity to Activity. This means we won’t be using the action bar features.

Similarly, we also want to make our game full screen. Add the following code to onCreate() before the call to setContentView():
Code
getWindow().setFlags(WindowManager.LayoutParams.FLAG_FULLSCREEN,
                          WindowManager.LayoutParams.FLAG_FULLSCREEN);
this.requestWindowFeature(Window.FEATURE_NO_TITLE);
Note that if you write out some code and it gets underlined in red, that probably means you need to import a class. In other words, you need to tell Android Studio that you wish to use certain statements and make them available. If you just click anywhere on the underlined word and then hit Alt+Enter, then that will be done for you automatically!
Creating your game view
You may be used to apps that use an XML script to define the layout of views like buttons, images and labels. This is what the line setContentView is doing for us.
But again, this is a game meaning it doesn’t need to have browser windows or scrolling recycler views. Instead of that, we want to show a canvas instead. In Android Studio a canvas is just the same as it is in art: it’s a medium that we can draw on.
So change that line to read as so:
Code
setContentView(new GameView(this))You’ll find that this is once again underlined red. But now if you press Alt+Enter, you don’t have the option to import the class. Instead, you have the option to create a class. In other words, we’re about to make our own class that will define what’s going to go on the canvas. This is what will allow us to draw to the screen, rather than just showing ready-made views.
So right click on the package name in your hierarchy over on the left and choose New > Class. You’ll now be presented with a window to create your class and you’re going to call it GameView. Under SuperClass, write: android.view.SurfaceView which means that the class will inherit methods – its capabilities – from SurfaceView.


In the Interface(s) box, you’ll write android.view.SurfaceHolder.Callback. As with any class, we now need to create our constructor. Use this code:
Code
private MainThread thread;

public GameView(Context context) {
    super(context);

    getHolder().addCallback(this);
}
Each time our class is called to make a new object (in this case our surface), it will run the constructor and it will create a new surface. The line ‘super’ calls the superclass and in our case, that is the SurfaceView.
By adding Callback, we’re able to intercept events.
Now override some methods:
Code
@Override
public void surfaceChanged(SurfaceHolder holder, int format, int width, int height) {

}

@Override
public void surfaceCreated(SurfaceHolder holder) {

}

@Override
public void surfaceDestroyed(SurfaceHolder holder) {

}
These basically allow us to override (hence the name) methods in the superclass (SurfaceView). You should now have no more red underlines in your code. Nice.

You just created a new class and each time we refer to that, it will build the canvas for your game to get painted onto. Classes create objects and we need one more.
Creating threads
Our new class is going to be called MainThread. And its job will be to create a thread. A thread is essentially like a parallel fork of code that can run simultaneously alongside the main part of your code. You can have lots of threads running all at once, thereby allowing things to occur simultaneously rather than adhering to a strict sequence. This is important for a game, because we need to make sure that it keeps on running smoothly, even when a lot is going on.
Create your new class just as you did before and this time it is going to extend Thread. In the constructor we’re just going to call super(). Remember, that’s the super class, which is Thread, and which can do all the heavy lifting for us. This is like creating a program to wash the dishes that just calls washingMachine().

When this class is called, it’s going to create a separate thread that runs as an offshoot of the main thing. And it’s from here that we want to create our GameView. That means we also need to reference the GameView class and we’re also using SurfaceHolder which is contains the canvas. So if the canvas is the surface, SurfaceHolder is the easel. And GameView is what puts it all together.
The full thing should look like so:
Code
public class MainThread extends Thread {
    private SurfaceHolder surfaceHolder;
    private GameView gameView;

    public MainThread(SurfaceHolder surfaceHolder, GameView gameView) {

        super();
        this.surfaceHolder = surfaceHolder;
        this.gameView = gameView;

    }
}
Schweet. We now have a GameView and a thread!
Creating the game loop
We now have the raw materials we need to make our game, but nothing is happening. This is where the game loop comes in. Basically, this is a loop of code that goes round and round and checks inputs and variables before drawing the screen. Our aim is to make this as consistent as possible, so that there are no stutters or hiccups in the framerate, which I’ll explore a little later.

For now, we’re still in the MainThread class and we’re going to override a method from the superclass. This one is run.
And it goes a little something like this:
Code
@Override
public void run() {
    while (running) {
        canvas = null;

        try {
            canvas = this.surfaceHolder.lockCanvas();
            synchronized(surfaceHolder) {
                this.gameView.update();
                this.gameView.draw(canvas);
            }
        } catch (Exception e) {} finally {
            if (canvas != null) {
                try {
                    surfaceHolder.unlockCanvasAndPost(canvas);
                } catch (Exception e) {
                    e.printStackTrace();
                }
            }
        }
    }
}
You’ll see a lot of underlining, so we need to add some more variables and references. Head back to the top and add:
Code
private SurfaceHolder surfaceHolder;
private GameView gameView;
private boolean running;
public static Canvas canvas;
Remember to import Canvas. Canvas is the thing we will actually be drawing on. As for ‘lockCanvas’, this is important because it is what essentially freezes the canvas to allow us to draw on it. That’s important because otherwise, you could have multiple threads attempting to draw on it at once. Just know that in order to edit the canvas, you must first lock the canvas.
Update is a method that we are going to create and this is where the fun stuff will happen later on.
The try and catch meanwhile are simply requirements of Java that show we’re willing to try and handle exceptions (errors) that might occur if the canvas isn’t ready etc.
Finally, we want to be able to start our thread when we need it. To do this, we’ll need another method here that allows us to set things in motion. That’s what the running variable is for (note that a Boolean is a type of variable that is only ever true or false). Add this method to the MainThread class:
Code
public void setRunning(boolean isRunning) {
    running = isRunning;
}
But at this point, one thing should still be highlighted and that’s update. This is because we haven’t created the update method yet. So pop back into GameView and now add method.
Code
public void update() {

}
We also need to start the thread! We’re going to do this in our surfaceCreated method:
Code
@Override
public void surfaceCreated(SurfaceHolder holder) {
    thread.setRunning(true);
    thread.start();

}
We also need to stop the thread when the surface is destroyed. As you might have guessed, we handle this in the surfaceDestroyed method. But seeing as it can actually take multiple attempts to stop a thread, we’re going to put this in a loop and use try and catch again. Like so:
Code
@Override
public void surfaceDestroyed(SurfaceHolder holder) {
    boolean retry = true;
    while (retry) {
        try {
            thread.setRunning(false);
            thread.join();
        } catch (InterruptedException e) {
            e.printStackTrace();
        }
        retry = false;
    }
}
And finally, head up to the constructor and make sure to create the new instance of your thread, otherwise you’ll get the dreaded null pointer exception! And then we’re going to make GameView focusable, meaning it can handle events.
Code
thread = new MainThread(getHolder(), this);
setFocusable(true);
Now you can finally actually test this thing! That’s right, click run and it should actually run without any errors. Prepare to be blown away!

It’s… it’s… a blank screen! All that code. For a blank screen. But, this is a blank screen of opportunity. You’ve got your surface up and running with a game loop to handle events. Now all that’s left is make stuff happen. It doesn’t even matter if you didn’t follow everything in the tutorial up to this point. Point is, you can simply recycle this code to start making glorious games!
Doing a graphics
Right, now we have a blank screen to draw on, all we need to do is draw on it. Fortunately, that’s the simple part. All you need to do is to override the draw method in our GameView class and then add some pretty pictures:
Code
@Override
public void draw(Canvas canvas) {
    super.draw(canvas);
    if (canvas != null) {
        canvas.drawColor(Color.WHITE);
        Paint paint = new Paint();
        paint.setColor(Color.rgb(250, 0, 0));
        canvas.drawRect(100, 100, 200, 200, paint);
    }
}
Run this and you should now have a pretty red square in the top left of an otherwise-white screen. This is certainly an improvement.

You could theoretically create pretty much your entire game by sticking it inside this method (and overriding onTouchEvent to handle input) but that wouldn’t be a terribly good way to go about things. Placing new Paint inside our loop will slow things down considerably and even if we put this elsewhere, adding too much code to the draw method would get ugly and difficult to follow.
Instead, it makes a lot more sense to handle game objects with their own classes. We’re going to start with one that shows a character and this class will be called CharacterSprite. Go ahead and make that.
This class is going to draw a sprite onto the canvas and will look like so
Code
public class CharacterSprite {
    private Bitmap image;

    public CharacterSprite(Bitmap bmp) {
        image = bmp;
    }

    public void draw(Canvas canvas) {
        canvas.drawBitmap(image, 100, 100, null);
    }
}
Now to use this, you’ll need to load the bitmap first and then call the class from GameView. Add a reference to private CharacterSprite characterSprite and then in the surfaceCreated method, add the line:
Code
characterSprite = new CharacterSprite(BitmapFactory.decodeResource(getResources(),R.drawable.avdgreen));As you can see, the bitmap we’re loading is stored in resources and is called avdgreen (it was from a previous game). Now all you need to do is pass that bitmap to the new class in the draw method with:
Code
characterSprite.draw(canvas);Now click run and you should see your graphic appear on your screen! This is BeeBoo. I used to draw him in my school textbooks.
What if we wanted to make this little guy move? Simple: we just create x and y variables for his positions and then change these values in an update method.
So add the references to your CharacterSprite and then then draw your bitmap at x, y. Create the update method here and for now we’re just going to try:
Each time the game loop runs, we’ll move the character down the screen. Remember, y coordinates are measured from the top so 0 is the top of the screen. Of course we need to call the update method in CharacterSprite from the update method in GameView.
Press play again and now you’ll see that your image slowly traces down the screen. We’re not winning any game awards just yet but it’s a start!
Okay, to make things slightly more interesting, I’m just going to drop some ‘bouncy ball’ code here. This will make our graphic bounce around the screen off the edges, like those old Windows screensavers. You know, the strangely hypnotic ones.
Code
public void update() {
    x += xVelocity;
    y += yVelocity;
    if ((x & gt; screenWidth - image.getWidth()) || (x & lt; 0)) {
        xVelocity = xVelocity * -1;
    }
    if ((y & gt; screenHeight - image.getHeight()) || (y & lt; 0)) {
        yVelocity = yVelocity * -1;
    }

}
You will also need to define these variables:
Code
private int xVelocity = 10;
private int yVelocity = 5;
private int screenWidth = Resources.getSystem().getDisplayMetrics().widthPixels;
private int screenHeight = Resources.getSystem().getDisplayMetrics().heightPixels;
Optimization
There is plenty more to delve into here, from handling player input, to scaling images, to managing having lots of characters all moving around the screen at once. Right now, the character is bouncing but if you look very closely there is slight stuttering. It’s not terrible but the fact that you can see it with the naked eye is something of a warning sign. The speed also varies a lot on the emulator compared to a physical device. Now imagine what happens when you have tons going on on the screen at once!
There are a few solutions to this problem. What I want to do to start with, is to create a private integer in MainThread and call that targetFPS. This will have the value of 60. I’m going to try and get my game to run at this speed and meanwhile, I’ll be checking to ensure it is. For that, I also want a private double called averageFPS.
I’m also going to update the run method in order to measure how long each game loop is taking and then to pause that game loop temporarily if it is ahead of the targetFPS. We’re then going to calculate how long it now took and then print that so we can see it in the log.
Code
@Override
public void run() {
    long startTime;
    long timeMillis;
    long waitTime;
    long totalTime = 0;
    int frameCount = 0;
    long targetTime = 1000 / targetFPS;

    while (running) {
        startTime = System.nanoTime();
        canvas = null;

        try {
            canvas = this.surfaceHolder.lockCanvas();
            synchronized(surfaceHolder) {
                this.gameView.update();
                this.gameView.draw(canvas);
            }
        } catch (Exception e) {       }
        finally {
            if (canvas != null)            {
                try {
                    surfaceHolder.unlockCanvasAndPost(canvas);
                }
                catch (Exception e) {
                    e.printStackTrace();
                }
            }
        }

        timeMillis = (System.nanoTime() - startTime) / 1000000;
        waitTime = targetTime - timeMillis;

        try {
            this.sleep(waitTime);
        } catch (Exception e) {}

        totalTime += System.nanoTime() - startTime;
        frameCount++;
        if (frameCount == targetFPS)        {
            averageFPS = 1000 / ((totalTime / frameCount) / 1000000);
            frameCount = 0;
            totalTime = 0;
            System.out.println(averageFPS);
        }
    }

}
Now our game is attempting to lock it’s FPS to 60 and you should find that it generally measures a fairly steady 58-62 FPS on a modern device. On the emulator though you might get a different result.

Try changing that 60 to 30 and see what happens. The game slows down and it should now read 30 in your logcat.
Closing Thoughts
There are some other things we can do to optimize performance too. There’s a great blog post on the subject here. Try to refrain from ever creating new instances of Paint or bitmaps inside the loop and do all initializing outside before the game begins.

If you’re planning on creating the next hit Android game then there are certainly easier and more efficient ways to go about it these days. But there are definitely still use-case scenarios for being able to draw onto a canvas and it’s a highly useful skill to add to your repertoire. I hope this guide has helped somewhat and wish you the best of luck in your upcoming coding ventures!
There are plenty of ways to create a game for Android and one important way is to do it from scratch in Android Studio with Java. This gives you the maximum control over how you want your game to look and behave and the process will teach you skills you can use in a range of other scenarios too – whether you’re creating a splash screen for an app or you just want to add some animations. With that in mind, this tutorial is going to show you how to create a simple 2D game using Android Studio and the Java. You can find all the code and resources at Github if you want to follow along.
Setting up
In order to create our game, we’re going to need to deal with a few specific concepts: game loops, threads and canvases. To begin with, start up Android Studio. If you don’t have it installed then check out our full introduction to Android Studio, which goes over the installation process. Now start a new project and make sure you choose the ‘Empty Activity’ template. This is a game, so of course you don’t need elements like the FAB button complicating matters.
The first thing you want to do is to change AppCompatActivity to Activity. This means we won’t be using the action bar features.
Similarly, we also want to make our game full screen. Add the following code to onCreate() before the call to setContentView():
Code
getWindow().setFlags(WindowManager.LayoutParams.FLAG_FULLSCREEN,
                          WindowManager.LayoutParams.FLAG_FULLSCREEN);
this.requestWindowFeature(Window.FEATURE_NO_TITLE);
Note that if you write out some code and it gets underlined in red, that probably means you need to import a class. In other words, you need to tell Android Studio that you wish to use certain statements and make them available. If you just click anywhere on the underlined word and then hit Alt+Enter, then that will be done for you automatically!
Creating your game view
You may be used to apps that use an XML script to define the layout of views like buttons, images and labels. This is what the line setContentView is doing for us.
But again, this is a game meaning it doesn’t need to have browser windows or scrolling recycler views. Instead of that, we want to show a canvas instead. In Android Studio a canvas is just the same as it is in art: it’s a medium that we can draw on.
So change that line to read as so:
Code
setContentView(new GameView(this))You’ll find that this is once again underlined red. But now if you press Alt+Enter, you don’t have the option to import the class. Instead, you have the option to create a class. In other words, we’re about to make our own class that will define what’s going to go on the canvas. This is what will allow us to draw to the screen, rather than just showing ready-made views.
So right click on the package name in your hierarchy over on the left and choose New > Class. You’ll now be presented with a window to create your class and you’re going to call it GameView. Under SuperClass, write: android.view.SurfaceView which means that the class will inherit methods – its capabilities – from SurfaceView.
In the Interface(s) box, you’ll write android.view.SurfaceHolder.Callback. As with any class, we now need to create our constructor. Use this code:
Code
private MainThread thread;

public GameView(Context context) {
    super(context);

    getHolder().addCallback(this);
}
Each time our class is called to make a new object (in this case our surface), it will run the constructor and it will create a new surface. The line ‘super’ calls the superclass and in our case, that is the SurfaceView.
By adding Callback, we’re able to intercept events.
Now override some methods:
Code
@Override
public void surfaceChanged(SurfaceHolder holder, int format, int width, int height) {

}

@Override
public void surfaceCreated(SurfaceHolder holder) {

}

@Override
public void surfaceDestroyed(SurfaceHolder holder) {

}
These basically allow us to override (hence the name) methods in the superclass (SurfaceView). You should now have no more red underlines in your code. Nice.
You just created a new class and each time we refer to that, it will build the canvas for your game to get painted onto. Classes create objects and we need one more.
Creating threads
Our new class is going to be called MainThread. And its job will be to create a thread. A thread is essentially like a parallel fork of code that can run simultaneously alongside the main part of your code. You can have lots of threads running all at once, thereby allowing things to occur simultaneously rather than adhering to a strict sequence. This is important for a game, because we need to make sure that it keeps on running smoothly, even when a lot is going on.
Create your new class just as you did before and this time it is going to extend Thread. In the constructor we’re just going to call super(). Remember, that’s the super class, which is Thread, and which can do all the heavy lifting for us. This is like creating a program to wash the dishes that just calls washingMachine().
When this class is called, it’s going to create a separate thread that runs as an offshoot of the main thing. And it’s from here that we want to create our GameView. That means we also need to reference the GameView class and we’re also using SurfaceHolder which is contains the canvas. So if the canvas is the surface, SurfaceHolder is the easel. And GameView is what puts it all together.
The full thing should look like so:
Code
public class MainThread extends Thread {
    private SurfaceHolder surfaceHolder;
    private GameView gameView;

    public MainThread(SurfaceHolder surfaceHolder, GameView gameView) {

        super();
        this.surfaceHolder = surfaceHolder;
        this.gameView = gameView;

    }
}
Schweet. We now have a GameView and a thread!
Creating the game loop
We now have the raw materials we need to make our game, but nothing is happening. This is where the game loop comes in. Basically, this is a loop of code that goes round and round and checks inputs and variables before drawing the screen. Our aim is to make this as consistent as possible, so that there are no stutters or hiccups in the framerate, which I’ll explore a little later.
For now, we’re still in the MainThread class and we’re going to override a method from the superclass. This one is run.
And it goes a little something like this:
Code
@Override
public void run() {
    while (running) {
        canvas = null;

        try {
            canvas = this.surfaceHolder.lockCanvas();
            synchronized(surfaceHolder) {
                this.gameView.update();
                this.gameView.draw(canvas);
            }
        } catch (Exception e) {} finally {
            if (canvas != null) {
                try {
                    surfaceHolder.unlockCanvasAndPost(canvas);
                } catch (Exception e) {
                    e.printStackTrace();
                }
            }
        }
    }
}
You’ll see a lot of underlining, so we need to add some more variables and references. Head back to the top and add:
Code
private SurfaceHolder surfaceHolder;
private GameView gameView;
private boolean running;
public static Canvas canvas;
Remember to import Canvas. Canvas is the thing we will actually be drawing on. As for ‘lockCanvas’, this is important because it is what essentially freezes the canvas to allow us to draw on it. That’s important because otherwise, you could have multiple threads attempting to draw on it at once. Just know that in order to edit the canvas, you must first lock the canvas.
Update is a method that we are going to create and this is where the fun stuff will happen later on.
The try and catch meanwhile are simply requirements of Java that show we’re willing to try and handle exceptions (errors) that might occur if the canvas isn’t ready etc.
Finally, we want to be able to start our thread when we need it. To do this, we’ll need another method here that allows us to set things in motion. That’s what the running variable is for (note that a Boolean is a type of variable that is only ever true or false). Add this method to the MainThread class:
Code
public void setRunning(boolean isRunning) {
    running = isRunning;
}
But at this point, one thing should still be highlighted and that’s update. This is because we haven’t created the update method yet. So pop back into GameView and now add method.
Code
public void update() {

}
We also need to start the thread! We’re going to do this in our surfaceCreated method:
Code
@Override
public void surfaceCreated(SurfaceHolder holder) {
    thread.setRunning(true);
    thread.start();

}
We also need to stop the thread when the surface is destroyed. As you might have guessed, we handle this in the surfaceDestroyed method. But seeing as it can actually take multiple attempts to stop a thread, we’re going to put this in a loop and use try and catch again. Like so:
Code
@Override
public void surfaceDestroyed(SurfaceHolder holder) {
    boolean retry = true;
    while (retry) {
        try {
            thread.setRunning(false);
            thread.join();
        } catch (InterruptedException e) {
            e.printStackTrace();
        }
        retry = false;
    }
}
And finally, head up to the constructor and make sure to create the new instance of your thread, otherwise you’ll get the dreaded null pointer exception! And then we’re going to make GameView focusable, meaning it can handle events.
Code
thread = new MainThread(getHolder(), this);
setFocusable(true);
Now you can finally actually test this thing! That’s right, click run and it should actually run without any errors. Prepare to be blown away!
It’s… it’s… a blank screen! All that code. For a blank screen. But, this is a blank screen of opportunity. You’ve got your surface up and running with a game loop to handle events. Now all that’s left is make stuff happen. It doesn’t even matter if you didn’t follow everything in the tutorial up to this point. Point is, you can simply recycle this code to start making glorious games!
Doing a graphics
Right, now we have a blank screen to draw on, all we need to do is draw on it. Fortunately, that’s the simple part. All you need to do is to override the draw method in our GameView class and then add some pretty pictures:
Code
@Override
public void draw(Canvas canvas) {
    super.draw(canvas);
    if (canvas != null) {
        canvas.drawColor(Color.WHITE);
        Paint paint = new Paint();
        paint.setColor(Color.rgb(250, 0, 0));
        canvas.drawRect(100, 100, 200, 200, paint);
    }
}
Run this and you should now have a pretty red square in the top left of an otherwise-white screen. This is certainly an improvement.
You could theoretically create pretty much your entire game by sticking it inside this method (and overriding onTouchEvent to handle input) but that wouldn’t be a terribly good way to go about things. Placing new Paint inside our loop will slow things down considerably and even if we put this elsewhere, adding too much code to the draw method would get ugly and difficult to follow.
Instead, it makes a lot more sense to handle game objects with their own classes. We’re going to start with one that shows a character and this class will be called CharacterSprite. Go ahead and make that.
This class is going to draw a sprite onto the canvas and will look like so
Code
public class CharacterSprite {
    private Bitmap image;

    public CharacterSprite(Bitmap bmp) {
        image = bmp;
    }

    public void draw(Canvas canvas) {
        canvas.drawBitmap(image, 100, 100, null);
    }
}
Now to use this, you’ll need to load the bitmap first and then call the class from GameView. Add a reference to private CharacterSprite characterSprite and then in the surfaceCreated method, add the line:
Code
characterSprite = new CharacterSprite(BitmapFactory.decodeResource(getResources(),R.drawable.avdgreen));As you can see, the bitmap we’re loading is stored in resources and is called avdgreen (it was from a previous game). Now all you need to do is pass that bitmap to the new class in the draw method with:
Code
characterSprite.draw(canvas);Now click run and you should see your graphic appear on your screen! This is BeeBoo. I used to draw him in my school textbooks.
What if we wanted to make this little guy move? Simple: we just create x and y variables for his positions and then change these values in an update method.
So add the references to your CharacterSprite and then then draw your bitmap at x, y. Create the update method here and for now we’re just going to try:
Each time the game loop runs, we’ll move the character down the screen. Remember, y coordinates are measured from the top so 0 is the top of the screen. Of course we need to call the update method in CharacterSprite from the update method in GameView.
Press play again and now you’ll see that your image slowly traces down the screen. We’re not winning any game awards just yet but it’s a start!
Okay, to make things slightly more interesting, I’m just going to drop some ‘bouncy ball’ code here. This will make our graphic bounce around the screen off the edges, like those old Windows screensavers. You know, the strangely hypnotic ones.
Code
public void update() {
    x += xVelocity;
    y += yVelocity;
    if ((x & gt; screenWidth - image.getWidth()) || (x & lt; 0)) {
        xVelocity = xVelocity * -1;
    }
    if ((y & gt; screenHeight - image.getHeight()) || (y & lt; 0)) {
        yVelocity = yVelocity * -1;
    }

}
You will also need to define these variables:
Code
private int xVelocity = 10;
private int yVelocity = 5;
private int screenWidth = Resources.getSystem().getDisplayMetrics().widthPixels;
private int screenHeight = Resources.getSystem().getDisplayMetrics().heightPixels;
Optimization
There is plenty more to delve into here, from handling player input, to scaling images, to managing having lots of characters all moving around the screen at once. Right now, the character is bouncing but if you look very closely there is slight stuttering. It’s not terrible but the fact that you can see it with the naked eye is something of a warning sign. The speed also varies a lot on the emulator compared to a physical device. Now imagine what happens when you have tons going on on the screen at once!
There are a few solutions to this problem. What I want to do to start with, is to create a private integer in MainThread and call that targetFPS. This will have the value of 60. I’m going to try and get my game to run at this speed and meanwhile, I’ll be checking to ensure it is. For that, I also want a private double called averageFPS.
I’m also going to update the run method in order to measure how long each game loop is taking and then to pause that game loop temporarily if it is ahead of the targetFPS. We’re then going to calculate how long it now took and then print that so we can see it in the log.
Code
@Override
public void run() {
    long startTime;
    long timeMillis;
    long waitTime;
    long totalTime = 0;
    int frameCount = 0;
    long targetTime = 1000 / targetFPS;

    while (running) {
        startTime = System.nanoTime();
        canvas = null;

        try {
            canvas = this.surfaceHolder.lockCanvas();
            synchronized(surfaceHolder) {
                this.gameView.update();
                this.gameView.draw(canvas);
            }
        } catch (Exception e) {       }
        finally {
            if (canvas != null)            {
                try {
                    surfaceHolder.unlockCanvasAndPost(canvas);
                }
                catch (Exception e) {
                    e.printStackTrace();
                }
            }
        }

        timeMillis = (System.nanoTime() - startTime) / 1000000;
        waitTime = targetTime - timeMillis;

        try {
            this.sleep(waitTime);
        } catch (Exception e) {}

        totalTime += System.nanoTime() - startTime;
        frameCount++;
        if (frameCount == targetFPS)        {
            averageFPS = 1000 / ((totalTime / frameCount) / 1000000);
            frameCount = 0;
            totalTime = 0;
            System.out.println(averageFPS);
        }
    }

}
Now our game is attempting to lock it’s FPS to 60 and you should find that it generally measures a fairly steady 58-62 FPS on a modern device. On the emulator though you might get a different result.
Try changing that 60 to 30 and see what happens. The game slows down and it should now read 30 in your logcat.
Closing Thoughts
There are some other things we can do to optimize performance too. There’s a great blog post on the subject here. Try to refrain from ever creating new instances of Paint or bitmaps inside the loop and do all initializing outside before the game begins.
If you’re planning on creating the next hit Android game then there are certainly easier and more efficient ways to go about it these days. But there are definitely still use-case scenarios for being able to draw onto a canvas and it’s a highly useful skill to add to your repertoire. I hope this guide has helped somewhat and wish you the best of luck in your upcoming coding ventures!
Hello developers, I decided to post this Android Game Development Tutorial. In this Android Game Development Tutorial we are going to create a simple 2d game using android studio. We will not be using any third party library or game engines for this android game development tutorial. So lets begin.
Table of Contents
- 1 Android Game Development with Unity
- 2 Planning the Game Story
- 3 The Game Rules
- 4 Android Game Development Tutorial
- 4.1 Android Game Development Tutorial – Video Demo
- 4.2 Android Game Development Tutorial – Live Demo
- 4.3 Download the Images Used
- 4.4 Creating a New Project
- 4.5 Designing the Start Screen
- 4.6 Building Game View
- 4.7 Adding GameView to GameActivity
- 4.8 Creating Player
- 4.9 Drawing Player to GameView
- 4.10 Adding Controls
- 4.11 Adding Booster to Space Jet
- 4.12 Adding Background Stars
- 4.13 Adding Enemies
- 4.14 Detecting Collision
- 4.15 Adding Blast Effect
- 5 Android Game Development Tutorial – Summary
- 6 Android Game Development Tutorial – Final Words
- 6.1 Related
Android Game Development with Unity
In this tutorial we are using Android Studio, and really that is not how actual games are build in the industry. If you are really serious about Mobile Game Development, and want to become a professional, or want to start your career in Game Development Industry; then you must learn some Game Engines. And the best Game Engine to start as a Student is Unity. It is one of the most popular Game Engines. It is also free. And I have a Complete Free Course about building Android Games with Unity. Check it out Here.
But if you are just casual learner and just want to learn some basics with Android Studio, keep reading the post.
Planning the Game Story
Every game start with a story. So you need to think. Not actually 😛 because I have already decided what we will be creating.
So In our game there will be a Space Jet, and the jet has to kill the enemies by hitting them. There will also be some good guys and our Space Jet should not kill them. So basically if our Space Jet touches other character that will be destroyed. So we have to only kill the enemies.
The Game Rules
- Player ship has to kill the enemies by colliding with them.
- If player lets 3 enemies to go safely then the game is over.
- If player kills a good guy the game is over.
We have decided the game story and the rules. Now its time to create the game. We will use Android Studio. And I am assuming all of you got Android Studio and know the basics of it.
Android Game Development Tutorial – Video Demo
Before going ahead in this tutorial you can check out this video to know what you will get at the end of this Android Game Development Tutorial part 1.
Android Game Development Tutorial – Live Demo
You can also download the apk for this part of Android Game Development Tutorial from the link given below.
Download APK
Download the Images Used
You can design and create your own character using Adobe Photoshop or other photo editing program. But if you don’t want to do it yourself you can download the images I used in this project from the link given below.
Android Game Development Images Download
Creating a New Project
- Open Android Studio and create a new project.
- Once the project is loaded you will get MainActivity.java and activity_main.xml
- First paste all the images that you downloaded inside the drawable folder of your project.
Designing the Start Screen

- Above you can see the first screen of the game. It has a nice background image with two ImageButtons. You already downloaded the images used in this screen.
- As you can see it is a full screen activity. So to make your application full screen, you need to go res->values->styles.xml and modify it as the following code.
|
<resources> <!— Base application theme. —> <style name=»AppTheme» parent=»Theme.AppCompat.Light.NoActionBar»> <item name=»windowNoTitle»>true</item> <item name=»windowActionBar»>false</item> <item name=»android:windowFullscreen»>true</item> <item name=»android:windowContentOverlay»>@null</item> </style> </resources> |
- Inside activity_main.xml write the following xml code.
|
1 2 3 4 5 6 7 8 9 10 11 12 13 14 15 16 17 18 19 20 21 22 23 24 25 26 27 28 29 30 31 |
<?xml version=«1.0» encoding=«utf-8»?> <RelativeLayout xmlns:android=«http://schemas.android.com/apk/res/android» xmlns:tools=«http://schemas.android.com/tools» android:layout_width=«match_parent» android:layout_height=«match_parent» android:paddingBottom=«@dimen/activity_vertical_margin» android:paddingLeft=«@dimen/activity_horizontal_margin» android:paddingRight=«@dimen/activity_horizontal_margin» android:paddingTop=«@dimen/activity_vertical_margin» android:background=«@drawable/splash» tools:context=«net.simplifiedcoding.simplegame.MainActivity»> <ImageButton android:id=«@+id/buttonPlay» android:background=«@drawable/playnow» android:layout_width=«wrap_content» android:layout_height=«wrap_content» android:layout_above=«@+id/buttonScore» android:layout_centerHorizontal=«true» /> <ImageButton android:id=«@+id/buttonScore» android:background=«@drawable/highscore» android:layout_width=«wrap_content» android:layout_height=«wrap_content» android:layout_alignParentBottom=«true» android:layout_centerHorizontal=«true» /> </RelativeLayout> |
- When we tap the Play Now button our Game Activity will start.
- Now come inside MainActivity.java and write the following code.
|
1 2 3 4 5 6 7 8 9 10 11 12 13 14 15 16 17 18 19 20 21 22 23 24 25 26 27 28 29 30 31 32 33 34 35 36 37 38 39 40 |
package net.simplifiedcoding.simplegame; import android.content.Intent; import android.content.pm.ActivityInfo; import android.media.Image; import android.support.v7.app.AppCompatActivity; import android.os.Bundle; import android.view.View; import android.widget.Button; import android.widget.ImageButton; public class MainActivity extends AppCompatActivity implements View.OnClickListener{ //image button private ImageButton buttonPlay; @Override protected void onCreate(Bundle savedInstanceState) { super.onCreate(savedInstanceState); setContentView(R.layout.activity_main); //setting the orientation to landscape setRequestedOrientation(ActivityInfo.SCREEN_ORIENTATION_LANDSCAPE); //getting the button buttonPlay = (ImageButton) findViewById(R.id.buttonPlay); //adding a click listener buttonPlay.setOnClickListener(this); } @Override public void onClick(View v) { //starting game activity startActivity(new Intent(this, GameActivity.class)); } } |
- Now you need to create a new activity named GameActivity. To create a new activity right click on the package name -> new -> activity -> empty activity
Building Game View
Now its time to build our Game View. We will be using SurfaceView for building our game view. Surfaceview provides a dedicated drawing surface.
- Create a new class named GameView and write the following code.
|
1 2 3 4 5 6 7 8 9 10 11 12 13 14 15 16 17 18 19 20 21 22 23 24 25 26 27 28 29 30 31 32 33 34 35 36 37 38 39 40 41 42 43 44 45 46 47 48 49 50 51 52 53 54 55 56 57 58 59 60 61 62 63 64 65 66 67 |
public class GameView extends SurfaceView implements Runnable { //boolean variable to track if the game is playing or not volatile boolean playing; //the game thread private Thread gameThread = null; //Class constructor public GameView(Context context) { super(context); } @Override public void run() { while (playing) { //to update the frame update(); //to draw the frame draw(); //to control control(); } } private void update() { } private void draw() { } private void control() { try { gameThread.sleep(17); } catch (InterruptedException e) { e.printStackTrace(); } } public void pause() { //when the game is paused //setting the variable to false playing = false; try { //stopping the thread gameThread.join(); } catch (InterruptedException e) { } } public void resume() { //when the game is resumed //starting the thread again playing = true; gameThread = new Thread(this); gameThread.start(); } } |
- The above class is our GameView class. It is the actual game panel where we will play the game. The class is implementing Runnable interface. We have a volatile boolean type variable running that will track whether the game is running or not. After that we have our gameThread, it is the main game loop. Then we have the constructor to the class. We are not doing anything inside the constructor right now. Then we have the overriden method run(), here we are running a loop until the playing variable running is true. Inside the loop we are calling the following methods.
update() -> Here we will update the coordinate of our characters.
draw() -> Here we will draw the characters to the canvas.
control() -> This method will control the frames per seconds drawn. Here we are calling the delay method of Thread. And this is actually making our frame rate to aroud 60fps.
After these we have two more methods.
pause() -> To pause the game, we are stopping the gameThread here.
resume() -> To resume the game, here we are starting the gameThread.
Adding GameView to GameActivity
- After tapping the play now button we are launching the GameActivity. We will set our GameView to the content of this activity. So go to GameActivity.java and modify the code as below.
I will be adding the comments only above the new code added so that you can understand what is new in this code so that you can modify your code easily.
|
1 2 3 4 5 6 7 8 9 10 11 12 13 14 15 16 17 18 19 20 21 22 23 24 25 26 27 28 29 30 31 32 33 34 35 36 37 |
package net.simplifiedcoding.spacefighter; import android.support.v7.app.AppCompatActivity; import android.os.Bundle; public class GameActivity extends AppCompatActivity { //declaring gameview private GameView gameView; @Override protected void onCreate(Bundle savedInstanceState) { super.onCreate(savedInstanceState); //Initializing game view object gameView = new GameView(this); //adding it to contentview setContentView(gameView); } //pausing the game when activity is paused @Override protected void onPause() { super.onPause(); gameView.pause(); } //running the game when activity is resumed @Override protected void onResume() { super.onResume(); gameView.resume(); } } |
Creating Player
- Create a new class Player inside your package and write the following code.
|
1 2 3 4 5 6 7 8 9 10 11 12 13 14 15 16 17 18 19 20 21 22 23 24 25 26 27 28 29 30 31 32 33 34 35 36 37 38 39 40 41 42 43 44 45 46 47 48 49 50 51 52 53 54 55 56 57 58 |
package net.simplifiedcoding.spacefighter; import android.content.Context; import android.graphics.Bitmap; import android.graphics.BitmapFactory; /** * Created by Belal on 6/24/2016. */ public class Player { //Bitmap to get character from image private Bitmap bitmap; //coordinates private int x; private int y; //motion speed of the character private int speed = 0; //constructor public Player(Context context) { x = 75; y = 50; speed = 1; //Getting bitmap from drawable resource bitmap = BitmapFactory.decodeResource(context.getResources(), R.drawable.player); } //Method to update coordinate of character public void update(){ //updating x coordinate x++; } /* * These are getters you can generate it autmaticallyl * right click on editor -> generate -> getters * */ public Bitmap getBitmap() { return bitmap; } public int getX() { return x; } public int getY() { return y; } public int getSpeed() { return speed; } } |
- The above code is very easy to understand. I have written comments to explain everything. So lets move ahead.
Drawing Player to GameView
- To draw the player to our GameView you need to come back to the GameView.java class and modify it as below.
|
1 2 3 4 5 6 7 8 9 10 11 12 13 14 15 16 17 18 19 20 21 22 23 24 25 26 27 28 29 30 31 32 33 34 35 36 37 38 39 40 41 42 43 44 45 46 47 48 49 50 51 52 53 54 55 56 57 58 59 60 61 62 63 64 65 66 67 68 69 70 71 72 73 74 75 76 77 78 79 80 |
public class GameView extends SurfaceView implements Runnable { volatile boolean playing; private Thread gameThread = null; //adding the player to this class private Player player; //These objects will be used for drawing private Paint paint; private Canvas canvas; private SurfaceHolder surfaceHolder; public GameView(Context context) { super(context); //initializing player object player = new Player(context); //initializing drawing objects surfaceHolder = getHolder(); paint = new Paint(); } @Override public void run() { while (playing) { update(); draw(); control(); } } private void update() { //updating player position player.update(); } private void draw() { //checking if surface is valid if (surfaceHolder.getSurface().isValid()) { //locking the canvas canvas = surfaceHolder.lockCanvas(); //drawing a background color for canvas canvas.drawColor(Color.BLACK); //Drawing the player canvas.drawBitmap( player.getBitmap(), player.getX(), player.getY(), paint); //Unlocking the canvas surfaceHolder.unlockCanvasAndPost(canvas); } } private void control() { try { gameThread.sleep(17); } catch (InterruptedException e) { e.printStackTrace(); } } public void pause() { playing = false; try { gameThread.join(); } catch (InterruptedException e) { } } public void resume() { playing = true; gameThread = new Thread(this); gameThread.start(); } } |
- Now try executing your application. Put your emulator in landscape mode. When you tap the play now button in the first activity you will see the moving Space Jet as shown below.
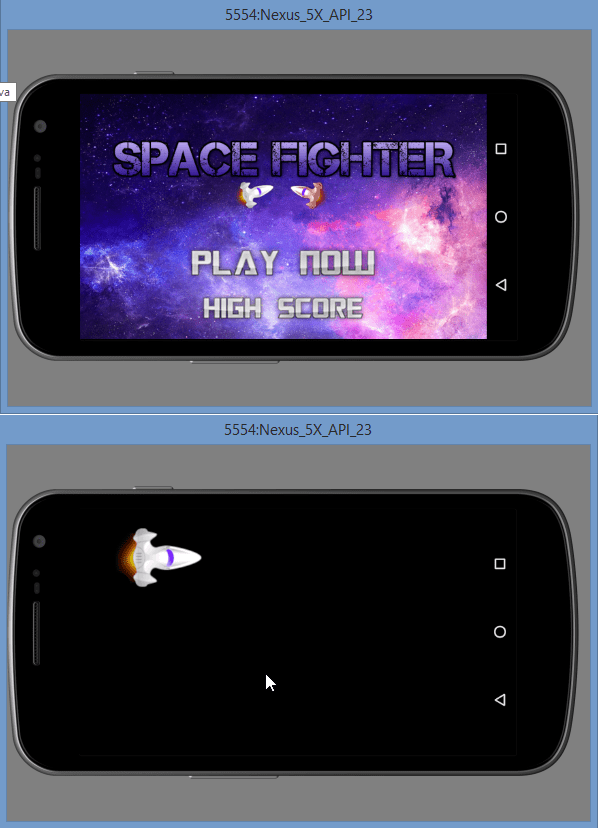
If you are getting the output as shown in the above image then Hurray!. You might have got the concept about drawing images in canvas using SurfaceView. And the movement is the magic of the coordinates. We are changing the x coordinate so it is moving horizontally ahead.
Now lets add control to our Space Jet.
Adding Controls
We will now add control to the player’s Space Jet. When the player will tap on the screen the Space Jet will boost up and after releasing the screen the Space Jet will boost down. The movement is inspired by the most popular game Flappy Bird.
To add this control we will need to detect touches of the screen. So lets begin.
- Come inside GameView.java file and override the method onTouchEvent().
|
1 2 3 4 5 6 7 8 9 10 11 12 13 14 15 16 17 |
@Override public boolean onTouchEvent(MotionEvent motionEvent) { switch (motionEvent.getAction() & MotionEvent.ACTION_MASK) { case MotionEvent.ACTION_UP: //When the user presses on the screen //we will do something here break; case MotionEvent.ACTION_DOWN: //When the user releases the screen //do something here break; } return true; } |
- Currently we need these two events only which are ACTION_UP and ACTION_DOWN. What we need to do is we need to boost up the Space Jet on ACTION_UP and boost down the Space Jet on ACTION_DOWN.
Adding Booster to Space Jet
Now we will add the booster to our Space Jet so that our player can control the Space Jet. Follow these steps to do this.
- Modify the code of Player.java file as follows.
|
1 2 3 4 5 6 7 8 9 10 11 12 13 14 15 16 17 18 19 20 21 22 23 24 25 26 27 28 29 30 31 32 33 34 35 36 37 38 39 40 41 42 43 44 45 46 47 48 49 50 51 52 53 54 55 56 57 58 59 60 61 62 63 64 65 66 67 68 69 70 71 72 73 74 75 76 77 78 79 80 81 82 83 84 85 86 87 88 89 90 |
public class Player { private Bitmap bitmap; private int x; private int y; private int speed = 0; //boolean variable to track the ship is boosting or not private boolean boosting; //Gravity Value to add gravity effect on the ship private final int GRAVITY = —10; //Controlling Y coordinate so that ship won’t go outside the screen private int maxY; private int minY; //Limit the bounds of the ship’s speed private final int MIN_SPEED = 1; private final int MAX_SPEED = 20; public Player(Context context) { x = 75; y = 50; speed = 1; bitmap = BitmapFactory.decodeResource(context.getResources(), R.drawable.player); //setting the boosting value to false initially boosting = false; } //setting boosting true public void setBoosting() { boosting = true; } //setting boosting false public void stopBoosting() { boosting = false; } public void update() { //if the ship is boosting if (boosting) { //speeding up the ship speed += 2; } else { //slowing down if not boosting speed -= 5; } //controlling the top speed if (speed > MAX_SPEED) { speed = MAX_SPEED; } //if the speed is less than min speed //controlling it so that it won’t stop completely if (speed < MIN_SPEED) { speed = MIN_SPEED; } //moving the ship down y -= speed + GRAVITY; //but controlling it also so that it won’t go off the screen if (y < minY) { y = minY; } if (y > maxY) { y = maxY; } } public Bitmap getBitmap() { return bitmap; } public int getX() { return x; } public int getY() { return y; } public int getSpeed() { return speed; } } |
- We also need to detect the size of screen so go inside GameActivity.java file and add the following code inside onCreate().
|
1 2 3 4 5 6 7 8 9 10 11 12 13 14 15 16 17 18 19 20 |
@Override protected void onCreate(Bundle savedInstanceState) { super.onCreate(savedInstanceState); //Getting display object Display display = getWindowManager().getDefaultDisplay(); //Getting the screen resolution into point object Point size = new Point(); display.getSize(size); //Initializing game view object //this time we are also passing the screen size to the GameView constructor gameView = new GameView(this, size.x, size.y); //adding it to contentview setContentView(gameView); } |
- In the above code we are passing screen size to GameView constructor, so we also need to change the GameView constructor. So change the GameView constructor as follow.
|
public GameView(Context context, int screenX, int screenY) { super(context); //initializing player object //this time also passing screen size to player constructor player = new Player(context, screenX, screenY); //initializing drawing objects surfaceHolder = getHolder(); paint = new Paint(); } |
- In the above code you can see we are passing the screen size to player constructor. So again we also need to modify the Player class constructor.
|
1 2 3 4 5 6 7 8 9 10 11 12 13 14 15 16 17 |
public Player(Context context, int screenX, int screenY) { x = 75; y = 50; speed = 1; bitmap = BitmapFactory.decodeResource(context.getResources(), R.drawable.player); //calculating maxY maxY = screenY — bitmap.getHeight(); //top edge’s y point is 0 so min y will always be zero minY = 0; //setting the boosting value to false initially boosting = false; } |
- Now to complete adding the boosters come inside GameView.java file and modify the onTouchEvent() as follows.
|
@Override public boolean onTouchEvent(MotionEvent motionEvent) { switch (motionEvent.getAction() & MotionEvent.ACTION_MASK) { case MotionEvent.ACTION_UP: //stopping the boosting when screen is released player.stopBoosting(); break; case MotionEvent.ACTION_DOWN: //boosting the space jet when screen is pressed player.setBoosting(); break; } return true; } |
Now execute your application again to test the boosters. If it is working fine then you can move ahead.
Adding Background Stars
Now we will add background stars to make the background looks animating.
|
1 2 3 4 5 6 7 8 9 10 11 12 13 14 15 16 17 18 19 20 21 22 23 24 25 26 27 28 29 30 31 32 33 34 35 36 37 38 39 40 41 42 43 44 45 46 47 48 49 50 51 52 53 54 55 56 57 58 59 60 61 62 63 64 65 66 67 68 69 |
package net.simplifiedcoding.spacefighter; import java.util.Random; /** * Created by Belal on 6/15/2016. */ public class Star { private int x; private int y; private int speed; private int maxX; private int maxY; private int minX; private int minY; public Star(int screenX, int screenY) { maxX = screenX; maxY = screenY; minX = 0; minY = 0; Random generator = new Random(); speed = generator.nextInt(10); //generating a random coordinate //but keeping the coordinate inside the screen size x = generator.nextInt(maxX); y = generator.nextInt(maxY); } public void update(int playerSpeed) { //animating the star horizontally left side //by decreasing x coordinate with player speed x -= playerSpeed; x -= speed; //if the star reached the left edge of the screen if (x < 0) { //again starting the star from right edge //this will give a infinite scrolling background effect x = maxX; Random generator = new Random(); y = generator.nextInt(maxY); speed = generator.nextInt(15); } } public float getStarWidth() { //Making the star width random so that //it will give a real look float minX = 1.0f; float maxX = 4.0f; Random rand = new Random(); float finalX = rand.nextFloat() * (maxX — minX) + minX; return finalX; } public int getX() { return x; } public int getY() { return y; } } |
- Now come inside GameView.java and modify it as follows.
|
1 2 3 4 5 6 7 8 9 10 11 12 13 14 15 16 17 18 19 20 21 22 23 24 25 26 27 28 29 30 31 32 33 34 35 36 37 38 39 40 41 42 43 44 45 46 47 48 49 50 51 52 53 54 55 56 57 58 59 60 61 62 63 64 65 66 67 68 69 70 71 72 73 74 75 76 77 78 79 80 81 82 83 84 85 86 87 88 89 90 91 92 93 94 95 96 97 98 99 100 101 102 103 104 105 106 107 108 |
public class GameView extends SurfaceView implements Runnable { volatile boolean playing; private Thread gameThread = null; private Player player; private Paint paint; private Canvas canvas; private SurfaceHolder surfaceHolder; //Adding an stars list private ArrayList<Star> stars = new ArrayList<Star>(); public GameView(Context context, int screenX, int screenY) { super(context); player = new Player(context, screenX, screenY); surfaceHolder = getHolder(); paint = new Paint(); //adding 100 stars you may increase the number int starNums = 100; for (int i = 0; i < starNums; i++) { Star s = new Star(screenX, screenY); stars.add(s); } } @Override public void run() { while (playing) { update(); draw(); control(); } } private void update() { player.update(); //Updating the stars with player speed for (Star s : stars) { s.update(player.getSpeed()); } } private void draw() { if (surfaceHolder.getSurface().isValid()) { canvas = surfaceHolder.lockCanvas(); canvas.drawColor(Color.BLACK); //setting the paint color to white to draw the stars paint.setColor(Color.WHITE); //drawing all stars for (Star s : stars) { paint.setStrokeWidth(s.getStarWidth()); canvas.drawPoint(s.getX(), s.getY(), paint); } canvas.drawBitmap( player.getBitmap(), player.getX(), player.getY(), paint); surfaceHolder.unlockCanvasAndPost(canvas); } } private void control() { try { gameThread.sleep(17); } catch (InterruptedException e) { e.printStackTrace(); } } public void pause() { playing = false; try { gameThread.join(); } catch (InterruptedException e) { } } public void resume() { playing = true; gameThread = new Thread(this); gameThread.start(); } @Override public boolean onTouchEvent(MotionEvent motionEvent) { switch (motionEvent.getAction() & MotionEvent.ACTION_MASK) { case MotionEvent.ACTION_UP: player.stopBoosting(); break; case MotionEvent.ACTION_DOWN: player.setBoosting(); break; } return true; } } |
- Now execute your app again. You will see a infinite scrolling background this time as shown in the following image.

Adding Enemies
So far in this Android Game Development Tutorial, we have added our player, we added an infinite scrolling background. We also added controls to our player. Now we need to add some enemies. So lets start coding the enemies.
- Create a new java class named Enemy and write the following code.
|
1 2 3 4 5 6 7 8 9 10 11 12 13 14 15 16 17 18 19 20 21 22 23 24 25 26 27 28 29 30 31 32 33 34 35 36 37 38 39 40 41 42 43 44 45 46 47 48 49 50 51 52 53 54 55 56 57 58 59 60 61 62 63 64 65 66 67 68 69 70 71 72 73 74 75 76 77 78 79 80 81 82 83 84 85 86 87 |
package net.simplifiedcoding.spacefighter; import android.content.Context; import android.graphics.Bitmap; import android.graphics.BitmapFactory; import android.graphics.Rect; import java.util.Random; /** * Created by Belal on 6/15/2016. */ public class Enemy { //bitmap for the enemy //we have already pasted the bitmap in the drawable folder private Bitmap bitmap; //x and y coordinates private int x; private int y; //enemy speed private int speed = 1; //min and max coordinates to keep the enemy inside the screen private int maxX; private int minX; private int maxY; private int minY; public Enemy(Context context, int screenX, int screenY) { //getting bitmap from drawable resource bitmap = BitmapFactory.decodeResource(context.getResources(), R.drawable.enemy); //initializing min and max coordinates maxX = screenX; maxY = screenY; minX = 0; minY = 0; //generating a random coordinate to add enemy Random generator = new Random(); speed = generator.nextInt(6) + 10; x = screenX; y = generator.nextInt(maxY) — bitmap.getHeight(); } public void update(int playerSpeed) { //decreasing x coordinate so that enemy will move right to left x -= playerSpeed; x -= speed; //if the enemy reaches the left edge if (x < minX — bitmap.getWidth()) { //adding the enemy again to the right edge Random generator = new Random(); speed = generator.nextInt(10) + 10; x = maxX; y = generator.nextInt(maxY) — bitmap.getHeight(); } } //getters public Bitmap getBitmap() { return bitmap; } public int getX() { return x; } public int getY() { return y; } public int getSpeed() { return speed; } } |
- We need to add the enemies in the GameView now. So come inside GameView.java and modify the code as follows.
|
1 2 3 4 5 6 7 8 9 10 11 12 13 14 15 16 17 18 19 20 21 22 23 24 25 26 27 28 29 30 31 32 33 34 35 36 37 38 39 40 41 42 43 44 45 46 47 48 49 50 51 52 53 54 55 56 57 58 59 60 61 62 63 64 65 66 67 68 69 70 71 72 73 74 75 76 77 78 79 80 81 82 83 84 85 86 87 88 89 90 91 92 93 94 95 96 97 98 99 100 101 102 103 104 105 106 107 108 109 110 111 112 113 114 115 116 117 118 119 120 121 122 123 124 125 126 127 128 129 130 131 |
public class GameView extends SurfaceView implements Runnable { volatile boolean playing; private Thread gameThread = null; private Player player; private Paint paint; private Canvas canvas; private SurfaceHolder surfaceHolder; //Adding enemies object array private Enemy[] enemies; //Adding 3 enemies you may increase the size private int enemyCount = 3; private ArrayList<Star> stars = new ArrayList<Star>(); public GameView(Context context, int screenX, int screenY) { super(context); player = new Player(context, screenX, screenY); surfaceHolder = getHolder(); paint = new Paint(); int starNums = 100; for (int i = 0; i < starNums; i++) { Star s = new Star(screenX, screenY); stars.add(s); } //initializing enemy object array enemies = new Enemy[enemyCount]; for(int i=0; i<enemyCount; i++){ enemies[i] = new Enemy(context, screenX, screenY); } } @Override public void run() { while (playing) { update(); draw(); control(); } } private void update() { player.update(); for (Star s : stars) { s.update(player.getSpeed()); } //updating the enemy coordinate with respect to player speed for(int i=0; i<enemyCount; i++){ enemies[i].update(player.getSpeed()); } } private void draw() { if (surfaceHolder.getSurface().isValid()) { canvas = surfaceHolder.lockCanvas(); canvas.drawColor(Color.BLACK); paint.setColor(Color.WHITE); for (Star s : stars) { paint.setStrokeWidth(s.getStarWidth()); canvas.drawPoint(s.getX(), s.getY(), paint); } canvas.drawBitmap( player.getBitmap(), player.getX(), player.getY(), paint); //drawing the enemies for (int i = 0; i < enemyCount; i++) { canvas.drawBitmap( enemies[i].getBitmap(), enemies[i].getX(), enemies[i].getY(), paint ); } surfaceHolder.unlockCanvasAndPost(canvas); } } private void control() { try { gameThread.sleep(17); } catch (InterruptedException e) { e.printStackTrace(); } } public void pause() { playing = false; try { gameThread.join(); } catch (InterruptedException e) { } } public void resume() { playing = true; gameThread = new Thread(this); gameThread.start(); } @Override public boolean onTouchEvent(MotionEvent motionEvent) { switch (motionEvent.getAction() & MotionEvent.ACTION_MASK) { case MotionEvent.ACTION_UP: player.stopBoosting(); break; case MotionEvent.ACTION_DOWN: player.setBoosting(); break; } return true; } } |
- Execute your application again and you should see the following output.

So we are almost done at this part of the Android Game Development Tutorial. Only the last thing is left. When our Space Jet touches the enemy, the enemy ship should blast. So we need a blast image and you already got it inside your drawable folder. To show the blast image we need to detect the collision between the player and enemy jet. So lets do this.
Detecting Collision
- To detect collision we will use Rect object. So come inside Enemy class modify the code as follows.
|
1 2 3 4 5 6 7 8 9 10 11 12 13 14 15 16 17 18 19 20 21 22 23 24 25 26 27 28 29 30 31 32 33 34 35 36 37 38 39 40 41 42 43 44 45 46 47 48 49 50 51 52 53 54 55 56 57 58 59 60 61 62 63 64 65 66 67 68 69 70 71 72 73 74 75 76 77 |
public class Enemy { private Bitmap bitmap; private int x; private int y; private int speed = 1; private int maxX; private int minX; private int maxY; private int minY; //creating a rect object private Rect detectCollision; public Enemy(Context context, int screenX, int screenY) { bitmap = BitmapFactory.decodeResource(context.getResources(), R.drawable.enemy); maxX = screenX; maxY = screenY; minX = 0; minY = 0; Random generator = new Random(); speed = generator.nextInt(6) + 10; x = screenX; y = generator.nextInt(maxY) — bitmap.getHeight(); //initializing rect object detectCollision = new Rect(x, y, bitmap.getWidth(), bitmap.getHeight()); } public void update(int playerSpeed) { x -= playerSpeed; x -= speed; if (x < minX — bitmap.getWidth()) { Random generator = new Random(); speed = generator.nextInt(10) + 10; x = maxX; y = generator.nextInt(maxY) — bitmap.getHeight(); } //Adding the top, left, bottom and right to the rect object detectCollision.left = x; detectCollision.top = y; detectCollision.right = x + bitmap.getWidth(); detectCollision.bottom = y + bitmap.getHeight(); } //adding a setter to x coordinate so that we can change it after collision public void setX(int x){ this.x = x; } //one more getter for getting the rect object public Rect getDetectCollision() { return detectCollision; } //getters public Bitmap getBitmap() { return bitmap; } public int getX() { return x; } public int getY() { return y; } public int getSpeed() { return speed; } } |
- The same thing you need to do inside the Player.java file.
|
1 2 3 4 5 6 7 8 9 10 11 12 13 14 15 16 17 18 19 20 21 22 23 24 25 26 27 28 29 30 31 32 33 34 35 36 37 38 39 40 41 42 43 44 45 46 47 48 49 50 51 52 53 54 55 56 57 58 59 60 61 62 63 64 65 66 67 68 69 70 71 72 73 74 75 76 77 78 79 80 81 82 83 84 85 86 87 88 89 90 91 |
public class Player { private Bitmap bitmap; private int x; private int y; private int speed = 0; private boolean boosting; private final int GRAVITY = —10; private int maxY; private int minY; private final int MIN_SPEED = 1; private final int MAX_SPEED = 20; private Rect detectCollision; public Player(Context context, int screenX, int screenY) { x = 75; y = 50; speed = 1; bitmap = BitmapFactory.decodeResource(context.getResources(), R.drawable.player); maxY = screenY — bitmap.getHeight(); minY = 0; boosting = false; //initializing rect object detectCollision = new Rect(x, y, bitmap.getWidth(), bitmap.getHeight()); } public void setBoosting() { boosting = true; } public void stopBoosting() { boosting = false; } public void update() { if (boosting) { speed += 2; } else { speed -= 5; } if (speed > MAX_SPEED) { speed = MAX_SPEED; } if (speed < MIN_SPEED) { speed = MIN_SPEED; } y -= speed + GRAVITY; if (y < minY) { y = minY; } if (y > maxY) { y = maxY; } //adding top, left, bottom and right to the rect object detectCollision.left = x; detectCollision.top = y; detectCollision.right = x + bitmap.getWidth(); detectCollision.bottom = y + bitmap.getHeight(); } //one more getter for getting the rect object public Rect getDetectCollision() { return detectCollision; } public Bitmap getBitmap() { return bitmap; } public int getX() { return x; } public int getY() { return y; } public int getSpeed() { return speed; } } |
- Now to complete the collision detection, again to inside GameView.java file and modify the update() method as follows.
|
1 2 3 4 5 6 7 8 9 10 11 12 13 14 15 16 17 18 |
private void update() { player.update(); for (Star s : stars) { s.update(player.getSpeed()); } for(int i=0; i<enemyCount; i++){ enemies[i].update(player.getSpeed()); //if collision occurrs with player if (Rect.intersects(player.getDetectCollision(), enemies[i].getDetectCollision())) { //moving enemy outside the left edge enemies[i].setX(—200); } } } |
- Again execute the app. You should see the enemies getting hidden after collision. Now after collision we will show a blast image for a fraction of second to make it look like destroying.
Adding Blast Effect
Now we are at the last phase for this part of this Android Game Development Tutorial. We need to display a blast effect after collision.
We already have a blast image inside the drawable folder. We will use that image to display for a fraction of second after the collision. So follow the following step.
- Create a new java class named Boom and write the following code.
|
1 2 3 4 5 6 7 8 9 10 11 12 13 14 15 16 17 18 19 20 21 22 23 24 25 26 27 28 29 30 31 32 33 34 35 36 37 38 39 40 41 42 43 44 45 46 47 48 49 50 51 52 53 54 55 56 57 58 59 60 61 |
package net.simplifiedcoding.spacefighter; import android.content.Context; import android.graphics.Bitmap; import android.graphics.BitmapFactory; /** * Created by Belal on 6/15/2016. */ public class Boom { //bitmap object private Bitmap bitmap; //coordinate variables private int x; private int y; //constructor public Boom(Context context) { //getting boom image from drawable resource bitmap = BitmapFactory.decodeResource (context.getResources(), R.drawable.boom); //setting the coordinate outside the screen //so that it won’t shown up in the screen //it will be only visible for a fraction of second //after collission x = —250; y = —250; } //setters for x and y to make it visible at the place of collision public void setX(int x) { this.x = x; } public void setY(int y) { this.y = y; } //getters public Bitmap getBitmap() { return bitmap; } public void setBitmap(Bitmap bitmap) { this.bitmap = bitmap; } public int getX() { return x; } public int getY() { return y; } } |
- Now again come inside GameView.java file and modify the code as follow.
|
1 2 3 4 5 6 7 8 9 10 11 12 13 14 15 16 17 18 19 20 21 22 23 24 25 26 27 28 29 30 31 32 33 34 35 36 37 38 39 40 41 42 43 44 45 46 47 48 49 50 51 52 53 54 55 56 57 58 59 60 61 62 63 64 65 66 67 68 69 70 71 72 73 74 75 76 77 78 79 80 81 82 83 84 85 86 87 88 89 90 91 92 93 94 95 96 97 98 99 100 101 102 103 104 105 106 107 108 109 110 111 112 113 114 115 116 117 118 119 120 121 122 123 124 125 126 127 128 129 130 131 132 133 134 135 136 137 138 139 140 141 142 143 144 145 146 147 148 149 150 151 152 153 154 155 156 |
public class GameView extends SurfaceView implements Runnable { volatile boolean playing; private Thread gameThread = null; private Player player; private Paint paint; private Canvas canvas; private SurfaceHolder surfaceHolder; private Enemy[] enemies; private int enemyCount = 3; private ArrayList<Star> stars = new ArrayList<Star>(); //defining a boom object to display blast private Boom boom; public GameView(Context context, int screenX, int screenY) { super(context); player = new Player(context, screenX, screenY); surfaceHolder = getHolder(); paint = new Paint(); int starNums = 100; for (int i = 0; i < starNums; i++) { Star s = new Star(screenX, screenY); stars.add(s); } enemies = new Enemy[enemyCount]; for (int i = 0; i < enemyCount; i++) { enemies[i] = new Enemy(context, screenX, screenY); } //initializing boom object boom = new Boom(context); } @Override public void run() { while (playing) { update(); draw(); control(); } } private void update() { player.update(); //setting boom outside the screen boom.setX(—250); boom.setY(—250); for (Star s : stars) { s.update(player.getSpeed()); } for (int i = 0; i < enemyCount; i++) { enemies[i].update(player.getSpeed()); //if collision occurrs with player if (Rect.intersects(player.getDetectCollision(), enemies[i].getDetectCollision())) { //displaying boom at that location boom.setX(enemies[i].getX()); boom.setY(enemies[i].getY()); enemies[i].setX(—200); } } } private void draw() { if (surfaceHolder.getSurface().isValid()) { canvas = surfaceHolder.lockCanvas(); canvas.drawColor(Color.BLACK); paint.setColor(Color.WHITE); for (Star s : stars) { paint.setStrokeWidth(s.getStarWidth()); canvas.drawPoint(s.getX(), s.getY(), paint); } canvas.drawBitmap( player.getBitmap(), player.getX(), player.getY(), paint); for (int i = 0; i < enemyCount; i++) { canvas.drawBitmap( enemies[i].getBitmap(), enemies[i].getX(), enemies[i].getY(), paint ); } //drawing boom image canvas.drawBitmap( boom.getBitmap(), boom.getX(), boom.getY(), paint ); surfaceHolder.unlockCanvasAndPost(canvas); } } private void control() { try { gameThread.sleep(17); } catch (InterruptedException e) { e.printStackTrace(); } } public void pause() { playing = false; try { gameThread.join(); } catch (InterruptedException e) { } } public void resume() { playing = true; gameThread = new Thread(this); gameThread.start(); } @Override public boolean onTouchEvent(MotionEvent motionEvent) { switch (motionEvent.getAction() & MotionEvent.ACTION_MASK) { case MotionEvent.ACTION_UP: player.stopBoosting(); break; case MotionEvent.ACTION_DOWN: player.setBoosting(); break; } return true; } } |
- Now again execute the application and you will see a blast effect on collision.

Bingo! it is working absolutely fine. You can download my source code if having any troubles or confusion. Unlock the download link to get the source code of this Android Game Development Tutorial from below.
Android Game Development Part 1 – Source Code Download
Android Game Development Tutorial – Summary
It is a really simple and small game we are creating in this Android Game Development Tutorial. This Android Game Development Tutorial is a two part series. This is the first part. In this part of this Android Game Development Tutorial we learnt:
- SurfaceView implementation
- Drawing Characters on Canvas using SurfaceView
- Creating an Infinite Scroll Background Loop
- Detecting Collision
- Adding Controlls
In the next part -> Android Game Development Tutorial Part 2, we will finally complete this game by adding some text displaying high score and other game values. We will also add a game over option and some sound effects.
Android Game Development Tutorial – Final Words
So thats all for this Android Game Development Tutorial friends. This is a really long tutorial. Probably the longest one I’ve posted so far. So try it carefully. And share it among your friends if you liked this Android Game Development Tutorial. Thank You 🙂

Hi, my name is Belal Khan and I am a Google Developers Expert (GDE) for Android. The passion of teaching made me create this blog. If you are an Android Developer, or you are learning about Android Development, then I can help you a lot with Simplified Coding.
Если ты вдруг решил создать игру для Android, да еще и свою первую игру, то с чего же ты начнешь? Год назад, я думал, что Android Studio — это лучшая среда разработки для всех андроид приложений, и сейчас, имея полностью готовое приложение в Google Play, готов поделиться опытом.
Когда ты первый раз в GameDev, нужно запастись терпением и изучить как можно больше средств и инструментов для создания своей игры, а также осознать свои возможности и средства. В моем случае средств не было, а возможности. . к слову, Java я изучал вместе с изучением Android Studio. Стоит сказать, что Java — это не первый мой язык. До этого я освоил Си и «плюсы», Python и даже Delphi, сейчас о нем никто и не вспомнит, наверное. В общем, программировать я умею и люблю, а на каком языке строится задача, это уже вопрос посредственный.
Что же предлагает мир для разработки приложений под Android? Да на самом деле очень много предлагает, это и Unity и Unreal Engine и набирающий популярность своей простотой Godot, а так же Cocos2d (правда, он только для 2D приложений).
Конечно, если ты еще новичок, то логично будет начать создание с 2D игр, а потом уже решить для себя, оставаться же на 2D или сделать что-то интересное в объемном 3D пространстве.
Дальше встает выбор, насколько крутой проект делать. Мозг обычно создает идеальные образы, и хочется сделать какой-нибудь Сall of Duty или GTA. Но нужно понимать, что AAA-проекты создаются большой командой разработчиков с огромным опытом за спиной, с многомилионными вложениями в проект, в течение 3-5 лет. А так как ты еще новичок, опыта за спиной ноль, то скорее всего ты сдашься в самом начале пути или заблудишься в этой пучине разработки. Потому проект должен быть максимально простой и давать результат. Тогда я решил, что надо придумать проект, который смогу сделать за месяц. Потом сделать еще проект, и еще, постепенно увеличивая сложность разработки. Так появилась идея создать игру Candy Coloration — раскраску для детей. Но спустя некоторое время идея перескочила на пазлы, которые нужно будет собирать с какой-то целью, а не просто так. Так родилась игра Puzzle of Life. Ссылка на игру ниже, если тебе будет интересно.
Казалось бы, просто пазлы, можно наверное сделать за день или неделю. Я же делал год. Конечно, если бы у меня стояли сроки в месяц, то какой никакой результат я бы реализовал. Но я хотел сделать что-то качественное, да и сам процесс мне очень нравился.
По итогу был написан сюжет, с которым игрок знакомится в процессе прохождения игры.
Были реализованы различные режимы игры: на время, на количество перестановок, совместный, а размер и сложность пазлов стал изменяться от эпизода к эпизоду. Все не торопливо выверено и продуманно.
Можно подумать, что создание игры так затянулось, потому что опыта в разработке было мало, да еще и Java только осваивал. Развею это заблуждение. За год разработки, на программирование была потрачена четверть времени. Все остальное время я тратил на продумывание логики игры, оформление сюжета и внешнего вида приложения. Но что же делать, создание игры — это многогранный процесс. Ты и программист, и художник, и геймдизайнер, и маркетолог, и много кто еще.
Надеюсь тебе известно, что Android Studio — это лишь интегрированная среда разработки, а вовсе не движок для создания игр. Потому если ты планируешь создавать только игры, то лучше выбрать движок, например Godot. Это сэкономит тебе время и нервы. Почему же я стал делать игру в Android Studio? Тогда я просто не знал, что никто не делает игры в Android Studio. Не знал, что в нем пишут приложения для бизнеса, соц. сетей и подобного. Но сейчас я не жалею, что начал писать игру таким образом. Какие же преимущества я получил.
Преимущества:
1. Игра — это тоже приложение.
Если ты создал игру в Android Studio, то поверь мне, ты сможешь создать в нем и качественное приложение под любые задачи. Ты будешь вынужден освоить разметку, логику работы всех активити (окон), многопоточность, сервисы, библиотеки и прочее.
2. Знание Android Studio — очень востребовано на рынке.
Эта IDE — очень популярна на бизнес площадке. Можно глянуть вакансии на hh. ru. Работодатели готовы платить приличные суммы за разработку приложений, которые не покажутся тебе сложными после создания даже одной такой игры как пазлы.
3. В Android Studio есть отличный инструментарий верстки окон.
Ты сможешь качественно настроить внешний вид окон под различные экраны. Конечно же, движок тоже наверняка позволяет настроить адаптивную верстку, но инструментарий там не настолько огромен как в Android Studio, уж поверь. Правда, как вариант можно интегрировать проект из движка в Android Studio, но это может стать большой нервотрепкой.
Недостатки:
1. Не подходит для сложных проектов.
Если проект будет более или менее сложным (это работа в 3D пространстве, анимация, физика движения объектов, коллизии) , то Android Studio станет еще той морокой, потому что в нем нет нужных инструментов. Их все нужно будет писать с нуля. Но зачем тебе это, если ты новичок. Лучше выбрать подходящий движок и начать с него. Помни, чем меньше препятствий на твоем пути, тем больше шансов, что ты закончишь проект. А закончить проект — очень важно.
Что ж на этом по Android Studio все. Переключимся на опыт разработки. Если ты хочешь писать игры, кроме средств программирования тебе понадобятся средства дизайна. Я пользовался люстрой(Adobe Illustrator) — просто шикарная программа для создания векторных изображений, иконок, объектов и подобное; конечно же фотошопом (Photoshop) — некоторые фоны, иллюстрации к игре; так же мне понадобилось освоить анимацию, в этом мне помогла программа Dragon Bones (порадовало, что в ней можно сделать даже кинематографичный клип) .
И напоследок скажу, что эта авантюра не даст тебе ни копейки на старте, так что будь готов работать на энтузиазме. Надеюсь, статья была для тебя полезной, удачи в GameDev!