Время на прочтение
7 мин
Количество просмотров 229K
В ходе моей работы в компании DataArt я, в числе прочего, занимаюсь менторской деятельностью. В частности это включает в себя проверку учебных заданий сделанных практикантами. В последнее время в заданиях наметилась тенденция «странного» использования логеров. Мы с коллегами решили включить в текст задания ссылку на статью с описанием java logging best practices, но оказалось, что такой статьи в которой бы просто и без лишних деталей на практике объяснялось бы как надо писать в лог на Java, вот так вот с ходу не находится.
Данная статья не содержит каких-то откровений, в ней не рассматриваются тонкости какого либо из многочисленных java logging frameworks. Здесь рассказываю как записать в лог так, чтобы это не вызвало удивления у Ваших коллег, основная цель написания включить ее в список обязательного чтения для практикантов. Если все еще интересно, читайте дальше
Несколько разъяснений.
- Весь код примеров использует java.util.logging framework. Вопрос «Какой из фреймворков логирования ниболее кошерен» я оставлю за кадром. Скажу только что до java.util.logging проще всего дотянуться ибо он уже идет вместе с JRE и на самом деле рассказанное в данной статье с минимальными косметическими правками верно для подавляющего большинства систем логирования.
- В целом рецепты приведенные в данной статье не являются единственно верными, есть моменты о которых можно поспорить, но в целом эти рецепты используются многие годы, многими разработчиками, во многих проектах и они достаточно хороши чтобы им следовать если у Вас нет каких-то совсем уже серьезных возражений.
- В статье не рассматриваются такие «продвинутые» топики как:
- Конфигурирование уровней для отдельных логеров
- Форматирования логов
- Асинхронное логирование
- Создание собственных уровней логирования в Log4J
- Контекстное логирование
- И многое другое
- Слово logging я пишу по русски как логирование с одной буквой «г» в основном потом, что такой вариант перевода чаще встречается
- Советы, что, с каким уровнем логировать я пожалуй тоже оставлю за кадром т.к. тут все сильно зависит от приложения, условий эксплуатации, отношений с заказчиком и т.п. тонких вещей.
Пример №1
Хорошо
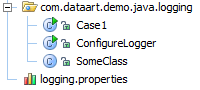
public class SomeClass {

	    private static Logger log = Logger.getLogger(SomeClass.class.getName());

	    public void someMethod()
	    {
	        log.info("Some message");
	    }
...
- Логер это статическое поле класса инициализируемое при загрузке класса, имеет простое, короткое имя, важно чтобы во всех Ваших классах переменная логера называлась одинаково (это диктуется общим правилом, одинаковые вещи в программе должны делаться одинаковым образом).
- В качестве имени логера я использую имя класса, на самом деле это не единственный способ, можно пытаться организовать какую-то свою иерархию логирования (например transport layer/app layer для подсистем имеющих дело с обменом данными), но как показывает практика выдумывать и главное потом неукоснительно следовать такой иерархии крайне сложно, а вариант с именами логеров совпадающими с именами классов весьма хорош и используется в 99% проектов
- Здесь для записи в лог я использую короткий метод .info, а не более общий метод .log, так много лаконичнее
- Имя логера берется как SomeClass.class.getName(), а не как «com.dataart.demo.java.logging.SomeClass», оба способа по идее одинаковы, но первый защищает Вас от сюрпризов при рефакторинге имени/пакета класса
Плохо
public class SomeClass {
	    public void someMethod()
	    {
	         Logger.getLogger("com.dataart.demo.java.logging.SomeClass").log(Level.INFO,"Some message");
	    }
...
По сути тоже самое но букв больше и читается не так легко.
Замечание между примерами
Вы наверное обратили внимание, что все сообщения в примерах на английском языке. Это не случайно. Дело в том, что даже если все-все кто работает и будет работать с Вашим кодом говорят по русски, есть вероятность, что Вам придется просматривать лог сообщения на удаленном компьютере например через ssh при этом в большом количестве случаев Вы увидите примерно такое сообщение «????, ???? ?????!!!!» (я безусловно знаю что через ssh можно протащить русские буквы, но вот почему-то далеко не всегда все оказывается настроенным должным образом).
Или даже на локальной машине в cmd вы можете увидеть что вот такое:
INFO: ╨Ъ╨░╨║╨╛╨╡-╤В╨╛ ╤Б╨╛╨╛╨▒╤Й╨╡╨╜╨╕╨╡ ╨▓ ╨╗╨╛╨│
С этим безусловно тоже можно бороться. Но не всегда легко объяснить заказчику на том конце телефонной трубки, как сделать так чтобы вместо крякозябр были видны русские буквы.
Совет: Пишите лог сообщения на английском языке, ну или в крайнем случае латинскими буквами.
Пример №2
Хорошо
	       try {
	            throw new Exception("Some exception");
	        } catch (Exception ex) {
	            log.log(Level.SEVERE, "Exception: ", ex);
	        }
	        //В стандартной лог конфигурации вы это сообщение не увидите
	        log.fine("some minor, debug message");

	        /*
	          Иногда вывод лог сообщений требует достаточно больших ресурсов (например
	          дамп какого-то пакета данных и т.п.).
	          В таких случаях стоит проверить выведется ли в лог сообщение для этого уровня
	          логирования
	        */
	        if (log.isLoggable(Level.FINE)) {
	            log.fine("Some CPU consuming message: " + prepareCPUConsumingLogMessage());
	        }
- Если Вам необходимо залогировать исключение, для этого служит метод .log(level,message,exception)
- Если вы специально не настроили конфигурацию лог системы, сообщения с уровнем ниже info, например fine выводиться не будут. Но писать их по крайней мере для важных частей системы стоит. Когда что-то пойдет не так, Вы настроите более подробный уровень логирования и увидите много интересного.
- Слишком много лог сообщений, даже если они физически не пишутся в лог файл из-за своего слишком маленького уровня, могут существенно замедлить выполнение программы. Особенно если для подготовки самого сообщения надо потратить много ресурсов. Для этого есть метод .isLoggable(level) — он позволяет узнать пропустит ли текущая конфигурация логера данное сообщение
Плохо
	       try {
	            throw new Exception("Some exception");
	        } catch (Exception ex) {
	            log.severe("Exception: " + ex.toString() );
	        }
                log.fine("Some CPU consuming message: " + itTakes500MillisecondsToPrepageThisMessage());
Если логировать только ex.toString(), то потом Вы не сможете понять в какой строке изначально сработало исключение.
Пример №3
Логер надо конфигурировать. Есть конфигурация по умолчанию она выводит в консоль все сообщения с уровнем INFO и выше. Она достаточно хороша, для разработки из IDE, но для реального приложения ее обычно неплохо бы подправить.
Какие тут есть варианты
По умолчанию: Файл logging.properties для уровня INFO, вывод в консоль
 #Console handler

 handlers= java.util.logging.ConsoleHandler

 .level=INFO
Делаем логирование более подробным выводим еще и сообщения уровня FINE
 #Console handler

 handlers= java.util.logging.ConsoleHandler

 .level=FINE

 java.util.logging.ConsoleHandler.level = FINE
Что мы тут сделали
- Установили уровень FINE для корневого логера, просто чтобы сообщения пролезали внутрь лог системы.
- И сказали что все что пролезет через лог систему надо выводить на консоль от уровня FINE и выше.
Выводим лог сообщения куда-то еще
Чем плох вывод на консоль? Консоль это по сути дела старый добрый stderr. Что это значит:
- Если приложение запускается с помощью javaw Вы вообще ничего не увидите.
- Если вывод идет в консоль и нужное вам сообщение промелькнуло 4 часа назад буфер консоли его уже съел, информация пропала.
- Если вывод консоли направлен в файл java com.yourcompanyname.EntryClass 2>>application_log.txt и приложение работает не останавливаясь несколько недель — файл будет весьма и весьма большим, рискуя занять весь диск.
Чтобы решить эти проблемы был придуман java.util.logging.FileHandler — хэндлер который выводит лог сообщения в файл. При этом он умеет ротировать файлы, т.е. после достижения максимально допустимого размера, он дописывает в файл текщуее лог сообщение и открывает новый файл с инкрементальным префиксом. И так по кругу. Например
handlers= java.util.logging.FileHandler
java.util.logging.FileHandler.pattern = application_log.txt
java.util.logging.FileHandler.limit = 50
java.util.logging.FileHandler.count = 7
java.util.logging.FileHandler.formatter = java.util.logging.SimpleFormatter
создаст вот такие файлы (последняя колонка — размер в байтах)
application_log.txt.0                                                │ 0
application_log.txt.1                                                │ 79
application_log.txt.2                                                │ 79
application_log.txt.3                                                │ 676
application_log.txt.4                                                │ 87
application_log.txt.5                                                │ 114
Мы указали максимальный размер 50 байтов, в реальной жизни надо скорее указывать не меньше мегабайта, например вот так (я знаю, что 1000000 это чуть меньше мегабайта, но кому охота по памяти писать 1048576, если суть дела это фактически не меняет)
java.util.logging.FileHandler.limit = 1000000
В примере, как мы видим, файлы получились больше 50 байт потому что размер по сути округляется вверх до последнего целого лог сообщения. Т.е. если Вы укажете размер 1 байт и запишете лог сообщение размером в 1000 байт то размер файла станет 1000 байт и после этого лог сообщения файл закроется и откроется следующий.
copy & paste конфиг для реальной жизни, его вполне хватает для большинства service, console и desktop приложений.
handlers= java.util.logging.FileHandler

java.util.logging.FileHandler.pattern = application_log.txt
java.util.logging.FileHandler.limit = 1000000
java.util.logging.FileHandler.count = 5
java.util.logging.FileHandler.formatter = java.util.logging.SimpleFormatter
Последняя часть магии
Ну и последнее о чем осталось рассказать — как собственно сконфигурировать логер из файла свойств. Есть два способа:
- Из командной строки запуска приложения
- В первых строчках кода Вашего приложения
Первый чуть более правильный ибо он декларативный и работает сразу, до того как начал работать код Вашего приложения.
Вот так
java Djava.util.logging.config.file=logging.properties com.dataart.application.ClassName
Но к сожалению менять строку запуска не всегда можно или не всегда удобно. Второй способ тоже неплохо работает.
    public static void main(String[] args) {
        try {
            LogManager.getLogManager().readConfiguration(
                    MainApplicationEntryClass.class.getResourceAsStream("/logging.properties"));
        } catch (IOException e) {
            System.err.println("Could not setup logger configuration: " + e.toString());
        }
        .....
- Здесь MainApplicationEntryClass — это класс — точка входа в Ваше приложение, видимо имя класса у Вас будет другое
- Сам файл logging.properties как правило в таких случаях кладется в корень иерархии классов и выглядит это например вот так
Что осталось за кадром
В реальной жизни как минимум половина всех Java приложений это web приложения. Сама техничка логирования в них совершенно не отличается от изложенного выше. Ну может быть за тем исключением что разные сервера приложений могут использовать разные библиотеки логирования такие например как:
- Log4J
- JULI logger (строго говоря это не вполне самостоятельный фреймворк, а своего рода надстройка над java.util.logging)
- SLF4J
- Commons Logging
Соответственно несколько отличается настройка и имена методов. Но сам принцип меняется мало. Конкретные особенности как правило хорошо описаны в документации на сам сервер приложений, например
- Tomcat
- JBoss
- Resin
Logging is an important feature which needs to be considered by the developers to trace back the errors. Java, being one of the most popular programming languages, comes with a customizable approach to logging by providing a basic logging API. So, in this article on Logger in Java, I am going to discuss how professionals can use this feature to enable extensible logging in Java.
The following topics will be covered in this article:
-
- Need for logging
- Logging Components
- What is Logger?
- Create new Logger
- Log Levels
- Properties File
- Logging Events
- Appender or Handlers
- Layout or Formatters
Before, we deep dive into logging in java, let us understand the need for logging.
Need for logging
While building applications, we often face errors which have to be debugged. So, with the help of logs, we can easily get information about what is happening in the application with a record of errors and unusual circumstances. Now, it might strike your mind that, why not use the System.out.print() statement in Java. Well, the problem with these statements is that log messages will be printed only on the console. So, once you close console, automatically, all the logs will be lost. Therefore, logs will be not be stored permanently, and are displayed one by one, as it is a single-threaded environment.
To avoid such issues, logging in Java is simplified with the help of the API provided through the java.util.logging package, and the org.apache.log4j.* package.
Logging Components
The Java logging components help the developer to create logs, pass the logs to the respective destination and maintain an proper format. The following are the three components:
- Loggers – Responsible for capturing log records and passing them to the corresponding Appender.
- Appenders or Handlers – They are responsible for recording log events to a destination. Appenders format events with the help of Layouts, before sending outputs.
- Layouts or Formatters – Responsible to determine how data looks when it appears in the log entry.
You can refer to the below image for the working of all the three components:
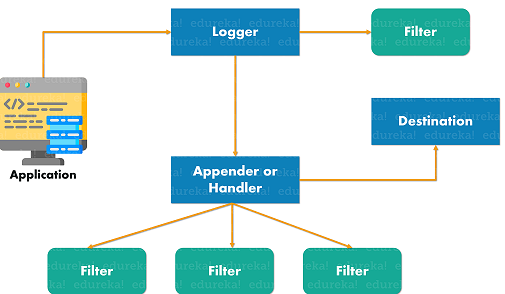
When an application makes a logging call, the Logger component records the event in a LogRecord and forwards it to the appropriate Appender. Then it formated the record using the Layout according to the required format. Apart from this, you can also use more than one Filters to specify which Appenders should be used for events.
Now, let us understand what is a logger in Java in depth.
What is Logger in Java?
Loggers in Java are objects which trigger log events, They are created and are called in the code of the application, where they generate Log Events before passing them to the next component which is an Appender. You can use multiple loggers in a single class to respond to various events or use Loggers in a hierarchy. They are normally named using the hierarchical dot-separated namespace. Also, all the Logger names must be based on the class or the package name of the logged component.
Apart from this, each Logger keeps a track of the nearest existing ancestor in the Logger namespace and also has a “Level” associated with it. Well, I will discuss the Loggers in the latter part of this article, but before that, let me show you how to create a Logger in Java.
Create new Logger
The process of creating a new Logger in Java is quite simple. You have to use Logger.getLogger() method. The getLogger() method identifies the name of the Logger and takes string as a parameter. So, if a Logger pre-exists then, that Logger is returned, else a new Logger is created.
Syntax:
static Logger logger = Logger.getLogger(SampleClass.class.getName());
Here, SampleClass is the class name for which we are getting the Logger object.
Example:
public class Customer{
    private static final Logger LOGGER = Logger.getLogger(Customer.class);
    public void getCustomerDetails() {
    }
}
Now that I have told you how to create a Logger in Java, let us see the different levels available in logging.
Log Levels
Log Levels are used to categorize the logs by their severity or the impact on the stability of the application. The org.apache.log4j.* package and the java.util.logging both provide different levels of logging. Let us take a look at each of them one by one.
org.apache.log4j.* package provides the following levels in descending order:
- FATAL
- ERROR
- WARN
- INFO
- DEBUG
java.util.logging package provides the following levels in descending order:
- SEVERE(HIGHEST LEVEL)
- WARNING
- INFO
- CONFIG
- FINE
- FINER
- FINEST(LOWEST LEVEL)
Apart from this, the above package also provides two additional levels ALL and OFF used for logging all messages and disabling logging respectively.
Example of Logging in Java using the org.apache.log4j.* package:
import org.apache.log4j.Logger;
public class Customer {
    static Logger logger = Logger.getLogger(Customer.class);
    public static void main(String[] args) {
	logger.error("ERROR");
        logger.warn("WARNING");
	logger.fatal("FATAL");
        logger.debug("DEBUG");
        logger.info("INFO");
        System.out.println("Final Output");
    }
}
So if your output is root logger as WARN-level in our log4j.properties file, then all the error messages with a higher priority than WARN will be printed as below:
You can also set the level by using the setLevel() method from the java.util.logging package as below:
logger.setLevel(Level.WARNING);
Example of Logging in Java using the java.util.logging package:
package edureka;
import java.io.IOException;
import java.util.logging.Level;
import java.util.logging.Logger;
import java.util.logging.*;

class EdurekaLogger {
    private final static Logger LOGGER =  Logger.getLogger(Logger.GLOBAL_LOGGER_NAME);
    public void sampleLog()
    {
        LOGGER.log(Level.WARNING, "Welcome to Edureka!");
    }
}
public class Customer {
    public static void main(String[] args)
    {
        EdurekaLogger obj = new EdurekaLogger();
        obj.sampleLog();
        LogManager slg = LogManager.getLogManager();
        Logger log = slg.getLogger(Logger.GLOBAL_LOGGER_NAME);
        log.log(Level.WARNING, "Hi! Welcome from Edureka");
    }
}
To enable logging in your application using the org.apache.log4j.* package or the java.util.logging package, you have to configure the properties file. Next in this article on Logger in Java, let us discuss the properties file of both of them.
Properties File of Log4j and Java Util Package
Sample Log4j Properties file:
# Enable Root logger option
log4j.rootLogger=INFO, file, stdout
# Attach appenders to print file
log4j.appender.file=org.apache.log4j.RollingFileAppender
log4j.appender.file.File=E:loglogging.log
log4j.appender.file.MaxFileSize=10MB
log4j.appender.file.MaxBackupIndex=5
log4j.appender.file.layout=org.apache.log4j.PatternLayout
log4j.appender.file.layout.ConversionPattern=%d{yyyy-MM-dd HH:mm:ss} %-5p %c{1}:%L - %m%n
# Attach appenders to print on console
log4j.appender.stdout=org.apache.log4j.ConsoleAppender
log4j.appender.stdout.Target=System.out
log4j.appender.stdout.layout=org.apache.log4j.PatternLayout
log4j.appender.stdout.layout.ConversionPattern=%d{yyyy-MM-dd HH:mm:ss} %-5p %c{1}:%L - %m%n
- The Log4j properties file is created inside the src folder of the project.
- log4j.appender.file=org.apache.log4j.RollingFileAppender -> Prints all logs in a file
- log4j.appender.stdout=org.apache.log4j.ConsoleAppender -> Prints all logs in the console
- log4j.appender.file.File=D:loglogging.log -> Specifies the log file location
- log4j.appender.file.MaxFileSize=10MB -> Maximum size of the log file to 10MB
- log4j.appender.file.MaxBackupIndex=5 -> Limits the number of backup files to 5
- log4j.appender.file.layout=org.apache.log4j.PatternLayout -> Specifies the pattern in which logs will print to the log file.
- log4j.appender.file.layout.ConversionPattern=%d{yyyy-MM-dd HH:mm:ss} %-5p %c{1}:%L – %m%n -> Sets the default conversion pattern.
Sample Java Util Package Properties File
handlers= java.util.logging.ConsoleHandler

.level= WARNING

# Output will be stored in the default directory
java.util.logging.FileHandler.pattern = %h/java%u.log
java.util.logging.FileHandler.limit = 60000
java.util.logging.FileHandler.count = 1
java.util.logging.FileHandler.formatter = java.util.logging.XMLFormatter

# Level of logs will be limited to WARNING and above.
java.util.logging.ConsoleHandler.level = WARNING
java.util.logging.ConsoleHandler.formatter = java.util.logging.SimpleFormatter
Here,
- java.util.logging.FileHandler.pattern = %h/java%u.log -> Log files would be written to C:TEMPjava1.log
- java.util.logging.FileHandler.limit = 50000 -> The maximum amount that the logger writes to any one file in bytes.
- java.util.logging.FileHandler.count = 1 -> Specifies the number of output files
- java.util.logging.FileHandler.formatter = java.util.logging.XMLFormatter -> Mentions the formatter used for formatting. Here XML Formatter is used.
- java.util.logging.ConsoleHandler.level = WARNING -> Sets the default log level to WARNING
- java.util.logging.ConsoleHandler.formatter = java.util.logging.SimpleFormatter -> Specifies the Formatter to be used by all ConsoleHandler‘s. Here, SimpleFormatter is used.
Logging Events
To log events in Java, you have to make sure that you assign a level to easily filer out the events. To assign a level and mention a message you can use the below methods:
Method 1:
logger.log(Level.INFO, “Display message”);
Here, level is INFO and the message to be printed is "Display Message".
Method 2:
logger.info(“Display message”);
To make sure that Logger in Java, logs only events which are at or above the INFO level, you can use the setLevel() method discussed above.
Now, that I have discussed how to use Logger in Java, let us discuss the next component of Log4j architecture, i.e. Appenders.
Appender or Handlers
Appender or Handlers are responsible for recording log events to a destination. Each logger has access to multiple handlers and receives the log message from the logger. Then, Appenders use Formatters or Layouts to format the events and send them to the corresponding destination.
An Appender can be turned off using the setLevel(Level.OFF) method. The two most standard handlers in the java.util.logging package are as follows:
- FileHandler: Writess the log message to file
- ConsoleHandler: Writes the log message to the console
For, your better understanding, I have explained few Appenders in the properties section.
Layout or Formatters
The layout of Formatters are used to format and convert data in a log event. Logging frameworks provide Layouts for HTML, XML, Syslog, JSON, plain text and other logs.
- SimpleFormatter: Generates text messages with basic information.
- XMLFormatter: Generates XML message for the log
For, your better understanding, I have explained a few Layouts in the properties section. With this, we come to the end of this blog on “Logger in Java”. I hope you guys are clear with what has been taught to you in this article. If you’re just beginning, then watch at this Java Tutorial to Understand the Fundamental Java Concepts.
Check out the Java Online Course by Edureka, a trusted online learning company with a network of more than 250,000 satisfied learners spread across the globe. Edureka’s Java J2EE and SOA training and certification course is designed for students and professionals who want to be a Java Developer. The course is designed to give you a head start into Java programming and train you for both core and advanced Java concepts along with various Java frameworks like Hibernate & Spring.
Got a question for us? Please mention it in the comments section of this “Logger in Java” blog and we will get back to you as soon as possible.
Logging is an important feature which needs to be considered by the developers to trace back the errors. Java, being one of the most popular programming languages, comes with a customizable approach to logging by providing a basic logging API. So, in this article on Logger in Java, I am going to discuss how professionals can use this feature to enable extensible logging in Java.
The following topics will be covered in this article:
-
- Need for logging
- Logging Components
- What is Logger?
- Create new Logger
- Log Levels
- Properties File
- Logging Events
- Appender or Handlers
- Layout or Formatters
Before, we deep dive into logging in java, let us understand the need for logging.
Need for logging
While building applications, we often face errors which have to be debugged. So, with the help of logs, we can easily get information about what is happening in the application with a record of errors and unusual circumstances. Now, it might strike your mind that, why not use the System.out.print() statement in Java. Well, the problem with these statements is that log messages will be printed only on the console. So, once you close console, automatically, all the logs will be lost. Therefore, logs will be not be stored permanently, and are displayed one by one, as it is a single-threaded environment.
To avoid such issues, logging in Java is simplified with the help of the API provided through the java.util.logging package, and the org.apache.log4j.* package.
Logging Components
The Java logging components help the developer to create logs, pass the logs to the respective destination and maintain an proper format. The following are the three components:
- Loggers – Responsible for capturing log records and passing them to the corresponding Appender.
- Appenders or Handlers – They are responsible for recording log events to a destination. Appenders format events with the help of Layouts, before sending outputs.
- Layouts or Formatters – Responsible to determine how data looks when it appears in the log entry.
You can refer to the below image for the working of all the three components:
When an application makes a logging call, the Logger component records the event in a LogRecord and forwards it to the appropriate Appender. Then it formated the record using the Layout according to the required format. Apart from this, you can also use more than one Filters to specify which Appenders should be used for events.
Now, let us understand what is a logger in Java in depth.
What is Logger in Java?
Loggers in Java are objects which trigger log events, They are created and are called in the code of the application, where they generate Log Events before passing them to the next component which is an Appender. You can use multiple loggers in a single class to respond to various events or use Loggers in a hierarchy. They are normally named using the hierarchical dot-separated namespace. Also, all the Logger names must be based on the class or the package name of the logged component.
Apart from this, each Logger keeps a track of the nearest existing ancestor in the Logger namespace and also has a “Level” associated with it. Well, I will discuss the Loggers in the latter part of this article, but before that, let me show you how to create a Logger in Java.
Create new Logger
The process of creating a new Logger in Java is quite simple. You have to use Logger.getLogger() method. The getLogger() method identifies the name of the Logger and takes string as a parameter. So, if a Logger pre-exists then, that Logger is returned, else a new Logger is created.
Syntax:
static Logger logger = Logger.getLogger(SampleClass.class.getName());
Here, SampleClass is the class name for which we are getting the Logger object.
Example:
public class Customer{
    private static final Logger LOGGER = Logger.getLogger(Customer.class);
    public void getCustomerDetails() {
    }
}
Now that I have told you how to create a Logger in Java, let us see the different levels available in logging.
Log Levels
Log Levels are used to categorize the logs by their severity or the impact on the stability of the application. The org.apache.log4j.* package and the java.util.logging both provide different levels of logging. Let us take a look at each of them one by one.
org.apache.log4j.* package provides the following levels in descending order:
- FATAL
- ERROR
- WARN
- INFO
- DEBUG
java.util.logging package provides the following levels in descending order:
- SEVERE(HIGHEST LEVEL)
- WARNING
- INFO
- CONFIG
- FINE
- FINER
- FINEST(LOWEST LEVEL)
Apart from this, the above package also provides two additional levels ALL and OFF used for logging all messages and disabling logging respectively.
Example of Logging in Java using the org.apache.log4j.* package:
import org.apache.log4j.Logger;
public class Customer {
    static Logger logger = Logger.getLogger(Customer.class);
    public static void main(String[] args) {
	logger.error("ERROR");
        logger.warn("WARNING");
	logger.fatal("FATAL");
        logger.debug("DEBUG");
        logger.info("INFO");
        System.out.println("Final Output");
    }
}
So if your output is root logger as WARN-level in our log4j.properties file, then all the error messages with a higher priority than WARN will be printed as below:
You can also set the level by using the setLevel() method from the java.util.logging package as below:
logger.setLevel(Level.WARNING);
Example of Logging in Java using the java.util.logging package:
package edureka;
import java.io.IOException;
import java.util.logging.Level;
import java.util.logging.Logger;
import java.util.logging.*;

class EdurekaLogger {
    private final static Logger LOGGER =  Logger.getLogger(Logger.GLOBAL_LOGGER_NAME);
    public void sampleLog()
    {
        LOGGER.log(Level.WARNING, "Welcome to Edureka!");
    }
}
public class Customer {
    public static void main(String[] args)
    {
        EdurekaLogger obj = new EdurekaLogger();
        obj.sampleLog();
        LogManager slg = LogManager.getLogManager();
        Logger log = slg.getLogger(Logger.GLOBAL_LOGGER_NAME);
        log.log(Level.WARNING, "Hi! Welcome from Edureka");
    }
}
To enable logging in your application using the org.apache.log4j.* package or the java.util.logging package, you have to configure the properties file. Next in this article on Logger in Java, let us discuss the properties file of both of them.
Properties File of Log4j and Java Util Package
Sample Log4j Properties file:
# Enable Root logger option
log4j.rootLogger=INFO, file, stdout
# Attach appenders to print file
log4j.appender.file=org.apache.log4j.RollingFileAppender
log4j.appender.file.File=E:loglogging.log
log4j.appender.file.MaxFileSize=10MB
log4j.appender.file.MaxBackupIndex=5
log4j.appender.file.layout=org.apache.log4j.PatternLayout
log4j.appender.file.layout.ConversionPattern=%d{yyyy-MM-dd HH:mm:ss} %-5p %c{1}:%L - %m%n
# Attach appenders to print on console
log4j.appender.stdout=org.apache.log4j.ConsoleAppender
log4j.appender.stdout.Target=System.out
log4j.appender.stdout.layout=org.apache.log4j.PatternLayout
log4j.appender.stdout.layout.ConversionPattern=%d{yyyy-MM-dd HH:mm:ss} %-5p %c{1}:%L - %m%n
- The Log4j properties file is created inside the src folder of the project.
- log4j.appender.file=org.apache.log4j.RollingFileAppender -> Prints all logs in a file
- log4j.appender.stdout=org.apache.log4j.ConsoleAppender -> Prints all logs in the console
- log4j.appender.file.File=D:loglogging.log -> Specifies the log file location
- log4j.appender.file.MaxFileSize=10MB -> Maximum size of the log file to 10MB
- log4j.appender.file.MaxBackupIndex=5 -> Limits the number of backup files to 5
- log4j.appender.file.layout=org.apache.log4j.PatternLayout -> Specifies the pattern in which logs will print to the log file.
- log4j.appender.file.layout.ConversionPattern=%d{yyyy-MM-dd HH:mm:ss} %-5p %c{1}:%L – %m%n -> Sets the default conversion pattern.
Sample Java Util Package Properties File
handlers= java.util.logging.ConsoleHandler

.level= WARNING

# Output will be stored in the default directory
java.util.logging.FileHandler.pattern = %h/java%u.log
java.util.logging.FileHandler.limit = 60000
java.util.logging.FileHandler.count = 1
java.util.logging.FileHandler.formatter = java.util.logging.XMLFormatter

# Level of logs will be limited to WARNING and above.
java.util.logging.ConsoleHandler.level = WARNING
java.util.logging.ConsoleHandler.formatter = java.util.logging.SimpleFormatter
Here,
- java.util.logging.FileHandler.pattern = %h/java%u.log -> Log files would be written to C:TEMPjava1.log
- java.util.logging.FileHandler.limit = 50000 -> The maximum amount that the logger writes to any one file in bytes.
- java.util.logging.FileHandler.count = 1 -> Specifies the number of output files
- java.util.logging.FileHandler.formatter = java.util.logging.XMLFormatter -> Mentions the formatter used for formatting. Here XML Formatter is used.
- java.util.logging.ConsoleHandler.level = WARNING -> Sets the default log level to WARNING
- java.util.logging.ConsoleHandler.formatter = java.util.logging.SimpleFormatter -> Specifies the Formatter to be used by all ConsoleHandler‘s. Here, SimpleFormatter is used.
Logging Events
To log events in Java, you have to make sure that you assign a level to easily filer out the events. To assign a level and mention a message you can use the below methods:
Method 1:
logger.log(Level.INFO, “Display message”);
Here, level is INFO and the message to be printed is "Display Message".
Method 2:
logger.info(“Display message”);
To make sure that Logger in Java, logs only events which are at or above the INFO level, you can use the setLevel() method discussed above.
Now, that I have discussed how to use Logger in Java, let us discuss the next component of Log4j architecture, i.e. Appenders.
Appender or Handlers
Appender or Handlers are responsible for recording log events to a destination. Each logger has access to multiple handlers and receives the log message from the logger. Then, Appenders use Formatters or Layouts to format the events and send them to the corresponding destination.
An Appender can be turned off using the setLevel(Level.OFF) method. The two most standard handlers in the java.util.logging package are as follows:
- FileHandler: Writess the log message to file
- ConsoleHandler: Writes the log message to the console
For, your better understanding, I have explained few Appenders in the properties section.
Layout or Formatters
The layout of Formatters are used to format and convert data in a log event. Logging frameworks provide Layouts for HTML, XML, Syslog, JSON, plain text and other logs.
- SimpleFormatter: Generates text messages with basic information.
- XMLFormatter: Generates XML message for the log
For, your better understanding, I have explained a few Layouts in the properties section. With this, we come to the end of this blog on “Logger in Java”. I hope you guys are clear with what has been taught to you in this article. If you’re just beginning, then watch at this Java Tutorial to Understand the Fundamental Java Concepts.
Check out the Java Online Course by Edureka, a trusted online learning company with a network of more than 250,000 satisfied learners spread across the globe. Edureka’s Java J2EE and SOA training and certification course is designed for students and professionals who want to be a Java Developer. The course is designed to give you a head start into Java programming and train you for both core and advanced Java concepts along with various Java frameworks like Hibernate & Spring.
Got a question for us? Please mention it in the comments section of this “Logger in Java” blog and we will get back to you as soon as possible.
При создании приложений мы часто сталкиваемся с ошибками, которые необходимо отлаживать. Итак, с помощью логов мы можем легко получить информацию о том, что происходит в приложении, с записью ошибок и необычных обстоятельств. Теперь вам может показаться, что почему бы не использовать оператор System.out.print() в Java.
Проблема с этими утверждениями состоит в том, что сообщения журнала будут печататься только на консоли. Поэтому, как только вы закроете консоль автоматически, все журналы будут потеряны. Они не хранятся постоянно и будут отображаться один за другим, так как это однопоточная среда.
Чтобы избежать таких проблем, логирование в Java упрощается с помощью API, предоставляемого через пакет java.util.logging пакет org.apache.log4j.* .
Компоненты
Компоненты ведения журнала помогают разработчику создавать их, передавать в соответствующее место назначения и поддерживать надлежащий формат. Ниже приведены три компонента:
- Loggers – отвечает за сбор записей журнала и передачу их соответствующему заявителю.
- Appenders или Handlers – они отвечают за запись событий журнала в пункт назначения. Аппендеры форматируют события с помощью макетов перед отправкой результатов.
- Layouts или Formatters – отвечает за определение того, как данные выглядят, когда они появляются в записи журнала.
Вы можете обратиться к изображению ниже для работы всех трех компонентов:

Когда приложение выполняет вызов регистрации, компонент Logger записывает событие в LogRecord и перенаправляет его соответствующему Appender. Затем он форматировал запись, используя формат в соответствии с требуемым форматом. Помимо этого, вы также можете использовать более одного фильтра, чтобы указать, какие Appenders следует использовать для событий.
Логгеры (Logger) в Java – это объекты, которые запускают события журнала. Они создаются и вызываются в коде приложения, где генерируют события журнала перед передачей их следующему компоненту, который является Appender.
Вы можете использовать несколько логгеров в одном классе для ответа на различные события или использовать в иерархии. Они обычно называются с использованием иерархического пространства имен, разделенных точками. Кроме того, все имена Logger должны основываться на классе или имени пакета зарегистрированного компонента.
Кроме того, каждый логгер отслеживает ближайшего существующего предка в пространстве имен, а также имеет связанный с ним «уровень».
Как создать?
Вы должны использовать Logger.getLogger() . Метод getLogger() идентифицирует имя Logger и принимает строку в качестве параметра. Таким образом, если Logger уже существует, он возвращается, в противном случае создается новый.
Синтаксис
static Logger logger = Logger.getLogger(SampleClass.class.getName());
Здесь SampleClass – это имя класса, для которого мы получаем объект Logger.
Пример:
public class Customer{
    private static final Logger LOGGER = Logger.getLogger(Customer.class);
    public void getCustomerDetails() {
    }
}
Уровни
Уровни журналов используются для классификации их по степени серьезности или влиянию на стабильность приложения. Пакет org.apache.log4j.* и java.util.logging предоставляют разные уровни ведения журнала.
Пакет org.apache.log4j.* предоставляет следующие уровни в порядке убывания:
- FATAL;
- ERROR;
- WARN;
- INFO;
- DEBUG.
Пакет java.util.logging предоставляет следующие уровни в порядке убывания:
- SEVERE(HIGHEST LEVEL);
- WARNING;
- INFO;
- CONFIG;
- FINE;
- FINER;
- FINEST(LOWEST LEVEL).
Помимо этого, вышеприведенный пакет также предоставляет два дополнительных уровня ALL и OFF используются для регистрации всех сообщений и отключения регистрации соответственно.
Пример с использованием пакета org.apache.log4j.*
import org.apache.log4j.Logger;
public class Customer {
    static Logger logger = Logger.getLogger(Customer.class);
    public static void main(String[] args) {
	logger.error("ERROR");
        logger.warn("WARNING");
	logger.fatal("FATAL");
        logger.debug("DEBUG");
        logger.info("INFO");
        System.out.println("Final Output");
    }
}
Таким образом, если в нашем файле log4j.properties ваш вывод является корневым логгером уровня WARN, то все сообщения об ошибках с более высоким приоритетом, чем WARN, будут напечатаны, как показано ниже:
Вы также можете установить уровень с помощью метода setLevel() из пакета java.util.logging , как java.util.logging ниже:
logger.setLevel(Level.WARNING);
Пример с использованием пакета java.util.logging
package edureka;
import java.io.IOException;
import java.util.logging.Level;
import java.util.logging.Logger;
import java.util.logging.*;

class EdurekaLogger {
    private final static Logger LOGGER =  Logger.getLogger(Logger.GLOBAL_LOGGER_NAME);
    public void sampleLog()
    {
        LOGGER.log(Level.WARNING, "Welcome to Edureka!");
    }
}
public class Customer {
    public static void main(String[] args)
    {
        EdurekaLogger obj = new EdurekaLogger();
        obj.sampleLog();
        LogManager slg = LogManager.getLogManager();
        Logger log = slg.getLogger(Logger.GLOBAL_LOGGER_NAME);
        log.log(Level.WARNING, "Hi! Welcome from Edureka");
    }
}
Чтобы включить вход в приложение с помощью пакета org.apache.log4j.* Или пакета java.util.logging , необходимо настроить файл свойств. Далее в этой статье о Logger в Java давайте обсудим файл свойств обоих из них.
Файл свойств пакета Log4j и Java Util
Пример файла свойств Log4j
# Enable Root logger option
log4j.rootLogger=INFO, file, stdout
# Attach appenders to print file
log4j.appender.file=org.apache.log4j.RollingFileAppender
log4j.appender.file.File=E:loglogging.log
log4j.appender.file.MaxFileSize=10MB
log4j.appender.file.MaxBackupIndex=5
log4j.appender.file.layout=org.apache.log4j.PatternLayout
log4j.appender.file.layout.ConversionPattern=%d{yyyy-MM-dd HH:mm:ss} %-5p %c{1}:%L - %m%n
# Attach appenders to print on console
log4j.appender.stdout=org.apache.log4j.ConsoleAppender
log4j.appender.stdout.Target=System.out
log4j.appender.stdout.layout=org.apache.log4j.PatternLayout
log4j.appender.stdout.layout.ConversionPattern=%d{yyyy-MM-dd HH:mm:ss} %-5p %c{1}:%L - %m%n
- Файл свойств Log4j создается внутри папки src проекта.
- log4j.appender.file = org.apache.log4j.RollingFileAppender -> Печатает все журналы в файле
- log4j.appender.stdout = org.apache.log4j.ConsoleAppender -> Печатает все журналы в консоли
- log4j.appender.file.File = D: loglogging.log -> Указывает расположение файла журнала
- log4j.appender.file.MaxFileSize = 10 МБ -> Максимальный размер файла журнала до 10 МБ
- log4j.appender.file.MaxBackupIndex = 5 -> Ограничивает количество файлов резервных копий до 5
- log4j.appender.file.layout = org.apache.log4j.PatternLayout -> Указывает шаблон, в котором журналы будут печататься в файл журнала.
- log4j.appender.file.layout.ConversionPattern =% d {гггг-ММ-дд ЧЧ: мм: сс}% -5p% c {1}:% L -% m% n -> Устанавливает шаблон преобразования по умолчанию.
Пример файла свойств пакета Java Util
handlers= java.util.logging.ConsoleHandler

.level= WARNING

# Output will be stored in the default directory
java.util.logging.FileHandler.pattern = %h/java%u.log
java.util.logging.FileHandler.limit = 60000
java.util.logging.FileHandler.count = 1
java.util.logging.FileHandler.formatter = java.util.logging.XMLFormatter

# Level of logs will be limited to WARNING and above.
java.util.logging.ConsoleHandler.level = WARNING
java.util.logging.ConsoleHandler.formatter = java.util.logging.SimpleFormatter
Здесь
- java.util.logging.FileHandler.pattern =% h / java% u.log -> Файлы журнала будут записаны в C: TEMPjava1.log
- java.util.logging.FileHandler.limit = 50000 -> Максимальная сумма, которую регистратор записывает в один файл в байтах.
- java.util.logging.FileHandler.count = 1 -> Указывает количество выходных файлов
- java.util.logging.FileHandler.formatter = java.util.logging.XMLFormatter -> Упоминает форматер, используемый для форматирования. Здесь используется XML Formatter.
- java.util.logging.ConsoleHandler.level = WARNING -> Устанавливает уровень журнала по умолчанию для WARNING
- java.util.logging.ConsoleHandler.formatter = java.util.logging.SimpleFormatter -> Указывает форматер, используемый всеми ConsoleHandler. Здесь используется SimpleFormatter.
Регистрация событий
Чтобы регистрировать события в Java, вы должны убедиться, что вы назначаете уровень, чтобы легко отфильтровать события. Чтобы назначить уровень и упомянуть сообщение, вы можете использовать следующие методы:
Способ 1
logger.log(Level.INFO, “Display message”);
Here, level is INFO and the message to be printed is "Display Message".
Способ 2
logger.info(“Display message”);
Чтобы убедиться, что Logger регистрирует только события, которые находятся на уровне или выше уровня INFO, вы можете использовать метод setLevel(), описанный выше.
Appender или Handlers
Appender или Handlers отвечают за запись событий журнала в пункт назначения. Каждый регистратор имеет доступ к нескольким обработчикам и получает сообщение журнала от регистратора. Затем Appenders используют средства форматирования или макеты для форматирования событий и отправки их в соответствующее место назначения.
Appender можно отключить с помощью метода setLevel (Level.OFF). Два наиболее стандартных обработчика в пакете java.util.logging :
- FileHandler: записать сообщение журнала в файл.
- ConsoleHandler: записывает сообщение журнала в консоль.
Layout или Formatters
Используются для форматирования и преобразования данных в журнале событий. Каркасы журналов предоставляют макеты для HTML, XML, Syslog, JSON, простого текста и других журналов.
% Logger
Интерфейс: org.slf4j.Logger
Описание
Абстрактный интерфейс для логирования сообщений, часть абстрактного API для логирования SLF4J, без привязки к конкретной
реализации этого API.
Подключение библиотеки SLF4J: Gradle
Посмотреть последнюю версию здесь (сейчас это 1.7.25).
Добавить в build.gradle зависимость от SLF4J API:
compile 'org.slf4j:slf4j-api:НомерВерсии'
И одну из реализаций (для Android это slf4j-android, для простых учебных Java-проектов подойдёт slf4j-simple).
compile 'org.slf4j:slf4j-android:НомерВерсии'
Подключение библиотеки SLF4J вручную
В составе JDK есть собственнный пакет логирования (java.util.logging), но у него есть недостаток: он привязан к одной
конкретной реализации логирования, к той, которая содержится в самом JDK. Разработчики приложений могут предпочесть ей
стороннюю библиотеку логирования, обладающую расширенными возможностями; для разработчиков же библиотек, использующих
логирование, нежелательно привязываться к конкретной реализации логирования, а желательно оставлять выбор реализации за
разработчиком приложения, использующего эту библиотеку.
SLF4J — это де факто стандарт для абстрактного API логирования. Библиотеки, использующие логирование, добавляют в
зависимости крошечную библиотеку slf4j-api, содержащую только интерфейсы самого API логирования. Приложения же при
развёртывании поставляют две библиотеки: само API и одну из его реализаций.
Реализаций SLF4J API существует несколько. Для учебных примеров нам вполне подойдёт простая реализация slf4j-simple,
которая просто записывает все сообщения логирования в один файл или в консоль (по умолчанию — System.err). Для
сеьёзных проектов имеет смысл посмотреть на одну из промышленных библиотек логирования. Например, Logback —
эталонная реализация SLF4J API от тех же разработчиков — это мощная библиотека с гибкими средствами конфигурации,
форматирования и направления сообщений логирования в консоль, файлы, по почте или в определённые пользователем приёмники
сообщений.
На первых порах нам достаточно будет скачать дистрибутив SLF4J с сайта slf4j.org.
В архиве содержится множество JAR-файлов, но нам из них понадобятся только два: slf4j-api-1.x.x.jar (собственно API) и
slf4j-simple-1.x.x.jar (простая реализация). Чтобы подключить их к проекту Eclipse, скопируйте из в папку проекта,
выделите оба файла и в их контекстном меню выберите Build Path → Add to Build Path.
Если подключить к проекту только библиотеку
slf4j-apiи не подключить никакую реализацию, то при создании первого
логгера SLF4J выдаст не очень вразумительное предупреждение.SLF4J: Failed to load class "org.slf4j.impl.StaticLoggerBinder". SLF4J: Defaulting to no-operation (NOP) logger implementation SLF4J: See http://www.slf4j.org/codes.html#StaticLoggerBinder for further details.Имеется в виду, что при отсутствии в classpath какой-либо другой реализации выбирается реализация, не выполняющая
никаких операций (no-operation) и просто игнорирующая все передаваемые логгеру сообщения.
Пять уровней логирования
В SLF4J API каждое сообщение логирования принадлежит к одному из пяти уровней, перечисленных в перечислимом типе
Level. Их интерпретация отдаётся на откуп
разработчику, но есть сложившиеся соглашения о том, какой уровень для каких случаев использовать.
Эти пять уровней соответствуют пяти из семи уровней
(Level) стандартного пакета
java.util.logging. Реализация slf4j-jdk14, оборачивающая SLF4J API поверх java.util.logging, отображает их
стандартным образом. Два оставшихся уровня — CONFIG и FINER — недоступны через SLF4J API.
ERROR (ошибка)
: Обычно используется для сообщений о фатальных ошибках, при которых выполнение текущей операции аварийно обрывается.
Также на этом уровне обычно логируются исключения. В реализации slf4j-jdk14 отображается в уровень SEVERE.
WARN (предупреждение)
: Обычно используется для предупреждений, после которых выполнение текущей операции продолжается, но может привести к
неожиданным для пользователя результатам. В реализации slf4j-jdk14 отображается в уровень WARNING.
INFO (информация)
: Обычно используется для сообщений, представляющих интерфейс для конечного пользователя. В реализации slf4j-jdk14
отображается в уровень INFO.
DEBUG (отладка)
: Обычно используется для отладочных сообщений, представляющих интерфейс только для разработчика. В реализации
slf4j-jdk14 отображается в уровень FINE.
TRACE (трассировка)
: Обычно используется для массового потока отладочных сообщений, позволяющих анализировать выполнение программы по шагам
— например, сообщений о входе в метод и выходе из него. В реализации slf4j-jdk14 отображается в уровень
FINEST.
Получение объекта-логгера
Для получения объекта типа Logger с определённым именем используются семейство фабричных методов
LoggerFactory.getLogger:
static Logger getLogger(String name)
static Logger getLogger(Class<?> clazz)
В случае вызова метода getLogger с параметром Class возвращается логгер с именем, равным полному имени переданного
класса. Например, в следующем коде
package com.mycompany;

import org.slf4j.Logger;
import org.slf4j.LoggerFactory;

public class MyClass {
	private static final Logger log = LoggerFactory.getLogger(MyClass.class);
}
имя логгера, присвоенного полю log, будет равно com.mycompany.MyClass.
Показанный код является стандартной идиомой для создания логгеров: каждый класс содержит в себе собственную ссылку на
используемый им логгер в private static final-поле.
Будьте внимательны при импорте типа
Logger. Убедитесь, что вы импортируете типLoggerиз библиотеки SLF4J
(org.slf4j.Logger), а не из стандартной библиотеки (java.util.logging.Logger).
Логирование сообщений
Для каждого уровня логирования в интерфейсе Logger есть одноимённый метод для логирования сообщения на этом уровне:
void error(String format, Object... arguments)
void warn(String format, Object... arguments)
void info(String format, Object... arguments)
void debug(String format, Object... arguments)
void trace(String format, Object... arguments)
Каждый метод принимает сообщение и необязательный список аргументов форматирования — идиома, похожая на printf,
но использующая для форматирования другой синтаксис. Строковое представление каждого аргумента форматирования
подставляется в строку вместо соответствующего по счёту вхождения пары фигурных скобок {}:
log.error("Index out of bounds (index: {}, size: {})", -1, 2);
// Index out of bounds (index: -1, size: 2)
Если пар фигурных скобок больше, чем аргументов форматирования, лишние пары не заменяются:
log.info("Я люблю {} и {}", "яблоки");
// Я люблю яблоки и {}
Наконец, каждый аргумент форматирования (как и в printf при использовании %s) преобразуется в строку с помощью
String.valueOf, поэтому значения null подставляются в виде строки "null", а для остальных объектов вызывается
toString:
log.info("Сегодня {}", LocalDate.now());
// Сегодня 2016-05-19

log.info("Нулевая ссылка отображается как {}", null);
// Нулевая ссылка отображается как null
Зачем в SLF4J используется свой собственный формат сообщений, когда есть String.format? Дело в том, что SLF4J API был
спроектирован до выхода Java 5, то есть до появления String.format. Кроме того, логирование критично к
производительности, и такой простой формат сообщений значительно быстрее, чем полные возможности String.format. Но,
конечно, ничто не запрещает использовать свои собственные средства форматирования вместо встроенных:
log.info(String.format("%04d", 42));
// 0042
Другая причина состоит в том, что форматирование сообщений в SLF4J осуществляется лениво, только в том случае, если
соответствующий уровень логирования включён в конфигурации логирования. Это позволяет избежать лишнего форматирования
строк, которые на самом деле никуда не будут выведены.
Оптимизация логирования с дорогими операциями
Представим себе, что сообщение логирования выводит результат какой-нибудь дорогой операции, которая может замедлить
работу приложения. Конечно, использование стандартных средств форматирования SLF4J позволит избежать лишнего слияния
строк и строковых представлений объектов, но сами объекты при этом будут созданы:
// Неоптимальное логирование с дорогими операциями - не делайте так!
List<String> words = getWords();
log.debug("Words in sorted order: {}",
		words.stream().sorted().collect(Collectors.joining(", ")));
В нашем случае, даже если уровень DEBUG отключён в настройках логирования, операции сортировки и слияния списка слов
всё равно будут выполнены — вхолостую. Имеет смысл выполнять их только в случае, если соответствующий уровень
логирования включён. Для такой проверки в классе Logger имеется пять методов, по одному на каждый уровень:
boolean isErrorEnabled()
boolean isWarnEnabled()
boolean isInfoEnabled()
boolean isDebugEnabled()
boolean isTraceEnabled()
Пользуясь этим средством, мы могли бы оптимизировать свой код:
List<String> words = getWords();

if (log.isDebugEnabled()) {
	log.debug("Words in sorted order: {}",
			words.stream().sorted().collect(Collectors.joining(", ")));
}
Логирование исключений
Для каждого из пяти уровней есть ещё одна форма методов логирования, принимающая вместо списка аргументов форматирования
один параметр типа Throwable (хотя на практике, как правило, исключения логируются только на уровне ERROR):
void error(String msg, Throwable t)
void warn(String msg, Throwable t)
void info(String msg, Throwable t)
void debug(String msg, Throwable t)
void trace(String msg, Throwable t)
Эти методы не поддерживают форматирование сообщений (хотя для него всегда можно использовать сторонние средства
форматирования, например, String.format). Эта форма методов логирования записывает в лог сначала сообщение, переданное
первым параметром, а затем — сообщение и трассировку стека для переданного исключения.
Например, следующий код
public class ExceptionLogging {
	private static final Logger log =
			LoggerFactory.getLogger(ExceptionLogging.class);

	public static void main(String[] args) {
		try {
			Files.size(Paths.get("/invalid/invalid"));
		} catch (final IOException e) {
			log.error("Не удалось получить размер файла", e);
		}
	}

}
запишет в лог сообщение наподобие этого:
[main] ERROR ExceptionLogging - Не удалось получить размер файла
java.nio.file.NoSuchFileException: /invalid/invalid
	at sun.nio.fs.UnixException.translateToIOException(UnixException.java:86)
	at sun.nio.fs.UnixException.rethrowAsIOException(UnixException.java:102)
	at sun.nio.fs.UnixException.rethrowAsIOException(UnixException.java:107)
	at sun.nio.fs.UnixFileAttributeViews$Basic.readAttributes(UnixFileAttributeViews.java:55)
	at sun.nio.fs.UnixFileSystemProvider.readAttributes(UnixFileSystemProvider.java:144)
	at sun.nio.fs.LinuxFileSystemProvider.readAttributes(LinuxFileSystemProvider.java:99)
	at java.nio.file.Files.readAttributes(Files.java:1737)
	at java.nio.file.Files.size(Files.java:2332)
	at ExceptionLogging.main(ExceptionLogging.java:15)
When it comes to troubleshooting Java application performance, JVM metrics are no longer enough. To fully understand the environment you also need Java logs and traces. Today, we’re going to focus on your Java application logs.
Logging in Java could be done just by easily writing data to a file, however, this is not the simplest or most convenient way of logging. There are frameworks for Java that provide the object, methods, and unified configuration methods that help setting up logging, store logs, and in some cases even ship them to a log centralization solution. On top of that, there are also abstraction layers that enable easy switching of the underlying framework without the need of changing the implementation. This can come in handy if you ever need to replace your logging library for whatever reason – for example performance, configuration, or even simplicity.
Sounds complicated? It doesn’t have to be.
In this blog post, we will focus on how to properly set up logging for your code to avoid all those mistakes that we already did. We will cover:
- Logging abstraction layers for Java
- Out of the box Java logging capabilities
- Java logging libraries
- Logging the important information
- Log centralization solutions.
Let’s get started!
Java Logging Frameworks
SLF4J
The Simple Logging Facade for Java or simply SLF4J is an abstraction layer for various logging frameworks allowing us, as users, to choose the logging framework during the deploy time, rather than during the development time. This enables quick and easy change of logging framework of choice when it is needed.
If you’re new to SLF4J, we have just the blog post for you. In our SLF4J tutorial, we explain everything there is to know about the abstraction layer so that you can log easier and smarter.
Java.util.logging
The java.util.logging package provides the classes and interfaces for Java core logging facilities. It comes bundled with the Java Development Kit and is available for every developer using Java since Java 1.4.
Logback
Logback started as an intended successor to the first version of the Log4j project claiming faster implementation, better tests, native SLF4J integration, and more. It is built out of three main modules and integrates with Servlet containers such as Tomcat or Jetty to provide HTTP-access log functionality. If this is your framework of choice, check out our Logback tutorial where we go over how it works and how to configure it for logging Java applications.
Log4j
Log4j is one of the most widely known Java logging libraries and the predecessor for such projects as Logback or Log4j 2. Log4j reached its end of life on 5th of August 2015 and users are recommended to use Log4j 2. If you are still using this framework, check out our Log4j tutorial where we go over its functionality.
Log4j 2
Log4j 2 is the newest in the list of all the mentioned Java logging frameworks. It incorporates lots of improvements over its predecessor and promises to provide Logback improvements while fixing issues with some of its architectural problems. If you are starting a new project and you are looking for a library of choice Log4j 2 should be the main focus. You can read more about how to use it for logging Java applications from our Log4j 2 tutorial.
Choosing the Right Logging Solution for Your Application
The best logging solution for your Java application is….well, it’s complicated. You have to think and look at your current environment and organization’s needs. If you already have a framework of choice that the majority of your applications use – go for that. It is very likely that you will already have an established format for your logs. That also means that you may already have an easy way to ship your logs to a log centralization solution of your choice, and you just need to follow the existing pattern.
However, if your organization does not have any kind of common logging framework, go and see what kind of logging is used in the application you are using. Are you using Elasticsearch? It uses Log4j 2. Do the majority of the third party applications also use Log4j 2? If so, consider using it. Why? Because you will probably want to have your logs in one place and it will be easier for you to just work with a single configuration or pattern. However, there is a pitfall here. Don’t go that route if it means using an outdated technology when a newer and mature alternative already exists.
Finally, if you select a new logging framework I suggest using an abstraction layer and a logging framework. Such an approach gives you the flexibility to switch to a different logging framework when needed and, what’s most important, without needing to change the code. You will only have to update the dependencies and configuration, the rest will stay the same.
In most cases, the SLF4J with bindings to the logging framework of your choice will be a good idea. The Log4j 2 is the go-to framework for many projects out there both open and closed source ones.
Logging in Java: How to Log Using the Java Logging API
Java contains the Java logging API which allows you to configure what type of log messages are written. The API comes with a standard set of key elements that we should know about to be able to proceed and discuss more than just the basic logging. The java.util.logging package provides the Logger class to log application messages.
Logger
The logger is the main entity that an application uses to make logging calls, to capture LogRecords to the appropriate handler. The LogRecord (or logging event) is the entity used to pass the logging requests between the framework that is used for logging and the handlers that are responsible for log shipping.
The Logger object is usually used for a single class or a single component to provide context-bound to a specific use case.
Adding logging to our Java application is usually about configuring the library of choice and including the Logger. That allows us to add logging into the parts of our application that we want to know about.
Handler
The handler is used to export the LogRecord entity to a given destination. Those destinations can be the memory, console, files, and remote locations via sockets and various APIs. There are different standard handlers. Below are a few examples of such a handlers:
- ConsoleHandler
- FileHandler
- SyslogHandler
The ConsoleHandler is designed to send your log messages to the standard output. The FileHandler writes the log messages to a dedicated file and the SyslogHandler sends the data to the Syslog compatible daemon.
Turning any handler on and off is just a matter of including it in the configuration file for the logging library of your choice. You don’t have to do anything more.
You can also create your own handler by extending the Handler class. Here’s a very simple example:
public class ExampleHandler extends Handler {
  @Override
  public void publish(LogRecord logRecord) {
    System.out.println(String.format("Log level: %s, message: %s",
        logRecord.getLevel().toString(), logRecord.getMessage()));
  }

  @Override
  public void flush() {
  }

  @Override
  public void close() throws SecurityException {
  }
}
Logging Levels
Java log levels are a set of standard severities of the logging message. Tells how important the log record is. If you’re new to the topic, make sure to check out our guide on log levels where dive deeper into the subject.
For example, the following log levels are sorted from least to most important with some explanation on how I see them:
TRACE – Very fine-grained information only used in a rare case where you need the full visibility of what is happening. In most cases, the TRACE level will be very verbose, but you can also expect a lot of information about the application. Use for annotating the steps in an algorithm that are not relevant in everyday use.
LOGGER.trace("This is a TRACE log level message");
DEBUG – Less granular than TRACE level, but still more granular than you should need in your normal, everyday use. The DEBUG level should be used for information that can be useful for troubleshooting and is not needed for looking at the everyday application state.
LOGGER.debug("This is a DEBUG log level message");
INFO – The standard level of log information that indicates normal application action – for example “Created a user {} with id {}” is an example of a log message on an INFO level that gives you information about a certain process that finished with a success. In most cases, if you are not looking into how your application performs you could ignore most if not all of the INFO level logs.
LOGGER.info("This is a INFO log level message");
WARN – Log level that usually indicates a state of the application that might be problematic or that it detected an unusual execution. Something may be wrong, but it doesn’t mean that the application failed. For example, a message was not parsed correctly, because it was not correct. The code execution is continuing, but we could log that with the WARN level to inform us and others that potential problems are happening.
LOGGER.warn("This is a WARN log level message");
ERROR – Log level that indicates an issue with a system that prevents certain functionality from working. For example, if you provide login via social media as one way of logging into your system, the failure of such a module is an ERROR level log for sure.
LOGGER.error("This is a ERROR log level message");
FATAL – The log level indicating that your application encountered an event that prevents it from working or a crucial part of it from working. A FATAL log level is, for example, an inability to connect to a database that your system relies on or to an external payment system that is needed to check out the basket in your e-commerce system. The FATAL error doesn’t have the representation in SLF4J.
Formatter
The formatter supports the formatting of the LogRecord objects. By default, two formatters are available:
- SimpleFormatter which prints the LogRecord object in a human-readable form using one or two lines
- XMLFormatter which writes the messages in the standard XML format.
You can also build your own custom formatter. Here’s an example:
public class TestFormatter extends Formatter {

  @Override
  public String format(LogRecord logRecord) {
    return String.format("Level: %s, message: %s",
        logRecord.getLevel(), logRecord.getMessage());
  }
}
The Abstraction Layers
Of course, your application can use the basic logging API provided out of the box by Java via the java.util.logging package. There is nothing wrong with that, but note that this will limit what you can do with your logs. Certain libraries provide easy to configure formatters, out-of-the-box industry standard destinations, and top-notch performance. If you wish to use one of those frameworks and you would also like to be able to switch the framework in the future, you should look at the abstraction layer on top of the logging APIs.
SLF4J – The Simple Logging Facade for Java is one such abstraction layer. It provides bindings for common logging frameworks such as Log4j, Logback, and the out-of-the-box java.util.logging package. You can imagine the process of writing the log message in the following, simplified way:
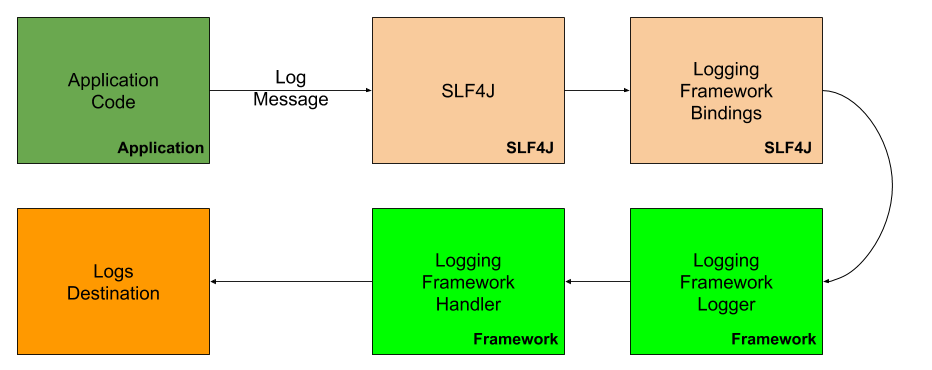
But how would that look from the code perspective? Well, that’s a very good question. Let’s start by looking at the out-of-the-box java.util.logging code. For example, if we would like to just start our application and print something to the log it would look as follows:
package com.sematext.blog.logging;

import java.util.logging.Level;
import java.util.logging.Logger;

public class JavaUtilsLogging {
  private static Logger LOGGER = Logger.getLogger(JavaUtilsLogging.class.getName());

  public static void main(String[] args) {
    LOGGER.log(Level.INFO, "Hello world!");
  }
}
You can see that we initialize the static Logger class by using the class name. That way we can clearly identify where the log message comes from and we can reuse a single Logger for all the log messages that are generated by a given class.
The output of the execution of the above code will be as follows:
Jun 26, 2020 2:58:40 PM com.sematext.blog.logging.JavaUtilsLogging main
INFO: Hello world!
Now let’s do the same using the SLF4J abstraction layer:
package com.sematext.blog.logging;

import org.slf4j.Logger;
import org.slf4j.LoggerFactory;

public class JavaSLF4JLogging {
  private static Logger LOGGER = LoggerFactory.getLogger(JavaSLF4JLogging.class);

  public static void main(String[] args) {
    LOGGER.info("Hello world!");
  }
}
This time the output is slightly different and looks like this:
[main] INFO com.sematext.blog.logging.JavaSLF4JLogging - Hello world!
This time, things are a bit different. We use the LoggerFactory class to retrieve the logger for our class and we use a dedicated info method of the Logger object to write the log message using the INFO level.
Starting with SLF4J 2.0 the fluent logging API was introduced, but at the time of writing of this blog it is still in alpha and is considered experimental, so we will skip it for now as the API may change.
So to finish up with the abstraction layer – it gives us a few major advantages compared to using the java.util.logging:
- A common API for all your application logging
- An easy way to use the desired logging framework
- An easy way to exchange the logging framework and not having to go through the whole code when wanting to switch
Hopefully, that sheds some light on what the log levels are and how you can use them in your application.
How Do You Enable Logging: java.util.logging Example
When using the standard java.util.logging package we don’t need any kind of external dependencies. Everything that we need is already present in the JDK distribution so we can just jump on it and start including logging to our awesome application.
There are two ways we can include and configure logging using the java.util.logging package – by using a configuration file or programmatically. For the demo purposes let’s assume that we want to see our log messages in a single line starting with a date and time, severity of the log message and of course the log message itself.
Configuring java.util.logging via Configuration File
To show you how to use the java.util.logging package we’ve created a simple Java project and shared it in our Github repository. The code that generates the log and sets up our logging looks as follows:
package com.sematext.blog.loggging;
import java.io.InputStream;
import java.util.logging.Level;
import java.util.logging.LogManager;
import java.util.logging.Logger;
public class UtilLoggingConfiguration {
  private static Logger LOGGER = Logger.getLogger(UtilLoggingConfiguration.class.getName());
  static {
    try {
      InputStream stream = UtilLoggingConfiguration.class.getClassLoader()
          .getResourceAsStream("logging.properties");
      LogManager.getLogManager().readConfiguration(stream);
    } catch (Exception ex) {
      ex.printStackTrace();
    }
  }
  public static void main(String[] args) throws Exception {
    LOGGER.log(Level.INFO, "An INFO level log!");
  }
}
We start with initializing the Logger for our UtilLoggingConfiguration class by using the name of the class. We also need to provide the name of our logging configuration. By default the default configuration lives in the JAVA_HOME/jre/lib/logging.properties file and we don’t want to adjust the default configuration. Because of that, I created a new file called logging.properties and in the static block we just initialize it and provide it to the LogManager class by using its readConfiguration method. That is enough to initialize the logging configuration and results in the following output:
[2020-06-29 15:34:49] [INFO ] An INFO level log!
Of course, you would only do the initialization once and not in each and every class. Keep that in mind.
Now that is different from what we’ve seen earlier in the blog post and the only thing that changed is the configuration that we included. Let’s now look at our logging.properties file contents:
handlers=java.util.logging.ConsoleHandler java.util.logging.ConsoleHandler.formatter=java.util.logging.SimpleFormatter java.util.logging.SimpleFormatter.format=[%1$tF %1$tT] [%4$-7s] %5$s %n
You can see that we’ve set up the handler which is used to set the log records destination. In our case, this is the java.util.logging.ConsoleHandler that prints the logs to the console.
Next, we said what format we would like to use for our handler and we’ve said that the formatter of our choice is the java.util.logging.SimpleFormatter. This allows us to provide the format of the log record.
Finally by using the format property we set the format to [%1$tF %1$tT] [%4$-7s] %5$s %n. That is a very nice pattern, but it can be confusing if you see something like this for the first time. Let’s discuss it. The SimpleFormatter uses String.format method with the following list or arguments: (format, date, source, logger, level, message, thrown).
So the [%1$tF %1$tT] part tells the formatter to take the second argument and provide the date and time parts. Then the [%4$-7s] part reads the log level and uses 7 spaces for formatting that. So for the INFO level, it will add 3 additional spaces. The %5$s tells the formatter to take the message of the log record and print it as a string and finally, the %n is the new line printing. Now that should be clearer.
Configuring java.util.logging Programmatically
Let’s now look at how to do similar formatting by configuring the formatter from the Java code level. We won’t be using any kind of properties file this time, but we will set up our Logger using Java.
The code that does that looks as follows:
package com.sematext.blog.loggging;
import java.util.Date;
import java.util.logging.*;
public class UtilLoggingConfigurationProgramatically {
  private static Logger LOGGER = Logger.getLogger(UtilLoggingConfigurationProgramatically.class.getName());
  static {
    ConsoleHandler handler = new ConsoleHandler();
    handler.setFormatter(new SimpleFormatter() {
      private static final String format = "[%1$tF %1$tT] [%2$-7s] %3$s %n";
      @Override
      public String formatMessage(LogRecord record) {
        return String.format(format,
            new Date(record.getMillis()),
            record.getLevel().getLocalizedName(),
            record.getMessage()
        );
      }
    });
    LOGGER.setUseParentHandlers(false);
    LOGGER.addHandler(handler);
  }
  public static void main(String[] args) throws Exception {
    LOGGER.log(Level.INFO, "An INFO level log!");
  }
}
The difference between this method and the one using a configuration file is this static block. Instead of providing the location of the configuration file, we are creating a new instance of the ConsoleHandler and we override the formatMessage method that takes the LogRecord object as its argument. We provide the format, but we are not passing the same number of arguments to the String.format method, so we modified our format as well. We also said that we don’t want to use the parent handler which means that we would only like to use our own handler and finally we are adding our handler by calling the LOGGER.addHandler method. And that’s it – we are done. The output of the above code looks as follows:
[2020-06-29 16:25:34] [INFO ] An INFO level log!
I wanted to show that setting up logging in Java can also be done programmatically, not only via configuration files. However, in most cases, you will end up with a file that configures the logging part of your application. It is just more convenient to use, simpler to adjust, modify, and work with.
Efficient Java Logging with Log Management Solutions
Now you know the basics about how to turn on logging in our Java application but with the complexity of the applications, the volume of the logs grows. You may get away with logging to a file and only using them when troubleshooting is needed, but working with huge amounts of data quickly becomes unmanageable and you should end up using a log management solution for log monitoring and centralization. You can either go for an in-house solution based on the open-source software or use one of the products available on the market like Sematext Logs.
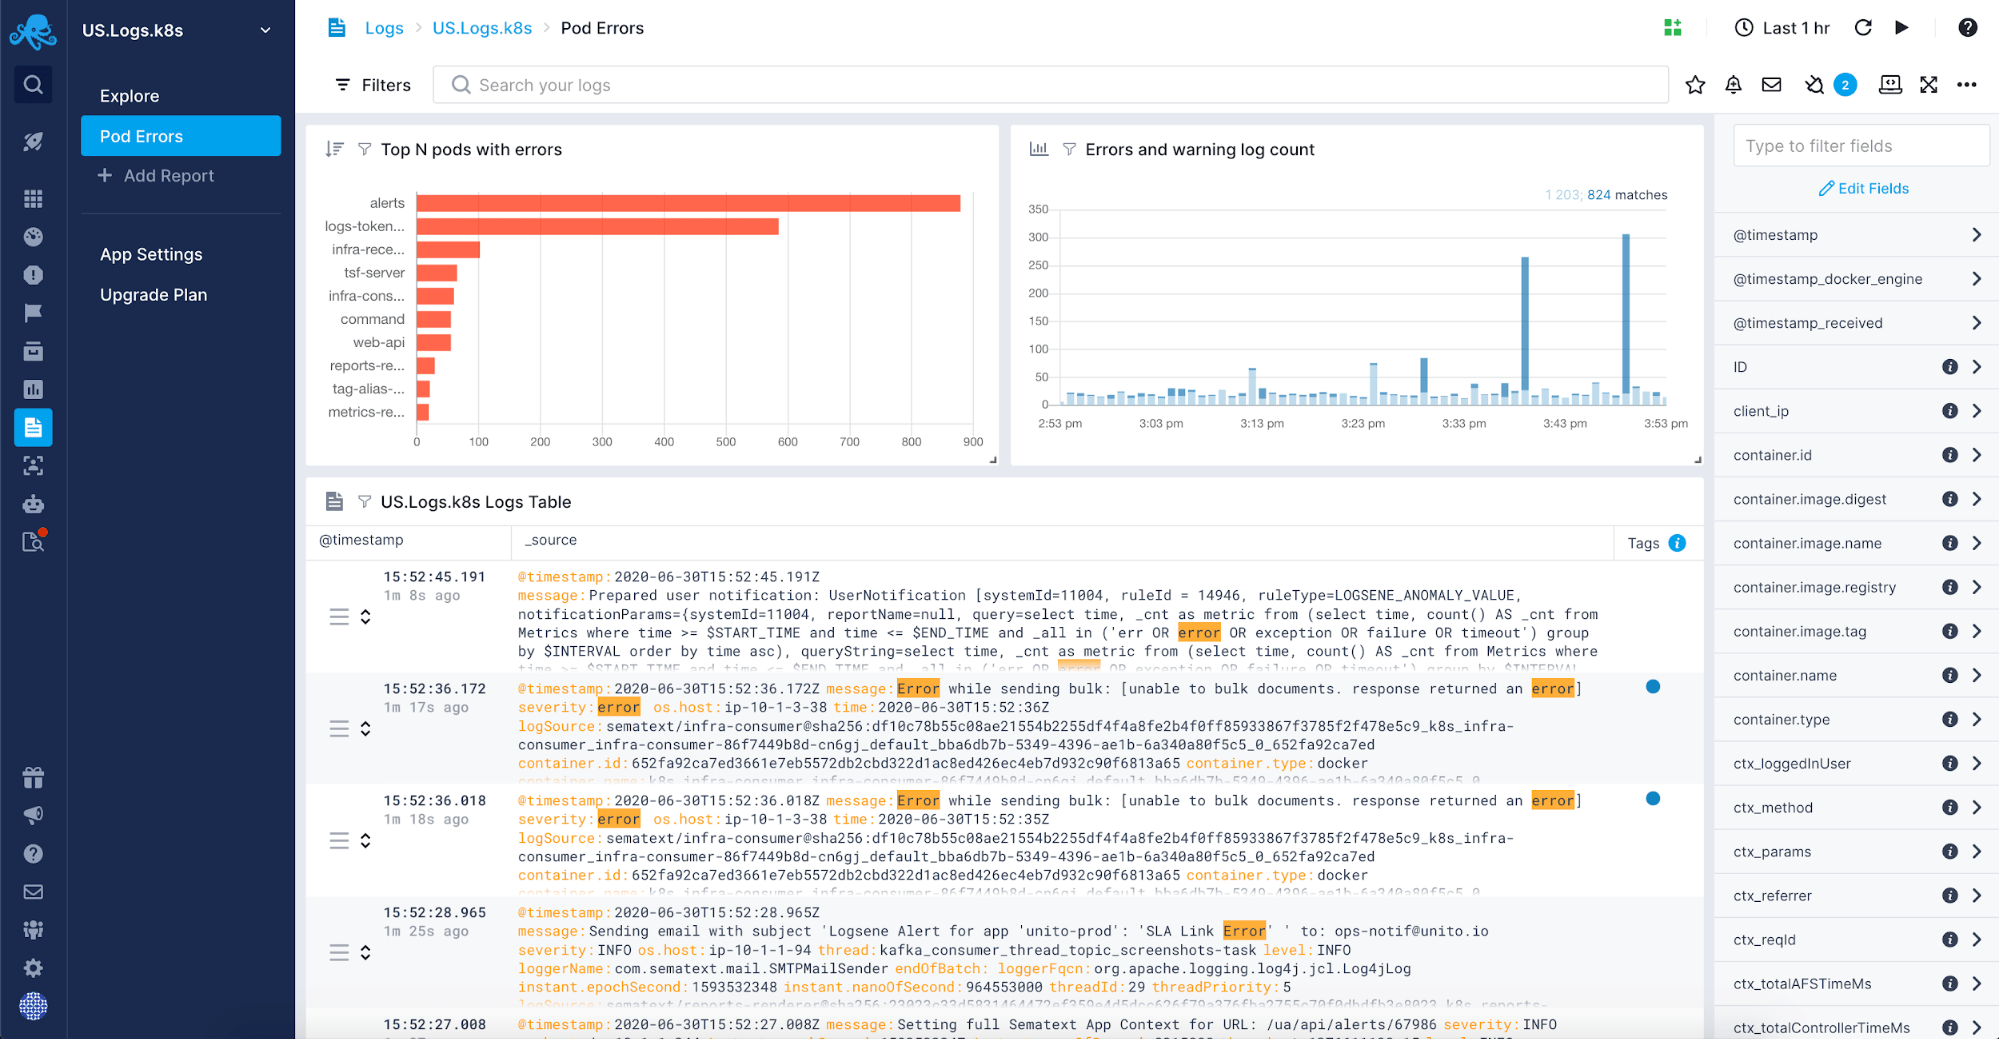
A fully managed log centralization solution such as Sematext Logs will give you the freedom of not needing to manage yet another, usually quite complex, part of your infrastructure. It will allow you to manage a plethora of sources for your logs. You can learn more about Sematext and how it stacks up against similar solutions from our reviews of the best log management software, log analysis tools, and cloud logging services available out there.
You may want to include logs like JVM garbage collection logs in your managed log solution. After turning them on for your applications and systems working on the JVM you will want to have them in a single place for correlation, analysis, and to help you tune the garbage collection in the JVM instances. Alert on logs, aggregate the data, save and re-run the queries, hook up your favorite incident management software.
Read more tips about how to efficiently write Java logs from our blog post about Java logging best practices.
Or you can check out this quick overview of Sematext Logs and see how you can easily centralize your log data.
Conclusion
Logging is invaluable when troubleshooting Java applications. In fact, logging is invaluable in troubleshooting in general, no matter if that is a Java application or a hardware switch or firewall. Both the software and hardware give us a look into how they are working in the form of parametrized logs enriched with contextual information.
In this article, we started with the basics of logging in your Java applications. We’ve learned what are the options when it comes to Java logging, how to add logging to your application, how to configure it.
I hope this article gave you an idea of how to deal with Java application logs and why you should start working with them right away if you haven’t already. And don’t forget, the key to efficient application logging is using a good log management tool. Try Sematext Logs to see how much easier things could be. There’s a 14-day free trial available for you to explore all its features. Good luck!
Logging is an important part of every application life cycle. Having a good
logging system becomes a key feature that helps developers, sysadmins, and
support teams to understand and solve appearing problems.
Every log message has an associated log level. The log level helps you
understand the severity and urgency of the message. Usually, each log level has
an assigned integer representing the severity of the message.
Though Java provides an extendable logging system, third-party logging libraries
can significantly simplify the logging process.
In this tutorial, we are going to use a Command Line Application for our
examples, and cover 3 methods of logging in Java:
- Logging with built-in tools
- Logging with log4j
- Logging with Logback
🔭 Want to centralize and monitor your Java application logs?
Head over to Logtail and start ingesting your logs in 5 minutes.
Prerequisites
To complete this tutorial you will need:
- Ubuntu 20.04 distribution including the non-root user with
sudoaccess. - Java installed.
- IntelliJ IDEA installed.
How to Create a Project
To get started, you need to create a new project. To simplify the work, we are
going to use a default IntelliJ template for the Console Applications, the
Command Line App template.
You can create a Command Line Application Let’s break it down into simple steps,
the first thing you need to do is to open the New Project windows. There are
several ways how to do it in the IntelliJ IDEA.
The first one is to select Create a new project in the welcome window.
The second one, If the IntelliJ is already open, you can follow the path on the
top menu bar File > New > Project.
In the New Project window click on Java, and select the Command Line
App template.
How to Install Dependencies
Before starting to work on the application, you need to install some dependency
packages. IntelliJ provides multiple ways to do it. However, in this tutorial we
will use Maven — a software project management and
comprehension tool. Based on the concept of a project object model.
The dependency management in Java may seem complicated, but we are going to
break it down into small steps.
So, the first thing you have to do is to open the Project Structure window.
You can do it using File > Project Structure. Alternatively, you can press
CTRL + SHIFT + ALT + S.
In the window that opens, select the Libraries tab, then press
ALT + INSERT and select From Maven.
Now, you can enter a Maven package you’d like to install and press OK. The
package will be available from any part of the project!
Java has a powerful built-in tool — the java.utils.logging package. It
supports structured output, multiple logging targets, and everything a modern
logging framework should support.
JUL is useful in the simplest small applications as well as in large and complex
ones. Due to its rich configuration abilities, you can use it in all your
projects.
Step 1 — Creating a Logger
Preparatory to creating a logger, we have to import the Logger package.
Main.java
package com.company;

import java.util.logging.Logger;

public class Main {
    public static void main(String[] args) {

    }
}
Now, you are ready to create a logger. The process is pretty straightforward and
can be done in one line of code.
Main.java
package com.company;

import java.util.logging.Logger;

public class Main {
    // create a static logger
    private static final Logger logger = Logger.getLogger(Main.class.getName());

    public static void main(String[] args) {

    }
}
The logger will use JUL’s default log levels system. The system consists of the
7 levels:
- Severe — used for logging serious problems occurred during execution of
the program. - Warning — used for reporting non-critical unusual behavior.
- Info — used for informative messages highlighting the progress of the
application for sysadmin and end user. - Config — used for logging the configuration information.
- Finest, Finer, Fine — used for tracing the code.
Step 2 — Configuring the Logger
The JUL provides several ways to configure the logger, such as the properties
file and programmatic configuration. The configuration consists of setting up
handlers and loggers.
In the tutorial we are going to configure the logger programmatically.
Let’s import the required packages:
Main.java
package com.company;

import java.io.IOException;
import java.util.logging.FileHandler;
import java.util.logging.Handler;
import java.util.logging.Level;
import java.util.logging.Logger;

public class Main {
    // create a static logger
    private static final Logger logger = Logger.getLogger(Main.class.getName());

    public static void main(String[] args) {

    }
}
After that, you are ready to configure the logger. By default, the JUL logger
has a console handler, so let’s add an extra file handler for with warning and
higher severity logs.
Main.java
package com.company;

import java.io.IOException;
import java.util.logging.FileHandler;
import java.util.logging.Handler;
import java.util.logging.Level;
import java.util.logging.Logger;

public class Main {
    // create a static logger
    private static final Logger logger = Logger.getLogger(Main.class.getName());

    public static void main(String[] args) {
        // create a file handler
        Handler fileHandler;
        // the file handler constructor may throw an exception
        // so we have to put it into try-catch block
        try {
            fileHandler = new FileHandler("./important.log");
            // set the file handler's minimum level
            fileHandler.setLevel(Level.WARNING);
            // add the handler to the logger
            logger.addHandler(fileHandler);
        } catch (IOException e) {
            // log the exception
            logger.log(Level.SEVERE, "Error occur in FileHandler.", e);
        }
    }
}
By default, the file handlers are set up to log events structured in XML.
Step 3 — Logging
To demonstrate how the logger works, we will log some simple messages, at least
one of each level.
Main.java
package com.company;

import java.io.IOException;
import java.util.logging.FileHandler;
import java.util.logging.Handler;
import java.util.logging.Level;
import java.util.logging.Logger;

public class Main {
    // create a static logger
    private static final Logger logger = Logger.getLogger(Main.class.getName());

    public static void main(String[] args) {
        // create a file handler
        Handler fileHandler;
        // the file handler constructor may throw an exception
        // so we have to put it into try-catch block
        try {
            fileHandler = new FileHandler("./important.log");
            // set the file handler's minimum level
            fileHandler.setLevel(Level.WARNING);
            // add the handler to the logger
            logger.addHandler(fileHandler);
        } catch (IOException e) {
            // log the exception
            logger.log(Level.SEVERE, "Error occur in FileHandler.", e);
        }

        // logging
        logger.finest("finest message log");
        logger.finer("finer message log");
        logger.fine("fine message log");
        logger.config("config message log");
        logger.info("info message log");
        logger.warning("warn message");
        logger.severe("severe message log");
    }
}
Now, let’s build and run the program. You can simply do this by pressing
SHIFT + F10.
After the execution, your console’s output should look like:
Output
May 31, 2021 2:52:15 AM com.company.Main main
INFO: info message log
May 31, 2021 2:52:15 AM com.company.Main main
WARNING: warn message
May 31, 2021 2:52:15 AM com.company.Main main
SEVERE: severe message log
Now, let’s check the logs written in the important.log file.
important.log
<?xml version="1.0" encoding="UTF-8" standalone="no"?>
<!DOCTYPE log SYSTEM "logger.dtd">
<log>
<record>
  <date>2021-05-31T03:52:15.623883648Z</date>
  <millis>1622433135623</millis>
  <nanos>883648</nanos>
  <sequence>1</sequence>
  <logger>com.company.Main</logger>
  <level>WARNING</level>
  <class>com.company.Main</class>
  <method>main</method>
  <thread>1</thread>
  <message>warn message</message>
</record>
<record>
  <date>2021-05-31T03:52:15.662811715Z</date>
  <millis>1622433135662</millis>
  <nanos>811715</nanos>
  <sequence>2</sequence>
  <logger>com.company.Main</logger>
  <level>SEVERE</level>
  <class>com.company.Main</class>
  <method>main</method>
  <thread>1</thread>
  <message>severe message log</message>
</record>
</log>
Option 2 — Logging with log4j
Log4j is a popular logging framework for Java with
great documentation, a lot of
related materials, and a big developer community. In the long list of the log4j
features you can find:
- Custom formatting layout
- Support of structured logging, that allows them to be treated as data sets
rather than text - Compatibility with asynchronous applications and systems
- Multiple logging targets, such as files, console, console, email, and many
other outputs.
Step 1 — Installing Dependencies
To start using the log4j package, you have to install it. We are going to
install the latest version at the time of writing —
org.apache.logging.log4j:log4j-1.2-api:2.11.2 via Maven.
Step 2 — Creating a Logger
Preparatory to creating a logger, we have to import 2 packages: log4j.Logger
and log4j.LogManager.
Main.java
package com.company;

import org.apache.log4j.Logger;
import org.apache.log4j.LogManager;

public class Main {
    public static void main(String[] args) {

    }
}
At the moment, you are ready to create a logger. For the application, we are
going to use the simplest way to do it in log4j — the LogManager class. It
provides the getLogger method to get a unique logger per each class. Unlike
the globally configured logger, the logger per class helps you to easily capture
the source of the log message.
Main.java
package com.company;

import org.apache.log4j.Logger;
import org.apache.log4j.LogManager;

public class Main {
    // create a static logger
    private static final Logger logger = LogManager.getLogger(Main.class);

    public static void main(String[] args) {

    }
}
The logger will use the log4j‘s default log levels system. The system consists
of the 6 levels:
- Fatal — used for reporting about errors that are forcing shutdown of the
application. - Error — used for logging serious problems occurred during execution of the
program. - Warn — used for reporting non-critical unusual behavior.
- Info — used for informative messages highlighting the progress of the
application for sysadmin and end user. - Debug — used for debugging messages with extended information about
application processing. - Trace — used for tracing the code.
Step 3 — Creating a Config
Log4j provides 2 ways how to configure the logging system: programmatically or
via a configuration file. You can get advanced information about each of them
in the documentation.
In the tutorial we’re going to configure the logger using log4j2.xml file.
The first thing to do is to create a log4j2.xml file in the root of your
application, in the src folder. You can do it by pressing right-clicking the
src tab in the sidebar and clicking the New option. The only thing left is
to enter the log4j2.xml name in the opened window.
The log4j2.xml file should look like:
log4j2.xml
<?xml version="1.0" encoding="UTF-8"?>
<Configuration status="WARN">
    <Appenders></Appenders>
    <Loggers>
        <Root></Root>
    </Loggers>
</Configuration>
Now, let’s write a config. The config is written in the XML language. If you are
not familiar with the XML language, you may dive
in the great XML tutorial by w3school.
In our case the config consists of 2 parts: setting up the root logger and
setting up the appenders.
We’ve decided to add 2 logging targets for the application: the console and a
file. In the config file, each of them will be represented by a separate XML
element. Let’s write the appenders in the config file.
log4j2.xml
<?xml version="1.0" encoding="UTF-8"?>
<Configuration status="WARN">
    <Appenders>
        <Console name="console" target="SYSTEM_OUT">
            <PatternLayout pattern="%d{HH:mm:ss.SSS} [%t] %-5level %logger{36} - %msg%n"/>
        </Console>

        <File name="file" fileName="logs/all.log">
            <PatternLayout>
                <pattern>[%-5level] %d{yyyy-MM-dd HH:mm:ss.SSS} [%t] %c{1} - %msg%n</pattern>
            </PatternLayout>
        </File>
    </Appenders>
    <Loggers>
        <Root></Root>
    </Loggers>
</Configuration>
The first appender will write all logs with debug and higher severity to the
console, the second one — to the logs/all.log file.
Now, let’s specify the minimum level for the root logger and appenders used by
the logger.
log4j2.xml
<?xml version="1.0" encoding="UTF-8"?>
<Configuration status="WARN">
    <Appenders>
        <Console name="console" target="SYSTEM_OUT">
            <PatternLayout pattern="%d{HH:mm:ss.SSS} [%t] %-5level %logger{36} - %msg%n"/>
        </Console>

        <File name="file" fileName="logs/all.log">
            <PatternLayout>
                <pattern>[%-5level] %d{yyyy-MM-dd HH:mm:ss.SSS} [%t] %c{1} - %msg%n</pattern>
            </PatternLayout>
        </File>
    </Appenders>
<Loggers>
        <Root level="debug">
            <AppenderRef ref="console"/>
            <AppenderRef ref="file"/>
        </Root>
    </Loggers>
</Configuration>
The appenders are referred by the name property, so make sure to make it unique!
Step 4 — Logging
To demonstrate how the logger works, we will log some simple messages, at least
one of each level. It’s a pretty straightforward task, because of the clear
log4j API.
More specifically, log4j logger provides 6 methods for logging: trace,debug,
info, warn, error, and fatal.
Main.java
package com.company;

import org.apache.log4j.Logger;
import org.apache.log4j.LogManager;

public class Main {
    // create a static logger
    private static final Logger logger = LogManager.getLogger(Main.class);

    public static void main(String[] args) {
    // logging
        logger.trace("trace message log");
        logger.debug("debug message log");
        logger.info("info message log");
        logger.warn("warn message log");
        logger.error("error message log");
        logger.fatal("fatal message log");
    }
}
Now, let’s build and run the program. You can simply do this by pressing
SHIFT + F10.
After the execution, your console’s output should look like:
Output
02:46:11.353 [main] DEBUG com.company.Main - debug message log
02:46:11.359 [main] INFO  com.company.Main - info message log
02:46:11.359 [main] WARN  com.company.Main - warn message log
02:46:11.360 [main] ERROR com.company.Main - error message log
02:46:11.361 [main] FATAL com.company.Main - fatal message log
Now, let’s check the logs written in the file. The all.log is located in the
./logs directory.
all.log
[DEBUG] 2021-05-29 02:46:11.353 [main] Main - debug message log
[INFO ] 2021-05-29 02:46:11.359 [main] Main - info message log
[WARN ] 2021-05-29 02:46:11.359 [main] Main - warn message log
[ERROR] 2021-05-29 02:46:11.360 [main] Main - error message log
[FATAL] 2021-05-29 02:46:11.361 [main] Main - fatal message log
Option 3 — Logging with Logback
Logback is one of the most popular logging frameworks in Java’s community. It’s
a successor of the log4j framework, which provides more configuration options.
Step 1 — Installing Dependencies
To start using the Logback package, you have to install it. We are going to
install the latest stable version at the time of writing —
ch.qos.logback:logback-classic:jar:1.2.3 via Maven.
Step 2 — Creating a Logger
Preparatory to creating a logger, we have to import 2 packages:
org.slf4j.Logger and org.slf4j.LoggerFactory.
Main.java
package com.company;

import org.slf4j.Logger;
import org.slf4j.LoggerFactory;

public class Main {
    public static void main(String[] args) {

    }
}
We don’t use the Logback package directly, because it’s commonly accessed via
the SLF4J API.
At the moment, you are ready to create a logger. We are going to use the
simplest way to do it — the LoggerFactory class. It provides the getLogger
method to get a unique logger per each class.
Main.java
package com.company;

import org.apache.log4j.Logger;
import org.apache.log4j.LogManager;

public class Main {
    // create a static logger
    private static final Logger logger = LoggerFactory.getLogger(Main.class);

    public static void main(String[] args) {

    }
}
The logger will use the Logback’s default log levels system. The system consists
of the 5 levels:
- Error — used for logging serious problems occurred during execution of the
program. - Warn — used for reporting non-critical unusual behavior.
- Info — used for informative messages highlighting the progress of the
application for sysadmin and end user. - Debug — used for debugging messages with extended information about
application processing. - Trace — used for tracing the code.
Step 3 — Configuring the KLogger
Logback provides 2 ways how to configure the logging system: programmatically or
via a configuration file. You can get advanced information about each of them
in the documentation.
In the tutorial we’re going to configure the logger using logback.xml file.
The first thing to do is to create a logback.xml file in the root of your
application, in the src folder. You can do it by pressing right-clicking the
src tab in the sidebar and clicking the New option. The only thing left is
to enter the logback.xml name in the opened window.
The logback.xml file should look like:
logback.xml
<?xml version="1.0" encoding="UTF-8"?>
<configuration>
    <root></root>
</configuration>
Now, let’s write a config. The config is written in the XML language. If you are
not familiar with the XML language, you may dive
in the great XML tutorial by w3school.
In our case the config consists of 2 parts: setting up the root logger and
setting up the appenders.
We’ve decided to add 2 logging targets for the application: the console and a
file. In the config file, each of them will be represented by a separate XML
element. Let’s write the appenders in the config file.
logback.xml
<?xml version="1.0" encoding="UTF-8"?>
<configuration>
    <appender name="STDOUT" class="ch.qos.logback.core.ConsoleAppender">
        <encoder>
            <pattern>%d{HH:mm:ss.SSS} %-5level %logger{36} - %msg%n</pattern>
        </encoder>
    </appender>

    <appender name="FILE" class="ch.qos.logback.core.FileAppender">
        <file>logs/important.log</file>
        <append>true</append>
        <!-- set immediateFlush to false for much higher logging throughput -->
        <immediateFlush>true</immediateFlush>
        <!-- encoders are assigned the type
             ch.qos.logback.classic.encoder.PatternLayoutEncoder by default -->
        <encoder>
            <pattern>%-4relative [%thread] %-5level %logger{35} - %msg%n</pattern>
        </encoder>
    </appender>

    <root></root>
</configuration>
The first appender will write all logs with debug and higher severity to the
console, the second one — to the logs/all.log file.
Now, let’s specify the minimum level for the root logger and appenders used by
the logger.
logback.xml
<?xml version="1.0" encoding="UTF-8"?>
<configuration>
    <appender name="STDOUT" class="ch.qos.logback.core.ConsoleAppender">
        <encoder>
            <pattern>%d{HH:mm:ss.SSS} %-5level %logger{36} - %msg%n</pattern>
        </encoder>
    </appender>

    <appender name="FILE" class="ch.qos.logback.core.FileAppender">
        <file>logs/important.log</file>
        <append>true</append>
        <!-- set immediateFlush to false for much higher logging throughput -->
        <immediateFlush>true</immediateFlush>
        <!-- encoders are assigned the type
             ch.qos.logback.classic.encoder.PatternLayoutEncoder by default -->
        <encoder>
            <pattern>%-4relative [%thread] %-5level %logger{35} - %msg%n</pattern>
        </encoder>
    </appender>

    <root level="debug">
        <appender-ref ref="STDOUT" />
        <appender-ref ref="FILE" />
    </root>
</configuration>
The appenders are referred by the name property, so make sure to make it unique!
Step 4 — Logging
To demonstrate how the logger works, we will log some simple messages, at least
one of each level. It’s a pretty straightforward task, because of the clear
log4j API.
More specifically, Logback logger provides 5 methods for logging:
trace,debug, info, warn, and error.
Main.java
package com.company;

import org.slf4j.Logger;
import org.slf4j.LoggerFactory;

public class Main {
    // create a static logger
    private static final Logger logger = LoggerFactory.getLogger(Main.class);

    public static void main(String[] args) {
        // logging
        logger.trace("trace message log");
        logger.debug("debug message log");
        logger.info("info message log");
        logger.warn("warn message log");
        logger.error("error message log");
    }
}
Now, let’s build and run the program. You can simply do this by pressing
SHIFT + F10.
After the execution, your console’s output should look like:
Output
07:18:26.923 DEBUG com.company.Main - debug message log
07:18:26.955 INFO  com.company.Main - info message log
07:18:26.956 WARN  com.company.Main - warn message log
07:18:26.957 ERROR com.company.Main - error message log
Now, let’s check the logs written in the important.log file.
important.log
2154 [main] DEBUG com.company.Main - debug message log
2186 [main] INFO  com.company.Main - info message log
2187 [main] WARN  com.company.Main - warn message log
2188 [main] ERROR com.company.Main - error message log
Conclusion
Proper logging can greatly assist in the support and development of your
application. This may seem like a daunting task, but Java has good built-in
tools and many fast and configurable logging libraries.
Now developing and maintaining your Java applications will be much easier!
Centralize all your logs into one place.
Analyze, correlate and filter logs with SQL.
Create actionable
dashboards.
Share and comment with built-in collaboration.
Got an article suggestion?
Let us know
![]()
![]()
![]()
Next article
How Start Logging With Log4j
Learn how to start logging with Log4j and go from basics to best practices in no time.
→
![]()
This work is licensed under a Creative Commons Attribution-NonCommercial-ShareAlike 4.0 International License.