Добавление текста в Гиф
Популярность формата Гиф в Интернете — неоспоримый факт. Есть простой способ добавить анимированный текст в Гиф с помощью онлайн-инструмента, тем самым персонализировав его или добавив забавную шутку. Правильно подобранная фраза на фото позволит выделить из остальных практически любое изображение, сделать акцент, обобщить суть публикации, чтобы пользователь хотя бы заинтересовался и прочитал пост. Многие блоггеры и коммерческие аккаунты используют это при создании своих лент и историй для Instagram.
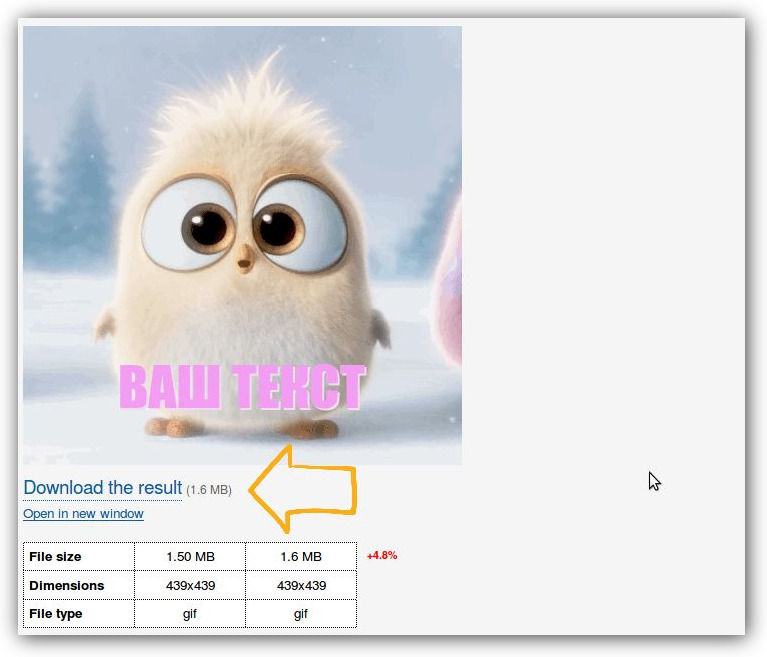
Используйте онлайн-сервис, чтобы применить текст к Гиф-файлам, используя различные шрифты, фоны и различные уровни прозрачности. Есть все необходимые функции для создания красивой надписи. После загрузки гифки вам будет представлен файл и редактор для добавления текста. Определившись с настройками, нажмите Добавить текст и надпись добавится к картинке. Вы можете изменить размер, шрифт, положение текста, границы и цвет символов.
Популярность формата GIF в интернете — неоспоримый факт. Существует простой способ добавить в GIF-картинку анимированный текст с помощью online-инструмента, тем самым персонализировав ее или добавив смешную шутку.

♥ ПО ТЕМЕ: Как удалить задний фон с картинки (фото) онлайн бесплатно: 5 лучших сервисов.
Gifntext предлагает очень простой в использовании интерфейс, позволяющий добавлять в свои GIF-картинки текст, изображения и рисунки. Добавить текст можно следующим образом:
1. Откройте сервис Gifntext и добавьте gif-изображение. Можно вставить ссылку на анимацию в Интернете или загрузить картинку с компьютера.

2. Нажмите на значок «Текст» (T).

3. Добавьте текст, выберите шрифт, размер и цвет.

4. Для того чтобы определить, где именно будет отображаться текст в GIF-изображении, щелкните и перетащите его в нужное место.

♥ ПО ТЕМЕ: Как записать видео с экрана компьютера в GIF (гиф) на Windows и Mac: 6 бесплатных программ.
5. Чтобы определить, когда текст появится в картинке, вы можете перетащить его на панели временной шкалы под ней. Нажмите и перетащите голубую полосу на любом конце временной шкалы, чтобы определить, как долго будет отображаться текст.
6. Повторите шаги с 2 по 4, если необходимо добавить несколько дорожек текста (в нашем случае их две).

7. Вы можете удалить текст, нажав на текст и нажав кнопку «Delete» на клавиатуре или воспользоваться кнопкой с изображением корзины на панели инструментов. Вы также можете дублировать текстовые слои, щелкнув значок «Duplicate Layer» рядом со слоем на временной шкале.

8. Если вы не хотите делиться GIF-картинкой в галерее Gifntext, нажмите «Make Private», а затем «Generate GIF».

9. Начнется процесс создания GIF-изображения.

10. Как только GIF-изображение будет отображено, нажмите кнопку «Download GIF» для его сохранения на компьютере или кнопку «← Back To Editing» для того чтобы продолжить редактирование.

Как только GIF-изображение будет готово, вы можете поделиться им с друзьями на Facebook или в Instagram. Ко всему этому при использовании Gifntext следует учитывать, что вы не можете загружать GIF-картинки размером более 100 МБ. А если вам нужно больше возможностей по управлению текстом, появляющимся в GIF-картинке, можно использовать аналогичные сайты, такие как EZGif, где есть возможность покадрово указать время отображения текста.
Смотрите также:
- Как создать Gif-картинку из любого видео на YouTube без использования специальных программ.
- Как конвертировать фото в форматы jpg, png, gif, tiff, bmp на Mac.
- В чем разница между JPEG, GIF, PNG, RAW, BMP, TIFF и прочими графическими форматами?

Интернет стал незаменимой частью нашей жизни во всех сферах. Там мы ищем ответы на вопросы, учимся, обмениваемся опытом, находим полезные идеи, общаемся, делаем покупки, просто отдыхаем — практически повсюду мы теперь связаны со всемирной паутиной. Количество информации, контента и ресурсов, растущее с каждым днем впечатляет – кажется, что в интернете можно найти абсолютно все. Чтобы у людей была возможность делиться настолько разнообразным материалом, постоянно разрабатываются специальные установки, программы, расширения.
И чтобы пользователи по всему миру могли использовать контент в корректном виде, для каждого типа файлов создаются свои форматы. Мы уже привыкли, что изображения — это jpg, видео, например, avi, а музыка mp3. В этой статье мы расскажем, как работать с одним из очень популярных в последнее время типом файла — gif.
Гифка – это формат графических изображений, анимированная движущаяся картинка. Чаще всего их используют в развлекательных целях: например, чтобы поделиться коротким интересным видео, с помощью гифки выразить эмоции, состояние, использовать для разнообразия общения.
Для удобства пользователей интернета непрерывно создаются специальные онлайн сервисы, благодаря которым осуществлять разные операции с материалом становится проще и быстрее. Предлагаем вам подборку лучших сайтов для добавления текста на гифки онлайн.
gifgifs.com
Удобный и простой сервис, но без перевода на русский. Есть все необходимые возможности для создания красивой надписи. Чтобы не запутаться в разных функциях, следуйте этой инструкции:
- Нажмите UPLOAD GIF, чтобы выбрать нужную гифку с компьютера (1) или выберите кнопку PASTE IMAGE URL, чтобы вставить внешнюю ссылку на файл (2);
- После того, как gif загрузится, вам откроется файл и редактор для добавления текста. Определившись с настройками, нажмите Add text и надпись добавится на картинку. Чтобы сбросить все настройки, нажмите на кнопку рядом с Reset.
 Настройки:
| Text on gif — сюда вставьте текст, который хотите видеть на гифке; | Font — шрифт. Учитывайте, что не все предлагаемые шрифты будут корректно отображаться для русских символов; |
| Color — цвет букв; | Size— размер букв; |
| Angle — наклон текста; | Shadow — тень от текста. Можно также выбрать ее цвет. |
Перемещать надпись по картине можно способом перетаскивания, а нажав на крестик возле рамки, можно удалить текст с гифки.
- Когда добьетесь удовлетворительного результата, прокрутите страницу вниз и нажмите на большую кнопку ADD TEXT. Гифка с надписью загрузится и появится возможность скачать результат. Выберите, куда сохранить файл.
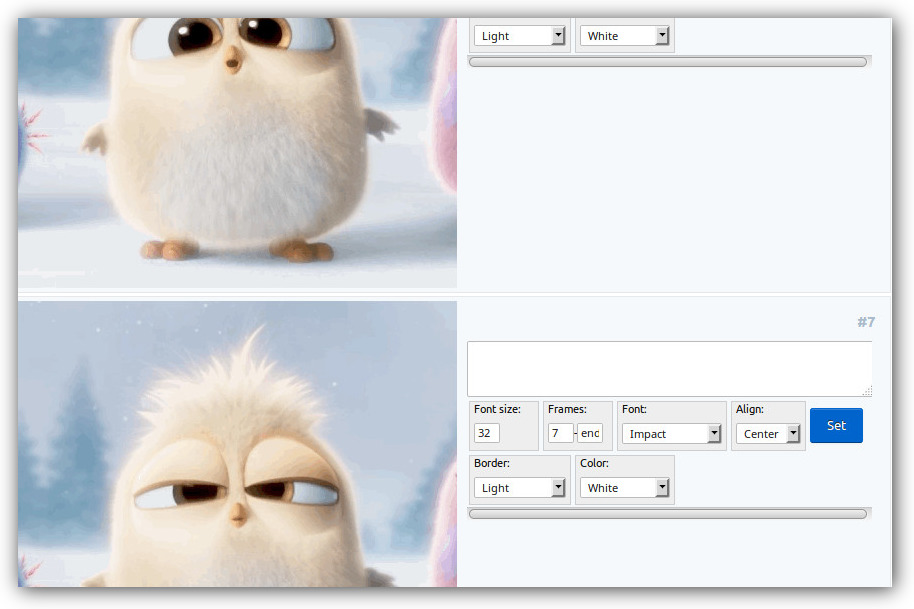
gifntext.com
Хороший сервис с более широким спектром возможностей. Но, к сожалению, тоже без перевода на русский.
Чтобы наложить тескт на файл gif, для начала загрузите его с компьютера (синяя кнопка) или вставьте в поле внешнюю ссылку на изображение;

Гифка загрузится, и сайт предоставит вам редактор. Справа нажмите на зеленый значок Т, чтобы добавить текст:

Вот основные возможности сервиса:

1 — поле для ввода текста; 2 — выбор шрифта; 3 — цвет границы букв; 4 — возможность запускать надпись в определенный момент. Для этого с помощью кнопки Воспроизвести (под картинкой) запустите анимацию и дождитесь нужного кадра, после чего остановите гифку и добавляйте текст на этом моменте. Если поставите галочку на этом пункте, текст будет виден не на протяжении всей гифки, а откроется в нужный момент; 5 — цвет текста.
Перемещать надпись, увеличивать и изменять угол наклона можно с помощью перетаскивания и зеленых квадратиков вокруг текста. Также, если опустите страницу немного вниз, увидите блок с возможностью регулировать, в какой момент какая будет появляться надпись (если у вас их несколько).
Чтобы скачать созданную гифку, опустите страницу немного вниз и нажмите синюю кнопку Create the gif , укажите путь сохранения файла.
ezgif.com
Этот англоязычный сайт предоставляет множество способов редактирвать gif файлы — обрезать, переворачивать, изменять цвет, скорость и т. д. Также можно добавить надпись на гифку, но сам редактор текста не гибкий. Есть только основные расширения: размер, шрифт, расположение надписи, границы и цвет символов. Когда вы загружаете файл в этот сервис, он автоматически разбивает гифку на 25 кадров, и благодаря этому вы можете точно решить, где какой текст вставлять. Как в вотсапе посмотреть удаленные сообщения вы можете найти в нашем посте.
Внизу страницы находится кнопка для сохранения работы.
Это самые популярные сервисы для добавления текста на gif файлы. К сожалению, на русском языке таких ресурсов пока не много, да и возможности в них очень ограничены. Но мы надеемся, что благодаря этим инструкциям вы сможете без затруднения добавлять текст на гифки онлайн. Qr код распознать онлайн вы можете с помощью нашей статьи.
*Nb. to add text to regular images use the image type tool.
GIFs allow us to use short, silent clips to share our reactions, fun moments or highlights from the latest viral video.
While images alone can be very effective in getting a point across you may sometimes need to personalize your GIFs
by adding a short text message of your own.
This simple online tool allows you to overlay text on an animated GIF.
By adding text you can annotate or label your GIFs.
You can add a single or multiple text objects.
Select from standard font families and over
900 web fonts
.
Customize fill colors, add strokes and drop shadows to add creative texts to your gifs.
There are two editing modes. If you select the static mode you can overlay an unchanging layer of text on the gif.
In animated mode you animate the text by changing it from frame to frame to create moving text, text that changes size,
color or any other text property that is editable in the editor panel.
How to add text to a GIF
Adding static text
To add a non-animated layer of text to an animated GIF:
- Make sure to select the ‘Static’ radio button option in the upload panel.
- Click the ‘Choose File’ button to upload a .gif file from your computer. A textbox with default text is placed over the uploaded GIF preview.
-
Edit the text:
- To type text — Double click the textbox to show the blinking cursor.
- Move text — Click and drag the textbox over the GIF.
- Style text — Use the input fields to style the text in the textbox. You can change the family, size and color of the text. You can also make the text bold or italic and add special styles such as stroke and drop shadow.
-
To add a new textbox click the ‘Add New’ button. To remove the currently selected textbox click the
‘Delete’ button. - Click the ‘Generate GIF’ button to generate the GIF file with the text overlay.
- Click the ‘Download’ button to download the GIF file to your computer. The file should be in the default download folder.
Adding animated text
To add animated text to your GIF:
- Select the ‘Animated’ radio button option in the upload panel.
-
Click the ‘Choose File’ button to upload a .gif file from your computer.
The gif file will be loaded in the gif preview with a default text loaded in the first frame.
The preview will have media control buttons to play and skip through the frames.
The frames in the gif will also be loaded in the timeline below the preview and editor panels. -
Use the skip button below the preview to move between frames.
You can add text using the ‘Add New’ button or copy text from one frame to another using the ‘Copy’ button in the editor panel.
Simply add new text or copy text from one frame to another then alter and manipulate it to animate the text. - Click the ‘Generate GIF’ button to generate the GIF file with the text overlay.
- Click the ‘Download’ button to download the GIF file to your computer. The file should be in the default download folder.
The Editor
When you upload a file the editor interface will load with a preview of the gif and the editing tools for you to add text.
A screenshot of the editor is shown below with the main editor panels labelled.
The components of the editor will depend on whether you are editing animated text or not,
for example, media control buttons (2) are only shown when adding animated text.
The parts of the editor are as follows:
| 1. | GIF Preview |
The preview shows the gif with an editable layer of the text objects(s) above it. If you are editing in animated mode the first frame of the gif will be loaded width default text loaded. |
| 2. | Media Controls |
The media control buttons are only loaded in animated mode. They are used to skip through the frames of the GIF or to play the gif to preview your animated text. |
| 3. | Text Controls | Controls to add, remove, apply styling text and the button to generate the output gif. |
| 4. | Output GIF Panel | Displays the generated output gif and download button. |
| 5. | Timeline |
Only displayed in animated mode the timeline shows the frames in the animated gif. The current or active frame is highlighted with a red border. Clicking a frame makes that frame active and shows it in the preview. The media control buttons also change the active frame. You can use the timeline to set a frame delay or whether it is rendered in the output gif. |
Editing GIF Text
All text in the editor is contained in a textbox. When a text is selected the textbox
is shown as a bounding box surrounding it.
The textbox shows which text in the editor is active and editable.
If for example, you make a change to the font size or fill color field, only the text in
the active textbox will be affected.
To deselect a text click outside the textbox or click on another text object. The textbox around the deselected text
will disappear and it will no longer be editable.

The textbox is not only used to indicate which text is selected.
Along the corners and edges are small squares called control handles.
These control handles can be used to transform the orientation, size and position of the textbox.
You can stretch the textbox vertically or horizontally, or rotate it by dragging the appropriate control handle.
When you open a GIF in the editor, a panel with the controls for the text properties is also loaded.
You can add more text objects to the editor by clicking the ‘Add New’ button. The added text is automatically selected
and is loaded with default font properties and text. You can edit the text by clicking in the textbox.
The ‘Delete’ button deletes the active textbox in the editor.
Text Properties
The properties below define how the text is rendered in your animated gif.
Font Color
Determines the fill color and opacity of the text using a dropdown color picker.
Font Family
Selects the font family of the text. You can choose regular fonts such as arial, verdana, times new roman or
from a selection of over 900 unique and creative web fonts to overlay on your animated gif.
Font Size
Set the size of the text by entering a value in the text field or by selecting from the dropdown menu.
Text Align
Aligns the text in the textbox. value can be left, center or right justified.
Text Style
Add bold, italic, underline, strike-through or overline text styling and decoration to the gif text.
Stroke Color
Determines the color of outline applied the text.
Stroke Width
Sets the thickness or width in pixels of the outline around the text.
Drop Shadow Color
Uses a dropdown color picker to set the color of the text shadow if set.
Shadow Vertical Offset
Determines vertical the offset in pixels of the shadow text from the foreground text.
The higher the value the lower the shadow text will be relative to the foreground text.
Shadow Horizontal Offset
Determines the horizontal offset in pixels of the shadow text from the foreground text.
The higher the value the more left the shadow text will be relative to the foreground text.
Shadow Blur
Sets the blur of the shadow text. The higher the blur the more spread and blurry the shadow will be.
![]() Please wait…
Please wait…
File «[FILENAME]» uploaded successfully, you can add text to GIF now.
Dimensions
[WIDTH]x[HEIGHT]
This is an online GIF tool that allows you to add text to animated GIFs in a couple of seconds. Just upload an animation, enter your text, choose font styles, then press the «ADD TEXT» button to perform the conversion.
Supported file types: GIF, JPG or PNG.
TIPS:
- Double-click on the text layer you created to edit it.
- You can move the text layers by drag and drop
If you think you’ve found a bug, please tell us about it here.
![]()
Download Article
![]()
Download Article
When you create a GIF from scratch using either Photoshop or an online tool, you have the opportunity to add a layer of text to your image. You can always use either Photoshop, GIMP, or an online tool to go back and edit your finished GIFs if you want, and this wikiHow will show you how to do that. Since Photoshop and GIMP work similarly, they are included in one method. While the methods in these articles were written focused on using a computer, you can also use a phone or tablet to add text to a GIF.
-

1
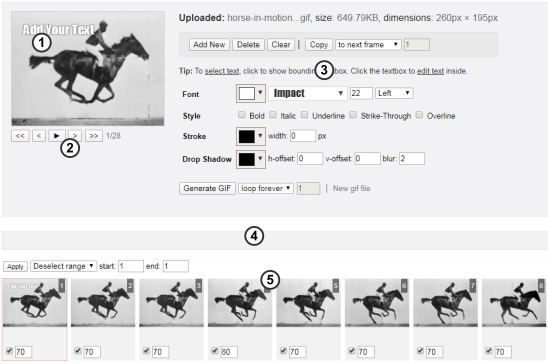
Go to https://ezgif.com/add-text in a web browser. This method works for both mobile devices as well as computers. However, you may lose GIF quality from using this method.
- This method is recommended for animated GIFs since it breaks the GIF into each frame.
- Using EzGif.com is the easiest solution as well as the most prominent in a Google Search.
-
2
Click Choose File. You’ll see this in the middle of the browser window. Supported file types are GIF, WebP, APNG, FLIF, and MNG up to 35MB.
- You can also paste the image URL. Skip the next step if you paste the URL.
Advertisement
-
3
Navigate to and double-click on your file.
-
4
Click Upload!. You’ll see an overview of the original GIF, as well as individual frames if it’s an animated GIF.
-
5
Type the text you want on the GIF. If your GIF is animated, you’ll see each frame of the GIF extracted from the overall image, so you can create text that appears in two frames instead of appearing in the whole GIF.
- You can change the font size, which frames that text appears in, the font style, alignment, border, and color within each text box.
-
6
Click Set. After each frame, you’ll see a blue «Set» button that will put the text on the GIF. Make sure you do this for each frame you enter text on, so it’ll show up in the final project.
-
7
Click Create GIF!. You’ll see this at the bottom of your project. This might take a few minutes, depending on the size of your GIF.
-
8
Click the save icon. This looks like the image of a floppy disk and says Save. You’ll find this under the preview of your created GIF.
- Give the edited GIF a name and click Save again.


Advertisement
-
1
Open your GIF in Photoshop or GIMP. If you don’t have Photoshop, you can get a free 7-day trial from https://www.adobe.com/products/photoshop/free-trial-download.html. If you don’t have GIMP, you can download it for free from https://www.gimp.org/downloads/.
- This method is recommended since it keeps the quality of the GIF. Online tools may minimize the quality of your images since they compress the files as they use them.
- You can open your GIF file by clicking Open from the File tab or by right-clicking the file in your file browser and selecting Open With….
- Make sure the timeline is visible. If not, you can show it by going to the Window tab and selecting Timeline.
-
2
Select all the layers/frames you want the text to appear on. You can do this by clicking to select one layer in the layer panel and pressing Ctrl+A (Windows) or Cmd+A (Mac). You can manually add to the selection instead by pressing Ctrl (Windows) or Cmd (Mac) as you click layers.
-
3
Click the text tool. This icon looks like a «T» that you can find in the tools menu.
-
4
Click anywhere on the canvas to activate typing. Placement isn’t a huge deal at the moment since you have the opportunity to move your text later.
-
5
Add your text to the GIF. You can also change the font style, size, and color using the Character panel.
- You can move your text with the Move tool, which is usually the first icon in the Tool menu.
-
6
Repeat selecting layers and adding text as needed (optional). If you want to display animated text, you can do that by adding different text to each frame displayed on the timeline.
-
7
Save your edited file. Click the File tab and select Save as and save the file as a GIF.


Advertisement
-
1
Open your GIF in Photoshop or GIMP. If you don’t have Photoshop, you can get a free 7-day trial from https://www.adobe.com/products/photoshop/free-trial-download.html. If you don’t have GIMP, you can download it for free from https://www.gimp.org/downloads/. You can also find Photoshop on the App Store or Google Play Store, but there is no app version of GIMP.
- This method is recommended since it keeps the quality of the GIF. Online tools may minimize the quality of your images.
- You can open your GIF file by clicking Open from the File tab.
-
2
Add a new layer. You can either click New Layer in the Layer tab or press Ctrl+Shift+N (Windows) or Command+Shift+N (Mac).
-
3
Select the text tool. It looks like a capital «T» in the tool menu in both GIMP and Photoshop. You can find the text tool in the tool menu or you can press T on your keyboard.
-
4
Click the canvas anywhere to start typing. Your cursor will blink where your text is.
-
5
Type your text.
-
6
Save the GIF. You can click Save or Save As from the File tab, or you can press Ctrl+S (Windows) or Command+S (Mac).


Advertisement

Ask a Question
200 characters left
Include your email address to get a message when this question is answered.
Submit
Advertisement
Thanks for submitting a tip for review!
About This Article
Article SummaryX
1. Open your GIF in Photoshop or GIMP.
2. Select the layers you want to show your text.
3. Select the text tool.
4. Click anywhere on the canvas to start typing.
5. Type your text.
6. Save as a GIF file.
Did this summary help you?
Thanks to all authors for creating a page that has been read 12,595 times.
Did this article help you?
![]()
Download Article
![]()
Download Article
When you create a GIF from scratch using either Photoshop or an online tool, you have the opportunity to add a layer of text to your image. You can always use either Photoshop, GIMP, or an online tool to go back and edit your finished GIFs if you want, and this wikiHow will show you how to do that. Since Photoshop and GIMP work similarly, they are included in one method. While the methods in these articles were written focused on using a computer, you can also use a phone or tablet to add text to a GIF.
-
1
Go to https://ezgif.com/add-text in a web browser. This method works for both mobile devices as well as computers. However, you may lose GIF quality from using this method.
- This method is recommended for animated GIFs since it breaks the GIF into each frame.
- Using EzGif.com is the easiest solution as well as the most prominent in a Google Search.
-
2
Click Choose File. You’ll see this in the middle of the browser window. Supported file types are GIF, WebP, APNG, FLIF, and MNG up to 35MB.
- You can also paste the image URL. Skip the next step if you paste the URL.
Advertisement
-
3
Navigate to and double-click on your file.
-
4
Click Upload!. You’ll see an overview of the original GIF, as well as individual frames if it’s an animated GIF.
-
5
Type the text you want on the GIF. If your GIF is animated, you’ll see each frame of the GIF extracted from the overall image, so you can create text that appears in two frames instead of appearing in the whole GIF.
- You can change the font size, which frames that text appears in, the font style, alignment, border, and color within each text box.
-
6
Click Set. After each frame, you’ll see a blue «Set» button that will put the text on the GIF. Make sure you do this for each frame you enter text on, so it’ll show up in the final project.
-
7
Click Create GIF!. You’ll see this at the bottom of your project. This might take a few minutes, depending on the size of your GIF.
-
8
Click the save icon. This looks like the image of a floppy disk and says Save. You’ll find this under the preview of your created GIF.
- Give the edited GIF a name and click Save again.
Advertisement
-
1
Open your GIF in Photoshop or GIMP. If you don’t have Photoshop, you can get a free 7-day trial from https://www.adobe.com/products/photoshop/free-trial-download.html. If you don’t have GIMP, you can download it for free from https://www.gimp.org/downloads/.
- This method is recommended since it keeps the quality of the GIF. Online tools may minimize the quality of your images since they compress the files as they use them.
- You can open your GIF file by clicking Open from the File tab or by right-clicking the file in your file browser and selecting Open With….
- Make sure the timeline is visible. If not, you can show it by going to the Window tab and selecting Timeline.
-
2
Select all the layers/frames you want the text to appear on. You can do this by clicking to select one layer in the layer panel and pressing Ctrl+A (Windows) or Cmd+A (Mac). You can manually add to the selection instead by pressing Ctrl (Windows) or Cmd (Mac) as you click layers.
-
3
Click the text tool. This icon looks like a «T» that you can find in the tools menu.
-
4
Click anywhere on the canvas to activate typing. Placement isn’t a huge deal at the moment since you have the opportunity to move your text later.
-
5
Add your text to the GIF. You can also change the font style, size, and color using the Character panel.
- You can move your text with the Move tool, which is usually the first icon in the Tool menu.
-
6
Repeat selecting layers and adding text as needed (optional). If you want to display animated text, you can do that by adding different text to each frame displayed on the timeline.
-
7
Save your edited file. Click the File tab and select Save as and save the file as a GIF.
Advertisement
-
1
Open your GIF in Photoshop or GIMP. If you don’t have Photoshop, you can get a free 7-day trial from https://www.adobe.com/products/photoshop/free-trial-download.html. If you don’t have GIMP, you can download it for free from https://www.gimp.org/downloads/. You can also find Photoshop on the App Store or Google Play Store, but there is no app version of GIMP.
- This method is recommended since it keeps the quality of the GIF. Online tools may minimize the quality of your images.
- You can open your GIF file by clicking Open from the File tab.
-
2
Add a new layer. You can either click New Layer in the Layer tab or press Ctrl+Shift+N (Windows) or Command+Shift+N (Mac).
-
3
Select the text tool. It looks like a capital «T» in the tool menu in both GIMP and Photoshop. You can find the text tool in the tool menu or you can press T on your keyboard.
-
4
Click the canvas anywhere to start typing. Your cursor will blink where your text is.
-
5
Type your text.
-
6
Save the GIF. You can click Save or Save As from the File tab, or you can press Ctrl+S (Windows) or Command+S (Mac).
Advertisement
Ask a Question
200 characters left
Include your email address to get a message when this question is answered.
Submit
Advertisement
Thanks for submitting a tip for review!
About This Article
Article SummaryX
1. Open your GIF in Photoshop or GIMP.
2. Select the layers you want to show your text.
3. Select the text tool.
4. Click anywhere on the canvas to start typing.
5. Type your text.
6. Save as a GIF file.
Did this summary help you?
Thanks to all authors for creating a page that has been read 12,595 times.