Время на прочтение
9 мин
Количество просмотров 50K
Перевод статьи подготовлен специально для студентов курса «Разработчик Java».

В экосистеме Java есть много фреймворков и библиотек. Хотя и не так много, как в JavaScript, но они и не устаревают так быстро. Тем не менее, это заставило меня задуматься о том, что мы уже забыли, как писать приложения без фреймворков.
Вы можете сказать, что Spring — это стандарт и зачем изобретать велосипед? А Spark — это хороший удобный REST-фреймворк. Или Light-rest-4jis. И я скажу, что вы, конечно, правы.
Но вместе с фреймворком, помимо готовой функциональности, вы получаете много магии, сложности с изучением, дополнительные функции, которые вы, скорее всего, не будете использовать, а также баги. И чем больше стороннего кода в вашем сервисе, тем больше вероятность того, что у вас будут ошибки.
Сообщество open source очень активное, и есть большая вероятность, что ошибки в фреймворке будут быстро исправлены. Но все же, я хотел бы призвать вас подумать, действительно ли вам нужен фреймворк. Если у вас небольшой сервис или консольное приложение, возможно, вы сможете обойтись без него.
Что вы можете получить (или потерять), используя чистый Java-код? Подумайте об этом:
- ваш код может быть намного чище и понятнее (а может и в полном беспорядке, если вы плохой программист)
- у вас будет больше контроля над вашим кодом, вы не будете ограничены рамками фреймворка (хотя вам придется писать больше своего кода для функциональности, которую фреймворк предоставляет из коробки)
- ваше приложение будет развертываться и запускаться гораздо быстрее, потому что фреймворку не нужно инициализировать десятки классов (или не будет запускаться вообще, если вы перепутаете что-то, например, в многопоточности)
- если вы развертываете приложение в Docker, то ваши образы будут намного меньше, потому что ваши jar также будут меньше
Я провел небольшой эксперимент и попытался разработать REST API без фреймворка. Возможно, это будет интересно с точки зрения обучения и освежения знаний.
Когда я начал писать этот код, то часто сталкивался с ситуациями, когда отсутствовал функционал, который есть в Spring из коробки. В эти моменты, вместо того, чтобы взять Spring, надо было переосмыслить и разработать все самостоятельно.
Я понял, что для решения реальных бизнес-задач я, все же, предпочел бы использовать Spring, а не изобретать велосипед. Тем не менее, я считаю, что это упражнение было довольно интересным опытом.
Начинаем
Я буду описывать каждый шаг, но не всегда буду приводить полный исходный код. Полный код вы можете посмотреть в отдельных ветках git-репозитория.
Сначала создайте новый Maven-проект со следующим pom.xml.
<?xml version="1.0" encoding="UTF-8"?>
<project xmlns="http://maven.apache.org/POM/4.0.0"
        xmlns:xsi="http://www.w3.org/2001/XMLSchema-instance"
        xsi:schemaLocation="http://maven.apache.org/POM/4.0.0 http://maven.apache.org/xsd/maven-4.0.0.xsd">
   <modelVersion>4.0.0</modelVersion>

   <groupId>com.consulner.httpserver</groupId>
   <artifactId>pure-java-rest-api</artifactId>
   <version>1.0-SNAPSHOT</version>

   <properties>
       <java.version>11</java.version>
       <maven.compiler.source>${java.version}</maven.compiler.source>
       <maven.compiler.target>${java.version}</maven.compiler.target>
   </properties>

   <dependencies></dependencies>
</project>
Добавьте в зависимости java.xml.bind, потому что он был удален в JDK 11 (JEP-320).
<dependency>
   <groupId>org.glassfish.jaxb</groupId>
   <artifactId>jaxb-runtime</artifactId>
   <version>2.4.0-b180608.0325</version>
</dependency>
и Jackson для JSON-сериализации
<dependency>
   <groupId>com.fasterxml.jackson.core</groupId>
   <artifactId>jackson-databind</artifactId>
   <version>2.9.7</version>
</dependency>
Для упрощения POJO-классов будем использовать Lombok:
<dependency>
   <groupId>org.projectlombok</groupId>
   <artifactId>lombok</artifactId>
   <version>1.18.0</version>
   <scope>provided</scope>
</dependency>
и vavr для средств функционального программирования
<dependency>
   <groupId>io.vavr</groupId>
   <artifactId>vavr</artifactId>
   <version>0.9.2</version>
</dependency>
Также создадим основной пустой класс Application.
Исходный код в ветке step-1.
Первый эндпоинт
В основе нашего веб-приложения будет класс com.sun.net.httpserver.HttpServer. И простейший эндпоинт (endpoint) /api/hello может выглядеть следующим образом:
package com.consulner.api;

import java.io.IOException;
import java.io.OutputStream;
import java.net.InetSocketAddress;

import com.sun.net.httpserver.HttpServer;

class Application {

   public static void main(String[] args) throws IOException {
       int serverPort = 8000;
       HttpServer server = HttpServer.create(new InetSocketAddress(serverPort), 0);
       server.createContext("/api/hello", (exchange -> {
           String respText = "Hello!";
           exchange.sendResponseHeaders(200, respText.getBytes().length);
           OutputStream output = exchange.getResponseBody();
           output.write(respText.getBytes());
           output.flush();
           exchange.close();
       }));
       server.setExecutor(null); // creates a default executor
       server.start();
   }
}
Веб-сервер запускается на порту 8000 и предоставляет эндпоинт, который просто возвращает Hello!.. Это можно проверить, например, используя curl:
curl localhost:8000/api/hello
Исходный код в ветке step-2.
Поддержка разных HTTP-методов
Наш первый эндпоинт работает отлично, но вы можете заметить, что независимо от того, какой HTTP-метод использовать, он всегда отвечает одинаково.
Например:
curl -X POST localhost:8000/api/hello
curl -X PUT localhost:8000/api/hello
Первое, что нужно сделать, это добавить код для различения методов, например:
server.createContext("/api/hello", (exchange -> {
   if ("GET".equals(exchange.getRequestMethod())) {
       String respText = "Hello!";
       exchange.sendResponseHeaders(200, respText.getBytes().length);
       OutputStream output = exchange.getResponseBody();
       output.write(respText.getBytes());
       output.flush();
   } else {
       exchange.sendResponseHeaders(405, -1);// 405 Method Not Allowed
   }
   exchange.close();
}));
Попробуйте еще раз такой запрос:
curl -v -X POST localhost:8000/api/helloответ будет примерно таким:
> POST /api/hello HTTP/1.1
> Host: localhost:8000
> User-Agent: curl/7.61.0
> Accept: */*
>
< HTTP/1.1 405 Method Not Allowed
Есть также несколько моментов, которые нужно помнить. Например, не забыть сделать flush() для OutputStream и close() для exchange. При использовании Spring мне об этом даже не приходилось думать.
Исходный код в ветке step-3.
Парсинг параметров запроса
Парсинг параметров запроса — это еще одна «функция», которую нам нужно реализовать самостоятельно.
Допустим, мы хотим, чтобы наш hello api получал имя в параметре name, например:
curl localhost:8000/api/hello?name=Marcin

Hello Marcin!
Мы могли бы распарсить параметры следующим образом:
public static Map<String, List<String>> splitQuery(String query) {
   if (query == null || "".equals(query)) {
       return Collections.emptyMap();
   }

   return Pattern.compile("&").splitAsStream(query)
           .map(s -> Arrays.copyOf(s.split("="), 2))
           .collect(groupingBy(s -> decode(s[0]), mapping(s -> decode(s[1]), toList())));
}
и использовать, как показано ниже:
Map<String, List<String>> params = splitQuery(exchange.getRequestURI().getRawQuery());
String noNameText = "Anonymous";
String name = params.getOrDefault("name", List.of(noNameText)).stream().findFirst().orElse(noNameText);
String respText = String.format("Hello %s!", name);
Полный пример в ветке step-4.
Аналогично, если мы хотим использовать параметры в path. Например:
curl localhost:8000/api/items/1Чтобы получить элемент по id=1, нам нужно распарсить url самостоятельно. Это становится громоздким.
Безопасность
Часто нам нужно защитить доступ к некоторым эндпоинтам. Например, это можно сделать, используя базовую аутентификацию (basic authentication).
Для каждого HttpContext мы можем установить аутентификатор, как показано ниже:
HttpContext context = server.createContext("/api/hello", (exchange -> {
   // здесь ничего не изменяем
}));
context.setAuthenticator(new BasicAuthenticator("myrealm") {
   @Override
   public boolean checkCredentials(String user, String pwd) {
       return user.equals("admin") && pwd.equals("admin");
   }
});
Значение “myrealm” в конструкторе BasicAuthenticator — это имя realm. Realm — это виртуальное имя, которое может быть использовано для разделения областей аутентификации.
Подробнее об этом можно прочитать в RFC 1945.
Теперь вы можете вызвать этот защищенный эндпоинт, добавив заголовок Authorization:
curl -v localhost:8000/api/hello?name=Marcin -H 'Authorization: Basic YWRtaW46YWRtaW4='
Текст после «Basic» — это кодированный в Base64 текст admin:admin, который представляет собой учетные данные, жестко закодированные в нашем примере.
Для аутентификации в реальном приложении вы, вероятно, получите учетные данные из заголовка и сравните их с именем пользователя и паролем, хранящимися в базе данных.
Если вы не укажете заголовок, то API ответит статусом
HTTP/1.1 401 UnauthorizedПолный пример в ветке step-5.
JSON, обработка исключений и прочее
Теперь пришло время для более сложного примера.
Из моего опыта в разработке программного обеспечения наиболее распространенным API, который я разрабатывал, был обмен JSON.
Мы собираемся разработать API для регистрации новых пользователей. Для их хранения будем использовать базу данных в памяти.
У нас будет простой доменный объект User:
@Value
@Builder
public class User {
   String id;
   String login;
   String password;
}
Я использую Lombok, чтобы избавится от бойлерплейта (конструкторы, геттеры).
В REST API я хочу передать только логин и пароль, поэтому я создал отдельный объект:
@Value
@Builder
public class NewUser {
   String login;
   String password;
}
Объекты User создаются в сервисе, который будем использовать в обработчике API. Сервисный метод просто сохраняет пользователя.
public String create(NewUser user) {
   return userRepository.create(user);
}
В реальном приложении можно сделать больше. Например, отправлять события после успешной регистрации пользователя.
Реализация репозитория выглядит следующим образом:
import java.util.Map;
import java.util.UUID;
import java.util.concurrent.ConcurrentHashMap;

import com.consulner.domain.user.NewUser;
import com.consulner.domain.user.User;
import com.consulner.domain.user.UserRepository;

public class InMemoryUserRepository implements UserRepository {

   private static final Map USERS_STORE = new ConcurrentHashMap();

   @Override
   public String create(NewUser newUser) {
       String id = UUID.randomUUID().toString();
       User user = User.builder()
           .id(id)
           .login(newUser.getLogin())
           .password(newUser.getPassword())
           .build();
       USERS_STORE.put(newUser.getLogin(), user);

       return id;
   }
}
Наконец, склеим все вместе в handle():
protected void handle(HttpExchange exchange) throws IOException {
    if (!exchange.getRequestMethod().equals("POST")) {
        throw new UnsupportedOperationException();
    }

    RegistrationRequest registerRequest = readRequest(exchange.getRequestBody(), RegistrationRequest.class);

    NewUser user = NewUser.builder()
        .login(registerRequest.getLogin())
        .password(PasswordEncoder.encode(registerRequest.getPassword()))
        .build();

    String userId = userService.create(user);

    exchange.getResponseHeaders().set(Constants.CONTENT_TYPE, Constants.APPLICATION_JSON);
    exchange.sendResponseHeaders(StatusCode.CREATED.getCode(), 0);

    byte[] response = writeResponse(new RegistrationResponse(userId));

    OutputStream responseBody = exchange.getResponseBody();
    responseBody.write(response);
    responseBody.close();
}
Здесь JSON-запрос преобразуется в объект RegistrationRequest:
@Value
class RegistrationRequest {
   String login;
   String password;
}
который позже я сопоставляю с объектом NewUser, чтобы сохранить его в базе данных и отправить ответ в виде JSON.
Также мне нужно преобразовать объект RegistrationResponse обратно в JSON-строку. Для этого используем Jackson
(com.fasterxml.jackson.databind.ObjectMapper).
Вот как я создаю новый обработчик (handler) в main():
public static void main(String[] args) throws IOException {
   int serverPort = 8000;
   HttpServer server = HttpServer.create(new InetSocketAddress(serverPort), 0);

   RegistrationHandler registrationHandler = new RegistrationHandler(getUserService(), getObjectMapper(),
           getErrorHandler());
   server.createContext("/api/users/register", registrationHandler::handle);

   // here follows the rest..
}
Рабочий пример можно найти в ветке step-6. Там я также добавил глобальный обработчик исключений для отправки стандартных JSON-сообщений об ошибках. Например, если HTTP-метод не поддерживается или запрос к API сформирован неправильно.
Вы можете запустить приложение и попробовать один из следующих запросов:
- пример правильного запроса
curl -X POST localhost:8000/api/users/register -d '{"login": "test" , "password" : "test"}'ответ:
{"id":"395eab24-1fdd-41ae-b47e-302591e6127e"}- пример ошибки
curl -v -X POST localhost:8000/api/users/register -d '{"wrong": "request"}'ответ:
< HTTP/1.1 400 Bad Request
< Date: Sat, 29 Dec 2018 00:11:21 GMT
< Transfer-encoding: chunked
< Content-type: application/json
<
* Connection #0 to host localhost left intact
{"code":400,"message":"Unrecognized field "wrong" (class com.consulner.app.api.user.RegistrationRequest), not marked as ignorable (2 known properties: "login", "password"])n at [Source: (sun.net.httpserver.FixedLengthInputStream); line: 1, column: 21] (through reference chain: com.consulner.app.api.user.RegistrationRequest["wrong"])"}
Кроме того, я случайно столкнулся с проектом java-express, который является Java-аналогом фреймворка Express для Node.js. В нем также используется jdk.httpserver, поэтому все концепции, описанные в этой статье, вы можете изучить на реальном фреймворке, который, к тому же, достаточно мал для изучения его кода.
Вступление
REST расшифровывается как REpresentational State Transfer ,
стандартизованный подход к созданию веб-сервисов.
REST API — это промежуточный интерфейс программирования
приложений, который позволяет двум приложениям взаимодействовать друг с
другом через HTTP, подобно тому, как серверы обмениваются данными с
браузерами.
RESTful — наиболее распространенный подход к созданию веб-сервисов из-за
того, что его легко изучать и создавать.
Допустим, вы заказываете что-то в ресторане быстрого питания, и кассир
запрашивает у вас информацию, необходимую для обработки вашего заказа.
После обработки они передают вам заказ, который вы запрашивали. Эта
транзакция — реальный пример того, как работает REST API.
В этом руководстве мы рассмотрим, как создать REST API на Java с
помощью Spring Boot . Он будет принимать POST и GET для просмотра и
добавления записей от объекта — User .
Требования
- IDE или текстовый редактор
- JDK
1.8 + - Maven 3+ или
Gradle 4+ (в этой статье мы будем
полагаться на Maven)
Инициализация проекта загрузки Spring
Использование Spring Initializr
Один простой способ инициализировать новый проект Spring Boot —
использовать Spring Initializr , который
автоматически генерирует для вас скелет проекта Spring Boot:
 {.ezlazyload}
Мы также добавим сюда несколько зависимостей, так как мы захотим
использовать их в нашем проекте:
- Spring Web — для включения Spring MVC и встроенного Tomcat в ваш
проект. - Spring Data JPA — Java Persistence API и Hibernate
- Spring Boot DevTools — очень полезные инструменты разработки
- Драйвер MySQL — драйвер JDBC (может быть любая БД, которую вы
хотите использовать)
После этого нажмите генерировать. Затем будет загружен zip-файл,
содержащий созданный проект.
Использование Spring CLI
Если у вас установлен Spring
CLI
, вы можете выбрать использование консоли для создания базового проекта
с помощью этой команды:
spring init --build=maven -p=jar UserDemo
Примечание. Spring CLI напрямую вызывает Spring Initializr для
выполнения этой операции. Оба варианта создают один и тот же проект.
После создания базового проекта загрузите и импортируйте его в IDE или
текстовый редактор по выбору. Если вы хотите собрать, скомпилировать и
запустить свое приложение через IDE, убедитесь, что вы импортировали его
как проект Maven или Gradle .
После импорта сгенерированный базовый pom.xml в вашем проекте будет
выглядеть так:
 <!-- Project information-->
 <dependencies>
 <dependency>
 <groupId>org.springframework.boot</groupId>
 <artifactId>spring-boot-starter-data-jpa</artifactId>
 </dependency>
 <dependency>
 <groupId>org.springframework.boot</groupId>
 <artifactId>spring-boot-starter-web</artifactId>
 </dependency>
 <dependency>
 <groupId>org.springframework.boot</groupId>
 <artifactId>spring-boot-devtools</artifactId>
 <scope>runtime</scope>
 <optional>true</optional>
 </dependency>
 <dependency>
 <groupId>mysql</groupId>
 <artifactId>mysql-connector-java</artifactId>
 </dependency>
 <dependency>
 <groupId>org.springframework.boot</groupId>
 <artifactId>spring-boot-starter-test</artifactId>
 <scope>test</scope>
 <exclusions>
 <exclusion>
 <groupId>org.junit.vintage</groupId>
 <artifactId>junit-vintage-engine</artifactId>
 </exclusion>
 </exclusions>
 </dependency>
 </dependencies>
 <!-- Build information -->
Все сделанные вами настройки будут отражены в этом файле. Кроме того,
автоматически настраиваются зависимости по умолчанию, базовый снимок
0.0.1-SNAPSHOT и плагин сборки Maven.
Для справки: если вы хотите создать проект Gradle , ваш
build.gradle будет выглядеть так:
 plugins {
 id 'org.springframework.boot' version '2.3.5.RELEASE'
 id 'io.spring.dependency-management' version '1.0.10.RELEASE'
 id 'java'
 }

 group = 'com.howto'
 version = '0.0.1-SNAPSHOT'
 sourceCompatibility = '11'

 repositories {
 mavenCentral()
 }

 dependencies {
 implementation 'org.springframework.boot:spring-boot-starter-data-jpa'
 implementation 'org.springframework.boot:spring-boot-starter-web'
 developmentOnly 'org.springframework.boot:spring-boot-devtools'
 runtimeOnly 'com.mysql:mysql-connector-java'
 testImplementation('org.springframework.boot:spring-boot-starter-test') {
 exclude group: 'org.junit.vintage', module: 'junit-vintage-engine'
 }
 }

 test {
 useJUnitPlatform()
 }
Подключение Spring Boot к базе данных
Далее, прежде чем мы начнем работать над приложением, нам нужно
настроить базу данных. Это легко сделать с помощью Spring Data JPA,
который позволяет нам установить это соединение всего с парой
параметров.
Он абстрагируется от всего, что нужно сделать разработчику, и позволяет
нам переключать базовые базы данных, если мы хотим, просто изменяя пару
свойств.
Чтобы сообщить Spring, как подключиться к предпочитаемой вами базе
данных, в application.properties вам необходимо добавить некоторую
элементарную информацию:
 spring.datasource.url = jdbc:mysql://localhost:3306/user
 spring.datasource.username = user
 spring.datasource.password = user
 spring.jpa.hibernate.ddl-auto = update
 spring.jpa.properties.hibernate.dialect = org.hibernate.dialect.MySQL5Dialect
Здесь мы установили datasource.url на наш URL-адрес подключения JDBC.
Это зависит от вашей базы данных. Мы предоставили username и
password необходимые для аутентификации в этой базе данных, а также
установили для ddl-auto значение update . Свойство
jpa.hibernate.ddl-auto напрямую влияет на hibernate.hbm2ddl.auto и
по существу определяет, как Hibernate должен обрабатывать управление
инструментами схемы.
Для производственных приложений это значение обычно установлено равным «
none , так как специальный персонал управляет поведением. В разработке
чаще всего используется update , позволяющее обновлять схему каждый
раз при перезапуске приложения, что обеспечивает гибкость при работе над
разработкой.
Наконец, мы установили свойство hibernate.dialect Hibernate имеет
разные диалекты для разных баз данных. Он может автоматически
устанавливать диалект в зависимости от вашей конфигурации, хотя для
дополнительной безопасности всегда рекомендуется указывать его явно.
Модель домена — Создание модели пользователя
Теперь, когда соединение с базой данных установлено и работает, мы можем
перейти к модели предметной области . Это набор классов или, скорее,
моделей , которые мы будем использовать в нашем приложении. В
Hibernate они также называются Entities , а также аннотируются
аннотацией @Entity
Каждый @Entity Hibernate, для него создается таблица, отображаются
поля, и он становится управляемым объектом для базы данных, которую вы
настроили.
Во-первых, давайте создадим простую сущность User Мы добавим к классу
@Entity и необязательную @Table чтобы указать имя нашей таблицы.
Если не установлен, он просто будет использовать то же имя, что и класс:
 @Entity
 @Table(name = "user")
 public class User {
 @Id
 @GeneratedValue(strategy = GenerationType.AUTO)
 private long id;
 private String name;

 // Constructor, getters and setters
 }
Чтобы аннотировать поле как id объекта, вы используете @Id , и она
будет установлена как автоматически увеличивающийся первичный ключ
таблицы. Кроме того, вы можете дополнительно установить, что это
@GeneratedValue и установить для GenerationType значение AUTO .
Это настройка по умолчанию, если вы опустите аннотацию @GeneratedValue
Вы также можете установить другие значения: IDENTITY , SEQUENCE и
TABLE . Они требуют отдельной статьи о Hibernate.
Кроме того, вы можете установить @Column для каждого из полей, указав
имя для каждого из них, если вы хотите настраиваемые имена —
@Column(name = "user_id") , сохранит поле id user_id а не просто
id .
Если вы хотите автоматизировать генерацию конструкторов, геттеров и
сеттеров и просто полностью отказаться от шаблонного кода, вы можете
использовать изящные инструменты, такие как
Lombok .
Этот класс (объект) теперь зарегистрирован в Hibernate. Если мы запустим
приложение, учитывая нашу ddl-auto , таблица отобразится в вашей
соответствующей базе данных с правильной таблицей и сопоставлениями для
типов данных.
Уровень сохраняемости — создание классов репозитория
Далее поработаем над слоем постоянства. Нам понадобится UserRepository
для выполнения операций CRUD с нашими объектами User Для этого мы
укажем интерфейс, расширяющий CrudRepository , и аннотируем его с
помощью @Repository .
@Repository — это вариант @Component , которая сообщает Spring, что
это компонент, которым должен управлять контейнер IoC. В частности,
репозитории предназначены для определения логики уровня сохраняемости.
CrudRepository CrudRepository принимает класс сущности, а также id
он должен использовать для запроса:
 @Repository
 public interface UserRepository extends CrudRepository<User, Long> {}
CrudRepository объявляет такие методы, как findAll() , findOne() и
save() которые составляют базовую функциональность CRUD репозитория.
Вы можете использовать этот UserRepository как есть, чтобы выполнять
операции CRUD с User , без дополнительной настройки.
Вы можете переопределить это поведение, если хотите, но оно будет
настроено автоматически, чтобы помочь вам выполнить загрузку некоторых
основных функций.
Бизнес-уровень — Создание контроллера
Наконец, мы дошли до бизнес-уровня, где мы реализуем фактическую
бизнес-логику обработки информации и используем компоненты уровня
сохраняемости вместе с моделью домена для хранения данных.
Давайте создадим контроллер, @RestController его как @RestController,
поскольку мы создаем REST API, и добавим к нему @RequestMapping
@RestController — это просто комбинация @Controller и
@ResponseBody , что означает, что вместо рендеринга страниц он просто
ответит данными, которые мы ему предоставили. Это естественно для REST
API — возврат информации после попадания в конечную точку API.
Если вы хотите узнать больше о @RequestMapping и его производных
вариантах , у нас
есть отличная статья, посвященная именно этой теме!
Давайте продолжим и UserController :
 @RestController
 @RequestMapping("/api/user")
 public class UserController {

 @Autowired
 private UserRepository userRepository;

 @GetMapping
 public List<User> findAllUsers() {
 // Implement
 }

 @GetMapping("/{id}")
 public ResponseEntity<User> findUserById(@PathVariable(value = "id") long id) {
 // Implement
 }

 @PostMapping
 public User saveUser(@Validated @RequestBody User user) {
 // Implement
 }
 }
Мы @Autowired наш UserRepository . Он используется для внедрения
зависимостей, поскольку класс репозитория здесь является зависимостью.
Если вы хотите узнать больше об аннотациях Core Spring
Framework ,
ознакомьтесь с нашим руководством!
Мы также использовали @GetMapping и @PostMapping чтобы указать,
какие типы HTTP-запросов принимают и обрабатывают наши методы. Это
производные варианты аннотации @RequestMapping
method = RequestMethod.METHOD для соответствующих типов.
Начнем с реализации конечной точки findAll()
 @GetMapping
 public List<User> findAllUsers() {
 return userRepository.findAll();
 }
Этот метод просто вызывает userRepository для findAll()
пользователей и возвращает список в качестве ответа.
Затем давайте реализуем конечную точку, чтобы получить каждого
пользователя по их id :
 @GetMapping("/{id}")
 public ResponseEntity<User> findUserById(@PathVariable(value = "id") long id) {
 Optional<User> user = userRepository.findById(id);

 if(user.isPresent()) {
 return ResponseEntity.ok().body(user.get());
 } else {
 return ResponseEntity.notFound().build();
 }
 }
Объект с данным id может отсутствовать в базе данных, поэтому мы
помещаем возвращенного User в Optional . Если вы хотите узнать
больше о Optional в Java 8 , у нас есть
подробное руководство!
Затем, если используется user.isPresent() , мы возвращаем HTTP-ответ
200 OK user экземпляр в качестве тела ответа. В противном случае мы
возвращаем ResponseEntity.notFound() .
Наконец, давайте создадим конечную точку для спасения пользователей:
 @PostMapping
 public User saveUser(@Validated @RequestBody User user) {
 return userRepository.save(user);
 }
Метод save() из пользовательского репозитория сохраняет нового
пользователя, если он еще не существует. Если пользователь с данным id
уже существует, генерируется исключение. В случае успеха он возвращает
постоянного пользователя.
@Validated является валидатором для данных, которые мы предоставляем о
пользователе, и обеспечивает базовую достоверность. Если информация о
пользователе недействительна, данные не сохраняются. Кроме того,
@RequestBody сопоставляет тело POST отправленного в конечную точку,
с User мы хотели бы сохранить.
Если вы хотите узнать больше о получении тела HTTP в Spring
Boot , мы вам поможем!
Теперь пора запустить приложение и проверить, работает ли оно.
Компиляция, сборка и запуск
Порт по умолчанию, на котором работает Spring Boot, — 8080 . Если вы
хотите изменить порт по какой-либо причине, вы можете настроить его в
своем файле application.properties
server.port = 9090
Если у вас есть IDE, такая как IntelliJ, которая имеет обширную
поддержку для запуска проектов Spring Boot, вы можете продолжить и
запустить ее таким образом.
Если нет, мы будем использовать командную строку для запуска нашего
проекта. Мы можем запустить приложение напрямую, выполнив
./mvnw spring-boot:run (или ./gradlew bootRun если вы используете
Gradle ) в командной строке из папки вашего базового проекта, где
находится pom.xml
Другой вариант — упаковать ваше приложение в jar и запустить его таким
образом.
Для этого нам просто нужно выполнить ./mvnw clean package ./mvnw (
.gradlew build в Gradle) и запустить файл jar, выполнив эту команду:
$ java -jar target/DemoUser-0.0.1-SNAPSHOT.jar
Если вы используете Gradle, путь к файлу jar будет другим:
$ java -jar build/libs/DemoUser-0.0.1-SNAPSHOT.jar
Вы узнаете, когда ваше приложение успешно запустилось, если увидите эти
журналы аудита в конце командной строки:
 2020-11-05 13:27:05.073 INFO 21796 --- [ restartedMain] osbdaOptionalLiveReloadServer : LiveReload server is running on port 35729
 2020-11-05 13:27:05.108 INFO 21796 --- [ restartedMain] osbwembedded.tomcat.TomcatWebServer : Tomcat started on port(s): 8080 (http) with context path ''
 2020-11-05 13:27:05.121 INFO 21796 --- [ restartedMain] com.howto.DemoUser.DemoUserApplication : Started DemoUserApplication in 1.765 seconds (JVM running for 2.236)
Тестирование API
Теперь, когда ваше приложение запущено и работает на
http://localhost:8080/ , мы можем протестировать конечные точки, чтобы
убедиться, что они работают.
Для GET мы можем использовать браузеры, curl или Postman — все, что
вам удобнее.
Давайте поразим конечную точку http://localhost:8080/api/user с
помощью запроса GET
$ curl http://localhost:8080/api/user
Или в адресной строке браузера перейдите по
http://localhost:8080/api/user , и ваш браузер отобразит ответ JSON:
 [
 {
 "id": 1,
 "name":"John"
 },
 {
 "id": 2,
 "name":"Jane"
 },
 {
 "id": 3,
 "name": "Juan"
 }
 ]
Мы можем изменить этот URL, чтобы включить параметр пути, id чтобы
получить конкретного пользователя. Отправим HTTP-запрос GET на
http://localhost:8080/api/user/3 :
 {
 "id": 3,
 "name": "Juan"
 }
Наконец, давайте отправим запрос HTTP POST и добавим пользователя в нашу
базу данных, предоставив данные, необходимые в нашей модели. Поля в
полезной нагрузке JSON должны совпадать с именами полей в нашей БД /
модели:
 $ curl --location --request POST 'http://localhost:8080/api/user'
 --header 'Content-Type: application/json'
 --data-raw '{ "id": 4, "name": "Jason" }'
API вернет 200 в качестве ответа с этим в качестве тела ответа
постоянного пользователя:
 {
 "id": 4,
 "name": "Jason"
 }
Заключение
Вот и все. Вы успешно создали свой собственный Spring Boot REST API!
В этом руководстве мы создали полностью работающий проект Spring Boot,
который предоставляет конечному пользователю API. Используя этот API,
пользователь может выполнять операции CRUD с объектом User
Мы рассмотрели модель домена , уровень сохраняемости , а также
бизнес-уровень после настройки подключения к базе данных и настройки
проекта.
Table of Contents
- Introduction
- REST API Design
- Design Example
- ClientImageCatalog
- Public-Facing Interface
- Back-end System is Black-Box
- Generic Meta-data
- API Design Tasks
- Determine Resources
- Resource Model
- Object Model
- Composition
- Relationship Direction and Cardinality
- Design Rules
- Nouns not Verbs
- HTTP Request Methods Define Actions
- Resources Must be Stateless
- Represent Resources as Hierarchical Relationships
- Specify a Version
- JSON Data Representation
- CatalogImage and CatalogMetaDatum Schema
- CatalogImage JSON Schema
- CatalogClient JSON Schema
- Modeling The Resource URIs
- Write Interactions Using Sentences
- Transform Sentences into URLs
- Design Example
- Coding The API
- JAX-RS 2.0
- Annotations
- Spring Boot Project Setup
- Coding the Controllers
- JSON Data Objects
- REST Controllers
- Create JerseyConfig File
- Implement getImages and getImage Methods
- Code a Test Data Generator
- Implement the getImages and getImage Methods
- Implement replaceImage and updateImage
- Modify getImage method
- Implement delete Method
- JAX-RS 2.0
- Documenting the API with Swagger
- Modify POM and JerseyConfig
- Swagger UI
- View API In Swagger-UI
- Status Codes & Exceptions
- HTTP Status Codes
- JAX-RS Exceptions
- Create an Example Business Exception
- JAX-RS ExceptionMapper
- Modify RestConfig
- Modifying the API
- Modify getImage
- Modify delete Method
- Test in Postman
- API Versioning
- Modify CatalogImageController & JerseyConfig
- Test in Postman
- Review in Swagger
- Publishing on RapidAPI
- Deploying API to a Server
- Publishing API on RapidAPI
- Summary
In this tutorial, we explore how to design and implement a RESTful API using Java. After finishing, you should better understand the following topics:
- Restful API Design,
- implementing a REST API using Java,
- documenting that REST API using Swagger,
- and publishing your API on RapidAPI.
Understanding this tutorial requires at least a cursory understanding of Java and the following Java technologies:
- JAX-RS 2.0,
- Spring Boot,
- JSON, and the
- Jackson JSON library.
However, the tutorial does not presuppose an in-depth knowledge of these technologies.
View the Best JavaScript APIs List
Introduction
Representational State Transfer (REST) is a web-based architectural style most developers get incorrect when implementing. Rather than creating a truly RESTful application programming interface (API), he or she implements a remote procedural call (RPC) API that proves confusing and difficult to other developers. But different pundits online have differing opinions on what is or is not truly a RESTful API. Here we will not waste time arguing what constitutes a genuinely RESTful API; instead, we design a simple RESTful API and then partially implement that API using Spring Boot and Jersey. After implementing the API, we document the API using a tool called Swagger. Our end goal is an example of a Restful API that is easy to understand and use in client applications. To achieve this goal, we adhere to the principles of RESTful API architecture.
REST API Design
A RESTful architecture is an architectural style that defines how software communicates over the Internet. Client software request resources while servers respond with resources. Resources map to universal resource identifiers (URIs) and actions performed on those resources map to HTTP methods such as POST, GET, PUT, PATCH, and DELETE.
- Google’s API Design Guide is an excellent resource for exploring REST API design (API Design Guide) in more depth.
A RESTFul API provides a robust solution to the following problem.
- You have a set of resources you wish to expose to external client systems using a protocol that most modern systems understand. You want the exposure to be intuitive and inexpensive for those external systems. REST provides a means of accomplishing these business goals through resources and HTTP methods.
REST is remarkably simple at its core; however, there are many principles and best practices to follow when designing and implementing a RESTful API. But rather than discussing these principles and practices, let’s illustrate them by designing and implementing a simple hypothetical Restful API.
- The Richardson Maturity Model defines what constitutes a RESTful API in more detail but not discussed here. If you would like more detail on what is or is not RESTful architecture, refer to the explanation of the Richardson Maturity Model on Martin Fowler’s website (Richardson Maturity Model).
Design Example
Let’s create a hypothetical system to illustrate building a RESTful API.
ClientImageCatalog
Imagine a simple system that stores images belonging to a person (termed a client) and associated generated metadata. Our system analyzes images using various tools that generate metadata describing each image. The system then stores the images and related metadata, along with information on the image’s owner (the client).

Public-Facing Interface
Now suppose we wish to make this system available to external systems allowing these systems to upload and manipulate images and image owners. Moreover, assume we want to make this system available to as many external systems as possible. The problem is that we have no control over these client systems, and the clients could be anything from a cellphone to another enterprise system. Attempting to code to all client systems is impossible. What we need is a simple, widely-accepted, robust API clients can use to manipulate the resources in our system. And of course, that API is a RESTful API.

Back-end System is Black-Box
When developing software, often, a designer must abstract certain aspects of a complete system to make understanding individual portions of the system more tractable. Here we abstract our hypothetical system, as we are not concerned with the Artificial Intelligence behind analyzing images or the storage technology of storing those images. Instead, we are only concerned with how external systems will access our system’s resources. We are only concerned with creating an API client can use to access our system; we treat the more extensive system as a black-box.

Generic Meta-data
Lastly, let’s add one final bit of complexity. Assume we cannot define the metadata generated in advance. We do not know what metadata the system will generate, and we wish the system to be easily expandable to allow new metadata. We keep our API metadata agnostic to accommodate new metadata over time. Of course, there are some obvious properties of an image such as the image format, and the binary data. But for non-obvious properties, we are restricted to a collection of key/value metadata pairs describing the image. The same restriction applies to the person (client) associated with his or her images. As an aside, by making “client” metadata agnostic, a client could be anything that has a collection of images. But for our purposes, consider a client a person.
API Design Tasks
We’ve described our hypothetical system, so let’s start designing the API for accessing it. Designing a robust REST API requires a minimum of the following activities:
- determine the resources;
- create a resource model;
- formalize the resource model as an object model;
- create JSON schemas (if using JSON) of the resources;
- write a list of actions to be performed on the resources;
- translate the object model into URLs;
- map the actions to HTTP methods and query parameters;
* Query parameters are parameters attached to the end of a URL that help define filter results or specify actions. For example, in the following URL, color and details are query parameters.
http://www.nowhere.com/foobars?color=green&details=full
- decide how to represent the transmitted data (i.e., JSON, XML, or some other format);
- and define the schemas describing the resources.
Now, you could argue that translating an object model into URLs and writing resource schemas are development and not design tasks, and you are probably correct. However, here we treat these tasks as design tasks. Regardless of how you classify these two tasks, though, you should perform them. Suspend disbelief and handle the tasks as design tasks.
Determine Resources
Now that we know the tasks to perform, let’s begin with the first task – defining the resources. We have a client and his or her associated images. Each client and image has associated metadata. Therefore, our resources are Client, Image, and MetaDatum. But a resource named Client, Image, or MetaDatum seems a recipe for disaster, as these are common terms and would probably confuse API consumers. Call me crazy, but calling a resource an Image appears to be asking developers using your API to confuse your image with an Image in a typical package such as java.awt.Image. Let’s avoid any potential confusion by pre-pending “Catalog” to our resources. And so, the resources we define become CatalogClient, CatalogImage, and CatalogMetaDatum.
- CatalogClient – a person described by a collection of MetaDatum who has one or more CatalogImages.
- CatalogImage – an image described by a collection of MetaDatum that belongs to one and only one CatalogClient.
- CatalogMetaDatum – a key/value pair that expresses some aspect of a CatalogImage or CatalogClient.
Resource Model
The fundamental concept behind REST is the resource – all design centers around resources. A collection is one or more resources of the same type. A collection can have sub-collections, and a resource can have sub-resources. These relationships between collections and resources and sub-collections and sub-resources determine your resource model.
 A resource model of our system’s resources.
Our resource model is summarized as follows:
- a CatalogClient collection is one or more CatalogClient resources;
- CatalogClient resources consist of a CatalogImage collection and a CatalogMetaDatum collection;
- a CatalogImage collection is one or more CatalogImage resources and a CatalogMetaDatum collection;
- and a CatalogMetaDatum collection is one or more CatalogMetaDatum resources.
This resource model is essential in later determining the hierarchical nature of our RESTful API’s URIs for our resources. The next step is optional, we could jump to the next step, writing a list of actions, but I feel more comfortable developing an object model before defining URIs, JSON resources, and Java classes. And so, let’s translate the looseness of a resource model to a more formal object model.
Object Model
After determining our resources and modeling them using a resource model, we model them using an object model. Here, we use the Unified Modeling Language (UML) as the notation for describing our object model. A CatalogClient has an identifier and one or more CatalogMetaDatum elements. A CatalogImage consists of an identifier, an image format, and binary. To keep the model simple, assume a directory on a web server that stores the binary as a file. A CatalogImage also has one or more MetaDatum that describe the image. We model each resource as a Class by drawing it as a rectangle.
- A class is synonymous with a resource.
Composition
A collection of CatalogMetaDatum objects defines a CatalogClient. These CatalogMetaDatum are dependent on the CatalogClient they express, and so their relationship is modeled using composition (solid diamond). A CatalogImage is also dependent on a CatalogClient and modeled as composition. Think of composition like this, when deleting a CatalogClient; you also remove the CatalogClient’s CatalogImage collection and CatalogMetaDatum collection. Neither object makes sense independent of its parent CatalogClient. The same is true for CatalogImage; when deleting a CatalogImage, you also delete its associated CatalogMetadatum collection.

Relationship Direction and Cardinality
Note that only one side of each line modeling the composition is adorned with an arrow. What this signifies is that only a CatalogClient “knows” its CatalogImage. Moreover, only CatalogClient and CatalogImage “know” about their associated CatalogMetaDatum collection. A number or symbol also decorates each line, indicating the relationship cardinality. A single CatalogClient contains many CatalogImages. Both CatalogImage and CatalogClient contain many CatalogMetaDatums. These relationships become important later when we translate this object model to URIs and HTTP methods.
- CatalogClient consists of one or more CatalogImage resources and one or more CatalogMetaDatum resources. When a CatalogClient is deleted, associated CatalogImage and CatalogMetaDatum are deleted.
- CatalogImage consists of one or more CatalogMetaDatum resources. When a CatalogImage is deleted, associated CatalogMetaDatum is deleted.
Design Rules
Before continuing with our design tasks, let’s pause to consider a few best practices when developing a RESTful API. These practices will help us construct a robust yet straightforward API and help with the next design steps we undertake. The following are standard best practices espoused on many websites discussing Restful API design.
- Use nouns to represent resources, plural for collections, singular for a single resource.
- HTTP request methods define actions performed on resources.
- All resources and communication are stateless.
- Specify a version number for your API.
- Forward-slashes represent a hierarchical relationship.
- Use hyphens rather than underscores in URIs.
- Prefer lower-case letters in REST URIs.
- Never include file extensions to indicate file types in URIs.
- Use query component variables in a URI to filter collections.
Nouns not Verbs
Remember, REST is an architecture for requesting HTTP actions to be performed against resources. Resources are objects; nouns represent objects. A URI is the resource’s identifier, while a URL is a resource’s identity and location. This distinction between resource and action is essential, as when developing a RESTful API, you should avoid an RPC style API. If not sure of the difference, the following two URLs illustrate an RPC API using a verb compared to a RESTful API using a noun.
// using a verb - RPC Style
http://www.nowhere.com/imageclient/getClientsById
// using a noun - RESTful
http://www.nowhere.com/imageClient/{client-id}
This distinction between nouns and verbs will be more apparent when we determine our API’s resource URLs.
- Note that we use the terms URL and URI interchangeably. Although technically different, as a URI, is only an identifier and not a location while a URL is both (hence URI and URL), here we treat both terms as synonymous.
HTTP Request Methods Define Actions
Use HTTP request methods to manipulate resources. Do not define your own. The following table lists the most commonly used HTTP request methods.
| GET | Retrieve a resource representation. |
| POST | Create a new resource. |
| PUT | Fully update an existing resource. |
| PATCH | Modify an existing resource. |
| DELETE | Delete an existing resource. |
| HEAD | Receive resource metadata. |
| OPTIONS | Receive supported HTTP request methods. |
What this means is that the same URL that identifies a resource can perform different actions on that resource. Consider the difference the HTTP request method makes to the same URL.
| GET /images/<image-id> | Get the image with a particular identifier. |
| PATCH /images/<image-id> | Update the image with the particular identifier. |
| PUT /images/<image-id> | Update by overwriting the image with the particular identifier. |
| DELETE /images/<image-id> | Delete the image with a particular identifier. |
If you are accustomed to developing RPC style APIs, then using an HTTP request method to distinguish between the action to take on a resource might seem confusing. However, it will become more intuitive as you become comfortable with RESTful API design.
Corollary Antipattern
Do not do the following, as this is a common antipattern when developing a RESTful API. It might seem easy to succumb to the seductive convenience of turning a RESTful API into an RPC API, but I promise, it only leads to confusion later. An RPC-style “RESTful API” such as the following, is harder for developers of external systems to understand and makes your API is harder to maintain. The creators of the HTTP methods are most likely smarter than you or I, trust their judgment and stick to the HTTP methods.
| GET http://www.nowhere.com/images/createImage?imageId=123 |
| GET http://www.nowhere.com/images/getImage?imageId=123 |
| GET http://www.nowhere.com/images/updateImage?imageId=123 |
| GET http://www.nowhere.com/images/replaceImage?imageId=123 |
| GET http://www.nowhere.com/images/deleteImage?imageId=123 |
Resources Must be Stateless
Resources must be stateless. If familiar with more traditional web development, then this might seem a problematic edict. Yes, it requires not using cookies, URL parameters, and session variables to maintain state. But consider this, these constructs are all schemes to try avoiding the harsh reality of the web, namely, that the Internet is stateless. But REST embraces the statelessness of the Internet and admits that these schemes all try to circumvent this reality of statelessness. So if you are designing a RESTful API, design it as a stateless system. Of course, a client sometimes requires that it maintain state, but if it does, then the client and not the server should maintain state. A server must know nothing of a client’s statefulness. A RESTful API is stateless.
Represent Resources as Hierarchical Relationships
Resources are hierarchical. REST interfaces should reflect this hierarchy. A well-designed hierarchical path makes your API easy to understand. The following object model and its translation to URLs illustrates a RESTful hierarchy.

We can translate these resources, and their relationships, into a hierarchy,
- a government is a collection of agency resources,
- an agency is a collection of department resources,
- and a department is a collection of employee resources.
We can translate the object model just created into the hierarchical URIs in the following table.
| /government |
| /government/agencies |
| /government/agencies/<agency-id> |
| /government/agencies/<agency-id>/departments |
| /government/agencies/<agency-id>/departments/<dept-id> |
| /government/agencies/<agency-id>/departments/<dept-id>/employees |
| /government/agencies/<agency-id>/departments/<dept-id>/employees/<emp-id> |
Specify a Version
Well designed REST APIs should include a version. Imagine the horror clients of your API will have if you were to suddenly change your REST API; all systems consuming your REST API endpoints would break. To avoid this problem, version your application so your APIs can continue to work with your old API and then orderly transition to your new API. The four common methods to version your API are to
- add the version to the URI,
- create a custom request header,
- append a query parameter,
- and change the accept header.
Versioning in URI
One technique for versioning is to add it directly to your API’s URL. For example, the following illustrates using versioning in an API’s URL.
| /v1/government |
| /v1/government/agencies |
| /v1/government/agencies/<agency-id> |
| /v2/government |
| /v2/governement/agencies |
| /v2/governement/agencies/<agency-id> |
When you use the version number in the URL, the client is requesting a different resource. Some claim using a version in the URL is technically violating RESTful architecture, as a URI is supposed to be a resource identifier, and adding a version breaks that contract. However, using a URI with a version is a common and pragmatic means of versioning a RESTful API.
Versioning in Header
Another technique for versioning is to add the version to the Http header of your HTTP request as a custom header, or using an accept header. These are also common techniques; for example, you might add a header that has the following value.
Accept-API-Version: resource=2.0
Versioning can be a contentious topic when discussing RESTful APIs. But the answer is to pragmatically research and choose the technique most useful to your particular circumstance.
- Versioning using custom Accept header (Versioning REST APIs with a custom Accept header in Jersey).
- Versioning using version in URI (Versioning web-services with Java EE).
- List of versioning techniques used by major websites (How are REST APIs versioned?).
For most of this tutorial, we do not version our API; however, we will cover an easy technique you can use to version your API if your API doesn’t change often.
JSON Data Representation
Enough discussion of best practices, let’s return to design tasks by defining our resources using JSON schemas. As the object-model above illustrates, we need to create a CatalogClient, CatalogMetaDatum, and CatalogImage resource. Moreover, we must make these resources available to and understandable by external systems. To facilitate this communication, we will transmit our resources as JSON objects. But how does an external system know the format of these resources? Simple, a JSON schema. Let’s define the JSON schema representation of our three resources.
CatalogImage and CatalogMetaDatum Schema
Admittedly, there is no standard admonishing developers to develop a JSON schema before using JSON objects. But in my opinion, one valuable concept JSON adoption lost when it replaced XML in popularity was explicitness. An XML schema is a powerful concept, and it fully defines a system’s object model in an easy to read and formal, albeit rather wordy, format. The loose nature of JSON adoption by most developers often loses this explicitness. Developers other than the developer defining the JSON resource are often left to “figure out” the resource’s structure through trial and error. But a schema helps avoid this trial and error. And so, although not required, creating JSON schemas provide a human and machine-readable description of resources that makes your REST API more robust. And, as you see in a few sections, machine-readable descriptions allow for machine-generated code.
JSON Schema
JSON schema allows JSON document validation. It provides an explicit description of your API’s JSON data. JSON Schema has never been formally accepted as a standard as XML Schema was (W3C XML Schema). Instead, it remains as a draft (JSON Schema) and not an agreed specification. But enough developers are using the JSON Schema specification to make it useful.
- For more information on JSON schemas, refer to the W3C site, here’s an excellent tutorial (JSON Schemas).
CatalogImage JSON Schema
- Create a new file named CatalogImage.schema.json and copy the following to the file.
{
  "$schema": "http://json-schema.org/draft-04/schema#",
  "title": "CatalogImage",
  "description": "A image from Image catalog",
  "type": "object",
  "properties": {
    "image-id": {
    "description": "The unique identifier for an image.",
    "type": "string"
    },
    "image-format": {
      "description": "Format of image (gif, png, jpeg, etc.).",
      "type": "string"
    },
    "image-path": {
      "description": "Path/URL to the image data.",
      "type": "string"
    },
    "meta-data": {
      "description": "Metadata item describing resource.",
      "type": "array",
       "items": {
         "type": "object",
         "title": "CatalogMetaDatum",
         "description": "The meta data object comprising the array.",
         "properties": {
           "name": {
             "type": "string",
             "description": "Meta data element property name."
           },
           "value": {
             "type": "string",
             "description": "Meta data element property value."
           }
         }
       }
     }
   }
}
- Save the file somewhere accessible so you can move it to your project later.
The schema’s top-level element is CatalogImage of type object. That object has an image-id, image-format, image-path, and meta-data property. The meta-data property is an array of objects of type CatalogMetaDatum. The CatalogMetaDatum consists of a name and a value.
The schema defines each element’s type using the type attribute. In our schema, we have the types: string and object; however, there are other types you can use. The basic schema types are:
- string,
- number,
- integer,
- boolean,
- and null.
For more information on types, refer to the JSON Schema website (Basic Types).
Other schema elements included in our schema are a title (the user-friendly element name) and description, which allows adding human-readable documentation. Again, you should refer to the JSON Schema website for a more complete description of JSON schemas (JSON Schema).
CatalogClient JSON Schema
In this tutorial, we treat CatalogClient as an exercise, and do not define a CatalogClient structure. However, we do require a bare-bones definition, so our code compiles in the following steps.
- Save the following simplistic schema to the same folder as CatalogClient.schema.json.
{
  "$schema": "http://json-schema.org/draft-04/schema#",
  "title": "CatalogClient",
  "description": "A Client from Image catalog",
  "type": "object"
}
Modeling The Resource URIs
Now that we have defined the JSON schemas for the resources (CatalogClient, CatalogImage, and CatalogMetaDatum), let’s define the REST API by first describing in complete English sentences (or whatever your native tongue happens to be) the actions external clients will perform with our system’s provided resources. Note that we switch to referring to the resources as clients, images, and metadatum rather than CatalogClient, CatalogImage, or CatalogMetaDatum for simplicity.
Write Interactions Using Sentences
Writing the interactions to be performed on our resources are essential to understand before we start coding our API. Usually, create, replace, update, and delete (CRUD) is a good starting point when considering the actions an API must support.
- Write each interaction that an external client will perform with our API. Number them so you can refer to them by their number in later design steps.
- Return a client with the specified client-id.
- Return an image with the specified image-id.
- Respond with all clients who match the supplied metadata.
- Get all images that match the metadata provided.
- Return images that match the provided image metadata for the client with the specified client-id.
- Create a new client.
- Create a new image for the client with the specified client-id.
- Fully update (overwrite) the client with the specified client-id.
- Fully update (overwrite) the image with the specified image-id.
- Update a client with the specified client-id.
- Update an image with the specified image-id.
- Delete a client with the specified client-id.
- Delete an image with the specified image-id.
Transform Sentences into URLs
After understanding the resources, the resources relationships, and how those resources will be manipulated, we translate our analysis into a list of REST endpoints (URLs) and corresponding HTTP commands.
- Refer to the table of HTTP Commands and the resource modeling to determine each URL.
- Create five GET requests to retrieve the resources.
- Write two POST requests to create the resources.
- Add two PUT requests to replace the resources.
- Create two PATCH requests to update the resources.
- Write two DELETE requests to delete the resources.
URI Templates
| 1. | GET | /clients/{client-id} |
| 2. | GET | /images/{image-id} |
| 3. | GET | /clients?(meta-data=<name>=<value>&)* |
| 4. | GET | /images?(meta-data=<name>=<value>&)* |
| 5. | GET | /clients/{client-id}/images?(meta-data<name>=<value>&)* |
| 6. | POST | /clients *body includes <client-json-data)> |
| 7. | POST | /clients/{client-id}/images *body includes <image-json-data> && <binary-data> |
| 8. | PUT | /clients/{client-id} *body includes <client-json-data> |
| 9. | PUT | /images/{image-id} *body includes <image-json-data> && <binary-data> |
| 10. | PATCH | /clients/{client-id} *body includes <client-json-data> |
| 11. | PATCH | /images/{image-id} *body includes <image-json-data> |
| 12. | DELETE | /clients/{client-id} |
| 13. | DELETE | /images/{image-id} |
|
||
|
The numbered URI templates correspond to the numbered statements we wrote earlier in the analysis. We use these numbers again when implementing our API in Java. Here too, we refer to our resources using the original terms, there is little danger in misinterpreting the client, image, or metadatum in a URL, and so we use the more compact name to keep the URI templates shorter. This decision is arbitrary, if you disagree with the decision, suspend disbelief for now and continue with the tutorial.
Hierarchy
The hierarchy is intuitive; however, we do pragmatically violate the hierarchy in a few instances. First, we allow obtaining images independently of their parent clients. Second, we do not require knowing a client-id and an image-id to obtain a particular image for a specific client. The image-id alone is sufficient. However, the hierarchical nature of clients and images is apparent when you consider the following URL template, as images belong to clients in this statement.
- /clients/{client-id}/images?(meta-data<name>=<value>&)*
Obtaining a client or an image is a GET operation while obtaining a specific client or specific image requires adding its identifier to the URI as a URI template parameter. Obtaining a client or image collection requires filtering the resource collection using one or more metadatum key/value pairs. Note that we repeat the query parameter’s name for each key/value pair for the parameter when passing a list as a query parameter’s value. For example, obtaining all portraits of females between the ages of 30 and 50 might appear similar to the following URL.
http://nowhere.com/images?meta-data=face-identified=true&meta-data=setting=portrait&meta-data=gender=female&meta-data=age=30-50
The meta-data keys are face-identified, setting, gender, and age, while the values are true, portrait, female, and 30-50. To pass them as a list of values of the meta-data query parameter we pass the key/value as a single statement (setting=portrait)
Coding The API
Now that we have designed our RESTful API, we can start implementing it. In the real world, deciding what to use to implement your API might prove a lengthy and possibly political process. But here, let’s use Spring Boot with Jersey (JAX-RS 2.0) to implement our API. Note that we only partially implement the API, just enough to illustrate how to translate our design into code.
Although you can use many different programming languages and frameworks to program a RESTful API; here, we use Java with Spring Boot and the Jersey framework. We use Eclipse Jersey because it implements the JAX-RS API rather than Spring’s non-standard MVC implementation of REST. Jersey is an opensource framework for developing RESTful Webservices and is the reference implementation for the Java API for RESTful Web Services (JAX-RS) specification. The JAX-RS specification is the accepted industry standard for Java REST API development. For a more in-depth discussion of JAX-RS and the importance of standards, refer to the article Top Java Rest Frameworks.
- The Eclipse Jersey website contains more information on Jersey (Eclipse Jersey).
JAX-RS 2.0
JAX-RS is a specification consisting of interfaces and annotations. It is part of the JEE specification in the package javax.ws.rs, which contains the JAX-RS annotations and interfaces (package javax.ws.rs). Vendors implement the specification by providing implementations of the provided interfaces and annotations. It is particularly crucial that you understand the JAX-RS annotations, as this is how we map the URIs we identified to Java methods.
Annotations
You use JAX-RS in your application by annotating classes with JAX-RS annotations. When compiling your project, these annotations are interpreted by the JAX-RS implementation (in this tutorial Jersey) and translated into the appropriate Java code. Refer to the specification for a full listing and description of the available annotations (JAX-RS: Java API for RESTful Web Services); here we use the @Path, @POST, @GET, @PUT, @PATCH, @DELETE, @PathParam, @QueryParam, and @Produces annotations. The following illustrates the annotation followed by its JavaDoc link and a usage example.
| @Path(“<resource path>”) | Specifies the URI path relative to a resource. |
| javax.ws.rs.PATH | |
import javax.ws.rs.Path;
...
@Path("/clients")
public class ClientController
|
|
| @POST | Specifies that a method handles HTTP POST requests. |
| javax.ws.rs.POST | |
import javax.ws.rs.POST; ... @POST public Response createClient(Client client) |
|
| @PUT | Specifies that a method handles HTTP PUT requests. |
| javax.ws.rs.PUT | |
import javax.ws.rs.PUT;
...
@PUT
@Path("{client-id}")
public Response updateClient(@PathParam("client-id") Integer clientId, Client client)
|
|
| @GET | Specifies that a method handles HTTP GET requests. |
| javax.ws.rs.GET | |
import javax.ws.rs.GET;
...
@GET
@Path("/{client-id}")
public Response getClient(@PathParam("client-id") Integer clientId)
|
|
| @DELETE | Specifies a method that handles HTTP DELETE requests. |
| javax.ws.rs.DELETE | |
import javax.ws.rs.DELETE;
...
@DELETE
@Path("/{client-id}")
public Response deleteClient(@PathParam("client-id") Integer clientId)
|
|
| @PathParam(“<parameter name>”) | Inject resource identifier from the URL as a method parameter. |
| javax.ws.rs.PathParam | |
import javax.ws.rs.PathParam;
...
@GET
@Path("/{image-id}")
public Response getImageById(@PathParam("image-id") Integer imageId
|
|
| @Produces | Define the MIME type returned from a resource method. |
| javax.ws.rs.Produces | |
import javax.ws.rs.Produces;
...
@Path("/clients")
@Produces("application/json")
public class ClientController
|
|
| @Consumes | Define the MIME type consumed by a resource method. |
| javax.ws.rs.Consumes | |
import javax.ws.rs.Consumes;
...
@POST
@Consumes("application/json")
public createClient(Client client)
|
|
| @QueryParam | Bind query parameters to method parameters |
| javax.ws.rs.QueryParam | |
import javax.ws.rs.QueryParam;
...
@GET
public Response getClients(@QueryParam("first-name") String firstName, @QueryParam("last-name") String lastName)
|
Spring Boot Project Setup
If new to Spring Boot, there are numerous online resources for learning the framework (Building an Application with Spring Boot). Here we spend minimal time discussing the framework, instead only using it to illustrate implementing our REST API.
- Navigate to the start.spring.io website.
- Add the Jersey framework to the project’s dependencies.
- Add the proper settings and generate the project as an executable jar file.

- Download the generated project and unzip it to the desired location.
The generated POM file should appear as the POM listed below. Notice there are no apparent dependencies on Jersey nor Jackson; the Jersey dependencies, including the JSON library Jackson, are aggregated into the larger spring-boot-starter-jersey jar.
<?xml version="1.0" encoding="UTF-8"?>
<project xmlns="http://maven.apache.org/POM/4.0.0"
  xmlns:xsi="http://www.w3.org/2001/XMLSchema-instance"
  xsi:schemaLocation="http://maven.apache.org/POM/4.0.0 https://maven.apache.org/xsd/maven-4.0.0.xsd">
  <modelVersion>4.0.0</modelVersion>
  <parent>
    <groupId>org.springframework.boot</groupId>
    <artifactId>spring-boot-starter-parent</artifactId>
    <version>2.2.6.RELEASE</version>
    <relativePath /> <!-- lookup parent from repository -->
  </parent>
  <groupId> com.bts.imageclient</groupId>
  <artifactId>SpringApiTutorial</artifactId>
  <version>0.0.1-SNAPSHOT</version>
  <name>SpringApiTutorial</name>
  <description>Creating a Rest API Tutorial Project</description>

  <properties>
    <java.version>1.8</java.version>
  </properties>

  <dependencies>
    <dependency>
      <groupId>org.springframework.boot</groupId>
      <artifactId>spring-boot-starter-jersey</artifactId>
    </dependency>

    <dependency>
      <groupId>org.springframework.boot</groupId>
      <artifactId>spring-boot-starter-test</artifactId>
      <scope>test</scope>
      <exclusions>
        <exclusion>
          <groupId>org.junit.vintage</groupId>
          <artifactId>junit-vintage-engine</artifactId>
        </exclusion>
      </exclusions>
    </dependency>
  </dependencies>
  <build>
    <plugins>
      <plugin>
        <groupId>org.springframework.boot</groupId>
        <artifactId>spring-boot-maven-plugin</artifactId>
      </plugin>
    </plugins>
  </build>
</project>
The SpringApiTutorialApplication.java file generated should appear as follows.
package com.bts.imageclient;

import org.springframework.boot.SpringApplication;
import org.springframework.boot.autoconfigure.SpringBootApplication;

@SpringBootApplication
public class SpringApiTutorialApplication {

  public static void main(String[] args) {
    SpringApplication.run(SpringApiTutorialApplication.class, args);
  }
}
- Compile the project using Maven just to ensure everything is correct.
After the project compiles successfully, we can start coding our REST API.
Coding the Controllers
You can call the REST API classes controllers, services, or whatever you wish to name them; however, here we call them controllers. As an aside, my preference for the term controller probably stems from Spring MVC, which refers to these classes as controllers by using the @Controller Spring annotation. The critical point, though, is that these classes are how client applications access our REST API. The controllers will contain the logic needed to make our resources available via HTTP.

The controller houses the methods (represented by lollipops) that clients use to manipulate the resources our REST API provides. A client can communicate with those endpoints by using a variety of data types, although XML or JSON is the data types most commonly used. Our API will use JSON exclusively.
- We do not implement the endpoints that send and receive the binary image data, see the tutorial How to Use an API using a REST Template for examples of uploading and downloading binary data.
The REST API endpoints in our API will take JSON resources as input and return JSON resources as output; therefore, before coding our controllers, we should implement our resources as Plain Old Java Classes (POJOs). From the object model, we already know our REST payload; it consists of CatalogImage, CatalogClient, and CatalogMetadata objects. Let’s define these resources.
JSON Data Objects
JSON is a data-interchange format that uses JavaScript syntax to describe data objects that consist of key/value pairs. Understanding JSON is a prerequisite for understanding this tutorial.
- A good starting point, if unfamiliar with JSON, is the Wikipedia page (JSON).
In this tutorial, we assume JSON as the data format used for requests and responses.
Jackson JSON Library
Mapping JSON to Java objects requires a library to perform the serialization/deserialization of resources. Jersey supports Jackson by default, and the spring-boot-starter-jersey package includes the needed libraries, so using Jackson in a Spring Boot Jersey application requires no configuration. Understanding Jackson, other than it is used to serialize/deserialize between JSON and POJOs automagically, is not necessary to continue with the tutorial.
- If you wish to explore Jackson further, refer to the following tutorial (Jackson JSON Java Parser API Example Tutorial).
One thing a library such as Jackson makes possible is automatic code generation. For example, if we wished to create our POJOs from a JSON schema, then a tool could automate this for us using the Jackson library. One tool freely available online is the jsonschema2pojo tool.
The jsonschema2pojo Maven Plugin
Let’s return to the two JSON schemas created earlier and generate our application’s POJOs using the jsonschema2pojo online tool (jsonschema2pojo.org). If interested in using the tool interactively, then refer to the How To Use an API with Spring RestTemplate tutorial; here, we use the tool’s Maven plugin. The instructions for using this plugin are available on the project’s website ( jsonschema2pojo Maven plugin).
- Add the following plugin to the plugins section of the project’s pom.xml file.
<plugin>
  <groupId>org.jsonschema2pojo</groupId>
  <artifactId>jsonschema2pojo-maven-plugin</artifactId>
  <version>1.0.2</version>
  <configuration>
    <sourceDirectory>${basedir}/src/main/resources/schema</sourceDirectory>
    <targetPackage>com.bts.imageclient.rest.api.types</targetPackage>
    <useTitleAsClassname>true</useTitleAsClassname>
    <includeAdditionalProperties>false</includeAdditionalProperties>
  </configuration>
  <executions>
    <execution>
      <goals>
        <goal>generate</goal>
      </goals>
    </execution>
  </executions>
</plugin>
The plugin’s configuration settings specify the source directory, that the schema’s title generates the class names, and that the generated class should not generate an additional properties property and associated getter and setter.
- Create a schema folder under the project’s resources folder.
- Add the two schemas to this folder.
--SpringAPITutorial
         |
         |-- src
         |
         |-- resources
                 |
                 |-- schema
                        |
                        |-- CatalogClient.schema.json
                        |
                        |-- CatalogImage.schema.json
- Execute Maven and specify the generate-sources life-cycle phase task.
> mvn generate-sources
- Notice that Maven creates the CatalogClient, CatalogImage, and CatalogMetaDatum classes in the generated-sources sub-folder in target.

- Either add this newly created path to your project’s classpath, or move the files manually to the correct location in your project’s source folder.
I use the Spring Tool Suite 4 (Eclipse), and so I modified my project’s classpath to include the generated types folder. Your IDE will doubtless have a way to add this folder to your project’s classpath.

Never modify the generated classes directly, change the classes by modifying the classes’ JSON Schema, and then executing the Maven generate task.
Let’s examine the three generated classes, starting with the CatalogMetaDatum class.
CatalogMetaDatum POJO
The CatalogMetaDatum class contains the two properties defined in the CatalogImage’s JSON schema and creates getters and setters for the properties.
package com.bts.imageclient.rest.api.types;

import com.fasterxml.jackson.annotation.JsonInclude;
import com.fasterxml.jackson.annotation.JsonProperty;
import com.fasterxml.jackson.annotation.JsonPropertyDescription;
import com.fasterxml.jackson.annotation.JsonPropertyOrder;


/**
 * CatalogMetaDatum
 * <p>
 * The meta data object comprising the array.
 *
 */
@JsonInclude(JsonInclude.Include.NON_NULL)
@JsonPropertyOrder({
    "name",
    "value"
})
public class CatalogMetaDatum {

    /**
     * Meta data element property name.
     *
     */
    @JsonProperty("name")
    @JsonPropertyDescription("Meta data element property name.")
    private String name;
    /**
     * Meta data element property value.
     *
     */
    @JsonProperty("value")
    @JsonPropertyDescription("Meta data element property value.")
    private String value;

    /**
     * Meta data element property name.
     *
     */
    @JsonProperty("name")
    public String getName() {
        return name;
    }

    /**
     * Meta data element property name.
     *
     */
    @JsonProperty("name")
    public void setName(String name) {
        this.name = name;
    }

    /**
     * Meta data element property value.
     *
     */
    @JsonProperty("value")
    public String getValue() {
        return value;
    }

    /**
     * Meta data element property value.
     *
     */
    @JsonProperty("value")
    public void setValue(String value) {
        this.value = value;
    }

    @Override
    public String toString() {
        StringBuilder sb = new StringBuilder();
        sb.append(CatalogMetaDatum.class.getName()).append('@').append(Integer.toHexString(System.identityHashCode(this))).append('[');
        sb.append("name");
        sb.append('=');
        sb.append(((this.name == null)?"<null>":this.name));
        sb.append(',');
        sb.append("value");
        sb.append('=');
        sb.append(((this.value == null)?"<null>":this.value));
        sb.append(',');
        if (sb.charAt((sb.length()- 1)) == ',') {
            sb.setCharAt((sb.length()- 1), ']');
        } else {
            sb.append(']');
        }
        return sb.toString();
    }

    @Override
    public int hashCode() {
        int result = 1;
        result = ((result* 31)+((this.name == null)? 0 :this.name.hashCode()));
        result = ((result* 31)+((this.value == null)? 0 :this.value.hashCode()));
        return result;
    }

    @Override
    public boolean equals(Object other) {
        if (other == this) {
            return true;
        }
        if ((other instanceof CatalogMetaDatum) == false) {
            return false;
        }
        CatalogMetaDatum rhs = ((CatalogMetaDatum) other);
        return (((this.name == rhs.name)||((this.name!= null)&&this.name.equals(rhs.name)))&&((this.value == rhs.value)||((this.value!= null)&&this.value.equals(rhs.value))));
    }

}
Notice that the jsonschema2pojo tool added Jackson Annotations automatically despite not needing the annotations. For example, you typically use the @JsonProperty to mark non-standard getter/setter methods for a JSON property. If a property has a getter and setter of the same name with the prefixes get and set attached to the property name, then the @JsonProperty annotation is not needed. But if a POJO does not follow this pattern, then the @JsonProperty is used to bypass the property naming limitation. The following code snippet illustrates the difference.
// ================= standard property =====================

String myStandardProperty;

public void setMyStandardProperty(String myStandardProperty) {
  this.myStandardProperty = myStandardProperty;
}

public String getMyStandardProperty(){
  return myStandardProperty;
}

// ================== non-standard property ==================

@JsonProperty("myProperty")
String myProperty;

@JsonProperty("myProperty")
public void setTheProperty(String theProperty) {
  myProperty = theProperty;
}

@JsonProperty("myProperty")
public String getTheProperty(){
  return myProperty;
}
The property myStandardProperty, because it follows the naming convention of capitalized property name prefixed by get and set, Jackson automatically recognizes that it should include the property when serializing/deserializing. However, the myProperty property’s getter and setter does not follow the standard naming convention and will be ignored by Jackson unless annotated.
Although we do not need all the annotations, marking standard getter/setter methods with @JsonProperty makes the code more human-readable, and so we leave the annotations. Of course, again, do not update the generated classes; if you wish to modify the generated classes, then change the associated schema and regenerate the classes.
CatalogImage POJO
The plugin also generated a CatalogImage consisting of an identifier, path to the binary file, and metadata. The identifier and path are both strings, while the metadata is a list of CatalogMetaDatum objects.
package com.bts.imageclient.rest.api.types;

import java.util.ArrayList;
import java.util.List;
import com.fasterxml.jackson.annotation.JsonInclude;
import com.fasterxml.jackson.annotation.JsonProperty;
import com.fasterxml.jackson.annotation.JsonPropertyDescription;
import com.fasterxml.jackson.annotation.JsonPropertyOrder;


/**
 * CatalogImage
 * <p>
 * A image from Image catalog
 *
 */
@JsonInclude(JsonInclude.Include.NON_NULL)
@JsonPropertyOrder({
    "image-id",
    "image-format",
    "image-path",
    "meta-data"
})
public class CatalogImage {

    /**
     * The unique identifier for an image.
     *
     */
    @JsonProperty("image-id")
    @JsonPropertyDescription("The unique identifier for an image.")
    private String imageId;
    /**
     * Format of image (gif, png, jpeg, etc.).
     *
     */
    @JsonProperty("image-format")
    @JsonPropertyDescription("Format of image (gif, png, jpeg, etc.).")
    private String imageFormat;
    /**
     * Path/URL to the image data.
     *
     */
    @JsonProperty("image-path")
    @JsonPropertyDescription("Path/URL to the image data.")
    private String imagePath;
    /**
     * Metadata item describing resource.
     *
     */
    @JsonProperty("meta-data")
    @JsonPropertyDescription("Metadata item describing resource.")
    private List<CatalogMetaDatum> metaData = new ArrayList<CatalogMetaDatum>();

    /**
     * The unique identifier for an image.
     *
     */
    @JsonProperty("image-id")
    public String getImageId() {
        return imageId;
    }

    /**
     * The unique identifier for an image.
     *
     */
    @JsonProperty("image-id")
    public void setImageId(String imageId) {
        this.imageId = imageId;
    }

    /**
     * Format of image (gif, png, jpeg, etc.).
     *
     */
    @JsonProperty("image-format")
    public String getImageFormat() {
        return imageFormat;
    }

    /**
     * Format of image (gif, png, jpeg, etc.).
     *
     */
    @JsonProperty("image-format")
    public void setImageFormat(String imageFormat) {
        this.imageFormat = imageFormat;
    }

    /**
     * Path/URL to the image data.
     *
     */
    @JsonProperty("image-path")
    public String getImagePath() {
        return imagePath;
    }

    /**
     * Path/URL to the image data.
     *
     */
    @JsonProperty("image-path")
    public void setImagePath(String imagePath) {
        this.imagePath = imagePath;
    }

    /**
     * Metadata item describing resource.
     *
     */
    @JsonProperty("meta-data")
    public List<CatalogMetaDatum> getMetaData() {
        return metaData;
    }

    /**
     * Metadata item describing resource.
     *
     */
    @JsonProperty("meta-data")
    public void setMetaData(List<CatalogMetaDatum> metaData) {
        this.metaData = metaData;
    }

    @Override
    public String toString() {
        StringBuilder sb = new StringBuilder();
        sb.append(CatalogImage.class.getName()).append('@').append(Integer.toHexString(System.identityHashCode(this))).append('[');
        sb.append("imageId");
        sb.append('=');
        sb.append(((this.imageId == null)?"<null>":this.imageId));
        sb.append(',');
        sb.append("imageFormat");
        sb.append('=');
        sb.append(((this.imageFormat == null)?"<null>":this.imageFormat));
        sb.append(',');
        sb.append("imagePath");
        sb.append('=');
        sb.append(((this.imagePath == null)?"<null>":this.imagePath));
        sb.append(',');
        sb.append("metaData");
        sb.append('=');
        sb.append(((this.metaData == null)?"<null>":this.metaData));
        sb.append(',');
        if (sb.charAt((sb.length()- 1)) == ',') {
            sb.setCharAt((sb.length()- 1), ']');
        } else {
            sb.append(']');
        }
        return sb.toString();
    }

    @Override
    public int hashCode() {
        int result = 1;
        result = ((result* 31)+((this.imageFormat == null)? 0 :this.imageFormat.hashCode()));
        result = ((result* 31)+((this.metaData == null)? 0 :this.metaData.hashCode()));
        result = ((result* 31)+((this.imageId == null)? 0 :this.imageId.hashCode()));
        result = ((result* 31)+((this.imagePath == null)? 0 :this.imagePath.hashCode()));
        return result;
    }

    @Override
    public boolean equals(Object other) {
        if (other == this) {
            return true;
        }
        if ((other instanceof CatalogImage) == false) {
            return false;
        }
        CatalogImage rhs = ((CatalogImage) other);
        return (((((this.imageFormat == rhs.imageFormat)||((this.imageFormat!= null)&&this.imageFormat.equals(rhs.imageFormat)))&&((this.metaData == rhs.metaData)||((this.metaData!= null)&&this.metaData.equals(rhs.metaData))))&&((this.imageId == rhs.imageId)||((this.imageId!= null)&&this.imageId.equals(rhs.imageId))))&&((this.imagePath == rhs.imagePath)||((this.imagePath!= null)&&this.imagePath.equals(rhs.imagePath))));
    }

}
CatalogClient POJO
Recall that we left the CatalogClient.schema.json schema as an exercise and only created a bare-bones schema. The CatalogClient POJO generated is likewise minimal and included so we can later code a CatalogClientController without compile errors.
package com.bts.imageclient.rest.api.types;

import com.fasterxml.jackson.annotation.JsonInclude;
import com.fasterxml.jackson.annotation.JsonPropertyOrder;


/**
 * CatalogClient
 * <p>
 * A Client from Image catalog
 *
 */
@JsonInclude(JsonInclude.Include.NON_NULL)
@JsonPropertyOrder({

})
public class CatalogClient {


    @Override
    public String toString() {
        StringBuilder sb = new StringBuilder();
        sb.append(CatalogClient.class.getName()).append('@').append(Integer.toHexString(System.identityHashCode(this))).append('[');
        if (sb.charAt((sb.length()- 1)) == ',') {
            sb.setCharAt((sb.length()- 1), ']');
        } else {
            sb.append(']');
        }
        return sb.toString();
    }

    @Override
    public int hashCode() {
        int result = 1;
        return result;
    }

    @Override
    public boolean equals(Object other) {
        if (other == this) {
            return true;
        }
        if ((other instanceof CatalogClient) == false) {
            return false;
        }
        CatalogClient rhs = ((CatalogClient) other);
        return true;
    }

}
REST Controllers
Now that we have the resources representative as POJOs, let’s code the controllers, beginning with the CatalogImageController class.
Catalog Image Controller
Refer to the numbered list of REST endpoints above. We now implement those REST endpoints using Java and the JAX-RS 2.0 specification. The endpoints numbered 2, 4, 9, 11, and 13 are all related to manipulating an image, and so we implement them in CatalogImageController.
Note that we implement the methods to return CatalogImage and CatalogClient objects, later we explore how these methods are returning JAX-RS Response objects (after serialized to JSON).
- Create a new package com.bts.imageclient.rest.api.controller.
- Add a new class, CatalogImageController, to the newly created package.
- Add the endpoint methods without implementing the methods. For the method bodies, simply return a null.
package com.bts.imageclient.rest.api.controller;

import java.util.ArrayList;
import java.util.List;

import javax.ws.rs.DELETE;
import javax.ws.rs.GET;
import javax.ws.rs.PATCH;
import javax.ws.rs.PUT;
import javax.ws.rs.Path;
import javax.ws.rs.PathParam;
import javax.ws.rs.Produces;
import javax.ws.rs.QueryParam;
import javax.ws.rs.core.Response;

import org.springframework.stereotype.Component;

import com.bts.imageclient.rest.api.types.CatalogImage;
import com.bts.imageclient.rest.api.types.CatalogMetaDatum;


@Component
@Path("/images")
@Produces("application/json")
@Api(value = "CatalogImageController Resource", produces = "application/json")
public class CatalogImageController {

  @GET
  @Path("/{image-id}")
  public Response getImage(@PathParam("image-id") String imageId){return null;}

  @GET
  public List<CatalogImage> getImages(@QueryParam("meta-data") List<String> imageMetadata) {return null;}

  @PUT
  @Path("/{image-id}")
  public CatalogImage replaceImage(@PathParam("image-id") String imageId, CatalogImage image) {return null;}

  @PATCH
  @Path("/{image-id}")
  public CatalogImage updateImage(@PathParam("image-id") String imageId, CatalogImage image) {return null;}

  @DELETE
  @Path("/{image-id}")
  public Response deleteImage(@PathParam("image-id") String imageId) throws CatalogImageDoesNotExistException {return null;}

}
Each method is commented with the relevant corresponding interaction sentence determined during analysis and design. The annotations are what make this class special. The @Component annotation tells Spring that the class is a component and its life-cycle managed by Spring. The JAX-RS @Path annotation decorating the CatalogImageController class definition denotes the controller’s base path (/images). The @Path annotation denotes a method’s path when decorating a method definition. The @Path annotations determine the complete path to a resource. The @Produces annotation indicates the class returns JSON data. Note that you can override this behavior by decorating a method with its @Produces annotation. Each method has a corresponding annotation indicating the HTTP command used and, if applicable, an @PathParam annotation or QueryParam annotation identifying the path or query parameter. These annotations are what make this class a JAX-RS resource provider.
Note that we did not implement REST statements 5 or 7, despite their fetching images. Instead, we implement them as part of the client controller, which we code now.
Catalog Client Controller
The client controller implements endpoints 1, 3, 5, 6, 7, 8, 10, and 12.
- Create a new class named CatalogClientController in the com.bts.imageclient.rest.api.controller package.
- Add the endpoints applicable to clients, but do not implement the methods. As with the CatalogImageController, have each method return null.
package com.bts.imageclient.rest.api.controller;

import java.util.List;
import javax.ws.rs.DELETE;
import javax.ws.rs.GET;
import javax.ws.rs.PATCH;
import javax.ws.rs.POST;
import javax.ws.rs.PUT;
import javax.ws.rs.Path;
import javax.ws.rs.PathParam;
import javax.ws.rs.Produces;
import javax.ws.rs.QueryParam;
import javax.ws.rs.core.Response;
import org.springframework.stereotype.Component;

import com.bts.imageclient.rest.api.types.CatalogClient;
import com.bts.imageclient.rest.api.types.CatalogImage;


@Component
@Path("/clients")
@Produces("application/json")
public class CatalogClientController {

  @GET
  @Path("/{client-id}")
  public CatalogClient getClient(@PathParam("client-id") String clientId){return null;}

  @GET
  public List<CatalogClient> getClients(@QueryParam("client-metadata") List<String> clientMetadata){return null;}

  @GET
  @Path("/{client-id}/images")
  public List<CatalogImage> getImages(@PathParam("client-id") String clientId, @QueryParam("image-metadata") List<String> imageMetadata){return null;}

  @POST
  public CatalogClient createClient(CatalogClient client){return null;}

  @PUT
  @Path("/{client-id}")
  public CatalogClient replaceClient(@PathParam("client-id") String clientId, CatalogClient client){return null;}

  @PATCH
  @Path("/{client-id}")
  public CatalogClient updateClient(@PathParam("client-id") String clientId, CatalogClient client){return null;}


  @DELETE
  @Path("/{client-id}")
  public Response delete(@PathParam("client-id") String clientId){return null;}

  @POST
  @Path("/clients/{client-id}/images")
  public CatalogImage createImage(@PathParam("client-id") String clientId){return null;}

}
Create JerseyConfig File
To access our newly created JAX-RS resources, we need to register them as Jersey resources. An easy way to accomplish this is by creating a Jersey configuration file.
- Create a new package named com.bts.imageclient.config and add a class called JerseyConfig to the package.
package com.bts.imageclient.config;

import javax.annotation.PostConstruct;
import javax.ws.rs.ApplicationPath;

import org.glassfish.jersey.server.ResourceConfig;
import org.glassfish.jersey.server.wadl.internal.WadlResource;
import org.springframework.beans.factory.annotation.Value;
import org.springframework.stereotype.Component;

import com.bts.imageclient.rest.api.controller.CatalogClientController;
import com.bts.imageclient.rest.api.controller.CatalogImageController;


@Component
@ApplicationPath("/imageclient")
public class JerseyConfig extends ResourceConfig {

  @PostConstruct
  public void init() {
    configEndPoints();
  }

  private void configEndPoints(){
    register(CatalogClientController.class);
    register(CatalogImageController.class);
  }
}
The @Component annotation tells Spring to manage this class. The @ApplicationPath annotation tells our JAX-RS implementation, Jersey, that the base URL for the application is imageclient. At the same time, the @PostConstruct tag instructs Spring to execute the init method after instantiating an instance of JerseyConfig. The ResourceConfig class is Jersey specific and implements the JAX-RS Application interface. The application, and by definition the ResourceConfig, defines the application’s JAX-RS components.
- Compile the application using Maven and correct any errors.
We are not testing anything yet, as we did not implement any controller methods. Let’s implement several of the methods in CatalogImageController, starting with the getImages and getImage REST endpoints. The methods only contain throw-away code that illustrates we called the methods correctly.
Implement getImages and getImage Methods
Before implementing the getImages and getImage methods, we need to have data to return from the REST endpoints. However, as we have not implemented the underlying application, we create a simple class that generates test data instead of the real thing.
Code a Test Data Generator
In a real-world project, you would connect the REST API layer to another layer containing your project’s business logic, which would connect to a persistence layer. For instance, the following diagram illustrates a typical web architecture.

The Multitier architecture page on Wikipedia (Multitier architecture) is a good starting point for more information on a tiered architecture. But here, we do not concern ourselves with the entire application, but rather, only the REST API layer, so instead of implementing a full application, we implement a much simpler architecture, using a class called ImageTestGenerator to generate test data.

- Create a package named com.bts.imageclient.rest.api.types.util and create a new class named ImageTestGenerator.
- Implement the generateTestImages and generateTestImage methods as static methods. Note the methods simply generate test data for the tutorial and have nothing to do with a “REST API.”
package com.bts.imageclient.rest.api.types.util;

import java.util.ArrayList;
import java.util.List;
import com.bts.imageclient.rest.api.types.CatalogImage;
import com.bts.imageclient.rest.api.types.CatalogMetaDatum;

public class CatalogImageTestGenerator {

  public static List<CatalogImage> generateTestImages()
  {
    List<CatalogImage> images = new ArrayList<CatalogImage>();
    for(int i = 0; i < 20; i++) {
      CatalogImage image = new CatalogImage();
      List<CatalogMetaDatum> metaData = new ArrayList<CatalogMetaDatum>();
      for(int k = 0; k < 10; k++) {
        CatalogMetaDatum item = new CatalogMetaDatum();
        item.setName("name"+k);
        item.setValue("value" + k);
        metaData.add(item);
      }
      image.setImageId(Integer.toString(i));
      image.setMetaData(metaData);
      image.setImageFormat("png");
      image.setImagePath("http://www.nowhere.com/image-binary-url/image" + i + "." + image.getImageFormat());
      images.add(image);
    }
    return images;
  }

  public static CatalogImage generateTestImage(StringimageId) {
    CatalogImage image = new CatalogImage();
    List<CatalogMetaDatum> metaData = new ArrayList<CatalogMetaDatum>();
    for(int k = 0; k < 10; k++) {
      CatalogMetaDatum item = new CatalogMetaDatum();
      item.setName("name"+k);
      item.setValue("value" + k);
      metaData.add(item);
    }

    image.setImageId(imageId.toString());
    image.setMetaData(metaData);
    image.setImageFormat("png");
    image.setImagePath("http://www.nowhere.com/image-binary-url/image" + imageId + ".png");
    return image;
  }
}
Implement the getImages and getImage Methods
Let’s implement the getImages and getImage methods so we can illustrate calling the REST endpoints. As previously mentioned, we implement the methods with throw-away code that merely allows us to verify we called the methods correctly.
Write the Code
- Add code to getImages to obtain imageMetadata as a list and print each list item. Have the system then return a list of CatalogImage objects by calling CatalogImageTestGenerator’s generateTestImages method.
- Modify getImage to return an image by calling the CatalogImageTestGenerator’s generateTestImage method.
@GET
public List<CatalogImage> getImages(@QueryParam("meta-data") List<String> imageMetadata)
{
  List<CatalogMetaDatum> metaData = imageMetadata.stream().map(c -> {
    String[] nameValue = c.split("=");
    CatalogMetaDatum item = new CatalogMetaDatum();
    item.setName(nameValue[0]);
    item.setValue(nameValue[1]);
    return item;
  }).collect(Collectors.toList());

  metaData.stream().forEach(c->System.out.println(c.toString()));

  List<CatalogImage> returnImages = CatalogImageTestGenerator.generateTestImages();

  return returnImages;
}

@GET
@Path("/{image-id}")
public CatalogImage getImage(@PathParam("image-id") String imageId)
{
  return CatalogImageTestGenerator.generateTestImage(imageId);
}
The getImages method now takes a list of metadata query parameters and prints those parameters. Remember that when passing multiple values for the same query parameter, you reuse the name, as the following URL illustrates.
http://localhost:8080/imageclient/images?meta-data=name1=value1&meta-data=name2=value2&meta-data=name3=value3
The method then returns a list of CatalogImage objects. Of course, Jackson converts the list and its objects to the appropriate JSON.
The getImage method takes a single CatalogImage’s unique identifier as a path parameter and returns the image. Of course, in a real application, it would fetch that image from the application’s data layer; however, here we simply create a test CatalogImage. The URL, if the resource’s id were “123” would appear as follows.
http://localhost:8080/imageclient/images/123
- Compile and package the application using Maven.
- Start the application so we can test using Postman.
Test Using Postman
Postman is a powerful tool used to test web services freely downloaded from its website (postman.com) on the download page (download Postman). If you have never used Postman before, you should refer to the tutorials at the postman learning website (Postman Learning Center). However, you should be able to follow along, even if you are not familiar with Postman.
- Create a new GET request that calls the images URL.
- Create the following three Query Params.
| meta-data | name1=value1 |
| meta-data | name2=value2 |
| meta-data | name3=value3 |
After adding the query params, the following URL is visible in the URL field in Postman.
http://localhost:8080/imageclient/images?meta-data=name1=value1&meta-data=name2=value2&meta-data=name3=value3
- Click Send, and Postman requests the images from our REST API.

If everything works correctly, the response appears in the Body results tab. The response consists of a JSON array of ten CatalogImage resources, and each resource contains ten MetaDatum resources.
[
    {
        "image-id": "0",
        "image-format": "png",
        "image-path": "http://www.nowhere.com/image-binary-url/image0.png",
        "meta-data": [
            {
                "name": "name0",
                "value": "value0"
            },

< ---- snip ---- >

            {
                "name": "name9",
                "value": "value9"
            }
        ]
    },

<--- snip ---->
    {
        "image-id": "19",
        "image-format": "png",
        "image-path": "http://www.nowhere.com/image-binary-url/image19.png",
        "meta-data": [
            {
                "name": "name0",
                "value": "value0"
            },

<--- snip ---->
            {
                "name": "name9",
                "value": "value9"
            }
        ]
    }
]
Now test getting a CatalogImage by its identifier.
- Create a new GET request adding “123” as the identifier. The URL should appear as follows.
http://localhost:8080/imageclient/images/123
- Click Send, and the response consists of a single CatalogImage.

Implement replaceImage and updateImage
Now that we have implemented two GET requests of resources, let’s implement the methods that use PUT and PATCH to replace and update a CatalogImage. Note that we do not implement creating a CatalogImage in the CatalogImageController class. Instead, we placed that method in the CatalogClient class. This decision is debatable; however, because an image cannot exist independent of a client, it seems logical to implement that functionality in the CatalogClientController. But replacing an image and updating an image is not reliant upon a CatalogClient; both actions are performed directly on an image with a particular identifier, and so are included in the CatalogImageController.
Write the Code
- Implement the replaceImage method.
- To ensure the method is working, simply change the CatalogImage’s path.
@PUT
@Path("/{image-id}")
public CatalogImage replaceImage(@PathParam("image-id") String imageId, CatalogImage image) {
  System.out.println(image.toString());
  image.setImagePath("http://www.nowhere.com/changed-path.jpg");
  return image;
}
The throw-away code simply takes a CatalogImage, prints it, and then changes the image’s path so we can ensure the path was changed by reviewing the response. Remember, PUT overwrites a resource, not update, but suspend disbelief and pretend our code replaces a CatalogImage and then returns that CatalogImage.
- Implement the updateImage method.
@PATCH
@Path("/{image-id}")
public CatalogImage updateImage(@PathParam("image-id") String imageId, CatalogImage image){
  System.out.println(image.toString());
  image.setImageId("http://www.nowhere.com/patch-path.jpg");
  CatalogMetaDatum val = image.getMetaData().get(0);
  val.setName("patch");
  val.setValue("patch-value");
  List<CatalogMetaDatum> theList = new ArrayList<CatalogMetaDatum>();
  theList.add(val);
  image.setMetaData(theList);
  return image;
}
- Compile and package the application using Maven.
- Start the application so you can test it using Postman.
Test Using Postman
- Create a new PUT request in Postman with “123” as the URL parameter.
- Click Send, and the endpoint returns the CatalogImage object.

Of course, the method’s implementation was hypothetical. In reality, it would replace the CatalogImage in an application’s data store with the CatalogImage passed as a parameter.
- Create a new PATCH request in Postman with “123” as the URL parameter.
- Click send, and the endpoint returns the CatalogImage object.

The PATCH method was also hypothetical. Recall that PATCH updates an existing resource with the modified properties; it does not replace the existing resource.
Modify getImage method
We now modify the getImage method to return a JAX-RS Response object. It is essential to realize that the RESTful API methods are not returning the objects, but JSON representations of a Response object deserialized to a JSON string.
JAX-RS Response
A Response is an abstract class provided by the JAX-RS specification. This class is what a JAX-RS endpoint returns. But note, throughout this tutorial, we returned Java objects; for example, getImages returned a list of CatalogImage objects. But this is an illusion; what the methods returned is a serialized Response object. Behind the scenes, the Jackson library automatically converts the custom object to a Response, which Jersey then serializes into an HTTP response. This automatic conversion allows developers to take a shortcut and return POJOs from methods implementing REST endpoints. Let’s illustrate this automatic conversion by modifying getImage to return a Response.
Write the Code
- Change the getImage method to return a Response. Note that it uses the builder pattern to construct the response.
- Build and package the application using Maven.
@GET
@Path("/{image-id}")
public Response getImage(@PathParam("image-id") String imageId)
{
  CatalogImage theImage = CatalogImageTestGenerator.generateTestImage(imageId);
  Response resp = Response.status(Response.Status.OK).entity(theImage).build();
  return resp;
}
- Start the application to allow testing with Postman.
The method loads the CatalogImage into the response and then returns the response rather than the CatalogImage.
Test Using Postman
- Perform the same steps as taken earlier to test the getImage method.
- Note that the response in Postman is the same as when the method returned a CatalogImage.
Implement delete Method
Now that we have discussed the Response object let’s implement the delete method.
// 12. Delete the client with the specified client-id.
@DELETE
@Path("/{client-id}")
public Response delete(@PathParam("client-id") String clientId) {return null;}
Note that it returns a Response object. Think about it, if you delete a CatalogImage, then you shouldn’t return that deleted CatalogImage. Instead, return a simple success string.
{"CatalogImage deleted successfully."}
Write the Code
- Implement the delete method to return a simple success message.
@DELETE
@Path("/{image-id}")
public Response deleteImage(@PathParam("image-id") String imageId) {
  return Response.ok().entity("{"CatalogImage deleted successfully."}").build();
}
- Build and package the application using Maven.
- Start the application so we can test it using Postman.
Test Using Postman
- Create a new DELETE method in Postman.
- Click Send, and the JSON message appears in the body after calling the delete endpoint.

Documenting the API with Swagger
Learning about a REST API’s endpoints through trial and error using a tool like Postman is slow and error-prone; It’s much better to provide explicit documentation to a client. But rather than delivering manually written documentation, it would be much better if you could provide documentation that also allowed developers to interact with your API. Enter Swagger. Swagger is a tool that can generate robust documentation, available through a URL on the same server as your API. Moreover, developers can test a REST APIs endpoints using Swagger.
Swagger implements the OpenAPI specification (OAS). You can access the OpenAPI specification at its website (OpenAPI Specification). Let’s set up our project to use Swagger. Remember, our Spring Boot project uses Jersey JAX-RS and not Spring’s MVC; therefore, setting up Swagger is different than you will read on most Spring Boot tutorials on the web.
Modify POM and JerseyConfig
Supporting Swagger requires modifying our project’s POM and JerseyConfig files. Also, add the spring-boot-starter-web to the POM so we can display the generated Swagger documentation as web pages.
- Add the swagger-jersey2-jaxrs dependency to the POM.
- Add the spring-boot-starter-web dependency to the POM.
<dependency>
  <groupId>org.springframework.boot</groupId>
  <artifactId>spring-boot-starter-web</artifactId>
</dependency>
<dependency>
  <groupId>io.swagger</groupId>
  <artifactId>swagger-jersey2-jaxrs</artifactId>
  <version>1.5.9</version>
</dependency>
<dependency>
  <groupId>org.springframework.boot</groupId>
  <artifactId>spring-boot-starter-web</artifactId>
</dependency>
- Modify JerseyConfig to configure Swagger.
package com.bts.imageclient.config;

import javax.annotation.PostConstruct;
import javax.ws.rs.ApplicationPath;

import org.glassfish.jersey.server.ResourceConfig;
import org.glassfish.jersey.server.wadl.internal.WadlResource;
import org.springframework.beans.factory.annotation.Value;
import org.springframework.stereotype.Component;

import com.bts.imageclient.rest.api.controller.CatalogClientController;
import com.bts.imageclient.rest.api.controller.CatalogImageController;

import io.swagger.jaxrs.config.BeanConfig;
import io.swagger.jaxrs.listing.ApiListingResource;
import io.swagger.jaxrs.listing.SwaggerSerializers;


@Component
@ApplicationPath("/imageclient")
public class JerseyConfig extends ResourceConfig {

  @PostConstruct
  public void init() {
    configureSwagger();
    configEndPoints();
  }

  private void configEndPoints(){
    register(CatalogClientController.class);
    register(CatalogImageController.class);
  }

  private void configureSwagger() {

    register(ApiListingResource.class);
    register(SwaggerSerializers.class);
    register(WadlResource.class);
    BeanConfig config = new BeanConfig();
    config.setTitle("ImageClient Tutorial API");
    config.setHost("localhost:8080");
    config.setVersion("v1");
    config.setContact("Joe Programmer");
    config.setSchemes(new String[] { "http", "https" });
    config.setBasePath("/imageclient");
    config.setResourcePackage("com.bts.imageclient.rest.api.controller");
    config.setPrettyPrint(true);
    config.setScan(true);
  }
}
- Add the Swagger @Api annotation to the CatalogImageController class.
@Component
@Path("/images")
@Produces("application/json")

@Api(value = "CatalogImageController Resource", produces = "application/json")

public class CatalogImageController {
Swagger UI
Swagger generates documentation as a JSON file. However, to display the API as dynamic web pages, we must download and add Swagger UI to our project. You can download Swagger UI from its website (swagger-ui).
- Download Swagger-UI and unzip the file.
- Create a folder named static in your project’s resources folder.
- Copy the content of the swagger-ui dist folder to your project’s static folder.

- Open the index.html file and replace the URL with the path to the swagger.json file (we set that path in the JerseyConfig file).

View API In Swagger-UI
- Build and package the project using Maven.
- Start the application.
- Navigate to your application’s root directory in a web browser.
http://localhost:8080/
If you configure Swagger correctly, you should see the CatalogImageController Resource documentation.

- Press the GET /images/{image-id} link, and expand the section.
- Click the Try It Out button and enter a number in image-id.
- Press the Execute button, and Swagger-UI returns the response.

Swagger not only documents the API, but it also provides an interface to explore your API with actual values. Swagger’s documentation allows developers of client applications to review the API documentation and interactively learn how to use the API. Note that Swagger-UI also shows the curl command if you wish to use curl to access the API.
curl -X GET "http://localhost:8080/imageclient/images/123" -H "accept: application/json"
Swagger is a powerful tool to document your API. Note that we only added the @Api annotation to the CatalogImageController class, but Swagger has many more available annotations that you might use to generate documentation of your API. Refer to the Swagger website for a complete listing of available annotations (Open API 2.X Annotations). A “getting started” guide is available from the Swagger Github repository (Swagger 2.X Getting Started).
Status Codes & Exceptions
Oops, this tutorial made the same mistake many developers make when coding; we only considered the happy path where everything works. What happens when things go awry? Let’s end this tutorial by briefly discussing REST API exceptions. These exceptions differ from regular Java exceptions, as a REST endpoint consumes an HTTP request and returns an HTTP response. Part of the returned response is a response code. A RESTful API should always return the proper response code.
- Note that this tutorial uses HTTP status code and HTTP response code as synonyms. Although status is more commonly used than response, both are used to refer to the codes returned with an HTTP response.
HTTP Status Codes
HTTP Status codes indicate if a request was handled correctly. There are five groups of response codes.
| 100-199 | Informational | |
| 200-299 | Success | Client’s request successfully processed. |
| 300-399 | Redirection | The client must take additional action to complete the request. |
| 400-499 | Client Error | An error caused by the client occurred. |
| 500-599 | Server Error | An error caused by the server occurred. |
The most commonly used HTTP Status codes encountered are as follows.
| 200 | OK | Successful GET, PUT, PATCH, DELETE. |
| 201 | Created | Successful POST. |
| 204 | No Content | No response body sent. |
| 400 | Bad Request | Request not understood due to malformed syntax. |
| 401 | Unauthorized | No authentication provided or authentication fails. |
| 403 | Forbidden | Authentication succeeded, but the client has no access to resources. |
| 404 | Not Found | Non-existent resource requested. |
| 415 | Unsupported Media Type | The request contained an incorrect content type. |
| 500 | Internal Server Error | General error on the server. |
| 503 | Service Unavailable | Server unavailable. |
A complete listing of HTTP status codes is available on the Wikipedia page (List of HTTP status codes).
A RESTful API should return the appropriate error codes. And do not return a 200 response code with an error as the response’s body no matter how great the temptation due to expediency (more common than you think). If you take a little time to return meaningful errors and error codes, your API will prove much easier to use. Now that we have examined HTTP status codes let’s see how these codes are used with JAX-RS exceptions.
JAX-RS Exceptions
The JAX-RS exception handling strategy provides an easy way to map exceptions in your code to the appropriate HTTP responses. The top-level exception class JAX-RS provides is named the WebApplicationException, and its subclasses are ClientErrorException, RedirectionException, and ServerErrorException. The WebApplicationException constructor, unlike a more standard Java exception, can take an integer as an HTTP status code. Refer to the java documentation for more detail (JavaDoc).
Although JAX-RS provides custom exceptions, a more straightforward approach is to use an ExceptionMapper to map the error to a response. This mapping allows you to develop custom responses for an exception. In the following example, we use an ExceptionMapper, but before we do, we first implement a simple custom exception to illustrate the ExceptionMapper’s functionality fully.
Create an Example Business Exception
Earlier, this tutorial admonished you to treat the business layer as a black-box. However, to illustrate exception handling accurately, we must stray from that assumption. Usually, business logic results in business errors. For example, if our back-end system attempted to delete a non-existent CatalogImage, it might throw a CatalogImageDoesNotExist exception. Of course, this is just a hypothetical example, but the critical point is that systems usually throw custom exceptions.
- Create a new package named com.bts.exceptions and create a new class named CatalogImageDoesNotExistException that extends Exception.
- Compile and package the application using Maven.
package com.bts.exception;

public class CatalogImageDoesNotExistException extends Exception {
}
JAX-RS ExceptionMapper
The ExceptionMapper interface maps exceptions to Response objects. When the application throws an exception of the mapped type, the mapper automatically handles the exception and returns a Response.
- Create the class CatalogImageDoesNotExistExceptionMapper and place it in the com.bts.imageclient.config package.
- Implement the ExceptionMapper interface.
- Implement the toResponse interface method.
package com.bts.imageclient.config;

import javax.ws.rs.core.MediaType;
import javax.ws.rs.core.Response;
import javax.ws.rs.ext.ExceptionMapper;
import javax.ws.rs.ext.Provider;
import com.bts.exception.CatalogImageDoesNotExistException;

@Provider
public class CatalogImageDoesNotExistExceptionMapper implements ExceptionMapper<CatalogImageDoesNotExistException> {

  @Override
  public Response toResponse(CatalogImageDoesNotExistException exception) {
    return Response.status(Response.Status.NOT_FOUND).type(MediaType.APPLICATION_JSON).entity("{"The CatalogImage does not exist."}").build();
  }
}
The method implementation, admittedly simplistic, returns a simple JSON response with the 404 HTTP response code and a simple JSON message informing the caller that the method CatalogImage was not found.
Modify RestConfig
- Modify RestConfig.java to register the CatalogImageDoesNotExistExceptionMapper.class. Although the @Provider JAX-RS annotation allows JAX-RS to discover this class when scanning annotations and register it as an exception mapping provider, keep it simple and register the class manually in the RestConfig class.
@PostConstruct
public void init() {
  register(CatalogImageDoesNotExistExceptionMapper.class);
  configureSwagger();
  configEndPoints();
}
Modifying the API
Now that we have mapped the exception let’s modify the delete method to throw this exception. However, before we do, pause to consider what happens if your code does not handle an exception. As you will see from the example, JAX-RS automatically translates the error into a generic error that returns a 500 HTTP response code and a JSON error message.
Modify getImage
- Modify getImage so it generates a null pointer exception when passing “foo” as the image identifier.
@GET
@Path("/{image-id}")
public CatalogImage getImage(@PathParam("image-id") String imageId)
{
  if(imageId.equals("foo"))
  {
    CatalogMetaDatum x = null;
    x.setName("foo");
  }

  return CatalogImageTestGenerator.generateTestImage(imageId);
}
- Test in Postman and note the method returns the error as the response and 500 as the HTTP status code.

JAX-RS returned a status code of 500 and a generic error JSON response for us. So if you forget error handling, you can rest assured that clients will receive an HTTP status code indicating an error occurred, and an error message provided as JSON.
Modify delete Method
Assume that when the application attempts to delete a non-existent CatalogImage, it throws a CatalogImageNotFoundException. To mimic this behavior, modify deleteImage to throw this exception.
- Modify deleteImage so it throws a CatalogImageDoesNotExistException if the CatalogImage’s identifier is “foo.”
@DELETE
@Path("/{image-id}")
public Response deleteImage(@PathParam("image-id") String imageId) throws CatalogImageDoesNotExistException {
  if(imageId.equals("foo")) throw new CatalogImageDoesNotExistException();
  return Response.ok().entity("{"CatalogImage deleted successfully."}").build();
}
- Compile and package the application using Maven.
- Start the application so we can test it using Postman.
Test in Postman
- Modify the call to delete so that the identifier is “foo.”
http://localhost:8080/imageclient/images/foo
- Click Save and the Response returned is the string mapped in the Mapper and is 404 response code.

Mapping business exceptions to responses allows RESTful APIs to send meaningful errors to client software. Map exceptions to responses so that your RESTful API returns useful HTTP status codes and error messages.
API Versioning
Versioning is often an afterthought when developing a RESTful API. This oversight can lead to problems later as, after having created a RESTful API, how can an API be versioned without significant refactoring? Fortunately, there is at least a straightforward technique to add versioning to a preexisting API. Let’s use this technique to add versioning to our API. The technique is to add a version to our URL and to extend ClientImageController with a child class. Note that this technique is not a good technique for APIs that are changed frequently; however, a well designed RESTful API should not require change often.
Modify CatalogImageController & JerseyConfig
An easy way to modify your API is by creating a subclass of your original controller. The subclass implements the modified methods while its parent (the original controller) remains unchanged.
- Create a new package com.bts.imageclient.rest.api.controller.v2
- Create a new class named CatalogImageControllerV2 that extends CatalogImageController.
- Change the @Path annotation to include v2 in the path.
- Modify getImage to return a simple string to confirm it is being called and not getImage in CatalogImageController.
package com.bts.imageclient.rest.api.controller.v2;

import javax.ws.rs.GET;
import javax.ws.rs.Path;
import javax.ws.rs.PathParam;
import javax.ws.rs.Produces;
import javax.ws.rs.core.Response;

import org.springframework.stereotype.Component;
import com.bts.imageclient.rest.api.controller.CatalogImageController;
import io.swagger.annotations.Api;

@Component
@Path("/v2/images")
@Produces("application/json")
@Api(value = "CatalogImageControllerV2 Resource", produces = "application/json")
public class CatalogImageControllerV2 extends CatalogImageController {

  @GET
  @Path("/{image-id}")
  public Response getImage(@PathParam("image-id") String imageId)
  {
    return Response.ok().entity("{"This is version Two."}").build();
  }
}
- Modify JerseyConfig to register the new controller.
private void configEndPoints(){
  register(CatalogClientController.class);
  register(CatalogImageController.class);
  register(CatalogImageControllerV2.class);
}
- Compile and package the application using Maven.
- Start the application so we can test in Postman.
Test in Postman
- Open Postman and get an image using the original URL.
http://localhost:8080/imageclient/images/123
As expected, Postman invoked the original REST endpoint and returned a CatalogImage as JSON.
- Add v2 to the path to get an image using the new API version.
http://localhost:8080/imageclient/v2/images/123
Postman returns the JSON message from the new version of getImage rather than the parent class getImage version.

- Add v2 to the delete URL and click Send.
http://localhost:8080/imageclient/v2/images/foo
Postman still returns the original response expected from delete.

Calling the original delete, even though we added v2 to the URL, makes sense, as the delete method, only exists in CatalogImageController. The original method, in the parent class CatalogImageController, was called because deleteImage was not overridden by CatalogImageControllerV2.
Review in Swagger
- Open the API’s Swagger UI.

As this simple example illustrates, adding a version to an API’s base URL is an easy means of adding versioning to an API.
Publishing on RapidAPI
Whew, we covered a lot of material. But we have one more thing to cover; publishing your API on RapidAPI. After all, you are reading this on RapidAPI’s blog, so naturally, this tutorial should end by publishing the API on RapidAPI. But seriously, if your API is for inter-departmental communication, then you probably do not want to publish it as a public API. But, let’s suppose your API is public. Just as nobody will read a tutorial, if he or she cannot find it, nobody will use your API if they cannot find it. RapidAPI is a centralized location where people go to find published API. By publishing your API to RapidAPI, your API has a much higher chance of being discovered by potential users. So let’s end by publishing the API to RapidAPI.
Deploying API to a Server
We will not discuss how to publish your API to a web server. However, we do briefly explain Heroku (Heroku website), which is what I used to host my Spring Boot application for this tutorial. The following two resources should be sufficient to deploy the API to Heroku if you wish to use Heroku. In particular, if you follow the tutorial listed in the second bullet, you will duplicate the steps I took to publish the API.
- The documentation on deploying Spring Boot to Heroku is available here (Deploying Spring Boot Applications to Heroku).
- This resource is a good tutorial explaining the steps to publish a Spring Boot REST API to Heroku (Create and Publish Your Rest API Using Spring Boot and Heroku).
- Before deploying your application to a server, do not forget to change the Swagger host in your JerseyConfig.java file.
private void configureSwagger() {

  register(ApiListingResource.class);
  register(SwaggerSerializers.class);
  register(WadlResource.class);
  BeanConfig config = new BeanConfig();
  config.setTitle("ImageClient Tutorial API");
  config.setHost("https://imagetestcatalog.herokuapp.com");
  config.setVersion("v1");
  config.setContact("Joe Programmer");
  config.setSchemes(new String[] { "http", "https" });
  config.setBasePath("/imageclient");
  config.setResourcePackage("com.bts.imageclient.rest.api.controller");
  config.setPrettyPrint(true);
  config.setScan(true);
}
After deploying your application, you should be able to navigate to the Swagger API. Let’s continue assuming you deployed the application to Heruku.
- Navigate to the Swagger UI for your site, for me it was https://imagetestcatalog.herokuapp.com.
- Notice the Base URL and the path to the swagger.json file directly below the “ImageClient Tutorial API” heading.
- Right-click on the URL and download the file.
- If you wish, test a few of the endpoints the same way we did earlier in the tutorial.

Publishing API on RapidAPI
After publishing the API to Heroku, the next step is publishing the API to RapidAPI. Rapid API has ample documentation on getting started publishing your API (Add an API), and it is assumed here that you already have a RapidAPI account and have familiarity using RapidAPI. Before continuing, read the documentation outlining adding an API to RapidAPI. After reading the documentation, complete the following steps to add the API to RapidAPI (changing names to your own).
- Click on the Add New API to open the Add New API screen.

- Add an API Name and Short Description.
- Click on OpenAPI and upload the swagger.json file you saved locally. Be sure to use the Swagger file from where you published your API and not when we developed locally.
- Click Add API after uploading the Swagger file.

- On the next screen, add the website name and click save.

- Navigate to your profile page and notice RapidAPI created yourAPI.

- Click on the API, and RapidAPI takes you to your API’s documentation page.

- Note that the API is private, you must make your API public for others to find and use your API (not discussed here).
Let’s test that the API is configured correctly by calling one of its endpoints.
- Test the getImage endpoint by entering the value “123” into the image-id and then clicking Test Endpoint.

- If, upon testing, you discover an error, do not panic. Note that I received a Server Error when calling my endpoint.

- Navigate to your API under My APIs and click Edit.
- Click on the Settings tab.
- Fix any errors.

Notice in the settings above, the Base URL is incorrect. So I fixed the URL and returned to my API documentation page. I then tested the getImage endpoint and obtained the expected response.

Although the following steps are sufficient for development, refer to the documentation for complete instructions on publishing your API on RapidAPI. There you will find more information on the settings, security, endpoints, plans & pricing, and other information needed to publish your API. Remember, your API need not be free; you can charge users and get paid through RapidAPI for your API. For more information, refer to the RapidAPI documentation.
Summary
We covered a lot of material in this tutorial. First, we designed a RESTful API. We then covered some best practices to follow while designing that API. Although design, in particular formal design, has lost the appeal it once had, do not skip the design tasks listed in this tutorial, even if your design is nothing more than pencil markings on a napkin. Remember, finding and fixing a bug on paper is a magnitude easier than finding and fixing that bug in code. Model the resources and, if necessary, formalize the resultant resource model into a UML object model. We finalized our API design by determining the list of interactions an external system will perform with our API. After designing our API, we implemented our API using Jersey running in a Spring Boot application. We then documented our API using Swagger. But then, after noticing we overlooked exception handling and versioning, we added both to our API. After implementing our RESTful API, we deployed it to a web server and then published it on RapidAPI.
Developing a RESTful API is a lot of work. But trust the extra effort spent carefully designing and implementing an API will pay dividends. You now have a better understanding of the process behind designing and implementing a RESTful API. Creating a robust and easy to use API ensures your application fulfills its client’s needs. And at the end of the day, that is the only important criterion for judging a successful API.
View the Best JavaScript APIs List

Java ecosystem is packed with frameworks and libraries.
For sure not as many as in JavaScript world and they don’t get old as quickly too but still this fact causes that I dare to think that we’ve already forgotten how to create a completely framework-less applications.
You may say: Spring is a standard, why to re-invent a wheel. Spark is a nice small REST framework.
Light-rest-4j is yet another.
I tell you, sure, you’re right. You get a lot of bells and whistles with a framework, but you also get a lot of magic, learning overhead, additional features which you’ll most likely not use and bugs as well.
The more external code is there in your service the more chance its developers made some mistakes.
Open source community is active and there’s a great chance that these bugs in framework will be fixed soon, but still I’d like to encourage you to re-think if you really need a framework.
If you’re doing a small service or a console application maybe you can live without it.
What you could gain (or loose) by sticking to pure java code? Think of these:
- your code could be much cleaner and predictable (or a complete mess if you’re a bad coder)
- you’d have more control over your code, you won’t be constrained by a framework (but you’d have to often write own code for what framework give you out of the box)
- your application would deploy and start much quicker, because the framework code does not need to initialise dozen of classes (or not start at all if you messed up the stuff, e.g. multi-threading)
- if you deploy your app on Docker, your images could be much slimmer because your jar would be slimmer too
I did a little experiment and tried developing a framework-less REST API.
I thought it could be interesting from learning perspective and a bit refreshing.
When I started building this I often came across situations when I missed some features which Spring provides out of the box.
At that times, instead of switching on another Spring capability, I had to rethink it and develop it myself.
It occurred that for real business case I would probably still prefer to use Spring instead of reinventing a wheel.
Still, I believe the exercise was pretty interesting experience.
Beginning.
I will go through this exercise step by step but not always paste a complete code here.
You can always checkout each step from a separate branch of the git repository.
Create a fresh Maven project with an initial pom.xml file:
<?xml version="1.0" encoding="UTF-8"?>
<project xmlns="http://maven.apache.org/POM/4.0.0"
  xmlns:xsi="http://www.w3.org/2001/XMLSchema-instance"
  xsi:schemaLocation="http://maven.apache.org/POM/4.0.0 http://maven.apache.org/xsd/maven-4.0.0.xsd">
  <modelVersion>4.0.0</modelVersion>

  <groupId>com.consulner.httpserver</groupId>
  <artifactId>pure-java-rest-api</artifactId>
  <version>1.0-SNAPSHOT</version>

  <properties>
    <java.version>11</java.version>
    <maven.compiler.source>${java.version}</maven.compiler.source>
    <maven.compiler.target>${java.version}</maven.compiler.target>
  </properties>

  <dependencies></dependencies>
</project>
Include java.xml.bind module dependency because those modules were removed in JDK 11 by JEP-320.
<dependency>
    <groupId>org.glassfish.jaxb</groupId>
    <artifactId>jaxb-runtime</artifactId>
    <version>2.4.0-b180608.0325</version>
</dependency>
and Jackson for JSON serialization
<dependency>
    <groupId>com.fasterxml.jackson.core</groupId>
    <artifactId>jackson-databind</artifactId>
    <version>2.9.7</version>
</dependency>
Then we will use Lombok to simplify POJO classes:
<dependency>
  <groupId>org.projectlombok</groupId>
  <artifactId>lombok</artifactId>
  <version>1.18.0</version>
  <scope>provided</scope>
</dependency>
and vavr for functional programming facilities
<dependency>
  <groupId>io.vavr</groupId>
  <artifactId>vavr</artifactId>
  <version>0.9.2</version>
</dependency>
I started from empty Application main class.
You can get an initial code from step-1 branch.
First endpoint
The starting point of the web application is com.sun.net.httpserver.HttpServer class.
The most simple /api/hello endpoint could look as below:
import java.io.IOException;
import java.io.OutputStream;
import java.net.InetSocketAddress;

import com.sun.net.httpserver.HttpServer;

class Application {

    public static void main(String[] args) throws IOException {
        int serverPort = 8000;
        HttpServer server = HttpServer.create(new InetSocketAddress(serverPort), 0);
        server.createContext("/api/hello", (exchange -> {
            String respText = "Hello!";
            exchange.sendResponseHeaders(200, respText.getBytes().length);
            OutputStream output = exchange.getResponseBody();
            output.write(respText.getBytes());
            output.flush();
            exchange.close();
        }));
        server.setExecutor(null); // creates a default executor
        server.start();
    }
}
When you run main program it will start web server at port 8000 and expose out first endpoint which is just printing Hello!, e.g. using curl:
curl localhost:8000/api/hello
Try it out yourself from step-2 branch.
Support different HTTP methods
Our first endpoint works like a charm but you will notice that no matter which HTTP method you’ll use it will respond the same.
E.g.:
curl -X POST localhost:8000/api/hello
curl -X PUT localhost:8000/api/hello
The first gotcha when building the API ourselves without a framework is that we need to add our own code to distinguish the methods, e.g.:
        server.createContext("/api/hello", (exchange -> {

            if ("GET".equals(exchange.getRequestMethod())) {
                String respText = "Hello!";
                exchange.sendResponseHeaders(200, respText.getBytes().length);
                OutputStream output = exchange.getResponseBody();
                output.write(respText.getBytes());
                output.flush();
            } else {
                exchange.sendResponseHeaders(405, -1);// 405 Method Not Allowed
            }
            exchange.close();
        }));
Now try again request:
curl -v -X POST localhost:8000/api/hello
and the response would be like:
> POST /api/hello HTTP/1.1
> Host: localhost:8000
> User-Agent: curl/7.61.0
> Accept: */*
>
< HTTP/1.1 405 Method Not Allowed
There are also a few things to remember, like to flush output or close exchange every time we return from the api.
When I used Spring I even did not have to think about it.
Try this part from step-3 branch.
Parsing request params
Parsing request params is another «feature» which we’ll need to implement ourselves in contrary to utilising a framework.
Let’s say we would like our hello api to respond with a name passed as a param, e.g.:
curl localhost:8000/api/hello?name=Marcin

Hello Marcin!
We could parse params with a method like:
public static Map<String, List<String>> splitQuery(String query) {
        if (query == null || "".equals(query)) {
            return Collections.emptyMap();
        }

        return Pattern.compile("&").splitAsStream(query)
            .map(s -> Arrays.copyOf(s.split("="), 2))
            .collect(groupingBy(s -> decode(s[0]), mapping(s -> decode(s[1]), toList())));

    }
and use it as below:
 Map<String, List<String>> params = splitQuery(exchange.getRequestURI().getRawQuery());
String noNameText = "Anonymous";
String name = params.getOrDefault("name", List.of(noNameText)).stream().findFirst().orElse(noNameText);
String respText = String.format("Hello %s!", name);
You can find complete example in step-4 branch.
Similarly if we wanted to use path params, e.g.:
curl localhost:8000/api/items/1
to get item by id=1, we would need to parse the path ourselves to extract an id from it. This is getting cumbersome.
Secure endpoint
A common case in each REST API is to protect some endpoints with credentials, e.g. using basic authentication.
For each server context we can set an authenticator as below:
HttpContext context =server.createContext("/api/hello", (exchange -> {
  // this part remains unchanged
}));
context.setAuthenticator(new BasicAuthenticator("myrealm") {
    @Override
    public boolean checkCredentials(String user, String pwd) {
        return user.equals("admin") && pwd.equals("admin");
    }
});
The «myrealm» in BasicAuthenticator is a realm name. Realm is a virtual name which can be used to separate different authentication spaces.
You can read more about it in RFC 1945
You can now invoke this protected endpoint by adding an Authorization header like that:
curl -v localhost:8000/api/hello?name=Marcin -H 'Authorization: Basic YWRtaW46YWRtaW4='
The text after Basic is a Base64 encoded admin:admin which are credentials hardcoded in our example code.
In real application to authenticate user you would probably get it from the header and compare with username and password store in database.
If you skip the header the API will respond with status
HTTP/1.1 401 Unauthorized
Check out the complete code from step-5 branch.
JSON, exception handlers and others
Now it’s time for more complex example.
From my past experience in software development the most common API I was developing was exchanging JSON.
We’re going to develop an API to register new users. We will use an in-memory database to store them.
Our user domain object will be simple:
@Value
@Builder
public class User {

    String id;
    String login;
    String password;
}
I’m using Lombok annotations to save me from constructor and getters boilerplate code, it will be generated in build time.
In REST API I want to pass only login and password so I created a separate domain object:
@Value
@Builder
public class NewUser {

    String login;
    String password;
}
Users will be created in a service which I will use in my API handler. The service method is simply storing the user.
In complete application it could do more, like send events after successful user registration.
public String create(NewUser user) {
    return userRepository.create(user);
}
Our in-memory implementation of repository is as follows:
import java.util.Map;
import java.util.UUID;
import java.util.concurrent.ConcurrentHashMap;

import com.consulner.domain.user.NewUser;
import com.consulner.domain.user.User;
import com.consulner.domain.user.UserRepository;

public class InMemoryUserRepository implements UserRepository {

    private static final Map USERS_STORE = new ConcurrentHashMap();

    @Override
    public String create(NewUser newUser) {
        String id = UUID.randomUUID().toString();
        User user = User.builder()
            .id(id)
            .login(newUser.getLogin())
            .password(newUser.getPassword())
            .build();
        USERS_STORE.put(newUser.getLogin(), user);

        return id;
    }
}
Finally, let’s glue all together in handler:
protected void handle(HttpExchange exchange) throws IOException {
        if (!exchange.getRequestMethod().equals("POST")) {
            throw new UnsupportedOperationException();
        }

        RegistrationRequest registerRequest = readRequest(exchange.getRequestBody(), RegistrationRequest.class);

        NewUser user = NewUser.builder()
            .login(registerRequest.getLogin())
            .password(PasswordEncoder.encode(registerRequest.getPassword()))
            .build();

        String userId = userService.create(user);

        exchange.getResponseHeaders().set(Constants.CONTENT_TYPE, Constants.APPLICATION_JSON);
        exchange.sendResponseHeaders(StatusCode.CREATED.getCode(), 0);

        byte[] response = writeResponse(new RegistrationResponse(userId));

        OutputStream responseBody = exchange.getResponseBody();
        responseBody.write(response);
        responseBody.close();
    }
It translates JSON request into RegistrationRequest object:
@Value
class RegistrationRequest {

    String login;
    String password;
}
which I later map to domain object NewUser to finally save it in database and write response as JSON.
I need to translate RegistrationResponse object back to JSON string.
Marshalling and unmarshalling JSON is done with Jackson object mapper (com.fasterxml.jackson.databind.ObjectMapper).
And this is how I instantiate the new handler in application main method:
 public static void main(String[] args) throws IOException {
        int serverPort = 8000;
        HttpServer server = HttpServer.create(new InetSocketAddress(serverPort), 0);

        RegistrationHandler registrationHandler = new RegistrationHandler(getUserService(), getObjectMapper(),
            getErrorHandler());
        server.createContext("/api/users/register", registrationHandler::handle);

        // here follows the rest..

 }
You can find the working example in step-6 git branch, where I also added a global exception handler which is used
by the API to respond with a standard JSON error message in case, e.g. when HTTP method is not supported or API request is malformed.
You can run the application and try one of the example requests below:
curl -X POST localhost:8000/api/users/register -d '{"login": "test" , "password" : "test"}'
response:
{"id":"395eab24-1fdd-41ae-b47e-302591e6127e"}
curl -v -X POST localhost:8000/api/users/register -d '{"wrong": "request"}'
response:
< HTTP/1.1 400 Bad Request
< Date: Sat, 29 Dec 2018 00:11:21 GMT
< Transfer-encoding: chunked
< Content-type: application/json
<
* Connection #0 to host localhost left intact
{"code":400,"message":"Unrecognized field "wrong" (class com.consulner.app.api.user.RegistrationRequest), not marked as ignorable (2 known properties: "login", "password"])n at [Source: (sun.net.httpserver.FixedLengthInputStream); line: 1, column: 21] (through reference chain: com.consulner.app.api.user.RegistrationRequest["wrong"])"}
Also, by chance I encountered a project java-express
which is a Java counterpart of Node.js Express framework
and is using jdk.httpserver as well, so all the concepts covered in this article you can find in real-life application framework 
which is also small enough to digest the codes quickly.
Creating a REST API
tutorial
java
server
rest
ajax
json
- REST
- Simple Example REST API
- Simple Java REST Client
- Simple JavaScript REST Client
- CORS
- Handling Logins in REST
- Token Authentication
- Summary
- Homework
Now we know how to create a web app using servlet classes. We know how to get user input, how to access a database, and how to handle user logins. But what if we want to support different kinds of programs instead of just a web app? What if we want to create a desktop application or an Android app? How do we provide access to our data for those programs without writing everything from scratch each time?
This tutorial introduces the idea of creating a REST API, which is a way of organizing our code so we can access our data from multiple applications. Your REST API is server code whose job it is to provide access to your data and to enforce rules like who can see what. Then other programs use your REST API to interact with your data.
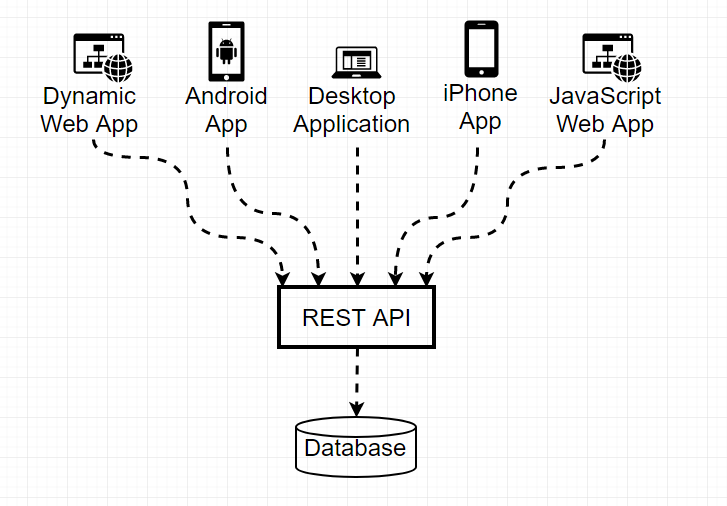
This high-level diagram shows how you might organize your code: you’d have a database (or multiple databases), and your REST API would sit on top of that. It would use SQL and JDBC to interact with the database, exactly like we’ve already learned about. Then other applications would call your REST API, which lets you centralize all of your core logic in one place instead of rewriting it every time you wanted to create a new application.
To put it another way: a REST API is just a web app, very similar to all of the web apps we’ve already built. The only difference is that instead of showing a website for a GET request, it provides data. And instead of using HTML forms to create a POST request, it takes POST requests from other applications! (Of course, one of those applications could be another web app that gets user input using HTML forms!)
REST
REST stands for representational state transfer, which is just a fancy name for a set of rules that you can follow to build a web app that provides access to data in a way that’s reusable by multiple applications, or many users of the same application. REST doesn’t actually involve any new technical concepts. It’s more a way of using the concepts we’ve already learned.
There are a few basic ideas behind REST:
- You access data via URLs. For example,
/users/Adalets you access data about a person named Ada. - You use HTTP methods to access or change data. For example, you’d view Ada’s data by issuing a
GETrequest to/people/Ada, and you’d modify Ada’s data by issuing aPOSTrequest to/people/Ada. You can use the other HTTP methods (likePUTorDELETE) to interact with the data as well. - You can represent data however you want. For example that
GETrequest might return a JSON string that represents the user data. ThePOSTrequest might then take aJSONstring. Or it could take a binary string, or XML, or a list of properties. It’s up to you. - Each request should be standalone. In other words, you should not store session information on the server! Everything needed to fulfill a request must be included in the request itself!
All of these “rules” exist for a reason, but it’s important to keep in mind that in the end, everything is up to you. You’re the programmer. The REST police aren’t going to come kick your door down if your code “violates” one of these rules. You should treat REST as a tool, not as a strict set of rules that you must follow at all costs. Do what makes sense to you and what works for your context.
API stands for application programmer interface, which is a fancy name for whatever a programmer uses to interact with a language or library. For example, Processing’s reference is an API: it’s the classes and functions we used to write Processing code. Similarly, the Java API is the list of classes and functions we use to write Java code. You can view JavaScript’s API on MDN. The point is that an API is a collection of things we can do when writing code. So when we say we’re creating a REST API, we just mean that we’re using REST ideas to create something that programmers can use to interact with our data.
Simple Example REST API
Let’s use all of these ideas to create a REST API. First off, let’s say we have a class that provides access to our data:
import java.util.HashMap;
import java.util.Map;

/**
 * Example DataStore class that provides access to user data.
 * Pretend this class accesses a database.
 */
public class DataStore {

	//Map of names to Person instances.
	private Map<String, Person> personMap = new HashMap<>();

	//this class is a singleton and should not be instantiated directly!
	private static DataStore instance = new DataStore();
	public static DataStore getInstance(){
		return instance;
	}

	//private constructor so people know to use the getInstance() function instead
	private DataStore(){
		//dummy data
		personMap.put("Ada", new Person("Ada", "Ada Lovelace was the first programmer.", 1815));
		personMap.put("Kevin", new Person("Kevin", "Kevin is the author of HappyCoding.io.", 1986));
		personMap.put("Stanley", new Person("Stanley", "Stanley is Kevin's cat.", 2007));
	}

	public Person getPerson(String name) {
		return personMap.get(name);
	}

	public void putPerson(Person person) {
		personMap.put(person.getName(), person);
	}
}
This example uses a Map to store data in memory, but this could just as easily use a database connection. The point is that this class provides access to our data. It uses a simple Person class:
public class Person {
	private String name;
	private String about;
	private int birthYear;

	public Person(String name, String about, int birthYear) {
		this.name = name;
		this.about = about;
		this.birthYear = birthYear;
	}

	public String getName() {
		return name;
	}

	public String getAbout() {
		return about;
	}

	public int getBirthYear() {
		return birthYear;
	}
}
This is just a plain old Java class that contains variables and functions for accessing those variables. Now we can create our servlet class:
import java.io.IOException;

import javax.servlet.ServletException;
import javax.servlet.http.HttpServlet;
import javax.servlet.http.HttpServletRequest;
import javax.servlet.http.HttpServletResponse;

import org.json.JSONObject;

public class PersonServlet extends HttpServlet {

	@Override
	public void doGet(HttpServletRequest request, HttpServletResponse response) throws IOException, ServletException {

		String requestUrl = request.getRequestURI();
		String name = requestUrl.substring("/people/".length());

		Person person = DataStore.getInstance().getPerson(name);

		if(person != null){
			String json = "{n";
			json += ""name": " + JSONObject.quote(person.getName()) + ",n";
			json += ""about": " + JSONObject.quote(person.getAbout()) + ",n";
			json += ""birthYear": " + person.getBirthYear() + "n";
			json += "}";
			response.getOutputStream().println(json);
		}
		else{
			//That person wasn't found, so return an empty JSON object. We could also return an error.
			response.getOutputStream().println("{}");
		}
	}


	@Override
	public void doPost(HttpServletRequest request, HttpServletResponse response) throws IOException, ServletException {

		String name = request.getParameter("name");
		String about = request.getParameter("about");
		int birthYear = Integer.parseInt(request.getParameter("birthYear"));

		DataStore.getInstance().putPerson(new Person(name, about, birthYear, password));
	}
}
This servlet class contains a doGet() function that gets a person’s name from the URL, and then uses the DataStore class to fetch that person. It then creates a JSON string from that person’s data, and returns that JSON as the response to the GET request. (If you don’t remember JSON, check out the JSON tutorial.) This code uses the json.org Java library to escape the String values before adding them to our JSON. This is important! Remember that JSON uses keys and values surrounded by quotation marks, like this:
{
"name": "Ada",
"about": "Ada Lovelace was the first programmer.",
"birthYear": 1815
}
But what if name or about contain a quotation mark? We’d have something like this:
{
"name": "Ada",
"about": "This contains " a quote",
"birthYear": 1815
}
This is not valid JSON, and you’ll get an error when you try to parse it. We need to escape the quotation mark so it looks like this:
{
"name": "Ada",
"about": "This contains " a quote",
"birthYear": 1815
}
The escaped quotation mark " is treated as a single character that doesn’t break the JSON format. We’re using the JSON library to handle this case for us through the JSONObject.quote() function.
Then the doPost() function gets three parameters from the POST request and uses them to add data to the DataStore class.
Finally, we just need a web.xml file to map our servlet to a URL:
<web-app
	xmlns="http://xmlns.jcp.org/xml/ns/javaee"
	xmlns:xsi="http://www.w3.org/2001/XMLSchema-instance"
	xsi:schemaLocation="http://xmlns.jcp.org/xml/ns/javaee
		http://xmlns.jcp.org/xml/ns/javaee/web-app_3_1.xsd"
	version="3.1">

	<servlet>
		<servlet-name>PersonServlet</servlet-name>
		<servlet-class>PersonServlet</servlet-class>
	</servlet>

	<servlet-mapping>
		<servlet-name>PersonServlet</servlet-name>
		<url-pattern>/people/*</url-pattern>
	</servlet-mapping>

</web-app>
This maps any URL that starts with /people/ to our servlet. Try running this on a local server and then navigating to http://localhost:8080/people/Ada in your browser. You should see the JSON representation:
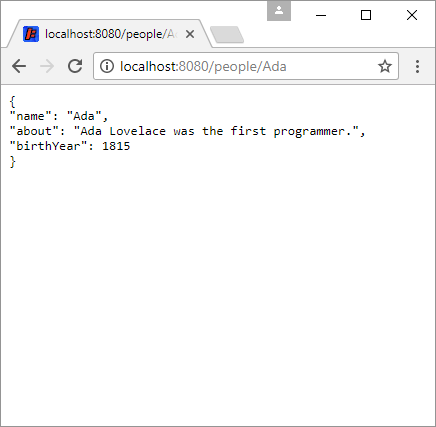
This isn’t very exciting, but that’s not the point. You’re not really supposed to view a REST API in a browser anyway. The whole point is that you can use this data to build other applications!
Simple Java REST Client
The details of exactly how to build one of those applications (also called clients) are a little bit outside this tutorial, whose goal is to show you how to create the REST API, not a client. But just to show you how everything fits together, here’s a very basic command line program that uses our REST API to get or set user data:
import java.io.IOException;
import java.io.OutputStreamWriter;
import java.net.HttpURLConnection;
import java.net.URL;
import java.net.URLEncoder;
import java.util.Scanner;
import org.json.JSONObject;

public class RestApiClient {

	public static void main(String[] args) throws IOException{

		Scanner scanner = new Scanner(System.in);

		System.out.println("Welcome to the Person Info Command Line Editor.");
		System.out.println("(PICLER for short.)");
		System.out.println("Do you want to get or set a person's info?");
		System.out.println("(Type 'get' or 'set' now.)");
		String getOrSet = scanner.nextLine();
		if("get".equalsIgnoreCase(getOrSet)){
			System.out.println("Whose info do you want to get?");
			System.out.println("(Type a person's name now.)");
			String name = scanner.nextLine();

			String jsonString = getPersonData(name);
			JSONObject jsonObject = new JSONObject(jsonString);

			int birthYear = jsonObject.getInt("birthYear");
			System.out.println(name + " was born in " + birthYear + ".");

			String about = jsonObject.getString("about");
			System.out.println(about);
		}
		else if("set".equalsIgnoreCase(getOrSet)){
			System.out.println("Whose info do you want to set?");
			System.out.println("(Type a person's name now.)");
			String name = scanner.nextLine();

			System.out.println("When was " + name + " born?");
			System.out.println("(Type a year now.)");
			String birthYear = scanner.nextLine();

			System.out.println("Can you tell me about " + name + "?");
			System.out.println("(Type a sentence now.)");
			String about = scanner.nextLine();

			setPersonData(name, birthYear, about, password);
		}

		scanner.close();

		System.out.println("Thanks for using PICLER.");

	}

	public static String getPersonData(String name) throws IOException{

		HttpURLConnection connection = (HttpURLConnection) new URL("http://localhost:8080/people/" + name).openConnection();

		connection.setRequestMethod("GET");

		int responseCode = connection.getResponseCode();
		if(responseCode == 200){
			String response = "";
			Scanner scanner = new Scanner(connection.getInputStream());
			while(scanner.hasNextLine()){
				response += scanner.nextLine();
				response += "n";
			}
			scanner.close();

			return response;
		}

		// an error happened
		return null;
	}

	public static void setPersonData(String name, String birthYear, String about) throws IOException{
		HttpURLConnection connection = (HttpURLConnection) new URL("http://localhost:8080/people/" + name).openConnection();

		connection.setRequestMethod("POST");

		String postData = "name=" + URLEncoder.encode(name);
		postData += "&about=" + URLEncoder.encode(about);
		postData += "&birthYear=" + birthYear;

		connection.setDoOutput(true);
	    OutputStreamWriter wr = new OutputStreamWriter(connection.getOutputStream());
	    wr.write(postData);
	    wr.flush();

		int responseCode = connection.getResponseCode();
		if(responseCode == 200){
			System.out.println("POST was successful.");
		}
		else if(responseCode == 401){
			System.out.println("Wrong password.");
		}
	}
}
This program asks the user whether they want to get or set user data. If they want to get data, then the program gets a name from the user, and then calls the getPersonData() function. That function uses the HttpUrlConnection class, which is just a regular Java class available in the standard API. That class lets you make requests to a server, and the getPersonData() function uses it to make a GET request to our REST API (make sure your server is running when you run this code). The response is the JSON our REST API outputs, which this client program then parses using the JSON library to output to the command line.
If the user wants to set data, then the program gets a name, birth year, and an about sentence from the user, and then calls the setPersonData() function. That function uses the HttpUrlConnection class to send a POST request to our server. The code uses the URLEncoder.encode() function to encode our String values, just in case they contain characters like & ampersands which would break the format of the data. Then our server handles that request and stores the data.
Welcome to the Person Info Command Line Editor.
(PICLER for short.)
Do you want to get or set a person's info?
(Type 'get' or 'set' now.)
get
Whose info do you want to get?
(Type a person's name now.)
Ada
Ada was born in 1815.
Ada Lovelace was the first programmer.
Thanks for using PICLER.
We now have two separate applications: our REST API running in a server, and a client application that runs in the command line. We could use very similar code to create a desktop application or an Android app, or even another server that provides a user interface.
Simple JavaScript REST Client
Similarly, here’s a simple HTML webpage that uses JavaScript to get or set person data using our REST API:
<!DOCTYPE html>
<html>
	<head>
		<title>PIJON</title>

		<script>
			function getPersonInfo(){
				var name = document.getElementById('name').value;

				var ajaxRequest = new XMLHttpRequest();
				ajaxRequest.onreadystatechange = function(){
					if(ajaxRequest.readyState == 4){
						if(ajaxRequest.status == 200){
							var person = JSON.parse(ajaxRequest.responseText);
							document.getElementById('birthYear').value = person.birthYear;
							document.getElementById('about').value = person.about;
						}
					}
				}
				ajaxRequest.open('GET', 'http://localhost:8080/people/' + name);
				ajaxRequest.send();
			}

			function setPersonInfo(){
				var name = document.getElementById('name').value;
				var about = document.getElementById('about').value;
				var birthYear = document.getElementById('birthYear').value;

				var postData = 'name=' + name;
				postData += '&about=' + encodeURIComponent(about);
				postData += '&birthYear=' + birthYear;

				var ajaxRequest = new XMLHttpRequest();
				ajaxRequest.open('POST', 'http://localhost:8080/people/' + name);
				ajaxRequest.setRequestHeader("Content-type", "application/x-www-form-urlencoded");
				ajaxRequest.send(postData);
			}
		</script>
	</head>
	<body>
		<h1>PIJON</h1>
		<p>(Person Info in JavaScript Object Notation)</p>
		<p><input type="text" value="Ada" id="name"><button type="button" onclick="getPersonInfo()">Get</button></p>
		<p>Birth year:</p>
		<input type="text" id="birthYear">
		<p>About:</p>
		<textarea id="about"></textarea>
		<p><button type="button" onclick="setPersonInfo()">Save</button></p>
	</body>
</html>
This webpage shows three input boxes. If the user types a name and presses the Get button, the getPersonInfo() function uses AJAX to make a GET request to our REST API. It then parses the JSON response and populates the other text boxes. If the user then modifies those text boxes and clicks the Save button, the setPersonInfo() function uses AJAX to make a POST request to our REST API.
Try making a change in the JavaScript client and then viewing it in the command line application!
CORS
Depending on your settings, you might have gotten an error when you tried to run the above JavaScript. Something like:
XMLHttpRequest cannot load http://localhost:8080/people/Ada. No 'Access-Control-Allow-Origin' header is present on the requested resource. Origin 'null' is therefore not allowed access.
This is because by default, JavaScript on one server is not allowed to access stuff on another server. In our case our JavaScript is not even on a server (we just opened the .html file in our browser), and our REST API is on a server at localhost:8080. The point is that our JavaScript isn’t allowed to access our server.
To fix this, we need to enable cross-origin resource sharing, or CORS, in our server. How you do this depends on which server you’re using. So if your real hosting is on AWS Elastic Beanstalk, you might want to Google something like “AWS Elastic Beanstalk enable CORS”.
We’re using a local Jetty server, so to enable CORS first we need to add jetty-servlets.jar and jetty-util.jar to our classpath. Then we need to add a filter to our web.xml file:
<web-app
	xmlns="http://xmlns.jcp.org/xml/ns/javaee"
	xmlns:xsi="http://www.w3.org/2001/XMLSchema-instance"
	xsi:schemaLocation="http://xmlns.jcp.org/xml/ns/javaee
		http://xmlns.jcp.org/xml/ns/javaee/web-app_3_1.xsd"
	version="3.1">

	<servlet>
		<servlet-name>PersonServlet</servlet-name>
		<servlet-class>PersonServlet</servlet-class>
	</servlet>

	<servlet-mapping>
		<servlet-name>PersonServlet</servlet-name>
		<url-pattern>/people/*</url-pattern>
	</servlet-mapping>

	<filter>
	    <filter-name>cross-origin</filter-name>
	    <filter-class>org.eclipse.jetty.servlets.CrossOriginFilter</filter-class>
	    <init-param>
	        <param-name>allowedOrigins</param-name>
	        <param-value>*</param-value>
	    </init-param>
	    <init-param>
	        <param-name>allowedMethods</param-name>
	        <param-value>GET,POST</param-value>
	    </init-param>
	    <init-param>
	        <param-name>allowedHeaders</param-name>
	        <param-value>X-Requested-With,Content-Type,Accept,Origin,Authorization</param-value>
	    </init-param>
	</filter>

	<filter-mapping>
	    <filter-name>cross-origin</filter-name>
	    <url-pattern>/*</url-pattern>
	</filter-mapping>

</web-app>
The <filter> and <filter-mapping> tags enable CORS for our local server.
Again, how you enable CORS for your server depends on which server you’re using!
Handling Logins in REST
We’ve already learned that we can use sessions to store per-user information on our server, which allows us to handle things like logins. But when creating a REST API, every request should be standalone, which means we shouldn’t store per-user information on the server. In other words, we shouldn’t use sessions to track user logins in a REST server.
But what if we want to restrict access to some of our data? For example, what if we only want a user to be able to edit their own information? If we could store per-user data on the server, we could track whether a user was logged in. But since we can’t store data on the server, we have to do something else.
We solve this problem by sending in the user’s login information (username and password) with every request.
To demonstrate this, let’s add a password field to our Person class:
public class Person {
	private String name;
	private String about;
	private int birthYear;
	private String password;

	public Person(String name, String about, int birthYear, String password) {
		this.name = name;
		this.about = about;
		this.birthYear = birthYear;
		this.password = password;
	}

	public String getName() {
		return name;
	}

	public String getAbout() {
		return about;
	}

	public int getBirthYear() {
		return birthYear;
	}

	public String getPassword(){
		return password;
	}
}
(Remember that in real life we wouldn’t store the password directly; we’d store a hash of the password.)
Then let’s add some passwords to our fake dummy data in the DataStore class
personMap.put("Ada", new Person("Ada", "Ada Lovelace was the first programmer.", 1815, "password one"));
personMap.put("Kevin", new Person("Kevin", "Kevin is the author of HappyCoding.io.", 1986, "password two"));
personMap.put("Stanley", new Person("Stanley", "Stanley is Kevin's cat.", 2007, "password three"));
In real life you’d get these passwords (again, the hashes of the passwords) from users when they register.
Finally, let’s change the doPost() function of our PersonServlet class:
public void doPost(HttpServletRequest request, HttpServletResponse response) throws IOException, ServletException {

	String name = request.getParameter("name");
	String about = request.getParameter("about");
	String password = request.getParameter("password");
	int birthYear = Integer.parseInt(request.getParameter("birthYear"));

	Person personToEdit = DataStore.getInstance().getPerson(name);

	if(personToEdit != null && personToEdit.getPassword().equals(password)){
		DataStore.getInstance().putPerson(new Person(name, about, birthYear, password));
	}
	else{
		response.sendError(HttpServletResponse.SC_UNAUTHORIZED);
	}
}
Now this function gets the password from the request, and checks to make sure it’s valid before it goes through with submitting the edit. If it’s not valid, it returns an error code.
This is just a simple example to show you the basics, but the idea is the same for more complicated projects: you pass in the login data with every request, and the server checks it before doing any processing.
Remember that GET requests usually have parameters passed in through the URL itself, usually through query parameters. So if we wanted to make it so users could only view their own information but not view the information of other users, we’d have to use URLs like this:
http://localhost:8080/people/Ada?password=MyPasswordHere
We could take this approach and modify the doGet() function in our PeopleServlet class to get the password from the query parameter and check it before returning any user data. Then we’d modify our REST client applications to build the URL so it contains the query parameter. This is very similar to what we did for the POST request, except we’re using query parameters in the URL instead of data in the request body.
Nothing is stopping us from doing exactly that, and it would work. But in general, passing login information via the URL is considered a bad idea. The URL might get cached or logged, which could allow hackers to get our login information. And from a design perspective it’s a little messy. This is pretty subjective, but we’re mixing login information with request information, which isn’t ideal. We want to separate the request (the what) from information about the request (the how). In other words, we don’t want to mix login information into our request URLs.
Instead of putting login information in the URL itself, most REST APIs use an authorization header to handle login information. A request header allows a request to include information about itself: stuff like the browser version and cache data. The authorization header is just a username and a password that goes along with a request.
We’re the ones writing the code, so how we represent the username and password is up to us. But traditionally, it’s represented as a 64-bit encoded string. That might sound complicated, but it’s just a way of storing the username and password so it doesn’t mess up the formatting of the request, exactly like we’ve already seen with URLEncoder.encode() and JSONObject.quote() in our code above. We can do that using the Base64 class that comes standard with Java.
In a servlet function, first we get the authorization header:
String authHeader = request.getHeader("authorization");
The authHeader variable will hold something like Basic dXNlcm5hbWU6cGFzc3dvcmQ=, which tells us how to authenticate (Basic just means to use a username and password), followed by a username and password encoded in base 64. Next we need to isolate the encoded part, which we can do using the substring() function:
String encodedAuth = authHeader.substring(authHeader.indexOf(' ') + 1);
This gets the part of the String that starts after the space, which gives us just the encoded username and password. Next we need to decode the encoded value:
String decodedAuth = new String(Base64.getDecoder().decode(encodedAuth));
This decodes dXNlcm5hbWU6cGFzc3dvcmQ= to be something like username:password. So now we need to separate the username and the password:
String username = decodedAuth.substring(0, decodedAuth.indexOf(':'));
String password = decodedAuth.substring(decodedAuth.indexOf(':')+1);
This uses the substring() function to separate the String into the part before and after the : colon. Note that this means your usernames should not contain a colon!
Putting it all together, it looks like this:
public void doPost(HttpServletRequest request, HttpServletResponse response) throws IOException, ServletException {

	String authHeader = request.getHeader("authorization");
	String encodedAuth = authHeader.substring(authHeader.indexOf(' ')+1);
	String decodedAuth = new String(Base64.getDecoder().decode(encodedAuth));
	String username = decodedAuth.substring(0, decodedAuth.indexOf(':'));
	String password = decodedAuth.substring(decodedAuth.indexOf(':')+1);

	String nameToEdit = request.getParameter("name");
	String about = request.getParameter("about");
	int birthYear = Integer.parseInt(request.getParameter("birthYear"));

	Person personToEdit = DataStore.getInstance().getPerson(nameToEdit);
	Person loggedInPerson = DataStore.getInstance().getPerson(username);

	//make sure user is in our data
	if(personToEdit == null || loggedInPerson == null){
		response.sendError(HttpServletResponse.SC_UNAUTHORIZED);
		return;
	}

	//don't let users edit other users
	if(!nameToEdit.equals(loggedInPerson.getName())){
		response.sendError(HttpServletResponse.SC_UNAUTHORIZED);
		return;
	}

	//make sure password is valid
	//use hashed passwords in real life!
	if(!password.equalsIgnoreCase(loggedInPerson.getPassword())){
		response.sendError(HttpServletResponse.SC_UNAUTHORIZED);
		return;
	}

	//if we made it here, everything is okay, save the user
	DataStore.getInstance().putPerson(new Person(nameToEdit, about, birthYear, password));
}
Now our doPost() function expects a username and password to be encoded in base 64 in the authorization header of the request. It still expects data to be in the request body, and it uses the request.getParameter() function to get that stuff. It then uses several if statements to make sure the login information matches the requirements. If not, it returns an error. If the login information is valid, then it stores the information from the request in the DataStore class (which would probably be going to a database in real life).
In our REST clients, we’d have to do the same thing, just in reverse:
String authString = name + ":" + password;
String encodedAuth = Base64.getEncoder().encodeToString(authString.getBytes());
String authHeader = "Basic " + encodedAuth;
connection.setRequestProperty ("Authorization", authHeader);
This code takes a username and password and creates an authorization string from them by simply combining them with a : colon in the middle. It then encodes that authorization string in base 64. It then creates a header string by adding Basic to the beginning, so the server knows to expect a username and password. Finally, it sets the Authorization header to be sent to the server.
Putting it all together, it looks like this:
public static void setPersonData(String name, String birthYear, String about, String password) throws IOException{
	HttpURLConnection connection = (HttpURLConnection) new URL("http://localhost:8080/people/" + name).openConnection();

	connection.setRequestMethod("POST");

	String authString = name + ":" + password;
	String encodedAuth = Base64.getEncoder().encodeToString(authString.getBytes());
	String authHeader = "Basic " + encodedAuth;
	connection.setRequestProperty ("Authorization", authHeader);

	String postData = "name=" + URLEncoder.encode(name);
	postData += "&about=" + URLEncoder.encode(about);
	postData += "&birthYear=" + birthYear;

	connection.setDoOutput(true);
	OutputStreamWriter wr = new OutputStreamWriter(connection.getOutputStream());
	wr.write(postData);
	wr.flush();

	int responseCode = connection.getResponseCode();
	if(responseCode == 200){
		System.out.println("POST was successful.");
	}
	else if(responseCode == 401){
		System.out.println("Wrong password.");
	}
}
Note that we’re using base 64 as an encoding, not as encryption! In other words, using base 64 doesn’t make it harder for hackers to get at a username and password! We only use it so we don’t break the formatting of the request with special characters in the username or password. To prevent hackers from getting the username and password, you need to use HTTPS and the other precautions we’ve already covered.
Also note that you can create a request that uses the authorization header, including the base 64 encoding, from JavaScript as well.
Token Authentication
With all of the above approaches, we need to send the username and password with every request, which means that clients need to keep the username and password in memory at all times. This gives hackers more opportunities to get at usernames and passwords: they might find ways to hack our clients, or they might find ways to look at our server logs, or any number of other attack vectors.
Instead of sending the username and password with every request, we can submit them to our REST API just once, and have the REST API return what’s called a token, which is just a random String value. The server stores that token, along with which username it maps to, as well as an expiration time (usually about 15 minutes in the future). The client then stores the token in memory instead of the password, and sends the token along with every request. The server uses that token to look up which username it maps to, and makes sure that requests using that token only work until the expiration time.
With this approach, if an attacker gets the token, they only have 15 minutes to do any damage. This is much better than a hacker getting a user’s password.
On the server side, we’d start by creating a way to store token information:
import java.util.HashMap;
import java.util.Map;
import java.util.UUID;

/**
 * Class that holds token data. In real life this might use a database.
 */
public class TokenStore {

	//Map of token (ranodm string) to TokenData (username and expiration time)
	private Map<String, TokenData> tokenMap = new HashMap<>();

	//this class is a singleton and should not be instantiated directly!
	private static TokenStore instance = new TokenStore();
	public static TokenStore getInstance(){
		return instance;
	}

	//private constructor so people know to use the getInstance() function instead
	private TokenStore(){}

	/**
	 * Generates a token for the username, stores that token along with an
	 * expiration time, and then returns the token so clients can store it.
	 */
	public String putToken(String username){
		String token = UUID.randomUUID().toString();
		tokenMap.put(token, new TokenData(username));
		return token;
	}

	/**
	 * Returns the username mapped to the username, or null
	 * if the token isn't found or has expired.
	 */
	public String getUsername(String token){
		if(tokenMap.containsKey(token)){
			if(tokenMap.get(token).expirationTime > System.currentTimeMillis()){
				return tokenMap.get(token).username;
			}
			else{
				//the token has expired, delete it
				tokenMap.remove(token);
			}
		}
		return null;
	}

	/**
	 * Internal class that holds a username and an expiration time.
	 */
	private static class TokenData{
		String username;
		long expirationTime;

		private TokenData(String username){
			this.username = username;
			//15 minutes from now
			expirationTime = System.currentTimeMillis() + 15 * 60 * 1000;
		}
	}
}
This class contains a Map of tokens (which are just random String values) to TokenData instances (which are just a username and an expiration time). The putToken() function uses the UUID class (which is just a regular Java class) to generate a random string to use as a token, then stores that token along with a username and an expiration time, and finally returns the token so clients can use it. The getUserName() function takes a token and checks that the token is valid and not expired, and if so it returns the associated username. Otherwise it returns null.
Then we would create a servlet class that allows clients to post a username and password to get a token:
import java.io.IOException;
import java.util.Base64;

import javax.servlet.ServletException;
import javax.servlet.http.HttpServlet;
import javax.servlet.http.HttpServletRequest;
import javax.servlet.http.HttpServletResponse;

public class AuthServlet extends HttpServlet {

	@Override
	public void doPost(HttpServletRequest request, HttpServletResponse response) throws IOException, ServletException {
		String authHeader = request.getHeader("authorization");
		String encodedAuth = authHeader.substring(authHeader.indexOf(' ')+1);
		String decodedAuth = new String(Base64.getDecoder().decode(encodedAuth));
		String username = decodedAuth.substring(0, decodedAuth.indexOf(':'));
		String password = decodedAuth.substring(decodedAuth.indexOf(':')+1);

		Person loggedInPerson = DataStore.getInstance().getPerson(username);

		//make sure user is in our data
		if(loggedInPerson == null){
			response.sendError(HttpServletResponse.SC_UNAUTHORIZED);
			return;
		}

		//make sure password is valid
		//use hashed passwords in real life!
		if(!password.equalsIgnoreCase(loggedInPerson.getPassword())){
			response.sendError(HttpServletResponse.SC_UNAUTHORIZED);
			return;
		}

		String token = TokenStore.getInstance().putToken(username);

		//the body of the response is just the token
		response.getOutputStream().print(token);
	}

}
This servlet class only contains a doPost() function, which gets the username and password from the authorization header. It then checks that username and password against the person data, and returns an error if it doesn’t match. If it does match, it uses the TokenStore class to generate a token, and it returns the token as the body of the response. Now clients can make a POST request to the URL we map to this servlet to get a token.
Next, we need to make it so the rest of our API accepts a token for authentication:
import java.io.IOException;
import java.util.Base64;

import javax.servlet.ServletException;
import javax.servlet.http.HttpServlet;
import javax.servlet.http.HttpServletRequest;
import javax.servlet.http.HttpServletResponse;

import org.json.JSONObject;

public class PersonServlet extends HttpServlet {

	@Override
	public void doGet(HttpServletRequest request, HttpServletResponse response) throws IOException, ServletException {

		String requestUrl = request.getRequestURI();
		String name = requestUrl.substring("/people/".length());

		Person person = DataStore.getInstance().getPerson(name);

		if(person != null){
			String json = "{n";
			json += ""name": " + JSONObject.quote(person.getName()) + ",n";
			json += ""about": " + JSONObject.quote(person.getAbout()) + ",n";
			json += ""birthYear": " + person.getBirthYear() + "n";
			json += "}";
			response.getOutputStream().println(json);
		}
		else{
			//That person wasn't found, so return an empty JSON object. We could also return an error.
			response.getOutputStream().println("{}");
		}
	}

	@Override
	public void doPost(HttpServletRequest request, HttpServletResponse response) throws IOException, ServletException {

		String authHeader = request.getHeader("authorization");
		String encodedToken = authHeader.substring(authHeader.indexOf(' ')+1);
		String decodedToken = new String(Base64.getDecoder().decode(encodedToken));
		String username = TokenStore.getInstance().getUsername(decodedToken);

		//token is invalid or expired
		if(username == null){
			response.sendError(HttpServletResponse.SC_UNAUTHORIZED);
			return;
		}

		String nameToEdit = request.getParameter("name");
		String about = request.getParameter("about");
		int birthYear = Integer.parseInt(request.getParameter("birthYear"));

		Person loggedInPerson = DataStore.getInstance().getPerson(username);

		//don't let users edit other users
		if(!nameToEdit.equals(loggedInPerson.getName())){
			response.sendError(HttpServletResponse.SC_UNAUTHORIZED);
			return;
		}

		loggedInPerson.setAbout(about);
		loggedInPerson.setBirthYear(birthYear);

		//if we made it here, everything is okay, save the user
		DataStore.getInstance().putPerson(loggedInPerson);
	}
}
The only thing that changes is our doPost() function, which now expects an encoded token in the authorization header. It then uses that token to authenticate the user. We no longer have to check the password here, since that’s already handled by the user getting the token in the first place! If the token is invalid or expired, or if the user is trying to update another user’s data, we return an error to the client.
Here’s a JavaScript client that interacts with our new token-based REST API:
<!DOCTYPE html>
<html>
	<head>
		<title>PIJON</title>

		<script>

			var name;

			function login(){
				name = document.getElementById('name').value;
				var password = document.getElementById('password').value;
				document.getElementById('password').value = '';

				var authString = name + ':' + password;
				var encodedAuth = btoa(authString);
				var authHeader = 'Basic ' + encodedAuth;

				var ajaxRequest = new XMLHttpRequest();
				ajaxRequest.onreadystatechange = function(){
					if(ajaxRequest.readyState == 4){
						if(ajaxRequest.status == 200){
							token = ajaxRequest.responseText;
							getPersonInfo();
						}
					}
				};
				ajaxRequest.open('POST', 'http://localhost:8080/auth');
				ajaxRequest.setRequestHeader("authorization", authHeader);
				ajaxRequest.send();
			}

			function getPersonInfo(){

				var encodedAuth = btoa(token);
				var authHeader = 'Bearer ' + encodedAuth;

				var ajaxRequest = new XMLHttpRequest();
				ajaxRequest.onreadystatechange = function(){
					if(ajaxRequest.readyState == 4){
						if(ajaxRequest.status == 200){
							var person = JSON.parse(ajaxRequest.responseText);
							document.getElementById('birthYear').value = person.birthYear;
							document.getElementById('about').value = person.about;

							// hide login, show content
							document.getElementById('login').style.display = 'none';
							document.getElementById('content').style.display = 'block';
						}
					}
				};
				ajaxRequest.open('GET', 'http://localhost:8080/people/' + name);
				ajaxRequest.setRequestHeader("authorization", authHeader);
				ajaxRequest.send();
			}

			function setPersonInfo(){
				var about = document.getElementById('about').value;
				var birthYear = document.getElementById('birthYear').value;

				var postData = 'name=' + name;
				postData += '&about=' + encodeURIComponent(about);
				postData += '&birthYear=' + birthYear;

				var encodedAuth = btoa(token);
				var authHeader = 'Bearer ' + encodedAuth;

				var ajaxRequest = new XMLHttpRequest();
				ajaxRequest.onreadystatechange = function(){
					if(ajaxRequest.readyState == 4){
						if(ajaxRequest.status != 200){

							// hide content, show login
							document.getElementById('content').style.display = 'none';
							document.getElementById('login').style.display = 'block';
						}

					}
				};
				ajaxRequest.open('POST', 'http://localhost:8080/people/' + name);
				ajaxRequest.setRequestHeader("authorization", authHeader);
				ajaxRequest.setRequestHeader("Content-type", "application/x-www-form-urlencoded");
				ajaxRequest.send(postData);
			}
		</script>
	</head>
	<body>
		<h1>PIJON</h1>
		<p>(Person Info in JavaScript Object Notation)</p>

		<div id="login">
			<p>Name: <input type="text" value="Ada" id="name" /></p>
			<p>Password: <input type="password" id="password" /></p>
			<p><button type="button" onclick="login()">Login</button></p>
		</div>

		<div id="content" style="display:none">
			<p>Birth year:</p>
			<input type="text" id="birthYear">
			<p>About:</p>
			<textarea id="about"></textarea>
			<p><button type="button" onclick="setPersonInfo()">Save</button></p>
		</div>

	</body>
</html>
This JavaScript client first shows a login screen. When the user clicks the Login button, this client makes a POST request to our REST API to get a token. This allows the user to stay logged in, without the client keeping the password around in memory. Then the edit screen is shown, where the user can edit their own info. When they click the Save button, the token is sent in the authorization header, and the server uses that for authentication. After fifteen minutes, the user will have to login again to get a new token!
This is just a barebones example of a token-based REST API and a client. There are a ton of enhancements you could make: you could send “token refresh” requests so the user doesn’t have to login every fifteen minutes, or you could add other endpoints (URLs) in your REST API for more functionality, or you could make the clients look prettier. But these basics were meant to show you how a token-based REST API works.
Summary
That was probably a lot to take in, but REST comes down to a few ideas:
- URLs (aka “endpoints”) represent your data. For example, the URL
/people/Adapoints to a person named Ada. - HTTP methods like
GETandPOSTallow clients to interact with the data at those URLs. You could make aGETrequest to/people/Adato get Ada’s data, or aPOSTrequest to/people/Adato set Ada’s data. - The format is up to you! Maybe you want to use JSON, or XML, or property strings, or some other format.
- Each request should be standalone. The server should not store information about requests. This means that every request should contain all of the information needed to form a response. No sessions!
- Clients can authenticate by sending in a username and password with every request. Or your REST API could offer a token system, and clients would send in the token with every request.
These ideas are designed to make it easier to separate your business logic from your presentation. In other words, it lets you work on your underlying data separately from working on the view that the user interacts with. This also makes it easier to create multiple clients, for example a website, an Android app, and a desktop application.
But like I said at the top, this is all entirely up to you! The REST police aren’t going to kick your door down if you want to only use a subset of these “rules” in your server. Do whatever makes the most sense to you and your application!
Homework
- Convert your server into a REST API, and then create two different clients that interact with it.
Глядя на отдых в Java? Тогда вы попали в нужное место, потому что в посте блога я расскажу вам, как «красиво» спроектировать REST API, а также, как реализовать его в Java с помощью среды Jersey. API RESTful, разработанный в этом руководстве, продемонстрирует полную функциональность Create, _read, _update_and_delete (CRUD) для ресурсов подкастов, хранящихся в базе данных MySql.
1. Пример
1.1. Почему?
Прежде чем мы начнем, позвольте мне рассказать вам, почему я написал этот пост. Что ж , я собираюсь предложить в будущем REST API для Podcastpedia.org . Конечно, я мог бы использовать собственную реализацию REST Spring , как я сейчас использую для вызовов AJAX, но я также хотел посмотреть, как выглядит «официальная» реализация. Таким образом, лучший способ познакомиться с технологией – создать прототип с ее использованием. Это то, что я сделал и что я представляю здесь, и я могу сказать, что я чертовски доволен Джерси. Читайте дальше, чтобы понять почему !!!
Примечание: вы можете посетить окно моего автозаполнения с jQuery и Spring MVC, чтобы увидеть, как Spring обрабатывает REST-запросы.
1.2. Что оно делает?
Ресурсом, управляемым в этом руководстве, являются подкасты. API REST позволит создавать, извлекать, обновлять и удалять такие ресурсы.
1.3. Архитектура и технологии
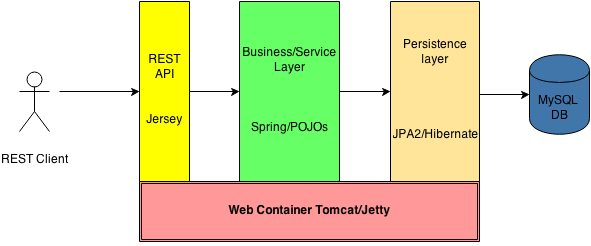
Демонстрационное приложение использует многоуровневую архитектуру, основанную на «Законе Деметры (LoD) или принципе наименьших знаний» [16] :
- Первый уровень – это поддержка REST, реализованная с помощью Jersey, выполняет роль фасада и делегирует логику бизнес-уровню.
- бизнес-уровень , где логика происходит
- уровень доступа к данным – это место, где происходит связь с хранилищем данных (в нашем случае база данных MySql)
Несколько слов об используемых технологиях / структурах:
1.3.1. Джерси (Фасад)
Инфраструктура RESTful Web Services Jersey представляет собой среду с открытым исходным кодом, качество производства, среду разработки RESTful Web Services на Java, которая обеспечивает поддержку API JAX-RS и служит эталонной реализацией JAX-RS (JSR 311 & JSR 339).
1.3.2. Весна (Деловой уровень)
Мне нравится склеивать вещи вместе с Spring , и этот пример не исключение. На мой взгляд, нет лучшего способа сделать POJO с различными функциями. В руководстве вы узнаете, что нужно для интеграции Jersey 2 с Spring.
1.3.3. JPA 2 / Hibernate (постоянный слой)
Для уровня персистентности я все еще использую шаблон DAO, хотя для его реализации я использую JPA 2, который, как некоторые люди говорят, должен сделать DAO излишним (мне, например, не нравятся мои классы обслуживания, загроможденные EntityManager / JPA конкретный код). В качестве поддерживающей платформы для JPA 2 я использую Hibernate.
Смотрите мой пост Пример Java Persistence с Spring, JPA2 и Hibernate для интересного обсуждения темы персистентности в Java.
1.3.4. Веб-контейнер
Все упаковано с Maven в виде файла .war и может быть развернуто в любом веб-контейнере – я использовал Tomcat и Jetty, но это также может быть Glassfih, Weblogic, JBoss или WebSphere.
1.3.5. MySQL
Пример данных хранится в таблице MySQL :
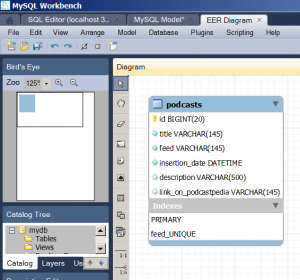
1.3.6. Технологические версии
- Джерси 2.9
- Spring 4.0.3
- Hibernate 4
- Maven 3
- Tomcat 7
- Причал 9
- MySql 5.6
Примечание . Основное внимание в посте будет уделено разработке API REST и его реализации с использованием JAX-RS в Джерси, а все остальные технологии / уровни рассматриваются как средства поддержки.
1.4. Исходный код
Исходный код проекта, представленный здесь, доступен на GitHub с подробными инструкциями по установке и запуску проекта:
- Codingpedia / демо-отдых-джерси-весна
2. Конфигурация
Прежде чем я начну представлять дизайн и реализацию REST API, нам нужно немного настроить, чтобы все эти замечательные технологии могли объединиться и играть вместе.
2.1. Зависимости проекта
Расширение Jersey Spring должно присутствовать в classpath вашего проекта. Если вы используете Maven, добавьте его в файл pom.xml вашего проекта:
Джерси-весна зависимость в pom.xml
|
01 02 03 04 05 06 07 08 09 10 11 12 13 14 15 16 17 18 19 20 21 22 23 24 |
|
Примечание: jersey-spring3.jar использует свою собственную версию для библиотек Spring, поэтому, чтобы использовать те, которые вы хотите (Spring 4.0.3. В этом случае – выпуск), вам необходимо исключить эти библиотеки вручную.
Предупреждение кода: Если вы хотите увидеть, какие другие зависимости нужны (например, Spring, Hibernate, плагин Jetty maven, тестирование и т. Д.) В проекте, вы можете посмотреть полный файл pom.xml, доступный на GitHub.
2.2. web.xml
Дескриптор развертывания веб-приложения
|
01 02 03 04 05 06 07 08 09 10 11 12 13 14 15 16 17 18 19 20 21 22 23 24 25 26 27 28 29 30 31 32 33 34 35 36 37 38 39 40 41 |
|
2.2.1. Джерси-сервлет
Обратите внимание на конфигурацию сервлета Джерси [строки 18-33]. Класс javax.ws.rs.core.Application определяет компоненты (классы корневых ресурсов и поставщиков) приложения JAX-RS. Я использовал ResourceConfig, который является собственной реализацией класса Application Джерси и предоставляет расширенные возможности для упрощения регистрации компонентов JAX-RS. Посмотрите Модель Приложения JAX-RS в документации для большего количества возможностей.
Моя реализация класса ResourceConfig , org.codingpedia.demo.rest.RestDemoJaxRsApplication , регистрирует ресурсы приложения, фильтры, средства отображения исключений и функции:
org.codingpedia.demo.rest.service.MyDemoApplication
|
01 02 03 04 05 06 07 08 09 10 11 12 13 14 15 16 17 18 19 20 21 22 23 24 25 26 27 28 29 30 31 32 33 34 35 |
|
Пожалуйста, обратите внимание:
-
org.glassfish.jersey.server.spring.scope.RequestContextFilter, который является фильтром Spring, обеспечивающим мост между атрибутами JAX-RS и Spring. -
org.codingpedia.demo.rest.resource.PodcastsResource, который является «фасадным» компонентом, который предоставляет REST API через аннотации и будет подробно представлен позже в посте. -
org.glassfish.jersey.jackson.JacksonFeature, функция, которая регистрирует JSON-провайдеров – она нужна приложению для понимания данных JSON
2.1.2.2. Настройка контекста приложения Spring
Конфигурация контекста приложения Spring находится в classpath в spring/applicationContext.xml :
Настройка контекста приложения Spring
|
01 02 03 04 05 06 07 08 09 10 11 12 13 14 15 16 17 18 19 20 21 22 23 24 25 26 27 28 29 30 31 32 33 34 35 36 37 38 39 40 41 42 43 44 45 46 47 48 49 50 51 52 53 54 55 56 57 58 59 60 61 62 63 |
|
Здесь нет ничего особенного, он просто определяет компоненты, необходимые для демонстрационного приложения (например, podcastsResource который является классом точки входа для нашего REST API).
3. REST API (разработка и реализация)
3.1. Ресурсы
3.1.1. дизайн
Как упоминалось ранее, демонстрационное приложение управляет подкастами, которые представляют ресурс в нашем REST API. Ресурсы являются центральной концепцией в REST и характеризуются двумя основными вещами:
- на каждый ссылается глобальный идентификатор (например, URI в HTTP).
- имеет одно или несколько представлений, которые они открывают для внешнего мира и которыми можно манипулировать (в этом примере мы будем работать в основном с представлениями JSON)
Ресурсы обычно представлены в REST существительными (подкасты, клиенты, пользователи, учетные записи и т. Д.), А не глаголами (getPodcast, deleteUser и т. Д.)
Конечные точки, используемые на протяжении всего урока:
-
/podcasts– (обратите внимание на множественное число) URI, идентифицирующий ресурс, представляющий коллекцию подкастов -
/podcasts/{id}– URI, идентифицирующий ресурс подкаста, по идентификатору подкаста
3.1.2. Реализация
Для простоты подкаст будет иметь только следующие свойства:
-
id– уникально идентифицирует подкаст -
feed– url-канал подкаста -
title– название подкаста -
linkOnPodcastpedia– где вы можете найти подкаст на Podcastpedia.org -
description– краткое описание подкаста
Я мог бы использовать только один класс Java для представления ресурса подкаста в коде, но в этом случае класс и его свойства / методы были бы загромождены аннотациями JPA и XML / JAXB / JSON. Я хотел избежать этого, и я использовал два представления, которые имеют почти одинаковые свойства:
- PodcastEntity.java – аннотированный класс JPA, используемый в БД и бизнес-уровнях
- Podcast.java – аннотированный класс JAXB / JSON, используемый на фасаде и бизнес-уровнях
Примечание: я все еще пытаюсь убедить себя, что это лучший подход, поэтому, если у вас есть предложения по этому вопросу, пожалуйста, оставьте комментарий.
Класс Podcast.java выглядит примерно так:
Podcast.java
|
01 02 03 04 05 06 07 08 09 10 11 12 13 14 15 16 17 18 19 20 21 22 23 24 25 26 27 28 29 30 31 32 33 34 35 36 37 38 39 40 41 42 43 44 45 46 47 48 49 50 51 52 53 54 55 56 57 58 59 60 61 62 63 64 65 66 67 68 69 |
|
и переводится в следующее представление JSON, которое фактически является типом носителя de facto, используемым в настоящее время с REST:
Несмотря на то, что JSON становится все более предпочтительным представлением в API-интерфейсах REST, не следует пренебрегать представлением XML, поскольку большинство систем по-прежнему используют формат XML для связи с другими сторонами.
Хорошо, что в Джерси вы можете убить двух кроликов одним выстрелом – с помощью бобов JAXB (как описано выше) вы сможете использовать ту же модель Java для генерации JSON, а также представления XML. Еще одним преимуществом является простота работы с такой моделью и доступность API в Java SE Platform.
Примечание. Большинство методов, определенных в этом руководстве, также создают и используют тип носителя application / xml, причем application / json является предпочтительным способом.
3.2. методы
Прежде чем я представлю вам API, позвольте мне сказать вам, что
- Создать = ПОСТ
- Читать = ПОЛУЧИТЬ
- Обновление = PUT
- Удалить = УДАЛИТЬ
и не является строгим отображением 1: 1. Почему? Потому что вы также можете использовать PUT для создания и POST для обновления. Это будет объяснено и продемонстрировано в следующих параграфах.
Примечание: для Read и Delete довольно ясно, они действительно отображаются один в один с помощью HTTP-операций GET и DELETE. В любом случае REST – это архитектурный стиль, а не спецификация, и вы должны адаптировать архитектуру к вашим потребностям, но если вы хотите сделать свой API общедоступным и иметь кого-то, кто хочет его использовать, вы должны следовать некоторым «наилучшим методам».
Как уже упоминалось, класс PodcastRestResource обрабатывает все остальные запросы:
|
01 02 03 04 05 06 07 08 09 10 |
|
Обратите внимание на @Path("/podcasts") перед определением класса – все, что связано с ресурсами подкаста, будет происходить по этому пути. Значение аннотации @Path – это относительный путь URI. В приведенном выше примере класс Java будет размещен в пути /podcasts URI. Интерфейс PodcastService предоставляет бизнес-логику фасадному слою REST.
Предупреждение кода: вы можете найти все содержимое класса на GitHub – PodcastResource.java . Мы рассмотрим файл шаг за шагом и объясним различные методы, соответствующие различным операциям.
3.2.1. Создать подкаст (ы)
3.2.1.1. дизайн
Хотя «наиболее известным» способом создания ресурса является использование POST, как уже упоминалось ранее, для создания нового ресурса я мог бы использовать как методы POST, так и PUT, и я сделал именно это:
| Описание | URI | HTTP метод |
HTTP Status response |
| Добавить новый подкаст | / Подкасты / | ПОЧТА | 201 Создано |
| Добавить новый подкаст (все значения должны быть отправлены) | / подкасты / {ID} | ПОЛОЖИТЬ | 201 Создано |
Большая разница между использованием POST (не идемпотент)
«Метод POST используется для запроса, чтобы исходный сервер принял объект, заключенный в запросе, в качестве нового подчиненного ресурса, идентифицируемого Request-URI в строке запроса […] Если ресурс был создан на исходном сервере ответ ДОЛЖЕН быть 201 (Создан) и содержать объект, который описывает состояние запроса и ссылается на новый ресурс, и заголовок Location »[1]
и PUT (идемпотент)
«Метод PUT запрашивает, чтобы вложенный объект был сохранен под предоставленным Request-URI […] Если Request-URI не указывает на существующий ресурс, и этот URI может быть определен как новый ресурс запрашивающим пользовательским агентом исходный сервер может создать ресурс с этим URI. Если новый ресурс создан, сервер происхождения ДОЛЖЕН проинформировать об этом агента пользователя через ответ 201 (Создано) ». [1]
в том, что для PUT вы должны заранее знать место, где будет создан ресурс, и отправить все возможные значения записи.
3.2.1.2. Реализация
3.2.1.2.1. Создать единый ресурс с POST
Создать один ресурс подкаста из JSON
|
01 02 03 04 05 06 07 08 09 10 11 12 13 14 15 16 17 18 19 |
|
Аннотации
-
@POST -
@Consumes({MediaType.APPLICATION_JSON})– определяет тип мультимедиа, который принимает метод, в данном случае"application/json" -
@Produces({MediaType.TEXT_HTML})– определяет тип носителя), который может создать метод, в данном случае"text/html".
отклик
- в случае успеха: текстовый / html-документ с HTTP-статусом
201 Createdи заголовком Location, указывающим, где был создан ресурс - по ошибке:
-
400 Bad requestесли недостаточно данных -
409 Conflictесли на стороне сервера определен подкаст с таким же фидом
-
3.2.1.2.2. Создать единый ресурс («подкаст») с PUT
Это будет рассмотрено в разделе «Обновление подкаста» ниже.
3.2.1.2.3. Бонус – создание единого ресурса («подкаста») из формы
Создать один ресурс подкаста из формы
|
01 02 03 04 05 06 07 08 09 10 11 12 13 14 15 16 17 18 19 20 21 22 23 24 25 26 27 28 29 30 31 32 33 |
|
Аннотации
-
@POST– указывает, что метод отвечает на запросы HTTP POST -
@Consumes({MediaType.APPLICATION_FORM_URLENCODED})– определяет тип носителя, который принимает метод, в данном случае"application/x-www-form-urlencoded"-
@FormParam– присутствует перед входными параметрами метода, эта аннотация связывает значение (я) параметра формы, содержащегося в теле объекта запроса, с параметром метода ресурса. Значения декодируются по URL, если только это не отключено с помощью аннотацииEncoded
-
-
@Produces({MediaType.TEXT_HTML})– определяет тип носителя, который может создать метод, в данном случае «text / html». Ответом будет HTML-документ со статусом 201, указывающий вызывающей стороне, что запрос был выполнен и привел к созданию нового ресурса.
отклик
- в случае успеха: текстовый / html-документ с HTTP-статусом
201 Createdи заголовком Location, указывающим, где был создан ресурс - по ошибке:
-
400 Bad requestесли недостаточно данных -
409 Conflictесли на стороне сервера определен подкаст с таким же фидом
-
3.2.2. Читать подкаст (ы)
3.2.2.1. дизайн
API поддерживает две операции чтения:
- вернуть коллекцию подкастов
- вернуть подкаст, идентифицированный по id
| Описание | URI | HTTP метод |
HTTP Status response |
| Вернуть все подкасты | ? / Подкастов / orderByInsertionDate = {ASC | DESC} & numberDaysToLookBack = {} Вал | ПОЛУЧИТЬ | 200 ОК |
| Добавить новый подкаст (все значения должны быть отправлены) | / подкасты / {ID} | ПОЛУЧИТЬ | 200 ОК |
Обратите внимание на параметры запроса для ресурса коллекции – orderByInsertionDate и numberDaysToLookBack. Имеет смысл добавить фильтры в качестве параметров запроса в URI и не быть частью пути.
3.2.2.2. Реализация
3.2.2.2.1. Читать все подкасты («/»)
Читать все ресурсы
|
01 02 03 04 05 06 07 08 09 10 11 12 13 14 15 16 17 18 19 20 |
|
Аннотации
-
@GET– указывает, что метод отвечает на запросы HTTP GET -
@Produces({MediaType.APPLICATION_JSON, MediaType.APPLICATION_XML})– определяет тип носителя), который может создавать метод, в данном случае либо"application/json"либо"application/xml"(вам нужен@XmlRootElementпередPodcastкласс). Ответом будет список подкастов в формате JSON или XML.
отклик
- список подкастов из базы данных и статус HTTP 200 OK
3.2.2.2.1. Читать один подкаст
Читать один ресурс по идентификатору
|
01 02 03 04 05 06 07 08 09 10 11 |
|
Аннотации
-
@GET– указывает, что метод отвечает на запросы HTTP GET -
@Path("{id}")– определяет путь URI, для которого метод класса будет обслуживать запросы. Значение «id» является встроенной переменной, создающей шаблон пути URI. Он используется в сочетании с переменной@PathParam.-
@PathParam("id")– связывает значение параметра шаблона URI («id») с параметром метода ресурса. Значение является URL-декодированным, если только оно не отключено с@Encodedаннотации@Encoded. Значение по умолчанию можно указать с@DefaultValueаннотации@DefaultValue.
-
-
@Produces({MediaType.APPLICATION_JSON, MediaType.APPLICATION_XML})– определяет тип носителя), который может создавать метод, в данном случае"application/json"или"application/xml"(вам необходим@XmlRootElementперед Podcast класс ).
отклик
- в случае успеха: запрошенный подкаст с HTTP-статусом
200 OK. Формат может быть xml или JSON, в зависимости от значения Accept -header, отправленного клиентом (может ставить application / xml или application / json) - по ошибке:
404 Not foundесли подкаст с указанным идентификатором не существует в базе данных
3.2.3. Обновить подкаст
3.2.3.1. дизайн
| Описание | URI | HTTP метод |
HTTP Status response |
| Обновить подкаст ( полностью ) | / подкасты / {ID} | ПОЛОЖИТЬ | 200 ОК |
| Обновление подкаста ( частично ) | / подкасты / {ID} | ПОЧТА | 200 ОК |
На арене REST вы будете делать два вида обновлений:
- полные обновления – вот где вы будете предоставлять все
- частичные обновления – когда только некоторые свойства будут отправлены по сети для обновления
Для полных обновлений довольно ясно, что вы можете использовать метод PUT, и вы соответствуете спецификации метода в RFC 2616 .
Теперь для частичного обновления есть куча предложений / дебатов о том, что использовать:
- через PUT
- через POST
- через патч
Позвольте мне рассказать, почему я считаю, что первый вариант (с PUT) – НЕТ GO. Ну и согласно спецификации
«Если Request-URI ссылается на уже существующий ресурс, вложенный объект СЛЕДУЕТ рассматривать как модифицированную версию, находящуюся на исходном сервере». [1]
если я хотел бы обновить только свойство заголовка подкаста с идентификатором 2
Команда PUT для частичного обновления
|
01 02 03 04 05 06 07 08 09 10 11 |
|
тогда, в соответствии со спецификацией, ресурс, «хранящийся» в местоположении, должен иметь только идентификатор и заголовок, и, очевидно, мои намерения были не в этом.
Второй вариант через POST… мы можем «злоупотребить» этим, и это именно то, что я сделал в реализации, но, похоже, он мне не подходит, потому что спецификация для POST гласит:
«Размещаемая сущность подчиняется этому URI так же, как файл подчиняется каталогу, в котором он находится, новостная статья подчиняется группе новостей, в которой она размещена, или запись подчиняется базе данных». [1 ]
Это не похоже на частичное обновление дела для меня …
Третий вариант – использовать PATCH, и я думаю, что это основная причина, по которой метод ожил:
«Несколько приложений, расширяющих протокол передачи гипертекста (HTTP)
требуется функция для частичной модификации ресурса. Существующий
Метод HTTP PUT позволяет только полную замену документа.
Это предложение добавляет новый метод HTTP, PATCH, чтобы изменить существующий
HTTP-ресурс. »[2]
Я почти уверен, что это будет использоваться в будущем для частичных обновлений, но, поскольку он еще не является частью спецификации и еще не реализован в Джерси, я решил использовать второй вариант с POST для этой демонстрации. Если вы действительно хотите реализовать частичное обновление в Java с помощью PATCH, ознакомьтесь с этой статьей – Поддержка прозрачного PATCH в JAX-RS 2.0
3.2.3.1. Реализация
3.2.3.1.1. Полное обновление
Создать или полностью обновить метод реализации ресурса
|
01 02 03 04 05 06 07 08 09 10 11 12 13 14 15 16 17 18 19 20 21 22 23 24 25 26 27 28 29 30 31 32 |
|
Аннотации
-
@PUT– указывает, что метод отвечает на запросы HTTP PUT -
@Path("{id}")– определяет путь URI, для которого метод класса будет обслуживать запросы. Значение «id» является встроенной переменной, создающей шаблон пути URI. Он используется в сочетании с переменной@PathParam.-
@PathParam("id")– связывает значение параметра шаблона URI («id») с параметром метода ресурса. Значение является URL-декодированным, если только оно не отключено с@Encodedаннотации@Encoded. Значение по умолчанию можно указать с@DefaultValueаннотации@DefaultValue.
-
-
@Consumes({MediaType.APPLICATION_JSON})– определяет тип мультимедиа, который принимает метод, в данном случае"application/json" -
@Produces({MediaType.TEXT_HTML})– определяет тип носителя), который может создать метод, в данном случае «text / html».
будет HTML-документ, содержащий различные сообщения и статус в зависимости от того, какое действие было предпринято
Respsonse
- на создание
- в случае успеха:
201 Createdи в заголовке Location указывается место, где был создан ресурс - по ошибке:
400 Bad requestесли для вставки не указаны минимально необходимые свойства
- при полном обновлении
- в случае успеха:
200 OK - по ошибке:
400 Bad Requestесли не все свойства предоставлены
- в случае успеха:
3.2.3.1.2. Частичное обновление
Частичное обновление
|
01 02 03 04 05 06 07 08 09 10 11 12 |
|
Аннотации
-
@POST -
@Path("{id}")– определяет путь URI, для которого метод класса будет обслуживать запросы. Значение «id» является встроенной переменной, создающей шаблон пути URI. Он используется в сочетании с переменной@PathParam.-
@PathParam("id")– связывает значение параметра шаблона URI («id») с параметром метода ресурса. Значение является URL-декодированным, если только оно не отключено с@Encodedаннотации@Encoded. Значение по умолчанию можно указать с@DefaultValueаннотации@DefaultValue.
-
-
@Consumes({MediaType.APPLICATION_JSON})– определяет тип мультимедиа, который принимает метод, в данном случае"application/json" -
@Produces({MediaType.TEXT_HTML})– определяет тип носителя), который может создать метод, в данном случае"text/html".
отклик
- в случае успеха:
200 OK - по ошибке:
404 Not Found, если в указанном месте больше нет доступных ресурсов
3.2.4. Удалить подкаст
3.2.4.1. дизайн
| Описание | URI | HTTP метод |
HTTP Status response |
| Удаляет все подкасты | / Подкасты / | УДАЛИТЬ | 204 Нет контента |
| Удаляет подкаст в указанном месте | / подкасты / {ID} | УДАЛИТЬ | 204 Нет контента |
3.2.4.2. Реализация
3.2.4.2.1. Удалить все ресурсы
Удалить все ресурсы
|
1 2 3 4 5 6 7 |
|
Аннотации
-
@DELETE– указывает, что метод отвечает на запросы HTTP DELETE. -
@Produces({MediaType.TEXT_HTML})– определяет тип носителя, который может создать метод, в данном случае «text / html».
отклик
- Ответом будет html-документ со статусом 204 «Нет содержимого», указывающий вызывающей стороне, что запрос был выполнен.
3.2.4.2.2. Удалить один ресурс
Удалить один ресурс
|
1 2 3 4 5 6 7 8 |
|
Аннотации
-
@DELETE– указывает, что метод отвечает на запросы HTTP DELETE. -
@Path("{id}")– определяет путь URI, для которого метод класса будет обслуживать запросы. Значение «id» является встроенной переменной, создающей шаблон пути URI. Он используется в сочетании с переменной@PathParam.-
@PathParam("id")– связывает значение параметра шаблона URI («id») с параметром метода ресурса. Значение является URL-декодированным, если только оно не отключено с@Encodedаннотации@Encoded. Значение по умолчанию можно указать с@DefaultValueаннотации@DefaultValue.
-
-
@Produces({MediaType.TEXT_HTML})– определяет тип носителя, который может создать метод, в данном случае «text / html».
отклик
- в случае успеха: при удалении подкаста возвращается статус успешного завершения
204 No Content - из-за ошибки: подкаст больше недоступен и возвращается статус
404 Not found
4. Регистрация
Путь каждого запроса и сущность ответа будут регистрироваться, когда уровень ведения журнала установлен на DEBUG. Это разработано как обертка, функциональность стиля AOP с помощью фильтров Jetty.
См. Мой пост Как войти в Spring с SLF4J и Logback для более подробной информации по этому вопросу.
5. Обработка исключений
В случае ошибок я решил ответить унифицированной структурой сообщений об ошибках. Вот пример того, как может выглядеть ответ об ошибке:
Пример – ответ на сообщение об ошибке
Примечание: следите за обновлениями, потому что в следующем посте будет представлена более подробная информация об обработке ошибок в REST с Джерси.
6. Добавьте поддержку CORS на стороне сервера.
Я расширил возможности API, разработанного для данного руководства, для поддержки перекрестного совместного использования ресурсов (CORS) на стороне сервера.
Пожалуйста, смотрите мой пост Как добавить поддержку CORS на стороне сервера в Java с Джерси для более подробной информации по этому вопросу.
7. Тестирование
7.1. Интеграционные тесты в Java
Чтобы протестировать приложение, я буду использовать Jersey Client и выполнять запросы к работающему серверу Jetty с развернутым на нем приложением. Для этого я буду использовать Maven Failsafe Plugin .
7.1.1. конфигурация
7.1.1.1 Зависимость клиента Джерси
Для создания клиента jersey-client требуется jar jersey-client в classpath. С Maven вы можете добавить его в качестве зависимости к файлу pom.xml :
Джерси Клиент maven зависимость
|
1 2 3 4 5 6 |
|
7.1.1.2. Отказоустойчивый плагин
Отказоустойчивыми Плагин используется во время интеграционного тестирования и проверки этапов жизненного цикла сборки для выполнения интеграционных тестов приложения. Плагин Failsafe не завершит сборку на этапе тестирования интеграции, что позволит выполнить этап после тестирования интеграции.
Чтобы использовать Failsafe Plugin, вам необходимо добавить следующую конфигурацию в вашpom.xml
Конфигурация Maven Failsafe Plugin
|
01 02 03 04 05 06 07 08 09 10 11 12 13 14 15 16 17 18 19 20 21 22 23 |
|
7.1.1.2. Jetty Maven Плагин
Интеграционные тесты будут выполняться на работающем сервере Jetty, который будет запущен только для выполнения тестов. Для этого вам необходимо настроить следующее выполнение в jetty-maven-plugin:
Конфигурация Jetty Maven Plugin для интеграционных тестов
|
01 02 03 04 05 06 07 08 09 10 11 12 13 14 15 16 17 18 19 20 21 22 23 24 25 26 27 28 29 30 31 32 33 34 35 36 37 38 |
|
Примечание. На этом pre-integration-testэтапе сервер Jetty будет запущен после остановки любого работающего экземпляра, чтобы освободить порт, и в этом случае post-integration-phaseон будет остановлен. Значение scanIntervalSecondsдолжно быть установлено на 0 и равно daemontrue.
Предупреждение кода: найдите полный файл pom.xml на GitHub
7.1.2. Постройте интеграционные тесты
Я использую JUnit в качестве основы тестирования. По умолчанию подключаемый модуль Failsafe автоматически включает все тестовые классы со следующими шаблонами подстановочных знаков:
-
"**/IT*.java" -
"**/*IT.java" -
"**/*ITCase.java"
Я создал один тестовый класс – RestDemoServiceITкоторый будет тестировать методы чтения (GET), но процедура должна быть одинаковой для всех остальных:
|
01 02 03 04 05 06 07 08 09 10 11 12 13 14 15 16 17 18 19 20 21 22 23 24 25 26 27 28 29 30 |
|
Замечания:
- Мне также пришлось зарегистрировать JacksonFeature для клиента, чтобы я мог маршалировать ответ подкаста в формате JSON – response.readEntity (Podcast.class)
- Я тестирую на работающей Jetty на порту 8888 – в следующем разделе я покажу вам, как запустить Jetty на желаемом порту
- Я ожидаю 200 статус для моего запроса
- С помощью
org.codehaus.jackson.map.ObjectMapperя показываю ответ JSON довольно отформатирован
7.1.3. Запуск интеграционных тестов
Плагин Failsafe может быть вызван путем вызова verify
Команда Maven для вызова интеграционных тестов
Чтобы запустить джетти через порт 8888, вам нужно установить jetty.portсвойство 8888. В Eclipse я использую следующую конфигурацию:
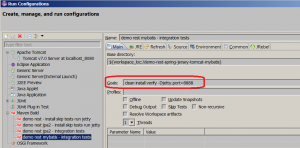
Запустите интеграционные тесты из Eclipse
7.2. Интеграционные тесты с SoapUI
Недавно я заново открыл SoapUI после интенсивного его использования для тестирования веб-сервисов на основе SOAP. В последних версиях (на момент написания статьи последняя версия 5.0.0) он предлагает довольно хорошую функциональность для тестирования веб-сервисов на основе REST, и в следующих версиях это должно улучшиться. Поэтому, если вы не разрабатываете собственную инфраструктуру / инфраструктуру для тестирования сервисов REST, почему бы не попробовать SoapUI. До сих пор я был доволен результатами и решил создать видеоурок, который вы теперь можете найти на YouTube на нашем канале:
8. Управление версиями
Есть три основных варианта
- URL : «/ v1 / podcasts / {id}»
- Accept / Content-type header : application / json; версия = 1
Потому что я разработчик, а не RESTafarian, но я бы сделал вариант URL. Все, что мне нужно было бы сделать на стороне реализации для этого примера, это изменить @Pathаннотацию значения в PodcastResourceклассе с
Управление версиями в пути
|
1 2 3 |
|
Конечно, в производственном приложении вы бы не хотели, чтобы каждый класс ресурсов был предварительно снабжен префиксом с номером версии, вы бы хотели, чтобы версия каким-то образом обрабатывалась через фильтр AOP-способом. Может быть, что-то подобное будет в следующем посте …
Вот несколько замечательных ресурсов от людей, которые лучше понимают ситуацию:
- [Видео] REST + JSON API Design – лучшие практики для разработчиков
- Версия вашего API неверна, поэтому я решил сделать это 3 разными путями @troyhunt
- Службы управления версиями REST
- Лучшие практики для управления версиями API? – интересное обсуждение Stackoverflow
9. Резюме
Ну вот и все. Я должен поздравить вас, если вы зашли так далеко, но я надеюсь, что вы могли бы кое-что узнать из этого урока о REST, например, о разработке REST API, реализации REST API в Java, тестировании REST API и многом другом. Если бы вы это сделали, я был бы очень признателен, если бы вы помогли ему распространиться, оставив комментарий или поделившись им в Twitter, Google+ или Facebook. Спасибо!Не забудьте также проверить Podcastpedia.org – вы обязательно найдете интересные подкасты и эпизоды. Мы благодарны за вашу поддержку.
Если вам понравилась эта статья, мы будем очень признательны за небольшой вклад в нашу работу! Пожертвуйте сейчас с Paypal.
10. Ресурсы
10.1. Исходный код
- GitHub – Codingpedia / demo-rest-jersey-spring (инструкция по установке и запуску проекта)
10,2. Веб-ресурсы
- HTTP – протокол передачи гипертекста – HTTP / 1.1 – RFC2616
- rfc5789 – метод PATCH для HTTP
- Джерси Руководство пользователя
- Определения кода состояния HTTP
- ОТДЫХ – http://en.wikipedia.org/wiki/Representational_State_Transfer
- CRUD – http://en.wikipedia.org/wiki/Create,_read,_update_and_delete
- Java API для сервисов RESTful (JAX-RS)
- Jersey – RESTful веб-сервисы на Java
- HTTP PUT, PATCH или POST – частичные обновления или полная замена?
- Поддержка прозрачного PATCH в JAX-RS 2.0
- Maven Failsafe Плагин
- Maven Failsafe Plugin Использование
- SoapUI 5.0 выпущен сегодня!
- SoapUI – Использование утверждений скрипта
- [Видео] REST + JSON API Design – лучшие практики для разработчиков
- [Видео] RESTful API Design – второе издание
- Закон Деметры
10.3. Ресурсы, связанные с Codingpedia
- Пример сохранения Java с использованием Spring, JPA2 и Hibernate
- http://www.codingpedia.org/ama/spring-mybatis-integration-example/
- http://www.codingpedia.org/ama/tomcat-jdbc-connection-pool-configuration-for-production-and-development/
- http://www.codingpedia.org/ama/error-when-executing-jettyrun-with-jetty-maven-plugin-version-9-java-lang-unsupportedclassversionerror-unsupported-major-minor-version-51-0/
- http://www.codingpedia.org/ama/autocomplete-search-box-with-jquery-and-spring-mvc/
Earlier, we have seen how to Build Spring Boot 2.X RESTful CRUD API. However, sometimes we might need to implement REST services without using the Spring framework at all. Hence, we are gonna create REST CRUD APIs using the Jersey framework in this article.
What You’ll Build
- Create REST APIs to perform CRUD operations
- Add support for Connection Pooling, Request validation, Exception Handling, and Logback Logging
What You’ll Need
- Spring Tool Suite 4
- JDK 11
- MySQL Server 8
- Apache Maven 3
- Apache Tomcat 9
Tech Stack
- Jersey 2.x – Implementation of JAX-RS 2.1 API Specification
- Jersey-hk2 – A light-weight and dynamic dependency injection framework
- JPA 2.1 – Java Persistence API Specification
- Hibernate 5.x – Implementation of JPA 2.1 Specification
- Hibernate-c3p0 – Connection Pool for Hibernate
- Lombok – Java library tool that is used to minimize boilerplate code
- Logback Classic – Logging Framework which implements SLF4J API Specification
Jersey 2.x Vs Jersey 3.x
Jersey 3.x is no longer compatible with JAX-RS 2.1 API (JSR 370), instead, it is compatible with Jakarta RESTful WebServices 3.x API. Therefore, Jersey 2.x, which remains compatible with JAX-RS 2.1 API is still being continued. That is why I have chosen Jersey 2.x for this tutorial.
Project Structure
This is how our project will look like once created
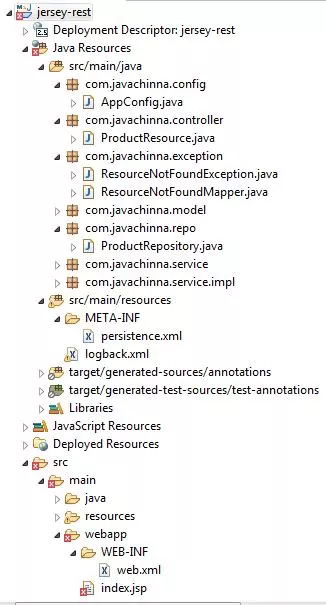
Create Maven Project
We can execute the following maven command to create a Servlet container deployable Jersey 2.34 web application:
mvn archetype:generate -DarchetypeGroupId=org.glassfish.jersey.archetypes -DarchetypeArtifactId=jersey-quickstart-webapp -DarchetypeVersion=2.34
It will ask you to provide your input for group Id, artifiact Id, name and package name details. Provide these details or enter to go with the default one. Once the project is generated, we can import that into our IDE.
Add Dependencies
Let’s add some other required dependencies like hibernate, Mysql-connector, Lombok, Logback, etc., After adding, our pom.xml will be as shown below:
pom.xml
<project xmlns="http://maven.apache.org/POM/4.0.0" xmlns:xsi="http://www.w3.org/2001/XMLSchema-instance"
	xsi:schemaLocation="http://maven.apache.org/POM/4.0.0 http://maven.apache.org/maven-v4_0_0.xsd">

	<modelVersion>4.0.0</modelVersion>

	<groupId>com.javachinna</groupId>
	<artifactId>jersey-rest</artifactId>
	<packaging>war</packaging>
	<version>1.0-SNAPSHOT</version>
	<name>jersey-rest</name>

	<build>
		<finalName>jersey-rest</finalName>
		<plugins>
			<plugin>
				<groupId>org.apache.maven.plugins</groupId>
				<artifactId>maven-compiler-plugin</artifactId>
				<version>3.8.1</version>
				<inherited>true</inherited>
				<configuration>
					<source>1.8</source>
					<target>1.8</target>
				</configuration>
			</plugin>
			<plugin>
				<groupId>org.apache.maven.plugins</groupId>
				<artifactId>maven-war-plugin</artifactId>
				<configuration>
					<failOnMissingWebXml>false</failOnMissingWebXml>
				</configuration>
			</plugin>
		</plugins>
	</build>

	<dependencyManagement>
		<dependencies>
			<dependency>
				<groupId>org.glassfish.jersey</groupId>
				<artifactId>jersey-bom</artifactId>
				<version>${jersey.version}</version>
				<type>pom</type>
				<scope>import</scope>
			</dependency>
		</dependencies>
	</dependencyManagement>

	<dependencies>
		<dependency>
			<groupId>org.glassfish.jersey.containers</groupId>
			<artifactId>jersey-container-servlet-core</artifactId>
			<!-- use the following artifactId if you don't need servlet 2.x compatibility -->
			<!-- artifactId>jersey-container-servlet</artifactId -->
		</dependency>
		<!-- A light-weight and dynamic dependency injection framework -->
		<dependency>
			<groupId>org.glassfish.jersey.inject</groupId>
			<artifactId>jersey-hk2</artifactId>
		</dependency>
		<dependency>
			<groupId>org.glassfish.jersey.media</groupId>
			<artifactId>jersey-media-json-binding</artifactId>
		</dependency>
		<!-- https://mvnrepository.com/artifact/org.glassfish.jersey.ext/jersey-bean-validation -->
		<dependency>
			<groupId>org.glassfish.jersey.ext</groupId>
			<artifactId>jersey-bean-validation</artifactId>
		</dependency>

		<!-- https://mvnrepository.com/artifact/org.hibernate/hibernate-core -->
		<dependency>
			<groupId>org.hibernate</groupId>
			<artifactId>hibernate-core</artifactId>
			<version>${hibernate.version}</version>
		</dependency>
		<!-- c3p0 connection pool -->
		<dependency>
			<groupId>org.hibernate</groupId>
			<artifactId>hibernate-c3p0</artifactId>
			<version>${hibernate.version}</version>
		</dependency>
		<!-- https://mvnrepository.com/artifact/mysql/mysql-connector-java -->
		<dependency>
			<groupId>mysql</groupId>
			<artifactId>mysql-connector-java</artifactId>
			<version>8.0.26</version>
		</dependency>
		<dependency>
			<groupId>org.projectlombok</groupId>
			<artifactId>lombok</artifactId>
			<version>1.18.20</version>
			<scope>provided</scope>
		</dependency>
		<dependency>
			<groupId>ch.qos.logback</groupId>
			<artifactId>logback-classic</artifactId>
			<version>1.2.4</version>
		</dependency>
	</dependencies>
	<properties>
		<hibernate.version>5.5.4.Final</hibernate.version>
		<jersey.version>2.34</jersey.version>
		<project.build.sourceEncoding>UTF-8</project.build.sourceEncoding>
	</properties>
</project>
Create JPA Entity
Product.java
This is our entity which maps to the Product table in the database
package com.javachinna.model;

import javax.persistence.Entity;
import javax.persistence.GeneratedValue;
import javax.persistence.GenerationType;
import javax.persistence.Id;
import javax.validation.constraints.NotBlank;

import lombok.AllArgsConstructor;
import lombok.Data;
import lombok.NoArgsConstructor;

@NoArgsConstructor
@AllArgsConstructor
@Data
@Entity
public class Product {
	@Id
	@GeneratedValue(strategy = GenerationType.IDENTITY)
	private Long id;

	@NotBlank(message = "Product name is required")
	private String name;

	@NotBlank(message = "Product price is required")
	private String price;
}
Create JPA Repository
ProductRepository.java
package com.javachinna.repo;

import java.util.List;
import java.util.Optional;

import javax.persistence.EntityManager;
import javax.persistence.EntityManagerFactory;
import javax.persistence.Persistence;

import com.javachinna.model.Product;

public class ProductRepository {
	private EntityManagerFactory emf = Persistence.createEntityManagerFactory("JavaChinna");
	private EntityManager em;

	public ProductRepository() {
		em = emf.createEntityManager();
	}

	public Product save(Product product) {
		em.getTransaction().begin();
		em.persist(product);
		em.getTransaction().commit();
		return product;
	}

	public Optional<Product> findById(Long id) {
		em.getTransaction().begin();
		Product product = em.find(Product.class, id);
		em.getTransaction().commit();
		return product != null ? Optional.of(product) : Optional.empty();
	}

	@SuppressWarnings("unchecked")
	public List<Product> findAll() {
		return em.createQuery("from Product").getResultList();
	}

	public Product update(Product product) {
		em.getTransaction().begin();
		product = em.merge(product);
		em.getTransaction().commit();
		return product;
	}

	public void deleteById(Long id) {
		em.getTransaction().begin();
		em.remove(em.find(Product.class, id));
		em.getTransaction().commit();
	}

	public void close() {
		emf.close();
	}
}
Create Service Interface and Implementation
ProductService.java
package com.javachinna.service;

import java.util.List;
import java.util.Optional;

import com.javachinna.model.Product;

public interface ProductService {
	Product save(Product product);

	Product update(Product product);

	void deleteById(Long id);

	Optional<Product> findById(Long id);

	List<Product> findAll();
}
ProductServiceImpl.java
@Inject annotation is used to inject the dependency just like the spring-specific @Autowired annotation. Here, we are using constructor injection. We can use it for field injection as well. However, I prefer to use the field injection only for optional dependencies. Otherwise, it is always good to use constructor injection.
package com.javachinna.service.impl;

import java.util.List;
import java.util.Optional;

import javax.inject.Inject;

import com.javachinna.model.Product;
import com.javachinna.repo.ProductRepository;
import com.javachinna.service.ProductService;;

public class ProductServiceImpl implements ProductService {

	private ProductRepository productRepository;

	@Inject
	public ProductServiceImpl(ProductRepository productRepository) {
		this.productRepository = productRepository;
	}

	@Override
	public Product save(Product product) {
		return productRepository.save(product);
	}

	@Override
	public void deleteById(Long id) {
		productRepository.deleteById(id);
	}

	@Override
	public Optional<Product> findById(Long id) {
		return productRepository.findById(id);
	}

	@Override
	public List<Product> findAll() {
		return productRepository.findAll();
	}

	@Override
	public Product update(Product product) {
		return productRepository.update(product);
	}

}
Create REST Resource
Let’s create a ProductResource class to expose REST endpoints for performing CRUD operations on the Product entity.
ProductResource.java
@Path annotation identifies the URI path that a resource class or class method will serve requests for. Paths are relative. For an annotated class the base URI is the application path, see ApplicationPath. For an annotated method the base URI is the effective URI of the containing class. For the purposes of absolutizing a path against the base URI, a leading ‘/’ in a path is ignored and base URIs are treated as if they ended in ‘/’. That is why we haven’t specified any leading ‘/’ in the paths.
@QueryParam annotation binds the value(s) of an HTTP query parameter to a resource method parameter, resource class field, or resource class bean property. Values are URL decoded unless this is disabled using the @Encoded annotation. A default value can be specified using the @DefaultValue annotation.
@PathParam annotation binds the value of a URI template parameter or a path segment containing the template parameter to a resource method parameter, resource class field, or resource class bean property. The value is URL decoded unless this is disabled using the @Encoded annotation. A default value can be specified using the @DefaultValue annotation
@GET annotation indicates that the annotated method responds to HTTP GET requests.
@POST annotation indicates that the annotated method responds to HTTP POST requests.
@PUT annotation indicates that the annotated method responds to HTTP PUT requests.
@DELETE annotation indicates that the annotated method responds to HTTP DELETE requests.
@Valid annotation triggers the validation of the method parameter. It marks a property, method parameter, or method return type for validation cascading.
package com.javachinna.controller;

import java.util.List;

import javax.inject.Inject;
import javax.validation.Valid;
import javax.validation.constraints.NotBlank;
import javax.ws.rs.DELETE;
import javax.ws.rs.GET;
import javax.ws.rs.POST;
import javax.ws.rs.PUT;
import javax.ws.rs.Path;
import javax.ws.rs.PathParam;
import javax.ws.rs.Produces;
import javax.ws.rs.QueryParam;
import javax.ws.rs.core.MediaType;

import com.javachinna.exception.ResourceNotFoundException;
import com.javachinna.model.Product;
import com.javachinna.service.ProductService;

import lombok.extern.slf4j.Slf4j;

/**
 * Root resource (exposed at "products" path)
 */
@Slf4j
@Path("products")
public class ProductResource {

	private ProductService productService;

	/**
	 * @param productService
	 */
	@Inject
	public ProductResource(ProductService productService) {
		this.productService = productService;
	}

	/**
	 * Method handling HTTP GET requests. The returned object will be sent to
	 * the client as "application/json" media type.
	 *
	 * @param consumerKey
	 * @return
	 */
	@GET
	@Produces(MediaType.APPLICATION_JSON)
	public List<Product> getProductList(@NotBlank(message = "Consumerkey is required") @QueryParam(value = "consumerKey") String consumerKey) {
		log.info("Consumer: {}", consumerKey);
		return productService.findAll();
	}

	@GET
	@Path("{productId}")
	@Produces(MediaType.APPLICATION_JSON)
	public Product getProduct(@PathParam(value = "productId") Long productId) {
		return productService.findById(productId).orElseThrow(() -> new ResourceNotFoundException("productId " + productId + " not found"));
	}

	@POST
	public String createProduct(@Valid Product product) {
		productService.save(product);
		return "Product added";
	}

	@PUT
	@Path("{productId}")
	public String updateProduct(@PathParam(value = "productId") Long productId, @Valid Product product) {
		return productService.findById(productId).map(p -> {
			p.setName(product.getName());
			p.setPrice(product.getPrice());
			productService.update(p);
			return "Product updated";
		}).orElseThrow(() -> new ResourceNotFoundException("productId " + productId + " not found"));
	}

	@DELETE
	@Path("{productId}")
	public String deleteProduct(@PathParam(value = "productId") Long productId) {
		return productService.findById(productId).map(p -> {
			productService.deleteById(productId);
			return "Product deleted";
		}).orElseThrow(() -> new ResourceNotFoundException("productId " + productId + " not found"));
	}
}
Exception Handling with Exception Mapper
Create Custom Exception
ResourceNotFoundException.java
This custom exception will be thrown whenever an entity is not found by the id in the database.
package com.javachinna.exception;

public class ResourceNotFoundException extends RuntimeException {
	/**
	 *
	 */
	private static final long serialVersionUID = 1L;

	public ResourceNotFoundException() {
		super();
	}

	public ResourceNotFoundException(String message) {
		super(message);
	}

	public ResourceNotFoundException(String message, Throwable cause) {
		super(message, cause);
	}
}
Create Exception Mapper
ResourceNotFoundMapper.java
ExceptionMapper interface is a contract for a provider that maps Java exceptions to javax.ws.rs.core.Response.
Providers implementing ExceptionMapper contract must be either programmatically registered in an API runtime or must be annotated with @Provider annotation to be automatically discovered by the runtime during a provider scanning phase.
@Provider annotation marks the implementation of an extension interface that should be discoverable by the runtime during a provider scanning phase.
ResourceNotFoundMapper is responsible for returning an HTTP Status 404 with the exception message in the response when ResourceNotFoundException is thrown.
package com.javachinna.exception;

import javax.ws.rs.core.MediaType;
import javax.ws.rs.core.Response;
import javax.ws.rs.ext.ExceptionMapper;
import javax.ws.rs.ext.Provider;

@Provider
public class ResourceNotFoundMapper implements ExceptionMapper<ResourceNotFoundException> {
	@Override
	public Response toResponse(ResourceNotFoundException ex) {
		return Response.status(404).entity(ex.getMessage()).type(MediaType.TEXT_PLAIN_TYPE).build();
	}
}
Configure Resources, Binders and Properties
ResourceConfig is used for configuring a web application. Hence we have extended this class to register our ProductResource, Binder, and set properties.
AbstractBinder is a skeleton implementation of an injection binder with convenience methods for binding definitions. Hence we have created an anonymous binder and overridden the configure method in order to bind our ProductServiceImpl to ProductService interface and ProductRepository to ProductRepository class since we haven’t defined a DAO interface.
AppConfig.java
package com.javachinna.config;

import org.glassfish.hk2.utilities.binding.AbstractBinder;
import org.glassfish.jersey.server.ResourceConfig;
import org.glassfish.jersey.server.ServerProperties;

import com.javachinna.controller.ProductResource;
import com.javachinna.repo.ProductRepository;
import com.javachinna.service.ProductService;
import com.javachinna.service.impl.ProductServiceImpl;

public class AppConfig extends ResourceConfig {

	public AppConfig() {
		register(ProductResource.class);
		register(new AbstractBinder() {
			@Override
			protected void configure() {
				bind(ProductServiceImpl.class).to(ProductService.class);
				bind(ProductRepository.class).to(ProductRepository.class);
			}
		});
		// Now you can expect validation errors to be sent to the
		// client.
		property(ServerProperties.BV_SEND_ERROR_IN_RESPONSE, true);
	}
}
Configure Hibernate
persistence.xml
<?xml version="1.0" encoding="UTF-8"?>
<persistence xmlns="http://xmlns.jcp.org/xml/ns/persistence"
    xmlns:xsi="http://www.w3.org/2001/XMLSchema-instance"
    xsi:schemaLocation="http://xmlns.jcp.org/xml/ns/persistence
          http://xmlns.jcp.org/xml/ns/persistence/persistence_2_1.xsd"
    version="2.1">
    <persistence-unit name="JavaChinna">
        <properties>
            <property name="javax.persistence.jdbc.url" value="jdbc:mysql://localhost:3306/rest?createDatabaseIfNotExist=true" />
            <property name="javax.persistence.jdbc.user" value="root" />
            <property name="javax.persistence.jdbc.password" value="chinna44" />
            <property name="javax.persistence.jdbc.driver" value="com.mysql.cj.jdbc.Driver" />
            <property name="hibernate.dialect" value="org.hibernate.dialect.MySQL5InnoDBDialect" />
            <property name="hibernate.show_sql" value="false" />
            <property name="hibernate.format_sql" value="false" />
            <property name="hibernate.hbm2ddl.auto" value="create" />
        </properties>
    </persistence-unit>
</persistence>
Note: We have set the hibernate.hbm2ddl.auto=create in order to create the tables based on the entities during application startup. So that, we don’t need to set up the database manually.
Configure Logback Logging
logback.xml
<configuration>
  <appender name="STDOUT" class="ch.qos.logback.core.ConsoleAppender">
    <!-- encoders are assigned the type
         ch.qos.logback.classic.encoder.PatternLayoutEncoder by default -->
    <encoder>
      <pattern>%d{HH:mm:ss.SSS} [%thread] %-5level %logger{36} - %msg%n</pattern>
    </encoder>
  </appender>

  <root level="info">
    <appender-ref ref="STDOUT" />
  </root>
</configuration>
Note: To enable debug logging, you can change the root level to debug.
Configure Deployment Descriptor
web.xml
The web.xml file should have the two init-param which are below. The first init-param’s value is the root package name that contains your JAX-RS resources. And the second init-param value is the complete package name of our AppConfig.java file. Please note that it is a package name + class name.
<?xml version="1.0" encoding="UTF-8"?>
<!-- This web.xml file is not required when using Servlet 3.0 container, see implementation details http://jersey.java.net/nonav/documentation/latest/jax-rs.html -->
<web-app version="2.5" xmlns="http://java.sun.com/xml/ns/javaee" xmlns:xsi="http://www.w3.org/2001/XMLSchema-instance"
	xsi:schemaLocation="http://java.sun.com/xml/ns/javaee http://java.sun.com/xml/ns/javaee/web-app_2_5.xsd">
	<servlet>
		<servlet-name>Jersey Web Application</servlet-name>
		<servlet-class>org.glassfish.jersey.servlet.ServletContainer</servlet-class>
		<init-param>
			<param-name>jersey.config.server.provider.packages</param-name>
			<param-value>com.javachinna</param-value>
		</init-param>
		<init-param>
			<param-name>javax.ws.rs.Application</param-name>
			<param-value>com.javachinna.config.AppConfig</param-value>
		</init-param>
		<load-on-startup>1</load-on-startup>
	</servlet>
	<servlet-mapping>
		<servlet-name>Jersey Web Application</servlet-name>
		<url-pattern>/api/*</url-pattern>
	</servlet-mapping>
</web-app>
Build Application
Run mvn clean install command to clean and build the war file.
Deploy Application
Deploy the generated war file in a server like tomcat.
Test REST Services
GET API
Get by Product ID
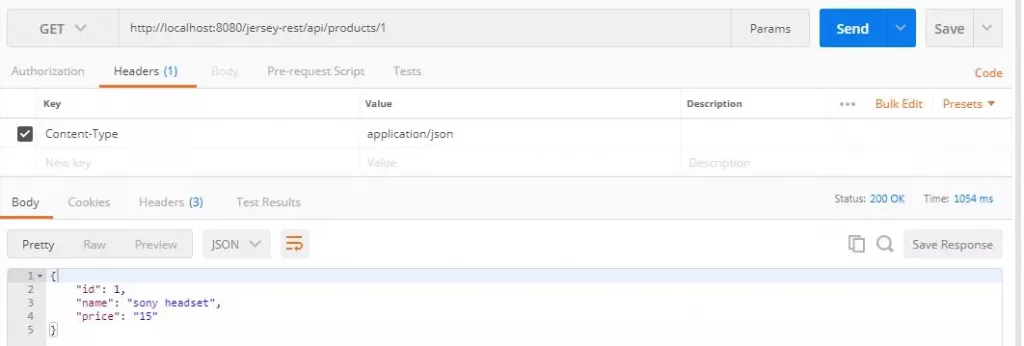
Get All Products
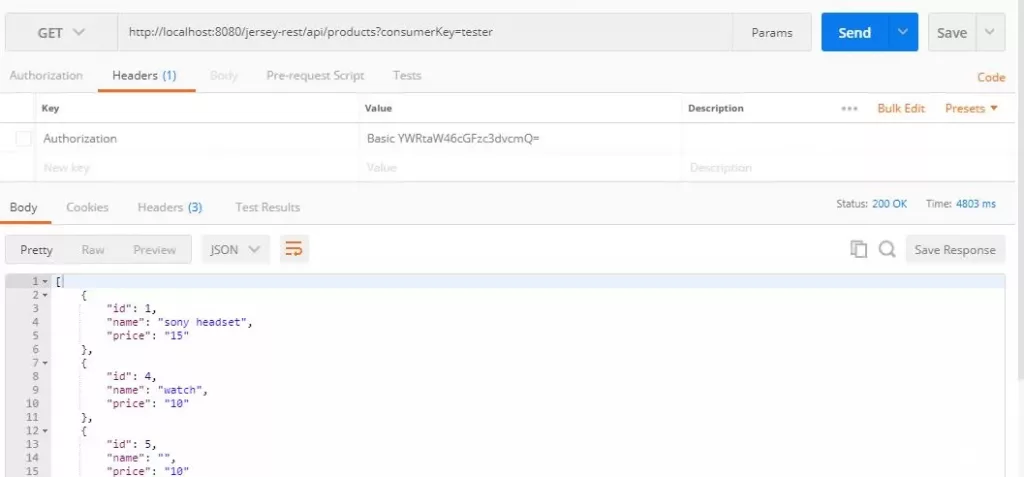
Request Parameter Validation

POST API
Create Product
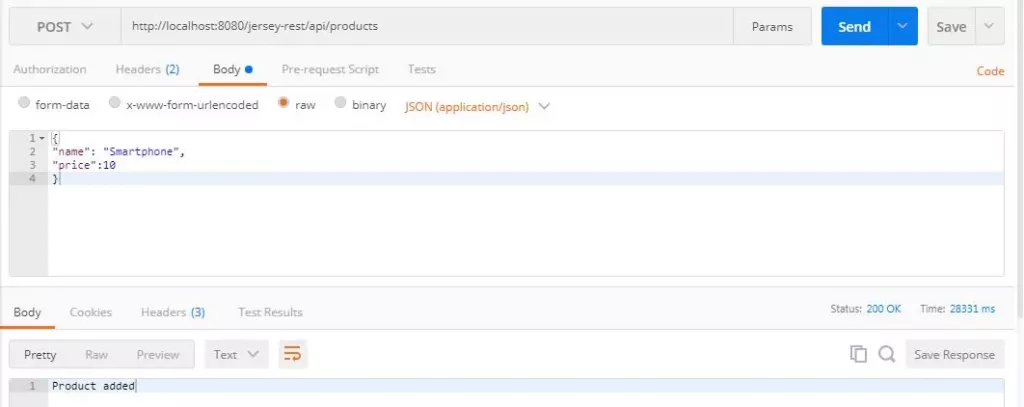
Request Body Validation
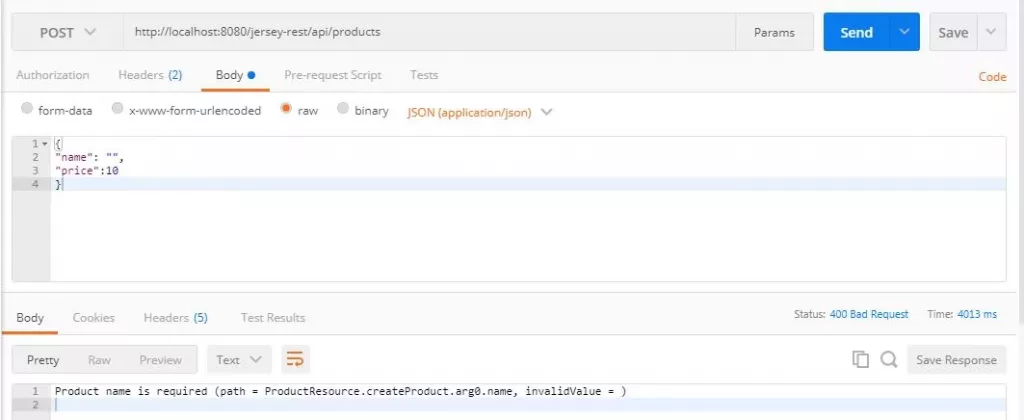
PUT API
Update Product
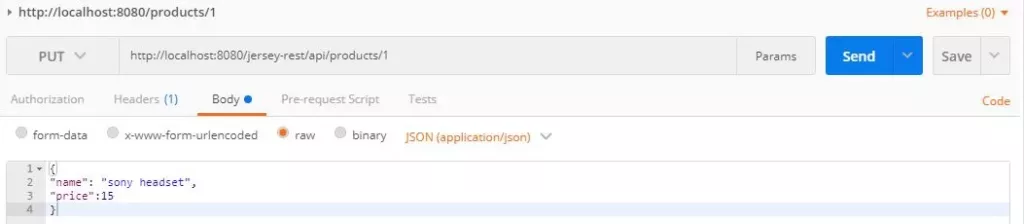
DELETE API
Delete Product
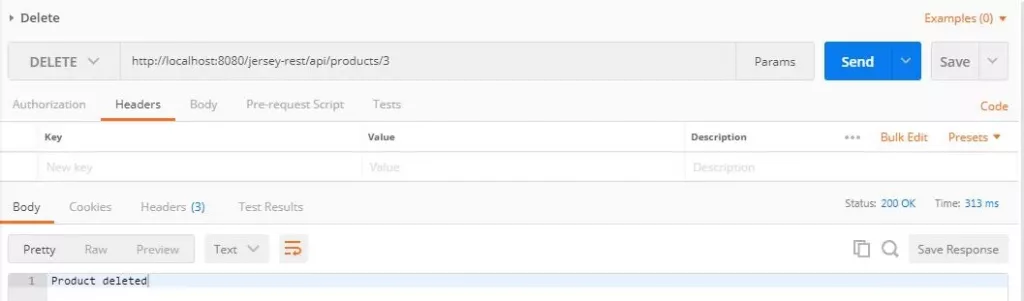
References
Source Code
As always, you can get the source code from Github below
https://github.com/JavaChinna/jersey-rest-crud
Conclusion
That’s all folks! In this article, you’ve learned how to implement Spring Boot RESTful services for CRUD operations.
I hope you enjoyed this article. Thank you for reading.