Время на прочтение
8 мин
Количество просмотров 528K
В любом деле самое сложное — это начало. Часто бывает тяжело войти в контекст, с чем столкнулся и я, решив разработать свое первое Android-приложение. Настоящая статья для тех, кто хочет начать, но не знает с чего.
Статья затронет весь цикл разработки приложения. Вместе мы напишем простенькую игру “Крестики-Нолики” с одним экраном (в ОС Android это называется Activity).
Отсутствие опыта разработки на языке Java не должно стать препятствием в освоении Android. Так, в примерах не будут использоваться специфичные для Java конструкции (или они будет минимизированы на столько, на сколько это возможно). Если Вы пишете, например, на PHP и знакомы с основополагающими принципами в разработке ПО, эта статья будет вам наиболее полезна. В свою очередь так как, я не являюсь экспертом по разработке на Java, можно предположить, что исходный код не претендует на лейбл “лучшие практики разработки на Java”.
Установка необходимых программ и утилит
Перечислю необходимые инструменты. Их 3:
- JDK — набор для разработки на языке Java;
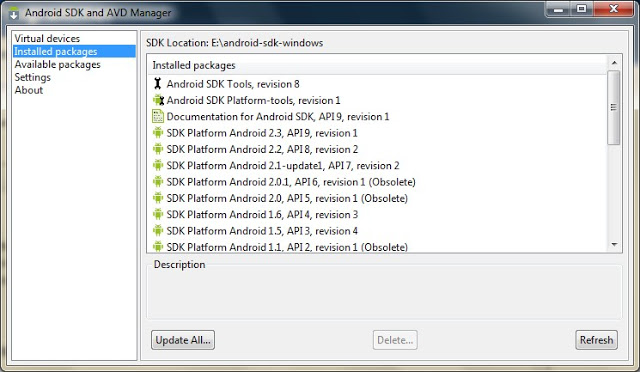
- Android SDK and AVD Manager — набор утилит для разработки + эмулятор;
- IDE c поддержкой разработки для Android:
- Eclipse + ADT plugin;
- IntelliJ IDEA Community Edition;
- Netbeans + nbandroid plugin;
Утилиты устанавливаются в определенном выше порядке. Ставить все перечисленные IDE смысла нет (разве только если Вы испытываете затруднения с выбором подходящей). Я использую IntelliJ IDEA Community Edition, одну из самых развитых на данный момент IDE для Java.
Запуск виртуального устройства
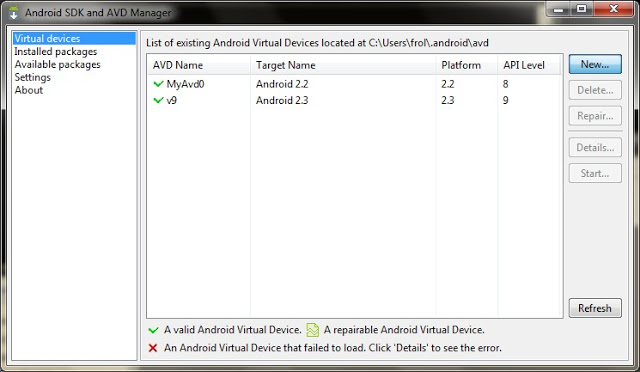
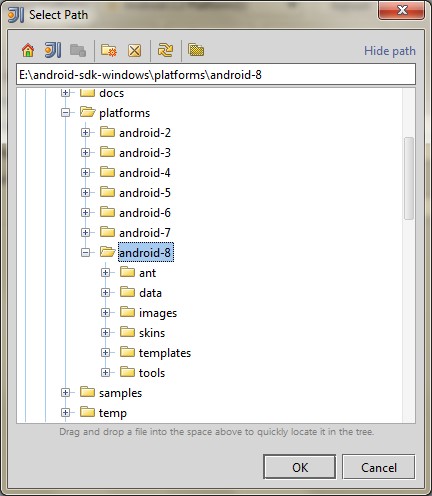
Запустив AVD Manager и установив дополнительные пакеты (SDK различных версий), можно приступить к созданию виртуального устройства с необходимыми параметрами. Разобраться в интерфейсе не должно составить труда.
Список устройств
Создание проекта
Мне всегда не терпится приступить к работе, минимизируя подготовительные мероприятия, к которым относится создание проекта в IDE, особенно, когда проект учебный и на продакшн не претендует.
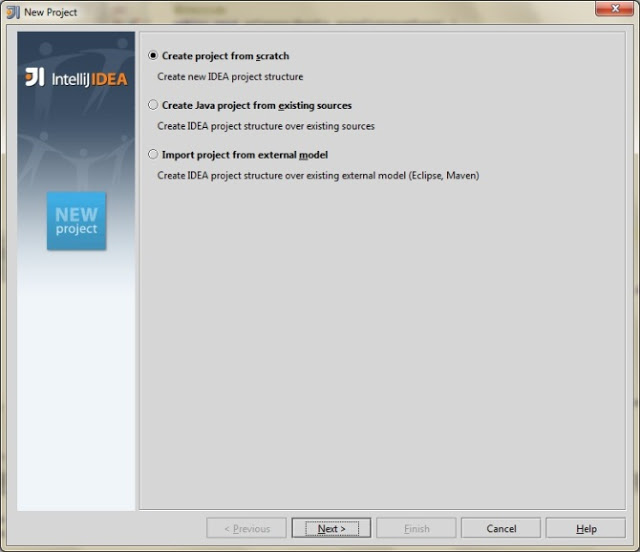
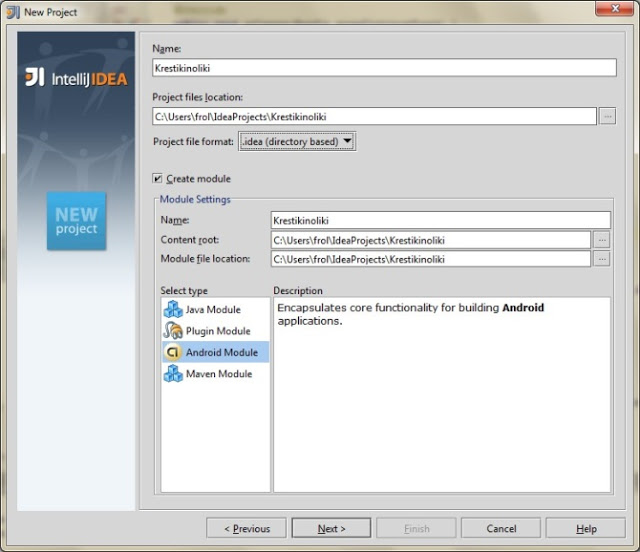
Итак, File->New Project:
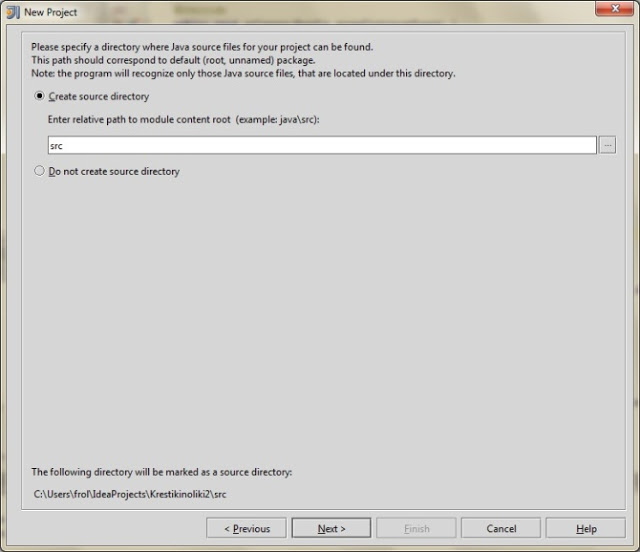


По нажатию кнопки F6 проект соберется, откомпилируется и запустится на виртуальном девайсе.
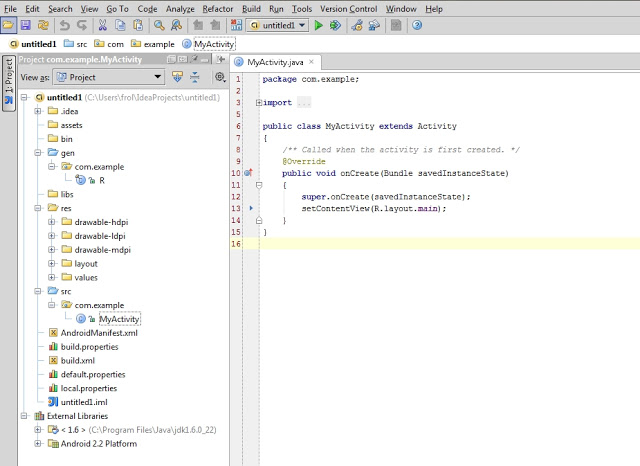
Структура проекта
На предыдущем скриншоте видна структура проекта. Так как в этой статье мы преследуем сугубо практические цели, заострим внимание лишь на тех папках, которые будем использовать в процессе работы. Это следующие каталоги: gen, res и src.
В папке gen находятся файлы, которые генерируются автоматически при сборке проекта. Вручную их менять нельзя.
Папка res предназначена для хранения ресурсов, таких как картинки, тексты (в том числе переводы), значения по-умолчанию, макеты (layouts).
src — это папка в которой будет происходить основная часть работы, ибо тут хранятся файлы с исходными текстами нашей программы.
Первые строки
Как только создается Activity (экран приложения), вызывается метод onCreate(). IDE заполнила его 2 строчками:
super.onCreate(savedInstanceState);
setContentView(R.layout.main);
Метод setContentView (равносильно this.setContentView) устанавливает xml-макет для текущего экрана. Далее xml-макеты будем называть «layout», а экраны — «Activity». Layout в приложении будет следующий:
<?xml version="1.0" encoding="utf-8"?>
<TableLayout xmlns:android="http://schemas.android.com/apk/res/android"
    android:layout_width="fill_parent"
    android:layout_height="fill_parent"
    android:id="@+id/main_l"
    android:gravity="center"
    >
</TableLayout>
Для этого приложения идеально подойдет TableLayout. Id можно присвоить любому ресурсу. В данном случае, TableLayout присвоен id = main_l. При помощи метода findViewById() можно получить доступ к виду:
    private TableLayout layout; // это свойство класса KrestikinolikiActivity

    public void onCreate(Bundle savedInstanceState) {
        super.onCreate(savedInstanceState);
        setContentView(R.layout.main);
        layout = (TableLayout) findViewById(R.id.main_l);
        buildGameField();
    }
Теперь необходимо реализовать метод buildGameField(). Для этого требуется сгенерировать поле в виде матрицы. Этим будет заниматься класс Game. Сначала нужно создать класс Square для ячеек и класс Player, объекты которого будут заполнять эти ячейки.
Square.java
package com.example;

public class Square {
    private Player player = null;

    public void fill(Player player) {
        this.player = player;
    }

    public boolean isFilled() {
        if (player != null) {
            return true;
        }
        return false;
    }

    public Player getPlayer() {
        return player;
    }
}
Player.java
package com.example;


public class Player {
    private String name;

    public Player(String name) {
        this.name = name;
    }

    public CharSequence getName() {
        return (CharSequence) name;
    }
}
Все классы нашего приложения находятся в папке src.
Game.java
package com.example;

public class Game {
 /**
     * поле
     */
    private Square[][] field;

 /**
     * Конструктор
     *
     */
    public Game() {
        field = new Square[3][3];
        squareCount = 0;
        // заполнение поля
        for (int i = 0, l = field.length; i < l; i++) {
            for (int j = 0, l2 = field[i].length; j < l2; j++) {
                field[i][j] = new Square();
                squareCount++;
            }
        }
    }

 public Square[][] getField() {
        return field;
    }
}
Инициализация Game в конструкторе KrestikinolikiActivity.
public KrestikinolikiActivity() {
    game = new Game();
 game.start(); // будет реализован позже
}
Метод buildGameField() класса KrestikinolikiActivity. Он динамически добавляет строки и колонки в таблицу (игровое поле):
private Button[][] buttons = new Button[3][3];
 //(....)
    private void buildGameField() {
        Square[][] field = game.getField();
        for (int i = 0, lenI = field.length; i < lenI; i++ ) {
            TableRow row = new TableRow(this); // создание строки таблицы
            for (int j = 0, lenJ = field[i].length; j < lenJ; j++) {
                Button button = new Button(this);
                buttons[i][j] = button;
                button.setOnClickListener(new Listener(i, j)); // установка слушателя, реагирующего на клик по кнопке
                row.addView(button, new TableRow.LayoutParams(TableRow.LayoutParams.WRAP_CONTENT,
                        TableRow.LayoutParams.WRAP_CONTENT)); // добавление кнопки в строку таблицы
                button.setWidth(107);
                button.setHeight(107);
            }
            layout.addView(row, new TableLayout.LayoutParams(TableLayout.LayoutParams.WRAP_CONTENT,
                    TableLayout.LayoutParams.WRAP_CONTENT)); // добавление строки в таблицу
        }
    }
В строке 8 создается объект, реализующий интерфейс View.OnClickListener. Создадим вложенный класс Listener. Он будет виден только из KrestikinolikiActivity.
public class Listener implements View.OnClickListener {
        private int x = 0;
        private int y = 0;

        public Listener(int x, int y) {
            this.x = x;
            this.y = y;
        }

        public void onClick(View view) {
            Button button = (Button) view;
        }
    }
Осталось реализовать логику игры.
public class Game {
    /**
     * игроки
     */
    private Player[] players;
    /**
     * поле
     */
    private Square[][] field;
    /**
     * начата ли игра?
     */
    private boolean started;
    /**
     * текущий игрок
     */
    private Player activePlayer;
    /**
     * Считает колличество заполненных ячеек
     */
    private int filled;
    /**
     * Всего ячеек
     */
    private int squareCount;

    /**
     * Конструктор
     *
     */
    public Game() {
        field = new Square[3][3];
        squareCount = 0;
        // заполнение поля
        for (int i = 0, l = field.length; i < l; i++) {
            for (int j = 0, l2 = field[i].length; j < l2; j++) {
                field[i][j] = new Square();
                squareCount++;
            }
        }
        players = new Player[2];
        started = false;
        activePlayer = null;
        filled = 0;
    }

    public void start() {
        resetPlayers();
        started = true;
    }

    private void resetPlayers() {
        players[0] = new Player("X");
        players[1] = new Player("O");
        setCurrentActivePlayer(players[0]);
    }

    public Square[][] getField() {
        return field;
    }

    private void setCurrentActivePlayer(Player player) {
        activePlayer = player;
    }

    public boolean makeTurn(int x, int y) {
        if (field[x][y].isFilled()) {
            return false;
        }
        field[x][y].fill(getCurrentActivePlayer());
        filled++;
        switchPlayers();
        return true;
    }

    private void switchPlayers() {
        activePlayer = (activePlayer == players[0]) ? players[1] : players[0];
    }

    public Player getCurrentActivePlayer() {
        return activePlayer;
    }

    public boolean isFieldFilled() {
        return squareCount == filled;
    }

    public void reset() {
        resetField();
        resetPlayers();
    }

    private void resetField() {
        for (int i = 0, l = field.length; i < l; i++) {
            for (int j = 0, l2 = field[i].length; j < l2; j++) {
                field[i][j].fill(null);
            }
        }
        filled = 0;
    }
}
Определение победителя
К. О. подсказывает, что в крестики-нолики выирывает тот, кто выстроет X или O в линию длиной, равной длине поля по-вертикали, или по-горизонтали, или по-диагонали. Первая мысль, которая приходит в голову — это написать методы для каждого случая. Думаю, в этом случае хорошо подойдет паттерн Chain of Responsobility. Определим интерфейс
package com.example;

public interface WinnerCheckerInterface {
    public Player checkWinner();
}
Так как Game наделен обязанностью выявлять победителя, он реализует этот интерфейс. Настало время создать виртуальных «лайнсменов», каждый из которых будет проверять свою сторону. Все они реализует интерфейс WinnerCheckerInterface.
WinnerCheckerHorizontal.java
package com.example;

public class WinnerCheckerHorizontal implements WinnerCheckerInterface {
    private Game game;

    public WinnerCheckerHorizontal(Game game) {
        this.game = game;
    }

    public Player checkWinner() {
        Square[][] field = game.getField();
        Player currPlayer;
        Player lastPlayer = null;
        for (int i = 0, len = field.length; i < len; i++) {
            lastPlayer = null;
            int successCounter = 1;
            for (int j = 0, len2 = field[i].length; j < len2; j++) {
                currPlayer = field[i][j].getPlayer();
                if (currPlayer == lastPlayer && (currPlayer != null && lastPlayer !=null)) {
                    successCounter++;
                    if (successCounter == len2) {
                        return currPlayer;
                    }
                }
                lastPlayer = currPlayer;
            }
        }
        return null;
    }
}
WinnerCheckerVertical.java
package com.example;

public class WinnerCheckerVertical implements WinnerCheckerInterface {
    private Game game;

    public WinnerCheckerVertical (Game game) {
        this.game = game;
    }
    public Player checkWinner() {
        Square[][] field = game.getField();
        Player currPlayer;
        Player lastPlayer = null;
        for (int i = 0, len = field.length; i < len; i++) {
            lastPlayer = null;
            int successCounter = 1;
            for (int j = 0, len2 = field[i].length; j < len2; j++) {
                currPlayer = field[j][i].getPlayer();
                if (currPlayer == lastPlayer && (currPlayer != null && lastPlayer !=null)) {
                    successCounter++;
                    if (successCounter == len2) {
                        return currPlayer;
                    }
                }
                lastPlayer = currPlayer;
            }
        }
        return null;
    }
}
WinnerCheckerDiagonalLeft.java
package com.example;

public class WinnerCheckerDiagonalLeft implements WinnerCheckerInterface {
    private Game game;

    public WinnerCheckerDiagonalLeft(Game game) {
        this.game = game;
    }

    public Player checkWinner() {
        Square[][] field = game.getField();
        Player currPlayer;
        Player lastPlayer = null;
        int successCounter = 1;
        for (int i = 0, len = field.length; i < len; i++) {
            currPlayer = field[i][i].getPlayer();
            if (currPlayer != null) {
                if (lastPlayer == currPlayer) {
                    successCounter++;
                    if (successCounter == len) {
                        return currPlayer;
                    }
                }
            }
            lastPlayer = currPlayer;
        }
        return null;
    }
}
WinnerCheckerDiagonalRight.java
package com.example;

public class WinnerCheckerDiagonalRight implements WinnerCheckerInterface {
    private Game game;

    public WinnerCheckerDiagonalRight(Game game) {
        this.game = game;
    }

    public Player checkWinner() {
        Square[][] field = game.getField();
        Player currPlayer;
        Player lastPlayer = null;
        int successCounter = 1;
        for (int i = 0, len = field.length; i < len; i++) {
            currPlayer = field[i][len - (i + 1)].getPlayer();
            if (currPlayer != null) {
                if (lastPlayer == currPlayer) {
                    successCounter++;
                    if (successCounter == len) {
                        return currPlayer;
                    }
                }
            }
            lastPlayer = currPlayer;
        }
        return null;
    }
}
Проинициализируем их в конструкторе Game:
//(....)
 /**
     * "Судьи" =). После каждого хода они будут проверять,
     * нет ли победителя
     */
    private WinnerCheckerInterface[] winnerCheckers;
 //(....)
    public Game() {
        //(....)
        winnerCheckers = new WinnerCheckerInterface[4];
        winnerCheckers[0] = new WinnerCheckerHorizontal(this);
        winnerCheckers[1] = new WinnerCheckerVertical(this);
        winnerCheckers[2] = new WinnerCheckerDiagonalLeft(this);
        winnerCheckers[3] = new WinnerCheckerDiagonalRight(this);
        //(....)
    }
Реализация checkWinner():
public Player checkWinner() {
        for (WinnerCheckerInterface winChecker : winnerCheckers) {
            Player winner = winChecker.checkWinner();
            if (winner != null) {
                return winner;
            }
        }
        return null;
    }
Победителя проверяем после каждого хода. Добавим кода в метод onClick() класса Listener
public void onClick(View view) {
            Button button = (Button) view;
            Game g = game;
            Player player = g.getCurrentActivePlayer();
            if (makeTurn(x, y)) {
                button.setText(player.getName());
            }
            Player winner = g.checkWinner();
            if (winner != null) {
                gameOver(winner);
            }
            if (g.isFieldFilled()) {  // в случае, если поле заполнено
                gameOver();
            }
        }
Метод gameOver() реализован в 2-х вариантах:
private void gameOver(Player player) {
        CharSequence text = "Player "" + player.getName() + "" won!";
        Toast.makeText(this, text, Toast.LENGTH_SHORT).show();
        game.reset();
        refresh();
    }

    private void gameOver() {
        CharSequence text = "Draw";
        Toast.makeText(this, text, Toast.LENGTH_SHORT).show();
        game.reset();
        refresh();
    }
Для Java, gameOver(Player player) и gameOver() — разные методы. Воспользовавшись Builder’ом Toast.makeText, можно быстро создать и показать уведомление. refresh() обновляет состояние поля:
private void refresh() {
        Square[][] field = game.getField();

        for (int i = 0, len = field.length; i < len; i++) {
            for (int j = 0, len2 = field[i].length; j < len2; j++) {
                if (field[i][j].getPlayer() == null) {
                    buttons[i][j].setText("");
                } else {
                    buttons[i][j].setText(field[i][j].getPlayer().getName());
                }
            }
        }
    }
Готово! Надеюсь, эта статья помогла Вам освоиться в мире разработки под OS Android. Благодарю за внимание!
Видео готового приложения
Исходники .
PS: статья была опубликована по просьбе комментаторов этого поста.
#Руководства
- 18 июл 2018
-

1
Платформа Android открытая, поэтому каждый может написать своё приложение и распространять его через каталоги программ. Все инструменты бесплатны.
vlada_maestro / shutterstock

Пишет про разработку в Skillbox Media. Работал главным редактором сайта «Хабрахабр», ведёт корпоративные блоги.
Язык программирования для мобильной разработки на Android очень простой — это Java. Сейчас Google активно продвигает Kotlin как язык, который сможет заменить Java. Приложения пишут и на C++.
Создание простейшего приложения состоит из нескольких этапов:
- проект в Android Studio;
- создание пользовательского интерфейса;
- добавление активностей, навигации и действий;
- тест-драйв приложения в эмуляторе.
Первым делом установите программу Android Studio. Это официальная среда разработки (IDE) для Android, она работает на Windows, macOS и Linux. Хотя при разработке программ для Android можно использовать и другие среды, кроме Android Studio.
Если на компьютере не установлены Android SDK и другие компоненты, то Android Studio автоматически скачает их. Android SDK — это среда программирования, в которую входят библиотеки, исполняемые файлы, скрипты, документация и т.д.
Android SDK компилирует код вместе с любыми данными и ресурсами в файл с расширением .apk. Он содержит всё необходимое для установки приложения на Android-устройство.
Полезно установить и эмулятор Android, чтобы запускать и тестировать приложения. Эмулятор поставляется в комплекте с Android Studio.
Когда все инструменты установлены, можно создать первый проект. Но сначала нужно разобраться с основными понятиями.
Android-приложение состоит из четырёх компонентов. Каждый компонент — это точка входа, через которую система или пользователь может получить доступ.
- Активность (activity) — элементы интерактивного пользовательского интерфейса.
Одна активность задействует другую и передаёт информацию о том, что намерен делать пользователь, через класс Intent (намерения). Активности подобны веб-страницам, а намерения — ссылкам между ними. Запуск приложения — это активность Main. - Сервис (service) — универсальная точка входа для поддержания работы приложения в фоновом режиме.
Этот компонент выполняет длительные операции или работу для удалённых процессов без визуального интерфейса. - Широковещательный приемник (broadcast receiver) транслирует нескольким участникам намерения из приложения.
- Поставщик содержимого (content provider) управляет общим набором данных приложения из файловой системы, базы данных SQLite, интернета или другого хранилища.
Теперь попробуем сделать своё приложение для Android.
Выбираем название приложения, домен компании, путь к проекту и название пакета. Указываем, включить ли поддержку опциональных языков программирования C++ и Kotlin.
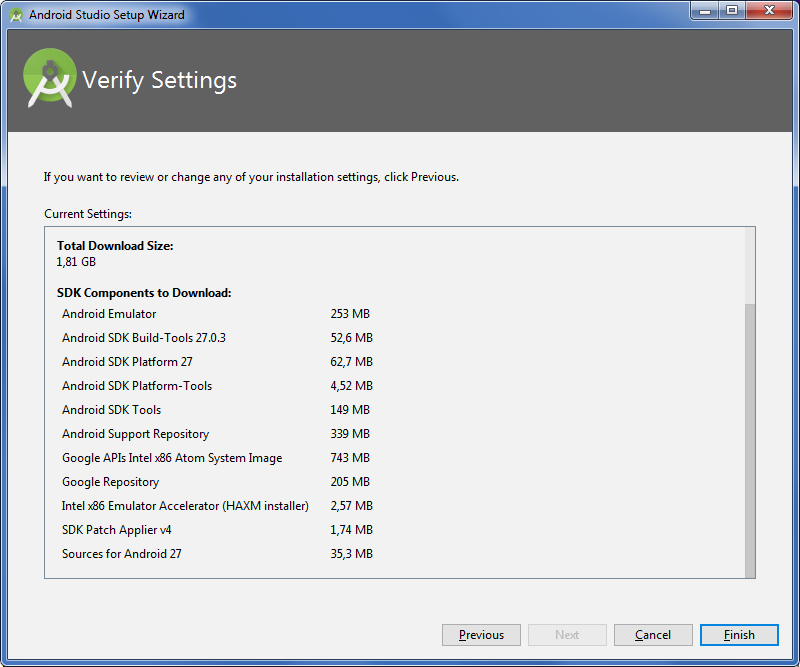
Задаём одну или несколько целевых платформ для сборки. Для этого используется SDK и AVD, менеджер виртуальных устройств Android. Инструмент позволяет устанавливать в SDK пакеты, которые поддерживают несколько версий ОС Android и несколько уровней API (интерфейсов программирования приложений).

Справка
Чем ниже версия Android, тем больше устройств, на которых приложение запустится. Чем выше версия, тем богаче функциональность API.
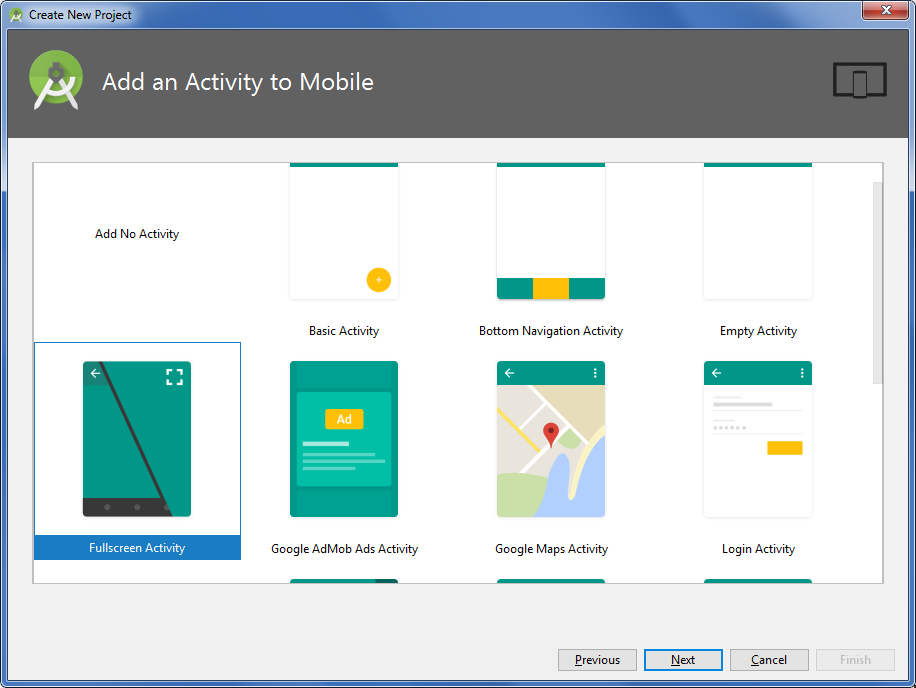
Выбираем основную активность, которая будет запускаться при нажатии на иконку приложения, и даём ей имя.
После нескольких минут сборки Android Studio открывает интерфейс IDE. Здесь три основных момента.
Если выбрать в выпадающем меню вид Android, то вы увидите файлы проекта. Например, наша основная активность называется app > java > ru.skillbox.skillboxapp > FullscreenActivity. При создании проекта мы указали вместо активности Main полноэкранную активность.
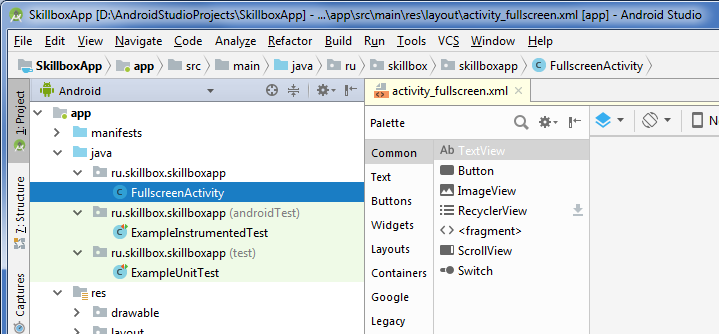
Далее можно посмотреть файл app > res > layout > activity_fullscreen.xml. Это XML-файл с макетом для UI нашей основной активности.
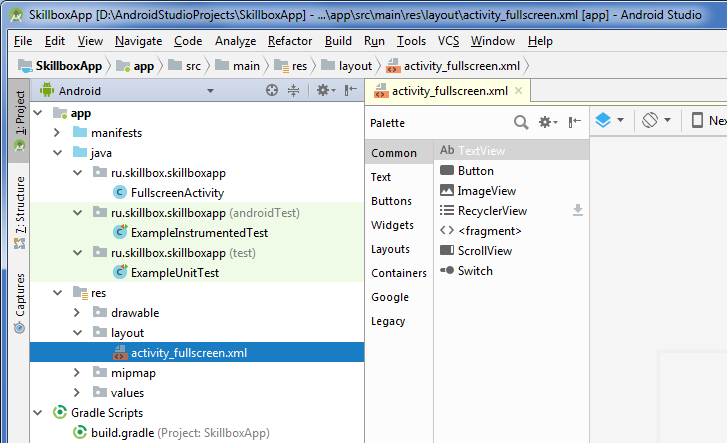
Наконец, третий важный файл app > manifests > AndroidManifest.xml описывает фундаментальные характеристики приложения и определяет все его компоненты.
<?xml version="1.0" encoding="utf-8"?>
<manifest xmlns:android="http://schemas.android.com/apk/res/android"
    package="ru.skillbox.skillboxapp">

    <application
        android:allowBackup="true"
        android:icon="@mipmap/ic_launcher"
        android:label="@string/app_name"
        android:roundIcon="@mipmap/ic_launcher_round"
        android:supportsRtl="true"
        android:theme="@style/AppTheme">
        <activity
            android:name=".FullscreenActivity"
            android:configChanges="orientation|keyboardHidden|screenSize"
            android:label="@string/app_name"
            android:theme="@style/FullscreenTheme">
            <intent-filter>
                <action android:name="android.intent.action.MAIN" />

                <category android:name="android.intent.category.LAUNCHER" />
            </intent-filter>
        </activity>
    </application>

</manifest>
Созданное нами приложение — это одна активность, которая запускается в полноэкранном режиме и не имеет графических элементов.
Запускаем на Android-устройстве или в эмуляторе.
Смартфон или планшет для этого подключаем в режиме USB-отладки, которая активируется в Настройках разработчика в меню Настройки.
Для запуска в эмуляторе нажимаем в Android Studio кнопку Run в меню Run (Shift+F10). Выбираем подходящее устройство и версию ОС, портретную или ландшафтную (альбомную) ориентацию.
Пользовательский интерфейс Android-приложения создаётся через иерархию макетов (layouts, объекты ViewGroup) и виджетов (объекты View). Макеты управляют расположением дочерних виджетов на экране. Сами виджеты — это непосредственно компоненты UI: кнопки, текстовые поля на экране и т.п.
Интерфейс активностей создаётся в Android Studio в редакторе макетов (Layout Editor) и хранится по большей части в XML-файлах.
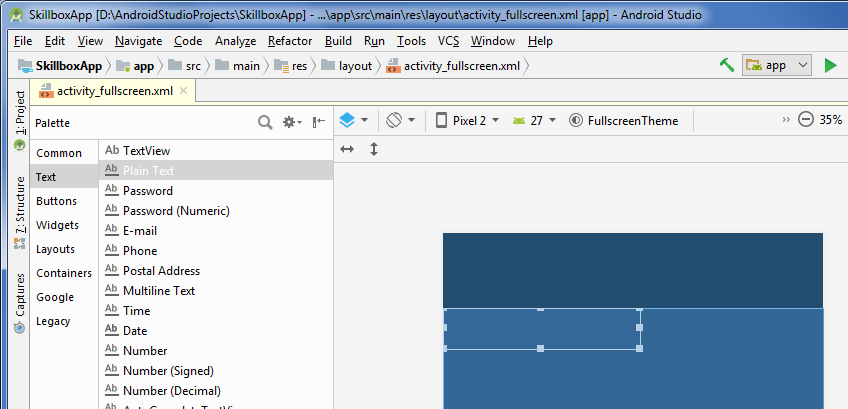
- Открываем файл app > res > layout > activity_fullscreen.xml.
- Добавляем на экран из палитры (Palette) виджеты перетаскиванием мышью.
- Например, берём текстовое поле (PlainText). Это виджет EditText, куда пользователь может вводить текст.
- Добавляем кнопки и другие нужные элементы.
Предположим, мы создали активность с текстовым полем и кнопкой «Отправить». После этого нужно написать, что конкретно будет происходить при нажатии кнопки «Отправить».
- Заходим в код app > java > FullscreenActivity.
- Добавляем метод SendMessage() в класс FullscreenActivity, чтобы при нажатии на кнопку вызывался этот метод.
- Создаём намерения (класс Intent) для перехода от одной активности к другой, новые активности, навигацию и всё остальное, что необходимо для приложения.
И, конечно, начинаем мечтать, как монетизировать приложение.

Учись бесплатно:
вебинары по программированию, маркетингу и дизайну.
Участвовать

Научитесь: Профессия Мобильный разработчик
Узнать больше
1. Welcome!
In this codelab, you’ll learn how to build and run your first Android app in the Java programming language. (If you’re looking for the Kotlin version of this codelab, you can go here.)
What you must know already
This codelab is written for programmers and assumes that you know either the Java or Kotlin programming language. If you are an experienced programmer and adept at reading code, you will likely be able to follow this codelab, even if you don’t have much experience with Java.
What you’ll learn
- How to use Android Studio to build your app.
- How to run your app on a device or in the emulator.
- How to add interactive buttons.
- How to display a second screen when a button is pressed.
Use Android Studio and Java to write Android apps
You write Android apps in the Java programming language using an IDE called Android Studio. Based on JetBrains’ IntelliJ IDEA software, Android Studio is an IDE designed specifically for Android development.
To work through this codelab, you will need a computer that can run Android Studio 3.6 or higher (or already has Android Studio 3.6 or higher installed).
2. Install Android Studio
You can download Android Studio 3.6 from the Android Studio page.
Android Studio provides a complete IDE, including an advanced code editor and app templates. It also contains tools for development, debugging, testing, and performance that make it faster and easier to develop apps. You can use Android Studio to test your apps with a large range of preconfigured emulators, or on your own mobile device. You can also build production apps and publish apps on the Google Play store.
Android Studio is available for computers running Windows or Linux, and for Macs running macOS. The OpenJDK (Java Development Kit) is bundled with Android Studio.
The installation is similar for all platforms. Any differences are noted below.
- Navigate to the Android Studio download page and follow the instructions to download and install Android Studio.
- Accept the default configurations for all steps, and ensure that all components are selected for installation.
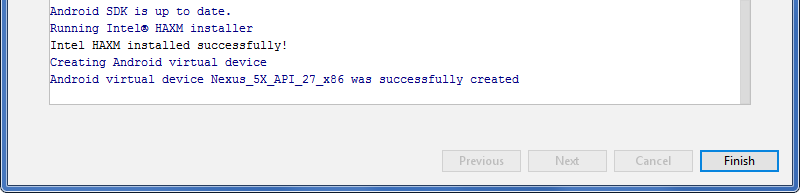
- After the install is complete, the setup wizard downloads and installs additional components, including the Android SDK. Be patient, because this process might take some time, depending on your internet speed.
- When the installation completes, Android Studio starts, and you are ready to create your first project.
3. Task: Create your first project
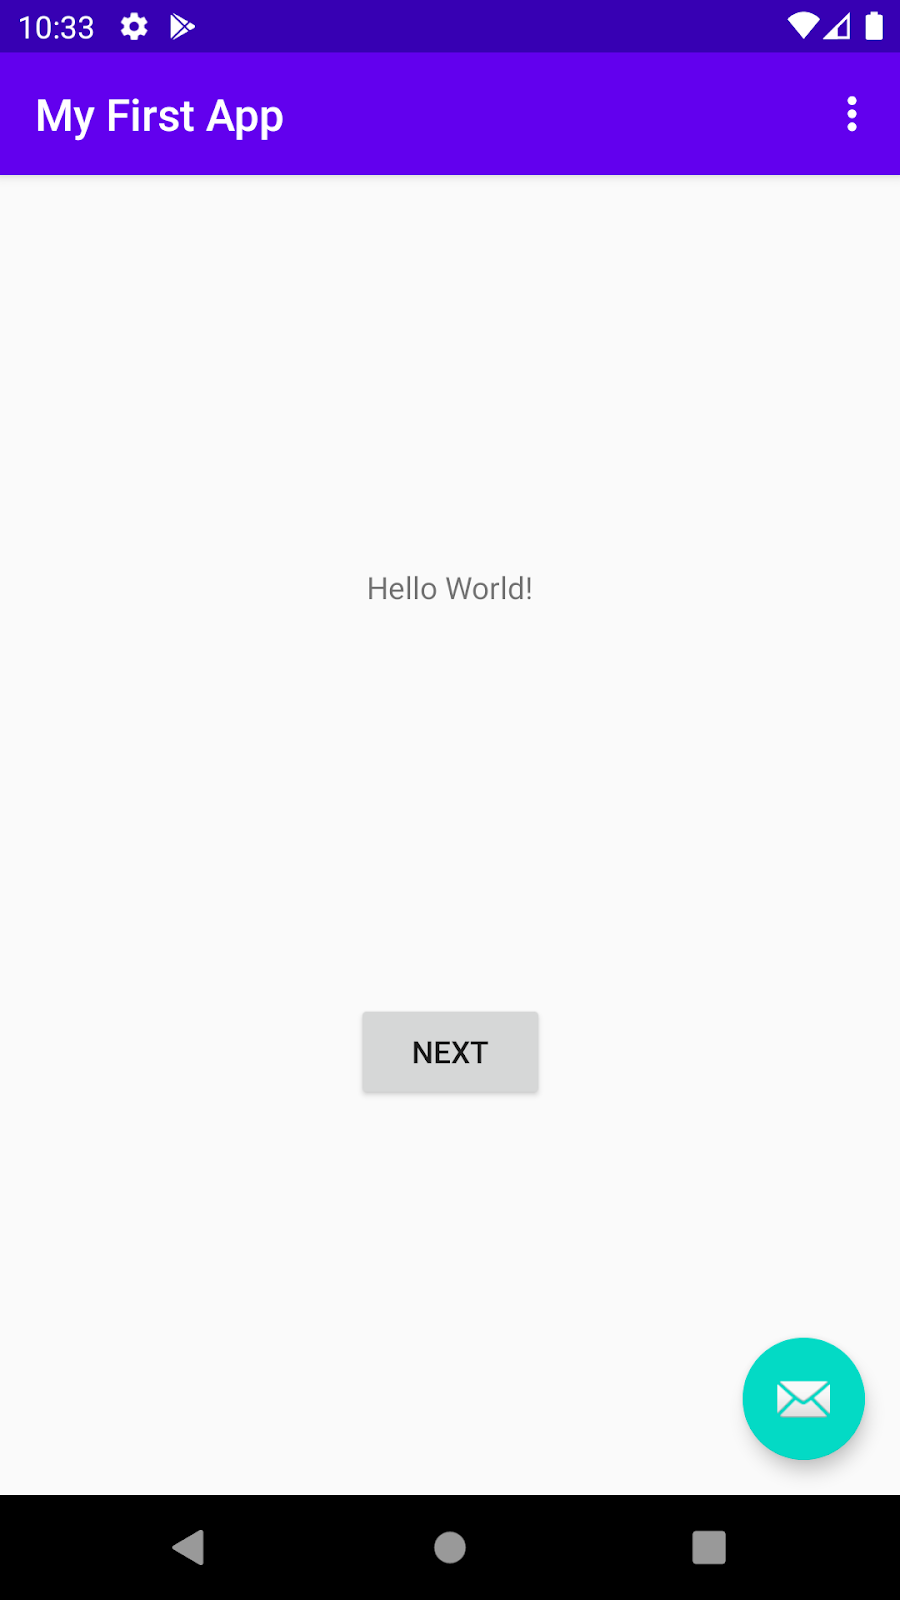
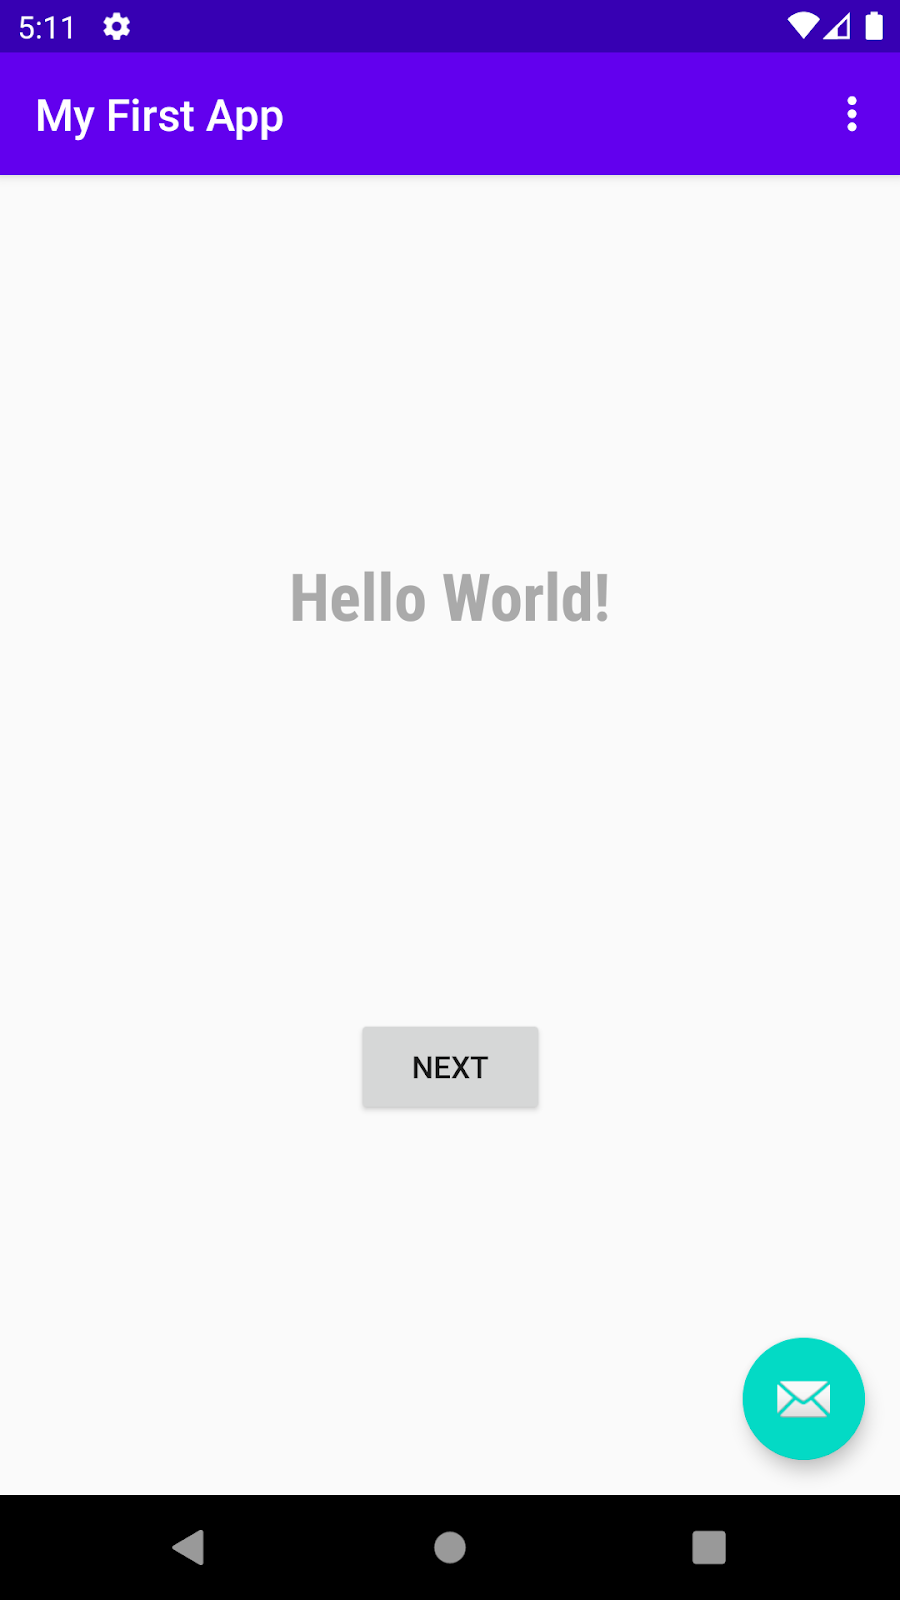
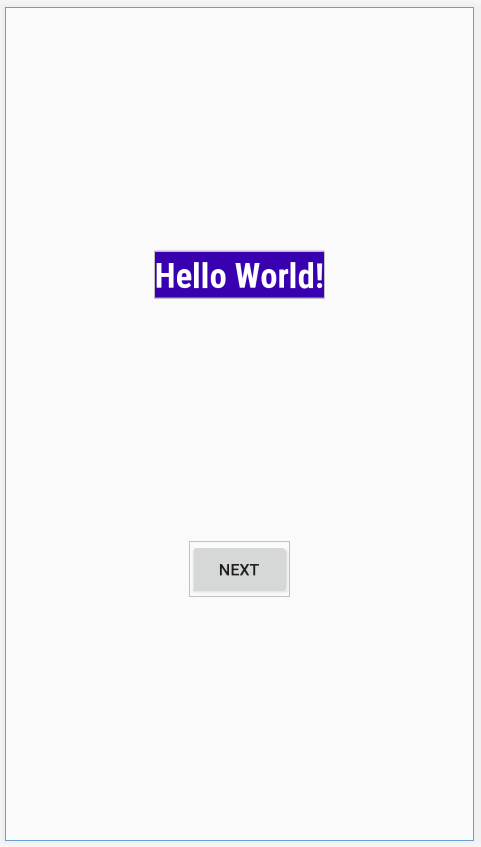
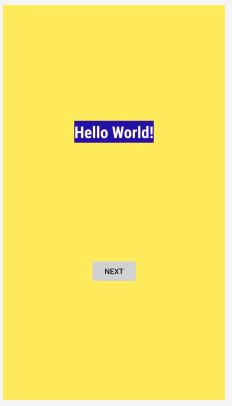
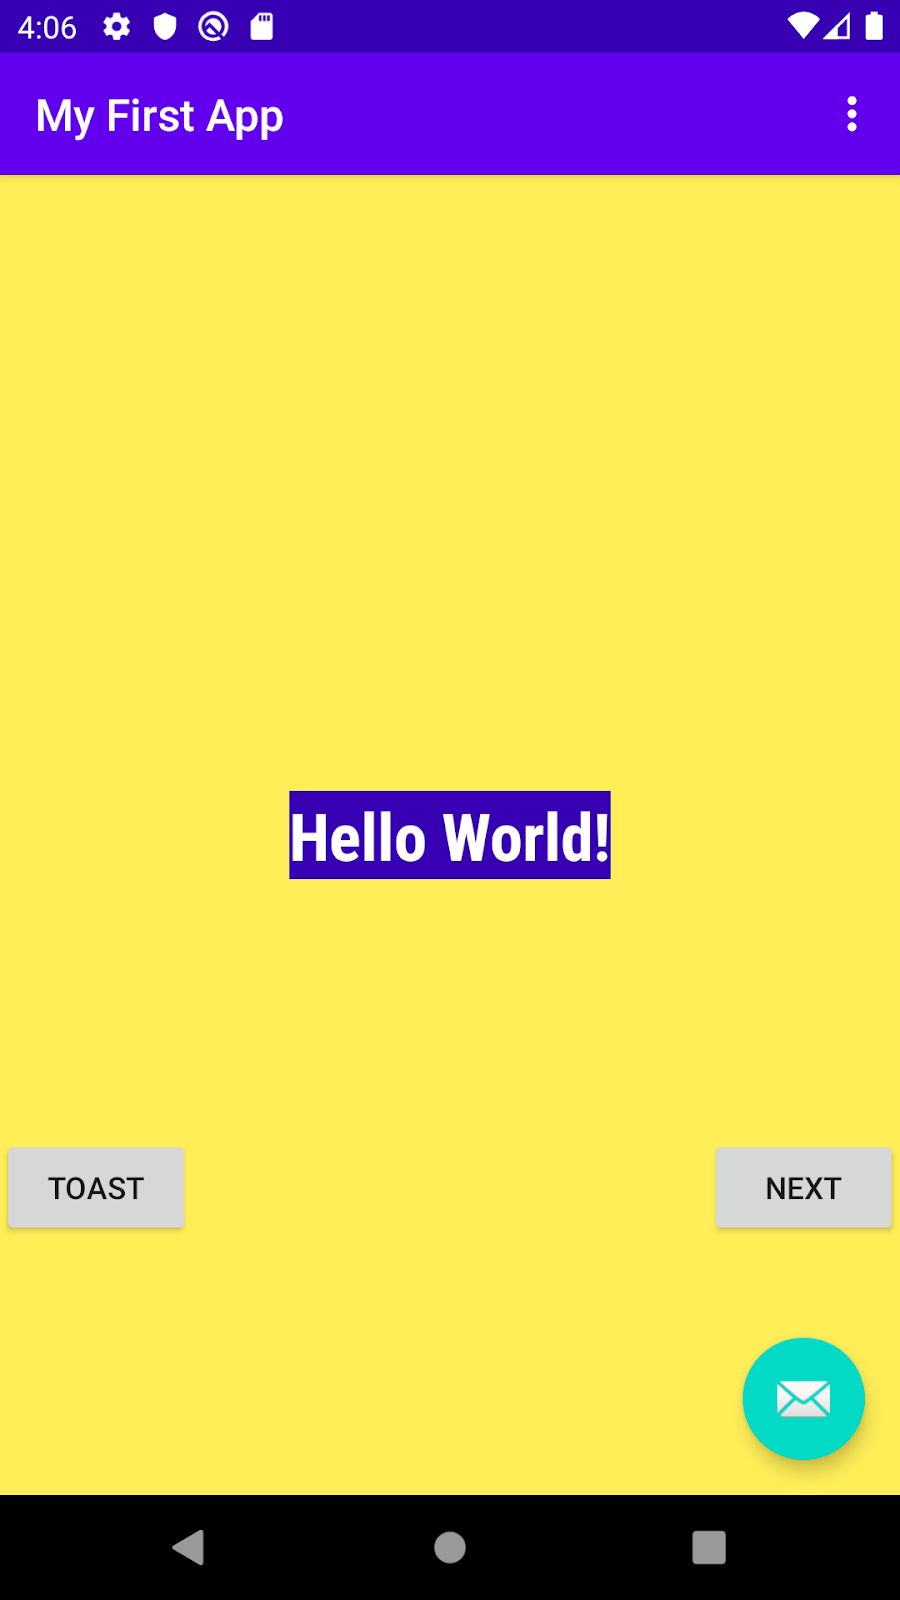
In this step, you will create a new Android project for your first app. This simple app displays the string «Hello World» on the screen of an Android virtual or physical device.
Here’s what the finished app will look like:
What you’ll learn
- How to create a project in Android Studio.
- How to create an emulated Android device.
- How to run your app on the emulator.
- How to run your app on your own physical device, if you have one.
Step 1: Create a new project
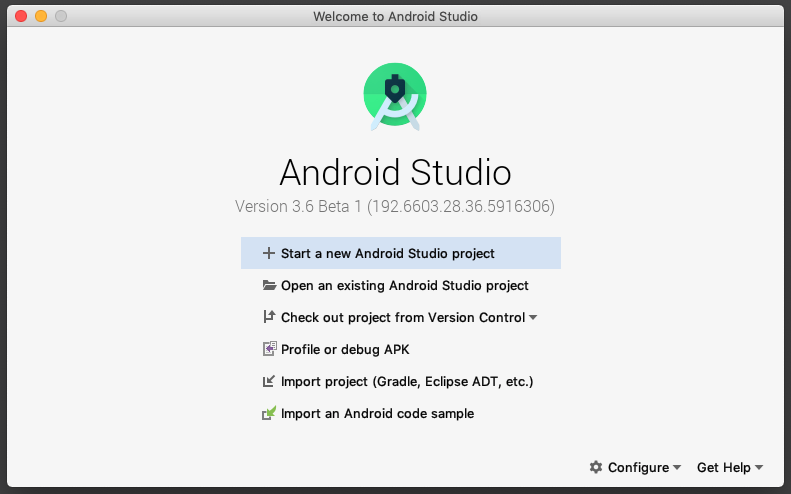
- Open Android Studio.
- In the Welcome to Android Studio dialog, click Start a new Android Studio project.
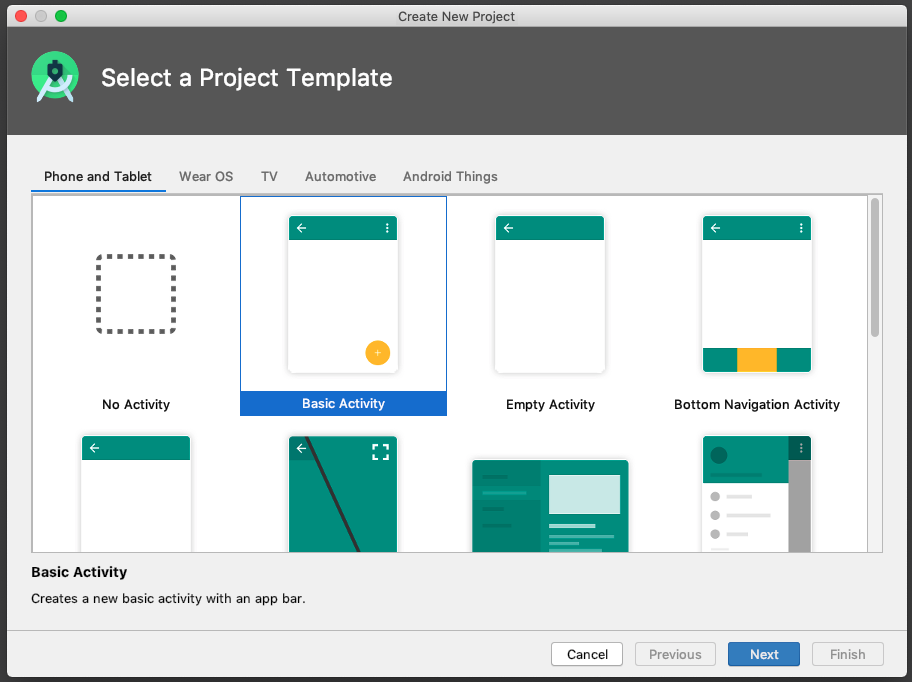
- Select Basic Activity (not the default). Click Next.
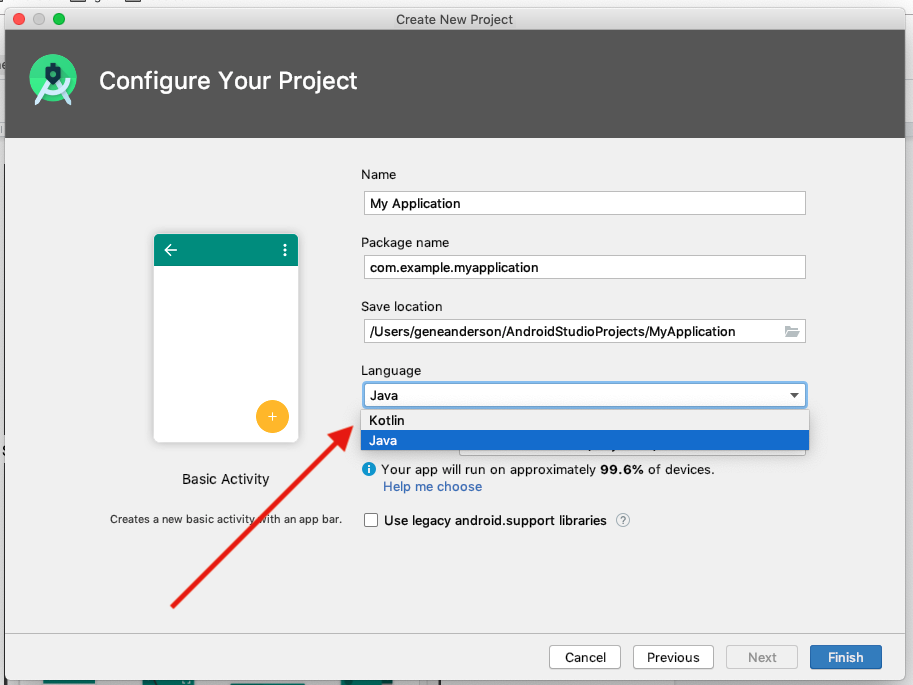
- Give your application a name such as My First App.
- Make sure the Language is set to Java.
- Leave the defaults for the other fields.
- Click Finish.
After these steps, Android Studio:
- Creates a folder for your Android Studio project called MyFirstApp. This is usually in a folder called AndroidStudioProjects below your home directory.
- Builds your project (this may take a few moments). Android Studio uses Gradle as its build system. You can follow the build progress at the bottom of the Android Studio window.
- Opens the code editor showing your project.
Step 2: Get your screen set up
When your project first opens in Android Studio, there may be a lot of windows and panes open. To make it easier to get to know Android Studio, here are some suggestions on how to customize the layout.
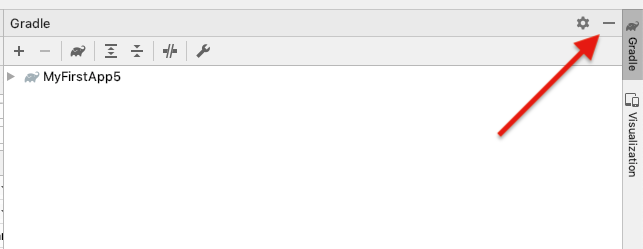
- If there’s a Gradle window open on the right side, click on the minimize button (—) in the upper right corner to hide it.
- Depending on the size of your screen, consider resizing the pane on the left showing the project folders to take up less space.
At this point, your screen should look a bit less cluttered, similar to the screenshot shown below.
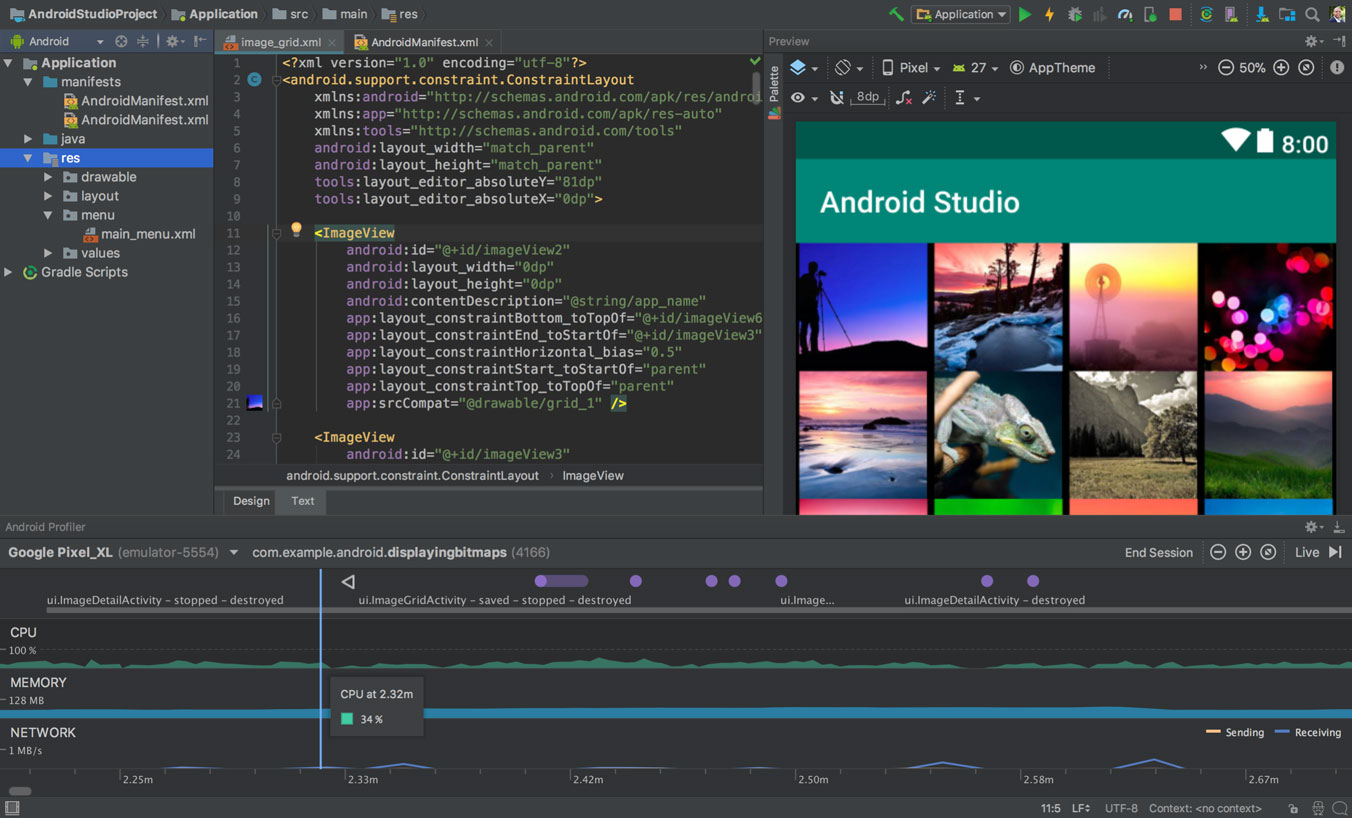
Step 3: Explore the project structure and layout
The upper left of the Android Studio window should look similar to the following diagram: 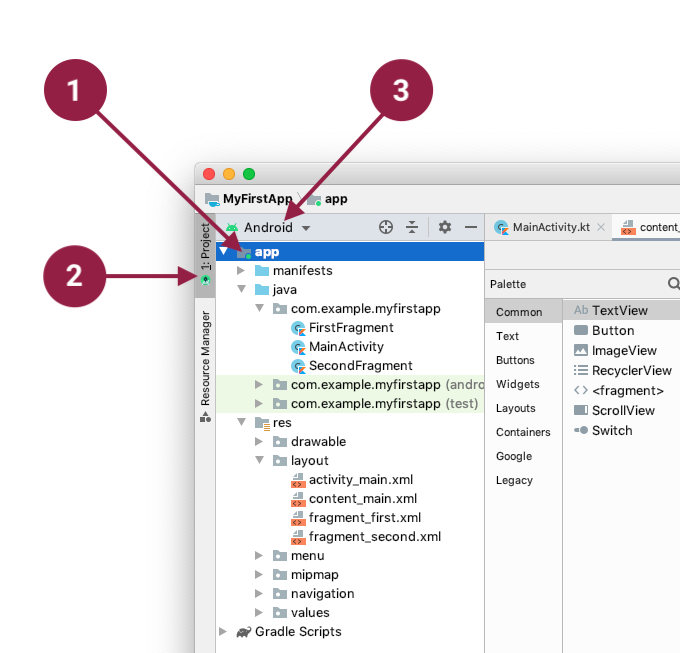
Based on you selecting the Basic Activity template for your project, Android Studio has set up a number of files for you. You can look at the hierarchy of the files for your app in multiple ways, one is in Project view. Project view shows your files and folders structured in a way that is convenient for working with an Android project. (This does not always match the file hierarchy! To see the file hierarchy, choose the Project files view by clicking (3).)
- Double-click the app (1) folder to expand the hierarchy of app files. (See (1) in the screenshot.)
- If you click Project (2), you can hide or show the Project view. You might need to select View > Tool Windows to see this option.
- The current Project view selection (3) is Project > Android.
In the Project > Android view you see three or four top-level folders below your app folder: manifests, java, java (generated) and res. You may not see java (generated) right away.
- Expand the manifests folder.
This folder contains AndroidManifest.xml. This file describes all the components of your Android app and is read by the Android runtime system when your app is executed. 2. Expand the java folder. All your Java language files are organized here. The java folder contains three subfolders:
com.example.myfirstapp: This folder contains the Java source code files for your app.
com.example.myfirstapp (androidTest): This folder is where you would put your instrumented tests, which are tests that run on an Android device. It starts out with a skeleton test file.
com.example.myfirstapp (test): This folder is where you would put your unit tests. Unit tests don’t need an Android device to run. It starts out with a skeleton unit test file. 3. Expand the res folder. This folder contains all the resources for your app, including images, layout files, strings, icons, and styling. It includes these subfolders:
drawable: All your app’s images will be stored in this folder.
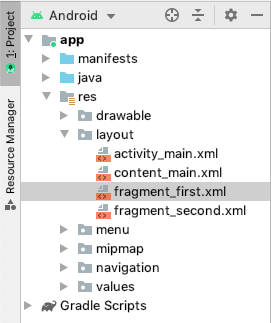
layout: This folder contains the UI layout files for your activities. Currently, your app has one activity that has a layout file called activity_main.xml. It also contains content_main.xml, fragment_first.xml, and fragment_second.xml.
menu: This folder contains XML files describing any menus in your app.
mipmap: This folder contains the launcher icons for your app.
navigation: This folder contains the navigation graph, which tells Android Studio how to navigate between different parts of your application.
values: This folder contains resources, such as strings and colors, used in your app.
Step 4: Create a virtual device (emulator)
In this task, you will use the Android Virtual Device (AVD) manager to create a virtual device (or emulator) that simulates the configuration for a particular type of Android device.
The first step is to create a configuration that describes the virtual device.
- In Android Studio, select Tools > AVD Manager, or click the AVD Manager icon in the toolbar.
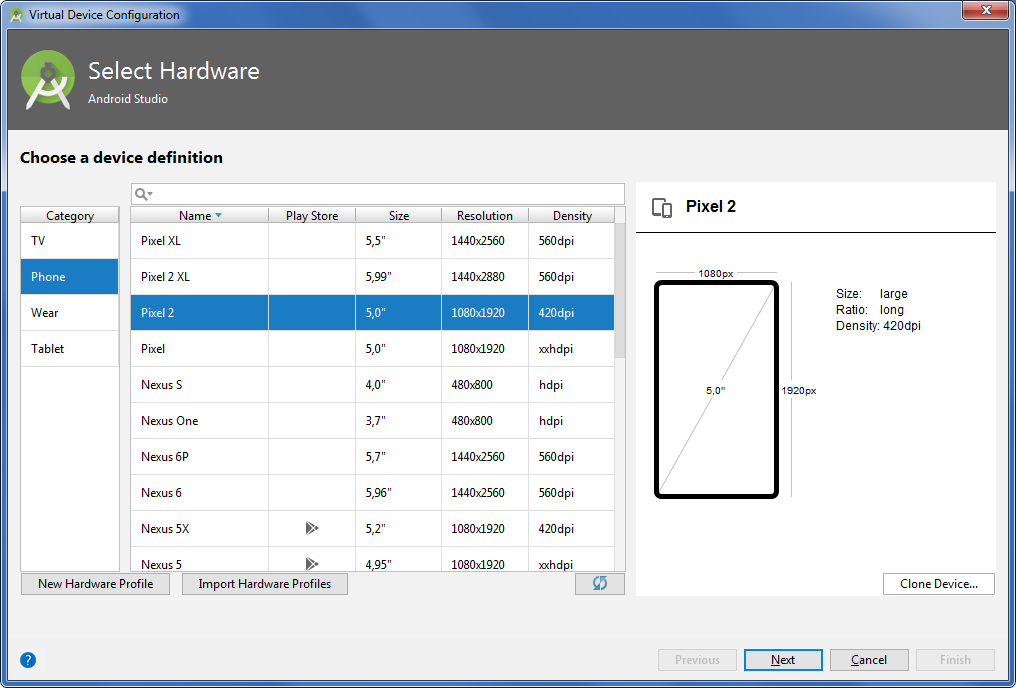
- Click +Create Virtual Device. (If you have created a virtual device before, the window shows all of your existing devices and the +Create Virtual Device button is at the bottom.) The Select Hardware window shows a list of pre-configured hardware device definitions.
- Choose a device definition, such as Pixel 2, and click Next. (For this codelab, it really doesn’t matter which device definition you pick).
- In the System Image dialog, from the Recommended tab, choose the latest release. (This does matter.)
- If a Download link is visible next to a latest release, it is not installed yet, and you need to download it first. If necessary, click the link to start the download, and click Next when it’s done. This may take a while depending on your connection speed.

- In the next dialog box, accept the defaults, and click Finish.
The AVD Manager now shows the virtual device you added.
- If the Your Virtual Devices AVD Manager window is still open, go ahead and close it.
Step 5: Run your app on your new emulator
- In Android Studio, select Run > Run ‘app’ or click the Run icon in the toolbar. The icon will change when your app is already running.
 The icon will change when your app is already running.
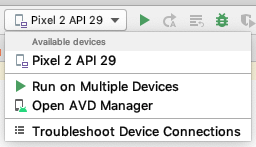
- In Run > Select Device, under Available devices, select the virtual device that you just configured. This menu also appears in the toolbar.
The emulator starts and boots just like a physical device. Depending on the speed of your computer, this may take a while. You can look in the small horizontal status bar at the very bottom of Android Studio for messages to see the progress.
|
Messages that might appear briefly in the status bar |
|
|
Gradle build running |
|
|
Waiting for target device to come on line |
|
|
Installing APK |
|
|
Launching activity |
|

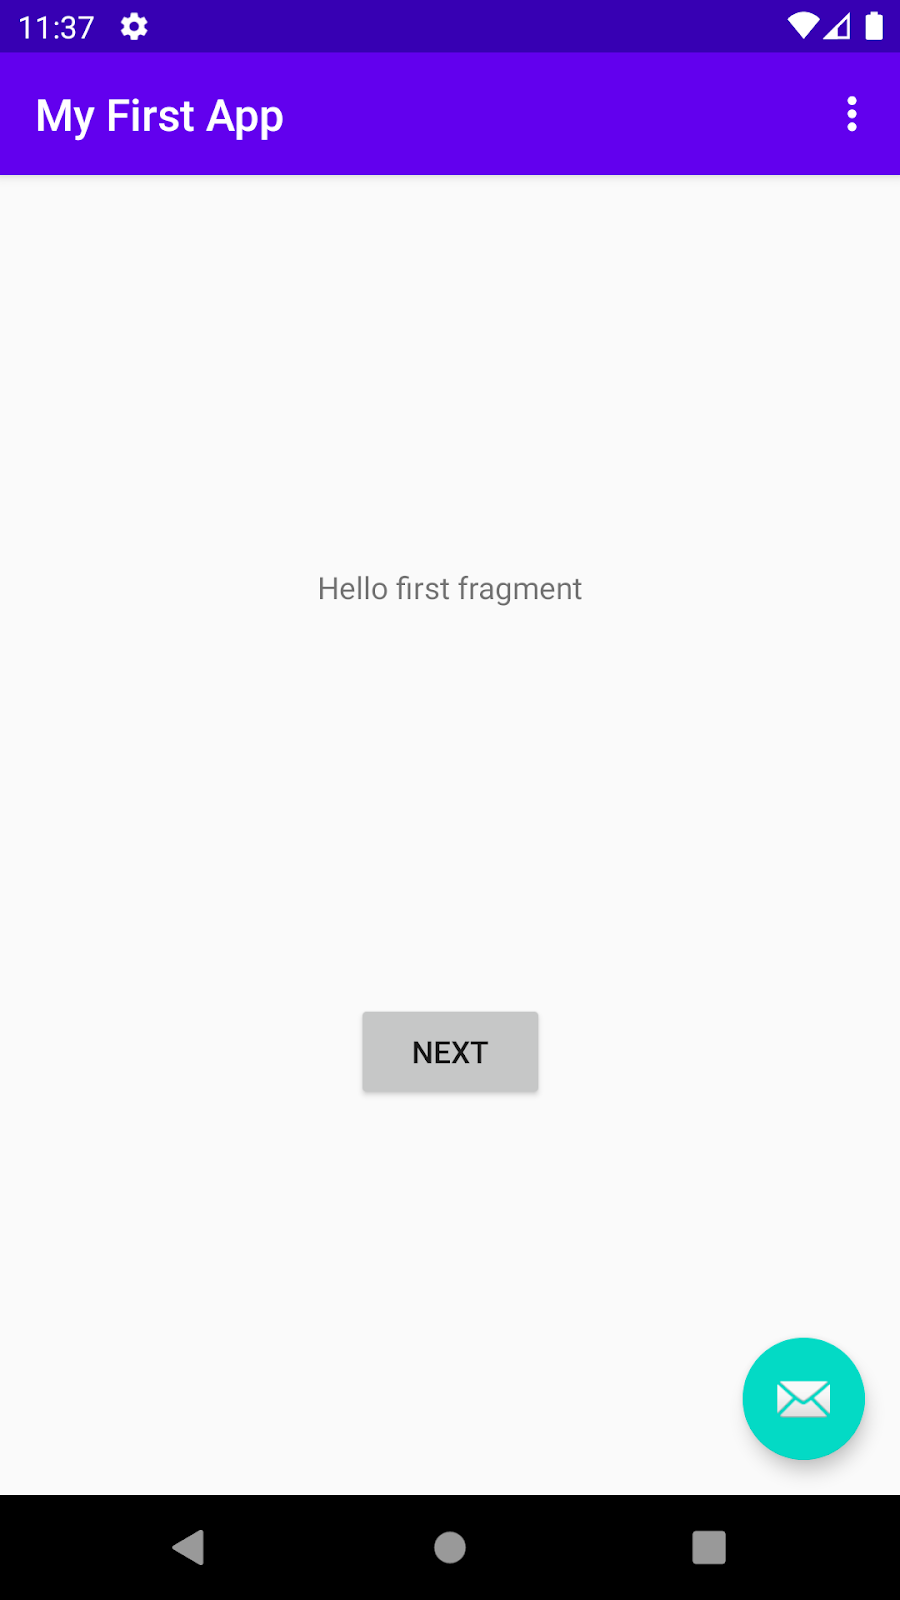
Once your app builds and the emulator is ready, Android Studio uploads the app to the emulator and runs it. You should see your app as shown in the following screenshot.
Step 6: Run your app on a device (if you have one)
What you need:
- An Android device such as a phone or tablet.
- A data cable to connect your Android device to your computer via the USB port.
- If you are using a Linux or Windows OS, you may need to perform additional steps to run your app on a hardware device. Check the Run Apps on a Hardware Device documentation. On Windows, you may need to install the appropriate USB driver for your device. See OEM USB Drivers.
Run your app on a device
To let Android Studio communicate with your device, you must turn on USB Debugging on your Android device.
On Android 4.2 and higher, the Developer options screen is hidden by default. To show Developer options and enable USB Debugging:
- On your device, open Settings > About phone and tap Build number seven times.
- Return to the previous screen (Settings). Developer options appears at the bottom of the list. Tap Developer options.
- Enable USB Debugging.
Now you can connect your device and run the app from Android Studio.
- Connect your device to your development machine with a USB cable. On the device, you might need to agree to allow USB debugging from your development device.
- In Android Studio, click Run in the toolbar at the top of the window. (You might need to select View > Toolbar to see this option.) The Select Deployment Target dialog opens with the list of available emulators and connected devices.
- Select your device, and click OK. Android Studio installs the app on your device and runs it.
Troubleshooting
If you’re stuck, quit Android Studio and restart it.
If Android Studio does not recognize your device, try the following:
- Disconnect your device from your development machine and reconnect it.
- Restart Android Studio.
If your computer still does not find the device or declares it «unauthorized»:
- Disconnect the device.
- On the device, open Settings->Developer Options.
- Tap Revoke USB Debugging authorizations.
- Reconnect the device to your computer.
- When prompted, grant authorizations.
If you are still having trouble, check that you installed the appropriate USB driver for your device. See the Using Hardware Devices documentation.
Check the troubleshooting section in the Android Studio documentation.
Step 7: Explore the app template
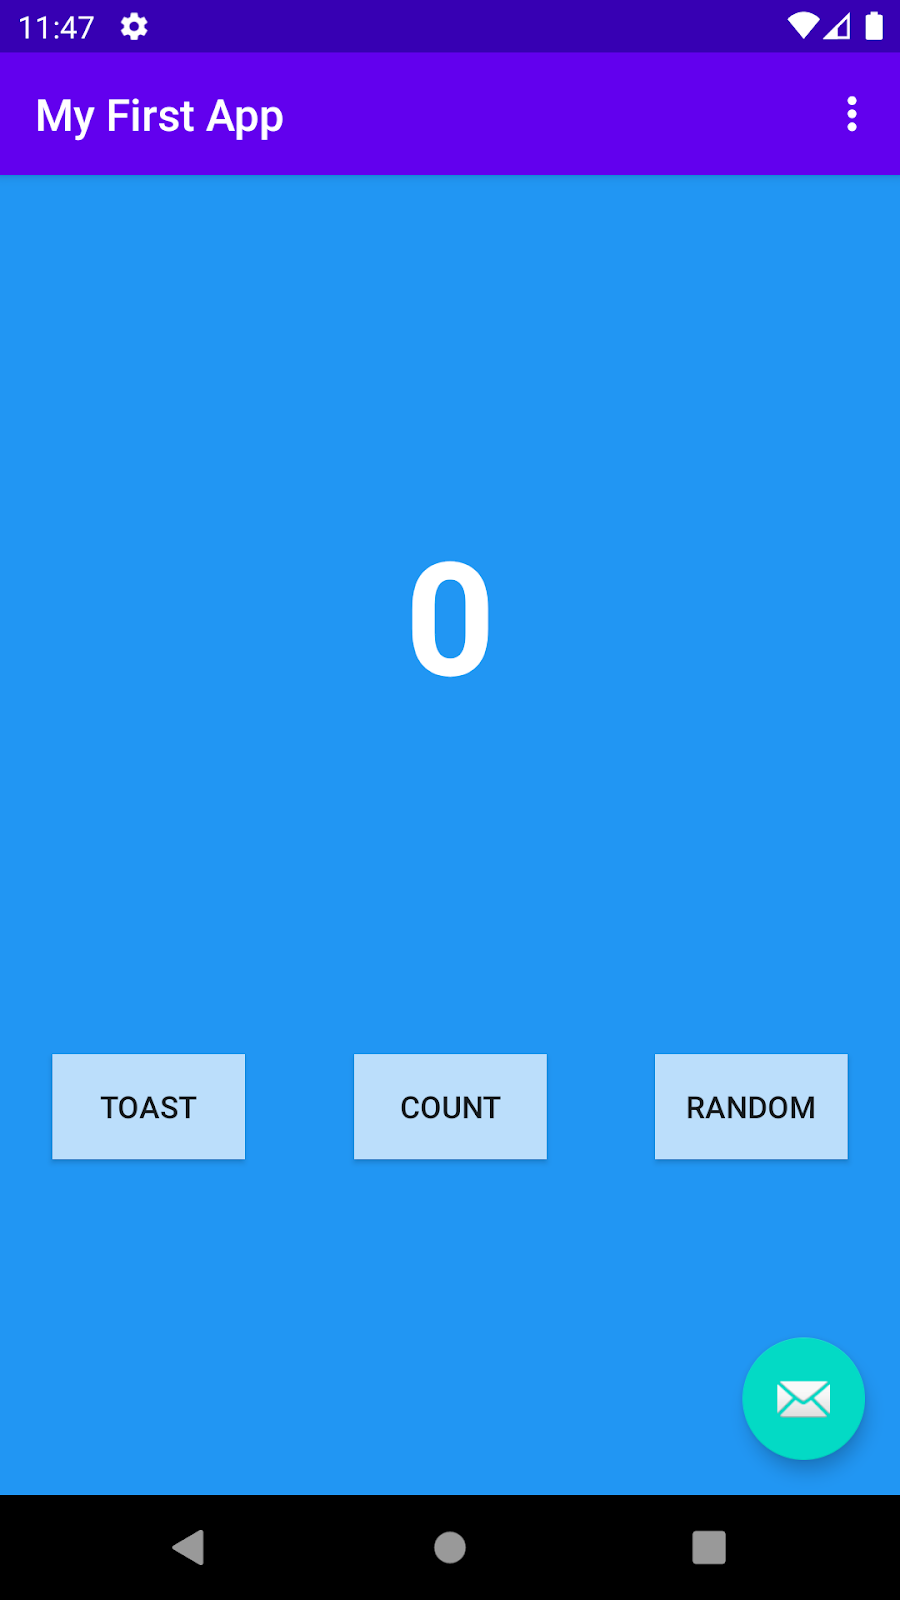
When you created the project and selected Basic Activity, Android Studio set up a number of files, folders, and also user interface elements for you, so you can start out with a working app and major components in place. This makes it easier to build your application.
Looking at your app on the emulator or your device, in addition to the Next button, notice the floating action button with an email icon.  If you tap that button, you’ll see it has been set up to briefly show a message at the bottom of the screen. This message space is called a snackbar, and it’s one of several ways to notify users of your app with brief information.
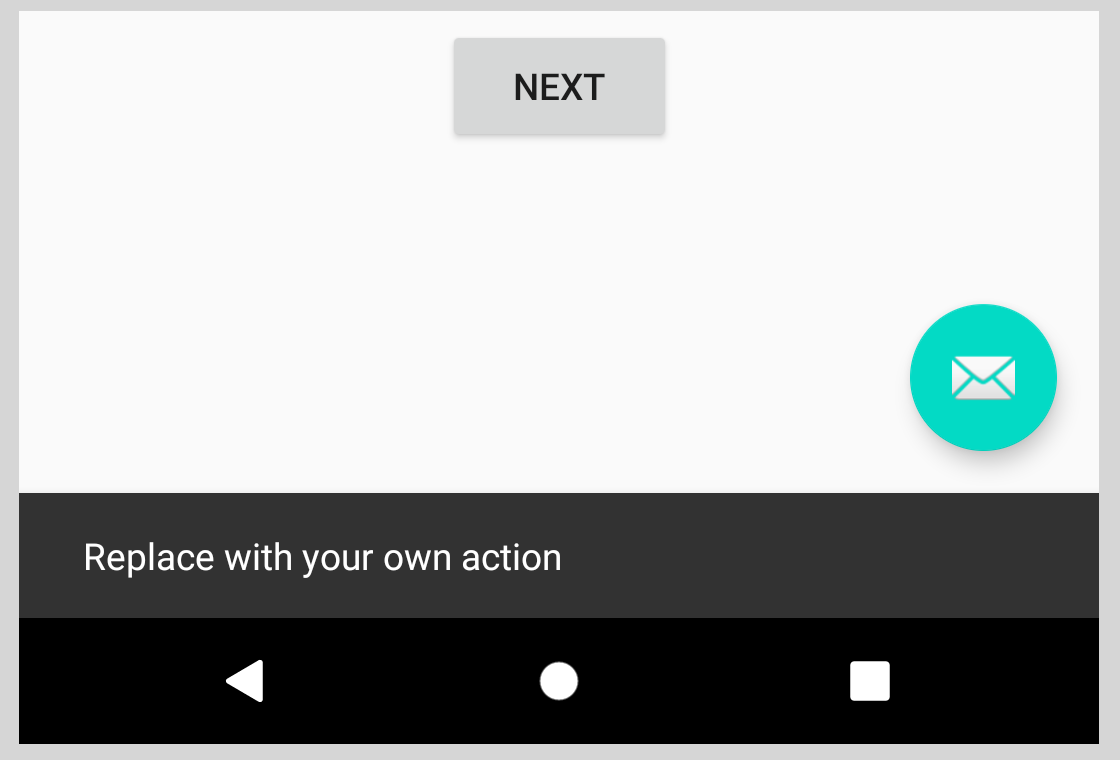
At the top right of the screen, there’s a menu with 3 vertical dots.  If you tap on that, you’ll see that Android Studio has also created an options menu with a Settings item. Choosing Settings doesn’t do anything yet, but having it set up for you makes it easier to add user-configurable settings to your app.
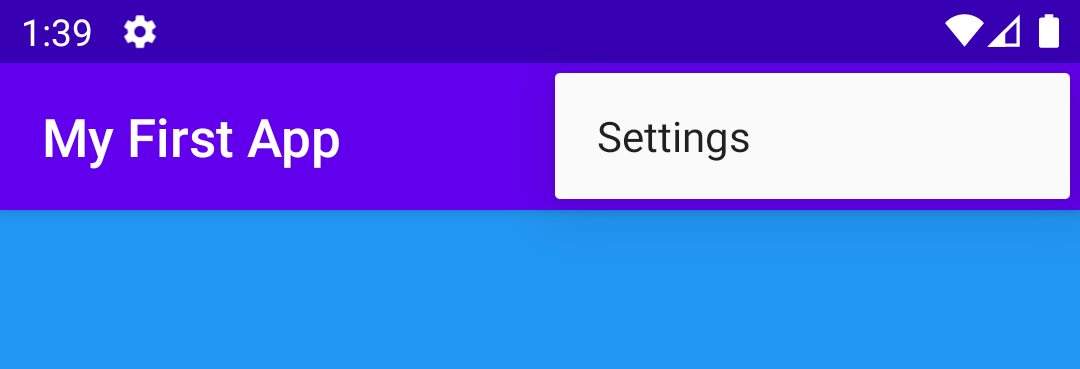
Later in this codelab, you’ll look at the Next button and modify the way it looks and what it does.
4. Task: Explore the layout editor
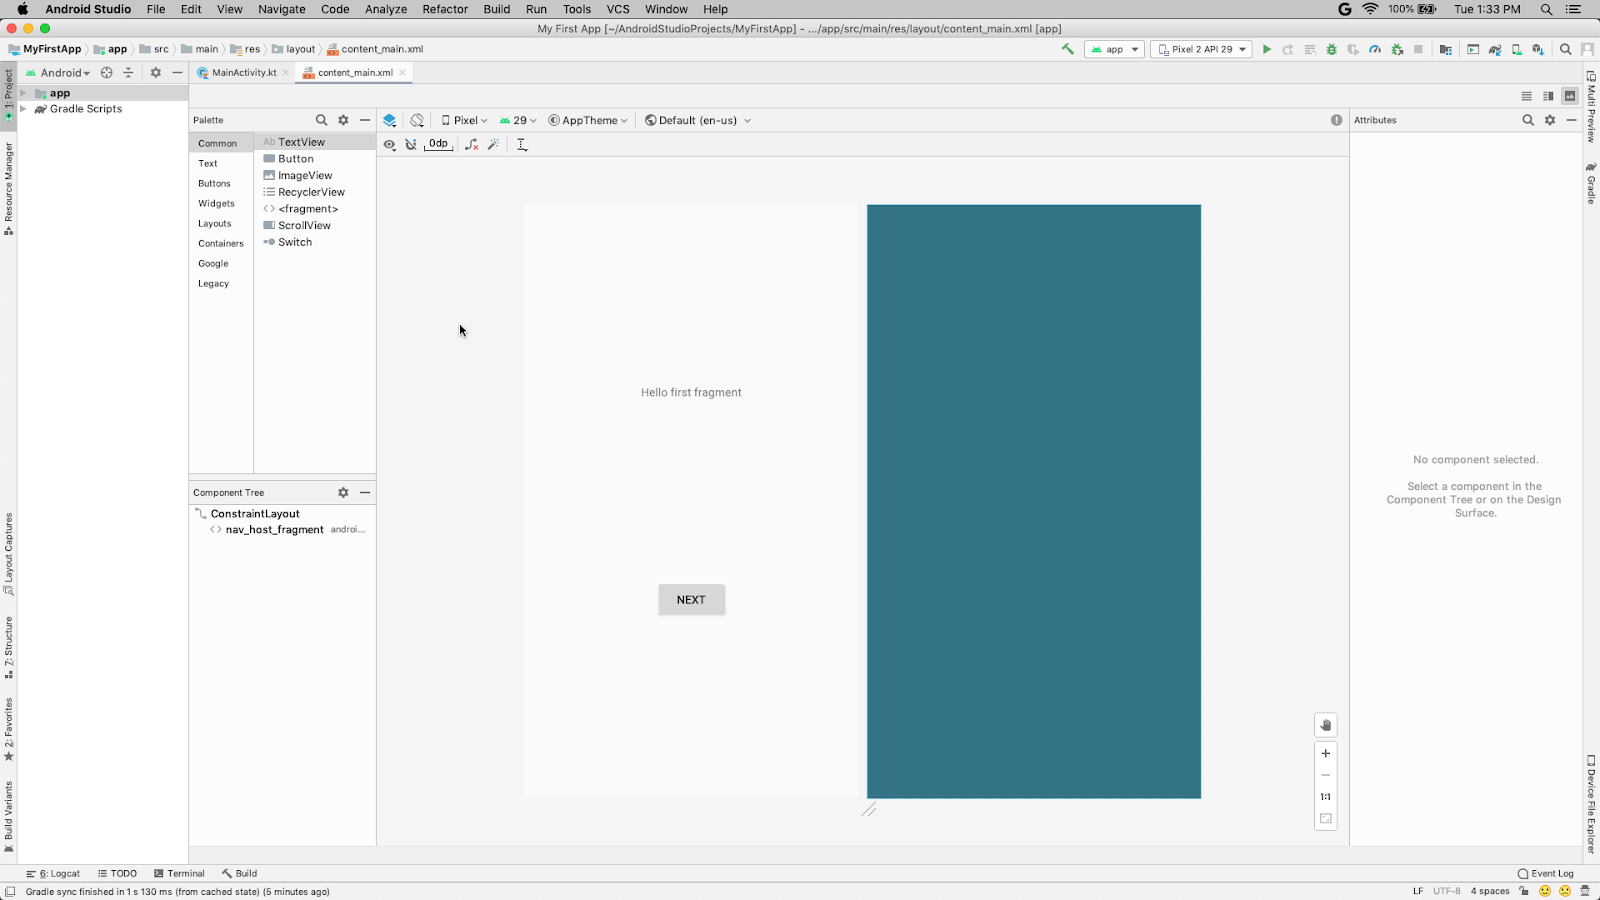
Generally, each screen in your Android app is associated with one or more fragments. The single screen displaying «Hello first fragment» is created by one fragment, called FirstFragment. This was generated for you when you created your new project. Each visible fragment in an Android app has a layout that defines the user interface for the fragment. Android Studio has a layout editor where you can create and define layouts.
Layouts are defined in XML. The layout editor lets you define and modify your layout either by coding XML or by using the interactive visual editor.
Every element in a layout is a view. In this task, you will explore some of the panels in the layout editor, and you will learn how to change property of views.
What you’ll learn
- How to use the layout editor.
- How to set property values.
- How to add string resources.
- How to add color resources.
Step 1: Open the layout editor
- Find and open the layout folder (app > res > layout) on the left side in the Project panel.
- Double-click
fragment_first.xml.
The panels to the right of the Project view comprise the Layout Editor. They may be arranged differently in your version of Android Studio, but the function is the same. 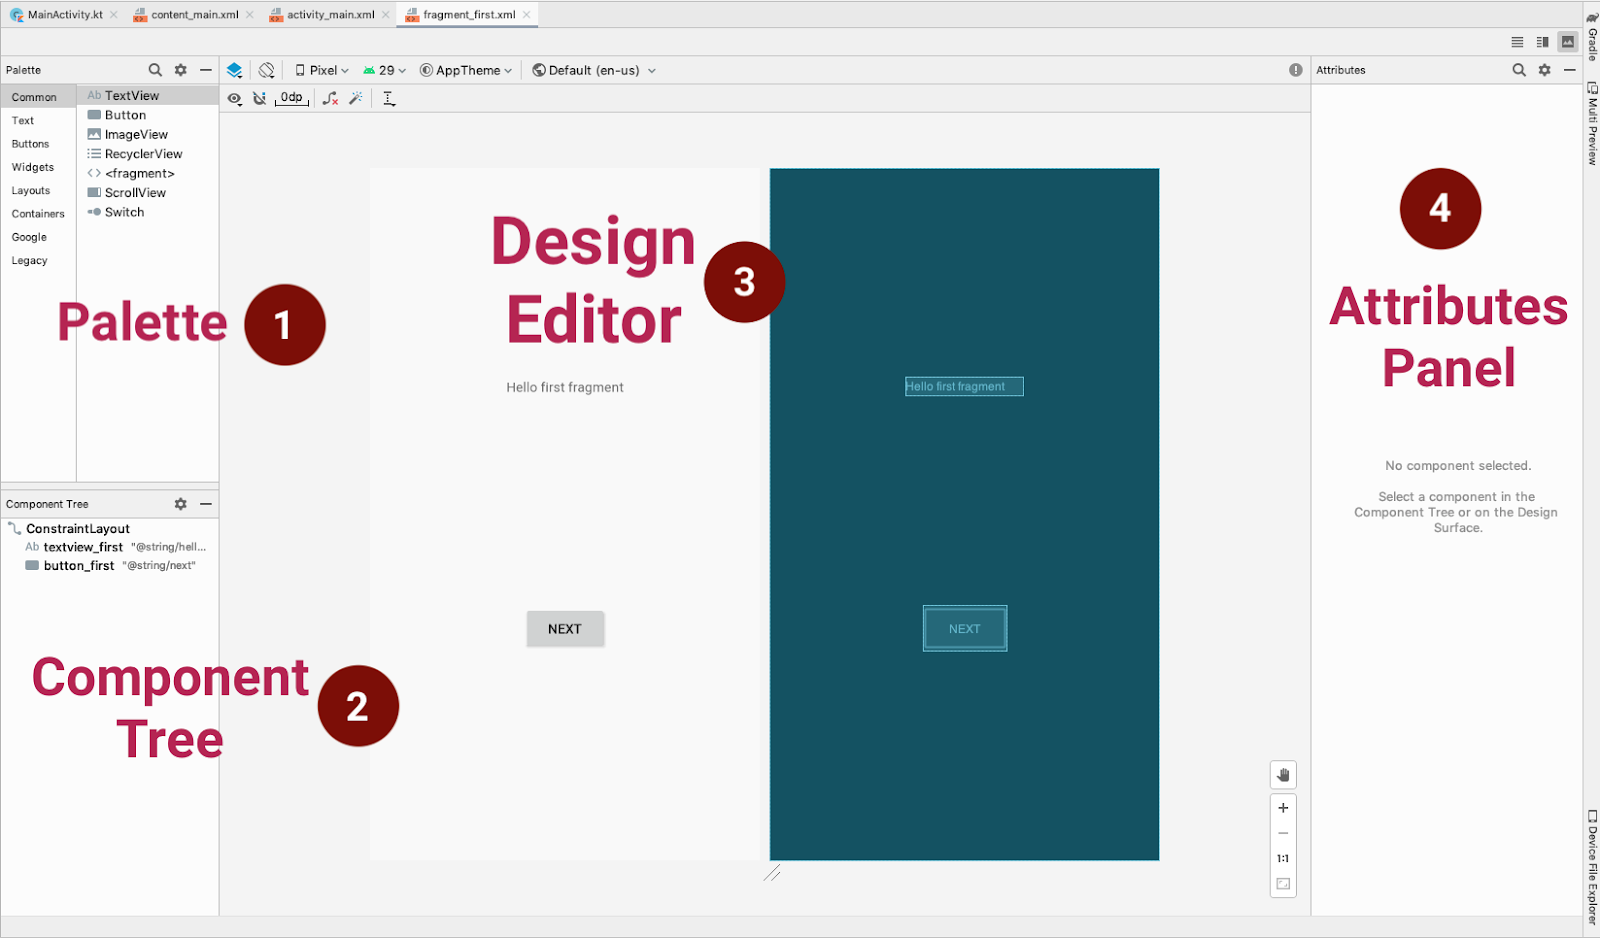
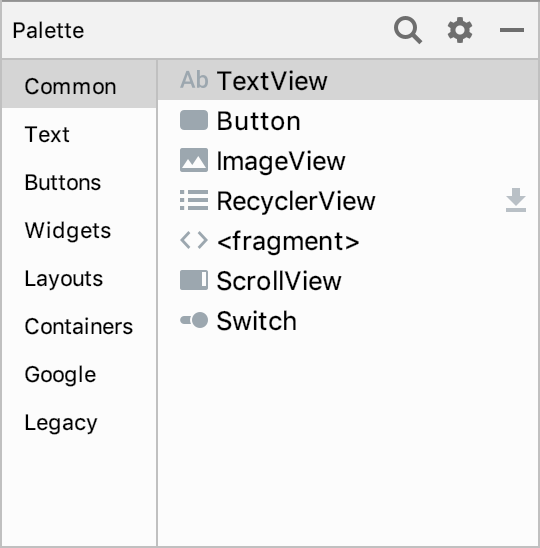
On the left is a Palette (1) of views you can add to your app.
Below that is a Component Tree (2) showing the views currently in this file, and how they are arranged in relation to each other.
In the center is the Design editor (3), which shows a visual representation of what the contents of the file will look like when compiled into an Android app. You can view the visual representation, the XML code, or both.
- In the upper right corner of the Design editor, above Attributes (4), find the three icons that look like this: These represent Code (code only), Split (code + design), and Design (design only) views.
- Try selecting the different modes. Depending on your screen size and work style, you may prefer switching between Code and Design, or staying in Split view. If your Component Tree disappears, hide and show the Palette.
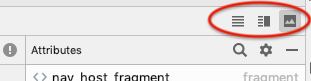 These represent Code (code only), Split (code + design), and Design (design only) views.
Split view: 
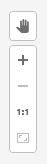
- At the lower right of the Design editor you see + and — buttons for zooming in and out. Use these buttons to adjust the size of what you see, or click the zoom-to-fit button so that both panels fit on your screen.
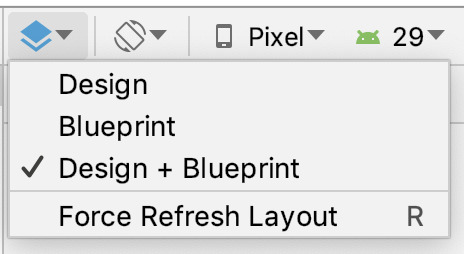
The Design layout on the left shows how your app appears on the device. The Blueprint layout, shown on the right, is a schematic view of the layout.
- Practice using the layout menu in the top left of the design toolbar to display the design view, the blueprint view, and both views side by side.
Depending on the size of your screen and your preference, you may wish to only show the Design view or the Blueprint view, instead of both.
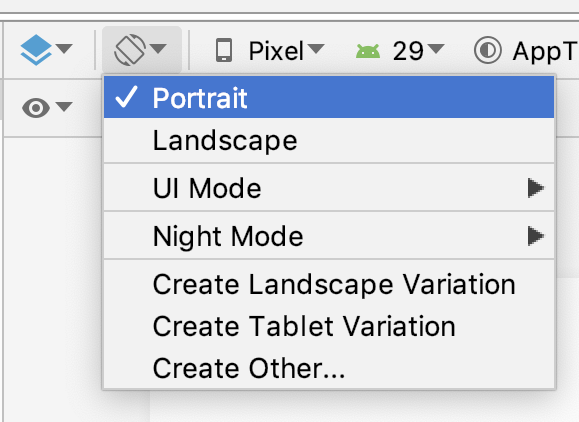
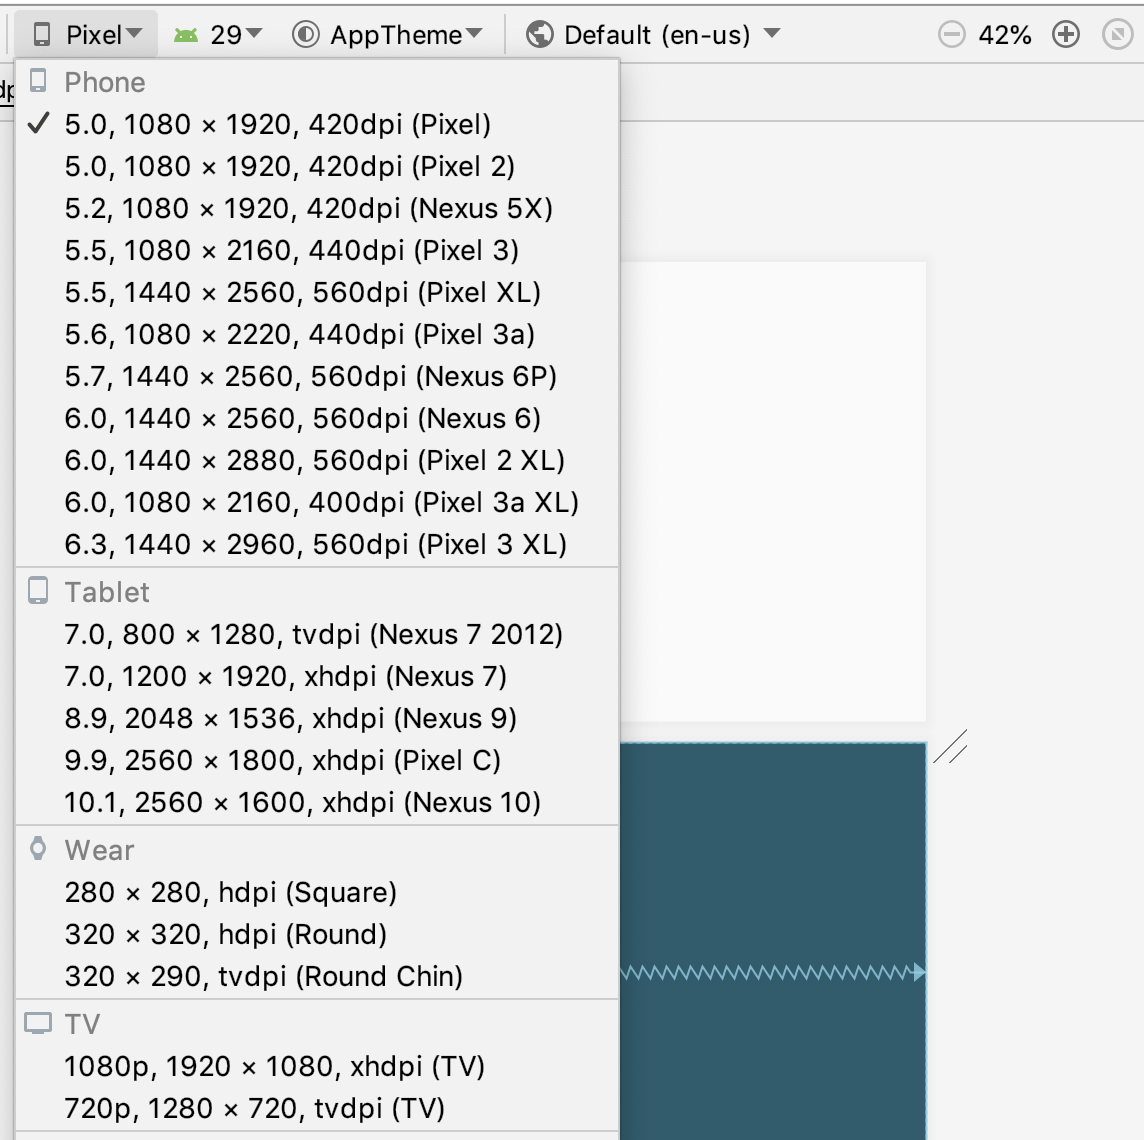
- Use the orientation icon to change the orientation of the layout. This allows you to test how your layout will fit portrait and landscape modes.
- Use the device menu to view the layout on different devices. (This is extremely useful for testing!)
On the right is the Attributes panel. You’ll learn about that later.
Step 2: Explore and resize the Component Tree
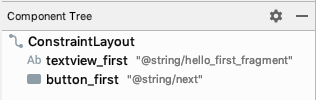
- In
fragment_first.xml, look at the Component Tree. If it’s not showing, switch the mode to Design instead of Split or Code.
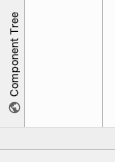
This panel shows the view hierarchy in your layout, that is, how the views are arranged in relation to each other. 2. If necessary, resize the Component Tree so you can read at least part of the strings. 3. Click the Hide icon at the top right of the Component Tree. 
The Component Tree closes. 4. Bring back the Component Tree by clicking the vertical label Component Tree on the left.
Step 3: Explore view hierarchies
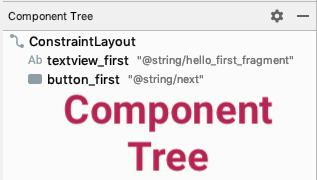
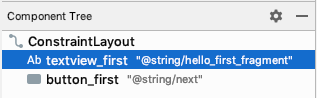
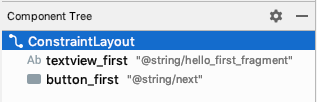
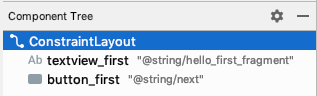
- In the Component Tree, notice that the root of the view hierarchy is a
ConstraintLayoutview.
Every layout must have a root view that contains all the other views. The root view is always a view group, which is a view that contains other views. A ConstraintLayout is one example of a view group. 2. Notice that the ConstraintLayout contains a TextView, called textview_first and a Button, called button_first.
- If the code isn’t showing, switch to Code or Split view using the icons in the upper right corner.
- In the XML code, notice that the root element is
<androidx.constraintlayout.widget.ConstraintLayout>. The root element contains a<TextView>element and a<Button>element.
<androidx.constraintlayout.widget.ConstraintLayout
  ... >

   <TextView
      ...  />

   <Button
      ...  />

</androidx.constraintlayout.widget.ConstraintLayout>
Step 4: Change property values
- In the code editor, examine the properties in the
TextViewelement.
<TextView
   android:layout_width="wrap_content"
   android:layout_height="wrap_content"
   android:text="Hello first fragment"
   ... />
- Click on the string in the text property, and you’ll notice it refers to a string resource,
hello_first_fragment.
android:text="@string/hello_first_fragment"
- Right-click on the property and click Go To > Declaration or Usages
values/strings.xml opens with the string highlighted.
<string name="hello_first_fragment">Hello first fragment</string>
- Change the value of the
stringproperty toHello World!. - Switch back to
fragment_first.xml. - Select
textview_firstin the Component Tree. - Look at the Attributes panel on the right, and open the Declared Attributes section if needed.
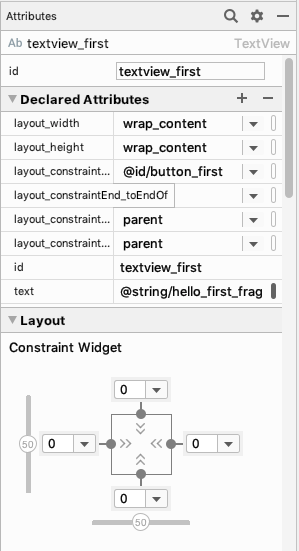
- In the text field of the
TextViewin Attributes, notice it still refers to the string resource@string/hello_first_fragment. Having the strings in a resource file has several advantages. You can change the value of string without having to change any other code. This simplifies translating your app to other languages, because your translators don’t have to know anything about the app code.

- Run the app to see the change you made in strings.xml. Your app now shows «Hello World!».

Step 5: Change text display properties
- With
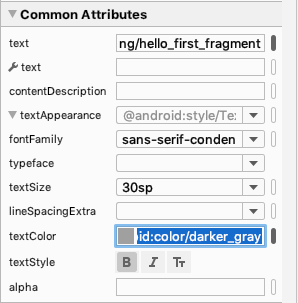
textview_firststill selected in the Component Tree, in the layout editor, in the list of attributes, under Common Attributes, expand the textAppearance field. (You may need to scroll down to find it.)
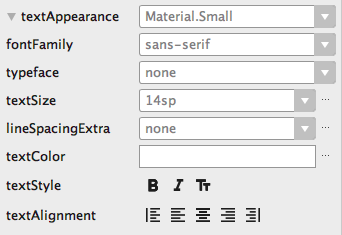
- Change some of the text appearance properties. For example, change the font family, increase the text size, and select bold style. (You might need to scroll the panel to see all the fields.)
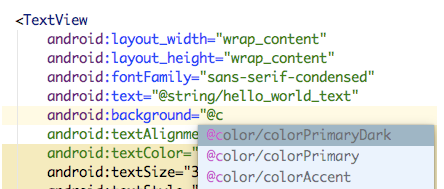
- Change the text color. Click in the textColor field, and enter
g.
A menu pops up with possible completion values containing the letter g. This list includes predefined colors.
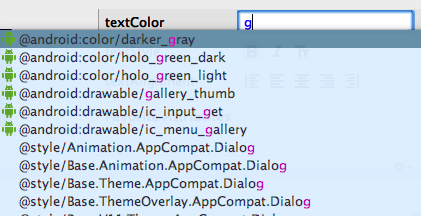
- Select @android:color/darker_gray and press Enter.
Below is an example of the textAppearance attributes after making some changes.
- Look at the XML for the
TextView. You see that the new properties have been added.
<TextView
   android:id="@+id/textview_first"
   android:layout_width="wrap_content"
   android:layout_height="wrap_content"
   android:fontFamily="sans-serif-condensed"
   android:text="@string/hello_first_fragment"
   android:textColor="@android:color/darker_gray"
   android:textSize="30sp"
   android:textStyle="bold"
- Run your app again and see the changes applied to your Hello World! string
Step 6: Display all attributes
- In the Attributes panel, scroll down until you find All Attributes.
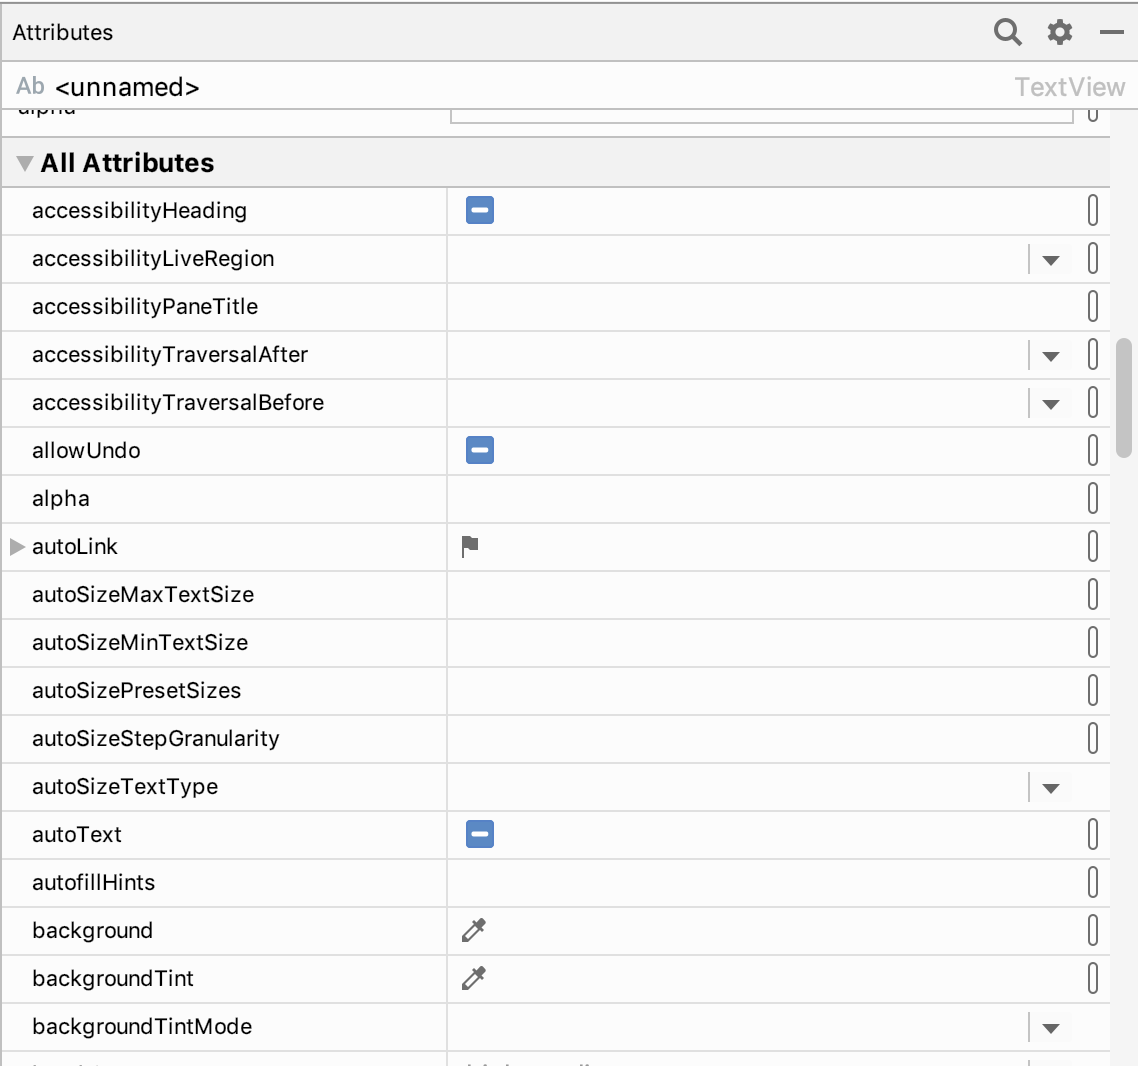
- Scroll through the list to get an idea of the attributes you could set for a
TextView.
5. Task: Add color resources
So far you have learned how to change property values. Next, you will learn how to create more resources like the string resources you worked with earlier. Using resources enables you to use the same values in multiple places, or to define values and have the UI update automatically whenever the value is changed.
What you’ll learn
- How resources are defined.
- Adding and using color resources.
- The results of changing layout height and width.
Step 1: Add color resources
First, you’ll learn how to add new color resources.
- In the Project panel on the left, double-click on res > values > colors.xml to open the color resource file.
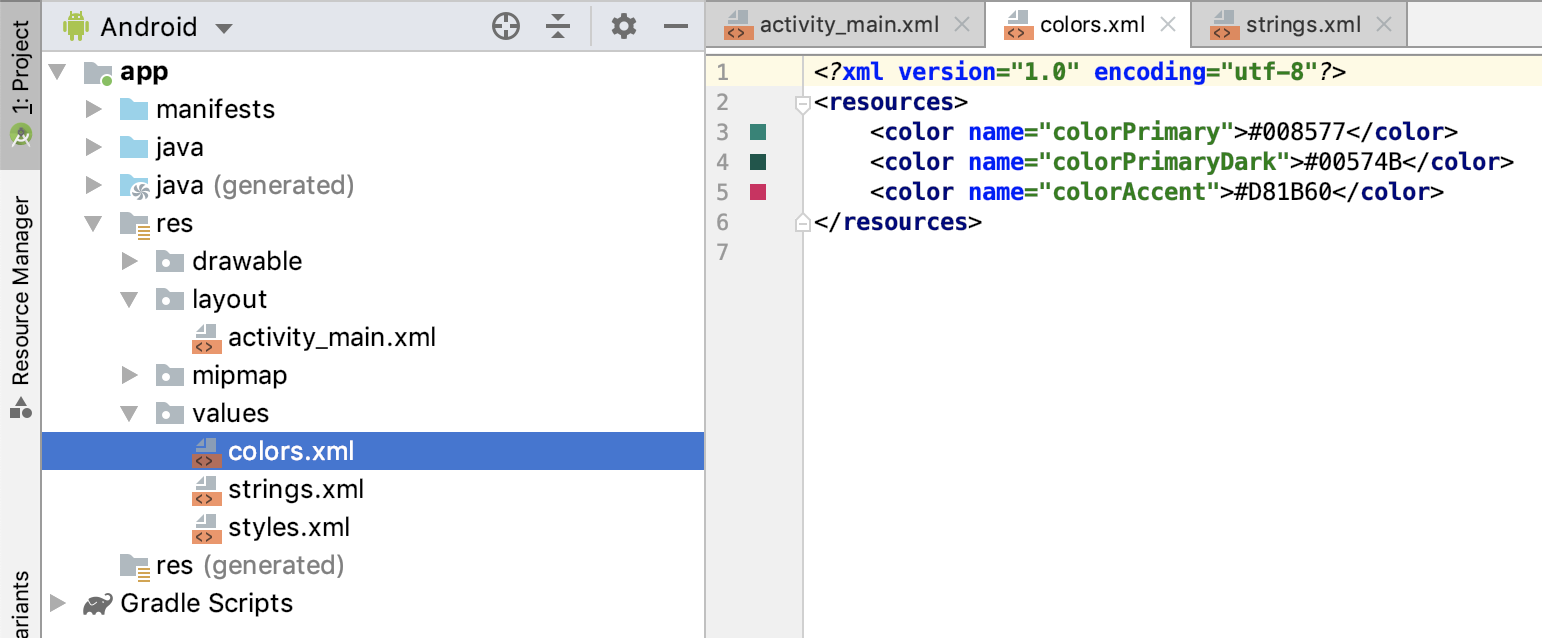
<resources>
    <color name="colorPrimary">#6200EE</color>
    <color name="colorPrimaryDark">#3700B3</color>
    <color name="colorAccent">#03DAC5</color>
</resources>
The colors.xml file opens in the editor. So far, three colors have been defined. These are the colors you can see in your app layout, for example, purple for the app bar.
- Go back to
fragment_first.xmlso you can see the XML code for the layout. - Add a new property to the
TextViewcalledandroid:background, and start typing to set its value to@color. You can add this property anywhere inside theTextViewcode.
A menu pops up offering the predefined color resources:
- Choose @color/colorPrimaryDark.
- Change the property
android:textColorand give it a value of@android:color/white.
The Android framework defines a range of colors, including white, so you don’t have to define white yourself. 6. In the layout editor, you can see that the TextView now has a dark blue background, and the text is displayed in white.
Step 2: Add a new color to use as the screen background color
- Back in
colors.xml, create a new color resource calledscreenBackground:
<color name="screenBackground">#FFEE58</color>
A Color can be defined as 3 hexadecimal numbers (#00-#FF, or 0-255) representing the red, blue, and green (RGB) components. The color you just added is yellow. Notice that the colors corresponding to the code are displayed in the left margin of the editor.

Note that a color can also be defined including an alpha value (#00-#FF) which represents the transparency (#00 = 0% = fully transparent, #FF = 100% = fully opaque). When included, the alpha value is the first of 4 hexadecimal numbers (ARGB).
The alpha value is a measure of transparency. For example, #88FFEE58 makes the color semi-transparent, and if you use #00FFEE58, it’s fully transparent and disappears from the left-hand bar.
- Go back to
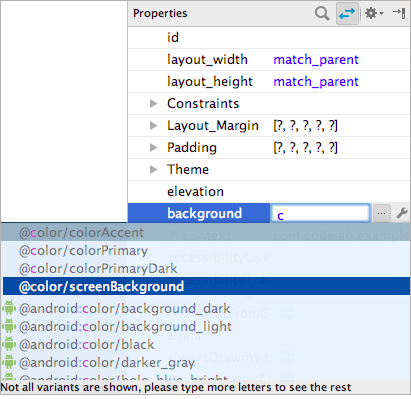
fragment_first.xml. - In the Component Tree, select the
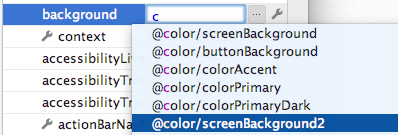
ConstraintLayout. - In the Attributes panel, select the background property and press Enter. Type «c» in the field that appears.
- In the menu of colors that appears, select @color/screenBackground. Press Enter to complete the selection.
- Click on the yellow patch to the left of the color value in the background field.
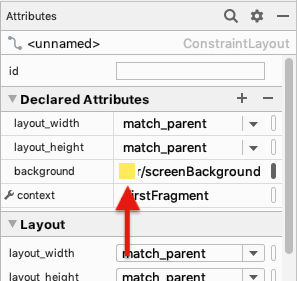
It shows a list of colors defined in colors.xml. Click the Custom tab to choose a custom color with an interactive color chooser. 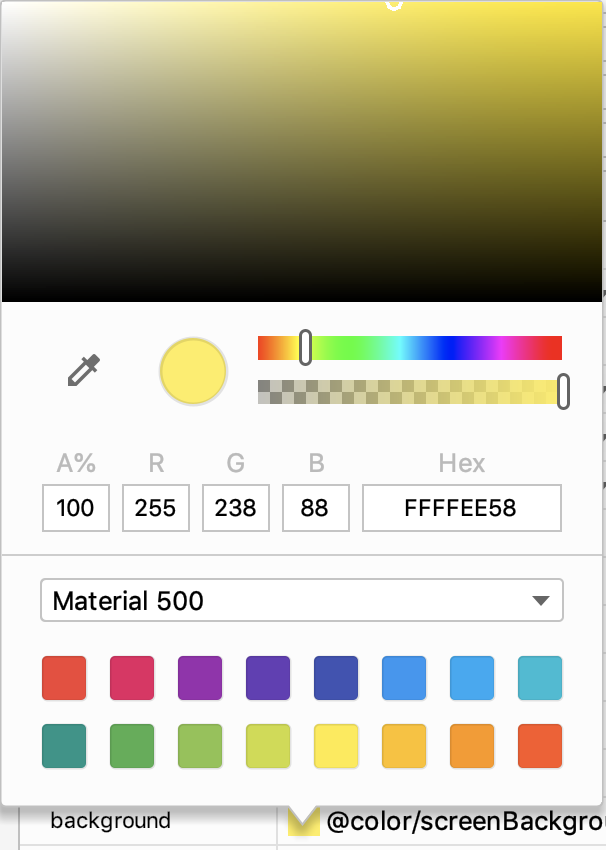
- Feel free to change the value of the screenBackground color, but make sure that the final color is noticeably different from the
colorPrimaryandcolorPrimaryDarkcolors.
Step 3: Explore width and height properties
Now that you have a new screen background color, you will use it to explore the effects of changing the width and height properties of views.
- In
fragment_first.xml, in the Component Tree, select theConstraintLayout.
- In the Attributes panel, find and expand the Layout section.
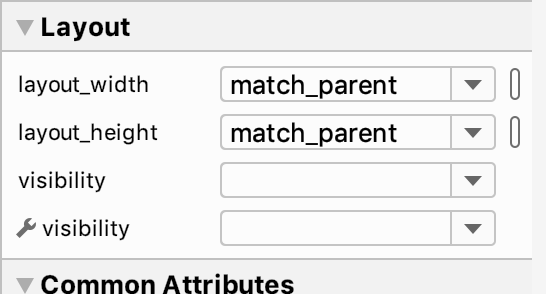
The layout_width and layout_height properties are both set to match_parent. The ConstraintLayout is the root view of this Fragment, so the «parent» layout size is effectively the size of your screen.
- Notice that the entire background of the screen uses the screenBackground color.
- Select
textview_first. Currently the layout width and height are wrap_content, which tells the view to be just big enough to enclose its content (plus padding) - Change both the layout width and layout height to match_constraint, which tells the view to be as big as whatever it’s constrained to.
The width and height show 0dp, and the text moves to the upper left, while the TextView expands to match the ConstraintLayout except for the button. The button and the text view are at the same level in the view hierarchy inside the constraint layout, so they share space.

- Explore what happens if the width is match_constraint and the height is wrap_content and vice versa. You can also change the width and height of the button_first.
- Set both the width and height of the
TextViewand theButtonback to wrap_content.
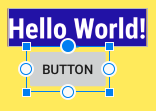
6. Task: Add views and constraints
In this task, you will add two more buttons to your user interface, and update the existing button, as shown below.
What you’ll learn
- How to add new views to your layout.
- How to constrain the position of a view to another view.
Step 1: View constraint properties
- In
fragment_first.xml, look at the constraint properties for theTextView.
app:layout_constraintBottom_toTopOf="@id/button_first"
app:layout_constraintEnd_toEndOf="parent"
app:layout_constraintStart_toStartOf="parent"
app:layout_constraintTop_toTopOf="parent"
These properties define the position of the TextView. Read them carefully.
You can constrain the top, bottom, left, and right of a view to the top, bottom, left, and right of other views.
- Select
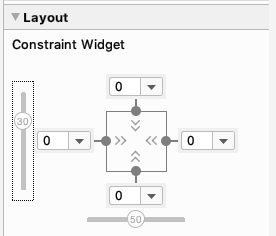
textview_firstin the Component Tree and look at the Constraint Widget in the Attributes panel.
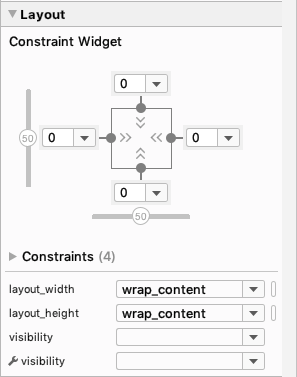
The square represents the selected view. Each of the grey dots represents a constraint, to the top, bottom, left, and right; for this example, from the TextView to its parent, the ConstraintLayout, or to the Next button for the bottom constraint. 3. Notice that the blueprint and design views also show the constraints when a particular view is selected. Some of the constraints are jagged lines, but the one to the Next button is a squiggle, because it’s a little different. You’ll learn more about that in a bit. 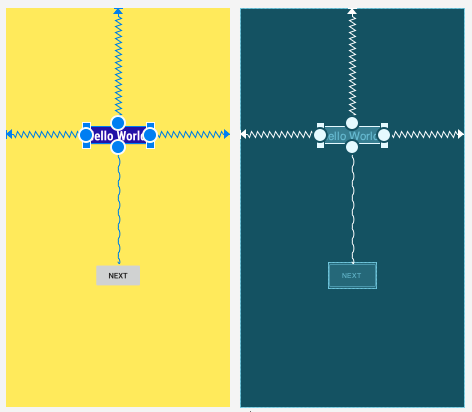
Step 2: Add buttons and constrain their positions
To learn how to use constraints to connect the positions of views to each other, you will add buttons to the layout. Your first goal is to add a button and some constraints, and change the constraints on the Next button.
- Notice the Palette at the top left of the layout editor. Move the sides if you need to, so that you can see many of the items in the palette.
- Click on some of the categories, and scroll the listed items if needed to get an idea of what’s available.
- Select Button, which is near the top, and drag and drop it onto the design view, placing it underneath the
TextViewnear the other button.
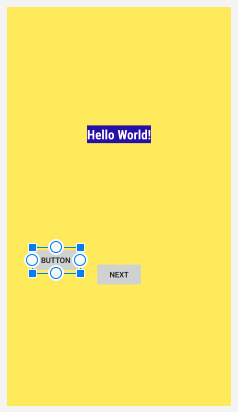
Notice that a Button has been added to the Component Tree under ConstraintLayout.
Step 3: Add a constraint to the new button
You will now constrain the top of the button to the bottom of the TextView.
- Move the cursor over the circle at the top of the
Button.
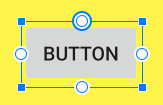
- Click and drag the circle at the top of the
Buttononto the circle at the bottom of theTextView.
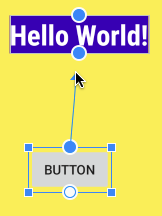
The Button moves up to sit just below the TextView because the top of the button is now constrained to the bottom of the TextView.
- Take a look at the Constraint Widget in the Layout pane of the Attributes panel. It shows some constraints for the
Button, including Top -> BottomOf textView. - Take a look at the XML code for the button. It now includes the attribute that constrains the top of the button to the bottom of the
TextView.
app:layout_constraintTop_toBottomOf="@+id/textview_first"
- You may see a warning, «Not Horizontally Constrained«. To fix this, add a constraint from the left side of the button to the left side of the screen.
- Also add a constraint to constrain the bottom of the button to the bottom of the screen.
Before adding another button, relabel this button so things are a little clearer about which button is which.
- Click on the button you just added in the design layout.
- Look at the Attributes panel on the right, and notice the id field.
- Change the id from
buttontotoast_button.
Step 4: Adjust the Next button
You will adjust the button labeled Next, which Android Studio created for you when you created the project. The constraint between it and the TextView looks a little different, a wavy line instead of a jagged one, with no arrow. This indicates a chain, where the constraints link two or more objects to each other, instead of just one to another. For now, you’ll delete the chained constraints and replace them with regular constraints.
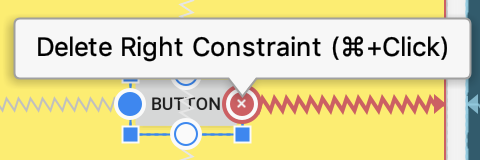
To delete a constraint:
- In the design view or blueprint view, hold the
Ctrlkey (Commandon a Mac) and move the cursor over the circle for the constraint until the circle highlights, then click the circle. - Or click on one of the constrained views, then right-click on the constraint and select Delete from the menu.
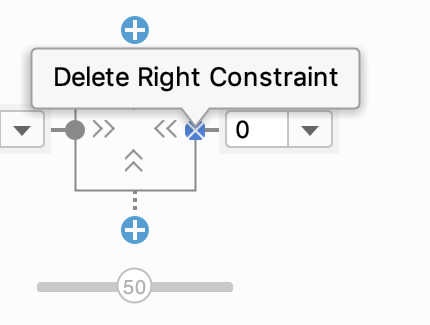
- Or in the Attributes panel, move the cursor over the circle for the constraint until it shows an x, then click it.
If you delete a constraint and want it back, either undo the action, or create a new constraint.
Step 5: Delete the chain constraints
- Click on the Next button, and then delete the constraint from the top of the button to the
TextView. - Click on the
TextView, and then delete the constraint from the bottom of the text to the Next button.
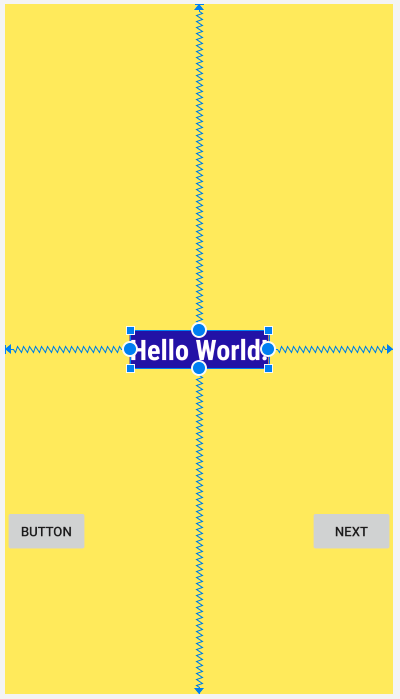
Step 6: Add new constraints
- Constrain the right side of the Next button to the right of the screen if it isn’t already.
- Delete the constraint on the left side of the Next button.
- Now constrain the top and bottom of the Next button so that the top of the button is constrained to the bottom of the
TextViewand the bottom is constrained to the bottom of the screen. The right side of the button is constrained to the right side of the screen. - Also constrain the
TextViewto the bottom of the screen.
It may seem like the views are jumping around a lot, but that’s normal as you add and remove constraints.
Your layout should now look something like this.
- In the
fragment_first.xmllayout file, find the text property for thetoast_buttonbutton.
<Button
   android:id="@+id/toast_button"
   android:layout_width="wrap_content"
   android:layout_height="wrap_content"
   android:text="Button"
- Notice that the text
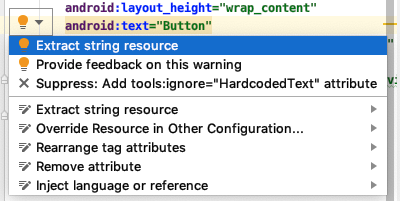
"Button"is directly in the layout field, instead of referencing a string resource as theTextViewdoes. This will make it harder to translate your app to other languages. - To fix this, click the highlighted code. A light bulb appears on the left.
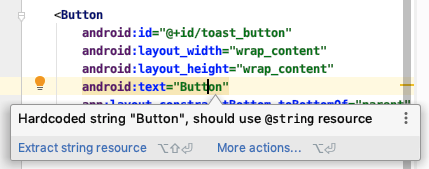
- Click the lightbulb. In the menu that pops up, select Extract string resource.
- In the dialog box that appears, change the resource name to
toast_button_textand the resource value toToastand click OK.
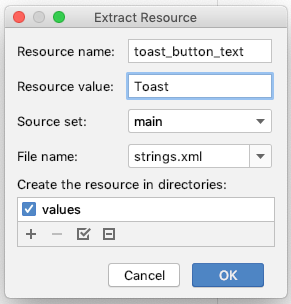
- Notice that the value of the
android:textproperty has changed to@string/toast_button_text.
<Button
   android:id="@+id/button"
   android:layout_width="wrap_content"
   android:layout_height="wrap_content"
   android:text="@string/toast_button_text"
- Go to the res > values > strings.xml file. Notice that a new string resource has been added, named
toast_button_text.
<resources>
   ...
   <string name="toast_button_text">Toast</string>
</resources>
- Run the app to make sure it displays as you expect it to.
You now know how to create new string resources by extracting them from existing field values. (You can also add new resources to the strings.xml file manually.) And you know how to change the id of a view.
Step 8: Update the Next button
The Next button already has its text in a string resource, but you’ll make some changes to the button to match its new role, which will be to generate and display a random number.
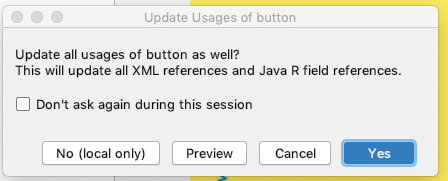
- As you did for the Toast button, change the id of the Next button from
button_firsttorandom_buttonin the Attributes panel. - If you get a dialog box asking to update all usages of the button, click Yes. This will fix any other references to the button in the project code.
- In
strings.xml, right-click on thenextstring resource. - Select Refactor > Rename… and change the name to
random_button_text. - Click Refactor to rename your string and close the dialog.
- Change the value of the string from
NexttoRandom. - If you want, move
random_button_textto belowtoast_button_text.
Step 9: Add a third button
Your final layout will have three buttons, vertically constrained the same, and evenly spaced from each other.
- In
fragment_first.xml, add another button to the layout, and drop it somewhere between the Toast button and the Random button, below theTextView. - Add vertical constraints the same as the other two buttons. Constrain the top of the third button to the bottom of
TextView; constrain the bottom of the third button to the bottom of the screen. - Add horizontal constraints from the third button to the other buttons. Constrain the left side of the third button to the right side of the Toast button; constrain the right side of the third button to the left side of the Random button.
Your layout should look something like this:
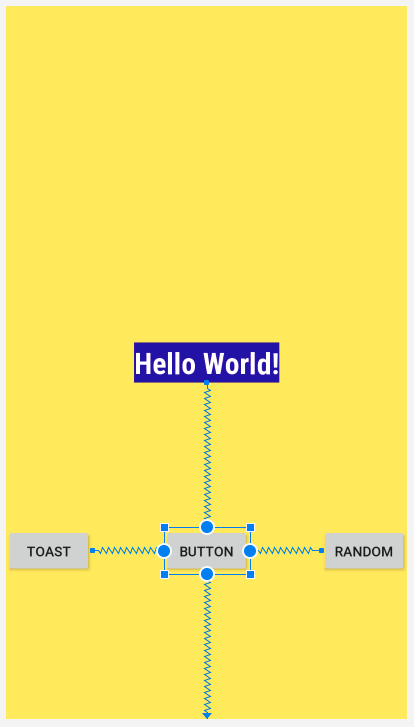
- Examine the XML code for
fragment_first.xml. Do any of the buttons have the attributeapp:layout_constraintVertical_bias? It’s OK if you do not see that constraint.
The «bias» constraints allows you to tweak the position of a view to be more on one side than the other when both sides are constrained in opposite directions. For example, if both the top and bottom sides of a view are constrained to the top and bottom of the screen, you can use a vertical bias to place the view more towards the top than the bottom.
Here is the XML code for the finished layout. Your layout might have different margins and perhaps some different vertical or horizontal bias constraints.The exact values of the attributes for the appearance of the TextView might be different for your app.
<?xml version="1.0" encoding="utf-8"?>
<androidx.constraintlayout.widget.ConstraintLayout <?xml version="1.0" encoding="utf-8"?>
<androidx.constraintlayout.widget.ConstraintLayout xmlns:android="http://schemas.android.com/apk/res/android"
   xmlns:app="http://schemas.android.com/apk/res-auto"
   xmlns:tools="http://schemas.android.com/tools"
   android:layout_width="match_parent"
   android:layout_height="match_parent"
   android:background="@color/screenBackground"
   tools:context=".FirstFragment">

   <TextView
       android:id="@+id/textview_first"
       android:layout_width="wrap_content"
       android:layout_height="wrap_content"
       android:background="@color/colorPrimaryDark"
       android:fontFamily="sans-serif-condensed"
       android:text="@string/hello_first_fragment"
       android:textColor="@android:color/white"
       android:textSize="30sp"
       android:textStyle="bold"
       app:layout_constraintBottom_toBottomOf="parent"
       app:layout_constraintEnd_toEndOf="parent"
       app:layout_constraintStart_toStartOf="parent"
       app:layout_constraintTop_toTopOf="parent" />

   <Button
       android:id="@+id/random_button"
       android:layout_width="wrap_content"
       android:layout_height="wrap_content"
       android:text="@string/random_button_text"
       app:layout_constraintBottom_toBottomOf="parent"
       app:layout_constraintEnd_toEndOf="parent"
       app:layout_constraintTop_toBottomOf="@+id/textview_first" />

   <Button
       android:id="@+id/toast_button"
       android:layout_width="wrap_content"
       android:layout_height="wrap_content"
       android:text="@string/toast_button_text"
       app:layout_constraintBottom_toBottomOf="parent"
       app:layout_constraintStart_toStartOf="parent"
       app:layout_constraintTop_toBottomOf="@+id/textview_first" />

   <Button
       android:id="@+id/button2"
       android:layout_width="wrap_content"
       android:layout_height="wrap_content"
       android:text="Button"
       app:layout_constraintBottom_toBottomOf="parent"
       app:layout_constraintEnd_toStartOf="@+id/random_button"
       app:layout_constraintStart_toEndOf="@+id/toast_button"
       app:layout_constraintTop_toBottomOf="@+id/textview_first" />
</androidx.constraintlayout.widget.ConstraintLayout>
Step 10: Get your UI ready for the next task
The next task is to make the buttons do something when they are pressed. First, you need to get the UI ready.
- Change the text of the
TextViewto show 0 (the number zero). - Change the
idof the last button you added,button2, tocount_buttonin the Attributes panel in the design editor. - In the XML, extract the string resource to
count_button_textand set the value toCount.

The buttons should now have the following text and ids:
|
Button |
text |
id |
|
Left button |
Toast |
@+id/toast_button |
|
Middle button |
Count |
@+id/count_button |
|
Right button |
Random |
@+id/random_button |
- Run the app.
Step 11: Fix errors if necessary

The errors occur because the buttons have changed their id and now these constraints are referencing non-existent views.
If you have these errors, fix them by updating the id of the buttons in the constraints that are underlined in red.
app:layout_constraintEnd_toStartOf="@+id/random_button"
app:layout_constraintStart_toEndOf="@+id/toast_button"
7. Task: Update the appearance of the buttons and the TextView
Your app’s layout is now basically complete, but its appearance can be improved with a few small changes.
Step 1: Add new color resources
- In
colors.xml, change the value ofscreenBackgroundto#2196F3, which is a blue shade in the Material Design palette. - Add a new color named
buttonBackground. Use the value#BBDEFB, which is a lighter shade in the blue palette.
<color name="buttonBackground">#BBDEFB</color>
Step 2: Add a background color for the buttons
- In the layout, add a background color to each of the buttons. (You can either edit the XML in
fragment_first.xmlor use the Attributes panel, whichever you prefer.)
android:background="@color/buttonBackground"
Step 3: Change the margins of the left and right buttons
- Give the Toast button a left (start) margin of 24dp and give the Random button a right (end) margin of 24dp. (Using start and end instead of left and right makes these margins work for all language directions.)
One way to do this is to use the Constraint Widget in the Attributes panel. The number on each side is the margin on that side of the selected view. Type 24 in the field and press Enter. 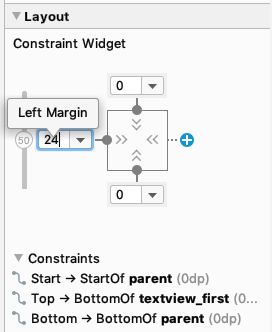
Step 4: Update the appearance of the TextView
- Remove the background color of the
TextView, either by clearing the value in the Attributes panel or by removing theandroid:backgroundattribute from the XML code.
When you remove the background, the view background becomes transparent. 2. Increase the text size of the TextView to 72sp.
android:textSize="72sp"
- Change the font-family of the
TextViewtosans-serif(if it’s not already). - Add an
app:layout_constraintVertical_biasproperty to theTextView, to bias the position of the view upwards a little so that it is more evenly spaced vertically in the screen. Feel free to adjust the value of this constraint as you like. (Check in the design view to see how the layout looks.)
app:layout_constraintVertical_bias="0.3"
- You can also set the vertical bias using the Constraint Widget. Click and drag the number 50 that appears on the left side, and slide it upwards until it says 30.
- Make sure the layout_width is wrap_content, and the horizontal bias is 50 (
app:layout_constraintHorizontal_bias="0.5"in XML).
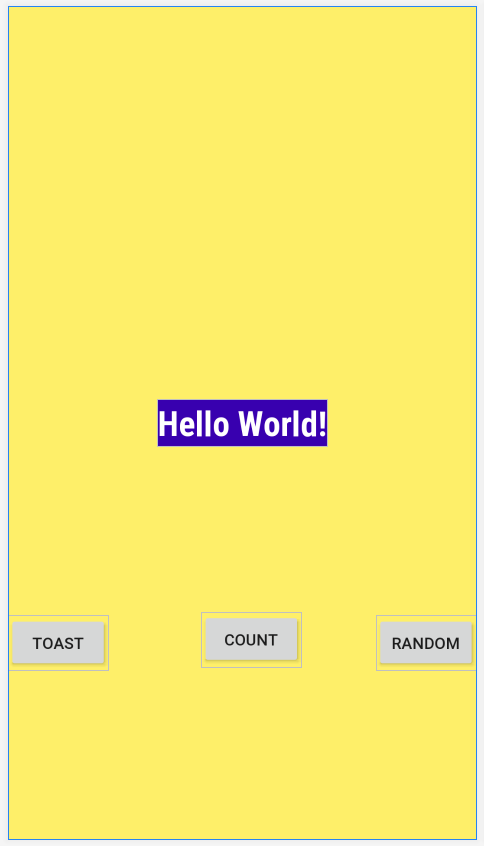
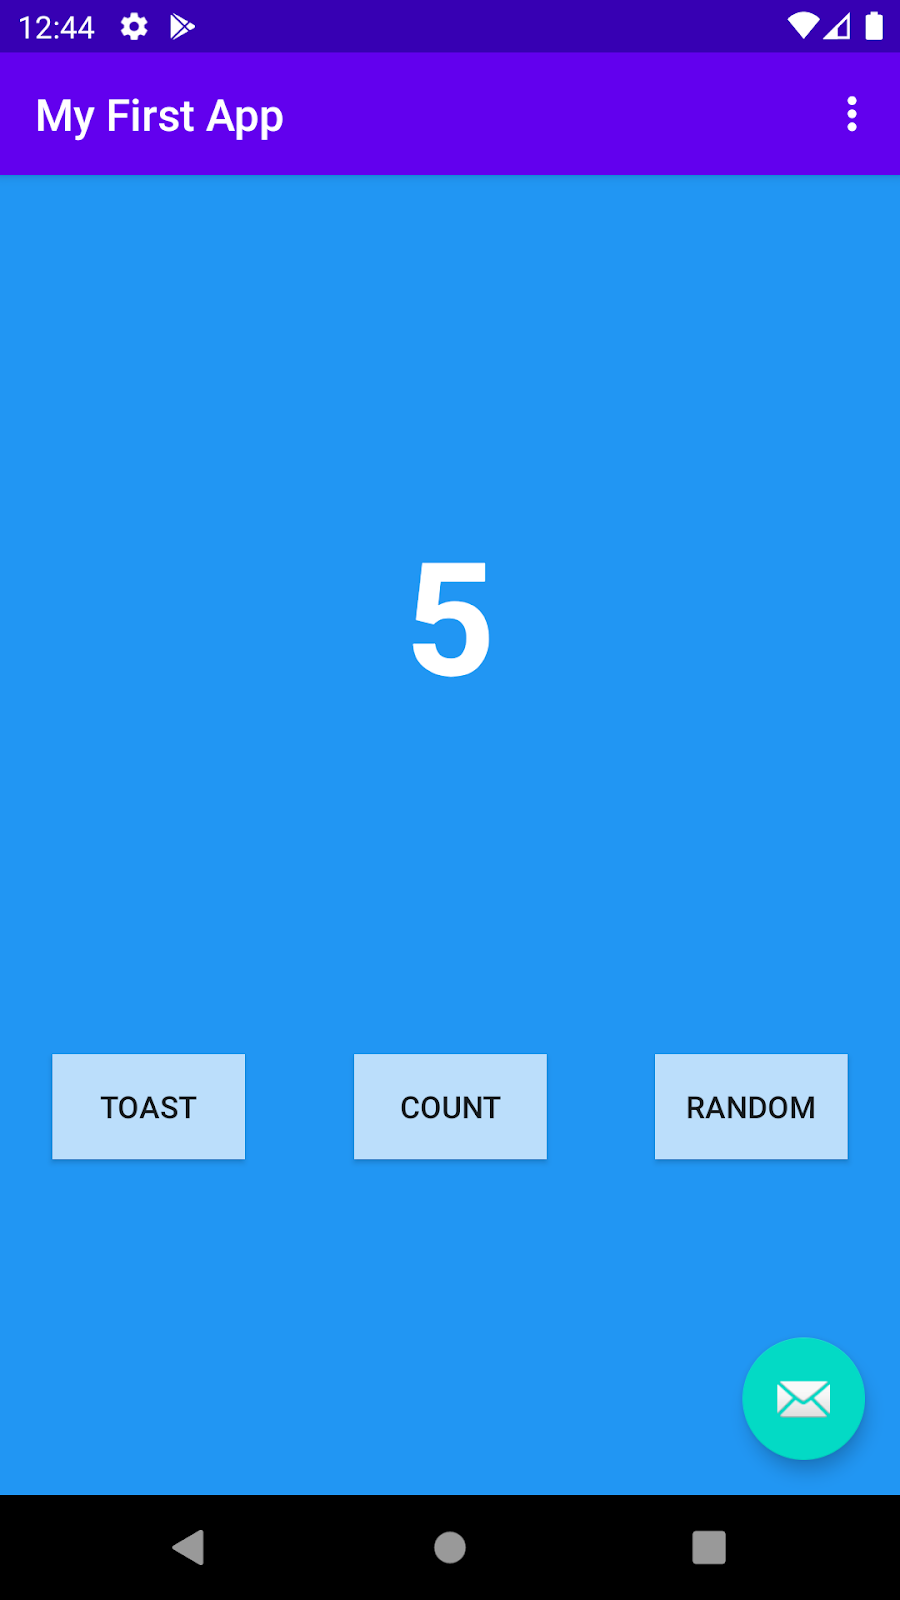
Step 5: Run your app
If you implemented all the updates, your app will look like the following figure. If you used different colors and fonts, then your app will look a bit different.

8. Task: Make your app interactive
You have added buttons to your app’s main screen, but currently the buttons do nothing. In this task, you will make your buttons respond when the user presses them.
First you will make the Toast button show a pop-up message called a toast. Next you will make the Count button update the number that is displayed in the TextView.
What you’ll learn
- How to find a view by its ID.
- How to add click listeners for a view.
- How to set and get property values of a view from your code.
Step 1: Enable auto imports
To make your life easier, you can enable auto-imports so that Android Studio automatically imports any classes that are needed by the Java code.
- In Android Studio, open the settings editor by going to File > Other Settings > Preferences for New Projects.
- Select Auto Imports. In the Java section, make sure Add Unambiguous Imports on the fly is checked.
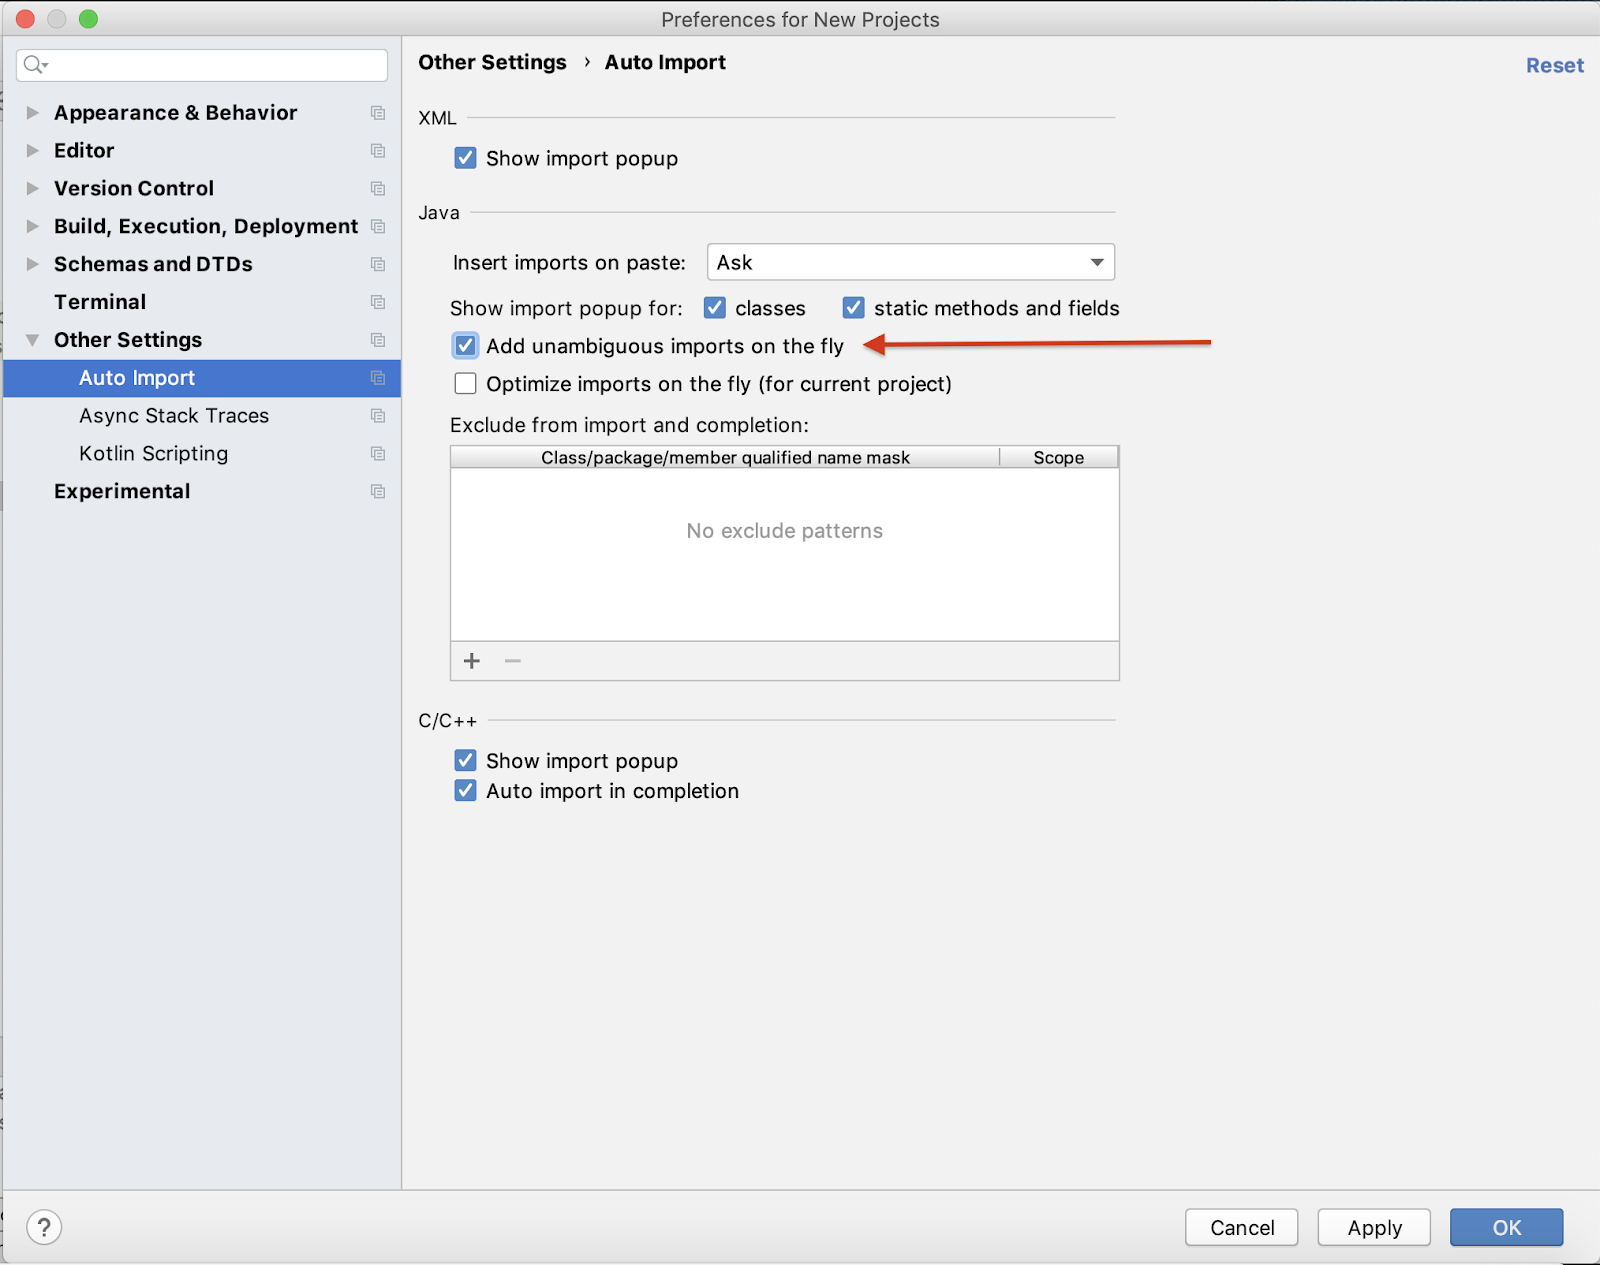 3. Close the settings editor by pressing OK.
Step 2: Show a toast
In this step, you will attach a Java method to the Toast button to show a toast when the user presses the button. A toast is a short message that appears briefly at the bottom of the screen.

- Open
FirstFragment.java(app > java > com.example.android.myfirstapp > FirstFragment).
This class has only two methods, onCreateView() and onViewCreated(). These methods execute when the fragment starts.
As mentioned earlier, the id for a view helps you identify that view distinctly from other views. Using the findViewByID() method, your code can find the random_button using its id, R.id.random_button. 2. Take a look at onViewCreated(). It sets up a click listener for the random_button, which was originally created as the Next button.
view.findViewById(R.id.random_button).setOnClickListener(new View.OnClickListener() {
   @Override
   public void onClick(View view) {
       NavHostFragment.findNavController(FirstFragment.this)
               .navigate(R.id.action_FirstFragment_to_SecondFragment);
   }
});
Here is what this code does:
- Use the
findViewById()method with the id of the desired view as an argument, then set a click listener on that view. - In the body of the click listener, use an action, which in this case is for navigating to another fragment, and navigate there. (You will learn about that later.)
- Just below that click listener, add code to set up a click listener for the
toast_button, which creates and displays a toast. Here is the code:
view.findViewById(R.id.toast_button).setOnClickListener(new View.OnClickListener() {
   @Override
   public void onClick(View view) {
       Toast myToast = Toast.makeText(getActivity(), "Hello toast!", Toast.LENGTH_SHORT);
       myToast.show();
   }
});
- Run the app and press the Toast button. Do you see the toasty message at the bottom of the screen?
- If you want, extract the message string into a resource as you did for the button labels.
You have learned that to make a view interactive you need to set up a click listener for the view which says what to do when the view (button) is clicked on. The click listener can either:
- Implement a small amount of code directly.
- Call a method that defines the desired click behavior in the activity.
Step 3: Make the Count button update the number on the screen
The method that shows the toast is very simple; it does not interact with any other views in the layout. In the next step, you add behavior to your layout to find and update other views.
Update the Count button so that when it is pressed, the number on the screen increases by 1.
- In the
fragment_first.xmllayout file, notice theidfor theTextView:
<TextView
   android:id="@+id/textview_first"
- In
FirstFragment.java, add a click listener for thecount_buttonbelow the other click listeners inonViewCreated(). Because it has a little more work to do, have it call a new method,countMe().
view.findViewById(R.id.count_button).setOnClickListener(new View.OnClickListener() {
   @Override
   public void onClick(View view) {
       countMe(view);
   }
});
- In the
FirstFragmentclass, add the methodcountMe()that takes a singleViewargument. This method will be invoked when the Count button is clicked and the click listener called.
private void countMe(View view) {

}
- Get the value of the
showCountTextView. You will define that in the next step.
   ...
    // Get the value of the text view
    String countString = showCountTextView.getText().toString();
- Convert the value to a number, and increment it.
   ...
    // Convert value to a number and increment it
    Integer count = Integer.parseInt(countString);
    count++;
- Display the new value in the
TextViewby programmatically setting thetextproperty of theTextView.
   ...
   // Display the new value in the text view.
   showCountTextView.setText(count.toString());
Here is the whole method:
private void countMe(View view) {
   // Get the value of the text view
   String countString = showCountTextView.getText().toString();
   // Convert value to a number and increment it
   Integer count = Integer.parseInt(countString);
   count++;
   // Display the new value in the text view.
   showCountTextView.setText(count.toString());
}
Step 4: Cache the TextView for repeated use
You could call findViewById() in countMe() to find showCountTextView. However, countMe() is called every time the button is clicked, and findViewById() is a relatively time consuming method to call. So it is better to find the view once and cache it.
- In the
FirstFragmentclass before any methods, add a member variable forshowCountTextViewof typeTextView.
TextView showCountTextView;
- In
onCreateView(), you will callfindViewById()to get theTextViewthat shows the count. ThefindViewById()method must be called on aViewwhere the search for the requested ID should start, so assign the layout view that is currently returned to a new variable,fragmentFirstLayout, instead.
// Inflate the layout for this fragment
View fragmentFirstLayout = inflater.inflate(R.layout.fragment_first, container, false);
- Call
findViewById()onfragmentFirstLayout, and specify theidof the view to find,textview_first. Cache that value inshowCountTextView.
   ...
    // Get the count text view
    showCountTextView = fragmentFirstLayout.findViewById(R.id.textview_first);
- Return
fragmentFirstLayoutfromonCreateView().
return fragmentFirstLayout;
Here is the whole method and the declaration of showCountTextView:
TextView showCountTextView;

@Override
public View onCreateView(
       LayoutInflater inflater, ViewGroup container,
       Bundle savedInstanceState
) {
   // Inflate the layout for this fragment
   View fragmentFirstLayout = inflater.inflate(R.layout.fragment_first, container, false);
   // Get the count text view
   showCountTextView = fragmentFirstLayout.findViewById(R.id.textview_first);

   return fragmentFirstLayout;
}
- Run your app. Press the Count button and watch the count update.
9. Task: Implement the second fragment
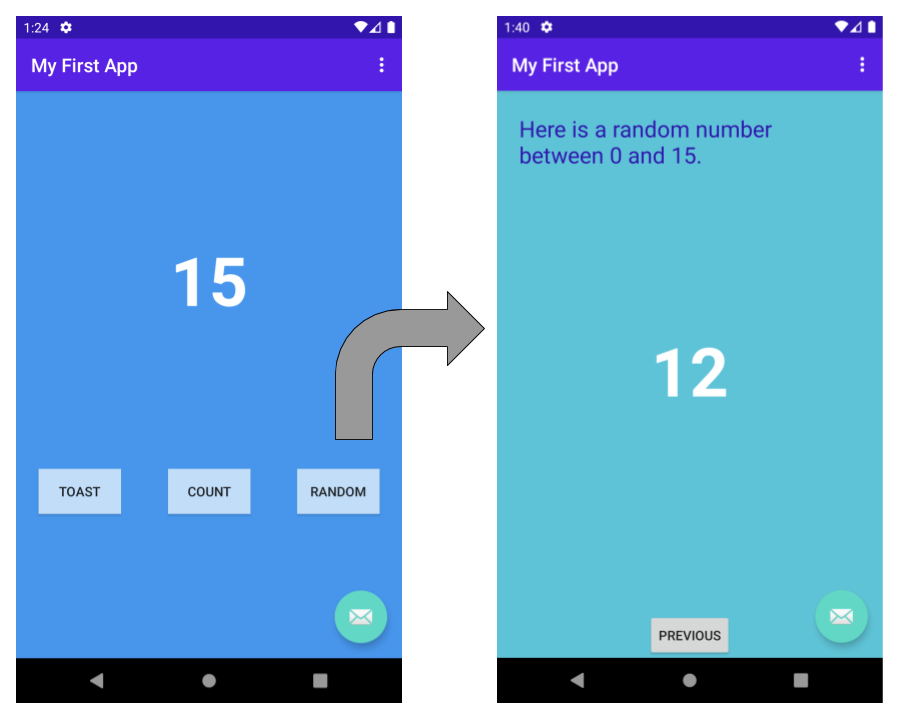
So far, you’ve focused on the first screen of your app. Next, you will update the Random button to display a random number between 0 and the current count on a second screen.
What you’ll learn
- How to pass information to a second fragment.
Update the layout for the second fragment
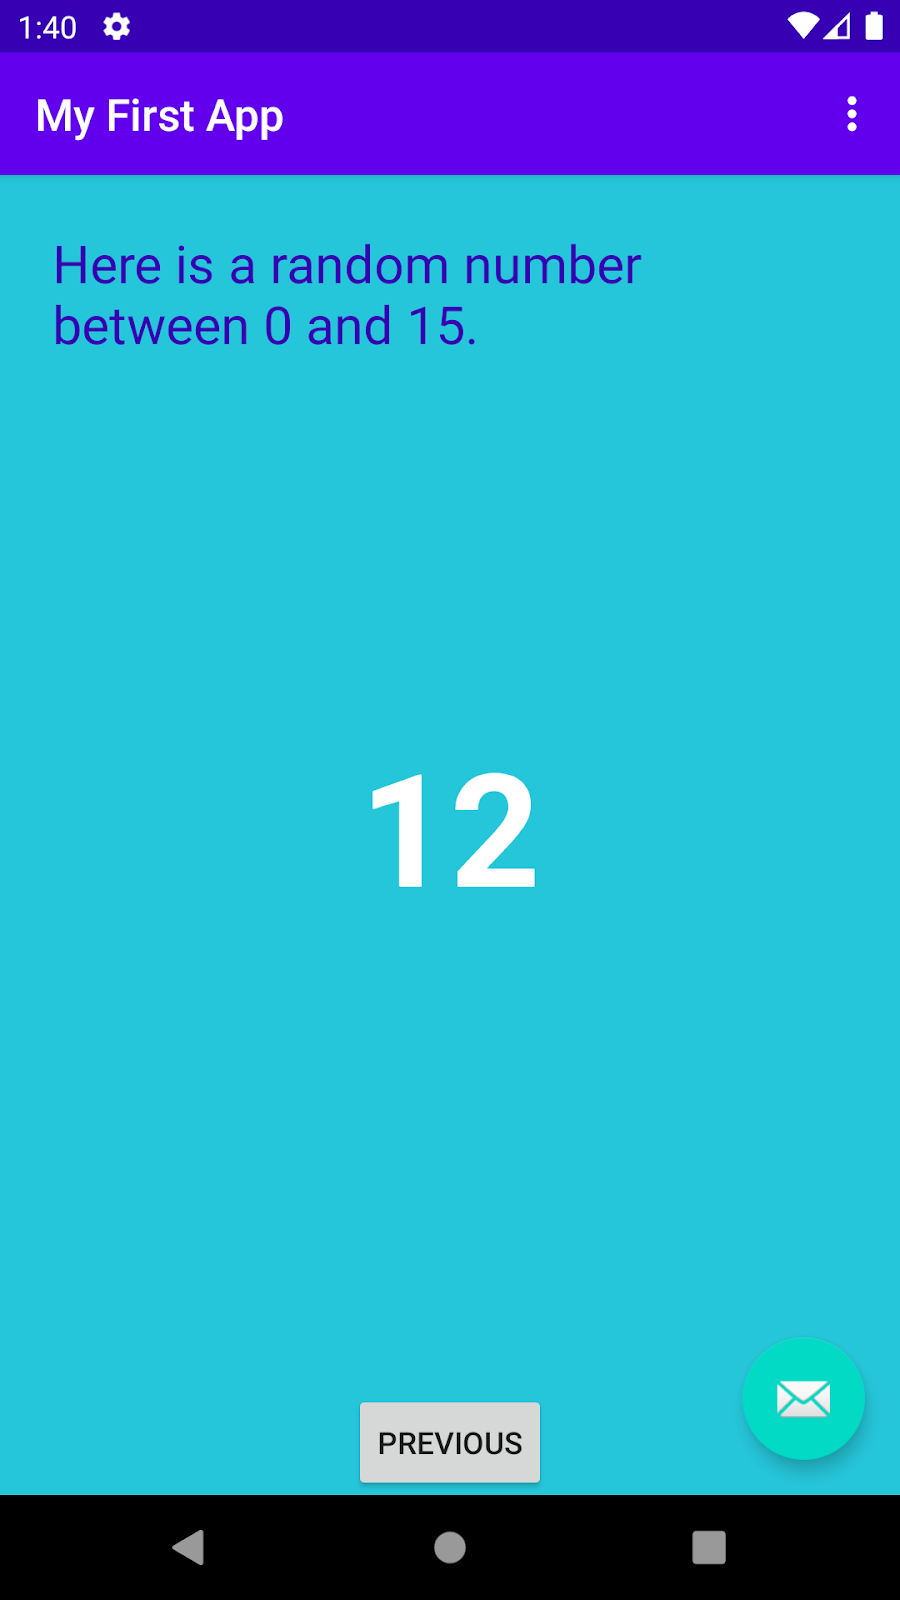
The screen for the new fragment will display a heading title and the random number. Here is what the screen will look like in the design view: 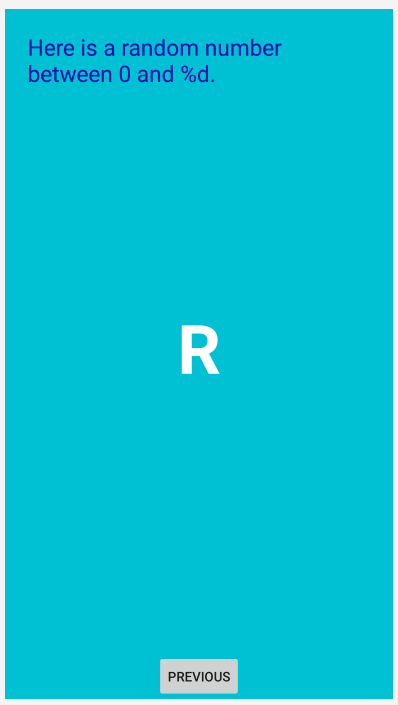 The %d indicates that part of the string will be replaced with a number. The R is just a placeholder.
Step 1: Add a TextView for the random number
- Open
fragment_second.xml(app > res > layout > fragment_second.xml) and switch to Design View if needed. Notice that it has aConstraintLayoutthat contains aTextViewand aButton. - Remove the chain constraints between the
TextViewand theButton. - Add another
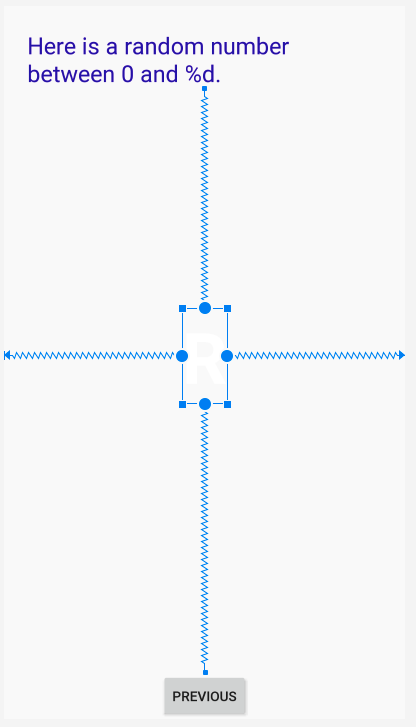
TextViewfrom the palette and drop it near the middle of the screen. ThisTextViewwill be used to display a random number between 0 and the current count from the firstFragment. - Set the
idto@+id/textview_random(textview_randomin the Attributes panel.) - Constrain the top edge of the new
TextViewto the bottom of the firstTextView, the left edge to the left of the screen, and the right edge to the right of the screen, and the bottom to the top of the Previous button. - Set both width and height to wrap_content.
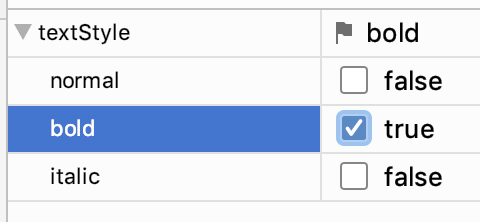
- Set the textColor to @android:color/white, set the textSize to 72sp, and the textStyle to bold.
- Set the text to «
R«. This text is just a placeholder until the random number is generated. - Set the layout_constraintVertical_bias to 0.45.
This TextView is constrained on all edges, so it’s better to use a vertical bias than margins to adjust the vertical position, to help the layout look good on different screen sizes and orientations. 10. If you get a warning «Not Horizontally Constrained,» add a constraint from the start of the button to the left side of the screen and the end of the button to the right side of the screen.
Here is the XML code for the TextView that displays the random number:
<TextView
   android:id="@+id/textview_random"
   android:layout_width="wrap_content"
   android:layout_height="wrap_content"
   android:text="R"
   android:textColor="@android:color/white"
   android:textSize="72sp"
   android:textStyle="bold"
   app:layout_constraintBottom_toTopOf="@+id/button_second"
   app:layout_constraintEnd_toEndOf="parent"
   app:layout_constraintStart_toStartOf="parent"
   app:layout_constraintTop_toBottomOf="@+id/textview_second"
   app:layout_constraintVertical_bias="0.45" />
- In
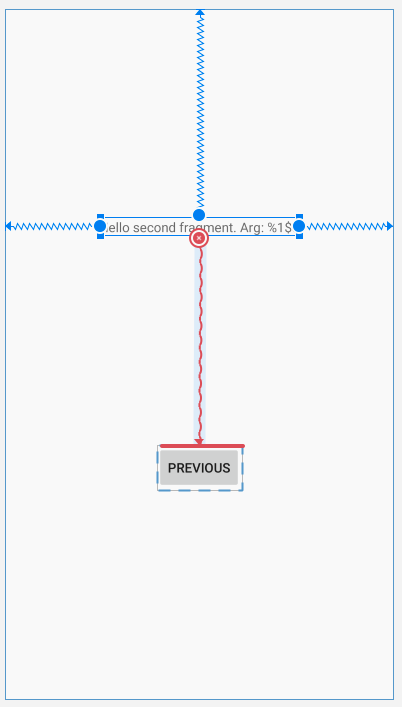
fragment_second.xml, selecttextview_second, which currently has the text"Hello second fragment. Arg: %1$s"in thehello_second_fragmentstring resource. - If
android:textisn’t set, set it to thehello_second_fragmentstring resource.
android:text="@string/hello_second_fragment"
- Change the id to
textview_headerin the Attributes panel. - Set the width to match_constraint, but set the height to wrap_content, so the height will change as needed to match the height of the content.
- Set top, left and right margins to
24dp. Left and right margins may also be referred to as «start» and «end» to support localization for right to left languages. - Remove any bottom constraint.
- Set the text color to
@color/colorPrimaryDarkand the text size to24sp. - In
strings.xml, changehello_second_fragmentto «Here is a random number between 0 and %d.« - Use Refactor > Rename… to change the name of
hello_second_fragmenttorandom_heading.
Here is the XML code for the TextView that displays the heading:
<TextView
   android:id="@+id/textview_header"
   android:layout_width="0dp"
   android:layout_height="wrap_content"
   android:layout_marginStart="24dp"
   android:layout_marginLeft="24dp"
   android:layout_marginTop="24dp"
   android:layout_marginEnd="24dp"
   android:layout_marginRight="24dp"
   android:text="@string/random_heading"
   android:textColor="@color/colorPrimaryDark"
   android:textSize="24sp"
   app:layout_constraintEnd_toEndOf="parent"
   app:layout_constraintStart_toStartOf="parent"
   app:layout_constraintTop_toTopOf="parent" />
Step 3: Change the background color of the layout
Give your new activity a different background color than the first activity:
- In
colors.xml, add a new color resource:
<color name="screenBackground2">#26C6DA</color>
- In the layout for the second activity,
fragment_second.xml, set the background of theConstraintLayoutto the new color.
In the Attributes panel:
Or in XML:
android:background="@color/screenBackground2"
Your app now has a completed layout for the second fragment. But if you run your app and press the Random button, it may crash. The click handler that Android Studio set up for that button needs some changes. In the next task, you will explore and fix this error.
Step 4: Examine the navigation graph
When you created your project, you chose Basic Activity as the template for the new project. When Android Studio uses the Basic Activity template for a new project, it sets up two fragments, and a navigation graph to connect the two. It also set up a button to send a string argument from the first fragment to the second. This is the button you changed into the Random button. And now you want to send a number instead of a string.
- Open
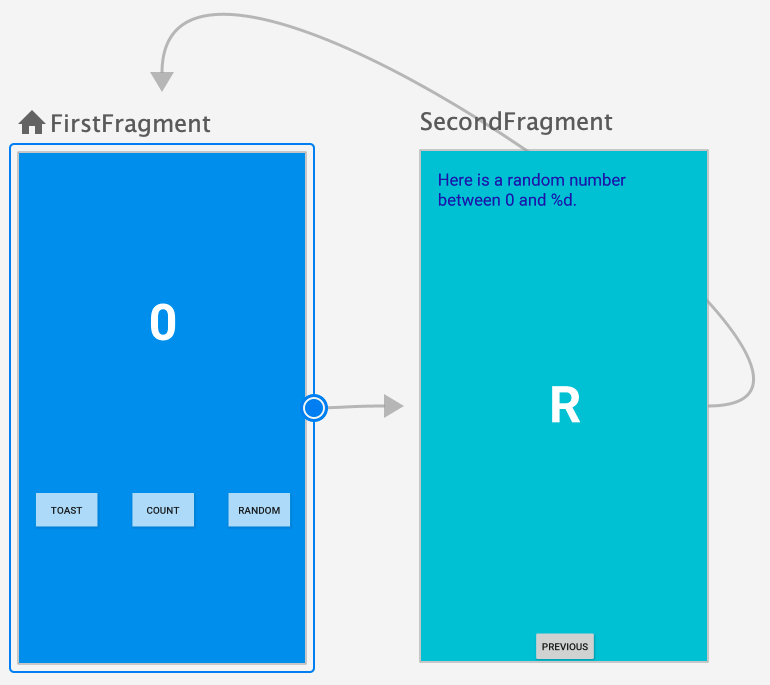
nav_graph.xml(app > res > navigation > nav_graph.xml).
A screen similar to the Layout Editor in Design view appears. It shows the two fragments with some arrows between them. You can zoom with + and — buttons in the lower right, as you did with the Layout Editor.
- You can freely move the elements in the navigation editor. For example, if the fragments appear with
SecondFragmentto the left, dragFirstFragmentto the left ofSecondFragmentso they appear in the order you work with them.
Step 5: Enable SafeArgs
This will enable SafeArgs in Android Studio.
- Open Gradle Scripts > build.gradle (Project: My First App)
- Find the
dependenciessection In thebuildscriptsection, and add the following lines after the otherclasspathentries:
def nav_version = "2.3.0-alpha04"
classpath "androidx.navigation:navigation-safe-args-gradle-plugin:$nav_version"
- Open Gradle Scripts > build.gradle (Module: app)
- Just below the other lines that begin with apply plugin add a line to enable SafeArgs:
apply plugin: 'androidx.navigation.safeargs'
- Android Studio should display a message about the Gradle files being changed. Click Sync Now on the right hand side.

After a few moments, Android Studio should display a message in the Sync tab that it was successful: 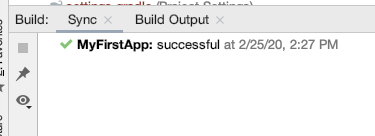
- Choose Build > Make Project. This should rebuild everything so that Android Studio can find
FirstFragmentDirections.
Step 6: Create the argument for the navigation action
- In the navigation graph, click on
FirstFragment, and look at the Attributes panel to the right. (If the panel isn’t showing, click on the vertical Attributes label to the right.) - In the Actions section, it shows what action will happen for navigation, namely going to
SecondFragment. - Click on
SecondFragment, and look at the Attributes panel.
The Arguments section shows Nothing to show.
- Click on the + in the Arguments section.
- In the Add Argument dialog, enter
myArgfor the name and set the type to Integer, then click the Add button.
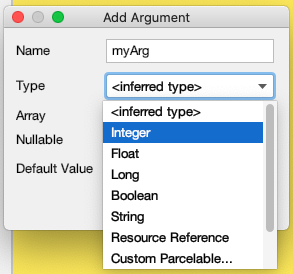
Step 7: Send the count to the second fragment
The Next/Random button was set up by Android Studio to go from the first fragment to the second, but it doesn’t send any information. In this step you’ll change it to send a number for the current count. You will get the current count from the text view that displays it, and pass that to the second fragment.
- Open
FirstFragment.java(app > java > com.example.myfirstapp > FirstFragment) - Find the method
onViewCreated()and notice the code that sets up the click listener to go from the first fragment to the second. - Replace the code in that click listener with a line to find the count text view,
textview_first.
int currentCount = Integer.parseInt(showCountTextView.getText().toString());
- Create an action with
currentCountas the argument toactionFirstFragmentToSecondFragment().
FirstFragmentDirections.ActionFirstFragmentToSecondFragment action = FirstFragmentDirections.actionFirstFragmentToSecondFragment(currentCount);
- Add a line to find the nav controller and navigate with the action you created.
NavHostFragment.findNavController(FirstFragment.this).navigate(action);
Here is the whole method, including the code you added earlier:
public void onViewCreated(@NonNull View view, Bundle savedInstanceState) {
   super.onViewCreated(view, savedInstanceState);

   view.findViewById(R.id.random_button).setOnClickListener(new View.OnClickListener() {
       @Override
       public void onClick(View view) {
           int currentCount = Integer.parseInt(showCountTextView.getText().toString());
           FirstFragmentDirections.ActionFirstFragmentToSecondFragment action = FirstFragmentDirections.actionFirstFragmentToSecondFragment(currentCount);
           NavHostFragment.findNavController(FirstFragment.this).navigate(action);
       }
   });

   view.findViewById(R.id.toast_button).setOnClickListener(new View.OnClickListener() {
       @Override
       public void onClick(View view) {
           Toast myToast = Toast.makeText(getActivity(), "Hello toast!", Toast.LENGTH_SHORT);
           myToast.show();
       }
   });

   view.findViewById(R.id.count_button).setOnClickListener(new View.OnClickListener() {
       @Override
       public void onClick(View view) {
           countMe(view);
       }
   });
}
- Run your app. Click the Count button a few times. Now when you press the Random button, the second screen shows the correct string in the header, but still no count or random number, because you need to write some code to do that.
Step 8: Update SecondFragment to compute and display a random number
You have written the code to send the current count to the second fragment. The next step is to add code to SecondFragment.java to retrieve and use the current count.
- In
SecondFragment.java, add an import for navArgs to the list of imported libraries.
import androidx.navigation.fragment.navArgs;
- In the
onViewCreated()method below the line that starts withsuper, add code to get the current count, get the string and format it with the count, and then set it for textview_header.
Integer count = SecondFragmentArgs.fromBundle(getArguments()).getMyArg();
String countText = getString(R.string.random_heading, count);
TextView headerView = view.getRootView().findViewById(R.id.textview_header);
headerView.setText(countText);
- Get a random number between 0 and the count.
Random random = new java.util.Random();
Integer randomNumber = 0;
if (count > 0) {
   randomNumber = random.nextInt(count + 1);
}
- Add code to convert that number into a string and set it as the text for
textview_random.
TextView randomView = view.getRootView().findViewById(R.id.textview_random);
randomView.setText(randomNumber.toString());
- Run the app. Press the Count button a few times, then press the Random button. Does the app display a random number in the new activity?
Congratulations, you have built your first Android app!
10. Learn more
The intention of this codelab was to get you started building Android apps. We hope you want to know a lot more though, like how do I save data? How do I run background tasks? How do I display a list of photos? How do I …
We encourage you to keep learning. We have more Android courses built by Google to help you on your learning journey.
Written tutorials
- Android Developer Fundamentals teaches programmers to build Android apps. This course is also available in some schools.
- Kotlin Bootcamp codelabs course is an introduction to Kotlin for programmers. You need experience with an object oriented programming language (Java, C++, Python) to take this course..
- Find more at developer.android.com, the official Android developer documentation from Google.
These interactive, video-based courses were created by Google experts in collaboration with Udacity. Take these courses at your own pace in your own time.
- Developing Android Apps in Kotlin: If you know how to program, learn how to build Android apps. This course uses Kotlin.
- Kotlin Bootcamp for Programmers: This is an introduction to Kotlin for programmers. You need some experience with an object oriented programming language (Java, C++, Python) to take this course.
Except as otherwise noted, the content of this page is licensed under the Creative Commons Attribution 4.0 License, and code samples are licensed under the Apache 2.0 License. For details, see the Google Developers Site Policies. Java is a registered trademark of Oracle and/or its affiliates.

Hello Kitty: Пример для Java
Здороваемся с вашим котом (Kotlin)
Здороваемся с вашим котом (Java)
После установки Android Studio (далее Студия) можно приступать к созданию своей первой программы.
Учтите, что студия постоянно обновляется, поэтому внешний вид окон и другие детали могут отличаться от данного примера. Иногда изменения носят косметический характер и новичкам достаточно просто разобраться и вникнуть в изучаемый материал. А иногда изменения слишком значительны и могут сбить с толку. Скриншоты у многих уроков сделаны со старых версий студии от 2.3 до 4.2. Если что-то сильно изменилось, то напишите мне, я постараюсь заменить картинки.
В качестве языка программирования для Android используется Java или Kotlin. Для создания пользовательского интерфейса используется XML.
Здесь следует сделать небольшое отступление. В Android Studio 3.0 добавлена полноценная поддержка нового языка Kotlin, разработанная котанами. Google объявила в 2017 году новый «кошачий» язык основным. Но вы должны понимать, что за предыдущие годы было написано огромное количество примеров на Java. Если вы новичок в программировании, то лучше в первый период обучения полностью сосредоточиться на Java, вам будет проще находить ответы на вопросы. Kotlin от вас никуда не денется, перейти потом на него будет проще, а вот обратный процесс будет проходить тяжелее. Когда немного освоитесь в Java, то можете параллельно изучать примеры на Kotlin. Google сейчас активно переписывает документацию под Kotlin, но до полного перехода ещё далеко, даже меньше 50%. Новые уроки я пишу в основном под Kotlin, но на сайте полно примеров под Java.
Статья в очередной раз переписана. На этот раз основной упор сделан на Kotlin. Возможно, где-то в статье остались хвосты от Java-варианта. Хвосты — это нормально.
По традиции, заложенной в прошлом веке, каждый программист должен был написать «Hello World!» (Здравствуй, Мир!) в качестве первой программы. Времена меняются, и программа «Hello World!» уже встроена в среду разработки под Android в целях совместимости, а современные программисты должны писать программу Hello Kitty! (Привет, киска!). Согласитесь, что здороваться с котёнком имеет больше здравого смысла, чем с каким-то миром.
Разобьём задачу на две части. Сначала запустим готовую программу Hello World! без написания кода, чтобы убедиться, что весь инструментарий корректно установился, и мы можем создавать и отлаживать программы. А потом уже напишем свою первую программу.
Создание нового проекта
Запускаем Студию и выбираем File | New | New Project…. Появится диалоговое окно мастера.

Окно имеет несколько разделов. В основном, мы будем использовать раздел Phone and Tablet.
Здесь следует выбрать внешний вид экрана приложения. Предложенные шаблоны позволяют сэкономить время на написание стандартного кода для типичных ситуаций. Опытный разработчик может вручную написать любой из предложенных вариантов, используя вариант No Activity, где никаких заготовок не будет.
Несколько лет назад был только один шаблон. Список шаблонов постоянно меняется (добавляют и удаляют). В 3.1 было 13, в Android Studio 3.2 добавили 14-й шаблон Fragment+ViewModel. А в 3.3 число сократилось до 12 (причём один из них относится к экзотическому C++). В версии 4.0 шаблонов стало 15.
В версии Dolphin 2020.3.1 шаблонов стало 21.
- No Activity
- Basic Activity
- Basic Activity (Material 3)
- Bottom Navigation Activity
- Empty Compose Activity
- Empty Compose Activity (Material 3)
- Empty Activity
- Fullscreen Activity
- Google AdMob Ads Activity
- Google Maps Activity
- Google Pay Activity
- Login Activity
- Primary/Detail Flow
- Navigation Drawer Activity
- Responsive Activity
- Settings Activity
- Scrolling Activity
- Tabbed Activity
- Fragment + ViewModel
- Game Activity(C++) (NEW!)
- Native C++
В версию Dolphin добавили новый шаблон Game Activity(C++) (стало 21).
В версию Chipmunk добавили три новых шаблона (стало 20).
Шаблон Empty Activity предназначен для обычных телефонов. На картинке над названием шаблона вы видите приблизительный вид приложения с использованием данной заготовки. Для учебных программ в 99% подойдёт этот вариант. Практически все примеры на сайте написаны с помощью данного шаблона.
Шаблон Primary/Detail Flow (раньше было Master/Detail Flow, BLM и всё такое) предназначен для планшетов с реализацией двухпанельного режима. Шаблон Fullscreen Activity можно использовать для игр, когда требуется дополнительное пространство без лишних деталей. Другие шаблоны нужны для создания приложений с гуглокартами или сервисами Google Play.
В следующем окне настраиваются параметры проекта.

Поле Name — понятное имя для приложения, которое будет отображаться в заголовке приложения. По умолчанию у вас уже может быть My Application. Заменим на Hello World. В принципе вы могли написать здесь и Здравствуй, мир!, но у Android есть замечательная возможность выводить нужные строки на телефонах с разными языками. Скажем, у американца на телефоне появится надпись на английском, а у русского — на русском. Поэтому в первоначальных настройках всегда используются английские варианты, а локализованные строки подготовите позже. Необходимо сразу вырабатывать привычку к правильному коду.
Поле Package name формирует специальный Java-пакет. В Java используется перевёрнутый вариант для наименования пакетов, поэтому сначала идёт ru, а потом уже название сайта. Пакет служит для уникальной идентификации вашего приложения, когда вы будете его распространять. Если сто человек напишет сто приложений с названием «Cat», то будет непонятно, где приложение, написанное разработчиком Василием Котовым. А приложение с именем пакета ru.vaskakotov.cat проще найти. Обратите внимание, что Гугл в своей документации использует пакет com.example в демонстрационных целях. Если вы будете просто копировать примеры из документации и в таком виде попытаетесь выложить в Google Play, то у вас ничего не выйдет — это название зарезервировано и запрещено к использованию в магазине приложений.
Третье поле Save location позволяет выбрать место на диске для создаваемого проекта. Вы можете создать на своём диске отдельную папку для своих проектов и хранить свои программы в ней. Студия запоминает последнюю папку и будет автоматически предлагать сохранение в ней. В случае необходимости вы можете задать другое местоположение для отдельного проекта через кнопку с значком папки.
В поле Language можно выбрать язык: Kotlin или Java.
В блоке Minimum API level выбираем минимальную версию системы, под которую будет работать приложение. Выберите свой вариант. На данный момент Гугл поддерживает версии, начиная с API 9, выпуская специальные библиотеки совместимости для старых устройств. Но вы можете выбрать более современный вариант. У меня в наличии телефон с минимальной версией Android 5.0, поэтому я выставляю этот вариант.
Если щёлкнуть по ссылке Help me choose, то откроется окно с графиком. Если вам интересно, можете посмотреть, но котиков там нет.
Если по каким-то причинам нужно поддерживать старые библиотеки, то ставьте флажок Use legacy android.support libraries. К вам это вряд ли относится, игнорируем флажок.
Сразу покажу приём, который вам пригодится в дальнейшем при обновлении библиотек. Откройте файл build.gradle, который относится к модулю.

Там будут подсвечены несколько строк у библиотек, у которых доступны обновления.

При подведении мыши появится подсказка, что библиотека устарела. Выбираем пункт для обновления Change to …. Повторяйте эти шаги для других библиотек при необходимости.

Затем нажмите ссылку синхронизации Sync Now в верхнем правом углу студии.

Данным способом вы потом будете неоднократно пользоваться в своих проектах, когда библиотеки будут устаревать. Студия сама определит, что пора обновиться (это относится не ко всем библиотекам, некоторые нужно проверять вручную).
Мы закончили с первоначальной настройкой. Нажимаем кнопку Finish и смотрим, что дальше будет.
А дальше студия формирует проект и создаёт необходимую структуру из различных файлов и папок. Поначалу глаза разбегаются. Давайте разбираться.
Боковая левая часть студии имеет несколько боковых вкладок. Скорее всего у вас будет активна первая вкладка 1:Project. Вкладки Structure и ResourceManager и другие используются гораздо реже.
В левой части среды разработки на вкладке Android появится иерархический список из папок, которые относятся к проекту. В некоторых случаях желательно переключиться на режим Project, который показывает истинное расположение файлов. Но на первых порах удобнее использовать именно вид Android, который прячет служебные файлы, чтобы не путать новичков.
Содержание проекта
Вкладка Android содержит две основные папки: app и Gradle Scripts. Первая папка app является отдельным модулем для приложения и содержит все необходимые файлы приложения — код, ресурсы картинок и т.п. Вторая папка служит для различных настроек, управления проектом и многих других вещей.
Сейчас нас должна интересовать папка app. Раскройте её. В ней находятся папки: manifest, java, res.
manifests
Папка manifests (раньше была в единственном числе) содержит единственный файл манифеста AndroidManifest.xml. В этом файле должны быть объявлены все активности, службы, приёмники и контент-провайдеры приложения. Также он должен содержать требуемые приложению разрешения. Например, если приложению требуется доступ к сети, это должно быть определено здесь. «AndroidManifest.xml» можно рассматривать, как описание для развёртывания Android-приложения.
Более подробно о структуре манифеста читайте в дополнительной статье Файл AndroidManifest.xml
java
Папка java содержит три подпапки — одну рабочую и два для тестов. Рабочая папка имеет название вашего пакета и содержит файлы классов. Сейчас там один класс MainActivity. Папки для тестов можете не трогать. Если вы знаете, как работают пакеты в Java, то можете создавать новые папки и подпапки.
res
Папка res содержит файлы ресурсов, разбитых на отдельные подпапки. В режиме Android выводятся виртуальные папки, если вы посмотрите на реальное содержимое на диске компьютера, то структура будет немного иной. Чтобы увидеть реальную структуру, не обязательно открывать Проводник (Windows) и искать там свой проект, можно просто переключиться в режим Project.
- drawable — в этих папках хранят графические ресурсы — картинки и xml-файлы, описывающие цвет и фигуры. В реальности на диске находятся папки drawable, drawable-anydpi, drawable-hdpi, drawable-mdpi, drawable-v24, drawable-xhdpi, drawable-xxhdpi. Состав папок менялся в каждой версии студии, сейчас там вообще две папки drawable и drawable-v24
- layout — в данной папке содержатся xml-файлы, описывающие внешний вид форм и различных элементов форм. После создания проекта там уже имеется файл activity_main.xml, который отвечает за внешний вид главного окна приложения.
- mipmap — здесь хранят значки приложения под разные разрешения экрана. В реальности это папки mipmap-anydpi-v26, mipmap-hdpi, mipmap-mdpi, mipmap-xhdpi, mipmap-xxhdpi, mipmap-xxxhdpi
- values — тут размещаются строковые ресурсы, ресурсы цветов, тем, стилей и измерений, которые мы можем использовать в нашем проекте. Здесь вы можете видеть файлы colors.xml, strings.xml, styles.xml. В старых проектах был ещё файл dimens.xml, сейчас от него отказались
В студии версии 4.1 убрали файл styles.xml, а вместо неё добавили файл themes.xml в папке values, и файл themes.xml в новой папке values-night. Файлы предназначены для обычной и ночной темы.
Со временем вы будет свободно ориентироваться в этих папках, пока не забивайте себе голову.
Работа с проектом — Здравствуй, Мир!
Как уже говорилось, программа Hello, World! уже встроена в любой новый проект, поэтому вам даже не нужно ничего писать. Просто нужно запустить проект и получить готовую программу!
Для изучения вам нужно открыть два файла — MainActivity.kt (скорее всего он уже открыт) и activity_main.xml (res/layout) в центральной части Студии. Если файлы не открыты, то откройте их самостоятельно двойным щелчком для редактирования (или просмотра). Таким способом вы можете открыть любой нужный вам файл.
Не будем пока изучать код, а просто нажмём на зелёный треугольник Run (Shift+F10) на панели инструментов в верхней части студии для запуска приложения.
Если вы не настроили эмулятор, значит вы не читали предыдущий урок. Настройте сначала эмулятор и запускайте проект снова. Либо подключайте реальное устройство.
Если всё сделали правильно, то в эмуляторе или на устройстве загрузится ваша программа. Поздравляю!
Итак, если программа запустилась, то увидите окно приложения с надписью Hello World!. Заголовок у программы будет также Hello World (берётся название проекта). Все эти строки можно найти в файле res/values/strings.xml и отредактировать при желании.

Теперь посмотрим на код. Сначала изучим activity_main.xml.
Смотреть его можно в разных режимах — Code, Split, Design (до версии 3.6 — Design и Text).
Откройте в режиме Code. Подробнее о режимах чуть ниже.
<?xml version="1.0" encoding="utf-8"?>
<androidx.constraintlayout.widget.ConstraintLayout
    xmlns:android="http://schemas.android.com/apk/res/android"
    xmlns:app="http://schemas.android.com/apk/res-auto"
    xmlns:tools="http://schemas.android.com/tools"
    android:layout_width="match_parent"
    android:layout_height="match_parent"
    tools:context=".MainActivity">

    <TextView
        android:layout_width="wrap_content"
        android:layout_height="wrap_content"
        android:text="Hello World!"
        app:layout_constraintBottom_toBottomOf="parent"
        app:layout_constraintLeft_toLeftOf="parent"
        app:layout_constraintRight_toRightOf="parent"
        app:layout_constraintTop_toTopOf="parent" />

</androidx.constraintlayout.widget.ConstraintLayout>
Сейчас в студии используется новый код шаблона на основе ConstraintLayout, который появился в Android Studio 2.3 в марте 2017 года. Раньше использовался другой код с RelativeLayout (а ещё раньше и другой код с LinearLayout). Если вам будут попадаться старые примеры, то в студии есть контекстное меню, которое поможет сконвертировать старый код в новый.
Немного о XML-коде. Имеется специальный контейнер ConstraintLayout, в котором размещён компонент TextView, предназначенный для вывода текста.
Теперь посмотрим на Kotlin-код (MainActivity.kt)
package ru.alexanderklimov.helloworld

import androidx.appcompat.app.AppCompatActivity
import android.os.Bundle

class MainActivity : AppCompatActivity() {
    override fun onCreate(savedInstanceState: Bundle?) {
        super.onCreate(savedInstanceState)
        setContentView(R.layout.activity_main)
    }
}
В первой строке идёт название пакета — его мы задавали при создании проекта (Package Name). Далее идут строки импорта необходимых классов для проекта. Для экономии места они свёрнуты в одну группу. Разверните её. Если однажды вы увидите, что имена классов выводятся серым цветом, значит они не используются в проекте (подсказка Unused import statement) и можете спокойно удалить лишние строки. Также они могут удаляться автоматически (настраивается).
Далее идёт объявление самого класса, который наследуется (двоеточие :) от абстрактного класса Activity. Это базовый класс для всех экранов приложения. У вас будет AppCompatActivity. В старых версиях не было плюшек, которые появились после Android 4, поэтому для них была создана специальная библиотека совместимости, которая позволяет использовать новинки от новых версий Android в старых программах. Класс AppCompatActivity как раз и относится к библиотеке совместимости. Считайте её родственником базовой Activity. У неё есть все нужные методы и вспомогательные классы, но названия могут немного различаться.
На разных этапах использовались разные названия класса активности, которые могут вам встретиться в старых проектах. Например, сначала использовался FragmenActivity, затем ActionBarActivity, а 22 апреля 2015 года вышла новая версия библиотеки совместимости и на данный момент используется новый класс AppCompatActivity.
В самом классе мы видим метод onCreate() – он вызывается, когда приложение создаёт и отображает разметку активности. Метод помечен ключевым словом override (переопределён из базового класса). Ключевое слово может пригодиться вам. Если вы сделаете опечатку в имени метода, то компилятор сможет предупредить вас, сообщив об отсутствии такого метода у родительского класса Activity.
Разберём код метода.
Строка super.onCreate(savedInstanceState) – это конструктор родительского класса, выполняющий необходимые операции для работы активности. Эту строчку вам не придётся трогать, оставляйте без изменений.
Вторая строчка setContentView(R.layout.activity_main) представляет больший интерес. Метод setContentView(int) подключает содержимое из файла разметки. В качестве аргумента мы указываем имя файла без расширения из папки res/layout. По умолчанию проект создаёт в нём файл activity_main.xml. Вы можете переименовать файл или создать свой файл с именем cat.xml и подключить его к своей активности. Тогда код будет выглядеть так:
setContentView(R.layout.cat)
Чтобы ваш код был аккуратным, старайтесь придерживаться стандартов. Если вы создаёте разметку для активности, то используйте префикс activity_ для имени файла. Например, разметка для второй активности может иметь имя activity_second.xml.
Hello Kitty!
Вы создали новую программу, но это ещё не повод считать себя программистом, так как вы не написали не единой строчки кода. Настало время набраться смелости и создать программу «Hello Kitty!».
Создаём новый проект. Снова выбираем шаблон Empty Activity и устанавливаем нужные настройки.

На данный момент наша программа слишком проста. Представьте себе, что у вас на экране должны располагаться несколько кнопок, текстовых полей, картинок. Каждому объекту нужно задать размеры, координаты, цвет, текст и так далее. Android поддерживает способ, основанный на XML-разметке, который будет напоминать разметку веб-страницы. Начинающие программисты могут использовать визуальный способ перетаскивания объектов с помощью мыши. Более продвинутые могут писать код вручную. Чаще используется комбинированный подход.
Файлы XML-разметки находятся в папке res/layout вашего проекта. Слово «res» является сокращением от слова «resources» (ресурсы). Папка содержит ресурсы, не связанные с кодом. Кроме разметки, там же содержатся изображения, звуки, строки для локализации и т.д.
Раскройте слева в структуре проектов папки res/layout и дважды щёлкните на файле activity_main.xml, если он у вас закрыт. Обратите внимание, что XML-файлы можно просматривать в разных режимах: текстовом, визуальном и смешанном. Для этого предназначены три вкладки в верхней части окна редактора: Code, Split, Design (если вы не кот и не пользуетесь мышкой, а предпочитаете клавиатуру, то используйте комбинацию Alt + Shift + Left/Right Arrow (Windows) для циклического переключения между режимами).

Переключитесь в режим Code (текстовый режим).
Структура XML-файла достаточна проста — стандартное дерево XML-элементов, где каждый узел является именем класса View (TextView — один из элементов View). Вы можете создать интерфейс программы, используя структуру и синтаксис XML. Подобный подход позволяет разделить код программы и визуальное представление.
Когда разметка открыта в графическом представлении, то слева от основной части редактора кода можно увидеть панель инструментов, в которой сгруппированы различные элементы по группам Widgets, Text, Layouts и так далее. В группе Buttons найдите элемент ImageButton, перетащите её на форму и отпустите. Точное расположение нас не интересует, поэтому не заморачивайтесь по этому поводу, постарайтесь разместить компонент в центре экрана активности. У вас появится диалоговое окно с просьбой выбрать изображение для кнопки. Пока выбирайте любую, например, первую. Потом заменим.
Теперь научимся менять фон для экрана приложения. Сейчас у нас экран белого цвета. Возвращаемся в файл разметки activity_main.xml. Справа найдите вкладку Attributes, в которой отображаются свойства для выбранного элемента. А слева есть вкладка Component Tree, который отображает структуру компонентов на экране. Вам нужно нужно выделить какой-нибудь компонент, что на вкладке свойств увидеть все доступные свойства компонента. Новички часто путаются на первых порах и начинают менять свойства не у тех элементов, которые им были нужны. Сейчас у вас есть окно активности, графическая кнопка ImageButton и текстовая метка TextView с надписью Hello World!. Пощёлкайте по этим элементами, чтобы увидеть, как меняется содержание свойств в панели свойств. Так как мы собираемся работать с фоном экрана приложения, то щёлкните на ConstraintLayout. В панели свойств отобразятся самые употребительные свойства выбранного компонента. К ним относятся идентификатор, ширина и высота.

Прокручиваем список атрибутов в All attributes и находим свойство background. Щёлкните рядом с этим словом во второй колонке, где нужно прописывать значения. Появится текстовое поле, в которое можно ввести значение вручную. Рядом есть маленькая кнопка, которая запустит диалоговое окно для создания ресурса.
Переходим на вкладку Color и выбираем цвет. Вы можете выбрать цвет, определённый в приложении (секция app) или в системе (секция android).
Давайте выберем цвет colorAccent и нажмём кнопку OK.

Экран окрасится в розовый цвет. Получилось глаМУРненько (в предыдущих версиях в качестве colorAccent использовался другой цвет, поэтому здесь расхождение между описанием и реальным цветом. Можете самостоятельно попытаться установить розовый цвет.
Если переключиться в текстовый режим, то увидим, что у элемента ConstraintLayout добавилась строчка:
android:background="@color/colorAccent"
Мы связали фон экран с именем цветового ресурса. Существует неправильный подход, когда можно сразу напрямую указать значение цвета.
android:background="#ffffc0cb"
Старайтесь так не делать, всегда используйте ресурсы.
Далее поменяем картинку для графической кнопки. Находим подходящее изображение и копируем его в папку res/drawable. Картинку можете взять у меня.

Простое перетаскивание из проводника в папку студии не сработает. Поэтому лучше скопировать картинку в буфер, затем щёлкнуть правой кнопкой мыши на папке drawable в студии, выбрать команду «Вставить». Сначала появится первое диалоговое окно для выбора папки, выбираем папку drawable.

Возможно первое окно у вас не появится, тогда в следующем диалоговом окне подтверждаем операцию копирования файла.

Когда вы поместите графический файл в указанную папку, то студия автоматически создаёт ресурс типа Drawable с именем файла без расширения, к которому можно обращаться программно.
Выделяем элемент ImageButton на форме и в панели свойств выбираем свойство srcCompat, щёлкаем на кнопку и выбираем в диалоговом окне ресурс в категории Drawable — вы там должны увидеть ресурс pinkhellokitty (имя добавленного ранее файла).

Запомните, что имена ресурсов должны начинаться с буквы и могут содержать буквы и цифры, а также знак нижнего подчёркивания. Другие символы типа тире, решётки и т.д. использовать нельзя.
Мы закончили работу с графическим интерфейсом приложения. Напоследок, выделите элемент TextView с надписью Hello, World и в окне свойств посмотрите на его идентификатор (ID). Если там пусто, то удалите его, он не оправдал наших надежд. В разделе Text найдите компонент TextView (самый первый) и перетащите его на форму приложения. Постарайтесь разместить его под графической кнопкой с котёнком.
У этого компонента точно будет что-то написано в свойстве id. Скорее всего, это будет textView. Запомните его. Впрочем, мы могли не удалять первый компонент, а прописать идентификатор вручную. Но мне пришлось бы объяснять лишние детали, а так сразу получили результат. Вот я не удалял его и у меня экран выглядит так. А у вас будет текст TextView. Ничего страшного.
Если текст вам кажется мелковатым, то у свойства textAppearance установите значение AppCompat.Display2.

У меня получилось следующее.
<?xml version="1.0" encoding="utf-8"?>
<androidx.constraintlayout.widget.ConstraintLayout
    xmlns:android="http://schemas.android.com/apk/res/android"
    xmlns:app="http://schemas.android.com/apk/res-auto"
    xmlns:tools="http://schemas.android.com/tools"
    android:layout_width="match_parent"
    android:layout_height="match_parent"
    android:background="#ffffc0cb"
    tools:context=".MainActivity">

    <TextView
        android:id="@+id/textView"
        android:layout_width="wrap_content"
        android:layout_height="wrap_content"
        android:textAppearance="@style/TextAppearance.AppCompat.Display2"
        app:layout_constraintBottom_toBottomOf="parent"
        app:layout_constraintLeft_toLeftOf="parent"
        app:layout_constraintRight_toRightOf="parent"
        app:layout_constraintTop_toBottomOf="@+id/imageButton"
        tools:text="Имя кота" />

    <ImageButton
        android:id="@+id/imageButton"
        android:layout_width="wrap_content"
        android:layout_height="wrap_content"
        android:layout_marginTop="32dp"
        app:layout_constraintEnd_toEndOf="parent"
        app:layout_constraintStart_toStartOf="parent"
        app:layout_constraintTop_toTopOf="parent"
        app:srcCompat="@drawable/pinkhellokitty" />

</androidx.constraintlayout.widget.ConstraintLayout>
Здесь очень много кода, который генерирует ConstraintLayout при размещении и выравнивании компонентов. Это новый контейнер, к которому нужно привыкать. Сейчас нет смысла объяснять принцип его работы, на сайте есть отдельная статья по нему. Пока советую при ручном размещении нажимать значок Infer Constraints (изображение волшебной палочки) в режиме дизайна — студия попытается предугадать нужные настройки самостоятельно.
Различия c Java начинаются с имени файла класса MainActivity.kt. У него расширение kt вместо java, но располагается в аналогичном пакете как у Java. Скорее всего он у вас уже открыт в редакторе. Если нет, то двойным щелчком запустите его из левой части студии.
Синтаксис кода немного отличается от Java. Первое, что бросается в глаза — не нужно ставить точку с запятой в конце оператора.
Так как мы собираемся менять текст в текстовой метке, необходимо прописать данный элемент в коде. До метода onCreate() наберите строчку:
private lateinit var mHelloTextView: TextView
Мы объявили переменную типа TextView под именем mHelloTextView.
Если вы набирали вручную и при подсказках использовали клавишу Enter, то класс TextView автоматически импортируется и запись появится в секции import. Если вы просто копируете текст с сайта, то студия подчеркнёт название класса TextView и предложит импортировать его вручную.
Далее внутри метода onCreate() после вызова метода setContentView() добавьте строку:
mHelloTextView = findViewById(R.id.textView) // помните, я просил запомнить идентификатор?
Избегайте соблазна скопировать строку с сайта и вставить в код, пишите самостоятельно и активно используйте автозавершение (Ctrl+Пробел) при наборе слов. Студия часто сама активно помогает подсказками. Теперь система знает о существовании элемента TextView, и мы можем к нему обращаться для изменения различных свойств, например, поменять текст.
Далее объявляем компонент ImageButton и пишем код для обработчика щелчка — обращаемся к элементу mHelloTextView и через его метод setText() программно меняем текст на нужные слова.
Общий код класса получится следующим. Я намерено оставил вещи, которые можно было упростить.
package ru.alexanderklimov.hellokot

import android.os.Bundle
import android.widget.ImageButton
import android.widget.TextView
import androidx.appcompat.app.AppCompatActivity

class MainActivity : AppCompatActivity() {

    private lateinit var mHelloTextView: TextView

    override fun onCreate(savedInstanceState: Bundle?) {
        super.onCreate(savedInstanceState)
        setContentView(R.layout.activity_main)

        mHelloTextView = findViewById(R.id.textView)

        var imageButton: ImageButton = findViewById(R.id.imageButton)
        // альтернативный вариант
        // val imageButton = findViewById<ImageButton>(R.id.imageButton)
        // или val imageButton = findViewById(R.id.imageButton) as ImageButton

        imageButton.setOnClickListener {
            mHelloTextView.setText("Hello Kitty")
        }
    }
}
Запускаем программу и нажимаем на кнопку с изображением котёнка. Если всё сделали правильно, то отобразится замечательная фраза. С этого момента можете считать себя настоящим программистом — вы научились создавать цветовые и графические ресурсы, менять фон у приложения через XML-разметку, обрабатывать нажатия кнопки и выводить текстовые сообщения.
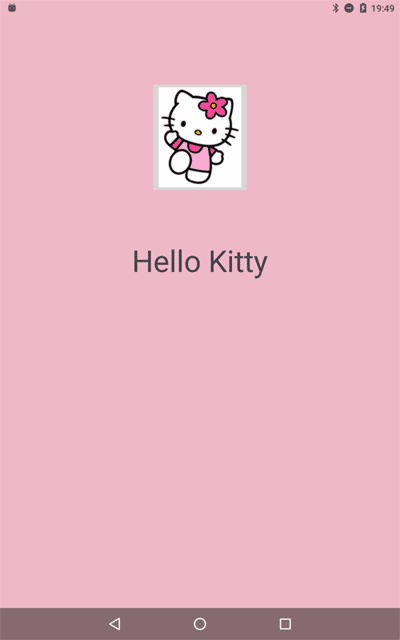
В данном случае я написал код в Java-стиле, не используя особенностей Kotlin. Студия подчеркнёт волнистой чертой метод setText() и предложить заменить его на свойство.
Kotlin позволяет заменить пары Java-методов вида getXX/setXX свойствами без приставок. Были методы getText()/setText(), остались рожки да ножки свойство text. Если вы что-то присваиваете свойству, значит вы хотите использовать setText(), а если хотите прочитать значение свойства — значит вы хотите вызвать getText(). Вот так изящно работает Kotlin.
Второй момент связан с рефакторингом кода. Раньше в эпоху Java было принято присваивать глобальным переменным имена с приставкой m (member). Сейчас в этом нет необходимости, студия выделяет подобные переменные другим цветом. Чтобы вручную не изменять в проекте все упоминания переменной, используют так называемый рефакторинг (изменение кода без потери его функциональности). Сделать это проще всего через комбинацию клавиш SHIFT+F6. Выделяем нужное слово, нажимаем указанную комбинацию клавиш и выбираем один из предложенных вариантов или печатаем свой вариант. В нашем случае подойдёт вариант helloTextView.

Можно заменить строчку кода.
imageButton.setOnClickListener {
    helloTextView.text = "Hello Kitty!"
}
В папке appbuildoutputsapk проекта можно найти готовый APK-файл, который вы можете выложить у себя на сайте и дать скачать своим знакомым (в телефоне должно быть разрешение на установку неподписанных приложений), вы станете невероятно круты в их глазах.
Забегая вперёд, скажу одну вещь. Каждому приложению выделяется определённый объем памяти под картинки. В новых устройствах чуть больше, в старых поменьше. Но в любом случае не нужно пытаться загрузить в этом примере фотографию своего любимого кота объёмом в несколько десятков мегабайт, иначе можете получить ошибку в приложении. Позже вы узнаете, как лучше использовать большие картинки.
Пример для Java
Примечание: Для примера на Java — Там же в окне свойств у ImageButton находим свойство onClick и вручную прописываем onClick — это будет именем метода для обработки нажатия на кнопку. Вы можете придумать и другое имя, например, onButtonPressed. Для Kotlin можно не использовать эту конструкцию.
В текстовом режиме установите курсор мыши внутри текста «onClick» у кнопки и нажмите комбинацию Alt+Enter

В всплывающем окне выберите вариант Create ‘onClick(View)’ in ‘MainActivity’.

В коде класса MainActivity появится заготовка для обработки щелчка кнопки.
Раз уж у нас теперь открыт файл MainActivity.java, то продолжим теперь работу в нём. Так как мы собираемся менять текст в текстовой метке, необходимо прописать данный элемент в коде. До метода onCreate() наберите строчку:
private TextView mHelloTextView;
Мы объявили переменную типа TextView под именем mHelloTextView.
Если вы набирали вручную и при подсказках использовали клавишу Enter, то класс TextView автоматически импортируется и запись появится в секции import. Если вы просто копируете текст с сайта, то студия подчеркнёт название класса TextView и предложит импортировать его вручную.
Далее внутри метода onCreate() после вызова метода setContentView() добавьте строку:
mHelloTextView = findViewById(R.id.textView); // помните, я просил запомнить идентификатор?
Избегайте соблазна скопировать строку с сайта и вставить в код, пишите самостоятельно и активно используйте автозавершение (Ctrl+Пробел) при наборе слов. Студия часто сама активно помогает подсказками. Теперь система знает о существовании элемента TextView, и мы можем к нему обращаться для изменения различных свойств, например, поменять текст.
В старых примерах вам может встретиться вариант со скобками.
mHelloTextView = (TextView) findViewById(R.id.textView);
Если вы используете компилятор compileSdkVersion 26 и выше, то скобки с названием компонента можно опустить, так как изменилась сигнатура метода.
// было
public View findViewById(int id);

// стало
public <T extends View> T findViewById(int id);
Эта возможность появилась совсем недавно, поэтому во всех старых примерах будет попадаться старый код. Можете сразу привыкать к новому способу, студия будет подсказывать о новой возможности.
Переходим к заготовке для щелчка кнопки.
public void onClick(View view) {
}
В следующих занятиях мы подробнее разберём работу с данным методом, пока просто пишем код между фигурными скобками:
mHelloTextView.setText("Hello Kitty!");
Мы обращаемся к элементу mHelloTextView и через его метод setText() программно меняем текст на нужные слова.
Исходный код для ленивых
Ткните лапкой, чтобы развернуть текст
// Если этот код работает, его написал Александр Климов,
// а если нет, то не знаю, кто его писал.

package ru.alexanderklimov.hellokitty;

import android.os.Bundle;
import android.view.View;
import android.widget.EditText;
import android.widget.TextView;

import androidx.appcompat.app.AppCompatActivity;

public class MainActivity extends AppCompatActivity {

    private TextView mHelloTextView;

    @Override
    protected void onCreate(Bundle savedInstanceState) {
        super.onCreate(savedInstanceState);
        setContentView(R.layout.activity_main);

        mHelloTextView = findViewById(R.id.textView);
    }

    public void onClick(View view) {
        mHelloTextView.setText("Hello Kitty!");
    }
}
Здороваемся с вашим котом (Kotlin)
Программа получилась замечательная, но у неё есть недостаток. Она показывает одну и ту же фразу «Hello Kitty!». Вряд ли ваш кот знает английский, да и здороваться лучше по имени. Не пытайтесь с котом мяукать, иначе разговор выглядит следующим образом.

Поздороваемся с котом по человечески. Найдите в разделе Text компонент Plain Text и перетащите его на экран активности, разместив где-то над картинкой. Оставляем все свойства без изменений, разве только в свойстве hint можно добавить строчку-подсказку, которая будет исчезать при вводе текста.
<EditText
    android:id="@+id/editText"
    android:layout_width="wrap_content"
    android:layout_height="wrap_content"
    android:layout_marginTop="29dp"
    android:ems="10"
    android:inputType="textPersonName"
    android:text="Name"
    app:layout_constraintEnd_toEndOf="parent"
    app:layout_constraintStart_toStartOf="parent"
    app:layout_constraintTop_toTopOf="parent" />
Отредактируем код для щелчка кнопки.
private lateinit var editText: EditText // до метода onCreate()

imageButton.setOnClickListener {
    if (editText.text.isEmpty()) {
        helloTextView.text = "Hello Kitty!";
    } else {
        helloTextView.text = "Привет, " + editText.text
    }
}
Мы внесли небольшую проверку. Если в текстовом поле пустой текст, мы по-прежнему выводим надпись «Hello Kitty!». Если пользователь введёт имя своего кота, то приложение поздоровается с ним. Какая умная и вежливая программа у нас получилась.

Здороваемся с вашим котом (Java)
Переходим в класс MainActivity и добавляем новую переменную рядом с переменной mHelloTextView:
private EditText mNameEditText;
Свяжем созданную переменную с компонентом в методе onCreate():
mNameEditText = findViewById(R.id.editText);
Поменяем код для щелчка кнопки.
public void onClick(View view) {
    if (mNameEditText.getText().length() == 0) {
        mHelloTextView.setText("Hello Kitty!");
    } else {
        mHelloTextView.setText("Привет, " + mNameEditText.getText());
    }
}
Мы внесли небольшую проверку. Если в текстовом поле пустой текст, то длина текста составляет ноль символов, и мы по-прежнему выводим надпись «Hello Kitty!». Если пользователь введёт имя своего кота, то приложение поздоровается с ним.
Дополнительное чтение
Обсуждение статьи на форуме.
Исходник на Гитхабе (Java)
Реклама
Android – базирующаяся на ОС Linux операционная система с открытым исходным кодом, предназначенная для мобильных устройств – таких, как, например, смартфоны или планшетные компьютеры.
Это руководство предназначено для введения в основные понятия программирования под Android, так что после его изучения вы будете понимать некоторые базовые концепции программирования под эту ОС.
От вас же, в свою очередь, требуется только желание и базовое понимание программирования на языке Java. Не так много, правда? Что ж, начнём!
Среда разработки
Для разработки приложений под Android можно использовать любые из перечисленных операционных систем:
- Microsoft Windows XP или более поздняя версия
- Mac OS X 10.5.8 или более поздняя версия с чипом Intel
- Linux, включающая GNU C Library 2.7 или более позднюю версию
При этом все необходимые инструменты для разработки Android-приложений находятся в свободном доступе и вы можете загрузить их из Интернета. Для того, чтобы начать создавать приложения под Android, вам понадобятся:
- Java JDK5 или более поздняя версия
- Android Studio
Структура приложений
Поздравляем, ваше оборудование готово к работе! Однако прежде чем приступить к вашему первому приложению, поговорим о том, что из себя представляет приложение на Android и из чего оно состоит.
Компоненты приложения являются своего рода «строительными блоками» для приложения Android. Эти компоненты связаны файлом-манифестом приложения AndroidManifest.xml, который описывает каждый компонент приложения и взаимодействие этих компонентов между собой.
Есть четыре базовых типа компонентов, которые могут быть использованы в приложении Android:
- Операции (Activities) представляют собой элементы пользовательского интерфейса (одна операция – один экран) и отвечают за взаимодействие пользователя с экраном мобильного устройства;
- Службы (Services) представляют собой длительные операции, работающие в фоновом режиме и не имеющие пользовательского интерфейса (например, передача данных), вместо этого они, как правило, запускаются иными элементами, уже имеющими пользовательский интерфейс, и взаимодействуют с ними;
- Приемники широковещательных сообщений (Broadcast receivers) представляют собой компоненты, реагирующие на объявления самой ОС, передаваемые всей системе (как хороший пример – объявление о низком уровне заряда батареи устройства). Они также не имеют пользовательского интерфейса, однако могут передавать данные другим компонентам, где они демонстрируются пользователю в виде уведомлений;
- Поставщики контента (Content providers) представляют собой компоненты, управляющие взаимодействием приложения с его базой данных — посредством поставщика контента другие компоненты приложения могут запрашивать или изменять данные.
Помимо четырех базовых типов, существуют дополнительные типы компонентов, используемые для выстраивания взаимодействий и связей как между базовыми типами компонентов, так и между компонентами и внешними элементами. К ним относятся:
- Фрагменты (Fragments) – части пользовательского интерфейса в Операциях (см. выше);
- Виды (Views) – элементы пользовательского интерфейса, отображаемые на экране, например, кнопки, списки и т. д.;
- Макеты (Layouts) – определяют элементы пользовательского интерфейса, их свойства и расположение;
- Намерения (Intents) – соединяют вместе различные компоненты приложения или связывают друг с другом работу разных приложений;
- Ресурсы (Resources) – внешние элементы, такие, как строки, константы или изображения;
- Манифест (Manifest) – конфигурационный файл приложения.
Теперь, когда вы получили базовое понимание о структуре приложений на Android, хотелось бы предложить вам самим попробовать создать свое первое приложение.
Первое приложение
Итак, давайте приступим к созданию простого Android-приложения, которое будет выводить на экран «Hello World!».
У вас к этому времени уже должен быть установлен Android Studio последней версии. Ниже будет приведена небольшая пошаговая инструкция:
- Откройте Android Studio.
- В открывшемся окне кликните на «Start a new Android Studio project», чтобы создать новый проект.
- В открывшемся окне в строку «Application name» введите название вашего будущего приложения. Нажмите Next.
- В следующем окне вам нужно выбрать тип устройств, для которых создается приложение – в нашем случае необходимо выбрать «Phone and Tablet» (смартфоны и планшетные компьютеры), а в выпадающем списке под названием «Minimum SDK» нужно выбрать версию Android, для которой создается приложение (обычно указывается самая ранняя версия, способная запустить приложение) – в нашем конкретном случае выберем версию Android 6.0. Если в вашей версии есть возможность выбрать язык программирования (выпадающее окно Language), выберите пункт “Java”. Остальные опции можно оставить без изменений. Нажмите Next.
- На следующем этапе выберите пункт Empty Activity – это будет означать, что экран нашего приложения не будет иметь никаких дополнительных элементов. Нажмите Next.
Теперь перед вами открылась привычная среда разработки. К сожалению или к счастью, но сейчас вам не нужно будет писать код – среда разработки уже сделала это за вас, создав файлы для приложения, выводящего «Hello world!» на экран, по умолчанию. Вместо этого хотелось бы обратить ваше внимание на несколько созданных файлов и папок, найти которые вы можете в колонке слева, отображающей все элементы проекта.
- Файл MainActivity.java
В папке «Java» содержатся исходные файлы формата .java для вашего приложения. По умолчанию в ней находится исходный файл MainActivity.java, имеющий класс Операция – он запускается при нажатии пользователем на иконку приложения на устройстве. Этот файл содержит главный код приложения, и именно он преобразуется в файл .exe для запуска приложения на устройстве.
- Файл AndroidManifest.xml
Это файл типа «Манифест», который описывает основные характеристики приложения и определяет каждый из его компонентов. Он является своего рода интерфейсом между ОС Android и вашим приложением – если компонент не упомянут в этом файле, он не будет отображен и в операционной системе.
- Файл Build.gradle
Это автоматически генерируемый файл, содержащий определённые данные касательно приложения – такие, как, например, версия SDK.
Запустить приложение можно двумя способами: на реальном устройстве или на эмуляторе в самой среде разработки. В нашем случае мы рассмотрим более универсальный случай – запуск на эмуляторе, полностью имитирующем работу устройства с операционной системой Android.
Запуск приложения на эмуляторе
Попытайтесь запустить приложение кнопкой «Run» – в появившемся диалоговом окне выберите пункт «Create New Virtual Device». В последующих окнах нужно будет выбрать размер экрана и версию Android – помните, что она должна быть не ниже, чем указанная на этапе создания проекта. В случае, если данная версия Android будет отсутствовать на компьютере, Android Studio предложит ее загрузить. Остальные пункты можно оставить без изменений – на данный момент нет необходимости их изменять. После выбора всех настроек нажмите кнопку «Finish», и если вы увидели на своем мониторе экран телефона с названием вашего приложения сверху и с надписью «Hello world!» на экране, значит, вы можете себя поздравить – вы создали свое первое Android-приложение!
Теперь у вас есть базовое понимание и минимальный опыт в создании приложений на Android. Этого, разумеется, совершенно не хватит, чтобы заниматься разработкой, но это необходимый для дальнейшего развития фундамент – продолжайте изучать и практиковаться! Всего наилучшего!
Также можно научиться создавать приложения на Android и другие ОС после прохождения нашего шестимесячного курса «Профессия: Разработчик» 👉 Узнать подробности!
Последнее обновление: 14.10.2021
Теперь создадим первое приложение в среде Android Studio для операционной системы Android. Откроем Android Studio и на начальном экране выберем пункт
New Project:
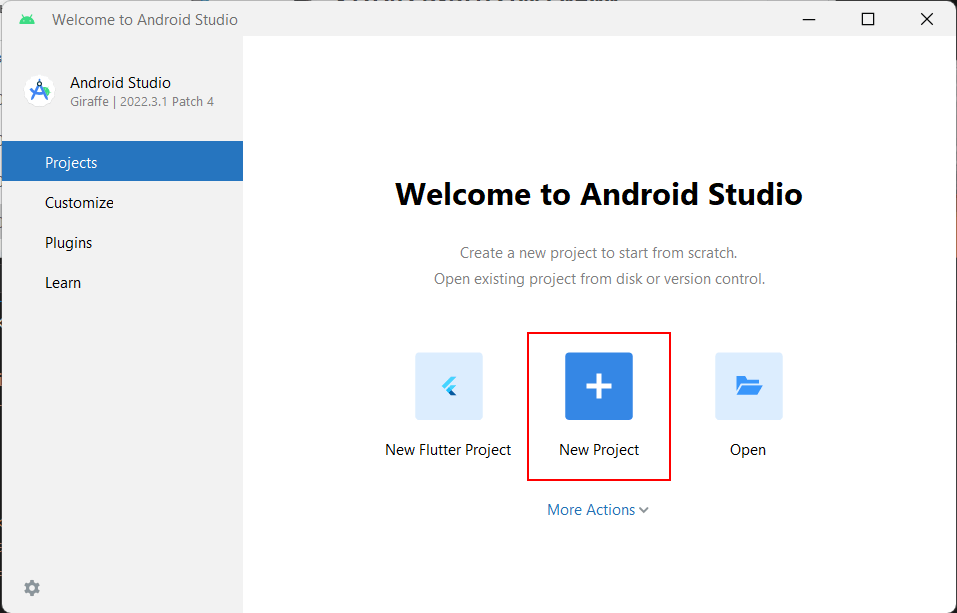
При создании проекта Android Studio вначале предложит нам выбрать шаблон проекта:

Android Studio предоставляет ряд шаблонов для различных ситуаций. Выберем в этом списке шаблон Empty Activity,
который предосавляет самый простейший фукционал, необходимый для начала, и нажмем на кнопку Next.
После этого отобразится окно настроек нового проекта:
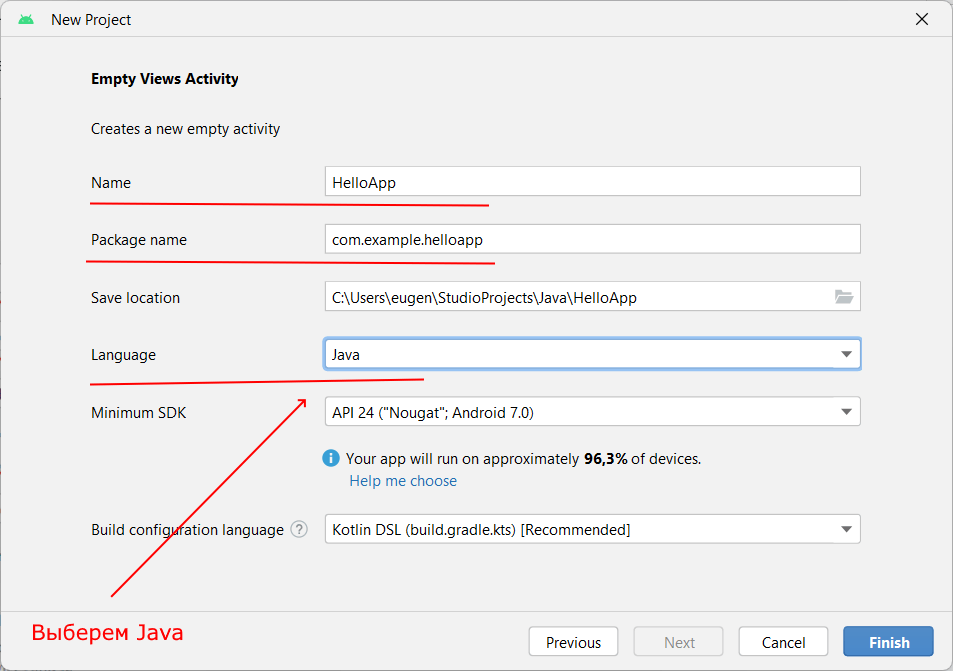
В окне создания нового проекта мы можем установить его начальные настройки:
-
В поле Name вводится название приложения. Укажем в качестве имени название HelloApp
-
В поле Package Name указывается имя пакета, где будет размещаться главный класс
приложения. В данном случае для тестовых проектов это значение не играет ольшого значения, поэтому установим com.example.helloapp. -
В поле Save Location установливается расположение файлов проекта на жестком диске. Можно оставить значение по умолчанию.
-
В поле Language в качестве языка программирования укажем Java (будьт внимательны, так как по умолчанию в этом поле стоит Kotlin)
-
В поле Minimum SDK указывается самая минимальная поддерживаемая версия SDK. Оставим значение по умолчанию — API 21: Android 5.0
(Lollipop), которая означает, что наше приложение можно будет запустить начиная с Android 5.0, а это 94% устройств. На более старых устройствах запустить будет нельзя.Стоит учитывать, что чем выше версия SDK, тем меньше диапазон поддерживаемых устройств.
Далее нажмем на кнопку Finish, и Android Studio создаст новый проект:

Вначале вкратце рассмотрим структуру проекта, что он уже имеет по умолчанию

Проект Android может состоять из различных модулей. По умолчанию, когда мы создаем проект, создается один модуль — app. Модуль имеет три подпапки:
-
manifests: хранит файл манифеста AndroidManifest.xml, который описывает конфигурацию приложения
и определяет каждый из компонентов данного приложения. -
java: хранит файлы кода на языке java, которые структурированы по отдельным пакетам. Так, в папке
com.example.helloapp(название
которого было указано на этапе создания проекта) имеется по умолчанию файл MainActivity.java с кодом на языке Java, который представляет класс
MainActivity, запускаемый по умолчанию при старте приложения -
res: содержит используемые в приложении ресурсы. Все ресурсы разбиты на подпапки.
-
папка drawable предназначена для хранения изображений, используемых в приложении
-
папка layout предназначена для хранения файлов, определяющих графический интерфейс.
По умолчанию здесь есть файл activity_main.xml, который определяет интерфейс для класса MainActivity в виде xml -
папки mipmap содержат файлы изображений, которые предназначены для создания иконки приложения при различных разрешениях экрана.
-
папка values хранит различные xml-файлы, содержащие коллекции ресурсов — различных данных, которые применяются в приложении. По умолчанию здесь есть два файла и одна папка:
-
файл colors.xml хранит описание цветов, используемых в приложении
-
файл strings.xml содержит строковые ресурсы, используемые в приложении
-
папки themes хранит две темы приложения — для светлую (дневную) и темную (ночную)
-
-
Отдельный элемент Gradle Scripts содержит ряд скриптов, которые используются при построении приложения.
Во всей этой структуре следует выделить файл MainActivity.java, который открыт в Android Studio и который содержит логику приложения и собственно с него начинается выполнение
приложения. И также выделим файл activity_main.xml, который определяет графический интерфейс — по сути то, что увидит пользователь
на своем смартфоне после загрузки приложения.
Возможные проблемы
Для создания приложения используется Java. А для построения приложения применяется инфраструктура Gradle. Однако текущая используемая версия
Gradle может быть несовместима с выбранной по умолчанию версией JDK. И в этом случае Android Studio может отображать ошибки, например, ошибку
Unsupported class file major version 61:
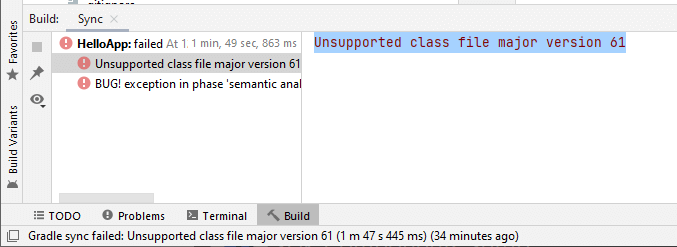
Эта ошибка говорит о том, что версия JDK 17 несовместима с текущей версией Gradle. И надо использовать меньшую версию.
Для решения этой проблемы перейдем в студии к меню File ->Settings (на MacOS это пункт Android Studio -> Preferences)
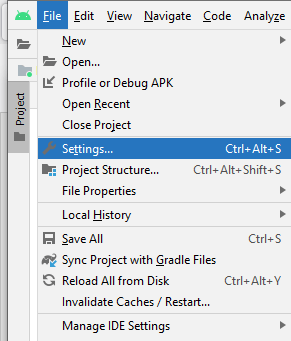
Затем в открывшемся окне настроек перейдем к пункту меню Build, Execution, Deployment -> Build Tools -> Gradle
и далее найдем поле Gradle JDK, где изменим версию JDK. Она должна иметь версию 11 и выше.
Как правило, вместе с Android Studio устанавливается и поддерживаемая версия JDK — на данный момент это JDK 11. И ее можно выбрать в списке JDK:
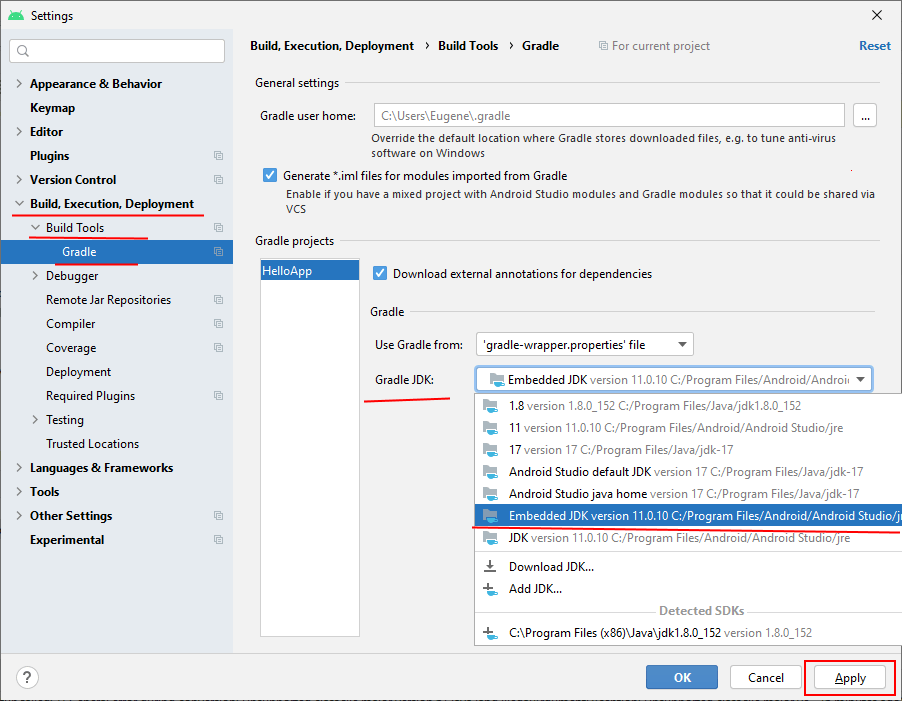
Наиболее оптимальный пункт для выбора версий JDK, которая идет вместе с Android Studio, называется Embedded JDK version….
Как видно на скриншоте, это версия 11, но при последующих обновлениях Android Studio эта версия может измениться.
После сделанных изменений сначала нажмем на кнопку Apply, а затем на кнопку OK. И повторим запуск проекта.
Запуск проекта
Созданный выше проект уже содержит некоторый примитивный функционал. Правда, этот функционал почти ничего не делает, только выводит на
экран строку «Hello world!». Тем не менее это уже фактически приложение, которое мы можем запустить.
Для запуска и тестирования приложения мы можем использовать эмуляторы или реальные устройства. Но в идеале лучше тестировать на реальных устройствах. К тому же эмуляторы требуют
больших аппаратных ресурсов, и не каждый компьютер может потянуть требования эмуляторов. А для использования мобильного устройства для тестирования может потребоваться разве что установить необходимый драйвер.
Режим разработчика на телефоне
По умолчанию опции разработчика на смартфонах скрыты. Чтобы сделать их доступными, надо зайти в Settings > About phone (Настройки > О телефоне)
(в Android 8 это в Settings > System > About phone (Настройки > Система > О телефоне)) и семь
раз нажать Build Number (Номер сборки).
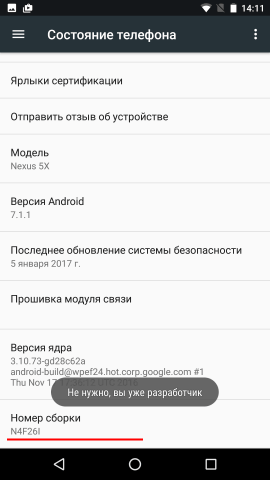
Теперь необходимо включить отладку по USB. Для этого перейдем в
Settings > System > Advanced > Developer options или
Настройки > Система > Дополнительно > Для разработчиков
(в Android 8 это в Settings > System > Developer options или Настройки > Система > Для разработчиков ).
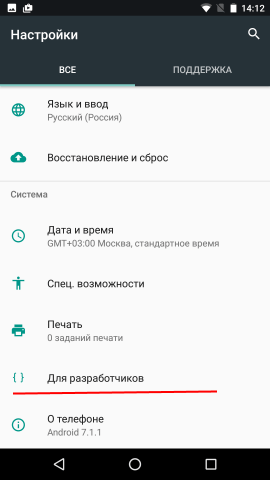
И включим возможность отладки по USB:
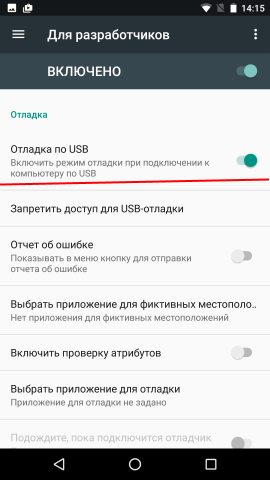
Запуск приложения
Подключим устройство с ОС Android (если мы тестируем на реальном устройстве) и запустим проект, нажав на зеленую стрелочку на панели инструментов.

Выберем устройство и нажмем на кнопку OK. И после запуска мы увидим наше приложение на экране устройства:
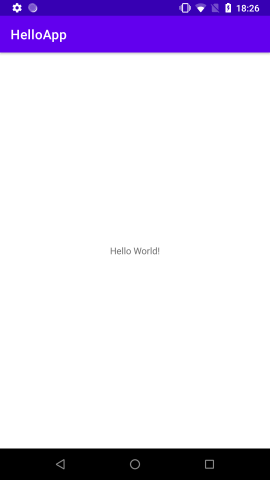
В этой
серии туториалов вы познакомитесь с
Java, языком программирования, используемым для разработки приложений для
Android. Наша
цель — подготовить тех, кто уже знаком с одним языком программирования, таким
как PHP или Objective-C, которые помогут в работе с Java и окунут вас в разработку приложений для
Android. В этом
уроке вы получите краткое введение в основы Java, включая
объектно-ориентированное программирование, наследование и многое другое. Если
вы новичок в Java или просто хотите разобраться в деталях, то этот курс для
вас!
Давайте начнем
Что
касается предпосылок, мы предположим, что вы понимаете, как программировать
(возможно, на PHP, или Visual Basic или C ++), но вы не знакомы со спецификой
программирования на языке Java. Мы не
собираемся учить вас программировать; мы собираемся предоставить вам четкие
примеры обычно используемых конструкций и принципов языка Java, указав на
некоторые советы и трюки касательно
Android.
Что вам понадобится
Технически вам не нужны какие-либо инструменты для
завершения этого урока, но вам наверняка понадобится для разработки приложение на
Android.
Для
разработки приложений для Android (или любых приложений Java, если на то пошло)
вам нужна среда разработки для написания и сборки приложений. Eclipse
— очень популярная среда разработки (IDE) для Java и предпочтительная среда
разработки для Android. Она доступна для операционных систем Windows, Mac
и Linux.
Полные инструкции по установке Eclipse (включая
поддерживаемые версии) и Android SDK см. На веб-сайте разработчика Android.
Что такое Java?
Приложения
для Android разрабатываются с использованием языка Java. На
данный момент это действительно ваш единственный вариант для нативных
приложений. Java —
очень популярный язык программирования, разработанный Sun Microsystems (теперь
принадлежащий Oracle). Разработанные
намного позже после C и C ++, Java включает в себя многие из мощных функций
этих мощных языков программирования и устраняет некоторые из их недостатков. Тем не
менее, языки программирования настолько же сильны, как и их библиотеки. Эти
библиотеки существуют, чтобы помочь разработчикам создавать приложения.
Некоторые из основных основных функций Java:
- Его
легко изучить и понять - Он разработан, чтобы быть независимым от платформы и
безопасным, так как использует
виртуальные машины. - Он
является объектно-ориентированным
Android
сильно зависит от этих основополагающих принципов Java. Android
SDK включает в себя множество стандартных Java-библиотек (библиотеки структуры
данных, математические библиотеки, графические библиотеки, сетевые библиотеки и
все остальное, что вам может понадобиться), а также специальные библиотеки
Android, которые помогут вам разработать потрясающие приложения для Android.
Почему Java легко изучить?
Java
легко изучить по целому ряду причин. Конечно,
нет недостатка в ресурсах Java, которые помогут вам изучить язык, включая
веб-сайты, учебные пособия, книги и классы. Java
является одним из наиболее широко обсуждаемых, преподаваемых и используемых
языков программирования на планете. Он
используется для различных проектов программирования, независимо от их
масштаба, от веб-приложений и настольных приложений до мобильных приложений.
Если
вы исходите из традиционного программирования, такого как C или C ++, вы
найдете синтаксис Java очень похожим. Если
вы этого не сделаете, то успокойтесь, зная, что вы выбрали один из самых
простых языков для изучения. Вы
скоро начнете работать.
Наконец,
Java является одним из самых читаемых человеком языков, под которым мы
подразумеваем, что человек, который ничего не знает о программировании, может
часто смотреть на некоторый Java-код и по крайней мере подозревать, что он
делает. Рассмотрим следующий пример:
char character = 'a';
if(character=='a')
{
    doSomething();
} else {
    doSomethingElse();
}
Если
вы просто прочитаете код вслух, вы можете в значительной степени сказать, что
этот фрагмент кода работает. Существует
одна переменная, называемая символом. Если переменная символа равна букве a, мы сделаем что-то (вызовем
метод doSomething (), или в другом случае (вызывая метод doSomethingElse ().
Почему важна независимость платформы?
Со
многими языками программирования вам нужно использовать компилятор, чтобы
уменьшить код на машинный язык, который может понять устройство. Хотя
это хорошо, разные устройства используют разные машинные языки. Это
означает, что вам нужно скомпилировать ваши приложения для каждого другого
устройства или машинного языка, другими словами, ваш код не очень портативен. Это не
относится к Java. Компиляторы Java преобразуют ваш код из человеческих
читаемых исходных файлов Java в так называемый «байт-код» в мире Java. Они интерпретируются виртуальной машиной Java, которая
работает так же, как физический процессор взаимодействует с машинным кодом,
чтобы выполнить скомпилированный код. Хотя
может показаться, что это неэффективно, было сделано много усилий, чтобы этот
процесс был очень быстрым и эффективный. Эти
усилия окупились в том, что производительность Java, как правило, уступает
только C/C++ в общих сравнениях производительности языка.
Приложения
Android запускаются на специальной виртуальной машине под названием Dalvik VM. Хотя
сведения об этой виртуальной машине не важны для среднего разработчика, может
быть полезно подумать о VM Dalvik как о пузыре, в котором работает ваше
приложение для Android, позволяя вам не беспокоиться о том, является ли
устройство Motorola Droid, HTC Evo, или новейший тостер под управлением
Android. Вам
все равно, пока устройство Dalvik VM дружелюбное, и это задача производителя
устройства, а не ваша.
Почему Java безопасен?
Давайте
рассмотрим эту мысль немного глубже. Поскольку
приложения Java работают в оболочке, которая является виртуальной машиной, они
изолированы от базового устройства. Таким
образом, виртуальная машина может инкапсулировать, содержать и управлять
выполнением кода безопасным образом по сравнению с языками, которые работают
непосредственно с машинным кодом. Платформа Android делает шаг вперед. Каждое
приложение для Android работает в операционной системе (на базе Linux),
используя другую учетную запись пользователя и в своем собственном экземпляре
Dalvik VM. Приложения
Android тщательно контролируются операционной системой и закрываются, если они не
работают правильно (например, используют слишком большую вычислительную
мощность, становятся невосприимчивыми, ресурсы отходов и т. д.). Поэтому
важно разрабатывать приложения, которые являются стабильными и отзывчивыми. Приложения
могут общаться друг с другом с использованием четко определенных протоколов.
Компиляция кода
Как и многие языки, Java по-прежнему является скомпилированным языком, хотя он не компилирует весь путь до машинного кода. Это
означает, что вы, разработчик, должны скомпилировать ваши проекты Android и
упаковать их для развертывания на устройства. Среда
разработки Eclipse (используемая с плагином для разработки Android) делает это
довольно безболезненным процессом. В
Eclipse автоматическая компиляция часто включается по умолчанию. Это
означает, что каждый раз, когда вы сохраняете файл проекта, Eclipse
перекомпилирует изменения для вашего пакета приложений. Вы
сразу видите ошибки компиляции. Eclipse также интерпретирует Java по мере ввода, обеспечивая удобную окраску и
форматирование кода, а также показывающие многие типы ошибок, когда вы идете. Часто
вы можете щелкнуть по ошибке, и Eclipse автоматически исправит опечатку или
добавит оператор импорта или предоставит вам заглушку для метода, сохраняя
множество ввода.
Вы
можете вручную скомпилировать свой код, если хотите. В
Eclipse вы найдете настройки сборки в меню проекта. Если
вы включили «Build Automatically», вы все равно можете выбрать опцию «Clean
…», которая позволит вам полностью перестроить все файлы. Если
«Build Automatically» отключено, включены опции «Build All» и «Build Project». «Build
All» означает создание всех проектов в рабочей области. У вас может быть много проектов в рабочем пространстве Eclipse.
Процесс сборки для обычных проектов Java приводит к созданию файла с расширением JAR — Java ARchive. Приложения Android берут файлы JAR и упаковывают их для развертывания на устройствах как файлы Android PacKage с расширением .apk. Эти
форматы включают не только ваш скомпилированный Java-код, но и любые другие
ресурсы, такие как строки, изображения или звуковые файлы, которые требуется
выполнить вашему приложению, а также файл манифеста приложения,
AndroidManifest.xml. Файл
манифеста Android является файлом, требуемым всеми приложениями Android,
которые вы используете для определения сведений о конфигурации вашего
приложения.
Что такое объектно-ориентированный язык программирования?
Отлично. Время для очень короткого и 20 000-футового просмотра объектно-ориентированного
программирования (ООП). ООП —
это стиль или техника программирования, которые основаны на определении
структур данных, называемых объектами. Для
тех, кто новичок в ООП, объект можно воспринимать так же, как пользовательский
тип данных. Например,
у вас может быть объект Dog, который представляет собой чертёж общей собаки, с именем,
породой и полом. Затем
вы можете создавать разные экземпляры объекта Dog для представления конкретных
собак. Каждый объект Dog должен быть создан путем вызова его конструктора (метода, который имеет то же имя, что и сам объект, и может иметь или не иметь параметров для установки начальных значений). Например,
следующие объекты Dog используют конструктор с тремя параметрами (имя, порода,
пол):
Dog dog1 = new Dog("Lassie", collie, female);
Dog dog2 = new Dog("Fifi", poodle, female);
Dog dog3 = new Dog("Asta", foxterrier, male);
Итак,
где этот объект Dog определен? Ну,
здесь нам нужно начать определение некоторых фундаментальных строительных
блоков языка программирования Java. Класс предоставляет определение для объекта. Таким
образом, есть класс Dog где-нибудь, определенный вами или в какой-то библиотеке
где-нибудь. Вообще
говоря, класс будет определен в собственном файле с именем файла,
соответствующим имени класса (например, Dog.java). Существуют исключения из этого правила, такие как классы, определенные в других классах (когда класс объявляется внутри класса, он обычно определяется для использования в родительском классе только как вспомогательный класс и
называется внутренним классом).
Если вы хотите ссылаться на объект из другого класса, вам нужно включить оператор импорта в начало вашего файла класса, так же, как вы бы использовали оператор #include на компилированном языке, таком как C.
Класс
обычно описывает данные и поведение объекта. Поведение определяется с помощью методов класса. Метод является общим термином для подпрограммы на языке ООП. Многие
общие классы объектов определены в библиотеках общих классов, таких как
комплекты разработки программного обеспечения (SDK), тогда как другие
определяются вами, разработчиком, в ваших собственных целях. Затем программное обеспечение создается с использованием и
манипулированием экземплярами объектов по-разному.
Пожалуйста,
поймите, что это очень обобщенное определение ООП. На эту тему написаны целые
книги. На эту
тему написаны целые книги. Википедия
имеет хороший обзор ООП
- Википедия имеет хороший обзор ООП
- Sun
Java Tutorials на Java - Учебники
Java в Oracle
Примечание.
В этом уроке мы используем много разных терминов. Существует
несколько способов ссылаться на данную концепцию (например, суперкласс по
сравнению с родительским классом), что сбивает с толку тех, кто новичок в
объектно-ориентированном программировании. Различные
разработчики используют разные термины, и поэтому мы старались упоминать
синонимы там, где это необходимо. Решение
о том, какие условия вы будете использовать, является личным выбором.
Понимание
наследования
Вот еще одна важная концепция Java, с которой вы столкнетесь: наследование. Проще говоря, наследование означает, что классы Java (и, следовательно, объекты) могут быть организованы в иерархии с более низкими, более конкретными классами в иерархии, наследующие поведение и черты из более высоких, более общих классов.
Эта
концепция лучше всего иллюстрируется примером. Давайте
притворимся, что мы разрабатываем Java-приложение для имитации аквариума. В этом
аквариуме есть рыба. Поэтому
мы могли бы определить класс для представления рыбы. Этот класс, называемый Fish, может включать в себя некоторые
поля данных (также называемые атрибутами или переменными-членами класса) для
описания объекта рыбы: вида, цвета и размера; а также некоторые его поведение в
виде методов (также называемых подпрограммами или функциями в процедурных
языках), таких как eat (), sleep () и makeBabyFish ().
Для создания и инициализации объекта используется специальный тип метода, называемый конструктором; конструкторы называются такими же, как и их класс, имогут включать в себя параметры. Следующий класс Fish имеет два конструктора: один для создания общего объекта Fish, а другой для конструирования определенного объекта Fish с некоторыми исходными данными. Вы
также увидите, что у класса Fish есть два метода eat (): один для приема
чего-то случайного, а другой — для еды другой рыбы, который будет представлен
другим экземпляром класса Fish:
public class Fish {

    private String mSpecies;
    private String mColor;
    private int mSize;

    Fish() {
        // generic fish
        mSpecies = "unknown";
        mColor = "unknown";
        mSize = 0;
    }

    Fish(String species, String color, int size) {
        mSpecies = species;
        mColor = color;
        mSize = size;
    }
    public void eat() {
        // eat some algae
    };

    public void eat(Fish fishToEat) {
        // eat another fish!
    };

    public void sleep() {
        // sleep
    };

    public void makeBabyFish(Fish fishSpouse, int numBabies) {
        // Make numBabies worth of baby fish with Fish spouse
    };
}
Классы могут быть организованы в иерархии, где производный класс (или подкласс) включает все функции его родительского класса (orsuperclass), но уточняет и добавляет к ним, чтобы определить более конкретный объект, используя ключевое слово extends. Это называется наследованием.
Например,
класс Fish может иметь два подкласса: FreshwaterFish и SaltwaterFish. Эти
подклассы будут иметь все функции класса Fish, но могут дополнительно настроить
объекты с помощью новых атрибутов и поведения или модифицированного поведения
из родительского класса Fish. Например,
класс FreshwaterFish может включать информацию о типе пресноводной среды, в
которой они жили (например, река, озеро, пруд или лужа). Аналогично,
класс SaltwaterFish может настроить метод makeBabyFish() таким образом, чтобы
рыба ест своего партнера после размножения (как определено в суперклассе),
используя механизм переопределения, например:
public class SaltwaterFish extends Fish
{
    @Override
    public void makeBabyFish(Fish fishSpouse, int numBabies) {
        // call parent method
        super.makeBabyFish(fishSpouse, numBabies);
        // eat mate
        eat(fishSpouse);
    }
}
Организация поведения объекта с интерфейсами
В Java
вы можете организовать поведение объектов в так называемых интерфейсах. Хотя
класс определяет объект, интерфейс определяет некоторое поведение, которое
может быть применено к объекту. Например,
мы можем определить интерфейс Swimmer, который предоставляет набор методов,
которые являются общими для всех объектов, которые могут плавать, будь то рыба,
выдры или погружные андроиды. Интерфейс
Swimmer может указывать четыре метода: startSwimming(), stopSwimming(), dive() и surface().
public interface Swimmer
{
    void startSwimming();
    void stopSwimming();
    void dive();
    void surface();
}
Затем класс, подобный Fish, может реализовать интерфейс
Swimmer (с использованием ключевого слова реализует) и обеспечить реализацию
поведения плавания:
public class Fish implements Swimmer {
    // Provide implementations of the four methods within the Swimmer interface
}
Организация классов и интерфейсов с пакетами
Затем иерархии классов, такие как наши классы рыбы, могут быть организованы в пакеты. Пакет — это просто набор классов и интерфейсов, объединенных вместе. Разработчики
используют пространства имен для уникального имени пакетов. Например,
мы могли бы использовать com.mamlambo.aquarium или om.ourclient.project.subproject
в качестве нашего имени пакета, чтобы отслеживать наши классы, связанные с
рыбой.
Заключение
Вау!
Вы только что начали курс по сбору данных в Java для разработки Android. Мы
рассмотрели здесь довольно много материала, поэтому давайте немного
поразмыслим, прежде чем переходить к следующему уроку этой серии уроков. В
уроке 2 мы переключим внимание на подробные детали синтаксиса Java.
Вы
только поцарапали поверхность Java-разработки для разработки Android. Ознакомьтесь
со всеми другими замечательными учебниками на Mobiletuts +, чтобы погрузиться
глубже в разработку Java и Android. Удачи!
Об авторах
Разработчики мобильных устройств Лорен Дарси и Шейн Кондер совместно со своими коллегами разработали несколько книг по разработке Android: углубленную книгу по программированию под названием Android Wireless Application Development и разработку приложений для Android от Sams TeachYourself за 24 часа. Когда
они не пишут книги, они тратят свое время на разработку мобильного программного
обеспечения в своей компании и предоставление консультационных услуг. Их можно найти по электронной почте: androidwirelessdev+mt@gmail.com, через свойблог androidbook.blogspot.com и на Twitter @androidwireless.
Нужна
дополнительная помощь? Написание приложений для Android? Ознакомьтесь с нашими новейшими книгами и ресурсами!


Связанные учебные пособия:
- Изучите
Java для разработки Android: синтаксис Java - Введение
в разработку Android SDK - Начало Android: Начало работы с FortuneCrunch
- Общие
конфигурации виртуальных устройств Android - Запуск
приложения «Карты в приложении» - Разрешение пользователям отправлять электронную почту в
приложении - Использование
предупреждений, тостов и уведомлений - Создание
простых пользовательских форм