На этой неделе вы могли прочитать крайне мотивирующей кейс от ученика GeekBrains Валерия Турова, который изучил профессию «Программист Java», где он рассказал об одной из своих целей, которая привела в профессию — желанию познать принцип работы и научиться создавать самому игровых ботов.
А ведь действительно, именно желание создать совершенный искусственный интеллект, будь то игровая модель или мобильная программа, сподвигла на путь программиста многих из нас. Проблема в том, что за тоннами учебного материала и суровой действительностью заказчиков, это самое желание было заменено простым стремлением к саморазвитию. Для тех, кто так и не приступил к исполнению детской мечты, далее краткий путеводитель по созданию настоящего искусственного разума.
Стадия 1. Разочарование
Когда мы говорим о создании хотя бы простых ботов, глаза наполняются блеском, а в голове мелькают сотни идей, что он должен уметь делать. Однако, когда дело доходит до реализации, оказывается, что ключом к разгадке реальной модели поведения является математика. Да-да, искусственный интеллект куда сложнее написания прикладных программ — одних знаний о проектировании ПО вам не хватит.
Математика — этот тот научный плацдарм, на котором будет строиться ваше дальнейшее программирование. Без знания и понимания этой теории все задумки быстро разобьются о взаимодействие с человеком, ведь искусственный разум на самом деле не больше, чем набор формул.
Стадия 2. Принятие
Когда спесь немного сбита студенческой литературой, можно приступать к практике. Бросаться на LISP или другие функциональные языки пока не стоит — сначала стоит освоиться с принципами проектирования ИИ. Как для быстрого изучения, так и дальнейшего развития прекрасно подойдёт Python — это язык, чаще всего используемый в научных целях, для него вы найдете множество библиотек, которые облегчат ваш труд.
Стадия 3. Развитие
Теперь переходим непосредственно к теории ИИ. Их условно можно разделить на 3 категории:
- Слабый ИИ – боты, которых мы видим в компьютерных играх, или простые подручные помощники, вроде Siri. Они или выполняют узкоспециализированные задачи или являются незначительным комплексом таковых, а любая непредсказуемость взаимодействия ставит их в тупик.
- Сильный ИИ – это машины, интеллект которых сопоставим с человеческим мозгом. На сегодняшний день нет реальных представителей этого класса, но компьютеры, вроде Watson очень близки к достижению этой цели.
- Совершенные ИИ – будущее, машинный мозг, который превзойдёт наши возможности. Именно об опасности таких разработок предупреждают Стивен Хоккинг, Элон Маск и кинофраншиза «Терминатор».
Естественно, начинать следует с самых простых ботов. Для этого вспомните старую-добрую игру «Крестики-нолики» при использовании поля 3х3 и постарайтесь выяснить для себя основные алгоритмы действий: вероятность победы при безошибочных действиях, наиболее удачные места на поле для расположения фигуры, необходимость сводить игру к ничьей и так далее.
Сыграв несколько десятков партий и анализируя собственные действия, вы наверняка сможете выделить все важные аспекты и переписать их в машинный код. Если нет, то продолжайте думать, а эта ссылка здесь полежит на всякий случай.
К слову, если вы всё-таки взялись за язык Python, то создать довольно простого бота можно, обратившись к этому подробному мануалу. Для других языков, таких как C++ или Java, вам также не составит труда найти пошаговые материалы. Почувствовав, что за созданием ИИ нет ничего сверхъестественного, вы сможете смело закрыть браузер и приступить к личным экспериментам.
Стадия 4. Азарт
Теперь, когда дело сдвинулось с мёртвой точки, вам наверняка хочется создать что-то более серьёзное. В этом вам поможет ряд следующих ресурсов:
- Diffbot;
- Google Cloud Prediction API;
- Mallet;
- Scrapy;
- Wolfram|Alpha;
Как вы поняли даже из названий, это API, которые позволят без лишних затрат времени создать некоторое подобие серьёзного ИИ.
Стадия 5. Работа
Теперь же, когда вы уже вполне ясно представляете, как ИИ создавать и чем при этом пользоваться, пора выводить свои знания на новый уровень. Во-первых, для этого потребуется изучение дисциплины, которое носит название «Машинное обучение». Во-вторых, необходимо научиться работать с соответствующими библиотеками выбранного языка программирования. Для рассматриваемого нами Python это Scikit-learn, NLTK, SciPy, PyBrain и Numpy. В-третьих, в развитии никуда не обойтись от функционального программирования. Ну и самое главное, вы теперь сможете читать литературу о ИИ с полным пониманием дела:
- Artificial Intelligence for Games, Ян Миллингтон;
- Game Programming Patterns, Роберт Найсторм;
- AI Algorithms, Data Structures, and Idioms in Prolog, Lisp, and Java, Джордж Люгер, Уильям Стбалфилд;
- Computational Cognitive Neuroscience, Рэнделл О’Рейли, Юко Мунаката;
- Artificial Intelligence: A Modern Approach, Стюарт Рассел, Питер Норвиг.
И да, вся или почти вся литература по данной тематике представлена на иностранном языке, поэтому если хотите заниматься созданием ИИ профессионально — необходимо подтянуть свой английский до технического уровня. Впрочем, это актуально для любой сферы программирования, не правда ли?
В остальном же ваше дальнейшее развитие будет зависеть лишь от практики и желания усложнять алгоритмы. Но будьте осторожны: возможно, совершенный искусственный разум опасен для человечества?
Спасибо GeekBrains за представленный материал.
![]()
Как я свой первый ИИ писал +16
Из песочницы, C#, Unity
Рекомендация: подборка платных и бесплатных курсов разработки под Unity — https://katalog-kursov.ru/
Привет, Хабр. История моя берёт начало в январе 2019 года.
Мы с моей тимой геймдевелоперов решили взяться за самый большой проект в нашей истории- 2Д платформер. Нет, мы не делали до этого какие-нибудь FlappyBird’ы или змейки, но объём работы в этом проекте просто сносил нам мозг. Для начала мы отказались от обычных, вертикальных лестниц, а взяли ступенчатые лестницы. Мы написали логику для дверей, которые можно было закрывать «на ключ» и прикрутили разрушаемые блоки. Наступил момент, когда надо было писать Искусственный Интеллект. Как самому опытному из нашей малоопытной команды скриптеру, честь писать ИИ выпала мне.
я плакал в подушку, не понимая, что мне делать
я был очень горд тем, что именно я напишу одну из самых сложных механик в нашем проекте.
Этап 1: поиск пути и движение по пути
Этап 1.1: Поиск пути
Так как основные локации у нас будут не на открытом воздухе, а в зданиях, то нужно было сделать поиск маршрута среди десятков дверей, лестниц и комнат. Подумав, мы с тимлидом решили, что стоит сделать некую пародию на алгоритм A*, где у нас будут узлы, между которыми будет бегать бот. сделали тестовую сцену, поставили узлы, для наглядности повесили на них SprateRenderer’ы. А что делать дальше?
С этим вопросом в голове я ходил 3 дня. Пока один мой товарищ не предложил интересный алгоритм, когда узлы будут возбуждаться, подобно нейронам головного мозга.
Итак. Есть узел A, около которого стоит ИИ и узел Б, к которому ИИ должен прийти. выдали всем Узлам свой ID и пометили соединенные узлы, к которым они будут отправлять сигнал. У каждого узла была своя булевая переменная «isChecked» и переменная «triggeredBy», в котором хранился ID узла, который его «возбудил». Так, когда затронут узел Б, он пройдёт по цепочке к узлу А, узнавая все ID узлов, которые прошёл сигнал. Так я получал путь из ID узлов, которые должен пройти бот. Если вы вдруг не поняли, как это работает, то я расскажу вам сказку.
Однажды Ивану нечего было делать, и поэтому он решил составить своё фамильное древо. К несчастью у него не хватало информации для воплощения этой идеи в жизнь. Иван был так увлечён этой идеей, что решил, что добравшись до главного прародителя он сможет обнаружить своих неожиданных родственников. Иван знал, где он может встретиться со своим отцом, чтобы поговорить и направился туда. Отец рассказал ему, что деда Ивана звали Iван и рассказал, где его можно найти. Иван нашёл Iвана, и тот рассказал, что прадед Ивана мог знать этого прародителя лично, но он давно помер. Иван посветил половину жизни изучению тёмных искусств, но в итоге смог воскресить своего прадеда. Прадед сказал, что его прародитель является оборотнем и что зарыто его тело на опушке у трёх сосен. Иван пошёл туда и обнаружил, роющего могилу человек. Оказалось, что этот человек – двеннадцатиюродный брат Иван. Иван сильно удивился тому, что они пришли к одному месту, но брат оказался программистом и всё объяснил.
– Здесь работает принцип навигации из моей любимой игры *название*!
– И в чём же он заключается?
– От каждого наследника можно придти к общему родителю системы, если в этой системе каждый наследник знает лично своего родителя.
Получился вот такой результат:

Это массив int-переменных, которые означают ID узлов, которые должен пройти юнит.
Этап 1.2.1: движение по пути
У меня есть список ID узлов, у меня есть бот. Что дальше? А дальше то, что надо двигать бота по этому пути.
Ну я прикинул такой вариант: дошёл бот до узла, поставил галочку, посмотрел, что там дальше, пошёл к следующему узлу. Сделал. Заработало. Я был рад… Но…
Этап 1.2.2: лестницы и их взаимодействие с ИИ
Как говорил один чёрно-белый герой: «Лестницы… мой главный враг..»
Нужно было определить, следующий узел находится над ИИ, под или на уровне. В зависимости от этой информации он будет проходить мимо лестницы(игнорировать коллизию), или забираться на неё(взаимодействовать с коллизией). Ох и много нервных клеток полегло на этой битве с движком… На форумах вычитал, что можно расставить всё по слоям и во вкладке Edit->Physics2D можно настроить игнорирование коллизий одного слоя и другого. Всё заработало!
Осталось только научить его открывать двери. Тут проблем не возникло.
Итог:


Этап 2: Эмоции и реплики
Этап 2.1: Эмоции
Да, мы решили приделать эмоции… И реплики.
Эмоции будут выделяться выражением лица и анимациями действий.
Реплики будут отображаться текстом над головой.
Эмоции я прикрутил на одном дыхании… Для этого я уже сделал переменную «emotionID», которая хранила в себе ID эмоции. А вот реплики…
Этап 2.2: Реплики
Для красоты сделал отдельный класс Phrases
[System.Serializable] //сериализуемый для красивого отображения в инспекторе
class Phrases
{
    public string Name;     //название эмоции, которой соответствуют реплики
    public int byEmotionID; //для определения, с какой эмоцией это соединять
    public string[] Phrases;//массив самих реплик
}
Сделал массив этого класса. Дальше просто в зависимости от emotionID ставил любую фразу из списка. Обновлял раз в N секунд.
Но я решил пойти дальше! Для каждого персонажа сделал файл с .phrs расширением, закодировал это с помощью того, что к байтовому числу каждого символа в файле прибавлял X байтов. Получался нечитаемый, не изменяемый текст. сделал что-то типа своей разметки, сделал алгоритм, который берёт и по этой разметке всё переводит в массив класса Phrases.
Отлично! Всё работает!
Хотел на чистом шарпе написать программку для заполнения такого файла, но тут мы переходим к концу истории.
Конец..?
От большой, неоплачиваемой работы мы быстро устали… Присоединение нового кодера не помогло… Команда развалилась… Код всё-ещё лежит на облаке Unity.
Конечно, не так давно начала зарождаться идея продолжить проект, но уже с дальнейшей монетизацией… Если что-то получится, то я, пожалуй, напишу всю историю разработки. Но на этом мой рассказ про начинающего скриптера и ИИ заканчивается.

Recently I wondered – how can I program the computer to be unbeatable in a tic-tac-toe game?
Well, I thought I could easily get an answer to this question. But as I went back and forth from articles to videos to a series of coding meditations, I only succeeded in becoming more confused.
However, my “Aha!” moment came when I took the time to understand how the minimax algorithm works.
If you are also on a similar path, let me take you through the steps to build an unbeatable AI (Artificial Intelligence).
Step 1: Understand the basics of the minimax algorithm
A minimax algorithm is a recursive program written to find the best gameplay that minimizes any tendency to lose a game while maximizing any opportunity to win the game.
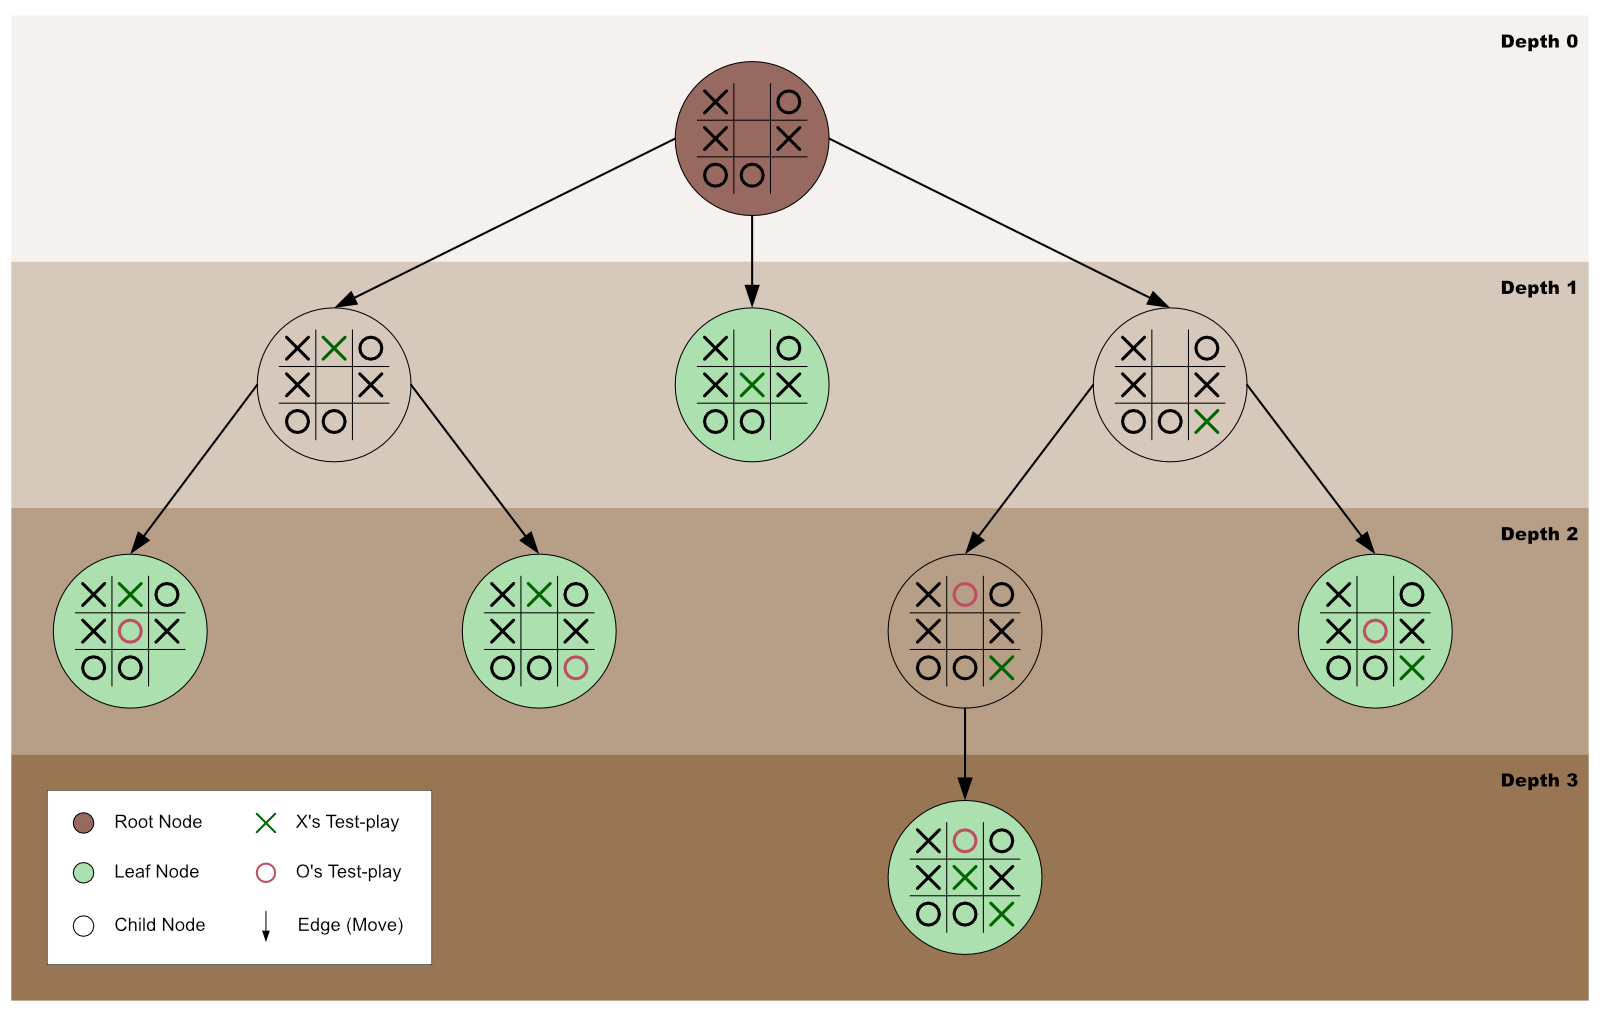
Graphically, we can represent minimax as an exploration of a game tree’s nodes to discover the best game move to make. In such a case, the tree’s root is the game’s current state — where the minimax algorithm got invoked.
Our focus in this guide is to use minimax to create an unbeatable AI for a tic-tac-toe game. However, you can also use it for complex games, like chess, and general decision-making to resolve any uncertainties.
In most cases, the player that initially invokes minimax is called the maximizing player. In other words, the original invocator of minimax is the player that wants to maximize any opportunity to win the game.
In contrast, the maximizing player’s opponent is called the minimizing player. As such, the minimizing player is the player whose chances of winning must be minimized.
In short, a minimax algorithm is a recursive function created to help a player (the maximizer) decide on the gameplay that minimizes the maximum possibility to lose a game.
Step 2: Get familiar with this tutorial’s root node
To make this tutorial precise, the root node (the current state of the tic-tac-toe game) we will use will be a near-the-end state game board — as shown in figure 2 below.
Also, the X mark will represent the AI’s mark, while the O mark will be the human player’s mark.
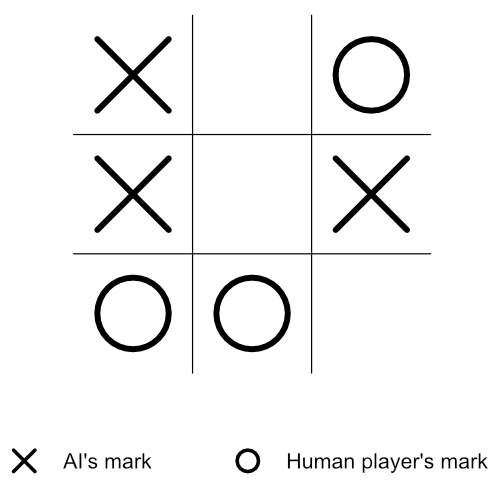
In the current stage of the tic-tac-toe game (as shown in figure 2 above), it’s X’s turn to play (that is, the AI’s turn). And since there are three empty cells on the board, it implies that X has three possible play choices — top-middle, center, or bottom-right.
But which is the best choice? Which move will best help X minimize the maximum possibility of losing the game?
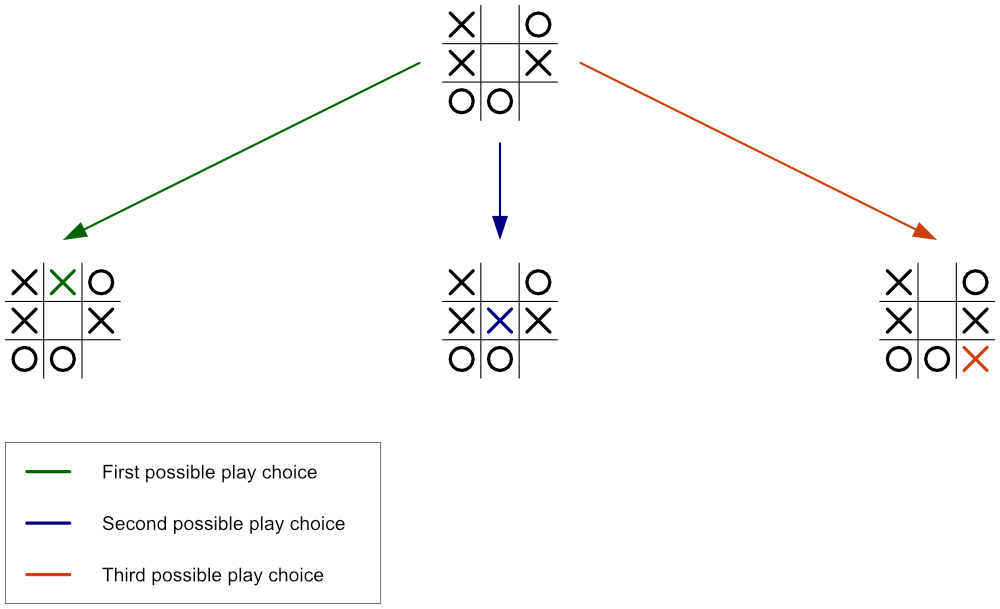
To make the best decision, the AI needs to do the following:
- Store the current state (values) of the tic-tac-toe board in an array. (For any empty cell, the cell’s index will get stored as its present content).
- Get an array list of only the empty cells’ indexes.
- Check and confirm if a specific player has won the game.
- Recursively invoke minimax on each of the board’s empty cells.
- Return a score for every possible move for both player X and player O.
- Out of all the returned scores, choose the best one (the highest) that is guaranteed to minimize the human player’s possibilities of winning the game.
Therefore, in the following steps below, we will configure the AI to accomplish the list above. So, let’s get started by storing the board’s current state in an array.
Step 3: Store the board’s current state in an array
Our next step is to store the current content of each of the board’s cells in an array like so:
const currentBoardState = ["X", 1, "O", "X", 4, "X", "O", "O", 8];Note:
- The current state of our tic-tac-toe board is still as illustrated in figure 2.
- The values
1,4, and8in thecurrentBoardStatearray are the board’s empty cells’ index numbers. In other words, instead of using empty strings, we chose to store the empty cells’ current content as their respective indexes.
Importantly, before moving to the next step, let us explicitly define whose mark is “X” and who owns “O”.
const aiMark = "X";
const humanMark = "O";
The two statements above denote that the AI’s mark is X while the human player’s mark is O.
Step 4: Create a function to get the indexes of all the empty cells
The function below will filter the currentBoardState array — which will be passed-in as the function’s parameter’s argument. It will then return a new array containing all the currentBoardState array’s items that are neither “X” nor “O”.
function getAllEmptyCellsIndexes(currBdSt) {
    return currBdSt.filter(i => i != "X" && i != "O");
}
Note: Remember that the currentBoardState array we created in step 3 contains only the values “X”, “O”, and the board’s empty cells’ indexes. Therefore, the getAllEmptyCellsIndexes() function above filters out any occurrence of an index in the currentBoardState array.
Step 5: Create a winner determiner function
The primary purpose of the winner determiner function below is to receive a currentBoardState array and a specific player’s mark (either mark “X” or “O”) as its parameters’ arguments.
Then, it checks if the received mark forms a winning combination on the tic-tac-toe board. If so, the Boolean value true is returned — otherwise, false is returned.
function checkIfWinnerFound(currBdSt, currMark) {
    if (
        (currBdSt[0] === currMark && currBdSt[1] === currMark && currBdSt[2] === currMark) ||
        (currBdSt[3] === currMark && currBdSt[4] === currMark && currBdSt[5] === currMark) ||
        (currBdSt[6] === currMark && currBdSt[7] === currMark && currBdSt[8] === currMark) ||
        (currBdSt[0] === currMark && currBdSt[3] === currMark && currBdSt[6] === currMark) ||
        (currBdSt[1] === currMark && currBdSt[4] === currMark && currBdSt[7] === currMark) ||
        (currBdSt[2] === currMark && currBdSt[5] === currMark && currBdSt[8] === currMark) ||
        (currBdSt[0] === currMark && currBdSt[4] === currMark && currBdSt[8] === currMark) ||
        (currBdSt[2] === currMark && currBdSt[4] === currMark && currBdSt[6] === currMark)
    ) {
        return true;
    } else {
        return false;
    }
}
Step 6: Create the minimax algorithm
A minimax algorithm is just an ordinary function that contains statements to be executed once the function is invoked. Therefore, the process of creating the algorithm is the same as creating any other function. So, let’s create one now.
function minimax(currBdSt, currMark) {

    // Space for the minimax’s statements

}
That’s it! We’ve created a minimax function — albeit an empty one. Our next step is to fill up the function with statements that will be executed once the function is invoked — which we will do below.
Note: The minimax function created above is designed to accept two arguments.
The first is an array list of the current board’s content — that is, the present value of the currentBoardState array. While the second argument is the mark of the player currently running the minimax algorithm — that is, mark “X” or mark “O”.
Step 7: First minimax invocation
To avoid any confusion later in this tutorial, let’s invoke our minimax function for the first time — while passing-in the currentBoardState array and the aiMark as the function’s arguments.
const bestPlayInfo = minimax(currentBoardState, aiMark);Step 8: Store the indexes of all empty cells
In this step, we will invoke the getAllEmptyCellsIndexes function that we created at step 4 — while passing-in the currentBoardState array as the function’s argument.
Then, we will store the returned array list of indexes inside a variable named availCellsIndexes.
const availCellsIndexes = getAllEmptyCellsIndexes(currBdSt);Step 9: Check if there is a terminal state
At this stage, we need to verify if there is a terminal state (that is, a loss state, a win state, or a draw state) on the tic-tac-toe board. We will accomplish this verification by invoking the winner determiner function (created in step 5) for each of the players.
If the function finds a win state for the human player (the minimizer), it will return -1 (which signifies that the human player has won, and the AI has lost). But if it finds a win state for the AI player (the maximizer), it will return +1 (which indicates that the AI has won, and the human player has lost).
However, suppose the winner determiner function cannot find any empty cell on the board or any win state for either player. In that case, it will return 0 (zero) — which signifies that the game has ended in a tie.
Note: The scores (-1, +1, and 0) indicated above are heuristic values — which means that we will still get the same result if we prefer to use -25, +25, and 0.
Let’s now proceed to implement the terminal state verification by using an if statement like so:
if (checkIfWinnerFound(currBdSt, humanMark)) {
    return {score: -1};
} else if (checkIfWinnerFound(currBdSt, aiMark)) {
    return {score: 1};
} else if (availCellsIndexes.length === 0) {
    return {score: 0};
}
When there is a terminal state (lose, win, or draw), the active minimax function will return the appropriate terminal state score (-1, +1, or 0) and end its invocation.
If the active minimax ends its invocation here, the algorithm will move on to step 12.
However, when there is no terminal state, the active minimax function will execute the next statement (step 10, below).
Step 10: Get ready to test the outcome of playing the current player’s mark on each empty cell
As step 9 found no terminal state, we have to devise a way to test what will happen if the current player (who is to make the next game move) plays on each empty cell.
In other words, if the current player plays on the first available cell, and the opponent plays on the second empty cell, will the current player win, lose, or draw the game? Or will there still be no terminal state found?
Alternatively, what will happen if the current player plays on the second available cell, and the opponent plays on the first empty cell?
Or perhaps, will the third available cell be the best spot for the current player to play?
This test drive is what we need to do now. But before we begin, we need a place to record each test’s outcome — so let’s do that first by creating an array named allTestPlayInfos.
const allTestPlayInfos = [];So, now that we have secured a place to store each test drive’s result, let’s begin the trials by creating a for-loop statement that will loop through each of the empty cells starting from the first one.
for (let i = 0; i < availCellsIndexes.length; i++) {

    // Space for the for-loop’s codes

}
In the next two steps, we will fill up the for-loop with the code it should run for each empty cell.
Step 11: Test-play the current player’s mark on the empty cell the for-loop is currently processing
Before doing anything in this step, let’s review the current state of our board.
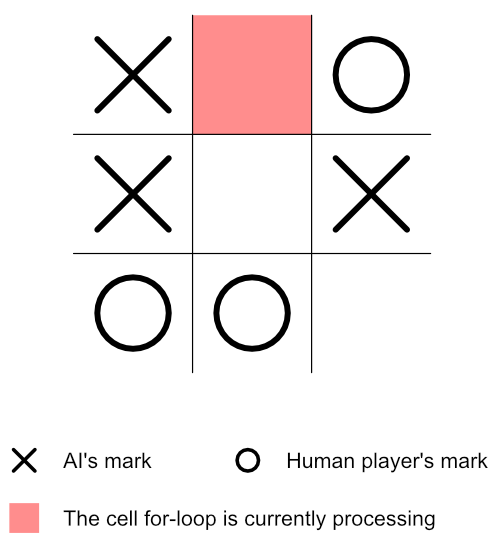
Notice that the above board is still the same as that of figure 2, except that we’ve highlighted — in red — the cell the for-loop is currently processing.
Next, it will be helpful to have a place to store this test-play’s terminal score — so let’s create an object like so:
const currentTestPlayInfo = {};Also, before test-playing the current player’s mark on the red cell, let’s save the cell’s index number — so that it will be easy to reset the cell’s info after this test-play.
currentTestPlayInfo.index = currBdSt[availCellsIndexes[i]];Let’s now place the current player’s mark on the red cell (that is, the cell currently being processed by the for-loop).
currBdSt[availCellsIndexes[i]] = currMark;Based on the current player’s gameplay, the board’s state will change to reflect its latest move.

Therefore, since the board’s state has changed, we need to recursively run minimax on the new board — while passing in the new board’s state and the next player’s mark.
if (currMark === aiMark) {
    const result = minimax(currBdSt, humanMark);
    currentTestPlayInfo.score = result.score;
} else {
    const result = minimax(currBdSt, aiMark);
    currentTestPlayInfo.score = result.score;
}
Note:
- The recursive invocation of minimax at this very point will be the _____ time we are invoking the function. The first invocation happened in step 7.
- This recursive invocation will cause the reiteration of steps 8 to 11.
- Suppose there is a terminal state at step 9. In that case, the current minimax invocation will stop running — and store the returned terminal object (for example,
{score: 1}) in theresultvariable. - Once there is a terminal state, step 12 will be the next step.
- If there exists no terminal state, a second for-loop will begin for the new board at step 10.
- If step 10 is repeated, please replace figure 4’s board with the new board in figure 5. However, the cell highlighted in red will now be the cell the for-loop is currently processing. So please, do reflect the changes accordingly.
Step 12: Save the latest terminal score
After the just concluded minimax invocation has returned its terminal state’s value, the active for-loop will save the result variable’s score into the currentTestPlayInfo object like so:
currentTestPlayInfo.score = result.score;Then, since the returned score officially ends the current test-play, it is best to reset the current board back to the state before the current player made its move.
currBdSt[availCellsIndexes[i]] = currentTestPlayInfo.index;Also, we need to save the result of the current player’s test-play for future use. So, let’s do that by pushing the currentTestPlayInfo object to the allTestPlayInfos array like so:
allTestPlayInfos.push(currentTestPlayInfo);Note:
- If you got to this step from step 17, kindly continue this tutorial at step 18. Otherwise, consider the next point.
- If the active for-loop has finished looping through all the current board’s empty cells, the loop will end at this point, and step 14 will be next. Otherwise, the loop will proceed to process the next available cell (step 13).
Step 13: Run the active for-loop on the next empty cell
Remember that the currently active for-loop (that began at step 10) has only finished its work for the preceding empty cell(s). Therefore, the loop will proceed to test-play the current player’s mark on the next free cell.
In other words, the currently running minimax function will repeat steps 11 and 12. But, essentially, take note of the following:
- The red cell highlighted in figure 4 will change to the cell the for-loop is currently processing.
- Please, be mindful that figure 5 will also change. In other words, the current player’s move will now be on the cell the for-loop is currently processing.
- After the active for-loop has completed its work, the
allTestPlayInfosarray will contain specific objects for each empty cell the for-loop has processed. - Each of the objects in the
allTestPlayInfosarray will contain anindexproperty and ascoreproperty (take for example:{index: 8, score: -1}). - If you got to this step from step 20, then, on completing step 12, kindly continue this tutorial at step 18.
Step 14: Plan how to get the object with the best test-play score for the current player
Immediately after the for-loop has completed its work of looping through all the empty cells of the current board, minimax will:
- Create a space to store the reference number that will later help to get the best test-play object.
- Get the reference number to the current player’s best test-play.
- Use the acquired reference number to get the object with the best test-play for the current player.
Without any further ado, let’s implement this plan in the next few steps.
Step 15: Create a store for the best test-play’s reference
The variable below is the place we will later store the reference to the best test-play object. (Note that the value null indicates that we have deliberately left the variable empty).
let bestTestPlay = null;Step 16: Get the reference to the current player’s best test-play
Now that there is a bestTestPlay store, the active minimax function can proceed to get the reference to the current player’s best test-play like so:
if (currMark === aiMark) {
    let bestScore = -Infinity;
    for (let i = 0; i < allTestPlayInfos.length; i++) {
        if (allTestPlayInfos[i].score > bestScore) {
            bestScore = allTestPlayInfos[i].score;
            bestTestPlay = i;
        }
    }
} else {
    let bestScore = Infinity;
    for (let i = 0; i < allTestPlayInfos.length; i++) {
        if (allTestPlayInfos[i].score < bestScore) {
            bestScore = allTestPlayInfos[i].score;
            bestTestPlay = i;
        }
    }
}
The code above means if the current mark is equal to the AI player’s mark:
- Create a
bestScorevariable with the value of-Infinity. (Note that this value is just a placeholder value that needs to be less than all the scores in theallTestPlayInfosarray. Therefore, using-700will do the same job). - Then, for every test-play object in the
allTestPlayInfosarray, check if the test-play the loop is currently processing has a higher score than the currentbestScore. If so, record that test-play’s details inside both thebestScorevariable and thebestTestPlayvariable.
Otherwise, if the current mark is the human player’s mark:
- Create a
bestScorevariable with the value of+Infinity. (Again, note that we will get the same outcome if we had preferred to use+300. It is just a placeholder value that needs to be greater than all the scores in theallTestPlayInfosarray). - Then, for every test-play object in the
allTestPlayInfosarray, check if the test-play the loop is currently processing has a lesser score than the currentbestScore. If so, record that test-play’s details inside both thebestScorevariable and thebestTestPlayvariable.
Step 17: Get the object with the best test-play score for the current player
Finally, the currently running minimax invocation can now finish its work by returning the object with the best test-play for the current player like so:
return allTestPlayInfos[bestTestPlay];Note that minimax will store the returned object inside the result variable of the first for-loop that began at step 11. It will then repeat step 12. Please revisit step 12 only. Then, continue this tutorial below.
Step 18: Let’s do a review
This stage is an excellent time to review what we’ve done thus far pictorially.
Note:
- If this is your first time on this step, please use the diagram in step 19.
- Is this your second time on this step? If so, the diagram in step 21 is yours.
- Are you here for the third time? Well-done! Check out the diagram in step 23.
Step 19: Tracing our steps with a diagram
The diagram below shows the AI and the human player’s first test-play for the first for-loop invocation initiated by the AI player.
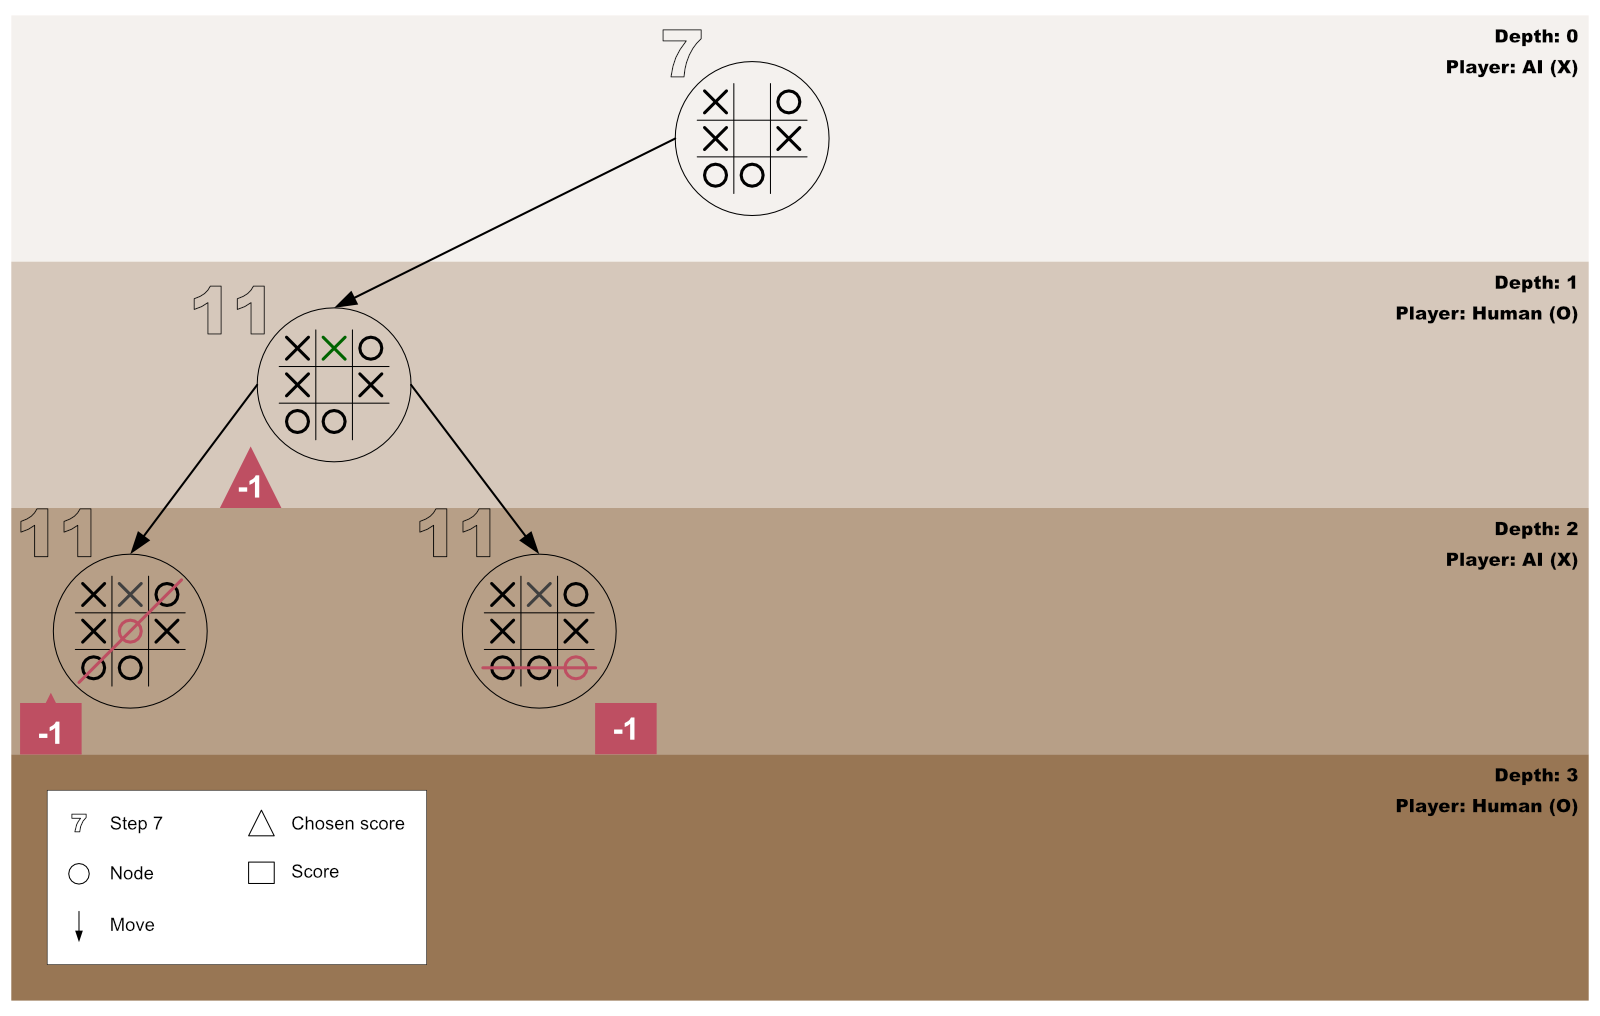
Step 20: The first for-loop moves forward to process the next empty cell
On concluding that playing on the first empty cell will end in a loss state, the AI forges ahead to test the outcome of playing on the second free cell by repeating step 13.
Step 21: Tracing our steps with a diagram
The diagram below shows the AI and the human player’s second test-play for the first for-loop invocation initiated by the AI player.
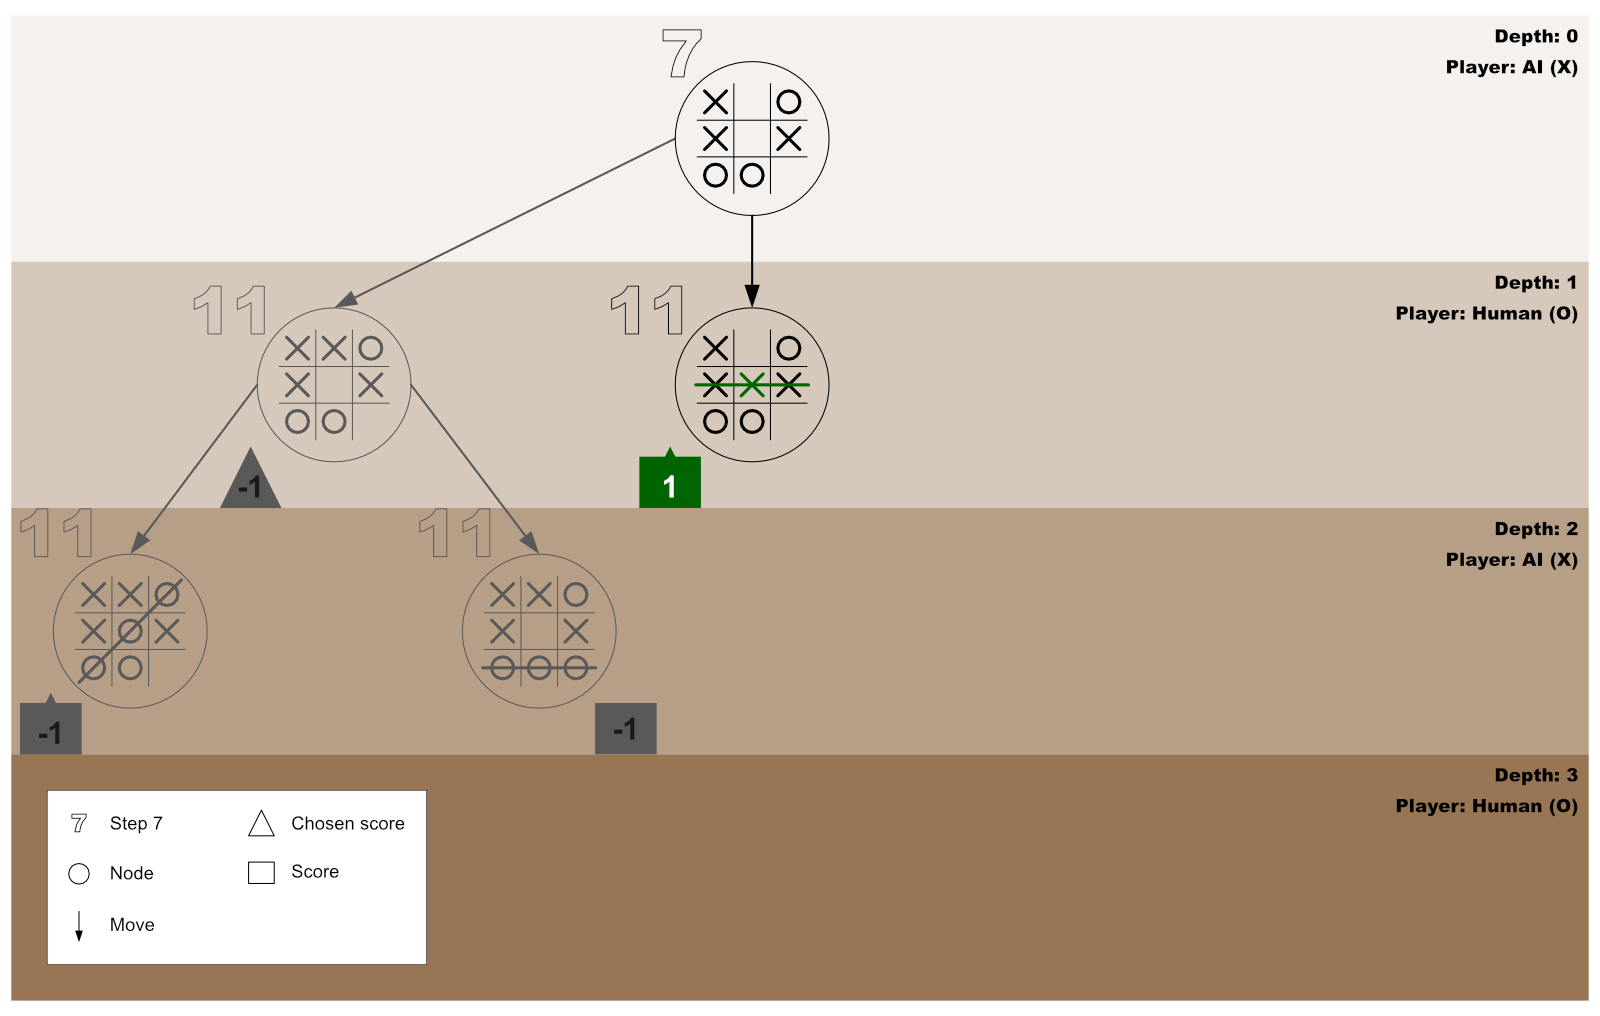
Step 22: The first for-loop moves forward to process the next empty cell
Now that the AI has confirmed that playing on the second empty cell will result in a win state, it further checks the outcome of playing on the third free cell by repeating step 13.
Step 23: Tracing our steps with a diagram
The diagram below shows the AI and the human player’s third test-play for the first for-loop invocation initiated by the AI player.
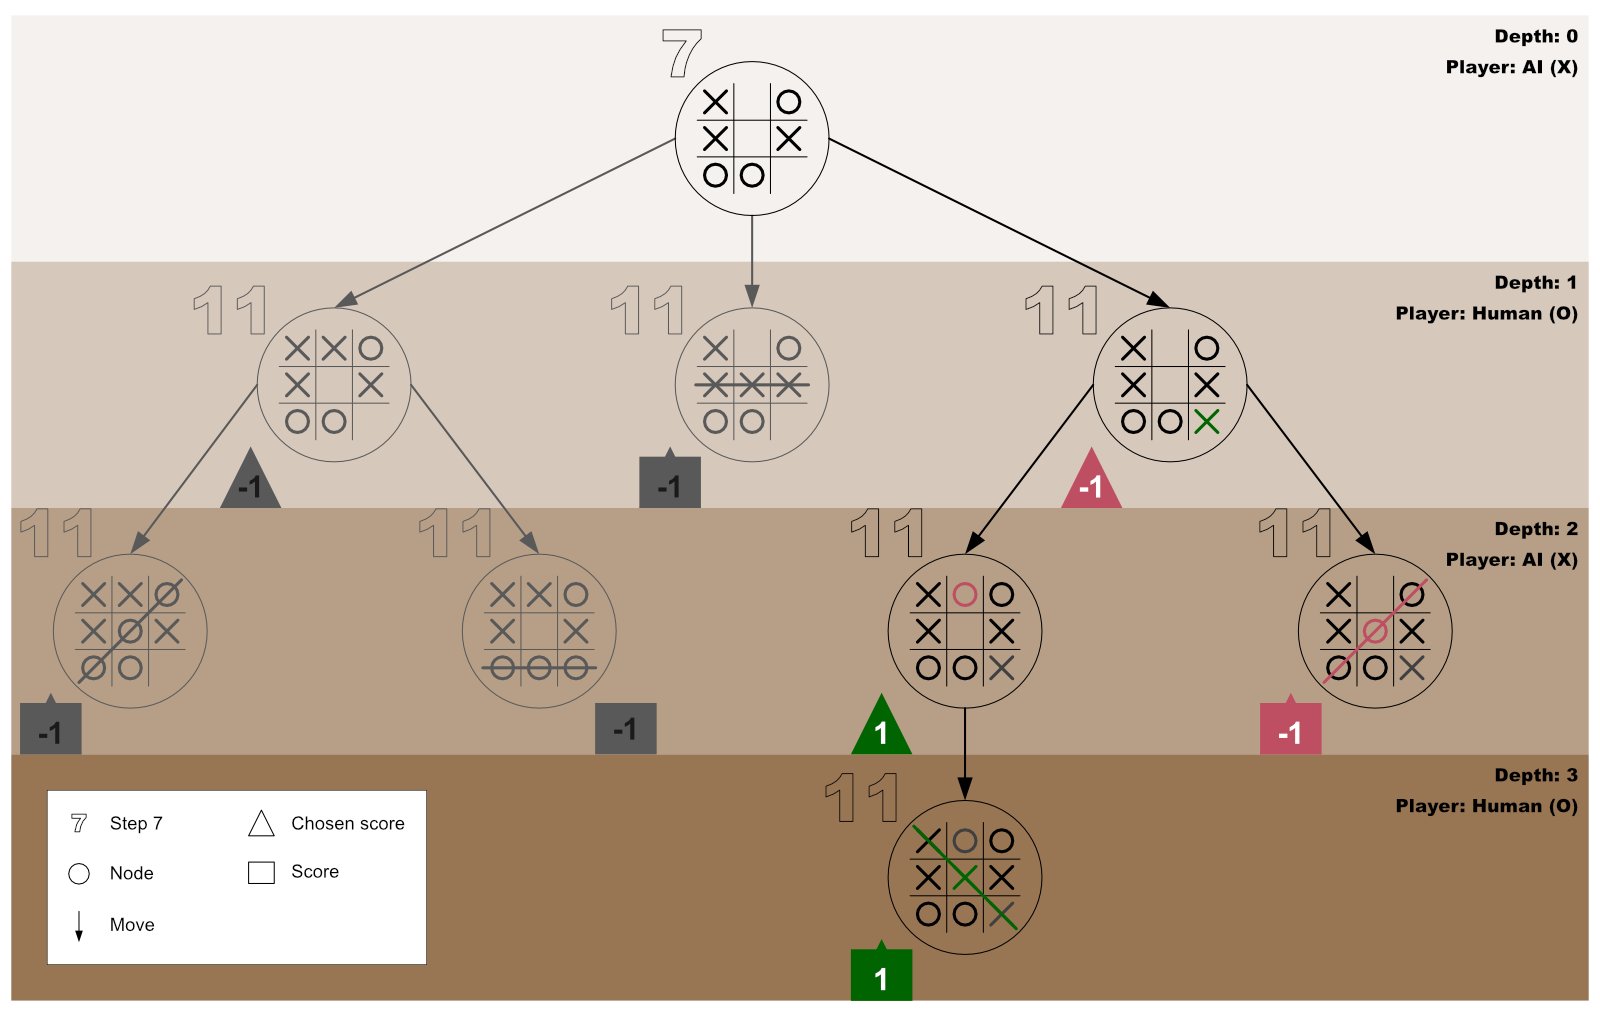
Step 24: Get the object with the best test-play score for the AI player
At this point (after the third test-play), the first for-loop would have processed all the three empty cells of the first board (passed-in to minimax at step 7).
Therefore, minimax will forge ahead to get the object with the best test-play for the AI player — by repeating steps 15 to 17. However, when at step 17, kindly note the following:
- The returned object will now get stored in the
bestPlayInfovariable that we created at step 7. - Minimax will not repeat step 12 because the for-loop statement is no longer active.
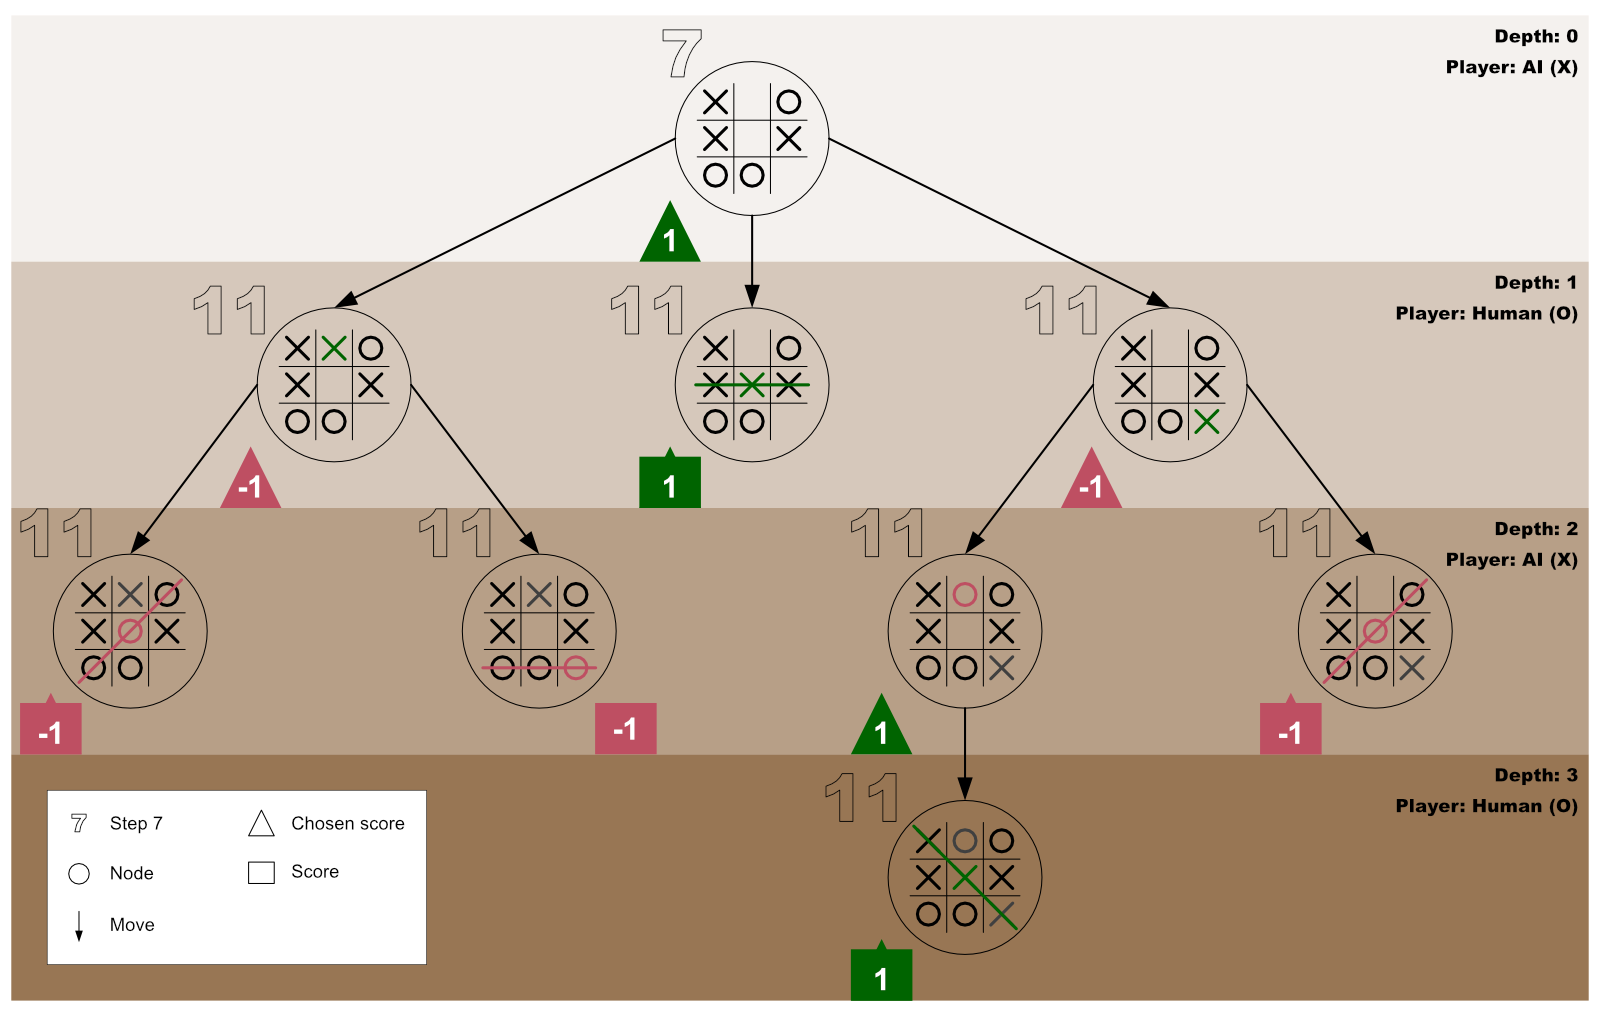
Step 25: Use the data inside bestPlayInfo
Considering this tutorial’s board (a near-the-end state game board — as shown in figure 2 of step 2), the object in the bestPlayInfo variable will be {index: 4, score: 1}. Therefore, the AI can now use its index value to choose the best cell to play on.
Example
// Get all the board’s cells:
const gameCells = document.querySelectorAll(".cell");

// Below is the variable we created at step 3:
const aiMark = "X";

// Here is the bestPlayInfo we created at step 7 to contain the best test-play object for the AI player:
const bestPlayInfo = minimax(currentBoardState, aiMark);

// Play the AI’s mark on the cell that is best for it:
gameCells[bestPlayInfo.index].innerText = aiMark;
Therefore, the AI player will win the game, and the new board will now look like so:

Step 26: A bird’s-eye view of this tutorial’s algorithm
Below is this tutorial’s minimax algorithm in one piece. Feel free to insert it into your editor. Play around with it for various game scenarios, and use the console to test, test, and test it again until you are comfortable building an unbeatable AI.
And remember, programming is better only when you code sweetly — so have lots of fun with it!
// Step 3 - Store the board’s current state in an array and define each mark's owner:
const currentBoardState = ["X", 1, "O", "X", 4, "X", "O", "O", 8];
const aiMark = "X";
const humanMark = "O";

// Step 4 - Create a function to get the indexes of all the empty cells:
function getAllEmptyCellsIndexes(currBdSt) {
    return currBdSt.filter(i => i != "O" && i != "X");
}

// Step 5 - Create a winner determiner function:
function checkIfWinnerFound(currBdSt, currMark) {
    if (
        (currBdSt[0] === currMark && currBdSt[1] === currMark && currBdSt[2] === currMark) ||
        (currBdSt[3] === currMark && currBdSt[4] === currMark && currBdSt[5] === currMark) ||
        (currBdSt[6] === currMark && currBdSt[7] === currMark && currBdSt[8] === currMark) ||
        (currBdSt[0] === currMark && currBdSt[3] === currMark && currBdSt[6] === currMark) ||
        (currBdSt[1] === currMark && currBdSt[4] === currMark && currBdSt[7] === currMark) ||
        (currBdSt[2] === currMark && currBdSt[5] === currMark && currBdSt[8] === currMark) ||
        (currBdSt[0] === currMark && currBdSt[4] === currMark && currBdSt[8] === currMark) ||
        (currBdSt[2] === currMark && currBdSt[4] === currMark && currBdSt[6] === currMark)
) {
        return true;
    } else {
        return false;
    }
}

// Step 6 - Create the minimax algorithm:
function minimax(currBdSt, currMark) {
    // Step 8 - Store the indexes of all empty cells:
    const availCellsIndexes = getAllEmptyCellsIndexes(currBdSt);

    // Step 9 - Check if there is a terminal state:
    if (checkIfWinnerFound(currBdSt, humanMark)) {
        return {score: -1};
    } else if (checkIfWinnerFound(currBdSt, aiMark)) {
        return {score: 1};
    } else if (availCellsIndexes.length === 0) {
        return {score: 0};
    }

    // Step 10 - Create a place to record the outcome of each test drive:
    const allTestPlayInfos = [];

    // Step 10 - Create a for-loop statement that will loop through each of the empty cells:
    for (let i = 0; i < availCellsIndexes.length; i++) {
        // Step 11 - Create a place to store this test-play’s terminal score:
        const currentTestPlayInfo = {};

        // Step 11 - Save the index number of the cell this for-loop is currently processing:
        currentTestPlayInfo.index = currBdSt[availCellsIndexes[i]];

        // Step 11 - Place the current player’s mark on the cell for-loop is currently processing:
        currBdSt[availCellsIndexes[i]] = currMark;

        if (currMark === aiMark) {
            // Step 11 - Recursively run the minimax function for the new board:
            const result = minimax(currBdSt, humanMark);

            // Step 12 - Save the result variable’s score into the currentTestPlayInfo object:
            currentTestPlayInfo.score = result.score;
        } else {
            // Step 11 - Recursively run the minimax function for the new board:
            const result = minimax(currBdSt, aiMark);

            // Step 12 - Save the result variable’s score into the currentTestPlayInfo object:
            currentTestPlayInfo.score = result.score;
        }

        // Step 12 - Reset the current board back to the state it was before the current player made its move:
        currBdSt[availCellsIndexes[i]] = currentTestPlayInfo.index;

        // Step 12 - Save the result of the current player’s test-play for future use:
        allTestPlayInfos.push(currentTestPlayInfo);
    }

    // Step 15 - Create a store for the best test-play’s reference:
    let bestTestPlay = null;

    // Step 16 - Get the reference to the current player’s best test-play:
    if (currMark === aiMark) {
        let bestScore = -Infinity;
        for (let i = 0; i < allTestPlayInfos.length; i++) {
            if (allTestPlayInfos[i].score > bestScore) {
                bestScore = allTestPlayInfos[i].score;
                bestTestPlay = i;
            }
        }
    } else {
        let bestScore = Infinity;
        for (let i = 0; i < allTestPlayInfos.length; i++) {
            if (allTestPlayInfos[i].score < bestScore) {
                bestScore = allTestPlayInfos[i].score;
                bestTestPlay = i;
            }
        }
    }

    // Step 17 - Get the object with the best test-play score for the current player:
    return allTestPlayInfos[bestTestPlay];
}

// Step 7 - First minimax invocation:
const bestPlayInfo = minimax(currentBoardState, aiMark);
Useful resource
- Recursion: What You Need to Know about Recursion
Learn to code for free. freeCodeCamp’s open source curriculum has helped more than 40,000 people get jobs as developers. Get started
Recently I wondered – how can I program the computer to be unbeatable in a tic-tac-toe game?
Well, I thought I could easily get an answer to this question. But as I went back and forth from articles to videos to a series of coding meditations, I only succeeded in becoming more confused.
However, my “Aha!” moment came when I took the time to understand how the minimax algorithm works.
If you are also on a similar path, let me take you through the steps to build an unbeatable AI (Artificial Intelligence).
Step 1: Understand the basics of the minimax algorithm
A minimax algorithm is a recursive program written to find the best gameplay that minimizes any tendency to lose a game while maximizing any opportunity to win the game.
Graphically, we can represent minimax as an exploration of a game tree’s nodes to discover the best game move to make. In such a case, the tree’s root is the game’s current state — where the minimax algorithm got invoked.
Our focus in this guide is to use minimax to create an unbeatable AI for a tic-tac-toe game. However, you can also use it for complex games, like chess, and general decision-making to resolve any uncertainties.
In most cases, the player that initially invokes minimax is called the maximizing player. In other words, the original invocator of minimax is the player that wants to maximize any opportunity to win the game.
In contrast, the maximizing player’s opponent is called the minimizing player. As such, the minimizing player is the player whose chances of winning must be minimized.
In short, a minimax algorithm is a recursive function created to help a player (the maximizer) decide on the gameplay that minimizes the maximum possibility to lose a game.
Step 2: Get familiar with this tutorial’s root node
To make this tutorial precise, the root node (the current state of the tic-tac-toe game) we will use will be a near-the-end state game board — as shown in figure 2 below.
Also, the X mark will represent the AI’s mark, while the O mark will be the human player’s mark.
In the current stage of the tic-tac-toe game (as shown in figure 2 above), it’s X’s turn to play (that is, the AI’s turn). And since there are three empty cells on the board, it implies that X has three possible play choices — top-middle, center, or bottom-right.
But which is the best choice? Which move will best help X minimize the maximum possibility of losing the game?
To make the best decision, the AI needs to do the following:
- Store the current state (values) of the tic-tac-toe board in an array. (For any empty cell, the cell’s index will get stored as its present content).
- Get an array list of only the empty cells’ indexes.
- Check and confirm if a specific player has won the game.
- Recursively invoke minimax on each of the board’s empty cells.
- Return a score for every possible move for both player X and player O.
- Out of all the returned scores, choose the best one (the highest) that is guaranteed to minimize the human player’s possibilities of winning the game.
Therefore, in the following steps below, we will configure the AI to accomplish the list above. So, let’s get started by storing the board’s current state in an array.
Step 3: Store the board’s current state in an array
Our next step is to store the current content of each of the board’s cells in an array like so:
const currentBoardState = ["X", 1, "O", "X", 4, "X", "O", "O", 8];Note:
- The current state of our tic-tac-toe board is still as illustrated in figure 2.
- The values
1,4, and8in thecurrentBoardStatearray are the board’s empty cells’ index numbers. In other words, instead of using empty strings, we chose to store the empty cells’ current content as their respective indexes.
Importantly, before moving to the next step, let us explicitly define whose mark is “X” and who owns “O”.
const aiMark = "X";
const humanMark = "O";
The two statements above denote that the AI’s mark is X while the human player’s mark is O.
Step 4: Create a function to get the indexes of all the empty cells
The function below will filter the currentBoardState array — which will be passed-in as the function’s parameter’s argument. It will then return a new array containing all the currentBoardState array’s items that are neither “X” nor “O”.
function getAllEmptyCellsIndexes(currBdSt) {
    return currBdSt.filter(i => i != "X" && i != "O");
}
Note: Remember that the currentBoardState array we created in step 3 contains only the values “X”, “O”, and the board’s empty cells’ indexes. Therefore, the getAllEmptyCellsIndexes() function above filters out any occurrence of an index in the currentBoardState array.
Step 5: Create a winner determiner function
The primary purpose of the winner determiner function below is to receive a currentBoardState array and a specific player’s mark (either mark “X” or “O”) as its parameters’ arguments.
Then, it checks if the received mark forms a winning combination on the tic-tac-toe board. If so, the Boolean value true is returned — otherwise, false is returned.
function checkIfWinnerFound(currBdSt, currMark) {
    if (
        (currBdSt[0] === currMark && currBdSt[1] === currMark && currBdSt[2] === currMark) ||
        (currBdSt[3] === currMark && currBdSt[4] === currMark && currBdSt[5] === currMark) ||
        (currBdSt[6] === currMark && currBdSt[7] === currMark && currBdSt[8] === currMark) ||
        (currBdSt[0] === currMark && currBdSt[3] === currMark && currBdSt[6] === currMark) ||
        (currBdSt[1] === currMark && currBdSt[4] === currMark && currBdSt[7] === currMark) ||
        (currBdSt[2] === currMark && currBdSt[5] === currMark && currBdSt[8] === currMark) ||
        (currBdSt[0] === currMark && currBdSt[4] === currMark && currBdSt[8] === currMark) ||
        (currBdSt[2] === currMark && currBdSt[4] === currMark && currBdSt[6] === currMark)
    ) {
        return true;
    } else {
        return false;
    }
}
Step 6: Create the minimax algorithm
A minimax algorithm is just an ordinary function that contains statements to be executed once the function is invoked. Therefore, the process of creating the algorithm is the same as creating any other function. So, let’s create one now.
function minimax(currBdSt, currMark) {

    // Space for the minimax’s statements

}
That’s it! We’ve created a minimax function — albeit an empty one. Our next step is to fill up the function with statements that will be executed once the function is invoked — which we will do below.
Note: The minimax function created above is designed to accept two arguments.
The first is an array list of the current board’s content — that is, the present value of the currentBoardState array. While the second argument is the mark of the player currently running the minimax algorithm — that is, mark “X” or mark “O”.
Step 7: First minimax invocation
To avoid any confusion later in this tutorial, let’s invoke our minimax function for the first time — while passing-in the currentBoardState array and the aiMark as the function’s arguments.
const bestPlayInfo = minimax(currentBoardState, aiMark);Step 8: Store the indexes of all empty cells
In this step, we will invoke the getAllEmptyCellsIndexes function that we created at step 4 — while passing-in the currentBoardState array as the function’s argument.
Then, we will store the returned array list of indexes inside a variable named availCellsIndexes.
const availCellsIndexes = getAllEmptyCellsIndexes(currBdSt);Step 9: Check if there is a terminal state
At this stage, we need to verify if there is a terminal state (that is, a loss state, a win state, or a draw state) on the tic-tac-toe board. We will accomplish this verification by invoking the winner determiner function (created in step 5) for each of the players.
If the function finds a win state for the human player (the minimizer), it will return -1 (which signifies that the human player has won, and the AI has lost). But if it finds a win state for the AI player (the maximizer), it will return +1 (which indicates that the AI has won, and the human player has lost).
However, suppose the winner determiner function cannot find any empty cell on the board or any win state for either player. In that case, it will return 0 (zero) — which signifies that the game has ended in a tie.
Note: The scores (-1, +1, and 0) indicated above are heuristic values — which means that we will still get the same result if we prefer to use -25, +25, and 0.
Let’s now proceed to implement the terminal state verification by using an if statement like so:
if (checkIfWinnerFound(currBdSt, humanMark)) {
    return {score: -1};
} else if (checkIfWinnerFound(currBdSt, aiMark)) {
    return {score: 1};
} else if (availCellsIndexes.length === 0) {
    return {score: 0};
}
When there is a terminal state (lose, win, or draw), the active minimax function will return the appropriate terminal state score (-1, +1, or 0) and end its invocation.
If the active minimax ends its invocation here, the algorithm will move on to step 12.
However, when there is no terminal state, the active minimax function will execute the next statement (step 10, below).
Step 10: Get ready to test the outcome of playing the current player’s mark on each empty cell
As step 9 found no terminal state, we have to devise a way to test what will happen if the current player (who is to make the next game move) plays on each empty cell.
In other words, if the current player plays on the first available cell, and the opponent plays on the second empty cell, will the current player win, lose, or draw the game? Or will there still be no terminal state found?
Alternatively, what will happen if the current player plays on the second available cell, and the opponent plays on the first empty cell?
Or perhaps, will the third available cell be the best spot for the current player to play?
This test drive is what we need to do now. But before we begin, we need a place to record each test’s outcome — so let’s do that first by creating an array named allTestPlayInfos.
const allTestPlayInfos = [];So, now that we have secured a place to store each test drive’s result, let’s begin the trials by creating a for-loop statement that will loop through each of the empty cells starting from the first one.
for (let i = 0; i < availCellsIndexes.length; i++) {

    // Space for the for-loop’s codes

}
In the next two steps, we will fill up the for-loop with the code it should run for each empty cell.
Step 11: Test-play the current player’s mark on the empty cell the for-loop is currently processing
Before doing anything in this step, let’s review the current state of our board.
Notice that the above board is still the same as that of figure 2, except that we’ve highlighted — in red — the cell the for-loop is currently processing.
Next, it will be helpful to have a place to store this test-play’s terminal score — so let’s create an object like so:
const currentTestPlayInfo = {};Also, before test-playing the current player’s mark on the red cell, let’s save the cell’s index number — so that it will be easy to reset the cell’s info after this test-play.
currentTestPlayInfo.index = currBdSt[availCellsIndexes[i]];Let’s now place the current player’s mark on the red cell (that is, the cell currently being processed by the for-loop).
currBdSt[availCellsIndexes[i]] = currMark;Based on the current player’s gameplay, the board’s state will change to reflect its latest move.
Therefore, since the board’s state has changed, we need to recursively run minimax on the new board — while passing in the new board’s state and the next player’s mark.
if (currMark === aiMark) {
    const result = minimax(currBdSt, humanMark);
    currentTestPlayInfo.score = result.score;
} else {
    const result = minimax(currBdSt, aiMark);
    currentTestPlayInfo.score = result.score;
}
Note:
- The recursive invocation of minimax at this very point will be the _____ time we are invoking the function. The first invocation happened in step 7.
- This recursive invocation will cause the reiteration of steps 8 to 11.
- Suppose there is a terminal state at step 9. In that case, the current minimax invocation will stop running — and store the returned terminal object (for example,
{score: 1}) in theresultvariable. - Once there is a terminal state, step 12 will be the next step.
- If there exists no terminal state, a second for-loop will begin for the new board at step 10.
- If step 10 is repeated, please replace figure 4’s board with the new board in figure 5. However, the cell highlighted in red will now be the cell the for-loop is currently processing. So please, do reflect the changes accordingly.
Step 12: Save the latest terminal score
After the just concluded minimax invocation has returned its terminal state’s value, the active for-loop will save the result variable’s score into the currentTestPlayInfo object like so:
currentTestPlayInfo.score = result.score;Then, since the returned score officially ends the current test-play, it is best to reset the current board back to the state before the current player made its move.
currBdSt[availCellsIndexes[i]] = currentTestPlayInfo.index;Also, we need to save the result of the current player’s test-play for future use. So, let’s do that by pushing the currentTestPlayInfo object to the allTestPlayInfos array like so:
allTestPlayInfos.push(currentTestPlayInfo);Note:
- If you got to this step from step 17, kindly continue this tutorial at step 18. Otherwise, consider the next point.
- If the active for-loop has finished looping through all the current board’s empty cells, the loop will end at this point, and step 14 will be next. Otherwise, the loop will proceed to process the next available cell (step 13).
Step 13: Run the active for-loop on the next empty cell
Remember that the currently active for-loop (that began at step 10) has only finished its work for the preceding empty cell(s). Therefore, the loop will proceed to test-play the current player’s mark on the next free cell.
In other words, the currently running minimax function will repeat steps 11 and 12. But, essentially, take note of the following:
- The red cell highlighted in figure 4 will change to the cell the for-loop is currently processing.
- Please, be mindful that figure 5 will also change. In other words, the current player’s move will now be on the cell the for-loop is currently processing.
- After the active for-loop has completed its work, the
allTestPlayInfosarray will contain specific objects for each empty cell the for-loop has processed. - Each of the objects in the
allTestPlayInfosarray will contain anindexproperty and ascoreproperty (take for example:{index: 8, score: -1}). - If you got to this step from step 20, then, on completing step 12, kindly continue this tutorial at step 18.
Step 14: Plan how to get the object with the best test-play score for the current player
Immediately after the for-loop has completed its work of looping through all the empty cells of the current board, minimax will:
- Create a space to store the reference number that will later help to get the best test-play object.
- Get the reference number to the current player’s best test-play.
- Use the acquired reference number to get the object with the best test-play for the current player.
Without any further ado, let’s implement this plan in the next few steps.
Step 15: Create a store for the best test-play’s reference
The variable below is the place we will later store the reference to the best test-play object. (Note that the value null indicates that we have deliberately left the variable empty).
let bestTestPlay = null;Step 16: Get the reference to the current player’s best test-play
Now that there is a bestTestPlay store, the active minimax function can proceed to get the reference to the current player’s best test-play like so:
if (currMark === aiMark) {
    let bestScore = -Infinity;
    for (let i = 0; i < allTestPlayInfos.length; i++) {
        if (allTestPlayInfos[i].score > bestScore) {
            bestScore = allTestPlayInfos[i].score;
            bestTestPlay = i;
        }
    }
} else {
    let bestScore = Infinity;
    for (let i = 0; i < allTestPlayInfos.length; i++) {
        if (allTestPlayInfos[i].score < bestScore) {
            bestScore = allTestPlayInfos[i].score;
            bestTestPlay = i;
        }
    }
}
The code above means if the current mark is equal to the AI player’s mark:
- Create a
bestScorevariable with the value of-Infinity. (Note that this value is just a placeholder value that needs to be less than all the scores in theallTestPlayInfosarray. Therefore, using-700will do the same job). - Then, for every test-play object in the
allTestPlayInfosarray, check if the test-play the loop is currently processing has a higher score than the currentbestScore. If so, record that test-play’s details inside both thebestScorevariable and thebestTestPlayvariable.
Otherwise, if the current mark is the human player’s mark:
- Create a
bestScorevariable with the value of+Infinity. (Again, note that we will get the same outcome if we had preferred to use+300. It is just a placeholder value that needs to be greater than all the scores in theallTestPlayInfosarray). - Then, for every test-play object in the
allTestPlayInfosarray, check if the test-play the loop is currently processing has a lesser score than the currentbestScore. If so, record that test-play’s details inside both thebestScorevariable and thebestTestPlayvariable.
Step 17: Get the object with the best test-play score for the current player
Finally, the currently running minimax invocation can now finish its work by returning the object with the best test-play for the current player like so:
return allTestPlayInfos[bestTestPlay];Note that minimax will store the returned object inside the result variable of the first for-loop that began at step 11. It will then repeat step 12. Please revisit step 12 only. Then, continue this tutorial below.
Step 18: Let’s do a review
This stage is an excellent time to review what we’ve done thus far pictorially.
Note:
- If this is your first time on this step, please use the diagram in step 19.
- Is this your second time on this step? If so, the diagram in step 21 is yours.
- Are you here for the third time? Well-done! Check out the diagram in step 23.
Step 19: Tracing our steps with a diagram
The diagram below shows the AI and the human player’s first test-play for the first for-loop invocation initiated by the AI player.
Step 20: The first for-loop moves forward to process the next empty cell
On concluding that playing on the first empty cell will end in a loss state, the AI forges ahead to test the outcome of playing on the second free cell by repeating step 13.
Step 21: Tracing our steps with a diagram
The diagram below shows the AI and the human player’s second test-play for the first for-loop invocation initiated by the AI player.
Step 22: The first for-loop moves forward to process the next empty cell
Now that the AI has confirmed that playing on the second empty cell will result in a win state, it further checks the outcome of playing on the third free cell by repeating step 13.
Step 23: Tracing our steps with a diagram
The diagram below shows the AI and the human player’s third test-play for the first for-loop invocation initiated by the AI player.
Step 24: Get the object with the best test-play score for the AI player
At this point (after the third test-play), the first for-loop would have processed all the three empty cells of the first board (passed-in to minimax at step 7).
Therefore, minimax will forge ahead to get the object with the best test-play for the AI player — by repeating steps 15 to 17. However, when at step 17, kindly note the following:
- The returned object will now get stored in the
bestPlayInfovariable that we created at step 7. - Minimax will not repeat step 12 because the for-loop statement is no longer active.
Step 25: Use the data inside bestPlayInfo
Considering this tutorial’s board (a near-the-end state game board — as shown in figure 2 of step 2), the object in the bestPlayInfo variable will be {index: 4, score: 1}. Therefore, the AI can now use its index value to choose the best cell to play on.
Example
// Get all the board’s cells:
const gameCells = document.querySelectorAll(".cell");

// Below is the variable we created at step 3:
const aiMark = "X";

// Here is the bestPlayInfo we created at step 7 to contain the best test-play object for the AI player:
const bestPlayInfo = minimax(currentBoardState, aiMark);

// Play the AI’s mark on the cell that is best for it:
gameCells[bestPlayInfo.index].innerText = aiMark;
Therefore, the AI player will win the game, and the new board will now look like so:
Step 26: A bird’s-eye view of this tutorial’s algorithm
Below is this tutorial’s minimax algorithm in one piece. Feel free to insert it into your editor. Play around with it for various game scenarios, and use the console to test, test, and test it again until you are comfortable building an unbeatable AI.
And remember, programming is better only when you code sweetly — so have lots of fun with it!
// Step 3 - Store the board’s current state in an array and define each mark's owner:
const currentBoardState = ["X", 1, "O", "X", 4, "X", "O", "O", 8];
const aiMark = "X";
const humanMark = "O";

// Step 4 - Create a function to get the indexes of all the empty cells:
function getAllEmptyCellsIndexes(currBdSt) {
    return currBdSt.filter(i => i != "O" && i != "X");
}

// Step 5 - Create a winner determiner function:
function checkIfWinnerFound(currBdSt, currMark) {
    if (
        (currBdSt[0] === currMark && currBdSt[1] === currMark && currBdSt[2] === currMark) ||
        (currBdSt[3] === currMark && currBdSt[4] === currMark && currBdSt[5] === currMark) ||
        (currBdSt[6] === currMark && currBdSt[7] === currMark && currBdSt[8] === currMark) ||
        (currBdSt[0] === currMark && currBdSt[3] === currMark && currBdSt[6] === currMark) ||
        (currBdSt[1] === currMark && currBdSt[4] === currMark && currBdSt[7] === currMark) ||
        (currBdSt[2] === currMark && currBdSt[5] === currMark && currBdSt[8] === currMark) ||
        (currBdSt[0] === currMark && currBdSt[4] === currMark && currBdSt[8] === currMark) ||
        (currBdSt[2] === currMark && currBdSt[4] === currMark && currBdSt[6] === currMark)
) {
        return true;
    } else {
        return false;
    }
}

// Step 6 - Create the minimax algorithm:
function minimax(currBdSt, currMark) {
    // Step 8 - Store the indexes of all empty cells:
    const availCellsIndexes = getAllEmptyCellsIndexes(currBdSt);

    // Step 9 - Check if there is a terminal state:
    if (checkIfWinnerFound(currBdSt, humanMark)) {
        return {score: -1};
    } else if (checkIfWinnerFound(currBdSt, aiMark)) {
        return {score: 1};
    } else if (availCellsIndexes.length === 0) {
        return {score: 0};
    }

    // Step 10 - Create a place to record the outcome of each test drive:
    const allTestPlayInfos = [];

    // Step 10 - Create a for-loop statement that will loop through each of the empty cells:
    for (let i = 0; i < availCellsIndexes.length; i++) {
        // Step 11 - Create a place to store this test-play’s terminal score:
        const currentTestPlayInfo = {};

        // Step 11 - Save the index number of the cell this for-loop is currently processing:
        currentTestPlayInfo.index = currBdSt[availCellsIndexes[i]];

        // Step 11 - Place the current player’s mark on the cell for-loop is currently processing:
        currBdSt[availCellsIndexes[i]] = currMark;

        if (currMark === aiMark) {
            // Step 11 - Recursively run the minimax function for the new board:
            const result = minimax(currBdSt, humanMark);

            // Step 12 - Save the result variable’s score into the currentTestPlayInfo object:
            currentTestPlayInfo.score = result.score;
        } else {
            // Step 11 - Recursively run the minimax function for the new board:
            const result = minimax(currBdSt, aiMark);

            // Step 12 - Save the result variable’s score into the currentTestPlayInfo object:
            currentTestPlayInfo.score = result.score;
        }

        // Step 12 - Reset the current board back to the state it was before the current player made its move:
        currBdSt[availCellsIndexes[i]] = currentTestPlayInfo.index;

        // Step 12 - Save the result of the current player’s test-play for future use:
        allTestPlayInfos.push(currentTestPlayInfo);
    }

    // Step 15 - Create a store for the best test-play’s reference:
    let bestTestPlay = null;

    // Step 16 - Get the reference to the current player’s best test-play:
    if (currMark === aiMark) {
        let bestScore = -Infinity;
        for (let i = 0; i < allTestPlayInfos.length; i++) {
            if (allTestPlayInfos[i].score > bestScore) {
                bestScore = allTestPlayInfos[i].score;
                bestTestPlay = i;
            }
        }
    } else {
        let bestScore = Infinity;
        for (let i = 0; i < allTestPlayInfos.length; i++) {
            if (allTestPlayInfos[i].score < bestScore) {
                bestScore = allTestPlayInfos[i].score;
                bestTestPlay = i;
            }
        }
    }

    // Step 17 - Get the object with the best test-play score for the current player:
    return allTestPlayInfos[bestTestPlay];
}

// Step 7 - First minimax invocation:
const bestPlayInfo = minimax(currentBoardState, aiMark);
Useful resource
- Recursion: What You Need to Know about Recursion
Learn to code for free. freeCodeCamp’s open source curriculum has helped more than 40,000 people get jobs as developers. Get started

Искусственный интеллект: холодный, бесчувственный и неосязаемый. Но именно за ним и есть будущее, именно эта область науки позволит сделать большой и существенный шаг в сторону автоматизации процессов, а, следовательно, снятия части рутинной нагрузки с ценных специалистов. И сейчас, на заре его развития только мы решаем каким будет искусственный интеллект через пару десятков лет, обучая его.
Попробуем разобраться какие существуют методы и алгоритмы машинного обучения искусственного интеллекта.
Традиционно вокруг нового и неизведанного возникает множество споров. И пусть об ИИ уже написано много, он до конца не понят людьми. Отсюда и возникают претензии типа: «Он заберет сотни рабочих мест у людей!», «Он восстанет против людей!», «Да мы сами себе роем могилу!», «Рано или поздно мы не сможем им управлять!» и т.п. Масса людей представляет себе ИИ как сверхразум, который раз уж не поддается их собственному объяснению, значит непременно представляет для них угрозу. И конечно, никто и слышать не хочет, что сейчас ИИ не принимает собственных решений, выходящих за пределы программы, прописанной человеком, на данный момент это технически невозможно.
А чему всё-таки возможно его обучить и как это происходит?
Методы машинного обучения искусственного интеллекта:
-
Индуктивное обучение
Получение эмпирических данных, выявление закономерностей, выявление алгоритмов действия в каждой подобной ситуации;
-
Дедуктивное обучение
Формализация данных, полученных человеком разными способами, и внесение их напрямую в базу;
Основные алгоритмы принятия решений искусственным интеллектом:
Наивный Байесовский классификатор
Один из простейших методов классификации.

Данный метод используется в технологии сканирования и распознавания лиц/сетчатки глаза/отпечатка пальца, в разделении контента в новостной ленте по темам, а также в разделении писем в Вашей электронной почте по категориям (конкретно — отделение спама);
Метод ансамблей
Метод ансамблей очень грубо можно назвать производным от вышеописанного наивного Байесовского классификатора, поскольку в его основе лежит Байесовское усреднение. Другими словами, этот способ выявляет пересечение вероятностей исходов, усредняет это значение, исключает дисперсию значений, одновременно контролируя поиск решения проблемы в рамках заданных условий.
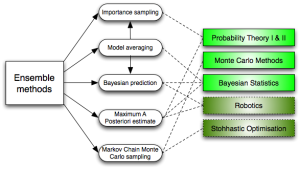
Именно метод ансамблей может позволить найти то самое оптимальное решение проблемы, при котором будет затрачено меньше ресурсов, а результат будет максимально удовлетворять условиям задачи.
Метод опорных векторов
Если не вдаваться в сущность самого метода и объяснение построения гиперплоскости и работы с ней, то SVM можно описать как алгоритмы для классификации и регрессионного анализа.
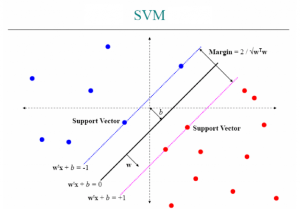
Подобная технология используется в распознавании определенных свойств объекта по фотографии (цвета волос, пола, цвета одежды), а также в генетике — в сплайсинге ДНК (отделение конкретных нуклеотидных последовательностей из РНК и их соединение в ходе процессинга РНК).
Дерево принятия решений
Способ (модель) принятия решений, используемый ежедневно каждым из нас. Именно поэтому он уже стал мемом

А если без шуток, то такая модель обычно содержит такие элементы, как: проблему, способы решения, последствия каждого способа, вероятность наступления последствий, затраты ресурсов, и конечный итог. На основе этой модели работают большинство простейших технологий с использованием ИИ.
Логическая регрессия
Способ, который может приблизить нас к мощному искусственному интеллекту, способному принимать самостоятельные решения в некоторых ситуациях. Логическая регрессия представляет собой метод прогнозирования наступления некоторого события при нескольких переменных.
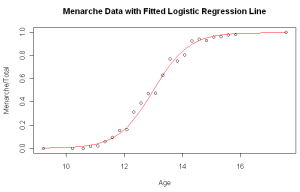
Подобный алгоритм используют в метеорологии и сейсмологии, в кредитовании, в маркетинге и других сферах.
Метод наименьших квадратов
Этот метод хотелось бы выделить отдельно, поскольку по своей сути он не является способом самого решения проблемы – скорее способом определения погрешностей каждого решения.

Описанные выше алгоритмы используются для метода контролируемого обучения, то есть такого, при котором конкретному массиву данных можно присвоить определенный ярлык (свойство), но в случае, если этот ярлык недоступен, следует спрогнозировать его присвоение в других подобных ситуациях.
Мы разобрали основные алгоритмы машинного обучения искусственного интеллекта чаще всего применяемые на практике. Стоит учитывать, что прикладное применение ИИ в быту и в решении повседневных задач, в которых чаще всего решение проблемы абсолютно понятно и необходимо лишь автоматизировать этот процесс, может предполагать использование подобных алгоритмов. Проблема же, решением которой должна стать инновационная разработка, либо решение будет зависеть от большого числа переменных (то есть в основном различные сферы точных наук), требует более сложных алгоритмов решения, узнать о которых Вы сможете, если будете следить за нашими новостями.