Ищете как создать RESTful API в Laravel? Если да, то я расскажу вам всё поэтапно, как создать полноценный API с аутентификацией с использованием Laravel Passport. API также известен как веб-служба.
На сегодняшний день, как мы знаем, Laravel является самым популярным фреймворком по причине своей безопасности. Поэтому многие разработчики выбирают его для разработки API мобильных приложений. Да, веб-службы очень важны при создании веб- и мобильных приложений, потому что вы можете создать одну базу данных для всех версий и работать с одинаковыми данными.
Если вы не знакомы с Laravel или не знаете, как начать создание API, не беспокойтесь, в этом уроке я шаг за шагом всё объясню. Вам просто нужно выполнить несколько этапов, чтобы получить API для регистрации, входа и работы с товарами (добавление, обновление, удаление).
Шаг 1: Установка Laravel
Поскольку это пошаговый урок, прямо с нуля, то нам нужно сначала установить Laravel. Откройте командную строку и выполните команду:
composer create-project --prefer-dist laravel/laravel blog
Шаг 2: Установка Passport
Устанавливаем Passport с помощью менеджера пакетов Composer, запустите команду:
composer require laravel/passport
После успешной установки пакета нам необходимо получить миграции для создания новых таблиц в нашей базе данных. Запускайте команду:
php artisan migrate
Далее, для получения токенов безопасности, нам нужно запустить команду:
php artisan passport:install
Шаг 3: Настройка паспорта
В этом шаге мы должны провести настройку в трех местах: в модели, в сервис-провайдере и в файле конфигурации.
В модели мы добавим класс HasApiTokens,
В AuthServiceProvider мы добавим Passport::routes(),
В файле auth.php мы добавим настройки аутентификации api.
app/User.php
<?php

namespace App;

use IlluminateNotificationsNotifiable;
use IlluminateContractsAuthMustVerifyEmail;
use LaravelPassportHasApiTokens;
use IlluminateFoundationAuthUser as Authenticatable;

class User extends Authenticatable implements MustVerifyEmail
{
    use HasApiTokens, Notifiable;

    /**
     * The attributes that are mass assignable.
     *
     * @var array
     */
    protected $fillable = [
        'name', 'email', 'password',
    ];

    /**
     * The attributes that should be hidden for arrays.
     *
     * @var array
     */
    protected $hidden = [
        'password', 'remember_token',
    ];
}
app/Providers/AuthServiceProvider.php
<?php

namespace AppProviders;

use LaravelPassportPassport;
use IlluminateSupportFacadesGate;
use IlluminateFoundationSupportProvidersAuthServiceProvider as ServiceProvider;

class AuthServiceProvider extends ServiceProvider
{
    /**
     * The policy mappings for the application.
     *
     * @var array
     */
    protected $policies = [
        'AppModel' => 'AppPoliciesModelPolicy',
    ];

    /**
     * Register any authentication / authorization services.
     *
     * @return void
     */
    public function boot()
    {
        $this->registerPolicies();

        Passport::routes();
    }
}
config/auth.php
return [
    .....
    'guards' => [
        'web' => [
            'driver' => 'session',
            'provider' => 'users',
        ],
        'api' => [
            'driver' => 'passport',
            'provider' => 'users',
        ],
    ],
    .....
]
Шаг 4: Добавляем таблицу товаров и Модель
Теперь нам нужно создать миграцию для таблицы товаров:
php artisan make:migration create_products_table
После выполнения этой команды вы найдете новый файл в папке database/migrations. Вам нужно вставить в него приведенный ниже код для создания таблицы товаров.
<?php

use IlluminateSupportFacadesSchema;
use IlluminateDatabaseSchemaBlueprint;
use IlluminateDatabaseMigrationsMigration;

class CreateProductsTable extends Migration
{
    /**
     * Run the migrations.
     *
     * @return void
     */
    public function up()
    {
        Schema::create('products', function (Blueprint $table) {
            $table->increments('id');
            $table->string('name');
            $table->text('detail');
            $table->timestamps();
        });
    }

    /**
     * Reverse the migrations.
     *
     * @return void
     */

    public function down()
    {
        Schema::dropIfExists('products');
    }
}
Теперь нужно запустить миграцию:
php artisan migrate
Таким образом мы создали таблицу «products». Теперь нужно сделать модель Product — создайте файл Product.php в папке app и поместите в него приведенный ниже код:
app/Product.php
<?php

namespace App;

use IlluminateDatabaseEloquentModel;

class Product extends Model
{
    /**
     * The attributes that are mass assignable.
     *
     * @var array
     */
    protected $fillable = [
        'name', 'detail'
    ];
}
Шаг 5. Создание маршрутов API
На этом этапе мы создадим маршруты API. Laravel предлагает для записи маршрутов веб-сервисов файл api.php. Давайте добавим новый маршрут к этому файлу.
routes/api.php
<?php

/*
|--------------------------------------------------------------------------
| API Routes
|--------------------------------------------------------------------------
|
| Here is where you can register API routes for your application. These
| routes are loaded by the RouteServiceProvider within a group which
| is assigned the "api" middleware group. Enjoy building your API!
|
*/

Route::post('register', 'APIRegisterController@register');

Route::middleware('auth:api')->group( function () {
  Route::resource('products', 'APIProductController');
});
Шаг 6: Создание файлов Контроллера
В этом шаге мы будем создавать новые контроллеры — BaseController, ProductController и RegisterController. Для них я создал новую папку «API» в папке контроллеров.
app/Http/Controllers/API/BaseController.php
<?php

namespace AppHttpControllersAPI;

use IlluminateHttpRequest;
use AppHttpControllersController as Controller;

class BaseController extends Controller
{
    /**
     * success response method.
     *
     * @return IlluminateHttpResponse
     */
    public function sendResponse($result, $message)
    {
    	$response = [
            'success' => true,
            'data'    => $result,
            'message' => $message,
        ];

        return response()->json($response, 200);
    }

    /**
     * return error response.
     *
     * @return IlluminateHttpResponse
     */
    public function sendError($error, $errorMessages = [], $code = 404)
    {
    	$response = [
            'success' => false,
            'message' => $error,
        ];

        if(!empty($errorMessages)){
            $response['data'] = $errorMessages;
        }

        return response()->json($response, $code);
    }
}
app/Http/Controllers/API/ProductController.php
<?php
namespace AppHttpControllersAPI;
use IlluminateHttpRequest;
use AppHttpControllersAPIBaseController as BaseController;
use AppProduct;
use Validator;
class ProductController extends BaseController
{
/**
* Display a listing of the resource.
*
* @return IlluminateHttpResponse
*/
public function index()
{
$products = Product::all();
return $this->sendResponse($products->toArray(), 'Products retrieved successfully.');
}
/**
* Store a newly created resource in storage.
*
* @param IlluminateHttpRequest $request
* @return IlluminateHttpResponse
*/
public function store(Request $request)
{
$input = $request->all();
$validator = Validator::make($input, [
'name' => 'required',
'detail' => 'required'
]);
if($validator->fails()){
return $this->sendError('Validation Error.', $validator->errors());
}
$product = Product::create($input);
return $this->sendResponse($product->toArray(), 'Product created successfully.');
}
/**
* Display the specified resource.
*
* @param int $id
* @return IlluminateHttpResponse
*/
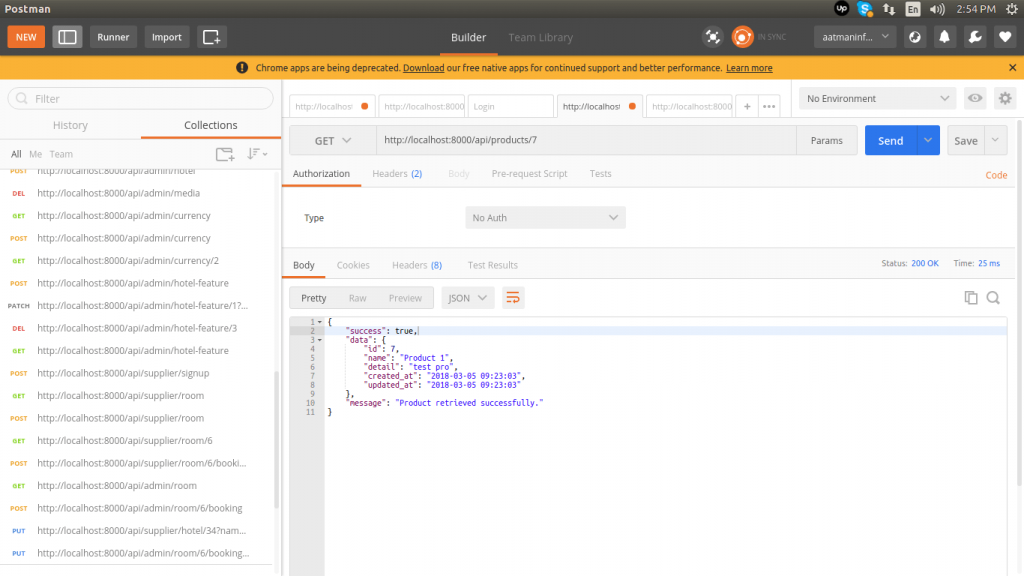
public function show($id)
{
$product = Product::find($id);
if (is_null($product)) {
return $this->sendError('Product not found.');
}
return $this->sendResponse($product->toArray(), 'Product retrieved successfully.');
}
/**
* Update the specified resource in storage.
*
* @param IlluminateHttpRequest $request
* @param int $id
* @return IlluminateHttpResponse
*/
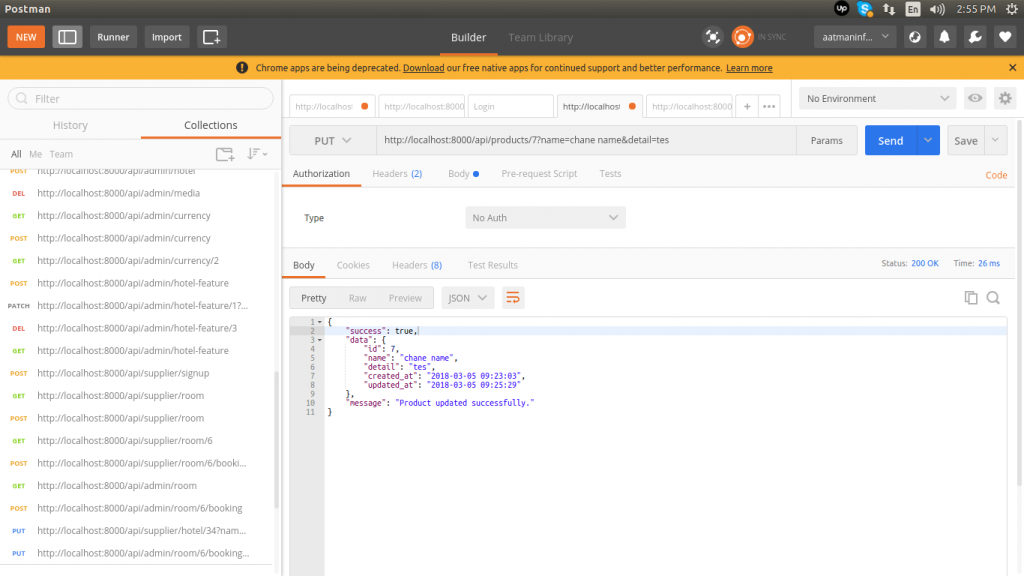
public function update(Request $request, Product $product)
{
$input = $request->all();
$validator = Validator::make($input, [
'name' => 'required',
'detail' => 'required'
]);
if($validator->fails()){
return $this->sendError('Validation Error.', $validator->errors());
}
$product->name = $input['name'];
$product->detail = $input['detail'];
$product->save();
return $this->sendResponse($product->toArray(), 'Product updated successfully.');
}
/**
* Remove the specified resource from storage.
*
* @param int $id
* @return IlluminateHttpResponse
*/
public function destroy(Product $product)
{
$product->delete();
return $this->sendResponse($product->toArray(), 'Product deleted successfully.');
}
}
app/Http/Controllers/API/RegisterController.php
<?php

namespace AppHttpControllersAPI;

use IlluminateHttpRequest;
use AppHttpControllersAPIBaseController as BaseController;
use AppUser;
use IlluminateSupportFacadesAuth;
use Validator;

class RegisterController extends BaseController
{
    /**
     * Register api
     *
     * @return IlluminateHttpResponse
     */
    public function register(Request $request)
    {
        $validator = Validator::make($request->all(), [
            'name' => 'required',
            'email' => 'required|email',
            'password' => 'required',
            'c_password' => 'required|same:password',
        ]);

        if($validator->fails()){
            return $this->sendError('Validation Error.', $validator->errors());
        }

        $input = $request->all();
        $input['password'] = bcrypt($input['password']);
        $user = User::create($input);
        $success['token'] =  $user->createToken('MyApp')->accessToken;
        $success['name'] =  $user->name;

        return $this->sendResponse($success, 'User register successfully.');
    }
}
Теперь мы готовы к запуску RESTful API и Passport API. Давайте запустим наш пример — открывайте консоль и вводите команду:
php artisan serve
Убедитесь, что API использует следующие заголовки, как указано ниже:
'headers' => [
    'Accept' => 'application/json',
    'Authorization' => 'Bearer '.$accessToken,
]
Список адресов с методами
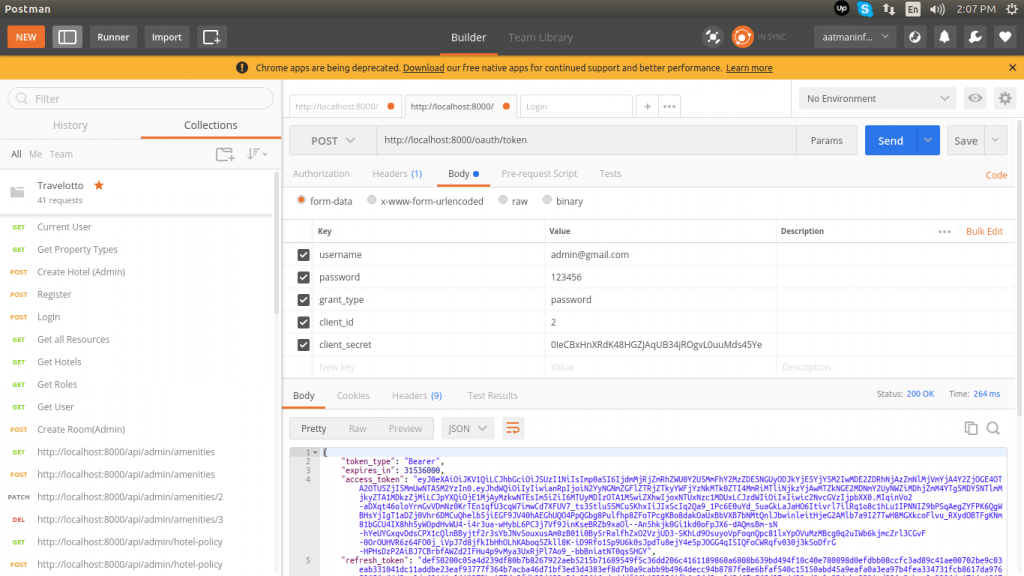
- Login: метод:GET, URL:http://localhost:8000/oauth/token
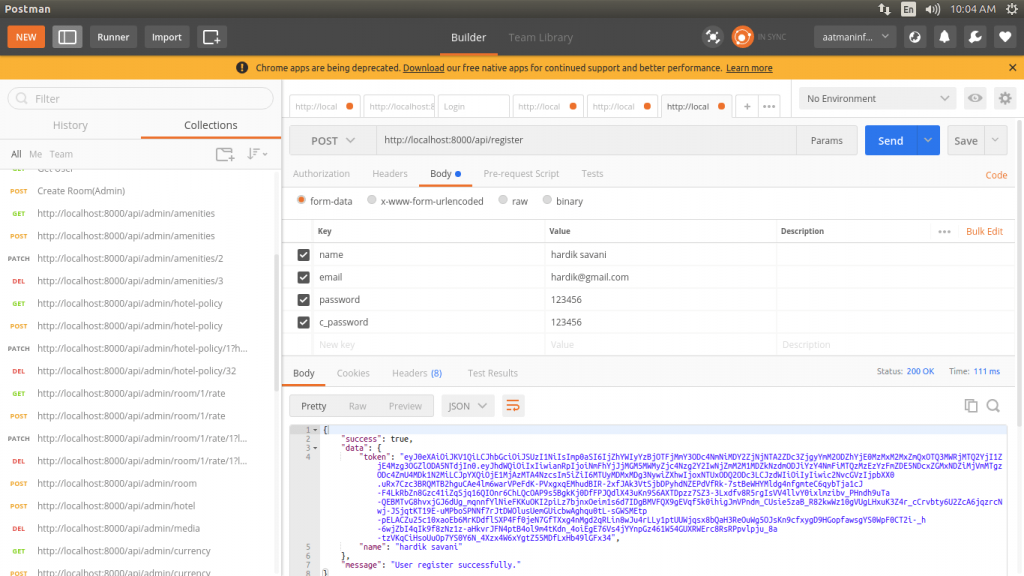
- Register: метод:GET, URL:http://localhost:8000/api/register
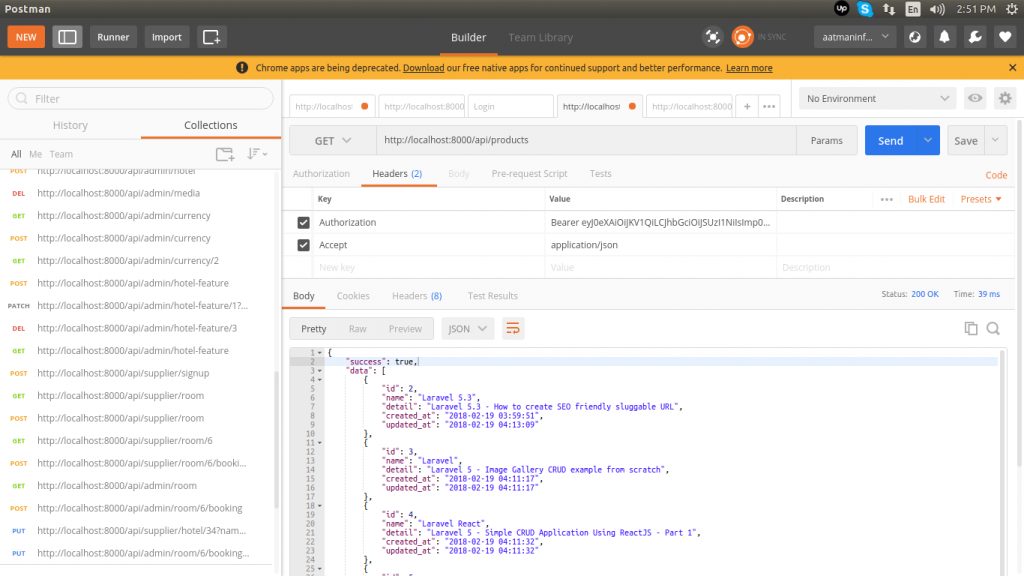
- List: метод:GET, URL:http://localhost:8000/api/products
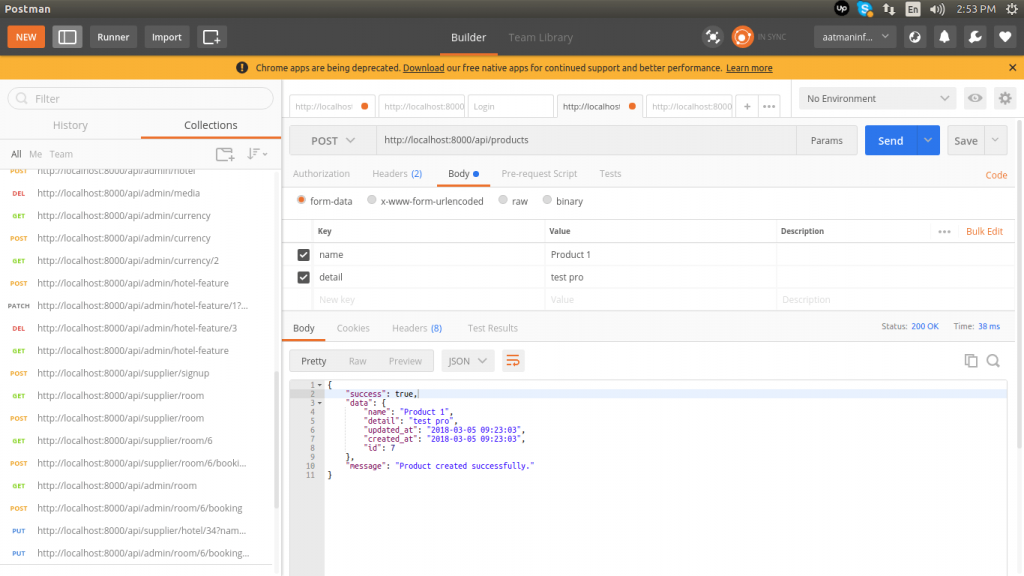
- Create: метод:POST, URL:http://localhost:8000/api/products
- Show: метод:GET, URL:http://localhost:8000/api/products/{id}
- Update: метод:PUT, URL:http://localhost:8000/api/products/{id}
- Delete: метод:DELETE, URL:http://localhost:8000/api/products/{id}
Теперь вы можете запускать вышеприведенные адреса, как на скриншотах:
Вход API:
Регистрация API:
Список товаров API:
Создание товара API:
Показ товара API:
Обновление товара API:
Удаление товара API:

Автор: Hardik Savani
Перевод: Алексей Широков
Задать вопросы по урокам можно на нашем форуме.
Содержание
- Что такое API?
- Что такое REST?
- Конечные точки API для неаутентифицированного маршрута
- Конечная точка API для аутентифицированного маршрута
- Тестирование конечных точек API
Что такое API?
API – это Application Programming Interface, это описание способов которыми одна компьютерная программа может взаимодействовать с другой программой.
Оригинал статьи
Что такое REST?
REST – это аббревиатура от REpresentational State Transfer. Этот термин был придуман Роем Филдингом в 2000 году. Это стиль архитектуры для проектирования слабо связанных приложений по протоколу HTTP, который часто используется при разработке веб-сервисов.
REST определяет 6 архитектурных ограничений, которые делают любой веб-сервис истинным RESTful API.
- Client-server – отделяя пользовательский интерфейс от хранилища данных, мы улучшаем переносимость пользовательского интерфейса на несколько платформ и улучшаем масштабируемость за счет упрощения серверных компонентов.
- Stateless – каждый запрос от клиента к серверу должен содержать всю информацию, необходимую для понимания запроса, и не может использовать преимущества любого сохраненного контекста на сервере. Таким образом, состояние сеанса полностью сохраняется на клиенте.
- Cacheable – ограничения кэша требуют, чтобы данные в ответе на запрос были неявно или явно помечены как cacheable или non-cacheable. Если ответ кэшируется, то клиентскому кэшу предоставляется право повторно использовать эти данные ответа для последующих эквивалентных запросов.
- Uniform interface – применяя принцип общности к компонентному интерфейсу, упрощается общая архитектура системы и улучшается видимость взаимодействий.
- Layered system – стиль слоистой системы позволяет архитектуре состоять из иерархических слоев, ограничивая поведение компонентов таким образом, что каждый компонент не может “видеть” за пределами непосредственного слоя, с которым они взаимодействуют.
- Code on demand (необязательно) – REST позволяет расширить функциональность клиента, загрузив и выполнив код в виде апплетов или скриптов. Это упрощает работу с клиентами за счет сокращения количества функций, необходимых для предварительной реализации.
Теперь давайте перейдем к созданию и использованию RESTful API в Laravel.
Потребители нашего API смогут выполнять несколько ограниченных задач. Там будут следующие конечные точки:
Конечные точки API для неаутентифицированного маршрута
Связанные с категорией:
- Получить все категории
GET/categories - Получить все сообщения категории
GET/categories/{id}/posts
Связанные с сообщениями:
- Получить все сообщения
GET/posts - Получить сообщение по ID
GET/posts/{id} - Получить все комментарии к сообщению
GET/posts/{id}/comments
Связанные с автором:
- Получить подробную информацию об авторе
GET/authors/{id} - Получить все сообщения от автора
GET/authors/posts - Получить все комментарии автора
GET/authors/{id}/comments
Связано с тегом:
- Получить все сообщения тега
GET/tags/{id}/posts
Конечная точка API для аутентифицированного маршрута
Связанные с комментарием:
- Комментарий пользователя магазина
POST/comments/posts/{id}
Вы должны создать ресурсы API, контроллеры и маршруты API для вышеупомянутых конечных точек API.
Шаг 1: Давайте сначала создадим ресурсы API. Для этого выполните следующие действия:
При построении API вам может понадобиться слой преобразования, который находится между вашими Eloquent моделями и ответами JSON, которые фактически возвращаются пользователям вашего приложения. Классы ресурсов Laravel позволяют вам выразительно и легко преобразовывать ваши модели и коллекции моделей в JSON.
Выполните команду
php artisan make:resource CategoryResource. Она создаст CategoryResource в appHttpResources каталоге.
Откройте этот файл и верните нужные данные, например. category_id на месте id. Вы можете сделать гораздо больше, чем просто маскировать имена полей или количество полей, которые должны быть возвращены, например – мы можем возвращать дополнительную информацию с помощью API и т. д.
public function toArray($request)
{
 return [
  'category_id' => $this->id,
  'category_title' => $this->title,
  'category_color' => $this->color,
 ];
}
// (Optional) Additional code is attached to the response
public function with($request){
 return [
  'version' => "1.0.0",
  'author_url' => "https://maxyc.ru"
 ];
}
Таким же образом вы должны создать и другие необходимые ресурсы—CommentResource, PostResource, TagResource, UserResource, ImageResource и VideoResource.
Шаг 2: Следующее действие заключается в создании необходимых контроллеров. Для этого выполните следующие действия:
Выполните команду
php artisan make:controller Api\CategoryApiController.
Она создаст CategoryApiController в appHttpControllersApi каталоге. Откройте этот файл и запишите методы для выполнения действий.
public function index()
{
 $categories = Category::all();
 return CategoryResource::collection($categories);
}

public function posts($id)
{
 $posts = Post::where('category_id', $id)->orderBy('id', 'desc')->paginate();
 return PostResource::collection($posts);
}
Здесь вы создали два метода index и posts внутри CategoryApiController.
index Метод вернет все категории, завернутые внутрь CategoryResource.
posts Метод вернет все записи, принадлежащие к определенной категории, завернутые внутрь PostResource.
Таким же образом создайте нужные методы в CommentApiController, PostApiController, TagApiController и UserApiController.
Шаг 3: Последний шаг-создание маршрутов для API. Перейдите в routes каталог, откройте api.php файл и создайте конечные точки API, которые будут ссылаться на методы, созданные в CategoryApiController, CommentApiController, PostApiController, TagApiController и UserApiController
<?php
use AppHttpControllersApiCategoryApiController;
use AppHttpControllersApiCommentApiController;
use AppHttpControllersApiPostApiController;
use AppHttpControllersApiUserApiController;
use IlluminateSupportFacadesRoute;
Route::get('authors/{id}', [UserApiController::class, 'show']);
Route::get('authors/{id}/posts', [UserApiController::class, 'posts']);
Route::get('authors/{id}/comments', [UserApiController::class, 'comments']);
Route::get('categories', [CategoryApiController::class, 'index']);
Route::get('categories/{id}/posts', [CategoryApiController::class, 'posts']);
Route::get('posts', [PostApiController::class, 'index']);
Route::get('posts/{id}', [PostApiController::class, 'show']);
Route::get('posts/{id}/comments', [PostApiController::class, 'comments']);
Route::get('tags/{id}/posts', [TagApiController::class, 'posts']);
Route::middleware('auth:sanctum')->group(function () {
Route::post('comments/posts', [CommentApiController::class, 'store']);
});
Тестирование конечных точек API
Запустите базу данных и выполните php artisan serve. Сервер разработки Laravel запустится на http://127.0.0.1:8000
Откройте Postman и протестируйте все маршруты, определенные в api.php, но обязательно добавьте свой маршрут в неймспейс /api/
Чтобы получить все категории вы должны отправить GET запрос по адресу http://127.0.0.1:8000/api/categories

Теперь давайте тоже проверим authenticated route. Существует только один аутентифицированный маршрут для хранения вошедшего пользователя.
Мы используем Laravel Sanctum для аутентификации и авторизации. Мы выпустим токен API и используем его в Postman для аутентификации запроса.
Laravel Sanctum предоставляет легкую систему аутентификации для SPAs (одностраничных приложений), мобильных приложений и простых API на основе токенов. Sanctum позволяет каждому пользователю вашего приложения генерировать несколько токенов API для своей учетной записи. Этим токенам могут быть предоставлены способности / области действия, которые определяют, какие действия токены могут выполнять.
Чтобы использовать токен API, мы запустим команду tinker
php artisan tinker
Теперь он позволит нам взаимодействовать с приложением Laravel из командной строки. Здесь вам нужно создать токен API для пользователя, используя метод createToken().

Копируем plainTextToken, предназначенная для использования в Postman.
Теперь откройте Postman и сделайте следующее:
- Новый
POSTзапрос кhttp://127.0.0.1:8000/api/comments/posts - На
Authorizationвкладке выберитеTypeкакBearer Tokenи вставьтеplainTextTokenв текстовое поле. - Затем во вкладке
HeadersукажитеAcceptв значенииapplication/json. - Затем на вкладке
Bodyвыберитеform-dataи укажите данные для отправки:id 159,comment "Testing some comment on post 159“ - Теперь нажмите кнопку
sendи вы получите обратно только что созданный комментарий.


В этой статье мы смогли построить и использовать (потребитель был Postman) RESTful API с помощью Laravel. Мы рассмотрели создание ресурсов API, создание контроллера API и протестировали аутентифицированные и Неаутентифицированные маршруты API.
- Исходный код доступен на Github.
- Твиттер: котагин
- GitHub: mdutt247
- Электронная почта: m.dutt@mditech.net
Laravel и React — это две популярные технологии веб-разработки, используемые для создания современных веб-приложений. Laravel — это, в основном, серверная сторона, тогда как React — это клиентская JavaScript библиотека. Этот руководство служит введением в Laravel и React, объединяя их для создания современного веб-приложения.
В современном веб-приложении серверная сторона ограниченна бекендом через некоторые конечные точки входа API (Application Programming Interface). Клиент отправляет запросы этим конечным точкам, и сервер возвращает ответ. Однако сервер не заботится о том, как клиент выводит представление, что идеально соответствует принципу разделения ответствености. Эта архитектура позволяет разработчикам создавать надежные веб приложения, а также приложения для разных устройств.
В этом руководстве мы будем использовать последнюю версию Laravel версии 5.5 для создания RESTful API. Фронтэнд будет состоять из компонентов, написанных на React. Мы будем создавать поисковое приложение для листинга продуктов. В первой части руководства основное внимание будет уделено концепциям Laravel и бекенду. Давайте начнем.
Введение
Laravel — это PHP-фреймворк, разработанный для современного веба. У него есть выразительный синтаксис, который поощряет парадигму соглашение над конфигурационной. У Laravel есть все возможности прямо из коробки, которые вам нужны для старта проекта. Но лично мне нравится Laravel, потому что он превращает разработку на PHP в совершенно другой опыт и рабочий процесс.
С другой стороны, React — популярная JavaScript библиотека, разработанная в Facebook для создания одностраничных приложений. React поможет вам разбить ваши представления на компоненты, в которых каждый компонент описывает часть пользовательского интерфейса приложения. Компонентный подход имеет дополнительное преимущество повторного использования компонентов и модульности.
Почему Laravel и React?
Если вы разрабатываете для веба, вы можете использовать одну базу кода как для сервера, так и для клиента. Однако далеко не каждая компания дает разработчику свободу использовать технологию по своему выбору, причем по некоторым веским причинам. Использование стека JavaScript для всего проекта является текущей нормой, но ничто не мешает выбрать две разные технологии для серверной и клиентской сторон.
Итак, насколько хорошо Laravel и React подходят друг другу? на самом деле довольно хорошо. Хотя в документации Laravel заявлена поддержка для Vue.js, что является еще одним JavaScript фреймворком, для клиентской стороны мы будем использовать React , потому что он более популярен.
Предварительное условие
Прежде чем приступить к работе, я собираюсь предположить, что у вас есть базовое представление об архитектуре RESTful и о том, как работают конечные точки API. Кроме того, если у вас есть предыдущий опыт в React или Laravel, вы сможете извлечь максимальную пользу из этого руководства.
Однако, если вы новичок в обоих фреймворках, не волнуйтесь. Руководство написано с точки зрения новичка, и вы должны быть в состоянии разобраться без особого труда. Исходный код руководства можно найти в GitHub.
Установка и настройка Laravel проекта
Laravel использует Composer для управления всеми зависимостями. Итак, прежде чем начинать работу с Laravel, загрузите и установите Composer на свой компьютер. Вам также может потребоваться настроить переменную среды path, чтобы Composer был доступен глобально.
Выполните следующую команду для загрузки и установки laravel.
1 |
composer global require "laravel/installer"
|
Если вы правильно настроили переменную $PATH и добавили ~/.composer/vendor/bin в свой путь, вы должны создать новый проект Laravel следующим образом:
1 |
laravel new PROJECT-NAME |
Кроме того, вы можете использовать Composer для создания нового проекта без установщика laravel.
1 |
composer create-project --prefer-dist laravel/laravel blog
|
Если все будет хорошо, вы сможете запустить свое приложение на сервере разработки по адресу http://localhost:8000.
Примечание: Artisan — это инструмент командной строки, без которого не обойтись при работе с Laravel. Artisan принимает большой список команд, которые позволяют генерировать код для вашего приложения. Запустите php artisan list, чтобы просмотреть все доступные команды.
Настройка среды
Ваше приложение будет иметь .env файл в корневом каталоге. Здесь описывается вся информация о конфигурации, специфичная для среды. Создайте базу данных для своего приложения, если вы еще этого не сделали, и добавьте конфигурацию базы данных в файл .env.
1 |
DB_CONNECTION=mysql |
2 |
DB_HOST=127.0.0.1 |
3 |
DB_PORT=3306 |
4 |
DB_DATABASE=sampledb |
5 |
DB_USERNAME=root |
6 |
DB_PASSWORD= |
Общие сведения о моделях, роутах и контроллерах
Laravel — это фреймворк, который следует архитектуре Model-View-Controller (MVC). Проще говоря, MVC помогает вам отделить запросы к базе данных (Модель) от логики, связанной с тем, как должны обрабатываться запросы (контроллер) и как должен быть отображен макет (вид). На изображении ниже демонстрируется работа типичного Laravel приложения.


Поскольку мы создаем API с использованием Laravel, мы ограничим наше обсуждение моделью и контроллером. Мы рассмотрим наши варианты создания представления во второй части этого руководства.
Роутинг
Когда сервер получает HTTP-запрос, Laravel пытается сопоставить его с роутом, зарегистрированным внутри любого из файлов роутинга. Все файлы роутинга находятся внутри соответсвующего каталога. route/web.php содержит роуты для веб-интерфейса, тогда как route/api.php содержит роуты для API. Роуты, зарегистрированные в api.php, будут иметь префикс /api (как в localhost:3000/api). Если вам нужно изменить это поведение, вы должны перейти в класс RouteServiceProvider в /app/Providers/RouteServiceProvider.php и внести туда изменения.
Поскольку мы создаем приложение для списка продуктов, здесь указаны конечные точки API и HTTP-методы, связанные с этими конечными точками.
- GET
/products/: Получение всех продуктов. - GET
/product/{id}:Получение продукта, соответствующегоid. - POST
/products:Создание нового продукта и вставка его в базу данных. - PUT
/products/{id}:Обновление существующего продукта, соответствующегоid. - DELETE
/products/{id}:Удаление продукта с заданнымid.
Давайте вернемся к терминологии. GET, POST, PUT и DELETE — это HTTP-глаголы (более известные как HTTP-методы), необходимые для создания RESTful-сервиса. /products — это URI, связанный с ресурсом продуктов. HTTP-методы запрашивают сервер для выполнения желаемого действия на заданном ресурсе.


Роутер позволяет объявлять роуты для ресурса вместе с HTTP-методами, которые нацелены на этот ресурс. Вот пример файла роутинга, который возвращает некоторые жестко кодированные данные.
routes/api.php
1 |
/**
|
2 |
** Basic Routes for a RESTful service:
|
3 |
**
|
4 |
** Route::get($uri, $callback);
|
5 |
** Route::post($uri, $callback);
|
6 |
** Route::put($uri, $callback);
|
7 |
** Route::delete($uri, $callback);
|
8 |
**
|
9 |
**/
|
10 |
|
11 |
Route::get('products', function () { |
12 |
return response(['Product 1', 'Product 2', 'Product 3'],200); |
13 |
});
|
14 |
|
15 |
Route::get('products/{product}', function ($productId) { |
16 |
return response()->json(['productId' => "{$productId}"], 200); |
17 |
});
|
18 |
|
19 |
|
20 |
Route::post('products', function() { |
21 |
return response()->json([ |
22 |
'message' => 'Create success' |
23 |
], 201); |
24 |
});
|
25 |
|
26 |
Route::put('products/{product}', function() { |
27 |
return response()->json([ |
28 |
'message' => 'Update success' |
29 |
], 200); |
30 |
});
|
31 |
|
32 |
Route::delete('products/{product}',function() { |
33 |
return response()->json(null, 204); |
34 |
});
|
Если вы хотите проверить, что роуты работают должным образом, вы должны использовать тулинг, например POSTMAN или curl.
Модель продукта
Ресурсу продуктов требуется модель, которая может взаимодействовать с базой данных. Модель — это слой, который находится поверх базы данных, скрывая все специфичные для базы данных детали. Laravel использует Eloquent ORM для моделирования базы данных.
Eloquent ORM, входящий в состав Laravel, обеспечивает красивую, простую реализацию ActiveRecord для работы с вашей базой данных. Каждая таблица базы данных имеет соответствующую «Модель», которая используется для взаимодействия с этой таблицей. Модели позволяют запрашивать данные из ваших таблиц, а также вставлять новые записи в таблицу.
— Laravel Docs
Что относительно определения схемы базы данных? Миграция Laravel’а позаботится об этом. У Artisan есть команда миграции, которая позволяет вам определять вашу схему и постепенно обновлять ее на более позднем этапе. Давайте создадим модель и миграции для сущьности Product.
1 |
$ php artisan make:model Product -m |
Примечание: Есть множество команд Artisan, и их легко забыть. Таким образом, каждая команда artisan включает хелпер, который отображает дополнительную информацию, такую как доступные параметры и аргументы. Чтобы перейти на страницу справки, имя команды должно сопровождаться c help. Выполните следующую команду help, чтобы увидеть, что означает параметр -m: $ php artisan help make: model.
Вот файл миграции.
database/migrations/timestamp_create_products_table.php
1 |
<?php
|
2 |
|
3 |
use IlluminateSupportFacadesSchema; |
4 |
use IlluminateDatabaseSchemaBlueprint; |
5 |
use IlluminateDatabaseMigrationsMigration; |
6 |
|
7 |
class CreateProductsTable extends Migration |
8 |
{
|
9 |
|
10 |
public function up() |
11 |
{
|
12 |
Schema::create('products', function (Blueprint $table) { |
13 |
$table->increments('id'); |
14 |
$table->timestamps(); |
15 |
});
|
16 |
}
|
17 |
|
18 |
|
19 |
public function down() |
20 |
{
|
21 |
Schema::dropIfExists('products'); |
22 |
}
|
23 |
}
|
Метод up вызывается при переносе новых таблиц и столбцов в базу данных, тогда как метод down вызывается при откате миграции. Мы создали схему для таблицы с тремя столбцами: id, created_at и updated_at. Метод $table->timestamps() отвечает за сохранение столбцов created_at и updated_at. Давайте добавим еще пару строк в определение схемы.
1 |
/* Let's add columns for title, description, price, availability */
|
2 |
|
3 |
public function up() |
4 |
{
|
5 |
Schema::create('products', function (Blueprint $table) { |
6 |
$table->increments('id'); |
7 |
$table->timestamps(); |
8 |
$table->string('title'); |
9 |
$table->text('description'); |
10 |
$table->integer('price'); |
11 |
$table->boolean('availability'); |
12 |
});
|
13 |
}
|
Мы обновили схему с четырьмя новыми столбцами. Конструктор схем Laravel поддерживает множество типов столбцов, таких как string, text, integer, boolean и т. д.
Чтобы выполнить ожидающие миграции, вы должны выполнить следующую команду:
По соглашению, Laravel предполагает, что модель Product связана с таблицей products. Однако, если вам нужно связать модель с пользовательским именем таблицы, вы можете использовать свойство $table для объявления имени таблицы. Затем модель будет связана с таблицей с именем custom_products.
1 |
protected $table = 'custom_products'; |
Но мы оставим все на своих местах и продолжим пользоваться соглашениями. Сгенерированная модель продукта находится внутри каталога app/. Хотя класс модели может казаться пустым, он оснащен различными методами построения запросов, которые можно использовать для запросов к базы данных. Например, вы можете использовать Product::all() для извлечения всех продуктов или Product::find(1) для получения определенного продукта с id 1.
Модели Laravel имеют встроенный механизм защиты от уязвимости массового назначения. Свойство fillable используется, чтобы объявить имена атрибутов, который можно смело присвоить.
app/Product.php
1 |
/* Add the fillable property into the Product Model */
|
2 |
|
3 |
protected $fillable = ['title', 'description', 'price', 'availability']; |
Вышеуказанный код присваивает атрибуты title, description, price и availability и рассматривает их как назначаемые массово. Теперь мы можем использовать метод Product::create для вставки новых строк в таблицу продуктов.
Заполнение базы данных
Laravel позволяет вам заполнить базу данных разработки и продакшена фиктивными данными, которые затем можно использовать для тестирования конечных точек API. Вы можете создать класс seed, выполнив следующую команду Artisan.
1 |
$ php artisan make:seeder ProductsTableSeeder
|
Сгенерированные файлы сидов будут помещены в каталог database/seeds.
Чтобы создать фиктивные данные, вы можете использовать что-то вроде str_random(10), которое возвращает случайную строку. Но если вам нужны данные, которые достаточно близки к фактическим данным, вы должны использовать что-то вроде библиотеки faker. Faker — это сторонняя библиотека, которая поставляется с Laravel для генерации фейковых данных.
database/seeds/ProductsTableSeeder.php
1 |
use AppProduct; |
2 |
|
3 |
class ProductsTableSeeder extends Seeder |
4 |
{
|
5 |
public function run() |
6 |
{
|
7 |
|
8 |
$faker = FakerFactory::create(); |
9 |
|
10 |
// Create 50 product records
|
11 |
for ($i = 0; $i < 50; $i++) { |
12 |
Product::create([ |
13 |
'title' => $faker->title, |
14 |
'description' => $faker->paragraph, |
15 |
'price' => $faker->randomNumber(2), |
16 |
'availability' => $faker->boolean(50) |
17 |
]);
|
18 |
}
|
19 |
}
|
20 |
}
|
Выполните команду artisan db:seed для заполнения базы данных.
1 |
$ php artisan db:seed --class=ProductsTableSeeder |
Вернемся к routes/api.php и добавим недостающие части.
routes/api.php
1 |
/**
|
2 |
**Basic Routes for a RESTful service:
|
3 |
**Route::get($uri, $callback);
|
4 |
**Route::post($uri, $callback);
|
5 |
**Route::put($uri, $callback);
|
6 |
**Route::delete($uri, $callback);
|
7 |
**
|
8 |
*/
|
9 |
Route::get('products', function () { |
10 |
return response(Product::all(),200); |
11 |
});
|
12 |
|
13 |
Route::get('products/{product}', function ($productId) { |
14 |
return response(Product::find($productId), 200); |
15 |
});
|
16 |
|
17 |
|
18 |
Route::post('products', function(Request $request) { |
19 |
$resp = Product::create($request->all()); |
20 |
return $resp; |
21 |
|
22 |
});
|
23 |
|
24 |
Route::put('products/{product}', function(Request $request, $productId) { |
25 |
$product = Product::findOrFail($productId); |
26 |
$product->update($request->all()); |
27 |
return $product; |
28 |
});
|
29 |
|
30 |
Route::delete('products/{product}',function($productId) { |
31 |
Product::find($productId)->delete(); |
32 |
|
33 |
return 204; |
34 |
|
35 |
});
|
Контроллер
В файле роутинга в настоящее время размещается логика роутинга и обработки запросов. Мы можем переместить логику обработки запросов в класс контроллера, чтобы наш код был лучше организован и более читабельным. Давайте сначала сгенерируем класс контроллера.
1 |
$ php artisan make:controller ProductsController |
Класс Controller состоит из различных методов (index, show, save, update и delete), которые соответствуют различным HTTP-действиям . Я переместил логику обработки запросов с роутинга в контроллер.
app/HTTP/Controllers/ProductsController.php
1 |
<?php
|
2 |
|
3 |
namespace AppHttpControllers; |
4 |
|
5 |
use IlluminateHttpRequest; |
6 |
use AppProduct; |
7 |
|
8 |
class ProductsController extends Controller |
9 |
{
|
10 |
|
11 |
public function index() |
12 |
{
|
13 |
return Product::all(); |
14 |
}
|
15 |
|
16 |
public function show(Product $product) |
17 |
{
|
18 |
return $product; |
19 |
}
|
20 |
|
21 |
public function store(Request $request) |
22 |
{
|
23 |
$product = Product::create($request->all()); |
24 |
|
25 |
return response()->json($product, 201); |
26 |
}
|
27 |
|
28 |
public function update(Request $request, Product $product) |
29 |
{
|
30 |
$product->update($request->all()); |
31 |
|
32 |
return response()->json($product, 200); |
33 |
}
|
34 |
|
35 |
public function delete(Product $product) |
36 |
{
|
37 |
$product->delete(); |
38 |
|
39 |
return response()->json(null, 204); |
40 |
}
|
41 |
|
42 |
}
|
routes/api.php
1 |
/**
|
2 |
**Basic Routes for a RESTful service:
|
3 |
**Route::get($uri, $callback);
|
4 |
**Route::post($uri, $callback);
|
5 |
**Route::put($uri, $callback);
|
6 |
**Route::delete($uri, $callback);
|
7 |
**
|
8 |
*/
|
9 |
|
10 |
|
11 |
Route::get('products', 'ProductsController@index'); |
12 |
|
13 |
Route::get('products/{product}', 'ProductsController@show'); |
14 |
|
15 |
Route::post('products','ProductsController@store'); |
16 |
|
17 |
Route::put('products/{product}','ProductsController@update'); |
18 |
|
19 |
Route::delete('products/{product}', 'ProductsController@delete'); |
20 |
|
21 |
Если вы не заметили, я включил экземпляр Product в методы контроллера. Это пример неявной привязки Laravel. Laravel пытается сопоставить имя экземпляра модели Product $product с названием URI-сегмента {product}. Если совпадение найдено, экземпляр модели продукта вводится в действия контроллера. Если база данных не имеет продукта, она возвращает ошибку 404. Конечный результат такой же, как и раньше, но с меньшим количеством кода.
Откройте POSTMAN, и конечные точки продукта должны работать. Убедитесь, что заголовок Accept: application/json включен.
Валидация и обработка исключений
Если вы перейдете к несуществующему ресурсу, это то, что вы увидите.


Исключение NotFoundHTTPException — это то, как Laravel отображает ошибку 404. Если вы хотите, чтобы сервер возвращал ответ JSON, вам придется изменить поведение обработки исключений по умолчанию. Laravel имеет класс Handler, предназначенный для обработки исключений, расположенный в app/Exceptions/Handler.php. Класс имеет два метода: report() и render(). Метод report полезен для отчетов и регистрации событий исключения, тогда как метод render используется для возврата ответа при возникновении исключения. Обновите метод render, чтобы вернуть ответ JSON:
app/Exceptions/Handler.php
1 |
public function render($request, Exception $exception) |
2 |
{
|
3 |
|
4 |
if ($exception instanceof IlluminateDatabaseEloquentModelNotFoundException) |
5 |
{
|
6 |
return response()->json([ |
7 |
'message' => 'Resource not found' |
8 |
], 404); |
9 |
}
|
10 |
|
11 |
return parent::render($request, $exception); |
12 |
}
|
Laravel также позволяет нам валидировать входящие HTTP-запросы с помощью набора правил валидации и автоматически возвращать ответ в JSON, если валидация не прошла. Логика проверки будет помещена внутри контроллера. Объект IlluminateHttpRequest предоставляет метод validate, который мы можем использовать для определения правил валидации. Давайте добавим несколько валидаций в методе store.
app/HTTP/Controllers/ProductsController.php
1 |
public function store(Request $request) |
2 |
{
|
3 |
$this->validate($request, [ |
4 |
'title' => 'required|unique:products|max:255', |
5 |
'description' => 'required', |
6 |
'price' => 'integer', |
7 |
'availability' => 'boolean', |
8 |
]);
|
9 |
$product = Product::create($request->all()); |
10 |
|
11 |
return response()->json($product, 201); |
12 |
}
|
Заключение
Теперь у нас есть рабочий API для приложения с листингом продуктов. Однако API не имеет базовых функций, таких как аутентификация и ограничение доступа к неавторизованным пользователям. У Laravel есть встроенная поддержка аутентификации, а создание API для нее делается относительно просто. Я рекомендую вам добавить API аутентификации в качестве упражнения.
Для тех из вас, кто только начинает работать с Laravel или хочет расширить свои знания, найти примеры сайтов или приложений, у нас есть множество материалов, которые вы можете изучить на Envato Market.
Теперь, когда мы закончили работу с бекендом, мы сосредоточим внимание на концепциях фронтенда. Оставайтесь с нами во второй части руководства. Оставляйте свои комментарии.
With the rise of mobile development and JavaScript frameworks, using a RESTful API is the best option to build a single interface between your data and your client.
Laravel is a PHP framework developed with PHP developer productivity in mind. Written and maintained by Taylor Otwell, the framework is very opinionated and strives to save developer time by favoring convention over configuration. The framework also aims to evolve with the web and has already incorporated several new features and ideas in the web development world—such as job queues, API authentication out of the box, real-time communication, and much more.
In this tutorial, we’ll explore the ways you can build—and test—a robust API using Laravel with authentication. We’ll be using Laravel 5.4, and all of the code is available for reference on GitHub.
RESTful APIs
First, we need to understand what exactly is considered a RESTful API. REST stands for REpresentational State Transfer and is an architectural style for network communication between applications, which relies on a stateless protocol (usually HTTP) for interaction.
HTTP Verbs Represent Actions
In RESTful APIs, we use the HTTP verbs as actions, and the endpoints are the resources acted upon. We’ll be using the HTTP verbs for their semantic meaning:
-
GET: retrieve resources -
POST: create resources -
PUT: update resources -
DELETE: delete resources

Update Action: PUT vs. POST
RESTful APIs are a matter of much debate and there are plenty of opinions out there on whether is best to update with POST, PATCH, or PUT, or if the create action is best left to the PUT verb. In this article we’ll be using PUT for the update action, as according to the HTTP RFC, PUT means to create/update a resource at a specific location. Another requirement for the PUT verb is idempotence, which in this case basically means you can send that request 1, 2 or 1000 times and the result will be the same: one updated resource in the database.
Resources
Resources will be the targets of the actions, in our case Articles and Users, and they have their own endpoints:
/articles/users
In this laravel api tutorial, the resources will have a 1:1 representation on our data models, but that is not a requirement. You can have resources represented in more than one data model (or not represented at all in the database) and models completely off limits for the user. In the end, you get to decide how to architect resources and models in a way that is fitting to your application.
A Note on Consistency
The greatest advantage of using a set of conventions such as REST is that your API will be much easier to consume and develop around. Some endpoints are pretty straightforward and, as a result, your API will be much more easier to use and maintain as opposed to having endpoints such as GET /get_article?id_article=12 and POST /delete_article?number=40. I’ve built terrible APIs like that in the past and I still hate myself for it.
However, there will be cases where it will be hard to map to a Create/Retrieve/Update/Delete schema. Remember that the URLs should not contain verbs and that resources are not necessarily rows in a table. Another thing to keep in mind is that you don’t have to implement every action for every resource.
Setting Up a Laravel Web Service Project
As with all modern PHP frameworks, we’ll need Composer to install and handle our dependencies. After you follow the download instructions (and add to your path environment variable), install Laravel using the command:
$ composer global require laravel/installer
After the installation finishes, you can scaffold a new application like this:
$ laravel new myapp
For the above command, you need to have ~/composer/vendor/bin in your $PATH. If you don’t want to deal with that, you can also create a new project using Composer:
$ composer create-project --prefer-dist laravel/laravel myapp
With Laravel installed, you should be able to start the server and test if everything is working:
$ php artisan serve
Laravel development server started: <http://127.0.0.1:8000>

When you open localhost:8000 on your browser, you should see this sample page.
Migrations and Models
Before actually writing your first migration, make sure you have a database created for this app and add its credentials to the .env file located in the root of the project.
DB_CONNECTION=mysql
DB_HOST=127.0.0.1
DB_PORT=3306
DB_DATABASE=homestead
DB_USERNAME=homestead
DB_PASSWORD=secret
You can also use Homestead, a Vagrant box specially crafted for Laravel, but that is a bit out of the scope of this article. If you’d like to know more, refer to the Homestead documentation.
Let’s get started with our first model and migration—the Article. The article should have a title and a body field, as well as a creation date. Laravel provides several commands through Artisan—Laravel’s command line tool—that help us by generating files and putting them in the correct folders. To create the Article model, we can run:
$ php artisan make:model Article -m
The -m option is short for --migration and it tells Artisan to create one for our model. Here’s the generated migration:
<?php

use IlluminateSupportFacadesSchema;
use IlluminateDatabaseSchemaBlueprint;
use IlluminateDatabaseMigrationsMigration;

class CreateArticlesTable extends Migration
{
    /**
     * Run the migrations.
     *
     * @return void
     */
    public function up()
    {
        Schema::create('articles', function (Blueprint $table) {
            $table->increments('id');
            $table->timestamps();
        });
    }

    /**
     * Reverse the migrations.
     *
     * @return void
     */
    public function down()
    {
        Schema::dropIfExists('articles');
    }
}
Let’s dissect this for a second:
- The
up()anddown()methods will be run when we migrate and rollback respectively; -
$table->increments('id')sets up an auto incrementing integer with the nameid; -
$table->timestamps()will set up the timestamps for us—created_atandupdated_at, but don’t worry about setting a default, Laravel takes care of updating these fields when needed. - And finally,
Schema::dropIfExists()will, of course, drop the table if it exists.
With that out of the way, let’s add two lines to our up() method:
public function up()
{
    Schema::create('articles', function (Blueprint $table) {
        $table->increments('id');
        $table->string('title');
        $table->text('body');
        $table->timestamps();
    });
}
The string() method creates a VARCHAR equivalent column while text() creates a TEXTequivalent. With that done, let’s go ahead and migrate:
$ php artisan migrate
You can also use the
--stepoption here, and it will separate each migration into its own batch so that you can roll them back individually if needed.
Laravel out of the box comes with two migrations, create_users_table and create_password_resets_table. We won’t be using the password_resets table, but having the users table ready for us will be helpful.
Now let’s go back to our model and add those attributes to the $fillable field so that we can use them in our Article::create and Article::update models:
class Article extends Model
{
    protected $fillable = ['title', 'body'];
}
Fields inside the
$fillableproperty can be mass assigned using Eloquent’screate()andupdate()methods. You can also use the$guardedproperty, to allow all but a few properties.
Database Seeding
Database seeding is the process of filling up our database with dummy data that we can use to test it. Laravel comes with Faker, a great library for generating just the correct format of dummy data for us. So let’s create our first seeder:
$ php artisan make:seeder ArticlesTableSeeder
The seeders will be located in the /database/seeds directory. Here’s how it looks like after we set it up to create a few articles:
class ArticlesTableSeeder extends Seeder
{
    public function run()
    {
        // Let's truncate our existing records to start from scratch.
        Article::truncate();

        $faker = FakerFactory::create();

        // And now, let's create a few articles in our database:
        for ($i = 0; $i < 50; $i++) {
            Article::create([
                'title' => $faker->sentence,
                'body' => $faker->paragraph,
            ]);
        }
    }
}
So let’s run the seed command:
$ php artisan db:seed --class=ArticlesTableSeeder
Let’s repeat the process to create a Users seeder:
class UsersTableSeeder extends Seeder
{
    public function run()
    {
        // Let's clear the users table first
        User::truncate();

        $faker = FakerFactory::create();

        // Let's make sure everyone has the same password and
        // let's hash it before the loop, or else our seeder
        // will be too slow.
        $password = Hash::make('toptal');

        User::create([
            'name' => 'Administrator',
            'email' => 'admin@test.com',
            'password' => $password,
        ]);

        // And now let's generate a few dozen users for our app:
        for ($i = 0; $i < 10; $i++) {
            User::create([
                'name' => $faker->name,
                'email' => $faker->email,
                'password' => $password,
            ]);
        }
    }
}
We can make it easier by adding our seeders to the main DatabaseSeeder class inside the database/seeds folder:
class DatabaseSeeder extends Seeder
{
    public function run()
    {
        $this->call(ArticlesTableSeeder::class);
        $this->call(UsersTableSeeder::class);
    }
}
This way, we can simply run $ php artisan db:seed and it will run all the called classes in the run() method.
Routes and Controllers
Let’s create the basic endpoints for our application: create, retrieve the list, retrieve a single one, update, and delete. On the routes/api.php file, we can simply do this:
Use AppArticle;

Route::get('articles', function() {
    // If the Content-Type and Accept headers are set to 'application/json',
    // this will return a JSON structure. This will be cleaned up later.
    return Article::all();
});

Route::get('articles/{id}', function($id) {
    return Article::find($id);
});

Route::post('articles', function(Request $request) {
    return Article::create($request->all);
});

Route::put('articles/{id}', function(Request $request, $id) {
    $article = Article::findOrFail($id);
    $article->update($request->all());

    return $article;
});

Route::delete('articles/{id}', function($id) {
    Article::find($id)->delete();

    return 204;
})
The routes inside api.php will be prefixed with /api/ and the API throttling middleware will be automatically applied to these routes (if you want to remove the prefix you can edit the RouteServiceProvider class on /app/Providers/RouteServiceProvider.php).
Now let’s move this code to its own Controller:
$ php artisan make:controller ArticleController
ArticleController.php:
use AppArticle;

class ArticleController extends Controller
{
    public function index()
    {
        return Article::all();
    }

    public function show($id)
    {
        return Article::find($id);
    }

    public function store(Request $request)
    {
        return Article::create($request->all());
    }

    public function update(Request $request, $id)
    {
        $article = Article::findOrFail($id);
        $article->update($request->all());

        return $article;
    }

    public function delete(Request $request, $id)
    {
        $article = Article::findOrFail($id);
        $article->delete();

        return 204;
    }
}
The routes/api.php file:
Route::get('articles', 'ArticleController@index');
Route::get('articles/{id}', 'ArticleController@show');
Route::post('articles', 'ArticleController@store');
Route::put('articles/{id}', 'ArticleController@update');
Route::delete('articles/{id}', 'ArticleController@delete');
We can improve the endpoints by using implicit route model binding. This way, Laravel will inject the Article instance in our methods and automatically return a 404 if it isn’t found. We’ll have to make changes on the routes file and on the controller:
Route::get('articles', 'ArticleController@index');
Route::get('articles/{article}', 'ArticleController@show');
Route::post('articles', 'ArticleController@store');
Route::put('articles/{article}', 'ArticleController@update');
Route::delete('articles/{article}', 'ArticleController@delete');
class ArticleController extends Controller
{
    public function index()
    {
        return Article::all();
    }

    public function show(Article $article)
    {
        return $article;
    }

    public function store(Request $request)
    {
        $article = Article::create($request->all());

        return response()->json($article, 201);
    }

    public function update(Request $request, Article $article)
    {
        $article->update($request->all());

        return response()->json($article, 200);
    }

    public function delete(Article $article)
    {
        $article->delete();

        return response()->json(null, 204);
    }
}
A Note on HTTP Status Codes and the Response Format
We’ve also added the response()->json() call to our endpoints. This lets us explicitly return JSON data as well as send an HTTP code that can be parsed by the client. The most common codes you’ll be returning will be:
-
200: OK. The standard success code and default option. -
201: Object created. Useful for thestoreactions. -
204: No content. When an action was executed successfully, but there is no content to return. -
206: Partial content. Useful when you have to return a paginated list of resources. -
400: Bad request. The standard option for requests that fail to pass validation. -
401: Unauthorized. The user needs to be authenticated. -
403: Forbidden. The user is authenticated, but does not have the permissions to perform an action. -
404: Not found. This will be returned automatically by Laravel when the resource is not found. -
500: Internal server error. Ideally you’re not going to be explicitly returning this, but if something unexpected breaks, this is what your user is going to receive. -
503: Service unavailable. Pretty self explanatory, but also another code that is not going to be returned explicitly by the application.
Sending a Correct 404 Response
If you tried to fetch a non-existent resource, you’ll be thrown an exception and you’ll receive the whole stacktrace, like this:

We can fix that by editing our exception handler class, located in app/Exceptions/Handler.php, to return a JSON response:
public function render($request, Exception $exception)
{
    // This will replace our 404 response with
    // a JSON response.
    if ($exception instanceof ModelNotFoundException) {
        return response()->json([
            'error' => 'Resource not found'
        ], 404);
    }

    return parent::render($request, $exception);
}
Here’s an example of the return:
{
    data: "Resource not found"
}
If you’re using Laravel to serve other pages, you have to edit the code to work with the Accept header, otherwise 404 errors from regular requests will return a JSON as well.
public function render($request, Exception $exception)
{
    // This will replace our 404 response with
    // a JSON response.
    if ($exception instanceof ModelNotFoundException &&
        $request->wantsJson())
    {
        return response()->json([
            'data' => 'Resource not found'
        ], 404);
    }

    return parent::render($request, $exception);
}
In this case, the API requests will need the header Accept: application/json.
Authentication
There are many ways to implement API Authentication in Laravel (one of them being Passport, a great way to implement OAuth2), but in this article, we’ll take a very simplified approach.
To get started, we’ll need to add an api_token field to the users table:
$ php artisan make:migration --table=users adds_api_token_to_users_table
And then implement the migration:
public function up()
{
    Schema::table('users', function (Blueprint $table) {
        $table->string('api_token', 60)->unique()->nullable();
    });
}

public function down()
{
    Schema::table('users', function (Blueprint $table) {
        $table->dropColumn(['api_token']);
    });
}
After that, just run the migration using:
$ php artisan migrate
Creating the Register Endpoint
We’ll make use of the RegisterController (in the Auth folder) to return the correct response upon registration. Laravel comes with authentication out of the box, but we still need to tweak it a bit to return the response we want.

The controller makes use of the trait RegistersUsers to implement the registration. Here’s how it works:
public function register(Request $request)
{
    // Here the request is validated. The validator method is located
    // inside the RegisterController, and makes sure the name, email
    // password and password_confirmation fields are required.
    $this->validator($request->all())->validate();

    // A Registered event is created and will trigger any relevant
    // observers, such as sending a confirmation email or any
    // code that needs to be run as soon as the user is created.
    event(new Registered($user = $this->create($request->all())));

    // After the user is created, he's logged in.
    $this->guard()->login($user);

    // And finally this is the hook that we want. If there is no
    // registered() method or it returns null, redirect him to
    // some other URL. In our case, we just need to implement
    // that method to return the correct response.
    return $this->registered($request, $user)
                    ?: redirect($this->redirectPath());
}
We just need to implement the registered() method in our RegisterController. The method receives the $request and the $user, so that’s really all we want. Here’s how the method should look like inside the controller:
protected function registered(Request $request, $user)
{
    $user->generateToken();

    return response()->json(['data' => $user->toArray()], 201);
}
And we can link it on the routes file:
Route::post('register', 'AuthRegisterController@register');
In the section above, we used a method on the User model to generate the token. This is useful so that we only have a single way of generating the tokens. Add the following method to your User model:
class User extends Authenticatable
{
    ...
    public function generateToken()
    {
        $this->api_token = str_random(60);
        $this->save();

        return $this->api_token;
    }
}
And that’s it. The user is now registered and thanks to Laravel’s validation and out of the box authentication, the name, email, password, and password_confirmation fields are required, and the feedback is handled automatically. Checkout the validator() method inside the RegisterController to see how the rules are implemented.
Here’s what we get when we hit that endpoint:
$ curl -X POST http://localhost:8000/api/register
 -H "Accept: application/json"
 -H "Content-Type: application/json"
 -d '{"name": "John", "email": "john.doe@toptal.com", "password": "toptal123", "password_confirmation": "toptal123"}'
{
    "data": {
        "api_token":"0syHnl0Y9jOIfszq11EC2CBQwCfObmvscrZYo5o2ilZPnohvndH797nDNyAT",
        "created_at": "2017-06-20 21:17:15",
        "email": "john.doe@toptal.com",
        "id": 51,
        "name": "John",
        "updated_at": "2017-06-20 21:17:15"
    }
}
Creating a Login Endpoint
Just like the registration endpoint, we can edit the LoginController (in the Auth folder) to support our API authentication. The login method of the AuthenticatesUsers trait can be overridden to support our API:
public function login(Request $request)
{
    $this->validateLogin($request);

    if ($this->attemptLogin($request)) {
        $user = $this->guard()->user();
        $user->generateToken();

        return response()->json([
            'data' => $user->toArray(),
        ]);
    }

    return $this->sendFailedLoginResponse($request);
}
And we can link it on the routes file:
Route::post('login', 'AuthLoginController@login');
Now, assuming the seeders have been run, here’s what we get when we send a POST request to that route:
$ curl -X POST localhost:8000/api/login
  -H "Accept: application/json"
  -H "Content-type: application/json"
  -d "{"email": "admin@test.com", "password": "toptal" }"
{
    "data": {
        "id":1,
        "name":"Administrator",
        "email":"admin@test.com",
        "created_at":"2017-04-25 01:05:34",
        "updated_at":"2017-04-25 02:50:40",
        "api_token":"Jll7q0BSijLOrzaOSm5Dr5hW9cJRZAJKOzvDlxjKCXepwAeZ7JR6YP5zQqnw"
    }
}
To send the token in a request, you can do it by sending an attribute api_token in the payload or as a bearer token in the request headers in the form of Authorization: Bearer Jll7q0BSijLOrzaOSm5Dr5hW9cJRZAJKOzvDlxjKCXepwAeZ7JR6YP5zQqnw.
Logging Out
With our current strategy, if the token is wrong or missing, the user should receive an unauthenticated response (which we’ll implement in the next section). So for a simple logout endpoint, we’ll send in the token and it will be removed on the database.
routes/api.php:
Route::post('logout', 'AuthLoginController@logout');
AuthLoginController.php:
public function logout(Request $request)
{
    $user = Auth::guard('api')->user();

    if ($user) {
        $user->api_token = null;
        $user->save();
    }

    return response()->json(['data' => 'User logged out.'], 200);
}
Using this strategy, whatever token the user has will be invalid, and the API will deny access (using middlewares, as explained in the next section). This needs to be coordinated with the front-end to avoid the user remaining logged without having access to any content.
Using Middlewares to Restrict Access
With the api_token created, we can toggle the authentication middleware in the routes file:
Route::middleware('auth:api')
    ->get('/user', function (Request $request) {
        return $request->user();
    });
We can access the current user using the $request->user() method or through the Auth facade
Auth::guard('api')->user(); // instance of the logged user
Auth::guard('api')->check(); // if a user is authenticated
Auth::guard('api')->id(); // the id of the authenticated user
And we get a result like this:

This is because we need to edit the current unauthenticated method on our Handler class. The current version returns a JSON only if the request has the Accept: application/json header, so let’s change it:
protected function unauthenticated($request, AuthenticationException $exception)
{
    return response()->json(['error' => 'Unauthenticated'], 401);
}
With that fixed, we can go back to the article endpoints to wrap them in the auth:api middleware. We can do that by using route groups:
Route::group(['middleware' => 'auth:api'], function() {
    Route::get('articles', 'ArticleController@index');
    Route::get('articles/{article}', 'ArticleController@show');
    Route::post('articles', 'ArticleController@store');
    Route::put('articles/{article}', 'ArticleController@update');
    Route::delete('articles/{article}', 'ArticleController@delete');
});
This way we don’t have to set the middleware for each of the routes. It doesn’t save a lot of time right now, but as the project grows it helps to keep the routes DRY.
Testing Our Endpoints
Laravel includes integration with PHPUnit out of the box with a phpunit.xml already set up. The framework also provides us with several helpers and extra assertions that makes our lives much easier, especially for testing APIs.
There are a number of external tools you can use to test your API; however, testing inside Laravel is a much better alternative—we can have all the benefits of testing an API structure and results while retaining full control of the database. For the list endpoint, for example, we could run a couple of factories and assert the response contains those resources.
To get started, we’ll need to tweak a few settings to use an in-memory SQLite database. Using that will make our tests run lightning fast, but the trade-off is that some migration commands (constraints, for example) will not work properly in that particular setup. I advise moving away from SQLite in testing when you start getting migration errors or if you prefer a stronger set of tests instead of performant runs.
We’ll also run the migrations before each test. This setup will allow us to build the database for each test and then destroy it, avoiding any type of dependency between tests.
In our config/database.php file, we’ll need to set up the database field in the sqlite configuration to :memory::
...
'connections' => [

    'sqlite' => [
        'driver' => 'sqlite',
        'database' => ':memory:',
        'prefix' => '',
    ],

    ...
]
Then enable SQLite in phpunit.xml by adding the environment variable DB_CONNECTION:
    <php>
        <env name="APP_ENV" value="testing"/>
        <env name="CACHE_DRIVER" value="array"/>
        <env name="SESSION_DRIVER" value="array"/>
        <env name="QUEUE_DRIVER" value="sync"/>
        <env name="DB_CONNECTION" value="sqlite"/>
    </php>
With that out of the way, all that’s left is configuring our base TestCase class to use migrations and seed the database before each test. To do so, we need to add the DatabaseMigrations trait, and then add an Artisan call on our setUp() method. Here’s the class after the changes:
use IlluminateFoundationTestingDatabaseMigrations;
use IlluminateFoundationTestingTestCase as BaseTestCase;
use IlluminateSupportFacadesArtisan;

abstract class TestCase extends BaseTestCase
{
    use CreatesApplication, DatabaseMigrations;

    public function setUp()
    {
        parent::setUp();
        Artisan::call('db:seed');
    }
}
One last thing that I like to do is to add the test command to composer.json:
    "scripts": {
        "test" : [
            "vendor/bin/phpunit"
        ],
    ...
    },
The test command will be available like this:
$ composer test
Setting Up Factories for Our Tests
Factories will allow us to quickly create objects with the right data for testing. They’re located in the database/factories folder. Laravel comes out of the box with a factory for the User class, so let’s add one for the Article class:
$factory->define(AppArticle::class, function (FakerGenerator $faker) {
    return [
        'title' => $faker->sentence,
        'body' => $faker->paragraph,
    ];
});
The Faker library is already injected to help us create the correct format of random data for our models.
Our First Tests
We can use Laravel’s assert methods to easily hit an endpoint and evaluate its response. Let’s create our first test, the login test, using the following command:
$ php artisan make:test Feature/LoginTest
And here is our test:
class LoginTest extends TestCase
{
    public function testRequiresEmailAndLogin()
    {
        $this->json('POST', 'api/login')
            ->assertStatus(422)
            ->assertJson([
                'email' => ['The email field is required.'],
                'password' => ['The password field is required.'],
            ]);
    }


    public function testUserLoginsSuccessfully()
    {
        $user = factory(User::class)->create([
            'email' => 'testlogin@user.com',
            'password' => bcrypt('toptal123'),
        ]);

        $payload = ['email' => 'testlogin@user.com', 'password' => 'toptal123'];

        $this->json('POST', 'api/login', $payload)
            ->assertStatus(200)
            ->assertJsonStructure([
                'data' => [
                    'id',
                    'name',
                    'email',
                    'created_at',
                    'updated_at',
                    'api_token',
                ],
            ]);

    }
}
These methods test a couple of simple cases. The json() method hits the endpoint and the other asserts are pretty self explanatory. One detail about assertJson(): this method converts the response into an array searches for the argument, so the order is important. You can chain multiple assertJson() calls in that case.
Now, let’s create the register endpoint test and write a couple for that endpoint:
$ php artisan make:test RegisterTest
class RegisterTest extends TestCase
{
    public function testsRegistersSuccessfully()
    {
        $payload = [
            'name' => 'John',
            'email' => 'john@toptal.com',
            'password' => 'toptal123',
            'password_confirmation' => 'toptal123',
        ];

        $this->json('post', '/api/register', $payload)
            ->assertStatus(201)
            ->assertJsonStructure([
                'data' => [
                    'id',
                    'name',
                    'email',
                    'created_at',
                    'updated_at',
                    'api_token',
                ],
            ]);;
    }

    public function testsRequiresPasswordEmailAndName()
    {
        $this->json('post', '/api/register')
            ->assertStatus(422)
            ->assertJson([
                'name' => ['The name field is required.'],
                'email' => ['The email field is required.'],
                'password' => ['The password field is required.'],
            ]);
    }

    public function testsRequirePasswordConfirmation()
    {
        $payload = [
            'name' => 'John',
            'email' => 'john@toptal.com',
            'password' => 'toptal123',
        ];

        $this->json('post', '/api/register', $payload)
            ->assertStatus(422)
            ->assertJson([
                'password' => ['The password confirmation does not match.'],
            ]);
    }
}
And lastly, the logout endpoint:
$ php artisan make:test LogoutTest
class LogoutTest extends TestCase
{
    public function testUserIsLoggedOutProperly()
    {
        $user = factory(User::class)->create(['email' => 'user@test.com']);
        $token = $user->generateToken();
        $headers = ['Authorization' => "Bearer $token"];

        $this->json('get', '/api/articles', [], $headers)->assertStatus(200);
        $this->json('post', '/api/logout', [], $headers)->assertStatus(200);

        $user = User::find($user->id);

        $this->assertEquals(null, $user->api_token);
    }

    public function testUserWithNullToken()
    {
        // Simulating login
        $user = factory(User::class)->create(['email' => 'user@test.com']);
        $token = $user->generateToken();
        $headers = ['Authorization' => "Bearer $token"];

        // Simulating logout
        $user->api_token = null;
        $user->save();

        $this->json('get', '/api/articles', [], $headers)->assertStatus(401);
    }
}
It’s important to note that, during testing, the Laravel application is not instantiated again on a new request. Which means that when we hit the authentication middleware, it saves the current user inside the
TokenGuardinstance to avoid hitting the database again. A wise choice, however—in this case, it means we have to split the logout test into two, to avoid any issues with the previously cached user.
Testing the Article endpoints is straightforward as well:
class ArticleTest extends TestCase
{
    public function testsArticlesAreCreatedCorrectly()
    {
        $user = factory(User::class)->create();
        $token = $user->generateToken();
        $headers = ['Authorization' => "Bearer $token"];
        $payload = [
            'title' => 'Lorem',
            'body' => 'Ipsum',
        ];

        $this->json('POST', '/api/articles', $payload, $headers)
            ->assertStatus(200)
            ->assertJson(['id' => 1, 'title' => 'Lorem', 'body' => 'Ipsum']);
    }

    public function testsArticlesAreUpdatedCorrectly()
    {
        $user = factory(User::class)->create();
        $token = $user->generateToken();
        $headers = ['Authorization' => "Bearer $token"];
        $article = factory(Article::class)->create([
            'title' => 'First Article',
            'body' => 'First Body',
        ]);

        $payload = [
            'title' => 'Lorem',
            'body' => 'Ipsum',
        ];

        $response = $this->json('PUT', '/api/articles/' . $article->id, $payload, $headers)
            ->assertStatus(200)
            ->assertJson([
                'id' => 1,
                'title' => 'Lorem',
                'body' => 'Ipsum'
            ]);
    }

    public function testsArtilcesAreDeletedCorrectly()
    {
        $user = factory(User::class)->create();
        $token = $user->generateToken();
        $headers = ['Authorization' => "Bearer $token"];
        $article = factory(Article::class)->create([
            'title' => 'First Article',
            'body' => 'First Body',
        ]);

        $this->json('DELETE', '/api/articles/' . $article->id, [], $headers)
            ->assertStatus(204);
    }

    public function testArticlesAreListedCorrectly()
    {
        factory(Article::class)->create([
            'title' => 'First Article',
            'body' => 'First Body'
        ]);

        factory(Article::class)->create([
            'title' => 'Second Article',
            'body' => 'Second Body'
        ]);

        $user = factory(User::class)->create();
        $token = $user->generateToken();
        $headers = ['Authorization' => "Bearer $token"];

        $response = $this->json('GET', '/api/articles', [], $headers)
            ->assertStatus(200)
            ->assertJson([
                [ 'title' => 'First Article', 'body' => 'First Body' ],
                [ 'title' => 'Second Article', 'body' => 'Second Body' ]
            ])
            ->assertJsonStructure([
                '*' => ['id', 'body', 'title', 'created_at', 'updated_at'],
            ]);
    }

}
Next Steps
That’s all there is to it. There’s definitely room for improvement—you can implement OAuth2 with the Passport package, integrate a pagination and transformation layer (I recommend Fractal), the list goes on—but I wanted to go through the basics of creating and testing an API in Laravel with no external packages.
Laravel development has certainly improved my experience with PHP and the ease of testing with it has solidified my interest in the framework. It’s not perfect, but it’s flexible enough to let you work around its issues.
If you’re designing a public API, check out 5 Golden Rules for Great Web API Design.
Further Reading on the Toptal Engineering Blog:
- Full User Authentication and Access Control: A Laravel Passport Tutorial, Pt. 1
- Building a GraphQL Server with Laravel
- JSON Web Token Tutorial: An Example in Laravel and AngularJS
- Handling Intensive Tasks with Laravel
- PHP Frameworks: Choosing Between Symfony and Laravel
Understanding the basics
-
What is Laravel?
Laravel is an opinionated PHP framework. It abstracts away the minutiae of building a web application to facilitate productivity, maintenance, and forward compatibility.
-
What is REST?
REpresentational State Transfer (REST) and RESTful web services represent a style of network communication between applications to transfer application states through a stateless protocol (such as HTTP).
-
What is the difference between JSON and XML?
JSON and XML are textual data formats. JSON (JavaScript Object Notation) uses JavaScript syntax to represent data and make it parseable while XML (eXtensible Markup Language) uses markup tagging and nesting to achieve the same thing.
-
What is Composer?
Composer is a package manager for PHP that manages software dependencies on an application level.
Introduction
Today a lot of websites use front-end JavaScript frameworks like React.js or Vue.js,
which require the backend to have some Restful API. Restful API is needed for mobile
apps, which consume backend APIs to do actions on behalf of a user. Restful APIs are also used
when you need to provide some integration methods for third-party systems. In this article,
we will show how to create a simple Restful API in Laravel. We will also create an authentication system
which will provide API access for SPAs with cookies, and for mobile apps and third-party systems
by issuing API tokens.
Create the Product Model
We will use the products and categories database as a simple example. A category may contain many products. A product belongs to one category.
First of all, we will create the categories
and products database tables. A Category will have the id and name fields. A Product will have the id, name, sku,price, and category_id fields. Create a Laravel migration file named database/migrations/2021_02_03_123000_create_two_tables.php:
With each product you can do the following:- GET `/api/products` - get the list of existing products
- GET `/api/products/{id}` - get a product by ID
- POST `/api/products` - create a new product
- PUT `/api/products/{id}` - update a product by ID
- DELETE `/api/products/{id}` - delete a product by IDLaravel provides a convenient way to create Restful APIs via resourceful controllers.
Create a route for the resourceful controller in routes/api.php:
Route::resource('products', 'ApiController');This route defines the GET, POST, PUT and DELETE actions for our resourceful controller.
Then create a file app/Http/Controllers/ApiController.php and put the following stub code in it:
response like below, assuming you have inserted some categories into your categories table
and some products into your products table:
{
"status": "SUCCESS",
"products": [
{
"id": 5,
"name": "Bottle of Mineral Water",
"sku": "BW-12345",
"price": "10.95",
"category_id": 3
},
{
"id": 7,
"name": "T-Shirt",
"sku": "TS-1532",
"price": "25.90",
"category_id": 2
},
{
"id": 8,
"name": "Hydraulic Drill",
"sku": "HD-94134",
"price": "200.50",
"category_id": 1
}
]
}In reality, there can be a lot of products (thousands or even millions), and the JSON response containing the list of all products
can become VERY long. To handle this problem, we can implement pagination. Modify the index() action as following:
public function index(Request $request)
{
    $page = $request->query('page', 0);
    $limit =  $request->query('limit', 10);
    $products = Product::skip($page*$limit)->take($limit)->get();

    $jsonData = ['status' => 'SUCCESS', 'products' => []];

    foreach ($products as $product){

        $jsonData ['products'][] = [
            'id' => $product->id,
            'name' => $product->name,
            'sku' => $product->sku,
            'price' => $product->price,
            'category_id' => $product->category->id,
        ];
    }

    return response()->json($jsonData);
}
Now you can enter the URL http://localhost/api/products?page=1&limit=10 in your web browser to see only a portion of products.
To show different pages of products, just increment the page query parameter. The query parameter limit defines how many
products per page the API will return.
Retrieving the Given Product
The action show() allows to retrieve an existing Product by its ID:
public function show($id)
{
    $product = Product::where('id', $id)->firstOrFail();

    $jsonData = [
        'status' => 'SUCCESS',
        'product' => [
            'id' => $product->id,
            'name' => $product->name,
            'sku' => $product->sku,
            'price' => $product->price,
            'category_id' => $product->category->id,
        ]
    ];

    return response()->json($jsonData);
}
Now if you open the URL http://localhost/api/products/5 in your browser (replace 5 with the actual product ID), you should see a response like below:
{
    "status": "SUCCESS",
    "product": {
        "id": 5,
        "name": "Bottle of Mineral Water",
        "sku": "BW-12345",
        "price": "10.95",
        "category_id": 3
    }
}
Creating a Product
The action store() allows to create a product:
public function store(Request $request)
{
    $data = $request->all();
    $product = new Product($data);
    $product->save();

    return [
            'status' => 'SUCCESS',
            'product' => [
                'id' => $product->id,
                'name' => $product->name,
                'sku' => $product->sku,
                'price' => $product->price,
                'category_id' => $product->category->id,
            ],
        ];
}
To create a real product, we will need to use the CURL command line utility, since it allows to make POST requests:
curl --location --request POST 'http://localhost/api/products'
--header 'Content-Type: application/json'
--data-raw '{"name":"Big Bananas", "sku":"BA-1495", "price":"5.95", "category_id":3}'
The API should response like below:
{
    "status": "SUCCESS",
    "product": {
        "id": 23,
        "name": "Big Bananas",
        "sku": "BA-1495",
        "price": "5.95",
        "category_id": 3
    }
}
Since users of your API can supply any data they want (including incorrect data), we need to perform validation
to ensure the data passes some rules. For example, the name field should be a string shorter than 512 characters in length,
and it should always present (be required). Modify the store() method as follows to add validation:
public function store(Request $request)
{
    $validated = $request->validate([
        'name' => 'required|unique:products|max:512',
        'sku' => 'required|unique:products|max:128',
        'price' => 'required|numeric|min:0|max:99999',
        'category_id' => 'required|exists:categories,id',
    ]);

    $data = $request->all();
    $product = new Product($data);
    $product->save();

    return [
        'status' => 'SUCCESS',
        'product' => [
            'id' => $product->id,
            'name' => $product->name,
            'sku' => $product->sku,
            'price' => $product->price,
            'category_id' => $product->category->id,
        ],
    ];
}
Now if you try to supply some invalid data, you will get a response describing what was wrong
with your input.
Updating an Existing Product
The action update() allows to update an existing product:
public function update(Request $request, $id)
{
    $validated = $request->validate([
        'name' => 'unique:products|max:512',
        'sku' => 'unique:products|max:128',
        'price' => 'numeric|min:0|max:99999',
        'category_id' => 'exists:categories,id',
    ]);

    $data = $request->all();
    $product = Product::where('id', $id)->firstOrFail();
    $product->fill($data);
    $product->save();

    $jsonData = [
        'status' => 'SUCCESS',
        'product' => [
            'id' => $product->id,
            'name' => $product->name,
            'sku' => $product->sku,
            'price' => $product->price,
            'category_id' => $product->category->id,
        ]
    ];

    return response()->json($jsonData);
}
To update a real product, make the following PUT request with CURL:
curl --location --request PUT 'http://localhost/api/products/5'
--header 'Content-Type: application/json'
--data-raw '{"price":10.1}'
The API should return something like below:
{
    "status": "SUCCESS",
    "product": {
        "id": 5,
        "name": "Bottle of Mineral Water",
        "sku": "BW-12345",
        "price": 10.1,
        "category_id": 3
    }
}
Deleting a Product
The action destroy() allows to delete an existing product:
public function destroy($id)
{
    $product = Product::where('id', $id)->firstOrFail();
    $product->delete();

    $jsonData = [
        'status' => 'SUCCESS',
    ];

    return response()->json($jsonData);
}
To delete some product, issue the following DELETE request with CURL:
curl --location --request DELETE 'http://localhost/api/products/5' The API should response:
{
    "status": "SUCCESS"
}
Forcing JSON Response for the API Route
Restful API should alway return JSON response, even if there was some PHP exception in your code.
To force JSON responses on every action, we need to use a Middleware. To do that,
create the file app/Http/Middleware/ForceJsonResponse.php:
describing the exception and giving the stack trace. However, this may be undesirable since

we want to give the user only the minimum of information. To do that,

modify the render() method in the app/Exceptions/Handler.php file:
public function render($request, Exception $exception)
{
if ($request->is('api/*')) {
if ($exception instanceOf IlluminateValidationValidationException) {
$messages = [];
foreach ($exception->errors() as $key => $errors) {
$messages[] = implode(', ', $errors);
}
$message = implode(', ', $messages);
} else {
$message = $exception->getMessage();
}
$jsonData = [
'status' => 'ERROR',
'message' => $message,
];
return response()->json($jsonData);
}
return parent::render($request, $exception);
}We basicly did the following. If an URL of some request starts with api, which means some API call,
we return the status ERROR and the message of exception. In addition, for validation exceptions,
we concatenate the list of validation errors. As a result, the user will see a response like below:
{
    "status": "ERROR",
    "message": "Some short and clear error message"
}
Rate Limiting
Rate limiting is very useful if you want to protect your server from being overloaded by
too many API requests. Laravel provides a useful middleware for that named throttle.
Just modify the routes/api.php file as follows (add throttle:20,1 to the list of middleware):
Route::group(['middleware' => ['json.response', 'throttle:20,1']], function () {

    Route::resource('products', 'ApiController');

});
The line throttle:20,1 means that a particular user will be able to make maximum of 20 requests per minute. In case of
too many requests, the user will see the following response:
{
    "status": "ERROR",
    "message": "Too Many Attempts."
}
Authentication
For now any person can use our API, which is not secure. We want to close the API to everybody except users which we granted access to.
This is also called authentication. In Laravel, you can implement several types of authentication:
- API token access. It is good for simple APIs where you issue personal access tokens.
- Cookie based access. It is very simple and suitable for Single Page Apps (SPAs), like React.js or Vue.js frontend apps.
- OAuth, which is the most secure and good for giving access to your API for third-party systems, although it is the most sophisticated of the three.
In this tutorial, we will implement the API based token access and Cookie based access. In Laravel, we have a module called Sanctum, which allows to do that.
Install Laravel Sanctum with Composer:
composer require laravel/sanctumThen you need to publish the Sanctum configuration and migration files:
php artisan vendor:publish --provider="LaravelSanctumSanctumServiceProvider"Run the following command to create the tables for API tokens:
php artisan migrateAdd Sanctum’s middleware to your api middleware group inside of app/Http/Kernel.php file:
'api' => [
    LaravelSanctumHttpMiddlewareEnsureFrontendRequestsAreStateful::class,
    ...
],
API Token Authentication
Modify the app/User.php file and add the HasApiTokens trait to your User model class:
use LaravelSanctumHasApiTokens;

class User extends Authenticatable
{
    use HasApiTokens, Notifiable;
}
To protect your API routes, modify routes/api.php as follows (note the auth:sanctum item in the list of middleware):
Route::group(['middleware' => ['json.response', 'auth:sanctum', 'throttle:20,1']], function () {

    Route::resource('products', 'ApiController');

});
Testing a Token
To issue a test token, you can create a simple POST action in your routes/web.php:
use IlluminateHttpRequest;

Route::get('/tokens/create', function (Request $request) {
    $token = $request->user()->createToken($request->token_name);

    return ['token' => $token->plainTextToken];
});
Now log in to your website with some user (we assume that you already have an authentication system in place),
and type http://localhost/tokens/create?token_name=test. You should see your token returned:
{"token":"2|lFv0wxshfcCGtFbi8xNqPFAacxWjI9ymRe5zqtHw"}Next, you need to add the Authorization: Bearer header to all your API requests, like below:
curl --location --request GET 'http:/localhost/api/products/3333'
--header 'Authorization: Bearer 2|lFv0wxshfcCGtFbi8xNqPFAacxWjI9ymRe5zqtHw'
Cookie Based Authentication
To authenticate SPAs, Laravel Sanctum provides an additional cookie based method of authentication.
First, configure which domains your frontend app will be making requests from. If your SPA is hosted at the same server
where your Laravel backend is hosted, use ‘localhost’. Modify the stateful configuration option in your config/sanctum.php
configuration file to make it look like below:
'stateful' => explode(',', env(
        'SANCTUM_STATEFUL_DOMAINS',
        'localhost,localhost:3000,127.0.0.1,127.0.0.1:8000,::1'
    )),
Next, add the EnsureFrontendRequestsAreStateful middleware to your app/Http/Kernel.php file:
use LaravelSanctumHttpMiddlewareEnsureFrontendRequestsAreStateful;

'api' => [
    EnsureFrontendRequestsAreStateful::class,
    //...
],
Testing Cookie-Based Access
To authenticate your frontend app, first issue a request to the http://localhost/sanctum/csrf-cookie URL
to initialize CSRF protection for the application:
axios.get('/sanctum/csrf-cookie').then(response => {
    // Do login...
});
Once you made that request, Laravel will set an XSRF-TOKEN cookie containing the CSRF token.
You should pass the token to further API requests an X-XSRF-TOKEN header, which is typically
done with your JavaScript HTTP client library automatically.
After getting the CSRF cookie, log in as some user via your /login action (we assume you have your login route in place already).
On successful login, you will be authenticated and should be able to issue API requests without problems.
Conclusion
In this article, we considered how to create a fully-functional Restful API in your Laravel website. The API we created
supports CRUD (Create-Read-Update-Delete) actions for the Product resource. We showed how to implement JSON responses,
error reporting and rate limiting. Finally, we implemented the API token-based and Cookie-based authentication with Laravel Sanctum, so only users who are granted access could
issue the API calls.
Laravel, API
Рекомендация: подборка платных и бесплатных курсов Java — https://katalog-kursov.ru/
inb4: копипаста из документации
В гайде упор на быстрое развертывание минимального набора для полноценной разработки API в соответствии с best practice, взятыми из документации Laravel 5.7, собранными в одном месте. Писал для себя и коллег как шпаргалку, надеюсь пригодится кому-нибудь еще.
Предварительная настройка
Ставим фреймворк
composer create-project --prefer-dist laravel/laravel scaffold-api
Удаляем ненужные UI компоненты (vuejs, react)
php artisan preset none
Настраиваем подключение к БД
Переходим в папку, редактируем файл .env:
DB_CONNECTION=mysql
DB_HOST=localhost
DB_PORT=3306
DB_DATABASE=api-authentification
DB_USERNAME=root
DB_PASSWORD=
Приступаем к генерации
Выполняем в консоли
php artisan make:model Game -mrc
Получаем модель, миграцию и контроллер:
Model created successfully.
Factory created successfully.
Created Migration: 2019_02_27_105610_create_games_table
Controller created successfully.
Создаем колонки в таблице БД
Правим миграцию, добавляя в таблицу нужны колонки. Наиболее часто используемые типы:
increments('id')string('title')text('description')tinyInteger('complexity')boolean('isActive')softDeletes()
Для необязательных полей не забываем добавлять значение по умолчанию с помощью ->default()
Применяем миграции, выполняя php artisan migrate
Генерируем правила валидации
Выполняем php artisan make:request GameRequest
Открываем App/Http/Requests/GameRequest.php.
В методе authorize() ставим return true, пока мы не добавили авторизацию.
В массиве, который возвращается в методе rules(), описываются правила для всех колонок, которые мы перечисляли в миграции. Доступные правила здесь
Для минимизации кода, мы используем конструкцию switch для разных http-глаголов, вместо того, чтобы делать отдельные StoreGameRequest, UpdateGameRequest и т.д.
public function rules(Request $request)
    {
      $rules = [
          'title' => 'required|string|unique:games,title',
          'description' => '',
          'complexity' => 'required|min:1|max:10',
          'minPlayers' => 'required|min:1|max:10',
          'maxPlayers' => 'required|min:1|max:10',
          'isActive' => 'required|boolean'
      ];

      switch ($this->getMethod())
      {
        case 'POST':
          return $rules;
        case 'PUT':
          return [
            'game_id' => 'required|integer|exists:games,id', //должен существовать. Можно вот так: unique:games,id,' . $this->route('game'),
            'title' => [
              'required',
              Rule::unique('games')->ignore($this->title, 'title') //должен быть уникальным, за исключением себя же
            ]
          ] + $rules; // и берем все остальные правила
        // case 'PATCH':
        case 'DELETE':
          return [
              'game_id' => 'required|integer|exists:games,id'
          ];
      }
    }
Собственные варианты описания ошибок
Если нужны собственные тексты ошибок, переопределяем метод messages(), который возвращает массив с переводами каждого правила:
public function messages()
    {
        return [
            'date.required' => 'A date is required',
            'date.date_format'  => 'A date must be in format: Y-m-d',
            'date.unique'  => 'This date is already taken',
            'date.after_or_equal'  => 'A date must be after or equal today',
            'date.exists'  => 'This date doesn't exists',
        ];
    }
Для того, чтобы в правилах валидации были доступны не только параметры, переданные в теле запроса, но и параметры, переданные в URL, переопределяем метод all (который обычно используют в контролере в виде $request->all()):
public function all($keys = null)
    {
      // return $this->all();
      $data = parent::all($keys);
      switch ($this->getMethod())
      {
        // case 'PUT':
        // case 'PATCH':
        case 'DELETE':
          $data['date'] = $this->route('day');
      }
      return $data;
    }
Настраиваем контроллер и описываем бизнес-логику
Открываем HttpControllersGameController. Удаляем сгенерированные методы create(), edit(), предназначенные для рендеринга форм (поскольку у нас REST API, они не нужны).
Заменяем стандартный use IlluminateHttpRequest;, на наш use AppHttpRequestsGameRequest;
Далее правим методы:
public function index()
    {
        return Game::all();
    }
public function store(GameRequest $request)
{
$day = Game::create($request->validated());
return $day;
}public function show(Game $game)
{
return $game = Game::findOrFail($game);
}public function update(GameRequest $request, $id)
{
$game = Game::findOrFail($id);
$game->fill($request->except(['game_id']));
$game->save();
return response()->json($game);
}public function destroy(GameRequest $request, $id)
{
$game = Game::findOrFail($id);
if($game->delete()) return response(null, 204);
}Если логики много, то её лучше вынести в отдельный слой Service/Repository
Настраиваем модель
Открываем модель app/Http/Game.php и добавляем свойства:
protected $fillable = ['title', 'description', 'complexity', 'minPlayers', 'maxPlayers', 'isActive'];

protected $hidden = ['created_at', 'updated_at', 'deleted_at'];
Настраиваем middleware
Чтобы наше приложение всегда возвращало json независимо от переданных заголовков, создаем middleware:
php artisan make:middleware ForceJsonResponseи добавляем в него код:
public function handle($request, Closure $next)
    {
        $request->headers->set('Accept', 'application/json');
        return $next($request);
    }
Регистрируем этот middleware в app/Http/Kernel.php:
...
'api' => [
            'throttle:60,1',
            'bindings',
            AppHttpMiddlewareForceJsonResponse::class,
        ],
Настраиваем роутинг
Открываем routes/api.php и добавляем:
use HttpControllersGameController;

Route::apiResource('/games', 'GameController');
Статичский метод Route::apiResource, в отличие от метода resource, исключает методы edit и create, оставляя только index, show, store, update, destroy.
Этого же можно добиться более очевидной записью:
Route::resource('/games', 'GameController')->only([
    'index', 'show', 'store', 'update', 'destroy'
]);
Теперь, можно посмотреть пути командой php artisan route:list и пользоваться.
REST API готово!
Послесловие
Послесловие
Если нужна авторизация, то подойдет стандартный Laravel Passport.
Настраиваем авторизацию Laravel Passport
composer require laravel/passport
php artisan make:auth
php artisan passport:install
php artisan migrate
Добавляем трейт LaravelPassportHasApiTokens в модель AppUser и вызов Passport::routesmethod в метод boot app/AuthServiceProvider:
public function boot() {
    $this->registerPolicies();
    Passport::routes();
}
В файле config/auth.php меняем драйвер на passport:
'api' => [
        'driver' => 'passport',
        'provider' => 'users',
    ],
Создаем контроллер для авторизации ‘php artisan make:controller Api/AuthController.php`
Добавляем туда код
use AppUser;
use IlluminateSupportFacadesValidator;
public function register (Request $request) {
$validator = Validator::make($request->all(), [
'name' => 'required|string|max:255',
'email' => 'required|string|email|max:255|unique:users',
'password' => 'required|string|min:6|confirmed',
]);
if ($validator->fails())
{
return response(['errors'=>$validator->errors()->all()], 422);
}
$request['password']=Hash::make($request['password']);
$user = User::create($request->toArray());
$token = $user->createToken('Laravel Password Grant Client')->accessToken;
$response = ['token' => $token];
return response($response, 200);
}
public function login (Request $request) {
$user = User::where('email', $request->email)->first();
if ($user) {
if (Hash::check($request->password, $user->password)) {
$token = $user->createToken('Laravel Password Grant Client')->accessToken;
$response = ['token' => $token];
return response($response, 200);
} else {
$response = "Password missmatch";
return response($response, 422);
}
} else {
$response = 'User does not exist';
return response($response, 422);
}
}
public function logout (Request $request) {
$token = $request->user()->token();
$token->revoke();
$response = 'You have been succesfully logged out!';
return response($response, 200);
}После этого можно пользоваться методами api/register, api/login, api/logout для авторизации, и закрыть доступ к апи. Для этого нужно обернуть роутинг наших REST контроллеров в middleware:
Route::middleware('auth:api')->group(function () {
    ...
    Route::get('/logout', 'ApiAuthController@logout')->name('logout');
});
Послепослесловие
Послепослесловие:
Тут бы еще сделать функциональные тесты и генерацию документации в swagger, но это немного выходит за рамки scaffold-туториала, так что об этом в другой раз
With the rise of mobile and javascript web frameworks such as React and Vue, Restful APIs have seen their popularity increase. This is because you can maintain one backend serving multiple front-end clients.
Laravel provides a good environment and ecosystem for building your Rest API.
First-party packages such as Laravel Passport and Laravel Sanctum provide API authentication implementation making authentication easy.
Laravel Breeze provides starter templates that can help with reset password features.
Socialite and Scout provide Social Login implementations and Full-text search functionalities.
The laravel ecosystem provides solutions to almost all problems you can encounter in your development journey thus providing maximum productivity to a developer.
This tutorial will explore how to create a Laravel Rest API with authentication using Laravel Sanctum.
What is a Restful API?
REST stands for REpresentational State Transfer and it is a pattern used for communication between applications through HTTP. The protocol is stateless meaning no session is stored between the applications. Each request is therefore processed as if it is a new request even though it is repeated.
A benefit of REST APIs is that they can easily be cached. It is easy to cache a response from the Rest API in a service such as Redis or Memcached and thus easy to scale.
For an API to be considered Restful, it has to have the following
- Must be accessible over a URL or endpoint
- Must use any of the REST Methods
The common REST Methods are:
GET -Fetch resources from an API
POST -Create a resource in the API
PUT/PATCH -Update a resource in the API
DELETE – Delete a resource from an API
- Can have HTTP headers
- Must return a valid response code in each response.
How to build a REST API with Laravel
Create a new Application
The first step is to create a new Laravel application.
laravel new rest
Enter fullscreen mode
Exit fullscreen mode
Set up a Model and Migration
The next step is to create a Model and its corresponding migration file. This acts as a blueprint for our database table. In this tutorial, I will use Products as my resource.
php artisan make:model Products -m
Enter fullscreen mode
Exit fullscreen mode
The -m flag will instruct Laravel to create the corresponding migration file of the Products Model.
//App/Models/Products
<?php

namespace AppModels;

use IlluminateDatabaseEloquentFactoriesHasFactory;
use IlluminateDatabaseEloquentModel;

class Products extends Model
{

    use HasFactory;

}
Enter fullscreen mode
Exit fullscreen mode
The migration file generated will resemble the one below.
<?php

use IlluminateDatabaseMigrationsMigration;
use IlluminateDatabaseSchemaBlueprint;
use IlluminateSupportFacadesSchema;

return new class extends Migration
{
    /**
     * Run the migrations.
     *
     * @return void
     */
    public function up()
    {
        Schema::create('products', function (Blueprint $table) {
            $table->id();
            $table->timestamps();
        });
    }

    /**
     * Reverse the migrations.
     *
     * @return void
     */
    public function down()
    {
        Schema::dropIfExists('products');
    }
};
Enter fullscreen mode
Exit fullscreen mode
We can start by updating the migration file by adding more columns to our database. I will add the following columns: product name , product price and product description
<?php

use IlluminateDatabaseMigrationsMigration;
use IlluminateDatabaseSchemaBlueprint;
use IlluminateSupportFacadesSchema;

return new class extends Migration
{
    /**
     * Run the migrations.
     *
     * @return void
     */
    public function up()
    {
        Schema::create('products', function (Blueprint $table) {
            $table->id();
            $table->string('name');
            $table->double('price');
            $table->longText('description');
            $table->timestamps();
        });
    }

    /**
     * Reverse the migrations.
     *
     * @return void
     */
    public function down()
    {
        Schema::dropIfExists('products');
    }
};
Enter fullscreen mode
Exit fullscreen mode
We can then update the Products model by registering the mass-assignable variables. This helps prevent SQL injection by instructing laravel only to accept data containing the specified keys/variables.
//App/Models/Products
<?php

namespace AppModels;

use IlluminateDatabaseEloquentFactoriesHasFactory;
use IlluminateDatabaseEloquentModel;

class Products extends Model
{
    use HasFactory;

    protected $fillable = [
        'name', 'price', 'description'
    ];
}
Enter fullscreen mode
Exit fullscreen mode
The last step is to set up the database credentials in the .env file and create the database
DB_CONNECTION=mysql
DB_HOST=127.0.0.1
DB_PORT=3306
DB_DATABASE=laravel-rest
DB_USERNAME=root
DB_PASSWORD=password
Enter fullscreen mode
Exit fullscreen mode
The final step is to migrate the database.
php artisan migrate
Enter fullscreen mode
Exit fullscreen mode
Create a Database Seeder and Factory
When developing, I prefer to use fake data to ensure that I develop as fast as possible. Laravel provides a handy Factory facade that can allow us to use Faker to generate dummy data.
We can run this command to create a Factory
php artisan make:factory ProductsFactory
Enter fullscreen mode
Exit fullscreen mode
This will create a file in the databases/factories folder
We can update the file as follows
//database/factories/ProductsFactory
<?php

namespace DatabaseFactories;

use IlluminateDatabaseEloquentFactoriesFactory;

/**
 * @extends IlluminateDatabaseEloquentFactoriesFactory<AppModelsProducts>
 */
class ProductsFactory extends Factory
{
    /**
     * Define the model's default state.
     *
     * @return array<string, mixed>
     */
    public function definition()
    {
        return [
            'name' => $this->faker->word,
            'price' => $this->faker->numberBetween(1, 99),
            'description' => $this->faker->sentence()
        ];
    }
}
Enter fullscreen mode
Exit fullscreen mode
Now that our factory is ready, we can call it in the DatabaseSeeder file to seed our database.
//database/seeders/DatabaseSeeder
<?php

namespace DatabaseSeeders;

// use IlluminateDatabaseConsoleSeedsWithoutModelEvents;
use IlluminateDatabaseSeeder;

class DatabaseSeeder extends Seeder
{
    /**
     * Seed the application's database.
     *
     * @return void
     */
    public function run()
    {
        AppModelsProducts::factory(10)->create();
    }
}
Enter fullscreen mode
Exit fullscreen mode
We can now seed the database
php artisan db:seed
Enter fullscreen mode
Exit fullscreen mode
Create a Controller
Let’s now create a Controller which will contain all the Business logic for the API.
php artisan make:controller ProductsController -r
Enter fullscreen mode
Exit fullscreen mode
The -r flag will generate a Controller that is resourceful. This means it will create a controller with all the required methods for a Restful API.
The main methods we will use are index , show , store , update and destroy. We can delete the create and edit methods as we will not need them. We can update the Products Controller as shown below
//App/Http/Controllers/ProductsController

<?php

namespace AppHttpControllers;

use AppHttpResourcesProductResource;
use AppModelsProducts;
use IlluminateHttpRequest;

class ProductsController extends Controller
{
    /**
     * Display a listing of the resource.
     *
     * @return IlluminateHttpResponse
     */
    public function index()
    {
        //
    }

    /**
     * Store a newly created resource in storage.
     *
     * @param IlluminateHttpRequest $request
     * @return IlluminateHttpResponse
     */
    public function store(Request $request)
    {
        //
    }

    /**
     * Display the specified resource.
     *
     * @param Products $product
     * @return IlluminateHttpResponse
     */
    public function show(Products $product)
    {
        //
    }

    /**
     * Update the specified resource in storage.
     *
     * @param IlluminateHttpRequest $request
     * @param Products $product
     * @return IlluminateHttpResponse
     */
    public function update(Request $request, Products $product)
    {
        //
    }

    /**
     * Remove the specified resource from storage.
     *
     * @param Products $product
     * @return IlluminateHttpResponse
     */
    public function destroy(Products $product)
    {
        //
    }
}
Enter fullscreen mode
Exit fullscreen mode
These methods can be mapped to the default HTTP verbs (get, post, patch/put and delete).
Index(Get all Products)
We can use this method to return all products present in the database
use AppModelsProducts;
public function index()
{
   return Products::all();
}
Enter fullscreen mode
Exit fullscreen mode
We can further customise it by paginating it or caching the response from the database.
Show(Get a Single Product)
We can use this method to return a single product present in the database
We can pass the product id as a parameter and we can then fetch it from the database
Note: I am using API Resources which I will discuss later in the article.
use AppHttpResourcesProductResource;
use AppModelsProducts;

public function show(Products $product)
{
   return new ProductResource($product);
}
Enter fullscreen mode
Exit fullscreen mode
Store(Create a Product)
We can create a new product record in the database using this method. A post method can be made to this method through an endpoint to create the record
use AppHttpResourcesProductResource;
use AppModelsProducts;

public function store(Request $request)
{
        $product_name = $request->input('name');
        $product_price = $request->input('price');
        $product_description = $request->input('description');

        $product = Products::create([
            'name' => $product_name,
            'price' => $product_price,
            'description' => $product_description,
        ]);
        return response()->json([
            'data' => new ProductResource($product)
        ], 201);
}
Enter fullscreen mode
Exit fullscreen mode
Update(Update Product Details)
To update the product details , we can update the logic of the update method
use AppHttpResourcesProductResource;
use AppModelsProducts;

public function update(Request $request, Products $product)
{
        $product_name = $request->input('name');
        $product_price = $request->input('price');
        $product_description = $request->input('description');

        $product->update([
            'name' => $product_name,
            'price' => $product_price,
            'description' => $product_description,
        ]);
        return response()->json([
            'data' => new ProductResource($product)
        ], 200);
}
Enter fullscreen mode
Exit fullscreen mode
Destroy(Delete a Product)
At times you might want to delete products from the database. We can add the following code to delete products from the database.
use AppModelsProducts;

public function destroy(Products $product)
{
   $product->delete();
   return response()->json(null,204);
}
Enter fullscreen mode
Exit fullscreen mode
Routes and endpoints
Let’s now create the endpoints that will be accessible over HTTP. We can add the routes in the routes/api.php file
//routes/api.php
<?php

use AppHttpControllersProductsController;
use IlluminateHttpRequest;
use IlluminateSupportFacadesRoute;

/*
|--------------------------------------------------------------------------
| API Routes
|--------------------------------------------------------------------------
|
| Here is where you can register API routes for your application. These
| routes are loaded by the RouteServiceProvider within a group which
| is assigned the "api" middleware group. Enjoy building your API!
|
*/

Route::middleware('auth:sanctum')->get('/user', function (Request $request) {
    return $request->user();
});

Route::get('products', [ProductsController::class, 'index'])->name('products.index');
Route::get('products/{product}', [ProductsController::class, 'show'])->name('products.show');
Route::post('products', [ProductsController::class, 'store'])->name('products.store');
Route::put('products/{product}', [ProductsController::class, 'update'])->name('products.update');
Route::delete('products/{product}', [ProductsController::class, 'destroy'])->name('products.destroy');
Enter fullscreen mode
Exit fullscreen mode
These endpoints are mapped to the methods in the ProductsController we created earlier.
We can now test the index method through a GET request. This will return the following response
[
    {
        "id": 1,
        "name": "quo",
        "price": 15,
        "description": "Ut rerum aut deleniti eveniet ad et ullam perferendis.",
        "created_at": "2022-11-18T15:18:13.000000Z",
        "updated_at": "2022-11-18T15:18:13.000000Z"
    },
    {
        "id": 2,
        "name": "maxime",
        "price": 70,
        "description": "Natus officiis repellat vero ea voluptatem mollitia similique.",
        "created_at": "2022-11-18T15:18:13.000000Z",
        "updated_at": "2022-11-18T15:18:13.000000Z"
    }
]
Enter fullscreen mode
Exit fullscreen mode
Formatting the Response
The response above is returned in JSON format. It includes details from the database with the column names as the keys.
What if you want to format this response? One thing you might not want to expose is the created_at and updated_at data. You might also want to calculate and return a predefined discount back as a response.
Laravel allows us to customize our responses using API resources.
In this example, I will assume that all products have a 10% discount. I will therefore return the product price and the discounted price as part of the payload in the response.
php artisan make:resource ProductResource
Enter fullscreen mode
Exit fullscreen mode
This will transform a model into an array.
//App/Http/Resources/ProductResource
<?php

namespace AppHttpResources;

use IlluminateHttpResourcesJsonJsonResource;

class ProductResource extends JsonResource
{
    /**
     * Transform the resource into an array.
     *
     * @param IlluminateHttpRequest $request
     * @return array|IlluminateContractsSupportArrayable|JsonSerializable
     */
    public function toArray($request)
    {
        return [
            'id' => $this->id,
            'product_name' => $this->name,
            'product_price' => "$" . $this->price,
            'discounted_price' => "$" . ($this->price * 0.9),
            'discount' => "$" . ($this->price * 0.1),
            'product_description' => $this->description,
        ];
    }
}
Enter fullscreen mode
Exit fullscreen mode
Let’s update our index method in Products Controller to use the Product resource
public function index()
{
   return ProductResource::collection(Products::all());
}
Enter fullscreen mode
Exit fullscreen mode
This will return the newly formatted response
{
    "data": [
        {
            "id": 1,
            "product_name": "quo",
            "product_price": "$15",
            "discounted_price": "$13.5",
            "discount": "$1.5",
            "product_description": "Ut rerum aut deleniti eveniet ad et ullam perferendis."
        },
{
            "id": 2,
            "product_name": "maxime",
            "product_price": "$70",
            "discounted_price": "$63",
            "discount": "$7",
            "product_description": "Natus officiis repellat vero ea voluptatem mollitia similique."
        }
    ]
}
Enter fullscreen mode
Exit fullscreen mode
Response Codes
It is important to always return a valid response code in each request. These response codes can be used by a consuming application or client to know what exactly happened on the server side.
Here is a list of the most common response codes
- 200 – Ok. This signifies it is a success code and it is the default response code
- 201- Created. This shows that a resource has been created. It is useful for POST requests.
- 204- No Content. This signifies that the action was successful but no content is returned. It is useful for DELETE requests since a deleted resource cannot return any body content
- 400- Bad Request. This signifies that the client passed an invalid request to the server
- 401- Unauthorized. This signifies that the client is not authorized to access the resource. It is typically used in authentication and authorization services.
- 403- Forbidden. This signifies that a user is authenticated but is not allowed to access the resource.
- 404- Not Found. This signifies that a resource is not found
- 500- Internal Server Error. This implies that there is an error at the server level
Laravel allows us to specify the correct response code using the response()->json() helper function. It is important to always return a response code so that the client/frontend can display the correct data and “fail gracefully” in the case of an error.
response()->json(data,status code)
Enter fullscreen mode
Exit fullscreen mode
Setting up Authentication with Laravel Sanctum
We have discussed the most basic way of creating a CRUD REST API in Laravel. We now want to add authentication to our API in order to secure it. There are two ways in which we can implement authentication; either through Laravel Passport or Laravel Sanctum.
Passport provides a way in which applications authenticate themselves over the internet. It basically adds Oauth implementation to your API which other systems can use to authenticate themselves when interacting with your API. It is useful for public APIs where you might want to track API usage and also limit requests for each API key.
Sanctum on the other hand provides a stateless integration of the normal authentication service by using email and passwords to provide authentication to a client. It is useful for private/internal APIs that don’t need all the features provided by an OAuth Server.
In this part, I will use Laravel Sanctum to create a simple authentication service for my API. I will use the default email and password to authenticate a user.
To learn more about the two authentication packages, you can read the Laravel Sanctum article or the Laravel Passport article.
Configuration and Setup
We will first create an authentication scaffold using Laravel Breeze
composer require laravel/breeze --dev
Enter fullscreen mode
Exit fullscreen mode
We can then install the package
php artisan breeze:install
php artisan migrate
npm install
npm run dev
Enter fullscreen mode
Exit fullscreen mode
This will create a basic authentication scaffold and a forgot and reset password functionality out of the box.
Let’s now install Laravel sanctum and set it up
composer require laravel/sanctum
Enter fullscreen mode
Exit fullscreen mode
Next is to publish Sanctum’s configurations
php artisan vendor:publish --provider="LaravelSanctumSanctumServiceProvider"
Enter fullscreen mode
Exit fullscreen mode
Finally, we can migrate the database that will store the access tokens
php artisan migrate
Enter fullscreen mode
Exit fullscreen mode
The last step is to allow Sanctum to issue access tokens which will be used to authenticate users’ requests.
App/Models/User
<?php

namespace AppModels;

// use IlluminateContractsAuthMustVerifyEmail;
use IlluminateDatabaseEloquentFactoriesHasFactory;
use IlluminateFoundationAuthUser as Authenticatable;
use IlluminateNotificationsNotifiable;
use LaravelSanctumHasApiTokens; //import the trait

class User extends Authenticatable
{
    use HasApiTokens; //add this trait
    use HasFactory, Notifiable;

    /**
     * The attributes that are mass assignable.
     *
     * @var array<int, string>
     */
    protected $fillable = [
        'name',
        'email',
        'password',
    ];

    /**
     * The attributes that should be hidden for serialization.
     *
     * @var array<int, string>
     */
    protected $hidden = [
        'password',
        'remember_token',
    ];

    /**
     * The attributes that should be cast.
     *
     * @var array<string, string>
     */
    protected $casts = [
        'email_verified_at' => 'datetime',
    ];
}
Enter fullscreen mode
Exit fullscreen mode
We can now create a new controller that will be responsible for the Authentication
php artisan make:controller UserAuthenticationController
Enter fullscreen mode
Exit fullscreen mode
Register
We can start by fleshing out the user registration logic. We will use the default user table that comes with laravel but feel free to add and remove some columns as you please
use IlluminateSupportFacadesAuth;
use IlluminateSupportFacadesHash;

public function register(Request $request)
{
        $name = $request->input('name');
        $email = strtolower($request->input('email'));
        $password = $request->input('password');

        $user = User::create([
            'name' => $name,
            'email' => $email,
            'password' => Hash::make($password)
        ]);

        $token = $user->createToken('auth_token')->plainTextToken;

        return response()->json([
            'message' => 'User Account Created Successfully',
            'access_token' => $token,
            'token_type' => 'Bearer',
        ], 201);
}
Enter fullscreen mode
Exit fullscreen mode
From the code, we can see that a user account is created in the database and an access token is issued to the user and is returned back to the user as a response.
Login
The next important feature is to allow users to log in. We can add the following logic
use IlluminateSupportFacadesAuth;

public function login(Request $request)
    {
        $email = strtolower($request->input('email'));
        $password = $request->input('password');

        $credentials = [
            'email' => $email,
            'password' => $password
        ];
        if (!Auth::attempt($credentials)) {
            return response()->json([
                'message' => 'Invalid login credentials'
            ], 401);
        }

        $user = User::where('email', $request['email'])->firstOrFail();

        $token = $user->createToken('auth_token')->plainTextToken;

        return response()->json([
            'access_token' => $token,
            'token_type' => 'Bearer',
        ],200);
    }
Enter fullscreen mode
Exit fullscreen mode
Similar to the registration, we need to return the access token as soon as the user credentials have been validated.
If the credentials are wrong, we need to alert the user that their credentials are wrong. But how?🤔
Since a REST API is stateless, there is no way of flashing responses in real-time. We, therefore, need to return a valid response code and a descriptive message so that a user knows what happened at the server level.
We can use a simple if else statement but this might make our code less clean. A solution is to use the default Exception Handler provided by Laravel.
We can add some logic to apply to the whole API and catch any Authentication Exceptions and return back a valid API Response back to the client.
We can update the App/Exceptions/Handler. php to resemble the one below
App/Exceptions/Handler

<?php

namespace AppExceptions;

use IlluminateAuthAuthenticationException;
use IlluminateFoundationExceptionsHandler as ExceptionHandler;
use IlluminateHttpRequest;
use Throwable;

class Handler extends ExceptionHandler
{
    /**
     * A list of exception types with their corresponding custom log levels.
     *
     * @var array<class-string<Throwable>, PsrLogLogLevel::*>
     */
    protected $levels = [
        //
    ];

    /**
     * A list of the exception types that are not reported.
     *
     * @var array<int, class-string<Throwable>>
     */
    protected $dontReport = [
        //
    ];

    /**
     * A list of the inputs that are never flashed to the session on validation exceptions.
     *
     * @var array<int, string>
     */
    protected $dontFlash = [
        'current_password',
        'password',
        'password_confirmation',
    ];

    /**
     * Register the exception handling callbacks for the application.
     *
     * @return void
     */
    public function register()
    {
        $this->renderable(function (AuthenticationException $exception, Request $request) {
            if ($request->is('api/*')) {
                if ($exception instanceof AuthenticationException) {
                    return $request->expectsJson() ?:
                        response()->json([
                            'message' => 'Unauthenticated.',
                            'status' => 401,
                            'Description' => 'Missing or Invalid Access Token'
                        ], 401);
                }
            }
        });
    }
}
Enter fullscreen mode
Exit fullscreen mode
This will come in handy when we discuss middleware.
Logout
Of course in each system, we need a logout functionality so we will also create its function
public function logout()
{
    auth()->user()->tokens()->delete();

    return response()->json([
        'message' => 'Succesfully Logged out'
    ], 200);
}
Enter fullscreen mode
Exit fullscreen mode
Note that we are using the delete function to invalidate an existing access token and delete it from the database. This makes the access token unusable and we can comfortably say the user is logged out.
The final piece left is to create the endpoints/routes in the routes/api.php file.
Route::post('login', [UserAuthenticationController::class, 'login']);
Route::post('register', [UserAuthenticationController::class, 'register']);
Route::post('logout', [UserAuthenticationController::class, 'logout'])->middleware('auth:sanctum');
Enter fullscreen mode
Exit fullscreen mode
Only the logout endpoint needs middleware because it requires a token to be passed to v erify which user is being logged out of the system.
Scopes and Middlewares
Scopes are commonly used in APIs to assign abilities to tokens. They help flesh out what a user can and cannot do in a system. Think of them as permissions you grant to users once you onboard them. Some users can access financial records in a system while others cannot.
Middlewares on the other hand are used to protect endpoints from unauthorized access. Think of them as a gate that filters out valid requests from unauthorized and malicious requests. They help safeguard your endpoints from being accessed by users who have no role in accessing them.
We can add the auth:sanctum middleware to the product’s endpoints to safeguard them. This means that for a request to be considered valid, it has to have the Authorization: Bearer token headers(where the token is the actual access token issued by the API).
HEADERS {
        'Content-Type': 'application/json',
        'Authorization': 'Bearer <Token>'
    }
Enter fullscreen mode
Exit fullscreen mode
Each request has to include the bearer token in the headers or the server will respond with a 401(Unauthorized) response.
Grouping Endpoints
In most cases, you might have multiple endpoints that share some common things such as version (e.g v1,v2), prefixes (admin), or middleware.
It is important to always version your APIs especially if they are being used by the public. This helps in preventing breaking changes and also allows for backward compatibility in the event new APIs are available.
We can group these endpoints using the Route::group method
Route::group(['middleware' => ['auth:sanctum']], function () {

    //All Routes that share the auth:sanctum middleware
});
Enter fullscreen mode
Exit fullscreen mode
This way we can have our code organized and clean. In this example, I will group the routes to be of version 1 and use the auth:sanctum middleware.
We might also want to reduce the size of the api.php file by making each resource use apiresource. This simple function reduces the file size by almost 60% and makes reading and maintaining the code an easy task.
Route::apiResource('products', ProductsController::class);
Enter fullscreen mode
Exit fullscreen mode
The apiresource method under the hood works by mapping the main functions(index, show, store, update and delete) in our controller to their various endpoints.
For example products.show is mapped to the endpoint api/products/{product}.
These are some cool techniques you can use to optimize your development experience and become more productive when developing your APIs.
The final routes/api.php file should resemble the one below
//routes/api.php
<?php

use AppHttpControllersProductsController;
use AppHttpControllersUserAuthenticationController;
use IlluminateSupportFacadesRoute;

/*
|--------------------------------------------------------------------------
| API Routes
|--------------------------------------------------------------------------
|
| Here is where you can register API routes for your application. These
| routes are loaded by the RouteServiceProvider within a group which
| is assigned the "api" middleware group. Enjoy building your API!
|
*/

//These routes are NOT protected using middleware

Route::prefix('v1')->group(function () {
    Route::post('login', [UserAuthenticationController::class, 'login']);
    Route::post('register', [UserAuthenticationController::class, 'register']);
});

//These routes are protected using middleware
Route::prefix('v1')->middleware('auth:sanctum')->group(function () {
    Route::post('logout', [UserAuthenticationController::class, 'logout']);
    Route::apiResource('products', ProductsController::class);
});
Enter fullscreen mode
Exit fullscreen mode
Testing using Postman
The last step in this tutorial is to test our API through an HTTP Client. There are numerous HTTP Clients such as Postman and Thunderclient just to name a few.
I personally use Thunderclient because it integrates seamlessly with Vscode which is my goto editor. It can be added as a Vscode extension thereby making your Vscode editor a powerful editor and REST API client at the same time.
It improves my productivity and development experience immensely. You are free to use any other HTTP Client of your choice.
I will use postman in this article as most people are familiar with it.
We will break down the test from authentication to the basic CRUD
Authentication
We can further break down authentication into registration, login and logout.
Registration
We can make a POST request to the endpoint api/v1/register with the body on postman

Successful Registration
Login
To test login functionality, we can make a POST request to the api/v1/login

Failed Login
A failed login attempt returns a 401(Unauthorized) Status Code and also returns a descriptive message to the client

Successful Login
A successful login attempt returns a 200(OK) Status Code and also returns an access token that can be stored for future use.
Logout
Logout can be tested by making a POST request to the api/v1/logout endpoint. We also need to attach the bearer token assigned to us during registration/login to the Headers.

Logout
Upon success, a descriptive message and a 200(OK) Status Code are returned back to a User.
We can now test the Product resource. Similar to log out, we also need to attach the bearer token assigned to us during registration/login to the Headers. This is because all the product’s endpoints are protected by the auth:sanctum middleware.
If we try to access any product’s endpoint without the access token , the server will respond with a 401(Unauthorized) Status Code.

Unauthorized Access
This is because we registered an Exception Handler to catch any access to the API that is not authorized and return a 401 Status Code with a descriptive response. This protects our API endpoints from unauthorized access.
Get All Products
All products can be returned by making a GET request to the api/v1/products endpoint.

Get All Products
Get A Single Product
We can fetch a single product from the API by making a GET request to the api/v1/products/{id} endpoint
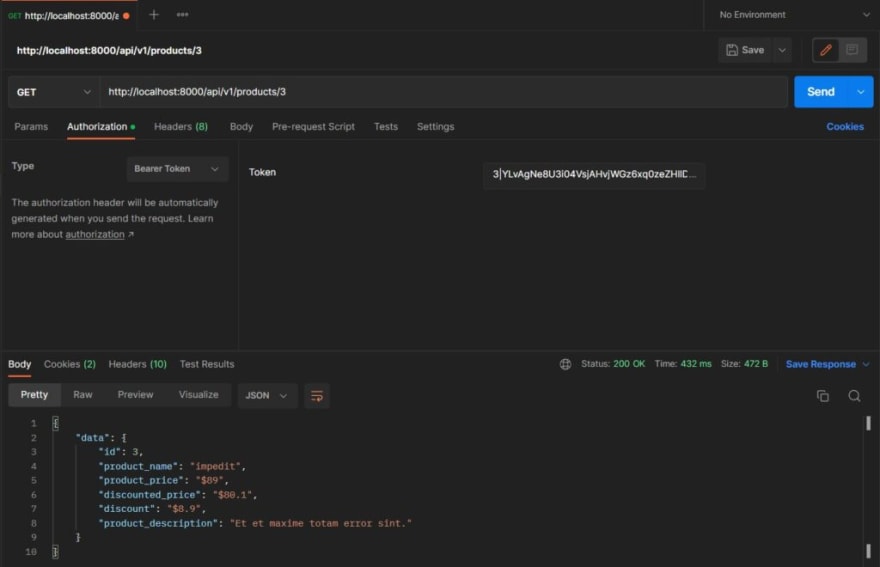
Get a Single Product
Add A Product
We can add a product by making a POST request to the api/v1/products endpoint

Add a Product
Update A Product
To update a product’s details, we can make a PUT/PATCH request to the api/v1/products/{id} endpoint.
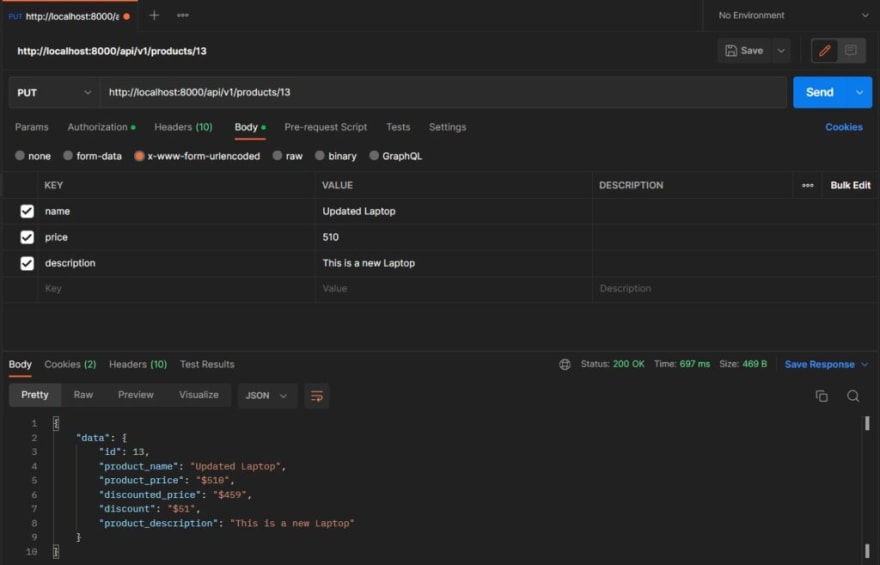
Update a Product
Delete A Product
We can make a DELETE request to the api/v1/products/{id} endpoint to delete a product from the database

Delete a Product
In Closing
In this article, we have covered what Rest APIs are and how to create one in Laravel. We have also covered API authentication and Using Middleware to control access to your API. I hope this article was insightful and helped you create a powerful REST API in laravel.
Thank you for reading.
The post How to Build a Rest API with Laravel: A Beginners Guide appeared first on Ian Kumu’s Blog.