Многие ежедневно используемые приложения и системы имеют свой API. От очень простых и обыденных вещей, таких как проверка погоды по утрам, до более захватывающих, вроде лент Instagram, TikTok или Twitter. Во всех современных приложениях API-интерфейсы играют центральную роль.
В этом туториале мы детально рассмотрим:
- Что такое API.
- Наиболее важные концепции, связанные с API.
- Как использовать Python для чтения данных, доступных через общедоступные API.
К концу прохождения туториала вы сможете использовать Python для большинства общедоступных API. Если вы разработчик, знание того, как использовать API-интерфейсы с Python, поможет в интеграции вашей работы со сторонними приложениями.
Примечание
В этом руководстве основное внимание уделяется тому, как использовать API-интерфейсы с помощью Python, но не их созданию. Для получения информации о создании API с помощью Python мы советуем обратиться к публикации API REST Python с Flask, Connexion и SQLAlchemy.
Аббревиатура API соответствует английскому application programming interface — программный интерфейс приложения. По сути, API действует как коммуникационный уровень или интерфейс, который позволяет различным системам взаимодействовать друг с другом без необходимости точно понимать, что делает каждая из систем.
API-интерфейсы имеют разные формы. Это может быть API операционной системы, используемый для включения камеры и микрофона для присоединения к звонку Zoom. Или это могут быть веб-API, используемые для действий, ориентированных на веб, таких как лайки фотографий в Instagram или получение последних твитов.
Независимо от типа, все API-интерфейсы работают приблизительно одинаково. Обычно программа-клиент запрашивает информацию или данные, а API возвращает ответ в соответствии с тем, что мы запросили. Каждый раз, когда мы открываем Twitter или прокручиваем ленту Instagram, приложение делает запрос к API и просто отображает ответ с учетом дизайна программы.
В этом руководстве мы подробно остановимся на высокоуровневых веб-API, которые обмениваются информацией между сетями.
SOAP vs REST vs GraphQL
В конце 1990-х и начале 2000-х годов две разные модели дизайна API стали нормой для публичного доступа к данным:
- SOAP (Simple Object Access Protocol) ассоциируется с корпоративным миром, имеет строгую систему на основе «контрактов». Этот подход в основном связан скорее с обработкой действий, чем с данными.
- REST (Representational State Transfer) используется для общедоступных API и идеально подходит для получения данных из интернета.
Сегодня распространение также получает GraphQL — созданный Facebook гибкий язык API-запросов. Хотя GraphQL находится на подъеме и внедряется крупными компаниями, включая GitHub и Shopify, большинство общедоступных API-интерфейсов это REST API. Поэтому в рамках руководства мы ограничимся именно REST-подходом и тем, как взаимодействовать с такими API с помощью Python.
requests и API
При использовании API с Python нам понадобится всего одна библиотека: requests. С её помощью вы сможете выполнять бо́льшую часть, если не все, действия, необходимые для использования любого общедоступного API.
Установите библиотеку любым удобным вам способом, например, с помощью pip:
python3 -m pip install requests
Чтобы следовать примерам кода из руководства, убедитесь, что вы используете Python не ниже 3.8 и версию библиотеки requests не ниже 2.22.0.
Обращение к API с помощью Python
Достаточно разговоров — пора сделать первый вызов API! Мы вызовем популярный API для генерации случайных пользовательских данных. Единственное, что нужно знать для начала работы с API — по какому URL-адресу его вызывать. В этом примере это https://randomuser.me/api/, и вот самый простой вызов API, с которого мы и начнем:
        >>> import requests
>>> requests.get("https://randomuser.me/api/")
<Response [200]>
Импортируем библиотеку requests, а затем получаем данные от URL-адреса. Мы еще не видим возвращенных данных, лишь результат запроса Response [200]. В терминах API такой результат означает, что всё прошло нормально.
Чтобы увидеть фактические данные, мы добавляем к имени переменной атрибут .text:
        >>> response = requests.get("https://randomuser.me/api/")
>>> response.text
'{
    "results": [
    {
        "gender": "female",
        "name":
        {
            "title": "Mrs",
            "first": "Britt",
            "last": "Ludwig"
        },
        "location":
        {
            "street":
            {
                "number": 3409,
                "name": "Fasanenweg"
            },
            "city": "Emden",
            "state": "Mecklenburg-Vorpommern",
            "country": "Germany",
            "postcode": 81824,
            "coordinates":
            {
                "latitude": "-47.3424",
                "longitude": "28.1159"
            },
            "timezone":
            {
                "offset": "-12:00",
                "description": "Eniwetok, Kwajalein"
            }
        },
        "email": "britt.ludwig@example.com",
        "login":
        {
            "uuid": "28605437-cc28-4f66-995d-7a4f0d5b4540",
            "username": "smallkoala688",
            "password": "edthom",
            "salt": "VkG0ABwM",
            "md5": "d14e0101caa53d74f6f96a0cdee22f66",
            "sha1": "3abc70fe184d1ff5b41e96f6b4ae084658aedeea",
            "sha256": "f1a6e7cb7190624fe59ec8edc590a1e7defeaeb061637416581af032cda32bdf"
        },
        "dob":
        {
            "date": "1960-07-19T23:08:49.001Z",
            "age": 61
        },
        "registered":
        {
            "date": "2019-02-17T12:37:53.484Z",
            "age": 2
        },
        "phone": "0837-2320219",
        "cell": "0173-5245926",
        "id":
        {
            "name": "",
            "value": null
        },
        "picture":
        {
            "large": "https://randomuser.me/api/portraits/women/4.jpg",
            "medium": "https://randomuser.me/api/portraits/med/women/4.jpg",
            "thumbnail": "https://randomuser.me/api/portraits/thumb/women/4.jpg"
        },
        "nat": "DE"
    }],
    "info":
    {
        "seed": "03fb5e0d405fcad6",
        "results": 1,
        "page": 1,
        "version": "1.3"
    }
}'
Конечные точки и ресурсы
Как мы видели выше, первое, что нужно знать для использования API, — это базовый URL-адрес API. Вот так выглядят базовые URL-адреса нескольких известных провайдеров API:
- https://api.twitter.com
- https://api.github.com
- https://api.stripe.com
Как видите, перечисленные URL начинаются с https:// api. Не существует определенного стандарта, но чаще всего базовый URL следует этому шаблону.
Попытавшись открыть любую из приведенных ссылок, вы заметите, что большинство из них возвращает ошибку или запрашивает учетные данные. Многие API-интерфейсы требуют аутентификации для определения прав доступа.
Сделаем запрос к интерфейсу TheDogAPI, аналогичный приведенному выше:
        >>> response = requests.get("https://api.thedogapi.com/")
>>> response.text
'{"message":"The Dog API"}'
При вызове базового URL-адреса мы получаем сообщение, в котором говорится, что мы обратились к Dog API. Базовый URL здесь используется для получения информации об API, а не реальных данных.
Конечная точка (endpoint) — это часть URL-адреса, указывающая, какой ресурс мы хотим получить. Хорошо документированные API-интерфейсы содержат справочник по API, описывающий конечные точки и ресурсы API, а также способы их использования.
Есть такой справочник и у TheDogAPI. Попробуем обратиться к конечной точке, предоставляющей характеристики пород:
        >>> response = requests.get("https://api.thedogapi.com/v1/breeds")
>>> response.text
'[{"weight":{"imperial":"6 - 13","metric":"3 - 6"},
"height":{"imperial":"9 - 11.5","metric":"23 - 29"},
"id":1,"name":"Affenpinscher","bred_for":"Small
rodent hunting, lapdog","breed_group":"Toy",
"life_span":"10 - 12 years","temperament":"Stubborn,
Curious, Playful, Adventurous, Active, Fun-loving",
"origin":"Germany, France","reference_image_id":
"BJa4kxc4X","image":{"id":"BJa4kxc4X","width":1600,
"height":1199,"url":
"https://cdn2.thedogapi.com/images/BJa4kxc4X.jpg"}},
{"weight": ...
Вуаля, мы получили список пород!
Если вы больше любите кошек, аналогичный API есть и для мурлыкающих питомцев:
        >>> response = requests.get("https://api.thecatapi.com/v1/breeds")
>>> response.text
Request и Response
Все взаимодействия между клиентом (в нашем случае консолью Python) и API разделены на запрос (request) и ответ (response):
requestсодержит данные запроса API: базовый URL, конечную точку, используемый метод, заголовки и т. д.responseсодержит соответствующие данные, возвращаемые сервером, в том числе контент, код состояния и заголовки.
Снова обратившись к TheDogAPI, мы можем немного подробнее рассмотреть, что именно находится внутри объектов request и response:
        >>> response = requests.get("https://api.thedogapi.com/v1/breeds")
>>> response
<Response [200]>
>>> request = response.request
>>> request
<PreparedRequest [GET]>
>>> request.url
'https://api.thedogapi.com/v1/breeds'
>>> request.path_url
'/v1/breeds'
>>> request.method
'GET'
>>> request.headers
{'User-Agent': 'python-requests/2.22.0',
'Accept-Encoding': 'gzip, deflate',
'Accept': '*/*', 'Connection': 'keep-alive'}
>>> response
<Response [200]>
>>> response.text
'[{"weight":{"imperial":"6 - 13","metric":"3 - 6"} ...
>>> response.status_code
200
>>> response.headers
{'Access-Control-Expose-Headers': ...
В приведенном примере показаны некоторые из наиболее важных атрибутов, доступных для объектов запроса и ответа.
Примечание
Мы узнаем больше о некоторых из этих атрибутов в этом руководстве, но если вы хотите копнуть еще глубже, посмотрите документацию Mozilla по HTTP-сообщениям.
Коды состояний HTTP
Код состояния — одна из наиболее важных частей ответа API, которая сообщает, закончился ли запрос успешно, были ли найдены данные, нужна ли информация об учетной записи и т. д.
Со временем вы без посторонней помощи научитесь распознавать различные коды состояний. Но пока приведем список наиболее распространенных:
| Код состояния | Описание |
200 OK |
Запрос успешно выполнен. |
201 Created |
Запрос принят и создан ресурс. |
400 Bad Request |
Запрос неверен или отсутствует некоторая информация. |
401 Unauthorized |
Запрос требует дополнительных прав. |
404 Not Found |
Запрошенный ресурс не существует. |
405 Method Not Allowed |
Конечная точка не поддерживает этот метод HTTP. |
500 Internal Server Error |
Ошибка на стороне сервера. |
Статус ответа можно проверить, используя .status_code и .reason. Библиотека requests также выводит код состояния в представлении Response-объекта:
        >>> response = requests.get("https://api.thedogapi.com/v1/breeds")
>>> response
<Response [200]>
>>> response.status_code
200
>>> response.reason
'OK'
Теперь отправим запрос, содержащий в пути намеренно сделанную ошибку:
        >>> response = requests.get("https://api.thedogapi.com/v1/breedz")
>>> response
<Response [404]>
>>> response.status_code
404
>>> response.reason
'Not Found'
Очевидно, конечной точки /breedz не существует, поэтому API возвращает код состояния 404 Not Found.
Заголовки HTTP
HTTP-заголовки (headers) используются для определения нескольких параметров, управляющих запросами и ответами:
| HTTP Header | Описание |
Accept |
Какой тип контента может принять клиент |
Content-Type |
Какой тип контента в ответе сервера |
User-Agent |
Какое программное обеспечение клиент использует для связи с сервером |
Server |
Какое программное обеспечение сервер использует для связи с клиентом |
Authentication |
Кто вызывает API и с какими учетными данными |
Чтобы проверить заголовки ответа, можно использовать response.headers:
        >>> response = requests.get("https://api.thedogapi.com/v1/breeds/1")
>>> response.headers
{'Content-Encoding': 'gzip', 'Content-Type': 'application/json;
charset=utf-8', 'Date': 'Thu, 25 Feb 2021 05:17:40 GMT', 'Server':
'Apache/2.4.43 (Amazon)', 'Strict-Transport-Security':
'max-age=15552000; includeSubDomains', 'Vary':
'Origin,Accept-Encoding', 'X-Content-Type-Options':
'nosniff', 'X-DNS-Prefetch-Control': 'off', 'X-Download-Options':
'noopen', 'X-Frame-Options': 'SAMEORIGIN', 'X-Response-Time':
'1ms', 'X-XSS-Protection': '1; mode=block', 'Content-Length':
'265', 'Connection': 'keep-alive'}
Чтобы сделать то же самое с заголовками запроса, вы можно использовать response.request.headers, поскольку запрос является атрибутом объекта Response:
        >>> response = requests.get("https://api.thedogapi.com/v1/breeds/1")
>>> response.request.headers
{'User-Agent': 'python-requests/2.22.0', 'Accept-Encoding': 'gzip,
deflate', 'Accept': '*/*', 'Connection': 'keep-alive'}
В этом случае мы не определяем какие-либо конкретные заголовки при отправке запроса, поэтому возвращаются заголовки по умолчанию.
Пользовательские заголовки
Еще один стандарт, с которым вы можете столкнуться при использовании API,— использование настраиваемых заголовков. Обычно они начинаются с префикса X-. Разработчики API обычно используют настраиваемые заголовки для отправки или запроса дополнительной информации от клиентов.
Для определения заголовков можно использовать словарь, передаваемый в метод requests.get(). Например, предположим, что вы хотите отправить некоторый идентификатор запроса на сервер API и знаете, что можете сделать это с помощью X-Request-Id:
        >>> headers = {"X-Request-Id": "<my-request-id>"}
>>> response = requests.get("https://example.org", headers=headers)
>>> response.request.headers
{'User-Agent': 'python-requests/2.22.0', 'Accept-Encoding':
'gzip, deflate', 'Accept': '*/*', 'Connection': 'keep-alive',
'X-Request-Id': '<my-request-id>'}
X-Request-Id находится среди других заголовков, которые по умолчанию идут с любым запросом API.
Ответ обычно содержит множество заголовков, но один из наиболее важных — Content-Type. Этот заголовок определяет тип содержимого, возвращаемого в ответе.
Content-Type
В наши дни большинство API-интерфейсов используют в качестве типа контента по умолчанию JSON.
Вернувшись к одному из предыдущих примеров использования TheDogAPI, мы заметим, что заголовок Content-Type определен как application/json:
        >>> response = requests.get("https://api.thedogapi.com/v1/breeds/1")
>>> response.headers.get("Content-Type")
'application/json; charset=utf-8'
Помимо типа содержимого (в данном случае application/json), заголовок может возвращать кодировку контента.
Вы можете столкнуться и c API, возвращающими XML или мультимедиа, например, изображения или видео.
Заголовок Content-Type позволяет узнать, как обрабатывать ответ и что делать с содержимым ответа.
Содержание ответа
Как мы только что узнали, тип контента указан в заголовке Content-Type ответа API. Чтобы правильно прочитать содержимое ответа в соответствии с различными заголовками Content-Type, объект Response поддерживает пару полезных атрибутов:
.textвозвращает содержание ответа в формате юникод..contentвозвращает содержание ответа в виде байтовой строки.
Мы уже использовали выше атрибут .text. Но для некоторых типов данных, таких как изображения и другие нетекстовые данные, обычно лучшим подходом использование .content.
Для ответов API с типом содержимого application/json библиотека requests поддерживает специальный метод .json(), позволяющий получить представление данных в виде объекта Python:
        >>> response = requests.get("https://api.thedogapi.com/v1/breeds/1")
>>> response.headers.get("Content-Type")
'application/json; charset=utf-8'
>>> response.json()
{'weight': {'imperial': '6 - 13', 'metric': '3 - 6'},
 'height': {'imperial': '9 - 11.5', 'metric': '23 - 29'},
 'id': 1,
 'name': 'Affenpinscher',
 'bred_for': 'Small rodent hunting, lapdog',
 'breed_group': 'Toy',
 'life_span': '10 - 12 years',
 'temperament': 'Stubborn, Curious, Playful, Adventurous, Active, Fun-loving',
 'origin': 'Germany, France',
 'reference_image_id': 'BJa4kxc4X'}
>>> response.json()["name"]
'Affenpinscher'
Как видите, после выполнения response.json() мы получаем словарь, который можно использовать так же, как любой другой словарь в Python.
Методы HTTP
При вызове API существует несколько различных методов, которые мы можем использовать, чтобы указать, какое действие хотим выполнить. Например, если мы хотим получить некоторые данные, мы используем метод GET, а если нужно создать некоторые данные — метод POST.
Вот список наиболее распространенных методов и их типичных вариантов использования:
| HTTP-метод | Описание | Метод requests |
POST |
Создает новый ресурс. | requests.post() |
GET |
Считывает имеющийся ресурс. | requests.get() |
PUT |
Обновляет существующий ресурс. | requests.put() |
DELETE |
Удаляет ресурс. | requests.delete() |
Эти четыре метода также называют CRUD-операциями, поскольку они позволяют создавать (create), читать (read), обновлять (update) и удалять (delete) ресурсы.
До сих пор мы использовали только .get(), но мы можем использовать requests для всех прочих HTTP-методов:
        >>> requests.post("https://api.thedogapi.com/v1/breeds/1")
>>> requests.get("https://api.thedogapi.com/v1/breeds/1")
>>> requests.put("https://api.thedogapi.com/v1/breeds/1")
>>> requests.delete("https://api.thedogapi.com/v1/breeds/1")
Большинство этих запросов вернут код состояния 405 (Method Not Allowed). Не все конечные точки поддерживают методы POST, PUT или DELETE. Действительно, большинство общедоступных API разрешают только запросы GET и не позволяют создавать или изменять существующие данные без авторизации.
Параметры запроса
Иногда при вызове API можно получить тонну данных, которые в массе своей не нужны. При вызове конечной точки TheDogAPI/breeds мы получаем всю информацию о каждой породе, но вполне вероятно, что нам достаточно лишь небольшой части данных для одного подвида собак. Тут пригождаются параметры запроса!
Наверняка вы уже сталкивались с параметрами запроса при просмотре веб-страниц в Интернете. При просмотре видео на YouTube у вас есть URL-адрес вида https://www.youtube.com/watch?v=aL5GK2LVMWI. Параметр v= в URL-адресе и есть параметр запроса. Обычно он идет после базового URL-адреса и конечной точки.
Чтобы добавить параметр запроса к заданному URL-адресу, мы должны добавить вопросительный знак (?) перед первым параметром запроса. Если в запросе нужно указать несколько параметров, их разделяют с помощью амперсанда (&).
Тот же URL-адрес YouTube, указанный выше, с несколькими параметрами запроса будет выглядеть следующим образом: https://www.youtube.com/watch?v=aL5GK2LVMWI&t=75.
В мире API параметры запроса используются в качестве фильтров. Они отправляются вместе с запросом API и позволяют сузить поле для поиска.
Возвратимся к API генератора случайных пользователей:
        >>> requests.get("https://randomuser.me/api/").json()
{'results': [{'gender': 'female',
   'name': {'title': 'Mrs', 'first': 'Georgia', 'last': 'Hamilton'},
   'location': {'street': {'number': 7475, 'name': 'Elgin St'},
    'city': 'Fort Lauderdale',
    'state': 'North Carolina',
    'country': 'United States',
    'postcode': 52323,
    'coordinates': {'latitude': '83.6943', 'longitude': '111.3404'},
    'timezone': {'offset': '-9:00', 'description': 'Alaska'}},
   'email': 'georgia.hamilton@example.com',
   'login': {'uuid': '5571b45a-739e-4bd2-a378-3f74da397fcc',
    'username': 'orangeduck951',
    'password': 'impala',
    'salt': 'pK6TZkNp',
    'md5': 'b58f48c5f58d0d33c6c958512bea6900',
    'sha1': '2336e82d79d64e8668fb3f92126dedda14ce1f53',
    'sha256': '9234f819158c8473e175732db22da52a0aab9ab4c636c3fec32cad471319f492'},
   'dob': {'date': '1969-06-21T00:54:25.658Z', 'age': 52},
   'registered': {'date': '2007-02-07T08:51:37.427Z', 'age': 14},
   'phone': '(625)-497-7824',
   'cell': '(253)-658-6904',
   'id': {'name': 'SSN', 'value': '959-66-1235'},
   'picture': {'large': 'https://randomuser.me/api/portraits/women/84.jpg',
    'medium': 'https://randomuser.me/api/portraits/med/women/84.jpg',
    'thumbnail': 'https://randomuser.me/api/portraits/thumb/women/84.jpg'},
   'nat': 'US'}],
 'info': {'seed': 'b5a5ac332d8ef9b4',
  'results': 1,
  'page': 1,
  'version': '1.3'}}
Предположим, что мы хотим привлечь женскую аудиторию из Германии, и в качестве примеров необходимо сгенерировать соответствующих пользователей. Согласно документации, для нашей задачи можно использовать параметры запроса gender= и nat=:
        >>> requests.get("https://randomuser.me/api/?gender=female&nat=de").json()
{'results': [{'gender': 'female',
   'name': {'title': 'Ms', 'first': 'Sylvia', 'last': 'Kranz'},
   'location': {'street': {'number': 1035, 'name': 'Mühlenstraße'},
    'city': 'Neckarsulm',
    'state': 'Niedersachsen',
    'country': 'Germany',
    'postcode': 92153,
    'coordinates': {'latitude': '-81.2409', 'longitude': '147.2697'},
    'timezone': {'offset': '-10:00', 'description': 'Hawaii'}},
   'email': 'sylvia.kranz@example.com',
   'login': {'uuid': '7f11b98e-91de-42ac-a622-3aec488ab07c',
    'username': 'blackcat302',
    'password': 'gggggggg',
    'salt': 'Je25kPW6',
    'md5': '7b6404e608b123da0cf32dbb69d19f4b',
    'sha1': '0806c0dbd9abf57b863b40da1a08cf322da2d404',
    'sha256': '3bccd7b925d2753350188f43f5fe5e02530eb322f54434b7280e39ca332c04d6'},
   'dob': {'date': '1979-10-01T01:44:21.871Z', 'age': 42},
   'registered': {'date': '2018-02-11T11:41:41.773Z', 'age': 3},
   'phone': '0355-6704793',
   'cell': '0172-9785781',
   'id': {'name': '', 'value': None},
   'picture': {'large': 'https://randomuser.me/api/portraits/women/72.jpg',
    'medium': 'https://randomuser.me/api/portraits/med/women/72.jpg',
    'thumbnail': 'https://randomuser.me/api/portraits/thumb/women/72.jpg'},
   'nat': 'DE'}],
 'info': {'seed': 'ab7997046a8ce34d',
  'results': 1,
  'page': 1,
  'version': '1.3'}}
Используя параметры запроса, мы можем получать более конкретные данные от API, адаптируя взаимодействие с API к нашим потребностям.
Чтобы избежать повторного создания URL-адреса, мы можем передавать параметры запроса в виде атрибута-словаря params:
        >>> query_params = {"gender": "female", "nat": "de"}
>>> requests.get("https://randomuser.me/api/", params=query_params).json()
{'results': [{'gender': 'female',
   'name': {'title': 'Mrs', 'first': 'Heide-Marie', 'last': 'Liebert'},
   'location': {'street': {'number': 481, 'name': 'Wiesenstraße'},
    'city': 'Barby',
    'state': 'Berlin',
    'country': 'Germany',
    'postcode': 44617,
    'coordinates': {'latitude': '71.1713', 'longitude': '-35.9063'},
    'timezone': {'offset': '-4:00',
     'description': 'Atlantic Time (Canada), Caracas, La Paz'}},
   'email': 'heide-marie.liebert@example.com',
   'login': {'uuid': '8840f126-71f8-4107-a58c-6f76255ddbbb',
    'username': 'orangerabbit454',
    'password': 'ffffff',
    'salt': 'Cg8FgcCP',
    'md5': '4095dbd532bd0cf11b5c98e523047966',
    'sha1': 'abb397200399b655841e704be8c06c6f023d24e5',
    'sha256': '7c8d10d84e1a2c0a6da756547cba3411f243df88b66ac16f457eb79a823a1136'},
   'dob': {'date': '1996-08-05T09:49:34.663Z', 'age': 25},
   'registered': {'date': '2010-01-27T02:30:33.015Z', 'age': 11},
   'phone': '0133-8876656',
   'cell': '0172-0931163',
   'id': {'name': '', 'value': None},
   'picture': {'large': 'https://randomuser.me/api/portraits/women/37.jpg',
    'medium': 'https://randomuser.me/api/portraits/med/women/37.jpg',
    'thumbnail': 'https://randomuser.me/api/portraits/thumb/women/37.jpg'},
   'nat': 'DE'}],
 'info': {'seed': 'faa5213e18a7e753',
  'results': 1,
  'page': 1,
  'version': '1.3'}}
Подход можно применить к любому другому API, в документации которого описаны параметры запроса. Например, TheDogAPI позволяет отфильтровать конечную точку /breeds, чтобы вернуть породы, соответствующие определенному имени. Например, если мы хотим найти породу Лабрадудель, мы можем сделать это с параметром запроса q:
        >>> query_params = {"q": "labradoodle"}
>>> endpoint = "https://api.thedogapi.com/v1/breeds/search"
>>> requests.get(endpoint, params=query_params).json()
[{'weight': {'imperial': '45 - 100', 'metric': '20 - 45'},
  'height': {'imperial': '14 - 24', 'metric': '36 - 61'},
  'id': 148,
  'name': 'Labradoodle',
  'breed_group': 'Mixed',
  'life_span': '10 - 15 years'}]
Изучение продвинутых концепций API
Теперь, когда у нас есть представление об основах использования API с Python, есть несколько более сложных тем, которые стоит хотя бы кратко затронуть: аутентификация, пагинация и ограничения по времени.
Аутентификация
Хотя многие API бесплатны и полностью общедоступны, аутентификация обычно существенно расширяет права доступа. Существует множество API, требующих аутентификации, например:
- GitHub API
- Twitter API
- Instagram API
Подходы к аутентификации варьируются от очень простых, например, использования ключей API или базовой аутентификации, до гораздо более сложных и безопасных методов, таких как OAuth.
Как правило, вызов API без учетных данных или с некорректной учетной записью возвращают коды состояний 401 Unauthorized или 403 Forbidden.
Ключи API
Самый распространенный подход к аутентификации — это ключ API (API key). Эти ключи используются для идентификации вас как пользователя или клиента API, а также для отслеживания использования вами интерфейса. Ключи API обычно отправляются как заголовок запроса или как параметр запроса.
В этом примере мы воспользуемся API-интерфейсом NASA Mars Rover Photo API и получим снимки, сделанные 1 июля 2020 года. В целях тестирования вы можете использовать ключ API DEMO_KEY, который НАСА предоставляет по умолчанию. В противном случае вы можете быстро создать собственный, перейдя на главную страницу API и нажав Get Started.
Чтобы добавить в свой запрос ключ API, укажите параметр запроса api_key=.
        >>> endpoint = "https://api.nasa.gov/mars-photos/api/v1/rovers/curiosity/photos"
# Замените DEMO_KEY ниже своим собственным ключом, если вы его сгенерировали.
>>> api_key = "DEMO_KEY"
>>> query_params = {"api_key": api_key, "earth_date": "2020-07-01"}
>>> response = requests.get(endpoint, params=query_params)
>>> response
<Response [200]>
Всё идет нормально. Нам удалось сделать аутентифицированный запрос к API NASA и получить ответ 200 OK.
Взглянем поближе на объект Response и попробуем извлечь из него несколько изображений:
        >>> response.json()
{'photos': [{'id': 754118,
   'sol': 2809,
   'camera': {'id': 20,
    'name': 'FHAZ',
    'rover_id': 5,
    'full_name': 'Front Hazard Avoidance Camera'},
   'img_src': 'https://mars.nasa.gov/msl-raw-images/proj/msl/redops/ods/surface/sol/02809/opgs/edr/fcam/FLB_646868981EDR_F0810628FHAZ00337M_.JPG',
   'earth_date': '2020-07-01',
   'rover': {'id': 5,
    'name': 'Curiosity',
    'landing_date': '2012-08-06',
    'launch_date': '2011-11-26',
    'status': 'active'}},
...
        >>> photos = response.json()["photos"]
>>> print(f"Найдено {len(photos)} фотографий.")
Найдено 12 фотографий.
>>> photos[7]["img_src"]
'https://mars.nasa.gov/msl-raw-images/proj/msl/redops/ods/surface/sol/02809/opgs/edr/rcam/RLB_646860185EDR_F0810628RHAZ00337M_.JPG'
Мы используем .json() для преобразования ответа в словарь Python, затем извлекаем поле photos и получаем URL-адрес изображения для одной из фотографий. Если мы откроем URL в браузере, то увидим снимок Марса, сделанный марсоходом Curiosity:
OAuth: начало работы
Другой распространенный стандарт аутентификации API — это OAuth. Это очень обширная тема, поэтому мы коснемся только самых основ.
Когда приложение или платформа позволяет зарегистрироваться или войти с помощью другого ресурса, например, Google или Facebook, поток аутенфикации обычно использует OAuth.
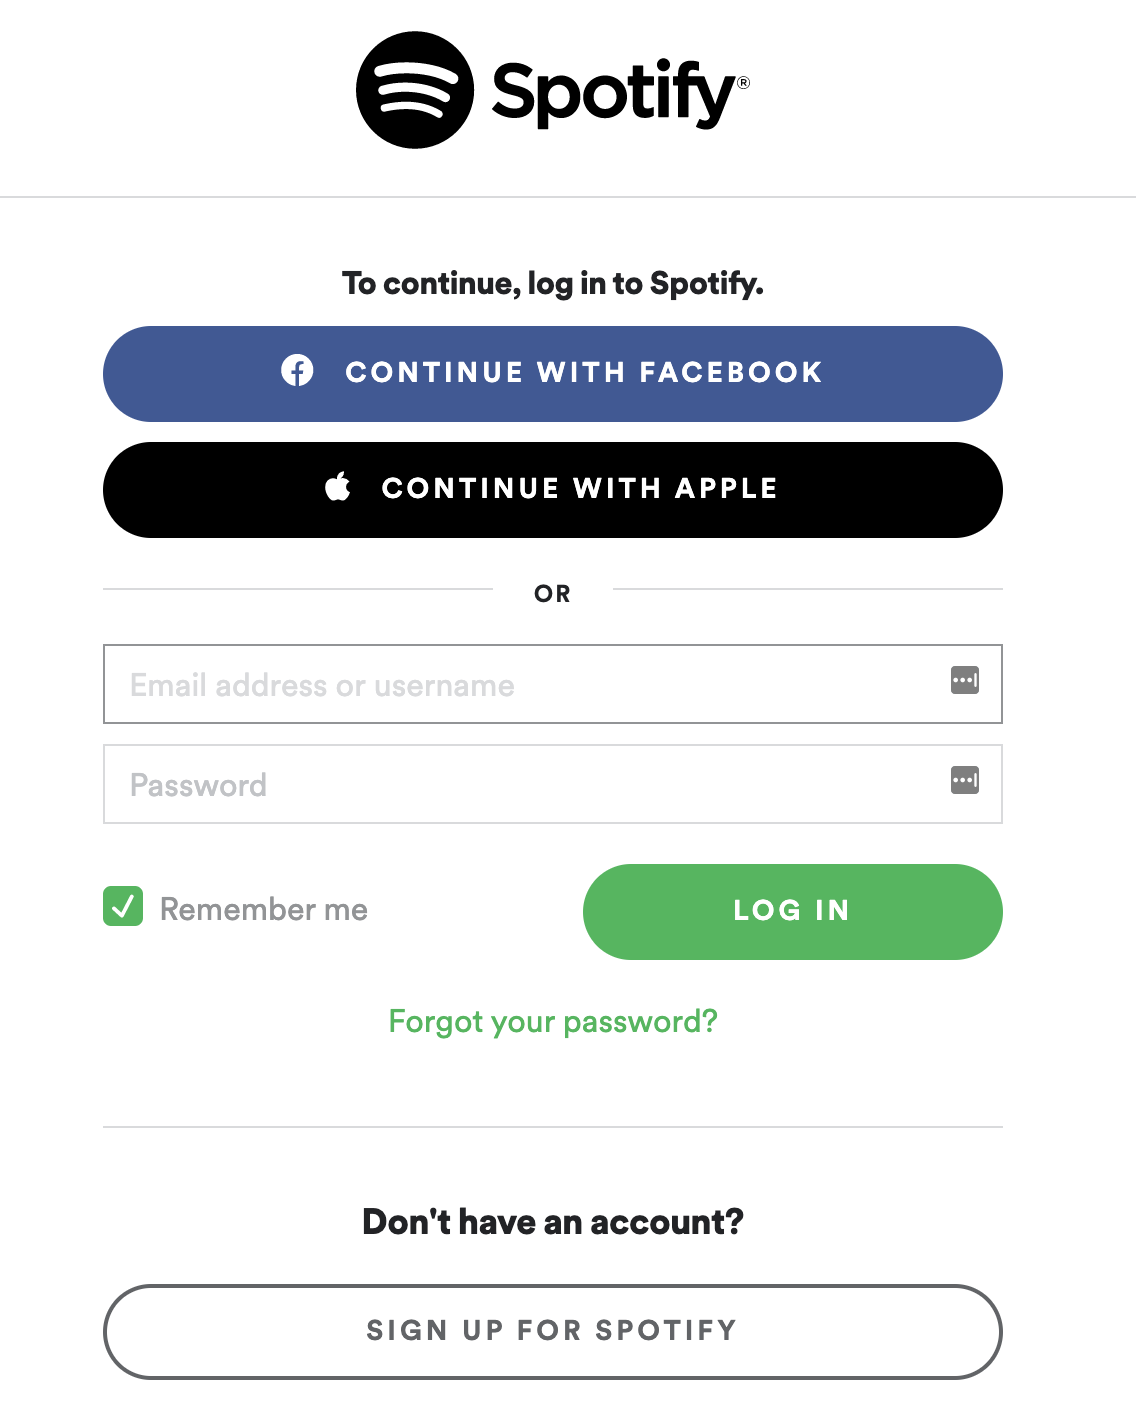
Вот пошаговое описание того, что происходит, когда мы нажимаем в приложении Spotify кнопку «Продолжить с Facebook»:
- Приложение Spotify запрашивает API Facebook запустить процесс аутентификации. Для этого приложение Spotify отправит идентификатор приложения (
client_id) и URL-адрес (redirect_uri) для перенаправления пользователя после взаимодействия с API Facebook. - Клиент будет перенаправлен на сайт Facebook, где нас попросят войти в систему с учетными данными. Приложение Spotify не увидит эти учетные данные и не получит к ним доступа. Это самое важное преимущество OAuth.
- Facebook отобразит данные профиля, запрашиваемые приложением Spotify, и попросит принять или отклонить обмен этими данными.
- Если вы согласитесь предоставить Spotify доступ к своим данным, вы будете перенаправлены обратно в приложение Spotify и получите доступ к системе.
При прохождении четвертого шага Facebook предоставит Spotify специальные учетные данные — токен доступа (access_token), который можно многократно использовать для получения информации. Этот токен входа в Facebook действителен в течение шестидесяти дней, но у других приложений могут быть другие сроки действия.
С технической точки зрения вот что нам нужно знать при использовании API с использованием OAuth:
- Нам нужно создать приложение, которое будет иметь идентификатор (
app_idилиclient_id) и некоторую секретную строку (app_secretилиclient_secret). - У нас должен быть URL-адрес перенаправления (
redirect_uri), который API будет использовать для отправки нам информации. - В результате аутентификации мы получим код (
exchange_code), который необходимо обменять на токен доступа (access_token).
Существуют различные вариации этого процесса, но большинство потоков OAuth содержат шаги, аналогичные описанным. Давайте попробуем OAuth на примере GitHub API.
OAuth: практический пример
Как мы видели выше, первое, с чего стоит начать — создать приложение. В документации GitHub есть отличное пошаговое объяснение, как это сделать. Чтобы не разворачивать отдельный сервер, в качестве адреса для перенаправления можно использовать адрес https://httpbin.org/anything. Эта веб-страница просто выводит все, что получает на входе.
Создадим приложение, скопируем и вставим Client_ID и Client_Secret вместе с указанным URL для переадресации в файл Python, который назовем github.py:
        import requests

# Замените следующие переменные вашим Client ID и Client Secret
CLIENT_ID = "<REPLACE_WITH_CLIENT_ID>"
CLIENT_SECRET = "<REPLACE_WITH_CLIENT_SECRET>"

# Замените значение переменной с помощью url, указанного вами
# в поле "Authorization callback URL"
REDIRECT_URI = "<REPLACE_WITH_REDIRECT_URI>"
У нас есть все необходимые переменные, теперь нужно создать ссылку для перенаправления пользователя на его учетную запись GitHub, как описано в документации GitHub:
        def create_oauth_link():
    params = {
        "client_id": CLIENT_ID,
        "redirect_uri": REDIRECT_URI,
        "scope": "user",
        "response_type": "code",
    }

    endpoint = "https://github.com/login/oauth/authorize"
    response = requests.get(endpoint, params=params)
    url = response.url
    return url
Сначала мы определяем требуемые параметры, которые ожидает API, а затем вызываем API, используя requests.get().
Когда мы делаем запрос к конечной точке /login/oauth/ authorize, API автоматически перенаправляет нас на сайт GitHub. В этом случае мы хотим получить из ответа параметр url. Этот параметр содержит точный URL-адрес, на который GitHub нас перенаправляет.
Следующим шагом в процессе авторизации является обмен полученного кода на токен доступа. Опять же, следуя инструкциям в документации GitHub, мы можем создать для этого метод:
        def exchange_code_for_access_token(code=None):
    params = {
        "client_id": CLIENT_ID,
        "client_secret": CLIENT_SECRET,
        "redirect_uri": REDIRECT_URI,
        "code": code,
    }

    headers = {"Accept": "application/json"}
    endpoint = "https://github.com/login/oauth/access_token"
    response = requests.post(endpoint, params=params, headers=headers).json()
    return response["access_token"]
Здесь мы делаем POST-запрос для обмена кода на токен доступа. В запросе мы должны отправить CLIENT_SECRET и код, чтобы GitHub проверил, что код сгенерирован нашим приложением. После этого GitHub API генерирует и возвращает токен доступа.
Мы можем добавить в свой файл следующий код и попробовать его запустить:
        link = create_oauth_link()
print(f"Перейдите по ссылке, чтобы запустить аутентификацию с помощью GitHub: {link}")
code = input("GitHub code: ")
access_token = exchange_code_for_access_token(code)
print(f"Exchanged code {code} и access token: {access_token}")
Мы должны получить действующий токен доступа, который можно использовать для вызовов API GitHub от имени аутентифицированного пользователя.
Попробуем добавить следующий код, чтобы получить свой профиль пользователя с помощью User API и распечатать свое имя, имя пользователя и количество приватных репозиториев:
        def print_user_info(access_token=None):
    headers = {"Authorization": f"token {access_token}"}
    endpoint = "https://api.github.com/user"
    response = requests.get(endpoint, headers=headers).json()
    name = response["name"]
    username = response["login"]
    private_repos_count = response["total_private_repos"]
    print(
        f"{name} ({username}) | private repositories: {private_repos_count}"
    )
Теперь, когда у нас есть токен доступа, необходимо отправлять его со всеми запросам API в заголовке Authorization. Ответом на запрос будет словарь Python, содержащий информацию о пользователе. Из этого словаря мы хотите получить поля name, login и total_private_repos. Мы также можете распечатать переменную respinse, чтобы увидеть, какие еще поля доступны.
Осталось только собрать все вместе и попробовать:
        import requests

# Замените следующие переменные вашим Client ID и Client Secret
CLIENT_ID = "<REPLACE_WITH_CLIENT_ID>"
CLIENT_SECRET = "<REPLACE_WITH_CLIENT_SECRET>"

# Замените значение переменной с помощью url, указанного вами
# в поле "Authorization callback URL"
REDIRECT_URI = "<REPLACE_WITH_REDIRECT_URI>"


def create_oauth_link():
    params = {
        "client_id": CLIENT_ID,
        "redirect_uri": REDIRECT_URI,
        "scope": "user",
        "response_type": "code",
    }
    endpoint = "https://github.com/login/oauth/authorize"
    response = requests.get(endpoint, params=params)
    url = response.url
    return url


def exchange_code_for_access_token(code=None):
    params = {
        "client_id": CLIENT_ID,
        "client_secret": CLIENT_SECRET,
        "redirect_uri": REDIRECT_URI,
        "code": code,
    }
    headers = {"Accept": "application/json"}
    endpoint = "https://github.com/login/oauth/access_token"
    response = requests.post(endpoint, params=params, headers=headers).json()
    return response["access_token"]


def print_user_info(access_token=None):
    headers = {"Authorization": f"token {access_token}"}
    endpoint = "https://api.github.com/user"
    response = requests.get(endpoint, headers=headers).json()
    name = response["name"]
    username = response["login"]
    private_repos_count = response["total_private_repos"]
    print(
        f"{name} ({username}) | private repositories: {private_repos_count}"
    )

link = create_oauth_link()
print(f"Follow the link to start the authentication with GitHub: {link}")
code = input("GitHub code: ")
access_token = exchange_code_for_access_token(code)
print(f"Exchanged code {code} и access token: {access_token}")
print_user_info(access_token=access_token)
В результате запуска скрипта мы получим примерно такой результат:
John Doe (johndoe) | number of private repositories: 42
Большинство API-интерфейсов, использующих OAuth, ведут себя одинаково, поэтому достаточно один раз разобраться во всех процессах.
Пагинация
За пересылку большого массива данных между клиентами и сервером приходится платить пропускной способностью. Для снижения нагрузки на сервер API-интерфейсы обычно используют пагинацию — разбиение выдаваемой информации на страницы.
Например, всякий раз, когда мы переходим на страницу вопросов в Stack Overflow, внизу страницы есть ряд чисел, соответствующих страницам пагинации:

В API пагинация обычно обрабатывается с помощью двух параметров запроса:
- Атрибут
pageопределяет номер запрашиваемой страницы - Атрибут
sizeопределяет размер каждой страницы
Конкретные имена параметров запроса могут сильно различаться в зависимости от выбора разработчиков API. Некоторые провайдеры API могут также использовать HTTP-заголовки или JSON для возврата текущих фильтров разбивки на страницы.
Снова воспользуемся GitHub API. Параметр per_page= определяет количество возвращаемых элементов, а page= позволяет разбивать результат на отдельные страницы. Пример использования параметров:
        >>> response = requests.get("https://api.github.com/events?per_page=1&page=0")
>>> response.json()[0]["id"]
'15315291644'
>>> response = requests.get("https://api.github.com/events?per_page=1&page=1")
>>> response.json()[0]["id"]
'15316180831'
>>> response = requests.get("https://api.github.com/events?per_page=1&page=2")
>>> response.json()[0]["id"]
'15316181822'
Используя параметр запроса page=, мы получаем страницы без перегрузки API.
Ограничение скорости
Учитывая, что рассматриваемые API-интерфейсы являются общедоступными и могут использоваться кем угодно, ими пытаются злоупотреблять люди с плохими намерениями. Чтобы предотвратить такие атаки, используется метод, называемый ограничением скорости (rate limit). API ограничивает количество запросов, которые пользователи могут сделать за определенный период. В случае превышения лимита API-интерфейсы временно блокируют IP-адрес или API-ключ.
Некоторые API, такие как GitHub, даже включают в заголовки дополнительную информацию о текущем ограничении скорости и количестве оставшихся запросов. Это очень помогает избежать превышения установленного лимита.
Использование API с помощью Python: практические примеры
Теперь, когда мы поэкспериментировали с несколькими API, можно объединить полученные знания с помощью еще нескольких практических примеров.
Запрос наиболее популярных сейчас гифок
Как насчет создания небольшого скрипта, который извлекает три самых популярных сейчас GIF-файла с веб-сайта GIPHY? Начните с получения API-ключа:
- Создайте аккаунт на GIPHY
- Перейдите в панель разработчика и зарегистрируйте новое приложение.
- Получите ключ для соединения с API.
Ключ API используем в GIPHY API:
        import requests

API_KEY = "API_KEY"
endpoint = "https://api.giphy.com/v1/gifs/trending"

params = {"api_key": API_KEY, "limit": 3, "rating": "g"}
response = requests.get(ENDPOINT, params=params).json()
for gif in response["data"]:
    title = gif["title"]
    trending_date = gif["trending_datetime"]
    url = gif["url"]
    print(f"{title} | {trending_date} | {url}")
Запуск этого кода выведет структурированный список со ссылками на гифки:
        Excited Schitts Creek GIF by CBC | 2020-11-28 20:45:14 | https://giphy.com/gifs/cbc-schittscreek-schitts-creek-SiGg4zSmwmbafTYwpj
Saved By The Bell Shrug GIF by PeacockTV | 2020-11-28 20:30:15 | https://giphy.com/gifs/peacocktv-saved-by-the-bell-bayside-high-school-dZRjehRpivtJsNUxW9
Schitts Creek Thank You GIF by CBC | 2020-11-28 20:15:07 | https://giphy.com/gifs/cbc-funny-comedy-26n79l9afmfm1POjC
Получение подтвержденных случаев COVID-19 в каждой стране
API сайта, отслеживающего случаи заболевания COVID-19, не требует аутентификации. В следующем примере мы получим общее количество подтвержденных случаев до предыдущего дня:
        import requests
from datetime import date, timedelta

today = date.today()
yesterday = today - timedelta(days=1)
country = "Russia"
endpoint = f"https://api.covid19api.com/country/{country}/status/confirmed"
params = {"from": str(yesterday), "to": str(today)}

response = requests.get(endpoint, params=params).json()
total_confirmed = 0
for day in response:
    cases = day.get("Cases", 0)
    total_confirmed += cases

print(f"Total Confirmed Covid-19 cases in {country}: {total_confirmed}")
Total Confirmed Covid-19 cases in Russia: 4153735
В этом примере мы получаем общее количество подтвержденных случаев для всей страны. Однако вы также можете просмотреть документацию и получить данные для конкретного города.
Поиск в Google Книгах
Воспользуемся API Google Книг для поиска информации об интересующей нас книге. Вот простой фрагмент кода для поиска названия книги Моби Дик во всем каталоге с выдачей трех первых записей:
        import requests

endpoint = "https://www.googleapis.com/books/v1/volumes"
query = "Моби Дик"

params = {"q": query, "maxResults": 3}
response = requests.get(endpoint, params=params).json()
for book in response["items"]:
    volume = book["volumeInfo"]
    title = volume["title"]
    published = volume.get("publishedDate", "год издания неизвестен")
    description = volume.get("description", "описание отсутствует")
    print(f"{title} ({published}) | {description}")
        Моби Дик (год издания неизвестен) | «Моби Дик» — самый
известный роман американского писателя Германа Мелвилла
(1819–1891), романтика, путешественника, философа, поэта,
автора морских повестей и психологических рассказов. В
настоящем издании «Моби Дик»...
Моби Дик (2018-01-03) | Моби Дик — это не кит, это человек…
Он одинок и у него нет никого и ничего, кроме работы,
составляющей всю его жизнь. И лишь настоящие чувства,
пробужденные в нем девушкой, изменяют смысл его жизни...
Моби Дик (1961) | описание отсутствует
Вы можете использовать свои знания OAuth и создать приложение, хранящее записи о книгах, которые читаете или хотите прочитать.
Заключение
Есть множество других вещей, которые вы ещё узнаете об API: другие заголовки, типы контента, методы аутентификации и так далее. Однако концепции и методы, которые мы рассмотрели в этом руководстве, позволят достаточно быстро разобраться и провзаимодействовать с помощью Python с любыми API.
Напоследок приведем список агрегаторов ссылок на публичные API, которые вы можете использовать в собственных проектах:
- Репозиторий GitHub со списком общедоступных API
- Public APIs
- Public API
- Any API
***
На Python создают прикладные приложения, пишут тесты и бэкенд веб-приложений, автоматизируют задачи в системном администрировании, его используют в нейронных сетях и анализе больших данных. Язык можно изучить самостоятельно, но на это придется потратить немало времени. Если вы хотите быстро понять основы программирования на Python, обратите внимание на онлайн-курс «Библиотеки программиста». За 30 уроков (15 теоретических и 15 практических занятий) под руководством практикующих экспертов вы не только изучите основы синтаксиса, но и освоите две интегрированные среды разработки (PyCharm и Jupyter Notebook), работу со словарями, парсинг веб-страниц, создание ботов для Telegram и Instagram, тестирование кода и даже анализ данных. Чтобы процесс обучения стал более интересным и комфортным, студенты получат от нас обратную связь. Кураторы и преподаватели курса ответят на все вопросы по теме лекций и практических занятий.
Оглавление
- Введение
- Краткое содержание
- План первой части
- Начало
- Создаем виртуальное окружение
- Добавляем зависимости
- Инициализируем Flask проект
- Добавляем первую конечную точку REST API
- Создаем конфигурационный файл нашего API
- Связываем Connexion c приложением
- Получаем данные от конечной точки people
- Изучаем документацию API
- Создаем полноценный API
- Работа с компонентами
- Создание нового персонажа
- Обработка персонажа
- Изучаем документацию API
- Заключение
Введение
Большинство современных веб-приложений работают на основе REST API. Это позволяет разработчикам отделить код фронтенда от внутренней логики, а пользователям — динамически взаимодействовать с интерфейсом.
В этой серии статей, состоящей из трех частей, мы создадим REST API на базе веб-фреймворка Flask.
Мы сделаем базовый проект Flask, добавим к нему конечные точки и подключим к базе данных SQLite. Далее мы протестируем наш проект при помощи документации API от Swagger UI , которую создадим по ходу дела.
Из первой части данной серии статей вы узнаете, как:
- создавать проект Flask при помощи REST API
- обрабатывать HTTP-запросы при помощи Connexion
- определять конечные точки API при помощи спецификации OpenAPI
- взаимодействовать с API для управления данными
- создавать пользовательскую документацию по API при помощи Swagger UI.
Затем мы перейдем ко второй части. В ней мы рассмотрим использование базы данных для постоянного хранения информации (вместо использования для этого оперативной памяти).
Эта серия статей представляет собой практическое руководство по созданию REST API при помощи фреймворка Flask и взаимодействию с ним при помощи CRUD-операций. Вы можете скачать код первой части данного проекта по данной ссылке.
Краткое содержание
В этой серии статей мы построим REST API, с помощью которого сможем оставлять записки-напоминания для вымышленных персонажей. Это те сущности, которые могут посещать нас в течение года. В этой части мы создадим следующих персонажей: Зубную фею, Пасхального кролика и кнехта Рупрехта.
Понятно, что мы хотим быть с ними в хороших отношениях. Поэтому, чтобы увеличить шансы на хорошие подарки, мы будем отправлять им всем записки.
Взаимодействовать со своим приложением мы сможем при помощи документации API. По ходу дела мы создадим базовый фронтенд, отражающий содержимое нашей базы данных.
В этой статье мы создадим базовый проект Flask и подключим к нему свои первые конечные точки API. В итоге мы сможем увидеть список персонажей во фронтенде и управлять всеми ими в бэкенде.
Используя Swagger UI, мы создадим удобную документацию для нашего API. Это даст нам возможность проверять работу API на каждом этапе данной статьи и отслеживать все наши конечные точки.
План первой части
Помимо создания основы для нашего проекта Flask мы собираемся создать REST API, который будет обеспечивать доступ к группе персонажей и отдельным лицам в этой группе. Вот дизайн API для такой группы людей:
| Действие | HTTP-запрос | URL-путь | Описание |
|---|---|---|---|
| Чтение | GET | /api/people | Считываем группу персонажей |
| Создание | POST | /api/people | Создаем нового персонажа |
| Чтение | GET | /api/people/<lname> | Считываем конкретного персонажа |
| Обновление | PUT | /api/people/<lname> | Обновляем существующего персонажа |
| Удаление | DELETE | /api/people/<lname> | Удаляем персонажа |
REST API, который мы будем создавать, должен обслуживать простую структуру данных персонажей, где ключами будут выступать их «фамилии» а любые обновления будут помечаться новой отметкой времени.
Набор данных, с которым мы будем работать, выглядит следующим образом:
PEOPLE = {
    "Fairy": {
        "fname": "Tooth",
        "lname": "Fairy",
        "timestamp": "2022-10-08 09:15:10",
    },
    "Ruprecht": {
        "fname": "Knecht",
        "lname": "Ruprecht",
        "timestamp": "2022-10-08 09:15:13",
    },
    "Bunny": {
        "fname": "Easter",
        "lname": "Bunny",
        "timestamp": "2022-10-08 09:15:27",
    }
}
Одной из целей API является отделение данных от приложения, которое их использует. Таким образом скрываются детали реализации этих данных. Позже мы сохраним данные в базе, но для начала нам подойдет и структура данных в оперативной памяти.
Начало
В этом разделе мы подготовим среду разработки для нашего Flask-проекта. Начнем с создания виртуальной среды и установки всех необходимых зависимостей.
Создаем виртуальное окружение
В этом разделе мы создадим структуру проекта. Корневую папку нашего проекта можно назвать как угодно. Например, назовем ее rp_flask_api/. Итак, создадим папку и перейдем в нее:
$ mkdir rp_flask_api
$ cd rp_flask_api
Мы создали корневую папку проекта rp_flask_api/. Файлы и папки, которые мы создадим в ходе этой серии статей, будут расположены либо в этой папке, либо в ее подпапках.
После перехода в папку проекта рекомендуется создать и активировать виртуальную среду. Это позволит устанавливать любые зависимости не для всей системы, а только в виртуальной среде нашего проекта.
Настроить виртуальную среду можно следующим образом:
# Для Windows

PS> python -m venv venv
PS> .venvScriptsactivate
(venv) PS>

# Для Linux или macOS

$ python -m venv venv
$ source venv/bin/activate
(venv) $
С помощью этих команд мы создаем и активируем виртуальную среду с именем venv, используя встроенный в Python модуль venv.
Запись (venv) перед приглашением командной строки показывает, что мы успешно создали и активировали виртуальную среду.
Добавляем зависимости
После создания и активации виртуальной среды настало время установить Flask при помощи менеджера pip:
(venv) $ python -m pip install Flask==2.2.2
Микрофреймворк Flask — это основная зависимость, которая требуется нашему проекту. Поверх Flask установим Connexion для обработки HTTP-запросов:
(venv) $ python -m pip install "connexion[swagger-ui]==2.14.1"
Чтобы использовать автоматически создаваемую документацию по API, мы устанавливаем Connexion с добавленной поддержкой Swagger UI. Со всеми этими пакетами мы познакомимся чуть позже.
Инициализируем Flask-проект
Основным файлом Flask-проекта будет app.py. Создаем файл его в директории rp_flask_api/ и добавляем в него следующий код:
# app.py

from flask import Flask, render_template

app = Flask(__name__)

@app.route("/")
def home():
    return render_template("home.html")

if __name__ == "__main__":
    app.run(host="0.0.0.0", port=8000, debug=True)
Мы импортируем Flask, предоставляя приложению доступ к функциям данного модуля. После этого создаем экземпляр приложения Flask с именем app.
Далее, при помощи декоратора @app.route("/"), мы подключаем маршрут URL «/» к функции home(). Эта функция вызывает функцию Flask render_template(), чтобы получить файл home.html из каталога шаблонов и вернуть его в браузер.
Если вкратце, этот код создает и запускает базовый веб-сервер и заставляет его возвращать шаблон home.html, который будет отображаться в браузере при переходе по URL-адресу «/».
Примечание: Сервер разработки Flask по умолчанию использует порт 5000. В более новых версиях macOS этот порт уже используется macOS AirPlay. Выше мы изменили порт своего приложения Flask на порт 8000. При желании можно вместо этого изменить настройки AirPlay на своем Mac.
Сервер Flask ожидает, что файл home.html находится в каталоге шаблонов с именем templates/. Создадим каталог templates/ и добавим в него файл home.html со следующим содержанием:
<!-- templates/home.html -->

<!DOCTYPE html>
<html lang="en">
<head>
    <meta charset="UTF-8">
    <title>RP Flask REST API</title>
</head>
<body>
    <h1>
        Hello, World!
    </h1>
</body>
</html>
Flask поставляется с движком шаблонов Jinja, который позволяет существенно совершенствовать шаблоны. Но наш шаблон home.html представляет собой простой HTML-файл без каких-либо функций Jinja. На данный момент это нормально, потому что первая цель home.html — убедиться, что наш проект Flask работает так, как задумано.
Когда созданная нами виртуальная среда Python активна, мы можем запустить свое приложение при помощи следующей команды (при этом нужно находиться в каталоге, содержащем файл app.py):
(venv) $ python app.py
Когда вы запускаете app.py, веб-сервер запускается через порт 8000. Если вы откроете браузер и перейдете по адресу http://localhost:8000, вы должны увидеть фразу Hello, World!:
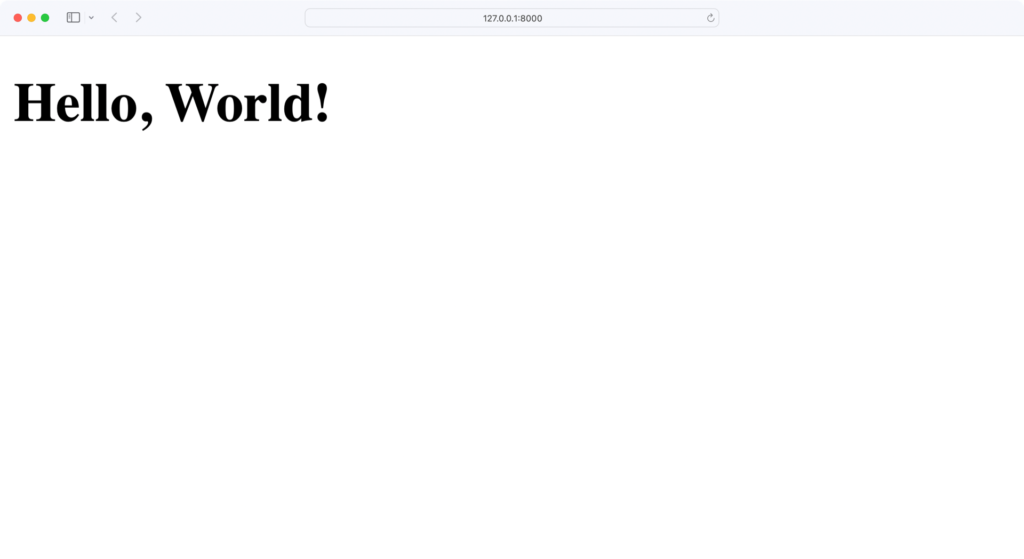
Поздравляем, наш веб-сервер запущен! Позже мы расширим файл home.html для работы с нашим REST API.
На данный момент структура нашего проекта Flask имеет следующий вид:
rp_flask_api/
│
├── templates/
│   └── home.html
│
└── app.py
Это отличная структура для запуска любого проекта Flask.
В следующих разделах мы расширим данный проект и добавим в него первые конечные точки REST API.
Теперь, имея работающий веб-сервер, мы можем добавить первую конечную точку REST API. Для этого мы применим Connexion, который установили в предыдущем разделе.
Модуль Connexion позволяет программе на Python использовать со Swagger спецификацию OpenAPI .
Спецификация OpenAPI представляет собой формат описания API для REST API и предоставляет множество функций, в том числе:
- проверку входных и выходных данных вашего API
- настройку URL-адресов конечных точек API и ожидаемых параметров.
При использовании OpenAPI вместе со Swagger можно создать пользовательский интерфейс для работы с API. Для этого необходимо создать конфигурационный файл, к которому наше Flask-приложение будет иметь доступ.
Создаем конфигурационный файл нашего API
Конфиг Swagger — это файл YAML или JSON, содержащий наши определения OpenAPI. Этот файл содержит всю информацию, необходимую для настройки сервера.
Создадим файл с именем swagger.yml и начнем добавлять в него метаданные:
# swagger.yml

openapi: 3.0.0
info:
  title: "RP Flask REST API"
  description: "An API about people and notes"
  version: "1.0.0"
При определении API мы должны установить версию определения OpenAPI. Для этого используется ключевое слово openapi. Строка версии важна, так как некоторые части структуры OpenAPI могут со временем измениться.
Кроме того, точно так же, как каждая новая версия Python включает новые функции, в спецификации OpenAPI могут быть добавлены или исключены ключевые слова.
Ключевое слово info начинает область действия информационного блока API:
- title: заголовок, включенный в систему пользовательского интерфейса, сгенерированную Connexion
- description: описание того, что API дает возможность сделать
- version: значение версии API
Затем добавьте серверы и URL-адреса, которые определяют корневой путь вашего API:
# swagger.yml

# ...

servers:
  - url: "/api"
Указав «/api» в качестве значения URL-адреса, мы сможем получить доступ ко всем путям API относительно http://localhost:8000/api.
Конечные точки API мы определим в блоке путей paths:
# swagger.yml

# ...

paths:
  /people:
    get:
      operationId: "people.read_all"
      tags:
        - "People"
      summary: "Read the list of people"
      responses:
        "200":
          description: "Successfully read people list"
Блок paths определяет конфигурацию URL-адреса для каждой конечной точки API:
/people: относительный URL-адрес вашей конечной точки APIget: HTTP-метод, которому будет отвечать конечная точка по этому URL-адресу
Вместе с определением url в servers это создает URL-адрес конечной точки GET /api/people — http://localhost:8000/api/people.
Блок get определяет конфигурацию URL-адреса отдельной конечной точки /api/people:
- operationId: функция Python, которая отвечает на запрос
- tags: теги, связанные с данной конечной точкой; они позволяют группировать операции в пользовательском интерфейсе
- summary: отображаемый текст пользовательского интерфейса для данной конечной точки
- responses: коды состояния, которые посылает данная конечная точка
OperationId должен содержать строку. Connexion будет использовать форму people.read_all, чтобы найти функцию Python с именем read_all() в модуле people нашего проекта. Позже в данной статье мы создадим соответствующий код.
Блок responses определяет конфигурацию возможных кодов состояния. Здесь мы определяем успешный ответ для кода состояния 200, содержащий некоторый текст описания description.
Ниже файл swagger.yml приведен полностью:
# swagger.yml

openapi: 3.0.0
info:
  title: "RP Flask REST API"
  description: "An API about people and notes"
  version: "1.0.0"

servers:
  - url: "/api"

paths:
  /people:
    get:
      operationId: "people.read_all"
      tags:
        - "People"
      summary: "Read the list of people"
      responses:
        "200":
          description: "Successfully read people list"
Мы организовали этот файл в иерархическом порядке. Каждый уровень отступа представляет собой уровень владения или область действия.
Например, paths отмечает начало блока, где определены все URL-адреса конечных точек API. Значение /people представляет собой начало блока, где будут определены все конечные точки по URL-адресу /api/people. Область get в разделе /people содержит определения, связанные с HTTP-запросом GET к конечной точке по URL-адресу /api/people. Этот шаблон действует для всего конфига.
Файл swagger.yml похож на план нашего API. С помощью спецификаций, включенных в этот файл, мы определяем, какие данные может ожидать наш веб-сервер и как сервер должен отвечать на запросы. Но пока наш проект Flask ничего не знает о файле swagger.yml. Для соединения OpenAPI с Flask-приложением мы будем использовать Connexion.
Связываем Connexion c приложением
Чтобы добавить URL-адрес конечной точки REST API в наше Flask-приложение при помощи Connexion, нужно выполнить два шага:
- Добавить конфигурационный файл API в наш проект.
- Связать Flask-приложение с этим файлом.
В предыдущем разделе мы уже добавили файл под именем swagger.yml. Чтобы подключить его к нашему Flask-приложнию, нужно прописать его в файле app.py:
# app.py

from flask import render_template # Remove: import Flask
import connexion

app = connexion.App(__name__, specification_dir="./")
app.add_api("swagger.yml")

@app.route("/")
def home():
    return render_template("home.html")

if __name__ == "__main__":
    app.run(host="0.0.0.0", port=8000, debug=True)
Выражение import connexion добавляет модуль в программу. Следующий шаг — это создание экземпляра класса Connexion вместо Flask. Flask-приложение по прежнему будет создано, но теперь у него появятся дополнительные функции.
Одним из параметров данного приложения является specification_dir (6 строка). Он сообщает классу Connexion, в какой директории искать конфигурационный файл. В данном случае он находится в той же папке, что и файл app.py.
В следующей строке мы читаем файл swagger.yml и настраиваем систему для обеспечения функциональности класса Connexion.
Получаем данные от конечной точки people
В файле swagger.yml мы настроили Connexion со значением operationId "people.read_all". Поэтому, когда API получает HTTP-запрос для GET /api/people, наше приложение Flask вызывает функцию read_all() в модуле people.
Чтобы это заработало, надо создать файл people.py с функцией read_all():
# people.py

from datetime import datetime

def get_timestamp():
    return datetime.now().strftime(("%Y-%m-%d %H:%M:%S"))

PEOPLE = {
    "Fairy": {
        "fname": "Tooth",
        "lname": "Fairy",
        "timestamp": get_timestamp(),
    },
    "Ruprecht": {
        "fname": "Knecht",
        "lname": "Ruprecht",
        "timestamp": get_timestamp(),
    },
    "Bunny": {
        "fname": "Easter",
        "lname": "Bunny",
        "timestamp": get_timestamp(),
    }
}

def read_all():
    return list(PEOPLE.values())
В строке 5 мы создаем вспомогательную функцию с именем get_timestamp(), которая генерирует строковое представление текущей метки времени.
Затем мы определяем структуру данных словаря PEOPLE (в строке 8), с которой и будем работать в этой статье.
Словарь PEOPLE заменяет нам базу данных. Поскольку PEOPLE является переменной модуля, ее состояние сохраняется между вызовами REST API. Однако любые данные, которые мы изменим, будут потеряны при перезапуске веб-приложения. Это, разумеется не идеально, но пока сойдет и так.
Затем мы создаем функцию read_all() (строка 26). Наш сервер запустит эту функцию, когда получит HTTP-запрос на GET /api/people. Возвращаемое значение функции read_all() — это список словарей с информацией о персонаже.
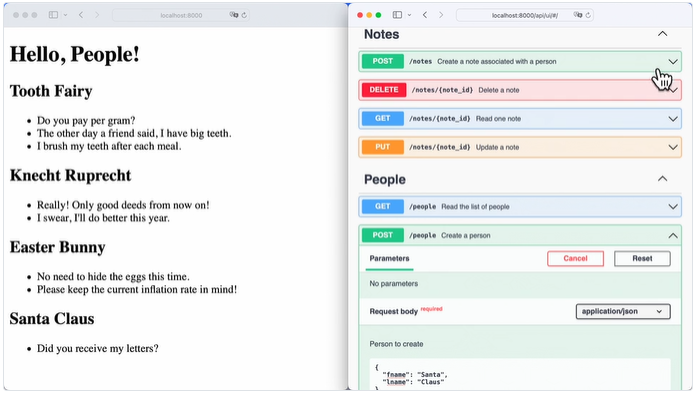
Запустив код нашего сервера и перейдя в браузере по адресу http://localhost:8000/api/people, мы увидим список персонажей на экране:

Поздравляем, вы только что создали свою первую конечную точку API! Прежде чем продолжить создание REST API с несколькими конечными точками, давайте потратим еще немного времени и изучим API немного подробнее.
Изучаем документацию API
На данный момент у нас есть REST API, работающий только с одной конечной точкой. Наше приложение Flask знает, что обслуживать, на основе нашей спецификации API в файле swagger.yml. Кроме того, класс Connexion использует swagger.yml для создания для нас документации по API.
Перейдём по адресу localhost:8000/api/ui, чтобы увидеть документацию по API в действии:
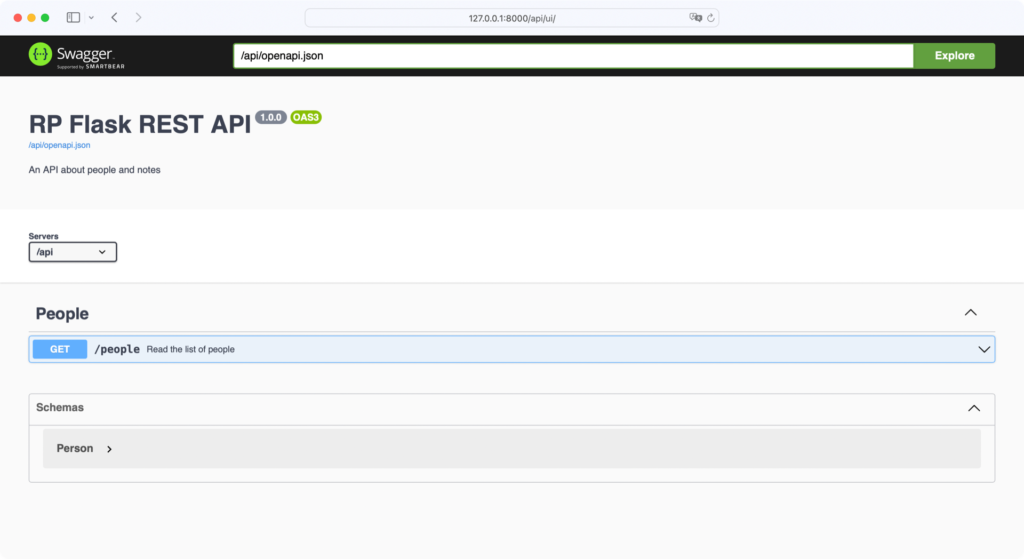
Это первоначальный интерфейс Swagger. Он показывает список URL конечных точек, поддерживаемых нашей конечной точкой http://localhost:8000/api. Класс Connexion создает его автоматически при анализе файла swagger.yml.
Нажав на конечную точку /people в интерфейсе, вы увидите больше информации о вашем API.
Будет выведена структура ожидаемого ответа, тип содержимого этого ответа и введенный нами текст описания конечной точки в файле swagger.yml. При любом изменении файла конфигурации меняется и пользовательский интерфейс Swagger.
Мы даже можем проверить конечную точку, нажав кнопку «Try it out». Эта функция может быть чрезвычайно полезна, когда наш API быстро растет. Документация API, сгенерированная Swagger UI, дает вам возможность исследовать API и экспериментировать с ним без необходимости писать для этого какой-либо код.
Использование OpenAPI со Swagger UI обеспечивает удобный и понятный способ создания URL-адресов конечных точек API. Пока что мы создали только одну конечную точку для обслуживания всех персонажей сразу. В следующем разделе мы добавим дополнительные конечные точки для создания, обновления и удаления персонажей в нашем словаре.
Создание полноценного API
Пока у нашего REST API есть только одна конечная точка. Пора создать API, обеспечивающий полный CRUD-доступ к нашей структуре персонажей. Как вы помните, определение нашего API выглядит следующим образом:
| Действие | HTTP-запрос | URL-путь | Описание |
|---|---|---|---|
| Чтение | GET | /api/people | Считываем группу персонажей |
| Создание | POST | /api/people | Создаем нового персонажа |
| Чтение | GET | /api/people/<lname> | Считываем конкретного персонажа |
| Обновление | PUT | /api/people/<lname> | Обновляем существующего персонажа |
| Удаление | DELETE | /api/people/<lname> | Удаляем персонажа |
Чтобы реализовать это, нам надо расширить файлы swagger.yml и people.py соответствующим образом.
Работа с компонентами
Прежде чем определять новые пути API в файле swagger.yml, нам нужно добавить новый блок для компонентов.
Компоненты — это строительные блоки в нашей спецификации OpenAPI, на которые мы можем ссылаться из других частей спецификации.
Добавьте блок components вместе с блоком schemas для одного персонажа:
# swagger.yml

openapi: 3.0.0
info:
  title: "RP Flask REST API"
  description: "An API about people and notes"
  version: "1.0.0"

servers:
  - url: "/api"

components:
  schemas:
    Person:
      type: "object"
      required:
        - lname
      properties:
        fname:
          type: "string"
        lname:
          type: "string"
# ...
Мы создаем эти блоки во избежание дублирования кода. На данный момент в блоке schemas мы сохраняем только модель Person:
- type: тип данных
- required: требуемые свойства
Дефис (-) перед -lname указывает, что required может содержать список свойств. Любое свойство, которое мы определяем как обязательное, также должно существовать в properties, включая следующие:
- fname: имя персонажа
- lname: его «фамилия»
Ключ type определяет значение, связанное с его родительским ключом. Для Person все свойства являются строками. Позже в этом руководстве мы представим эту схему в виде словаря Python.
Создание нового персонажа
Расширим конечные точки API, добавив новый блок для запроса POST в блоке /people:
# swagger.yml

# ...

paths:
  /people:
    get:
        # ...
    post:
      operationId: "people.create"
      tags:
        - People
      summary: "Create a person"
      requestBody:
          description: "Person to create"
          required: True
          content:
            application/json:
              schema:
                x-body-name: "person"
                $ref: "#/components/schemas/Person"
      responses:
        "201":
          description: "Successfully created person"
Структура запроса post похожа на существующую схему запроса get. Первое отличие состоит в том, что на сервер мы также отправляем requestBody. В конце концов, нам нужно сообщить Flask информацию, необходимую для создания нового персонажа. Второе отличие — это operationId, для которого мы устанавливаем значение people.create.
Внутри content мы определяем application/json как формат обмена данными нашего API.
В своих запросах к API и ответах API мы можем использовать различные типы данных. В настоящее время в качестве формата обмена данными обычно используют JSON. Это хорошая новость для нас как Python-разработчиков, поскольку объекты JSON очень похожи на словари Python. Например:
{
    "fname": "Tooth",
    "lname": "Fairy"
}
Этот объект JSON напоминает компонент Person, который мы определили ранее в файле swagger.yml и на который мы ссылаемся с помощью $ref в блоке schema.
Мы также используем код состояния HTTP 201, который является успешным ответом, указывающим на создание нового ресурса.
Примечание: Если вы хотите узнать больше о кодах состояния HTTP, то можете ознакомиться с документацией Mozilla на эту тему.
При помощи выражения people.create мы говорим серверу искать функцию create() в модуле people. Откроем файл people.py и добавим туда функцию create():
# people.py

from datetime import datetime
from flask import abort

# ...

def create(person):
    lname = person.get("lname")
    fname = person.get("fname", "")

    if lname and lname not in PEOPLE:
        PEOPLE[lname] = {
            "lname": lname,
            "fname": fname,
            "timestamp": get_timestamp(),
        }
        return PEOPLE[lname], 201
    else:
        abort(
            406,
            f"Person with last name {lname} already exists",
        )
В строке 4 мы импортируем функцию Abort() из модуля Flask. Использование этой функции помогает нам отправить сообщение об ошибке в строке 20. Мы вызываем сообщение об ошибке, когда тело запроса не содержит фамилии или когда персонаж с такой фамилией уже существует.
Примечание: Фамилия персонажа должна быть уникальной, потому что мы используем lname в качестве ключа словаря PEOPLE. Это означает, что в вашем проекте пока не может быть двух персонажей с одинаковой фамилией.
Если данные в теле запроса валидны, мы обновляем словарь PEOPLE в строке 13 и возвращаем новый объект и HTTP-код 201 в строке 18.
Обработка персонажа
На данный момент мы можем создать нового персонажа и получить их полный список. В этом разделе мы обновим файлы swagger.yml и people.py, чтобы они работали с новым путем, который будет обрабатывать одного существующего пользователя.
Откроем файл swagger.yml и добавим следующий код:
# swagger.yml

# ...

components:
  schemas:
    # ...
  parameters:
    lname:
      name: "lname"
      description: "Last name of the person to get"
      in: path
      required: True
      schema:
        type: "string"

paths:
  /people:
    # ...
  /people/{lname}:
    get:
      operationId: "people.read_one"
      tags:
        - People
      summary: "Read one person"
      parameters:
        - $ref: "#/components/parameters/lname"
      responses:
        "200":
          description: "Successfully read person"
Как и в случае с нашим путем /people, мы начинаем с операции get для пути /people/{lname}. Подстрока {lname} является заполнителем для фамилии, которую мы должны передать в качестве параметра URL. Так, например, URL-путь api/people/Ruprecht содержит имя Рупрехта (Ruprecht) в качестве lname.
Примечание: URL-параметры чувствительны к регистру. Это означает, что мы должны ввести фамилию, например Ruprecht, с заглавной буквой R.
Параметр lname мы будем использовать и в других операциях. Поэтому имеет смысл создать для него отдельный компонент и ссылаться на него там, где это необходимо.
operationId указывает на функцию read_one() в файле people.py, поэтому снова перейдём к этому файлу и создадим отсутствующую функцию:
# people.py

# ...

def read_one(lname):
    if lname in PEOPLE:
        return PEOPLE.get[lname]
    else:
        abort(
            404, f"Person with last name {lname} not found"
        )
Когда наше приложение Flask находит данную фамилию в словаре PEOPLE, оно возвращает данные для этого конкретного персонажа. В противном случае сервер вернет код ответа HTTP 404 (ошибка).
Чтобы иметь возможность обновлять существующего персонажа, изменим файл swagger.yml:
# swagger.yml

# ...

paths:
  /people:
    # ...
  /people/{lname}:
    get:
        # ...
    put:
      tags:
        - People
      operationId: "people.update"
      summary: "Update a person"
      parameters:
        - $ref: "#/components/parameters/lname"
      responses:
        "200":
          description: "Successfully updated person"
      requestBody:
        content:
          application/json:
            schema:
              x-body-name: "person"
              $ref: "#/components/schemas/Person"
При таком определении операции put наш сервер ожидает функцию update() в файле people.py:
# people.py

# ...

def update(lname, person):
    if lname in PEOPLE:
        PEOPLE[lname]["fname"] = person.get("fname", PEOPLE[lname]["fname"])
        PEOPLE[lname]["timestamp"] = get_timestamp()
        return PEOPLE[lname]
    else:
        abort(
            404,
            f"Person with last name {lname} not found"
        )
Функция update() принимает аргументы lname и person. Если персонаж с данной фамилией уже существует, то мы просто обновляем соответствующие значения в словаре PEOPLE.
Чтобы удалить персонажа из нашего набора данных, нужно использовать операцию delete:
# swagger.yml

# ...

paths:
  /people:
    # ...
  /people/{lname}:
    get:
        # ...
    put:
        # ...
    delete:
      tags:
        - People
      operationId: "people.delete"
      summary: "Delete a person"
      parameters:
        - $ref: "#/components/parameters/lname"
      responses:
        "204":
          description: "Successfully deleted person"
Добавим соответствующую функцию delete() в файл person.py:
# people.py

from flask import abort, make_response

# ...

def delete(lname):
    if lname in PEOPLE:
        del PEOPLE[lname]
        return make_response(
            f"{lname} successfully deleted", 200
        )
    else:
        abort(
            404,
            f"Person with last name {lname} not found"
        )
Если персонаж, которого мы хотим удалить, есть в нашем наборе данных, то мы удаляем этот элемент из словаря PEOPLE.
Итак, мы закончили работу над фалами people.py и swagger.yml.
Когда созданы все конечные точки для управления пользователями, пришло время опробовать наш API. Поскольку мы использовали Connexion для подключения нашего проекта Flask к Swagger, документация по API будет готова после перезапуска сервера.
Изучаем документацию API
После обновления файлов swagger.yml и people.py система Swagger UI также обновится.
Этот UI (пользовательский интерфейс) позволяет просматривать всю документацию, которую мы включили в файл swagger.yml, и взаимодействовать со всеми конечными точками по заданным URL-адресам для осуществления CRUD-операций.
К сожалению, любые внесенные вами изменения не сохранятся после перезапуска приложения Flask. Вот почему в следующей части этого руководства мы подключим к своему проекту базу данных.
Заключение
В первой части нашей серии статей мы создали REST API с помощью веб-фреймворка Flask на Python. При помощи модуля Connexion и дополнительной настройки мы создали полезную документацию и интерактивную систему. Это делает создание REST API очень приятным занятием.
Мы разобрали, как:
- создать базовый проект Flask с
REST API. - обрабатывать HTTP-запросы при помощи модуля Connexion.
- задать конечные точки API, используя спецификацию OpenAPI
- взаимодействовать с API для управления данными
- создать документацию по API при помощи Swagger UI.
Во второй части этой серии мы разберем, как использовать базу данных для сохранения наших данных вместо того, чтобы полагаться на хранилище в оперативной памяти, как мы это делали сейчас.
Перевод статьи Филиппа Аксани «Python REST APIs With Flask, Connexion, and SQLAlchemy – Part 1».
В этой статье мы рассмотрим новый фреймворк Arrested, который используется для создания REST API при помощи Python. Мы используем Docker, SQLAlchemy и прочие инструменты для создания API на тему Звездных Войн всего за пять минут!
Это первый пост в серии в будущей серии статей, нацеленных на помощь людям в построении REST API Python. Мы собрали коллекцию инструментов, которые помогут вам быстро начать и не слишком напрягаться на протяжении работы. В данном материале мы представим вам фреймворк Arrested, который используется для создания API при помощи Flask. Данный фреймворк нацелен сделать создание REST API безболезненным процессом. Подходит для быстрого использования в проектах, при этом легко расширяется для особых требований.
В данной статье мы рассмотрим
- Использование Cookie Cutter шаблона для установки приложения Flask вместе с базой данных SQLAlchemy ORM для взаимодействия с базой данных, Kim Mappers для сериализации и сортировки, хранилище Docker для среды разработки и пример пользовательского API;
- Создание ресурсов на тему Звездных Войн, для получения списков персонажей, создания новых персонажей, поиск персонажей по ID и наконец, обновление и удаление персонажа.
Список ресурсов инструментов, которые мы будем использовать
- Docker – используется во всех наших примерах;
- Git – для клонирования некоторых хранилищ;
- Cookie Cutter – инструмент для создания проектных шаблонов;
- Flask – наш фреймворк Arrested работает на Flask, микро-фреймворке для Python, который в свою очередь базируется на Werkzeug;
- Kim – фреймворк Python для сортировки и сериализации;
- Arrested – фреймворк для быстрого создания API при помощи Flask
Создаем приложение ?
Мы используем Cookie Cutter для быстрого создания базовой структуры приложения и избегания всех скучных этапов перед созданием ресурса, который будет выдавать персонажей из нашей базы данных «Звездных Войн«. Если вы не хотите использовать Cookie Cutter, вы можете скачать готовую структуру здесь.
|
$ cookiecutter gh:mikeywaites/arrested—cookiecutter project_name [Arrested Users API]: star wars project_slug [star—wars]: package_name [star_wars]: |
Теперь у нас есть базовый скелет приложения, давайте создадим контейнер Docker и создадим базу данных:
|
$ cd star_wars $ docker—compose build $ docker—compose run —rm api flask db upgrade |
Есть вопросы по Python?
На нашем форуме вы можете задать любой вопрос и получить ответ от всего нашего сообщества!
Telegram Чат & Канал
Вступите в наш дружный чат по Python и начните общение с единомышленниками! Станьте частью большого сообщества!
Паблик VK
Одно из самых больших сообществ по Python в социальной сети ВК. Видео уроки и книги для вас!
Теперь запускаем контейнер API и создаем запрос к конечной точке, чтобы убедиться в том, что все работает корректно.
|
$ docker—compose up api $ curl —u admin:secret localhost:8080/v1/users | python —m json.tool { «payload»: [] } |
Ву а ля. Мы создали рабочий REST API за 5 минут.
Конечно, мы получили рабочий REST API, но вся тяжелая работа уже была сделана за вас, но вы все еще понятия не имеет, как использовать Arrested для создания API в Python. В следующем разделе мы рассмотрим, как создавать базовый API для нашей базы данных персонажей Звездных Войн.
Создаем ресурс персонажей
Теперь, когда у нас есть установленное приложение, мы можем начать создание Python API наших персонажей. Мы добавим конечные точки, которые позволяют клиенту получать список персонажей, создавать новых, выполнять поиск персонажей, обновлять и удалять персонажей. Перед созданием нового API нам нужно создать модель Character и CharacterMapper.
|
$ touch star_wars/models/character.py $ touch star_wars/apis/v1/characters.py $ touch star_wars/apis/v1/mappers/character.py |
Начнем с очень простого объекта Character, который нужно назвать.
|
from .base import db, BaseMixin __all__ = [‘Character’] class Character(BaseMixin, db.Model): __tablename__ = ‘character’ name = db.Column(db.Unicode(255), nullable=False) |
Далее нам нужно импортировать модель в models/__init__.py
|
1 2 3 4 5 6 7 8 9 10 11 12 13 14 15 16 17 18 19 20 21 22 23 24 25 26 27 28 |
import datetime from flask_sqlalchemy import SQLAlchemy from sqlalchemy.ext.declarative import declared_attr db = SQLAlchemy() class BaseMixin(object): @declared_attr def id(cls): return db.Column(db.Integer, primary_key=True) @declared_attr def created_at(cls): return db.Column(db.DateTime, default=datetime.datetime.utcnow) @declared_attr def updated_at(cls): return db.Column(db.DateTime, default=datetime.datetime.utcnow) from .user import * from .character import * |
Создаем миграцию для новой модели
|
$ docker—compose run —rm api flask db revision «character model» INFO [alembic.runtime.migration] Context impl SQLiteImpl. INFO [alembic.runtime.migration] Will assume non—transactional DDL. INFO [alembic.autogenerate.compare] Detected added table ‘character’ Generating /opt/code/star_wars/migrations/d7d80c02d806_character_model.py ... done # Выполняем файлы миграции для создание таблиц в базе данных $ docker—compose run —rm api flask db upgrade |
Редактируем файл «star_wars/apis/v1/mappers/character.py» который мы ранее создали для объекта CharacterMapper. Он отвечает за сериализацию и сортировку наших данных в API.
|
from kim import field from .base import BaseMapper from star_wars.models import Character class CharacterMapper(BaseMapper): __type__ = Character name = field.String() |
Теперь импортируем мэппер в модуль mapper/__init__.py
|
from .user import UserMapper from .character import CharacterMapper |
Великолепно! Теперь у нас есть модель базы данных и способ её сериализации, давайте создадим конечную точку, которая позволяет нашим клиентам API получить список персонажей. Добавьте следующий код в созданный нами файл «api/v1/characters.py«.
|
1 2 3 4 5 6 7 8 9 10 11 12 13 14 15 16 17 18 19 20 21 22 23 |
from arrested import Resource from arrested.contrib.kim_arrested import KimEndpoint from arrested.contrib.sql_alchemy import DBListMixin from star_wars.models import db, Character from .mappers import CharacterMapper characters_resource = Resource(‘characters’, __name__, url_prefix=‘/characters’) class CharactersIndexEndpoint(KimEndpoint, DBListMixin): name = ‘list’ many = True mapper_class = CharacterMapper model = Character def get_query(self): stmt = db.session.query(Character) return stmt characters_resource.add_endpoint(CharactersIndexEndpoint) |
Теперь нам нужно зарегистрировать наш Resource при помощи объекта Arrested API. Откройте модуль «api/v1/__init__.py» и импортируйте characters_resource. Укажите «defer=True«, чтобы Arrested отложил регистрацию маршрутов с Flask, пока объект API не инициализируется.
|
from arrested import ArrestedAPI from .users import users_resource from .characters import characters_resource from .middleware import basic_auth api_v1 = ArrestedAPI(url_prefix=‘/v1’, before_all_hooks=[basic_auth]) api_v1.register_resource(users_resource, defer=True) api_v1.register_resource(characters_resource, defer=True) |
Давайте проведем тестовый запуск нашего API. Убедитесь в том, что контейнер Docker запущен и затем используйте команду curl, которая выполнит GET запрос к ресурсу персонажей.
|
$ docker—compose up api $ curl —u admin:secret localhost:8080/v1/characters | python —m json.tool { «payload»: [] } |
Чудесно! Мы получили ответ, но не получили ни одного объекта персонажа из нашей базы данных, но это пока что. Теперь нам нужно получить способность создавать новых персонажей при помощи DBCreateMixin
Наш модуль characters.py теперь выглядит следующим образом:
|
1 2 3 4 5 6 7 8 9 10 11 12 13 14 15 16 17 18 19 20 21 22 23 24 |
from arrested import Resource from arrested.contrib.kim_arrested import KimEndpoint from arrested.contrib.sql_alchemy import DBListMixin, DBCreateMixin from star_wars.models import db, Character from .mappers import CharacterMapper characters_resource = Resource(‘characters’, __name__, url_prefix=‘/characters’) class CharactersIndexEndpoint(KimEndpoint, DBListMixin, DBCreateMixin): name = ‘list’ many = True mapper_class = CharacterMapper model = Character def get_query(self): stmt = db.session.query(Character) return stmt characters_resource.add_endpoint(CharactersIndexEndpoint) |
Все, что нам нужно для поддержки создания нашего объекта Character – это добавить DBCreateMixin в CharactersIndexEndpoint. Интеграция Arrested с SQLAlchemy и Kim позволяет обработать входящие данные, конвертируя вводные данные JSON Python в объект Character, с последующим сохранением в базе данных. Давайте пойдем дальше и создадим Персонажа.
|
curl —u admin:secret —H «Content-Type: application/json» —d ‘{«name»:»Darth Vader»}’ —X POST localhost:8080/v1/characters | python —m json.tool { «payload»: { «created_at»: «2017-11-22T08:18:26.044931», «id»: 1, «name»: «Darth Vader», «updated_at»: «2017-11-22T08:18:26.044958» } } |
Дарт Вейдер удачно создан! Теперь, если мы выполним запрос GET, как мы делали это ранее в нашем API, то наш Дарт Вейдер должен вернуться.
|
curl —u admin:secret localhost:8080/v1/characters | python —m json.tool { «payload»: [ { «created_at»: «2017-11-22T08:18:26.044931», «id»: 1, «name»: «Darth Vader», «updated_at»: «2017-11-22T08:18:26.044958» } ] } |
Теперь нам нужно установить конечную точку, которая позволяет клиентам получить персонажа, используя ID ресурса.
|
1 2 3 4 5 6 7 8 9 10 11 12 13 14 15 16 17 18 19 20 21 22 23 24 25 26 27 28 29 30 31 32 33 34 35 36 37 38 |
from arrested import Resource from arrested.contrib.kim_arrested import KimEndpoint from arrested.contrib.sql_alchemy import DBListMixin, DBCreateMixin, DBObjectMixin from star_wars.models import db, Character from .mappers import CharacterMapper characters_resource = Resource(‘characters’, __name__, url_prefix=‘/characters’) class CharactersIndexEndpoint(KimEndpoint, DBListMixin, DBCreateMixin): name = ‘list’ many = True mapper_class = CharacterMapper model = Character def get_query(self): stmt = db.session.query(Character) return stmt class CharacterObjectEndpoint(KimEndpoint, DBObjectMixin): name = ‘object’ url = ‘/<string:obj_id>’ mapper_class = CharacterMapper model = Character def get_query(self): stmt = db.session.query(Character) return stmt characters_resource.add_endpoint(CharactersIndexEndpoint) characters_resource.add_endpoint(CharacterObjectEndpoint) |
Мы добавили новую конечную точку – CharacterObjectEndpoint и зарегистрировали её в ресурсе персонажей. DBObjectMixin позволяет нам получать ресурс по ID, обновлять тот или иной ресурс, а также удалить ресурс. Давайте попробуем!
|
1 2 3 4 5 6 7 8 9 10 11 12 13 14 15 16 17 18 19 20 21 22 23 24 25 26 |
# Получаем персонажа с ID 1 curl —u admin:secret localhost:8080/v1/characters/1 | python —m json.tool { «payload»: { «created_at»: «2017-11-22T08:18:26.044931», «id»: 1, «name»: «Darth Vader», «updated_at»: «2017-11-22T08:18:26.044958» } } # После этого мы можем обновить имя персонажа curl —u admin:secret —H «Content-Type: application/json» —d ‘{«id»: 1, «name»:»Anakin Skywalker»}’ —X PUT localhost:8080/v1/characters/1 | python —m json.tool { «payload»: { «created_at»: «2017-11-22T08:18:26.044931», «id»: 1, «name»: «Anakin Skywalker», «updated_at»: «2017-11-22T08:18:26.044958» } } # И наконец, мы можем удалить персонажа curl —u admin:secret —X DELETE localhost:8080/v1/characters/1 |
Что-ж, вот и все. Это было введение в создание REST API в Python при помощи Arrested. Следите за дальнейшими обновлениями, у нас готовится много чего полезного!

Являюсь администратором нескольких порталов по обучению языков программирования Python, Golang и Kotlin. В составе небольшой команды единомышленников, мы занимаемся популяризацией языков программирования на русскоязычную аудиторию. Большая часть статей была адаптирована нами на русский язык и распространяется бесплатно.
E-mail: vasile.buldumac@ati.utm.md
Образование
Universitatea Tehnică a Moldovei (utm.md)
- 2014 — 2018 Технический Университет Молдовы, ИТ-Инженер. Тема дипломной работы «Автоматизация покупки и продажи криптовалюты используя технический анализ»
- 2018 — 2020 Технический Университет Молдовы, Магистр, Магистерская диссертация «Идентификация человека в киберпространстве по фотографии лица»
There’s an amazing amount of data available on the Web. Many web services, like YouTube and GitHub, make their data accessible to third-party applications through an application programming interface (API). One of the most popular ways to build APIs is the REST architecture style. Python provides some great tools not only to get data from REST APIs but also to build your own Python REST APIs.
In this tutorial, you’ll learn:
- What REST architecture is
- How REST APIs provide access to web data
- How to consume data from REST APIs using the
requestslibrary - What steps to take to build a REST API
- What some popular Python tools are for building REST APIs
By using Python and REST APIs, you can retrieve, parse, update, and manipulate the data provided by any web service you’re interested in.
REST Architecture
REST stands for representational state transfer and is a software architecture style that defines a pattern for client and server communications over a network. REST provides a set of constraints for software architecture to promote performance, scalability, simplicity, and reliability in the system.
REST defines the following architectural constraints:
- Stateless: The server won’t maintain any state between requests from the client.
- Client-server: The client and server must be decoupled from each other, allowing each to develop independently.
- Cacheable: The data retrieved from the server should be cacheable either by the client or by the server.
- Uniform interface: The server will provide a uniform interface for accessing resources without defining their representation.
- Layered system: The client may access the resources on the server indirectly through other layers such as a proxy or load balancer.
- Code on demand (optional): The server may transfer code to the client that it can run, such as JavaScript for a single-page application.
Note, REST is not a specification but a set of guidelines on how to architect a network-connected software system.
REST APIs and Web Services
A REST web service is any web service that adheres to REST architecture constraints. These web services expose their data to the outside world through an API. REST APIs provide access to web service data through public web URLs.
For example, here’s one of the URLs for GitHub’s REST API:
https://api.github.com/users/<username>
This URL allows you to access information about a specific GitHub user. You access data from a REST API by sending an HTTP request to a specific URL and processing the response.
HTTP Methods
REST APIs listen for HTTP methods like GET, POST, and DELETE to know which operations to perform on the web service’s resources. A resource is any data available in the web service that can be accessed and manipulated with HTTP requests to the REST API. The HTTP method tells the API which action to perform on the resource.
While there are many HTTP methods, the five methods listed below are the most commonly used with REST APIs:
| HTTP method | Description |
|---|---|
GET |
Retrieve an existing resource. |
POST |
Create a new resource. |
PUT |
Update an existing resource. |
PATCH |
Partially update an existing resource. |
DELETE |
Delete a resource. |
A REST API client application can use these five HTTP methods to manage the state of resources in the web service.
Status Codes
Once a REST API receives and processes an HTTP request, it will return an HTTP response. Included in this response is an HTTP status code. This code provides information about the results of the request. An application sending requests to the API can check the status code and perform actions based on the result. These actions could include handling errors or displaying a success message to a user.
Below is a list of the most common status codes returned by REST APIs:
| Code | Meaning | Description |
|---|---|---|
200 |
OK | The requested action was successful. |
201 |
Created | A new resource was created. |
202 |
Accepted | The request was received, but no modification has been made yet. |
204 |
No Content | The request was successful, but the response has no content. |
400 |
Bad Request | The request was malformed. |
401 |
Unauthorized | The client is not authorized to perform the requested action. |
404 |
Not Found | The requested resource was not found. |
415 |
Unsupported Media Type | The request data format is not supported by the server. |
422 |
Unprocessable Entity | The request data was properly formatted but contained invalid or missing data. |
500 |
Internal Server Error | The server threw an error when processing the request. |
These ten status codes represent only a small subset of the available HTTP status codes. Status codes are numbered based on the category of the result:
| Code range | Category |
|---|---|
2xx |
Successful operation |
3xx |
Redirection |
4xx |
Client error |
5xx |
Server error |
HTTP status codes come in handy when working with REST APIs as you’ll often need to perform different logic based on the results of the request.
API Endpoints
A REST API exposes a set of public URLs that client applications use to access the resources of a web service. These URLs, in the context of an API, are called endpoints.
To help clarify this, take a look at the table below. In this table, you’ll see API endpoints for a hypothetical CRM system. These endpoints are for a customer resource that represents potential customers in the system:
| HTTP method | API endpoint | Description |
|---|---|---|
GET |
/customers |
Get a list of customers. |
GET |
/customers/<customer_id> |
Get a single customer. |
POST |
/customers |
Create a new customer. |
PUT |
/customers/<customer_id> |
Update a customer. |
PATCH |
/customers/<customer_id> |
Partially update a customer. |
DELETE |
/customers/<customer_id> |
Delete a customer. |
Each of the endpoints above performs a different action based on the HTTP method.
You’ll note that some endpoints have <customer_id> at the end. This notation means you need to append a numeric customer_id to the URL to tell the REST API which customer you’d like to work with.
The endpoints listed above represent only one resource in the system. Production-ready REST APIs often have tens or even hundreds of different endpoints to manage the resources in the web service.
REST and Python: Consuming APIs
To write code that interacts with REST APIs, most Python developers turn to requests to send HTTP requests. This library abstracts away the complexities of making HTTP requests. It’s one of the few projects worth treating as if it’s part of the standard library.
To start using requests, you need to install it first. You can use pip to install it:
$ python -m pip install requests
Now that you’ve got requests installed, you can start sending HTTP requests.
GET
GET is one of the most common HTTP methods you’ll use when working with REST APIs. This method allows you to retrieve resources from a given API. GET is a read-only operation, so you shouldn’t use it to modify an existing resource.
To test out GET and the other methods in this section, you’ll use a service called JSONPlaceholder. This free service provides fake API endpoints that send back responses that requests can process.
To try this out, start up the Python REPL and run the following commands to send a GET request to a JSONPlaceholder endpoint:
>>>
>>> import requests
>>> api_url = "https://jsonplaceholder.typicode.com/todos/1"
>>> response = requests.get(api_url)
>>> response.json()
{'userId': 1, 'id': 1, 'title': 'delectus aut autem', 'completed': False}
This code calls requests.get() to send a GET request to /todos/1, which responds with the todo item with the ID 1. Then you can call .json() on the response object to view the data that came back from the API.
The response data is formatted as JSON, a key-value store similar to a Python dictionary. It’s a very popular data format and the de facto interchange format for most REST APIs.
Beyond viewing the JSON data from the API, you can also view other things about the response:
>>>
>>> response.status_code
200

>>> response.headers["Content-Type"]
'application/json; charset=utf-8'
Here, you access response.status_code to see the HTTP status code. You can also view the response’s HTTP headers with response.headers. This dictionary contains metadata about the response, such as the Content-Type of the response.
POST
Now, take a look at how you use requests to POST data to a REST API to create a new resource. You’ll use JSONPlaceholder again, but this time you’ll include JSON data in the request. Here’s the data that you’ll send:
{
    "userId": 1,
    "title": "Buy milk",
    "completed": false
}
This JSON contains information for a new todo item. Back in the Python REPL, run the following code to create the new todo:
>>>
>>> import requests
>>> api_url = "https://jsonplaceholder.typicode.com/todos"
>>> todo = {"userId": 1, "title": "Buy milk", "completed": False}
>>> response = requests.post(api_url, json=todo)
>>> response.json()
{'userId': 1, 'title': 'Buy milk', 'completed': False, 'id': 201}

>>> response.status_code
201
Here, you call requests.post() to create a new todo in the system.
First, you create a dictionary containing the data for your todo. Then you pass this dictionary to the json keyword argument of requests.post(). When you do this, requests.post() automatically sets the request’s HTTP header Content-Type to application/json. It also serializes todo into a JSON string, which it appends to the body of the request.
If you don’t use the json keyword argument to supply the JSON data, then you need to set Content-Type accordingly and serialize the JSON manually. Here’s an equivalent version to the previous code:
>>>
>>> import requests
>>> import json
>>> api_url = "https://jsonplaceholder.typicode.com/todos"
>>> todo = {"userId": 1, "title": "Buy milk", "completed": False}
>>> headers =  {"Content-Type":"application/json"}
>>> response = requests.post(api_url, data=json.dumps(todo), headers=headers)
>>> response.json()
{'userId': 1, 'title': 'Buy milk', 'completed': False, 'id': 201}

>>> response.status_code
201
In this code, you add a headers dictionary that contains a single header Content-Type set to application/json. This tells the REST API that you’re sending JSON data with the request.
You then call requests.post(), but instead of passing todo to the json argument, you first call json.dumps(todo) to serialize it. After it’s serialized, you pass it to the data keyword argument. The data argument tells requests what data to include in the request. You also pass the headers dictionary to requests.post() to set the HTTP headers manually.
When you call requests.post() like this, it has the same effect as the previous code but gives you more control over the request.
Once the API responds, you call response.json() to view the JSON. The JSON includes a generated id for the new todo. The 201 status code tells you that a new resource was created.
PUT
Beyond GET and POST, requests provides support for all the other HTTP methods you would use with a REST API. The following code sends a PUT request to update an existing todo with new data. Any data sent with a PUT request will completely replace the existing values of the todo.
You’ll use the same JSONPlaceholder endpoint you used with GET and POST, but this time you’ll append 10 to the end of the URL. This tells the REST API which todo you’d like to update:
>>>
>>> import requests
>>> api_url = "https://jsonplaceholder.typicode.com/todos/10"
>>> response = requests.get(api_url)
>>> response.json()
{'userId': 1, 'id': 10, 'title': 'illo est ... aut', 'completed': True}

>>> todo = {"userId": 1, "title": "Wash car", "completed": True}
>>> response = requests.put(api_url, json=todo)
>>> response.json()
{'userId': 1, 'title': 'Wash car', 'completed': True, 'id': 10}

>>> response.status_code
200
Here, you first call requests.get() to view the contents of the existing todo. Next, you call requests.put() with new JSON data to replace the existing to-do’s values. You can see the new values when you call response.json(). Successful PUT requests will always return 200 instead of 201 because you aren’t creating a new resource but just updating an existing one.
PATCH
Next up, you’ll use requests.patch() to modify the value of a specific field on an existing todo. PATCH differs from PUT in that it doesn’t completely replace the existing resource. It only modifies the values set in the JSON sent with the request.
You’ll use the same todo from the last example to try out requests.patch(). Here are the current values:
{'userId': 1, 'title': 'Wash car', 'completed': True, 'id': 10}
Now you can update the title with a new value:
>>>
>>> import requests
>>> api_url = "https://jsonplaceholder.typicode.com/todos/10"
>>> todo = {"title": "Mow lawn"}
>>> response = requests.patch(api_url, json=todo)
>>> response.json()
{'userId': 1, 'id': 10, 'title': 'Mow lawn', 'completed': True}

>>> response.status_code
200
When you call response.json(), you can see that title was updated to Mow lawn.
DELETE
Last but not least, if you want to completely remove a resource, then you use DELETE. Here’s the code to remove a todo:
>>>
>>> import requests
>>> api_url = "https://jsonplaceholder.typicode.com/todos/10"
>>> response = requests.delete(api_url)
>>> response.json()
{}

>>> response.status_code
200
You call requests.delete() with an API URL that contains the ID for the todo you would like to remove. This sends a DELETE request to the REST API, which then removes the matching resource. After deleting the resource, the API sends back an empty JSON object indicating that the resource has been deleted.
The requests library is an awesome tool for working with REST APIs and an indispensable part of your Python tool belt. In the next section, you’ll change gears and consider what it takes to build a REST API.
REST and Python: Building APIs
REST API design is a huge topic with many layers. As with most things in technology, there’s a wide range of opinions on the best approach to building APIs. In this section, you’ll look at some recommended steps to follow as you build an API.
Identify Resources
The first step you’ll take as you build a REST API is to identify the resources the API will manage. It’s common to describe these resources as plural nouns, like customers, events, or transactions. As you identify different resources in your web service, you’ll build out a list of nouns that describe the different data users can manage in the API.
As you do this, make sure to consider any nested resources. For example, customers may have sales, or events may contain guests. Establishing these resource hierarchies will help when you define API endpoints.
Define Your Endpoints
Once you’ve identified the resources in your web service, you’ll want to use these to define the API endpoints. Here are some example endpoints for a transactions resource you might find in an API for a payment processing service:
| HTTP method | API endpoint | Description |
|---|---|---|
GET |
/transactions |
Get a list of transactions. |
GET |
/transactions/<transaction_id> |
Get a single transaction. |
POST |
/transactions |
Create a new transaction. |
PUT |
/transactions/<transaction_id> |
Update a transaction. |
PATCH |
/transactions/<transaction_id> |
Partially update a transaction. |
DELETE |
/transactions/<transaction_id> |
Delete a transaction. |
These six endpoints cover all the operations that you’ll need to create, read, update, and delete transactions in the web service. Each resource in your web service would have a similar list of endpoints based on what actions a user can perform with the API.
Now take a look at an example of endpoints for a nested resource. Here, you’ll see endpoints for guests that are nested under events resources:
| HTTP method | API endpoint | Description |
|---|---|---|
GET |
/events/<event_id>/guests |
Get a list of guests. |
GET |
/events/<event_id>/guests/<guest_id> |
Get a single guest. |
POST |
/events/<event_id>/guests |
Create a new guest. |
PUT |
/events/<event_id>/guests/<guest_id> |
Update a guest. |
PATCH |
/events/<event_id>/guests/<guest_id> |
Partially update a guest. |
DELETE |
/events/<event_id>/guests/<guest_id> |
Delete a guest. |
With these endpoints, you can manage guests for a specific event in the system.
This isn’t the only way to define an endpoint for nested resources. Some people prefer to use query strings to access a nested resource. A query string allows you to send additional parameters with your HTTP request. In the following endpoint, you append a query string to get guests for a specific event_id:
This endpoint will filter out any guests that don’t reference the given event_id. As with many things in API design, you need to decide which method fits your web service best.
Now that you’ve covered endpoints, in the next section you’ll look at some options for formatting data in your REST API.
Pick Your Data Interchange Format
Two popular options for formatting web service data are XML and JSON. Traditionally, XML was very popular with SOAP APIs, but JSON is more popular with REST APIs. To compare the two, take a look at an example book resource formatted as XML and JSON.
Here’s the book formatted as XML:
<?xml version="1.0" encoding="UTF-8" ?>
<book>
    <title>Python Basics</title>
    <page_count>635</page_count>
    <pub_date>2021-03-16</pub_date>
    <authors>
        <author>
            <name>David Amos</name>
        </author>
        <author>
            <name>Joanna Jablonski</name>
        </author>
        <author>
            <name>Dan Bader</name>
        </author>
        <author>
            <name>Fletcher Heisler</name>
        </author>
    </authors>
    <isbn13>978-1775093329</isbn13>
    <genre>Education</genre>
</book>
XML uses a series of elements to encode data. Each element has an opening and closing tag, with the data in between. Elements can be nested inside other elements. You can see this above, where several <author> tags are nested inside of <authors>.
Now, take a look at the same book in JSON:
{
    "title": "Python Basics",
    "page_count": 635,
    "pub_date": "2021-03-16",
    "authors": [
        {"name": "David Amos"},
        {"name": "Joanna Jablonski"},
        {"name": "Dan Bader"},
        {"name": "Fletcher Heisler"}
    ],
    "isbn13": "978-1775093329",
    "genre": "Education"
}
JSON stores data in key-value pairs similar to a Python dictionary. Like XML, JSON supports nesting data to any level, so you can model complex data.
Neither JSON nor XML is inherently better than the other, but there’s a preference for JSON among REST API developers. This is especially true when you pair a REST API with a front-end framework like React or Vue.
Design Success Responses
Once you’ve picked a data format, the next step is to decide how you’ll respond to HTTP requests. All responses from your REST API should have a similar format and include the proper HTTP status code.
In this section, you’ll look at some example HTTP responses for a hypothetical API that manages an inventory of cars. These examples will give you a sense of how you should format your API responses. To make things clear, you’ll look at raw HTTP requests and responses instead of using an HTTP library like requests.
To start things off, take a look at a GET request to /cars, which returns a list of cars:
GET /cars HTTP/1.1
Host: api.example.com
This HTTP request is made up of four parts:
GETis the HTTP method type./carsis the API endpoint.HTTP/1.1is the HTTP version.Host: api.example.comis the API host.
These four parts are all you need to send a GET request to /cars. Now take a look at the response. This API uses JSON as the data interchange format:
HTTP/1.1 200 OK
Content-Type: application/json
...

[
    {
        "id": 1,
        "make": "GMC",
        "model": "1500 Club Coupe",
        "year": 1998,
        "vin": "1D7RV1GTXAS806941",
        "color": "Red"
    },
    {
        "id": 2,
        "make": "Lamborghini",
        "model":"Gallardo",
        "year":2006,
        "vin":"JN1BY1PR0FM736887",
        "color":"Mauve"
    },
    {
        "id": 3,
        "make": "Chevrolet",
        "model":"Monte Carlo",
        "year":1996,
        "vin":"1G4HP54K714224234",
        "color":"Violet"
    }
]
The API returns a response that contains a list of cars. You know that the response was successful because of the 200 OK status code. The response also has a Content-Type header set to application/json. This tells the user to parse the response as JSON.
It’s important to always set the correct Content-Type header on your response. If you send JSON, then set Content-Type to application/json. If XML, then set it to application/xml. This header tells the user how they should parse the data.
You also want to include an appropriate status code in your response. For any successful GET request, you should return 200 OK. This tells the user that their request was processed as expected.
Take a look at another GET request, this time for a single car:
GET /cars/1 HTTP/1.1
Host: api.example.com
This HTTP request queries the API for car 1. Here’s the response:
HTTP/1.1 200 OK
Content-Type: application/json

{
    "id": 1,
    "make": "GMC",
    "model": "1500 Club Coupe",
    "year": 1998,
    "vin": "1D7RV1GTXAS806941",
    "color": "Red"
},
This response contains a single JSON object with the car’s data. Since it’s a single object, it doesn’t need to be wrapped in a list. Like the last response, this also has a 200 OK status code.
Next up, check out a POST request to add a new car:
POST /cars HTTP/1.1
Host: api.example.com
Content-Type: application/json

{
    "make": "Nissan",
    "model": "240SX",
    "year": 1994,
    "vin": "1N6AD0CU5AC961553",
    "color": "Violet"
}
This POST request includes JSON for the new car in the request. It sets the Content-Type header to application/json so the API knows the content type of the request. The API will create a new car from the JSON.
Here’s the response:
HTTP/1.1 201 Created
Content-Type: application/json

{
    "id": 4,
    "make": "Nissan",
    "model": "240SX",
    "year": 1994,
    "vin": "1N6AD0CU5AC961553",
    "color": "Violet"
}
This response has a 201 Created status code to tell the user that a new resource was created. Make sure to use 201 Created instead of 200 OK for all successful POST requests.
This response also includes a copy of the new car with an id generated by the API. It’s important to send back an id in the response so that the user can modify the resource again.
Now take a look at a PUT request:
PUT /cars/4 HTTP/1.1
Host: api.example.com
Content-Type: application/json

{
    "make": "Buick",
    "model": "Lucerne",
    "year": 2006,
    "vin": "4T1BF3EK8AU335094",
    "color":"Maroon"
}
This request uses the id from the previous request to update the car with all new data. As a reminder, PUT updates all fields on the resource with new data. Here’s the response:
HTTP/1.1 200 OK
Content-Type: application/json

{
    "id": 4,
    "make": "Buick",
    "model": "Lucerne",
    "year": 2006,
    "vin": "4T1BF3EK8AU335094",
    "color":"Maroon"
}
The response includes a copy of the car with the new data. Again, you always want to send back the full resource for a PUT request. The same applies to a PATCH request:
PATCH /cars/4 HTTP/1.1
Host: api.example.com
Content-Type: application/json

{
    "vin": "VNKKTUD32FA050307",
    "color": "Green"
}
PATCH requests only update a part of a resource. In the request above, the vin and color fields will be updated with new values. Here’s the response:
HTTP/1.1 200 OK
Content-Type: application/json

{
    "id": 4,
    "make": "Buick",
    "model": "Lucerne",
    "year": 2006,
    "vin": "VNKKTUD32FA050307",
    "color": "Green"
}
The response contains a full copy of the car. As you can see, only the vin and color fields have been updated.
Finally, take a look at how your REST API should respond when it receives a DELETE request. Here’s a DELETE request to remove a car:
This DELETE request tells the API to remove the car with the ID 4. Here’s the response:
This response only includes the status code 204 No Content. This status code tells a user that the operation was successful, but no content was returned in the response. This makes sense since the car has been deleted. There’s no reason to send a copy of it back in the response.
The responses above work well when everything goes as planned, but what happens if there’s a problem with the request? In the next section, you’ll look at how your REST API should respond when errors occur.
Design Error Responses
There’s always a chance that requests to your REST API could fail. It’s a good idea to define what an error response will look like.
These responses should include a description of what error occurred along with the appropriate status code. In this section, you’ll look at a few examples.
To start, take a look at a request for a resource that doesn’t exist in the API:
GET /motorcycles HTTP/1.1
Host: api.example.com
Here, the user sends a GET request to /motorcycles, which doesn’t exist. The API sends back the following response:
HTTP/1.1 404 Not Found
Content-Type: application/json
...

{
    "error": "The requested resource was not found."
}
This response includes a 404 Not Found status code. Along with this, the response contains a JSON object with a descriptive error message. Providing a descriptive error message gives the user more context for the error.
Now take a look at the error response when the user sends an invalid request:
POST /cars HTTP/1.1
Host: api.example.com
Content-Type: application/json

{
    "make": "Nissan",
    "year": 1994,
    "color": "Violet"
This POST request contains JSON, but it isn’t formatted correctly. It’s missing a closing curly brace (}) at the end. The API won’t be able to process this data. The error response tells the user about the issue:
HTTP/1.1 400 Bad Request
Content-Type: application/json

{
    "error": "This request was not properly formatted. Please send again."
}
This response includes a descriptive error message along with the 400 Bad Request status code, telling the user they need to fix the request.
There are several other ways that the request can be wrong even if it’s formatted properly. In this next example, the user sends a POST request but includes an unsupported media type:
POST /cars HTTP/1.1
Host: api.example.com
Content-Type: application/xml

<?xml version="1.0" encoding="UTF-8" ?>
<car>
    <make>Nissan</make>
    <model>240SX</model>
    <year>1994</year>
    <vin>1N6AD0CU5AC961553</vin>
    <color>Violet</color>
</car>
In this request, the user sends XML, but the API only supports JSON. The API responds with this:
HTTP/1.1 415 Unsupported Media Type
Content-Type: application/json

{
    "error": "The application/xml mediatype is not supported."
}
This response includes the 415 Unsupported Media Type status code to indicate that the POST request included a data format that isn’t supported by the API. This error code makes sense for data that’s in the wrong format, but what about data that’s invalid even with the correct format?
In this next example, the user sends a POST request but includes car data that doesn’t match fields of the other data:
POST /cars HTTP/1.1
Host: api.example.com
Content-Type: application/json

{
    "make": "Nissan",
    "model": "240SX",
    "topSpeed": 120
    "warrantyLength": 10
}
In this request, the user adds topSpeed and warrantyLength fields to the JSON. These fields aren’t supported by the API, so it responds with an error message:
HTTP/1.1 422 Unprocessable Entity
Content-Type: application/json

{
    "error": "Request had invalid or missing data."
}
This response includes the 422 Unprocessable Entity status code. This status code indicates that there weren’t any issues with the request, but the data was invalid. A REST API needs to validate incoming data. If the user sends data with the request, then the API should validate the data and inform the user of any errors.
Responding to requests, both successful and erroneous, is one of the most important jobs of a REST API. If your API is intuitive and provides accurate responses, then it’ll be easier for users to build applications around your web service. Luckily, some great Python web frameworks abstract away the complexities of processing HTTP requests and returning responses. You’ll look at three popular options in the next section.
REST and Python: Tools of the Trade
In this section, you’ll look at three popular frameworks for building REST APIs in Python. Each framework has pros and cons, so you’ll have to evaluate which works best for your needs. To this end, in the next sections, you’ll look at a REST API in each framework. All the examples will be for a similar API that manages a collection of countries.
Each country will have the following fields:
nameis the name of the country.capitalis the capital of the country.areais the area of the country in square kilometers.
The fields name, capital, and area store data about a specific country somewhere in the world.
Most of the time, data sent from a REST API comes from a database. Connecting to a database is beyond the scope of this tutorial. For the examples below, you’ll store your data in a Python list. The exception to this is the Django REST framework example, which runs off the SQLite database that Django creates.
To keep things consistent, you’ll use countries as your main endpoint for all three frameworks. You’ll also use JSON as your data format for all three frameworks.
Now that you’ve got the background for the API, you can move on to the next section, where you’ll look at the REST API in Flask.
Flask
Flask is a Python microframework used to build web applications and REST APIs. Flask provides a solid backbone for your applications while leaving many design choices up to you. Flask’s main job is to handle HTTP requests and route them to the appropriate function in the application.
Below is an example Flask application for the REST API:
# app.py
from flask import Flask, request, jsonify

app = Flask(__name__)

countries = [
    {"id": 1, "name": "Thailand", "capital": "Bangkok", "area": 513120},
    {"id": 2, "name": "Australia", "capital": "Canberra", "area": 7617930},
    {"id": 3, "name": "Egypt", "capital": "Cairo", "area": 1010408},
]

def _find_next_id():
    return max(country["id"] for country in countries) + 1

@app.get("/countries")
def get_countries():
    return jsonify(countries)

@app.post("/countries")
def add_country():
    if request.is_json:
        country = request.get_json()
        country["id"] = _find_next_id()
        countries.append(country)
        return country, 201
    return {"error": "Request must be JSON"}, 415
This application defines the API endpoint /countries to manage the list of countries. It handles two different kinds of requests:
GET /countriesreturns the list ofcountries.POST /countriesadds a newcountryto the list.
You can try out this application by installing flask with pip:
$ python -m pip install flask
Once flask is installed, save the code in a file called app.py. To run this Flask application, you first need to set an environment variable called FLASK_APP to app.py. This tells Flask which file contains your application.
Run the following command inside the folder that contains app.py:
$ export FLASK_APP=app.py
This sets FLASK_APP to app.py in the current shell. Optionally, you can set FLASK_ENV to development, which puts Flask in debug mode:
$ export FLASK_ENV=development
Besides providing helpful error messages, debug mode will trigger a reload of the application after all code changes. Without debug mode, you’d have to restart the server after every change.
With all the environment variables ready, you can now start the Flask development server by calling flask run:
$ flask run
* Serving Flask app "app.py" (lazy loading)
* Environment: development
* Debug mode: on
* Running on http://127.0.0.1:5000/ (Press CTRL+C to quit)
This starts up a server running the application. Open up your browser and go to http://127.0.0.1:5000/countries, and you’ll see the following response:
[
    {
        "area": 513120,
        "capital": "Bangkok",
        "id": 1,
        "name": "Thailand"
    },
    {
        "area": 7617930,
        "capital": "Canberra",
        "id": 2,
        "name": "Australia"
    },
    {
        "area": 1010408,
        "capital": "Cairo",
        "id": 3,
        "name": "Egypt"
    }
]
This JSON response contains the three countries defined at the start of app.py. Take a look at the following code to see how this works:
@app.get("/countries")
def get_countries():
    return jsonify(countries)
This code uses @app.get(), a Flask route decorator, to connect GET requests to a function in the application. When you access /countries, Flask calls the decorated function to handle the HTTP request and return a response.
In the code above, get_countries() takes countries, which is a Python list, and converts it to JSON with jsonify(). This JSON is returned in the response.
Now take a look at add_country(). This function handles POST requests to /countries and allows you to add a new country to the list. It uses the Flask request object to get information about the current HTTP request:
@app.post("/countries")
def add_country():
    if request.is_json:
        country = request.get_json()
        country["id"] = _find_next_id()
        countries.append(country)
        return country, 201
    return {"error": "Request must be JSON"}, 415
This function performs the following operations:
- Using
request.is_jsonto check that the request is JSON - Creating a new
countryinstance withrequest.get_json() - Finding the next
idand setting it on thecountry - Appending the new
countrytocountries - Returning the
countryin the response along with a201 Createdstatus code - Returning an error message and
415 Unsupported Media Typestatus code if the request wasn’t JSON
add_country() also calls _find_next_id() to determine the id for the new country:
def _find_next_id():
    return max(country["id"] for country in countries) + 1
This helper function uses a generator expression to select all the country IDs and then calls max() on them to get the largest value. It increments this value by 1 to get the next ID to use.
You can try out this endpoint in the shell using the command-line tool curl, which allows you to send HTTP requests from the command line. Here, you’ll add a new country to the list of countries:
$ curl -i http://127.0.0.1:5000/countries
-X POST
-H 'Content-Type: application/json'
-d '{"name":"Germany", "capital": "Berlin", "area": 357022}'

HTTP/1.0 201 CREATED
Content-Type: application/json
...

{
    "area": 357022,
    "capital": "Berlin",
    "id": 4,
    "name": "Germany"
}
This curl command has some options that are helpful to know:
-Xsets the HTTP method for the request.-Hadds an HTTP header to the request.-ddefines the request data.
With these options set, curl sends JSON data in a POST request with the Content-Type header set to application/json. The REST API returns 201 CREATED along with the JSON for the new country you added.
You can use curl to send a GET request to /countries to confirm that the new country was added. If you don’t use -X in your curl command, then it sends a GET request by default:
$ curl -i http://127.0.0.1:5000/countries

HTTP/1.0 200 OK
Content-Type: application/json
...

[
    {
        "area": 513120,
        "capital": "Bangkok",
        "id": 1,
        "name": "Thailand"
    },
    {
        "area": 7617930,
        "capital": "Canberra",
        "id": 2,
        "name": "Australia"
    },
    {
        "area": 1010408,
        "capital": "Cairo",
        "id": 3,
        "name": "Egypt"
    },
    {
        "area": 357022,
        "capital": "Berlin",
        "id": 4,
        "name": "Germany"
    }
]
This returns the full list of countries in the system, with the newest country at the bottom.
This is just a sampling of what Flask can do. This application could be expanded to include endpoints for all the other HTTP methods. Flask also has a large ecosystem of extensions that provide additional functionality for REST APIs, such as database integrations, authentication, and background processing.
Django REST Framework
Another popular option for building REST APIs is Django REST framework. Django REST framework is a Django plugin that adds REST API functionality on top of an existing Django project.
To use Django REST framework, you need a Django project to work with. If you already have one, then you can apply the patterns in the section to your project. Otherwise, follow along and you’ll build a Django project and add in Django REST framework.
First, install Django and djangorestframework with pip:
$ python -m pip install Django djangorestframework
This installs Django and djangorestframework. You can now use the django-admin tool to create a new Django project. Run the following command to start your project:
$ django-admin startproject countryapi
This command creates a new folder in your current directory called countryapi. Inside this folder are all the files you need to run your Django project. Next, you’re going to create a new Django application inside your project. Django breaks up the functionality of a project into applications. Each application manages a distinct part of the project.
To create the application, change directories to countryapi and run the following command:
$ python manage.py startapp countries
This creates a new countries folder inside your project. Inside this folder are the base files for this application.
Now that you’ve created an application to work with, you need to tell Django about it. Alongside the countries folder that you just created is another folder called countryapi. This folder contains configurations and settings for your project.
Open up the settings.py file that’s inside the countryapi folder. Add the following lines to INSTALLED_APPS to tell Django about the countries application and Django REST framework:
# countryapi/settings.py
INSTALLED_APPS = [
    "django.contrib.admin",
    "django.contrib.auth",
    "django.contrib.contenttypes",
    "django.contrib.sessions",
    "django.contrib.messages",
    "django.contrib.staticfiles",
    "rest_framework",
    "countries",
]
You’ve added a line for the countries application and rest_framework.
You may be wondering why you need to add rest_framework to the applications list. You need to add it because Django REST framework is just another Django application. Django plugins are Django applications that are packaged up and distributed and that anyone can use.
The next step is to create a Django model to define the fields of your data. Inside of the countries application, update models.py with the following code:
# countries/models.py
from django.db import models

class Country(models.Model):
    name = models.CharField(max_length=100)
    capital = models.CharField(max_length=100)
    area = models.IntegerField(help_text="(in square kilometers)")
This code defines a Country model. Django will use this model to create the database table and columns for the country data.
Run the following commands to have Django update the database based on this model:
$ python manage.py makemigrations
Migrations for 'countries':
  countries/migrations/0001_initial.py
    - Create model Country

$ python manage.py migrate
Operations to perform:
  Apply all migrations: admin, auth, contenttypes, countries, sessions
Running migrations:
  Applying contenttypes.0001_initial... OK
  Applying auth.0001_initial... OK
  ...
These commands use Django migrations to create a new table in the database.
This table starts empty, but it would be nice to have some initial data so you can test Django REST framework. To do this, you’re going to use a Django fixture to load some data in the database.
Copy and save the following JSON data into a file called countries.json and save it inside the countries directory:
[
    {
        "model": "countries.country",
        "pk": 1,
        "fields": {
            "name": "Thailand",
            "capital": "Bangkok",
            "area": 513120
        }
    },
    {
        "model": "countries.country",
        "pk": 2,
        "fields": {
            "name": "Australia",
            "capital": "Canberra",
            "area": 7617930
        }
    },
    {
        "model": "countries.country",
        "pk": 3,
        "fields": {
            "name": "Egypt",
            "capital": "Cairo",
            "area": 1010408
        }
    }
]
This JSON contains database entries for three countries. Call the following command to load this data in the database:
$ python manage.py loaddata countries.json
Installed 3 object(s) from 1 fixture(s)
This adds three rows to the database.
With that, your Django application is all set up and populated with some data. You can now start adding Django REST framework to the project.
Django REST framework takes an existing Django model and converts it to JSON for a REST API. It does this with model serializers. A model serializer tells Django REST framework how to convert a model instance into JSON and what data to include.
You’ll create your serializer for the Country model from above. Start by creating a file called serializers.py inside of the countries application. Once you’ve done that, add the following code to serializers.py:
# countries/serializers.py
from rest_framework import serializers
from .models import Country

class CountrySerializer(serializers.ModelSerializer):
    class Meta:
        model = Country
        fields = ["id", "name", "capital", "area"]
This serializer, CountrySerializer, subclasses serializers.ModelSerializer to automatically generate JSON content based on the model fields of Country. Unless specified, a ModelSerializer subclass will include all fields from the Django model in the JSON. You can modify this behavior by setting fields to a list of data you wish to include.
Just like Django, Django REST framework uses views to query data from the database to display to the user. Instead of writing REST API views from scratch, you can subclass Django REST framework’s ModelViewSet class, which has default views for common REST API operations.
Here’s a list of the actions that ModelViewSet provides and their equivalent HTTP methods:
| HTTP method | Action | Description |
|---|---|---|
GET |
.list() |
Get a list of countries. |
GET |
.retrieve() |
Get a single country. |
POST |
.create() |
Create a new country. |
PUT |
.update() |
Update a country. |
PATCH |
.partial_update() |
Partially update a country. |
DELETE |
.destroy() |
Delete a country. |
As you can see, these actions map to the standard HTTP methods you’d expect in a REST API. You can override these actions in your subclass or add additional actions based on the requirements of your API.
Below is the code for a ModelViewSet subclass called CountryViewSet. This class will generate the views needed to manage Country data. Add the following code to views.py inside the countries application:
# countries/views.py
from rest_framework import viewsets

from .models import Country
from .serializers import CountrySerializer

class CountryViewSet(viewsets.ModelViewSet):
    serializer_class = CountrySerializer
    queryset = Country.objects.all()
In this class, serializer_class is set to CountrySerializer and queryset is set to Country.objects.all(). This tells Django REST framework which serializer to use and how to query the database for this specific set of views.
Once the views are created, they need to be mapped to the appropriate URLs or endpoints. To do this, Django REST framework provides a DefaultRouter that will automatically generate URLs for a ModelViewSet.
Create a urls.py file in the countries application and add the following code to the file:
# countries/urls.py
from django.urls import path, include
from rest_framework.routers import DefaultRouter

from .views import CountryViewSet

router = DefaultRouter()
router.register(r"countries", CountryViewSet)

urlpatterns = [
    path("", include(router.urls))
]
This code creates a DefaultRouter and registers CountryViewSet under the countries URL. This will place all the URLs for CountryViewSet under /countries/.
Finally, you need to update the project’s base urls.py file to include all the countries URLs in the project. Update the urls.py file inside of the countryapi folder with the following code:
# countryapi/urls.py
from django.contrib import admin
from django.urls import path, include

urlpatterns = [
    path("admin/", admin.site.urls),
    path("", include("countries.urls")),
]
This puts all the URLs under /countries/. Now you’re ready to try out your Django-backed REST API. Run the following command in the root countryapi directory to start the Django development server:
$ python manage.py runserver
The development server is now running. Go ahead and send a GET request to /countries/ to get a list of all the countries in your Django project:
$ curl -i http://127.0.0.1:8000/countries/ -w 'n'

HTTP/1.1 200 OK
...

[
    {
        "id": 1,
        "name":"Thailand",
        "capital":"Bangkok",
        "area":513120
    },
    {
        "id": 2,
        "name":"Australia",
        "capital":"Canberra",
        "area":7617930
    },
    {
        "id": 3,
        "name":"Egypt",
        "capital":"Cairo",
        "area":1010408
    }
]
Django REST framework sends back a JSON response with the three countries you added earlier. The response above is formatted for readability, so your response will look different.
The DefaultRouter you created in countries/urls.py provides URLs for requests to all the standard API endpoints:
GET /countries/GET /countries/<country_id>/POST /countries/PUT /countries/<country_id>/PATCH /countries/<country_id>/DELETE /countries/<country_id>/
You can try out a few more endpoints below. Send a POST request to /countries/ to a create a new Country in your Django project:
$ curl -i http://127.0.0.1:8000/countries/
-X POST
-H 'Content-Type: application/json'
-d '{"name":"Germany", "capital": "Berlin", "area": 357022}'
-w 'n'

HTTP/1.1 201 Created
...

{
    "id":4,
    "name":"Germany",
    "capital":"Berlin",
    "area":357022
}
This creates a new Country with the JSON you sent in the request. Django REST framework returns a 201 Created status code and the new Country.
You can view an existing Country by sending a request to GET /countries/<country_id>/ with an existing id. Run the following command to get the first Country:
$ curl -i http://127.0.0.1:8000/countries/1/ -w 'n'

HTTP/1.1 200 OK
...

{
    "id":1,
    "name":"Thailand",
    "capital":"Bangkok",
    "area":513120
}
The response contains the information for the first Country. These examples only covered GET and POST requests. Feel free to try out PUT, PATCH, and DELETE requests on your own to see how you can fully manage your model from the REST API.
As you’ve seen, Django REST framework is a great option for building REST APIs, especially if you have an existing Django project and you want to add an API.
FastAPI
FastAPI is a Python web framework that’s optimized for building APIs. It uses Python type hints and has built-in support for async operations. FastAPI is built on top of Starlette and Pydantic and is very performant.
Below is an example of the REST API built with FastAPI:
# app.py
from fastapi import FastAPI
from pydantic import BaseModel, Field

app = FastAPI()

def _find_next_id():
    return max(country.country_id for country in countries) + 1

class Country(BaseModel):
    country_id: int = Field(default_factory=_find_next_id, alias="id")
    name: str
    capital: str
    area: int

countries = [
    Country(id=1, name="Thailand", capital="Bangkok", area=513120),
    Country(id=2, name="Australia", capital="Canberra", area=7617930),
    Country(id=3, name="Egypt", capital="Cairo", area=1010408),
]

@app.get("/countries")
async def get_countries():
    return countries

@app.post("/countries", status_code=201)
async def add_country(country: Country):
    countries.append(country)
    return country
This application uses the features of FastAPI to build a REST API for the same country data you’ve seen in the other examples.
You can try this application by installing fastapi with pip:
$ python -m pip install fastapi
You’ll also need to install uvicorn[standard], a server that can run FastAPI applications:
$ python -m pip install uvicorn[standard]
If you’ve installed both fastapi and uvicorn, then save the code above in a file called app.py. Run the following command to start up a development server:
$ uvicorn app:app --reload
INFO: Uvicorn running on http://127.0.0.1:8000 (Press CTRL+C to quit)
The server is now running. Open up a browser and go to http://127.0.0.1:8000/countries. You’ll see FastAPI respond with this:
[
    {
        "id": 1,
        "name":"Thailand",
        "capital":"Bangkok",
        "area":513120
    },
    {
        "id": 2,
        "name":"Australia",
        "capital":"Canberra",
        "area":7617930
    },
    {
        "id": 3,
        "name":"Egypt",
        "capital":"Cairo",
        "area":1010408
    }
]
FastAPI responds with a JSON array containing a list of countries. You can also add a new country by sending a POST request to /countries:
$ curl -i http://127.0.0.1:8000/countries
-X POST
-H 'Content-Type: application/json'
-d '{"name":"Germany", "capital": "Berlin", "area": 357022}'
-w 'n'

HTTP/1.1 201 Created
content-type: application/json
...

{"id":4,"name":"Germany","capital":"Berlin","area": 357022}
You added a new country. You can confirm this with GET /countries:
$ curl -i http://127.0.0.1:8000/countries -w 'n'

HTTP/1.1 200 OK
content-type: application/json
...

[
    {
        "id":1,
        "name":"Thailand",
        "capital":"Bangkok",
        "area":513120,
    },
    {
        "id":2,
        "name":"Australia",
        "capital":"Canberra",
        "area":7617930
    },
    {
        "id":3,
        "name":"Egypt",
        "capital":"Cairo",
        "area":1010408
    },
    {
        "id":4,
        "name": "Germany",
        "capital": "Berlin",
        "area": 357022
    }
]
FastAPI returns a JSON list including the new country you just added.
You’ll notice that the FastAPI application looks similar to the Flask application. Like Flask, FastAPI has a focused feature set. It doesn’t try to handle all aspects of web application development. It’s designed to build APIs with modern Python features.
If you look near the top of app.py, then you’ll see a class called Country that extends BaseModel. The Country class describes the structure of the data in the REST API:
class Country(BaseModel):
    country_id: int = Field(default_factory=_find_next_id, alias="id")
    name: str
    capital: str
    area: int
This is an example of a Pydantic model. Pydantic models provide some helpful features in FastAPI. They use Python type annotations to enforce the data type for each field in the class. This allows FastAPI to automatically generate JSON, with the correct data types, for API endpoints. It also allows FastAPI to validate incoming JSON.
It’s helpful to highlight the first line as there’s a lot going on there:
country_id: int = Field(default_factory=_find_next_id, alias="id")
In this line, you see country_id, which stores an integer for the ID of the Country. It uses the Field function from Pydantic to modify the behavior of country_id. In this example, you’re passing Field the keyword arguments default_factory and alias.
The first argument, default_factory, is set to _find_next_id(). This argument specifies a function to run whenever a new Country is created. The return value will be assigned to country_id.
The second argument, alias, is set to id. This tells FastAPI to output the key "id" instead of "country_id" in the JSON:
{
    "id":1,
    "name":"Thailand",
    "capital":"Bangkok",
    "area":513120,
},
This alias also means you can use id when you create a new Country. You can see this in the countries list:
countries = [
    Country(id=1, name="Thailand", capital="Bangkok", area=513120),
    Country(id=2, name="Australia", capital="Canberra", area=7617930),
    Country(id=3, name="Egypt", capital="Cairo", area=1010408),
]
This list contains three instances of Country for the initial countries in the API. Pydantic models provide some great features and allow FastAPI to easily process JSON data.
Now take a look at the two API functions in this application. The first, get_countries(), returns a list of countries for GET requests to /countries:
@app.get("/countries")
async def get_countries():
    return countries
FastAPI will automatically create JSON based on the fields in the Pydantic model and set the right JSON data type from the Python type hints.
The Pydantic model also provides a benefit when you make a POST request to /countries. You can see in the second API function below that the parameter country has a Country annotation:
@app.post("/countries", status_code=201)
async def add_country(country: Country):
    countries.append(country)
    return country
This type annotation tells FastAPI to validate the incoming JSON against Country. If it doesn’t match, then FastAPI will return an error. You can try this out by making a request with JSON that doesn’t match the Pydantic model:
$ curl -i http://127.0.0.1:8000/countries
-X POST
-H 'Content-Type: application/json'
-d '{"name":"Germany", "capital": "Berlin"}'
-w 'n'

HTTP/1.1 422 Unprocessable Entity
content-type: application/json
...

{
    "detail": [
        {
            "loc":["body","area"],
            "msg":"field required",
            "type":"value_error.missing"
        }
    ]
}
The JSON in this request was missing a value for area, so FastAPI returned a response with the status code 422 Unprocessable Entity as well as details about the error. This validation is made possible by the Pydantic model.
This example only scratches the surface of what FastAPI can do. With its high performance and modern features like async functions and automatic documentation, FastAPI is worth considering for your next REST API.
Conclusion
REST APIs are everywhere. Knowing how to leverage Python to consume and build APIs allows you to work with the vast amount of data that web services provide.
In this tutorial, you’ve learned how to:
- Identify the REST architecture style
- Work with HTTP methods and status codes
- Use
requeststo get and consume data from an external API - Define endpoints, data, and responses for a REST API
- Get started with Python tools to build a REST API
Using your new Python REST API skills, you’ll be able to not only interact with web services but also build REST APIs for your applications. These tools open the door to a wide range of interesting, data-driven applications and services.

Программист, писатель и предприниматель из США. Он в основном работает в веб-разработке.
API, Application Programming Interface (программный интерфейс приложения), — очень широкое понятие в бэкенд-разработке. Тот API, который мы рассмотрим сегодня, представляет собой сайт без фронтенд-составляющей. Вместо рендеринга HTML-страниц, бэкенд возвращает данные в JSON формате для использования их в нативных или веб-приложениях. Самое пристальное внимание при написании API (как и при написании вебсайтов) нужно обратить на то, как он будет использоваться. Сегодня мы поговорим о том, как использовать Django для создания API для простого приложения со списком дел.
Нам понадобится несколько инструментов. Для выполнения всех шагов я бы рекомендовал вам, вместе с данной статьей, клонировать вот этот учебный проект из GitHub-репозитория. Также вы должны установить Python 3, Django 2.2, и djangorestframework 3.9 (из репозитория запустите pip install -r requirements.txt для установки библиотек). Если не все будет понятно с установкой Django, можно воспользоваться официальной документацией. Также вам нужно будет скачать бесплатную версию Postman. Postman – отличный инструмент для разработки и тестирования API, но в этой статье мы воспользуемся лишь его самыми базовыми функциями.
Для начала откройте папку taskmanager, содержащую manage.py, и выполните python manage.py migrate в командной строке, чтобы применить миграции баз данных к дефолтной sqlite базе данных Django. Создайте суперпользователя с помощью python manage.py createsuperuserи не забудьте записать имя пользователя и пароль. Они понадобятся нам позже. Затем выполните python manage.py runserver для взаимодействия с API.
Вы можете работать с API двумя способами: просматривая фронтенд Django REST фреймворка или выполняя http-запросы. Откройте браузер и перейдите к 127.0.0.1:8000 или к localhost через порт 8000, где Django-проекты запускаются по умолчанию. Вы увидите веб-страницу со списком доступных конечных точек API. Это важнейший принцип в RESTful подходе к API-разработке: сам API должен показывать пользователям, что доступно и как это использовать.
Сначала давайте посмотрим на функцию api_index в views.py. Она содержит список конечных точек, которые вы посещаете.
    @define_usage(returns={'url_usage': 'Dict'})
    @api_view(['GET'])
    @permission_classes((AllowAny,))
    def api_index(request):
        details = {}
        for item in list(globals().items()):
            if item[0][0:4] == 'api_':
                if hasattr(item[1], 'usage'):
                    details[reverse(item[1].__name__)] = item[1].usage
        return Response(details)
API функции для каждого представления (view в Django) обернуты тремя декораторами. Мы еще вернемся к @define_usage. @api_view нужен для Django REST фреймворка и отвечает за две вещи: шаблон для веб-страницы, которая в результате получится, и HTTP-метод, поддерживаемый конечной точкой. Чтобы разрешить доступ к этому url без проверки подлинности,@permission_classes, также из Django REST фреймворка, задан как AllowAny. Главная функция API обращается к глобальной области видимости приложения чтобы «собрать» все определенные нами функции. Так как мы добавили к каждой функции представления префикс api_, мы можем легко их отфильтровать и вернуть словарь, содержащий информацию об их вызовах. Детали вызовов предоставляются пользовательским декоратором, написанным в decorators.py.
    def define_usage(params=None, returns=None):
        def decorator(function):
            cls = function.view_class
            header = None
            # Нужна ли аутентификация для вызова этого представления?
            if IsAuthenticated in cls.permission_classes:
                header = {'Authorization': 'Token String'}
            # Создаем лист доступных методов, исключая 'OPTIONS'
            methods = [method.upper() for method in cls.http_method_names if method != 'options']
            # Создаем словарь для ответа
            usage = {'Request Types': methods, 'Headers': header, 'Body': params, 'Returns': returns}


            # Защита от побочных эффектов
            @wraps(function)
            def _wrapper(*args, **kwargs):
                return function(*args, **kwargs)
            _wrapper.usage = usage
            return _wrapper
        return decorator
Декоратор — часть синтаксиса, которая позволяет легко определять функции высокого порядка, чтобы добавить функциям представления атрибуты (как классам). Представления на основе функций с декораторами — отличный компромисс между простыми функциями и представлениями на основе классов в Django. Этот декоратор предоставляет четыре информационных элемента: типы запросов, заголовки, параметры и возвращаемое значение каждой функции. Декоратор генерирует заголовок и информацию о методе на основе информации, полученной от других декораторов, прикрепленных к функции, и принимает в качестве входных данных параметры и возвращаемые значения на момент вызова данного декоратора.
Помимо вывода результатов index-запроса, мы также будем использовать наш API для взаимодействия с данными пользователя, так что нам понадобится какой-то способ аутентификации. Если бы это был не просто учебный проект, а что-то посерьезнее, можно было бы реализовать регистрацию пользователей (к тому же, это отличная практика, если вы хотите проверить, насколько вы разобрались с понятиями из этой статьи). Но вместо этого мы просто войдем под учетной записью суперпользователя, которую создали заранее.
 @define_usage(params={'username': 'String', 'password': 'String'},
               returns={'authenticated': 'Bool', 'token': 'Token String'})
 @api_view(['POST'])
 @permission_classes((AllowAny,))
 def api_signin(request):
     try:
         username = request.data['username']
         password = request.data['password']
     except:
         return Response({'error': 'Please provide correct username and password'},
                         status=HTTP_400_BAD_REQUEST)
     user = authenticate(username=username, password=password)
     if user is not None:
         token, _ = Token.objects.get_or_create(user=user)
         return Response({'authenticated': True, 'token': "Token " + token.key})
     else:
         return Response({'authenticated': False, 'token': None})
Важно отметить, что для того, чтобы идентификация на основе токенов заработала, нужно настроить несколько параметров. Гид по настройке можно найти в файле settings.py учебного проекта.
Чтобы верифицировать пользователя, метод api_signin запрашивает имя пользователя и пароль и использует встроенный в Django метод authenticate. Если предоставленные учетные данные верны, он возвращает токен, позволяющий клиенту получить доступ к защищенным конечным точкам API. Помните о том, что данный токен предоставляет те же права доступа, что и пароль, и поэтому должен надежно храниться в клиентском приложении. Теперь мы наконец можем поработать с Postman. Откройте приложение и используйте его для отправки post-запроса к /signin/, как показано на скриншоте.

Теперь, когда у вас есть токен для вашего пользователя, можно разобраться и с остальными составляющими API. Так что давайте немного отвлечемся и посмотрим на Django-модель, лежащую в основе API.
    class Task(models.Model):
        user = models.ForeignKey(User, on_delete=models.CASCADE) #Каждая задача принадлежит только одному пользователю
        description = models.CharField(max_length=150) #У каждой задачи есть описание
        due = models.DateField() #У каждой задачи есть дата выполнения, тип datetime.date
Модель Task представляет собой довольно простой подход к менеджменту задач нашего приложения. Каждый элемент имеет описание, например, «Написать API с помощью Django» и дату выполнения. Задачи также связаны внешним ключом с объектом Django User, что означает, что каждая задача принадлежит только одному конкретному пользователю, но каждый пользователь может иметь неограниченное количество задач или не иметь вовсе. Каждый объект Django также имеет идентификатор, уникальное целое число, которое можно использовать для ссылки на индивидуальные задачи.
Приложения типа этого часто называют CRUD-приложениями, от «Create, Read, Update, Destroy» (Создание, Чтение, Модификация, Удаление), четырех операций, поддерживаемых нашим приложением на объектах Task.
Для начала создадим пустой список задач, связанных с конкретным пользователем. Используйте Postman для создания GET-запроса к /all/, как на скриншоте ниже. Не забудьте добавить токен к заголовкам этого и всех последующих запросов.

    @define_usage(returns={'tasks': 'Dict'})
    @api_view(['GET'])
    @authentication_classes((SessionAuthentication, BasicAuthentication, TokenAuthentication))
    @permission_classes((IsAuthenticated,))
    def api_all_tasks(request):
        tasks = taskSerializer(request.user.task_set.all(), many=True)
        return Response({'tasks': tasks.data})
Функция api_all_tasks довольно проста. Стоит обратить внимание лишь на смену требований к проверке подлинности и классов разрешения на аутентификацию токеном. У нас есть новый декоратор @authentication_classes, позволяющий выполнять как дефолтные методы аутентификации Django REST framework, так иTokenAuthentication. Это позволяет нам ссылаться на все экземпляры User как на request.user, как если бы пользователи залогинились через стандартную Django-сессию. Декоратор @define_usage показывает нам, что api_all_tasks не принимает параметров (в отличие от GET-запроса) и возвращает лишь одну вещь — список задач. Поскольку данная функция возвращает данные в формате JSON (JavaScript Object Notation), мы используем сериализатор, чтобы сообщить Django, как парсить данные для отправки.
    class taskSerializer(serializers.ModelSerializer):
        class Meta:
            model = Task
            fields = ('id', 'description', 'due')
Эта простая модель определяет данные для класса Task: идентификатор, описание и дату выполнения. Сериализаторы могут добавлять и исключать поля и данные из модели. Например, вот этот сериализатор не возвращает идентификатор пользователя, т.к. он бесполезен для конечного клиента.
    @define_usage(params={'description': 'String', 'due_in': 'Int'},
                  returns={'done': 'Bool'})
    @api_view(['PUT'])
    @authentication_classes((SessionAuthentication, BasicAuthentication, TokenAuthentication))
    @permission_classes((IsAuthenticated,))
    def api_new_task(request):
        task = Task(user=request.user,
                    description=request.data['description'],
                    due=date.today() + timedelta(days=int(request.data['due_in'])))
        task.save()
        return Response({'done': True})
Теперь нам нужно создать задачу. Для этого используем api_new_task. Обычно для создания объекта в базе данных используется PUT-запрос. Обратите внимание, что этот метод, как и два других, не требует предварительной сериализации данных. Вместо этого мы передаем параметры в конструктор объекта класса Task, их же мы затем сохраним в базу данных. Мы отправляем количество дней для выполнения задачи, так как это гораздо проще, чем пытаться отправить объект Python-класса Date. Затем в API мы сохраняем какую-нибудь дату в далеком будущем. Чтобы увидеть созданный объект, нужно создать запрос к /new/ для создания задачи и повторить запрос к /all/.
    @define_usage(params={'task_id': 'Int', 'description': 'String', 'due_in': 'Int'},
                  returns={'done': 'Bool'})
    @api_view(['POST'])
    @authentication_classes((SessionAuthentication, BasicAuthentication, TokenAuthentication))
    @permission_classes((IsAuthenticated,))
    def api_update_task(request):
        task = request.user.task_set.get(id=int(request.data['task_id']))
        try:
            task.description = request.data['description']
        except: #Обновление описания необязательно
            pass
        try:
            task.due = date.today() + timedelta(days=int(request.data['due_in']))
        except: #Обновление даты выполнения необязательно
            pass
        task.save()
        return Response({'done': True})
Для редактирования только что созданной задачи нужно создать POST-запрос к api_update_task через /update/. Мы включаем task_id для ссылки на правильную задачу из пользовательского task_set. Код здесь будет немного сложнее, т.к. мы хотим иметь возможность обновлять описания и/ или дату выполнения задачи.
    @define_usage(params={'task_id': 'Int'},
                  returns={'done': 'Bool'})
    @api_view(['DELETE'])
    @authentication_classes((SessionAuthentication, BasicAuthentication, TokenAuthentication))
    @permission_classes((IsAuthenticated,))
    def api_delete_task(request):
        task = request.user.task_set.get(id=int(request.data['task_id']))
        task.delete()
        return Response({'done': True})
Используйте DELETE-запрос кapi_delete_task через /delete/ для удаления задачи. Этот метод работает аналогично функции api_update_task, за исключением того, что вместо изменения задачи он удаляет ее.
Сегодня мы с вами разобрались, как реализовать index-запрос, аутентификацию на основе токенов и четыре основных HTTP-метода для Django API. Вы можете использовать эти знания для поддержки любых веб- и нативных мобильных приложений или для разработки публичного API для обмена данными. Не стесняйтесь клонировать учебный проект, содержащий весь код, представленный в этой статье, и попробуйте реализовать такие расширения как пагинация, ограничение числа запросов и создание пользователя.
TL;DR: Throughout this article, we will use Flask and Python to develop a RESTful API. We will create an endpoint that returns static data (dictionaries). Afterward, we will create a class with two specializations and a few endpoints to insert and retrieve instances of these classes. Finally, we will look at how to run the API on a Docker container. The final code developed throughout this article is available in this GitHub repository. I hope you enjoy it!
«Flask allows Python developers to create lightweight RESTful APIs.»
Tweet This

Summary
This article is divided into the following sections:
- Why Python?
- Why Flask?
- Bootstrapping a Flask Application
- Creating a RESTful Endpoint with Flask
- Mapping Models with Python Classes
- Serializing and Deserializing Objects with Marshmallow
- Dockerizing Flask Applications
- Securing Python APIs with Auth0
- Next Steps
Why Python?
Nowadays, choosing Python to develop applications is becoming a very popular choice. As StackOverflow recently analyzed, Python is one of the fastest-growing programming languages, having surpassed even Java in the number of questions asked on the platform. On GitHub, the language also shows signs of mass adoption, occupying the second position among the top programming languages in 2021.
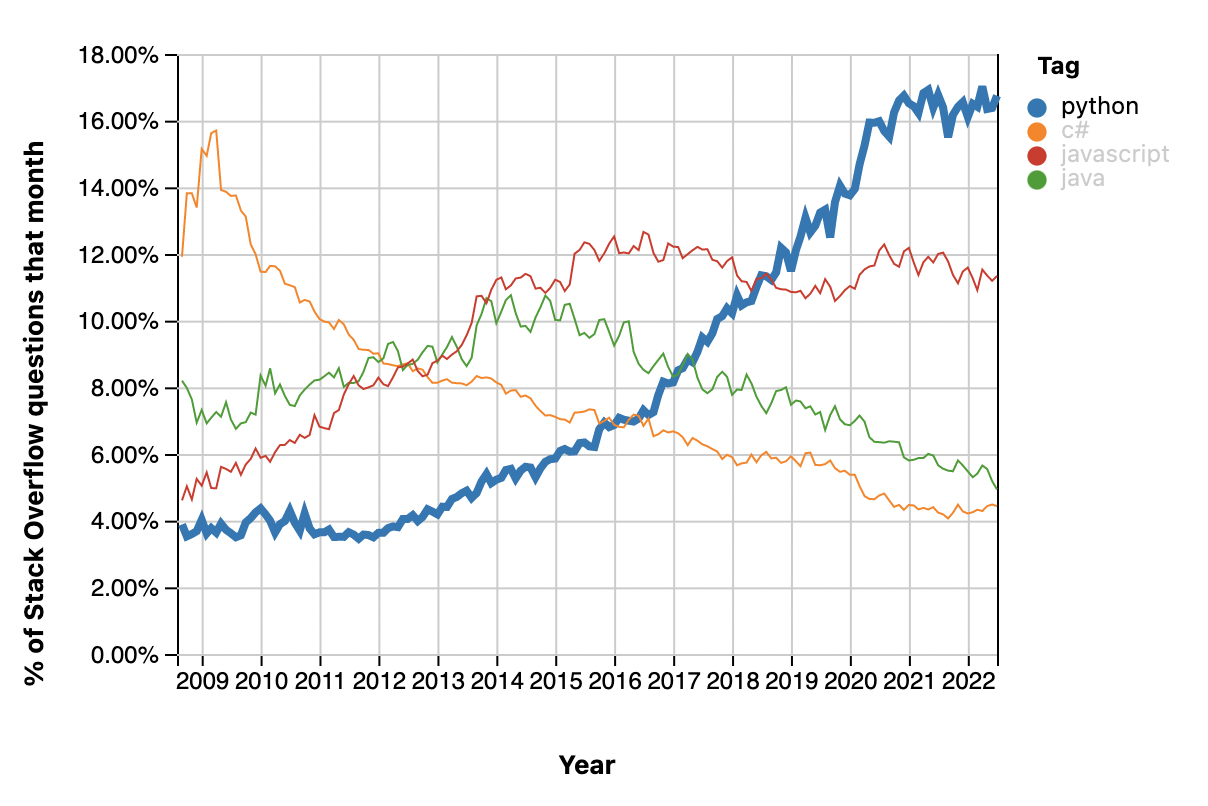
The huge community forming around Python is improving every aspect of the language. More and more open source libraries are being released to address many different subjects, like Artificial Intelligence, Machine Learning, and web development. Besides the tremendous support provided by the overall community, the Python Software Foundation also provides excellent documentation, where new adopters can learn its essence fast.
Why Flask?
When it comes to web development on Python, there are three predominant frameworks: Django, Flask, and a relatively new player FastAPI. Django is older, more mature, and a little bit more popular. On GitHub, this framework has around 66k stars, 2.2k contributors, ~ 350 releases, and more than 25k forks.
FastAPI is growing at high speed, with 48k stars on Github, 370 contributors, and more than 3.9k forks. This elegant framework built for high-performance and fast-to-code APIs is not one to miss.
Flask, although less popular, is not far behind. On GitHub, Flask has almost 60k stars, ~650 contributors, ~23 releases, and nearly 15k forks.
Even though Django is older and has a slightly more extensive community, Flask has its strengths. From the ground up, Flask was built with scalability and simplicity. Flask applications are known for being lightweight, mainly compared to their Django counterparts. Flask developers call it a microframework, where micro (as explained here) means that the goal is to keep the core simple but extensible. Flask won’t make many decisions for us, such as what database to use or what template engine to choose. Lastly, Flask has extensive documentation that addresses everything developers need to start.
FastAPI follows a similar «micro» approach to Flask, though it provides more tools like automatic Swagger UI and is an excellent choice for APIs. However, as it is a newer framework, many more resources and libraries are compatible with frameworks like Django and Flask but not with FastAPI.
Being lightweight, easy to adopt, well-documented, and popular, Flask is a good option for developing RESTful APIs.
Bootstrapping a Flask Application
First and foremost, we will need to install some dependencies on our development machine. We will need to install Python 3, Pip (Python Package Index), and Flask.
Installing Python 3
If we are using some recent version of a popular Linux distribution (like Ubuntu) or macOS, we might already have Python 3 installed on our computer. If we are running Windows, we will probably need to install Python 3, as this operating system does not ship with any version.
After installing Python 3 on our machine, we can check that we have everything set up as expected by running the following command:
python --version
# Python 3.8.9
Note that the command above might produce a different output when we have a different Python version. What is important is that you are running at least Python 3.7 or newer. If we get «Python 2» instead, we can try issuing python3 --version. If this command produces the correct output, we must replace all commands throughout the article to use python3 instead of just python.
Installing Pip
Pip is the recommended tool for installing Python packages. While the official installation page states that pip comes installed if we’re using Python 2 >= 2.7.9 or Python 3 >= 3.4, installing Python through apt on Ubuntu doesn’t install pip. Therefore, let’s check if we need to install pip separately or already have it.
# we might need to change pip by pip3
pip --version
# pip 9.0.1 ... (python 3.X)
If the command above produces an output similar to pip 9.0.1 ... (python 3.X), then we are good to go. If we get pip 9.0.1 ... (python 2.X), we can try replacing pip with pip3. If we cannot find Pip for Python 3 on our machine, we can follow the instructions here to install Pip.
Installing Flask
We already know what Flask is and its capabilities. Therefore, let’s focus on installing it on our machine and testing to see if we can get a basic Flask application running. The first step is to use pip to install Flask:
# we might need to replace pip with pip3
pip install Flask
After installing the package, we will create a file called hello.py and add five lines of code to it. As we will use this file to check if Flask was correctly installed, we don’t need to nest it in a new directory.
# hello.py

from flask import Flask

app = Flask(__name__)

@app.route("/")
def hello_world():
    return "Hello, World!"
These 5 lines of code are everything we need to handle HTTP requests and return a «Hello, World!» message. To run it, we execute the following command:
flask --app hello run

 * Serving Flask app 'hello'
 * Debug mode: off
WARNING: This is a development server. Do not use it in a production deployment. Use a production WSGI server instead.
 * Running on http://127.0.0.1:5000
Press CTRL+C to quit
On Ubuntu, we might need to edit the
$PATHvariable to be able to run flask directly. To do that, let’stouch ~/.bash_aliasesand thenecho "export PATH=$PATH:~/.local/bin" >> ~/.bash_aliases.
After executing these commands, we can reach our application by opening a browser and navigating to http://127.0.0.1:5000/ or by issuing curl http://127.0.0.1:5000/.
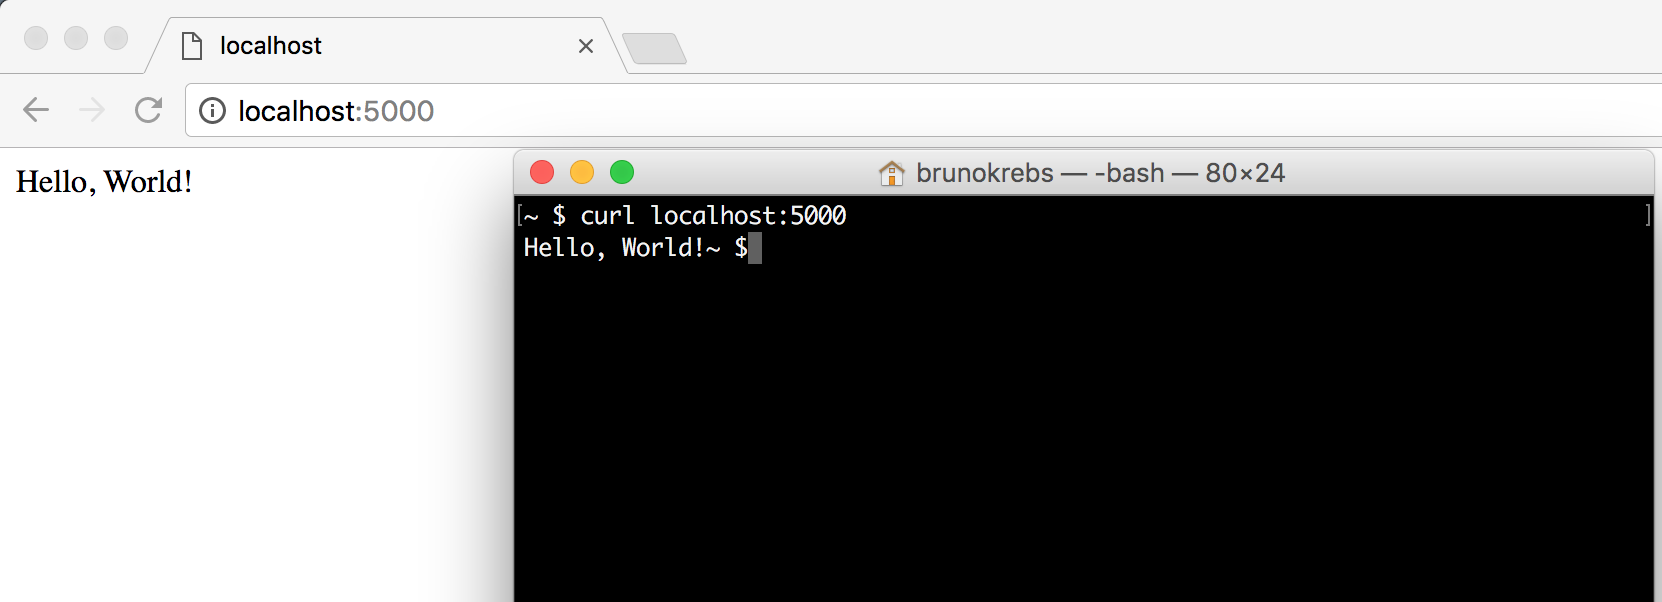
Virtual environments (virtualenv)
Although PyPA—the Python Packaging Authority group—recommends pip as the tool for installing Python packages, we will need to use another package to manage our project’s dependencies. It’s true that pip supports package management through the requirements.txt file, but the tool lacks some features required on serious projects running on different production and development machines. Among its issues, the ones that cause the most problems are:
pipinstalls packages globally, making it hard to manage multiple versions of the same package on the same machine.requirements.txtneed all dependencies and sub-dependencies listed explicitly, a manual process that is tedious and error-prone.
To solve these issues, we are going to use Pipenv. Pipenv is a dependency manager that isolates projects in private environments, allowing packages to be installed per project. If you’re familiar with NPM or Ruby’s bundler, it’s similar in spirit to those tools.
pip install pipenvNow, to start creating a serious Flask application, let’s create a new directory that will hold our source code. In this article, we will create Cashman, a small RESTful API that allows users to manage incomes and expenses. Therefore, we will create a directory called cashman-flask-project. After that, we will use pipenv to start our project and manage our dependencies.
# create our project directory and move to it
mkdir cashman-flask-project && cd cashman-flask-project

# use pipenv to create a Python 3 (--three) virtualenv for our project
pipenv --three

# install flask a dependency on our project
pipenv install flask
The second command creates our virtual environment, where all our dependencies get installed, and the third will add Flask as our first dependency. If we check our project’s directory, we will see two new files:
Pipfilecontains details about our project, such as the Python version and the packages needed.Pipenv.lockcontains precisely what version of each package our project depends on and its transitive dependencies.
Python modules
Like other mainstream programming languages, Python also has the concept of modules to enable developers to organize source code according to subjects/functionalities. Similar to Java packages and C# namespaces, modules in Python are files organized in directories that other Python scripts can import. To create a module on a Python application, we need to create a folder and add an empty file called __init__.py.
Let’s create our first module on our application, the main module, with all our RESTful endpoints. Inside the application’s directory, let’s create another one with the same name, cashman. The root cashman-flask-project directory created before will hold metadata about our project, like what dependencies it has, while this new one will be our module with our Python scripts.
# create source code's root
mkdir cashman && cd cashman

# create an empty __init__.py file
touch __init__.py
Inside the main module, let’s create a script called index.py. In this script, we will define the first endpoint of our application.
from flask import Flask
app = Flask(__name__)


@app.route("/")
def hello_world():
    return "Hello, World!"
As in the previous example, our application returns a «Hello, world!» message. We will start improving it in a second, but first, let’s create an executable file called bootstrap.sh in the root directory of our application.
# move to the root directory
cd ..

# create the file
touch bootstrap.sh

# make it executable
chmod +x bootstrap.sh
The goal of this file is to facilitate the start-up of our application. Its source code will be the following:
#!/bin/sh
export FLASK_APP=./cashman/index.py
pipenv run flask --debug run -h 0.0.0.0
The first command defines the main script to be executed by Flask. The second command runs our Flask application in the context of the virtual environment listening to all interfaces on the computer (-h 0.0.0.0).
Note: we are setting flask to run in debug mode to enhance our development experience and activate the hot reload feature, so we don’t have to restart the server each time we change the code. If you run Flask in production, we recommend updating these settings for production.
To check that this script is working correctly, we run ./bootstrap.sh to get similar results as when executing the «Hello, world!» application.
 * Serving Flask app './cashman/index.py'
 * Debug mode: on
WARNING: This is a development server. Do not use it in a production deployment. Use a production WSGI server instead.
 * Running on all addresses (0.0.0.0)
 * Running on http://127.0.0.1:5000
 * Running on http://192.168.1.207:5000
Press CTRL+C to quit
Creating a RESTful Endpoint with Flask
Now that our application is structured, we can start coding some relevant endpoints. As mentioned before, the goal of our application is to help users to manage incomes and expenses. We will begin by defining two endpoints to handle incomes. Let’s replace the contents of the ./cashman/index.py file with the following:
from flask import Flask, jsonify, request

app = Flask(__name__)

incomes = [
    { 'description': 'salary', 'amount': 5000 }
]


@app.route('/incomes')
def get_incomes():
    return jsonify(incomes)


@app.route('/incomes', methods=['POST'])
def add_income():
    incomes.append(request.get_json())
    return '', 204
Since improving our application, we have removed the endpoint that returned «Hello, world!» to users. In its place, we defined an endpoint to handle HTTP GET requests to return incomes and another endpoint to handle HTTP POST requests to add new ones. These endpoints are annotated with @app.route to define routes listening to requests on the /incomes endpoint. Flask provides great documentation on what exactly this does.
To facilitate the process, we currently manipulate incomes as dictionaries. However, we will soon create classes to represent incomes and expenses.
To interact with both endpoints that we have created, we can start our application and issue some HTTP requests:
# start the cashman application
./bootstrap.sh &

# get incomes
curl http://localhost:5000/incomes

# add new income
curl -X POST -H "Content-Type: application/json" -d '{
  "description": "lottery",
  "amount": 1000.0
}' http://localhost:5000/incomes

# check if lottery was added
curl localhost:5000/incomes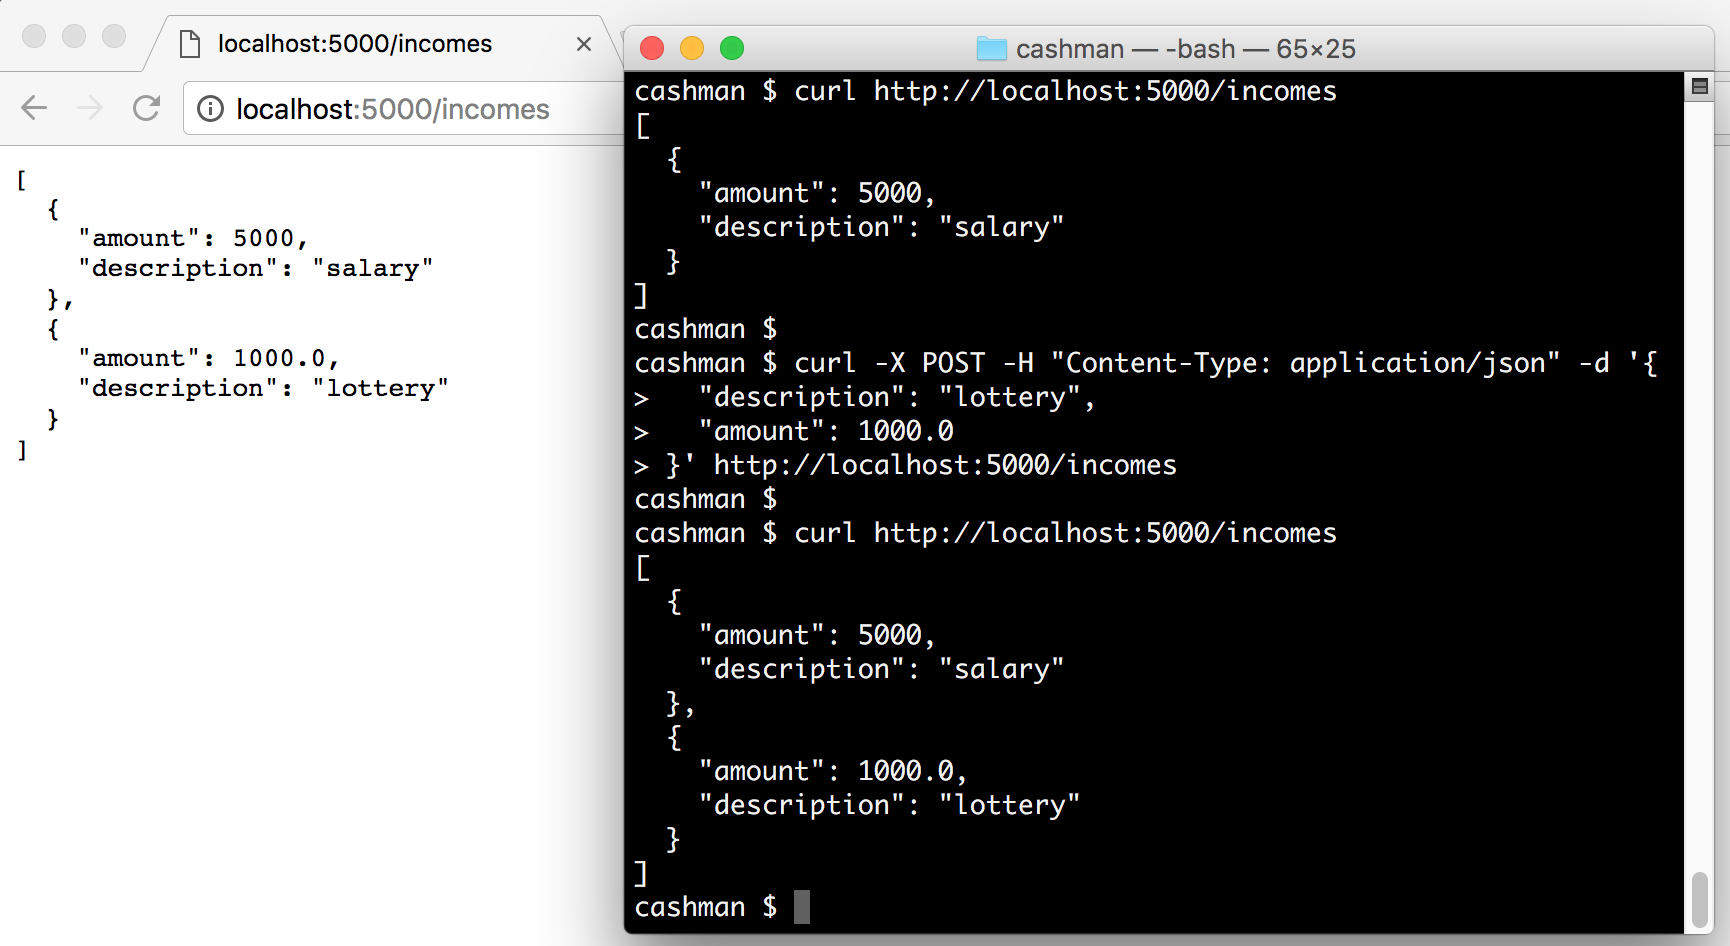
Mapping Models with Python Classes
Using dictionaries in a simple use case like the one above is enough. However, for more complex applications that deal with different entities and have multiple business rules and validations, we might need to encapsulate our data into Python classes.
We will refactor our application to learn the process of mapping entities (like incomes) as classes. The first thing that we will do is create a submodule to hold all our entities. Let’s create a model directory inside the cashman module and add an empty file called __init__.py on it.
# create model directory inside the cashman module
mkdir -p cashman/model

# initialize it as a module
touch cashman/model/__init__.py
Mapping a Python superclass
We will create three classes in this new module/directory: Transaction, Income, and Expense. The first class will be the base for the two others, and we will call it Transaction. Let’s create a file called transaction.py in the model directory with the following code:
import datetime as dt

from marshmallow import Schema, fields


class Transaction(object):
    def __init__(self, description, amount, type):
        self.description = description
        self.amount = amount
        self.created_at = dt.datetime.now()
        self.type = type

    def __repr__(self):
        return '<Transaction(name={self.description!r})>'.format(self=self)


class TransactionSchema(Schema):
    description = fields.Str()
    amount = fields.Number()
    created_at = fields.Date()
    type = fields.Str()
Besides the Transaction class, we also defined a TransactionSchema. We will use the latter to deserialize and serialize instances of Transaction from and to JSON objects. This class inherits from another superclass called Schema that belongs on a package not yet installed.
# installing marshmallow as a project dependency
pipenv install marshmallow
Marshmallow is a popular Python package for converting complex datatypes, such as objects, to and from built-in Python datatypes. We can use this package to validate, serialize, and deserialize data. We won’t dive into validation in this article, as it will be the subject of another one. Though, as mentioned, we will use marshmallow to serialize and deserialize entities through our endpoints.
Mapping Income and Expense as Python Classes
To keep things more organized and meaningful, we won’t expose the Transaction class on our endpoints. We will create two specializations to handle the requests: Income and Expense. Let’s make a file called income.py inside the model module with the following code:
from marshmallow import post_load

from .transaction import Transaction, TransactionSchema
from .transaction_type import TransactionType


class Income(Transaction):
    def __init__(self, description, amount):
        super(Income, self).__init__(description, amount, TransactionType.INCOME)

    def __repr__(self):
        return '<Income(name={self.description!r})>'.format(self=self)


class IncomeSchema(TransactionSchema):
    @post_load
    def make_income(self, data, **kwargs):
        return Income(**data)
The only value that this class adds for our application is that it hardcodes the type of transaction. This type is a Python enumerator, which we still have to create, that will help us filter transactions in the future. Let’s create another file, called transaction_type.py, inside model to represent this enumerator:
from enum import Enum


class TransactionType(Enum):
    INCOME = "INCOME"
    EXPENSE = "EXPENSE"
The code of the enumerator is quite simple. It just defines a class called TransactionType that inherits from Enum and that defines two types: INCOME and EXPENSE.
Lastly, let’s create the class that represents expenses. To do that, let’s add a new file called expense.py inside model with the following code:
from marshmallow import post_load

from .transaction import Transaction, TransactionSchema
from .transaction_type import TransactionType


class Expense(Transaction):
    def __init__(self, description, amount):
        super(Expense, self).__init__(description, -abs(amount), TransactionType.EXPENSE)

    def __repr__(self):
        return '<Expense(name={self.description!r})>'.format(self=self)


class ExpenseSchema(TransactionSchema):
    @post_load
    def make_expense(self, data, **kwargs):
        return Expense(**data)
Similar to Income, this class hardcodes the type of the transaction, but now it passes EXPENSE to the superclass. The difference is that it transforms the given amount to be negative. Therefore, no matter if the user sends a positive or a negative value, we will always store it as negative to facilitate calculations.
Serializing and Deserializing Objects with Marshmallow
With the Transaction superclass and its specializations adequately implemented, we can now enhance our endpoints to deal with these classes. Let’s replace ./cashman/index.py contents to:
from flask import Flask, jsonify, request

from cashman.model.expense import Expense, ExpenseSchema
from cashman.model.income import Income, IncomeSchema
from cashman.model.transaction_type import TransactionType

app = Flask(__name__)

transactions = [
    Income('Salary', 5000),
    Income('Dividends', 200),
    Expense('pizza', 50),
    Expense('Rock Concert', 100)
]


@app.route('/incomes')
def get_incomes():
    schema = IncomeSchema(many=True)
    incomes = schema.dump(
        filter(lambda t: t.type == TransactionType.INCOME, transactions)
    )
    return jsonify(incomes)


@app.route('/incomes', methods=['POST'])
def add_income():
    income = IncomeSchema().load(request.get_json())
    transactions.append(income)
    return "", 204


@app.route('/expenses')
def get_expenses():
    schema = ExpenseSchema(many=True)
    expenses = schema.dump(
        filter(lambda t: t.type == TransactionType.EXPENSE, transactions)
    )
    return jsonify(expenses)


@app.route('/expenses', methods=['POST'])
def add_expense():
    expense = ExpenseSchema().load(request.get_json())
    transactions.append(expense)
    return "", 204


if __name__ == "__main__":
    app.run()
The new version that we just implemented starts by redefining the incomes variable into a list of Expenses and Incomes, now called transactions. Besides that, we have also changed the implementation of both methods that deal with incomes. For the endpoint used to retrieve incomes, we defined an instance of IncomeSchema to produce a JSON representation of incomes. We also used filter to extract incomes only from the transactions list. In the end we send the array of JSON incomes back to users.
The endpoint responsible for accepting new incomes was also refactored. The change on this endpoint was the addition of IncomeSchema to load an instance of Income based on the JSON data sent by the user. As the transactions list deals with instances of Transaction and its subclasses, we just added the new Income in that list.
The other two endpoints responsible for dealing with expenses, get_expenses and add_expense, are almost copies of their income counterparts. The differences are:
- instead of dealing with instances of
Income, we deal with instances ofExpenseto accept new expenses, - and instead of filtering by
TransactionType.INCOME, we filter byTransactionType.EXPENSEto send expenses back to the user.
This finishes the implementation of our API. If we run our Flask application now, we will be able to interact with the endpoints, as shown here:
# start the application
./bootstrap.sh

# get expenses
curl http://localhost:5000/expenses

# add a new expense
curl -X POST -H "Content-Type: application/json" -d '{
    "amount": 20,
    "description": "lottery ticket"
}' http://localhost:5000/expenses

# get incomes
curl http://localhost:5000/incomes

# add a new income
curl -X POST -H "Content-Type: application/json" -d '{
    "amount": 300.0,
    "description": "loan payment"
}' http://localhost:5000/incomes
Dockerizing Flask Applications
As we are planning to eventually release our API in the cloud, we are going to create a Dockerfile to describe what is needed to run the application on a Docker container. We need to install Docker on our development machine to test and run dockerized instances of our project. Defining a Docker recipe (Dockerfile) will help us run the API in different environments. That is, in the future, we will also install Docker and run our program on environments like production and staging.
Let’s create the Dockerfile in the root directory of our project with the following code:
# Using lightweight alpine image
FROM python:3.8-alpine

# Installing packages
RUN apk update
RUN pip install --no-cache-dir pipenv

# Defining working directory and adding source code
WORKDIR /usr/src/app
COPY Pipfile Pipfile.lock bootstrap.sh ./
COPY cashman ./cashman

# Install API dependencies
RUN pipenv install --system --deploy

# Start app
EXPOSE 5000
ENTRYPOINT ["/usr/src/app/bootstrap.sh"]
The first item in the recipe defines that we will create our Docker container based on the default Python 3 Docker image. After that, we update APK and install pipenv. Having pipenv, we define the working directory we will use in the image and copy the code needed to bootstrap and run the application. In the fourth step, we use pipenv to install all our Python dependencies. Lastly, we define that our image will communicate through port 5000 and that this image, when executed, needs to run the bootstrap.sh script to start Flask.
Note: For our
Dockerfile, we use Python version 3.8, however, depending on your system configuration,pipenvmay have set a different version for Python in the filePipfile. Please make sure that the Python version in bothDockerfileandPipfileare aligned, or the docker container won’t be able to start the server.
To create and run a Docker container based on the Dockerfile that we created, we can execute the following commands:
# build the image
docker build -t cashman .

# run a new docker container named cashman
docker run --name cashman
    -d -p 5000:5000
    cashman

# fetch incomes from the dockerized instance
curl http://localhost:5000/incomes/
The Dockerfile is simple but effective, and using it is similarly easy. With these commands and this Dockerfile, we can run as many instances of our API as we need with no trouble. It’s just a matter of defining another port on the host or even another host.
Securing Python APIs with Auth0
Securing Python APIs with Auth0 is very easy and brings a lot of great features to the table. With Auth0, we only have to write a few lines of code to get:
- A solid identity management solution, including single sign-on
- User management
- Support for social identity providers (like Facebook, GitHub, Twitter, etc.)
- Enterprise identity providers (Active Directory, LDAP, SAML, etc.)
- Our own database of users
For example, to secure Python APIs written with Flask, we can simply create a requires_auth decorator:
# Format error response and append status code

def get_token_auth_header():
    """Obtains the access token from the Authorization Header
    """
    auth = request.headers.get("Authorization", None)
    if not auth:
        raise AuthError({"code": "authorization_header_missing",
                        "description":
                            "Authorization header is expected"}, 401)

    parts = auth.split()

    if parts[0].lower() != "bearer":
        raise AuthError({"code": "invalid_header",
                        "description":
                            "Authorization header must start with"
                            " Bearer"}, 401)
    elif len(parts) == 1:
        raise AuthError({"code": "invalid_header",
                        "description": "Token not found"}, 401)
    elif len(parts) > 2:
        raise AuthError({"code": "invalid_header",
                        "description":
                            "Authorization header must be"
                            " Bearer token"}, 401)

    token = parts[1]
    return token

def requires_auth(f):
    """Determines if the access token is valid
    """
    @wraps(f)
    def decorated(*args, **kwargs):
        token = get_token_auth_header()
        jsonurl = urlopen("https://"+AUTH0_DOMAIN+"/.well-known/jwks.json")
        jwks = json.loads(jsonurl.read())
        unverified_header = jwt.get_unverified_header(token)
        rsa_key = {}
        for key in jwks["keys"]:
            if key["kid"] == unverified_header["kid"]:
                rsa_key = {
                    "kty": key["kty"],
                    "kid": key["kid"],
                    "use": key["use"],
                    "n": key["n"],
                    "e": key["e"]
                }
        if rsa_key:
            try:
                payload = jwt.decode(
                    token,
                    rsa_key,
                    algorithms=ALGORITHMS,
                    audience=API_AUDIENCE,
                    issuer="https://"+AUTH0_DOMAIN+"/"
                )
            except jwt.ExpiredSignatureError:
                raise AuthError({"code": "token_expired",
                                "description": "token is expired"}, 401)
            except jwt.JWTClaimsError:
                raise AuthError({"code": "invalid_claims",
                                "description":
                                    "incorrect claims,"
                                    "please check the audience and issuer"}, 401)
            except Exception:
                raise AuthError({"code": "invalid_header",
                                "description":
                                    "Unable to parse authentication"
                                    " token."}, 400)

            _app_ctx_stack.top.current_user = payload
            return f(*args, **kwargs)
        raise AuthError({"code": "invalid_header",
                        "description": "Unable to find appropriate key"}, 400)
    return decorated
Then use it in our endpoints:
# Controllers API

# This doesn't need authentication
@app.route("/ping")
@cross_origin(headers=['Content-Type', 'Authorization'])
def ping():
    return "All good. You don't need to be authenticated to call this"

# This does need authentication
@app.route("/secured/ping")
@cross_origin(headers=['Content-Type', 'Authorization'])
@requires_auth
def secured_ping():
    return "All good. You only get this message if you're authenticated"
To learn more about securing Python APIs with Auth0, take a look at this tutorial. Alongside with tutorials for backend technologies (like Python, Java, and PHP), the Auth0 Docs webpage also provides tutorials for Mobile/Native apps and Single-Page applications.
Next Steps
In this article, we learned about the basic components needed to develop a well-structured Flask application. We looked at how to use pipenv to manage the dependencies of our API. After that, we installed and used Flask and Marshmallow to create endpoints capable of receiving and sending JSON responses. In the end, we also looked at how to dockerize the API, which will facilitate the release of the application to the cloud.
Although well structured, our API is not that useful yet. Among the things that we can improve, we are going to cover the following topics in the following article:
- Database persistence with SQLAlchemy
- Add authorization to a Flask API application
- How to handle JWTs in Python
Stay tuned!