Время на прочтение
17 мин
Количество просмотров 15K
Вступление
Эта статья как продолжение статьи Как правильно писать UI авто тесты на Python. Если мы говорим про UI автотесты, то тут хотя бы есть паттерны Page Object, Pagefactory; для API автотестов таких паттернов нет. Да, существуют общие паттерны, по типу Decorator, SIngletone, Facade, Abstract Factory, но это не то, что поможет протестировать бизнес логику. Когда мы пишем API автотесты, то нам хотелось бы, чтобы они отвечали требованиям:
-
Проверки должны быть полными, то есть мы должны проверить статус код ответа, данные в теле ответа, провалидировать JSON схему;
-
Автотесты должны быть документированными и поддерживаемыми. Чтобы автотесты мог читать и писать не только QA Automation, но и разработчик;
-
Хотелось бы, чтобы JSON схема и тестовые данные генерировались автоматически на основе документации;
-
Отчет должен быть читабельным, содержав в себе информацию о ссылках, заголовках, параметрах, с возможностью прикреплять какие-то логи.
Для меня требования выше являются базой, ваши же требования могут быть другие в зависимости от продукта.
Также очень важно отметить, что если при написании автотестов вы выберете неправильный подход, то проблемы появляются не сразу, а примерно через 100-150 написанных тестов. Тогда фиксы автотестов превратятся в ад, добавление новых автотестов будет все сложнее и сложнее, а читать такие автотесты никто кроме вас не сможет, что плохо. В практике встречаются случаи, когда компания просит переписать их автотесты и очень часто мотивом является: “Наш QA Automation ушел, поэтому теперь мы не можем даже запустить автотесты и непонятно, что в них происходит”. Это означает, что человек, написавший автотесты, писал их костыльно, как бы повышая свою ценность (в плохом смысле, что никто, кроме него, не сможет понять автотесты в будущем после его ухода или банального ухода на больничный), как сотрудника, что очень плохо для компании. В итоге время потрачено, деньги потрачены.
Еще один распространенный кейс — это когда новый QA Automation приходит на проект и сразу же хочет все переписать. Окай, переписывает, суть не меняется, автоматизация также страдает. По «правильному» мнению человека, который все переписал, виноват продукт, разработчики, но не он сам. Компания в данном случае выступает тренажером/плейграундом для неопытного QA Automation. В итоге время потрачено, деньги потрачены.
Requirements
Для примера написания API автотестов мы будем использовать:
-
pytest — pip install pytest;
-
httpx — pip install httpx, — для работы с HTTP протоколом;
-
allure — pip install allure-pytest, — необязательная зависимость. Вы можете использовать любой другой репортер;
-
jsonschema — pip install jsonschema, — для валидации JSON схемы;
-
pydantic, python-dotenv — pip install pydantic python-dotenv, — для генерации тестовых данных, для управления настройками, для автогенерации JSON схемы;
Почему не requests? Мне нравится httpx, потому что он умеет работать асинхронно и у него есть AsyncClient. Также документация httpx в стиле Material Design мне больше нравится, чем у requests. В остальном requests замечательная библиотека, можно использовать ее и разницы никакой нет.
Библиотека pydantic служит для валидации, аннотации, парсинга данных в python. Она нам нужна для автогенерации JSON схемы, для описания моделей данных, для генерации тестовых данных. У этой библиотеки есть много плюсов по сравнению с обычными dataclass-сами в python. Если приводить пример из жизни, то pydantic — это как ехать на автомобиле, а dataclass’ы — это идти пешком.
В качестве альтернативы pydantic можно взять библиотеку models-manager, которая делает все тоже самое, что и pydantic, т.е. умеет работать с базой данных из коробки, генерировать рандомные негативные тестовые данные на основе модели. Эта библиотека больше подойдет для тестирования валидации входных данных вашего API. Документацию по models-manager можно найти тут. Мы не будем использовать models-manager, так как нам не нужна база данных и мы не будем тестировать валидацию.
Но у pydantic тоже есть библиотека SQLModel для работы с базой данных. Если вам для автотестов нужна база данных, то вы можете использовать: SQLAlchemy + pydantic, SQLModel, models-manager. В нашем же случае работа с базой данных не потребуется.
Тесты будем писать на публичный API https://sampleapis.com/api-list/futurama. Данный API всего лишь пример. На реальных проектах API может быть гораздо сложнее, но суть написания автотестов остается та же.
Settings
Опишем настройки проекта. Для этого будем использовать класс BaseSettings из pydantic, потому что он максимально удобный, умеет читать настройки из .env файла, умеет читать настройки из переменных окружения, умеет читать настройки из .txt файла, умеет управлять ссылками на редис или базу данных и много чего еще, можно почитать тут https://docs.pydantic.dev/usage/settings/. Это очень удобно для использования на CI/CD, или когда у вас есть много настроек, которые разбросаны по всему проекту + с BaseSettings все настройки можно собрать в один объект.
settings.py
from pydantic import BaseModel, BaseSettings, Field


class TestUser(BaseModel):
    email: str
    password: str


class Settings(BaseSettings):
    base_url: str = Field(..., env='BASE_URL')
    user_email: str = Field(..., env='TEST_USER_EMAIL')
    user_password: str = Field(..., env='TEST_USER_PASSWORD')

    class Config:
        env_file = '.env'
        env_file_encoding = 'utf-8'

    @property
    def api_url(self) -> str:
        return f'{self.base_url}/futurama'

    @property
    def user(self) -> TestUser:
        return TestUser(
            email=self.user_email,
            password=self.user_password
        )


base_settings = Settings()
Мы будем читать настройки из .env файла.
.env
BASE_URL="https://api.sampleapis.com" # API endpoint
TEST_USER_EMAIL="some@gmail.com" # Some random user just for example
TEST_USER_PASSWORD="some" # Some random password just for example
Models
Теперь опишем модели, используя pydantic, перед этим переопределим базовую модель из pydantic. Нам это нужно, чтобы закрыть некоторые ограничения и баги, которые есть в pydantic.
utilsmodelsbase_model.py
from pydantic import BaseModel as PydanticBaseModel


class BaseModel(PydanticBaseModel):
    class Config:
        @staticmethod
        def schema_extra(schema: dict, model: PydanticBaseModel):
            """
            https://github.com/pydantic/pydantic/issues/1270#issuecomment-729555558
            """
            for prop, value in schema.get('properties', {}).items():
                field = [
                    model_field for model_field in model.__fields__.values()
                    if model_field.alias == prop
                ][0]

                if field.allow_none:
                    if 'type' in value:
                        value['anyOf'] = [{'type': value.pop('type')}]

                    elif '$ref' in value:
                        if issubclass(field.type_, BaseModel):
                            value['title'] = field.type_.__config__.title or field.type_.__name__
                        value['anyOf'] = [{'$ref': value.pop('$ref')}]
                    value['anyOf'].append({'type': 'null'})

    def __hash__(self):
        """
        https://github.com/pydantic/pydantic/issues/1303#issuecomment-599712964
        """
        return hash((type(self),) + tuple(self.__dict__.values()))
Я прикрепил ссылки на github issue, где вы можете почитать подробнее, какая именно проблема закрывается. Если будете использовать pydantic, то вам это пригодится. Ну или же вы можете использовать models-manager, ибо там нет этих проблем.
Теперь опишем модель для аутентификации:
modelsauthentication.py
from pydantic import Field

from settings import base_settings
from utils.models.base_model import BaseModel


class AuthUser(BaseModel):
    email: str = Field(default=base_settings.user.email)
    password: str = Field(default=base_settings.user.password)


class Authentication(BaseModel):
    auth_token: str | None
    user: AuthUser | None = AuthUser()
Напишем модель для объекта question из API https://sampleapis.com/api-list/futurama. Сам объект выглядит примерно так:
{
  "id": 1,
  "question": "What is Fry's first name?",
  "possibleAnswers": [
    "Fred",
    "Philip",
    "Will",
    "John"
  ],
  "correctAnswer": "Philip"
}
modelsquestions.py
from typing import TypedDict

from pydantic import BaseModel, Field

from utils.fakers import random_list_of_strings, random_number, random_string


class UpdateQuestion(BaseModel):
    question: str | None = Field(default_factory=random_string)
    possible_answers: list[str] | None = Field(
        alias='possibleAnswers',
        default_factory=random_list_of_strings
    )
    correct_answer: str | None = Field(
        alias='correctAnswer',
        default_factory=random_string
    )


class DefaultQuestion(BaseModel):
    id: int = Field(default_factory=random_number)
    question: str = Field(default_factory=random_string)
    possible_answers: list[str] = Field(
        alias='possibleAnswers',
        default_factory=random_list_of_strings
    )
    correct_answer: str = Field(
        alias='correctAnswer',
        default_factory=random_string
    )


class DefaultQuestionsList(BaseModel):
    __root__: list[DefaultQuestion]


class QuestionDict(TypedDict):
    id: int
    question: str
    possibleAnswers: list[str]
    correct_answer: str
Обратите внимание на аргумент alias в функции Field. Он служит для того, чтобы мы могли работать со snake_case в python и с любым другим форматом извне. Например, в python нам бы не хотелось писать название атрибута таким образом — possibleAnswers, т.к. это нарушает PEP8, поэтому мы используем alias. Pydantic сам разберется, как обработать JSON объект и разобрать его по нужным атрибутам в модели. Так же в функции Field есть очень много крутых фич по типу: max_length, min_length, gt, ge, lt, le и можно писать регулярки. Есть куча полезных настроек для ваших моделей и есть возможность использовать встроенные типы или писать свои. Короче, пользуйтесь.
Данные функции: random_list_of_strings, random_number, random_string используются, чтобы сгенерировать какие-то рандомные данные. Мы не будем усложнять и напишем эти функции, используя стандартные средства python, в своих же проектах вы можете использовать faker.
utilsfakers.py
from random import choice, randint
from string import ascii_letters, digits


def random_number(start: int = 100, end: int = 1000) -> int:
    return randint(start, end)


def random_string(start: int = 9, end: int = 15) -> str:
    return ''.join(choice(ascii_letters + digits) for _ in range(randint(start, end)))


def random_list_of_strings(start: int = 9, end: int = 15) -> list[str]:
    return [random_string() for _ in range(randint(start, end))]
Готово, мы описали нужные нам модели. С помощью них можно будет генерировать тестовые данные:
DefaultQuestion().dict(by_alias=True)

{
  'id': 859,
  'question': 'a5mii6xsAmxZ',
  'possibleAnswers': ['3HW4gA0HW', 'dcp07Wm2EHM9X4', '4oSm5xSIF', 'SSQXoUrYc', 'xeCV3GGduHjI', '9ScfUI2pF', 'b5ezRFJ8m8', '9fY1nKTNlp', '4BbKZUamwJjDnG', 'PRdHxVgH0lmSL', 'b4budMBfz', 'Oe62YMnC7wRb', 'BI6DUSsct4aCE', 'WIxX0efx6t5IPxd', 'x3ZKlXXTGEd'],
  'correctAnswer': 'fX7nXClR6nS'
}
JSON схема генерируется автоматически на основе модели. В практике встречал людей, которые писали JSON схему руками, при этом считали это единственным верным подходом, но не нужно так. Ведь если объект состоит из 4-х полей, как в нашем случае, то еще можно написать JSON схему руками, а что если объект состоит их 30-ти полей? Тут уже могут быть сложности и куча потраченного времени. Поэтому мы полностью скидываем эту задачу на pydantic:
DefaultQuestion().schema()

{
  'title': 'DefaultQuestion',
  'type': 'object',
  'properties': {
    'id': {'title': 'Id', 'type': 'integer'},
    'question': {'title': 'Question', 'type': 'string'},
    'possibleAnswers': {'title': 'Possibleanswers', 'type': 'array', 'items': {'type': 'string'}},
    'correctAnswer': {'title': 'Correctanswer', 'type': 'string'}
  }
}
API Client
Теперь опишем базовый API httpx клиент, который будем использовать для выполнения HTTP запросов:
baseclient.py
import typing
from functools import lru_cache

import allure
from httpx import Client as HttpxClient
from httpx import Response
from httpx._client import UseClientDefault
from httpx._types import (AuthTypes, CookieTypes, HeaderTypes, QueryParamTypes,
                          RequestContent, RequestData, RequestExtensions,
                          RequestFiles, TimeoutTypes, URLTypes)

from base.api.authentication_api import get_auth_token
from models.authentication import Authentication
from settings import base_settings


class Client(HttpxClient):
    @allure.step('Making GET request to "{url}"')
    def get(
        self,
        url: URLTypes,
        *,
        params: typing.Optional[QueryParamTypes] = None,
        headers: typing.Optional[HeaderTypes] = None,
        cookies: typing.Optional[CookieTypes] = None,
        auth: typing.Union[AuthTypes, UseClientDefault] = None,
        follow_redirects: typing.Union[bool, UseClientDefault] = None,
        timeout: typing.Union[TimeoutTypes, UseClientDefault] = None,
        extensions: typing.Optional[RequestExtensions] = None
    ) -> Response:
        return super().get(
            url=url,
            params=params,
            headers=headers,
            cookies=cookies,
            auth=auth,
            follow_redirects=follow_redirects,
            timeout=timeout,
            extensions=extensions
        )

    @allure.step('Making POST request to "{url}"')
    def post(
        self,
        url: URLTypes,
        *,
        content: typing.Optional[RequestContent] = None,
        data: typing.Optional[RequestData] = None,
        files: typing.Optional[RequestFiles] = None,
        json: typing.Optional[typing.Any] = None,
        params: typing.Optional[QueryParamTypes] = None,
        headers: typing.Optional[HeaderTypes] = None,
        cookies: typing.Optional[CookieTypes] = None,
        auth: typing.Union[AuthTypes, UseClientDefault] = None,
        follow_redirects: typing.Union[bool, UseClientDefault] = None,
        timeout: typing.Union[TimeoutTypes, UseClientDefault] = None,
        extensions: typing.Optional[RequestExtensions] = None
    ) -> Response:
        return super().post(
            url=url,
            content=content,
            data=data,
            files=files,
            json=json,
            params=params,
            headers=headers,
            cookies=cookies,
            auth=auth,
            follow_redirects=follow_redirects,
            timeout=timeout,
            extensions=extensions
        )

    @allure.step('Making PATCH request to "{url}"')
    def patch(
        self,
        url: URLTypes,
        *,
        content: typing.Optional[RequestContent] = None,
        data: typing.Optional[RequestData] = None,
        files: typing.Optional[RequestFiles] = None,
        json: typing.Optional[typing.Any] = None,
        params: typing.Optional[QueryParamTypes] = None,
        headers: typing.Optional[HeaderTypes] = None,
        cookies: typing.Optional[CookieTypes] = None,
        auth: typing.Union[AuthTypes, UseClientDefault] = None,
        follow_redirects: typing.Union[bool, UseClientDefault] = None,
        timeout: typing.Union[TimeoutTypes, UseClientDefault] = None,
        extensions: typing.Optional[RequestExtensions] = None
    ) -> Response:
        return super().patch(
            url=url,
            content=content,
            data=data,
            files=files,
            json=json,
            params=params,
            headers=headers,
            cookies=cookies,
            auth=auth,
            follow_redirects=follow_redirects,
            timeout=timeout,
            extensions=extensions
        )

    @allure.step('Making DELETE request to "{url}"')
    def delete(
        self,
        url: URLTypes,
        *,
        params: typing.Optional[QueryParamTypes] = None,
        headers: typing.Optional[HeaderTypes] = None,
        cookies: typing.Optional[CookieTypes] = None,
        auth: typing.Union[AuthTypes, UseClientDefault] = None,
        follow_redirects: typing.Union[bool, UseClientDefault] = None,
        timeout: typing.Union[TimeoutTypes, UseClientDefault] = None,
        extensions: typing.Optional[RequestExtensions] = None
    ) -> Response:
        return super().delete(
            url=url,
            params=params,
            headers=headers,
            cookies=cookies,
            auth=auth,
            follow_redirects=follow_redirects,
            timeout=timeout,
            extensions=extensions
        )


@lru_cache(maxsize=None)
def get_client(
    auth: Authentication | None = None,
    base_url: str = base_settings.api_url
) -> Client:
    headers: dict[str, str] = {}

    if auth is None:
        return Client(base_url=base_url, trust_env=True)

    if (not auth.auth_token) and (not auth.user):
        raise NotImplementedError(
            'Please provide "username" and "password" or "auth_token"'
        )

    if (not auth.auth_token) and auth.user:
        token = get_auth_token(auth.user)
        headers = {**headers, 'Authorization': f'Token {token}'}

    if auth.auth_token and (not auth.user):
        headers = {**headers, 'Authorization': f'Token {auth.auth_token}'}

    return Client(base_url=base_url, headers=headers, trust_env=True)
Мы создали свой класс Client, который унаследовали от httpx.Client и переопределили необходимые нам методы, добавив к ним allure.step. Теперь при http-запросе через Client в отчете у нас будут отображаться те запросы, которые мы выполняли. Мы специально использовали allure.step, как декоратор, чтобы в отчет также попали параметры, которые мы передаем внутрь функции метода. Позже посмотрим, как это все будет выглядеть в отчете. Внутрь Client мы также можем добавить запись логов или логирование в консоль, но в данном примере обойдемся только allure.step, на своем проекте вы можете добавить логирование.
Также мы создали функцию get_client, которая будет конструировать и возвращать объект Client. Эта функция будет добавлять базовые атрибуты, заголовки, base_url от которого будем строить ссылки на запросы к API. В этом API https://sampleapis.com/api-list/futurama нет аутентификации, я указал заголовок для аутентификации по API Key ради примера. Скорее всего на вашем проекте у вас будет другой заголовок для аутентификации.
Обратите внимание, что мы использовали декоратор lru_cache для кеширования клиента, чтобы не конструировать его для каждого запроса.
API endpoints
Теперь опишем методы для взаимодействия с API.
Для примера опишем методы, которые будут работать с аутентификацией. Для https://sampleapis.com/api-list/futurama аутентификация не требуется, но в своем проекте вы можете указать ваши методы для получения токена.
baseapiauthentication_api.py
from functools import lru_cache

from httpx import Client, Response

from models.authentication import AuthUser
from settings import base_settings
from utils.constants.routes import APIRoutes


def get_auth_token_api(payload: AuthUser) -> Response:
    client = Client(base_url=base_settings.api_url)
    return client.post(f'{APIRoutes.AUTH}/token', json=payload.dict())


@lru_cache(maxsize=None)
def get_auth_token(payload: AuthUser) -> str:
    """
    Should be used like this:

    response = get_auth_token_api(payload)
    json_response = response.json()

    assert response.status_code == HTTPStatus.OK
    assert json_response.get('token')

    return json_response['token']
    """
    return 'token'
Теперь опишем методы работы с questions:
import allure
from httpx import Response

from base.client import get_client
from models.authentication import Authentication
from models.questions import DefaultQuestion, UpdateQuestion
from utils.constants.routes import APIRoutes


@allure.step(f'Getting all questions')
def get_questions_api(auth: Authentication = Authentication()) -> Response:
    client = get_client(auth=auth)
    return client.get(APIRoutes.QUESTIONS)


@allure.step('Getting question with id "{question_id}"')
def get_question_api(
    question_id: int,
    auth: Authentication = Authentication()
) -> Response:
    client = get_client(auth=auth)
    return client.get(f'{APIRoutes.QUESTIONS}/{question_id}')


@allure.step('Creating question')
def create_question_api(
    payload: DefaultQuestion,
    auth: Authentication = Authentication()
) -> Response:
    client = get_client(auth=auth)
    return client.post(APIRoutes.QUESTIONS, json=payload.dict(by_alias=True))


@allure.step('Updating question with id "{question_id}"')
def update_question_api(
    question_id: int,
    payload: UpdateQuestion,
    auth: Authentication = Authentication()
) -> Response:
    client = get_client(auth=auth)
    return client.patch(
        f'{APIRoutes.QUESTIONS}/{question_id}',
        json=payload.dict(by_alias=True)
    )


@allure.step('Deleting question with id "{question_id}"')
def delete_question_api(
    question_id: int,
    auth: Authentication = Authentication()
) -> Response:
    client = get_client(auth=auth)
    return client.delete(f'{APIRoutes.QUESTIONS}/{question_id}')


def create_question(auth: Authentication = Authentication()) -> DefaultQuestion:
    payload = DefaultQuestion()

    response = create_question_api(payload=payload, auth=auth)
    return DefaultQuestion(**response.json())
С помощью методов выше сможем выполнять простые CRUD запросы к API.
Utils
Добавим необходимые утилитки, которые помогут сделать тесты лучше:
utilsconstantsroutes.py
from enum import Enum


class APIRoutes(str, Enum):
    AUTH = '/auth'
    INFO = '/info'
    CAST = '/cast'
    EPISODES = '/episodes'
    QUESTIONS = '/questions'
    INVENTORY = '/inventory'
    CHARACTERS = '/characters'

    def __str__(self) -> str:
        return self.value
Лучше хранить роутинги в enum, чтобы не дублировать код и наглядно видеть, какие роутинги используются:
utilsfixturesquestions.py
import pytest

from base.api.questions_api import create_question, delete_question_api
from models.questions import DefaultQuestion


@pytest.fixture(scope='function')
def function_question() -> DefaultQuestion:
    question = create_question()
    yield question

    delete_question_api(question.id)
Для некоторых тестов, например, на удаление или изменение, нам понадобится фикстура, которая будет создавать question. После создания мы будем возвращать объект DefaultQuestion и когда тест завершится, то удалим его delete_question_api(question.id).
conftest.py
pytest_plugins = (
    'utils.fixtures.questions',
)
Поэтому не забудем добавить нашу API фикстуру в pytest_plugins. В принципе вы можете писать API фикстуры прямо рядом с вашими тестами, но, как показывает моя практика, это не долгоиграющая история. На реальных проектах бизнес логика может быть гораздо сложнее, где фикстуры могут наследоваться друг от друга. Поэтому сразу выносим эту фикстуру в pytest_plugins
utilsassertionsschema.py
import allure
from jsonschema import validate


@allure.step('Validating schema')
def validate_schema(instance: dict, schema: dict) -> None:
    validate(instance=instance, schema=schema)
Функция validate_schema будет использоваться для валидации схемы. Можно было бы использовать validate из jsonschema, но тогда мы потеряем allure.step.
Для проверок вы можете использовать обычный assert в python, либо же одну из библиотек: assertpy, pytest-assertions. Но мы будем использовать кастомную реализацию expect, которая будет включать в себя allure.step или другой удобный для вас репортер. Стоит отметить, что в библиотеке pytest-assertions также есть встроенные allure.step.
Реализацию expect вы можете посмотреть тут https://github.com/Nikita-Filonov/sample_api_testing/tree/main/utils/assertions/base. По этой ссылке код достаточно объемный, поэтому я не буду разбирать его в статье.
Также добавим функцию, которая будет проверять корректность объекта question, который вернуло на API.
utilsassertionsapiquestions.py
from models.questions import DefaultQuestion, QuestionDict, UpdateQuestion
from utils.assertions.base.expect import expect


def assert_question(
    expected_question: QuestionDict,
    actual_question: DefaultQuestion | UpdateQuestion
):
    if isinstance(actual_question, DefaultQuestion):
        expect(expected_question['id'])
            .set_description('Question "id"')
            .to_be_equal(actual_question.id)

    expect(expected_question['question'])
        .set_description('Question "question"')
        .to_be_equal(actual_question.question)

    expect(expected_question['possibleAnswers'])
        .set_description('Question "possibleAnswers"')
        .to_be_equal(actual_question.possible_answers)

    expect(expected_question['correctAnswer'])
        .set_description('Question "correctAnswer"')
        .to_be_equal(actual_question.correct_answer)
Эта функция служит для того, чтобы нам не приходилось в каждом тесте писать заново все проверки для объекта question и достаточно будет использовать функцию assert_question. Если у вас объект состоит из множества ключей (например, 20), то рекомендую писать такие обертки, чтобы использовать их повторно в будущем.
Также обратите внимание на QuestionDict — это не модель, это TypedDict и он служит для аннотации dict в python. Лучше стараться писать более конкретные типы вместо абстрактного dict, учитывая, что аннотации в python — это просто документация и не более. Ибо в будущем абстрактные аннотации будут только затруднять понимание кода. Даже если вы пишете просто тип int, то лучше писать что-то конкретное по типу MyScoreInt = int.
Testing
Мы подготовили всю базу для написания тестов. Осталось только написать сами тесты:
teststest_futurama_questions.py
from http import HTTPStatus

import allure
import pytest

from base.api.questions_api import (create_question_api, delete_question_api,
                                    get_question_api, get_questions_api,
                                    update_question_api)
from models.questions import (DefaultQuestion, DefaultQuestionsList,
                              QuestionDict, UpdateQuestion)
from utils.assertions.api.questions import assert_question
from utils.assertions.base.solutions import assert_status_code
from utils.assertions.schema import validate_schema


@pytest.mark.questions
@allure.feature('Questions')
@allure.story('Questions API')
class TestQuestions:
    @allure.title('Get questions')
    def test_get_questions(self):
        response = get_questions_api()
        json_response: list[QuestionDict] = response.json()

        assert_status_code(response.status_code, HTTPStatus.OK)

        validate_schema(json_response, DefaultQuestionsList.schema())

    @allure.title('Create question')
    def test_create_question(self):
        payload = DefaultQuestion()

        response = create_question_api(payload)
        json_response: QuestionDict = response.json()

        assert_status_code(response.status_code, HTTPStatus.CREATED)
        assert_question(
            expected_question=json_response,
            actual_question=payload
        )

        validate_schema(json_response, DefaultQuestion.schema())

    @allure.title('Get question')
    def test_get_question(self, function_question: DefaultQuestion):
        response = get_question_api(function_question.id)
        json_response: QuestionDict = response.json()

        assert_status_code(response.status_code, HTTPStatus.OK)
        assert_question(
            expected_question=json_response,
            actual_question=function_question
        )

        validate_schema(json_response, DefaultQuestion.schema())

    @allure.title('Update question')
    def test_update_question(self, function_question: DefaultQuestion):
        payload = UpdateQuestion()

        response = update_question_api(function_question.id, payload)
        json_response: QuestionDict = response.json()

        assert_status_code(response.status_code, HTTPStatus.OK)
        assert_question(
            expected_question=json_response,
            actual_question=payload
        )

        validate_schema(json_response, DefaultQuestion.schema())

    @allure.title('Delete question')
    def test_delete_question(self, function_question: DefaultQuestion):
        delete_question_response = delete_question_api(function_question.id)
        get_question_response = get_question_api(function_question.id)

        assert_status_code(delete_question_response.status_code, HTTPStatus.OK)
        assert_status_code(
            get_question_response.status_code, HTTPStatus.NOT_FOUND
        )
Тут 5-ть тестов на стандартные CRUD операции для questions API https://api.sampleapis.com/futurama/questions.
Возвращаясь к нашим требованиям:
-
Проверяем статус код ответа, тело ответа, JSON схему;
-
При создании объекта внутри метода create_question у нас происходит автоматическая валидация на основе модели pydantic DefaultQuestion(**response.json()). Это автоматически избавляет нас от необходимости писать проверки для ответа API;
-
Автотесты документированы и легко читаются. Теперь другой QA Automation или разработчик, когда посмотрит на наши тесты, сможет увидеть аннотацию в виде моделей. Посмотрев на модели, он сможет легко разобраться с какими именно объектами мы работаем. В pydantic имеется возможность добавлять description к функции Field, поэтому при желании вы сможете описать каждое поле вашей модели;
-
JSON схема генерируется автоматически, рандомные тестовые данные тоже генерируются автоматически на основе модели. При большой мотивации вы можете взять ваш Swagger и вытащить из него JSON схему с помощью https://github.com/instrumenta/openapi2jsonschema. Далее y pydantic есть убойная фича https://docs.pydantic.dev/datamodel_code_generator/ и на основе JSON схемы pydantic сам сделает нужные модели. Этот процесс можно сделать автоматическим.
Report
Запустим тесты и посмотрим на отчет:
python -m pytest --alluredir=./allure-resultsТеперь запустим отчет:
allure serveЛибо можете собрать отчет и в папке allure-reports открыть файл index.html:
allure generate
Получаем прекрасный отчет, в котором отображается вся нужная нам информация. Вы можете модифицировать шаги под свои требования или добавить логирование для каждого HTTP запроса.
Полную версию отчета посмотрите тут.
Заключение
Весь исходный код проекта расположен на моем github.
Всегда старайтесь писать автотесты так, чтобы после вас их смог прочитать любой другой QA Automation или разработчик; желательно не только прочитать и понять, но и легко починить, если потребуется. Не повышайте свою ценность для компании через «магический код» понятный только вам.
Продолжаем погружаться в работу тестировщика, он же — QA, quality assurance engineer. Его задача — проверить код на наличие ошибок и работу программы в разных условиях.
Мы уже писали о том, что ещё делают тестировщики и какие инструменты для этого используют:
- Кто такой инженер по тестированию и стоит ли на него учиться
- Зарплата 113 тысяч за то, чтобы ломать программы
- Тестируем и исправляем калькулятор на JavaScript
- Словарь тестировщика: автотесты, юнит-тесты и другие важные слова
- Какой софт нужен, чтобы стать тестировщиком
Сегодня мы попробуем написать автотесты — чаще всего именно этим занимаются тестировщики на работе.
Что такое автотесты
Автотесты — это когда одна программа проверяет работу другой программы. Работает это примерно так:
- У нас есть код программы с нужными функциями.
- Мы пишем новую программу, которая вызывает наши функции и смотрит на результат.
- Если результат совпадает с тем, что должно быть, — тест считается пройденным.
- Если результат не совпадает — тест не пройден и нужно разбираться.
Чтобы всё было наглядно, покажем работу автотестов на реальном коде.
Исходная программа
Допустим, мы пишем интерактивную текстовую игру — в ней всё оформляется текстом, и развитие игры зависит от ответов пользователя. Мы сделали отдельный модуль, который делает четыре вещи:
- получает имя игрока;
- принудительно делает в имени большую букву (вдруг кто-то случайно ввёл с маленькой);
- добавляет к нему приветствие;
- сформированную строку отправляет как результат работы функции.
# Собираем приветствие
def hello(name):
    # делаем первую букву имени большой
    out = name.title()
    # формируем приветствие
    out = 'Привет, ' + out + '.'
    # возвращаем его как результат работы функции
    return out
Эта функция хранится в файле hello_function.py — так мы разбиваем программу на модули, каждый из которых делает что-то своё.
Напишем начало основной программы, которая запрашивает имя, формирует приветствие и добавляет к нему стартовую фразу:
# импортируем функцию из другого файла
from hello_function import hello
# объясняем, что нужно сделать пользователю
print("Введите имя, чтобы начать игру")

# спрашиваем имя
name = input("Как вас зовут: ")
# обрабатываем имя и формируем приветствие
result = hello(name)
# добавляем вторую строку
print(result + " nДобро пожаловать в «Код»!")
Сохраним это в новом файле start.py и запустим его:
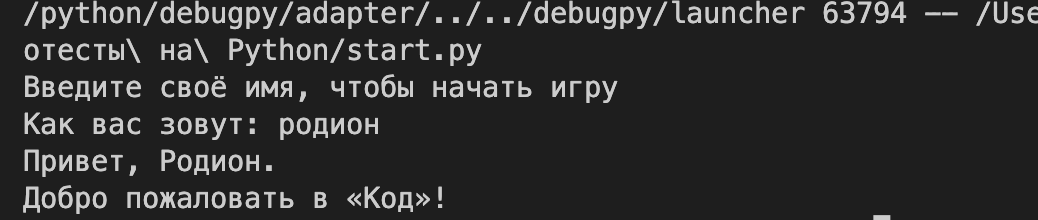
Вроде работает, но хорошо бы проверить, а всегда ли приветствие будет формироваться правильно? Можно сделать вручную, а можно написать автотест.
Пишем автотест
Первое, что нам нужно сделать, — подключить стандартный модуль для автотестов unittest. Есть модули покруче, но для наших проектов стандартного хватит с запасом. Также получаем доступ к функции hello() из файла hello_function.py — работу именно этой функции мы будем проверять автотестом.
# подключаем модуль для автотестов

import unittest

# импортируем функцию из другого файла

from hello_function import hello
А теперь самое важное: нам нужно объявить класс и функцию, внутри которой и будет находиться наш тест. Причём название функции должно начинаться с test_, чтобы она выполнялась автоматически.
Внутри функции делаем такое:
- формируем данные, которые мы отправляем в тестируемую функцию;
- прописываем ожидаемый результат.
Этими действиями мы как будто вызываем ту функцию и смотрим, получилось ли то, что нам нужно, или нет. При этом нам не нужно обрабатывать результаты тестов — за нас это сделает модуль unittest.
Для запуска тестов добавляем в конец кода стандартный вызов. Читайте комментарии, чтобы лучше вникнуть в код:
# подключаем модуль для автотестов
import unittest
# импортируем функцию из другого файла
from hello_function import hello
# объявляем класс с тестом
class HelloTestCase(unittest.TestCase):
# функция, которая проверит, как формируется приветствие
def test_hello(self):
# отправляем тестовую строку в функцию
result = hello("миша")
# задаём ожидаемый результат
self.assertEqual(result, "Привет, Миша.")
# запускаем тестирование
if __name__ == '__main__':
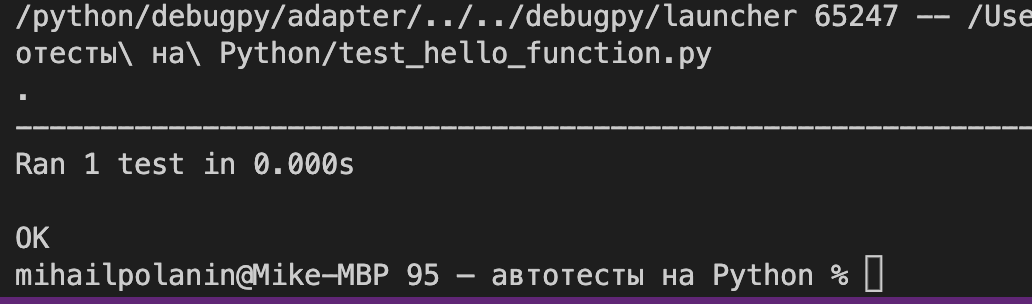
unittest.main() После запуска мы увидим такое. Ответ «OK» означает, что наш тест сработал и завершился без ошибок:
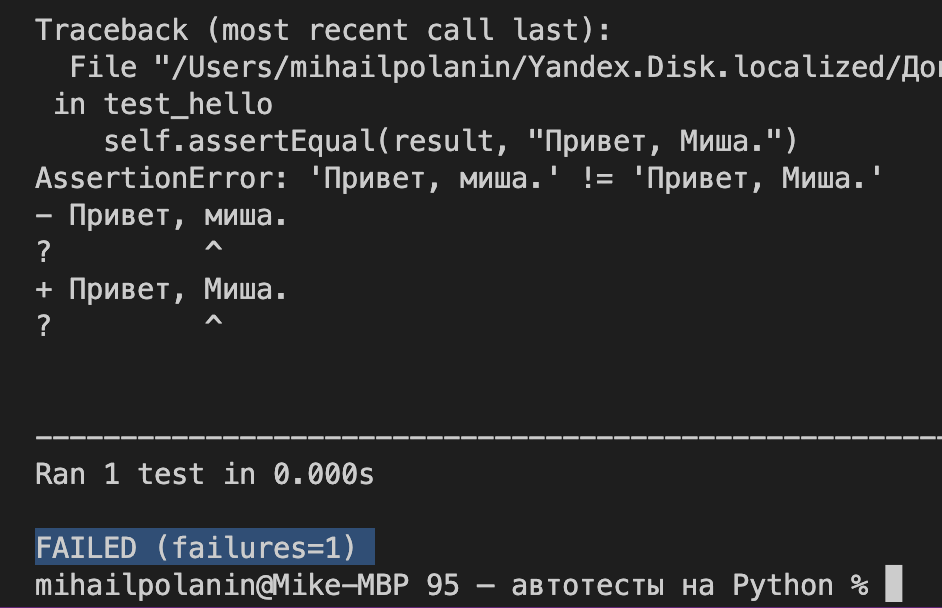
Ещё такие тесты позволяют найти ошибки в самом коде. Допустим, разработчик забыл добавить принудительный перевод большой буквы в имени, и тогда тест не пройдёт. Если получится, система даже подсветит, что именно не совпало в результате, — в нашем случае это первая буква имени.
Что дальше
Мы написали самый простой тест и всего с одним условием. При этом мы не проверили тестами работу основной программы — в реальном проекте это тоже нужно было бы сделать. Чтобы попрактиковаться, мы сделаем тесты для одного из наших старых проектов на Python. Заодно проверим, нет ли там каких ошибок, которые мы не заметили.
Вёрстка:
Кирилл Климентьев
Мы будем использовать Selenium совместно с Python версий 3.x.x. Цель статьи – не дать фундаментальные знания по теории программирования и написания автотестов, а заинтересовать в этой области и показать, как они пишутся в целом.
1. Установка необходимых компонентов
Для начала работы нам потребуется установить Python на рабочую машину.
Переходим на официальный сайт Python и качаем установщик для вашей ОС (мы будем использовать Windows). В процессе инсталляции поставьте галочки на добавлении компонентов в системные переменные PATH. Дождитесь завершения процесса, и если программа попросит перезагрузки, перезагрузитесь. Если у вас Linux, интерпретатор может уже присутствовать в системе, в противном случае стоит установить его из репозитория пакетов вашего дистрибутива.
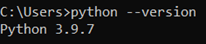
Проверьте корректность установки, перейдите в терминал (в Windows нажмите Win+R и запустите cmd или Alt+Ctrl+T в графической среде Linux). Выполните следующую команду:
python --version
Далее нам понадобится сам Selenium:
pip install selenium
Дождитесь завершения установки. Поскольку мы будем писать тест, воспользуемся популярной библиотекой pytest. Устанавливается она аналогично:
pip install pytest
Для создания приложений нужна интегрированная среда разработки или IDE (integrated development environment), но можно писать код и в обычном текстовом редакторе. Я выбрал самую популярную и удобную среду PyCharm от компании JetBrains.
Чтобы работать с браузером, помимо Selenium потребуется веб-драйвер: в нашем случае ChromeDriver – по сути это связующее звено в цепочке. Обратите внимание, что версия драйвера должна соответствовать версии браузера и вперед – к созданию проекта и написанию первого скрипта.
2. Первый скрипт с использованием драйвера
Все компоненты готовы, давайте создадим новый проект. Для
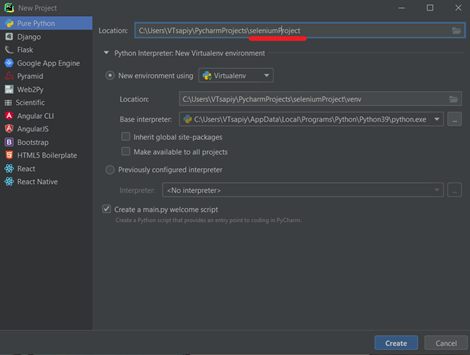
этого запускаем PyCharm и в открывшимся окне выбираем New Project.
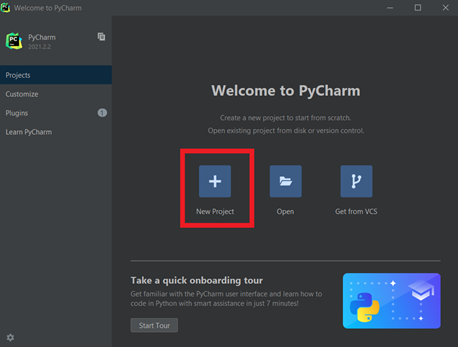
Указываем
имя проекта и нажимаем Create.
Напишем первый тест, чтобы проверить работоспособность драйвера.
В качестве примера ресурса для тестирования возьмем
популярный сайт для практики автоматизированного тестирования: https://www.saucedemo.com.
Кейс:
- Зайти на страницу.
- Найти элемент по id.
- Вывести в консоль сообщение с результатом поиска.
        from selenium import webdriver

options = webdriver.ChromeOptions()
options.add_experimental_option("excludeSwitches", ["enable-logging"])
driver = webdriver.Chrome(options=options, executable_path=r'C:/Users/.../.../chromedriver.exe')
driver.get("https://www.saucedemo.com/")
input_username = driver.find_element_by_id("user-name")
if input_username is None:
   print("Элемент не найден")
else:
   print("Элемент найден")
После
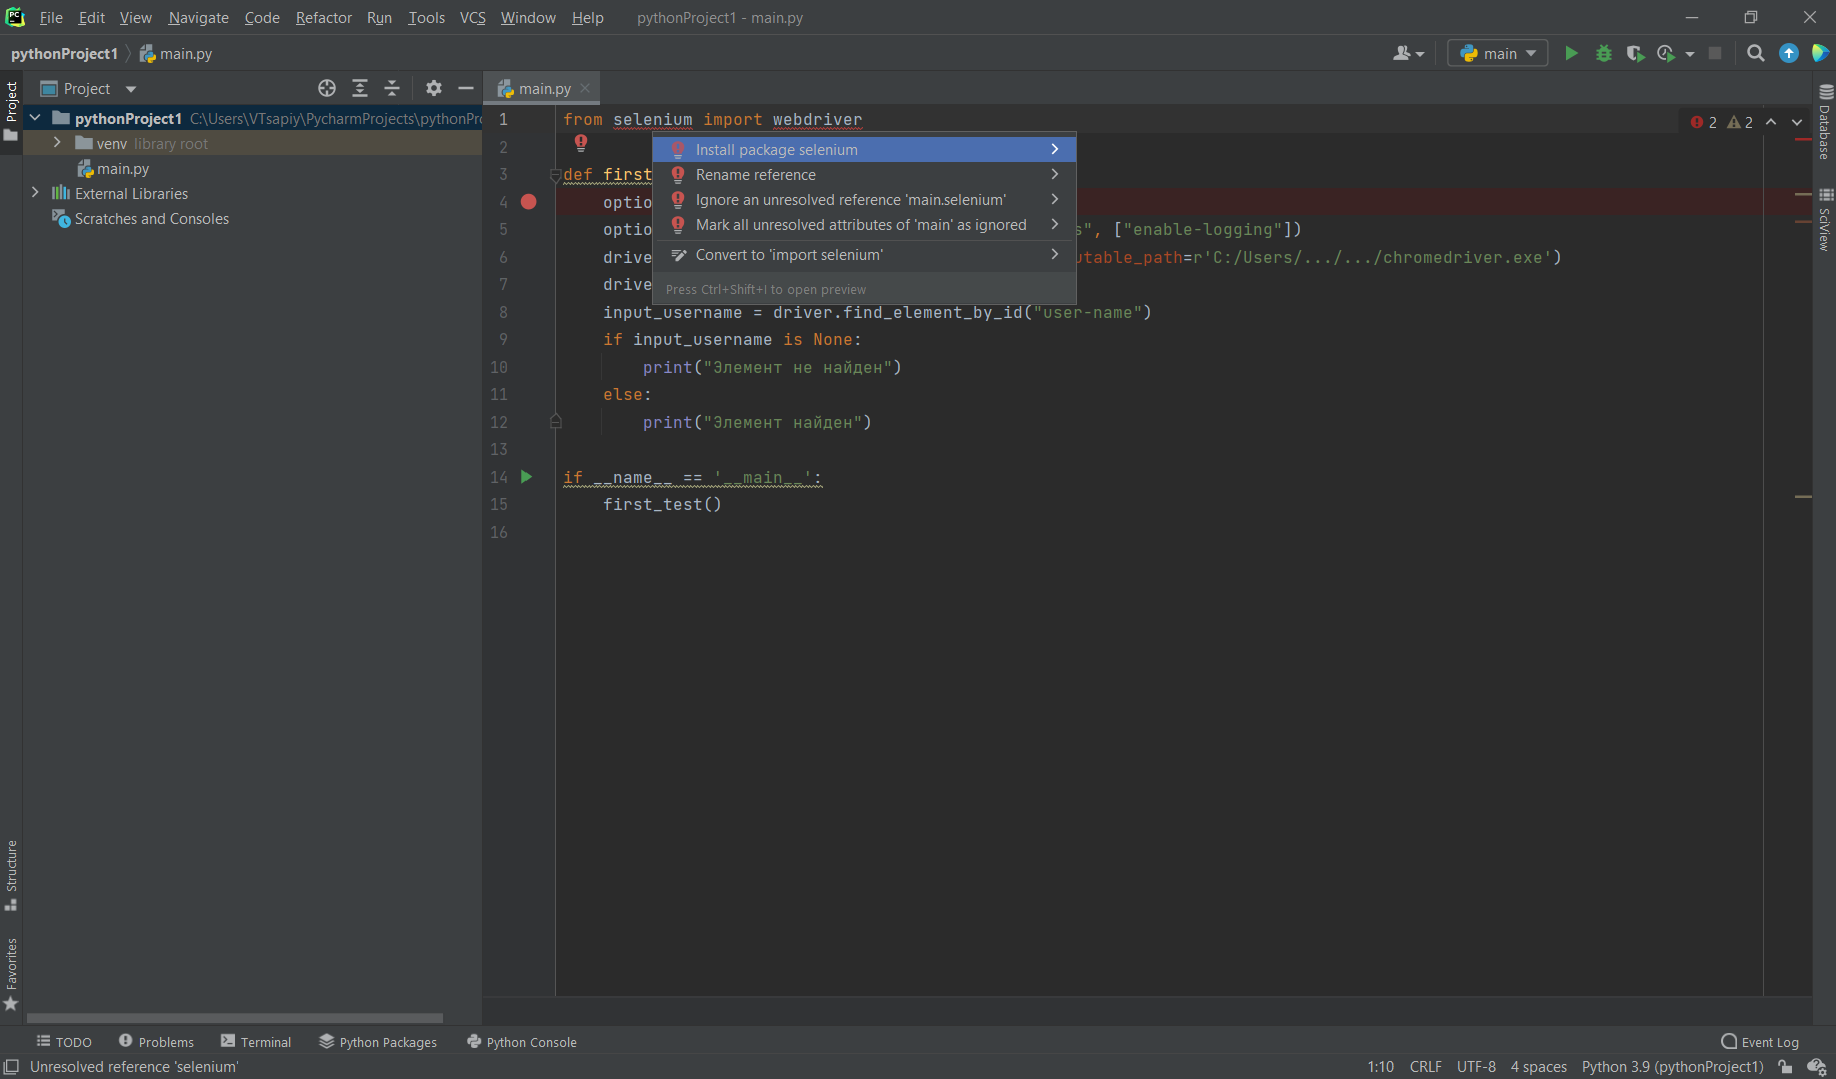
ввода кода необходимо установить библиотеку Selenium в наш проект.
Для
этого нажмите на подсвеченный текст в редакторе, нажмите Alt + Enter и далее
выберите Install package selenium. Это нужно делать для
каждого неустановленного пакета.
Запустить сценарий можно во встроенном эмуляторе терминала IDE или в любом другом:
python main.py

запуска скрипта из IDE
Если все установлено правильно, должен запуститься браузер,
который откроет страницу. Результатом запуска нашего сценария на Python, будет
сообщение: “Элемент найден”.

3. Поиск элементов
В нашем скрипте присутствует следующая строка:
input_username = driver.find_element_by_id("user-name")
Метод find_element_by_id позволяет процессу найти элемент в разметке HTML по наименованию атрибута id. В реализации драйвера есть несколько способов поиска элементов на странице: по name, xpath, css, id. Поиск по css и xpath являются более универсальным, но он сложнее для начинающих. Использование поиска по name и id намного удобнее, но в практической разработке используется редко. Далее я буду использовать только xpath.
Теперь
давайте напишем кейс аутентификации пользователя на странице входа:
- Шаг 1: пользователь вводит корректный
usernameиpassword. - Шаг 2: нажимает кнопку ввода.
- Ожидаемый результат: пользователь попадает на главную страницу магазина. Проверка заголовка на соответствие “PRODUCTS”.
        import time

from selenium import webdriver
from selenium.webdriver.common.keys import Keys


def first_test():
    options = webdriver.ChromeOptions()
    options.add_experimental_option("excludeSwitches", ["enable-logging"])
    driver = webdriver.Chrome(options=options, executable_path=r'C:/Users/.../.../chromedriver.exe')
    driver.get("https://www.saucedemo.com/")

    # Поиск элементов и присваивание к переменным.
    input_username = driver.find_element_by_xpath("//*[@id="user-name"]")
    input_password = driver.find_element_by_xpath("//*[@id="password"]")
    login_button = driver.find_element_by_xpath("//*[@id="login-button"]")

    # Действия с формами
    input_username.send_keys("standard_user")
    input_password.send_keys("secret_sauce")
    login_button.send_keys(Keys.RETURN)

    # Поиск и проверка попадания на главную страницу
    title_text = driver.find_element_by_xpath("//*[@id="header_container"]/div[2]/span")
    if title_text.text == "PRODUCTS":
        print("Мы попали на главную страницу")
    else:
        print("Ошибка поиска элемента")

    time.sleep(5)


if __name__ == '__main__':
    first_test()
Разберем
пример пошагово:
- Для работы с формой найдем и присвоим элементы переменным
input_username,input_passwordиlogin_buttonс помощьюxpath. - Далее вызовем для элемента метод
send_keysс данными, которые хотим передать в текстовое поле. В нашем случае вusernameотправляем «standart_user», вpassword– «secret_sauce». Проецируя поведение пользователя нажимаемEnterдля ввода данных, используя методsend_keysдля найденной кнопки с переданным аргументомKeys.RETURN. Этот аргумент позволяет работать с действиями клавиатуры в Selenium, аналогично нажатию наEnterна клавиатуре. - На главном экране нам необходимо найти и присвоить переменной элемент текста
Products. Как я говорил раннее, не всегда есть возможность найти элемент поid– здесь как раз тот случай.
title_text = driver.find_element_by_xpath("//*[@id="header_container"]/div[2]/span")
- Путь
xpathдо элемента://*[@id="header_container"]/div[2]/span. - Чтобы найти путь
xpath, зайдите на https://www.saucedemo.com и нажмите F12, чтобы открыть инструменты разработчика. Затем выберите стрелку-указатель и кликните по элементу до которого хотите найти путь. В нашем случае доProducts.
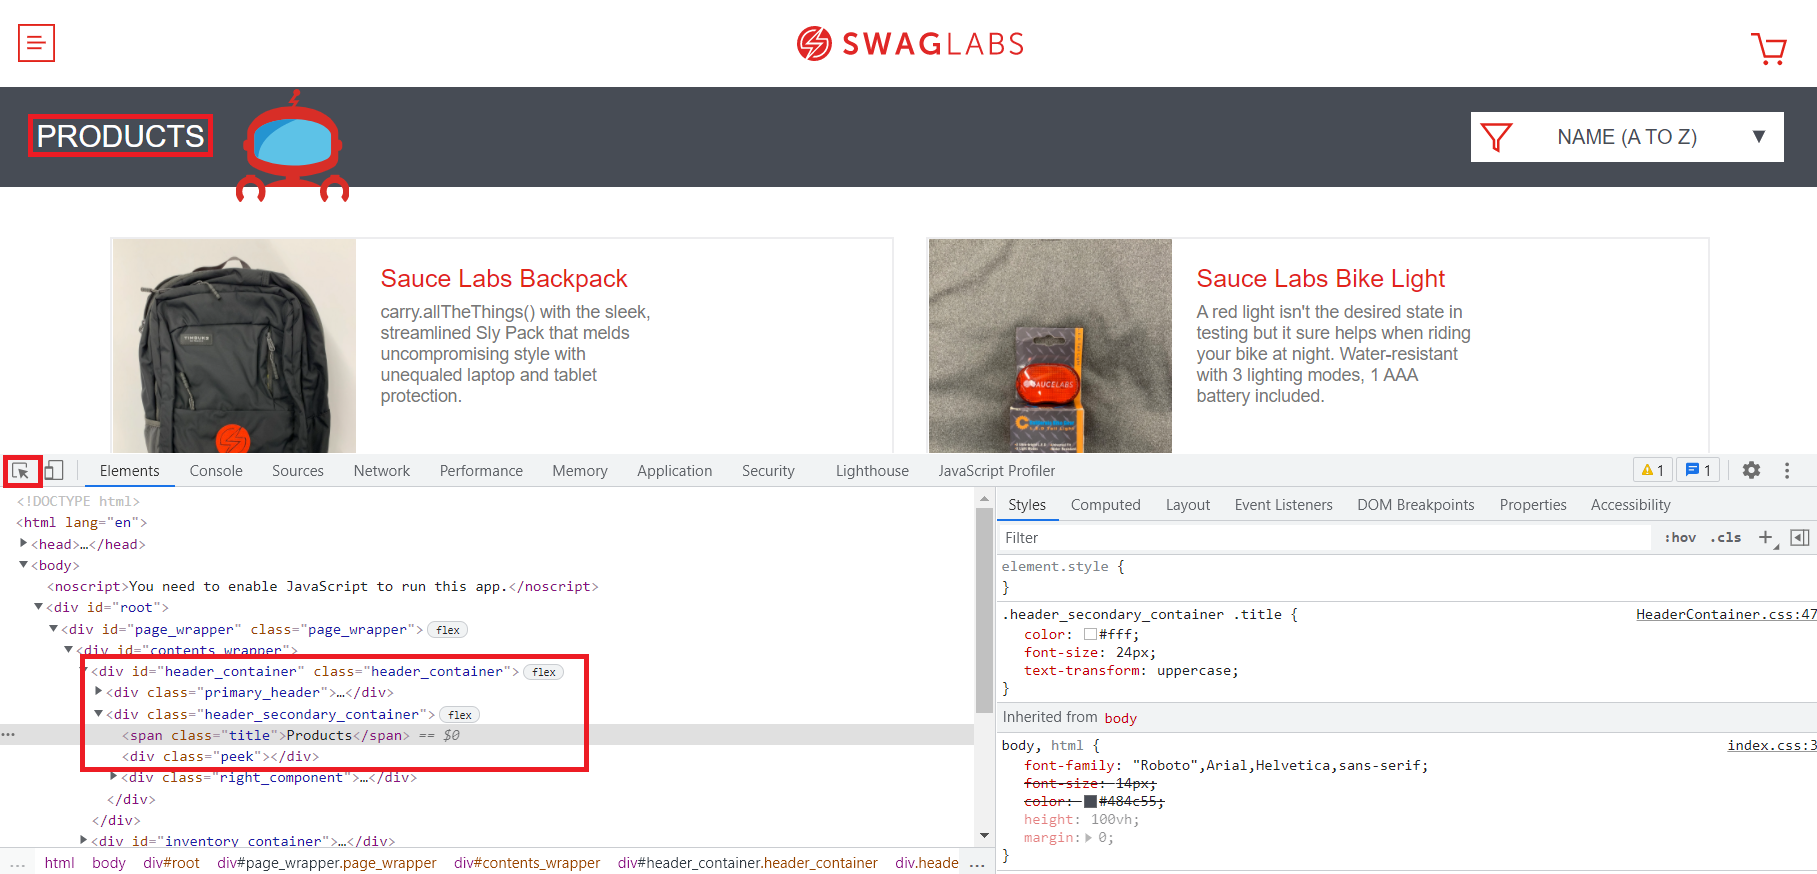
- Откроется код элемента в дереве HTML, далее нужно открыть контекстное меню выделенной строки и скопировать
xpath.
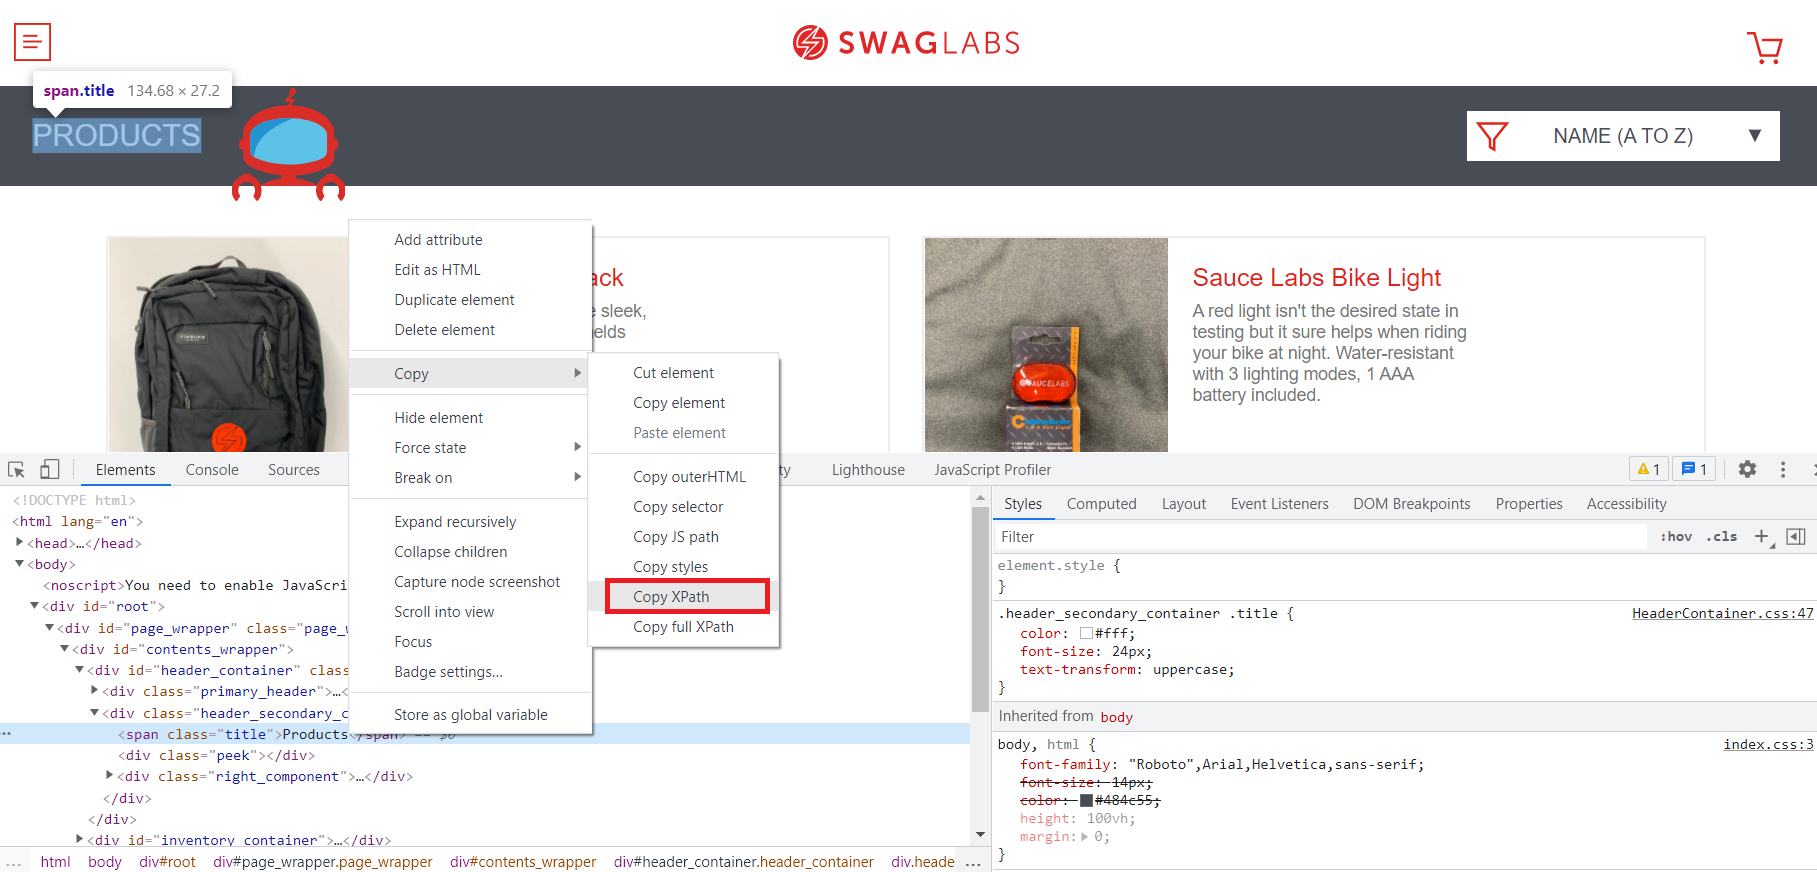
Если кратко рассматривать путь, то //* обозначает, что будут найдены все элементы на странице, а [@id="header_container"] обозначает условие поиска (будут найдены все элементы на странице с тэгом id = "header_container").И далее /div[2]/span – спускаемся на второй дочерний элемент div и далее на дочерний элемент span. Сравните полученный xpath с деревом элемента в инструментах разработчика – сразу станет понятно что к чему.
- Тут мы просто сравниваем текст найденного элемента с ожидаемым значением и выводим в консоль сообщение.
        if title_text.text == "PRODUCTS":
    print("Мы попали на главную страницу")
else:
    print("Ошибка поиска элемента")
При выполнении скрипта получили следующий результат:

4. Первый тест с поиском и переходом по странице
Кейс:
- Введем логин и пароль пользователя и зайдем на главную страницу.
- Найдем позицию с названием «Sauce Labs Fleece Jacket».
- Перейдем на страницу товара и нажмем кнопку добавления в корзину.
- Перейдем в корзину и проверим что там присутствует 1 позиция с названием «Sauce Labs Fleece Jacket».
        import time

from selenium import webdriver
from selenium.webdriver.common.keys import Keys


def first_test():
    options = webdriver.ChromeOptions()
    options.add_experimental_option("excludeSwitches", ["enable-logging"])
    driver = webdriver.Chrome(options=options, executable_path=r'C:/Users/…/…/chromedriver.exe')
    driver.get("https://www.saucedemo.com/")

    # Поиск элементов и присваивание к переменным.
    input_username = driver.find_element_by_xpath("//*[@id="user-name"]")
    input_password = driver.find_element_by_xpath("//*[@id="password"]")
    login_button = driver.find_element_by_xpath("//*[@id="login-button"]")

    # Действия с формами
    input_username.send_keys("standard_user")
    input_password.send_keys("secret_sauce")
    login_button.send_keys(Keys.RETURN)

    # Поиск ссылки элемента позиции магазина и клик по ссылке
    item_name = driver.find_element_by_xpath("//*[@id="item_5_title_link"]/div")
    item_name.click()

    # Поиск кнопки добавления товара и клик по этой кнопке
    item_add_button = driver.find_element_by_xpath("//*[@id="add-to-cart-sauce-labs-fleece-jacket"]")
    item_add_button.click()

    # Поиск кнопки коризины и клик по этой кнопке
    shopping_cart = driver.find_element_by_xpath("//*[@id="shopping_cart_container"]/a")
    shopping_cart.click()

    # Еще один поиск ссылки элемента позиции магазина
    item_name = driver.find_element_by_xpath("//*[@id="item_5_title_link"]/div")
    if item_name.text == "Sauce Labs Fleece Jacket":
        print("Товар пристутствует в корзине")
    else:
        print("Товар отсутствует")

    time.sleep(5)


if __name__ == '__main__':
    first_test()
Из
нового тут добавился только метод click(), который просто кликает по
найденному элементу.
После прохождения всех шагов в консоль выводится результат, что в
корзине имеется товар.
Ожидания в selenium: что нужно знать?
В предыдущем кейсе с большой вероятностью можно столкнуться с проблемой, когда при нажатии на позицию мы сразу кликаем на корзину. При медленном интернете или долгом ответе от сервера в корзину может ничего не добавиться. Для таких случаев предусмотрены ожидания.
Selenium driver поддерживает два вида ожиданий: явное (explicit) и неявное (implicity). Для явных ожиданий есть специальные методы, которые помогут рационально использовать время выполнения теста: например, можно установить минимальное время ожидания и возвращать элемент, если он прогрузился раньше предполагаемого времени.
Пример явного ожидания:
        element = WebDriverWait(driver, 10).until(
    EC.element_to_be_clickable(
        (By.XPATH, '//*[@id="page_wrapper"]/footer/ul/li[2]/a')
    )
)
Процесс ждет 10 секунд пока элемент станет доступным, чтобы по
нему можно было кликнуть. Если элемент так и не прогрузился и недоступен для
клика, генерируется исключение TimeoutException.
Неявные ожидания в свою очередь устанавливаются один раз для
драйвера, а не для каждого элемента. Включается неявное ожидание, когда Selenium не может найти элемент: он ждет установленное время и если не дождется, тоже возвращает TimeoutException. В отличии от явного ожидания, этот тип менее гибок и может оказать плохое влияние на общее время прогона
тестов.
Пример неявного ожидания:
driver.implicitly_wait(10)
Ожидать действия можно и с помощью time.sleep(5). У нас в
примерах есть использование этого метода, но оно считается плохой практикой и обычно применяется только для дебага.
5. Рефакторинг теста, добавление ожиданий
Чтобы
pytest понял, что перед ним именно тестовая, а не обычная функция, сама тестовая функция
должна начинаться с test_.
Обновим наш тест, добавим необходимые ожидания для
стабильности тестовых функций.
Также я вынес отдельную функцию под ожидания, куда мы просто
передаем xpath и driver в виде аргументов.
        from selenium.webdriver.support import expected_conditions as EC
from selenium.webdriver.common.by import By
from selenium.webdriver.support.wait import WebDriverWait
import time

from selenium import webdriver
from selenium.webdriver.common.keys import Keys


# Функция ожидания элементов
def wait_of_element_located(xpath, driver):
    element = WebDriverWait(driver, 10).until(
        EC.presence_of_element_located(
            (By.XPATH, xpath)
        )
    )
    return element


def test_add_jacket_to_the_shopcart():
    options = webdriver.ChromeOptions()
    options.add_experimental_option("excludeSwitches", ["enable-logging"])
driver = webdriver.Chrome(options=options, executable_path=r'C:/Users/…/…/chromedriver.exe')
    driver.get("https://www.saucedemo.com/")

    # Поиск и ожидание элементов и присваивание к переменным.
    input_username = wait_of_element_located(xpath='//*[@id="user-name"]', driver=driver)
    input_password = wait_of_element_located(xpath='//*[@id="password"]', driver=driver)
    login_button = wait_of_element_located(xpath='//*[@id="login-button"]', driver=driver)

    # Действия с формами
    input_username.send_keys("standard_user")
    input_password.send_keys("secret_sauce")
    login_button.send_keys(Keys.RETURN)

    # Поиск и ождиание прогрузки ссылки элемента товара магазина и клик по ссылке
    item_name = wait_of_element_located(xpath='//*[@id="item_5_title_link"]/div', driver=driver)
    item_name.click()

    # Поиск и ожидание кнопки добавления товара и клик по этой кнопке
    item_add_button = wait_of_element_located(xpath='//*[@id="add-to-cart-sauce-labs-fleece-jacket"]', driver=driver)
    item_add_button.click()

    # Ждем пока товар добавится в корзину, появится span(кол-во позиций в корзине) и кликаем по корзине чтобы перейти
    wait_of_element_located(xpath='//*[@id="shopping_cart_container"]/a/span', driver=driver).click()

    # Еще один поиск ссылки элемента позиции магазина
    item_name = wait_of_element_located(xpath='//*[@id="item_5_title_link"]/div', driver=driver)
    if item_name.text == "Sauce Labs Fleece Jacket":
        print("Товар пристутствует в корзине")
    else:
        print("Товар отсутствует")

    time.sleep(5)


if __name__ == '__main__':
    test_add_jacket_to_the_shopcart()
Для запуска теста с помощью pytest в терминале введите
pytest main.py. После прохождения всех этапов должен отобразиться результат
прохождения.
6. Проверки, проверки, проверки
Мы плавно перешли к заключительному этапу написания теста – проверке вывода по известному ответу. Хотя тест выполняется успешно, он ничего
не проверяет и является бессмысленным. Будем использовать
стандартные инструкции assert или утверждения. Суть инструмента – проверить, что результат соответствует наши ожиданиям. Если соответствует, наш тест будет
считаться пройденным, а в противном случае – проваленным.
Добавим в тест проверки. Будем проверять, что название
куртки «Sauce Labs Fleece Jacket» и описание как в магазине.
        from selenium.webdriver.support import expected_conditions as EC
from selenium.webdriver.common.by import By
from selenium.webdriver.support.wait import WebDriverWait

from selenium import webdriver
from selenium.webdriver.common.keys import Keys


# Функция ожидания элементов
def wait_of_element_located(xpath, driver):
    element = WebDriverWait(driver, 10).until(
        EC.presence_of_element_located(
            (By.XPATH, xpath)
        )
    )
    return element


def test_add_jacket_to_the_shopcart():
    options = webdriver.ChromeOptions()
    options.add_experimental_option("excludeSwitches", ["enable-logging"])
    driver = webdriver.Chrome(options=options, executable_path=r'C:/Users/…/…/chromedriver.exe')
    driver.get("https://www.saucedemo.com/")

    # Поиск и ожидание элементов и присваивание к переменным.
    input_username = wait_of_element_located(xpath='//*[@id="user-name"]', driver=driver)
    input_password = wait_of_element_located(xpath='//*[@id="password"]', driver=driver)
    login_button = wait_of_element_located(xpath='//*[@id="login-button"]', driver=driver)

    # Действия с формами
    input_username.send_keys("standard_user")
    input_password.send_keys("secret_sauce")
    login_button.send_keys(Keys.RETURN)

    # Поиск и ождиание прогрузки ссылки элемента товара магазина и клик по ссылке
    item_name = wait_of_element_located(xpath='//*[@id="item_5_title_link"]/div', driver=driver)
    item_name.click()

    # Поиск и ожидание кнопки добавления товара и клик по этой кнопке
    item_add_button = wait_of_element_located(xpath='//*[@id="add-to-cart-sauce-labs-fleece-jacket"]', driver=driver)
    item_add_button.click()

    # Ждем пока товар добавится в корзину, появится span(кол-во позиций в корзине) и кликаем по корзине чтобы перейти
    wait_of_element_located(xpath='//*[@id="shopping_cart_container"]/a/span', driver=driver).click()

    # Еще один поиск ссылки элемента позиции магазина
    item_name = wait_of_element_located(xpath='//*[@id="item_5_title_link"]/div', driver=driver)

    item_description = wait_of_element_located(
        xpath='//*[@id="cart_contents_container"]/div/div[1]/div[3]/div[2]/div[1]',
        driver=driver
    )

    assert item_name.text == "Sauce Labs Fleece Jacket"
    assert item_description.text == "It's not every day that you come across a midweight quarter-zip fleece jacket capable of handling everything from a relaxing day outdoors to a busy day at the office."

    driver.close()


if __name__ == '__main__':
    test_add_jacket_to_the_shopcart()
Теперь при расхождении результата и ожидаемого
условия будет возвращена ошибка прохождения. Укажем название куртки «Sauce Labs Fleece Jacket1». Результат выполнения скрипта будет следующим:
Теперь причешем код, распределив логику по
методам, как, например, было с wait_of_element_located. Разбивать логику необходимо
для написания множества тестов.
        import pytest
from selenium.webdriver.support import expected_conditions as EC
from selenium.webdriver.common.by import By
from selenium.webdriver.support.wait import WebDriverWait

from selenium import webdriver
from selenium.webdriver.common.keys import Keys


# Функция ожидания элементов
def wait_of_element_located(xpath, driver_init):
    element = WebDriverWait(driver_init, 10).until(
        EC.presence_of_element_located(
            (By.XPATH, xpath)
        )
    )
    return element


# Вынесем инициализцию драйвера в отдельную фикстуру pytest
@pytest.fixture
def driver_init():
    options = webdriver.ChromeOptions()
    options.add_experimental_option("excludeSwitches", ["enable-logging"])
    driver = webdriver.Chrome(options=options, executable_path=r'C:/Users/…/…/chromedriver.exe')
    driver.get("https://www.saucedemo.com/")
    yield driver
    driver.close()


# Вынесем аутентификацию юзера в отдельную функцию
def auth_user(user_name, password, driver_init):
    # Поиск и ожидание элементов и присваивание к переменным.
    input_username = wait_of_element_located(xpath='//*[@id="user-name"]', driver_init=driver_init)
    input_password = wait_of_element_located(xpath='//*[@id="password"]', driver_init=driver_init)
    login_button = wait_of_element_located(xpath='//*[@id="login-button"]', driver_init=driver_init)

    # Действия с формами
    input_username.send_keys(user_name)
    input_password.send_keys(password)
    login_button.send_keys(Keys.RETURN)


def add_item_to_cart(xpath_item, driver_init):
    # Поиск и ождиание прогрузки ссылки элемента товара магазина и клик по ссылке
    item_name = wait_of_element_located(
        xpath=xpath_item,
        driver_init=driver_init)
    item_name.click()

    # Поиск и ожидание кнопки добавления товара и клик по этой кнопке
    item_add_button = wait_of_element_located(
        xpath='//*[@id="add-to-cart-sauce-labs-fleece-jacket"]',
        driver_init=driver_init)
    item_add_button.click()

    # Ждем пока товар добавится в корзину, появится span(кол-во позиций в корзине)
    # Возвращаем True или False в зависимости добавлися товар или нет
    shop_cart_with_item = wait_of_element_located(
        xpath='//*[@id="shopping_cart_container"]/a/span',
        driver_init=driver_init)
    return shop_cart_with_item


def test_add_jacket_to_the_shopcart(driver_init):
    # Аутентификация пользователя
    auth_user("standard_user", "secret_sauce", driver_init=driver_init)

    # Добавление товара в корзину и если товар добавлен переход в корзину
    add_item_to_cart(xpath_item='//*[@id="item_5_title_link"]/div',
                     driver_init=driver_init).click()
    # Поиск корзины и клик
    wait_of_element_located(xpath='//*[@id="shopping_cart_container"]/a',
                            driver_init=driver_init).click()

    # Поиск ссылки элемента позиции магазина
    item_name = wait_of_element_located(xpath='//*[@id="item_5_title_link"]/div',
                                        driver_init=driver_init)

    # Поиск описания товара
    item_description = wait_of_element_located(xpath='//*[@id="cart_contents_container"]/div/div[1]/div[3]/div[2]/div[1]',
                                               driver_init=driver_init)

    assert item_name.text == "Sauce Labs Fleece Jacket"
    assert item_description.text == "It's not every day that you come across a midweight quarter-zip fleece jacket"
                                    " capable of handling everything from a relaxing day outdoors to a busy day at "
                                    "the office."


if __name__ == '__main__':
    test_add_jacket_to_the_shopcart(driver_init=driver_init)
В этом примере логика поделилась на функциональные компоненты (фикстуры). Теперь аутентификация пользователя будет происходить в отдельной функции, что позволит не производить одни и те же действия и дублировать код при каждом тесте, в котором нужно проходить аутентификацию. В качестве примера использования фикстур сделана инициализация драйвера, что позволит использовать инстанс драйвера во всех тестах, не пересоздавая его. Логика добавления товара в корзину тоже была вынесена в отдельный функциональный компонент для дальнейшего использования.
Суть разнесения логики заключается в принципе конструктора: собирать тесты из отдельных частей, подставляя только необходимые данные при переиспользовании функций в разных тестах.
При желании можно и дальше проводить рефакторинг кода.
Рекомендации по архитектуре
- Очевидно, что в одном файле хранить все вспомогательные функции и тесты неудобно. После добавления еще нескольких тестов даже с распределенной логикой скрипт будет похож на полотно с трудночитаемым кодом. К тому же если вы разрабатываете тесты с коллегами, без конфликтов в коде не обойтись. Для начала нужно разделить проект на модули: в одном будут находиться файлы с тестами, в другом частичная логика, в третьем – ресурсы, в четвертом – утилиты и т.д.
- Далее следует переходить на разработку автотестов с использованием объектно-ориентированного программирования. Это сэкономит массу времени и поможет в написании сложного и лаконичного кода.
- Стоит также обратить внимание на паттерны проектирования, особенно на PageObject и PageFactoroy. В эффективном тестировании UI они играют большую роль.
- Все тестовые данные лучше хранить в неизменяемых классах, константах или в отдельных файлах (json, csv).
Заключение
На этом создание первого автотеста закончено. Некоторые
моменты были рассмотрены поверхностно, что дает возможность пытливым умам
поглотить информацию из других источников. Удачи!
 Автор: Энди Найт (Andy Knight)
Оригинал статьи
Перевод: Ольга Алифанова
Часть 1
Теперь, когда мы знаем, зачем нам Web UI-тестирование и какими должны быть наши цели, настроим проект тест-автоматизации на Python, используя pytest!
Почему Python?
Python – один из самых популярных из доступных языков программирования. На нем пишут бэкэнды сайтов, проводят анализ данных, создают скрипты для администрирования системы… Его синтаксис чист, читабелен и элегантен, и отлично подходит как для экспертов, так и для начинающих. К тому же все мыслимое и немыслимое всего лишь в одном импорте от вас. Логично, что Python также отлично подходит для тест-автоматизации. Его лаконичность позволяет больше фокусироваться на тесте, и меньше – на коде. Тестировщики без особых навыков программирования, как правило, изучают Python быстрее, нежели другие языки вроде Java или C#. Python прекрасен для быстрого погружения в автоматизацию!
Что такое pytest?
В сердце любого проекта функциональной тест-автоматизации лежит «корневой» тест-фреймворк. Фреймворк имеет дело со структурой тест-кейсов, выполнением тестов, и отчетности о пройденных и упавших проверках. Это основа, к которой добавляются дополнительные пакеты и код (вроде Selenium WebDriver).
pytest – один из лучших тест-фреймворков Python. Он прост, масштабируем, и «Пайтоничен». Тест-кейсы пишутся как функции, а не классы. Падения тест-утверждений выводятся в отчете с реальными значения ми. При помощи плагинов можно добавить покрытие кода, красивые отчеты, и параллельный запуск. pytest может интегрироваться с другими фреймворками вроде Django и Flask. Согласно опросу разработчиков Python-2018, pytest – самый популярный тест-фреймворк для Python.
Приступим
Давайте создадим наш первый тест-проект на Python! Если вы еще этого не сделали, пожалуйста, скачайте и установите Python 3. Затем создайте новую директорию для проекта:
- $ mkdir python-webui-testing
- $ cd python-webui-testing
Создавая новый проект Python, я всегда создаю виртуальное окружение для его зависимостей. В этом случае у проектов на одной машине не будет конфликтующих версий пакетов. Я пользуюсь pipenv, потому что он упрощает дело. Для глобальной установки pipenv введите:
- $ pip install pipenv
Затем установите pytest для вашего нового проекта:
- $ pipenv install pytest —dev
Pipenv добавит в ваш проект два новых файла: Pipfile и Pipfile.lock. Pipfile определяет требования проекта, а Pipfile.lock «блокирует» явные версии, которыми проект будет пользоваться. Опция “–dev” в команде означает, что пакет pytest будет использоваться для разработки, а не для деплоя.
Первый тест
По традиции большинство проектов размещают все тесты в директории tests/. Давайте следовать традиции:
- $ mkdir tests
- $ cd tests
Создайте модуль Python с названием test_math.py для нашего первого теста, и добавьте следующий код:
- def test_addition():
- assert 1 + 1 == 2
Тестам, написанным при помощи pytest, обычно не требуется много кода. Эти две строчки – полнофункциональный тест-кейс! Тест-кейс записан как функция, а не как класс. Для такого базового теста импорты не нужны. Нативный оператор контроля Python используется вместо кастомных контрольных вызовов.
Запуск тестов
Давайте запустим наш новый тест. Смените директорию на корневую директорию проекта, и вызовите модуль pytest:
- $ cd ..
- $ pipenv run python -m pytest
- ============================= test session starts ==============================
- platform darwin — Python 3.7.3, pytest-4.5.0, py-1.8.0, pluggy-0.12.0
- rootdir: /Users/andylpk247/Programming/automation-panda/python-webui-testing
- collected 1 item
- tests/test_math.py . [100%]
- =========================== 1 passed in 0.02 seconds ===========================
Наш первый тест пройден!
Как pytest обнаружил наш тест? По имени: pytest будет искать тест-функции с именем test_* в модулях по имени test_*.py. Интересно, что pytest не требует файла __init__.py в тест-директориях.
Упавшие тесты
Что будет, если тест упадет? Давайте добавим другой тест с багом, чтобы проверить это:
- def test_subtraction():
- diff = 1 — 1
- assert diff == 1
Теперь при запуске Pytest мы увидим вот что:
- $ pipenv run python -m pytest
- ============================= test session starts ==============================
- platform darwin — Python 3.7.3, pytest-4.5.0, py-1.8.0, pluggy-0.12.0
- rootdir: /Users/andylpk247/Programming/automation-panda/python-webui-testing
- collected 2 items
- tests/test_math.py .F [100%]
- =================================== FAILURES ===================================
- _______________________________ test_subtraction _______________________________
- def test_subtraction():
- diff = 1 — 1
- > assert diff == 1
- E assert 0 == 1
- tests/test_math.py:13: AssertionError
- ====================== 1 failed, 1 passed in 0.08 seconds ======================
Тест test_subtraction упал с «F» вместо «.». Более того, pytest выводит сообщения трассировки, показывающие упавшее утверждение вместе с модулем и номером строки. Отметим, что реальные значения каждого выражения в утверждении тоже отображаются: diff оценивается как 0, что явно не равно 1. Круто! Эта самодиагностика утверждений очень помогает разбираться в падениях тестов.
Исправим баг:
- def test_subtraction():
- diff = 1 — 1
- assert diff == 0
И перезапустим эти тесты:
- $ pipenv run python -m pytest
- ============================= test session starts ==============================
- platform darwin — Python 3.7.3, pytest-4.5.0, py-1.8.0, pluggy-0.12.0
- rootdir: /Users/andylpk247/Programming/automation-panda/python-webui-testing
- collected 2 items
- tests/test_math.py .. [100%]
- =========================== 2 passed in 0.02 seconds ===========================
Мы снова на верном пути.
Параметризованные тесты
Что, если нам нужно запустить тест-процедуру с разными сочетаниями ввода? У pytest для этого есть декоратор! Составим тест для умножения с параметризованным вводом:
- import pytest
- @pytest.mark.parametrize(
- «a,b,expected»,
- [(0, 5, 0), (1, 5, 5), (2, 5, 10), (-3, 5, -15), (-4, -5, 20)])
- def test_multiplication(a, b, expected):
- assert a * b == expected
На этот раз нужно импортировать модуль pytest. Декоратор @pytest.mark.parametrize будет заменять наборы значений для аргументов тест-функции, запуская функцию по разу для каждого набора. Повторный запуск тестов покажет больше пройденных тестов:
- $ pipenv run python -m pytest
- ============================= test session starts ==============================
- platform darwin — Python 3.7.3, pytest-4.5.0, py-1.8.0, pluggy-0.12.0
- rootdir: /Users/andylpk247/Programming/automation-panda/python-webui-testing
- collected 7 items
- tests/test_math.py ……. [100%]
- =========================== 7 passed in 0.03 seconds ===========================
Супер! Параметры – отличный способ реализовать тестирование, управляемое через данные.
Sweet! Parameters are a great way to do data-driven testing.
Верификация исключений
Pytest относится к необрабатываемым исключениям, как к падениям теста. На самом деле оператор контроля просто выдает исключение для регистрации падения. Что, если нам нужно убедиться, что выдается правильное исключение? Используйте pytest.raises с нужным типом исключения – например, так:
- def test_divide_by_zero():
- with pytest.raises(ZeroDivisionError):
- 1 / 0
Rerun the tests to make sure all is well:
- $ pipenv run python -m pytest
- ============================= test session starts ==============================
- platform darwin — Python 3.7.3, pytest-4.5.0, py-1.8.0, pluggy-0.12.0
- rootdir: /Users/andylpk247/Programming/automation-panda/python-webui-testing
- collected 8 items
- tests/test_math.py …….. [100%]
- =========================== 8 passed in 0.04 seconds ===========================
Отлично. Математика все еще работает!
Больше информации
В этой главе мы рассказали об основах, но pytest умеет и многое другое. Изучите официальный сайт pytest, чтобы узнать о более продвинутых фичах фреймворка. Далее мы разберемся, как использовать фикстуры и новые плагины.
Software testing is the process in which a developer ensures that the actual output of the software matches with the desired output by providing some test inputs to the software. Software testing is an important step because if performed properly, it can help the developer to find bugs in the software in very less amount of time. Software testing can be divided into two classes, Manual testing and Automated testing. Automated testing is the execution of your tests using a script instead of a human. In this article, we’ll discuss some of the methods of automated software testing with Python. Let’s write a simple application over which we will perform all the tests.
Python3
class Square:
def __init__(self, side):
""" creates a square having the given side
"""
self.side = side
def area(self):
""" returns area of the square
"""
return self.side**2
def perimeter(self):
""" returns perimeter of the square
"""
return 4 * self.side
def __repr__(self):
""" declares how a Square object should be printed
"""
s = 'Square with side = ' + str(self.side) + 'n' +
'Area = ' + str(self.area()) + 'n' +
'Perimeter = ' + str(self.perimeter())
return s
if __name__ == '__main__':
side = int(input('enter the side length to create a Square: '))
square = Square(side)
print(square)
Note: For more information about the function __repr__(), refer this article. Now that we have our software ready, let’s have a look at the directory structure of our project folder and after that, we’ll start testing our software.
---Software_Testing
   |--- __init__.py (to initialize the directory as python package)
   |--- app.py (our software)
   |--- tests (folder to keep all test files)
           |--- __init__.py
The ‘unittest’ module
One of the major problems with manual testing is that it requires time and effort. In manual testing, we test the application over some input, if it fails, either we note it down or we debug the application for that particular test input, and then we repeat the process. With unittest, all the test inputs can be provided at once and then you can test your application. In the end, you get a detailed report with all the failed test cases clearly specified, if any. The unittest module has both a built-in testing framework and a test runner. A testing framework is a set of rules which must be followed while writing test cases, while a test runner is a tool which executes these tests with a bunch of settings, and collects the results. Installation: unittest is available at PyPI and can be installed with the following command –
pip install unittest
Use: We write the tests in a Python module (.py). To run our tests, we simply execute the test module using any IDE or terminal. Now, let’s write some tests for our small software discussed above using the unittest module.
- Create a file named tests.py in the folder named “tests”.
- In tests.py import unittest.
- Create a class named TestClass which inherits from the class unittest.TestCase. Rule 1: All the tests are written as the methods of a class, which must inherit from the class unittest.TestCase.
- Create a test method as shown below. Rule 2: Name of each and every test method should start with “test” otherwise it’ll be skipped by the test runner.
Python3
def test_area(self):
sq = Square(2)
self.assertEqual(sq.area(), 4,
f'Area is shown {sq.area()} for side = {sq.side} units')
- Rule 3: We use special assertEqual() statements instead of the built-in assert statements available in Python. The first argument of assertEqual() is the actual output, the second argument is the desired output and the third argument is the error message which would be displayed in case the two values differ from each other (test fails).
- To run the tests we just defined, we need to call the method unittest.main(), add the following lines in the “tests.py” module.
Python3
if __name__ == '__main__':
unittest.main()
- Because of these lines, as soon as you run execute the script “test.py”, the function unittest.main() would be called and all the tests will be executed.
Finally the “tests.py” module should resemble the code given below.
Python3
import unittest
from .. import app
class TestSum(unittest.TestCase):
def test_area(self):
sq = app.Square(2)
self.assertEqual(sq.area(), 4,
f'Area is shown {sq.area()} rather than 9')
if __name__ == '__main__':
unittest.main()
Having written our test cases let us now test our application for any bugs. To test your application you simply need to execute the test file “tests.py” using the command prompt or any IDE of your choice. The output should be something like this.
.
----------------------------------------------------------------------
Ran 1 test in 0.000s

OK
In the first line, a .(dot) represents a successful test while an ‘F’ would represent a failed test case. The OK message, in the end, tells us that all the tests were passed successfully. Let’s add a few more tests in “tests.py” and retest our application.
Python3
import unittest
from .. import app
class TestSum(unittest.TestCase):
def test_area(self):
sq = app.Square(2)
self.assertEqual(sq.area(), 4,
f'Area is shown {sq.area()} rather than 9')
def test_area_negative(self):
sq = app.Square(-3)
self.assertEqual(sq.area(), -1,
f'Area is shown {sq.area()} rather than -1')
def test_perimeter(self):
sq = app.Square(5)
self.assertEqual(sq.perimeter(), 20,
f'Perimeter is {sq.perimeter()} rather than 20')
def test_perimeter_negative(self):
sq = app.Square(-6)
self.assertEqual(sq.perimeter(), -1,
f'Perimeter is {sq.perimeter()} rather than -1')
if __name__ == '__main__':
unittest.main()
.F.F
======================================================================
FAIL: test_area_negative (__main__.TestSum)
----------------------------------------------------------------------
Traceback (most recent call last):
  File "tests_unittest.py", line 11, in test_area_negative
    self.assertEqual(sq.area(), -1, f'Area is shown {sq.area()} rather than -1 for negative side length')
AssertionError: 9 != -1 : Area is shown 9 rather than -1 for negative side length

======================================================================
FAIL: test_perimeter_negative (__main__.TestSum)
----------------------------------------------------------------------
Traceback (most recent call last):
  File "tests_unittest.py", line 19, in test_perimeter_negative
    self.assertEqual(sq.perimeter(), -1, f'Perimeter is {sq.perimeter()} rather than -1 for negative side length')
AssertionError: -24 != -1 : Perimeter is -24 rather than -1 for negative side length

----------------------------------------------------------------------
Ran 4 tests in 0.001s

FAILED (failures=2)
A few things to note in the above test report are –
- The first line represents that test 1 and test 3 executed successfully while test 2 and test 4 failed
- Each failed test case is described in the report, the first line of the description contains the name of the failed test case and the last line contains the error message we defined for that test case.
- At the end of the report you can see the number of failed tests, if no test fails the report will end with OK
Note: For further knowledge you can read the complete documentation of unittest.
The “nose2” module
The purpose of nose2 is to extend unittest to make testing easier. nose2 is compatible with tests written using the unittest testing framework and can be used as a replacement of the unittest test runner. Installation: nose2 can be installed from PyPI using the command,
pip install nose2
Use: nose2 does not have any testing framework and is merely a test runner which is compatible with the unittest testing framework. Therefore we’ll the run same tests we wrote above (for unittest) using nose2. To run the tests we use the following command in the project source directory (“Software_Testing” in our case),
nose2
In nose2 terminology all the python modules (.py) with name starting from “test” (i.e. test_file.py, test_1.py) are considered as test files. On execution, nose2 will look for all test files in all the sub-directories which lie under one or more of the following categories,
- which are python packages (contain “__init__.py”).
- whose name starts with “test” after being lowercased, i.e. TestFiles, tests.
- which are named either “src” or “lib”.
nose2 first loads all the test files present in the project and then the tests are executed. Thus, with nose2 we get the freedom to split our tests among various test files in different folders and execute them at once, which is very useful when dealing with large number of tests. Let’s now learn about different customisation options provided by nose2 which can help us during the testing process.
- Changing the search directory – If we want to change the directory in which nose2 searches for test files, we can do that using the command line arguments -s or –start-dir as,
nose2 -s DIR_ADD DIR_NAME
- here, DIR_NAME is the directory in which we want to search for the test files and, DIR_ADD is the address of the parent directory of DIR_NAME relative to the project source directory (i.e. use “./” if test directory is in the project source directory itself). This is extremely useful when you want to test only one feature of your application at a time.
- Running specific test cases – Using nose2 we can also run a specific test at a time by using the command line arguments -s and –start-dir as,
nose2 -s DIR_ADD DIR_NAME.TEST_FILE.TEST_CLASS.TEST_NAME
- TEST_NAME: name of the test method.
- TEST_CLASS: class in which the test method is defined.
- TEST_FILE: name of the test file in which the test case is defined i.e. test.py.
- DIR_NAME: directory in which the test file exists.
- DIR_ADD: address of the parent directory of DIR_NAME relative to the project source.
- Running tests in a single module – nose2 can also be used like unittest by calling the function nose2.main() just like we called unittest.main() in previous examples.
The “pytest” module
pytest is the most popular testing framework for python. Using pytest you can test anything from basic python scripts to databases, APIs and UIs. Though pytest is mainly used for API testing, in this article we’ll cover only the basics of pytest. Installation: You can install pytest from PyPI using the command,
pip install pytest
Use: The pytest test runner is called using the following command in project source,
py.test
Unlike nose2, pytest looks for test files in all the locations inside the project directory. Any file with name starting with “test_” or ending with “_test” is considered a test file in the pytest terminology. Let’s create a file “test_file1.py” in the folder “tests” as our test file. Creating test methods: pytest supports the test methods written in the unittest framework, but the pytest framework provides easier syntax to write tests. See the code below to understand the test method syntax of the pytest framework.
Python3
from .. import app
def test_file1_area():
sq = app.Square(2)
assert sq.area() == 4,
f"area for side {sq.side} units is {sq.area()}"
def test_file1_perimeter():
sq = app.Square(-1)
assert sq.perimeter() == -1,
f'perimeter is shown {sq.perimeter()} rather than -1'
Note: similar to unittest, pytest requires all test names to start with “test”. Unlike unittest, pytest uses the default python assert statements which make it further easier to use. Note that, now the “tests” folder contains two files namely, “tests.py” (written in unittest framework) and “test_file1.py” (written in pytest framework). Now let’s run the pytest test runner.
py.test
You’ll get a similar report as obtained by using unittest.
============================= test session starts ==============================
platform linux -- Python 3.6.7, pytest-4.4.1, py-1.8.0, pluggy-0.9.0
rootdir: /home/manthan/articles/Software_testing_in_Python
collected 6 items

tests/test_file1.py .F                                                   [ 33%]
tests/test_file2.py .F.F                                                 [100%]

=================================== FAILURES ===================================
The percentages on the right side of the report show the percentage of tests that have been completed at that moment, i.e. 2 out of the 6 test cases were completed at the end of the “test_file1.py”. Here are a few more basic customisations that come with pytest.
- Running specific test files: To run only a specific test file, use the command,
py.test <filename>
- Substring matching: Suppose we want to test only the area() method of our Square class, we can do this using substring matching as follows,
py.test -k "area"
- With this command pytest will execute only those tests which have the string “area” in their names, i.e. “test_file1_area()”, “test_area()” etc.
- Marking: As a substitute to substring matching, marking is another method using which we can run a specific set of tests. In this method we put a mark on the tests we want to run. Observe the code example given below,
Python3
@pytest.mark.area
def test_file1_area():
sq = app.Square(2)
assert sq.area() == 4,
f"area for side {sq.side} units is {sq.area()}"
- In the above code example test_file1_area() is marked with tag “area”. All the test methods which have been marked with some tag can be executed by using the command,
py.test -m <tag_name>
- Parallel Processing: If you have a large number of tests then pytest can be customised to run these test methods in parallel. For that you need to install pytest-xdist which can be installed using the command,
pip install pytest-xdist
- Now you can use the following command to execute your tests faster using multiprocessing,
py.test -n 4
- With this command pytest assigns 4 workers to perform the tests in parallel, you can change this number as per your needs. If your tests are thread-safe, you can also use multithreading to speed up the testing process. For that you need to install pytest-parallel (using pip). To run your tests in multithreading use the command,
pytest --workers 4
Пример фреймворка для автоматизации тестирования на Python
Инструменты
- Pytest — тестовый фреймворк для создания тестов и их запуска
- Selenium — инструмент для автоматизации действий веб-браузера
- Selenoid — легковесный аналог Selenium Hub написанный на Golang.Позволяет запускать тесты внутри Docker контейнеров.
- Allure Report — Система отчетности (Тест репорт система)
- Docker — программное обеспечение для автоматизации развёртывания и управления приложениями в средах с поддержкой контейнеризации.
Описание структуры проекта
- config — Каталог для конфигурационных файлов.В нем находится
browsers.jsonкоторый содержит описание браузеров и их версий для работы с Selenoid. - core — Каталог для хранения объектов,классов и т.д. которые используются как слой инициализации для WebDriver.
- helpers — Методы для взаимодействия с браузером через протокол WebDriver .
- page — Слой описания page элементов и page object.
- tests — Слой описания бизнес логики сценариев и их проверки.
- utils — Каталог для хранения вспомогательных утилит
Способы запуска автотестов
Способ №1. Запуск автотестов внутри контейнера.
- Запускаем shell скрипт
sh up.sh. Это запустит все необходимые контейнеры для работы и создаcт shell скрипт,в котором описаны команды для загрузки образов Selenoid с готовыми браузерами.
Selenoid-UI станет доступен по адресу
http://localhost:8080/#/

Allure Report UI доступен по адресу
http://localhost:5252/allure-docker-service-ui/projects/default
- Скрипт автоматически скачает необходимые image с браузерами, которые будут использоваться для создания контейнеров.Скрипт собирает default версии браузеров, указанных в
config/browsers.json - Вводим в консоль команду
docker exec -it ui-autotests <ваша_команда>,где вместо<ваша команда>подставляем неообходимую команду для тест-комплекта. Как пример:docker exec -it ui-autotests pytest
Наhttp://localhost:8080/#/вы сможете увидеть запущенные контейнеры с браузерами, в которых запущены тестовые сценарии
Посмотреть что происходит в контейнере можно, нажав на его идентификатор
4. После прогона автотестов, результаты можно посмотреть по адресу http://localhost:5252/allure-docker-service-ui/projects/default/ либо получить последний отчет — http://localhost:5252/allure-docker-service-ui/projects/default/reports/latest
Способ №2. Запуск автотестов локально
- Устанавливаем локально Python. Подробнее на
https://www.python.org/downloads/ - В папке проекта запускаем команду
python -m pip install --upgrade pipдля обновления pip - В папке проекта запуска команду
pip3 install -r requirements.txtдля установки зависимостей - Загружаем образ с браузером. Допустим
docker pull selenoid/chrome:106.0 - Вводим команду для запуска автотестов. Допустим
python pytest - После прогона автотестов, результаты можно посмотреть по адресу
http://localhost:5252/allure-docker-service-ui/
Опции
- В файле pytest.ini прописаны доп.опции.
- pytest-xdist и его параметр -n X, где X — количество запущенных тестов одновременно, параллельно друг другу.