I have to admit I’m quite excited about this bot and I can’t wait to test it out. The bot that I’m about to walk you through is able to analyse the changes in price across all coins on Binance and place trades on the most volatile ones. In addition to that, this Binance trading algorithm will also keep track of all the coins bought and sell them according to your specified Stop Loss and Take Profit.
Requirements
- a Binance account
- a GitHub account
- Binance Testnet & MainnetAPI keys
- a few python libraries
- some knowledge of Python
Making a start
First things first, if you don’t have a Binance account, or would like to create a separate account to run the bot on, go ahead and create one. You can use my referral link to get 5% off your trading fees. With a Binance account created, we’re going to Generate some API Keys. We’ll start with the mainnet keys and then the testnet keys.
Mainnet Keys
To get your mainnet keys, navigate over your account, and click on API management.
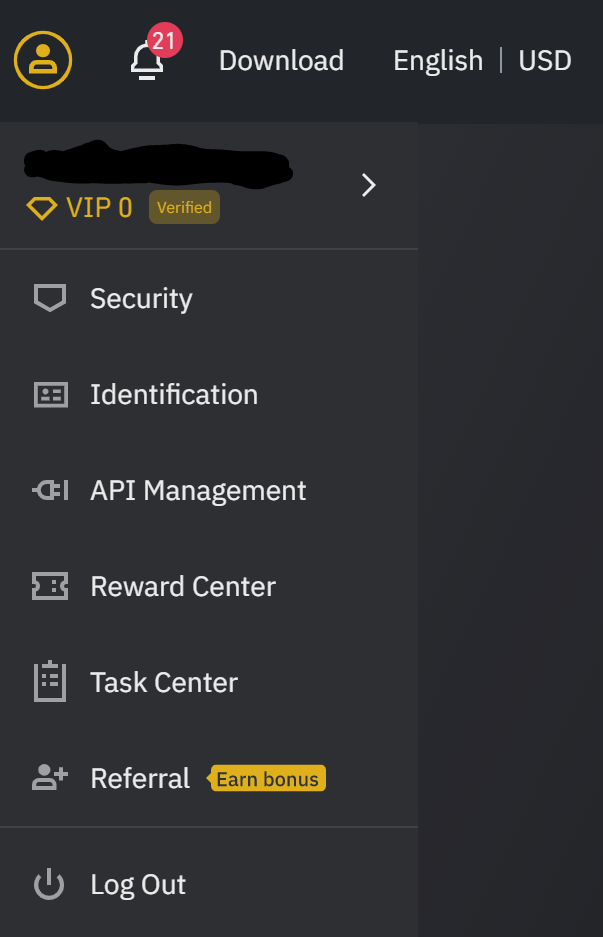
On the API management page, give a label to your API key and click create API.

Once your key and secret have been generated make sure to save these, as you will only be shown the secret once. You’ll need to regenerate your keys if you haven’t saved the secret.
Now let’s give it the permissions that we require to run the bot on it. We’re only going to do Spot trading, so we only need to select Enable Reading and Enable Spot & Margin Trading.

Testnet Keys
Head over to testnet.binance.vision in order to create a testnet account.
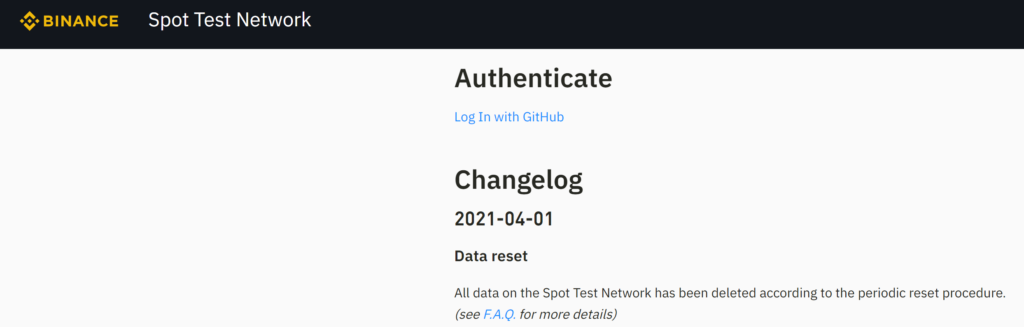
Log In with GitHub and authenticate with your GitHub account. If you don’t have a GitHub account, simpy head over to GitHub and create one first. Once you’re logged in with your GitHub, click on Generate HMAC_SHA256 Key.
![]()
Give your key a description and click Generate.
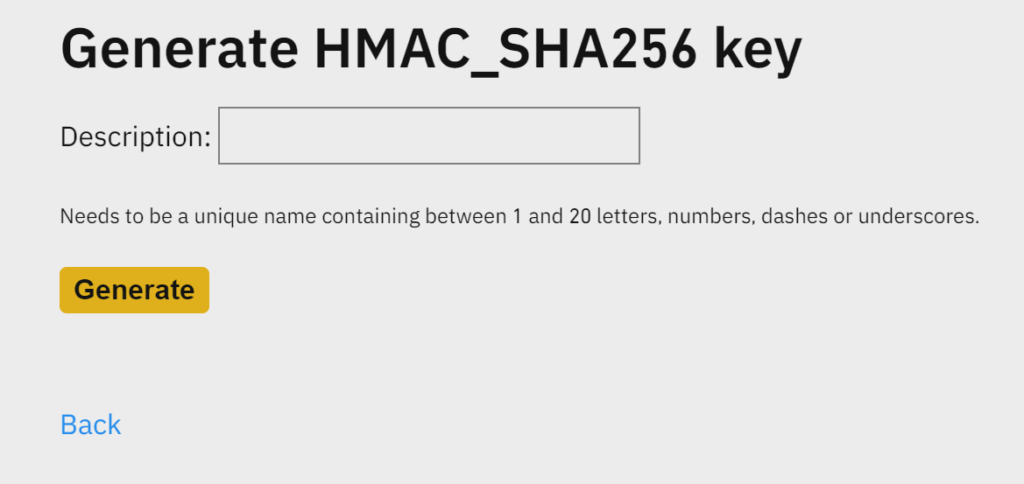
Now it’s important that you SAVE your API Key and Secret displayed as for security reasons, this is the only time you will be able to see them. Simply regenerate the keys if you haven’t saved them.
Before we get down to the actual coding of Binance volatility trading bot, due to how popular it’s been with the GitHub community, the current and most recent version of the bot looks and works quite a bit different than the initial version that I’ll be walking you through here. Still, this article will give you a good idea of the implementation of the concept and if you’re keen on learning how to build your own trading bots it serves as a great resource.
With the Binance account and keys out of the way it’s time for the exciting part – coding our trading bot in Python! Let’s start by clearly defining the parameters of this bot:
Defining Params
- The bot will listen to changes in price accross all Coins on Binance*
- By default we’re only picking USDT pairs
- We’re excluding Margin (like BTCDOWNUSDT) and Fiat pairs
- The bot checks if the any coin has gone up by more than 3% in the last 5 minutes
- The bot will buy 100 USDT of the most volatile coins on Binance
- The bot will sell at 6% profit or 3% stop loss
These are all easily configurable, and I encourage you to play with these parameters around. This is not a money-printer, but rather a tool that can help you automate your current strategy. It will only be as good as your own strategy, but you have the advantage of playing around with the parameters in test mode, so that you can find your trading strategy without putting real money in, if you don’t have one.
Making a start on the code
Importing modules
The first thing we want to do is import the modules that we need for the script. Quick sidenote here, python-binance needs to be installed via pip by using the pip install python-binance command. If you don’t have pip on your machine, this other guide I wrote, contains some more info on how to install pip on your machine.
Configuring the Binance Client
We now need to store the Binance API keys in our script. In order to be able to easily switch between Test and Mainnet, there is a short conditional statement that will feed the Binance Client the correct keys for out bot depending on the value inside the TESTNET variable. Set this to True if you want to use the testnet, or (at your own risk) set this to False to use the Mainnet. Using the mainnet you will trade using real money from your account so be particularly careful here if you choose to do so.
UPDATE: In the latest version of the bot on GitHub the testnet is not longer being used. The testnet offers a limited number of pairs and is not reliable. This has instead been replaced with a paper-trading mode, simulating live trades on the mainnet, making testing a lot more accurate.
Another thing to note here is the syntax for your api keys. In the code above, I am using the os.getenv method in order to call API keys that I have stored on my machine. You don’t have to do this if you’re not planning to make your code public, so simply re-write the syntax for your keys as api_key_test = “YOUR_API_KEY”
Defining user inputs
It’s time to define our user inputs – or the parameters on which our Binance trading bot will place our trades. You can modify these to change the parameters of the algorithm in order to test different strategies, by default we going with the following:
- PAIR_WITH defines the coin (or fiat) that each crypto is paired to. I have only tested this USDT, as most coins are paired to it.
- QUANTITY represents the size of your trade, by default in USDT. Be extra careful with the QUANTITY if you change PAIR_WITH to BNB for example.
- FIATS is a list of fiat currencies and margin symbols that I’m excluding. Anything added here will be excluded from the coins output and won’t be traded with.
- TIME_DIFFERENCE by default we’re checking the difference in price for each coin on Binance in the last 5 minutes, you can change this value for different results. This also dictates how often each code iteration executes.
- CHANGE_IN_PRICE the threshold at which the bot will decide to buy a coin. By default, if a coin has moved by more than 3% in the last 5 minutes, we consider that a strong buying signal.
- STOP LOSS and TAKE PROFIT define in % how to sell the coins that the Binance algorithm bought.
Load Binance bot portfolio
The next step is check if the bot has placed any trades already, and if so to load the bot portfolio. By default, the bot will save each trade in a json file in the same directory as the script, so that we can keep track of trades and sell when TP or SL are reached
Get the current price for each coin listed on Binance
It’s time for our algorithm to read the price for each coin. The get_price() function will the return the price of each coin that meets our criteria.
Wait and fetch the price again
The next function will wait according to the time defined in the TIME_DIFFERENCE variable and will return any coin that has moved by more than the CHANGE_IN_PRICE – by default 3%.
Convert the volume from USDT to each of coins returned
The next step is to convert our QUANTITY of 100USDT (default) into the respective quantity for each coin that we’re about to buy. Because Binance is a bit particular with the format of the volume, our trading bot needs to know the step size for each coin. For example BTC supports a step size of 6 decimal points while XRP only supports one. So if we want to buy XRP, we need to make sure that the volume formatting is correct. Trying to buy 1.000 XRP would fail, while 1.0 would be executed.
Place the trade
Now that we have the volatile coins from Binance as well as the correct format for the volume it’s time to let our Binance trading bot to place some trades for us.
Update portfolio
You nearly did it so hand in there! The next step is to update our portfolio by saving the details of each trade into the json file that we’re checking for at the beginning of each iteration. By default, we’re saving the symbol, orderId, timestamp, buying price and volume for each coin.
You can add more info if you wish by looking at the format of client.get_all_orders(symbol=coin, limit=1) and add other information you deem necessary.
Execute sell orders
This function (the last one too!) checks if any of the coins we own in our bot portfolio should be sold due to SL or TP being reached. Note what we’re using our Spot account so we can only sell what we own. We cannot place sell orders if a coin is going down and we don’t own it. But I would be curious to see how the Binance trading bot performs on a Futures account.
Putting it all together
The last piece in our code brings all the functions together and makes the code to keep on executing until you stop it.
That’s it. You have a fully functioning Binance trading bot that detects the most volatile coins on Binance, buys and sells according to each coin’s performance. Don’t forget to subscribe for more insights and bot guides.
Did you enjoy this article? Please consider subscribing to the newsletter for more awesome content.
If you appreciate my content and would like to see more, you can support me by donating here or via the Brave Browser. This is much appreciated as it helps me to keep the content free and open source. Thank you!

The first point about trading crypto currencies or any asset is to have a goal and a strategy to achieve. Here i’am not writing about trading strategy but just build a simple yet functional crypto trader bot to apply your strategy. Trade with caution this serie of post is just more like an automated crypto trading bot framework.
We’ll use python 3.9 (3.9.2) to first create the project file structure.
/exchanges
/strategies
/models
Here «exchanges» folder store the exchanges API wrappers, strategies your strategies and models the business object we gonna use.
The models
We’ll defined several business objects for this projects, such like price, currency or order for instance. First let’s begin with the Price one to use it on the strategy we’ll create just after.
Before we write a common abstract layer forour business object.
./models/model.py
from datetime import datetime


class AbstractModel:
    created: datetime

    def __init__(self, **kwargs):
        for key, value in kwargs.items():
            setattr(self, key, value)
Enter fullscreen mode
Exit fullscreen mode
Then our first Price class.
./models/price
from models.model import AbstractModel


class Price(AbstractModel):
    pair: str = ''
    exchange: str = ''
    current: float = 0
    lowest: float = 0
    highest: float = 0
    currency: str = ''
    asset: str = ''

    def __init__(self, **kwargs):
        super().__init__(**kwargs)
        self.pair = self.get_pair()

    def get_pair(self):
        return self.currency + '_' + self.asset
Enter fullscreen mode
Exit fullscreen mode
The strategy part
Here if the biggest part of this system, the strategy will be responsible to run your own trading logic and to do so, there’s two way, a classic using an interval then run API calls to external exchanges API or even internal webhooks and route and a real time event based one using WebSocket.
To do so we’ll first create an abstract strategy class that our strategies will extend.
./strategies/strategy.py
import json
import threading
import time
from datetime import datetime
from decouple import config
from models.price import Price


class Strategy(object):
    price: Price

    def __init__(self, exchange, interval=60, *args, **kwargs):
        self._timer = None
        self.interval = interval
        self.args = args
        self.kwargs = kwargs
        self.is_running = False
        self.next_call = time.time()
        self.portfolio = {}
        self.exchange = exchange
        # Load account portfolio for pair at load
        self.get_portfolio()

    def _run(self):
        self.is_running = False
        self.start()
        self.run(*self.args, **self.kwargs)

    def start(self):
        if not self.is_running:
            print(datetime.now())
            if self._timer is None:
                self.next_call = time.time()
            else:
                self.next_call += self.interval

            self._timer = threading.Timer(self.next_call - time.time(), self._run)
            self._timer.start()
            self.is_running = True

    def stop(self):
        self._timer.cancel()
        self.is_running = False

    def get_portfolio(self):
        self.portfolio = {'currency': self.exchange.get_asset_balance(self.exchange.currency),
                          'asset': self.exchange.get_asset_balance(self.exchange.asset)}

    def get_price(self):
        try:
            self.price = self.exchange.symbol_ticker()
        except Exception as e:
            pass

...
Enter fullscreen mode
Exit fullscreen mode
Here our strategy abstract layer constructor signature need an Exchange instance, we’ll do this part later writing of first wrapper using the Binance API.
We define without any extra library a simple yet functional infinite interval runner, note that this every run will launch the next call on another thread but in fact your strategy will use never no more than two threads, one main and the current run iteration if you strategy take a lot of external call or heavy computation. Each thread consume 0.3% of RAM and 0 or 0.1 CPU usage, this also involve the Strategy to fetch ticker and orders, then store price and order related data on an another internal API.
Yet the interval run precision can drift a little bit on microseconds, but will be stable at seconds level.
Here a simple usage of that layer, a strategy that basically print your exchange account portfolio and the exchange price. We got method to also retrieve a symbol ticker from an external exchange we gonna connect later, and also a method to retrieve your current portfolio available on connected exchange.
./strategies/watcher.py
from exchanges.exchange import Exchange
from strategies.strategy import Strategy


class Watcher(Strategy):
    def __init__(self, exchange: Exchange, timeout=60, *args, **kwargs):
        super().__init__(exchange, timeout, *args, **kwargs)

    def run(self):
        self.get_price()
        print('*******************************')
        print('Exchange: ', self.exchange.name)
        print('Pair: ', self.exchange.get_symbol())
        print('Available: ', self.portfolio['currency'] + ' ' + self.exchange.currency)
        print('Available: ', self.portfolio['asset'] + ' ' + self.exchange.asset)
        print('Price: ', self.price.current)
Enter fullscreen mode
Exit fullscreen mode
In the next parts we gonna connect our first Exchange Binance by coding a simple wrapper using the official Binance API https://github.com/binance/binance-spot-api-docs and Python requests library https://pypi.org/project/requests/. Then code our missing business objects order and currency to store respectively the order you send to exchanges and the currencies we’ll manipulate fiat or cryptocurrencies then put all those different pieces together.
Thank for reading, stay tuned for the next part.
Binance and trading bots.
The world hasn’t seen a more iconic duo since Bert and Ernie. The legendary exchange has been flooded with automated trading bots of all kinds. Institutions and high net worth individuals are executing advanced algorithmic trading strategies while investors are automating their portfolio. It has become an exciting playground for builders.
Yet, there is still a lot to build. Only a fraction of the necessary services have been developed up until this point and there will be a lot of growth in the coming year.
If you want to get started participating in the development of trading bots, this is the best place to start. Throughout this article, we will teach you how to access market data from the exchange, connect to exchange accounts to read balance data, execute trades, chart candlesticks, and even connect to real-time websockets for ticker data.
There is a lot to cover, so let’s get started!
Getting Started
The following steps will break down the necessary components to begin programming your Binance Python scripts.
Installing Shrimpy Python
First, we will need to install the Shrimpy Python Library. The official Shrimpy Python GitHub can be found here.
Using Pip, you can quickly install the library using the following.
pip install shrimpy-pythonBinance API Keys
In order to connect to the Binance exchange, we will need to generate a new API key through the exchange. This can be done by following the Binance API Key Help Article.
After you get to the step where you copy the API keys out of Binance, you can stop and store them in a secure place (instead of pasting them into the Shrimpy Portfolio Management Application). These keys will be used in our scripts by assigning them to a variable that we can pass into our client when it’s created.
exchange_public_key = '...'
exchange_secret_key = '...'
Shrimpy API Keys
After the exchange API keys have been created, we must also generate API keys for the Shrimpy Universal Crypto Trading APIs. These keys are generated by signing up for the Shrimpy Developer APIs then following the guide outlined here.
Once the keys have been created, store them in a secure location and use them in your Python scripts in the following way.
shrimpy_public_key = '...'
shrimpy_secret_key = '...'
Exchange Data
Getting accurate market data is the first step to creating a crypto trading bot that can execute strategies based on signals, market conditions, and price movements.
This is typically done using both live order book data and trade data. In the following sections, we will provide examples of how to collect both of these types of information through websockets and REST APIs.
Price Ticker
A price ticker is something that updates the price on a consistent basis in order to get the latest price of the asset on an exchange. The following examples will present a couple of examples of how to create and access price tickers.
A Simple Price Ticker
This example will provide a script for the most simple kind of price ticker. This ticker will use REST API calls to access pricing data on the exchange. This endpoint updates on a 1-minute interval, so that means the highest possible frequency for updating the ticker in this example is 1-minute.
import shrimpy

# Assign public and secret Shrimpy Master API Keys
shrimpy_public_key = '...'
shrimpy_secret_key = '...'

# Create the Shrimpy REST API client
client = shrimpy.ShrimpyApiClient(shrimpy_public_key, shrimpy_secret_key)

# Request the ticker for all assets on Binance
ticker = client.get_ticker('binance')
Websocket Price Ticker
More complex than the simple price ticker is the real-time websocket ticker. This ticker leverages the real-time websockets to stay updated with the latest price on the exchange.
Unlike the simple price ticker that is updated on a 1-minute interval, this price ticker will be updated instantly. As soon as the price changes on the exchange, the websocket will send the update and the new price will be received by this script to display.
import shrimpy

shrimpy_public_key = '...'
shrimpy_secret_key = '...'

# This is a sample handler, it simply prints the incoming message to the console
def error_handler(err):
    print(err)

# This is a sample handler, it simply prints the incoming message to the console
def handler(msg):
    print(msg['content'][0]['price'])

# Create the websocket client using the raw token retrieved by the REST API
api_client = shrimpy.ShrimpyApiClient(shrimpy_public_key, shrimpy_secret_key)
raw_token = api_client.get_token()
client = shrimpy.ShrimpyWsClient(error_handler, raw_token['token'])

# The subscription data for the websocket
subscribe_data = {
    "type": "subscribe",
    "exchange": "binance",
    "pair": "eth-btc",
    "channel": "trade"
}

# Start processing the Shrimpy websocket stream!
client.connect()
client.subscribe(subscribe_data, handler)

# Once complete, stop the client
client.disconnect()
Exchange Order Books
Precise order books on an exchange are used by traders and crypto bots to determine the exact order they would like to place on the exchange.
When placing orders, it is always beneficial to have real-time updates to the order book. That way you are always making decisions based on the most up-to-date information.
Simple Live Order Book Snapshot
The most simple way to get access to an exchange’s order books is to request the order book at the time you are going to place an order.
For example, if you want to execute a trade on the ETH/BTC trading pair, you can request to get the latest order book for this market by calling into the REST API.
import shrimpy

shrimpy_public_key = '...'
shrimpy_secret_key = '...'

# Create the API client for REST calls
client = shrimpy.ShrimpyApiClient(shrimpy_public_key, shrimpy_secret_key)

# Retrieve the live order book
orderbooks = client.get_orderbooks(
    'binance',  # exchange
    'ETH',      # base_symbol
    'BTC',      # quote_symbol
    10          # limit
)
Websocket Live Order Book
In more advanced scenarios, it would be ideal to maintain a local copy of the order book that is updated in real-time through websockets. This can be done using the order book websocket available through the websocket APIs.
Connecting to the ETH/BTC pair would look something like the following example.
import shrimpy

shrimpy_public_key = '...'
shrimpy_secret_key = '...'

# This is a sample handler, it simply prints the incoming message to the console
def error_handler(err):
    print(err)

# This is a sample handler, it simply prints the incoming message to the console
def handler(msg):
    print(msg)

# Create the websocket client by getting the raw token.
api_client = shrimpy.ShrimpyApiClient(shrimpy_public_key, shrimpy_secret_key)
raw_token = api_client.get_token()
ws_client = shrimpy.ShrimpyWsClient(error_handler, raw_token['token'])

subscribe_data = {
    "type": "subscribe",
    "exchange": "binance",
    "pair": "eth-btc",
    "channel": "orderbook"
}

# Start processing the Shrimpy websocket stream!
ws_client.connect()
ws_client.subscribe(subscribe_data, handler)

# Once complete, stop the client
ws_client.disconnect()
Notice that this example does not describe how to manage the order book locally, but only how to access the data through the websocket. The organization of data would need to be done through custom code based on how you want to manage the books.
Essentially, managing the books will require a way to keep track of the current state of the book. That way you can insert new orders, update old orders, and delete orders as necessary based on the updates through the websocket.
Exchange Account Connectivity
In order to trade, we need access to an exchange account. This exchange account will be used to collect data on the available balances and execute the trading strategy.
Linking a Binance Account
Shrimpy provides a convenient user management system where you can link individual Binance accounts to users. Each user can maintain up to 20 exchange accounts. That way, all of your exchange accounts can be managed together.
Linking an exchange account to Shrimpy is a one-time event. That means once the account has been linked, Shrimpy will maintain the connection to the exchange for that account and not require re-linking in the future. You can always get your linked accounts by listing the accounts that have been connected to a user.
In this example, we will create our first user, then link the exchange account. Once you create your first user, you do not need to create another user again. You can always access your users by listing the users you have created.
# import required libraries
import shrimpy

# assign your Shrimpy Master API keys for later use
shrimpy_public_key = '...'
shrimpy_secret_key = '...'

# assign your exchange keys for which you wish to access the balance data
exchange_name = "binance"
exchange_public_key = '...'
exchange_secret_key = '...'

# create the Shrimpy client
client = shrimpy.ShrimpyApiClient(shrimpy_public_key, shrimpy_secret_key)

# create a user which will be linked to our exchange
create_user_response = client.create_user('The Shrimp Master')
user_id = create_user_response['id']

# link our first exchange so we can access balance data
link_account_response = client.link_account(
    user_id,
    exchange_name,
    exchange_public_key,
    exchange_secret_key
)

account_id = link_account_response['id']
Retrieving Binance Account Balances
As soon as the account has been linked, Shrimpy will begin collecting data from the exchange regarding the exchange account. This can take up to 5 seconds, so we recommend waiting a few seconds (only for the initial linkage) before using the next script to access the balance data for the exchange account that was linked.
After the data has been collected, Shrimpy will continuously update the balance as trades are executed, deposits or withdrawals are made, and other operations are done on the account.
In this example, we demonstrate how to retrieve the Binance account balance.
import shrimpy

# use your Shrimpy API public and private keys to create the client
shrimpy_public_key = '...'
shrimpy_secret_key = '...'

client = shrimpy.ShrimpyApiClient(shrimpy_public_key, shrimpy_secret_key)

# note: since we created a user in our last example script,
# we can just retrieve our list of users.
users = client.list_users()
first_user_id = users[0]['id']

# retrieve the accounts associated with this user
accounts = client.list_accounts(
    first_user_id
)
first_account_id = accounts[0]['id']

# access balance data for the user account you previously created
balance = client.get_balance(
    first_user_id,   # user_id
    first_account_id # account_id
)
Notice how we used the endpoints to “list users” and “list accounts”. If you already have the account and user IDs, you can simply input those values as well without retrieving them every time.
Executing a Trade on Binance
Exchanges can be complicated. Confusing documentation, inconsistent trading rules, and discrepancies across endpoints can cause the development process to be chaotic.
In the following examples, we will break down some of the most simple ways to execute trades on Binance. Without any complex logic, Shrimpy can help you execute an order on every major exchange in an identical way.
Simple Trade
The most simple way to execute a trade with Shrimpy is to use the “Create Trade” endpoint. All this endpoint requires is the relevant account IDs and the two assets you will trade “from” and “to”.
It will look something like the following.
create_trade_response = client.create_trade(
    user_id, # The ID of the user
    account_id, # The ID of the account linked to the user
    from_symbol, # The asset you want to sell
    to_symbol, # The asset you want to buy
    from_native_amount # How much of the "from" asset you want to sell
)
The result is a simple way to buy and sell assets without worrying about the specifics of how the trades are executed. You don’t need to place individual limit orders, determine different trading pairs, or manually route the assets through different quote currencies. Shrimpy will take care of everything.
We can then put this endpoint to work by putting it into an example script. In this example, we will examine all of the assets you hold on the exchange. We will then iterate over the list of assets you own and sell all of them to a consolidation asset (in this case BTC).
STOP! Running this script will literally sell everything you own on the exchange and buy BTC. This is not a hypothetical script, this is a real example that executes real trades on your real exchange account. Don’t run the script if you don’t want to sell everything you own to Bitcoin.
import shrimpy

# Use your Shrimpy API public and private keys to create the client
shrimpy_public_key = '...'
shrimpy_secret_key = '...'

client = shrimpy.ShrimpyApiClient(shrimpy_public_key, shrimpy_secret_key)

# Note: since we created a user in our last example script,
# We can just retrieve our list of users.
users = client.list_users()
first_user_id = users[0]['id']

# Retrieve the accounts associated with this user
accounts = client.list_accounts(
    first_user_id
)
first_account_id = accounts[0]['id']

# Access balance data for the user account you previously created
balance = client.get_balance(
    first_user_id,   # user_id
    first_account_id # account_id
)

holdings = balance['balances']

# Select the asset for which you would like to consolidate
consolidation_symbol = 'BTC'

# Sell every asset besides the consolidation asset
for asset in holdings:
    asset_symbol = asset['symbol']
    asset_amount = asset['nativeValue']
    if asset_symbol != consolidation_symbol:
        print('Selling ' + str(asset_amount) + ' of ' + asset_symbol)
        create_trade_response = client.create_trade(
            first_user_id,
            first_account_id,
            asset_symbol,
            consolidation_symbol,
            asset_amount
        )
Smart Order Routing
In the previous example, we did not use any intelligent routing. Essentially, Shrimpy will identify the “from” and “to” asset, then sell the “from” asset to BTC, then buy the “to” asset from BTC. This can be inefficient if there are alternative quote currencies that the asset could utilize.
In many cases, using the smart order routing option would be ideal. This simple flag tells Shrimpy to evaluate every possible route when deciding how we should trade the “from” asset and acquire the “to” asset.
import shrimpy

# Use your Shrimpy API public and private keys to create the client
shrimpy_public_key = '...'
shrimpy_secret_key = '...'

client = shrimpy.ShrimpyApiClient(shrimpy_public_key, shrimpy_secret_key)

# Note: since we created a user in our last example script,
# We can just retrieve our list of users.
users = client.list_users()
first_user_id = users[0]['id']

# Retrieve the accounts associated with this user
accounts = client.list_accounts(
    first_user_id
)
first_account_id = accounts[0]['id']

# Access balance data for the user account you previously created
balance = client.get_balance(
    first_user_id,   # user_id
    first_account_id # account_id
)

# Execute a market order
smart_order_response = client.create_trade(
    first_user_id,    # user_id
    first_account_id, # account_id
    'BTC',            # from_symbol
    'ETH',            # to_symbol
    '0.01'            # amount of from_symbol
    True              # enable smart_routing
)
Notice how the only difference is the extra flag in the request for enabling smart routing and setting it to “True”.
Charting Candlesticks
Building an application with a user interface means we will need other components to illustrate the current state of the market to users. One example of data the user may wish to receive is candlestick charts.
Candlestick charts help traders decide when they should buy or sell an asset.
Shrimpy provides access to free endpoints for accessing real-time candlestick data. Every time a new trade is executed on the exchange, the candlesticks are updated in real-time. These candlesticks can then be polled on a regular interval in order to display them in the user interface in your application.
In the following example, we will poll the latest candlesticks for the ETH/BTC trading pair on the Binance exchange. This same endpoint can be used for every other major exchange, so there is no difference between using Binance and other exchanges.
import shrimpy
import plotly.graph_objects as go

shrimpy_public_key = '...'
shrimpy_secret_key = '...'

# Collect the historical candlestick data
client = shrimpy.ShrimpyApiClient(shrimpy_public_key, shrimpy_secret_key)
candles = client.get_candles(
    'binance', # exchange
    'ETH',     # base_trading_symbol
    'BTC',     # quote_trading_symbol
    '1d'       # interval
)

dates = []
open_data = []
high_data = []
low_data = []
close_data = []

# Format the data to match the plotting library
for candle in candles:
    dates.append(candle['time'])
    open_data.append(candle['open'])
    high_data.append(candle['high'])
    low_data.append(candle['low'])
    close_data.append(candle['close'])

# Plot the candlesticks
fig = go.Figure(data=[go.Candlestick(x=dates,
                       open=open_data, high=high_data,
                       low=low_data, close=close_data)])
fig.show()
Putting It All Together
There is only one thing left for us to do. That’s to put everything we’ve discussed so far together into a single script. This script will monitor the ticker for the BTC/USDT pair on Binance and execute a trade to sell all of your BTC when the value of BTC has gone above 10,000 USDT. This is a simple example of how you can combine the data from the websockets to execute a trading strategy.
import shrimpy
import time

shrimpy_public_key = '...'
shrimpy_secret_key = '...'

# Assign your exchange keys for which you wish to access the balance data
exchange_name = "binance"
exchange_public_key = '...'
exchange_secret_key = '...'

# Create the websocket client
api_client = shrimpy.ShrimpyApiClient(shrimpy_public_key, shrimpy_secret_key)
raw_token = api_client.get_token()
ws_client = shrimpy.ShrimpyWsClient(error_handler, raw_token['token'])

# Create a user which will be linked to our exchange
# Skip this step (or use the "list users" endpoint) if you've already created a user
create_user_response = api_client.create_user('The Shrimp Master')
user_id = create_user_response['id']

# Link our first exchange so we can access balance data
# Skip this step (or use the "list accounts" endpoint) if you've already linked an account
link_account_response = api_client.link_account(
    user_id,
    exchange_name,
    exchange_public_key,
    exchange_secret_key
)

account_id = link_account_response['id']

# Wait while Shrimpy collects data for the exchange account
# Only required the first time linking
time.sleep(5)

# Access balance data for the user account you previously created
balance = api_client.get_balance(
    user_id,   # user_id
    account_id # account_id
)

btcAmount = 0

for asset in balance['balances']:
    if asset['symbol'] = 'BTC':
        btcAmount = asset['nativeValue']

# This is a sample handler, it simply prints the incoming message to the console
def error_handler(err):
    print(err)

# This is a sample handler, it simply prints the incoming message to the console
def handler(msg):
    price = msg['content'][0]['price']
    if int(price) > 10000:
        smart_order_response = api_client.create_trade(
            user_id,    # user_id
            account_id, # account_id
            'BTC',            # from_symbol
            'USDT',           # to_symbol
            btcAmount         # amount of from_symbol
            True              # enable smart_routing
        )

subscribe_data = {
    "type": "subscribe",
    "exchange": "binance",
    "pair": "btc-usdt",
    "channel": "trade"
}

# Start processing the Shrimpy websocket stream!
ws_client.connect()
ws_client.subscribe(subscribe_data, handler)
Conclusions
Armed with these scripts, it’s possible to build any number of exciting trading bots on Binance. As you explore more things about trading and the Shrimpy Trading APIs, you may find other useful endpoints, like the limit order endpoints. These give you finer control over the orders that you place on the exchange.
We encourage everyone to explore everything that we offer and make suggestions in our Developer Telegram. The cryptocurrency market is exciting and this is just the beginning of a new way to trade assets.
Shrimpy is an application for constructing custom cryptocurrency index funds, rebalancing, and managing a diverse portfolio of digital assets. Automate your portfolio by linking to any of the 16 crypto exchanges we support.
Shrimpy’s Universal Crypto Exchange APIs are designed for developers. Integrating with our unified APIs gives you instant access to uniform endpoints for trading, data collection, user management, and more across every major cryptocurrency exchange.
To access the complete Python and Node libraries, follow these links:
Node
Python
Follow us on Twitter and Facebook for updates, and ask any questions to our amazing, active communities on Telegram & Discord.
Thanks for stopping by!
The Shrimpy Team
Введение
В этой статье представлен простой бот для торговли на бирже Binance.
Бот создает ордер на покупку, основываясь на средней цене из указанного количества предложений на покупку, после чего отслеживает его. Если ордер не выполнен в течении определенного количества времени, ордер отменяется. Если ордер исполнен, выставляется ордер на продажу с указанным профитом. После исполнения ордера на продажу торговля идет по новому кругу.
Поддерживается торговля по нескольким парам, по умолчанию бот работает с комиссией BNB, но поддерживается так же торговля с обычным видом комиссии.
Об особенностях торговли
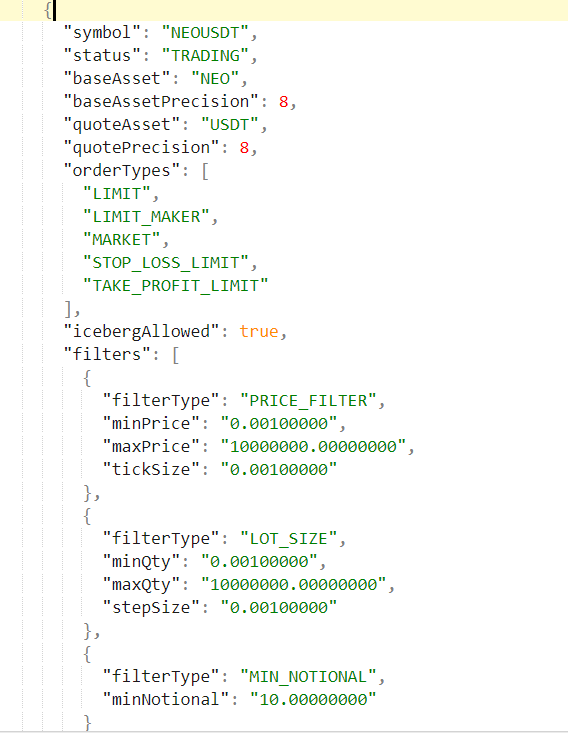
Цены и объемы
Binance, в отличии от многих бирж, жестко регламентирует размеры лотов и порядки цен. Нельзя купить произвольное количество валюты по произвольному курсу — для каждой пары заведены ограничения, которых необходимо придерживаться при создании ордера.
Существует шаг цены – например, для пары NEOUSDT цена должна быть кратной 0.00100000. Нельзя выставить ордер по цене, 0.1234 – можно либо 0.123, либо 0.125.
Существует шаг продаваемых/покупаемых монет – например, для пары NEOUSDT шаг объема 0.001 – поэтому не получится продать или купить 123.45678 – можно либо 123.456, либо 123.457.
Ну, и как везде, нельзя создавать ордера меньше указанного объема.
Эти ограничения находятся можно получать через api-метод exchangeInfo (подробности о работе API Binance тут), нужная информация находится в разделе filters по каждой паре. Для цены это tickSize, для объема stepSize в соответствующих структурах данных.
Бот учитывает эти ограничения, но обратите внимание, как меняется цена торгов:
Допустим, вы собираетесь торговать на 11 USDT.
Бот получает цены из стакана – например, 5 цен — [118.753, 118.750, 118.730, 118.712, 118.704]. Берет среднюю — 118,7298. Т.к. минимальный шаг цены 0.001, то берется цена 118,729 (в нижнюю сторону).
После этого бот вычисляет количество валюты, которое можно купить по этой цене – делит 11 USDT на 118,729, получает 0,092648. Т.к. минимальный шаг по монетам 0.001, то выбирается количество 0,092.
В итоге бот покупает 0.092 NEO по курсу 118,729 – и итоговая сумма торгов составит 10,923068. Это меньше, чем указано в настройках, но бот вынужден подстраиваться под требования биржи.
При продаже бот будет продавать так, чтобы получить 10,923068 + нужный процент профита.
Комиссии
У бинанса своя система взимания комиссии. Точнее, их две. По умолчанию, используется такой вид комиссии – неважно, по какой паре вы торгуете, комиссия списывается с вашего счета в валюте BNB. BNB – это собственная валюта Binance, подробнее я расскажу о ней отдельно, но суть такая:
Вы, например, торгуете NEO-USDT. Совершаете покупку по курсу X, рассчитывая купить Y монет NEO и потратить Z USDT. Вы выставляете ордер, он исполняется, и вы получаете Y монет NEO, потратив Z USDT. Вы, как бы, ничего не потеряли на этих торгах – но с вас списалось S монет BNB.

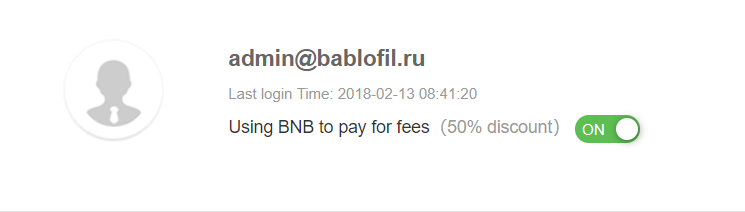
В общем-то, это хорошо – потому что Binance даёт скидку. Оплачивая комиссию через BNB, вы платите на 50% меньше. Теоретически, если комиссия 0.1%, то оплачивая комиссию таким образом, вы платите 0.05% с каждой сделки. Бот рассчитан в первую очередь на такую комиссию, и рекомендуется использовать именно её. Если вдруг вы хотите торговать с обычным видом комиссии, то зайдите в свой профиль и переключите флажок:
После этого в боте нужно будет поменять переменную
USE_BNB_FEES = True
На
USE_BNB_FEES = False
Правда, я не вижу, зачем бы вам это делать. В любом случае, если вы раньше не торговали на Binance, то первым делом нужно прикупить немного BNB. Прикупить, и пусть лежат. Если вы, тем более, будете торговать с базовой парой BNB, вам это будет на руку.
Как лучше пользоваться ботом
Бот покупает чуть ниже текущего курса, и продает с профитом, чуть задирая цену. Т.к. цена имеет тенденцию то расти, то падать, вполне вероятна такая ситуация, что бот купит, выставит на продажу, и будет долго ждать роста. Что бы снизить количество таких ситуаций, лучше отслеживать обстановку и запускать бота по тем парам, которые обещают рост.
Такой вывод вы можете сделать, либо используя индикаторы, либо новости – например, если валюту добавили на биржу, скорее всего она первое время будет расти. Если IBM решил вложиться в Etherium, скорее всего эфир будет расти. Если MACD и RSI показывают сигналы к покупке, скорее всего будет расти, и т.п.
Выбрав пару для торгов, вы останавливаете бота (если запущен), и добавляете пару в конфиг, вот так:
"""
    Пропишите пары, на которые будет идти торговля.
    base - это базовая пара (BTC, ETH,  BNB, USDT) - то, что на бинансе пишется в табличке сверху
    quote - это квотируемая валюта. Например, для торгов по паре NEO/USDT базовая валюта USDT, NEO - квотируемая
"""
pairs = [
     {
        'base': 'USDT',
        'quote': 'BTC',
        'offers_amount': 5, # Сколько предложений из стакана берем для расчета средней цены
                            # Максимум 1000. Допускаются следующие значения:[5, 10, 20, 50, 100, 500, 1000]
        'spend_sum': 11,  # Сколько тратить base каждый раз при покупке quote
        'profit_markup': 0.005, # Какой навар нужен с каждой сделки? (0.001 = 0.1%)

    },{
        'base': 'USDT',
        'quote': 'NEO',
        'offers_amount': 5, # Сколько предложений из стакана берем для расчета средней цены
                            # Максимум 1000. Допускаются следующие значения:[5, 10, 20, 50, 100, 500, 1000]
        'spend_sum': 11,  # Сколько тратить base каждый раз при покупке quote
        'profit_markup': 0.005, # Какой навар нужен с каждой сделки? (0.001 = 0.1%)

    }
]
Пар можно добавлять любое количество, угрозу бана это не спровоцирует, просто отдельные пары будут реже проверяться, но ответы сервера тут шустрые, так что это особо не скажется на производительности.
Если же вы думаете, что ситуация становится опасной, и пора бы прекратить торги, то дождитесь, когда бот выставит ордер на продажу, остановите бота, и удалите пару из конфигурации. Бот продолжит отслеживать ордер на продажу, но новых покупок создавать не будет.
Если вы отменили ордера или что-то еще сделали на бирже, но бот «запомнил» и теперь проверяет несуществующие ордера, у вас есть два варианта:
- Удалите файл binance.db из папки с ботом. Это вынудит бота начать всё с чистого листа, и он начнет работать с нуля по всем парам из конфигурации. Открытые ордера на бирже пропадут из его надзора, и вам нужно будет разрешить их судьбу самостоятельно.
- Если вы не хотите терять открытые ордера по другим парам, то откройте файл binance.db с помощью программы SQLiteStudio, Вы запустите программу, добавите базу данных через обзор, там откроете таблицу orders и удалите оттуда только нужный ордер. Кстати говоря, т.к. бот записывает все свои покупки и продажи, с помощью этой программы вы можете выгружать историю торгов бота в Excel и анализировать.
Реклама
Установка и запуск
- Зарегистрироваться на Binance (если еще не сделали, вот инструкция)
- Пополнить баланс
- Убедиться, что на балансе есть BNB (если нет, докупить чуток)
- Получить API-ключи (инструкция). Потребуется включить двухфакторную авторизацию, я советую использовать SMS, но можно и Google Authenticator.
- Установить Python версии 3.6 и выше. Прямую ссылка на скачивание я не указываю, т.к. к моменту прочтения статьи все может измениться, вам нужно зайти на официальный сайт по ссылке https://www.python.org/downloads/, скачать и установить Python 3.6 и выше (кнопка слева). При установке поставьте все галочки. В идеале, выберите расширенный режим установки (advanced) и поставьте все галки там – нужны будут права администратора.
- Скачать архив с ботом.
- Распаковать в любую директорию на компьютере
- Запустить файл setup.bat – установятся нужные модули (для надежности, запустите и так, и от имени администратора)
- Открыть файл binance_bot.py в текстовом редакторе и прописать API-ключи и настройки (об этом ниже)
- Запустить файл run.bat – запустится бот и начнет зарабатывать деньги.
Остановить бота можно закрыв окно крестиком.
Реклама
Настройка

Настроек не так много, в API_KEY и API_SECRET нужно прописать ключи, которые вы получили на бирже.
В пары нужно прописать соответственно пары, на которые планируете торговать, максимальную сумму, которую планируете тратить, и желаемый процент прибыли. С этим есть некоторый момент, т.к. вы платите комисиию BNB. Я советую ставить 0.003 (0.3%) и выше, но если у вас есть возможность дешево получать BNB, то можно и меньше.
BUY_LIFE_TIME_SEC – через сколько отменять ордер на покупку (если он не исполнен), в секундах.
STOCK_FEE – комиссия биржи, если вдруг решите торговать без BNB.
USE_BNB_FEES = True – если торгуете с BNB, False – в противном случае.
Реклама
ВСЁ!
Я гонял этого бота несколько дней, меня не забанили, я немного увеличил количество USDT – так что я со спокойной душой передаю вам бота и его исходный код. Вы можете модифицировать его под свои нужды, или обратиться за доработкой.
Я желаю вам хороших заработков, если в процессе эксплуатации будут выявлены какие-то проблемы, или возникнут вопросы, смело пишите в комментарии или лично мне, контакты есть в профиле.
Шаг 1. Установка необходимых библиотек
Нам потребуется набор библиотек и инструментов для приложений. Для этого мы будем использовать такие библиотеки как NumPy, Pandas и Scikit-learn. Чтобы установить их, можно использовать команду pip:
pip install numpy pandas scikit-learn
Шаг 2. Настройка веб-фреймворков
Для создания веб-интерфейса для вашего бота мы будем использовать фреймворки Flask и Django. Чтобы установить их, можно использовать команду pip:
pip install flask django
Шаг 3. Создание алгоритма торговли
Для создания алгоритма торговли мы будем использовать алгоритмы машинного обучения, такие как регрессия. Мы можем использовать данные для предсказания цен и определения, когда войти или выйти из торговой пары. Мы также можем использовать аналитические платформы, такие как Plotly или Bokeh, чтобы визуализировать данные и понять, как влияют конкретные параметры на торговые решения.
Шаг 4. Подключение бота к торговой платформе
Чтобы подключить бота к торговой платформе, мы можем использовать API-интерфейсы для подключения бота к различным криптовалютным биржам, таким как Coinbase, Binance или Kraken.
Шаг 5. Запуск бота
После успешной настройки и подключения бота к бирже мы можем запустить его и начать торговать. Но мы должны постоянно отслеживать ситуацию и делать необходимые изменения в конфигурации бота, чтобы он мог адаптироваться к меняющимся условиям рынка.
Второй алгоритм
- Начните с установки установки библиотек Python: NumPy, Pandas и Scikit-learn, которые помогут преобразовывать данные и использовать алгоритмы машинного обучения.
- Далее установите фреймворки для разработки приложений, такие как Flask и Django, чтобы создать веб-интерфейс для вашего бота.
- Следующим шагом будет проектирование алгоритма для торговли. Для этого установите параметры и выберите алгоритм машинного обучения для идентификации точки входа и выхода из торговой пары.
- Для отслеживания активности торговли и просмотра динамики цен установите аналитические платформы, такие как Plotly или Bokeh, чтобы визуализировать данные и определить, как конкретные параметры влияют на торговые решения.
- Затем подключите бота к торговой платформе с помощью API-интерфейсов, таких как Coinbase, Binance или Kraken.
- После этого вы можете протестировать алгоритм торговли и проверить точность предсказания с помощью различных аналитических платформ.
- Наконец, запустите бота на торговой платформе и начните торговать. Отслеживайте ситуацию и делайте регулярные изменения в настройках бота, чтобы он мог адаптироваться к изменениям на рынке.
1 Шаг: Установить библиотеки и инструменты для приложения, такие как NumPy, Pandas и Scikit-learn. Эти библиотеки предоставят инструменты для анализа и аналитики, которые будут необходимы для создания торгового бота. Настройте интерпретатор Python, чтобы вы могли использовать инструменты и библиотеки, необходимые для разработки приложения.
2 Шаг: Выбрать фреймворк для разработки приложений, например, Flask или Django. Эти фреймворки предоставят идеальные инструменты для разработки веб-решений и интерфейсов. Сконфигурируйте фреймворк и интерпретатор Python, чтобы они могли работать вместе для разработки приложения.
3 Шаг: Создать алгоритм для торговли, отслеживающий данные, которые помогут выявить входную и выходную точку торговой пары. Для этого можно использовать методы машинного обучения, такие как регрессия, для предсказания цен и определения точек входа и выхода. Настройте алгоритм машинного обучения, чтобы подходить для ваших торговых целей.
4 Шаг: Используйте аналитические платформы, такие как Plotly или Bokeh, чтобы визуализировать данные и понять, как влияют конкретные параметры на решения по торговле. Настройте аналитические платформы, чтобы они могли отображать данные так, как вы хотите.
5 Шаг: Подключите бота к торговой платформе используя API-интерфейсы, доступные для бирж криптовалют, таких как Coinbase, Binance или Kraken. Настройте API-интерфейсы, чтобы бот мог получать данные о рынке и выполнять торговые операции на вашей платформе. Вы можете также создать интерфейс для отслеживания производительности бота и просмотра торговых историй.
6 Шаг: Проверьте работу бота, чтобы убедиться, что он правильно использует данные и правильно использует алгоритмы, которые вы проектировали. Если вы недовольны работой бота, вы можете изменить алгоритмы и проверить работу бота заново. Также проверьте, что бот правильно отвечает на данные биржи и не делает неправильные торговые действия.
7 Шаг: Проведите тестирование бота для проверки его надежности и стабильности. Проверьте производительность бота на различных платформах и проверьте его способность корректно обрабатывать данные. Также проверьте скорость бота и его способность адаптироваться к изменениям рынка. Если бот не удовлетворяет вашим требованиям, продолжайте править алгоритмы и тестировать бота, пока он не будет работать как надо.
8 Шаг: После окончания тестирования бота и достижения желаемых результатов, реализуйте мониторинг и отчетность, чтобы проверять производительность бота и делать аналитику данных. Добавьте другие инструменты для наблюдения за рыночными трендами, такие как графики цен или аналитику торговых операций. Это поможет вам проанализировать результаты бота и поможет принять решения для дальнейшего улучшения работы бота.
Создание торгового бота на Python: шаг первый — установка необходимых библиотек
Процесс создания торгового бота на Python можно разделить на несколько этапов. На первом этапе необходимо установить необходимые библиотеки и подготовить необходимые средства для последующей работы.
Установка Python
Для начала необходимо установить Python, для этого можно воспользоваться специальным дистрибутивом, доступным на официальном сайте Python. На этом этапе необходимо определиться с версией Python, которую вы хотите использовать. В данном случае мы будем использовать Python 3.7.
Установка библиотек
Для работы с торговым ботом нам потребуются следующие библиотеки:
- Pandas — это библиотека для анализа и обработки данных. Она позволяет работать с различными типами данных, включая таблицы, матрицы и даже временные ряды.
- Numpy — это библиотека для работы с массивами и матрицами. Она позволяет выполнять различные математические операции и предоставляет инструменты для анализа данных.
- Matplotlib — это библиотека для визуализации данных. Она позволяет создавать различные графики и диаграммы, которые могут быть использованы для анализа данных.
- Scikit-learn — это библиотека для машинного обучения. Она предоставляет инструменты для обучения моделей машинного обучения и применения их для анализа данных.
- TensorFlow — это библиотека для глубокого обучения. Она предоставляет инструменты для обучения нейронных сетей и применения их для анализа данных.
Для установки библиотек можно воспользоваться пакетным менеджером pip. Для этого необходимо открыть командную строку и выполнить следующую команду:
pip install pandas numpy matplotlib scikit-learn tensorflow
Эта команда установит все необходимые библиотеки.
Установка дополнительных инструментов
Для работы с торговым ботом нам потребуются дополнительные инструменты. Это может быть инструмент для автоматической сборки кода, инструмент для интеграции с другими системами и т.д.
Для установки этих инструментов можно воспользоваться пакетным менеджером pip. Для этого необходимо открыть командную строку и выполнить следующую команду:
pip install <имя инструмента>
Например, для установки инструмента для автоматической сборки кода необходимо выполнить следующую команду:
pip install make
Заключение
На первом этапе процесса создания торгового бота на Python мы установили необходимые библиотеки и инструменты. Теперь мы можем перейти к следующему этапу — подготовке данных.
- Introduction
- Importing Libraries and Keys
- Current Price
- Account Balance
- Latest Transaction
- Submit Order
- Trading Loop
- Bash Script
Introduction
This tutorial will show the reader how to set up a Binance Trading Robot. The robot is written in Python and uses the Binance REST API to communicate with Binance’s trading platform. REpresentational State Transfer (REST) is a standardized architecture for systems to communicate with one another. An Application Programming Interface (API) is a method for systems to communicate with one another. Therefore, a REST API is an API that adheres to the REST architecture. We will use the Python library requests to communicate with the Binance REST API. This will allow us (clients) to send ‘get’ and ‘post’ requests to Binance (servers) which will send back responses that contain account information and trade confirmations.
This Binance Trading Robot runs continuously in a while True: loop. The trading robot has four functions that are called upon in the while loop: current_price() (checks current price for selected symbol pair), account_balance() (checks account balance for selected symbol pair), latest_transaction() (checks latest transaction for selected symbol pair), and submit_order() (submits order for selected symbol pair). The robot submits market orders and its logic can be seen below.
The function submit_order() can be commented out in the while loop to avoid submitting an order to understand the logic of the bot.
- Checks account balance
account_balance()to see how much of the symbol pair is free to trade - Checks latest transaction
latest_transaction()for the symbol pair to see the price it was traded at - Calculates buy/sell price for the next trade based on the latest transaction price
- Submits order
submit_order()to trade all available free asset if buy/sell price is met based on current price of symbol pair - Wait for a designated amount of time and go back to Step 1.
Disclaimer: I do not provide personal investment advice and I am not a qualified licensed investment advisor. The information provided may include errors or inaccuracies. Conduct your own due diligence, or consult a licensed financial advisor or broker before making any and all investment decisions. Any investments, trades, speculations, or decisions made on the basis of any information found on this site and/or script, expressed or implied herein, are committed at your own risk, financial or otherwise. No representations or warranties are made with respect to the accuracy or completeness of the content of this entire site and/or script, including any links to other sites and/or scripts. The content of this site and/or script is for informational purposes only and is of general nature. You bear all risks associated with the use of the site and/or script and content, including without limitation, any reliance on the accuracy, completeness or usefulness of any content available on the site and/or script. Use at your own risk.
Importing Libraries and Keys
The first thing that needs to be done is to import the necessary libraries. The numpy, time, and datetime libraries are imported for maths and creating some verification timestamps for the Binance Rest API. The requests library is used to communicate with the Binance Rest API while the hmac and hashlib libraries are used to hash the keys for authentication with the Binance Rest API. The yaml library safely imports the configuration file config.yml (which contains the keys to access the account) using the function yaml.safe_load() instead of a .py file since we don’t want potential malicious code to run within the .py file. The json library prints the response data from the Binance Rest API request in a more human readable format in order to better understand the format of the returned data. A link to the Binance Rest API is included along with the USE AT YOUR OWN RISK Disclaimer that is also located in the Introduction section.
The API and Secret Keys are then loaded from the config.yml file. DO NOT SHARE THESE WITH ANYBODY!!! This is how access to the account is granted. The Binance tutorial on how to create a Binance Rest API key pair can be seen here. The config.yml file should have the information and format below. Select the desired symbol_pair to trade and make sure symbol_first and symbol_second match accordingly.
config.yml file:
apikey: 'API_KEY_HERE'
secretkey: 'SECRET_KEY_HERE'
binance_bot.py file:
import numpy as np
import time
from datetime import datetime, timezone, timedelta
import requests
import hmac
import hashlib
import yaml
import json


# Binance Rest API documentation
# https://github.com/binance-us/binance-official-api-docs/blob/master/rest-api.md
# Each url gets you slightly different information and has slightly different input params
# api/v3/exchangeInfo, api/v3/depth, api/v3/trades, etc...

# Disclaimer:
# I do not provide personal investment advice and I am not a qualified licensed investment advisor.
# The information provided may include errors or inaccuracies. Conduct your own due diligence, or consult
# a licensed financial advisor or broker before making any and all investment decisions. Any investments,
# trades, speculations, or decisions made on the basis of any information found on this site and/or script,
# expressed or implied herein, are committed at your own risk, financial or otherwise. No representations
# or warranties are made with respect to the accuracy or completeness of the content of this entire site
# and/or script, including any links to other sites and/or scripts. The content of this site and/or script
# is for informational purposes only and is of general nature. You bear all risks associated with the use
# of the site and/or script and content, including without limitation, any reliance on the accuracy,
# completeness or usefulness of any content available on the site and/or script. Use at your own risk.


config = yaml.safe_load(open('config.yml')) # Load yaml file that has api and secret key

apikey=config['apikey'] # Api key from yaml file
secretkey=config['secretkey'] # Secret key from yaml file

symbol_pair='BNBBUSD' # Pair to trade
symbol_first='BNB' # Make sure this matches above
symbol_second='BUSD' # Make sure this matches above
Current Price
The first of the four functions discussed in the Introduction section is the current_price() function. This function calls the Binance Rest API ticker/price endpoint by passing in the endpoint url urlcp and parameters paramscp to the requests.get() function (which is from the requests library) to ‘get’ the ticker price. A response of <Response [200]> signifies a successful request. We convert the response from the Binance Rest API to the json format to extract the necessary data as a Python dictionary.The current_price() function returns the current price cp of the symbol_pair that will be used to calculate the buy/sell price to decide if the trade should be executed. The pretty print version of the response in json format can be seen below. This is useful as it allows the user to understand the format of the data in order to extract the necessary information.
def current_price():

	#################################
	##### Ticker price endpoint #####
	#################################
	urlcp='https://api.binance.us/api/v3/ticker/price'


	paramscp={'symbol':symbol_pair} # Ticker wanted
	response_cp = requests.get(urlcp, params=paramscp) # Sending GET request for ticker information
	# print(response_cp) # Returns HTTP Status, a value of 200 (OK) means no error

	pair_info = response_cp.json() # Convert response to JSON object for data extraction
	# print(json.dumps(pair_info, indent=4)) # Pretty print to understand structure of data
	cp = pair_info['price'] # Current price of symbol


	print('--------------------Current Price--------------------')
	print(f'{symbol_pair} Current Price: {cp}')
	print('n')

	return cp
>>> print(response_cp)

	<Response [200]>

>>> print(json.dumps(pair_info, indent=4))

	{
		"symbol": "BNBBUSD",
		"price": "411.13100000"
	}
Account Balance
The next function is the account_balance() function which calls the Binance Rest API account endpoint to acquire the symbol_pair account balance. The endpoint url urlcp and parameters paramscp are passed to the requests.get() function in a slightly different manner since we are now using the generated keys to ‘get’ specific account information. Again: DO NOT SHARE THESE WITH ANYBODY!!! This is how access to the account is granted.
A timestamp in milliseconds is created for this request since the Binance Rest API has timing security to ensure communication can only happen within a small window of time. The hmac (Hashing for Message Authentication) library hashes the secret key secretkey with Secure Hash Algorithm 256-bit (SHA-256) using the hash library to create an authentication signature for the API. The url, queryString (which contains the parameters), signature, and api key apikey are all passed to the requests.get() function to ‘get’ the account balance.
If we take a look at the pretty print version of the response in json format below, we can start extracting some key information now that we know how the response data looks like. We want to extract how much of each asset in the symbol_pair we have free to trade. The balances key in the response dictionary has a list of assets and how much of each are free to trade or locked. We want to extract the symbol_pair information but we can’t get the value of the desired asset using the key:pair method since the value of the key balances is a list of dictionaries and not a dictionary itself so we cycle through the list until we get the index of the desired assets. We print some information regarding the account balance for the symbol_pair and return the assetfree and assetfree2 variables. These variables contain the total amount of free assets in the symbol_pair that we can use to trade later on in the script.
def account_balance():

	print('###############################################################')
	print('########################Account Balance########################')
	print('###############################################################')
	print('nn')

	########################################
	##### Account information endpoint #####
	########################################
	url = "https://api.binance.us/api/v3/account"


	# Creating datetime variable required for account connection
	now = datetime.now(timezone.utc) # current date
	epoch = datetime(1970, 1, 1, tzinfo=timezone.utc)  # use POSIX epoch
	posix_timestamp_micros = (now - epoch) // timedelta(microseconds=1)
	posix_timestamp_millis = posix_timestamp_micros // 1000  # or `/ 1e3` for float

	# Input variables
	queryString = "timestamp=" + str(posix_timestamp_millis)
	# Creating hash for authentication
	signature = hmac.new(secretkey.encode(), queryString.encode(), hashlib.sha256).hexdigest()
	# Combining account information endpoint url with input variables and authentication hash
	url = url + f"?{queryString}&signature={signature}"

	# Sending GET request for account information
	response_ai = requests.get(url, headers={'X-MBX-APIKEY': apikey})

	# Convert response to JSON object for data extraction
	account_info=response_ai.json()
	# print(json.dumps(account_info, indent=4)) # Pretty print to understand structure of data


	# Can't call out the symbols directly because 'balances' is a list of dictionaries and not a dictionary
	# Cycle through the list of dictionaries containing the different assets
	for i, balance in enumerate(account_info['balances']):

		if balance['asset']==symbol_first: # Finding first symbol in symbol pair
			ifirst=i

		if balance['asset']==symbol_second: # Finding second symbol in symbol pair
			isecond=i

	# First asset information
	asset=account_info['balances'][ifirst]['asset'] # Asset name
	assetfree=account_info['balances'][ifirst]['free'] # Asset amount that is free to trade
	assetlocked=account_info['balances'][ifirst]['locked'] # Asset amount that is locked and can't be traded

	assetfreecp=float(assetfree)*float(cp) # Current price of asset that is free
	assetlockedcp=float(assetlocked)*float(cp) # Current price of asset that is locked

	# Printing information
	print(f'Asset: {asset}')
	print(f'Free: {assetfree} at {cp} = ${assetfreecp}' )
	print(f'Locked: {assetlocked} at {cp} = ${assetlockedcp}')
	print(f'Subtotal: $ {assetfreecp+assetlockedcp}')
	print(f'Subtotal: $ {assetfreecp+assetlockedcp}')
	print('n')

	print('+')
	print('n')

	# Second asset information
	asset2=account_info['balances'][isecond]['asset'] # Asset name
	assetfree2=account_info['balances'][isecond]['free'] # Asset amount that is free to trade
	assetlocked2=account_info['balances'][isecond]['locked'] # Asset amount that is locked and can't be traded

	# Printing information
	print(f'Asset: {asset2}')
	print(f'Free: {assetfree2}')
	print(f'Locked: {assetlocked2}')
	print(f'Subtotal: {float(assetfree2)+float(assetlocked2)}')
	print('n')

	# Total net worth in account
	print('----------Total----------')
	print('$',assetfreecp+assetlockedcp+float(assetfree2)+float(assetlocked2))
	print('nn')

	print('###############################################################')
	print('########################Account Balance########################')
	print('###############################################################')
	print('n')

	return assetfree, assetfree2
>>> print(json.dumps(account_info, indent=4))

	{
		"makerCommission": 10,
		"takerCommission": 10,
		"buyerCommission": 0,
		"sellerCommission": 0,
		"canTrade": true,
		"canWithdraw": true,
		"canDeposit": true,
		"updateTime": ############,
		"accountType": "SPOT",
		"balances": [
			{
				"asset": "BTC",
				"free": "0.00000000",
				"locked": "0.00000000"
			},
			{
				"asset": "ETH",
				"free": "0.00000000",
				"locked": "0.00000000"
			},
			...,
			{
				"asset": "BNB",
				"free": "0.00000000",
				"locked": "0.00000000"
			},
			...,
			{
				"asset": "POLY",
				"free": "0.00000000",
				"locked": "0.00000000"
			}
		],
		"permissions": [
			"SPOT"
		]
	}
Latest Transaction
The third function we have is the latest_transaction() function which calls the myTrades endpoint to see the user’s latest transactions. Just like the account information endpoint in the last section, we pass in all the relevant parameters and key information to get access to the user’s trade history. The response of the ‘get’ request returns a list of dictionaries containing the latest 500 symbol_pair trades. However, we only want the latest trade latest_transaction=trades[-1] since this is what we base our trading criteria on. The function returns the price tp_price at which this latest transaction occurred and whether it was a buy or sell order isBuyer. The value of isBuyer refers to the first asset in the symbol_pair.
def latest_transaction():
###################################
##### Account trades endpoint #####
###################################
url = "https://api.binance.us/api/v3/myTrades"
# Creating datetime variable required for account connection
now = datetime.now(timezone.utc)
epoch = datetime(1970, 1, 1, tzinfo=timezone.utc) # use POSIX epoch
posix_timestamp_micros = (now - epoch) // timedelta(microseconds=1)
posix_timestamp_millis = posix_timestamp_micros // 1000 # or `/ 1e3` for float
# Input variables
queryString = "symbol=" + symbol_pair + "×tamp=" + str(posix_timestamp_millis)
# Creating hash for authentication
signature = hmac.new(secretkey.encode(), queryString.encode(), hashlib.sha256).hexdigest()
# Combining account information endpoint url with input variables and authentication hash
url = url + f"?{queryString}&signature={signature}"
# Sending GET request for account trades
response_trades = requests.get(url, headers={'X-MBX-APIKEY': apikey})
# Convert response to JSON object for data extraction
trades=response_trades.json()
# print(json.dumps(trades, indent=4)) # Pretty print to understand structure of data
latest_transaction=trades[-1] # Latest transaction
print('--------------------Latest Transaction--------------------')
print('n')
tp=latest_transaction['symbol'] # Trading pair
tp_price=latest_transaction['price'] # Trading pair price
# Printing information
print(f'Trading Pair: {tp}')
print(f'Price: {tp_price}')
print('n')
# Buy and Sell is for the first symbol of the trading pair
# True is buy first symbol
# False is sell first symbol
isBuyer= latest_transaction['isBuyer']
symbol_first_qty = latest_transaction['qty'] # First Symbol quantity
symbol_second_qty = latest_transaction['quoteQty'] # Second Symbol quantity
# Buy first symbol
if isBuyer == True:
print('BUY')
print(f'{symbol_first} BOUGHT: {symbol_first_qty}')
print(f'{symbol_second} SOLD: {symbol_second_qty}')
# Sell first symbol
elif isBuyer == False:
print('SELL')
print(f'{symbol_first} SOLD: {symbol_first_qty}')
print(f'{symbol_second} BOUGHT: {symbol_second_qty}')
print('n')
return tp_price, isBuyer
>>> print(json.dumps(trades, indent=4))

	[
		{
			"symbol": "BNBBUSD",
			"id": ######,
			"orderId": ######,
			"orderListId": -1,
			"price": "######",
			"qty": "######",
			"quoteQty": "######",
			"commission": "######",
			"commissionAsset": "BUSD",
			"time": ######,
			"isBuyer": false,
			"isMaker": false,
			"isBestMatch": true
		},
		...,
		{
			"symbol": "BNBBUSD",
			"id": ######,
			"orderId": ######,
			"orderListId": -1,
			"price": "######",
			"qty": "######",
			"quoteQty": "######",
			"commission": "######",
			"commissionAsset": "BNB",
			"time": ######,
			"isBuyer": true,
			"isMaker": false,
			"isBestMatch": true
		}
	]
Submit Order
The final function submit_order() uses the order endpoint to submit a buy or sell market order based on the isBuyer variable. This variable also determines the parameters we pass in to the queryString. Note that Binance also has a dummy order endpoint to practice submitting an order which will return a response of <Response [200]> if successful. The type variable is set to ‘MARKET’ as this script will submit a market order but other options are available. The submit_order() function will buy or sell the maximum amount of free assets available (assetfree and assetfree2) acquired from the account_balance() function. Note that this time we are using requests.post() rather than requests.get() (like all the previous functions) since we want to ‘post’ some data to the Binance Rest API in order to submit the order. The other functions were just ‘getting’ data that was already there to post process but this time we want to ‘post’ some data. An example of the pretty print response after submitting a successful order can be seen in the order endpoint documentation linked at the beginning of this section.
The function submit_order() can be commented out in the while loop to avoid submitting an order to understand the logic of the bot.
def submit_order():
##########################
##### Order endpoint #####
##########################
url = "https://api.binance.us/api/v3/order"
# url = "https://api.binance.us/api/v3/order/test" # Test url for dummy trades
# Creating datetime variable required for account connection
now = datetime.now(timezone.utc)
epoch = datetime(1970, 1, 1, tzinfo=timezone.utc) # use POSIX epoch
posix_timestamp_micros = (now - epoch) // timedelta(microseconds=1)
posix_timestamp_millis = posix_timestamp_micros // 1000 # or `/ 1e3` for float
# Input variables
type='MARKET' # Order type
if isBuyer == False:
side='BUY' # Want to buy
quoteOrderQty=str(symbol_second_avail) # How much second symbol you want to use to buy first symbol
queryString = "symbol=" + symbol_pair + "&side=" + side + "&type=" + type + ""eOrderQty=" + quoteOrderQty + "×tamp=" + str(posix_timestamp_millis)
elif isBuyer == True:
side='SELL' # Want to sell
quantity=str(symbol_first_avail) #how much first symbol you want to sell to buy second symbol
queryString = "symbol=" + symbol_pair + "&side=" + side + "&type=" + type + "&quantity=" + quantity + "×tamp=" + str(posix_timestamp_millis)
# Creating hash for authentication
signature = hmac.new(secretkey.encode(), queryString.encode(), hashlib.sha256).hexdigest()
# Combining account information endpoint url with input variables and authentication hash
url = url + f"?{queryString}&signature={signature}"
# Sending POST request for order
response_order = requests.post(url, headers={'X-MBX-APIKEY': apikey})
# Convert response to JSON object for data extraction
order=response_order.json()
# print(json.dumps(order, indent=4)) # Pretty print to understand structure of data
symbol_first_transaction=order['executedQty'] # How much of first symbol was bought/sold
symbol_second_transaction=order['cummulativeQuoteQty'] # How much of second symbol was sold/bought
fills=order['fills'] # Order fill information
# Printing information
if isBuyer == False:
print('########################BOUGHT!########################')
print(f'{symbol_first} Bought: {symbol_first_transaction}')
print(f'{symbol_second} Sold: {symbol_second_transaction}')
print(f'Fills: {fills}')
print('########################BOUGHT!########################')
elif isBuyer == True:
print('########################SOLD!########################')
print(f'{symbol_first} Sold: {symbol_first_transaction}')
print(f'{symbol_second} Bought: {symbol_second_transaction}')
print(f'Fills: {fills}')
print('########################SOLD!########################')
print('nn')
time.sleep(5) # In seconds
Trading Loop
Now that all the essential functions for this Binance Trading Robot have been defined, they can be called in the continuous while loop that will automatically trade the selected symbol_pair. This while loop continuously runs without end since it will always be true while True:. The logic of the loop can be seen below.
- We first call the
current_price()function to acquire the current pricecpof thesymbol_pair. - We then call the
account_balance()function to calculate the user’ssymbol_pairaccount balance usingcpand return how much of each asset is free (assetfreeandassetfree2) to determine how much we can trade later on. - The
latest_transaction()function is called to grab the latest transaction pricetp_priceat which thesymbol_pairwas traded at and to determine whether the first symbol was bought or soldisBuyer. - The next section of code determines what the buy/sell percentage
bspcriteria is to submit an order to the Binance Rest API. The variablebspis used to calculate buy/sell pricedeltaneeded to submit the order based off of the latest transaction pricetp_price. - The script then goes into various if statements depending on the value of
isBuyer.- If
isBuyeris equal to False, then the latest transaction was a SELL meaning that we want to buy the first symbol. The buy pricebuypriceis then calculated to bebuyprice = tp_price - deltasince we want to buy at a lesser price than what we sold it at. The buy pricebuypriceis compared to the current pricecpto see if the buy order should be submittedif cp < buyprice; else it doesn’t do anything. - If
isBuyeris equal to True, then the latest transaction was a BUY meaning that we want to sell the first symbol. The sell pricesellpriceis then calculated to besellprice = tp_price + deltasince we want to sell at a greater price than what we bought it at. The sell pricesellpriceis compared to the current pricecpto see if the sell order should be submittedif cp > sellprice; else it doesn’t do anything.
- If
- Once the if statement is exited, the script waits an hour
time.sleep(60*60)before it goes to the next loop in the continous while loop.
⚠ ⚠ ⚠ The function submit_order() is commented out by default for buying and selling orders in the actual script on GitHub. ⚠⚠⚠
while True: # Continuously Run

	print('--------------------------------------------------New Check-------------------------------------------------')
	print('----------------------------------------',datetime.now(),'----------------------------------------')
	print('n')

	#################
	# Current Price #
	#################

	cp = current_price() # Current price of symbol


	###################
	# Account Balance #
	###################

	assetfree, assetfree2 = account_balance()

	time.sleep(5)


	######################
	# Latest Transaction #
	######################

	tp_price, isBuyer = latest_transaction()


	############
	# BUY/SELL #
	############

	print('--------------------BUY/SELL Criteria--------------------')
	print('n')

	# Trading fee is .075% if using bnb for fees https://www.binance.com/en/fee/schedule
	# Buy Sell Percentage bsp below must be greater than trading fee
	# But also needs to include a bit more margin to account for slippage since this script does market orders
	bsp=0.5 #buy/sell percent criteria in %
	print('Buy/Sell Percent Criteria: ', bsp, '%')
	delta=bsp/100*float(tp_price) # Delta of price calculated from buy/sell percent criteria
	print('Buy/Sell Criteria Delta (Previous Price * Percent): $', delta)
	print('n')

	#################
	# Current Price #
	#################

	# Do this again to get the latest and greatest price since prices change so quickly
	cp = current_price() # Current price of symbol


	##################
	##### Buying #####
	##################

	if  isBuyer == False: # If latest transaction was a SELL

		buyprice=float(tp_price) - delta # Price to buy at
		print('--------------------Checking to see if time to BUY--------------------')
		print(f'Needed Price to Buy (Previous Price - Delta): ${buyprice}')
		print('n')

		###################
		##### Yes Buy #####
		###################

		if float(cp) < buyprice:

			print('YES!')
			print(f'Current Price: {cp} < BUY Price: {buyprice}')
			print('n')

			symbol_second_avail=np.floor(float(assetfree2)) # Round down to nearest whole number for second asset
			print(f'{symbol_second} Available: {symbol_second_avail}')
			print('n')

			################
			# Submit Order #
			################

			submit_order()

			###################
			# Account Balance #
			###################

			#Do this again to get the latest and greatest account info after the new trade
			assetfree, assetfree2 = account_balance()


		##################
		##### No Buy #####
		##################

		elif float(cp) > buyprice:

			print('NO! PRICE IS HIGH!')
			print(f'Current Price: {cp} > BUY Price: {buyprice}')


		##################
		##### No Buy #####
		##################

		elif float(cp) == buyprice:

			print('NO! PRICE IS SAME!')
			print(f'Current Price: {cp} = BUY Price: {buyprice}')


	###################
	##### Selling #####
	###################

	elif isBuyer == True: # If latest transaction was a BUY

		sellprice=float(tp_price) + delta # Price to sell at
		print('--------------------Checking to see if time to SELL--------------------')
		print(f'Needed Price to Sell (Previous Price + Delta): ${sellprice}')
		print('n')

		####################
		##### Yes Sell #####
		####################

		if float(cp) > sellprice:

			print('YES!')
			print(f'Current Price: {cp} > SELL Price: {sellprice}')

			# Round down to nearest hundredths place 0.01 for first asset
			n_decimals=2
			a=float(assetfree)
			symbol_first_avail=((a*10**n_decimals)//1)/(10**n_decimals)
			print(f'{symbol_first} Available: {symbol_first_avail}')

			################
			# Submit Order #
			################

			submit_order()

			###################
			# Account Balance #
			###################

			#Do this again to get the latest and greatest account info after the new trade
			assetfree, assetfree2 = account_balance()


		###################
		##### No Sell #####
		###################

		elif float(cp) < sellprice:

			print('NO! PRICE IS LOW!')
			print(f'Current Price: {cp} < SELL Price: {sellprice}')


		###################
		##### No Sell #####
		###################

		elif float(cp) == sellprice:

			print('NO! PRICE IS SAME!')
			print(f'Current Price: {cp} = SELL Price: {sellprice}')


	print('nnnn')
	time.sleep(60*60) # In seconds
Bash Script
The b_rerun.sh bash script below can be used on a server/Raspberry Pi/etc… to run the binance_bot.py script and continuously check if it needs to be ran again just in case binance_bot.py crashes. The command ps aux | grep '[p]ython binance_bot.py' looks for a process running with the text ‘[p]ython binance_bot.py’ to see if the binance_bot.py script is running. If it finds a matching process, it continues, does nothing, and then waits for 30 minutes before continuing to the next loop in the continuous while loop. If it doesn’t find a matching process, it calls on python to run the script, outputs the script’s print to b_output.txt, and then waits for 30 minutes before continuing to the next loop in the continuous while loop. The b_rerun.sh bash script can be ran with sh b_rerun.sh &> b_rerunoutput.txt & where the echo (print) is outputted to b_rerunoutput.txt.
If the process ID (PID) for either the b_rerun.sh or binance_bot.py script needs to be found in order to terminate the process, one can use ps aux | grep '[b]_rerun.sh' and ps aux | grep '[b]inance_bot.py', respectively. Once the PIDs are found, one can terminate the scripts using kill PID. Note that b_rerun.sh needs to be killed as well or else it will start binance_bot.py up again after 30 minutes. If the square brackets [] are not included in these commands, the search itself will be returned as well. This is why the square brackets [] are used in the b_rerun.sh bash script since it will see the search itself and think the binance_bot.py script is still running when it is not.
>>> ps aux | grep '[b]_rerun.sh'
	pi         618  0.0  0.0   1940   420 pts/1    S    22:53   0:00 sh b_rerun.sh

>>> ps aux | grep 'b_rerun.sh'
	pi         618  0.0  0.0   1940   420 pts/1    S    22:53   0:00 sh b_rerun.sh
	pi         769  0.0  0.0   7348   492 pts/1    S+   23:00   0:00 grep --color=auto b_rerun.sh

>>> kill 618
b_rerun.sh file:
while :
do
	if ps aux | grep '[p]ython binance_bot.py'; then

		echo $(date)
		echo "Script is still running"

	else

		echo $(date)
		echo "Script stopped running, time to rerun"
		python binance_bot.py &> b_output.txt &

	fi

	sleep 30m
done
Мне был необходим для личного удобства бот в Телеграм, который умеет выполнять следующие действия:
- Показать текущий размер активов в USD(T).
- Показать изменения по портфелю в USD(T) за неделю и за все время.
Мне критически важно не использовать никакое приложение вида «все биржи в одном месте» в качестве proxy — да, я не хочу никому предоставлять свои ключи.
Если нужен — давайте напишем.
Что нам потребуется?
В качестве примера в данной статье я буду использовать криптовалютную биржу Binance. Стоит отметить, что никаких ограничений на использование с другими биржами нет — весь каркас тот же самый. Разве что взаимодействие по API будет немного другим (зависит от биржи).
- Нам потребуется функционал Telegram (куда же без него).
- Нам потребуется Dropbox вместо базы данных (о, да).
- Нам потребуется инструмент, где будет крутиться наш бот. Лично я использую Heroku, но можно использовать и AWS.
Создаем бота в Телеграм
Данный этап был описан сотни раз в огромном числе статей, найти которые не составляет проблем. Поэтому здесь будет кратко.
Нам нужно найти в телеграмме контакт @BotFather и выполнить последовательность команд
/start
/newbot
# Нужно ввести приватное имя нового бота и его публичное имя
# Я использую непопулярное публичное имя, т.к. тут будут наши финансы
# Здесь же мы получим API token нашего бота, сохраним его
# Запомним ссылку вида t.me/alias_binance_bot
База из топора
Для начала мы подготовим Dropbox.
Перейдем по ссылке и получим свой API token для Dropbox, нажав на кнопку Create App. Я создам доступ на отдельную папку в Dropbox.

На текущей странице нам необходимо будет сгенерировать OAuth 2.0 для Dropbox:

После создания пройдем на вкладку Permissions и установим права на files.content.write
Теперь по ссылке у нас появилась папка APPS. Зайдем в нее, далее зайдем в поддерикторию с названием нашего бота. Туда нам необходимо поместить файл totalData.txt, содержащий только пустой список.
[]Взаимодействие с Binance
Нам необходимо создать наш API ключ на бирже Binance.
Данная активность происходит по этой ссылке.
Результатом данного действия для нас будет API Key и Secret Key. В нашем случае будет достаточно прав только на чтение.

В качестве следующего шага мы напишем код, который будем использовать в дальнейшем.
import json
import time
import logging
import os
import binance
import dropbox
from binance.client import Client

logging.basicConfig(format='%(asctime)s - %(name)s - %(levelname)s - %(message)s',
                    level=logging.INFO)

logger = logging.getLogger(__name__)

binanceKey = ['BinanceKey']
binanceSecret = ['BinanceSecret']

dropboxToken = 'DropboxKey'

SLEEP_TIMEOUT = 1 * 60

def getBalance(idx):
    client = Client(binanceKey[idx], binanceSecret[idx])
    balances = client.get_account()['balances']
    balanceUsd = 0
    prices = client.get_all_tickers()
    for b in balances:
        curB = float(b['free']) + float(b['locked'])
        asset = b['asset']
        if curB < 0.000001:
            continue
        if asset == "USDT":
            balanceUsd += curB
        prices = sorted(prices, key=lambda p: p['symbol'])
        for p in prices:
            if p['symbol'] == str(asset) + "USDT":
                balanceUsd += float(curB) * float(p['price'])
    balanceUsd = float("%.2f" % balanceUsd)
    curt = time.time()
    return balanceUsd, curt

def getAccountInfo():
        amountUsd, timenow = getBalance(0)
        return {'usd': amountUsd, 'ts': timenow}

def loadJsonFromDropbox(dbx):
    for i in range(1):
        try:
            meta, resp = dbx.files_download('/totalData.txt')
            print(meta, resp)
            body = resp.content.decode('utf-8')
            resp.close()
            return json.loads(body)
        except Exception as ex:
            time.sleep(0.5 * (2 ** i))
            print(ex)

def saveJsonToDropbox(dbx, content):
    jsonBytes = json.dumps(content, indent=4).encode('utf-8')
    dbx.files_upload(jsonBytes, '/totalData.txt', mode=dropbox.files.WriteMode('overwrite'))

def addInfoPointToDropbox(dbx):
        content = loadJsonFromDropbox(dbx)
        content += [getAccountInfo()]
        saveJsonToDropbox(dbx, content)

def main():
    dbx = dropbox.Dropbox(dropboxToken)
    while True:
        addInfoPointToDropbox(dbx)
        time.sleep(SLEEP_TIMEOUT)
    amountUsd, timenow = getBalance(0)
    print(amountUsd)
    print(timenow)

if __name__ == '__main__':
	main()
Для начала попробуем запустить данный код локально. Если все сделано правильно — код будет исполняться каждые 60 секунд и спустя некоторое время файл totalData.txt должен выглядеть как-то так:
[
    {
        "usd": 2.81,
        "ts": 1670699696.930476
    },
    {
        "usd": 2.82,
        "ts": 1670699760.437554
    },
    {
        "usd": 2.84,
        "ts": 1670699823.819883
    },
    {
        "usd": 2.86,
        "ts": 1670700537.611635
    },
    {
        "usd": 2.88,
        "ts": 1670700600.6501918
    }
]
Еще немного кода. Как считать diff
Далее я приведу пример кода, с помощью которого мы будем получать сами изменения портфеля, а так же этот же код должен запускаться ботом.Как я уже писал выше — я использую Heroku. К тому же до недавнего времени данный сервис был бесплатным, но времена меняются и уже можно задуматься — стоит ли использовать Heroku или присягнуть AWS. Если вы, как и решите выбрать Heroku — я могу посоветовать данную статью.
Сам бот будет иметь одну ключевую команду — stats.
API ключей от Binance здесь уже не потребуется. Только token полученный при регистрации бота в Telegram и Dropbox token (вы же помните, Dropbox заменяет нам базу данных?). Для подсчета информации по неделе мы просто генерим список по балансам за неделю. При необходимости код несложно изменить и считать diff за любой временной срез.
import logging
from telegram.ext import Updater, CommandHandler, MessageHandler, Filters
import os
import dropbox
import time
import json
import datetime

PORT = int(os.environ.get('PORT', 5000))

# Enable logging
logging.basicConfig(format='%(asctime)s - %(name)s - %(levelname)s - %(message)s',
                    level=logging.INFO)

logger = logging.getLogger(__name__)
TOKEN = os.environ.get('TELEGRAM_TOKEN', None)

dropboxToken = ''

def start(update, context):
    update.message.reply_text('Hi!')

def loadJsonFromDropbox(dbx):
	meta, resp = dbx.files_download('/totalData.txt')
	body = resp.content.decode('utf-8')
	resp.close()
	return json.loads(body)

def getHistory():
	dbx = dropbox.Dropbox(dropboxToken)
	prices = loadJsonFromDropbox(dbx)

	timeNow = time.time()
	dtNow = datetime.datetime.now()
	dtToday = dtNow.replace(hour=0, minute=0, second=1)
	dtWeek = dtToday - datetime.timedelta(days=dtToday.weekday())
	dtAllTime = dtNow - datetime.timedelta(days=100000)

	stats = {
		'this week': {
			'since': dtWeek.timestamp(),
			'till': dtNow.timestamp(),
			'prices': []
		},
		'all time': {
			'since': dtAllTime.timestamp(),
			'till': dtNow.timestamp(),
			'prices': []
		}
	}

	for item in prices:
		for stat in stats:
			if stats[stat]['since'] < item['ts'] < stats[stat]['till']:
				stats[stat]['prices'].append(item)

	text = ''
	totalBalance = 0.
	totalBalanceUsd = 0.
	for stat in stats:
		usdt = [p['usd'] for p in stats[stat]['prices']]

		if len(usdt) >= 1:
			u1 = usdt[-1]
			u2 = usdt[0]
			valueUsd = '{:+.2f} USD'.format(u1 - u2)
		else:
		    values = 'n/a'
		text += '{}: {}n'.format(stat, valueUsd)
		if stat == 'all time':
			totalBalanceUsd = u1

	dt = datetime.datetime.fromtimestamp(prices[-1]['ts'])
	text += 'nLast update: {:%A %H:%M:%S} UTC+0n'.format(dt)

	return update.message.reply_text(text, parse_mode='markdown')

def main():
    updater = Updater(TOKEN, use_context=True)
    dp = updater.dispatcher

    dp.add_handler(CommandHandler("start", start))
    dp.add_handler(CommandHandler("stats", getHistory))
    dp.add_handler(MessageHandler(Filters.text, echo))
    dp.add_error_handler(error)

    updater.start_webhook(listen="0.0.0.0", port=int(PORT), url_path=TOKEN)
    print(TOKEN + ' <- TOKEN | ' + str(PORT) + ' <- PORT')
    updater.bot.setWebhook('https://ваш_хероку_апп.com/' + TOKEN)

    updater.idle()

if __name__ == '__main__':
    main()
Вместо заключения
В результате применения команды stats вы должны получить в ответ, например, такое сообщение:
Стоит отметить, что данного бота можно развивать и дальше до еще более прикладных применений.
Например, можно реализовать команду buy или sell. Можно подключить дополнительные аккаунты или сразу несколько бирж и мониторить все свои портфели в одном месте. Удобно? Удобно!
Для подключения дополнительных аккаунтов достаточно добавить еще один вызов в этом месте (и конечно же дополнительные api ключи — там они уже и так в list’е).
amountUsd, timenow = getBalance(1)Однако данные упражнения мы оставим дорогим читателям для самостоятельной работы. Всё же потребности у всех разные 🙂
В целом, все исходники уже представлены в статье, но на всякий случай — также они на GitHub.
Благодарю за внимание и буду рад ответить на ваши вопросы.