In this tutorial, we’ll make a Python Discord bot that can play music in the voice channels and send GIFs. Discord is an instant messaging and digital distribution platform designed for creating communities. Users can easily enter chat rooms, initiate video calls, and create multiple groups for messaging friends.
We’ll skip the basics and jump straight over to the music playing. Check out this Medium article to catch up on the basics of setting up your bot. In the end, our Python Discord bot will look like the cover image of this article!
Before we dive in: remember to allow Administrator permissions for the bot.
Thanks to Rohan Krishna Ullas, who wrote this guest tutorial! Make sure to check out his Medium profile for more articles from him. If you want to write for Python Land too, please contact us.
Table of Contents
- 1 Part 1: Importing all the libraries
- 2 Part 2: Using youtube_dl to download audio
- 3 Part 3: Adding commands to the Python Discord bot
- 4 Part 4: Running the Python Discord bot locally
- 5 Bonus: send GIFs on start-up and print server details
Part 1: Importing all the libraries
First, create a virtual environment and install the requirements:
discord==1.0.1
discord.py==1.6.0
python-dotenv==0.15.0
youtube-dl==2021.2.10
Next, let’s set up the .env file for our project. Create a .env file so that we can separate the environment configuration variables (these are variables whose values are set outside the program) from the main code:
discord_token = "copy_paste_your_bot_token_here"
Then use Python import to load all the needed modules in the main file app.py:
import discord
from discord.ext import commands,tasks
import os
from dotenv import load_dotenv
import youtube_dl
The module youtube_dl is an open-source download manager for video and audio content from YouTube and other video hosting websites.
Now we need to set intents for our bot. Intents allow a bot to subscribe to specific buckets of events, allowing developers to choose which events the bot listens to and to which it doesn’t. For example, sometimes we want the bot to listen to only messages and nothing else.
load_dotenv()

# Get the API token from the .env file.
DISCORD_TOKEN = os.getenv("discord_token")

intents = discord.Intents().all()
client = discord.Client(intents=intents)
bot = commands.Bot(command_prefix='!',intents=intents)
Part 2: Using youtube_dl to download audio
The next step in building our Python Discord bot is dealing with the part that actually downloads the audio file from the video link we provide. Please note that this bo is just a demonstration. It’s not illegal to download from YouTube for personal use according to this article, but it might be against the YouTube Terms Of Service. Please be sensible and use this for personal use only.
youtube_dl.utils.bug_reports_message = lambda: ''

ytdl_format_options = {
    'format': 'bestaudio/best',
    'restrictfilenames': True,
    'noplaylist': True,
    'nocheckcertificate': True,
    'ignoreerrors': False,
    'logtostderr': False,
    'quiet': True,
    'no_warnings': True,
    'default_search': 'auto',
    'source_address': '0.0.0.0' # bind to ipv4 since ipv6 addresses cause issues sometimes
}

ffmpeg_options = {
    'options': '-vn'
}

ytdl = youtube_dl.YoutubeDL(ytdl_format_options)

class YTDLSource(discord.PCMVolumeTransformer):
    def __init__(self, source, *, data, volume=0.5):
        super().__init__(source, volume)
        self.data = data
        self.title = data.get('title')
        self.url = ""

    @classmethod
    async def from_url(cls, url, *, loop=None, stream=False):
        loop = loop or asyncio.get_event_loop()
        data = await loop.run_in_executor(None, lambda: ytdl.extract_info(url, download=not stream))
        if 'entries' in data:
            # take first item from a playlist
            data = data['entries'][0]
        filename = data['title'] if stream else ytdl.prepare_filename(data)
        return filename
The from_url() method of YTDLSource class takes in the URL as a parameter and returns the filename of the audio file which gets downloaded. You can read the youtube_dl documentation at their GitHub repository.
Part 3: Adding commands to the Python Discord bot
Now let’s add the join() method to tell the bot to join the voice channel and the leave() method to tell the bot to disconnect:

@bot.command(name='join', help='Tells the bot to join the voice channel')
async def join(ctx):
    if not ctx.message.author.voice:
        await ctx.send("{} is not connected to a voice channel".format(ctx.message.author.name))
        return
    else:
        channel = ctx.message.author.voice.channel
    await channel.connect()

@bot.command(name='leave', help='To make the bot leave the voice channel')
async def leave(ctx):
    voice_client = ctx.message.guild.voice_client
    if voice_client.is_connected():
        await voice_client.disconnect()
    else:
        await ctx.send("The bot is not connected to a voice channel.")
Here we first check if the user who wants to play music has already joined the voice channel or not. If not, we tell the user to join first.
Awesome! Give yourself a pat on the back if you’ve reached this far! You’re doing great. In the next step, we’ll add the following methods:
- play()
- pause()
- resume()
- stop()
@bot.command(name='play_song', help='To play song')
async def play(ctx,url):
    try :
        server = ctx.message.guild
        voice_channel = server.voice_client

        async with ctx.typing():
            filename = await YTDLSource.from_url(url, loop=bot.loop)
            voice_channel.play(discord.FFmpegPCMAudio(executable="ffmpeg.exe", source=filename))
        await ctx.send('**Now playing:** {}'.format(filename))
    except:
        await ctx.send("The bot is not connected to a voice channel.")


@bot.command(name='pause', help='This command pauses the song')
async def pause(ctx):
    voice_client = ctx.message.guild.voice_client
    if voice_client.is_playing():
        await voice_client.pause()
    else:
        await ctx.send("The bot is not playing anything at the moment.")

@bot.command(name='resume', help='Resumes the song')
async def resume(ctx):
    voice_client = ctx.message.guild.voice_client
    if voice_client.is_paused():
        await voice_client.resume()
    else:
        await ctx.send("The bot was not playing anything before this. Use play_song command")

@bot.command(name='stop', help='Stops the song')
async def stop(ctx):
    voice_client = ctx.message.guild.voice_client
    if voice_client.is_playing():
        await voice_client.stop()
    else:
        await ctx.send("The bot is not playing anything at the moment.")
At this point, we need to have the ffmpeg binary in the base directory. It can be downloaded from https://ffmpeg.org/. In this case, I used the exe since I’m using a Windows machine.
Part 4: Running the Python Discord bot locally
Add the final piece of code to start the bot and it’s done:
if __name__ == "__main__" :
    bot.run(DISCORD_TOKEN)
To deploy the bot locally, activate the virtual environment and run the app.py file:
(venv1) C:GithubDiscord-Bot>python app.py
Bonus: send GIFs on start-up and print server details
In this bonus section, we will set up our bot to listen to events such as start-up. This example sends a previously downloaded GIF image to the text channel when the bot is activated:
@bot.event
async def on_ready():
    for guild in bot.guilds:
        for channel in guild.text_channels :
            if str(channel) == "general" :
                await channel.send('Bot Activated..')
                await channel.send(file=discord.File('add_gif_file_name_here.png'))
        print('Active in {}n Member Count : {}'.format(guild.name,guild.member_count))
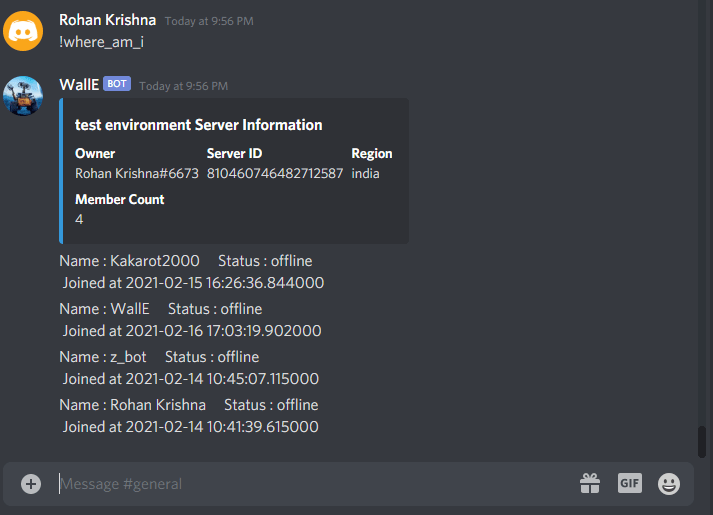
To print server details such as owner name, the number of users, and a server id, we can add a bot command ‘where_am_i’:
@bot.command(help = "Prints details of Server")
async def where_am_i(ctx):
    owner=str(ctx.guild.owner)
    region = str(ctx.guild.region)
    guild_id = str(ctx.guild.id)
    memberCount = str(ctx.guild.member_count)
    icon = str(ctx.guild.icon_url)
    desc=ctx.guild.description

    embed = discord.Embed(
        title=ctx.guild.name + " Server Information",
        description=desc,
        color=discord.Color.blue()
    )
    embed.set_thumbnail(url=icon)
    embed.add_field(name="Owner", value=owner, inline=True)
    embed.add_field(name="Server ID", value=guild_id, inline=True)
    embed.add_field(name="Region", value=region, inline=True)
    embed.add_field(name="Member Count", value=memberCount, inline=True)

    await ctx.send(embed=embed)

    members=[]
    async for member in ctx.guild.fetch_members(limit=150) :
        await ctx.send('Name : {}t Status : {}n Joined at {}'.format(member.display_name,str(member.status),str(member.joined_at)))

@bot.command()
async def tell_me_about_yourself(ctx):
    text = "My name is WallE!n I was built by Kakarot2000. At present I have limited features(find out more by typing !help)n :)"
    await ctx.send(text)
This is what this will look like:
You can view and clone the complete results from my Discord-Bot GitHub Repository.
That’s it! We made a Python Discord bot. Thank you for reading, and don’t hesitate to leave a reply or ask your questions in the comments section.
Our premium courses offer a superior user experience with small, easy-to-digest lessons, progress tracking, quizzes to test your knowledge, and practice sessions. Each course will earn you a downloadable course certificate.
Do you find it surprising that Discord has become well-known in the digital and business world? There are good reasons why it currently dominates the social media scene. It enhances social media interaction, chatting, gaming, or simply interacting with business organizations.
Millions of people use Discord daily, and a considerable percentage regularly automate tasks using bots. These bots are making Discord one of the best social messaging platforms for different industries.
Let’s dive in!
Table of Contents
- What is Discord?
- Why is Discord Popular?
- Terms Associated With Discord
- Is Discord Free?
- What is a Discord Bot?
- Benefits of Discord Bots
-
Steps to Creating a Discord Bot With Python using Nextcord.py
-
Sample Codes for Discord Bots in Python
- A. Sample Codes to make Discord Bots Respond to Greetings
- B. Sample Codes to Make a Discord Bots Send Gifs
- C. Sample Codes to make Discord Bots Play Music
-
Sample Codes for Discord Bots in Python
- Conclusion
What is Discord?
Discord is a social application that offers free phone, video, and text communication. It is one of the most well-known social networking sites used by millions of people to communicate and hang out with their friends and neighbors
People frequently use Discord to talk about a range of subjects, such as family vacations, homework assistance, NFTs, cryptocurrencies, the Metaverse, and mental health support. Any sized group of people can call it home, but the tiniest, chattiest groups use it the most regularly.
It gives public communities the platform to interact. People have complete control over who they interact with and how they use Discord because all discussions are opt-in.
It includes servers that are exclusive and private channels where communities and friendship circles can communicate and socialize and hold events.
Discord, however, swiftly gained popularity among gamers after its initial 2015 release by Jason Citron and Stanislav Vishnevskiy. The two co-founders wanted to create a better communication tool while working in the video game industry.
Why is Discord Popular?
Even though it has been seeing yearly user growth since its launch in 2015, Discord’s popularity increased in 2018 as streaming and online gaming began to expand quickly.
Discord’s connection with Xbox was the second significant action following its launch. It was a truly great experience for users to connect their Xbox Live accounts with their Discord servers. But by 2020, everyone was familiar with Discord.
Its fast popularity is due to the convenience it provides to players and streamers worldwide. Since then, Discord has become a well-liked platform for connecting with loved ones and having simple conversations.
Discord achieved quick popularity, unlike many other similar messaging applications. Because it serves as a home for all communities and friendship groups, people adore Discord. They may be themselves there while socializing with others who appreciate the same things they do.
On Discord, conversations are stimulated by common interests from people who share a similar view on a topic. Discord provides different communication options for like minds to interact in the best way they can use to understand themselves.
Terms Associated With Discord
Discord users occasionally utilize some terminology when referring to some of the activities on the platform. Below are examples of some of these terminologies.
- Channel: Text and voice channels are servers Discord relies on to transmit information. Users can exchange photographs, upload files, and publish messages in text channels at any time for other people to see. Additionally, users can go “live” in voice channels, where they can show their screen with peers and interact through voice or video chat in real-time.
- DMs and GDMs: Users can initiate voice or video calls as well as send private messages to other users as direct messages (DM). Group Direct Messages are private and accessible only by invitation from a group member.
- Server: Discord’s spaces are called servers. Particular communities and cliques create them. A new server can be set up by any user for no cost, and they can invite their friends to join.
- Nitro: Nitro is Discord’s premium subscription service. It enables users to customize Discord Tag, use custom emotes on every server, have a higher file upload cap, and discounted Server Boosts.
- Server Boosts: Dual to Nitro, Server Boosts grant servers exclusive benefits, including more personalized emotes, improved voice and video quality, and the capacity to set a personalized invite link.
- Student Hubs: Students can choose servers for study groups or classes, connect with other verified students, and share their own servers with other students using Discord Hubs for Students.
Is Discord Free?
Discord is without communication limitations. Access to communities is unrestricted, and starting your server is also cost-free.
You’ve probably heard of Discord bots if you use the platform for business purposes. With the help of these AI-powered bots, you can carry out different tasks, such as welcoming new users or people in search of your service.
It is a helpful tactic for online marketers who are learning how to use it to their advantage. Discord bots may be the way to go if you’re searching for a distinctive and interesting approach to interacting with your community.
What is a Discord Bot?
Discord bots are top A.I.s used by marketers and business owners to perform a range of automated tasks on the server. Discord bots can manage the discussion, filter material, automatically welcome new users, and ban disruptive individuals. Some bots even add music or games to your server.
They are amiable AI that supports server management or service enhancement. Discord bots are pre-made and free to download — no computer skills necessary.
You can back up your business information that the bot emulates in a database.
MongoDB is a popular database you can use for this purpose, although storing data in MongoDB is an activity among experienced programmers coding these bots. So this may require that only top programmers handle this process.
Benefits of Discord Bots
- Developing an active community is made simpler by Discord bots.
- When you’re briefly unavailable online, it takes your place. It acquaints new players with your server and moderately satisfies some of their needs.
- You can utilize them to include games, music, memes, and other fun material.
- Discord bots help to enhance your server and foster a better community, making users stay and engage with you more.
Steps to Creating a Discord Bot With Python using Nextcord.py
First, you need to enable the bot from the Discord application. Make your Python environment function going there next. Then go to your Python environment to make it functional.
To set everything up, you do need a basic understanding of programming, although the complexity of the code may vary depending on the type of bot you’re building.
Let’s look at some of the prerequisites for getting started. You must first have a Discord account, which you undoubtedly already do. If not, visit the Discord webpage to create one at no cost. The Discord client is also available for download, and you may use it on a phone or your gaming laptop.
To start with the bots creation, let’s enable it first from the server.
- Visit the official website of Discord to register; or log in if you are an old user
- Select “New Application” and then enter a name for the program before clicking “Create.”
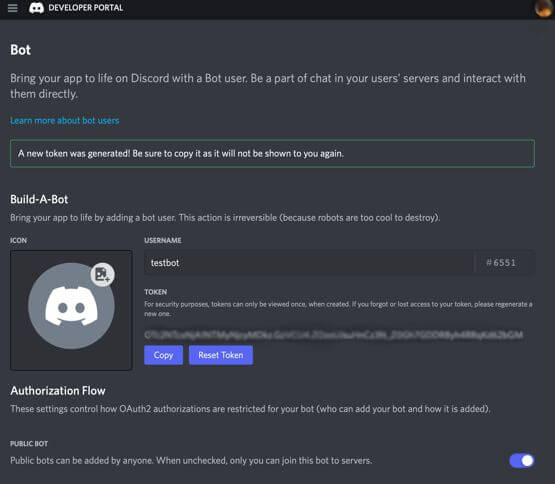
- Create a Bot User by visiting the “Bot” page and clicking “Add Bot.”
- To move forward, click “Yes, go ahead!”
- Check the Public Bot button.
- Do not check the OAuth2 Code button unless you’re developing a service that requires you to. If you’re unsure of its functionality, leave it unchecked.
- If you don’t already have a token, just hit the Reset button to create one. Keep this token ID safe because we’ll need it later.
So that’s it, you can log in to your newly created bot account.
Even though you created a bot user, it isn’t truly present in any servers. We need to do one more thing.
- Visit the application page, and click on your newly created bot page
- Select the “OAuth2” tab.
- To discover your CLIENT ID, locate the OAuth2 option in the menu on the left sidebar and click on it. Ensure you copy the lengthy string of numbers and paste them into the URL.
- You’ll notice a message verifying the bot’s arrival after you add it to your server. The bot icon appears on the right-hand side of your Discord application.
It’s time to finish developing your app. To test the functionality of your bot, open the Python source code.
Sample Codes for Discord Bots in Python
A. Sample Codes to make Discord Bots Respond to Greetings
from nextcord.ext import commands


bot = commands.Bot(command_prefix="!")

# make the bot to greet the user

@bot.command(name="hi")
async def SendMsg(ctx):
  await ctx.send('Hello, Who is am i with on the best chat platform?')

  @bot.event
  async def on_ready():
    print(f"logged in as: {bot.user.name}")

    if __name__ == '__main__':
      #please paste your own special token here
      bot.run("OTYwrdgffhhHHVGYFTFgjh.YuygTY.urPO_JSSDvbHFJBVssdfdgbJ")

#run your program and go back to discord
B. Sample Codes to Make a Discord Bots Send Gifs
from nextcord.ext import commands


bot = commands.Bot(command_prefix="dog ")

#The aim is to make our bot send dog pictures whenever we enter dog pic
#We will be visiting the Dog API website to copy the APi address that returns a JSON containing the link
# we will be using a python module called request to make this request from the dog server

  @bot.command(name="pic")
  async def Dog(ctx):
    response = request.get("https://dog.ceo/api/breeds/image/random")
    Pic_link = response.json()["message"]
    await ctx.send(Pic_link)

#run your program and go back to discord to test, on discord type dog pic
C. Sample Codes to make Discord Bots Play Music
import nextcord
import asyncio
import youtube_dl
from nextcord.ext import commands

#remember to do pip install youtube_dl if you have not

youtube_dl.utils.bug_reports_message = lambda: ""


#this acts like a schema for youtube files, just copy and paste on this format
ytdl_format_options = {

  "format": "bestaudio/best",

  "outtmpl": "%(extractor)s-%(id)s-%(title)s.%(ext)s",

  "restrictfilename": True,

  "noplaylist": True,

  "nocheckcertificate": True,

  "ignoreerrors": False,

  "logtostderr": False,

  "quiet": True,

  "no_warning": True,

  "default_search": "auto",

  "source_address": "0.0.0.0",

}

ffmpeg_options = {"options": "-vn"}

ytdl = youtube_dl.YoutubeDL(ytdl_format_options)


#this function will get a download from a Url to allow the bot get youtube Url and download that and play it through the bot
class YTDLSource(nextcord.PCMVolumeTransformer):
  def__init__(self, source: *, data, volume = 0.5):
    super().__init__(source, volume)

    self.data = data
    self.title = data.get("title")
    self.url = data.get("url")

#this method is basically returning the file so it can be played through the bot
  @classmethod
  async def from_url(cls, url, *, loop=None, stream=False):
    loop = loop or asyncio.get_event_loop()
    data = await loop.run_in_executor(None, lambda: ytdl.extract_info(url, download=not stream))

    if "entries" in data:
      data = data["entries"][0]

    filename = data["url"] if stream else ytdl.prepare_filename(data)
    return cls(nextcord.FFmpegAudio(filename, **ffmpeg_options), data=data)

#this class holds all the commands for the music bot
class Music(commands.Cog):
  def __init__(self, bot):
    self.bot = bot


#this method joins the command and makes the connection to the channel(on your bot enter $join to join channel)
  @commands.command()
  async def join(self, ctx, *, channel: nextcord.VoiceChannel):
    if ctx.voice_client is not None:
      return await ctx.voice_client.move_to(channel)
    await channel.connect()

#method to automate the bot to play the file it fetches
  @commands.command()
  async def play(self, ctx, *, query):
    source = nextcord.PCMVolumeTransformer(nextcord.FFmpegPCMAudio(query))
    ctx.voice_client.play(source, after= lambda e: print(f"player error": {e}") if e else None)

    await ctx.send(f"Now playing: {query}")
#this command gets the YouTube link and makes the download before the music plays
  @commands.command()
  async def yt(self, ctx, *, url):
    player = await YTDLSource.from_url(url, loop=self.bot.loop)
    ctx.voice_client.play(
        player, after=lambda e: print(f"Player error: {e}") if e else None
    )

    await ctx.send(f"Now playing...: {player.title}")

#the stream command ensures that the bot do not make downloads before playing the songs if it receives a stream command
  @commands.command()
  async def stream(self,ctx, *, url):
    async with ctx.typing():
      player = await YTDLSource.from_url(url, loop=self.bot.loop, stream= True)
      ctx.voice_client.play(
          player, after=lambda e: print(f"player error: {e}") if e elase None
      )

    await ctx.send(f"now playing: {player.title}")

#this method stops the music
  @commands.command()
  async def stop(self, ctx):
    await ctx.voice_client.disconnect()

  @play.before_invoke
  @yt.before_invoke
  @stream.before_invoke
#check if the user gets is connected or not
  async def e_voice(self, ctx):
    if ctx.voice_client id None:
      if ctx.author.voice:
        await ctx.author.voice.channel.connect()
      else:
        await ctx.send("oppps, you are not connected to a voice channel currently")
        raise commands.CommandError("Author is absent on a voice channel")
    elif ctx.voice_client.is_playing():
      ctx.voice_client.stop()


#set up the bot so that we can actually run it
intents = nextcord.Intents.default()
intents.message_content = True

bot = commands.Bot(command_prefix = "!", intents= intents)
bot.add_cog(Music(bot))

#copy the secret keys for the hot app and paste here
bot.run("OTYwrdgffhhHHVGYFTFgjh.YuygTY.urPO_JSSDvbHFJBVssdfdgbJ")


#at the end of the code, a file will be downloaded on your visit when you run the code for the first time
Conclusion
Using Discord bots is a cutting-edge and effective digital marketing tactic. Discord bots make your discord server lively and active. Additionally, they operate round-the-clock.
Dive deeper into creating Discord Bots in Python using Discord.py.

![]()
Nir
Posted on Sep 13, 2019
• Updated on Dec 27, 2021
![]()
![]()
![]()
![]()
![]()
Setting up a music bot isn’t easy since it requires lots of different things to be installed. In this guide I will list all the requirements and provide you with the code you need. Make sure you follow all the steps 
Let’s start!
Create a bot
First we need to create the bot, go here and make sure you’re logged in. Click on New Application and give your bot a name.
Go to the «Bot» tab on the left and click Add Bot under the «BUILD-A-BOT» tab. Copy the token and save it because we will need it for later.
Copy the Application ID under the «General Information» tab and save it for later as well.
Now click on the «OAuth2» tab and then on «URL Generator». Under «Scopes», check «bot» and on «applications.commands». Under «Bot Permissions», check «Administrator». Now copy the URL under «Generated URL» and paste it into your browser in order to invite your newly created bot to your Discord server!
Code Editor
A code editor let’s us write and modify code. The code editor I use and recommend is Visual Studio Code.
You can also use other great editors like Sublime Text and Atom.
Node.js and npm
Node.js is a JavaScript runtime. It basically lets us run JavaScript code on our machine. We also use its package ecosystem, npm, which we will discuss next.
Download Node.js from its official website (LTS or latest).
To check if you installed it correctly, open your terminal(cmd or bash depending on which OS you are using), and run node -v, you should get a number back. If you’re struggling with installing Node, check out this guide.
nom comes installed with Node.js, we will use npm later to install dependencies.
Git
Git is an open source version control system. It helps developers to manage projects by keeping track of the entire history of a project and makes it easy to add features without worrying about breaking the entire codebase. We will use Git in order to obtain code for our bot from GitHub. GitHub is a hosting service for Git repositories. You can learn more about Git and Github from this superb article.
If you’re on Windows, install Git from here. For macOS users, install Xcode and then hit git —version, it’ll prompt you to install it. If you’re using Linux based OS, hit sudo dnf install git-all or sudo apt install git-all for debian.
Java 13
Download Java 13 from here, make sure you download the correct one for your Operating System.
Cloning the repository
Go to your terminal(cmd, git bash or bash), you probably see on the left that you are now in your user folder(C:Users/»username»). Enter cd Desktop to go to your Desktop. Then ‘git clone https://github.com/galnir/Master-Bot‘. You are cloning(copying) the repository from GitHub so you can use its code.
Getting Lavalink
Download the latest Lavalink jar file from here (under assets). Place the jar file in the root directory of the project (same folder as index.js and package.json)
Application.yml
Create a file named application.yml in the same folder you placed the jar file from before. Copy everything from this example to your application.yml
Tokens
For everything to function we need the following tokens:
- The bots discord ID (saved from the first section)
- The bots token (saved from the first section)
- A Spotify client ID
- A Spotify client secret
In order to generate the last 2 tokens you need to create a Spotify account and login to the dev dashboard
After you login, simply create an app and copy the client ID and secret.
Config.json
In the root directory of the project create a file named config.json and have it look like this:
{
  "client_id": "the-bots-discord-id",
  "token": "Your-Bot-Token",
  "lava_host": "0.0.0.0",
  "lava_pass": "youshallnotpass",
  "spotify_client_id": "get-it-from-spotify-dev",
  "spotify_client_secret": "get-it-from-spotify-dev"
}
Enter fullscreen mode
Exit fullscreen mode
Put every token you generated in its place surrounded by quotes
Running the bot
Open a terminal in the root directory of the project and run java -jar Lavalink.jar.
Now open another terminal instance in the same folder and run node index.js
After running both commands you should be able to run music commands using the new Slash feature! Simply type / in a text channel and you should see the command list!
If you have any questions/issues you can comment here or open an issue in the repo. Also don’t forget to leave a star in the repo if you found it helpful
Bot Repo: https://github.com/galnir/Master-Bot
Cover image by Malte Wingen
Discord bots are programs that allow automated interaction with Discord services.
They can be programmed to do simple tasks, such as play music or print a welcome message, or they can perform multiple tasks based on pre-programmed commands.
Discord bots are also handy for maintaining and moderating large servers as they can be used to moderate certain administration-level tasks.
There are also several bots available that you can access through the bot store.
In this tutorial, we’ll build a Discord bot using Python.
Table of Contents
1
Bot creation requirements
Creating a Discord bot is a simple, straightforward procedure and can be done through the developer portal or by using any code editor.
Before adding the code, a bot account needs to be created.
Go to the Discord developer portal at https://discord.com/developers/applications, log in, and click on ‘New Application’.
Name this application and click on the option bot from the list on the left side.
Now, add a bot and after naming it, copy the token for further use.
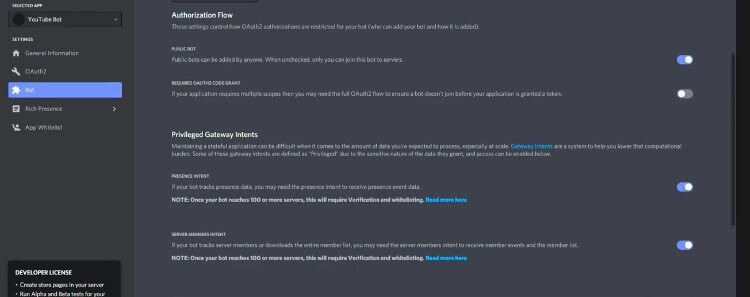
A Discord bot may need to access data that Discord qualifies as ‘sensitive’ in nature.
To give your bot access to privileged intents, you need to enable ‘Privileged Gateway Intents’ in the Developer Portal under the bots section.
This is only possible for unverified bots that are a part of fewer than 100 servers.
For verified bots, privileged intents need to be requested.
Discord API
The Discord API allows for simpler and deeper integration with other services that enable users to have a smoother user experience.
The API is an open API that can be used to serve requests for bots and OAuth2 integration.
Various versions of the API are in use, you can use the preferred version by adding it to the request path such as https://discord.com/api/v{version_number}.
If the version is not mentioned then the default version is used to follow operations.
Create your first Python Discord bot
To start making a Discord bot in Python, the library we will use ‘discord.py’ which implements Discord’s API extensively. You will need the pip command to install discord.py.
pip install -U discord.py
We can now begin making the connection with the API.
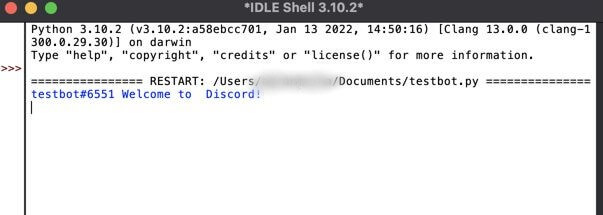
import discord
TOKEN = "Insert Your Token here"
discord_client = discord.Client()
@discord_client.event
async def on_ready():
    print(f'{discord_client.user} Welcome to  Discord!')
discord_client.run(TOKEN)
This code is used to set up the initial connection with Discord. We first import the required library discord.
The token value can be obtained from the developer portal. You can place the token within the program in the placeholder string provided above.
For a more secure approach, you can place it in a .env file and refer to the same in your program.
Hard-coding secure keys in the program is not a very good developer practice. We are doing it here for demonstration purposes.
The discord_client object is an instance of the Client class, which is the connection to Discord.
@client.event is used to register an event, it is called when something happens i.e. some event is triggered.
The on_ready function will be called when the connection is set up and the bot is ready to take further steps.
The final step then runs the bot using the login token specified above.
Now run the code to see an established connection.
Output:
Welcome new members to the server
To print a welcome message when new users join the server, let’s add a new function on_member_join to the Python file.
import discord
from discord.ext import commands
TOKEN ="Insert Your token here"
intents=discord.Intents.all()
client = commands.Bot(command_prefix=',', intents=intents)
@client.event
async def on_member_join(member):
    await member.create_dm()
    await member.dm_channel.send(f'Hi {member.name}, welcome to the test Discord server!')
client.run(TOKEN)
Output:
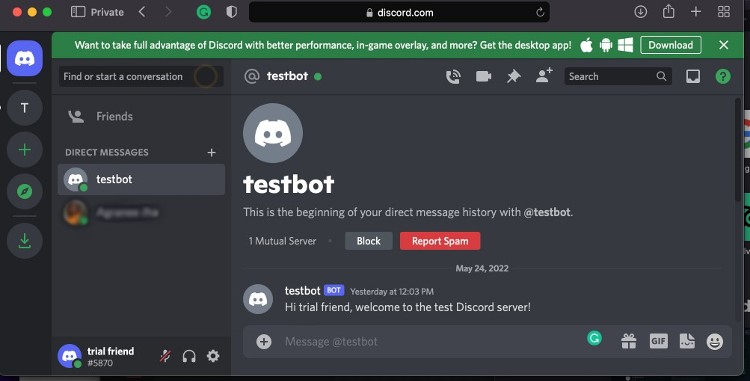
The welcome_member function uses create.dm method to send the welcome message as a direct message to the user on joining.
Intents are permissions for the bot that are enabled based on the features necessary to run the bot. To run on_member_join we need to ensure intents are enabled.
Discord Bot Commands
Commands are short directions to perform a particular action or specific task.
Many Discord bots that are available in the bot store have multiple pre-configured commands that can be enabled or disabled by visiting the dashboard.
Besides the command, the prefix required to run the command in Discord will also be available. These prefixes can be of various types such as exclamation marks and many more.
Discord has various types of commands such as chat commands, text commands, and slash commands. The slash-type commands are always executed by using a slash as the prefix.
The text commands need to be entered in the text box based on the syntax of the command, whereas chat commands are used by directly entering the command in the text box.
import discord
import random
from discord.ext import commands
TOKEN ="Insert Your token here"
discord_bot = commands.Bot(command_prefix='!')
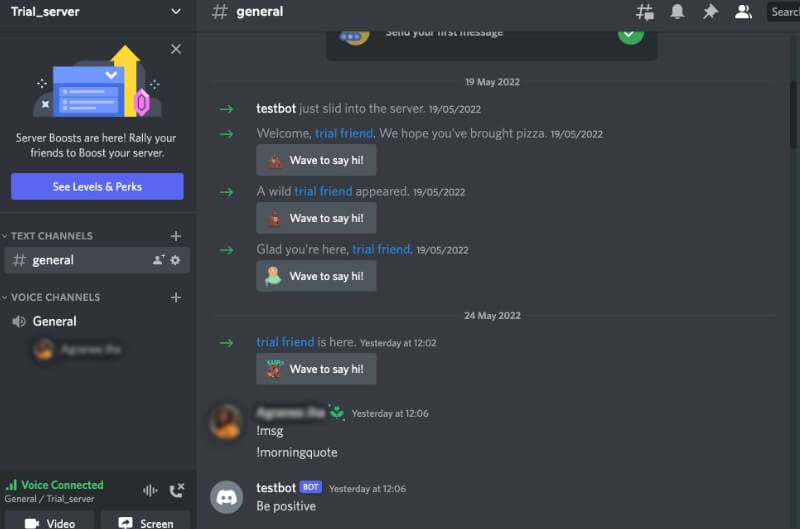
@discord_bot.command(name='morningquote')
async def msg(ctx):
quotes = [
"It's a new day",
(
"Be positive"
),
]
response = random.choice(quotes)
await ctx.send(response)
discord_bot.run(TOKEN)
While using commands, we use discord_bot.command to set the prefix for the command as ! and pass the name for the command as “morningquote”.
The command will be executed by the bot when a user types !morningquote in the chat.
Output:
Send text, image, or file
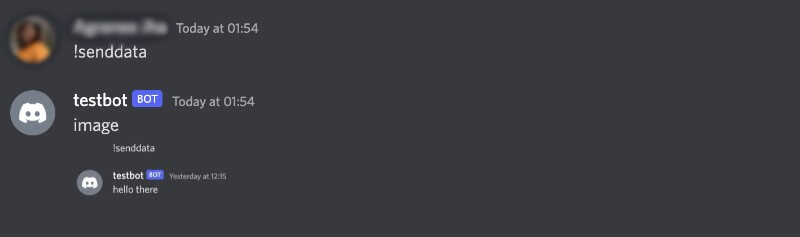
To send any data using Python, we use the send() method.
To send a text, add content to the method as shown:
import discord
from discord.ext import commands
TOKEN = "Insert Your token here"
discord_bot = commands.Bot(command_prefix='!')
@discord_bot.command(name='senddata')
async def send_data(ctx):
    await ctx.send("hello there")
discord_bot.run(TOKEN)
Output:

To send an image, add the image file to the method as shown below. The file my_file.png will be sent when the command !sendimg is used in the chat.
import discord
from discord.ext import commands
import os
os.chdir("Your file path")
TOKEN = "Insert Your token here"
discord_bot = commands.Bot(command_prefix='!')
@discord_bot.command(name='senddata')
async def send_img(ctx):
	await ctx.send("image",file=discord.File('Your file name'))
discord_bot.run(TOKEN)
Output:
To send a file or file-like object, you need to first open the file with the open() method and then use the send method to send data.
Send colored text
In Discord, it is possible to send a text in 8 different colors by code markup. It uses Highlight.js and solarized dark theme to achieve this effect.
import discord
from discord.ext import commands
TOKEN = "Insert Your token here"
discord_bot = commands.Bot(command_prefix='!')
@discord_bot.command(name='coloured_text')
async def test(ctx):
    retStr = str("""```yamlnThis is some colored Text```""")
    await ctx.send(retStr)
discord_bot.run(TOKEN)
Output:
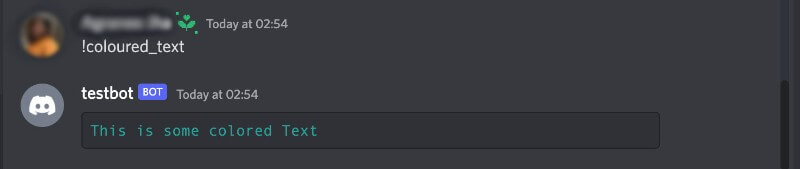
```yaml is the markup used to indicate the solarized cyan color. Below is a list of escape sequences or markup with their color codes that can be used to color your text.
Use the special characters such as ‘#’,'[‘, etc. wherever mentioned, to get the desired color. Note that the colored text is visible in the web application, but not the mobile application.
Default: #839496
```
Your text
```
Quote: #586e75
```bash
#Your text
```
Solarized Green: #859900
```diff
+ Your text
```
Solarized Cyan: #2aa198
```yaml
Your text
```
or
```cs
"Your text"
```
Solarized Blue: #268bd2
```ini
[Your text]
```
Solarized Yellow: #b58900
```fix
Your text
```
Solarized Orange: #cb4b16
```css
[Your text]
```
Solarized Red: #dc322f
```diff
-Your text
```
Simply replace the markup with markup for the desired color. The image below shows what the colors look like.

Get username from ID
To get the username based on the user id, we will use the fetch_user method. If the entire profile of a user is required then we can use the fetch_user_profile method.
import discord
from discord.ext import commands
TOKEN = "Insert Your token here"
discord_bot = commands.Bot(command_prefix='!')
@discord_bot.command(name='username')
async def user_name(ctx,user_id):
    user=await discord_bot.fetch_user(user_id)
    await ctx.send(user)
discord_bot.run(TOKEN)
Output:

Add user roles using the Discord bot
Roles are used to delegate permission to users within the server to help in management.
Roles can be implemented within large public servers such as in a learning-based server, roles like ‘student level 1’, ‘student level 2’, ‘teacher’, and ‘moderator’ can be assigned to users.
They can also be implemented in private servers with friends if such a need arises.
Each role has a different color and different permissions associated with it.
A user inherits the maximum permissions from each of the roles assigned to them.
The colors also work similarly, with the name of the member inheriting the role with the highest position in the hierarchy or with maximum permissions.
The roles have a linear hierarchy in Discord and can be managed from the ‘Manage role’ option in the ‘Roles’ tab.
Multiple roles with separate administrative powers can also be established so that the responsibilities of one user do not interfere with the other.
import discord
from discord import Member
from discord.ext.commands import has_permissions, MissingPermissions
from discord.ext import commands
TOKEN = "Insert Your token here"
intents=discord.Intents.all()
intents.members=True
bot = commands.Bot(command_prefix="!",intents=intents)
#code to add role
@bot.command()
@commands.has_permissions(manage_roles = True)
async def addRole(ctx, user : discord.Member, role:discord.Role):
    await user.add_roles(role)
    await ctx.send(f" Added {role} to {user.ention}")
@addRole.error
async def role_error(self,ctx,error):
    if isinstance(error, commands.MissingPermissions):
        await ctx.send("You are not authorized for this action")
bot.run(TOKEN)
To add a role, first, we use the commands to ensure that the user trying to add the role is authorized to do so.
We then use the add_roles method to add a function to the user.
Based on the requirements, you can allow multiple roles to be assigned to a user or use if-else statements to only allow one.
The role_error function is used to print an error message in case an unauthorized user tries to assign a role to another user.
Output:
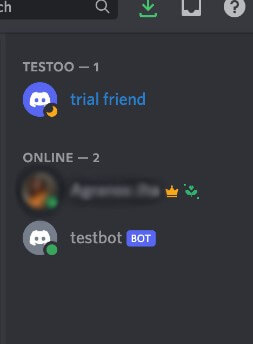
User is assigned the ‘testoo’ role.
Send a Direct Message to Users
A lot of Discord servers are configured to send a welcome message via direct message when a user joins the server or to send a warning if they violate any of the server’s rules.
Let us look at a code that sends a DM when the designated command is used.
import discord
from discord.ext import commands
TOKEN ="Insert Your token here"
intents=discord.Intents.all()
client = commands.Bot(command_prefix='!', intents=intents)
@client.command()
async def drtmsg(ctx, user:discord.Member, *, message=None):
message = "welcome"
embed=discord.Embed(title=message)
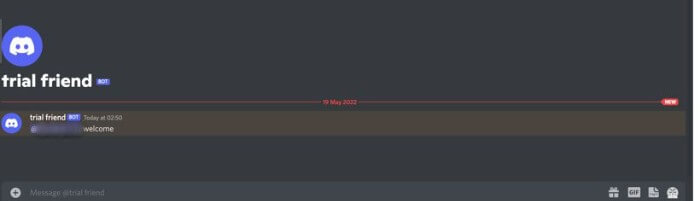
await user.send(embed=embed)
client.run(TOKEN)
This function will take input such as !drtmsg @User and then send the message “welcome” via private messaging to the selected user.
Output:
Get members of a specific role and DM them
We first import the asyncio package for concurrent programming. We can use ctx.guild.roles to access the roles declared in the server.
The list of roles is fetched in user.roles which we can then traverse to find the correct role of the members and send them the desired message.
import asyncio
import discord
from discord.ext import commands, tasks
Token ="Insert Your token here"
prefix="!"
intents=discord.Intents.all()
bot = commands.Bot(command_prefix=prefix,intents=intents)
@bot.command(name='dm')
async def msg(ctx):
    for guild in bot.guilds:  # all servers of the bot
        role = discord.utils.find(lambda r: r.name == 'Your role name', guild.roles)
        for member in guild.members:
            if role in member.roles:
                await member.send("Dm to role member")
bot.run(Token)
Output:

Ban/Kick Members using Discord bot
To remove a member from the server you need to add the following code to your Python file.
import discord
from discord import Member
from discord.ext import commands
from discord.ext.commands import has_permissions, MissingPermissions
TOKEN = "Insert Your token here"
intents=discord.Intents.all()
discord_client = commands.Bot(command_prefix='!',intents=intents)
@discord_client.command()
@has_permissions(kick_members=True)
async def kick(ctx, member:discord.Member,*,reason=None):
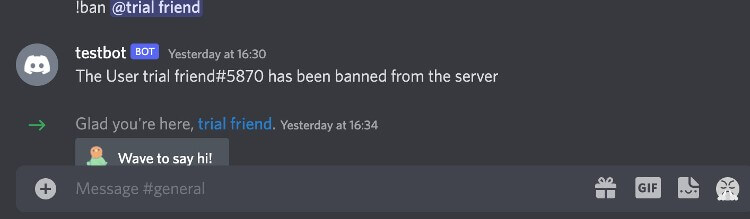
await member.kick(reason=reason)
await ctx.send(f'The User {member} has been kicked from the server')
@kick.error
async def kick_error(ctx,error):
if isinstance(error,commands.MissingPermissions):
await ctx.send("You do not have required permission for the action performed")
discord_client.run(TOKEN)
First, import the member and required permissions method from the discord library to allow us to manage permissions and address a user.
We use @discord_client.command() to use the client object of the bot and inform it the code written ahead is a command.
@has_permissions is used to check whether the user performing the action is authorized to do so or not.
kick is the function that performs the actions of removing the given user from the server.
A dynamic reason can also be given, we have however simply stated the reason as “test”.
The second function kick_error is an exception function that is executed if the user is not authorized to kick another user out and the error message is printed.
A user that is kicked out is not permanently banned from the server.
To ensure that a user is added to the banned member list of the server add the function defined below.
This will ensure that the user cannot rejoin the server as long as they are present in the list.
import discord
from discord import Member
from discord.ext import commands
from discord.ext.commands import has_permissions, MissingPermissions
TOKEN = "Insert Your token here"
intents=discord.Intents.all()
discord_client = commands.Bot(command_prefix='!',intents=intents)
@discord_client.command()
@has_permissions(ban_members=True)
async def ban(ctx, member:discord.Member,*,reason=None):
    await member.ban(reason=reason)
    await ctx.send(f'The User {member} has been banned from the server')
@ban.error
async def ban_error(ctx,error):
    if isinstance(error,commands.MissingPermissions):
        await ctx.send("You do not have required permission for the action performed")
discord_client.run(TOKEN)
Output:
Send a message at a specific time
To send a message at a specific time, the datetime library is required in addition to the discord library being used until now.
import discord
from datetime import datetime
client = discord.Client()
token = "Insert Your token here"
channel_id=Insert Your channel id without quotes
def time_required():
    while True:
        current_time = datetime.now().strftime("%H:%M")
        if current_time == "Insert required time":
            print("time reached")
            break
time_required()
@client.event
async def on_ready():
    print("bot:user ready == {0.user}".format(client))
    channel = client.get_channel(channel_id)
    await channel.send("timed message")
client.run(token)
The time_required function is created to establish when it is time to send the message. Until the required time is reached the bot will be in sleep mode.
Once it is time to send the message, the on_ready event will be executed, and the message “timed message” will be sent in the channel id mentioned in your code.
Output:

Play audio files in Python
To play audio files in Python, the FFmpeg library is an appropriate choice.
It can be downloaded from https://ffmpeg.org/.
Hover over the Windows icon and select ‘Windows builds by BtbN’ or ‘Windows builds from gyan.dev’.
In case you have doubts about which library to choose, use the one by gyan.dev as it includes all the libraries that could be required.
The Download tab takes you to a link from where you can download the required zip file.
Extract the files and place them in the C drive in a new folder or any location of your choice from where they can go live.
Add the path of this folder to the ‘PATH’ environment variable.
Also, import the audio file to the directory in which the bot is, or you have to specify the full path to the audio file.
In the below code we set up the play command such that when the bot joins the voice channel it will play the audio file ‘venezuela.mp3’ using the FFmpeg library.
Install the ‘PyNaCl’ library using pip:
pip3 install pynacl
You have to install and place FFmpeg in your Environment variables for this to run successfully.
import discord
import nacl
from discord import FFmpegPCMAudio
from discord.ext import commands
intents=discord.Intents.all()
token="Insert Your token here"
discord_bot = commands.Bot(command_prefix='!',intents=intents)
@discord_bot.command(pass_context=True)
async def play(ctx):
    if(ctx.author.voice):
        channel = ctx.message.author.voice.channel
        voice=await channel.connect()
        music_source = FFmpegPCMAudio('venezuela.mp3')
        player = voice.play(music_source)
    else:
        await ctx.send("please join voice channel")
discord_bot.run(token)
Filter words
Sometimes users may use inappropriate language that the server moderators may want to delete to maintain the decorum of the server.
To avoid having to analyze every message one by one, a function can be written to automatically filter out and delete messages that contain a word from a pre-defined list of banned words.
Ensure that your bot has administration capabilities to run this code.
In the on_message function, if the message sent by the user contains a word from the list bannedWords, the message is deleted and a warning is sent to the user to refrain them from sending using such words again.
We then use process_commands to ensure the bot continues to process other commands assigned to it.
import discord
from discord.ext import commands, tasks
import re
Token ="Insert Your token here"
prefix="!"
bot = commands.Bot(command_prefix=prefix)
def msg_contains_word(msg, word):
return re.search(fr'b({word})b', msg) is not None
@bot.command()
async def loadcog(ctx, cog):
bot.load_extension(f"cogs.{cog}")
@bot.command()
async def unloadcog(ctx, cog):
bot.unload_extension(f"cogs.{cog}")
bannedWords={"ret"}
@bot.event
async def on_message(message):
messageAuthor = message.author
if bannedWords != None and (isinstance(message.channel, discord.channel.DMChannel) == False):
for bannedWord in bannedWords:
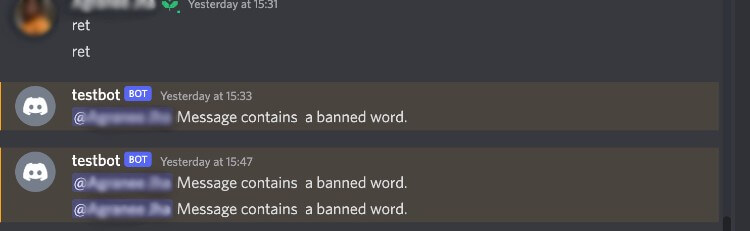
if msg_contains_word(message.content.lower(), bannedWord):
await message.delete()
await message.channel.send(f"{messageAuthor.mention} Message contains a banned word.")
await bot.process_commands(message)
bot.run(Token)
Output:
Conclusion
Discord is a powerful social media tool with a wide array of features. Bots additionally are extremely versatile and are capable to do a lot of things, some of which have been covered in this tutorial.
We can enable our bot to do a lot more things with the use of the correct combination of commands and events.

Mokhtar is the founder of LikeGeeks.com. He works as a Linux system administrator since 2010. He is responsible for maintaining, securing, and troubleshooting Linux servers for multiple clients around the world. He loves writing shell and Python scripts to automate his work.
Время на прочтение
5 мин
Количество просмотров 17K
Началось все с того, что мне захотелось написать музыкального бота для своего discord сервера.
При проектировании проекта, я решил разделить его на две части. Первая — получение музыки из ВК. Вторая — сам бот. И начать я решил с первой части.
Поиск какой-либо информации на этот счет или уже возможно готового куска кода не принес никаких результатов из-за чего очевидным решением данной проблемы было то, что придется разбираться с этим самому.
Я решил посмотреть что сейчас отдает ВКонтакте при воспроизведении записи и полез во вкладку network, вот что я там увидел:
Фото
Теперь передо мной стояла новая задача, как получить с определенного аудио нужную ссылку на m3u8 файл и уже потом думать как его разбирать и собирать в дальнейшем в цельным mp3 файл.
В ходе раздумий был найден довольно простой вариант в виде библиотеки для питона vk_api и реализация получения такой ссылки через эту библиотеку выглядит так:
from vk_api import VkApi
from vk_api.audio import VkAudio

login = "+7XXXXXXXXXX"
password = "your_password"

vk_session = VKApi(
  login=login,
  password=password,
  api_version='5.81'
)
vk_session.auth()

vk_audio = VKAudio(vk_session)

# Делаем поиск аудио по названию
# Так же можно получать аудио со страницы функцией .get_iter(owner_id)
# где owner_id это айди страницы
# или же можно получить аудио с альбома, где мы сначала получаем айди альбомов
# функцией .get_albums_iter()
# и после снова вызываем .get_iter(owner_id, album_id), где album_id полученный
# айди альбома
q = "audio name"
audio = next(vk_audio.search_iter(q=q))
url = audio['url'] # получаем ту длиннющую ссылку на m3u8 файл
Вот мы и получили ссылку на этот файл и встал вопрос, а что делать дальше. Я попробовал запихнуть эту ссылку в ffmpeg и уже было обрадовался, ведь он скачал мой заветный аудиофайл и сразу же сделал конвертацию в mp3, однако, счастье мое длилось не долго, ведь ffmpeg хоть и скачал все сегменты, самостоятельно склеив их, но зашифрованные сегменты он не расшифровал, поэтому давайте еще раз взглянем на внутренности m3u8 файла
#EXTM3U
#EXT-X-TARGETDURATION:25
#EXT-X-ALLOW-CACHE:YES
#EXT-X-PLAYLIST-TYPE:VOD
#EXT-X-KEY:METHOD=AES-128,URI="https://cs1-66v4.vkuseraudio.net/s/v1/ac/wYaompMqHNQpBIH183wK68QVW45tvaJLaznkPiqES66JM-xzffiiM4KQx5WPS0Vg99U9ggCDronPKO8bzit3v_j8fH6LymN2pngBXYTv5uaDnFiAfc2aXv848bhRJEyFVB1gaJw1VR4BS9WnSb8jIMd0haPgfvJMcWC7FW7wpFkGU14/key.pub"
#EXT-X-VERSION:3
#EXT-X-MEDIA-SEQUENCE:1
#EXTINF:2.000,
seg-1-a1.ts
#EXT-X-KEY:METHOD=NONE
#EXTINF:4.000,
seg-2-a1.ts
#EXTINF:20.000,
seg-3-a1.ts
#EXT-X-KEY:METHOD=AES-128,URI="https://cs1-66v4.vkuseraudio.net/s/v1/ac/wYaompMqHNQpBIH183wK68QVW45tvaJLaznkPiqES66JM-xzffiiM4KQx5WPS0Vg99U9ggCDronPKO8bzit3v_j8fH6LymN2pngBXYTv5uaDnFiAfc2aXv848bhRJEyFVB1gaJw1VR4BS9WnSb8jIMd0haPgfvJMcWC7FW7wpFkGU14/key.pub"
#EXTINF:20.000,
seg-4-a1.ts
#EXT-X-KEY:METHOD=NONE
#EXTINF:25.444,
seg-5-a1.ts
#EXT-X-ENDLIST
Мы видим, что перед зашифрованными сегментами в EXT-X-KEY указан метод шифровки AES-128 и ссылка на скачку ключа для расшифровки.
Для решения уже этой проблемы была найдена прекрасная библиотека m3u8 и pycryptodome:
import m3u8
import requests
from Crypto.Cipher import AES
from Crypto.Util.Padding import unpad

# Получаем этот самый m3u8 файл
m3u8_data = m3u8.load(
  url="" # Вставляем наш полученный ранее url
)
segments = m3u8.data.get("segments")

# Парсим файл в более удобный формат
segments_data = {}

for segment in segments:
  segment_uri = segment.get("uri")
  extended_segment = {
    "segment_method": None,
    "method_uri": None
  }
  if segment.get("key").get("method") == "AES-128":
    extended_segment["segment_method"] = True
    extended_segment["method_uri"] = segment.get("key").get("uri")

	segments_data[segment_uri] = extended_segment

# И наконец качаем все сегменты с расшифровкой
uris = segments_data.keys()

downloaded_segments = []
for uri in uris:
  # Используем начальный url где мы подменяем index.m3u8 на наш сегмент
  audio = requests.get(url=index_url.replace("index.m3u8", uri))
  # Сохраняем .ts файл
  downloaded_segments.append(audio.content)
  # Если у сегмента есть метод, то расшифровываем его
  if segments_data.get(uri).get("segment_method") is not None:
    # Качаем ключ
    key_uri = segments_data.get(uri).get("method_uri")
    key = requests.get(url=key_uri)

    iv = downloaded_segments[-1][0:16]
    ciphered_data = downloaded_segments[-1][16:]

    cipher = AES.new(key, AES.MODE_CBC, iv=iv)
    data = unpad(cipher.decrypt(ciphered_data), AES.block_size)
    downloaded_segments[-1] = data


complete_segments = b''.join(downloaded_segments)
И наконец конвертируем все в mp3 формат, для чего нам понадобится установленный ffmpeg на ПК.
import os

with open('../m3u8_downloader/segments/temp.ts', 'w+b') as f:
  f.write(complete_segments)

os.system(f'ffmpeg -i "media/music/segments/temp.ts" -vcodec copy '
          f'-acodec copy -vbsf h264_mp4toannexb "media/music/mp3/temp.wav"')
os.remove("../m3u8_downloader/segments/temp.ts")
Для меня это был довольно интересный опыт, поскольку я никогда до этого в своей жизни не работал с зашифрованными файлами и HLS протоколом, надеюсь Вам тоже было интересно читать это. Так же надеюсь я смог помочь другим людям, ведь никаких решений по скачиванию аудио с ВКонтакте на питоне в 2022 году я не нашел.
Так же выложу весь код:
Hidden text
import os
import m3u8
import requests
from vk_api import VkApi
from vk_api.audio import VkAudio
from Crypto.Cipher import AES
from Crypto.Util.Padding import unpad


class M3U8Downloader:

    def __init__(self, login: str, password: str):

        self._vk_session = VkApi(
            login=login,
            password=password,
            api_version='5.81'
        )
        self._vk_session.auth()

        self._vk_audio = VkAudio(self._vk_session)

    def download_audio(self, q: str):
        url = self._get_audio_url(q=q)
        segments = self._get_audio_segments(url=url)
        segments_data = self._parse_segments(segments=segments)
        segments = self._download_segments(segments_data=segments_data, index_url=url)
        self._convert_ts_to_mp3(segments=segments)

    @staticmethod
    def _convert_ts_to_mp3(segments: bytes):
        with open(f'media/music/segments/temp.ts', 'w+b') as f:
        		f.write(segments)
        os.system(f'ffmpeg -i "media/music/segments/temp.ts" -vcodec copy '
                  f'-acodec copy -vbsf h264_mp4toannexb "media/music/mp3/temp.wav"')
        os.remove("../m3u8_downloader/segments/temp.ts")

    def _get_audio_url(self, q: str):
        self._vk_audio.get_albums_iter()
        audio = next(self._vk_audio.search_iter(q=q))
        url = audio['url']
        return url

    @staticmethod
    def _get_audio_segments(url: str):
        m3u8_data = m3u8.load(
            uri=url
        )
        return m3u8_data.data.get("segments")

    @staticmethod
    def _parse_segments(segments: list):
        segments_data = {}

        for segment in segments:
            segment_uri = segment.get("uri")

            extended_segment = {
                "segment_method": None,
                "method_uri": None
            }
            if segment.get("key").get("method") == "AES-128":
                extended_segment["segment_method"] = True
                extended_segment["method_uri"] = segment.get("key").get("uri")
            segments_data[segment_uri] = extended_segment
        return segments_data

    @staticmethod
    def _download_segments(segments_data: dict, index_url: str) -> bin:
    downloaded_segments = []

    for uri in segments_data.keys():
        audio = requests.get(url=index_url.replace("index.m3u8", uri))

        downloaded_segments.append(audio.content)

        if segments_data.get(uri).get("segment_method") is not None:
            key_uri = segments_data.get(uri).get("method_uri")
            key = download_key(key_uri=key_uri)

            iv = downloaded_segments[-1][0:16]
            ciphered_data = downloaded_segments[-1][16:]

            cipher = AES.new(key, AES.MODE_CBC, iv=iv)
            data = unpad(cipher.decrypt(ciphered_data), AES.block_size)
            downloaded_segments[-1] = data

    return b''.join(downloaded_segments)

    @staticmethod
    def download_key(key_uri: str) -> bin:
    return requests.get(url=key_uri).content


login = "" # phone
password = "" # password
md = M3U8Downloader(login=login, password=password)

q = "Воллны Волны" # Запрос музыки по названию
md.download_audio()RhinoBot: The music bot for Discord.
MusicBot is a Discord music bot written in Python. It plays requested songs and if the queue becomes empty it will play through a list of existing songs.
How do I set it up?
CLICK HERE to find the guide that suites your operating system.
Commands
Commands are listed here.
Configuration
The main configuration file is config/options.ini, but is not included. Simply make a copy of example_options.ini and rename to options.ini. See example_options.ini for more information on how to configure it.
CLICK HERE for more details.
Great, now how do I use it?
Download the bot, set the dependencies up, then run runbot.bat! (or run.sh on mac/linux) Read the tutorial if you don’t know what to do.
If you have any errors, read the FAQ. If that didn’t help, you can ask for assistance on the discord help server. Is is recommended to take screenshots so the developers can see errors.
Rhino Help Server
FAQ
Some frequently asked questions are listed on the wiki here.