pybot — A Minecraft bot written in Python using Mineflayer
pybot is a Minecraft bot written using the Mineflayer framework via the Python to Javascript bridge. It is built for practical utility automating such tasks as mining for resources, mining out rooms or long corridors, building bridges, farming, chopping wood, building structures and moving around resources between chests. It has a partially complete UI written in Tk.
Tested with Java Edition 1.16.5.
It will NOT work with 1.18 or 1.19.
Authors
Guido Appenzeller, Daniel Appenzeller
License
Released under Apache 2.0
Requirements
To run the bot, your system needs to have:
- A recent version of Python. On macOS, easiest is to install Python 3 from the www.python.org web site. Homebrew python may require the additional install of tkinter.
- The python/javascript bridge. ‘pip3 install javascript’ should do the trick.
Setup
Copy the account_sample.py to account/account.py and edit the following fields:
- User Name
- Password
- Server IP or name
- «master» is the in-game name of the player that the bot should take commands from (i.e. your in-game name)
- version to the server’s minecraft version
You can also specify locations in this file. This is mostly useful to have the bot transfer contents between chests.
Normally the bot will open a Window, but you can also run it without any graphical UX using the «—nowindow» option.
Functionality
Simple commands are given via chat. The bot has a specific «master» player that it will listen to. Try «come», «inventory» or «status» to get an idea. Other users can also give commands but need to preface it with a callsign.
Many activities can be stopped with the command «stop».
PyBot starts most complex activities around a chest. There are two types:
- For an activity that dodesn’t need a specifi direction like farming an area, it’s just a chest. Material (e.g. seeds) and resources (e.g. wheat) will be taken from or, after collecting them, placed into that chest.
- For activities that do have a direction (e.g. dig a tunnel in a specific direction), starting point is a chest and the direction is indicated by placing a torch on the ground directly next to the chest.
For these activities, have the bot come next to the chest and once it is there tell it to «farm» or «mine 3×3».
Farming
To start, place a chest in the area you want to farm and start with «farm». The bot will take seeds from the cest, and plant them in any nearby farmland that it can reach. If there are fully grown crops, the pot will harvest them and place them and any extra seeds in the chest. Chat «stop» to stop the bot. Right now, only Wheat is in the code, but other crops are easy to add.
Chop Wood
Right now only works with mega spruce trees as they are the most efficient. Plant 2×2 saplings and get a tree with up to 100 blocks of wood. Place a chest within 25 blocks from the tree, put a few stone axes and bread as food in the chest and start with «chop». The bot will do a spiral cut up the trunk and then cut down. It will continue to chop down trees as long as it finds them and deposit the wood into the chest.
Right now, this activity can’t be aborted with stop.
Mining
Supports:
- Use «mine fast» to start strip mining. By default it will clear a 11 wide and 9 high area of all valuable blocks (it can see through walls to find it)
- Mine large corridors, try «mine 3×3» or «mine 5×5»
- The bot will looking for valuable ores off corridors, usually with a default distance of 5
- The bot will also look in ceilings and the floow up to 2 deep
- Try «boxmine» to mine out large areas for underground rooms
- The bot will automatically bridge across chasms/lava
- It will not defend itself yet, but it will run away when taking damage and ninja-log when below 50%
- It will light up tunnels
- If you put a wall sign close to the chest, the bot will record its progress on that sign (e.g. length of tunnel, dangers etc.)
If there is a chest-in-a-minecart next to the starting chest, the bot will deposit into the minecart, and restock from the chest. That makes it easy to keep it supplied with tools while hauling away resources automatically
Movement
Try «come» to make the bot come to the player
Building
Still early, but if you add a blueprint to bulueprint_list.py, the bot can build it. Starting point is a chest with a torch. The bot can build a full sorting system with «build sorter».
Время на прочтение
9 мин
Количество просмотров 17K
Обучение с подкреплением и имитация поведения человека с помощью MineRL
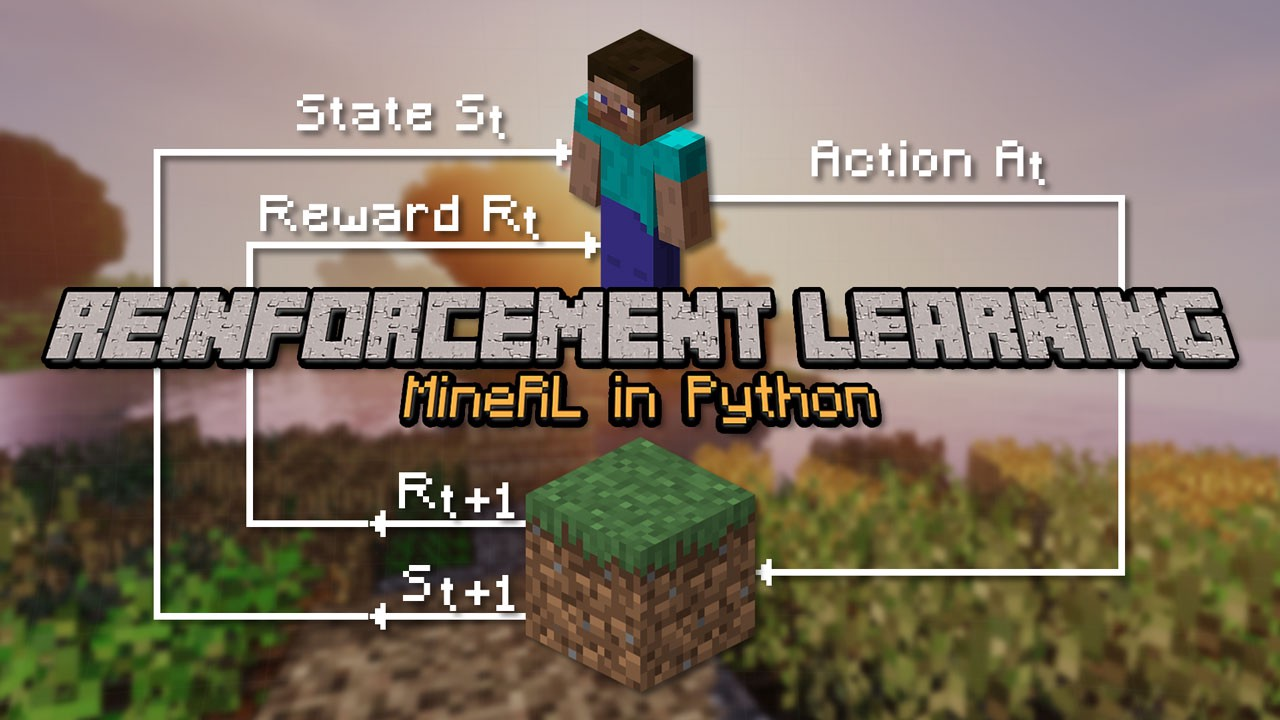
В случайно сгенерированном мире Minecraft найдём алмазы с помощью ИИ. Как обученный с подкреплением агент проявит себя в одной из самых сложных задач игры? Подробностями делимся к старту флагманского курса по Data Science.
Minecraft — масштабная игра с большим количеством механик и сложных последовательностей действий. Чтобы просто научить людей играть в эту игру, написали целую энциклопедию на 8000 страниц.

Обсуждаемое не ограничивается только Minecraft; подход можно применять в таких же сложных средах. Строго говоря, мы реализуем два разных метода, которые станут основой нашего интеллектуального агента.
Но, прежде чем обучать агента, необходимо понять, как взаимодействовать со средой. Начнём со скриптового бота и познакомимся с синтаксисом. Работать мы будем с MineRL — потрясающей библиотекой для создания приложений искусственного интеллекта в Minecraft.
Код из статьи доступен в Google Colab. Это упрощённая и доработанная версия потрясающих блокнотов, написанных организаторами турнира MineRL 2021 (лицензия MIT).
I. Скриптовый бот
MineRL позволяет запускать Minecraft в Python и взаимодействовать с игрой. Взаимодействие реализовано через популярную библиотеку gym:
env = gym.make('MineRLObtainDiamond-v0')
env.seed(21)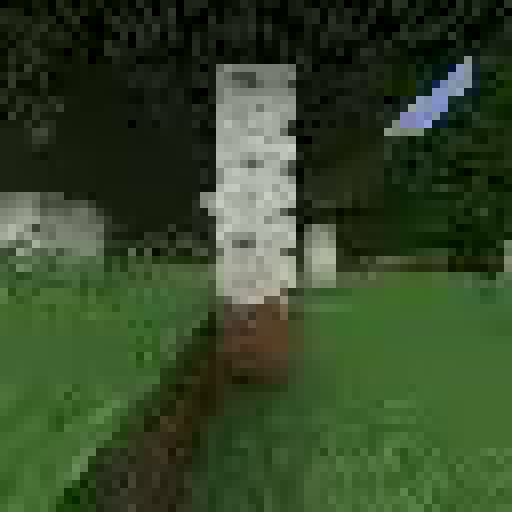
Мы стоим перед деревом. Как вы видите, разрешение довольно низкое. В низком разрешении используется меньше пикселей, что ускоряет работу. К счастью для нас, нейронным сетям не нужно разрешение 4К, чтобы понять происходящее.
Мы хотим взаимодействовать с игрой. Что может делать наш агент? Вот список возможных действий:

Первый шаг при поиске алмазов — добыть древесину для изготовления верстака и деревянной кирки.
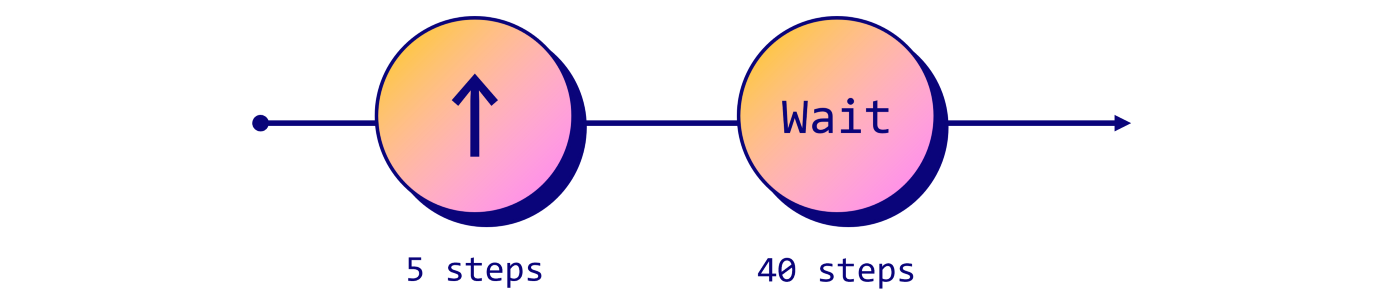
Давайте постараемся подойти к дереву поближе. То есть нам нужно удерживать кнопку Forward меньше секунды. В MineRL обрабатывается по 20 действий в секунду: нам не нужна целая секунда, поэтому давайте повторим действие Forward 5 раз и подождём ещё 40 тактов:
# Define the sequence of actions
script = ['forward'] * 5 + [''] * 40

env = gym.make('MineRLObtainDiamond-v0')
env = Recorder(env, './video', fps=60)
env.seed(21)
obs = env.reset()

for action in script:
    # Get the action space (dict of possible actions)
    action_space = env.action_space.noop()

    # Activate the selected action in the script
    action_space[action] = 1

    # Update the environment with the new action space
    obs, reward, done, _ = env.step(action_space)

env.release()
env.play()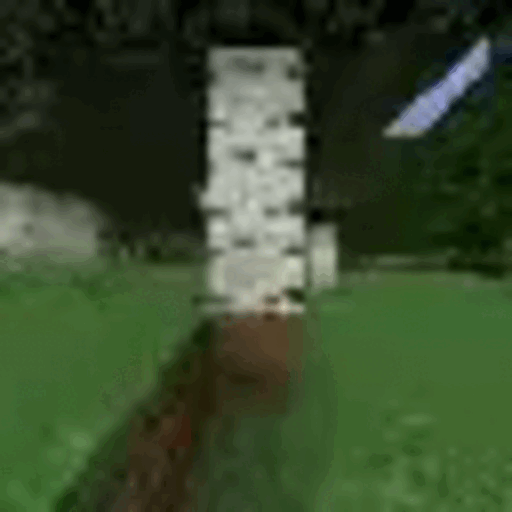
Отлично, а сейчас срубим дерево. В общей сложности от нас требуется 4 действия:
-
Forward — встать перед деревом;
-
Attack — срубить дерево;
-
Camera — посмотреть вверх или вниз;
-
Jump — получить готовый кусок древесины.
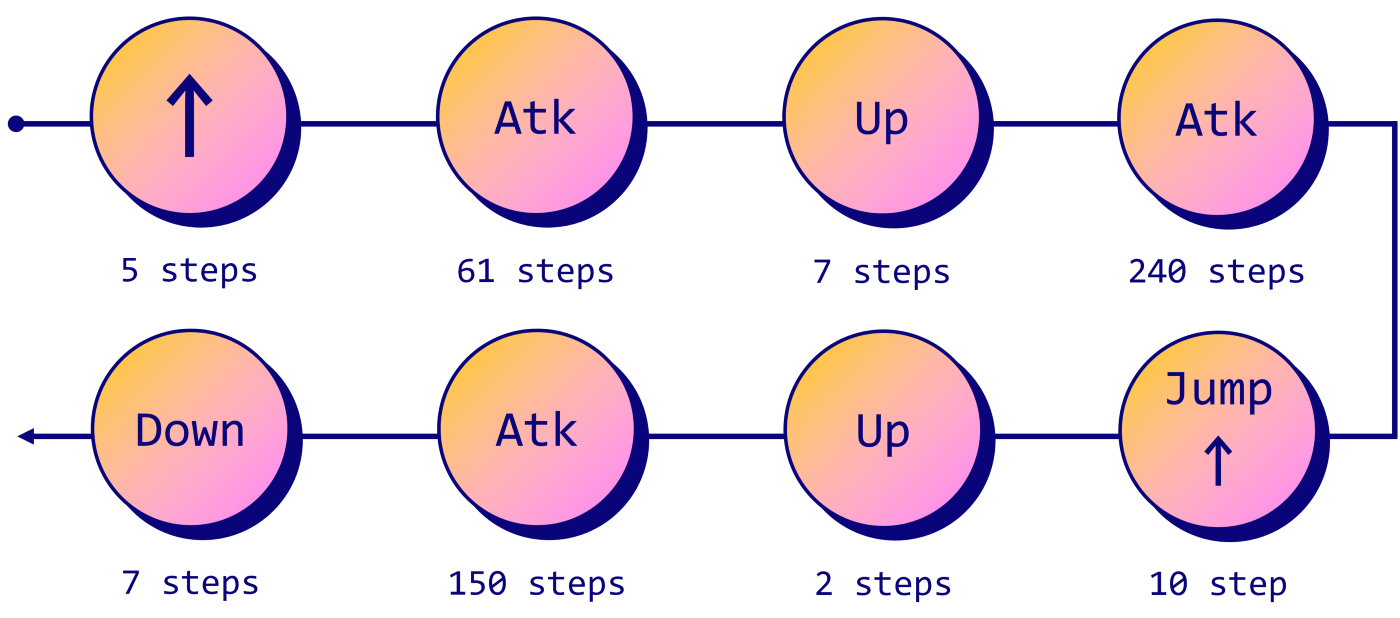
Управляться с камерой может быть трудновато. Для упрощения синтаксиса мы задействуем функцию str_to_act из этого GitHub-репозитория (лицензия MIT). Новый скрипт теперь выглядит так:
script = []
script += [''] * 20
script += ['forward'] * 5
script += ['attack'] * 61
script += ['camera:[-10,0]'] * 7  # Look up
script += ['attack'] * 240
script += ['jump']
script += ['forward'] * 10        # Jump forward
script += ['camera:[-10,0]'] * 2  # Look up
script += ['attack'] * 150
script += ['camera:[10,0]'] * 7   # Look down
script += [''] * 40

for action in tqdm(script):
    obs, reward, done, _ = env.step(str_to_act(env, action))

env.release()
env.play()
Агент успешно срубил целое дерево. Неплохо для начала, но от ИИ хотелось бы побольше самостоятельности…
II. Глубокое обучение
Наш бот хорошо работает в фиксированной среде. Но что случится, если мы поменяем затравку или её начальную точку? Всё прописано в скрипте, так что агент, скорее всего, попытается срубить несуществующее дерево.
Такой подход слишком статичен для наших целей: нам нужно что-то, что могло бы адаптироваться к новым средам. И вместо заданных в скрипте команд нам нужен искусственный интеллект, который бы знал, как рубить деревья. Конечно же, подходящей основой для обучения такого агента служит обучение с подкреплением. Если точнее, то подходящим вариантом будет глубокое обучение с подкреплением, поскольку мы обрабатываем изображения, из которых выбираются правильные действия.
Существует два способа реализации глубокого обучения с подкреплением:
-
Истинное глубокое обучение с подкреплением: агент обучается с нуля, взаимодействуя со средой. Он поощряется каждый раз, когда срубает дерево.
-
Имитационное обучение: агент учится, как рубить деревья, исходя из набора данных. Здесь данные — это последовательность действий по рубке деревьев, выполняемая человеком.
Оба подхода дают один и то же результат, но они не одинаковы. Авторы турнира MineRL 2021 пишут, что одинаковый уровень производительности достигается в обучении с подкреплением за 8 часов, а в имитационном обучении — за 15 минут.
У нас нет столько времени, поэтому что мы останавливаемся на варианте с имитационным обучением. Эта техника также называется клонированием поведения, то есть простейшей формой имитации.
Обратите внимание, что имитационное обучение не всегда бывает эффективнее обучения с подкреплением. Если хотите почитать подробнее, то Кумар с соавторами написал об этом отличную статью в блоге.

Проблема сводится к задаче классификации с несколькими классами данных. Набор данных состоит из видео в mp4, так что мы воспользуемся свёрточной нейронной сетью (CNN), чтобы перевести данные изображения в соответствующие действия. Кроме того, наша цель — ограничить количество возможных действий (классов). Таким образом, у CNN останется меньше доступных вариантов, и обучение пройдёт эффективнее:
class CNN(nn.Module):
    def __init__(self, input_shape, output_dim):
        super().__init__()
        n_input_channels = input_shape[0]
        self.cnn = nn.Sequential(
            nn.Conv2d(n_input_channels, 32, kernel_size=8, stride=4),
            nn.BatchNorm2d(32),
            nn.ReLU(),
            nn.Conv2d(32, 64, kernel_size=4, stride=2),
            nn.BatchNorm2d(64),
            nn.ReLU(),
            nn.Conv2d(64, 64, kernel_size=3, stride=1),
            nn.BatchNorm2d(64),
            nn.ReLU(),
            nn.Flatten(),
            nn.Linear(1024, 512),
            nn.ReLU(),
            nn.Linear(512, output_dim)
        )

    def forward(self, observations):
        return self.cnn(observations)

def dataset_action_batch_to_actions(dataset_actions, camera_margin=5):
    ...

class ActionShaping(gym.ActionWrapper):
    ...
В этом примере мы вручную определили 7 подходящих действий: Attack — атака, Forward — движение вперёд, Jump (прыжок) и движение камеры влево, вправо, вверх и вниз. Ещё один популярный подход — использовать метод k-средних для автоматического подбора релевантных действий человека. В любом случае смысл в том, чтобы убрать самые бесполезные для решения задачи действия. Наша задача — изготовление (крафтинг) вещей.
Давайте обучим нашу CNN на наборе данных MineRLTreechop-v0. Другие наборы данных можно найти здесь. Мы выбрали скорость обучения 0,0001 и 6 эпох с размером пакетов в 32:
# Get data
minerl.data.download(directory='data', environment='MineRLTreechop-v0')
data = minerl.data.make("MineRLTreechop-v0", data_dir='data', num_workers=2)

# Model
model = CNN((3, 64, 64), 7).cuda()
optimizer = torch.optim.Adam(model.parameters(), lr=0.0001)
criterion = nn.CrossEntropyLoss()

# Training loop
step = 0
losses = []
for state, action, _, _, _
          in tqdm(data.batch_iter(num_epochs=6, batch_size=32, seq_len=1)):
    # Get pov observations
    obs = state['pov'].squeeze().astype(np.float32)
    # Transpose and normalize
    obs = obs.transpose(0, 3, 1, 2) / 255.0

    # Translate batch of actions for the ActionShaping wrapper
    actions = dataset_action_batch_to_actions(action)

    # Remove samples with no corresponding action
    mask = actions != -1
    obs = obs[mask]
    actions = actions[mask]

    # Update weights with backprop
    logits = model(torch.from_numpy(obs).float().cuda())
    loss = criterion(logits, torch.from_numpy(actions).long().cuda())
    optimizer.zero_grad()
    loss.backward()
    optimizer.step()

    # Print loss
    step += 1
    losses.append(loss.item())
    if (step % 4000) == 0:
        mean_loss = sum(losses) / len(losses)
        tqdm.write(f'Step {step:>5} | Training loss = {mean_loss:.3f}')
        losses.clear()
Step 4000 | Training loss = 0.878
Step 8000 | Training loss = 0.826
Step 12000 | Training loss = 0.805
Step 16000 | Training loss = 0.773
Step 20000 | Training loss = 0.789
Step 24000 | Training loss = 0.816
Step 28000 | Training loss = 0.769
Step 32000 | Training loss = 0.777
Step 36000 | Training loss = 0.738
Step 40000 | Training loss = 0.751
Step 44000 | Training loss = 0.764
Step 48000 | Training loss = 0.732
Step 52000 | Training loss = 0.748
Step 56000 | Training loss = 0.765
Step 60000 | Training loss = 0.735
Step 64000 | Training loss = 0.716
Step 68000 | Training loss = 0.710
Step 72000 | Training loss = 0.693
Step 76000 | Training loss = 0.695Модель обучена. Теперь мы можем создать экземпляр объекта среды и посмотреть, как поведёт себя модель. Если обучение прошло успешно, модель должна безостановочно рубить все деревья в зоне видимости.
В этот раз мы воспользуемся обёрткой ActionShaping. Она нужна для сопоставления массива чисел, созданного с помощью dataset_action_batch_to_actions, с дискретными действиями из MineRL.
Нашей модели нужно наблюдение от первого лица в корректном формате, а на выходе она выводит логиты. С помощью функции softmax эти логиты можно перевести в распределение вероятностей в наборе из 7 действий. Далее случайным образом выбираем действие по его вероятности. Выбранное действие реализуется в MineRL через env.step(action).
Этот процесс можно повторять сколько угодно раз. Повторим его 1 000 раз и посмотрим, что получится:
model = CNN((3, 64, 64), 7).cuda()
model.load_state_dict(torch.load('model.pth'))

env = gym.make('MineRLObtainDiamond-v0')
env1 = Recorder(env, './video', fps=60)
env = ActionShaping(env1)

action_list = np.arange(env.action_space.n)

obs = env.reset()

for step in tqdm(range(1000)):
    # Get input in the correct format
    obs = torch.from_numpy(obs['pov'].transpose(2, 0, 1)[None].astype(np.float32) / 255).cuda()
    # Turn logits into probabilities
    probabilities = torch.softmax(model(obs), dim=1)[0].detach().cpu().numpy()
    # Sample action according to the probabilities
    action = np.random.choice(action_list, p=probabilities)

    obs, reward, _, _ = env.step(action)

env1.release()
env1.play()
Наш агент довольно хаотичный, но в этой новой, незнакомой среде у него всё-таки получается рубить деревья. А теперь… как же найти алмазы?
III. Скрипт + имитационное обучение
Простой, но действенный подход — комбинировать скриптовые действия с действиями искусственного интеллекта. Учим всему скучному и записываем знания в скрипт.
В этой парадигме нам нужна свёрточная сеть, которая позволит получить большой объём древесины (3 000 шагов). Затем в скрипте прописывается последовательность действий для изготовления досок, палок, верстака, деревянной кирки и приступаем к добыче камня (он должен быть у нас под ногами). Этот камень можно использовать для изготовления каменной кирки, которой можно добывать железную руду.

Вот здесь всё и начинает усложняться: железная руда встречается довольно редко, поэтому для поиска её залежей придётся на какое-то время запустить игру. Далее нужно создать печь и расплавить руду, чтобы получить железную кирку. И, наконец, придётся спуститься ещё глубже и суметь получить алмаз, не упав в лаву.
Как видите, это выполнимо, но результат — непредсказуем. Мы могли бы обучить второго агента искать алмазы, а третьего — создавать железную кирку. Если вам интересны более сложные подходы, то можете почитать про результаты турнира MineRL Diamond 2021. Канервисто с соавторами описал несколько решений на основе разных хитроумных методов, включая архитектуры сквозного глубокого обучения. Надо сказать, что это сложная задача, и ни одной команде не удавалось находить алмазы постоянно… если они вообще хоть что-то находили.
По этой причине в примере ниже ограничимся созданием каменной кирки, но код можно изменить и пойти дальше:
obs = env_script.reset()
done = False

# 1. Get wood with the CNN
for i in tqdm(range(3000)):
    obs = torch.from_numpy(obs['pov'].transpose(2, 0, 1)[None].astype(np.float32) / 255).cuda()
    probabilities = torch.softmax(model(obs), dim=1)[0].detach().cpu().numpy()
    action = np.random.choice(action_list, p=probabilities)
    obs, reward, done, _ = env_script.step(action)

# 2. Craft stone pickaxe with scripted actions
for action in tqdm(script):
    obs, reward, done, _ = env_cnn.step(str_to_act(env_cnn, action))

env_cnn.release()
env_cnn.play()
Видно, что в первые 3 000 шагов агент рубит деревья как сумасшедший, а затем срабатывает скрипт, и выполняется задача. Возможно, это не так очевидно, но команда print(obs.inventory) показывает каменную кирку. Обратите внимание, что это избранный пример; большинство запусков завершаются не так успешно.
Существует несколько причин, почему агент терпит неудачу: он может попасть во враждебную среду (вода, лава и т. д.), в область без леса или даже упасть и погибнуть. Если вы поэкспериментируете с разными затравками, то сможете лучше понять всю сложность проблемы и, надеюсь, получите идеи по созданию ещё более «талантливых» агентов.
Заключение
Надеюсь, вам понравилось это небольшое руководство по обучению с подкреплением в Minecraft. Это не просто популярная игра, но и интересная среда для проверки агентов ИИ, обученных с подкреплением. Здесь, как и в NetHack, нужно очень хорошо разбираться в игровой механике, чтобы спланировать точную последовательность действий в процедурно-сгенерированном мире. В данной статье мы:
-
узнали, как пользоваться MineRL;
-
рассмотрели 2 подхода (скрипт, клонирование поведения) и их комбинацию;
-
показали действия агента в коротких роликах.
Основная проблема среды — низкая скорость её обработки. Minecraft — не такая лёгкая игра, как NetHack или Pong, поэтому агентам нужно много времени на обучение. Если для вас это проблема, рекомендую присмотреться к средам полегче, например Gym Retro.
Спасибо за внимание! Если вам интересно, как использовать ИИ в видеоиграх, то подписывайтесь на меня в Twitter. А мы поможем прокачать ваши навыки или с самого начала освоить профессию, актуальную в любое время:
-
Профессия Data Scientist
-
Профессия Fullstack-разработчик на Python
Выбрать другую востребованную профессию.


Вадим Бордик
Основатель школы программирования для детей «Пиксель»
Игра Minecraft (Майнкрафт) пользуется огромной популярностью во всём мире, особенно среди детей и подростков. Почти мгновенно после выхода игра «обросла» фанатской субкультурой, а армия поклонников продолжает расти с каждым днём. В связи с этим разработчики сделали игровой процесс ещё полезнее: теперь можно подключать к игре язык Python и учиться программировать, не покидая любимых героев.
Благодаря программированию модов для Minecraft дети могут познакомиться с профессией Python-разработчика, не отрываясь от игрового процесса.
Мы подготовили бесплатные видеоуроки по изучению Python. Всего за 10 уроков вы изучите программирование в Minecraft, создадите новых героев, построите целые улицы и выполните огромное количество интересных заданий. Данный курс программирования для детей абсолютно бесплатен.
Подготовка к обучению
Прежде чем начать обучение программированию, необходимо установить все необходимые программы, с помощью которых мы и будем создавать коды. Специально для вас мы подготовили две видеоинструкции:
Minecraft и Python на Windows:

Minecraft и Python на MacOS:

Видеоурок №1. Знакомство с языком программирования Python
Начинаем изучать язык программирования Python в Майнкрафт. На первом занятии мы расскажем, как настроить все необходимые программы, а также напишем код для добавления сообщений в чат.

Видеоурок №2. Координаты
Второе занятие посвящено изучению координат: что это такое, для чего они нужны и как их определять. В конце данного урока мы зададим координаты для героя, после чего используем цикл, чтобы в режиме реального времени получать информацию о его расположении на координатной клетке.

Видеоурок №3. Переменные и условия. Создаём свою первую игру
Третье занятие посвящено изучению переменной и условия. После прохождения темы мы напишем код для подсчёта и выведения количества набранных очков.

Видеоурок №4. Блоки: как их создавать c помощью Python?
Блоки — важнейший элементы игры Майнкрафт, из них создаются все постройки в игре. На четвёртом уроке мы научимся работать с блоками. Для этого нам необходимо импортировать несколько дополнительных библиотек и написать скрипты. Также во время урока мы разберём понятие цикла. Затем закрепим знания: с помощью цикла возведём несколько зданий.

Видеоурок №5. Строительство улиц
Одного дома нам будет недостаточно, поэтому мы переходим к строительству улиц. Во время урока мы изучим функцию и с её помощью построим 12 домов.

Видеоурок №6. Создание плоских 2D-фигур
Шестой урок посвящён созданию плоских фигур. Мы установим дополнительные библиотеки, которые и помогут нам их создать.

Видеоурок №7. Создание объёмных 3D-фигур
Седьмой урок посвящён созданию объёмных трёхмерных фигур. Здесь мы покажем, как сделать сферу с помощью Python.

Видеоурок №8. Создание многоугольников
Восьмой урок посвящён изучению массивов и векторов, а также созданию многоугольника.

Видеоурок №9. Искусственный интеллект в Майнкрафте
Программирование в Майнкрафт для детей выходит на новый уровень. В девятом уроке мы изучим, что такое искусственный интеллект и для чего он применяется в современных технологиях. Чтобы закрепить материал, мы создадим бота на основе ИИ, которые будет передвигаться за нашим героем и определять, как далеко он находится от персонажа.

Видеоурок №10. Случайные числа в ИИ
На последнем уроке мы изучим понятия случайного числа и вероятности, а также научимся использовать их в ИИ. В конце занятия мы применим полученные знания: напишем код для бота, который будет передвигаться максимально непредсказуемо — как живой человек.

На этом наш видеокурс подходит к концу. Как мы видим, программирование для детей может быть интересным и увлекательным, особенно если ребёнок не покидает любимую игру.
Мы подготовили серию коротких обучающих видеоуроков по программированию в игровой вселенной Minecraft с помощью языка Python.
Minecraft (Майнкрафт) – это популярная во всём мире компьютерная инди-игра в жанре песочницы. Её разработал известный программист Маркус Перссон. Первая версия игры вышла в 2009-ом, а в 2011-м была выпущена версия для компьютеров.
Игра пользуется огромной популярностью как среди взрослых, так и детей. Поэтому разработчики Майнкрафт придумали, как сделать игровой процесс ещё полезнее. Теперь вы можете создавать объекты в игре с помощью кода Python (Питон). Это один из самых популярных и востребованных языков программирования. Minecraft программирование – это прекрасная возможность познакомиться детей с программированием, не отрывая их от любимой игры.
Школа программирования для детей Pixel подготовила несколько видеоуроков по программированию в Minecraft. Данный курс разработан специально для детей и подростков от 9 лет. Также он подходит тем, кто решил делать первые шаги в программировании.
Для начала давайте установим все необходимые программы. Мы подготовили два коротких видеоролика, которые помогут разобраться в данном вопросе.
В первом видеоролике мы рассказываем, как скачать Minecraft и Python на Windows (на компьютер).
Во втором видеоролике рассказывается, как скачать Minecraft и Python на MacOS.
Теперь мы можем переходить к обучению программированию детей в Майнкрафт.
Видеоурок 1. Знакомство с языком Питон
Начинаем изучать Minecraft программирование. Во время первого урока мы научимся настраивать взаимодействие Питона с Майнкрафт, после чего напишем первый код, а также выведем сообщение в чат.
Видеоурок 2. Вывод координат персонажа в чат и цикл
Во время второго урока мы расскажем, что такое координаты и как они определяются. В конце видеоурока мы закрепим пройденный материал: зададим для нашего героя координаты с помощью кода, после чего воспользуемся циклом, который позволит нам получать данные о координатах нашего персонажа.
Видеоурок 3. Переменная, условие. Создание первой игры
Во время третьего урока мы изучим переменную и условие. В конце видеоурока мы закрепим полученные знания: напишем код, с помощью которого в чате будет выводиться количество очков.
Видеоурок 4. Создание блоков
Во время четвёртого урока мы научимся устанавливать блоки с помощью Питона: импортируем необходимые библиотеки и напишем небольшой код. Также во время урока мы расскажем об ограниченном цикле, и используя полученные знания, создадим несколько небольших построек.
Видеоурок 5. Строительство домов и улиц
На пятом уроке мы рассмотрим, что такое функция, а в конце занятия построим 12 домов на одной улице.
Видеоурок 6. Создание 2D-фигур
Во время шестого урока мы установим новые библиотеки, с помощью которых нарисуем несколько 2D-фигурок.
Видеоурок 7. Создание 3D-фигур
Седьмой урок посвящён созданию трёхмерных фигур с помощью блоков. Также во время занятия мы научимся создавать сферу.
Видеоурок 8. Создание многоугольников
Во время восьмого урока мы познакомимся с понятием массива и вектора. Для закрепления пройденного материала мы создадим многоугольную пирамиду.
Видеоурок 9. Создание ботов
На девятом уроке Minecraft программирование для детей переходит на новый уровень. Во время занятия мы расскажем, что такое искусственный интеллект и как он применяется в современных технологиях. По окончании урока мы создадим бота, который будет следовать за нашим героем и сможет определять, как далеко мы находимся от него.
Видеоурок 10. Применение случайных чисел в искусственном интеллекте
На десятом уроке мы расскажем о случайных числах и вероятности, а также научимся их использовать в ИИ. Всё это понадобится нам при создании программы, которая будет действовать, как настоящий человек.
Мы продолжаем выпускать бесплатные видеоуроки на нашем YouTube-канале: учимся создавать игры внутри Майнкрафт с помощью Пайтона. Присоединяйтесь!
***
Материал подготовлен школой программирования для детей Pixel. Мы обучаем детей и подростков от 5 до 17 лет программированию, созданию игр и сайтов, 3D-моделированию и др. Приходите к нам на продвинутые курсы учиться программировать в Minecraft на Python.
Sep 28, 2021
3 min read
pybot is a Minecraft bot written using the Mineflayer framework via the Python to Javascript bridge. It is built for practical utility automating such tasks as mining for resources, mining out rooms or long corridors, building bridges, farming, chopping wood, building structures and moving around resources between chests.
Tested with Java Edition 1.16.5.
Guido Appenzeller, Daniel Appenzeller
License
Released under Apache 2.0
Setup
Copy the account_sample.py to account/account.py and edit the following fields:
- User Name
- Password
- Server IP or name
- «master» is the in-game name of the player that the bot should take commands from (i.e. your in-game name)
- version to the server’s minecraft version
You can also specify locations in this file. This is mostly useful to have the bot transfer contents between chests.
Functionality
Simple commands are given via chat. The bot has a specific «master» player that it will listen to. Try «come», «inventory» or «status» to get an idea. Other users can also give commands but need to preface it with a callsign.
Many activities can be stopped with the command «stop».
PyBot starts most complex activities around a chest. There are two types:
- For an activity that dodesn’t need a specifi direction like farming an area, it’s just a chest. Material (e.g. seeds) and resources (e.g. wheat) will be taken from and later placed into that chest.
- For activities that do have a direction (e.g. dig a tunnel in a specific direction), starting point is a chest and the direction is indicated by placing a torch on the ground directly next to the chest.
For these activities, have the bot come next to the chest and once it is there tell it to «farm» or «mine 3×3».
Farming
To start, place a chest in the area you want to farm and start with «farm». The bot will take seeds from the cest, and plant them in any nearby farmland that it can reach. If there are fully grown crops, the pot will harvest them and place them and any extra seeds in the chest. Chat «stop» to stop the bot.
Chop Wood
Right now only works with mega spruce trees. Plant 2×2 saplings and get a tree with up to 100 blocks of wood. Place a chest within 25 blocks from the tree, put a few stone axes and bread as food in the chest and start with «chop». The bot will do a spiral cut up the trunk and then cut down. It will continue to chop down trees as long as it finds them and deposit the wood into the chest.
Right now, this activity can’t be aborted with stop.
Mining
Supports:
- Strip mining and lighting up corridors with torches. Try «mine fast», «mine 3×3» or «mine 5×5»
- The bot will looking for valuable ores off corridors, usually with a default distance of 5
- Try «boxmine» to mine out large areas for underground rooms
- The bot will automatically bridge across chasms/lava
- It will not defend itself yet, but it will run away when taking damage and ninja-log when below 50%
Movement
Try «come» to make the bot come to the player
Building
Still early, but if you add a blueprint to bulueprint_list.py, the bot can build it. Starting point is a chest with a torch. The bot can build a full sorting system with «build sorter».
GitHub — appenz/minebot: A minecraft bot written in python that can mine, chop wood, farm and build things. Written in python using mineflayer.
A minecraft bot written in python that can mine, chop wood, farm and build things. Written in python using mineflayer. — GitHub — appenz/minebot: A minecraft bot written in python that can mine, ch…
 GitHubappenz


John was the first writer to have joined pythonawesome.com. He has since then inculcated very effective writing and reviewing culture at pythonawesome which rivals have found impossible to imitate.
Previous Post
ksp.py: An API wrapper for KSP
Next Post
A classic word search game that you can play in your terminal
Короткие видеоуроки по изучению популярного языка программирования Python в игровой вселенной Minecraft.
Minecraft (Майнкрафт) — инди-игра в жанре песочницы — пользуется огромной популярностью среди детей, поэтому мы предлагаем сделать игровой процесс не только увлекательным, но и полезным. Если подключить к Майнкрафту Python (Питон, Пайтон), то можно не только играть, но и учиться кодить на одном из самых востребованных языков программирования.
С помощью Python каждый день разрабатываются десятки новых игр и полезных программ, которые активно внедряются в нашу с вами жизнь. Minecraft программирование на языке Python – прекрасная возможность познакомить ребёнка с профессией программиста и создать отличающую базу для дальнейшего развития.
Школа программирования для детей Pixel подготовила специальный бесплатный видеокурс с уроками по Python и Minecraft. В нём мы не просто изучаем программирование на примере Minecraft, а детально разбираем все основные моменты.
Первое, что вам нужно сделать, — это скачать ПО для Minecraft программирования.
— для компьютеров с OC Windows;
— на MacOS.
После того, как вы установили нужное ПО, давайте перейдём к изучению программирования в Minecraft.
Видеоурок №1. Знакомство с языком Питон
Во время первого урока мы расскажем вам, как настроить взаимодействие Питон с Майнкрафт, после чего напишем свой первый скрипт и выведем сообщение в чат.
Видеоурок №2. Вывод координат вашего героя в цикл и чат
Во втором уроке мы расскажем о координатах и как их определять. После этого мы перейдём к практике и зададим координаты для вашего героя. В скрипт мы добавим цикл, чтобы в режиме реального времени получать информацию о его координатах.
Видеоурок №3. Переменная, условие
Третий урок посвящён изучению понятий переменной и условия. Чтобы закрепить знания, мы напишем небольшой скрипт, с помощью которого на экране будет выводиться количество очков в чат.
Видеоурок №4. Блоки
В Майнкрафт все герои создаются с помощью блоков. Четвёртый урок посвящён именно этой теме. Мы импортируем необходимые для работы библиотеки и напишем скрипт, с помощью которого на арене появятся первые постройки.
Видеоурок №5. Улицы из домов
Чтобы построить улицу, нам нужно возвести определённое количество домов. Пятый урок посвящён изучению функции, с помощью которой мы и выполним поставленную задачу, а именно — построим улицу из 12 домов.
Видеоурок №6. Создание 2D-фигур
Для дальнейшей работы нам нужно установить ещё несколько библиотек. С их помощью мы сможем рисовать простейшие 2D-фигуры. В конце урока мы закрепим знания и напишем несколько скриптов.
Видеоурок №7. Разработка объёмных 3D-фигур
Мы научимся создавать простые трёхмерные фигуры с помощью блоков. Также на уроке мы расскажем, как создавать сферу в Майнкрафте.
Видеоурок №8. Создание многоугольников
Восьмой урок посвящён изучению массивов и вектора. Мы расскажем, что это такое и как с их помощью создавать сферы. В конце урока мы закрепим полученные знания: напишем несколько кодов и с их помощью получим различные многоугольники.
Видеоурок №9. Искусственный интеллект: как создавать ботов
Во время девятого урока изучение программирования для детей выходит на новый уровень. Теперь мы учимся создавать ботов. В этом видео мы познакомимся с понятием искусственного интеллекта (ИИ) и расскажем, как использовать ИИ в играх. В конце занятия мы применим ИИ на практике: создадим бота, который будет следовать за нашим героем и определять расстояние от него.
Видеоурок №10. Случайные числа в ИИ
Десятый урок посвящён изучению случайных чисел и вероятности. На занятия мы узнаем, как их использовать в ИИ. Полученные знания необходимы нам для создания персонажа, который будет действовать непредсказуемо и по своему поведению будет напоминать «живого человека».
Надеемся, что этот видеокурс поможет вам разобраться в языке Питон и создаст необходимую базу для дальнейшего изучения программирования. Если вы хотите продолжить обучение по видеоурокам, заглядывайте на наш YouTube-канал, где мы продолжаем выкладывать уроки по Minecraft и Python.
***
Материал подготовлен школой программирования для детей Pixel. Мы знакомим детей 5-17 лет с IT-сферой, учим их программировать, создавать игры, мультфильмы, сайты и др. Приходите к нам учиться программировать на Python в Minecraft на продвинутых курсах.
Introduction: Python Coding for Minecraft
This Instructable shows how to install and use a mod I wrote that lets you control Minecraft with python scripts. I’ll focus on Windows, though OS X and Linux should work just as well. (If you want something simpler than python, here is a Scratch version of this project.)
Python scripts can generate neat in-world things, and there are many examples on the web. With a few lines you can draw a giant glass sphere, and with a bit more work make a giant Sierpinski triangle in the sky and even import obj files like a space shuttle. I myself made fun scripts to draw a water-filled glass donut and a gigantic Klein bottle, to turn everything around into TNT and to control Minecraft with your brain using a MindFlex EEG toy. There is a whole book introducing programming using python scripts for Minecraft, and you can even make simple Minecraft-based games. I will also show how to do simple (and sometimes more elaborate) turtle-based drawings in Minecraft, while you can ride along with the drawing as the turtle.
For a while now you could write python scripts for Minecraft on the Raspberry Pi. I wanted my kids to be able to do that, but we don’t have a Pi, plus it would be nice to do this with the full desktop Minecraft. You could run your own server with the Raspberry Juice plugin which enables most of the python scripts to work. But not everyone wants to install and configure a server.
So I wrote the Raspberry Jam Mod for Minecraft 1.8 (now ported to 1.8.8, 1.8.9 and 1.9 as well) that emulates most of the Raspberry Pi Minecraft protocol (about the same as the Raspberry Juice plugin provides) and lets Raspberry Pi python scripts run with full desktop Minecraft. (I later found out that someone wrote the mcpiapi mod for Minecraft 1.7.10 a couple of weeks earlier.) I wrote this Instructable initially for Python 2.7, but I think most of my samples will work for 3.x.
I assume that you have basic facility with creating folders and downloading, unzipping, and copying files on Windows (or your operating system of choice).
You can create Python scripts for Minecraft with a text editor, the IDLE environment which comes with Python, or with Visual Studio Python Tools on Windows. The last is actually the nicest in some ways, so I’ll have some optional steps on how to do that.
This summer I plan to teach coding and basic 3D geometry to gifted middle- and high-schoolers using Minecraft, Raspberry Jam Mod, Python and Visual Studio.
If you want to do this with Minecraft Pocket Edition on Android instead, I have an Instructable for that, too.
Step 1: Install Forge for Minecraft
The Forge manages Minecraft mods, and is needed for the Raspberry Jam Mod.
I assume you have Minecraft installed.
- You need to run Minecraft 1.12.2 (the version is very important) once. To do that, start the Minecraft Launcher, and after logging in, click on Installations, and press the «New» button to create a profile. Choose «Release 1.12.2» from the dropdown, save the profile (you can give it a name like «1.12.2»), start a world and make sure it works.
- Exit Minecraft and Minecraft Launcher.
- Download Forge installer for 1.12.2.
- Run the Forge installer. Default settings should work.
- Start Minecraft. You will now have a new Forge 1.12.2 profile.
Step 2: Windows Installer [automatic Install]
If you have Windows, once you have Forge, you can install everything using a Windows installer. This will install RaspberryJamMod, a Python interpreter, IDLE for Python and sample scripts. If you don’t have Windows, or want more control, look at the next two steps (but you’ll have to adapt them if you don’t have Windows).
Step 3: Install Python [manual Installation]
You need to decide if you want Python 2.7 or Python 3.x. The Adventures in Minecraft book uses 2.7, and most of the scripts floating around the web are for 2.7, but I have converted a lot of scripts for 3.x.
1. Download your choice of Python installed from here.
2. Run the installer.
3. Click through to the Customize Python dialog, and make sure to scroll down to «Add python.exe to path», click on it and select «Will be installed on local hard drive.» If you don’t add Python to the path, you won’t be able to launch scripts with /python from within Minecraft.
Step 4: Install Mod and Scripts
1. Create a mods folder in your Minecraft folder. (To do that, press Windows-R, type %appdata%.minecraft, press enter. You will see everything in your Minecraft folder. If you already have a mods subfolder, you don’t need to do anything. Otherwise, make one. On Windows 8, click on New folder, and then type in the name mods and press enter.)
2. Download the mods.zipfile from the latest version of the Raspberry Jam Mod. Put the contents of the zip file (currently consisting of a number of folders with names like 1.8 and 1.10.2) inside the mods folder you had just made.
3. Download the latest zip file containing sample Python scripts and the mcpi library from my Raspberry Jam Mod github release. (The scripts are supposed to work on both Python 2.7 and 3.x.)
4. Open the downloaded zip file (in Chrome, by clicking on it at the bottom of the window). It has a mcpipy folder. Copy the mcpipy folder into your Minecraft folder. (To do that, click once on the mcpipy folder in the zip file, and press ctrl-c, then navigate to the %appdata%.minecraft folder as in step 1, and press ctrl-v).
Step 5: Testing Mod
Start Minecraft, making sure that you use the Forge profile.
Create a new world (it’s too easy to mess things up with the python scripts). My daughter suggested I use Creative and Superflat.
In Minecraft, type /py donut and press enter.
If all goes well, a giant glass donut will be drawn around you, and then it will be filled with water.
If you get something like a Script not found error, this probably means that you don’t have the sample scripts installed in the %appdata%.minecraftmcpipy folder.
If you get a ‘Cannot run program «python»‘ error, you don’t have your python directory in your system path. You may want to add it manually to the path, or just reinstall python, following the directions in Step 3 of my python install step.
Running a new script with /py stops any earlier scripts running (if you don’t like that, use /apy instead of /py). You can stop a script that’s running by just typing /py without any arguments.
Step 6: Getting Started Programming Minecraft in Python
The easiest way to get started programming Minecraft in python is to start with one of the simpler sample scripts. I recommend making a shortcut on your desktop to the scripts folder (%appdata%.minecraftmcpipy).
You can load the scripts into IDLE. A fun script to modify is my water-filled donut script (donut.py). For instance, change WATER to GRASS in the second last line to make a silly grass-filled donut. You can run this with /py donut from Minecraft, or just by pressing F5 in IDLE.
Or to make a simple new script, create a helloworld.py file with your favorite text editor (even Notepad) in the scripts directory. Put at the top:
from mine import *
This imports the needed library code. It also conveniently imports all the functions from the math library as well as names for all the blocks. Connect to Minecraft with:
mc = Minecraft()
You can then send a «Hello world!» message to the user with:
mc.postToChat("Hello world!")
If you want to create a diamond block right under the player, you can also do:
playerPos = mc.player.getPos()
mc.setBlock(playerPos.x,playerPos.y-1,playerPos.z,block.DIAMOND_ORE)
The coordinates for setBlock() and getPos() are measured from the player’s spawn point (which is thus (0,0,0)).
(For a list of all the block names other than DIAMOND_ORE, see mcpiblock.py in the scripts folder. You can also directly use Minecraft block numbers.)
To run your script, save it and type /py helloworld in your Minecraft world and press enter.
It’s sometimes useful to set a whole rectangular prism of blocks at one time: use mc.setBlocks(). For instance, this excerpt from my mengersponge.py script draws an 81×81 cube at the player position (the script then recursively deletes—i.e., replaces with AIR—subblocks to form the fractal image in the screenshot):
length = 3*3*3*3
mc.setBlocks(playerPos.x,playerPos.y,playerPos.z,
             playerPos.x+length-1,playerPos.y+length-1,playerPos.z+length-1,block.WOOL_PURPLE)
Technical note: Starting with from mine import * imports a lot of stuff (Minecraft, block definitions, entity definitions, math) into our namespace. This is handy for focusing on the essentials for beginners (remember that I am going to be using this to teach coding to beginners). More advanced users may prefer being more pythonic by keeping the namespaces separate and putting in the header:
import mcpi.minecraft as minecraft
import mcpi.block as block
import mcpi.entity as entity
import math
and then starting with mc = minecraft.Minecraft() or even mc = minecraft.Minecraft.create().
Step 7: Simple Turtle-based Drawing
A particularly simple way to draw in Minecraft is to use a turtle-based system. I made a very simple Turtle class (inspired by Martin O’Hanlon’s MinecraftTurtle class) that I use to introduce middle- and high-schoolers to Minecraft python scripting.
Start up a Minecraft world in creative mode, and make your player fly (double-tap spacebar). Initialize the script with:
from mineturtle import *
t = Turtle()
(I wrapped all the Minecraft connection code inside the Turtle class and it also brings math into the namespace for convenience.) You can now do things like t.go(15) to draw a line while moving 15 blocks forward, t.right(45) to rotate 45 degrees to the right, t.down(30) to rotate 30 degrees down, and thus draw simple pictures.
You move along with the turtle as it draws, which is fun, and the turtle starts off where the player is, pointing horizontally.
For instance you can draw a horizontal square with:
t.go(50)
t.right(90)
t.go(50)
t.right(90)
t.go(50)
t.right(90)
t.go(50)
You do a 7-sided star by doing:
t.go(50)
t.right(180.-180./7)
seven times. Or just once in a loop:
for i in range(7):
    t.go(50)
    t.right(180.-180./7)
You can change materials with penblock(). For instance, a golden vertical star:
t.penblock(block.GOLD_BLOCK)
for i in range(7):
    t.go(50)
    t.right(180.-180./7)
And you can change the pen width with penwidth(x). For instance, this draws a very simple glass donut (actually, a thickened 90-gon, but who can tell the difference?):
t.penblock(block.GLASS)
radius = 20
circumference = 2 * radius * pi
t.penwidth(10)
for i in range(90):
    t.go(circumference/90)
    t.left(360/90)
Here are all the methods available:
- go(x): move x blocks forward (drawing if pen is down)
- back(x): move x blocks backward (drawing if pen is down)
- penup(): pause drawing resume drawing
- left(angle): rotate left by angle (in degrees)
- right(angle): rotate right by angle (in degrees)
- up(angle): rotate up by angle (in degrees); beginners should not mix the left/right and up/down rotations or they may get unexpected results (technical note: the same as pitch(angle))
- down(angle): rotate down by angle (in degrees) (technical note: the same as pitch(-angle))
- pendelay(x): each movement or rotation of the turtle is delayed by x seconds; default is 0.05; set to zero for much faster drawing (the player will still move with each line drawn, but instantaneously from beginning to end)
- angle(x): set horizontal angle to x (clockwise in degrees; 0 = South, 90 = West, 180 = North, 270 = East); resets roll angle
- verticalangle(x): set vertical angle to x (in degrees; upward is positive; 90 = vertically up; -90 = vertically down); resets roll angle
- angles(compass,vertical,roll): set compass, vertical and roll angles; omitted arguments are taken to be zero
- penblock(x): set material for drawing to block x; for a list of the predefined blocks, see mcpi/block.py
- goto(x,y,z): set pen position to (x,y,z); you can also access the position as t.position.x, t.position.y and t.position.z
- follow(): the player follows the turtle
- nofollow(): the player doesn’t follow the turtle
- turtle(x): if x is PLAYER, this is the same as follow(), and if x is None, this is the same as nofollow(). If you are using Raspberry Jam Mod you can also use other entities than yourself as the turtle. For instance, turtle(HORSE) spawns a horse to use as a turtle (all the entities available are listed in mcpi/entity.py, but the living ones are best as others are unable to levitate; and the Ender Dragon cannot be controlled). The entity remains once the script is finished. To make it disappear, call turtle(None) or turtle(PLAYER).
- penwidth(x): set stroke width to x (default is 1; wider strokes slow down drawing, and if follow mode is on, you may end up trapped inside the stroke, so at the end you should call penup() and back out of the drawing)
- pitch(x), yaw(x) and roll(x): rotate turtle via pitch/yaw/roll angles (see next step of Instructable)
- startface() and endface(): start and finish drawing a filled convex polygon
- push() and pop(): save and restore drawing state (heading, material, face status, thickness; but not speed or turtle type); useful for L-systems
- gridalign(): align the current position and turtle direction to the grid (the best approximation to the turtle’s current direction is chosen)
The mcpiapi mod, unlike my Raspberry Jam Mod, doesn’t support setting the player’s direction. This means that the player won’t face the same direction as the turtle. (And there is some chance of other problems with turtle scripts.)
Technical note: If you already have a Minecraft object mc, initialize with t = Turtle(mc). If you omit the Minecraft object when initializing the turtle, it’s created for you, and in either case, you can access the Minecraft object via t.mc.
You can also play with python code for controlling the turtle right from the Minecraft chat window.
In Minecraft, run the turtleconsole.py script by typing: /py turtleconsole [enter].
Then every python line you enter into chat will get executed by the python interpreter. To enter a line into chat, press T, type the line and press [enter]. To exit turtleconsole, just type /py [enter] or enter quit() [enter] into chat.
The context includes a local variable t initialized to a Turtle() object, so you don’t need to run any initialization code, just things like:
t.penblock(block.GOLD_BLOCK)
t.back(10)
There is also a console for the full non-Turtle API: console.py (which includes a pre-initialized mc local variable). (Just don’t put in any postToChat() calls, or they will confuse the interpreter.)
Step 8: Advanced Turtle-based Drawing
Using the left(), right(), up() and down() methods for the turtle is easy. But for some drawings we need more sophisticated 3D control. For instance, you might want to draw a donut tilted 45 degrees up. It’s tempting to take the glass donut script from the previous step, and add before the loop:
t.up(45)
But that produces an unexpected result—see the picture. The reason for this is that the turtle will be climbing up all the time, while the d.left() method rotates it around the vertical axis, and so you get a spiral.
Instead, what we need to do is yaw/pitch/roll rotatins of the turtle. See the picture from NASA (US government works are public domain) explaining how the three angles go, and just imagine that the airplane is your turtle. (Unfortunately, because of Minecraft limitations, the roll angle doesn’t affect how the turtle looks or the point of view from which you’re viewing.) What we need to do to draw our sideways donut is first roll our turtle by 45 degrees with t.roll(45), and then when drawing the donut use t.yaw(-angle) instead of t.left(angle). The revised code is in the screenshot.
What’s nice about the yaw/pitch/roll rotations is that they are always relative to where the turtle is pointing, while left() and right() are relative to the Minecraft world.
Finally, here is a much more advanced example. Let’s draw a tree. This involves making a recursive function. Start with this to ensure that the drawing is done as fast as possible
from mineturtle import *
t = Turtle()
t.pendelay(0)
t.turtle(None)
Now we do our recursive tree function. The basic idea behind this is that a branch is just a smaller tree. So we make a function that takes a counter and a branch length. The counter specifies how many iterations the tree will go. For instance, counter=1 means just the trunk will be drawn, and counter=1 means the trunk and one set of branches will be drawn.
def tree(counter,branchLen):
  if counter == 0:
    return
  t.go(branchLen)
  for i in range(4):
    t.pitch(30)
    tree(counter-1,branchLen*0.75)
    t.pitch(-30)
    t.roll(90)
  t.back(branchLen)
First, the code checks if our counter has run down to zero. If so, we don’t have anything to draw. Then we draw a trunk. Then we draw four branches sticking out of it with a simple loop. To design this bit of code, I just imagine myself as the turtle, having just moved up along the trunk. To draw a branch, I tilt my self up by 30 degrees (i.e., t.pitch(30)) and draw a new tree of smaller size: its counter is less by one, and its trunk will be 3/4 of the length of my current trunk. I think tilt myself back down by 30 degrees. I rotate myself by 90 degrees and repeat the exercise. Finally, once I’m done with the branches, I go back down the trunk.
Finally, I just need to invoke this code. I will make a tree with a counter of 6 and an initial branch length of 20. And for good measure, I’l make it out of wood, and of course vertically upward:
t.penblock(block.WOOD)
t.verticalangle(90)
tree(6,20)
This fractal tree doesn’t look very realistic. We should make the trunk thick and the branches get thinner and thinner as they go outward (say, get half as thick, until they reach a single block), and we should switch from WOOD to LEAVES blocks as we go out. But most of all, real trees aren’t that regular. We need some randomness. The simplest form of randomness is just to give each branch a chance of failing to grow, say a 20% chance. I implemented all of these in my fancytree.py script. The resulting tree looks surprisingly realistic for something produced by such a relatively simple piece of code. A funny side-effect of how I implemented it is that there is a 20% chance that nothing will be drawn—i.e., the tree has a chance of failing to grow, which is also realistic. And each time you run the script, you get something different.
Another useful feature of the turtle drawing class is being able to draw not just lines but polygonal surfaces. To do this, just do t.startface(), draw your surface, and then do t.endface(). Once you’re in face mode, each time you draw a line, the code actually draws a triangle: one vertex is the point the turtle was when t.startface() was called and the line is the opposite edge. This draws a pentagon tilted on its side by 45 degrees:
t.roll(45)
t.startface()
for i in range(5):
  t.go(20)
  t.yaw(360/5)
t.endface()
Step 9: L-system Fractals With Turtle Graphics
Draw a triangle. Now take each line of the triangle and replace it by a line with a triangular bump on it. Repeat. Like on the animated image (public domain, based on Wikipedia), you get a Koch snowflake.
This can be modeled by a super-simple turtle-graphics program. Imagine that F means «draw forward», and «+» and «-» turn by 60 degrees, counterclockwise and clockwise, respectively. Then the initial triangle can be drawn by:
F++F++F
I.e., go forward, turn right by 120 degrees, then go forward, turn right by 120 degrees, go forward.
The triangular bump line can be drawn by:
F-F++F-F
So here’s how we can generate a snowflake. We take the initial turtle program F++F++F to draw a triangle. Each F in it represents a line. So replace each F by F-F++F-F. If we keep on going, we generate the Koch snowflake.
This is a simple example of an L-system. The idea behind an L-system is that we start with a string of characters (in this case F++F++F), and then a bunch of rules how to change the characters (in this case, the one rule to replace F with F-F++F-F) in each iteration. We apply this a bunch of times and we get a rather complicated string. For instance, after two iterations in the snowflake case, we get:
F-F++F-F-F-F++F-F++F-F++F-F-F-F++F-F++F-F++F-F-F-F++F-F++F-F++F-F-F-F++F-F++F-F++F-F-F-F++F-F++F-F++F-F-F-F++F-F
After four, we get the image above. (To really get a fractal, the lines should shrink with each iteration, but that won’t work in Minecraft.)
There is a lot of really good information in this free PDF book.
I wrote a very simple lsystem.py module. To implement the snowflake, start with boilerplate:
import lsystem
from turtle import *
t = Turtle()
t.pendelay(0)
t.penblock(block.GOLD_BLOCK)
Now we need to define the rules. I define the rules by a python dictionary:
rules = { 'F': 'F-F++F-F' }
Next we define the axiom, or starting point:
axiom = 'F++F++F'
Finally we need to tell the system what each of the symbols in the strings mean. For different L-systems, we will assign different meanings to them (rotations by different angles, for instance). So we need a second python dictionary specifying what is done for each symbol. If you don’t specify an action for a symbol, the symbol is ignored when it is time for the turtle to draw the output (but it might be important for the generation). The meanings are given by a dictionary that specifies a function to call for each symbol. One-line functions can be specified with the lambda operator. In this case, all the functions are one-liners:
dictionary = {
  'F': lambda: t.go(2),
  '+': lambda: t.yaw(60),
  '-': lambda: t.yaw(-60)
}
Finally we invoke the L-system, specifying how many iterations (in this case 4):
lsystem.lsystem(axiom, rules, dictionary, 4)
There is one special trick for some L-systems. These L-systems are grid-aligned, with all the rotations being 90 degrees. The square curve (squarecurve.py) and dragon curve (dragoncurve.py) are nice examples. The trick is to call, somewhere near the beginning of your code:
t.gridalign()
This moves your turtle to an integer grid location, and aligns its heading to a grid direction. After this, the turtle will remain exactly grid aligned provided that you move it only by integer amounts (e.g., 7, not 7.1, and not even 7. or 7.0 as these are floating point in Python), and you rotate only by integer amounts that are multiples of 90 degrees (e.g., -180, or 90, but not 90.0 or 45). The dragon curve code also gives an example of a forward function that is a bit more complicated—instead of just a line, it draws a wall with an opening in it.
Actually, calling gridalign() can sometimes be a good idea even if not all of your angles are right angles. You will probably get some round-off problems in a large image, but it can still look better. See the spacefilling curve example (rendered in purple stained glass!).
L-systems don’t have to be two-dimensional. You can include symbols that do yaw, pitch and roll rotations. For designing trees, a useful trick is to have stack commands: ‘[‘ to save the current drawing state to a stack and ‘]’ to restore it. This will use the turtle module’s push() and pop() methods. For instance, here’s a snippet of code for drawing a simple tree (ltree.py):
t.pitch(90)
rules = { 'L':'[^FL]>[^FL]>[^FL]' }
axiom = 'FL'
dictionary = {
  'F': lambda: t.go(10),
  '^': lambda: t.pitch(20),
  '>': lambda: t.roll(120),
  '[': lambda: t.push(),
  ']': lambda: t.pop()
}
lsystem.lsystem(axiom,rules,dictionary,5)
Think of the L as a leaf (though this simple code doesn’t actually draw the leaf—that would need to be added to the dictionary). We start with FL, which is a trunk plus a leaf. Then we replace each leaf by [^FL]>[^FL]>[^FL]. This is a set of three branches, each tilted by 20 degrees from the trunk, 120 degrees apart. The brackets ensure that after each new ^FL is drawn, we’re back where we were before it. This repeats, so that the leaves on the branches are replaced by triples of branches, and so on.
A more realistic tree could have more complex code for ‘[‘. It could make the succeeding branches shorter and thinner, and change their material as we get closer to the leaves (and then restore on ‘]’). I include such a tree as the demo code in lsystem.py, based on rules (with some tweaks) from the Geeky Blogger.
You can also do grid-aligned 3D things. For instance, hilbert.py has a 3D Hilbert curve.
Finally, you might want to introduce some randomization into the L-system rules. So far our rules were deterministic: a single string was given that replaces a symbol, e.g., ‘F’: ‘F-F++F-F’. But instead of a simple replacement string, one can give a Python list of pairs (p,string), where p is a probability (from 0 to 1) and string is the string to use with that probability. The probabilities for a given source symbol had better not add up to more than 1, but they can add up to less than one—in that case, there is a chance that there will be no replacement. For instance, here’s a slightly randomized version of geeky.blogger’s tree:
rules = {'A': [(0.55,'^f[^^f>>>>>>A]>>>[^^f>>>>>>A]>>>>>[^^f>>>>>>A]'),
               (0.25,'^f>>[^^f>>>>>>A]>>>[^^f>>>>>>A]')]}
This rule has a 55% chance of replacing an A with a three-branch structure, and a 25% chance of replacing it with a two-branch structure. This isn’t very random—more randomness would make things even more lifelike. I attach a screenshot of a fairly sparse forest randomly generated using this rule (and random placement of trees, subject to a minimum distance).
Step 10: Cartesian Drawing
I also made a simple class for drawing with Cartesian coordinates. You can initialize with:
from drawing import *
d = Drawing()
(This initializes the Minecraft connection and brings math and block names into the namespace.) Then you have several convenience methods:
- d.penwidth(x): sets thickness of points/lines/faces
- d.line(x1,x2,x3,y1,y2,y3,block): draws line from (x1,x2,x3) to (y1,y2,y3) made from the block material
- d.face(vertexlist,block): draws a face with the vertices in the vertexlist made from the block material
For instance, you can do a rectangle sloped at 45 degrees made of glass at level 0 at the spawn point with:
d.face([(0,0,0),(0,10,10),(10,10,10),(10,0,0)])
For fun, I adapted Simon Tatham’s really neat polyhedron generation code to use the Minecraft drawing class. His code starts with a number of random points on a sphere, and then simulates them repelling themselves until they stabilize into a configuration that is often regular. Then he has two neat methods of making a polyhedron out of these points, a face method and a vertex method. I put this in polyhedron.py. This script takes commandline arguments. For instance, to draw an icosahedron use 12 points and the vertex construction. Directly from Minecraft:
/py polyhedron 12 vertex
For an dodecahedron, change vertex to face. You can also add one more argument for size. The polyhedron will be made of glass with stone edges and will be centered around the player.
Technical note: If you already have a Minecraft object mc, initialize with d = Drawing(mc). In either case, you can access the Minecraft object via d.mc.
Step 11: Optional: Disable Pause on Loss of Focus
Minecraft normally pauses the game and goes to the Game menu when you alt-tab out of it or otherwise lose focus. This makes it harder to see what your python scripts are doing if you’re launching them from outside of Minecraft. To do that, you can edit the options.txt file in your Minecraft directory (%appdata%.minecraft on Windows), change the
pauseOnLostFocus:true
line to
pauseOnLostFocus:false
and then save, and restart Minecraft.
This is particularly nice for running python scripts interactively. In the screenshot, I am playing with Michael O’Hanlon’s 3D turtle drawing (and, yes, that’s Deep Space Nine in the background).
Step 12: Advanced Notes 1: Drawing Objects Defined by an Inequality
There are basically two different techniques for drawing mathematically defined objects with a python script in Minecraft.
One way is to define a solid object by an inequality. For instance, a sphere centered on (x0,y0,z0) with radius r can be defined by the inequality:
(x-x0)**2 + (y-y0)**2 + (z-z0)**2 <= r**2
(I.e., the distance to (x0,y0,z0) is at most r.) So to draw a sphere, just loop through all points (x,y,z) in a cube of side-length 2*r+1 surrounding (x0,y0,z0), and draw a block if the above inequality holds.
I learned this technique from the sample nt7s_sphere.py script. Start with the standard header and init Minecraft connection code:
from mine import *
mc = Minecraft()
Then just do:
radius = 8
playerPos = mc.player.getPos()
for x in range(radius*-1,radius):
  for y in range(radius*-1, radius):
    for z in range(radius*-1,radius):
      if x**2 + y**2 + z**2 < radius**2:
        mc.setBlock(playerPos.x + x, playerPos.y + y + radius, playerPos.z - z - 10, block.GLASS)
This draws a sphere of the specified radius above the player, and a little offset in the z-direction.
I use the same technique, but with a more complicated formula, in my donut.py script (yes, this is more complicated than the turtle-based method):
for x in range(-R-r,R+r):
     for y in range(-R-r,R+r):
        xy_dist = math.sqrt(x**2 + y**2)
        if (xy_dist > 0):
           ringx = x / xy_dist * R # nearest point on major ring
           ringy = y / xy_dist * R
           ring_dist_sq = (x-ringx)**2 + (y-ringy)**2
           for z in range(-R-r,R+r):
               if (ring_dist_sq + z**2 <= r**2):
                  mc.setBlock(mcx+x, mcy+z, mcz+y, mcblock, mcmeta)
While the inequality technique works best for solid shapes, you can use it for hollow shapes in two ways. One way is to use two inequalities, for instance in the case of the sphere one to make sure that we’re within the outer radius of the center and another to make sure we’re not closer than the inner radius. The other way is just to draw another object with smaller dimensions made out of air inside the larger solid object, much as in my donut.py script, I initially draw a glass donut, and then replace the inside of it with water.
Step 13: Advanced Notes 2: Drawing an Object Defined by a Parametric Surface
One can also draw a surface by parametrizing it with two parameters, say a and b, and then looping over a range of these parameters, setting blocks where needed. In my Klein bottle and Mobius strip scripts, I have a general draw_surface() method that lets one do this. For instance, the Mobius strip (see my mobius.py script) is defined by the three formulae:
x = (3 + a * cos(b/2)) * cos(b)
y = a * sin(b/2)
z = (3 + a * cos(b/2)) * sin(b)
with a ranging from -1 to 1 and b ranging from 0 to 2*pi (yet another reason why this can be in the pi/e contest?). You can think of b as defining the angle around the circuit, and a moving one from one edge to the other.
Using scripts like this, you need to ensure that in your loops over a and b, the steps are sufficiently small that there are no gaps in the surface. Unless that’s the effect you’re after.
For details and examples see mobius.py, klein.py and klein2.py.
Step 14: Advanced Notes 3: Knots
You can find parametric equation for knots on the net. This time, we’re going to do things slightly different from before. Before, we had loops driving calls to mc.setBlock() directly. But in our surface plots, such as the Klein bottle, often the same block would get drawn multiple times, which is slow and inefficient. A better way is to keep track of the set of exact blocks that were already drawn to avoid redoing the same thing.
Let me go through an example like that (in knot.py) to draw a knot. Start with a standard header like:
from mine import *
We now need to generate our knot. I used the cinquefoil formulas from here. This requires looping a parameter t from 0 to 2*pi, with small enough steps to ensure we don’t have gaps. I used 10000 steps. Since this is done in-memory, and computers are fast, and overlapping blocks are only sent once to Minecraft, it’s easier to easier to do more steps than to think how many is enough. It’s important for the coordinates that go in the dictionary to be integers so we can tell that the same block is being drawing (a block at (1.1,1.2,1.4) and a block at (1,1,1) are the same thing in Minecraft).
We first initialize and set the position of the knot relative to the player. Note that the player position need not be an integer (you might not be standing exactly aligned with a block) and should be turned into an integer.
mc = Minecraft()
playerPos = mc.player.getPos()
scale = 12
x0 = int(playerPos.x)
y0 = int(playerPos.y + 5*scale)
z0 = int(playerPos.z)
Now we make an empty set named done to store the coordinates we’ve already drawn:
done = set()
And we draw the set:
t = 0
while t < 2*pi:
  x = x0+int( scale * cos(2*t) * (3 + cos(5*t)) )
  y = y0+int( scale * sin(2*t) * (3 + cos(5*t)) )
  z = z0+int( scale * sin(5*t) )
  if (x,y,z) not in done:
     mc.setBlock(x,y,z,block.GOLD_BLOCK)
     done.add((x,y,z))
  t += 2*pi / 10000
This only draws data that isn’t already drawn. Note that we need to round off the x, y and z coordinates with the int() function. That’s the magic behind the overlap removal: when the rounded coordinates are the same, only one block is drawn. (Note: the double parenthesis in the done.add((x,y,z)) line are due to the fact that what we’re adding to the set is the coordinate triple (x,y,z).)
The above code is in knot.py.
The knot would look better if the rope were thicker. There are many ways one can do that. An inefficient way, but easy since computers are fast these days, is just to draw a little ball instead of a point at each pixel. To do that, first I make a little utility function to draw a ball while checking in the done set to ensure there are no duplicate blocks:
def ball(x0,y0,z0,r,block,done):
  for x in range(-r,r):
    for y in range(-r,r):
      for z in range(-r,r):
         if (x**2 + y**2 + z**2 <= r**2):
            if not (x0+x,y0+y,z0+z) in done:
               mc.setBlock(x0+x,y0+y,z0+z, block)
               done.add((x0+x,y0+y,z0+z))
This uses the inequality method to fill in a ball at (x0,y0,z0), of radius r.
Then just modify our knot-making while loop to make a ball instead of just a point:
scale = 10
x0 = int(playerPos.x)
y0 = int(playerPos.y + 5*scale)
z0 = int(playerPos.z)
done = set()
t = 0
while t < 2*pi:
  x = x0+int( scale * cos(2*t) * (3 + cos(5*t)) )
  y = y0+int( scale * sin(2*t) * (3 + cos(5*t)) )
  z = z0+int( scale * sin(5*t) )
  ball(x,y,z,4,block.GOLD_BLOCK,done)
  t += 2*pi / 10000
The result is in knot2.py in the sample scripts.
Other sample knots are in trefoil.py, trefoil2.py and borromean.py. If you draw with multiple materials, you can use a dictionary in place of a set, or just go sequentially through the different materials and clear the set before each (that’s what I do in trefoil2.py and borromean.py).
Step 15: Advanced Note 4: Flying With Your Brain
In another Instructable, I describe how to hack a Mindflex EEG toy to work over Bluetooth. Using python and a modified version of the NeuroPy package, you can now control Minecraft with your brain. Here’s how to do it, either with the Mindflex or with a full Mindwave Mobile set. In my example scripts, I do this in the neurosky.py script.
Start by importing relevant packages and initializing Minecraft:
from mine import *
from NeuroPy.NeuroPy import NeuroPy
mc = Minecraft()
Then connect to the EEG headset. My hacked Mindflex EEG toy connects to my Windows laptop as COM11 and works over 57600 baud. It also needs a special initialization string to be sent to it to switch it to 57600 baud (and raw mode). This was done with:
eeg = NeuroPy("COM11",57600,True)
If you have an official Mindwave Mobile (or are using Mindflex but left it at 9600 baud), then you can omit the «,True» part.
Now we set up a simple callback routine that will move you upward (this needs Creative mode) when the «meditation» value from the eeg (which ranges from 0 to 100) goes above 60, and to move downward when it goes below 40:
up = 60
down = 40
def callback(a):
    mc.postToChat(a)
    if a > up:
       pos = mc.player.getPos()
       pos.y = pos.y + 1
       if mc.getBlock(pos.x,pos.y,pos.z) == block.AIR.id:
          mc.player.setPos(pos)
    elif a < down:
       pos = mc.player.getPos()
       pos.y = pos.y - 1
       if mc.getBlock(pos.x,pos.y,pos.z) == block.AIR.id:
          mc.player.setPos(pos)
eeg.setCallBack("meditation", callback)
For good measure, I posted the meditation value to chat. Now, all we need to do is start up the EEG and inform the user:
mc.postToChat("Connecting to EEG")
eeg.start()
mc.postToChat("To fly up, be meditative")
Finally, we need to keep the script from exiting, by starting an endless loop of sleeping:
while True:
    time.sleep(10)
(My neurosky.py script is slightly fancier by letting you select whether to work with the «meditation» or the «attention» value from the headset. By default it does attention, but /py neurosky m will start it in meditation mode.)
Then turn on the headset, and start the script with /py scriptname. To stop the script, do /py again.
Step 16: Optional: Visual Studio With Python and Minecraft: Getting Started
If you’re running on Windows, Visual Studio (I recommend free Visual Studio Express for Desktop 2015) together with the Python Tools is a nice way to develop python code for Minecraft. (But if you used my Windows installer for the mod, you’ll need a full official Python installation instead of what I bundled, or else you’ll need to use PTVS to set up a custom environment pointed to %appdata%.minecraftpythonX.)
A really useful thing is that Visual Studio’s code completion will help you with the Minecraft python api. For instance, when you type «block.» it will pop up a list of all the block types (AIR, BED, etc.).
Make sure you have installed Python, the mod, and the sample scripts.
1. Download and install Visual Studio Community Edition 2013.
2. Download and install Python Tools for Visual Studio (PTVS 2.1 VS 2013.msi).
3. Start Visual Studio.
4. Click on «Open Project», search for your sample scripts folder (%appdata%.minecraftmcpipy with Raspberry Jam Mod) and load the mcpipy.sln solution.
5. In the Solution Explorer window on the right, you can choose an existing script to modify, for instance knot2.py (or you can create a new one by clicking on the bold mcpipy in the Solution Explorer and choosing from the main menu «Project», «Add new item», and then choosing «Python» and «Empty module»).
Now you can edit the script to your heart’s content.
Step 17: Optional: Visual Studio With Python and Minecraft: Running and Debugging
Because we set up all the scripts to be part of one project, to run or debug a script, you need to tell Visual Studio which script is the one you want to run. Right click on the script in the Solution Explorer window (if you lose the Solution Explorer, go to the «Windows» menu and choose «Reset Window Layout») and «Set as Startup File».
You will also want to have Minecraft running with a world opened, or otherwise your script won’t be able to connect to Minecraft.
After setting the startup file, you can run by pulling down «Debug», and choosing «Start debugging» (or just press F5) or «Start without debugging» (ctrl-F5). If you choose «Start debugging», the script will run much more slowly, but you will have useful debug features, like the ability to pause the script at any time, step through it step-by-step (there are useful buttons on the toolbar), and examine the variables while running (see the «Autos» and «Locals» boxes).
You can also run in debug mode up to a particular line in the script by right-clicking on the line and choosing «Run to cursor». This is handy if you know that something is wrong in your script around that line, and you want to have a look at the variables at that point. For instance, if you run the knot2.py script up to around the line that invokes draw_data(), you can see the contents of the knot dictionary that stores the list of blocks to be drawn.
Step 18: Additional Resources
The best resource for programming Minecraft in python is the Adventures in Minecraft book by Martin O’Hanlon.
O’Hanlon also has a lot of good information on the stuffaboutcode.com site. In particular, he has an API reference here. The Raspberry Jam Mod (and mcpiapi mod) supports just about everything that the Raspberry Juice server plugin does.
The real-time working analog clock in the picture above is from one of the stuffaboutcode scripts (sitting above one of my donuts): /py stuffaboutcode_clock
A rather cool thing that O’Hanlon did was to write a python script to convert Wavefront mesh.obj files to Minecraft. I’ve adapted this to convert 3DS, PLY and binary STL files as well. For instance, you can draw a space shuttle with /py render shuttle (there are .txt files describing the block choices in the mcpipy/models directory; the meshes will automatically be downloaded).
10 People Made This Project!