
![]()
💾 bun9000
Posted on Oct 18, 2019
• Updated on Nov 6, 2019
![]()
![]()
![]()
![]()
![]()
This tutorial gets you up and running with a simple chat bot for Twitch channel.
Who’s this tutorial for?
Beginners to coding and experienced coders new to Python.
Contents
We’ll start out by setting up the accounts, getting the secrets, and installing the softywares. Then we’ll setup and code the bot. By the end of this tutorial you should be ready to start adding your own custom commands.
BUT FIRST… we need to make sure we have our credentials in order. 👏
Papers, please!
📢 Glory to Arstotzka!
- Make an account on Twitch (for your bot) or use the one you stream with. Make it something cool like
RealStreamer69😎 - Request an oauth code. You’ll need to login and give the app permissions to generate it for you.
- Register your app with Twitch dev and request a client-id (so you can interface with Twitch’s API)
Keep the oauth and client id somewhere handy but not public. You’ll need them later to configure the bot.
💡 PROTIP™ — Keep it secret. Keep it safe.
Install all the things! 🧹
- Install Python 3.6 or 3.7 — Windows // Linux // OS X
- Install PIPENV. In the console, run ⇒
pip install pipenv
Create a cozy home for the bot to live in
Virtual environments require a couple extra steps to set up but make developing Python apps a breeze. For this tutorial, we’ll use PIPENV which marries pip and venv into a single package.
- In the console, navigate to your working directory
- Run ⇒
pipenv --python 3.6orpipenv --python 3.7- This is going to create
pipfileandpiplock. They hold venv info like Python version and libraries you install.
- This is going to create
- Then run ⇒
pipenv install twitchio
Configuring and authorizing the bot
Create 2 files in your working directory. One called bot.py and another called .env (no file name, just the extension — it’s weird, I know).
/.env
Your secrets will live inside the .env file. Add the oauth token and client-id from above after the = in the file. Fill in the other vars as well.
# .env
TMI_TOKEN=oauth:
CLIENT_ID=
BOT_NICK=
BOT_PREFIX=!
CHANNEL=
Enter fullscreen mode
Exit fullscreen mode
/bot.py
Inside bot.py, import the libraries we’ll need and create the bot obj that we’ll start in the next step.
# bot.py
import os # for importing env vars for the bot to use
from twitchio.ext import commands

bot = commands.Bot(
    # set up the bot
    irc_token=os.environ['TMI_TOKEN'],
    client_id=os.environ['CLIENT_ID'],
    nick=os.environ['BOT_NICK'],
    prefix=os.environ['BOT_PREFIX'],
    initial_channels=[os.environ['CHANNEL']]
)
Enter fullscreen mode
Exit fullscreen mode
💡 PROTIP™ — When we run
bot.pyusing PIPENV, it first loads the variables from the.envfile into the virtual environment and then runsbot.py. So, inside this venv, we have acess (on an instance-basis) to these variables. We’re going to use python’sosmodule to import them, just like we would import environment variables on our native environment.
At the bottom of the file, we need to make sure the bot runs when we call bot.py directly using if __name__ == "__main__":
# bot.py
if __name__ == "__main__":
    bot.run()
Enter fullscreen mode
Exit fullscreen mode
WAKE BOT UP (wake bot up inside!)
Let’s test the bot and make sure it can connect to Twitch.
- In the console, run ⇒
pipenv run python bot.py
If it worked, you shouldn’t get any errors — that means the environment variables loaded correctly and your bot successfully connected to Twitch!
If you got errors, check out the next section before moving on.
Error: Can’t wake up. [save me]
A wild Request to join the channel has timed out. Make sure the channel exists. appears. You evade with..
-
Make sure you have the right tokens (oauth and client-id) in the .env file and that they’re in the same directory/folder as
bot.py -
Your directory structure at this point should look like this…
working-directory/
├─ .env
├─ bot.py
├─ Pipfile
└─ Pipfile.lock
-
If that still doesn’t fix it, comment below and we’ll sort it out for ya!
Adding some functionality to the bot
Greet the chat room!
Back to bot.py…. Below the bot object, let’s create a function called event_ready with the decorator @bot.event. This function will run once when we start the bot. It then reports to terminal and chat that it successfully connected to Twitch.
# bot.py, below bot object
@bot.event
async def event_ready():
'Called once when the bot goes online.'
print(f"{os.environ['BOT_NICK']} is online!")
ws = bot._ws # this is only needed to send messages within event_ready
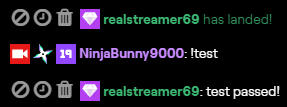
await ws.send_privmsg(os.environ['CHANNEL'], f"/me has landed!")
Enter fullscreen mode
Exit fullscreen mode
Go ahead and test the bot again. It should greet chat when it comes online now.

Respond to messages in chat
Next up, we’re going to add a function that’s run every time a message is sent in your channel. You can add all sorts of logic here later, but we’ll start out with making sure the bot ignores itself.
# bot.py, below event_ready
@bot.event
async def event_message(ctx):
    'Runs every time a message is sent in chat.'

    # make sure the bot ignores itself and the streamer
    if ctx.author.name.lower() == os.environ['BOT_NICK'].lower():
        return
Enter fullscreen mode
Exit fullscreen mode
After that, we’ll drop in a line of code that will annoyingly echo back every message sent in chat. ᴷᵃᵖᵖᵃ
# bot.py, in event_message, below the bot-ignoring stuff
await ctx.channel.send(ctx.content)
Enter fullscreen mode
Exit fullscreen mode
Restart the bot and check it out!

💡 PROTIP™ — Comment out that line now cuz it’s actually really annoying.
Making a chat command
Any command you make needs to follow this format when defining them..
- Decorated with
@bot.command(name='whatever') - Be asynchronous functions with names that match the
namevariable in the decorator - Pass the message context in through the function
How the function works and what it does is all up to you. For this example, we’ll create a command called !test that says test passed! in chat when we call it.
# bot.py, below event_message function
@bot.command(name='test')
async def test(ctx):
    await ctx.send('test passed!')
Enter fullscreen mode
Exit fullscreen mode
Before this can work, we need to make sure that the bot knows to listen for commands coming through.
Add this just below the ignore bot code in event_message:
    #bot.py, in event_message, below the bot ignore stuffs
    await bot.handle_commands(ctx)
Enter fullscreen mode
Exit fullscreen mode
Alright! Time to test it out. Reboot the bot and send !test in chat!
Responding to specific messages
Tell my bot I said… «Hello.»
You can respond to specific messages in your chat too, they don’t have to be !commands. Let’s write some code that says hi when people say hello.
    # bot.py, at the bottom of event_message
    if 'hello' in ctx.content.lower():
        await ctx.channel.send(f"Hi, @{ctx.author.name}!")
Enter fullscreen mode
Exit fullscreen mode
Go ahead and test it out! You’ve got the framework to start buildng your bot and adding commands.

Here’s what you should have when you’re done
/bot.py
import os
from twitchio.ext import commands

# set up the bot
bot = commands.Bot(
    irc_token=os.environ['TMI_TOKEN'],
    client_id=os.environ['CLIENT_ID'],
    nick=os.environ['BOT_NICK'],
    prefix=os.environ['BOT_PREFIX'],
    initial_channels=[os.environ['CHANNEL']]
)

@bot.event
async def event_ready():
    'Called once when the bot goes online.'
    print(f"{os.environ['BOT_NICK']} is online!")
    ws = bot._ws  # this is only needed to send messages within event_ready
    await ws.send_privmsg(os.environ['CHANNEL'], f"/me has landed!")


@bot.event
async def event_message(ctx):
    'Runs every time a message is sent in chat.'

    # make sure the bot ignores itself and the streamer
    if ctx.author.name.lower() == os.environ['BOT_NICK'].lower():
        return

    await bot.handle_commands(ctx)

    # await ctx.channel.send(ctx.content)

    if 'hello' in ctx.content.lower():
        await ctx.channel.send(f"Hi, @{ctx.author.name}!")


@bot.command(name='test')
async def test(ctx):
    await ctx.send('test passed!')


if __name__ == "__main__":
    bot.run()
Enter fullscreen mode
Exit fullscreen mode
And ofc your .env with your secrets and a pipfile and Piplock.
I’ve uploaded the files to a github repo too, if that’s your thing.
Congrats!! 🥳🎉
You’ve made it this far.. You know what that means? Time to celebrate by clicking this GitKraken referral link and signing up so I can get free socks (or maybe a Tesla? 😎).
Also, feel free to check out the Live Coding Stream recap where we developed this tutorial. Shoutouts to everyone in chat that collaborated!
What do you want to do next?
Questions? Comments? Ideas? Let me know in the comments below!
I’ll be following up to this post soon with some tips on how to get the most out of the TwitchIO library — more stuff that’s not really well-documented and was a PITA to figure out, like how to get the author, using badges for permissions, etc.

Введение
В этой статье мы исследуем, как создать чат-бота Twitch с использованием node.js и tmi.js. Мы рассматриваем как приложения, так и теорию, чтобы понять лежащие в основе технологии, одновременно изучая, как применять примеры, представленные в других проектах.
Настройка проекта и генерация ключей
Если у вас нет скачайте и установите Node.js для вашей ОС. Создайте в своей системе пустую папку под названием проект или используйте название по вашему выбору и запустите npm init -y, чтобы создать чистый лист для вашего проекта Node.
Мы продолжаем создавать twitchscript.js в корневом каталоге каталога проекта вместе с файлом с именем .env для хранения переменных среды. Чтобы создать этот файл:
Windows: создайте пустой файл в корневом каталоге вашего проекта и переименуйте его .env
Mac: перейдите в корневой каталог в терминале с помощью команды «cd», а затем нажмите,
$ touch .env
Command + Shift +. позволит файлу появиться в Finder. Базовая файловая структура должна выглядеть следующим образом:
проект /
.env
twitchscript.js
node_modules
Мы добавим в.env три строки текста, включая имя пользователя, пароль и каналы.
Имя пользователя — это отображаемое имя учетной записи бота, пароль соответствует секретному ключу API, а каналы — это разделенный запятыми список каналов, с которыми будет взаимодействовать клиент. Https://twitchapps.com/tmi/ генерирует токен для вашей учетной записи. Обратите внимание, что перед ключом в файле creds.txt добавляется oauth:. В большинстве случаев проще создать дополнительную учетную запись, чтобы легко различать предпочтения разработчика и личные предпочтения.
Ваш файл должен выглядеть примерно так:
имя пользователя = ’имя пользователя’
пароль = ’пароль’
каналы = ’каналы’
В моем случае:
имя пользователя = tbot8001
пароль = oauth: КЛЮЧ
канал = tbot8001
Зависимости
Node.js — это обычная среда выполнения javascript с рядом вариантов использования. Описано на домашней странице проекта: Как асинхронная среда выполнения JavaScript, управляемая событиями, Node.js предназначена для создания масштабируемых сетевых приложений. Фреймворк tmi.js обеспечивает мост между IRC API Twitch и Node, упрощая его для объявления нескольких прослушивателей событий для диапазона действий чата.
В этом руководстве клиентский класс tmi используется для прослушивания сообщений чата, чтобы возвращать целое число от одного до шести, когда в chat набирается «! Dice». Node.js выполняет функции, чтобы определить, какие действия следует предпринять на основе ввода чата. Наконец, мы используем dotenv для управления переменными среды, которые мы хотим скрыть, например, нашим ключом API. Если это еще не сделано, обязательно импортируйте dotenv, node-fetch и tmi, запустив
npm установить dotenv node -fetch tmi
Обратите внимание, что эти команды следует запускать в корневом каталоге проекта. Чтобы установить эти пакеты глобально, чтобы их можно было использовать в любом проекте узла, добавьте — global в конец команды, например npm install имя_пакета — global.
Аутентификация
После всего этого мы можем перейти к функциональной части учебника. Откройте twitchbot.js и начните с написания нижеприведенного.
//import dependencies
const tmi = require('tmi.js');
const fetch = require("node-fetch");
require('dotenv').config();

//setting up tmi client connection
const client = new tmi.Client({
   connection: {
       secure: true,
       reconnect: true
   },
   identity: {
       username: process.env.username,
       password: process.env.password
   },
   channels: [process.env.channel]
});
client.connect();
Этот клиент абстрагирует работу по аутентификации и подключению к Twitch, при этом dotenv извлекает ваши учетные данные из объекта env в текущем процессе узла.
События чата
События чата запускают анонимную функцию, которая выводит информацию в ответ на чат. Функция записана стрелками; если вы не знакомы, вы можете просмотреть краткую справку здесь. Подойдет любая стандартная нотация функций, поэтому не стесняйтесь использовать наиболее знакомые вам соглашения.
В качестве функции отладки мы добавляем следующий фрагмент кода для вывода всех сообщений чата на консоль, в которой запускается Node. Более того, функция обрабатывает все последующие события чата.
//handles all events caused by chat input
client.on('chat', (channel, tags, message) => {
   //log all chat messages to console
   console.log(`${tags['display-name']}: ${message}`);
}
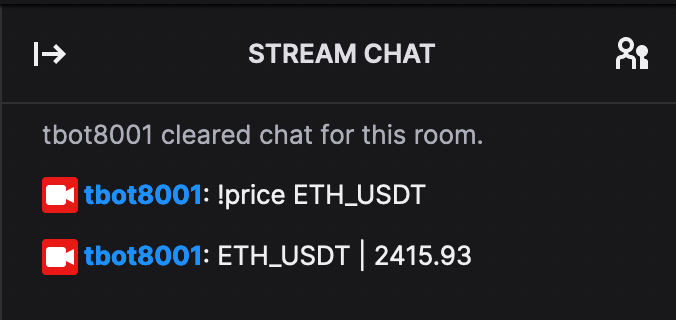
Первый интерактивный пример, который мы реализуем, — это функция игры в кости. Любое сообщение чата, совпадающее с строкой «! Dice», вызовет срабатывание tbot8001 для публикации числа от одного до шести. Напишите ниже после вызова console.log выше.
//logic for dice rolls. Returns a random integer from 1-6
if (message == '!dice') {
    client.say(channel, (1 + Math.floor(Math.random() * 6)).toString());
}
К этому моменту twitchscript.js должен выглядеть так:
//import dependencies
const tmi = require('tmi.js');
const fetch = require("node-fetch");
require('dotenv').config();

//setting up tmi client connection

const client = new tmi.Client({
   connection: {
       secure: true,
       reconnect: true
   },
   identity: {
       username: process.env.username,
       password: process.env.password
   },
   channels: [process.env.channel]
});
client.connect();

//handles all events caused by chat input
client.on('chat', (channel, tags, message) => {
   //log all chat messages to console
   console.log(`${tags['display-name']}: ${message}`);

   //logic for dice rolls. Returns a random integer from 1-6
   if (message == '!dice') {
       client.say(channel, (1 + Math.floor(Math.random() * 6)).toString());
   }
})
Чтобы убедиться, что все идет по плану, перейдите в корневой каталог вашего проекта в предпочитаемом интерфейсе командной строки и запустите node twitchscript.js. Затем перейдите в чат Twitch и введите! Dice. Вы должны увидеть что-то вроде этого:
Поздравляем! Вы создали своего первого работающего бота Twitch! Прежде чем продолжить интеграцию с Bitmart, вот еще одна полезная функция для вашего бота:
if (message == '!clear' and username == 'tbot8001') {
  client.clear(channel);
}
Только не забудьте заменить tbot8001 на свое имя пользователя.
Интеграция Bitmart
Давайте реализуем функцию, которая взаимодействует с общедоступным Bitmart API спотовой торговли. Bitmart — это популярная биржа криптовалют, предлагающая свои API бесплатно как пользователям, так и не пользователям. Приведенный ниже фрагмент кода содержит большое количество информации для разбивки, но предоставляет пользователям полную функциональность, позволяющую ввести ! Price CUR для получения цены актива.
//logic for returning a specific price on command
if (message.startsWith('!price ')) {
 ccy = message.substring(7)
 fetch(`https://api-cloud.bitmart.com/spot/v1/ticker?symbol=${ccy}`)
   .then(response => response.json())
   .then((data) => {
     pair_info = data['data']['tickers'][0]
     client.say(client.channels[0], `${pair_info['symbol']} | ${pair_info['last_price']}`);
   })
   .catch((err) => {
     client.say(client.channels[0], `Invalid input.`)
     console.log('Fetch Error :-S', err);
   })
}
Достаточно просто, мы сканируем сообщения, начинающиеся с «! Price», чтобы запустить наше дерево решений. Переменная ccy считывает подстроку, следующую за «! Price», которая должна быть названием криптовалюты, поддерживаемой платформой. Наконец, мы реализуем наше подключение к Bitmart.
Прежде чем перейти к части выборки, где мы пингуем серверы Bitmart, мы определяем объект обещания. По MDN Web Docs:
«Объект Promise представляет собой окончательное завершение (или сбой) асинхронной операции и ее результирующее значение».
Кроме того,
Обещание находится в одном из следующих состояний:
- ожидает: начальное состояние, ни выполнено, ни отклонено.
- выполнено: означает, что операция была успешно завершена.
- отклонено: это означает, что операция не удалась.
В нашем коде вызов fetch возвращает обещание, которое при разрешении возвращает либо цену актива, либо сообщение об ошибке как в консоль, так и в чат. Причина, по которой мы должны использовать выборку, заключается в том, что данные возвращаются не какой-либо функцией в нашем коде, а с внешнего сервера, который не будет возвращать данные немедленно или надежно.
Тестируя эту функцию, мы видим:
Заключение
Теперь у нас есть работающий бот Twitch с возможностью подключения к сторонним сервисам. Это руководство должно служить кратким введением в создание чат-бота и взаимодействия с API, которое можно распространить на другие платформы и варианты использования. К концу этого руководства ваш код должен выглядеть примерно так:
//import dependencies
const tmi = require('tmi.js');
const fetch = require("node-fetch");
require('dotenv').config();

//setting up tmi client connection

const client = new tmi.Client({
 connection: {
   secure: true,
   reconnect: true
 },
 identity: {
   username: process.env.username,
   password: process.env.password
 },
 channels: [process.env.channel]
});
client.connect();

//handles all events caused by chat input
client.on('chat', (channel, tags, message) => {
 //log all chat messages to console
 console.log(`${tags['display-name']}: ${message}`);

 //logic for dice rolls. Returns a random integer from 1-6
 if (message == '!dice') {
   client.say(channel, (1 + Math.floor(Math.random() * 6)).toString());
 }

 if (message == '!clear' and username == 'tbot8001') {
   client.clear(channel);
 }

 //logic for returning a specific price on command
 if (message.startsWith('!price ')) {
   ccy = message.substring(7)
   fetch(`https://api-cloud.bitmart.com/spot/v1/ticker?symbol=${ccy}`)
     .then(response => response.json())
     .then((data) => {
       pair_info = data['data']['tickers'][0]
       client.say(client.channels[0], `${pair_info['symbol']} | ${pair_info['last_price']}`);
     })
     .catch((err) => {
       client.say(client.channels[0], `Invalid input.`)
       console.log('Fetch Error: ', err);
     })

 }
});
Спасибо за чтение, увидимся в следующий раз.
1. Вступление
Streamlabs Chatbot это бесплатный и мощный инструмент решающий множество задач стримера. Данная статья не является рекламой, я лишь делюсь своим опытом использования этой программы и расскажу о тех ее функциях, которыми пользуюсь сам.
Не бойтесь сложностей: новичку настройка бот-составляющей может показаться запутанным и трудоемким процессом. Но все гораздо проще, чем кажется. Да, это займет некоторое время, чтобы освоиться, но поверьте — удобство, выигранное время и облегчение обязанностей
модераторов в дальнейшем оправдают себя с лихвой! На моем примере вы можете видеть, как человек, который имеет очень слабое представление о программировании, смог разобраться в этом всем разобраться.
Перечислю несколько интересных преимуществ по сравнению с обычными ботами:
• Можно дать боту любое имя! (Другие бот-сервисы, как правило, просят за это платную подписку). Для бота вы создаете отдельный аккаунт твича, а следовательно сами решаете какой у него будет никнейм. Но я все же рекомендую в качестве бота использовать тот же аккаунт, с которого вы стримите — далее объясню почему.
• Воспроизведение звуковых файлов по команде из чата! (функция по умолчанию, не требует установки дополнительных скриптов или плагинов).
• Автоматические индивидуальные Shoutout/любые другие сообщения при появлении конкретного человека в чате (функция по умолчанию, не требует установки дополнительных скриптов или плагинов).
• Большое количество скриптов на любой вкус, значительно расширяющие возможности бота. Их все, а также ряд прочей информации можно найти в большом и активном дискорд-сообществе, посвященном боту https://discord.gg/xFcsxft
• Прочие инструменты, которые есть и у других сервисов: собственная валюта (альтернатива очкам канала), команды по таймеру, голосование, розыгрыши, встроенные чат-игры, списки
подписчиков и т.д.
Для ознакомления со всеми возможностями и доступными переменными для команд, а также большей части всего того же о чем здесь написано, я настоятельно рекомендую изучить официальную инструкцию https://cdn.streamlabs.com/chatbot/Documentation_Twitch.pdf
2. Установка компонентов
Важный момент: Streamlabs Chatbot это отдельная программа для компьютера. То есть для работы бота необходимо, чтобы приложение было запущено, а учетные записи подключены до или во время стрима!
1. Скачиваем установщик самой программы с официального сайта Streamlabs: https://streamlabs.com/chatbot/download
и устанавливаем.
2. Скачиваем Python 2.7, который понадобится для работы сторонних скриптов. Обратите внимание , что версия Python должна быть 2.x — версии 3.x не будут работать!
https://www.python.org/ftp/python/2.7.13/python-2.7.13.msi
Многие рекомендуют устанавливать Python в корень диска. Например, C:Python27 . В любом случае, запомните директорию — это еще пригодится.
3. Активация бота и первичная настройка
Запускаем программу и после загрузки закрываем всплывающее
окно.

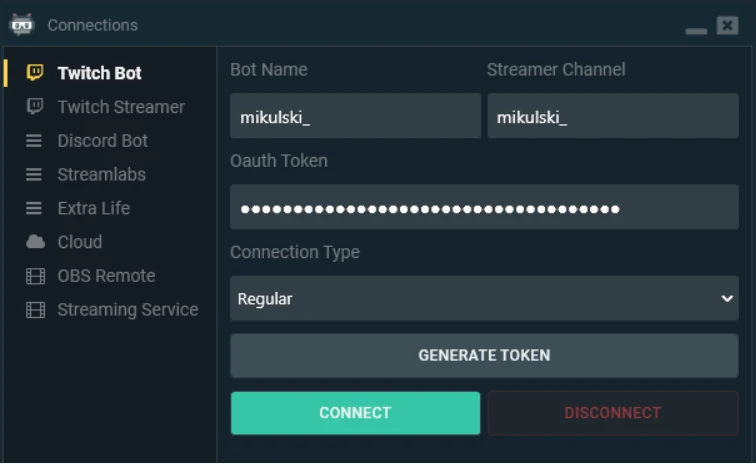
Слева внизу экрана нажимаем на иконку с фигурой человека — это раздел с подключениями. Подключаться необходимо в каждый запуск программы!
1. Первый раздел — это подключение бота.
В строке Bot Name пишем никнейм аккаунта Твича, созданного под бота. Либо вписываем собственный никнейм. Преимущество использования собственного аккаунта в качестве бота заключается в том, что вы сможете использовать в командах все доступные смайлики на вашем канале. Правда, как мне показалось, реакция бота в таком случае немного замедляется, а некоторые скрипты не срабатывают корректно с первого раза. Но это из разряда домыслов и тестовых сравнений я не проводил.
В строку Streamer Channel пишем никнейм канала, к которому будет подключаться бот.
Далее нажимаем Generate Token — откроется окно авторизации Твича. Вводим пароль бот-аккаунта или собственный.
После этого нажимаем Connect — и через пару мгновений бот подключится к каналу.
Никнеймы в дальнейшем вводить не придется. Запускаете программу, Connect и все готово. Но, периодически (раз в несколько месяцев) происходит разлогин аккаунта и шаг с Generate Token надо будет повторить.

2. Следующий раздел Twitch Streamer: здесь все аналогично, вводим никнейм нашего канала, Generate Token — чтобы авторизоваться и Connect, чтобы произошло соединение.
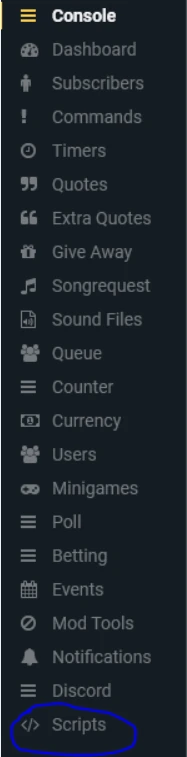
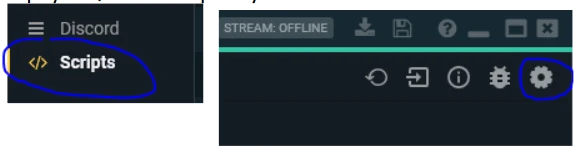
←Обратите внимание, что после этого шага в панели слева появится новое меню Scripts. Без подключения Twitch Streamer — оно не доступно! Поэтому, когда вам надо будет что-либо отредактировать в настройках скриптов, не забывайте о коннекте!

- Далее идет раздел Discord Bot.
Программа умеет публиковать на сервере Дискорда анонсы и сообщения по таймеру, также присваивать роль новым участникам. Я этим не пользуюсь, поэтому пропущу этот шаг. К тому же настройка подключения там весьма запутанная – если требуется, то изучите этот момент самостоятельно по официальной инструкции чатбота.
На мой же взгляд, MEE6 или Pingcord куда более удобней и понятней для этих целей в Дискорде.

4. аздел Streamlabs. Делает доступным в панели слева меню с уведомлениями о событиях в чате. Например, когда кто-либо фолловится, подписывается, делает хост и т. д. То в чате появляется сообщение об этом, которое вы сами и назначаете («Спасибо за фоллоу»). Странно, но там отсутствует уведомление о рейдах — его
придется активировать через отдельный скрипт, но об этом позже.
Для работы этой функции потребуется активный аккаунт в https://streamlabs.com, который моментально создается
авторизацией через аккаунт Твича.
Если вы уже используете Streamlabs для алертов и донатов, то хорошо, если же нет, то ничего страшного в том, чтобы авторизоваться там. Я сам имею аккаунты Streamlabs и Streamelements и использую их для разных целей. SL для алертов и полосок с целями, а SE для списков топ-гифтеров, kappagen и чата.
Действия все те же: Generate Token, авторизация и Connect


Возвращаемся в чатбот. Если OBS у вас работает на том же компьютере, что и Чатбота, то строку IP оставляем без изменений 127.0.0.1 . Если же OBS у вас на втором ПК, то надо вбить сюда его IP.
Вводим пароль, что мы придумали в OBS, ставим тот же порт, что и в OBS и нажимаем Connect..
7. Последний раздел Streaming Service. Здесь можно переключить бота с аккаунта Твича на аккаунт Ютуба.
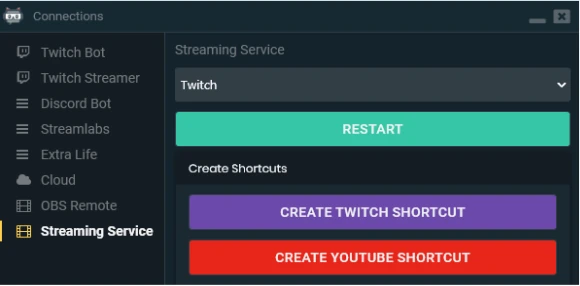
Подытожим: перед каждым стримом необходимо запускать программу и прожимать кнопки Connect в используемых разделах. В моем случае это Twitch Bot, Twitch Streamer, Streamlabs и OBS Remote.
4. Подключение Скриптов
В панели слева находим меню Scripts (не забудьте, что нужно сделать соединение Twitch Streamer, чтобы оно появилось). Далее справа вверху ищем шестеренку и нажимаем на нее.
Нажимаем на Pick Folder и указываем директорию библиотеки (Lib) куда мы установили Python. А также нажимаем Generate Api Key.

Возвращаемся на предыдущий экран и нажимаем на кнопку Import, чтобы добавить скрипт (скрипт всегда находится в архиве, именно архив и указываем, его не нужно распаковывать). Рекомендую создать отдельную папку для скриптов.

Поставим OBS Remote Parameters для пробы, о котором говорилось выше https://github.com/Consoletation/OBSRemoteParameters после чего обновляем скрипты на кнопку. Не забывайте обновляться после того как редактируете настройки скриптов.

Нажимаем на строку появившегося скрипта в списке. Также в чекбоксе можно установить галочку будет ли скрипт активным. Справа панель с настройками — у разных скриптов свои настройки. В конкретном случае можно ознакомиться с инструкцией как прописывать правильно команду для влияния на источники.

Что ж, мы разобрали основы. В следующей статье я перейду от общего к частному: покажу реализацию некоторых идей через команды, пройдусь по функциональным разделам и поделюсь скриптами, которые использую. А пока что вы можете самостоятельно подключиться и попробовать в действии эту программу, поискать подходящие вашему
стриму скрипты в Дискорд-сообществе, посвященному Чатботу https://discord.gg/xFcsxft. Настроить OBS remote и по инструкции добавить несколько команд дя источников и переключения сцен.
Надеюсь, эта информация оказалась полезной. Я решил поделить это руководство на несколько частей для удобства восприятия. Эта часть рассчитана больше на новичков и на тех, кто хочет быстро «зайти» в новую программу.
Introduction: Twitch.tv Moderator Bot
In this tutorial, you’ll implement a bot that moderates the chat for a channel on Twitch.tv. The bot will be able to connect to the Twitch IRC server, read the channel chat, search for unwanted messages and spam, and timeout or ban the user who sent the message.
Required Resources
- A basic understanding of Python. I use Python 3 in this tutorial, but Python 2 is similar enough that the tutorial can be easily translated.
- A Python installation. You’ll need this to run the bot.
- A separate Twitch.tv account. You should not use your main account, as incorrectly implementing the bot can cause you to be (temporarily) banned.
Step 1: Create a Configuration Module
Values that will differ between executions of the bot should be easy to view and modify. For this purpose, we’ll create a configuration module that will store these values. Get your Twitch.tv OAuth token from twitchapps.com/tmi, and then create a new file in your source directory called ‘cfg.py’ and add these values:
# cfg.py
HOST = "irc.twitch.tv"              # the Twitch IRC server
PORT = 6667                         # always use port 6667!
NICK = "twitch_username"            # your Twitch username, lowercase
PASS = "oauth:xxxxxxxxxxxxxxxxxxxx" # your Twitch OAuth token
CHAN = "#channel"                   # the channel you want to join
Step 2: Write the Network Functions
Twitch uses IRC as its chat protocol, which makes most communication trivial. Still, the code will end up much cleaner if we define some utility functions first.
We use sockets as the network abstraction for this bot. Sockets provide a very clear send-and-receive interface for network communications, so these functions won’t be very complicated.
I’ve provided docstrings in compliance with PEP 257 which will provide brief explanation of the functions.
# bot.py
def chat(sock, msg):
    """
    Send a chat message to the server.
    Keyword arguments:
    sock -- the socket over which to send the message
    msg  -- the message to be sent
    """
    sock.send("PRIVMSG #{} :{}".format(cfg.CHAN, msg))def ban(sock, user):
    """
    Ban a user from the current channel.
    Keyword arguments:
    sock -- the socket over which to send the ban command
    user -- the user to be banned
    """
    chat(sock, ".ban {}".format(user))def timeout(sock, user, secs=600):
    """
    Time out a user for a set period of time.
    Keyword arguments:
    sock -- the socket over which to send the timeout command
    user -- the user to be timed out
    secs -- the length of the timeout in seconds (default 600)
    """
    chat(sock, ".timeout {}".format(user, secs))
Step 3: Connect to the Twitch IRC Server
You’ll need to get your Twitch OAuth token here in order to log in. You should send your OAuth token, your username, and the channel you wish to join (in that order) as shown below.
# bot.pyimport cfg
import socket# network functions go here
s = socket.socket()
s.connect((HOST, PORT))
s.send("PASS {}rn".format(PASS).encode("utf-8"))
s.send("NICK {}rn".format(NICK).encode("utf-8"))
s.send("JOIN {}rn".format(CHAN).encode("utf-8"))
Joining a channel will give us a huge amount of text and also connect us to the channel chat, so we need to handle responses from the server continually. We’ll do this with an infinite loop; you can interrupt the program with CTRL-C.
while True:
    response = s.recv(1024).decode("utf-8")
    print(response)
    sleep(0.1)
Sleeping for a tenth of a second is barely noticeable to humans, but it drastically decreases the CPU time of the program without decreasing performance.
Step 4: Make Sure the Server Knows You’re Connected
IRC servers will «ping» your bot at regular intervals to make sure you’re still connected: [PING :tmi.twitch.tv]. The bot should respond as soon as possible with [PONG :tmi.twitch.tv].
# bot.py
while True:
    response = s.recv(1024).decode("utf-8")
    if response == "PING :tmi.twitch.tvrn":
        s.send("PONG :tmi.twitch.tvrn".encode("utf-8"))
    else:
        print(response)
Step 5: Limit Your Messages to the Server
In order to prevent users from spamming commands, Twitch limits how quickly a user can send IRC messages to the server. For regular users, this limit is set at 20 messages per 30 seconds; moderators may send up to 100 messages per 30 seconds. Disobeying this limit will earn you an 8-hour ban from the IRC server.
The simple way to handle this limit is to define the maximum send rate in your configuration module:
# cfg.py
RATE = (20/30) # messages per second
and then change the sleep time to the inverse of that rate:
# bot.py
while True:
    response = s.recv(1024).decode("utf-8")
    if response == "PING :tmi.twitch.tvrn":
        s.send("PONG :tmi.twitch.tvrn".encode("utf-8"))
    else:
        print(response)
    sleep(1 / cfg.RATE)
Step 6: Recognize Messages to the Chat
Not all messages from the server are worthy of the bot’s attention. We don’t need to know who’s joining or leaving the channel, and it’s not very important who the other moderators are. We do, however, want to see chat messages, which look like this:
:nickname!nickname@nickname.tmi.twitch.tv PRIVMSG #channel :message
IRC’s formatting of a chat message is rather complicated, so we’ll use a regular expression to pick out messages that match this pattern. Import Python’s regular expressions module:
# bot.py
import re
and define the pattern we’re looking for.
# Make sure you prefix the quotes with an 'r'!
CHAT_MSG=re.compile(r"^:w+!w+@w+.tmi.twitch.tv PRIVMSG #w+ :")
Once we’ve determined that this is a chat message, we can strip out most of the text, since we only need one copy of the username and their message. First, we need to pick the username out of the string. The username will be the first substring made up solely of regex word characters, which consist of alphanumeric characters and underscores. Once we find the username, we can replace the ugly prefix with just the username and a colon.
# bot.py
while True:
    response = s.recv(1024).decode("utf-8")
    if response == "PING :tmi.twitch.tvrn":
        s.send("PONG :tmi.twitch.tvrn".encode("utf-8"))
    else:
        username = re.search(r"w+", line).group(0) # return the entire match
        message = CHAT_MSG.sub("", line)
        print(username + ": " + message)
    sleep(1 / cfg.RATE)
Step 7: Register Patterns and Drop the Banhammer
Once again, we’ll use regex to match messages that contain unwanted patterns. The most obvious of these patterns are individual words or phrases, which can simply be typed as they are into the regex. For more complicated or variable patterns, you’ll need to look into more advanced regex; this can be used to ban links, phone numbers, addresses (physical and email), and other information that follows a particular pattern.
Add a list of patterns to your config file:
# cfg.py
PATT = [
    r"swear",
    # ...
    r"some_pattern"
]
Now, in your source file, add a loop that checks each message for the pattern you (don’t) want:
# bot.py
while True:
    response = s.recv(1024).decode("utf-8")
    if response == "PING :tmi.twitch.tvrn":
        s.send("PONG :tmi.twitch.tvrn".encode("utf-8"))
    else:
        username = re.search(r"w+", line).group(0) # return the entire match
        message = CHAT_MSG.sub("", line)
        print(username + ": " + message)
        for pattern in cfg.PATT:
            if re.match(pattern, message):
                ban(s, username)
                break
        sleep(1 / cfg.RATE)
Step 8: Congratulations!
You’ve successfully implemented a moderator bot for Twitch.tv. Of course, this tutorial only walks you through a fairly minimal implementation; in order to have functionality like that of Nightbot or Moobot, you’ll have to do a bit more work. However, this bot provides a solid foundation for expansion and customization. Good luck!
1 Person Made This Project!
Recommendations
Создаем своего чат-бота для Twitch [C#]
LOLZTEAM
Гайд по созданию собственного чат бота!
Статья носит образовательный характер, мы ни к чему не призываем и не обязываем. Информация представлена исключительно в ознакомительных целях.
Больше интересных статей на нашем форуме: https://lolz.guru/articles/
Подписывайтесь на канал и делитесь ссылкой на статью с друзьями!
Сегодня речь пойдет о том, как создать собственного чат-бота для Twitch на языке программирования C#.
В конце статьи наш бот сможет отвечать на несколько команд и наказывать пользователей, которые нарушают порядок.
Прежде всего Вам нужно создать аккаунт для бота. Далее, определитесь на каком канале будет работать Ваш бот. Выдайте ему права модератора с помощью команды /mod *никнейм бота* или обратитесь за этим к владельцу канала. Для управления ботом нужно получить OAuth-токен. Сделать это можно с помощью специального сайта, выполнив вход под аккаунтом бота.
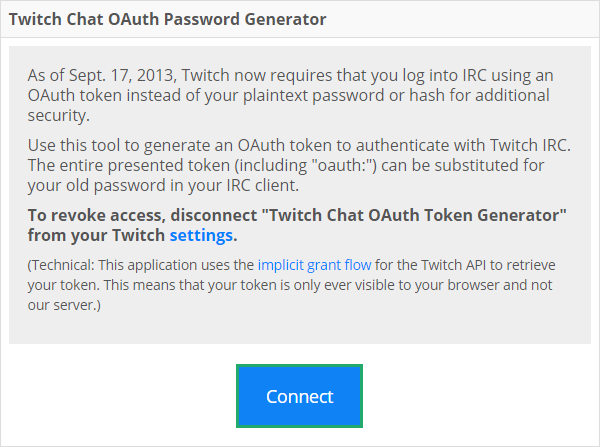
Сохраняем токен, который мы получили.

Работать будем в Visual Studio. Выбираем «Создание проекта».
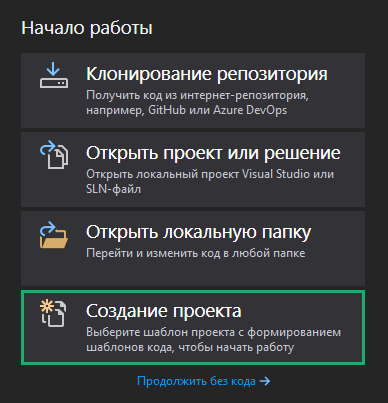
Тип проекта, который Вы видите на скриншоте.
Если не можете найти нужный тип, то убедитесь, что компоненты для работы с C# установлены в Visual Studio и установите недостающие с помощью Visual Studio Installer.

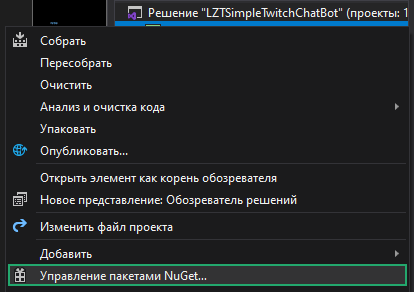
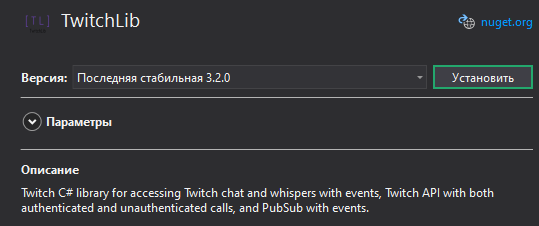
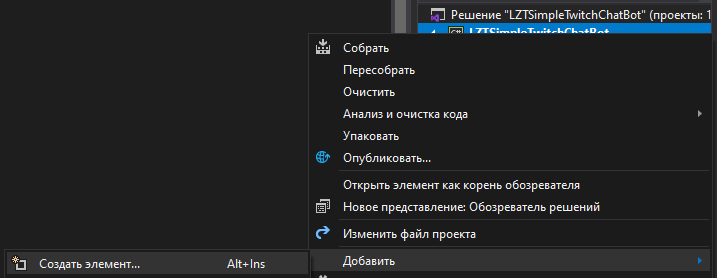
Далее выбираем произвольное название проекта и нажимаем «Создать». Теперь нам нужно подключить библиотеку для работы с Twitch. Будем использовать библиотеку TwitchLib. С ее функционалом и документацией вы можете ознакомиться на GitHub. Для того, чтобы добавить ее в наш проект нажимаем ПКМ по названию проекта в «Обозревателе решений» и выбираем «Управление пакетами NuGet…».
В открывшейся вкладке вписываем «TwitchLib» в строку поискового запроса и выбираем первый результат.
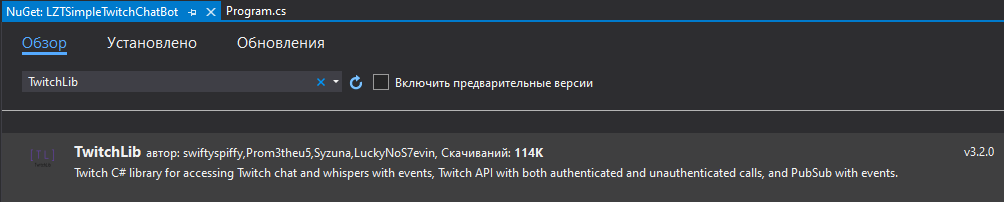
Нажимаем «Установить» и дожидаемся окончания установки.
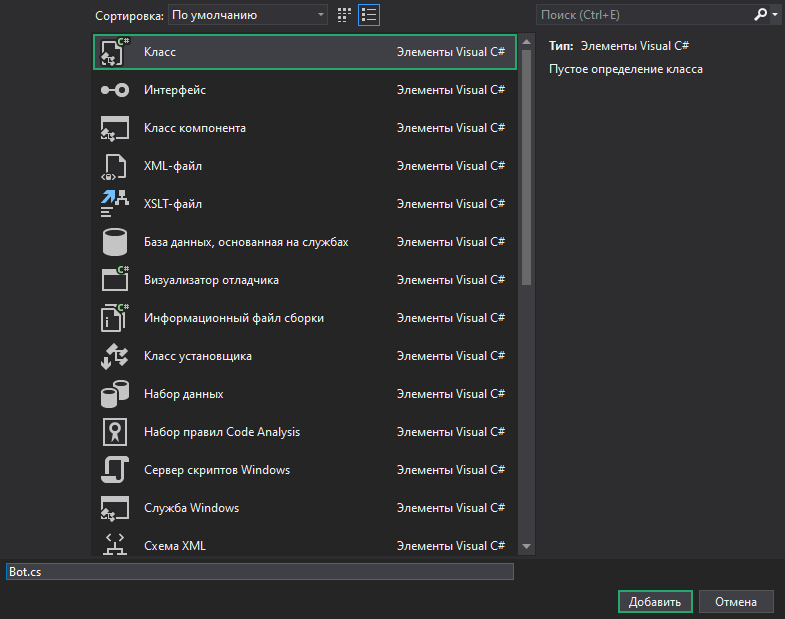
Создадим новый класс, который будет олицетворять нашего бота.
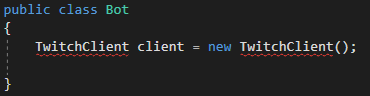
Сделаем его публичным.

Добавим поле класса TwitchClient — он отвечает за всё подключение к чату.
И поле класса ConnectionCredentials — он отвечает за данные авторизации. Первым параметром идет ник Вашего бота, вторым — токен, который мы получили на этапе подготовки.

Добавим недостающие using’и с помощью подсказок Visual Studio.

Создадим конструктор класса, в котором будем вызывать инициализацию клиента и подключение к чату. В метод инициализации передаем поле с данными авторизации и ник канала, к которому будет подключаться бот при запуске.

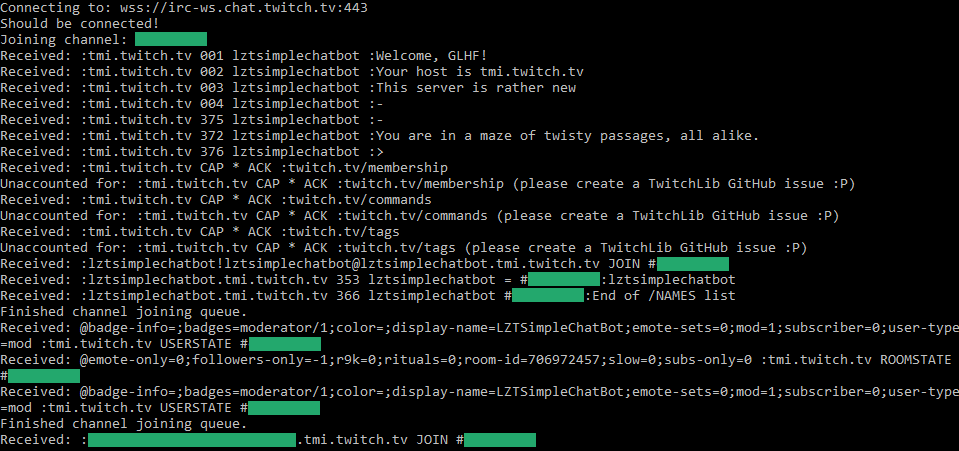
Теперь добавим лог бота в консоль. Для этого назначим метод-обработчик для OnLog. Чтобы сделать это, напишем client.OnLog += и нажмём Tab для автоматического дополнения.

В сгенерированном методе будем выводить в консоль поступающие данные.

Аналогичным образом добавим отправку приветственного сообщения в чат при запуске бота.

В сгенерированном методе воспользуемся полем client для отправки сообщения, передав ему первым параметром название канала, куда должно быть отправлено сообщение, а вторым — его содержание.

Теперь сделаем так, чтобы бот запускался. Для этого перейдем в класс, который был создан на этапе генерации проекта Program.cs и в методе Main создадим новый экземпляр бота. Добавим считывание с консоли, чтобы программа не завершала работу моментально.

Запустим бота. В случае успеха, в консоли вы увидите логи подключения к чату и каналу, а бот отправит в чат приветственное сообщение.

Пора сделать бота более интерактивным. Для этого добавим команды. По умолчанию команда в чате начинается с восклицательного знака.
Пример: !помощь
По аналогии, присвоим метод-обработчик.

В сгенерированном классе есть два параметра. Во втором параметре хранится вся информация про полученную команду.
Нам нужно получить ее текст и отправить соответствующий ответ. Чтобы получить доступ к тексту команды нужно обратится к следующему полю: e.Command.CommandText. Для того, чтобы избежать огромного количества конструкций if else воспользуемся оператором switch .
Первой командой будет !кубик, которая будет возвращать случайное число от 1 до 6.
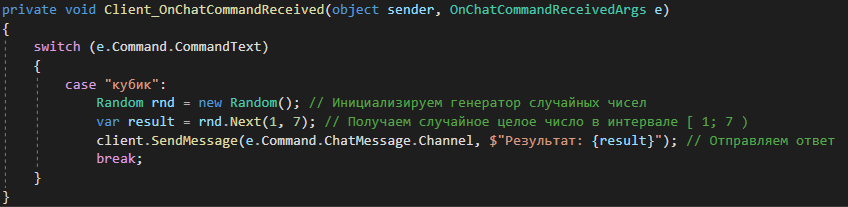
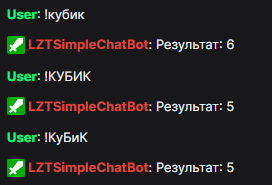
Запустим бота и убедимся, что команда работает.

Но если изменить регистр команды, то бот не будет отвечать.

Чтобы это исправить принудительно понизим регистр полученной команды, добавив ToLower().

Теперь бот отлично отвечает на команду в любом регистре.
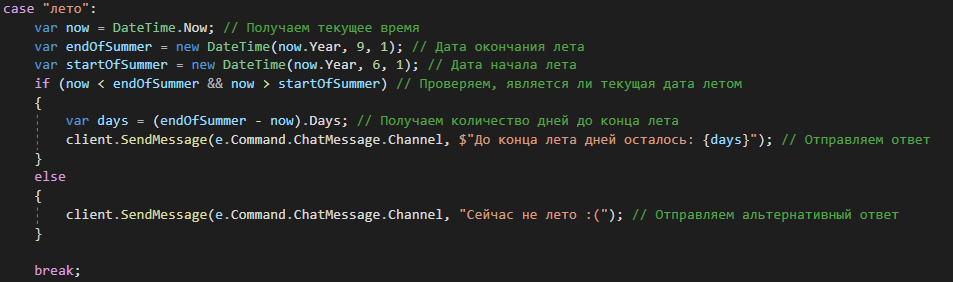
Вторая команда нашего бота будет показывать количество дней до конца лета. Добавим в наш switch еще один case — «лето». Внутри посчитаем количество дней и отправим его пользователю или напомним ему о том, что он вызывает команду не летом.
Запустим бота и убедимся, что команда работает.

Теперь заставим бота следить за порядком в чате. Присваиваем метод-обработчик на получение обычных сообщений.

В сгенерированном методе получим доступ к полученному сообщению с помощью e.ChatMessage.Message, понизим его регистр через ToLower() и с помощью функции Contains() проверим, содержит ли она запрещенное слово.

Теперь добавим тайм-аут пользователя на 30 секунд за его употребление.

Cейчас бот будет пытаться выдавать тайм-аут всем пользователям чата за употребление запрещенного словосочетания, даже если это модератор или владелец канала. Поэтому стоит добавить проверку, которая решит эту проблему. Для этого просто поставим условие, что автор сообщения не является ни модератором, ни владельцем канала.

Запустим бота и проверим, что при попытке отправить сообщение, которое содержит запрещенное словосочетание пользователь получит тайм-аут от бота.

На этом все! Удачи!
