Пишем будильник на питоне
26 октября 2017 г.
Хочется написать себе будильник, который стартовал бы в определенное время, проигрывал бы несколько композиций и выключался бы до следующего раза. Это возможно сделать, используя, например, библиотеку gstreamer.
Я буду писать его под Ubuntu, поскольку использую данную ОС дома. Также можно попробовать сделать то же самое под Raspbian, если у вас есть Raspberry. Будильник будет работать как демон, тоесть не будет блокировать терминал, а будет работать в фоновом режиме.
Установка библиотек
Установить небходимые библиотеки на Debian — системах можно так:
apt-get install python-gst0.10 gstreamer0.10-plugins-good gstreamer0.10-plugins-ugly
Чтобы проверить, что все работает корректно, откройте интерпретатор python и сделайте такие импорты:
1 import gst
2 import gobject
Также можно попробовать проиграть какой-нибудь аудиофайл:
gst-launch-0.10 filesrc location=/path/to/file/test.mp3 ! decodebin ! audioconvert ! autoaudiosink
Для демонизации процесса понадобится библиотека daemonize, установить ее можно так:
pip install daemonize
Пишем будильник
Простейший демон с помощью данной библиотеки:
 1 from time import sleep
 2 from daemonize import Daemonize
 3
 4 pid = "/tmp/test.pid"
 5
 6
 7 def main():
 8     while True:
 9         sleep(5)
10
11
12 daemon = Daemonize(app="test_app", pid=pid, action=main)
13 daemon.start()
Полезная команда, которая вам может пригодится, если вы запустили этот тестовый демон, или если вам нужно точно убить какой-то процесс в системе, сколько бы экземпляров данного процесса ни было:
1 sudo kill -9 `ps -ef | grep python | grep -v grep | awk '{print $2}'`
Разберем по частям, следующая команда выведет список процессов:
Дальше отберем только python процессы:
Затем удалим из полученного списка саму нашу команду
1 ps -ef | grep python | grep -v grep
И, наконец, отберем PID’ы процессов и убьем их:
1 sudo kill -9 `ps -ef | grep python | grep -v grep | awk '{print $2}'`
Gstreamer — это библиотека основанная на плагинах, один такой плагин — playbin мы будем использовать. Данные в gstreamer проходят через pipeline. Нам придется использовать элемент playbin для построения pipeline. Также будет задействована библиоткека gobject. Простейший аудиоплеер с помощью gstreamer:
 1 import gst
 2 import gobject
 3 import threading
 4
 5 class AlarmClock():
 6
 7     def __init__(self, musiclist):
 8         self.musiclist = musiclist
 9         self.song_num = 0
10         self.construct_pipeline()
11         self.set_property_file()
12
13     def construct_pipeline(self):
14         self.player = gst.element_factory_make("playbin")
15         self.is_playing = False
16         self.connect_signals()
17
18     def connect_signals(self):
19         # In this case, we only capture the messages
20         # put on the bus.
21         bus = self.player.get_bus()
22         bus.add_signal_watch()
23         bus.connect("message", self.message_handler)
24
25     def play(self):
26         self.is_playing = True
27         self.player.set_state(gst.STATE_PLAYING)
28
29     def handle_error(self, message):
30         print(message)
31
32     def set_property_file(self):
33         self.player.set_property(
34             "uri",
35             "file://"+self.musiclist[self.song_num])
36
37     def stop(self):
38         self.player.set_state(gst.STATE_NULL)
39         self.is_playing = False
40
41     def message_handler(self, bus, message):
42         # Capture the messages on the bus and
43         # set the appropriate flag
44         msg_type = message.type
45         if msg_type == gst.MESSAGE_ERROR:
46             self.handle_error(message)
47         elif msg_type == gst.MESSAGE_EOS:
48             print("End Of Song")
49             if self.song_num < len(self.musiclist)-1:
50                 self.song_num += 1
51                 self.stop()
52                 self.set_property_file()
53                 self.play()
54             else:
55                 self.stop()
56
57
58 class GobInit(threading.Thread):
59     def __init__(self):
60         threading.Thread.__init__(self)
61
62     def run(self):
63         gobject.threads_init()
64         self.loop = gobject.MainLoop()
65         self.loop.run()
66
67
68 PATH_TO_SONG = '/home/Downloads/test.mp3'
69 PATH_TO_SONG2 = '/home/Downloads/test2.mp3'
70
71
72 def main():
73     gob = GobInit()
74     gob.start()
75     print('start')
76     player = AlarmClock([PATH_TO_SONG, PATH_TO_SONG2])
77     print('player created')
78     player.play()
79
80
81 main()
При конце каждой песни на шину приходит сообщение MESSAGE_EOS, пользуясь этим, можно переключать песни, что и реализовано на строках 50-53.
Если добавить в этот плеер daemonize и логирование в файл /tmp/test.log:
 1 import gst
 2 import gobject
 3 import threading
 4 import logging
 5 import time
 6 from daemonize import Daemonize
 7
 8
 9 pid = "/tmp/test.pid"
10 logger = logging.getLogger(__name__)
11 logger.setLevel(logging.DEBUG)
12 logger.propagate = False
13 fh = logging.FileHandler("/tmp/test.log", "a")
14 fh.setLevel(logging.DEBUG)
15 logger.addHandler(fh)
16 keep_fds = [fh.stream.fileno()]
17
18
19 class AlarmClock():
20
21     def __init__(self, musiclist):
22         self.musiclist = musiclist
23         self.song_num = 0
24         self.construct_pipeline()
25         self.set_property_file()
26
27     def construct_pipeline(self):
28         self.player = gst.element_factory_make("playbin")
29         self.is_playing = False
30         self.connect_signals()
31
32     def connect_signals(self):
33         # In this case, we only capture the messages
34         # put on the bus.
35         bus = self.player.get_bus()
36         bus.add_signal_watch()
37         bus.connect("message", self.message_handler)
38
39     def play(self):
40         self.is_playing = True
41         self.player.set_state(gst.STATE_PLAYING)
42
43     def handle_error(self, message):
44         logger.debug(message)
45
46     def set_property_file(self):
47         self.player.set_property(
48             "uri",
49             "file://"+self.musiclist[self.song_num])
50
51     def stop(self):
52         self.player.set_state(gst.STATE_NULL)
53         self.is_playing = False
54         logger.debug("player stopped")
55
56     def message_handler(self, bus, message):
57         # Capture the messages on the bus and
58         # set the appropriate flag
59         msg_type = message.type
60         if msg_type == gst.MESSAGE_ERROR:
61             self.handle_error(message)
62         elif msg_type == gst.MESSAGE_EOS:
63             logger.debug("End Of Song")
64             if self.song_num < len(self.musiclist)-1:
65                 self.song_num += 1
66                 self.stop()
67                 self.set_property_file()
68                 self.play()
69             else:
70                 self.stop()
71
72
73 class GobInit(threading.Thread):
74     def __init__(self):
75         threading.Thread.__init__(self)
76
77     def run(self):
78         gobject.threads_init()
79         self.loop = gobject.MainLoop()
80         self.loop.run()
81
82
83 PATH_TO_SONG = '/home/Downloads/test.mp3'
84 PATH_TO_SONG2 = '/home/Downloads/test2.mp3'
85
86
87 def main():
88     logger.debug("start")
89     gob = GobInit()
90     gob.start()
91     player = AlarmClock([PATH_TO_SONG, PATH_TO_SONG2])
92     logger.debug("player created")
93     player.play()
94
95
96 daemon = Daemonize(app="test_app", pid=pid, action=main, keep_fds=keep_fds)
97 daemon.start()
Теперь вы можете запустить данный плеер:
python alarm_clock.py
А в другом терминале мониторить лог:
tail -f /tmp/test.log
Также, вам может понадобится что-то отдебажить или принтануть, можете тогда перевести в блокирующий режим, задав foreground=True:
1 daemon = Daemonize(app="test_app", pid=pid, action=main, keep_fds=keep_fds,
2                    foreground=True)
Далее, хочется сделать так, чтобы после одного проигрывания снова устанавливался первый трек, для этого необходимо так изменить функцию message_handler:
 1 def message_handler(self, bus, message):
 2     msg_type = message.type
 3     if msg_type == gst.MESSAGE_ERROR:
 4         self.handle_error(message)
 5     elif msg_type == gst.MESSAGE_EOS:
 6         logger.debug("End Of Song")
 7         if self.song_num < len(self.musiclist)-1:
 8             self.song_num += 1
 9             self.stop()
10             self.set_property_file()
11             self.play()
12         else:
13             self.stop()
14             self.song_num = 0
15             self.set_property_file()
Я добавил строки 14 и 15 — установку первого трека после того, как все треки проиграны, чтобы на следующий день будильник начал играть с первого трека, также необходимо поменять функцию main и добавить функцию sleep_till_next_play:
 1 from datetime import datetime, timedelta
 2 ...
 3
 4
 5 def sleep_till_next_play(
 6         current_datetime, time_weekdays, time_weekend, logger):
 7     next_datetime = current_datetime + timedelta(days=1)
 8     next_str_date = next_datetime.strftime('%d/%m/%Y')
 9     if next_datetime.weekday() not in (5, 6):
10         next_datetime_play = datetime.strptime(
11             next_str_date + " " + time_weekdays,  "%d/%m/%Y %H:%M")
12     else:
13         next_datetime_play = datetime.strptime(
14             next_str_date + " " + time_weekend,  "%d/%m/%Y %H:%M")
15     delta = next_datetime_play - current_datetime
16     sleep_sec = delta.total_seconds()
17     logger.debug("sleep till next start for {0} sec".format(sleep_sec))
18     time.sleep(sleep_sec)
19
20
21 def main():
22     logger.debug("start")
23     gob = GobInit()
24     gob.start()
25     player = AlarmClock([PATH_TO_SONG, PATH_TO_SONG2])
26     logger.debug("player created")
27
28     time_weekdays = "8:00"
29     time_weekend = "9:00"
30     current_datetime = datetime.now()
31     current_str_date = current_datetime.strftime('%d/%m/%Y')
32     if current_datetime.weekday() not in (5, 6):
33         datetime_play = datetime.strptime(
34             current_str_date + " " + time_weekdays,  "%d/%m/%Y %H:%M")
35     else:
36         datetime_play = datetime.strptime(
37             current_str_date + " " + time_weekend,  "%d/%m/%Y %H:%M")
38     delta = datetime_play - current_datetime
39     if delta.total_seconds() < 0:
40         sleep_till_next_play(
41             current_datetime, time_weekdays, time_weekend, logger)
42     else:
43         sleep_sec = delta.total_seconds()
44         logger.debug("sleep till start for {0} sec".format(sleep_sec))
45         time.sleep(sleep_sec)
46
47     while True:
48         player.play()
49         sleep_till_next_play(
50             datetime.now(), time_weekdays, time_weekend, logger)
Функция weekday() возвращает числа от 0 до 6, которые соответствуют дням с понедельника по воскресенье. Сначала определяется текущее время (с. 30), если оно больше заданного, то демон спит до следующего дня (с. 40), а если меньше, то до заданного времени (стр. 45). Затем запускается бесконечный цикл, в котором будильник каждый раз играет и отправляется спать до следующего дня.
Теперь добавим возможность остановить будильник и узнать статус (запущен или нет), для этого используем модуль argparse:
 1 ...
 2 import argparse
 3 import sys
 4 import os
 5 import signal
 6
 7 ...
 8 def main():
 9     ...
10
11 def kill(pid_f, logger):
12     if os.path.isfile(pid_f):
13         with open(pid_f) as pid_file:
14             pid = pid_file.read()
15             try:
16                 os.kill(int(pid), signal.SIGKILL)
17             except (OSError, ValueError) as e:
18                 logger.debug(
19                     'Process is not killed due to: {0}'.format(e))
20             else:
21                 logger.debug('Stopped')
22                 os.remove(pid_f)
23     else:
24         logger.debug(
25             'There is no pid_file, nothing to kill')
26
27
28 parser = argparse.ArgumentParser()
29 mutually_exclusive_group = parser.add_mutually_exclusive_group(
30         required=True)
31
32 mutually_exclusive_group.add_argument(
33     "-start", action="store_true")
34 mutually_exclusive_group.add_argument(
35     "-stop", action="store_true")
36 mutually_exclusive_group.add_argument(
37     "-status", action="store_true")
38 args = vars(parser.parse_args())
39
40 if args.get('stop'):
41     kill(PID, logger)
42     sys.exit()
43
44 elif args.get('status'):
45     try:
46         with open(PID) as pid_file:
47             pid = pid_file.read()
48         os.kill(int(pid), 0)
49     except Exception as e:
50         logger.debug("Process is stopped")
51     else:
52         logger.debug("Process is running")
53     sys.exit()
54
55 kill(PID, logger)
56
57 daemon = Daemonize(app="test_app", pid=PID, action=main, keep_fds=keep_fds)
58 daemon.start()
Теперь проверить статус демона, убить его или запустить можно с помощью аргументов status, stop, start. Для корректной работы нужно передать хотя бы один аргумент:
python alarm_clock.py -status
python alarm_clock.py -stop
python alarm_clock.py -start
После выполнения любой из этих команд смотрите на то, что залогировалось (у меня лог задан «/tmp/test.log», вы можете поместить его куда хотите). Я добавил функцию kill, для того, чтобы нельзя было включить несколько процессов одновременно. После небольшого рефакторинга получилось:
  1 # -*- coding: utf-8 -*-
  2 import gst
  3 import gobject
  4 import threading
  5 import logging
  6 import time
  7 from datetime import datetime, timedelta
  8 from daemonize import Daemonize
  9 import argparse
 10 import sys
 11 import os
 12 import signal
 13
 14 PID = "/tmp/test.pid"
 15 # настройки логера
 16 logger = logging.getLogger(__name__)
 17 logger.setLevel(logging.DEBUG)
 18 logger.propagate = False
 19 fh = logging.FileHandler("/tmp/test.log", "a")
 20 fh.setLevel(logging.DEBUG)
 21 logger.addHandler(fh)
 22 keep_fds = [fh.stream.fileno()]
 23
 24 # настройки в какое время играть
 25 time_weekdays = "8:30"
 26 time_weekend = "9:00"
 27
 28 # пути до песен
 29 basic_path = '/home/Downloads/'
 30 path_to_song = basic_path + 'test.mp3'
 31 path_to_song_2 = basic_path + 'test2.mp3'
 32
 33
 34 class AlarmClock():
 35
 36     def __init__(self, musiclist):
 37         self.musiclist = musiclist
 38         self.song_num = 0
 39         self.construct_pipeline()
 40         self.set_property_file()
 41
 42     def construct_pipeline(self):
 43         self.player = gst.element_factory_make("playbin")
 44         self.is_playing = False
 45         self.connect_signals()
 46
 47     def connect_signals(self):
 48         bus = self.player.get_bus()
 49         bus.add_signal_watch()
 50         bus.connect("message", self.message_handler)
 51
 52     def play(self):
 53         self.is_playing = True
 54         self.player.set_state(gst.STATE_PLAYING)
 55         logger.debug("player set to play")
 56
 57     def handle_error(self, message):
 58         logger.debug(message)
 59
 60     def set_property_file(self):
 61         self.player.set_property(
 62             "uri",
 63             "file://"+self.musiclist[self.song_num])
 64
 65     def stop(self):
 66         self.player.set_state(gst.STATE_NULL)
 67         self.is_playing = False
 68         logger.debug("player stopped")
 69
 70     def message_handler(self, bus, message):
 71         msg_type = message.type
 72         if msg_type == gst.MESSAGE_ERROR:
 73             self.handle_error(message)
 74         elif msg_type == gst.MESSAGE_EOS:
 75             logger.debug("End Of Song")
 76             if self.song_num < len(self.musiclist)-1:
 77                 self.song_num += 1
 78                 self.stop()
 79                 self.set_property_file()
 80                 self.play()
 81             else:
 82                 self.stop()
 83                 self.song_num = 0
 84                 self.set_property_file()
 85
 86
 87 class GobInit(threading.Thread):
 88     def __init__(self):
 89         threading.Thread.__init__(self)
 90
 91     def run(self):
 92         gobject.threads_init()
 93         self.loop = gobject.MainLoop()
 94         self.loop.run()
 95
 96
 97 def get_delta(datetime_obj, str_date, time_weekdays, time_weekend,
 98               current_datetime_obj=None):
 99     """Функция для вычисления разности между двумя datetime"""
100
101     if datetime_obj.weekday() not in (5, 6):
102         datetime_play = datetime.strptime(
103             str_date + " " + time_weekdays,  "%d/%m/%Y %H:%M")
104     else:
105         datetime_play = datetime.strptime(
106             str_date + " " + time_weekend,  "%d/%m/%Y %H:%M")
107     if current_datetime_obj:
108         delta = datetime_play - current_datetime_obj
109     else:
110         delta = datetime_play - datetime_obj
111     return delta
112
113
114 def sleep_till_next_play(
115         current_datetime, time_weekdays, time_weekend, logger):
116     next_datetime = current_datetime + timedelta(days=1)
117     next_str_date = next_datetime.strftime('%d/%m/%Y')
118     delta = get_delta(
119         next_datetime, next_str_date, time_weekdays, time_weekend,
120         current_datetime)
121     sleep_sec = delta.total_seconds()
122     logger.debug("sleep till next start for {0} sec".format(sleep_sec))
123     time.sleep(sleep_sec)
124
125
126 def main():
127     logger.debug("start")
128     gob = GobInit()
129     gob.start()
130     player = AlarmClock([path_to_song, path_to_song_2])
131     logger.debug("player created")
132
133     current_datetime = datetime.now()
134     current_str_date = current_datetime.strftime('%d/%m/%Y')
135     delta = get_delta(
136         current_datetime, current_str_date, time_weekdays, time_weekend)
137     # время для проигрывания треков уже прошло, спим до следующего раза:
138     if delta.total_seconds() < 0:
139         sleep_till_next_play(
140             current_datetime, time_weekdays, time_weekend, logger)
141     # спим до времени, в которое нужно проигрывать треки:
142     else:
143         sleep_sec = delta.total_seconds()
144         logger.debug("sleep till start for {0} sec".format(sleep_sec))
145         time.sleep(sleep_sec)
146
147     while True:
148         player.play()
149         # спим до следующего раза
150         sleep_till_next_play(
151             datetime.now(), time_weekdays, time_weekend, logger)
152
153
154 def kill(pid_f, logger):
155     if os.path.isfile(pid_f):
156         with open(pid_f) as pid_file:
157             pid = pid_file.read()
158             try:
159                 os.kill(int(pid), signal.SIGKILL)
160             except (OSError, ValueError) as e:
161                 logger.debug(
162                     'Process is not killed due to: {0}'.format(e))
163             else:
164                 logger.debug('Stopped')
165                 os.remove(pid_f)
166     else:
167         logger.debug(
168             'There is no pid_file, nothing to kill')
169
170
171 parser = argparse.ArgumentParser()
172 mutually_exclusive_group = parser.add_mutually_exclusive_group(
173         required=True)
174
175 mutually_exclusive_group.add_argument(
176     "-start", action="store_true")
177 mutually_exclusive_group.add_argument(
178     "-stop", action="store_true")
179 mutually_exclusive_group.add_argument(
180     "-status", action="store_true")
181 args = vars(parser.parse_args())
182
183 if args.get('stop'):
184     kill(PID, logger)
185     sys.exit()
186
187 elif args.get('status'):
188     try:
189         with open(PID) as pid_file:
190             pid = pid_file.read()
191         os.kill(int(pid), 0)
192     except Exception as e:
193         logger.debug("Process is stopped")
194     else:
195         logger.debug("Process is running")
196     sys.exit()
197
198 # в любом случае убиваю демон, чтобы не запустить дважды
199 kill(PID, logger)
200
201 daemon = Daemonize(app="test_app", pid=PID, action=main, keep_fds=keep_fds)
202 daemon.start()
Я собрал все настройки в начале, добавил функцию get_delta, потому что я использовал один и тот же кусок кода дважды (строки 101-106). Соответственно, я вынес этот дублированный код в эту функцию, чтобы следовать принципу DRY, что является хорошим тоном в программировании.
И все вроде хорошо, и все работает, но потом я еще раз посмотрел на этот код:
 1 def sleep_till_next_play(
 2         current_datetime, time_weekdays, time_weekend, logger):
 3     next_datetime = current_datetime + timedelta(days=1)
 4     next_str_date = next_datetime.strftime('%d/%m/%Y')
 5     delta = get_delta(
 6         next_datetime, next_str_date, time_weekdays, time_weekend,
 7         current_datetime)
 8     sleep_sec = delta.total_seconds()
 9     logger.debug("sleep till next start for {0} sec".format(sleep_sec))
10     time.sleep(sleep_sec)
И осознал, что я написал кучу говнокода, посмотрел как решают проблему нормальные люди, понял, что все можно сделать гораздо проще и решил переписать часть кода, убрав совсем функции sleep_till_next_play, get_delta, и подчистив main:
  1 import gst
  2 import gobject
  3 import threading
  4 import logging
  5 from datetime import datetime
  6 from daemonize import Daemonize
  7 import argparse
  8 import sys
  9 import os
 10 import signal
 11
 12 PID = "/tmp/test.pid"
 13 # logger's settings
 14 log_file = "/tmp/test.log"
 15 logger = logging.getLogger(__name__)
 16 logger.setLevel(logging.DEBUG)
 17 logger.propagate = False
 18 fh = logging.FileHandler(log_file, "a")
 19 fh.setLevel(logging.DEBUG)
 20 logger.addHandler(fh)
 21 keep_fds = [fh.stream.fileno()]
 22
 23 # what time to play
 24 time_weekdays = "21:05"
 25 time_weekend = "9:00"
 26
 27 # paths to songs
 28 basic_path = '/home/austinnikov/Downloads/'
 29 song_array = (basic_path+'test.mp3', basic_path+'test2.mp3')
 30
 31
 32 class AlarmClock():
 33
 34     def __init__(self, musiclist):
 35         self.musiclist = musiclist
 36         self.song_num = 0
 37         self.construct_pipeline()
 38         self.set_property_file()
 39
 40     def construct_pipeline(self):
 41         self.player = gst.element_factory_make("playbin")
 42         self.is_playing = False
 43         self.connect_signals()
 44
 45     def connect_signals(self):
 46         bus = self.player.get_bus()
 47         bus.add_signal_watch()
 48         bus.connect("message", self.message_handler)
 49
 50     def play(self):
 51         self.is_playing = True
 52         self.player.set_state(gst.STATE_PLAYING)
 53
 54     def handle_error(self, message):
 55         logger.debug(message)
 56
 57     def set_property_file(self):
 58         self.player.set_property(
 59             "uri",
 60             "file://"+self.musiclist[self.song_num])
 61
 62     def stop(self):
 63         self.player.set_state(gst.STATE_NULL)
 64         self.is_playing = False
 65         logger.debug("player stopped")
 66
 67     def message_handler(self, bus, message):
 68         msg_type = message.type
 69         if msg_type == gst.MESSAGE_ERROR:
 70             self.handle_error(message)
 71         elif msg_type == gst.MESSAGE_EOS:
 72             logger.debug("End Of Song")
 73             if self.song_num < len(self.musiclist)-1:
 74                 self.song_num += 1
 75                 self.stop()
 76                 self.set_property_file()
 77                 self.play()
 78             else:
 79                 self.stop()
 80                 self.song_num = 0
 81                 self.set_property_file()
 82
 83
 84 class GobInit(threading.Thread):
 85     def __init__(self):
 86         threading.Thread.__init__(self)
 87
 88     def run(self):
 89         gobject.threads_init()
 90         self.loop = gobject.MainLoop()
 91         self.loop.run()
 92
 93
 94 def main():
 95     logger.debug("start")
 96     gob = GobInit()
 97     gob.start()
 98     player = AlarmClock(song_array)
 99     logger.debug("player created")
100
101     hour_weekdays = int(time_weekdays.split(':')[0])
102     minute_weekdays = int(time_weekdays.split(':')[1])
103
104     hour_weekend = int(time_weekend.split(':')[0])
105     minute_weekend = int(time_weekend.split(':')[1])
106
107     while True:
108         now = datetime.now()
109         if any((
110                 now.weekday() in (5, 6) and
111                 (hour_weekend == now.hour and minute_weekend == now.minute),
112                 now.weekday() not in (5, 6) and
113                 (hour_weekdays == now.hour and minute_weekdays == now.minute)
114         )):
115             player.play()
116
117
118 def kill(pid_f, logger):
119     if os.path.isfile(pid_f):
120         with open(pid_f) as pid_file:
121             pid = pid_file.read()
122             try:
123                 os.kill(int(pid), signal.SIGKILL)
124             except (OSError, ValueError) as e:
125                 logger.debug(
126                     'Process is not killed due to: {0}'.format(e))
127             else:
128                 logger.debug('Stopped')
129                 os.remove(pid_f)
130     else:
131         logger.debug(
132             'There is no pid_file, nothing to kill')
133
134
135 parser = argparse.ArgumentParser()
136 mutually_exclusive_group = parser.add_mutually_exclusive_group(
137         required=True)
138
139 mutually_exclusive_group.add_argument(
140     "-start", action="store_true")
141 mutually_exclusive_group.add_argument(
142     "-stop", action="store_true")
143 mutually_exclusive_group.add_argument(
144     "-status", action="store_true")
145 args = vars(parser.parse_args())
146
147 if args.get('stop'):
148     kill(PID, logger)
149     sys.exit()
150
151 elif args.get('status'):
152     try:
153         with open(PID) as pid_file:
154             pid = pid_file.read()
155         os.kill(int(pid), 0)
156     except Exception as e:
157         logger.debug("Process is stopped")
158     else:
159         logger.debug("Process is running")
160     sys.exit()
161
162 # kill in order not to start several processes
163 kill(PID, logger)
164
165 daemon = Daemonize(app="test_app", pid=PID, action=main, keep_fds=keep_fds)
166 daemon.start()
Выводы
Рефакторинг — хорошо! Сделан, правда, не с первой попытки, простой будильник, который работает как демон в фоновом режиме, управляется аргументами из командной строки и логирует свою работу. Правда, у него есть один недостаток: если вы заблокируете компьютер чем-то вроде xflock, то тайминги собьются, так что лучше просто убирать яркость монитора на ночь (если, конечно, вы не используете что-то типа raspberry pi). Код на github.
Если вам понравился пост, можете поделиться им в соцсетях:
Содержание
- Введение
- Установка модуля playsound
- Пишем будильник на Python
- Заключение
Введение
В ходе статьи напишем будильник с графическим интерфейсом на языке программирования Python.
Установка модуля playsound
Для написания будильника нам понадобится модуль под названием playsound. Для его установки нужно перейти в терминал, или же командную строку, прописать pip install playsound, нажать Enter и ждать установки.
Пишем будильник на Python
Импортируем класс datetime из модуля datetime, и playsound из модуля playsound:
from datetime import datetime
from playsound import playsound
Создадим функцию validate_time(), в качестве аргумента укажем alarm_time. В аргумент alarm_time будет передаваться время точное время срабатывания будильника:
Внутри функции зададим условие, что если длина alarm_time не равно восьми, то возвращается надпись “Неверный формат, попробуйте снова”. Если же условие не сработало, то срабатывает else, в котором производится проверка правильности ввода времени, и если всё в норме, возвращается текст “Верно”:
from datetime import datetime
from playsound import playsound


def validate_time(alarm_time):
    if len(alarm_time) != 8:
        return "Неверный формат, попробуйте снова"
    else:
        if int(alarm_time[0:2]) > 23:
            return "Неверный формат часов, попробуйте снова"
        elif int(alarm_time[3:5]) > 59:
            return "Неверный формат минут, попробуйте снова"
        elif int(alarm_time[6:8]) > 59:
            return "Неверный формат секунд, попробуйте снова"
        else:
            return "Верно"
Создадим бесконечный цикл, в котором будет производиться ввод времени воспроизведения будильника, после чего производиться проверка на правильность ввода при помощи созданной нами ранее функции validate_time():
from datetime import datetime
from playsound import playsound


def validate_time(alarm_time):
    if len(alarm_time) != 8:
        return "Неверный формат, попробуйте снова"
    else:
        if int(alarm_time[0:2]) > 23:
            return "Неверный формат часов, попробуйте снова"
        elif int(alarm_time[3:5]) > 59:
            return "Неверный формат минут, попробуйте снова"
        elif int(alarm_time[6:8]) > 59:
            return "Неверный формат секунд, попробуйте снова"
        else:
            return "Верно"


while True:
    # Запрашиваем время установки будильника
    alarm_time = input("Введите время будильника в следующем формате 'HH:MM:SS' n Время будильника: ")

    validate = validate_time(alarm_time)  # присваиваем результаты функции
    if validate != "Верно":
        print(validate)
    else:
        print(f"Будильник установлен на {alarm_time}...")
        break
Отдельно сохраним часы, минуты и секунды в разные переменные:
from datetime import datetime
from playsound import playsound


def validate_time(alarm_time):
    if len(alarm_time) != 8:
        return "Неверный формат, попробуйте снова"
    else:
        if int(alarm_time[0:2]) > 23:
            return "Неверный формат часов, попробуйте снова"
        elif int(alarm_time[3:5]) > 59:
            return "Неверный формат минут, попробуйте снова"
        elif int(alarm_time[6:8]) > 59:
            return "Неверный формат секунд, попробуйте снова"
        else:
            return "Верно"


while True:
    # Запрашиваем время установки будильника
    alarm_time = input("Введите время будильника в следующем формате 'HH:MM:SS' n Время будильника: ")

    validate = validate_time(alarm_time)  # присваиваем результаты функции
    if validate != "Верно":
        print(validate)
    else:
        print(f"Будильник установлен на {alarm_time}...")
        break

alarm_hour = int(alarm_time[0:2])
alarm_min = int(alarm_time[3:5])
alarm_sec = int(alarm_time[6:8])
Создадим бесконечный цикл, в котором для начала получим текущую дату и время:
from datetime import datetime
from playsound import playsound


def validate_time(alarm_time):
    if len(alarm_time) != 8:
        return "Неверный формат, попробуйте снова"
    else:
        if int(alarm_time[0:2]) > 23:
            return "Неверный формат часов, попробуйте снова"
        elif int(alarm_time[3:5]) > 59:
            return "Неверный формат минут, попробуйте снова"
        elif int(alarm_time[6:8]) > 59:
            return "Неверный формат секунд, попробуйте снова"
        else:
            return "Верно"


while True:
    # Запрашиваем время установки будильника
    alarm_time = input("Введите время будильника в следующем формате 'HH:MM:SS' n Время будильника: ")

    validate = validate_time(alarm_time)  # присваиваем результаты функции
    if validate != "Верно":
        print(validate)
    else:
        print(f"Будильник установлен на {alarm_time}...")
        break

alarm_hour = int(alarm_time[0:2])
alarm_min = int(alarm_time[3:5])
alarm_sec = int(alarm_time[6:8])

while True:
    now = datetime.now()

    current_hour = now.hour  # Получение текущего часа
    current_min = now.minute  # Получение текущей минуты
    current_sec = now.second  # Получение текущей секунды
Добавим условие, что если введённый пользователем час совпадает с нынешним, то переходим во вложенное условие, проверяем минуты, и по такому же принципу секунды. Если же сработали все условия, то включаем мелодию указанную в пути:
from datetime import datetime
from playsound import playsound


def validate_time(alarm_time):
    if len(alarm_time) != 8:
        return "Неверный формат, попробуйте снова"
    else:
        if int(alarm_time[0:2]) > 23:
            return "Неверный формат часов, попробуйте снова"
        elif int(alarm_time[3:5]) > 59:
            return "Неверный формат минут, попробуйте снова"
        elif int(alarm_time[6:8]) > 59:
            return "Неверный формат секунд, попробуйте снова"
        else:
            return "Верно"


while True:
    # Запрашиваем время установки будильника
    alarm_time = input("Введите время будильника в следующем формате 'HH:MM:SS' n Время будильника: ")

    validate = validate_time(alarm_time)  # присваиваем результаты функции
    if validate != "Верно":
        print(validate)
    else:
        print(f"Будильник установлен на {alarm_time}...")
        break

alarm_hour = int(alarm_time[0:2])
alarm_min = int(alarm_time[3:5])
alarm_sec = int(alarm_time[6:8])

while True:
    now = datetime.now()

    current_hour = now.hour  # Получение текущего часа
    current_min = now.minute  # Получение текущей минуты
    current_sec = now.second  # Получение текущей секунды

    if alarm_hour == current_hour:
        if alarm_min == current_min:
            if alarm_sec == current_sec:
                print("Подъем!")
                playsound('C:/music.mp3') # Путь до аудиозаписи
                break
Заключение
В ходе статьи мы с Вами написали будильник с графическим интерфейсом на языке программирования Python. Надеюсь Вам понравилась статья, желаю удачи и успехов! 🙂
An alarm clock is a clock with a function that can be activated to ring at a time set in advance, used to wake someone up. In this article, I’ll walk you through how to write a Python program to create an alarm clock with Python.
How to Create an Alarm Clock with Python?
As the title suggests, our task here is to write a python script that creates an alarm clock. For this task, I will be using the DateTime module in Python to create an alarm clock and the sound library in Python to play the alarm sound.
Also, Read – 100+ Machine Learning Projects Solved and Explained.
The DateTime module comes preinstalled in the Python programming language so you can easily import it in your program. The playsound library can be easily installed by using a pip command; pip install playsound. I hope you will be able to install it in your systems, now let’s see how to write a program to create an alarm with Python.
Before writing the program you should know that you also need an alarm tone which will ring at the time of the alarm. So you can download an alarm tune from here. Now as we are ready with the libraries and the alarm song, let’s see how to write a program to create an alarm clock with Python:
The user input should be in a format of hours: minutes: and then seconds. You will start listening to the song as you will reach the time that has been set. To test your code set the time 2 or 3 minutes later from the time you are giving the user input.
Summary
This idea can be implemented in software applications also, so you now have an idea of what can be a good Python project other than just designing the User interface of an application.
I hope you liked this article on how to write a program to create an alarm with Python. Feel free to ask your valuable questions in the comments section below.

I’m a writer and data scientist on a mission to educate others about the incredible power of data📈.
Articles: 1383
Hello there! Today in this tutorial, we will be developing a basic Python Tkinter Alarm Clock.
There is no wonder that an alarm clock is always useful to warn us while we sleep, take a brief nap, or to remind us about the job, we always get ignorant about.
Recommended read: Python Tkinter GUI Calculator
Introduction to the Project
The project makes use of some python libraries namely, datetime and Tkinter.
The project makes use of the current date and time along with a feature to set an alarm according to the current date and time found.
Building the Tkinter Alarm Clock
Let’s not waste anymore time and start off building the project now!
1. Importing required modules
Before building any project, the first step is importing all the necessary libraries and modules that we require for the project.
from tkinter import *
import datetime
import time
import winsound
Let’s know about each module we have just imported:
- Tkinter module: Helps us to create a window for the user to use the application
- datetime and time modules: Help us to handle dates and time and manipulate them when needed.
- winsound module: Helpful to generate sounds for our alarm clock.
2. Creating a function for the alarm
The next step involves creating functions for the alarm clock. Let’s look at the code for the same first.
def Alarm(set_alarm_timer):
    while True:
        time.sleep(1)
        actual_time = datetime.datetime.now()
        cur_time = actual_time.strftime("%H:%M:%S")
        cur_date = actual_time.strftime("%d/%m/%Y")
        msg="Current Time: "+str(cur_time)
        print(msg)
        if cur_time == set_alarm_timer:
            winsound.PlaySound("Music.wav",winsound.SND_ASYNC)
            break

def get_alarm_time():
    alarm_set_time = f"{hour.get()}:{min.get()}:{sec.get()}"
    Alarm(alarm_set_time)
The function named Alarm handles the main functionality of the application. The function takes the alarm time the user sets in the entry boxes of the window as an argument.
sleep function stops the execution of the program until it gets the time values entered by the user.
Then we get the current date and time using the datetime.now function and store the time and date into separate variables with the help of strftime function.
The the program checks when the current time matches the alarm time set by the user. When the condition is true then the sound is played using the winsound module or else the timer continues.
A new function is defined to get the input from the user entry boxes and pass it to the previous function.
3. Creating the Tkinter Window
The final step is to create the main window of the application with all the widgets and features defined. The code for the same is shown below.
window = Tk()
window.title("Alarm Clock")
window.geometry("400x160")
window.config(bg="#922B21")
window.resizable(width=False,height=False)

time_format=Label(window, text= "Remember to set time in 24 hour format!", fg="white",bg="#922B21",font=("Arial",15)).place(x=20,y=120)

addTime = Label(window,text = "Hour     Min     Sec",font=60,fg="white",bg="black").place(x = 210)
setYourAlarm = Label(window,text = "Set Time for Alarm: ",fg="white",bg="#922B21",relief = "solid",font=("Helevetica",15,"bold")).place(x=10, y=40)

hour = StringVar()
min = StringVar()
sec = StringVar()

hourTime= Entry(window,textvariable = hour,bg = "#48C9B0",width = 4,font=(20)).place(x=210,y=40)
minTime= Entry(window,textvariable = min,bg = "#48C9B0",width = 4,font=(20)).place(x=270,y=40)
secTime = Entry(window,textvariable = sec,bg = "#48C9B0",width = 4,font=(20)).place(x=330,y=40)

submit = Button(window,text = "Set Your Alarm",fg="Black",bg="#D4AC0D",width = 15,command = get_alarm_time,font=(20)).place(x =100,y=80)

window.mainloop()
Complete Code for Tkinter Alarm Clock
from tkinter import *
import datetime
import time
import winsound

def Alarm(set_alarm_timer):
    while True:
        time.sleep(1)
        actual_time = datetime.datetime.now()
        cur_time = actual_time.strftime("%H:%M:%S")
        cur_date = actual_time.strftime("%d/%m/%Y")
        msg="Current Time: "+str(cur_time)
        print(msg)
        if cur_time == set_alarm_timer:
            winsound.PlaySound("Music.wav",winsound.SND_ASYNC)
            break

def get_alarm_time():
    alarm_set_time = f"{hour.get()}:{min.get()}:{sec.get()}"
    Alarm(alarm_set_time)

window = Tk()
window.title("Alarm Clock")
window.geometry("400x160")
window.config(bg="#922B21")
window.resizable(width=False,height=False)

time_format=Label(window, text= "Remember to set time in 24 hour format!", fg="white",bg="#922B21",font=("Arial",15)).place(x=20,y=120)
addTime = Label(window,text = "Hour     Min     Sec",font=60,fg="white",bg="black").place(x = 210)
setYourAlarm = Label(window,text = "Set Time for Alarm: ",fg="white",bg="#922B21",relief = "solid",font=("Helevetica",15,"bold")).place(x=10, y=40)

hour = StringVar()
min = StringVar()
sec = StringVar()

hourTime= Entry(window,textvariable = hour,bg = "#48C9B0",width = 4,font=(20)).place(x=210,y=40)
minTime= Entry(window,textvariable = min,bg = "#48C9B0",width = 4,font=(20)).place(x=270,y=40)
secTime = Entry(window,textvariable = sec,bg = "#48C9B0",width = 4,font=(20)).place(x=330,y=40)

submit = Button(window,text = "Set Your Alarm",fg="Black",bg="#D4AC0D",width = 15,command = get_alarm_time,font=(20)).place(x =100,y=80)

window.mainloop()
Sample Output
The video below displays the working of the application. You can customize the window and variables according to your preferences.
Conclusion
Congratulations! Today, we have successfully learned how to make an Alarm Clock using Tkinter module of Python. We also learned about extracting current date and time and playing sound at the particular instant of time.
Hope you liked it! Happy learning!
from tkinter import *
import datetime
import time
import winsound
from threading import *
root = Tk()
root.geometry("400x200")
def Threading():
t1=Thread(target=alarm)
t1.start()
def alarm():
while True:
set_alarm_time = f"{hour.get()}:{minute.get()}:{second.get()}"
time.sleep(1)
current_time = datetime.datetime.now().strftime("%H:%M:%S")
print(current_time,set_alarm_time)
if current_time == set_alarm_time:
print("Time to Wake up")
winsound.PlaySound("sound.wav",winsound.SND_ASYNC)
Label(root,text="Alarm Clock",font=("Helvetica 20 bold"),fg="red").pack(pady=10)
Label(root,text="Set Time",font=("Helvetica 15 bold")).pack()
frame = Frame(root)
frame.pack()
hour = StringVar(root)
hours = ('00', '01', '02', '03', '04', '05', '06', '07',
'08', '09', '10', '11', '12', '13', '14', '15',
'16', '17', '18', '19', '20', '21', '22', '23', '24'
)
hour.set(hours[0])
hrs = OptionMenu(frame, hour, *hours)
hrs.pack(side=LEFT)
minute = StringVar(root)
minutes = ('00', '01', '02', '03', '04', '05', '06', '07',
'08', '09', '10', '11', '12', '13', '14', '15',
'16', '17', '18', '19', '20', '21', '22', '23',
'24', '25', '26', '27', '28', '29', '30', '31',
'32', '33', '34', '35', '36', '37', '38', '39',
'40', '41', '42', '43', '44', '45', '46', '47',
'48', '49', '50', '51', '52', '53', '54', '55',
'56', '57', '58', '59', '60')
minute.set(minutes[0])
mins = OptionMenu(frame, minute, *minutes)
mins.pack(side=LEFT)
second = StringVar(root)
seconds = ('00', '01', '02', '03', '04', '05', '06', '07',
'08', '09', '10', '11', '12', '13', '14', '15',
'16', '17', '18', '19', '20', '21', '22', '23',
'24', '25', '26', '27', '28', '29', '30', '31',
'32', '33', '34', '35', '36', '37', '38', '39',
'40', '41', '42', '43', '44', '45', '46', '47',
'48', '49', '50', '51', '52', '53', '54', '55',
'56', '57', '58', '59', '60')
second.set(seconds[0])
secs = OptionMenu(frame, second, *seconds)
secs.pack(side=LEFT)
Button(root,text="Set Alarm",font=("Helvetica 15"),command=Threading).pack(pady=20)
root.mainloop()
Welcome everyone, today we are going to build an Alarm Clock using Python.
How do an Alarm Clock works?
An alarm clock usually requires you to set the specific time you want the alarm to ring. Once you have set your preferred time, the alarm will continuously match the time you provided with the current time. As soon as both the time matches, the alarm rings.
This is a very general idea of how usually an real alarm clock works. The alarm clock we will be building will follow the same mechanism.
Project Setup
Install required modules/libraries
Alright, so first things first!
In this project, we are going to use some external modules which are already made available by other developers. These modules will help us save a lot of time and effort. All we have to do is import them into our project to get started.
Importing modules is pretty simple. All you have to do is run a simple pip install command from terminal & our specified module will be downloaded in our system.
We need 2 different modules for our project — datetime & playsound.
Let’s run pip install command and download both of these modules.
pip install datetime
Enter fullscreen mode
Exit fullscreen mode
datetime — We will use this module to obtain current time which is not possible without this module.
pip install playsound
Enter fullscreen mode
Exit fullscreen mode
playsound — We will use this module to play our alarm tone once the alarm rings.
Download alarm ringtone
We are almost there! One last thing before we start our project, we have to download a ringtone which will be played when our alarm goes off.
You can download an alarm tone from here. Not just alarm tones, you can use any kind of music you like for this project. All you have to do is make sure that the file extension of the audio file is .wav. Another thing to make sure is that try to keep the audio file in the same folder as your code.
Let’s Code
So the first we are going to do is, of course, import both of our modules, we just installed.
from datetime import datetime
from playsound import playsound
Enter fullscreen mode
Exit fullscreen mode
Both of our modules are now ready to use.
Now let’s ask the user for the time when the alarm will go off.
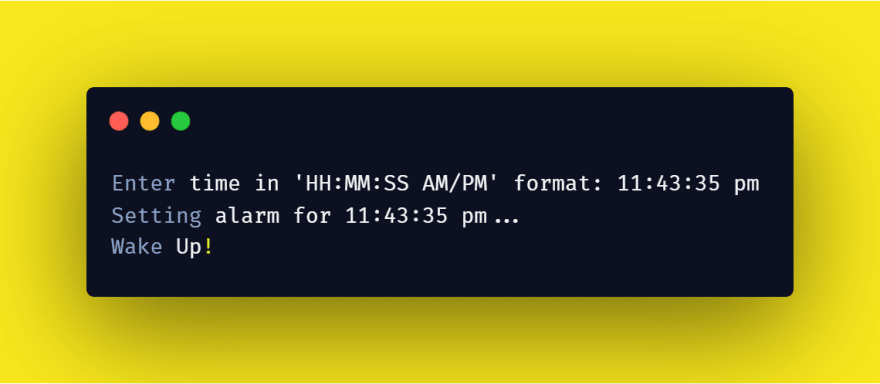
alarm_time = input("Enter time in 'HH:MM:SS AM/PM' format: ")
Enter fullscreen mode
Exit fullscreen mode
We need to have a pre-defined format in which the user will enter the time. Here we are using a standard time format HH:MM:SS AM/PM which asks for Hour, minute, second & period (AM/PM). We will save this input into alarm_time variable.
Now we know human errors are very possible and hence we need some way to make sure that the time input the user has provided is exactly in the format we asked for.
To do this we will create a function which will do the job of validating the user-provided time, if the time format is unexpected or invalid then our function will display the message on the console and will ask the user to re-enter the time.
def validate_time(alarm_time):
    if len(alarm_time) != 11:
        return "Invalid time format! Please try again..."
    else:
        if int(alarm_time[0:2]) > 12:
            return "Invalid HOUR format! Please try again..."
        elif int(alarm_time[3:5]) > 59:
            return "Invalid MINUTE format! Please try again..."
        elif int(alarm_time[6:8]) > 59:
            return "Invalid SECOND format! Please try again..."
        else:
            return "ok"
Enter fullscreen mode
Exit fullscreen mode
Here is our function called validate_time. Let’s break it down and understand what is going on —
- Our function accepts the user input as a parameter
alarm_time. -
In first
ifstatement, atlen(alarm_time) != 11we are checking the length of user input to be exactly 11 characters. If not then it willreturna statement, asking the user to re-enter the value. If the user input is exactly 11 characters long, thenelseblock will execute, this is where the more in-depth validation of our user input happens. -
In the first if statement within else block, we are validating the first two characters of our input which are
HH. There could be a slight chance that user may enter invalid hour values like something more than 12 hours. Here atalarm_time[0:2], we are using a slicing operator to access the first two characters of user input. The input is not more than 12 hours then the execution will move forward to the next conditional statement. But if the input is more than 12 hours, then it willreturna statement asking the user to re-enter the time. - Next two conditional statements do the same job as the first, comparing minutes & seconds respectively.
- If the input is all good then,
elseblock of our function will return an OK. Now, this is where the job of our function is over.
Awesome! Our validate_time function is now ready to use!
Now it’s time to call our function.
while True:
    alarm_time = input("Enter time in 'HH:MM:SS AM/PM' format: ")

    validate = validate_time(alarm_time.lower())
    if validate != "ok":
        print(validate)
    else:
        print(f"Setting alarm for {alarm_time}...")
        break
Enter fullscreen mode
Exit fullscreen mode
Here we are storing the output of the function into a variable validate which we are using to judge whether the input is valid or not. If it is not valid then the user will be prompted to enter the time again. If not then the execution will head to the next step.
Now we are sure that the input provided by the user is valid and now we can separately store the values into different variables. Have a look at the code.
alarm_hour = alarm_time[0:2]
alarm_min = alarm_time[3:5]
alarm_sec = alarm_time[6:8]
alarm_period = alarm_time[9:].upper()
Enter fullscreen mode
Exit fullscreen mode
Here we are using slicing operator to store the specific unit of time into specific variables. HH will be stored in alarm_hour, MM in alarm_min and so on.
Coming up next, we now have to get the current time to compare it with the user-provided time.
now = datetime.now()

    current_hour = now.strftime("%I")
    current_min = now.strftime("%M")
    current_sec = now.strftime("%S")
    current_period = now.strftime("%p")
Enter fullscreen mode
Exit fullscreen mode
Remember our datetime module we imported at the beginning of our project. We are finally gonna make use of it.
First, we are using datetime.now() to obtain the current time and we are storing this data in now variable.
Next up we are using % notation to extract specific time data from now variable. This is exactly similar to what we just did with user input. now.strftime() is used to the data in string format for comparison.
Awesome! We are almost done!
if alarm_period == current_period:
        if alarm_hour == current_hour:
            if alarm_min == current_min:
                if alarm_sec == current_sec:
                    print("Wake Up!")
                    playsound('D:/Library/Documents/Projects/Coding/Beginner Python Projects/Alarm Clock/alarm.wav')
Enter fullscreen mode
Exit fullscreen mode
Now, this is were the main mechanism of our alarm lies. We are simply using if statements to compare current time & user time.
Here, if the user & current period (AM/PM) matches then the next if statement is executed which will make the comparison between user input hour & current hour. This same process repeats until the last if statement is executed.
Finally when the last if statement is executed and if it matches, the Wake Up! will be printed on console & the alarm tone will be played.
To play alarm tone we are making use of our playsound module. All we did is passed the absolute address of our audio file to the playsound() and it played the audio file as per our request.
Now before we wrap up, it is important for us to put all the code we wrote for the final part, into a loop so that it keeps executing until our alarms rings.
while True:
    now = datetime.now()

    current_hour = now.strftime("%I")
    current_min = now.strftime("%M")
    current_sec = now.strftime("%S")
    current_period = now.strftime("%p")

    if alarm_period == current_period:
        if alarm_hour == current_hour:
            if alarm_min == current_min:
                if alarm_sec == current_sec:
                    print("Wake Up!")
                    playsound('D:/Library/Documents/Projects/Coding/Beginner Python Projects/Alarm Clock/alarm.wav')
                    break
Enter fullscreen mode
Exit fullscreen mode
Here looks good right… We also added a break statement at the end so that the execution of our alarm will stop once the alarm has rung.
YOU DID IT! GIVE YOURSELF A PAT ON THE BACK ⭐
Source Code
You can find the complete source code of this project here —
mindninjaX/Python-Projects-for-Beginners
Support
Thank you so much for reading! I hope you found this beginner project useful.
If you like my work please consider Buying me a Coffee so that I can bring more projects, more articles for you.

Also if you have any questions or doubts feel free to contact me on Twitter, LinkedIn & GitHub. Or you can also post a comment/discussion & I will try my best to help you 
Creating your alarm in Python can be anything between fun, educating, useful and even liberating.
For example, Windows alarm application is pretty but sometimes it’s too tedious to adjust each parameter with the mouse and you may wish to just type the values (date, hour, minute, second, millisecond etc.).
With Python you can create an alarm that works exactly the way you intend it to do and it can be a great learning project as well.
So, we have prepared numerous different methods that can count as an alarm and hopefully you will find some of them cool.
Featured image credit: Laura Chouette
Holy Python is reader-supported. When you buy through links on our site, we may earn an affiliate commission.
Creating Creative Alarms (w/ Python)
These ideas will construct the core programming of a Python alarm application. A combination of:
- Task Scheduling with Python method
- Plus one of the Python alarm methods mentioned here
will give you an OS level DIY alarm. If you won’t turn off your system or if you don’t mind leaving the alarm script or your programming IDE running in the background you can avoid using the Task Scheduler extension. In that case your alarm will probably be set for shorter time periods such as a few minutes to hours.
Here are 5 Alarm Ideas using Python and some of its default libraries!


Functions
.sleep, .open,
.Beep, .system
Libraries
time, webbrowser,
win32api, win32com
os, random
1- Using Webbrowser Library to Create a Python Alarm
Let’s start with the web browser method. You can easily open any page on your default web browser using webbrowser library.
import webbrowser

webbrowser.open("https://www.youtube.com/watch?v=x0mmajhLKh8")
So, just find a video you’d like to set as an alarm. It can be your favorite music or something inspirational on Youtube or another streaming/video site.
Maybe check out “New Day Video Clip” from 50 Cent, Alicia Keys and Dr. Dre for ideas.
Alternatively you can set the link to
- your favorite movie clips,
- upcoming movie trailers,
- your favorite Youtube Vlogger,
- nature sounds (ocean, forest, wind, rain etc.)
- bird sounds
- cute animals
- puppy videos
- funny videos etc.
So, the video depends on your preference, the event and the environment. You might choose different setups for an event like waking up, reminder of an event or reminder for taking a break.
2- Python Alarm Using Print Function
This one is my absolute favorite. Its beauty is its simplicity.
Apparently if try to print “a”, this triggers a Windows notification sound (I think it’s called warning sound. Whatever its called its a sound we’ve all heard thanks to Windows Operating System and it’s somewhat alarming indeed.  )
)
So all you have to do is to execute this code: print ("a")
For a more sophisticated code you’d wanna put it in a loop or it will be too short to act as an alarm. But once in a loop it actually works surprisingly well. Very elegant and creative in my opinion.
import time

for i in range(5):
    time.sleep(1)
    print("a")
Also, we’re using Python’s convenient time library to create a little bit of delay between each chime.
This will create 5 Windows sounds with approximately 1 second breaks. Feel free to adjust for loop parameters according to your taste and heaviness of your snooze maybe.
You can also create a nested loop to produce multiple blocks of these with a longer break in between. Check out this code:
import time

for i in range(10):
    for i in range(4):
        time.sleep(0.5)
        print("a")
    time.sleep(3)
It will produce 10 blocks of alarm tunes which will consist of 4 chimes. Between blocks there will be a 3 second break. I don’t know if it’s just me but it’s mind blowing to me to be able to create something like this from print function and a couple of Python loops. Well, there is also the time library but I think you know what I mean.
3- Win32api’s Beep Method for a Proper Frequency Implementation
Now, this is also simply a beep but it’s a more proper and complete method than the print method. Using win32api library you can actually make a precision on the frequency of the sound and adjust its length to the milisecond.
This opens the door for lots of sound creativity. Check out this alarm tune creation method which will produce unique sequence of sound every time it’s run because of the implementation of random library’s randint method:
Note: Frequency range is limited to approximately something like 37 to 32000.
Lower frequencies will create a very deep sound while high frequencies produce high pitch sounds.
Also, random library’s ranint simply produces a random integer between the values its given.
import win32api
    import random

    for i in range(5):
        win32api.Beep(random.randint(37,10000), random.randint(750,3000))

Increasing frequency and decreasing length is another approach to creating an alarm in Python using Beep method. If this paranoia evoking – bunker style alarm won’t wake you up I don’t know what will. But hey, no one said it was gonna be a pleasant alarm. If you’re in the market for a pleasant alarm check out the next idea! 🙂
x=37
y=2500
for i in range(13):
    win32api.Beep(x,y)
    x+=100
    y-=120
4- Playing a Local Audio File Using Python
This might be the most appropriate approach if you’re particular about using an exact sound, chime, tune, song, audio book, speech, podcast or any other audio file for your self-made alarm. In my opinion bird chirping, ocean waves or funny audios make excellent alarm tunes.
It can also be helpful in cases where you are missing an internet connection temporarily such as on a boat or off-grid cabin. Playing a local audio is really easy with Python:
- All you have to do is import os library and make use of its .system method.
Check out the example:
import os
f="birds_chirping.mp3"
os.system(f)
If you use a path just make sure to use double backslashes instead of regular slashes. If it still doesn’t work try changing the direction of the slash. There can be conflicts due to operating system’s directory notation. This is usually the case for Windows to recognize the path.
You can also use os.system method to open any other file such as video clips or movies.
5- Win32com.client for Python Alarm with Video Files
You can also use the Run method from win32com.client to run any file in your system locally. You can also use this method as an alternative to webbrowser because if you pass a web link as an argument to Windows Run it will automatically Run it in your default browser.
import win32com.client

shell = win32com.client.Dispatch("WScript.Shell")
shell.Run("Matrix_IV.mp4")
Bonus: — Python Alarm Library on Pypi
If you’re still not satisfied with none of these methods or if you don’t want to deal with the Task Scheduling part (which is a fantastic method to improve your coding skill-set and practice Python) you can also check out this interesting alarm library created for Python here.
That’s all the methods we have. Thanks for reading! I hope you found some of these methods useful and entertaining. Using Python for personal solutions is a great way to immerse yourself in coding and engage with Python learning at a more conscious level.
Please also consider sharing this article with your audience, followers, friends and family so they can also learn or hear a few simple but cool programming tricks.
And also, you can check out some other cool Python scripting ideas from HolyPython.