Today we’re going learn how to create a Simple Digital Clock using Python in a few lines of code. For building this Clock up we will require the tkinter and time module.
Requirements for building a Digital Clock in Python
First, we need to install the Tkinter module. If you don’t have this module already installed in your system then you can install the same using the pip package manager:
C:UsersAdmin>pip install tkinter
Once your tkinter module is successfully installed on your system you’re good to go.
Coding the Digital Clock in Python
We’ll be using the tkinter module and the time module to build our clock today.
1. Tkinter Module
Tkinter is the standard GUI library for Python. Tkinter gets its name from Tk interface. When python is combined with Tkinter it provides a fast and easy way to create GUI applications. Tkinter provides a powerful object-oriented interface to the Tk GUI toolkit. Tkinter is a Python binding to the Tk GUI toolkit.
2. Time Module
Time module provides a variety of ways of getting time, In this article, we are going to use strftime() to parse the current time into the Hour: Minutes: Seconds format.
3. Implementing the digital clock
In this code, we will use geometry() to specify the dimension of the displayed window and we will use mainloop() to prevent the displayable window from exiting quickly.
#import all the required libraries first
import sys
from tkinter import *
#import time library to obtain current time
import time

#create a function timing and variable current_time
def timing():
    #display current hour,minute,seconds
    current_time = time.strftime("%H : %M : %S")
    #configure the clock
    clock.config(text=current_time)
    #clock will change after every 200 microseconds
    clock.after(200,timing)

#Create a variable that will store our tkinter window
root=Tk()
#define size of the window
root.geometry("600x300")
#create a variable clock and store label
#First label will show time, second label will show hour:minute:second, third label will show the top digital clock
clock=Label(root,font=("times",60,"bold"),bg="blue")
clock.grid(row=2,column=2,pady=25,padx=100)
timing()

#create a variable for digital clock
digital=Label(root,text="AskPython's Digital Clock",font="times 24 bold")
digital.grid(row=0,column=2)

nota=Label(root,text="hours        minutes        seconds",font="times 15 bold")
nota.grid(row=3,column=2)

root.mainloop()
Output:
Final Words…
This is how you can create a simple Digital Clock in Python programming! What are you waiting for? Create your own by trying the code yourself!

The Original article can be found on kalebujordan.dev
Hi guys,
In this article, I’m going to share with you how to build a digital clock using Python programming in just a few lines of code using the Tkinter and Time module.
Requirements
If you’re on window OS you don’t really need to install anything since our simple digital clock app will be using only built-in modules time and Tkinter
But if you’re running Linux OS most of the time pre installed python interpreter doesn’t come with the Tkinter installed, therefore you might need to install it manually just as shown below;
Installation
sudo apt-get install python3-tk
Enter fullscreen mode
Exit fullscreen mode
Now that everything is installed, lets’s build our digital clock,
Let’s get started ….
The idea is really simple, firstly we will create an empty window using the Tkinter, then we gonna configure and place a Label widget within our empty window, and then finally we will be updating the value of the label to be the current time after every 0.08s.
getting current time ….
Time module provides a variety of ways of getting time, In this article, we are going to use* strftime() to parse the current time into the *Hour: Minutes: Seconds format.
Example of usage
>>import time
>>time.strftime('%H:%M:%S')
'18:10:53'
Enter fullscreen mode
Exit fullscreen mode
Now lets add graphical interface
Previous experience with the Tkinter library would be an advantage for you, but even if this is your first time still you can make it, the syntax is intuitive and straight forward.
Making empty window with tkinter
In making an empty clock window, we gonna use geometry () to specify the dimension of the displayed window, and at the end put mainloop() to prevent the displayable window from exiting immediately.
from tkinter import Label, Tk

#======= Configuring window =========
window = Tk()
window.title("digital clock")
window.geometry("200x200")
window.resizable(False, False)

#============ Logic lives here =======


window.mainloop()
Enter fullscreen mode
Exit fullscreen mode
When you run the above code, it will produce an interface like this;

Adding some logic to our code ..
Now that we have our empty window, let’s now add a label to place our time information together with a function to update the value on the label every 80 milliseconds.
clock_label = Label(window, bg="green", fg="white", font = ("Times", 30), relief='flat')
clock_label.place(x = 20, y = 20)

def update_label():
    current_time = strftime('%H: %M: %S')
    clock_label.configure(text = current_time)
    clock_label.after(80, update_label)

update_label()
Enter fullscreen mode
Exit fullscreen mode
why 80 milliseconds?
According to research human brain can only process 12 separate images per second, anything more than that it will be perceived as a single picture, this is what causes the illusion of motion.
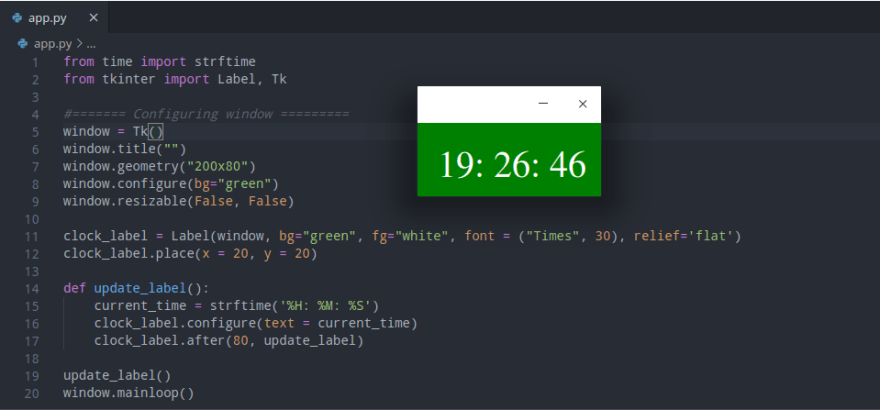
Below is the full code of our digital clock, with you, can try changing the code parameter the way you would like and then press run again.
from time import strftime
from tkinter import Label, Tk

#======= Configuring window =========
window = Tk()
window.title("")
window.geometry("200x80")
window.configure(bg="green")
window.resizable(False, False)

clock_label = Label(window, bg="green", fg="white", font = ("Times", 30, 'bold'), relief='flat')
clock_label.place(x = 20, y = 20)

def update_label():
    current_time = strftime('%H: %M: %S')
    clock_label.configure(text = current_time)
    clock_label.after(80, update_label)

update_label()
window.mainloop()
Enter fullscreen mode
Exit fullscreen mode
Once you run the above lines of code, you should be seeing a widget with clock details rendered on your machine similar to that screenshot below;
Based on your interest I recommend you to also check these;
- How to make a music player in python
- How to track phone number in Python
- How to make a python GUI calculator in Python
- How to make a guessing game in Python
- How to program Arduino board with Python
- How to build a website blocker in Python
Digital-clock-in-Python
Intro
This is a code for a simple digital clock made in python
with help of the time module and Tkinter library
How to run
Firstly download or clone this repo and then move into the project folder as shown below;
$-> git clone https://github.com/Kalebu/Digital-clock-in-Python
$-> cd Digital-clock-in-Python
$ Digital-clock-in-Python -> python app.py
Enter fullscreen mode
Exit fullscreen mode
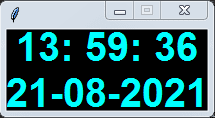
Output
Once you run the code, it will render the output similar to what shown below;
This code is the continuation of a series of Python tutorial published
on my blog, and the full article with code for can
be found on Make a Digital Clock
Give it a star 🎉
Did you find this information useful, then give it a star
Credits
All the credits to kalebu
Improve Article
Save Article
Improve Article
Save Article
As we know Tkinter is used to create a variety of GUI (Graphical User Interface) applications. In this article we will learn how to create a Digital clock using Tkinter.
Prerequisites:
- Python functions
- Tkinter basics (Label Widget)
- Time module
Using Label widget from Tkinter and time module:
In the following application, we are going to use Label widget and also going to use time module which we will use to retrieve system’s time.
Below is the implementation:
Python3
from tkinter import *
from tkinter.ttk import *
from time import strftime
root = Tk()
root.title('Clock')
def time():
string = strftime('%H:%M:%S %p')
lbl.config(text=string)
lbl.after(1000, time)
lbl = Label(root, font=('calibri', 40, 'bold'),
background='purple',
foreground='white')
lbl.pack(anchor='center')
time()
mainloop()
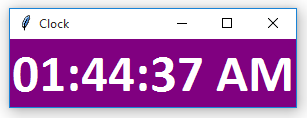
Output:
Code Explanation:
- The code starts by importing the necessary modules.
- The first module is the tkinter library, which provides basic functionality for creating graphical user interfaces (GUIs).
- Next, the strftime function is imported to retrieve system time.
- Next, a window is created and given a title of “Clock.”
- A function called time() is then created to display the current time on the label widget.
- This function uses the strftime() function to format the time string according to system conventions.
- The last part of this code sets up styling for the label widget so that it will look nicer.
- Finally, an instance of Label is created and placed at the center of the window.
- The time() function is executed, and your output should look like this: Clock: Tue Dec 12 08:00:00 2016
- The code creates a window and assigns it the title “Clock”.
- The time() function is then called to display the current time on the label widget.
- The lbl.config() function is used to set the text of the label widget.
- The after() function is used to delay displaying the time for 1000 milliseconds.
- Finally, the style of the label widget is modified with lbl.pack().
Здравствуйте! В сегодняшней статье мы рассмотрим, как создать цифровые часы при помощи Python и Tkinter. Также нам понадобится модуль time.
Мы создадим окно, затем добавим к нему метку Lable, в которой будут отображаться цифровые знаки, обновляющиеся по логике часов. Так мы будем имитировать изменение времени.
И так, приступим.
Создадим файл в Pycharm или любом другом редакторе и придадим ему расширение .py.
# Для начала импортируем все элементы из модуля
from tkinter import *
from tkinter.ttk import *
# импорт модуля для преобразования кортежей через format
from time import strftime
# создание экземпляра класса Tk(), для отображенния окна приложения
root = Tk()
# добавление заголовка к окну
root.title('Цифровые часы')
# создание текстовой метки в окне прилржения, для отображения цифровых знаков. Цифры будут белыми на черном фоне
lable = Label(root, font=('aerial', 30), background='black', foreground='white')
# функция отображения времени
def time():
string = strftime('%H:%M:%S %p')
lable.config(text=string)
lable.after(1000, time)
# азмещение метки времени по центру
lable.pack(anchor='center')
time()
# запуск цикла программы
mainloop()
Если все сделано правильно, на экране отобразится текущее время с компьютера.
Таким образом, мы создали цифровые часы с Python и графической библиотекой Tkinter.
-

Создано 27.10.2022 12:37:46
-
Михаил Русаков

Копирование материалов разрешается только с указанием автора (Михаил Русаков) и индексируемой прямой ссылкой на сайт (http://myrusakov.ru)!
Добавляйтесь ко мне в друзья ВКонтакте: http://vk.com/myrusakov.
Если Вы хотите дать оценку мне и моей работе, то напишите её в моей группе: http://vk.com/rusakovmy.
Если Вы не хотите пропустить новые материалы на сайте,
то Вы можете подписаться на обновления: Подписаться на обновления
Если у Вас остались какие-либо вопросы, либо у Вас есть желание высказаться по поводу этой статьи, то Вы можете оставить свой комментарий внизу страницы.
Если Вам понравился сайт, то разместите ссылку на него (у себя на сайте, на форуме, в контакте):
-
Кнопка:
Она выглядит вот так:
-
Текстовая ссылка:
Она выглядит вот так: Как создать свой сайт
- BB-код ссылки для форумов (например, можете поставить её в подписи):

Всем привет! Сегодня я расскажу как создать аналоговые часы на Python 3.0 и вывести их с помощью tkinter.
Сначала разберем самое интересное.
подключаем модули math (для вычислений) и time (для получения значений часов минут и секунд на вашем компьютере).
# -*- coding:utf-8 -*-
import math #подключаем модуль math
import time #подключаем модуль для определения времени и работы со временем
Подключаем графическую библиотеку tkinter и инициализируем окно:
from tkinter import * #подключаем графическую библиотеку tkinter
root = Tk()
Создаем холст размером 500 на 500 пикселей
и размещаем его в окне
canvas = Canvas(root, width = 500, height = 550) #инициализация холста 500х500
canvas.pack()#размещаем холст в нашем окне
Теперь нарисуем просто круг — будущий циферблат
canvas.create_oval(10, 10, 490, 490, fill = "lightblue") #циферблат просто круг
Теперь выведем надпись: Сделано на Python и точку — центр часов:
#вывод текста "cделано на Python"
canvas.create_text(250, 350, text = 'сделано на Python', font = ('Arial', 8))
#выводим точку - центр циферблата, чтобы было куда стрелки крепить
canvas.create_text(250, 225, text = '.', font = ("Arial", 62))
Теперь зададим счетчик цикла i и выведем рисочки секунд и часов
i = 0 #счетчик цикла
while i < 60:   #цикл вывода секундных рисочек
    i = i + 1
    canvas.create_line(250 + 210 * math.cos(-i * 6 * math.pi/180 + math.pi/2),
                       250 - 210 * math.sin(-6 * i * math.pi/180 + math.pi/2),
                       250 + 190 * math.cos(-6 * i * math.pi/180 + math.pi/2),
                       250 - 190 * math.sin(-6 * i * math.pi/180 + math.pi/2),
                       width = 2)
    if i % 5 == 0:  #когда i кратно 5 выводим более жирную рисочку для обозначения часов
        canvas.create_line(250 + 215 * math.cos(-i * 6 * math.pi/180 + math.pi/2),
                           250 - 215 * math.sin(-6 * i * math.pi/180 + math.pi/2),
                           250 + 190 * math.cos(-6 * i * math.pi/180 + math.pi/2),
                           250 - 190 * math.sin(-6 * i * math.pi/180 + math.pi/2),
                           width = 4)
        continue
Выведем цифры:
i = 0
while i < 12:  #цикл вывода цифр часов
    i += 1
    canvas.create_text(250 + 225 * math.cos(-i * 30 * math.pi/180 + math.pi/2),
                       250 - 225 * math.sin(-30 * i * math.pi/180 + math.pi/2),
                       text = i, font = ('Arial' ,16))
Далее создаем бесконечный цикл, получаем значение текущего времени выводим стрелки бегущую строку и т.д.
все понятно из коментариев в коде:
i = 950   #счетчик цикла  и координата х для вывода текста бегущей строки
while 1:  #основной бесконечный цикл
    time_now = time.localtime()#получаем текущее время в виде
#time.struct_time(tm_year=2016, tm_mon=3, tm_mday=27, tm_hour=22,
#tm_min=23, tm_sec=35, tm_wday=6, tm_yday=87, tm_isdst=0)
    time_sec = int(time.strftime("%S", time_now))  #получаем секунды из переменной time_now
    time_hour = int(time.strftime("%I", time_now)) #получаем часы из переменной time_now
    time_min = int(time.strftime("%M", time_now))  #получаем минуты из переменной time_now
    sec_angle = 6 * time_sec                 #угол отклонения секундной стрелки за 1 секунду
    min_angle = time_min * 6 + time_sec * 0.1    #угол отклонения минутной стрелки за 1 секунду
    #угол отклонения часовой стрелки за 1 секунду
    hour_angle = time_hour * 30 + time_min * 60 * (30/3600)


    #рисуем минутную стрелку
    line_min = canvas.create_line(250,
                                  250,
                                  250 - 180 * math.cos(min_angle * math.pi/180 + math.pi/2),
                                  250 - 180 * math.sin(min_angle * math.pi/180 + math.pi/2),
                                  width = 3, fill = 'darkblue')
    #рисуем часовую стрелку
    line_hour = canvas.create_line(250,
                                   250,
                                   250 - 150 * math.cos(hour_angle * math.pi/180 + math.pi/2),
                                   250 - 150 * math.sin(hour_angle * math.pi/180 + math.pi/2),
                                   width = 5, fill = 'darkblue')
    #рисуем секундную стрелку
    line_sec = canvas.create_line(250,
                                  250,
                                  250 - 180 * math.cos(sec_angle * math.pi/180 + math.pi/2),
                                  250 - 180 * math.sin(sec_angle * math.pi/180 + math.pi/2),
                                  width =2, fill = 'red')
    #Задаем бегущую строку
    text_bottom = canvas.create_text(i, 525,
                                     text = 'Хочешь научиться программировать на Python?'+
                                     'Узнай все подробности на http://pro365.net', font = ('Arial',16))
    i = i - 0.5
    if i == -600:
        i = 950
    root.update()#обновляем экран/холст
    canvas.delete(line_sec) #удаляем секундную стрелку
    canvas.delete(line_min) #удаляем минутную стрелку
    canvas.delete(line_hour) #удаляем часовую стрелку
    canvas.delete(text_bottom) #удаляем строку внизу

root.mainloop   #создаем постоянный цикл
Файл скрипта можно скачать по ссылке и запускать на Python 3:
https://drive.google.com/file/d/0Bzi-qFYpx9H1VjhXdG5FYnFxZjQ/view?usp=drivesdk&resourcekey=0-YqyP_ZGDwF360fGSdIVrlQ
Далее для тех кто хочет разобраться немного математики.
Чтобы создать аналоговые часы в любом языке программирования нужно немного математики
Рассчитаем на какой угол повернуться секундная, часовая и минутная стрелки за одну секунду:
Секундная повернется на угол 360 °/60 = 6 °, т.к. вся окружность 360 ° и всего по ней распределены 60 секунд.
Минутная стрелка за это время повернется на 1/60 минуты т.е. расстояние от одной рисочки минут до другой разделится на 60 частей и каждую секунду минутная стрелка будет проходить одну часть которая рассчитывается так: (1/60) * (360 °/60) = 0,1 °.
Часы на циферблате располагаются через каждые 30 °. Расстояние (значение угла) от одного часа до следующего поделится на 3600 частей потомучто в часе 3600 секунд. Значит часовая стрелка за 1 секунду будет перемещаться на 1/3600 секунды или 1/60 минуты (т.к. один час равен 60 мин.) и расстояние между рисочками от одного часа до другого равно 5 рисочкам минут. Таким образом угол на который повернется часовая стрелка за секунду будет равен
30 °/3600 = 0,0083(3).
Опираясь на рассуждения выше запишем формулы расчета углов поворота для каждой стрелки мы можем написать формулы для отсчета углов:
#угол отклонения секундной стрелки за 1 секунду
sec_angle = 6 * time_sec
#угол отклонения минутной стрелки за 1 секунду
min_angle = time_min * 6 + time_sec * 0.1
#угол отклонения часовой стрелки за 1 секунду
hour_angle = time_hour * 30 + time_min * 60 * (30/3600)
как можно заметить секундная стрелка будет двигаться рывками (дискретно) как в кварцевых часах,
а остальные стрелки двигаются плавно.
Описание переменных:
time_sec, time_min, time_hour — реальные значения времени соответственно секунд, минут и часов которое установлено на вашем компьютере.
Стрелки часов выходят из центра. Для отрисовки стрелок нужно создать линию один конец которой известен (условный центр — допустим x и y) , для определения координат второго конца потребуются тригонометрические формулы. Координаты любой стрелки могут быть описаны следующим образом
начало — (x, y), конец — (x — x1 * cos(angle * П/180 + П/2), y — y1 * sin (angle * П/180 + П/2) ).
Вместо angle подставляем sec_angle если стрелка секундная и т.д. Умножение на П/180 нужно для того чтобы перевести градусы в радианы, + П/2 нужно для того чтобы начало отсчета было от 12 часов.
Формулы для всех стрелок будут выглядеть так:
На этом все если есть вопросы задавайте в комментариях.
Автор оригинала: Pankaj Kumar.
Сегодня мы собираемся научиться создавать Простые цифровые часы используя Python в нескольких строках кода. Для построения этой часы нам потребуется Tkinter и модуль времени.
Требования к строительству цифровых часов в Python
Во-первых, нам нужно установить модуль Tkinter. Если у вас нет этого модуля, уже установленного в вашей системе, вы можете установить то же самое, используя диспетчер пакетов PIP Package:
C:UsersAdmin>pip install tkinter
После того, как ваш модуль Tkinter успешно установлен в вашей системе, вы хотите пойти.
Кодирование цифровых часов в Python
Мы будем использовать модуль TKinter и модуль времени, чтобы построить наши часы сегодня.
1. Модуль Tkinter.
Tkinter – это стандартная библиотека GUI для Python. Tkinter получает свое название от интерфейса TK. Когда Python сочетается с TKinter, он обеспечивает быстрый и простой способ создания приложений GUI. TKINTER предоставляет мощный объектно-ориентированный интерфейс для TK GUI Toolkit. Tkinter – это привязка Python с TK GUI Toolkit.
2. Время модуля
Время модуля предоставляет множество способов получения времени, в этой статье мы собираемся использовать strftime () Чтобы разбирать текущее время в час: минуты: в секунду формата.
3. Реализация цифровых часов
В этом коде мы будем использовать Геометрия () Чтобы указать размер отображаемого окна, и мы будем использовать mainloop () Чтобы предотвратить быстрое окно в окне.
#import all the required libraries first
import sys
from tkinter import *
#import time library to obtain current time
import time

#create a function timing and variable current_time
def timing():
    #display current hour,minute,seconds
    current_time = time.strftime("%H : %M : %S")
    #configure the clock
    clock.config(text=current_time)
    #clock will change after every 200 microseconds
    clock.after(200,timing)

#Create a variable that will store our tkinter window
root=Tk()
#define size of the window
root.geometry("600x300")
#create a variable clock and store label
#First label will show time, second label will show hour:minute:second, third label will show the top digital clock
clock=Label(root,font=("times",60,"bold"),bg="blue")
clock.grid(row=2,column=2,pady=25,padx=100)
timing()

#create a variable for digital clock
digital=Label(root,text="AskPython's Digital Clock",font="times 24 bold")
digital.grid(row=0,column=2)

nota=Label(root,text="hours        minutes        seconds",font="times 15 bold")
nota.grid(row=3,column=2)

root.mainloop()
Выход:
Последние слова …
Вот как вы можете создать простые цифровые часы в программировании Python! Чего ты ждешь? Создайте свой собственный, попробовав код себя!
-
Метки
clock, python, tkinter, today
In this article, we are going to learn how to create an Analog Clock in Python.
Requirements:
- Python
- Python Turtle Module
- Basic Knowlege of Python and Turtle
Creating Analog Clock in Python
First, we need to import the clock image from turtle graphics module:
import turtle
import time

wndw = turtle.Screen()
wndw.bgcolor("black")
wndw.setup(width=600, height=600)
wndw.title("Analogue Clock")
wndw.tracer(0)
Then we have to draw the clock and define the hour, minutes and seconds of the clock:
def draw_clock(hr, mn, sec, pen):

    # Draw clock face
    pen.up()
    pen.goto(0, 210)
    pen.setheading(180)
    pen.color("green")
    pen.pendown()
    pen.circle(210)

    # Draw hour hashes
    pen.up()
    pen.goto(0, 0)
    pen.setheading(90)

    for _ in range(12):
        pen.fd(190)
        pen.pendown()
        pen.fd(20)
        pen.penup()
        pen.goto(0, 0)
        pen.rt(30)
Drawing the hand of the clock and adding the degree is the third step :
# Draw the hands
  # Each tuple in list hands describes the color, the length
  # and the divisor for the angle
  hands = [("white", 80, 12), ("blue", 150, 60), ("red", 110, 60)]
  time_set = (hr, mn, sec)

  for hand in hands:
      time_part = time_set[hands.index(hand)]
      angle = (time_part/hand[2])*360
      pen.penup()
      pen.goto(0, 0)
      pen.color(hand[0])
      pen.setheading(90)
      pen.rt(angle)
      pen.pendown()
      pen.fd(hand[1])
After that, we have to add a while True statement. A while True means a loop forever
while True:
    hr = int(time.strftime("%I"))
    mn = int(time.strftime("%M"))
    sec = int(time.strftime("%S"))

    draw_clock(hr, mn, sec, pen)
    wndw.update()
    time.sleep(1)
    pen.clear()

wndw.mainloop()
Code :
import turtle
import time

wndw = turtle.Screen()
wndw.bgcolor("black")
wndw.setup(width=600, height=600)
wndw.title("Analogue Clock")
wndw.tracer(0)

# Create the drawing pen
pen = turtle.Turtle()
pen.hideturtle()
pen.speed(0)
pen.pensize(3)


def draw_clock(hr, mn, sec, pen):

    # Draw clock face
    pen.up()
    pen.goto(0, 210)
    pen.setheading(180)
    pen.color("green")
    pen.pendown()
    pen.circle(210)

    # Draw hour hashes
    pen.up()
    pen.goto(0, 0)
    pen.setheading(90)

    for _ in range(12):
        pen.fd(190)
        pen.pendown()
        pen.fd(20)
        pen.penup()
        pen.goto(0, 0)
        pen.rt(30)

    # Draw the hands
    # Each tuple in list hands describes the color, the length
    # and the divisor for the angle
    hands = [("white", 80, 12), ("blue", 150, 60), ("red", 110, 60)]
    time_set = (hr, mn, sec)

    for hand in hands:
        time_part = time_set[hands.index(hand)]
        angle = (time_part/hand[2])*360
        pen.penup()
        pen.goto(0, 0)
        pen.color(hand[0])
        pen.setheading(90)
        pen.rt(angle)
        pen.pendown()
        pen.fd(hand[1])


while True:
    hr = int(time.strftime("%I"))
    mn = int(time.strftime("%M"))
    sec = int(time.strftime("%S"))

    draw_clock(hr, mn, sec, pen)
    wndw.update()
    time.sleep(1)
    pen.clear()

wndw.mainloop()
Output:

Also read:
- How to create a digital watch in Python