Дата публикации: 02.09.2022
Время чтения: 6 мин.
![]()

Эльвина Амирханова
ЭКСПЕРТ
Редактор портала Otzyvmarketing.ru. Работаю в сфере интернет-маркетинга с 2010 года.
Вы можете общаться с пользователями параллельно в нескольких каналах – в соцсетях, мессенджерах и т.д. Чтобы оповестить подписчиков о чем-нибудь, необязательно вручную делать публикации во всех каналах одновременно – достаточно отправить уведомления. Рассмотрим, как это сделать с помощью вебхуков на примере Discord.
Что такое вебхук в Дискорд
Вебхук (от англ. Webhook) – это метод расширения или изменения поведения сайтов или приложений с помощью обратных вызовов.
Простыми словами, это механизм, с помощью которого можно автоматизировать отправку уведомлений пользователям при наступлении определенных событий – например, отправке кода в репозиторий или публикации комментария в блоге.
Тысячи надёжных каналов для продвижения бизнеса в Telegram

Telega.in — платформа нативных интеграций с блогерами в Telegram. Каждый канал в каталоге проверен вручную, а админы готовы к сотрудничеству — никаких долгих переговоров!
- Выбирайте лучшие каналы в открытом каталоге самостоятельно или с помощью менеджера.
- Планируйте кампании эффективно: интеграции гарантированно будут опубликованы в срок и в том виде, в котором их согласует заказчик.
- Экономьте время: отчёты по каждой кампании предоставляются в удобной таблице со всеми необходимыми данными.
Репозиторий – это место, в котором хранятся и поддерживаются данные.
Как это работает:
- Происходит событие;
- Исходный сайт отравляет НТТР-запрос на URL-сайта, который указан для вебхука;
- Пользователь получает уведомление о событии.
Подробно о настройке вебхук смотрите в этом видео:
Discord – это кроссплатформенный мессенджер, с помощью которого можно организовывать голосовые и видеоконференции, обмениваться текстовыми сообщениями в приватных и публичных чатах и многое другое.
Он имеет веб-клиент, а также десктопные (Windows, MacOS, Linux) и мобильные (Android, iOS) приложения.
Мессенджер пользуется огромной популярностью у геймеров и учащихся. Количество зарегистрированных пользователей превышает 250 миллионов.
Для чего он нужен
Пользователи Discord могут создавать собственные серверы – виртуальные пространства, на которых можно общаться друг с другом. Например, учебные классы, кружки по интересам и т.д.

Если вы хотите оповестить участников сервера о каком-то событии, вам не придется делать это вручную.
С помощью вебхуков можно настроить обмен информацией с другими ресурсами и автоматическое оповещение пользователей. Например, вы можете опубликовать видео на своем канале – и пользователи Discord увидят информацию об этом.
Таким образом, вебхук в Discord – это простой способ публикации сообщений с других сайтов или приложений в свой Discord-сервер.
Как настроить webhook discord
В первую очередь, нужно создать Discord-сервер. Для этого открываем приложение Discord и нажимаем на значок «+» в левом верхнем углу.
.png)
Процесс настройки вебхука будем рассматривать на примере десктопного приложения Discord для Windows. Интерфейс в других приложениях может отличаться.
Вы можете использовать готовый шаблон (например, для игры, школьного клуба, учебной группы и т.д.) или создать сервер с нуля. При этом вас попросят персонализировать его – выбрать название и значок. По умолчанию название сервера генерируется по формуле «Сервер + имя пользователя», а в качестве значка используется название сервера.
Теперь вам нужно перейти в настройки сервера. Для этого нажмите на его название в правом верхнем углу и в выпадающем меню выберите «Настройки сервера».
.png)
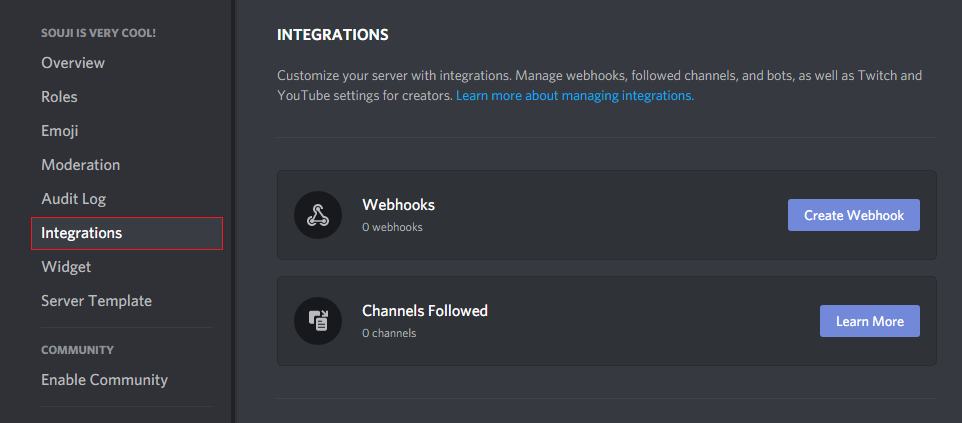
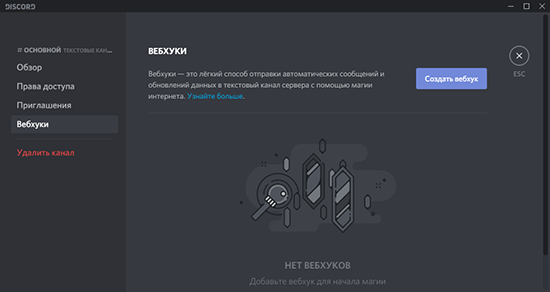
На открывшейся странице в левой части экрана выберите раздел «Интеграции» (находится во вкладке «Мой сервер»). Здесь вы сможете персонализировать свой сервер с помощью интеграций – например, управлять вебхуками, отслеживаемыми каналами и ботами, управлять настройками и т.д.
Ранее раздел «Вебхуки» был вынесен в основное меню настроек сервера.
Для создания вебхуков необходимо в поле «Вебхуки» нажать кнопку «Создать вебхук».
.png)
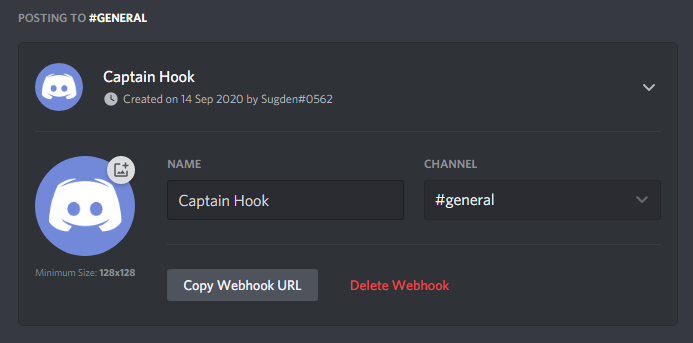
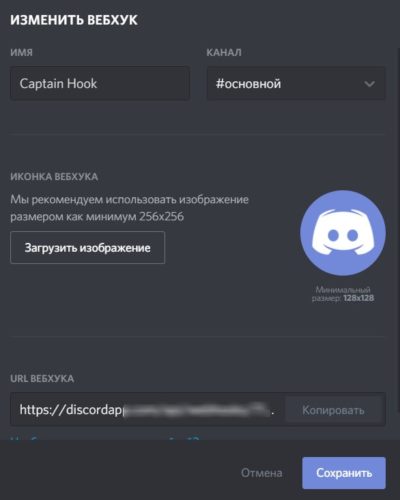
В открывшемся окне можно настроить вебхук:
- Изменить имя
- Выбрать канал, на который будут поступать уведомления (по умолчанию используется #основной)
- Загрузить иконку (размер от 128х128, оптимальный – 256х256)
Если вы измените настройки вебхука, не забудьте нажать кнопку «Сохранить изменения». В противном случае будут выставлены настройки по умолчанию.
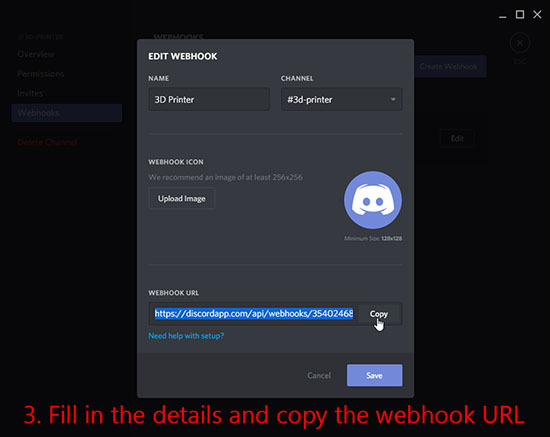
Теперь нужно скопировать адрес вебхука – для этого нажмите кнопку «Копировать URL вебхука».
.png)
Как пользоваться вебхуком
Вебхук, который мы создали выше, сам по себе не работает. Ему необходимо взаимодействие с другим сайтом или приложением. Рассмотрим на примере Discohook. С его помощью вы сможете отправлять оповещения пользователям на свой сервер. Приложение выглядит вот так:
.png)
В левой части экрана располагаются основные поля «конструктора». С их помощью можно настраивать работу вебхука и внешний вид оповещения. Все изменения отображаются в правой части экрана.
При первом запуске Dischook в левой и правой части экрана вы можете увидеть информацию о работе сервиса. Чтобы очистить все поля, нажмите кнопку «Clear All».
Рассмотрим доступные поля:
1) Webhook URL. В это поле необходимо вставить URL-адрес вебхука, который мы сгенерировали ранее. С его помощью будут отправляться сообщения на сервер.
Если вы хотите отправить оповещение на несколько серверов одновременно, используйте соответствующие вебхуки для каждого из них. Чтобы добавить поля для URL-адресов дополнительных вебхуков, нажмите «Add Webhook».
2) Content. В этом поле нужно опубликовать текст сообщения, которое вы планируете отправить на Discord-сервер. Обратите внимание на ограничение – максимальный размер сообщения 2 000 символов.
3) Profile. Здесь вы можете изменить настройки своего вебхука (если вы не сделали этого при его создании). Например, вы можете изменить его имя, а также добавить аватар.
4) Add Embed. С помощью этой кнопки вы можете вставить дополнительный текст, ссылки, изображения и т.д. Благодаря чему в вашем сообщении появится полноценное вложение.
После заполнения всех полей в правой части экрана вы увидите, как будет выглядеть ваше сообщение в Discord. В нашем случае оно выглядит следующим образом:
.png)
Для отправки оповещения на сервер нажмите кнопку «Send» в левой части экрана (рядом с полем, в которое вы вставляли URL-адрес вебхука). После этого в Discord появится ваше сообщение, а все пользователи получат уведомление.
.png)
Как его использовать с другим сервисом
С помощью вебхуков можно настроить автоматический обмен информацией между различными сайтами и Discord. В число поддерживаемых ресурсов входят:
- CircleCl
- GitHub
- DataLog
Если же вы хотите настроить отправку уведомлений с Twitch, YouTube и других площадок, вам понадобится специальный сервис – например, IFTTT.
.png)
Для работы в IFTTT нужно там зарегистрироваться. Вы можете это сделать традиционным (по email) или быстрым способом (через аккаунт Apple, Google и др.). После регистрации получите бесплатный аккаунт, с помощью которого можно настроить 5 апплетов. Чтобы увеличить их количество, вам понадобится платный аккаунт Pro (20 апплетов) или Pro+ (неограниченное количество апплетов).
Апплеты – это несамостоятельные компоненты каких-либо программ, которые работают в рамках других программ. В нашем случае речь идет о количестве синхронизаций, которые вы можете настроить между двумя разными сервисами.
Чтобы начать работу с сервисом, нажмите «Create». На открывшейся странице вы увидите кнопки для настройки триггера («If this») и соответствующего действия («Then That»).
.png)
Для добавления триггера нажмите кнопку «Add». На открывшейся странице необходимо выбрать сервис, действия внутри которого вы планируете отслеживать – например, YouTube, Twitter и т.д. В качестве примера возьмем Reddit.

После выбора сервиса вы увидите список триггеров, срабатывание которых приведет к целевому действию. Например, для Reddit триггером может служить:
- Любая новая публикация
- Новая горячая публикация
- Новая лучшая публикация
- Новая публикация из поиска
- Ваша новая публикация
- Ваш новый комментарий и т.д.
Для примера в качестве триггера выберем «Новая публикация, сохраненная вами».

После этого попросят подключить ваш аккаунт на Reddit к сервису IFTTT. Когда вы это сделаете, нажмите кнопку «Create Trigger».

Теперь вы можете приступить к настройке целевого действия. Так же нажмите кнопку «Add» и выберите сервис. В этом случае вам понадобится выбрать Webhooks, где нужно нажать на «Make a web request».

На открывшейся странице заполните следующие поля:
- URL – здесь укажите URL-адрес сгенерированного вебхука;
- Method – в этом поле нужно выбрать метод запроса (например, GET, POST, DELETE и др.). В нашем случае необходимо выбрать POST;
- Content Type – в этом поле выбираем тип содержимого (например, application/json, text/plain и пр.). В нашем случае – application/json.
Также вы можете добавить заголовок и основной текст. После того, как вы все настроите, нажмите «Create Action».

При желании вы можете добавить в цепочку дополнительные действия (это доступно только на платных тарифах). В противном случае создание апплета закончено. Останется лишь нажать кнопку «Finish» и следить за тем, как он будет работать.
При использовании IFTTT вы можете не создавать вебхуки – в качестве целевого действия достаточно выбрать Discord и публикацию сообщения на сервер. В этом случае оповещения будут приходить от бота IFTTT, а не от бота, созданного через вебхук, как мы это сделали выше.
Заключение
Таким образом, вебхук представляет собой полезный инструмент, с помощью которого можно оповещать пользователей своего Discord-сервера. При этом вы можете отправлять уведомления вручную с помощью бота, а можете пользоваться специальными сервисами для автоматической рассылки оповещений из разных платформ – YouTube, Reddit, Twitter и т.д.
Вам понравилась статья?
![]()
4
![]()
1
Webhook Resource
Webhooks are a low-effort way to post messages to channels in Discord. They do not require a bot user or authentication to use.
Webhook Object
Used to represent a webhook.
Webhook Structure
| Field | Type | Description |
|---|---|---|
| id | snowflake | the id of the webhook |
| type | integer | the type of the webhook |
| guild_id? | ?snowflake | the guild id this webhook is for, if any |
| channel_id | ?snowflake | the channel id this webhook is for, if any |
| user? | user object | the user this webhook was created by (not returned when getting a webhook with its token) |
| name | ?string | the default name of the webhook |
| avatar | ?string | the default user avatar hash of the webhook |
| token? | string | the secure token of the webhook (returned for Incoming Webhooks) |
| application_id | ?snowflake | the bot/OAuth2 application that created this webhook |
| source_guild? * | partial guild object | the guild of the channel that this webhook is following (returned for Channel Follower Webhooks) |
| source_channel? * | partial channel object | the channel that this webhook is following (returned for Channel Follower Webhooks) |
| url? | string | the url used for executing the webhook (returned by the webhooks OAuth2 flow) |
* These fields will be absent if the webhook creator has since lost access to the guild where the followed channel resides
Webhook Types
| Value | Name | Description |
|---|---|---|
| 1 | Incoming | Incoming Webhooks can post messages to channels with a generated token |
| 2 | Channel Follower | Channel Follower Webhooks are internal webhooks used with Channel Following to post new messages into channels |
| 3 | Application | Application webhooks are webhooks used with Interactions |
Example Incoming Webhook
{
  "name": "test webhook",
  "type": 1,
  "channel_id": "199737254929760256",
  "token": "3d89bb7572e0fb30d8128367b3b1b44fecd1726de135cbe28a41f8b2f777c372ba2939e72279b94526ff5d1bd4358d65cf11",
  "avatar": null,
  "guild_id": "199737254929760256",
  "id": "223704706495545344",
  "application_id": null,
  "user": {
    "username": "test",
    "discriminator": "7479",
    "id": "190320984123768832",
    "avatar": "b004ec1740a63ca06ae2e14c5cee11f3",
    "public_flags": 131328
  }
}
Example Channel Follower Webhook
{
  "type": 2,
  "id": "752831914402115456",
  "name": "Guildy name",
  "avatar": "bb71f469c158984e265093a81b3397fb",
  "channel_id": "561885260615255432",
  "guild_id": "56188498421443265",
  "application_id": null,
  "source_guild": {
    "id": "56188498421476534",
    "name": "Guildy name",
    "icon": "bb71f469c158984e265093a81b3397fb"
  },
  "source_channel": {
    "id": "5618852344134324",
    "name": "announcements"
  },
  "user": {
    "username": "test",
    "discriminator": "7479",
    "id": "190320984123768832",
    "avatar": "b004ec1740a63ca06ae2e14c5cee11f3",
    "public_flags": 131328
  }
}
Example Application Webhook
{
  "type": 3,
  "id": "658822586720976555",
  "name": "Clyde",
  "avatar": "689161dc90ac261d00f1608694ac6bfd",
  "channel_id": null,
  "guild_id": null,
  "application_id": "658822586720976555"
}
Create Webhook % POST /channels/{channel.id#DOCS_RESOURCES_CHANNEL/channel-object}/webhooks
Creates a new webhook and returns a webhook object on success. Requires the MANAGE_WEBHOOKS permission. Fires a Webhooks Update Gateway event.
An error will be returned if a webhook name (name) is not valid. A webhook name is valid if:
- It does not contain the substring ‘clyde‘ (case-insensitive)
- It follows the nickname guidelines in the Usernames and Nicknames documentation, with an exception that webhook names can be up to 80 characters
info
This endpoint supports theX-Audit-Log-Reasonheader.
JSON Params
| Field | Type | Description |
|---|---|---|
| name | string | name of the webhook (1-80 characters) |
| avatar? | ?image data | image for the default webhook avatar |
Get Channel Webhooks % GET /channels/{channel.id#DOCS_RESOURCES_CHANNEL/channel-object}/webhooks
Returns a list of channel webhook objects. Requires the MANAGE_WEBHOOKS permission.
Get Guild Webhooks % GET /guilds/{guild.id#DOCS_RESOURCES_GUILD/guild-object}/webhooks
Returns a list of guild webhook objects. Requires the MANAGE_WEBHOOKS permission.
Get Webhook % GET /webhooks/{webhook.id#DOCS_RESOURCES_WEBHOOK/webhook-object}
Returns the new webhook object for the given id.
Get Webhook with Token % GET /webhooks/{webhook.id#DOCS_RESOURCES_WEBHOOK/webhook-object}/{webhook.token#DOCS_RESOURCES_WEBHOOK/webhook-object}
Same as above, except this call does not require authentication and returns no user in the webhook object.
Modify Webhook % PATCH /webhooks/{webhook.id#DOCS_RESOURCES_WEBHOOK/webhook-object}
Modify a webhook. Requires the MANAGE_WEBHOOKS permission. Returns the updated webhook object on success. Fires a Webhooks Update Gateway event.
info
All parameters to this endpoint are optional
info
This endpoint supports theX-Audit-Log-Reasonheader.
JSON Params
| Field | Type | Description |
|---|---|---|
| name | string | the default name of the webhook |
| avatar | ?image data | image for the default webhook avatar |
| channel_id | snowflake | the new channel id this webhook should be moved to |
Modify Webhook with Token % PATCH /webhooks/{webhook.id#DOCS_RESOURCES_WEBHOOK/webhook-object}/{webhook.token#DOCS_RESOURCES_WEBHOOK/webhook-object}
Same as above, except this call does not require authentication, does not accept a channel_id parameter in the body, and does not return a user in the webhook object.
Delete Webhook % DELETE /webhooks/{webhook.id#DOCS_RESOURCES_WEBHOOK/webhook-object}
Delete a webhook permanently. Requires the MANAGE_WEBHOOKS permission. Returns a 204 No Content response on success. Fires a Webhooks Update Gateway event.
info
This endpoint supports theX-Audit-Log-Reasonheader.
Delete Webhook with Token % DELETE /webhooks/{webhook.id#DOCS_RESOURCES_WEBHOOK/webhook-object}/{webhook.token#DOCS_RESOURCES_WEBHOOK/webhook-object}
Same as above, except this call does not require authentication.
Execute Webhook % POST /webhooks/{webhook.id#DOCS_RESOURCES_WEBHOOK/webhook-object}/{webhook.token#DOCS_RESOURCES_WEBHOOK/webhook-object}
Refer to Uploading Files for details on attachments and multipart/form-data requests. Returns a message or 204 No Content depending on the wait query parameter.
info
Note that when sending a message, you must provide a value for at least one ofcontent,embeds,components, orfile.
info
If the webhook channel is a forum channel, you must provide eitherthread_idin the query string params, orthread_namein the JSON/form params. Ifthread_idis provided, the message will send in that thread. Ifthread_nameis provided, a thread with that name will be created in the forum channel.
warn
Discord may strip certain characters from message content, like invalid unicode characters or characters which cause unexpected message formatting. If you are passing user-generated strings into message content, consider sanitizing the data to prevent unexpected behavior and usingallowed_mentionsto prevent unexpected mentions.
Query String Params
| Field | Type | Description | Required |
|---|---|---|---|
| wait | boolean | waits for server confirmation of message send before response, and returns the created message body (defaults to false; when false a message that is not saved does not return an error) |
false |
| thread_id | snowflake | Send a message to the specified thread within a webhook’s channel. The thread will automatically be unarchived. | false |
JSON/Form Params
| Field | Type | Description | Required |
|---|---|---|---|
| content | string | the message contents (up to 2000 characters) | one of content, file, embeds |
| username | string | override the default username of the webhook | false |
| avatar_url | string | override the default avatar of the webhook | false |
| tts | boolean | true if this is a TTS message | false |
| embeds | array of up to 10 embed objects | embedded rich content |
one of content, file, embeds |
| allowed_mentions | allowed mention object | allowed mentions for the message | false |
| components * | array of message component | the components to include with the message | false |
| files[n] ** | file contents | the contents of the file being sent | one of content, file, embeds |
| payload_json ** | string | JSON encoded body of non-file params | multipart/form-data only |
| attachments ** | array of partial attachment objects | attachment objects with filename and description | false |
| flags | integer | message flags combined as a bitfield (only SUPPRESS_EMBEDS can be set) |
false |
| thread_name | string | name of thread to create (requires the webhook channel to be a forum channel) | false |
* Requires an application-owned webhook.
** See Uploading Files for details.
info
For the webhook embed objects, you can set every field excepttype(it will berichregardless of if you try to set it),provider,video, and anyheight,width, orproxy_urlvalues for images.
Execute Slack-Compatible Webhook % POST /webhooks/{webhook.id#DOCS_RESOURCES_WEBHOOK/webhook-object}/{webhook.token#DOCS_RESOURCES_WEBHOOK/webhook-object}/slack
Refer to Slack’s documentation for more information. We do not support Slack’s channel, icon_emoji, mrkdwn, or mrkdwn_in properties.
Query String Params
| Field | Type | Description | Required |
|---|---|---|---|
| thread_id | snowflake | id of the thread to send the message in | false |
| wait | boolean | waits for server confirmation of message send before response (defaults to true; when false a message that is not saved does not return an error) |
false |
Execute GitHub-Compatible Webhook % POST /webhooks/{webhook.id#DOCS_RESOURCES_WEBHOOK/webhook-object}/{webhook.token#DOCS_RESOURCES_WEBHOOK/webhook-object}/github
Add a new webhook to your GitHub repo (in the repo’s settings), and use this endpoint as the «Payload URL.» You can choose what events your Discord channel receives by choosing the «Let me select individual events» option and selecting individual events for the new webhook you’re configuring.
Query String Params
| Field | Type | Description | Required |
|---|---|---|---|
| thread_id | snowflake | id of the thread to send the message in | false |
| wait | boolean | waits for server confirmation of message send before response (defaults to true; when false a message that is not saved does not return an error) |
false |
Get Webhook Message % GET /webhooks/{webhook.id#DOCS_RESOURCES_WEBHOOK/webhook-object}/{webhook.token#DOCS_RESOURCES_WEBHOOK/webhook-object}/messages/{message.id#DOCS_RESOURCES_CHANNEL/message-object}
Returns a previously-sent webhook message from the same token. Returns a message object on success.
Query String Params
| Field | Type | Description | Required |
|---|---|---|---|
| thread_id | snowflake | id of the thread the message is in | false |
Edit Webhook Message % PATCH /webhooks/{webhook.id#DOCS_RESOURCES_WEBHOOK/webhook-object}/{webhook.token#DOCS_RESOURCES_WEBHOOK/webhook-object}/messages/{message.id#DOCS_RESOURCES_CHANNEL/message-object}
Edits a previously-sent webhook message from the same token. Returns a message object on success.
When the content field is edited, the mentions array in the message object will be reconstructed from scratch based on the new content. The allowed_mentions field of the edit request controls how this happens. If there is no explicit allowed_mentions in the edit request, the content will be parsed with default allowances, that is, without regard to whether or not an allowed_mentions was present in the request that originally created the message.
Refer to Uploading Files for details on attachments and multipart/form-data requests.
Any provided files will be appended to the message. To remove or replace files you will have to supply the attachments field which specifies the files to retain on the message after edit.
warn
Starting with API v10, theattachmentsarray must contain all attachments that should be present after edit, including retained and new attachments provided in the request body.
info
All parameters to this endpoint are optional and nullable.
Query String Params
| Field | Type | Description | Required |
|---|---|---|---|
| thread_id | snowflake | id of the thread the message is in | false |
JSON/Form Params
| Field | Type | Description |
|---|---|---|
| content | string | the message contents (up to 2000 characters) |
| embeds | array of up to 10 embed objects | embedded rich content |
| allowed_mentions | allowed mention object | allowed mentions for the message |
| components * | array of message component | the components to include with the message |
| files[n] ** | file contents | the contents of the file being sent/edited |
| payload_json ** | string | JSON encoded body of non-file params (multipart/form-data only) |
| attachments ** | array of partial attachment objects | attached files to keep and possible descriptions for new files |
* Requires an application-owned webhook.
** See Uploading Files for details.
Delete Webhook Message % DELETE /webhooks/{webhook.id#DOCS_RESOURCES_WEBHOOK/webhook-object}/{webhook.token#DOCS_RESOURCES_WEBHOOK/webhook-object}/messages/{message.id#DOCS_RESOURCES_CHANNEL/message-object}
Deletes a message that was created by the webhook. Returns a 204 No Content response on success.
Query String Params
| Field | Type | Description | Required |
|---|---|---|---|
| thread_id | snowflake | id of the thread the message is in | false |
# Webhooks
Webhooks can send messages to a text channel without having to log in as a bot. discord.js implements a variety of methods to fetch, create, edit, and use webhooks. In this section, you will learn how to create, fetch, edit, and use webhooks.
# What is a webhook
Webhooks are a utility used to send messages to text channels without needing a Discord application. Webhooks are useful for allowing something to send messages without requiring a Discord application. However, you should note that you cannot directly edit or delete messages you sent through the webhook. discord.js introduces two structures to make use of this functionality, Webhook and WebhookClient. WebhookClient is an extended version of a Webhook which allows you to send messages through it without needing a bot client.
TIP
If you would like to read about using webhooks through the API without discord.js, you can read about them here (opens new window).
# Detecting webhook messages
Bots receive webhook messages in a text channel as usual. You can detect if a webhook sent the message by checking if the Message.webhookID is not null. In this example, we return if a webhook sent the message.
If you would like to get the webhook object that sent the message, you can use Message#fetchWebhook (opens new window).
# Fetching webhooks
TIP
Webhook fetching will always make use of collections and Promises. If you do not understand either concept, revise them, and then come back to this section. You can read about collections here, and Promises here and here (opens new window).
# Fetching all webhooks of a guild
If you would like to get all webhooks of a guild you can use Guild#fetchWebhooks() (opens new window). This will return a Promise which will resolve into a Collection of Webhooks.
# Fetching webhooks of a channel
Webhooks belonging to a channel can be fetched using TextChannel#fetchWebhooks() (opens new window). This will return a Promise which will resolve into a Collection of Webhooks. A collection will be returned even if the channel contains a single webhook. If you are certain the channel contains a single webhook, you can use Collection#first() (opens new window) on the Collection to get the webhook.
# Fetching a single webhook
# Using client
You can fetch a specific webhook using its id with Client#fetchWebhook() (opens new window). You can obtain the webhook id by looking at its link, the number after https://discord.com/api/webhooks/ is the id, and the part after that is the token.
# Using the WebhookClient constructor
If you are not using a bot client, you can get a webhook by creating a new instance of WebhookClient and passing the id and token into the constructor. These credentials do not require you to have a bot application, but it also offers limited information instead of fetching it using an authorized client.
# Creating webhooks
# Creating webhooks through server settings
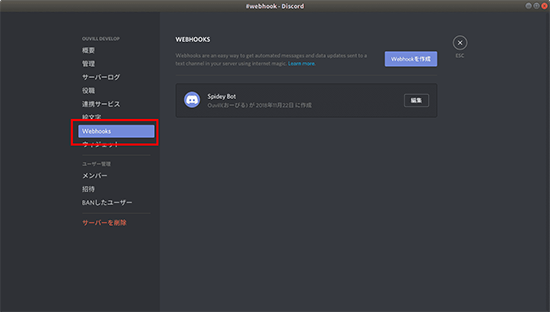
You can create webhooks directly through the Discord client. Go to Server Settings, and you will see an Integrations tab.
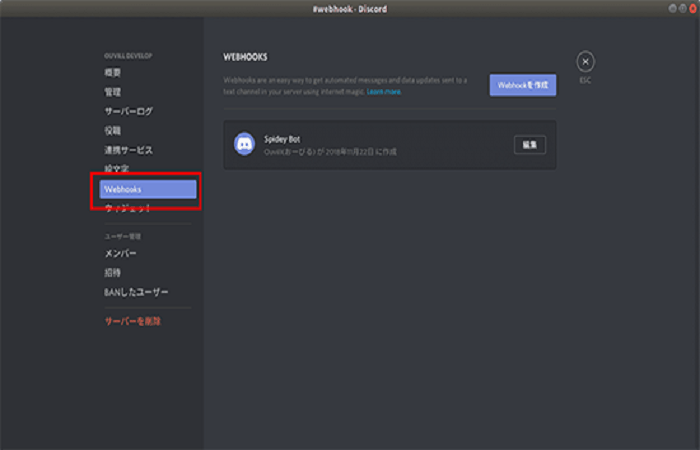
If you already have created a webhook, the webhooks tab will look like this; you will need to click the View Webhooks button.
Once you are there, click on the Create Webhook / New Webhook button; this will create a webhook. From here, you can edit the channel, the name, and the avatar. Copy the link, the first part is the id, and the second is the token.
# Creating webhooks with discord.js
discord.js provides a method for creating webhooks called TextChannel#createWebhook() (opens new window).
# Editing webhooks
You can edit Webhooks and WebhookClients to change their name, avatar, and channel using Webhook#edit() (opens new window).
# Using webhooks
Webhooks, unlike bots, can send more than one embed per message, up to 10. They can also send attachments and normal content. The Webhook#send() (opens new window) method to send to a webhook is very similar to the method for sending to a text channel. Webhooks can also choose how the username and avatar will appear when they send the message.
Example using a WebhookClient:
Example using a Webhook:
# Resulting code
If you want to compare your code to the code we’ve constructed so far, you can review it over on the GitHub repository
here (opens new window).
Что такое вебхуки и как ими пользоваться в Дискорде, настройка и управление

Пользователи, которые только начинают свой путь в ведении Дискорд-сервера, часто сталкиваются с проблемой, когда всех пользователей или конкретного персонажа нужно о чем-то уведомить. Когда начинающий владелец сервера захочет решить эту проблему, он наткнется на Дискорд вебхуки. Сначала такая информация может показаться сложной, но на деле все довольно просто, и, следуя инструкции, разобраться сможет человек с любым уровнем навыков.

Для чего нужны вебхуки и их особенности
Вебхук – один из основных инструментов автоматизации сервера. Он позволяет автоматически оповещать пользователей о любых событиях и обмениваться информацией со сторонними ресурсами. Например, это может быть новое видео на каком-либо канале или информация по поводу сервера, ролей на нем. В вебхук можно поместить информацию какого угодно типа, настроить ее получателей и интеграцию на другие сайты.
Как пользоваться
Чтобы использовать вебхук, сначала нужно создать его и настроить:
- Зайдите на свой Дискорд-сервер.

- Откройте настройки текстового канала, нажав на знак шестеренки возле названия.
- Перейдите в раздел «Интеграция», нажмите «Создать вебхук».
- При необходимости дайте боту имя и выберите текстовый канал, в который он будет отправлять сообщения.
- В том же окне скопируйте URL, нажав на соответствующую кнопку внизу.

- Перейдите на официальный сайт discohook.org, где и происходит настройка, также можно использовать аналог – Discord Webhook Sender.
- Нажмите «Clear all», чтобы очистить уже имеющуюся информацию.
- В первую графу «Webhook URL» вставьте скопированную ранее ссылку.
- В «Message content» напишите текст, который необходимо распространить.
- Нажмите «Send», сообщение будет отправлено на сервер от лица бота.

На этом базовая настройка вебхука завершена, но даже на этой стадии его можно назвать волшебным ботом. Таким способом можно вручную уведомлять о какой-либо информации. Более детальная настройка потребует немного больше времени:
- Для детальной настройки потребуется создать Embed. На том же сайте нажмите кнопку «Add Embed», которая расположена чуть ниже раздела с текстом.
- Здесь для сообщения можно обозначить название – «Title», ссылку в названии – «Title URL», описание – «Description», имя и ссылку на автора и его иконку – «Author Name», «URL» и «Icon», цвет – «Color».
- Чтобы обозначить каждый раздел, нужно в соответствующую графу вставить нужную информацию, например: имя автора, ссылку на него и на его иконку.
Такие возможности можно использовать по-разному. Например, делать красивое оформление для постов. Также с настройкой сервера и автопостингом может помочь Magic Bot.
Интеграция Дискорда с другим сервисом
Для интеграции Дискорда с другим сервисом, например Ютубом или Твитчем, понадобится использовать сайт ifttt.com. Именно он делает использование и управление разными соц. сетями одновременно простым и доступным
- Для начала нужно зарегистрироваться на сайте, что не займет много времени.
- Перейдите на главную страницу, и в графе «Search services» начните вводить название необходимого вам сайта.
- Выберите его из списка, нажав по нему.
- В следующем окне откроются доступные функции взаимодействия, например, уведомление о начавшихся стримах пользователя или о выходе нового видео.
- Выберите нужное действие и настройте его. Например, чтобы настроить уведомление о стримах, понадобится выбрать стримера из списка.
- Нажмите «Create trigger».
- Затем вернитесь на главную страницу и в строке поиска начните вводить «Webhooks», выберите его.
- Нажмите «Make a web request».
- В строке «URL» вставьте ссылку на вебхук, а в «Method» выберите «POST». В «Content Type» необходимо выбрать «application/json».
- В «Body» написать текст автоматического сообщения, используя конструкцию: {content : «необходимый текст»}, и в него добавить ссылку, используя кнопку «Add ingredient», а из списка выбрать «ChannelURL».
- Нажмите «Create action», а затем «Finish», чтобы создать действие и закончить его.
Так можно создать интеграцию с любым другим сервисом – выбор на сайте очень большой.
Официальный пример
Также хорошим примером может стать совместная работа вебхука и Ютуба:
- Откройте сайт ifttt.com.

- Найдите Ютуб в поиске и выберите его.
- Кликните на необходимую функцию. Это может быть оповещение о выходе ваших новых видео, например.
- Снова перейдите на главную страницу.
- Найдите «Webhooks», откройте, нажмите «Make a web request».
- В первую строку вставьте ссылку на вебхук, далее выберите «POST», а в «Content Type» – «application/json».
- В «Body» используйте необходимый текст. Шаблон: {«content» : «необходимый текст» **{{Title}}**:{{Url}}» }.

- Закончите действие, нажав «Create action» и «Finish».
На этом настройка нового вебхука с уведомлениями закончена.
Как писать от имени вебхука
Управлять вебхуком и писать от его имени также можно через сайт discohook.org, как и говорилось выше. В разделе «Message content» можно вписать любой текст и, с помощью него, например, общаться с другими участниками сервера или просто уведомлять их о каких-либо событиях.

Вам помогло? Поделитесь с друзьями — помогите и нам!
platforms | Dec 14, 2021

Fikayo Adepoju Oreoluwa
Setup for receiving GitHub commit updates in Discord channels
Before we dive into the implementation of our integration of GitHub and Discord, let’s take a few seconds to go through the requirements and steps that will be taken to achieve the integration.
To begin, the following accounts are required:
- A Discord account you own
- A GitHub account with a repository to experiment with
- A Hookdeck account (you can sign up for a free account here)
- An HTTP client tool (I will be using Postman for this tutorial)
Now that you have these in place, here are the steps you will take to create the communication flow between GitHub and Discord using webhooks created with the Discord API:
- Create a Discord server and set up a channel to receive the commit updates from GitHub
- Create a Discord application and add a bot to it with required permissions for creating webhooks
- Create a Discord webhook using the Discord API by authenticating with the Bot token
- Create a Hookdeck connection to ingest your webhooks
- Create a GitHub webhook using the webhook URL from Hookdeck
- Test your connection
Sound easy? Let’s get right into it!
Creating a Discord server and channel
The first step is to create a Discord server and add a channel to it. To create a server, click on the plus (+) button on the side menu of your Discord interface. Then follow the server creation wizard (Create my own → For me and my friends) and enter a name for your server like below:

Click the Create button to complete the process.
Next, add a channel to your server by clicking the + icon next to the TEXT CHANNELS label on the server menu. When a dialog pops up to enter a name for your channel, enter the value webhooks-channel like below, and click the Create Channel button.

Now that you have created the channel, you need the channel ID. The channel ID can only be retrieved in developer mode, so you must click on the User Settings cog icon on the lower-left corner of your screen and click Advanced on the side menu. Here, you can turn on developer mode as shown below:

With developer mode on, you can now return to your Discord server and right-click on the webhooks-channel channel to copy the channel ID (click on Copy ID on the context menu).
Creating a Discord bot
The next step is to create a Discord application and add a Discord bot to the application. A Discord Bot (or a Discord bot account) is a special type of Discord user account dedicated to automation. Bot accounts have full access to all API routes without using bearer tokens, instead using a Bot token.
To create a Discord application, go to the applications page and click the New Application button. Enter a name for your app like below:

Click Create to complete the app creation process.
Once the application is created, go to OAuth2 → General to copy the client ID. This ID will be required later on, so store it in a place where you can easily retrieve it.
Next, you need to add a bot to the application. Click Bot on the application menu and then click the Add Bot button (click Yes, do it! on the confirmation prompt). On the bot page, copy the bot token as shown below:

Next, scroll down to the Bot Permissions section and select Manage Webhooks like below:

This permission is required for you to create webhooks using the Discord API. Click the Copy button beside the PERMISSIONS INTEGER field. This permission integer is required to authenticate the bot.
To authenticate the bot to have access to the Discord API, enter the following URL in your browser (ensure to replace the client_id and permissions_integer with your values):
https://discord.com/api/oauth2/authorize?client_id={{client_id}}&scope=bot&permissions={{permissions_integer}}
You can find more details about the bot authorization flow here. This URL will take you through the authorization process, where you will authorize the bot with the required permissions as shown below:


A robot check might also be required, but once you pass that, you will get a message that your bot is now authorized.
Creating a Discord webhook using the Discord API
Now let’s create a Discord webhook using the Discord API. Enter the Discord webhooks API address shown below as your endpoint address:
https://discordapp.com/api/channels/{{channel_id}}/webhooks
Remember to replace channel_id with your channel ID.
Select the POST request method and add the Authorization header using the format below:
Authorization: Bot {{bot_token}}
bot_token is the token you copied from your Discord bot page.
The final item to add is the request body. Using the content-type of application/json, send the following request body:
{
	name : "my test webhook"
}
The name property is the name you wish to give your Discord webhook, and it is the only compulsory property. Check here for more details on creating webhooks using the API.
Now send the request and you will get a successful response, as shown below:
 We have now successfully created a webhook for the
 webhooks-channel channel using the API.
One interesting thing I noticed the first time I created a webhook using the Discord API was that there was no webhook URL returned. According to the Discord webhook object definition, a webhook URL should be returned. However, I noticed that the webhook ID and webhook token were returned (id and token fields in the response).
A Discord webhook URL takes the format:
https://discord.com/api/webhooks/{{webhook_id}}/{{webhook_token}}
Thus, you can easily construct your webhook URL using details from the API response.
Setting up a connection in Hookdeck
The next step is to create a webhook connection in Hookdeck. A Hookdeck connection helps ingest the webhook requests coming from GitHub, and asynchronously sends them to Discord to ensure that no webhooks are dropped in the case of a spike in webhook traffic. This is considered a best practice for webhooks in production. Check out this article for more best practices for webhooks in production environments.
To create a connection on Hookdeck, go to Connections on your dashboard and click the Create button. Fill in the connection form fields as listed below.
- Source Name:
my-github-repository - Destination Name:
my-discord-channel - Destination URL: Your Discord Webhook URL
- Ruleset:
my-discord-ruleset
The filled form is shown below as a reference.

Click the Save button to create your connection.
Your connection is now displayed in the list of connections, like below:

Click the Copy webhook URL link on the connection source to get the Hookdeck webhook URL, as shown below:

This is the webhook URL you will need to set up your GitHub webhook.
Best Practices When Deploying Webhooks in Production
In this article, learn what are the practices for setting up , scaling and error recovery to deploy webhooks in production.
Setting up your GitHub repository to send commits to Discord
The next step is to set up a webhook on your GitHub repository. This webhook will be triggered anytime the push event is fired. A push event is fired when a new commit is made to the GitHub repository.
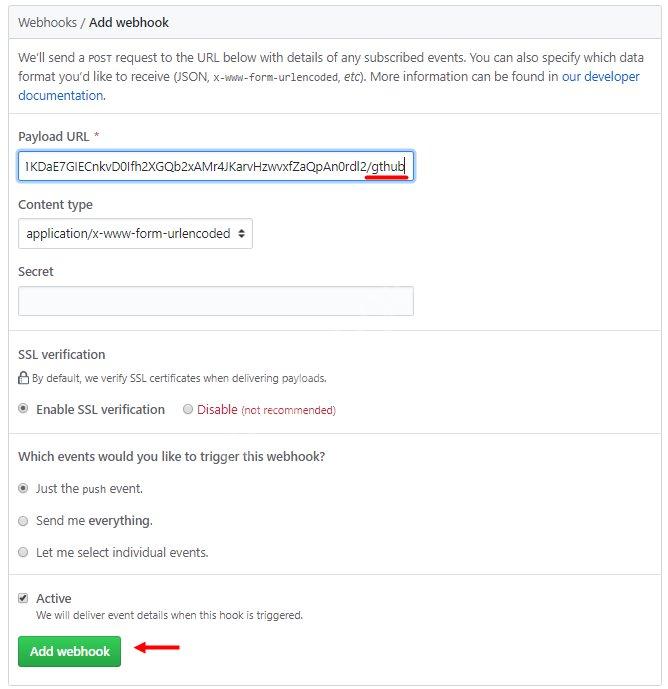
To set up the GitHub webhook, navigate to the repository you wish to use for this tutorial, then go to Settings → Webhooks and click the Add Webhook button on the Webhooks page. Fill the GitHub webhook form as follows:
- Payload URL: The webhook URL copied from Hookdeck with
/githubappended to it, i.e.https://[MY-HOOKDECK-URL]/github - Content-type:
application/json - Secret: Leave this blank
Leave the remaining options on the form in their default state. A filled version of the webhook form is shown below.

Do note once again to append /github to your Hookdeck, as this will ensure that Discord understands how to parse the payload sent by GitHub. This may not be applicable to all applications you want to integrate with Discord webhooks. To find information about the format for Discord webhook messages, check this guide. You can also find more details about GitHub’s integration with Discord here.
Click the Add webhook button to complete the GitHub webhook creation process. GitHub will automatically trigger a ping webhook request when a new webhook is created. You can ignore this ping request and move on to the next step.
Testing your Discord webhook notifications
With the connection between Discord and GitHub established through Hookdeck, time to test the communication flow. Push a new update to your GitHub repository. Once pushed, check the Connections page on your Hookdeck dashboard, where you will see an event similar to the one below:

Clicking on the event will pull up the event details on a right-hand-side screen. However, to view the complete event details, you must click the arrow icon on the top right. On the full event page, you can view the webhook metadata, headers, and body as shown below:
Metadata 
Headers 
Body 
Hookdeck gives you the ability to inspect your webhooks down to the last detail.
Let’s now confirm that the GitHub commit information is being sent to the Discord channel that was created. Return to your Discord account and click the webhooks-channel channel to view the messages in it. You will see a new GitHub message similar to the one shown below:

Sleek, isn’t it?
Conclusion
APIs provide flexible ways for developers to integrate with SaaS platforms. Using the Discord webhooks API, you can programmatically control how your webhooks are managed and also involve them in your automation workflows.
In this tutorial, you have learned how to use the Discord webhook API to create webhooks. The API also contains a bunch of endpoints for retrieving, editing, and deleting your webhooks. I encourage you to visit the documentation and play around with more endpoints, as well as other configuration options the API offers.
Happy coding!
Try Hookdeck Today
Instantly & reliably manage
your webhooks
Learn More
Related Guides
How to Get Started with Discord Webhooks
Learn what Discord webhooks do, where to find Discord webhooks ,and how to add a Discord webhook and more!
Tutorial: How to Configure Discord Webhooks Using the Admin Interface
Learn how to create, edit, and delete a discord webhook using the Settings page with the help of an example detailed step-by-step
Пользователям программном обеспечения интересно, что скрывается под определением Вебхука и для чего он предназначен в принципе. Discord Webhook – специально разработанная функция, после активации которой зарегистрированные клиенты получают сообщения об актуальных обновлениях данных по интересующему тематическому текстовому каналу в автоматическом режиме. Соблюдая четкую последовательность действий, и понимая особенности, можно при создании исключить вероятность допущения ошибок с вытекающими последствиями.
Что такое и зачем нужны Вебхуки в Дискорде
Discord Webhook – уникальная методика, предоставляющая возможность зарегистрированным пользователям программного обеспечения автоматически увеличить расширенный функционал, путем организации обратного вызова. Обратите внимание, последний тип актуален среди профессиональных разработчиков и клиентов, которые могут быть не связаны с приложением в целом.
Под определением Discord Webhook php подразумевается дополнительная функция, активация которой позволяет в автоматическом режиме получать соответствующие уведомления относительно обновления по тематическому сообществу. Умение грамотно управлять специально разработанной опцией, можно в реальном времени организовать непрерывное получение информации с различных виртуальных платформ. Обратите внимание, во время создания конечного тематического сервера Вебхук в программном обеспечении Дискорд, осуществляется генерирование уникального адреса. Полученную скопированную URL-ссылку, можно делиться ее с участниками и площадками.
Подключение вебхуков и настройка
Использование специализированного программного обеспечения Дискорд Вебхук требует от пользователя качественного интернет-соединения с другой платформой. Однако необходимо обращать внимание на то, что далеко не все порталы способны обеспечить обмен информацией. Поэтому перед подключением функции, пользователям рекомендуется ознакомиться с сайтами, которые поддерживаются:
- CircleCI;
- GitHub;
- DataDog.
При этом следующие порталы не поддерживаются функцией Вебхука:
- Твич;
- Фейсбук;
- YouTube;
- Nelly The Hamster.
Представленные особенности позволяют исключить вероятность возникновения негативных последствий при использовании программного обеспечения с функцией Вебхука с целью обновления сервера. В ином случае последовательность подразумевает следующий алгоритм действий:
- Осуществляется запуск программного обеспечения Дискорд с последующей авторизацией в личном кабинете. При отсутствии учетной записи заполняется регистрационная анкета.
- В левой части панели управления пользователь выбирает из представленного списка определенный тематический сервер путем нажатия на правую кнопку мыши.
- На следующем этапе выполняется переход в раздел внесения настроек.
- Во вновь открывшейся форме требуется перейти в подкатегорию Вебхуки.
- Далее указывается уникальное имя серверу.
- После этого активируется клавиша создания вебхука.
- На следующем этапе осуществляется загрузка интересующего изображения.
Обратите внимание, рекомендуется пользоваться стандартным размером 256х256.
Нажимается клавиша сохранения полученных результатов.
После внесения правок, программное обеспечение в автоматическом режиме отображает созданный вебхук с уникальным наименованием, а также исчерпывающей информацией об интересующем сервере и датой разработки. При необходимости можно внести изменения путем нажатия на соответствующую клавишу в категорию настроек.
Официальный пример: интеграция Webhook GitHub
Обратите внимание, представленная выше последовательность действий позволяет в максимально сжатые сроки разработать Вебхук в программном обеспечении Дискорд и внести персональные настройки. Однако нужно помнить, что функция не работает в автономном режиме – обязательная настройка взаимодействия с другими виртуальными платформами. В случае правильной установки функциональных параметров, опция применима для моментальной отправки кода либо обновления текстового канала тематического сервера.
Последовательность действий не вызывает сложностей и подразумевает следующую инструкцию:
- Изначально требуется выполнить переход по адресу discordapp.com.
- После авторизации в личном кабинете осуществляется переход в настройки с последующим выбором функции создания.
- Нажатие правой клавишей мыши на интересующий сервер для вызова функции настроек.
- Ввод персонального уникального имени тематическому каналу, загрузка привлекательного изображения – при условии, что ранее пользователь не выполнят рассматриваемых действий.
- На следующем этапе осуществляется копирование уникального URL-адреса.
После этого требуется скопировать полученную ссылку на репозитарный портал, с которого планируется в дальнейшем получать соответствующие обновления на специализированный сервер программного обеспечения Дискорд.
Далее пользователь осуществляет нажатие на клавишу добавления рассматриваемой функции с обязательным вводом полученной ранее уникальной ссылки в специально отведенное поле.
На завершающем этапе пользователю рекомендуется проверить корректность указанной ссылки. Обратите внимание, это ключевой фактор, от которого напрямую зависит бесперебойное функционирование инструмента. Не стоит забывать прикреплять соответствующую надпись в конце github.
Дополнительно рекомендуется в специально разработанной категории Content Type активировать параметр application/json. После этого пользователь осуществляет выбор ивент-тригеров, которые в последующем используются во время обмена информацией в сообщениях.
Последний этап дополнительных настроек предусматривает нажатие клавишей мыши на Add Webhook, которая расположена под формой уведомления. Сохранение результатов для обеспечения бесперебойной работы функции.
Обратите внимание, после соблюдения представленной последовательности действий, любой тип обновления в репозитари, включая корректировки данных в режиме «редми», автоматически отображаются в тематическом текстовом канале программного обеспечения. В конечном итоге будет автоматически сформирована соответствующая ссылка функции discordapp.com/api/webhooks/698070180693278780/XG1VRZQ8cGnCEG9wNjbvpSk605AugbK3HQ9Hxk8aJ9bm1MCfsL6gFSqV3U-SZkdxY0a8/github.
Как писать от имени вебхука в Дискорд
Чтобы писать от имени вебхука, пользователям рекомендуется перейти в раздел внесения настроек и установить соответствующие параметры. Далее требуется сохранить новые параметры и перезагрузить программное обеспечение.