Задача построения системы управления содержанием (CMS) может привести в замешательство новичка разработчика PHP. Но не так страшен черт, как его малюют! В данной серии уроков мы построим простую, но полностью работоспособную систему с нуля.
В ходе процесса вы научитесь создавать базы и таблицы MySQL, работать с объектами, константами, включениями, сессиями и прочими инструментами PHP. Кроме того мы покажем, как отделять логику приложения от презентации и сделать код PHP более безопасным. А также вам откроется многое другое, полезное в деле создания собственной системы мечты.
Вы можете посмотреть работу готового приложения на странице демонстрации (с целью безопасности включен режим «только чтение», так что добавлять, изменять и удалять статьи не получится). Также можно скачать полный код PHP нашей меленькой CMS с переведенными комментариями.
Примечание: для изучения материалов уроков потребуется веб сервер Apache с установленным модулем PHP и сервер MySQL. Для работы на локальном компьютере можно воспользоваться одним из инструментов веб разработчика: XAMPP (на английском языке), Denwer, Open server или другим.


Функционал нашей CMS
Первым делом надо точно определиться, что будет делать наша CMS. Итак, вот список функций:
Клиентская часть:
- Главная страница, на которой выводиться список последних 5 статей
- Страница со списком всех статей
- Страница просмотра отдельной статьи
Серверная часть:
- Вход/выход для администратора
- Список всех статей
- Добавление новой статьи
- Редактирование существующей статьи
- Удаление существующей статьи
Каждая статья имеет собственный заголовок, резюме и дату публикации.
Планирование работ
Для создания нашей CMS нужно сделать следующие шаги
- Создать базу данных
- Создать таблицу
articles - Сделать файл конфигурации
- Построить класс
Article - Написать скрипт клиентской части
index.php - Написать скрипт серверной части
admin.php - Создать шаблон клиентской части
- Создать шаблон серверной части
- Создать таблицу стилей и логотип системы
Примечание: на страницах уроков приводится код для нашей CMS готовый к копированию в ваши текстовые файлы. Если у вас нет желания создавать файлы самостоятельно, то можно скачать архив с исходниками, в котором содержатся все нужные папки и файлы.
Шаг 1. Создаем базу данных
На первом шаге нужно создать базу данных MySQL для хранения содержания. Можно сделать так:
-
Запускаем программу клиент
mysqlОткрываем окно терминала и набираем командуmysql -u username -p
После запроса введите пароль для доступа к MySQL.
username— имя пользователя, который имеет полномочия для создания баз данных. В случае работы на локальном компьютере можно использоватьroot, хотя для безопасности всегда следует создавать пользователя с другим именем для решения задач администрирования. -
Создаем базу данных После метки
mysql>вводим:create database cms;
И нажимаем Enter.
-
Выходим из программы клиента
mysqlПосле меткиmysql>вводим:exit
И нажимаем Enter.
Теперь у нас есть пустая база данных, в которой можно размещать таблицы и содержание.
Для решения такой задачи также можно воспользоваться инструментами для администрирования баз данных, таким как phpMyAdmin, cPanel или Plesk (если они установлены на вашем сервере). В некоторых случаях использование подобных инструментов является единственным доступным для пользователя инструментом для работы с базами данных (ситуация зависит от правил, установленных на вашем хостинге).
Шаг 2. Создаем таблицу articles
Наша простая CMS имеет единственную таблицу в базе данных: articles. В ней содержатся все статьи в нашей системе.
Создадим схему таблицы. Схема таблицы описывает типы данных, которые могут содержаться в таблице и информацию о ней.
Создаем текстовой файл tables.sql на жестком диске и добавляем в него следующий код:
DROP TABLE IF EXISTS articles;
CREATE TABLE articles
(
  id              smallint unsigned NOT NULL auto_increment,
  publicationDate date NOT NULL,                              # Когда статья опубликована
  title           varchar(255) NOT NULL,                      # Полный заголовок статьи
  summary         text NOT NULL,                              # Резюме статьи
  content         mediumtext NOT NULL,                        # HTML содержание статьи

  PRIMARY KEY     (id)
);
Выше приведенный код определяет схему таблицы articles. Он написан на SQL, языке для создания и манипулирования базами данных в MySQL (и во многих других системах).
Разберем выше приведенный код
- Создаем таблицу
articlesВыражениеDROP TABLE IF EXISTS articlesудаляет любую существующую таблицуarticles(вместе с данным — осторожно!). Мы выполняем данную операцию чтобы в базе не было двух таблиц с одинаковыми именами. ВыражениеCREATE TABLE articles ( )создает новую таблицуarticles. Код, размещенный в скобках, определяет структуру данных в таблице… - Определяем для каждой статьи уникальный ID Теперь можно определять структуру таблицы. Таблица состоит из набора полей (также их называют столбцами). Каждое поле содержит опредленный тип информации о статье. Сначала мы создаем поле
id. Оно имеет типsmallint unsigned(без знаковое маленькое целое), то есть число от 0 до 65,535. Таким образом, наша CMS может содержать до 65,535 статей. Также для него определяется атрибутNOT NULL, который означает, что поле не может быть пустым (null). Данное свойство существенно облегчает труд разработчика. Добавляем атрибутauto_increment, который указывает MySQL назначать новое, уникальное значение для поляidпри создании записи. Итак, первая статья будет иметьid1, вторая —id2, и так далее. Мы будем использовать уникальные значения как указатели на статью при выводе и редактировании в CMS. - Добавляем поле
publicationDateСледующая строка создает полеpublicationDate, которое хранит дату публикации каждой статьи. Данное поле имеет типdate, соответствующий значениям дат. - Добавляем поле
titleТеперь создаем полеtitle, в котором размещается заголовок. Оно имеет типvarchar(255), то есть может хранить строку длиной до 255 символов. - Добавляем поля
summaryиcontentПоследние два поля 2,summaryиcontent, содержат резюме статьи (краткое описание материала) и HTML содержание соответственно. Резюме имеет типtext(то есть, может состоять из 65,535). А полеcontentимеет типmediumtext(то есть может содержать до 16,777,215). - Добавляем основной ключ Последняя строка в выражении
CREATE TABLEопределяет ключ для таблицы. Ключ также называют индексом, и он служит для быстрого поиска данных в таблице за счет некоторого увеличения требующегося пространства для хранения. Мы определяем полеidкакPRIMARY KEY. Каждая таблица может содержать единственныйPRIMARY KEY, так как данный ключ уникально определяет каждую запись в таблице. Кроме того, с помощью данного ключа MySQL очень быстро находит нужную запись.
Теперь у нас есть схема таблицы и ее нужно загрузить в MySQL для создания структуры. Самый простой способ — открыть окно терминала, перейти к папке с файлом tables.sql и запустить следующую команду:
mysql -u username -p cms < tables.sql
…где username — имя пользователя MySQL, а cms — имя базы данных, которую мы создали на шаге 1.
Вводите пароль пользователя после запроса, и MySQL загрузит и выполнит код из файла tables.sql, создав таблицу articles в базе данных cms.
Также можно воспользоваться инструментами для администрирования баз данных, таким как phpMyAdmin, cPanel или Plesk (если они установлены на вашем сервере).
Шаг 3. Создаем файл конфигурации
Теперь у нас есть база данных и мы готовы разрабатывать код PHP. Начнем с создания файла конфигурации для хранения различных установок для нашей CMS. Данный файл будет использоваться остальными скриптами нашей системы.
Первым делом создаем папку cms в папке веб сервера. Она будет содержать все файлы нашей CMS.
В папке cms создаем файл config.php и копируем в него следующий код:
<?php
ini_set( "display_errors", true );
date_default_timezone_set( "Australia/Sydney" );  // http://www.php.net/manual/en/timezones.php
define( "DB_DSN", "mysql:host=localhost;dbname=cms" );
define( "DB_USERNAME", "username" );
define( "DB_PASSWORD", "password" );
define( "CLASS_PATH", "classes" );
define( "TEMPLATE_PATH", "templates" );
define( "HOMEPAGE_NUM_ARTICLES", 5 );
define( "ADMIN_USERNAME", "admin" );
define( "ADMIN_PASSWORD", "mypass" );
require( CLASS_PATH . "/Article.php" );

function handleException( $exception ) {
  echo "Sorry, a problem occurred. Please try later.";
  error_log( $exception->getMessage() );
}

set_exception_handler( 'handleException' );
?>
Разберем код подробно:
- Выводим ошибки в браузере Строка
ini_set()устанавливает режим вывода сообщений об ошибках в браузере. Отличная опция для отладки кода, но на готовом проекте данную опцию надо отключить ( установить значениеfalse) для безопасности ресурса. - Устанавливаем временную зону Так как наша CMS будет использовать функцию PHP
date(), нужно указать временную зону сервера для PHP (иначе PHP будет генерировать предупреждение). В примере установлена зона"Australia/Sydney"— поменяйте на свою. - Устанавливаем детали доступа к базе данных Затем определяем константу
DB_DSN, которая указывает PHP, где искать базу данных MySQL. Параметрdbnameдолжен соответствовать имени базы данных нашей CMS (cms). Также мы будем хранить имя пользователя MySQL и пароль, которые используются для доступа к базе данных CMS в константахDB_USERNAMEиDB_PASSWORD. Установите правильные значения в данных константах, которые соответствуют вашим настройкам. - Устанавливаем пути Мы устанавливаем 2 пути в нашем файле конфигураций:
CLASS_PATH, который указывает на место хранения файлов классов, иTEMPLATE_PATH, который указывает на место хранения шаблонов HTML. Оба пути указываются относительно верхнего каталогаcms. - Устанавливаем количество статей, выводимых на главной странице
HOMEPAGE_NUM_ARTICLESуправляет максимальным количеством заголовков статей, которые выводятся на главной странице. Мы установили 5, но можно легко увеличить или уменьшить значение. - Устанавливаем имя и пароль администратора Константы
ADMIN_USERNAMEиADMIN_PASSWORDсодержат данные регистрации для администратора нашей CMS. - Включаем класс
ArticleТак как файл классаArticle(мы его создадим позже) требуется во всех скриптах нашего приложения, добавим его здесь. - Создаем обработчик исключительных ситуаций В завершение определяем
handleException()— простую функцию для обработки исключений PHP, которые могут генерироваться при выполнении кода. Данная функция выводит общее сообщение об ошибке и записывает данные об ошибке в журнал веб сервера. Такая функция способствует улучшению безопасности системы за счет обработки исключений PDO, которые могут выводить имя пользователя и пароль на странице. После определения функцииhandleException(), мы устанавливаем ее как обработчик исключений PHP, вызывая функциюset_exception_handler().Такой обработчик исключений сделан для упрощения материалов урока. «Правильный» способ для обработки исключений для перехвата всех вызовов PDO в
Article.phpзаключается в использовании блоковtry ... catch.
Замечание о безопасности
В реальных проектах лучше помещать config.php где-нибудь за пределами корневого каталога веб сайта, так как в файле содержатся имена и пароли. Обычно код PHP невозможно просмотреть в браузере, но иногда из-за неправильной конфигурации веб сервера код становится доступным. Вы можете использовать функцию hash() для хэширования паролей и хранить в config.php хэши, вместо текстовых паролей. Затем при регистрации пользователя можно опять воспользоваться функцией hash() для кодирования введенного пароля и сравнения результата с сохраненным в config.php хэшем.
В следующем уроке мы построим основной класс нашего приложения — Article.
Как написать свою CMS на базе PHP и MySQL? Как сделать собственную административную панель (админку) на php?
Наверное, многие могли задаваться подобными вопросами, но сложности в изучении и скудный материал в сети Интернет вряд ли содействовал в этом. Скудный, спросите вы, несмотря на обилие копипастов? Да, отвечу я, ибо на десятках сайтах копирующих тупо копирующих статьи со сторонних источников, распространяются одни и те же ошибки, которые становятся серьезнейшим камнем преткновения для начинающих изучать PHP. Многочисленные высоколобые форумчане зачастую не могут разобраться в наипростейших кодах, что приходится самому разбираться во всем.
В очередной раз я нашел тому подтверждение, когда решил начать освоение языка PHP и работы с базами данных MySQL с создания простейшей админки и небольшого сайтика, дабы на реальном движке отточить свое мастерство. Каково же было мое удивление, когда ни один из приведенных в сети кодов не заработал. Мне понадобился целый день, чтобы самому решить те простейшие задачи, на которые я так и не нашел ответа в сети.
Итак, в этой статье я представляю работающий код простой админки и шаблона, позволяющего создавать и редактировать статьи, используя php.
По сути своей CMS — это инструмент для записи в базу данных всей информации о сайте. Все это должно содержаться в таблицах, и у администратора сайта должен быть удобный способ для ввода информации в таблицы, ее изменения или удаления.
Для начала создадим с помощью phpMyAdmin базу данных, а в ней — таблицу pages с двумя полями title и content. Для этого войдите в раздел SQL на панели phpMyAdmin и выполните такой запрос:
CREATE TABLE 'pages' (
   'title' varchar(100) NOT NULL default '',
   'content' text NOT NULL
 ) ENGINE=MyISAM DEFAULT CHARSET=utf8;
и phpMyAdmin построит вам эту таблицу.
Маленькое отступление:
если вы знакомы с базами данных хотя бы на уровне Microsoft Access, то вы помните, что каждое поле таблицы имеет ряд свойств. В данном случае мы присвоили полю content свойство text. Казалось бы, логично, ведь оно и предназначено для хранения текстов. Но следует помнить, что размер этого поля ограничен, поэтому, если вы хотите сохранить в нем текст «Войны и мира», то лучше определить его как longtext.
Чтобы управлять такой таблицей из админки, нам понадобится форма, состоящая из простого текстового поля (input type=»text») для ввода заголовка, текстовой области (textarea) для ввода содержимого и кнопка «Отправить» (input type=»submit»).
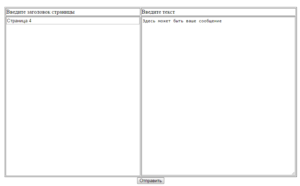
Форма добавления страницы
Поместим эту форму в файл page.php
page.php
<html>
<head>
<meta http-equiv="Content-Type" content="text/html; charset=utf-8" />
<title>Моя первая CMS</title>
</head>
<? include ('config.php'); ?>
<body>
<form action="page.php" method="post">
<table border="1" align="center">
  <tr>
    <td>Введите заголовок страницы</td>
    <td>Введите текст</td>
  </tr>
  <tr>
    <td valign="top"><input name="my_title" type="text"
        size="50" /></td>
    <td valign="top"><textarea name="my_text" cols="60"
        rows="30" > </textarea></td>
  </tr>
</table>
<div align="center">
<input name="send" type="submit" value="Отправить" />
</div>
</form>
</body>
</html>
Создадим файл config.php, который будет осуществлять подключение к базе данных.
config.php
<?
$dblocation = "localhost";
$dbuser = "root";
$dbpasswd = "";
$dbname="simple_cms";

//Подключение к базе данных
$dbcnx = @mysql_connect($dblocation,$dbuser,$dbpasswd);
if (!$dbcnx) // Если дескриптор равен 0 соединение не установлено
 {
 echo("<p>В настоящий момент сервер базы данных не
         доступен, поэтому корректное отображение страницы
         невозможно.</p>");
 exit();
 }

if (!@mysql_select_db($dbname, $dbcnx))
 {
 echo( "<p>В настоящий момент база данных не доступна,
          поэтому корректное отображение страницы невозможно.</p>" );
 exit();
 }
?>
Теперь, когда у нас появилось подключение к базе данных и скрипт для ввода в нее нужной информации, остается организовать отправку туда содержимого текстового поля с именем my_title и текстовой области my_text. С этой целью мы определили в форме метод POST для передачи данных файлу page.php — <form action=»page.php» method=»post»>.
Когда администратор внесет в поля формы информацию и нажмет кнопку «Отправить», этот метод присвоит переменной $_POST[‘my_title’] значение текстового поля my_title, а переменной $_POST[‘my_text’] — значение текстовой области my_text.
Чтобы удостовериться в этом, добавим небольшой код в начало файла page.php:
<? include ('config.php');

<body>

<? print  $_POST['my_title'].'<br />'.$_POST['my_text'];?>
Запустим файл page.php. Если в программе нет ошибок, то вы увидите ваш заголовок и текст в окне броузера.
Прекрасно! Осталось только организовать запись этой информации в нашу базу данных. Для этого нам придется обратиться к языку запросов SQL, а точнее — к MySQL.
Чтобы записать новые данные в таблицу базы данных, которая благодаря функции
$dbcnx = @mysql_connect($dblocation,$dbuser,$dbpasswd);
уже подключена к работе, нам следует использовать оператор INSERT языка MySQL. Вставьте этот фрагмент в файл page.php вместо кода вывода на печать:
if ($send)
   $sql = mysql_query("INSERT  into pages (title, content)
          values ('".$_POST['my_title']."', '".$_POST['my_text']."');");
То есть, если от кнопки «Отправить» методом POST был передан $send (см. name этой кнопки!), то должен выполниться данный запрос (функция mysql_query), и в таблицу базы данных будет записано содержимое полей формы.
Запись эта поначалу кажется трудной для чтения, и в ней можно просто запутаться во многочисленных простых и двойных кавычках. Поэтому рассмотрим ее в «чистом виде».
Параметром функции mysql_query(); является сам SQL-запрос, который можно представить в виде:
INSERT  into pages (title, content)
values ('значение_переменной_1', 'значение_переменной_2');
Так оно, вроде, понятнее …
Теперь откройте phpMyAdmin и убедитесь, что записи внесены в поля таблицы. Но это всего лишь полдела. Нам нужно научиться «вытаскивать» из таблиц необходимые данные, чтобы работать с ними в админке, а главное — показывать их на сайте.
В окончательном виде файл page.php должен выглядеть так:
<html>
<head>
<meta http-equiv="Content-Type" content="text/html; charset=utf-8" />
<title>Моя первая CMS</title>
</head>
<? include ('config.php');
if (@$send)
   $sql = mysql_query("INSERT  into pages (title, content)
          values ('".$_POST['my_title']."', '".$_POST['my_text']."');");
?>
<body>
<form action="page.php" method="post">
<table border="1" align="center">
  <tr>
    <td align="center">Введите заголовок страницы</td>
    <td align="center">Введите текст</td>
  </tr>
  <tr>
    <td valign="top"><input name="my_title" type="text"
        size="50" /></td>
    <td valign="top"><textarea name="my_text" cols="80"
        rows="30" > </textarea></td>
  </tr>
  <tr>
    <td  colspan="2" align="center"><input name="send"
        type="submit" value="Отправить" /></td>
  </tr>
</table>
</form>
</body>
</html>
Об этом — в следующей части.
Часть 2. Чтение из таблиц базы данных MySQL
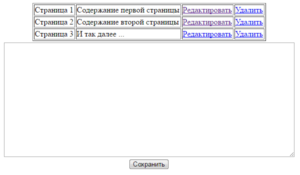
Создадим в нашей админке перечень всех заголовков страниц, хранящихся в таблице pages. И организуем работу этого списка так, чтобы пользователь, щелкнув мышкой, получил доступ к содержимому страницы.
Для чтения записей из таблицы воспользуемся следующей конструкцией:
$sql = mysql_query("SELECT*FROM pages");
      while($record = mysql_fetch_array($sql))
   {
     $title = $record['title'];

   }
Если в таблице находятся уже несколько записей, то в «чистом» виде конструкция выдаст нам только последнюю из них, ведь значение переменной $title все время обновляются в цикле while. Но мы применим маленькую хитрость. В том же цикле будем выводить их на экран все записи, одну за другой.
Для этого нарисуем таблицу, и часть ее поместим внутрь цикла:
<table border="1" align="center">
<?
$sql = mysql_query("SELECT*FROM pages");
      while($record = mysql_fetch_array($sql))
   {
  print '<tr><td>'.$record['title'].'</td>
       <td>Редактировать</td></tr>';
   }
?>
</table>
Теперь каждая прочитанная запись будет вноситься в ячейку, а ряды таблицы — «размножаться» по мере чтения последующих записей.
Рядом с ячейкой, куда мы поместили заголовки страниц находится еще одная ячейка. Я просто написал в ней слово Редактировать, а можно было какую-нибудь красивую пиктограммку поставить — неважно. Важно другое: эта запись (или картинка) должна привести администратора в раздел админки, где находится редактор текстов.
Теперь настала пора воспользоваться самым примитивным «редактором» — текстовой областью формы.
Редактор статей
Для этого создадим файл editor.php со следующим кодом.
editor.php
<? include ('config.php'); ?>
<html>
<body>
<table border="1" align="center">
<?
if(isset($_GET['page_title']))
$page_title=$_GET['page_title'];
$sql = mysql_query("SELECT*FROM pages");
 while($record = mysql_fetch_array($sql))
 {
 print '<tr><td>'.$record['title'].'</td>
 <td>'.$record['content'].'</td>
 <td><a href="editor.php?page_title='.$record['title'].'">Редактировать</a></td>
 <td><a href="editor.php?page_title='.$_SESSION['id'].'&delete=y">Удалить</a></td>
 </tr>';
 }
?>
</table>
<?

$sql = mysql_query("select * FROM pages where title='".$page_title."';");
 while($record = mysql_fetch_array($sql))
 {
 $content=$record['content'];
 }
?>
<form action="editor.php" method="post">
<table width="100%" align="center">
 <tr>
 <td align="center"><textarea name="text_edit" cols="80" rows="15"><? print $content; ?></textarea></td>
 </tr>
 <tr>
 <td align="center"><input name="save" type="submit" value="Сохранить"></td>
 </tr>
</table>
</form>
</body>
</html>
Разберем основные конструкции этого скрипта.
В каждой из рядов верхней таблицы появляется заголовок страницы, прочитанный из базы данных. Справа от него, в соседней клетке — слово Редактировать. Оно залинковано на ту же страницу editor.php и передает ей значение переменной $page_title, которое равно заголовку страницы в этом ряду (я выделил этот фрагмент кода красным цветом):
print '<tr><td>'.$record['title'].'</td><td><a href="editor.php?page_title='.$record['title'].
      '">Редактировать</a></td></tr>';
Когда пользователь нажимает на такой линк, он возвращается на ту же самую страницу, но уже с определенным значением переменной $page_title.
Следующий фрагмент кода ищет в базе данных таблицу pages, а в ней — значение поля content для которого поле title совпадает со значением переменной $page_title.
<?

$sql = mysql_query("select * FROM pages where title='".$page_title."';");
 while($record = mysql_fetch_array($sql))
 {
 $content=$record['content'];
 }
Найдя такое поле, он передает его содержимое переменной $content, которая и распечатывает его в текстовой области.
<? print $content; ?>
Теперь у нас появляется возможность редактировать этот текст. А вот как вернуть исправленный вариант этого текста в базу данных — об этом в следующей части.
Часть 3. Редактирование записей из таблиц базы данных MySQL
Добавим в начало файла editor.php следующие фрагменты кода:
<?
session_start();
include ('config.php');
?>
А в самом конце этого файла допишем:
<?
  $_SESSION['id']= $page_title;
?>
Этот прием называется сессии. Сессия понадобится для того, чтобы в переменной запомнить страницу, которую мы редактируем. Хотя мы и нажали на кнопку Редактировать, и получили значение переменной $page_title (заголовок редактируемой страницы), после того, как мы внесем изменения и нажмем на кнопку Сохранить, страница editor.php перезагрузится, и значение $page_title будет потеряно. Вот поэтому мы и сохраним его в $_SESSION[‘id’].
А когда форма отправит методом POST на перезагруженную страницу editor.php значение переменной $text_edit (такое имя мы дали текстовой области), то нам удасться запустить следующий код:
if (isset($_POST['save']))
$my_text = strval($_POST['text_edit']);
 $sql =mysql_query ("UPDATE pages SET content = '".$my_text."' WHERE title='".$_SESSION['id']."';");
где save — это имя кнопки Сохранить.
Надеюсь, вы поняли, зачем нам понадобилась переменная $_SESSION[‘id’].
Полный скрипт файла editor.php будет выглядеть так:
<?
header('Content-Type: text/html; charset=utf-8');
session_start();
include ('config.php');
?>
<html>
<body>
<table border="1" align="center">
<?
if(isset($_GET['page_title']))
$page_title=$_GET['page_title'];
$sql = mysql_query("SELECT*FROM pages");
 while($record = mysql_fetch_array($sql))
 {
 print '<tr><td>'.$record['title'].'</td>
 <td>'.$record['content'].'</td>
 </tr>';
 }
?>
</table>
<?

$sql = mysql_query("select * FROM pages where title='".$page_title."';");
 while($record = mysql_fetch_array($sql))
 {
 $content=$record['content'];
 }
if (isset($_POST['save']))
$my_text = strval($_POST['text_edit']);
 $sql =mysql_query ("UPDATE pages SET content = '".$my_text."' WHERE title='".$_SESSION['id']."';");
?>
<form action="editor.php" method="post">
<table width="100%" align="center">
 <tr>
 <td align="center"><textarea name="text_edit" cols="80" rows="15"><? print $content; ?></textarea></td>
 </tr>
 <tr>
 <td align="center"><input name="save" type="submit" value="Сохранить"></td>
 </tr>
</table>
</form>
</body>
</html>
<?
 $_SESSION['id']= $page_title;
?>
Часть 4. Удаление записей из таблиц базы данных MySQL
Добавим еще одну ячейку к таблице файла editor.php :
  <td><a href="editor.php?page_title='.$record['title'].
  '">Редактировать</a></td>
  <td><a href="editor.php?page_title='.$record['title'].'&delete=y">Удалить</a></td>
  </tr>';
Совершенно неважно, какое значение мы передадим переменной $delete, можете написать &delete=1 или &delete=abcd, а важно то, что теперь можно написать условие, с помощью которого мы удалим выбранную запись:
if($delete)
   $sql =mysql_query ("DELETE FROM pages WHERE title='".$_SESSION['id']."';");
В окончательном виде наш файл editor.php выглядит так:
Внимание! Однако данный код у меня ни в какую не хотел работать. Поэтому мне пришлось немного изменить код. В editor.php:
- Я убрал следующую конструкцию:
<td><a href="editor.php?page_title='.$_SESSION['id'].'&delete=y">Удалить</a></td>
чтобы нечаянно не удалить нужную страницу;
- Добавил функцию удаления страницы в случае, если нажата кнопка «delete»
if (isset($_POST[‘delete’]))
$title = strval($_SESSION[‘id’]);
$sql =mysql_query («DELETE FROM pages WHERE title='».$title.»‘;»);
В окончательном виде наш файл editor.php выглядит так:
<?
header(‘Content-Type: text/html; charset=utf-8’);
session_start();
include (‘config.php’);
?>
<html>
<body>
<table border=»1″ align=»center»>
<?
if(isset($_GET[‘page_title’]))
$page_title=$_GET[‘page_title’];
$sql = mysql_query(«SELECT*FROM pages»);
while($record = mysql_fetch_array($sql))
{
print ‘<tr><td>’.$record[‘title’].'</td>
<td>’.$record[‘content’].'</td>
<td><a href=»admin_main.php?page_title=’.$record[‘title’].'»>Редактировать</a></td>
</tr>’;
}
?>
</table>
<?
$sql = mysql_query(«select * FROM pages where title='».$page_title.»‘;»);
while($record = mysql_fetch_array($sql))
{
$content=$record[‘content’];
}
if (isset($_POST[‘save’]))
$my_text = strval($_POST[‘text_edit’]);
$sql =mysql_query («UPDATE pages SET content = ‘».$my_text.»‘ WHERE title='».$_SESSION[‘id’].»‘;»);
if (isset($_POST[‘delete’]))
$title = strval($_SESSION[‘id’]);
$sql =mysql_query («DELETE FROM pages WHERE title='».$title.»‘;»);
?>
<form action=»admin_main.php» method=»post»>
<table width=»70%» align=»center»>
<tr>
<td align=»center»><textarea name=»text_edit» cols=»80″ rows=»15″><? print $content; ?></textarea></td>
</tr>
<tr>
<td align=»center»><input name=»save» type=»submit» value=»Сохранить изменения»> <input name=»delete» type=»submit» value=»Удалить страницу»> </td>
</tr>
</table>
</form>
</body>
</html>
<?
$_SESSION[‘id’]= $page_title;
?>
Вот, пожалуй, и все, что я хотел рассказать о принципах работы админки. Конечно же, в настоящей CMS все отдельные модули (а у нас их пока три: page.php, editor.php и служебный файл config.php) работают под управлением главного файла index.php, который единоразово подключает все модули к базе данных и по желанию пользователя может присоединять к себе модуль создания страниц, модуль редактирования, а также массу других модулей (модуль меню сайта, модуль управления гостевой книгой, баннерами и т.п.). Важно только понимать, что любые модули, любые действия в админке основаны на четырех главных операторах языка SQL:
- INSERT — вставить запись в базу данных;
- SELECT — выбрать записи из базы данных;
- UPDATE — изменить запись;
- DELETE — удалить запись.
Так что ничего сверхсложного нет в том, чтобы написать свою собственную админку. Любые CMS, даже такие гиганты как Joomla, работают на одном и том же принципе.
А уж подключить к админке сам сайт — это вообще проще простого, после того, как вы написали скрипт самой админки.
Успехов вам!
По материалам из разных источников с собственными исправлениями.
Решил поделиться своими знаниями  CMS на основе этого примера Я написал в 2007 году. После этого она претерпела кучу изменений. Внимание. Мне лень разбираться, почему тут конвертируются кавычки. Так что не забудьте изменить кавычки на стандартные. Ну и да. Тут может быть много ошибок. Потому что пишу Я это почти по памяти и не проверяю (да-да, Я вот такой вот хитрый и злой). Да и код оформлен в списках, что не шибко может быть удобно злобным копипастерам! Комментарии приветствуются.
Задача: написать несложную систему управления сайтом, чтобы можно было быстренько дописать нужные модули и внедрить их в систему.
Средства: крутиться это всё будет под Apache‘м в связке с PHP5 (ибо будет использоваться шаблонизатор на основе XSLT) должны быть установлены модули MySQLi, DOM) и MySQL‘ем. Разрабатываю Я на Eclipse IDE с утсановленным плагином PDT. Я предполагаю, что те, кто это будут читать уже умеют поднять AMP на какой-либо платформе Если нет, то сначала подумайте — а надо ли оно вам? Если надо, Я как-нибудь распишу, как всё настроить
Что получим:
Это будет простенькая CMS, которая будет написана на PHP5 с использованием ООП. В качестве шаблонизатора мы будем использовать XSLT. Т.е. с помощью PHP подготавливаем XML’ку для последующей обработки XSL. В результате получаем HTML, который и засовываем в нужное место на страничке. Система будет работать используя mod_rewrite и поддерживать альясы страниц.
Создаём БД.
Нам потребуется пара табличек в БД. У всех таблиц будут префиксы, чтобы можно было избежать конфликта с другими похожими таблицами в базе.
Во-первых, надо будет где-то хранить обработчиков наших страниц. Обработчиками назовём те классы, который будут создавать нам страницу какого-то определённого типа. Т.е. новостную. Или карту сайта, к примеру. Можно это делать в одном файле, и его подключать. Недостаток этого в том, что каждый раз при добавлении нового обработчика надо будет закачивать обновлённый файл на сервер. При этом если другой программист добавит туда свой обработчик, а вы об этом знать не будете — вы его затрёте. И будет lulz
Во-вторых, надо будет где-то хранить сами страницы.
Итак, приступим. Создаём таблицу, где будем хранить обработчики и таблицу страниц:
CREATE TABLE `e_handlers` (
  `id` int(11) NOT NULL AUTO_INCREMENT PRIMARY KEY, // первичный ключ
  `classname` varchar(50) NOT NULL,  // имя класса обработчика
  `classpath` varchar(255) NOT NULL,  // имя файла класса
  `description` varchar(255) DEFAULT '',  // описание, к примеру "простая страница"
  `enable` tinyint(4) DEFAULT 1 // доступен для создания страниц или нет
);
CREATE TABLE `e_pages` (
 `id` int(11) NOT NULL AUTO_INCREMENT PRIMARY KEY, // первичный ключ
 `id_parent` int(11) DEFAULT '0',  // родитель страницы. для вложенности
 `id_handler` int(11) NOT NULL,  // ID обработчика страницы
 `is_mainpage` enum('0','1') DEFAULT '0',  // если это главная страница
 `alias` varchar(255) DEFAULT NULL,  // альяс страницы
 `title` varchar(255) DEFAULT NULL, // заголовок страницы
 `keywords` varchar(255) DEFAULT NULL,  // ключевые слова
 `description` varchar(255) DEFAULT NULL, // описание страницы
 `body` text, // собственно текст страницы
 `in_menu` enum('0','1') DEFAULT '1',  // показывать в меню сайта
 `title_menu` varchar(255) DEFAULT NULL,  // заголовок для меню
 `in_map` enum('0','1') DEFAULT '1',  // показывать в карте сайта
);
После чего добавляем вручную (админки то у нас нет ;( ) два обработчика и две страницы для начала работы. Один обработчик — это типовые страницы (назовём их так). Ну или просто страницы, которых можно наплодить сколько угодно и назовём его Parent. Второй обработчик — это обработчик главной страницы, назовём его Mainpage. Ведь мы можем захотеть, чтобы главная страница у нас отличалась от всех остальных, правда? И соотстветственно две страницы — просто страница и главная страница. Вот собственно и две самые необходимые нам таблицы.
mysql> INSERT INTO `e_handlers` VALUES(0,'Parent', 'Parent.class.php','Типовая страница',1); --обработчик Parent
mysql> INSERT INTO `e_handlers` VALUES(0,'Mainpage', 'Mainpage.class.php','Главная страница',1); --обработчик Mainpage
mysql> INSERT INTO `e_pages` VALUES(0,0,2,1,'','Главная страница сайта','','','Текст главной страницы','1','На главную','1'); --создаём главную страницу
mysql> INSERT INTO `e_pages` VALUES(0,0,2,0,'','страница сайта','','','Текст тестовой страницы страницы','1','Какая-то страничка','1'); --создаём тестовую страницу
Далее создаём структуру каталогов на диске
/ - корень проекта
/admin - административная часть
/class - папка с классами
/template - папка с шаблонами
Начинаем программирование 
Создаём в корне файлы index.php, config.php, load.php, functions.php.
config.php:
- $const = «»; // доступные константы (будет позже)
- $domain = «http://localhost:2000/»; // домен, на котором крутится сайт
- $pfx = «e»; // префикс базы данных
- $charset = «UTF-8»; // кодировка для подстановки в html
- $db_charset = «UTF8»; // кодировка для подключения к БД
- $db_user = «user»; // имя пользователя БД
- $db_pass = «user»; // пароль
- $db_host = «localhost»; // хост БД
- $db_name = «engine»; // сама БД
- $db = new mysqli(&$db_host, &$db_user, &$db_pass, &$db_name);
- $db->query(«SET NAMES {$db_charset}»);
- // загружаем все классы
- $classes_query_str = «SELECT `classpath`,`classname` FROM `{$pfx}_handlers`»;
- $classes_query = $db->query($classes_query_str);
- while($classes = $classes_query->fetch_object()) {
- if(file_exists($_SERVER[‘DOCUMENT_ROOT’].’/class/’.$classes->classpath))
- require_once $_SERVER[‘DOCUMENT_ROOT’].’/class/’.$classes->classpath;
- else
- exit(«Class {$classes->classname} not found»);
- }
index.php:
- <?php
- require_once ‘load.php’;
- ?>
load.php:
- <?php
- session_start();
- require_once $_SERVER[‘DOCUMENT_ROOT’].’/config.php’; // конфиг
- require_once $_SERVER[‘DOCUMENT_ROOT’].’/functions.php’; // файл с общими функциями
- // подключаем классы
- $classes_query_str = «SELECT `classpath` FROM `{$pfx}_handlers`»;
- $classes_query = $db->query($classes_query_str);
- while($classes = $classes_query->fetch_object())
- require_once $_SERVER[‘DOCUMENT_ROOT’].’/’.$classes->classpath;
- // создаем перменные альясов, страницы, и id страницы
- isset($_GET[‘page’]) ? $page = clearVar($_GET[‘page’]) : $page = 1;
- isset($_GET[‘alias’]) ? $alias = clearVar($_GET[‘alias’]) : $alias = »;
- isset($_GET[‘uid’]) ? $uid = clearVar($_GET[‘uid’]) : $uid = 0;
- $page = (int)$page;
- $uid = (int)$uid;
- //получаем информацию о странице
- $info_page = getPageInfo($alias,$uid,$page);
- // теперь вызываем класс
- if($info_page) {
- // ищем нужный обработчик
- $query_handler_str = «SELECT `classname` FROM `{$pfx}_handlers` WHERE `id` ={$info_page[‘id_handler’]}»;
- $query_handler = $db->query($query_handler_str);
- if($query_handler->num_rows < 1)
- exit(‘Error: no such handler’);
- else {
- $handler = $query_handler->fetch_object();
- $page = new $handler->classname($info_page);
- print $page->getContent();
- }
- }
В файл functions.php добавляем следующие функции:
- /**
- * Выводит информацию о переменной
- * @param $text информация для вывода
- * @param $exit прекращать работу после вывода
- */
- function vardump($text, $exit = false) {
- print ‘<pre>’;
- var_dump($text);
- print ‘</pre>’;
- if($exit)
- exit;
- }
- /**
- * Вырезает из переменной ненужные символы
- * @param $var переменная для очистки
- * @return чистая переменная
- */
- function clearVar($var) {
- return str_replace(‘»‘,»»,str_replace(«‘»,»»,stripcslashes(trim(htmlspecialchars($var)))));
- }
- /**
- * Получаем информацию по странице
- * @param $alias альяс для страницы в базе данных
- * @param $uid id страницы в базе данных
- * @param $page номер страницы в базе данных
- * @return массив со всеми значениями
- */
- function getPageInfo($alias,$uid,$page) {
- global $db,$pfx;
- // если установлен alias
- if($alias)
- $query_page_str = «SELECT * FROM `{$pfx}_pages` WHERE `alias` = ‘{$alias}’ AND `is_delete` = ‘0’»; // запрос по альясу
- else // иначе
- $query_page_str = «SELECT * FROM `{$pfx}_pages` WHERE `is_mainpage` = ‘1’»; // запрос главной страницы
- $query_page = $db->query(&$query_page_str);
- if($query_page->num_rows < 1) { // а если ничего нету
- if($uid) {
- $query_page_str = «SELECT * FROM `{$pfx}_pages` WHERE `id` = {$uid}»; // пытаемся найти страницу с таким id
- $query_page = $db->query(&$query_page_str);
- if($query_page->numRows < 1) {
- print ‘No pages found by UID ;(‘;
- return false;
- }
- }
- else {
- print ‘No pages found ;(‘;
- return false;
- }
- }
- $info = $query_page->fetch_object();
- ($uid == 0) ? $info->page_id = 0 : $info->page_id = &$uid;
- $info->page_alias = &$alias;
- $info->page_pagenum = &$page;
- return $info;
- }
Теперь в папке /class создаём два файла:
Parent.class.php:
- <?php
- class Parent {
- var $template_page = ‘template/Parent/page.php’;
- var $pageinfo = »;
- var $template_menu = ‘template/Parent/menu.xsl’;
- /**
- * устанавливает данные о странице, которые будут доступны в классе
- */
- function __construct($info) {
- $this->pageinfo = &$info;
- }
- /**
- * Составляет страницу
- * @return unknown_type
- */
- function getContent() {
- global $domain;
- ob_start();
- $head = $this->getDoctype();
- $head .= $this->getTitle();
- $head .= $this->getMetaInf();
- $head .= $this->getIncludes();
- $menu = $this->getMenu();
- $body = $this->getBody();
- require_once $this->template_page;
- $page = ob_get_contents();
- $page .= $this->getLastTag();
- ob_clean();
- $page = str_replace(«~/»,$domain,$page);
- print $page;
- }
- /**
- * Возвращает DOCTYPE
- * @return XHTML1.0 DOCTYPE
- */
- function getDoctype() {
- return ‘<!DOCTYPE html PUBLIC «-//W3C//DTD XHTML 1.0 Transitional//EN» «http://www.w3.org/TR/xhtml1
- /DTD/xhtml1-transitional.dtd»>’.»n»;
- }
- /**
- * Возвращает заголовок страницы
- * @return заголовок страницы
- */
- function getTitle() {
- global $db,$pfx;
- $head = ‘<html xmlns=»http://www.w3.org/1999/xhtml» xml:lang=»en» lang=»ru»>’.»n»;
- $head .= «t<head>n»;
- $title_query_str = «SELECT `title`,`title_menu` FROM `{$pfx}_pages` WHERE `id` = {$this->pageinfo[‘id’]}»;
- $title_query = $db->query(&$title_query_str);
- $title = $title_query->fetch_object;
- isset($title->title) ? $title_str = $title->title : $title_str = $title->title_menu;
- $head .= «tt<title>{$title_str}</title>n»;
- return $head;
- }
- /**
- * Добавляет META информацию на страницу: кодировка, автор, генератор, ключевые слова, описание
- * @return META тэги
- */
- function getMetaInf() {
- global $pfx,$db,$charset;
- $query_meta_str = «SELECT `keywords`,`description` FROM `{$pfx}_pages` WHERE `id` =
- {$this->pageinfo[‘id’]} «;
- $query_meta = $db->query(&$query_meta_str);
- $meta = $query_meta->fetch_object();
- $kw = &$meta->keywords;
- $dsc = &$meta->description;
- $meta = «tt<meta name=»Author» content=»Maksim Voloshin» />n»;
- $meta .= «tt<meta name=»GENERATOR» content=»The best engine » />n»;
- $meta .= «tt<meta name=»Author e-mail» content=»me@maksimvoloshin.ru» />n»;
- $meta .= «tt<meta http-equiv=»Content-Type» content=»text/html;charset={$charset}» />n»;
- $meta .= «tt<meta name=»keywords» content=»{$kw}» />n»;
- $meta .= «tt<meta name=»description» content=»{$dsc}» />n»;
- return $meta;
- }
- /**
- * Подключает CSS и javascript файлы
- * @return нужные тэги
- */
- function getIncludes() {
- $style = «tt<link rel=»Stylesheet» href=»~/template/style.css» type=»text/css» />n»;
- $style .= «tt<link rel=’favorite icon’ type=’image/gif’ href=’~/favicon.gif’ />n»;
- $js = «tt».'<script type=»text/javascript» language=»JavaScript» src=»~/template/script.js»></script>’.»n»;
- $closehead = «t</head>nt<body>n»;
- return $style.$js.$closehead;
- }
- function getMenu() {
- global $pfx,$db;
- $query_menu_str = «SELECT `id`,`title_menu`,`title`,`alias` FROM `{$pfx}_pages` WHERE `in_menu` = ‘1’»;
- $query_menu = $db->query(&$query_menu_str);
- $doc = new DOMDocument(«1.0″,»utf-8»);
- $rootnode = $doc->createElement(«root»);
- $root = $doc->appendChild($rootnode);
- while($menu = $query_menu->fetch_object())) {
- $menuitem = $doc->createElement(«menu»);
- if($this->pageinfo[‘id’] == $menu->id)
- $menuitem->setAttribute(«active»,»active_menu»);
- else
- $menuitem->setAttribute(«active»,»nonactive_menu»);
- if(!empty($menu->alias))
- $menuitem->setAttribute(«link»,»~/».$menu->alias.»/»);
- else
- $menuitem->setAttribute(«link»,»~/page/».$menu->id.»/»);
- if(!empty($menu->title_menu))
- $menuitem->appendChild($doc->createTextNode($menu->title_menu));
- else
- $menuitem->appendChild($doc->createTextNode($menu->title));
- $root->appendChild($menuitem);
- }
- $xsl = new DOMDocument;
- $xsl->load($this->template_menu);
- $xslt = new XSLTProcessor;
- $xslt->importStylesheet($xsl);
- return $xslt->transformToXML($doc);
- }
- /**
- * Переопредлять в новых классах
- * @return
- */
- function getBody() {
- global $db,$pfx;
- $query_body = $db->query(«SELECT `body` FROM `{$pfx}_pages` WHERE `id` = {$this->pageinfo[‘id’]}»);
- $body_arr = $query_body->fetch_object();
- return $body_arr->body;
- }
- }
Теперь создаём в папке /template папку Parent, в ней создаём файлы page.php и menu.xsl. Первый будет шаблоном страницы, второй будет шаблоном меню.
page.php:
- <?php echo $head; ?>
- <?php echo $menu; ?>
- <div>
- <?php echo $body; ?>
- </div>
menu.xsl:
- <?xml version=»1.0″ encoding=»UTF-8″?>
- <xsl:stylesheet version=»1.0″ xmlns:xsl=»http://www.w3.org/1999/XSL/Transform»>
- <xsl:output method=»xml» omit-xml-declaration=»yes» />
- <xsl:template match=»/root/menu»>
- <div>
- <a href=»{@link}» class=»{@active}»>
- <xsl:value-of select=»text()» />
- </a>
- </div>
- </xsl:template>
- </xsl:stylesheet>
Так как у нас в системе зарегистрирован класс для главной страницы, просто определяем его. Создаём в папке /class файл Mainpage.class.php:
- <?php
- class Mainpage extends Parent {
- }
- ?>
Работать над ним мы будем как-нибудь потом. В этом классе, к примеру, можно переопределить шаблон старницы $template_page и в результате будет использоваться он, а не тот, который задан в Parent.
Осталось определить правила rewrite’а. Для этого в директиве DocumentRoot апачи должно стоять AllowOverride All. Создаём файл .htaccess в корне нашего сайта со следующим содержимым:
- RewriteEngine On
- #страницы
- RewriteRule ^(.*)/(.*)/$ index.php?alias=$1&uid=$2 [QSA,L]
- RewriteRule ^(.*)/$ index.php?alias=$1 [QSA,L]
QSA — позволит нам добавлять к этому правилу GET переменные из запроса. Т.е. /page/1/?a=1 превратится в index.php?alias=page&uid=1&a=1.
L — показывает что это последнее правило, и других применять больше не нужно.
И да. Если сайт лежит не в корне — то надо сделать RewriteBase /dirname или добавлять dirname в правила.
Ещё можно создать в папке /template файлы style.css (и определить там active_menu и nonactive_menu) и script.js — а то firebug ругаться будет (у вас ведь стоит firebug, а то как же вы верстаете? )
Для чего Я сделал функцию vardump — смотри тут
Ну-с. Момент истины. Заходим на http://localhost и видим либо меню из двух пунктов и текст: «Текст главной страницы», либо кучу ошибок, которые можно постить тут
P.S. Всем доброго утра =D
$db = new mysqli(&$db_host, &$db_user, &$db_pass, &$db_name);
PHP
Рекомендация: подборка платных и бесплатных курсов php — https://katalog-kursov.ru/
Сразу хочу умерить ваш пыл по отношению к заголовку: школьный возраст я давно пережил и знаю о чем говорю. Поэтому давайте будем толерантны друг к другу и дадим мне возможность изложить свою идею до того как вы ее раскритикуете.
Все мы хорошо знаем существующие популярные движки на PHP. Также можно упомянуть практически никому неизвестные, которые разрабатываются любителями. Но всех их объединяет одно большое «НО» в плане идеи, что собственно меня всегда и беспокоило. Почему никто не пользуется CMS при разработке высоконагруженных проектов? Все дело в том, что каждая из них спроектирована таким образом, чтобы всячески мешать разрабатывать какой-либо неспецифический функционал, не говоря о некоторых отдельных ситуациях.
Идея эта у меня появилась так же давно, как я начал программировать. С тех пор много лет прошло, много опыта набрался, практики. В общем, есть с чем сравнивать. Почти идеальным примером для меня является Django на Python’е. Но для конечного пользователя требуется огромное время для шлифовки интерфейса, базовых функций и прочего. И я подумал: не лучше ли мне писать ядро системы и прочее, под чутким руководством публики, которая предоставит максимум конструктивной критики в пользу моих наработок?
Базовые шаблоны программирования
Наиболее распространенным шаблоном программирования, по моему опыту, на данный момент является MVC и его модификации. Множество раз я пытался писать, следуя патерну, но результат всегда доводил меня до безумия. Нельзя так просто взять и разделить все на Model-View-Controller. Конечно, я могу ошибаться, и собственно потому вы это читаете.
Возьмем за пример простую работу с API и синхронизацию с данными модели к примеру User. За движок, фреймворк (кому как удобно) — Symfony. Я уверен: опытные в этом деле люди уже поняли с чего все начнется и чем все закончится.
Мою альтернативу я не могу назвать идеалом, но мне она очень по душе. Суть сего такова, что любые операции с данными системы, вычисляемыми данными, данными других сервисов позиционируются как Сервис. Сервис по сути является обычным пакетом PHP с классами и собственным пространством имен. Но кто мешает нам положить туда файл конфигураций, базовые шаблоны части View или кешируемые данные? Ведь все эти вещи относятся именно к нему, и стоит ли нам засорять общую папку для шаблонов/конфигов?
- Доступ к базе данных будет иметь только Service / Сервис
- Сервис может содержать классы, трейты, Конфигурационные и кеш-файлы, базовые шаблоны
- Доступ к сервису будет осуществляться с помощью единого метода объекта из области контроллера
- Сервис обязательно имеет собственное пространство имен
Такое решение значительно упрощает модуляцию всей системы. Когда ваш контроллер вообще не имеет доступа к базе данных, потребуется редактировать, к примеру, трейты сервиса, чтобы получить необходимые данные. Но с другой стороны, это очень поможет организовывать правильно код и не мешать одно с другим.
Если хорошенько подумать, то это — тот же самый MVC, только здесь роль модели выполняет наш Service, который, как мы видим, значительно отличается от устоявшихся стереотипичных ОРМ моделей.
Как результат, фасадный класс сервиса User может в себя вмещать работу с его локальными данными, собственными файлами на сервере, работу с API и прочее. Унификация такой большой области разработки дает возможность очень качественно реализовывать конечный результат.
Очень хотел бы узнать ваше мнение.
Вообще мысля проста создать так сказать модуль для своей CMS который выводил бы предпросмотр новостей… По моему мнению, движок это простое отделение кода PHP от кода HTML Я возможно не правильно его называю, это не движок, если верить терминам то, то, что мы будем писать — это шаблонизатор. Вообщем то это совсем не важно, конечный продукт будет уметь выводить мини новости, и при этом мы сможем менять шаблон не трогая код. Мы не будем вытаскивать информацию из базы данных, просто напрямую впишем ее в переменную. Приступим…Создадим файл index.php в нем напишем такой код
<?
include("module/news.php");
$news = index_page();include("templates/index.html");
?>
из него видно что мы подключаем два файла. Один из папки «module» т.е. модули, другой из папки «templates» т.е. шаблоны… Как вы поняли нам нужно написать сам модуль и шаблон… Но шаблонов мы будем писать два, один будет содержать разметку главной страницы, а другой будет содержать разметку самой мини новости. Начнем с мини новости, назовем файл news.html
<span>[title]</span>
<div style="border:1px solid #DCDCDC;width:550px;">
<p>[text]</p>
</div>
<table border="0" cellpadding="0" cellspacing="0">
    <tr><td>Автор: [author] | [date_b]</td></tr>
</table>
<br>
индексы [title], [text], [author], [date_b] заменятся на переменные в нашем модуле. Теперь напишем шаблон главной страницы, назовем его index.html
<!DOCTYPE HTML PUBLIC "-//W3C//DTD HTML 4.01 Transitional//EN" "http://www.w3.org/TR/html4/loose.dtd">
<html>
<head>
<title>Первый движок</title>
<meta http-equiv="Content-Type" content="text/html; charset=windows-1251">
</head><body>
<?=$news?>
</body>
</html>
Обычная страница html только в ней присутствует php код <?=$news?> Тут будут выведены наши новости… Приступим к самому модулю, называем его news.php
<?
function index_page()
{
//Заполняем переменные с информацией
//В наших мининовостях будет виден текст, заголовок, дата и автор
$txt[0]="Печально когда при создание чего то ты забываешь про какие то мелочи...и для того что бы не переписывать все ты пытаешься измудриться так, чтобы вмешательство в код было минимальное..";
$txt[1]="Когда то такие попытки увенчаются успехом, а иногда бывает и так, собственными же руками уродуешь код =(";
$title[0]="Титл новости 1";
$title[1]="Титл новости 2";
$author[0]="Первый автор";
$author[1]="Второй автор";
$date_b[0]="12/10/11";
$date_b[1]="13/10/11";$sm_read = file("templates/news.html");//Открываем шаблон
$sm_read = implode("",$sm_read);//Так как функция file() в результате дает нам массив, то склеиваем его
for($i=0;isset($txt[$i]);$i++)//Выводим цикл где меняем индексы на информацию из переменных
{
$edd_tamp = $sm_read;
$edd_tamp = str_replace("[text]",$txt[$i],$edd_tamp);
$edd_tamp = str_replace("[title]",$title[$i],$edd_tamp);
$edd_tamp = str_replace("[author]",$author[$i],$edd_tamp);
$edd_tamp = str_replace("[date_b]",$date_b[$i],$edd_tamp);$news .= $edd_tamp;//Склеиваем все в одну переменную
}
return $news;//Выводим результат функции
}
?>
Собственно небольшой движок написан…Поместим файлы news.html и index.html в папку templates. Файл news.php в папку module, а файл index.php в корень сайта…
Это лишь простой пример реализации скрипта который может генерировать страничку «на лету». Более подробнее оп простом движке на php может почитать вот тут
14 May 2019: This article and the code were updated for PHP7 compatibility.
Building a content management system can seem like a daunting task to the novice PHP developer. However, it needn’t be that difficult. In this tutorial I’ll show you how to build a basic, but fully functional, CMS from scratch in just a few hours. Yes, it can be done!
Along the way, you’ll learn how to create MySQL databases and tables; how to work with PHP objects, constants, includes, sessions, and other features; how to separate business logic from presentation; how to make your PHP code more secure, and much more!
Before you begin, check out the finished product by clicking the View Demo link above. (For security reasons this demo is read-only, so you can’t add, change or delete articles.) You can also click the Download Code link above to download the complete PHP code for the CMS, so you can run it on your own server.
The feature list
Our first job is to work out exactly what we want our CMS to do. The CMS will have the following features:
Front end:
- The homepage, listing the 5 most recent articles
- The article listing page, listing all articles
- The “view article” page, letting visitors see a single article
Back end:
- Admin login/logout
- List all articles
- Add a new article
- Edit an existing article
- Delete an existing article
Each article will have an associated headline, summary, and publication date.
Planning it out
Here are the steps we’ll need to follow to create our CMS:
- Create the database
- Create the
articlesdatabase table - Make a configuration file
- Build the
Articleclass - Write the front-end
index.phpscript - Write the back-end
admin.phpscript - Create the front-end templates
- Create the back-end templates
- Create the stylesheet and logo image
Ready? Grab a cup of tea, and let’s get coding!
Step 1: Create the database
The first thing we need to do is create a MySQL database to store our content. You can do this as follows:
- Run the
mysqlclient program
Open a terminal window and enter the following:mysql -u username -p
Then enter your MySQL password when prompted.
- Create the database
At themysql>prompt, type:create database cms;
Then press Enter.
- Quit the
mysqlclient program
At themysql>prompt, type:exit
Then press Enter.
That’s it! You’ve now created a new, empty database, into which you can put your database tables and content.
Step 2: Create the articles database table
Our simple CMS has just one database table: articles. This, as you’d imagine, holds all of the articles in the system.
Let’s create the schema for the table. A table’s schema describes the types of data that the table can hold, as well as other information about the table.
Create a text file called tables.sql somewhere on your hard drive. Add the following code to the file:
DROP TABLE IF EXISTS articles;
CREATE TABLE articles
(
  id              smallint unsigned NOT NULL auto_increment,
  publicationDate date NOT NULL,                              # When the article was published
  title           varchar(255) NOT NULL,                      # Full title of the article
  summary         text NOT NULL,                              # A short summary of the article
  content         mediumtext NOT NULL,                        # The HTML content of the article

  PRIMARY KEY     (id)
);
The above code defines the schema for the articles table. It’s written in SQL, the language used to create and manipulate databases in MySQL (and most other database systems).
Let’s break the above code down a little:
- Create the
articlestableDROP TABLE IF EXISTS articlesremoves any existingarticlestable (and data — be careful!) if it already exists. We do this because we can’t define a table with the same name as an existing table.CREATE TABLE articles ( )creates the newarticlestable. The stuff inside the parentheses defines the structure of the data within the table, explained below… - Give each article a unique ID
We’re now ready to define our table structure. A table consists of a number of fields (also called columns). Each field holds a specific type of information about each article.
First, we create an
idfield. This has asmallint unsigned(unsigned small integer) data type, which means it can hold whole numbers from 0 to 65,535. This lets our CMS hold up to 65,535 articles. We also specify theNOT NULLattribute, which means the field can’t be empty (null) — this makes life easier for us. We also add theauto_incrementattribute, which tells MySQL to assign a new, unique value to an article’sidfield when the article record is created. So the first article will have anidof 1, the second will have anidof 2, and so on. We’ll use this unique value as a handle to refer to the article that we want to display or edit in the CMS. - Add the
publicationDatefield
The next line creates thepublicationDatefield, which stores the date that each article was published. This field has a data type ofdate, which means it can store date values. - Add the
titlefield
Next we create thetitlefield to hold each article’s title. It has a data type ofvarchar(255), which means it can store a string of up to 255 characters. - Add the
summaryandcontentfields
The last 2 fields,summaryandcontent, hold a short summary of the article and the article’s HTML content respectively. summary has atextdata type (which can hold up to 65,535 characters) andcontenthas amediumtextdata type (which can hold up to 16,777,215 characters). - Add the primary key
The last line inside the
CREATE TABLEstatement defines a key for the table. A key is also called an index, and in simple terms it makes it quicker to find data in the table, at the expense of some extra storage space.We make the
idfield aPRIMARY KEY. Each table can only have a singlePRIMARY KEY; this is the key that uniquely identifies each record in the table. In addition, by adding this key, MySQL can retrieve an article based on its ID very quickly.
Now that we’ve created our table schema, we need to load it into MySQL to create the table itself. The easiest way to do this is to open up a terminal window and change to the folder containing your tables.sql file, then run this command:
mysql -u username -p cms < tables.sql
…where username is your MySQL username. cms is the name of the database that you created in Step 1.
Enter your password when prompted. MySQL then loads and runs the code in your tables.sql file, creating the articles table inside the cms database.
Step 3: Make a configuration file
Now that you’ve created your database, you’re ready to start writing your PHP code. Let’s start by creating a configuration file to store various useful settings for our CMS. This file will be used by all the script files in our CMS.
First, create a cms folder somewhere in the local website on your computer, to hold all the files relating to the CMS. If you’re running XAMPP then the local website will be in an htdocs folder inside your XAMPP folder. Or, if you prefer, you can create a brand new website just for your CMS, and put all the files in that new website’s document root folder.
Inside the cms folder, create a file called config.php with the following code:
<?php
ini_set( "display_errors", true );
date_default_timezone_set( "Australia/Sydney" );  // http://www.php.net/manual/en/timezones.php
define( "DB_DSN", "mysql:host=localhost;dbname=cms" );
define( "DB_USERNAME", "username" );
define( "DB_PASSWORD", "password" );
define( "CLASS_PATH", "classes" );
define( "TEMPLATE_PATH", "templates" );
define( "HOMEPAGE_NUM_ARTICLES", 5 );
define( "ADMIN_USERNAME", "admin" );
define( "ADMIN_PASSWORD", "mypass" );
require( CLASS_PATH . "/Article.php" );

function handleException( $exception ) {
  echo "Sorry, a problem occurred. Please try later.";
  error_log( $exception->getMessage() );
}

set_exception_handler( 'handleException' );
?>
Let’s break this file down:
- Display errors in the browser
Theini_set()line causes error messages to be displayed in the browser. This is good for debugging, but it should be set tofalseon a live site since it can be a security risk. - Set the timezone
As our CMS will use PHP’sdate()function, we need to tell PHP our server’s timezone (otherwise PHP generates a warning message). Mine is set to"Australia/Sydney"— change this value to your local timezone. - Set the database access details
Next we define a constant,DB_DSN, that tells PHP where to find our MySQL database. Make sure thedbnameparameter matches the name of your CMS database (cmsin this case). We also store the MySQL username and password that are used to access the CMS database in the constantsDB_USERNAMEandDB_PASSWORD. Set these values to your MySQL username and password. - Set the paths
We set 2 path names in our config file:CLASS_PATH, which is the path to the class files, andTEMPLATE_PATH, which is where our script should look for the HTML template files. Both these paths are relative to our top-levelcmsfolder. - Set the number of articles to display on the homepage
HOMEPAGE_NUM_ARTICLEScontrols the maximum number of article headlines to display on the site homepage. We’ve set this to 5 initially, but if you want more or less articles, just change this value. - Set the admin username and password
TheADMIN_USERNAMEandADMIN_PASSWORDconstants contain the login details for the CMS admin user. Again, you’ll want to change these to your own values. - Include the
Articleclass
Since theArticleclass file — which we’ll create next — is needed by all scripts in our application, we include it here. - Create an exception handler
Finally, we definehandleException(), a simple function to handle any PHP exceptions that might be raised as our code runs. The function displays a generic error message, and logs the actual exception message to the web server’s error log. In particular, this function improves security by handling any PDO exceptions that might otherwise display the database username and password in the page. Once we’ve definedhandleException(), we set it as the exception handler by calling PHP’sset_exception_handler()function.
Step 4: Build the Article class
You’re now ready to build the Article PHP class. This is the only class in our CMS, and it handles the nitty-gritty of storing articles in the database, as well as retrieving articles from the database. Once we’ve built this class, it will be really easy for our other CMS scripts to create, update, retrieve and delete articles.
Inside your cms folder, create a classes folder. Inside that classes folder, create a new file called Article.php, and put the following code into it:
<?php

/**
 * Class to handle articles
 */

class Article
{

  // Properties

  /**
  * @var int The article ID from the database
  */
  public $id = null;

  /**
  * @var int When the article was published
  */
  public $publicationDate = null;

  /**
  * @var string Full title of the article
  */
  public $title = null;

  /**
  * @var string A short summary of the article
  */
  public $summary = null;

  /**
  * @var string The HTML content of the article
  */
  public $content = null;


  /**
  * Sets the object's properties using the values in the supplied array
  *
  * @param assoc The property values
  */

  public function __construct( $data=array() ) {
    if ( isset( $data['id'] ) ) $this->id = (int) $data['id'];
    if ( isset( $data['publicationDate'] ) ) $this->publicationDate = (int) $data['publicationDate'];
    if ( isset( $data['title'] ) ) $this->title = preg_replace ( "/[^.,-_'"@?!:$ a-zA-Z0-9()]/", "", $data['title'] );
    if ( isset( $data['summary'] ) ) $this->summary = preg_replace ( "/[^.,-_'"@?!:$ a-zA-Z0-9()]/", "", $data['summary'] );
    if ( isset( $data['content'] ) ) $this->content = $data['content'];
  }


  /**
  * Sets the object's properties using the edit form post values in the supplied array
  *
  * @param assoc The form post values
  */

  public function storeFormValues ( $params ) {

    // Store all the parameters
    $this->__construct( $params );

    // Parse and store the publication date
    if ( isset($params['publicationDate']) ) {
      $publicationDate = explode ( '-', $params['publicationDate'] );

      if ( count($publicationDate) == 3 ) {
        list ( $y, $m, $d ) = $publicationDate;
        $this->publicationDate = mktime ( 0, 0, 0, $m, $d, $y );
      }
    }
  }


  /**
  * Returns an Article object matching the given article ID
  *
  * @param int The article ID
  * @return Article|false The article object, or false if the record was not found or there was a problem
  */

  public static function getById( $id ) {
    $conn = new PDO( DB_DSN, DB_USERNAME, DB_PASSWORD );
    $sql = "SELECT *, UNIX_TIMESTAMP(publicationDate) AS publicationDate FROM articles WHERE id = :id";
    $st = $conn->prepare( $sql );
    $st->bindValue( ":id", $id, PDO::PARAM_INT );
    $st->execute();
    $row = $st->fetch();
    $conn = null;
    if ( $row ) return new Article( $row );
  }


  /**
  * Returns all (or a range of) Article objects in the DB
  *
  * @param int Optional The number of rows to return (default=all)
  * @return Array|false A two-element array : results => array, a list of Article objects; totalRows => Total number of articles
  */

  public static function getList( $numRows=1000000 ) {
    $conn = new PDO( DB_DSN, DB_USERNAME, DB_PASSWORD );
    $sql = "SELECT SQL_CALC_FOUND_ROWS *, UNIX_TIMESTAMP(publicationDate) AS publicationDate FROM articles
            ORDER BY publicationDate DESC LIMIT :numRows";

    $st = $conn->prepare( $sql );
    $st->bindValue( ":numRows", $numRows, PDO::PARAM_INT );
    $st->execute();
    $list = array();

    while ( $row = $st->fetch() ) {
      $article = new Article( $row );
      $list[] = $article;
    }

    // Now get the total number of articles that matched the criteria
    $sql = "SELECT FOUND_ROWS() AS totalRows";
    $totalRows = $conn->query( $sql )->fetch();
    $conn = null;
    return ( array ( "results" => $list, "totalRows" => $totalRows[0] ) );
  }


  /**
  * Inserts the current Article object into the database, and sets its ID property.
  */

  public function insert() {

    // Does the Article object already have an ID?
    if ( !is_null( $this->id ) ) trigger_error ( "Article::insert(): Attempt to insert an Article object that already has its ID property set (to $this->id).", E_USER_ERROR );

    // Insert the Article
    $conn = new PDO( DB_DSN, DB_USERNAME, DB_PASSWORD );
    $sql = "INSERT INTO articles ( publicationDate, title, summary, content ) VALUES ( FROM_UNIXTIME(:publicationDate), :title, :summary, :content )";
    $st = $conn->prepare ( $sql );
    $st->bindValue( ":publicationDate", $this->publicationDate, PDO::PARAM_INT );
    $st->bindValue( ":title", $this->title, PDO::PARAM_STR );
    $st->bindValue( ":summary", $this->summary, PDO::PARAM_STR );
    $st->bindValue( ":content", $this->content, PDO::PARAM_STR );
    $st->execute();
    $this->id = $conn->lastInsertId();
    $conn = null;
  }


  /**
  * Updates the current Article object in the database.
  */

  public function update() {

    // Does the Article object have an ID?
    if ( is_null( $this->id ) ) trigger_error ( "Article::update(): Attempt to update an Article object that does not have its ID property set.", E_USER_ERROR );

    // Update the Article
    $conn = new PDO( DB_DSN, DB_USERNAME, DB_PASSWORD );
    $sql = "UPDATE articles SET publicationDate=FROM_UNIXTIME(:publicationDate), title=:title, summary=:summary, content=:content WHERE id = :id";
    $st = $conn->prepare ( $sql );
    $st->bindValue( ":publicationDate", $this->publicationDate, PDO::PARAM_INT );
    $st->bindValue( ":title", $this->title, PDO::PARAM_STR );
    $st->bindValue( ":summary", $this->summary, PDO::PARAM_STR );
    $st->bindValue( ":content", $this->content, PDO::PARAM_STR );
    $st->bindValue( ":id", $this->id, PDO::PARAM_INT );
    $st->execute();
    $conn = null;
  }


  /**
  * Deletes the current Article object from the database.
  */

  public function delete() {

    // Does the Article object have an ID?
    if ( is_null( $this->id ) ) trigger_error ( "Article::delete(): Attempt to delete an Article object that does not have its ID property set.", E_USER_ERROR );

    // Delete the Article
    $conn = new PDO( DB_DSN, DB_USERNAME, DB_PASSWORD );
    $st = $conn->prepare ( "DELETE FROM articles WHERE id = :id LIMIT 1" );
    $st->bindValue( ":id", $this->id, PDO::PARAM_INT );
    $st->execute();
    $conn = null;
  }

}

?>
This file is quite long, but it’s fairly simple stuff when you break it down. Let’s take a look at each section of the code:
1. The class definition and properties
First, we begin to define our Article class with the code:
class Article
{
Everything after these lines of code — up until the closing brace at the end of the file — contains the code that makes up the Article class.
After starting our class definition, we declare the properties of the class: $id, $publicationDate, and so on. Each Article object that we create will store its article data in these properties. You can see that the property names mirror the field names in our articles database table.
2. The constructor
Next we create the class methods. These are functions that are tied to the class, as well as to objects created from the class. Our main code can call these methods in order to manipulate the data in the Article objects.
The first method, __construct(), is the constructor. This is a special method that is called automatically by the PHP engine whenever a new Article object is created. Our constructor takes an optional $data array containing the data to put into the new object’s properties. We then populate those properties within the body of the constructor. This gives us a handy way to create and populate an object in one go.
You’ll notice that the method filters the data before it stores them in the properties. The id and publicationDate properties are cast to integers using (int), since these values should always be integers. The title and summary are filtered using a regular expression to only allow a certain range of characters. It’s good security practice to filter data on input like this, only allowing acceptable values and characters through.
We don’t filter the content property, however. Why? Well, the administrator will probably want to use a wide range of characters, as well as HTML markup, in the article content. If we restricted the range of allowed characters in the content then we would limit the usefulness of the CMS for the administrator.
Normally this could be a security loophole, since a user could insert malicious JavaScript and other nasty stuff in the content. However, since we presumably trust our site administrator — who is the only person allowed to create the content — this is an acceptable tradeoff in this case. If you were dealing with user-generated content, such as comments or forum posts, then you would want to be more careful, and only allow “safe” HTML to be used. A really great tool for this is HTML Purifier, which thoroughly analyses HTML input and removes all potentially malicious code.
3. storeFormValues()
Our next method, storeFormValues(), is similar to the constructor in that it stores a supplied array of data in the object’s properties. The main difference is that storeFormValues() can handle data in the format that is submitted via our New Article and Edit Article forms (which we’ll create later). In particular, it can handle publication dates in the format YYYY-MM-DD, converting the date into the UNIX timestamp format suitable for storing in the object.
The purpose of this method is simply to make it easy for our admin scripts to store the data submitted by the forms. All they have to do is call storeFormValues(), passing in the array of form data.
4. getById()
Now we come to the methods that actually access the MySQL database. The first of these, getById(), accepts an article ID argument ($id), then retrieves the article record with that ID from the articles table, and stores it in a new Article object.
Usually, when you call a method, you first create or retrieve an object, then call the method on that object. However, since this method returns a new Article object, it would be helpful if the method could be called directly by our calling code, and not via an existing object. Otherwise, we would have to create a new dummy object each time we wanted to call the method and retrieve an article.
To enable our method to be called without needing an object, we add the static keyword to the method definition. This allows the method to be called directly without specifying an object:
public static function getById( $id ) {
The method itself uses PDO to connect to the database, retrieve the article record using a SELECT SQL statement, and store the article data in a new Article object, which is then returned to the calling code.
Let’s break this method down:
- Connect to the database
$conn = new PDO( DB_DSN, DB_USERNAME, DB_PASSWORD );
This makes a connection to the MySQL database using the login details from the
config.phpfile, and stores the resulting connection handle in$conn. This handle is used by the remaining code in the method to talk to the database. - Retrieve the article record
    $sql = "SELECT *, UNIX_TIMESTAMP(publicationDate) AS publicationDate FROM articles WHERE id = :id";
    $st = $conn->prepare( $sql );
    $st->bindValue( ":id", $id, PDO::PARAM_INT );
    $st->execute();
    $row = $st->fetch();
Our
SELECTstatement retrieves all fields (*) from the record in thearticlestable that matches the givenidfield. It also retrieves thepublicationDatefield in UNIX timestamp format instead of the default MySQL date format, so we can store it easily in our object.Rather than placing our
$idparameter directly inside theSELECTstring, which can be a security risk, we instead use:id. This is known as a placeholder. In a minute, we’ll call a PDO method to bind our$idvalue to this placeholder.Once we’ve stored our
SELECTstatement in a string, we prepare the statement by calling$conn->prepare(), storing the resulting statement handle in a$stvariable.We now bind the value of our
$idvariable — that is, the ID of the article we want to retrieve — to our:idplaceholder by calling thebindValue()method. We pass in the placeholder name; the value to bind to it; and the value’s data type (integer in this case) so that PDO knows how to correctly escape the value.Lastly, we call
execute()to run the query, then we usefetch()to retrieve the resulting record as an associative array of field names and corresponding field values, which we store in the$rowvariable. - Close the connection
$conn = null;
Since we no longer need our connection, we close it by assigning
nullto the$connvariable. It’s a good idea to close database connections as soon as possible to free up memory on the server. - Return the new
Articleobjectif ( $row ) return new Article( $row ); }
The last thing our method needs to do is create a new
Articleobject that stores the record returned from the database, and return this object to the calling code. First it checks that the returned value from thefetch()call,$row, does in fact contain data. If it does then it creates a newArticleobject, passing in$rowas it does so. Remember that this calls our constructor that we created earlier, which populates the object with the data contained in the$rowarray. We then return this new object, and our work here is done.
5. getList()
Our next method, getList(), is similar in many ways to getById(). The main difference, as you might imagine, is that it can retrieve many articles at once, rather than just 1 article. It’s used whenever we need to display a list of articles to the user or administrator.
getList() accepts an optional argument:
$numRows- The maximum number of articles to retrieve. We default this value to 1,000,000 (i.e. effectively all articles). This parameter allows us to display, say, just the first 5 articles on the site homepage.
Much of this method’s code is similar to getById(). Let’s look at a few lines of interest:
    $sql = "SELECT SQL_CALC_FOUND_ROWS *, UNIX_TIMESTAMP(publicationDate) AS publicationDate FROM articles
            ORDER BY publicationDate DESC LIMIT :numRows";
Our query is a bit more complex than last time. First, notice that there’s no WHERE clause this time; this is because we want to retrieve all articles, rather than an article that matches a specific ID.
We’ve also added a LIMIT clause, passing in the $numRows parameter (as a placeholder), so that we can optionally limit the number of records returned.
Finally, the special MySQL value SQL_CALC_FOUND_ROWS tells MySQL to return the actual number of records returned; this information is useful for displaying to the user, as well as for other things like pagination of results.
    $list = array();

    while ( $row = $st->fetch() ) {
      $article = new Article( $row );
      $list[] = $article;
    }
Since we’re returning multiple rows, we create an array, $list, to hold the corresponding Article objects. We then use a while loop to retrieve the next row via fetch(), create a new Article object, store the row values in the object, and add the object to the $list array. When there are no more rows, fetch() returns false and the loop exits.
    // Now get the total number of articles that matched the criteria
    $sql = "SELECT FOUND_ROWS() AS totalRows";
    $totalRows = $conn->query( $sql )->fetch();
    $conn = null;
    return ( array ( "results" => $list, "totalRows" => $totalRows[0] ) );
Finally, we run another query that uses the MySQL FOUND_ROWS() function to get the number of returned rows calculated by our previous SQL_CALC_FOUND_ROWS command. This time we use the PDO query() method, which lets us quickly run a query if there are no placeholders to bind. We call fetch() on the resulting statement handle to retrieve the result row, then return both the list of Article objects ($list) and the total row count as an associative array.
6. insert()
The remaining methods in our Article class deal with adding, changing and deleting article records in the database.
insert() adds a new article record to the articles table, using the values stored in the current Article object:
- First, the method makes sure that the object doesn’t already have its
$idproperty set. If it does have an ID then the article presumably already exists in the database, so we shouldn’t try to insert it again. - Then the method runs an SQL
INSERTquery to insert the record into thearticlestable, using placeholders to pass the property values to the database. Note the use of the MySQLFROM_UNIXTIME()function to convert the publication date from UNIX timestamp format back into MySQL format. - After running the query, the method retrieves the new article record’s ID using the PDO
lastInsertId()function, and stores it in the object’s$idproperty for future reference. Remember that we set up thearticlestable’sidfield as anauto_incrementfield, so that MySQL generates a new unique ID for each new article record.
7. update()
This method is similar to insert(), except that it updates an existing article record in the database instead of creating a new record.
First it checks that the object has an ID, since you can’t update a record without knowing its ID. Then it uses the SQL UPDATE statement to update the record’s fields. Notice that we pass the object’s ID to the UPDATE statement so that it knows which record to update.
5. delete()
The delete() method is pretty self-explanatory. It uses the SQL DELETE statement to remove the article stored in the object from the articles table, using the object’s $id property to identify the record in the table. For safety reasons, we add LIMIT 1 to the query to make sure that only 1 article record can be deleted at a time.
Step 5: Write the front-end index.php script

We’ve now created our Article class, which does the heavy lifting for our CMS. Now that’s out of the way, the rest of the code is pretty simple!
First, let’s create index.php, the script that controls the display of the front-end pages of the site. Save this file in the cms folder you created earlier, at the start of Step 4:
<?php

require( "config.php" );
$action = isset( $_GET['action'] ) ? $_GET['action'] : "";

switch ( $action ) {
  case 'archive':
    archive();
    break;
  case 'viewArticle':
    viewArticle();
    break;
  default:
    homepage();
}


function archive() {
  $results = array();
  $data = Article::getList();
  $results['articles'] = $data['results'];
  $results['totalRows'] = $data['totalRows'];
  $results['pageTitle'] = "Article Archive | Widget News";
  require( TEMPLATE_PATH . "/archive.php" );
}

function viewArticle() {
  if ( !isset($_GET["articleId"]) || !$_GET["articleId"] ) {
    homepage();
    return;
  }

  $results = array();
  $results['article'] = Article::getById( (int)$_GET["articleId"] );
  $results['pageTitle'] = $results['article']->title . " | Widget News";
  require( TEMPLATE_PATH . "/viewArticle.php" );
}

function homepage() {
  $results = array();
  $data = Article::getList( HOMEPAGE_NUM_ARTICLES );
  $results['articles'] = $data['results'];
  $results['totalRows'] = $data['totalRows'];
  $results['pageTitle'] = "Widget News";
  require( TEMPLATE_PATH . "/homepage.php" );
}

?>
Let’s break this script down:
- Include the config file
The first line of code includes theconfig.phpfile we created earlier, so that all the configuration settings are available to the script. We userequire()rather thaninclude();require()generates an error if the file can’t be found. - Grab the
actionparameterWe store the
$_GET['action']parameter in a variable called$action, so that we can use the value later in the script. Before doing this, we check that the$_GET['action']value exists by usingisset(). If it doesn’t, we set the corresponding$actionvariable to an empty string (""). - Decide which action to perform
Theswitchblock looks at theactionparameter in the URL to determine which action to perform (display the archive, or view an article). If noactionparameter is in the URL then the script displays the site homepage. archive()
This function displays a list of all the articles in the database. It does this by calling thegetList()method of theArticleclass that we created earlier. The function then stores the results, along with the page title, in a$resultsassociative array so the template can display them in the page. Finally, it includes the template file to display the page. (We’ll create the templates in a moment.)viewArticle()
This function displays a single article page. It retrieves the ID of the article to display from thearticleIdURL parameter, then calls theArticleclass’sgetById()method to retrieve the article object, which it stores in the$resultsarray for the template to use. (If noarticleIdwas supplied, or the article couldn’t be found, then the function simply displays the homepage instead.)homepage()
Our last function,homepage(), displays the site homepage containing a list of up toHOMEPAGE_NUM_ARTICLESarticles (5 by default). It’s much like thearchive()function, except that it passesHOMEPAGE_NUM_ARTICLESto thegetList()method to limit the number of articles returned.
Step 6: Write the back-end admin.php script
Our admin script is a bit more complex than index.php, since it deals with all the admin functions for the CMS. The basic structure, though, is similar to index.php.
Save this file, admin.php, in the same folder as your index.php script:
<?php

require( "config.php" );
session_start();
$action = isset( $_GET['action'] ) ? $_GET['action'] : "";
$username = isset( $_SESSION['username'] ) ? $_SESSION['username'] : "";

if ( $action != "login" && $action != "logout" && !$username ) {
  login();
  exit;
}

switch ( $action ) {
  case 'login':
    login();
    break;
  case 'logout':
    logout();
    break;
  case 'newArticle':
    newArticle();
    break;
  case 'editArticle':
    editArticle();
    break;
  case 'deleteArticle':
    deleteArticle();
    break;
  default:
    listArticles();
}


function login() {

  $results = array();
  $results['pageTitle'] = "Admin Login | Widget News";

  if ( isset( $_POST['login'] ) ) {

    // User has posted the login form: attempt to log the user in

    if ( $_POST['username'] == ADMIN_USERNAME && $_POST['password'] == ADMIN_PASSWORD ) {

      // Login successful: Create a session and redirect to the admin homepage
      $_SESSION['username'] = ADMIN_USERNAME;
      header( "Location: admin.php" );

    } else {

      // Login failed: display an error message to the user
      $results['errorMessage'] = "Incorrect username or password. Please try again.";
      require( TEMPLATE_PATH . "/admin/loginForm.php" );
    }

  } else {

    // User has not posted the login form yet: display the form
    require( TEMPLATE_PATH . "/admin/loginForm.php" );
  }

}


function logout() {
  unset( $_SESSION['username'] );
  header( "Location: admin.php" );
}


function newArticle() {

  $results = array();
  $results['pageTitle'] = "New Article";
  $results['formAction'] = "newArticle";

  if ( isset( $_POST['saveChanges'] ) ) {

    // User has posted the article edit form: save the new article
    $article = new Article;
    $article->storeFormValues( $_POST );
    $article->insert();
    header( "Location: admin.php?status=changesSaved" );

  } elseif ( isset( $_POST['cancel'] ) ) {

    // User has cancelled their edits: return to the article list
    header( "Location: admin.php" );
  } else {

    // User has not posted the article edit form yet: display the form
    $results['article'] = new Article;
    require( TEMPLATE_PATH . "/admin/editArticle.php" );
  }

}


function editArticle() {

  $results = array();
  $results['pageTitle'] = "Edit Article";
  $results['formAction'] = "editArticle";

  if ( isset( $_POST['saveChanges'] ) ) {

    // User has posted the article edit form: save the article changes

    if ( !$article = Article::getById( (int)$_POST['articleId'] ) ) {
      header( "Location: admin.php?error=articleNotFound" );
      return;
    }

    $article->storeFormValues( $_POST );
    $article->update();
    header( "Location: admin.php?status=changesSaved" );

  } elseif ( isset( $_POST['cancel'] ) ) {

    // User has cancelled their edits: return to the article list
    header( "Location: admin.php" );
  } else {

    // User has not posted the article edit form yet: display the form
    $results['article'] = Article::getById( (int)$_GET['articleId'] );
    require( TEMPLATE_PATH . "/admin/editArticle.php" );
  }

}


function deleteArticle() {

  if ( !$article = Article::getById( (int)$_GET['articleId'] ) ) {
    header( "Location: admin.php?error=articleNotFound" );
    return;
  }

  $article->delete();
  header( "Location: admin.php?status=articleDeleted" );
}


function listArticles() {
  $results = array();
  $data = Article::getList();
  $results['articles'] = $data['results'];
  $results['totalRows'] = $data['totalRows'];
  $results['pageTitle'] = "All Articles";

  if ( isset( $_GET['error'] ) ) {
    if ( $_GET['error'] == "articleNotFound" ) $results['errorMessage'] = "Error: Article not found.";
  }

  if ( isset( $_GET['status'] ) ) {
    if ( $_GET['status'] == "changesSaved" ) $results['statusMessage'] = "Your changes have been saved.";
    if ( $_GET['status'] == "articleDeleted" ) $results['statusMessage'] = "Article deleted.";
  }

  require( TEMPLATE_PATH . "/admin/listArticles.php" );
}

?>
Let’s look at some interesting sections of this script:
- Start a user session
Towards the top of the script we call
session_start(). This PHP function starts a new session for the user, which we can use to track whether the user is logged in or not. (If a session for this user already exists, PHP automatically picks it up and uses it.) - Grab the
actionparameter andusernamesession variable
Next we store the$_GET['action']parameter in a variable called$action, and the$_SESSION['username']session variable in$username, so that we can use these values later in the script. Before doing this, we check that these values exist by usingisset(). If a value doesn’t exist then we set the corresponding variable to an empty string (""). - Check the user is logged in
The user shouldn’t be allowed to do anything unless they’re logged in as an administrator. So the next thing we do is inspect$usernameto see if the session contained a value for theusernamekey, which we use to signify that the user is logged in. If$username‘s value is empty — and the user isn’t already trying to log in or out — then we display the login page and exit immediately. - Decide which action to perform
The
switchblock works much like the one inindex.php: it calls the appropriate function based on the value of theactionURL parameter. The default action is to display the list of articles in the CMS. login()
This is called when the user needs to log in, or is in the process of logging in.If the user has submitted the login form — which we check by looking for the
loginform parameter — then the function checks the entered username and password against the config valuesADMIN_USERNAMEandADMIN_PASSWORD. If they match then theusernamesession key is set to the admin username, effectively logging them in, and we then redirect the browser back to theadmin.phpscript, which then displays the list of articles. If the username and password don’t match then the login form is redisplayed with an error message.If the user hasn’t submitted the login form yet then the function simply displays the form.
logout()
This function is called when the user elects to log out. It simply removes theusernamesession key and redirects back toadmin.php.newArticle()This function lets the user create a new article. If the user has just posted the “new article” form then the function creates a new
Articleobject, stores the form data in the object by callingstoreFormValues(), inserts the article into the database by callinginsert(), and redirects back to the article list, displaying a “Changes Saved” status message.If the user has not posted the “new article” form yet then the function creates a new empty
Articleobject with no values, then uses theeditArticle.phptemplate to display the article edit form using this emptyArticleobject.editArticle()This function is similar to
newArticle(), except that it lets the user edit an existing article. When the user saves their changes then the function retrieves the existing article usinggetById(), stores the new values in theArticleobject, then saves the changed object by callingupdate(). (If the article isn’t found in the database then the function displays an error.)When displaying the article edit form, the function again uses the
getById()method to load the current article field values into the form for editing.deleteArticle()
If the user has chosen to delete an article then this function first retrieves the article to be deleted (displaying an error if the article couldn’t be found in the database), then calls the article’sdelete()method to remove the article from the database. It then redirects to the article list page, displaying an “article deleted” status message.listArticles()
The last function inadmin.phpdisplays a list of all articles in the CMS for editing. The function uses theArticleclass’sgetList()method to retrieve all the articles, then it uses thelistArticles.phptemplate to display the list. Along the way, it also checks the URL query parameterserrorandstatusto see if any error or status message needs to be displayed in the page. If so, then it creates the necessary message and passes it to the template for display.
Step 7: Create the front-end templates
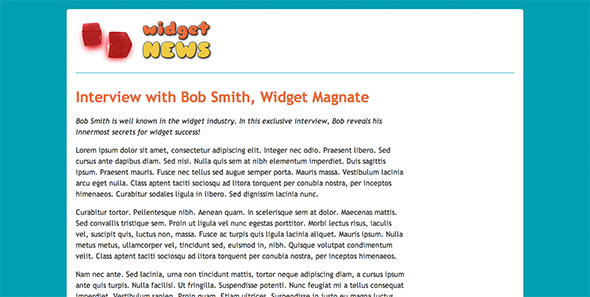
We’ve now created all the PHP code for our CMS’s functionality. The next step is to create the HTML templates for both the front-end and admin pages.
First, the front-end templates.
1. The include files
Create a folder called templates inside your cms folder. Now create a folder called include inside the templates folder. In this folder we’re going to put the header and footer markup that is common to every page of the site, to save having to put it inside every template file.
Create a new file called header.php inside your include folder, with the following code:
<!DOCTYPE html>
<html lang="en">
  <head>
    <title><?php echo htmlspecialchars( $results['pageTitle'] )?></title>
    <link rel="stylesheet" type="text/css" href="style.css" />
  </head>
  <body>
    <div id="container">

      <a href="."><img id="logo" src="images/logo.jpg" alt="Widget News" /></a>
As you can see, this code simply displays the markup to start the HTML page. It uses the $results['pageTitle'] variable passed from the main script (index.php or admin.php) to set the title element, and also links to a stylesheet, style.css (we’ll create this in a moment).
Next, create a file called footer.php in the same folder:
<div id="footer">
Widget News © 2011. All rights reserved. <a href="admin.php">Site Admin</a>
</div>
</div>
</body>
</html>
This markup finishes off each HTML page in the system.
2. homepage.php
Now go back up to the templates folder, and create a homepage.php template file in there, with the following code:
<?php include "templates/include/header.php" ?>
<ul id="headlines">
<?php foreach ( $results['articles'] as $article ) { ?>
<li>
<h2>
<span class="pubDate"><?php echo date('j F', $article->publicationDate)?></span><a href=".?action=viewArticle&articleId=<?php echo $article->id?>"><?php echo htmlspecialchars( $article->title )?></a>
</h2>
<p class="summary"><?php echo htmlspecialchars( $article->summary )?></p>
</li>
<?php } ?>
</ul>
<p><a href="./?action=archive">Article Archive</a></p>
<?php include "templates/include/footer.php" ?>
This template displays the article headlines on the homepage as an unordered list. It loops through the array of Article objects stored in $results['articles'] and displays each article’s publication date, title, and summary. The title is linked back to '.' (index.php), passing action=viewArticle, as well as the article’s ID, in the URL. This allows the visitor to read an article by clicking its title.
The template also includes a link to the article archive ("./?action=archive").
3. archive.php
Now create an archive.php template file in your templates folder:
<?php include "templates/include/header.php" ?>
<h1>Article Archive</h1>
<ul id="headlines" class="archive">
<?php foreach ( $results['articles'] as $article ) { ?>
<li>
<h2>
<span class="pubDate"><?php echo date('j F Y', $article->publicationDate)?></span><a href=".?action=viewArticle&articleId=<?php echo $article->id?>"><?php echo htmlspecialchars( $article->title )?></a>
</h2>
<p class="summary"><?php echo htmlspecialchars( $article->summary )?></p>
</li>
<?php } ?>
</ul>
<p><?php echo $results['totalRows']?> article<?php echo ( $results['totalRows'] != 1 ) ? 's' : '' ?> in total.</p>
<p><a href="./">Return to Homepage</a></p>
<?php include "templates/include/footer.php" ?>
This template displays the archive of all articles in the CMS. As you can see, it’s almost identical to homepage.php. It adds an archive CSS class to the unordered list so we can style the list items a bit differently to the homepage, and it also adds the year to the article publication dates (since the archive might go back a few years).
The page also includes a total count of the articles in the database, retrieved via $results['totalRows']. Finally, instead of the archive link at the bottom of the page, it includes a “Return to Homepage” link.
4. viewArticle.php
The last front-end template displays an article to the user. Create a file called viewArticle.php in your templates folder, and add the following markup:
<?php include "templates/include/header.php" ?>

      <h1 style="width: 75%;"><?php echo htmlspecialchars( $results['article']->title )?></h1>
      <div style="width: 75%; font-style: italic;"><?php echo htmlspecialchars( $results['article']->summary )?></div>
      <div style="width: 75%;"><?php echo $results['article']->content?></div>
      <p class="pubDate">Published on <?php echo date('j F Y', $results['article']->publicationDate)?></p>

      <p><a href="./">Return to Homepage</a></p>

<?php include "templates/include/footer.php" ?>
This template is very straightforward. It displays the selected article’s title, summary and content, as well as its publication date and a link to return to the homepage.
Step 8: Create the back-end templates
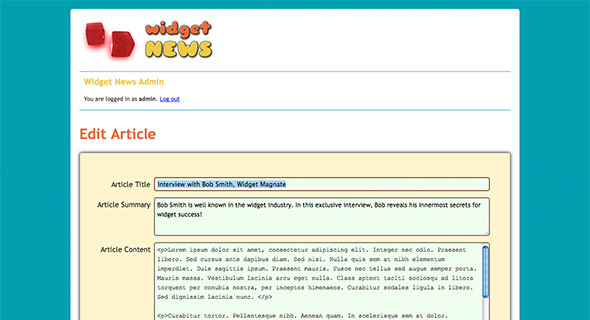
Now that we’ve created the templates for the front end of the site, it’s time to create the 3 admin templates.
1. loginForm.php
First, create another folder called admin inside your templates folder. Inside the admin folder, create the first of the 3 templates, loginForm.php:
<?php include "templates/include/header.php" ?>

      <form action="admin.php?action=login" method="post" style="width: 50%;">
        <input type="hidden" name="login" value="true" />

<?php if ( isset( $results['errorMessage'] ) ) { ?>
        <div class="errorMessage"><?php echo $results['errorMessage'] ?></div>
<?php } ?>

        <ul>

          <li>
            <label for="username">Username</label>
            <input type="text" name="username" id="username" placeholder="Your admin username" required autofocus maxlength="20" />
          </li>

          <li>
            <label for="password">Password</label>
            <input type="password" name="password" id="password" placeholder="Your admin password" required maxlength="20" />
          </li>

        </ul>

        <div class="buttons">
          <input type="submit" name="login" value="Login" />
        </div>

      </form>

<?php include "templates/include/footer.php" ?>
This page contains the admin login form, which posts back to admin.php?action=login. It includes a hidden field, login, that our login() function from Step 6 uses to check if the form has been posted. The form also contains an area for displaying any error messages (such as an incorrect username or password), as well as username and password fields and a “Login” button.
2. listArticles.php
Now create the second admin template in your admin folder. This one’s called listArticles.php:
<?php include "templates/include/header.php" ?>
<div id="adminHeader">
<h2>Widget News Admin</h2>
<p>You are logged in as <b><?php echo htmlspecialchars( $_SESSION['username']) ?></b>. <a href="admin.php?action=logout"?>Log out</a></p>
</div>
<h1>All Articles</h1>
<?php if ( isset( $results['errorMessage'] ) ) { ?>
<div class="errorMessage"><?php echo $results['errorMessage'] ?></div>
<?php } ?>
<?php if ( isset( $results['statusMessage'] ) ) { ?>
<div class="statusMessage"><?php echo $results['statusMessage'] ?></div>
<?php } ?>
<table>
<tr>
<th>Publication Date</th>
<th>Article</th>
</tr>
<?php foreach ( $results['articles'] as $article ) { ?>
<tr onclick="location='admin.php?action=editArticle&articleId=<?php echo $article->id?>'">
<td><?php echo date('j M Y', $article->publicationDate)?></td>
<td>
<?php echo $article->title?>
</td>
</tr>
<?php } ?>
</table>
<p><?php echo $results['totalRows']?> article<?php echo ( $results['totalRows'] != 1 ) ? 's' : '' ?> in total.</p>
<p><a href="admin.php?action=newArticle">Add a New Article</a></p>
<?php include "templates/include/footer.php" ?>
This template displays the list of articles for the administrator to edit. After displaying any error or status messages, it loops through the array of Article objects stored in $results['articles'], displaying each article’s publication date and title in a table row. It also adds a JavaScript onclick event to each article’s table row, so that the administrator can click an article to edit it.
The template also includes the total article count, as well as a link to let the administrator add a new article.
3. editArticle.php
Now save the final template, editArticle.php, in your admin folder:
<?php include "templates/include/header.php" ?>
<div id="adminHeader">
<h2>Widget News Admin</h2>
<p>You are logged in as <b><?php echo htmlspecialchars( $_SESSION['username']) ?></b>. <a href="admin.php?action=logout"?>Log out</a></p>
</div>
<h1><?php echo $results['pageTitle']?></h1>
<form action="admin.php?action=<?php echo $results['formAction']?>" method="post">
<input type="hidden" name="articleId" value="<?php echo $results['article']->id ?>"/>
<?php if ( isset( $results['errorMessage'] ) ) { ?>
<div class="errorMessage"><?php echo $results['errorMessage'] ?></div>
<?php } ?>
<ul>
<li>
<label for="title">Article Title</label>
<input type="text" name="title" id="title" placeholder="Name of the article" required autofocus maxlength="255" value="<?php echo htmlspecialchars( $results['article']->title )?>" />
</li>
<li>
<label for="summary">Article Summary</label>
<textarea name="summary" id="summary" placeholder="Brief description of the article" required maxlength="1000" style="height: 5em;"><?php echo htmlspecialchars( $results['article']->summary )?></textarea>
</li>
<li>
<label for="content">Article Content</label>
<textarea name="content" id="content" placeholder="The HTML content of the article" required maxlength="100000" style="height: 30em;"><?php echo htmlspecialchars( $results['article']->content )?></textarea>
</li>
<li>
<label for="publicationDate">Publication Date</label>
<input type="date" name="publicationDate" id="publicationDate" placeholder="YYYY-MM-DD" required maxlength="10" value="<?php echo $results['article']->publicationDate ? date( "Y-m-d", $results['article']->publicationDate ) : "" ?>" />
</li>
</ul>
<div class="buttons">
<input type="submit" name="saveChanges" value="Save Changes" />
<input type="submit" formnovalidate name="cancel" value="Cancel" />
</div>
</form>
<?php if ( $results['article']->id ) { ?>
<p><a href="admin.php?action=deleteArticle&articleId=<?php echo $results['article']->id ?>" onclick="return confirm('Delete This Article?')">Delete This Article</a></p>
<?php } ?>
<?php include "templates/include/footer.php" ?>
This edit form is used both for creating new articles, and for editing existing articles. It posts to either admin.php?action=newArticle or admin.php?action=editArticle, depending on the value passed in the $results['formAction'] variable. It also contains a hidden field, articleId, to track the ID of the article being edited (if any).
The form also includes an area for error messages, as well as fields for the article title, summary, content, and publication date. Finally, there are 2 buttons for saving and cancelling changes, and a link to allow the admin to delete the currently-edited article.
Step 9: Create the stylesheet and logo image
Our CMS application is basically done now, but in order to make it look a bit nicer for both our visitors and the site administrator, we’ll create a CSS file to control the look of the site. Save this file as style.css in your cms folder:
/* Style the body and outer container */

body {
  margin: 0;
  color: #333;
  background-color: #00a0b0;
  font-family: "Trebuchet MS", Arial, Helvetica, sans-serif;
  line-height: 1.5em;
}

#container {
  width: 960px;
  background: #fff;
  margin: 20px auto;
  padding: 20px;
  -moz-border-radius: 5px;
  -webkit-border-radius: 5px;
  border-radius: 5px;
}


/* The logo and footer */

#logo {
  display: block;
  width: 300px;
  padding: 0 660px 20px 0;
  border: none;
  border-bottom: 1px solid #00a0b0;
  margin-bottom: 40px;
}

#footer {
  border-top: 1px solid #00a0b0;
  margin-top: 40px;
  padding: 20px 0 0 0;
  font-size: .8em;
}


/* Headings */

h1 {
  color: #eb6841;
  margin-bottom: 30px;
  line-height: 1.2em;
}

h2, h2 a {
  color: #edc951;
}

h2 a {
  text-decoration: none;
}


/* Article headlines */

#headlines {
  list-style: none;
  padding-left: 0;
  width: 75%;
}

#headlines li {
  margin-bottom: 2em;
}

.pubDate {
  font-size: .8em;
  color: #eb6841;
  text-transform: uppercase;
}

#headlines .pubDate {
  display: inline-block;
  width: 100px;
  font-size: .5em;
  vertical-align: middle;
}

#headlines.archive .pubDate {
  width: 130px;
}

.summary {
  padding-left: 100px;
}

#headlines.archive .summary {
  padding-left: 130px;
}


/* "You are logged in..." header on admin pages */

#adminHeader {
  width: 940px;
  padding: 0 10px;
  border-bottom: 1px solid #00a0b0;
  margin: -30px 0 40px 0;
  font-size: 0.8em;
}


/* Style the form with a coloured background, along with curved corners and a drop shadow */

form {
  margin: 20px auto;
  padding: 40px 20px;
  overflow: auto;
  background: #fff4cf;
  border: 1px solid #666;
  -moz-border-radius: 5px;
  -webkit-border-radius: 5px;
  border-radius: 5px;
  -moz-box-shadow: 0 0 .5em rgba(0, 0, 0, .8);
  -webkit-box-shadow: 0 0 .5em rgba(0, 0, 0, .8);
  box-shadow: 0 0 .5em rgba(0, 0, 0, .8);
}


/* Give form elements consistent margin, padding and line height */

form ul {
  list-style: none;
  margin: 0;
  padding: 0;
}

form ul li {
  margin: .9em 0 0 0;
  padding: 0;
}

form * {
  line-height: 1em;
}


/* The field labels */

label {
  display: block;
  float: left;
  clear: left;
  text-align: right;
  width: 15%;
  padding: .4em 0 0 0;
  margin: .15em .5em 0 0;
}


/* The fields */

input, select, textarea {
  display: block;
  margin: 0;
  padding: .4em;
  width: 80%;
}

input, textarea, .date {
  border: 2px solid #666;
  -moz-border-radius: 5px;
  -webkit-border-radius: 5px;
  border-radius: 5px;
  background: #fff;
}

input {
  font-size: .9em;
}

select {
  padding: 0;
  margin-bottom: 2.5em;
  position: relative;
  top: .7em;
}

textarea {
  font-family: "Trebuchet MS", Arial, Helvetica, sans-serif;
  font-size: .9em;
  height: 5em;
  line-height: 1.5em;
}

textarea#content {
  font-family: "Courier New", courier, fixed;
}


/* Place a border around focused fields */

form *:focus {
  border: 2px solid #7c412b;
  outline: none;
}


/* Display correctly filled-in fields with a green background */

input:valid, textarea:valid {
  background: #efe;
}


/* Submit buttons */

.buttons {
  text-align: center;
  margin: 40px 0 0 0;
}

input[type="submit"] {
  display: inline;
  margin: 0 20px;
  width: 12em;
  padding: 10px;
  border: 2px solid #7c412b;
  -moz-border-radius: 5px;
  -webkit-border-radius: 5px;
  border-radius: 5px;
  -moz-box-shadow: 0 0 .5em rgba(0, 0, 0, .8);
  -webkit-box-shadow: 0 0 .5em rgba(0, 0, 0, .8);
  box-shadow: 0 0 .5em rgba(0, 0, 0, .8);
  color: #fff;
  background: #ef7d50;
  font-weight: bold;
  -webkit-appearance: none;
}

input[type="submit"]:hover, input[type="submit"]:active {
  cursor: pointer;
  background: #fff;
  color: #ef7d50;
}

input[type="submit"]:active {
  background: #eee;
  -moz-box-shadow: 0 0 .5em rgba(0, 0, 0, .8) inset;
  -webkit-box-shadow: 0 0 .5em rgba(0, 0, 0, .8) inset;
  box-shadow: 0 0 .5em rgba(0, 0, 0, .8) inset;
}


/* Tables */

table {
  width: 100%;
  border-collapse: collapse;
}

tr, th, td {
  padding: 10px;
  margin: 0;
  text-align: left;
}

table, th {
  border: 1px solid #00a0b0;
}

th {
  border-left: none;
  border-right: none;
  background: #ef7d50;
  color: #fff;
  cursor: default;
}

tr:nth-child(odd) {
  background: #fff4cf;
}

tr:nth-child(even) {
  background: #fff;
}

tr:hover {
  background: #ddd;
  cursor: pointer;
}


/* Status and error boxes */

.statusMessage, .errorMessage {
  font-size: .8em;
  padding: .5em;
  margin: 2em 0;
  -moz-border-radius: 5px;
  -webkit-border-radius: 5px;
  border-radius: 5px;
  -moz-box-shadow: 0 0 .5em rgba(0, 0, 0, .8);
  -webkit-box-shadow: 0 0 .5em rgba(0, 0, 0, .8);
  -box-shadow: 0 0 .5em rgba(0, 0, 0, .8);
}

.statusMessage {
  background-color: #2b2;
  border: 1px solid #080;
  color: #fff;
}

.errorMessage {
  background-color: #f22;
  border: 1px solid #800;
  color: #fff;
}
I won’t go into the details of the CSS, since this tutorial is about PHP and MySQL! Suffice to say, it styles things like the page layout, colours, fonts, forms, tables and so on.
Last, but not least, our site needs a logo. Here’s one I prepared earlier — save it in an images folder inside your cms folder, calling it logo.jpg (or roll your own logo):
![]()
All done!
We’ve finished our CMS! To try it out, open a browser and point it to the base URL of your CMS (for example, http://localhost/cms/). Click the em>Site Admin link in the footer, log in, and add some articles. Then try browsing them on the front end (click the logo to return to the homepage).
Don’t forget you can try out the demo on my server too!
In this tutorial you’ve built a basic content management system from the ground up, using PHP and MySQL. You’ve learnt about MySQL, tables, field types, PDO, object-oriented programming, templating, security, sessions, and lots more.
While this CMS is pretty basic, it has hopefully given you a starting point for building your own CMS-driven websites. Some features you might want to add include:
- Pagination on the article archive (front end) and article list (back end) so that the system can easily handle hundreds of articles
- A WYSIWYG editor for easier content editing
- An image upload facility (I’ve written a follow-up tutorial on adding an image upload feature to the CMS)
- A preview facility, so the admin can see how an article will look before publishing it
- Article categories and tags (I’ve written a follow-up tutorial on adding categories)
- Integration with Apache’s mod_rewrite to create more human-friendly permalink URLs for the articles (find out how to do this)
- A user comments system
I hope you’ve enjoyed this tutorial and found it useful. Happy coding!