Время на прочтение
9 мин
Количество просмотров 28K
Curl (client URL) — это инструмент командной строки на основе библиотеки libcurl для передачи данных с сервера и на сервер при помощи различных протоколов, в том числе HTTP, HTTPS, FTP, FTPS, IMAP, IMAPS, POP3, POP3S, SMTP и SMTPS. Он очень популярен в сфере автоматизации и скриптов благодаря широкому диапазону функций и поддерживаемых протоколов. В этой статье мы расскажем, как использовать curl в Windows на различных примерах.
▍ Установка в Windows
Во всех современных версиях Windows, начиная с Windows 10 (версия 1803) и Server 2019, исполняемый файл curl поставляется в комплекте, поэтому ручная установка не требуется. Чтобы определить местоположение curl и его версию в системе, можно использовать следующие команды:
where curl
curl --version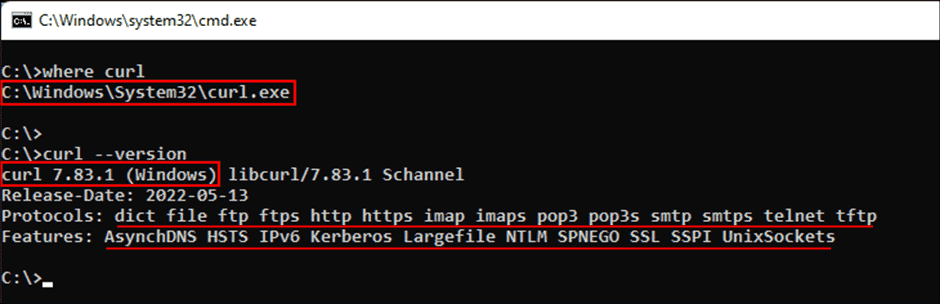
Определение местоположения и версии curl в Windows
Команда curl —version также выводит список протоколов и функций, поддерживаемых текущей версией curl. Как видно из показанного выше скриншота, к использованию встроенной утилиты curl всё готово. Если вместо этого отображается сообщение об ошибке, curl может быть недоступен потому, что вы используете более раннюю версию Windows (например, Windows 8.1 или Server 2016). В таком случае вам потребуется установить curl в Windows вручную.
▍ Синтаксис curl
Команда curl использует следующий синтаксис:
curl [options...] [url]Инструмент поддерживает различные опции, которые мы рассмотрим ниже. Как и в любом инструменте командной строки, вы можете использовать для получения справки команду curl —help.
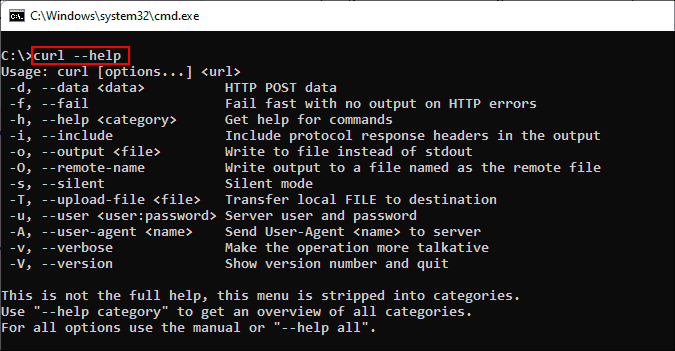
Получение справки при помощи команды curl
Для получения подробной справки можно использовать команду curl —help all. Справка разделена на категории, поэтому при помощи curl —help category можно просмотреть все темы.
Ознакомившись с синтаксисом curl, давайте рассмотрим различные способы применения этого инструмента на примерах.
▍ HTTP-запрос GET
При использовании curl с URL и без указания опций запрос по умолчанию использует метод GET протокола HTTP. Попробуйте выполнить такую команду:
curl https://4sysops.comПриведённая выше команда по сути эквивалентна curl —request GET 4sysops.com, отправляющей запрос GET к 4sysops.com по протоколу HTTPS. Чтобы указать версию протокола HTTP (например, http/2), используйте опцию —http2:
curl --http2 https://4sysops.comВ случае URL, начинающихся с HTTPS, curl сначала пытается установить соединение http/2 и автоматически откатывается к http/1.1, если это не удаётся. Также он поддерживает другие методы, например, HEAD, POST, PUT и DELETE. Для использования этих методов вместе с командой curl нужно указать опцию —request (или -X), за которой следует указание метода. Стоит заметить, что список доступных методов зависит от используемого протокола.
▍ Получение информации об удалённом файле
Если вы администратор, то иногда вам могут быть интересны только заголовки HTTP. Их можно получить при помощи опции —head (или -I). Иногда URL может перенаправлять пользователя в другую точку. В таком случае опция —location (или -L) позволяет curl выполнять перенаправления. Также можно использовать —insecure (или -k), чтобы разрешить незащищённые подключения и избежать ошибок с сертификатом TLS в случае, если целевой URL использует самоподписанный сертификат. Пользуйтесь этой опцией только при абсолютной необходимости. Все эти три опции можно скомбинировать в одну краткую запись, как показано в следующей команде:
curl -kIL 4sysops.com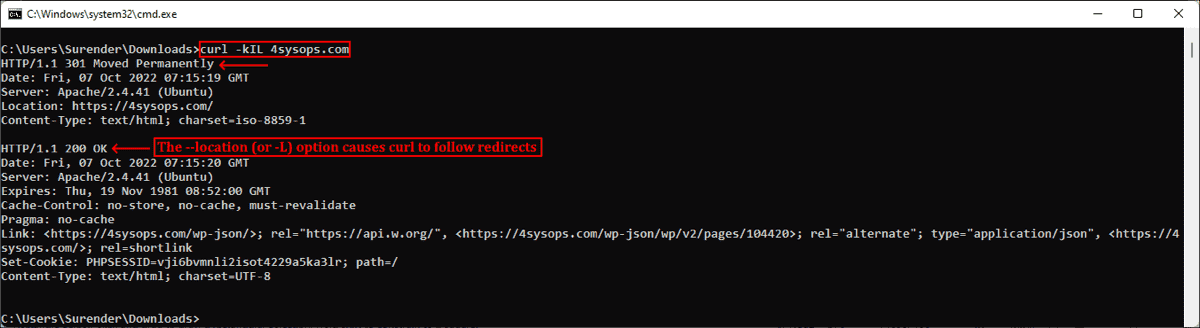
Опции просмотра заголовков запросов, включения незащищённого соединения и использования перенаправлений
Как можно заметить, такая краткая запись особенно полезна для комбинирования нескольких опций. Приведённая выше команда по сути эквивалентна команде curl —insecure —head —location 4sysops.com.
Опция —head (или -I) также даёт основную информацию об удалённом файле без его скачивания. Как показано на скриншоте ниже, при использовании curl с URL удалённого файла он отображает различные заголовки, дающие информацию об удалённом файле.
curl -IL https://curl.se/windows/dl-7.85.0_5/curl-7.85.0_5-win64-mingw.zip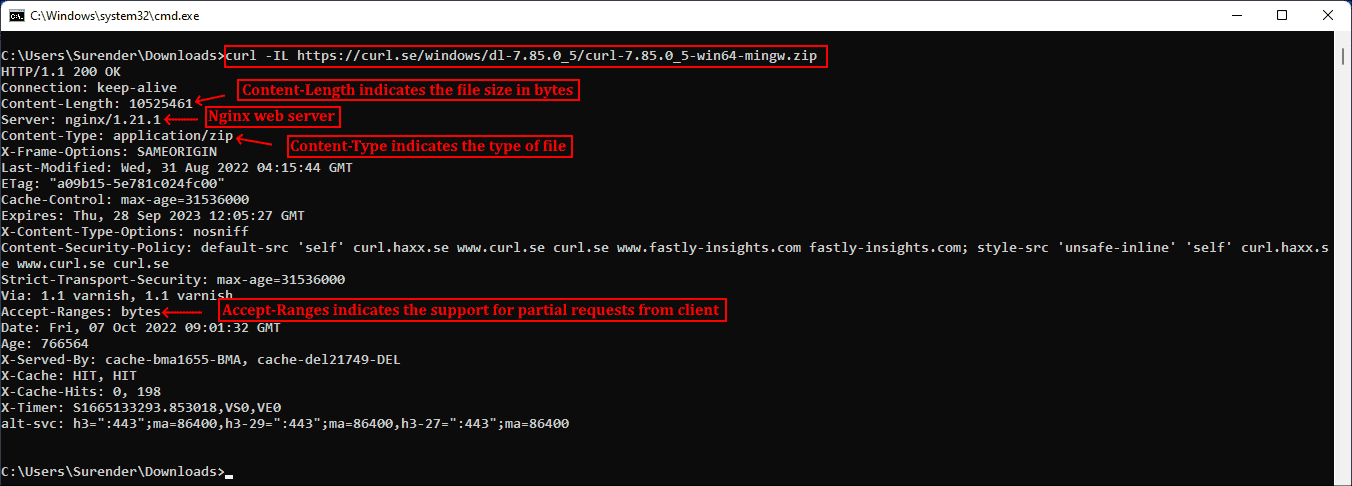
Использование curl для просмотра основной информации удалённых файлов
Заголовок Content-Length обозначает размер файла (в байтах), Content-Type сообщает о типе медиафайла (например, image/png, text/html), Server обозначает тип серверного приложения (Apache, Gunicorn и так далее), Last-Modified показывает дату последнего изменения файла на сервере, а заголовок Accept-Ranges обозначает поддержку частичных запросов для скачивания от клиента, что по сути определяет возможность продолжения прерванной загрузки.
▍ Скачивание файла
Для скачивания файла и сохранения с тем же именем, что и на сервере, можно использовать curl с опцией —remote-name (или -O). Показанная ниже команда скачивает последнюю версию curl для Windows с официального сайта:
curl -OL https://curl.se/windows/latest.cgi?p=win64-mingw.zip
Скачивание файла с именем по умолчанию и индикатором прогресса
При необходимости для нахождения ресурса добавляется опция -L, разрешающая перенаправления. Если нужно сохранить файл с новым именем, используйте опцию —output (или -o). Кроме того, при использовании команды curl в скрипте может понадобиться отключить индикатор прогресса, что можно сделать при помощи опции —silent (или -s). Эти две опции можно скомбинировать:
curl -sLo curl.zip https://curl.se/windows/latest.cgi?p=win64-mingw.zip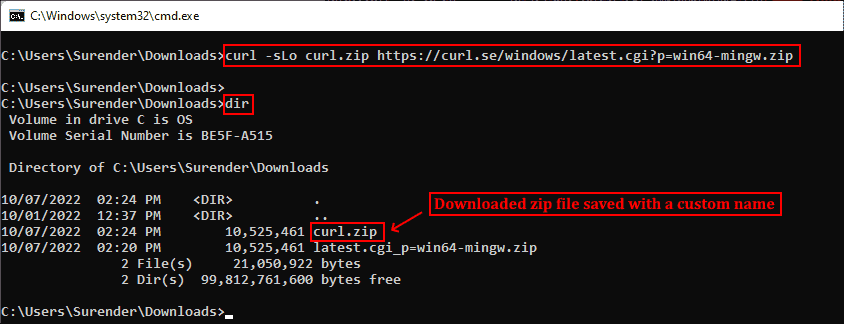
Скачивание файла без индикатора и сохранение под произвольным именем
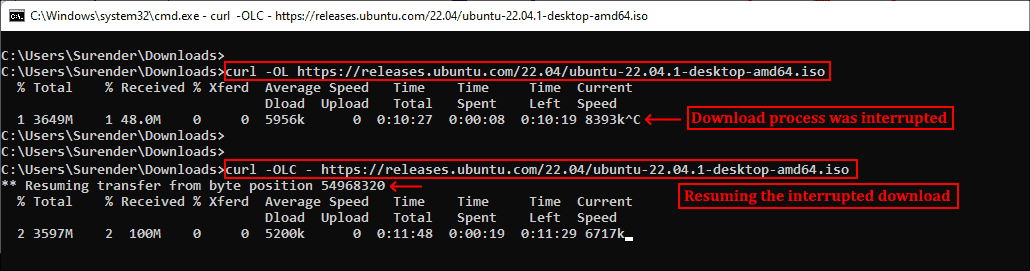
▍ Продолжение прерванного скачивания
Наличие Accept-Ranges: bytes в заголовке ответа в буквальном смысле обозначает, что сервер поддерживает скачивания с возможностью продолжения. Чтобы продолжить прерванное скачивание, можно использовать опцию —continue-at (или -C), получающую смещение (в байтах). Обычно указывать смещение непросто, поэтому curl предоставляет простой способ продолжения прерванной загрузки:
curl -OLC - https://releases.ubuntu.com/22.04/ubuntu-22.04.1-desktop-amd64.iso
Продолжение прерванного скачивания
Как видно из скриншота, я скачивал iso-файл Ubuntu, но скачивание было прервано. Затем я снова запустил команду curl с опцией -C, и передача продолжилась с того диапазона байтов, на котором была прервана. Знак минус (—) рядом с -C позволяет curl автоматически определить, как и где продолжить прерванное скачивание.
▍ Аутентификация с Curl
Также Curl поддерживает аутентификацию, что позволяет скачать защищённый файл, предоставив учётные данные при помощи опции —user (or -u), принимающей имя пользователя и пароль в формате username:password. Если не вводить пароль, curl попросит ввести его в режиме no-echo.
curl -u surender -OL https://techtutsonline.com/secretFiles/sample.zip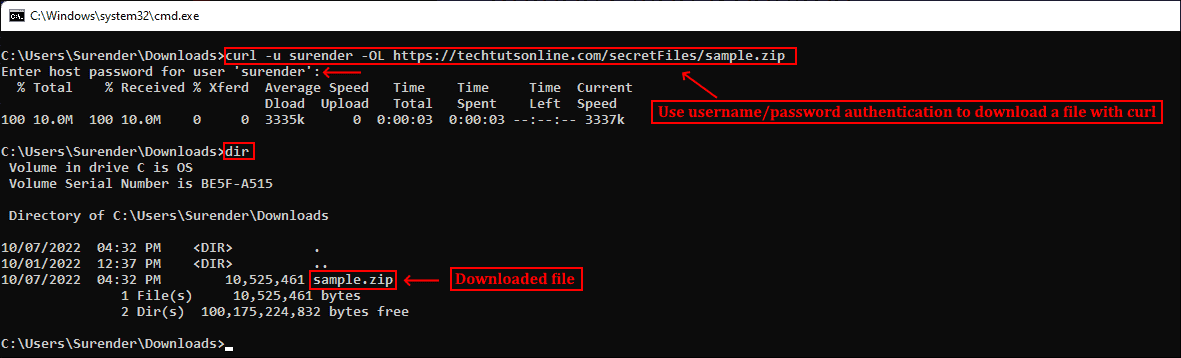
Скачивание файла с аутентификацией по имени пользователя и паролю
Если вы используете Basic authentication, то необходимо передать имя пользователя и пароль, а значит, воспользоваться защищённым протоколом наподобие HTTPS (вместо HTTP) или FTPS (вместо FTP). Если по каким-то причинам приходится использовать протокол без шифрования, то убедитесь, что вы используете способ аутентификации, не передающий учётные данные в виде простого текста (например, аутентификацию Digest, NTLM или Negotiate).
Также curl поддерживает использование файлов конфигурации .curlrc, _curlrc и .netrc, позволяющих задавать различные опции curl в файле, а затем добавлять файл в команду при помощи опции curl —config (или curl -K), что особенно полезно при написании скриптов.
▍ Выгрузка файла
Опция —upload-file (или -T) позволяет выгружать локальный файл на удалённый сервер. Показанная ниже команда выгружает файл из локальной системы на удалённый веб-сервер по протоколу FTPS:
curl -kT C:UsersSurenderDownloadssample1.zip -u testlabsurender ftps://192.168.0.80/awesomewebsite.com/files/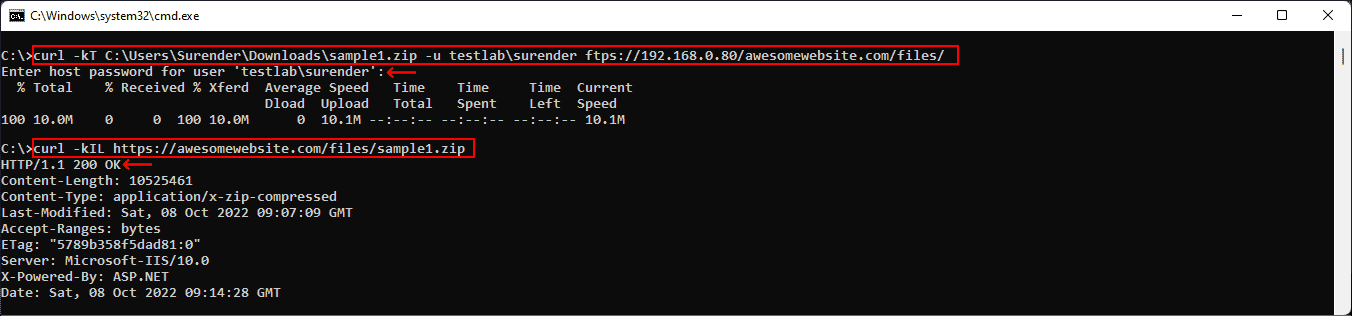
Выгрузка файла на удалённый сервер
Опция -k добавляется для устранения проблем с сертификатами на случай, если веб-сервер использует самоподписанный сертификат. Наклонная черта в конце URL сообщает curl, что конечная точка является папкой. Можно указать несколько имён файлов, например «{sample1.zip,sample2.zip}». Ниже показано, как с помощью одной команды curl можно выгрузить на сервер несколько файлов:
curl -kT sample[1-5].zip -u testlabsurender ftps://192.168.0.80/awesomewebsite.com/files/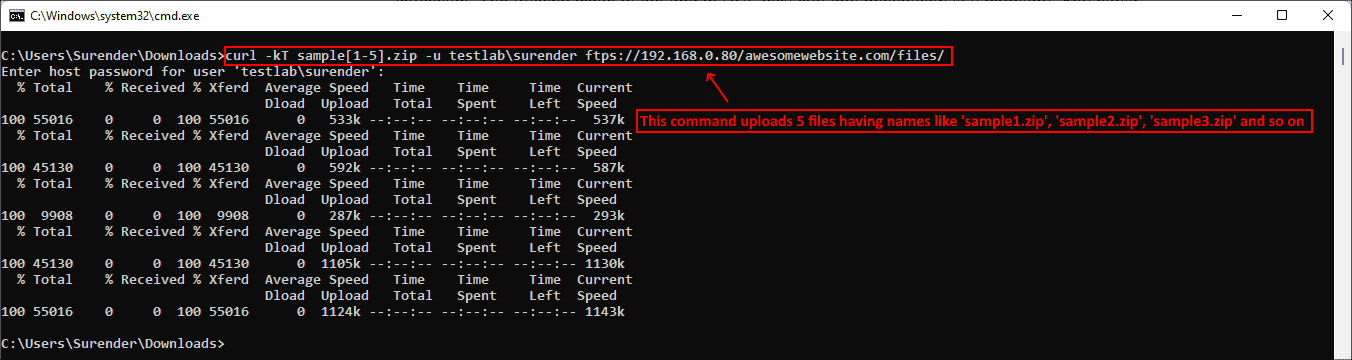
Выгрузка нескольких файлов на сервер
▍ Последовательность команд
Как говорилось ранее, curl поддерживает различные методы в зависимости от используемого протокола. Дополнительные команды можно отправлять при помощи —quote (или -Q) для выполнения операции до или после обычной операции curl. Например, можно скачать файл с удалённого сервера по протоколу FTPS и удалить файл с сервера после успешного скачивания. Для этого нужно выполнить следующую команду:
curl -u testlabsurender -kO "ftps://192.168.0.80/awesomewebsite.com/files/sample1.zip" -Q "-DELE sample1.zip"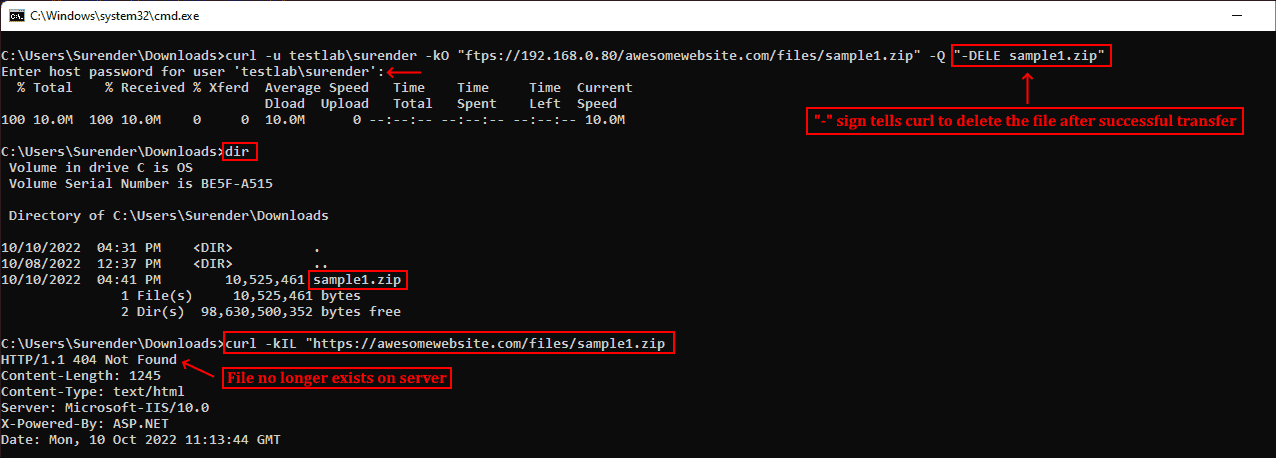
Удаление файла после успешного скачивания
В показанном выше примере я скачал файл sample1.zip с FTPS-сервера при помощи опции -O. После опции -Q я добавил минус (-) перед командой DELE, что заставляет curl отправить команду DELE sample1.zip сразу после успешного скачивания файла. Аналогично, если вы хотите отправить команду на сервер до выполнения операции curl, используйте плюс (+) вместо минуса.
▍ Изменение user-agent
Информация user-agent сообщает серверу тип клиента, отправляющего запрос. При отправке запроса curl на сервер по умолчанию используется user-agent curl/<version>. Если сервер настроен так, чтобы блокировать запросы curl, можно задать собственный user-agent при помощи опции —user-agent (или -A). Показанная ниже команда отправляет стандартный user-agent Google Chrome:
curl -kIA "Mozilla/5.0 (Windows NT 10.0; Win64; x64) AppleWebKit/537.36 (KHTML, like Gecko) Chrome/106.0.0.0" https://awesomewebsite.com/files/secretFile.zip
Использование собственного user-agent с командой curl, чтобы избежать блокировки сервером
На показанном выше скриншоте видно, что обычный запрос curl был отклонён веб-сервером (с ответом 403 Forbidden), но при передаче другого user-agent запрос выполняется успешно, возвращая ответ 200 OK.
▍ Отправка куки
По умолчанию запрос curl не отправляет и не сохраняет куки. Для записи куки можно использовать опцию —cookie-jar (или -c), а отправить куки можно опцией —cookie (or -b):
curl -c /path/cookie_file https://awesomewebsite.com/
curl -b /path/cookie_file https://awesomewebsite.com/
Первая команда записывает файл куки, а вторая отправляет куки с запросом curl. Также можно отправить куки в формате ‘name = value’:
curl -b 'session=abcxyz' -b 'loggedin=true' http://echo.hoppscotch.io
Отправка нескольких куки командой curl
Я воспользовался веб-сайтом echo.hoppscotch.io для демонстрации заголовков HTTP-запросов, которые обычно невидимы клиентам, отправляющим запрос. Если вы не хотите пользоваться этим веб-сайтом, то можете применить опцию –verbose (или -v) для отображения запроса в сыром виде (который отображает и заголовки запросов).
▍ Использование прокси-сервера
Если вы пользуетесь прокси-сервером для подключения к интернету, в curl можно указать прокси опцией —proxy (или -x). Если прокси-сервер требует аутентификации, то добавьте —proxy-user (или -U):
curl -x 192.168.0.250:8088 -U username:password https://awesomewebsite.com/Прокси-сервер указывается в формате server:port, а пользователь прокси — в формате username:password. Можно не вводить пароль пользователя прокси, тогда curl попросит ввести его в режиме no-echo.

Использование прокси-сервера и аутентификации
▍ Дополнительные заголовки запросов
Иногда вместе с запросом к серверу необходимо отправить дополнительную информацию. В curl это можно сделать при помощи —header (или -H), как показано в следующей команде:
curl -vkIH "x-client-os: Windows 11 Enterprise (x64)" https://awesomewebsite.com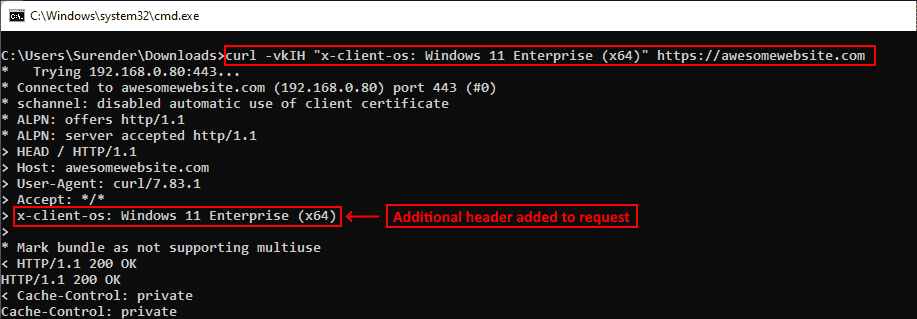
Указание дополнительных заголовков для запроса curl
Можно отправлять любую информацию, недоступную через стандартные заголовки HTTP-запросов. В этом примере я отправил название своей операционной системы. Также я добавил опцию -v для включения verbose-вывода, отображающего дополнительный заголовок, отправляемый вместе с каждым моим запросом curl.
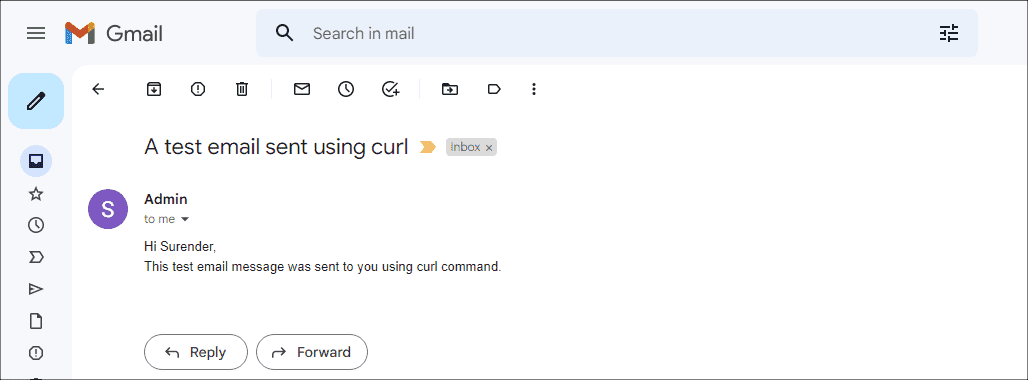
▍ Отправка электронного письма
Так как curl поддерживает протокол SMTP, его можно использовать для отправки электронного письма. Показанная ниже команда позволяет отправить электронное письмо при помощи curl:
curl --insecure --ssl-reqd smtps://mail.yourdomain.com –-mail-from sender@yourdomain.com –-mail-rcpt receiver@company.com --user sender@yourdomain.com --upload-file email_msg.txt
Отправка электронного письма командой curl
Давайте вкратце перечислим использованные здесь опции:
- Опция —insecure (или -k) используется, чтобы избежать ошибки сертификата SSL. Мы уже применяли её ранее.
- Опция —ssl-reql используется для апгрейда соединения передачи простого текста до зашифрованного соединения, если оно поддерживается SMTP-сервером. Если вы уверены, что ваш SMTP-сервер поддерживает SSL, то можно использовать непосредственно имя сервера smtps (например, smtps://smtp.yourdomain.com), как показано на скриншоте.
- Опция —mail-from используется для указания адреса электронной почты отправителя.
- Опция mail-rcpt указывает адрес электронной почты получателя.
- Опция —user (или -u) отправляет имя пользователя для аутентификации, оно должно совпадать с адресом mail-from, потому что в противном случае письмо может быть отклонено или помечено как спам.
- Опция —upload-file (или -T) используется для указания файла, в котором находится отправляемое письмо.
На скриншоте ниже показано письмо, полученное мной во входящие:
Просмотр письма, отправленного с помощью curl
Это всего лишь несколько примеров использования curl — на самом деле их гораздо больше. Я настоятельно рекомендую проверить справку по curl и поэкспериментировать с ней.
А вы используете curl? И если да, то для чего?
Telegram-канал с полезностями и уютный чат

Команда Mail.ru Cloud Solutions перевела статью, автор которой составил краткий справочник часто используемых команд curl для протоколов HTTP/HTTPS. Это не замена официального руководства по cURL, скорее, краткий конспект.
cURL (расшифровывается как Client URL) — программное обеспечение, которое предоставляет библиотеку libcurl и инструмент командной строки curl. Возможности cURL огромны, во многих опциях легко потеряться.
curl — инструмент для передачи данных с сервера или на него, при этом используется один из поддерживаемых протоколов: DICT, FILE, FTP, FTPS, GOPHER, HTTP, HTTPS, IMAP, IMAPS, LDAP, LDAPS, POP3, POP3S, RTMP, RTSP, SCP, SFTP, SMB, SMBS, SMTP, SMTPS, TELNET и TFTP. Команда предназначена для работы без взаимодействия с пользователем.
Команда curl запускается из командной строки и предустановлена в большинстве дистрибутивов Linux.
Варианты применения:
- доступ без браузера;
- внутри shell-скриптов;
- для тестирования API.
В основном я использовал curl для тестирования API, иногда просто вставляя команды, которые нашел в интернете. Но я хочу разобраться в curl и лучше понять его особенности. Так что поделюсь некоторыми командами, с которыми столкнулся во время работы.
Запрос страницы
Если никакие аргументы не указаны, то команда curl выполняет HTTP-запрос get и отображает статическое содержимое страницы. Оно аналогично тому, что мы видим при просмотре исходного кода в браузере.
curl www.google.com
Скачивание файла
Есть два варианта этой команды.
- Скачать файл и сохранить под оригинальным именем (testfile.tar.gz).
curl -O https://testdomain.com/testfile.tar.gz
- Скачать файл и сохранить под другим именем.
curl -o custom_file.tar.gz https://testdomain.com/testfile.tar.gz
Еще можно скачать несколько файлов одной командой, хотя в мануале так делать не рекомендуют.
curl -O https://testdomain.com/testfile.tar.gz -O https://testdomain.com/testfile2.tar.gz
Получение заголовков HTTP
Если вы хотите посмотреть, какие заголовки отдает сервер, то можно использовать опции -I или -head. Они позволяют получить заголовок без тела документа.
curl -I https://www.google.com
HTTP/1.1 200 OK
Content-Type: text/html; charset=ISO-8859-1
P3P: CP=»This is not a P3P policy! See g.co/p3phelp for more info.»
Date: Thu, 04 Jun 2020 15:07:42 GMT
Server: gws
X-XSS-Protection: 0
X-Frame-Options: SAMEORIGIN
Transfer-Encoding: chunked
Expires: Thu, 04 Jun 2020 15:07:42 GMT
Cache-Control: private
Set-Cookie: 1P_JAR=2020-06-04-15; expires=Sat, 04-Jul-2020 15:07:42 GMT; path=/; domain=.google.com; Secure
Set-Cookie: <cookie_info>
Игнорирование ошибки неправильных или самоподписанных сертификатов
Когда вы тестируете веб-приложение или API, то в вашем тестовом окружении могут быть самоподписанные или неправильные SSL-сертификаты. По умолчанию curl верифицирует все сертификаты. Чтобы он не выдавал ошибку о неверных сертификатах и устанавливал соединение для тестирования, используйте опцию -k или -insecure.
curl -k https://localhost/my_test_endpoint
Отправка POST-запроса
Иногда для тестирования API нужно отправить какие-либо данные, обычно это делают через POST-запрос. Если вы делаете POST-запрос при помощи curl, то можете отправить данные либо в виде списка имя=значение, либо в виде JSON.
- Запрос в виде списка имя=значение.
curl —data «param1=test1¶m2=test2» http://test.com
- Запрос в виде JSON.
curl -H ‘Content-Type: application/json’ —data ‘{«param1″:»test1″,»param2″:»test2»}’ http://www.test.com
Параметр —data эквивалентен -d, оба указывают curl выполнить HTTP POST-запрос.
Указание типа запроса
Если curl не передаются никакие данные, то по умолчанию он выполняет HTTP GET запрос. Но если вам, например, нужно обновить данные, а не пересоздать их заново, то curl поддерживает опции, указывающие тип запроса. Параметры -x или —request позволяют указать тип HTTP-запроса, который используется для сообщения с сервером.
# updating the value of param2 to be test 3 on the record id
curl -X ‘PUT’ -d ‘{«param1″:»test1″,»param2″:»test3»}’ http://test.com/1
Использование авторизации
API защищено авторизацией по логину-паролю — вы можете передать пару логин-пароль, используя параметр -u или —user. Если просто передать логин, то curl запросит пароль в командной строке. Используете параметр несколько раз — для авторизации на сервер будет передано только последнее значение.
curl -u <user:password> https://my-test-api.com/endpoint1
Управление резольвом имен
Вы хотите протестировать API перед развертыванием и перенаправить запрос на тестовую машину — это можно сделать, указав альтернативный резольв имени эндпоинта для данного запроса. Все работает эквивалентно пропиcыванию хоста в /etc/hosts.
curl —resolve www.test.com:80:localhost http://www.test.com/
Загрузка файла
О возможности загрузки файла через curl я узнал недавно. Не был уверен, что это возможно, но, по всей видимости, это так: curl с опцией -F эмулирует отправку заполненной формы, когда пользователь нажимает кнопку отправки. Опция указывает curl передавать данные в виде POST-запроса, используя multipart / form-data Content-Type.
Вы можете загрузить несколько файлов, повторяя параметр -F.
Измерение продолжительности соединения
Вы можете использовать опцию -w для отображения информации в stdout после завершения передачи. Она поддерживает отображение набора переменных. Например, можно узнать общее время, которое потребовалось для успешного выполнения запроса. Это удобно, если вам нужно определить время загрузки или скачивания с помощью curl.
curl -w «%{time_total}n» -o /dev/null -s www.test.com
Это некоторые из опций, которые можно использовать с curl. Надеюсь, информация была вам полезна и статья понравилась.
Удачи!
Что еще почитать:
- Иллюстрированное руководство по полезным инструментам командной строки.
- Что происходит, когда вы обновляете свой DNS.
- Наш Телеграм-канал о цифровой трансформации.
Нам часто приходится загружать различные файлы из интернета, например, исполняемые файлы программ, файлы скриптов, архивы с исходниками. Но не всегда это нужно делать через браузер. Во многих ситуациях гораздо проще выполнить все действия через терминал. Поскольку таким образом вы можете автоматизировать процесс. С другой стороны, веб-мастерам время от времени приходится тестировать доступность веб-сайтов, проверять отправляемые и получаемые заголовки и многое другое.
Для решения таких задач и задач подобного круга можно воспользоваться утилитой curl. Она позволяет решить намного более широкий круг задач, среди которых даже имитация действий пользователя на сайте. В этой статье мы рассмотрим как пользоваться curl, что это такое и зачем нужна эта программа.
На самом деле, curl — это больше чем просто утилита командной строки для Linux или Windows. Это набор библиотек, в которых реализуются базовые возможности работы с URL страницами и передачи файлов. Библиотека поддерживает работу с протоколами: FTP, FTPS, HTTP, HTTPS, TFTP, SCP, SFTP, Telnet, DICT, LDAP, а также POP3, IMAP и SMTP. Она отлично подходит для имитации действий пользователя на страницах и других операций с URL адресами.
Поддержка библиотеки curl была добавлена в множество различных языков программирования и платформ. Утилита curl — это независимая обвертка для этой библиотеки. Именно на этой утилите мы и остановимся в этой статье.
Команда curl
Перед тем как перейти к описанию того как может использоваться команда curl linux, давайте разберем саму утилиту и ее основные опции, которые нам понадобятся. Синтаксис утилиты очень прост:
$ curl опции ссылка
Теперь рассмотрим основные опции:
- -# — отображать простой прогресс-бар во время загрузки;
- -0 — использовать протокол http 1.0;
- -1 — использовать протокол шифрования tlsv1;
- -2 — использовать sslv2;
- -3 — использовать sslv3;
- -4 — использовать ipv4;
- -6 — использовать ipv6;
- -A — указать свой USER_AGENT;
- -b — сохранить Cookie в файл;
- -c — отправить Cookie на сервер из файла;
- -C — продолжить загрузку файла с места разрыва или указанного смещения;
- -m — максимальное время ожидания ответа от сервера;
- -d — отправить данные методом POST;
- -D — сохранить заголовки, возвращенные сервером в файл;
- -e — задать поле Referer-uri, указывает с какого сайта пришел пользователь;
- -E — использовать внешний сертификат SSL;
- -f — не выводить сообщения об ошибках;
- -F — отправить данные в виде формы;
- -G — если эта опция включена, то все данные, указанные в опции -d будут передаваться методом GET;
- -H — передать заголовки на сервер;
- -I — получать только HTTP заголовок, а все содержимое страницы игнорировать;
- -j — прочитать и отправить cookie из файла;
- -J — удалить заголовок из запроса;
- -L — принимать и обрабатывать перенаправления;
- -s — максимальное количество перенаправлений с помощью Location;
- -o — выводить контент страницы в файл;
- -O — сохранять контент в файл с именем страницы или файла на сервере;
- -p — использовать прокси;
- —proto — указать протокол, который нужно использовать;
- -R — сохранять время последнего изменения удаленного файла;
- -s — выводить минимум информации об ошибках;
- -S — выводить сообщения об ошибках;
- -T — загрузить файл на сервер;
- -v — максимально подробный вывод;
- -y — минимальная скорость загрузки;
- -Y — максимальная скорость загрузки;
- -z — скачать файл, только если он был модифицирован позже указанного времени;
- -V — вывести версию.
Это далеко не все параметры curl linux, но здесь перечислено все основное, что вам придется использовать.
Как пользоваться curl?
Мы рассмотрели все, что касается теории работы с утилитой curl, теперь пришло время перейти к практике, и рассмотреть примеры команды curl.
Загрузка файлов
Самая частая задача — это загрузка файлов linux. Скачать файл очень просто. Для этого достаточно передать утилите в параметрах имя файла или html страницы:
curl https://raw.githubusercontent.com/curl/curl/master/README.md
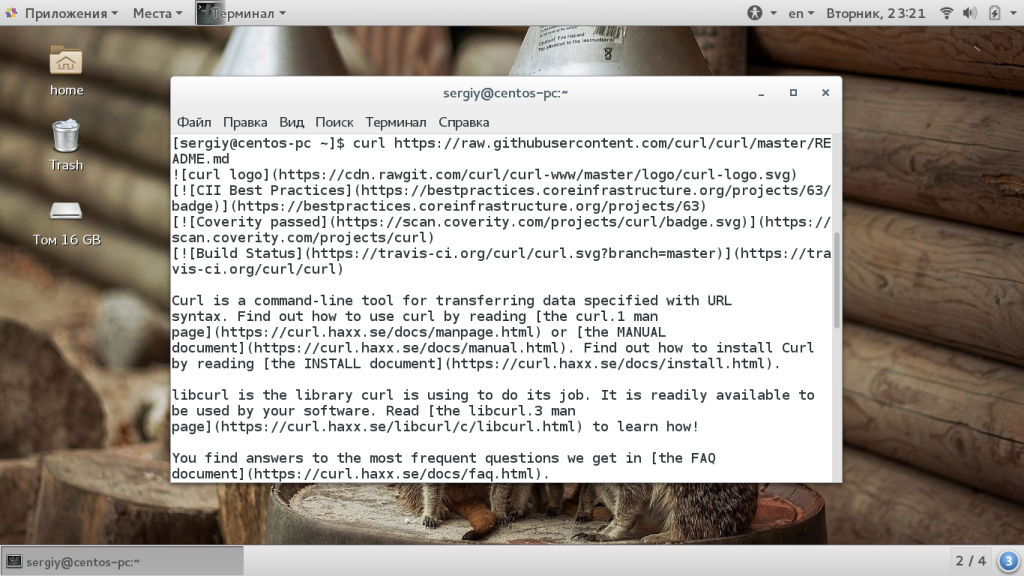
Но тут вас ждет одна неожиданность, все содержимое файла будет отправлено на стандартный вывод. Чтобы записать его в какой-либо файл используйте:
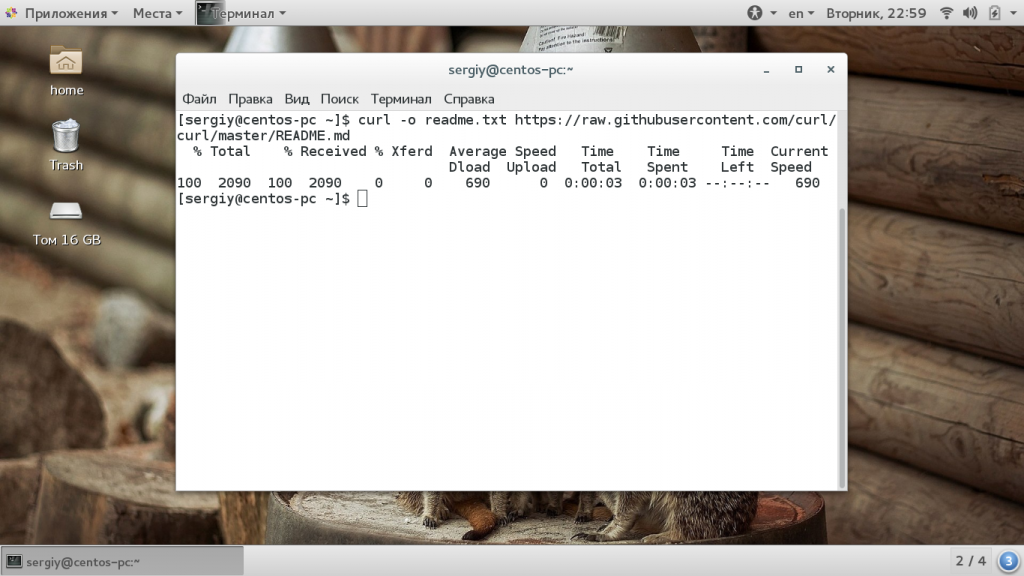
curl -o readme.txt https://raw.githubusercontent.com/curl/curl/master/README.md
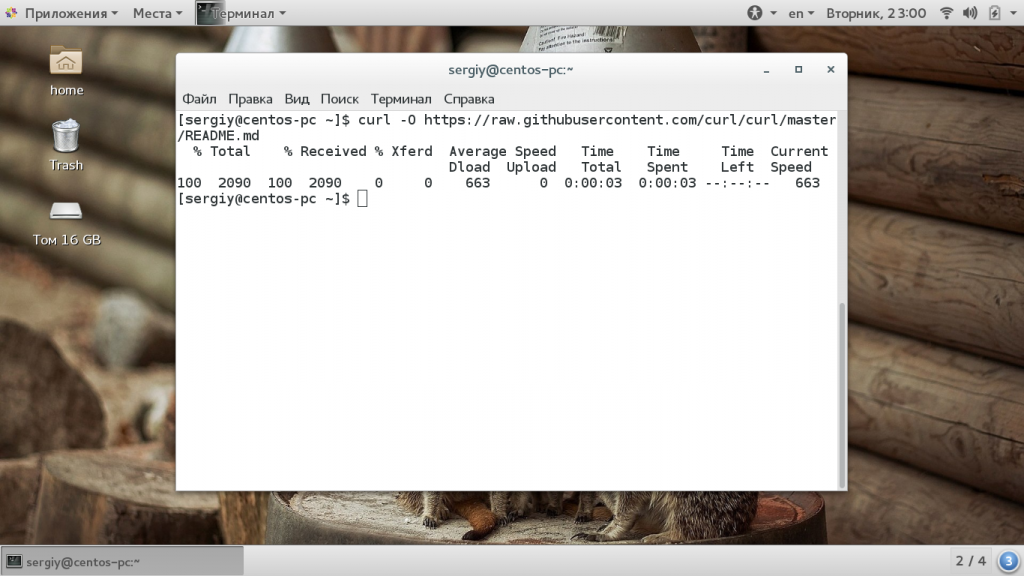
А если вы хотите, чтобы полученный файл назывался так же, как и файл на сервере, используйте опцию -O:
curl -O https://raw.githubusercontent.com/curl/curl/master/README.md
Если загрузка была неожиданно прервана, вы можете ее возобновить:
curl -# -C - -O https://cdn.kernel.org/pub/linux/kernel/v4.x/testing/linux-4.11-rc7.tar.xz

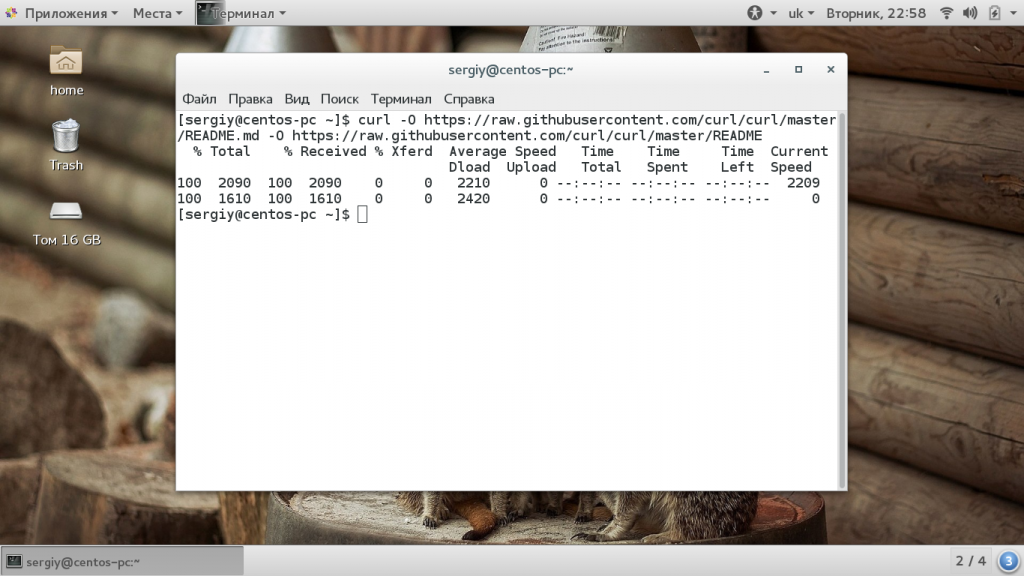
Если нужно, одной командой можно скачать несколько файлов:
curl -O https://raw.githubusercontent.com/curl/curl/master/README.md -O https://raw.githubusercontent.com/curl/curl/master/README
Еще одна вещь, которая может быть полезной администратору — это загрузка файла, только если он был изменен:
curl -z 21-Dec-17 https://raw.githubusercontent.com/curl/curl/master/README.md -O https://raw.githubusercontent.com/curl/curl/master/README
Данная команда скачает файл, только если он был изменен после 21 декабря 2017.
Ограничение скорости
Вы можете ограничить скорость загрузки до необходимого предела, чтобы не перегружать сеть с помощью опции -Y:
curl --limit-rate 50K -O https://cdn.kernel.org/pub/linux/kernel/v4.x/testing/linux-4.11-rc7.tar.xz
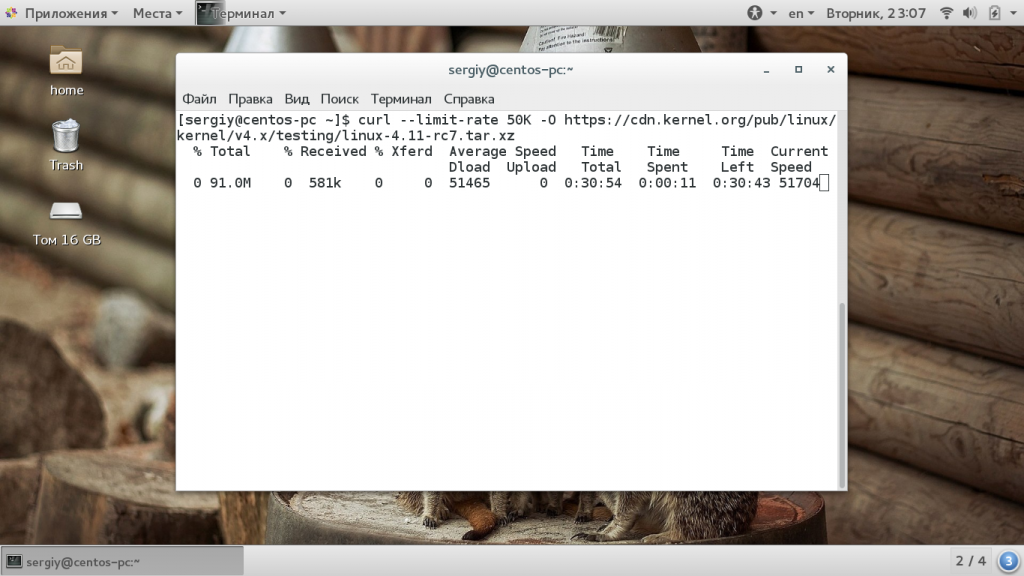
Здесь нужно указать количество килобайт в секунду, которые можно загружать. Также вы можете разорвать соединение если скорости недостаточно, для этого используйте опцию -Y:
curl -Y 100 -O https://raw.githubusercontent.com/curl/curl/master/README.md
Передача файлов
Загрузка файлов, это достаточно просто, но утилита позволяет выполнять и другие действия, например, отправку файлов на ftp сервер. Для этого существует опция -T:
curl -T login.txt ftp://speedtest.tele2.net/upload/
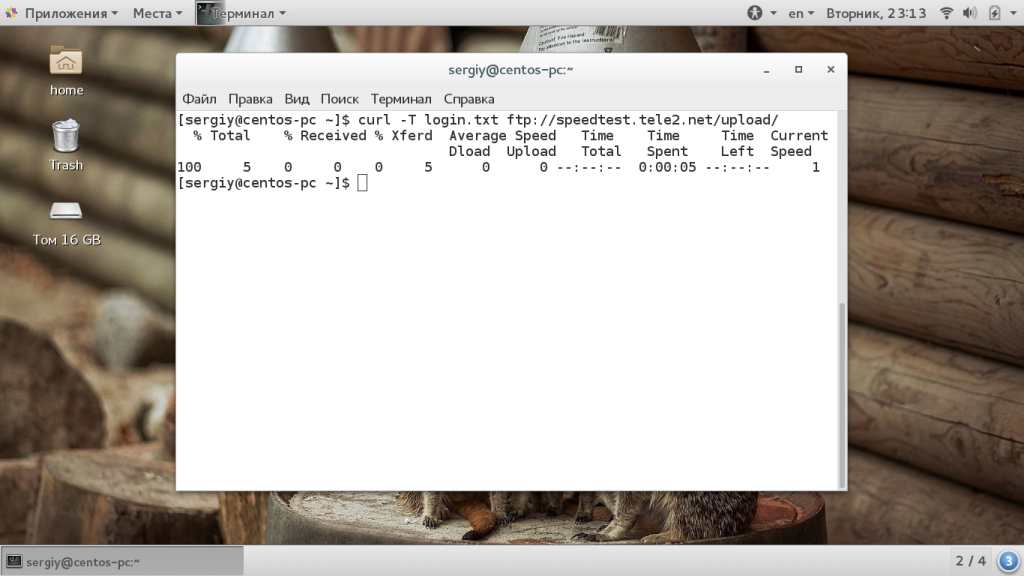
Или проверим отправку файла по HTTP, для этого существует специальный сервис:
curl -T ~/login.txt http://posttestserver.com/post.php
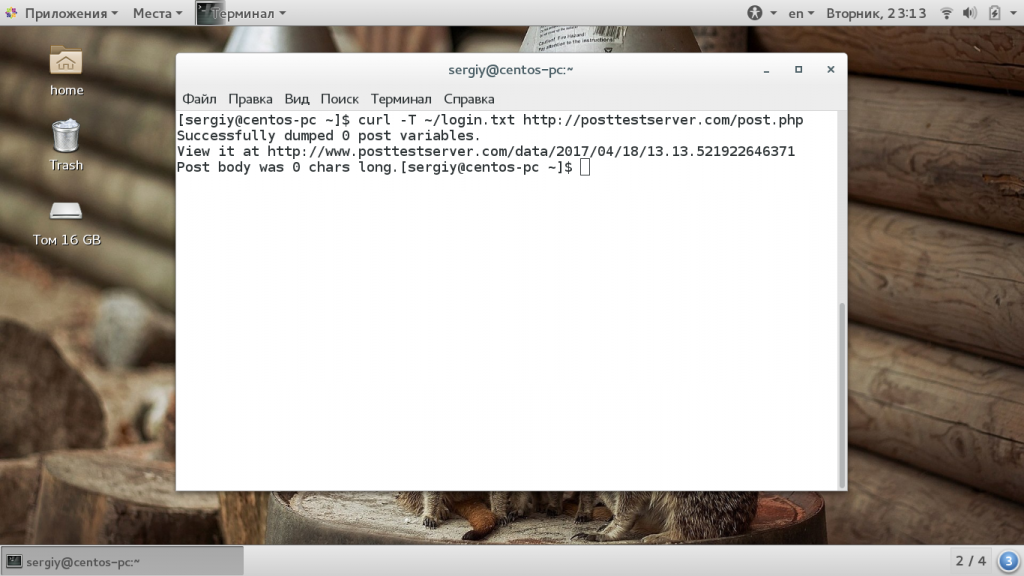
В ответе утилита сообщит где вы можете найти загруженный файл.
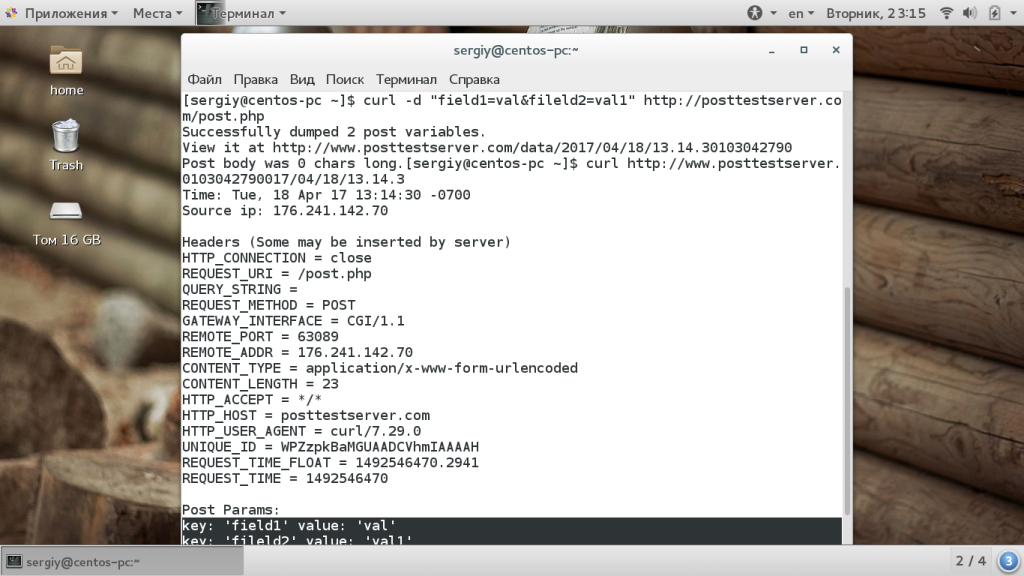
Отправка данных POST
Вы можете отправлять не только файлы, но и любые данные методом POST. Напомню, что этот метод используется для отправки данных различных форм. Для отправки такого запроса используйте опцию -d. Для тестирования будем пользоваться тем же сервисом:
curl -d "field1=val&fileld2=val1"http://posttestserver.com/post.php
Если вас не устраивает такой вариант отправки, вы можете сделать вид, что отправили форму. Для этого есть опция -F:
curl -F "password=@pass;type=text/plain" http://posttestserver.com/post.php
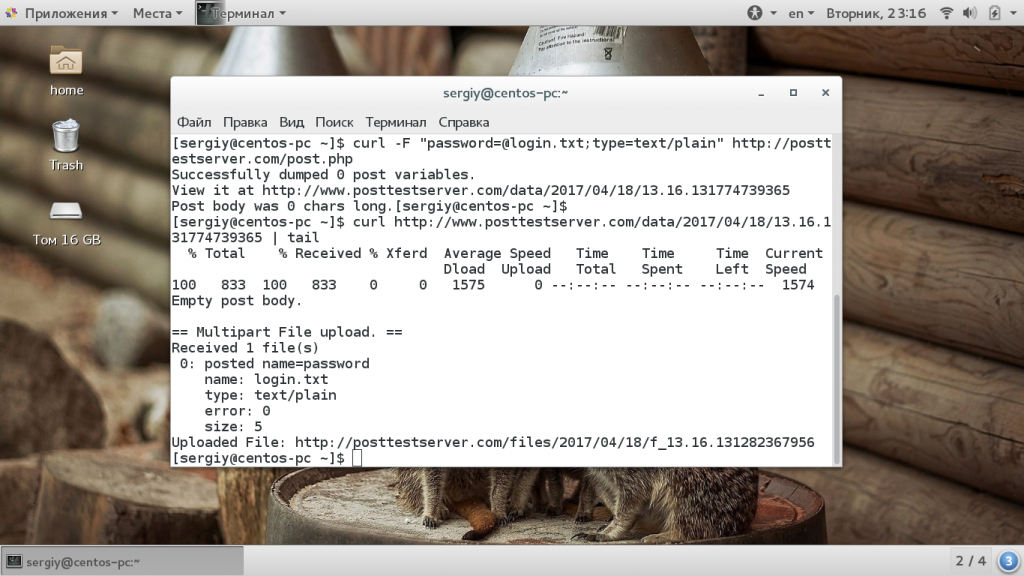
Здесь мы передаем формой поле password, с типом обычный текст, точно так же вы можете передать несколько параметров.
Передача и прием куки
Куки или Cookie используются сайтами для хранения некой информации на стороне пользователя. Это может быть необходимо, например, для аутентификации. Вы можете принимать и передавать Cookie с помощью curl. Чтобы сохранить полученные Cookie в файл используйте опцию -c:
curl -c cookie.txt http://posttestserver.com/post.php
Затем можно отправить cookie curl обратно:
curl -b cookie.txt http://posttestserver.com/post.php
Передача и анализ заголовков
Не всегда нам обязательно нужно содержимое страницы. Иногда могут быть интересны только заголовки. Чтобы вывести только их есть опция -I:
curl -I https://losst.pro

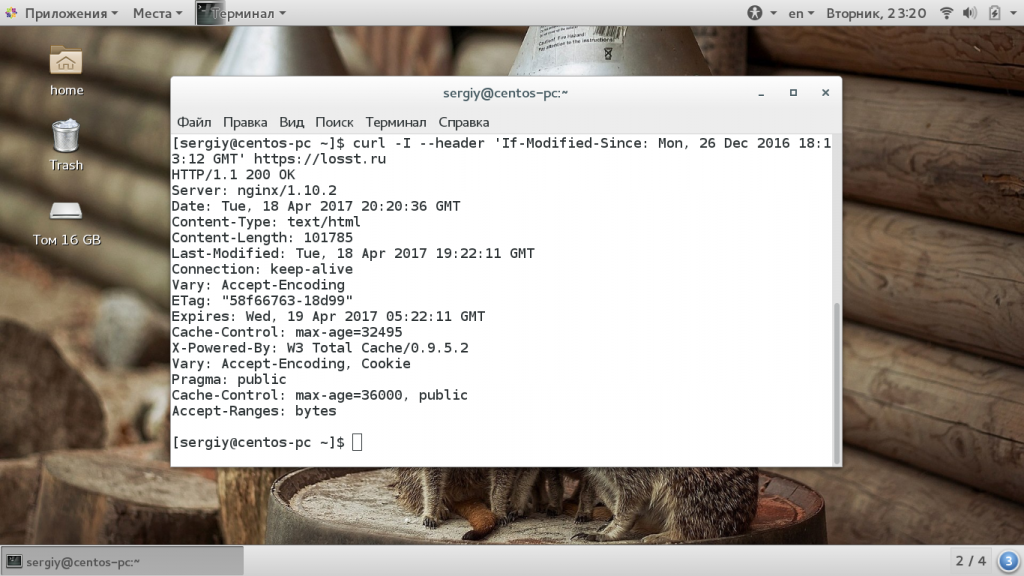
А опция -H позволяет отправить нужный заголовок или несколько на сервер, например, можно передать заголовок If-Modified-Since чтобы страница возвращалась только если она была изменена:
curl -I --header 'If-Modified-Since: Mon, 26 Dec 2016 18:13:12 GMT' https://losst.pro
Аутентификация curl
Если на сервере требуется аутентификация одного из распространенных типов, например, HTTP Basic или FTP, то curl очень просто может справиться с такой задачей. Для указания данных аутентификации просто укажите их через двоеточие в опции -u:
curl -u ftpuser:ftppass -T - ftp://ftp.testserver.com/myfile_1.txt
Точно так же будет выполняться аутентификация на серверах HTTP.
Использование прокси
Если вам нужно использовать прокси сервер для загрузки файлов, то это тоже очень просто. Достаточно задать адрес прокси сервера в опции -x:
curl -x proxysever.test.com:3128 http://google.co.in
Выводы
В этой статье мы рассмотрели как пользоваться curl, зачем нужна эта утилита и основные ее возможности. Несмотря на свою схожесть с wget, они очень сильно отличаются. Команда curl linux предназначена больше для анализа и имитации различных действий на сервере, тогда как wget больше подходит для загрузки файлов и краулинга сайтов.

Статья распространяется под лицензией Creative Commons ShareAlike 4.0 при копировании материала ссылка на источник обязательна .
Осваиваем быстрый, маленький и простой инструмент тестирования API
- Настройка
- Базовые опции
- GET-метод
- POST-метод
- Отправка простого текста
- Параметры строки запроса
- Отправка JSON-объекта
- Эмуляция отправки значений формы
- Отправка файла
- Другие методы
- Аутентификация
- Платный тариф
“Когда я начал изучать HTTP-протокол и надо было работать с URL-ами и передаваемыми в них данными, в каждом найденном инструменте не хватало хорошей документации, или она была, но в виде избыточно сложных инструкций для простых вещей, типа отправки простого HTTP-запроса. Однажды обратил внимание на curl, которым раньше скачивал файлы, и это оказался лучший инструмент для изучения веб-API.
Этот материал требует базового знакомства с HTTP-протоколом, понимания что такое веб-API, а также умения работать с командной строкой в Windows, надеемся ты это умеешь.
Итак, поехали.
Настройка
Как всякий серьезный софт, curl требует установки в операционной системе. Хорошая новость: скорее всего, он уже установлен! Точнее, встроен в операционку. Уважающий себя тестировщик, разумеется, работает в Linux, а почти каждый дистрибутив Linux уже идет с curl. Более того, даже Windows 10 (начиная с версии 1803) поставляется с curl.
Проверим, есть ли в системе curl.
В Linux набираем в терминале:
curl --version
Если все-таки работаешь в Windows, то запускаешь cmd или, лучше, PowerShell:
curl.exe --version
Команда покажет версию curl, прикрепленные библиотеки, дату релиза, поддерживаемые протоколы и поддерживаемые функции. В Linux увидим следующее:
curl 7.68.0 (x86_64-pc-linux-gnu) libcurl/7.68.0 OpenSSL/1.1.1f zlib/1.2.11 brotli/1.0.7 libidn2/2.2.0 libpsl/0.21.0 (+libidn2/2.2.0) libssh/0.9.3/openssl/zlib nghttp2/1.40.0 librtmp/2.3
Release-Date: 2020-01-08
Protocols: dict file ftp ftps gopher http https imap imaps ldap ldaps pop3 pop3s rtmp rtsp scp sftp smb smbs smtp smtps telnet tftp
Features: AsynchDNS brotli GSS-API HTTP2 HTTPS-proxy IDN IPv6 Kerberos Largefile libz NTLM NTLM_WB PSL SPNEGO SSL TLS-SRP UnixSockets
Если введенная команда выдала ошибку, то curl не установлен, значит его надо скачать и поставить. Еще одна хорошая новость: он бесплатный (но есть нюансы, о которых в конце). Есть версии для практически всех операционных систем, размер ехе-шника не превышает 5 Мб.
Если понадобилось ознакомиться с curl, а опыта с API нет, ситуацию облегчит тестовый httpbin-сервис, примеры с которым приведены далее в этом посте.
Примечание. С этого момента, будут приводиться исключительно «линуксовые» bash-команды, для ясности и читабельности. Если ты сидишь в Windows и примеры почему-то не работают, попробуй добавлять «.exe» после команды curl, или удалять (возможные) лишние пробелы в строках (line breaks).
Базовые опции
Несмотря на то, что Curl очень простой инструмент, он имеет множество различных функций. Начнем с ними знакомиться:
--requestили-X: Указывает нужный http-метод (здесь подробнее — желательно хорошо разобраться). Если опции нет, запрос по умолчанию обрабатывается как GET. Например:curl -X POST ...
--headerили-H: В HTTP-запрос добавляется дополнительный заголовок, их может быть сколько угодно. Например:curl -H "X-First-Name: John" -H "X-Last-Name: Doe" ...
--dataили-d: В запрос включаются какие-то данные. Они могут добавляться в той же строке, или указывать на текстовый файл, откуда считываются. Пример:curl -d "тут текстовые данные" ...
- —
-formили-F: curl эмулирует заполненную форму, с нажатием кнопки отправки. Допускается отправка бинарных файлов. Пример:curl -F name=John -F shoesize=11 ...
--user <user:password>или-u <user:password>: Логин и пароль для аутентификации на сервере.
curl показывает логи HTTP-транзакций в терминале. Если нужно еще больше подробностей, то curl сохраняет все в файлы для проверки при необходимости. Для это есть функции:
--dump-headerили-D: Сохраняет в указанный дамп-файл полученные заголовки. Пример:curl -D result.header ...--outputили-O: Выводит в указанный дамп-файл, минуя stdout. Пример:curl -o result.json ...
GET-метод
Мы познакомились с основами, пора перейти к более серьезным вещам.
Во первых, меняем текущую папку в командной оболочке, на домашнюю папку или на рабочий стол (desktop), чтобы легче было найти выведенные из curl файлы.
Делаем первые запросы:
curl -X GET "https://httpbin.org/get"
-H "accept: application/json"
-D result.headers
-o result.json
В первой строке указываем curl выполнить HTTP-запрос GET-методом, по такому-то URL. Во второй строке добавляем заголовок, чтобы сервер знал, что нам отправить в ответе. В третьей строке прописываем вывод полученных заголовков в файл дампа, который мы назовем result.headers. В последней строчке даем указание вывести результат запроса в файл result.json.
Если все пошло как надо, после запуска команды в прописанной на первом этапе домашней папке появятся нужные файлы. В данном случае будет выглядеть так.
файл result.headers
HTTP/2 200
date: Thu, 02 Sep 2021 05:47:14 GMT
content-type: application/json
content-length: 169
В файле result.headers видим, что запрос успешно выполнен, с кодом ответа 200 (все ОК), от сервера получен таймкод ответа (timestamp), и все заголовки.
Файл result.json
{
  "args": {},
  "headers": {
    "Accept": "application/json",
    "Host": "httpbin.org",
    "User-Agent": "curl/7.68.0"
  },
  "url": "https://httpbin.org/get"
}
В этом файле result.json находится тело ответа. Это данные, возвращенные сервером, в красивом JSON-формате (об особенностях формата читаем здесь).
POST-метод
Отправка простого текста
Сейчас попробуем отправить обычный текст (plaintext) на сервер, с помощью метода POST.
curl -X POST "https://httpbin.org/post"
-H "accept: application/json"
-H "Content-Type: text/plain"
-H "Custom-Header: Testing"
-d "I love hashnode"
-D result.headers
-o result.json
Как видим, в запрос включен кастомный заголовок "Custom-Header: Testing". Он должен отображаться в теле ответа.
Смотрим теперь в файл result.headers
HTTP/2 200
date: Fri, 03 Sep 2021 03:16:20 GMT
content-type: application/json
content-length: 182
и файл result.json
{
  "data": "I love hashnode",
  "headers": {
    "Accept": "application/json",
    "Content-Length": "15",
    "Content-Type": "text/plain",
    "Custom-Header": "Testing"
  }
}
Видим, что сервер получил plaintext-сообщение с тестовым заголовком и вернул его обратно без изменений.
Параметры строки запроса
В curl поддерживается не только простой текст, но и достаточно сложные параметры типа:
curl -X POST "https://httpbin.org/post?name=Carlos&last=Jasso"
-H "accept: application/json"
-D result.headers
-o result.json
файл result.headers
HTTP/2 200
date: Fri, 03 Sep 2021 03:30:47 GMT
content-type: application/json
content-length: 120
файл result.json
{
  "args": {
    "lastname": "Jasso",
    "name": "Carlos"
  },
  "headers": {
    "Accept": "application/json"
  }
}
Сервер, как и предыдущем примере, правильно «зеркалит» параметры, которые curl отправил.
Отправка JSON-объекта
Поставим curl-у задачу посложнее, попытаемся отправить на сервер json-файл и посмотрим что получится:
curl -X POST "https://httpbin.org/post"
-H "Content-Type: application/json; charset=utf-8"
-d @data.json
-o result.json
Тут мы добавили специальный заголовок Content-Type, сообщающий серверу, что ему посылается json-файл. Путь к файлу с данными указывается флагом -d с собачкой @, и далее путь к файлу (в нашем случае это будет текущая папка).
Вот содержимое файла data.json, который надо создать:
{
    "name": "Jane",
    "last": "Doe"
}
И файл result.json:
{
  "data": "{    "name": "Jane",    "last": "Doe"}",
  "headers": {
    "Accept": "*/*",
    "Content-Length": "38",
    "Content-Type": "application/json; charset=utf-8"
  },
  "json": {
    "last": "Doe",
    "name": "Jane"
  }
}
И снова видим, как curl умеет корректно отправлять контент JSON-файлов на сервер.
Эмуляция отправки значений формы
Иногда может понадобиться имитировать отправку формы. Curl умеет и это:
curl -X POST "https://httpbin.org/post"
-H "Content-Type: multipart/form-data"
-F "FavoriteFood=Pizza"
-F "FavoriteBeverage=Beer"
-o result.json
Чтобы обозначить для сервера, что посылаются данные формы, добавляется заголовок с соответствующим MIME-типом (как показано выше), плюс параметр -F в каждом из полей и значений.
result.json:
{
  "form": {
    "FavoriteBeverage": "Beer",
    "FavoriteFood": "Pizza"
  },
  "headers": {
    "Accept": "*/*",
    "Content-Length": "261",
    "Content-Type": "multipart/form-data;"
  }
}
Видим, что сервер получил форму и правильно обработал все поля.
Отправка файла
Выше мы демонстрировали достаточно простые действия. А как насчет передачи файла? Файлы передаются таким же образом, как формы выше. Отправим изображение из текущей папки:
curl -X POST "https://httpbin.org/post"
-H "Content-Type: multipart/form-data"
-F "FileComment=This is a JPG file"
-F "image=@image.jpg"
-o result.json
result.json:
{
  "files": {
    "image": "data:image/jpeg;base64,/9j/4AAQSkZJ..."
  },
  "form": {
    "FileComment": "This is a JPG file"
  },
  "headers": {
    "Accept": "*/*",
    "Content-Length": "78592",
    "Content-Type": "multipart/form-data;"
  }
}
curl может потребоваться некоторое время чтобы отправить большой файл, а потом сервер вернет этот файл (причем закодированный в Base64). Curl должен правильно обработать такой запрос.
Другие методы
Можно попробовать «погонять» любые запросы, чтобы убедиться, как полезен бывает curl при тестировании API. В целом, обработка запросов зависит от типа API и имплементации метода.
Аутентификация
curl умеет проводить аутентификацию на сервере, когда по URL-адресу нужен ввод пользовательских имени-пароля. В этом случае httpbin получает ожидаемые имя и пароль в формате /basic-auth/{user}/{passwd} и сопоставляет значения с введенными. Если эти данные не введены, получается следующее:
curl -X GET "https://httpbin.org/basic-auth/carlos/secret"
-H "accept: application/json"
-D result.headers
result.headers:
HTTP/2 401
date: Fri, 03 Sep 2021 04:08:44 GMT
content-length: 0
То есть код 401 (не прошла авторизация).
Добавим в запрос логин и пароль:
curl -X GET "https://httpbin.org/basic-auth/carlos/secret"
-u carlos:secret
-H "accept: application/json"
-D result.headers
result.headers:
HTTP/2 200
date: Fri, 03 Sep 2021 04:14:19 GMT
content-type: application/json
content-length: 48
result.json:
{
  "authenticated": true,
  "user": "carlos"
}
Все хорошо, авторизация прошла успешно.
Curl позволяет авторизоваться и другими методами — например, с помощью токена. Токен просто отправляется в соответствующем заголовке.
Платный тариф
Уже должно быть понятно, что curl — полезная вещь для тестировщика. Чтобы в этом мнении укрепиться, рассмотрим еще некоторые нюансы.
Распространенные инструменты тестирования API — бесплатные, но в них чаще всего бывают платными функции командной работы. Или например, запросы к социальным сетям (Вконтакте и Facebook) блокированы в бесплатном тарифе, и это один из немногих минусов в столь приятном продукте.
В других похожих инструментах бывает слишком сложный интерфейс, но это не об curl. Для простоты, рекомендую работать в VSCode. Связка VSCode c curl — идеальная.

На скрине слева отрендеренный markdown-документ, справа полученные result.headers и result.json, и терминал внизу, куда тестировщику приходится глядеть чаще всего.
Вопреки убеждению, бытующему в определенных кругах, curl хорошо работает не только в REST-архитектуре, но и в SOAP.
Конечно, раскрыть все нюансы в одной статье невозможно, и чтобы продолжить знакомство с такой полезной вещью как curl, не обойтись без чтения официальной документации на их сайте. Там же и примеры использования.”

cURL is a command line tool and a library which can be used to receive and send data between a client and a server or any two machines connected over the internet. It supports a wide range of protocols like HTTP, FTP, IMAP, LDAP, POP3, SMTP and many more.
Due to its versatile nature, cURL is used in many applications and for many use cases. For example, the command line tool can be used to download files, testing APIs and debugging network problems. In this article, we shall look at how you can use the cURL command line tool to perform various tasks.
Contents
- 1 Install cURL
- 1.1 Linux
- 1.2 MacOS
- 1.3 Windows
- 2 cURL basic usage
- 3 Downloading Files with cURL
- 4 Anatomy of a HTTP request/response
- 5 Following redirects with cURL
- 6 Viewing response headers with cURL
- 7 Viewing request headers and connection details
- 8 Silencing errors
- 9 Setting HTTP request headers with cURL
- 10 Making POST requests with cURL
- 11 Submitting JSON data with cURL
- 12 Changing the request method
- 13 Replicating browser requests with cURL
- 14 Making cURL fail on HTTP errors
- 15 Making authenticated requests with cURL
- 16 Testing protocol support with cURL
- 17 Setting the Host header and cURL’s —resolve option
- 18 Resolve domains to IPv4 and IPv6 addresses
- 19 Disabling cURL’s certificate checks
- 20 Troubleshooting website issues with “cURL timing breakdown”
- 21 cURL configuration files
- 22 Conclusion
Install cURL
Linux
Most Linux distributions have cURL installed by default. To check whether it is installed on your system or not, type curl in your terminal window and press enter. If it isn’t installed, it will show a “command not found” error. Use the commands below to install it on your system.
For Ubuntu/Debian based systems use:
sudo apt update
sudo apt install curl
For CentOS/RHEL systems, use:
sudo yum install curl
On the other hand, for Fedora systems, you can use the command:
sudo dnf install curl
MacOS
MacOS comes with cURL preinstalled, and it receives updates whenever Apple releases updates for the OS. However, in case you want to install the most recent version of cURL, you can install the curl Homebrew package. Once you install Homebrew, you can install it with:
brew install curl
Windows
For Windows 10 version 1803 and above, cURL now ships by default in the Command Prompt, so you can use it directly from there. For older versions of Windows, the cURL project has Windows binaries. Once you download the ZIP file and extract it, you will find a folder named curl-<version number>-mingw. Move this folder into a directory of your choice. In this article, we will assume our folder is named curl-7.62.0-win64-mingw, and we have moved it under C:.
Next, you should add cURL’s bin directory to the Windows PATH environment variable, so that Windows can find it when you type curl in the command prompt. For this to work, you need to follow these steps:
- Open the “Advanced System Properties” dialog by running
systempropertiesadvancedfrom the Windows Run dialog (Windows key + R). - Click on the “Environment Variables” button.
- Double-click on “Path” from the “System variables” section, and add the path
C:curl-7.62.0-win64-mingwbin. For Windows 10, you can do this with the “New” button on the right. On older versions of Windows, you can type in;C:curl-7.62.0-win64-mingwbin(notice the semicolon at the beginning) at the end of the “Value” text box.
Once you complete the above steps, you can type curl to check if this is working. If everything went well, you should see the following output:
C:UsersAdministrator>curl
curl: try 'curl --help' or 'curl --manual' for more information
cURL basic usage
The basic syntax of using cURL is simply:
curl <url>
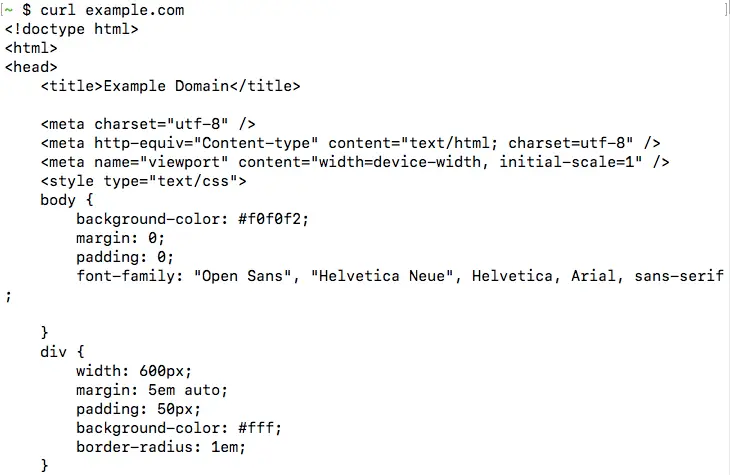
This fetches the content available at the given URL, and prints it onto the terminal. For example, if you run curl example.com, you should be able to see the HTML page printed, as shown below:
This is the most basic operation cURL can perform. In the next few sections, we will look into the various command line options accepted by cURL.
Downloading Files with cURL
As we saw, cURL directly downloads the URL content and prints it to the terminal. However, if you want to save the output as a file, you can specify a filename with the -o option, like so:
curl -o vlc.dmg http://ftp.belnet.be/mirror/videolan/vlc/3.0.4/macosx/vlc-3.0.4.dmg
In addition to saving the contents, cURL switches to displaying a nice progress bar with download statistics, such as the speed and the time taken:

Instead of providing a file name manually, you can let cURL figure out the filename with the -O option. So, if you want to save the above URL to the file vlc-3.0.4.dmg, you can simply use:
curl -O http://ftp.belnet.be/mirror/videolan/vlc/3.0.4/macosx/vlc-3.0.4.dmg
Bear in mind that when you use the -o or the -O options and a file of the same name exists, cURL will overwrite it.
If you have a partially downloaded file, you can resume the file download with the -C - option, as shown below:
curl -O -C - http://ftp.belnet.be/mirror/videolan/vlc/3.0.4/macosx/vlc-3.0.4.dmg

Like most other command line tools, you can combine different options together. For example, in the above command, you could combine -O -C - and write it as -OC - .
Anatomy of a HTTP request/response
Before we dig deeper into the features supported by cURL, we will discuss a little bit about HTTP requests and responses. If you are familiar with these concepts, you directly skip to the other sections.
To request a resource such as a webpage, or to submit some data to a server, a HTTP client (such as a browser or cURL) makes a HTTP request to the server The server responds back with a HTTP response, which contains the “contents” of that page.
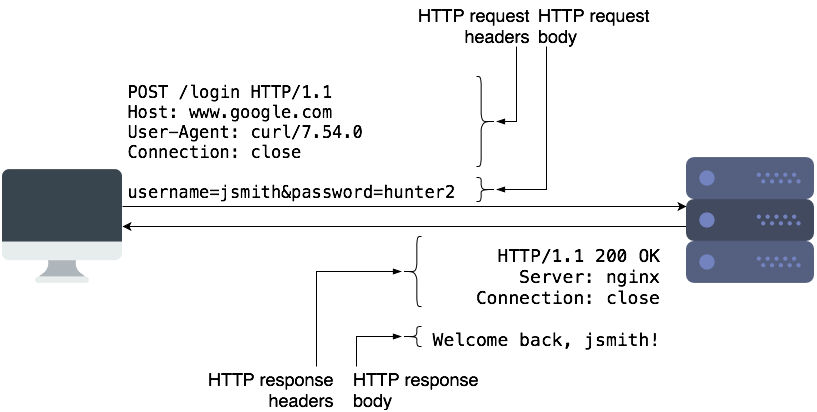
HTTP requests contain the request method, URL, some headers, and some optional data as part of the “request body”. The request method controls how a certain request should be processed. The most common types of request methods are “GET” and “POST”. Typically, we use “GET” requests to retrieve a resource from the server, and “POST” to submit data to the server for processing. “POST” requests typically contain some data in the request body, which the server can use.
HTTP responses are similar and contain the status code, some headers, and a body. The body contains the actual data that clients can display or save to a file. The status code is a 3-digit code which tells the client if the request succeeded or failed, and how it should proceed further. Common status codes are 2xx (success), 3xx (redirect to another page), and 4xx/5xx (for errors).
HTTP is an “application layer protocol”, and it runs over another protocol called TCP. It takes care of retransmitting any lost data, and ensures that the client and server transmit data at an optimal rate. When you use HTTPS, another protocol called SSL/TLS runs between TCP and HTTP to secure the data.
Most often, we use domain names such as google.com to access websites. Mapping the domain name to an IP address occurs through another protocol called DNS.
You should now have enough background to understand the rest of this article.
Following redirects with cURL
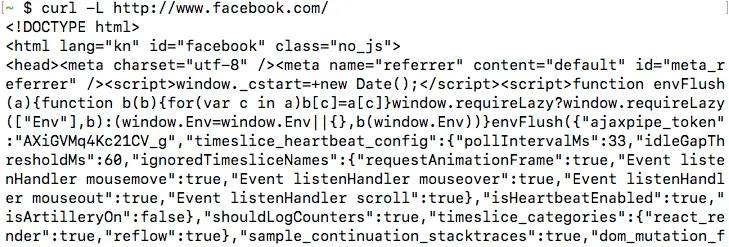
By default, when cURL receives a redirect after making a request, it doesn’t automatically make a request to the new URL. As an example of this, consider the URL http://www.facebook.com. When you make a request using to this URL, the server sends a HTTP 3XX redirect to https://www.facebook.com/. However, the response body is otherwise empty. So, if you try this out, you will get an empty output:
![]()
If you want cURL to follow these redirects, you should use the -L option. If you repeat make a request for http://www.facebook.com/ with the -L flag, like so:
curl -L http://www.facebook.com/
Now, you will be able to see the HTML content of the page, similar to the screenshot below. In the next section, we will see how we can verify that there is a HTTP 3XX redirect.
Please bear in mind that cURL can only follow redirects if the server replied with a “HTTP redirect”, which means that the server used a 3XX status code, and it used the “Location” header to indicate the new URL. cURL cannot process Javascript or HTML-based redirection methods, or the “Refresh header“.
If there is a chain of redirects, the -L option will only follow the redirects up to 500 times. You can control the number of maximum redirects that it will follow with the --max-redirs flag.
curl -L --max-redirs 700 example.com
If you set this flag to -1, it will follow the redirects endlessly.
curl -L --max-redirs -1 example.com
When debugging issues with a website, you may want to view the HTTP response headers sent by the server. To enable this feature, you can use the -i option.
Let us continue with our previous example, and confirm that there is indeed a HTTP 3XX redirect when you make a HTTP request to http://www.facebook.com/, by running:
curl -L -i http://www.facebook.com/
Notice that we have also used -L so that cURL can follow redirects. It is also possible to combine these two options and write them as -iL or -Li instead of -L -i.
Once you run the command, you will be able to see the HTTP 3XX redirect, as well as the page HTTP 200 OK response after following the redirect:

If you use the -o/-O option in combination with -i, the response headers and body will be saved into a single file.
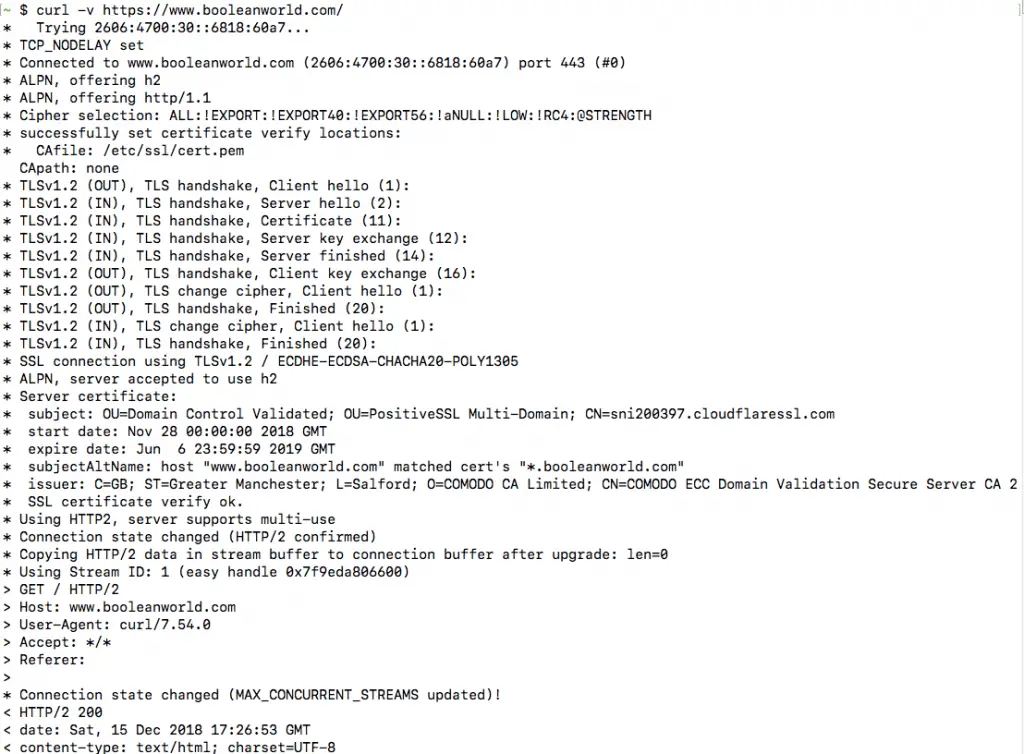
Viewing request headers and connection details
In the previous section, we have seen how you can view HTTP response headers using cURL. However, sometimes you may want to view more details about a request, such as the request headers sent and the connection process. cURL offers the -v flag (called “verbose mode”) for this purpose, and it can be used as follows:
curl -v https://www.booleanworld.com/
The output contains request data (marked with >), response headers (marked with <) and other details about the request, such as the IP used and the SSL handshake process (marked with *). The response body is also available below this information. (However, this is not visible in the screenshot below).
Most often, we aren’t interested in the response body. You can simply hide it by “saving” the output to the null device, which is /dev/null on Linux and MacOS and NUL on Windows:
curl -vo /dev/null https://www.booleanworld.com/ # Linux/MacOS
curl -vo NUL https://www.booleanworld.com/ # Windows
Silencing errors
Previously, we have seen that cURL displays a progress bar when you save the output to a file. Unfortunately, the progress bar might not be useful in all circumstances. As an example, if you hide the output with -vo /dev/null, a progress bar appears which is not at all useful.
You can hide all these extra outputs by using the -s header. If we continue with our previous example but hide the progress bar, then the commands would be:
curl -svo /dev/null https://www.booleanworld.com/ # Linux/MacOS
curl -svo NUL https://www.booleanworld.com/ # Windows
The -s option is a bit aggressive, though, since it even hides error messages. For your use case, if you want to hide the progress bar, but still view any errors, you can combine the -S option.
So, if you are trying to save cURL output to a file but simply want to hide the progress bar, you can use:
curl -sSvo file.html https://www.booleanworld.com/
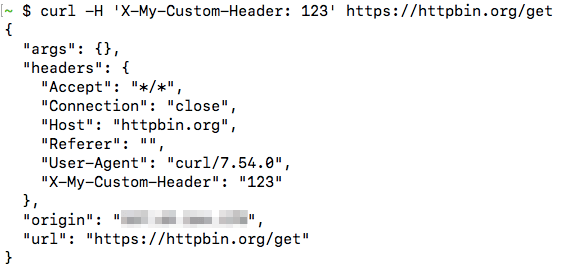
When testing APIs, you may need to set custom headers on the HTTP request. cURL has the -H option which you can use for this purpose. If you want to send the custom header X-My-Custom-Header with the value of 123 to https://httpbin.org/get, you should run:
curl -H 'X-My-Custom-Header: 123' https://httpbin.org/get
(httpbin.org is a very useful website that allows you to view details of the HTTP request that you sent to it.)
The data returned by the URL shows that this header was indeed set:
You can also override any default headers sent by cURL such as the “User-Agent” or “Host” headers. The HTTP client (in our case, cURL) sends the “User-Agent” header to tell the server about the type and version of the client used. Also, the client uses the “Host” header to tell the server about the site it should serve. This header is needed because a web server can host multiple websites at a single IP address.
Also, if you want to set multiple headers, you can simply repeat the -H option as required.
curl -H 'User-Agent: Mozilla/5.0' -H 'Host: www.google.com' ...
However, cURL does have certain shortcuts for frequently used flags. You can set the “User-Agent” header with the -A option:
curl -A Mozilla/5.0 http://httpbin.org/get
The “Referer” header is used to tell the server the location from which they were referred to by the previous site. It is typically sent by browsers when requesting Javascript or images linked to a page, or when following redirects. If you want to set a “Referer” header, you can use the -e flag:
curl -e http://www.google.com/ http://httpbin.org/get
Otherwise, if you are following a set of redirects, you can simply use -e ';auto' and cURL will take care of setting the redirects by itself.
Making POST requests with cURL
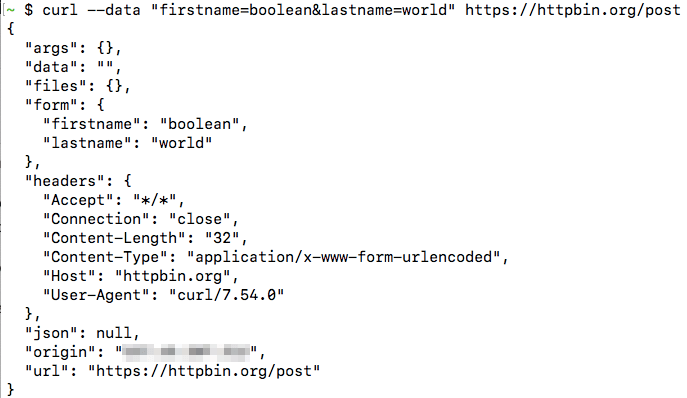
By default, cURL sends GET requests, but you can also use it to send POST requests with the -d or --data option. All the fields must be given as key=value pairs separated by the ampersand (&) character. As an example, you can make a POST request to httpbin.org with some parameters:
curl --data "firstname=boolean&lastname=world" https://httpbin.org/post
From the output, you can easily tell that we posted two parameters (this appears under the “form” key):
Any special characters such as @, %, = or spaces in the value should be URL-encoded manually. So, if you wanted to submit a parameter “email” with the value “[email protected]”, you would use:
curl --data "email=test%40example.com" https://httpbin.org/post
Alternatively, you can just use --data-urlencode to handle this for you. If you wanted to submit two parameters, email and name, this is how you should use the option:
curl --data-urlencode "[email protected]" --data-urlencode "name=Boolean World" https://httpbin.org/post
If the --data parameter is too big to type on the terminal, you can save it to a file and then submit it using @, like so:
curl --data @params.txt example.com
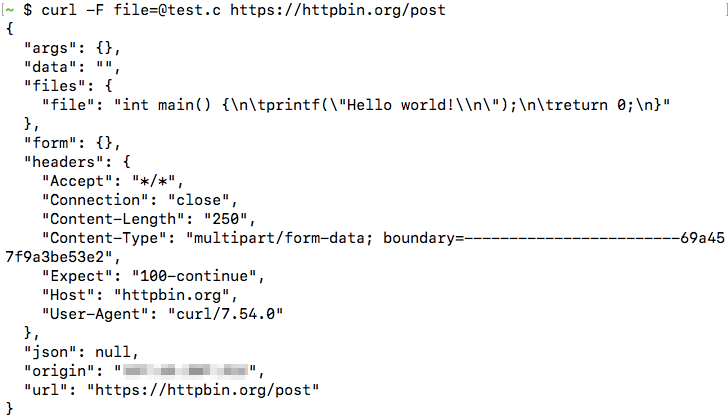
So far, we have seen how you can make POST requests using cURL. If you want to upload files using a POST request, you can use the -F (“form”) option. Here, we will submit the file test.c, under the parameter name file:
curl -F [email protected] https://httpbin.org/post
This shows the content of the file, showing that it was submitted successfully:
Submitting JSON data with cURL
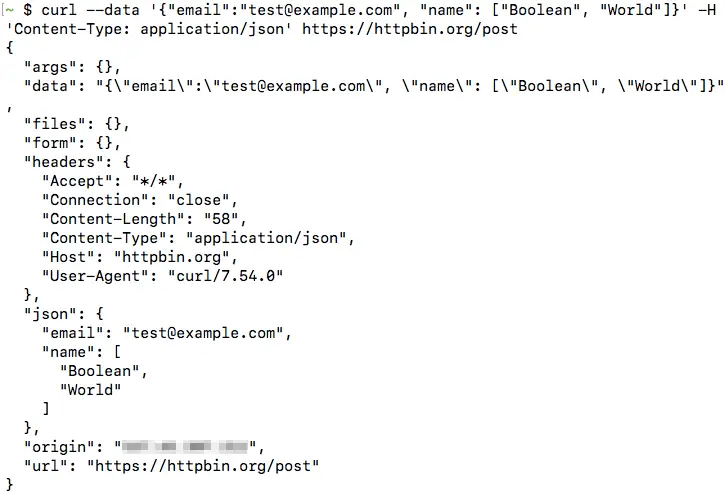
In the previous section, we have seen how can submit POST requests using cURL. You can also submit JSON data using the --data option. However, most servers expect to receive a POST request with key-value pairs, similar to the ones we have discussed previously. So, you need to add an additional header called ‘Content-Type: application/json’ so that the server understands it’s dealing with JSON data and handles it appropriately. Also, you don’t need to URL-encode data when submitting JSON.
So if you had the following JSON data and want to make a POST request to https://httpbin.org/post:
{
  "email": "[email protected]",
  "name": ["Boolean", "World"]
}
Then, you can submit the data with:
curl --data '{"email":"[email protected]", "name": ["Boolean", "World"]}' -H 'Content-Type: application/json' https://httpbin.org/post
In this case, you can see the data appear under the json value in the httpbin.org output:
You can also save the JSON file, and submit it in the same way as we did previously:
curl --data @data.json https://httpbin.org/post
Changing the request method
Previously, we have seen how you can send POST requests with cURL. Sometimes, you may need to send a POST request with no data at all. In that case, you can simply change the request method to POST with the -X option, like so:
curl -X POST https://httpbin.org/post
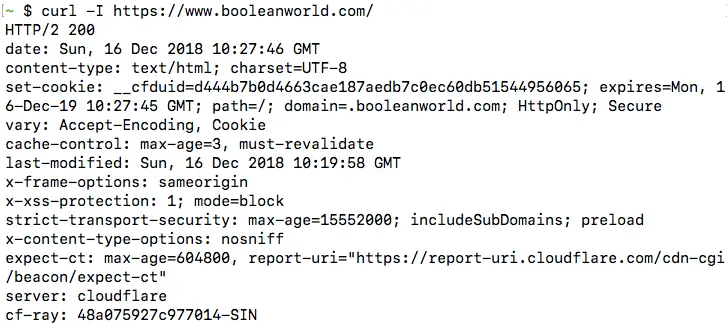
You can also change the request method to anything else, such as PUT, DELETE or PATCH. One notable exception is the HEAD method, which cannot be set with the -X option. The HEAD method is used to check if a document is present on the server, but without downloading the document. To use the HEAD method, use the -I option:
curl -I https://www.booleanworld.com/
When you make a HEAD request, cURL displays all the request headers by default. Servers do not send any content when they receive a HEAD request, so there is nothing after the headers:
Replicating browser requests with cURL
If you want to replicate a request made through your browser through cURL, you can use the Chrome, Firefox and Safari developer tools to get a cURL command to do so.
The steps involved are the same for all platforms and browsers:
- Open developer tools in Firefox/Chrome (typically F12 on Windows/Linux and Cmd+Shift+I on a Mac)
- Go to the network tab
- Select the request from the list, right click it and select “Copy as cURL”
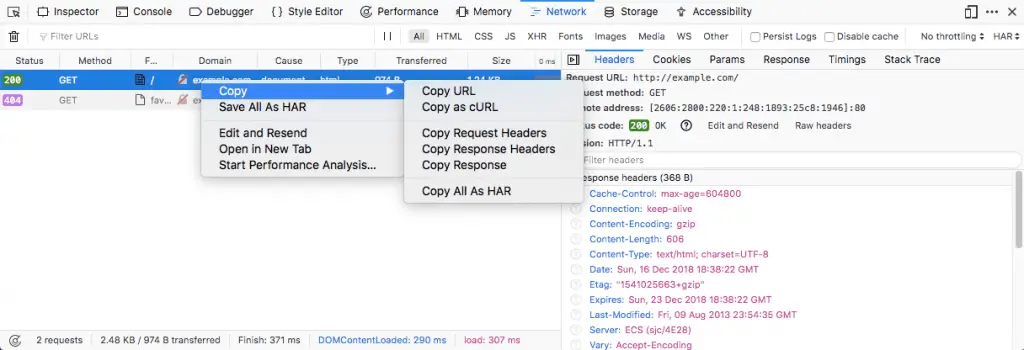
The copied command contains all the headers, request methods, cookies etc. needed to replicate the exact same request. You can paste the command in your terminal to run it.
Making cURL fail on HTTP errors
Interestingly, cURL doesn’t differentiate between a successful HTTP request (2xx) and a failed HTTP request (4xx/5xx). So, it always returns an exit status of 0 as long as there was no problem connecting to the site. This makes it difficult to write shell scripts because there is no way to check if the file could be downloaded successfully.
You can check this by making a request manually:
curl https://www.booleanworld.com/404 -sSo file.txt
You can see that curl doesn’t print any errors, and the exit status is also zero:

If you want to consider these HTTP errors as well, you can use the -f option, like so:
curl https://www.booleanworld.com/404 -fsSo file.txt
Now, you can see that cURL prints an error and also sets the status code to 22 to inform that an error occured:

Making authenticated requests with cURL
Some webpages and APIs require authentication with an username and password. There are two ways to do this. You can mention the username and password with the -u option:
curl -u boolean:world https://example.com/
Alternatively, you can simply add it to the URL itself, with the <username>:<password>@<host> syntax, as shown:
curl https://boolean:[email protected]/
In both of these methods, curl makes a “Basic” authentication with the server.
Testing protocol support with cURL
Due to the wide range of protocols supported by cURL, you can even use it to test protocol support. If you want to check if a site supports a certain version of SSL, you can use the --sslv<version> or --tlsv<version> flags. For example, if you want to check if a site supports TLS v1.2, you can use:
curl -v --tlsv1.2 https://www.booleanworld.com/
The request takes place normally, which means that the site supports TLSv1.2. Now, let us check if the site supports SSL v3:
curl -v --sslv3 https://www.booleanworld.com/
This command throws a handshake_failed error, because the server doesn’t support this version of SSL.
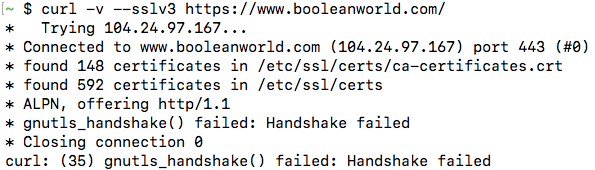
Please note that, depending on your system and the library version/configuration, some of these version options may not work. The above output was taken from Ubuntu 16.04’s cURL. However, if you try this with cURL in MacOS 10.14, it gives an error:

You can also test for HTTP protocol versions in the same way, by using the flags --http1.0, --http1.1 or --http2.
Setting the Host header and cURL’s --resolve option
Previously, we have discussed about how a web server chooses to serve different websites to visitors depending upon the “Host” header. This can be very useful to check if your website has virtual hosting configured correctly, by changing the “Host” header. As an example, say you have a local server at 192.168.0.1 with two websites configured, namely example1.com and example2.com. Now, you can test if everything is configured correctly by setting the Host header and checking if the correct contents are served:
curl -H 'Host: example1.com' http://192.168.0.1/
curl -H 'Host: example1.com' http://192.168.0.1/
Unfortunately, this doesn’t work so well for websites using HTTPS. A single website may be configured to serve multiple websites, with each website using its own SSL/TLS certificate. Since SSL/TLS takes place at a lower level than HTTP, this means clients such as cURL have to tell the server which website we’re trying to access at the SSL/TLS level, so that the server can pick the right certificate. By default, cURL always tells this to the server.
However, if you want to send a request to a specific IP like the above example, the server may pick a wrong certificate and that will cause the SSL/TLS verification to fail. The Host header only works at the HTTP level and not the SSL/TLS level.
To avoid the problem described above, you can use the --resolve flag. The resolve flag will send the request to the port and IP of your choice but will send the website name at both SSL/TLS and HTTP levels correctly.
Let us consider the previous example. If you were using HTTPS and wanted to send it to the local server 192.168.0.1, you can use:
curl https://example1.com/ --resolve example1.com:192.168.0.1:443
It also works well for HTTP. Suppose, if your HTTP server was serving on port 8080, you can use either the --resolve flag or set the Host header and the port manually, like so:
curl http://192.168.0.1:8080/ -H 'Host: example1.com:8080'
curl http://example.com/ --resolve example1.com:192.168.0.1:8080
The two commands mentioned above are equivalent.
Resolve domains to IPv4 and IPv6 addresses
Sometimes, you may want to check if a site is reachable over both IPv4 or IPv6. You can force cURL to connect to either the IPv4 or over IPv6 version of your site by using the -4 or -6 flags.
Please bear in mind that a website can be reached over IPv4 and IPv6 only if:
- There are appropriate DNS records for the website that links it to IPv4 and IPv6 addresses.
- You have IPv4 and IPv6 connectivity on your system.
For example, if you want to check if you can reach the website icanhazip.com over IPv6, you can use:
curl -6 https://icanhazip.com/
If the site is reachable over HTTPS, you should get your own IPv6 address in the output. This website returns the public IP address of any client that connects to it. So, depending on the protocol used, it displays an IPv4 or IPv6 address.
You can also use the -v option along with -4 and -6 to get more details.
Disabling cURL’s certificate checks
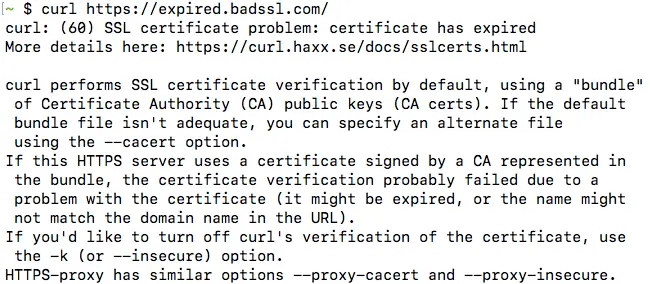
By default, cURL checks certificates when it connects over HTTPS. However, it is often useful to disable the certificate checking, when you are trying to make requests to sites using self-signed certificates, or if you need to test a site that has a misconfigured certificate.
To disable certificate checks, use the -k certificate. We will test this by making a request to expired.badssl.com, which is a website using an expired SSL certificate.
curl -k https://expired.badssl.com/
With the -k option, the certificate checks are ignored. So, cURL downloads the page and displays the request body successfully. On the other hand, if you didn’t use the -k option, you will get an error, similar to the one below:
Troubleshooting website issues with “cURL timing breakdown”
You may run into situations where a website is very slow for you, and you would like to dig deeper into the issue. You can make cURL display details of the request, such as the time taken for DNS resolution, establishing a connection etc. with the -w option. This is often called as a cURL “timing breakdown”.
As an example, if you want to see these details for connecting to https://www.booleanworld.com/, run:
curl https://www.booleanworld.com/ -sSo /dev/null -w 'namelookup:t%{time_namelookup}nconnect:t%{time_connect}nappconnect:t%{time_appconnect}npretransfer:t%{time_pretransfer}nredirect:t%{time_redirect}nstarttransfer:t%{time_starttransfer}ntotal:tt%{time_total}n'
(If you are running this from a Windows system, change the /dev/null to NUL).
You will get some output similar to this:
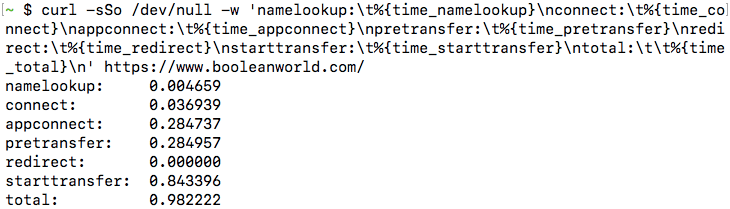
Each of these values is in seconds, and here is what each value represents:
- namelookup — The time required for DNS resolution.
- connect — The time required to establish the TCP connection.
- appconnect — This is the time taken to establish connections for any layers between TCP and the application layer, such as SSL/TLS. In our case, the application layer is HTTP. Also, if there is no such intermediate layer (such as when there is a direct HTTP request), this time will always be 0.
- pretransfer — This is the time taken from the start to when the transfer of the file is just about to begin.
- redirect — This is the total time taken to process any redirects.
- starttransfer — Time it took from the start to when the first byte is about to be transferred.
- total — The total time taken for cURL to complete the entire process.
As an example, say, you are facing delays connecting to a website and you notice the “namelookup” value was too high. As this indicates a problem with your ISP’s DNS server, you may start looking into why the DNS lookup is so slow, and switch to another DNS server if needed.
cURL configuration files
Sometimes, you may want to make all cURL requests use the same options. Passing these options by hand isn’t a feasible solution, so cURL allows you to specify options in a configuration file.
The default configuration file is located in ~/.curlrc in Linux/MacOS and %appdata%_curlrc in Windows. Inside this file, you can specify any options that you need, such as:
# Always use IPv4
-4
# Always show verbose output
-v
# When following a redirect, automatically set the previous URL as referer.
referer = ";auto"
# Wait 60 seconds before timing out.
connect-timeout = 60
After creating the above file, try making a request with curl example.com. You will find that these options have taken effect.
If you want to use a custom configuration file instead of the default one, then you can use -K option to point curl to your configuration file. As an example, if you have a configuration file called config.txt, then you can use it with:
curl -K config.txt example.com
Conclusion
In this article, we have covered the most common uses of the cURL command. Of course, this article only scratches the surface and cURL can do a whole lot of other things. You can type man curl in your terminal or just visit this page to see the man page which lists all the options.

As a current (or aspiring) web developer, there’s a good chance you’re familiar with HTTP requests, especially when interacting with APIs.

API platforms can be helpful for automating your requests calls and building more sophisticated requests. But sometimes, whether you’re doing a one-off test or some debugging, you want to fire off a quick HTTML request from your terminal.
For these situations, cURL is one of the best free web dev tools around, and something every developer should have handy.
In this article, we’ll introduce the cURL command, explore how and why it’s used, and showcase some common cURL command examples and use cases.
![Download Now: 25 HTML & CSS Hacks [Free Guide]](https://no-cache.hubspot.com/cta/default/53/848be230-f06a-420e-9a24-82b45fe61632.png)
Client URL (cURL, pronounced “curl”) is a command line tool that enables data exchange between a device and a server through a terminal. Using this command line interface (CLI), a user specifies a server URL (the location where they want to send a request) and the data they want to send to that server URL.
API tools like Postman and Insomnia provide an interactive user interface (UI) that allows you to make different forms of requests to URLs, for receiving and processing requests. The cURL command does the same thing, except in your terminal. cURL works on Linux, Mac, and Windows.
The cURL command uses the libcURL client-side URL transfer library. This library supports many different transfer protocols including HTTPS, SMTP, and FTP. It also enables you to include cookies, set proxies, and add authentication credentials when making requests.
Use cases of cURL include testing APIs, downloading data from sources, testing websites, and following redirects from the terminal.
How to Use cURL
You know what the cURL command is, but how does it work?
cURL comes pre-installed on Windows and macOS — otherwise, you can download the package from the cURL website.
The cURL command receives the URL to transfer data to — or receive data from — along with other options for different purposes.
The syntax of a cURL command is:
cURL [options] [URL]
This article uses the JSONPlaceholder Fake API to explain the different ways to use cURL. This mock API contains different example paths for making requests.
Request Data From a Source
Using the GET method with cURL, you can quickly request data from a source or API. Here’s a simple cURL command that makes a GET request:
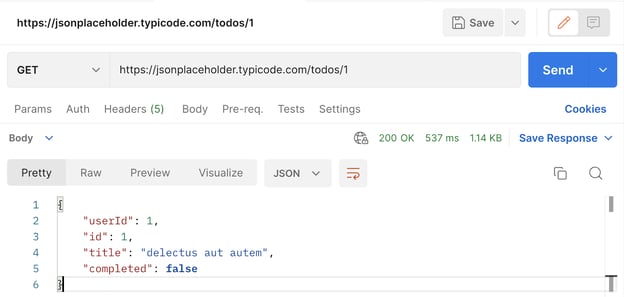
cURL https://jsonplaceholder.typicode.com/todos/1
Without passing any flags or options, the cURL command defaults to making a GET request to the specified URL. The command returns the response body sent from the API, which would look like this in your terminal:
{
«userId»: 1,
«id»: 1,
«title»: «delectus aut autem»,
«completed»: false
}
This is similar to the results from platforms like Postman, shown below:
Additionally, you can include options and values to use a different request method with the cURL command. For example, you can use the -X (hyphen and uppercase X) option with the request method. The -X option is an alias for —request.
Write the command as follows:
cURL -X [METHOD] [URL]
The default GET method in the first cURL command above is the same as the following:
cURL -X GET https://jsonplaceholder.typicode.com/todos/1
Send Data to a Source
Using the POST method and the cURL command, you can transfer data to a server through an API. The API processes the data, then takes steps such as saving it to a database, and returns return a response indicating the status of your request.
To make a POST request to a URL, use the -X option and pass the POST method as the value. But how about adding data with the request? You use another option, -d (hyphen and lowercase d), which is an alias for —data.
You can use the two popular data formats when sending data with a request: application/x-www-form-urlencoded or application/json. We’ll cover both of these methods next.
application/x-www-form-URLencoded
If you do not specify the format you want, cURL uses application/x-www-form-urlencoded by default. Here’s an example using this format and the JSON fake API:
cURL -X POST -d «name=cURL&type=article» https://jsonplaceholder.typicode.com/posts
This command makes a POST request to https://jsonplaceholder.typicode.com/posts and passes the URL encoded data «name=cURL&type=article» which is a name key with a cURL value and a type key with an article value.
For POST requests made to the JSON Fake API, the response body is the data object sent to it along with an ID property.
Here’s the response body from the API after entering the command:
{
«name»: «cURL»,
«type»: «article»,
«id»: 101
}
application/JSON
With cURL, you can also send a stringified JSON object like this:
cURL -X POST -d ‘{«name»: «cURL», «type»: «article»}’ https://jsonplaceholder.typicode.com/posts
As described above, the data in this request is sent in the application/x-www-form-urlencoded format. Here’s the result from the API:
{
«{«name»: «cURL», «type»: «article»}»: «»,
«id»: 101
}
The API understands the request data to be in URL encoded data format, so it doesn’t interpret it as you would expect. You must specify that this is the JSON data format by using the -H (hyphen with an uppercase H) option, an alias for —header, and passing the Content-Type header as follows:
cURL -X POST -d ‘{«name»: «cURL», «type»: «article»}’ -H «Content-Type: application/json» https://jsonplaceholder.typicode.com/posts
Now, you get the right response body from the API:
{
«name»: «cURL»,
«type»: «article»,
«id»: 101
}
Instead of typing the JSON string in the terminal, you can specify a JSON file that the cURL command will use for the data option. For example, suppose you have a file called data.json with the following contents:
{
«name»: «cURL»,
«type»: «article»
}
You can run the cURL command assuming it’s in the same project as the file. This command will get the JSON file, stringify it and send it with the request. You get the same result as above:
{
«name»: «cURL»,
«type»: «article»
}
Delete Resources on a Server
You can send deletion requests to an API using the DELETE method and the cURL command. The URL and data you provide to this request depend on the API configuration.
For the JSON Fake API, you specify the resource path and the DELETE method like this:
cURL -X DELETE https://jsonplaceholder.typicode.com/posts/1
The response body is an empty object:
Best for Updating Existing Resources Using an API
Using the PUT method and the cURL command, you can make “update” requests to an API that modify an existing resource. For the JSON Fake API, you specify the resource path and the PUT method, and pass some data to update the resource.
You can use any data format you want here. This example uses application/json:
cURL -X PUT -d ‘{«name»: «json», «type»: «post»}’ -H «Content-Type: application/json» https://jsonplaceholder.typicode.com/posts/1
You must directly specify the data format in the header so that the API can interpret the request correctly.
The above code returns this response body:
{
«name»: «json»,
«type»: «post»,
«id»: 1
}
cURL Protocols and Formats
By default, cURL uses the HTTP protocol. Here are some other protocols and formats that cURL can use:
File Transfer Protocol
The File Transfer Protocol (FTP) transfers files from a server to a client. Use this protocol with cURL to upload files like this:
cURL -T [selected-file] «ftp://[target-destination]»
cURL makes for a good replacement for a standard FTP client.
Simple Mail Transfer Protocol
The Simple Mail Transfer Protocol (SMTP) is for sending data to an SMTP server. This data consists of the text you’re sending, the sender, and the receiver. It looks like this:
cURL smtp://[smtp-sever] —mail-from [sender] —mail-rcpt [receiver] —upload-file [mail-content-file]
Dictionary Network Protocol
The Dictionary Network Protocol (DICT) provides access to dictionaries. Using it with cURL, you run the following command:
cURL «dict://dict.org/d:hello»
With this command, you get a result showing the dictionary selected and the meaning of “hello” from the dictionary.
You can find more protocols on the cURL man page.
Common Use Cases for cURL
While API platforms usually provide intuitive interfaces for requesting and transferring data to a URL, cURL can be a great tool to use with the terminal. Here are some common use cases for the cURL command.
Quickly Testing APIs From the Terminal
As we’ve seen, cURL allows you to test APIs quickly form your terminal without having to download any API-based application.
Downloading Images and Files to a Device
Since the terminal has access to the file system, you can also download images from URLs easily.
For example, here’s the Google logo URL. Using cURL, you can download the image like this:
cURL https://www.google.com/images/branding/googlelogo/2x/googlelogo_light_color_272x92dp.png > google-logo.png
Using cURL and the URL of the image returns the binary data of the image. By storing the raw image data in an image file (with a .png extension matching the extension of the original image), you can save the image on your device.
Saving URL Content
Like downloading images, you can also save the content of a URL (for example, a web page) to a file. Here’s an example for the Google homepage:
cURL -o google.html https://www.google.com
This saves the source code of the Google homepage to a file called google.html.
Make cURL work for you.
cURL is a CLI tool that allows you to request and transfer data over a URL under different protocols. It gives you flexibility and control of URLs on the terminal.
Using cURL on the terminal is simple, but may not be intuitive to use by every user. By providing the URL and the options needed, you can request and download data from URLs, transfer data to URLs, and more.

cURL (client URL) is a command line tool that can be used to transfer data from a server. It is often used by developers to test web applications. cURL can be used to download files, submit form data, and even to login to websites.
The curl command is one of the most used commands to automate the process of sending and receiving data to or from a server, and it provides a simple, easy-to-use command-line interface that can be used to do this.
The curl command supports many protocols such as – HTTP, HTTPS, FTP, SFTP, TELNET, etc. It is a cross-platform tool available in Windows, Unix, and macOS.
cURL has a very broad usage – a quick way to see how broad of a usage, you can run curl -h in your command line and see all of the options it offers.
Objectives
This tutorial will explain the basics of the cURL command and how to use it to transfer data to or from a server, along with some of it’s most frequently used options.
We’ll also explain the basics of HTTP requests and how to perform them with the cURL command, along with some useful things you can do.
Table of Contents
- Objectives
- Installing cURL on Your System
- Installing cURL on Debian-based Distros
- Installing cURL on RPM-based Distros
- Installing cURL on Windows
- Installing cURL on Mac OS X
- Basics of the cURL command
- Redirects with the cURL Command
- Use the -L Flag to Follow Redirects
- Save Outputs to A File with the cURL Command
- Downloading Multiple files
- Resuming Downloads
- Redirects with the cURL Command
- Basics of HTTP Requests & Responses
- HTTP Requests
- HTTP Responses
- HTTP Requests with The cURL Command
- GET Request With the cURL Command
- HEAD Request With the cURL Command
- Extract the HTTP Header
- Debugging with the HTTP Headers
- HTTP Header With the Redirect Option
- POST Requests With the cURL Command
- Sending Data Using POST Method
- Uploading Files with cURL
- Modify the HTTP Header
- PUT Requests With the cURL Command
- DELETE Requests With the cURL Command
- Conclusion
Installing cURL on Your System
If you’re using Linux, Mac OS X, or Windows 10 version 1803 or later, chances are cURL is already installed in your machine. You can check if you have cURL simply by typing the following in your command line:
curl -V
This will output the version of cURL, if it is installed:
Output
curl 7.68.0 (x86_64-pc-linux-gnu) libcurl/7.68.0 OpenSSL/1.1.1f zlib/1.2.11 brotli/1.0.7 libidn2/2.2.0 libpsl/0.21.0 (+libidn2/2.2.0) libssh/0.9.3/openssl/zlib nghttp2/1.40.0 librtmp/2.3

Release-Date: 2020-01-08

Protocols: dict file ftp ftps gopher http https imap imaps ldap ldaps pop3 pop3s rtmp rtsp scp sftp smb smbs smtp smtps telnet tftp

Features: AsynchDNS brotli GSS-API HTTP2 HTTPS-proxy IDN IPv6 Kerberos Largefile libz NTLM NTLM_WB PSL SPNEGO SSL TLS-SRP UnixSockets
You can also see the list of the supported protocols and the features. If you did not have cURL installed, you would’ve got something like this:
cURL not installed on Ubuntu 20.04
Command 'curl' not found, but can be installed with:

sudo snap install curl  # version 7.76.1, or
sudo apt  install curl  # version 7.68.0-1ubuntu2.5

See 'snap info curl' for additional versions.
cURL not installed on Windows
'curl' is not recognized as an internal or external command, operable program or batch file.
If you don’t have cURL installed, next we’ll cover how to install it on your system.
Installing cURL on Debian-based Distros
To install cURL on Debian-based distros (Debian, Ubuntu etc.) run:
sudo apt-get update
sudo apt-get install curl
Installing cURL on RPM-based Distros
To install cURL on RPM-based distros (CentOS, Fedora etc.) run:
sudo yum update
sudo yum install curl
Installing cURL on Windows
There are multiple ways you can install cURL on Windows. We’ll focus on just one quick and clean way (in my opinion), which I hope works for most using Windows. If you encounter any issues please leave a comment and we’ll get back to you as soon as we can.
- Go to download page: Go to the curl Windows (https://curl.se/windows/)
- Download zip file: Click on curl for 64 bit or curl for 32 bit, to download the package, depending on which version you have. (Here is an article on Microsoft.com with a FAQ on 32-bit and 64-bit Windows, in case you need to check which one you have, along with a bit more info on the topic)

- Extract necessary files: It’s a a .zip archive. Double click to see the contents and go inside the
binfolder. We wantcurl.exeandcurl-ca-bundle.crt. We’ll need to place them in some folder on our computer. You can create the folder anywhere and name it anything you want – I prefer to createC:Program Filescurland extract the two files in there. - Add cURL to
PATH: We need to do this to be able to run the cURL command from anywhere in the command line. If we don’t do this, we’ll have to always navigate to wherecurl.exeis located when we try to run it in the command line.What is thisPATH? It’s an environment variable that specifies directories in which executables are located on the machine without knowing and typing the whole path to the file on the command line. To do this we need to find the Environment Variables section.

Installing cURL on Mac OS X
Mac OS X should come with the cURL command, but if it isn’t, we recommend installing it via Homebrew, a very popular package manager for Mac.
To install Homebrew open up the command line and run:
/bin/bash -c "$(curl -fsSL https://raw.githubusercontent.com/Homebrew/install/HEAD/install.sh)"
The script should explain what it’s doing in the output.
When it’s finished, just run the following command to install cURL:
brew install curl
Basics of the cURL command
Now let’s move on to some basic usages of the cURL command.
The general structure of the curl command looks like:
curl [options...] <url>
Let’s try the curl command without any options:
curl https://example.com
This command will display the source code of example.com on your command line.
curl example.com
Let’s try another:
curl bytexd.com
curl bytexd.com
You may be surprised that there is no output. We’ll discuss this in the next section.
Redirects with the cURL Command
The curl command without any options will use HTTP protocol by default. So, it will not perform any HTTPS redirects. As our website bytexd.com uses HTTPS redirect, cURL cannot fetch the data over the HTTP protocol.
Now let’s try running the command again but this time we add https://:
curl https://bytexd.com
Now you should get the expected result.
curl https://bytexd.com
Use the -L Flag to Follow Redirects
This is a good time to learn about the redirect option with the curl command:
curl -L bytexd.com
Notice how we didn’t have to specify https:// like we did previously.
The -L flag or --location option follows the redirects. Use this to display the contents of any website you want. By default, the curl command with the -L flag will follow up to 50 redirects.
curl -L bytexd.com
Save Outputs to A File with the cURL Command
Now that you know how to display website content in your terminal, you may be wondering why anybody would want to do this. A bunch of HTML is indeed difficult to read when you’re looking at it in the command line.
But that’s where outputting them to a file becomes super helpful. You can save the file in different formats that’ll make them easier to read.
What can be even more useful is some cURL script pulling up content from the website and performing some tasks with the content automatically.
For now, let’s see how to save the output of the curl command into a file:
curl -L -o file bytexd.com
The flag -o or --output will save the content of bytexd.com to the file.
You can open this file with your browser, and you’ll see the homepage of bytexd.com.
Now if the URL you used has some page with a name or some file you can use the -O or --remote-name flag to save the page/file with its original name. Let’s see this in action –
curl -O https://github.com/pbatard/rufus/releases/download/v3.14/rufus-3.14p.exe
  % Total    % Received % Xferd  Average Speed   Time    Time     Time  Current
                                 Dload  Upload   Total   Spent    Left  Speed
100   619  100   619    0     0   3942      0 --:--:-- --:--:-- --:--:--  3917
Here, I downloaded an executable file which is the Rufus tool. The file name will be rufus-3.14p.exe.
So, the main difference between the -o and -O flag is that the -o (lowercase) lets you save the file with a custom name.
Let’s understand this a bit more:
curl -L -O bytexd.com
curl -L -O bytexd.com
curl: Remote file name has no length!
curl: try 'curl --help' or 'curl --manual' for more information
Now it’s clear that the -O flag cannot be used where there is no page/filename. Whereas:
curl -L -O php.net/manual/en/tutorial.firstpage.php
This will generate the file tutorial.firstpage.php which you can read.
Downloading Multiple files
You can download multiple files together using multiple -O flags. Here’s an example where we download both of the files we used as examples previously:
curl -L -O https://github.com/pbatard/rufus/releases/download/v3.14/rufus-3.14p.exe -O php.net/manual/en/tutorial.firstpage.php
curl -L -O ..rufus-3.14p.exe -O ..tutorial.firstpage.php
Resuming Downloads
If you cancel some downloads midway, you can resume them by using the -C - option:
curl -C - -O example.com/somefile.ext
With this, we’ve covered the basic cURL commands. Now we’ll move on to HTTP requests with cURL.
Basics of HTTP Requests & Responses
We need to learn some basics of the HTTP Requests & Responses before we can perform them with the cURL command efficiently.
Notice: Even though we’re starting the basics of HTTP requests, you’ve already done some HTTP requests with the curl command in previous sections. You’ll understand better to perform more commands after this section.
 Whenever your browser is loading a page from any website, it performs HTTP requests. It is a client-server model.
- Your browser is the client here, and it requests the server to send back its content.
- The server provides the requested resources with the response.
The request your browser sent is called an HTTP request.
The response from the server is the HTTP response.
HTTP Requests
In the HTTP request-response model, the request is sent first.
These requests can be of different types which are called HTTP request methods.
The HTTP protocol establishes a group of methods that signals what action is required for the specific resources.
Let’s look at some of the HTTP request methods:
- GET Method: This request method does exactly as its name implies. It fetches the requested resources from the server. When a webpage is shown, the browser requests the server with this method.
- HEAD Method: This method is used when the client requests only for the HTTP Header. It does not retrieve other resources along with the header.
- POST Method: This method sends data and requests the server to accept it. The server might store it and use the data. Some common examples for this request method would be when you fill out a form and submit the data. This method would also be used when you’re uploading a photo, possibly a profile picture.
- PUT Method: This method is similar to the POST method, but it only affects the URI specified. It requests the server to create or replace the existing data. One key difference between this method and the post is that the PUT method always produces the same result when performed multiple times. The user decides the URI of the resource.
- DELETE Method: This method requests the server to delete the specified resources.
Now that you know some of the HTTP request methods, can you tell which request did you perform with the curl command in the previous sections? The GET requests. We only requested the server to send the specified data and retrieved it.
We’ll shortly go through the ways to perform other requests with the cURL command. Let’s quickly go over the HTTP responses before that.
HTTP Responses
The server responds to the HTTP requests by sending back some responses.
The structure of the HTTP response is as follows:
- Status code: This is the first line of an HTTP response. See all the codes here. (Another way to remember status codes is by seeing each code associated with a picture of silly cats – https://http.cat)
- Response Header: The response will have a header section revealing some more information about the request and the server.
- Message Body: The response might have an additional message-body attached to it. It is optional. The message body is just below the Response Header, separated by an empty line.
Let’s take a look at an example HTTP response. We’ll use the cURL command to generate a GET request and see what response the server sends back:
curl -i example.com
Don’t worry about the -i flag. It just tells the cURL command to show the response including the header.
Here is the response:
curl -i example.com
HTTP/1.1 200 OK
Age: 525920
Cache-Control: max-age=604800
Content-Type: text/html; charset=UTF-8
Date: Sun, 16 May 2021 17:07:42 GMT
Etag: "3147526947+ident"
Expires: Sun, 23 May 2021 17:07:42 GMT
Last-Modified: Thu, 17 Oct 2019 07:18:26 GMT
Server: ECS (dcb/7F81)
Vary: Accept-Encoding
X-Cache: HIT
Content-Length: 1256

<!doctype html>
<html>
<head>
    <title>Example Domain</title>

    <meta charset="utf-8" />
    <meta http-equiv="Content-type" content="text/html; charset=utf-8" />
    <meta name="viewport" content="width=device-width, initial-scale=1" />
    <style type="text/css">
    body {
        background-color: #f0f0f2;
        margin: 0;
        padding: 0;
        font-family: -apple-system, system-ui, BlinkMacSystemFont, "Segoe UI", "Open Sans", "Helvetica Neue", Helvetica, Arial, sans-serif;

    }
    div {
        width: 600px;
        margin: 5em auto;
        padding: 2em;
        background-color: #fdfdff;
        border-radius: 0.5em;
        box-shadow: 2px 3px 7px 2px rgba(0,0,0,0.02);
    }
    a:link, a:visited {
        color: #38488f;
        text-decoration: none;
    }
    @media (max-width: 700px) {
        div {
            margin: 0 auto;
            width: auto;
        }
    }
    </style>
</head>

<body>
<div>
    <h1>Example Domain</h1>
    <p>This domain is for use in illustrative examples in documents. You may use this
    domain in literature without prior coordination or asking for permission.</p>
    <p><a href="https://www.iana.org/domains/example">More information...</a></p>
</div>
</body>
</html>
Can you break down the response?
The first line, which is highlighted, is the Status code. It means the request was successful, and we get a standard response.
Lines 2 to 12 represent the HTTP header. You can see some information like content type, date, etc.
The header ends before the empty line. Below the empty line, the message body is received.
Now you know extensive details about how the HTTP request and response work.
Let’s move on to learning how to perform some requests with the curl command.
From this section, you’ll see different HTTP requests made by the cURL command. We’ll show you some example commands and explain them along the way.
GET Request With the cURL Command
By default, the cURL command performs the GET requests when no other methods are specified.
We saw some basic commands with cURL at the beginning of the article. All of those commands sent GET requests to the server, retrieved the data, and showed them in your terminal.
Here are some examples in the context of the GET requests:
curl example.com
As we mentioned before, the -L flag enables the cURL command to follow redirects.
curl -L bytexd.com
Both will send GET requests to the servers specified.
HEAD Request With the cURL Command
We can extract the HTTP headers from the response of the server.
Why? Because sometimes you might want to take a look at the headers for some debugging or monitoring purposes.
The header is not shown when you perform GET requests with the cURL command.
For example, this command will only output the message body without the HTTP header.
curl example.com
To see only the header, we use the -I flag or the --head option.
curl -I example.com
It will output only the header section of the HTTP response.
Output
HTTP/1.1 200 OK
Content-Encoding: gzip
Accept-Ranges: bytes
Age: 390829
Cache-Control: max-age=604800
Content-Type: text/html; charset=UTF-8
Date: Mon, 17 May 2021 19:33:52 GMT
Etag: "3147526947"
Expires: Mon, 24 May 2021 19:33:52 GMT
Last-Modified: Thu, 17 Oct 2019 07:18:26 GMT
Server: ECS (dcb/7EEB)
X-Cache: HIT
Content-Length: 648
If you wanted to see the whole HTTP response, you’d use the -i flag or --include option as we mentioned earlier:
curl -i example.com
Now let’s find out why you might want to look at the headers. We’ll run the following command:
curl -I bytexd.com
Remember we couldn’t redirect to bytexd.com without the -L flag? If you didn’t include the -I flag there would’ve been no outputs.
With the -I flag you’ll get the header of the response, which offers us some information:
HTTP/1.1 301 Moved Permanently
Date: Thu, 13 May 2021 07:06:05 GMT
Connection: keep-alive
Cache-Control: max-age=3600
Expires: Thu, 13 May 2021 08:06:05 GMT
Location: https://bytexd.com/
cf-request-id: 0a062512d2000001c88dbb2000000001
Report-To: {"endpoints":[{"url":"https://a.nel.cloudflare.com/report?s=U8B0HJ%2BLZ9xb%2FodQtDu1E0YCDElQ9%2FHpFJ0kuLX6tJRdY%2F4t9rAr9e2sdeEpTtnz%2FuBnOpyJj%2BjIm74ffdfhDExFFVkAKHoJDgu3"}],"group":"cf-nel","max_age":604800}
NEL: {"report_to":"cf-nel","max_age":604800}
Server: cloudflare
CF-RAY: 64ea0acaeed601c8-SIN
alt-svc: h3-27=":443"; ma=86400, h3-28=":443"; ma=86400, h3-29=":443"; ma=86400
Look at the first line and you’ll see something interesting. It is the status code of your response. The code is 301 which indicates a redirect is necessary. As we mentioned before you can check HTTP status codes and their meanings here (Wikipedia) or here (status codes associated with silly cat pictures)
If you want to see the communication between cURL and the server then turn on the verbose option with the -v flag:
curl -v bytexd.com
Output
*   Trying 104.21.37.46:80...
* TCP_NODELAY set
* Connected to bytexd.com (104.21.37.46) port 80 (#0)
> GET / HTTP/1.1
> Host: bytexd.com
> User-Agent: curl/7.68.0
> Accept: */*
>
* Mark bundle as not supporting multiuse
< HTTP/1.1 301 Moved Permanently
< Date: Mon, 17 May 2021 19:40:57 GMT
< Transfer-Encoding: chunked
< Connection: keep-alive
< Cache-Control: max-age=3600
< Expires: Mon, 17 May 2021 20:40:57 GMT
< Location: https://bytexd.com/
< cf-request-id: 0a1d71998f00004108c090c000000001
< Report-To: {"endpoints":[{"url":"https://a.nel.cloudflare.com/report?s=y8EgEvrQ5VQuErysespUqCcmICva4jHOAap0Z1UKkT450FC4jcBLmAGOkyMcm2BhBnK7rRezgRwOOqffOIcCEJFH3zNQnO5vxy%2FO"}],"group":"cf-nel","max_age":604800}
< NEL: {"report_to":"cf-nel","max_age":604800}
< Server: cloudflare
< CF-RAY: 650f5208ee5e4108-PRG
< alt-svc: h3-27=":443"; ma=86400, h3-28=":443"; ma=86400, h3-29=":443"; ma=86400
<
* Connection #0 to host bytexd.com left intact
You can trace the whole request and response and save it to a file with the --trace option:
curl --trace-ascii file.log bytexd.com
This is important for debugging and looking under the hood.
Now you might wonder what will happen if we use the redirect option -L with the Header only -I option. Let’s try it out:
curl -L -I bytexd.com
This will show the headers for all the HTTP responses for all the redirects. Previously we saw that without the -L flag, the response only had one header. Now you’ll see two response headers.
The second one will have the status code of 200 OK which means Standard Response.
HTTP/1.1 301 Moved Permanently
Date: Thu, 13 May 2021 07:26:16 GMT
Connection: keep-alive
Cache-Control: max-age=3600
Expires: Thu, 13 May 2021 08:26:16 GMT
Location: https://bytexd.com/
cf-request-id: 0a06378cf60000ddbbac1c5000000001
Report-To: {"endpoints":[{"url":"https://a.nel.cloudflare.com/report?s=sBhAuyICvY79ULS0CZk3tMjz1y%2F%2BUiegyUCtTD7bojs1SXcXlGf26py8vLGXg%2Ba%2F%2FJAWgY2997sTMk4VS1qguJ3I%2F9IvKMe2TW7y"}],"group":"cf-nel","max_age":604800}
NEL: {"report_to":"cf-nel","max_age":604800}
Server: cloudflare
CF-RAY: 64ea285b28c7ddbb-SIN
alt-svc: h3-27=":443"; ma=86400, h3-28=":443"; ma=86400, h3-29=":443"; ma=86400

HTTP/1.1 200 OK
Date: Thu, 13 May 2021 07:26:19 GMT
Content-Type: text/html; charset=UTF-8
Connection: keep-alive
Vary: Accept-Encoding
cf-edge-cache: cache,platform=wordpress
Link: <https://bytexd.com/wp-json/>; rel="https://api.w.org/"
X-Powered-By: WordOps
X-Frame-Options: SAMEORIGIN
X-Xss-Protection: 1; mode=block
X-Content-Type-Options: nosniff
Referrer-Policy: no-referrer, strict-origin-when-cross-origin
X-Download-Options: noopen
Strict-Transport-Security: max-age=31536000; includeSubDomains; preload
X-fastcgi-cache: HIT
CF-Cache-Status: DYNAMIC
cf-request-id: 0a063793f1000001f6efa4e000000001
Expect-CT: max-age=604800, report-uri="https://report-uri.cloudflare.com/cdn-cgi/beacon/expect-ct"
Report-To: {"endpoints":[{"url":"https://a.nel.cloudflare.com/report?s=vQ1vk%2BhP027gW2my981tBWMOTbmfpXYDwiJS%2BZExFsjw95qlyzHkFI2I1i3SdhuloGfDglCZRevbkdR8YdSNaD9C46KTz92qHqNd"}],"group":"cf-nel","max_age":604800}
NEL: {"report_to":"cf-nel","max_age":604800}
Server: cloudflare
CF-RAY: 64ea28664e4b01f6-SIN
alt-svc: h3-27=":443"; ma=86400, h3-28=":443"; ma=86400, h3-29=":443"; ma=86400
Now let’s move on to the POST requests.
POST Requests With the cURL Command
We already mentioned that the cURL command performs the GET request method by default. For using other request methods need to use the -X or --request flag followed by the request method.
Let’s see an example:
curl -X [method] [more options] [URI]
For using the POST method we’ll use:
curl -X POST [more options] [URI]
Sending Data Using POST Method
You can use the -d or --data option with the curl command to specify the data you want to send to the server.
This flag sends data with the content type of application/x-www-form-urlencoded.
We’ll use httpbin.org/post to send POST requests to. httpbin.org is free service HTTP request & response service and httpbin.org/post accepts POST requests and will help us better understand how requests are made.
Here’s an example with the -d flag:
curl -X POST -d "p1=value1" https://httpbin.org/post
This command will request the server to post the data p1=value1. The p1 could be any parameter having any value. The URI is used just as an example here.
Multiple data can be sent like below:
curl -X POST -d 'p1=value1' -d 'p2=value1' https://httpbin.org/post
..or..
curl -X POST -d 'p1=value1&p2=value2' https://httpbin.org/post
Uploading Files with cURL
Multipart data can be sent with the -F or --form flag which uses the multipart/form-data or form content type.
You can also send files using this flag, and you’ll also need to attach the @ prefix to attach a whole file.
Replace /root/Desktop/file with the path to any file on your computer that you want to test this command with.
curl -X POST -F '[email protected]/root/Desktop/file' https://httpbin.org/post
Upload multiple files by joining the strings representing the files to upload, joined by ;:
curl -X POST -F '[email protected]/root/Desktop/file1;[email protected]/root/Desktop/file2' https://httpbin.org/post
..or by using multiple -F flags:
curl -X POST -F '[email protected]/root/Desktop/file1' -F '[email protected]/root/Desktop/file2' https://httpbin.org/post
You can use the -H or --header flag to change the header content when sending data to a server. This will allow us to send custom-made requests to the server.
Specify the content type in the Header
We can specify the content type using this header.
Let’s send a JSON object with the application/json content type:
curl -H 'Content-Type: application/json' -X POST -d '{"date": "18-May-2021", "name": "Ed"}' https://httpbin.org/post
PUT Requests With the cURL Command
The PUT request will update or replace the specified content.
We’ll use httpbin.org/put for testing.
Perform the PUT request by using the -X flag:
curl -X PUT -d 'arg1=val1' -d 'arg2=val2' https://httpbin.org/put
We’ll show another example with the PUT method sending raw JSON data:
curl -X PUT -H "Content-Type: application/json" -d '{"name":"bytexd"}' https://httpbin.org/put
DELETE Requests With the cURL Command
You can request the server to delete some content with the DELETE request method.
We’ll use httpbin.org/delete for testing.
Here is the syntax for this request:
curl -X DELETE https://httpbin.org/delete
Let’s see what actually happens when we send a request like this. We can look at the status code by extracting the header:
curl -I -X DELETE https://httpbin.org/delete
HTTP/2 200
date: Mon, 17 May 2021 21:40:03 GMT
content-type: application/json
content-length: 319
server: gunicorn/19.9.0
access-control-allow-origin: *
access-control-allow-credentials: true
Here we can see the status code is 200 which means the request was successful.
Conclusion
In this tutorial, we covered how to perform HTTP requests with the cURL command from the basics. You can learn more about the cURL command by typing man curl in the terminal.
If you have any issues, questions or feedback, then feel free to contact us or leave a comment below, and we’ll get back to you as soon as possible.