Время на прочтение
12 мин
Количество просмотров 18K

Введение
Discord — это чат-приложение, которое позволяет миллионам пользователей по всему миру обмениваться сообщениями и общаться голосом вживую в сообществах, называемых гильдиями (guilds) или серверами. Discord также предоставляет обширный API, который разработчики могут использовать для создания весьма функциональных Discord-ботов. Боты могут выполнять различные действия, такие как отправка сообщений на серверы и личных сообщений пользователям, модерация серверов и воспроизведение звука в голосовых чатах. Это позволяет разработчикам создавать продвинутых ботов, которые реализуют сложные функции, такие как инструменты модерации или даже игры. Например, служебный бот Dyno обслуживает миллионы гильдий и содержит такие полезные функции, как защита от спама, музыкальный проигрыватель и много других вспомогательных служб. Знание того, как создавать Discord-ботов, позволит вам реализовать возможности, с которыми смогут взаимодействовать каждый день тысячи людей.
В этом туториале мы с вами создадим Discord-бота с нуля, используя Node.js и библиотеку Discord.js, которая позволяет пользователям напрямую взаимодействовать с Discord API. Мы настроим профиль для Discord-бота, получим для него токены аутентификации и реализуем в боте возможность обработки команд с аргументами от пользователей.
Что вам для этого понадобится
Прежде чем вы начнете, вам понадобится следующее:
-
Node.js, установленный на вашем компьютере. Чтобы установить его на macOS или Ubuntu 20.04, выполните действия, перечисленные в ”Как установить Node.js и создать локальную среду разработки в macOS” или в разделе “Установка Node.js посрдством Apt с помощью NodeSource PPA” руководства ”Как установить Node.js в Ubuntu 20.04”.
-
Любой текстовый редактор на ваш вкус, например Visual Studio Code, Atom, Sublime или nano.
-
Бесплатный Discord-аккаунт, подтвержденный по электронной почте, и бесплатный Discord-сервер, который мы будем использовать для тестирования нашего Discord-бота.
Шаг 1 — Настройка Discord-бота
На этом этапе мы будем использовать GUI Discord для разработчиков, чтобы настроить Discord-бота и получить для него токен, который вы будете использовать в своей программе.
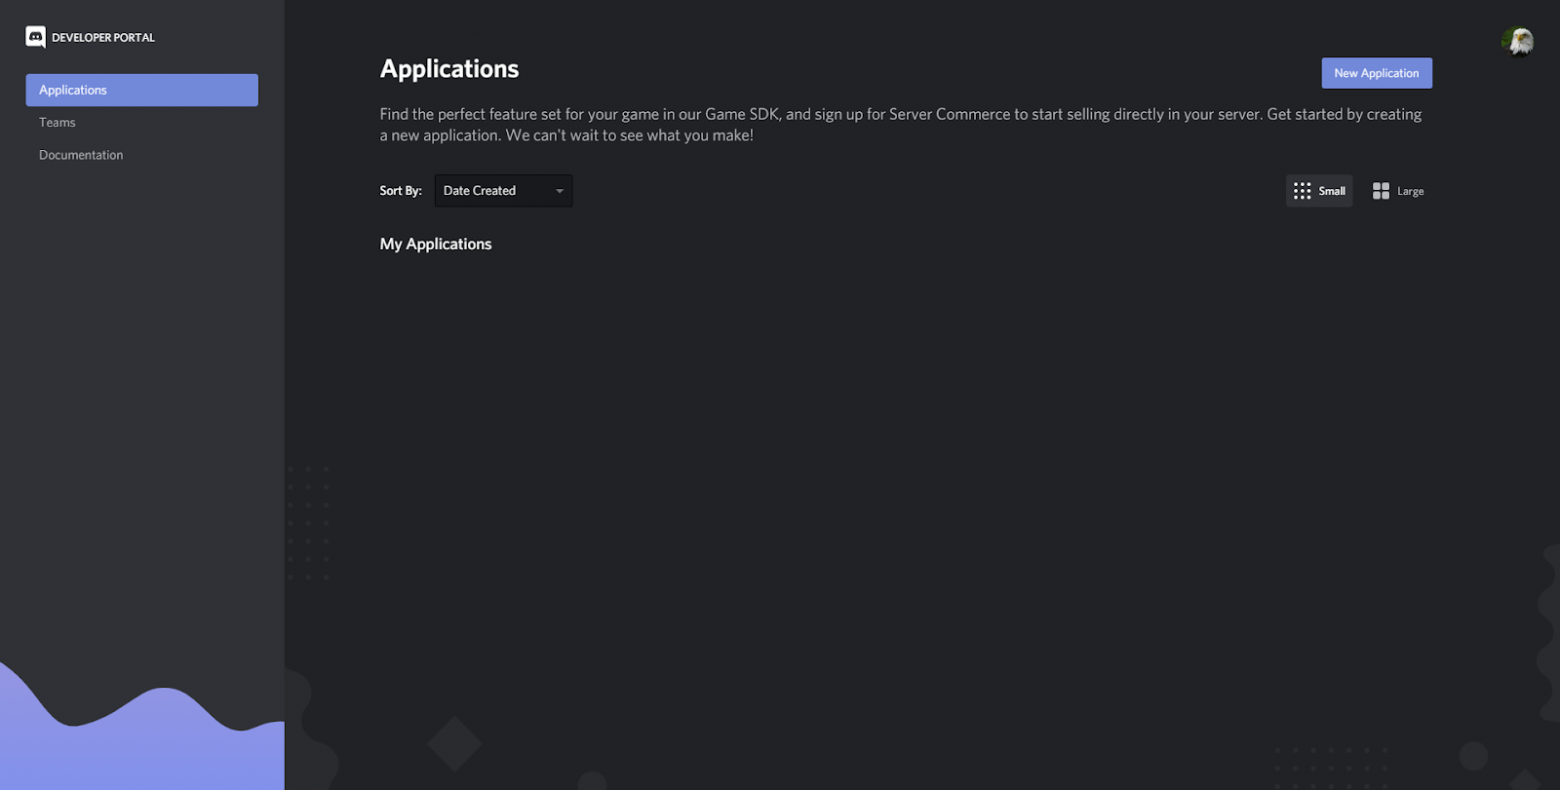
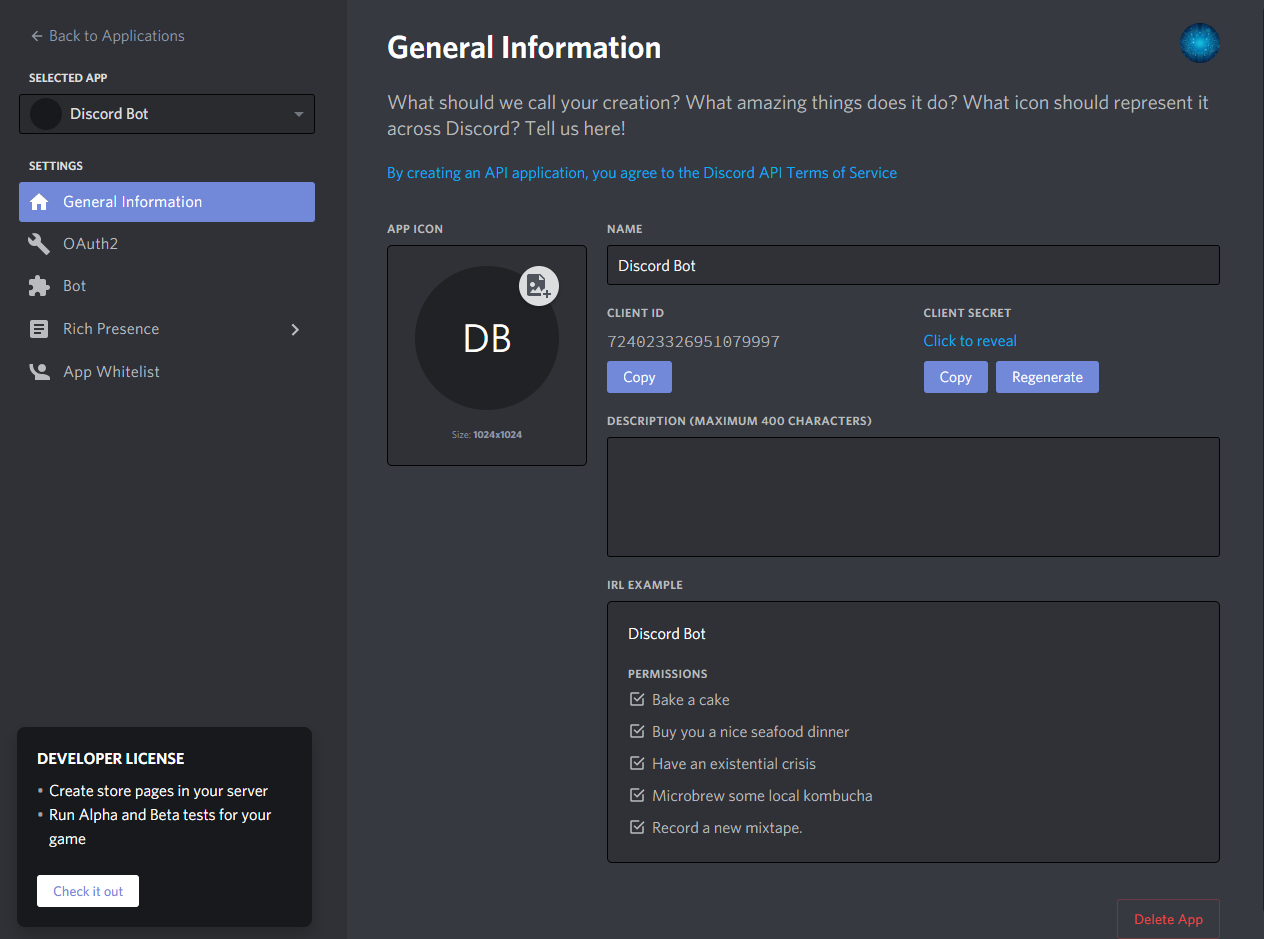
Чтобы зарегистрировать бота на платформе Discord, используйте Discord application dashboard (панель управления приложением). В ней разработчики могут создавать Discord-приложения, в частности — Discord-ботов.
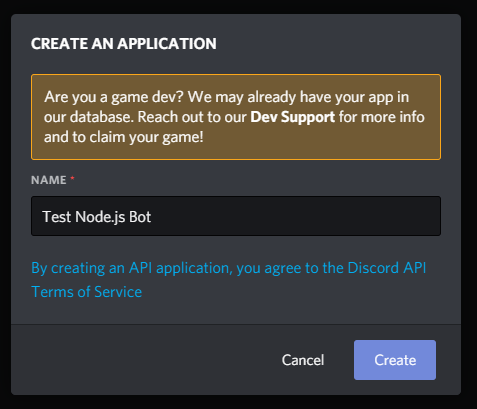
Чтобы начать, кликните New Application. Discord попросит вас ввести имя для вашего нового приложения. Далее кликните Create, чтобы создать приложение.
Примечание: Имя вашего бота не зависит от имени приложения, т.е. имя бота не обязательно должно совпадать с именем приложения.
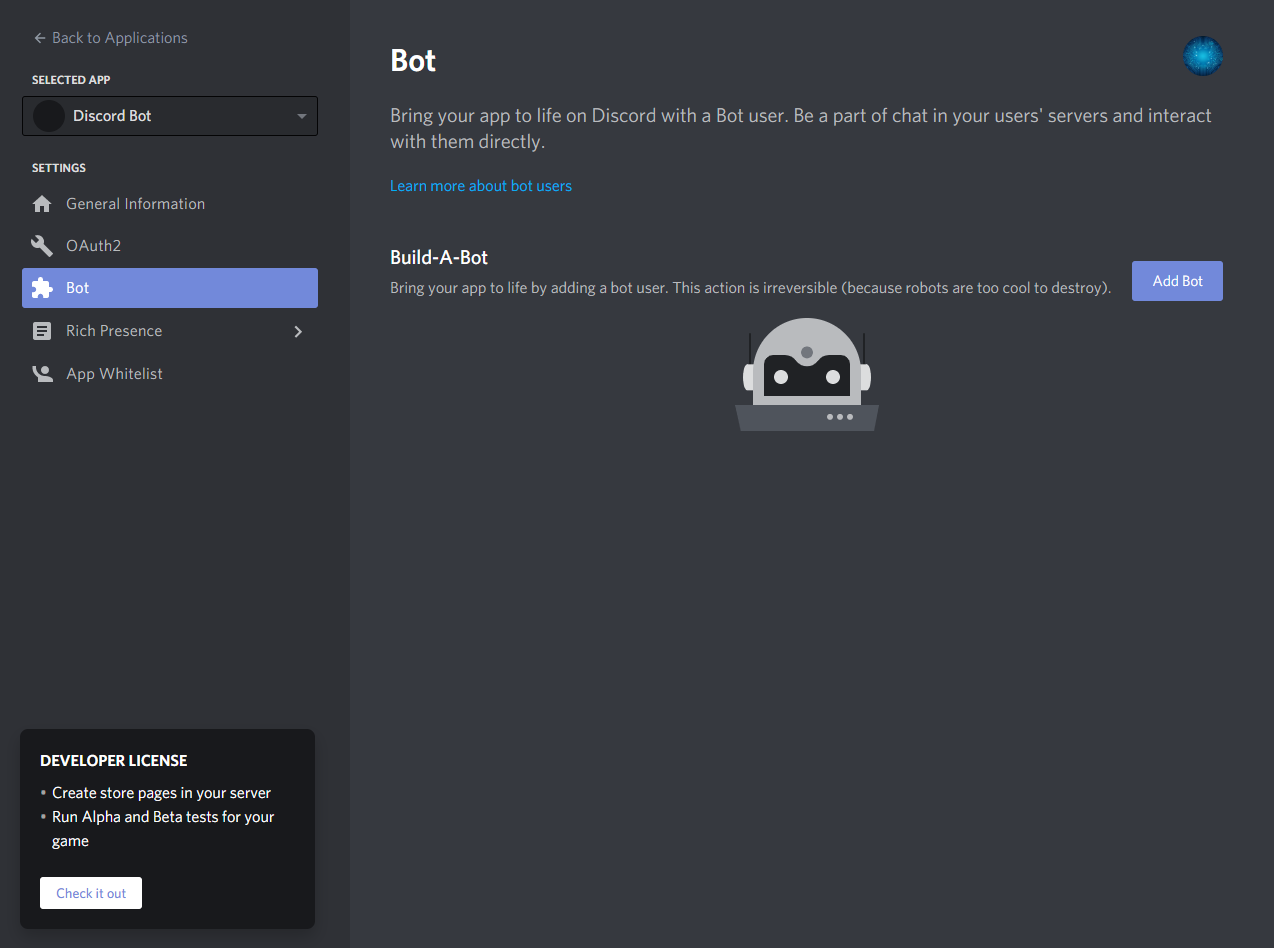
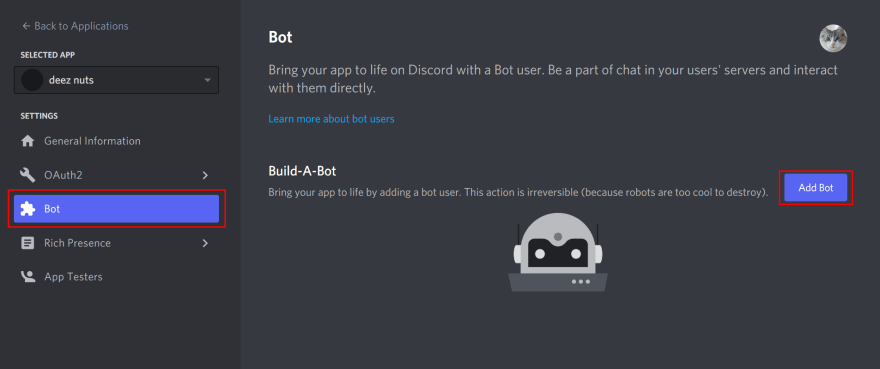
Теперь откройте панель управления вашего приложения. Чтобы добавить бота в приложение, перейдите на вкладку Bot на навигационной панели слева.
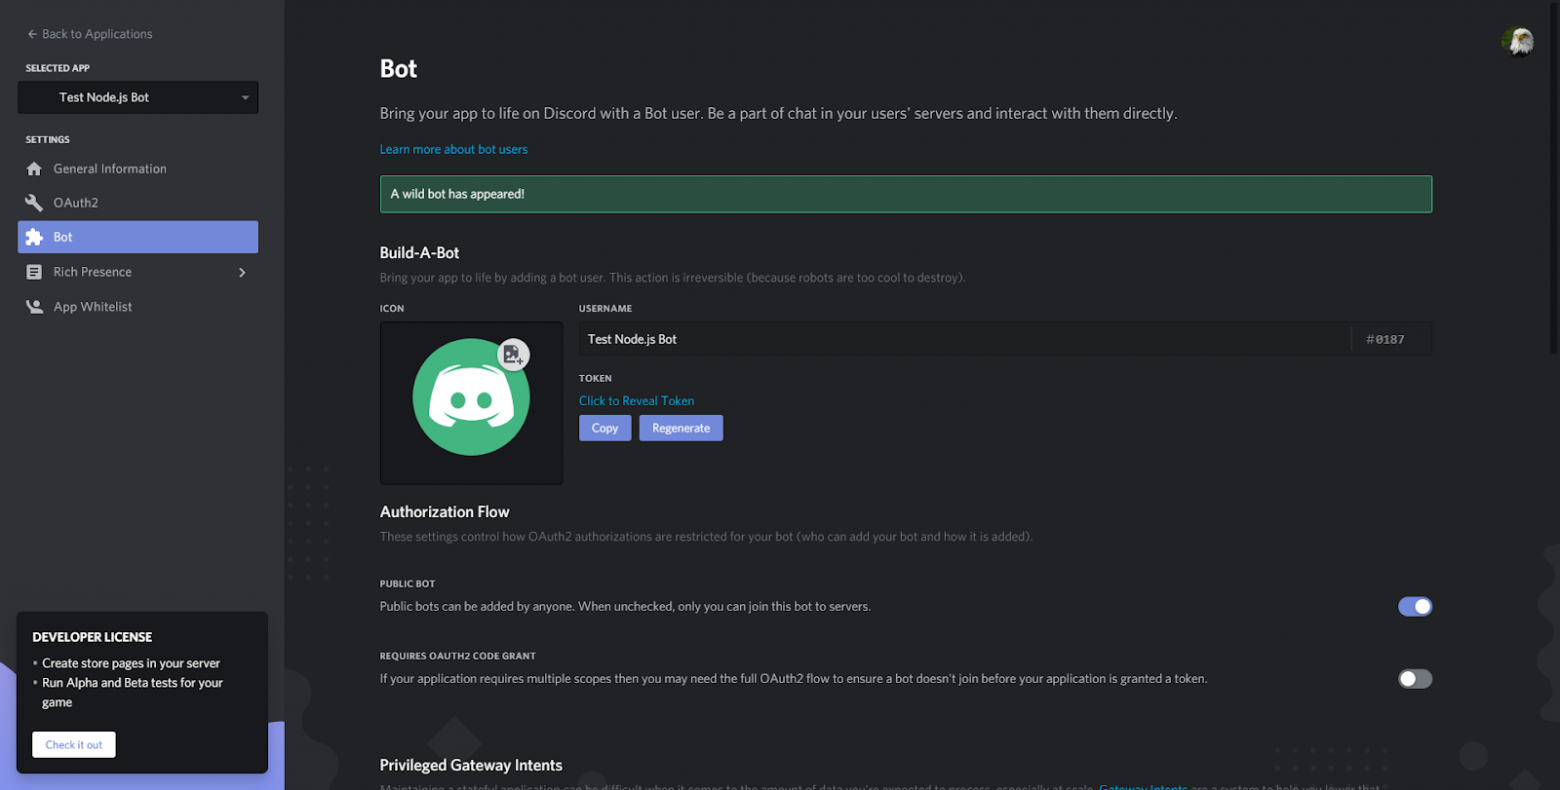
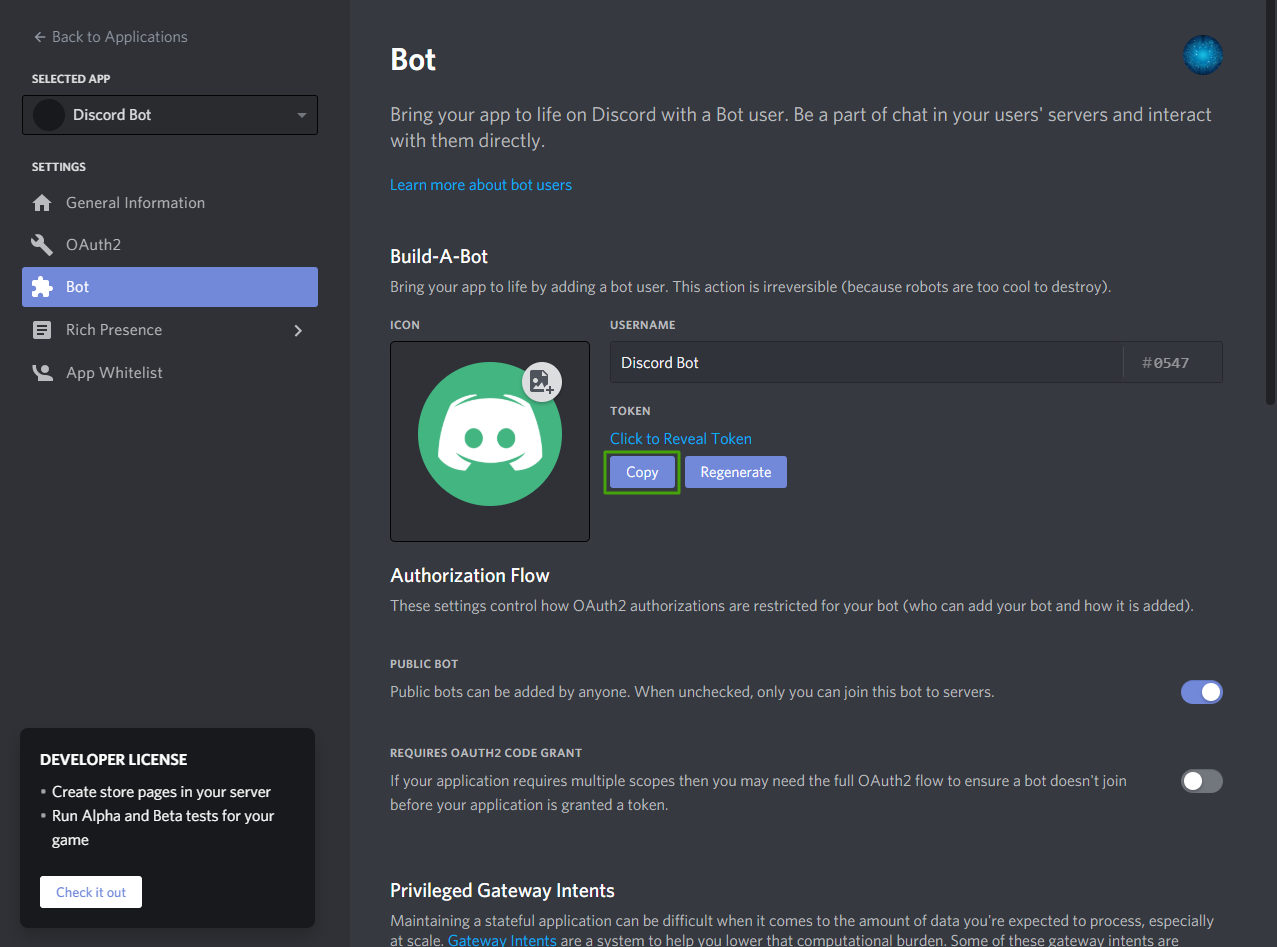
Чтобы добавить бота в приложение, нажмите кнопку Add Bot. Кликните Yes, do it!, когда появится диалог подтверждения. После этого вы попадете в панель управления, содержащую сведения об имени вашего бота, токен аутентификации и изображение профиля.
Вы можете изменить имя или изображение профиля своего бота здесь, в этой панели управления. Вам также необходимо получить токен аутентификации бота, кликнув Click to Reveal Token и скопировав появившийся токен.
Предупреждение: никогда ни с кем не делитесь и никуда не публикуйте токен вашего бота, так как он позволяет любому, кто им обладает, получить доступ к вашему боту.
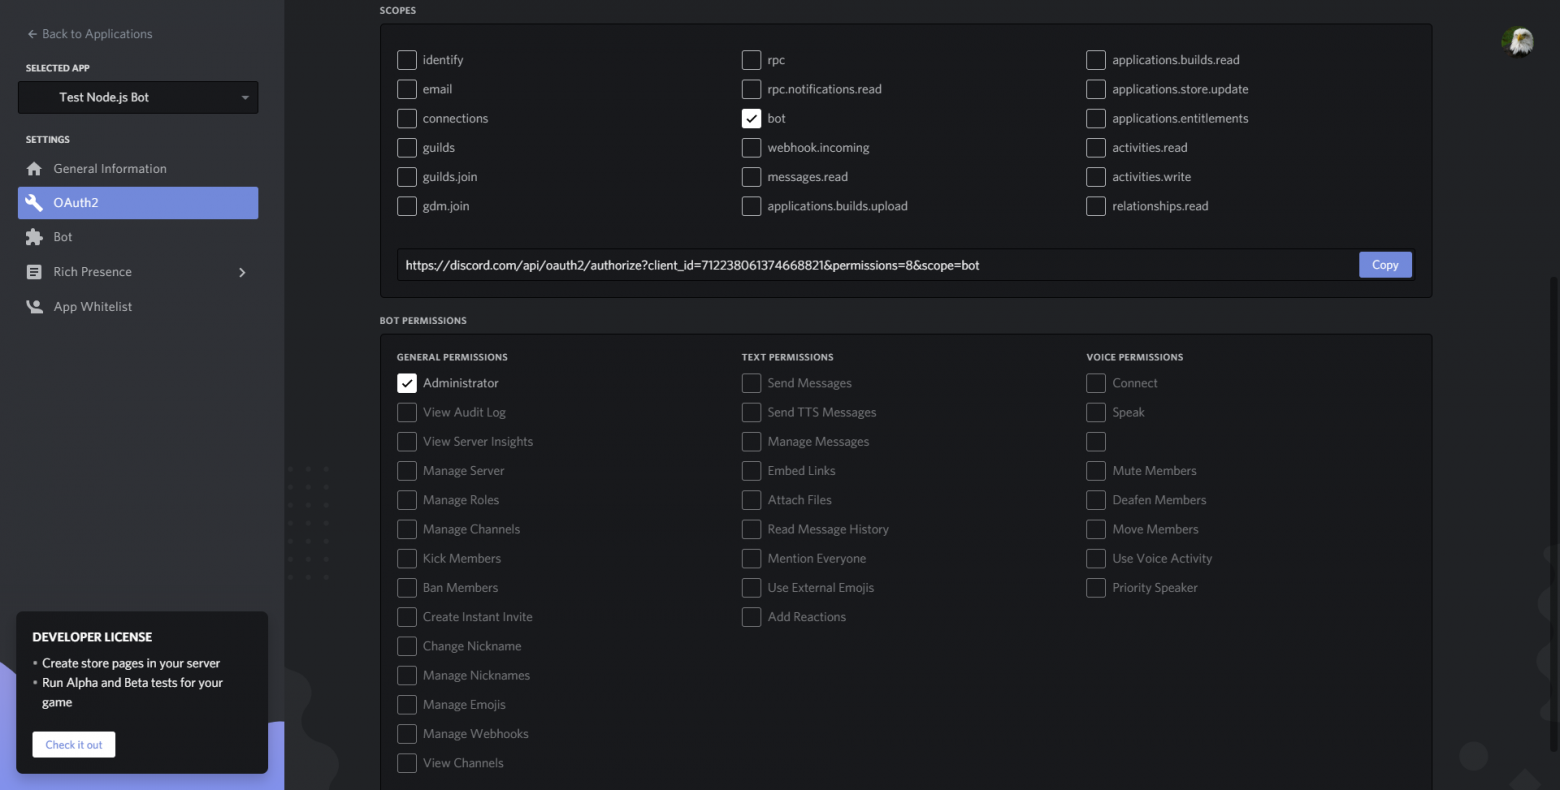
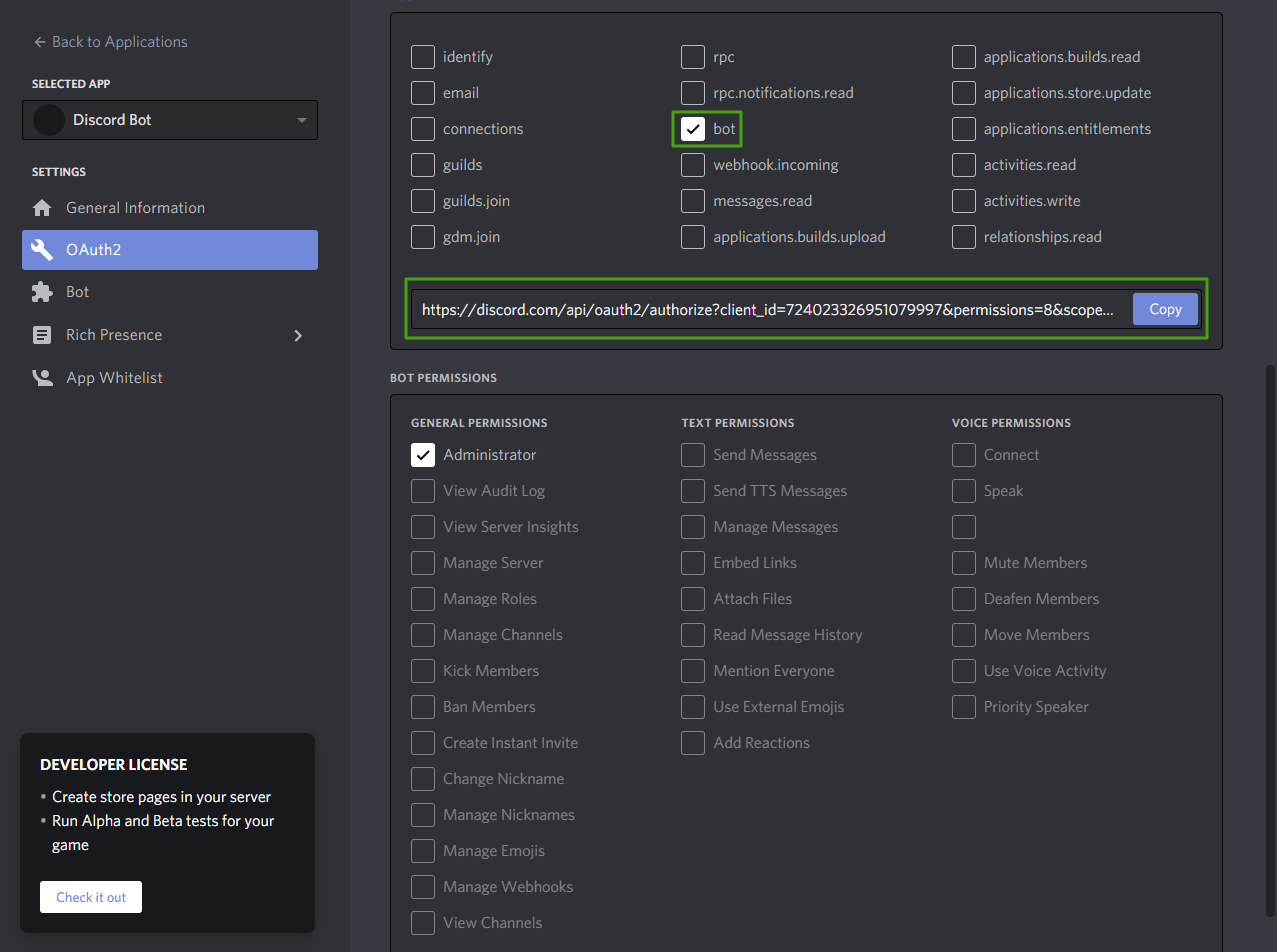
Теперь вам нужно создать инвайт для добавления бота в Discord-гильдию, где вы сможете его тестировать. Сначала перейдите на страницу URL Generator во вкладке OAuth2 панели управления приложением. Чтобы создать инвайт, проскрольте вниз и выберите bot в scopes. Вам также следует установить разрешения (permissions), чтобы контролировать, какие действия ваш бот может выполнять в гильдиях. В рамках этого руководства мы выберем Administrator, что даст вашему боту права на выполнение почти всех возможных действий в гильдиях. Скопируйте ссылку с помощью, нажав на кнопку Copy.
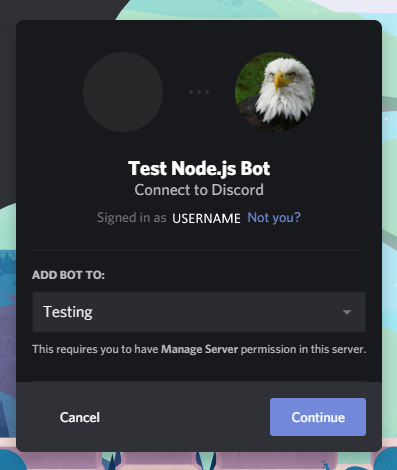
Затем добавьте бота на сервер. Перейдите по только что созданной ссылке-инвайту. В раскрывающемся меню вы можете добавить бота на любой сервер, которым вы владеете или на котором имеете права администратора.
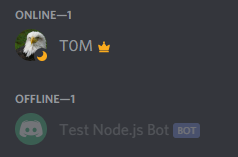
Теперь нажмите Continue. Убедитесь, что у вас установлен флажок рядом с Administrator — это предоставит боту права администратора. Затем нажмите Authorize. До того, как бот присоединится к серверу, Discord попросит вас заполнить капчу. После этого бот должен появиться в offline в списке участников на сервере, на который вы его добавили.
Вы успешно создали Discord-бота и добавили его на сервер. Далее мы напишем программу для логина в бот.
Шаг 2 — Создание вашего проекта
На этом шаге мы настроим базовую среду разработки, в которой вы напишете код своего бота и залогинитесь в него программным способом.
Во-первых, вам нужно создать папку проекта и необходимые файлы для бота.
Создайте папку своего проекта:
mkdir discord-botПерейдите в папку проекта, которую вы только что создали:
cd discord-botЗатем с помощью текстового редактора создайте файл с именем config.json, где будет храниться токен аутентификации вашего бота:
nano config.jsonДобавьте следующий код в полученный файл конфигурации, заменив выделенный текст на токен аутентификации вашего бота:
{
    "BOT_TOKEN": "YOUR BOT TOKEN"
}
Сохраните и закройте файл.
Затем вам нужно создать файл package.json, в котором будут храниться сведения о вашем проекте и зависимостях, которые вы будете для него использовать. Создайте файл package.json, выполнив следующую npm-команду:
npm initnpm запросит у вас различные сведения о вашем проекте. Если вам нужна помощь в заполнении этих сведений, вы можете почитать об этом в разделе “Как использовать модули Node.js с npm и package.json”.
Теперь вам нужно установить пакет discord.js, который вы будете использовать для взаимодействия с Discord API. Вы можете установить discord.js через npm с помощью следующей команды:
npm install discord.jsКогда вы настроили файл конфигурации и установили необходимую зависимость, вы готовы приступить к созданию своего бота. В реальном приложении, если бот большой, то он будет разделен на множество файлов, но в этом руководстве весь код вашего бота будет написан в одном файле.
Сначала создайте файл с именем index.js в папке discord-bot:
nano index.jsНачнем код бота с требования зависимости discord.js и файл конфигурации с токеном:
const Discord = require("discord.js");

const config = require("./config.json");
После этого добавьте следующие две строки кода:
...

const client = new Discord.Client({intents: ["GUILDS", "GUILD_MESSAGES"]);

client.login(config.BOT_TOKEN);
Сохраните и закройте файл.
Первая строка кода создает новый Discord.Client и присваивает его константе client. Этот клиент — это то, как вы будете взаимодействовать с Discord API и как Discord будет уведомлять вас о таких событиях, как новые сообщения. Клиент, по сути, представляет Discord-бота. Объект, переданный в конструктор Client, определяет намерения (gateway intents) вашего бота. Таким образом определяется, какие WebSocket-события будет слушать ваш бот. Здесь мы указали GUILDS и GUILD_MESSAGES, чтобы бот получал события сообщений в гильдиях.
Вторая строка кода использует метод login для входа в созданный вами Discord-бот, используя токен из файла config.json в качестве пароля. Токен позволяет Discord API узнать, для какого бота предназначена программа, и что вы прошли аутентификацию для использования этого бота.
Теперь запустите файл index.js с помощью Node:
node index.jsСтатус вашего бота на Discord-сервере, на который вы его добавили, изменится на online.
Вы успешно настроили среду разработки и написали базовый код для логина в Discord-бот. На следующем шаге мы будем обрабатывать пользовательские команды и научим ваш бот выполнять действия, такие как отправка сообщений.
Шаг 3 — Обработка вашей первой пользовательской команды
На этом шаге вы создадите бота, который может обрабатывать пользовательские команды. Вы реализуете свою первую команду ping, которая будет отвечать "pong" и временем, которое потребовалось для ответа на команду.
Во-первых, чтобы вы могли обрабатывать команды, вам нужно обнаруживать и получать сообщения, которые отправляют пользователи. Используя метод Discord-клиента on, вы будете получать от Discord уведомление о новых событиях. Метод on принимает два аргумента: имя ожидаемого события и функцию, запускаемую каждый раз, когда это событие происходит. С помощью этого метода вы можете прослушивать событие message, которое генерируется каждый раз, когда сообщение отправляется в гильдию, в которой бот имеет разрешение на просмотр сообщений. Таким образом мы создадим функцию, которая запускается каждый раз, когда отправляется сообщение.
Сначала откройте свой файл:
nano index.jsДобавьте в файл следующий код:
...

const client = new Discord.Client({intents: ["GUILDS", "GUILD_MESSAGES"]});

client.on("messageCreate", function(message) {


});

client.login(config.BOT_TOKEN);
Эта функция, которая запускается в ответ на событие messageCreate, принимает message в качестве параметра. message имеет значение инстанса сообщения Discord.js, которое содержит информацию об отправленном сообщении и методах, которые помогут боту ответить.
Добавьте следующую строку кода в свою функцию обработки команд:
...
client.on("messageCreate", function(message) {
  if (message.author.bot) return;
});
...
Эта строка проверяет, является ли автор сообщения ботом, и, если да, то прекращает обработку команды. Это важно, поскольку обычно вы не хотите обрабатывать сообщения ботов или отвечать на них. Ботам обычно не нужно использовать информацию от других ботов, поэтому игнорирование их сообщений помогает предотвратить нежелательные ответы и экономит вычислительную мощность.
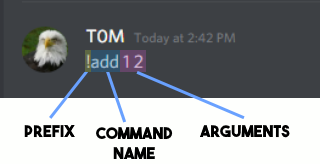
Теперь мы напишем обработчик команд. Для этого нужно понимать формат команды Discord. Обычно команда Discord состоит из трех частей в следующем порядке: префикс, имя команды и (иногда) аргументы команды.
-
Префикс: префиксом может быть что угодно, но зачастую это пунктуационный символ или абстрактная фраза, которая обычно не встречается в начале сообщения. Это означает, что когда вы начинаете сообщение с префикса, бот поймет, что предназначение этой команды заключается в том, чтобы бот обработал ее.
-
Имя команды: имя команды, которую хочет использовать пользователь. Это означает, что бот может поддерживать несколько команд с разной функциональностью и позволяет пользователям выбирать между ними, указывая соответствующее имя команды.
-
Аргументы: иногда, если команда использует или даже требует дополнительную информацию от пользователя, пользователь может указать аргументы после имени команды, где этом каждый аргумент отделяется пробелом.
Примечание: Нет унифицированной жесткой структуры команд, и боты могут обрабатывать команды так, как вам хочется, но представленная здесь структура является эффективной, и ее использует подавляющее большинство ботов.
Начнем создание парсера команд, обрабатывающего этот формат, добавив следующие строки кода в функцию обработки сообщений:
...
const prefix = "!";

client.on("messageCreate", function(message) {
  if (message.author.bot) return;
  if (!message.content.startsWith(prefix)) return;
});
...
В первой строке кода мы присваиваем константе prefix значение "!", которое будет использоваться в качестве префикса команды.
Во второй строке кода, которую вы добавляете, мы проверяем, начинается ли содержимое сообщения, полученного ботом, с установленного вами префикса, и, если нет, то останавливаем обработку сообщения.
Теперь нам нужно преобразовать остальную часть сообщения в имя команды и аргументы, которые могут присутствовать в сообщении. Добавьте следующие выделенные строки:
...
client.on("messageCreate", function(message) {
  if (message.author.bot) return;
  if (!message.content.startsWith(prefix)) return;

  const commandBody = message.content.slice(prefix.length);
  const args = commandBody.split(' ');
  const command = args.shift().toLowerCase();
});
...
В первой строке мы удаляем префикс из сообщения и присваиваем результат константе commandBody. Это необходимо, поскольку нам не нужно включать префикс в имя команды, которую мы парсим.
Вторая строка принимает сообщение уже без префикса и применяет к нему метод split с пробелом в качестве разделителя. Это разобьет его на массив подстрок, делая разделение везде, где стоит пробел. В результате получается массив, содержащий имя команды, а затем, если они включены в сообщение, все аргументы. Мы присваиваем этот массив константе args.
Третья строка удаляет первый элемент из массива args (он станет именем полученной команды), преобразует его в нижний регистр и затем назначает его константе command. Это позволяет вам изолировать имя команды и оставить в массиве только аргументы. Вы также следует использовать метод toLowerCase, поскольку команды в Discord-ботах обычно нечувствительны к регистру.
Вы завершили создание парсера команд, реализовали требуемый префикс и получили имя команды и все аргументы из сообщения. Теперь вам нужно написать код для конкретных команд.
Добавьте следующий код для команды ping :
...
  const args = commandBody.split(' ');
  const command = args.shift().toLowerCase();

  if (command === "ping") {

  }
});
...
Этот if-оператор проверяет, совпадает ли имя команды, которое вы распарсили (присвоенное константе command), с "ping". Если совпадает, то это означает, что пользователь хочет использовать команду "ping". В подобной примитивной реализации код для конкретной команд вы можете просто обернуть в блок if-оператора. Делайте тоже самое и для других команд, которые хотите реализовать.
Теперь вы можете написать код для команды "ping":
...
  if (command === "ping") {
    const timeTaken = Date.now() - message.createdTimestamp;
    message.reply(`Pong! This message had a latency of ${timeTaken}ms.`);
  }
...
Сохраните и закройте файл.
Мы добавили блок команды "ping", который вычисляет разницу между текущим временем, полученным с помощью метода now объекта Date, и таймстемпом, когда сообщение было создано, в миллисекундах. Таким образом мы узнаем, сколько времени потребовалось для обработки сообщения, т.е. "ping" бота.
Вторая строка отвечает на команду пользователя, используя метод reply константы message. Метод reply пингует (уведомляет и выделяет сообщение для указанного пользователя) пользователя, который отправил команду, с содержимым, предоставляемым в качестве первого аргумента метода. Вы предоставляете литерал шаблона, содержащий сообщение и вычисленный пинг, в качестве ответа, который использует метод reply.
На этом реализация команды "ping" закончена.
Запустите своего бота с помощью следующей команды (в той же папке, что и index.js):
node index.jsТеперь вы можете использовать команду "!ping" в любом канале, который бот может просматривать и отправлять туда сообщения, и получите ответ.
Вы успешно создали бота, который может обрабатывать пользовательские команды, и реализовали свою первую команду. На следующем шаге мы научим бота выполнив команду sum.
Шаг 4 — Реализация команды Sum
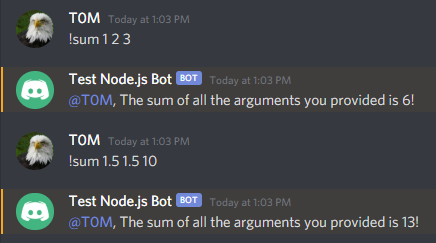
Теперь мы расширим программу командой "!sum". Команда примет любое количество аргументов, сложит их, а потом вернет пользователю сумму всех аргументов.
Если Discord бот все еще работает, вы можете остановить его процесс с CTRL + C.
Снова откройте файл index.js:
nano index.jsДля реализации команды "!sum" мы будем использовать блок else-if. После проверки имени команды на равенство ping он проверит, совпадает ли оно с «sum». Мы используем блок else-if, поскольку одновременно будет обрабатываться только одна команда, т.е., если программа получит команду "ping", ей не нужно проверять, что это была команда "sum". Добавьте в файл следующие выделенные строки:
...
  if (command === "ping") {
    const timeTaken = Date.now() - message.createdTimestamp;
    message.reply(`Ping! This message had a latency of ${timeTaken}ms.`);
  }

  else if (command === "sum") {

  }
});
...
Приступим к написанию кода команды "sum" . Код для команды "sum" будет расположен в только что созданном вами блоке else-if. Добавьте следующий код:
...
  else if (command === "sum") {
    const numArgs = args.map(x => parseFloat(x));
    const sum = numArgs.reduce((counter, x) => counter += x);
    message.reply(`The sum of all the arguments you provided is ${sum}!`);
  }
...
Мы используем метод map на списке аргументов, чтобы создать новый список, используя функцию parseFloat для каждого элемента в массиве args. Это создаст новый массив (присвоенный константе numArgs), в котором все элементы являются числами, а не строками. Это означает, что позже вы сможете успешно найти сумму этих чисел, сложив их вместе.
Вторая строка использует метод reduce на константе numArgs, которая суммирует все элементы в списке. Мы присваиваем сумму всех элементов в numArgs константе sum.
Затем мы используем метод reply, чтобы ответить по аналогии с предыдущей командой.
На этом реализация команды "sum" завершена. Теперь запустим бота, используя следующую команду (в той же папке, что и index.js):
node index.jsВы можете использовать команду «!sum» в любом канале, который бот может просматривать и отправлять туда сообщения.
Ниже представлена полная версия index.js бота:
const Discord = require("discord.js");
const config = require("./config.json");

const client = new Discord.Client({intents: ["GUILDS", "GUILD_MESSAGES"]});

const prefix = "!";

client.on("messageCreate", function(message) {
  if (message.author.bot) return;
  if (!message.content.startsWith(prefix)) return;

  const commandBody = message.content.slice(prefix.length);
  const args = commandBody.split(' ');
  const command = args.shift().toLowerCase();

  if (command === "ping") {
    const timeTaken = Date.now() - message.createdTimestamp;
    message.reply(`Pong! This message had a latency of ${timeTaken}ms.`);
  }

  else if (command === "sum") {
    const numArgs = args.map(x => parseFloat(x));
    const sum = numArgs.reduce((counter, x) => counter += x);
    message.reply(`The sum of all the arguments you provided is ${sum}!`);
  }
});

client.login(config.BOT_TOKEN);
Заключение
Вы успешно создали Discord-бота, который может обрабатывать несколько разных пользовательских команд с аргументами. Если вы хотите расширить возможности своего бота, вы могли бы реализовать больше команд или опробовать другие части Discord API. Рекомендую вам почитать документацию Discord.js и Discord API, чтобы углубить свои знания о Discord API. В частности, вы можете преобразовать свои команды своего бота в слэш-команды, что является лучшей практикой для Discord.js v13.
Создавая Discord-ботов, вы всегда должны помнить об условиях обслуживания Discord API, в которых описывается, как разработчики должны использовать Discord API. Если вы хотите узнать больше о Node.js, ознакомьтесь с нашей серией статей How To Code in Node.js.
Перевод статьи подготовлен в преддверии старта специализации Fullstack developer, а также курса Node.js Developer.
-
Узнать подробнее о специализации Fullstack developer
-
Узнать о курсе Node.js Developer
⛔ DEPRECATED
discordbotstut
Начнём. Ссылка на мой youtube канал.
Discord bot туториал. Туториал по созданию ботов для дискорда на node.js используя discord.js.
Creation date : 06.12.2019
Также отдельное спасибо Top Bots List и его создателю Angrymoyse#0444 за помощь в написании.
Установка node.js.
Давайте начнём создание бота. Если у вас установлена node.js, то пропустите сделающие 2 строчки.
Заходим на сайт node.js, скачиваем, устанавливаем. Скриншотов процесса установки нету, тк переустанавливать node.js нету желания. Но там всё интуитивно понятно.
Создание файлов, инициализация проекта, установка библиотек.
Создаём папку bot. Желательно не использовать кирилицу, юникод и т. п. в названии.
Сразу же создаём файл index.js или bot.js. Это не несёт особого смысла. Можно назвать как угодно, но принятно index.js / bot.js.
Это будет главный файл бота, т.е. первым запускается, в нём основной код бота.
Далее открываем консоль / терминал если у вас linux.
Для быстрого открытия консоли на windows можно нажать WIN + R, ввести cmd.
Далее переходим в папку бота, думаю как это сделать через консоль всем понятно. Пишим :
npm init — инициализация проекта.
Жмём enter до конца. Если ошибка в package name, то напишите bot.
npm i discord.js — установка библиотеки discord.js.
Редакторы кода.
Далее рекомендую установить один из следующих редакторов кода :
Atom.
VScode.
WebStorm (спасибо за подсказку Mice V 4.4.4#0444 )
Если очень слабый компьюер можете поставить notepad++, но это для постоянной основы не самый хороший вариант.
Лично я использую Atom.
Аккаунт бота.
Вы можете зарегистрировать его на сайте discord developers.
Жмём кнопку «New Application». Вводим название бота. Жмём «Create».
Переходим во вкладку «Bot», нажимаем «Add Bot», затем «Yes, do it!»
Находим строку «token», немного ниже есть кнопка «Copy», нажимаем. Теперь в вашем буфере обмена есть токен бота.
Код.
Начало.
Создадим первый код. Пишем :
const Discord = require("discord.js"); //Подключаем discord.js для дальнейшего использования.
const client = new Discord.Client();
client.login("token"); //Где token пишем токен бота.
Запуск.
Открываем консоль, переходим в папку проекта и пишем :
node название-файла-с-кодом.js
в зависимости от названия файла.
Если у вас windows, то вы можете создать файл start.bat с текстом
node название-файла-с-кодом.js
pause
Если линукс, то вы можете создать файл start.sh
node название-файла-с-кодом.js
Это будет запускать бота. Далее я не буду говорить про запуск. Делайте это сами.
Конфиг.
Создаем файл config.json с конфигурацией нашего бота.
{
"version" : "1.0",
"prefix" : "!"
}
В начале кода бота напишем :
const config = require("./config.json");
Еще вы можете создать конфиг прямо в коде бота.
let config ={
"version" : "1.0",
"prefix" : "!"
}
Но второй вариант крайне не рекомендуется использовать, ведь для того что-бы изменить конфиг бота нам придется изменять его код.
Реагирование на сообщение.
Теперь давайте делать что-то когда приходит новое сообщение.
Например логировать его текст.
client.on("message", message => { //Пришло сообщение.
console.log(message.content); //console.log логирует в консоль, message - объект сообщения, message.content - строка объекта с текстом сообщения.
})
Получение информации о авторе сообщения (отправителе).
Давайте залогируем тег автора.
client.on("message", message => { //Пришло сообщение.
console.log(message.author.tag); //message.author.tag содержит в себе тег автора.
})
Команда !ping
Давайте в ответ на сообщение !ping отправлять такое сообщение : «@user, мой пинг равен » далее пинг.
client.on("message", message => { //Пришло сообщение.
if(message.content.toLowerCase()==config.prefix + "ping") //Если текст сообщения равен префиксу плюс ping, то происходит код в {} Часть кода .toLowerCase() превращает текст в строчный. (Делает из заглавных букв обычные.)
{
message.reply("мой пинг равен " + client.ping) //message.reply отвечает на сообщение.
//Также можно использовать message.channel.send(message.author + ", мой пинг равен " + client.ping);
}
})
Также можно писать не
if(message.content.toLowerCase()==config.prefix + "ping")
А
if(message.content.toLowerCase().startsWith(config.prefix + "ping"))
.startsWith проверят начинается ли строка с символов в аргументах.
Об отправке сообщений.
Теперь рассмотрим message.channel.send();
Когда я только начинал программировать я не понимал смысл этой фразы, но сейчас понимаю и могу рассказать вам. message — объект сообщения, в нём есть channel — канал в который было отправлено, то есть с помощью message.channel мы получаем канал, а .send() отправляет туда сообщение.
client.on("message", message => { //Пришло сообщение.
if(message.content.toLowerCase()==config.prefix + "test")
{
message.channel.send("I am working now!");
}
})
Также можно отправлять сообщение по ID канала.
Делается это так :
//some code...
client.channels.get('ID канала').send("Hi!");
client.channels — все каналы которые есть на серверах с ботом.
.get(‘ID’) получает канал из них по ID.
.send(«Text»); Отправляет сообщение.
ID канала можно получить используя devepoer mode
Eval.
Также даже начинающим программистам будет очень полезна в боте команда !eval для выполнения кода не пиша его в коде бота, т.е. вы пишите !eval какой-то код и бот выполняет этот код.
Я нашёл хороший туториал по этой команде на github. Рекомендую ознакомиться и взять себе команду в код бота. Принцип её работы мы разберём позже. Тык.
RichEmbed.
Пример.
Думаю вы все видели как боты отправляют сообщения такого типа.
Это называется RichEmbed (Embed).
Давайте отправим простой эмбед похожий на данный. (Картинка ниже)
Команда.
Для этого создадим новую команду !ping.
client.on("message", message => { //Пришло сообщение.
if(message.content.toLowerCase()==config.prefix + "ping") //Выше было
{
let embed = new Discord.RichEmbed() //Создаём новый эмбед.
.setTitle('Пинг бота.') //Устанавливаем заголовок.
.setColor(`GREEN`) //Цвет зелёный. Можно указать hex.
.setDescription("Пинг : " + client.ping); //Устанавливаем описание.
message.channel.send(embed); //Отправляем.
}
})
Параметры.
В Embed есть много различных параметров, вы можете прочесть их далее, либо посмотреть на оффициальном сайте discord.js
embed.setColor("Цвет в hex или один из встроенных."); // Устанавливает цвет боковой полосы.
embed.setDescription("Описание") //Устанавливает описание.
embed.serFooter("Подпись") //Устанавливает подпись мелким шрифтом под эмбедом.
embed.setThumbnail("url") //Миниатюра эмбеда.
embed.setAuthor("Имя", "Url") //Устанавливает автора.
embed.addField("Заголовок", "Текст") //Добавляет поле.
embed.setImage("URL") //Добавляет картинку.
Пример.
Команда !avatar.
client.on("message", message => { //Пришло сообщение.
if(message.content.toLowerCase().startsWith(config.prefix + "avatar")) //Выше было
{
let mb = message.mentions.members.first() || message.member; // Если есть упомянание человека в сообщении, то берём его, если нету, то себя. Расскажу чуть позже.
let color = mb.displayHexColor; //Цвет самой высокой роли человека, если цвет невидимый то самой высокой отображаемой роли.
if (color == '#000000') color = mb.hoistRole.hexColor;//Цвет самой высокой роли человека.
let embed = new Discord.RichEmbed() //Создаём эмбед
.setImage(mb.user.avatarURL) //Устанавливаем картинку - аватар человека.
.setColor(color) //Цвет.
.setFooter("Аватар пользователя " + mb.user.tag); //Устанавливаем в подпись чей это аватар.
message.channel.send({embed}); //Отправляем.
}
})
Вышло так
Команда !userinfo.
Давайте сделаем команду для получения информации о пользователе. Команда взята из моего бота.
Будем использовать библиотеку moment.js, устанавливаем npm i moment.js
const status = { //Создадим переменную со статусами чтобы они были не английском.
  "online": "Онлайн.",
  "idle": "Не на месте.",
  "dnd": "Не беспокоить.",
  "offline": "Оффлайн."
}

let mbr = message.mentions.members.first() || message.member; //Если есть упомянание, то mbr = тот кого упомянули, если нету то автору сообщения.
      if (mbr){ //Если всё ок.
      let embed = new Discord.RichEmbed() //Создаём эмбед
      .setAuthor(mbr.user.tag, mbr.user.avatarURL) //Устанавливаем автора
      .setColor(`GREEN`) //Цвет зелёный
      .setTitle("Тег") //Устанавливаем заголовок
      .setDescription(mbr.user.tag) //Описание - тег юзера.
      .addField("ID",  mbr.user.id) //Первое поле - айди автора.
      .addField("Никнейм",  mbr.nickname !== null ? mbr.nickname : "No nickname") //Второе поле - никнейм (НЕ ПУТАТЬ С НИКОМ И ТЕГОМ)!
      .addField("Статус", status[mbr.user.presence.status]) //Статус человека
      .addField("Играет в ", mbr.user.presence.game ? mbr.user.presence.game.name : "Ничего") //Во что играет
      .addField("Присоединился", moment(mbr.joinedAt).format('MMMM Do YYYY h:mm:ss')) //Когда зашёл на сервер
      .addField("Аккаунт создан", mbr.user.createdAt.toLocaleString()) //Когда создан аккаунт
      .addField("Роли на сервере", mbr.roles.filter(r => r.id !== message.guild.id).map(roles => ``${roles.name}``).join(" **|** ") || "No Roles") //Роли человека на сервере
      .setThumbnail(mbr.user.displayAvatarURL) //Аватар человека
      .setFooter("Информация о пользователе.") //Футер
      message.channel.send({embed}); //Отправляем
}
else message.reply("Вы забыли упомянуть пользователя."); //Это вряд-ли сможет произойти, но на всякий случай
Вышло так.
Мой дискорд сервер!
Прошу зайти на мой дискорд сервер, ведь я долго делал туториал, а вам не сложно зайти на мой сервер в виде благодарности.
В разработке..
Vojta
Posted on Feb 5, 2022
What Will You Need
- Visual Studio Code (or any other code editor)
- Node.js 16.6.0 or newer
- Discord Account
1) Make a New Discord Application
Go to the Discord Developer Portal and click on New Application
Name it and hit Create
Now let’s go to the Bot section and Add a Bot
2) Invite The Bot to Your Server
Go to the URL Generator, and select bot and Administrator
Copy the URL at the bottom of the page and open it in a new tab
You should see something like this:
Select a server you want to add the bot to, and click Continue and Authorize
The bot has joined the server, hurray 🎉
3) Add functionality to the bot
First, you’ll need to go back to Discord Developer Portal, go back to the Bot section, and Copy the bot token (here you can also name the bot and add a profile picture)
The bot token is like a password for the bot, so DON’T SHARE IT!
Now create a new folder for the project if you haven’t done that yet and open it in VSCode
We’re gonna need to install discord.js first, which you can do in the integrated terminal (ctrl+J, select Terminal).
Type these two commands into it, and that’s it
npm init -y
npm i discord.js
Enter fullscreen mode
Exit fullscreen mode
Now create a new file (bot.js) and paste this in (don’t forget to replace ‘your token’ with the bot token) :
const { Client } = require('discord.js');

const client = new Client({
  intents: ['GUILDS', 'GUILD_MESSAGES'],
});

client.once('ready', () => console.log('Ready!'));

client.on('messageCreate', (message) => {
  if (message.content.includes('dn')) {
    return message.reply('deez nuts haha gotem');
  }

  if (message.content === '!help') {
    return message.reply("there's no help lmao");
  }
});

client.login('your token');
Enter fullscreen mode
Exit fullscreen mode
Run this using
node bot.js
Enter fullscreen mode
Exit fullscreen mode
And now you can see the result:
Tutorial Completed!
here, have a cat as a reward
(image by Tuqa Nabi on Unsplash)
JavaScript, Из песочницы, Node.JS
Рекомендация: подборка платных и бесплатных курсов PR-менеджеров — https://katalog-kursov.ru/
Введение
В этой статье я подробно расскажу о том, как работать с библиотекой discord.js, создать своего Discord-бота, а также покажу несколько интересных и полезных команд.
Сразу хочу отметить, что я планирую сделать ряд подобных статей, начиная с простых команд, заканчивая музыкой, системой экономики и распознаванием голоса ботом.
Начало работы
Если вы уже знакомы с приведёнными ниже материалами, — смело можете пролистать этот раздел.
Установка среды разработки
Для начала работы с кодом нам нужно установить среду разработки, это может быть:
- Sublime Text
- Notepad++
- Atom
- Brackets
- InteliJ Idea
- Eclipse
- Visual Studio Code
… и так далее.
Среда разработки выбирается по удобству использования и практичности, она у вас может быть любая, но мы рассмотрим её на примере Visual Studio Code, так как она является одной из самых приемлемых для новичков, а также для опытных программистов.
Для установки переходим по этой ссылке.
Выбираем свою операционную систему и запускаем скачивание.
Установка среды выполнения
Для создания бота мы используем среду выполнения node.js. Для её установки нам необходимо перейти на этот сайт.
На данный момент нас интересует версия долгосрочной поддержки (LTS), скачиваем её.
Установка полезных расширений
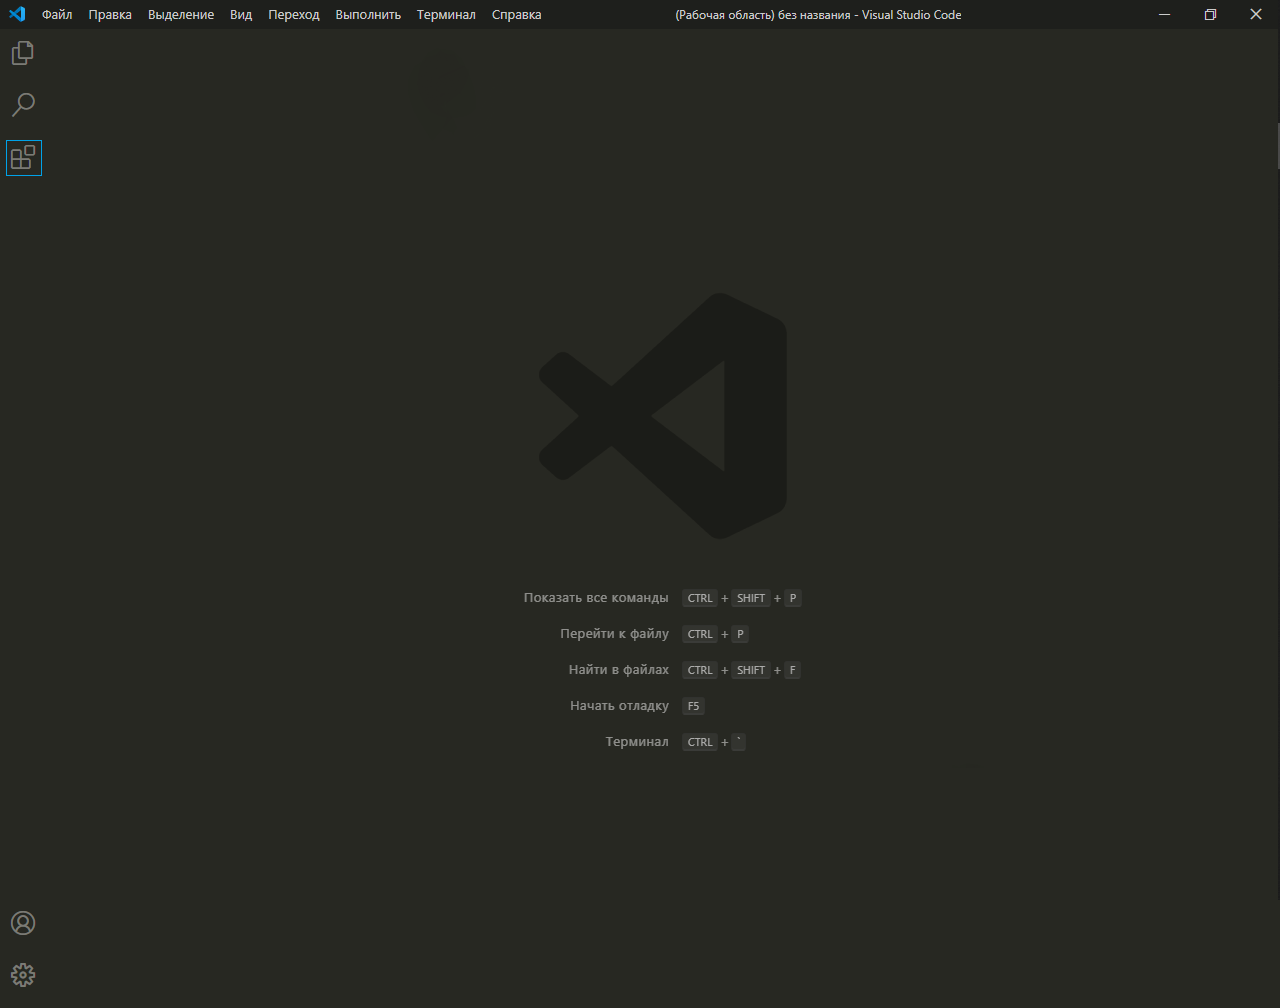
В Visual Studio Code присутствует возможность устанавливать расширения.
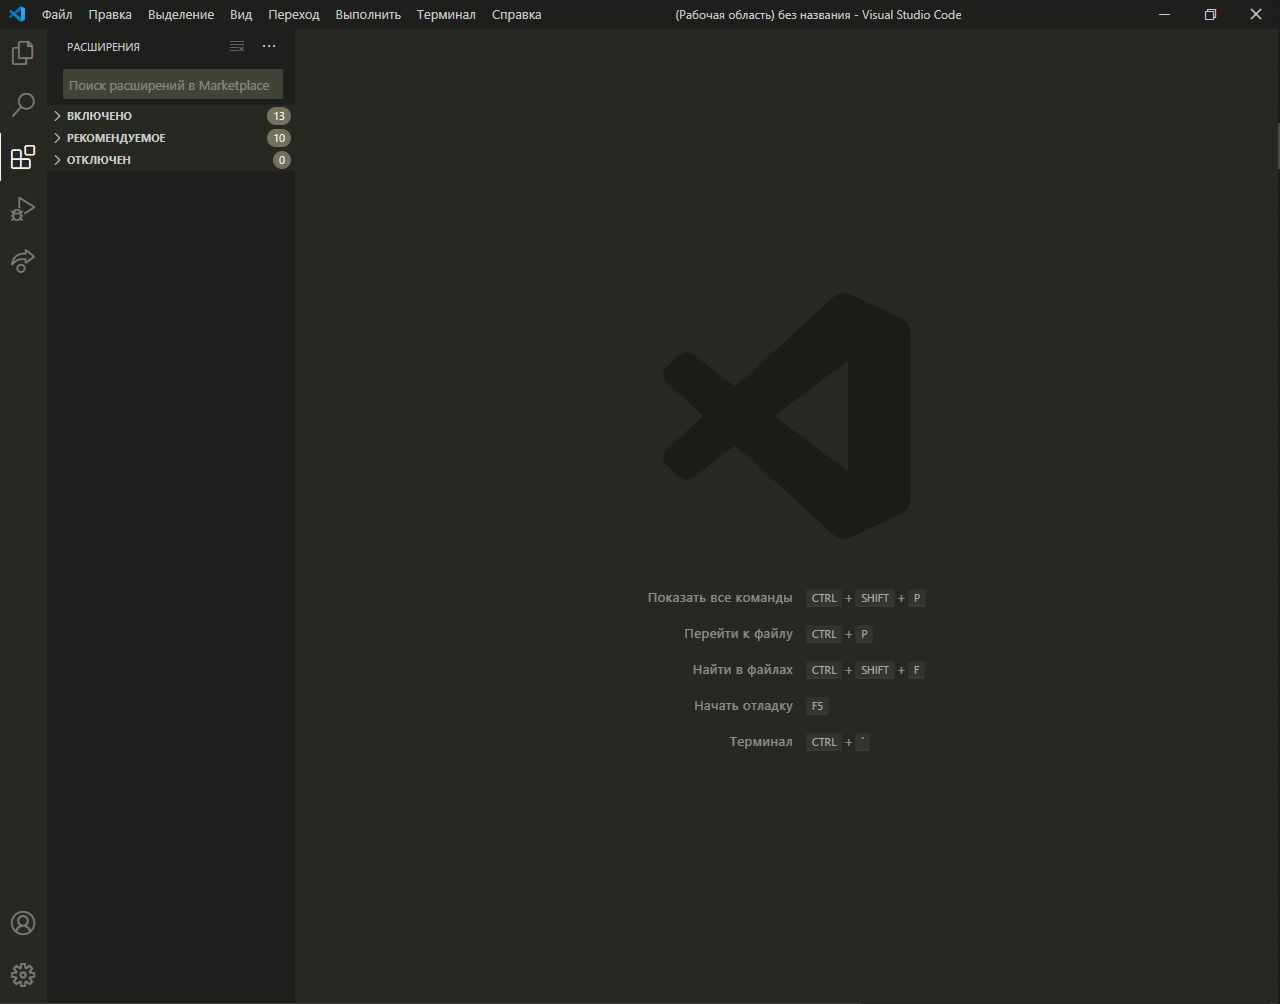
Для этого, кликните по отмеченной ниже иконке.
В открывшемся окне вписываем название название/идентификатор нужного нам расширения, после чего устанавливаем его.
Из полезных расширений могу отметить:
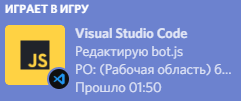
- Discord Presence — расширение, позволяющее отображать рабочую область и файл, в котором вы работаете в вашей игровой активности (функция работает только при использовании приложения Discord).
Идентификатор расширения: icrawl.discord-vscode
- Code runner — расширение, с помощью которого предоставляется возможность запускать определённые фрагменты кода.
Идентификатор расширения: formulahendry.code-runner
Создание бота
Теперь, когда вы установили все нужные компоненты, мы можем приступить к созданию самого бота.
Здесь всё просто. Переходим на портал разработчиков и нажимаем на кнопку с надписью «New Application» — она находится в правом верхнем углу.
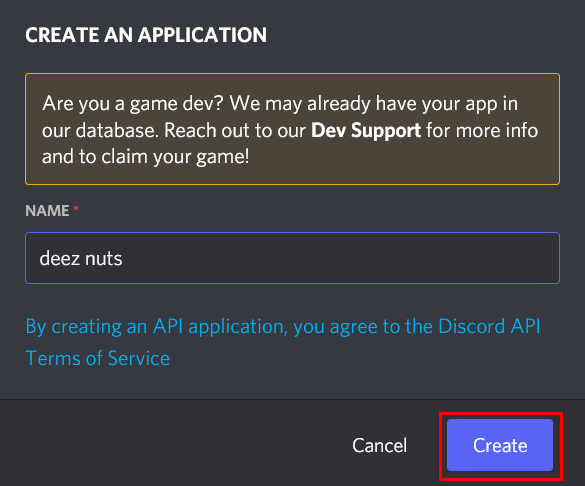
В открывшемся окне вписываем имя бота, после чего, нажимаем на кнопку с надписью «Create».
На этой странице мы можем изменить имя бота, загрузить для него иконку, заполнить описание.
Теперь наша задача — воплотить бота в жизнь. Для этого переходим во вкладку «Bot».
Нажимаем на кнопку с надписью «Add Bot» и воплощаем бота в жизнь.
Поздравляю! Вы создали аккаунт для вашего бота. Теперь у него есть тег, токен, ник и иконка.
Подготовка к написанию кода
После создания аккаунта для бота, мы должны установить нужные пакеты и модули, чтобы в дальнейшем он корректно работал.
Первым делом создаём папку, после чего открываем её в VS Code (Файл > Открыть папку) / (Ctrl + K Ctrl + O)
Далее нам нужно открыть терминал (Терминал > Создать терминал) / (Ctrl + Shift + `)
Теперь мы должны создать файл с неким «описанием» нашего бота, сделаем это через терминал.
Вписываем данную строку в терминал и нажимаем Enter:
npm init
После каждой появившейся строки нажимаем Enter или вписываем свои значения.
Значения в этом файле можно будет изменить в любой момент.
Далее, мы должны поочерёдно вводить в терминал эти строки:
npm installnpm install discord.js«Install» также можно сокращать в «I», но необязательно.
Итого, если вы следовали инструкциям и всё сделали правильно, в вашей папке должны были появиться 3 объекта:
Написание кода
Об удобстве написания кода
Для того, чтобы наш бот появился в сети и мог реагировать на команды, нам нужно написать для него код.
Существует множество вариантов для его написания: используя один файл, два, несколько, и т.д
Мы рассмотрим вариант с двумя файлами, так как его использовать очень легко и удобно, но у каждого варианта есть свои недостатки — например, у этого недостатком является сложность в написании начального кода.
Но не волнуйтесь, весь код вам писать не придётся.
О хранении данных
Для начала, нам нужно где-то хранить основные параметры и информацию о боте.
Мы можем сделать это двумя способами:
- Создать отдельный файл
- Записать всё в константы
Я не советую вам использовать второй вариант, так как в будущем вам придётся работать с большим объёмом информации, и такая запись будет доставлять неудобства.
Разберём хранение параметров в отдельном файле.
Итак, создаем файл config.json
Вставляем в него следующий код:
{
    "token" : "Ваш_токен",
    "prefix" : "Ваш_префикс"
}
* Для получения токена зайдите на портал разработчиков, перейдите во вкладку «Bot» и скопируйте его.
* Самым распространённым среди разработчиков префиксом является !
Далее нам нужно создать файл bot.js и вставить в него данный код:
const Discord = require('discord.js'); // Подключаем библиотеку discord.js
const robot = new Discord.Client(); // Объявляем, что robot - бот
const comms = require("./comms.js"); // Подключаем файл с командами для бота
const fs = require('fs'); // Подключаем родной модуль файловой системы node.js
let config = require('./config.json'); // Подключаем файл с параметрами и информацией
let token = config.token; // «Вытаскиваем» из него токен
let prefix = config.prefix; // «Вытаскиваем» из него префикс

robot.on("ready", function(){ /* Бот при запуске должен отправить в терминал сообщение «[Имя бота] запустился!» */
	console.log(robot.user.username + " запустился!");
});


robot.on('message', (msg) => { // Реагирование на сообщения
	if(msg.author.username != robot.user.username && msg.author.discriminator != robot.user.discriminator){
    	var comm = msg.content.trim()+" ";
	    var ok = false;
	    var comm_name = comm.slice(0, comm.indexOf(" "));
	    var messArr = comm.split(" ");
	    for(comm_count in comms.comms){
	    	var comm2 = prefix + comms.comms[comm_count].name;
	    	if(comm2 == comm_name){
	    		comms.comms[comm_count].out(robot, msg, messArr);
	    	}
	    }
    }
});


robot.login(token); // Авторизация бота
Теперь создаём файл comms.js, в нём будут сами команды.
В нём должен быть следующий код:
const config = require('./config.json'); // Подключаем файл с параметрами и информацией
const Discord = require('discord.js'); // Подключаем библиотеку discord.js
const prefix = config.prefix; // «Вытаскиваем» префикс

// Команды //

    function test(robot, mess , args) {
        mess.channel.send('Test!')
    }


 // Список комманд //

var comms_list = [
	{name: "test", out: test, about: "Тестовая команда"}
];

// Name - название команды, на которую будет реагировать бот
// Out - название функции с командой
// About - описание команды


module.exports.comms = comms_list;
Чтобы добавить больше команд — просто объявляйте больше функций и добавляйте их в список, например:
const config = require('./config.json');
const Discord = require('discord.js');
const prefix = config.prefix;
const versions = config.versions;


// Команды //

    function test(robot, mess, args) {
        mess.channel.send("Тест!")
    }

    function hello(robot, mess, args) {
        mess.reply("Привет!")
    }


 // Список комманд //

var comms_list = [
	{name: "test", out: test, about: "Тестовая команда"},
        {name: "hello", out: hello, about: "Команда для приветствия!"}
}


module.exports.comms = comms_list;
И вот, мы вышли на финишную прямую!
Осталось всего ничего — запустить бота.
Для этого открываем терминал и вставляем в него следующую строку:
node bot.jsГотово! Бот запущен и вы можете им пользоваться, ура!
Чтобы пригласить бота на свой сервер, воспользуемся нам уже известным порталом разработчиков.
Перейдём во вкладку OAuth2, пролистаем чуть ниже, выберем «Bot» и отметим нужные боту привилегии.
Теперь осталось скопировать ссылку-приглашение и добавить бота на свой сервер.
Как вывести ссылку-приглашение в терминал, при запуске бота?
Существует два способа:
- Заранее отметить нужные привилегии.
Для этого, сначала мы должны скопировать ссылку-приглашение.
После чего перейти в файл bot.js и вставить данную строчку кода сюда:robot.on("ready", function(){ console.log(robot.user.username + " запустился!"); console.log("Ссылка-приглашение") // << // })Итоговый код должен быть таким:
const Discord = require('discord.js'); const robot = new Discord.Client(); var comms = require("./comms.js"); const fs = require('fs'); let config = require('./config.json'); let token = config.token; let prefix = config.prefix; robot.on("ready", function(){ console.log(robot.user.username + " запустился!"); console.log("Ссылка-приглашение") }) robot.on('message', (msg) => { if(msg.author.username != robot.user.username && msg.author.discriminator != robot.user.discriminator){ var comm = msg.content.trim()+" "; var ok = false; var comm_name = comm.slice(0, comm.indexOf(" ")); var messArr = comm.split(" "); for(comm_count in comms.comms){ var comm2 = prefix + comms.comms[comm_count].name; if(comm2 == comm_name){ comms.comms[comm_count].out(robot, msg, messArr); } } } }); robot.login(token) robot.login(token); - Отметить нужные привилегии в самом коде.
Повторяем процедуры из первого способа, но уже с другими строками кода:robot.on("ready", function(){ console.log(robot.user.username + " запустился!"); robot.generateInvite(["ADMINISTRATOR"]).then((link) => { // < // console.log(link); // < // })})Итоговый код:
const Discord = require('discord.js');
const robot = new Discord.Client();
var comms = require("./comms.js");
const fs = require('fs');
let config = require('./config.json');
let token = config.token;
let prefix = config.prefix;

robot.on("ready", function(){
    console.log(robot.user.username + " запустился!");
    robot.generateInvite(["ADMINISTRATOR"]).then((link) => {
        console.log(link);
})})


robot.on('message', (msg) => {
	if(msg.author.username != robot.user.username && msg.author.discriminator != robot.user.discriminator){
    	var comm = msg.content.trim()+" ";
	    var ok = false;
	    var comm_name = comm.slice(0, comm.indexOf(" "));
	    var messArr = comm.split(" ");
	    for(comm_count in comms.comms){
	    	var comm2 = prefix + comms.comms[comm_count].name;
	    	if(comm2 == comm_name){
	    		comms.comms[comm_count].out(robot, msg, messArr);
	    	}
	    }
    }
});


robot.login(token);
Чтобы указать несколько привилегий, мы должны перечислить их в квадратных скобках, через запятую:
    robot.generateInvite(['KICK_MEMBERS', 'BAN_MEMBERS', 'SEND_MESSAGES']).then((link) => {
        console.log(link);
* Все привилегии указываются заглавными буквами
Список доступных привилегий:
ADMINISTRATOR
CREATE_INSTANT_INVITE
KICK_MEMBERS
BAN_MEMBERS
MANAGE_CHANNELS
MANAGE_GUILD
ADD_REACTIONS
VIEW_AUDIT_LOG
PRIORITY_SPEAKER
STREAM
VIEW_CHANNEL
SEND_MESSAGES
SEND_TTS_MESSAGES
MANAGE_MESSAGES
EMBED_LINKS
ATTACH_FILES
READ_MESSAGE_HISTORY
MENTION_EVERYONE
USE_EXTERNAL_EMOJIS
VIEW_GUILD_INSIGHTS
CONNECT
SPEAK
MUTE_MEMBERS
DEAFEN_MEMBERS
MOVE_MEMBERS
USE_VAD
CHANGE_NICKNAME
MANAGE_NICKNAMES
MANAGE_ROLES
MANAGE_WEBHOOKS
MANAGE_EMOJISЯ не советую вам из привилегий выбирать только ADMINISTRATOR, поэтому лучше указать только те привилегии, которые бот действительно использует для корректной работы
Полезные и интересные команды
В предыдущем разделе я показал вам, как запустить бота и как писать для него команды.
Теперь я хочу поделиться с вами несколькими своими командами.
- !say — с помощью этой команды бот может повторить ваше сообщение.
Код:
if(!mess.member.hasPermission("MANAGE_MESSAGES")) return mess.channel.send("У вас нет прав"); /* Если у исполнителя команды нету привилегии MANGAGE_MESSAGES, он не сможет её использовать */ let robotmessage = args = mess.content.split(' '); // Пробелы между словами args.shift(); args = args.join(' '); mess.delete().catch(); // Удаление сообщения пользователя после отправки mess.channel.send(robotmessage).then(mess.channel.send(mess.author)) /* Отправление в чат сообщения бота */ - !heads_or_tails — игра «Орёл или Решка».
Код:
mess.channel.send('Монета подбрасывается...') var random = Math.floor(Math.random() * 4); // Объявление переменной random - она вычисляет случайное число от 1 до 3 if (random == 1) { // Если вычислено число 1, то выпадает орёл. mess.channel.send(':full_moon: Орёл!') } else if (random == 2) { // Если вычислено число 2, то выпадает решка. mess.channel.send(':new_moon: Решка!') } else if (random == 3) { // Если вычислено число 3, то монета падает ребром. mess.channel.send(':last_quarter_moon: Монета упала ребром!') } - !clear — удаление определённого количества сообщений.
Код:
const arggs = mess.content.split(' ').slice(1); // Все аргументы за именем команды с префиксом const amount = arggs.join(' '); // Количество сообщений, которые должны быть удалены if (!amount) return mess.channel.send('Вы не указали, сколько сообщений нужно удалить!'); // Проверка, задан ли параметр количества if (isNaN(amount)) return mess.channel.send('Это не число!'); // Проверка, является ли числом ввод пользователя if (amount > 100) return mess.channel.send('Вы не можете удалить 100 сообщений за раз'); // Проверка, является ли ввод пользователя числом больше 100 if (amount < 1) return mess.channel.send('Вы должны ввести число больше чем 1'); // Проверка, является ли ввод пользователя числом меньше 1 async function delete_messages() { // Объявление асинхронной функции await mess.channel.messages.fetch({ limit: amount }).then(messages => { mess.channel.bulkDelete(messages) mess.channel.send(`Удалено ${amount} сообщений!`) })}; delete_messages(); // Вызов асинхронной функции - !random_name — генерация случайного имени.
Не стоит пугаться большого кода, здесь всё предельно просто.
Код:
        var name = new Array( // Объявление массива name и занесение в него большого количества имён
            'Абрам',' Аваз',' Аввакум',' Август',' Августин',
            ' Авдей',' Авраам',' Автандил',' Агап',' Агафон',
            ' Аггей',' Адам',' Адис',' Адольф',' Адриан',
            ' Азамат',' Айдар',' Айнур',' Айрат',' Аким',
            ' Алан',' Алей',' Александр',' Алексей',' Али',
            ' Альберт',' Альфред',' Амадей',' Амадеус',
            ' Амаяк',' Амвросий',' Ананий',' Анастасий',
            ' Анатолий',' Анвар',' Ангел',' Андоим',' Андрей',
            ' Аникита',' Антон',' Арам',' Арий',' Аристарх',
            ' Аркадий',' Арман',' Арно',' Арнольд',' Арон',' Арсен',
            ' Арсений',' Арслан',' Артем',' Артемий',' Артур',' Архип'
            ,' Аскар',' Аскольд',' Аслан',' Афанасий',' Ахмет',' Ашот'
            ,' Бальтазар',' Бежен',' Бенедикт',' Берек',' Бернард',
            ' Бертран',' Богдан',' Болеслав',' Борис',' Бронислав',
            ' Булат',' Вадим',' Валентин',' Валерий',' Вальтер',
            ' Варфоломей',' Василий',' Вацлав',' Велизар',' Венедикт',' Вениамин',' Викентий',' Виктор',' Вилли',' Вильгельм',' Виссарион',' Виталий',' Витольд',' Владимир',' Владислав',' Владлен',' Володар',' Вольдемар',' Всеволод',' Вячеслав',' Гавриил',' Галактион',' Гарри',' Гастон',' Гаяс',' Гевор',' Геннадий',' Генрих',' Георгий',' Геракл',' Геральд',' Герасим',' Герман',' Глеб',' Гордей',' Гордон',' Горислав',' Градимир',' Григорий',' Гурий',' Густав',' Давид',' Дамир',' Даниил',' Даниэль',' Данияр',' Дарий',' Дементий',' Демид',' Демосфен',' Демьян',' Денис',' Джамал',' Джордан',' Дмитрий',' Добрыня',' Дональд',' Донат',' Дорофей',' Евгений',' Евграф',' Евдоким',' Евсевий',' Евсей',' Евстафий',' Егор',' Елеазар',' Елисей',' Емельян',' Еремей',' Ермолай',' Ерофей',' Ефим',' Ефрем',' Жан',' Ждан',' Жорж',' Захар',' Зиновий',' Ибрагим',' Иван',' Игнатий',' Игорь',' Илларион',' Ильдар',' Ильнар',' Ильнур',' Илья',' Ильяс',' Иннокентий',' Иоанн',' Иосиф',' Ипполит',' Искандер',' Ислам',' Камиль',' Карим',' Карл',' Кирилл',' Клим',' Кондрат',' Константин',' Корней',' Кузьма',' Лавр',' Лаврентий',' Лев',' Леон',' Леонид',' Леонтий',' Леопольд',' Лука',' Лукьян',' Любим',' Макар',' Максим',' Максимилиан',' Марат',' Марк',' Марсель',' Мартин',' Матвей',' Мирон',' Мирослав',' Митрофан',' Михаил',' Михей',' Мишель',' Мстислав',' Мурат',' Муслим',' Назар','Абрам',' Аваз',' Аввакум',' Август',' Августин',' Авдей',' Авраам',' Автандил',' Агап',' Агафон',' Аггей',' Адам',' Адис',' Адольф',' Адриан',' Азамат',' Айдар',' Айнур',' Айрат',' Аким',' Алан',' Алей',' Александр',
            ' Алексей',' Али',' Альберт',' Альфред',' Амадей',' Амадеус',' Амаяк',' Амвросий',' Ананий',' Анастасий',' Анатолий',' Анвар',' Ангел',' Андоим',' Андрей',' Аникита',' Антон',' Арам',' Арий',' Аристарх',' Аркадий',' Арман',' Арно',' Арнольд',' Арон',' Арсен',' Арсений',' Арслан',' Артем',' Артемий',' Артур',' Архип',' Аскар',' Аскольд',' Аслан',' Афанасий',' Ахмет',' Ашот',' Бальтазар',' Бежен',' Бенедикт',' Берек',' Бернард',' Бертран',' Богдан',' Болеслав',' Борис',' Бронислав',' Булат',' Вадим',' Валентин',' Валерий',' Вальтер',' Варфоломей',' Василий',' Вацлав',' Велизар',' Венедикт',' Вениамин',' Викентий',' Виктор',' Вилли',' Вильгельм',' Виссарион',' Виталий',' Витольд',' Владимир',' Владислав',' Владлен',' Володар',' Вольдемар',' Всеволод',' Вячеслав',' Гавриил',' Галактион',' Гарри',' Гастон',
            ' Гаяс',' Гевор',' Геннадий',' Генрих',' Георгий',' Геракл',
            ' Геральд',' Герасим',' Герман',' Глеб',' Гордей',' Гордон',
            ' Горислав',' Градимир',' Григорий',' Гурий',' Густав',
            ' Давид',' Дамир',' Даниил',' Даниэль',' Данияр',
            ' Дарий',' Дементий',' Демид',' Демосфен',
            ' Демьян',' Денис',' Джамал',' Джордан',' Дмитрий',' Добрыня',
            ' Дональд',' Донат',' Дорофей',' Евгений',' Евграф',' Евдоким',' Евсевий',' Евсей',' Евстафий',' Егор',' Елеазар',' Елисей',' Емельян',' Еремей',' Ермолай',' Ерофей',' Ефим',' Ефрем',' Жан',' Ждан',' Жорж',' Захар',' Зиновий',' Ибрагим',' Иван',' Игнатий',' Игорь',' Илларион',' Ильдар',' Ильнар',' Ильнур',' Илья',' Ильяс',' Иннокентий',' Иоанн',' Иосиф',' Ипполит',' Искандер',' Ислам',' Камиль',' Карим',' Карл',' Кирилл',' Клим',' Кондрат',' Константин',' Корней',' Кузьма',' Лавр',' Лаврентий',' Лев',' Леон',' Леонид',' Леонтий',' Леопольд',' Лука',' Лукьян',' Любим',' Макар',' Максим',' Максимилиан',' Марат',' Марк',' Марсель',' Мартин',' Матвей',' Мирон',' Мирослав',' Митрофан',' Михаил',' Михей',' Мишель',' Мстислав',' Мурат',
            ' Муслим',' Назар'
        );
        var RandElement = name[Math.floor(Math.random()*(name.length))]; // Выбор случайного элемента из массива
        mess.channel.send(RandElement) // Отправка сообщения со случайным элементом из массива в чат
Заключение
Вот и подошла к концу первая часть обучения, как вы могли заметить, создать бота, используя библиотеку discord.js очень просто.
Итого, из этой статьи мы выяснили:
- Как установить нужные модули и пакеты
- Как установить среду разработки
- Как установить среду выполнения
- Как установить полезные расширения
- Как создать аккаунт для бота
- Как воплотить бота в жизнь
- Как запустить бота
- Как научить бота реагировать на команды
- Как пригласить бота на свой сервер
- Как писать код для работы команд
А также научились некоторым интересным и полезным командам.
Надеюсь, что вам понравилась моя статья и вы узнали из неё что-то новое.
Я постарался объяснить всё максимально доходчиво и подробно.
Следующую часть обучения я планирую сделать об использовании аргументов, а также покажу вам команды для модерации (!kick, !ban, !warn, !mute и т.д).
Сайты для самостоятельного изучения
- Основная документация discord.js
- Документация discord.js №2
- Руководство discord.js
- Руководство discord.js №2
This tutorial will show you how to use JavaScript and Node.js to build your own Discord bot completely in the cloud.
You do not need to install anything on your computer, and you do not need to pay anything to host your bot.
We are going to use a number of tools, including the Discord API, Node.js libraries, and a cloud computing platform called Repl.it.
If you’d rather code your discord bot using Python instead of JavaScript, read this tutorial instead.
There is also a video version of this written tutorial. The video is embedded below and the written version is after the video.
How to Create a Discord Bot Account
In order to work with the Node.js library and the Discord API, we must first create a Discord Bot account.
Here are the step to creating a Discord Bot account.
1. Make sure you’re logged on to the Discord website.
2. Navigate to the application page.
3. Click on the “New Application” button.
4. Give the application a name and click “Create”.
5. Go to the “Bot” tab and then click “Add Bot”. You will have to confirm by clicking «Yes, do it!»
Keep the default settings for Public Bot (checked) and Require OAuth2 Code Grant (unchecked).
Your bot has been created. The next step is to copy the token.
This token is your bot’s password so don’t share it with anybody. It could allow someone to log in to your bot and do all sorts of bad things.
You can regenerate the token if it accidentally gets shared.
How to Invite Your Bot to Join a Server
Now you have to get your Bot User into a server. To do this, you should create an invite URL for it.
Go to the «OAuth2» tab. Then select «bot» under the «scopes» section.
Now choose the permissions you want for the bot. Our bot is going to mainly use text messages so we don’t need a lot of the permissions. You may need more depending on what you want your bot to do. Be careful with the «Administrator» permission.
After selecting the appropriate permissions, click the ‘copy’ button above the permissions. That will copy a URL which can be used to add the bot to a server.
Paste the URL into your browser, choose a server to invite the bot to, and click “Authorize”.
To add the bot, your account needs «Manage Server» permissions.
Now that you’ve created the bot user, we’ll start writing the Python code for the bot.
How to Code a Basic Discord Bot with the discord.js Library
We’ll be using the discord.js Node library to write the code for the bot. discord.js is an API wrapper for Discord that makes it easier to create a Discord bot in Node.js / JavaScript.
How to Create a Repl and Install discord.js
You can develop the bot on your local computer with any code editor. However, in this tutorial, we’ll be using Repl.it because it will make it simpler for anyone to follow along. Repl.it is an online IDE that you can use in your web browser.
Start by going to Repl.it. Create a new Repl and choose «Node.js» as the language. This means the programming language will be JavaScript.
To use the discord.js library, just add const Discord = require("discord.js"); at the top of main.js. Repl.it will automatically install this dependency when you press the «run» button.
How to Set Up Discord Events for Your Bot
discord.js revolves around the concept of events. An event is something you listen to and then respond to. For example, when a message happens, you will receive an event about it that you can respond to.
Let’s make a bot that replies to a specific message. This simple bot code is taken directly from the discord.js documentation. We will be adding more features to the bot later.
Add this code to main.js. I’ll explain what all this code does shortly.
const Discord = require("discord.js")
const client = new Discord.Client()

client.on("ready", () => {
  console.log(`Logged in as ${client.user.tag}!`)
})

client.on("message", msg => {
  if (msg.content === "ping") {
    msg.reply("pong");
  }
})

client.login(process.env.TOKEN)
When you created your bot user on Discord, you copied a token. Now we are going to create a .env file to store the token.
.env files are used for declaring environment variables. On Repl.it, most files you create are visible to anyone but .env files are only visible to you. Other people viewing a public repl will not be able to see the contents of the .env file.
So if you are developing on Repl.it, only include private information like tokens or keys in a .env file.
Click the «Add file» button and create a file named .env.
Inside the file add the following line, including your actual token you copied previously:
TOKEN=[paste token here]Now let’s go over what each line of code is doing in your Discord bot code.
The first line imports the discord.js library. Next, we create an instance of a Client. This is the connection to Discord.
The client.on() is used to check for events. It accepts an event name, and then a callback function to be called when the event takes place. In this code, the ready event is called when the bot is ready to start being used. Then, when the Discord server has a new message, the message event is called.
The code checks if the msg.content equals 'ping'. If so, then the bot replies with 'pong' to the channel.
Now that the bot is set up, the final line runs the bot with the login token. It gets the token from out .env file.
We have the code for the bot so now we just have to run it.
How to Run the Bot
Now click run button on the top to run your bot in repl.it.
Now go to your Discord room and type «ping». Your bot should return «pong».
How to Improve the Bot
Now that we have a basic bot working, we’ll improve it. It is called «Encourage Bot» for a reason.
This bot will respond with a message of encouragement whenever someone sends a message containing a sad or depressing word.
Anyone will be able to add encouraging messages for the bot to use and the user-submitted messages will be stored in the Repl.it database.
The bot will also return a random inspirational quote from an API when someone types the message «$inspire» into the chat.
We’ll start with adding the «$inspire» feature.
How to Add Inspirational Quotes to the Bot
We will get inspirational quotes from an API called zenquotes.io. We need to import the node-fetch module, add a getQuote() function, and update our bot code to call the function.
Here is the updated code. After the code, I’ll explain the new parts.
const Discord = require("discord.js")
const fetch = require("node-fetch")
const client = new Discord.Client()

function getQuote() {
  return fetch("https://zenquotes.io/api/random")
    .then(res => {
      return res.json()
      })
    .then(data => {
      return data[0]["q"] + " -" + data[0]["a"]
    })
}

client.on("ready", () => {
  console.log(`Logged in as ${client.user.tag}!`)
})

client.on("message", msg => {
  if (msg.author.bot) return

  if (msg.content === "$inspire") {
    getQuote().then(quote => msg.channel.send(quote))
  }
})

client.login(process.env.TOKEN)
We now have to import the node-fetch module. This module allows our code to make an HTTP request to get data from the API.
The getQuote() function is pretty straightforward. First, it uses the node-fetch module to request data from the API URL. The API returns a random inspirational quote. This function could easily be rewritten to get quotes from a different API, if the current one stops working.
Then the function converts the response from the API to JSON and creates a string to return. Through trial and error I figured out how to get the quote from the JSON into the string format I wanted. The quote is returned from the function as a string.
The final part updated in the code is toward the end. Previously it looked for the message «ping». Now it looks for «$inspire». Instead of returning «pong», it gets the quote with getQuote() and returns the quote. We use msg.channel.send() to send the message to the channel. Also, the code checks if the message comes from the bot itself and if it does, it leaves the function so it does not do anything.
At this point you can run your code and try it out.
How to Add Encouraging Messages to the Bot
Now we will implement the feature where the bot responds with encouraging messages when a user posts a message with a sad word.
How to Add Sad Words to the Bot
First we need to create an array that contains the sad words that the bot will respond to.
Add the following line after the client variable is created:
sadWords = ["sad", "depressed", "unhappy", "angry", "miserable"]
Feel free to add more words to the list.
How to Add Encouraging Messages to the Bot
Now we’ll add an array of encouraging messages that the bot will respond with.
Add the following array after the sadWords list you created:
encouragements = [
  "Cheer up!",
  "Hang in there.",
  "You are a great person / bot!"
]
Like before, feel free to add more phrases of your choice to the array . I’m just using three items for now because later we’ll add the ability for users to add more encouraging phrases for the bot to use.
How to Respond to Messages
Now we need to update our bot to use the two lists we created.
Now we will update the message function to check all messages to see if they contain a word from the sadWords list. If a sad word is found, the bot will send a random message of encouragement.
Here is the updated code:
client.on("message", msg => {
  if (msg.content === "$inspire") {
    getQuote().then(quote => msg.channel.send(quote))
  }

  if (sadWords.some(word => msg.content.includes(word))) {
    const encouragement = encouragements[Math.floor(Math.random() * encouragements.length)]
    msg.reply(encouragement)
  }

})
This is a good time to test the bot. You know enough now to create your own bot. But next you’ll learn how to implement more advanced features and store data using the Repl.it database.
How to Enable User-submitted Messages
The bot is completely functional, but now let’s make it possible to update the bot right from Discord. A user should be able to add more encouraging messages for the bot to use when it detects a sad word.
We are going to use Repl.it’s built-in database to store user-submitted messages. This database is a key-value store that’s built into every repl.
At the top of the code, under the other import statements, add:
const Database = require("@replit/database")
const db = new Database()
This will allow us to use the Repl.it database. When you run the code, Repl.it should install the database module automatically. If for some reason it doesn’t, you may have to go into the Shell tab (not the Console) and type «npm install @replit/database».
After where the encouragements array is created, insert the following code to add the encouragements to the database if needed:
db.get("encouragements").then(encouragements => {
  if (!encouragements || encouragements.length < 1) {
    db.set("encouragements", starterEncouragements)
  }
})
Also, rename the encouragements array toward the top to starterEncouragements.
Users will be able to add custom encouraging messages for the bot to use directly from the Discord chat. Before we add new commands for the bot, let’s create two helper functions that will add custom messages to the database and delete them.
Add the following code after the getQuote() function:
function updateEncouragements(encouragingMessage) {
  db.get("encouragements").then(encouragements => {
    encouragements.push([encouragingMessage])
    db.set("encouragements", encouragements)
  })
}

function deleteEncouragment(index) {
  db.get("encouragements").then(encouragements => {
    if (encouragements.length > index) {
      encouragements.splice(index, 1)
      db.set("encouragements", encouragements)
    }
  })
}
The updateEncouragements() function accepts an encouraging message as an argument.
First it gets the «encouragements» from the database. Then, it adds the new encouragement to the array, and stores the updated array back in the database under the «encouragements» key.
The deleteEncouragement() function accepts an index as an argument.
It gets the list of encouragements from the database stored under the «encouragements» key. If the length is more than the index, then the list item at that index is deleted. Finally, the updated list is stored back in the database under the «encouragements» key.
Here is the updated code for the message function. After the code, I’ll explain the new sections.
client.on("message", msg => {
  if (msg.content === "$inspire") {
    getQuote().then(quote => msg.channel.send(quote))
  }


  if (sadWords.some(word => msg.content.includes(word))) {
    db.get("encouragements").then(encouragements => {
      const encouragement = encouragements[Math.floor(Math.random() * encouragements.length)]
      msg.reply(encouragement)
    })
  }

  if (msg.content.startsWith("$new")) {
    encouragingMessage = msg.content.split("$new ")[1]
    updateEncouragements(encouragingMessage)
    msg.channel.send("New encouraging message added.")
  }

  if (msg.content.startsWith("$del")) {
    index = parseInt(msg.content.split("$del ")[1])
    deleteEncouragment(index)
    msg.channel.send("Encouraging message deleted.")
  }
})
The sad words section has been updated to use the encouraging messages from the database so user submitted messages can be used.
The next new section of code is used to add a new user-submitted message to the database. If a Discord message starts with «$new», then the text after «$new» will be used as a new encouraging message.
The code msg.content.split('$new ')[1] splits off the message from the «$new» command and stores the message in a variable. In that line of code, take note of the space in '$new '. We want everything after the space.
We call the updateEncouragements helper function with the new message, and then the bot sends a message to the discord chat confirming that the message was added.
The third new section (at the end of the code above) checks if a new Discord message starts with «$del». This is the command to delete an item from the «encouragements» list in the database.
The index is split off from the Discord message starting with «$del». Then, the deleteEncouragement() function is called passing in the index to delete. The updated list of encouragements is loaded into the encouragements variable, and then the bot sends a message to Discord with the current list.
Final Bot Features
The bot should work so this is a good time to test it. We will now add a few final features.
We will add the ability to get a list of user-submitted messages right from Discord and we will add the ability to turn off and on whether the bot responds to sad words.
I will give you the full final code of the program, and then I’ll discuss the updates below the code.
const Discord = require("discord.js")
const fetch = require("node-fetch")
const Database = require("@replit/database")

const db = new Database()
const client = new Discord.Client()

const sadWords = ["sad", "depressed", "unhappy", "angry", "miserable"]

const starterEncouragements = [
  "Cheer up!",
  "Hang in there.",
  "You are a great person / bot!"
]

db.get("encouragements").then(encouragements => {
  console.log(encouragements)
  if (!encouragements || encouragements.length < 1) {
    db.set("encouragements", starterEncouragements)
  }
})

db.get("responding").then(value => {
  if (value == null) {
    db.set("responding", true)
  }
})

function getQuote() {
  return fetch("https://zenquotes.io/api/random")
    .then(res => {
      return res.json()
      })
    .then(data => {
      return data[0]["q"] + " -" + data[0]["a"]
    })
}

function updateEncouragements(encouragingMessage) {
  db.get("encouragements").then(encouragements => {
    encouragements.push([encouragingMessage])
    db.set("encouragements", encouragements)
  })
}

function deleteEncouragment(index) {
  db.get("encouragements").then(encouragements => {
    if (encouragements.length > index) {
      encouragements.splice(index, 1)
      db.set("encouragements", encouragements)
    }
  })
}

client.on("ready", () => {
  console.log(`Logged in as ${client.user.tag}!`)
})

client.on("message", msg => {
  if (msg.content === "$inspire") {
    getQuote().then(quote => msg.channel.send(quote))
  }

  db.get("responding").then(responding => {
    if (responding && sadWords.some(word => msg.content.includes(word))) {
      db.get("encouragements").then(encouragements => {
        const encouragement = encouragements[Math.floor(Math.random() * encouragements.length)]
        msg.reply(encouragement)
      })
    }
  })

  if (msg.content.startsWith("$new")) {
    encouragingMessage = msg.content.split("$new ")[1]
    updateEncouragements(encouragingMessage)
    msg.channel.send("New encouraging message added.")
  }

  if (msg.content.startsWith("$del")) {
    index = parseInt(msg.content.split("$del ")[1])
    deleteEncouragment(index)
    msg.channel.send("Encouraging message deleted.")
  }

  if (msg.content.startsWith("$list")) {
    db.get("encouragements").then(encouragements => {
      msg.channel.send(encouragements)
    })
  }

  if (msg.content.startsWith("$responding")) {
    value = msg.content.split("$responding ")[1]

    if (value.toLowerCase() == "true") {
      db.set("responding", true)
      msg.channel.send("Responding is on.")
    } else {
      db.set("responding", false)
      msg.channel.send("Responding is off.")
    }
  }
})

client.login(process.env.TOKEN)
The first section added to the code is right under the starterEncouragements list:
db.get("responding").then(value => {
  if (value == null) {
    db.set("responding", true)
  }
})
We create a new key in the database called «responding» and set it to «true». We’ll use this to determine if the bot should respond to sad words or not. Since the database is saved even after the program stops running, we only create the new key if it doesn’t already exist.
The next new part of the code is in the section that responds to sad words is now inside this if statement. The bot will only respond to sad words if db.get("responding") = true. The ability to update this value comes after this next section.
Next, after the code to make the bot respond to the «$del» command, there is new code to respond to the «$list» command when sent as a Discord message.
The bot sends the list of encouragements as a Discord message.
The final new section comes next. This code makes the bot respond to the «$responding» command. This command takes an argument of either «true» or «false». Here is a usage example: «$responding true».
The code first pulls off the argument with value = msg.content.split("$responding ")[1] (like before, note the space in "$responding "). Then there is an if/else statement that appropriately sets the «responding» key in the database and sends a notification message back to Discord. If the argument is anything but «true», the code assumes «false».
The code for the bot is complete! You can now run the bot and try it out. But there is one more important step that we will discuss next.
How to Set Up the Bot to Run Continuously
If you run your bot in repl.it and then close the tab it is running in, your bot will stop running.
But there are two ways you can keep your bot running continuously, even after you close your web bowser.
The first way and simplest way is to sign up for paid plan in Repl.it. Their cheapest paid plan is called the Hacker Plan and it includes five always-on Repls.
You can get three months free using this link (limited to first 1000 people): https://repl.it/claim?code=tryalwayson2103
Once you have signed up for that plan, open your Repl and click the name at the top. Then select the «Always On» option.
There is another way to keep your code running even on the free tier but it is a little more complicated. Repl.it will continue running a web server even after the tab is closed. But even a web server will only run for up to an hour without any use.
Here is what the repl.it docs say:
Once deployed, the server will continue to run in the background, even after you close the browser tab. The server will stay awake and active until an hour after its last request, after which it will enter a sleeping stage. Sleeping repls will be woken up as soon as it receives another request; there is no need to re-run the repl. However, if you make changes to your server, you will need to restart the repl in order to see those changes reflected in the live version.
To keep the bot running continuously, we’ll use another free service called Uptime Robot at https://uptimerobot.com/.
Uptime Robot can be set up to ping the bot’s web server on repl.it every 5 minutes. With constant pings, the bot will never enter the sleeping stage and will just keep running.
So we have to do two more things to get our bot to run continuously:
- create a web server in repl.it and
- set up Uptime Robot to continuously ping the web server.
How to Create a Web Server in repl.it
Creating a web server is simpler than you may think.
To do it, create a new file in your project called server.js.
Then add the following code:
const express = require("express")

const server = express()

server.all("/", (req, res) => {
  res.send("Bot is running!")
})

function keepAlive() {
  server.listen(3000, () => {
    console.log("Server is ready.")
  })
}

module.exports = keepAlive
In this code, we use express to start a web server. The server returns «Bot is running!» to anyone who visits it. The server will run on a separate thread from our bot. We won’t discuss everything here since the rest is not really relevant to our bot.
Now we just need the bot to run this web server.
Add the following line toward the top of index.js to import the server.
const keepAlive = require("./server")To start the web server when index.js is run, add the following line as the second-to-last line, right before the bot runs.
keepAlive()
When you run the bot on repl.it after adding this code, a new web server window will open up. There is a URL shown for the web server. Copy the URL so you can use it in the next section.
How to Set Up Uptime Robot
Now we need to set up Uptime Robot to ping the web server every five minutes. This will cause the bot to run continuously.
Create a free account on https://uptimerobot.com/.
Once you are logged in to your account, click «Add New Monitor».
For the new monitor, select «HTTP(s)» as the Monitor Type and name it whatever you like. Then, paste in the URL of your web server from repl.it. Finally, click «Create Monitor».
We’re done! Now the bot will run continuously so people can always interact with it on Repl.it.
Conclusion
You now know how to create a Discord bot with JavaScript, and run it continuously in the cloud.
There are a lot of other things that the discord.js library can do. So if you want to give a Discord bot even more features, your next step is to check out the docs for discord.js.
Learn to code for free. freeCodeCamp’s open source curriculum has helped more than 40,000 people get jobs as developers. Get started

