Как накрутить ядовитый Drum & Bass Reese (DnB Риз) в стиле Noisia в FL Studio. SeamlessR на русском.
Видео взято с канала: FL Studio PRO
Вот как надо делать реальный Drum`n`Bass.mp4
Видео взято с канала: Valera Matveev
DRUM & BASS | Neurofunk | обучение | Fl studio | Tutorial
Видео взято с канала: Liquid Mane
DRUM`N`BASS ЗА 5 МИНУТ | DRUM`N`BASS TUTORIAL
Видео взято с канала: ScaBry
КАК НАПИСАТЬ DRUM and BASS / КОЛЛАБ С FATAL-M
Видео взято с канала: IY Beats
DRUM&BASS TUTORIAL | КАК НАПИСАТЬ DRUM&BASS | FL STUDIO 20
Видео взято с канала: ScaBry
FL Studio!!! ТРЕК С НУЛЯ ЗА 25мин!!!! Drum and Bass FL!!! УРОК ДЛЯ НОВИЧКОВ 20
Видео взято с канала: HARD FL
Дата: 04.03.2018 16:48 |
Автор: Павел Уоллен
|
Категория: Аранжировка

Как писать Драм Эн Бейс в секвенсоре FL Studio 12
Привет! С Вами канал FL STUDIO PRO и его автор Freaxment.
В данном уроке мы разберём основные приёмы аранжировки.
В сегодняшнем видео я расскажу Вам:
- Как быстро писать аранжировку для драм энд бейс дропов
- Вы узнаете, как правильно строить драм партию
- Как быстро и легко создать знаменитый нейро бас и апгрейдить его звучание.
- А также разнообразить аранжировку второплановыми звуками.
И это:
- Основной тембр — Bass Reese
- Драм партия (Beat)
- Сбивки в нужных моментах
- Разбавление Hats и перкуссией
- Заднеплановые Leads
- Вокальные фишки и элементы
- Звуковые эффекты
Обучающий видео урок по созданию Drum & Bass музыки:

Забрать курс по синтезу в синтезаторе Serum можно здесь!
Вам так же очень понравится:
Понравился пост? Буду рад Вашей маленькой поддержки в виде Like и поделиться!)
Получай новые видеоуроки моего блога, прямо на свой эл. ящик!
![]()
Комментарии
Обучающий видео урок по созданию Drum & Bass музыки
поделись этим с друзьями или сохрани к себе:

рекомендуем лучший обучающий материал
что почитать?
Что такое реверберация и какие виды Reverb плагинов существуют
Всем привет! Вы на канале FL Studio PRO, и я Nelson Norman. Сегодня, мы поговорим о «реверберации», узнаем какие её виды существуют, для чего применяют данный эффект в обработке, и также, я кратко расскажу какие основные параметры могут Вас встретить в данных плагинах. Реверберация — это отражение звукового сигнала в замкнутом пространстве с некоторым количеством […]
Что такое сатураторы и для чего они нужны?
Всем привет, Вы на канале FL Studio Pro, и я Nelson Norman. Сегодня, я расскажу, что такое «сатурация», где применяют данную обработку, какие виды «сатурации» бывают и коротко посмотрим на самые популярные плагины-сатураторы. Поехали! Итак, что такое «сатурация»? Сатурация — это насыщение аудио сигнала новыми гармониками, с целью добавления яркости, насыщения и «теплоты» звучания. Придуманы […]
Какие виды эквалайзеров существуют и как они влияют на звук
Всем привет, Вы на канале FL Studio PRO, и я Nelson Norman. Сегодня я расскажу Вам о таком устройстве частотной обработки как «эквалайзер». Вы узнаете для чего применяется эквалайзер, какие бывают их разновидности, а также способы применения этих самых устройств в «цифровом мире» аудио. Поехали! Для начала давайте определимся, что же такое «эквалайзер»? Эквалайзер — […]
Собираем бюджетный ПК для работы в FL Studio 20 в 2021
Всем привет, я Nelson Norman и это проект FL Studio PRO. Сегодня мы затронем самый задаваемый вопрос, как от новичков, так и от более-менее опытных продюсеров: «Какой ПК нужен для комфортной работы в FL Studio?», и даже скажу большее, сегодня мы постараемся собрать несколько «бюджетных» ПК, на которых будет комфортно работать еще не один год, […]
Genres have come and gone over the years, but drum and bass has always held its ground.
And there’s a reason – it’s distinctive and energetic sound is infectious, and it’s consistently kept going by labels like Hospital, Shogun and Metalheadz.
So if you’re here, you probably want to learn how to make this sound for yourself.
So in this complete guide on how to make DNB, we’ll get into:
- Common drum patterns and how to construct them
- The different genres and how they differ in production and arrangement
- Where your basslines should sit in the mix for maximum impact
- How to fill out the spectrum with sounds and instruments
- Mastering for that loud, club-ready sound
Lastly, this is applicable across all DAWs, whether you use Ableton Live, FL Studio, Logic Pro X or anything else.
Let’s go.
Get the headstart you need in music production with our DNB Starter Kit 🎛️
✅ Have the best sounds on hand with over 40 high-quality samples (drums, FX & more)
✅ Sculpt your sound with included DNB presets for Serum (basses and more)
✅ Know you’re making the right production decisions with our DNB cheat sheet
General Considerations
As eager as you may be to get into the nitty-gritty of producing DNB, there are a few important points to consider that are essential for any sort of success.
This Is Not A Silver Bullet
You might expect to read this article and walk away as a master of drum and bass production. Let me disappoint you – that will not happen.
While this article aims to be as comprehensive as possible, you must dedicate time and effort into your craft in order to become a good producer.
What this article will do is provide you with a solid framework for making DNB.
No more short YouTube videos showing you how to make a particular bass (as much as they can be helpful). This article will give you the knowledge necessary to make a drum and bass track from start to finish.
So my recommendation would be to follow along in your DAW as you walk through the article. That way, you will maximize your potential for improving as a music producer.
And if you need an introduction to music production in general, check out EDM Foundations.
The Many Faces of Drum & Bass
One of the beauties of DnB is that it’s such a multi-faceted genre.
You can have both heaving basslines and soothing pads across the spectrum of subgenres. So it’s important to have a particular style in mind when producing (or you could combine some). Here are the main:
- Neurofunk
- Black Sun Empire, Noisia, Mefjus
- Jump Up
- Macky Gee, Heist, Original Sin
- Dancefloor
- Dimension, Sub Focus, Camo & Krooked
- Liquid
- Netsky (old), High Contrast, Nu:Tone
- Minimal/Deep
- Alix Perez, dBridge, Icicle
- Jungle
- Goldie, Roni Size, Shy FX
Across this guide, we will provide alternative paths that you could go on depending on the subgenre you are planning on making (and we may also do a dedicated guide for each in the future).
Standards
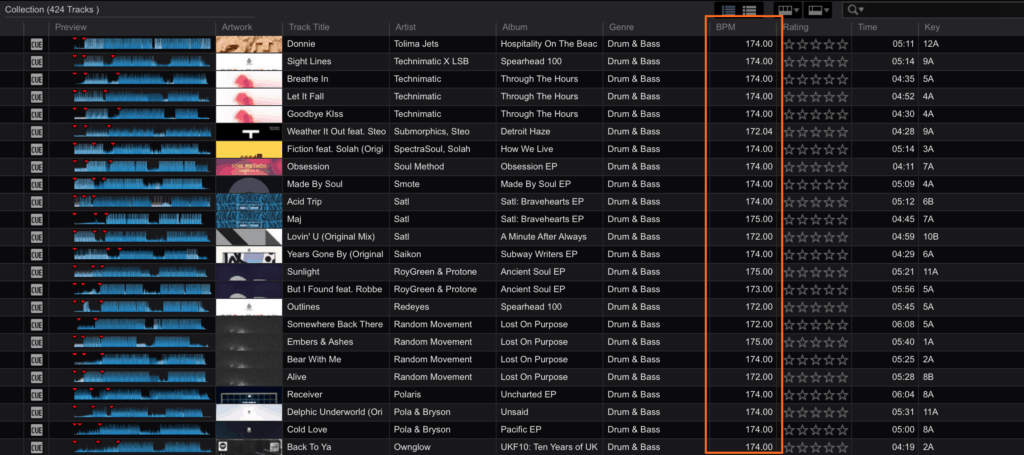
Most drum and bass tends to be written between 170-180bpm, with the majority falling at 174-175bpm, as it seems to have a fast enough pace without being too fast.
Many tracks will also be written in a minor key to give the genre a ‘moodier’ and ‘driving’ feel. More on this later.
Let’s get into the real stuff.
Step 1: Drums
Because it wouldn’t be drum and bass without, well, drums.
Subgenres aside, the drum patterns in drum and bass tend to stay very similar in terms of rhythm.
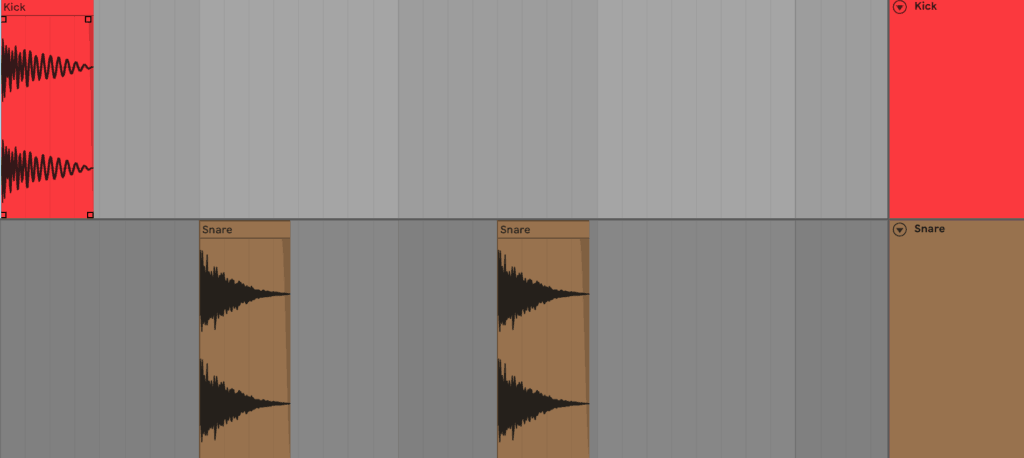
Kick & Snare
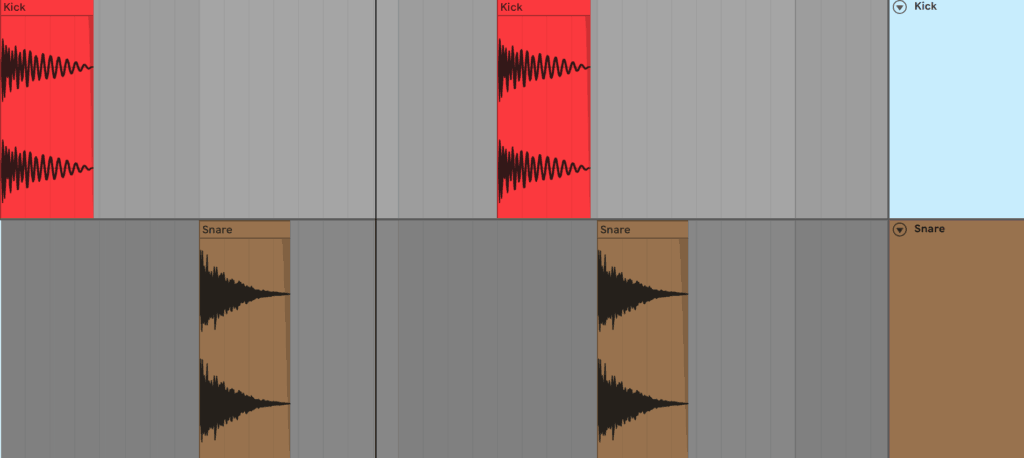
The core drum and bass drum pattern is a kick drum-snare pattern that sounds as follows:
This kick-snare pattern can have many other variations too, such as the extra snare or one less kick, etc:
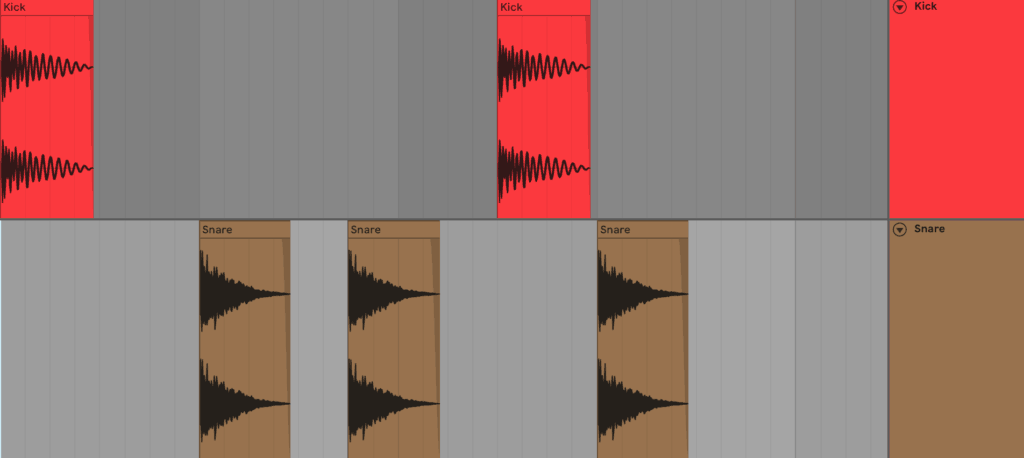
The possibilities are endless, but these are a few common options.
The sound of the kick and snare are crucial to the energy level of the track and therefore the genre you are making.
For example, if you are making Dancefloor DnB, then you’ll want a really punchy kick with weight and a very heavy and bright snare, both of which should fill out the bottom end.
Whereas if you were making liquid or minimal, you would have snappier, softer samples that perhaps sit a bit higher in the frequency spectrum.
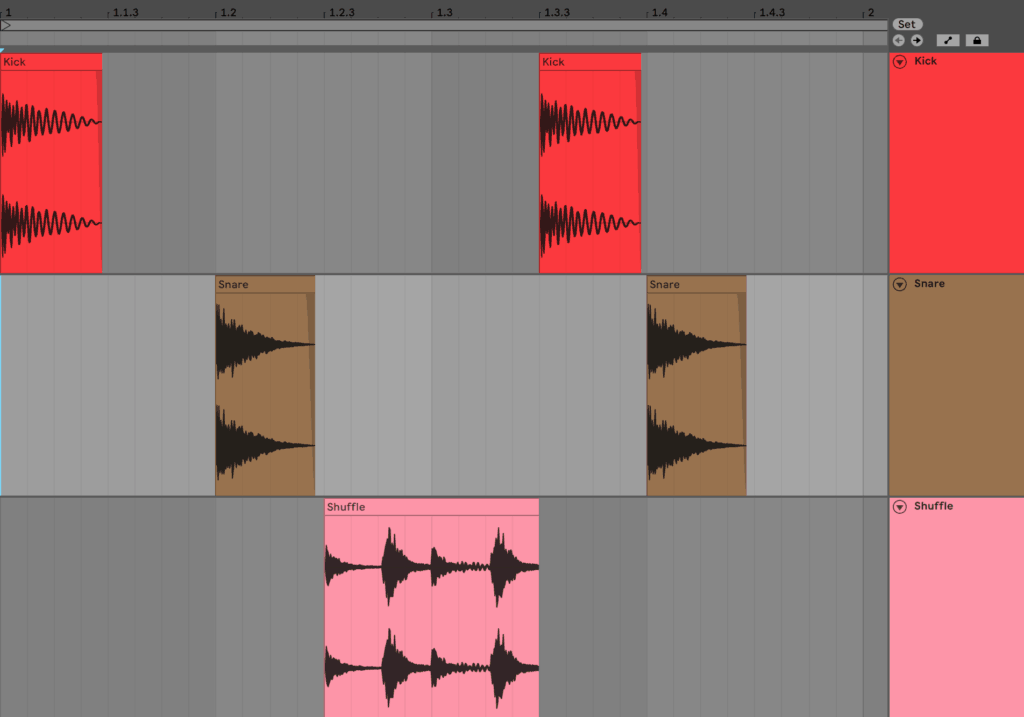
The Shuffle
A major feature of a DnB drum pattern is the ‘shuffle’. This percussive element consists of a series of 1/16 notes after the first snare of each bar.
This technique is borrowed from funk and soul drummers, where the emphasis on the offbeat was used to add a feeling of groove to the drums, rather than having a boring, stale and straight kick/snare.
You can program a basic shuffle with some hats, percussion and or ghost snares. Or, there are many samples out there that can be used as pre-made shuffles.
Tip: Ghost snares are just normal snares, traditionally played by a drummer to vary up the rhythm and velocity of a drum pattern. In production, this may be emulated through the use of different snare samples.
If you’re using sampled breakbeats, many of these will have shuffles in them already, so be aware when layering extra samples that you don’t overcomplicate the drums.
Hats, Percussion & Breaks
Apart from the shuffle, the other factor that can dramatically change the feel of the track is the hats, percussion and use of sampled breaks.
Percussion Samples
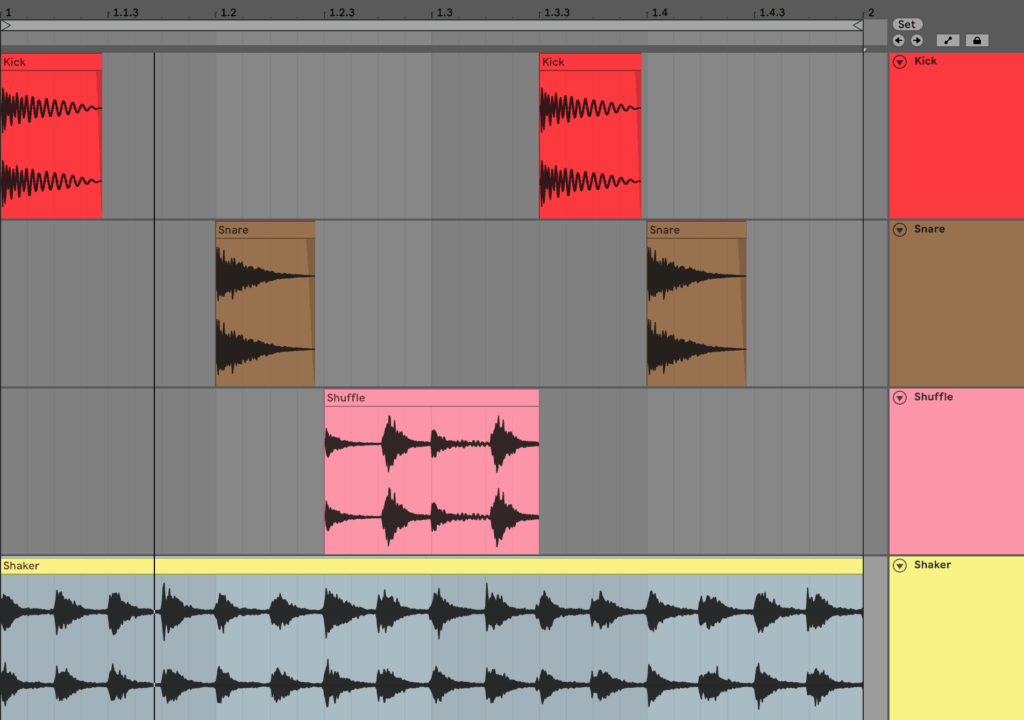
You can add any number of hats, shakers, tambourines to fill out the rest of the percussion.
Generally speaking, faster rhythmic patterns add more energy.
General Percussion
Once again, consider the rhythm when layering in percussion and hats. It’s fine to have elements that are fairly consistent throughout, but make sure to balance that with other elements with offbeat emphasis.
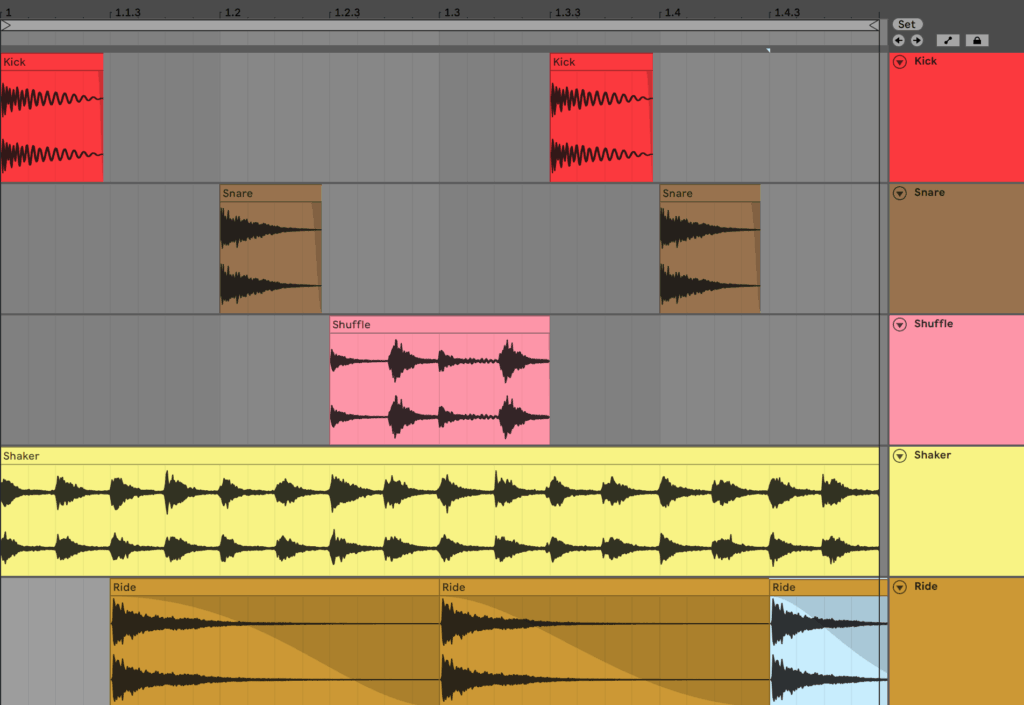
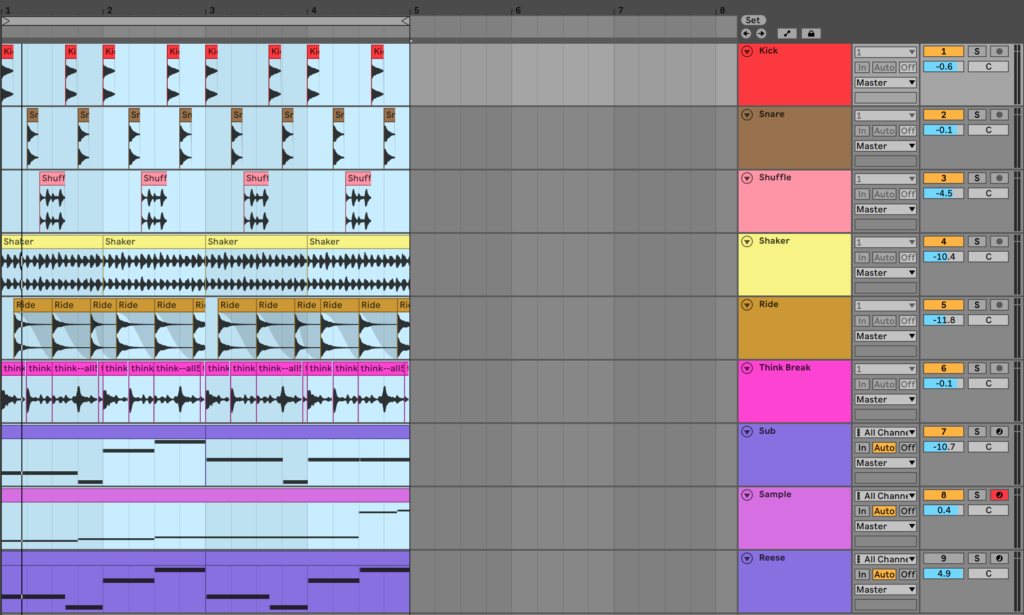
For example, you might have a shaker loop in the background for every 1/16 note, along with a kick and snare:
But to add more interest, you could add a ride on the offbeats that pokes out a little more in the mix, giving the loop a human feel.
Sampled Breakbeats
Depending on the style, you may also want to consider layering in some classic breakbeats, which are particularly utilized in Jungle (many jungle tracks just use a sampled breakbeat).
Not only do these add extra rhythmic interest, but also textural interest, due to the age of the recordings and the technology used at the time.

When layering these with other percussion elements, it’s important to consider the role of the sound, and whether it improves or takes away from the drums as a whole. This is especially true when using multiple sampled breakbeats, where things can get messy if you’re not careful.
Here are a few considerations:
- Many of these samples are originally recorded at a much slower tempo and are sped up to work at a DNB tempo. The time-stretching algorithm here is very important, as it can drastically alter the sound.
- For an old school feel, using a standard repitch mode works well to preserve the punchiness and flow, but you lose the original texture.
- These drum samples were likely played by humans, meaning you might need to make them work on the grid through warping and time-correction.
- Sometimes you might need to manually adjust the audio and line up the drum hits on time, as warping might destroy the integrity of the sample.
- If using another kick and snare, consider how layering these breakbeats affect the sound of your other samples. You might like it, or you might need to process one to make space for the other.
- Generally, you might like to add a high-pass to your breakbeat to solve bass clash.
- Old breakbeats may have strange tonalities and textures that may need to be resolved with EQ. Don’t be afraid to get a bit surgical to make them work in your mix.
Names of some classic/popular breaks you can sample. Don’t be afraid to find other ones to use though:
- Amen Break
- Think Break
- Apache Break
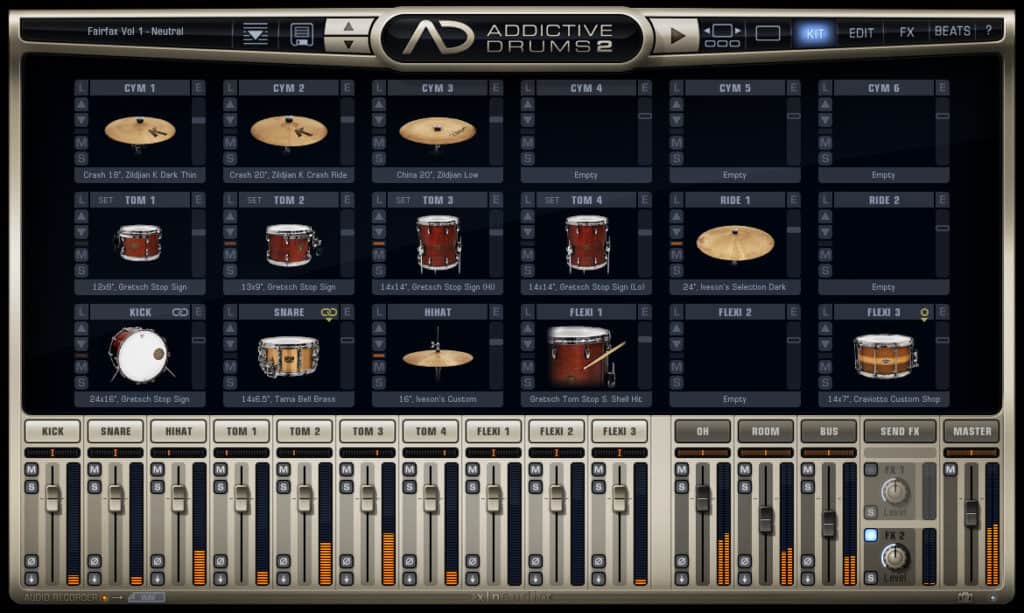
If you want to get creative, you can get a drum instrument plugin (e.g. Addictive Drums) and program your own human drum patterns, and then process them to taste to add your own textures. This is not necessary but can give you greater control.
Finding Good Samples
Traditionally, many of the drum sounds in DNB have come from short snippets of chopped breaks, giving the genre it’s organic yet rolling feel.
Today, a lot of drum and bass tracks combine these techniques with synthesized and processed drums to give you more control and power.
Apart from our free sample pack, using a service like Splice Sounds (sponsored link) or Loopcloud can help you find the particular sounds you are looking for. A few pointers:
- Don’t be afraid to use samples from your favourite artists’ sample packs – use whatever helps you get the sound you’re after
- Use random sorting to find lesser-known sounds
- Get a few options to see what you like best in the context of a track
- Think of the bigger picture when choosing a sample – it might sound good on its own, but not with the rest of your drums
Remember this: there’s no point making the drums from scratch if they already exist. Use high-quality samples and your life will be much easier.
As for sampled breaks, you’ll have to do some digging of your own to find these. Many producers have chopped and recorded these drum loops for you to use and download, so a quick Google search should suffice.
Recommended: Free Sample Packs
Step 2: Bass
As with drums, the bass is an extremely important part of DNB (obviously).
But in this case, there are a few best practices to consider when writing basslines for DNB.
Notes & Frequency Range
Most DNB basses occupy the sub-bass frequency range, which is typically from about 75-100Hz downwards. This is the frequency range that is well-reproduced by a subwoofer and that vibrates the human body.

This range is different because it often isn’t reproduced very well by traditional speakers and earphones, making it better suited to bigger systems.
Because this range can be very temperamental and important to get write, a lot of drum and bass tends to be written in keys like E Minor, F Minor and F# Minor.
This is because bass tends to be low enough to be felt well, but high enough to still be heard.
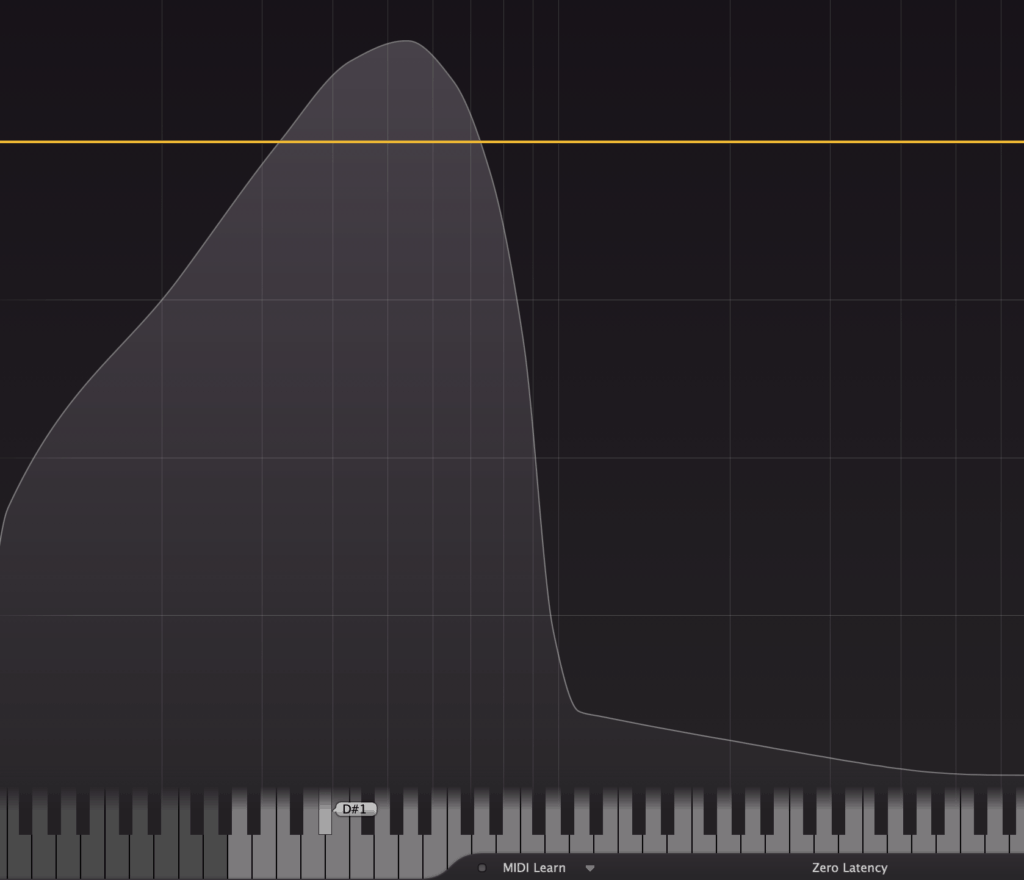
The sweet spot tends to be between D#1 and G#1, in terms of striking a balance between ‘feel’ and ‘listenability’.
Frequencies under D#1 (38.89Hz) tend to be poorly heard by the human ear, and they take up a lot of headroom in the mix.
However, frequencies about G#1 (51.91Hz) tend to still be heard well but start to become less and less ‘felt’ when played on a system with dedicated subwoofers, which is most clubs.
This is fine for less bass-dependant subgenres like liquid, and it’s not a crime to jump into this range (as that can stifle creativity), but try to stick to lower notes where you can.
Of course, don’t get too caught up in what notes your playing, and definitely don’t sacrifice musicality for engineering.
Recommended: EQ: The Ultimate Guide
Sound Design
With the ideal notes in mind, the sound of the bass itself can vary quite a lot.
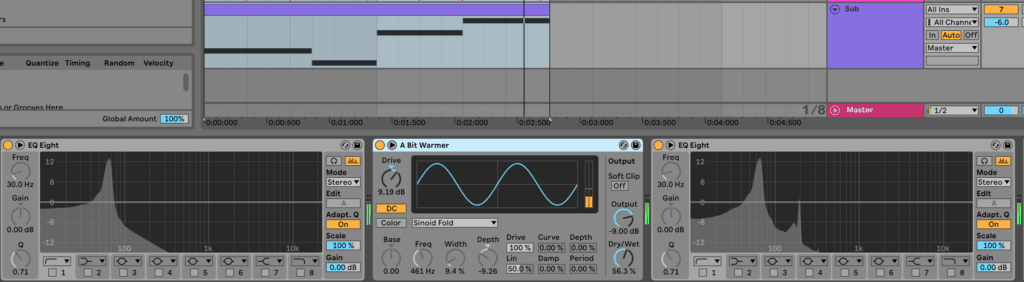
In deeper subgenres like Liquid and Minimal, the basses tend to utilize less distortion and upper harmonics (through softer distortion and/or filtering), and in many cases are comprised of just a single sine wave.
A sine wave (used above) works well as it clearly reproduces the dedicated frequency, which is once again ideal for club use and clean bass.
The problem is, that it isn’t reproduced well on high speakers. So to compensate, you can add a subtle amount of saturation to warm up the sound.
But in more intense genres, more distortion and FX can be used to add energy, colour and interest. One of the more common of these sounds is the ‘Reese Bass’.
A Brief Guide to ‘Reese’ Basses
Reese basses are a staple in drum & bass and have been for a very long time.
The use of them varies between subgenres, but typically they feature longer, drawn-out bass notes with subtle movement over time. In higher-energy genres, the basses can have a lot more variation and quicker movements.
Reese basses tend to be made of the following:
- A supersaw (detuned saw with many unison voices) playing a low note
- As many supersaws spread across the stereo field, this adds a lot of ‘width’ to the bass, giving it a large feeling.
- Using multiple oscillators can help to achieve a thicker sound
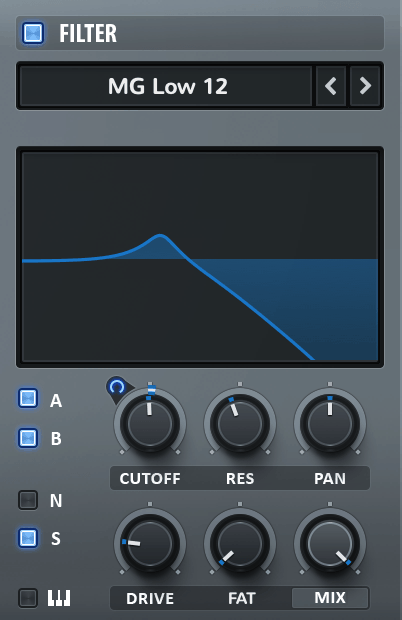
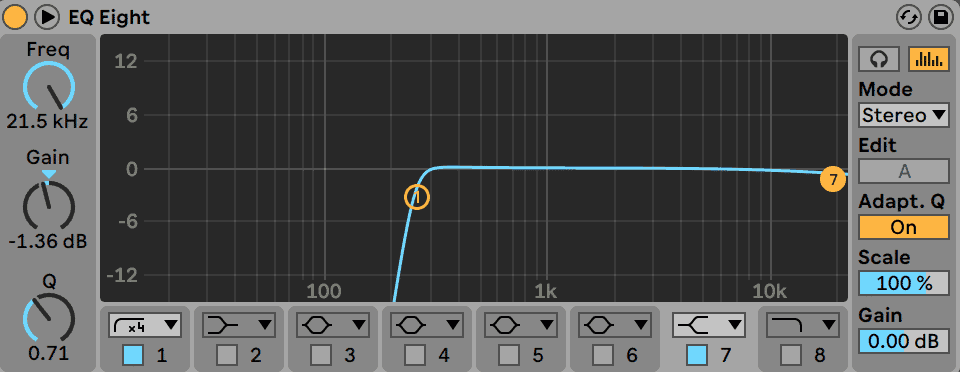
- Filtering
- A filter’s cutoff can be automated to move the bass during the track in certain parts (or for the whole track).
- Set the resonance to taste, but it’s easy to overdo it.
- The distortion can come after filtering to add colour, but this is optional.
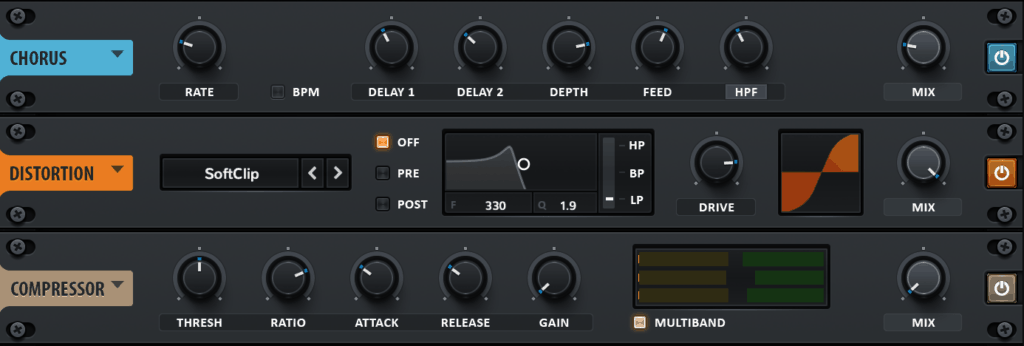
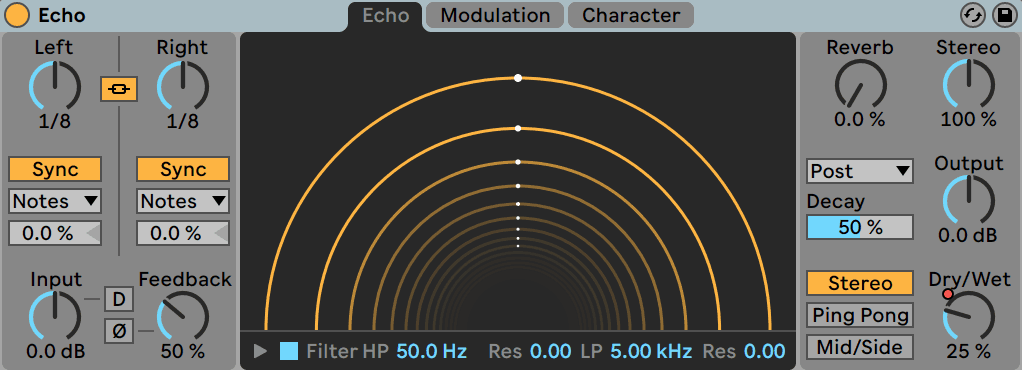
- Chorus, phaser and/or flanger modulation to add movement
- These time-based effects can add motion to the bass, which is important in subgenres where the bass occupies a lot of the spectrum. Chorus, in particular, can also add nice width to the sound.
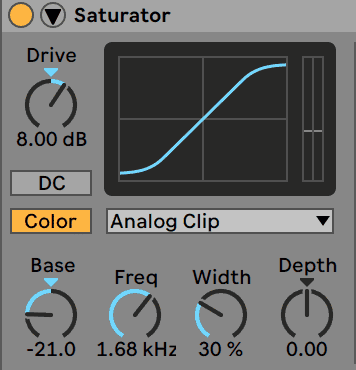
- Saturation and distortion
- Distortion is key to adding grit to basses, especially in genres like Neurofunk and Jump Up. Usually, a tube or clipping distortion sounds pleasant, but you can get creative here.
- Compression or multiband compression
- A more recent technique is to use subtle amounts of OTT compression in order to control the dynamics of the sound, especially where movement is present.
A lot of the time, producers opt to layer this with a clean sine layer to still get that deep bass feeling.
Recommended: 100 Sound Design Tips
Step 3: Instruments & Samples
So we’ve made the drums and the bass, so why not stop there?
Even if it’s all about the drums and basses, people still remember the melody.
Truth be told, all genres of DnB make use of some sort of melodic or harmonic idea, even if very vague and through the use of samples.
Sampling
In fact, DnB borrowed a lot of sampling techniques from hip-hop in its heyday. But as technology progressed, it’s now possible to use synths, recordings and samples as part of the composition.
Sampling is still a major part, and traditionally this was done by sampling a lot of funk, soul and jazz records (a lot of the time done without clearance too, which is harder these days).
There are lots of royalty-free samples you can use on platforms like Splice to find musical loops and samples to chop, mangle and process into your own DNB productions.
Here’s an example of a sample I downloaded of Splice and how I reworked it by chopping it into my loop.
Composition
While genres like liquid tend to utilize more ‘traditional’ forms of composition (melodies and chords), it’s still important to consider the tonality of sounds in other subgenres. In the majority of DNB, tracks are written in a minor key. Here’s a quick breakdown:
Liquid
- Soulful and emotional chord progressions, can be written in a major or minor key.
Neurofunk/Jump Up
- Usually one-note basslines in a minor key (often uses a Phyrigian or Locrian mode), tending to utilize repetition of the same root note and playing with the rhythm.
- Minor chords in the breakdown can be used to add atmosphere.
- Lots of atonality across the board.
Dancefloor
- More pop-friendly chord progressions, catchy melodies and bright sounds.
- Lots of layering sounds to get a thicker, fuller mix.
Minimal
- Written almost always in a standard minor key, using the pentatonic scale for bass notes.
- Short, stabby synths are used to give an urgent feel.
Jungle
- Tends to utilize sampled soul/jazz chords and sampled basslines.
- Features vocals sampled from reggae/dub tunes.
Step 4: FX
FX play a massive role in drum & bass, as they are key in building energy and transitioning between sections.
Building Tension with Risers, Downlifters and Impacts
Tension is the name of the game with DnB, and FX contribute a lot to that.
The most simple FX used are sweeps of white noise and crashes, which are standard for electronic music across the board.
Riser:
Downlifter:
Impact:
But they can also vary a lot more than that, with pitching oscillators, moving filters and raging distortion.
As always, more subtle, less aggressive sounds can be used in genres like liquid and minimal, whereas intense FX would be used in neuro, jump up and dancefloor.
You can find different risers, downlifters and impacts from sample packs, or you can synthesize them on your own.
If creating your own, consider the following:
- The length of the FX sample is important and is often dictated by the length of the section in which it’s being used
- Use volume and filters to bring sounds in and out, creating crescendo/decrescendo effects
- Utilize FX processing to add creative interest
- Make use of organic samples as a source if you want more interesting sounds
Other FX
Like with many genres, you can use all sorts of creative FX – because drum and bass is not limited to just tension-building sounds.
You can use speeches, foley and any manner of crazy sounds to spice up your productions.
In fact, some producers use spoken-word vocals as the main hook in their tracks.
I’m not going to provide any examples here as the possibilities are too broad. The key here is to think outside the box.
Get the headstart you need in music production with our DNB Starter Kit 🎛️
✅ Have the best sounds on hand with over 40 high-quality samples (drums, FX & more)
✅ Sculpt your sound with included DNB presets for Serum (basses and more)
✅ Know you’re making the right production decisions with our DNB cheat sheet
Step 5: Arrangement
Now that you’ve got a bunch of elements, you need to bring everything together.
Structure
Like many forms of electronic and dance music, drum & bass is made primarily for a club environment. This means it’s made for DJs.
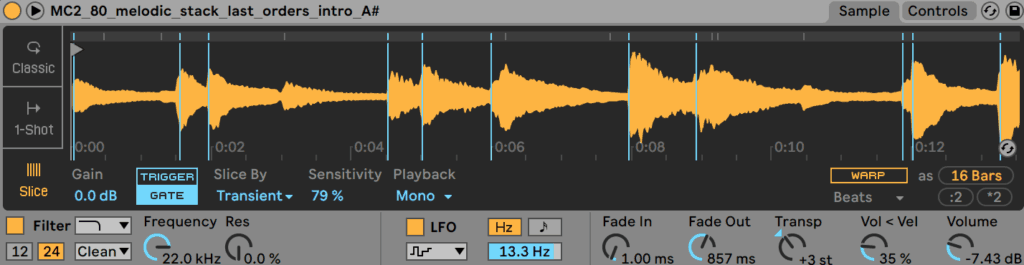
When writing for DJs, you’ll normally need to include some sort of intro for at least 16-32 bars, otherwise, the core idea will come in too quickly and you won’t be able to create a good transition.
Same goes for the outro, as the DJ will likely be blending in the next track.
Normally, the overall track structure is as follows:
DJ Intro (32 Bars) – Breakdown (16-32 Bars) – Drop (16-32 Bars) – Drop Variation (16-32 Bars) – Breakdown (16-32 Bars) – Drop (16-32 Bars) – Outro (16-32 Bars)
An example:
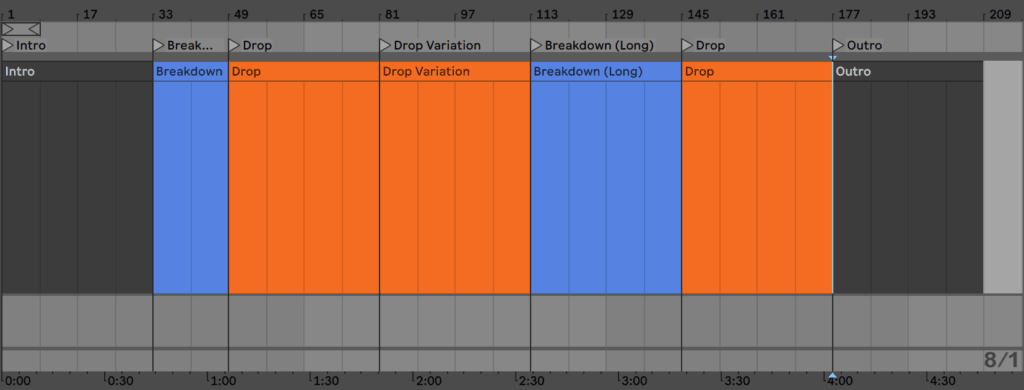
Therefore, it’s uncommon to see DnB tracks that are under 4 minutes, and some can go as long as 7-8.
Note: If you’re also trying to make your music stream-friendly, consider opting for the 4-5 minute mark as a maximum, or even creating a separate edit for the platform that sits at 3-4 minutes (without the DJ intro/outro), as Spotify and the like prefers shorter music.
Instrumentation & Layering
Drum and bass is a loop-heavy genre and therefore has a lot of repetition with subtle addition, subtraction and manipulation over time.
Most of the time, you’ll have a drum break with a bassline as a standard, with a melody/hook on top for interest, while FX will be scattered around to move the energy level of the track.
Apart from that, DNB doesn’t tend to be a very ‘dense’ genre, except maybe when layering pads in genres like liquid, or in atmospheric breakdowns in other subgenres.
While the number of channels used in a project can be very workflow-dependant, generally you could get away with anywhere between 10-30 channels for most tracks, going beyond that for more complex bass-oriented genres (Neurofunk etc.), sometimes up to around 100.
This is due to the number of different bass sounds used in those genres, and even if they only occur once in the track, they may need their own channel.
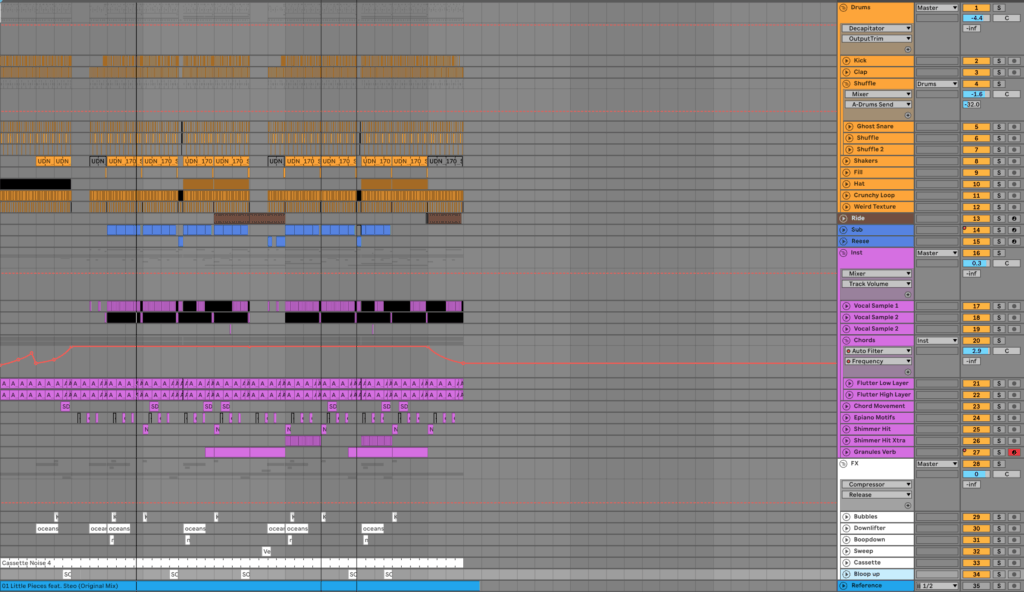
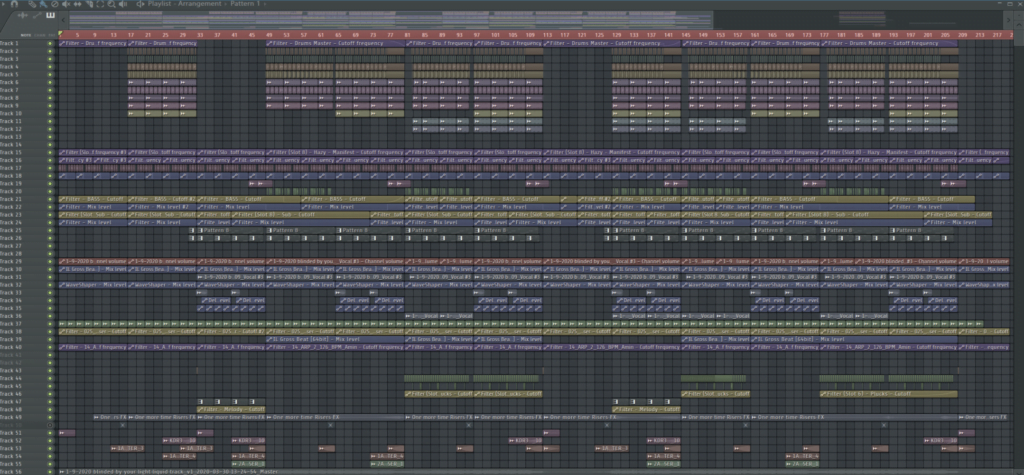
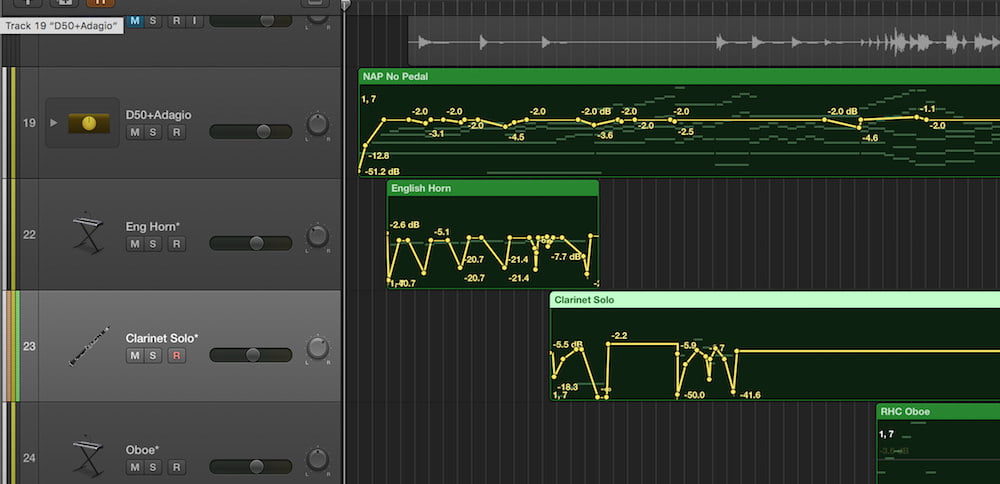
My last liquid drum & bass track that I personally finished had 35 channels in total:
Step 6: Mixing & Mastering
The process of mixing DnB has to be done in a very particular way, otherwise, you can end up with a weak and messy track.
Mixing
The aim when mixing DNB is to have a very balanced mix while not compromising musicality. Heavy amounts of compression and distortion may be used for a lot of the bass sounds, but often there is still movement in the dynamics.
Volume
In terms of volume, you want the drums to poke through fairly well, generally with the kick and snare sitting slightly above the rest of the drums.
Heavier genres may have a much louder kick and snare to get that dancefloor energy.
Secondly, the level of the bass should be fairly on par with the drums. Usually, the kick will have a bit more room the punch through over the bass, but there won’t be a huge difference (this can also be achieved with sidechain compression, but basic mixing should solve the majority of kick-bass problems).
Any melodies, hook elements and instruments usually sit just under the drums and bass, creating a nice bed for the rest of the track, and FX are usually pushed a bit more towards the background, maybe coming in louder during builds and energy changes.
Example
On my most recent liquid track, I spent a lot of work on the mixdown, even changing things by 0.1dB to get them to sit in the right place.
Although (of course) there are things I’m still unhappy about, overall I think the mix came out nicely, and most of it was achieved through volume changes, big and small.
EQ
EQ is very important in drum & bass, as you want to carve out maximum space for the kick, snare and bass to poke through well. This is typically achieved by using high-pass filters to roll off and unnecessary low end.
It’s ok to get away with more aggressive filtering in drum & bass, as a clean sound is ideal for a club-ready track. Where you cut is also a very important consideration, as you can easily ‘thin’ out the track too much by putting the cutoff too high. Make sure to EQ in the context of other sounds to hear things relatively.
Make sure to use reductive EQ to take out problem frequencies. These problem frequencies can build up anywhere on the spectrum (depending on genre), but normally too much 200-500Hz can make a track sound muddy, and too much 1k-3k can start to sound sharp and too resonant, as our ears are very sensitive to this area.
How much gain to reduce is simply a matter of context. Err on the side of less, otherwise, you may affect the sound too much and therefore it will lose its character.
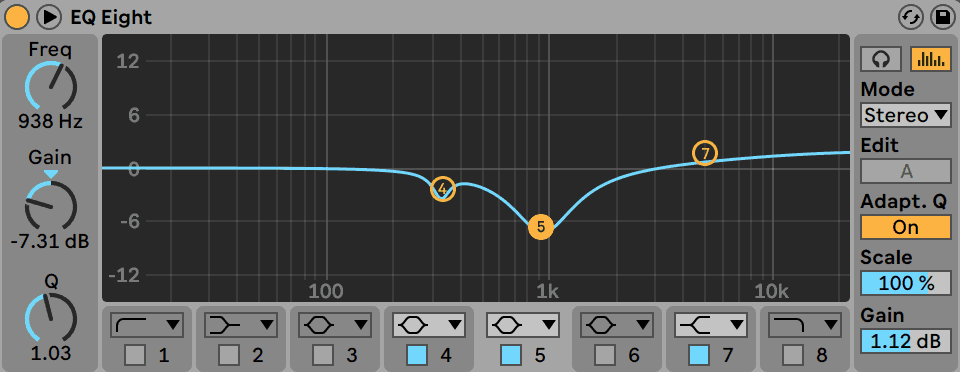
Of course, boosting is also fine, but use it sparingly. Otherwise, you’ll end up with a nightmare of frequency buildups.
Always cut, then boost.
Compression
In order to get a well-rounded track, you’ll find yourself using compression to balance out overly-punchy dynamics and weird volume inconsistencies.
Fast compression can be used to tame overly-punchy drums and slower compression can be used to even out groups and other sounds.
It’s also not uncommon to see multiband compression being used either, as you can control the energy of certain elements by just compressing the lows and highs. Just be careful when using it on the mids as it can make a mix sound overly processed.
Recommended: Mixing EDM
Other Mixing Tools
Saturation, reverb, delay and other effects are also great tools to use when you need to use them. There are no specific use cases, so feel free to use them subtly to add interest and warmth to your channels and groups.
Mastering
As with any music, if you’re not familiar with mastering, you can hire a mastering engineer to do it for you. Many labels will get their own mastering done as well.
But let’s run through a general chain of plugins you might have on. These aren’t all necessary in all cases but can be helpful to achieve a loud, standardized master.
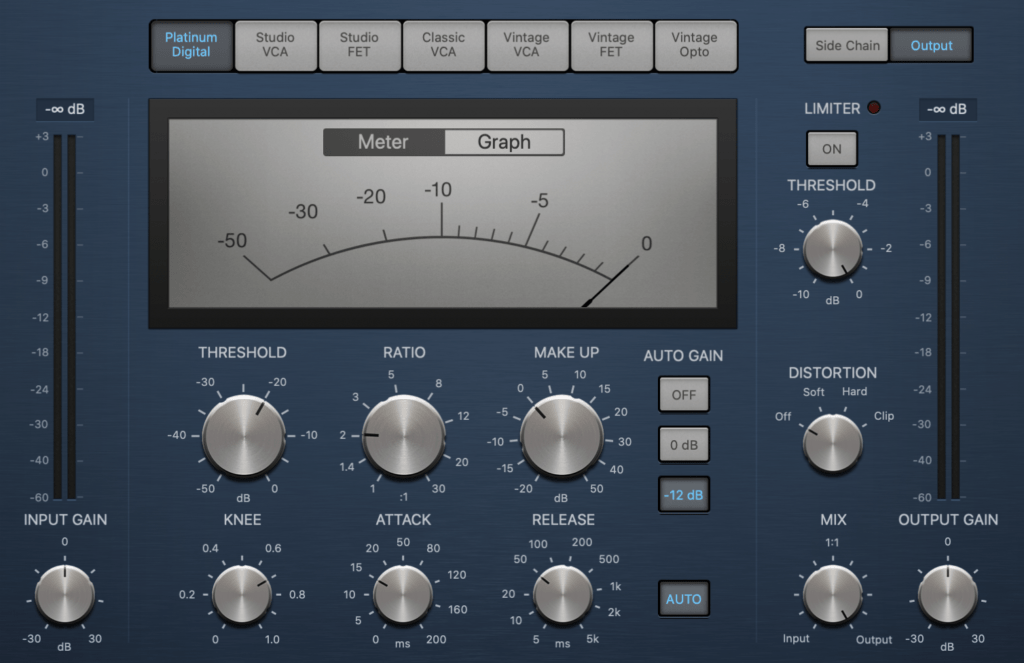
Buss Compression
You might like to use a bit of compression to ‘glue’ the mix together before applying further processing.
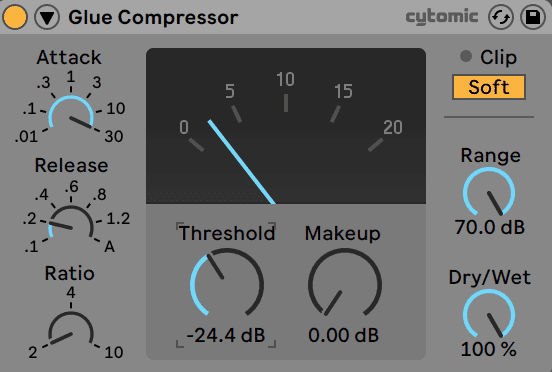
I like to use Ableton Live’s Glue Compressor to dial in some analogue-style compression. Normally on the default settings with no more than 1-2dB of gain reduction after adjusting the threshold. I then bring up the gain to compensate, making sure ‘soft clipping’ is on incase.
Multiband Compression
As with the mixing stage, multiband compression can help balance out certain areas of your mix’s frequency spectrum. If the highs are too piercing, you might want to control them with some fast yet subtle compression above 10kHz.
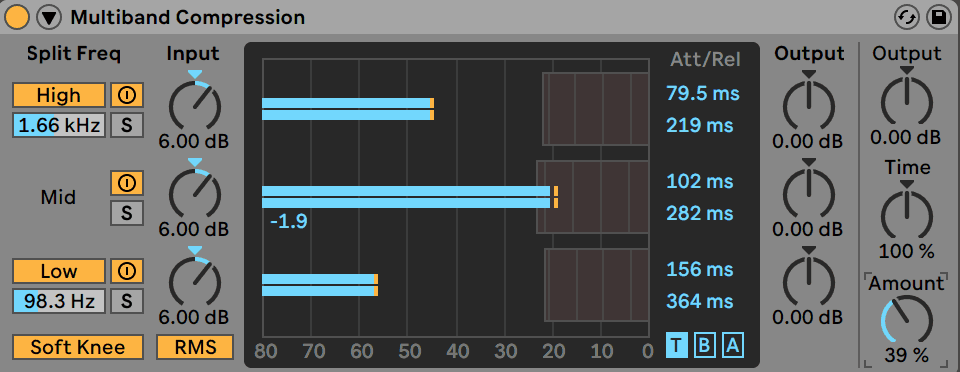
As you can customize the settings for each band, you can get a much more transparent form of compression than the standard variety.
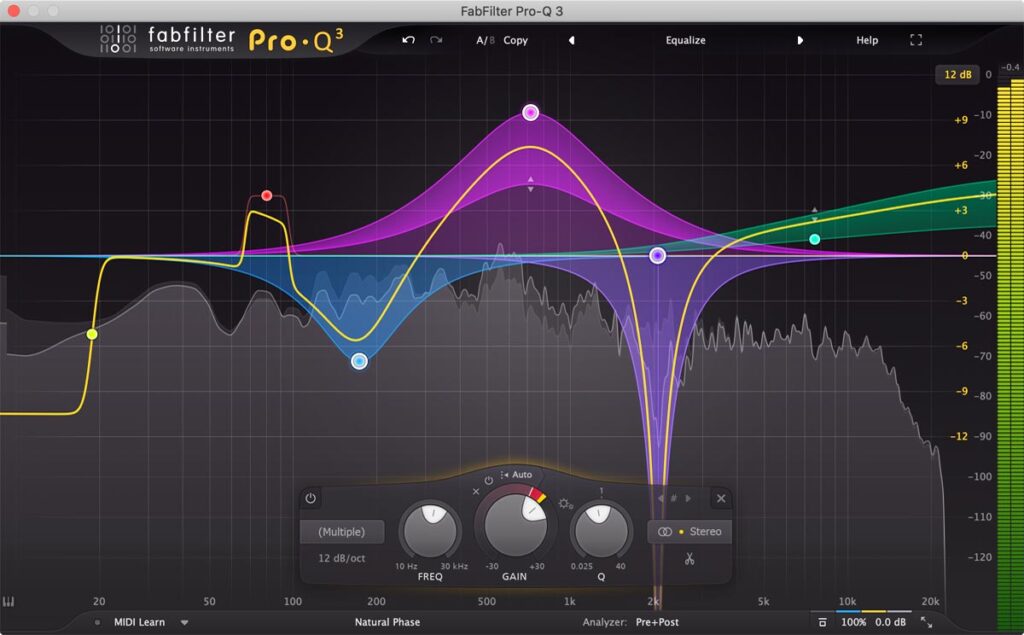
Limiting
If there’s one essential thing you need to do in the mastering phase, it’s limiting.
It’s the thing that takes your mixes from good to great and gets that final polish all-round.
Generally, you’ll want to pull out a third-party plugin, as most DAWs don’t have great limiters built-in.
I recommend something like FabFilter Pro-L 2 (a personal favourite) or iZotope Ozone’s Maximizer.
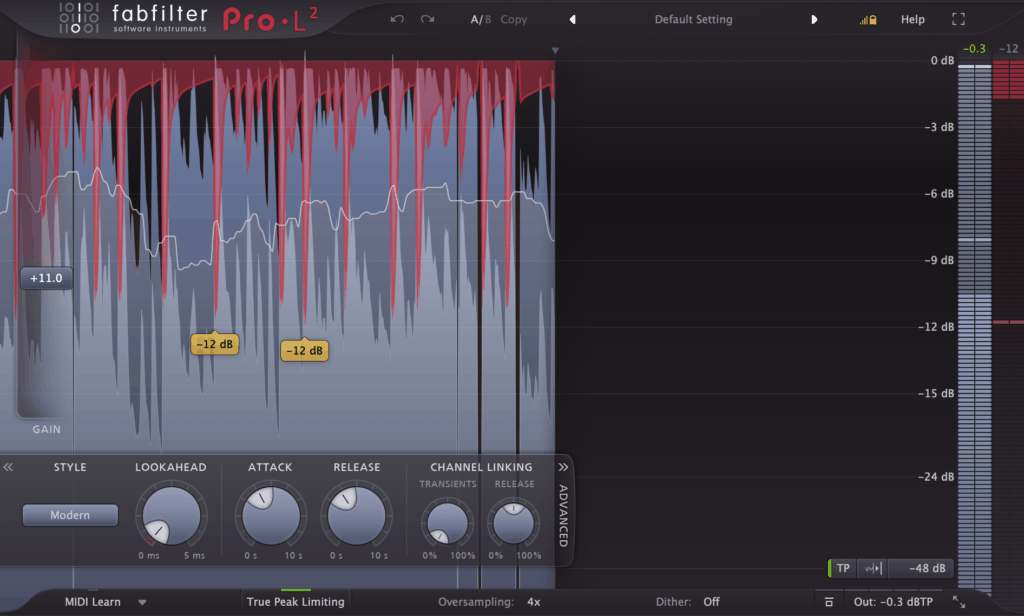
Once this is loaded up, I’ll add some gain until I can hear the limiter working too hard. Then I’ll change the settings – I’ll use fairly aggressive style (either Transparent, Modern or Aggressive in Pro-L 2 or IRC IV in Ozone) with a short lookahead and short to medium attack and release.
Once this is set, I’ll play with the gain to see if the new settings allow for more loudness. When it’s at the max possible, I’ll compare it to a reference track.
If mine doesn’t hold up, normally something in the mix will be causing the issue and I’ll have to backtrack. I repeat this process until I get the desired result.
And there you have it – that’s the basic process of writing a drum & bass track!
Need Some Samples?
So you’ve followed the article, but maybe you haven’t put things into practice yet.
Well, make sure to grab our FREE DNB Starter Kit, which includes a sample pack of over 50 drums, FX and sounds, as well as some presets for Xfer Serum.
Get the headstart you need in music production with our DNB Starter Kit 🎛️
✅ Have the best sounds on hand with over 40 high-quality samples (drums, FX & more)
✅ Sculpt your sound with included DNB presets for Serum (basses and more)
✅ Know you’re making the right production decisions with our DNB cheat sheet
Any questions? Hit me up at [email protected].
В данной статье будет рассматриваться процесс создания драм н басс бита с активным использованием инструментов нарезки и перемешивания семплов. Для примера мы будем использовать программу FL Studio, но в любой другой виртуальной студии могут быть проделаны те же операции. Мы будем работать с достаточно известным типом бита «Amen», записанным в ранних 1960-х годах.
Вы можете скачать этот семпл по этой ссылке.
Загрузите семпл в FL Studio, перетащив его в пошаговый секвенсор программы. Для разъединения бита на составляющие мы будем использовать стандартный инструмент фруктов — Slicer.

Откройте пиано ролл, нажав по миниатюрному дисплею:

Задайте темп проекта равным 120 BPM для того чтобы иметь возможность хорошо различать компоненты бита.

Такт первый:
Отрезки 1,2 и 3 содержат в себе бас бочку и снер. Отрезки 5, 6, 7, 8, 9 — открытые и закрытые тарелки, второй снер.
Такт второй:
Второй такт такой же как и первый, только содержит простое ритмическое отличие бас бочки. Удалите второй такт.

Простая структура бита позволяет его использовать заново без особых проблем.
Назовите 1,2,3 отрезки»Kick 1″, «Kick 2» и «Snare» соответственно. Для того чтобы переименовать отрезок нажмите по нему левой клавишей мыши.

Далее мы будем использовать операции копирования (CTRL+C), вставки (CTRL+V), также Вы можете использовать инструмент «карандаш» + Shift для формирования групп нот.
Выделите наги первые три ноты : две бас бочки и снер. Выберите инструмент карандаш и, удерживая клавишу Shift, переместите ноты по горизонтали/времени:

Теперь изсените темп проекта на значение 180 BMP. Послушаем что у нас получилось:
Далее мы будем добавлять в бит новые звуки, для чего воспользуемся редактором событий (event editor) нашей программы. С помощью этого редактора мы сможем создать автоматизацию различных эффектов и фильтров. Достаточно эффектным, но игнорируемым многими, инструментом является изменение частоты звука.

Нажмите по серой области для отображения контекстного меню. В этом меню задайте стандартную частоту ноты. Нарисуйте новое событие с помощью инструмента «карандаш» (Pen Tool).

Выделите бас бочку и снер, копируйте их и измените частоту на 300%. Мы создадим как бы «спрашивающую» и «отвечающую» ритмические структуры.

Теперь выделите отрезок 5 (оригинального бита), копируйте его и назовите «‘ghost snare’», разместив следующим образом:

послушаем что у нас получилось:
Давайте внесём некоторые структурные изменения в наш бит: добавим 5 нот снеру, и с помощью автоматизации изменим для них значения катофф:

Давайте ещё раз внесём изменения в наш бит, добавив ghost снеров:

Добавим ещё одну партию на 3-й и 4-й такт, с изменением частоты в 600% и 300%:

Послушаем что у нас получилось:
Далее, используя те же операции копирования/вставки и изменения параметров частоты, катофа, силы удара (Velocity ) и добавлением дилея был получен следующий финальный результат:
In this post we continue with our tutorial on how to make Drum and Bass in FL Studio. If you haven’t been following along with the first part, you can find it here.
Step 6
From here we can begin to build-up the body of our break via edits and adding various rhythmic variations. One excellent way to do this is to incorporate the use of FL Studio’s event editor. Automation clips have been incorporated in recent versions of FL Studio, but for the purposes of this tut we will be sticking with the inline event editor and piano roll, which in my opinion offers a far more intuitive way of working.
Through the event editor we can now automate various effects, including pitch, filters, velocity and all sorts of goodness by drawing-in automation events via the Pen Tool.
The following are some popular break manipulation techniques commonly employed by contemporary breakcore and DNB artists. Each technique that follows will employ only our prepared break and we will progress one technique at a time.
Down that caffeine!
Step 7
Time for pitch adjustments. This may seem obvious to some, but unfortunately it is very often overlooked and many an aspiring producer will fail to recognize its potential as a major creative tool.
Here are some examples of effective Pitch Adjustments:

Right-click on the mysteriously blank grey box to open up the contextual menu. From here select Note Fine Pitch. Remember this menu as we will we be referring to it later.
Draw-in the event manually using the Pen Tool. Right-clicking and dragging while drawing makes it easier to create straight lines.

Select our Kick and Snare notes beginning just prior to bar 2, and ending thereof. As highlighted below, proceed to drop the pitch by 300%. This will create an “ask” and “answer” decapo rhythmic structure.

Step 8
Here we’ll create a pitch adjustment with simple ghost snare variation. Let’s start with the rhythmic variation. We’ll achieve this using both the Note Fine Pitch event and introduce our first ‘ghost snare’.
Select Slice 5 and rename it ‘ghost snare’.

Proceed to add the snare notes as depicted above.
By adding a simple doubling of a ghost snare we have given the break a new groove. Exploring this technique is a fantastic way to make fresh and arresting rhythms.
Step 9
While we’ve explored some interesting techniques so far, this loop will quickly get boring if we do not begin to add and build-up rhythmic edits. Let’s start by creating a filtered snare roll to nicely tail-off our 8 bars. Highlight and select the last 5 notes on the 8th Bar. It’s these that we’ll be working with. Select the Snare and dupe it 6 times, then draw-in a cut-off freq event and drop the value to 90%

Now we have a cool glitchy snare roll that ends the 8 bars nicely. Incorporating this technique and using the cut off frequency at sporadic intervals can help create interest and inject lifeblood into a loop.
Any DJ or producer worth their spit always know how to drop, alter, mix, edit, glitch up, mash up, smack up anything at unexpected intervals! A skilled beat-master will focus on the off-beats—and never eat freakin’ jellybeans! EVER!
Step 10
Let’s add even more rhythmic variation. We will achieve this using both the note fine pitch and our new ghost snare. Above the first 2 kicks on the 2nd bar, add 2 ghost snares as shown below.

On the 3rd and 4th bar let’s draw-in a Note Fine Pitch Event, again using the Pen tool and selecting Note-Fine-Pitch. From that mysteriously unlabeled large grey rectangle, bring up the context menu.
Draw in one pitch adjustment event at 600% on the very beginning of the 3rd Bar. Draw in another pitch adjustement event beginning just after the first Kick on the 4th Bar at 300%, and on the 4th Bar, if you feel like it, delete the kick at the end. This gives a “tighter” sound to the edit.

Step 11
As you can see, the Amen break used alongside a simple toolset can be a highly expressive instrument. The most important aspect of this, in my experience, is the body of the break, which underpins the whole structure. Remember: it only takes a very limited toolset to achieve great results.
Don’t be seduced by all the frilly extras until you have your foundational techniques mastered. Sit down, get yourself in the right mindset and explore mixing these techniques together to create new and interesting rhythms.
From here on out it is a matter of exploration, and in all honestly this is the best advice I can give you. To give you a number-by-number account of notes, which were placed by ear to begin with, would only lead you to recreating my exact edits. This is not something you want.
Instead, think along the lines of using this loop as a instrument. Here are the techniques that I employ to play it.
- Pitch
- Cut-off Filter
- Velocity
- Ghost Notes
- Delay (occasionally)
Knowing where and when to drop in the perc sounds is a creative process. There is no one set of rules for you to follow every time. This doesn’t mean there isn’t a formula that must be followed—there is!—but it does mean that the only true way to discover what works and what doesn’t is to immerse yourself in as much of the music as possible. And if you love it, this is hardly a challenge!
I am sure there are numerically inclined perfectionists cursing me right now. But if you take a numerical approach to producing beats, it will often show. To capture energy and expressivity requires personal inspiration, and a little bit of skill.
Although these are basic tools they are the bread-and-butter of understanding Breaks. The more you limit yourself to a particular discipline, the quicker you will discover your creativity has no choice but to flourish. Beginning by learning how to mangle the crap out of the Amen Break and other select breaks is a path some of today’s biggest names have walked, and you too can follow this in this time-honored tradition.
Below is a little snippet of what using only the techniques explored in this tutorial can do (with a bit of patience and a lil’ bit of lurrrve…)
Mostly importantly, keep your ego at bay! Allow yourself to listen. Let the music speak through you.
Please be aware this is my first tutorial on behalf of AUDIOTUTS. If you’ve enjoyed it, feel free to drop me a comment about this tut or anything else you might interested in knowing (mixing theory/EQ/Compression/Effects/Tricks/Programming Beats/Gnarly B-Lines/Analogue and FM Synthesis).
Thanks to Skellie, Collis and all those associated with the Envato Network—and very special big-ups to a very special girl… Kuyan.
Amen, Brothers!
Original source here.
Intro to Drum and Bass
Drum and bass – one of the most diverse, enduring genres of electronic music. It’s your favorite artist’s favorite genre. Just ask Flume.
Whether you’re a fan of the genre looking to start making your own tracks, or an experienced producer that wants to try your hand at a new style, knowing where to start can be hard.
Here at DNB Academy, our goal is to help teach the art of drum and bass production in a way that is clear and easy to understand. That’s why we’ve created this comprehensive Beginner’s Crash Course. It includes everything you need to know to get started making drum and bass, plus some extra tips and tricks along the way.
While this Crash Course is choc full of knowledge, you should know that it takes time to become a good producer of drum and bass. It’s ok to be confused. Reading this guide is the perfect way to start your drum and bass journey, but remember, it’s just that – a journey. So enjoy the process, embrace the challenge, and look forward to an incredibly fun and addictive new passion.
Table of Contents
The Crash Course is divided into several sections. We recommend going through from start to finish, but feel free to jump around as suits your needs:
Table of Contents
What Is Drum and Bass?
While tracing the development of a genre of music is a tough (and often controversial) task, we’ll try to briefly sketch drum and bass’ history so that you can understand the broader context in which the genre sits.
Drum and bass is a veritable melting pot of styles and influences. It emerged out of the UK rave scene in the mid-90s as an evolution of breakbeat hardcore, a hard-hitting style of EDM then popular at UK clubs and parties. Artists experimented heavily with new sounds, while also plundering samples from classic records. Reggae records from the 70s and 80s became popular sources for drum and vocal samples, creating drum and bass’ direct predecessor, Jungle.
As this style gained more mainstream appeal, especially with the British public, many artists began to riff on the Jungle sound, keeping the fast-paced percussion while straying from the genre’s reggae influences. Since Jungle was heavily associated with the tropical sounds of reggae, these new artists began referring to their music “drum and bass,” a phrase that was used to describe certain reggae tracks in the 70s. Drum and bass was meant to emphasize that these artists were sampling the high-octane breakbeats from these records as opposed to the more melodic elements.
Over the course of the next 25 years, drum and bass grew into a many-faced beast, spawning dozens of its own sub-genres.
Styles of Drum and Bass
Which particular style of drum and bass you choose to produce will depend on personal preference. The best thing you can do is listen to a lot of drum and bass music and determine which particular sound appeals to you. We’ll go into greater detail on how to achieve the sounds of each style of DNB a bit later on, but for now, here is a list of some of the most popular variants:
- Liquid
- Neurofunk
- Jump Up
- Dancefloor
- Jungle
- Minimal/Deep
Knowing which style you want to emulate will inform many of the choices you make when producing drum and bass, so familiarize yourself with the nuances of each sub-genre!
How to Program Drums for Drum and Bass
It’s in the name: drum patterns are one of the two defining aspects of drum and bass. The best artists program rich, layered drums, but they’re all building upon the same fundamental pattern.
A Note On BPM
In drum and bass, the BPM (beats per minute) typically ranges from 170 to 180. The vast majority of professional drum and bass, however, is going to sit at 174 bpm. This is pretty fast, and it’s one of the reasons drum and bass sounds so intense and hard-hitting compared to other genres of electronic music.
Kick & Snare Patterns
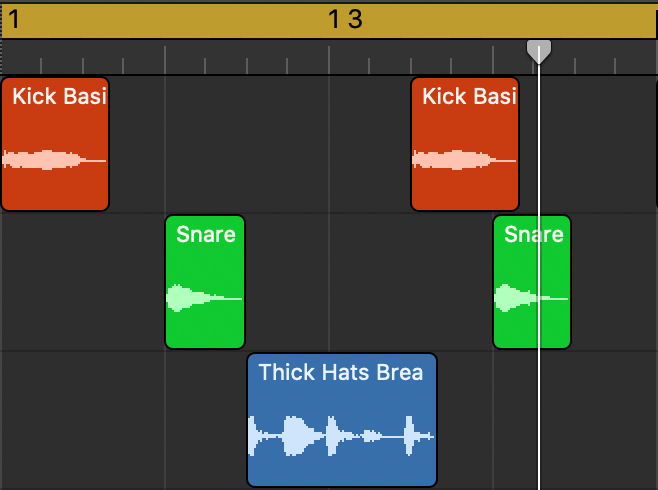
The kick and snare form the bedrock of the prototypical DNB pattern. It sounds as follows:
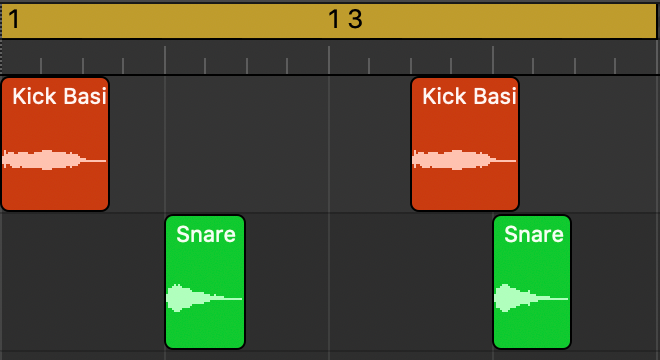
It consists of a kick on the “1” and “3 &” beats, plus a snare on the “2” and “4” beats. Introducing the kick on the “3 &” beat instead of the “3” beat is what leads to the swing sensation.
The world is your oyster here, though. You’ll hear tons of producers toying around with the drums, but again, the core of the track always remains the interplay of the kick and snare. It’s the driving force of drum and bass. It provides a track with its energy.
Another oft overlooked factor in DNB production is the quality of your drum samples. Luckily, we’ve got you covered. Check out our FREE Tentacles Neuro DNB Starter Kit, complete with 15 kicks, snares, and top loops to help you start making out-of-this-world neurofunk.
Shuffle
The “shuffle” is another important sonic element in drum and bass tracks. Originally used by funk drummers to add swing and feeling to their playing, shuffles are that little “roll” you hear after the first snare of each bar.
A shuffle consists of a series of 1/16th notes. Luckily, there’s a nearly infinite amount of shuffle samples floating around out there, so it’s as easy finding the one you like and throwing it after your first snare.
Shuffles act as a sort of glue by filling the empty space between the first snare and second kick. Unique, interesting shuffle samples are one way to add a personal touch to your drum and bass tracks, so experiment with placement and sound.
Percussion
Hats, percussion, and other breaks are where you can really start to add personality and set your drum and bass tracks apart. When fleshing out your drums, it’s important to consider the overall sonic profile of your track. Are those particular shakers going to clash with the shuffle? Is the ride overpowering? There are no right or wrong answers, but be mindful of how each percussive element fits into the overall puzzle of your rhythm section.
Adding hats gives the drums a sense of continuity:
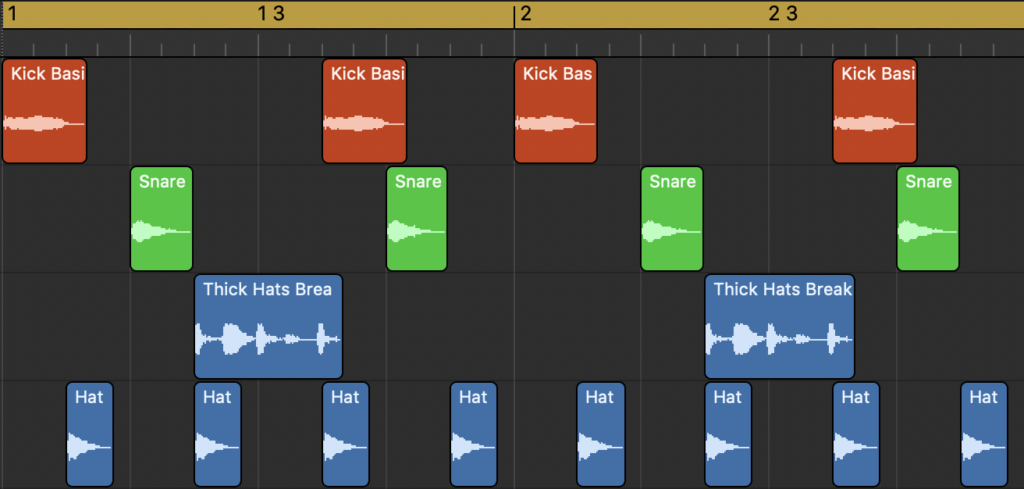
More unique percussion can really spice things up:
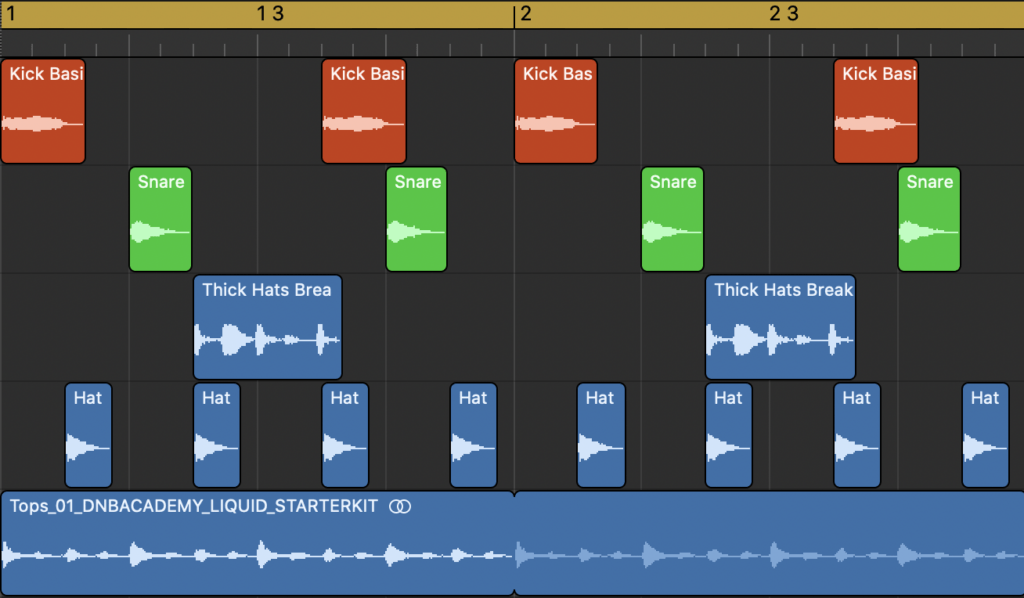
Breakbeats
A “breakbeat” is a full drum pattern sample, usually taken from older soul and funk records. When producing drum and bass, you can use breakbeats in addition to your own drums, or even on their own. In fact, in some genres of drum and bass, like Jungle, a sampled breakbeat will be the only percussion present.

Working with breakbeats can be a bit of an art, and there are several things you’ll want to keep in mind. First, the quality of the breakbeat sample is not always guaranteed. Depending on where you got it from, the sample could have been compressed and encoded dozens of times, which is no bueno in terms of fidelity. Try and source your samples from quality sample packs or trusted sites like Splice.
Further, since most breakbeats are sampled from vinyl records that were recorded using older equipment, there are sometimes sound artifacts or other organic textural qualities present in the sample. This can often be a good thing, but if you’re looking to keep your drum and bass ultra-clean and modern sounding, this is something to be aware of.
Since these are recordings of humans playing live drums, they aren’t always going to be perfectly quantized. (When something is quantized, it matches perfectly to the bpm and time signature of your track.) You might need to stretch or compress the sample to make it fit your track. Not all time-stretching algorithms are created equal, and it’s likely that the sample will get pitched up or down. You can use a simple pitch shifter to correct this, but it will affect the texture of your sample.
Again, this is neither a good nor a bad thing – it all depends on the drum and bass sound you’re trying to achieve!
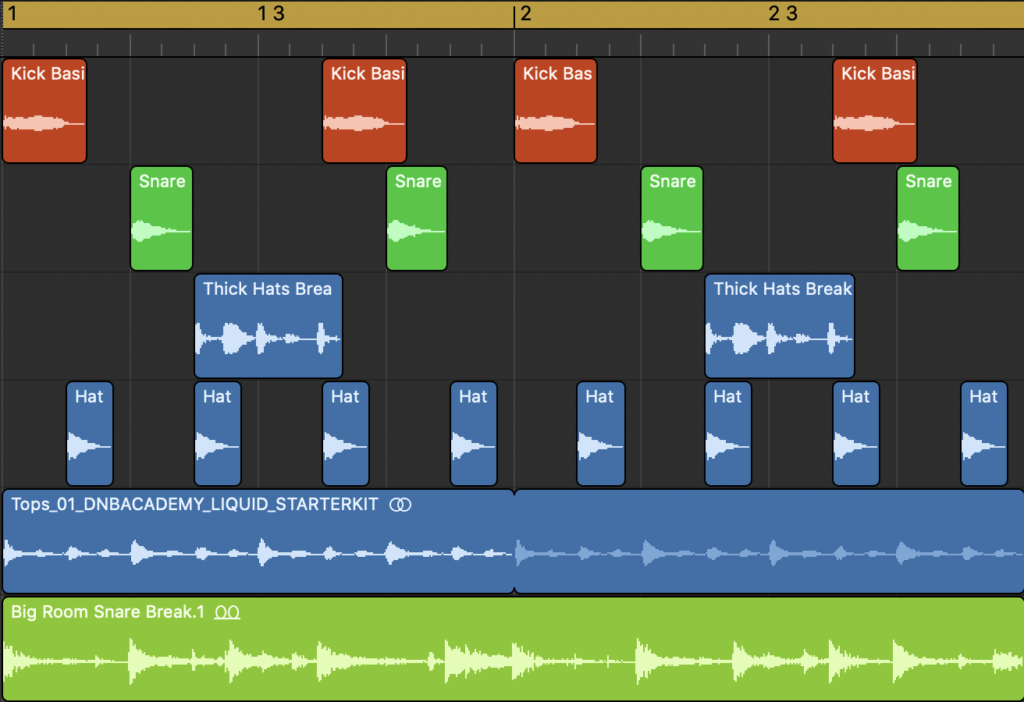
As a final note, if you’re not using a breakbeat on its own, remember to examine how it interacts with your kick and snare. Is it overpowering them? Creating some frequency clash? Use an EQ to inspect the frequencies, and don’t be afraid to cut any problem areas. As a rule of thumb, throwing a high-pass filter on your breakbeat will give your kick and snare room to shine through while still keeping most of the breaktbeat’s other percussive elements.
Utilizing Drum and Bass Samples
Don’t make more work for yourself than is necessary: there are TONS of high-quality drum and bass sample packs out there. In addition to our free packs, many pro drum and bass producers release their own packs for use. While you should strive to one day have a mastery of sound design and be able to whip up your own drum samples, it’s perfectly fine to make use of samples.
How to Design Basses for Drum and Bass
It’s the other half of the equation. We talked about drums, now we’re talking about bass.
Some Technical Stuff
Before we dive in, we should mention a few technical tidbits that are important to know when you’re working on your bass sounds.
DNB basses are heavy. They’re usually fat and very present in the mix. If you take a look at how one of these basses stacks up across the frequency spectrum, you’ll notice that most of the sounds are occurring in the 75hz to 100hz range and below.
For this reason, most drum and bass tends to be written and produced in the keys of E minor, F minor, and F# minor. That’s because the pitches of the notes in these keys have enough low frequency information for the basses to hit hard, but are high enough that they are perceptible to the ear.
Bass Sound Design
Bass sound design depends heavily on two main factors:
- the style of drum and bass you’re hoping to emulate
- the synth you’re using
Jungle basses, for example, are often gritty, full, and in your face, whereas Liquid features mellower, less harmonically complex basses. By “less harmonically complex,” we mean these basses have fewer added effects and are often comprised of just one oscillator outputting a sine wave.
The way synths work is by using “oscillators” (think of these as generators or sources) to create soundwaves. A sine wave is the most basic waveform an oscillator can generate, and it has smooth, round quality to it. Sine waves tend to have more stuff going in the higher frequencies, though, so in order to make your sine wave stand out in the mix, you can add a bit of saturation. This will help it cut through any other sounds that might be masking it.
Common Basses
Reese Bass
Reese basses are one of the most commonly used basses in DNB. You likely recognize the sound: a full-bodied, gritty bass that feels like it has an edge. Depending on what sub-genre of drum and bass you’re working in, a reese bass can either be long and sustained note or a wobbly and high-energy.
Let’s take a look at how to design a simple Reese bass in Vital, one of the best free softsynths on the market.
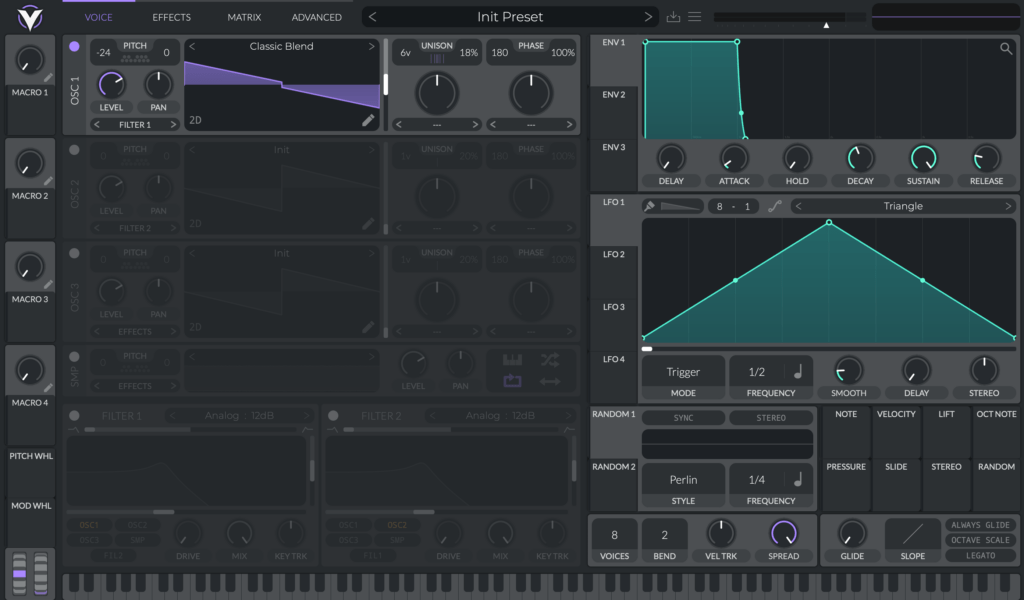
Step 1
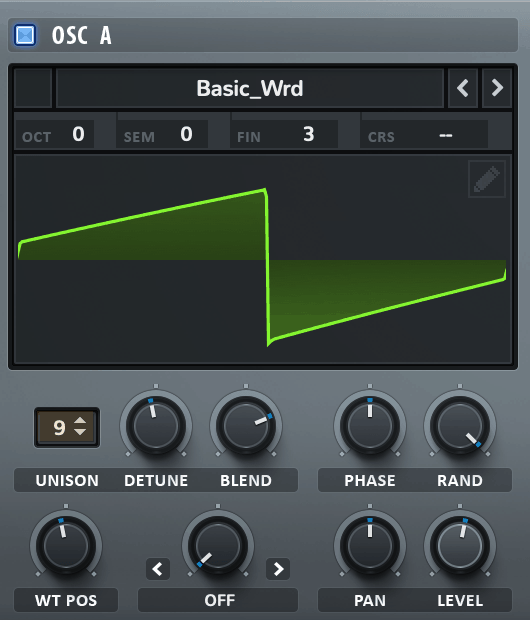
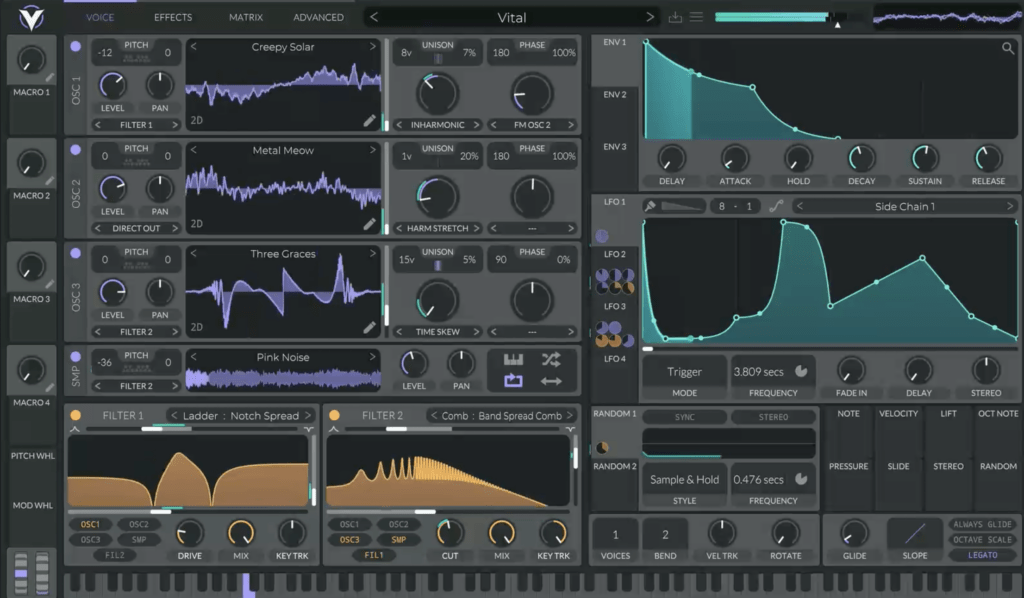
Make a supersaw on oscillator 1 and have it play a low note. A supersaw is a detuned saw wave that has many unison voices. To do that in Vital, we’ll load up the Classic Blend wavetable, then cycle through the frames until you have a slightly modified saw wave. Up the voices to around 6, and detune to approximately 20%. By adding voices, you create the feeling that the bass is very wide and all-encompassing. This is because the voices get spread out across the stereo field. Pitch the oscillator down two octaves, or 24 steps.
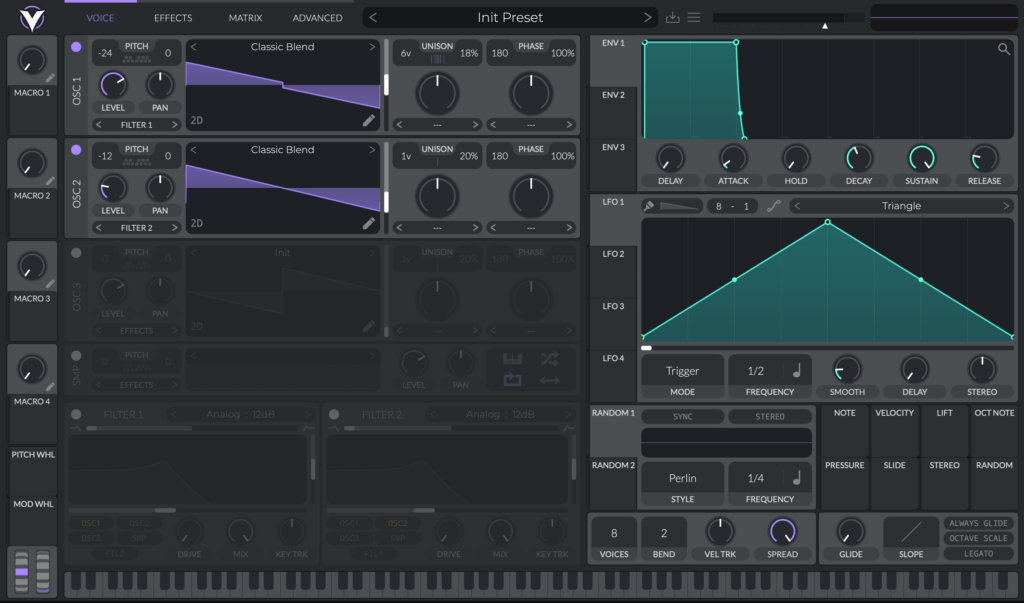
Step 2
Add another Classic Blend saw wavetable to oscillator 2. Leave this one in unison (1 voice), and keep the detune at 20%. Pitch this down just one octave, or 12 steps. Decrease the volume level slightly.
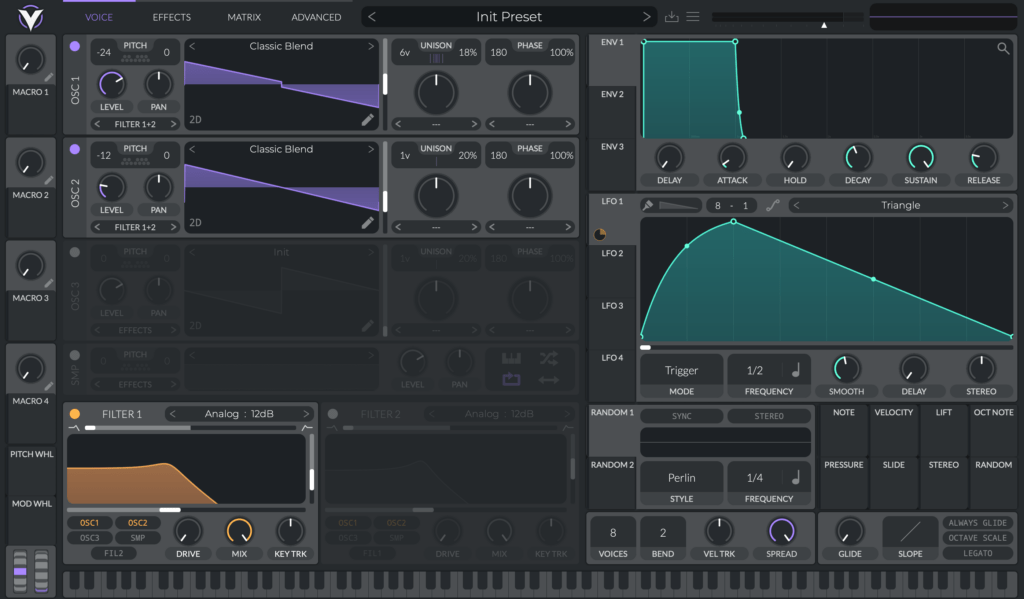
Step 3
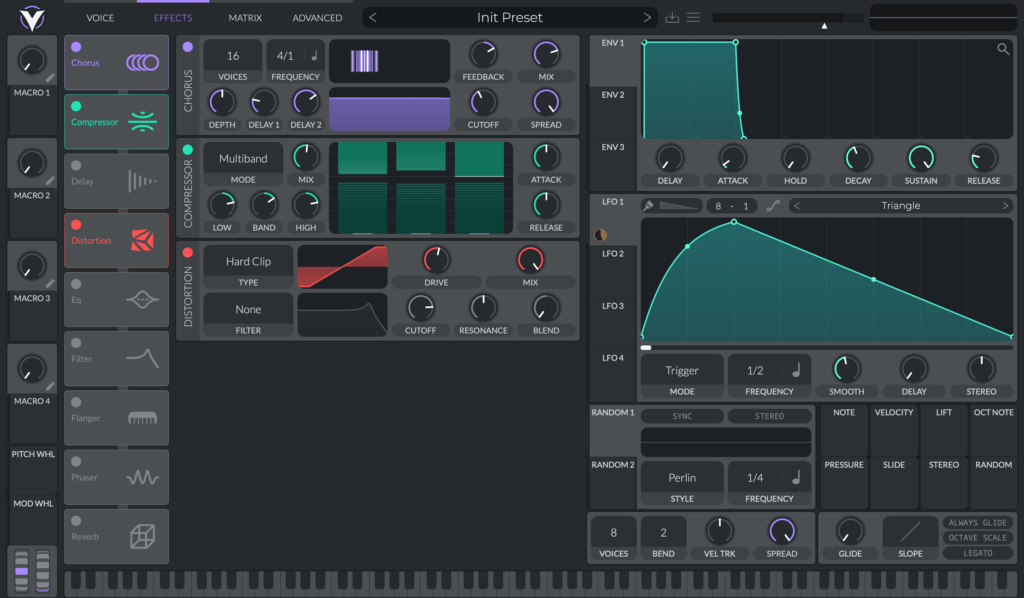
Load Filter 1 and route both oscillators through it. Then, shape LFO 1 like shown, and drag it to the Filter 1’s cutoff (the white bar below the filter graphic). By automating the filter cutoff, we can create that classic “wub” effect. Feel free to play around with the LFO and the filter to achieve the sound you desire.
Step 4
Add chorus, distortion, and a compressor. A chorus widens the bass, while distortion helps to create a Reese bass’ crackly grit. Compressors are pretty standard for any signal chain. They work by decreasing (or “compressing”) the difference between the loudest and quietest parts of a sound. This helps it stand out in the mix.
Roller Bass
Another drum and bass classic, roller basses are relatively sparse and typically feature “rolling” movement.
In the following video, we break down how to make a roller bass in Vital:
Synths & Samples for Drum and Bass
Drum – check. Bass – check. Now it’s time to flesh out your track and really bring it to life. One of the things that makes drum and bass such a diverse genre is that different producers feature wildly different instruments and sound in their tracks.
For example, a Neurofunk track will almost definitely have several futuristic synth pads and leads, while Liquid producers might prefer to have some mellow Rhodes keys play their chord progression.
The sounds of the instruments and other samples you use to build out your track will determine what style of drum and bass people label your track, but always remember – there are NO hard and fast rules when it comes what sounds a DNB song has to have! Make the music that you find inspiring. If that means throwing a classical piano sample in your Sambabass track, go for it.
You might just create the next big thing.
Genre Traits
Dancefloor
Dancefloor is an energetic style of drum and bass tailor-made for getting people to vibe on the dancefloor (as its name suggests). It features punchy, splashy drums, vocal samples, and simple, catchy melodies.
Jump-up
Jump-up is even higher octane, and often calls for hard drums, call and response basses, and unique rhythms that catch the ear.
Jungle
Jungle is known for having a slightly tropical vibe due to its roots in reggae. Amen or other classic drum breaks are typically the bedrock of Jungle grooves, with reggae-esque vocals and dub fx layered throughout.
Liquid
Drums that roll like the hills, silky-smooth basslines, and luscious melodic elements are textbook Liquid drum and bass.
Neurofunk
The stuff that’ll still be hip in 2077. Basses that have complex modulation, drums that sock you in the face, and outside-the-box sound design. The Wild West of DNB.
Synth Recs
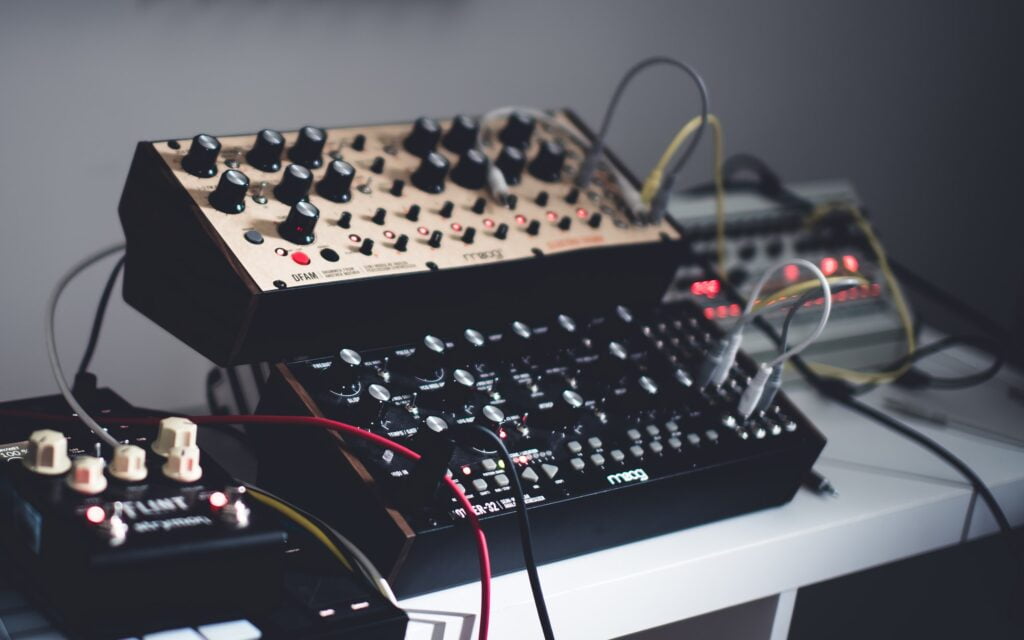
It used to be that you had to have thousands of dollars to spend on hardware synthesizers if you wanted to produce electronic music. Thankfully, we live in an era of abundance, and there are literally hundreds of high quality synthesizers available on the internet – many of them for free. Below are a couple of our favorites when it comes to making drum and bass.
Serum
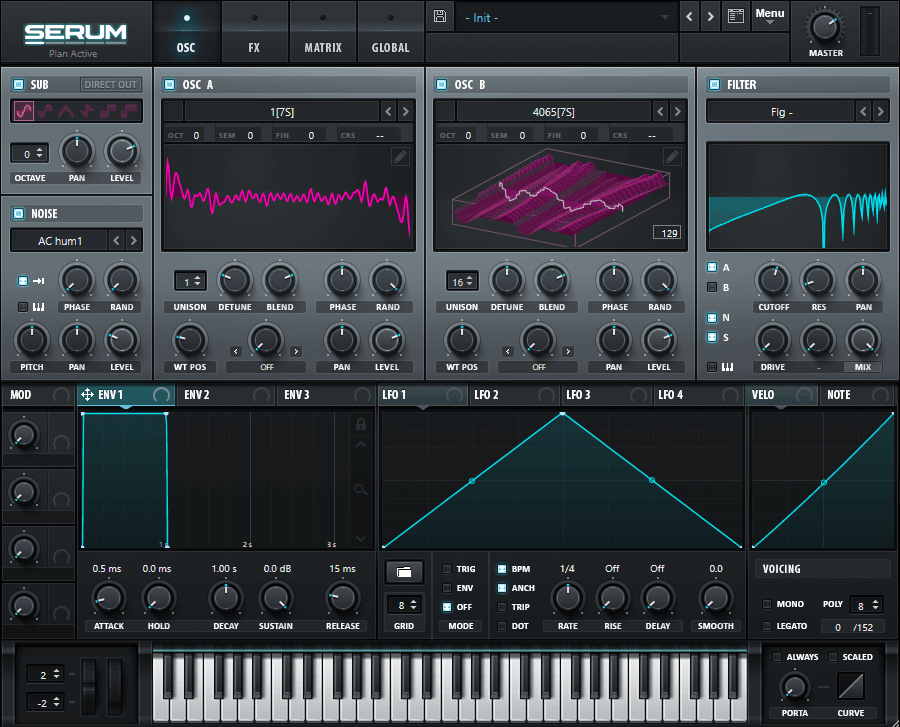
$189 or $10/month with splice “rent-to-own”
Serum is more or less the industry standard for electronic music production, regardless of the genre. Released in 2015, Serum is the brainchild of DJ Steve Duda. He wanted to create a “dream synth” that would make sound design a breeze, and, well, judging by the popularity of Serum, it’s safe to say he did the job. Serum is a digital wavetable synth, essentially meaning it uses scans of soundwaves to drive its oscillators. The interface is clean, and compared to other softsynths, very user-friendly, especially for beginners. One of the highlights of Serum is that you can easily route all of the parameters to one another by simply clicking and dragging, making modulation a breeze.
Vital
FREE
New to the scene, Vital is a spectral warping wavetable synthesizer. Sounds complex, but it basically means you can manipulate the wavetables in new and interesting ways. Vital’s user interface is similar to Serum’s in that it’s very sleek and intuitive. One of this synth’s most unique features is that you can use custom samples to create your own wavetables, leading to near endless sound design possibilities.
Check out some of our Vital tutorials on YouTube:

A DEEP MINIMAL DNB Vital preset pack filled with 100 bass, drum, FX, pad, and lead presets. Crafted with reverse-engineering in mind.
FX
FX is what we call the little extras and textures that help glue drum and bass tracks together. A casual listener might not notice them, but they’re absolutely crucial to building tension and excitement in DNB.
Risers – Downlifters – Impacts
The most standard FX are white noise sounds known as risers, downlifters, and impacts.

We use risers to transition between the various sections of our tracks or before a drop. Their rising volume creates expectation, which primes the listener’s ear for what’s to come next.

A downlifter is basically the flip side of a riser. After a transition, a downlifter helps defuse the tension created and usher us into the next section of the song. Impacts help create atmosphere, especially in the intro and breakdown of a drum and bass track.
Other FX include textural samples that can serve as percussion, vocal samples you’ve chopped up, or anything else. Get creative, the possibilities are endless!
How to Arrange Drum and Bass
Structure
The structure of drum and bass isn’t too dissimilar from other genres of electronic music, but it’s definitely got some unique traits.
First, you should think in terms of phrases. A phrase is equal to one 16 bar loop, so if a section is two phrases, it’s 32 bars.
The general structure of a drum and bass track is as follows:
-
Intro – 1-2 phrases
- This is where you usher listeners into the sonic world you’re building. Intros are usually slower and more atmospheric. They might hint at the melody or tease other elements that will be heard later on.
-
First Build-Up/Breakdown – 1 phrase
- Here, you start working toward the first drop. The pace picks up and you begin layering in more sounds.
-
First Drop – 4 phrases (with progressions and switch-ups)
- The main show. This is where you give the listener everything you’ve got. Often, this is the first time we hear the kick and the bass to their full extent. Engage the listener by adding or subtracting different elements over the course of the 64 bars.
-
Second Build-Up/Breakdown – 1-2 phrases
- Time to decompress from the first drop and get mellow again.
-
Second Drop – 4 phrases
- Same as the first drop, but the first phrase should have a notable variation.
-
Outro – 1 phrase
- Cool down and let listeners reflect on having had their minds blown.
As always, rules are made to be broken, but this is where you should start.
Layering
Because most drum and bass tracks will be undergirded by a strong drum pattern and a bass sound that plays for more or less the whole track, it’s important to carefully consider what sounds to add or subtract and when to do so. You want to keep things fresh and ensure that your song has a sense of passage – the feeling that we went from point A to point B.
Think in terms of phrases. How can I make this phrase feel different from the one that came before it? Of course, not every phrase has to be different from the others.
Sometimes you’ve got a kickass melody that people just want to dance to, and thus can be repeated over and over again. How you vary the phrases should strive to be more subtle than obvious, though, so even if you’ve got that melody bumping for 64 bars straight, you can add texture and intrigue by throwing in FX or adding or subtracting percussion.
For example, in order to differentiate your second drop from the first, you might add an additional layer to your melody (or perhaps tweak the melody itself), add an ear-catching sample, or beef up the drums, amongst other tricks. This helps prevent the listener from getting fatigued and feeling like they’re hearing the same thing over and over again.
Tracks
Often, new producers tend to think that more tracks equals better. I certainly did. But this is DEFINITELY not true. That is not to say that more tracks (or channels) equals bad, it just means that the number of tracks in your song does not correlate with the quality of your song. You can make a kickass drum and bass number with 10 tracks, easy.
Many professional drum and bass tracks have around 30-50 channels, depending on the genre. Sure, some of the more intricate styles of DNB can feature upwards of 130 tracks, but that’s no rule of thumb. In fact, when you’re first starting out, the more tracks you add, the more likely it is that you’re going to add clashing sounds that muddy up your mix.
The best pro DNB producers know that less is more. Every sound in your song should have a purpose. Don’t feel like you have to throw in an extra bass just because it’s what you’ve heard you need to do. Master your craft by making clean, tight projects without excess tracks.
Mixing & Mastering Drum and Bass
Mixing and mastering are two processes that often leave new drum and bass producers scratching their heads. While these can indeed be complicated art forms, there are a few overarching principles that can help you start down the path to doing your own mixing and mastering.
FREE Mixing and Mastering
Roadmap E-Books!
How to Mix Drum and Bass
Once you feel like you’re completely done with the production of your song, it’s time to mix. Mixing refers to how you balance all of the sounds in your track across the frequency spectrum, as well as how you manage the track’s overall sound design.
Volume
Changing volume is one of the most powerful tools you have when mixing. This can be done in a direct fashion by simply adjusting the volume slider, or through other means, such as compression. In fact, a majority of the mixing process is balancing the volume of the various elements in your tracks.
In a genre like drum and bass, we unsurprisingly want the drums and the bass to stand out. The kick and the snare should be the stars, with the bass not much below them.
Then comes melodies and chords, followed by FX and other textures that will be pushed more into the background.
Compression
As we mentioned before, a compressor “compresses” the differences between the quietest and loudest parts of a sound, creating a more consistent volume level, which, in turn, helps the sound stand out.
You’ll want to compress all of your drum sounds individually, and then also route them to a master bus that has further compression. By processing your drums together on the master bus, they become “glued” together.
EQ
An EQ gives you the ability to increase or decrease the volume of the different frequencies in a track. As a general rule of thumb, ALWAYS use subtractive EQ (decreasing the volume) before additive EQ (increasing the volume). When in doubt, subtract!
(See, we weren’t kidding when we said mixing was just about changing the volume!)
EQ is important in a genre like drum and bass, where the kick and the bass compete with everything else, including each other, for sonic real estate. You’ll want to make sure none of the other channels in your track have much going on in the sub-150Hz, otherwise they will be crowding space reserved for the kick and bass.
You’ll also want to see how your melody is interacting with things like pads and chords. Perhaps your melody gets most of its power from the 600-1000Hz range, but your pads also have a lot going on in this range. Because your melody should stand out, you’d want to cut the pads between 600 and 1000Hz to carve out some space.
When reducing the gain – or volume – of an EQ band, you don’t need to be too extreme. It’s very contextual, but less is usually more.
How to Master Drum and Bass
Once you’ve bounced your mixed track out a single audio file, it’s time to master. Mastering is the final step in getting a song ready for release. It can be even more finicky than mixing, and many people opt to hire mixing engineers or use algorithmic mastering services like Landr. But you should have some basic familiarity with what’s going on, and following these steps can be helpful if you find yourself having to master your own drum and bass tracks (which many beginners do).
The idea behind is mastering is taking all of the sounds in your song, now mixed, and really turning them into a cohesive piece. Mastering aims to achieve three general goals:
-
To increase the perceived loudness of the track
-
Balance the track’s stereo image
-
Ensure the track maintains its sound across a variety of playback systems (speakers, headphones, car stereo, etc.)
When first starting out, many experts recommend sticking to just three tools in your mastering chain:
-
EQ
-
Compressor
-
Limiter
EQ
The goal here is to iron out any problem frequencies you may have missed in the mix. Remember, this EQ is being applied to every sound in your song, since it’s just one audio file now, so be sparing. And as always, cut before boosting!
Here are some general rules of thumb:
- If your mix sounds hollow and thin…
-
-
- Gently boost in the 500Hz range.
-
- If your mix sounds too bass-heavy…
-
-
- Roll off around 100-150Hz
-
- If your mix has too much in the high frequencies…
-
-
- Add some subtle cuts in the 3k-8kHz range.
-
- If your mix sounds flat and dull…
-
- Try a shelf boost from 10k-15kHz.
Compression
It can take awhile to fully grasp how compressors function, and that’s ok. Most compressor plugins will have mastering presets, which serve as great starting points for getting things right.
Adding a compressor in your mastering chain is optional. Depending on how much compression you added to your stereo buss during mixing, you might not need it.
Thankfully, you can rely on visual cues to help you out:
Look at the waveform of your track’s audio file. Are there lots of jagged peaks sticking way above low valleys? Or is everything more or less the same height? Remember, the point of compression is to decrease your track’s dynamic range, or to shrink the differences between the loudest and quietest parts. Having large peaks means that the loudest parts of your track are still much louder than the quietest parts, and thus, you need more compression.

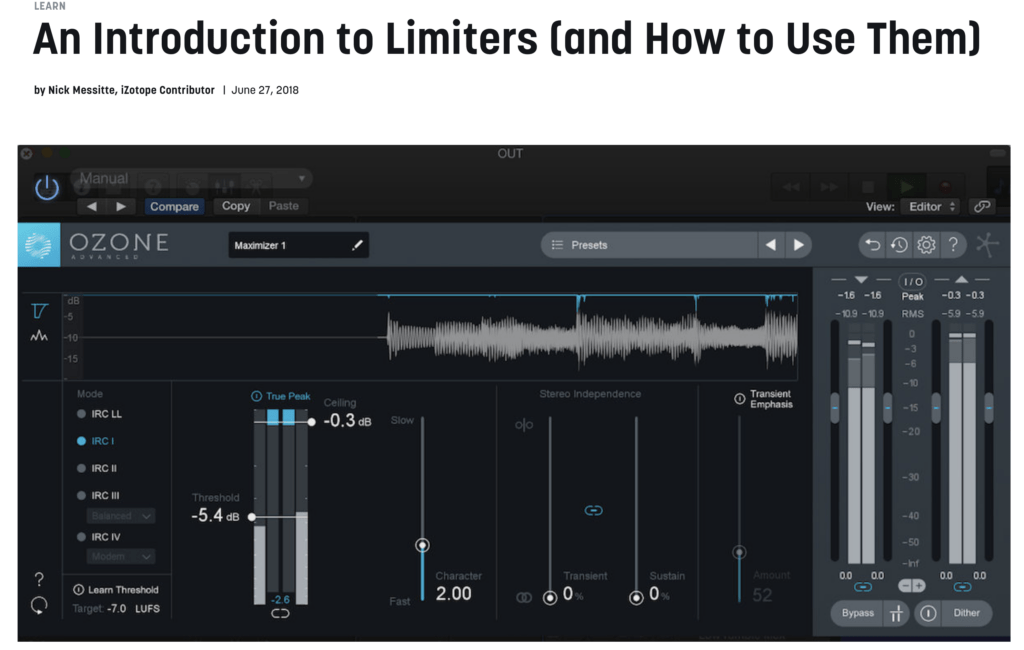
Limiter
Any jarring peaks that somehow make it through your master compressor should get chopped down by your limiter. Technically, a limiter is just a really aggressive compressor.
As its name suggests, this tool “limits” how loud a track can get. Again, sticking with one of your plugin’s presets is the safest bet, but for a much more in-depth look at mixing, check out this incredible blog post from Izotope.
Final Thoughts
Next Steps
And with that, we’ve reached the end of our Beginner’s Crash Course! Hopefully you picked up some useful stuff along the way. Here’s what we recommend doing next:
1. Download Our FREE Neuro and Liquid DNB Starter Packs

- 15 high-quality kicks, snares, and top loops to create heavy hitting drums.
- 25 neuro bass samples to make your drops 10x more powerful.
- 10 fx samples to add that extra spice into your tracks.
- 50 royalty free samples in total.
- Ableton project files.
- 16 high-quality kicks, snares, and top loops to create rolling liquid drums.
- 10 musical and fx samples to make smooth drops.
- 26 royalty free samples in total.
- FL Studio project files.

2. Download the Free Version of Vital and Use Our FREE Neuro Preset Pack


- Neuro bass presets
- Pluck presets
- Lead presets
- 10 Presets in total to get you started using Vital
- Sounds inspired by Mefjus, Noisia, Current Value, etc.
3. Enroll in DNB Foundations
")
65+ Hours of Content:
DAW Fundamentals | Music Theory | Drum Programming | Bass Programming | Structure & Arrangements | 6 Start-to-Finish DNB Projects | Sound Design Fundamentals | Applied Synthesis | Mixing & Mastering Fundamentals | Artist Development Course | Completed Project Files | DNB Academy Creative Suite | Bonus Content
4. Follow Us On Instagram and Subscribe to Our YouTube
We’re always posting useful tips and tricks to our Instagram and YouTube. Got something you want to know how to do? Just leave a comment and we’ll do our best to make a tutorial!

Stay tuned to our blog, as we’ve got a TON more valuable drum and bass content coming your way.

Alex Bragan
Alex Bragan is music producer and writer based out of Atlanta, Georgia. When he’s not working on DNB Academy, he’s busy shopping his TV pilot around Hollywood.