- Download source code — 54.1 KB
Introduction
When I wanted to create a Joystick driver so I could control my robot via a joystick plugged into my computer, one of the first things I did was look for a simple joystick driver that could set up everything for me and give me the readings I wanted without me having to code anything myself or even understand how it works. Unfortunately, despite all the people using joysticks in their programs and projects before me, it seems I couldn’t find anyone had created anything like what I was looking for and shared it online.
So if no one else had done it, I decided I would do it myself. Thus, I began this project to create a portable and reusable universal joystick driver that anyone could use to easily implement joystick control in their programs. This driver uses the Joystick sample program from the DirectX SDK, as its foundation.
If you know what you’re doing, it isn’t that hard to write a simple program to get some readings from a joystick. But if you don’t know what you’re doing, learning all about direct input in order to create your own joystick driver isn’t easy. Given I didn’t and still don’t know what the hell I’m doing, I decided to adapt the sample code from the SDK rather than writing a driver from scratch. This probably ended up being more difficult for me in the long run, however the sample code from the SDK is very comprehensive and robust program that will acquire and accept any joystick device you plug in, giving me what I believe is a better result than I could have produced otherwise.
My driver is meant to handle Joystick stuff only so all the GUI related code from the sample program has been removed making it all considerably smaller and simpler.
This driver packages all your joystick needs into a Joystick class which gets all your joystick readings. You can read 8 possible axis/sliders, four possible POV/hats and 128 possible buttons.
Here is a test GUI showing readings from a twist handle Joystick.
An altered version for the test GUI of a steering wheel set.
Just Tell Me How to Use It Already!
Step 1
Download the files and add the Joystick_Driver.h, Joystick_Driver.cpp and resource.h to your project
Step 2
Make sure the linker can find all your required external dependencies: windows.h, commctrl.h, dinput.h, dinputd.h, assert.h, and wbemidl.h and additional dependencies. If your project is in Visual Studio, right click on your project and go to properties. In the properties window, go to…
Configuration properties->linker->input->additional dependencies->edit
Then add dxguid.lib, dinput8.lib, comctl32.lib.
At the moment, I am yet to try using this in another IDE but you should need to do for whatever IDE you may be trying to use this in.
Step 3
Now for the easy part.
Declare the following:
Joystick* myJoystick; HWND hWnd;
Where appropriate, initialize:
myJoystick = new Joystick();
hWnd =
Step 4
Create a timer driven function call to run the joystick.
Using a while loop is a bad idea. Especially, if you have a GUI, that you don’t want to have freezing up on you.
You can check that things work using a while loop but in the end, you are going to need a timer driven function call regardless.
Configure your timer to go off 20-30 times a second or at intervals of 30ms-50ms.
Step 5
In your timer driven function, you may have something as simple as:
Void timerFunct()
{
  myJoystick->runJoystick(hWnd);
if(myJoystick->getmsg() == WM_TIMER)
  {
  XAxis = myJoystick->getXAxis();
  YAxis = myJoystick->getYAxis();
  ZRot = myJoystick->getZRot();
  Slider1 = myJoystick->getSlider0();

  POV1 = myJoystick->getPOV0();

  Button0 = myJoystick->getButton(0);
  Button1 = myJoystick->getButton(1);
  Button2 = myJoystick->getButton(2);
  Button3 = myJoystick->getButton(3);
  Button4 = myJoystick->getButton(4);
  }
}
This should give you the gist of how to use it. For a proper working example, consider the next section.
Windows Form Application Example
Design a form application while following this example and add in the following code where needed in your form.h.
#include "Joystick_Driver.h"

public ref class Form1 : public System::Windows::Forms::Form
{
public:
    Form1(void)
    {
        InitializeComponent();
        this->JS = new Joystick();
        this->hWnd = static_cast<HWND>(this->Handle.ToPointer());
    }
    ~Form1()
    {
        if (components)
        {
            delete components;
        }
    }


private:
    Joystick* JS; private:
    HWND hWnd;
    #pragma region Windows Form Designer generated code

    void InitializeComponent(void)
    {
                            }
    #pragma endregion

    };
In the design view, add a timer to your form:

Don’t forget to set the timer properties:

You will now have a function in your form:
private: System::Void timer1_Tick(System::Object^  sender, System::EventArgs^  e) {
}
In the design view, double click the Run and Stop buttons and use these button click event functions to enable and disable the timer.
private: System::Void Run_Click(System::Object^  sender, System::EventArgs^  e)
{
    this->timer1->Enabled = true;
}

private: System::Void Stop_Click(System::Object^  sender, System::EventArgs^  e)
{
    this->timer1->Enabled = false;
}
Add the following to the timer tick function:
private: System::Void timer1_Tick(System::Object^  sender, System::EventArgs^  e)
{
    this->JS->runJoystick(this->hWnd);
        if(this->JS->getmsg() == WM_TIMER)
    {
        this->XAxis->Text = (this->JS->getXAxis()).ToString();
        this->YAxis->Text = (this->JS->getYAxis()).ToString();
        this->ZAxis->Text = (this->JS->getZAxis()).ToString();
        this->XRot->Text = (this->JS->getXRot()).ToString();
        this->YRot->Text = (this->JS->getYRot()).ToString();
        this->ZRot->Text = (this->JS->getZRot()).ToString();

        this->Slider1->Text = (this->JS->getSlider0()).ToString();
        this->Slider2->Text = (this->JS->getSlider1()).ToString();

        this->POV1->Text = (this->JS->getPOV0()).ToString();
        this->POV2->Text = (this->JS->getPOV1()).ToString();
        this->POV3->Text = (this->JS->getPOV2()).ToString();
        this->POV4->Text = (this->JS->getPOV3()).ToString();

        this->Button0->Checked = this->JS->getButton(0);
        this->Button1->Checked = this->JS->getButton(1);
        this->Button2->Checked = this->JS->getButton(2);
        this->Button3->Checked = this->JS->getButton(3);
        this->Button4->Checked = this->JS->getButton(4);
        this->Button5->Checked = this->JS->getButton(5);
        this->Button6->Checked = this->JS->getButton(6);
        this->Button7->Checked = this->JS->getButton(7);
        this->Button8->Checked = this->JS->getButton(8);
        this->Button9->Checked = this->JS->getButton(9);
        this->Button10->Checked = this->JS->getButton(10);
        this->Button11->Checked = this->JS->getButton(11);
        this->Button12->Checked = this->JS->getButton(12);
        this->Button13->Checked = this->JS->getButton(13);
        this->Button14->Checked = this->JS->getButton(14);
        this->Button15->Checked = this->JS->getButton(15);
        this->Button16->Checked = this->JS->getButton(16);
        this->Button17->Checked = this->JS->getButton(17);
        this->Button18->Checked = this->JS->getButton(18);
    }
}
Running the Program
All Axis and Sliders should read within the range of -1000 to 1000. The POV will give 8 different values for all 8 directions and all buttons will simply read true or false.
Notes on Functionality
You may need to delve into the driver and add your own code to it in order to do certain things. Depending on your application, you are going to have to consider…
What happens when you disconnect the joystick?
At this time, the diver will automatically look for another joystick and will accept any joystick it finds, whether it be the same joystick once it’s plugged back in or another joystick that is already plugged in or is to be plugged in.
What happens to the readings when you disconnect the joystick?
Do you want them to freeze at the last updated value or do you want everything to go back to its default zero position?
At this time, the driver freezes the readings at the last read value if the joystick disconnects.
What happens when you have two or more joysticks plugged in?
You may want to be able to choose a joystick device, or you may want to switch between joysticks while your program is running, or you may wish to have two or more joysticks working at the same time.
At this time, the driver doesn’t support multiple joysticks, but it could be adapted to do so. What it will do is create a list of joystick devices and pick one of them automatically. So you can’t choose which joystick.
You can switch devices while the program is running but this means you need to physically unplug them and plug them in.
What if you want to accept inputs only from a specific type of joystick?
The driver has the capacity to recognize the Axis and Buttons that the connected joystick has available so to some degree, you could implement this.
History
- 10th February, 2013: Initial version
This member has not yet provided a Biography. Assume it’s interesting and varied, and probably something to do with programming.
- Download source code — 54.1 KB
Introduction
When I wanted to create a Joystick driver so I could control my robot via a joystick plugged into my computer, one of the first things I did was look for a simple joystick driver that could set up everything for me and give me the readings I wanted without me having to code anything myself or even understand how it works. Unfortunately, despite all the people using joysticks in their programs and projects before me, it seems I couldn’t find anyone had created anything like what I was looking for and shared it online.
So if no one else had done it, I decided I would do it myself. Thus, I began this project to create a portable and reusable universal joystick driver that anyone could use to easily implement joystick control in their programs. This driver uses the Joystick sample program from the DirectX SDK, as its foundation.
If you know what you’re doing, it isn’t that hard to write a simple program to get some readings from a joystick. But if you don’t know what you’re doing, learning all about direct input in order to create your own joystick driver isn’t easy. Given I didn’t and still don’t know what the hell I’m doing, I decided to adapt the sample code from the SDK rather than writing a driver from scratch. This probably ended up being more difficult for me in the long run, however the sample code from the SDK is very comprehensive and robust program that will acquire and accept any joystick device you plug in, giving me what I believe is a better result than I could have produced otherwise.
My driver is meant to handle Joystick stuff only so all the GUI related code from the sample program has been removed making it all considerably smaller and simpler.
This driver packages all your joystick needs into a Joystick class which gets all your joystick readings. You can read 8 possible axis/sliders, four possible POV/hats and 128 possible buttons.
Here is a test GUI showing readings from a twist handle Joystick.
An altered version for the test GUI of a steering wheel set.
Just Tell Me How to Use It Already!
Step 1
Download the files and add the Joystick_Driver.h, Joystick_Driver.cpp and resource.h to your project
Step 2
Make sure the linker can find all your required external dependencies: windows.h, commctrl.h, dinput.h, dinputd.h, assert.h, and wbemidl.h and additional dependencies. If your project is in Visual Studio, right click on your project and go to properties. In the properties window, go to…
Configuration properties->linker->input->additional dependencies->edit
Then add dxguid.lib, dinput8.lib, comctl32.lib.
At the moment, I am yet to try using this in another IDE but you should need to do for whatever IDE you may be trying to use this in.
Step 3
Now for the easy part.
Declare the following:
Joystick* myJoystick; HWND hWnd;
Where appropriate, initialize:
myJoystick = new Joystick();
hWnd =
Step 4
Create a timer driven function call to run the joystick.
Using a while loop is a bad idea. Especially, if you have a GUI, that you don’t want to have freezing up on you.
You can check that things work using a while loop but in the end, you are going to need a timer driven function call regardless.
Configure your timer to go off 20-30 times a second or at intervals of 30ms-50ms.
Step 5
In your timer driven function, you may have something as simple as:
Void timerFunct()
{
  myJoystick->runJoystick(hWnd);
if(myJoystick->getmsg() == WM_TIMER)
  {
  XAxis = myJoystick->getXAxis();
  YAxis = myJoystick->getYAxis();
  ZRot = myJoystick->getZRot();
  Slider1 = myJoystick->getSlider0();

  POV1 = myJoystick->getPOV0();

  Button0 = myJoystick->getButton(0);
  Button1 = myJoystick->getButton(1);
  Button2 = myJoystick->getButton(2);
  Button3 = myJoystick->getButton(3);
  Button4 = myJoystick->getButton(4);
  }
}
This should give you the gist of how to use it. For a proper working example, consider the next section.
Windows Form Application Example
Design a form application while following this example and add in the following code where needed in your form.h.
#include "Joystick_Driver.h"

public ref class Form1 : public System::Windows::Forms::Form
{
public:
    Form1(void)
    {
        InitializeComponent();
        this->JS = new Joystick();
        this->hWnd = static_cast<HWND>(this->Handle.ToPointer());
    }
    ~Form1()
    {
        if (components)
        {
            delete components;
        }
    }


private:
    Joystick* JS; private:
    HWND hWnd;
    #pragma region Windows Form Designer generated code

    void InitializeComponent(void)
    {
                            }
    #pragma endregion

    };
In the design view, add a timer to your form:
Don’t forget to set the timer properties:
You will now have a function in your form:
private: System::Void timer1_Tick(System::Object^  sender, System::EventArgs^  e) {
}
In the design view, double click the Run and Stop buttons and use these button click event functions to enable and disable the timer.
private: System::Void Run_Click(System::Object^  sender, System::EventArgs^  e)
{
    this->timer1->Enabled = true;
}

private: System::Void Stop_Click(System::Object^  sender, System::EventArgs^  e)
{
    this->timer1->Enabled = false;
}
Add the following to the timer tick function:
private: System::Void timer1_Tick(System::Object^  sender, System::EventArgs^  e)
{
    this->JS->runJoystick(this->hWnd);
        if(this->JS->getmsg() == WM_TIMER)
    {
        this->XAxis->Text = (this->JS->getXAxis()).ToString();
        this->YAxis->Text = (this->JS->getYAxis()).ToString();
        this->ZAxis->Text = (this->JS->getZAxis()).ToString();
        this->XRot->Text = (this->JS->getXRot()).ToString();
        this->YRot->Text = (this->JS->getYRot()).ToString();
        this->ZRot->Text = (this->JS->getZRot()).ToString();

        this->Slider1->Text = (this->JS->getSlider0()).ToString();
        this->Slider2->Text = (this->JS->getSlider1()).ToString();

        this->POV1->Text = (this->JS->getPOV0()).ToString();
        this->POV2->Text = (this->JS->getPOV1()).ToString();
        this->POV3->Text = (this->JS->getPOV2()).ToString();
        this->POV4->Text = (this->JS->getPOV3()).ToString();

        this->Button0->Checked = this->JS->getButton(0);
        this->Button1->Checked = this->JS->getButton(1);
        this->Button2->Checked = this->JS->getButton(2);
        this->Button3->Checked = this->JS->getButton(3);
        this->Button4->Checked = this->JS->getButton(4);
        this->Button5->Checked = this->JS->getButton(5);
        this->Button6->Checked = this->JS->getButton(6);
        this->Button7->Checked = this->JS->getButton(7);
        this->Button8->Checked = this->JS->getButton(8);
        this->Button9->Checked = this->JS->getButton(9);
        this->Button10->Checked = this->JS->getButton(10);
        this->Button11->Checked = this->JS->getButton(11);
        this->Button12->Checked = this->JS->getButton(12);
        this->Button13->Checked = this->JS->getButton(13);
        this->Button14->Checked = this->JS->getButton(14);
        this->Button15->Checked = this->JS->getButton(15);
        this->Button16->Checked = this->JS->getButton(16);
        this->Button17->Checked = this->JS->getButton(17);
        this->Button18->Checked = this->JS->getButton(18);
    }
}
Running the Program
All Axis and Sliders should read within the range of -1000 to 1000. The POV will give 8 different values for all 8 directions and all buttons will simply read true or false.
Notes on Functionality
You may need to delve into the driver and add your own code to it in order to do certain things. Depending on your application, you are going to have to consider…
What happens when you disconnect the joystick?
At this time, the diver will automatically look for another joystick and will accept any joystick it finds, whether it be the same joystick once it’s plugged back in or another joystick that is already plugged in or is to be plugged in.
What happens to the readings when you disconnect the joystick?
Do you want them to freeze at the last updated value or do you want everything to go back to its default zero position?
At this time, the driver freezes the readings at the last read value if the joystick disconnects.
What happens when you have two or more joysticks plugged in?
You may want to be able to choose a joystick device, or you may want to switch between joysticks while your program is running, or you may wish to have two or more joysticks working at the same time.
At this time, the driver doesn’t support multiple joysticks, but it could be adapted to do so. What it will do is create a list of joystick devices and pick one of them automatically. So you can’t choose which joystick.
You can switch devices while the program is running but this means you need to physically unplug them and plug them in.
What if you want to accept inputs only from a specific type of joystick?
The driver has the capacity to recognize the Axis and Buttons that the connected joystick has available so to some degree, you could implement this.
History
- 10th February, 2013: Initial version
This member has not yet provided a Biography. Assume it’s interesting and varied, and probably something to do with programming.
Уже много лет занимаюсь программированием под различные платформы, но написание драйверов понадобилось только сейчас. Читал различную литературу на эту тему, копался в MSDN, но в итоге в голове куча несвязанной информации, очень много непонятно. Подскажите куда копать.
Что имеется: bluetooth джойстик, который Windows видит как игровое HID устройство… И не более. Управлять им нельзя. У меня есть подробная документация по его HID репортам, и я без особых проблем могу из своей программы читать данные о нажатых кнопках, осях и пр.
Что я хочу: написать под это устройство драйвер, чтобы оно виделоcь виндой именно как игровой контроллер, чтобы игры его понимали. На данный момент драйверов под Windows для этого устройства не существует.
Я так понимаю, что kernel-mode мне и не нужен, достаточно UMDF драйвера, так?
Есть ли хоть какой-то простейший пример драйвера хотя бы виртуального джойстика? В примерах WDK я ничего такого не нашёл…
Каким образом Windows ассоциирует устройство с установленным драйвером? По информации в .inf файле? По каким именно критериям? Будет ли Windows ассоциировать драйвер с HID устройством, которое подключено по bluetooth?
Подскажите хоть в какую сторону копать…
|
0 / 0 / 0 Регистрация: 24.10.2016 Сообщений: 8 |
|
|
1 |
|
|
31.07.2013, 13:58. Показов 11430. Ответов 3
Добрый день. В комплекте с купленным портативным DVD-плеером, который поддерживает свои игры, поставляется некий геймпад неизвестной (скорее всего, китайской) фирмы-производителя. На обороте написано лишь JD-2018. В сети драйверов для него нет. Интерфейс USB. Семёрка определяет его как неизвестное USB-устройство. Возможно ли в таких условиях самостоятельно написать для него драйвер, чтобы система определяла его именно как игровой контроллер, и соответствующие программы цепляли.
__________________
0 |

|
Ушел с форума
16456 / 7420 / 1186 Регистрация: 02.05.2013 Сообщений: 11,617 Записей в блоге: 1 |
|
|
31.07.2013, 17:56 |
2 |
|
Возможно ли в таких условиях самостоятельно написать для него драйвер, чтобы система определяла его именно как игровой контроллер, и соответствующие программы цепляли. Возможно. Но с нуля Вы вряд ли такое напишете. Добавлено через 1 минуту
1 |

|
0 / 0 / 0 Регистрация: 24.10.2016 Сообщений: 8 |
|
|
03.08.2013, 16:07 |
3 |
|
Спасибо за ответ. Как я понял, с точки зрения устройства мало быть просто геймпадом, чтобы быть HID-устройством, так? Нужно, чтобы тебя разрабатывали в соответствии с определённым стандартом. Как узнать, HID-устройство у меня или нет? Ведь оно не определяется системой, оставаясь для неё «неизвестным», что наводит на мысли.
0 |
|
Ушел с форума
16456 / 7420 / 1186 Регистрация: 02.05.2013 Сообщений: 11,617 Записей в блоге: 1 |
|
|
03.08.2013, 23:27 |
4 |
|
Как я понял, с точки зрения устройства мало быть просто геймпадом, чтобы быть HID-устройством, так? Да. Устройство должно соответствовать спецификации HID.
Как узнать, HID-устройство у меня или нет? Ведь оно не определяется системой, оставаясь для неё «неизвестным», что наводит на мысли. HID-совместимые устройства при подключении автоматически распознаются системой и
0 |
Урок 3. Сборка и запуск драйвера
Еще один, особый, вид программ – драйверы. В отличие от остальных – выполняются в особом режиме, где они имеют ряд возможностей, недоступных для обычных приложений Windows. Однако это осложняется тем, что в этом режиме практически отсутствуют средства для взаимодействия с пользователем. Для тестирования драйвера можно пользоваться функцией DbgPrint, выдающей отладочные сообщения отладчику. Но отладчика может не оказаться и этих сообщений никто в таком случае не увидит. Для обычного же взаимодействия с пользователем драйвер должен полагаться на прикладные приложения, обмениваясь с ними запросами ввода/вывода.
Сообщения, выдаваемые отладчику, проще всего увидеть при помощи программы DebugView, которую нужно запустить перед сеансом проверки.
Создание проекта будем вести следующим образом. Создаем папку DrvHello, где будем разрабатывать приложение-драйвер. Внутри нее создаем такие файлы:
• makefile
#
# DO NOT EDIT THIS FILE!!!  Edit .sources. if you want to add a new source
# file to this component.  This file merely indirects to the real make file
# that is shared by all the driver components of the Windows NT DDK
#

!INCLUDE $(NTMAKEENV)makefile.def
Над текстом этого файла не следует задумываться, он просто должен присутствовать в таком вот неизменном виде. Хотя в чужих проектах этого файла может и не быть, либо он будет работать другим образом. В общем, если он есть и содержит это содержимое – то все в порядке, если нет – необходимы дополнительные исследования.
• sources
TARGETNAME=drvhello
TARGETTYPE=DRIVER
TARGETPATH=obj
SOURCES=main.c
Задает параметры сборки. Здесь в параметре SOURCES необходимо перечислить через пробел все файлы с исходным кодом, которые нужно будет скомпилировать.
• main.c – это наш файл с исходным кодом. Может носить любое имя, их может быть много, а может быть очень много. Главное, не забыть их все перечислить в файле sources
#include "ntddk.h"

#pragma code_seg("INIT")
NTSTATUS DriverEntry(IN PDRIVER_OBJECT DriverObject,
    IN PUNICODE_STRING RegistryPath)
{
    DbgPrint("Hello, world!");			// Выдача отладочного сообщения
    return STATUS_DEVICE_CONFIGURATION_ERROR;	// Выдача ошибки заставит систему сразу же выгрузить драйвер
}
#pragma code_seg()
Основная функция у нас здесь носит название DriverEntry. Запускаться она будет при попытке загрузки драйвера. А чтобы сделать такую попытку – нужна программа-загрузчик, которую напишем чуть поздней.
Откомпилируем драйвер. Чтобы мы могли что-то увидеть в отладчике, драйвер должен быть собран в отладочном режиме. Напомню, что отладочный режим у программистов драйверов называется checked, а финальный — free (прикладные программисты так не заморачиваются и называют их debug и release соответственно). В этом режиме программный код не оптимизируется и исполняемый файл содержит много избыточной информации, совершенно не нужной для работы, но очень полезной при изучении того, что будет делать этот код.
Для сборки открываем меню Start, затем Programs/Windows Driver Kits/WDK <номер версии>/Build Environment/Windows Server 2003 (или Windows XP)/ x86 Checked Build Environment. Щелкаем и попадаем в консольное окно. Если FAR был добавлен в PATH, то можно набрать far и перейти в директорию проекта обычным способом, иначе туда придется добираться используя команду cd (и может быть смену диска). Когда добрались до папки DrvHello (там где лежат три файла, которые были созданы выше) – набираем команду nmake. Если сборка прошла без ошибок, то будет созданы директории objchk_wnet_x86/i386, а в ней уже можно обнаружить файл drvhello.sys. Это и есть наш собранный драйвер.
Теперь вернемся к загрузчику. Это у нас будет консольное приложение (см. главу 1). Имя я ему дал DrvHelloloader и разместил, как всегда, в c:Projects. Имя файла с исходным кодом такое же – main.c, содержимое:
#include <windows.h>
#include <shlwapi.h>
#pragma comment(lib, "shlwapi.lib")

void main(int argc, char* argv[])
{
	char serviceName[] = "drvhello";
	char driverBinary[MAX_PATH] = "";
	SC_HANDLE hSc;
	SC_HANDLE hService;

	// Чтобы запустить драйвер, потребуется полный путь к нему
	// Предполагаем, что он лежит в той же папке, что и экзешник
	strcpy(driverBinary, argv[0]);			// argv[0] - здесь будет имя экзешника с полным путем
	PathRemoveFileSpec(driverBinary);		// Выкидываем имя экзешника, остается только путь к папке
	strcat(driverBinary, "\drvhello.sys");	// Добавляем имя драйвера.
					// Бэкслэш в строках Си надо удваивать, из-за его специального значения.

	hSc = OpenSCManager(NULL, NULL, SC_MANAGER_ALL_ACCESS);	// Открываем SCM (Service Control Management)
								// Это такая штука, которая позволяет запускать драйверы
								// из пользовательского режима
	CreateService(hSc, serviceName, serviceName,
		SERVICE_ALL_ACCESS, SERVICE_KERNEL_DRIVER, SERVICE_DEMAND_START, SERVICE_ERROR_NORMAL,
		driverBinary, NULL, NULL, NULL, NULL, NULL);				// Загрузка в 3 этапа - создаем службу
	hService = OpenService(hSc, serviceName, SERVICE_ALL_ACCESS);	// Открываем ее
	StartService(hService, 0, NULL);	// И запускаем. Вообще-то было бы неплохо
						// еще и закрыть ее... Как нибудь потом.
}
Выбираем в меню cтудии – Build/Rebuild Solution. Произойдет пересборка проекта без запуска. В принципе, можно и запустить. Находим экзешник в папке проекта, докидываем в ту же папку drvhello.sys. Далее запускаем DebugView, включаем галочку Capture/Capture Kernel, как показано на рисунке:
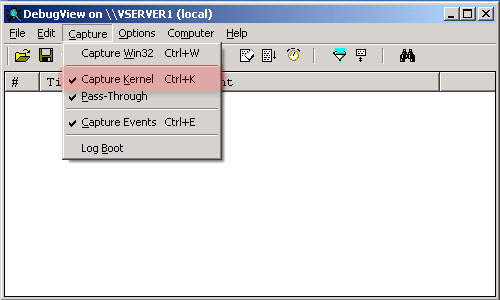
Рис. 3.1 – Настройка DebugView
Теперь запускаем программу. Если все прошло успешно – видим следующую картину:
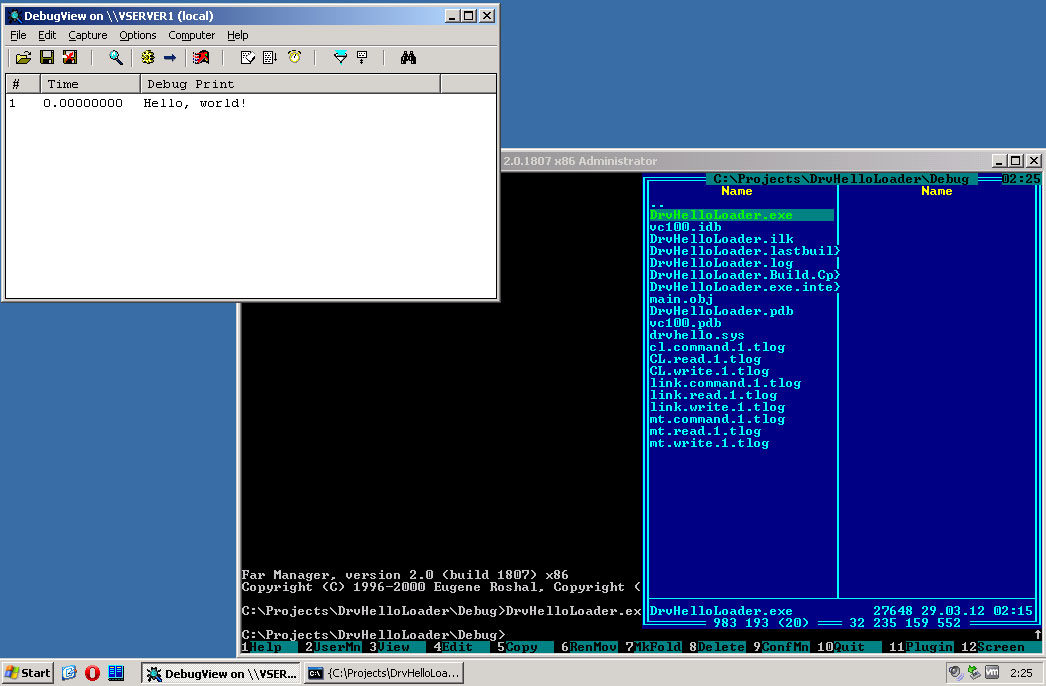
Рис. 3.2 – Проверка драйвера
Вот такой простой код позволяет уже очень много – работать на уровне ядра. Но следует помнить, что если допустить ошибку в прикладной программе – упадет она одна; если в драйвере – вся система. К примеру, если в код драйвера перед DbgPrint добавить строку:
int a = *((int *)0);
которая делает попытку прочесть содержимое памяти по нулевому адресу – то картинка будет уже иной:
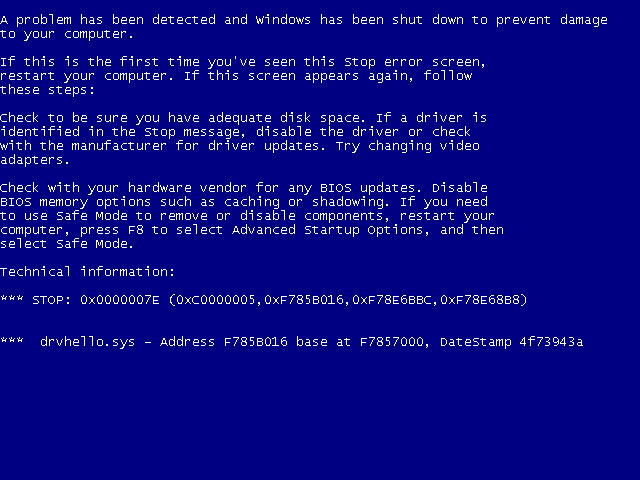
Рис. 3.3 – Попытка чтения из нулевого адреса
Если бы это был не драйвер, а просто программа пользовательского режима, то при выполнении этого кода она бы просто закрылась, выдав ошибку:
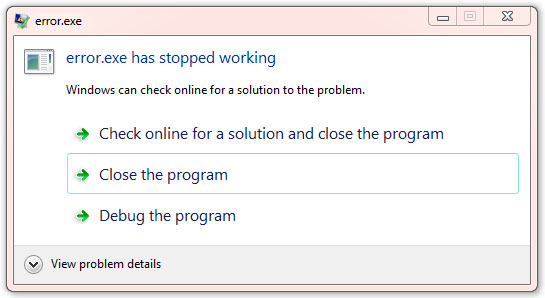
Рис. 3.4 – Та же ошибка в программе пользовательского режима