|
0 / 0 / 0 Регистрация: 28.10.2011 Сообщений: 27 |
|
|
1 |
|
Драйвер для вебкамеры04.05.2012, 06:29. Показов 11130. Ответов 3
Здравтвуйте.
__________________
0 |

|
10229 / 6607 / 498 Регистрация: 28.12.2010 Сообщений: 21,159 Записей в блоге: 1 |
|
|
04.05.2012, 10:37 |
2 |
|
…скорее драйвер не придется писать, он уже есть в системе, а даже если и нет, то его придется поставить с сайта производителя камеры. Что же касаемо получения данных с WEB-камеры, то примеров использования VFW и DirectShow — море. К примеру, под DirectShow есть обертка DSPack, с готовыми примерами. Для старта вам самое оно. p.s.: а можете и VFW с AVICAP32.DLL общаться, пример https://www.cyberforum.ru/blog… og286.html
0 |
|
0 / 0 / 0 Регистрация: 28.10.2011 Сообщений: 27 |
|
|
05.05.2012, 19:31 [ТС] |
3 |
|
…. Хм, дело в том, что драйвер необходимо писать для стенда, на котором установлен контроллер. Писать скорей всего придётся на ASM (это я ещё уточню. пока собираю информацию касательно работы с вебкамерой).. Затем прошить контроллер этим драйвером.. Так вот необходимо послать управляющие сигналы, предварительно настроить вебкамеру опять же сигналами(если нужно будет) затем считывать информацию с вебкамеры и сохранять в памяти…
0 |

|
10229 / 6607 / 498 Регистрация: 28.12.2010 Сообщений: 21,159 Записей в блоге: 1 |
|
|
05.05.2012, 22:12 |
4 |
|
…хм, чего еще вы забыли упомянуть? Ищите документацию на саму камеру, точнее контроллер матрицы. Добавлено через 10 минут Добавлено через 11 минут
0 |
Чтобы написать драйвер камеры на самом деле очень просто, до тех пор, пока он соответствует каркасу V4L2. Остальные — это операция самой камеры.
static int myvivi_init(void)
{
    int error;

    / * 1. Назначьте структуру Video_Device * /
    myvivi_device = video_device_alloc();

         / * 2. Установка * /

    /* 2.1 */
    myvivi_device->release = myvivi_release;

    /* 2.2 */
    myvivi_device->fops    = &myvivi_fops;

    /* 2.3 */
    myvivi_device->ioctl_ops = &myvivi_ioctl_ops;

         / * 2.4 Операция очереди
           * а. Определить / инициализировать очередь (будет использовать спинлок)
     */
    spin_lock_init(&myvivi_queue_slock);

         / * 3. Зарегистрироваться * /
    error = video_register_device(myvivi_device, VFL_TYPE_GRABBER, -1);

         / * Генерировать данные с таймером и процессом пробуждения * /
	init_timer(&myvivi_timer);
    myvivi_timer.function  = myvivi_timer_function;

    INIT_LIST_HEAD(&myvivi_vb_local_queue);

    return error;
}

static void myvivi_exit(void)
{
    video_unregister_device(myvivi_device);
    video_device_release(myvivi_device);
}

module_init(myvivi_init);
module_exit(myvivi_exit);
MODULE_LICENSE("GPL");
1. Назначьте структуру VIDEO_DEVICE: VIDEO_DEVICE_ALLOC ()
2. Установить
В основном настройте функцию обратного вызова Video_Device->
Настройте видео_девице-> FOPS
Настройте видео_девице-> IOCTL_OPS
3. Очередь инициализации
4. Зарегистрируйте Video_Device, Video_register_Device () L
Наиболее важным из них является реализация VIDEO_DEVICE-> FOPS и VIDEO_DEVICE-> IOCTL_OPS на основе определенных камер.
static const struct v4l2_ioctl_ops myvivi_ioctl_ops = {
                 / / Означает, что это устройство камеры
        .vidioc_querycap      = myvivi_vidioc_querycap,

                 / * Формат, используемый для списка, получения, тестирования, настройки данных камеры * /
        .vidioc_enum_fmt_vid_cap  = myvivi_vidioc_enum_fmt_vid_cap,
        .vidioc_g_fmt_vid_cap     = myvivi_vidioc_g_fmt_vid_cap,
        .vidioc_try_fmt_vid_cap   = myvivi_vidioc_try_fmt_vid_cap,
        .vidioc_s_fmt_vid_cap     = myvivi_vidioc_s_fmt_vid_cap,

                 / * Буферная операция: Приложение / Запрос / Поставьте очередь / Удалить Querary * /
        .vidioc_reqbufs       = myvivi_vidioc_reqbufs,
        .vidioc_querybuf      = myvivi_vidioc_querybuf,
        .vidioc_qbuf          = myvivi_vidioc_qbuf,
        .vidioc_dqbuf         = myvivi_vidioc_dqbuf,

                 // Остановить остановку
        .vidioc_streamon      = myvivi_vidioc_streamon,
        .vidioc_streamoff     = myvivi_vidioc_streamoff,
};


static const struct v4l2_file_operations myvivi_fops = {
	.owner		= THIS_MODULE,
    .open       = myvivi_open,
    .release    = myvivi_close,
    .mmap       = myvivi_mmap,
    .ioctl      = video_ioctl2, /* V4L2 ioctl handler */
    .poll       = myvivi_poll,
};Урок 3. Сборка и запуск драйвера
Еще один, особый, вид программ – драйверы. В отличие от остальных – выполняются в особом режиме, где они имеют ряд возможностей, недоступных для обычных приложений Windows. Однако это осложняется тем, что в этом режиме практически отсутствуют средства для взаимодействия с пользователем. Для тестирования драйвера можно пользоваться функцией DbgPrint, выдающей отладочные сообщения отладчику. Но отладчика может не оказаться и этих сообщений никто в таком случае не увидит. Для обычного же взаимодействия с пользователем драйвер должен полагаться на прикладные приложения, обмениваясь с ними запросами ввода/вывода.
Сообщения, выдаваемые отладчику, проще всего увидеть при помощи программы DebugView, которую нужно запустить перед сеансом проверки.
Создание проекта будем вести следующим образом. Создаем папку DrvHello, где будем разрабатывать приложение-драйвер. Внутри нее создаем такие файлы:
• makefile
#
# DO NOT EDIT THIS FILE!!!  Edit .sources. if you want to add a new source
# file to this component.  This file merely indirects to the real make file
# that is shared by all the driver components of the Windows NT DDK
#

!INCLUDE $(NTMAKEENV)makefile.def
Над текстом этого файла не следует задумываться, он просто должен присутствовать в таком вот неизменном виде. Хотя в чужих проектах этого файла может и не быть, либо он будет работать другим образом. В общем, если он есть и содержит это содержимое – то все в порядке, если нет – необходимы дополнительные исследования.
• sources
TARGETNAME=drvhello
TARGETTYPE=DRIVER
TARGETPATH=obj
SOURCES=main.c
Задает параметры сборки. Здесь в параметре SOURCES необходимо перечислить через пробел все файлы с исходным кодом, которые нужно будет скомпилировать.
• main.c – это наш файл с исходным кодом. Может носить любое имя, их может быть много, а может быть очень много. Главное, не забыть их все перечислить в файле sources
#include "ntddk.h"

#pragma code_seg("INIT")
NTSTATUS DriverEntry(IN PDRIVER_OBJECT DriverObject,
    IN PUNICODE_STRING RegistryPath)
{
    DbgPrint("Hello, world!");			// Выдача отладочного сообщения
    return STATUS_DEVICE_CONFIGURATION_ERROR;	// Выдача ошибки заставит систему сразу же выгрузить драйвер
}
#pragma code_seg()
Основная функция у нас здесь носит название DriverEntry. Запускаться она будет при попытке загрузки драйвера. А чтобы сделать такую попытку – нужна программа-загрузчик, которую напишем чуть поздней.
Откомпилируем драйвер. Чтобы мы могли что-то увидеть в отладчике, драйвер должен быть собран в отладочном режиме. Напомню, что отладочный режим у программистов драйверов называется checked, а финальный — free (прикладные программисты так не заморачиваются и называют их debug и release соответственно). В этом режиме программный код не оптимизируется и исполняемый файл содержит много избыточной информации, совершенно не нужной для работы, но очень полезной при изучении того, что будет делать этот код.
Для сборки открываем меню Start, затем Programs/Windows Driver Kits/WDK <номер версии>/Build Environment/Windows Server 2003 (или Windows XP)/ x86 Checked Build Environment. Щелкаем и попадаем в консольное окно. Если FAR был добавлен в PATH, то можно набрать far и перейти в директорию проекта обычным способом, иначе туда придется добираться используя команду cd (и может быть смену диска). Когда добрались до папки DrvHello (там где лежат три файла, которые были созданы выше) – набираем команду nmake. Если сборка прошла без ошибок, то будет созданы директории objchk_wnet_x86/i386, а в ней уже можно обнаружить файл drvhello.sys. Это и есть наш собранный драйвер.
Теперь вернемся к загрузчику. Это у нас будет консольное приложение (см. главу 1). Имя я ему дал DrvHelloloader и разместил, как всегда, в c:Projects. Имя файла с исходным кодом такое же – main.c, содержимое:
#include <windows.h>
#include <shlwapi.h>
#pragma comment(lib, "shlwapi.lib")

void main(int argc, char* argv[])
{
	char serviceName[] = "drvhello";
	char driverBinary[MAX_PATH] = "";
	SC_HANDLE hSc;
	SC_HANDLE hService;

	// Чтобы запустить драйвер, потребуется полный путь к нему
	// Предполагаем, что он лежит в той же папке, что и экзешник
	strcpy(driverBinary, argv[0]);			// argv[0] - здесь будет имя экзешника с полным путем
	PathRemoveFileSpec(driverBinary);		// Выкидываем имя экзешника, остается только путь к папке
	strcat(driverBinary, "\drvhello.sys");	// Добавляем имя драйвера.
					// Бэкслэш в строках Си надо удваивать, из-за его специального значения.

	hSc = OpenSCManager(NULL, NULL, SC_MANAGER_ALL_ACCESS);	// Открываем SCM (Service Control Management)
								// Это такая штука, которая позволяет запускать драйверы
								// из пользовательского режима
	CreateService(hSc, serviceName, serviceName,
		SERVICE_ALL_ACCESS, SERVICE_KERNEL_DRIVER, SERVICE_DEMAND_START, SERVICE_ERROR_NORMAL,
		driverBinary, NULL, NULL, NULL, NULL, NULL);				// Загрузка в 3 этапа - создаем службу
	hService = OpenService(hSc, serviceName, SERVICE_ALL_ACCESS);	// Открываем ее
	StartService(hService, 0, NULL);	// И запускаем. Вообще-то было бы неплохо
						// еще и закрыть ее... Как нибудь потом.
}
Выбираем в меню cтудии – Build/Rebuild Solution. Произойдет пересборка проекта без запуска. В принципе, можно и запустить. Находим экзешник в папке проекта, докидываем в ту же папку drvhello.sys. Далее запускаем DebugView, включаем галочку Capture/Capture Kernel, как показано на рисунке:
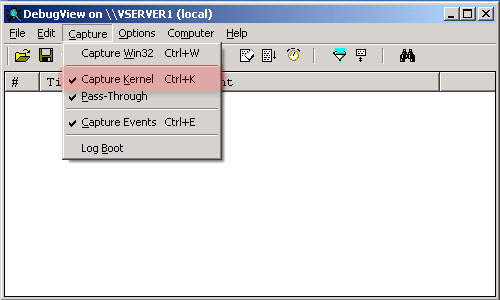
Рис. 3.1 – Настройка DebugView
Теперь запускаем программу. Если все прошло успешно – видим следующую картину:
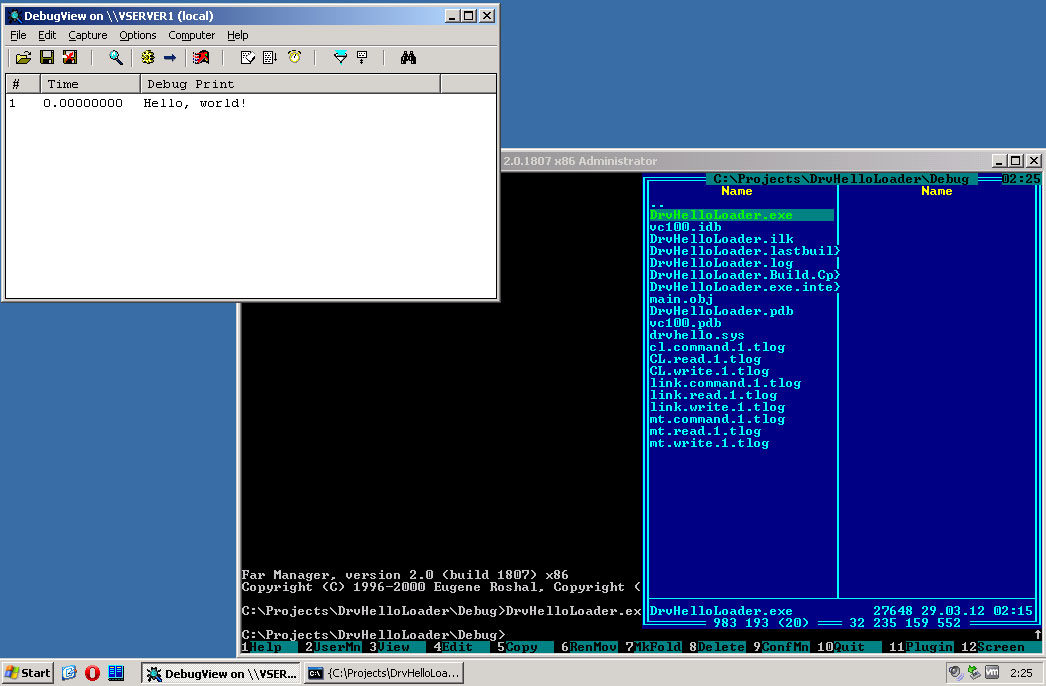
Рис. 3.2 – Проверка драйвера
Вот такой простой код позволяет уже очень много – работать на уровне ядра. Но следует помнить, что если допустить ошибку в прикладной программе – упадет она одна; если в драйвере – вся система. К примеру, если в код драйвера перед DbgPrint добавить строку:
int a = *((int *)0);
которая делает попытку прочесть содержимое памяти по нулевому адресу – то картинка будет уже иной:
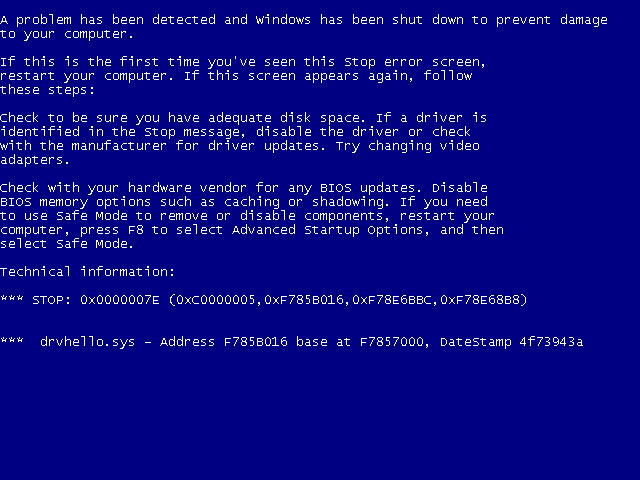
Рис. 3.3 – Попытка чтения из нулевого адреса
Если бы это был не драйвер, а просто программа пользовательского режима, то при выполнении этого кода она бы просто закрылась, выдав ошибку:
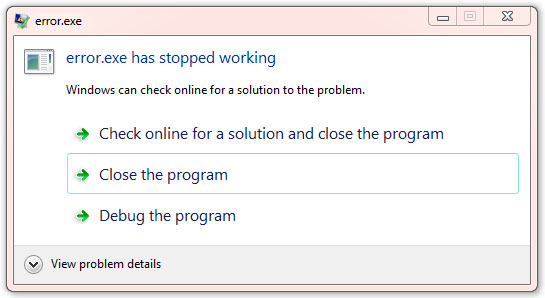
Рис. 3.4 – Та же ошибка в программе пользовательского режима
- Download demo source project — 160 Kb
Introduction
A lot of articles have been investigating in application layer issues, like skin-based dialogs, MFC, ATL, thread, process, registry etc. It won’t be easy to find any driver related articles posted with full source code. The root cause is that most drivers are developed for specific hardware. Without the domain knowledge, you will never want to get in touch with it. I believe a lot of software engineers are afraid when they involve in kernel mode programming for the very first time, and there are not too much resources that can guide them through the whole process from DDK study to program stage. Hence I decided to share some of my experiences in driver programming in Windows. This demo focuses on a quick introduction to WDM Driver’s architecture, and will introduce two I/O modes coming with Windows, which are Direct I/O and Buffered I/O, how to communicate with drivers residing in system kernel space, and read/write data to it.
There is no need for you to read the demo program with any hardware related background, the demo drivers are all pseudo drivers. That’s drivers installed without a physical device in computer.
The member functions defined in this demo program can be used as templates for later driver development by you.
Background
You might be a well-experienced software engineer and might want to involve in kernel programming.
Create your WDM Driver: a Pseudo Driver tutorial
Before we start, declaration for member routines and structures is required. The most important driver-required data structure is — DEVICE_EXTENSION!
typedef struct tagDEVICE_EXTENSION {
    PDEVICE_OBJECT DeviceObject;
    PDEVICE_OBJECT NextDeviceObject;

    DEVICE_CAPABILITIES pdc;
    IO_REMOVE_LOCK RemoveLock;
    LONG handles;
    PVOID DataBuffer;
    UNICODE_STRING Device_Description;
    SYSTEM_POWER_STATE SysPwrState;
    DEVICE_POWER_STATE DevPwrState;
    PIRP PowerIrp;
} DEVICE_EXTENSION, *PDEVICE_EXTENSION;
Code segment below demonstrates the start of creating a valid WDM Driver.
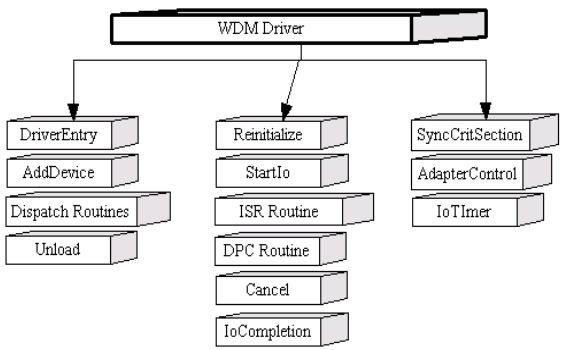
There are mandatory and optional members in a WDM Driver. A valid WDM Driver should come with the following member routines, the most important task item for DriverEntry is to register all member routines to kernel:
NTSTATUS
DriverEntry(
IN PDRIVER_OBJECT DriverObject,
IN PUNICODE_STRING RegistryPath
)
{
RtlInitUnicodeString(
&Global_sz_Drv_RegInfo,
RegistryPath->Buffer);


DriverObject->DriverUnload = DriverUnload;
DriverObject->DriverExtension->AddDevice = AddDevice;

DriverObject->MajorFunction[IRP_MJ_CREATE] = PsdoDispatchCreate;
DriverObject->MajorFunction[IRP_MJ_CLOSE] = PsdoDispatchClose;
DriverObject->MajorFunction[IRP_MJ_READ] = PsdoDispatchRead;
DriverObject->MajorFunction[IRP_MJ_WRITE] = PsdoDispatchWrite;
DriverObject->MajorFunction[IRP_MJ_DEVICE_CONTROL] = PsdoDispatchDeviceControl;
DriverObject->MajorFunction[IRP_MJ_POWER] = PsdoDispatchPower;
DriverObject->MajorFunction[IRP_MJ_PNP] = PsdoDispatchPnP;

return STATUS_SUCCESS;
}
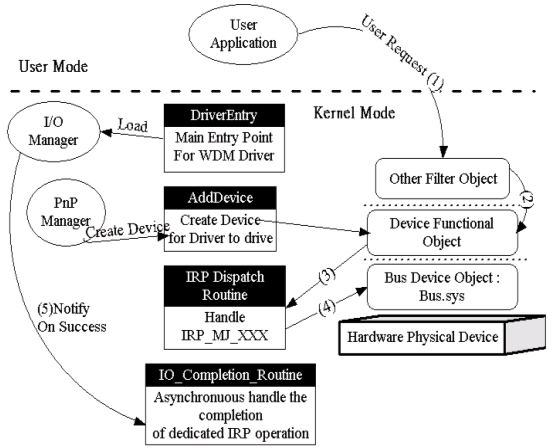
Normal operation workflow within WDM Driver
Code segment below demonstrates the workflow in AddDevice routine: the most important task for AddDevice routine is to create a Device object, and attach it to the existing device stack.
NTSTATUS
AddDevice(
IN PDRIVER_OBJECT DriverObject,
IN PDEVICE_OBJECT PhysicalDeviceObject
)
{
    ULONG DeviceExtensionSize;
    PDEVICE_EXTENSION p_DVCEXT;
    PDEVICE_OBJECT ptr_PDO;
    NTSTATUS status;

    RtlInitUnicodeString(
        &Global_sz_DeviceName, L"");

    DeviceExtensionSize = sizeof(DEVICE_EXTENSION);

    status = IoCreateDevice(
        DriverObject,
        DeviceExtensionSize,
        &Global_sz_DeviceName,
        FILE_DEVICE_UNKNOWN,
        FILE_DEVICE_SECURE_OPEN,
        FALSE,
        &ptr_PDO
        );

    if (NT_SUCCESS(status)) {
        ptr_PDO->Flags &= ~DO_DEVICE_INITIALIZING;
<font color="#ff0000">        ptr_PDO->Flags |= DO_BUFFERED_IO;

        p_DVCEXT = ptr_PDO->DeviceExtension;
        p_DVCEXT->DeviceObject = ptr_PDO;
        RtlInitUnicodeString(


        p_DVCEXT->NextDeviceObject =
            IoAttachDeviceToDeviceStack(ptr_PDO, PhysicalDeviceObject);
    }

    return status;
}
Code segment below shows how to support IRP_MJ_CREATE, it is send when client application tries to connect to the underlying Pseudo Driver. Before proceeding, see graph below in advance to realize the connection process.
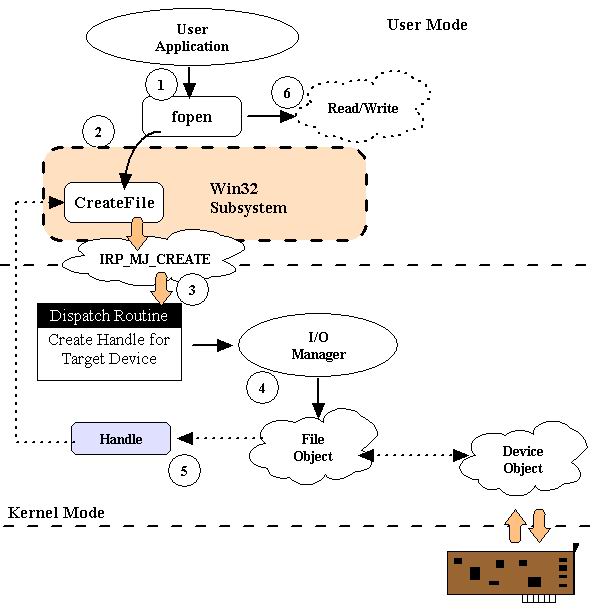
Usually, you will use CreateFile/fopen Win32 API to connect to the underlying device. It is the right time that Win32 Subsystem submits IRP_MJ_CREATE and asks driver to connect to the target device!
NTSTATUS
PsdoDispatchCreate(
IN PDEVICE_OBJECT DeviceObject,
IN PIRP Irp
)
{
    PIO_STACK_LOCATION p_IO_STK;
    PDEVICE_EXTENSION p_DVCEXT;
    NTSTATUS status;

    p_IO_STK = IoGetCurrentIrpStackLocation(Irp);
    p_DVCEXT = DeviceObject->DeviceExtension;
    status = IoAcquireRemoveLock(&p_DVCEXT->RemoveLock, p_IO_STK->FileObject);
    if (NT_SUCCESS(status)) {
        CompleteRequest(Irp, STATUS_SUCCESS, 0);
        return STATUS_SUCCESS;
    } else {
        IoReleaseRemoveLock(&p_DVCEXT->RemoveLock, p_IO_STK->FileObject);
        CompleteRequest(Irp, status, 0);
        return status;
    }
}
Code segment below shows how to support IRP_MJ_CLOSE, the IRP is sent when client application tries to close connection to the underlying Pseudo Driver. Before proceeding, see graph below in advance to realize the closing process.
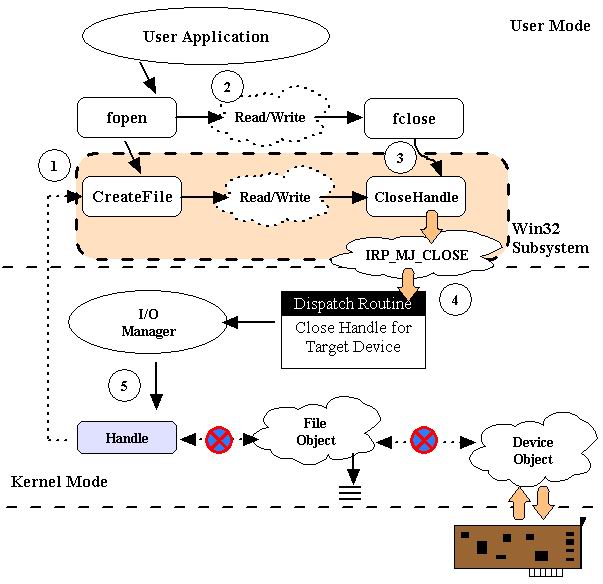
Usually, you will use CloseHandle/fclose Win32 API to close connection to the underlying device. It is the right time that Win32 Subsystem submits IRP_MJ_CLOSE and asks driver to close connection to target device!
NTSTATUS
PsdoDispatchClose(
IN PDEVICE_OBJECT DeviceObject,
IN PIRP Irp
)
{
    PIO_STACK_LOCATION p_IO_STK;
    PDEVICE_EXTENSION p_DVCEXT;

    p_IO_STK = IoGetCurrentIrpStackLocation(Irp);
    p_DVCEXT = DeviceObject->DeviceExtension;
    IoReleaseRemoveLock(&p_DVCEXT->RemoveLock,
    p_IO_STK->FileObject);
    CompleteRequest(Irp, STATUS_SUCCESS, 0);
    return STATUS_SUCCESS;
}
I/O Support : Buffered I/O Mode
There are three I/O modes in Windows kernel, they are Buffer, Direct and Neither modes. Now, we’ll talk about Buffered I/O, and this article will not involve Neither mode for data transfer if processing under user-thread occupied memory space, it might be dangerous!! If client application is going to read/write data to and from driver, the memory address of data source will not be directly referenced by the underlying driver. System kernel will allocate another data buffer with equivalent size in kernel. All data transferred must be copied into this area before they are to the target place. Usually, you will call ReadFile/WriteFile or fread/fwrite to make read/write request.

Below code segment demos the workflow in I/O handle for read request. As we can see, the routine that is registered for reading is PsdoDispatchRead in DriverEntry, this member routine will read data out of Driver’s internal member — DataBuffer to client application:
NTSTATUS
PsdoDispatchRead(
IN PDEVICE_OBJECT DeviceObject,
IN PIRP Irp
)
{
    PVOID Buf;
    ULONG BufLen;
    LONGLONG Offset;
    PVOID DataBuf;
    ULONG DataLen;
    ULONG ByteTransferred;
    PIO_STACK_LOCATION p_IO_STK;
    PDEVICE_EXTENSION p_DVCEXT;

    DbgPrint("IRP_MJ_READ : Beginrn");

    p_IO_STK = IoGetCurrentIrpStackLocation(Irp);
    p_DVCEXT = DeviceObject->DeviceExtension;


    BufLen = p_IO_STK->Parameters.Read.Length;
    Offset = p_IO_STK->Parameters.Read.ByteOffset.QuadPart;
    Buf = (PUCHAR)(Irp->AssociatedIrp.SystemBuffer) + Offset;


    DataBuf = p_DVCEXT->DataBuffer;
    if (DataBuf == NULL)
        DataLen = 0;
    else
        DataLen = 1024;

    IoAcquireRemoveLock(&p_DVCEXT->RemoveLock, Irp);

    DbgPrint("Output Buffer Length : %drn", BufLen);
    DbgPrint("Driver Data Length : %drn", DataLen);

    if (BufLen <= DataLen) {
        ByteTransferred = BufLen;
    } else {
        ByteTransferred = DataLen;
    }

    RtlCopyMemory(
        Buf, DataBuf,
        ByteTransferred);

    IoReleaseRemoveLock(&p_DVCEXT->RemoveLock, Irp);
    CompleteRequest(Irp, STATUS_SUCCESS, ByteTransferred);

    DbgPrint("IRP_MJ_READ : Endrn");
    return STATUS_SUCCESS;
}
Below code segment demos the possible task items in workflow that can support the normal I/O requests to write data from application to driver.
NTSTATUS
PsdoDispatchWrite(
IN PDEVICE_OBJECT DeviceObject,
IN PIRP Irp
)
{
    PVOID Buf;
    ULONG BufLen;
    LONGLONG Offset;
    PVOID DataBuf;
    ULONG DataLen;
    ULONG ByteTransferred;
    PIO_STACK_LOCATION p_IO_STK;
    PDEVICE_EXTENSION p_DVCEXT;
    NTSTATUS status;

    DbgPrint("IRP_MJ_WRITE : Beginrn");


    p_IO_STK = IoGetCurrentIrpStackLocation(Irp);
    p_DVCEXT = DeviceObject->DeviceExtension;


    BufLen = p_IO_STK->Parameters.Write.Length;
    Offset = p_IO_STK->Parameters.Read.ByteOffset.QuadPart;
    Buf = (PUCHAR)(Irp->AssociatedIrp.SystemBuffer) + Offset;


    DataBuf = p_DVCEXT->DataBuffer;
    DataLen = 1024;

    IoAcquireRemoveLock(&p_DVCEXT->RemoveLock, Irp);

    DbgPrint("Input Buffer Length : %drn", BufLen);
    DbgPrint("Driver Data Length : %drn", DataLen);

    if (BufLen <= DataLen) {
        ByteTransferred = BufLen;
    } else {
        ByteTransferred = DataLen;
    }

    ByteTransferred = BufLen;
        RtlZeroMemory(
        p_DVCEXT->DataBuffer,
        1024);

    RtlCopyMemory(
        DataBuf,
        Buf,
        ByteTransferred);

    IoReleaseRemoveLock(&p_DVCEXT->RemoveLock, Irp);
    CompleteRequest(Irp, STATUS_SUCCESS, ByteTransferred);

    DbgPrint("IRP_MJ_WRITE : Endrn");
    return STATUS_SUCCESS;
}
I/O Support : Direct I/O Mode
Below graph exhibits how Direct I/O mode is supported when data is transferred between client application and driver. Under Direct I/O mode, Memory Manager will create MDL (Memory Descriptor List) to reference the physical address taken by user-provided buffer, all data can be directly referenced via MDL from kernel environment.
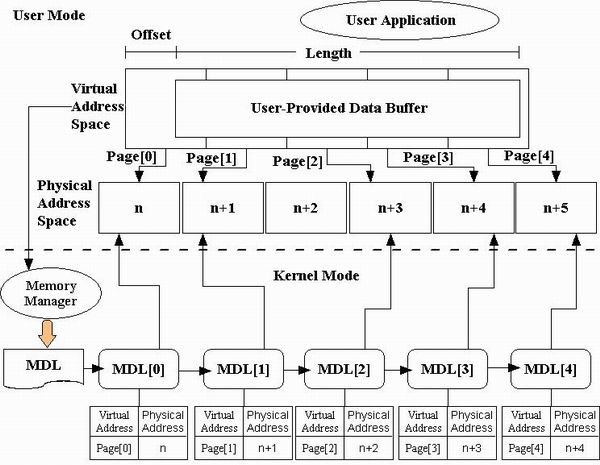
In DDK, some MMXxx routines are provided to help you to get MDL that maps to physical address of user-provided buffer.
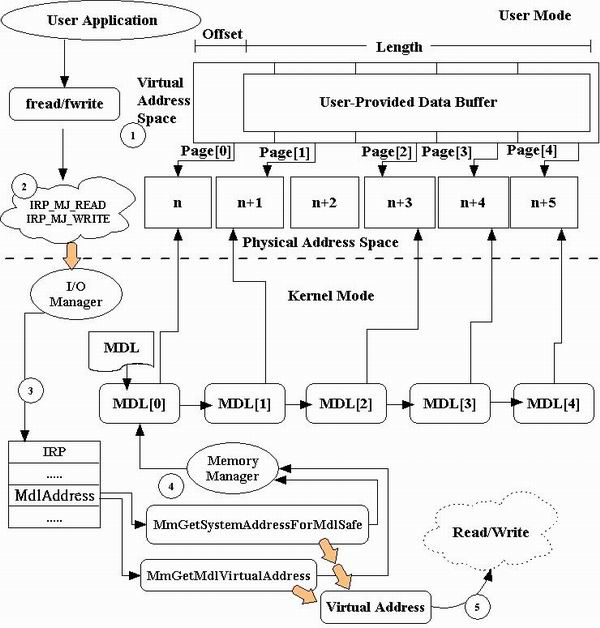
Below code segment contains the statements that can support data reading under Direct I/O mode. It is achieved by Mmxxx routine, please read it carefully, and you can also find the full code in the zip file. The most important MmXxx you will use in this mode should be — MmGetSystemAddressForMdlSafe, it can obtain the MDL that references the physical address of user-buffer.
NTSTATUS
PsdoDispatchRead(
IN PDEVICE_OBJECT DeviceObject,
IN PIRP Irp
)
{
    PVOID Buf;
    ULONG BufLen;
    ULONG Offset;
    PVOID DataBuf;
    ULONG DataLen;
    ULONG ByteTransferred;
    PIO_STACK_LOCATION p_IO_STK;
    PDEVICE_EXTENSION p_DVCEXT;

    DbgPrint("IRP_MJ_READ : Beginrn");

    p_IO_STK = IoGetCurrentIrpStackLocation(Irp);
    p_DVCEXT = DeviceObject->DeviceExtension;


    Buf = MmGetSystemAddressForMdlSafe(
        Irp->MdlAddress, HighPagePriority);

    if (Buf == NULL) {
        DbgPrint("Can't get Virtual Address from MDLrn");
        return STATUS_INSUFFICIENT_RESOURCES;
    }
    BufLen = MmGetMdlByteCount(Irp->MdlAddress);
    Offset = MmGetMdlByteOffset(Irp->MdlAddress);


    DataBuf = p_DVCEXT->DataBuffer;
    if (DataBuf == NULL)
        DataLen = 0;
    else
        DataLen = 1024;

    IoAcquireRemoveLock(&p_DVCEXT->RemoveLock, Irp);

    DbgPrint("Output Buffer Length : %drn", BufLen);
    DbgPrint("Offset for Buffer in the Memory Page: %drn", Offset);
    DbgPrint("Driver Data Length : %drn", DataLen);

    if (BufLen <= DataLen) {
        ByteTransferred = BufLen;
    } else {
        ByteTransferred = DataLen;
    }

    RtlCopyMemory(
        Buf,
        DataBuf,
        ByteTransferred);

    IoReleaseRemoveLock(&p_DVCEXT->RemoveLock, Irp);
    CompleteRequest(Irp, STATUS_SUCCESS, ByteTransferred);

    DbgPrint("IRP_MJ_READ : Endrn");
    return STATUS_SUCCESS;
}
Below code segment demos the possible workflow to write data from user application to driver:
NTSTATUS
PsdoDispatchWrite(
IN PDEVICE_OBJECT DeviceObject,
IN PIRP Irp
)
{
    PVOID Buf;
    ULONG BufLen;
    ULONG Offset;
    PVOID DataBuf;
    ULONG DataLen;
    ULONG ByteTransferred;
    PIO_STACK_LOCATION p_IO_STK;
    PDEVICE_EXTENSION p_DVCEXT;
    NTSTATUS status;

    DbgPrint("IRP_MJ_WRITE : Beginrn");


    p_IO_STK = IoGetCurrentIrpStackLocation(Irp);
    p_DVCEXT = DeviceObject->DeviceExtension;


    Buf = MmGetSystemAddressForMdlSafe(
        Irp->MdlAddress, HighPagePriority);

    if (Buf == NULL) {
        DbgPrint("Can't get Virtual Address from MDLrn");
        return STATUS_INSUFFICIENT_RESOURCES;
    }

    BufLen = MmGetMdlByteCount(Irp->MdlAddress);
    Offset = MmGetMdlByteOffset(Irp->MdlAddress);


    DataBuf = p_DVCEXT->DataBuffer;
    DataLen = 1024;

    IoAcquireRemoveLock(&p_DVCEXT->RemoveLock, Irp);

    DbgPrint("Input Buffer Length : %drn", BufLen);
    DbgPrint("Offset for Buffer in the Memory Page: %drn", Offset);
    DbgPrint("Driver Data Length : %drn", DataLen);

    if (BufLen <= DataLen) {
        ByteTransferred = BufLen;
    } else {
        ByteTransferred = DataLen;
    }

    ByteTransferred = BufLen;
    RtlZeroMemory(
        p_DVCEXT->DataBuffer,
        1024);

    RtlCopyMemory(
        DataBuf,
        Buf,
        ByteTransferred);

    IoReleaseRemoveLock(&p_DVCEXT->RemoveLock, Irp);
    CompleteRequest(Irp, STATUS_SUCCESS, ByteTransferred);

    DbgPrint("IRP_MJ_WRITE : Endrn");
    return STATUS_SUCCESS;
}
Contents of the source zip package
The zip file contains below subfolders:
- Application: it contains the client applications to the Pseudo Driver.
- bin: it contains the install/uninstall utility for Pseudo Driver.
- BufferedIO_PW: it is where the Pseudo Driver that employees Buffered I/O mode for read/write resides.
- DirectIO_PW: it is where the Pseudo Driver that employees Direct I/O Mode for read/write resides.
- IOCTL_PW: it is where the Pseudo Driver that simply supports user-defined I/O Control Code resides.
- ShareFiles: it is the common shared library for PnP, Power Management, I/O completion.
- Install: it contains the source code of install/uninstall utility. (Install utility is directly referenced from DDK’s sample, I won’t provide redundant copy of it, only the uninstall utility source code is provided in it).
How to build the Pseudo Driver?
- Unzip the package to some folder you’d like it to be, let’s name it ROOT_OF_SOURCE.
- Select Start->Programs->Development Kits->Windows DDK xxxx.xxxx->Build Environments->Free Build. (This is for free release without debug information in it.)
- Enter ROOT_OF_SOURCESharedFiles subfolder, enter build -cefw, it all goes well, shared library will be generated.
- Enter ROOT_OF_SOURCEBufferedIO_PW subfolder, enter build -cefw, it will create Pseudo Driver — BufferDrv.sys. Copy this file into ROOT_OF_SOURCEBufferedIO_PWInstall if you have made add-in for any new features, the copy is for later driver install.
- Enter ROOT_OF_SOURCEDirectIO_PW subfolder, enter build -cefw, it will create Pseudo Driver — DirectDrv.sys. Copy this file into ROOT_OF_SOURCEDirectIO_PWInstall if you have made add-in for any new features, the copy is for later driver install.
- Enter ROOT_OF_SOURCEIOCTL_PW subfolder, enter build -cefw, it will create Pseudo Driver — PseudoDrv.sys. Copy this file into ROOT_OF_SOURCEIOCTL_PWInstall if you have made add-in for any new features, the copy is for later driver install.
Install Pseudo Driver into system (XP)
- Unzip the source file, launch DOS prompt-console.
- Enter into bin subfolder.
- Execute DevInst.bat, it will automatically install the Pseudo Driver into your system.
Uninstall Pseudo Driver from system (XP)
- Enter into bin subfolder.
- Execute DevRemove.bat, it will automatically uninstall all-driver related resources from your system.
Execute client application
You can enter into ROOT_OF_SOURCEApplication subfolder, execute bufferclient.exe, directclient.exe, and clientapp.exe to verify if the three Pseudo Drivers have been installed successfully.
Known Issues
- The install/uninstall of Pseudo Driver won’t wok on Window 2000, the root cause might be that the Setup API doesn’t work on Window 2000, can’t allow driver installed without a physical hardware in it. Can anybody help to resolve it? Many Thanks.
- If you’d like to install/uninstall the Pseudo Driver in Windows 2000, you will need to launch New Hardware Wizard from within Device Manager, and select to install new hardware->Display all hardware->Install from disk->»ROOT_OF_SOURCEBufferedIO_PWInstall», click on OK button. New Hardware Wizard will install Buffered I/O Pseudo Driver. (This is for Buffered I/O demo driver install. As for Direct I/O, please set source directory to «ROOT_OF_SOURCEDirectIO_PWInstall«).
- Reboot is required if the driver has been reinstalled after un-installation. I don’t know why this happened, I hope somebody can inform me. Many Thanks.
Future Directions for Pseudo Driver
- Fix above issues.
- WMI support in Pseudo Driver will be added-in.
History
- Started to create the three Pseudo Drivers on 2002/02/10, finished on 2003/12/28 (I use the rest time for it), released on 2004/10/20 after my book published.
This member has not yet provided a Biography. Assume it’s interesting and varied, and probably something to do with programming.
- Download demo source project — 160 Kb
Introduction
A lot of articles have been investigating in application layer issues, like skin-based dialogs, MFC, ATL, thread, process, registry etc. It won’t be easy to find any driver related articles posted with full source code. The root cause is that most drivers are developed for specific hardware. Without the domain knowledge, you will never want to get in touch with it. I believe a lot of software engineers are afraid when they involve in kernel mode programming for the very first time, and there are not too much resources that can guide them through the whole process from DDK study to program stage. Hence I decided to share some of my experiences in driver programming in Windows. This demo focuses on a quick introduction to WDM Driver’s architecture, and will introduce two I/O modes coming with Windows, which are Direct I/O and Buffered I/O, how to communicate with drivers residing in system kernel space, and read/write data to it.
There is no need for you to read the demo program with any hardware related background, the demo drivers are all pseudo drivers. That’s drivers installed without a physical device in computer.
The member functions defined in this demo program can be used as templates for later driver development by you.
Background
You might be a well-experienced software engineer and might want to involve in kernel programming.
Create your WDM Driver: a Pseudo Driver tutorial
Before we start, declaration for member routines and structures is required. The most important driver-required data structure is — DEVICE_EXTENSION!
typedef struct tagDEVICE_EXTENSION {
    PDEVICE_OBJECT DeviceObject;
    PDEVICE_OBJECT NextDeviceObject;

    DEVICE_CAPABILITIES pdc;
    IO_REMOVE_LOCK RemoveLock;
    LONG handles;
    PVOID DataBuffer;
    UNICODE_STRING Device_Description;
    SYSTEM_POWER_STATE SysPwrState;
    DEVICE_POWER_STATE DevPwrState;
    PIRP PowerIrp;
} DEVICE_EXTENSION, *PDEVICE_EXTENSION;
Code segment below demonstrates the start of creating a valid WDM Driver.
There are mandatory and optional members in a WDM Driver. A valid WDM Driver should come with the following member routines, the most important task item for DriverEntry is to register all member routines to kernel:
NTSTATUS
DriverEntry(
IN PDRIVER_OBJECT DriverObject,
IN PUNICODE_STRING RegistryPath
)
{
RtlInitUnicodeString(
&Global_sz_Drv_RegInfo,
RegistryPath->Buffer);


DriverObject->DriverUnload = DriverUnload;
DriverObject->DriverExtension->AddDevice = AddDevice;

DriverObject->MajorFunction[IRP_MJ_CREATE] = PsdoDispatchCreate;
DriverObject->MajorFunction[IRP_MJ_CLOSE] = PsdoDispatchClose;
DriverObject->MajorFunction[IRP_MJ_READ] = PsdoDispatchRead;
DriverObject->MajorFunction[IRP_MJ_WRITE] = PsdoDispatchWrite;
DriverObject->MajorFunction[IRP_MJ_DEVICE_CONTROL] = PsdoDispatchDeviceControl;
DriverObject->MajorFunction[IRP_MJ_POWER] = PsdoDispatchPower;
DriverObject->MajorFunction[IRP_MJ_PNP] = PsdoDispatchPnP;

return STATUS_SUCCESS;
}
Normal operation workflow within WDM Driver
Code segment below demonstrates the workflow in AddDevice routine: the most important task for AddDevice routine is to create a Device object, and attach it to the existing device stack.
NTSTATUS
AddDevice(
IN PDRIVER_OBJECT DriverObject,
IN PDEVICE_OBJECT PhysicalDeviceObject
)
{
    ULONG DeviceExtensionSize;
    PDEVICE_EXTENSION p_DVCEXT;
    PDEVICE_OBJECT ptr_PDO;
    NTSTATUS status;

    RtlInitUnicodeString(
        &Global_sz_DeviceName, L"");

    DeviceExtensionSize = sizeof(DEVICE_EXTENSION);

    status = IoCreateDevice(
        DriverObject,
        DeviceExtensionSize,
        &Global_sz_DeviceName,
        FILE_DEVICE_UNKNOWN,
        FILE_DEVICE_SECURE_OPEN,
        FALSE,
        &ptr_PDO
        );

    if (NT_SUCCESS(status)) {
        ptr_PDO->Flags &= ~DO_DEVICE_INITIALIZING;
<font color="#ff0000">        ptr_PDO->Flags |= DO_BUFFERED_IO;

        p_DVCEXT = ptr_PDO->DeviceExtension;
        p_DVCEXT->DeviceObject = ptr_PDO;
        RtlInitUnicodeString(


        p_DVCEXT->NextDeviceObject =
            IoAttachDeviceToDeviceStack(ptr_PDO, PhysicalDeviceObject);
    }

    return status;
}
Code segment below shows how to support IRP_MJ_CREATE, it is send when client application tries to connect to the underlying Pseudo Driver. Before proceeding, see graph below in advance to realize the connection process.
Usually, you will use CreateFile/fopen Win32 API to connect to the underlying device. It is the right time that Win32 Subsystem submits IRP_MJ_CREATE and asks driver to connect to the target device!
NTSTATUS
PsdoDispatchCreate(
IN PDEVICE_OBJECT DeviceObject,
IN PIRP Irp
)
{
    PIO_STACK_LOCATION p_IO_STK;
    PDEVICE_EXTENSION p_DVCEXT;
    NTSTATUS status;

    p_IO_STK = IoGetCurrentIrpStackLocation(Irp);
    p_DVCEXT = DeviceObject->DeviceExtension;
    status = IoAcquireRemoveLock(&p_DVCEXT->RemoveLock, p_IO_STK->FileObject);
    if (NT_SUCCESS(status)) {
        CompleteRequest(Irp, STATUS_SUCCESS, 0);
        return STATUS_SUCCESS;
    } else {
        IoReleaseRemoveLock(&p_DVCEXT->RemoveLock, p_IO_STK->FileObject);
        CompleteRequest(Irp, status, 0);
        return status;
    }
}
Code segment below shows how to support IRP_MJ_CLOSE, the IRP is sent when client application tries to close connection to the underlying Pseudo Driver. Before proceeding, see graph below in advance to realize the closing process.
Usually, you will use CloseHandle/fclose Win32 API to close connection to the underlying device. It is the right time that Win32 Subsystem submits IRP_MJ_CLOSE and asks driver to close connection to target device!
NTSTATUS
PsdoDispatchClose(
IN PDEVICE_OBJECT DeviceObject,
IN PIRP Irp
)
{
    PIO_STACK_LOCATION p_IO_STK;
    PDEVICE_EXTENSION p_DVCEXT;

    p_IO_STK = IoGetCurrentIrpStackLocation(Irp);
    p_DVCEXT = DeviceObject->DeviceExtension;
    IoReleaseRemoveLock(&p_DVCEXT->RemoveLock,
    p_IO_STK->FileObject);
    CompleteRequest(Irp, STATUS_SUCCESS, 0);
    return STATUS_SUCCESS;
}
I/O Support : Buffered I/O Mode
There are three I/O modes in Windows kernel, they are Buffer, Direct and Neither modes. Now, we’ll talk about Buffered I/O, and this article will not involve Neither mode for data transfer if processing under user-thread occupied memory space, it might be dangerous!! If client application is going to read/write data to and from driver, the memory address of data source will not be directly referenced by the underlying driver. System kernel will allocate another data buffer with equivalent size in kernel. All data transferred must be copied into this area before they are to the target place. Usually, you will call ReadFile/WriteFile or fread/fwrite to make read/write request.
Below code segment demos the workflow in I/O handle for read request. As we can see, the routine that is registered for reading is PsdoDispatchRead in DriverEntry, this member routine will read data out of Driver’s internal member — DataBuffer to client application:
NTSTATUS
PsdoDispatchRead(
IN PDEVICE_OBJECT DeviceObject,
IN PIRP Irp
)
{
    PVOID Buf;
    ULONG BufLen;
    LONGLONG Offset;
    PVOID DataBuf;
    ULONG DataLen;
    ULONG ByteTransferred;
    PIO_STACK_LOCATION p_IO_STK;
    PDEVICE_EXTENSION p_DVCEXT;

    DbgPrint("IRP_MJ_READ : Beginrn");

    p_IO_STK = IoGetCurrentIrpStackLocation(Irp);
    p_DVCEXT = DeviceObject->DeviceExtension;


    BufLen = p_IO_STK->Parameters.Read.Length;
    Offset = p_IO_STK->Parameters.Read.ByteOffset.QuadPart;
    Buf = (PUCHAR)(Irp->AssociatedIrp.SystemBuffer) + Offset;


    DataBuf = p_DVCEXT->DataBuffer;
    if (DataBuf == NULL)
        DataLen = 0;
    else
        DataLen = 1024;

    IoAcquireRemoveLock(&p_DVCEXT->RemoveLock, Irp);

    DbgPrint("Output Buffer Length : %drn", BufLen);
    DbgPrint("Driver Data Length : %drn", DataLen);

    if (BufLen <= DataLen) {
        ByteTransferred = BufLen;
    } else {
        ByteTransferred = DataLen;
    }

    RtlCopyMemory(
        Buf, DataBuf,
        ByteTransferred);

    IoReleaseRemoveLock(&p_DVCEXT->RemoveLock, Irp);
    CompleteRequest(Irp, STATUS_SUCCESS, ByteTransferred);

    DbgPrint("IRP_MJ_READ : Endrn");
    return STATUS_SUCCESS;
}
Below code segment demos the possible task items in workflow that can support the normal I/O requests to write data from application to driver.
NTSTATUS
PsdoDispatchWrite(
IN PDEVICE_OBJECT DeviceObject,
IN PIRP Irp
)
{
    PVOID Buf;
    ULONG BufLen;
    LONGLONG Offset;
    PVOID DataBuf;
    ULONG DataLen;
    ULONG ByteTransferred;
    PIO_STACK_LOCATION p_IO_STK;
    PDEVICE_EXTENSION p_DVCEXT;
    NTSTATUS status;

    DbgPrint("IRP_MJ_WRITE : Beginrn");


    p_IO_STK = IoGetCurrentIrpStackLocation(Irp);
    p_DVCEXT = DeviceObject->DeviceExtension;


    BufLen = p_IO_STK->Parameters.Write.Length;
    Offset = p_IO_STK->Parameters.Read.ByteOffset.QuadPart;
    Buf = (PUCHAR)(Irp->AssociatedIrp.SystemBuffer) + Offset;


    DataBuf = p_DVCEXT->DataBuffer;
    DataLen = 1024;

    IoAcquireRemoveLock(&p_DVCEXT->RemoveLock, Irp);

    DbgPrint("Input Buffer Length : %drn", BufLen);
    DbgPrint("Driver Data Length : %drn", DataLen);

    if (BufLen <= DataLen) {
        ByteTransferred = BufLen;
    } else {
        ByteTransferred = DataLen;
    }

    ByteTransferred = BufLen;
        RtlZeroMemory(
        p_DVCEXT->DataBuffer,
        1024);

    RtlCopyMemory(
        DataBuf,
        Buf,
        ByteTransferred);

    IoReleaseRemoveLock(&p_DVCEXT->RemoveLock, Irp);
    CompleteRequest(Irp, STATUS_SUCCESS, ByteTransferred);

    DbgPrint("IRP_MJ_WRITE : Endrn");
    return STATUS_SUCCESS;
}
I/O Support : Direct I/O Mode
Below graph exhibits how Direct I/O mode is supported when data is transferred between client application and driver. Under Direct I/O mode, Memory Manager will create MDL (Memory Descriptor List) to reference the physical address taken by user-provided buffer, all data can be directly referenced via MDL from kernel environment.
In DDK, some MMXxx routines are provided to help you to get MDL that maps to physical address of user-provided buffer.
Below code segment contains the statements that can support data reading under Direct I/O mode. It is achieved by Mmxxx routine, please read it carefully, and you can also find the full code in the zip file. The most important MmXxx you will use in this mode should be — MmGetSystemAddressForMdlSafe, it can obtain the MDL that references the physical address of user-buffer.
NTSTATUS
PsdoDispatchRead(
IN PDEVICE_OBJECT DeviceObject,
IN PIRP Irp
)
{
    PVOID Buf;
    ULONG BufLen;
    ULONG Offset;
    PVOID DataBuf;
    ULONG DataLen;
    ULONG ByteTransferred;
    PIO_STACK_LOCATION p_IO_STK;
    PDEVICE_EXTENSION p_DVCEXT;

    DbgPrint("IRP_MJ_READ : Beginrn");

    p_IO_STK = IoGetCurrentIrpStackLocation(Irp);
    p_DVCEXT = DeviceObject->DeviceExtension;


    Buf = MmGetSystemAddressForMdlSafe(
        Irp->MdlAddress, HighPagePriority);

    if (Buf == NULL) {
        DbgPrint("Can't get Virtual Address from MDLrn");
        return STATUS_INSUFFICIENT_RESOURCES;
    }
    BufLen = MmGetMdlByteCount(Irp->MdlAddress);
    Offset = MmGetMdlByteOffset(Irp->MdlAddress);


    DataBuf = p_DVCEXT->DataBuffer;
    if (DataBuf == NULL)
        DataLen = 0;
    else
        DataLen = 1024;

    IoAcquireRemoveLock(&p_DVCEXT->RemoveLock, Irp);

    DbgPrint("Output Buffer Length : %drn", BufLen);
    DbgPrint("Offset for Buffer in the Memory Page: %drn", Offset);
    DbgPrint("Driver Data Length : %drn", DataLen);

    if (BufLen <= DataLen) {
        ByteTransferred = BufLen;
    } else {
        ByteTransferred = DataLen;
    }

    RtlCopyMemory(
        Buf,
        DataBuf,
        ByteTransferred);

    IoReleaseRemoveLock(&p_DVCEXT->RemoveLock, Irp);
    CompleteRequest(Irp, STATUS_SUCCESS, ByteTransferred);

    DbgPrint("IRP_MJ_READ : Endrn");
    return STATUS_SUCCESS;
}
Below code segment demos the possible workflow to write data from user application to driver:
NTSTATUS
PsdoDispatchWrite(
IN PDEVICE_OBJECT DeviceObject,
IN PIRP Irp
)
{
    PVOID Buf;
    ULONG BufLen;
    ULONG Offset;
    PVOID DataBuf;
    ULONG DataLen;
    ULONG ByteTransferred;
    PIO_STACK_LOCATION p_IO_STK;
    PDEVICE_EXTENSION p_DVCEXT;
    NTSTATUS status;

    DbgPrint("IRP_MJ_WRITE : Beginrn");


    p_IO_STK = IoGetCurrentIrpStackLocation(Irp);
    p_DVCEXT = DeviceObject->DeviceExtension;


    Buf = MmGetSystemAddressForMdlSafe(
        Irp->MdlAddress, HighPagePriority);

    if (Buf == NULL) {
        DbgPrint("Can't get Virtual Address from MDLrn");
        return STATUS_INSUFFICIENT_RESOURCES;
    }

    BufLen = MmGetMdlByteCount(Irp->MdlAddress);
    Offset = MmGetMdlByteOffset(Irp->MdlAddress);


    DataBuf = p_DVCEXT->DataBuffer;
    DataLen = 1024;

    IoAcquireRemoveLock(&p_DVCEXT->RemoveLock, Irp);

    DbgPrint("Input Buffer Length : %drn", BufLen);
    DbgPrint("Offset for Buffer in the Memory Page: %drn", Offset);
    DbgPrint("Driver Data Length : %drn", DataLen);

    if (BufLen <= DataLen) {
        ByteTransferred = BufLen;
    } else {
        ByteTransferred = DataLen;
    }

    ByteTransferred = BufLen;
    RtlZeroMemory(
        p_DVCEXT->DataBuffer,
        1024);

    RtlCopyMemory(
        DataBuf,
        Buf,
        ByteTransferred);

    IoReleaseRemoveLock(&p_DVCEXT->RemoveLock, Irp);
    CompleteRequest(Irp, STATUS_SUCCESS, ByteTransferred);

    DbgPrint("IRP_MJ_WRITE : Endrn");
    return STATUS_SUCCESS;
}
Contents of the source zip package
The zip file contains below subfolders:
- Application: it contains the client applications to the Pseudo Driver.
- bin: it contains the install/uninstall utility for Pseudo Driver.
- BufferedIO_PW: it is where the Pseudo Driver that employees Buffered I/O mode for read/write resides.
- DirectIO_PW: it is where the Pseudo Driver that employees Direct I/O Mode for read/write resides.
- IOCTL_PW: it is where the Pseudo Driver that simply supports user-defined I/O Control Code resides.
- ShareFiles: it is the common shared library for PnP, Power Management, I/O completion.
- Install: it contains the source code of install/uninstall utility. (Install utility is directly referenced from DDK’s sample, I won’t provide redundant copy of it, only the uninstall utility source code is provided in it).
How to build the Pseudo Driver?
- Unzip the package to some folder you’d like it to be, let’s name it ROOT_OF_SOURCE.
- Select Start->Programs->Development Kits->Windows DDK xxxx.xxxx->Build Environments->Free Build. (This is for free release without debug information in it.)
- Enter ROOT_OF_SOURCESharedFiles subfolder, enter build -cefw, it all goes well, shared library will be generated.
- Enter ROOT_OF_SOURCEBufferedIO_PW subfolder, enter build -cefw, it will create Pseudo Driver — BufferDrv.sys. Copy this file into ROOT_OF_SOURCEBufferedIO_PWInstall if you have made add-in for any new features, the copy is for later driver install.
- Enter ROOT_OF_SOURCEDirectIO_PW subfolder, enter build -cefw, it will create Pseudo Driver — DirectDrv.sys. Copy this file into ROOT_OF_SOURCEDirectIO_PWInstall if you have made add-in for any new features, the copy is for later driver install.
- Enter ROOT_OF_SOURCEIOCTL_PW subfolder, enter build -cefw, it will create Pseudo Driver — PseudoDrv.sys. Copy this file into ROOT_OF_SOURCEIOCTL_PWInstall if you have made add-in for any new features, the copy is for later driver install.
Install Pseudo Driver into system (XP)
- Unzip the source file, launch DOS prompt-console.
- Enter into bin subfolder.
- Execute DevInst.bat, it will automatically install the Pseudo Driver into your system.
Uninstall Pseudo Driver from system (XP)
- Enter into bin subfolder.
- Execute DevRemove.bat, it will automatically uninstall all-driver related resources from your system.
Execute client application
You can enter into ROOT_OF_SOURCEApplication subfolder, execute bufferclient.exe, directclient.exe, and clientapp.exe to verify if the three Pseudo Drivers have been installed successfully.
Known Issues
- The install/uninstall of Pseudo Driver won’t wok on Window 2000, the root cause might be that the Setup API doesn’t work on Window 2000, can’t allow driver installed without a physical hardware in it. Can anybody help to resolve it? Many Thanks.
- If you’d like to install/uninstall the Pseudo Driver in Windows 2000, you will need to launch New Hardware Wizard from within Device Manager, and select to install new hardware->Display all hardware->Install from disk->»ROOT_OF_SOURCEBufferedIO_PWInstall», click on OK button. New Hardware Wizard will install Buffered I/O Pseudo Driver. (This is for Buffered I/O demo driver install. As for Direct I/O, please set source directory to «ROOT_OF_SOURCEDirectIO_PWInstall«).
- Reboot is required if the driver has been reinstalled after un-installation. I don’t know why this happened, I hope somebody can inform me. Many Thanks.
Future Directions for Pseudo Driver
- Fix above issues.
- WMI support in Pseudo Driver will be added-in.
History
- Started to create the three Pseudo Drivers on 2002/02/10, finished on 2003/12/28 (I use the rest time for it), released on 2004/10/20 after my book published.
This member has not yet provided a Biography. Assume it’s interesting and varied, and probably something to do with programming.