Время на прочтение
24 мин
Количество просмотров 197K
Многие мои друзья и знакомые крутят пальцем у виска или задаются вопросом: не жмёт ли мне череп, когда узнают, что я пишу драйвера под Linux. Слово “драйвер” окутано каким-то почти мистическим смыслом, и постичь Дао его написания способны лишь избранные гуру.
К счастью это не так. Не знаю, как обстоят дела с написанием драйверов под другие операционные системы, в т.ч. и наиболее популярные, но под linux, вне зависимости от аппаратной архитектуры драйвера пишутся очень просто. Для написания драйвера необходимы базовые знания языка си, представление о работе ОС линукс (базовые), понимание того, что мы хотим получить, желание чтения документации и исходных кодов, ну и усидчивость. Всё.
Вы хотите посмотреть как написать драйвер для своего устройства? Тогда ныряйте под кат!
Лёгкость написания драйверов объясняется тем, что исходный код linux великолепно задокументирован и доступен в исходниках, в сети множество примеров и куча литературы. А для создания драйвера вам нужен только любимый дистрибутив и исходники ядра, ну и компилятор под нужную вам архитектуру. Свой первый, не учебный, драйвер я писал для процессора PowerPC 8360, он взаимодействовал с микросхемой ПЛИС и осуществлял сброс настроек по умолчанию. Как это ни странно звучит, я его сделал, немного переписав драйвер SPI для этой архитектуры. Я это говорю к тому, что единая стандартизация написания программ в ядре Linux позволяет проводить такие штуки.
Настольная книга разработчика драйверов под Linux — это “Linux Device Drivers”. Книжка является исчерпывающим руководством по разработке и если что-то не хватает в книге, то это точно можно найти самостоятельно в исходниках ядра. Разумеется, данный пост не претендует на то, чтобы заменить эту замечательную книгу. Более того, написан он по мотивам прочтения оных трудов, но всё же не является кратким пересказом данной книги. Автор этих строк ставит собой цель заинтересовать читателя простотой и изяществом ОС Linux, и понизить порог вхождения людей в разработку драйверов. Поверьте — это очень просто!
То, для чего будем писать драйвер
Поскольку основная цель данной статьи — написание драйверов, железу мы уделим минимум внимания. Я надеюсь все дружат с паяльником, а те кто не дружат — настало время начать дружить, я кратко расскажу, что и как делалось.
Мы будем писать драйвер для дисплея семейства HD44780 подключённого через LPT-порт к компьютеру. Знаю, что порт древний, а типу дисплеев лет не меньше, чем мне, но всё же — это красивый и простой пример написания драйверов под linux, не углубляясь в аппаратные подробности. И тем более, что переделать этот драйвер для этого экрана для других архитектур будет делом замены одной строчки!
Итак, нам понадобится LPT-порт; шнурок для старого принтера и опционально разъём CENTRONICS на 36 контактов, хотя можно просто распатронить кабель; разумеется экран семейства HD44780, самое лучшее — это минимум 4х40 символов, хотя подойдут даже самые маленькие; ну и переменный резистор на 10 кОм, для регулировки контраста. Поскольку LPT-порта у меня нет уже давным-давно, я прикупил первую попавшуюся плату на PCI (можно и PCI-E). Причём плата попалась на столько китайская, что я даже не смог найти никакой документации по напаянному чипу на ней. Ничего, будем ещё и реверсить её :)))).

Аппаратные исходники
Будем считать, что достать эти компоненты не составило труда, и ваши руки горят от нетерпения всё сделать.
Предупреждение!!!
Внимательно прочитать!

Хочу обозначить, что мы работаем в самых тяжёлых условиях, с железом, да ещё и будем работать на уровне ядра. Живём, так сказать, внутри пациента. Любая ошибка в программе и ядро падает. При чём оно может даже не успеть помахать вам kernel_panic-ом, просто внезапно всё перестаёт работать. Обратите внимание, что вы запустили драйвер, выгрузили его, и вдруг начались неявные глюки — всё, ваш путь — перезагрузка. Если система жива, то командой reboot. Если уже нет, то аппаратный reset. Хотя при тяжёлых случаях иногда система может сама себя перезагрузить.
Плюс, если вы не знаете что делаете (пишете в порт, обращаетесь к областям памяти и т.п.), то лучше этого не делать. Ибо всё это в лучшем случае может сбить настройки (записанное неверное значение в порт 70h раньше сбрасывало BIOS в х86) или даже попортить оборудование (например посадив ножку GPIO на землю). Поэтому чётко понимайте что вы делаете, как на аппаратном, так на программном уровне!
Приступаем
Для счастливых обладателей встроенного lpt-порта в своём компьютере скажу, что в вашем случае порт живёт по стандартному адресу 378h. Меня можно среди ночи разбудить и я скажу эту цифру, столько с ней связанно. Но ныне нам дали вражескую плату, и нам предстоит её победить!
Вставляем плату в слот PCI или PCI-E, загружаемся и смотрим что у нас происходит на шине PCI следующей командой:
lspci  -v
…
05:01.0 Serial controller: Device 4348:5053 (rev 10) (prog-if 02 [16550])
	Subsystem: Device 4348:5053
	Flags: medium devsel, IRQ 18
	I/O ports at c030 [size=8]
	I/O ports at c020 [size=8]
	Kernel driver in use: serial
Как видим линух нашёл что-то на шине PCI, и даже попытался дать ему какой-то левый, явно неправильный драйвер. Но нас более всего интересует адреса, на которых сидит данный порт. Это строки: I/O ports, а именно цифры c030h и c020h.
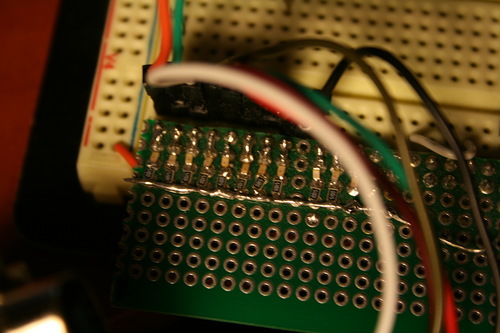
Нам теперь нужно найти какие же адреса за что отвечают. Для этого к порту вывода подключим светодиоды с резисторами примерно по такой схеме (резисторы примерно 310 Ом, или больше или меньше, не важно)

Схема проверки
Поскольку у меня уже есть заготовка светодиодов для теста такого рода, то я вставлял провода прямо в разъем CENTRONICS и у меня не влезло все 8 штук проводов, поэтому вставил только 6 (первые 4 и последние два).

Собранный тестер порта
И набросаем небольшую программку для проверки.
Для работы с портом я взял пример отсюда www.faqs.org/docs/Linux-mini/IO-Port-Programming.html#s9. Единственное, что надо исправить строку:
#include <asm/io.h>
на
#include <sys/io.h>
Делаем нормальные задержки в секунду (вместо usleep(100000);
, пишем sleep(1);) и делаем последовательно три вывода в порт:
outb(0, BASEPORT);
sleep(1);
outb(0xAA, BASEPORT);
sleep(1);
outb(0xFF, BASEPORT);
sleep(1);
Дефайн #define BASEPORT меняем на порт 0xc030. Компилируем, запускаем из под рута: светодиоды не горят. Меняем на другую цифру — 0xc020 — але оп:
Нуль

На выводах AAh
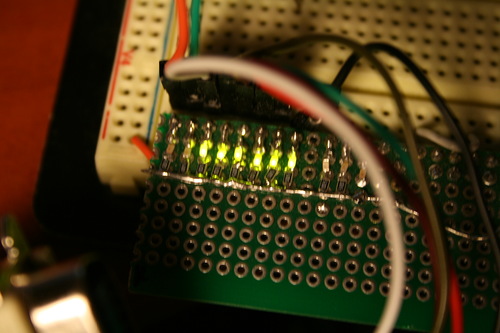
И, разумеется через секунду FFh
Результат налицо. Т.е. с нумерацией портов мы угадали, можно приступать к дровам. LPT-порт данной платы живёт по адресу. 0Xc020!
Хочу обратить внимание программистов-жестянщиков на магическое число 0xAA — это последовательность единиц и нулей. Вот так: 10101010b. Это очень удобно для всяких отладок. А вообще всякий кто работает с железом должен легко в уме переводить двоичное, десятичное, шестнадцатеричное туда-сюда-обратно.
Таки дисплей
Барабанная дробь, настало время собрать железку воедино! Для этого нам осталось всё спаять вместе. Всё собираем по следующей схеме.
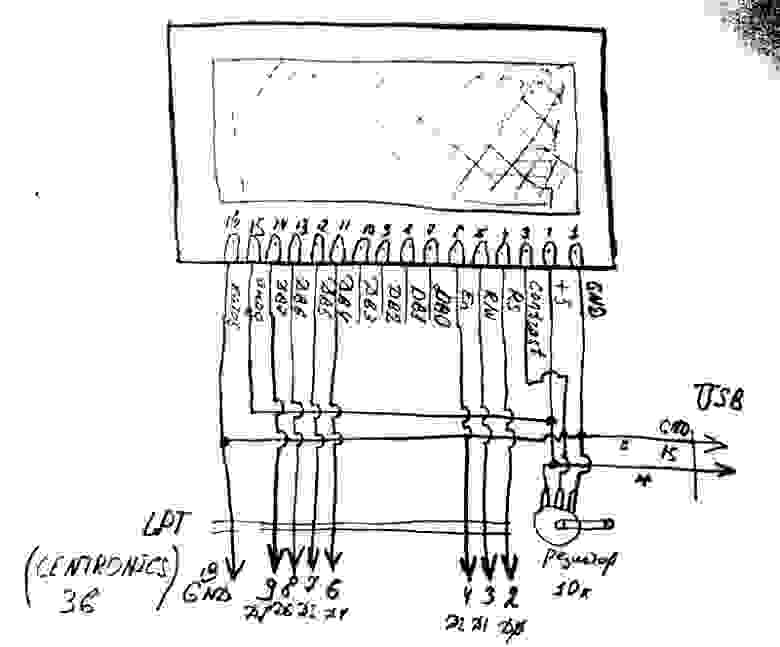
Знаю, что схема не по ГОСТу, но это и не журнал «Радио»
Для питания экрана я распатронил провод USB, и сейчас у меня к экрану идут два провода. Есть хитрый вариант, просто до него никак не доходят руки — это пустить питание USB прямо в проводе LPT, отпаяв один из многочисленных земляных проводов. Как дойдут руки — обязательно сделаю. Допишу только эту статью :)))).
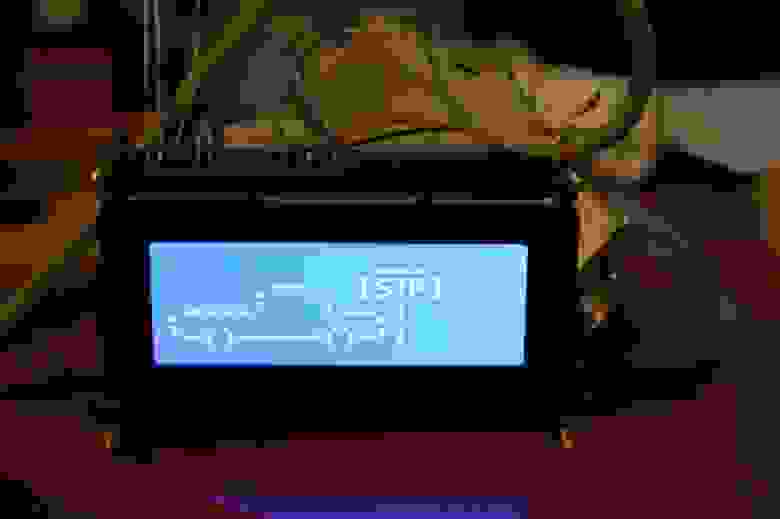
В результате, после подачи питания, мы должны получить что-то вроде этого. Подрегулируйте яркость резистором, чтобы появились две полоски. Они свидетельствуют нам о том, что дисплей не проинициализирован.
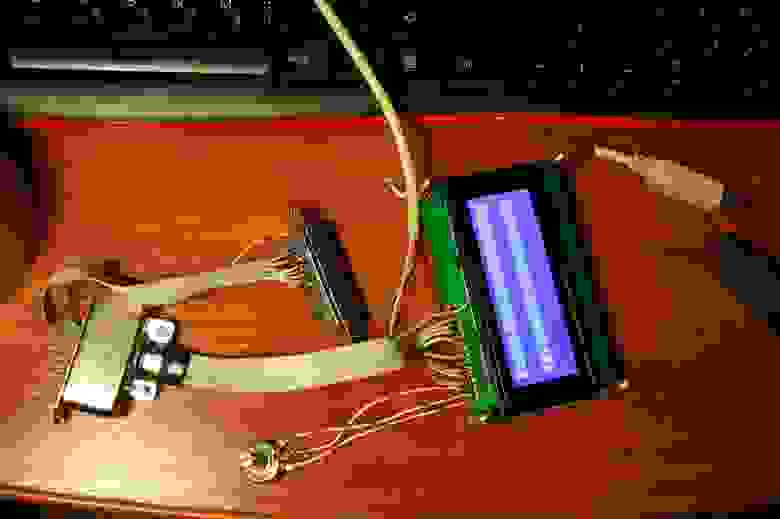
Девайс в сборе
Фух, с аппаратной частью мы закончили, пришла пора переходить к программе.
Приступаем злобным опытам с экраном в программе
В качестве готовой либы для работы с дисплеем использовал код от Arduino взятый отсюда. Я тоже не люблю эту платформу, но код годный для дисплеев, подключаемых по I2C. Если последнее слово вам ни о чём не говорит, не пугайтесь. Суть такова, что тот же самый дисплей подключён по двум проводам (как следует из названия шины), а далее там стоит регистр, который снова преобразует переданный байт в параллельную шину, прям как у нашего LPT-порта. В результате выкинув часть работы с I2C, получим годную либу.
Для чистоты переписал на сях, добавил парочку нужных функций, переименовал некоторые конфликтные, сделал ещё какие-то изменения (не помню, много воды утекло) и получил конфетку.
К слову сказать код использовался на STM32, так же с дисплеями подключающимися по I2C. А теперь мы его портируем уже на х86 да под linux. Вот она — великая сила переносимости кода! Потратив всего 10 минут, чтобы код адаптировать уже под новую платформу.
Работа с портом осуществляется в одной единственной функции — это непереносимый узел, и в зависимости от платформы способ вывода следует менять. Тут был вывод по I2C:
 void expanderWrite(unsigned char _data){
	outb(((_data) | _backlightval), BASEPORT); //x86 instruction!!!!!
}
Обратите внимание на эту функцию. Заменив её, код можно запустить в AVR, STM32, MIPS и т. д.
Уже знакомый нам вывод в порт. Дефайн порта определяем в хедере lcd.h. Всё, теперь можно попробовать сделать вывод. Программа стала ещё проще и нагляднее.
Для вывода на экран используется функция-обёртка print_to_string
void print_to_string (unsigned char col, unsigned char row, unsigned char c[], unsigned char len);
Первый параметр номер столбца (от нуля до 19), второй номер строки (от нуля до трёх), третий — указатель на символьную строку и последний — длина строки. Строка не проверяется на окончание “”, длину надо контролировать самостоятельно! В результате попробуем дисплейчик:
#include <stdio.h>
#include <stdlib.h>
#include <unistd.h>
#include <sys/io.h>
#include "lcd.h"

#define LCD_STRINGS	4 //строк
#define LCD_COLUMNS 	20 //столбцов


int main()
{
	LCD_init(0, LCD_COLUMNS, LCD_STRINGS);//инициализация экрана
	print_to_string (0, 0, "XXXXXXXXXXXXXXXXXXXX"			, 20);
	print_to_string (0, 1, "YYYYYYYYYYYYYYYYYYYY"			, 20);
	print_to_string (0, 2, "ZZZZZZZZZZZZZZZZZZZZ"			, 20);
	print_to_string (0, 3, "MMMMMMMMMMMMMMMMMMMM"			, 20);
	exit(0);
}
В результате на экране должно появится что-то типа этого:

Наш первый дебют!
Не пугайтесь этой порнографии. Этот экран был списан за битые пиксели, точнее там просто погиб контроллер от статики (их там несколько). Для работы он не годится, а для всяких подобных опытов — самое оно. Такие хреновые экраны делают китайцы!
На этом можно было бы остановиться, т.к. с данным примером можно выводить любые символы, загружать шрифты и т.п. Но, не в качестве драйвера. Хотя можно переделать в демон или как-то ещё, насколько позволит фантазия.
Поэтому, для тех кому стало скучно читать дальше, полную версию этого примера выкладываю тут.
Наша глобальная цель — драйвер устройства, поэтому к нему и приступим.
Инструментарий для сборки драйвера
Чтобы приступить к написанию драйвера, надо поставить необходимый инструментарий. Как подготовить инструментарий для Ubuntu и Debian хорошо рассказывается вот в этой статье blog.markloiseau.com/2012/04/hello-world-loadable-kernel-module-tutorial
Лишь кратко скажу, что если вам не нужно собирать debian-пакеты, а вы пишете модуль только для себя, то достаточно будет установить необходимые компоненты следующей командой:
sudo apt-get install build-essential linux-headers-$(uname -r)
Всячески рекомендую так же скачать исходные тексты своего ядра. Есть два варианта это сделать. Первый, и очевидный, но возможно слегка геморройный — это узнать версию своего ядра командой:
uname - a
и скачать его с www.kernel.org. Я же лентяй лазать по ссылкам и искать версию ядра, доверю это дело автоматике.
#переходим в режим суперпользователя
sudo -s
cd /usr/src/
apt-get source linux-image-$(uname -r)
#после чего вы получите архив вашего ядра.
#в моём случае это был файл linux_3.8.0-9.18.tar.gz он же и распаковался в /usr/src/linux-3.8.0
Усё, запомните этот путь или добавьте ссылку на него, например /usr/src/linux, но не рекомендую это делать, т.к. ядра имеют тенденцию к обновлению. Тут вопрос спорный быть или не быть, решайте сами.
Теперь вы имеете у себя настоящее сокровище: кладезь актуальный документации и чудовищное количество примеров исходного кода и разумеется необходимый плацдарм для сборки модуля.
Настоятельнейше рекомендую лазать в папочку Documents, drivers и прочие, просматривать исходные тексты — это невероятно полезно!
Собстна драйвер
Если вы думаете, что мы сейчас просто поправим мейкфайл и получим готовый драйвер, то вы глубоко заблуждаетесь. Всё, теперь мы находимся в другом мире: не в пространстве пользователя, в пространстве ядра. И тут действуют совсем другие правила.
Чтобы осознать всю бедовость ситуации, то вы должны понимать, что ядро — это одна большая-пребольшая программа. А это означает, что глобальные переменные, функции и т.п. могут быть доступны в других местах ядра! Поэтому ВСЕ глобальные переменные (их следует избегать по максимуму) должны быть объявлены как static!
Мы не будем пересобирать ядро, встраивая в него драйвер, и каждый раз перезапускаться, пробуя его. Это конечно забавно, но очень долго. Вместо этого, мы сделаем модуль ядра, который мы будем загружать и выгружать прямо во время работы.
В нашем будущем модуле, по сравнении с программой для пространства пользователя, изменения будут не очень значительные. Во первых, перенесём все сишные файлы в один, чтобы не иметь проблем с компиляцией (ну или инклудим сишники в друг друга). Хедер оставляем, но чётко определяем все параметры функций (если никаких параметров, то надо прописать void). Вспоминаем, что мы в пространстве ядра, и все библиотеки у нас другие. Меняем все хидеры на ядерные:
#include <linux/module.h>
#include <linux/init.h>
#include <linux/fs.h>  /* everything... */

#include <asm/io.h>
#include <linux/unistd.h>
#include <linux/delay.h>	/* udelay */
#include <asm/uaccess.h>
#include <linux/miscdevice.h>
Обратите внимание, что даже unistd.h и io.h стали ядерными.
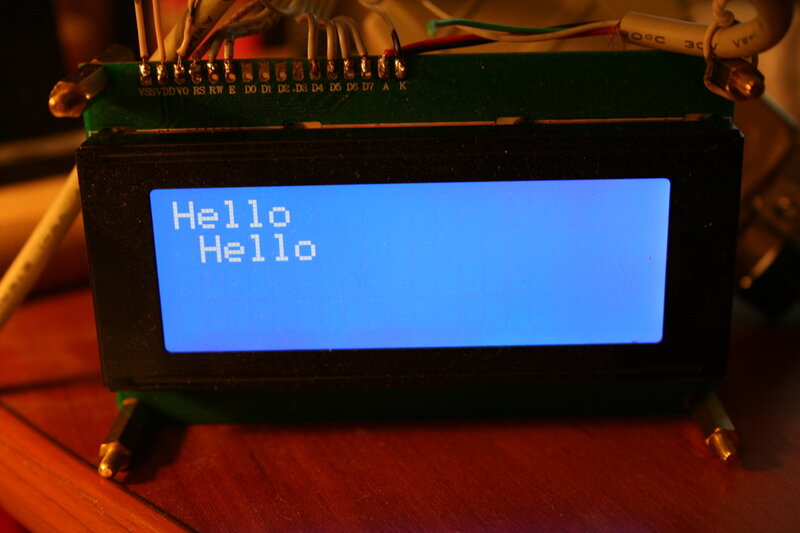
В качестве первичной основы драйвера возьмём модуль hello world. Поправим функцию init:
static int __init hello_init(void)
{
    	LCD_init(0, LCD_COLUMNS, LCD_STRINGS);
	print_to_string (0, 1, "Hello Habrahabr     "			, 20);
	printk(KERN_INFO "Lpt module initn");
	return 0;    // Non-zero return means that the module couldn't be loaded.
}
Здесь всё практически без изменений. Меняется у нас функция работы с железом (самая платформозависимая), т.к. будет работать уже с ядерной функцией вывода в порт:
void expanderWrite(unsigned char _data){
	//outb(((_data) | _backlightval), BASEPORT); //x86 instruction rootfs!!!!!
	outb_p(((_data) | _backlightval),BASEPORT); //x86 instruction kernel!!!!!
}
И, как это ни странно, функция задержек. Вообще задержки — отдельная песня, которой можно посвятить целую статью. У нас же должно быть всё быстро, и как можно меньше занимать ядро на всякую ерунду. Но всё же:
static inline int delayMicroseconds(int value)
{
	//usleep(value); //rootfs
	if (value > 1000)
		msleep(value/1000);
	udelay(value%1000);
	return 0; //kernel
}
Объяснение такой махинации простое: udelay внутри ядра не может принимать значения больше тысячи. Чтобы избежать казусов, необходима такая заглушка.
После этого собираем примерно таким мейкфайлом:
TARGET = lptlcd
obj-m	:= $(TARGET).o

KERNELDIR ?= /lib/modules/$(shell uname -r)/build
PWD       := $(shell pwd)
CC = gcc
all:
	$(MAKE) -C $(KERNELDIR) M=$(PWD)

clean:
	rm -rf *.o *~ core .depend .*.cmd *.ko *.mod.c .tmp_versions
И загружаем модуль в систему следующей командой:
sudo insmod lptlcd.ko
Если мы всё сделали правильно, то нам не будет выведено ошибок, а экран верно проинициализируется и dmesg покажет последней строкой сообщение вашего модуля:
[10036.950566] Lpt module init
Выгрузить модуль можно командой
sudo rmmod lptlcd
dmesg скажет:
[10077.176714] Cleaning up module
Вообще, чтобы не жать постоянно dmesg существует скрипт существует решение, которое мне подсказал камрад Jtu:
while true; do sudo dmesg -c; sleep 1; done
Или, если вы используете дистрибутив отличный от Ubuntu, то следует исполнять это под root, и убрать sudo.
Результат на экране:

Привет вам!
Если вы всё это увидели — поздравляю, это ваш первый рабочий бесполезный модуль ядра, который выводит надпись на экран! Это конечно занимательно, но надо таки превращать наши эксперименты в нормальный драйвер, с которым можно работать. А для этого всё же придётся рассказать о матчасти, хоть немного.
Пару слов о матчасти
Как ни крути, но без знания некой матчасти далеко не уйдёшь.Есть символьные, блочные и сетевые устройства. Также у каждого устройства есть старший и младший номер устройства. Лучше, чем в книге “The Linux Kernel Module Programming Guide” сказать нельзя, по этому приведу цитату из книги в спойлере:
Старший и младший номер устройства
Старший и младший номер устройства
Давайте взглянем на некоторые файлы устройств. Ниже перечислены те из них, которые представляют первые три раздела на первичном жестком диске:
# ls -l /dev/hda[1-3]
brw-rw----  1 root  disk  3, 1 Jul  5  2000 /dev/hda1
brw-rw----  1 root  disk  3, 2 Jul  5  2000 /dev/hda2
brw-rw----  1 root  disk  3, 3 Jul  5  2000 /dev/hda3
Обратили внимание на столбец с числами, разделенными запятой? Первое число называют «Старшим номером» устройства. Второе — «Младшим номером». Старший номер говорит о том, какой драйвер используется для обслуживания аппаратного обеспечения. Каждый драйвер имеет свой уникальный старший номер. Все файлы устройств с одинаковым старшим номером управляются одним и тем же драйвером. Все из выше перечисленных файлов устройств имеют старший номер, равный 3, потому что все они управляются одним и тем же драйвером.
Младший номер используется драйвером, для различения аппаратных средств, которыми он управляет. Возвращаясь к примеру выше, заметим, что хотя все три устройства обслуживаются одним и тем же драйвером, тем не менее каждое из них имеет уникальный младший номер, поэтому драйвер «видит» их как различные аппаратные устройства.
Устройства подразделяются на две большие группы — блочные и символьные. Основное различие блочных и символьных устройств состоит в том, что обмен данными с блочным устройством производится порциями байт — блоками. Они имеют внутренний буфер, благодаря чему повышается скорость обмена. В большинстве Unix-систем размер одного блока равен 1 килобайту или другому числу, являющемуся степенью числа 2. Символьные же устройства — это лишь каналы передачи информации, по которым данные следуют последовательно, байт за байтом. Большинство устройств относятся к классу символьных, поскольку они не ограничены размером блока и не нуждаются в буферизации. Если первый символ в списке, полученном командой ls-l /dev, ‘b’, тогда это блочное устройство, если ‘c’, тогда — символьное. Устройства, которые были приведены в примере выше — блочные. Ниже приводится список некоторых символьных устройств (последовательные порты):
crw-rw----  1 root  dial 4, 64 Feb 18 23:34 /dev/ttyS0
crw-r-----  1 root  dial 4, 65 Nov 17 10:26 /dev/ttyS1
crw-rw----  1 root  dial 4, 66 Jul  5  2000 /dev/ttyS2
crw-rw----  1 root  dial 4, 67 Jul  5  2000 /dev/ttyS3
Если вам интересно узнать, как назначаются старшие номера устройств, загляните в файл /usr/src/linux/documentation/devices.txt.
Все файлы устройств создаются в процессе установки системы с помощью утилиты mknod. Чтобы создать новое устройство, например с именем «coffee», со старшим номером 12 и младшим номером 2, нужно выполнить команду mknod /dev/coffee c 12 2. Вас никто не обязывает размещать файлы устройств в каталоге /dev, тем не менее, делается это в соответствии с принятыми соглашениями. Однако, при разработке драйвера устройства, на период отладки, размещать файл устройства в своем домашнем каталоге — наверное не такая уж и плохая идея. Единственное — не забудьте исправить место для размещения файла устройства после того, как отладка будет закончена.
Еще несколько замечаний, которые явно не касаются обсуждаемой темы, но которые мне хотелось бы сделать. Когда происходит обращение к файлу устройства, ядро использует старший номер файла, для определения драйвера, который должен обработать это обращение. Это означает, что ядро в действительности не использует и даже ничего не знает о младшем номере. Единственный, кто обеспокоен этим — это сам драйвер. Он использует младший номер, чтобы отличить разные физические устройства.
Между прочим, когда я говорю «устройства», я подразумеваю нечто более абстрактное чем, скажем, PCI плата, которую вы можете подержать в руке. Взгляните на эти два файла устройств:
% ls -l /dev/fd0 /dev/fd0u1680
brwxrwxrwx   1 root  floppy   2,  0 Jul  5  2000 /dev/fd0
brw-rw----   1 root  floppy   2, 44 Jul  5  2000 /dev/fd0u1680
К настоящему моменту вы можете сказать об этих файлах устройств, что оба они — блочные устройства, что обслуживаются одним и тем же драйвером (старший номер 2). Вы можете даже заявить, что они оба представляют ваш дисковод для гибких дисков, несмотря на то, что у вас стоит только один дисковод. Но почему два файла? А дело вот в чем, один из них представляет дисковод для дискет, емкостью 1.44 Мб. Другой — тот же самый дисковод, но для дискет емкостью 1.68 Мб, и соответствует тому, что некоторые люди называют «суперотформатированным» диском («superformatted» disk). Такие дискеты могут хранить больший объем данных, чем стандартно-отформатированная дискета. Вот тот случай, когда два файла устройства, с различным младшими номерами, фактически представляют одно и то же физическое устройство. Так что, слово «устройство», в нашем обсуждении, может означать нечто более абстрактное.
Создаём файл устройства
Мы будем использовать файл-драйвер символьного устройства. Чтобы не заниматься пересказом книги Linux Device Driver, а так же упростить себе жизнь, то я взял готовый пример регистрации символьного драйвера из этой статьи. В данной статье не занимаются поиском свободного фиксированного минора, а используется динамический минор. Для нас — это самое то.
Итак, модуль теперь будет выглядеть следующем образом: работа с экраном, которую мы реализовали выше остаётся без изменений, а вот остальную часть переписываем с нуля.
Определяем структуру file_operations
static const struct file_operations lptlcd_fops = {
	.owner  = THIS_MODULE,
	.read   = dev_read,
	.write  = dev_write,
};
Где dev_read и dev_write — это указатели на функции (регистрация обратного вызова), которые будут обрабатывать соответственно чтение и запись из файла устройства. Здесь ещё можно, да наверное и нужно добавить указатели .open и .release для проверки однократного открытия и закрытия файла устройства, но мне пока лениво.
Для регистрации драйвера заводим вот такую структуру
static struct miscdevice lptlcd_dev = {
	MISC_DYNAMIC_MINOR,
	"lptlcd",
	&lptlcd_fops
};
где MISC_DYNAMIC_MINOR — макрос для динамического минора, строка «lptlcd» — это название устройства, как оно будет выглядеть в папке /dev/ (в нашем случае будет /dev/lptlcd), &lptlcd_fops — указатель на структуру file_operations.
Код регистрации драйвера тоже весьма прост
static int __init dev_init( void ) {
	int ret;
//регистрируем файл устройство
	ret = misc_register( &lptlcd_dev );
//проблемы с регистрацией ругаемся
	if( ret ) printk( KERN_ERR "=== Unable to register misc devicen" );
//Инициализируем экран
	LCD_init(0, LCD_COLUMNS, LCD_STRINGS);
	print_to_string (0, 0, "lptlcd init     "			, 16);
	return ret;
}
Дерегистрация устройства проста:
static void __exit dev_exit( void ) {
	misc_deregister( &lptlcd_dev );
}
Ну и не забываем макросы установки колбеков, лицензии, автора и версии
module_init( dev_init );

module_exit( dev_exit );

MODULE_LICENSE("GPL");
MODULE_AUTHOR( "Dolin Sergey <dlinyj@gmail.com>" );
MODULE_VERSION( "0.1" );
Магия начинается в функции dev_read и dev_write. Начну с первой
static char *info_str = "lcdlpt device drivernAuthor Dolin Sergey aka dlinyj dliny@gmail.comn";         // buffer!

static ssize_t dev_read( struct file * file, char * buf,
						size_t count, loff_t *ppos ) {
	int len = strlen( info_str );
	if( count < len ) return -EINVAL;
	if( *ppos != 0 ) {
		return 0;
	}
	if( copy_to_user( buf, info_str, len ) ) return -EINVAL;
	*ppos = len;
	return len;
}
Делает она следующее: если мы произведём чтение файла устройства, например так:
cat /dev/lptlcd
То нам на экран будет выведена строка за указателем info_str.
Код настолько очевидный, что в комментариях, надеюсь, не нуждается. Единственное, что функция copy_to_user наравне с функцией copy_from_user используется копирования данных между адресными пространствами пользователя и ядра.
Другая функции dev_write, она-то и пихает данные в экран.
static int str_pos = 0; //номер строки
static int col_pos = 0; //номер столбца

static ssize_t dev_write( struct file *file, const char *buf, size_t count, loff_t *ppos ) {
	int i;
//Начинаем копировать байты.
	for (i=0; i<count;i++) {
//переводим курсор в текущую позицию
		setCursor(col_pos, str_pos);
//если позиция у нас нулевая по обоим координатам, то очищаем экран
		if ((col_pos==0) && (str_pos==0)) clear();
//если не перевод каретки, то выводим на экран
		if (buf[i] != 'n') {
			write_l(buf[i]);
			col_pos++;
			}
//если перевод каретки, то делаем позицию курсора максимальной
		else {col_pos=LCD_COLUMNS;}
//при максимальной позиции курсора переходим на следующую строку
		if (col_pos == LCD_COLUMNS) {
			col_pos=0;
			str_pos++;
//если исчерпали лимит строк, то идём в нулевую строку
			if (str_pos == LCD_STRINGS)	{
				str_pos=0;
			}
		}
	}
	return count;
}
На мой взгляд, не добавить и не убрать. Надеюсь тут всё понятно.
Компилируем, добавляем модуль в ядро и смотрим, что у нас появился файл:
$ ls /dev/lptlcd
/dev/ttylptlcd
Пробуем прочитать из него и записать что-то:
$ cat /dev/lptlcd
lcdlpt device driver
Author Dolin Sergey aka dlinyj dliny@gmail.com
echo -ne "Trolo PyshnPysh" > /dev/lptlcd
И увидим вот это:

Я водитель НЛО
Всё, мы теперь имеем полностью рабочий драйвер вместе с отвечающим взаимностью устройством! Поздравляю, можно бежать в лабаз за шампанским, и потом в юзерспейсе под волшебные пузырьки писать программы, работающие с этим девайсом.
Но всё же меня лично гложут какие-то сомнения, вот что-то не так…
Хочется БОЛЬШЕГО!!!
Итак, сейчас мы написали вполне рабочий драйвер, который уже можно использовать в повседневной практике. Выводить на него любой текст, даже текст из файла, использовать в своих программах. Но есть ощущение незавершённости, несовершенства.
Если вы возьмёте и почитаете любую документацию на экран, например статью, которую написал DIHALT о инициализации дисплея для AVR, то будете удивлены богатством возможностей. Например:
1. Можно загрузить текст в память, а затем просто двигать видимую область, экономя такты на загрузку новых данных (как помним, у нас могучие задержки).
2. Можно выводить текст в произвольную позицию.
3. Можно очищать экран.
4. И конечно, можно загружать свои шрифты. Не стоит обольщаться по этому поводу, доступно всего 8 символов. Например, задача реализация русского меню с этим экраном без русского шрифта, с латинскими буквами и частично загруженными русскими (8 символов), превращается во вполне занимательный ребус для целого отдела (было, плавали). Так что это юзается для каких-то специфических символов.
Хороший пример применения возможности загрузки шрифтов я нашёл на кофейном автомате на работе, в котором как раз установлен аналогичный экран, только русифицированный.

Экран на кофейном автомате
Вот тут отлично видно использование символов:
— два символа на сахар, пустой кружок (не догадался снять) и полный;
— пять символов бегущей строки (в символе 5 столбцов).
Итого 2+5 — остаётся всего один запасной символ, который так же, вероятно, используется. Не очень-то разбежишься.
В общем фишек у дисплея полно, так много, что мне уже лениво читать в документации. Но, как мы видим, всего этого мы делать пока не можем. И в этот чудесный момент настало время достать мой рояль из кустов, который уже давным-давно там стоит.
Прежде, чем я приступил к реализации данной идеи (даже до того, как начал покупать детали), я погуглил, а делал ли кто-то подобное. И, о чудо(!) таковой драйвер уже существует. Его написал Michael McLellan и обитает драйвер тут.
Честно скажу, данный драйвер на меня произвёл смешанное впечатление. Скажем так, он стал ценным пособием, как НЕ надо писать драйвера — переписать его под другую схему включения будет нетривиальной задачей, поскольку идёт тупая запись байтов, а каких, куда и зачем — непонятно. Переносимость отсутствует как класс. А куча define-ов для разных ядер выносят моск. Плюс, изначально драйвер задумывался под полную схему включения (8 бит на порт данных, см. схему lcd-mod.sourceforge.net/wiring.php ), а я сразу был нацелен на 4-х битную шину. Она хоть и медленнее (примерно в два раза, т.к. байт посылается двумя посылками), но во-первых, будет меньше паять, а во-вторых — не потребуется отыскивать другие порты. Ну и в третьих, у меня уже был отличный и логичный код для 4-х битной шины. В результате я решил таки написать свой драйвер сам и с нуля, попутно рассказывая как это сделать.
Ладно, к чёрту лирику. В том драйвере есть бесценная штука — это обработка управляющих или ESC-последовательностей. Если потрудится и качнуть этот “рояль”, то можно там найти всякие ридми и хау-ту. Так же на офсайте есть фак. Чтобы вам не пришлось лазать по этим всем данным, я решил собрать всё в одну кучу и на русском языке. Во первых, пару слов об этих последовательностях, вы все уже с ними сталкивались, когда операторе printf добавляли перевод строки в виде ‘n’ — это и есть простейшая ESC-последовательность, которая интерпретируется, как символ 0Ah в ASCII. Такая же петрушка лежит в управлении данным дисплеем.
Итак, управляющие последовательности, для нашего экрана:
- 33 = Отправка ESC-последовательности, с которой начинаются команды
- [A = Переместить курсор на одну строку вверх
- [B = Переместить курсор на одну строку вниз
- [C = Сдвинуть курсор на одну позицию вправо
- [D = Сдвинуть курсор на одну позицию влево
- [H = Переместить курсор в левый верхний угол — домой (позиция 0,0)
- [J = Очистить всё, НЕ возвращает курсор домой!
- [K = Стирает до конца строки, НЕ возвращает курсор домой!
- [M = Новая карта символов (ДЗ — объяснить зачем!)
- [Y = Позиция Y (см. FAQ ниже)
- [X = Позиция X (см. FAQ ниже)
- [R = CGRAM Выбор ячейки памяти
- [V = Прокрутка включена
- [W = Прокрутка выключена
- [b = Подсветка включена-выключена (у нас работать не будет).
Другие полезные команды, работают без префикса 33!
- r = Возврат каретки (возвращают курсор в позицию 0 на текущей линии!)
- n = Новая линия
- t = Табуляция (по умолчанию 3 символа)
Идея мне показалось очень крутой, и я нагло решил позаимствовать эту функцию в нашем проекте.
К слову, все эти последовательности чудесно работают в обычной консоли, ими можно пользоваться при выводе текста.
Кто ещё не понял, что это и зачем, то более подробно у него описано тут lcd-mod.sourceforge.net/faq.php. Чтобы не мучаться, я вольно перевёл его и заботливо положил в спойлер с картинками
FAQ
Q. Хорошо, я установил модуль, как теперь я могу его использовать?
A. Экран будет вести себя почти так же, как vt52-терминал ru.wikipedia.org/wiki/VT52, отличие состоит только в использовании пользовательских шрифтов. Если вы хотите просто вывести текст на экран, вам следует послать его в формате ASCII на устройство. Для начала новой строки, следует отправить символ подачи строки — ‘r’ и символ перевода каретки ‘n’ (см. википедию ). Например, дав команду:
echo -en "Line OnernLine Two" > /dev/lptlcd

Перевод каретки
на экран будет выведено “Line One” и “Line Two” на двух строках экрана. От себя замечу, что опции команды “echo” означают:
-n — не завершать строку символом перевода каретки ‘n’
-e — включается поддержка интерпретации управляющих последовательностей
Q. Когда я вывожу новую строку на экран, курсор не перемещается в начало строки?
A. Вы должны так же послать на экран символ перевода на новую строку и перевод каретки. Например:
echo -en "line1rnline2" > /dev/lptlcd
(см. предыдущий пример)
Q. Почему, когда я пишу более, чем n линий на мой n-строчный эран, я вижу только n-1 линий, а последняя линия пустая?
A. Это потому, что вы используете команду “echo”. Данная комманда, без опций добавляет символ перевода каретки ‘n’ в конце строки. Необходимо использовать аргумент -n, как я говорил выше.
Q. Как я могу передвигать курсор по кругу?
A. Вы можете установить курсор где хотите с помощью специальной управляющей последовательности: ESC-Y[Y-координата+037][X-координата+037]. Например:
echo -en "33[Y3737Hello" > /dev/lptlcd

Hello в позиции 0:0
Курсор будет перемещён в нулевую строку, нулевой столбец и будет выведено на экран слово “Hello”;
echo -en "33[Y4040Hello" > /dev/lptlcd
будет выведено тоже самое, но в позицию 1, 1;
Hello в позиции 1:1 (без очистки экрана)
echo -en "33[Y4141Hello" > /dev/lptlcd
аналогично, но напечатано будет в позицию 2, 2

Hello в позиции 2:2 (без очистки экрана, с предыдущими сообщениями)
Число “037” может немного запутать особенно, если вы не привыкли использовать восьмиричную арифметику, в будущих версиях я думаю о том, чтобы отбросить весь протокол vt52 и заменить его в более понятную реализацию (как автор жестоко ошибается  )..
)..
Q. Как я могу использовать мои собственные шрифты?
A. Контроллер экрана HD4480 поддерживат до восьми символов определённых пользователем и наш модуль ядра поддерживает это, но это может быть довольной сложной операцией. Я собираюсь написать красивую GUI делающее это для вас, когда я вернусь к ней (или когда вы сможете написать об этом мне). Готов поспорить, что это предложение прочтут сущие единицы. Трололо, проверка на внимательность.
Вы можете установить один символ, отправив в устройство следующую команду: Esc-R[позиция шрифта][8 байт, определяющих битовую маску символа]. Символ определяет только последние пять бит во всём байте, поскольку в символе используется всего 5 столбцов. Я уже говорил об этом выше. Например:
echo -en "33[R13737373737373737" > /dev/lptlcd
Устанавливает символпо адресу 1, представляющую собой полностью закрашенный блок. Такой же, как я выше приводил у кофейного автомата в полосе готовности.

Символ полностью закрашенного блока
echo -en "33[R23700370037003700" > /dev/lptlcd
Устанавливает символ по адресу 0 в виде горизонтальных полос.

Символ горизонтальных полос
Чтобы вывести все «левые» символы, надо ввести следующую команду:
echo -en "0001020304050607" > /dev/lptlcd

Вся порнография, что у нас есть сейчас в памяти.
В общем, как видно, требуется переписать функцию dev_write. И она теперь стала выглядеть так:
static ssize_t dev_write( struct file *file, const char *buf, size_t count, loff_t *ppos ) {
	int i;
	for (i=0; i<count;i++)
		handleInput(buf[i]);
	return count;
}
А всю грязную работу по разбору полётов на себя взяла функция handleInput. Код данной функции монструозен, поэтому я его приводить тут не буду. Оставлю вам на домашнее задание разобраться с ним и найти бекдор. Кто найдёт пасхальное яйцо в коде, отмечайтесь в комментах, тому конфетка.
Для затравки видос бекдора (он реализован в драйвере)
ASCII-ART Move! Запускается пасхалкой
Те, кто покажут мне аналогичный видос на своих экранах получат от меня подарок!
В общем, в результате мы получили кошерный экран, который можно использовать для вывода разной полезной и бесполезной информации. Вот, например на него можно выводить текущее время.
while true; do echo -en "33[H`date +"%d.%m.%Y"` rn`date +%r`" > /dev/lptlcd ; sleep 1s; done

И они таки ходят!
Разумеется, написал — поделись с народом! Исходные коды доступны по ссылке (всё никак не соберусь юзать гитхаб для обмена кодом, позор).
Чего хотелось бы сделать
Просто так экранчик на столе мало понятно зачем нужен, это правда. Тем более в век планшетов и прочей техники. Когда всё можно перенаправить на ваш смартфон. Другое дело, что скоро грядёт Новый Год, и вспоминается один замечательный новогодний девайс — ёлочка на процессоре lpc2104

Embedded Artists Cristmas Tree
Не стоит гуглить этот девайс, все упоминания о нём убраны даже с официального сайта, а редкие упоминания о нём сложно найти даже на просторах интернета.
Я даже снял видео работы этой ёлочки
Как работает эмбеддеровская ёлочка
Кроме весёлого мигания огоньками у этого забавного устройства была крутая особенность — можно было вести переписку с другими владельцами таких ёлочек. Был некий сервант, куда через специальную форму можно было вбить сообщение и оно рассылалось по ёлочкам и выводилось на экран. Это было очень и очень круто и весело.
Теперь внимание: идея! Сейчас ничего не мешает заплатить на месяц 500 рублей (а если скинемся, сумма будет совсем мелкой), и арендовать сервак на виртуалке. Туда поставить программулину, которая будет рассылать сообщения. Либо jabber либо какие-то другие способы (да хоть nc и telnet всё сделать). А на компе поставить приёмник этих сообщений. И на Новый Год все мы будем иметь поздравления.
Кто готов помочь это реализовать, и кто будет делать себе такие экраны? Если нас наберётся хотя бы три человека, то будет весьма и весьма весело! Вливайтесь в тусовку разработчиков :)))). Выслушаю ЛЮБЫЕ идеи!
Итог
Буду краток. Данным постом я ставил цель не сделать пересказ книги Linux Device Drivers, а просто показать, что написание дров это тривиальная задача. Я умышленно ушёл от USB, т.к. там достаточно много теории, подводных камней и прочего геморроя. Но вы вполне можете переписать данный модуль для USB-LPT-шнурков, типа таких

Делается относительно просто: перехватывается протокол обмена с usb и реализуется в вашей программе. Поверьте — это просто. Будет интересно как — я вам расскажу!
А данный драйвер, поменяв всего ОДНУ(!!!) строку вывода в порт можно переписать для применения, например на Raspberry Pi на порт GPIO. Точно, что написать я вам не скажу, но всё решается чтением даташита на используемый проц и занимает всего несколько минут.
Благодарности:
1. Хочу высказать главную благодарность своему учителю Боронину Сергею Сергеевичу sboronin за обучению программированию под linux и прекрасному курсу разработки драйверов под linux. Благодаря его курсам я весьма успешно работаю разработчиком.
2. Камраду Ariman с его замечательной серией статей про разработку дисплея для роутера (первая, вторая, третья часть (а ведь обещалась четвёртая…)). Эта серия, хоть и весьма специфическая, прекрасно иллюстрирует создание устройства и написание для него соответствующих драйверов. И я неоднократно обращался к ней, как к источнику бесценной информации, как в разработке драйверов, так и в разработке модулей для OpenWRT.
3. Разумеется автору книги “Linux Device Driver” Greg Kroah-Hartman. Эта книга просто библия, и в ядре часто можно встретить драйвера, которые базируются на его примерах. Например, в драйверах USB встретил такой:
/drivers/usb/misc/idmouse.c
…
Derived from the USB Skeleton driver 1.1,
Copyright © 2003 Greg Kroah-Hartman (greg@kroah.com)
…
И так во многих драйверах. Так, что пользуйтесь книгой — это библия.
4. Michael McLellan автору аналогичного драйвера. Как он говорит в своём драйвере:
* LCD driver for HD44780 compatible displays connected to the parallel port,
* because real men use device files.
К сожалению у меня нет его координат, кроме ссылки на linkedin. Почта из его программ уже не работает. Так, что как ему лично сказать спасибо, я не знаю… Если кто ему напишет, я буду очень признателен.
Ссылки
1. Исходники моей программы для rootfs работающая с дисплеем качнуть
2. Исходники моего модуля ядра, который мы разбирали в этом посте качнуть
3. «Рояль в кустах»
4. dmilvdv.narod.ru/translate.html Переводы статей. Настольная книга — Linux Device Drivers, Third Edition».
5. Отличная библиотека статей по программированию на русском от IBM обитает тут. Конкретно по разработке модулей ядра
6. Описание дисплея HD44780 (для AVR, но в целом оно универсально) easyelectronics.ru/avr-uchebnyj-kurs-podklyuchenie-k-avr-lcd-displeya-hd44780.html
7. Программы для дисплея (модуль ядра и спектральный анализатор для этого модуля) от Michael McLellan linux.downloadatoz.com/developer-michael-mclellan.html
P.S. Не стреляйте в пианиста, он играет как умеет. Такую громадную статью при моей врождённой неграмотности написать нормально нельзя. Обязательно присылайте мне замечания, правки, и дополнения, буду очень признателен!!!
P.P.S. Ничто не греет душу так, как оставленный комментарий.
P.P.P.S. В тексте тоже есть пасхалка, кто найдёт — тому конфетка ;)))
UPD Вот я создал группу, для желающих участвовать меседжере
Для участников, желающих, прошу присоединяться :)))
C, Разработка под Linux, Из песочницы
Рекомендация: подборка платных и бесплатных курсов таргетированной рекламе — https://katalog-kursov.ru/
Здравствуйте, дорогие хабрачитатели.
Цель данной статьи — показать принцип реализации драйверов устройств в системе Linux, на примере простого символьного драйвера.
Для меня же, главной целью является подвести итог и сформировать базовые знания для написания будущих модулей ядра, а также получить опыт изложения технической литературы для публики, т.к. через полгода я буду выступать со своим дипломным проектом (да я студент).
Это моя первая статья, пожалуйста не судите строго!
P.S
Получилось слишком много букв, поэтому я принял решение разделить статью на три части:
Часть 1 — Введение, инициализация и очистка модуля ядра.
Часть 2 — Функции open, read, write и trim.
Часть 3 — Пишем Makefile и тестируем устройство.
Перед вступлением, хочу сказать, что здесь будут изложены базовые вещи, более подробная информация будет изложена во второй и последней части данной статьи.
Итак, начнем.
Подготовительные работы
UPD.
Спасибо Kolyuchkin за уточнения.
Символьный драйвер (Char driver) — это, драйвер, который работает с символьными устройствами.
Символьные устройства — это устройства, к которым можно обращаться как к потоку байтов.
Пример символьного устройства — /dev/ttyS0, /dev/tty1.
UPD.
К вопросу про проверсию ядра:
~$ uname -r
4.4.0-93-generic
Драйвер представляет каждое символьное устройство структурой scull_dev, а также предостовляет интерфейс cdev к ядру.
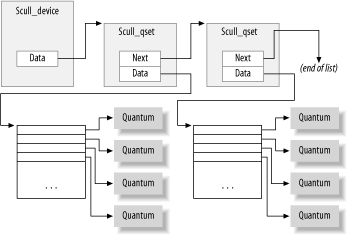
struct scull_dev {
	struct scull_qset *data;  /* Указатель на первый кусок памяти */
	int quantum;		  /* Размер одного кванта памяти */
	int qset;		  /* Количество таких квантов */
	unsigned long size;	  /* Размер используемой памяти */
	struct semaphore sem;     /* Используется семафорами */
	struct cdev cdev;	  /* Структура, представляющая символьные устройства */
};

struct scull_dev *scull_device;
Устройство будет представлять связный список указателей, каждый из которых указывает на структуру scull_qset.
struct scull_qset {
	void **data;
	struct scull_qset *next;
};
Для наглядности посмотрите на картинку.
Для регистрации устройства, нужно задать специальные номера, а именно:
MAJOR — старший номер (является уникальным в системе).
MINOR — младший номер (не является уникальным в системе).
В ядре есть механизм, который позволяет регистрировать специализированные номера вручную, но такой подход нежелателен и лучше вежливо попросить ядро динамически выделить их для нас. Пример кода будет ниже.
После того как мы определили номера для нашего устройства, мы должны установить связь между этими номерами и операциями драйвера. Это можно сделать используя структуру file_operations.
struct file_operations scull_fops = {
	.owner = THIS_MODULE,
	.read = scull_read,
	.write = scull_write,
	.open = scull_open,
	.release = scull_release,
};
В ядре есть специальные макросы module_init/module_exit, которые указывают путь к функциям инициализации/удаления модуля. Без этих определений функции инициализации/удаления никогда не будут вызваны.
module_init(scull_init_module);
module_exit(scull_cleanup_module);
Здесь будем хранить базовую информацию об устройстве.
int scull_major = 0;		/* MAJOR номер*/
int scull_minor = 0;		/* MINOR номер*/
int scull_nr_devs = 1;		/* Количество регистрируемых устройств */
int scull_quantum = 4000;	/* Размер памяти в байтах */
int scull_qset = 1000;		/* Количество квантов памяти */
Последним этапом подготовительной работы будет подключение заголовочных файлов.
Краткое описание приведено ниже, но если вы хотите копнуть поглубже, то добро пожаловать на прекрасный сайт: lxr
#include <linux/module.h> /* Содержит функции и определения для динамической загрузки модулей ядра */
#include <linux/init.h>  /* Указывает на функции инициализации и очистки */
#include <linux/fs.h>    /* Содержит функции регистрации и удаления драйвера */
#include <linux/cdev.h>  /* Содержит необходимые функции для символьного драйвера */
#include <linux/slab.h>  /* Содержит функцию ядра для управления памятью */
#include <asm/uaccess.h> /* Предоставляет доступ к пространству пользователя */
Инициализация
Теперь давайте посмотрим на функцию инициализации устройства.
static int scull_init_module(void)
{
	int rv, i;
	dev_t dev;

	rv = alloc_chrdev_region(&dev, scull_minor, scull_nr_devs, "scull");

	if (rv) {
		printk(KERN_WARNING "scull: can't get major %dn", scull_major);
		return rv;
	}

        scull_major = MAJOR(dev);

	scull_device = kmalloc(scull_nr_devs * sizeof(struct scull_dev), GFP_KERNEL);

	if (!scull_device) {
		rv = -ENOMEM;
		goto fail;
	}

	memset(scull_device, 0, scull_nr_devs * sizeof(struct scull_dev));

	for (i = 0; i < scull_nr_devs; i++) {
		scull_device[i].quantum = scull_quantum;
		scull_device[i].qset = scull_qset;
		sema_init(&scull_device[i].sem, 1);
		scull_setup_cdev(&scull_device[i], i);
	}

	dev = MKDEV(scull_major, scull_minor + scull_nr_devs);

	return 0;

fail:
	scull_cleanup_module();
	return rv;
}
Первым делом, вызывая alloc_chrdev_region мы регистрируем диапазон символьных номеров устройств и указываем имя устройства. После вызовом MAJOR(dev) мы получаем старший номер.
Далее проверяется вернувшееся значение, если оно является кодом ошибки, то выходим из функции. Стоит отметить, что при разработке реального драйвера устройства следует всегда проверять возвращаемые значения, а также указатели на любые элементы (NULL?).
rv = alloc_chrdev_region(&dev, scull_minor, scull_nr_devs, "scull");

if (rv) {
	printk(KERN_WARNING "scull: can't get major %dn", scull_major);
	return rv;
}

scull_major = MAJOR(dev);
Если вернувшееся значение не является кодом ошибки, продолжаем выполнять инициализацию.
Выделяем память, делая вызов функции kmalloc и обязательно проверяем указатель на NULL.
UPD
Стоит упомянуть, что вместо вызова двух функций kmalloc и memset, можно использовать один вызов kzalloc, который выделят область памяти и инициализирует ее нулями.
scull_device = kmalloc(scull_nr_devs * sizeof(struct scull_dev), GFP_KERNEL);

if (!scull_device) {
	rv = -ENOMEM;
	goto fail;
}

memset(scull_device, 0, scull_nr_devs * sizeof(struct scull_dev));
Продолжаем инициализацию. Главная здесь функция — это scull_setup_cdev, о ней мы поговорим чуть ниже. MKDEV служит для хранения старший и младших номеров устройств.
for (i = 0; i < scull_nr_devs; i++) {
		scull_device[i].quantum = scull_quantum;
		scull_device[i].qset = scull_qset;
		sema_init(&scull_device[i].sem, 1);
		scull_setup_cdev(&scull_device[i], i);
	}

	dev = MKDEV(scull_major, scull_minor + scull_nr_devs);
Возвращаем значение или обрабатываем ошибку и удаляем устройство.
return 0;

fail:
	scull_cleanup_module();
	return rv;
}
Выше были представлены структуры scull_dev и cdev, которые реализуют интерфейс между нашим устройством и ядром. Функция scull_setup_cdev выполняет инициализацию и добавление структуры в систему.
static void scull_setup_cdev(struct scull_dev *dev, int index)
{
	int err, devno = MKDEV(scull_major, scull_minor + index);

	cdev_init(&dev->cdev, &scull_fops);

	dev->cdev.owner = THIS_MODULE;
	dev->cdev.ops = &scull_fops;

	err = cdev_add(&dev->cdev, devno, 1);

	if (err)
		printk(KERN_NOTICE "Error %d adding scull  %d", err, index);
}
Удаление
Функция scull_cleanup_module вызывается при удалении модуля устройства из ядра.
Обратный процесс инициализации, удаляем структуры устройств, освобождаем память и удаляем выделенные ядром младшие и старшие номера.
void scull_cleanup_module(void)
{
	int i;
	dev_t devno = MKDEV(scull_major, scull_minor);

	if (scull_device) {
		for (i = 0; i < scull_nr_devs; i++) {
			scull_trim(scull_device + i);
			cdev_del(&scull_device[i].cdev);
		}

		kfree(scull_device);
	}

	unregister_chrdev_region(devno, scull_nr_devs);
}
Полный код
#include <linux/module.h>
#include <linux/init.h>
#include <linux/fs.h>
#include <linux/cdev.h>
#include <linux/slab.h>
#include <asm/uaccess.h>

int scull_major = 0;
int scull_minor = 0;
int scull_nr_devs = 1;
int scull_quantum = 4000;
int scull_qset = 1000;

struct scull_qset {
	void **data;
	struct scull_qset *next;
};

struct scull_dev {
	struct scull_qset *data;
	int quantum;
	int qset;
	unsigned long size;
	unsigned int access_key;
	struct semaphore sem;
	struct cdev cdev;
};

struct scull_dev *scull_device;

int scull_trim(struct scull_dev *dev)
{
	struct scull_qset *next, *dptr;
	int qset = dev->qset;
	int i;

	for (dptr = dev->data; dptr; dptr = next) {
		if (dptr->data) {
			for (i = 0; i < qset; i++)
				kfree(dptr->data[i]);

			kfree(dptr->data);
			dptr->data = NULL;
		}

		next = dptr->next;
		kfree(dptr);
	}

	dev->size = 0;
	dev->quantum = scull_quantum;
	dev->qset = scull_qset;
	dev->data = NULL;

	return 0;
}

struct file_operations scull_fops = {
	.owner = THIS_MODULE,
	//.read = scull_read,
	//.write = scull_write,
	//.open = scull_open,
	//.release = scull_release,
};

static void scull_setup_cdev(struct scull_dev *dev, int index)
{
	int err, devno = MKDEV(scull_major, scull_minor + index);

	cdev_init(&dev->cdev, &scull_fops);

	dev->cdev.owner = THIS_MODULE;
	dev->cdev.ops = &scull_fops;

	err = cdev_add(&dev->cdev, devno, 1);

	if (err)
		printk(KERN_NOTICE "Error %d adding scull  %d", err, index);
}

void scull_cleanup_module(void)
{
	int i;
	dev_t devno = MKDEV(scull_major, scull_minor);

	if (scull_device) {
		for (i = 0; i < scull_nr_devs; i++) {
			scull_trim(scull_device + i);
			cdev_del(&scull_device[i].cdev);
		}

		kfree(scull_device);
	}

	unregister_chrdev_region(devno, scull_nr_devs);
}

static int scull_init_module(void)
{
	int rv, i;
	dev_t dev;


	rv = alloc_chrdev_region(&dev, scull_minor, scull_nr_devs, "scull");

	if (rv) {
		printk(KERN_WARNING "scull: can't get major %dn", scull_major);
		return rv;
	}

        scull_major = MAJOR(dev);

	scull_device = kmalloc(scull_nr_devs * sizeof(struct scull_dev), GFP_KERNEL);

	if (!scull_device) {
		rv = -ENOMEM;
		goto fail;
	}

	memset(scull_device, 0, scull_nr_devs * sizeof(struct scull_dev));

	for (i = 0; i < scull_nr_devs; i++) {
		scull_device[i].quantum = scull_quantum;
		scull_device[i].qset = scull_qset;
		sema_init(&scull_device[i].sem, 1);
		scull_setup_cdev(&scull_device[i], i);
	}

	dev = MKDEV(scull_major, scull_minor + scull_nr_devs);

	printk(KERN_INFO "scull: major = %d minor = %dn", scull_major, scull_minor);

	return 0;

fail:
	scull_cleanup_module();
	return rv;
}

MODULE_AUTHOR("Your name");
MODULE_LICENSE("GPL");

module_init(scull_init_module);
module_exit(scull_cleanup_module);
С удовольствием выслушаю конструктивную критику и буду ждать feedback’a.
Если вы нашли ошибки или я не правильно изложил материал, пожалуйста, укажите мне на это.
Для более быстрой реакции пишите в ЛС.
Спасибо!
Литература
- Linux device drivers 3rd edition
- Essential linux device drivers
- Download driver — 2.19 KB
Table of Contents
- Introduction
- General Information
- Functions of Module Loading and Unloading
- Registration of the Character Device
- The Usage of Memory Allocated in the User Mode
- The Kernel Module Build System
- The Module Loading and Its Usage
- Bibliography List
Introduction
In this article, I am going to describe the process of writing and building of a simple driver-module for Linux OS. Meanwhile, I will touch upon the following questions:
- The system of the kernel logging
- The work with character devices
- The work with the “user level” memory from the kernel
The article concerns the Linux kernel version 2.6.32 because other kernel versions can have the modified API, which is used in examples or in the build system.
General Information
Linux is a monolithic kernel. That is why the driver for it should be compiled together with the kernel itself or should be implemented in the form of a kernel module to avoid the recompiling of the kernel when driver adding is needed. This article deals with the kernel modules exactly.
A module is an object file prepared in a special way. The Linux kernel can load a module to its address space and link the module with itself. The Linux kernel is written in 2 languages: C and assembler (the architecture dependent parts). The development of drivers for Linux OS is possible only in C and assembler languages, but not in C++ language (as for the Microsoft Windows kernel). It is connected with the fact that the kernel source pieces of code, namely, header files, can contain C++ key words such as new, delete and the assembler pieces of code can contain the ‘::’ lexeme.
The module code is executed in the kernel context. It rests some additional responsibility in the developer: if there is an error in the user level program, the results of this error will affect mainly the user program; if an error occurs in the kernel module, it may affect the whole system. But one of the specifics of the Linux kernel is a rather high resistance to errors in the modules’ code. If there is a non-critical error in a module (such as the dereferencing of the null pointer), the oops message will be displayed (oops is a deviation from the normal work of Linux and in this case, the kernel creates a log record with the error description). Then, the module, in which the error appeared, is unloaded, while the kernel itself and the rest of modules continue working. However, after the oops message, the system kernel can often be in an inconsistent state and the further work may lead to the kernel panic.
The kernel and its modules are built into a practically single program module. That is why it is worth remembering that within one program module, one global name space is used. To clutter up the global name space minimally, one should monitor that the module exports only the necessary minimum of global characters and that all exported global characters have the unique names (the good practice is to add the name of the module, which exports the character, to the name of the character as a prefix).
Functions of Module Loading and Unloading
The piece of code that is required for the creation of the simplest module is very simple and laconic. It looks as follows:
#include <linux/init.h>
#include <linux/module.h>

static int my_init(void)
{
                       return  0;
}

static void my_exit(void)
{
                       return;
}

module_init(my_init);
module_exit(my_exit);
This piece of code does not do anything but allowing loading and unloading the module. When loading the driver, the my_init function is called; when unloading the driver, the my_exit function is called. We inform the kernel about it with the help of the module_init and module_exit macros. These functions must have exactly the following signature:
int init(void);
void exit(void);
The linking of the linux/module.h header file is necessary for adding information about a kernel version, for which the module is built, to the module itself. Linux OS will not allow loading of the module that was built for another kernel version. It is because the kernel API changes intensively and the change of signature of one of the functions used in the module will lead to the damage of the stack when calling this function. The linux/init.h header file contains the declaration of the module_init and module_exit macros.
Registration of the Character Device
We will not dwell on such a simple module. I would like to demonstrate the work with the device files and with logging in the kernel. These are tools that will be useful for each driver and will somewhat expand the development in the kernel mode for Linux OS.
First, I would like to say a few words about the device file. The device file is a file that is usually located in hierarchy of the /dev/ folder. It is the easiest and the most accessible way of interaction of the user code and the kernel code. To make it shorter, I can say that everything that is written to such file is passed to the kernel, to the module that serves this file; everything that is read from such file comes from the module that serves the file. There are two types of device files: character (non-buffered) and block (buffered) files. The character file implies the possibility to read and write information to it by one character whereas the block file allows reading and writing only the data block as a whole. This article will touch upon only the character device files.
In Linux OS, device files are identified by two positive numbers: major device number and minor device number. The major device number usually identifies the module that serves the device file or a group of devices served by a module. The minor device number identifies a definite device in the range of the defined major device number. These two numbers can be either defined as constants in the driver code or received dynamically. In the first case, the system will try to use the defined numbers and if they are already used, it will return an error. Functions that allocate the device numbers dynamically also reserve the allocated device numbers so that the dynamically allocated device number cannot be used by another module when it is allocated or used.
To register the character device, the following function can be used:
int register_chrdev (unsigned int   major,
                     const char *   name,
					 const struct   fops);
					 file_operations *
It registers the device with the specified name and major device number (or it allocates the major device number if the major parameter is equal to zero) and links the file_operations structure with the device. If the function allocates the major device number, the returned value will be equal to the allocated number. In other case, the zero value means the successful completion and the negative value means an error. The registered device is associated with the defined major device number and minor device number is in the range of 0 to 255.
The string that is passed as the name parameter is the name of the device or the module if the last registers only one device and is used for the identification of the device in the /sys/devices file. The file_operations structure contains the pointers to the functions that must process the manipulations with the device file (such as open, read, write, etc.) and the pointer to the module structure that identifies the module, which implements these functions. The structure for the kernel version 2.6.32 looks as follows:
struct file_operations {
       struct module *owner;
       loff_t (*llseek) (struct file *, loff_t, int);
       ssize_t (*read) (struct file *, char *, size_t, loff_t *);
       ssize_t (*write) (struct file *, const char *, size_t, loff_t *);
       int (*readdir) (struct file *, void *, filldir_t);
       unsigned int (*poll) (struct file *, struct poll_table_struct *);
       int (*ioctl) (struct inode *, struct file *, unsigned int, unsigned long);
       int (*mmap) (struct file *, struct vm_area_struct *);
       int (*open) (struct inode *, struct file *);
       int (*flush) (struct file *);
       int (*release) (struct inode *, struct file *);
       int (*fsync) (struct file *, struct dentry *, int datasync);
       int (*fasync) (int, struct file *, int);
       int (*lock) (struct file *, int, struct file_lock *);
    ssize_t (*readv) (struct file *, const struct iovec *, unsigned long,
          loff_t *);
    ssize_t (*writev) (struct file *, const struct iovec *, unsigned long,
          loff_t *);
    };
It is not necessary to implement all functions from the file_operations structure to use the file. If the function is not implemented, the corresponding pointer can be of zero value. In this case, the system will implement some default behavior for this function. It is enough to implement the read function for our example.
As our driver will provide the work of devices of one type, we can create the global static file_operations structure and fill it statically. It can look as follows:
static struct file_operations simple_driver_fops =
{
	.owner   = THIS_MODULE,
	.read    = device_file_read,
};
Here, the THIS_MODULE macro (declared in linux/module.h) will be converted to the pointer to the module structure that corresponds to our module. The device_file_read is a pointer to the function with the prototype, whose body we will write later.
ssize_t device_file_read (struct file *, char *, size_t, loff_t *);
So, when we have the file_operations structure, we can write a pair of functions for registration and unregistration of the device file:
static int device_file_major_number = 0;
static const char device_name[] = "Simple-driver";

static int register_device(void)
{
		int result = 0;

		printk( KERN_NOTICE "Simple-driver: register_device() is called." );

		result = register_chrdev( 0, device_name, &simple_driver_fops );
		if( result < 0 )
		{
			printk( KERN_WARNING "Simple-driver:  can't register
				character device with errorcode = %i", result );
			return result;
		}

		device_file_major_number = result;
		printk( KERN_NOTICE "Simple-driver: registered character device
			with major number = %i and minor numbers 0...255"
			 , device_file_major_number );

		return 0;
}
We store the major device number in the device_file_major_number global variable as we will need it for the device file unregistration in the end of the “driver life”.
In the listing above, the only function, which was not mentioned, is the printk() function. It is used for logging of messages from the kernel. The printk() function is declared in the linux/kernel.h file and works like the printf library function except one nuance. As you have already noticed, each format string of printk in this listing has the KERN_SOMETHING prefix. It is the message priority and it can be of eight levels, from the highest zero level (KERN_EMERG), which informs that the kernel is unstable, to the lowest seventh level (KERN_DEBUG).
The string that is formed by printk function is written to the circular buffer. From there, it is read by the klogd daemon and gets to the system log. The printk function is written in such a way that it can be called from any place in the kernel. The worst that can happen is circular buffer overflow when the oldest messages will not get to the system log.
Now, we need only to write the function for the device file unregistration. Its logic is simple: if we succeed in the device file registration, the device_file_major_number value will not be zero and we will be able to unregister it with the help of the unregister_chrdev function declared in linux/fs.h. The first parameter is the major device number and the second is the device name string. The unregister_chrdev function, by its action, is fully symmetric to the register_chrdev function.
We receive the following piece of code for the device registration:
void unregister_device(void)
{
	printk( KERN_NOTICE "Simple-driver: unregister_device() is called" );
	if(device_file_major_number != 0)
	{
		unregister_chrdev(device_file_major_number, device_name);
	}
}
The Usage of Memory Allocated in the User Mode
We need to write the function for reading characters from the device. It must have the signature that is appropriate for the signature from the file_operations structure:
ssize_t (*read) (struct file *, char *, size_t, loff_t *);
The first parameter of this function is the pointer to the file structure from which we can find out the details: what file we work with, what private data is associated with it, etc. The second parameter is a buffer that is allocated in the user space for the read data. The third parameter is the number of bytes to be read. The fourth parameter is the offset (position) in the file, starting from which we should count bytes. After the performing of the function, the position in the file should be refreshed. Also the function should return the number of successfully read bytes.
One of the actions that our read function should perform is the copying of the information to the buffer allocated by the user in the address space of the user mode. We cannot just dereference the pointer from the address space of the user mode because the address, to which it refers, can have another value in the kernel address space. There is a special set of functions and macros (declared in asm/uaccess.h) for working with pointers from the user address space. The copy_to_user() function is the best for our task. As it can be seen from its name, it copies data from the buffer in the kernel to the buffer allocated by the user. Besides, the copy_to_user() function checks the pointer validity and the sufficiency of the size of the buffer allocated in the user space. It makes it easier to process errors in the driver. The copy_to_user prototype looks like the following:
long copy_to_user( void __user *to, const void * from, unsigned long n );
The first parameter, which should be passed to the function, is the user pointer to the buffer. The second parameter should be the pointer to the data source, the third – the number of bytes to be copied. The function will return 0 in case of success and not 0 in case of error. The __user macro in the function prototype is used for documenting. It also allows analyzing the piece of code for the correctness of using the pointers from the user address space by means of the sparse static code analyzer. The pointers from the user address space should always be marked as __user.
We create only an example of the driver and we do not have the real device. So it will be sufficient if reading from our device file will always return some text string (e.g., Hello world from kernel mode!).
Now, we can start writing the piece of code of the read function:
static const char    g_s_Hello_World_string[] = "Hello world from kernel mode!n";
static const ssize_t g_s_Hello_World_size = sizeof(g_s_Hello_World_string);

static ssize_t device_file_read(
						struct file *file_ptr
					   , char __user *user_buffer
					   , size_t count
					   , loff_t *position)
{
	printk( KERN_NOTICE "Simple-driver:
		Device file is read at offset = %i, read bytes count = %u"
				, (int)*position
				, (unsigned int)count );


	if( *position >= g_s_Hello_World_size )
		return 0;


	if( *position + count > g_s_Hello_World_size )
		count = g_s_Hello_World_size - *position;

	if( copy_to_user(user_buffer, g_s_Hello_World_string + *position, count) != 0 )
		return -EFAULT;


	*position += count;
	return count;
}
The Kernel Module Build System
Now, when the whole driver piece of code is written, we would like to build it and see how it will work. In the kernels of version 2.4, to build the module, the developer had to prepare the compilation environment himself and to compile the driver with the help of the GCC compiler. As a result of the compilation, the received .o file is the module loadable to the kernel. Since then, the order of the kernel modules build has changed. Now, the developer should only write a special makefile that will start the kernel build system and will inform the kernel what the module should be built of. To build a module from one source file, it is enough to write the one-string makefile and to start the kernel build system:
obj-m := source_file_name.o
The module name will correspond to the source file name and the module itself will have the .ko extension.
To build the module from several source files, we should add one string:
obj-m := module_name.o
module_name-objs := source_1.o  source_2.o … source_n.o
We can start the kernel build system with the help of the make command:
make –C KERNEL_MODULE_BUILD_SYSTEM_FOLDER M=`pwd` modules
for the module build and
make –C KERNEL_MODULES_BUILD_SYSTEM_FOLDER M=`pwd` clean
for the build folder cleanup.
The module build system is usually located in the /lib/modules/`uname -r`/build folder. We should prepare the module build system for building to build the first module. To do this, we should go to the build system folder and execute the following:
#> make modules_prepare
Let’s unite this knowledge into a single makefile:
TARGET_MODULE:=simple-module

# If we are running by kernel building system
ifneq ($(KERNELRELEASE),)
	$(TARGET_MODULE)-objs := main.o device_file.o
	obj-m := $(TARGET_MODULE).o

# If we running without kernel build system
else
	BUILDSYSTEM_DIR:=/lib/modules/$(shell uname -r)/build
	PWD:=$(shell pwd)


all :
# run kernel build system to make module
	$(MAKE) -C $(BUILDSYSTEM_DIR) M=$(PWD) modules

clean:
# run kernel build system to cleanup in current directory
	$(MAKE) -C $(BUILDSYSTEM_DIR) M=$(PWD) clean

load:
	insmod ./$(TARGET_MODULE).ko

unload:
	rmmod ./$(TARGET_MODULE).ko

endif
The load and unload targets are for loading of the built module and for deleting it from the kernel.
In our example, the driver is compiled from two files with the main.c and device_file.c source pieces of code and has the simple-module.ko name.
Module Loading and Its Usage
When our module is built, we can load it by executing the following command in the folder with the source files:
#> make load
After that, a string with the name of our driver appears in the special /proc/modules file. And a string with the device, registered by our module, appears in the special /proc/devices file. It will look as follows:
Character devices:
1 mem
4 tty
4 ttyS
…
250 Simple-driver
…
The number before the device name is a major number associated with it. We know the range of minor numbers for our device (0…255) and that is why we can create the device file in the /dev virtual file system:
#> mknod /dev/simple-driver c 250 0
When the device file is created, we will check if everything works correctly and will display its contents with the help of the cat command:
$> cat /dev/simple-driver
Hello world from kernel mode!
Bibliography List
- Jonathan Corbet, Alessandro Rubini,Greg Kroah-Hartman Linux Device Drivers, Third Edition, O’Reilly, ISBN 978-0-596-00590-0 http://lwn.net/Kernel/LDD3/
- Peter Jay Salzman Ori Pomerantz The Linux Kernel Module Programming Guide http://tldp.org/LDP/lkmpg/2.6/html/lkmpg.html
- Linux Cross Reference http://lxr.free-electrons.com/ident
This member has not yet provided a Biography. Assume it’s interesting and varied, and probably something to do with programming.
Чтоб бесценный труд хорошего человека не затерялся в интернете, сделаю у себя его копию
Хочу признаться сразу, что я вас отчасти обманул, ибо драйвер, если верить википедии — это компьютерная программа, с помощью которой другая программа (обычно операционная система) получает доступ к аппаратному обеспечению некоторого устройства. А сегодня мы создадим некую заготовку для драйвера, т.к. на самом деле ни с каким железом мы работать не будем. Эту полезную функциональность вы сможете добавить сами, если пожелаете.
То, что мы сегодня создадим, корректнее будет назвать LKM (Linux Kernel Module или загрузочный модуль ядра). Стоит сказать, что драйвер – это одна из разновидностей LKM.
Писать модуль мы будем под ядра линейки 2.6. LKM для 2.6 отличается от 2.4. Я не буду останавливаться на различиях, ибо это не входит в рамки поста.
Мы создадим символьное устройство /dev/test, которое будет обрабатываться нашим модулем. Хочу сразу оговориться, что размещать символьное устройство не обязательно в каталоге /dev, просто это является частью «древнего магического ритуала».
Немного теории
Если кратко, то LKM – это объект, который содержит код для расширения возможностей уже запущенного ядра Linux. Т.е. работает он в пространстве ядра, а не пользователя. Так что не стоит экспериментировать на рабочем сервере. В случае ошибки, закравшейся в модуль, получите kernel panic. Будем считать, что я вас предупредил.
Модуль ядра должен иметь как минимум 2 функции: функцию инициализации и функцию выхода. Первая вызывается во время загрузки модуля в пространство ядра, а вторая, соответственно, при выгрузке его. Эти функции задаются с помощью макроопределений: module_init и module_exit.
Стоит сказать несколько слов о функции printk(). Основное назначение этой функции — реализация механизма регистрации событий и предупреждений. Иными словами эта функция для записи в лог ядра некой информации.
Т.к. драйвер работает в пространстве ядра, то он отграничен от адресного пространства пользователя. А нам хотелось бы иметь возможность вернуть некий результат. Для этого используется функция put_user(). Она как раз и занимается тем, что перекидывает данные из пространства ядра в пользовательское.
Хочу ещё сказать пару слов о символьных устройствах.
Выполните команду ls -l /dev/sda*. Вы увидите что-то вроде:
brw-rw---- 1 root disk 8, 0 2010-10-11 10:23 /dev/sda

brw-rw---- 1 root disk 8, 1 2010-10-11 10:23 /dev/sda1

brw-rw---- 1 root disk 8, 2 2010-10-11 10:23 /dev/sda2

brw-rw---- 1 root disk 8, 5 2010-10-11 10:23 /dev/sda5
Между словом «disk» и датой есть два числа разделённых запятой. Первое число называют старшим номером устройства. Старший номер указывает на то, какой драйвер используется для обслуживания данного устройства. Каждый драйвер имеет свой уникальный старший номер.
Файлы устройства создаются с помощью команты mknod, например: mknod /dev/test c 12. Этой командой мы создадим устройство /dev/test и укажем для него старший номер (12).
Я не буду сильно углубляться в теорию, т.к. кому интересно – тот сможет сам почитать про это подробнее. Я дам ссылку в конце.
Прежде чем начать
Нужно знать несколько «волшебных» команд:
- insmod – добавить модуль в ядро
- rmmod – соответственно, удалить
- lsmod – вывести список текущих модулей
- modinfo – вывести информацию о модуле
Для компиляции модуля нам потребуются заголовки текущего ядра.
В debian/ubutnu их можно легко поставить так (к примеру для 2.6.26-2-686):
apt-get install linux-headers-2.6.26-2-686
Либо собрать пакет для вашего текущего ядра самим: fakeroot make-kpkg kernel_headers
Исходник
#include <linux/kernel.h> /* Для printk() и т.д. */

#include <linux/module.h> /* Эта частичка древней магии, которая оживляет модули */

#include <linux/init.h> /* Определения макросов */

#include <linux/fs.h>

#include <asm/uaccess.h> /* put_user */
// Ниже мы задаём информацию о модуле, которую можно будет увидеть с помощью Modinfo
MODULE_LICENSE( "GPL" );
MODULE_AUTHOR( "Alex Petrov <petroff.alex@gmail.com>" );
MODULE_DESCRIPTION( "My nice module" );
MODULE_SUPPORTED_DEVICE( "test" ); /* /dev/testdevice */#define SUCCESS 0
#define DEVICE_NAME "test" /* Имя нашего устройства */// Поддерживаемые нашим устройством операции
static int device_open( struct inode *, struct file * );
static int device_release( struct inode *, struct file * );
static ssize_t device_read( struct file *, char *, size_t, loff_t * );
static ssize_t device_write( struct file *, const char *, size_t, loff_t * );// Глобальные переменные, объявлены как static, воизбежание конфликтов имен.
static int major_number; /* Старший номер устройства нашего драйвера */
static int is_device_open = 0; /* Используется ли девайс ? */
static char text[ 5 ] = "testn"; /* Текст, который мы будет отдавать при обращении к нашему устройству */
static char* text_ptr = text; /* Указатель на текущую позицию в тексте */// Прописываем обработчики операций на устройством
static struct file_operations fops =
{
.read = device_read,
.write = device_write,
.open = device_open,
.release = device_release
};// Функция загрузки модуля. Входная точка. Можем считать что это наш main()
static int __init test_init( void )
{
printk( KERN_ALERT "TEST driver loaded!n" );// Регистрируем устройсво и получаем старший номер устройства
major_number = register_chrdev( 0, DEVICE_NAME, &fops );if ( major_number < 0 )
{
printk( "Registering the character device failed with %dn", major_number );
return major_number;
}// Сообщаем присвоенный нам старший номер устройства
printk( "Test module is loaded!n" );printk( "Please, create a dev file with 'mknod /dev/test c %d 0'.n", major_number );
return SUCCESS;
}// Функция выгрузки модуля
static void __exit test_exit( void )
{
// Освобождаем устройство
unregister_chrdev( major_number, DEVICE_NAME );printk( KERN_ALERT "Test module is unloaded!n" );
}// Указываем наши функции загрузки и выгрузки
module_init( test_init );
module_exit( test_exit );static int device_open( struct inode *inode, struct file *file )
{
text_ptr = text;if ( is_device_open )
return -EBUSY;is_device_open++;
return SUCCESS;
}static int device_release( struct inode *inode, struct file *file )
{
is_device_open--;
return SUCCESS;
}static ssize_t
device_write( struct file *filp, const char *buff, size_t len, loff_t * off )
{
printk( "Sorry, this operation isn't supported.n" );
return -EINVAL;
}static ssize_t device_read( struct file *filp, /* include/linux/fs.h */
char *buffer, /* buffer */
size_t length, /* buffer length */
loff_t * offset )
{
int byte_read = 0;if ( *text_ptr == 0 )
return 0;while ( length && *text_ptr )
{
put_user( *( text_ptr++ ), buffer++ );
length--;
byte_read++;
}
return byte_read;

}
* This source code was highlighted with Source Code Highlighter.
Сборка модуля
Ну а теперь можем написать небольшой Makefile:
obj-m += test.o

all:

make -C /lib/modules/$(shell uname -r)/build M=$(PWD) modules

clean:

make -C /lib/modules/$(shell uname -r)/build M=$(PWD) clean
И проверить его работоспособность:
root@joker:/tmp/test# make
make -C /lib/modules/2.6.26-2-openvz-amd64/build M=/tmp/test modules

make[1]: Entering directory `/usr/src/linux-headers-2.6.26-2-openvz-amd64'

CC [M] /tmp/1/test.o

Building modules, stage 2.

MODPOST 1 modules

CC /tmp/test/test.mod.o

LD [M] /tmp/test/test.ko

make[1]: Leaving directory `/usr/src/linux-headers-2.6.26-2-openvz-amd64'
Посмотрим что у нас получилось:
root@joker:/tmp/test# ls -la
drwxr-xr-x 3 root root 4096 Окт 21 12:32 .

drwxrwxrwt 12 root root 4096 Окт 21 12:33 ..

-rw-r--r-- 1 root root 219 Окт 21 12:30 demo.sh

-rw-r--r-- 1 root root 161 Окт 21 12:30 Makefile

-rw-r--r-- 1 root root 22 Окт 21 12:32 modules.order

-rw-r--r-- 1 root root 0 Окт 21 12:32 Module.symvers

-rw-r--r-- 1 root root 2940 Окт 21 12:30 test.c

-rw-r--r-- 1 root root 10364 Окт 21 12:32 test.ko

-rw-r--r-- 1 root root 104 Окт 21 12:32 .test.ko.cmd

-rw-r--r-- 1 root root 717 Окт 21 12:32 test.mod.c

-rw-r--r-- 1 root root 6832 Окт 21 12:32 test.mod.o

-rw-r--r-- 1 root root 12867 Окт 21 12:32 .test.mod.o.cmd

-rw-r--r-- 1 root root 4424 Окт 21 12:32 test.o

-rw-r--r-- 1 root root 14361 Окт 21 12:32 .test.o.cmd

drwxr-xr-x 2 root root 4096 Окт 21 12:32 .tmp_versions
Теперь посмотрим информацию о только что скомпилированном модуле:
root@joker:/tmp/test# modinfo test.ko
filename: test.ko

description: My nice module

author: Alex Petrov <druid@joker.botik.ru>

license: GPL

depends:

vermagic: 2.6.26-2-openvz-amd64 SMP mod_unload modversions
Ну и наконец установим модуль в ядро:
root@joker:/tmp/test# insmod test.ko
Посмотрим есть ли наш модуль с списке:
root@joker:/tmp/test# lsmod | grep test
test 6920 0
И что попало в логи:
root@joker:/tmp/test# dmesg | tail
[829528.598922] Test module is loaded!

[829528.598926] Please, create a dev file with 'mknod /dev/test c 249 0'.
Наш модуль подсказываем нам что нужно сделать.
Последуем его совету:
root@joker:/tmp/test# mknod /dev/test c 249 0
Ну и наконец проверим работает ли наш модуль:
root@joker:/tmp/test# cat /dev/test
test
Наш модуль не поддерживает приём данных со стороны пользователя:
root@joker:/tmp/test# echo 1 > /dev/test
bash: echo: ошибка записи: Недопустимый аргумент
Посмотрим что что скажет модуль на наши действия:
root@joker:/tmp/test# dmesg | tail
[829528.598922] Test module is loaded!

[829528.598926] Please, create a dev file with 'mknod /dev/test c 249 0'.

[829747.462715] Sorry, this operation isn't supported.
Удалим его:
root@joker:/tmp/test# rmmod test
И посмотрим что он нам скажет на прощание:
root@joker:/tmp/test# dmesg | tail
[829528.598922] Test module is loaded!

[829528.598926] Please, create a dev file with 'mknod /dev/test c 249 0'.

[829747.462715] Sorry, this operation isn't supported.

[829893.681197] Test module is unloaded!
Удалим файл устройства, что бы он нас не смущал:
root@joker:/tmp/test# rm /dev/test
Заключение
Дальнейшее развитие этой «заготовки» зависит только от вас. Можно превратить её в настоящий драйвер, который будет предоставлять интерфейс к вашему девайсу, либо использовать для дальнейшего изучения ядра Linux.
Только что в голову пришла совершенно безумная идея сделать sudo через файл устройства. Т.е. посылаем в /dev/test команду и она выполняется от имени root.
Литература
И под конец дам ссылку на книгу заклинаний LKMPG (Linux Kernel Module Programming Guide)
UPD:
У некоторых может не собраться модуль через Makefile, описанный выше.
Решение:
Создаём Makefile только с одной строкой: obj-m += test.o
И запускаем сборку так:
make -C /usr/src/linux-headers-`uname -r` SUBDIRS=$PWD modules
UPD2:
Поправил ошибки в исходнике.
Парсер глючит и сохраняет ‘MODULE_DEscriptION( «My nice module» );’. Естественно в module_description все буквы заглавные.
UPD3:
segoon прислал несколько поправок к посту:
1) В функции device_open() находится race condition:
static int device_open( struct inode *inode, struct file *file )
{
text_ptr = text;
if ( is_device_open ) <<<<
return -EBUSY;
is_device_open++; <<<<
return SUCCESS;
}
Если один процесс увеличит is_device_open во время исполнения другим
процессом команд между if (is_device_open) и is_device_open++, то в
итоге файл откроется 2 раза. Для атомарных действий нужно использовать
функцию из серии atomic_XXX().
Атомарные операции нужно использовать во всех местах работы с данными. В данном случае и в close().
2) device_write() можно было вообще не писать, т.к. обработчик по
умолчанию write() сам возвращает ошибку.
3) у put_user() ОБЯЗАТЕЛЬНО нужно проверять результат. Если не ноль, то
нужно либо
а) вернуть результат -EFAULT и сделать вид, что ничего не было (т.е.
не удалять не до конца считанные данные из внутренних буферов, в данном
случае данные константные и ничего изменять не надо)
б) вернуть кол-во УЖЕ записанный байт (это называется partial read,
позволено POSIX’ом). При этом нужно следить за тем, чтобы не вернуть 0:
read() = 0 означает, что файл подошёл к концу, а это не так.
4) В ядре в качестве успешного кода завершения используется 0, а не
задефайненная константа SUCCESS. Есть исключения, например, в
обработчике сетевого пакета, но там, где возвращается либо -EXXX (код
ошибки), либо 0 (всё хорошо), используется именно константа 0.
Ещё много функций можно заменить на более подходящие аналоги, но это
усложнило бы понимание статьи новичками 🙂
Programming a device driver for Linux requires a deep understanding of the operating system and strong development skills. To help you master this complex domain, Apriorit driver development experts created this tutorial.
We’ll show you how to write a device driver for Linux (5.15.0 version of the kernel). In doing so, we’ll discuss the kernel logging system, principles of working with kernel modules, character devices, the file_operations structure, and accessing user-level memory from the kernel. You’ll also get code for a simple Linux driver that you can augment with any functionality you need.
This article will be useful for development teams interested in Linux device driver programming.
Contents:
Getting started with the Linux kernel module
Creating a kernel module
Building the kernel module
Creating a device file directly from the module
Conclusion
Resources
Getting started with the Linux kernel module
The Linux kernel is written in the C and Assembler programming languages. C implements the main part of the kernel, while Assembler implements architecture-dependent parts. That’s why we can use only these two languages for Linux device driver development. We cannot use C++, which is used for the Microsoft Windows kernel, because some parts of the Linux kernel source code (e.g. header files) may include keywords from C++ (for example, delete or new), while in Assembler we may encounter lexemes such as ‘ :: ’.
There are two ways of a Linux device driver programming:
- Compile the driver along with the kernel, which is monolithic in Linux.
- Implement the driver as a kernel module, in which case you won’t need to recompile the kernel.
In this tutorial, we’ll develop a driver in the form of a kernel module. A module is a specifically designed object file. When working with modules, Linux links them to the kernel by loading them to the kernel address space.
Module code has to operate in the kernel context. This requires a developer to be very attentive. If a developer makes a mistake when implementing a user-level application, it will not cause problems outside the user application in most cases. But mistakes in the implementation of a kernel module will lead to system-level issues.
Luckily for us, the Linux kernel is resistant to non-critical errors in module code. When the kernel encounters such errors (for example, null pointer dereferencing), it displays the oops message — an indicator of insignificant malfunctions during Linux operation. After that, the malfunctioning module is unloaded, allowing the kernel and other modules to work as usual. In addition, you can analyze logs that precisely describe non-critical errors. Keep in mind that continuing driver execution after an oops message may lead to instability and kernel panic.
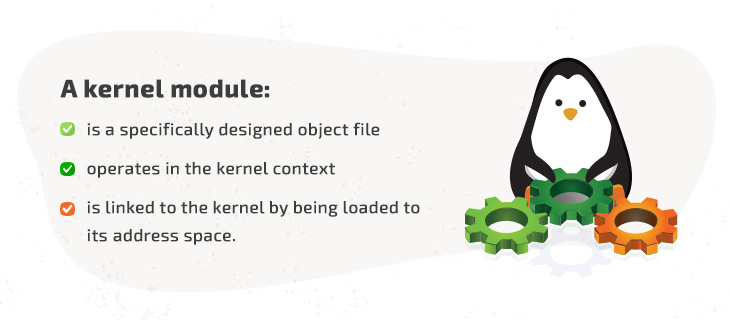
The kernel and its modules represent a single program module and use a single global namespace. In order to minimize the namespace, you must control what’s exported by the module. Exported global characters must have unique names and be cut to the bare minimum. A commonly used workaround is to simply use the name of the module that’s exporting the characters as the prefix for a global character name.
With this basic information in mind, let’s start writing Linux device drivers.
Creating a kernel module
We’ll start by creating a simple prototype of a kernel module that can be loaded and unloaded. We can do that with the following code:
C
#include <linux/init.h>
#include <linux/module.h>

static int my_init(void)
{
    return  0;
}

static void my_exit(void)
{
    return;
}

module_init(my_init);
module_exit(my_exit);
The my_init function is the driver initialization entry point and is called during system startup (if the driver is statically compiled into the kernel) or when the module is inserted into the kernel. The my_exit function is the driver exit point. It’s called when unloading a module from the Linux kernel. This function has no effect if the driver is statically compiled into the kernel.
These functions are declared in the linux/module.h header file. The my_init and my_exit functions must have identical signatures such as these:
C
int init(void);
void exit(void);
Now our simple module is complete. Let’s teach it to log in to the kernel and interact with device files. These operations will be useful for Linux kernel driver development.
Registering a character device
Please note that in this article, we describe the most basic way to register a character device that works best when you need to create a device class from the kernel module. While using this method, you need to use the mknod /dev/simple-driver c 250 0 bash command after loading a module to create the needed file in the /dev folder and keep your code simple.
Device files are usually stored in the /dev folder. They facilitate interactions between the user space and the kernel code. To make the kernel receive anything, you can just write it to a device file to pass it to the module serving this file. Anything that’s read from a device file originates from the module serving it.
There are two groups of device files:
- Character files — Non-buffered files that allow you to read and write data character by character. We’ll focus on this type of file in this tutorial.
- Block files — Buffered files that allow you to read and write only whole blocks of data.
Linux systems have two ways of identifying device files:
- Major device numbers identify modules serving device files or groups of devices.
- Minor device numbers identify specific devices among a group of devices specified by a major device number.
We can define these numbers in the driver code, or they can be allocated dynamically. In case a number defined as a constant has already been used, the system will return an error. When a number is allocated dynamically, the function reserves that number to prevent other device files from using the same number.
To register a character device, we need to use the register_chrdev function:
C
int register_chrdev (unsigned int   major,
                     const char *   name,
                     const struct file_operations * fops);
Here, we specify the name and the major number of a device to register it. After that, the device and the file_operations structure will be linked. If we assign 0 to the major parameter, the function will allocate a major device number on its own. If the value returned is 0, this indicates success, while a negative number indicates an error. Both device numbers are specified in the 0–255 range.

The device name is a string value of the name parameter. This string can pass the name of a module if it registers a single device. We use this string to identify a device in the /sys/devices file. Device file operations such as read, write, and save are processed by the function pointers stored within the file_operations structure. These functions are implemented by the module, and the pointer to the module structure identifying this module is also stored within the file_operations structure (more about this structure in the next section).
The file_operations structure
In the Linux 5.15.0 kernel, the file_operations structure looks like this:
C
struct file_operations {
	struct module *owner;
	loff_t (*llseek) (struct file *, loff_t, int);
	ssize_t (*read) (struct file *, char __user *, size_t, loff_t *);
	ssize_t (*write) (struct file *, const char __user *, size_t, loff_t *);
	ssize_t (*read_iter) (struct kiocb *, struct iov_iter *);
	ssize_t (*write_iter) (struct kiocb *, struct iov_iter *);
	int (*iopoll)(struct kiocb *kiocb, bool spin);
	int (*iterate) (struct file *, struct dir_context *);
	int (*iterate_shared) (struct file *, struct dir_context *);
	__poll_t (*poll) (struct file *, struct poll_table_struct *);
	long (*unlocked_ioctl) (struct file *, unsigned int, unsigned long);
	long (*compat_ioctl) (struct file *, unsigned int, unsigned long);
	int (*mmap) (struct file *, struct vm_area_struct *);
	unsigned long mmap_supported_flags;
	int (*open) (struct inode *, struct file *);
	int (*flush) (struct file *, fl_owner_t id);
	int (*release) (struct inode *, struct file *);
	int (*fsync) (struct file *, loff_t, loff_t, int datasync);
	int (*fasync) (int, struct file *, int);
	int (*lock) (struct file *, int, struct file_lock *);
	ssize_t (*sendpage) (struct file *, struct page *, int, size_t, loff_t *, int);
	unsigned long (*get_unmapped_area)(struct file *, unsigned long, unsigned long, unsigned long, unsigned long);
	int (*check_flags)(int);
	int (*flock) (struct file *, int, struct file_lock *);
	ssize_t (*splice_write)(struct pipe_inode_info *, struct file *, loff_t *, size_t, unsigned int);
	ssize_t (*splice_read)(struct file *, loff_t *, struct pipe_inode_info *, size_t, unsigned int);
	int (*setlease)(struct file *, long, struct file_lock **, void **);
	long (*fallocate)(struct file *file, int mode, loff_t offset,
			  loff_t len);
	void (*show_fdinfo)(struct seq_file *m, struct file *f);
#ifndef CONFIG_MMU
	unsigned (*mmap_capabilities)(struct file *);
#endif
	ssize_t (*copy_file_range)(struct file *, loff_t, struct file *,
			loff_t, size_t, unsigned int);
	loff_t (*remap_file_range)(struct file *file_in, loff_t pos_in,
				   struct file *file_out, loff_t pos_out,
				   loff_t len, unsigned int remap_flags);
	int (*fadvise)(struct file *, loff_t, loff_t, int);
} __randomize_layout;
If this structure contains functions that aren’t required for your driver, you can still use the device file without implementing them. A pointer to an unimplemented function can simply be set to 0. After that, the system will take care of implementing the function and make it behave normally. In our case, we’ll just implement the read function.
As we’re going to ensure the operation of only a single type of device with our Linux driver, our file_operations structure will be global and static. After it’s created, we’ll need to fill it statically like this:
C
#include <linux/fs.h>
static struct file_operations simple_driver_fops =
{
    .owner   = THIS_MODULE,
    .read    = device_file_read,
};
The declaration of the THIS_MODULE macro is contained in the linux/export.h header file. We’ll transform the macro into a pointer to the module structure of the required module. Later, we’ll write the body of the function with a prototype, but for now we have only the device_file_read pointer to it:
C
ssize_t device_file_read (struct file *, char *, size_t, loff_t *);The file_operations structure allows us to develop several functions that will register and revoke the registration of the device file. To register a device file, we use the following code:
C
static int device_file_major_number = 0;
static const char device_name[] = "Simple-driver";
int register_device(void)
{
    int result = 0;
    printk( KERN_NOTICE "Simple-driver: register_device() is called.n" );
    result = register_chrdev( 0, device_name, &simple_driver_fops );
    if( result < 0 )
    {
            printk( KERN_WARNING "Simple-driver:  can't register character device with error code = %in", result );
            return result;
    }
    device_file_major_number = result;
    printk( KERN_NOTICE "Simple-driver: registered character device with major number = %i and minor numbers 0...255n", device_file_major_number );
    return 0;
}
device_file_major_number is a global variable that contains the major device number. When the lifetime of the driver expires, this global variable will be used to revoke the registration of the device file.
In the code above, we’ve added the printk function that logs kernel messages. Pay attention to the KERN_NOTICE and KERN_WARNING prefixes in all listed printk format strings. NOTICE and WARNING indicate the priority level of a message. Levels range from insignificant (KERN_DEBUG) to critical (KERN_EMERG), alerting about kernel instability. This is the only difference between the printk function and the printf library function.
The printk function
The printk function forms a string, which we add to the circular buffer. From there the klog daemon reads it and sends it to the system log. Implementing the printk allows us to call this function from any point in the kernel. Use this function carefully, as it may cause overflow of the circular buffer, meaning the oldest message will not be logged.
Our next step is writing a function for unregistering the device file. If a device file is successfully registered, the value of the device_file_major_number will not be 0. This value allows us to revoke the registration of a file using the unregister_chrdev function, which we declare in the linux/fs.h file. The major device number is the first parameter of this function, followed by a string containing the device name. The register_chrdev and the unresister_chrdev functions have similar contents.
To unregister a device, we use the following code:
C
void unregister_device(void)
{
    printk( KERN_NOTICE "Simple-driver: unregister_device() is calledn" );
    if(device_file_major_number != 0)
    {
        unregister_chrdev(device_file_major_number, device_name);
    }
}
The next step in implementing functions for our module is allocating and using memory in user mode. Let’s see how it’s done.
Using memory allocated in user mode
The read function we’re going to write will read characters from a device. The signature of this function must be appropriate for the function from the file_operations structure:
C
ssize_t (*read) (struct file *filep, char *buffer, size_t len, loff_t *offset);Let’s look at the filep parameter — the pointer to the file structure. This file structure allows us to get necessary information about the file we’re working with, data related to this file, and more. The data we’ve read is allocated in the user space at the address specified by the second parameter — buffer. The number of bytes to be read is defined in the len parameter, and we start reading bytes from a certain offset defined in the offset parameter. After executing the function, the number of bytes that have been successfully read must be returned. Then we must refresh the offset.
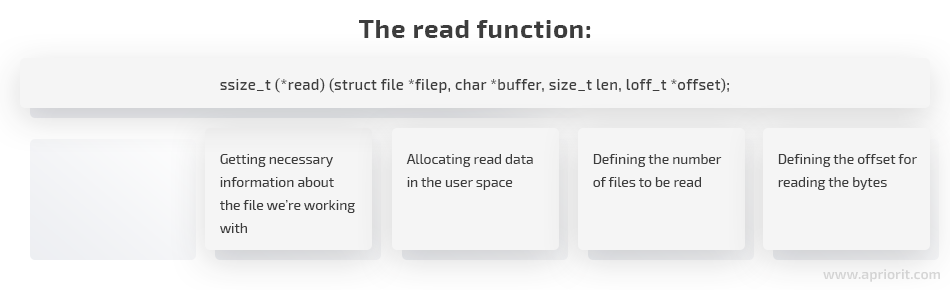
To work with information from the device file, the user allocates a special buffer in the user-mode address space. Then, the read function copies the information to this buffer. The address to which a pointer from the user space points and the address in the kernel address space may have different values. That’s why we cannot simply dereference the pointer.
When working with these pointers, we have a set of specific macros and functions we declare in the linux/uaccess.h file. The most suitable function in our case is copy_to_user. Its name speaks for itself: it copies specific data from the kernel buffer to the buffer allocated in the user space. It also verifies if a pointer is valid and if the buffer size is large enough. Here’s the code for the copy_to_user prototype:
C
long copy_to_user( void __user *to, const void * from, unsigned long n );First of all, this function must receive three parameters:
- A pointer to the buffer
- A pointer to the data source
- The number of bytes to be copied
If there are any errors in execution, the function will return a value other than 0. In case of successful execution, the value will be 0. The copy_to_user function contains the _user macro that documents the process. Also, this function allows us to find out if the code uses pointers from the address space correctly. This is done using Sparse, an analyzer for static code. To be sure that it works correctly, always mark the user address space pointers as _user.
Here’s the code for implementing the read function:
C
#include <linux/uaccess.h>
static const char    g_s_Hello_World_string[] = "Hello world from kernel mode!n";
static const ssize_t g_s_Hello_World_size = sizeof(g_s_Hello_World_string);
static ssize_t device_file_read(
                        struct file *file_ptr
                       , char __user *user_buffer
                       , size_t count
                       , loff_t *position)
{
    printk( KERN_NOTICE "Simple-driver: Device file is read at offset = %i, read bytes count = %un"
                , (int)*position
                , (unsigned int)count );
    /* If position is behind the end of a file we have nothing to read */
    if( *position >= g_s_Hello_World_size )
        return 0;
    /* If a user tries to read more than we have, read only as many bytes as we have */
    if( *position + count > g_s_Hello_World_size )
        count = g_s_Hello_World_size - *position;
    if( copy_to_user(user_buffer, g_s_Hello_World_string + *position, count) != 0 )
        return -EFAULT;
    /* Move reading position */
    *position += count;
    return count;
}
With this function, the code for our driver is ready. Now it’s time to build the kernel module and see if it works as expected.
Building the kernel module
In modern kernel versions, the makefile does most of the building for a developer. It starts the kernel build system and provides the kernel with information about the components required to build the module.
A module built from a single source file requires a single string in the makefile. After creating this file, you only need to initiate the kernel build system with the obj-m := source_file_name.o command. As you can see, here we’ve assigned the source file name to the module — the *.ko file.
If there are several source files, only two strings are required for the kernel build:
C
obj-m := module_name.o
module_name-objs := source_1.o source_2.o … source_n.o
To initialize the kernel build system and build the module, we need to use the make –C KERNEL_MODULE_BUILD_SYSTEM_FOLDER M=`pwd` modules command. To clean up the build folder, we use the make –C KERNEL_MODULES_BUILD_SYSTEM_FOLDER M=`pwd` clean command.
The module build system is commonly located in /lib/modules/`uname -r`/build. Now it’s time to prepare the module build system. To build our first module, execute the make modules_prepare command from the folder where the build system is located.
Finally, we’ll combine everything we’ve learned into one makefile:
C
TARGET_MODULE:=simple-module
# If we are running by kernel building system
ifneq ($(KERNELRELEASE),)
	$(TARGET_MODULE)-objs := main.o device_file.o
	obj-m := $(TARGET_MODULE).o
# If we running without kernel build system
else
	BUILDSYSTEM_DIR:=/lib/modules/$(shell uname -r)/build
	PWD:=$(shell pwd)
all :
# run kernel build system to make module
	$(MAKE) -C $(BUILDSYSTEM_DIR) M=$(PWD) modules
clean:
# run kernel build system to cleanup in current directory
	$(MAKE) -C $(BUILDSYSTEM_DIR) M=$(PWD) clean
load:
	insmod ./$(TARGET_MODULE).ko
unload:
	rmmod ./$(TARGET_MODULE).ko
endif
The load target loads the build module and the unload target deletes it from the kernel.
In our tutorial for device driver development in Linux, we’ve used code from main.c and device_file.c to compile a driver. The resulting driver is named simple-module.ko. Let’s see how to use it.
Loading and using the module
To load the module, we have to execute the make load command from the source file folder. After this, the name of the driver is added to the /proc/modules file, while the device that the module registers is added to the /proc/devices file. The added records look like this:
C
Character devices:
  1 mem
  4 tty
  4 ttyS
…
250 Simple-driver
…
The first three records contain the name of the added device and the major device number with which it’s associated. The minor number range (0–255) allows device files to be created in the /dev virtual file system.
Then we need to create the special character file for our major number with the mknod /dev/simple-driver c 250 0 command.
C
#> mknod /dev/simple-driver c 250 0After we’ve created the device file, we need to perform the final verification to make sure that what we’ve done works as expected. To verify, we can use the cat command to display the device file contents:
C
$> cat /dev/simple-driver
Hello world from kernel mode!
If we see the contents of our driver, it works correctly!
Creating a device file directly from the module
To use the mknod command, we need to load the kernel module (which may be done automatically) and work with the command line from the user space. However, there’s a way to do everything we need inside the kernel module.To create a device file from the module, we need to use the class_create macros:
C
#define class_create(owner, name)
({
    static struct lock_class_key __key;
    __class_create(owner, name, &__key);
})
Calling class_create macros creates the linux device class — a high-level view of the Linux Device Model, which abstracts implementation details.
We also need the device_create function:
C
device_create(struct class *cls, struct device *parent, dev_t devt, void *drvdata, const char *fmt, ...);Calling the device_create function creates a Linux device and adds it to the cls class. This function accepts a 32 bit device number as the third parameter. This device number may be combined from the device major number and device minor number with MKDEV macros:
C
#define MKDEV(ma,mi) (((ma) << MINORBITS) | (mi))To integrate the creation of a device file to our module, we need to complete the register_device function:
C
int register_device(void)
{
    int result = 0;
    printk( KERN_NOTICE "Simple-driver: register_device() is called.n" );
    result = register_chrdev( 0, device_name, &simple_driver_fops );
    if( result < 0 )
    {
        printk( KERN_WARNING "Simple-driver:  can't register character device with errorcode = %in", result );
        return result;
    }
    device_file_major_number = result;
    printk( KERN_NOTICE "Simple-driver: registered character device with major number = %i and minor numbers 0...255n", device_file_major_number );

    device_class = class_create( THIS_MODULE, device_name );
    if( IS_ERR( device_class ) )
    {
        printk( KERN_WARNING "Simple-driver:  can't create device class with errorcode = %in", PTR_ERR( device_class ) );
        unregister_chrdev( device_file_major_number, device_name );
        return PTR_ERR( device_class );
    }
    printk( KERN_NOTICE "Simple-driver: Device class createdn" );

    device_number = MKDEV( device_file_major_number, 0 );
    device_struct = device_create( device_class, NULL, device_number, NULL, device_name );
    if ( IS_ERR(device_struct ) )
    {
        printk( KERN_WARNING "can't create device with errorcode = %in", PTR_ERR( device_struct ) );
        class_destroy( device_class );
        unregister_chrdev( device_file_major_number, device_name );
        return PTR_ERR( device_struct );
    }
    printk( KERN_NOTICE "Simple-driver: Device createdn" );

    return 0;
}
Also, we have to remember about the destruction of the device file in the unregister_device function. To destroy a device file, we need to call the device_destroy and class_destroy functions:
C
void unregister_device(void)
{
    printk( KERN_NOTICE "Simple-driver: unregister_device() is calledn" );

    if( !IS_ERR( device_class ) )
    {
        device_destroy( device_class, device_number );
    }
    if( !IS_ERR( device_class ) && !IS_ERR( device_struct ) )
    {
        class_destroy( device_class );
    }
    if( device_file_major_number != 0 )
    {
        unregister_chrdev( device_file_major_number, device_name );
    }
}
As a result, a device file will be created right after the loading of our module to the kernel.
Conclusion
In this tutorial, we’ve shown you how to write a Linux driver. You can find the full source code of this driver in the Apriorit GitHub repository. If you need a more complex device driver, you may use this tutorial as a basis for embedded Linux driver development and add more functions and context to it.
At Apriorit, we’ve made Linux kernel and driver development our speciality. Our developers have successfully delivered hundreds of complex drivers for Linux, Unix, macOS, and Windows. Contact our experienced team to start working on your next Linux device drivers development project!
Resources
- Linux Device Drivers, 3rd Edition by Jonathan Corbet, Alessandro Rubini, and Greg Kroah-Hartman
- The Linux Kernel Module Programming Guide by Peter Jay Salzman, and Ori Pomeranz
- Linux Cross Reference
- Our device driver source code (GitHub)
“Do you pine for the nice days of Minix-1.1, when men were men and wrote their own device drivers?” Linus Torvalds
Pre-requisites
In order to develop Linux device drivers, it is necessary to have an understanding of the following:
- C programming. Some in-depth knowledge of C programming is needed, like pointer usage, bit manipulating functions, etc.
- Microprocessor programming. It is necessary to know how microcomputers work internally: memory addressing, interrupts, etc. All of these concepts should be familiar to an assembler programmer.
There are several different devices in Linux. For simplicity, this brief tutorial will only cover type char devices loaded as modules. Kernel 2.6.x will be used (in particular, kernel 2.6.8 under Debian Sarge, which is now Debian Stable).
User space and kernel space
When you write device drivers, it’s important to make the distinction between “user space” and “kernel space”.
- Kernel space. Linux (which is a kernel) manages the machine’s hardware in a simple and efficient manner, offering the user a simple and uniform programming interface. In the same way, the kernel, and in particular its device drivers, form a bridge or interface between the end-user/programmer and the hardware. Any subroutines or functions forming part of the kernel (modules and device drivers, for example) are considered to be part of kernel space.
- User space. End-user programs, like the UNIX
shellor other GUI based applications (kpresenterfor example), are part of the user space. Obviously, these applications need to interact with the system’s hardware . However, they don’t do so directly, but through the kernel supported functions.
All of this is shown in figure 1.
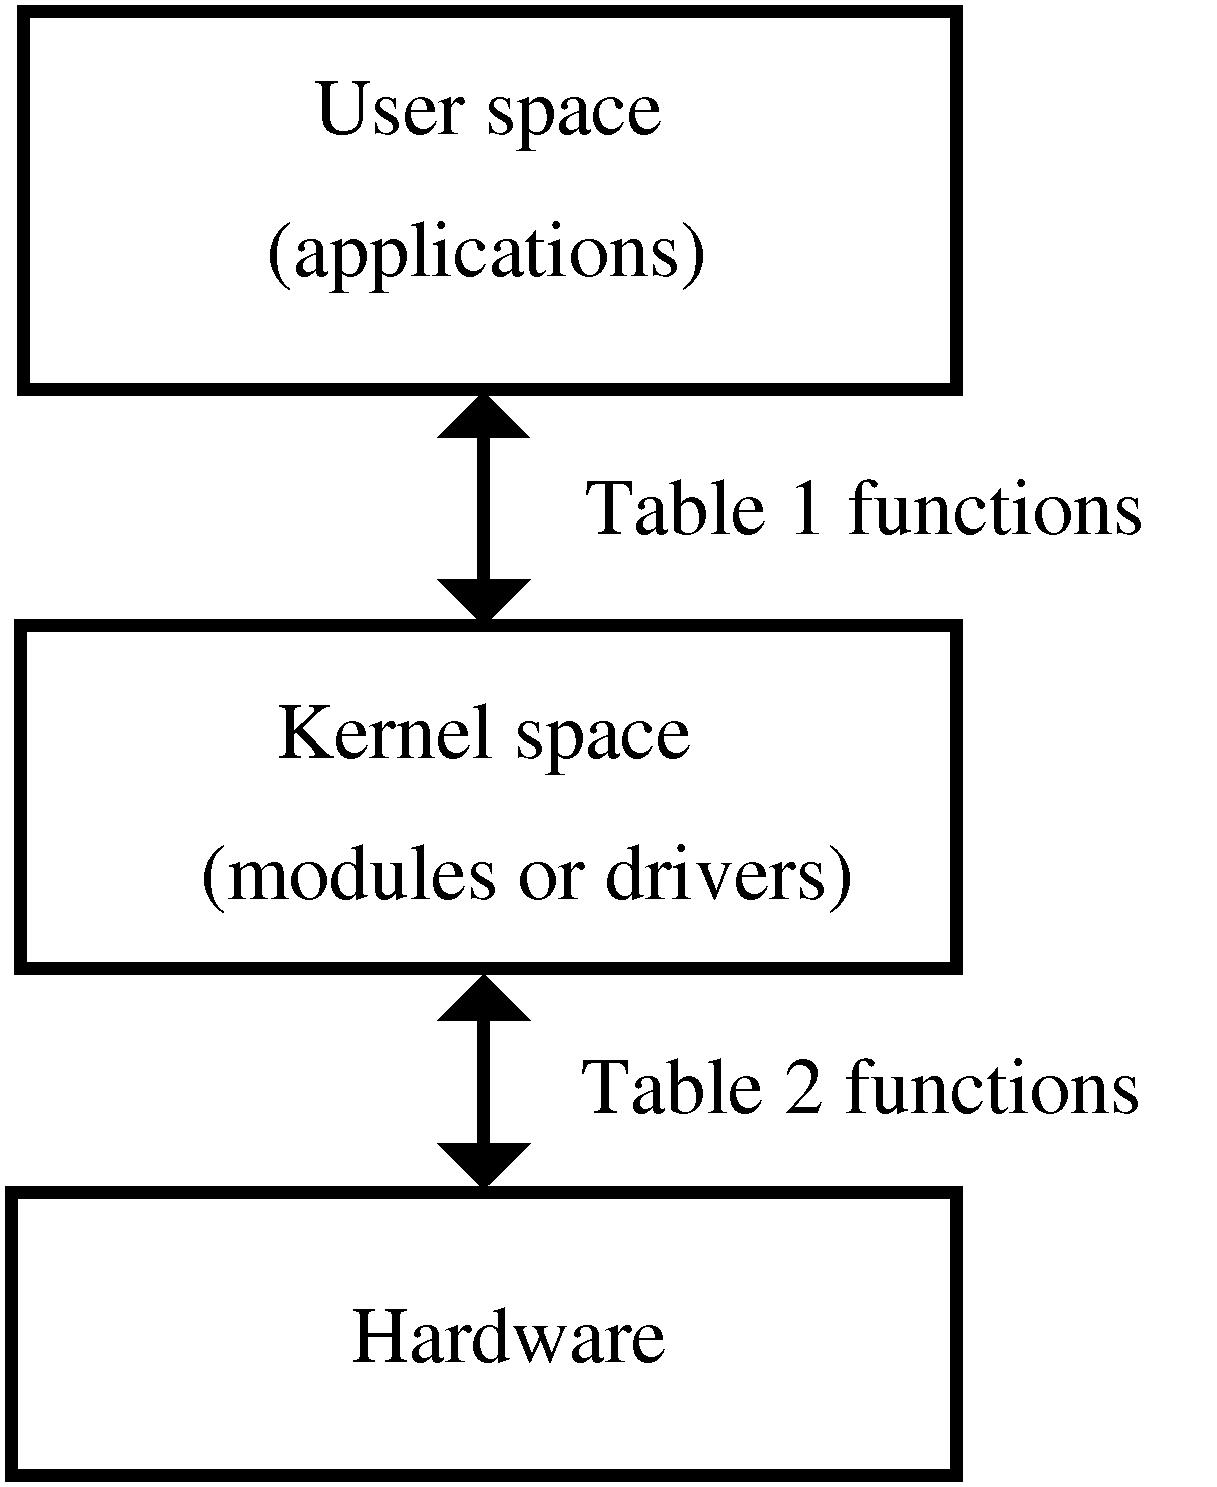
Interfacing functions between user space and kernel space
The kernel offers several subroutines or functions in user space, which allow the end-user application programmer to interact with the hardware. Usually, in UNIX or Linux systems, this dialogue is performed through functions or subroutines in order to read and write files. The reason for this is that in Unix devices are seen, from the point of view of the user, as files.
On the other hand, in kernel space Linux also offers several functions or subroutines to perform the low level interactions directly with the hardware, and allow the transfer of information from kernel to user space.
Usually, for each function in user space (allowing the use of devices or files), there exists an equivalent in kernel space (allowing the transfer of information from the kernel to the user and vice-versa). This is shown in Table 1, which is, at this point, empty. It will be filled when the different device drivers concepts are introduced.
| Events | User functions | Kernel functions |
| Load module | ||
| Open device | ||
| Read device | ||
| Write device | ||
| Close device | ||
| Remove module |
Table 1. Device driver events and their associated interfacing functions in kernel space and user space.
Interfacing functions between kernel space and the hardware device
There are also functions in kernel space which control the device or exchange information between the kernel and the hardware. Table 2 illustrates these concepts. This table will also be filled as the concepts are introduced.
| Events | Kernel functions |
| Read data | |
| Write data |
Table 2. Device driver events and their associated functions between kernel space and the hardware device.
The first driver: loading and removing the driver in user space
I’ll now show you how to develop your first Linux device driver, which will be introduced in the kernel as a module.
For this purpose I’ll write the following program in a file named nothing.c
<nothing.c> =
#include <linux/module.h>


MODULE_LICENSE("Dual BSD/GPL");
Since the release of kernel version 2.6.x, compiling modules has become slightly more complicated. First, you need to have a complete, compiled kernel source-code-tree. If you have a Debian Sarge system, you can follow the steps in Appendix B (towards the end of this article). In the following, I’ll assume that a kernel version 2.6.8 is being used.
Next, you need to generate a makefile. The makefile for this example, which should be named Makefile, will be:
=
obj-m := nothing.o
Unlike with previous versions of the kernel, it’s now also necessary to compile the module using the same kernel that you’re going to load and use the module with. To compile it, you can type:
$ make -C /usr/src/kernel-source-2.6.8 M=`pwd` modules
This extremely simple module belongs to kernel space and will form part of it once it’s loaded.
In user space, you can load the module as root by typing the following into the command line:
# insmod nothing.ko
The insmod command allows the installation of the module in the kernel. However, this particular module isn’t of much use.
It is possible to check that the module has been installed correctly by looking at all installed modules:
# lsmod
Finally, the module can be removed from the kernel using the command:
# rmmod nothing
By issuing the lsmod command again, you can verify that the module is no longer in the kernel.
The summary of all this is shown in Table 3.
| Events | User functions | Kernel functions |
| Load module | insmod | |
| Open device | ||
| Read device | ||
| Write device | ||
| Close device | ||
| Remove module | rmmod |
Table 3. Device driver events and their associated interfacing functions between kernel space and user space.
The “Hello world” driver: loading and removing the driver in kernel space
When a module device driver is loaded into the kernel, some preliminary tasks are usually performed like resetting the device, reserving RAM, reserving interrupts, and reserving input/output ports, etc.
These tasks are performed, in kernel space, by two functions which need to be present (and explicitly declared): module_init and module_exit; they correspond to the user space commands insmod and rmmod , which are used when installing or removing a module. To sum up, the user commands insmod and rmmod use the kernel space functions module_init and module_exit.
Let’s see a practical example with the classic program Hello world:
<hello.c> =
#include <linux/init.h>

#include <linux/module.h>

#include <linux/kernel.h>


MODULE_LICENSE("Dual BSD/GPL");


static int hello_init(void) {

  printk("<1> Hello world!n");

  return 0;

}


static void hello_exit(void) {

  printk("<1> Bye, cruel worldn");

}


module_init(hello_init);

module_exit(hello_exit);
The actual functions hello_init and hello_exit can be given any name desired. However, in order for them to be identified as the corresponding loading and removing functions, they have to be passed as parameters to the functions module_init and module_exit.
The printk function has also been introduced. It is very similar to the well known printf apart from the fact that it only works inside the kernel. The <1> symbol shows the high priority of the message (low number). In this way, besides getting the message in the kernel system log files, you should also receive this message in the system console.
This module can be compiled using the same command as before, after adding its name into the Makefile.
=
obj-m := nothing.o hello.o
In the rest of the article, I have left the Makefiles as an exercise for the reader. A complete Makefile that will compile all of the modules of this tutorial is shown in Appendix A.
When the module is loaded or removed, the messages that were written in the printk statement will be displayed in the system console. If these messages do not appear in the console, you can view them by issuing the dmesg command or by looking at the system log file with cat /var/log/syslog.
Table 4 shows these two new functions.
| Events | User functions | Kernel functions |
| Load module | insmod | module_init() |
| Open device | ||
| Read device | ||
| Write device | ||
| Close device | ||
| Remove module | rmmod | module_exit() |
Table 4. Device driver events and their associated interfacing functions between kernel space and user space.
The complete driver “memory”: initial part of the driver
I’ll now show how to build a complete device driver: memory.c. This device will allow a character to be read from or written into it. This device, while normally not very useful, provides a very illustrative example since it is a complete driver; it’s also easy to implement, since it doesn’t interface to a real hardware device (besides the computer itself).
To develop this driver, several new #include statements which appear frequently in device drivers need to be added:
=
/* Necessary includes for device drivers */

#include <linux/init.h>

#include <linux/config.h>

#include <linux/module.h>

#include <linux/kernel.h> /* printk() */

#include <linux/slab.h> /* kmalloc() */

#include <linux/fs.h> /* everything... */

#include <linux/errno.h> /* error codes */

#include <linux/types.h> /* size_t */

#include <linux/proc_fs.h>

#include <linux/fcntl.h> /* O_ACCMODE */

#include <asm/system.h> /* cli(), *_flags */

#include <asm/uaccess.h> /* copy_from/to_user */


MODULE_LICENSE("Dual BSD/GPL");


/* Declaration of memory.c functions */

int memory_open(struct inode *inode, struct file *filp);

int memory_release(struct inode *inode, struct file *filp);

ssize_t memory_read(struct file *filp, char *buf, size_t count, loff_t *f_pos);

ssize_t memory_write(struct file *filp, char *buf, size_t count, loff_t *f_pos);

void memory_exit(void);

int memory_init(void);


/* Structure that declares the usual file */

/* access functions */

struct file_operations memory_fops = {

  read: memory_read,

  write: memory_write,

  open: memory_open,

  release: memory_release

};


/* Declaration of the init and exit functions */

module_init(memory_init);

module_exit(memory_exit);


/* Global variables of the driver */

/* Major number */

int memory_major = 60;

/* Buffer to store data */

char *memory_buffer;
After the #include files, the functions that will be defined later are declared. The common functions which are typically used to manipulate files are declared in the definition of the file_operations structure. These will also be explained in detail later. Next, the initialization and exit functions—used when loading and removing the module—are declared to the kernel. Finally, the global variables of the driver are declared: one of them is the major number of the driver, the other is a pointer to a region in memory, memory_buffer, which will be used as storage for the driver data.
The “memory” driver: connection of the device with its files
In UNIX and Linux, devices are accessed from user space in exactly the same way as files are accessed. These device files are normally subdirectories of the /dev directory.
To link normal files with a kernel module two numbers are used: major number and minor number. The major number is the one the kernel uses to link a file with its driver. The minor number is for internal use of the device and for simplicity it won’t be covered in this article.
To achieve this, a file (which will be used to access the device driver) must be created, by typing the following command as root:
# mknod /dev/memory c 60 0
In the above, c means that a char device is to be created, 60 is the major number and 0 is the minor number.
Within the driver, in order to link it with its corresponding /dev file in kernel space, the register_chrdev function is used. It is called with three arguments: major number, a string of characters showing the module name, and a file_operations structure which links the call with the file functions it defines. It is invoked, when installing the module, in this way:
=
int memory_init(void) {

  int result;


  /* Registering device */

  result = register_chrdev(memory_major, "memory", &memory_fops);

  if (result < 0) {

    printk(

      "<1>memory: cannot obtain major number %dn", memory_major);

    return result;

  }


  /* Allocating memory for the buffer */

  memory_buffer = kmalloc(1, GFP_KERNEL);

  if (!memory_buffer) {

    result = -ENOMEM;

    goto fail;

  }

  memset(memory_buffer, 0, 1);


  printk("<1>Inserting memory modulen");

  return 0;


  fail:

    memory_exit();

    return result;

}
Also, note the use of the kmalloc function. This function is used for memory allocation of the buffer in the device driver which resides in kernel space. Its use is very similar to the well known malloc function. Finally, if registering the major number or allocating the memory fails, the module acts accordingly.
The “memory” driver: removing the driver
In order to remove the module inside the memory_exit function, the function unregsiter_chrdev needs to be present. This will free the major number for the kernel.
=
void memory_exit(void) {

  /* Freeing the major number */

  unregister_chrdev(memory_major, "memory");


  /* Freeing buffer memory */

  if (memory_buffer) {

    kfree(memory_buffer);

  }


  printk("<1>Removing memory modulen");


}
The buffer memory is also freed in this function, in order to leave a clean kernel when removing the device driver.
The “memory” driver: opening the device as a file
The kernel space function, which corresponds to opening a file in user space (fopen), is the member open: of the file_operations structure in the call to register_chrdev. In this case, it is the memory_open function. It takes as arguments: an inode structure, which sends information to the kernel regarding the major number and minor number; and a file structure with information relative to the different operations that can be performed on a file. Neither of these functions will be covered in depth within this article.
When a file is opened, it’s normally necessary to initialize driver variables or reset the device. In this simple example, though, these operations are not performed.
The memory_open function can be seen below:
=
int memory_open(struct inode *inode, struct file *filp) {


  /* Success */

  return 0;

}
This new function is now shown in Table 5.
| Events | User functions | Kernel functions |
| Load module | insmod | module_init() |
| Open device | fopen | file_operations: open |
| Read device | ||
| Write device | ||
| Close device | ||
| Remove module | rmmod | module_exit() |
Table 5. Device driver events and their associated interfacing functions between kernel space and user space.
The “memory” driver: closing the device as a file
The corresponding function for closing a file in user space (fclose) is the release: member of the file_operations structure in the call to register_chrdev. In this particular case, it is the function memory_release, which has as arguments an inode structure and a file structure, just like before.
When a file is closed, it’s usually necessary to free the used memory and any variables related to the opening of the device. But, once again, due to the simplicity of this example, none of these operations are performed.
The memory_release function is shown below:
=
int memory_release(struct inode *inode, struct file *filp) {


  /* Success */

  return 0;

}
This new function is shown in Table 6.
| Events | User functions | Kernel functions |
| Load module | insmod | module_init() |
| Open device | fopen | file_operations: open |
| Read device | ||
| Write device | ||
| Close device | fclose | file_operations: release |
| Remove module | rmmod | module_exit() |
Table 6. Device driver events and their associated interfacing functions between kernel space and user space.
The “memory” driver: reading the device
To read a device with the user function fread or similar, the member read: of the file_operations structure is used in the call to register_chrdev. This time, it is the function memory_read. Its arguments are: a type file structure; a buffer (buf), from which the user space function (fread) will read; a counter with the number of bytes to transfer (count), which has the same value as the usual counter in the user space function (fread); and finally, the position of where to start reading the file (f_pos).
In this simple case, the memory_read function transfers a single byte from the driver buffer (memory_buffer) to user space with the function copy_to_user:
=
ssize_t memory_read(struct file *filp, char *buf,

                    size_t count, loff_t *f_pos) {


  /* Transfering data to user space */

  copy_to_user(buf,memory_buffer,1);


  /* Changing reading position as best suits */

  if (*f_pos == 0) {

    *f_pos+=1;

    return 1;

  } else {

    return 0;

  }

}
The reading position in the file (f_pos) is also changed. If the position is at the beginning of the file, it is increased by one and the number of bytes that have been properly read is given as a return value, 1. If not at the beginning of the file, an end of file (0) is returned since the file only stores one byte.
In Table 7 this new function has been added.
| Events | User functions | Kernel functions |
| Load module | insmod | module_init() |
| Open device | fopen | file_operations: open |
| Read device | fread | file_operations: read |
| Write device | ||
| Close device | fclose | file_operations: release |
| Remove modules | rmmod | module_exit() |
Table 7. Device driver events and their associated interfacing functions between kernel space and user space.
The “memory” driver: writing to a device
To write to a device with the user function fwrite or similar, the member write: of the file_operations structure is used in the call to register_chrdev. It is the function memory_write, in this particular example, which has the following as arguments: a type file structure; buf, a buffer in which the user space function (fwrite) will write; count, a counter with the number of bytes to transfer, which has the same values as the usual counter in the user space function (fwrite); and finally, f_pos, the position of where to start writing in the file.
=
ssize_t memory_write( struct file *filp, char *buf,

                      size_t count, loff_t *f_pos) {


  char *tmp;


  tmp=buf+count-1;

  copy_from_user(memory_buffer,tmp,1);

  return 1;

}
In this case, the function copy_from_user transfers the data from user space to kernel space.
In Table 8 this new function is shown.
| Events | User functions | Kernel functions |
| Load module | insmod | module_init() |
| Open device | fopen | file_operations: open |
| Close device | fread | file_operations: read |
| Write device | fwrite | file_operations: write |
| Close device | fclose | file_operations: release |
| Remove module | rmmod | module_exit() |
Device driver events and their associated interfacing functions between kernel space and user space.
The complete “memory” driver
By joining all of the previously shown code, the complete driver is achieved:
<memory.c> =
<memory initial>

<memory init module>

<memory exit module>

<memory open>

<memory release>

<memory read>

<memory write>
Before this module can be used, you will need to compile it in the same way as with previous modules. The module can then be loaded with:
# insmod memory.ko
It’s also convenient to unprotect the device:
# chmod 666 /dev/memory
If everything went well, you will have a device /dev/memory to which you can write a string of characters and it will store the last one of them. You can perform the operation like this:
$ echo -n abcdef >/dev/memory
To check the content of the device you can use a simple cat:
$ cat /dev/memory
The stored character will not change until it is overwritten or the module is removed.
The real “parlelport” driver: description of the parallel port
I’ll now proceed by modifying the driver that I just created to develop one that does a real task on a real device. I’ll use the simple and ubiquitous computer parallel port and the driver will be called parlelport.
The parallel port is effectively a device that allows the input and output of digital information. More specifically it has a female D-25 connector with twenty-five pins. Internally, from the point of view of the CPU, it uses three bytes of memory. In a PC, the base address (the one from the first byte of the device) is usually 0x378. In this basic example, I’ll use just the first byte, which consists entirely of digital outputs.
The connection of the above-mentioned byte with the external connector pins is shown in figure 2.
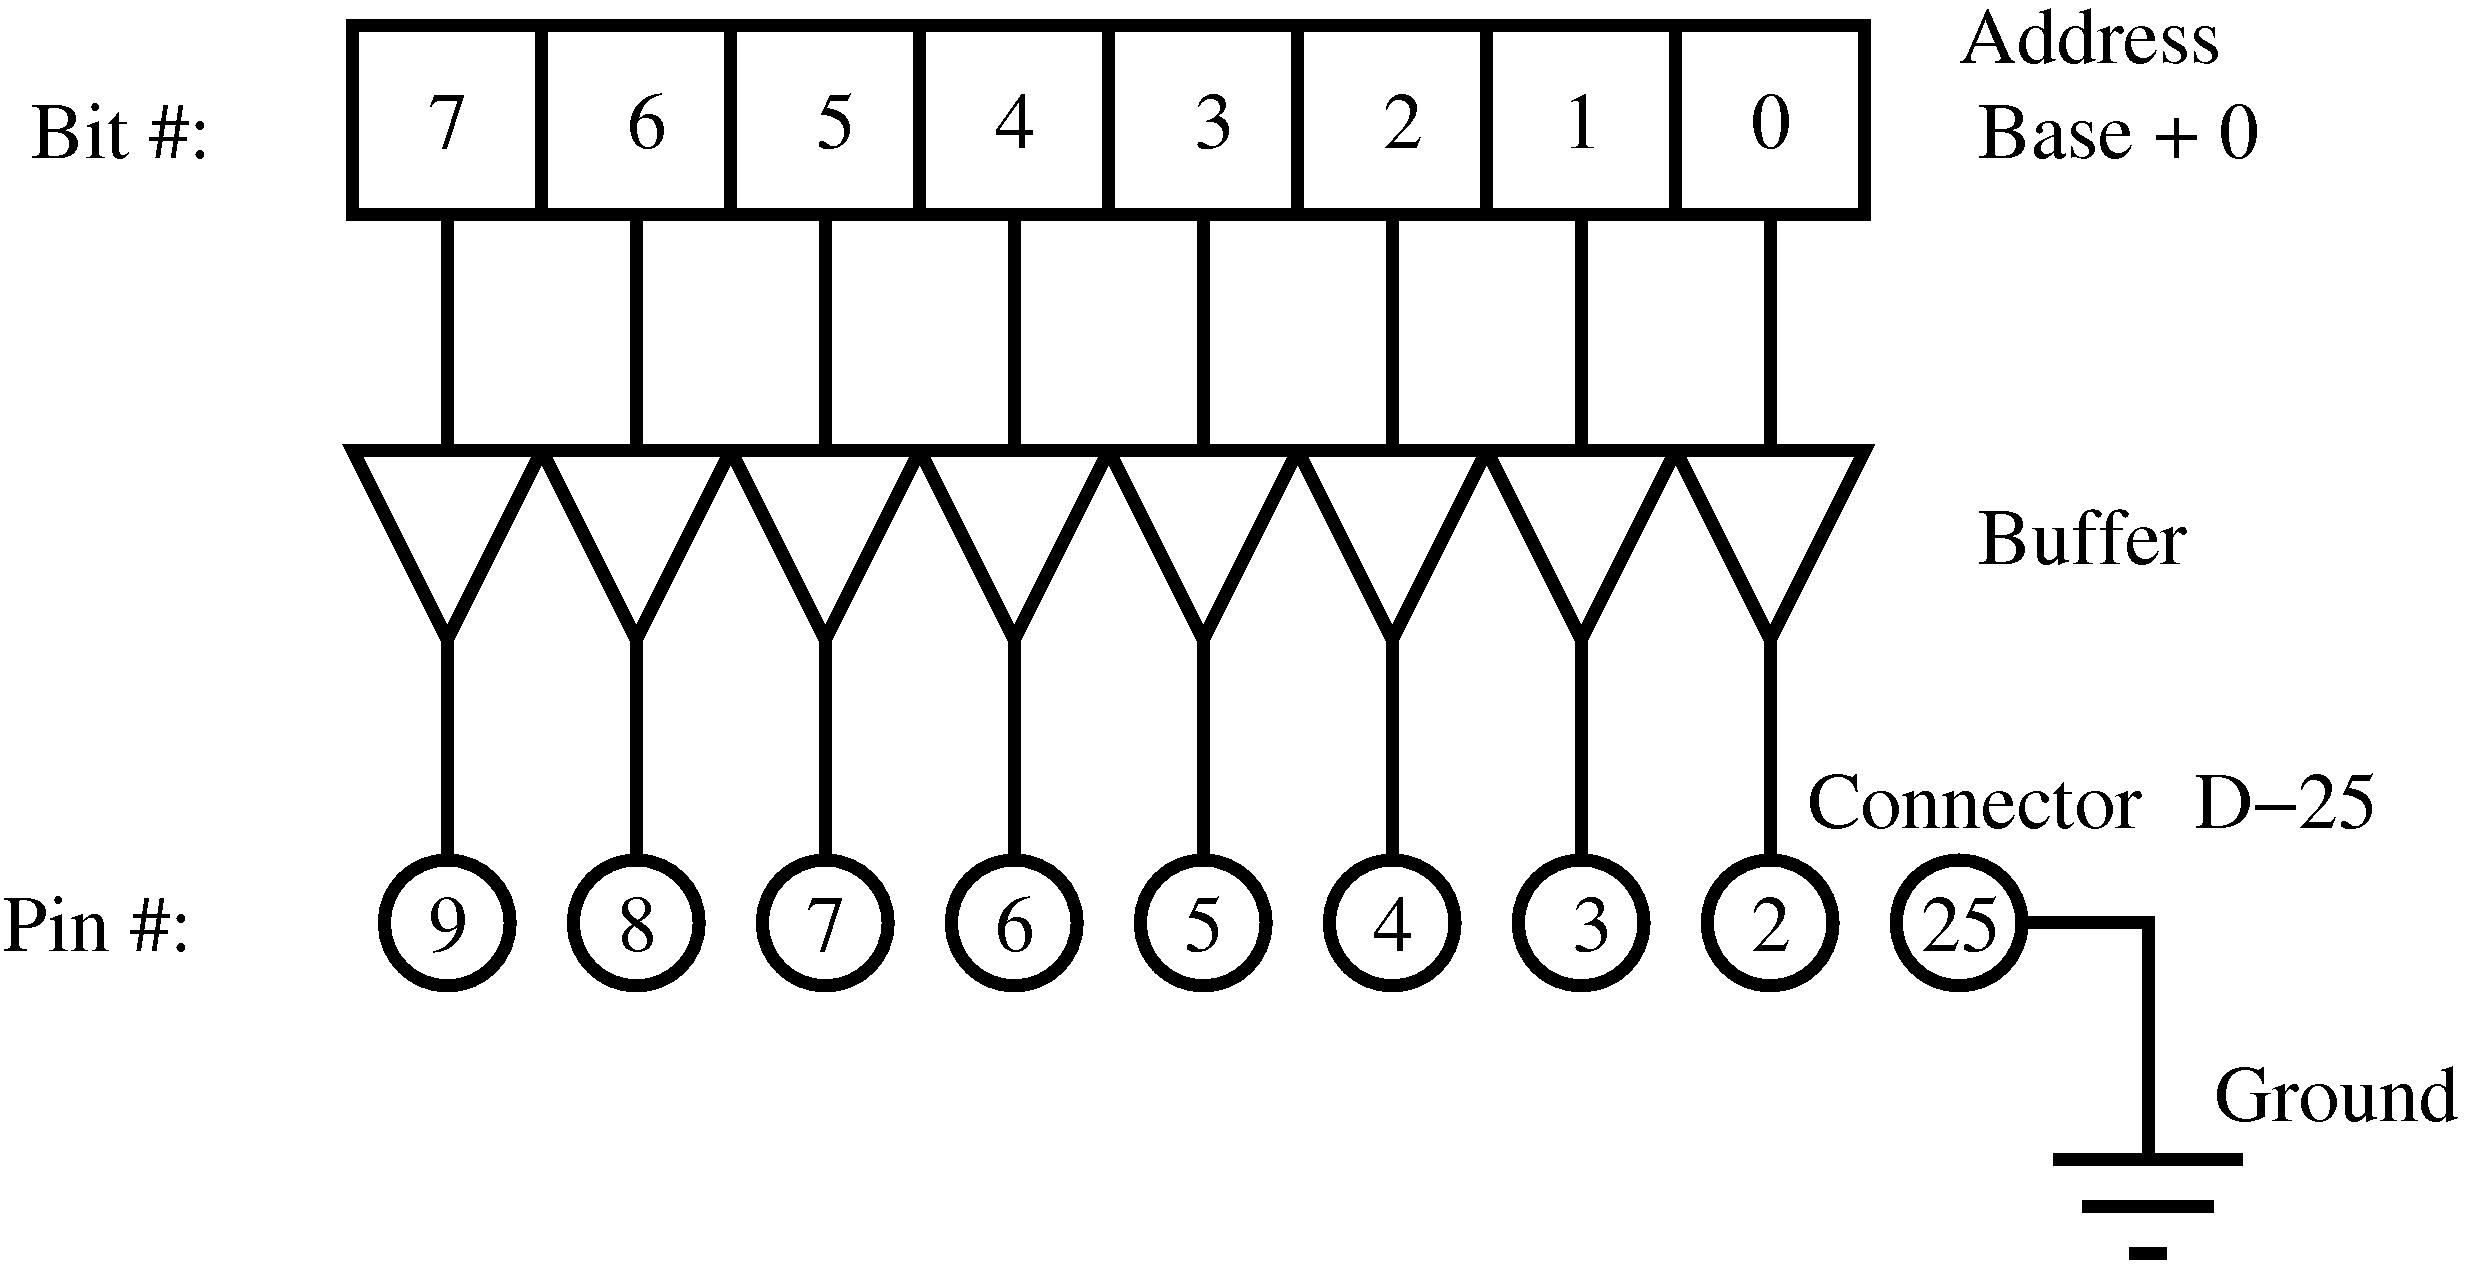
The “parlelport” driver: initializing the module
The previous memory_init function needs modification—changing the RAM memory allocation for the reservation of the memory address of the parallel port (0x378). To achieve this, use the function for checking the availability of a memory region (check_region), and the function to reserve the memory region for this device (request_region). Both have as arguments the base address of the memory region and its length. The request_region function also accepts a string which defines the module.
=
  /* Registering port */

  port = check_region(0x378, 1);

  if (port) {

    printk("<1>parlelport: cannot reserve 0x378n");

    result = port;

    goto fail;

  }

  request_region(0x378, 1, "parlelport");
The “parlelport” driver: removing the module
It will be very similar to the memory module but substituting the freeing of memory with the removal of the reserved memory of the parallel port. This is done by the release_region function, which has the same arguments as check_region.
=
  /* Make port free! */

  if (!port) {

    release_region(0x378,1);

  }
The “parlelport” driver: reading the device
In this case, a real device reading action needs to be added to allow the transfer of this information to user space. The inb function achieves this; its arguments are the address of the parallel port and it returns the content of the port.
=
/* Reading port */

parlelport_buffer = inb(0x378);
Table 9 (the equivalent of Table 2) shows this new function.
| Events | Kernel functions |
| Read data | inb |
| Write data |
Device driver events and their associated functions between kernel space and the hardware device.
The “parlelport” driver: writing to the device
Again, you have to add the “writing to the device” function to be able to transfer later this data to user space. The function outb accomplishes this; it takes as arguments the content to write in the port and its address.
=
/* Writing to the port */

outb(parlelport_buffer,0x378);
Table 10 summarizes this new function.
| Events | Kernel functions |
| Read data | inb |
| Write data | outb |
Device driver events and their associated functions between kernel space and the hardware device.
The complete “parlelport” driver
I’ll proceed by looking at the whole code of the parlelport module. You have to replace the word memory for the word parlelport throughout the code for the memory module. The final result is shown below:
<parlelport.c> =
<parlelport initial>

<parlelport init module>

<parlelport exit module>

<parlelport open>

<parlelport release>

<parlelport read>

<parlelport write>
Initial section
In the initial section of the driver a different major number is used (61). Also, the global variable memory_buffer is changed to port and two more #include lines are added: ioport.h and io.h.
=
/* Necessary includes for drivers */

#include <linux/init.h>

#include <linux/config.h>

#include <linux/module.h>

#include <linux/kernel.h> /* printk() */

#include <linux/slab.h> /* kmalloc() */

#include <linux/fs.h> /* everything... */

#include <linux/errno.h> /* error codes */

#include <linux/types.h> /* size_t */

#include <linux/proc_fs.h>

#include <linux/fcntl.h> /* O_ACCMODE */

#include <linux/ioport.h>

#include <asm/system.h> /* cli(), *_flags */

#include <asm/uaccess.h> /* copy_from/to_user */

#include <asm/io.h> /* inb, outb */


MODULE_LICENSE("Dual BSD/GPL");


/* Function declaration of parlelport.c */

int parlelport_open(struct inode *inode, struct file *filp);

int parlelport_release(struct inode *inode, struct file *filp);

ssize_t parlelport_read(struct file *filp, char *buf,

                       size_t count, loff_t *f_pos);

ssize_t parlelport_write(struct file *filp, char *buf,

                       size_t count, loff_t *f_pos);

void parlelport_exit(void);

int parlelport_init(void);


/* Structure that declares the common */

/* file access fcuntions */

struct file_operations parlelport_fops = {

  read: parlelport_read,

  write: parlelport_write,

  open: parlelport_open,

  release: parlelport_release

};


/* Driver global variables */

/* Major number */

int parlelport_major = 61;


/* Control variable for memory */

/* reservation of the parallel port*/

int port;


module_init(parlelport_init);

module_exit(parlelport_exit);
Module init
In this module-initializing-routine I’ll introduce the memory reserve of the parallel port as was described before.
=
int parlelport_init(void) {

  int result;


  /* Registering device */

  result = register_chrdev(parlelport_major, "parlelport",

      &parlelport_fops);

  if (result < 0) {

    printk(

      "<1>parlelport: cannot obtain major number %dn",

      parlelport_major);

    return result;

  }


  <parlelport modified init module>


  printk("<1>Inserting parlelport modulen");

  return 0;


  fail:

    parlelport_exit();

    return result;

}
Removing the module
This routine will include the modifications previously mentioned.
=
void parlelport_exit(void) {


  /* Make major number free! */

  unregister_chrdev(parlelport_major, "parlelport");


  <parlelport modified exit module>


  printk("<1>Removing parlelport modulen");

}
Opening the device as a file
This routine is identical to the memory driver.
=
int parlelport_open(struct inode *inode, struct file *filp) {


  /* Success */

  return 0;


}
Closing the device as a file
Again, the match is perfect.
=
int parlelport_release(struct inode *inode, struct file *filp) {


  /* Success */

  return 0;

}
Reading the device
The reading function is similar to the memory one with the corresponding modifications to read from the port of a device.
=
ssize_t parlelport_read(struct file *filp, char *buf,

  size_t count, loff_t *f_pos) {


  /* Buffer to read the device */

  char parlelport_buffer;


  <parlelport inport>


  /* We transfer data to user space */

  copy_to_user(buf,&parlelport_buffer,1);


  /* We change the reading position as best suits */

  if (*f_pos == 0) {

    *f_pos+=1;

    return 1;

  } else {

    return 0;

  }

}
Writing to the device
It is analogous to the memory one except for writing to a device.
=
ssize_t parlelport_write( struct file *filp, char *buf,

  size_t count, loff_t *f_pos) {


  char *tmp;


  /* Buffer writing to the device */

  char parlelport_buffer;


  tmp=buf+count-1;

  copy_from_user(&parlelport_buffer,tmp,1);


  <parlelport outport>


  return 1;

}
LEDs to test the use of the parallel port
In this section I’ll detail the construction of a piece of hardware that can be used to visualize the state of the parallel port with some simple LEDs.
WARNING: Connecting devices to the parallel port can harm your computer. Make sure that you are properly earthed and your computer is turned off when connecting the device. Any problems that arise due to undertaking these experiments is your sole responsibility.
The circuit to build is shown in figure 3 You can also read “PC & Electronics: Connecting Your PC to the Outside World” by Zoller as reference.
In order to use it, you must first ensure that all hardware is correctly connected. Next, switch off the PC and connect the device to the parallel port. The PC can then be turned on and all device drivers related to the parallel port should be removed (for example, lp, parport, parport_pc, etc.). The hotplug module of the Debian Sarge distribution is particularly annoying and should be removed. If the file /dev/parlelport does not exist, it must be created as root with the command:
# mknod /dev/parlelport c 61 0
Then it needs to be made readable and writable by anybody with:
# chmod 666 /dev/parlelport
The module can now be installed, parlelport. You can check that it is effectively reserving the input/output port addresses 0x378 with the command:
$ cat /proc/ioports
To turn on the LEDs and check that the system is working, execute the command:
$ echo -n A >/dev/parlelport
This should turn on LED zero and six, leaving all of the others off.
You can check the state of the parallel port issuing the command:
$ cat /dev/parlelport
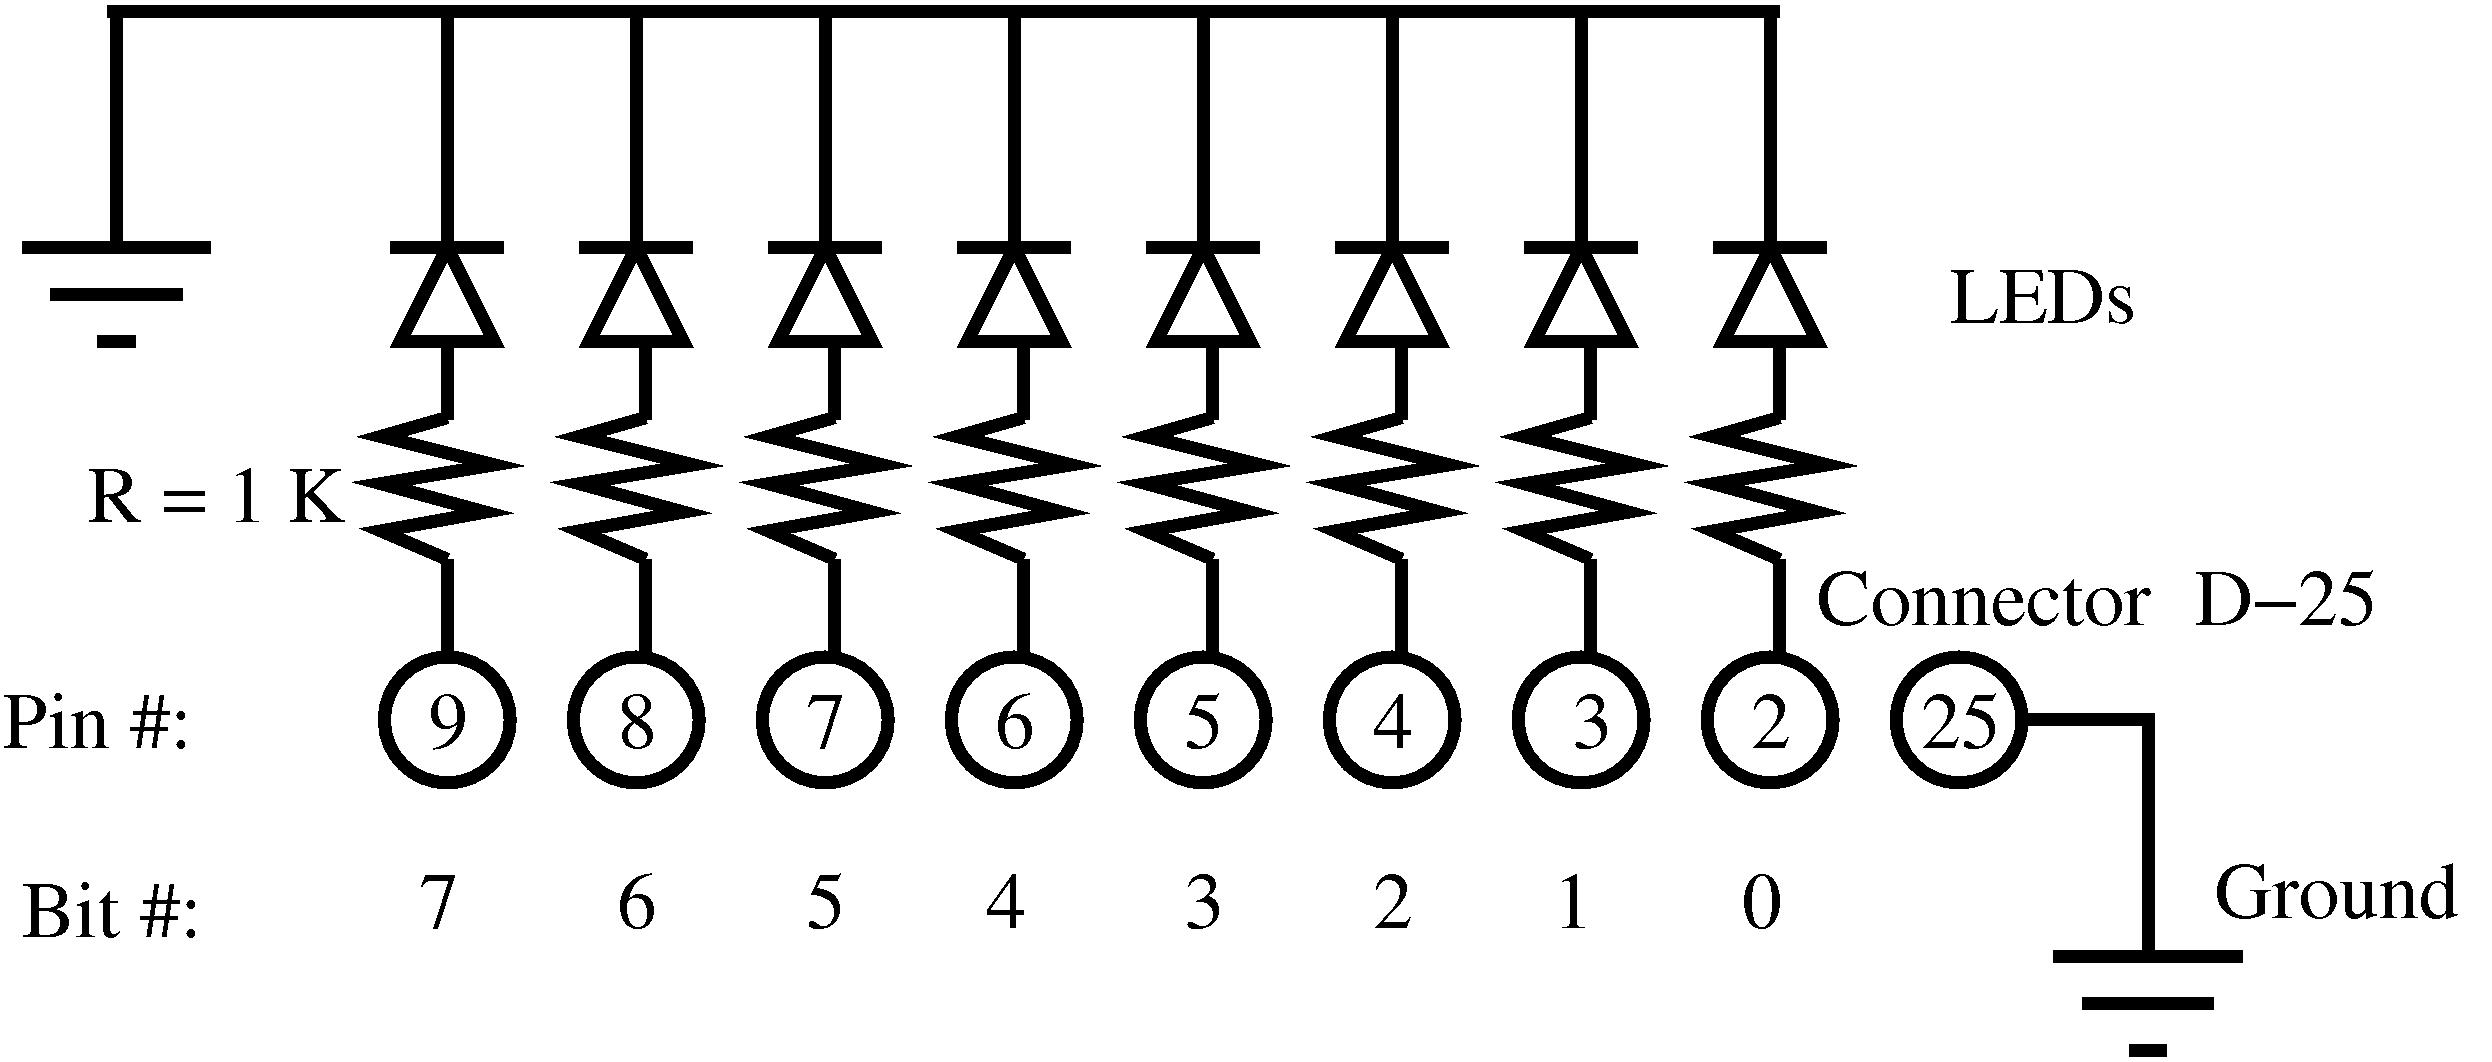
Final application: flashing lights
Finally, I’ll develop a pretty application which will make the LEDs flash in succession. To achieve this, a program in user space needs to be written with which only one bit at a time will be written to the /dev/parlelport device.
<lights.c> =
#include <stdio.h>

#include <unistd.h></p>


int main() {

  unsigned char byte,dummy;

  FILE * PARLELPORT;


  /* Opening the device parlelport */

  PARLELPORT=fopen("/dev/parlelport","w");

  /* We remove the buffer from the file i/o */

  setvbuf(PARLELPORT,&dummy,_IONBF,1);


  /* Initializing the variable to one */

  byte=1;


  /* We make an infinite loop */

  while (1) {

    /* Writing to the parallel port */

    /* to turn on a LED */

    printf("Byte value is %dn",byte);

    fwrite(&byte,1,1,PARLELPORT);

    sleep(1);


    /* Updating the byte value */

    byte<<=1;

    if (byte == 0) byte = 1;

  }


  fclose(PARLELPORT);


}
It can be compiled in the usual way:
$ gcc -o lights lights.c
and can be executed with the command:
$ lights
The lights will flash successively one after the other! The flashing LEDs and the Linux computer running this program are shown in figure 4.
Conclusion
Having followed this brief tutorial you should now be capable of writing your own complete device driver for simple hardware like a relay board (see Appendix C), or a minimal device driver for complex hardware. Learning to understand some of these simple concepts behind the Linux kernel allows you, in a quick and easy way, to get up to speed with respect to writing device drivers. And, this will bring you another step closer to becoming a true Linux kernel developer.
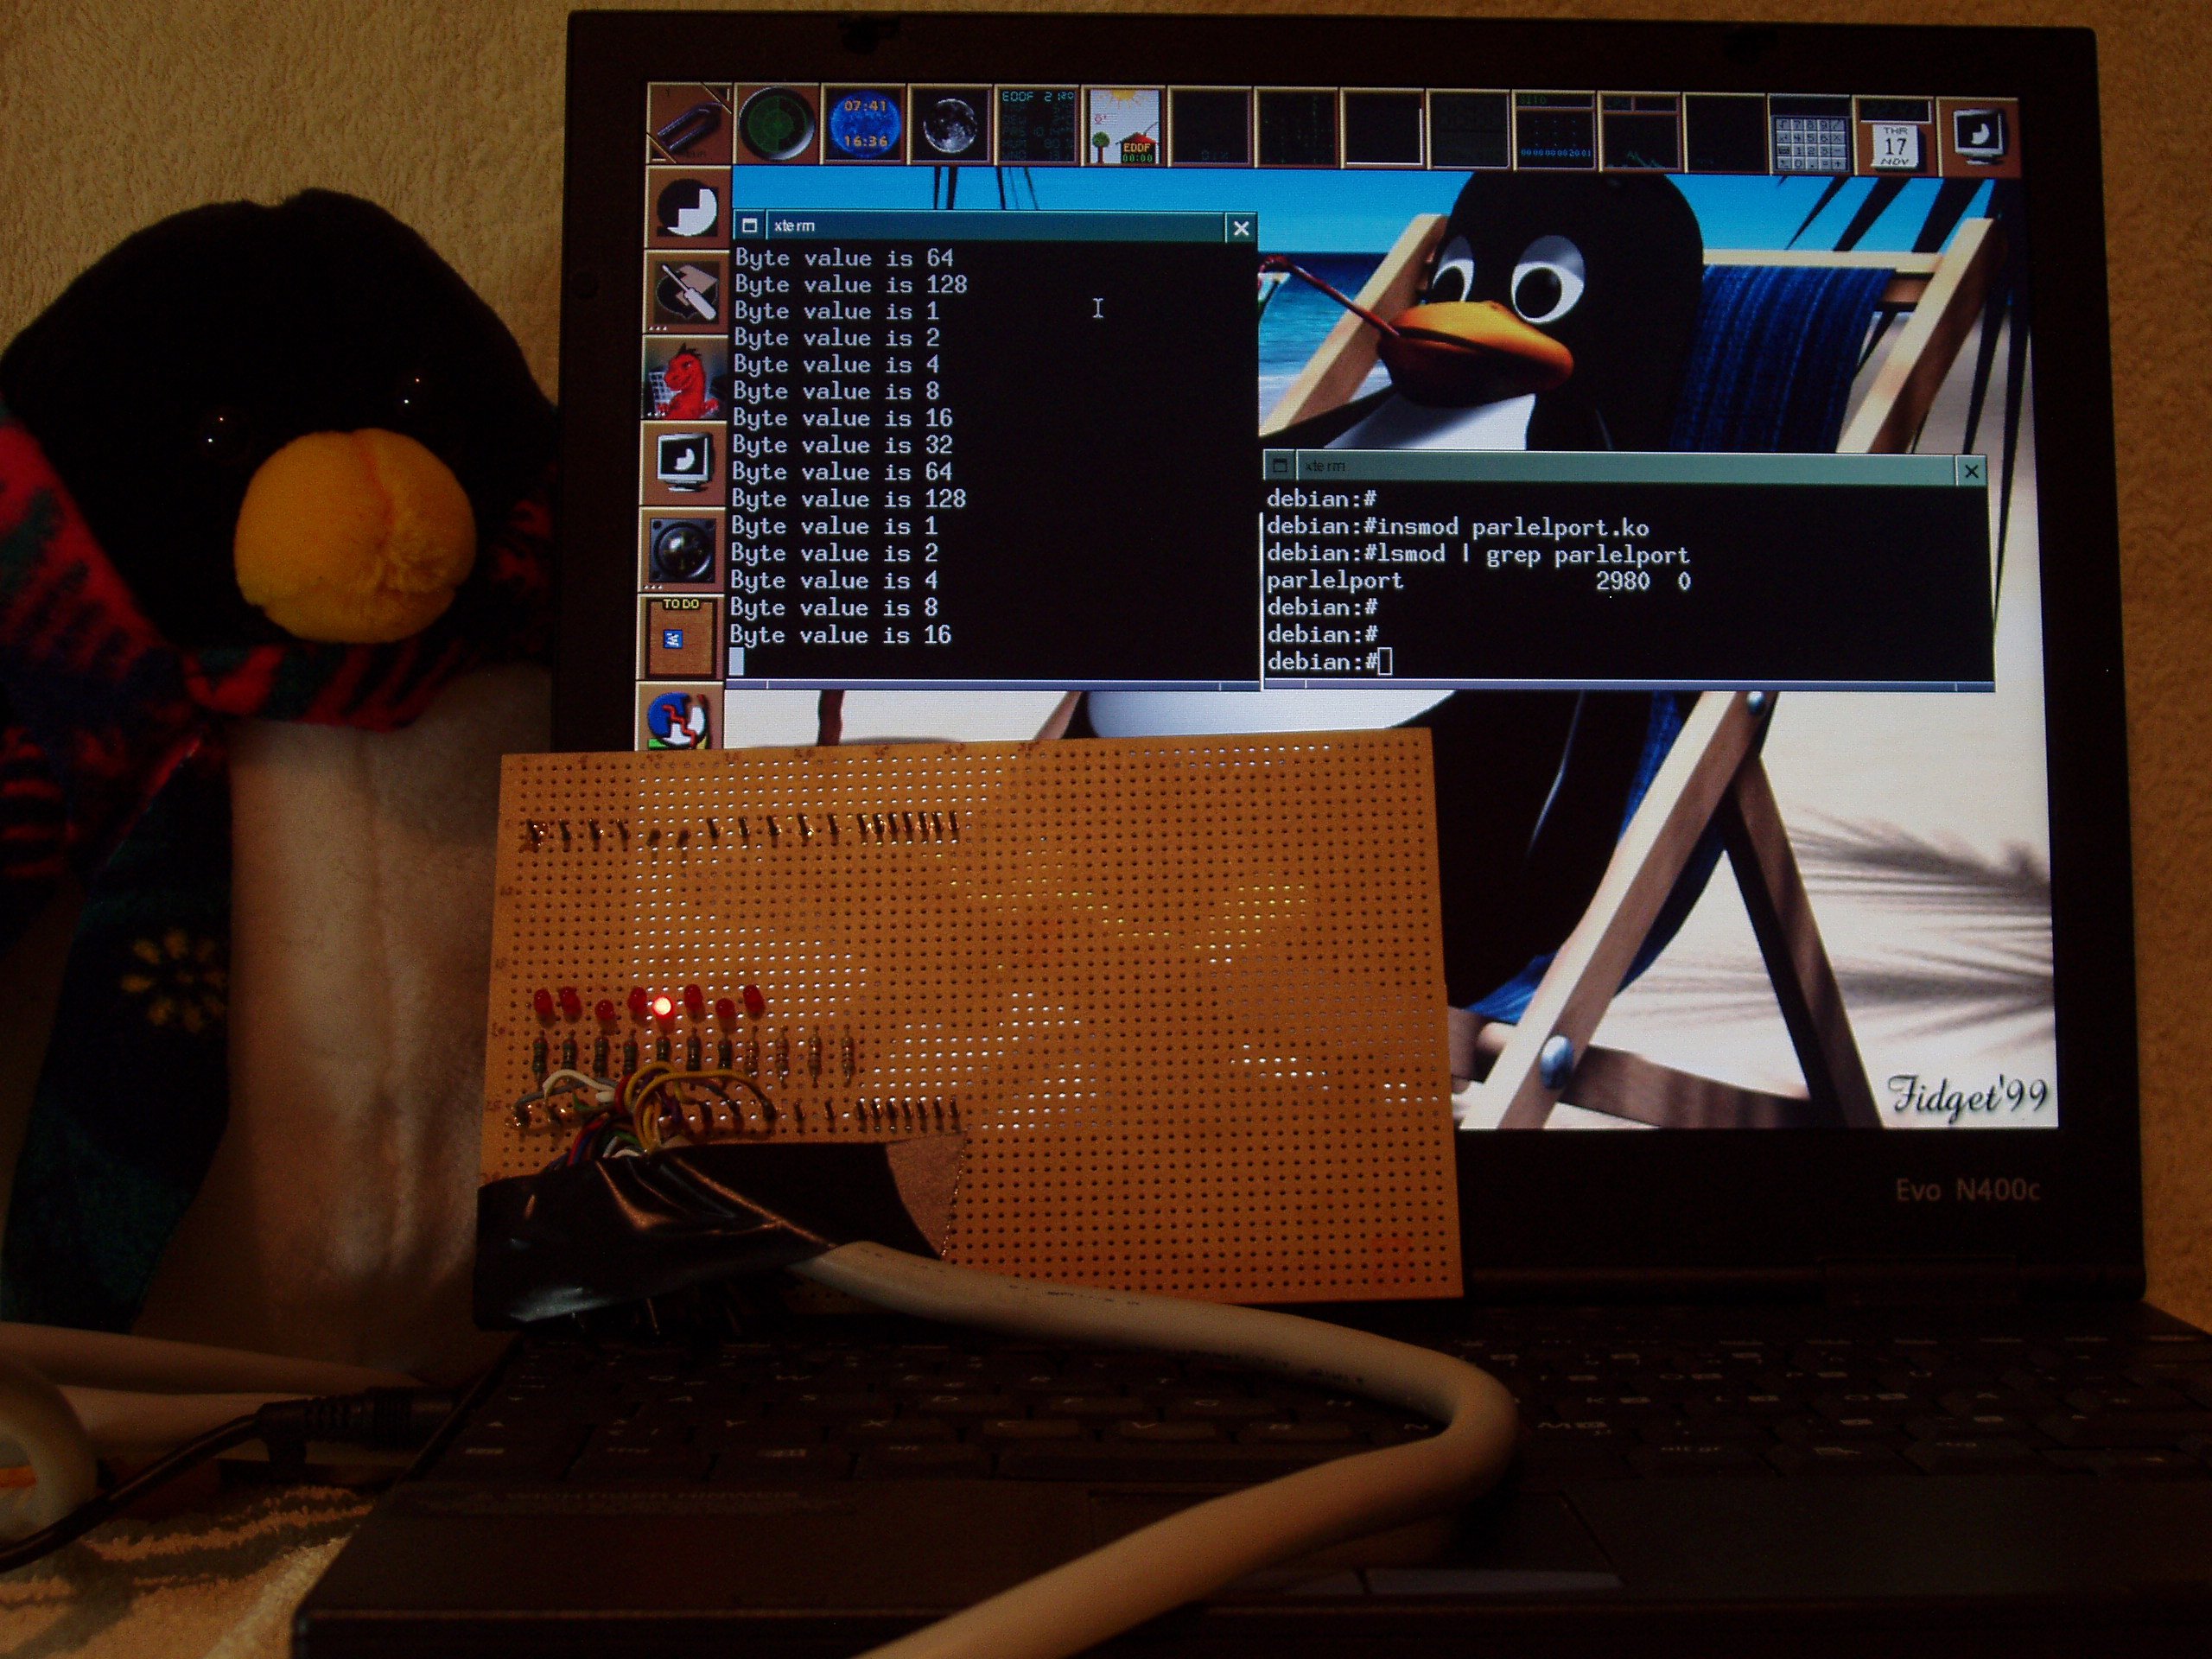
Bibliography
A. Rubini, J. Corbert. 2001. Linux device drivers (second edition). Ed. O’Reilly. This book is available for free on the internet.
Jonathan Corbet. 2003/2004. Porting device drivers to the 2.6 kernel. This is a very valuable resource for porting drivers to the new 2.6 Linux kernel and also for learning about Linux device drivers.
B. Zoller. 1998. PC & Electronics: Connecting Your PC to the Outside World (Productivity Series). Nowadays it is probably easier to surf the web for hardware projects like this one.
M. Waite, S. Prata. 1990. C Programming. Any other good book on C programming would suffice.
Appendix A. Complete Makefile
=
obj-m := nothing.o hello.o memory.o parlelport.o
Appendix B. Compiling the kernel on a Debian Sarge system
To compile a 2.6.x kernel on a Debian Sarge system you need to perform the following steps, which should be run as root:
- Install the “kernel-image-2.6.x” package.
- Reboot the machine to make this the running kernel image. This is done semi-automatically by Debian. You may need to tweak the lilo configuration file
/etc/lilo.confand then runliloto achieve this. - Install the “kernel-source-2.6.x” package.
- Change to the source code directory,
cd /usr/srcand unzip and untar the source code withbunzip2 kernel-source-2.6.x.tar.bz2andtar xvf kernel-source-2.6.x.tar. Change to the kernel source directory withcd /usr/src/kernel-source-2.6.x - Copy the default Debian kernel configuration file to your local kernel source directory
cp /boot/config-2.6.x .config. - Make the kernel and the modules with
makeand thenmake modules.
Appendix C. Exercises
If you would like to take on some bigger challenges, here are a couple of exercises you can do:
- I once wrote two device drivers for two ISA Meilhaus boards, an analog to digital converter (ME26) and a relay control board (ME53). The software is available from the ADQ project. Get the newer PCI versions of these Meilhaus boards and update the software.
- Take any device that doesn’t work on Linux, but has a very similar chipset to another device which does have a proven device driver for Linux. Try to modify the working device driver to make it work for the new device. If you achieve this, submit your code to the kernel and become a kernel developer yourself!
Comments and acknowledgements
Three years have elapsed since the first version of this document was written. It was originally written in Spanish and intended for version 2.2 of the kernel, but kernel 2.4 was already making its first steps at that time. The reason for this choice is that good documentation for writing device drivers, the Linux device drivers book (see bibliography), lagged the release of the kernel in some months. This new version is also coming out soon after the release of the new 2.6 kernel, but up to date documentation is now readily available in Linux Weekly News making it possible to have this document synchronized with the newest kernel.
Fortunately enough, PCs still come with a built-in parallel port, despite the actual trend of changing everything inside a PC to render it obsolete in no time. Let us hope that PCs still continue to have built-in parallel ports for some time in the future, or that at least, parallel port PCI cards are still being sold.
This tutorial has been originally typed using a text editor (i.e. emacs) in noweb format. This text is then processed with the noweb tool to create a LaTeX file ( .tex ) and the source code files ( .c ). All this can be done using the supplied makefile.document with the command make -f makefile.document.
I would like to thank the “Instituto Politécnico de Bragança”, the “Núcleo Estudantil de Linux del Instituto Politécnico de Bragança (NUX)”, the “Asociación de Software Libre de León (SLeón)” and the “Núcleo de Estudantes de Engenharia Informática da Universidade de Évora” for making this update possible.