Так уж сложилось, что сейчас мало кто из разработчиков помнит, как написать простую DLL библиотеку и в чем особенности связывания разнородных систем.
Я постараюсь за 10 минут на примерах показать весь процесс создания простых DLL библиотек и раскрою некоторые технические детали нашей реализации связывания. Демонстрация будет на примере Visual Studio 2005 / 2008, бесплатные Express-версии которых можно свободно скачать с сайта Microsoft.
1. Создание проекта DLL на С++ в Visual Studio 2005/2008
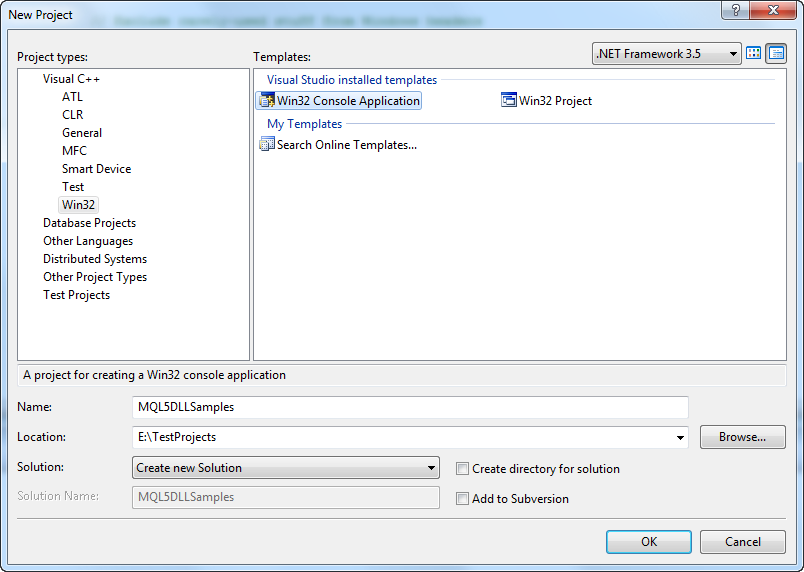
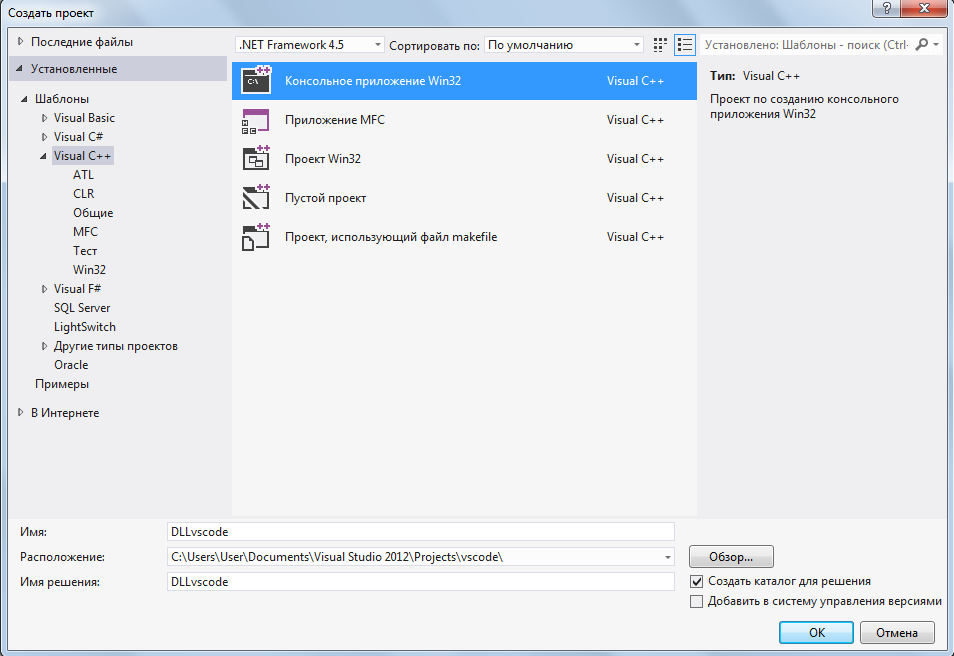
Запустите визард через меню ‘File -> New‘, выберите тип проекта ‘Visual C++‘, шаблон ‘Win32 Console Application‘ и укажите имя проекта (например, ‘MQL5DLLSamples‘). Выберите отдельный корневой каталог хранения проектов ‘Location‘ вместо предлагаемого по умолчанию, отключите галочку ‘Create directory for solution‘ и нажмите на кнопку ‘OK‘:
Рис 1. Win32 Application Wizard, создание проекта DLL
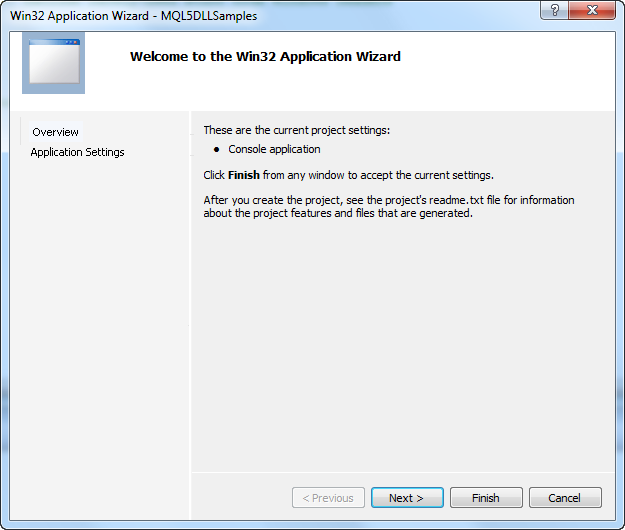
На следующем шаге просто нажмите на кнопку ‘Next‘ для перехода на страницу настроек:
Рис 2. Win32 Application Wizard, параметры проекта
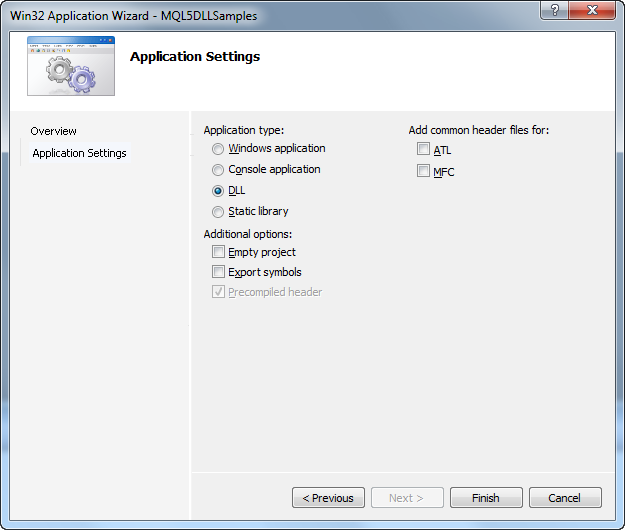
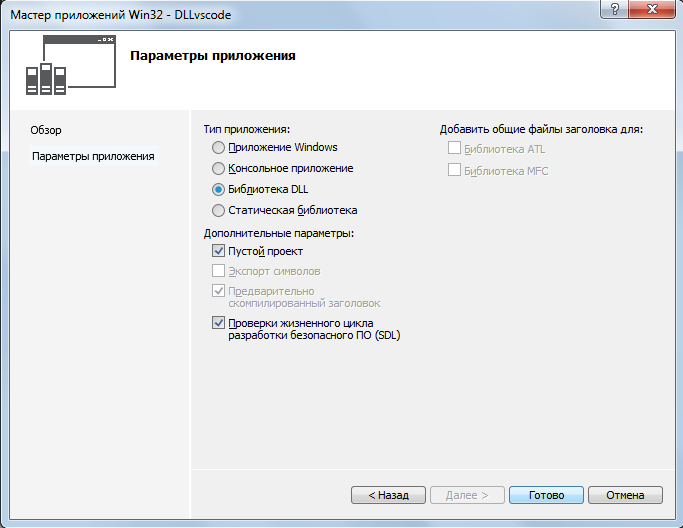
На финальной странице выберите тип ‘DLL‘, оставив остальные поля пустыми как есть, и нажмите на ‘Finish‘. Ставить галочку на ‘Export symbols‘ не нужно, чтобы потом не удалять автоматически добавленный демонстрационный код:
Рис 3. Win32 Application Wizard, настройка свойств приложения
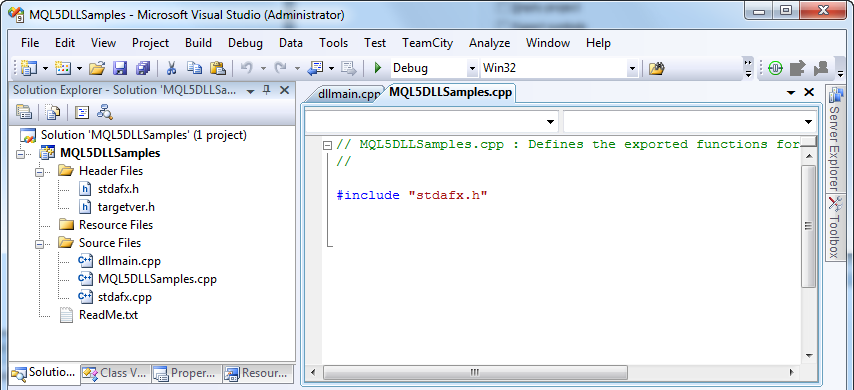
В результате получите пустой проект:
Рис 4. Пустой проект DLL
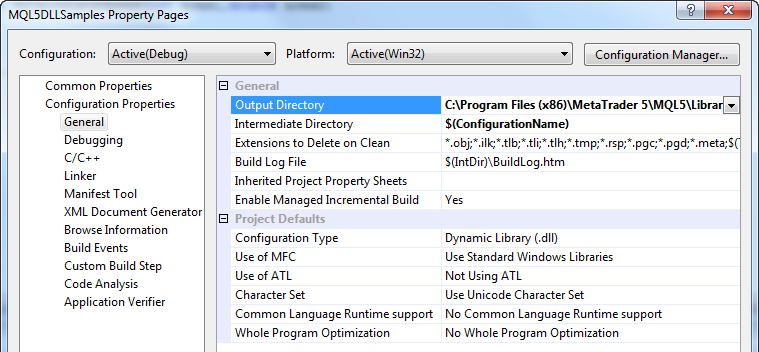
Для удобства тестирования лучше всего прямо в настройках ‘Output Directory‘ указать выкладку DLL файлов напрямую в каталог ‘…MQL5Libraries‘
клиентского терминала. Это сэкономит много времени в последующей работе:
Рис 5. Каталог выкладки DLL файлов
2. Подготовка к добавлению функций
Добавьте макрос ‘_DLLAPI‘ в конец файла stdafx.h, чтобы можно было удобно и просто описывать экспортируемые функции:
#pragma once

#include "targetver.h"

#define WIN32_LEAN_AND_MEAN             // Exclude rarely-used stuff from Windows headers
#include <windows.h>


#define _DLLAPI extern "C" __declspec(dllexport)
В вызовах функций MQL5 используется соглашение о связях __stdcall и __cdecl. Хотя вызовы stdcall и cdecl отличаются вариантами извлечения параметров со стека, но исполняющая среда MQL5 позволяет безболезненно использовать оба варианта за счет специального враппера DLL вызовов.
По умолчанию в настройках компилятора С++ для функций используется __cdecl, но я рекомендую для экспортируемых функций явным образом указывать режим __stdcall.
Правильно оформленная экспортная функции должна иметь следующий вид:
_DLLAPI int __stdcall fnCalculateSpeed(int &res1,double &res2)
  {
   return(0);
  }
а в MQL5 программе описываться и вызываться так:
#import "MQL5DLLSamples.dll"
int  fnCalculateSpeed(int &res1,double &res2);
#import


   speed=fnCalculateSpeed(res_int,res_double);
После сборки проекта DLL эта stdcall функция будет видна в таблице экспорта под именем _fnCalculateSpeed@8, где компилятором добавляются знак подчеркивания и количество передаваемых через стек данных в байтах. Такое декорирование позволяет лучше контролировать безопасность вызовов DLL функций за счет того, что вызывающая сторона точно знает, сколько (но не каких!) данных нужно помещать в стек.
Если при описании импорта DLL функции будет ошибка в итоговом размере блока параметров, то функция не будет вызвана, а в журнале появится сообщение вида ‘Cannot find ‘fnCrashTestParametersStdCall’ in ‘MQL5DLLSamples.dll’‘. В этом случае надо тщательно перепроверить все параметры как в протопите функции, так и в самой DLL.
При отсутствии полного имени функции в таблице экспорта для совместимости используется поиск упрощенного описания без декорирования. Такие имена вида fnCalculateSpeed создаются при описаниях функции в формате __cdecl:
_DLLAPI int fnCalculateSpeed(int &res1,double &res2)
  {
   return(0);
  }
3. Способы передачи параметров и обмен данными
Давайте посмотрим на несколько вариантов передаваемых параметров:
- Прием и передача простых переменных
С простыми переменными все просто — их можно передавать по значению или по ссылке через &._DLLAPI int __stdcall fnCalculateSpeed(int &res1,double &res2) { int res_int=0; double res_double=0.0; int start=GetTickCount(); for(int i=0;i<=10000000;i++) { res_int+=i*i; res_int++; res_double+=i*i; res_double++; } res1=res_int; res2=res_double; return(GetTickCount()-start); }
Вызов из MQL5:
#import "MQL5DLLSamples.dll"
int  fnCalculateSpeed(int &res1,double &res2);
#import


   int    speed=0;
   int    res_int=0;
   double res_double=0.0;

   speed=fnCalculateSpeed(res_int,res_double);
   Print("Time ",speed," msec, int: ",res_int," double: ",res_double);
Результат:
MQL5DLL Test (GBPUSD,M1) 19:56:42 Time 16 msec, int: -752584127 double: 17247836076609
- Прием и передача массива с заполнением элементов
Передача массива в DLL, в отличие от других MQL5-программ, происходит через прямую ссылку на буфер с данными без доступа к служебной информации о размерностях и размерах. Поэтому размерности и размеры массива нужно передавать отдельно.
_DLLAPI void __stdcall fnFillArray(int *arr,const int arr_size)
  {

   if(arr==NULL || arr_size<1) return;

   for(int i=0;i<arr_size;i++) arr[i]=i;
  }
Вызов из MQL5:
#import "MQL5DLLSamples.dll"
void fnFillArray(int &arr[],int arr_size);
#import


   int    arr[];
   string result="Array: ";
   ArrayResize(arr,10);

   fnFillArray(arr,ArraySize(arr));
   for(int i=0;i<ArraySize(arr);i++) result=result+IntegerToString(arr[i])+" ";
   Print(result);
Результат:
MQL5DLL Test (GBPUSD,M1) 20:31:12 Array: 0 1 2 3 4 5 6 7 8 9
- Передача и модификация строк
Строки (unicode) также передаются через прямые ссылки на рабочие буферы без служебной информации. Обратите внимание, что функция для примера описана в формате cdecl:_DLLAPI void fnReplaceString(wchar_t *text,wchar_t *from,wchar_t *to) { wchar_t *cp; if(text==NULL || from==NULL || to==NULL) return; if(wcslen(from)!=wcslen(to)) return; if((cp=wcsstr(text,from))==NULL) return; memcpy(cp,to,wcslen(to)*sizeof(wchar_t)); }
Вызов из MQL5:
#import "MQL5DLLSamples.dll"
void fnReplaceString(string text,string from,string to);
#import


   string text="A quick brown fox jumps over the lazy dog";

   fnReplaceString(text,"fox","cat");
   Print("Replace: ",text);
Результат:
MQL5DLL Test (GBPUSD,M1) 19:56:42 Replace: A quick brown fox jumps over the lazy dog
Оказалось, что строка не изменилась! Это обычная ошибка начинающих программистов, когда они передают копии объектов (а string — это объект) вместо ссылки на них. Для строки ‘text’ была автоматически создана копия, которая была модифицирована в DLL, а затем копия также автоматически удалилась, не затронув оригинал.
Чтобы исправить ситуацию, надо передавать строку по ссылке. Для этого просто модифицируем блок импорта, добавив знак & к параметру text:
#import "MQL5DLLSamples.dll"
void fnReplaceString(string &text,string from,string to);
#import
После перекомпиляции и запуска получим правильный результат:
MQL5DLL Test (GBPUSD,M1) 19:58:31 Replace: A quick brown cat jumps over the lazy dog
4. Перехват исключений в DLL функциях
Чтобы избежать падения самого терминала, каждый вызов функций DLL автоматически защищается оберткой Unhandled Exception. Этот механизм позволяет уберечься от большинства стандартных ошибок (обращения в недоступную память, деления на ноль и т.д.)
Для проверки работоспособности этого механизма создадим следующий код:
_DLLAPI void __stdcall fnCrashTest(int *arr)
  {

   *arr=0;
  }
и вызовем его из терминала:
#import "MQL5DLLSamples.dll"
void fnCrashTest(int arr);
#import


   fnCrashTest(NULL);
   Print("Этого текста не увидите!");
В результате произойдет попытка записи в нулевой адрес с генерацией исключения. Терминал его перехватит, сообщит в журнале и продолжит работу:
MQL5DLL Test (GBPUSD,M1) 20:31:12 Access violation write to 0x00000000
5. Враппер DLL вызовов и потери скорости на вызовах
Как уже было рассказано выше, для обеспечения безопасности каждый вызов DLL функции оборачивается в специальный враппер. Эта обвязка маскирует основной код, подменяет стек, поддерживает stdcall/cdecl соглашения и контролирует исключения внутри вызываемых функций.
Такой объем выполняемой работы не приводит к существенному замедлению вызова функций.
6. Финальная сборка
Соберите все вышеприведенные примеры DLL функций в файле ‘MQL5DLLSamples.cpp‘, а MQL5 примеры в скрипт ‘MQL5DLL Test.mq5‘. Готовый проект для Visual Studio 2008 и скрипт на MQL5 приложены к статье.
#include "stdafx.h"


_DLLAPI int __stdcall fnCalculateSpeed(int &res1,double &res2)
  {
   int    res_int=0;
   double res_double=0.0;
   int    start=GetTickCount();

   for(int i=0;i<=10000000;i++)
     {
      res_int+=i*i;
      res_int++;
      res_double+=i*i;
      res_double++;
     }

   res1=res_int;
   res2=res_double;

   return(GetTickCount()-start);
  }


_DLLAPI void __stdcall fnFillArray(int *arr,const int arr_size)
  {

   if(arr==NULL || arr_size<1) return;

   for(int i=0;i<arr_size;i++) arr[i]=i;
  }


_DLLAPI void fnReplaceString(wchar_t *text,wchar_t *from,wchar_t *to)
  {
   wchar_t *cp;

   if(text==NULL || from==NULL || to==NULL) return;
   if(wcslen(from)!=wcslen(to))             return;

   if((cp=wcsstr(text,from))==NULL)         return;

   memcpy(cp,to,wcslen(to)*sizeof(wchar_t));
  }


_DLLAPI void __stdcall fnCrashTest(int *arr)
  {

   *arr=0;
  }
#property copyright "2010, MetaQuotes Software Corp."
#property link      "https://www.mql5.com"
#property version   "1.00"

#import "MQL5DLLSamples.dll"
int  fnCalculateSpeed(int &res1,double &res2);
void fnFillArray(int &arr[],int arr_size);
void fnReplaceString(string text,string from,string to);
void fnCrashTest(int arr);
#import


void OnStart()
  {

   int    speed=0;
   int    res_int=0;
   double res_double=0.0;

   speed=fnCalculateSpeed(res_int,res_double);
   Print("Time ",speed," msec, int: ",res_int," double: ",res_double);

   int    arr[];
   string result="Array: ";
   ArrayResize(arr,10);

   fnFillArray(arr,ArraySize(arr));
   for(int i=0;i<ArraySize(arr);i++) result=result+IntegerToString(arr[i])+" ";
   Print(result);

   string text="A quick brown fox jumps over the lazy dog";

   fnReplaceString(text,"fox","cat");
   Print("Replace: ",text);

   fnCrashTest(NULL);
   Print("Этого текста не увидите!");

  }
Спасибо за внимание! Буду рад ответить на вопросы.
Download Article
Download Article
DLL files are dynamic-linked library files written and controlled with C++. DLLs make sharing, storing, and saving your code simple. This wikiHow will show you how to create a DLL file with Visual Studio, the Windows application, or Visual Studio for Mac. Make sure you have “Desktop Development with C++” checked when you install. If you already have Visual Studio but didn’t check that box, you can run the installer again to make sure you do.
Steps
-
1
-
2
Click the File. You’ll find this either above the project space (Windows) or along the top of your screen (Macs).
Advertisement
-
3
Click New and Project. The “Create a New Project” dialog box will pop up.
-
4
Set the options for Language, Platform, and Project Type. These will filter what kinds of project templates appear.
- Click Language to get a drop-down menu and click C++.
-
5
Click Platform to get a drop-down menu and click Windows.
-
6
Click Project Type to get a drop-down menu and click Library.
-
7
Click Dynamic-link Library (DLL). Your choice will highlight blue. Click Next to continue.
-
8
Type a name in the Name Box for the project. For example, type “MathLibrary” in the box for a sample name.
-
9
Click Create. The DLL project is created.
-
10
Add a header file to the DLL. You can do this by clicking “Add New Item” from “Project” in the menu bar.
- Select Visual C++ from the left menu of the dialog box.
- Select Header file (.h) from the center of the dialog box.
- Type the name as “MathLibrary.h” in the name field below the menu choices.
- Click Add to generate the blank header file.
-
11
Type the following code into the blank header file.
- This is sample code provided from the Microsoft help website.
// MathLibrary.h - Contains declarations of math functions
#pragma once

#ifdef MATHLIBRARY_EXPORTS
#define MATHLIBRARY_API __declspec(dllexport)
#else
#define MATHLIBRARY_API __declspec(dllimport)
#endif

// The Fibonacci recurrence relation describes a sequence F
// where F(n) is { n = 0, a
//               { n = 1, b
//               { n > 1, F(n-2) + F(n-1)
// for some initial integral values a and b.
// If the sequence is initialized F(0) = 1, F(1) = 1,
// then this relation produces the well-known Fibonacci
// sequence: 1, 1, 2, 3, 5, 8, 13, 21, 34, ...

// Initialize a Fibonacci relation sequence
// such that F(0) = a, F(1) = b.
// This function must be called before any other function.
extern "C" MATHLIBRARY_API void fibonacci_init(
    const unsigned long long a, const unsigned long long b);

// Produce the next value in the sequence.
// Returns true on success and updates current value and index;
// false on overflow, leaves current value and index unchanged.
extern "C" MATHLIBRARY_API bool fibonacci_next();

// Get the current value in the sequence.
extern "C" MATHLIBRARY_API unsigned long long fibonacci_current();

// Get the position of the current value in the sequence.
extern "C" MATHLIBRARY_API unsigned fibonacci_index();
-
12
Add a CPP file to the DLL. You can do this by clicking Add New Item from “Project” in the menu bar.
- Select “Visual C++” from the left menu of the dialog box.
- Select “C++ File (.cpp)” from the center of the dialog box.
- Type the name as “MathLibrary.cpp” in the name field below the menu choices.
- Click Add to generate the blank file.
-
13
Type the following code into the blank file.
- This is sample code provided from the Microsoft help website.
// MathLibrary.cpp : Defines the exported functions for the DLL.
#include "stdafx.h" // use pch.h in Visual Studio 2019
#include <utility>
#include <limits.h>
#include "MathLibrary.h"

// DLL internal state variables:
static unsigned long long previous_;  // Previous value, if any
static unsigned long long current_;   // Current sequence value
static unsigned index_;               // Current seq. position

// Initialize a Fibonacci relation sequence
// such that F(0) = a, F(1) = b.
// This function must be called before any other function.
void fibonacci_init(
    const unsigned long long a,
    const unsigned long long b)
{
    index_ = 0;
    current_ = a;
    previous_ = b; // see special case when initialized
}

// Produce the next value in the sequence.
// Returns true on success, false on overflow.
bool fibonacci_next()
{
    // check to see if we'd overflow result or position
    if ((ULLONG_MAX - previous_ < current_) ||
        (UINT_MAX == index_))
    {
        return false;
    }

    // Special case when index == 0, just return b value
    if (index_ > 0)
    {
        // otherwise, calculate next sequence value
        previous_ += current_;
    }
    std::swap(current_, previous_);
    ++index_;
    return true;
}

// Get the current value in the sequence.
unsigned long long fibonacci_current()
{
    return current_;
}

// Get the current index position in the sequence.
unsigned fibonacci_index()
{
    return index_;
}
-
14
Click Build in the menu bar. You’ll find this either above the project space (Windows) or along the top of your screen (Macs).
-
15
Click Build Solution. After you click that, you should see text similar to this:
- If your DLL creation was successful, you’ll see that here. If there was an error, it will be listed here for you to fix.[1]
1>------ Build started: Project: MathLibrary, Configuration: Debug Win32 ------
1>MathLibrary.cpp
1>dllmain.cpp
1>Generating Code...
1>   Creating library C:UsersusernameSourceReposMathLibraryDebugMathLibrary.lib and object C:UsersusernameSourceReposMathLibraryDebugMathLibrary.exp
1>MathLibrary.vcxproj -> C:UsersusernameSourceReposMathLibraryDebugMathLibrary.dll
1>MathLibrary.vcxproj -> C:UsersusernameSourceReposMathLibraryDebugMathLibrary.pdb (Partial PDB)
========== Build: 1 succeeded, 0 failed, 0 up-to-date, 0 skipped ==========
- If your DLL creation was successful, you’ll see that here. If there was an error, it will be listed here for you to fix.[1]
Advertisement
Ask a Question
200 characters left
Include your email address to get a message when this question is answered.
Submit
Advertisement
Thanks for submitting a tip for review!
References
About This Article
Article SummaryX
1. Open Visual Studio.
2. Open a new Dynamic-link library (DLL) project.
3. Add a header file.
4. Add a CPP file.
5. Check to see if the library works.
Did this summary help you?
Thanks to all authors for creating a page that has been read 101,039 times.
Is this article up to date?
Download Article
Download Article
DLL files are dynamic-linked library files written and controlled with C++. DLLs make sharing, storing, and saving your code simple. This wikiHow will show you how to create a DLL file with Visual Studio, the Windows application, or Visual Studio for Mac. Make sure you have “Desktop Development with C++” checked when you install. If you already have Visual Studio but didn’t check that box, you can run the installer again to make sure you do.
Steps
-
1
-
2
Click the File. You’ll find this either above the project space (Windows) or along the top of your screen (Macs).
Advertisement
-
3
Click New and Project. The “Create a New Project” dialog box will pop up.
-
4
Set the options for Language, Platform, and Project Type. These will filter what kinds of project templates appear.
- Click Language to get a drop-down menu and click C++.
-
5
Click Platform to get a drop-down menu and click Windows.
-
6
Click Project Type to get a drop-down menu and click Library.
-
7
Click Dynamic-link Library (DLL). Your choice will highlight blue. Click Next to continue.
-
8
Type a name in the Name Box for the project. For example, type “MathLibrary” in the box for a sample name.
-
9
Click Create. The DLL project is created.
-
10
Add a header file to the DLL. You can do this by clicking “Add New Item” from “Project” in the menu bar.
- Select Visual C++ from the left menu of the dialog box.
- Select Header file (.h) from the center of the dialog box.
- Type the name as “MathLibrary.h” in the name field below the menu choices.
- Click Add to generate the blank header file.
-
11
Type the following code into the blank header file.
- This is sample code provided from the Microsoft help website.
// MathLibrary.h - Contains declarations of math functions
#pragma once

#ifdef MATHLIBRARY_EXPORTS
#define MATHLIBRARY_API __declspec(dllexport)
#else
#define MATHLIBRARY_API __declspec(dllimport)
#endif

// The Fibonacci recurrence relation describes a sequence F
// where F(n) is { n = 0, a
//               { n = 1, b
//               { n > 1, F(n-2) + F(n-1)
// for some initial integral values a and b.
// If the sequence is initialized F(0) = 1, F(1) = 1,
// then this relation produces the well-known Fibonacci
// sequence: 1, 1, 2, 3, 5, 8, 13, 21, 34, ...

// Initialize a Fibonacci relation sequence
// such that F(0) = a, F(1) = b.
// This function must be called before any other function.
extern "C" MATHLIBRARY_API void fibonacci_init(
    const unsigned long long a, const unsigned long long b);

// Produce the next value in the sequence.
// Returns true on success and updates current value and index;
// false on overflow, leaves current value and index unchanged.
extern "C" MATHLIBRARY_API bool fibonacci_next();

// Get the current value in the sequence.
extern "C" MATHLIBRARY_API unsigned long long fibonacci_current();

// Get the position of the current value in the sequence.
extern "C" MATHLIBRARY_API unsigned fibonacci_index();
-
12
Add a CPP file to the DLL. You can do this by clicking Add New Item from “Project” in the menu bar.
- Select “Visual C++” from the left menu of the dialog box.
- Select “C++ File (.cpp)” from the center of the dialog box.
- Type the name as “MathLibrary.cpp” in the name field below the menu choices.
- Click Add to generate the blank file.
-
13
Type the following code into the blank file.
- This is sample code provided from the Microsoft help website.
// MathLibrary.cpp : Defines the exported functions for the DLL.
#include "stdafx.h" // use pch.h in Visual Studio 2019
#include <utility>
#include <limits.h>
#include "MathLibrary.h"

// DLL internal state variables:
static unsigned long long previous_;  // Previous value, if any
static unsigned long long current_;   // Current sequence value
static unsigned index_;               // Current seq. position

// Initialize a Fibonacci relation sequence
// such that F(0) = a, F(1) = b.
// This function must be called before any other function.
void fibonacci_init(
    const unsigned long long a,
    const unsigned long long b)
{
    index_ = 0;
    current_ = a;
    previous_ = b; // see special case when initialized
}

// Produce the next value in the sequence.
// Returns true on success, false on overflow.
bool fibonacci_next()
{
    // check to see if we'd overflow result or position
    if ((ULLONG_MAX - previous_ < current_) ||
        (UINT_MAX == index_))
    {
        return false;
    }

    // Special case when index == 0, just return b value
    if (index_ > 0)
    {
        // otherwise, calculate next sequence value
        previous_ += current_;
    }
    std::swap(current_, previous_);
    ++index_;
    return true;
}

// Get the current value in the sequence.
unsigned long long fibonacci_current()
{
    return current_;
}

// Get the current index position in the sequence.
unsigned fibonacci_index()
{
    return index_;
}
-
14
Click Build in the menu bar. You’ll find this either above the project space (Windows) or along the top of your screen (Macs).
-
15
Click Build Solution. After you click that, you should see text similar to this:
- If your DLL creation was successful, you’ll see that here. If there was an error, it will be listed here for you to fix.[1]
1>------ Build started: Project: MathLibrary, Configuration: Debug Win32 ------
1>MathLibrary.cpp
1>dllmain.cpp
1>Generating Code...
1>   Creating library C:UsersusernameSourceReposMathLibraryDebugMathLibrary.lib and object C:UsersusernameSourceReposMathLibraryDebugMathLibrary.exp
1>MathLibrary.vcxproj -> C:UsersusernameSourceReposMathLibraryDebugMathLibrary.dll
1>MathLibrary.vcxproj -> C:UsersusernameSourceReposMathLibraryDebugMathLibrary.pdb (Partial PDB)
========== Build: 1 succeeded, 0 failed, 0 up-to-date, 0 skipped ==========
- If your DLL creation was successful, you’ll see that here. If there was an error, it will be listed here for you to fix.[1]
Advertisement
Ask a Question
200 characters left
Include your email address to get a message when this question is answered.
Submit
Advertisement
Thanks for submitting a tip for review!
References
About This Article
Article SummaryX
1. Open Visual Studio.
2. Open a new Dynamic-link library (DLL) project.
3. Add a header file.
4. Add a CPP file.
5. Check to see if the library works.
Did this summary help you?
Thanks to all authors for creating a page that has been read 101,039 times.
Is this article up to date?
| title | description | ms.custom | ms.topic | ms.date | helpviewer_keywords | ||
|---|---|---|---|---|---|---|---|
|
Walkthrough: Create and use your own Dynamic Link Library (C++) |
Use C++ to create a Windows dynamic-link library (DLL) in Visual Studio. |
contperf-fy21q2 |
tutorial |
12/09/2021 |
|
Walkthrough: Create and use your own Dynamic Link Library (C++)
This step-by-step walkthrough shows how to use the Visual Studio IDE to create your own dynamic link library (DLL) written in Microsoft C++ (MSVC). Then it shows how to use the DLL from another C++ app. DLLs (also known as shared libraries in UNIX-based operating systems) are one of the most useful kinds of Windows components. You can use them as a way to share code and resources, and to shrink the size of your apps. DLLs can even make it easier to service and extend your apps.
In this walkthrough, you’ll create a DLL that implements some math functions. Then you’ll create a console app that uses the functions from the DLL. You’ll also get an introduction to some of the programming techniques and conventions used in Windows DLLs.
This walkthrough covers these tasks:
-
Create a DLL project in Visual Studio.
-
Add exported functions and variables to the DLL.
-
Create a console app project in Visual Studio.
-
Use the functions and variables imported from the DLL in the console app.
-
Run the completed app.
Like a statically linked library, a DLL exports variables, functions, and resources by name. A client app imports the names to use those variables, functions, and resources. Unlike a statically linked library, Windows connects the imports in your app to the exports in a DLL at load time or at run time, instead of connecting them at link time. Windows requires extra information that isn’t part of the standard C++ compilation model to make these connections. The MSVC compiler implements some Microsoft-specific extensions to C++ to provide this extra information. We explain these extensions as we go.
This walkthrough creates two Visual Studio solutions; one that builds the DLL, and one that builds the client app. The DLL uses the C calling convention. It can be called from apps written in other programming languages, as long as the platform, calling conventions, and linking conventions match. The client app uses implicit linking, where Windows links the app to the DLL at load-time. This linking lets the app call the DLL-supplied functions just like the functions in a statically linked library.
This walkthrough doesn’t cover some common situations. The code doesn’t show the use of C++ DLLs by other programming languages. It doesn’t show how to create a resource-only DLL, or how to use explicit linking to load DLLs at run-time rather than at load-time. Rest assured, you can use MSVC and Visual Studio to do all these things.
Even though the code of the DLL is written in C++, we’ve used C-style interfaces for the exported functions. There are two main reasons for this: First, many other languages support imports of C-style functions. The client app doesn’t have to be written in C++. Second, it avoids some common pitfalls related to exported classes and member functions. It’s easy to make hard-to-diagnose errors when exporting classes, since everything referred to within a class declaration has to have an instantiation that’s also exported. This restriction applies to DLLs, but not static libraries. If your classes are plain-old-data style, you shouldn’t run into this issue.
For links to more information about DLLs, see Create C/C++ DLLs in Visual Studio. For more information about implicit linking and explicit linking, see Determine which linking method to use. For information about creating C++ DLLs for use with programming languages that use C-language linkage conventions, see Exporting C++ functions for use in C-language executables. For information about how to create DLLs for use with .NET languages, see Calling DLL Functions from Visual Basic Applications.
Prerequisites
- A computer that runs Microsoft Windows 7 or later versions. We recommend the latest version of Windows for the best development experience.
::: moniker range=»>=msvc-150″
-
A copy of Visual Studio. For information on how to download and install Visual Studio, see Install Visual Studio. When you run the installer, make sure that the Desktop development with C++ workload is checked. Don’t worry if you didn’t install this workload when you installed Visual Studio. You can run the installer again and install it now.
::: moniker-end
::: moniker range=»msvc-140″
- A copy of Visual Studio. For information on how to download and install Visual Studio 2015, see Install Visual Studio 2015. Use a Custom installation to install the C++ compiler and tools, since they’re not installed by default.
::: moniker-end
-
An understanding of the basics of using the Visual Studio IDE. If you’ve used Windows desktop apps before, you can probably keep up. For an introduction, see Visual Studio IDE feature tour.
-
An understanding of enough of the fundamentals of the C++ language to follow along. Don’t worry, we don’t do anything too complicated.
::: moniker range=»msvc-150″
[!NOTE]
This walkthrough assumes you’re using Visual Studio 2017 version 15.9 or later. Some earlier versions of Visual Studio 2017 had defects in the code templates, or used different user interface dialogs. To avoid problems, use the Visual Studio Installer to update Visual Studio 2017 to version 15.9 or later.
::: moniker-end
Create the DLL project
In this set of tasks, you create a project for your DLL, add code, and build it. To begin, start the Visual Studio IDE, and sign in if you need to. The instructions vary slightly depending on which version of Visual Studio you’re using. Make sure you have the correct version selected in the control in the upper left of this page.
::: moniker range=»>=msvc-160″
To create a DLL project in Visual Studio 2019
-
On the menu bar, choose File > New > Project to open the Create a New Project dialog box.
-
At the top of the dialog, set Language to C++, set Platform to Windows, and set Project type to Library.
-
From the filtered list of project types, select Dynamic-link Library (DLL), and then choose Next.
-
In the Configure your new project page, enter MathLibrary in the Project name box to specify a name for the project. Leave the default Location and Solution name values. Set Solution to Create new solution. Uncheck Place solution and project in the same directory if it’s checked.
-
Choose the Create button to create the project.
When the solution is created, you can see the generated project and source files in the Solution Explorer window in Visual Studio.
::: moniker-end
::: moniker range=»msvc-150″
To create a DLL project in Visual Studio 2017
-
On the menu bar, choose File > New > Project to open the New Project dialog box.
-
In the left pane of the New Project dialog box, select Installed > Visual C++ > Windows Desktop. In the center pane, select Dynamic-Link Library (DLL). Enter MathLibrary in the Name box to specify a name for the project. Leave the default Location and Solution name values. Set Solution to Create new solution. Check Create directory for solution if it’s unchecked.
-
Choose the OK button to create the project.
When the solution is created, you can see the generated project and source files in the Solution Explorer window in Visual Studio.
::: moniker-end
::: moniker range=»msvc-140″
To create a DLL project in Visual Studio 2015 and older versions
-
On the menu bar, choose File > New > Project.
-
In the left pane of the New Project dialog box, expand Installed > Templates, and select Visual C++, and then in the center pane, select Win32 Console Application. Enter MathLibrary in the Name edit box to specify a name for the project. Leave the default Location and Solution name values. Set Solution to Create new solution. Check Create directory for solution if it’s unchecked.
-
Choose the OK button to dismiss the New Project dialog and start the Win32 Application Wizard.
-
Choose the Next button. On the Application Settings page, under Application type, select DLL.
-
Choose the Finish button to create the project.
When the wizard completes the solution, you can see the generated project and source files in the Solution Explorer window in Visual Studio.
::: moniker-end
Right now, this DLL doesn’t do very much. Next, you’ll create a header file to declare the functions your DLL exports, and then add the function definitions to the DLL to make it more useful.
To add a header file to the DLL
-
To create a header file for your functions, on the menu bar, choose Project > Add New Item.
-
In the Add New Item dialog box, in the left pane, select Visual C++. In the center pane, select Header File (.h). Specify MathLibrary.h as the name for the header file.
-
Choose the Add button to generate a blank header file, which is displayed in a new editor window.
-
Replace the contents of the header file with this code:
// MathLibrary.h - Contains declarations of math functions
#pragma once

#ifdef MATHLIBRARY_EXPORTS
#define MATHLIBRARY_API __declspec(dllexport)
#else
#define MATHLIBRARY_API __declspec(dllimport)
#endif

// The Fibonacci recurrence relation describes a sequence F
// where F(n) is { n = 0, a
//               { n = 1, b
//               { n > 1, F(n-2) + F(n-1)
// for some initial integral values a and b.
// If the sequence is initialized F(0) = 1, F(1) = 1,
// then this relation produces the well-known Fibonacci
// sequence: 1, 1, 2, 3, 5, 8, 13, 21, 34, ...

// Initialize a Fibonacci relation sequence
// such that F(0) = a, F(1) = b.
// This function must be called before any other function.
extern "C" MATHLIBRARY_API void fibonacci_init(
    const unsigned long long a, const unsigned long long b);

// Produce the next value in the sequence.
// Returns true on success and updates current value and index;
// false on overflow, leaves current value and index unchanged.
extern "C" MATHLIBRARY_API bool fibonacci_next();

// Get the current value in the sequence.
extern "C" MATHLIBRARY_API unsigned long long fibonacci_current();

// Get the position of the current value in the sequence.
extern "C" MATHLIBRARY_API unsigned fibonacci_index();
This header file declares some functions to produce a generalized Fibonacci sequence, given two initial values. A call to fibonacci_init(1, 1) generates the familiar Fibonacci number sequence.
Notice the preprocessor statements at the top of the file. The new project template for a DLL project adds <PROJECTNAME>_EXPORTS to the defined preprocessor macros. In this example, Visual Studio defines MATHLIBRARY_EXPORTS when your MathLibrary DLL project is built.
When the MATHLIBRARY_EXPORTS macro is defined, the MATHLIBRARY_API macro sets the __declspec(dllexport) modifier on the function declarations. This modifier tells the compiler and linker to export a function or variable from the DLL for use by other applications. When MATHLIBRARY_EXPORTS is undefined, for example, when the header file is included by a client application, MATHLIBRARY_API applies the __declspec(dllimport) modifier to the declarations. This modifier optimizes the import of the function or variable in an application. For more information, see dllexport, dllimport.
To add an implementation to the DLL
::: moniker range=»>=msvc-160″
-
In Solution Explorer, right-click on the Source Files node and choose Add > New Item. Create a new .cpp file called MathLibrary.cpp, in the same way that you added a new header file in the previous step.
-
In the editor window, select the tab for MathLibrary.cpp if it’s already open. If not, in Solution Explorer, double-click MathLibrary.cpp in the Source Files folder of the MathLibrary project to open it.
-
In the editor, replace the contents of the MathLibrary.cpp file with the following code:
// MathLibrary.cpp : Defines the exported functions for the DLL.
#include "pch.h" // use stdafx.h in Visual Studio 2017 and earlier
#include <utility>
#include <limits.h>
#include "MathLibrary.h"

// DLL internal state variables:
static unsigned long long previous_;  // Previous value, if any
static unsigned long long current_;   // Current sequence value
static unsigned index_;               // Current seq. position

// Initialize a Fibonacci relation sequence
// such that F(0) = a, F(1) = b.
// This function must be called before any other function.
void fibonacci_init(
    const unsigned long long a,
    const unsigned long long b)
{
    index_ = 0;
    current_ = a;
    previous_ = b; // see special case when initialized
}

// Produce the next value in the sequence.
// Returns true on success, false on overflow.
bool fibonacci_next()
{
    // check to see if we'd overflow result or position
    if ((ULLONG_MAX - previous_ < current_) ||
        (UINT_MAX == index_))
    {
        return false;
    }

    // Special case when index == 0, just return b value
    if (index_ > 0)
    {
        // otherwise, calculate next sequence value
        previous_ += current_;
    }
    std::swap(current_, previous_);
    ++index_;
    return true;
}

// Get the current value in the sequence.
unsigned long long fibonacci_current()
{
    return current_;
}

// Get the current index position in the sequence.
unsigned fibonacci_index()
{
    return index_;
}
::: moniker-end
::: moniker range=»<=msvc-150″
-
In the editor window, select the tab for MathLibrary.cpp if it’s already open. If not, in Solution Explorer, double-click MathLibrary.cpp in the Source Files folder of the MathLibrary project to open it.
-
In the editor, replace the contents of the MathLibrary.cpp file with the following code:
// MathLibrary.cpp : Defines the exported functions for the DLL.
#include "stdafx.h" // use pch.h in Visual Studio 2019 and later
#include <utility>
#include <limits.h>
#include "MathLibrary.h"

// DLL internal state variables:
static unsigned long long previous_;  // Previous value, if any
static unsigned long long current_;   // Current sequence value
static unsigned index_;               // Current seq. position

// Initialize a Fibonacci relation sequence
// such that F(0) = a, F(1) = b.
// This function must be called before any other function.
void fibonacci_init(
    const unsigned long long a,
    const unsigned long long b)
{
    index_ = 0;
    current_ = a;
    previous_ = b; // see special case when initialized
}

// Produce the next value in the sequence.
// Returns true on success, false on overflow.
bool fibonacci_next()
{
    // check to see if we'd overflow result or position
    if ((ULLONG_MAX - previous_ < current_) ||
        (UINT_MAX == index_))
    {
        return false;
    }

    // Special case when index == 0, just return b value
    if (index_ > 0)
    {
        // otherwise, calculate next sequence value
        previous_ += current_;
    }
    std::swap(current_, previous_);
    ++index_;
    return true;
}

// Get the current value in the sequence.
unsigned long long fibonacci_current()
{
    return current_;
}

// Get the current index position in the sequence.
unsigned fibonacci_index()
{
    return index_;
}
::: moniker-end
To verify that everything works so far, compile the dynamic link library. To compile, choose Build > Build Solution on the menu bar. The DLL and related compiler output are placed in a folder called Debug directly below the solution folder. If you create a Release build, the output is placed in a folder called Release. The output should look something like this:
::: moniker range=»>=msvc-160″
1>------ Build started: Project: MathLibrary, Configuration: Debug Win32 ------
1>pch.cpp
1>dllmain.cpp
1>MathLibrary.cpp
1>Generating Code...
1>   Creating library C:UsersusernameSourceReposMathLibraryDebugMathLibrary.lib and object C:UsersusernameSourceReposMathLibraryDebugMathLibrary.exp
1>MathLibrary.vcxproj -> C:UsersusernameSourceReposMathLibraryDebugMathLibrary.dll
========== Build: 1 succeeded, 0 failed, 0 up-to-date, 0 skipped ==========
::: moniker-end
::: moniker range=»msvc-150″
1>------ Build started: Project: MathLibrary, Configuration: Debug Win32 ------
1>stdafx.cpp
1>dllmain.cpp
1>MathLibrary.cpp
1>Generating Code...
1>   Creating library C:UsersusernameSourceReposMathLibraryDebugMathLibrary.lib and object C:UsersusernameSourceReposMathLibraryDebugMathLibrary.exp
1>MathLibrary.vcxproj -> C:UsersusernameSourceReposMathLibraryDebugMathLibrary.dll
========== Build: 1 succeeded, 0 failed, 0 up-to-date, 0 skipped ==========
::: moniker-end
::: moniker range=»msvc-140″
1>------ Build started: Project: MathLibrary, Configuration: Debug Win32 ------
1>MathLibrary.cpp
1>dllmain.cpp
1>Generating Code...
1>   Creating library C:UsersusernameSourceReposMathLibraryDebugMathLibrary.lib and object C:UsersusernameSourceReposMathLibraryDebugMathLibrary.exp
1>MathLibrary.vcxproj -> C:UsersusernameSourceReposMathLibraryDebugMathLibrary.dll
1>MathLibrary.vcxproj -> C:UsersusernameSourceReposMathLibraryDebugMathLibrary.pdb (Partial PDB)
========== Build: 1 succeeded, 0 failed, 0 up-to-date, 0 skipped ==========
::: moniker-end
Congratulations, you’ve created a DLL using Visual Studio! Next, you’ll create a client app that uses the functions exported by the DLL.
Create a client app that uses the DLL
When you create a DLL, think about how client apps may use it. To call the functions or access the data exported by a DLL, client source code must have the declarations available at compile time. At link time, the linker requires information to resolve the function calls or data accesses. A DLL supplies this information in an import library, a file that contains information about how to find the functions and data, instead of the actual code. And at run time, the DLL must be available to the client, in a location that the operating system can find.
Whether it’s your own or from a third-party, your client app project needs several pieces of information to use a DLL. It needs to find the headers that declare the DLL exports, the import libraries for the linker, and the DLL itself. One solution is to copy all of these files into your client project. For third-party DLLs that are unlikely to change while your client is in development, this method may be the best way to use them. However, when you also build the DLL, it’s better to avoid duplication. If you make a local copy of DLL files that are under development, you may accidentally change a header file in one copy but not the other, or use an out-of-date library.
To avoid out-of-sync code, we recommend you set the include path in your client project to include the DLL header files directly from your DLL project. Also, set the library path in your client project to include the DLL import libraries from the DLL project. And finally, copy the built DLL from the DLL project into your client build output directory. This step allows your client app to use the same DLL code you build.
::: moniker range=»>=msvc-160″
To create a client app in Visual Studio
-
On the menu bar, choose File > New > Project to open the Create a new project dialog box.
-
At the top of the dialog, set Language to C++, set Platform to Windows, and set Project type to Console.
-
From the filtered list of project types, choose Console App then choose Next.
-
In the Configure your new project page, enter MathClient in the Project name box to specify a name for the project. Leave the default Location and Solution name values. Set Solution to Create new solution. Uncheck Place solution and project in the same directory if it’s checked.
-
Choose the Create button to create the client project.
A minimal console application project is created for you. The name for the main source file is the same as the project name that you entered earlier. In this example, it’s named MathClient.cpp. You can build it, but it doesn’t use your DLL yet.
::: moniker-end
::: moniker range=»msvc-150″
To create a client app in Visual Studio 2017
-
To create a C++ app that uses the DLL that you created, on the menu bar, choose File > New > Project.
-
In the left pane of the New Project dialog, select Windows Desktop under Installed > Visual C++. In the center pane, select Windows Console Application. Specify the name for the project, MathClient, in the Name edit box. Leave the default Location and Solution name values. Set Solution to Create new solution. Check Create directory for solution if it’s unchecked.
-
Choose OK to create the client app project.
A minimal console application project is created for you. The name for the main source file is the same as the project name that you entered earlier. In this example, it’s named MathClient.cpp. You can build it, but it doesn’t use your DLL yet.
::: moniker-end
::: moniker range=»msvc-140″
To create a client app in Visual Studio 2015
-
To create a C++ app that uses the DLL that you created, on the menu bar, choose File > New > Project.
-
In the left pane of the New Project dialog, select Win32 under Installed > Templates > Visual C++. In the center pane, select Win32 Console Application. Specify the name for the project, MathClient, in the Name edit box. Leave the default Location and Solution name values. Set Solution to Create new solution. Check Create directory for solution if it’s unchecked.
-
Choose the OK button to dismiss the New Project dialog and start the Win32 Application Wizard. On the Overview page of the Win32 Application Wizard dialog box, choose the Next button.
-
On the Application Settings page, under Application type, select Console application if it isn’t already selected.
-
Choose the Finish button to create the project.
When the wizard finishes, a minimal console application project is created for you. The name for the main source file is the same as the project name that you entered earlier. In this example, it’s named MathClient.cpp. You can build it, but it doesn’t use your DLL yet.
::: moniker-end
Next, to call the MathLibrary functions in your source code, your project must include the MathLibrary.h file. You could copy this header file into your client app project, then add it to the project as an existing item. This method can be a good choice for third-party libraries. However, if you’re working on the code for your DLL and your client at the same time, the header files could get out of sync. To avoid this issue, set the Additional Include Directories path in your project to include the path to the original header.
To add the DLL header to your include path
-
Right-click on the MathClient node in Solution Explorer to open the Property Pages dialog.
-
In the Configuration drop-down box, select All Configurations if it’s not already selected.
-
In the left pane, select Configuration Properties > C/C++ > General.
-
In the property pane, select the drop-down control next to the Additional Include Directories edit box, and then choose Edit.
-
Double-click in the top pane of the Additional Include Directories dialog box to enable an edit control. Or, choose the folder icon to create a new entry.
-
In the edit control, specify the path to the location of the MathLibrary.h header file. You can choose the ellipsis (…) control to browse to the correct folder.
You can also enter a relative path from your client source files to the folder that contains the DLL header files. If you followed the directions to put your client project in a separate solution from the DLL, the relative path should look like this:
....MathLibraryMathLibraryIf your DLL and client projects are in the same solution, the relative path might look like this:
..MathLibraryWhen the DLL and client projects are in other folders, adjust the relative path to match. Or, use the ellipsis control to browse for the folder.
-
After you’ve entered the path to the header file in the Additional Include Directories dialog box, choose the OK button. In the Property Pages dialog box, choose the OK button to save your changes.
You can now include the MathLibrary.h file and use the functions it declares in your client application. Replace the contents of MathClient.cpp by using this code:
// MathClient.cpp : Client app for MathLibrary DLL.
// #include "pch.h" Uncomment for Visual Studio 2017 and earlier
#include <iostream>
#include "MathLibrary.h"

int main()
{
    // Initialize a Fibonacci relation sequence.
    fibonacci_init(1, 1);
    // Write out the sequence values until overflow.
    do {
        std::cout << fibonacci_index() << ": "
            << fibonacci_current() << std::endl;
    } while (fibonacci_next());
    // Report count of values written before overflow.
    std::cout << fibonacci_index() + 1 <<
        " Fibonacci sequence values fit in an " <<
        "unsigned 64-bit integer." << std::endl;
}
This code can be compiled, but not linked. If you build the client app now, the error list shows several LNK2019 errors. That’s because your project is missing some information: You haven’t specified that your project has a dependency on the MathLibrary.lib library yet. And, you haven’t told the linker how to find the MathLibrary.lib file.
To fix this issue, you could copy the library file directly into your client app project. The linker would find and use it automatically. However, if both the library and the client app are under development, that might lead to changes in one copy that aren’t shown in the other. To avoid this issue, you can set the Additional Dependencies property to tell the build system that your project depends on MathLibrary.lib. And, you can set an Additional Library Directories path in your project to include the path to the original library when you link.
To add the DLL import library to your project
-
Right-click on the MathClient node in Solution Explorer and choose Properties to open the Property Pages dialog.
-
In the Configuration drop-down box, select All Configurations if it’s not already selected. It ensures that any property changes apply to both Debug and Release builds.
-
In the left pane, select Configuration Properties > Linker > Input. In the property pane, select the drop-down control next to the Additional Dependencies edit box, and then choose Edit.
-
In the Additional Dependencies dialog, add MathLibrary.lib to the list in the top edit control.
-
Choose OK to go back to the Property Pages dialog box.
-
In the left pane, select Configuration Properties > Linker > General. In the property pane, select the drop-down control next to the Additional Library Directories edit box, and then choose Edit.
-
Double-click in the top pane of the Additional Library Directories dialog box to enable an edit control. In the edit control, specify the path to the location of the MathLibrary.lib file. By default, it’s in a folder called Debug directly under the DLL solution folder. If you create a release build, the file is placed in a folder called Release. You can use the
$(IntDir)macro so that the linker can find your DLL, no matter which kind of build you create. If you followed the directions to put your client project in a separate solution from the DLL project, the relative path should look like this:....MathLibrary$(IntDir)If your DLL and client projects are in other locations, adjust the relative path to match.
-
Once you’ve entered the path to the library file in the Additional Library Directories dialog box, choose the OK button to go back to the Property Pages dialog box. Choose OK to save the property changes.
Your client app can now compile and link successfully, but it still doesn’t have everything it needs to run. When the operating system loads your app, it looks for the MathLibrary DLL. If it can’t find the DLL in certain system directories, the environment path, or the local app directory, the load fails. Depending on the operating system, you’ll see an error message like this:
One way to avoid this issue is to copy the DLL to the directory that contains your client executable as part of the build process. You can add a Post-Build Event to your project, to add a command that copies the DLL to your build output directory. The command specified here copies the DLL only if it’s missing or has changed. It uses macros to copy to and from the Debug or Release locations, based on your build configuration.
To copy the DLL in a post-build event
-
Right-click on the MathClient node in Solution Explorer and choose Properties to open the Property Pages dialog.
-
In the Configuration drop-down box, select All Configurations if it isn’t already selected.
-
In the left pane, select Configuration Properties > Build Events > Post-Build Event.
-
In the property pane, select the edit control in the Command Line field. If you followed the directions to put your client project in a separate solution from the DLL project, then enter this command:
xcopy /y /d "....MathLibrary$(IntDir)MathLibrary.dll" "$(OutDir)"If your DLL and client projects are in other directories, change the relative path to the DLL to match.
-
Choose the OK button to save your changes to the project properties.
Now your client app has everything it needs to build and run. Build the application by choosing Build > Build Solution on the menu bar. The Output window in Visual Studio should have something like the following example depending on your version of Visual Studio:
1>------ Build started: Project: MathClient, Configuration: Debug Win32 ------
1>MathClient.cpp
1>MathClient.vcxproj -> C:UsersusernameSourceReposMathClientDebugMathClient.exe
1>1 File(s) copied
========== Build: 1 succeeded, 0 failed, 0 up-to-date, 0 skipped ==========
Congratulations, you’ve created an application that calls functions in your DLL. Now run your application to see what it does. On the menu bar, choose Debug > Start Without Debugging. Visual Studio opens a command window for the program to run in. The last part of the output should look like:
Press any key to dismiss the command window.
Now that you’ve created a DLL and a client application, you can experiment. Try setting breakpoints in the code of the client app, and run the app in the debugger. See what happens when you step into a library call. Add other functions to the library, or write another client app that uses your DLL.
When you deploy your app, you must also deploy the DLLs it uses. The simplest way to make the DLLs that you build, or that you include from third parties, available is to put them in the same directory as your app. It’s known as app-local deployment. For more information about deployment, see Deployment in Visual C++.
See also
Calling DLL Functions from Visual Basic Applications
DLL (Dynamic Link Library) — динамически подключаемая библиотека функций. Для библиотек DLL предполагается многократное использование различными программами. Поговорим о том, как создать библиотеку DLL в Visual Studio, используя языки программирования C и C#.
Создание dll на языке Си
Создаем в Visual Studio новый проект — консольное приложение.
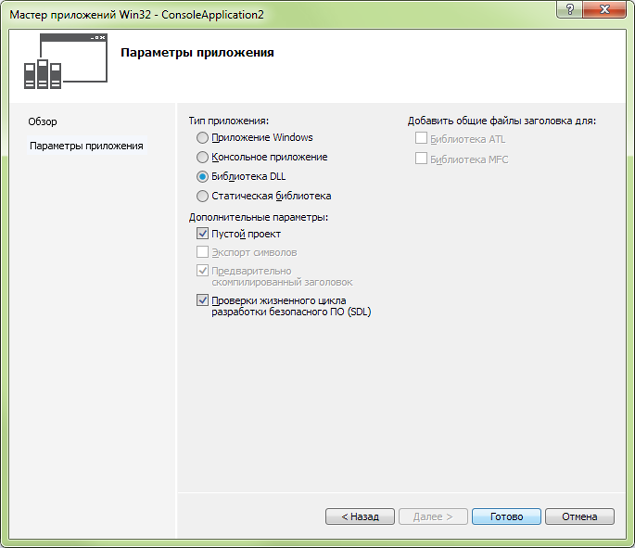
В запустившемся «Мастере приложений Win32» жмем кнопку «Далее». В следующем окне выбираем тип приложения: «Библиотека DLL»; также ставим галочку напротив параметра «Пустой проект». Жмем кнопку «Готово».
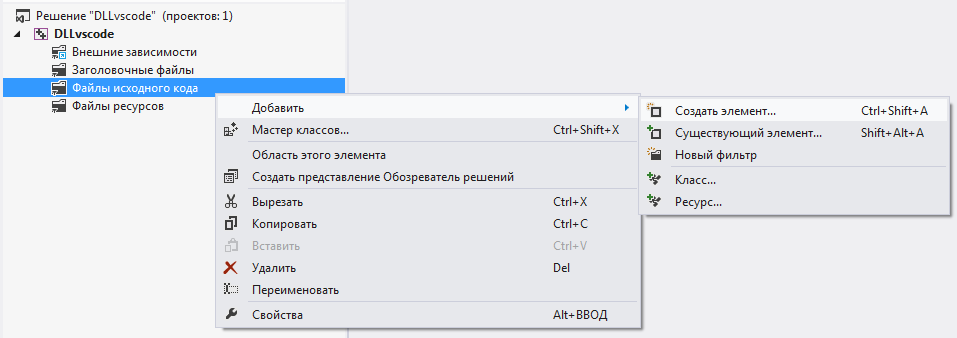
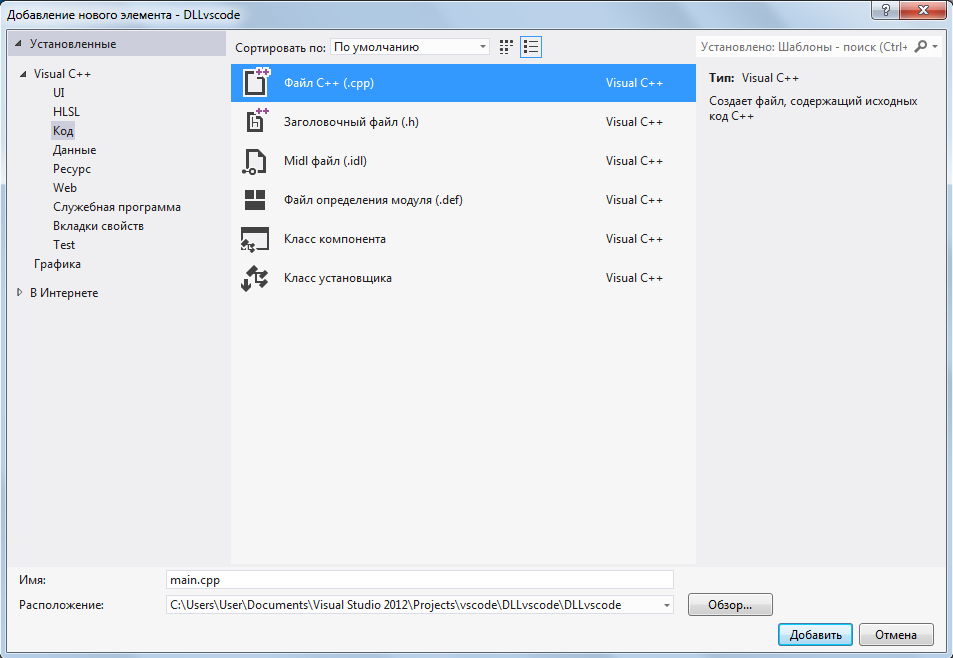
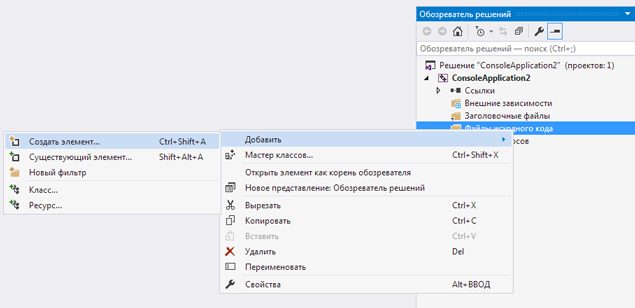
Теперь необходимо создать два файла исходного кода: «main.cpp» и «main.def». Для этого в «обозревателе решений» нажмем правой кнопкой мыши на папку «Файлы исходного кода», далее — «Добавить» — «Создать элемент».
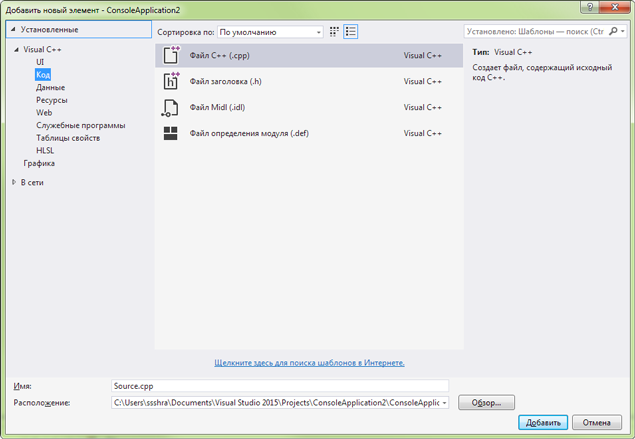
В появившемся окне «Добавление нового элемента» во вкладке «Код» представлены типы файлов, которые нам необходимы. Создадим «main.cpp» и «main.def».
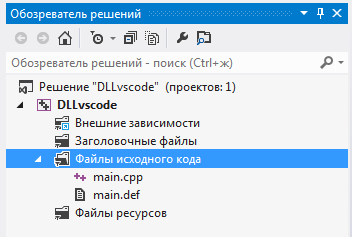
В итоге обозреватель решений будет выглядеть вот так:
Перейдем к файлу «main.cpp». Для примера, напишем две функции add и sub, выполняющих сложение и вычитание соответственно для двух целых чисел.
|
int add(int a, int b) { return a + b; } int sub(int a, int b) { return a — b; } |
Перед каждой функцией необходимо добавить модификатор __declspec(dllexport) (два нижних подчеркивания). Этот модификатор разрешает экспорт функции из библиотеки DLL для ее использования в других приложениях. В итоге получим такой код:
|
__declspec(dllexport) int add(int a, int b) { return a + b; } __declspec(dllexport) int sub(int a, int b) { return a — b; } |
Теперь перейдем к файлу «main.def». В нем необходимо указать: название библиотеки DLL, ключевое слово EXPORTS, а после него названия функций, экспорт которых необходимо разрешить. В нашем случае, получится вот так:
|
LIBRARY «dll_vscode» EXPORTS add sub |
Осталось построить решение. Для этого во вкладке «ПОСТРОЕНИЕ» нажмем кнопку «Построить решение» (Ctrl+Shift+B).
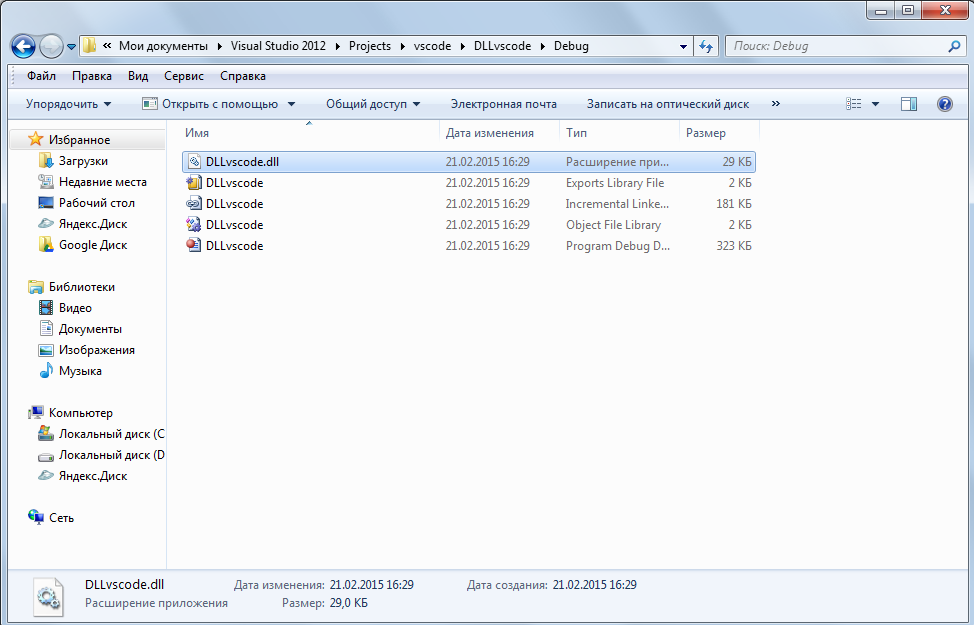
В итоге, в папке с проектом будет создан файл DLLvscode.dll.
На этом создание DLL-файла завершено.
Если вы хотите скачать исходник проекта в Visual Studio, то нажмите на кнопку ниже:
Скачать исходник на Си
Создание dll на языке C#
В языке программирования C#, в отличие от языка C, при создании dll-файлов, не нужно указывать модификатор __declspec(dllexport). И в наличии файла «main.def» также нет необходимости.
Создадим в Visual Studio новый проект на языке C#: «Библиотеку классов».
На основе функций add и sub, описанных выше, создадим в классе vscode соответствующие методы. Пространство имен указывать не нужно.
|
1 2 3 4 5 6 7 8 9 10 11 12 13 14 15 16 17 18 |
using System; using System.Collections.Generic; using System.Linq; using System.Text; using System.Threading.Tasks; public class vscode { public int add(int a, int b) { return a + b; } public int sub(int a, int b) { return a — b; } } |
Построим решение проекта (Ctrl+Shift+B). В папке Debug будет лежать созданный dll-файл.
Скачать исходник проекта можно ниже:
Скачать исходник C#
В предыдущей статье мы создавали DLL, используя Delphi, на языке Pascal. Delphi является коммерческой средой разработки, и стоит огромных денег. Потому мы сегодня поменяем среду разработки и язык программирования, а задача останется прежней.
В качестве среды разработки на C++ я выбрал бесплатно распространяемый Microsoft visual studio community 2015. Не берусь назвать причину этого аттракциона неслыханной щедрости со стороны Microsoft, это тема отдельного исследования :).
Вновь мы напишем две функции, и сделаем так, чтобы одна из них была доступна для внешнего вызова из DLL.
Инициализация нового проекта
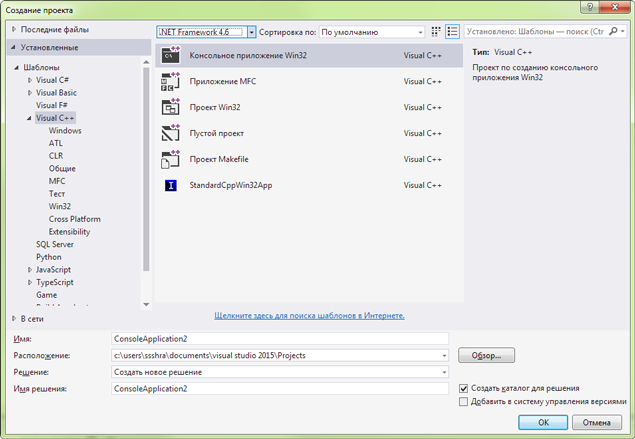
Необходимо создать новый проект Visual C++ (меню Файл -> Создать -> Проект), используем шаблон консольного приложения.
Выбираем и жмем ОК.
В следующем диалоговом окне устанавливаем параметры приложения как показано на следующем слайде.
Думаю, тоже не возникнет вопросов с выбором параметров. Остаётся нажать кнопку — «Готово».
Создание файлов проекта DLL.
Добавим в проект два исходных файла. Один с расширением .cpp будет содержать программный код двух наших тестовых функций, а второй .def будет содержать инструкции для билдера.
Откройте «обозреватель решений» (ох уж мне эти тонкости перевода интерфейса на русский язык 
Нужно добавить два файла в секцию «Файлы исходного кода».
Сначала добавим файл .cpp, потом .def.
Пишем код DLL
Запрограммируем код наших функций (.cpp)
|
float power2(float x) { return x*x; } __declspec(dllexport) float power3(float x) { return power2(x) * x; } |
Для экспортируемой функции нужен префикс, разрешающий экспорт __declspec(dllexport). Функция, используемая только внутри DLL, в таком объявлении не нуждается.
Def файл будет содержать следующие инструкции:
|
LIBRARY «test_dll» EXPORTS power3 |
Название библиотеки и перечень экспортируемых функций (у нас только функция для получения куба числа — power3).
Компиляция и сборка библиотеки.
Все готово к компиляции и сборке. В меню «Сборка» выбираем «Собрать решение» CTRL+Shift+B. Если звезды будут вам благоприятствовать, то в папке проекта /debug вы обнаружите файл с расширением .dll.
Написать комментарий
Данная запись опубликована в 15.12.2015 22:35 и размещена в C++.
Вы можете перейти в конец страницы и оставить ваш комментарий.
Мало букафф? Читайте есчо !
Установка C++ для unix (debian)
Декабрь 19, 2015 г.
Мне пришла мысль кое что «по-кодить» для веб-сервера, начал вспоминать когда то горячо любимый C++. Но сразу столкнулся с тем фактом, что в современной UNIX не установлен компилятор С++ по умолчанию.
Устанавливаем
Итак, устанавливаем Си на хостинге …
Читать
- Статическая загрузка
- Динамическая загрузка
Сейчас мы рассмотрим для чего нужны DLL (Dynamic Link Library — динамически компануемая библиотека) и как их создавать. DLL- это участок кода хранимый в файле с расширением .dll. Код может быть использован другими программами, но сама посебе библиотека прораммой не является. Вобщем-то, динамически компонуемые библиотеки представляют собой набао скомпилированныых функций. Но у ютих библиотек есть свой особенности, так например, если каккието две или более программы для Windows одновременно исполняются и используют функции, находящиеся в одной DLL, то в памяти будет постоянно находится только одна библиотека, обеспечивая тем самым экономное расходование памяти. Загрузка библиотеки в память может быть статической и динамической.
При статической загрузке DLL автоматически загружается при запуске исользующего ее приложения. Такая DLL содержит экспортируемые функции, описание которых находится в файле библиотеки импорта(import library file — .lib). Для использования статической загрузки вы должны на этапе компоновки к программе додключить .lib файл вашей DLL. В C++ Builder это сводится к включения в проект .lib файла через менджер проектов.
При диамической загрузке вы можете загружать DLL при необходимости, выгрузить ее когода она ненужна. Однако работать с такими библиотеками сложнее чем со статическими.
Рассмотрим созздание и использование DLL статической загрузки.
Статическая загрузка
Создадим сперва проект (File / New / DLL). Будет создан проект, содержащий следующее:
int WINAPI DllEntryPoint(HINSTANCE hinst, unsigned long reason, void*) {
    return 1;
	}
и длинный коментарий предупреждающий вас о том, что для работо способности вашей DLL необходимо снеи обеспечить поствку некоторых dll если вы используете экземпляры класса String.
Для экспорта и импорта из DLL необходимо использовать моди фикаторы __export и __import соответсвенно. Но в C++ Builder можно использовать новое ключевое слово __delspec() с параметрами dllexport и dllimport соответсвенно. Сами понимаете, что для того чтобы эспортировать функции из библиотеки еужен один заголовочный файл с описаниями _delspec(dllexport) для экспортируемых функций, для импорта функций в приложение вам необходимо будет поставить анологичный заголовочный файл но с _delspec(dllimport) описаниями, что достаточно неудобно. Эта проблема решается легко: добавте в заголовочный файл библиотеки следующее:
#if defined(BUILD_DLL)
#  define DLL_EXP __declspec(dllexport)
#else
# if defined(BUILD_APP)
#  define DLL_EXP __declspec(dllimport)
# else
#  define DLL_EXP
# endif
#endif
в исходном файле DLL напишите #define BUILD_DLL, а вместо __declspec(dllexport) пишите DLL_EXP. При написании программы добавте строчку #define BUILD_APP, и просто подключите заголовочный файл DLL.
Пример DLL: файл P.cpp
//---------------------------------------------------------------------------
#define BUILD_DLL
#include
#include "p.h"
#pragma hdrstop

//---------------------------------------------------------------------------
// Important note about DLL memory management when your DLL uses the
// static version of the RunTime Library:
//
// If your DLL exports any functions that pass String objects (or structs/
// classes containing nested Strings) as parameter or function results,
// you will need to add the library MEMMGR.LIB to both the DLL project and
// any other projects that use the DLL. You will also need to use MEMMGR.LIB
// if any other projects which use the DLL will be perfomring new or delete
// operations on any non-TObject-derived classes which are exported from the
// DLL. Adding MEMMGR.LIB to your project will change the DLL and its calling
// EXE's to use the BORLNDMM.DLL as their memory manager. In these cases,
// the file BORLNDMM.DLL should be deployed along with your DLL.
// To avoid using BORLNDMM.DLL, pass string information using "char *" or
// ShortString parameters.
//
// If your DLL uses the dynamic version of the RTL, you do not need to
// explicitly add MEMMGR.LIB as this will be done implicitly for you
//-------------------------------------------------------------------------
int WINAPI DllEntryPoint(HINSTANCE hinst, unsigned long reason, void*) {
	return 1;
	}

//-------------------------------------------------------------------------

void Message(char *s) {
	i=10;
	Application->MessageBox(s,"From DLL",IDOK);
	}
Файл P.h
#if defined(BUILD_DLL)
# define DLL_EXP __declspec(dllexport)
#else
# if defined(BUILD_APP)
# define DLL_EXP __declspec(dllimport)
# else
# define DLL_EXP
# endif
#endif

DLL_EXP void Message(char *s);
DLL_EXP int i;
Скомпилируйте проект.
Если вы нажмете Run то после завершенния построения будет выдано сообщение что данная программа не можнт быть исполнена (естественно).
Теперь напишем вызывающую программу. Втомже каталоге создайде новый проект (File / New Application) в форму поместите одну кнопку и создай обработчик события OnClick. Ваш исполняемый файл должен представлять собой слдующее:
//---------------------------------------------------------------------------
#include
#define BUILD_APP
#pragma hdrstop
#include "p.h"
#include "Unit1.h"
#include
//---------------------------------------------------------------------------
#pragma package(smart_init)
#pragma resource "*.dfm"
TForm1 *Form1;
//-------------------------------------------------------------------------
__fastcall TForm1::TForm1(TComponent* Owner) : TForm(Owner) {
    }

//-------------------------------------------------------------------------
void __fastcall TForm1::Button1Click(TObject *Sender) {
    char c[10];
    Message("roma");
    for( ; i>0;i--) {
        sprintf(c,"Example %d",i );
        Application->MessageBox("Example of using DLL variable",(char*)c,IDOK);
    }
}

//-------------------------------------------------------------------------
Не забудьте об объявлениях в начале файла. Зайдите в менеджер проектов.Там откройте свой проект и добавте .lib файл из предыдушего проект с DLL( правый клик, пункт ADD). Запустите проект.
Как видите, для того, чтобы вашу DLL можно было использовать необходимо три файла: сама DLL, заголовочный файл и библиотечный файл .lib.
Динамическая загрузка
Динамическая загрузка горазда сложнее. Однако для динамической загрузки требуется только сама DLL ( не ненужен ни .lib ни заголовочный файл, хотя его можно исполбзовать для описания экспортируемых функций для предполагемого пользователя).
Давайте рассмотрим на примере, как производится динамическая загрузка. Создайте новый прокт DLL и внесите в него следующее:
extern "C" void __export  Message(char *s)  {
	Application->MessageBox(s,"From DLL",IDOK);
	}
Cкомпилируйте проект, в результате чего будет создана DLL.
Теперь создайте проект приложения анологичный проекту для использования статической загрузки (форма с кнопкой и обработчиком события кнопки OnClick) ниже приведен код приложения:(Unit11.cpp)
//---------------------------------------------------------------------------
#include
#pragma hdrstop
#include "Unit11.h"
#include
//---------------------------------------------------------------------------
#pragma package(smart_init)
#pragma resource "*.dfm"
TForm1 *Form1;
//---------------------------------------------------------------------------
__fastcall TForm1::TForm1(TComponent* Owner) : TForm(Owner) {
	}
//---------------------------------------------------------------------------

void __fastcall TForm1::Button1Click(TObject *Sender) {
	void (__stdcall *Message)(char *s);
	HINSTANCE dllp = LoadLibrary("p.dll");
	if (dllp) {
		Message= (void(__stdcall *) (char*))
		GetProcAddress(dllp, "_Message");
		if (Message) Message("Hi From Dinamic DLL");
		}
	FreeLibrary(dllp);
	}
//---------------------------------------------------------------------------
запустите это проект, при нажатии на кнопку должно выдаватся сообшение. Теперь разберемся, как это работает.
- void (__stdcall *Message)(char *s);-объявление указателя на функцию.
- HINSTANCE dllp = LoadLibrary(«p.dll»);— загрузка библиотеки в память.
- Message= (void(__stdcall *) (char*)) GetProcAddress(dllp, «_Message»); присвоение указателю адреса функции DLL.
- Message(«Hi From Dinamic DLL»); рабочий вызов фунциий (собственно то для чего все это и делается).
- FreeLibrary(dllp);— выгрузка библиотеки из памяти.
Обратите внимание на то, что призагрузке можно указать точное местоположние библиотеки (необезательно в том же каталоге где и приложение).

