Дата: 08.07.2017 10:28 |
Автор: Павел Уоллен
|
Категория: Аранжировка

Всем привет! У микрофона Freaxment, сегодня Вы узнаете как можно быстро написать интересную прогрессию аккордов для жанра Future Bass, на примере проекта, который Вы могли видеть в одном из наших обучающих видео в проекте FL Studio PRO.
Чтобы начать писать нашу аккордовую прогрессию для начала нужно определиться с тональностью, в которой она будет написана, и так как подавляющее большинство композиций в жанре Future Bass пишется в минорных тональностях (так как настроение лучше передает именно минор) то предлагаю нам выбрать тональность F#min (Фа-диез минор), и пропишем нашу новую прогрессию в отдельном пустом Pattern…
Как сочинять крутые аккорды для Future Bass в FL Studio 12

Спасибо за просмотр этого видео, подписывайтесь на нашу группу ВК (FL Studio PRO), там сейчас происходит очень много интересного и полезного для электронных музыкантов и продюссеров!
Вам так же очень понравится:
Понравился пост? Буду рад Вашей маленькой поддержки в виде Like и поделиться!)
Получай новые видеоуроки моего блога, прямо на свой эл. ящик!
![]()
Комментарии
Future Bass is undoubtedly the biggest genre in EDM right now.
It has virally infiltrated a lot of pop music.
Artists like Marshmello, San Holo and Illenium have dominated the industry and brought with them a melodic & euphoric take on the bass drop.
But it sounds complicated to make, right? Just listen to those massive chords, loud, professional drums and catchy melodies.
That’s why we created this framework for making your own future bass tracks – to demystify the process.
No matter whether you use Ableton Live, FL Studio or any DAW, the techniques in this guide can work for you. We do recommend you use Xfer Serum for this guide.
Let’s get into the process and get you making your own beats 👇
Grab the samples, presets and resources from this article in our Future Bass Sample Pack 🎛️
Includes: 61 kicks, 50 snares, 28 808’s, 20 claps + snaps, 9 tom fills, 25 percussive fills, 35 closed and open hats, 6 Future Bass construction kits & our EDM Essentials for Xfer Serum Pack 👇
Table Of Contents
- Find Great Presets and Samples
- Punchy Drums
- Pulsing Chord Progressions
- Infectious Hook
- Energetic Bass
- Interesting FX and Pads
- Arranging for the Listener
- Clean and Punchy Mixing
- Mastering for Loudness and Release
Before You Start: The Basics of Future Bass
While the title may suggest making Future Bass is as easy as applying a formula, that is not the case. This tutorial is to give you a framework for how to make future bass and is not aimed at reducing your creativity throughout the process. Break the rules if you want.
In this guide, I’ll be making a track from scratch as an example, but the point here is to teach you the concepts.
I’d recommend following along with this guide by using the samples and presets provided so that you learn what I’m talking about in a practical manner.
For this example, I’ll use 145BPM as my tempo. 140-160BPM tends to be the range many future bass tracks sit in.
I’ll also make the track in F Minor, seeing as that is popular for a lot of EDM and bass music today.
Step 1: Find Great Presets and Samples
A person is only as good as their tools, right? Maybe, maybe not.
But a producer is definitely only as good as their sounds.
Starting with bad sample packs and dodgy synth patches is going to get you nowhere fast.
Use a service like Splice Sounds (sponsored link) to sift through the millions of amazing samples and presets they have on their platform.
A few hints:
- Use random to find lesser-known sounds
- Get a few options to see what you like best in the context of a track
- Preview before downloading
- Think in terms of sounds working in layers, not in isolation
In this case, use the sample pack you’ve downloaded to find some great samples to start with. You’ll save yourself some time there.
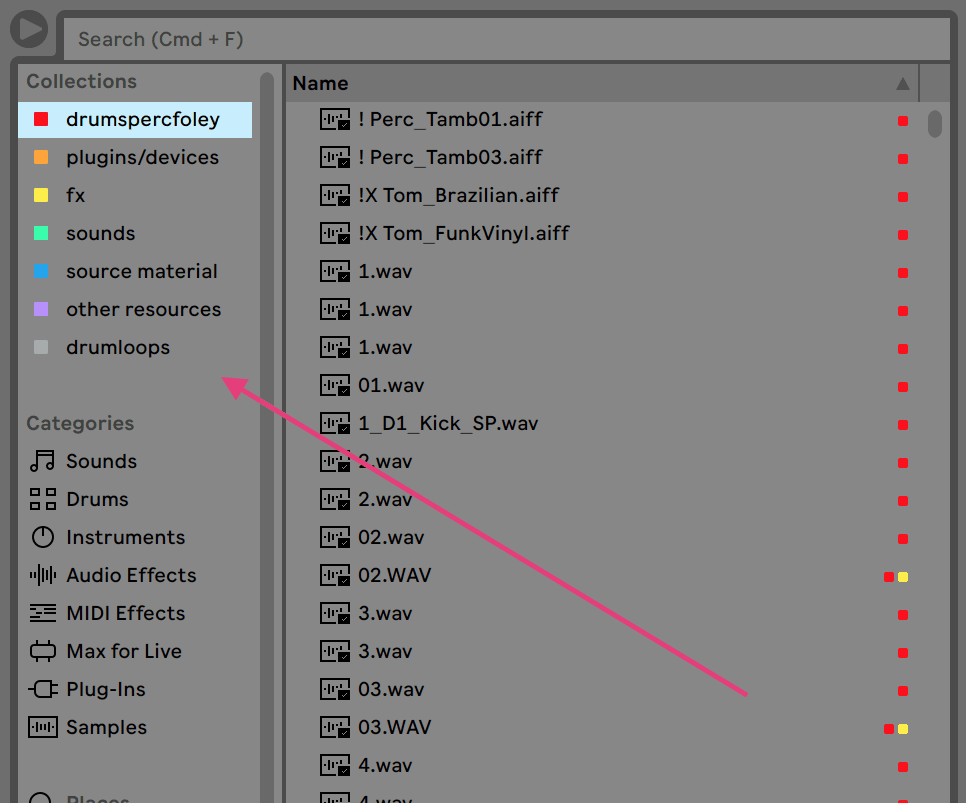
Once you’ve got your sounds, have them in an easy-to-access folder.
I personally save all my favourite samples in Ableton Live’s collections so I can always access great sounds. In other DAW’s like FL Studio, you may want to consider using a sample organizer, or manually organizing your samples into folders.
Step 2: Punchy Drums
Future Bass borrows a lot from Trap music, including the drums.
Now that you’ve found some suitable samples from digging around, we can make a new project in Ableton Live (or your DAW of choice) manipulate and utilize them to construct an energetic and punchy drum arrangement.
Let’s start by creating a simple kick & snare pattern by placing a snare on the 3 of each bar, and a kick on the 1.
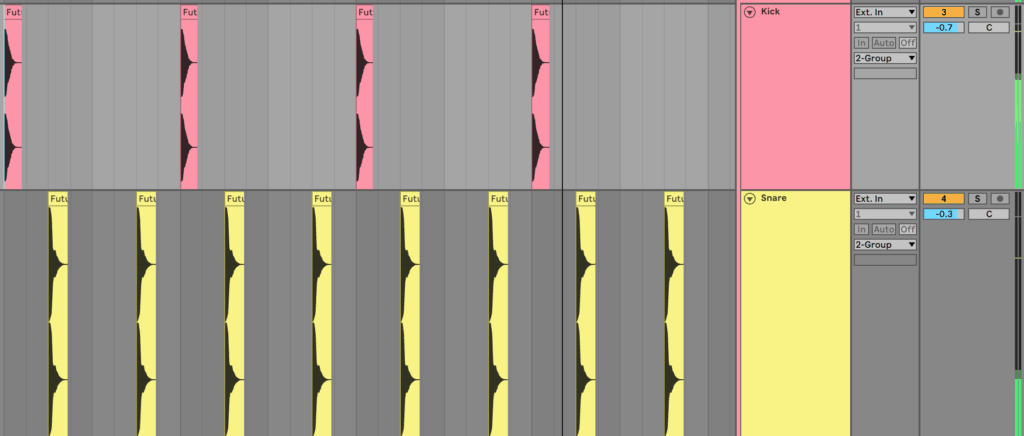
Next, to add some variation to the stale pattern, we’ll add a kick half a beat after the 3 of each bar.
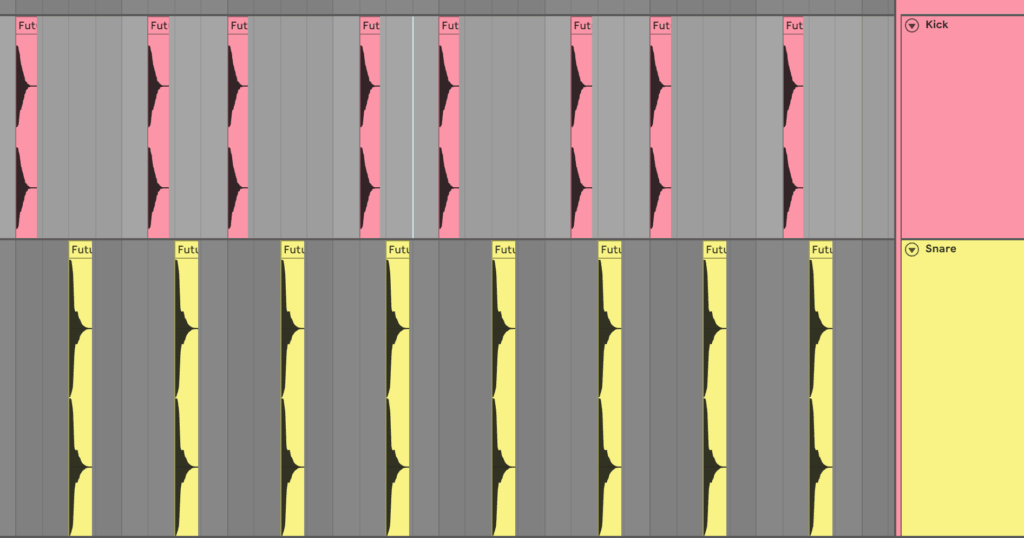
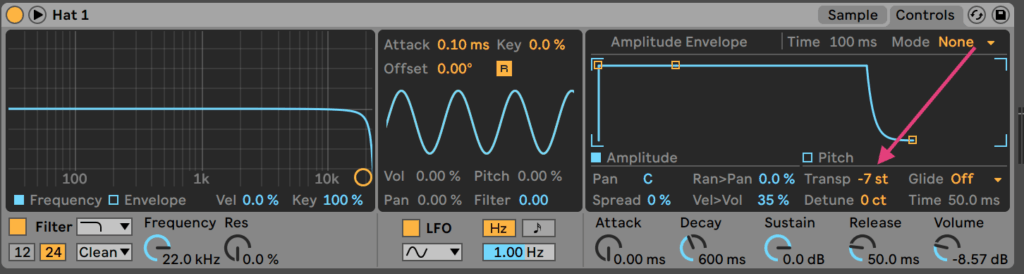
This is still a fairly basic pattern, so we’ll fill it out with some hi-hats. Load the ‘Hat 1’ sample from the sample pack into a Simpler or sample instrument of choice. Fill every 1/8th note out with a hat. Make sure to pitch it down -7st to get it sounding good with the other drums. Once again, this technique is also used in a lot of trap music.
Now you should have a drum pattern sounding like this.
It’s sounding solid but not quite there yet, so we’ll come back and do some processing later.
Recommended: How To Make Trap Music
Step 3: Pulsing Chord Progressions
With some solid drums as a foundation for the track, we need to create those big, modulated chord sounds that give the track energy and attitude.
We’ll use a few layers to achieve this sound, as layering is key to getting a unique yet full sound.
Typically the bass layer revolves around a standard ‘supersaw’ patch, which is achieved by adding multiple detuned saw wave voices in a synth like Xfer Serum.
You can get our Supersaw Patch in the sample pack above.
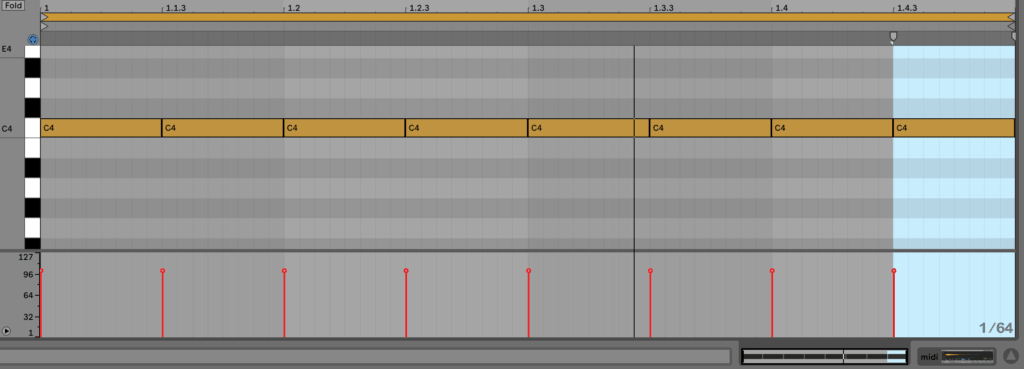
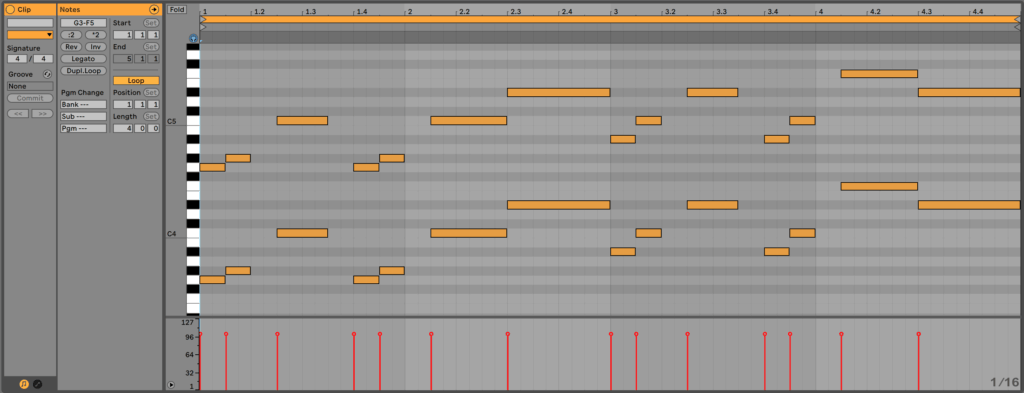
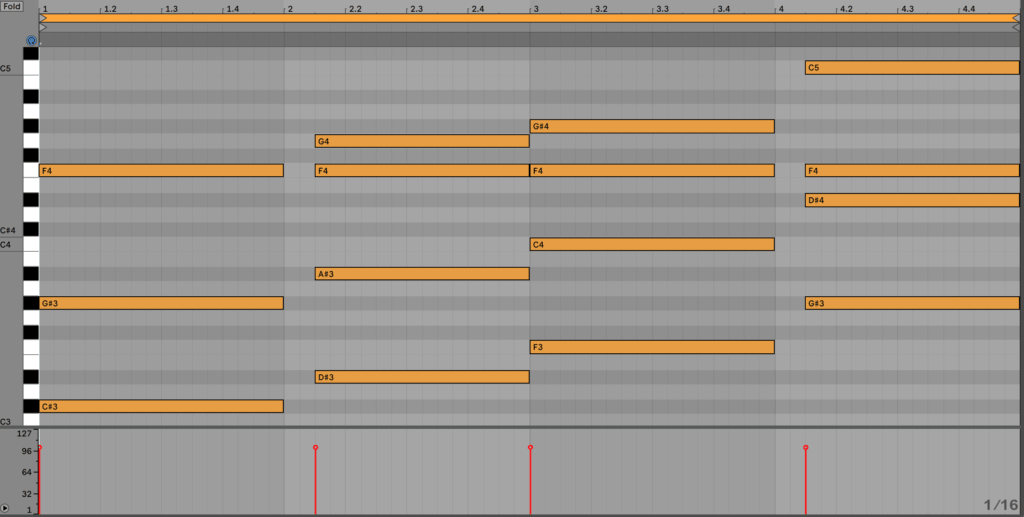
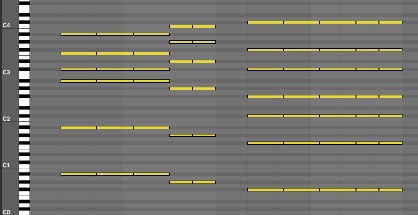
Let’s lay out a basic chord progression in the key of F Minor.
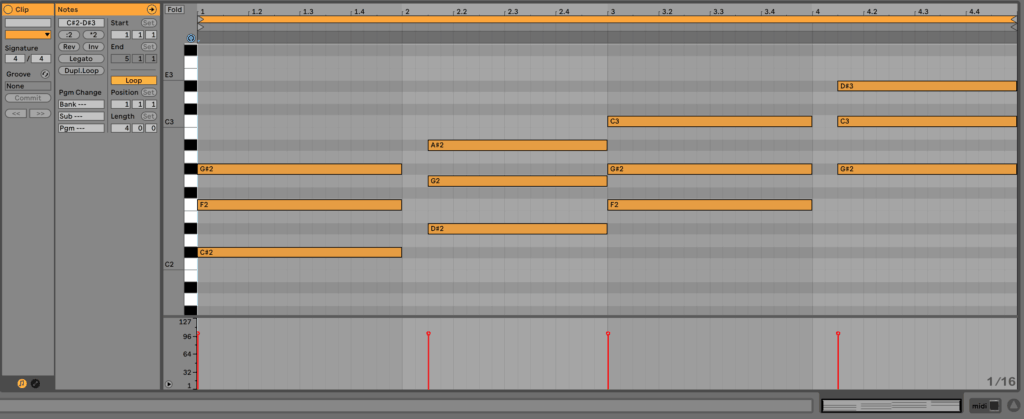
The chords here are Db Major 7, E Major 7, F Minor 7, and Ab Major 7.
Notice the little gap at the beginning of every second chord. This slight variation will give us space to add cool things later.
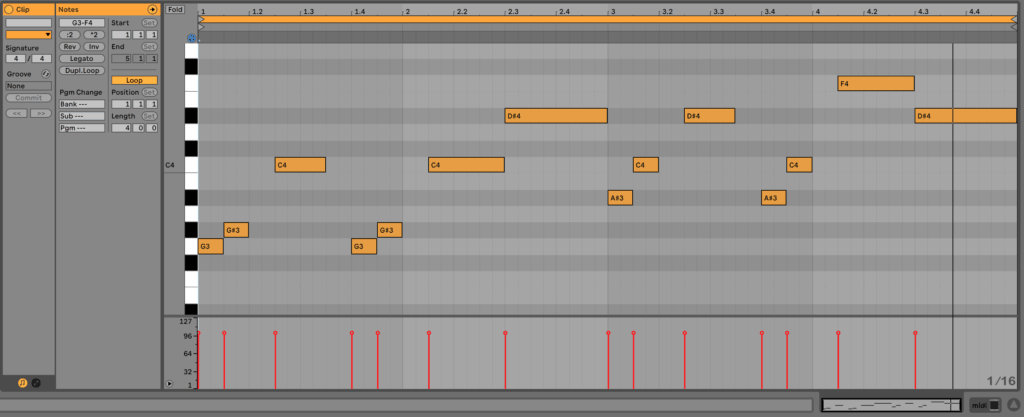
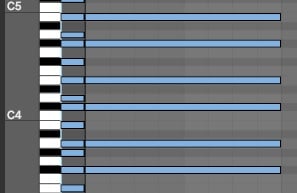
Now, these chords are fine, but the energy and power that come from future bass chords are often dependant on the voicing of the chords.
So what I’ll do, is move the middle note of each chord up one octave by selecting them all and pressing Shift + Up.
I’ll also double the bottom note by copy-pasting it and pressing Shift + Down.
Now the chord progression should look and sound like this.
A lot more powerful.
The last step to get that future bass vibe is to use an LFO. Thankfully, the preset inside Serum already has one set up, just crank up Macro 2 to activate it.
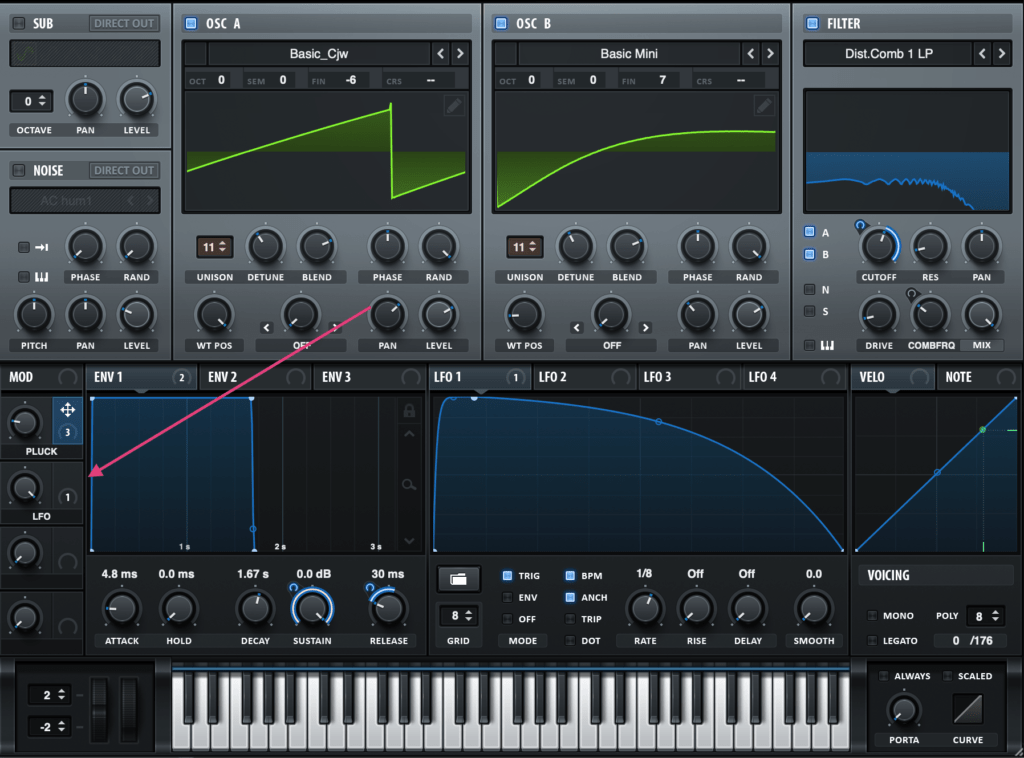
Now you can start to hear that iconic future bass sound.
Grab the samples, presets and resources from this article in our Future Bass Sample Pack 🎛️
Includes: 61 kicks, 50 snares, 28 808’s, 20 claps + snaps, 9 tom fills, 25 percussive fills, 35 closed and open hats, 6 Future Bass construction kits & our EDM Essentials for Xfer Serum Pack 👇
Step 4: Infectious Hook
This is arguably the most important step.
Why?
This is how people are going to remember the track.
Whether it’s a synth melody, vocal chop or even a rapper, you need to consider this early on.
If you plan on getting a featured vocalist on the track, which is very common in Future Bass, make sure to carve out space in your mix. Nothing is worse than a vocal that gets buried underneath a bunch of synths when it’s meant to be the main element.
Otherwise, here are a few ways to get a hook line and melody in your DAW.
Lead Synth
Usually, in synth-driven future bass tracks, the lead synth is bright and catchy, yet gels well with the chords. In fact, sometimes it even follows the same rhythm as the chords to get the cohesive effect.
In this example, I’ll use the ‘Top Lead’ serum preset to sketch out a melody that goes nicely along with the chords we created.
See how the notes only play at the same time as the chords? Here’s what it sounds like with the chords.
But the melody lacks power and cohesion. So firstly, we’ll double the notes on this synth.
Then, to give it even more, we’ll make a new ‘Supersaw Lead’ patch (same as the one from the chords) and copy over the bottom note. Now it should sound like this.
Coming together with the chords, you’ll be able to hear the track taking shape.
Vocal Chops
If you aren’t using a vocalist but want something more organic and interesting, vocal chops are a common way to go.
Start with a solid sample of a vocal or acapella, and make sure it has some sort of auto-tune or pitch correction on it (pre or post sample).
The best way to work here is in audio rather than MIDI. That way you can chop accurately and pitch individual chops rather than all of them.
I won’t show how to do this in this example, but check out this great video on vocal chops if you are interested (Logic Pro X).
Get Creative
You aren’t limited to just vocal chops or lead synths. You could combine both, or use some other hook element (like a proper vocalist or rapper, or even some other sound).
The possibilities are endless.
Step 5: Energetic Bass
Finding and layering bass synths is a delicate art form, especially considering you’ve got many other layers to fight for space with.
First and foremost, you want a sub-bass to start with.
This fills out the low end and glues all the instruments together.
Load up the ‘Sub Bass’ serum preset from the pack, or load any synth up with a sine wave (just make sure it has maximum sustain and fast attack/release).
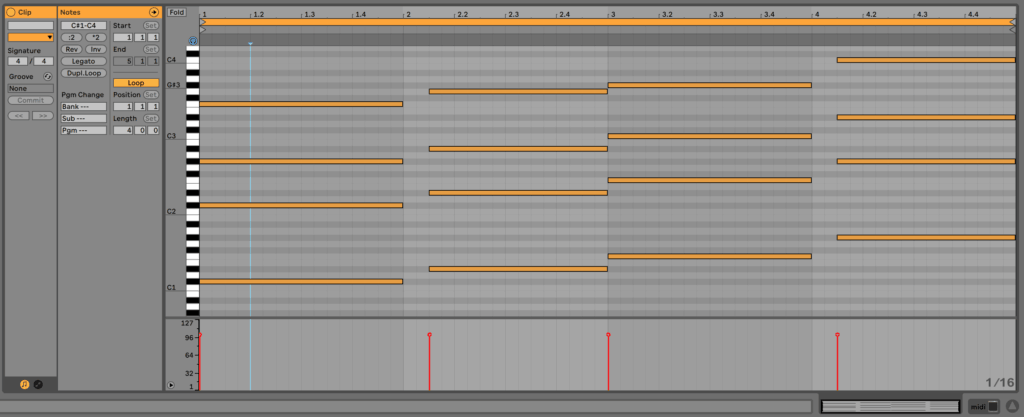
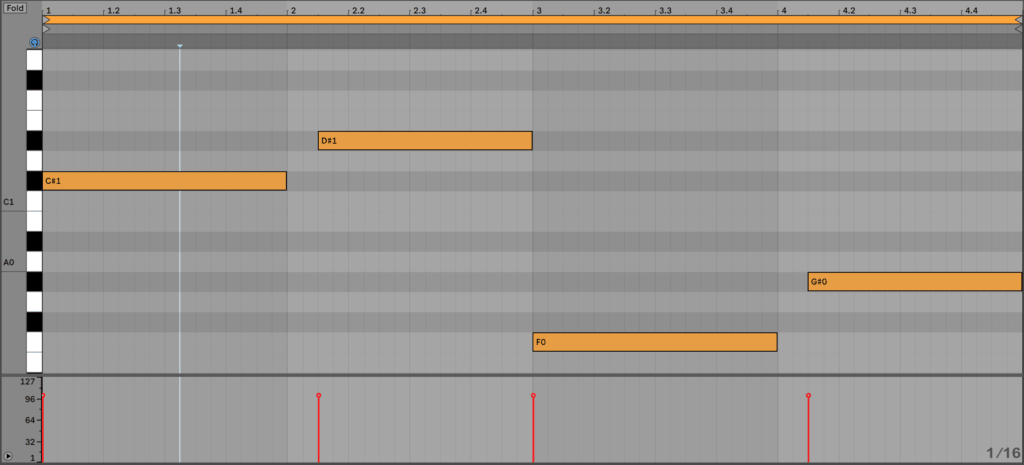
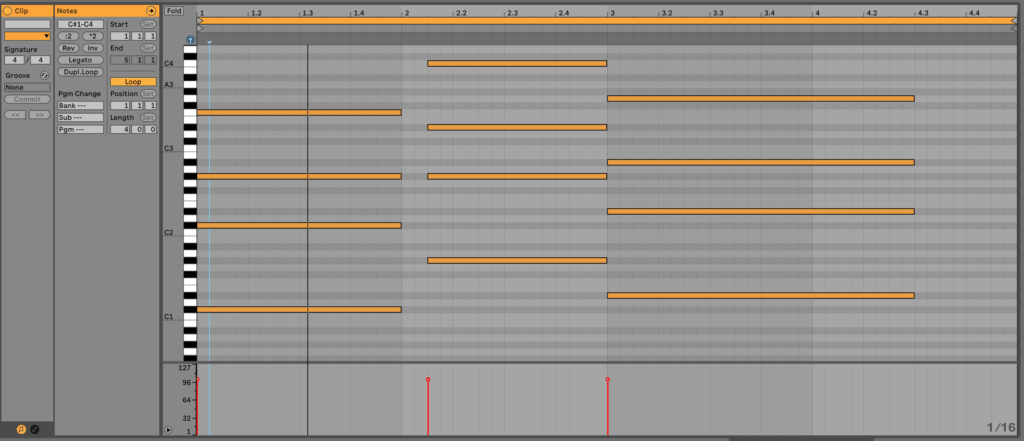
Then, copy over the chords and delete all but the bottom note, moving it down octaves until you get to C#1 as the starting note. It should look something like this:
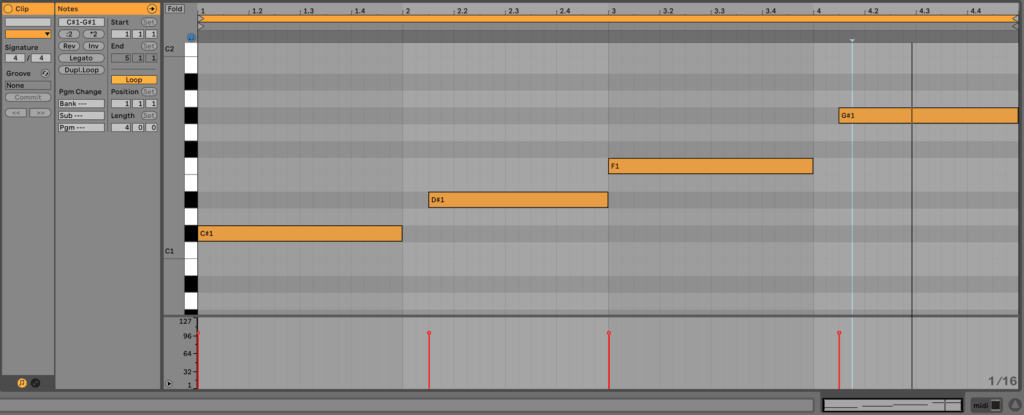
Playing those notes, you’ll notice the last two sound a bit higher. That’s why we’ll move them down an octave to get this.
An easy way to start is to get your sub to follow the bottom notes of your chords, but you can get more interesting by changing it up.
Next, you want to layer it with a main bass synth. This will give your low-end character and help it to poke through the mix better. While there is no hard and fast rule here, generally something that compliments your supersaw chords will work well.
For this reason, we’ll use the ‘Processed Saw Bass’ as our starting point. Using distortion and multiband compression in Serum, we can get something unique that works in the mix.
Copy the same notes over and you’ll get this sound.
Here’s how it sounds with the chords and lead synth melodies.
Step 6: Interesting Pads and FX
Now we’ve got the core idea, it’s time to add little bits of variation and ‘ear candy’ to make the idea more interesting and developed.
Once again, there aren’t any rules here, but you can add extra percussion, synth layers, background FX or whatever.
Here, I’ll start by adding the ‘Trippy Crash’ sample in the background to fill out the track a little bit. I’ll place it on every beat to carry across the entire drop.
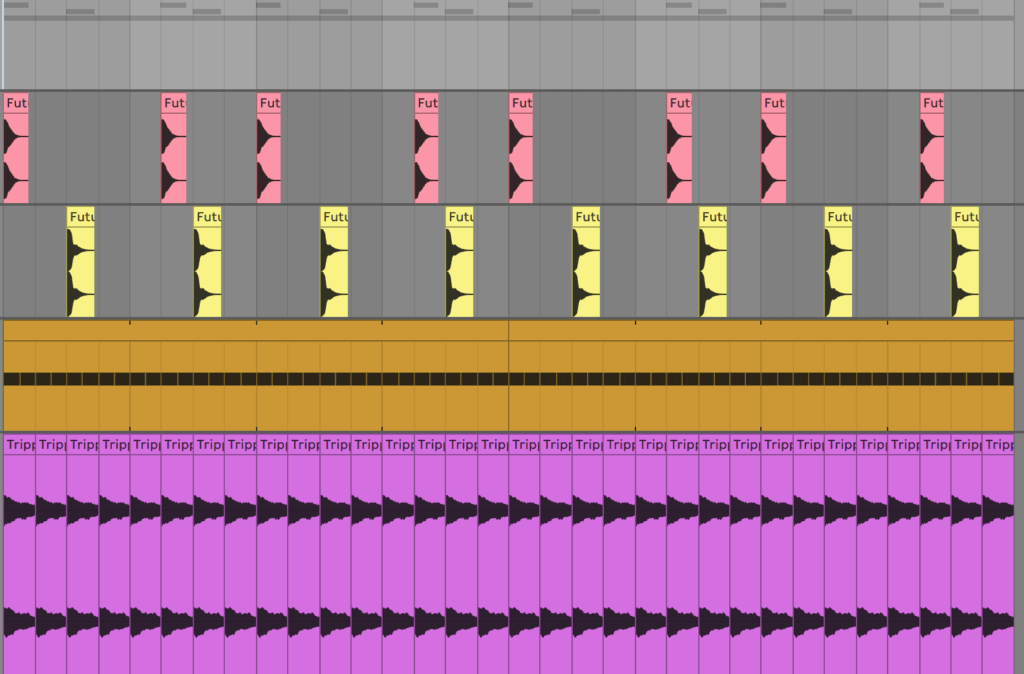
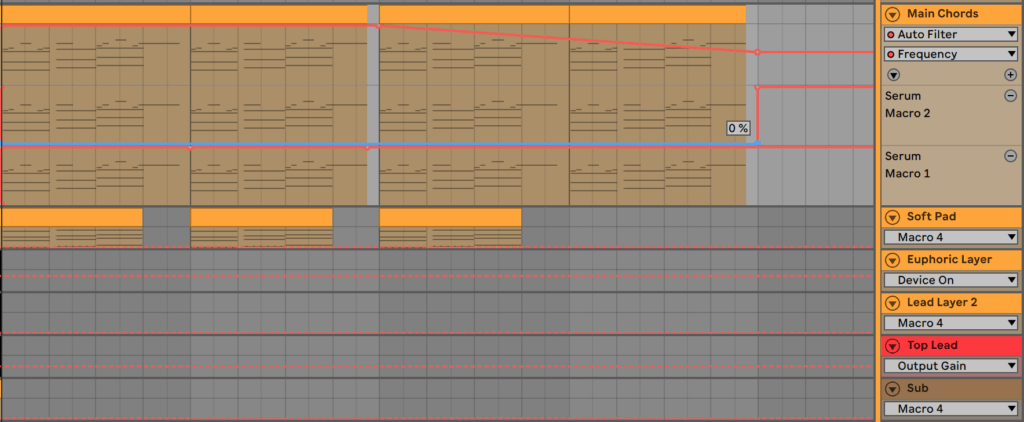
To add one final synth layer to our drop, we’ll load up the ‘Euphoric Chords’ layer on a new MIDI track.
Let’s use the MIDI from the main chords, but we’ll:
- Move it up an octave
- Remove the bottom doubled note
- Add an extra F4 to every chord to add a ‘droning’ effect
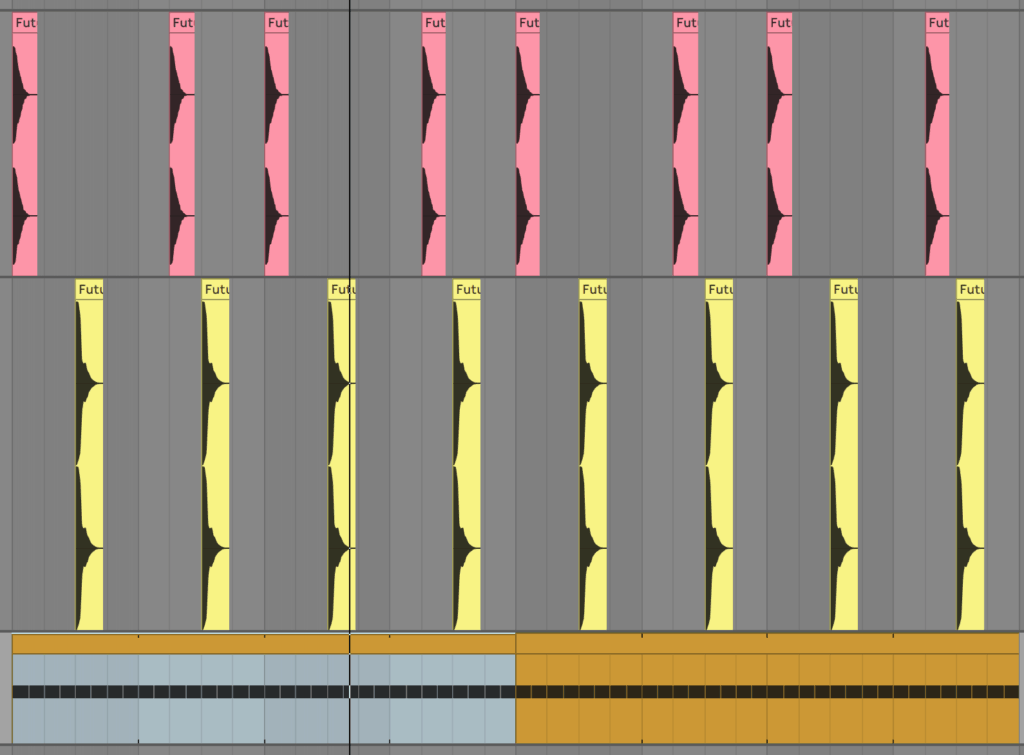
The result should look and sound like this.
Don’t worry about the distortion, it adds a nice crunch when layering with other sounds.
Altogether, we get a solid drop sound.
But of course, Future Bass is more than just a drop. So let’s learn how to arrange the track and add more elements in that process.
Grab the samples, presets and resources from this article in our Future Bass Sample Pack 🎛️
Includes: 61 kicks, 50 snares, 28 808’s, 20 claps + snaps, 9 tom fills, 25 percussive fills, 35 closed and open hats, 6 Future Bass construction kits & our EDM Essentials for Xfer Serum Pack 👇
Step 7: Arranging For The Listener
A track isn’t complete as an 8-bar loop, so let’s start to copy this out and change some things up.
Typically future bass songs sit between 3-4 minutes, like a lot of pop and EDM. Since this is the drop, we want it to happen around 45-60 seconds into the song, with some form of intro before it.
Normally there tends to be a breakdown after the first drop, with a build into the second. Lastly, the song cools down into an outro.
In this example, I’ll follow that basic structure but leave out the second build and drop for the sake of time.
Start by duplicating the drop pattern to take up 16 bars. This is a standard length for the drop.
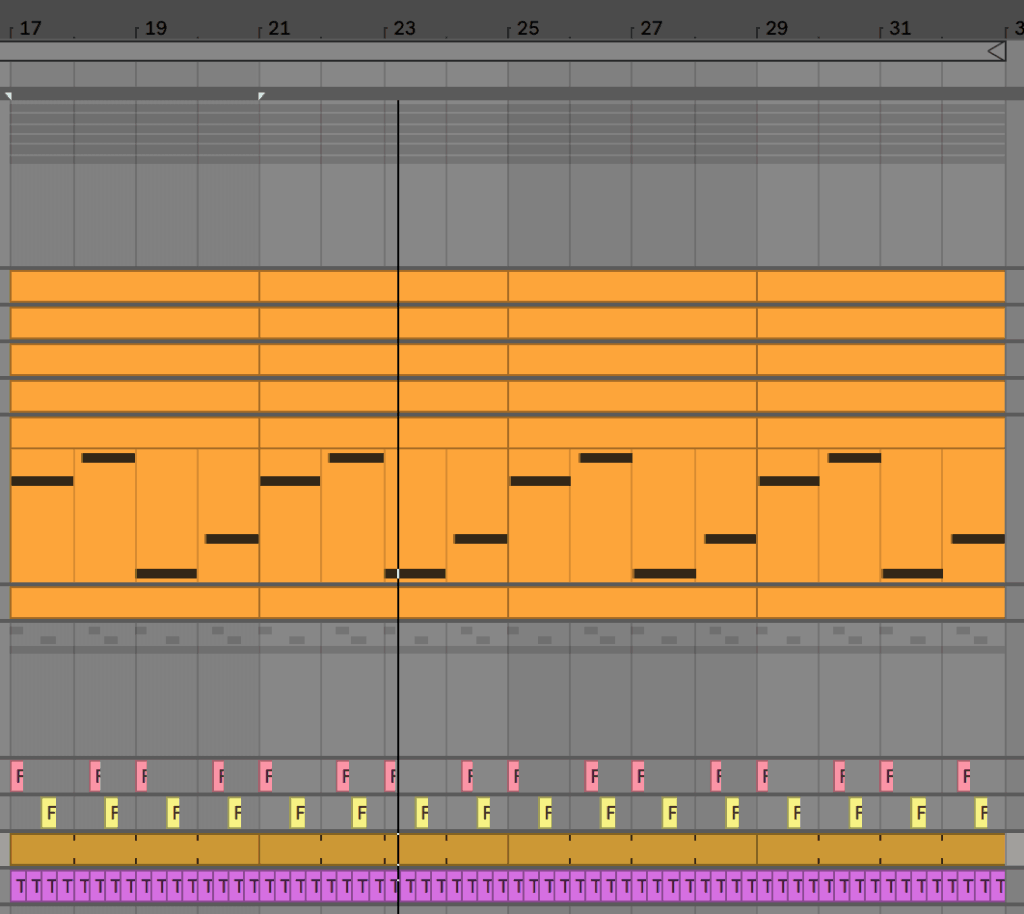
After that, insert some time before and after the drop (Cmd or Ctrl + I in Ableton Live) – in this case I do 16 bars. Normally intro’s would go for double this with a typical intro and build, but 16 can work fine for this example.
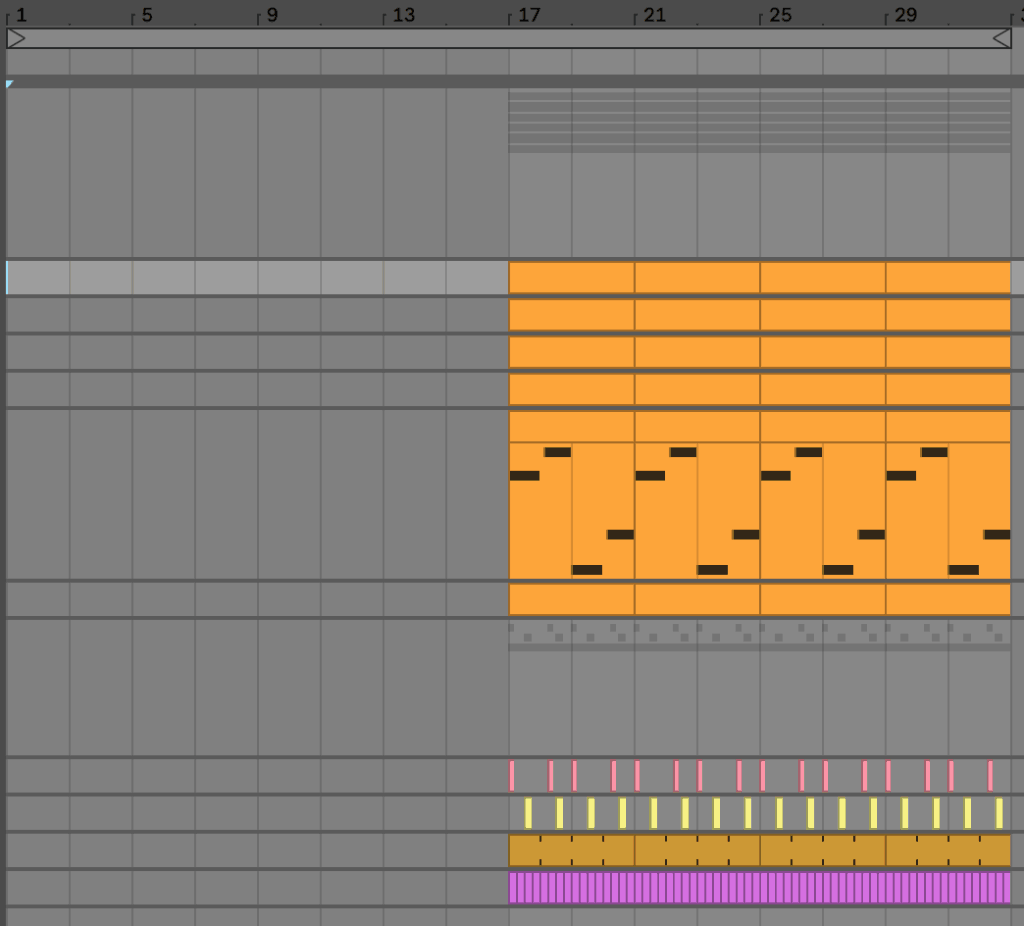
Lastly, duplicate the drop so we can do a switchup and lead into the breakdown, and then leave 16 bars at the end for a breakdown/intro.
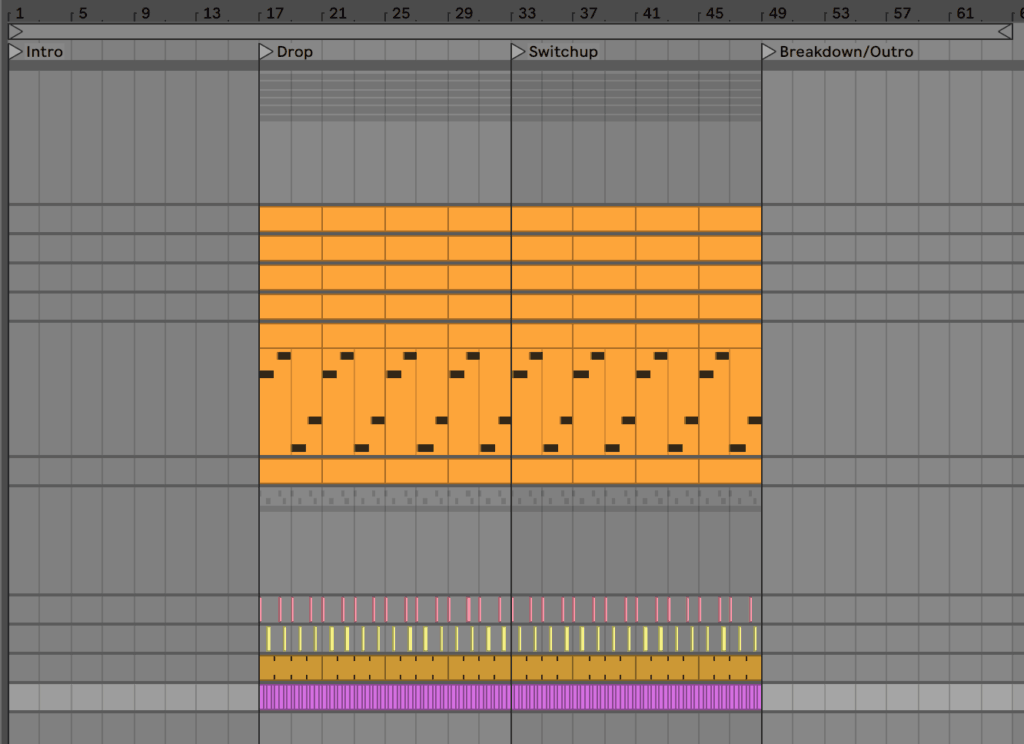
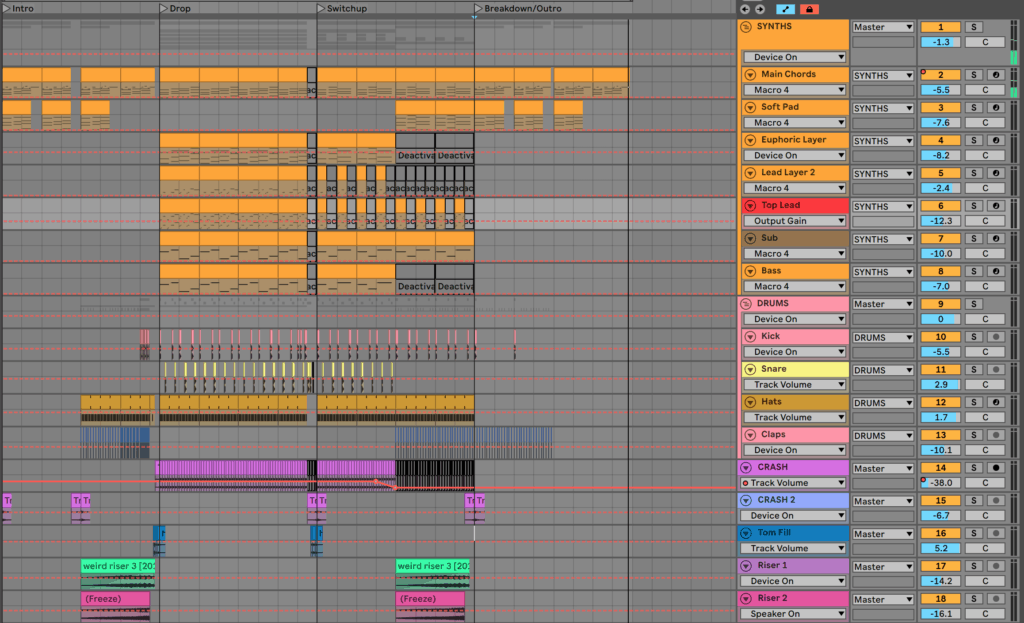
Intro
Now we can start to visually see the track take shape. Let’s start by adding some elements to the intro.
There’s a lot of little things I’ll do, so let me list them out, and show you a screenshot:
- hats in second half of intro
- automate macros on main chord synth to create intro sound
- add filter in first half to introduce sound softly
- add ‘Riser 1’ sound
- add ‘Fill’ sound before drop
- add ‘Clap’ sample that repeats and gets faster
Be as creative as you want here, and don’t feel the need to copy exactly what I do. Use is simply as a starting point.
Here is how my intro sounds.
Switch-up
Now let’s add some variation to the drop. Firstly, I’ll switch up the chords to a IV – I – V progression using the same voicing for all the chords.
This is how it looks.
If you change all the sounds, including the bass, then you will get this kind of sound.
We’ll leave the first half of the switch up like this, but then we’ll start to bring down the energy after that.

Here’s what I did:
- filtered out the main chords
- removed the main bass and higher euphoric chords
- removed the 2nd melody layer
- removed the crash
- removed the snare
- removed every 2nd bar of the melody
- added the intro pad playing the same notes as the main chords
- added the claps and risers from the build, but not getting faster
- faded the every-beat crashes out towards the middle
- reverse crash at the end
Here’s the result:
Outro
Lastly, I used a similar structure as the intro for the outro.
We use:
- The main chords, with the macros adjusted
- A low-pass filter sweeping down
- The soft pad playing the same chords
- The main chords playing same notes as in intro
- Claps in first half of outro
- Kick on first two sets of 4 bars
- Crash on the first beat
Here’s how it sounds!
Step 8: Clean and Punchy Mixing
So your track has taken form and is starting to sound legit. Now you need to get it sounding nice and clean.
If you haven’t played around with mixing before, now is a great time to start.
In this article, I won’t go over every detail, but I’ll mention the main things I do. Check out the included project file for more details.
Volume
The kick and snare drive the rhythm in future bass, so make sure they poke through the mix loud enough, but not too loud that they dwarf the rest of the track.
Make sure all of the main elements are cutting through, and that the sub-bass sits well with the instruments and the drums too. Loud sub-bass can tend to eat up the room in your track, so make sure it’s not set too high. Listen on headphones with a good bass response to avoid this.
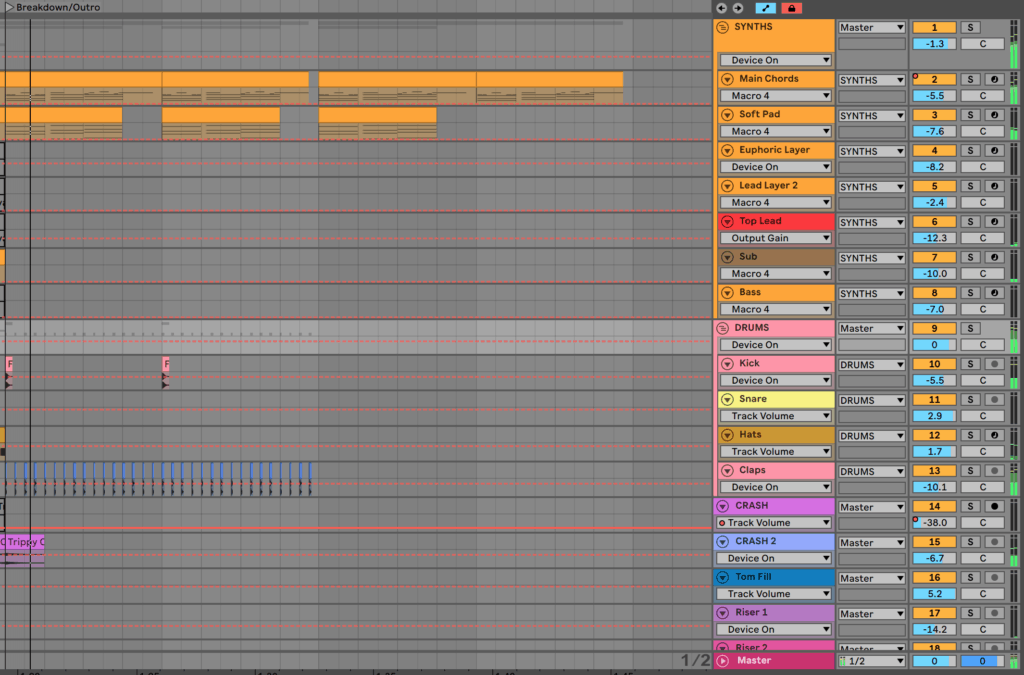
Here are the fader values in the project, for reference. Don’t follow these exactly, as the volume of samples may automatically adjust when importing, but use them as a reference.
EQ
Try high-passing a lot of the bass out of sounds to get your kick and sub coming through well. Where you high-pass here is very important. Too little and you won’t have any effect on the sound, too much and you’ll thin them out.
Each sound has different characteristics, so listen out for what you want and don’t want in each sound.

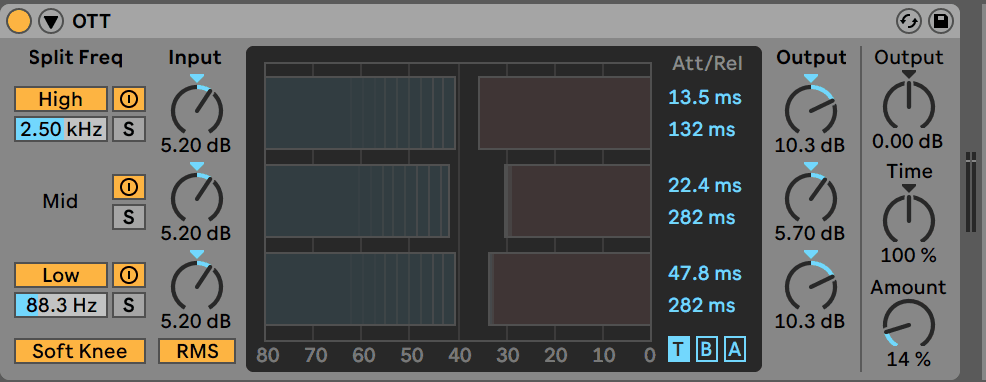
Compression
A lot of the sounds are synthesized in this case, and therefore don’t need compression. However, I do dial in some OTT on groups to glue certain elements together, like the drums.
Other Adjustments
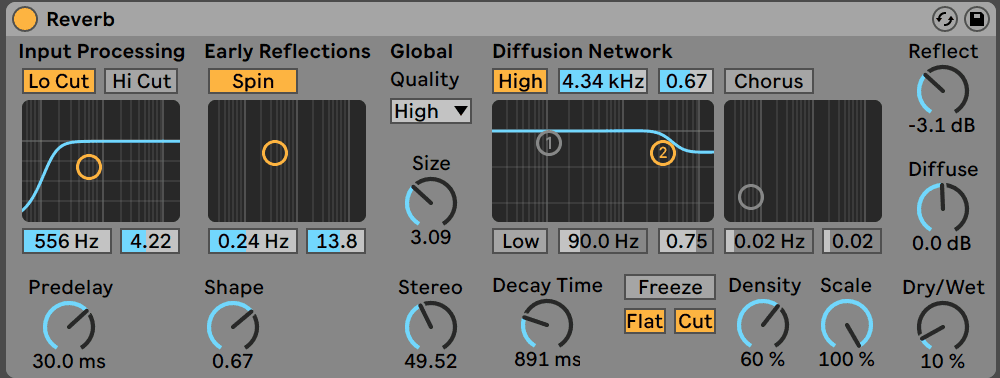
As I mentioned much earlier in the article, the snare wasn’t working very well for me. It needed more of a tail and a ‘compressed’ feel, so I processed it with more OTT and reverb.

On top of this, I wanted to add more grit to the euphoric chords that occupy the high end. So I added some Pedal distortion in Ableton Live (Guitar Dirt preset, but modified for fuzz distortion) and high-passed it to remove the lows.

There are other things done too, but you’ll have to check the project file for those.
Step 9: Mastering For Loudness and Release
At this point, if you’re not comfortable with mastering, you can get a mastering engineer to do it for you.
But in this case, we can do a rough master to get your track to release-level quality.
Firstly, some extra multiband compression won’t hurt, so use a device like Ableton Live ‘s Multiband Dynamics to process your audio.
I like to use a bit of the OTT preset and the Multiband Compression to gel the mix together.

If you don’t have Ableton Live, make sure to grab the OTT plugin to get the same sound.
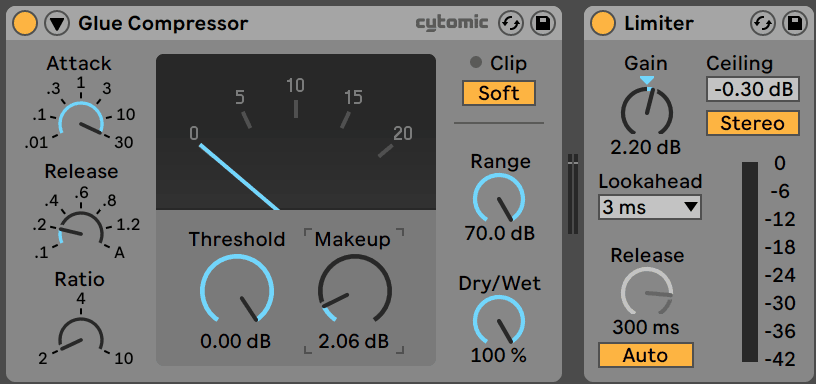
Before throwing a limiter on, I like to drive the audio into a soft clipper. This warms the signal up and adds an extra level of energy while adding a solid amount of loudness.
For this, I use Live’s Glue Compressor and just turn up the output gain. The device has built-in soft clipping (as long as the ‘Soft’ button is enabled).
Lastly, I chuck a limiter on the track to keep the volume as loud as possible, giving it a little bit more gain to round off the track. Ableton Live’s limiter is fine in this case, but if you want to achieve more transparent limiting, try a third-party plugin like the Waves L2 or FabFilter Pro-L.
And here’s the final result!
What Next?
Now you know how to make a basic future bass track, you can start practising and make your own tracks!
Need somewhere to start? Make sure to grab our FREE sample pack.
Grab the samples, presets and resources from this article in our Future Bass Sample Pack 🎛️
Includes: 61 kicks, 50 snares, 28 808’s, 20 claps + snaps, 9 tom fills, 25 percussive fills, 35 closed and open hats, 6 Future Bass construction kits & our EDM Essentials for Xfer Serum Pack 👇
Any questions? Email me at [email protected].
Introductory discount!
Save 25% on Jazzy Flavors — valid until 2023/03/09 🔥
Contains 50 jazz-inspired chord progressions in three formats (MIDI, Sundog, Engines).
Perfect for House, Lofi, Lounge, DnB, Synthwave, Hip Hop, Neo Soul…
Bonus deal: Purchase HouseEngine or the Engines bundle and get Jazzy Flavors for free.
Future Bass tutorial (chords and melodies)
In the following video Sundog is used to create a Future Bass song part. The tutorial focuses on chords, basslines, and melodies
Genre basics
- BPM range: 130 to 160 BPM. Other tempos are fine as well, but not as common.
- Typical song part length: 4 bars.
- Scale: The Major scale is perfect. Future Bass sounds happier than Trap, so Major is better than Minor here.
- Chords: Triads are not a good fit. They don’t have enough notes, and the octave range is too small. Typical Future Bass songs use Major7 and Minor7 chords extensively. Make sure that you use Major7 chords often enough, so that the atmosphere sounds happier. (Note: Actually, triads CAN work. But we need to extend the note range a bit. Simply take the second note of the triad and double it to the next octave. This is not as common as using Major7 and Minor7 chords, but it’s good, too).
- The bass is playing long notes, the chord instrument is playing short, rhythmic notes.
- Lead melodies commonly use short notes (16th, 8th, quarter notes).
Sundog Song Studio
Sundog is used in this video to create the different chords and melodies.
You can download it here: http://feelyoursound.com/sundog/ (Windows, macOS)
A quickstart tutorial is available at http://feelyoursound.com/sundog-quickstart/ (7 minutes and you will know everything you need).
Some thoughts on sound design
The tutorial above concentrates on chords and melodies, because there are quite a few tutorials available on YouTube that will tell you more about Future Bass sound design, mixing, and instrument choices.
But here are some key concepts:
- The bass is typically created by using two layers: 1) a sub bass, 2) a «higher» bass sound, that sounds a bit harsh (like a saw bass for example).
- The chord sound consists of multiple layers as well. Use supersaw synths and «wobbly» synths where the filter is opened or closed quickly. This is perfect for quick, rhythmic chord rhythms then.
- Many Future Bass songs use wavetable synths like Massive or Serum. Especially for the chords and for the lead melodies.
- Pitched vocal melodies are quite commonly found.
The drum rhythm
The rhythm in the video is quite basic. Some thoughts:
- The bassdrum and the snaredrum play in a half time tempo. Otherwise 145 BPM would sound way too fast.
- The hihat uses the «double tempo» feature of Sundog (a checkbox in the pattern section). This way we can create some fast hihat rolls from time to time.
- The click (or side stick) is a percussive element that I use to create some motion in the song.

Download
You can download the final Sundog song and the MIDI file here:
http://feelyoursound.com/data/future_bass.zip
Жирный бас и синтовые аккорды всему голова, и конечно же плотный звучок 🔥
В этом уроке покажу как я бы писал бит в таком стиле используя сэмпл пак Cymatics и сведение на простых и не сложных плагинах
При достижении 2500 лайков = Выкладываю сразу бесплатный проект этого бита 🔥
Видео где есть коллаб с подписчиками —
C 49 минуты, приятного просмотра и фана)
Подробная информация о моем курсе по битмейкингу — 🎓
Провожу стримы 2 раза в неделю (пишу биты, слушаю ваши треки и все такое), чтобы узнать когда стримлю, следите за новостями в паблике! vk.com/iy_beats
Также вы можете заказать или купить готовый бит, консультацию и т.д. в ВК (ссылки внизу)
——————————————————————
* Паблик ВК — vk.com/iy_beats
* Личная Страница ВК — vk.com/compose_ivan
256 комментариев

Writing melodies and chords can be difficult. The best future bass tracks always have an excellent catchy melody & chord progression. Today we will go over some techniques, that help you get better at writing hooks.
Here’s our Harmony and Chord Progressions course!
1. Know what emotion you’re trying to capture
Before you start writing a progression, it’s good to think about what kind of mood is the track going to be in. If you’re aiming at a happier feel, try using major scales. If you’re trying to achieve a more mysterious vibe, try writing some minor scale progressions.
2. Make the progression more interesting
To make any progression more interesting, try some of these techniques:
— invert the chords
— pitch the chords up/down an octave
— use 7th/9th extended chords for a more interesting feel
A minor 7th chord is a triad with a minor third stacked on top. Accordingly a major 7th is extended by a major third. If we number all the notes of a scale starting from the root note, a 7th chord could be described as 1-3-5-7. A 9th chord would be 1-3-5-7-9.

3. Mix and match in Session View
If you’re struggling with writing chord progressions that are interesting in themselves, try making more chord progressions and have a melody writing session. Put all the chord progressions in Session View, make another track and write melodies on another. When you come up with melodies, try matching it to multiple chord progressions to see which one fits it best.
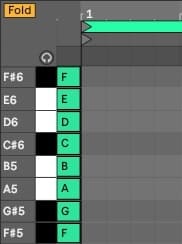
4. Fold the keys
Confused by all the music theory knowledge required to make chords & progressions? Try inserting all the scale keys into a clip, moving them outside of the loop and clicking the Fold button. You’ll be left only with the keys of your scale.
5. Start from one note
Sometimes it’s hard to think of a melody instantly. Try just inserting one note and going somewhere (up or down) with it. Try to listen to your head — if your head gives you a hint of a melody, try it out and see if it works.
6. Make a lot of instruments for your melodies before writing
Some melodies will sound good only on certain instruments. For instance a gliding vocal chop in Simpler will do a different job than a simple saw synth pluck with reverb. Make a lot of instruments and try out melodies on all of them to see if they fit.
7. Chop up an acapella
If you’re feeling stuck writing, try importing a random acapella into the Arrangement and chopping it up. Later on import the chopped parts into a drum rack and play around with them on a MIDI keyboard. If you find any good melodies, try to match a chord progression to it. Here’s a full article on how to do that.
8. Use MIDI packs and change them up
There’s a lot of MIDI packs out there with melodies and chord progressions which you can easily change up to create your own patterns. Here’s some of our future bass MIDI packs.
9. Take an existing chord progression/melody and change it
An approach I like a lot is figuring out the exact chord progression of my favourite tracks and changing them up. I like to do the same thing with melodies. I also like to change up the rhythm and speed of LFO modulations to make the progression even more „mine”.
10. Reverse the melody
Try inversing a melody you already have. Chances are it will work well for another part of a track, like a bridge or an outro. In Ableton you can do it by selecting the notes and pressing the Rev button in Clip View.
11. Use the arpeggiator
Future bass uses a lot of arpeggiated patterns. Making them is simple — you make a chord progression, put the MIDI clip onto a track with a melodic instrument, put an arpeggiator MIDI effect onto it and tweak its settings (rate, steps). If you’d like even more control over the notes, you can then record the arp’s generated notes onto another MIDI track. Just route a new MIDI track’s „Track In” to the track with the Arpeggiator and hit arm & record.
12. Hum or sing along to chord progressions or other tracks
This is an approach by Flume — he often makes chord progressions, turns on Voice Memos on his phone and sings along to a chord progression until he finds a good hook. You can do the same thing with a track you like — or even improvise on an instrument to it.
Have fun with your future bass ideas. See you in the next articles!
Check out this article with other 5 ways to write a melody, including Flume’s tips!
Check out our new MELODY COURSE:
We are offering a great Future Bass MIDI Pack with predesigned melodies and chord progressions to chose from as inspiration. Also, if you want to dive deeper into writing chords, feel free to take a look at our course: Harmony & Chord Progressions.
- Future Bass Midi Pack
- Harmony & Chord Progressions Course
k-pizza

I’m a music maker who likes to share his experiences with other producers. I regularly show up with tutorials, articles & project files at PML.
Skype lessons with me: http://bit.ly/pml_s_one2one
← Older Post
Newer Post →
Making awesome Future bass chord progressions is possibly
one of the hardest things to achieve if you have no musical background. Lucky for us there are some basic rules we
can follow to help us understand what’s involved. Let’s take a look at these 10 tips on future
bass chord progressions.
Want awesome chord progressions the easy way? Check out our HUGE list of free MIDI files HERE. P.S. There is a surprise for you there.
Future Bass Chord Progressions for Beginners
- Pick a scale
- Add 5th, 7th, 9th and 11th
- Inversions
- Spread chords
- Cadence Chords
- Create suspension
- Change your progression
- Fold piano roll
- Use ‘Scale’ MIDI effect
- Summary
Most future bass chord progressions can be broken down into
a basic chord structure. If we
understand how this basic structure works, then we can repeat the process and
make our own future bass chord progressions using the same techniques.
Let’s take a closer look at the following 9 steps.
1. Pick a scale
When choosing a scale, you want to consider the vibe of your
song. Do you want it to feel sad and
depressing? Or do you want it to feel happy and joyful?
- Minor scales generally portray a sad vibe.
- Major scaled generally express a happy vibe.
There are many other scales out there but these two are a
good starting point.
There are simple formulas we can use to work out the minor
and major scales.
Minor scale – WHWWHWW
Major scale – WWHWWWH
‘W’ = 2 semitones or one full note
‘H’ = 1 semitone or half of note
For example:
- F# minor scale would be: F# G# A B C# D E
- F# major scale would be: F# G# A# B C# D# F
Each of the notes in the scale is allocated a number. 1
through to 7. We will talk more about
this in the next chapter.
Tip: Generally, most future bass tracks are in a minor scale. Some common future bass chord progression scales are F# minor and G# minor.
2. Add 7th, 9th, and 11th
As we mentioned before, each note in a scale has an allocated
number. 1 is the root note. Once you have reached 7, the scale starts at 1
again only up one octave.
When counting out your 7th 9th and 11th
chords we do not reset the scale back to 1 on the new octave. We keep counting, following the scale
formula.
Generally, a chord is made up of 3 notes. This is called a triad. Typical triads use the 1st 3rd
and 5th from any note in the desired scale.
But these triads can sound hollow and not full enough for
future bass chord progressions. This is
where we can choose to add more notes to our triad.
We can add 7th 9th 11th 13th
notes to fill out the spectrum and come up with interesting chord progressions.
3. Inversions
Inversions are quite basic. It is simply shifting the desired notes from your chord up or down an octave.
A common technique is to shift the 5th down one
octave. You can experiment on all the other
notes in your chord until you find something you like.
Tip: To achieve that full future bass sound you need to have notes from your chord playing over several octaves. Seven Lions, Flume and Illenium use this technique and have notes playing over 4 or 5 octaves.
4. Spread chords
Another way to help your chords sound full is by adding space in between your notes. Now we have learned about inversions, try and move other notes up or down an octave and get some notes playing on at least 4 or 5 octaves.
Tip: Having
too many notes close to one spot will grab your attention. You can use this to make draw the listeners
attention.
5. Cadence Chords
Now we understand how to make a single chord, let’s talk about how to turn that chord into a chord progression.
Every note in your scale can be turned into a chord using
the 1st 3rd and 5th. And as every note was allocated a number from
1 – 7, every chord is allocated a roman numeral. I, II, III, IV, V, VI, VII.
Certain chords have specific feelings. The I chord has a comfortable home feeling,
while the IV and V chords have a sound that helps emphasize that home feeling. That makes the chords IV and V cadence chords.
Cadence chords are chords that make that section of the song feel complete and finished. Future bass chord progressions do you cadence chords but in a limited way.
6. Create suspension
Future bass chord progressions create a lot of suspense and rarely
land on the I. They will bounce around
II, III, VI and VII to help build that suspense.
After a long time, they will eventually land back on the I
to satisfy that home feeling in the listener.
Tips: Use the
II, III,VI, and VII more than I, IV, and V.
This will create more suspense in your track. For example. III, VI, II,
VII, III, VI, V,IV.
7. Change your progression
Change is always a good thing. It’s important to keep the listener interested with slight changes.
Changes can be in the form of a complete chord change or even
just a few notes in a chord progression.
Changing the timing of your chords is very important.
Look at my example below.
Tips: Try different chord inversions in different chords. Experiment with changing 1 chord out of a whole chord progression rather than the whole chord progression. Or even try changing the order of chords.
8. Fold piano roll
Ableton makes it super easy for the average person to pencil
in chords even if they don’t understand music theory.
An easy way to do this is to pencil in the notes from your
scale and move them outside your looped section. Copy them all and paste them over 4 or 5
octaves. Then hit the fold button to hide
all the other notes.
This is a great option if you want to pencil in your chord
progressions rather than play them.
Tips: Fill in
one octave of your scale and drag it out of the loop section. Then copy all those notes. Press ‘Shift + up’ to move the notes up one
octave and then paste with ‘Ctrl + v’.
Repeat this process until you have your scale over 4 or 5 octaves.
9. Use ‘Scale’ MIDI effect
There is even a built-in option into Ableton that allows the
inexperienced musician to play their chords progressions using only the white
notes on your MIDI controller.
The MIDI effect called ‘Scale’ is perfect for this.
Simply drag an instance of ‘scale’
onto your MIDI track and change the base note to the root note of your scale.
The vertical columns with no black
dots are the white keys, and ones with the black dots are black keys.
The horizontal rows are semitones.
Fill out the white columns using
your scale formula.
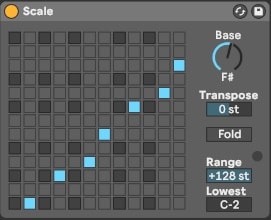
Now when you play the white notes on your MIDI only the notes from your scale will be heard.
Sidechain
Last but not least, we have sidechain compression. I have a full guide to sidechain compression with audio samples you can view HERE.
So for those of you who are not familiar with sidechain compression, let me explain.
Sidechain compression is when one signal reduces the gain of another signal.
For example. A kick can reduce the volume of a synth patch right when the kick hits. This is what creates a pumping feeling in your music and it also makes room for your kick to sit nicely in your mix.
You can even mute your kick and use sidechain compression to give the synth a nice ducking sound. Lots of future bass producers use this technique to add some rhythm to their chord progressions.
If you want to add heavy sidechain compression to your music, copy the settings from the image below.
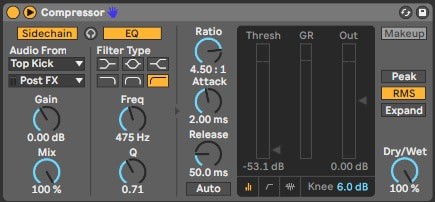
Raising the ‘Threshold’ control will reduce the sidechain effect.
Summary
Future Bass is an amazing genre filled with amazing harmonically pleasing chords and melodies. It’s quite difficult to learn but when you do it will make learning other genres easier.
I recommend you watch my future bass/future pop tutorial and see exactly what goes into making a future bass song from start to finish. You can even get the Ableton project files for free!
I hope these tips serve you well.
Check out some of my other future bass stuff:
- 10 small future bass record labels you can easily approach
- 15 Essential tips for producing future bass
- Electronic Music Theory For Beginners
Good luck and happy producing.
![[Tramplin] Создание Future Bass трека [2016, RUS]](http://vsthouse.ru/_ld/244/30253162.jpg "[Tramplin] Создание Future Bass трека [2016, RUS]")
[Tramplin] Создание Future Bass трека [2016, RUS]
Год выпуска: 2016
Производитель: Tramplin
Сайт производителя: tramplin.pro
Автор: Саша OAK
Продолжительность: 7 часов
Тип раздаваемого материала: Видеоурок
Видео: AVC ,1808×1024 , 16:9 , 24,000 кадра/сек, 402 Кбит/сек
Аудио: AAC, 44,1 КГц , 192 Кбит/сек , 2 канала
Язык: Русский
Размер: 2.04 GB
Future Bass — довольно молодой модный стиль музыки. Он настолько быстро набирает обороты, что ему уже предрекают популярность дабстепа и трэпа. Для многих музыкантов это отличный шанс сделать имя «попав в струю», а наша задача — раскрыть новые приемы и фишки продакшна, используемые в этом жанре. Кладезь знаний по имени Саша Оак в течении четырех интерактивных вебинаров будет создавать Future Bass трек, попутно углубляясь в особенности синтеза, гармонии, ритмики, структуры аранжировки, работы с сэмплером и.т.п. Те, кто участвовал в предыдущих мастер-классах Александра не дадут соврать — полезной и интересной информации будет очень много!
