Время на прочтение
10 мин
Количество просмотров 61K
Почти любой игре необходим взаимодействующий с пользователем искусственный интеллект (AI), чаще всего в виде враждебной игроку силы. В некоторых случаях ИИ должен помогать игроку, в других — бороться с ним, но у всех управляемых компьютером персонажей существует некоторое сходство. В зависимости от требований проекта ИИ может использовать простые или сложные поведения. Такими требованиями могут быть дипломатия с другим игроком или простое блуждание вперёд-назад по платформе. Как бы то ни было, необходимо сделать так, чтобы ИИ качественно выполнял свою работу.
В этом проекте я продемонстрирую очень простой искусственный интеллект. Допустим, мы создаём игру, в которой игрок должен тайком пробраться рядом с вражеским штабом. Когда игрока замечает камера слежения, рядом создаются враги и в течение короткого промежутка времени преследуют игрока. Именно это мы и реализуем в проекте на простейшем уровне. Завершив проект, вы получите управляемый объект игрока, круг, используемый в качестве камеры врага, и объект врага, который будет преследовать игрока, когда о его присутствии сообщит объект камеры.
Подготовка
Для начала нам нужно создать 3D-проект. Нажмите на кнопку New в верхней части окна после запуска Unity, как это показано на рисунке 1.

Рисунок 1: создание нового проекта
Назовите свой проект AI и убедитесь, что он является 3D-проектом. Выбрав место на компьютере для хранения проекта, нажмите на кнопку Create Project внизу, показанную на рисунке 2.

Рисунок 2: экран настройки проекта
После создания проекта нам первым делом нужно настроить папки в окне Assets, чтобы упорядочить свою работу. Нажмите правой кнопкой на окне Assets и выберите Create → Folder для создания новой папки. Назовите эту папку Materials. Затем создайте вторую папку и назовите её Scripts. На рисунке 3 показано, как это должно выглядеть.
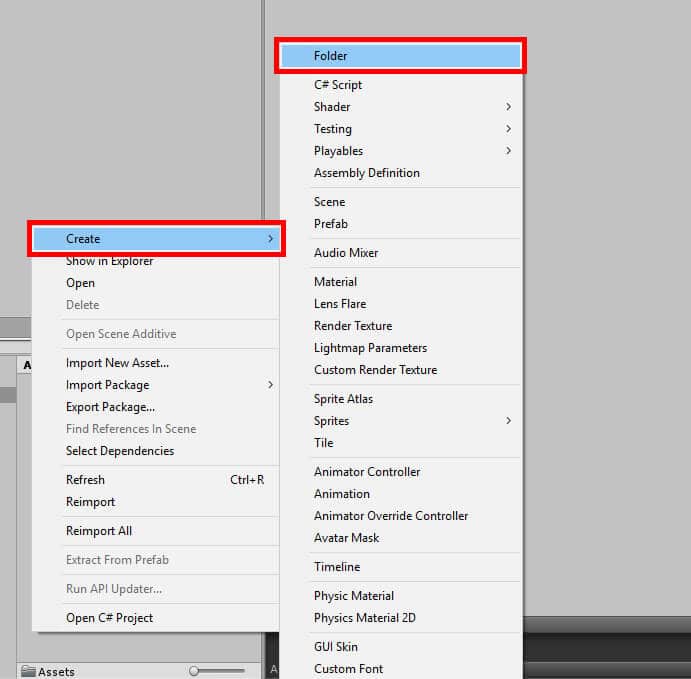
Рисунок 3: создание новой папки
После всего этого окно Assets должно выглядеть так, как показано на рисунке 4.

Рисунок 4: окно Assets.
Далее создадим пол, на котором будут стоять все объекты. В окне Hierarchy выберите Create → 3D Object → Plane, чтобы создать объект-плоскость, которая будет использоваться в качестве пола.
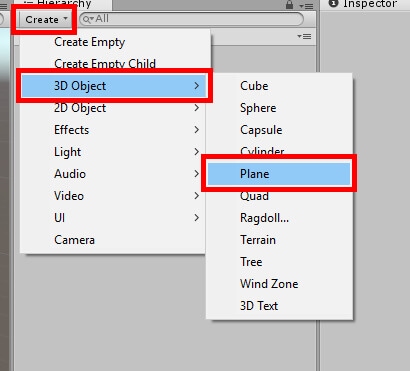
Рисунок 5: создание объекта Plane.
Назовите этот объект Floor и измените его значение X Scale на 7, а значение Z Scale — на 3. После этого окно Inspector с выбранным объектом Floor должно выглядеть так, как показано на рисунке 6.

Рисунок 6: задание свойств объекта Floor.
Теперь нам нужно создать новый материал для Floor, чтобы отличать его от остальных объектов, которые будут размещены в сцене. В папке Materials окна Assets создайте новый материал, нажав правой кнопкой на окно Assets и выбрав Create → Material.

Рисунок 7: создание нового материала
После завершения назовите материал Floor.

Рисунок 8: материал Floor.
В верхней части окна Inspector с выбранным материалом Floor выберите color picker.
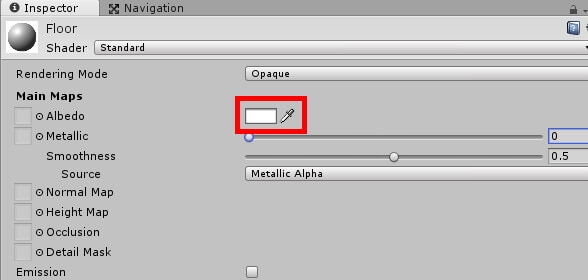
Рисунок 9: выбор color picker.
Разумеется, вы можете выбрать для пола любой цвет, но в этом примере я выбрал красно-коричневый цвет, как показано на рисунке 10.
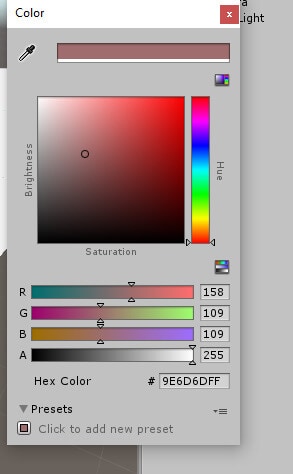
Рисунок 10: color picker.
Выберите объект Floor в окне Hierarchy, и в компоненте Mesh Renderer выберите маленькую стрелку рядом с Materials.
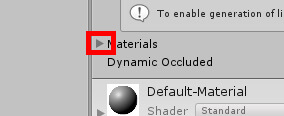
Рисунок 11: подготовка к изменению материала.
Перетащите материал Floor из окна Assets в поле Element 0 компонента Mesh Renderer в окне Inspector.

Рисунок 12: задание материала Floor в качестве материала объекта Floor.
Закончив с объектом Floor, мы дожны создать вокруг области стены, чтобы игрок не мог свалиться с края. Снова заходим в Create → 3D Object → Plane для создания новой плоскости. Назовём эту плоскость Wall и выставим ей те же размеры, что и у Floor, то есть X Scale со значением 7 и Z Scale со значением 3. Затем создадим ещё три стены, выбрав объект и трижды нажав Ctrl + D. После этого разместим стены вокруг пола в соответствии с данными из таблицы.
Таблица 1: позиции и повороты всех объектов Wall.
Завершив всё это, нужно изменить положение камеры, чтобы она смотрела на пол сверху. Выберите объект Main Camera и задайте для Y Position значение 30, для Z Position значение 0, а X Rotation — значение 80.
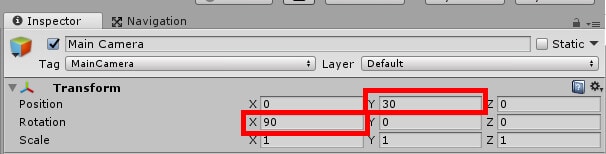
Рисунок 13: настройка объекта камеры.
Сцена подготовлена, поэтому настало время создания персонажа игрока. В окне Hierarchy нажмите на Create → 3D Object → Sphere, чтобы создать объект-сферу. Назовите этот объект Player, а затем нажмите на кнопку Add Component в нижней части окна Inspector.

Рисунок 14: добавление нового компонента.
Теперь найдите Rigidbody. После этого выберите из списка компонент Rigidbody и добавьте Rigidbody к объекту Player.

Рисунок 15: добавление компонента Rigidbody.
Далее нужно присвоить игроку тэг, который позже пригодится нам в коде. Нажмите на раскрывающееся меню Tag в левом верхнем углу окна Inspector и выберите тэг Player.

Рисунок 16: задание нового тэга.
Нам нужно задать позицию игрока, чтобы он не находился под объектом Floor. В примере я расположил игрока в левом верхнем углу с X position равным 26, Y Position равным 1, и Z position равным -9.

Рисунок 17: размещение игрока.
Чтобы наш будущий код работал правильно, нам, разумеется, нужно прикрепить его к объекту. Снова заходим в окно Hierarchy и на этот раз выбираем Create → 3D Object → Cube. Назовём этот куб Guard, добавим к нему компонент Rigidbody и компонент NavMesh Agent с помощью кнопки Add Component в окне Inspector. Далее поместим его где-нибудь в верхнем левом углу сцены. После этого окно Inspector объекта Guard будет выглядеть следующим образом:
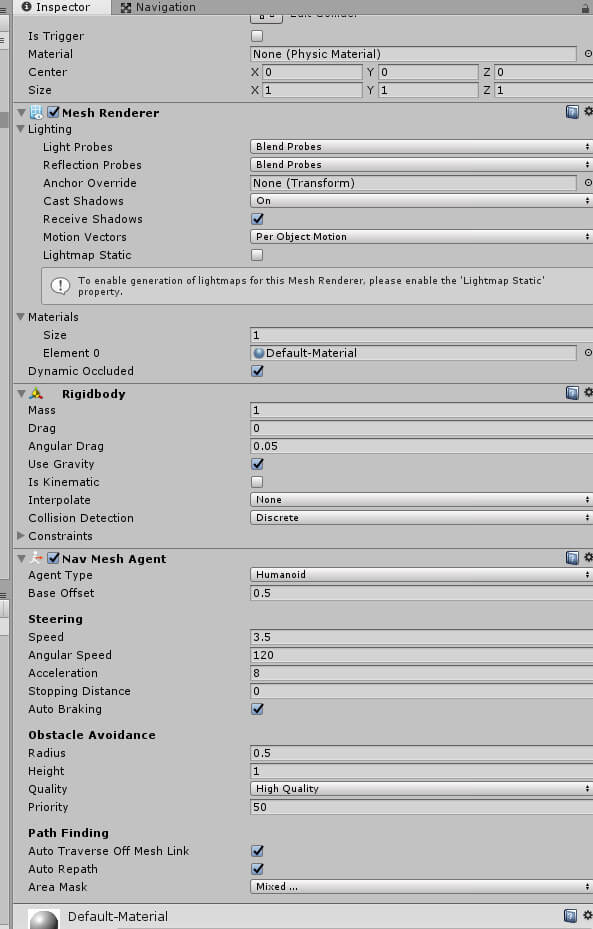
Рисунок 18: объект Guard в окне Inspector.
И этот объект должен быть расположен так:
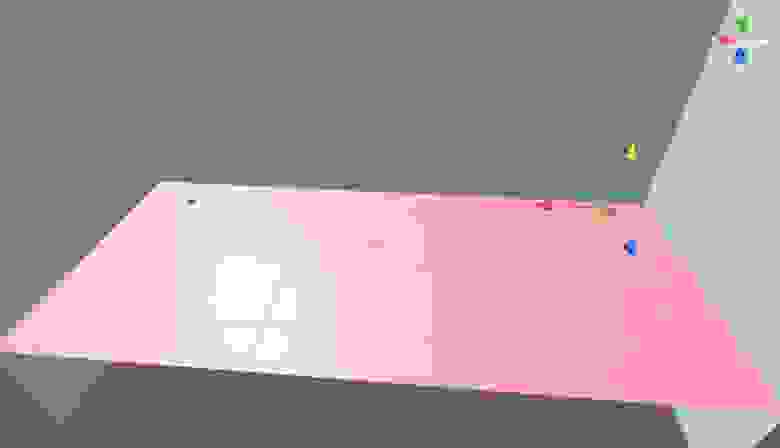
Рисунок 19: Размещение объекта Guard.
Наконец, нам потребуется объект, используемый в качестве «глаз» объекта Guard, который будет уведомлять Guard о том, что его касается игрок. В последний раз перейдите в окно Hierarchy и выберите Create → 3D Object → Sphere для создания ещё одного объекта-сферы. Назовите этот объект Looker. На этот раз нам не нужно добавлять к нему никаких других компонентов. Однако мы изменим размер объекта. Выбрав Looker, измените следующие переменные компонента Transform в окне Inspector.
- Scale Xна 9.
- Scale Y на 0.5.
- Scale Z на 9.
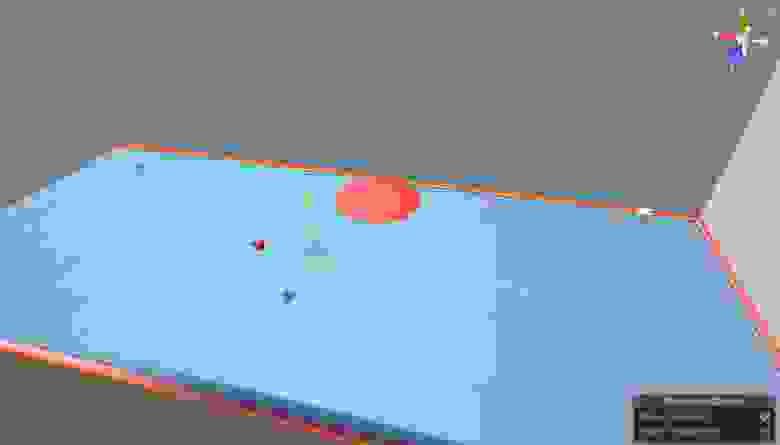
После этого разместите объект Looker так, чтобы он располагался в средней верхней части пола, как показано на рисунке 20.

Рисунок 20: размещение объекта Looker.
Настало подходящее время для того, чтобы придать Looker уникальный материал, чтобы было заметно, что его стоит избегать. В папке Materials окна Assets нажмите правой клавишей мыши и создайте новый материал. Назовите его Looker и задайте ему ярко-красный цвет. После этого назначьте этот материал в качестве материала объекта Looker, чтобы изменить его цвет. После этого сцена должна выглядеть следующим образом:

Рисунок 21: объект Looker с новым материалом.
Единственное, что нам осталось — создать навигационный меш для Guard, по которому он сможет перемещаться. В верхней части редактора Unity есть меню Window. Выберите Window → Navigation, чтобы открыть окно Navigation, показанное на рисунке 22.
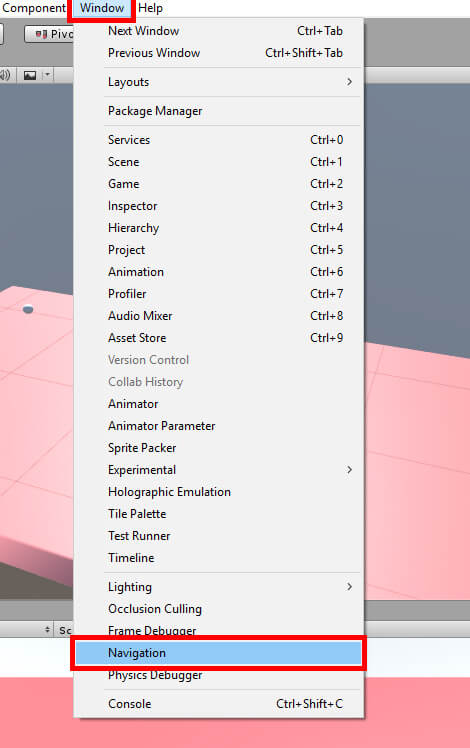
Рисунок 22: окно Navigation.
Выберите объект Floor в Hierarchy, а затем в окне Navigation поставьте флажок Navigation Static.
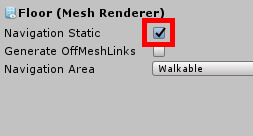
Рисунок 23: Navigation Static.
Далее выберем опцию Bake в верхней части окна.
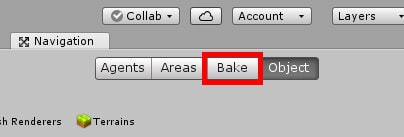
Рисунок 24: переключение на меню Bake.
Откроется меню Bake, в котором можно изменять свойства навигационного меша, который мы собираемся создать. В нашем примере ничего изменять не требуется. Достаточно нажать на кнопку Bake в правой нижней части.
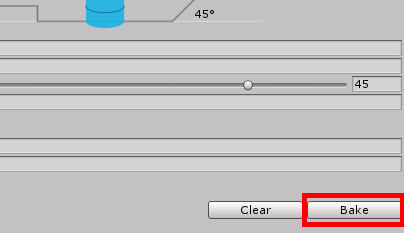
Рисунок 25: создание нового навигационного меша.
На этом этапе Unity попросит сохранить сцену. Сохраните её, после чего будет создан навигационный меш. Теперь сцена будет выглядеть так:

Рисунок 26: текущая сцена с добавленным навигационным мешем.
Теперь всё в Unity настроено, поэтому настало время для создания скриптов, необходимых для работы проекта. В окне Assets нажмите правой клавишей мыши и выберите Create → C# Script. Назовите этот скрипт Player. Повторите эту операцию ещё два раза, создав скрипты с названиями Guard и Looker.

Рисунок 27: создание нового скрипта.
После этого папка Scripts в окне Assets будет выглядеть так:

Рисунок 28: папка Scripts.
Первым мы начнём писать код скрипта Player. Дважды щёлкните по скрипту Player в окне Assets, чтобы открыть Visual Studio и приступить к созданию кода.
Код
Скрипт Player достаточно прост, всё что он делает — позволяет пользователю перемещать объект-мяч. Под объявлением класса нам нужно получить ссылку на компонент Rigidbody, который мы ранее создали в проекте.
private Rigidbody rb;Сразу после этого в функции Start мы прикажем Unity сделать текущий компонент Rigidbody объекта Player значением rb.
rb = GetComponent<Rigidbody>();После этого скрипт Player будет выглядеть так:
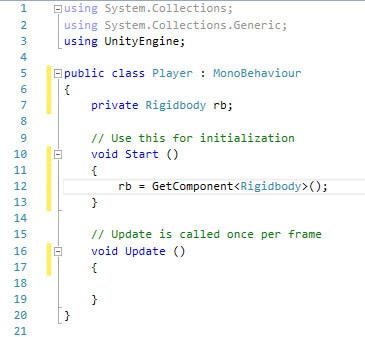
Рисунок 29: скрипт Player на текущий момент.
Теперь, когда значение rb присвоено, нам нужно позволить объекту Player двигаться при нажатии клавиш со стрелками. Для перемещения объекта мы будем использовать физику, применяя силу к объекту при нажатии пользователем клавиш со стрелками. Для этого достаточно добавить в функцию Update следующий код:
if (Input.GetKey(KeyCode.UpArrow))
            rb.AddForce(Vector3.forward * 20);
if (Input.GetKey(KeyCode.DownArrow))
            rb.AddForce(Vector3.back * 20);
if (Input.GetKey(KeyCode.LeftArrow))
            rb.AddForce(Vector3.left * 20);
if (Input.GetKey(KeyCode.RightArrow))
            rb.AddForce(Vector3.right * 20);
На этом мы завершили скрипт Player. Готовый скрипт будет выглядеть следующим образом:

Рисунок 30: готовый скрипт Player.
Сохраните свою работу и вернитесь в Unity. На этот раз выберите в окне Assets скрипт Guard. Чтобы заставить код для Guard работать, нужно добавить в верхнюю часть скрипта конструкцию using.
using UnityEngine.AI;Далее объявим следующие переменные сразу после объявления класса.
public GameObject player;
private NavMeshAgent navmesh;
В качестве значения переменной player объекта Guard используется объект Player. Она пригодится нам позже, когда мы прикажем объекту Guard преследовать игрока. Затем объявляется переменная navmesh для получения компонента NavMeshAgent объекта. Её мы используем позже, когда Guard начнёт преследовать игрока после того, как узнает о том, что игрок касается объекта Looker. В функции Start нам нужно задать в качестве значения переменной navmesh компонент NavMesh Agent объекта:
navmesh = GetComponent<NavMeshAgent>();Затем в функции Update мы добавим единственную строку кода:
navmesh.destination = player.transform.position;Эта строка задаёт точку назначения для объекта Guard. В нашем случае она будет брать текущую позицию объекта Player и перемещаться к этой точке. После срабатывания объект будет постоянно преследовать игрока. Вопрос в том, как выполняется процесс срабатывания? Он будет закодирован не в скрипте Guard, а в скрипте Looker. Прежде чем переходить к скрипту Looker, посмотрите на рисунок 31, чтобы сверить свой код скрипта Guard.
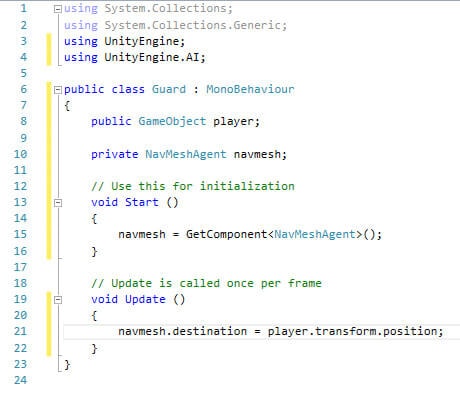
Рисунок 31: готовый скрипт Guard.
Внутри Looker нам снова нужно объявить следующие переменные:
public GameObject guard;
private float reset = 5;
private bool movingDown;
После этого закомментируем функцию Start, которая в этом скрипте нам не нужна. Перейдём к функции Update и добавим следующий код:
if (movingDown == false)
            transform.position -= new Vector3(0, 0, 0.1f);
        else
            transform.position += new Vector3(0, 0, 0.1f);
if (transform.position.z > 10)
            movingDown = false;
else if (transform.position.z < -10)
            movingDown = true;
reset -= Time.deltaTime;
if (reset < 0)
{
            guard.GetComponent<Guard>().enabled = false;
            GetComponent<SphereCollider>().enabled = true;
}
Именно здесь происходят основные действия проекта, поэтому давайте проанализируем код. Во-первых, в зависимости от значения булевой переменной movingDown, объект, к которому прикреплён этот скрипт, будет двигаться вверх или вниз. Как только он достигнет определённой точки, то изменит направление. Далее Looker снизит значение сброса на основании реального времени. Как только таймер станет меньше нуля, он возьмём скрипт Guard из объекта Guard и отключит его, после чего объект Guard начнёт перемещаться к последней известной до этого момента позиции игрока, а затем остановится. Looker также снова включает его коллайдер, чтобы весь процесс мог начаться заново. Теперь наш скрипт выглядит следующим образом:

Рисунок 32: скрипт Looker.
Кстати о коллайдерах: настало время создать код коллизии, сбрасывающий таймер Looker и включающий скрипт Guard. В функции Update создайте следующий код:
private void OnCollisionEnter(Collision collision)
{
        if (collision.gameObject.tag == "Player")
        {
            guard.GetComponent<Guard>().enabled = true;
            reset = 5;
            GetComponent<SphereCollider>().enabled = false;
        }
}
OnCollisionEnter Unity автоматически распознаёт как код коллизии, а поэтому выполняет его при возникновении коллизии с другим объектом. В нашем случае он сначала проверяет, имеет ли столкнувшийся объект тэг Player. Если нет, то он игнорирует остальную часть кода. В противном случае он включает скрипт Guard, задаёт таймеру reset значение 5 (то есть пять секунд), и отключает его коллайдер, чтобы игрок по-прежнему мог двигаться сквозь объект и случайно не застрял в объекте Looker. Функция показана на рисунке 33.

Рисунок 33: код коллизии для Looker.
На этом весь код проекта готов! Можно сделать ещё пару вещей, прежде чем закончить проект. Сохраните всю работу и вернитесь в Unity.
Завершение проекта
Для завершения проекта нам достаточно прикрепить скрипты к соответствующим объектам и задать несколько переменных. Во-первых, перейдите из окна Navigation в окно Inspector:

Рисунок 34: переход в окно Inspector.
После этого начнём с объекта Player. Выберите его в окне Hierarchy, а затем в нижней части окна Inspector нажмите на кнопку Add Component и добавьте скрипт Player. На этом объект Player завершён.

Рисунок 35: компонент скрипта Player.
Далее выберите объект Guard. Как и раньше, прикрепим скрипт Guard к объекту. На этот раз нам понадобится сообщить Guard, кто является игроком. Для этого перетащите объект Player из Hierarchy в поле Player компонента скрипта Guard, как показано на рисунке 36.

Рисунок 36: делаем объект Player значением поля Player.
Также нам нужно отключить скрипт Guard. В нашем проекте Guard будет преследовать игрока после включения его скрипта. Этот скрипт Guard должен включаться только после того, как игрок коснётся объекта Looker. Всё, что нужно сделать — снять флажок рядом с текстом Guard (Script) в компоненте:

Рисунок 37: отключение скрипта Guard.
Наконец, перейдём к объекту Looker и прикрепим к нему скрипт Looker. На этот раз объекту Looker потребуется объект Guard в качестве значения его переменной Guard. Так же, как мы назначали объект Player переменной Player скрипта Guard, мы сделаем то же самое с объектом Guard и скриптом Looker. Перетащите Guard из Hierarchy в поле Guard скрипта Looker. И на этом проект завершён! Нажмите на кнопку Play в верхней части редактора Unity, чтобы проверить свой проект.

Рисунок 38: тестирование проекта.
Попробуйте переместить объект Player в объект Looker (не забывайте, что перемещение выполняется стрелками!). Заметьте, что после этого объект Guard начнёт преследовать игрока. Он будет продолжать преследование примерно 5 секунд, после чего сдастся.
Рисунок 39: полностью готовый проект в действии.
Заключение
Этот ИИ очень прост, но его запросто можно расширить. Допустим, если мы представим, что объект Looker — это камера, а охранник смотрит через неё, чтобы найти вас, то будет логично дать объекту Guard собственную пару глаз. Игрок может проходить рядом с камерами, но они должны учитывать и глаза охранника. Также можно скомбинировать этот проект с концепцией поиска пути: дать охраннику путь, по которому он будет следовать, создав таким образом более интересную для игрока среду.
Подобный простой ИИ можно развить множеством разных способов. Возможно, вы не захотите делать ничего вышеизложенного и решите сделать что-то своё. Советую вам экспериментировать, возможно, у вас появится идея интересного проекта, который стоит довести до конца.
Всем привет. С сегодняшнего дня я решил начать написание цикла статей по работе с ИИ противника. В ходе данного цикла я хочу показать на простых примерах, как можно сделать ИИ в игре, который будет учитывать поле зрения противника, уровень издаваемого шума, умеет патрулировать местность, ставить приоритетные цели и обладать различными типами поведения.
В конце цикла статей наш ИИ будет уметь:
- Получать список целей по FOV;
- Искать путь до ближайшей цели, будь то враг или что-то другое;
- Обладать типом (враг, союзник, болванка);
- Обладать поведением (патруль, поиск цели, бой, следование, убегание);
- Учитывать уровень шума и освещенности;
- Работать с инверсной кинематикой (получать Impact конечностей, смотреть на врагов);
Для чего это нужно?
В сегодняшней статье я расскажу о простой реализации поля зрения противника. Дабы исключить архитектурные особенности — мы сделаем все на обычных монобехах.
Итак, начнем с того, что должно делать наше поле зрения:
- Находить цели, которые попадают в угол обзора;
- Ставить приоритет на ближайшую цель в области обзора;
- При выходе текущей цели из поля обзора — сохранять её до определенной дистанции;
- При полной потере цели — переключиться на другие;
Интерфейс Field of View
Начнем с того, что нам нужен некий интерфейс, который сможет просто обрабатывать наше поле зрения:
public interface IFOV
{
float Radius { get; }
float Angle { get; }
Transform CurrentTargetTransform { get; }
bool HasTargets();
List<Transform> GetAllTargets();
Transform GetNearestTarget();
void ForceRecalculate();
}
Рассмотрим, что содержит наш интерфейс:
- Параметры Radius, Angle — для того, чтобы получить возможность узнать информацию о FOV;
- Параметр CurrentTarget (в моем случае для простоты используется Transform, но лучше сделать интерфейс ITarget и работать с ним);
- Методы для проверки целей — HasTargets, GetAllTargets, GetNearestTarget и ForceRecalculate.
Почему здесь нет метода поиска целей, а сделан только ForceRecalculate? Мы делаем просчет внутри самого компонента FOV, а все его данные получаем через его методы обработки целей. ForceRecalculate нужен нам только тогда, когда к примеру текущая цель умерла и хочет оповестить наш объект об этом.
Базовая реализация FOV
Теперь приступим к самой реализации FOV. По своей сути он работает через оверлап коллайдера, однако вы можете использовать Raycast. Также у компонента FOV есть таймер пересчета целей и чем меньше он будет, тем больше будет нагрузки и тем выше точность поиска. Таймер полезен тогда, когда игрок непосредственно видит ИИ противника и для него выставляется наименьший таймер, а для противников в далеке — наибольший.
internal class FieldOfView : MonoBehaviour, IFOV
{
[Header(«Field of View Parameters»)]
[SerializeField] private float _viewRadius = 3f;
[SerializeField] [Range(0,360)] private float _viewAngle = 90f;
[SerializeField] private float _distanceToLostTarget = 2f;
[SerializeField] private double _updateTimer = 0.2;
[Header(«Layer Mask»)]
[SerializeField] private LayerMask _targetMask;
[SerializeField] private LayerMask _obstructionMask;
// Targets Data
private bool _hasTargets = false;
private bool _isLostTargets = false;
private Transform _currentTarget = null;
private List<Transform> _targetsList = new List<Transform>();
private IDisposable _searchTargets;
public GameEvent<Transform> OnMainTargetChanged = new GameEvent<Transform>();
public GameEvent OnTargetsFound = new GameEvent();
public GameEvent OnTargetsLost = new GameEvent();
// Public Fields
public float Radius => _viewRadius;
public float Angle => _viewAngle;
public Transform CurrentTargetTransform => _currentTarget;
private void Start()
{
_searchTargets = Observable.Interval(TimeSpan.FromSeconds(_updateTimer)).Subscribe(l =>
{
FieldOfViewCheck();
});
}
private void FieldOfViewCheck()
{
// Check Current FOV
if (!_hasTargets || _currentTarget==null)
{
_targetsList.Clear();
Collider[] rangeChecks = Physics.OverlapSphere(transform.position, _viewRadius, _targetMask);
if (rangeChecks.Length > 0)
{
for (int i = 0; i < rangeChecks.Length; i++)
{
bool isSeeTarget = false;
Transform target = rangeChecks[i].transform;
Vector3 directionToTarget = (target.position — transform.position).normalized;
if (Vector3.Angle(transform.forward, directionToTarget) < _viewAngle / 2)
{
float distanceToTarget = Vector3.Distance(transform.position, target.position);
if (!Physics.Raycast(transform.position, directionToTarget, distanceToTarget,
_obstructionMask))
{
isSeeTarget = true;
}
else
isSeeTarget = false;
}
else
isSeeTarget = false;
if (isSeeTarget)
{
_targetsList.Add(target);
}
}
}
}
// Get Nearest Target
if (!_hasTargets && _targetsList.Count > 0)
{
Transform nearestTarget = GetNearestTarget();
if (_currentTarget != nearestTarget && nearestTarget!=null)
{
_hasTargets = true;
_currentTarget = nearestTarget;
OnMainTargetChanged?.Invoke(_currentTarget);
OnTargetsFound?.Invoke();
}
}
// Check Distance to Current Targets
if (_hasTargets)
{
float distanceToTarget = Vector3.Distance(_currentTarget.position, transform.position);
if (distanceToTarget > _distanceToLostTarget)
{
_hasTargets = false;
_currentTarget = null;
return;
}
_isLostTargets = false;
}
if (!_hasTargets && _targetsList.Count < 1)
{
if (!_isLostTargets)
{
_isLostTargets = true;
OnTargetsLost?.Invoke();
}
}
}
public List<Transform> GetAllTargets()
{
return _targetsList;
}
public Transform GetNearestTarget()
{
Transform nearestTarget = null;
float nearestDistance = 0f;
if (_targetsList.Count < 1)
return null;
for (int i = 0; i < _targetsList.Count; i++)
{
float currentDistance = Vector3.Distance(transform.position, _targetsList[i].position);
if (i == 0)
{
nearestTarget = _targetsList[i];
nearestDistance = currentDistance;
continue;
}
if (currentDistance < nearestDistance)
{
nearestTarget = _targetsList[i];
nearestDistance = currentDistance;
}
}
return nearestTarget;
}
public bool HasTargets()
{
return _hasTargets;
}
public void ForceRecalculate()
{
FieldOfViewCheck();
}
}
Теперь разберем подробнее составляющие кода:
- В методе Start() мы запускаем наш счетчик проверки FieldOfView через интервал. В моем случае используется UniRx, но вы можете сделать реализацию таймера по-другому.
- Метод FieldOfViewCheck() запускает процесс проверки целей внутри поля зрения. Если изначально у нас нет никаких целей — мы проверяем есть ли кто-то по нужному слою в физике, затем смотрим ближайшую цель и добавляем её в список. Если же цель есть — мы смотрим дистанцию до неё вне зависимости от поля зрения и если главная цель слишком далеко — пересчитываем снова список целей.
- Дополнительные методы GetAllTargets, GetNearestTarget, HasTargets и ForceRecalculate служат вспомогательными. Они могут использоваться в нашем контроллере ИИ.
Теперь мы научили нашего противника определять ближайшую цель в поле зрения:
Так же важно, что если цель покинет поле зрения, то герой останется на ней сфокусирован, пока её дистанция не увеличиться больше допустимой, в этом случае он опять будет переключаться на ближайшую цель в поле зрения. Так же нужно учесть, что пока здесь не реализовано поведение, которое учитывает урон от ближайших целей (о чем мы поговорим в следующих частях цикла).
Итог
Проверка поля зрения позволяет нам убедиться, что наш ИИ вообще видит кого-то перед собой, цель не перекрывается и задать приоритет по целям исходя из дистанции. В дальнейшем, мы будем комбинировать FieldOfView с показателями шума, издаваемого целями, а также задавать поведение для нашего ИИ.
Следующая часть статьи будет включать в себя обработку целей в зависимости от паттерна поведения нашего ИИ, а также же учитывать инверсную кинематику для того, чтобы наш герой поворачивал голову и туловище к ближайшей цели.
Буду рад пообщаться на эту тему и послушать о ваших реализациях FOV.
Creating a Platformer in Unity is relatively easy, but making it with AI support, may not be as straightforward.
In this post, I will be showing how to create a 2D platformer game with an enemy AI.
Generally in 2D platformers, the player can only walk front/back, jump, and in some cases climb up/down the ladder, if the map is multileveled. Knowing that we could use a modular approach where the same controller is shared between the player and the AI.
Step 1: Create the Scripts
Let’s begin by creating all the necessary scripts. Check the source code below:
Ladder2D.cs
//Copyright @2018 sharpcoderblog.com
//You are free to use this script in free or commercial projects
//Selling the source code of this script is not allowed

using UnityEngine;

public class Ladder2D : MonoBehaviour
{
    Collider2D ladderCollider;
    [HideInInspector]
    public Vector3 boundsCenter;

    void Start()
    {
        //t = transform;
        ladderCollider = GetComponent<Collider2D>();
        if (ladderCollider)
        {
            ladderCollider.isTrigger = true;
            ladderCollider.gameObject.layer = 2; //Set ladder collider layer to IgnoreRaycast
        }
    }

    void OnTriggerEnter2D(Collider2D other)
    {
        if (other.CompareTag("Player"))
        {
            if (ladderCollider)
            {
                boundsCenter = ladderCollider.bounds.center;
            }
            other.SendMessage("AssignLadder", this, SendMessageOptions.DontRequireReceiver);
        }
    }

    void OnTriggerExit2D(Collider2D other)
    {
        if (other.CompareTag("Player"))
        {
            other.SendMessage("RemoveLadder", this, SendMessageOptions.DontRequireReceiver);
        }
    }
}
PlayerController2D.cs
//Copyright @2018 sharpcoderblog.com
//You are free to use this script in free or commercial projects
//Selling the source code of this script is not allowed

using System.Collections.Generic;
using UnityEngine;

public class PlayerController2D : MonoBehaviour
{
    //Move player in 2D space
    public float maxSpeed = 2.57f;
    public float jumpHeight = 6.47f;
    public float playerHP = 100;

    [HideInInspector]
    public bool facingRight = true;
    [HideInInspector]
    public float moveDirection = 0;
    [HideInInspector]
    public Rigidbody2D r2d;
    [HideInInspector]
    public Collider2D mainCollider;
    [HideInInspector]
    public Vector2 playerDimensions;
    [HideInInspector]
    public bool isGrounded = false;
    //Check every collider except Player and Ignore Raycast
    LayerMask layerMask = ~(1 << 2 | 1 << 8); //Make sure our player has Layer 8

    [HideInInspector]
    public Ladder2D currentLadder;
    List<Ladder2D> allLadders = new List<Ladder2D>();
    float moveDirectionY = 0;
    float distanceFromLadder;
    [HideInInspector]
    public bool isAttachedToLadder = false;
    bool ladderGoingDown = false;
    //bool isMovingOnLadder = false;
    [HideInInspector]
    public bool canGoDownOnLadder = false;
    [HideInInspector]
    public bool canClimbLadder = false;

    //Bot movement directions
    [HideInInspector]
    public bool isBot = false;
    [HideInInspector]
    public float botMovement = 0;
    [HideInInspector]
    public float botVerticalMovement = 0;
    [HideInInspector]
    public bool botJump = false;
    [HideInInspector]
    public Transform t;
    [HideInInspector]
    public int selectedWeaponTmp = 0;

    float gravityScale;

    // Use this for initialization
    void Start()
    {
        r2d = GetComponent<Rigidbody2D>();
        r2d.freezeRotation = true;
        mainCollider = GetComponent<Collider2D>();
        t = transform;

        gravityScale = r2d.gravityScale;
        selectedWeaponTmp = -100;

        facingRight = t.localScale.x > 0;

        //sr = GetComponent<SpriteRenderer>();
        playerDimensions = BotController2D.ColliderDimensions(GetComponent<Collider2D>());
    }

    void OnDisable()
    {
        r2d.bodyType = RigidbodyType2D.Static;
        r2d.velocity = Vector3.zero;
    }

    // Update is called once per frame
    void Update()
    {
        if (!isBot)
        {
            if ((Input.GetKey(KeyCode.A) || Input.GetKey(KeyCode.D)) &&
                (isGrounded || r2d.velocity.x > 0.01f || isAttachedToLadder))
            {
                moveDirection = Input.GetKey(KeyCode.A) ? -1 : 1;
            }
            else
            {
                if (isGrounded || r2d.velocity.magnitude < 0.01f)
                    moveDirection = 0;
            }
        }
        else
        {
            if (botMovement != 0 && (isGrounded || r2d.velocity.x > 0.01f))
            {
                moveDirection = botMovement < 0 ? -1 : 1;
            }
            else
            {
                if (isGrounded || r2d.velocity.magnitude < 0.01f)
                    moveDirection = 0;
            }
        }

        //Change facing position
        if (moveDirection != 0)
        {
            if (moveDirection > 0 && !facingRight)
            {
                facingRight = true;
            }
            if (moveDirection < 0 && facingRight)
            {
                facingRight = false;
            }
        }

        if (facingRight)
        {
            if (t.localScale.x < 0)
            {
                t.localScale = new Vector3(Mathf.Abs(t.localScale.x), t.localScale.y, transform.localScale.z);
            }
        }
        else
        {
            if (t.localScale.x > 0)
            {
                t.localScale = new Vector3(-Mathf.Abs(t.localScale.x), t.localScale.y, t.localScale.z);
            }
        }

        //Vector2 velocityTmp = r2d.velocity;
        bool canGoDownTmp = false;

        // LADDER CONTROL START
        if (currentLadder)
        {
            distanceFromLadder = Mathf.Abs(currentLadder.boundsCenter.x - t.position.x);
            canClimbLadder = distanceFromLadder < 0.34f;
            if (!isAttachedToLadder)
            {
                if (canClimbLadder)
                {
                    if (currentLadder.boundsCenter.y > t.position.y)
                    {
                        if (!isBot)
                        {
                            if (Input.GetKey(KeyCode.W))
                            {
                                isAttachedToLadder = true;
                            }
                        }
                        else
                        {
                            if (botVerticalMovement > 0)
                            {
                                isAttachedToLadder = true;
                            }
                        }
                    }
                    if (currentLadder.boundsCenter.y < t.position.y)
                    {
                        if (!isBot)
                        {
                            if (Input.GetKey(KeyCode.S))
                            {
                                isAttachedToLadder = true;
                            }
                        }
                        else
                        {
                            if (botVerticalMovement < 0)
                            {
                                isAttachedToLadder = true;
                            }
                        }

                        canGoDownTmp = true;
                    }
                }

                if (isAttachedToLadder)
                {
                    r2d.gravityScale = 0;
                    moveDirection = 0;
                    moveDirectionY = 0;
                }
            }
            else
            {
                //Make our collider trigger if we stand on top of the ladder (To prevent collision with the ground while going down)
                mainCollider.isTrigger = currentLadder.boundsCenter.y < t.position.y;

                //Ladder movement
                if ((!isBot && Input.GetKey(KeyCode.W)) || (isBot && botVerticalMovement > 0))
                {
                    moveDirectionY = 3.97f;
                    ladderGoingDown = false;
                    //For sound controller
                    //isMovingOnLadder = true;
                }
                else if ((!isBot && Input.GetKey(KeyCode.S)) || (isBot && botVerticalMovement < 0))
                {
                    moveDirectionY = -3.97f;
                    ladderGoingDown = true;
                    if (!mainCollider.isTrigger && isGrounded)
                    {
                        //RemoveLadder(currentLadder);
                        isAttachedToLadder = false;
                        mainCollider.isTrigger = false;
                        r2d.gravityScale = gravityScale;
                        moveDirectionY = 0;
                    }
                    //For sound controller
                    //isMovingOnLadder = true;
                }
                else
                {
                    //isMovingOnLadder = false;
                    moveDirectionY = 0;
                }
            }

            if (distanceFromLadder > playerDimensions.x * 2)
            {
                RemoveLadder(currentLadder);
            }
        }
        canGoDownOnLadder = canGoDownTmp;
        // LADDER CONTROL END

        if (!isBot)
        {
            //Jumping
            if (Input.GetKeyDown(KeyCode.W))
            {
                Jump();
            }
        }
        else
        {
            if (botJump)
            {
                botJump = false;
                Jump();
            }
        }

        if (!isBot)
        {
            //Weapon firing
            if (Input.GetKeyDown(KeyCode.LeftControl))
            {
                Attack();
            }
        }
    }

    void FixedUpdate()
    {
        Bounds colliderBounds = mainCollider.bounds;
        Vector3 groundCheckPos = colliderBounds.min + new Vector3(colliderBounds.size.x * 0.5f, 0.1f, 0);
        //Check if player is grounded
        isGrounded = Physics2D.OverlapCircle(groundCheckPos, 0.25f, layerMask);

        Debug.DrawLine(groundCheckPos, groundCheckPos - new Vector3(0, 0.25f, 0), isGrounded ? Color.green : Color.red);

        //Apply player velocity
        r2d.velocity = new Vector2((moveDirection) * maxSpeed, isAttachedToLadder ? moveDirectionY : r2d.velocity.y);
    }

    void AssignLadder(Ladder2D ladderTmp)
    {
        currentLadder = ladderTmp;
        allLadders.Add(ladderTmp);
    }

    void RemoveLadder(Ladder2D ladderTmp)
    {
        //print("On trigger out");
        allLadders.Remove(ladderTmp);
        if (currentLadder == ladderTmp)
        {
            currentLadder = null;

            if (allLadders.Count > 0)
            {
                currentLadder = allLadders[allLadders.Count - 1];
            }
        }

        if (isAttachedToLadder && !currentLadder)
        {
            isAttachedToLadder = false;
            //r2d.bodyType = RigidbodyType2D.Dynamic;
            mainCollider.isTrigger = false;

            r2d.gravityScale = gravityScale;
            r2d.velocity = Vector3.zero;

            if (!ladderGoingDown)
            {
                r2d.velocity = new Vector2(r2d.velocity.x, 1.47f);
            }
            ladderGoingDown = false;
        }
    }

    public void Jump()
    {
        if (isGrounded && !isAttachedToLadder)
        {
            r2d.velocity = new Vector2(r2d.velocity.x, jumpHeight);
            //Tip: Play jump sound here
        }
    }

    public void Attack()
    {
        print(gameObject.name + " is Attacking");

        //Tip: Write your attack function here (ex. Raycast toward the enemy to inflict the damage)
    }
}
CameraFollow2D.cs
//Copyright @2018 sharpcoderblog.com
//You are free to use this script in free or commercial projects
//Selling the source code of this script is not allowed

using UnityEngine;

public class CameraFollow2D : MonoBehaviour
{
    public Transform target;
    public Vector3 offset = new Vector3(0, 2.8f, 0);
    public bool smoothFollow = true;

    Vector2 moveToPos;
    bool beginMove = false;
    float distanceTmp = 0f;

    // Update is called once per frame
    void LateUpdate()
    {
        if (!target)
            return;

        if (smoothFollow)
        {
            distanceTmp = ((target.position + offset) - transform.position).sqrMagnitude;
            if (beginMove)
            {
                moveToPos = Vector3.Lerp(moveToPos, target.position + offset, Time.fixedDeltaTime * 7.75f);
                transform.position = new Vector3(moveToPos.x, moveToPos.y, -10);

                if (distanceTmp < 0.05f * 0.05f)
                {
                    beginMove = false;
                }
            }
            else
            {
                if (distanceTmp > 0.5f * 0.5f)
                {
                    beginMove = true;
                }
            }
        }
        else
        {
            transform.position = new Vector3(target.position.x, target.position.y, -10);
        }

    }

    void StopFollowing()
    {
        beginMove = false;
    }
}
BotController2D.cs
//Copyright @2018 sharpcoderblog.com
//You are free to use this script in free or commercial projects
//Selling the source code of this script is not allowed
using System.Collections;
using UnityEngine;
public class BotController2D : MonoBehaviour
{
//This script will handle bot control
public enum BotType { Enemy, Friendly }
public BotType botType = BotType.Enemy;
public enum BotDifficulty { Easy, Medium, Hard }
public BotDifficulty botDifficulty = BotDifficulty.Medium;
public enum InitialState { Idle, Explore }
public InitialState initialState = InitialState.Idle; //Should the Bot stand in place until approached or begin exploring the level right away
public bool canJump = true; //Can this bot jump?
public enum CurrentState { Idle, MovingLeft, MovingRight, GoinUPLadder, GoingDownLadder, Attack }
CurrentState currentState;
InitialState appliedState;
PlayerController2D pc2d;
RaycastHit2D hitLeft;
RaycastHit2D hitRight;
RaycastHit2D groundHit;
Vector3 leftOrigin;
Vector3 rightOrigin;
float distanceLeft = -1;
float distanceRight = -1;
int encounteredLadders = 0;
int encounteredLaddersCacche = 0;
Ladder2D previousLadder;
Ladder2D lastAttachedLadder;
bool previousCanGoDownOnLadder = false;
bool previousCanClimbLadder = false;
//Everything except "Player" and "IgnoreRaycast" layers
LayerMask layerMask = ~(1 << 2 | 1 << 8);
//Only "Player" layer
LayerMask playerLayerMask = 1 << 8;
float timeMotionless = 0.0f;
bool statePause = false;
float trVelocity;
Vector3 previousPos;
Collider2D[] detectedPlayers = new Collider2D[0];
Collider2D[] previousDetectedPlayers = new Collider2D[0];
PlayerController2D enemyToFollow;
int followPriority = 0; //0 = Easy, 1 = Medium (This player inflicted the damage)
[HideInInspector]
public Transform t;
bool checkingTotalEnemies = false;
bool runAway = false;
int attackingFromLeft = 0;
int attackingFromRight = 0;
//Limit attack rate for easy bots
float attackTimer = 0;
float nextAttackTime = 0;
Camera mainCamera;
float cameraWidth; //Horizontal size of camera view
// Use this for initialization
void Start()
{
pc2d = GetComponent<PlayerController2D>();
pc2d.isBot = true;
t = transform;
appliedState = initialState;
if (Random.Range(-10, 10) > 0)
{
StartCoroutine(StatePause(CurrentState.Idle, true));
}
}
// Update is called once per frame
void FixedUpdate()
{
//Draw rays back and forth
if (!mainCamera)
{
mainCamera = Camera.main;
cameraWidth = mainCamera.aspect * mainCamera.orthographicSize;
}
rightOrigin = t.position + t.right * (pc2d.playerDimensions.x / 2f);
hitRight = Physics2D.Raycast(rightOrigin, t.right, cameraWidth, layerMask);
if (hitRight)
{
Debug.DrawLine(rightOrigin, hitRight.point, Color.red);
distanceRight = hitRight.distance;
}
else
{
Debug.DrawLine(rightOrigin, rightOrigin + t.right * cameraWidth, Color.cyan);
distanceRight = -1;
}
leftOrigin = t.position - t.right * (pc2d.playerDimensions.x / 2f);
hitLeft = Physics2D.Raycast(leftOrigin, -t.right, cameraWidth, layerMask);
if (hitLeft)
{
Debug.DrawLine(leftOrigin, hitLeft.point, Color.red);
distanceLeft = hitLeft.distance;
}
else
{
Debug.DrawLine(leftOrigin, leftOrigin - t.right * cameraWidth, Color.cyan);
distanceLeft = -1;
}
if (appliedState == InitialState.Explore)
{
if (currentState == CurrentState.Idle)
{
if (!statePause)
{
//Decide which direction to move
if (distanceRight == -1 && distanceLeft == -1)
{
//Decide random direaction
currentState = Random.Range(-10, 10) > 0 ? CurrentState.MovingRight : CurrentState.MovingLeft;
}
else if (distanceRight == -1 && distanceLeft >= 0)
{
currentState = CurrentState.MovingRight;
}
else if (distanceRight >= 0 && distanceLeft == -1)
{
currentState = CurrentState.MovingLeft;
}
else if (distanceRight > distanceLeft)
{
currentState = CurrentState.MovingRight;
}
else if (distanceRight < distanceLeft)
{
currentState = CurrentState.MovingLeft;
}
}
}
else if (currentState == CurrentState.MovingLeft)
{
if (!statePause && pc2d.isGrounded)
{
pc2d.botMovement = -1;
float jumpHeightTmp = pc2d.jumpHeight * 0.25f;
if (distanceLeft > 0 && distanceLeft < pc2d.playerDimensions.x)
{
if (hitLeft && canJump &&
!Physics2D.Linecast(t.position + t.up * jumpHeightTmp, (t.position + t.up * jumpHeightTmp) - t.right * pc2d.playerDimensions.x * 2, layerMask) &&
Random.Range(-2, 10) > 0
)
{
StartCoroutine(DoJump());
}
else
{
if (!enemyToFollow)
{
StartCoroutine(StatePause(CurrentState.Idle, true));
}
}
}
/*if(!Physics2D.Linecast(t.position + t.up * jumpHeightTmp, (t.position + t.up * jumpHeightTmp) - t.right * pc2d.playerDimensions.x * 2)){
Debug.DrawLine(t.position + t.up * jumpHeightTmp, (t.position + t.up * jumpHeightTmp) - t.right * pc2d.playerDimensions.x * 2, Color.yellow);
}
else
{
Debug.DrawLine(t.position + t.up * jumpHeightTmp, (t.position + t.up * jumpHeightTmp) - t.right * pc2d.playerDimensions.x * 2, Color.red);
}*/
//Jump if there is no groun in front
groundHit = Physics2D.Raycast(leftOrigin, -t.up, pc2d.playerDimensions.y * 2.1f, layerMask);
if (groundHit)
{
Debug.DrawLine(leftOrigin, groundHit.point, Color.red);
}
else
{
Debug.DrawLine(leftOrigin, leftOrigin - t.up * (pc2d.playerDimensions.y * 2.1f), Color.blue);
if (canJump)
{
StartCoroutine(DoJump());
}
else
{
//StartCoroutine(StatePause(CurrentState.MovingRight, true));
StartCoroutine(CheckEnemiesEnumerator(1, 0, false));
}
}
}
}
else if (currentState == CurrentState.MovingRight)
{
if (!statePause && pc2d.isGrounded)
{
pc2d.botMovement = 1;
float jumpHeightTmp = pc2d.jumpHeight * 0.25f;
if (distanceRight > 0 && distanceRight < pc2d.playerDimensions.x)
{
if (hitRight && canJump &&
!Physics2D.Linecast(t.position + t.up * jumpHeightTmp, (t.position + t.up * jumpHeightTmp) + t.right * pc2d.playerDimensions.x * 2, layerMask) &&
Random.Range(-2, 10) > 0
)
{
StartCoroutine(DoJump());
}
else
{
if (!enemyToFollow)
{
StartCoroutine(StatePause(CurrentState.Idle, true));
}
}
}
/*if (!Physics2D.Linecast(t.position + t.up * jumpHeightTmp, (t.position + t.up * jumpHeightTmp) + t.right * pc2d.playerDimensions.x * 2))
{
Debug.DrawLine(t.position + t.up * jumpHeightTmp, (t.position + t.up * jumpHeightTmp) + t.right * pc2d.playerDimensions.x * 2, Color.yellow);
}
else
{
Debug.DrawLine(t.position + t.up * jumpHeightTmp, (t.position + t.up * jumpHeightTmp) + t.right * pc2d.playerDimensions.x * 2, Color.red);
}*/
//Jump if there is no groun in front
groundHit = Physics2D.Raycast(rightOrigin, -t.up, pc2d.playerDimensions.y * 2.1f, layerMask);
if (groundHit)
{
Debug.DrawLine(rightOrigin, groundHit.point, Color.red);
}
else
{
Debug.DrawLine(rightOrigin, rightOrigin - t.up * (pc2d.playerDimensions.y * 2.1f), Color.blue);
if (canJump)
{
StartCoroutine(DoJump());
}
else
{
//StartCoroutine(StatePause(CurrentState.MovingLeft, true));
StartCoroutine(CheckEnemiesEnumerator(0, 1, false));
}
}
}
}
else if (currentState == CurrentState.GoinUPLadder)
{
if (!statePause)
{
pc2d.botVerticalMovement = 1;
if (!pc2d.currentLadder)
{
StartCoroutine(StatePause(CurrentState.Idle, true));
}
}
}
else if (currentState == CurrentState.GoingDownLadder)
{
if (!statePause)
{
pc2d.botVerticalMovement = -1;
if (!pc2d.currentLadder)
{
StartCoroutine(StatePause(CurrentState.Idle, true));
}
}
}
else if (currentState == CurrentState.Attack)
{
if (!statePause)
{
if (!enemyToFollow)
{
StartCoroutine(StatePause(CurrentState.Idle, true));
}
else
{
//Firing weapon
if (attackTimer >= nextAttackTime)
{
//Check if player is above us and jump
if (enemyToFollow.t.position.y > t.position.y && enemyToFollow.t.position.y - t.position.y > pc2d.playerDimensions.y * 0.95f)
{
if (Random.Range(-5, 10) > 0)
{
StartCoroutine(DoJump());
}
}
//
pc2d.Attack();
if (botDifficulty == BotDifficulty.Easy)
{
attackTimer = 0;
nextAttackTime = Random.Range(0.25f, 0.95f);
}
if (botDifficulty == BotDifficulty.Medium)
{
attackTimer = 0;
nextAttackTime = Random.Range(0.01f, 0.37f);
}
if (botDifficulty == BotDifficulty.Hard)
{
attackTimer = 0;
nextAttackTime = Random.Range(0.01f, 0.24f);
}
}
else
{
attackTimer += Time.deltaTime;
}
if (enemyToFollow && !checkingTotalEnemies)
{
if (enemyToFollow.t.position.x > t.position.x && !pc2d.facingRight)
{
pc2d.facingRight = true;
}
if (enemyToFollow.t.position.x < t.position.x && pc2d.facingRight)
{
pc2d.facingRight = false;
}
attackingFromLeft = 0;
attackingFromRight = 0;
//Check if there too many player attacking us and run away
for (int i = 0; i < detectedPlayers.Length; i++)
{
if (detectedPlayers[i])
{
BotController2D bcTmp = detectedPlayers[i].GetComponent<BotController2D>();
if (bcTmp && bcTmp.botType != botType && bcTmp.enemyToFollow == pc2d && bcTmp.currentState == CurrentState.Attack)
{
if (bcTmp.t.position.x > t.position.x)
{
attackingFromRight++;
}
else
{
attackingFromLeft++;
}
}
}
}
//If the value playerHP from PlayerController2D get too low, and the bot is being attacked, increase the probability to run away
if (attackingFromRight >= 2 || attackingFromLeft >= 2 || (pc2d.playerHP < 70 && botDifficulty == BotDifficulty.Hard && (attackingFromRight > 0 || attackingFromLeft > 0)) || (pc2d.playerHP < 40 && botDifficulty == BotDifficulty.Medium && (attackingFromRight > 0 || attackingFromLeft > 0)))
{
StartCoroutine(CheckEnemiesEnumerator(attackingFromLeft, attackingFromRight, false));
}
}
}
}
}
}
if (pc2d.currentLadder && (previousLadder != pc2d.currentLadder || previousCanGoDownOnLadder != pc2d.canGoDownOnLadder || previousCanClimbLadder != pc2d.canClimbLadder))
{
previousLadder = pc2d.currentLadder;
previousCanGoDownOnLadder = pc2d.canGoDownOnLadder;
previousCanClimbLadder = pc2d.canClimbLadder;
if (!pc2d.isAttachedToLadder)
{
if (pc2d.canClimbLadder)
{
encounteredLadders++;
if ((lastAttachedLadder != pc2d.currentLadder || encounteredLadders > 1) && !statePause)
{
if (Random.Range(-10, 10) > 0)
{
if (pc2d.canGoDownOnLadder)
{
StartCoroutine(StatePause(CurrentState.GoingDownLadder, true));
}
else
{
StartCoroutine(StatePause(CurrentState.GoinUPLadder, true));
}
}
}
}
}
else
{
encounteredLadders = 0;
lastAttachedLadder = pc2d.currentLadder;
}
}
trVelocity = ((t.position - previousPos).magnitude) / Time.deltaTime;
previousPos = t.position;
if (trVelocity < 0.01f && !statePause)
{
timeMotionless += Time.deltaTime;
if (timeMotionless > 0.5f)
{
StartCoroutine(StatePause(CurrentState.Idle, true));
}
}
else
{
timeMotionless = 0;
}
//Detect and attack enemy players
detectedPlayers = Physics2D.OverlapCircleAll(t.position, cameraWidth, playerLayerMask);
if (!enemyToFollow)
{
if (!runAway)
{
if (previousDetectedPlayers.Length != detectedPlayers.Length || (previousDetectedPlayers.Length > 0 && detectedPlayers.Length > 0 && previousDetectedPlayers[0] != detectedPlayers[0]))
{
previousDetectedPlayers = detectedPlayers;
for (int i = 0; i < detectedPlayers.Length; i++)
{
BotController2D bcTmp = detectedPlayers[i].GetComponent<BotController2D>();
PlayerController2D pc2dTmp = null;
if (!bcTmp)
{
pc2dTmp = detectedPlayers[i].GetComponent<PlayerController2D>();
}
if ((pc2dTmp && botType == BotType.Enemy) || (bcTmp && bcTmp.botType != botType))
{
Vector3 enemyPos = bcTmp ? bcTmp.t.position : pc2dTmp.t.position;
float yDistance = Mathf.Abs(enemyPos.y - t.position.y);
if (yDistance < pc2d.playerDimensions.y * 2)
{
if (!enemyToFollow || Mathf.Abs(enemyPos.x - t.position.x) < Mathf.Abs(enemyToFollow.t.position.x - t.position.x))
{
enemyToFollow = bcTmp ? bcTmp.pc2d : pc2dTmp;
appliedState = InitialState.Explore;
}
}
}
}
}
}
}
else
{
float yDistance = enemyToFollow.t.position.y - t.position.y;
float xDistance = enemyToFollow.t.position.x - t.position.x;
if (Mathf.Abs(yDistance) >= pc2d.playerDimensions.y * 2 || Mathf.Abs(xDistance) > cameraWidth || !enemyToFollow.enabled)
{
enemyToFollow = null;
}
else
{
if (Mathf.Abs(xDistance) > pc2d.playerDimensions.x * 1.45f)
{
if (!statePause && pc2d.botVerticalMovement == 0)
{
if (xDistance > 0)
{
if (currentState != CurrentState.MovingRight)
{
statePauseCoroutine = StartCoroutine(StatePause(CurrentState.MovingRight, false));
}
}
else if (xDistance < 0)
{
if (currentState != CurrentState.MovingLeft)
{
statePauseCoroutine = StartCoroutine(StatePause(CurrentState.MovingLeft, false));
}
}
}
else
{
StopPauseCoroutine();
}
}
else
{
if (pc2d.botVerticalMovement == 0)
{
if (currentState != CurrentState.Attack)
{
if (!statePause)
{
statePauseCoroutine = StartCoroutine(StatePause(CurrentState.Attack, true));
}
}
else
{
if (Mathf.Abs(xDistance) < pc2d.playerDimensions.x / 3 && !checkingTotalEnemies)
{
//print("Enemies are too close!!!");
StartCoroutine(CheckEnemiesEnumerator(attackingFromLeft, attackingFromRight, true));
}
}
}
}
}
}
}
Coroutine statePauseCoroutine = null;
void StopPauseCoroutine()
{
if (statePauseCoroutine != null)
{
StopCoroutine(statePauseCoroutine);
statePauseCoroutine = null;
statePause = false;
}
}
IEnumerator StatePause(CurrentState newState, bool stopMovement)
{
//print("State pause");
statePause = true;
if (stopMovement)
{
pc2d.botMovement = 0;
pc2d.botVerticalMovement = 0;
}
currentState = newState;
if (newState == CurrentState.Attack && botDifficulty == BotDifficulty.Hard)
{
yield return new WaitForSeconds(Random.Range(0.15f, 0.45f));
}
else
{
yield return new WaitForSeconds(Random.Range(0.45f, 0.75f));
}
statePause = false;
}
IEnumerator DoJump()
{
//print("Do jump");
statePause = true;
pc2d.botJump = true;
yield return new WaitForSeconds(0.65f);
statePause = false;
}
IEnumerator CheckEnemiesEnumerator(int attackingFromLeft, int attackingFromRight, bool doNotRunAway)
{
checkingTotalEnemies = true;
//print("CHECKING FOR TOTAL ENEMIES");
yield return new WaitForSeconds(Random.Range(0.27f, 0.75f));
if (Random.Range(-10, 10) > 0)
{
runAway = true;
enemyToFollow = null;
if (attackingFromLeft > attackingFromRight)
{
currentState = CurrentState.MovingRight;
}
else
{
currentState = CurrentState.MovingLeft;
}
}
checkingTotalEnemies = false;
if (runAway)
{
if (doNotRunAway)
{
//Simply walk away a bit
yield return new WaitForSeconds(Random.Range(0.37f, 0.75f));
}
else
{
//Run away
yield return new WaitForSeconds(Random.Range(1.57f, 2.45f));
}
runAway = false;
}
}
public static Vector2 ColliderDimensions(Collider2D sp)
{
return new Vector2(sp.bounds.max.x - sp.bounds.min.x, sp.bounds.max.y - sp.bounds.min.y);
}
}
Step 2: Set up the Player and the Enemies
Now it’s time to set up our player and the enemy AI using the scripts above.
Setting up our Player instance
- Create a new GameObject and name it «Player»
- Change the Tag of that object to «Player»
- Change the object’s layer to 8 (if there is no Layer 8 in the selection, add one by clicking Add Layer…, name it «Player»)
- Create another GameObject, call it «Body» and add a SpriteRenderer component
- Assign your player Sprite to a «Body» and move it inside «Player» object
- Select «Player» object and add CapsuleCollider2D, Rigidbody2D and PlayerController2D components
- Scale the CapsuleCollider2D until it fits the player Sprite

![]()

As you can see PlayerController2D has a couple of variables, most of them are self-explanatory, however, one of them need a bit of explanation:
PlayerHP — this value is used in BotController2D to decide whether the AI should run away when its HP is too low.
Use the PlayerHP variable when implementing the attack function (Check void Attack() at the end of the PlayerController2D.cs script).
Setting up player Camera
- Select the Main Camera and add the CameraFollow2D component
- Assign the Player into a Target variable
- Optionally you can tweak the Offset variable (If you don’t want the camera to be centered exactly in the middle)

Setting up a ladder
PlayerController2D also supports climbable Ladders.
Setting up a new ladder is really easy:
- Create a new GameObject and call it «Ladder»
- Change its layer to «IgnoreRaycast»
- Create another game object with a SpriteRenderer and assign a sprite of your ladder and move it inside the Ladder object
- Add a BoxCollider2D and Ladder2D components to a «Ladder» object
- Scale the collider dimensions to match the ladder Sprite and mark it as Trigger


Setting up the enemy AI
- First, go to the Physics2D panel and disable a collision between the Player layer, so the bots and players are not stuck between each other.


- Duplicate the Player instance
- Add a BotController2D component
- The bot is now ready

Check the video below to see the enemy AI in action (White instance is our player, Red instances are controlled by the AI):

Простой искусственный интеллект.
Продолжаем создавать простой искусственный интеллект в бесплатном игровом движке Unity5. В прошлых частях мы разобрались с анимацией нашей крысы, теперь создадим скрипт, который будет вызывать определенную анимацию в зависимости от внешних факторов, например если дистанция от крысы до персонажа больше заданной, то крыса будет стоять на месте и будет проигрываться анимация бездействия, если дистанция меньше заданной, то крыса будет направляться в сторону персонажа.
Давайте приступим. Откроем предыдущий проект и добавим новый скрипт (RatII) и напишем такой код:
using System.Collections;
using System.Collections.Generic;
using UnityEngine;
using System;
public class RatII : MonoBehaviour {
[Serializable]
public class Animation_Rat //подключаем наши анимации
{
[SerializeField]
private AnimationClip _idle;
[SerializeField]
private AnimationClip _walk;
[SerializeField]
private AnimationClip _run;
[SerializeField]
private AnimationClip _death;
[SerializeField]
private AnimationClip[] _attack;
}
[SerializeField] //подключаем наши параметры, которые создавали в Animatore
private float _horiz;
Видео: Как сделать игру на Андроид Unity 5 | Урок #3 - Главное меню. Часть 1Скачать

Видео: Создание простой 3D игры в Unity | #3 - Движение игрокаСкачать
[SerializeField]
private float _vert;
[SerializeField]
private float _attack;
[SerializeField]
private bool _stun;
[SerializeField]
public bool _death;
private GameObject player;// наш персонаж
public int rotationSpeed; //переменная скорости поворота
public Transform target; // на этот объект будет реагировать наша крыса
private Transform myTransform; // координаты крысы
private Animator AnimRat = new Animator();
Видео: 🌐 Онлайн игра: полный туториал, часть 3 [Unity 3D] [Photon] - события и перемещение персонажейСкачать
Видео: Unity C# Урок 3 Unity 5 Unity3DСкачать
private void SetValue()
{
this.AnimRat.SetFloat("VertMov", this._vert);
this.AnimRat.SetFloat("HorizMov", this._horiz);
this.AnimRat.SetFloat("attack", this._attack);
this.AnimRat.SetBool("Idle", this._stun);
this.AnimRat.SetBool("death", this._death);
}
private void Awake()
{
this.myTransform = base.transform; //определяем текущее положение крысы
this.player = GameObject.FindGameObjectWithTag("Player"); // определяем объект на который будет реагировать крысы
this.target = player.transform;
}
void Start () {
this.AnimRat = base.GetComponent();
}
private void FixedUpdate()
{
this.SetValue();
if (this.player != null)
{
float num = Vector3.Distance(base.transform.position, this.player.transform.position); // если дистанция до персонажа будет меньше 8, то крыса будет двигаться в сторону персонажа
if (num < 8f && num > 1.2f)
{
this._attack = 0f;
this._vert = 2f;
this.rotationSpeed = 2;
this.myTransform.rotation = Quaternion.Slerp(this.myTransform.rotation, Quaternion.LookRotation(this.target.position - this.myTransform.position), (float)this.rotationSpeed * Time.deltaTime);
this._stun = false;
this.myTransform.position += this.myTransform.forward * ((float)this.rotationSpeed * Time.deltaTime);
}
if (num >= 8f) //если больше, крыса будет стоять
{
this._attack = 0f;
this._stun = true;
}
if (num <= 1.2f)
{
this._vert = 0f;
this._attack = 20f;
this._stun = false;
}
}
}
}

![🌐 Онлайн игра: полный туториал, часть 3 [Unity 3D] [Photon] - события и перемещение персонажей](https://i.ytimg.com/vi/_FkeQyW8mtk/0.jpg)

Далее, перемещаем этот скрипт на нашу крысу. Теперь нужно добавить компоненты BoxCollider и Rigidbody , для того чтобы наша крыса не провалилась сквозь землю.
Следующий шаг добавление персонажа, можно добавить своего, а можно стандартного, что мы и сделаем. Назначим персонажу тэг Player, для того чтобы наша крыса знала в какую сторону направляться.
Изменим размеры Plane(земли) по которой будет передвигаться крыса, сделаем размеры равные 10. Так же можно добавит другие элементы, например кубы в виде стен.
Теперь можно проверить игру
![]()
Как видим крыса при достижении определенной дистанции двигается к персонажу и атакует его при приближении к нему. На этом серию уроков про простой искусственный интеллект можно завершить, к скрипту написанному выше можно добавить так же нанесение урона крысой и другие функции. Удачных проектов!
Видео
Искуственный интеллект врага в Unity (патрулирование, погоня и атака).Скачать

Пошаговая боевая система в Unity #5. Навыки (скиллы). продолжениеСкачать

Unreal Engine 5 против Unity 2020: Физика (Часть 3 из 7)Скачать

Как сделать игру на Андроид Unity 5 | Урок #3 — Главное меню. Часть 2Скачать
Порталы в Unity 3D как в Portal2 [Tutorial] Часть 1/3 — внешний вид и портальный шейдерСкачать
![Порталы в Unity 3D как в Portal2 [Tutorial] Часть 1/3 - внешний вид и портальный шейдер](https://i.ytimg.com/vi/bciyTmBPiFg/0.jpg)
Демонстрация ИИ в юнити | Простая реализация искусственного интеллекта | Unity realizationСкачать

Учим Unity за 1 час! #От ПрофессионалаСкачать

Unity 5. Распознавание тега объекта и прокачка топора ( Часть 3 )Скачать

Уроки Unity Урок 6-3 Простой искусственный интеллект [универсальный] AI Simple C#Скачать
![Уроки Unity Урок 6-3 Простой искусственный интеллект [универсальный] AI Simple C#](https://i.ytimg.com/vi/Vp3Su_XBwSw/0.jpg)
⛏️Minecraft на Unity3D. Часть 3Скачать

Изучение Unity для начинающих / Урок #3 – Работа с объектами и компонентамиСкачать

Создание простого хоррора на Unity #1 (Как создать хоррор-игру)Скачать

Как сделать машину в Unity? Как я это делаю :3Скачать

Here we are on Day 12 of the 100 days of VR. Yesterday, we looked at the power of rig models and Unity’s mecanim system (which I should have learned but ignored in the Survival Shooter tutorial…).
Today, we’re going to continue off after creating our animator controller.
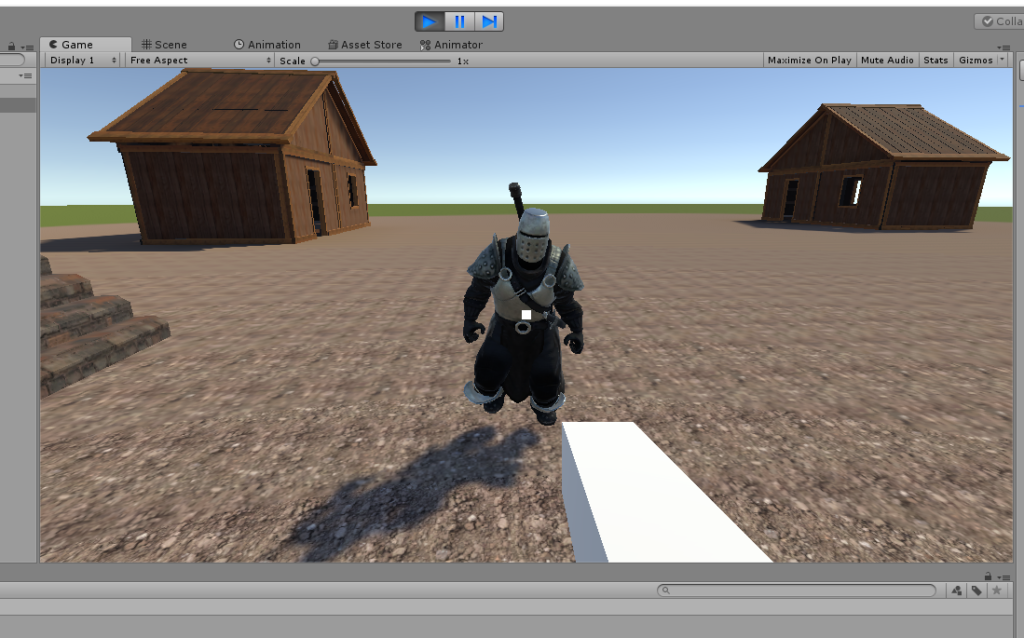
We’re going to create the navigation component to our Knight Enemy to chase and attack the player. As you might recall, Unity provides us an AI pathfinder that allows our game objects to move towards a direction while avoiding obstacles.
Moving the Enemy toward the Player
Setting Up the Model
To be able to create an AI movement for our enemy, we need to add the Nav Mesh Agent component to our Knight game object. The only setting that I’m going to change is the Speed, which I set to 2.
At this point, we can delete our old enemy game object. We don’t need it anymore.
Next up, we need to create a NavMesh for our enemy to traverse.
Click on the Navigation panel next to the Inspector.
If it’s not there, then click on Window > Navigation to open up the pane.
Under the bake tab, just hit bake to create the NavMesh. I’m not looking to create anything special right now for our character.
Once we finish, we should have something like this if we show the nav that we created.
Make sure that the environment parent game object is set to static!
)
Creating the Script
At this point, the next thing we need to do is create the script that allows the enemy to chase us.
To do that, I created the EnemyMovement script and attach it to our knight.
Here’s what it looks like right now:
using UnityEngine;
using UnityEngine.AI;

public class EnemyMovement : MonoBehaviour
{
    private NavMeshAgent _nav;
    private Transform _player;

	void Start ()
	{
	    _nav = GetComponent<NavMeshAgent>();
	    _player = GameObject.FindGameObjectWithTag("Player").transform;
	}

	void Update ()
	{
	    _nav.SetDestination(_player.position);
	}
}
It’s pretty straightforward right now:
- We get our player
GameObjectand the Nav Mesh Agent Component. - We set the Nav Agent to chase our player.
An important thing that we have to do to make sure that the code works is that we have to add the Player tag to our character to make sure that we grab the GameObject.
After that, we can play the game and we can see that our Knight enemy will chase us.
Using the Attack Animation
Right now, the Knight would run in a circle around us. But how do we get it to do an attack animation?
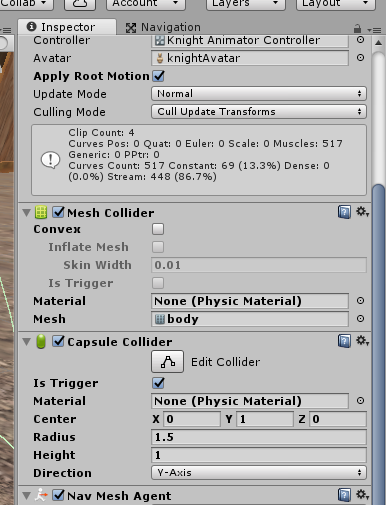
The first thing we need to do is attach a capsule collider component onto our knight game object and make these settings:
Is Triggeris checkedY Centeris1Y Radiusis1.5Y Heightis1
Similar to what we did in the Survival Shooter, when our Knight gets close to us, we’ll switch to an attack animation that will damage the player.
With our new Capsule Collider get into contact with the player, we’re going to add the logic to our animator to begin the attack animation.
First, we’re going to create a new script called EnemyAttack and attach it to our Knight.
Here’s what it looks like:
using UnityEngine;
using System.Collections;


public class EnemyAttack : MonoBehaviour
{
    Animator _animator;
    GameObject _player;

    void Awake()
    {
        _player = GameObject.FindGameObjectWithTag("Player");
        _animator = GetComponent<Animator>();
    }

    void OnTriggerEnter(Collider other)
    {
        if (other.gameObject == _player)
        {
            _animator.SetBool("IsNearPlayer", true);
        }
    }

    void OnTriggerExit(Collider other)
    {
        if (other.gameObject == _player)
        {
            _animator.SetBool("IsNearPlayer", false);
        }
    }
}
The logic for this is similar to what we seen in the Survival Shooter. When our collider is triggered, we’ll set our “IsNearPlayer” to be true so that we’ll start the attacking animation and when our player leaves the trigger range, the Knight will stop attacking.
Note: If you’re having a problem where the Knight stops attacking the player after the first time, check the animation clip and make sure Loop Time is checked. I’m not sure how, but I disabled it.
Detecting Attack Animation
Adding a Mesh Collider
So now, the Knight will start the attack animation. You might notice that nothing happens to the player.
We’re not going to get to that today, but we’re going to write some of the starter code that will allow us to do damage later.
Currently, we have a Capsule Collider that will allow us to detect when the enemy is within striking range. The next thing we need to do is figure out if the enemy touches the player.
To do that, we’re going to attach a Mesh Collider on our enemy.
Unlike the previous collider which is a trigger, this one will actually be to detect when the enemy collides with the player.
Make sure that we attach the body mesh that our Knight uses to our Mesh Collider.
I will take note that for some reason the Knight’s mesh is below the floor, however I’ve not encountered any specific problems with this so I decided to ignore this.
Adding an Event to our Attack Animation
Before we move on to writing the code for when the Knight attacks the player, we have to add an event in the player animation.
Specifically, I want to make it so that when the Knight attacks, if they collide with the player, we’ll take damage.
To do that, we’re going to do something similar to what the Survival Shooter tutorial did. We’re going to add an event inside our animation to call a function in our script.
We have 2 ways of doing this:
- We create an Animation event on imported clips from the model
- We add the Animation Event in the Animation tab from the animation clip
Since our knight model doesn’t have the animation we added in, we’re going to add our event the 2nd way.
We want to edit our Attack1 animation clip from the Brute Warrior Mecanim pack. inside the Animator tab.
While selecting our Knight Animator Controller, click on Attack1 in the Animator and then select the Animation tab to open it.
If either of these tabs aren’t already opened in your project, you can open them by going to Windows and select them to put them in your project.
Now at this point, we’ll encounter a problem. Our Attack1 animation is read only and we can’t edit it.
What do we do?
According to this helpful post, we should just duplicate the animation clip.
So that’s what we’re going to do. Find Attack1 and hit Ctrl + D to duplicate our clip. I’m going to rename this to Knight Attack and I’m going to move this into my animations folder that I created in the project root directory.
Back in our Animator tab for the Knight Animator Controller, I’m going to switch the Attack1 state to use the new Knight Attack animation clip instead of the previous one.

Next, we’re going to have to figure out what’s a good point to set our trigger to call our code.
To do this, I dragged out the Animation tab and docked it pretty much anywhere else in the window, like so:

Select our Knight object in the game hierarchy and then you can notice that back in the animation tab, the play button is clickable now.
If we click it, we’ll see that our knight will play the animation clip that we’re on.
Switch to Knight Attack and press play to see our attack animation.
From here, we need to figure out where would be a good point to run our script.
Playing the animation, I believe that triggering our event at frame 16 would be the best point to see if we should damage the player.

Next we need to click the little + button right below 16 to create a new event. Drag that event to frame 16.
From under the Inspector, we can select a function from the scripts attached to play. Right now, we don’t have anything, except for OnTrigger().
For now, let’s create an empty function called Attack() in our EnemyAttack script so we can use:
using UnityEngine;
using System.Collections;

public class EnemyAttack : MonoBehaviour
{
    Animator _animator;
    GameObject _player;

    void Awake()
    {
        _player = GameObject.FindGameObjectWithTag("Player");
        _animator = GetComponent<Animator>();
    }

    void OnTriggerEnter(Collider other)
    {
        if (other.gameObject == _player)
        {
            _animator.SetBool("IsNearPlayer", true);
        }
    }

    void OnTriggerExit(Collider other)
    {
        if (other.gameObject == _player)
        {
            _animator.SetBool("IsNearPlayer", false);
        }
    }

    void Attack()
    {

    }
}
All I did was that I added Attack() in.
Now that we have this code, we might have to re-select the animation for the new function to be shown, but when you’re done, you should be able to see Attack() and we should have something like this now:
Updating our EnemyAttack Script
So now that we finally have everything in our character setup, it’s finally time to get started in writing code.
So back in our EnemyAttack script, here’s what we have:
using UnityEngine;
using System.Collections;

public class EnemyAttack : MonoBehaviour
{
    private Animator _animator;
    private GameObject _player;
    private bool _collidedWithPlayer;

    void Awake()
    {
        _player = GameObject.FindGameObjectWithTag("Player");
        _animator = GetComponent<Animator>();
    }

    void OnTriggerEnter(Collider other)
    {
        if (other.gameObject == _player)
        {
            _animator.SetBool("IsNearPlayer", true);
        }
        print("enter trigger with _player");
    }

    void OnCollisionEnter(Collision other)
    {
        if (other.gameObject == _player)
        {
            _collidedWithPlayer = true;
        }
        print("enter collided with _player");
    }

    void OnCollisionExit(Collision other)
    {
        if (other.gameObject == _player)
        {
            _collidedWithPlayer = false;
        }
        print("exit collided with _player");
    }

    void OnTriggerExit(Collider other)
    {
        if (other.gameObject == _player)
        {
            _animator.SetBool("IsNearPlayer", false);
        }
        print("exit trigger with _player");
    }

    void Attack()
    {
        if (_collidedWithPlayer)
        {
            print("player has been hit");
        }
    }
}
Here’s what I did:
- Added
OnCollisionExit()andOnCollisionEnter()to detect when ourMesh Collidercomes into contact with our player. - Once it does, we set a boolean to indicate that we’ve collided with the enemy.
- Then when the attack animation plays, at exactly frame
16, we’ll callAttack(). If we’re still in contact with theMesh Collider, our player will be hit. Otherwise, we’ll successfully have dodged the enemy.
And that’s it!
Play the game and look at the console for the logs to see when the knight gets within attacking zone, when he bumps into the player, and when he successfully hits the player.
There’s actually quite a bit of ways we could have implemented this and I’m not sure which way is correct, but this is the thing I have come up with.
Other things that we could have done, but didn’t was:
- Made it so that if we ever come in contact with the enemy, whether attacking or not, we would take damage.
- Created an animation event at the beginning of
Knight Attackand set some sort of_isAttackingboolean to betrueand then in ourUpdate(), if the enemy is attacking and we’re in contact with them, the player takes damage, then set_isAttackingto befalse, so we don’t get hit again in the same animation loop.
Conclusion
And that’s that for day 11! That actually took a lot longer than I thought!
Initially, I thought it would be simply applying the Nav Mesh Agent like we did in the Survivor Shooter game, however, when I started thinking about attack animations, things became more complicated and I spent a lot of time trying to figure out how to damage the player ONLY during the attack animation.
Tomorrow, I’m going to update the PlayerShootingController to be able to shoot our Knight enemy.
There’s a problem in our script. Currently, whenever we run into an enemy, for some strange reason, we’ll start sliding in a direction forever. I don’t know what’s causing that, but we’ll fix that in another day!
Day 11 | 100 Days of VR | Day 13
The post Day 12: Creating AI Movements For Enemies In Unity appeared first on Coding Chronicles.
CodeProject
Here we are on Day 12 of the 100 days of VR. Yesterday, we looked at the power of rig models and Unity’s mecanim system (which I should have learned but ignored in the Survival Shooter tutorial…).
Today, we’re going to continue off after creating our animator controller.
We’re going to create the navigation component to our Knight Enemy to chase and attack the player. As you might recall, Unity provides us an AI pathfinder that allows our game objects to move towards a direction while avoiding obstacles.
Moving the Enemy toward the Player
Setting Up the Model
To be able to create an AI movement for our enemy, we need to add the Nav Mesh Agent component to our Knight game object. The only setting that I’m going to change is the Speed, which I set to 2.
At this point, we can delete our old enemy game object. We don’t need it anymore.
Next up, we need to create a NavMesh for our enemy to traverse.
Click on the Navigation panel next to the Inspector.
If it’s not there, then click on Window > Navigation to open up the pane.
Under the bake tab, just hit bake to create the NavMesh. I’m not looking to create anything special right now for our character.
Once we finish, we should have something like this if we show the nav that we created.
Make sure that the environment parent game object is set to static!
Creating the Script
At this point, the next thing we need to do is create the script that allows the enemy to chase us.
To do that, I created the EnemyMovement script and attach it to our knight.
Here’s what it looks like right now:
using UnityEngine;
using UnityEngine.AI;

public class EnemyMovement : MonoBehaviour
{
    private NavMeshAgent _nav;
    private Transform _player;

	void Start ()
	{
	    _nav = GetComponent<NavMeshAgent>();
	    _player = GameObject.FindGameObjectWithTag("Player").transform;
	}

	void Update ()
	{
	    _nav.SetDestination(_player.position);
	}
}
It’s pretty straightforward right now:
- We get our player
GameObjectand the Nav Mesh Agent Component. - We set the Nav Agent to chase our player.
An important thing that we have to do to make sure that the code works is that we have to add the Player tag to our character to make sure that we grab the GameObject.
After that, we can play the game and we can see that our Knight enemy will chase us.
Using the Attack Animation
Right now, the Knight would run in a circle around us. But how do we get it to do an attack animation?
The first thing we need to do is attach a capsule collider component onto our knight game object and make these settings:
Is Triggeris checkedY Centeris1Y Radiusis1.5Y Heightis1
Similar to what we did in the Survival Shooter, when our Knight gets close to us, we’ll switch to an attack animation that will damage the player.
With our new Capsule Collider get into contact with the player, we’re going to add the logic to our animator to begin the attack animation.
First, we’re going to create a new script called EnemyAttack and attach it to our Knight.
Here’s what it looks like:
using UnityEngine;
using System.Collections;


public class EnemyAttack : MonoBehaviour
{
    Animator _animator;
    GameObject _player;

    void Awake()
    {
        _player = GameObject.FindGameObjectWithTag("Player");
        _animator = GetComponent<Animator>();
    }

    void OnTriggerEnter(Collider other)
    {
        if (other.gameObject == _player)
        {
            _animator.SetBool("IsNearPlayer", true);
        }
    }

    void OnTriggerExit(Collider other)
    {
        if (other.gameObject == _player)
        {
            _animator.SetBool("IsNearPlayer", false);
        }
    }
}
The logic for this is similar to what we seen in the Survival Shooter. When our collider is triggered, we’ll set our “IsNearPlayer” to be true so that we’ll start the attacking animation and when our player leaves the trigger range, the Knight will stop attacking.
Note: If you’re having a problem where the Knight stops attacking the player after the first time, check the animation clip and make sure Loop Time is checked. I’m not sure how, but I disabled it.
Detecting Attack Animation
Adding a Mesh Collider
So now, the Knight will start the attack animation. You might notice that nothing happens to the player.
We’re not going to get to that today, but we’re going to write some of the starter code that will allow us to do damage later.
Currently, we have a Capsule Collider that will allow us to detect when the enemy is within striking range. The next thing we need to do is figure out if the enemy touches the player.
To do that, we’re going to attach a Mesh Collider on our enemy.
Unlike the previous collider which is a trigger, this one will actually be to detect when the enemy collides with the player.
Make sure that we attach the body mesh that our Knight uses to our Mesh Collider.
I will take note that for some reason the Knight’s mesh is below the floor, however I’ve not encountered any specific problems with this so I decided to ignore this.
Adding an Event to our Attack Animation
Before we move on to writing the code for when the Knight attacks the player, we have to add an event in the player animation.
Specifically, I want to make it so that when the Knight attacks, if they collide with the player, we’ll take damage.
To do that, we’re going to do something similar to what the Survival Shooter tutorial did. We’re going to add an event inside our animation to call a function in our script.
We have 2 ways of doing this:
- We create an Animation event on imported clips from the model
- We add the Animation Event in the Animation tab from the animation clip
Since our knight model doesn’t have the animation we added in, we’re going to add our event the 2nd way.
We want to edit our Attack1 animation clip from the Brute Warrior Mecanim pack. inside the Animator tab.
While selecting our Knight Animator Controller, click on Attack1 in the Animator and then select the Animation tab to open it.
If either of these tabs aren’t already opened in your project, you can open them by going to Windows and select them to put them in your project.
Now at this point, we’ll encounter a problem. Our Attack1 animation is read only and we can’t edit it.
What do we do?
According to this helpful post, we should just duplicate the animation clip.
So that’s what we’re going to do. Find Attack1 and hit Ctrl + D to duplicate our clip. I’m going to rename this to Knight Attack and I’m going to move this into my animations folder that I created in the project root directory.
Back in our Animator tab for the Knight Animator Controller, I’m going to switch the Attack1 state to use the new Knight Attack animation clip instead of the previous one.
Next, we’re going to have to figure out what’s a good point to set our trigger to call our code.
To do this, I dragged out the Animation tab and docked it pretty much anywhere else in the window, like so:
Select our Knight object in the game hierarchy and then you can notice that back in the animation tab, the play button is clickable now.
If we click it, we’ll see that our knight will play the animation clip that we’re on.
Switch to Knight Attack and press play to see our attack animation.
From here, we need to figure out where would be a good point to run our script.
Playing the animation, I believe that triggering our event at frame 16 would be the best point to see if we should damage the player.
Next we need to click the little + button right below 16 to create a new event. Drag that event to frame 16.
From under the Inspector, we can select a function from the scripts attached to play. Right now, we don’t have anything, except for OnTrigger().
For now, let’s create an empty function called Attack() in our EnemyAttack script so we can use:
using UnityEngine;
using System.Collections;

public class EnemyAttack : MonoBehaviour
{
    Animator _animator;
    GameObject _player;

    void Awake()
    {
        _player = GameObject.FindGameObjectWithTag("Player");
        _animator = GetComponent<Animator>();
    }

    void OnTriggerEnter(Collider other)
    {
        if (other.gameObject == _player)
        {
            _animator.SetBool("IsNearPlayer", true);
        }
    }

    void OnTriggerExit(Collider other)
    {
        if (other.gameObject == _player)
        {
            _animator.SetBool("IsNearPlayer", false);
        }
    }

    void Attack()
    {

    }
}
All I did was that I added Attack() in.
Now that we have this code, we might have to re-select the animation for the new function to be shown, but when you’re done, you should be able to see Attack() and we should have something like this now:
Updating our EnemyAttack Script
So now that we finally have everything in our character setup, it’s finally time to get started in writing code.
So back in our EnemyAttack script, here’s what we have:
using UnityEngine;
using System.Collections;

public class EnemyAttack : MonoBehaviour
{
    private Animator _animator;
    private GameObject _player;
    private bool _collidedWithPlayer;

    void Awake()
    {
        _player = GameObject.FindGameObjectWithTag("Player");
        _animator = GetComponent<Animator>();
    }

    void OnTriggerEnter(Collider other)
    {
        if (other.gameObject == _player)
        {
            _animator.SetBool("IsNearPlayer", true);
        }
        print("enter trigger with _player");
    }

    void OnCollisionEnter(Collision other)
    {
        if (other.gameObject == _player)
        {
            _collidedWithPlayer = true;
        }
        print("enter collided with _player");
    }

    void OnCollisionExit(Collision other)
    {
        if (other.gameObject == _player)
        {
            _collidedWithPlayer = false;
        }
        print("exit collided with _player");
    }

    void OnTriggerExit(Collider other)
    {
        if (other.gameObject == _player)
        {
            _animator.SetBool("IsNearPlayer", false);
        }
        print("exit trigger with _player");
    }

    void Attack()
    {
        if (_collidedWithPlayer)
        {
            print("player has been hit");
        }
    }
}
Here’s what I did:
- Added
OnCollisionExit()andOnCollisionEnter()to detect when ourMesh Collidercomes into contact with our player. - Once it does, we set a boolean to indicate that we’ve collided with the enemy.
- Then when the attack animation plays, at exactly frame
16, we’ll callAttack(). If we’re still in contact with theMesh Collider, our player will be hit. Otherwise, we’ll successfully have dodged the enemy.
And that’s it!
Play the game and look at the console for the logs to see when the knight gets within attacking zone, when he bumps into the player, and when he successfully hits the player.
There’s actually quite a bit of ways we could have implemented this and I’m not sure which way is correct, but this is the thing I have come up with.
Other things that we could have done, but didn’t was:
- Made it so that if we ever come in contact with the enemy, whether attacking or not, we would take damage.
- Created an animation event at the beginning of
Knight Attackand set some sort of_isAttackingboolean to betrueand then in ourUpdate(), if the enemy is attacking and we’re in contact with them, the player takes damage, then set_isAttackingto befalse, so we don’t get hit again in the same animation loop.
Conclusion
And that’s that for day 11! That actually took a lot longer than I thought!
Initially, I thought it would be simply applying the Nav Mesh Agent like we did in the Survivor Shooter game, however, when I started thinking about attack animations, things became more complicated and I spent a lot of time trying to figure out how to damage the player ONLY during the attack animation.
Tomorrow, I’m going to update the PlayerShootingController to be able to shoot our Knight enemy.
There’s a problem in our script. Currently, whenever we run into an enemy, for some strange reason, we’ll start sliding in a direction forever. I don’t know what’s causing that, but we’ll fix that in another day!
Day 11 | 100 Days of VR | Day 13
The post Day 12: Creating AI Movements For Enemies In Unity appeared first on Coding Chronicles.
CodeProject
Если вам нужна помощь с проектом, можете обратиться с заказом в телегу по этой ссылке.
Это так сказать ИИ бота в одноклеточном виде, но тем не менее, кто хочет сделать нечто подобное для своего платформера, данный материал может пригодится. Поведение бота. Если игрок не замечен, то бот будет двигаться от точки А к точке Б, затем обратно и так по кругу. Если игрок попадает в поле зрения бота, он начинает преследовать игрока, с целью прямого контакта и передачи, например, повреждения или чего угодно еще. Если бот упрется в препятствие, то перейдет в режим ожидания, тоже самое произойдет, когда бот обнаружит, что впереди яма и он не может больше следовать за игроком. При этом, есть возможность настройки допустимой высоты, допустим, когда впереди небольшой спуск/обрыв и можно продолжить преследование.
Для удобства редактирования уровня, с начало нужно сделать префаб вейпоинта, какой-нибудь спрайт чтобы визуально ориентироваться, для этого объекта нужно назначить отдельный слой и отключить его в настройках камеры Culling Mask, чтобы сделать такие объекты не видимыми в самой игре, но в тоже время без проблем использовать их в редакторе для настройки.
Теперь, создадим вспомогательный скрипт для редактора, с помощью которого мы будем создавать вейпоинты для каждого бота, короче говоря, чтобы не создавать их в ручную. Итак, содержание скрипта:
#if UNITY_EDITOR
using UnityEngine;
using System.Collections;
using UnityEditor;

[CustomEditor(typeof(EnemyAI))]

public class EnemyAIEditor : Editor {

	public GameObject waypoint; // префаб вейпоинта

	public override void OnInspectorGUI()
	{
		DrawDefaultInspector();
		EnemyAI t = (EnemyAI)target;
		if(GUILayout.Button("Generate Waypoints"))
		{
			t.GenerateWaypoints(waypoint);
		}
	}
}
#endif![Пример скрипта бота для платформера [2D]](https://null-code.ru/uploads/posts/2016-02/1455780811_1.png)
Для того чтобы всё работало, нужно выбрать скрипт и указать ранее созданный префаб, данный скрипт добавлять на сцену не нужно.
Еще нам понадобиться скрипт который будет содержать ссылку на нашего персонажа, мы получаем ее при старте сцены и далее, объект игрока будет доступен для всех остальных скриптов, это очень удобно и не нужно каждый раз выполнять поиск объекта:
using UnityEngine;
using System.Collections;

public class GameManager : MonoBehaviour {

	private static Transform _player;

	void Awake()
	{
		_player = GameObject.FindGameObjectWithTag("Player").transform;
	}

	public static Transform player
	{
		get{ return _player; }
	}
}
Главное не забыть персонажу поставить тег Player. Данный скрипт необходимо добавить на сцену.
Далее, «мозги» бота. За основу был взят наш скрипт управления 2D персонажем.
using UnityEngine;
using System.Collections;

[RequireComponent(typeof(Rigidbody2D))]

public class EnemyAI : MonoBehaviour {

	// точки, между которыми бот будет двигаться, в ожидании игрока
	public Transform waypointA;
	public Transform waypointB;

	public float speed = 1.5f; // скорость движения
	public float acceleration = 10; // ускорение
	public float searchDistance = 3; // с какого расстояния бот сможет "увидеть" игрока
	public float checkDistance = 1; // расстояние с которого бот проверку перед собой, на наличие обрыва
	public float resetDistance = 50; // макс дистанция, когда бот отслеживает позицию игрока
	public float height = 2; // маск высота, для падения (например, если надо спуститься по ступеням за игроком)

	// действие, когда позиция игрока не отслеживается (например, он ушел далеко вперед)
	// возврат в стартовую позицию и отключение, отключение в текущей позиции, уничтожение объекта
	public enum Mode {WaypointsAndDisabled = 0, Disabled = 1, Destroy = 2};
	public Mode action = Mode.WaypointsAndDisabled;

	public bool facingRight = true; // бот смотрит вправо?

	private int layerMask;
	private bool isTarget, isWait;
	private Rigidbody2D body;
	private Vector3 direction;
	private Vector3 startPosition;
	private float curDist;

	void Awake()
	{
		layerMask = 1 << gameObject.layer | 1 << 2;
		layerMask = ~layerMask;
		body = GetComponent<Rigidbody2D>();
		body.freezeRotation = true;
		startPosition = transform.position;
	}

	void OnCollisionEnter2D(Collision2D coll)
	{
		if(coll.transform.tag == "Player")
		{
			// физический контакт с целью
		}

	}

	Vector3 SetDirection(float xPos)
	{
		return new Vector3(xPos, transform.position.y, transform.position.z) - transform.position;
	}

	void Walk() // зацикленное движение от А к В и обратно
	{
		float a = Vector3.Distance(transform.position, waypointA.position);
		float b = Vector3.Distance(transform.position, waypointB.position);

		if(a < 1)
		{
			direction = SetDirection(waypointB.position.x);
		}
		else if(b < 1)
		{
			direction = SetDirection(waypointA.position.x);
		}
		else if(body.velocity.x == 0)
		{
			direction = SetDirection(waypointA.position.x);
		}
		else if(curDist > resetDistance)
		{
			Choose();
		}

		if(SearchPlayer()) isTarget = true;
	}

	void Follow() // преследование игрока
	{
		if(!CheckPath() && curDist > checkDistance || body.velocity.magnitude == 0 && curDist > searchDistance)
		{
			direction = Vector3.zero;
			body.velocity = Vector3.zero;
			isWait = true;
		}
		else if(curDist > resetDistance)
		{
			Choose();
		}
		else
		{
			direction = SetDirection(GameManager.player.position.x);
		}
	}

	void Wait() // режим ожидания
	{
		if(curDist < searchDistance)
		{
			isWait = false;
		}
		else if(curDist > resetDistance)
		{
			Choose();
		}
	}

	void Choose() // финальное действие
	{
		switch(action)
		{
		case Mode.Disabled:
			isWait = false;
			isTarget = false;
			gameObject.SetActive(false);
			break;

		case Mode.WaypointsAndDisabled:
			transform.position = startPosition;
			isWait = false;
			isTarget = false;
			gameObject.SetActive(false);
			break;

		case Mode.Destroy:
			Destroy(gameObject);
			break;
		}
	}

	void LateUpdate()
	{
		if(!waypointA || !waypointB) return;

		curDist = Vector3.Distance(GameManager.player.position, transform.position);

		if(!isTarget)
		{
			Walk();
		}
		else if(!isWait && isTarget)
		{
			Follow();
		}
		else if(isWait && isTarget)
		{
			Wait();
		}

		if(body.velocity.x > 0 && !facingRight) Flip();
		else if(body.velocity.x < 0 && facingRight) Flip();
	}

	bool CheckPath() // проверка поверхности на пути следования
	{
		Vector3 pos = new Vector3(transform.position.x + checkDistance * Mathf.Sign(body.velocity.x), transform.position.y, transform.position.z);

		Debug.DrawRay(pos, Vector3.down * height, Color.red);

		RaycastHit2D hit = Physics2D.Raycast(pos, Vector3.down, Mathf.Infinity, layerMask);

		if(hit.collider && hit.distance < height)
		{
			return true;
		}

		return false;
	}

	bool SearchPlayer() // поиск игрока на пути следования
	{
		Vector3 dir = Vector3.right * searchDistance * Mathf.Sign(body.velocity.x);

		Debug.DrawRay(transform.position, dir, Color.blue);

		RaycastHit2D hit = Physics2D.Raycast(transform.position, dir, searchDistance, layerMask);

		if(hit.collider && hit.transform.tag == "Player")
		{
			return true;
		}

		return false;
	}

	void FixedUpdate()
	{
		body.AddForce(direction.normalized * body.mass * speed * acceleration);

		if(Mathf.Abs(body.velocity.x) > speed)
		{
			body.velocity = new Vector2(Mathf.Sign(body.velocity.x) * speed, body.velocity.y);
		}
	}

	void Flip() // отражение по горизонтали
	{
		facingRight = !facingRight;
		Vector3 theScale = transform.localScale;
		theScale.x *= -1;
		transform.localScale = theScale;
	}

	public void GenerateWaypoints(GameObject point) // вспомогательная функция для создания вейпоинтов
	{
		if(!waypointA && !waypointB)
		{
			GameObject obj = new GameObject(gameObject.name + "_Waypoints");
			obj.transform.position = transform.position;

			GameObject clone = Instantiate(point) as GameObject;
			clone.transform.parent = obj.transform;
			clone.transform.localPosition = new Vector2(3, 0);
			clone.name = "Point_A";
			waypointA = clone.transform;

			clone = Instantiate(point) as GameObject;
			clone.transform.parent = obj.transform;
			clone.transform.localPosition = new Vector2(-3, 0);
			clone.name = "Point_B";
			waypointB = clone.transform;
		}
	}
}
Поиск игрока или сканирование поверхности, делается с помощью рейкаста, одновременно возможно использование только одного луча. При настройке параметров нужно учитывать, что бот будет останавливаться перед обрывам, если он превышает допустимую высоту, однако при этом не должно возникать ситуации, когда игрок может перепрыгнуть яму, а бот тем временем просто упадет на нижнюю платформу. То есть высоту надо ставить такую, которая подходит под не высокие спуски/ступеньки и подобное. Еще важный момент, это чтобы для ботов и персонажа, был отдельный слой, иначе рейкаст будет работать не корректно. Когда в нужную позицию добавлен бот, просто жмем кнопочку Generate Waypoints и рядом с ним появятся вейпоинты, остается только растащить точки на нужное расстояние и всё.
Перед тестированием рекомендуется в плеере редактора включить Gizmos.
Скачать демо сцену:
Внимание! Посетители, находящиеся в группе Гости, не могут скачивать файлы.