Время на прочтение
7 мин
Количество просмотров 148K

Предисловие
Как можно развлечься в новогодние праздники? Поиграть в компьютерные игры? Нет! Лучше написать бота, который это будет делать за тебя, а самому пойти лепить снеговика и пить глинтвейн.
Когда-то в школьные годы был увлечен одной из популярных MMORPG — Lineage 2. В игре можно объединяться в кланы, группы, заводить друзей и сражаться с соперниками, но в общем игра наполнена однообразными действиями: выполнением квестов и фармом (сбор ресурсов, получение опыта).
В итоге решил, что бот должен решать одну задачу: фарм. Для управления будут использоваться эмулированные клики мыши и нажатия клавиш клавиатуры, а для ориентирования в пространстве — компьютерное зрение, язык программирования — Python.
Вообще, создание бота для L2 дело не новое и их готовых есть довольно много. Делятся они на 2 основные группы: те, которые внедряются в работу клиента и кликеры.
Первые — это жёсткий чит, в плане игры пользоваться ими слишком уж неспортивно. Второй вариант интереснее, учитывая, что его можно будет с некоторыми доработками применить к любой другой игре, да и реализация будет интереснее. Те кликеры, которых я находил, по разным причинам не работали, либо работали нестабильно.
Внимание: вся информация здесь изложена только в познавательных целях. Особенно для разработчиков игр, чтобы помочь им лучше бороться с ботами.
Итак, к делу.
Работа с окном
Тут все просто. Будем работать со скриншотами из окна с игрой.
Для этого определим координаты окна. С окном работаем с помощью модуля win32gui. Нужное окно определим по заголовку — “Lineage 2”.
Код методов получения положения окна
def get_window_info():
    # set window info
    window_info = {}
    win32gui.EnumWindows(set_window_coordinates, window_info)
    return window_info

# EnumWindows handler
# sets L2 window coordinates
def set_window_coordinates(hwnd, window_info):
    if win32gui.IsWindowVisible(hwnd):
        if WINDOW_SUBSTRING in win32gui.GetWindowText(hwnd):
            rect = win32gui.GetWindowRect(hwnd)
            x = rect[0]
            y = rect[1]
            w = rect[2] - x
            h = rect[3] - y
            window_info['x'] = x
            window_info['y'] = y
            window_info['width'] = w
            window_info['height'] = h
            window_info['name'] = win32gui.GetWindowText(hwnd)
            win32gui.SetForegroundWindow(hwnd)
Получаем картинку нужного окна с помощью ImageGrab:
def get_screen(x1, y1, x2, y2):
    box = (x1 + 8, y1 + 30, x2 - 8, y2)
    screen = ImageGrab.grab(box)
    img = array(screen.getdata(), dtype=uint8).reshape((screen.size[1], screen.size[0], 3))
    return img
Теперь будем работать с содержимым.
Поиск монстра
Самое интересное. Те реализации, которые я находил, мне не подошли. Например, в одном из популярных и даже платном это сделано через игровой макрос. И “игрок” должен для каждого типа монстра прописывать в макросе типа “/target Monster Name Bla Bla”.
В нашем случае мы последуем такой логике: в первую очередь найдём все тексты белого цвета на экране. Белый текст может быть не только названием монстра, но и именем самого персонажа, именем NPC или других игроков. Поэтому надо навести курсор на объект и если появится подсветка с нужным нам паттерном, то можно атаковать цель.
Вот исходная картинка, с который будем работать:
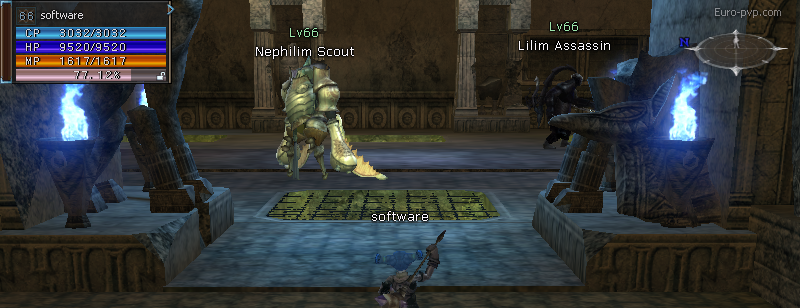
Закрасим черным своё имя, чтобы не мешало и переведем картинку в ч/б. Исходная картинка в RGB — каждый пиксель это массив из трёх значений от 0 до 255, когда ч/б — это одно значение. Так мы значительно уменьшим объем данных:
img[210:230, 350:440] = (0, 0, 0)
gray = cv2.cvtColor(img, cv2.COLOR_BGR2GRAY)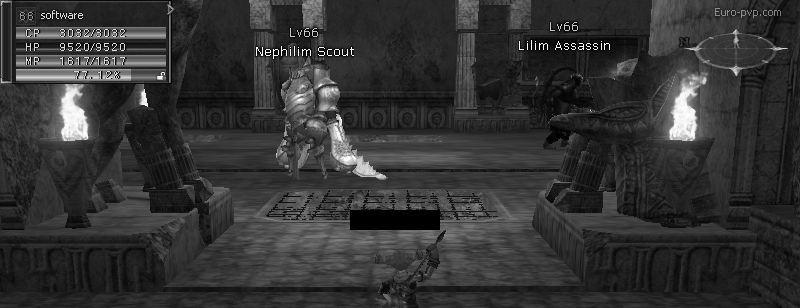
Найдем все объекты белого цвета (это белый текст с названиями монстров)
ret, threshold1 = cv2.threshold(gray, 252, 255, cv2.THRESH_BINARY)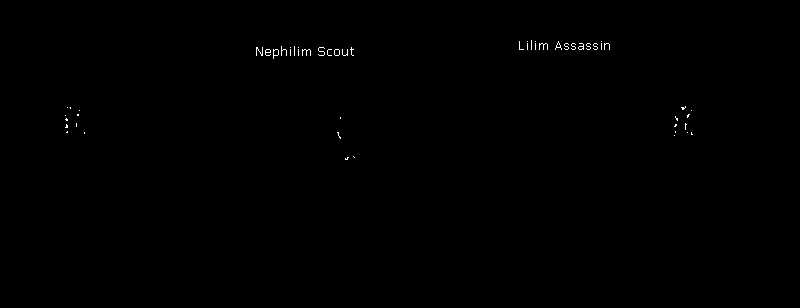
Морфологические преобразования:
- Фильтровать будем по прямоугольнику размером 50×5. Такой прямоугольник подошел лучше всех.
- Убираем шум внутри прямоугольников с текстом (по сути закрашиваем всё между букв белым)
- Еще раз убираем шум, размывая и растягивая с применением фильтра
kernel = cv2.getStructuringElement(cv2.MORPH_RECT, (50, 5))
closed = cv2.morphologyEx(threshold1, cv2.MORPH_CLOSE, kernel)
closed = cv2.erode(closed, kernel, iterations=1)
closed = cv2.dilate(closed, kernel, iterations=1)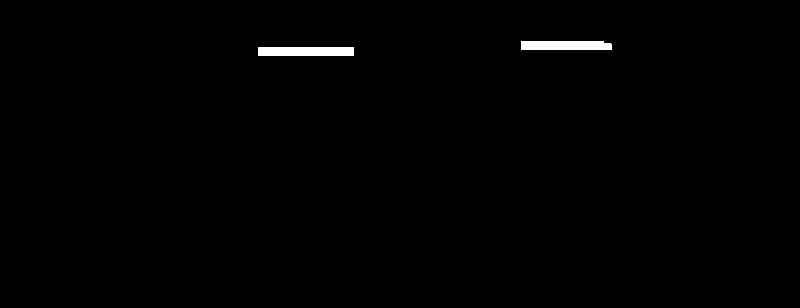
Находим середины получившихся пятен
(_, centers, hierarchy) = cv2.findContours(closed, cv2.RETR_TREE, cv2.CHAIN_APPROX_SIMPLE)Работает, но можно сделать прикольнее (например, для монстров, имена которых не видны, т.к. находятся далеко) — с помощью TensorFlow Object Detection, как тут, но когда-нибудь в следующей жизни.
Теперь наводим курсор на найденного монстра и смотрим, появилась ли подсветка с помощью метода cv2.matchTemplate. Осталось нажать ЛКМ и кнопку атаки.
Клик
С поиском монстра разобрались, бот уже может найти цели на экране и навести на них мышь. Чтобы атаковать цель, нужно кликнуть левой кнопкой мыши и нажать «атаковать» (на кнопку «1» можно забиндить атаку). Клик правой кнопкой мыши нужен для того, чтобы вращать камеру.
На сервере, где я тестировал бота, я вызвал клик через AutoIt, но он почему-то не сработал.
Как оказалось, игры защищаются от автокликеров разными способами:
- поиск процессов, которые эмулируют клики
- запись кликов и определение, какого цвета объект, на который кликает бот
- определение паттернов кликов
- определение бота по периодичности кликов
А некоторые приложения, как клиент этого сервера, могут определять источник клика на уровне ОС. (будет здорово, если кто-нибудь подскажет как именно).
Были перепробованы некоторые фреймворки, которые могут кликать (в т.ч. pyautogui, robot framework и что-то еще), но ни один из вариантов не сработал. Проскользнула мысль соорудить устройство, которое будет нажимать кнопку (кто-то даже так делал). Похоже, что нужен клик максимально хардварный. В итоге стал смотреть в сторону написания своего драйвера.
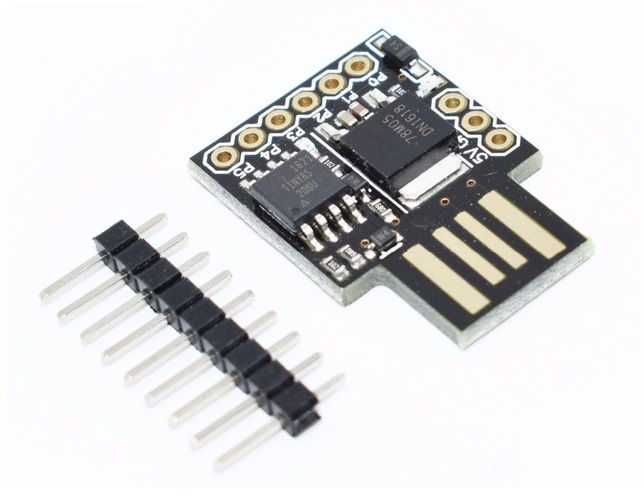
На просторах интернета был найден способ решения проблемы: usb-устройство, которое можно запрограммировать на подачу нужного сигнала — Digispark.
Ждать несколько недель с Алиэкспресса не хочется, поэтому поиски продолжились.
В итоге была найдена замечательная библиотека на C
Нашлась для неё и обёртка на Python
Библиотека у меня не завелась на питоне 3.6 — вываливалась ошибка Access violation что-то там. Поэтому пришлось соскочить на питон 2.7, там всё заработало like a charm.
Движение курсора
Библиотека может посылать любые команды, в том числе, куда переместить мышь. Но выглядит это как телепортация курсора. Нужно сделать движение курсора плавным, чтобы нас не забанили.
По сути задача сводится к тому, чтобы перемещать курсор из точки A в точку B с помощью обертки AutoHotPy. Неужели придется вспоминать математику?
Немного поразмыслив, всё-таки решил погуглить. Оказалось, что ничего придумывать не надо — задачу решает алгоритм Брезенхэма, один из старейших алгоритмов в компьютерной графике:

Прямо с Википедии можно взять и реализацию
Логика работы
Все инструменты есть, осталось самое простое — написать сценарий.
- Если монстр жив, продолжаем атаковать
- Если нет цели, найти цель и начать атаковать
- Если не удалось найти цель, немного повернемся
- Если 5 раз никого не удалось найти — идём в сторону и начинаем заново
Из более-менее интересного опишу, как я получал статус здоровья жертвы. В общих чертах: находим по паттерну с помощью OpenCV элемент управления, показывающий статус здоровья цели, берём полоску высотой в один пиксель и считаем в процентах, сколько закрашено красным.
Код метода получения уровня здоровья жертвы
def get_targeted_hp(self):
        """
        return victim's hp
        or -1 if there is no target
        """

        hp_color = [214, 24, 65]
        target_widget_coordinates = {}
        filled_red_pixels = 1

        img = get_screen(
            self.window_info["x"],
            self.window_info["y"],
            self.window_info["x"] + self.window_info["width"],
            self.window_info["y"] + self.window_info["height"] - 190
        )

        img_gray = cv2.cvtColor(img, cv2.COLOR_BGR2GRAY)

        template = cv2.imread('img/target_bar.png', 0)
        # w, h = template.shape[::-1]

        res = cv2.matchTemplate(img_gray, template, cv2.TM_CCOEFF_NORMED)
        threshold = 0.8
        loc = np.where(res >= threshold)
        if count_nonzero(loc) == 2:
            for pt in zip(*loc[::-1]):
                target_widget_coordinates = {"x": pt[0], "y": pt[1]}
                # cv2.rectangle(img, pt, (pt[0] + w, pt[1] + h), (255, 255, 255), 2)

        if not target_widget_coordinates:
            return -1

        pil_image_hp = get_screen(
            self.window_info["x"] + target_widget_coordinates['x'] + 15,
            self.window_info["y"] + target_widget_coordinates['y'] + 31,
            self.window_info["x"] + target_widget_coordinates['x'] + 164,
            self.window_info["y"] + target_widget_coordinates['y'] + 62
        )

        pixels = pil_image_hp[0].tolist()
        for pixel in pixels:
            if pixel == hp_color:
                filled_red_pixels += 1

        percent = 100 * filled_red_pixels / 150
        return percent
Теперь бот понимает, сколько HP у жертвы и жива ли она еще.
Основная логика готова, вот как теперь он выглядит в действии:
Для занятых я ускорил на 1.30
Остановка работы
Вся работа с курсором и клавиатурой ведется через объект autohotpy, работу которого в любой момент можно остановить нажатием кнопки ESC.
Проблема в том, что всё время бот занят выполнением цикла, отвечающим за логику действий персонажа и обработчики событий объекта и autohotpy не начинают слушать события, пока цикл не закончится. Работу программы не остановить и с помощью мыши, т.к. бот управляет ей и уводит курсор куда ему нужно.
Нам это не подходит, поэтому пришлось разделить бота на 2 потока: слушание событий и выполнение логики действий персонажа.
Создадим 2 потока
        # init bot stop event
        self.bot_thread_stop_event = threading.Event()

        # init threads
        self.auto_py_thread = threading.Thread(target=self.start_auto_py, args=(auto_py,))
        self.bot_thread = threading.Thread(target=self.start_bot, args=(auto_py, self.bot_thread_stop_event, character_class))

        # start threads
        self.auto_py_thread.start()
        self.bot_thread.start()
и теперь вешаем обработчик на ESC:
auto_py.registerExit(auto_py.ESC, self.stop_bot_event_handler)при нажатии ESC устанавливаем событие
self.bot_thread_stop_event.set()и в цикле логики персонажа проверяем, установлено ли событие:
while not stop_event.is_set():Теперь спокойно останавливаем бота по кнопке ESC.
Заключение
Казалось бы, зачем тратить время на продукт, который не приносит никакой практической пользы?
На самом деле компьютерная игра с точки зрения компьютерного зрения — почти то же самое, что и снятая на камеру реальность, а там возможности для применения огромны. Отличный пример описан в статье про подводных роботов, которые лазером стреляют по лососям. Также статья может помочь разработчикам игр в борьбе с ботоводами.
Ну а я ознакомился с Python, прикоснулся к компьютерному зрению, написал свой первый слабоумный искусственный интеллект и получил массу удовольствия.
Надеюсь, было интересно и вам.
P.S. Ссылка на репозиторий
Всем привет! В этом блоге я бы хотел рассказать как я создавал свой кликер на Python.
Идея у меня пришла спонтано. Я сидел изучал Canvas, и я подумал «А может мне свой кликер создать?» И я начал разработку.
P.s Я не всё запомнил в процессе разработки, и поэтому могут быть некоторые пробелы.
День 1-2
В начале я написал программу которая создавала кнопку, при нажатии которой переменная money увеличивалась на 1.
from tkinter import *
root = Tk()

def click():
    money += 1
    print(money)
click_button = Button(text='Touch me!', command=click)
click_button.pack()

root.mainloop()
И тут я столкнулся с ошибкой «UnboundLocalError: local variable 'money' referenced before assignment". Я попытался что-то сделать, но не получилось, и поэтому я пошёл в гугл с этим вопросом, и там я нашёл вопрос на свой ответ!
from tkinter import *
root = Tk()
money = 0

def click():
    global money
    money += 1
    print(money)
click_button = Button(text='Touch me!', command=click)
click_button.pack()

root.mainloop()
Теперь мне надо было создать кнопку которая улучшала бы количество валюты за клик, ну и чтобы выводилось количество валюты не в терминале а в окне.
from tkinter import *
root = Tk()
money = 0; upgrading = 0
label = Label()
label.pack()

def click():
    global money
    money += upgrading
    label['text'] = money
click_button = Button(text='Touch me!', command=click)
click_button.pack()

def upgrade_click():
    global money; global upgrading
    if money >= 20:
        money -= 20
        upgrading += 1
    else: label['text'] = f'{money} | Недостаточно денег!'
upgrade_button = Button(text='Click +1', command=upgrade_click)
upgrade_button.pack()

root.mainloop()
?!?! Да, мне захотелось «основные» переменные и global’ы писать через точку с запятой. И тут возникла ошибка: количество валюты не увеличивалось. Но добавив global upgrading и изменив значение upgrading на 1 всё исправилось.
Следующей задачей над которой мне действительно пришлось попотеть и даже сделать перерыв — количество денег в секунду. Изначально я попробовал через time.
from tkinter import *
import time
root = Tk()
money = 0; upgrading = 20; mps_val = 1
def mps():
    time.sleep(1)
    money += mps_val
mps_button = Button(text='mps 50', command=mps)
mps_button.pack()
Очевидно что вызывалась ошибка. Я делал global’ы, пробовал делать while циклы внутри и вне функций, но что бы я не делал ничего нормально не работало и тогда я решил обратится в гугл и там я нашёл пример с ежесекудным обновлением времени. Тогда я понял что надо делать.
from tkinter import *
root = Tk()
money = 0; upgrading = 1; mps_val = 0; game_time = 0
label = Label()
label.pack()

def click():
    global money; global upgrading
    money += upgrading
    label['text'] = f'{money} | {mps_val}'
Button(text='Touch me!', command=click).pack()

def upgrade_click():
    global money; global upgrading
    if money >= 20:
        money -= 20
        upgrading += 1
    else: label['text'] = f'{money} | Недостаточно денег!'
Button(text='Click +1', command=upgrade_click).pack()

def mps():
    global money; global mps_val
    if money >= 50:
        money -= 50
        mps_val += 1
        label['text'] = f'{money} | {mps_val}'
    else: label['text'] = f'{money} | Недостаточно денег!'
Button(text='mps +1', command=mps).pack()

lab = Label()
lab.pack(anchor=CENTER, side=BOTTOM)
def every_second_event():
    global game_time; global money; global mps_val
    game_time += 1
    game_time = round(game_time, 2)
    lab['text'] = f'You play {game_time} seconds'

    money += mps_val
    money = round(money, 1); mps_val = round(mps_val, 1) # Fix ".00000000" bug
    label['text'] = f'{money} | {mps_val}'

    root.after(1000, every_second_event)
every_second_event()


root.mainloop()
Я сделал событие которое будет происходить каждую секунду. Да, я решил сделать текст который будет показывать сколько проведено времени в игре. Однако у меня возникла какая-то ошибка. У меня были проблемы с выводом денег. В этом коде ошибки нет, а в текущем я сделал недоисправление где разделил все значения на 10 и в root.after я сделал событие каждые 100 миллисекунд.
Далее я подумал над престижем, но перед этим я решил сделать систему сохранений и кол-во покупаемой валюты в зависимости от выбраной кнопки (их у меня 3: x1, x10, x100). С количеством покупки у меня возникли небольшие проблемы но быстро исправил. Сохранения — я создал файл data.py. В нём хранились данные об игре. Также я решил сделать сокращения k, m, и b в коде.
# Файл data.py. Если что этого комментария нет в самом файле.
money_data = 214.6
upgrading_data = 88.0
mps_data = 3.4
game_time_data = 65.6
from tkinter import *
from data import *
root = Tk()
money = money_data; upgrading = upgrading_data; mps_val = mps_data; game_time = game_time_data
frame = Frame()
frame.pack()
label = Label(frame, text=f'Balance: {money} | Money Per Click: {upgrading} | Money Per Second: {mps_val * 10}')
label.pack(side=TOP)
err_label = Label()
err_label.pack(side=TOP)

buy_quantity = 1
def buy_quantity_x1():
    global buy_quantity
    buy_quantity = 1
def buy_quantity_x10():
    global buy_quantity
    buy_quantity = 10
def buy_quantity_x100():
    global buy_quantity
    buy_quantity = 100
Button(frame, text='x1', command=buy_quantity_x1).pack(side=LEFT)
Button(frame, text='x10', command=buy_quantity_x10).pack(side=LEFT)
Button(frame, text='x100', command=buy_quantity_x100).pack(side=LEFT)

def click():
    global money; global upgrading; global money_txt
    money += upgrading
    money_txt = money

    #Reductions k, m, b
    ceil = lambda num: round(money_txt / num, 1)

    if money_txt >= 1e9:
        money_txt = f'{ceil(1e9)}b'
    elif money_txt >= 1e6:
        money_txt = f'{ceil(1e6)}m'
    elif money_txt >= 1e3:
        money_txt = f'{ceil(1e3)}k'
    else: pass

    label['text'] = f'Balance: {money_txt} | Money Per Click: {upgrading} | Money Per Second: {mps_val * 10}'
Button(frame, text='Touch me!', command=click).pack(anchor=CENTER, side=LEFT)

def upgrade_click():
    global money; global upgrading
    if money >= 20.0 * buy_quantity:
        money -= 20.0 * buy_quantity
        upgrading += 1.0 * buy_quantity
    else: pass
Button(frame, text='Click +1', command=upgrade_click).pack(anchor=CENTER, side=LEFT)

# mps = money per second
def mps():
    global money; global mps_val; global money_txt
    if money >= 50.0 * buy_quantity:
        money -= 50.0 * buy_quantity
        mps_val += 0.1 * buy_quantity
        label['text'] = f'Balance: {money_txt} | Money Per Click: {upgrading} | Money Per Second: {mps_val * 10}'
    else: pass
Button(frame, text='mps +1', command=mps).pack(anchor=CENTER, side=LEFT)

lab = Label()
lab.pack(anchor=CENTER, side=BOTTOM)

# def prestige():
#     if money >= 1e5:

def every_second_event():
    global game_time; global money; global mps_val;
    game_time += 0.1
    game_time = round(game_time, 2)
    lab['text'] = f'You play {game_time} seconds'

    money += mps_val
    money = round(money, 1); mps_val = round(mps_val, 1) # Fix ".00000000" bug
    money_txt = money
    #Reductions k, m, b
    if money_txt >= 1e9:
        money_txt = f'{round(money_txt / 1e9, 1)}b'
    elif money_txt >= 1e6:
        money_txt = f'{round(money_txt / 1e6, 1)}m'
    elif money_txt >= 1e3:
        money_txt = f'{round(money_txt / 1e3, 1)}k'
    else: pass
    label['text'] = f'Balance: {money_txt} | Money Per Click: {upgrading} | Money Per Second: {mps_val * 10}'

    root.after(100, every_second_event)
every_second_event()

def save():
    file = open('data.py', 'w')
    file.write(f'money_data = {money}nupgrading_data = {upgrading}nmps_data = {mps_val}ngame_time_data = {game_time}n# Every data in code multiplicate on 10')
Button(frame, text='Save', command=save).pack(side=LEFT)

root.mainloop()
День 3
Первую половину дня я посвятил написанию этого блога. Привет мне из будущего!
Я решил всё же реализовать престиж и после этого занятся оформлением кода.
def prestige():
    global money; global upgrading; global mps_val; global prestige_bonus
    if money >= 1e6:
        prestige_bonus = 1 + (money / 1e7)
        money = 0
        upgrading = 1
        mps_val = 0
    else: pass
Button(text='Prestige', command=prestige).pack()
def save():
    file = open('data.py', 'w')
    file.write(f'''money_data = {money}
upgrading_data = {upgrading}
mps_data = {mps_val}
game_time_data = {game_time}
prestige_bonus_data = {prestige_bonus}
# Every data in code multiplicate on 10''')
Button(frame, text='Save', command=save).pack(side=LEFT)
С третьей попытки всё заработало. В первой была ошибка в save, вторая с global’амы.
После того как я добавил бонусы престижа в код, я не учёл что изначально в upgrading в label’е будет отображаться изначально как 1 а не с бонусом сразу. На это я подзабил, но я не мог подзабить на ещё один баг: баг с плавающей точкой у MPS и кол-во денег за клик. С кликами я решил баг, а клики в секунду почему-то не исправлялись. В чём дело не понятно, код с upgrading_click() практически идентичен, ну и я решил также подзабить на это.
Теперь надо будет заняться оформлением и компактизацией кода.
Компактизация и оформление кода
from tkinter import *
from data import *
root = Tk()
money = money_data; upgrading = upgrading_data; mps_val = mps_data; game_time = game_time_data; prestige_bonus = prestige_bonus_data
frame = Frame()
frame.pack()
label = Label(frame, text=f'Balance: {money} | Money Per Click: {upgrading} | Money Per Second: {mps_val * 10} | Prestige bonus: {prestige_bonus}')
label.pack(side=TOP)
err_label = Label()
err_label.pack(side=TOP)

buy_quantity = 1
def buy_quantity_x1():
    global buy_quantity
    buy_quantity = 1
def buy_quantity_x10():
    global buy_quantity
    buy_quantity = 10
def buy_quantity_x100():
    global buy_quantity
    buy_quantity = 100
Button(frame, text='x1', command=buy_quantity_x1).pack(side=LEFT)
Button(frame, text='x10', command=buy_quantity_x10).pack(side=LEFT)
Button(frame, text='x100', command=buy_quantity_x100).pack(side=LEFT)

fix = lambda var: round(var, 2)

def click():
    global money; global upgrading; global money_txt
    money += upgrading * prestige_bonus
    money_txt = money

    #Reductions k, m, b
    ceil = lambda num: round(money_txt / num, 1)

    if money_txt >= 1e9: money_txt = f'{ceil(1e9)}b'
    elif money_txt >= 1e6: money_txt = f'{ceil(1e6)}m'
    elif money_txt >= 1e3: money_txt = f'{ceil(1e3)}k'
    else: pass

    label['text'] = f'Balance: {money_txt} | Money Per Click: {upgrading} | Money Per Second: {mps_val * 10} | Prestige bonus: {prestige_bonus}'
Button(frame, text='Touch me!', command=click).pack(anchor=CENTER, side=LEFT)

def upgrade_click():
    global money; global upgrading
    if money >= 20.0 * buy_quantity:
        money -= 20.0 * buy_quantity
        upgrading += 1.0 * buy_quantity * prestige_bonus
        upgrading = fix(upgrading)
        label['text'] = f'Balance: {money_txt} | Money Per Click: {upgrading} | Money Per Second: {mps_val * 10} | Prestige bonus: {prestige_bonus}'
    else: pass
Button(frame, text='Click +1', command=upgrade_click).pack(anchor=CENTER, side=LEFT)

# mps = money per second
def mps():
    global money; global mps_val; global money_txt
    if money >= 50.0 * buy_quantity:
        money -= 50.0 * buy_quantity
        mps_val += 0.1 * buy_quantity * prestige_bonus
        mps_val = fix(mps_val)
        label['text'] = f'Balance: {money_txt} | Money Per Click: {upgrading} | Money Per Second: {mps_val * 10} | Prestige bonus: {prestige_bonus}'
    else: pass
Button(frame, text='mps +1', command=mps).pack(anchor=CENTER, side=LEFT)

lab = Label()
lab.pack(anchor=CENTER, side=BOTTOM)

def prestige():
    global money; global upgrading; global mps_val; global prestige_bonus
    if money >= 1e6:
        prestige_bonus = 1 + (money / 1e7)
        money = 0
        upgrading = 1
        mps_val = 0
    else: pass
Button(text='Prestige', command=prestige).pack()

def every_second_event():
    global game_time; global upgrading; global money; global mps_val
    game_time += 0.1
    game_time = round(game_time, 2)
    lab['text'] = f'You play {game_time} seconds'

    money += mps_val

    # Fixing ".00000000" bug
    money = fix(money)
    upgrading = fix(upgrading)
    mps_val = fix(mps_val)
    money_txt = money

    #Reductions k, m, b
    if money_txt >= 1e9:
        money_txt = f'{round(money_txt / 1e9, 1)}b'
    elif money_txt >= 1e6:
        money_txt = f'{round(money_txt / 1e6, 1)}m'
    elif money_txt >= 1e3:
        money_txt = f'{round(money_txt / 1e3, 1)}k'
    else: pass
    label['text'] = f'Balance: {money_txt} | Money Per Click: {upgrading} | Money Per Second: {mps_val * 10} | Prestige bonus: {prestige_bonus}'

    root.after(100, every_second_event)
every_second_event()

def save():
    file = open('data.py', 'w')
    file.write(f'''money_data = {money}
upgrading_data = {upgrading}
mps_data = {mps_val}
game_time_data = {game_time}
prestige_bonus_data = {prestige_bonus}
# Every data in code multiplicate on 10''')
Button(frame, text='Save', command=save).pack(side=LEFT)

root.mainloop()
Первое что бросается в глаза это постояное повторение f'Balance: {money} | Money Per Click: {upgrading} | Money Per Second: {mps_val * 10} | Prestige bonus: {prestige_bonus}'. Я думал что просто создам переменную, но всё слетело к фигам собачим и ничего не работало. Добавил global’ы — не работало.
Убрав f я понял в чём проблема. Заданные значения сохраняются и не хотят обновляться. Я не понимал как это исправить. Я столько всякой фигни поиспробывал, но ничего не помогало (даже гугл). В итоге это стало третьей вещью над которой я положил хрен.
А после того как я решил оставить этот повторяющийся текст и запустить игру, спустя второго престижа после любого клика на милисекунду вылизал тот баг с милисекундой. После этого я решил отложить этот проект на неопределённое время.
День 4 (6 с начала проекта)
Спустя три дня я решил вернуться к проекту. За это время я уже изучил основы SQLite и начал изучать библиотеку sqlite3. Я догадался что в коде можно сначала сделать самые простые сокращения, но после небольших изменений оказалось что вылезало два окна и при закрытии одного из них вылезала ошибка. Это было не критично, но всё же не очень. Посмотрев на свою последнюю версию кода в третий день разработки я переставил переменную root на третье место и всё заработало нормально.
Далее баг второго престижа. Он был тоже не критичен, но так сильно бесил… Я решил что стоит округлять бонус престижа до десятых.
Также до меня дошло что money и money_data ничем не отличаются и поэтому переменные в файле «data.py» я назвал также как и переменные в основном файле.
Смотря на код, до меня внезапно дошло что код функций upgrade_click() и mps() практически ничем не отличается, и я создал функцию some_upgrade()
Когда я запустил код с новой функцией, то я заметил что money_txt появляется только после нажатия по кнопке клика. Но ещё улучшения не прибавлялись. Со вторым было понятно что действия происходят со значением value а не с переменной. Но чтобы полностью убедиться я заменил в функции выражения с value на upgrading и всё как полагалось. И на этот момент времени что наступил пятый день… Ну пофигу, допишу в четвёртом дне то что я хотел сделать.
В общем, из выражений с value я сделал переменую some_value. Однако всё не так просто (опять!), мне пришлось добавить if elif в код и туповатый ведь при новом улучшении мне придётся переписывать some_upgrade(), но лучше чем ничего. Пожалуй покажу код а то говорю говорю и ничего не показываю.
def some_upgrade(float1, value, float2):
    global money; global money_txt; global upgrading; global mps_val
    if money >= float1 * buy_quantity:
        money -= float1 * buy_quantity
        if value == upgrading:
            upgrading += float2 * buy_quantity * prestige_bonus
            upgrading = fix(upgrading)
        elif value == mps_val:
            mps_val += float2 * buy_quantity * prestige_bonus
            mps_val = fix(mps_val)
        label['text'] = f'Balance: {money_txt} | Money Per Click: {upgrading} | Money Per Second: {mps_val * 10} | Prestige bonus: {prestige_bonus}'
    else: pass


def upgrade_click():
    global money; global upgrading; global money_txt
    some_upgrade(20.0, upgrading, 1.0)
Button(frame, text='Click +1', command=upgrade_click).pack(anchor=CENTER, side=LEFT)

# mps = money per second
def mps():
    global money; global mps_val; global money_txt
    some_upgrade(50.0, mps_val, 0.1)
Button(frame, text='mps +1', command=mps).pack(anchor=CENTER, side=LEFT)
Да, там лишь часть, но надо скидывать почти весь код чтобы показать все изменения. Могу сказать что в нём сейчас 123 строки.
Итак, у меня осталось из проблем:
money_txtпоявляется только после клика по одноимённой кнопке.- Повторение
f'Balance: {money} | Money Per Click: {upgrading} | Money Per Second: {mps_val * 10} | Prestige bonus: {prestige_bonus}' - «Баг .00000»
Всех их я конечно решу в пятый день. Надеюсь.
День 5 (7 с нач. пр.)
Я решил просто поиграть в игру, и тут я понял что мне нужно как-то сделать ресет данных. Это удалось мне легко.
def reset():
    cmd = input('You want reset data? ("yes" or "no") ')
    cmd = cmd.lower()
    if cmd == 'yes':
        file = open('data.py', 'w')
        file.write(f'''money = 0.0
upgrading = 1.0
mps_val = 0.0
game_time = 0.0
prestige_bonus = 1.0
# mps_val multiplies on 10
''')
        print('After close all data will be erased.')
    else: pass
Button(frame, text='Reset', command=reset).pack(side=LEFT)
Также я сделал так чтобы у игрового времени не было исчисления в десятых секундах а также добавил сокращение до минут и часов. Для этого мне пришлось создать отдельную переменную для исправления не только бага «.00000», а чтобы ещё работало оно нормально.
def every_second_event():
    global game_time; global upgrading; global money; global mps_val
    game_time += 0.1; gt_fix = game_time
    time_reductions = ''

    if game_time >= 3600.0:
        gt_fix = round(game_time / 3600)
        time_reductions = f'You play {gt_fix} hours'
    elif game_time >= 60.0:
        gt_fix = round(game_time / 60)
        time_reductions = f'You play {gt_fix} minutes'
    else:
        gt_fix = round(game_time)
        time_reductions = f'You play {gt_fix} seconds'

    lab['text'] = time_reductions
Спустя некоторое время я понял чтобонус престижа не влияет на mps, что было непонятно ведь с upgrading проблем не было. Возможно это было из-за того что изначальное значение mps_val в 10 раз меньше показываемого. Я подумал что стоит заменить это на обычное число, но это не помогло и пишлось бы копаться в коде чтобы всё это переделать. Я решил сделать перерыв :/
pygameClicker
A simple clicker game made with the pygame library to learn Python.
IMPORTANT: This was made with Python 3.5.3, and as such MAY only run with that version (it might run on other versions).
It will also require that you install the correct version of pygame hosted here: http://www.lfd.uci.edu/~gohlke/pythonlibs/#pygame
YOU MUST CHOOSE THE pygame-1.9.3-cp35-cp35m-win_amd64.whl FILE. Install it according to the instructions here: https://www.webucator.com/blog/2015/03/installing-the-windows-64-bit-version-of-pygame/
Run the program by typing «python clicker.py» into your command line in the correct directory.
Alternative download link for the specific version of pygame.
Which comes from here.
Simple Screenshot:

In this article, we will see how to create an auto-clicker using Python. The code will take input from the keyboard when the user clicks on the start key and terminates auto clicker when the user clicks on exit key, the auto clicker starts clicking wherever the pointer is placed on the screen. We are going to use the pynput module here.
What is Auto Clicker?
Auto-Clicker is a script where you can auto control mouse and keyboard as many numbers of times as you want. It is controlled using user-defined keys. It works on various platforms like Windows, Mac and Linux. Auto clicker is present in pywin32 module.
Approach:
In this project, we will use a cross-platform module pynput to control the mouse and monitor the keyboard at the same time to create simple auto-clicker. To check for mouse events we will install pynput module (used to control the mouse) for this execute, pip install pynput in cmd.
Note: If you’re stuck on how to set up python-pip package on your system then click here
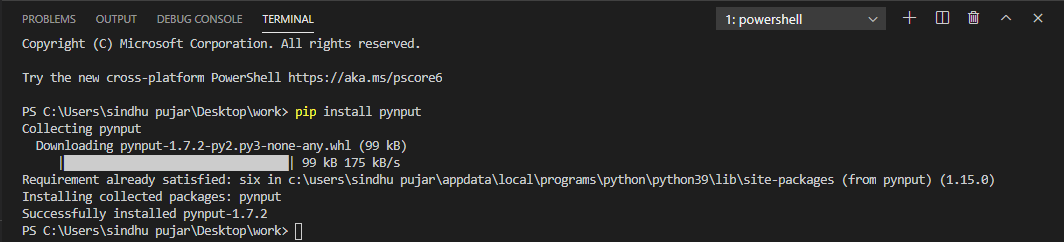
Installation of pynput module
Verify whether the pynput module has been successfully installed into your working environment for this, open IDLE on the system that is cmd or Python Shell. Execute the command import pynput, after executing this the output should give zero errors which means your module is successfully installed.
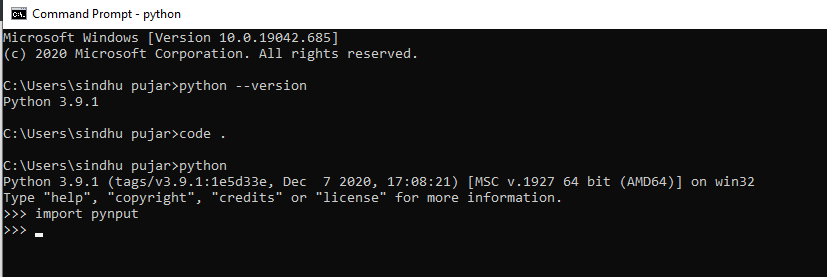
Verifying module installation
Implementation:
Let’s now proceed with the code that is required to build an Auto-clicker using Python. Follow the below steps to create an auto-clicker:
Step 1: Import time and threading then import Button and Controller from pynput.mouse module. Import Listener and KeyCode from pynput.keyboard.
Python3
import time
import threading
from pynput.mouse import Button, Controller
from pynput.keyboard import Listener, KeyCode
Step 2: Create four variables as mentioned below,
- delay: Delay between each click (in seconds)
- button: Button is used to click in whatever direction you want to. Button.left | Button.middle | Button.right
- start_stop_key: The key used for start and stop of the click while you run the program for executing the auto clicker. It should be from a key class or set using KeyCode.
- exit_key: The key used to terminate the auto clicker that is being executed. This should be from the key class or set using KeyCode.
Python3
delay = 0.001
button = Button.right
start_stop_key = KeyCode(char='a')
stop_key = KeyCode(char='b')
Step 3: Create a class extending threading.Thread. Pass delay and button to the class that have two flags to check if the program is executed or not.
Python3
class ClickMouse(threading.Thread):
def __init__(self, delay, button):
super(ClickMouse, self).__init__()
self.delay = delay
self.button = button
self.running = False
self.program_running = True
Step 4: Add methods to control the threads externally.
Python3
def start_clicking(self):
self.running = True
def stop_clicking(self):
self.running = False
def exit(self):
self.stop_clicking()
self.program_running = False
Step 5: A method is created when the thread starts, the program_running runs on loop until the value comes out to be true and also create another loop inside the existing loop where it checks if running is set to true or not. In case, we are inside both loops, it will click on the set button and sleep for the set delay.
Python3
def run(self):
while self.program_running:
while self.running:
mouse.click(self.button)
time.sleep(self.delay)
time.sleep(0.1)
Step 6: Creating an instance for the mouse controller, then create ClickMouse thread. Start the instance to move into the loop inside the run method.
Python3
mouse = Controller()
click_thread = ClickMouse(delay, button)
click_thread.start()
Step 7: Create a method on_press which takes a key as an argument and sets up a keyboard listener. The start_stop_key matches with a start key (a) when it is executed. Then the click is to be terminated when running flag is set to True in the thread. Exit method is called in the method if the exit key (b) is executed and stop the listener.
Python3
def on_press(key):
if key == start_stop_key:
if click_thread.running:
click_thread.stop_clicking()
else:
click_thread.start_clicking()
elif key == stop_key:
click_thread.exit()
listener.stop()
with Listener(on_press=on_press) as listener:
listener.join()
After the code is run we can see in the output as shown below, it shows the number of clicks the auto-clicker has made after the code is implemented. It is compatible with Windows, Mac and Linux. Auto-Clicker is helpful software for the systems as it let’s save a reasonable amount of time that is spent on repeated amount of clicks.
Below is the complete program:
Python3
import time
import threading
from pynput.mouse import Button, Controller
from pynput.keyboard import Listener, KeyCode
delay = 0.001
button = Button.right
start_stop_key = KeyCode(char='a')
stop_key = KeyCode(char='b')
class ClickMouse(threading.Thread):
def __init__(self, delay, button):
super(ClickMouse, self).__init__()
self.delay = delay
self.button = button
self.running = False
self.program_running = True
def start_clicking(self):
self.running = True
def stop_clicking(self):
self.running = False
def exit(self):
self.stop_clicking()
self.program_running = False
def run(self):
while self.program_running:
while self.running:
mouse.click(self.button)
time.sleep(self.delay)
time.sleep(0.1)
mouse = Controller()
click_thread = ClickMouse(delay, button)
click_thread.start()
def on_press(key):
if key == start_stop_key:
if click_thread.running:
click_thread.stop_clicking()
else:
click_thread.start_clicking()
elif key == stop_key:
click_thread.exit()
listener.stop()
with Listener(on_press=on_press) as listener:
listener.join()
Now let’s execute the python program we’ve written and then press the start (a) and stop (a) keys in order to initiate the auto clicker.
Output:
I have come up with some code that I am using for a clicker game, kinda like Cookie Clicker.
from tkinter import *
import time

master = Tk()

def uiPrint():
    info()
    print("")
    print(click)
    blankLine()

def info():
    print("Double click purchases need 50 clicks!")
    print("Auto clicker purchases need 75 clicks!")

info()

click = 0
mult = 1
dcp1 = 0

def blankLine():
    for i in range(20):
        print("")

def purchaseDoubleClicksCommand():
    global click
    global mult
    if click < 5:
        print("Not enough clicks!")
        blankLine()
    elif click >= 5:
        mult = mult*2
        click = click - 5
        print("Double Clicks Purchased!")
        blankLine()


def purchaseAutoClickerCommand():
    global click
    if click < 7:
        print("Not enough clicks!")
        blankLine()
    elif click >= 7:
        click = click - 7
        print("Auto clicker purchased!")
        while True:
            click = click + 1
            time.sleep(1)


def buttonCommand():
    global click
    global mult
    click += 1*(mult)
    uiPrint()

    if click == 100:
        print('''Achievement Unlocked: Junior Clicker!
        BONUS 100 clicks!''')
        click += 100

    elif click == 400:
        print ('''Achievement Unlocked: Little Ninja Clicks!
        BONUS 200!''')
        click += 300

    elif click == 1500:
        print ('''Achievement Unlocked: Click Ninja Master!
        QUAD CLICKS!''')
        mult = mult * 4

    elif click == 3000:
        print ('''Achievement Unlocked:  Jackie Chan Style!
        8 TIMES THE CLICKS!''')
        mult = mult * 8

mainClickButton = Button(master, text="Click!", command = buttonCommand)
mainClickButton.pack()

purchaseDoubleClickButton = Button(master, text="Purchase Double Clicks", command = purchaseDoubleClicksCommand)
purchaseDoubleClickButton.pack()

purchaseAutoClickerButton = Button(master, text="Purchase Auto Clicker", command = purchaseAutoClickerCommand)
purchaseAutoClickerButton.pack()

master.title("Clicker! v0.0.6")
master.geometry("%sx%s+%s+%s" % (200,70,512,512))
mainloop()
This is the code that I have so far. I am trying to add an Auto Clicker that you can buy through a button. I have found one other post that is about this, but the solution for that uses PyMouse which 1.) I can’t get installed (Trust me I’ve tried everything) and 2.) Don’t want to imitate user input.
So this is the code in question.
def purchaseAutoClickerCommand():
    global click
    if click < 7:
        print("Not enough clicks!")
        blankLine()
    elif click >= 7:
        click = click - 7
        print("Auto clicker purchased!")
        while True:
            click = click + 1
            time.sleep(1)
And the code in charge of the button
purchaseAutoClickerButton = Button(master, text="Purchase Auto Clicker", command = purchaseAutoClickerCommand)
purchaseAutoClickerButton.pack()
When I hit the button that says «Purchase Auto Clicker», not only do I not get the number of clicks to increase by one per second, but the entire app crashes.
So my main question is, how can I have the number of clicks increase by one per second by the game itself (without the user needing to keep the mouse on the «Click!» button), and how can I have the Auto Clickers stack when more than one are bought (plus I would like to not have the program crash as soon as I try to buy it).
Editing this for Scratso to see:
This is what I have changed to the code
click = 0
mult = 1
dcp1 = 0
autoclickers = 0

def blankLine():
    for i in range(20):
        print("")

def purchaseDoubleClicksCommand():
    global click
    global mult
    if click < 5:
        print("Not enough clicks!")
        blankLine()
    elif click >= 5:
        mult = mult*2
        click = click - 5
        print("Double Clicks Purchased!")
        blankLine()


def purchaseAutoClickerCommand():
    global click
    global autoclickers
    if click < 7:
        print("Not enough clicks!")
        blankLine()
    elif click >= 7:
        autoclickers += 1 # add an autoclicker
        click = click - 7
        print("Auto clicker purchased!")
And at the end of the code I have added
while True:
    mainClickButton = Button(master, text="Click!", command = buttonCommand)
    mainClickButton.pack()

    purchaseDoubleClickButton = Button(master, text="Purchase Double Clicks", command = purchaseDoubleClicksCommand)
    purchaseDoubleClickButton.pack()

    purchaseAutoClickerButton = Button(master, text="Purchase Auto Clicker", command = purchaseAutoClickerCommand)
    purchaseAutoClickerButton.pack()

    master.title("Clicker! v0.0.6")
    master.geometry("%sx%s+%s+%s" % (200,70,512,512))
    mainloop()

    for autoclicker in range(autoclickers):
        click += 1
    time.sleep(1)
This game is Clicky Clicks it’s just gone into beta still has lots of problems and bugs but I am going to take a break from programming it for a bit and I thought i should just share an open beta of the game leave a comment if you find any bugs or have any suggestions and thanks for checking this out
# importing stuff

import pygame
import time


# initializing pygame

pygame.init()

# defining variables

clock = pygame.time.Clock()
ver = "Beta 0.1.3.3"
autog = 0
coins = 0
display_width = 800
display_height = 600
white = (255, 255, 255)
black = (0, 0, 0)
grey = (128, 128, 128)
light_grey = (224, 224, 224)

# creating display and caption

gameDisplay = pygame.display.set_mode((display_width, display_height))
pygame.display.set_caption("clicky clicks")

# defining functions

def autominer():
    global coins
    global autog
    time.sleep(0.1)
    coins = coins + autog


def DrawText(text, Textcolor, Rectcolor, x, y, fsize):
    font = pygame.font.Font('freesansbold.ttf', fsize)
    text = font.render(text, True, Textcolor, Rectcolor)
    textRect = text.get_rect()
    textRect.center = (x, y)
    gameDisplay.blit(text, textRect)


def rectangle(display, color, x, y, w, h):
    pygame.draw.rect(display, color, (x, y, w, h))


def main_loop():
    global clock
    global autog
    global ver
    mong = 1
    cost = 50
    cost2 = 50
    global coins
    game_running = True
    while game_running:
        if game_running:
            autominer()
        for event in pygame.event.get():
            if event.type == pygame.QUIT:
                game_running = False

            if event.type == pygame.MOUSEBUTTONDOWN:
                mopos = pygame.mouse.get_pos()
                if mopos >= (350, 0):
                    if mopos <= (450, 0):
                        coins += mong

                if mopos <= (800, 0):
                    if mopos >= (600, 0):
                        if coins >= cost:
                            coins = coins - cost
                            cost = cost * 1.5
                            mong += 1
                            cost = round(cost, 0)
                            print(f'{cost:.2f}')

                if mopos >= (50, 0):
                    if mopos <= (245, 0):
                        if coins >= cost2:
                            coins = coins - cost2
                            cost2 = cost2 * 1.5
                            autog = autog + 0.4
                            cost2 = round(cost2, 0)
                            print(f'{cost2:.2f}')

                if coins == 2147483647:
                    print("You Beat the game")


        # drawing stuff

        gameDisplay.fill(white)
        DrawText("Clicky Clicks", black, white, 400, 100, 50)
        DrawText("you have " + str(f'{coins:.2f}') + " coins", black, white, 100, 50, 20)
        DrawText("upgrade 50*1.2", black, white, 700, 300, 20)
        DrawText("buy auto miner 50*1.2", black, white, 150, 370, 20)
        DrawText("Version: " + ver, black, white, 650, 50, 20)
        rectangle(gameDisplay, light_grey, 50, 400, 200, 300)
        rectangle(gameDisplay, black, 350, 250, 100, 100)
        rectangle(gameDisplay, light_grey, 600, 317, 200, 300)
        pygame.display.update()
        clock.tick(60)

# ending the program

main_loop()
pygame.quit()
quit()
~~ UwU
Posts: 15
Threads: 7
Joined: Jan 2020
Reputation:
0
Updated version of clicky clicks
# importing stuff

import pygame
import time


# initializing pygame

pygame.init()

# defining variables

clock = pygame.time.Clock()
ver = "Beta 0.1.4.2"
autog = 0
coins = 0
display_width = 800
display_height = 600
white = (255, 255, 255)
black = (0, 0, 0)
grey = (128, 128, 128)
light_grey = (224, 224, 224)

# creating display and caption

gameDisplay = pygame.display.set_mode((display_width, display_height))
pygame.display.set_caption("clicky clicks")

# defining functions

def autominer():
    global coins
    global autog
    time.sleep(0.1)
    coins = coins + autog


def DrawText(text, Textcolor, Rectcolor, x, y, fsize):
    font = pygame.font.Font('freesansbold.ttf', fsize)
    text = font.render(text, True, Textcolor, Rectcolor)
    textRect = text.get_rect()
    textRect.center = (x, y)
    gameDisplay.blit(text, textRect)


def rectangle(display, color, x, y, w, h):
    pygame.draw.rect(display, color, (x, y, w, h))


def main_loop():
    global clock
    global autog
    global ver
    mong = 1
    cost = 50
    cost2 = 50
    global coins
    game_running = True
    while game_running:
        if game_running:
            autominer()
        for event in pygame.event.get():
            if event.type == pygame.QUIT:
                game_running = False

            if event.type == pygame.MOUSEBUTTONDOWN:
                mopos = pygame.mouse.get_pos()
                if mopos >= (350, 0):
                    if mopos <= (450, 0):
                        coins += mong

                if mopos <= (800, 0):
                    if mopos >= (600, 0):
                        if coins >= cost:
                            coins = coins - cost
                            cost = cost * 1.5
                            mong = mong * 1.1
                            cost = round(cost, 0)

                if mopos >= (50, 0):
                    if mopos <= (245, 0):
                        if coins >= cost2:
                            coins = coins - cost2
                            cost2 = cost2 * 1.5
                            autog = autog + 0.5
                            cost2 = round(cost2, 0)

                if coins == 2147483647:
                    print("You Beat the game")
                    game_running = False


        # drawing stuff

        gameDisplay.fill(white)
        DrawText("Clicky Clicks", black, white, 400, 100, 50)
        DrawText("you have " + str(f'{coins:.2f}') + " coins", black, white, 100, 50, 20)
        DrawText("upgrade clicker " + str(cost), black, white, 700, 300, 20)
        DrawText("buy auto miner " + str(cost2), black, white, 150, 370, 20)
        DrawText("Version: " + ver, black, white, 650, 50, 20)
        rectangle(gameDisplay, light_grey, 50, 400, 200, 300)
        rectangle(gameDisplay, black, 350, 250, 100, 100)
        rectangle(gameDisplay, light_grey, 600, 317, 200, 300)
        pygame.display.update()
        clock.tick(60)

# ending the program

main_loop()
pygame.quit()
quit()
~~ UwU
Posts: 15
Threads: 7
Joined: Jan 2020
Reputation:
0
another update to the game
# importing stuff

import pygame
import time


# initializing pygame

pygame.init()

# defining variables

clock = pygame.time.Clock()
ver = "Beta 0.1.6.3"
autog = 0
coins = 0
display_width = 800
display_height = 600
white = (255, 255, 255)
black = (0, 0, 0)
grey = (128, 128, 128)
light_grey = (224, 224, 224)
light_blue = (173, 216, 230)
grey = (128, 128, 128)
blue = (0, 100, 250)

# creating display and caption

gameDisplay = pygame.display.set_mode((display_width, display_height))
pygame.display.set_caption("clicky clicks")

# defining functions

def circle(display, color, x, y, radius):
    pygame.draw.circle(display, color, [x, y], radius)

def autominer():
    global coins
    global autog
    time.sleep(0.1)
    coins = coins + autog


def DrawText(text, Textcolor, Rectcolor, x, y, fsize):
    font = pygame.font.Font('freesansbold.ttf', fsize)
    text = font.render(text, True, Textcolor, Rectcolor)
    textRect = text.get_rect()
    textRect.center = (x, y)
    gameDisplay.blit(text, textRect)


def rectangle(display, color, x, y, w, h):
    pygame.draw.rect(display, color, (x, y, w, h))


def main_loop():
    global clock
    global autog
    global ver
    global color1
    global color2
    global color3
    mong = 1
    cost = 50
    cost2 = 50
    global coins
    game_running = True
    while game_running:
        if game_running:
            autominer()
        for event in pygame.event.get():
            if event.type == pygame.QUIT:
                game_running = False

            if event.type == pygame.MOUSEBUTTONDOWN:
                mopos = pygame.mouse.get_pos()
                if mopos >= (350, 0):
                    if mopos <= (450, 0):
                        coins += mong

                if mopos <= (800, 0):
                    if mopos >= (600, 0):
                        if coins >= cost:
                            coins = coins - cost
                            cost = cost * 1.5
                            mong = mong * 1.1
                            cost = round(cost, 0)

                if mopos >= (50, 0):
                    if mopos <= (245, 0):
                        if coins >= cost2:
                            coins = coins - cost2
                            cost2 = cost2 * 1.5
                            autog = autog + 0.5
                            cost2 = round(cost2, 0)

                if coins == 2147483647:
                    print("You Beat the game")
                    game_running = False


        # drawing stuff

        gameDisplay.fill(light_blue)
        DrawText("Clicky Clicks", black, light_blue, 400, 100, 50)
        DrawText("you have " + str(f'{coins:.2f}') + " coins", black, light_blue, 100, 50, 20)
        DrawText("upgrade clicker " + str(cost), black, light_blue, 700, 300, 20)
        DrawText("buy auto miner " + str(cost2), black, light_blue, 150, 370, 20)
        DrawText("Version: " + ver, black, light_blue, 650, 50, 20)
        rectangle(gameDisplay, blue, 50, 400, 200, 300)
        circle(gameDisplay, blue, 400, 260, 60)
        rectangle(gameDisplay, blue, 600, 317, 200, 300)
        pygame.display.update()
        clock.tick(60)

# ending the program

main_loop()
pygame.quit()
quit()
~~ UwU
Hello coders!! In this article, we will understand the concept of auto clicker in python. We will first understand its meaning and its implementation in python. So without wasting any time, let’s get straight into the topic.
What is an auto clicker?
Auto clicker is a script available in python that facilitates the user to repeatedly clicking their mouse within small delay intervals. It is controlled by user-defined keys and works on every environment – Windows, Mac, and Linux. To achieve this, we will use a module called PyAutoGUI in Python. This will allow us to control the mouse and monitor the keyboard at the same time.
Ways to Create an Auto Clicker in Python:
- Using PyAutoGui
- Using Pynput
PyAutoGUI Installation:
To install pyautogui, type the following command:
pip install pyautogui
Key features of PyAutoGUI:
- Sends Keystrokes to applications
- Moves the mouse and clicks in the windows of other applications
- Locate an application’s window
- Display of message boxes for user interaction
Keyboard and Mouse Controls using PyAutoGUI:
PyAutoGUI uses the (x,y) coordinate with the origin (0,0) at the screen’s top-left corner. The x coordinates increase as we go to the right, whereas the ‘y’ coordinates increase as we go down. Currently, PyAutoGUI works only on the primary monitor. It isn’t reliable for the screen of a second monitor. All the presses on the keyboard done by PyAutoGUI are delivered to the window that currently has focus.
Making auto clicker in Python using PyAutoGUI:
import pyautogui
import time

def click():
    time.sleep(0.1)
    pyautogui.click()

def main():
    for i in range(20):
        click()

main()
Making Auto Clicker in Python using Pynput:
Pynput is a module available in python used to control mouse movements. It can be used to make an auto clicker in python.
Installation of Pynput:
To install pynput, type the following command:
pip install pynput
import time
import threading
from pynput.mouse import Button, Controller
from pynput.keyboard import Listener, KeyCode


delay = 0.001
button = Button.left
start_stop_key = KeyCode(char='s')
exit_key = KeyCode(char='e')


class ClickMouse(threading.Thread):
    def __init__(self, delay, button):
        super(ClickMouse, self).__init__()
        self.delay = delay
        self.button = button
        self.running = False
        self.program_run = True

    def start_clicking(self):
        self.running = True

    def stop_clicking(self):
        self.running = False

    def exit(self):
        self.stop_clicking()
        self.program_run = False

    def run(self):
        while self.program_run:
            while self.running:
                mouse.click(self.button)
                time.sleep(self.delay)
            time.sleep(0.1)


mouse = Controller()
thread = ClickMouse(delay, button)
thread.start()


def on_press(key):
    if key == start_stop_key:
        if thread.running:
            thread.stop_clicking()
        else:
            thread.start_clicking()
    elif key == exit_key:
        thread.exit()
        listener.stop()

with Listener(on_press=on_press) as listener:
    listener.join()
Explanation:
Importing required modules:
- Button and controller: to control the mouse.
- Listener and KeyCode: to watch for keyboard events to start and stop the python auto clicker.
Declaring important variables:
- button: a button that will be clicked.
- begin_end: the key that we will use to start and stop the auto clicker.
- exit_key: to close and reset the program and reset everything.
Creating a class to extend threading:
The thread created will allow us to control the mouse clicks. There are two parameters – delay and button. There are also two flags about whether the program is running or not.
Creating methods to handle the thread externally:
- begin(): starts the thread
- end(): stops the thread
- exit(): exits the program and resets
Creating a method that will run when the thread starts:
This method will run once the thread starts. We will keep iterating through the loop till the value of run_prgm is True. The loop inside the first loop is iterated till the value of a run is True. Once we are inside both the loops, we click the set button.
Creating an instance for mouse controller:
The Mouse_click thread that we created will start when the user gets into the loop in the run method.
Creating a method to setup keyboard listener:
If the key pressed is the begin_end, it will stop clicking given that the flag is set to true. Otherwise, it will start it. If the key pressed is the exit_key, the exit method is called in the thread and stop the listener.
More >> Interesting Python Frameworks You Should Know
Conclusion: Python Auto Clicker
These are two different ways in which one can create an auto clicker in python. It can be further modified as per one’s requirement.
However, if you have any doubts or questions, do let me know in the comment section below. I will try to help you as soon as possible.
Happy Pythoning!