В нынешнее время каждый может стать успешным разработчиком мобильных игр или приложений, не прилагая к этому титанических усилий. Примером такого случая является Донг Нгуен, разработавший Flappy Bird. В игре не было никакой сложной механики или графики, но это не помешало ей стать популярной и приносить своему создателю по пятьдесят тысяч долларов в день. Однако в игре не было ничего примечательного. Всё, что потребовалось для успеха, — оказаться в нужном месте в нужное время и немного удачи. Подобное может произойти и сегодня, вам просто нужна правильная идея.
Чтобы продемонстрировать, насколько легко написать что-то подобное, сегодня мы напишем свой Flappy Bird с помощью Unity всего за 10 минут.
Игровой персонаж
Сначала создайте новый проект и убедитесь, что выбрана опция 2D.

Загрузите свой спрайт птицы в сцену. Не забудьте включить фантазию!
Затем отрегулируйте размер спрайта как вам нравится, перетягивая его за угол в нужном направлении. Спрайт должен быть виден в окне иерархии (hierarchy) слева. В нём видны все объекты в сцене, и на данный момент их должно быть всего два: камера и птица.
Перетащите камеру на птицу и отпустите. Камера должна оказаться под птицей, это будет значить, что камера теперь «ребёнок» птицы. Теперь позиция камеры будет фиксироваться относительно птицы. Если птица двигается вперёд, то камера делает то же самое.

Снова выберите птицу в сцене или в окне иерархии. Вы увидите список опций и атрибутов справа в окне под названием Inspector. Здесь вы можете управлять различными переменными, привязанными к определённому объекту.
Теперь нажмите на Add Component. Выберите Physics2D > Rigidbody2D — это готовый набор инструкций для применения гравитации к нашему персонажу. Нажмите на Constraints в этой панели и затем выберите freeze rotation Z. Это позволит предотвратить вращение птицы вместе с камерой по кругу.
Таким же образом добавьте Polygon Collider, который говорит Unity, где находятся границы персонажа. Нажмите Play и увидите, как спрайт вместе с камерой бесконечно падает вниз.

Пока всё идёт хорошо!
Теперь пора заняться полётами персонажа, благо это будет несложно.
Сначала нужно создать C#-скрипт. Создайте для него папку (кликните правой кнопкой мыши где-нибудь в assets и создайте папку «Scripts»), сделайте клик правой кнопкой мыши и выберите Create > C# Script.
Назовём его «Character». Кликните по нему дважды, чтобы открыть его в вашей IDE, будь то MonoDevelop или Visual Studio. Затем добавьте следующий код:
public class Character : MonoBehaviour {

    public Rigidbody2D rb;
    public float moveSpeed;
    public float flapHeight;

    // Это нужно для инициализации
    void Start () {
        rb = GetComponent();
    }


    // Update вызывается один раз на кадр
    void Update () {
        rb.velocity = new Vector2(moveSpeed, rb.velocity.y);
        if (Input.GetMouseButtonDown(0))
        {
            rb.velocity = new Vector2(rb.velocity.x, flapHeight);
        }

        if (transform.position.y > 18 || transform.position.y < -19)
        {
            Death();
        }

    }

    public void Death()
    {
        rb.velocity = Vector3.zero;
        transform.position = new Vector2(0, 0);
    }

}
Этот код делает две вещи. Он заставляет персонажа двигаться вперёд со скоростью, которую мы определим в инспекторе, и создаёт ощущение полёта птицы. Метод Update() вызывается повторно на протяжении игры, поэтому всё, что вы сюда поместите, будет выполняться непрерывно. В данном случае мы добавляем немного скорости нашему объекту. Переменная rb является скриптом RigidBody2D, который мы применили к нашему объекту ранее, поэтому когда мы пишем rb.velocity, мы обращаемся к скорости объекта.
Тап по экрану интерпретируется Unity как клик мыши, если вы используете мобильное устройство. После нажатия мы заставляем персонажа немного подняться вверх.
Переменная moveSpeed будет отвечать за скорость движения, а переменная flapHeight — за увеличение высоты полёта птицы после каждого нажатия. Поскольку эти переменные объявлены как public, мы сможем изменить их вне скрипта.
Метод Death() тоже объявлен как public, что значит, что другие объекты и скрипты смогут его вызвать. Этот метод просто возвращает положение персонажа в начало. Также он будет использоваться каждый раз, когда персонаж будет залетать слишком высоко или низко. Скоро вы поймёте, почему он объявлен именно как public. Строка rb.velocity = Vector3.zero; нужна, чтобы убрать импульс — мы же не хотим, чтобы после каждой смерти персонаж падал всё быстрее и быстрее?
Теперь можно выходить из IDE и добавлять скрипт как компонент к персонажу. Для этого нужно выбрать нашу птицу и нажать Add Component > Scripts > Character. Теперь мы можем определять moveSpeed и flapHeight в инспекторе (для этого и нужны public-переменные). Присвоим переменным значения 3 и 5 соответственно.
И ещё: в инспекторе нужно добавить тег к персонажу. Для этого кликните там, где написано Tag: Untagged и затем выберите Player в выпадающем списке.
Препятствия
Теперь добавим препятствия: трубы. Кто-то в трубах находит грибы, а кто-то — свою смерть.
Перетащите спрайт трубы в сцену в место, где должно быть первое препятствие, и назовите его pipe_up.
Теперь создадим новый скрипт под названием Pipe:
public class Pipe : MonoBehaviour {

    private Character character;

    // Это нужно для инициализации
    void Start () {
        character = FindObjectOfType();
    }


    // Update вызывается один раз на кадр
    void Update () {
        if (character.transform.position.x - transform.position.x > 30)
        {

        }
    }

    void OnCollisionEnter2D(Collision2D other)
    {
        if (other.gameObject.tag == "Player")
        {
            character.Death();
        }
    }

}
Добавьте этот скрипт к спрайту трубы тем же образом, что и раньше. Таким образом, труба будет возвращаться на экран после выхода за его левую границу. Мы тут ещё ничего не сделали, но ещё вернёмся к этому.
Метод OnCollisionEnter2D() вызывается каждый раз при взаимодействии трубы с персонажем. После этого вызывается созданный ранее метод Death(), возвращающий игрока в начальную точку.
Итак, у нас есть одна труба, которая время от времени будет исчезать и появляться на другом конце экрана. Врежешься в неё — умрёшь.
Перевёрнутые трубы
Сейчас у нас есть только один спрайт трубы. Давайте добавим ещё один. Для этого кликните правой кнопкой мыши в окне иерархии, нажмите New 2D Object > Sprite и затем выберите спрайт, который хотите использовать. Ещё проще будет просто перетащить файл в сцену ещё раз.
Назовите этот спрайт pipe_down. В инспекторе в части Sprite Renderer выберите опцию Flip Y, чтобы перевернуть трубу вверх ногами. Добавьте такое же RigidBody2D.
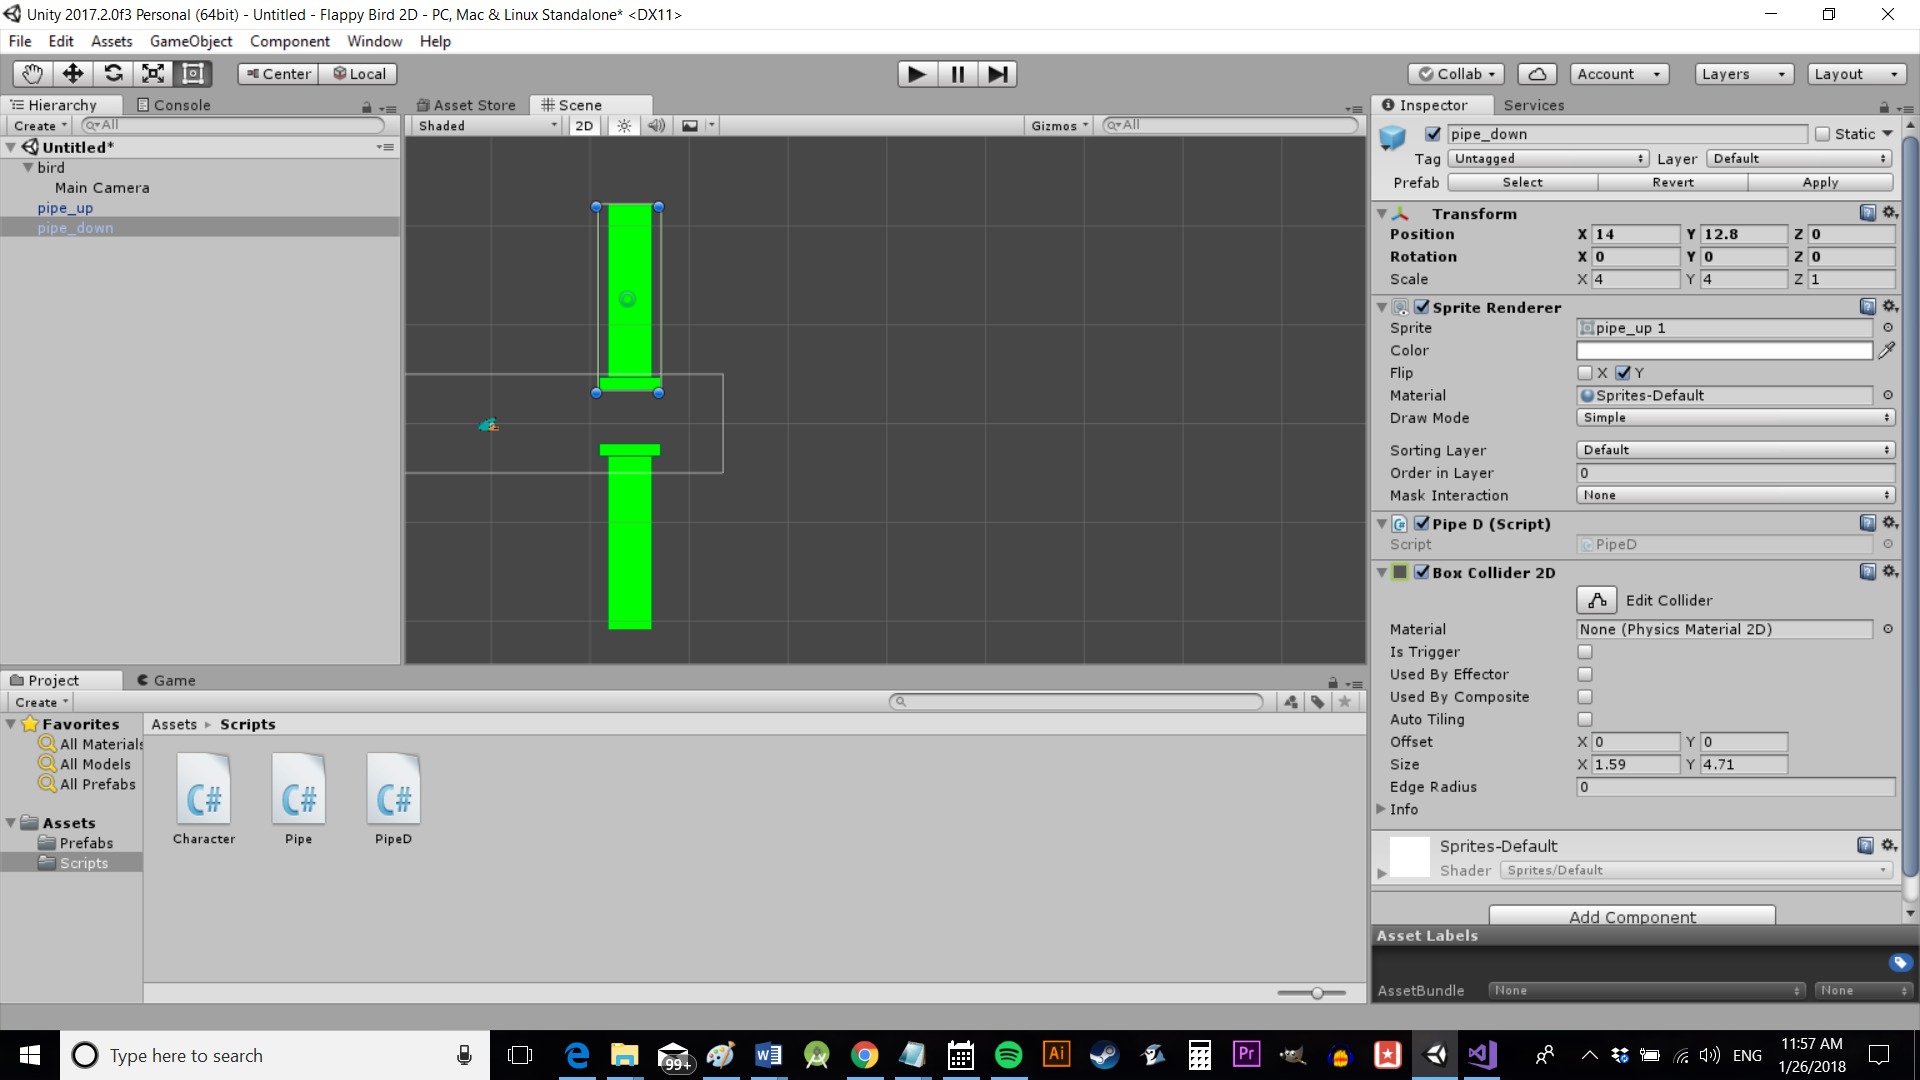
Теперь напишем новый C#-скрипт под названием PipeD. В нём будет похожий код:
public class PipeD : MonoBehaviour {

    private Character character;

    //Это нужно для инициализации
    void Start()
    {
        character = FindObjectOfType();
    }

    // Update вызывается один раз на кадр
    void Update()
    {
        if (character.transform.position.x - transform.position.x > 30)
        {
        }

    }

    void OnCollisionEnter2D(Collision2D other)
    {
        if (other.gameObject.tag == "Player")
        {
            character.Death();
        }

    }

}
Префабы
Итак, нам достаточно этого кода, чтобы сделать всю игру. Мы могли бы передвигать трубы на правую сторону экрана каждый раз, когда они исчезают, или скопировать и вставить столько труб, сколько мы хотели бы встретить на протяжении всей игры.
Если пойти первым путём, то убедиться, что трубы стоят как надо после случайной генерации, и поддерживать честный ход вещей было бы сложно. После смерти персонажа они могли бы появиться в километрах от первой трубы!
Если пойти вторым путём, то всё закончится излишним потреблением памяти, с вытекающим из этого замедлением игры, и ограниченной реиграбельностью, т.к. всё стоит на одних и тех же местах каждый раз.
Вместо этого давайте воспользуемся префабами. Если говорить просто, то мы превратим наши трубы в шаблоны, которые потом сможем использовать для эффективного создания большего количества труб по желанию. Если тут есть программисты, то считайте скрипт Pipe классом, а трубы — экземплярами этого объекта.

Для этого создайте новую папку «Prefabs». Затем перетащите pipe_up и pipe_down из окна иерархии в папку.
Каждый раз, когда вы перетаскиваете объект из этой папки в сцену, у него будут те же свойства, поэтому вам не нужно будет постоянно добавлять компоненты. Более того, если вы измените размер компонента в папке, это повлияет на все трубы в игре, и вам не придётся изменять каждую из них отдельно.
Как вы понимаете, это сильно сэкономит наши ресурсы. Также это означает, что мы можем взаимодействовать с объектами из кода. Мы можем создавать экземпляры наших труб.
Сначала добавьте этот код в условное выражение в методе Update() скрипта Pipe, которое мы оставили пустым:
void Update () {
        if (character.transform.position.x - transform.position.x > 30)
        {

            float xRan = Random.Range(0, 10);
            float yRan = Random.Range(-5, 5);

            Instantiate(gameObject, new Vector2(character.transform.position.x + 15 + xRan, -10 + yRan), transform.rotation);
            Destroy(gameObject);

        }

    }
Это нужно для создания экземпляра нашего gameObject. В результате получается новая идентичная копия. В Unity всегда, когда вы используете слово gameObject, оно ссылается на объект, к которому скрипт в данный момент привязан — в нашем случае к трубе.
Мы генерируем заново наши трубы в случайных вариациях, чтобы было повеселее.
Но вместо того, чтобы проделывать всё то же в скрипте PipeD , мы генерируем оба объекта в одном месте. Таким образом мы можем легко устанавливать положение второй трубы относительно первой. Также это значит, что нам нужно меньше кода для PipeD.
Создайте public gameObject с именем pipeDown. Затем обновите код следующим образом:
if (character.transform.position.x - transform.position.x > 30)
        {

            float xRan = Random.Range(0, 10);
            float yRan = Random.Range(-5, 5);
            float gapRan = Random.Range(0, 3);

            Instantiate(gameObject, new Vector2(character.transform.position.x + 15 + xRan, -11 + yRan), transform.rotation);
            Instantiate(pipeDown, new Vector2(character.transform.position.x + 15 + xRan, 12 + gapRan + yRan), transform.rotation);
            Destroy(gameObject);

        }
Мы добавили переменную gapRan, которая позволяет слегка менять расстояние между трубами, чтобы было интереснее играть.
Возвращаемся обратно в Unity и перетаскиваем префаб pipe_down из папки с префабами (это важно!) в место, где написано «Pipe Down» (заметьте, как наш camel case заменяется пробелом) на спрайт трубы pipe up. Если вы помните, мы определили Pipe Down как public gameObject, что даёт нам возможность определять, чем является этот объект откуда угодно – в данном случае через инспектор. Выбирая префаб для этого объекта, мы убеждаемся, что при создании экземпляра трубы он будет включать в себя все атрибуты и скрипт, которые мы добавили ранее. Мы не просто создаём спрайт, но пересоздаём объект с коллайдером, который может убить персонажа.
Всё, что мы добавим в то же место в скрипте PipeD — просто Destroy(gameObject), чтобы труба саморазрушалась при выходе за левую границу экрана.
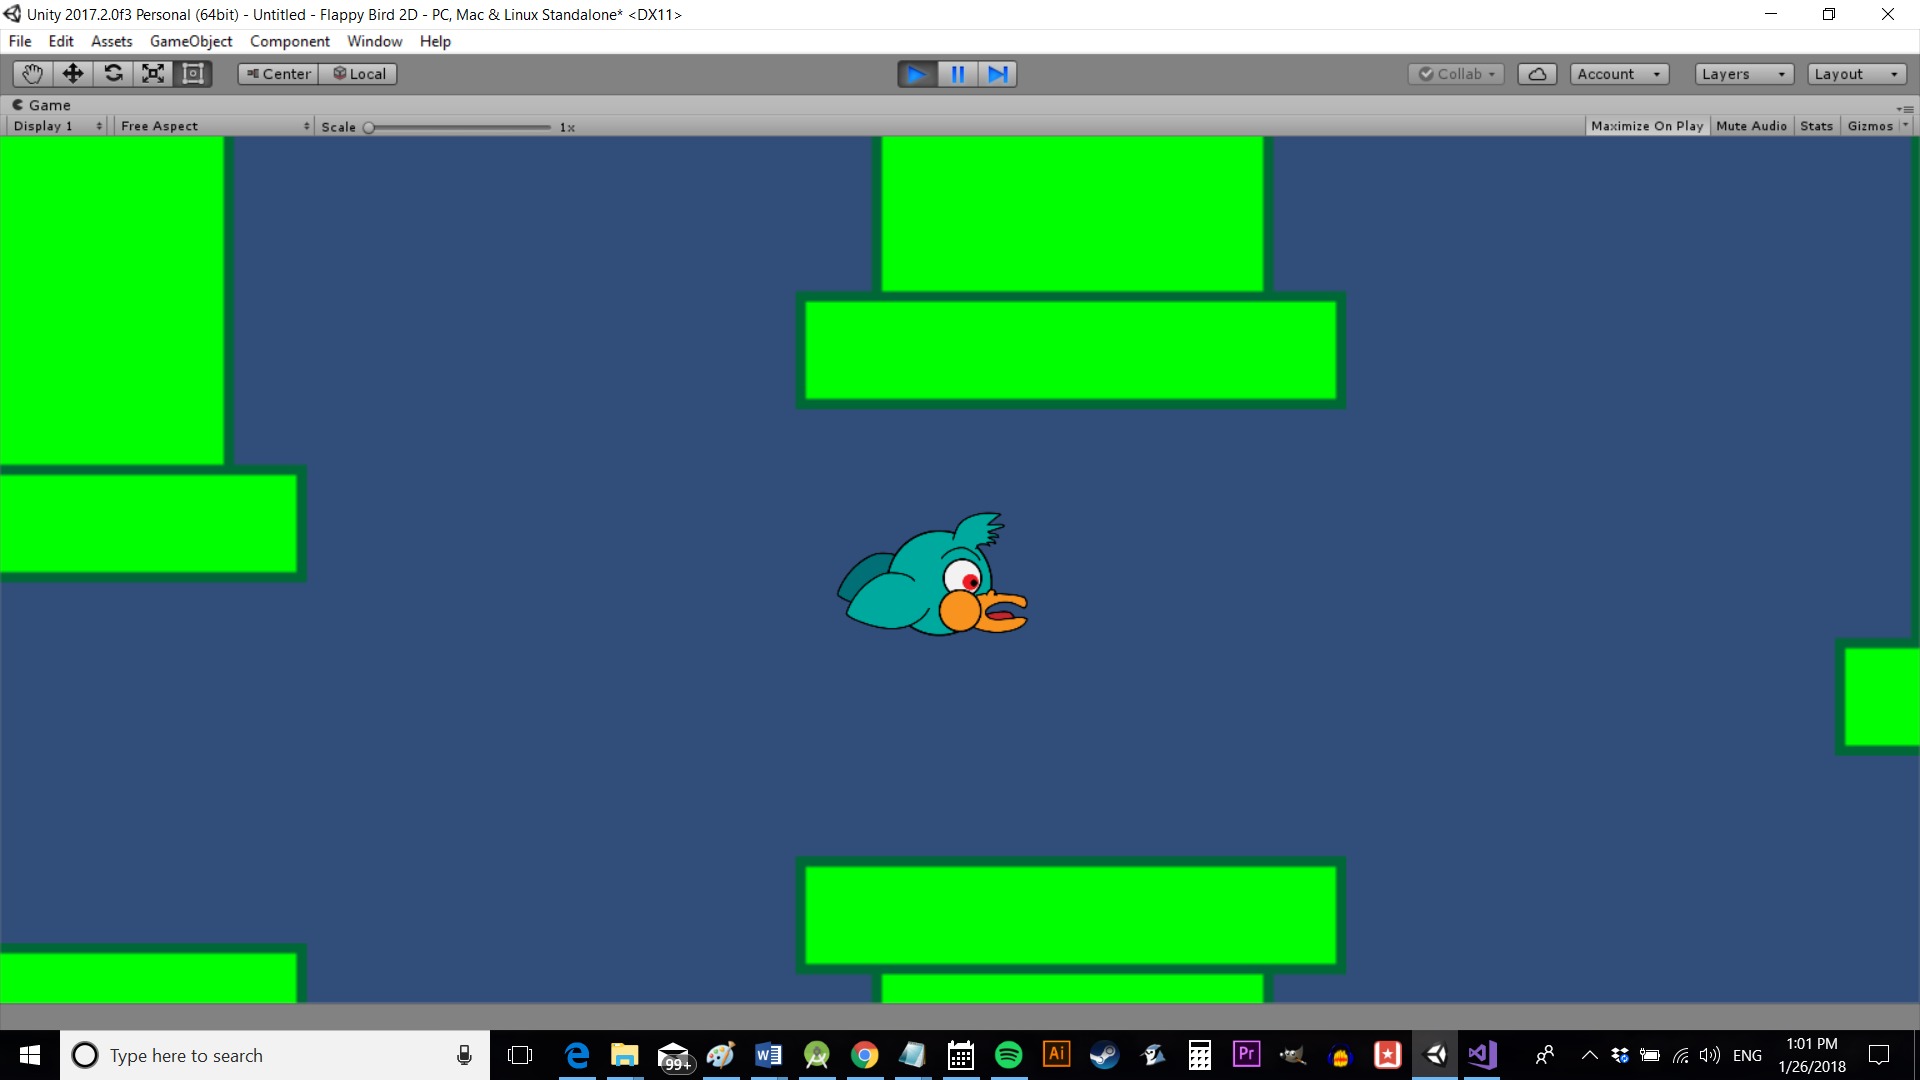
Если вы сейчас запустите игру, то экран будет продвигаться дальше автоматически, и вы умрёте, если столкнётесь с любой из труб. Пролетите достаточно далеко, и эти трубы исчезнут и появятся снова впереди.
К сожалению, между трубами большое расстояние, и экран выглядит пустым. Мы могли бы исправить это, добавив несколько префабов в нашу сцену, чтобы создать конвейер постоянно появляющихся труб. Однако было бы лучше генерировать трубы в скрипте. Это важно, так как в противном случае после смерти персонажа трубы в начале пути уничтожатся, и снова образуется пустое пространство.
Таким образом, мы можем создавать несколько первых труб во время каждой загрузки игры и возвращать всё на свои места после смерти персонажа.
Бесконечный полёт
Теперь создадим public-переменные pipe_up и pipe_down в скрипте Character. Это даст вам возможность ссылаться на созданные объекты, перетаскивая префабы на объект персонажа, прямо как когда мы добавили pipe_down в скрипт Pipe.
Нам нужно добавить эти переменные:
public GameObject pipe_up;
public GameObject pipe_down;
Затем мы напишем такой метод:
 public void BuildLevel()
    {
        Instantiate(pipe_down, new Vector3(14, 12), transform.rotation);
        Instantiate(pipe_up, new Vector3(14, -11), transform.rotation);

        Instantiate(pipe_down, new Vector3(26, 14), transform.rotation);
        Instantiate(pipe_up, new Vector3(26, -10), transform.rotation);

        Instantiate(pipe_down, new Vector3(38, 10), transform.rotation);
        Instantiate(pipe_up, new Vector3(38, -14), transform.rotation);

        Instantiate(pipe_down, new Vector3(50, 16), transform.rotation);
        Instantiate(pipe_up, new Vector3(50, -8), transform.rotation);

        Instantiate(pipe_down, new Vector3(61, 11), transform.rotation);
        Instantiate(pipe_up, new Vector3(61, -13), transform.rotation);

    }
Мы будем вызывать его один раз в методе Update() и один раз в методе Death().
После начала игры вызывается Update(), и наши трубы ставятся согласно заданной конфигурации. За счёт этого первые несколько препятствий всегда будут стоять на одном и том же месте. После смерти игрока трубы встанут на те же самые места.
Вернитесь в сцену в Unity и удалите две трубы, которые сейчас там находятся. Ваша «игра» будет выглядеть просто как пустой экран с птицей. Нажмите Play и трубы появятся, после нескольких первых их положение будет определяться случайным образом.
В заключение
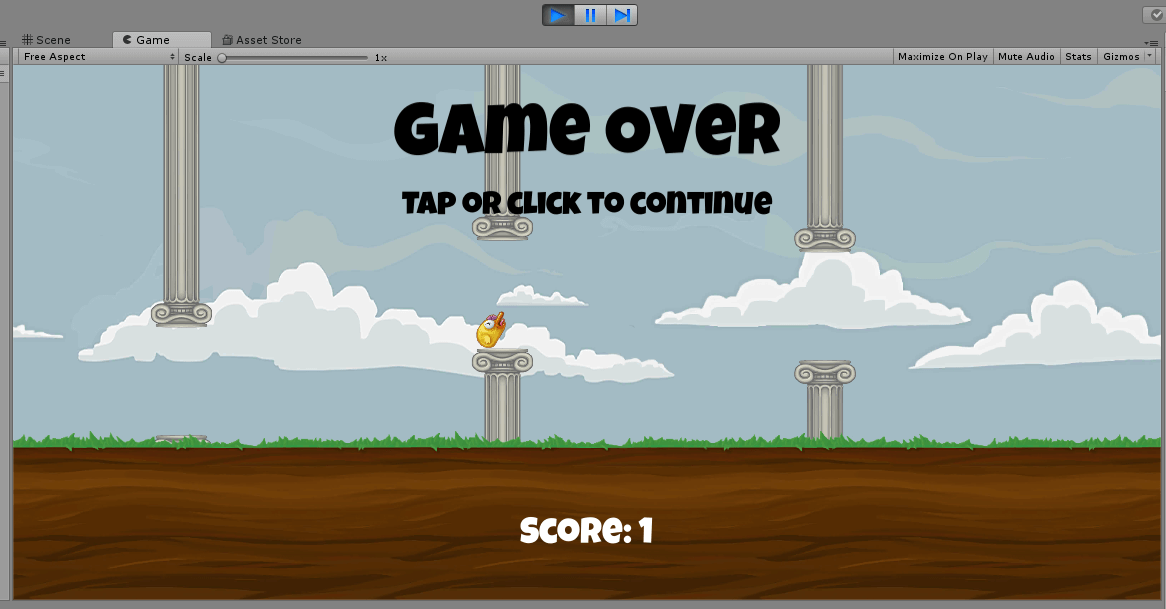
Вот мы и сделали целую игру! Добавьте счётчик очков, попробуйте сделать его более оригинальным и увеличивайте сложность игры по мере продвижения. Также не будет лишним сделать меню. Ещё хорошей идеей будет уничтожать трубы на экране после смерти персонажа. Как только вы с этим закончите — считайте, что готовая к выпуску в Play Store игра у вас в кармане! Когда-то похожая игра сделала другого разработчика очень богатым, и это доказывает, что вам не нужно быть гением-программистом или иметь за своей спиной богатого издателя, чтобы достичь успеха. Вам просто нужна хорошая идея и десять минут!
Хотите писать приложения под Android, но не знаете, с чего начать? Тогда ознакомьтесь с нашей большой подборкой ресурсов для изучения Android-разработки.
Перевод статьи «Flappy Bird Unity tutorial for Android – Full game in 10 minutes!»
Post Views: 75 761
Ранее мы рассказывали о том, как можно с помощью движка Unreal Engine создать свою игру на Android. В этой статье мы рассмотрим другой не менее популярный движок для разработки игр — Unity.
![]()
Unity является очень известным движком среди инди-разработчиков. По сути, это кроссплатформенный движок, который позволяет разрабатывать 3D— и 2D-игры. Особенностью, которая выделяет Unity среди остальных движков, является низкий порог вхождения для новичков при наличии богатого инструментария для профессионалов. Кроссплатформенность же позволяет разрабатывать приложения под любую платформу, начиная с десктопных игр и заканчивая мобильными.
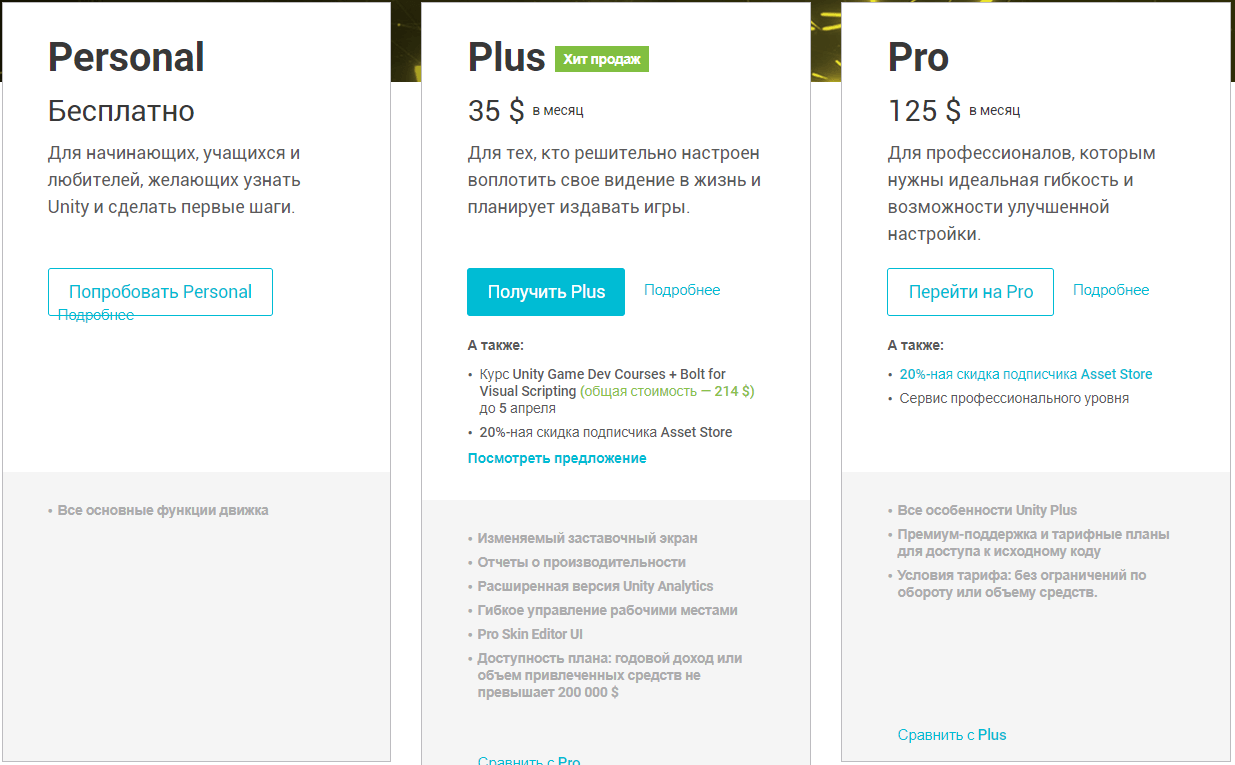
Отдельно стоит сказать про систему подписки, поскольку Unity не является полностью бесплатным продуктом. Существует несколько видов подписок:
- Personal. Бесплатная версия, которая содержит все основные функции движка. Имеет следующее ограничение: доход в год или объём привлечённых средств не должен превышать 100000$.
- Plus. За 35 долларов в месяц предоставляются различные отчёты и аналитика, а также возможность изменять заставочный экран, 20%-ая скидка на покупки в Asset Store и различные мелкие преимущества. Имеет следующее ограничение: доход за год или объём привлечённых средств не должен превышать 200000$.
- Pro. За 125 долларов в месяц включает в себя все преимущества версии Plus и дополнительно профессиональный сервис и премиум-поддержку. Без ограничений по обороту или объёму средств.
- Отдельные версии для бизнеса (используются крупными компаниями).
Таким образом, инди-разработчикам с малыми бюджетами должно быть достаточно версии Personal или Plus, в ином случае придётся оформлять подписку Pro. В данной статье воспользуемся бесплатной версией для первого запуска.
Для того, чтобы начать установку Unity, нужно перейти на сайт Unity Store, где будет предложено выбрать тип подписки. Как уже говорилось выше, выберем Personal.
Затем будет предложено принять условия использования и загрузить установщик. Также можно ознакомиться с системными требованиями для работы с Unity.
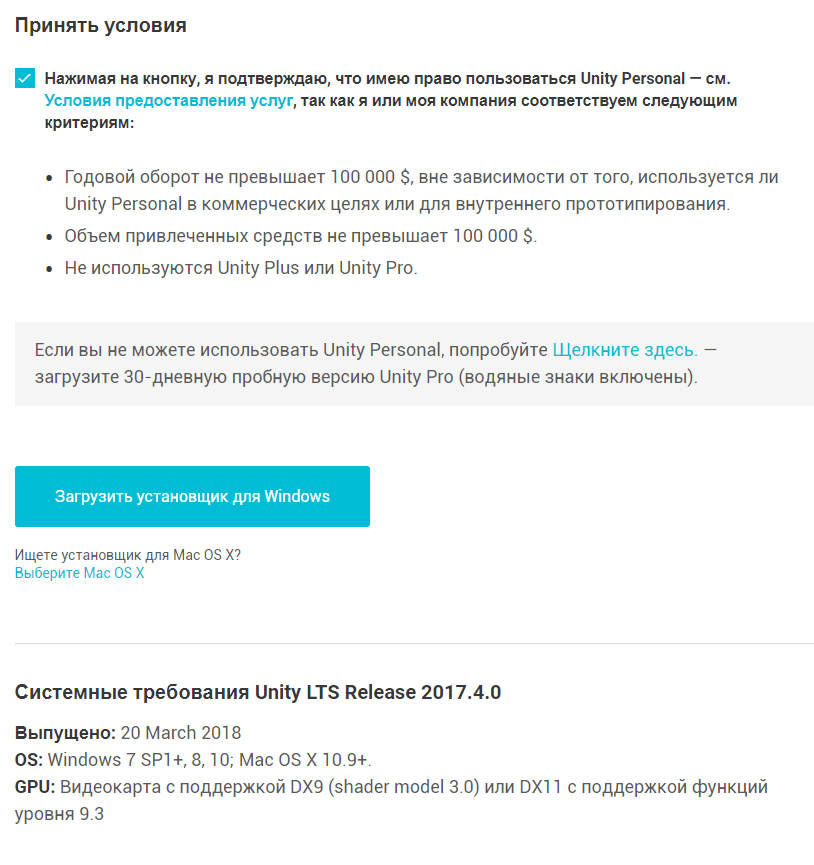
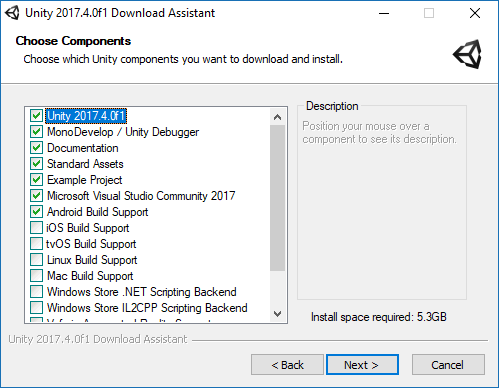
После запуска установщика, будет предложено выбрать, какие компоненты необходимо установить. Поскольку нам нужно создать приложение под Android, поставим флажок на Android Build Support. Также при желании вместо с Unity можно установить Visual Studio Community 2017 для программирования на C#.
После этого останется только выбрать путь установки и начать инсталляцию Unity.
Шаг 2. Регистрация и настройка Unity
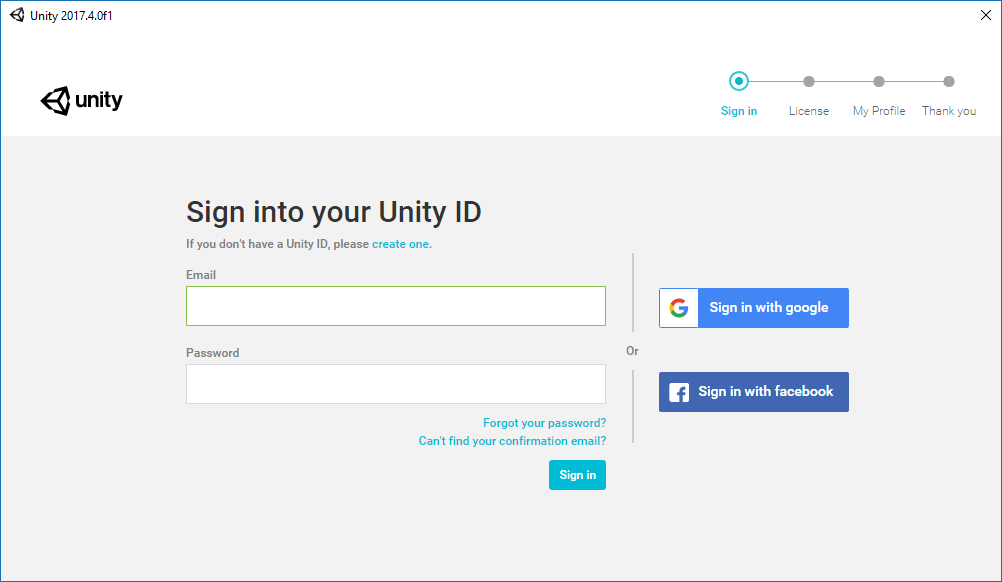
Закончив установку и запустив Unity, нам предлагается войти под своим аккаунтом.
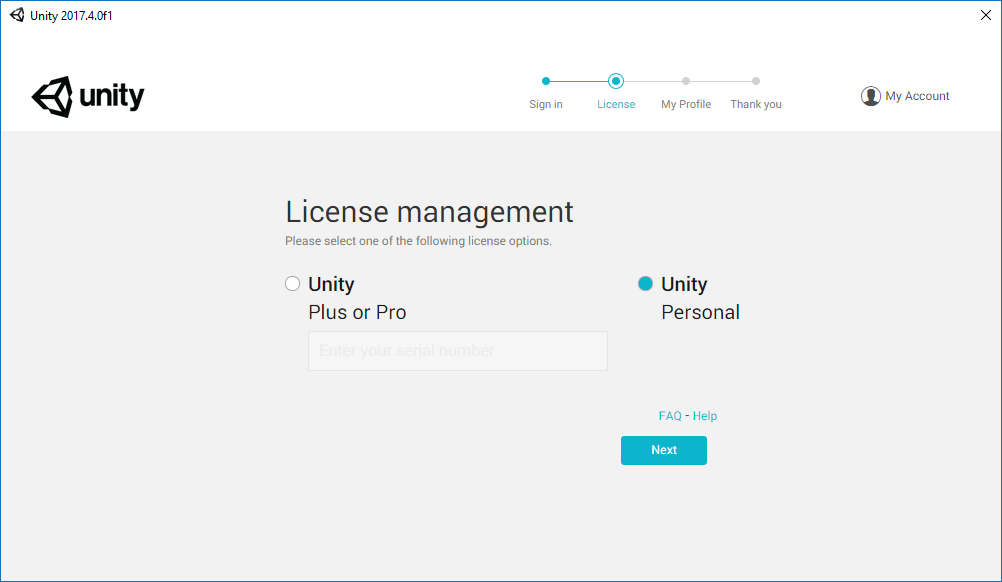
Затем снова будет предложено выбрать подписку, всё также остановимся на Personal. В этом случае нужно будет подтвердить, что годовой доход компании составляет менее 100000$, либо что Unity используется в целях обучения.
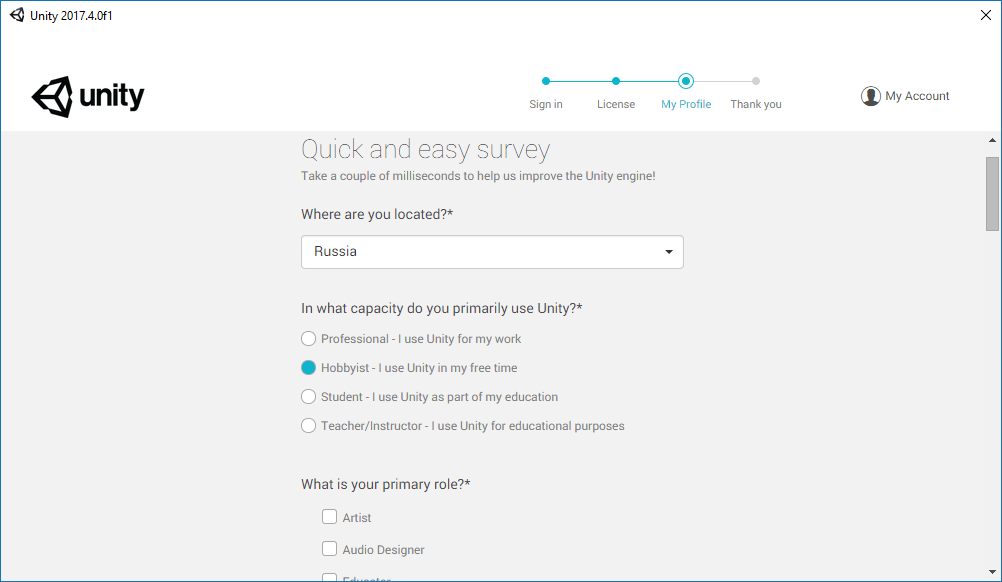
В конце предлагается пройти маленький опрос, в котором нужно ответить, чем вы занимаетесь и с какой целью устанавливаете Unity.
Шаг 3. Создание нового проекта
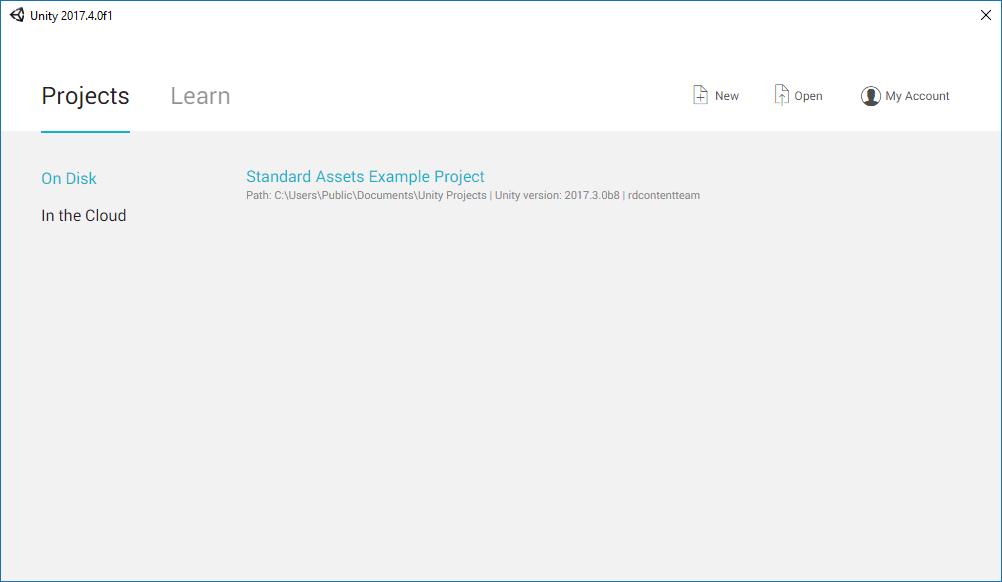
Настроив Unity, мы попадаем на экран выборасоздания проекта. Здесь нужно нажать New, чтобы создать свой новый проект.
После этого в появившемся окне предлагается ввести название проекта и директорию, где он будет расположен. Также не забудьте поставить флажок на 3D, чтобы использовать редактор в 3D-режиме.
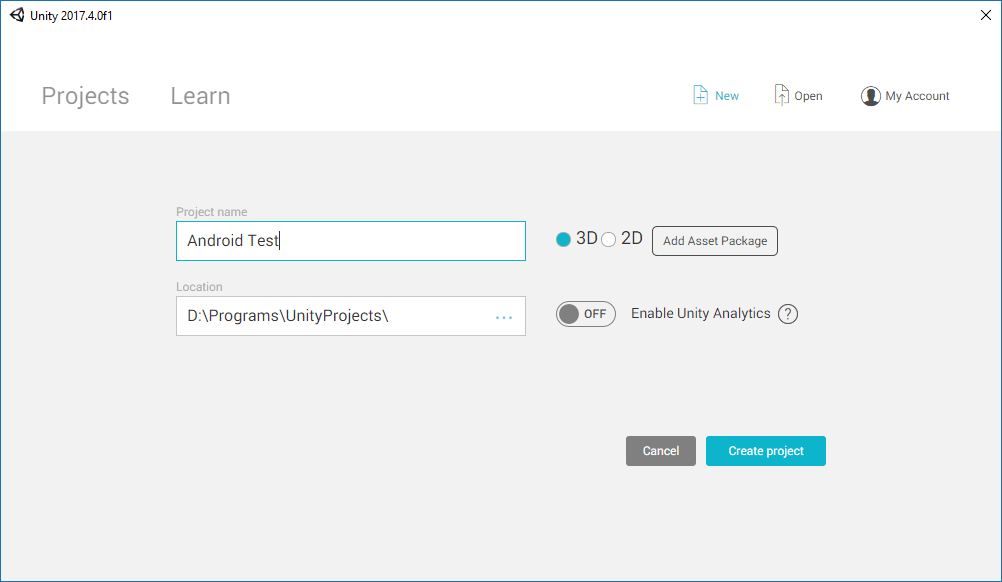
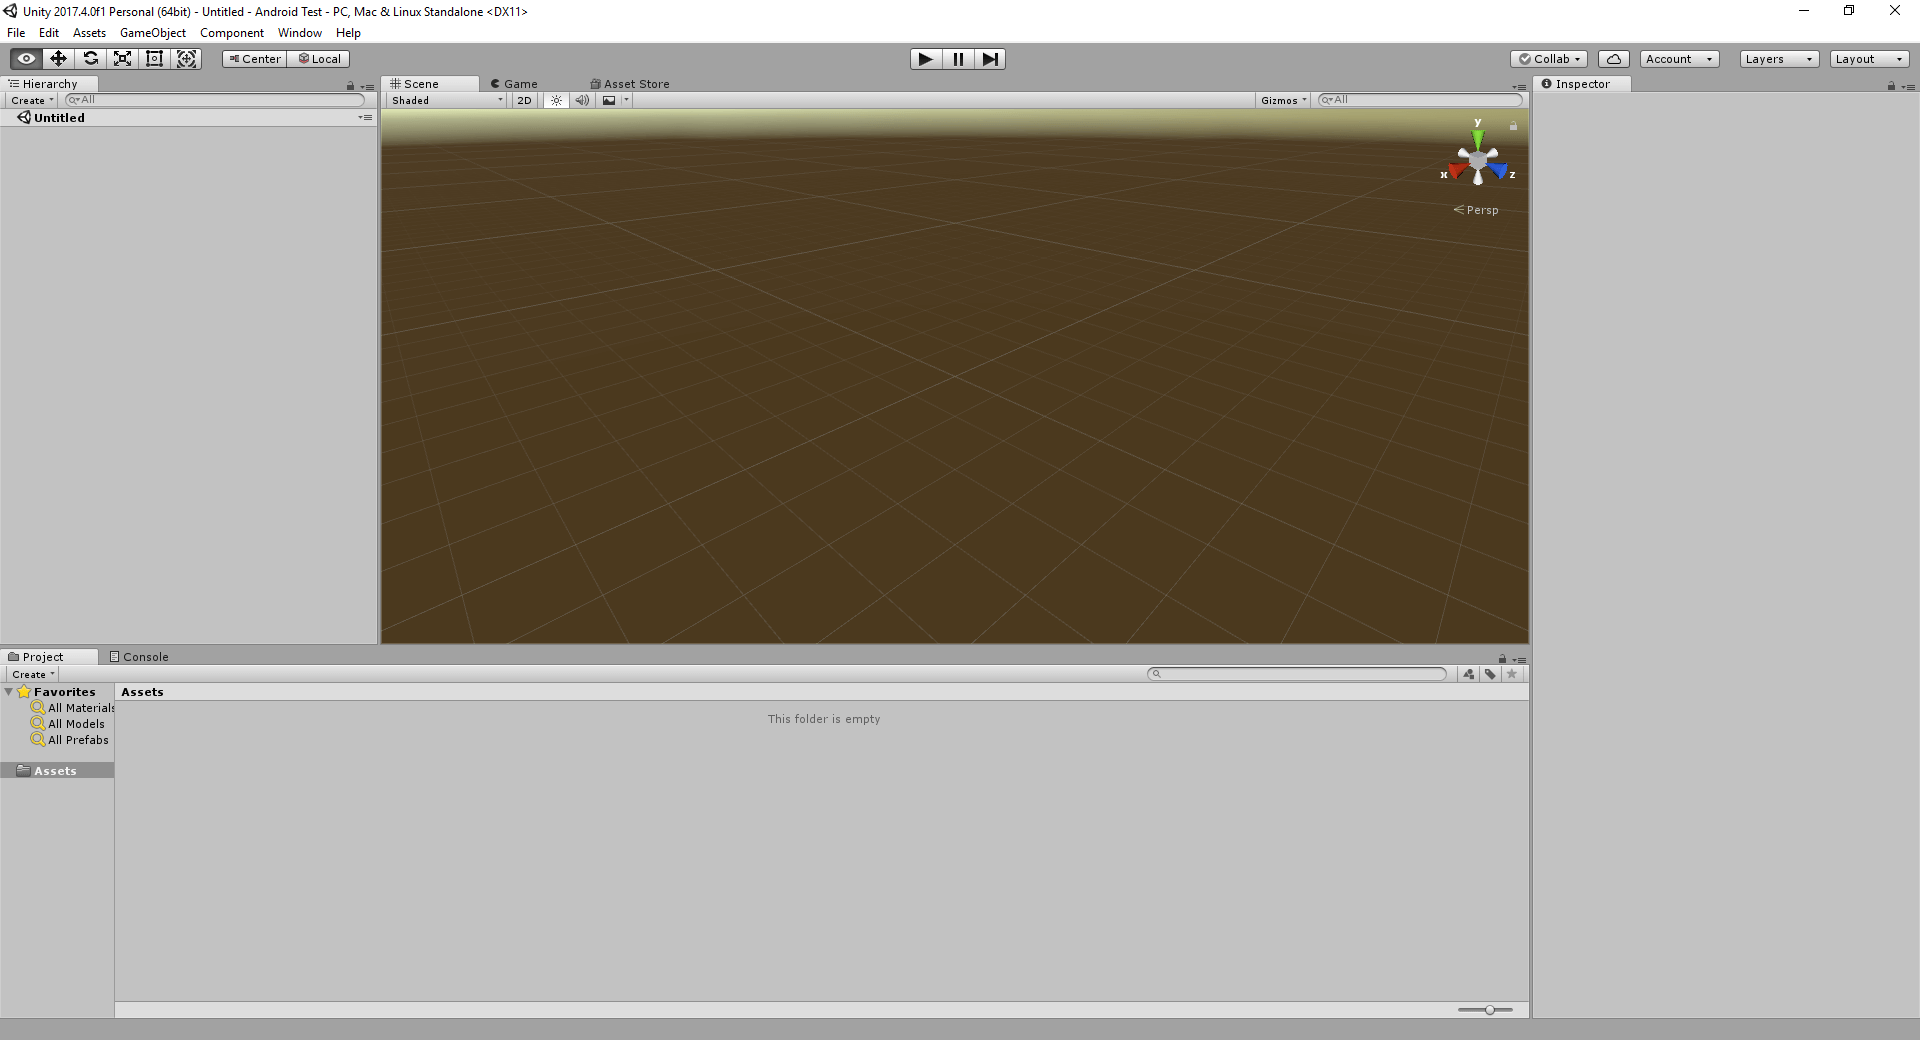
Закончив с этим, нажмите Create project, чтобы создать проект. После этого откроется окно редактора с заранее сгенерированной сценой.
Не будем пока что разбираться с тонкостями программирования и возьмём для примера готовую игру. Для этого здесь существует Asset Store, который содержит огромное количество готовых моделей, анимаций, звуков (и даже игр), как платных, так и бесплатных.
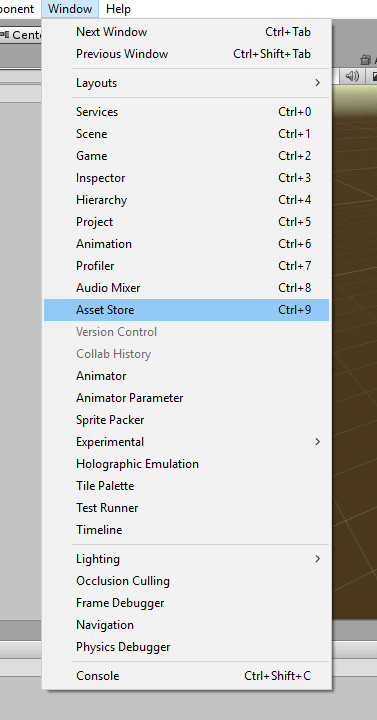
Чтобы открыть Asset Store, нужно в меню Window выбрать Asset Store (комбинация клавиш Ctrl-9).
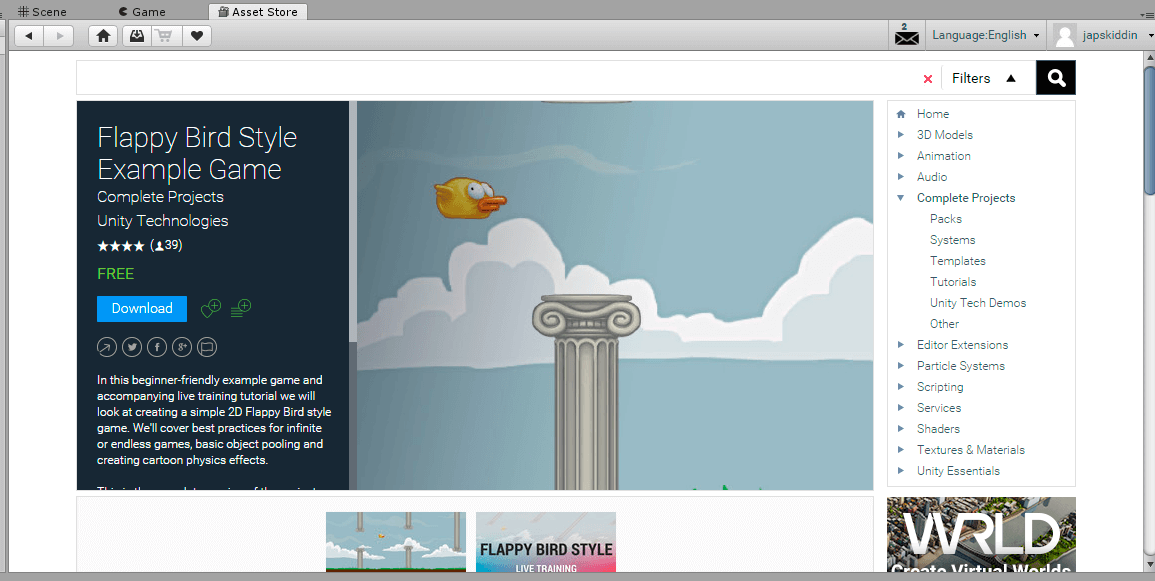
Откроется окно магазина. Введём в строке поиска «flappy bird style example game» и откроем бесплатный пример, который мы будем использовать в своём проекте.
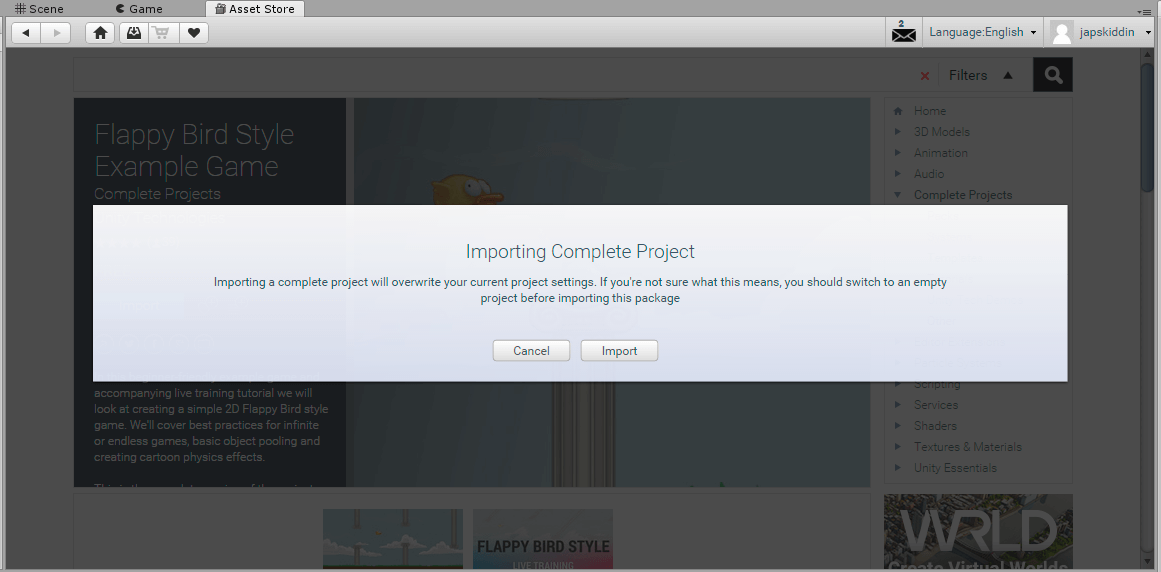
Нажав Download и тем самым скачав его, вы можете затем импортировать себе в проект. Для этого нажмите Import, после чего появится предупреждение о том, что настройки проекта после импорта будут изменены.
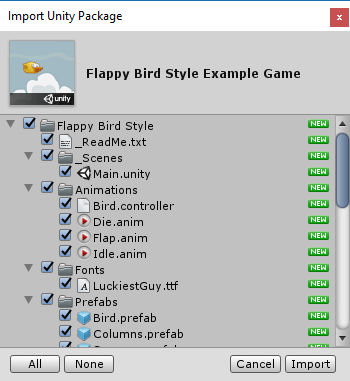
Согласившись на импорт, вы увидите окно, в котором нужно выбрать, какие компоненты импортировать. Выбираем все и нажимаем Import.
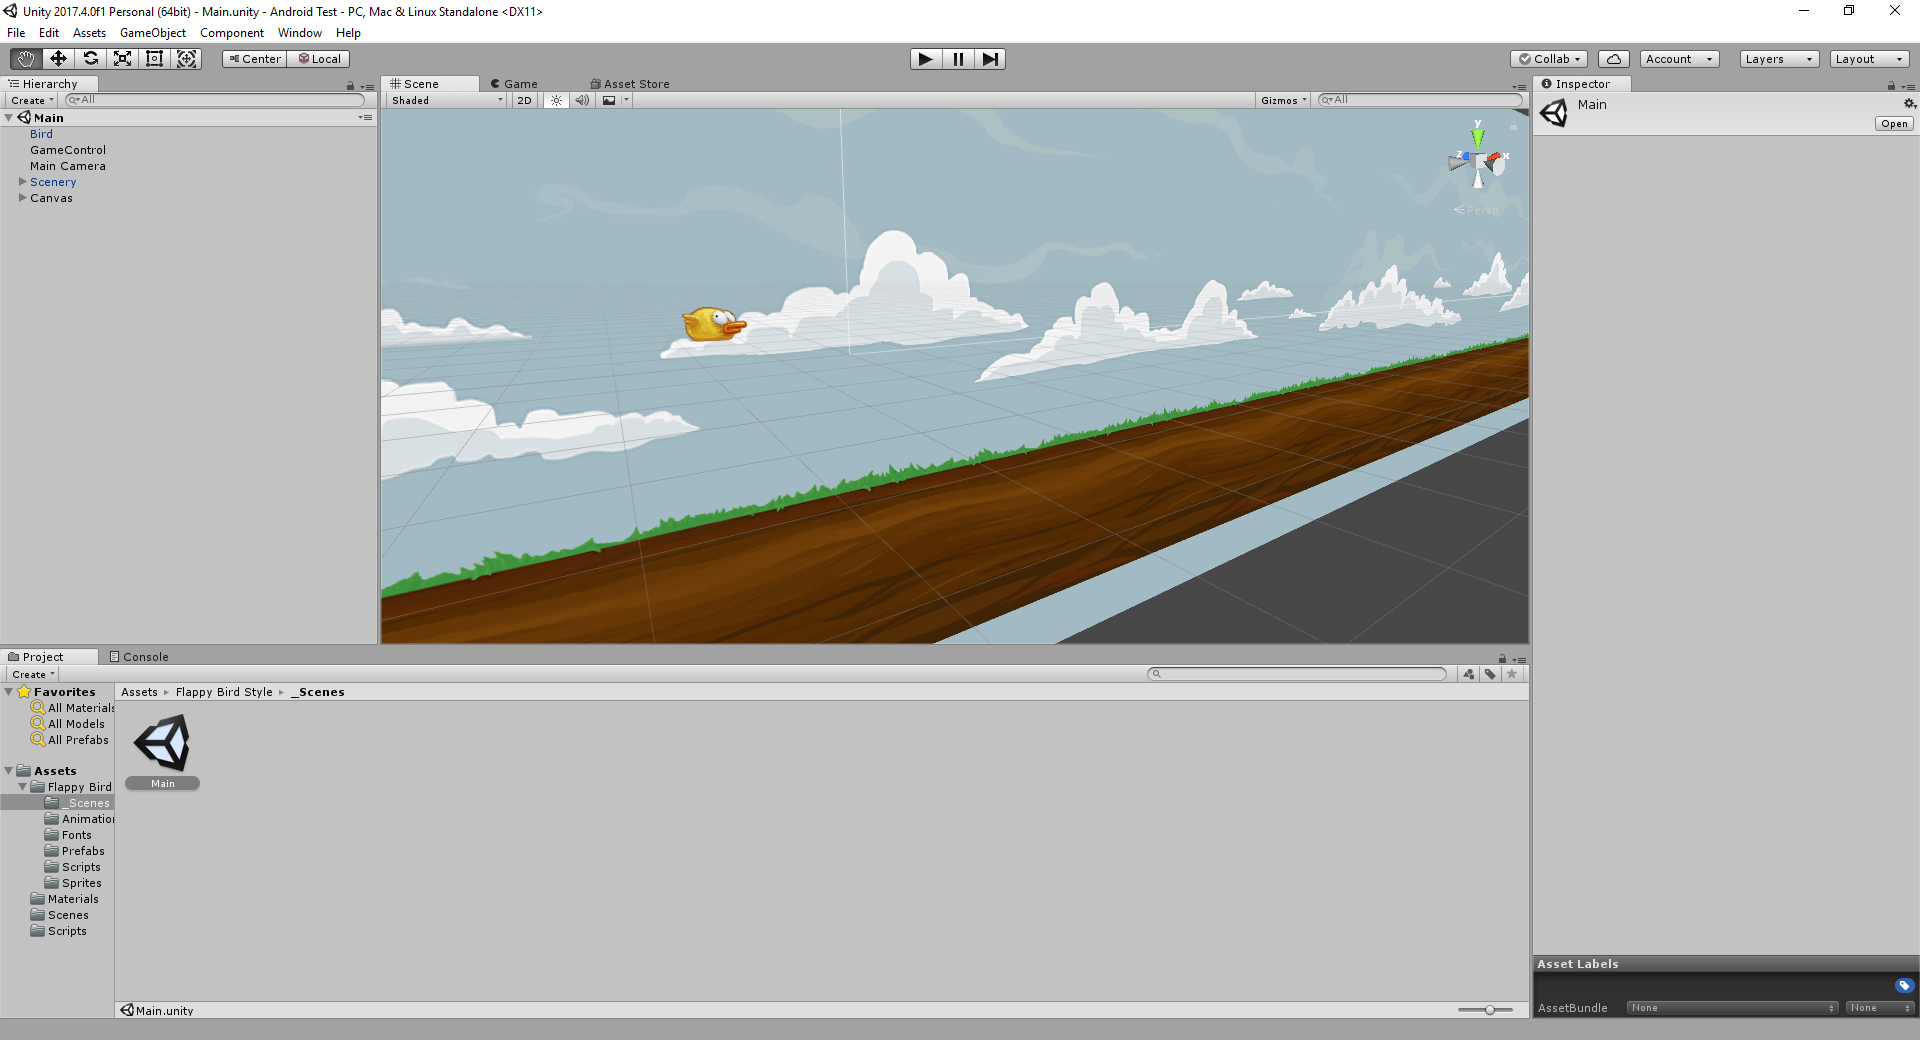
После завершения импорта в обозревателе проекта вы увидите новые файлы. Это и есть файлы игры. Чтобы открыть сцену в редакторе, раскройте Flappy Bird Style — Scenes и дважды кликните по Main.

В результате в окне 3D-редактора появится сцена игры.
Вы можете проверить, как игра работает, прямо в Unity, нажав на кнопку Play над окном редактора.
Шаг 4. Настройка инструментов Android
Примечание: если вы пользуетесь Android Studio, то у вас уже установлены все необходимые компоненты и поэтому можно смело переходить к следующему шагу.
Для того, чтобы собрать получившуюся игру на Android, нужно установить следующие инструменты:
- Java Development Kit (JDK). Скачать его можно с сайта Java. Перейдя по ссылке, вы увидите на самом верху Java Platform (JDK), кликните по Download рядом с надписью, затем выберите вашу операционную систему и начните скачивание. После этого просто следуйте инструкциям инсталлятора.
- Android SDK. Самым простым способом установить актуальную версию является скачивание Android Studio, с которым этот SDK поставляется. Для этого нужно перейти на сайт Android Studio и нажать Download Android Studio. Инсталлятор Android Studio установить базовые компоненты Android SDK, необходимые для разработки на Android.
Шаг 5. Подготовка проекта для запуска
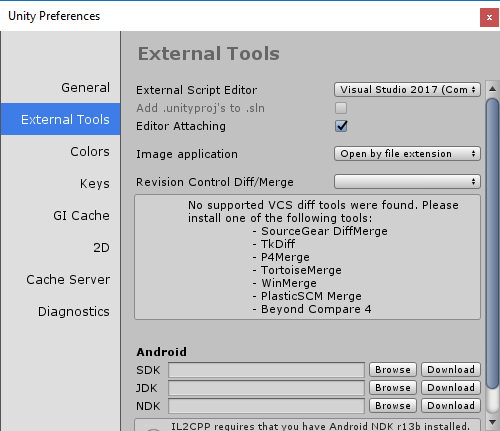
Для начала, необходимо изменить платформу разработки на Android. Для этого в Unity откройте меню File и выберите Build Settings.
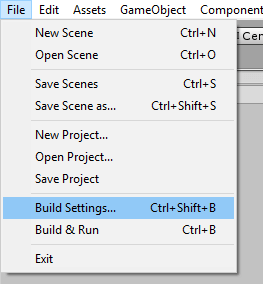
В появившемся окне нужно выбрать Android и затем нажать Switch platform.
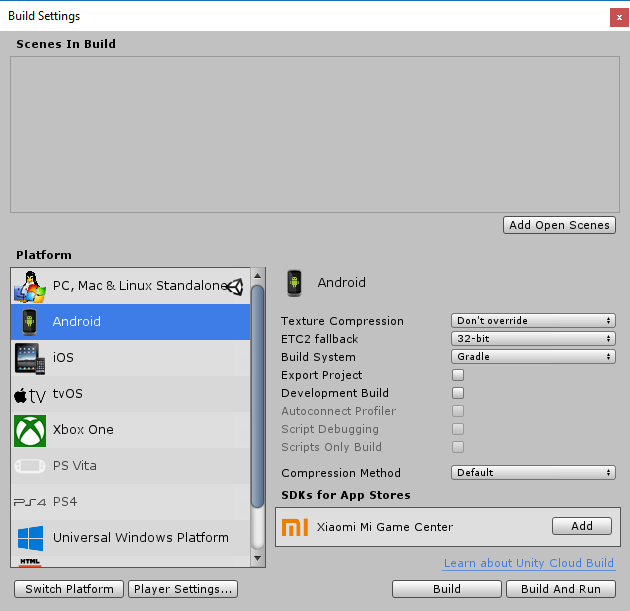
Переключение платформы сообщает, что мы будем собирать приложение для Android. Это означает, что когда мы будем собирать приложение, Unity будет создавать APK-файл. Переключение платформы также заставляет Unity импортировать все ассеты проект заново. Это не займёт много времени на небольшом проекте, но имейте ввиду, что в больших проектах эта операция может занять длительное время.
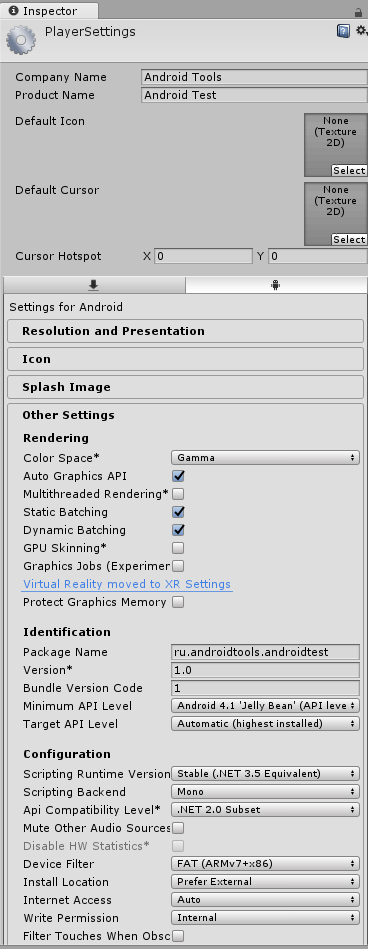
Теперь нам нужно указать имя пакета для приложения.
Примечание: Имя пакета — это уникальный идентификатор приложения, он пишется в стиле обратного DNS в формате com.CompanyName.ProductName. После публикации приложения в Google Play имя пакета уже нельзя будет изменить.
Для этого перейдём в меню Edit и выберем Project Settings — Player.
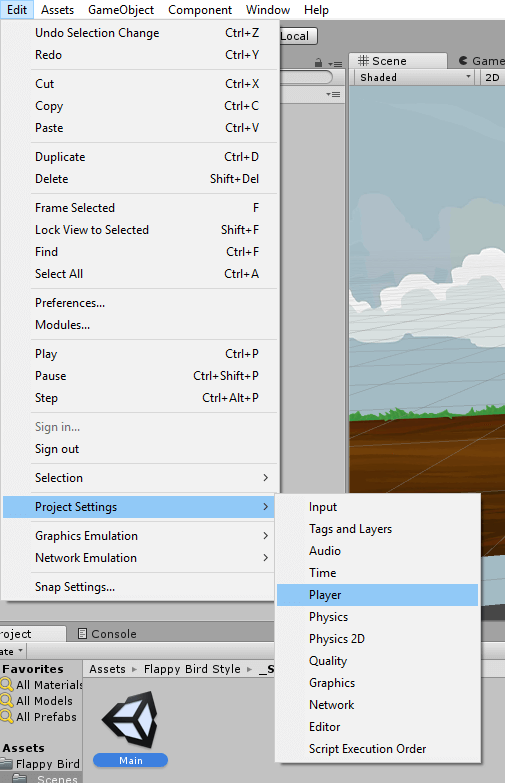
В правой части Unity откроется окно с множеством различных настроек, таких как версия приложения, целевой и минимальный SDK, выбор иконки и т.д. Здесь нам нужно в блоке Other Settings найти Identification и задать имя пакета в поле Package Name. При желании можно также изменить и другие параметры.
Теперь осталось только указать путь до Android SDK и JDK. Для этого перейдём в меню и выберем Edit — Preferences.
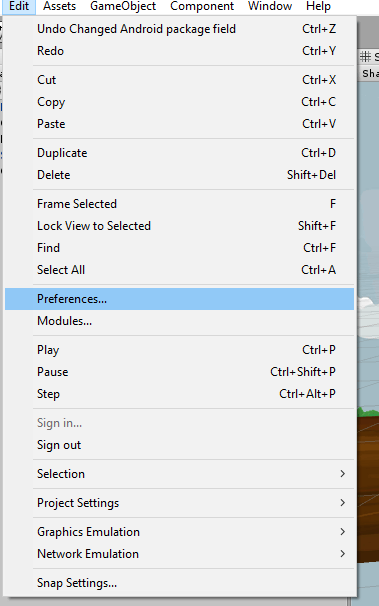
В появившемся окне нужно перейти в External Tools и в полях SDK и JDK указать соответствующие пути, после чего закрыть окно.
Шаг 6. Сборка и запуск приложения
Настало время собрать своё первое приложение на Unity. Для этого нужно в меню выбрать File — Build Settings. Откроется окно, в нём нужно будет добавить сцену, которую нужно собрать. Поскольку у нас эта сцена уже открыта в редакторе, достаточно просто нажать Add Open Scenes, чтобы добавить её в сборку, после добавления вы увидите её в списке сцен.
Осталось только нажать Build, после чего Unity приступит к сборке приложения. Перед этим вам может быть предложено выбрать папку, куда будут сохраняться собранные файлы приложений, а также имя APK-файла.
Примечание: на данный момент, если у вас в Android SDK установлена альфа-версия Build-Tools (версия 28.0.0-rc1), при сборке Gradle выдаст ошибку. Чтобы это исправить, просто удалите из Android SDK эту версию.
В результате в папке, которую вы указали, появится собранный APK-файл, готовый к установке на эмуляторе или на реальном устройстве.
Посмотрим, что находится внутри собранного APK. Для этого воспользуемся утилитой APK Analyzer, которая входит в состав Android Studio,
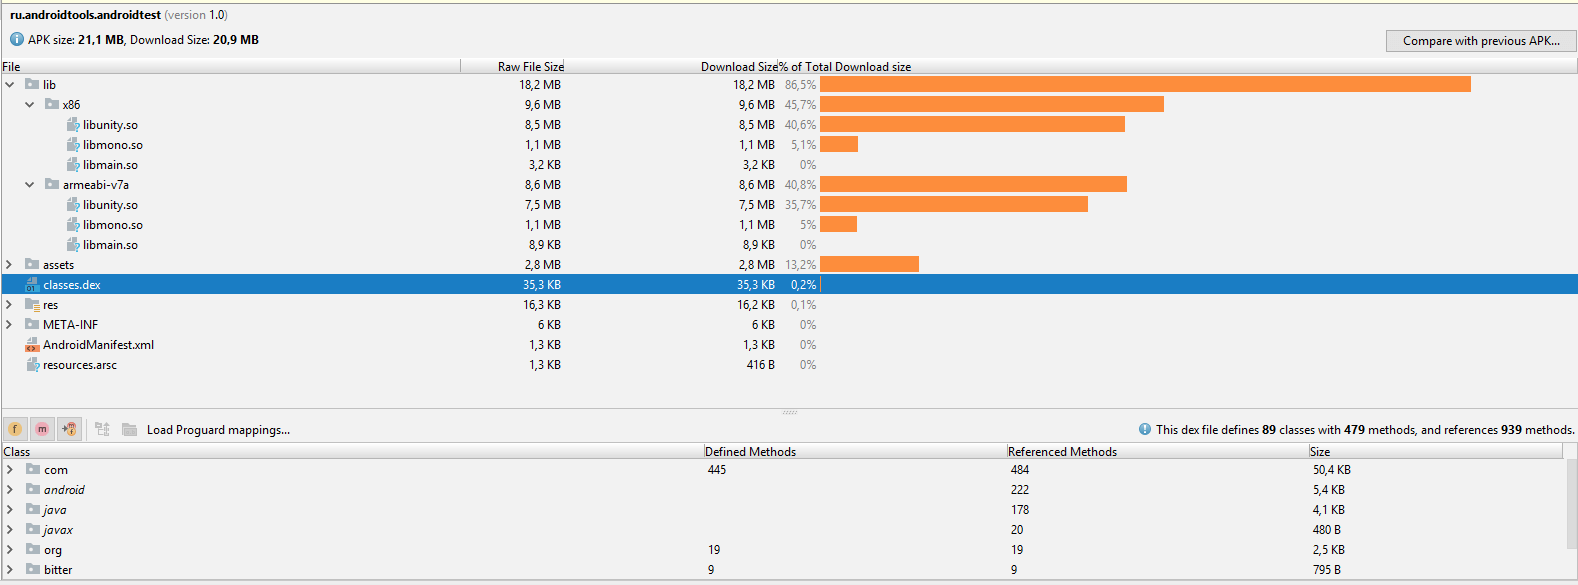
Размер APK-файла в несжатом виде составляет 21,1 MB, в сжатом же 20,9 MB. Как можно увидеть из графика, большую часть объёма занимают сторонние библиотеки, добавленные Unity. Затем в assets расположены все ресурсы, которые используются в собранной сцене. Файл classes.dex содержит всего 89 классов и 479 методов.
Кроме того, если заглянуть в AndroidManifest.xml, приложение состоит из одной активности.
<activity
    android:label="@ref/0x7f040000"
    android:name="com.unity3d.player.UnityPlayerActivity"
    android:launchMode="2"
    android:screenOrientation="10"
    android:configChanges="0x40003fff">

    <intent-filter>

        <action
            android:name="android.intent.action.MAIN" />

        <category
            android:name="android.intent.category.LAUNCHER" />

        <category
            android:name="android.intent.category.LEANBACK_LAUNCHER" />
    </intent-filter>

    <meta-data
        android:name="unityplayer.UnityActivity"
        android:value="true" />
</activity>
Заключение
На этом всё. В этой статье мы научились устанавливать и настраивать Unity, а также собрали своё первое приложение на Android.

Unity — это кроссплатформенный игровой движок, используемый многими играми в Google Play Store. Модульные инструменты Unity помогают создавать и выпускать увлекательные мобильные игры в 2D или 3D.
Шаги для начала разработки игры Unity под Android
Чтобы использовать Unity для создания игрового процесса для игроков на Android, выполните следующие действия:
-
Загрузите и установите Unity Hub
-
Запустите Unity Hub. На вкладке «Установки» добавьте версию редактора Unity, поддерживающую 64-разрядные приложения . Обратите внимание, что эти версии поддерживают пакеты Android App Bundle, которые позволяют выполнять более мелкие и оптимизированные загрузки.

3. Во время установки редактора Unity не забудьте включить модуль поддержки сборки Android, установив флажок рядом с ним.
4. Разверните модуль поддержки сборки Android . Если вы используете Unity 2019 или новее, добавьте модуль Android SDK и NDK Tools .

5. Добавьте опцию Android Build Support NDK в Unity Hub

6. На вкладке » Проекты» нажмите » Создать», чтобы начать новый проект Unity.
7. Начать новый проект
Измените настройки сборки для вывода 64-битных библиотек.
Освещение — один из важнейших аспектов игры. Он может задавать настроение, вести игрока, определять угрозы, цели и многое другое. Освещение может улучшить или испортить визуальные эффекты в игре. Например, хорошее освещение может улучшить внешний вид плохой модели в игре, а плохое освещение может ухудшить внешний вид
Параметры конвейера рендеринга
Устаревший конвейер рендеринга Unity включает следующие пути рендеринга:
-
Прямой рендеринг
-
Отложенное затенение
Прямой рендеринг
При прямом рендеринге источники света в реальном времени очень дороги. Если вы уменьшите количество источников света на пиксель, вы сможете компенсировать эту стоимость.
Отложенное затенение
Для отложенного затенения требуется поддержка графического процессора. На совместимом оборудовании с помощью отложенного затенения можно визуализировать большое количество источников света в реальном времени с высоким уровнем точности освещения. К сожалению, отложенное затенение плохо работает на мобильных графических процессорах, потому что у них более низкая пропускная способность.
Когда вы создаете мобильную игру, важно, чтобы ваша игра плавно работала на как можно большем количестве устройств.
Универсальный конвейер рендеринга
Unity разработала универсальный конвейер рендеринга (URP). Мы настоятельно рекомендуем вам использовать URP для ваших мобильных игр.
Световые режимы
Различные режимы освещения используются в зависимости от того, как свет движется или используется в сцене. Типы легких режимов имеют разные рабочие характеристики. При установке освещения учитывайте следующее:
-
Используйте запекание для статического освещения. Это лучше всего подходит для объектов, которые не меняют свое освещение во время выполнения. Запекание источников света — это процесс предварительного вычисления и сохранения данных освещения в текстурных картах, называемых картами освещения.
-
Запеченное освещение нельзя изменить во время выполнения. Свет и тени на картах освещения статичны. Поскольку все освещение было предварительно обработано в Unity, нет никаких расчетов освещения во время выполнения, влияющих на производительность.
-
Невозможно создать динамические тени с помощью запеченного света. Это может выглядеть странно с динамическими или движущимися объектами.
-
Используйте смешанный для неподвижных источников света, которые вы собираетесь взаимодействовать с движущимися объектами. Например, факел, который освещает игрока и создает тень, когда игрок проходит мимо.
-
Смешанное освещение создает динамический прямой свет и тень.
-
Вы можете включить смешанное освещение в вычисления карты освещения для статических объектов.
-
Вы можете изменить интенсивность во время выполнения. Обновляется только прямой свет.
-
Дорогие.
-
Используйте в реальном времени динамические или подвижные источники света, например, свет, исходящий от огненного шара, который поднимается с земли и взрывается.
-
Свойства динамического света и тени можно изменять во время выполнения.
-
Источники света в реальном времени не запекаются в карты освещения.
-
Очень дорого.
По возможности используйте статический свет и избегайте динамического освещения.
Динамическое освещение или освещение в реальном времени рассчитывается и обновляется каждый кадр. Это отлично подходит для движущихся объектов, интерактивности и создания эмоций.
Напротив, статическая информация о освещении запекается в световых картах. Использование текстуры Lightmap позволяет объекту избежать дорогостоящих вычислений освещения для каждой вершины или пикселя. Стоимость визуализации текстуры карты освещения всегда намного дешевле динамического освещения. Мы рекомендуем использовать запеченное освещение в качестве первого варианта для внедрения в мобильную игру.
Запекание карты освещения
Предварительный расчет эффектов света известен как запекание карты освещения. Эффект света хранится в отдельной текстуре, называемой картой освещения. Карту освещения можно использовать для улучшения внешнего вида объектов. Запекание карты освещения нужно выполнять только один раз за итерацию вашей сцены. Если вы измените геометрию сцены или параметры запеченных источников света, вам нужно будет пересоздать карты освещения. За исключением накладных расходов на текстуру карты освещения, нет дополнительных затрат на производительность во время выполнения. Это лучший начальный подход к освещению на мобильной платформе.
На выжженный свет не влияют какие-либо динамические или движущиеся аспекты вашей сцены. Запеченное освещение действительно включает запеченное глобальное освещение для всех статических элементов. Это означает, что вычисления карты освещения включают в себя непрямой свет, который отражается от других статических объектов, а также запеченные источники света, которые напрямую падают на объект.

Чтобы запечь лампочки, выполните следующие три шага.
Шаг 1. Установите свет на смешанный или запеченный.
Установите огни режим либо смешанный или запекают. Для мобильных игр лучше использовать «Запеченные огни» вместо «Смешанные». Запеченный — наименее затратный способ визуализации света.

Шаг 2. Сделайте объекты статичными
Сделайте любые объекты, на которые воздействует запеченный свет, статичными . Есть много оптимизаций для объекта, помеченного как статический, но обычно лучше всего выбрать Все в раскрывающемся списке Статический. Если объект помечен как Static, Unity знает, что нужно включить его в запекание света.
Примечание. Если у вас включена статическая пакетная обработка, вы не можете перемещать или анимировать объекты, отмеченные как статические. По возможности оставьте эту оптимизацию включенной.

Шаг 3. Запекание огней
Вы можете запечь свои огни с помощью меню «Освещение», которое находится в « Окно»> «Рендеринг»> «Настройки освещения» .
Когда вы запекаете огни, сохраняемые данные основаны на том, какая сцена была активна, когда вы начали запекание. Создается папка с тем же именем, что и запеченная сцена. В этой папке хранятся все компоненты данных освещения. Если ваш проект загружает несколько сцен одновременно, вы должны запечь источники света для каждой сцены. Если вы настроите сцену, вам придется заново запечь свет.

Оптимизировать карты освещения
После того, как источники света настроены для запекания, убедитесь, что запеченные карты оптимизированы. Карты освещения различаются по размеру в зависимости от их настроек при запекании. Вы должны уменьшить использование памяти на мобильных устройствах, поэтому необходимо следить за размером карты освещения.
В следующем примере из демонстрации есть семь карт освещения 1024×1024 пикселей. В предварительном просмотре карты вы можете увидеть сетки, наложенные на карту освещения. Выбранные сетки выделяются.

В Lightmapping есть множество настроек , а также размер карт, которые определяют, сколько памяти и места для хранения использует каждая карта. В следующих разделах выделено несколько важных настроек.
Lightmappers
Unity предлагает следующие три метода запекания источников света на сцене:
-
Enlighten : поддерживается только до выпуска с долгосрочной поддержкой (LTS) 2020 года. Не используйте это для новых проектов.
-
Прогрессивный ЦП : экономит много времени, так как постепенно создает карты освещения. Если выбран параметр « Приоритет просмотра», приоритет отдается областям в представлении «Сцена». Это может сократить время итерации для настройки освещения вашей сцены.
-
Прогрессивный графический процессор : работает так же, как прогрессивный процессор, но генерирует карту освещения на графическом процессоре, а не на процессоре. На поддерживаемом оборудовании этот метод может значительно сократить время запекания по сравнению с использованием ЦП. Существуют дополнительные требования для настройки Progressive GPU. Узнайте больше о требованиях на странице Progressive GPU Lightmapper .

Texels
Тексели, или текстуры пикселей, являются индивидуальным пикселем в карте текстуры. Тексели хранят информацию о свете в карте освещения для каждой точки света, которая попадает на объект. Чем больше текселей используется на единицу пространства, тем больше зависит качество освещения, время запекания, затраты на дисковое хранилище и стоимость VRAM ваших карт освещения.
Чтобы уменьшить количество требуемых данных карты освещения, отрегулируйте количество текселей на единицу запекания в настройках Lightmapping.

В настройках Lightmapping, в Lightmap Разрешение параметр контролирует, сколько текселей используются на единицу в Lightmap. Ниже приведен пример куба с разными настройками разрешения карты освещения. Вы можете видеть, как более высокое разрешение быстро увеличивает объем необходимой работы.

Мы рекомендуем начинать с низкого разрешения карты освещения. Используйте начальную настройку между 5и 10и масштабируйте вверх или вниз в зависимости от потребностей вашей сцены.
Чтобы просмотреть, как тексели расположены в вашей сцене, выберите раскрывающийся список Draw Mode в окне Scene и выберите Baked Lightmap .
Запеченные предметы покрыты шахматной доской. Шаблон шахматной доски показывает, как распределяются ваши тексели, когда вы запекаете свет.
В следующем примере уменьшение разрешения карты освещения с 15 до 12в демонстрации Armies уменьшает количество необходимых карт освещения с семи до четырех.

Материал подготовлен в рамках курса «Unity Game Developer. Professional».
Всех желающих приглашаем на двухдневный онлайн-интенсив «Гексагональная карта, своя Цивилизация». На интенсиве:
— займемся созданием гексагональной карты, основы игры Цивилизация;
— научимся процедурно генерировать меш, проводить оптимизацию карты;
— создадим основу для механик пошаговой игры, научимся сохранять и загружать карту.
>> РЕГИСТРАЦИЯ
A lot of the most successful Android apps on the Google Play Store are games. Getting started with Android game development and building your first game can be daunting as there are many game engines to choose from such as Unity, libGDX, Unreal Engine and Corona SDK among others that require you to use different programming languages.

I have put together this tutorial on how to make a simple two dimensional game for Android using the popular game engine Unity. The game we will make in this tutorial will be GemBester which is a stripped down clone of the match 3 casual game Bejewelled by PopCap Games. In addition to the gameplay the game will contain 2D graphics, sound effects and a scoring system.

Read on and we will cover some of the benefits of using the Unity game engine for Android game development before we start building our first game for Android using Unity.
What are the Benefits of Using Unity for Android Game Development?
As mentioned in the introduction we will be using the Unity game engine in this tutorial for building a simple 2D game for Android.
The Unity game engine is feature rich easy to use game engine that will improve your productivity on building your game.
The Unity game engine has mutli-platform support, this allows you to create your game once and deploy it across many different platforms. Some of the platforms supported by Unity includes:
- Desktop platforms such as Windows, Mac and Linux
- Mobile platforms such as Android and iOS
- Console platforms such as PS4, Xbox One and Nintendo Switch
Unity offers a generous free tier for using the game engine even for commercial purposes which reduces the upfront costs for development. Providing you make less than $100,000 in revenue or funding from the use of the Unity game engine you will qualify to use the free to use Unity personal license.
If you create a well received game and your revenue grows the pricing for the Plus and Pro licenses at $40 per month and $150 per month respectively are quite reasonable for the value you get.

Unity also has an Asset Store where you can purchase assets for use in your game such as 2D graphics, 3D graphics, audio files and much more to help you save on development costs.
Another strength of Unity is such as popular game engine there are many free resources such as tutorials and YouTube videos available online to help you were you may get stuck using it.
How to Install Unity
In this section of the post I will take you through how to install the Unity game engine to allow you to start making games for Android.
We will be using the Unity Personal license for an Individual which is free to use providing you make less than $100,000 in revenue or funding from game development.
First we will navigate to the Unity Store and select the “Get started” button under the Unity Personal license for an Individual.

Next in the “First-time users” section select the “Start here” button.

Review the terms presented then select “Agree and download” button.

This will start the download of the UnityHubSetup application.

Once the download is complete, run the UnityHubSetup Application. Install the latest version of Unity using UnityHub by selecting the “Install” button.

Next we will create a Unity ID, then we will sign in to your Unity ID in UnityHub while the latest version of Unity is being installed. After you have signed in select continue and wait for Unity to finish installing.

Once Unity has finished installing select the “Launch Unity” button.

This will load the Unity editor with a sample project. For now we will close the Unity editor and in the next section of this tutorial we will create our first project in Unity.

Creating your First Unity Project
In this section we will be creating our first unity project for our 2D puzzle game “GemBuster”.
To create a unity project, open the Unity Hub application. Navigate the Projects section and select “NEW”.

Select the 2D Template, enter the Project Name as “Gem Buster” and select the “Create” button.

This will create and load the Gem Bester Unity project in the Unity Editor.

Configuring Unity Project to Build for Android
Next we will set up our Unity environment to allow us to build Android apps.
Open up Unity Hub then navigate into the “Installs” section.

Select the 3 veritical dots, and select “Add Modules”

Check the “Android Build Support” module and check the “Android SDK & NDK Tools” module and the “OpenJDK module” and select the “Next” button and follow the prompts to install the modules.

Once the download is completed, open your Unity project in the Unity Editor and open the build settings by selecting “File” then “Build Settings”.

Select the “Android” platform then select “Switch Platform”.

Select a connected device from the Run Device drop down list and select “Build And Run”.

Enter a name for the APK and select Save

This will run the Unity project on your Android device as per the photo below.

Creating GemBuster (A Bejeweled Clone)
What We Will Create
GemBuster is a simple clone of the casual match 3 game Bejeweled created by PopCap Games which is also responsible for creating other popular casual games such as the Plants vs. Zombies Series and Peggle.
The GemBuster game will feature an 8 by 8 grid of gems that will start in a random order. The player will be able to select a gem and move it to an adjacent tile in the grid to switch positions with the gems. If gems of the same are positioned in the grid 3 times or greater, the gems will be removed from the grid, the player will score points and the existing gems will fall into the empty spaces spawning more gems into the grid to fill all empty spaces.
<GemBuster Screenshot>
We will utilize game assets from the popular free to use Kenney.nl game asset packs. The sprites for the gems will be sourced from the Kenney.nl puzzle asset pack. The sound effects for the gems falling with be sourced from the Kenney.nl impact sounds asset pack. <Assets for the UI>.
The game will be built using Unity targeting release for Android.
Step 1: Importing Game Assets into the Unity Project
First we will need to download the following free to use asset packs from Kenney.nl.
- Puzzle pack – https://kenney.nl/assets/puzzle-pack
- Impact sounds pack – https://kenney.nl/assets/impact-sounds
- Interface sounds pack – https://kenney.nl/assets/interface-sounds
Next we will open our GemBuster project in Unity and add some directories into the Assets folder.
We will create the following directories:
- Sprites
- Sounds
- Scripts
- Scenes
- Prefabs
Importing Sprites
The “Sprites” directory will contain all of the images we want to use in our game. Unzip the Kenney.nl Puzzle Pack archive and copy the following images we will use for the 6 different colored gems into the “Sprites” folder in Unity.
Importing Sounds
Have a look through the impact and interface sound packs mentioned above and offered for free by Kenney.nl. We will need three sounds to add to our GemBuster game later in this tutorial.
Find a sound you like for each of the actions below and copy them into the Sounds folder inside the Assets directory.
- Selecting a Gem
- Swapping a Gem
- Clearing Gems
I chose the following audio clips from the Kenney.ml impact and interface sounds pack for GemBuster.

Saving the Game Scene
Make sure to save the Scene in Unity and give it the name “GameScene”. Place the GameScene file in the Scenes folder in the Assets directory.
Step 2: Creating a Grid and Displaying the Gems on Screen
In this section of the tutorial for the GemBuster game for Android we will implement a 8×8 Grid of Gems of different colours to be shown on the screen in a randomized order.

Creating the Prefab for the Gem
In this section of the tutorial we will introduce the Unity concepts of GameObjects and Prefabs.
In Unity a GameObject is an object that is placed inside a Unity Scene that always has a position and rotation. Components can be added to GameObjects such as a Box Collider, Light, SpriteRenderer or a Script to change it’s appearance or functionality.
In Unity a Prefab is a template of a GameObject which enable you to save the configuration details of a GameObject in an Asset that you can reuse throughout the Unity Scene.
We will need to create Prefab of one of the gem sprites that we will use in our Script for generating a grid of gems. Before we create the Prefab of the gem we will need to create and configure it as a GameObject first then convert the GameObject into the Prefab saving all of it’s configuration details.
To create the GameObject of a gem that we will then turn into a Prefab navigate into the Sprites folder inside the Assets folder, select the Sprite of the grey gem and drag and drop it into the Unity Scene Editor. Locate and on the GameObject you have just created for the grey gem in the Unity Scene Hierarchy. Next will will configure the GameObject of the grey gem and set the scale of the X and Y to 1.25 on the Transform vector to increase the size.
Now we are ready to create the Prefab of the grey gem, navigate to the Prefab directory in the Unity Assets folder then drag and drop the GameObject of the grey gem from the Unity Scene Hierarchy into the Prefabs folder. This will create the Prefab and now you can delete the GameObject of the grey gem.
Creating the GridManager Script
Next we will create our first Unity script that will be used for creating an 8 by 8 Grid of Gems.
In Unity a Script is code you write in the C# programming language to control the behaviour of GameObjects in your game. Scripts are written using a code editor and consist of classes and methods. Scripts can be added to GameObjects to be displayed in your Scene in Unity.
I recommend you bookmark the following resources below that contain documentation to help you to write C# scripts in Unity.
- Official C# documentation from Microsoft
- Unity Scripting Reference
To create the Script, navigate into the Scripts folder inside the Assets folder. Left click on the Assets folder, select “Create” then “C# Script”. Give the Script the name “GridManager” and select enter key.

Now that the Script has been created, open it up in a code editor and copy and paste the following C# code into the GridManager.cs Script.
As mentioned above Unity Scripts are written in the C# (pronounced C Sharp) programming language. If you have experience with Java, you may notice there are some similarities in syntax.
In Unity, public variables in Scripts can be configured against the GameObject in the Unity Inspector. In the GridManager script we have a mix of the following public and private variables.
- An instance of GridManager, that is a static variable that has public visibility
- Two integer variables with public visibility, representing the number of rows and columns in the grid
- A private multi dimensional array of GameObjects representing the Gems shown in the Grid, with the column and row of the Gem in the Grid as indices to the array
- A public variable for the list of Sprites to be populated with a Sprite for each color of the Gem
- A public variable for the GameObject of a Gem Prefab that we will use for creating each of the Gems in the Grid
Also in the Unity Script for the GridManager we have three methods. A Start() method, an Update() method and the GenerateGrid(float, float) method. Our class for the GridManager Script extends the MonoBehaviour class.
The Start() method is called in a Unity Script that extends the MonoBehaviour class when the game is run. In our Start() method we first set the GridManager instance variable using the GetComponent method.
After that the Gem Prefab is used to obtain the width and height of each Gem to be shown in the Grid by getting the SpriteRenderer from the Gem Prefab and accessing the bounds.size variable on the SpriteRenderer. Finally in the Start() method we set up the 8 x 8 Grid by calling the GenerateGrid(float, float) method passing the Gem width and height as parameters.
The Update() method is called in a Unity Script that extends the MonoBehaviour class at the frequency of once per frame. For our GridManager Script we have left the Update() method empty.
The GenerateGrid(float, float) method is used to create the 8 x 8 Grid of Gems. First in the GenerateGrid method we initialize the multi dimensional array of Gems using the number of columns and rows that are to be provided to the Script in the Unity Inspector.
Next we start two for loops to create a Gem GameObject at each row and column in the Grid.
The Gem GameObject is created using the Instantiate(…) method with the Gem Prefab as the GameObject to be replicated, at a calculated position using a 3D Vector with the rotation matching the rotation of the Prefab of the Gem.
The position of each Gem is calculated using the coordinates of the Grid (using the transform.position 3D Vector) and adding the Gem width or Gem height multiplied by the index of the column or row.
Once a Gem is created using the Instantiate(…) method, it gets assigned to the applicable column and row in the multi dimensional array. Then a parent child relationship is created between the Grid and the Gem using transform.parent variable on the Gem.
The Sprite to be used for the Gem (which is different for each Gem color) is set using the SpriteRenderer on the Gem by assigning the sprite variable on the SpriteRenderer of the Gem to a random Sprite in the List of Sprites containing each Gem color.
Creating and Configuring the Grid GameObject
Now that we have a Script for the GridManager the next step will be to add a Grid to be shown in the Unity Scene.
To do this we will first open the GameScene in Unity from the Scenes folder in the Assets directory. Next we will add an empty GameObject to the GameScene by clicking the right mouse button in the Unity Scene Hierarchy and selecting “Create Empty”. Rename the GameObject you have just created to “Grid”.

Next we will add the GridManager script to the Grid GameObject in the Unity Inspector by selecting the Grid GameObject, then selecting the “Add Component” button, selecting the “Script” option then selecting the “GridManager” Script.

Now that the GridManager Script has been added to the Grid GameObject next we will populate the public variables from GridManager Script in the Unity inspector.
Because we want an 8 by 8 grid enter 8 in the Rows and Columns fields on the Grid Manager Script. Under the Gem Sprites public variable for the Size variable enter 6 as we have 6 different color Gems, this will create Elements 0 – 5 in under the Gem Sprites variable.
Next navigate into the Sprites folder in the Assets directory and locate the 6 different Gem Sprites, drag and drop each Gem Sprite into one of the Element slots.
Finally navigate into the Prefabs folder in the Assets directory and locate the Gem Prefab you created earlier. Drag and drop this Gem Prefab into the Gem variable in the Grid Manager Script in the Unity Inspector.

Now if you select the Play button in the Unity Editor you should see the 8 by 8 grid of Gems in a random order shown on screen. You may need to reposition the Grid GameObject if the Gems are spilling over the bounds of the screen so that all of the Gems are shown correctly on screen.

You may notice that we do have some Gems in the Grid that are shown as 3 or more in a row either vertically or horizontally this is something we will address in later stages of the tutorial.
Step 3: Adding Touch Controls to Swap Gems
In the third step of the tutorial for creating the GemBuster game we will create a Script for the Gem and implement basic touch controls to select, unselect and swap gems.
Creating the Gem Script
Create a new C# Script in Unity by navigating the Scripts folder inside the Asset directory, right click the mouse button, select “Create” and click on “C# Script”. Rename is to “Gem” and open the script in the code editor.
Copy and paste the following C# code into the Gem.cs Script.
All of the variables in the Gem Script are private. The following variables are defined in the Gem Script.
- A variable for the color to be applied to the SpriteRenderer on the Gem when it is selected
- A variable for the color to be applied to the SpriteRenderer on the Gem when it is not selected
- A boolean variable which is set to true if the Gem is selected, otherwise it is set to false
- A Gem variable which references the previously Gem selected which is used for swapping the previous Gem with the currently selected Gem
- A SpriteRenderer variable which is used for applying a color against the Gem Sprite if it is selected or unselected as well as changing the Gem Sprite if two Gems are swapped
The following methods are defined in the Gem Script.
- Start()
- Select()
- Unselect()
- OnMouseDown()
- IsSelectedGemAdjacent()
- SwapGem()
The Start() method is used to initialize the Gem. It retrieves the SpriteRenderer and defaults the Gem to unselected.
The Select() method is used to handle the selection of a Gem in the 8 x 8 Grid. The Unselect() method will unselect the currently selected Gem.
The IsSelectedGemAdjacent() method calculates the adjacent Gems by sending a raycast in the up, down, left and right directions of the selected Gem and adding the GameObjects that produced a collision into a List. This List is then checked if it contains the previously selected Gem. If this is the case, the selected Gem is adjacent to the previous Gem and the method will return true otherwise it will return false.
The SwapGem() method is used to adjacent swap gems that have been selected one after the other. This is achieved by swapping the Sprite of the Gems with the help of a temporary value for the Sprite.
The OnMouseDown() method is used for handling touch events on the Gem. It determines whether the Gem needs to be Selected, Unselected or Swapped with an adjacent Gem using a series of conditional statements.
Updating the Gem Prefab
Now we will to make two changes to the Gem Prefab we created earlier in this tutorial. We will need to open the Gem Prefab in the Unity Inspector for editting, to do this, locate the Gem Prefab inside the Prefabs folder in the Assets directory and double click on it.
First we will need to assign the Gem Script we have just created to the Gem Prefab. To do this, select the “Add Component” button, select “Scripts” then click on the “Gem” Script.
Next we will need to add a Box Collider 2D component to the Gem Prefab. This is required so that when we tap on a Gem to select or swap it, the taps will only be registered if there is a collider present on the GameObject. To add the Box Collider 2D to the Gem Prefab, select the “Add Component” button, select “Physics 2D” then click on “Box Collider 2D”.
Once you have made these changes to the Gem Prefab, the Unity Inspector should show the Gem Script and the Box Collider 2D components added to the Gem Prefab as per the screenshot below.

Save the changes to the Gem Prefab then proceed to the next section of the tutorial.
Configuring Physics 2D Unity Project Settings
For the last part of the step to ensure the raycasting will work correctly when detecting adjacent gems we will need to disable the “Queries Start In Colliders” flag in the Unity Physics 2D Project Settings.
To access the Unity Project Settings, select the “Edit” menu and select the “Project Settings…” menu item.

Select the “Physics 2D” option in the left side bar and uncheck the “Queries Start In Colliders” flag.

Now if you run your the GemBuster game you should be able to swap adjacent Gems in the 8 x 8 Grid as per the screen capture below.
Step 4: Implementing Matching, Clearing and Falling Gems
In the forth step of this tutorial we will be finalizing the game logic that is required to be built for the GemBuster game.
First we will modifying the GridManager Script to update the Grid creation method to prevent matches of 3 or more Gems found in the initial Grid generated.
After that we will create some methods to detect matches of 3 or more Gems in the Grid using ray casting against the two Gems that have swapped positions. Once matches are detected we will create some methods to clear those Gems from the Grid.
Finally in forth step of the tutorial we will implement game logic to drop gems that sit above cleared gems and spawn new games where required to fill the 8 x 8 Grid of gems.
Modifying the Grid Creation Script to Prevent Matches in the Initial Grid
We will start this section by opening up the GridManager.cs Script in a code editor and we will make some changes to GenerateGrid(float, float) method along with adding a new method RandomSpriteExcluding(List<Sprite>).
In the GenerateGrid(float, float) method we change how we assign a new Sprite to a Gem in the Grid. Instead of selecting any Gem Sprite at random we will create a List of Sprites to choose for the Gem and we will first exclude the Sprite of the Gem to the left of the new Gem, if it exists. And we also exclude the Sprite of the Gem underneath the new Gem, if it exists. Then from this List of possible Sprites we select a random Sprite ensuring we don’t end up with a match of 3 or more in the initial Grid.
See the code excerpt showing the changes in the GridManager.cs script below.
If you implement the changes above in the GridManager script, when you run the GemBuster game, you will see that the 8 x 8 Grid will start with no matches of 3 or more in a row as per the screenshot below.

Detecting and Clearing Matches of 3 or More Gems in the Grid
In this section of the tutorial we will alter the existing Gem.cs Script to introduce some new methods to detect and clear matches of 3 or more gems in a grid.
See the code excerpt showing the changes for implementing the match finding and clearing game logic in the Gem.cs script below.
Three new methods have been created in this code excerpt.
- FindHorizontalMatches()
- FindVeriticalMatches()
- ClearMatches()
The FindHorizontalMatches() method returns a List of GameObjects which are Gems that match the same color of the swapped Gem in the left and right direction. Ray casting is used in the Vector2.left and Vector2.right direction of the swapped gem to check if the adjacent gem matches the swapped gem’s color.
If there is a match the gem is added to the List and the ray casting is performed again on the adjacent gem until either the adjacent gem’s color doesn’t match or the left or right side of the grid is hit and there are no more gems to compare.
The FindVeriticalMatches() method also returns a List of GameObjects, it uses the same logic defined in the FindHorizontalMatches() method but instead of going in the Vector2.left and Vector2.right direction when comparing the color of adjacent gems to the swapped gem it moves in the Vector2.up and Vector2.down direction.
The FindVeriticalMatches() method will check that the swapped gem matches in the adjacent gem’s color in the up and down direction until the color’s no longer match or the top or the bottom of the grid is reached and there are no more gems to compare.
The ClearMatches() method is responsible for calling the FindHorizontalMatches() and FindVerticalMatches() methods after gems are swapped in the grid. If there are at least two gems in the List of horizontal matches or the List of vertical matches these gems will be cleared from the screen by using the SpriteRenderer on the Gem and setting the Sprite to null. At least two gems are required instead of three because the swapped gem is not included in the count of matches.
The ClearMatches() method also calls the DropGems() method on the GridManager instance if there are at least two vertical or horizontal matches. This method will be covered in the next section of this tutorial.
In additional to the three new methods, the OnMouseDown() method has also been altered slightly. After the user has swapped two adjacent gems the ClearMatches() method will be called twice against gem that was swapped.
If you implement these changes and run the GemBuster game, you will see that when you swap two adjacent gems and a match of 3 or more gems is detected, they will be cleared from the grid as per the screen capture below.
Implementing Falling and Spawning Gems
In this section of the tutorial we will update the GridManager.cs Script to make gems falls if there are cleared spots underneath. In addition to this we will implement spawning of new gems after gems are cleared so that they can be replenished in the 8×8 grid.
See the code sample of the GridManager.cs Script containing the functionality for implementing falling and spawning Gems.
Three new methods have been added in this GridManager Script.
- GetDroppableGems()
- GetSpawnableGems()
- DropGems()
The GetDroppableGems() method returns a list of x and y indices of the multi dimensional array of Gems that are sitting above a blank spot in the Grid.
The GetSpawnableGems() method returns a list of x and y indices of the multi dimensional array of Gems that can have a Gem spawned in that location from the top of the grid.
The DropGems() method uses both the GetDroppableGems() method and the GetSpawnableGems() method to make sure that any droppable gems fall to the correct location in the Grid and new gems are spawned correctly.
The DropGems() method will first use the GetDroppableGems() method and get a list of x and y indices that contain gems that can drop. Then it uses a while loop to lower the position of each droppable a gem one space at a time until no more droppable gems are left.
After that the DropGems() method will call the GetSpawnableGems() method to retrieve the list of x and y indices that can have a gem spawned into them. For each of these x and y indices a random Sprite that will not cause a match to be created is spawned and placed at the x and y coordinates in the Grid.
Finally each Gem in the Grid is retrieved and the GetMatches() method is called on the Gem to check if there are any new matches requiring the process around matching, clear, dropping and spawning of gems to be repeated.
If you implement these changes to the GridManager.cs Script and run the GemBuster game, you will see Gems will drop if there is an empty space underneath and new gems will spawn from the top as required as seen in the screen capture below.
Step 5: Adding Sound
Back in Step 1 you would have downloaded some sound packs from Kenney.nl and added three sounds into the Sounds folder in the Assets directory.
In this step of the tutorial we will be updating our Gem Prefab and Gem.cs Script to play the following three sounds during game play in the GemBuster game.
- Selecting a Gem Sound
- Swapping a Gem Sound
- Clearing Gems Sound
We will start by making the following changes to the Gem.cs Script.
- Add three public AudioClip variables
- Adding code to the Select() method, the Swap() method and the ClearMatches() method to play each of the Audio Clips
See the code excerpt from the Gem.cs Script below.
Next we will need to make some changes to the Gem Prefab to set the Audio Clips to the variables on the Script and then add an Audio Source component.
Open the Gem Prefab, then open the Sounds folder in the Assets directory and drag and drop the sound files into the relevant Audio Clip variable.

Then to add the Audio Source component to the Gem Prefab, select the “Add Component” button, select “Audio” then select “Audio Source”.

Once you make these changes and run the GemBuster game, you should hear different sounds playing when you select a gem, swap a gem or clear gems from the grid.
Step 6: Adding Scoring and a Count Down Timer
In the sixth step of this tutorial we will be adding a scoring system to the game as well as a count down timer that we will be displaying in the game user interface.
Adding a Canvas with Text Fields
We will start this step of the tutorial by adding some text fields to the screen for showing the current score, high score and a count down timer.
The Canvas can be added to the screen by right clicking the mouse in the Unity Scene Hierarchy, selecting “UI” then selecting “Canvas”.

Next we will add a Panel to the Canvas by right mouse clicking on the Canvas and selecting “UI”, then “Panel”.

Give the Panel the name of “GameUIPanel” and make sure the Panel is fully transparent by unchecking the Image checkbox.

Next we will add three text fields to the panel by clicking the right mouse button on the panel in the Unity Hierarchy, selecting “UI” and clicking on “Text”.

Configure each of the three Text fields in the Unity inspector by giving them a recognisable name, setting the text to be shown, setting the font size and configuring the horizontal and vertical text alignment as per the screenshot below.

After configuring the panel for the game user interface, repeat the relevant parts of the process above to create a second panel underneath the Canvas to be shown when the game ends.
Add three Text fields to this panel, one for displaying “Game Over” text and two others for showing the final score and the high score.
Add a Button to the panel to restart the game from the Game Over screen by clicking the right mouse button on the panel in the Unity Hierarchy, selecting “UI” then clicking on “Button”.

Expand the Button in the Unity Hierarchy and select the Text element underneath the Button and update the Text to “PLAY AGAIN” in the Unity Inspector as per the screenshot below.

Make one additional change the GameOverPanel to load as inactive (hiding it from the user) by unchecking the checkbox next to the name of the panel in the Unity inspector as per the screenshot below.

Setting up the GameManager
Next we will set up the GameManager which will be responsible for keeping track of the game score, the game count down timer, showing the game over screen and restarting the game.
Create a new Script called “GameManager” and copy and paste the following code inside.
Next create an empty GameObject in the Unity Hierarchy and give it the name “GameManager”. Then add the GameManager Script to the GameManager GameObject.
Next drag and drop the relevant Text fields, Panels and Buttons from the Unity Hierarchy into the public variables in the Unity Inspector for the GameManager GameObject.

Finally, we will make two minor changes to the Gem Script.
The first change is in the OnMouseDown() method where we will add a condition to the if statement to return null at the start of the OnMouseDown() method to check if the game is over using the boolean variable from the GameManager. This will allow us to prevent the user from interacting with the game play if the game is over until the game is restarted.
The second change is in the ClearMatches() method where the IncreaseScore() method on the GameManager is invoked to add points to the score after calling the DropGems() method on the GridManager.
See the code excerpt below containing the changes to the Gem.cs Script.
If you make the changes above and run the GemBuster game you should see something like the screenshot shown in the introduction of this post.
Now that you have completed the GemBuster game, to create an APK for your Android app in Unity, select “File” then “Build Settings”. Then click the “Build” button, choose a file name and location for the APK file and select “Save” and wait for the APK to be generated.

Всем привет! Это снова Илья и сегодня мы поговорим о технической реализации мобильной игры в современных реалиях. Статья не претендует на уникальность, однако в ней вы можете найти для себя что-то полезное. А чтобы рассмотреть разработку на реальном проекте — мы возьмем реализацию нашей игры, которая на днях выходит в Soft-Launch.
Итак, запасаемся кофе, открываем Unity и погнали!
Базовая настройка проекта. URP и все-все-все.
Начнем с того, что мы работаем с URP (Universal Render Pipeline). Почему так? Потому что он проще в настройке и обладает более гибким контролем, чем стандартный рендер. Ну и добиться хорошей производительности на тапках исходя из этого — намного проще.
Стоит указать, что ниже пойдет речь о 2D игре. Для 3D игр подходы будут несколько отличаться, как и настройки.
Мы реализовали два уровня графики. Low Level — для деревянных смартфонов и High Level — для флагманов. Уровни графики подключаются при помощи Project Settings.
В нашем проекте стоят следующие настройки (для Quality уровней):
На что здесь следует обратить внимание:
- Texture Quality — качество текстур. Для High — мы берем полный размер текстур, для Low — Четверть. Можно еще внести Middle пресет с дополнительным уровнем.
- Resolution Scaling везде стоит 1 — мы берем это значение из URP Asset.
- VSync на Low уровне стоит отключить.
- Все что связано с реалтаймом — отключаем.
Теперь перейдем к настройкам самих URP Asset. На что следует обратить внимание:
Для разных уровней качества можно установить Render Scale — тем самым снижая разрешение для отрисовки. Также незабываем про Dynamic / Static батчинг.
Adaptive Performance
Отличная штука для автоматической подгонки производительности мобильных игр (в частности для Samsung-устройств):
Другие полезные настройки:
- Отключите 3D освещение, лайтмапы, тени и все что с этим связано.
- Используйте для сборки IL2CPP — ускорьте работу вашего кода.
- Используйте Color Space — Linear.
- По-возможности подключите multithreaded rendering.
Игровой фреймворк
Едем дальше. URP и другие настройки проекта сделали. Теперь настало время поговорить о нашем ядре проекта. Что оно включает в себя?
Само ядро фреймворка включает в себя:
- Игровые менеджеры для управления состояниями игры, аудио, переводов, работы с сетью, аналитикой, рекламными интеграциями и прочим.
- Базовые классы для интерфейсов (компоненты, базовые классы View).
- Классы для работы с контентом, сетью, шифрованием и др.
- Базовые классы для работы с логикой игры.
- Базовые классы для персонажей и пр.
- Утилитарные классы (Coroutine Provider, Unix Timestamp, Timed Event и пр.)
Зачем нужны менеджеры?
Они нужны нам для того, чтобы из контроллеров управлять состояниями и глобальными функциями (к примеру, аналитикой).
Хотя мы и используем внедрение зависимостей, менеджеры состояний реализованы в качестве синглтонов и могут быть (и по их назначению должны быть) инициализированы единожды. А дальше мы просто можем использовать их:
AnalyticsManager.Instance().SendEvent(«moreGamesRequested»);
А уже сам менеджер распределяет, в какие системы аналитики, как и зачем мы отправляем эвент.
Базовые классы.
Здесь все просто. Они включают в себя базовую логику для наследования. К примеру, класс BaseView и его интерфейс:
namespace GameFramework.UI.Base
{
using System;
public interface IBaseView
{
public void ShowView(ViewAnimationOptions animationOptions = null, Action onComplete = null);
public void HideView(ViewAnimationOptions animationOptions = null, Action onComplete = null);
public void UpdateView();
}
}
namespace GameFramework.UI.Base
{
using System;
using UnityEngine;
using UnityEngine.Events;
using DG.Tweening;
internal class BaseView : MonoBehaviour, IBaseView
{
// Private Params
[Header(«View Container»)]
[SerializeField] private Canvas viewCanvas;
[SerializeField] private CanvasGroup viewTransform;
private void Awake()
{
// View Canvas Detecting
if (viewCanvas == null)
{
viewCanvas = GetComponent<Canvas>();
if (viewCanvas == null) throw new Exception(«Failed to initialize view. View canvas is not defined.»);
}
// View Transform Detecting
if (viewTransform == null)
{
viewTransform = GetComponent<CanvasGroup>();
if (viewTransform == null) throw new Exception(«Failed to initialize view. View transform is not defined.»);
}
// On Before Initialized
OnViewInitialized();
}
public virtual void OnViewInitialized() {
}
private void OnDestroy()
{
viewTransform?.DOKill();
OnViewDestroyed();
}
public virtual void OnViewDestroyed() {
}
public virtual void UpdateView() {
}
public bool IsViewShown()
{
return viewCanvas.enabled;
}
public void ShowView(ViewAnimationOptions animationOptions = null, Action onComplete = null)
{
viewCanvas.enabled = true;
if (animationOptions == null) animationOptions = new ViewAnimationOptions();
if (animationOptions.isAnimated)
{
viewTransform.DOFade(1f, animationOptions.animationDuration).From(0f)
.SetDelay(animationOptions.animationDelay).OnComplete(() =>
{
if (onComplete != null) onComplete();
OnViewShown();
});
}
else
{
if (onComplete != null) onComplete();
OnViewShown();
}
}
public void HideView(ViewAnimationOptions animationOptions = null, Action onComplete = null)
{
if (animationOptions == null) animationOptions = new ViewAnimationOptions();
if (animationOptions.isAnimated)
{
viewTransform.DOFade(0f, animationOptions.animationDuration).From(1f)
.SetDelay(animationOptions.animationDelay).OnComplete(() =>
{
viewCanvas.enabled = false;
if (onComplete != null) onComplete();
OnViewHidden();
});
}
else
{
viewCanvas.enabled = false;
if (onComplete != null) onComplete();
OnViewHidden();
}
}
public virtual void OnViewShown(){
}
public virtual void OnViewHidden(){
}
}
}
А дальше мы можем использовать его, к примеру таким образом:
namespace Game.UI.InGame
{
using System;
using System.Collections;
using System.Collections.Generic;
using UnityEngine;
using UnityEngine.Events;
using UnityEngine.UI;
using GameFramework.UI.Base;
using GameFramework.Components;
using GameFramework.UI.Components;
using GameFramework.Managers;
using GameFramework.Models;
using GameFramework.Models.Ads;
using Game.Models;
using GameFramework.Utils;
internal class ToDoListView : BaseView
{
// View Context
public struct Context
{
public Action onToDoListClosed;
}
private Context _ctx;
// View Params
[Header(«View References»)]
[SerializeField] private Button closeButton;
[SerializeField] private AudioClip clickButtonSFX;
// Private Params
private AudioSource _windowAudioSource;
public ToDoListView SetContext(Context ctx)
{
_ctx = ctx;
// Initialize Audio SOurce
if (_windowAudioSource == null)
{
_windowAudioSource = transform.gameObject.AddComponent<AudioSource>();
transform.gameObject.AddComponent<AudioSettingsApplier>().currentAudioType = GameFramework.Models.AudioType.Sounds;
}
// Add Handlers
closeButton.onClick.AddListener(() =>
{
_ctx.onToDoListClosed.Invoke();
PlayClickSoundSFX();
});
return this;
}
public override void OnViewDestroyed()
{
closeButton.onClick.RemoveAllListeners();
}
public override void UpdateView()
{
}
private void PlayClickSoundSFX()
{
if (_windowAudioSource != null && clickButtonSFX!=null)
{
_windowAudioSource.playOnAwake = false;
_windowAudioSource.clip = clickButtonSFX;
_windowAudioSource.loop = false;
_windowAudioSource.Play();
}
}
}
}
Классы для работы с контентом, сетью, шифрованием
Ну здесь все просто и очевидно. Вообще, у нас реализовано несколько классов:
1) Классы шифрования (Base64, MD5, AES и пр.)
2) FileReader — считывающий, записывающий файл, с учетом кодировки, шифрования и других параметров. Также он умеет сразу сериализовать / десериализовать объект в нужном формате и с нужным шифрованием.
3) Network-классы, которые позволяют удобно работать с HTTP-запросами, работать с бандлами / адрессаблс и др.
Утилитарные классы
Здесь у нас хранятся полезные штуки, вроде Unix Time конвертера, а также костыли (вроде Coroutine Provider-а).
Unix Time Converter:
namespace GameFramework.Utils
{
using UnityEngine;
using System.Collections;
using System;
public static class UnixTime {
public static int Current()
{
DateTime epochStart = new DateTime(1970, 1, 1, 0, 0, 0, DateTimeKind.Utc);
int currentEpochTime = (int)(DateTime.UtcNow — epochStart).TotalSeconds;
return currentEpochTime;
}
public static int SecondsElapsed(int t1)
{
int difference = Current() — t1;
return Mathf.Abs(difference);
}
public static int SecondsElapsed(int t1, int t2)
{
int difference = t1 — t2;
return Mathf.Abs(difference);
}
}
}
Костыль Coroutine-Provider:
namespace GameFramework.Utils
{
using System.Collections;
using System.Collections.Generic;
using UnityEngine;
public class CoroutineProvider : MonoBehaviour
{
static CoroutineProvider _singleton;
static Dictionary<string,IEnumerator> _routines = new Dictionary<string,IEnumerator>(100);
[RuntimeInitializeOnLoadMethod( RuntimeInitializeLoadType.BeforeSceneLoad )]
static void InitializeType ()
{
_singleton = new GameObject($»#{nameof(CoroutineProvider)}»).AddComponent<CoroutineProvider>();
DontDestroyOnLoad( _singleton );
}
public static Coroutine Start ( IEnumerator routine ) => _singleton.StartCoroutine( routine );
public static Coroutine Start ( IEnumerator routine , string id )
{
var coroutine = _singleton.StartCoroutine( routine );
if( !_routines.ContainsKey(id) ) _routines.Add( id , routine );
else
{
_singleton.StopCoroutine( _routines[id] );
_routines[id] = routine;
}
return coroutine;
}
public static void Stop ( IEnumerator routine ) => _singleton.StopCoroutine( routine );
public static void Stop ( string id )
{
if( _routines.TryGetValue(id,out var routine) )
{
_singleton.StopCoroutine( routine );
_routines.Remove( id );
}
else Debug.LogWarning($»coroutine ‘{id}’ not found»);
}
public static void StopAll () => _singleton.StopAllCoroutines();
}
}
Логика сцен
Наша игра — это по своей сути интерактивная история с различными мини-играми (поиск предметов, простенькие бои, крафтинг, найди пару, а также большое количество головоломок).
Каждая сцена — содержит в себе основной Installer, который помимо различных View, подключает логические блоки — своеобразные куски механик:
Эти куски механик последовательно выполняются, отдавая события OnInitialize, OnProgress, OnComplete. Когда последний блок сыграет свой OnComplete — он завершит работу сцены (закончит уровень).
Зачем это сделано?
- Мы можем собирать каждую сцену из отдельных механик, как конструктор. Это может быть диалог -> поиск предметов -> катсцена -> поиск предметов -> диалог, или любой другой порядок.
- Мы можем сохранять прогресс внутри сцены, привязываясь к определенному блоку.
- Блоки механик удобнее изменять, нежели огромный инсталлер с кучей разных контроллеров.
Работа с контентом
При работе с контентом, мы стараемся делать упор на оптимизацию. В игре содержится много UI, скелетные 2D анимации, липсинк и прочее. Вообще, контента достаточно много, не смотря на простоту игры.
Анимации в игре
Самый удобный для нас вариант — оказался из коробки. Мы используем систему для работы с костной анимацией от самой Unity:
Да, можно взять Spine, но у нас нет настолько большого количества анимаций, поэтому вариант от Unity — весьма оптимален.
Упаковка и сжатие
Все, что можно и нужно запихнуть в атласы — мы запихиваем в атласы и сжимаем. Это могут быть элементы UI, иконки и многое другое. Для упаковки атласов — используем стандартный Unity пакер из Package Manager (V1):
Локализация
Вся локализация базируется на JSON. Мы планируем отказаться от этого в ближайшее время, но пока что на время Soft-Launch этого хватает:
Работа с UI
При работе с UI мы разбиваем каждый View под отдельный Canvas. 99% всех анимаций работает на проверенном временем DOTween и отлично оптимизирован.
View инициализируются и обновляются по запросу через эвенты, которые внедряются в Level Installer, либо в отдельных блоках логики.
Что мы используем еще?
- Salsa — для липсинка;
- 2D Lighting — для освещения. В большинстве сцен используется освещение по маске спрайта;
- DOTween — для анимаций;
Итого
Работа с механиками получается достаточно гибкой за счет блоков логики, внедрение зависимостей — позволяет контролировать оптимизацию кода. У нас собственная реализация внедрения зависимостей, как и системы реактивных событий, дабы не громоздить Zenject + UniRX. Да, мы сделали проще, но нам и не нужно всех возможностей этих огромных библиотек.
Полезные ссылки:
Надеюсь, вам было полезно.
Готов ответить на все вопросы. 