![]()
Загрузить PDF
![]()
Загрузить PDF
Древесина — не самый простой материал для создания вещей своими руками. Если вам нужно покрасить деревянный знак или украсить мебель, вам придется постараться, чтобы получить четкий и профессиональный текст на деревянной поверхности. Подобная задача требует подготовки, поэтому следует запастись терпением. Также необходимы подходящие краски и сведения о том, как создать четкие и красивые буквы на древесине.
-

1
Накройте рабочую поверхность. Даже самому аккуратному человеку следует накрыть рабочую поверхность для защиты от загрязнений. При работе с водой, опилками, грунтовкой, краской и отделочным слоем существует немало возможностей устроить беспорядок. Накройте рабочий стол или пол старым полотенцем или газетами.[1]
-
2
Очистите древесину. Даже если поверхность выглядит чистой, ее необходимо слегка очистить. Смочите салфетку в теплой воде и протрите всю поверхность. Если вы хотите сделать надпись на мебели или знаке с металлическими элементами, то их необходимо снять до начала покрасочных работ.[2]
- Если в древесине есть отверстия или большие вмятины, поверх которых нужно нанести краску, то их следует заделать шпаклевкой по дереву.
-
3
Обработайте дерево наждачной бумагой. Этот шаг важен по ряду причин. При работе с мебелью, которая покрыта лаком, поверхность нужно обработать наждачной бумагой, чтобы краска хорошо держалась. В случае с необработанной неровной доской такая обработка позволит получить гладкую поверхность.[3]
- Работайте с небольшим нажимом и двигайтесь вдоль волокон. Не шлифуйте против или поперек волокон, иначе древесина будет выглядеть грубой и шероховатой.
- Используйте мелкую наждачную бумагу с размером частиц 140 микрон, чтобы снять верхний слой материала. Затем возьмите более мелкую бумагу, чтобы получить гладкую поверхность.
-
4
Удалите пыль. После шлифовки на поверхности наверняка будет древесная пыль. Удалите пыль, даже если поверхность выглядит вполне чистой. Сметите пыль и опилки с помощью крупной щетки или чистой салфетки.[4]
- Тщательно удалите пыль, чтобы краска легла на поверхность, а не на частицы пыли.
-
5
Нанесите грунтовку. Перед нанесением надписи краской нужно использовать грунтовку. Только так можно заделать поры в древесине и создать хорошую основу для краски. Благодаря грунтовке она не будет отслаиваться или тускнеть.[5]
- Если вам также необходимо покрасить фон, то используйте белую или серую грунтовку. Если же только буквы, то выбирайте прозрачную грунтовку.
Реклама
-
1
Создайте дизайн символов. Если вы уверены в своей способности создавать надписи от руки, то можете пропустить этот шаг. В остальных случаях создайте дизайн букв на компьютере, чтобы они имели ровный и четкий вид. В программе Microsoft Word можно напечатать нужные буквы, которые потом следует перенести на дерево.[6]
- Откройте Microsoft Word, нажмите “Файл” и выберите вкладку “Разметка страницы”. Определите размер листа в соответствии с размером деревянной поверхности или укажите свой размер.
- Напечатайте надпись в документе так, как она должна выглядеть на древесине. Если размеры страницы соответствуют размеру древесины, то надпись будет в натуральную величину.
- Напечатайте документ.
-
2
Перенесите буквы на древесину. Существует немало способов перенести напечатанные буквы на деревянный предмет, и некоторые из них позволяют получить более точный результат. Первый способ — можно вырезать буквы на бумаге, а затем обвести контуры (подойдет только в том случае, если буквы достаточно большие и вам будет удобно вырезать). Второй способ подходит для надписей любого размера.
- Переверните напечатанную страницу, чтобы работать с обратной стороной. Возьмите карандаш и закрасьте всю площадь чернил, которые находятся на лицевой стороне. Иными словами, нужно закрасить грифелем все напечатанные буквы, только с другой стороны листа.[7]
- Снова переверните бумагу и приложите ее к древесине. Напечатанные буквы будут обращены к вами. Снова используйте карандаш и обведите контуры всех букв.
- Когда все будет готово, уберите бумагу. Благодаря нажиму карандаша графит на обратной стороне бумаги перенесется на древесину. Теперь на материале будут контуры букв, которые нужно закрасить, а в результате получится красивая надпись.
- Переверните напечатанную страницу, чтобы работать с обратной стороной. Возьмите карандаш и закрасьте всю площадь чернил, которые находятся на лицевой стороне. Иными словами, нужно закрасить грифелем все напечатанные буквы, только с другой стороны листа.[7]
-
3
Купите трафареты с буквами. Найдите готовые трафареты в магазине товаров для творчества, которые позволят сделать желаемую надпись. Если вас интересует конкретный размер или тип шрифта, то попробуйте заказать трафареты онлайн. Для оптимального результата используйте трафаретную кисть и липкий аэрозоль.[8]
- Не торопитесь и закрепите трафарет на древесине именно так, как нужно для вашей надписи. Нанесите метки карандашом, чтобы увидеть, где должен располагаться трафарет.
- Встряхните баллончик с липким аэрозолем и нанесите тонкий слой на трафарет. Так его можно будет зафиксировать на древесине, чтобы он оставался неподвижным, а буквы не размазались.
- После фиксации трафарета используйте специальную кисть, чтобы нанести акриловую краску на древесину через вырезы в трафарете.
- Не спешите снимать шаблон с дерева и подождите, пока краска высохнет.
Реклама


-
1
Возьмите разные кисти. Для надписи от руки лучше использовать кисти разного размера и фактуры материала. Жесткие кисти квадратной формы позволяют создавать толстые и прямые контуры букв, а небольшие кисти отлично подходят для мелких деталей. Если вы уверены в своих способностях, то купите карандаши с акриловой краской в магазине товаров для творчества.
-
2
Используйте линейку, чтобы получить ровные буквы. Если буквы должны располагаться на ровной линии, то воспользуйтесь линейкой. Возьмите карандаш и проведите мягкую ровную линию как в тетрадях. Также можно начертить верхнюю границу, если вы знаете точные размеры каждой буквы. Наносите любые пометки и границы, которые помогут вам сделать ровную надпись.
-
3
Осторожно нанесите буквы. Выдавите небольшое количество краски на лист бумаги или палитру и начинайте рисовать. Следите за тем, чтобы соблюдать все ранее нанесенные линии и пометки на древесине, если надпись не должна иметь причудливый вид! Возьмите стакан с водой, чтобы промывать кисть при смене цвета.[9]
- В случае ошибки осторожно сотрите элемент чистой влажной ветошью. Влажную краску можно удалить.
Реклама


-
1
Подождите, пока краска высохнет. Акриловая краска сохнет весьма быстро, но лучше подождать несколько часов до полного высыхания. Если нужно подкрасить буквы вторым слоем краски, то сделайте это лишь тогда, когда высохнет первый слой. Обычно второй слой требуется для более светлых надписей (белый и пастельные цвета).[10]
-
2
Нанесите прозрачное акриловое полиуретановое покрытие. Прозрачный верхний слой закрепит надпись краской на древесине. Благодаря этому краска не будет отслаиваться или царапаться, а также долгое время сохранит первоначальный вид. Такое покрытие можно купить в хозяйственном магазине или магазине товаров для творчества.[11]
-
3
Покрытие должно полностью высохнуть. Рекомендуется оставить готовый деревянный предмет на 24 часа, чтобы он полностью высох. Через сутки ваш проект готов! Теперь его можно подарить близкому человеку или оставить себе. В любом случае такой работой можно гордиться.
Реклама
Что вам понадобится
- Древесина
- Газеты или старое полотенце
- Ветошь для протирки
- Наждачная бумага (мелкая и очень мелкая)
- Кисти (различных размеров в зависимости от величины букв)
- Грунтовка для краски по дереву
- Компьютер с программой Microsoft Word и принтером (чтобы сделать свой шаблон)
- Карандаши (чтобы обводить шаблон)
- Трафареты
- Линейка
- Акриловые краски
- Вода
- Прозрачное акриловое полиуретановое покрытие
Об этой статье
Эту страницу просматривали 18 242 раза.
Была ли эта статья полезной?
Introduction: Name Carved on Wood
Wood working is a very good hobby which gives lot of ideas to create new designs and good relaxation over regular office work.
My first experiment in the world of wood, with little knowledge on powered and manual wood working tools, I chose to carve/engrave name on wood. As it is a first wood working model for me, this idea will be easy to complete with minimum number of tools and average cost.
Step 1: Plan, Cost and Requirements.
First is plan. The idea is all about having a square wood piece on which letter of a name is engraved, adding more similar pieces gives the name.
Carved piece is either fixed on the wall using double sided gum tape or left hanging, connecting small chain to each plate.
Required items are,
- A wooden block
- Jigsaw or Circular saw, which cut wooden block into square pieces
- Dremel rotary tool with engraving burr, drum sander, cut-off wheel, for cleaning and engraving
- Colors and painting brush (optional)
Step 2: Cutting and Cleaning Wood
Cut the wooden block into square pieces of equal size, one piece for each letter. Clean the piece using Dremel tool, with drum sander.
Step 3: Selection of Design
Choose font and design for the name, print on a paper and stick it to wood pieces using gum stick.
Step 4: Carving/Engraving
Use cutting disk to cut on straight edges of the character, rest of the carving is done using carving/engraving burr. Remove all unwanted wood from the wood piece. Dremel 3000 tool, which I used, supports multiple speeds. use low speeds where precision is required. Be sure to follow safety requirements while using any any tool.
Step 5: Colouring(Optional)
It is not the good choice to color wood blocks as polishing itself gives the great look to wood. In my design, I chose to color it, as per my needs. Just select the color combination which suits to wall and color characters on the wood.
Step 6: Fixing and Lighting
Name carved on wood pieces is ready by this time. Can be fixed on to wall using double sided gum tape, or hanging using metal chain pieces.
When fixed to wall, using LED lights from one side of the pieces, gives shadows, looks great.
Happy Wood Working 
Be the First to Share
Recommendations
Introduction: Name Carved on Wood
Wood working is a very good hobby which gives lot of ideas to create new designs and good relaxation over regular office work.
My first experiment in the world of wood, with little knowledge on powered and manual wood working tools, I chose to carve/engrave name on wood. As it is a first wood working model for me, this idea will be easy to complete with minimum number of tools and average cost.
Step 1: Plan, Cost and Requirements.
First is plan. The idea is all about having a square wood piece on which letter of a name is engraved, adding more similar pieces gives the name.
Carved piece is either fixed on the wall using double sided gum tape or left hanging, connecting small chain to each plate.
Required items are,
- A wooden block
- Jigsaw or Circular saw, which cut wooden block into square pieces
- Dremel rotary tool with engraving burr, drum sander, cut-off wheel, for cleaning and engraving
- Colors and painting brush (optional)
Step 2: Cutting and Cleaning Wood
Cut the wooden block into square pieces of equal size, one piece for each letter. Clean the piece using Dremel tool, with drum sander.
Step 3: Selection of Design
Choose font and design for the name, print on a paper and stick it to wood pieces using gum stick.
Step 4: Carving/Engraving
Use cutting disk to cut on straight edges of the character, rest of the carving is done using carving/engraving burr. Remove all unwanted wood from the wood piece. Dremel 3000 tool, which I used, supports multiple speeds. use low speeds where precision is required. Be sure to follow safety requirements while using any any tool.
Step 5: Colouring(Optional)
It is not the good choice to color wood blocks as polishing itself gives the great look to wood. In my design, I chose to color it, as per my needs. Just select the color combination which suits to wall and color characters on the wood.
Step 6: Fixing and Lighting
Name carved on wood pieces is ready by this time. Can be fixed on to wall using double sided gum tape, or hanging using metal chain pieces.
When fixed to wall, using LED lights from one side of the pieces, gives shadows, looks great.
Happy Wood Working
Be the First to Share
Recommendations
![]()
Download Article
![]()
Download Article
Wood signs can be an excellent way to express your creativity and decorate your home. Not only are wood signs a gorgeous and popular form of DIY home decor, but they’re incredibly easy to create! All it takes is selecting the wood, then treating it so you can add your lettering via a typography template and paint markers. With the right tools and knowledge, you’ll be well on your way to making a beautifully personalized addition to your home decorations!
-
1
Select a rectangular piece of plywood or MDF in any size. Before you begin working, you must acquire the right piece of wood. The easiest and best type of woods to use are plywood and medium-density fiberboard (MDF), which you can purchase from your nearest hardware store. When you visit the hardware store, ask the attendant to cut the wood to a specific size, or buy a large piece and trim it on your own.[1]
- You can go as large or small as you want, depending on how you’re using your sign. The majority of precut wood is sold in 48 in (120 cm) by 24 in (61 cm) or 24 in (61 cm) by 24 in (61 cm).[2]
- Square or rectangular pieces of wood are the easiest shapes to work with, especially for beginners. However, if you’re trying to fit a certain theme or just want something different from the norm, use a woodcutter to shape your wood differently.
- Circular signs make excellent wall art, for instance. Alternatively, a heart-shaped sign with a romantic quote is a great choice for decorating yours and your significant other’s bedroom.
- You can go as large or small as you want, depending on how you’re using your sign. The majority of precut wood is sold in 48 in (120 cm) by 24 in (61 cm) or 24 in (61 cm) by 24 in (61 cm).[2]
-
2
Choose or create a typography template for the letters. You can’t write on wood without first having an idea of what you want to write! If you have an eye for design and typography, draw out a template of your own on a piece of paper with a calligraphy pen. Alternatively, do an online search for typography designs and print out a design you like.[3]
- For example, you could write something like, “Welcome to our abode,” to create an entrance sign for house guests.
- If the sign is for a specific room in your home, use your favorite phrase to describe the home. For instance, this could be a literary quote about enjoying family and the smaller moments in life for your living room.
- Alternatively, write a family member’s name to create a nameplate for their bedroom.
Advertisement
-
3
Sand the wood with 120- to 220-grit sandpaper until it’s smooth. Sand the entire surface of the wood—even the sides and back—by rubbing the fine-grit sandpaper back and forth along the grain. Sanding will make the wood easier to stain and write on.[4]
- Alternatively, you could use an electric sander.
-
4
Apply oil-based stain to the wood. Mix the stain thoroughly with a wooden spoon or a stick. Apply the stain with either a paintbrush or a clean rag. Load up your paint brush or rag with stain and swipe it across the wood. Coat the wood with stain from top to bottom.[5]
- Don’t forget to put on a pair of gloves before you begin staining![6]
- The stain can be any color you want. Don’t be afraid to get creative!
- Don’t forget to put on a pair of gloves before you begin staining![6]
-
5
Wait until the stain has dried before you start writing. The stain may take around 2 hours to dry. Waiting to add your lettering will ensure your writing looks clear and tidy. Test for dryness by swiping a gloved finger across the wood and seeing if it comes away clean.[7]
-
6
Smear a stain blocker onto the wood to protect your lettering. This will especially help if you’re writing with permanent markers. Focus on coating the darkest parts of the wood and use a soft cloth to apply the product. Add a second layer once the first layer has completely dried. Most stain blockers take between 6 and 8 hours to dry. [8]
- Stain blocker is available at your local hardware store.
-
7
Sketch out the size and spacing for your lettering. You may want to use a ruler to calculate exactly where you want each letter to be and what size to make your writing. Sketch out how much space the writing will take up on the wood by making a box (or boxes) to fit your letters into. The box(es) will form a guideline to help you center your template and keep your letters organized.[9]
- Alternatively, make a frame to block your letters into with masking tape.[10]
- Alternatively, make a frame to block your letters into with masking tape.[10]


Advertisement
-
1
Center the template on top of the wood. Retrieve the template you’ve made or printed out and lay it on top of the wood. Line up your template within the guidelines you’ve drawn. Add tape to the corners of your template to keep it in position as you draw.[11]
-
2
Trace the outlines of each word on the template with a pencil. Press the tip of your pencil into the paper and trace over the lines of your template. Focus only on the outlines of each letter. Apply strong pressure so the strokes show up on the wood. Use a pencil so that you’ll be able to correct any mistakes.[12]
-
3
Take the template off of the wood to check the visibility of your outlines. If your outlining was successful, you’ll notice strokes left behind by the pencil. If you can’t make out the lines, place the template over the wood and outline the letters again. You can erase any mistakes you’ve made with a pencil eraser.[13]
-
4
Write each letter carefully with a permanent marker or paint pen. Mistakes made with permanent markers or paint markers cannot be erased! Pay attention to the lines as you trace over them. Focus on drawing the correct positioning and shapes of each letter.[14]
-
5
Embellish your letters with different stroke widths and curly designs. Focus on making them look appealing once the letters have been outlined properly. Make wider strokes where the letters loop to add visual appeal. Add curls to the ends of letters for flourish. Follow your template to remember where to add the extra designs to your letters.[15]
-
6
Go over the words with your pen or marker to darken them. Adding a second layer to the letters with your paint marker will sharpen them and create a cleaner design. Make sure the first layer has dried before you re-apply! Use fast-drying paint markers to save time and create bolder lines; fast-drying markers take only a couple of minutes to dry.[16]


Advertisement
Add New Question
-
Question
What paint or pen do you use to write on wood?

Claire Donovan-Blackwood is the owner of Heart Handmade UK, a site dedicated to living a happy, creative life. She is a 12 year blogging veteran who loves making crafting and DIY as easy as possible for others, with a focus on mindfulness in making.
Arts & Crafts Specialist
Expert Answer
I recommend using a pencil on the wood first, then fill in the letters with either acrylic paint and a brush or an acrylic paint marker. If you use a fine liner or an alcohol-based ink, the color will bleed when you’re writing. However, avoid using alcohol-based ink on your wood.
-
Question
Do I have to write «FREE BEER»?
🌻 Summer 🌻
Community Answer
You don’t have write this phrase. It’s the example. You can write other phrases, such as “Welcome home!”
-
Question
Can I just write «Meep!»?
Yes. You’re creating the template, so feel free to write whatever you’d like.


See more answers
Ask a Question
200 characters left
Include your email address to get a message when this question is answered.
Submit
Advertisement
Video
-
Use latex-based paint if you don’t have oil-based wood stain. Dilute the paint with 2 parts water before brushing it on. Coat the entire surface of the wood wood in paint and let it dry for 1 hour.[17]
Advertisement
Things You’ll Need
- Wooden planks or boards
- Electric sander or 120- to 220-grit sandpaper
- Mixing tool (for the stain)
- Gloves
- Stain (in any color)
- Stain blocker
- Paintbrushes (or a clean rag)
- A pencil
- Permanent markers or paint pens
- Rulers
- Masking tape
References
About This Article
Thanks to all authors for creating a page that has been read 69,051 times.
Reader Success Stories
-

Shellie Osborne
Sep 10, 2021
«I have been doing DIY wooden signs for a little while now and just now learned about staining the wood before…» more
Did this article help you?
Get all the best how-tos!
Sign up for wikiHow’s weekly email newsletter
Subscribe
You’re all set!
![]()
Download Article
![]()
Download Article
Wood signs can be an excellent way to express your creativity and decorate your home. Not only are wood signs a gorgeous and popular form of DIY home decor, but they’re incredibly easy to create! All it takes is selecting the wood, then treating it so you can add your lettering via a typography template and paint markers. With the right tools and knowledge, you’ll be well on your way to making a beautifully personalized addition to your home decorations!
-
1
Select a rectangular piece of plywood or MDF in any size. Before you begin working, you must acquire the right piece of wood. The easiest and best type of woods to use are plywood and medium-density fiberboard (MDF), which you can purchase from your nearest hardware store. When you visit the hardware store, ask the attendant to cut the wood to a specific size, or buy a large piece and trim it on your own.[1]
- You can go as large or small as you want, depending on how you’re using your sign. The majority of precut wood is sold in 48 in (120 cm) by 24 in (61 cm) or 24 in (61 cm) by 24 in (61 cm).[2]
- Square or rectangular pieces of wood are the easiest shapes to work with, especially for beginners. However, if you’re trying to fit a certain theme or just want something different from the norm, use a woodcutter to shape your wood differently.
- Circular signs make excellent wall art, for instance. Alternatively, a heart-shaped sign with a romantic quote is a great choice for decorating yours and your significant other’s bedroom.
- You can go as large or small as you want, depending on how you’re using your sign. The majority of precut wood is sold in 48 in (120 cm) by 24 in (61 cm) or 24 in (61 cm) by 24 in (61 cm).[2]
-
2
Choose or create a typography template for the letters. You can’t write on wood without first having an idea of what you want to write! If you have an eye for design and typography, draw out a template of your own on a piece of paper with a calligraphy pen. Alternatively, do an online search for typography designs and print out a design you like.[3]
- For example, you could write something like, “Welcome to our abode,” to create an entrance sign for house guests.
- If the sign is for a specific room in your home, use your favorite phrase to describe the home. For instance, this could be a literary quote about enjoying family and the smaller moments in life for your living room.
- Alternatively, write a family member’s name to create a nameplate for their bedroom.
Advertisement
-
3
Sand the wood with 120- to 220-grit sandpaper until it’s smooth. Sand the entire surface of the wood—even the sides and back—by rubbing the fine-grit sandpaper back and forth along the grain. Sanding will make the wood easier to stain and write on.[4]
- Alternatively, you could use an electric sander.
-
4
Apply oil-based stain to the wood. Mix the stain thoroughly with a wooden spoon or a stick. Apply the stain with either a paintbrush or a clean rag. Load up your paint brush or rag with stain and swipe it across the wood. Coat the wood with stain from top to bottom.[5]
- Don’t forget to put on a pair of gloves before you begin staining![6]
- The stain can be any color you want. Don’t be afraid to get creative!
- Don’t forget to put on a pair of gloves before you begin staining![6]
-
5
Wait until the stain has dried before you start writing. The stain may take around 2 hours to dry. Waiting to add your lettering will ensure your writing looks clear and tidy. Test for dryness by swiping a gloved finger across the wood and seeing if it comes away clean.[7]
-
6
Smear a stain blocker onto the wood to protect your lettering. This will especially help if you’re writing with permanent markers. Focus on coating the darkest parts of the wood and use a soft cloth to apply the product. Add a second layer once the first layer has completely dried. Most stain blockers take between 6 and 8 hours to dry. [8]
- Stain blocker is available at your local hardware store.
-
7
Sketch out the size and spacing for your lettering. You may want to use a ruler to calculate exactly where you want each letter to be and what size to make your writing. Sketch out how much space the writing will take up on the wood by making a box (or boxes) to fit your letters into. The box(es) will form a guideline to help you center your template and keep your letters organized.[9]
- Alternatively, make a frame to block your letters into with masking tape.[10]
- Alternatively, make a frame to block your letters into with masking tape.[10]
Advertisement
-
1
Center the template on top of the wood. Retrieve the template you’ve made or printed out and lay it on top of the wood. Line up your template within the guidelines you’ve drawn. Add tape to the corners of your template to keep it in position as you draw.[11]
-
2
Trace the outlines of each word on the template with a pencil. Press the tip of your pencil into the paper and trace over the lines of your template. Focus only on the outlines of each letter. Apply strong pressure so the strokes show up on the wood. Use a pencil so that you’ll be able to correct any mistakes.[12]
-
3
Take the template off of the wood to check the visibility of your outlines. If your outlining was successful, you’ll notice strokes left behind by the pencil. If you can’t make out the lines, place the template over the wood and outline the letters again. You can erase any mistakes you’ve made with a pencil eraser.[13]
-
4
Write each letter carefully with a permanent marker or paint pen. Mistakes made with permanent markers or paint markers cannot be erased! Pay attention to the lines as you trace over them. Focus on drawing the correct positioning and shapes of each letter.[14]
-
5
Embellish your letters with different stroke widths and curly designs. Focus on making them look appealing once the letters have been outlined properly. Make wider strokes where the letters loop to add visual appeal. Add curls to the ends of letters for flourish. Follow your template to remember where to add the extra designs to your letters.[15]
-
6
Go over the words with your pen or marker to darken them. Adding a second layer to the letters with your paint marker will sharpen them and create a cleaner design. Make sure the first layer has dried before you re-apply! Use fast-drying paint markers to save time and create bolder lines; fast-drying markers take only a couple of minutes to dry.[16]
Advertisement
Add New Question
-
Question
What paint or pen do you use to write on wood?
Claire Donovan-Blackwood is the owner of Heart Handmade UK, a site dedicated to living a happy, creative life. She is a 12 year blogging veteran who loves making crafting and DIY as easy as possible for others, with a focus on mindfulness in making.
Arts & Crafts Specialist
Expert Answer
I recommend using a pencil on the wood first, then fill in the letters with either acrylic paint and a brush or an acrylic paint marker. If you use a fine liner or an alcohol-based ink, the color will bleed when you’re writing. However, avoid using alcohol-based ink on your wood.
-
Question
Do I have to write «FREE BEER»?
🌻 Summer 🌻
Community Answer
You don’t have write this phrase. It’s the example. You can write other phrases, such as “Welcome home!”
-
Question
Can I just write «Meep!»?
Yes. You’re creating the template, so feel free to write whatever you’d like.
See more answers
Ask a Question
200 characters left
Include your email address to get a message when this question is answered.
Submit
Advertisement
Video
-
Use latex-based paint if you don’t have oil-based wood stain. Dilute the paint with 2 parts water before brushing it on. Coat the entire surface of the wood wood in paint and let it dry for 1 hour.[17]
Advertisement
Things You’ll Need
- Wooden planks or boards
- Electric sander or 120- to 220-grit sandpaper
- Mixing tool (for the stain)
- Gloves
- Stain (in any color)
- Stain blocker
- Paintbrushes (or a clean rag)
- A pencil
- Permanent markers or paint pens
- Rulers
- Masking tape
References
About This Article
Thanks to all authors for creating a page that has been read 69,051 times.
Reader Success Stories
-
Shellie Osborne
Sep 10, 2021
«I have been doing DIY wooden signs for a little while now and just now learned about staining the wood before…» more
Did this article help you?
Get all the best how-tos!
Sign up for wikiHow’s weekly email newsletter
Subscribe
You’re all set!
Довольно часто при изготовлении поделок из древесины возникает необходимость в нанесении на поверхность деревянных изделий различных знаков, например, букв и цифр.
Эту операцию можно выполнить различными способами, например, просто нарисовать знаки с помощью фломастера, наклеить, вырезав из бумаги или картона, или выжечь, прикладывая к поверхности, заранее изготовленные и раскаленные заготовки знаков.

Есть еще один способ нанесения букв и цифр на деревянные поверхности, который заключается в их выдавливании. Ниже мы рассмотрим именно этот легко выполнимый метод, для реализации которого нужно немного терпения и кое-какие материалы и инструменты.
Нам потребуется:
- кусок отожженной (вязальной) проволоки;
- длинногубцы (утконосы);
- молоток с плоским бойком;
- лак и краска.
Процесс выдавливания знаков на поверхности дерева
1. Вначале следует изготовить набор всех необходимых знаков с помощью пары утконосов, используя для этого отожженную проволоку. Причем, некоторые элементы знаков можно унифицировать.
Рассмотрим, например, цифры. Нет смысла выгибать из проволоки все подряд. Так, заготовка единицы может использоваться для выдавливания части четверки. Из элементов тройки и четверки можно составить пятерку. Если перевернуть шестерку, то получится девятка и т. д.
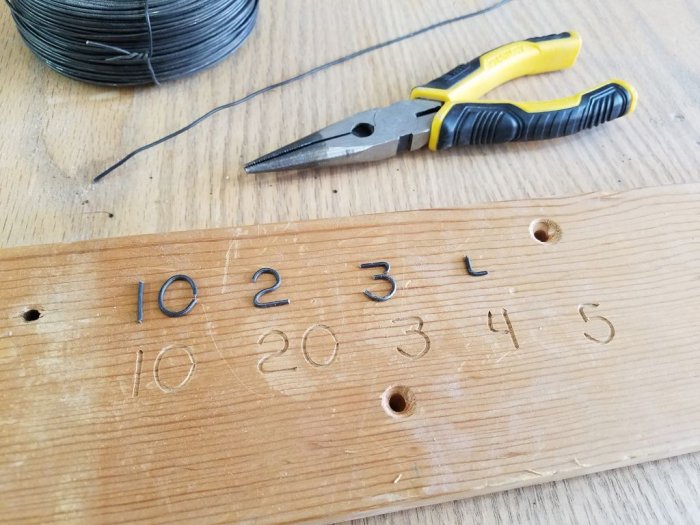
2. Далее, чтобы не ошибиться, можно прорисовать карандашом или маркером последовательность знаков на поверхности дерева.
3. Затем, используя временный трафарет, устанавливаем проволочную форму цифры или ее элемента, и ударяем по нему молотком. Если форму заклинило в дереве, то ее можно аккуратно удалить из ложа, поддев тонким шилом или толстой иглой.
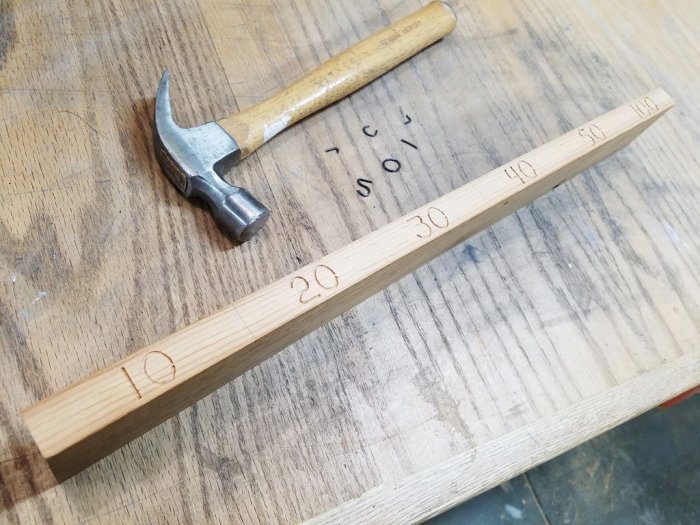
4. Для того чтобы механически выдавленные знаки выглядели эстетично или соответствовали общему дизайну деревянного изделия, их можно выкрасить в тот или цвет.

Но выкрашивать углубления знаков следует осторожно, особенно если основой является мягкая древесина, например, сосна или липа. Иначе краска, попавшая в углубления знаков, начнет по порам расползаться во все стороны и очертания букв и цифр потеряют четкость форм.
Чтобы этого не произошло необходимо перед окраской покрыть углубления лаком и дать ему отвердеть. После этого можно наносить краску. Если после высыхания краски поверхность с нанесенными знаками еще раз покрыть лаком, то надписи прослужат без потери качества много лет.

Где возможно использование данного способа получения знаков на деревянной поверхности? Можно, например, пронумеровать крючки на вешалке в гардеробной, щит с ключами в общежитии, торец подиума с образцами и т. д.
Original article in English

-
Заказы -
ВойтиВойдите, чтобы покупать с персональной скидкой и получать специальные предложения
-
Корзина
- Мастер-Классы
- Журнал
- Вебинары
- Ярмарка Талантов
- BIG SALE
Товары со скидками

Имя из дерева
По Вашему запросу найдено 47 товаров
Слова интерьерные
16
![]()
Элементы интерьера
5
![]()
Фоторамки
4
![]()
Заготовки для декупажа и росписи
3
![]()
Реквизит для детской фотосессии
3
![]()
Метрики
2
![]()
Подарок новорожденному
2
![]()
Именные сувениры
2
![]()
Метрики детские
2
![]()
Таблички для сада
2
![]()
Цвет
Бордовый
Красный
Коралловый
Розовый
Фиолетовый
Синий
Голубой
Бирюзовый
Зелёный
Хаки
Жёлтый
Коричневый
Оранжевый
Бежевый
Чёрный
Серый
Белый
Серебряный
Золотой
Чёрно-белый
Комбинированный
Оплата
Банковская карта
Программа привилегий
Материалы
фанера
дерево
акрил
берёзовая фанера
любовь
акриловые краски
картон
ПЭТ
фанера 6 мм
акриловые краски и лак
сосна
краски
фурнитура
проволочный каркас
нитки
пряжа
Фанера 9мм
липа
акриловая краска
пластик 10 мм
Фанера 3 мм
антисептик
фанера 8 мм
фанера 4 мм
масло
металлическая фурнитура
акриловая эмаль
масло оливковое
берёза
грунтовка
Слова интерьерные
16
![]()
Элементы интерьера
5
![]()
Фоторамки
4
![]()
Заготовки для декупажа и росписи
3
![]()
Реквизит для детской фотосессии
3
![]()
Метрики
2
![]()
Подарок новорожденному
2
![]()
Именные сувениры
2
![]()
Метрики детские
2
![]()
Таблички для сада
2
![]()
-20% на доставку
-20% на доставку
− 15%
-20% на доставку
-20% на доставку
-20% на доставку
-20% на доставку
![]()