Wattpad позволяет создавать истории где угодно! Здесь вы можете найти пару простых путей, как начать писать и создавать собственные рассказы.
С помощью приложения для Windows
Сейчас это пока невозможно. Для большей информации о возможностях на Windows нажмите ...
С помощью приложения для Android
1.Вы должны войти на свой аккаунт или зарегистрироваться. Как только Вы сделали это, нажмите на иконку карандаша в середине панели управления снизу.
2.Перейдите на Создать новую историю, чтобы начать писать новую историю
3.На самом верху страницы Вы сможете добавить название. Название истории, какое Вы только захотите! Будьте креативными! Вы также можете добавить описание на этом этапе. Нажмите Далее, если вы готовы идти дальше.
4.Сейчас Вы можете добавить обложку к Вашей истории, как только закончите, нажмите Далее. Вы можете пропустить этот шаг и изменить обложку позже, также нажимая Далее.
5.Вы увидите первую главу Вашей истории, и тогда воспользуйтесь клавиатурой, наберите название и начинайте писать.
С помощью приложения для iOS
1.Для начала Вы должны войти или создать аккаунт. Как только Вы сделали это, нажмите на иконку карандаша на панели управления снизу.
2.Далее, Вы сможете добавить обложку, название и описание для Вашей новой истории. Вы можете нажать Пропустить в правом верхнем углу, чтобы пропустить этот этап создания, и заполнить эти графы позже.
3.Далее, Вы будете направлены прямо в первую главу Вашей истории. Здесь Вы можете добавить название части и начать писать. Также можно добавить фото или видео к этой части прямо тут.
4.Убедитесь, что нажали Сохранить в верхнем правом углу экрана, когда закончите работу. Теперь Ваша история сохранена как черновик в Ваших работах.
С помощью вебсайта Wattpad
1.Чтобы начать историю, нажмите Создать на верхней навигационной панели.
2.Если это Ваша первая история, то Вы увидите кнопку + Создать историю. Если у Вас уже есть работы, Вы увидите кнопку + Новая история в правом верхнем углу.
3.На странице деталей Вы сможете добавить название, обложку, описание, теги и выбрать жанр. Нажмите Сохранить изменения, если Вы закончили.
4.Чтобы написать первую часть истории, нажмите Без Названия 1 ниже характеристики истории.
Сохранение как Черновик
Чтобы сохранить историю как черновик, нажмите Сохранить.
Публикация Вашей Истории
Если захотите, Вы сможете посмотреть рейтинг вашей истории и установить авторское право. Добавьте к истории теги, которые помогут пользователям найти её.
Как только вы закончили с этим, Вы сможете опубликовать Вашу историю, нажав Сохранить и Опубликовать.
Download Article
Download Article
Wattpad is a social media site that lets you connect to readers. You post installments of stories, and you gain followers as people read your stories.[1]
Getting started is as easy as signing up for an account.
-
1
Find the tab for writers. Go to the main page of the Wattpad website. The main page of the website is primarily designed for readers and people who want to sign up to be readers. However, you will find a small button, generally at the bottom of the page, to take you to the writer’s page, which provides you with information you may need about Wattpad.
-
2
Sign up for an account. You will sign up for a reader’s account, but you can use it to post stories. You can sign up with Facebook to create an account. However, if you prefer, you can use an email, username, and password instead of Facebook.
Advertisement
-
3
Pick three stories. On the next page, the signup section requires you to pick three stories to follow. You can search for different types of stories by keyword, then click on the cover to select.
Advertisement
-
1
Click on the drop-down menu in the upper right-hand part of the screen. Choose «My Profile» from the menu. You need to create a profile because readers are interested in knowing who you are. On that page, click on «Edit Profile.»
-
2
Create a short biography. Let the readers know who you are. You can provide some background information, including your education and a little bit about your family if you want. It’s important to talk some about your writing, however, as the bio introduces you to the readers. Discuss your style and what you like to write. You might also talk about how you got started writing.
- This bio should be in first person rather than third person. In other words, you should be using «I» in your bio.[2]
- For instance, you could say something like «I’m a fiction writer living in Denver with my 2 kids and 3 cats. I love to write young adult fantasy, from fairies and princesses to dystopian futures. My style of writing is fun and funky, with touches of humor throughout.»
- This bio should be in first person rather than third person. In other words, you should be using «I» in your bio.[2]
-
3
Enter an author’s name. You can use your name as your author’s name, of course. However, you can also choose a pen name for your work. Enter it in the box near the top of the page.
-
4
Add graphics. You can change your background to add your own personal style. You can also include a picture of yourself by uploading it to the page.
Advertisement
-
1
Click «Create.» At the top of the page is a button marked «Create.» You must be logged in to see this button. It will take you to where you can publish stories. It will bring up a page with a button marked «Create a Story.» Click on that button, too.[3]
-
2
Create a title. First, put in your title. Your title can be anything you want. It can be merely descriptive or provide an air of mystery.
-
3
Add a cover image. Just like your background, you can upload a cover to set the tone for your book. Be sure to include the title and your name or pen name on the cover. Also, make sure the cover fits the genre. You don’t want a dark, blood-splattered cover for a romance novel. It is possible to request a cover made for you by fellow Wattpadders who may do this for you (for free) in exchange for a follow, a certain number of likes on their stories, one of their books added to your reading list, etc.
-
4
Create a description of your story. The description is important because it sells your story to the reader. It’s like the back of the book that provides a short, engaging summary of the work. This type of description works best if it reveals just enough to leave the reader wanting to know more but not so much that you give away the whole story.[4]
- Don’t forget to include the main characters’ names and the setting.[5]
- Use strong imagery and make sure that imagery is appropriate for what you’re writing. For instance, you wouldn’t want to use a sentence like «Leslie yearned for a man to sweep her off her feet» with a crime thriller, but it would work well for a romance.[6]
- Keep it relatively short. 100 to 150 words is plenty.[7]
- Don’t forget to include the main characters’ names and the setting.[5]
-
5
Choose tags. Tags are short keywords that describe your story. Tags are used all across the web to help people find what they are looking for. Pick tags that cover your setting, genre, and tone of your story. For instance, for a camping ghost story, you might include «ghost,» «haunted,» «campfire story,» «scary,» «spooky,» «West Coast,» «California,» «woods,» and «camping.» You can add tags by clicking «Add a Tag» under the description box.
-
6
Pick a genre/category. Basically, this category is what type of story you’re telling. You can choose categories such as «Fanfiction,» «Humor,» «Romance,» or «Spiritual.» If your story falls under two categories, pick the one that is strongest in your story.
-
7
Decide on options. From the drop-down menu, pick the main language of your story. Next, choose the copyright you want to have. If you don’t understand copyright yet, a good bet is «All Rights Reserved,» as that means the copyright remains with you. You also must decide if your story is meant for a mature audience or not. Save the changes you’ve made, which will take you to the next page.
-
8
Begin the first installment. Once you’ve input all the information, you can publish the first part of your story. Click on «Untitled Part 1» on the next page. Type in your text on the next page. When you’re done, submit it.[8]
- You can also add a title to each part, as well as video or photos by clicking the buttons at the top of this screen.
-
9
Add new installments often. You can add a new installment on the same page you found «Untitled Part 1» by clicking «+ New Part.» Readers on Wattpad expect regular updates to their stories. In fact, you should update at least once a week, but two or three times a week is better.[9]
Advertisement
Add New Question
-
Question
Why can’t readers see my published story?
Readers would have to stumble upon your story, whether you share it or tag it in a category. For example, if you write a Teen Wolf Imagines book, tag your story with #teenwolfimagines. Don’t expect 1K reads overnight. It takes a few weeks to get readers.
-
Question
What cover do I use on Wattpad?
It depends on what story you will write. Your cover should describe your story.
-
Question
What if I didn’t have the Create button?
Miraculous Aly-bug
Community Answer
The website was updated, and now the button is the Write button, which is next to the Go Premium and Profile buttons.
See more answers
Ask a Question
200 characters left
Include your email address to get a message when this question is answered.
Submit
Advertisement
Thanks for submitting a tip for review!
About This Article
Thanks to all authors for creating a page that has been read 78,969 times.
Did this article help you?
Download Article
Download Article
Wattpad is a social media site that lets you connect to readers. You post installments of stories, and you gain followers as people read your stories.[1]
Getting started is as easy as signing up for an account.
-
1
Find the tab for writers. Go to the main page of the Wattpad website. The main page of the website is primarily designed for readers and people who want to sign up to be readers. However, you will find a small button, generally at the bottom of the page, to take you to the writer’s page, which provides you with information you may need about Wattpad.
-
2
Sign up for an account. You will sign up for a reader’s account, but you can use it to post stories. You can sign up with Facebook to create an account. However, if you prefer, you can use an email, username, and password instead of Facebook.
Advertisement
-
3
Pick three stories. On the next page, the signup section requires you to pick three stories to follow. You can search for different types of stories by keyword, then click on the cover to select.
Advertisement
-
1
Click on the drop-down menu in the upper right-hand part of the screen. Choose «My Profile» from the menu. You need to create a profile because readers are interested in knowing who you are. On that page, click on «Edit Profile.»
-
2
Create a short biography. Let the readers know who you are. You can provide some background information, including your education and a little bit about your family if you want. It’s important to talk some about your writing, however, as the bio introduces you to the readers. Discuss your style and what you like to write. You might also talk about how you got started writing.
- This bio should be in first person rather than third person. In other words, you should be using «I» in your bio.[2]
- For instance, you could say something like «I’m a fiction writer living in Denver with my 2 kids and 3 cats. I love to write young adult fantasy, from fairies and princesses to dystopian futures. My style of writing is fun and funky, with touches of humor throughout.»
- This bio should be in first person rather than third person. In other words, you should be using «I» in your bio.[2]
-
3
Enter an author’s name. You can use your name as your author’s name, of course. However, you can also choose a pen name for your work. Enter it in the box near the top of the page.
-
4
Add graphics. You can change your background to add your own personal style. You can also include a picture of yourself by uploading it to the page.
Advertisement
-
1
Click «Create.» At the top of the page is a button marked «Create.» You must be logged in to see this button. It will take you to where you can publish stories. It will bring up a page with a button marked «Create a Story.» Click on that button, too.[3]
-
2
Create a title. First, put in your title. Your title can be anything you want. It can be merely descriptive or provide an air of mystery.
-
3
Add a cover image. Just like your background, you can upload a cover to set the tone for your book. Be sure to include the title and your name or pen name on the cover. Also, make sure the cover fits the genre. You don’t want a dark, blood-splattered cover for a romance novel. It is possible to request a cover made for you by fellow Wattpadders who may do this for you (for free) in exchange for a follow, a certain number of likes on their stories, one of their books added to your reading list, etc.
-
4
Create a description of your story. The description is important because it sells your story to the reader. It’s like the back of the book that provides a short, engaging summary of the work. This type of description works best if it reveals just enough to leave the reader wanting to know more but not so much that you give away the whole story.[4]
- Don’t forget to include the main characters’ names and the setting.[5]
- Use strong imagery and make sure that imagery is appropriate for what you’re writing. For instance, you wouldn’t want to use a sentence like «Leslie yearned for a man to sweep her off her feet» with a crime thriller, but it would work well for a romance.[6]
- Keep it relatively short. 100 to 150 words is plenty.[7]
- Don’t forget to include the main characters’ names and the setting.[5]
-
5
Choose tags. Tags are short keywords that describe your story. Tags are used all across the web to help people find what they are looking for. Pick tags that cover your setting, genre, and tone of your story. For instance, for a camping ghost story, you might include «ghost,» «haunted,» «campfire story,» «scary,» «spooky,» «West Coast,» «California,» «woods,» and «camping.» You can add tags by clicking «Add a Tag» under the description box.
-
6
Pick a genre/category. Basically, this category is what type of story you’re telling. You can choose categories such as «Fanfiction,» «Humor,» «Romance,» or «Spiritual.» If your story falls under two categories, pick the one that is strongest in your story.
-
7
Decide on options. From the drop-down menu, pick the main language of your story. Next, choose the copyright you want to have. If you don’t understand copyright yet, a good bet is «All Rights Reserved,» as that means the copyright remains with you. You also must decide if your story is meant for a mature audience or not. Save the changes you’ve made, which will take you to the next page.
-
8
Begin the first installment. Once you’ve input all the information, you can publish the first part of your story. Click on «Untitled Part 1» on the next page. Type in your text on the next page. When you’re done, submit it.[8]
- You can also add a title to each part, as well as video or photos by clicking the buttons at the top of this screen.
-
9
Add new installments often. You can add a new installment on the same page you found «Untitled Part 1» by clicking «+ New Part.» Readers on Wattpad expect regular updates to their stories. In fact, you should update at least once a week, but two or three times a week is better.[9]
Advertisement
Add New Question
-
Question
Why can’t readers see my published story?
Readers would have to stumble upon your story, whether you share it or tag it in a category. For example, if you write a Teen Wolf Imagines book, tag your story with #teenwolfimagines. Don’t expect 1K reads overnight. It takes a few weeks to get readers.
-
Question
What cover do I use on Wattpad?
It depends on what story you will write. Your cover should describe your story.
-
Question
What if I didn’t have the Create button?
Miraculous Aly-bug
Community Answer
The website was updated, and now the button is the Write button, which is next to the Go Premium and Profile buttons.
See more answers
Ask a Question
200 characters left
Include your email address to get a message when this question is answered.
Submit
Advertisement
Thanks for submitting a tip for review!
About This Article
Thanks to all authors for creating a page that has been read 78,969 times.
Did this article help you?
Wattpad — это приложение для чтения историй, в котором будут истории, разделенные на разные жанры, чтобы люди могли свободно читать свои любимые истории. Кроме того, это также помогает нам размещать свои собственные истории.
Если вы писатель, это место, где люди могут создавать и писать свои собственные истории. Наши истории будут размещены в разделе библиотеки историй, чтобы каждый мог их прочитать и внести свой вклад. Итак, сегодня мы представим каждому учебное пособие для публикации историй на Wattpad , приглашаем вас следовать за ним.
Если вы хотите загрузить истории в это приложение, то сначала вам нужно установить Wattpad на свой телефон, нажав кнопку загрузки ниже, а затем войти в свою учетную запись с помощью Facebook или Google .
Скачать Wattpad на Android Скачать Wattpad на iOS
Шаг 1: Первое, что нам нужно сделать, прежде чем публиковать статью, — это щелкнуть значок Wattpad на экране телефона.
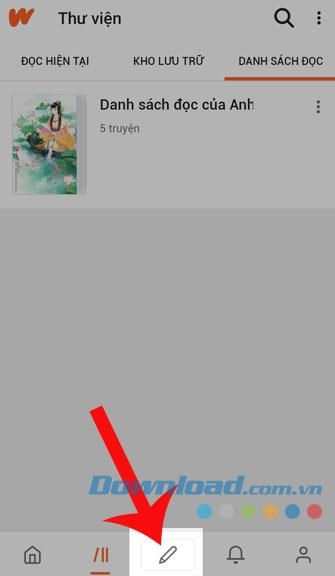
Шаг 2: В главном интерфейсе приложения люди нажимают на значок пера в нижней части экрана.
Шаг 3. Чтобы создать историю, первое, что нам нужно сделать, это добавить изображение обложки , ввести заголовок и введение в историю , а затем нажать « Продолжить» .

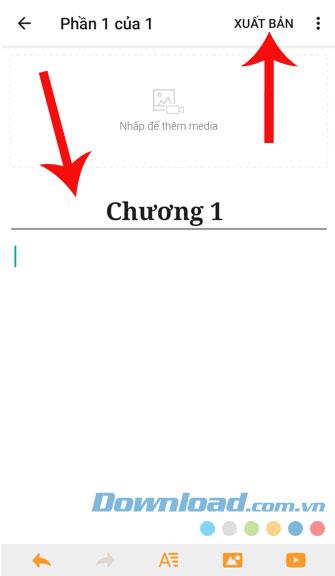
Шаг 4. Введите имя и содержание первой статьи, которую вы хотите опубликовать, затем нажмите « Опубликовать» .
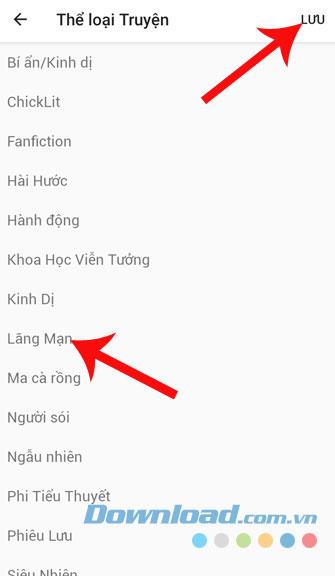
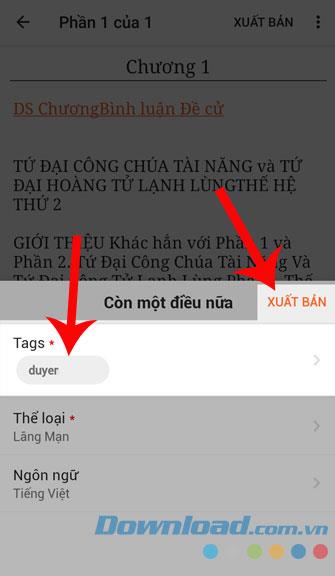
Шаг 5: Теперь мы нажимаем на категорию и выбираем тип истории, которую вы хотите опубликовать, затем нажимаем Сохранить .
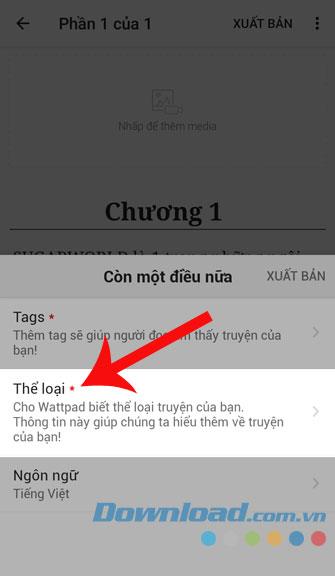
Шаг 6: В разделе « Теги » введите имя друга, который хочет, чтобы он или она сначала нашел нашу историю, затем нажмите « Опубликовать» .
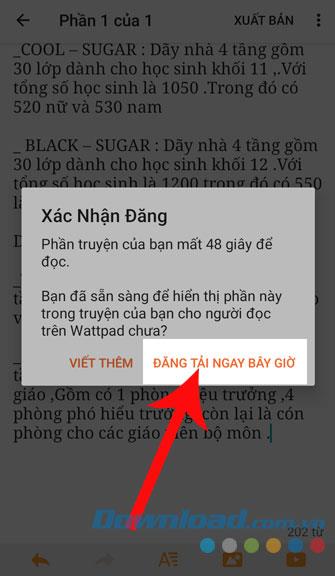
Шаг 7: Нажмите Загрузить прямо сейчас или нажмите на Write более , если вы хотите продолжать писать, но тогда все было бы вернуться снова выполнить с шага 4.
Шаг 8: После загрузки истории люди нажимают на кнопку « Просмотр» , чтобы снова прочитать свою историю.
Выше приведено руководство по публикации историй на Wattpad. Мы надеемся, что после прочтения этой статьи люди смогут свободно писать и создавать свои собственные истории и отправлять их другим для совместного чтения.
Кроме того, если вы не знаете, как установить это приложение, люди могут обратиться к статье о том, как устанавливать и читать истории на Wattpad .
Желаю вам успешной реализации!
Шаги
-
1
Перейдите на веб-страницу «www.wattpad.com/home».
-
2
Создайте учетную запись, если ее у вас еще нет.
-
3
Нажмите на кнопку Мои работы.
-
4
Создайте заголовок и напишите свой собственный рассказ или главу.
-
5
Добавьте теги и выберите жанр, чтобы людям было легче найти ваше произведение.
-
6
Нажмите Сохранить и опубликовать.
Реклама
Об этой статье
wikiHow работает по принципу вики, а это значит, что многие наши статьи написаны несколькими авторами. При создании этой статьи над ее редактированием и улучшением работали авторы-волонтеры. Количество просмотров этой статьи: 14 087.
Эту страницу просматривали 14 087 раз.
Была ли эта статья полезной?
grushaiyabloko
(27)
10
1
02.06.2020 20:05
Решил написать книга на wattpad, написал главу, а она отображается как черновик, написано, что доступно только мне, скажите пожалуйста как сделать чтобы ее могли прочесть другие, я написал сообщение более опытному пользователю, но ответа так и нет. Помогите.
Буду признателен
#215739
Цитировать
С появлением Интернета энтузиастам комиксов больше не нужно продавать и нанимать комиксы для чтения. Нам нужен только компьютер или смартфон и доступ к Wattpad, чтобы читать тысячи разных жанров.
В следующем руководстве TipsMake расскажет, как проще всего загружать истории на Wattpad. Следуйте инструкциям в статье ниже.
Шаг 1. Войдите в Wattpad по следующему адресу и зарегистрируйте учетную запись https://www.wattpad.com/.
Нажимаем на «Зарегистрироваться», чтобы зарегистрироваться.
Выберите Начать писать.
Шаг 2: Вы заполняете регистрационную информацию, такую как полное имя (Имя пользователя), адрес электронной почты (Электронная почта), пароль (Пароль), дату рождения (День рождения). Затем нажмите «Начать запись» для завершения.
Выберите «Мне нравятся оба» и нажмите «Далее».
Шаг 3: Нажмите «Пропустить», чтобы продолжить.
Шаг 4: Нажмите «Написать» (1) => «Создать новую историю» (2).
Шаг 5: Мы приступаем к созданию истории, выбирая изображение обложки для истории (1), называя заголовок (2), вводя описание для истории (3), записывая имена главных героев рассказа (4 ), отметьте историю (5).
Шаг 6: Мы прокручиваем вниз и выбираем категорию (1), аудиторию (2), язык (3), авторские права (4), контент для взрослых (если история содержит жестокие подробности, вы включаете эту опцию, чтобы аудитория могла это понять) (5). Затем нажмите «Далее» (6) для завершения.
Шаг 7: Вы загружаете изображение заголовка для истории (1), устанавливаете заголовок истории (2) и загружаете содержание истории (3).
Шаг 8: Если мы публикуем комикс, наведите указатель мыши на область содержимого и щелкните значок изображения с именем «Добавить встроенное мультимедиа».
Щелкаем по изображению в папке на компьютере и нажимаем «Открыть».
Шаг 9: После загрузки и ожидания, пока Wattpad сохранит рукопись, нажмите «Опубликовать», чтобы загрузить историю на Wattpad.
Шаг 10: Нажмите «Опубликовать», чтобы продолжить.
После Поздравления! Появление — это успех.
С помощью инструкций в статье мы можем поделиться хорошими историями, чтобы всем понравилось. У вас есть хорошие книги о Wattpad? Если это так, пожалуйста, оставьте ссылку на свою серию на TipsMake.com в разделе комментариев в конце статьи, чтобы вы и другие читатели могли наслаждаться!


