- Назад
- Обзор: Objects
- Далее
Обозначение объектов JavaScript (JSON — JavaScript Object Notation) — стандартный текстовый формат для представления структурированных данных на основе синтаксиса объекта JavaScript. Он обычно используется для передачи данных в веб-приложениях (например, отправка некоторых данных с сервера клиенту,таким образом чтобы это могло отображаться на веб-странице или наоборот). Вы будете сталкиваться с этим довольно часто, поэтому в этой статье мы даём вам все, что вам нужно для работы с JSON используя JavaScript, включая парсинг JSON, чтобы вы могли получить доступ к данным внутри него при создании JSON.
| Необходимые знания: | Базовая компьютерная грамотность, базовые знания HTML и CSS, знакомство с основами JavaScript (см. First steps и Building blocks) и основами OOJS (see Introduction to objects (en-US)). |
|---|---|
| Цель: | Понять, как работать с данными, хранящимися в JSON, и создавать свои собственные объекты JSON. |
Нет, действительно, что такое JSON?
JSON — текстовый формат данных, следующий за синтаксисом объекта JavaScript, который был популяризирован Дугласом Крокфордом. Несмотря на то, что он очень похож на буквенный синтаксис объекта JavaScript, его можно использовать независимо от JavaScript, и многие среды программирования имеют возможность читать (анализировать) и генерировать JSON.
JSON существует как строка,что необходимо при передаче данных по сети. Он должен быть преобразован в собственный объект JavaScript, если вы хотите получить доступ к данным. Это не большая проблема. JavaScript предоставляет глобальный объект JSON, который имеет методы для преобразования между ними.
Примечание: Преобразование строки в родной объект называется десериализацией (преобразование из последовательной формы в параллельную*)*, в то время как преобразовании родного объекта в строку, таким образом ,чтобы он мог быть передан через сеть, называется сериализацией(преобразование в последовательную форму).
Объект JSON может быть сохранён в собственном файле, который в основном представляет собой текстовый файл с расширением .json и MIME type application/json.
Структура JSON
Как описано выше, JSON представляет собой строку, формат которой очень похож на буквенный формат объекта JavaScript. Вы можете включать одни и те же базовые типы данных внутри JSON, так же как и в стандартном объекте JavaScript — строки, числа, массивы, булевы и другие объектные литералы. Это позволяет построить иерархию данных, к примеру, так:
{
  "squadName": "Super hero squad",
  "homeTown": "Metro City",
  "formed": 2016,
  "secretBase": "Super tower",
  "active": true,
  "members": [
    {
      "name": "Molecule Man",
      "age": 29,
      "secretIdentity": "Dan Jukes",
      "powers": [
        "Radiation resistance",
        "Turning tiny",
        "Radiation blast"
      ]
    },
    {
      "name": "Madame Uppercut",
      "age": 39,
      "secretIdentity": "Jane Wilson",
      "powers": [
        "Million tonne punch",
        "Damage resistance",
        "Superhuman reflexes"
      ]
    },
    {
      "name": "Eternal Flame",
      "age": 1000000,
      "secretIdentity": "Unknown",
      "powers": [
        "Immortality",
        "Heat Immunity",
        "Inferno",
        "Teleportation",
        "Interdimensional travel"
      ]
    }
  ]
}
Если бы мы загрузили этот объект в программу JavaScript, создали переменную с названием superHeroes, мы могли бы затем получить доступ к данным внутри неё, используя те же самые точечную и скобочную нотации, которые мы рассмотрели в статье JavaScript object basics. Например:
superHeroes.homeTown
superHeroes['active']
Чтобы получить доступ к последующим данным по иерархии, вам просто нужно объединить требуемые имена свойств и индексы массивов. Например, чтобы получить доступ к третьей сверхспособности второго героя, указанного в списке участников, вы должны сделать следующее:
superHeroes['members'][1]['powers'][2]
- Сначала у нас есть имя переменной —
superHeroes. - Внутри мы хотим получить доступ к свойству
members, поэтому мы используем['members']. membersсодержат массив, заполненный объектами. Мы хотим получить доступ ко второму объекту внутри массива, поэтому мы используем[1].- Внутри этого объекта мы хотим получить доступ к свойству
powers, поэтому мы используем['powers']. - Внутри свойства
powersнаходится массив, содержащий сверхспособности выбранного героя. Нам нужен третий, поэтому мы используем[2].
Примечание: . Мы сделали JSON, видимый выше, доступным внутри переменной в нашем примере JSONTest.html (см. исходный код). Попробуйте загрузить это, а затем получить доступ к данным внутри переменной через консоль JavaScript вашего браузера.
Массивы как JSON
Выше мы упоминали ,что JSON текст выглядит практически так же как и JavaScript объект,и это почти правильно.Причина,по которой мы говорим почти правильно заключается в том ,что массив также валиден JSON например:
[
  {
    "name": "Molecule Man",
    "age": 29,
    "secretIdentity": "Dan Jukes",
    "powers": [
      "Radiation resistance",
      "Turning tiny",
      "Radiation blast"
    ]
  },
  {
    "name": "Madame Uppercut",
    "age": 39,
    "secretIdentity": "Jane Wilson",
    "powers": [
      "Million tonne punch",
      "Damage resistance",
      "Superhuman reflexes"
    ]
  }
]
Вышесказанное вполне справедливо для JSON. Вам просто нужно получить доступ к элементам массива (в его анализируемой версии), начиная с индекса массива, например [0]["powers"][0].
Другие примечания
- JSON — это чисто формат данных — он содержит только свойства, без методов.
- JSON требует двойных кавычек, которые будут использоваться вокруг строк и имён свойств. Одиночные кавычки недействительны.
- Даже одна неуместная запятая или двоеточие могут привести к сбою JSON-файла и не работать. Вы должны быть осторожны, чтобы проверить любые данные, которые вы пытаетесь использовать (хотя сгенерированный компьютером JSON с меньшей вероятностью включает ошибки, если программа генератора работает правильно). Вы можете проверить JSON с помощью приложения вроде JSONLint.
- JSON может принимать форму любого типа данных, допустимого для включения в JSON, а не только массивов или объектов. Так, например, одна строка или номер будут действительным объектом JSON.
- В отличие от кода JavaScript, в котором свойства объекта могут не заключаться в двойные кавычки, в JSON в качестве свойств могут использоваться только строки заключённые в двойные кавычки.
Активное обучение: Работа с примером JSON
Итак, давайте рассмотрим пример, чтобы показать то, как мы можем использовать некоторые данные JSON на веб-сайте.
Начало работы
Для начала создайте локальные копии наших файлов heroes.html и style.css. Последний содержит простой CSS для стилизации нашей страницы, в то время как первый содержит очень простой HTML-код сущности:
<header>
</header>

<section>
</section>
Плюс <script>, чтобы содержать код JavaScript, который мы будем писать в этом упражнении. На данный момент он содержит только две строки, которые захватывают ссылки на элементы <header> и <section> и сохраняют их в переменных:
var header = document.querySelector('header');
var section = document.querySelector('section');
Мы предоставили данные JSON на нашем GitHub, на https://mdn.github.io/learning-area/javascript/oojs/json/superheroes.json.
Мы собираемся загрузить его на нашу страницу и использовать некоторые изящные манипуляции DOM, чтобы отобразить их, например:

Получение JSON
Чтобы получить JSON, мы будем использовать API, называемый XMLHttpRequest (часто называемый XHR). Это очень полезный объект JavaScript, который позволяет нам делать сетевые запросы для извлечения ресурсов с сервера через JavaScript (например, изображения, текст, JSON, даже фрагменты HTML), что означает, что мы можем обновлять небольшие разделы контента без необходимости перезагрузки всей страницы. Это привело к более отзывчивым веб-страницам и звучит захватывающе, но, к сожалению, выходит за рамки этой статьи, чтобы изучить это гораздо более подробно.
- Начнём с того, что мы собираемся сохранить URL-адрес JSON, который мы хотим получить в переменной. Добавьте нижеследующий код JavaScript:
var requestURL = 'https://mdn.github.io/learning-area/javascript/oojs/json/superheroes.json'; - Чтобы создать запрос, нам нужно создать новый экземпляр объекта запроса из конструктора
XMLHttpRequest, используя ключевое словоnew. Добавьте следующую ниже свою последнюю строку:var request = new XMLHttpRequest(); - Теперь нам нужно открыть новый запрос, используя метод
open(). Добавьте следующую строку:request.open('GET', requestURL);Это занимает не менее двух параметров — есть другие доступные параметры. Нам нужно только два обязательных для этого простого примера:
- Метод HTTP, который следует использовать при выполнении сетевого запроса. В этом случае
GETсамый подходящий, так как мы просто извлекаем некоторые простые данные. - URL-адрес для запроса — это URL-адрес файла JSON, который мы сохранили ранее.
- Метод HTTP, который следует использовать при выполнении сетевого запроса. В этом случае
- Затем добавьте следующие две строки: здесь мы устанавливаем
responseTypeв JSON, так что XHR знает, что сервер будет возвращать JSON и, что это должно быть преобразовано за кулисами в объект JavaScript. Затем мы отправляем запрос методомsend():request.responseType = 'json'; request.send(); - Последний бит этого раздела предполагает ожидание ответа на возврат с сервера, а затем работы с ним. Добавьте следующий код ниже вашего предыдущего кода:
request.onload = function() {
  var superHeroes = request.response;
  populateHeader(superHeroes);
  showHeroes(superHeroes);
}
Здесь мы сохраняем ответ на наш запрос (доступный в свойстве response) в переменной superHeroes; эта переменная теперь будет содержать объект JavaScript, основанный на JSON! Затем мы передаём этот объект двум вызовам функций — первый из них заполнит <header> правильными данными, а второй создаст информационную карту для каждого героя в команде и вставляет её в <section>.
Мы свернули код в обработчик событий, который запускается, когда событие загрузки запускается в объекте запроса (см. onload) — это связано с тем, что событие загрузки запускается, когда ответ успешно возвращается; поступая таким образом,это гарантия того, что request.response определённо будет доступен, когда мы начнём работу с ним.
Заполнение заголовка
Теперь мы извлекли данные JSON и превратили его в объект JavaScript, давайте воспользуемся им, написав две функции, на которые мы ссылались выше. Прежде всего, добавьте следующее определение функции ниже предыдущего кода:
function populateHeader(jsonObj) {
  var header = document.querySelector('header');
  var myH1 = document.createElement('h1');
  myH1.textContent = jsonObj['squadName'];
  header.appendChild(myH1);

  var myPara = document.createElement('p');
  myPara.textContent = 'Hometown: ' + jsonObj['homeTown'] + ' // Formed: ' + jsonObj['formed'];
  header.appendChild(myPara);
}
Мы назвали параметр jsonObj, чтобы напомнить себе, что этот объект JavaScript возник из JSON. Здесь мы сначала создаём элемент <h1> (en-US) с createElement(), устанавливаем его textContent равным свойству squadName объекта, а затем добавляем его в заголовок с помощью appendChild(). Затем мы выполняем очень похожую операцию с абзацем: создаём его, устанавливаем его текстовое содержимое и добавляем его в заголовок. Единственное различие заключается в том, что его текст задан, как конкатенированная строка, содержащая как homeTown, так и formed свойства объекта.
Создание информационных карт героя
Затем добавьте следующую функцию внизу кода, которая создаёт и отображает карты супергероев:
function showHeroes(jsonObj) {
  var section = document.querySelector('section');
  var heroes = jsonObj['members'];

  for (var i = 0; i < heroes.length; i++) {
    var myArticle = document.createElement('article');
    var myH2 = document.createElement('h2');
    var myPara1 = document.createElement('p');
    var myPara2 = document.createElement('p');
    var myPara3 = document.createElement('p');
    var myList = document.createElement('ul');

    myH2.textContent = heroes[i].name;
    myPara1.textContent = 'Secret identity: ' + heroes[i].secretIdentity;
    myPara2.textContent = 'Age: ' + heroes[i].age;
    myPara3.textContent = 'Superpowers:';

    var superPowers = heroes[i].powers;
    for (var j = 0; j < superPowers.length; j++) {
      var listItem = document.createElement('li');
      listItem.textContent = superPowers[j];
      myList.appendChild(listItem);
    }

    myArticle.appendChild(myH2);
    myArticle.appendChild(myPara1);
    myArticle.appendChild(myPara2);
    myArticle.appendChild(myPara3);
    myArticle.appendChild(myList);

    section.appendChild(myArticle);
  }
}
Для начала сохраним свойство members объекта JavaScript в новой переменной. Этот массив содержит несколько объектов, которые содержат информацию для каждого героя.
Затем мы используем for loop для циклического прохождения каждого объекта в массиве. Для каждого из них мы:
- Создаём несколько новых элементов:
<article>,<h2>, три<p>и<ul>. - Устанавливаем
<h2>, чтобы содержатьnameтекущего героя. - Заполняем три абзаца своей
secretIdentity,ageи строкой, в которой говорится: «Суперспособности:», чтобы ввести информацию в список. - Сохраняем свойство
powersв другой новой переменной под названиемsuperPowers— где содержится массив, в котором перечислены сверхспособности текущего героя. - Используем другой цикл
for, чтобы прокрутить сверхспособности текущего героя , для каждого из них мы создаём элемент<li>, помещаем в него сверхспособности, а затем помещаемlistItemвнутри элемента<ul>(myList) с помощьюappendChild(). - Последнее, что мы делаем, это добавляем
<h2>,<p>и<ul>внутри<article>(myArticle), а затем добавляем<article>в<section>. Важное значение имеет порядок, в котором добавляются элементы, так как это порядок, который они будут отображать внутри HTML.
Примечание: . Если вам не удаётся заставить этот пример работать, попробуйте обратиться к нашему исходному коду heroes-finished.html (см. также он работает в режиме live).
Примечание: . Если у вас возникли проблемы после нотации точек / скобок, которые мы используем для доступа к объекту JavaScript, в этом поможет открытие файла superheroes.json на другой вкладке или в текстовом редакторе ,и обращаться к нему каждый раз, когда вам нужен JavaScript. Вы также можете обратиться к нашей статье JavaScript objectbasics чтобы получить дополнительную информацию о нотации точек и скобок.
Преобразование между объектами и текстом
Вышеприведённый пример был прост с точки зрения доступа к объекту JavaScript, потому что мы задали XHR-запрос для прямого преобразования ответа JSON в объект JavaScript, используя:
request.responseType = 'json';
Но иногда нам не так везёт — иногда мы получаем сырую строку JSON и нам нужно преобразовать её в объект самостоятельно. И когда мы хотим отправить объект JavaScript по сети, нам нужно преобразовать его в JSON (строку) перед отправкой. К счастью, эти две проблемы настолько распространены в веб-разработке, что встроенный объект JSON доступен в браузерах, которые содержат следующие два метода:
parse(): принимает строку JSON в качестве параметра и возвращает соответствующий объект JavaScript.stringify(): принимает объект, как параметр и возвращает эквивалентную строковую JSON строку.
Вы можете увидеть первый метод в действии в нашем примере heroes-finished-json-parse.html (см. исходный код) — это то же самое, что и в примере, который мы создали ранее, за исключением того, что мы установили XHR для возврата сырого JSON текста, затем используется parse(), чтобы преобразовать его в фактический объект JavaScript. Ключевой фрагмент кода находится здесь:
request.open('GET', requestURL);
request.responseType = 'text'; // now we're getting a string!
request.send();

request.onload = function() {
  var superHeroesText = request.response; // get the string from the response
  var superHeroes = JSON.parse(superHeroesText); // convert it to an object
  populateHeader(superHeroes);
  showHeroes(superHeroes);
}
Как вы могли догадаться, stringify() работает обратным образом. Попробуйте ввести следующие строки в консоль JavaScript браузера один за другим, чтобы увидеть его в действии:
var myJSON = { "name": "Chris", "age": "38" };
myJSON
var myString = JSON.stringify(myJSON);
myString
Здесь мы создаём объект JavaScript, затем проверяем, что он содержит, а затем преобразуем его в строку JSON, используя stringify() , сохраняя возвращаемое значение в новой переменной, а затем снова проверяем его.
Резюме
В этой статье мы предоставили вам простое руководство по использованию JSON в ваших программах, в том числе о том, как создавать и анализировать JSON, и как получить доступ к данным, заблокированным внутри него. В следующей статье мы рассмотрим объектно-ориентированный JavaScript.
Смотрите также
В этом модуле
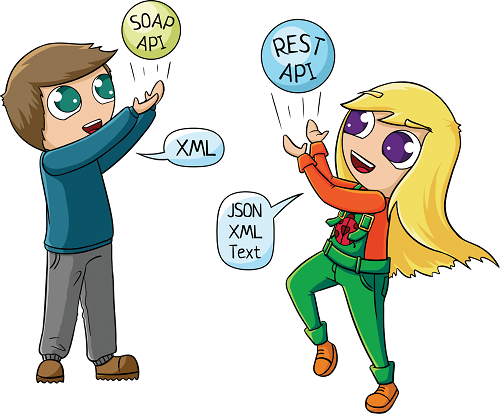
Если вы тестируете API, то должны знать про два основных формата передачи данных:
-
XML — используется в SOAP (всегда) и REST-запросах (реже);
-
JSON — используется в REST-запросах.
Сегодня я расскажу вам про JSON. И расскажу в основном с точки зрения «послать запрос в Postman или прочитать ответ», потому что статья рассчитана на студентов, впервые работающих с Postman.
JSON (англ. JavaScript Object Notation) — текстовый формат обмена данными, основанный на JavaScript. Но при этом формат независим от JS и может использоваться в любом языке программирования.
JSON используется в REST API. По крайней мере, тестировщик скорее всего столкнется с ним именно там.
См также:
Что такое API — общее знакомство с API
Что такое XML — второй популярный формат
Введение в SOAP и REST: что это и с чем едят — видео про разницу между SOAP и REST
В SOAP API возможен только формат XML, а вот REST API поддерживает как XML, так и JSON. Разработчики предпочитают JSON — он легче читается человеком и меньше весит. Так что давайте разберемся, как он выглядит, как его читать, и как ломать!
Содержание
-
Как устроен JSON
-
JSON-объект
-
Как устроен
-
Ключ или свойство?
-
Итого
-
-
JSON-массив
-
Как устроен
-
Значения внутри
-
Итого
-
-
-
JSON vs XML
-
Well Formed JSON
-
Данные написаны в виде пар ключ:значение
-
Данные разделены запятыми
-
Объект находится внутри фигурных скобок {}
-
Массив — внутри квадратных []
-
-
Итого
Как устроен JSON
В качестве значений в JSON могут быть использованы:
-
JSON-объект
-
Массив
-
Число (целое или вещественное)
-
Литералы true (логическое значение «истина»), false (логическое значение «ложь») и null
-
Строка
Я думаю, с простыми значениями вопросов не возникнет, поэтому разберем массивы и объекты. Ведь если говорить про REST API, то обычно вы будете отправлять / получать именно json-объекты.

JSON-объект
Как устроен
Возьмем пример из документации подсказок Дадаты по ФИО:
{
  "query": "Виктор Иван",
  "count": 7
}
И разберемся, что означает эта запись.
Объект заключен в фигурные скобки {}
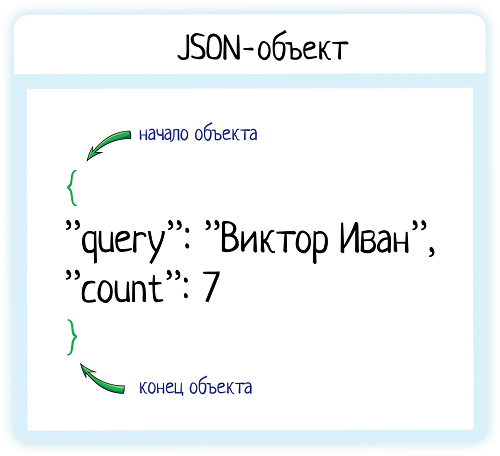
JSON-объект — это неупорядоченное множество пар «ключ:значение».
Ключ — это название параметра, который мы передаем серверу. Он служит маркером для принимающей запрос системы: «смотри, здесь у меня значение такого-то параметра!». А иначе как система поймет, где что? Ей нужна подсказка!
Вот, например, «Виктор Иван» — это что? Ищем описание параметра «query» в документации — ага, да это же запрос для подсказок!

Это как если бы мы вбили строку «Виктор Иван» в GUI (графическом интерфейсе пользователя):

Когда пользователь начинает вводить данные в формочку, то сразу видит результат — появляется список подсказок. Это значит, что разработчик прописал в коде условие — делать некое действие на каждый ввод символа в это поле. Какое действие? Можно увидеть через f12.
Открываем вкладку Network, вбиваем «Виктор Иван» и находим запрос, который при этом уходит на сервер. Ого, да это тот самый пример, что мы разбираем!
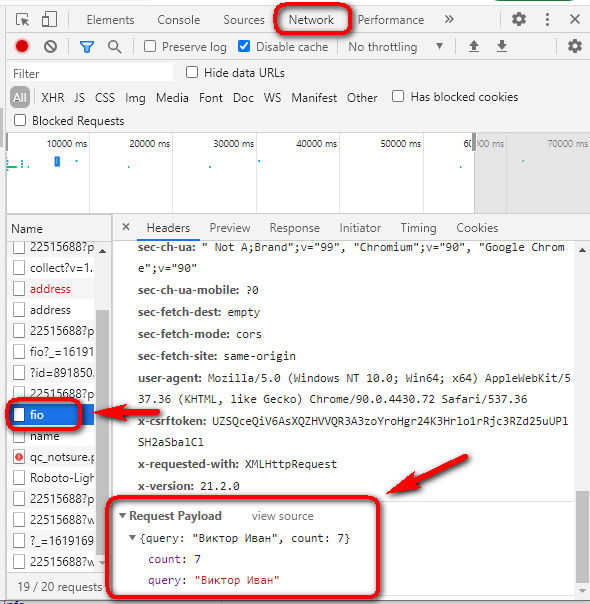
Клиент передает серверу запрос в JSON-формате. Внутри два параметра, две пары «ключ-значение»:
-
query — строка, по которой ищем (то, что пользователь вбил в GUI);
-
count — количество подсказок в ответе (в Дадате этот параметр зашит в форму, всегда возвращается 7 подсказок. Но если дергать подсказки напрямую, значение можно менять!)
Пары «ключ-значение» разделены запятыми:

Строки берем в кавычки, числа нет:

Конечно, внутри может быть не только строка или число. Это может быть и другой объект! Или массив… Или объект в массиве, массив в объекте… Любое количество уровней вложенности =))
Объект, массив, число, булево значение (true / false) — если у нас НЕ строка, кавычки не нужны. Но в любом случае это будет значение какого-то ключа:
|
НЕТ |
ДА |
|
{ «a»: 1, { x:1, y:2 } } |
{ «a»: 1, «inner_object»: { «x»:1, «y»:2 } } |
|
{ «a»: 1, [2, 3, 4] } |
{ «a»: 1, «inner_array»: [2, 3, 4] } |
Переносы строк делать необязательно. Вообще пробелы и переносы строк нужны только человеку для читабельности, система поймет и без них:
|
Так правильно |
Так тоже правильно |
|
{ «query»: «Виктор Иван», «count»: 7 } |
{ «query»:»Виктор Иван», «count»:7} |
Ключ — ВСЕГДА строка, но мы все равно берем его в кавычки. В JavaScript этого можно не делать, в JSON нельзя.
|
Так правильно |
Так правильно в JS, но неправильно в JSON |
|
{ «query»: «Виктор Иван», «count»: 7 } |
{ query: «Виктор Иван», count: 7 } |
По крайней мере, если вы работаете с простыми значениями ключей, а несколько слов записываете в верблюжьемРегистре или в змеином_регистре. Если вы хотите написать в ключе несколько слов через пробел, ключ нужно взять в кавычки.
|
НЕТ |
ДА |
|
{ my query: «Виктор Иван» } |
{ «my query»: «Виктор Иван» } |
И все же я рекомендую использовать простые названия ключей, или использовать snake_case.
См также:
CamelCase, snake_case и другие регистры — подробнее о разных регистрах
Писать ключи можно в любом порядке. Ведь JSON-объект — это неупорядоченное множество пар «ключ:значение».
|
Так правильно |
Так тоже правильно |
|
{ query: «Виктор Иван», count: 7 } |
{ count: 7, query: «Виктор Иван» } |
Очень важно это понимать, и тестировать! Принимающая запрос система должна ориентировать на название ключей в запросе, а не на порядок их следования. Ключевое слово «должна» )) Хотя знаю примеры, когда от перестановки ключей местами всё ломалось, ведь «первым должен идти запрос, а не count!».
Ключ или свойство?
Вот у нас есть JSON-объект:
{
  "query": "Виктор Иван",
  "count": 7
}
Что такое «query»? Если я хочу к нему обратиться, как мне это сказать? Есть 2 варианта, и оба правильные:
— Обратиться к свойству объекта;
— Получить значение по ключу.

То есть «query» можно назвать как ключом, так и свойством. А как правильно то?

Правильно и так, и так! Просто есть разные определения объекта:
Объект
В JS объект — это именно объект. У которого есть набор свойств и методов:
-
Свойства — описывают, ЧТО мы создаем.
-
Методы — что объект умеет ДЕЛАТЬ.
То есть если мы хотим создать машину, есть два пути:
-
Перечислить 10 разных переменных — модель, номер, цвет, пробег…
-
Создать один объект, где будут все эти свойства.
Аналогично с кошечкой, собачкой, другом из записной книжки…

Объектно-ориентированное программирование (ООП) предлагает мыслить не набором переменных, а объектом. Хотя бы потому, что это логичнее. Переменных в коде будет много, как понять, какие из них взаимосвязаны?
Вот если я создаю машину, сколько переменных мне надо заполнить? А если меняю данные? А если удаляю? Когда переменные разбросаны по коду, можно забыть про какую-то и получить ошибку в интерфейсе. А если у нас есть цельный объект, всегда можно посмотреть, какие у него есть свойства и методы.
Например, создадим кошечку:
var cat = {

name: “Pussy”,

year: 1,


sleep: function() {

// sleeping code

}

}
В объекте cat есть:
-
Свойства — name, year (что это за кошечка)
-
Функции — sleep (что она умеет делать, описание поведения)
По коду сразу видно, что у кошечки есть имя и возраст, она умеет спать. Если разработчик решит добавить новые свойства или методы, он дополнит этот объект, и снова всё в одном месте.
Если потом нужно будет получить информацию по кошечке, разработчик сделает REST-метод getByID, searchKitty, или какой-то другой. А в нем будет возвращать свойства объекта.
То есть метод вернет
{

name: “Pussy”,

year: 1,

}
И при использовании имени вполне уместно говорить «обратиться к свойству объекта». Это ведь объект (кошечка), и его свойства!
Набор пар «ключ:значение»
Второе определение объекта — неупорядоченное множество пар ключ:значение, заключенное в фигурные скобки {}.
Оно применимо тогда, когда внутри фигурных скобок приходит не конкретный целостный объект, а просто набор полей. Они могут быть связаны между собой, а могут относится к совершенно разным объектам внутри кода:
-
client_fio (в коде это свойство fio объекта client)
-
kitty_name (в коде это свойство name объекта cat)
-
car_model (в коде это свойство model объекта car)
-
…
В таком случае логично называть эти параметры именно ключами — мы хотим получить значение по ключу.

Но в любом случае, и «ключ», и «свойство» будет правильно. Не пугайтесь, если в одной книге / статье / видео увидели одно, в другой другое… Это просто разные трактовки ¯_(ツ)_/¯
Итого
Json-объект — это неупорядоченное множество пар «ключ:значение», заключённое в фигурные скобки «{ }». Ключ описывается строкой, между ним и значением стоит символ «:». Пары ключ-значение отделяются друг от друга запятыми.
Значения ключа могут быть любыми:
-
число
-
строка
-
массив
-
другой объект
-
…
И только строку мы берем в кавычки!
JSON-массив
Как устроен
Давайте снова начнем с примера. Это массив:
[ "MALE", "FEMALE" ]Массив заключен в квадратные скобки []
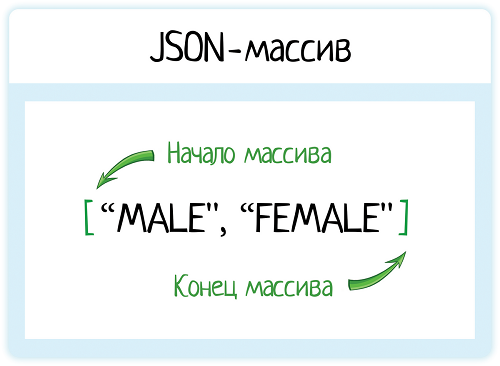
Внутри квадратных скобок идет набор значений. Тут нет ключей, как в объекте, поэтому обращаться к массиву можно только по номеру элемента. И поэтому в случае массива менять местами данные внутри нельзя. Это упорядоченное множество значений.

Значения разделены запятыми:

Значения внутри
Внутри массива может быть все, что угодно:
Цифры
[ 1, 5, 10, 33 ]Строки
[ "MALE", "FEMALE" ]Смесь
[ 1, "Андрюшка", 10, 33 ]Объекты
Да, а почему бы и нет:
[1, {a:1, b:2}, "такой вот массивчик"]Или даже что-то более сложное. Вот пример ответа подсказок из Дадаты:
[
        {
            "value": "Иванов Виктор",
            "unrestricted_value": "Иванов Виктор",
            "data": {
                "surname": "Иванов",
                "name": "Виктор",
                "patronymic": null,
                "gender": "MALE"
            }
        },
        {
            "value": "Иванченко Виктор",
            "unrestricted_value": "Иванченко Виктор",
            "data": {
                "surname": "Иванченко",
                "name": "Виктор",
                "patronymic": null,
                "gender": "MALE"
            }
        },
        {
            "value": "Виктор Иванович",
            "unrestricted_value": "Виктор Иванович",
            "data": {
                "surname": null,
                "name": "Виктор",
                "patronymic": "Иванович",
                "gender": "MALE"
            }
        }
]
Система возвращает массив подсказок. Сколько запросили в параметре count, столько и получили. Каждая подсказка — объект, внутри которого еще один объект. И это далеко не сама сложная структура! Уровней вложенности может быть сколько угодно — массив в массиве, который внутри объекта, который внутри массива, который внутри объекта…
Ну и, конечно, можно и наоборот, передать массив в объекте. Вот пример запроса в подсказки:
{
"query": "Виктор Иван",
"count": 7,
"parts": ["NAME", "SURNAME"]
}
Это объект (так как в фигурных скобках и внутри набор пар «ключ:значение»). А значение ключа «parts» — это массив элементов!
Итого
Массив — это просто набор значений, разделенных запятыми. Находится внутри квадратных скобок [].
А вот внутри него может быть все, что угодно:
-
числа
-
строки
-
другие массивы
-
объекты
-
смесь из всего вышеназванного
JSON vs XML
В SOAP можно применять только XML, там без вариантов.
В REST можно применять как XML, так и JSON. Разработчики отдают предпочтение json-формату, потому что он проще воспринимается и меньше весит. В XML есть лишняя обвязка, название полей повторяется дважды (открывающий и закрывающий тег).
Сравните один и тот же запрос на обновление данных в карточке пользователя:
XML
<req>

	<surname>Иванов</surname>

	<name>Иван</name>

	<patronymic>Иванович</patronymic>

	<birthdate>01.01.1990</birthdate>

	<birthplace>Москва</birthplace>

	<phone>8 926 766 48 48</phone>

</req>
JSON
{

	"surname": "Иванов",

	"name": "Иван",

	"patronymic": "Иванович",

	"birthdate": "01.01.1990",

	"birthplace": "Москва",

	"phone": "8 926 766 48 48"

}
За счет того, что мы не дублируем название поля каждый раз «surname – surname», читать JSON проще. И за счет этого же запрос меньше весит, что при плохом интернете бывает важно. Или при большой нагрузке.
См также:
Инфографика REST vs SOAP
Well Formed JSON
Разработчик сам решает, какой JSON будет считаться правильным, а какой нет. Но есть общие правила, которые нельзя нарушать. Наш JSON должен быть well formed, то есть синтаксически корректный.
Чтобы проверить JSON на синтаксис, можно использовать любой JSON Validator (так и гуглите). Я рекомендую сайт w3schools. Там есть сам валидатор + описание типичных ошибок с примерами.
Но учтите, что парсеры внутри кода работают не по википедии или w3schools, а по RFC, стандарту. Так что если хотите изучить «каким должен быть JSON», то правильнее открывать RFC и искать там JSON Grammar. Однако простому тестировщику хватит набора типовых правил с w3schools, их и разберем.
Правила well formed JSON:
-
Данные написаны в виде пар «ключ:значение»
-
Данные разделены запятыми
-
Объект находится внутри фигурных скобок {}
-
Массив — внутри квадратных []

1. Данные написаны в виде пар «ключ:значение»
Например, так:
"name":"Ольга"В JSON название ключа нужно брать в кавычки, в JavaScript не обязательно — он и так знает, что это строка. Если мы тестируем API, то там будет именно JSON, так что кавычки обычно нужны.
Но учтите, что это правило касается JSON-объекта. Потому что json может быть и числом, и строкой. То есть:
123Или
"Ольга"Это тоже корректный json, хоть и не в виде пар «ключ:значение».
И вот если у вас по ТЗ именно json-объект на входе, попробуйте его сломать, не передав ключ. Ещё можно не передать значение, но это не совсем негативный тест — система может воспринимать это нормально, как пустой ввод.
2. Данные разделены запятыми
Пары «ключ:значение» в объекте разделяются запятыми. После последней пары запятая не нужна!
Типичная ошибка: поставили запятую в конце объекта:
{
  "query": "Виктор Иван",
  "count": 7,
}
Это последствия копипасты. Взяли пример из документации, подставили в постман (ну или разработчик API подставил в код, который будет вызывать систему), а потом решили поменять поля местами.
В итоге было так:
{
  "count": 7,
  "query": "Виктор Иван"
}
Смотрим на запрос — ну, query то важнее чем count, надо поменять их местами! Копипастим всю строку ««count»: 7,», вставляем ниже. Перед ней запятую добавляем, а «лишнюю» убрать забываем. По крайней мере у меня это частая ошибка, когда я «кручу-верчу, местами поменять хочу».
Другой пример — когда мы добавляем в запрос новое поле. Примерный сценарий:
-
У меня уже есть работающий запрос в Postman-е. Но в нем минимум полей.
-
Я его клонирую
-
Копирую из документации нужное мне поле. Оно в примере не последнее, так что идёт с запятой на конце.
-
Вставляю себе в конце запроса — в текущий конец добавляю запятую, потом вставляю новую строку.
-
Отправляю запрос — ой, ошибка! Из копипасты то запятую не убрала!
Я на этот сценарий постоянно напарываюсь при тестировании перестановки полей. А ведь это нужно проверять! Хороший запрос должен быть как в математической присказке: «от перемены мест слагаемых сумма не меняется».

Не зря же определение json-объекта гласит, что «это неупорядоченное множество пар ключ:значение». Раз неупорядоченное — я могу передавать ключи в любом порядке. И сервер должен искать по запросу название ключа, а не обращаться к индексу элемента.
Разработчик, который будет взаимодействовать с API, тоже человек, который может ошибиться. И если система будет выдавать невразумительное сообщение об ошибке, можно долго думать, где конкретно ты налажал. Поэтому ошибки тоже тестируем.
Чтобы протестировать, как система обрабатывает «плохой json», замените запятую на точку с запятой:
{
  "count": 7;
  "query": "Виктор Иван"
}
Или добавьте лишнюю запятую в конце запроса — эта ошибка будет встречаться чаще!
{
  "count": 7,
  "query": "Виктор Иван",
}
Или пропустите запятую там, где она нужна:
{
"count": 7
"query": "Виктор Иван"
}
Аналогично с массивом. Данные внутри разделяются через запятую. Хотите попробовать сломать? Замените запятую на точку с запятой! Тогда система будет считать, что у вас не 5 значений, а 1 большое:
[1, 2, 3, 4, 5] <!-- корректный массив на 5 элементов* -->

[1; 2; 3; 4; 5] <!-- некорректный массив, так как такого разделителя быть не должно. Это может быть простой строкой, но тогда нужны кавычки -->!
*Я добавила комментарии внутри блока кода. Но учтите, что в JSON комментариев нет. Вообще. Так что если вы делаете запрос в Postman, не получится расставить комментарии у разных строчек в JSON-формате.
3. Объект находится внутри фигурных скобок {}
Это объект:
{a: 1, b: 2}Чтобы сломать это условие, уберите одну фигурную скобку:
{a: 1, b: 2a: 1, b: 2}Или попробуйте передать объект как массив:
[ a: 1, b: 2 ]Ведь если система ждет от вас в запросе объект, то она будет искать фигурные скобки.

4. Массив — внутри квадратных []
Это массив:
[1, 2]Чтобы сломать это условие, уберите одну квадратную скобку:
[1, 21, 2]Или попробуйте передать массив как объект, в фигурных скобках:
{ 1, 2 }Ведь если система ждет от вас в запросе массив, то она будет искать квадратные скобки.
Итого
JSON (JavaScript Object Notation) — текстовый формат обмена данными, основанный на JavaScript. Легко читается человеком и машиной. Часто используется в REST API (чаще, чем XML).
Корректные значения JSON:
-
JSON-объект — неупорядоченное множество пар «ключ:значение», заключённое в фигурные скобки «{ }».
-
Массив — упорядоченный набор значений, разделенных запятыми. Находится внутри квадратных скобок [].
-
Число (целое или вещественное).
-
Литералы true (логическое значение «истина»), false (логическое значение «ложь») и null.
-
Строка
При тестировании REST API чаще всего мы будем работать именно с объектами, что в запросе, что в ответе. Массивы тоже будут, но обычно внутри объектов.
Комментариев в JSON, увы, нет.
Правила well formed JSON:
-
Данные в объекте написаны в виде пар «ключ:значение»
-
Данные в объекте или массиве разделены запятыми
-
Объект находится внутри фигурных скобок {}
-
Массив — внутри квадратных []
См также:
Introducing JSON
RFC (стандарт)
Что такое XML
+комментарии к этой статье =)
PS — больше полезных статей ищите в моем блоге по метке «полезное». А полезные видео — на моем youtube-канале
Наверняка вы когда-нибудь слышали о JSON. Что же это такое? Что он может и как его использовать?
В данном уроке мы расскажем об основах JSON и раскроем следующие пункты:
- Что такое JSON?
- Для чего используется JSON?
- Как создать строку JSON?
- Простой пример строки JSON.
- Сравним JSON и XML.
- Как работать с JSON в JavaScript и PHP?
Что такое JSON?
JSON — простой, основанный на использовании текста, способ хранить и передавать структурированные данные. С помощью простого синтаксиса вы можете легко хранить все, что угодно, начиная от одного числа до строк, массивов и объектов, в простом тексте. Также можно связывать между собой массивы и объекты, создавая сложные структуры данных.
После создания строки JSON, ее легко отправить другому приложению или в другое место сети, так как она представляет собой простой текст.
JSON имеет следующие преимущества:
- Он компактен.
- Его предложения легко читаются и составляются как человеком, так и компьютером.
- Его легко преобразовать в структуру данных для большинства языков программирования (числа, строки, логические переменные, массивы и так далее)
- Многие языки программирования имеют функции и библиотеки для чтения и создания структур JSON.
Название JSON означает JavaScript Object Notation (представление объектов JavaScript). Как и представляет имя, он основан на способе определения объектов (очень похоже на создание ассоциативных массивов в других языках) и массивов.
Для чего используется JSON?
Наиболее частое распространенное использование JSON — пересылка данных от сервера к браузеру. Обычно данные JSON доставляются с помощью AJAX, который позволяет обмениваться данными браузеру и серверу без необходимости перезагружать страницу.
Пример:
- Пользователь нажимает миниатюру продукта в онлайн магазине.
- JavaScript, выполняющийся на браузере, генерирует запрос AJAX к скрипту PHP, запущенному на сервере, передавая ID выбранного продукта.
- Скрипт PHP получает название продукта, описание, цену и другую информацию из базы данных. Затем составляет из данных строку JSON и отсылает ее браузеру.
- JavaScript, выполняющийся на браузере, получает строку JSON, декодирует ее и выводит информацию о продукте на странице для пользователя.
Также можно использовать JSON для отправки данных от браузера на сервер, передавая строку JSON в качестве параметра запросов GET или POST. Но данный метод имеет меньшее распространение, так как передача данных через запросы AJAX может быть упрощена. Например, ID продукта может быть включен в адрес URL как часть запроса GET.
Библиотека jQuery имеет несколько методов, например, getJSON() и parseJSON(), которые упрощают получение данных с помощью JSON через запросы AJAX.
Как создать строку JSON?
Есть несколько основных правил для создания строки JSON:
- Строка JSON содержит либо массив значений, либо объект (ассоциативный массив пар имя/значение).
- Массив заключается в квадратные скобки (
[и]) и содержит разделенный запятой список значений. - Объект заключается в фигурные скобки (
{и}) и содержит разделенный запятой список пар имя/значение. - Пара имя/значение состоит из имени поля, заключенного в двойные кавычки, за которым следует двоеточие (
:) и значение поля. - Значение в массиве или объекте может быть:
- Числом (целым или с плавающей точкой)
- Строкой (в двойных кавычках)
- Логическим значением (
trueилиfalse) - Другим массивом (заключенным в квадратные скобки)
- Другой объект (заключенный в фигурные скобки)
- Значение
null
Чтобы включить двойные кавычки в строку, нужно использовать обратную косую черту: ". Так же, как и во многих языках программирования, можно помещать управляющие символы и шестнадцатеричные коды в строку, предваряя их обратной косой чертой. Смотрите детали на сайте JSON.
Простой пример строки JSON
Ниже приводится пример оформления заказа в формате JSON:
{
  "orderID": 12345,
  "shopperName": "Ваня Иванов",
  "shopperEmail": "ivanov@example.com",
  "contents": [
    {
      "productID": 34,
      "productName": "Супер товар",
      "quantity": 1
    },
    {
      "productID": 56,
      "productName": "Чудо товар",
      "quantity": 3
    }
  ],
  "orderCompleted": true
}
Рассмотрим строку подробно:
- Мы создаем объект с помощью фигурных скобок (
{и}). - В объекте есть несколько пар имя/значение:
"orderID": 12345- Свойство с именем
"orderId"и целочисленным значением12345 "shopperName": "Ваня Иванов"- свойство с именем
"shopperName"и строковым значением"Ваня Иванов" "shopperEmail": "johnsmith@example.com"- Свойство с именем
"shopperEmail"и строковым значением"ivanov@example.com" "contents": [ ... ]- Свойство с именем
"contents", значение которого является массивом "orderCompleted": true- Свойство с именем
"orderCompleted"и логическим значениемtrue
- В массиве
"contents"есть 2 объекта, представляющие отдельные позиции в заказе. Каждый объект содержит 3 свойства:productID,productName, иquantity.
Кстати, так как JSON основан на объявлении объектов JavaScript, то вы можете быстро и просто сделать выше приведенную строку JSON объектом JavaScript:
<script type="text/javascript">
var cart = {
  "orderID": 12345,
  "shopperName": "Ваня Иванов",
  "shopperEmail": "ivanov@example.com",
  "contents": [
    {
      "productID": 34,
      "productName": "Супер товар",
      "quantity": 1
    },
    {
      "productID": 56,
      "productName": "Чудо товар",
      "quantity": 3
    }
  ],
  "orderCompleted": true
};
</script>
Сравнение JSON и XML
Во многих отношениях вы можете рассматривать JSON как альтернативу XML, по крайней мере, в сфере веб приложений. Концепция AJAX оригинально основывалась на использовании XML для передачи данных между сервером и браузером. Но в последние годы JSON становится все более популярным для переноса данных AJAX.
Хотя XML является проверенной технологией, которая используется в достаточном количестве приложений, преимуществами JSON являются более компактный и простой для распознавания формат данных.
Вот как будет выглядеть выше приведенный пример объекта на XML:
<object>
  <property>
    <key>orderID</key>
    <number>12345</number>
  </property>
  <property>
    <key>shopperName</key>
    <string>Ваня Иванов</string>
  </property>
  <property>
    <key>shopperEmail</key>
    <string>ivanov@example.com</string>
  </property>
  <property>
    <key>contents</key>
    <array>
      <object>
        <property>
          <key>productID</key>
          <number>34</number>
        </property>
        <property>
          <key>productName</key>
          <string>Супер товар</string>
        </property>
        <property>
          <key>quantity</key>
          <number>1</number>
        </property>
      </object>
      <object>
        <property>
          <key>productID</key>
          <number>56</number>
        </property>
        <property>
          <key>productName</key>
          <string>Чудо товар</string>
        </property>
        <property>
          <key>quantity</key>
          <number>3</number>
        </property>
      </object>
    </array>
  </property>
  <property>
    <key>orderCompleted</key>
    <boolean>true</boolean>
  </property>
</object>
Версия XML имеет существенно больший размер. В действительности она имеет длину 1128 символов, а вариант JSON — только 323 символа. Версию XML также достаточно трудно воспринимать.
Конечно, это радикальный пример. И возможно создать более компактную запись XML. Но даже она будет существенно длиннее эквивалента на JSON.
Работаем со строкой JSON в JavaScript
JSON имеет простой формат, но создавать строку JSON вручную достаточно утомительно. Кроме того, часто нужно взять строку JSON, конвертировать ее содержание в переменную, которую можно будет использовать в коде.
Большинство языков программирования имеют инструменты для простого преобразования переменных в строки JSON и наоборот.
Создаем строку JSON из переменной
JavaScript имеет встроенный метод JSON.stringify(), который берет переменную и возвращает строку JSON, представляющую ее содержание. Например, создадим объект JavaScript, который содержит сведения о заказе из нашего примера, а затем создадим из него строку JSON:
<script type="text/javascript">

var cart = {
  "orderID": 12345,
  "shopperName": "Ваня Иванов",
  "shopperEmail": "ivanov@example.com",
  "contents": [
    {
      "productID": 34,
      "productName": "Супер товар",
      "quantity": 1
    },
    {
      "productID": 56,
      "productName": "Чудо товар",
      "quantity": 3
    }
  ],
  "orderCompleted": true
};

alert ( JSON.stringify( cart ) );

</script>
Данный код выдаст:
{"orderID":12345,"shopperName":"Ваня Иванов","shopperEmail":"ivanov@example.com","contents":[{"productID":34,"productName":"Супер товар","quantity":1},{"productID":56,"productName":"Чудо товар","quantity":3}],"orderCompleted":true}
Обратите внимание, что метод JSON.stringify() возвращает строку JSON без пробелов. Ее сложнее читать, но зато она более компактна для передачи через сеть.
Создаем переменную из строки JSON
Существует несколько способов разобрать строку JSON в JavaScript, но самый безопасный и надежный — использовать встроенный метод JSON.parse(). Он получает строку JSON и возвращает объект или массив JavaScript, который содержит данные. Например:
<script type="text/javascript">

var jsonString = '
{
  "orderID": 12345,
  "shopperName": "Ваня Иванов",
  "shopperEmail": "ivanov@example.com",
  "contents": [
    {
      "productID": 34,
      "productName": "Супер товар",
      "quantity": 1
    },
    {
      "productID": 56,
      "productName": "Чудо товар",
      "quantity": 3
    }
  ],
  "orderCompleted": true
}
';

var cart = JSON.parse ( jsonString );

alert ( cart.shopperEmail );
alert ( cart.contents[1].productName );

</script>
Мы создали переменную jsonString, которая содержит строку JSON нашего примера с заказом. Затем мы передаем данную строку методу JSON.parse(), который создает объект, содержащий данные JSON и сохраняет его в переменной cart. Остается только осуществить проверку, выведя свойства объекта shopperEmail и productName массива contents.
В результате мы получим следующий вывод:
ivanov@example.com
Чудо товар
В реальном приложении ваш JavaScript код будет получать заказ в виде строки JSON в AJAX ответе от скрипта сервера, передавать строку методу JSON.parse(), а затем использовать данные для отображения на странице пользователя.
JSON.stringify() и JSON.parse() имеют другие возможности, такие как использование возвратных функций для пользовательской конвертации определённых данных. Такие опции очень удобны для конвертации различных данных в правильные объекты JavaScript.
Работаем со строкой JSON в PHP
PHP, как и JavaScript, имеет встроенные функции для работы с JSON строками.
Создаем строку JSON из переменной PHP
Функция json_encode() принимает переменную PHP и возвращает строку JSON, представляющую содержание переменной. Вот наш пример с заказом, написанный на PHP:
<?php
$cart = array(
  "orderID" => 12345,
  "shopperName" => "Ваня Иванов",
  "shopperEmail" => "ivanov@example.com",
  "contents" => array(
    array(
      "productID" => 34,
      "productName" => "Супер товар",
      "quantity" => 1
    ),
    array(
      "productID" => 56,
      "productName" => "Чудо товар",
      "quantity" => 3
    )
  ),
  "orderCompleted" => true
);

echo json_encode( $cart );
?>
Данный код возвращает абсолютно такую же строку JSON, как и в примере с JavaScript:
{"orderID":12345,"shopperName":"Ваня Иванов","shopperEmail":"ivanov@example.com","contents":[{"productID":34,"productName":"Супер товар","quantity":1},{"productID":56,"productName":"Чудо товар","quantity":3}],"orderCompleted":true}
В реальном приложении ваш скрипт PHP пришлет данную строку JSON как часть AJAX ответа браузеру, где JavaScript код с помощью метода JSON.parse() преобразует ее обратно в переменную для вывода на странице пользователя.
Вы может передавать различные флаги в качестве второго аргумента функции json_encode(). С их помощью можно изменять принципы кодирования содержания переменных в строку JSON.
Создаем переменную из строки JSON
Для преобразования строки JSON в переменную PHP используется метод json_decode(). Заменим наш пример для JavaScript с методом JSON.parse() на код PHP:
<?php
$jsonString = '
{
  "orderID": 12345,
  "shopperName": "Ваня Иванов",
  "shopperEmail": "ivanov@example.com",
  "contents": [
    {
      "productID": 34,
      "productName": "Супер товар",
      "quantity": 1
    },
    {
      "productID": 56,
      "productName": "Чудо товар",
      "quantity": 3
    }
  ],
  "orderCompleted": true
}
';

$cart = json_decode( $jsonString );
echo $cart->shopperEmail . "<br>";
echo $cart->contents[1]->productName . "<br>";
?>
Как и для JavaScript данный код выдаст:
ivanov@example.com
Чудо товар
По умолчанию функция json_decode() возвращает объекты JSON как объекты PHP. Существуют обобщенные объекты PHP класса stdClass. Поэтому мы используем -> для доступа к свойствам объекта в примере выше.
Если вам нужен объект JSON в виде ассоциированного массива PHP, нужно передать true в качестве второго аргумента функции json_decode(). Например:
$cart = json_decode( $jsonString, true );
echo $cart["shopperEmail"] . "<br>";
echo $cart["contents"][1]["productName"] . "<br>";
Данный код выдаст такой же вывод:
ivanov@example.com
Чудо товар
Также функции json_decode() можно передавать другие аргументы для указания глубины рекурсии и способов обработки больших целых чисел.
Заключение
Хотя JSON прост для понимания и использования, он является очень полезным и гибким инструментом для передачи данных между приложениями и компьютерами, особенно при использовании AJAX. Если вы планируете разрабатывать AJAX приложение, то нет сомнений, что JSON станет важнейшим инструментом в вашей мастерской.
JSON — Overview
JSON or JavaScript Object Notation is a lightweight text-based open standard designed for human-readable data interchange. Conventions used by JSON are known to programmers, which include C, C++, Java, Python, Perl, etc.
-
JSON stands for JavaScript Object Notation.
-
The format was specified by Douglas Crockford.
-
It was designed for human-readable data interchange.
-
It has been extended from the JavaScript scripting language.
-
The filename extension is .json.
-
JSON Internet Media type is application/json.
-
The Uniform Type Identifier is public.json.
Uses of JSON
-
It is used while writing JavaScript based applications that includes browser extensions and websites.
-
JSON format is used for serializing and transmitting structured data over network connection.
-
It is primarily used to transmit data between a server and web applications.
-
Web services and APIs use JSON format to provide public data.
-
It can be used with modern programming languages.
Characteristics of JSON
- JSON is easy to read and write.
- It is a lightweight text-based interchange format.
- JSON is language independent.
Simple Example in JSON
The following example shows how to use JSON to store information related to books based on their topic and edition.
{
   "book": [

      {
         "id":"01",
         "language": "Java",
         "edition": "third",
         "author": "Herbert Schildt"
      },

      {
         "id":"07",
         "language": "C++",
         "edition": "second",
         "author": "E.Balagurusamy"
      }
   ]
}
After understanding the above program, we will try another example. Let’s save the below code as json.htm −
<html>
<head>
<title>JSON example</title>
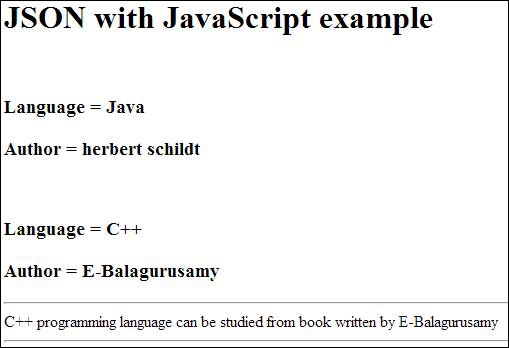
<script language = "javascript" >
var object1 = { "language" : "Java", "author" : "herbert schildt" };
document.write("<h1>JSON with JavaScript example</h1>");
document.write("<br>");
document.write("<h3>Language = " + object1.language+"</h3>");
document.write("<h3>Author = " + object1.author+"</h3>");
var object2 = { "language" : "C++", "author" : "E-Balagurusamy" };
document.write("<br>");
document.write("<h3>Language = " + object2.language+"</h3>");
document.write("<h3>Author = " + object2.author+"</h3>");
document.write("<hr />");
document.write(object2.language + " programming language can be studied " + "from book written by " + object2.author);
document.write("<hr />");
</script>
</head>
<body>
</body>
</html>
Now let’s try to open json.htm using IE or any other javascript enabled browser that produces the following result −
You can refer to JSON Objects chapter for more information on JSON objects.
JSON — Syntax
Let’s have a quick look at the basic syntax of JSON. JSON syntax is basically considered as a subset of JavaScript syntax; it includes the following −
-
Data is represented in name/value pairs.
-
Curly braces hold objects and each name is followed by ‘:'(colon), the name/value pairs are separated by , (comma).
-
Square brackets hold arrays and values are separated by ,(comma).
Below is a simple example −
{
   "book": [

      {
         "id": "01",
         "language": "Java",
         "edition": "third",
         "author": "Herbert Schildt"
      },

      {
         "id": "07",
         "language": "C++",
         "edition": "second",
         "author": "E.Balagurusamy"
      }

   ]
}
JSON supports the following two data structures −
-
Collection of name/value pairs − This Data Structure is supported by different programming languages.
-
Ordered list of values − It includes array, list, vector or sequence etc.
JSON — DataTypes
JSON format supports the following data types −
| Sr.No. | Type & Description |
|---|---|
| 1 |
Number double- precision floating-point format in JavaScript |
| 2 |
String double-quoted Unicode with backslash escaping |
| 3 |
Boolean true or false |
| 4 |
Array an ordered sequence of values |
| 5 |
Value it can be a string, a number, true or false, null etc |
| 6 |
Object an unordered collection of key:value pairs |
| 7 |
Whitespace can be used between any pair of tokens |
| 8 |
null empty |
Number
-
It is a double precision floating-point format in JavaScript and it depends on implementation.
-
Octal and hexadecimal formats are not used.
-
No NaN or Infinity is used in Number.
The following table shows the number types −
| Sr.No. | Type & Description |
|---|---|
| 1 |
Integer Digits 1-9, 0 and positive or negative |
| 2 |
Fraction Fractions like .3, .9 |
| 3 |
Exponent Exponent like e, e+, e-, E, E+, E- |
Syntax
var json-object-name = { string : number_value, .......}
Example
Example showing Number Datatype, value should not be quoted −
var obj = {marks: 97}
String
-
It is a sequence of zero or more double quoted Unicode characters with backslash escaping.
-
Character is a single character string i.e. a string with length 1.
The table shows various special characters that you can use in strings of a JSON document −
| Sr.No. | Type & Description |
|---|---|
| 1 |
« double quotation |
| 2 |
backslash |
| 3 |
/ forward slash |
| 4 |
b backspace |
| 5 |
f form feed |
| 6 |
n new line |
| 7 |
r carriage return |
| 8 |
t horizontal tab |
| 9 |
u four hexadecimal digits |
Syntax
var json-object-name = { string : "string value", .......}
Example
Example showing String Datatype −
var obj = {name: 'Amit'}
Boolean
It includes true or false values.
Syntax
var json-object-name = { string : true/false, .......}
Example
var obj = {name: 'Amit', marks: 97, distinction: true}
Array
-
It is an ordered collection of values.
-
These are enclosed in square brackets which means that array begins with .[. and ends with .]..
-
The values are separated by , (comma).
-
Array indexing can be started at 0 or 1.
-
Arrays should be used when the key names are sequential integers.
Syntax
[ value, .......]
Example
Example showing array containing multiple objects −
{
   "books": [
      { "language":"Java" , "edition":"second" },
      { "language":"C++" , "lastName":"fifth" },
      { "language":"C" , "lastName":"third" }
   ]
}
Object
-
It is an unordered set of name/value pairs.
-
Objects are enclosed in curly braces that is, it starts with ‘{‘ and ends with ‘}’.
-
Each name is followed by ‘:'(colon) and the key/value pairs are separated by , (comma).
-
The keys must be strings and should be different from each other.
-
Objects should be used when the key names are arbitrary strings.
Syntax
{ string : value, .......}
Example
Example showing Object −
{
   "id": "011A",
   "language": "JAVA",
   "price": 500,
}
Whitespace
It can be inserted between any pair of tokens. It can be added to make a code more readable. Example shows declaration with and without whitespace −
Syntax
{string:" ",....}
Example
var obj1 = {"name": "Sachin Tendulkar"}
var obj2 = {"name": "SauravGanguly"}
null
It means empty type.
Syntax
null
Example
var i = null;

if(i == 1) {
   document.write("<h1>value is 1</h1>");
} else {
   document.write("<h1>value is null</h1>");
}
JSON Value
It includes −
- number (integer or floating point)
- string
- boolean
- array
- object
- null
Syntax
String | Number | Object | Array | TRUE | FALSE | NULL
Example
var i = 1;
var j = "sachin";
var k = null;
JSON — Objects
Creating Simple Objects
JSON objects can be created with JavaScript. Let us see the various ways of creating JSON objects using JavaScript −
- Creation of an empty Object −
var JSONObj = {};
- Creation of a new Object −
var JSONObj = new Object();
-
Creation of an object with attribute bookname with value in string, attribute price with numeric value. Attribute is accessed by using ‘.’ Operator −
var JSONObj = { "bookname ":"VB BLACK BOOK", "price":500 };
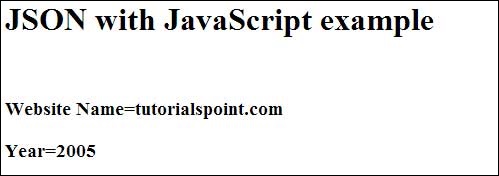
This is an example that shows creation of an object in javascript using JSON, save the below code as json_object.htm −
<html>
   <head>
      <title>Creating Object JSON with JavaScript</title>
      <script language = "javascript" >
         var JSONObj = { "name" : "tutorialspoint.com", "year"  : 2005 };

         document.write("<h1>JSON with JavaScript example</h1>");
         document.write("<br>");
         document.write("<h3>Website Name = "+JSONObj.name+"</h3>");
         document.write("<h3>Year = "+JSONObj.year+"</h3>");
      </script>
   </head>

   <body>
   </body>
</html>
Now let’s try to open Json Object using IE or any other javaScript enabled browser. It produces the following result −
Creating Array Objects
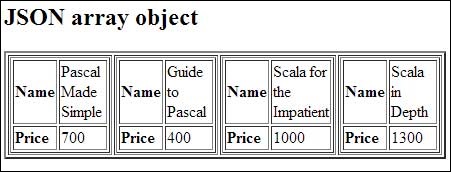
The following example shows creation of an array object in javascript using JSON, save the below code as json_array_object.htm −
<html>
   <head>
      <title>Creation of array object in javascript using JSON</title>
      <script language = "javascript" >
         document.writeln("<h2>JSON array object</h2>");
         var books = { "Pascal" : [
            { "Name"  : "Pascal Made Simple", "price" : 700 },
            { "Name"  : "Guide to Pascal", "price" : 400 }],

            "Scala"  : [
               { "Name"  : "Scala for the Impatient", "price" : 1000 },
               { "Name"  : "Scala in Depth", "price" : 1300 }]
         }
         var i = 0
         document.writeln("<table border = '2'><tr>");

         for(i = 0;i<books.Pascal.length;i++) {
            document.writeln("<td>");
            document.writeln("<table border = '1' width = 100 >");
            document.writeln("<tr><td><b>Name</b></td><td width = 50>" + books.Pascal[i].Name+"</td></tr>");
            document.writeln("<tr><td><b>Price</b></td><td width = 50>" + books.Pascal[i].price +"</td></tr>");
            document.writeln("</table>");
            document.writeln("</td>");
         }

         for(i = 0;i<books.Scala.length;i++) {
            document.writeln("<td>");
            document.writeln("<table border = '1' width = 100 >");
            document.writeln("<tr><td><b>Name</b></td><td width = 50>" + books.Scala[i].Name+"</td></tr>");
            document.writeln("<tr><td><b>Price</b></td><td width = 50>" + books.Scala[i].price+"</td></tr>");
            document.writeln("</table>");
            document.writeln("</td>");
         }

         document.writeln("</tr></table>");
      </script>
   </head>

   <body>
   </body>
</html>
Now let’s try to open Json Array Object using IE or any other javaScript enabled browser. It produces the following result −
JSON — Schema
JSON Schema is a specification for JSON based format for defining the structure of JSON data. It was written under IETF draft which expired in 2011. JSON Schema −
- Describes your existing data format.
- Clear, human- and machine-readable documentation.
- Complete structural validation, useful for automated testing.
- Complete structural validation, validating client-submitted data.
JSON Schema Validation Libraries
There are several validators currently available for different programming languages. Currently the most complete and compliant JSON Schema validator available is JSV.
| Languages | Libraries |
|---|---|
| C | WJElement (LGPLv3) |
| Java | json-schema-validator (LGPLv3) |
| .NET | Json.NET (MIT) |
| ActionScript 3 | Frigga (MIT) |
| Haskell | aeson-schema (MIT) |
| Python | Jsonschema |
| Ruby | autoparse (ASL 2.0); ruby-jsonschema (MIT) |
| PHP | php-json-schema (MIT). json-schema (Berkeley) |
| JavaScript | Orderly (BSD); JSV; json-schema; Matic (MIT); Dojo; Persevere (modified BSD or AFL 2.0); schema.js. |
JSON Schema Example
Given below is a basic JSON schema, which covers a classical product catalog description −
{
   "$schema": "http://json-schema.org/draft-04/schema#",
   "title": "Product",
   "description": "A product from Acme's catalog",
   "type": "object",

   "properties": {

      "id": {
         "description": "The unique identifier for a product",
         "type": "integer"
      },

      "name": {
         "description": "Name of the product",
         "type": "string"
      },

      "price": {
         "type": "number",
         "minimum": 0,
         "exclusiveMinimum": true
      }
   },

   "required": ["id", "name", "price"]
}
Let’s the check various important keywords that can be used in this schema −
| Sr.No. | Keyword & Description |
|---|---|
| 1 |
$schema The $schema keyword states that this schema is written according to the draft v4 specification. |
| 2 |
title You will use this to give a title to your schema. |
| 3 |
description A little description of the schema. |
| 4 |
type The type keyword defines the first constraint on our JSON data: it has to be a JSON Object. |
| 5 |
properties Defines various keys and their value types, minimum and maximum values to be used in JSON file. |
| 6 |
required This keeps a list of required properties. |
| 7 |
minimum This is the constraint to be put on the value and represents minimum acceptable value. |
| 8 |
exclusiveMinimum If «exclusiveMinimum» is present and has boolean value true, the instance is valid if it is strictly greater than the value of «minimum». |
| 9 |
maximum This is the constraint to be put on the value and represents maximum acceptable value. |
| 10 |
exclusiveMaximum If «exclusiveMaximum» is present and has boolean value true, the instance is valid if it is strictly lower than the value of «maximum». |
| 11 |
multipleOf A numeric instance is valid against «multipleOf» if the result of the division of the instance by this keyword’s value is an integer. |
| 12 |
maxLength The length of a string instance is defined as the maximum number of its characters. |
| 13 |
minLength The length of a string instance is defined as the minimum number of its characters. |
| 14 |
pattern A string instance is considered valid if the regular expression matches the instance successfully. |
You can check a http://json-schema.org for the complete list of keywords that can be used in defining a JSON schema. The above schema can be used to test the validity of the following JSON code −
[
   {
      "id": 2,
      "name": "An ice sculpture",
      "price": 12.50,
   },

   {
      "id": 3,
      "name": "A blue mouse",
      "price": 25.50,
   }
]
JSON — Comparison with XML
JSON and XML are human readable formats and are language independent. They both have support for creation, reading and decoding in real world situations. We can compare JSON with XML, based on the following factors −
Verbose
XML is more verbose than JSON, so it is faster to write JSON for programmers.
Arrays Usage
XML is used to describe the structured data, which doesn’t include arrays whereas JSON include arrays.
Parsing
JavaScript’s eval method parses JSON. When applied to JSON, eval returns the described object.
Example
Individual examples of XML and JSON −
JSON
{
   "company": Volkswagen,
   "name": "Vento",
   "price": 800000
}
XML
<car>
   <company>Volkswagen</company>
   <name>Vento</name>
   <price>800000</price>
</car>
JSON with PHP
This chapter covers how to encode and decode JSON objects using PHP programming language. Let’s start with preparing the environment to start our programming with PHP for JSON.
Environment
As of PHP 5.2.0, the JSON extension is bundled and compiled into PHP by default.
JSON Functions
| Function | Libraries |
|---|---|
| json_encode | Returns the JSON representation of a value. |
| json_decode | Decodes a JSON string. |
| json_last_error | Returns the last error occurred. |
Encoding JSON in PHP (json_encode)
PHP json_encode() function is used for encoding JSON in PHP. This function returns the JSON representation of a value on success or FALSE on failure.
Syntax
string json_encode ( $value [, $options = 0 ] )
Parameters
-
value − The value being encoded. This function only works with UTF-8 encoded data.
-
options − This optional value is a bitmask consisting of JSON_HEX_QUOT, JSON_HEX_TAG, JSON_HEX_AMP, JSON_HEX_APOS, JSON_NUMERIC_CHECK, JSON_PRETTY_PRINT, JSON_UNESCAPED_SLASHES, JSON_FORCE_OBJECT.
Example
The following example shows how to convert an array into JSON with PHP −
<?php
   $arr = array('a' => 1, 'b' => 2, 'c' => 3, 'd' => 4, 'e' => 5);
   echo json_encode($arr);
?>
While executing, this will produce the following result −
{"a":1,"b":2,"c":3,"d":4,"e":5}
The following example shows how the PHP objects can be converted into JSON −
<?php
   class Emp {
      public $name = "";
      public $hobbies  = "";
      public $birthdate = "";
   }

   $e = new Emp();
   $e->name = "sachin";
   $e->hobbies  = "sports";
   $e->birthdate = date('m/d/Y h:i:s a', "8/5/1974 12:20:03 p");
   $e->birthdate = date('m/d/Y h:i:s a', strtotime("8/5/1974 12:20:03"));

   echo json_encode($e);
?>
While executing, this will produce the following result −
{"name":"sachin","hobbies":"sports","birthdate":"08/05/1974 12:20:03 pm"}
Decoding JSON in PHP (json_decode)
PHP json_decode() function is used for decoding JSON in PHP. This function returns the value decoded from json to appropriate PHP type.
Syntax
mixed json_decode ($json [,$assoc = false [, $depth = 512 [, $options = 0 ]]])
Paramaters
-
json_string − It is an encoded string which must be UTF-8 encoded data.
-
assoc − It is a boolean type parameter, when set to TRUE, returned objects will be converted into associative arrays.
-
depth − It is an integer type parameter which specifies recursion depth
-
options − It is an integer type bitmask of JSON decode, JSON_BIGINT_AS_STRING is supported.
Example
The following example shows how PHP can be used to decode JSON objects −
<?php
   $json = '{"a":1,"b":2,"c":3,"d":4,"e":5}';

   var_dump(json_decode($json));
   var_dump(json_decode($json, true));
?>
While executing, it will produce the following result −
object(stdClass)#1 (5) {
   ["a"] => int(1)
   ["b"] => int(2)
   ["c"] => int(3)
   ["d"] => int(4)
   ["e"] => int(5)
}

array(5) {
   ["a"] => int(1)
   ["b"] => int(2)
   ["c"] => int(3)
   ["d"] => int(4)
   ["e"] => int(5)
}
JSON with Perl
This chapter covers how to encode and decode JSON objects using Perl programming language. Let’s start with preparing the environment to start our programming with Perl for JSON.
Environment
Before you start encoding and decoding JSON using Perl, you need to install JSON module, which can be obtained from CPAN. Once you downloaded JSON-2.53.tar.gz or any other latest version, follow the steps mentioned below −
$tar xvfz JSON-2.53.tar.gz
$cd JSON-2.53
$perl Makefile.PL
$make
$make install
JSON Functions
| Function | Libraries |
|---|---|
| encode_json | Converts the given Perl data structure to a UTF-8 encoded, binary string. |
| decode_json | Decodes a JSON string. |
| to_json | Converts the given Perl data structure to a json string. |
| from_json | Expects a json string and tries to parse it, returning the resulting reference. |
| convert_blessed | Use this function with true value so that Perl can use TO_JSON method on the object’s class to convert an object into JSON. |
Encoding JSON in Perl (encode_json)
Perl encode_json() function converts the given Perl data structure to a UTF-8 encoded, binary string.
Syntax
$json_text = encode_json ($perl_scalar );
or
$json_text = JSON->new->utf8->encode($perl_scalar);
Example
The following example shows arrays under JSON with Perl −
#!/usr/bin/perl
use JSON;

my %rec_hash = ('a' => 1, 'b' => 2, 'c' => 3, 'd' => 4, 'e' => 5);
my $json = encode_json %rec_hash;
print "$jsonn";
While executing, this will produce the following result −
{"e":5,"c":3,"a":1,"b":2,"d":4}
The following example shows how Perl objects can be converted into JSON −
#!/usr/bin/perl

package Emp;
sub new {
   my $class = shift;

   my $self = {
      name => shift,
      hobbies  => shift,
      birthdate  => shift,
   };

   bless $self, $class;
   return $self;
}

sub TO_JSON { return { %{ shift() } }; }

package main;
use JSON;

my $JSON = JSON->new->utf8;
$JSON->convert_blessed(1);

$e = new Emp( "sachin", "sports", "8/5/1974 12:20:03 pm");
$json = $JSON->encode($e);
print "$jsonn";
On executing, it will produce the following result −
{"birthdate":"8/5/1974 12:20:03 pm","name":"sachin","hobbies":"sports"}
Decoding JSON in Perl (decode_json)
Perl decode_json() function is used for decoding JSON in Perl. This function returns the value decoded from json to an appropriate Perl type.
Syntax
$perl_scalar = decode_json $json_text
or
$perl_scalar = JSON->new->utf8->decode($json_text)
Example
The following example shows how Perl can be used to decode JSON objects. Here you will need to install Data::Dumper module if you already do not have it on your machine.
#!/usr/bin/perl
use JSON;
use Data::Dumper;

$json = '{"a":1,"b":2,"c":3,"d":4,"e":5}';

$text = decode_json($json);
print  Dumper($text);
On executing, it will produce following result −
$VAR1 = {
   'e' => 5,
   'c' => 3,
   'a' => 1,
   'b' => 2,
   'd' => 4
};
JSON with Python
This chapter covers how to encode and decode JSON objects using Python programming language. Let’s start with preparing the environment to start our programming with Python for JSON.
Environment
Before you start with encoding and decoding JSON using Python, you need to install any of the JSON modules available. For this tutorial we have downloaded and installed Demjson as follows −
$tar xvfz demjson-1.6.tar.gz
$cd demjson-1.6
$python setup.py install
JSON Functions
| Function | Libraries |
|---|---|
| encode | Encodes the Python object into a JSON string representation. |
| decode | Decodes a JSON-encoded string into a Python object. |
Encoding JSON in Python (encode)
Python encode() function encodes the Python object into a JSON string representation.
Syntax
demjson.encode(self, obj, nest_level=0)
Example
The following example shows arrays under JSON with Python.
#!/usr/bin/python
import demjson

data = [ { 'a' : 1, 'b' : 2, 'c' : 3, 'd' : 4, 'e' : 5 } ]

json = demjson.encode(data)
print json
While executing, this will produce the following result −
[{"a":1,"b":2,"c":3,"d":4,"e":5}]
Decoding JSON in Python (decode)
Python can use demjson.decode() function for decoding JSON. This function returns the value decoded from json to an appropriate Python type.
Syntax
demjson.decode(self, txt)
Example
The following example shows how Python can be used to decode JSON objects.
#!/usr/bin/python
import demjson

json = '{"a":1,"b":2,"c":3,"d":4,"e":5}';

text = demjson.decode(json)
print  text
On executing, it will produce the following result −
{u'a': 1, u'c': 3, u'b': 2, u'e': 5, u'd': 4}
JSON with Ruby
This chapter covers how to encode and decode JSON objects using Ruby programming language. Let’s start with preparing the environment to start our programming with Ruby for JSON.
Environment
Before you start with encoding and decoding JSON using Ruby, you need to install any of the JSON modules available for Ruby. You may need to install Ruby gem, but if you are running latest version of Ruby then you must have gem already installed on your machine, otherwise let’s follow the following single step assuming you already have gem installed −
$gem install json
Parsing JSON using Ruby
The following example shows that the first 2 keys hold string values and the last 3 keys hold arrays of strings. Let’s keep the following content in a file called input.json.
{
   "President": "Alan Isaac",
   "CEO": "David Richardson",

   "India": [
      "Sachin Tendulkar",
      "Virender Sehwag",
      "Gautam Gambhir"
   ],

   "Srilanka": [
      "Lasith Malinga",
      "Angelo Mathews",
      "Kumar Sangakkara"
   ],

   "England": [
      "Alastair Cook",
      "Jonathan Trott",
      "Kevin Pietersen"
   ]

}
Given below is a Ruby program that will be used to parse the above mentioned JSON document −
#!/usr/bin/ruby
require 'rubygems'
require 'json'
require 'pp'

json = File.read('input.json')
obj = JSON.parse(json)

pp obj
On executing, it will produce the following result −
{
   "President"=>"Alan Isaac",
   "CEO"=>"David Richardson",

   "India"=>
   ["Sachin Tendulkar", "Virender Sehwag", "Gautam Gambhir"],

   "Srilanka"=>
   ["Lasith Malinga ", "Angelo Mathews", "Kumar Sangakkara"],

   "England"=>
   ["Alastair Cook", "Jonathan Trott", "Kevin Pietersen"]
}
JSON with Java
This chapter covers how to encode and decode JSON objects using Java programming language. Let’s start with preparing the environment to start our programming with Java for JSON.
Environment
Before you start with encoding and decoding JSON using Java, you need to install any of the JSON modules available. For this tutorial we have downloaded and installed JSON.simple and have added the location of json-simple-1.1.1.jar file to the environment variable CLASSPATH.
Mapping between JSON and Java entities
JSON.simple maps entities from the left side to the right side while decoding or parsing, and maps entities from the right to the left while encoding.
| JSON | Java |
|---|---|
| string | java.lang.String |
| number | java.lang.Number |
| true|false | java.lang.Boolean |
| null | null |
| array | java.util.List |
| object | java.util.Map |
On decoding, the default concrete class of java.util.List is org.json.simple.JSONArray and the default concrete class of java.util.Map is org.json.simple.JSONObject.
Encoding JSON in Java
Following is a simple example to encode a JSON object using Java JSONObject which is a subclass of java.util.HashMap. No ordering is provided. If you need the strict ordering of elements, use JSONValue.toJSONString ( map ) method with ordered map implementation such as java.util.LinkedHashMap.
import org.json.simple.JSONObject;

class JsonEncodeDemo {

   public static void main(String[] args) {
      JSONObject obj = new JSONObject();

      obj.put("name", "foo");
      obj.put("num", new Integer(100));
      obj.put("balance", new Double(1000.21));
      obj.put("is_vip", new Boolean(true));

      System.out.print(obj);
   }
}
On compiling and executing the above program the following result will be generated −
{"balance": 1000.21, "num":100, "is_vip":true, "name":"foo"}
Following is another example that shows a JSON object streaming using Java JSONObject −
import org.json.simple.JSONObject;

class JsonEncodeDemo {

   public static void main(String[] args) {

      JSONObject obj = new JSONObject();

      obj.put("name","foo");
      obj.put("num",new Integer(100));
      obj.put("balance",new Double(1000.21));
      obj.put("is_vip",new Boolean(true));

      StringWriter out = new StringWriter();
      obj.writeJSONString(out);

      String jsonText = out.toString();
      System.out.print(jsonText);
   }
}
On compiling and executing the above program, the following result is generated −
{"balance": 1000.21, "num":100, "is_vip":true, "name":"foo"}
Decoding JSON in Java
The following example makes use of JSONObject and JSONArray where JSONObject is a java.util.Map and JSONArray is a java.util.List, so you can access them with standard operations of Map or List.
import org.json.simple.JSONObject;
import org.json.simple.JSONArray;
import org.json.simple.parser.ParseException;
import org.json.simple.parser.JSONParser;

class JsonDecodeDemo {

   public static void main(String[] args) {

      JSONParser parser = new JSONParser();
      String s = "[0,{"1":{"2":{"3":{"4":[5,{"6":7}]}}}}]";

      try{
         Object obj = parser.parse(s);
         JSONArray array = (JSONArray)obj;

         System.out.println("The 2nd element of array");
         System.out.println(array.get(1));
         System.out.println();

         JSONObject obj2 = (JSONObject)array.get(1);
         System.out.println("Field "1"");
         System.out.println(obj2.get("1"));

         s = "{}";
         obj = parser.parse(s);
         System.out.println(obj);

         s = "[5,]";
         obj = parser.parse(s);
         System.out.println(obj);

         s = "[5,,2]";
         obj = parser.parse(s);
         System.out.println(obj);
      }catch(ParseException pe) {

         System.out.println("position: " + pe.getPosition());
         System.out.println(pe);
      }
   }
}
On compiling and executing the above program, the following result will be generated −
The 2nd element of array
{"1":{"2":{"3":{"4":[5,{"6":7}]}}}}

Field "1"
{"2":{"3":{"4":[5,{"6":7}]}}}
{}
[5]
[5,2]
JSON with Ajax
AJAX is Asynchronous JavaScript and XML, which is used on the client side as a group of interrelated web development techniques, in order to create asynchronous web applications. According to the AJAX model, web applications can send and retrieve data from a server asynchronously without interfering with the display and the behavior of the existing page.
Many developers use JSON to pass AJAX updates between the client and the server. Websites updating live sports scores can be considered as an example of AJAX. If these scores have to be updated on the website, then they must be stored on the server so that the webpage can retrieve the score when it is required. This is where we can make use of JSON formatted data.
Any data that is updated using AJAX can be stored using the JSON format on the web server. AJAX is used so that javascript can retrieve these JSON files when necessary, parse them, and perform one of the following operations −
-
Store the parsed values in the variables for further processing before displaying them on the webpage.
-
It directly assigns the data to the DOM elements in the webpage, so that they are displayed on the website.
Example
The following code shows JSON with AJAX. Save it as ajax.htm file. Here the loading function loadJSON() is used asynchronously to upload JSON data.
<html>
   <head>
      <meta content = "text/html; charset = ISO-8859-1" http-equiv = "content-type">

      <script type = "application/javascript">
         function loadJSON() {
            var data_file = "http://www.tutorialspoint.com/json/data.json";
            var http_request = new XMLHttpRequest();
            try{
               // Opera 8.0+, Firefox, Chrome, Safari
               http_request = new XMLHttpRequest();
            }catch (e) {
               // Internet Explorer Browsers
               try{
                  http_request = new ActiveXObject("Msxml2.XMLHTTP");

               }catch (e) {

                  try{
                     http_request = new ActiveXObject("Microsoft.XMLHTTP");
                  }catch (e) {
                     // Something went wrong
                     alert("Your browser broke!");
                     return false;
                  }

               }
            }

            http_request.onreadystatechange = function() {

               if (http_request.readyState == 4  ) {
                  // Javascript function JSON.parse to parse JSON data
                  var jsonObj = JSON.parse(http_request.responseText);

                  // jsonObj variable now contains the data structure and can
                  // be accessed as jsonObj.name and jsonObj.country.
                  document.getElementById("Name").innerHTML = jsonObj.name;
                  document.getElementById("Country").innerHTML = jsonObj.country;
               }
            }

            http_request.open("GET", data_file, true);
            http_request.send();
         }

      </script>

      <title>tutorialspoint.com JSON</title>
   </head>

   <body>
      <h1>Cricketer Details</h1>

      <table class = "src">
         <tr><th>Name</th><th>Country</th></tr>
         <tr><td><div id = "Name">Sachin</div></td>
         <td><div id = "Country">India</div></td></tr>
      </table>

      <div class = "central">
         <button type = "button" onclick = "loadJSON()">Update Details </button>
      </div>

   </body>

</html>
Given below is the input file data.json, having data in JSON format which will be uploaded asynchronously when we click the Update Detail button. This file is being kept in http://www.tutorialspoint.com/json/
{"name": "Brett", "country": "Australia"}
The above HTML code will generate the following screen, where you can check AJAX in action −
Cricketer Details
| Name | Country |
|---|---|
|
Sachin |
India |
When you click on the Update Detail button, you should get a result something as follows. You can try JSON with AJAX yourself, provided your browser supports Javascript.
Cricketer Details
| Name | Country |
|---|---|
|
Brett |
Australia |
JSON — Overview
JSON or JavaScript Object Notation is a lightweight text-based open standard designed for human-readable data interchange. Conventions used by JSON are known to programmers, which include C, C++, Java, Python, Perl, etc.
-
JSON stands for JavaScript Object Notation.
-
The format was specified by Douglas Crockford.
-
It was designed for human-readable data interchange.
-
It has been extended from the JavaScript scripting language.
-
The filename extension is .json.
-
JSON Internet Media type is application/json.
-
The Uniform Type Identifier is public.json.
Uses of JSON
-
It is used while writing JavaScript based applications that includes browser extensions and websites.
-
JSON format is used for serializing and transmitting structured data over network connection.
-
It is primarily used to transmit data between a server and web applications.
-
Web services and APIs use JSON format to provide public data.
-
It can be used with modern programming languages.
Characteristics of JSON
- JSON is easy to read and write.
- It is a lightweight text-based interchange format.
- JSON is language independent.
Simple Example in JSON
The following example shows how to use JSON to store information related to books based on their topic and edition.
{
   "book": [

      {
         "id":"01",
         "language": "Java",
         "edition": "third",
         "author": "Herbert Schildt"
      },

      {
         "id":"07",
         "language": "C++",
         "edition": "second",
         "author": "E.Balagurusamy"
      }
   ]
}
After understanding the above program, we will try another example. Let’s save the below code as json.htm −
<html>
   <head>
      <title>JSON example</title>
      <script language = "javascript" >
         var object1 = { "language" : "Java", "author"  : "herbert schildt" };
         document.write("<h1>JSON with JavaScript example</h1>");
         document.write("<br>");
         document.write("<h3>Language = " + object1.language+"</h3>");
         document.write("<h3>Author = " + object1.author+"</h3>");

         var object2 = { "language" : "C++", "author"  : "E-Balagurusamy" };
         document.write("<br>");
         document.write("<h3>Language = " + object2.language+"</h3>");
         document.write("<h3>Author = " + object2.author+"</h3>");

         document.write("<hr />");
         document.write(object2.language + " programming language can be studied " + "from book written by " + object2.author);
         document.write("<hr />");
      </script>
   </head>

   <body>
   </body>
</html>
Now let’s try to open json.htm using IE or any other javascript enabled browser that produces the following result −
You can refer to JSON Objects chapter for more information on JSON objects.
JSON — Syntax
Let’s have a quick look at the basic syntax of JSON. JSON syntax is basically considered as a subset of JavaScript syntax; it includes the following −
-
Data is represented in name/value pairs.
-
Curly braces hold objects and each name is followed by ‘:'(colon), the name/value pairs are separated by , (comma).
-
Square brackets hold arrays and values are separated by ,(comma).
Below is a simple example −
{
   "book": [

      {
         "id": "01",
         "language": "Java",
         "edition": "third",
         "author": "Herbert Schildt"
      },

      {
         "id": "07",
         "language": "C++",
         "edition": "second",
         "author": "E.Balagurusamy"
      }

   ]
}
JSON supports the following two data structures −
-
Collection of name/value pairs − This Data Structure is supported by different programming languages.
-
Ordered list of values − It includes array, list, vector or sequence etc.
JSON — DataTypes
JSON format supports the following data types −
| Sr.No. | Type & Description |
|---|---|
| 1 |
Number double- precision floating-point format in JavaScript |
| 2 |
String double-quoted Unicode with backslash escaping |
| 3 |
Boolean true or false |
| 4 |
Array an ordered sequence of values |
| 5 |
Value it can be a string, a number, true or false, null etc |
| 6 |
Object an unordered collection of key:value pairs |
| 7 |
Whitespace can be used between any pair of tokens |
| 8 |
null empty |
Number
-
It is a double precision floating-point format in JavaScript and it depends on implementation.
-
Octal and hexadecimal formats are not used.
-
No NaN or Infinity is used in Number.
The following table shows the number types −
| Sr.No. | Type & Description |
|---|---|
| 1 |
Integer Digits 1-9, 0 and positive or negative |
| 2 |
Fraction Fractions like .3, .9 |
| 3 |
Exponent Exponent like e, e+, e-, E, E+, E- |
Syntax
var json-object-name = { string : number_value, .......}
Example
Example showing Number Datatype, value should not be quoted −
var obj = {marks: 97}
String
-
It is a sequence of zero or more double quoted Unicode characters with backslash escaping.
-
Character is a single character string i.e. a string with length 1.
The table shows various special characters that you can use in strings of a JSON document −
| Sr.No. | Type & Description |
|---|---|
| 1 |
« double quotation |
| 2 |
backslash |
| 3 |
/ forward slash |
| 4 |
b backspace |
| 5 |
f form feed |
| 6 |
n new line |
| 7 |
r carriage return |
| 8 |
t horizontal tab |
| 9 |
u four hexadecimal digits |
Syntax
var json-object-name = { string : "string value", .......}
Example
Example showing String Datatype −
var obj = {name: 'Amit'}
Boolean
It includes true or false values.
Syntax
var json-object-name = { string : true/false, .......}
Example
var obj = {name: 'Amit', marks: 97, distinction: true}
Array
-
It is an ordered collection of values.
-
These are enclosed in square brackets which means that array begins with .[. and ends with .]..
-
The values are separated by , (comma).
-
Array indexing can be started at 0 or 1.
-
Arrays should be used when the key names are sequential integers.
Syntax
[ value, .......]
Example
Example showing array containing multiple objects −
{
   "books": [
      { "language":"Java" , "edition":"second" },
      { "language":"C++" , "lastName":"fifth" },
      { "language":"C" , "lastName":"third" }
   ]
}
Object
-
It is an unordered set of name/value pairs.
-
Objects are enclosed in curly braces that is, it starts with ‘{‘ and ends with ‘}’.
-
Each name is followed by ‘:'(colon) and the key/value pairs are separated by , (comma).
-
The keys must be strings and should be different from each other.
-
Objects should be used when the key names are arbitrary strings.
Syntax
{ string : value, .......}
Example
Example showing Object −
{
   "id": "011A",
   "language": "JAVA",
   "price": 500,
}
Whitespace
It can be inserted between any pair of tokens. It can be added to make a code more readable. Example shows declaration with and without whitespace −
Syntax
{string:" ",....}
Example
var obj1 = {"name": "Sachin Tendulkar"}
var obj2 = {"name": "SauravGanguly"}
null
It means empty type.
Syntax
null
Example
var i = null;

if(i == 1) {
   document.write("<h1>value is 1</h1>");
} else {
   document.write("<h1>value is null</h1>");
}
JSON Value
It includes −
- number (integer or floating point)
- string
- boolean
- array
- object
- null
Syntax
String | Number | Object | Array | TRUE | FALSE | NULL
Example
var i = 1;
var j = "sachin";
var k = null;
JSON — Objects
Creating Simple Objects
JSON objects can be created with JavaScript. Let us see the various ways of creating JSON objects using JavaScript −
- Creation of an empty Object −
var JSONObj = {};
- Creation of a new Object −
var JSONObj = new Object();
-
Creation of an object with attribute bookname with value in string, attribute price with numeric value. Attribute is accessed by using ‘.’ Operator −
var JSONObj = { "bookname ":"VB BLACK BOOK", "price":500 };
This is an example that shows creation of an object in javascript using JSON, save the below code as json_object.htm −
<html>
   <head>
      <title>Creating Object JSON with JavaScript</title>
      <script language = "javascript" >
         var JSONObj = { "name" : "tutorialspoint.com", "year"  : 2005 };

         document.write("<h1>JSON with JavaScript example</h1>");
         document.write("<br>");
         document.write("<h3>Website Name = "+JSONObj.name+"</h3>");
         document.write("<h3>Year = "+JSONObj.year+"</h3>");
      </script>
   </head>

   <body>
   </body>
</html>
Now let’s try to open Json Object using IE or any other javaScript enabled browser. It produces the following result −
Creating Array Objects
The following example shows creation of an array object in javascript using JSON, save the below code as json_array_object.htm −
<html>
   <head>
      <title>Creation of array object in javascript using JSON</title>
      <script language = "javascript" >
         document.writeln("<h2>JSON array object</h2>");
         var books = { "Pascal" : [
            { "Name"  : "Pascal Made Simple", "price" : 700 },
            { "Name"  : "Guide to Pascal", "price" : 400 }],

            "Scala"  : [
               { "Name"  : "Scala for the Impatient", "price" : 1000 },
               { "Name"  : "Scala in Depth", "price" : 1300 }]
         }
         var i = 0
         document.writeln("<table border = '2'><tr>");

         for(i = 0;i<books.Pascal.length;i++) {
            document.writeln("<td>");
            document.writeln("<table border = '1' width = 100 >");
            document.writeln("<tr><td><b>Name</b></td><td width = 50>" + books.Pascal[i].Name+"</td></tr>");
            document.writeln("<tr><td><b>Price</b></td><td width = 50>" + books.Pascal[i].price +"</td></tr>");
            document.writeln("</table>");
            document.writeln("</td>");
         }

         for(i = 0;i<books.Scala.length;i++) {
            document.writeln("<td>");
            document.writeln("<table border = '1' width = 100 >");
            document.writeln("<tr><td><b>Name</b></td><td width = 50>" + books.Scala[i].Name+"</td></tr>");
            document.writeln("<tr><td><b>Price</b></td><td width = 50>" + books.Scala[i].price+"</td></tr>");
            document.writeln("</table>");
            document.writeln("</td>");
         }

         document.writeln("</tr></table>");
      </script>
   </head>

   <body>
   </body>
</html>
Now let’s try to open Json Array Object using IE or any other javaScript enabled browser. It produces the following result −
JSON — Schema
JSON Schema is a specification for JSON based format for defining the structure of JSON data. It was written under IETF draft which expired in 2011. JSON Schema −
- Describes your existing data format.
- Clear, human- and machine-readable documentation.
- Complete structural validation, useful for automated testing.
- Complete structural validation, validating client-submitted data.
JSON Schema Validation Libraries
There are several validators currently available for different programming languages. Currently the most complete and compliant JSON Schema validator available is JSV.
| Languages | Libraries |
|---|---|
| C | WJElement (LGPLv3) |
| Java | json-schema-validator (LGPLv3) |
| .NET | Json.NET (MIT) |
| ActionScript 3 | Frigga (MIT) |
| Haskell | aeson-schema (MIT) |
| Python | Jsonschema |
| Ruby | autoparse (ASL 2.0); ruby-jsonschema (MIT) |
| PHP | php-json-schema (MIT). json-schema (Berkeley) |
| JavaScript | Orderly (BSD); JSV; json-schema; Matic (MIT); Dojo; Persevere (modified BSD or AFL 2.0); schema.js. |
JSON Schema Example
Given below is a basic JSON schema, which covers a classical product catalog description −
{
   "$schema": "http://json-schema.org/draft-04/schema#",
   "title": "Product",
   "description": "A product from Acme's catalog",
   "type": "object",

   "properties": {

      "id": {
         "description": "The unique identifier for a product",
         "type": "integer"
      },

      "name": {
         "description": "Name of the product",
         "type": "string"
      },

      "price": {
         "type": "number",
         "minimum": 0,
         "exclusiveMinimum": true
      }
   },

   "required": ["id", "name", "price"]
}
Let’s the check various important keywords that can be used in this schema −
| Sr.No. | Keyword & Description |
|---|---|
| 1 |
$schema The $schema keyword states that this schema is written according to the draft v4 specification. |
| 2 |
title You will use this to give a title to your schema. |
| 3 |
description A little description of the schema. |
| 4 |
type The type keyword defines the first constraint on our JSON data: it has to be a JSON Object. |
| 5 |
properties Defines various keys and their value types, minimum and maximum values to be used in JSON file. |
| 6 |
required This keeps a list of required properties. |
| 7 |
minimum This is the constraint to be put on the value and represents minimum acceptable value. |
| 8 |
exclusiveMinimum If «exclusiveMinimum» is present and has boolean value true, the instance is valid if it is strictly greater than the value of «minimum». |
| 9 |
maximum This is the constraint to be put on the value and represents maximum acceptable value. |
| 10 |
exclusiveMaximum If «exclusiveMaximum» is present and has boolean value true, the instance is valid if it is strictly lower than the value of «maximum». |
| 11 |
multipleOf A numeric instance is valid against «multipleOf» if the result of the division of the instance by this keyword’s value is an integer. |
| 12 |
maxLength The length of a string instance is defined as the maximum number of its characters. |
| 13 |
minLength The length of a string instance is defined as the minimum number of its characters. |
| 14 |
pattern A string instance is considered valid if the regular expression matches the instance successfully. |
You can check a http://json-schema.org for the complete list of keywords that can be used in defining a JSON schema. The above schema can be used to test the validity of the following JSON code −
[
   {
      "id": 2,
      "name": "An ice sculpture",
      "price": 12.50,
   },

   {
      "id": 3,
      "name": "A blue mouse",
      "price": 25.50,
   }
]
JSON — Comparison with XML
JSON and XML are human readable formats and are language independent. They both have support for creation, reading and decoding in real world situations. We can compare JSON with XML, based on the following factors −
Verbose
XML is more verbose than JSON, so it is faster to write JSON for programmers.
Arrays Usage
XML is used to describe the structured data, which doesn’t include arrays whereas JSON include arrays.
Parsing
JavaScript’s eval method parses JSON. When applied to JSON, eval returns the described object.
Example
Individual examples of XML and JSON −
JSON
{
   "company": Volkswagen,
   "name": "Vento",
   "price": 800000
}
XML
<car>
   <company>Volkswagen</company>
   <name>Vento</name>
   <price>800000</price>
</car>
JSON with PHP
This chapter covers how to encode and decode JSON objects using PHP programming language. Let’s start with preparing the environment to start our programming with PHP for JSON.
Environment
As of PHP 5.2.0, the JSON extension is bundled and compiled into PHP by default.
JSON Functions
| Function | Libraries |
|---|---|
| json_encode | Returns the JSON representation of a value. |
| json_decode | Decodes a JSON string. |
| json_last_error | Returns the last error occurred. |
Encoding JSON in PHP (json_encode)
PHP json_encode() function is used for encoding JSON in PHP. This function returns the JSON representation of a value on success or FALSE on failure.
Syntax
string json_encode ( $value [, $options = 0 ] )
Parameters
-
value − The value being encoded. This function only works with UTF-8 encoded data.
-
options − This optional value is a bitmask consisting of JSON_HEX_QUOT, JSON_HEX_TAG, JSON_HEX_AMP, JSON_HEX_APOS, JSON_NUMERIC_CHECK, JSON_PRETTY_PRINT, JSON_UNESCAPED_SLASHES, JSON_FORCE_OBJECT.
Example
The following example shows how to convert an array into JSON with PHP −
<?php
   $arr = array('a' => 1, 'b' => 2, 'c' => 3, 'd' => 4, 'e' => 5);
   echo json_encode($arr);
?>
While executing, this will produce the following result −
{"a":1,"b":2,"c":3,"d":4,"e":5}
The following example shows how the PHP objects can be converted into JSON −
<?php
   class Emp {
      public $name = "";
      public $hobbies  = "";
      public $birthdate = "";
   }

   $e = new Emp();
   $e->name = "sachin";
   $e->hobbies  = "sports";
   $e->birthdate = date('m/d/Y h:i:s a', "8/5/1974 12:20:03 p");
   $e->birthdate = date('m/d/Y h:i:s a', strtotime("8/5/1974 12:20:03"));

   echo json_encode($e);
?>
While executing, this will produce the following result −
{"name":"sachin","hobbies":"sports","birthdate":"08/05/1974 12:20:03 pm"}
Decoding JSON in PHP (json_decode)
PHP json_decode() function is used for decoding JSON in PHP. This function returns the value decoded from json to appropriate PHP type.
Syntax
mixed json_decode ($json [,$assoc = false [, $depth = 512 [, $options = 0 ]]])
Paramaters
-
json_string − It is an encoded string which must be UTF-8 encoded data.
-
assoc − It is a boolean type parameter, when set to TRUE, returned objects will be converted into associative arrays.
-
depth − It is an integer type parameter which specifies recursion depth
-
options − It is an integer type bitmask of JSON decode, JSON_BIGINT_AS_STRING is supported.
Example
The following example shows how PHP can be used to decode JSON objects −
<?php
   $json = '{"a":1,"b":2,"c":3,"d":4,"e":5}';

   var_dump(json_decode($json));
   var_dump(json_decode($json, true));
?>
While executing, it will produce the following result −
object(stdClass)#1 (5) {
   ["a"] => int(1)
   ["b"] => int(2)
   ["c"] => int(3)
   ["d"] => int(4)
   ["e"] => int(5)
}

array(5) {
   ["a"] => int(1)
   ["b"] => int(2)
   ["c"] => int(3)
   ["d"] => int(4)
   ["e"] => int(5)
}
JSON with Perl
This chapter covers how to encode and decode JSON objects using Perl programming language. Let’s start with preparing the environment to start our programming with Perl for JSON.
Environment
Before you start encoding and decoding JSON using Perl, you need to install JSON module, which can be obtained from CPAN. Once you downloaded JSON-2.53.tar.gz or any other latest version, follow the steps mentioned below −
$tar xvfz JSON-2.53.tar.gz
$cd JSON-2.53
$perl Makefile.PL
$make
$make install
JSON Functions
| Function | Libraries |
|---|---|
| encode_json | Converts the given Perl data structure to a UTF-8 encoded, binary string. |
| decode_json | Decodes a JSON string. |
| to_json | Converts the given Perl data structure to a json string. |
| from_json | Expects a json string and tries to parse it, returning the resulting reference. |
| convert_blessed | Use this function with true value so that Perl can use TO_JSON method on the object’s class to convert an object into JSON. |
Encoding JSON in Perl (encode_json)
Perl encode_json() function converts the given Perl data structure to a UTF-8 encoded, binary string.
Syntax
$json_text = encode_json ($perl_scalar );
or
$json_text = JSON->new->utf8->encode($perl_scalar);
Example
The following example shows arrays under JSON with Perl −
#!/usr/bin/perl
use JSON;

my %rec_hash = ('a' => 1, 'b' => 2, 'c' => 3, 'd' => 4, 'e' => 5);
my $json = encode_json %rec_hash;
print "$jsonn";
While executing, this will produce the following result −
{"e":5,"c":3,"a":1,"b":2,"d":4}
The following example shows how Perl objects can be converted into JSON −
#!/usr/bin/perl

package Emp;
sub new {
   my $class = shift;

   my $self = {
      name => shift,
      hobbies  => shift,
      birthdate  => shift,
   };

   bless $self, $class;
   return $self;
}

sub TO_JSON { return { %{ shift() } }; }

package main;
use JSON;

my $JSON = JSON->new->utf8;
$JSON->convert_blessed(1);

$e = new Emp( "sachin", "sports", "8/5/1974 12:20:03 pm");
$json = $JSON->encode($e);
print "$jsonn";
On executing, it will produce the following result −
{"birthdate":"8/5/1974 12:20:03 pm","name":"sachin","hobbies":"sports"}
Decoding JSON in Perl (decode_json)
Perl decode_json() function is used for decoding JSON in Perl. This function returns the value decoded from json to an appropriate Perl type.
Syntax
$perl_scalar = decode_json $json_text
or
$perl_scalar = JSON->new->utf8->decode($json_text)
Example
The following example shows how Perl can be used to decode JSON objects. Here you will need to install Data::Dumper module if you already do not have it on your machine.
#!/usr/bin/perl
use JSON;
use Data::Dumper;

$json = '{"a":1,"b":2,"c":3,"d":4,"e":5}';

$text = decode_json($json);
print  Dumper($text);
On executing, it will produce following result −
$VAR1 = {
   'e' => 5,
   'c' => 3,
   'a' => 1,
   'b' => 2,
   'd' => 4
};
JSON with Python
This chapter covers how to encode and decode JSON objects using Python programming language. Let’s start with preparing the environment to start our programming with Python for JSON.
Environment
Before you start with encoding and decoding JSON using Python, you need to install any of the JSON modules available. For this tutorial we have downloaded and installed Demjson as follows −
$tar xvfz demjson-1.6.tar.gz
$cd demjson-1.6
$python setup.py install
JSON Functions
| Function | Libraries |
|---|---|
| encode | Encodes the Python object into a JSON string representation. |
| decode | Decodes a JSON-encoded string into a Python object. |
Encoding JSON in Python (encode)
Python encode() function encodes the Python object into a JSON string representation.
Syntax
demjson.encode(self, obj, nest_level=0)
Example
The following example shows arrays under JSON with Python.
#!/usr/bin/python
import demjson

data = [ { 'a' : 1, 'b' : 2, 'c' : 3, 'd' : 4, 'e' : 5 } ]

json = demjson.encode(data)
print json
While executing, this will produce the following result −
[{"a":1,"b":2,"c":3,"d":4,"e":5}]
Decoding JSON in Python (decode)
Python can use demjson.decode() function for decoding JSON. This function returns the value decoded from json to an appropriate Python type.
Syntax
demjson.decode(self, txt)
Example
The following example shows how Python can be used to decode JSON objects.
#!/usr/bin/python
import demjson

json = '{"a":1,"b":2,"c":3,"d":4,"e":5}';

text = demjson.decode(json)
print  text
On executing, it will produce the following result −
{u'a': 1, u'c': 3, u'b': 2, u'e': 5, u'd': 4}
JSON with Ruby
This chapter covers how to encode and decode JSON objects using Ruby programming language. Let’s start with preparing the environment to start our programming with Ruby for JSON.
Environment
Before you start with encoding and decoding JSON using Ruby, you need to install any of the JSON modules available for Ruby. You may need to install Ruby gem, but if you are running latest version of Ruby then you must have gem already installed on your machine, otherwise let’s follow the following single step assuming you already have gem installed −
$gem install json
Parsing JSON using Ruby
The following example shows that the first 2 keys hold string values and the last 3 keys hold arrays of strings. Let’s keep the following content in a file called input.json.
{
   "President": "Alan Isaac",
   "CEO": "David Richardson",

   "India": [
      "Sachin Tendulkar",
      "Virender Sehwag",
      "Gautam Gambhir"
   ],

   "Srilanka": [
      "Lasith Malinga",
      "Angelo Mathews",
      "Kumar Sangakkara"
   ],

   "England": [
      "Alastair Cook",
      "Jonathan Trott",
      "Kevin Pietersen"
   ]

}
Given below is a Ruby program that will be used to parse the above mentioned JSON document −
#!/usr/bin/ruby
require 'rubygems'
require 'json'
require 'pp'

json = File.read('input.json')
obj = JSON.parse(json)

pp obj
On executing, it will produce the following result −
{
   "President"=>"Alan Isaac",
   "CEO"=>"David Richardson",

   "India"=>
   ["Sachin Tendulkar", "Virender Sehwag", "Gautam Gambhir"],

   "Srilanka"=>
   ["Lasith Malinga ", "Angelo Mathews", "Kumar Sangakkara"],

   "England"=>
   ["Alastair Cook", "Jonathan Trott", "Kevin Pietersen"]
}
JSON with Java
This chapter covers how to encode and decode JSON objects using Java programming language. Let’s start with preparing the environment to start our programming with Java for JSON.
Environment
Before you start with encoding and decoding JSON using Java, you need to install any of the JSON modules available. For this tutorial we have downloaded and installed JSON.simple and have added the location of json-simple-1.1.1.jar file to the environment variable CLASSPATH.
Mapping between JSON and Java entities
JSON.simple maps entities from the left side to the right side while decoding or parsing, and maps entities from the right to the left while encoding.
| JSON | Java |
|---|---|
| string | java.lang.String |
| number | java.lang.Number |
| true|false | java.lang.Boolean |
| null | null |
| array | java.util.List |
| object | java.util.Map |
On decoding, the default concrete class of java.util.List is org.json.simple.JSONArray and the default concrete class of java.util.Map is org.json.simple.JSONObject.
Encoding JSON in Java
Following is a simple example to encode a JSON object using Java JSONObject which is a subclass of java.util.HashMap. No ordering is provided. If you need the strict ordering of elements, use JSONValue.toJSONString ( map ) method with ordered map implementation such as java.util.LinkedHashMap.
import org.json.simple.JSONObject;

class JsonEncodeDemo {

   public static void main(String[] args) {
      JSONObject obj = new JSONObject();

      obj.put("name", "foo");
      obj.put("num", new Integer(100));
      obj.put("balance", new Double(1000.21));
      obj.put("is_vip", new Boolean(true));

      System.out.print(obj);
   }
}
On compiling and executing the above program the following result will be generated −
{"balance": 1000.21, "num":100, "is_vip":true, "name":"foo"}
Following is another example that shows a JSON object streaming using Java JSONObject −
import org.json.simple.JSONObject;

class JsonEncodeDemo {

   public static void main(String[] args) {

      JSONObject obj = new JSONObject();

      obj.put("name","foo");
      obj.put("num",new Integer(100));
      obj.put("balance",new Double(1000.21));
      obj.put("is_vip",new Boolean(true));

      StringWriter out = new StringWriter();
      obj.writeJSONString(out);

      String jsonText = out.toString();
      System.out.print(jsonText);
   }
}
On compiling and executing the above program, the following result is generated −
{"balance": 1000.21, "num":100, "is_vip":true, "name":"foo"}
Decoding JSON in Java
The following example makes use of JSONObject and JSONArray where JSONObject is a java.util.Map and JSONArray is a java.util.List, so you can access them with standard operations of Map or List.
import org.json.simple.JSONObject;
import org.json.simple.JSONArray;
import org.json.simple.parser.ParseException;
import org.json.simple.parser.JSONParser;

class JsonDecodeDemo {

   public static void main(String[] args) {

      JSONParser parser = new JSONParser();
      String s = "[0,{"1":{"2":{"3":{"4":[5,{"6":7}]}}}}]";

      try{
         Object obj = parser.parse(s);
         JSONArray array = (JSONArray)obj;

         System.out.println("The 2nd element of array");
         System.out.println(array.get(1));
         System.out.println();

         JSONObject obj2 = (JSONObject)array.get(1);
         System.out.println("Field "1"");
         System.out.println(obj2.get("1"));

         s = "{}";
         obj = parser.parse(s);
         System.out.println(obj);

         s = "[5,]";
         obj = parser.parse(s);
         System.out.println(obj);

         s = "[5,,2]";
         obj = parser.parse(s);
         System.out.println(obj);
      }catch(ParseException pe) {

         System.out.println("position: " + pe.getPosition());
         System.out.println(pe);
      }
   }
}
On compiling and executing the above program, the following result will be generated −
The 2nd element of array
{"1":{"2":{"3":{"4":[5,{"6":7}]}}}}

Field "1"
{"2":{"3":{"4":[5,{"6":7}]}}}
{}
[5]
[5,2]
JSON with Ajax
AJAX is Asynchronous JavaScript and XML, which is used on the client side as a group of interrelated web development techniques, in order to create asynchronous web applications. According to the AJAX model, web applications can send and retrieve data from a server asynchronously without interfering with the display and the behavior of the existing page.
Many developers use JSON to pass AJAX updates between the client and the server. Websites updating live sports scores can be considered as an example of AJAX. If these scores have to be updated on the website, then they must be stored on the server so that the webpage can retrieve the score when it is required. This is where we can make use of JSON formatted data.
Any data that is updated using AJAX can be stored using the JSON format on the web server. AJAX is used so that javascript can retrieve these JSON files when necessary, parse them, and perform one of the following operations −
-
Store the parsed values in the variables for further processing before displaying them on the webpage.
-
It directly assigns the data to the DOM elements in the webpage, so that they are displayed on the website.
Example
The following code shows JSON with AJAX. Save it as ajax.htm file. Here the loading function loadJSON() is used asynchronously to upload JSON data.
<html>
   <head>
      <meta content = "text/html; charset = ISO-8859-1" http-equiv = "content-type">

      <script type = "application/javascript">
         function loadJSON() {
            var data_file = "http://www.tutorialspoint.com/json/data.json";
            var http_request = new XMLHttpRequest();
            try{
               // Opera 8.0+, Firefox, Chrome, Safari
               http_request = new XMLHttpRequest();
            }catch (e) {
               // Internet Explorer Browsers
               try{
                  http_request = new ActiveXObject("Msxml2.XMLHTTP");

               }catch (e) {

                  try{
                     http_request = new ActiveXObject("Microsoft.XMLHTTP");
                  }catch (e) {
                     // Something went wrong
                     alert("Your browser broke!");
                     return false;
                  }

               }
            }

            http_request.onreadystatechange = function() {

               if (http_request.readyState == 4  ) {
                  // Javascript function JSON.parse to parse JSON data
                  var jsonObj = JSON.parse(http_request.responseText);

                  // jsonObj variable now contains the data structure and can
                  // be accessed as jsonObj.name and jsonObj.country.
                  document.getElementById("Name").innerHTML = jsonObj.name;
                  document.getElementById("Country").innerHTML = jsonObj.country;
               }
            }

            http_request.open("GET", data_file, true);
            http_request.send();
         }

      </script>

      <title>tutorialspoint.com JSON</title>
   </head>

   <body>
      <h1>Cricketer Details</h1>

      <table class = "src">
         <tr><th>Name</th><th>Country</th></tr>
         <tr><td><div id = "Name">Sachin</div></td>
         <td><div id = "Country">India</div></td></tr>
      </table>

      <div class = "central">
         <button type = "button" onclick = "loadJSON()">Update Details </button>
      </div>

   </body>

</html>
Given below is the input file data.json, having data in JSON format which will be uploaded asynchronously when we click the Update Detail button. This file is being kept in http://www.tutorialspoint.com/json/
{"name": "Brett", "country": "Australia"}
The above HTML code will generate the following screen, where you can check AJAX in action −
Cricketer Details
| Name | Country |
|---|---|
|
Sachin |
India |
When you click on the Update Detail button, you should get a result something as follows. You can try JSON with AJAX yourself, provided your browser supports Javascript.
Cricketer Details
| Name | Country |
|---|---|
|
Brett |
Australia |
Many software applications need to exchange data between a client and server.
For a long time, XML was the preferred data format when it came to information exchange between the two points. Then in early 2000, JSON was introduced as an alternate data format for information exchange.
In this article, you will learn all about JSON. You’ll understand what it is, how to use it, and we’ll clarify a few misconceptions. So, without any further delay, let’s get to know JSON.
What is JSON?
JSON (JavaScript Object Notation) is a text-based data exchange format. It is a collection of key-value pairs where the key must be a string type, and the value can be of any of the following types:
- Number
- String
- Boolean
- Array
- Object
- null
A couple of important rules to note:
- In the JSON data format, the keys must be enclosed in double quotes.
- The key and value must be separated by a colon (:) symbol.
- There can be multiple key-value pairs. Two key-value pairs must be separated by a comma (,) symbol.
- No comments (// or /* */) are allowed in JSON data. (But you can get around that, if you’re curious.)
Here is how some simple JSON data looks:
{
    "name": "Alex C",
    "age": 2,
    "city": "Houston"
}Valid JSON data can be in two different formats:
- A collection of key-value pairs enclosed by a pair of curly braces
{...}. You saw this as an example above. - A collection of an ordered list of key-value pairs separated by comma (,) and enclosed by a pair of square brackets
[...]. See the example below:
[
	{
        "name": "Alex C",
        "age": 2,
        "city": "Houston"
	},
    {
        "name": "John G",
        "age": 40,
        "city": "Washington"
	},
    {
        "name": "Bala T",
        "age": 22,
        "city": "Bangalore"
	}
]Suppose you are coming from a JavaScript developer background. In that case, you may feel like the JSON format and JavaScript objects (and array of objects) are very similar. But they are not. We will see the differences in detail soon.
The structure of the JSON format was derived from the JavaScript object syntax. That’s the only relationship between the JSON data format and JavaScript objects.
JSON is a programming language-independent format. We can use the JSON data format in Python, Java, PHP, and many other programming languages.
JSON Data Format Examples
You can save JSON data in a file with the extension of .json. Let’s create an employee.json file with attributes (represented by keys and values) of an employee.
{
	"name": "Aleix Melon",
	"id": "E00245",
	"role": ["Dev", "DBA"],
	"age": 23,
	"doj": "11-12-2019",
	"married": false,
	"address": {
		"street": "32, Laham St.",
		"city": "Innsbruck",
		"country": "Austria"
	},
	"referred-by": "E0012"
}The above JSON data shows the attributes of an employee. The attributes are:
name: the name of the employee. The value is ofStringtype. So, it is enclosed with double quotes.id: a unique identifier of an employee. It is aStringtype again.role: the roles an employee plays in the organization. There could be multiple roles played by an employee. SoArrayis the preferred data type.age: the current age of the employee. It is aNumber.doj: the date the employee joined the company. As it is a date, it must be enclosed within double-quotes and treated like aString.married: is the employee married? If so, true or false. So the value is ofBooleantype.address: the address of the employee. An address can have multiple parts like street, city, country, zip, and many more. So, we can treat the address value as anObjectrepresentation (with key-value pairs).referred-by: the id of an employee who referred this employee in the organization. If this employee joined using a referral, this attribute would have value. Otherwise, it will havenullas a value.
Now let’s create a collection of employees as JSON data. To do that, we need to keep multiple employee records inside the square brackets […].
[
	{
        "name": "Aleix Melon",
        "id": "E00245",
        "role": ["Dev", "DBA"],
        "age": 23,
        "doj": "11-12-2019",
        "married": false,
        "address": {
            "street": "32, Laham St.",
            "city": "Innsbruck",
            "country": "Austria"
            },
        "referred-by": "E0012"
	},
    {
        "name": "Bob Washington",
        "id": "E01245",
        "role": ["HR"],
        "age": 43,
        "doj": "10-06-2010",
        "married": true,
        "address": {
            "street": "45, Abraham Lane.",
            "city": "Washington",
            "country": "USA"
            },
        "referred-by": null
	}
]Did you notice the referred-by attribute value for the second employee, Bob Washington? It is null. It means he was not referred by any of the employees.
How to Use JSON Data as a String Value
We have seen how to format JSON data inside a JSON file. Alternatively, we can use JSON data as a string value and assign it to a variable. As JSON is a text-based format, it is possible to handle as a string in most programming languages.
Let’s take an example to understand how we can do it in JavaScript. You can enclose the entire JSON data as a string within a single quote '...'.
const user = '{"name": "Alex C", "age": 2, "city": "Houston"}';If you want to keep the JSON formatting intact, you can create the JSON data with the help of template literals.
const user = `{
    "name": "Alex C",
    "age": 2,
    "city": "Houston"
}`;
It is also useful when you want to build JSON data using dynamic values.
const age = 2;

const user = `{
    "name": "Alex C",
    "age": ${age},
    "city": "Houston"
}`;

console.log(user);

// Output
{
    "name": "Alex C",
    "age": 2,
    "city": "Houston"
}JavaScript Objects and JSON are NOT the Same
The JSON data format is derived from the JavaScript object structure. But the similarity ends there.
Objects in JavaScript:
- Can have methods, and JSON can’t.
- The keys can be without quotes.
- Comments are allowed.
- Are JavaScript’s own entity.
Here’s a Twitter thread that explains the differences with a few examples.
JavaScript Object and JSON(JavaScript Object Notation) are NOT the same.
We often think they are similar. That’s NOT TRUE 👀
Let’s Understand 🔥
A Thread
🧵 👇
— Tapas Adhikary (@tapasadhikary) November 24, 2021
How to Convert JSON to a JavaScript Object, and vice-versa
JavaScript has two built-in methods to convert JSON data into a JavaScript object and vice-versa.
How to Convert JSON Data to a JavaScript Object
To convert JSON data into a JavaScript object, use the JSON.parse() method. It parses a valid JSON string into a JavaScript object.
const userJSONData = `{
    "name": "Alex C",
    "age": 2,
    "city": "Houston"
}`;

const userObj = JSON.parse(userJSONData);
console.log(userObj);Output:

How to Convert a JavaScript Object to JSON Data
To convert a JavaScript object into JSON data, use the JSON.stringify() method.
const userObj = {
    name: 'Alex C',
    age: 2,
    city: 'Houston'
}

const userJSONData = JSON.stringify(userObj);
console.log(userJSONData);Output:

Did you notice the JSON term we used to invoke the parse() and stringify() methods above? That’s a built-in JavaScript object named JSON (could have been named JSONUtil as well) but it’s not related to the JSON data format we’ve discussed so far. So, please don’t get confused.
How to Handle JSON Errors like «Unexpected token u in JSON at position 1»?
While handling JSON, it is very normal to get an error like this while parsing the JSON data into a JavaScript object:

Whenever you encounter this error, please question the validity of your JSON data format. You probably made a trivial error and that is causing it. You can validate the format of your JSON data using a JSON Linter.
Before We End…
I hope you found the article insightful and informative. My DMs are open on Twitter if you want to discuss further.
Recently I have published a few helpful tips for beginners to web development. You may want to have a look:
5 tips for beginners to web development
Are you a beginner in web development? I have a few tips for you to sustain and progress your web development goals. Please read on.
 Tapas AdhikaryGreenRoots Blog — Tapas Adhikary

Let’s connect. I share my learnings on JavaScript, Web Development, and Blogging on these platforms as well:
- Follow me on Twitter
- Subscribe to my YouTube Channel
- Side projects on GitHub
Learn to code for free. freeCodeCamp’s open source curriculum has helped more than 40,000 people get jobs as developers. Get started
Урок, в котором рассматривается, что такое JSON и какие он имеет преимущества по сравнению с другими форматами данных.
JSON (JavaScript Object Notation) – это текстовый формат представления данных в нотации объекта JavaScript. Предназначен JSON, также как и некоторые другие форматы такие как XML и YAML, для обмена данными.

Несмотря на своё название, JSON можно использовать не только в JavaScript, но и в любом другом языке программирования.
JSON по сравнению с другими форматами также обладает достаточно весомым преимуществом. Он в отличие от них является более компактным, а это очень важно при обмене данными в сети Интернет. Кроме этого, JSON более прост в использовании, его намного проще читать и писать.
При веб-разработке JSON очень часто применяется в качестве формата для передачи информации от веб-сервера клиенту (веб-браузеру) при AJAX запросе.
Как выглядит этот процесс? Его можно представить в виде двух шагов. На первом шаге, сервер, по запросу пришедшему ему от клиента, сначала формирует некоторый набор данных в удобном формате, который затем можно было бы очень просто упаковать в строку JSON. Завершается работа на сервере отправкой JSON данных в качестве результата клиенту. На втором шаге, клиент получает в качестве ответа от сервера строку JSON и распаковывает её, т.е. переводит в JavaScript объект. После этого на клиенте выполняются дальнейшие с ними действия, например, выводятся на страницу.
Это один из примеров использования формата JSON. Но его применение не ограничивается только этим сценарием, их очень много и не только в веб.
В JSON, в отличие от XML и YAML, данные организованы также как в объекте JavaScript. Но JSON – это не объект, а строка. При этом не любой объект JavaScript может быть переведён один к одному в JSON. Например, если у объекта есть методы, то они при преобразовании в строку JSON будут проигнорированы и не включены в неё.
Структура формата JSON
Структура строки JSON практически ничем не отличается от записи JavaScript объекта.
Она состоит из набора пар ключ-значения. В этой паре ключ отделяется от значения с помощью знака двоеточия (:), а одна пара от другой — с помощью запятой (,). При этом ключ в JSON, в отличие от объекта обязательно должен быть заключен в двойные кавычки. Это первое отличие JSON от JavaScript объекта. В объекте ключ (имя свойства) не обязательно следует заключать в двойные кавычки.
Например:
// строка JSON
var jsonPerson = '{"name":"Иван","age":25}';

// объект JavaScript
var person = {
  name: "Иван",
  age: 25
};
Чтобы не усложнять доступ к данным, при задании ключам имён лучше придерживаться тех же правил, что и при именовании переменных.
Второе отличие заключается в том, что значение ключа в JSON можно задать только в одном из следующих форматов: string (строкой), number (числом), object (объектом), array (массивом), boolean (логическим значением true или false) или null (специальным значением JavaScript). Например, значение ключа в JSON не может быть функцией или датой (объектом типа Date).
// объект JavaScript
var person = {
  name: "Иван",
  birthDay: new Date(Date.UTC(1985, 03, 05)),
  getAge: function () {
    var ageDate = new Date(Date.now() - this.birthDay.getTime());
    return Math.abs(ageDate.getUTCFullYear() - 1970);
  }
};

// строка JSON
var jsonPerson = '{"name":"Иван","birthDay":"1985-04-05T00:00:00.000Z"}';
Пример JSON строки, состоящей из различных типов данных:
{
  "name": "Иван",
  "age": 37,
  "mother": {
    "name": "Ольга",
    "age": 58
  },
  "children": [
    "Маша",
    "Игорь",
    "Таня"
  ],
  "married": true,
  "dog": null
}
В ней ключ «name» имеет в качестве значения строку, «age» — число, «mother» — объект, состоящий из «name» и «age», «children» — массив, «married» — логический тип, «dog» — null.
При этом стоит обратить внимание на то, что JSON не допускает использование внутри своей структуры комментариев.
Работа с JSON в JavaScript
Как было уже отмечено выше, JSON – это строка.
// переменная personData, содержит в качестве значения строку в формате JSON
var personData = '{"name":"Иван","age":37,"mother":{"name":"Ольга","age":58},"children":["Маша","Игорь","Таня"],"married": true,"dog":null}';
Работа с JSON в JavaScript обычно осуществляется в двух направлениях:
- перевод строки JSON в объект (данный процесс ещё называют парсингом);
- конвертирование объекта в строку JSON (другими словами действие обратное парсингу).
Парсинг JSON
Парсинг JSON (перевод строки JSON в объект JavaScript) осуществляется с помощью метода eval или parse.
Пример использования eval для парсинга JSON:
var person = eval('('+personData+')');
Метод eval не рекомендуется использовать так как он не безопасен. Так если кто-то сможет добавить скрипт в строку JSON, то он выполнится.
В JavaScript для парсинга строки в JSON рекомендуется использовать метод JSON.parse. Он такой уязвимости не имеет.
Использование метода JSON.parse:
// переменная person - это объект JavaScript, который получен путём парсинга строки JSON
var person = JSON.parse(personData);
Конвертирование объекта JavaScript в строку JSON
Перевод объекта JavaScript в строку JSON осуществляется с помощью метода JSON.stringify. Данный метод осуществляет действие обратное методу JSON.parse.
var personString = JSON.strigify(person);
Преимущества формата JSON
Формат представления данных JSON имеет следующие преимущества:
- удобные и быстрые в работе методы, предназначенные для конвертации (парсинга) строки JSON в объект JavaScript и обратно;
- понятная и простая структура данных;
- очень маленький размер по сравнению с другими форматами данных (например XML). Это связано с тем, что формат JSON содержит минимальное возможное форматирование, т.е. при его написании используется всего несколько специальных знаков. Это очень важное преимущество, т.к. данные представленные в формате JSON будут быстрее загружаться, чем, если бы они были бы представлены в других форматах.
Из-за того что данный формат имеет очень много преимуществ он стал применяться не только в JavaScript, но и во многих других языках, таких как C, Ruby, Perl, Python, PHP и т.д.
Сравнение форматов JSON и XML
Формат JSON имеет следующие преимущества перед форматом XML:
- При передаче некоторых данных размер JSON будет значительно меньше, чем размер XML.
- JSON имеет более удобные методы конвертации в структуры данных JavaScript, чем XML.
- JSON более просто создавать, чем XML.
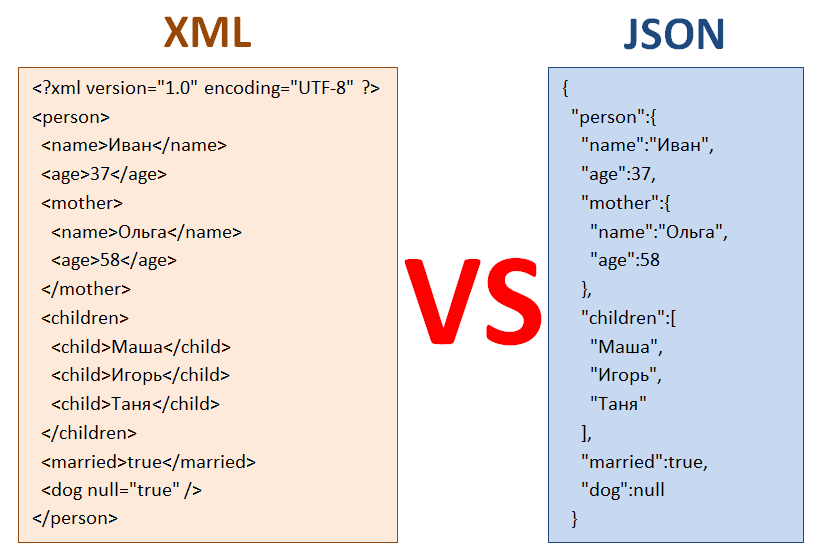
Работа с данными JSON после парсинга
Работа с данными JSON после парсинга осуществляется как с объектом JavaScript.
//JSON
var personData = '{"name":"Иван","age":37,"mother":{"name":"Ольга","age":58},"children":["Маша","Игорь","Таня"],"married": true,"dog": null}';
//Объект JavaScript person
var person = JSON.parse(personData);
Рассмотрим основные моменты:
//получить значения ключа (свойства) name
person.name;
person["name"];
//получить значения ключа (свойства) name, находящегося в объекте mother
person.mother.name;
//удалить элемент age
delete(person.age)
//добавить (или обновить) ключ (свойство)
person.eye = "карие";
//при работе с массивами необходимо использовать методы, предназначенные для работы именно с массивами
//удалить 1 элементиз массива (метод splice)
person.children.splice(1,1)
//добавить элемент в массив (метод push)
person.children.push("Катя");

Для перебора элементов в объекте можно использовать цикл for..in:
for (key in person) {
  if (person.hasOwnProperty(key)) {
    //ключ = key
    //значение = person[key]
    console.log("Ключ = " + key);
    console.log("Значение = " + person[key]);
  } // если объект person имеет key (если у person есть свойство key)
} // перерабрать все ключи (свойства) в объекте

Для перебора элементов массива можно использовать следующий цикл:
for (var i=0; i<=person.children.length-1; i++) {
 // if (person.children[i].hasOwnProperty(key)) {
    //i = индекс
    //значение = person.children[i]
    console.log("Элемент [ "+ i +" ] = " + person.children[i]);
 // }
