![]()
Загрузить PDF
![]()
Загрузить PDF
Математические вычисления можно выполнить на компьютере с помощью калькулятора, но интереснее создать калькулятор посредством простейшего HTML-кода. Для этого необходимо разобраться в основах HTML, скопировать код в текстовый редактор и сохранить его с расширением HTML. Чтобы воспользоваться калькулятором, нужно открыть HTML-страницу в браузере. Описанные действия позволят не только выполнять вычисления в браузере, но и узнать некоторые основы программирования.
-

1
Изучите основные функции HTML. Описываемый код, посредством которого можно создать калькулятор, включает множество элементов синтаксиса, которые определяют различные параметры страницы. Прочитайте статью о том, как выучить HTML, или читайте дальше, чтобы узнать, для чего предназначена каждая строка представленного здесь кода.
-
html: этот элемент синтаксиса свидетельствует о языке, на котором написана программа. При написании кода могут использоваться несколько языков программирования, поэтому тег <html> указывает на язык HTML.[1]
-
head: внутри этого тега задаются параметры других данных, то есть указываются так называемые метаданные. Как правило, команда <head> используется для определения параметров стилистических элементов, таких как заголовки, подзаголовки и так далее. Этот тег представляет собой своеобразный зонтик, под которым находится основная часть программы.[2]
- title: этот тег определяет название страницы, которое отобразится в веб-браузере, когда вы ее откроете.
- body bgcolor= «#»: этот атрибут задает цвет фона страницы. Число, которое вводится внутри кавычек после символа #, соответствует определенному цвету.
- text= «»: слово, которое вводится внутри кавычек, определяет цвет текста страницы.
-
form name=»»: этот атрибут определяет имя формы, которая используется для создания структуры на основе того, что Javascript известно значение имени формы. В нашем примере в качестве имени формы будет использовано значение «calculator» (калькулятор), что приведет к созданию специальной структуры страницы.[3]
-
input type=»»: это, пожалуй, основной атрибут, который определяет, каким элементам страницы соответствуют значения, введенные внутри кавычек. Например, такими элементами могут быть тексты, пароли, кнопки (как в нашем случае с калькулятором) и так далее.[4]
-
value=»»: эта команда определяет символы, которые отобразятся на элементах, заданных атрибутом «input type=». В случае калькулятора такими символами являются цифры (1-9) и математические операции (+, -, *, /, =).[5]
-
onClick=»»: этот синтаксис описывает событие, которое должно произойти при нажатии на кнопку. В случае калькулятора нужно сделать так, чтобы символ, отображенный на кнопке, понимался системой в буквальном смысле. Например, если на кнопке отображена цифра 6, в кавычках нужно ввести следующее значение: document.calculator.ans.value+=’6′.[6]
-
br: этот тег инициирует разрыв строки на странице, поэтому все, что расположено после этого тега, будет отображено на следующей строке.[7]
-
/form, /body, and /html: это закрывающие теги, которые завершают процессы, запущенные соответствующими открывающими тегами.[8]
Реклама
-
html: этот элемент синтаксиса свидетельствует о языке, на котором написана программа. При написании кода могут использоваться несколько языков программирования, поэтому тег <html> указывает на язык HTML.[1]

-
1
Скопируйте код, приведенный ниже. Чтобы выделить код, переместите курсор в верхний левый угол окна, зажмите левую кнопку мыши и перетащите курсор в правый нижний угол окна; код будет выделен синим цветом. Затем нажмите «Command+C» (в Mac OS) или «Ctrl+C» (в Windows), чтобы скопировать код в буфер обмена.

<html>
<head>
<title>HTML Calculator</title>
</head>
<body bgcolor= "#000000" text= "gold">
<form name="calculator" >
<input type="button" value="1" onClick="document.calculator.ans.value+='1'">
<input type="button" value="2" onClick="document.calculator.ans.value+='2'">
<input type="button" value="3" onClick="document.calculator.ans.value+='3'"><br>
<input type="button" value="4" onClick="document.calculator.ans.value+='4'">
<input type="button" value="5" onClick="document.calculator.ans.value+='5'">
<input type="button" value="6" onClick="document.calculator.ans.value+='6'">
<input type="button" value="7" onClick="document.calculator.ans.value+='7'"><br>
<input type="button" value="8" onClick="document.calculator.ans.value+='8'">
<input type="button" value="9" onClick="document.calculator.ans.value+='9'">
<input type="button" value="-" onClick="document.calculator.ans.value+='-'">
<input type="button" value="+" onClick="document.calculator.ans.value+='+'"><br>
<input type="button" value="*" onClick="document.calculator.ans.value+='*'">
<input type="button" value="/" onClick="document.calculator.ans.value+='/'">

<input type="button" value="0" onClick="document.calculator.ans.value+='0'">
<input type="reset" value="Reset">
<input type="button" value="=" onClick="document.calculator.ans.value=eval(document.calculator.ans.value)">
<br>Solution is <input type="textfield" name="ans" value="">
</form>
</body>
</html>
-
1
На компьютере откройте текстовый редактор. Существует множество подобных программ, но мы рекомендуем использовать TextEdit или Блокнот.[9]
[10]
- В Mac OS щелкните по значку в виде лупы (в верхнем правом углу экрана), чтобы открыть Spotlight. Введите «textedit» и щелкните по программе TextEdit, которая будет выделена синим цветом.
- В Windows откройте меню Пуск (в левом нижнем углу экрана). В строке поиска введите «блокнот» и щелкните по программе Блокнот, которая отобразится в строке результатов поиска (справа).
-
2
В текстовый документ вставьте скопированный HTML-код.
- В Mac OS щелкните по документу и нажмите «Command+V». Затем нажмите «Формат» (в верхней части экрана) – «Создать текстовый документ».[11]
- В Windows щелкните по документу и нажмите «Ctrl + V».
- В Mac OS щелкните по документу и нажмите «Command+V». Затем нажмите «Формат» (в верхней части экрана) – «Создать текстовый документ».[11]
-
3
Сохраните файл. Для этого нажмите «Файл» (в верхнем левом углу окна), а затем нажмите «Сохранить как» (в Windows) или «Сохранить» (в Mac OS).
-
4
К имени файла добавьте расширение .html. В окне «Сохранить как» введите имя файла с расширением .html, а затем нажмите «Сохранить». Например, если вы хотите назвать файл «МойПервыйКалькулятор», сохраните его как МойПервыйКалькулятор.html.
Реклама


-
1
Найдите созданный файл. Для этого введите имя файла в Spotlight или в строке поиска меню «Пуск» (как описано в предыдущей части). Расширение .html вводить не нужно.
-
2
Щелкните по файлу, чтобы открыть его. Файл будет открыт на новой странице веб-браузера.
-
3
Щелкните по кнопкам калькулятора, чтобы воспользоваться им. Решение будет отображено в строке «Ответ».
Реклама


Советы
- Такой калькулятор можно добавить на веб-страницу (если нужно).
- Можно воспользоваться HTML-стилями, чтобы изменить внешний вид калькулятора.
Реклама
Об этой статье
Эту страницу просматривали 130 952 раза.
Была ли эта статья полезной?
Время на прочтение
5 мин
Количество просмотров 22K
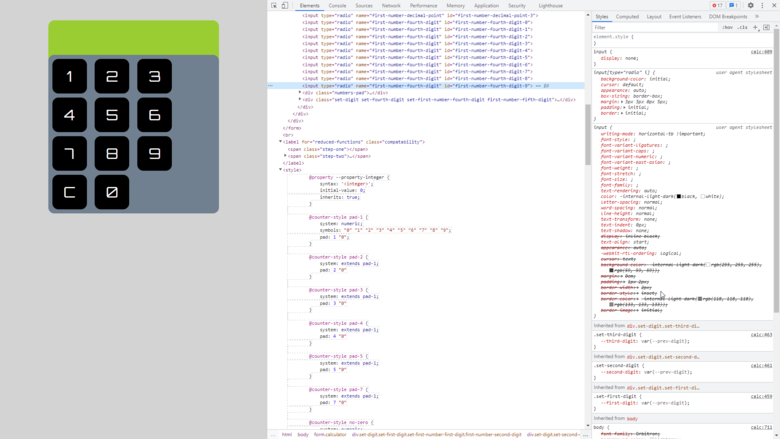
Материалом о разработке калькулятора на CSS и HTML, без файла JS, тега script и обработчиков событий в HTML делимся к старту курса по Fullstack-разработке на Python. За подробностями приглашаем под кат.
Постановка задачи
В проектах CSS часто в обычные статические HTML и CSS компилируются HAML и SCSS. Последние при этом применяются во многих сумасшедших проектах, но свой я решил не усложнять: взгляните на весь код.
Как это сделать?
Начнём со взаимодействия с пользователем. Как без JS понять, что кнопка нажата? Ответ: при помощи значений радиокнопок:
<input type="radio" name="x" id="q-1" />
<input type="radio" name="x" id="q-2" />
<label for="q-1">Quote 1</label>
<label for="q-2">Quote 2</label>

<p class="quote-1">...</p>
<p class="quote-2">...</p>
и
input, p { display: none }

#q-1:checked ~ .quote-1 { display: block; }
#q-2:checked ~ .quote-2 { display: block; }
дают результат:
Метки (label) соединены с input так, что нажатие на них станет нажатием на input. Метки упрощают стиль, поэтому они лучше нажатия на радиокнопку напрямую.
Символ ~ — это селектор, выбирающий элементы на том же уровне сложности: A ~ B соответствует элементам B после A. Код выше по умолчанию скрывает элементы p, отображая их, только когда подключенная радиокнопка выбрана.
Переменные и счётчики CSS
Значения счётчиков в функции calc неприменимы, поэтому, чтобы сгенерировать число, объявим переменную. Напишем имя свойства с двумя дефисами (—) в начале и любым значением CSS: —colour: brown или —digit: 3. Для подстановки переменной вызовите функцию CSS var.
Счётчики CSS хранят и отображают числа. Они применяются, например, для автоматической нумерации разделов.
<input type="radio" name="theFirstDigit" id="set-to-1" />
<input type="radio" name="theFirstDigit" id="set-to-2" />
<input type="radio" name="theFirstDigit" id="set-to-3" />
<!-- insert labels -->

<div class="number-dsplay"></div>
и
#set-to-1:checked ~ div { --digit: 1; }
#set-to-2:checked ~ div { --digit: 2; }
#set-to-3:checked ~ div { --digit: 3; }

.number-display { counter-increment: digit var(--digit);  }
.number-display::after { content: counter(digit) }
дают результат:
Когда пользователь отмечает кнопку, внутри div задаётся значение переменной —digit, наследуемое всеми дочерними элементами. Это значение нельзя вывести напрямую, поэтому увеличим счётчик digit и отобразим его через сгенерированный content.
Чтобы получить числа больше 9, нужно просто продублировать уже существующие цифры. За счёт тщательно продуманной структуры HTML и использования промежуточных переменных дублирование CSS сводится к минимуму:
<!-- digit inputs name="theFirstDigit -->

<div class="first-digit">
  <!-- digit inputs name="theSecondDigit" -->

  <div class="second-digit">
    <!-- ..and so on -->

  </div>
</div>
/* Include previous CSS */
.first-digit { --first-digit: var(--digit); }
.second-digit { --second-digit: var(--digit); }Переменная —digit по-прежнему задаётся через input, каждый отдельный div принимает это значение и присваивает его —first-digit, —second-digit и так далее: повторять код #set-to-1:checked для каждой цифры не нужно.
Функция CSS calc
Функция calc в CSS выполняет вычисления и применяется, например, когда задаётся значение width (ширины): calc(100% — 95px). Определим с помощью calc число элемента input, а также результат всех вычислений:
[name="theFirstDigit"]:checked ~ * .set-number { --number: var(--first-digit); }
[name="theSecondDigit"]:checked ~ * .set-number {
  --number: calc(var(--first-digit)*10 + var(--second-digit));
}
[name="theThirdDigit"]:checked ~ * .set-number {
  --number: calc(var(--first-digit)*100 + var(--second-digit)*10 + var(--third-digit));
}
/* and so on */
Селектор * выбирает все элементы, поэтому в коде выше вы найдёте .set-number — потомка любого элемента после input с флажком и определённым именем. Второй селектор переопределяет первый просто потому, что расположен после первого.
Добавив несколько input для выбора операции, аналогичным методом мы получим окончательный ответ. В этом случае значения просто захватываются в счётчике и отображаются. Свойство content тоже может принимать строку, отображая операцию калькулятора.
@property и @counter-style
Теперь можно создать калькулятор. Но вот загвоздка: в счётчиках есть только целые числа, знаков после запятой у нас нет, поэтому нужно разделить число на целую и дробную части и найти способ округления чисел.
Счётчики при этом использовать нельзя, ведь их нельзя завести в calc. Воспользуемся экспериментальной функцией @property: она определяет переменную с помощью такого функционала, как проверка типа или контроль за наследованием значений. Определим @property:
@property --integer {
    syntax: '<integer>';
    initial-value: 0;
    inherits: true;
}
Так любое присваиваемое —integer значение округляется до целого числа. Чтобы отобразить число с точностью до семи знаков после запятой, сначала выполним следующие вычисления. Здесь —number определяется внешним кодом:
.number-display {
    --abs-number: max(var(--number), -1 * var(--number));
    /* By suptracting 0.5 we make sure that we round down */
    --integer: calc(var(--abs-number) - 0.5);
    --decimal: calc((var(--integer) - var(--abs-number)) * 10000000);

    --sign-number: calc(var( --abs-number) / var(--number));
}
Используя —integer для целых чисел и —decimal для знаков после запятой, можно увеличивать счётчики с похожими именами, но отображать их напрямую нельзя: например, для числа 1,005 значение —integer равно 1, а значение —decimal — 5.
Знаки после запятой дополняются пользовательским свойством @counter-style, оно применяется для отображения знака «минус»: мы не можем сообщить системе, что число -0,5 — это «отрицательный нуль». Вот как правильно отобразить -0,5:
@counter-style pad-7 {
    system: numeric;
    symbols: "0" "1" "2" "3" "4" "5" "6" "7" "8" "9";
    pad: 7 "0"
}

@counter-style sign {
    system: numeric;
    symbols: "" "";
}

.number-display::after {
    content: counter(sign-number, sign) counter(integer) "." counter(decimal, pad-7);
}
Второй аргумент функции counter — это стиль. В стиле pad-7 определяется обычная система счисления, за исключением того, что любое значение с менее чем семью цифрами дополняется нулями.
В стиле sign тоже используется числовая система, но мы определили символы пустыми, поэтому отображается в нём только знак «минус», если нужно.
Возможности
Всё это — ключевые элементы калькулятора, но осталось ещё кое-что — это стилизация. Вы могли заметить, что для каждой цифры числа в текущей конфигурации есть отдельный набор из нескольких input.
Чтобы всегда показывать метку следующей цифры, можно применять селектор ~, :checked и свойство display, а content — разбить на отдельные элементы, таким образом показывая десятичную часть только при необходимости.
Теоретически через генерацию HTML можно приблизиться к научному калькулятору. Например, можно воспользоваться симметрией и периодичностью тригонометрических функций, применив приближённые вычисления.
Самое сложное — скобки, ведь неизвестно, как динамически добавить их в calc, поэтому для каждого сценария пришлось бы иметь отдельные селекторы и CSS.
Заключение
Я написал этот калькулятор просто ради забавы, но многому научился, это было очень весело, поэтому если у вас есть идея пустякового проекта, реализуйте её. Почему нет?
А пока вы практикуетесь, мы поможем прокачать ваши навыки или с самого начала освоить профессию, востребованную в любое время:
-
Профессия Fullstack-разработчик на Python
-
Профессия Frontend-разработчик
Выбрать другую востребованную профессию.

<!DOCTYPE html>
<html>
<head>
<script src=
integrity=
"sha512-BbVEDjbqdN3Eow8+empLMrJlxXRj5nEitiCAK5A1pUr66+jLVejo3PmjIaucRnjlB0P9R3rBUs3g5jXc8ti+fQ=="
crossorigin="anonymous"
referrerpolicy="no-referrer"></script>
<script src=
integrity=
"sha512-iphNRh6dPbeuPGIrQbCdbBF/qcqadKWLa35YPVfMZMHBSI6PLJh1om2xCTWhpVpmUyb4IvVS9iYnnYMkleVXLA=="
crossorigin="anonymous"
referrerpolicy="no-referrer"></script>
<style>
table {
border: 1px solid black;
margin-left: auto;
margin-right: auto;
}
input[type="button"] {
width: 100%;
padding: 20px 40px;
background-color: green;
color: white;
font-size: 24px;
font-weight: bold;
border: none;
border-radius: 5px;
}
input[type="text"] {
padding: 20px 30px;
font-size: 24px;
font-weight: bold;
border: none;
border-radius: 5px;
border: 2px solid black;
}
</style>
</head>
<body>
<table id="calcu">
<tr>
<td colspan="3"><input type="text" id="result"></td>
<td><input type="button" value="c" onclick="clr()" /> </td>
</tr>
<tr>
<td><input type="button" value="1" onclick="dis('1')"
onkeydown="myFunction(event)"> </td>
<td><input type="button" value="2" onclick="dis('2')"
onkeydown="myFunction(event)"> </td>
<td><input type="button" value="3" onclick="dis('3')"
onkeydown="myFunction(event)"> </td>
<td><input type="button" value="/" onclick="dis('/')"
onkeydown="myFunction(event)"> </td>
</tr>
<tr>
<td><input type="button" value="4" onclick="dis('4')"
onkeydown="myFunction(event)"> </td>
<td><input type="button" value="5" onclick="dis('5')"
onkeydown="myFunction(event)"> </td>
<td><input type="button" value="6" onclick="dis('6')"
onkeydown="myFunction(event)"> </td>
<td><input type="button" value="*" onclick="dis('*')"
onkeydown="myFunction(event)"> </td>
</tr>
<tr>
<td><input type="button" value="7" onclick="dis('7')"
onkeydown="myFunction(event)"> </td>
<td><input type="button" value="8" onclick="dis('8')"
onkeydown="myFunction(event)"> </td>
<td><input type="button" value="9" onclick="dis('9')"
onkeydown="myFunction(event)"> </td>
<td><input type="button" value="-" onclick="dis('-')"
onkeydown="myFunction(event)"> </td>
</tr>
<tr>
<td><input type="button" value="0" onclick="dis('0')"
onkeydown="myFunction(event)"> </td>
<td><input type="button" value="." onclick="dis('.')"
onkeydown="myFunction(event)"> </td>
<td><input type="button" value="=" onclick="solve()"> </td>
<td><input type="button" value="+" onclick="dis('+')"
onkeydown="myFunction(event)"> </td>
</tr>
</table>
<script>
// Function that display value
function dis(val) {
document.getElementById("result").value += val
}
function myFunction(event) {
if (event.key == '0' || event.key == '1'
|| event.key == '2' || event.key == '3'
|| event.key == '4' || event.key == '5'
|| event.key == '6' || event.key == '7'
|| event.key == '8' || event.key == '9'
|| event.key == '+' || event.key == '-'
|| event.key == '*' || event.key == '/')
document.getElementById("result").value += event.key;
}
var cal = document.getElementById("calcu");
cal.onkeyup = function (event) {
if (event.keyCode === 13) {
console.log("Enter");
let x = document.getElementById("result").value
console.log(x);
solve();
}
}
// Function that evaluates the digit and return result
function solve() {
let x = document.getElementById("result").value
let y = math.evaluate(x)
document.getElementById("result").value = y
}
// Function that clear the display
function clr() {
document.getElementById("result").value = ""
}
</script>
</body>
</html>
![]()
Adam Nagy
Posted on Oct 26, 2021
• Updated on Nov 4, 2021
![]()
![]()
![]()
![]()
![]()
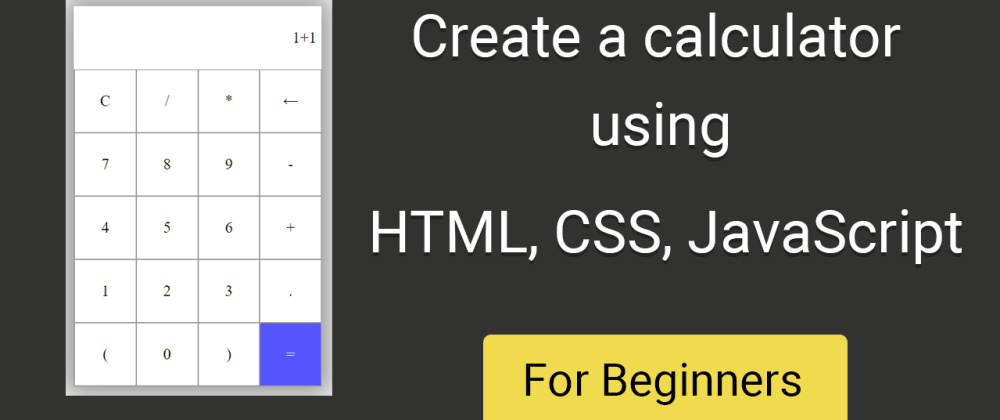
In this tutorial we will create a fully working calculator using only HTML, CSS and vanilla Javascript. You’ll learn about event handling, and DOM manipulations throughout the project. In my opinion this is a really good beginner project for those who want to become web developers.
Video Tutorial
If you would watch a detailed step-by-step video instead you can check out the video I made covering this project on my Youtube Channel:
HTML
The html will be pretty simple for this project. We’ll start out with a standard HTML5 boilerplate. At the bottom of our body I included the index.js script that we will create later. This needs to be at the bottom, because this way, when our javascript runs, the html elements required for the calculator will be in the DOM.
In the body we have a section and inside that a div with a container class. We will use these wrappers to position our calculator on the page. Inside our container we have an empty div with the id of display, and this will be the display of our calculator. It is empty, because we will modify its content from Javascript. Then we have a div with the class of buttons which will represent the keypad of the calculator.
<body>
    <section>
        <div class="container">
            <div id="display"></div>
            <div class="buttons">

            </div>
        </div>
    </section>
    <script src="index.js"></script>
</body>
Enter fullscreen mode
Exit fullscreen mode
The buttons container will hold all of the buttons. Each button will be a div with a class of button. This will make the styling easy, and also will help us to gather the user input. Here we have a div for every button that we want on our keypad. You can notice that we have a weird looking label between the buttons: ←. This is a HTML entity and it renders a back arrow (←), and we’ll use this as a backspace. Also please not that for the equal sign button we have a separate id equal. We will use this Id to distinguish this special button, and evaluate the expression provided to the calculator.
<div class="buttons">
<div class="button">C</div>
<div class="button">/</div>
<div class="button">*</div>
<div class="button">←</div>
<div class="button">7</div>
<div class="button">8</div>
<div class="button">9</div>
<div class="button">-</div>
<div class="button">4</div>
<div class="button">5</div>
<div class="button">6</div>
<div class="button">+</div>
<div class="button">1</div>
<div class="button">2</div>
<div class="button">3</div>
<div class="button">.</div>
<div class="button">(</div>
<div class="button">0</div>
<div class="button">)</div>
<div id="equal" class="button">=</div>
</div>
Enter fullscreen mode
Exit fullscreen mode
And this is all of the HTML markup that we need for this project, let’s jump into CSS.
Don’t forget to link the CSS styleshead in the head of the HTML file:
<link rel="stylesheet" href="style.css">
Enter fullscreen mode
Exit fullscreen mode
CSS
Let’s create a style.css file.
We set a width for the container and center it using margin (also give it a decent top margin of 10vh), and apply a little box shadow.
.container {
    max-width: 400px;
    margin: 10vh auto 0 auto;
    box-shadow: 0px 0px 43px 17px rgba(153,153,153,1);
}
Enter fullscreen mode
Exit fullscreen mode
For the display we set a fixed height, and to center the text vertically we need to set the line-height to the exact same amount. The text should be right align, because this is how most calculator displays work. Also set the font-size and give a decent amount paddings.
#display {
    text-align: right;
    height: 70px;
    line-height: 70px;
    padding: 16px 8px;
    font-size: 25px;
}
Enter fullscreen mode
Exit fullscreen mode
To position the buttons we use CSS grid. By setting 4 x 1fr in-grid-template-coloumns we’ll have 4 equally sized buttons in each row. We only set bottom and left borders, so we won’t get double borders. We’ll set the other two sides in the next CSS rule.
.buttons {
    display: grid;
    border-bottom: 1px solid #999;
    border-left: 1px solid#999;
    grid-template-columns: 1fr 1fr 1fr 1fr;
}
Enter fullscreen mode
Exit fullscreen mode
Apply the missing two sides of the borders for every button:
.buttons > div {
    border-top: 1px solid #999;
    border-right: 1px solid#999;
}
Enter fullscreen mode
Exit fullscreen mode
For the button we’ll set borders, font-size and 100px of line height to center it vertically, and set text-align: center to center the button labels horizontally. To have a better user experience set cursor to pointer, so the user will know that this is a clickable element.
.button {
    border: 0.5px solid #999;
    line-height: 100px;
    text-align: center;
    font-size: 25px;
    cursor: pointer;
}
Enter fullscreen mode
Exit fullscreen mode
We want the equal button to stand out so, we’ll set a blue background color and white text to it. Also to have a nice hover effect we’ll set a darker background color and white text color on hover. To make the transition smoot set: transition: 0.5s ease-in-out;.
#equal {
    background-color: rgb(85, 85, 255);
    color: white;
}

.button:hover {
    background-color: #323330;
    color: white;
    transition: 0.5s ease-in-out;
}
Enter fullscreen mode
Exit fullscreen mode
Javascript
This will be the heart of our application. Let’s create the index.js file. The first thing we need to do is to save a reference to our display dom element. We can easily do that because it has an id of display.
let display = document.getElementById('display');
Enter fullscreen mode
Exit fullscreen mode
Next we have to get references for the buttons. We’ll store the button references in an array. To gather the buttons we can select them by document.getElementsByClassName('button'), but this function gives back a NodeCollection instead of an array so we have to convert it to an array using Array.from().
let buttons = Array.from(document.getElementsByClassName('button'));
Enter fullscreen mode
Exit fullscreen mode
The next and last step we have to make is to add event listener to the buttons and build the functionalities. To add event listeners for the buttons, we’ll map through the buttons array and add a click event listener for each. (An advanced solution would be to only add event listener to the buttons container and use event bubbling but this is a more beginner-friendly solution.)
To determine what should we do, we’ll use e.target.innerText, which will simply give back the label of the button that was clicked.
In the first case, when the user hits the «C» button we’d like to clear the display. To do that we can access our display reference and set the innerText to an empty string. Don’t forget to add break; at the end, because it is needed to prevent the execution of the code defined in other case blocks.
For the equal button we’ll use javascript built in eval function. We need to provide the display’s content to eval and it will evaluate and return the result, so we should set the result of the eval call to the display’s innerText. We need to wrap this into a try catch block to handle errors. Erros can happen when we have syntactically wrong math expressions, for example //(9(, ine these cases we’ll set the display’s innerText to display ‘Error’.
⚠️ You should not use eval in user facing applications, because it can be abused and external code can be run with it. More details If you want to replace eval I suggest using Math.js lib.
If the user hits the back arrow we need to remove the last character from the display’s innerText. To do that we’ll use the String.slice() method, but we only want to do that if the display has any value.
In the default case, so whenever the user don’t hit these special symbols we just want to append the clicked button’s innerText to the display’s innerText. We can use the += operator to do that.
buttons.map( button => {
    button.addEventListener('click', (e) => {
        switch(e.target.innerText){
            case 'C':
                display.innerText = '';
                break;
            case '=':
                try{
                    display.innerText = eval(display.innerText);
                } catch {
                    display.innerText = "Error"
                }
                break;
            case '←':
                if (display.innerText){
                   display.innerText = display.innerText.slice(0, -1);
                }
                break;
            default:
                display.innerText += e.target.innerText;
        }
    });
});
Enter fullscreen mode
Exit fullscreen mode
The whole project is available on GitHub
And that’s it you have a working calculator.
Thanks for reading.
Where you can learn more from me?
I create education content covering web-development on several platforms, feel free to 👀 check them out.
I also create a newsletter where I share the week’s or 2 week’s educational content that I created. No bull💩 just educational content.
🔗 Links:
- 🍺 Support free education and buy me a beer
- 💬 Join our community on Discord
- 📧 Newsletter Subscribe here
- 🎥 YouTube Javascript Academy
- 🐦 Twitter: @dev_adamnagy
- 📷 Instagram @javascriptacademy
Сегодня сделаем простейший калькулятор на JavaScript, но не просто так, а с умыслом. Позднее мы представим, что мы тестировщики, и попробуем протестировать этот калькулятор. Вернее, не протестировать, а дико сломать.
Что делаем
На старте у нас будет самый простой калькулятор, который сможет только складывать, вычитать, умножать и делить два числа. Этого уже будет достаточно, чтобы потренироваться и в коде, и в дальнейшем тестировании.
Логика работы
Так как это простой калькулятор, то поступим так:
- Сделаем поле ввода для первого числа.
- Под ним разместим 4 кнопки с математическими действиями.
- Потом сделаем поле ввода для второго числа.
- И внизу будет кнопка «Посчитать».
Размещаем кнопки и поля ввода на странице
Разместим кнопки с полями на странице, а потом будем писать скрипт.
<!DOCTYPE html>
<html lang="ru">
<head>
	<meta charset="utf-8">
	<title>Калькулятор</title>
</head>
<body>
	<!-- поле ввода первого числа -->
	<input id="num1" />

	<!-- блок с кнопками -->
	<div id="operator_btns">
	  <button id="plus" >+</button>
	  <button id="minus" >-</button>
	  <button id="times" >x</button>
	  <button id="divide" >:</button>
	</div>

	<!-- поле ввода второго числа -->
	<input id="num2" />
	<br>

	<!-- кнопка для рассчётов -->
	<button >Посчитать</button>

</body>
</html>

Обрабатываем нажатия на кнопки математических действий
Сейчас у нас есть 4 кнопки, но нажимать их бесполезно — всё равно ничего не произойдёт, потому что нет обработчиков нажатий. Но что нам прописывать в обработчике?
Первый вариант — привязать к каждой кнопке свою функцию, а потом для каждой операции выполнять свои действия внутри этого обработчика. Но раз у нас есть кнопка «Посчитать», то нам придётся при нажатии на неё из этих четырёх функций вытаскивать действие и нужные команды, запоминать выбранное и как-то использовать в вычислениях. Сложно и громоздко.
Второй вариант — просто записывать в какую-то переменную, какая кнопка была нажата. А потом, при нажатии «Посчитать», просто смотреть в эту переменную и выполнять соответствующее действие. Так и поступим.
👉 Воспользуемся хитростью, про которые многие забывают: в обработчике onclick необязательно писать только функцию — туда можно отправить любую JS-команду. Главное, не забыть потом в скрипте предусмотреть эту переменную, которую мы используем.
<!-- блок с кнопками -->
<div id="operator_btns">
  <button id="plus" onclick="op='+'">+</button>
  <button id="minus" onclick="op='-'">-</button>
  <button id="times" onclick="op='*'">x</button>
  <button id="divide" onclick="op='/'">:</button>
</div>
Пишем скрипт
Сам скрипт тоже будет простой:
- Берём два числа.
- Смотрим, какое значение в переменной для выбранного действия.
- В зависимости от этого вычисляем результат.
<script>
  // переменная, в которой хранится выбранное математическое действие
  var op;

  // функция расчёта
  function func() {
  	// переменная для результата
    var result;
    // получаем первое и второе число
    var num1 = Number(document.getElementById("num1").value);
    var num2 = Number(document.getElementById("num2").value);
    // смотрим, что было в переменной с действием, и действуем исходя из этого
    switch (op) {
      case '+':
        result = num1 + num2;
        break;
      case '-':
        result = num1 - num2;
        break;
      case '*':
        result = num1 * num2;
        break;
      case '/':
        result = num1 / num2;
        break;
    }

  }
</script>
Сразу привяжем функцию func() к нажатию на кнопку «Посчитать»:
<button onclick="func()">Посчитать</button>Выводим результат
Сейчас в скрипте есть проблема: он всё считает, но ничего не выводит. А всё потому, что мы не предусмотрели на странице место для вывода. Исправим это и добавим строчку в скрипт.
Это — добавим на страницу после кнопки с расчётом:
<p id="result"></p>А это — в функцию func(), чтобы она сразу отправляла результат на страницу:
document.getElementById("result").innerHTML = result;
Собираем всё вместе и смотрим результат
<!DOCTYPE html>
<html lang="ru">
<head>
	<meta charset="utf-8">
	<title>Калькулятор</title>
</head>
<body>
	<!-- поле ввода первого числа -->
	<input id="num1" />

	<!-- блок с кнопками -->
	<div id="operator_btns">
	  <button id="plus" onclick="op='+'">+</button>
	  <button id="minus" onclick="op='-'">-</button>
	  <button id="times" onclick="op='*'">x</button>
	  <button id="divide" onclick="op='/'">:</button>
	</div>

	<!-- поле ввода второго числа -->
	<input id="num2" />
	<br>

	<!-- кнопка для расчётов -->
	<button onclick="func()">Посчитать</button>

	<!-- здесь будет результат -->
	<p id="result"></p>

	<!-- наш скрипт -->
	<script>
	  // переменная, в которой хранится выбранное математическое действие
	  var op;

	  // функция расчёта
	  function func() {
	  	// переменная для результата
	    var result;
	    // получаем первое и второе число
	    var num1 = Number(document.getElementById("num1").value);
	    var num2 = Number(document.getElementById("num2").value);
	    // смотрим, что было в переменной с действием, и действуем исходя из этого
	    switch (op) {
	      case '+':
	        result = num1 + num2;
	        break;
	      case '-':
	        result = num1 - num2;
	        break;
	      case '*':
	        result = num1 * num2;
	        break;
	      case '/':
	        result = num1 / num2;
	        break;
	    }

	    // отправляем результат на страницу
	    document.getElementById("result").innerHTML = result;
	  }
	</script>

</body>
</html>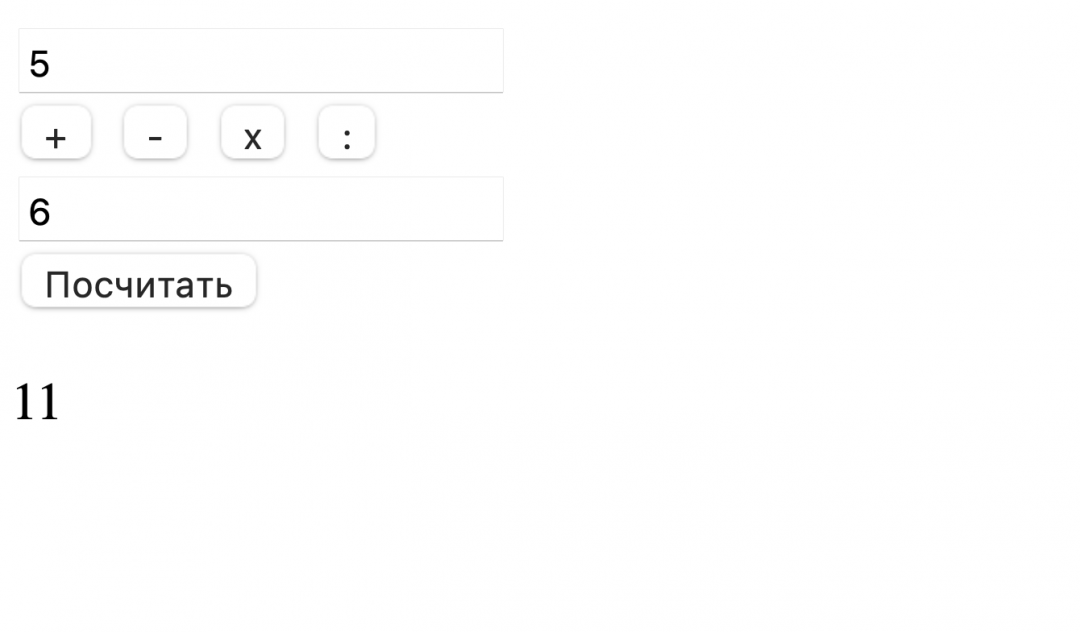
Отлично, калькулятор работает и складывает всё как нужно! Мы выполнили свою задачу — быстро запилили калькулятор на JavaScript, можно закрывать задачу в таск-трекере и браться за новую.
Посмотреть калькулятор на странице проекта.
Что дальше
Дальше мы этот код отправим тестировщикам — вряд ли они в нём найдут что-то критичное или вообще какие-то ошибки, но правила есть правила. А если тестировщики тут что-то найдут, мы обязательно расскажем об этом в новой статье.
Попробуйте сами побыть тестировщиком и протестировать эту программу, а результатами тестирования поделитесь в комментариях.
Вёрстка:
Кирилл Климентьев
The best way to learn JavaScript is to build projects. If you want to become a good web developer, you need to start creating projects as soon as possible. You can start by building beginner-level projects like a simple calculator, digital clock, or stopwatch.
You can make a simple calculator using just core web technologies: HTML, CSS, and JavaScript. This calculator can perform basic mathematical operations like addition, subtraction, multiplication, and division.
Features of the Calculator
In this project, you are going to develop a calculator that will have the following features:
- It will perform basic arithmetic operations like addition, subtraction, division, and multiplication.
- It will perform decimal operations.
- The calculator will display Infinity if you try to divide any number by zero.
- It will not display any result in case of invalid expression. For example, 5++9 will not display anything.
- Clear screen feature to clear the display screen anytime you want.
The code used in this project is available in a GitHub repository and is free for you to use under the MIT license. If you want to have a look at a live version of this project, you can check out this demo.
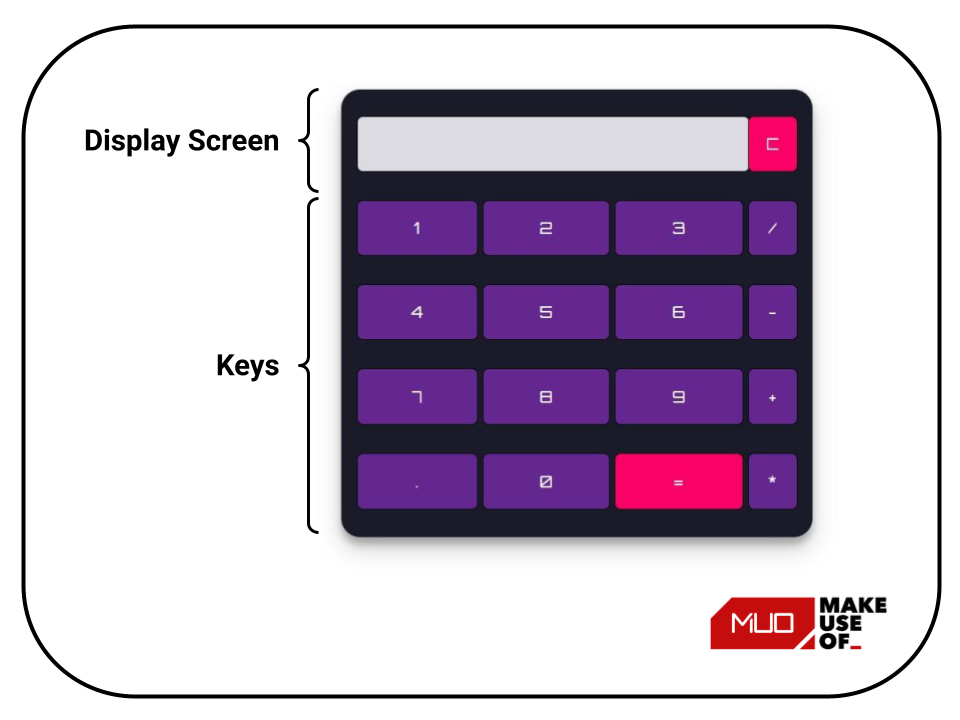
Components of the Calculator
The calculator consists of the following components:
Mathematical Operators: Addition (+), Subtraction (-), Multiplication (*), and Division (/).
Digits and Decimal Button: 0, 1, 2, 3, 4, 5, 6, 7, 8, 9, . .
Display Screen: It displays the mathematical expression and the result.
Clear Screen Button: It clears all mathematical values.
Calculate button (=): It evaluates the mathematical expression and returns the result.
Folder Structure of the Calculator Project
Create a root folder that contains the HTML, CSS, and JavaScript files. You can name the files anything you want. Here the root folder is named Calculator. According to the standard naming convention, the HTML, CSS, and JavaScript files are named index.html, styles.css, and script.js respectively.

HTML Code
Open the index.html file and paste the following HTML code for the calculator:
 <!DOCTYPE html>
<html lang="en" dir="ltr"> <head>
  <meta charset="utf-8">
  <title>Simple Calculator using HTML, CSS and JavaScript</title>
  <link rel="stylesheet" href="styles.css">
</head> <body> <table class="calculator" >
  <tr>
    <td colspan="3"> <input class="display-box" type="text" id="result" disabled /> </td>     <!-- clearScreen() function clears all the values -->
    <td> <input type="button" value="C" onclick="clearScreen()" id="btn" /> </td>
  </tr>
  <tr>
    <!-- display() function displays the value of clicked button -->
    <td> <input type="button" value="1" onclick="display('1')" /> </td>
    <td> <input type="button" value="2" onclick="display('2')" /> </td>
    <td> <input type="button" value="3" onclick="display('3')" /> </td>
    <td> <input type="button" value="/" onclick="display('/')" /> </td>
  </tr>
  <tr>
    <td> <input type="button" value="4" onclick="display('4')" /> </td>
    <td> <input type="button" value="5" onclick="display('5')" /> </td>
    <td> <input type="button" value="6" onclick="display('6')" /> </td>
    <td> <input type="button" value="-" onclick="display('-')" /> </td>
  </tr>
  <tr>
    <td> <input type="button" value="7" onclick="display('7')" /> </td>
    <td> <input type="button" value="8" onclick="display('8')" /> </td>
    <td> <input type="button" value="9" onclick="display('9')" /> </td>
    <td> <input type="button" value="+" onclick="display('+')" /> </td>
  </tr>
  <tr>
    <td> <input type="button" value="." onclick="display('.')" /> </td>
    <td> <input type="button" value="0" onclick="display('0')" /> </td>     <!-- calculate() function evaluates the mathematical expression -->
    <td> <input type="button" value="=" onclick="calculate()" id="btn" /> </td>
    <td> <input type="button" value="*" onclick="display('*')" /> </td>
  </tr>
</table> <script type="text/javascript" src="script.js"></script> </body> </html>
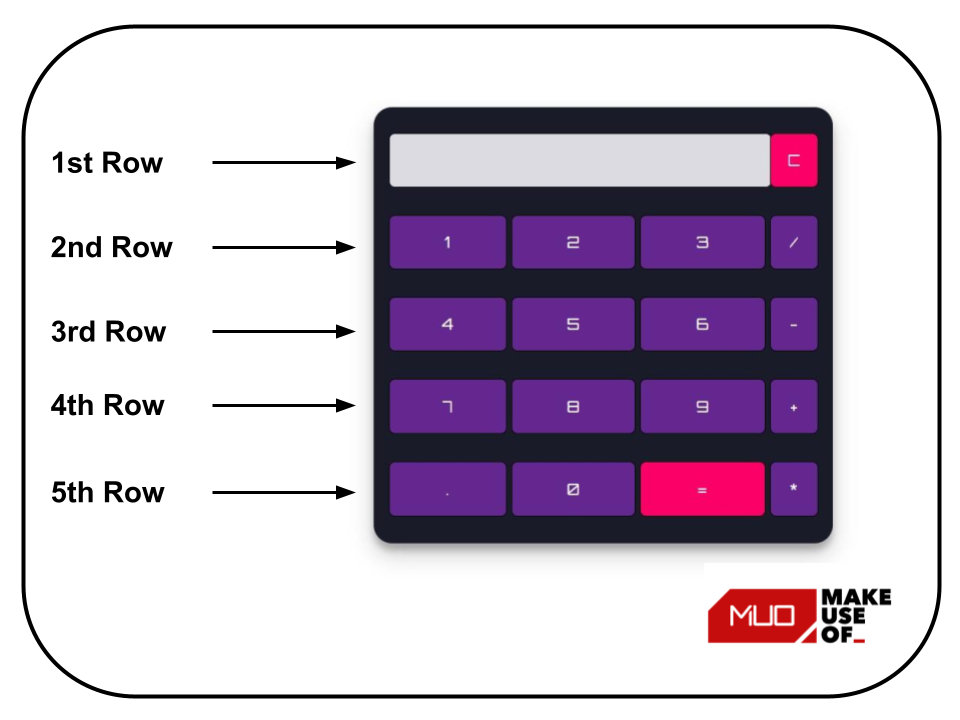
This project uses a <table> tag to create the overall structure of the calculator. The <table> tag contains five rows which represent five horizontal sections of the calculator. Each row has a corresponding <tr> tag. Each <tr> tag contains <td> tags which hold the display screen and buttons of the calculator.
CSS Code
Open the styles.css file and paste the following CSS code for the calculator:
@import url('https://fonts.googleapis.com/css2?family=Orbitron&display=swap');.calculator {
padding: 10px;
border-radius: 1em;
height: 380px;
width: 400px;
margin: auto;
background-color: #191b28;
box-shadow: rgba(0, 0, 0, 0.19) 0px 10px 20px, rgba(0, 0, 0, 0.23) 0px 6px 6px;
}
.display-box {
font-family: 'Orbitron', sans-serif;
background-color: #dcdbe1;
border: solid black 0.5px;
color: black;
border-radius: 5px;
width: 100%;
height: 65%;
}
#btn {
background-color: #fb0066;
}
input[type=button] {
font-family: 'Orbitron', sans-serif;
background-color: #64278f;
color: white;
border: solid black 0.5px;
width: 100%;
border-radius: 5px;
height: 70%;
outline: none;
}
input:active[type=button] {
background: #e5e5e5;
-webkit-box-shadow: inset 0px 0px 5px #c1c1c1;
-moz-box-shadow: inset 0px 0px 5px #c1c1c1;
box-shadow: inset 0px 0px 5px #c1c1c1;
}
The above CSS styles the calculator. The .class selector in CSS selects elements with a specific class attribute. The .calculator and .display-box class selectors style the table structure and the display screen of the calculator respectively. @import imports the Orbitron font-family from Google fonts.
JavaScript Code
Open the script.js file and add functionality to the simple calculator using the following JavaScript code:
 // This function clear all the values
function clearScreen() {
    document.getElementById("result").value = "";
} // This function display values
function display(value) {
    document.getElementById("result").value += value;
} // This function evaluates the expression and returns result
function calculate() {
    var p = document.getElementById("result").value;
    var q = eval(p);
    document.getElementById("result").value = q;
}
Understanding the JavaScript Code
The clearScreen(), display(), and calculate() functions add functionality to the Calculator.
Clearing Values
The clearScreen() function access the DOM using the id of the result and clear its value by assigning it an empty string. You can use DOM selectors to target various components of a page.
 function clearScreen() {
    document.getElementById("result").value = "";
}
Displaying Values
The display() function accesses the DOM using the id of the result and appends the value of the clicked button to the result.
 function display(value) {
    document.getElementById("result").value += value;
}
Evaluating Expression
The calculate() function accesses the DOM using the id of the result and evaluates the expression using the eval() function. The evaluated value of the expression is again assigned to the result.
The JavaScript eval() function evaluates an expression that you pass to it. It returns the result of that expression.
 function calculate() {
    var p = document.getElementById("result").value;
    var q = eval(p);
    document.getElementById("result").value = q;
}
Develop Cool Programming Projects
You can improve your coding skills by developing projects, whether you’re a beginner or you’re getting back into coding after some time off. Creating fully-working apps, even simple ones, can boost your confidence.
You can try out many simple projects from games (chess, tic-tac-toe, Rock Paper Scissors) to simple utilities (to-do list, weight conversion, countdown clock).
Get your hands dirty with these projects and become a better developer.
The best way to learn JavaScript is to build projects. If you want to become a good web developer, you need to start creating projects as soon as possible. You can start by building beginner-level projects like a simple calculator, digital clock, or stopwatch.
You can make a simple calculator using just core web technologies: HTML, CSS, and JavaScript. This calculator can perform basic mathematical operations like addition, subtraction, multiplication, and division.
Features of the Calculator
In this project, you are going to develop a calculator that will have the following features:
- It will perform basic arithmetic operations like addition, subtraction, division, and multiplication.
- It will perform decimal operations.
- The calculator will display Infinity if you try to divide any number by zero.
- It will not display any result in case of invalid expression. For example, 5++9 will not display anything.
- Clear screen feature to clear the display screen anytime you want.
The code used in this project is available in a GitHub repository and is free for you to use under the MIT license. If you want to have a look at a live version of this project, you can check out this demo.
Components of the Calculator
The calculator consists of the following components:
Mathematical Operators: Addition (+), Subtraction (-), Multiplication (*), and Division (/).
Digits and Decimal Button: 0, 1, 2, 3, 4, 5, 6, 7, 8, 9, . .
Display Screen: It displays the mathematical expression and the result.
Clear Screen Button: It clears all mathematical values.
Calculate button (=): It evaluates the mathematical expression and returns the result.
Folder Structure of the Calculator Project
Create a root folder that contains the HTML, CSS, and JavaScript files. You can name the files anything you want. Here the root folder is named Calculator. According to the standard naming convention, the HTML, CSS, and JavaScript files are named index.html, styles.css, and script.js respectively.
HTML Code
Open the index.html file and paste the following HTML code for the calculator:
 <!DOCTYPE html>
<html lang="en" dir="ltr"> <head>
  <meta charset="utf-8">
  <title>Simple Calculator using HTML, CSS and JavaScript</title>
  <link rel="stylesheet" href="styles.css">
</head> <body> <table class="calculator" >
  <tr>
    <td colspan="3"> <input class="display-box" type="text" id="result" disabled /> </td>     <!-- clearScreen() function clears all the values -->
    <td> <input type="button" value="C" onclick="clearScreen()" id="btn" /> </td>
  </tr>
  <tr>
    <!-- display() function displays the value of clicked button -->
    <td> <input type="button" value="1" onclick="display('1')" /> </td>
    <td> <input type="button" value="2" onclick="display('2')" /> </td>
    <td> <input type="button" value="3" onclick="display('3')" /> </td>
    <td> <input type="button" value="/" onclick="display('/')" /> </td>
  </tr>
  <tr>
    <td> <input type="button" value="4" onclick="display('4')" /> </td>
    <td> <input type="button" value="5" onclick="display('5')" /> </td>
    <td> <input type="button" value="6" onclick="display('6')" /> </td>
    <td> <input type="button" value="-" onclick="display('-')" /> </td>
  </tr>
  <tr>
    <td> <input type="button" value="7" onclick="display('7')" /> </td>
    <td> <input type="button" value="8" onclick="display('8')" /> </td>
    <td> <input type="button" value="9" onclick="display('9')" /> </td>
    <td> <input type="button" value="+" onclick="display('+')" /> </td>
  </tr>
  <tr>
    <td> <input type="button" value="." onclick="display('.')" /> </td>
    <td> <input type="button" value="0" onclick="display('0')" /> </td>     <!-- calculate() function evaluates the mathematical expression -->
    <td> <input type="button" value="=" onclick="calculate()" id="btn" /> </td>
    <td> <input type="button" value="*" onclick="display('*')" /> </td>
  </tr>
</table> <script type="text/javascript" src="script.js"></script> </body> </html>
This project uses a <table> tag to create the overall structure of the calculator. The <table> tag contains five rows which represent five horizontal sections of the calculator. Each row has a corresponding <tr> tag. Each <tr> tag contains <td> tags which hold the display screen and buttons of the calculator.
CSS Code
Open the styles.css file and paste the following CSS code for the calculator:
@import url('https://fonts.googleapis.com/css2?family=Orbitron&display=swap');.calculator {
padding: 10px;
border-radius: 1em;
height: 380px;
width: 400px;
margin: auto;
background-color: #191b28;
box-shadow: rgba(0, 0, 0, 0.19) 0px 10px 20px, rgba(0, 0, 0, 0.23) 0px 6px 6px;
}
.display-box {
font-family: 'Orbitron', sans-serif;
background-color: #dcdbe1;
border: solid black 0.5px;
color: black;
border-radius: 5px;
width: 100%;
height: 65%;
}
#btn {
background-color: #fb0066;
}
input[type=button] {
font-family: 'Orbitron', sans-serif;
background-color: #64278f;
color: white;
border: solid black 0.5px;
width: 100%;
border-radius: 5px;
height: 70%;
outline: none;
}
input:active[type=button] {
background: #e5e5e5;
-webkit-box-shadow: inset 0px 0px 5px #c1c1c1;
-moz-box-shadow: inset 0px 0px 5px #c1c1c1;
box-shadow: inset 0px 0px 5px #c1c1c1;
}
The above CSS styles the calculator. The .class selector in CSS selects elements with a specific class attribute. The .calculator and .display-box class selectors style the table structure and the display screen of the calculator respectively. @import imports the Orbitron font-family from Google fonts.
JavaScript Code
Open the script.js file and add functionality to the simple calculator using the following JavaScript code:
 // This function clear all the values
function clearScreen() {
    document.getElementById("result").value = "";
} // This function display values
function display(value) {
    document.getElementById("result").value += value;
} // This function evaluates the expression and returns result
function calculate() {
    var p = document.getElementById("result").value;
    var q = eval(p);
    document.getElementById("result").value = q;
}
Understanding the JavaScript Code
The clearScreen(), display(), and calculate() functions add functionality to the Calculator.
Clearing Values
The clearScreen() function access the DOM using the id of the result and clear its value by assigning it an empty string. You can use DOM selectors to target various components of a page.
 function clearScreen() {
    document.getElementById("result").value = "";
}
Displaying Values
The display() function accesses the DOM using the id of the result and appends the value of the clicked button to the result.
 function display(value) {
    document.getElementById("result").value += value;
}
Evaluating Expression
The calculate() function accesses the DOM using the id of the result and evaluates the expression using the eval() function. The evaluated value of the expression is again assigned to the result.
The JavaScript eval() function evaluates an expression that you pass to it. It returns the result of that expression.
 function calculate() {
    var p = document.getElementById("result").value;
    var q = eval(p);
    document.getElementById("result").value = q;
}
Develop Cool Programming Projects
You can improve your coding skills by developing projects, whether you’re a beginner or you’re getting back into coding after some time off. Creating fully-working apps, even simple ones, can boost your confidence.
You can try out many simple projects from games (chess, tic-tac-toe, Rock Paper Scissors) to simple utilities (to-do list, weight conversion, countdown clock).
Get your hands dirty with these projects and become a better developer.