Время на прочтение
34 мин
Количество просмотров 90K
Вы можете использовать эту статью, чтобы понять, как использовать Spring MVC для создания веб-сайтов или RESTful сервисов. А также получить обзор часто задаваемых вопросов, охватывающих наиболее распространенные задачи Spring MVC.
Примечание: Статья ~ 7500 слов, вероятно, не стоит читать ее на мобильном устройстве. Добавьте ее в закладки и вернитесь позже.
Содержание
- Введение
- HttpServlets 101
- DispatcherServlet
- Контроллеры — создание HTML
- REST контроллеры — создание XML / JSON
- Часто задаваемые вопросы
- Заключение
- Благодарности
Введение
Что такое Spring MVC?
Spring MVC — это веб-фреймворк Spring. Он позволяет создавать веб-сайты или RESTful сервисы (например, JSON/XML) и хорошо интегрируется в экосистему Spring, например, он поддерживает контроллеры и REST контроллеры в ваших Spring Boot приложениях.
Это не очень помогло, не так ли?
К счастью, есть и более длинный ответ: остальная часть этого документа.
(Если вы не уверены, что знаете что такое Spring или Spring Boot, вы можете сначала прочитать, Что такое Spring Framework?)
HttpServlets 101
При написании веб-приложений на Java с использованием Spring или без него (MVC/Boot) вы в основном имеете в виду написание приложений, которые возвращают два разных формата данных:
- HTML → Ваше веб-приложение создает HTML-страницы, которые можно просматривать в браузере.
- JSON/XML → Ваше веб-приложение предоставляет сервисы RESTful, которые генерируют JSON или XML. Сайты с большим количеством Javascript или даже другие веб-сервисы могут затем использовать данные, которые предоставляют эти сервисы.
- Да, есть и другие форматы данных и варианты использования, но пока мы их игнорируем.
Как бы вы написали такие приложения без каких-либо фреймворков? Только на простой Java?
На самом низком уровне каждое веб-приложение Java состоит из одного или нескольких HttpServlets. Они генерируют ваш HTML, JSON или XML. Фактически, каждый отдельный фреймворк из 1 миллиона доступных веб-фреймворков на Java (Spring MVC, Wicket, Struts) построена на основе HttpServlets.
(Примечание для придир: это может быть сделано без HttpServlets, но мы пока проигнорируем это.)
Создание HTML-страниц с помощью HttpServlets
Давайте посмотрим на супер простой HttpServlet, который возвращает очень простую статическую HTML-страницу.
package com.marcobehler.springmvcarticle;

import javax.servlet.http.HttpServlet;
import javax.servlet.http.HttpServletRequest;
import javax.servlet.http.HttpServletResponse;
import java.io.IOException;

public class MyServletV1 extends HttpServlet {

    @Override
    protected void doGet(HttpServletRequest req, HttpServletResponse resp) throws IOException {
        if (req.getRequestURI().equals("/")) {
            resp.setContentType("text/html");
            resp.getWriter().print("<html><head></head><body><h1>Welcome!</h1><p>This is a very cool page!</p></body></html>");
        }
        else {
            throw new IllegalStateException("Help, I don't know what to do with this url");
        }
    }
}
Давайте разберемся с этим кодом.
public class MyServletV1 extends HttpServlet {Ваш сервлет расширяет класс Java HttpServlet.
@Override
protected void doGet(HttpServletRequest req, HttpServletResponse resp) throws IOException {
Чтобы обработать (любой) запрос GET, вам необходимо переопределить метод doGet () из суперкласса. Для запросов POST вы должны переопределить doPost (). Аналогично для всех других HTTP методов.
if (req.getRequestURI().equals("/")) {Ваш сервлет должен убедиться, что входящий URL-адрес является запросом, который он знает как обрабатывать. Пока сервлет обрабатывает только «/», то есть он обрабатывает www.marcobehler.com, но НЕ www.marcobehler.com/hello.
resp.setContentType("text/html");Вам нужно установить правильный тип контента в ServletResponse, чтобы браузер знал, какой контент вы отправляете. В данном случае это HTML.
resp.getWriter().print("<html><head></head><body><h1>Welcome!</h1><p>This is a very cool page!</p></body></html>");Помните: веб-сайты — это просто строки HTML! Поэтому вам нужно сгенерировать HTML-строку любым удобным вам способом и отправить ее обратно с помощью ServletResponse. Один из способов сделать это с помощью response writer.
После написания вашего сервлета вы должны зарегистрировать его в контейнере сервлетов, таком как Tomcat или Jetty. Если вы используете встроенную версию любого контейнера сервлета, весь код, необходимый для запуска вашего сервлета, будет выглядеть следующим образом:
package com.marcobehler.springmvcarticle;

import org.apache.catalina.Context;
import org.apache.catalina.LifecycleException;
import org.apache.catalina.Wrapper;
import org.apache.catalina.startup.Tomcat;

public class TomcatApplicationLauncher {

    public static void main(String[] args) throws LifecycleException {
        Tomcat tomcat = new Tomcat();
        tomcat.setPort(8080);
        tomcat.getConnector();

        Context ctx = tomcat.addContext("", null);
        Wrapper servlet = Tomcat.addServlet(ctx, "myServlet", new MyServletV2());
        servlet.setLoadOnStartup(1);
        servlet.addMapping("/*");

        tomcat.start();
    }
}
Давайте разберемся с этим кодом.
Tomcat tomcat = new Tomcat();
tomcat.setPort(8080);
tomcat.getConnector();
Вы настраиваете новый сервер Tomcat, который будет слушать порт 8080.
        Context ctx = tomcat.addContext("", null);
        Wrapper servlet = Tomcat.addServlet(ctx, "myServlet", new MyServletV2());
Так вы регистрируете свой сервлет в Tomcat. Это первая часть, где вы просто сообщаете Tomcat о своем сервлете.
servlet.addMapping("/*");Вторая часть сообщает Tomcat, за какие запросы отвечает сервлет, то есть за отображение. Отображение /* означает, что оно отвечает за любой входящий запрос (/users, /register, /checkout).
tomcat.start();Вот и все. Теперь вы запускаете метод main(), переходите на порт 8080 в своем любимом веб-браузере (http://localhost:8080 /), и вы увидите красивую страницу HTML.
Таким образом, по сути, пока вы продолжаете расширять методы doGet () и doPost (), все ваше веб-приложение может состоять только из одного сервлета. Давайте попробуем это.
Создание JSON с помощью HttpServlets
Представьте себе, что помимо вашей (довольно пустой) HTML-страницы индекса вы теперь также хотите предложить REST API для вашего готовящегося к разработке внешнего интерфейса. Так что ваш интерфейс React или AngularJS будет вызывать URL-адрес примерно так:
/api/users/{userId}Эта конечная точка должна возвращать данные в формате JSON для пользователя с заданным userId. Как мы могли бы доработать наш MyServlet для этого, опять же, без каких-либо фреймворков?
package com.marcobehler.springmvcarticle;

import javax.servlet.http.HttpServlet;
import javax.servlet.http.HttpServletRequest;
import javax.servlet.http.HttpServletResponse;
import java.io.IOException;

public class MyServletV2 extends HttpServlet {

    @Override
    protected void doGet(HttpServletRequest req, HttpServletResponse resp) throws IOException {
        if (req.getRequestURI().equals("/")) {
            resp.setContentType("text/html");
            resp.getWriter().print("<html><head></head><body><h1>Welcome!</h1><p>This is a very cool page!</p></body></html>");
        } else if (req.getRequestURI().startsWith("/api/users/")) {

            Integer prettyFragileUserId = Integer.valueOf(req.getRequestURI().lastIndexOf("/") + 1);

            resp.setContentType("application/json");

            // User user = dao.findUser(prettyFragileUserId)
            // actually: jsonLibrary.toString(user)
            resp.getWriter().print("{n" +
                    "  "id":" + prettyFragileUserId + ",n" +
                    "  "age": 55,n" +
                    "  "name" : "John Doe"n" +
                    "}");
        } else {
            throw new IllegalStateException("Help, I don't know what to do with this url");
        }
    }
}
Давайте разберемся с этим кодом.
} else if (req.getRequestURI().startsWith("/api/users/")) {Мы добавляем еще один if в наш метод doGet для обработки вызовов /api/users/.
Integer prettyFragileUserId = Integer.valueOf(req.getRequestURI().lastIndexOf("/") + 1);Мы делаем очень слабый разбор URL. Последняя часть URL — это идентификатор пользователя userID, например, 5 для /api/users/5. Здесь мы просто предполагаем, что пользователь всегда передает действительный int, что нам в действительности нужно проверить!
resp.setContentType("application/json");Запись JSON в браузер означает установку правильного типа контента.
// User user = dao.findUser(prettyFragileUserId)
// actually: jsonLibrary.toString(user)
resp.getWriter().print("{n" +
        "  "id":" + prettyFragileUserId + ",n" +
        "  "age": 55,n" +
        "  "name" : "John Doe"n" +
        "}");
Опять же, JSON — это просто текст, поэтому мы можем записать его непосредственно в HTTPServletResponse. Возможно, мы бы использовали библиотеку JSON для преобразования нашего пользовательского Java-объекта в эту строку, но для простоты я не буду показывать это здесь.
Проблема с нашим подходом «один сервлет для всего»
Хотя наш сервлет выше работает, на горизонте вас ожидает немало проблем:
- Ваш сервлет должен выполнить множество ручных HTTP-специфических операций, проверять URI запроса, перебирать строки и т.д. Другими словами: ему нужно знать ЧТО хотят пользователи.
- Затем он также должен найти данные для всего, что вы хотите отобразить. Другими словами: это должно знать, КАК. В нашем примере выше это будет поиск пользователя в базе данных, которую мы для простоты закомментировали.
- Затем необходимо также преобразовать эти данные в JSON или HTML и установить соответствующие типы ответов.
Довольно много разных обязанностей, не так ли? Разве не было бы лучше, если бы вам не приходилось заботиться обо всем этом стандартом коде? Больше нет парсинга URI запроса и параметров, нет больше преобразований JSON, больше нет ответов сервлета?
Именно здесь на помощь приходит Spring MVC.
DispatcherServlet
Мы расскажем о Spring MVC немного нетрадиционно и не будем подробно останавливаться на том, что означает Model-View-Controller. Вместо этого немного раздразним вас.
Что если я скажу вам, что Spring MVC — это всего лишь один сервлет, как наш выше супер-сервлет?
Встречайте DispatcherServlet.
(О да, в этом, конечно, немного обмана)
Что делает Spring MVC DispatcherServlet?
Как уже упоминалось выше, почти все веб-фреймворки Java основаны на сервлетах, поэтому Spring MVC также нужен сервлет, который обрабатывает каждый входящий HTTP-запрос (поэтому DispatcherServlet также называется фронт-контроллером).
Что же в точности означает обрабатывать HTTP-запрос, точно? Представьте себе «рабочий процесс регистрации пользователя», при котором пользователь заполняет форму и отправляет ее на сервер и в ответ получает небольшую HTML страницу об успешной регистрации.
В этом случае ваш DispatcherServlet должен выполнить следующие действия:
- Необходимо просмотреть URI входящего запроса HTTP и любые параметры запроса. Например: POST /register?name=john&age33.
- Он должен потенциально преобразовывать входящие данные (параметры/тело запроса) в симпатичные маленькие объекты Java и перенаправить их в класс контроллер или REST контроллер,, который вы написали.
- Ваш контроллер сохраняет нового пользователя в базе данных, возможно отправляет электронное письмо и т.д. Он, скорее всего, делегирует это другому сервисному классу, но давайте предположим, что пока это происходит внутри контроллера.
- Он должен взять любой вывод из вашего контроллера и преобразовать его обратно в HTML/JSON/XML.
Весь процесс выглядит следующим образом, пренебрежем для простоты большим количеством промежуточных классов, потому что DispatcherServlet не выполняет всю работу сам.

До сих пор изложение было немного расплывчато в отношении некоторых частей этого процесса. Что такое ModelAndView на рисунке выше? Как именно DispatcherServlet преобразует данные?
Как выглядит реальный процесс Let’s-write-HTML? Об этом узнаем в следующем разделе.
Контроллеры — создание HTML
Всякий раз, когда вы хотите написать HTML на клиенте, таком как браузер с Spring MVC (включая Spring Boot), вы захотите написать класс контроллера. Давайте сделаем это сейчас.
Как написать контроллер в Spring
Для нашего рабочего процесса регистрации пользователей выше (POST/register?name=john&age33) мы бы написали следующий класс.
package com.marcobehler.springmvcarticle;

import org.springframework.stereotype.Controller;
import org.springframework.ui.Model;
import org.springframework.web.bind.annotation.PostMapping;
import org.springframework.web.bind.annotation.RequestParam;

@Controller
public class RegistrationController {

    @PostMapping("/register")
    public String registerUser(@RequestParam(required = false) Integer age, @RequestParam String name, Model model) {
        User user = new User(name, age);

        // TODO save user to database
        // userDao.save(user);

        // TODO send out registration email
        // mailService.sendRegistrationEmail(user);

        model.addAttribute("user", user);
        return "registration-success";
    }
}
Давайте разберемся с этим кодом.
@Controller
public class RegistrationController {
Класс контроллера в Spring просто аннотируется аннотацией Controller, ему не нужно реализовывать определенный интерфейс или расширяться из другого класса.
@PostMapping("/register")Эта строка сообщает нашему DispatcherServlet, что всякий раз, когда приходит запрос POST для пути /register, включая любые параметры запроса (например, ?Username=), он должен отправлять запрос именно этому методу контроллера.
public String registerUser(@RequestParam(required = false) Integer age, @RequestParam String name, Model model) {Примечание Наименование нашего метода на самом деле не имеет значения, его можно назвать как угодно.
Однако мы указываем, что каждый запрос должен включать два параметра запроса, которые могут быть либо частью URL (?age=10&name=Joe), либо находиться в теле запроса POST. Кроме того, требуется только параметр name (параметр age является необязательным)
И параметр age, если пользователь предоставил его, автоматически преобразуется в Integer (исключение выдается, если предоставленное значение не является допустимым Integer)
Наконец, что не менее важно, Spring MVC автоматически внедряет параметр model в наш метод контроллера. Эта модель представляет собой простую карту, на которой вам нужно поместить все данные, которые вы хотите отобразить на вашей окончательной HTML-странице, но об этом чуть позже.
User user = new User(name, age);

// TODO save user to database
// userDao.save(user);

// TODO send out registration email
// mailService.sendRegistrationEmail(user);
Вы делаете все, что вам нужно сделать с данными входящего запроса. Создать пользователя, сохранить его в базе данных, отправить по электронной почте. Это ваша бизнес-логика.
model.addAttribute("user", user);Вы добавляете своего пользователя в модель с ключом «user». Это означает, что вы сможете ссылаться на него в своем HTML-шаблоне позже, например, «${user.name}». Подробнее об этом через секунду.
return "registration-success";Ваш метод возвращает простую строку со значением registration-success. Это не просто строка, это ссылка на ваше представление, т.е. шаблон HTML, который вы хотите, чтобы Spring отображал.
Views (представления)
Давайте пока проигнорируем, как (или, скорее, где) Spring MVC попытается найти это представление, т.е. ваш шаблон, вместо этого давайте посмотрим, как должен выглядеть ваш шаблон registration-success.html.
<!DOCTYPE html>
<html lang="en">
<head>
    <meta charset="UTF-8">
    <title>Title</title>
</head>
<body>

<p th:text="'Hello ' + ${user.name} + '!'"></p>

</body>
</html>
Это простая HTML-страница, которая содержит одну строку шаблона. Он печатает имя пользователя, который только что зарегистрировался.
<p th:text="'Hello ' + ${user.name} + '!'"></p>Вопрос в том, что означает синтаксис th:text=? Он специфический для Spring? Или это что-то еще?
И ответ таков: Spring MVC ничего не знает о шаблонах HTML. Для работы с HTML-шаблонами требуется сторонняя библиотека шаблонов, и не нужно заботиться о том, какую библиотеку вы выберете.
В приведенном выше примере вы видите шаблон Thymeleaf, который очень популярен при работе над проектами Spring MVC.
Spring MVC и библиотеки шаблонов
Существует несколько различных библиотек шаблонов, которые хорошо интегрируются с Spring MVC, из которых вы можете выбрать: Thymeleaf, Velocity, Freemarker, Mustache и даже JSP (хотя это не библиотека шаблонов).
Фактически, вы должны явно выбрать библиотеку шаблонов, потому что если у вас нет такой библиотеки шаблонов, добавленной в ваш проект и настроенной правильно, то ваш метод контроллера не будет отображать вашу HTML-страницу — потому что он не знает, как это сделать.
Это также означает, что вы должны изучить и понять синтаксис конкретной библиотеки шаблонов в зависимости от проекта, в котором вы работаете, потому что все они немного отличаются друг от друга. Весело, правда?
Что такое ViewResolver?
На секунду давайте подумаем, где Spring на самом деле попытается найти ваши HTML-шаблоны, которые возвращает ваш контроллер.
Класс, который пытается найти ваш шаблон, называется ViewResolver. Поэтому всякий раз, когда запрос поступает в ваш контроллер, Spring проверяет настроенные ViewResolvers и запрашивает их, чтобы найти шаблон с заданным именем. Если у вас нет настроенных ViewResolvers, это не сработает.
Представьте, что вы хотите интегрироваться с Thymeleaf. Следовательно, вам нужен ThymeleafViewResolver.
package com.marcobehler.springmvcarticle;

import org.springframework.context.annotation.Bean;
import org.thymeleaf.spring5.SpringTemplateEngine;
import org.thymeleaf.spring5.templateresolver.SpringResourceTemplateResolver;
import org.thymeleaf.spring5.view.ThymeleafViewResolver;

public class ThymeleafConfig {

    @Bean
    public ThymeleafViewResolver viewResolver() {
        ThymeleafViewResolver viewResolver = new ThymeleafViewResolver();

        SpringResourceTemplateResolver templateResolver = new SpringResourceTemplateResolver();
        templateResolver.setPrefix("classpath:/templates");
        templateResolver.setSuffix(".html");
        // some other lines neglected...

        SpringTemplateEngine templateEngine = new SpringTemplateEngine();
        templateEngine.setTemplateResolver(templateResolver);
        // some other lines neglected...

        viewResolver.setTemplateEngine(templateEngine);
        return viewResolver;
    }
}
Давайте разберемся с этим кодом.
    @Bean
    public ThymeleafViewResolver viewResolver() {
        ThymeleafViewResolver viewResolver = new ThymeleafViewResolver();
В конце концов, ThymeleafViewResolver просто реализует интерфейс Spring ViewResolver. Учитывая имя шаблона (помните: registration-success), ViewResolvers может найти фактический шаблон.
SpringResourceTemplateResolver templateResolver = new SpringResourceTemplateResolver();Для правильной работы ThymeleafViewResolver требуется несколько других специфичных для Thymeleaf классов. Одним из этих классов является SpringResourceTemplateResolver. Это делает фактическую работу по поиску вашего шаблона.
Примечание SpringResourceTemplateResolver является классом Thymeleaf
templateResolver.setPrefix("classpath:/templates");
templateResolver.setSuffix(".html");
По существу, вы говорите (с помощью синтаксиса Spring Resources): «Все мои шаблоны находятся по пути classpath, в папке /templates». И по умолчанию все они заканчиваются на .html. Это означает:
Всякий раз, когда наш контроллер возвращает String, подобный registration-success, ThymeleafViewResolver будет искать шаблон: classpath:/templates/registration-success.html.
Заметка на полях: Spring Boot
Вы можете подумать: Марко, мне никогда не приходилось настраивать такой ViewResolver, работая над проектами Spring Boot. И это правильно. Потому что Spring Boot автоматически настраивает его для вас каждый раз, когда вы добавляете в свой проект зависимость, такую как spring-boot-starter-thymeleaf.
Он также настраивает ViewResolver так, чтобы он по умолчанию просматривал ваш каталог src/main/resources/template.
Итак, Spring Boot действительно предварительно настраивает Spring MVC для вас. Запомните.
Резюме: Model-View-Controller
Посмотрев полный пример Controller & ViewResolver, становится намного проще говорить о концепции Spring Model-View-Controller.
- С помощью нескольких аннотаций (Controller, @PostMapping, @RequestParam) вы можете написать контроллер, который будет заботиться о получении данных запроса и обрабатывать их соответствующим образом.
- Ваша модель содержит все данные (и только данные), которые вы хотите отобразить в своем представлении. Это ваша работа, чтобы заполнить эту карту модели.
- Ваше представление — это просто шаблон HTML. Неважно, откуда вы взяли данные (модели). Или каков текущий HTTP-запрос. Или даже если у вас есть активный HTTP-сеанс или нет.
Это все о разделении ответственностей.
На первый взгляд, немного перегруженный аннотациями, наш класс Spring контроллера читается намного лучше, с гораздо меньшим количеством подключений HTTP, чем наш супер-сервлет с самого начала.
Подробнее о контроллерах
Мы уже видели небольшое удобство, которое предоставляет нам Spring MVC при обработке входов HTTP.
- Вам не нужно возиться с requestURI, вместо этого вы можете использовать аннотацию.
- Вам не нужно возиться с преобразованиями типов параметров запроса или, разбираться является ли параметр необязательным или обязательным, вы можете использовать аннотацию вместо этого.
Давайте рассмотрим наиболее распространенные аннотации, которые помогут вам обрабатывать входящие HTTP-запросы.
@GetMapping и @RequestMappping
Вы уже видели аннотацию @GetMapping выше. Она эквивалентна аннотации *@RequestMapping*. Давайте рассмотрим пример:
@GetMapping("/books")
public void book() {
        //
}

/* these two mappings are identical */

@RequestMapping(value = "/books", method = RequestMethod.GET)
public void book2() {

}
@GetMapping, @[Post|Put|Delete|Patch]Mapping эквивалентно @RequestMapping(method=XXX). Это просто более новый способ (Spring 4.3+) для определения мапинга (связывания) с URL, поэтому вы найдете, что аннотация @RequestMapping часто используется в более старых, унаследованных проектах Spring.
@RequestParam
Для параметров HTTP-запроса, будь то в вашем URL (?Key=value) или в отправленном теле запроса формы, можно прочитать с помощью аннотации @RequestParam.
Вы уже видели, что он выполняет базовое преобразование типов (например, из параметра HTTP String в int), а также проверяет обязательные или дополнительные параметры.
@PostMapping("/users")   /* First Param is optional */
public User createUser(@RequestParam(required = false) Integer age, @RequestParam String name) {
   // does not matter
}
Если вы забудете указать в запросе обязательный параметр, вы получите код ответа 400 Bad Request и, при использовании Spring Boot, объект ошибки по умолчанию, который выглядит следующим образом:
{"timestamp":"2020-04-26T08:34:34.441+0000","status":400,"error":"Bad Request","message":"Required Integer parameter 'age' is not present","path":"/users"}Если вы хотите еще большего удобства, вы можете позволить Spring напрямую преобразовывать все @RequestParams в объект без каких-либо необходимых аннотаций. Просто укажите ваш объект как «параметр метода«.
Вам просто нужно убедиться, что у вашего класса есть соответствующие методы getter/setter.
@PostMapping("/users")   /* Spring преобразует это автоматически, если у вас есть getters and setters */
public User createUser(UserDto userDto) {
    //
}
@PathVariable
Помимо параметров запроса, другим популярным способом указания переменных является непосредственное задание их в URI запроса, как @PathVariable. Поэтому, чтобы получить профиль пользователя с userId=123, вы должны вызвать следующий URL: GET / users/123
- Вам просто нужно убедиться, что значение вашего параметра соответствует значению между {} в аннотации сопоставления вашего запроса.
Кроме того, PathVariables также может быть обязательным или необязательным.
@GetMapping("/users/{userId}")
   public User getUser(@PathVariable(required = false) String userId) {
       // ...
       return user;
   }
И PathVariables, конечно, может быть напрямую преобразованы в Java-объект (при условии, что у объекта есть соответствующие методы getter/setter).
@GetMapping("/users/{userId}")
public User getUser(UserDto userDto) {
    // ...
    return user;
}
Резюме: Контроллеры
Короче говоря, при написании HTML-страниц с помощью Spring MVC вам придется сделать всего несколько вещей:
- Напишите свои контроллеры, «присыпанные» несколькими аннотациями. Spring позаботится о том, чтобы представить вам запрос ввода (параметры запроса, переменные пути) удобным способом.
- Выполните любую логику, необходимую для заполнения вашей модели. Вы можете удобно ввести модель в любой метод контроллера.
- Сообщите вашему контроллеру, какой шаблон HTML вы хотите отобразить, и верните имя шаблона в виде строки.
- Всякий раз, когда поступает запрос, Spring обязательно вызовет ваш метод контроллера и примет полученную модель и представление, отобразит его в HTML-строку и вернет его обратно в браузер.
- При условии, конечно, вы настроили соответствующую библиотеку шаблонов, что Spring Boot автоматически сделает для вас, если вы добавите необходимые зависимости в ваш проект.
Вот и все.
REST контроллеры — создание XML/JSON
Когда вы разрабатываете RESTFul сервисы, все немного по-другому. Ваш клиент, будь то браузер или другой веб-сервис, будет (обычно) создавать запросы JSON или XML. Клиент отправляет, скажем, запрос JSON, вы обрабатываете его, а затем отправитель ожидает возврата JSON.
Таким образом, отправитель может отправить вам этот фрагмент JSON как часть тела HTTP-запроса.
POST http://localhost:8080/users

###
{"email": "angela@merkel.de"}
Но на стороне Java (в вашей программе Spring MVC) вы не хотите иметь дело с JSON строками. Ни при получении запросов, как указано выше, ни при отправке ответов обратно клиенту. Вместо этого вы хотели бы просто иметь объекты Java, в которые Spring автоматически конвертирует JSON.
public class UserDto {
    private String email;
    //...
}
Это также означает, что вам не нужна вся эта обработка модели и представления, которые вам приходилось делать при рендеринге HTML в ваших контроллерах. Для RESTful сервисов у вас нет библиотеки шаблонов, читающей шаблон HTML и заполняющей его данными модели, чтобы сгенерировать для вас ответ JSON.
Вместо этого вы хотите перейти непосредственно из HTTP запрос → Java объект и из Java объект → HTTP ответ.
Как вы уже догадались, это именно то, что Spring MVC обеспечивает при написании REST контроллера.
Как написать REST контроллер
Первое, что вам нужно сделать для вывода XML/JSON, это написать аннотацию @RestController вместо Controller. (Хотя @RestController является Controller, см. FAQ для точной разницы).
Если бы мы написали REST-контроллер для банка, который возвращает список транзакций пользователя, он мог бы выглядеть примерно так:
package com.marcobehler.springmvcarticle;

import org.springframework.web.bind.annotation.GetMapping;
import org.springframework.web.bind.annotation.RestController;

import java.util.Collections;
import java.util.List;

@RestController
public class BankController {

    @GetMapping("/transactions/{userId}")
    public List<Transaction> transactions(String userId) {

        // find transaction by user
        // List<Transaction> = dao.findByUserId(userId);

        List<Transaction> transactions = Collections.emptyList();
        return transactions;
    }
}
Давайте разберемся с этим кодом.
@RestController
public class BankController {
Вы снабдили класс BankController аннотацией @RestController, которая сообщает Spring, что вы не хотите писать HTML-страницы через обычный процесс ModelAndView. Вместо этого вы хотите записать XML/JSON (или какой-либо другой формат) непосредственно в тело ответа HTTP.
public List<Transaction> transactions(String userId) {Ваш контроллер больше не возвращает String (представление). Вместо этого он возвращает List, который Spring необходимо преобразовать в соответствующую структуру JSON или XML. По сути, вы хотите, чтобы ваши Java объекты Transaction стали такими (кто-то жаждал фаст-фуд очень рано утром):
[
  {
    "occurred": "28.04.2020 03:18",
    "description": "McDonalds - Binging",
    "id": 1,
    "amount": 10
  },
  {
    "occurred": "28.04.2020 06:18",
    "description": "Burger King - Never enough",
    "id": 2,
    "amount": 15
  }
]
Но как Spring MVC узнает, что ваш список транзакций должен быть преобразован в JSON? Почему не XML? Или YAML? Как ваш метод REST контроллер знает, каким должен быть предполагаемый формат ответа?
Для этого у Spring есть концепция согласования контента.
Короче говоря, согласование контента означает, что клиент должен сообщить вашему серверу, какой формат ответа он хочет получить от вашего REST контроллера.
Как? Указав заголовок Accept в HTTP-запросе.
GET http://localhost:8080/transactions/{userid}
Accept: application/json
Spring MVC разберет этот заголовок Accept и узнает: клиент хочет вернуть JSON (application/json), поэтому мне нужно преобразовать мой List в JSON. (Краткое примечание. Существуют и другие способы согласования содержимого, но заголовок Accept используется по умолчанию.)
Давайте назовем это согласование содержимого ответа, поскольку речь идет о формате данных ответа HTTP, который вы отправляете обратно своему клиенту.
Но согласование контента также работает для входящих запросов. Посмотрим как.
Согласование контента запроса — Content-Type Header (заголовок типа контента)
При создании RESTful API очень высока вероятность того, что ваши клиенты также смогут отправлять запросы в формате JSON или XML. Давайте снова возьмем пример из начала главы, где вы предлагаете конечную точку REST для регистрации новых пользователей:
POST http://localhost:8080/users

###
{"email": "angela@merkel.de"}
Как Spring узнает, что тело запроса выше содержит JSON, а не XML или YAML? Возможно, вы догадались, вам нужно добавить еще один заголовок, на этот раз это заголовок Content-Type.
POST ...

Content-Type: application/json; charset=UTF-8

###
...
Как будет выглядеть соответствующий REST контроллер для этого запроса?
package com.marcobehler.springmvcarticle;

import org.springframework.web.bind.annotation.PostMapping;
import org.springframework.web.bind.annotation.RequestBody;
import org.springframework.web.bind.annotation.RestController;

@RestController
public class BookingController {

    @PostMapping("/transactions")
    public Transaction transaction(@RequestBody TransactionDto dto) {
        // do something with the dto..create the booking..convert it to a transaction
        Transaction transaction = null;
        return transaction;
    }
}
Давайте разберемся с этим кодом.
public Transaction transaction(@RequestBody TransactionDto dto) {Подобно @RequestParam или @Pathvariable, вам понадобится другая аннотация, называемая @RequestBody.
@RequestBody в сочетании с правильным Content-Type будет сигнализировать Spring о том, что ему необходимо просмотреть тело HTTP-запроса и преобразовать его в любой Content-Type, указанный пользователем: JSON в нашем случае.
    // do something with the dto..create the booking..convert it to a transaction
    Transaction transaction = null;
    return transaction;
}
Тогда вашему методу больше не нужно заботиться об необработанной строке JSON, он может просто работать с TransactionDTO, сохранять его в базе данных, преобразовывать в объект Transaction, что угодно. В этом сила Spring MVC.
Сам Spring не может конвертировать форматы данных
Есть только одна небольшая проблема: Spring знает о заголовках Accept и Content-Type, но не знает, как конвертировать между объектами Java и JSON. Или XML. Или ЯМЛ.
Для этой грязной работы требуется соответствующая сторонняя библиотека (также называемая маршалинг / демаршаллинг или сериализация / десериализация.)
А классы, которые интегрируются между Spring MVC и этими сторонними библиотеками, называются HttpMessageConverters.
Что такое HttpMessageConverter?
HttpMessageConverter — это интерфейс с четырьмя методами (обратите внимание, я немного упростил интерфейс для более простого объяснения, так как он выглядит немного более продвинутым в реальной жизни).
- canRead (MediaType) → Может ли этот конвертер читать (JSON | XML | YAML | и т. д.)? Переданный здесь MediaType обычно является значением из заголовка запроса Content-Type.
- canWrite (MediaType) → Может ли этот преобразователь писать (JSON | XML | YAML | и т. д.)? Тип MediaType, переданный здесь, обычно является значением из заголовка запроса Accept.
- read(Object, InputStream, MediaType) → Читать мой Java-объект из (JSON | XML | YAML | и т. д.) InputStream
- write(Object, OutputStream, MediaType) → Записать мой Java-объект в OutputStream как (JSON | XML | YAML | и т. д.)
Короче говоря, MessageConverter должен знать, какие MediaTypes он поддерживает (например, application/json), а затем должен реализовать два метода для фактического чтения / записи в этом формате данных.
Какие есть HttpMessageConverters?
К счастью, вам не нужно писать эти конвертеры сообщений самостоятельно. Spring MVC поставляется с классом, который автоматически регистрирует пару стандартных HTTPMessageConverters для вас — если у вас есть соответствующие сторонние библиотеки в пути к классам.
Если вы не знаете об этом, это будет выглядеть как магия. В любом случае, взгляните на Spring AllEncompassingFormHttpMessageConverter (мне нравится это имя).
static {
        ClassLoader classLoader = AllEncompassingFormHttpMessageConverter.class.getClassLoader();
        jaxb2Present = ClassUtils.isPresent("javax.xml.bind.Binder", classLoader);
        jackson2Present = ClassUtils.isPresent("com.fasterxml.jackson.databind.ObjectMapper", classLoader) &&
                                        ClassUtils.isPresent("com.fasterxml.jackson.core.JsonGenerator", classLoader);
        jackson2XmlPresent = ClassUtils.isPresent("com.fasterxml.jackson.dataformat.xml.XmlMapper", classLoader);
        jackson2SmilePresent = ClassUtils.isPresent("com.fasterxml.jackson.dataformat.smile.SmileFactory", classLoader);
        gsonPresent = ClassUtils.isPresent("com.google.gson.Gson", classLoader);
        jsonbPresent = ClassUtils.isPresent("javax.json.bind.Jsonb", classLoader);
}
Давайте разберемся с этим кодом.
jaxb2Present = ClassUtils.isPresent("javax.xml.bind.Binder", classLoader);Spring MVC проверяет наличие класса javax.xml.bind.Binder и, если он есть, предполагает, что вы добавили в свой проект необходимую библиотеку для выполнения преобразований JAXB.
jackson2Present = ClassUtils.isPresent("com.fasterxml.jackson.databind.ObjectMapper", classLoader) &&
ClassUtils.isPresent("com.fasterxml.jackson.core.JsonGenerator", classLoader);
Spring MVC проверяет наличие двух классов ..jackson..ObjectMapper и ..jackson..JsonGenerator и, если это так, предполагает, что вы добавили библиотеку Jackson в свой проект для выполнения преобразований JSON.
jackson2XmlPresent = ClassUtils.isPresent("com.fasterxml.jackson.dataformat.xml.XmlMapper", classLoader);Spring MVC проверяет наличие класса ..jackson..XmlMapper и, если это так, предполагает, что вы добавили поддержку XML библиотеки Jackson s в свой проект для выполнения преобразований XML.
И так далее. И через пару строк Spring просто добавляет HttpMessageConverter для каждой библиотеки, которую он «обнаружил».
if (jaxb2Present && !jackson2XmlPresent) {
        addPartConverter(new Jaxb2RootElementHttpMessageConverter());
}

if (jackson2Present) {
        addPartConverter(new MappingJackson2HttpMessageConverter());
}
else if (gsonPresent) {
        addPartConverter(new GsonHttpMessageConverter());
}
Заметка на полях: Spring Boot
При создании проектов Spring Boot вы автоматически будете использовать Spring MVC под капотом. Но Spring Boot также вызывает Jackson по умолчанию.
Вот почему вы можете сразу написать конечные точки JSON с помощью Spring Boot, потому что необходимые HttpMessageConverts будут добавлены автоматически для вас.
Резюме: REST контроллеры
По сравнению с HTML использование JSON / XML немного проще, так как вам не нужен рендеринг Model и View.
Вместо этого ваши контроллеры напрямую возвращают объекты Java, которые Spring MVC будет удобно сериализовать в JSON / XML или любой другой формат, который пользователь запросил с помощью HttpMessageConverters.
Однако вы должны убедиться в двух вещах, однако:
- Имеются соответствующие сторонние библиотеки на пути к классам.
- Отправлены правильные заголовки Accept или Content-Type с каждым запросом.
Часто задаваемые вопросы
Вы где-нибудь публиковали исходный код этой статьи?
Вы можете найти рабочий исходный код для большей части этой статьи в следующем репозитории GitHub:
https://github.com/marcobehler/spring-mvc-article
Просто клонируйте проект и запустите класс SpringMvcArticleApplication, чтобы запустить веб-приложение.
В чем разница между Spring MVC и Spring Boot?
Вкратце: нет никакой разницы, Spring Boot использует и строит приложение поверх Spring MVC.
Для более подробного объяснения вам нужно сначала прочитать статью Что такое Spring Framework?.
Какой самый быстрый способ создать новое приложение Spring MVC?
Если вы хотите упростить использование Spring MVC, самым быстрым способом будет создание нового Spring Boot проекта.
- Перейдите на сайт: https://start.spring.io/.
- Обязательно выберите Spring Web в качестве зависимости для вашего нового проекта.
Это позволит вам создавать веб / RESTful-приложения с помощью Spring MVC.
Какой тип ввода HTTP-запроса понимает Spring MVC?
Spring MVC понимает практически все, что предлагает HTTP — с помощью сторонних библиотек.
Это означает, что вы можете добавить в него тела запросов JSON, XML или HTTP (Multipart) Fileuploads, и Spring будет удобно конвертировать этот ввод в объекты Java.
Какие HTTP-ответы может создавать Spring MVC?
Spring MVC может записывать все что угодно в HttpServletResponse — с помощью сторонних библиотек.
Будь то HTML, JSON, XML или даже тела ответов WebSocket. Более того, он берет ваши объекты Java и генерирует эти тела ответов для вас.
В чем разница между контроллером и REST контроллером
- Контроллер по умолчанию возвращают HTML пользователям с помощью библиотеки шаблонов, если вы не добавите аннотацию @ResponseBody к определенным методам, которые также позволяют возвращать XML / JSON.
- Исходный код REST контроллера показывает, что на самом деле это контроллер с добавленной аннотацией @ResponseBody. Что эквивалентно написанию контроллера с аннотацией @ResponseBody для каждого метода.
@Controller
@ResponseBody
public @interface RestController {- Поэтому REST контроллеры по умолчанию возвращает XML / JSON вместо HTML.
Примечание. XML и JSON — это просто самые популярные форматы данных, которые вы будете использовать в приложении Spring MVC. Однако ваши контроллеры / REST контроллеры могут возвращать что-либо еще, например, YAML. Вам нужно только убедиться, что правильный HttpMessageConverter зарегистрирован в вашем ApplicationContext.
Какую библиотеку шаблонов мне выбрать?
На протяжении многих лет я лично работал почти со всеми библиотеками шаблонов, и, хотя есть определенное стимулирование к использованию Thymeleaf в проектах Spring, у меня нет сильных предпочтений. Итак, либо воспользуйтесь Thymeleaf (если у вас нет опыта работы с другими системами), либо выберите тот, который вам наиболее удобен.
Почему мой контроллер выводит 404? Все мапинги верны.
Относительно распространенной ошибкой является то, что контроллер возвращает объекты, которые вы хотите преобразовать в JSON или XML, но вам не хватает аннотации @ResponseBody.
Spring возвратит довольно бессмысленное исключение 404 Not Found в этом случае.
package com.marcobehler.springmvcarticle;

import org.springframework.stereotype.Controller;
import org.springframework.web.bind.annotation.GetMapping;
import org.springframework.web.bind.annotation.PathVariable;
import org.springframework.web.bind.annotation.ResponseBody;

@Controller
public class _404WithMissingResponseBodyController {

    @GetMapping("/users/{id}")   /* This won't work and lead to a 404 */
    public User getUser_404(@PathVariable String id) {
        return new User("Everyone's name is John", id);
    }

    @GetMapping("/users2/{id}")
    @ResponseBody  /* This will work */
    public User getUser_200(@PathVariable String id) {
        return new User("Everyone's name is John", id);
    }
}Исправление: добавьте @ResponseBody или превратите ваш контроллер в REST контроллер.
Что произойдет, если вы определите один и тот же мапинг запросов для двух разных методов?
Если эти два метода имеют разные HTTP методы, это не будет проблемой.
/* это сработает */

@PostMapping("/users")
public void method1() {

}

@GetMapping("/users")
publi void method(2) {

}
Однако если вы сопоставите однотипные HTTP методы с одним и тем же путем, у вас возникнет проблема.
/* это не сработает */

@PostMapping("/users")
public void method1() {

}

@PostMapping("/users")
publi void method(2) {

}
При запуске приложения это приведет к исключению IllegalStateException, что намекает на ваше неоднозначное отображение.
Caused by: java.lang.IllegalStateException: Ambiguous mapping. Cannot map 'howToPassAndRetrieveRequestParametersController' method
com.marcobehler.springmvcarticle.HowToPassAndRetrieveRequestParametersController#createUser(User)
to {POST /users3}: There is already 'howToPassAndRetrieveRequestParametersController' bean method
Нужно ли в URL кодировать @RequestParams?
Да, потому что Spring автоматически декодирует их из URL. Распространенная ошибка:
Представьте, что ваше приложение отправляет электронные письма с подтверждением всякий раз, когда новый пользователь регистрируется, и пользователь указывает знак «+» на своем адресе электронной почты, например, marco+wantsnospam@marcobehler.com.
@GetMapping("/confirm")
public void confirm(@RequestParam String email, @RequestParam String token){
    // confirm user...
}
Если вы забыли правильно закодировать знак ‘+’ в URL в своем письме-подтверждении и отправляете строку как есть на свой контроллер, какое значение будет содержать электронная почта @RequestParam?
Это будет «marco[space]wantnospam@marcobehler.com», так как Spring заменит + пробелом, что является правильной обработкой RFC3986.
Исправление: Убедитесь, что URL-адреса, которые вы вводите в свое приложение, правильно закодированы: marco%2Bwantsnospam@marcobehler.com, так как Spring будет автоматически их декодировать.
Как получить доступ к текущей HttpSession пользователя?
В Spring MVC контроллере или REST контроллере вы можете просто указать HttpSession в качестве аргумента метода, и Spring автоматически вставит его (создав его, если он еще не существует).
@RestController
public class HttpSessionController {

    @GetMapping("/session")
    public String getSession(HttpSession httpSession) {
        System.out.println("httpSession = " + httpSession);
        return httpSession.getId();
    }
}
Вы не можете сделать это со произвольными компонентами или сервисами, но вы все равно можете внедрить HttpSession в них.
@Service
class SomeOtherService {

    @Autowired
    private HttpSession httpSession;

    public HttpSession getHttpSession() {
        return httpSession;
    }
}
Как получить доступ к HttpServletRequest?
В вашем Spring MVC контроллере или REST контроллере вы можете просто указать HttpServletRequest в качестве аргумента метода, и Spring автоматически вставит его (создавая, если он еще не существует)
@RestController
public class HttpServletRequestController {

    @Autowired
    private SomeRequestService someRequestService;

    @GetMapping("/request")
    public String getRequest(HttpServletRequest request) {
        System.out.println("request = " + request);
        return request.toString();
    }
}
Вы не можете сделать это с произвольными компонентами или сервисами, но вы все еще можете внедрить HttpServletRequest в них.
@Service
class SomeRequestService {

    @Autowired
    private HttpServletRequest httpServletRequest;

    public HttpServletRequest getRequest() {
        return httpServletRequest;
    }
}
Как читать HTTP заголовки?
Существует множество способов получить доступ к заголовкам запросов, в зависимости от того, хотите ли вы только один или карту со всеми из них. В любом случае вам нужно аннотировать их с помощью @RequestHeader.
Какую бы версию вы ни выбрали, постарайтесь быть последовательным с вашим выбором.
package com.marcobehler.springmvcarticle;

import org.springframework.http.HttpHeaders;
import org.springframework.stereotype.Controller;
import org.springframework.web.bind.annotation.GetMapping;
import org.springframework.web.bind.annotation.RequestHeader;

import java.util.Map;

@Controller
public class HttpHeaderController {

    @GetMapping("/headers1")
    public void singleHeader(@RequestHeader("x-forwarded-for") String xForwardedFor) {
       // ...
    }

    @GetMapping("/headers2")
    public void headersAsMap(@RequestHeader Map<String,String> headers) {  // or MultiValueMap<String,String>
        // ...
    }

    @GetMapping("/headers3")
    public void headersAsObject(HttpHeaders headers) {
        // ...
    }
}
Как читать и писать cookie?
Для чтения файлов cookie вы можете использовать аннотацию @CookieValue в своих контроллерах. Вы должны будете писать cookie прямо в HttpServletResponse.
package com.marcobehler.springmvcarticle;

import org.springframework.stereotype.Controller;
import org.springframework.web.bind.annotation.CookieValue;
import org.springframework.web.bind.annotation.GetMapping;

import javax.servlet.http.Cookie;
import javax.servlet.http.HttpServletResponse;

@Controller
public class CookieController {

    @GetMapping("/cookie")
    public void handle(@CookieValue("JSESSIONID") String cookie, HttpServletResponse response) {

        response.addCookie(new Cookie("SOME_COOKIE_NAME", "This is a crazy new cookie!"));
        //...
    }
}
Как получить IP-адрес пользователя?
Это вопрос с подвохом. Существует метод с именем httpServletRequest.getRemoteAddr(), который, однако, возвращает только IP-адрес пользователя или последнего прокси-сервера, отправившего запрос, в 99,99% случаев это ваш Nginx или Apache.
Следовательно, вам нужно проанализировать заголовок X-Forwarded-For для получения правильного IP-адреса. Но что произойдет, если ваше приложение, кроме того, будет работать за CDN, например CloudFront? Тогда ваш X-Forwarded-For будет выглядеть так:
X-Forwarded-For: MaybeSomeSpoofedIp, realIp, cloudFrontIpПроблема в том, что вы не можете прочитать заголовок слева направо, поскольку пользователи могут предоставить и, следовательно, подделать свой собственный заголовок X-Forwarded-For. Вам всегда нужно идти справа налево и исключать все известные IP-адреса. В случае CloudFront это означает, что вам необходимо знать диапазоны IP-адресов CloudFront и удалить их из заголовка. Ага!
Это приводит к довольно сложному коду, разрешающему IP. Угадайте, сколько проектов сделали это неправильно!
package com.marcobehler.springmvcarticle;

import org.springframework.web.bind.annotation.GetMapping;
import org.springframework.web.bind.annotation.RestController;

import javax.servlet.http.HttpServletRequest;

@RestController
public class IpController {

    private static final String[] HEADERS_TO_TRY = {
            "X-Forwarded-For",
            "Proxy-Client-IP",
            "WL-Proxy-Client-IP",
            "HTTP_X_FORWARDED_FOR",
            "HTTP_X_FORWARDED",
            "HTTP_X_CLUSTER_CLIENT_IP",
            "HTTP_CLIENT_IP",
            "HTTP_FORWARDED_FOR",
            "HTTP_FORWARDED",
            "HTTP_VIA",
            "REMOTE_ADDR"};

    @GetMapping("/ip")
    public String getClientIpAddress(HttpServletRequest request) {
        for (String header : HEADERS_TO_TRY) {
            String ip = request.getHeader(header);
            if (ip != null && ip.length() != 0 && !"unknown".equalsIgnoreCase(ip)) {
                return getRealClientIpAddress(ip);
            }
        }
        return request.getRemoteAddr();
    }

    /**
     * Goes through the supplied ip string (could be one or multiple). Traverses it through the right side...
     * and removes any known ip address ranges
     *
     * @param ipString
     * @return
     */
    public String getRealClientIpAddress(String ipString) {
        String[] manyPossibleIps = ipString.split(",");

        for (int i = manyPossibleIps.length - 1; i >= 0; i--) {
            String rightMostIp = manyPossibleIps[i].trim();
            if (isKnownAddress(rightMostIp)) {
                continue; // skip this ip as it is trusted
            } else {
                return rightMostIp;
            }
        }

        return ipString;
    }

    private boolean isKnownAddress(String rightMostIp) {
        // do your check here..for cloudfront you'd need to download their ip address ranges
        // from e.g. http://d7uri8nf7uskq.cloudfront.net/tools/list-cloudfront-ips
        // and compare the current ip against them
        return false;
    }
}
Как вы можете управлять загрузкой файлов в приложении Spring MVC?
Предположим, что у вас есть правильная форма загрузки HTML-файла, которая выглядит примерно так:
<form method="POST" enctype="multipart/form-data" action="/upload">
    File to upload:<input type="file" name="file" />
    <input type="submit" value="Upload" />
</form>
Вам просто нужен контроллер с аннотацией @PostMapping и соответствующим параметром MultiPartFile, который содержит ваши данные для загрузки и удобные методы для сохранения файла на вашем диске.
package com.marcobehler.springmvcarticle;

import org.springframework.stereotype.Controller;
import org.springframework.web.bind.annotation.PostMapping;
import org.springframework.web.bind.annotation.RequestParam;
import org.springframework.web.multipart.MultipartFile;

import java.io.IOException;
import java.nio.file.Path;
import java.nio.file.Paths;

@Controller
public class FileUploadController {

    @PostMapping("/upload")
    public String handleFileUpload(@RequestParam MultipartFile file) throws IOException {
        // don't generate upload files like this in a real project.
        // give them random names and save their uploaded name as metadata in a database or similar
        final Path uploadDestination = Paths.get("C:\uploads").resolve(file.getName());

        file.transferTo(uploadDestination);
        return "redirect:/";
    }
}
Как обрабатывать загрузку бинарных файлов (xls, pdf, csv, jpg, zip) с помощью Spring контроллеров?
Есть множество способов заставить это работать, от записи непосредственно в HttpServletResponse или возвращения массива byte[] в результате.
Тем не менее, самая Spring-и и гибкая версия заключается в возврате ‘ResponseEntity ‘. В зависимости от того, где вы сохранили файл, вы будете использовать различные ресурсы.
- На диске → FileSystemResource
- На пути к классам вашего проекта → ClassPathResource
- Потоковая передача из «где-то» → InputStreamResource
- Сделали его доступным как массив byte[] в памяти → ByteArrayResource
Все, что осталось сделать, это установить соответствующие HTTP-заголовки ответа (имя файла, тип контента и т.д.).
package com.marcobehler.springmvcarticle;

import org.springframework.core.io.ClassPathResource;
import org.springframework.core.io.Resource;
import org.springframework.http.HttpHeaders;
import org.springframework.http.HttpStatus;
import org.springframework.http.MediaType;
import org.springframework.http.ResponseEntity;
import org.springframework.stereotype.Controller;
import org.springframework.web.bind.annotation.PathVariable;
import org.springframework.web.bind.annotation.RequestMapping;
import org.springframework.web.bind.annotation.RequestMethod;
import org.springframework.web.server.ResponseStatusException;

import java.io.IOException;

@Controller
public class FileDownloadController {

    @RequestMapping(value = "/download/{jpgName}", method = RequestMethod.GET)
    public ResponseEntity<Resource> downloadJpg(
            @PathVariable String jpgName) throws IOException {

        //  Resource downloadResource = new InputStreamResource(soimeinputStream)
        //  Resource downloadResource = new ByteArrayResource(someByteArray)
        //  Resource downloadResource = new FileSystemResource(someFile)
        final ClassPathResource downloadResource = new ClassPathResource(jpgName);

        if (!downloadResource.exists()) {
            throw new ResponseStatusException(HttpStatus.BAD_REQUEST);
        }

        HttpHeaders headers = new HttpHeaders();

        // 1. set the correct content type
        headers.setContentType(MediaType.IMAGE_JPEG);

        // 2. set the correct content length, maybe stored in a db table
        headers.setContentLength(downloadResource.contentLength());

        // 3. if you want to force downloads, otherwise attachments might be displayed directly in the brwoser
        headers.setContentDispositionFormData("attachment", jpgName);

        return new ResponseEntity<>(downloadResource, headers, HttpStatus.OK);
    }
}
Как я могу глобально обрабатывать исключения в моих контроллерах?
В Spring MVC есть несколько способов обработки исключений, если вы не хотите обрабатывать их непосредственно в своих контроллерах, а в одном центральном месте.
Создайте класс ControllerAdvice или RestControllerAdvice в сочетании с аннотациями @ResponseStatus и @ExceptionHandler. Несолько замечаний:
- Вы можете догадаться о разнице между этими двумя классами, понимая разницу между контроллером и REST контроллером.
- @ResponseStatus позволяет вам определить код статуса HTTP, который должен быть возвращен клиенту после обработки вашего исключения.
- @ExceptionHandler указывает исключение, которое должно вызывать ваш метод-обработчик.
- Кроме этого, это все похоже на написание обычного контроллера или REST контроллера.
package com.marcobehler.springmvcarticle;

import org.springframework.http.HttpStatus;
import org.springframework.ui.Model;
import org.springframework.web.bind.annotation.ControllerAdvice;
import org.springframework.web.bind.annotation.ExceptionHandler;
import org.springframework.web.bind.annotation.ResponseStatus;

@ControllerAdvice
public class GlobalControllerExceptionHandler {

    @ResponseStatus(HttpStatus.CONFLICT)  // 409
    @ExceptionHandler(SomeConflictException.class)
    public String handleConflict(SomeConflictException e, Model model) {
        // do something
        model.addAttribute("message", e.getMessage());
        return "new-template";
    }

    @ResponseStatus(HttpStatus.NOT_IMPLEMENTED)  // 409
    @ExceptionHandler(NotYetImplementedExceptoin.class)
    public void handleBandwithLimitExceeded(NotYetImplementedExceptoin e) {
        // do nothing;
    }
}
Как вернуть любой код состояния (400, 404 и т.д.) из ваших контроллеров?
Создайте исключение ResponseStatusException с соответствующим кодом состояния и, возможно, причиной.
Альтернативой будет возвращение объекта ResponseEntity, но в большинстве случаев исключение лучше.
package com.marcobehler.springmvcarticle;

import org.springframework.http.HttpStatus;
import org.springframework.stereotype.Controller;
import org.springframework.web.bind.annotation.GetMapping;
import org.springframework.web.server.ResponseStatusException;

@Controller
public class HttpStatusCodeController {

    @GetMapping("/somePath")
    public void alwaysThrowsException() {
         //throw new ResponseStatusException(HttpStatus.NOT_FOUND, "Meeepp, not found.");

        throw new ResponseStatusException(HttpStatus.BAD_REQUEST, "Well, that just wasn't right!");
    }
}
Как насчет концепции XYZ в Spring MVC?
Официальная документация Spring MVC буквально содержит сотни страниц, описывающих, как работает веб-фреймворк.
Поэтому, если вы хотите узнать больше о моделях, представлениях, ViewHandlers, InitBinders, RootContexts, фильтрах, кэшировании и т.д., я предлагаю вам прочитать документацию Spring MVC. Это просто выходит за рамки данного руководства, невозможно охватить это все.
Заключение
Это была хорошая прогулка. Наконец я надеюсь, что вы узнали множество вещей из этой статьи:
- Spring MVC — это старый добрый MVC-фреймворк, который позволяет довольно легко писать веб-сайты HTML или JSON/XML веб-службы.
- Он прекрасно интегрируется со множеством шаблонных библиотек и библиотек преобразования данных, а также с остальной частью экосистемы Spring, такой как Spring Boot.
- Главным образом он позволяет вам сосредоточиться на написании своей бизнес-логики, не беспокоясь о стандартом коде сервлета, разборе HTTP-запросов / ответов и преобразовании данных.
Вот и все на сегодня. Спасибо за чтение.
Благодарности
Большое спасибо Patricio «Pato» Moschcovich, который не только выполнил корректуру этой статьи, но и дал бесценный отзыв!
Spring MVC framework enables separation of modules namely Model, View, and Controller, and seamlessly handles the application integration. This enables the developer to create complex applications also using plain java classes. The model object can be passed between view and controller using maps. In this article, we will see how to set up a Spring MVC application in the Eclipse IDE and understand how to make applications. The Spring MVC framework is comprised of the following components:
- Model: A model can be an object or collection of objects which basically contains the data of the application.
- View: A view is used for displaying the information to the user in a specific format. Spring supports various technologies like freemarker, velocity, and thymeleaf.
- Controller: It contains the logical part of the application. @Controller annotation is used to mark that class as controller.
- Front Controller: It remains responsible for managing the flow of the web application. DispatcherServlet acts as a front controller in Spring MVC.
Here are going to create our first spring MVC controller in Spring Tool Suite IDE.
Requirements:
- Eclipse (EE version)/STS IDE
- Spring JAR Files
- Tomcat Apache latest version
Implementation:
It is illustrated below step by step as follows:
Note: We are going to use Spring Tool Suite 4 IDE for this project. Please refer to this article to install STS in your local machine How to Download and Install Spring Tool Suite (Spring Tools 4 for Eclipse) IDE?
Step 1: Create a Dynamic Web Project in your STS IDE. You may refer to this article to create a Dynamic Web Project in STS: How to Create a Dynamic Web Project in Spring Tool Suite?
Step 2: Download the spring JARs file from this link and go to the src > main > webapp > WEB-INF > lib folder and past these JAR files.
Step 3: Configure Apache Tomcat Server and configure the Tomcat Server with the application. Now we are ready to go.
Configuring Dispatcher Servlet
Please refer to this article What is Dispatcher Servlet in Spring? and read more about Dispatcher Servlet which is a very very important concept to understand. Now we are going to configure Dispatcher Servlet with our Spring MVC application.
Step 4: Go to the src > main > webapp > WEB-INF > web.xml file
File: web.xml
XML
<?xml version="1.0" encoding="UTF-8"?>
<display-name>myfirst-mvc-project</display-name>
<welcome-file-list>
<welcome-file>index.html</welcome-file>
<welcome-file>index.jsp</welcome-file>
<welcome-file>index.htm</welcome-file>
<welcome-file>default.html</welcome-file>
<welcome-file>default.jsp</welcome-file>
<welcome-file>default.htm</welcome-file>
</welcome-file-list>
<absolute-ordering/>
<servlet>
<servlet-name>frontcontroller-dispatcher</servlet-name>
<servlet-class>org.springframework.web.servlet.DispatcherServlet</servlet-class>
<load-on-startup>1</load-on-startup>
</servlet>
<servlet-mapping>
<servlet-name>frontcontroller-dispatcher</servlet-name>
<url-pattern>/student.com/*</url-pattern>
</servlet-mapping>
</web-app>
Step 5: Now go to the src > main > webapp > WEB-INF and create an XML file. Actually, this is a Spring Configuration file like beans.xml file. And the name of the file must be in this format
YourServletName-servlet.xml
For example, for this project, the name of the file must be
frontcontroller-dispatcher-servlet.xml
So either you can create a Spring Configuration File or you can just create a simple XML file add the below lines of code inside that file.
File: frontcontroller-dispatcher-servlet.xml
XML
Creating First Spring MVC Controller
Step 6: Now, let’s create some controllers. Go to the src/main/java and create a new controllers package (For ex. com.student.controllers) as per your choice. And inside that create a Java class and name the class as DemoController. Now how to tell the Spring that this is our controller class. So the way we are going to tell the Spring is by marking it with a @Controller annotation.
@Controller
public class DemoController {}
Note: Spring will automatically initialize the class having a @Controller annotation and register that class with the spring container.
Now let’s create a simple method inside the Controller class and use @RequestMapping and @ResponseBody annotation before the method something like this.
// Annotation
@ResponseBody
@RequestMapping("/hello")

// Method
public String helloWorld()
{
    return "Hello World!";
}
Now let’s understand both annotations.
@RequestMapping(“/hello”), so what does it mean? This line means, in the URL if somebody hits student.com/hello then this particular method will be executed and it is going to perform the operation that is written inside that particular method. For example, for this project, we are just returning a message “Hello World!” and we are expecting this is going to display in the client browser. But this thing will not happen. And to make it happen we need to use the @ResponseBody annotation. So @ResponseBody annotation is basically gonna write this particular message, here “Hello World!”, in your HTTP response.
File: DemoController.java
Java
package com.student.controllers;
import org.springframework.stereotype.Controller;
import org.springframework.web.bind.annotation.RequestMapping;
import org.springframework.web.bind.annotation.ResponseBody;
@Controller
public class DemoController {
@ResponseBody
@RequestMapping("/hello")
public String helloWorld()
{
return "Hello World!";
}
}
Step 7: Add the below line inside the frontcontroller-dispatcher-servlet.xml file
<context:component-scan base-package="com.student.controllers"></context:component-scan>
File: frontcontroller-dispatcher-servlet.xml
XML
Run Your First Spring MVC Controller
Step 8: To run your Spring MVC Application right-click on your project > Run As > Run on Server and run your application as shown in the below image.
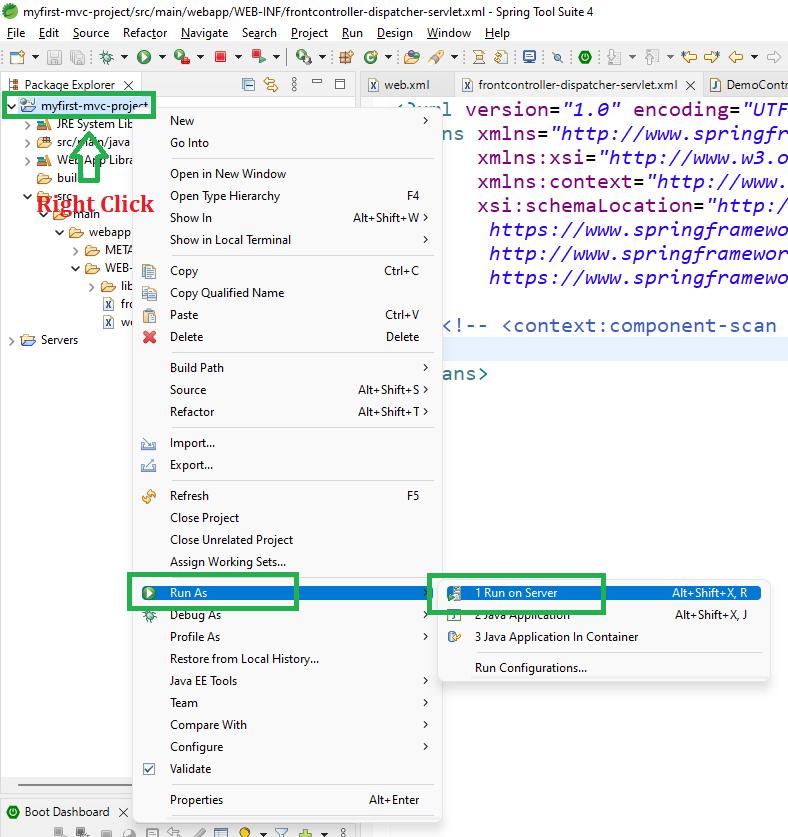
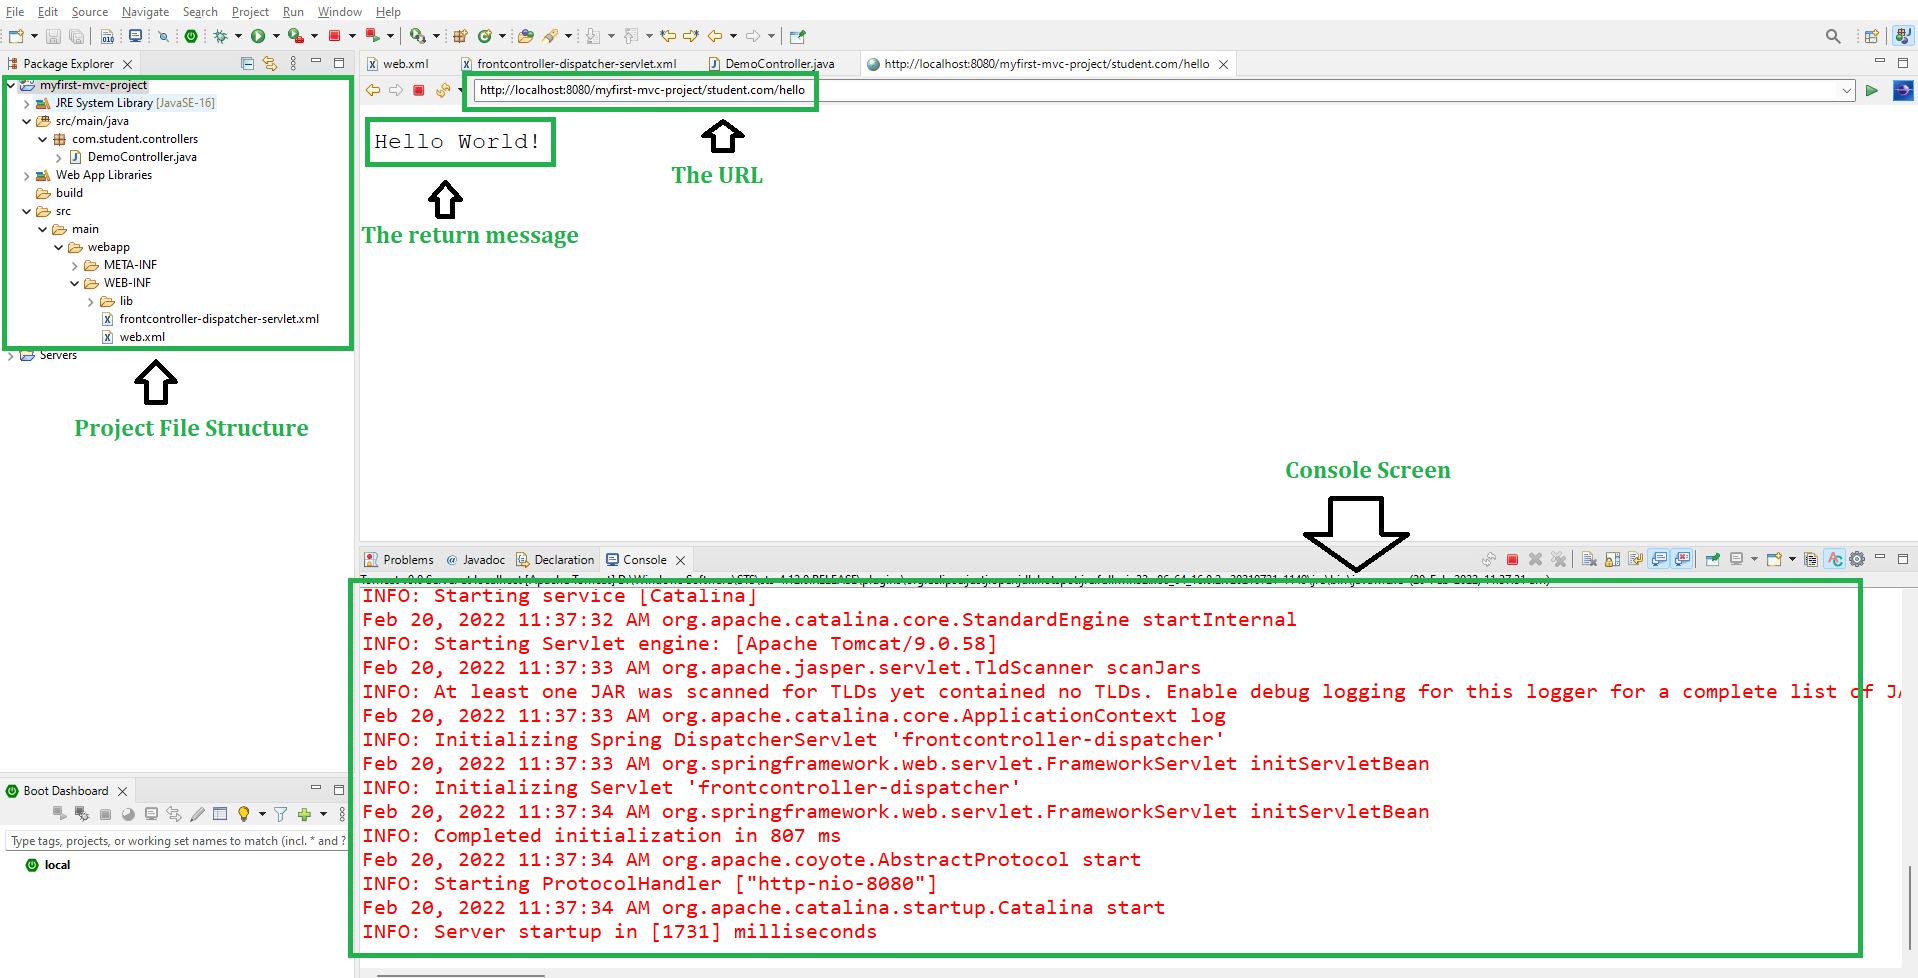
After that use the following URL to run your controller as shown in the below image. All other details can be perceived through below image as follows:
http://localhost:8080/myfirst-mvc-project/student.com/hello
Spring MVC framework enables separation of modules namely Model, View, and Controller, and seamlessly handles the application integration. This enables the developer to create complex applications also using plain java classes. The model object can be passed between view and controller using maps. In this article, we will see how to set up a Spring MVC application in the Eclipse IDE and understand how to make applications. The Spring MVC framework is comprised of the following components:
- Model: A model can be an object or collection of objects which basically contains the data of the application.
- View: A view is used for displaying the information to the user in a specific format. Spring supports various technologies like freemarker, velocity, and thymeleaf.
- Controller: It contains the logical part of the application. @Controller annotation is used to mark that class as controller.
- Front Controller: It remains responsible for managing the flow of the web application. DispatcherServlet acts as a front controller in Spring MVC.
Here are going to create our first spring MVC controller in Spring Tool Suite IDE.
Requirements:
- Eclipse (EE version)/STS IDE
- Spring JAR Files
- Tomcat Apache latest version
Implementation:
It is illustrated below step by step as follows:
Note: We are going to use Spring Tool Suite 4 IDE for this project. Please refer to this article to install STS in your local machine How to Download and Install Spring Tool Suite (Spring Tools 4 for Eclipse) IDE?
Step 1: Create a Dynamic Web Project in your STS IDE. You may refer to this article to create a Dynamic Web Project in STS: How to Create a Dynamic Web Project in Spring Tool Suite?
Step 2: Download the spring JARs file from this link and go to the src > main > webapp > WEB-INF > lib folder and past these JAR files.
Step 3: Configure Apache Tomcat Server and configure the Tomcat Server with the application. Now we are ready to go.
Configuring Dispatcher Servlet
Please refer to this article What is Dispatcher Servlet in Spring? and read more about Dispatcher Servlet which is a very very important concept to understand. Now we are going to configure Dispatcher Servlet with our Spring MVC application.
Step 4: Go to the src > main > webapp > WEB-INF > web.xml file
File: web.xml
XML
<?xml version="1.0" encoding="UTF-8"?>
<display-name>myfirst-mvc-project</display-name>
<welcome-file-list>
<welcome-file>index.html</welcome-file>
<welcome-file>index.jsp</welcome-file>
<welcome-file>index.htm</welcome-file>
<welcome-file>default.html</welcome-file>
<welcome-file>default.jsp</welcome-file>
<welcome-file>default.htm</welcome-file>
</welcome-file-list>
<absolute-ordering/>
<servlet>
<servlet-name>frontcontroller-dispatcher</servlet-name>
<servlet-class>org.springframework.web.servlet.DispatcherServlet</servlet-class>
<load-on-startup>1</load-on-startup>
</servlet>
<servlet-mapping>
<servlet-name>frontcontroller-dispatcher</servlet-name>
<url-pattern>/student.com/*</url-pattern>
</servlet-mapping>
</web-app>
Step 5: Now go to the src > main > webapp > WEB-INF and create an XML file. Actually, this is a Spring Configuration file like beans.xml file. And the name of the file must be in this format
YourServletName-servlet.xml
For example, for this project, the name of the file must be
frontcontroller-dispatcher-servlet.xml
So either you can create a Spring Configuration File or you can just create a simple XML file add the below lines of code inside that file.
File: frontcontroller-dispatcher-servlet.xml
XML
Creating First Spring MVC Controller
Step 6: Now, let’s create some controllers. Go to the src/main/java and create a new controllers package (For ex. com.student.controllers) as per your choice. And inside that create a Java class and name the class as DemoController. Now how to tell the Spring that this is our controller class. So the way we are going to tell the Spring is by marking it with a @Controller annotation.
@Controller
public class DemoController {}
Note: Spring will automatically initialize the class having a @Controller annotation and register that class with the spring container.
Now let’s create a simple method inside the Controller class and use @RequestMapping and @ResponseBody annotation before the method something like this.
// Annotation
@ResponseBody
@RequestMapping("/hello")

// Method
public String helloWorld()
{
    return "Hello World!";
}
Now let’s understand both annotations.
@RequestMapping(“/hello”), so what does it mean? This line means, in the URL if somebody hits student.com/hello then this particular method will be executed and it is going to perform the operation that is written inside that particular method. For example, for this project, we are just returning a message “Hello World!” and we are expecting this is going to display in the client browser. But this thing will not happen. And to make it happen we need to use the @ResponseBody annotation. So @ResponseBody annotation is basically gonna write this particular message, here “Hello World!”, in your HTTP response.
File: DemoController.java
Java
package com.student.controllers;
import org.springframework.stereotype.Controller;
import org.springframework.web.bind.annotation.RequestMapping;
import org.springframework.web.bind.annotation.ResponseBody;
@Controller
public class DemoController {
@ResponseBody
@RequestMapping("/hello")
public String helloWorld()
{
return "Hello World!";
}
}
Step 7: Add the below line inside the frontcontroller-dispatcher-servlet.xml file
<context:component-scan base-package="com.student.controllers"></context:component-scan>
File: frontcontroller-dispatcher-servlet.xml
XML
Run Your First Spring MVC Controller
Step 8: To run your Spring MVC Application right-click on your project > Run As > Run on Server and run your application as shown in the below image.
After that use the following URL to run your controller as shown in the below image. All other details can be perceived through below image as follows:
http://localhost:8080/myfirst-mvc-project/student.com/hello
Это первая статья в моем блоге, связанная с Spring MVC. Начало всегда волнующее, поэтому я постараюсь быть лаконичным и информативным. Spring MVC позволяет создавать веб-приложения максимально удобным, простым и быстрым способом. Начало работы с этой технологией подразумевает знание Spring CORE. В посте вы прочтете о создании простого Spring MVC Controller. Я предпочитаю настройку приложения на основе Java, поэтому пример будет содержать этот подход.
Основная цель – создание контроллера, который будет обрабатывать запрос. Следовательно, после нажатия на ссылку вы будете перенаправлены на конкретную страницу с помощью контроллера Spring.
подготовка
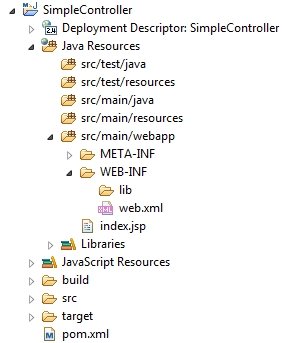
Создайте в Eclipse новый динамический веб-проект, а затем преобразуйте его в проект Maven . Убедитесь, что ваш файл web.xml выглядит следующим образом:
index.jsp будет играть роль домашней страницы в приложении, поместите ее в src / main / webapp / index.jsp ; Вот код index.jsp:
|
1 2 3 4 5 6 |
|
В результате структура проекта будет выглядеть так:
Настройка зависимостей
Далее мне нужно добавить некоторые зависимости в файл pom.xml. Я больше не буду говорить о зависимостях, я прокомментирую код ниже:
|
01 02 03 04 05 06 07 08 09 10 11 12 13 14 15 16 17 18 19 20 21 22 23 24 25 26 27 28 29 30 31 32 33 34 35 36 37 38 39 40 41 42 43 44 45 |
|
Более подробную информацию о зависимостях Spring вы можете найти в официальном блоге .
Конфигурация на основе Java
Пришло время создать конфигурацию для приложения. Как я упоминал выше, этот подход удобен, и одной из причин является использование аннотаций. Во-первых, я собираюсь создать класс WebAppConfig
|
01 02 03 04 05 06 07 08 09 10 11 12 13 14 15 16 17 18 19 20 21 22 23 24 |
|
Это сделано, чтобы указать путь, где хранятся все JSP. Это необходимо для того, чтобы использовать дополнительные читаемые URL-адреса.
Теперь очередь за классом Initializer для обзора:
|
01 02 03 04 05 06 07 08 09 10 11 12 13 14 15 16 17 18 19 20 21 22 23 24 25 26 27 |
|
Обратите внимание, что класс Initializer реализует интерфейс WebApplicationInitializer . Это необходимо, чтобы избежать XML-конфигурации веб-приложения.
JSP для контроллера
Прежде чем я покажу вам, как создать простой контроллер, мне нужно создать файл JSP, к которому контроллер нас приведет.
|
1 2 3 4 5 6 7 |
|
Вот путь к JSP-файлу: src / main / webapp / WEB-INF / pages / hello.jsp
Обратите внимание, что в классе WebAppConfig я указал такие части пути, как sufix и prefix.
контроллер
И, наконец, код класса LinkController
|
01 02 03 04 05 06 07 08 09 10 11 12 13 14 15 16 17 18 19 20 21 |
|
Теперь вам нужно обновить файл index.jsp, добавив туда ссылку на страницу Hello:
|
1 2 3 4 5 6 7 |
|
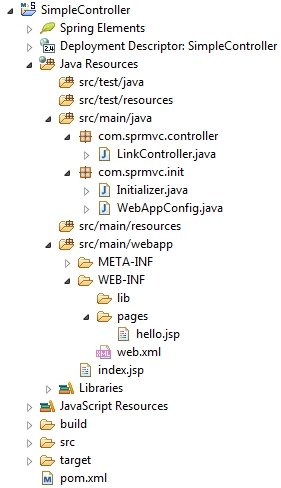
Окончательная структура проекта:
Запустите проект, откройте index.jsp и нажмите на ссылку, и вы получите:

Резюме
Иногда учебники действительно полезны, но лучший способ научиться использовать Spring – это прочитать официальную документацию, поэтому я рекомендую вам углубиться в блог Spring.
Ссылка: Spring MVC: Создание простого контроллера на основе Java от нашего партнера по JCG Алекса Фрузенштейна в блоге заметок Фрузенштейна .
The first of the MVC elements we’ll work on implementing are the controllers. Recall that controllers
are like the traffic cops of our application. They handle the requests made from users interacting with the
application’s view and update model data accordingly. Conversely, changes to model data are sent to the view
via controller methods.

MVC flow
10.1.1. Controllers and Static Responses — Video
Note
The starter code for this video is found in the starter branch
of the hello-spring-demo repo. The final code presented in this video is found on the static-responses branch.
Code along to the videos on your own hello-spring project.
10.1.2. Controllers and Static Responses — Intro
10.1.2.1. @Controller
In the Spring Boot context, we’ll organize controller code into a controller package. Remember when we
mentioned that the framework works by convention over configuration? This is what we mean. It’s not required
for a controller to be in a controller package, but it’s generally a good idea.
To designate a given class as a controller within the Spring framework,
we use the annotation @Controller. Recall that Java Annotations
are like metadata about your code. They help the framework do
its work by adding context to your code.
@Controller
public class HelloSpringController {

   // class code here ...

}
10.1.2.2. Controllers Map to Requests
@GetMapping is another critical annotation used on controller methods.
@GetMapping designates a controller action with a URL path. For every GET request made to the provided
path, the controller method will be called. The path is defined with
@GetMapping("pathname"). If the pathname value is null, then the path used is the
index path, or /.
@Controller
public class HelloSpringController {

   // responds to get requests at "/hello"
   @GetMapping("hello")
   public String hello() {
      // method code here ...
   }

}
For every controller method that you want to respond to a request, you will want to use a mapping annotation.
Not surprisingly, though, @GetMapping only handles GET requests. If you want to write a controller
method that takes care of a POST request, you’ll want to use @PostMapping. Of course, there are
other annotations for the other request methods, but these are the two we will use in this class.
@Controller
public class HelloSpringController {

   // responds to post requests at "/goodbye"
   @PostMapping("goodbye")
   public String goodbye() {
      // method code here ...
   }

}
If we want to write a controller method that will be used for both GET and POST at the same path, we
can label the method with @RequestMapping. @RequestMapping can handle more than one method as such:
@Controller
public class HelloSpringController {

   // responds to get and post requests at "/hellogoodbye"
   @RequestMapping(value="hellogoodbye", method = {RequestMethod.GET, RequestMethod.POST})
   public String hellogoodbye() {
      // method code here ...
   }

}
The default method of @RequestMapping is GET. Another added capability of @RequestMapping is that
it can be applied to a whole class, not just a single method. When applied to a whole class, @RequestMapping
essentially designates a base path that all methods in the class start with.
10.1.2.3. @ResponseBody
@ResponseBody is yet another annotation used in the Spring controller context to return plain text
from a controller method. This annotation we will only need to use for a short while, before we start
to work with templates. Spring Boot’s default action when responding to a controller method is to return
a template. Since we aren’t doing that yet however, we need to tell the framework to return plain text by
adding the @ResponseBody annotation.
Let’s put it all together:
@Controller
public class HelloSpringController {

   // responds to get requests at "/hello"
   @GetMapping("hello")
   @ResponseBody
   public String hello() {
      return "Hello, Spring!";
   }

}
10.1.3. Check Your Understanding
Question
True/False: The @Controller annotation goes above a method to classify
it as a controller method.
-
True
-
False
Question
Which of the following is true about controllers?
-
Controllers handle the data storage of an MVC app.
-
Controllers manage what the user of an MVC application sees.
-
Controllers relay the messages between data and views in an MVC application.
-
Controllers determine what information can be submitted in an online form.
By Robert Eckstein,
March 2007
Contents
What Is Model-View-Controller (MVC)?
If you’ve programmed with graphical user interface (GUI) libraries in the past 10 years or so, you have likely come across the model-view-controller (MVC) design. MVC was first introduced by Trygve Reenskaug, a Smalltalk developer at the Xerox Palo Alto Research Center in 1979, and helps to decouple data access and business logic from the manner in which it is displayed to the user. More precisely, MVC can be broken down into three elements:
- Model — The model represents data and the rules that govern access to and updates of this data. In enterprise software, a model often serves as a software approximation of a real-world process.
- View — The view renders the contents of a model. It specifies exactly how the model data should be presented. If the model data changes, the view must update its presentation as needed. This can be achieved by using a push model, in which the view registers itself with the model for change notifications, or a pull model, in which the view is responsible for calling the model when it needs to retrieve the most current data.
- Controller — The controller translates the user’s interactions with the view into actions that the model will perform. In a stand-alone GUI client, user interactions could be button clicks or menu selections, whereas in an enterprise web application, they appear as
GETandPOSTHTTP requests. Depending on the context, a controller may also select a new view — for example, a web page of results — to present back to the user.
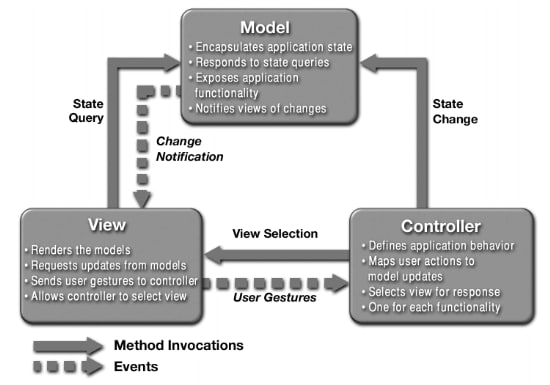
Figure1. A Common MVC Implementation
Interaction Between MVC Components
This section will take a closer look at one way to implement Figure 1 in the context of an application in the Java Platform, Standard Edition 6 (Java SE 6). Once the model, view, and controller objects are instantiated, the following occurs:
- The view registers as a listener on the model. Any changes to the underlying data of the model immediately result in a broadcast change notification, which the view receives. This is an example of the push model described earlier. Note that the model is not aware of the view or the controller — it simply broadcasts change notifications to all interested listeners.
- The controller is bound to the view. This typically means that any user actions that are performed on the view will invoke a registered listener method in the controller class.
- The controller is given a reference to the underlying model.
Once a user interacts with the view, the following actions occur:
- The view recognizes that a GUI action — for example, pushing a button or dragging a scroll bar — has occurred, using a listener method that is registered to be called when such an action occurs.
- The view calls the appropriate method on the controller.
- The controller accesses the model, possibly updating it in a way appropriate to the user’s action.
- If the model has been altered, it notifies interested listeners, such as the view, of the change. In some architectures, the controller may also be responsible for updating the view. This is common in Java technology-based enterprise applications.
Figure 2 shows this interaction in more detail.

Figure 2. A Java SE Application Using MVC
As this article mentioned earlier, the model does not carry a reference to the view but instead uses an event-notification model to notify interested parties of a change. One of the consequences of this powerful design is that the many views can have the same underlying model. When a change in the data model occurs, each view is notified by a property change event and can update itself accordingly. For example, Figure 3 shows two views that use the same data model.

Figure 3. Multiple Views Using the Same Model
Modifying the MVC Design
A more recent implementation of the MVC design places the controller between the model and the view. This design, which is common in the Apple Cocoa framework, is shown in Figure 4.
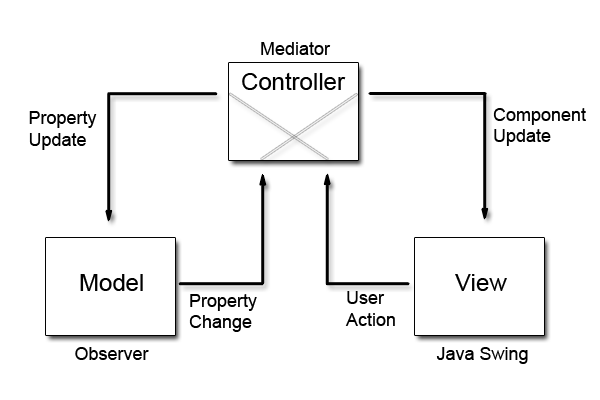
Figure 4. An MVC Design Placing the Controller Between the Model and the View
The primary difference between this design and the more traditional version of MVC is that the notifications of state changes in model objects are communicated to the view through the controller. Hence, the controller mediates the flow of data between model and view objects in both directions. View objects, as always, use the controller to translate user actions into property updates on the model. In addition, changes in model state are communicated to view objects through an application’s controller objects.
Thus, when all three components are instantiated, the view and the model will both register with the controller. Once a user interacts with the view, the events are nearly identical:
- The view recognizes that a GUI action — for example, pushing a button or dragging a scroll bar — has occurred, using a listener method that is registered to be called when such an action occurs.
- The view calls the appropriate method on the controller.
- The controller accesses the model, possibly updating it in a way appropriate to the user’s action.
- If the model has been altered, it notifies interested listeners of the change. However, in this case, the change is sent to the controller.
Why adopt this design? Using this modified MVC helps to more completely decouple the model from the view. In this case, the controller can dictate the model properties that it expects to find in one or more models registered with the controller. In addition, it can also provide the methods that effect the model’s property changes for one or more views that are registered with it.
Using the Modified MVC
This section of the article shows you how to put this design into practice, starting with the model. Suppose that you want to paint some text using a simple display model with five properties. Code Sample 1 shows a simple component that you can use to create such a model.
Code Sample 1
public class TextElementModel extends AbstractModel
{

    private String text;
    private Font font;
    private Integer x;
    private Integer y;
    private Integer opacity;
    private Integer rotation;


    /**
     * Provides the means to set or reset the model to
     * a default state
     */
    public void initDefault() {

        setOpacity(89);
        setRotation(0);
        setText("Sample Text");
        setFont(new Font("Arial", Font.BOLD, 24));
        setX(50);
        setY(50);

    }

    //  Accessors


    public String getText() {
        return text;
    }

    public void setText(String text) {

        String oldText = this.text;
        this.text = text;

        firePropertyChange(
            DefaultController.ELEMENT_TEXT_PROPERTY,
            oldText, text);
    }

    public Font getFont() {
        return font;
    }

    public void setFont(Font font) {

        Font oldFont = this.font;
        this.font = font;

        firePropertyChange(
            DefaultController.ELEMENT_FONT_PROPERTY,
            oldFont, font);
    }

    //  The remaining accessors for properties are omitted.

}
Note that the rest of the accessors follow the standard JavaBeans model, although they are omitted in Code Sample 1. For reference, Code Sample 2 shows the underlying AbstractModel class, which simply uses the javax.beans.PropertyChangeSupport class to register, deregister, and notify interested listeners of changes to the model.
Code Sample 2
public abstract class AbstractModel
{

    protected PropertyChangeSupport propertyChangeSupport;

    public AbstractModel()
    {
        propertyChangeSupport = new PropertyChangeSupport(this);
    }

    public void addPropertyChangeListener(PropertyChangeListener listener) {
        propertyChangeSupport.addPropertyChangeListener(listener);
    }

    public void removePropertyChangeListener(PropertyChangeListener listener) {
        propertyChangeSupport.removePropertyChangeListener(listener);
    }

    protected void firePropertyChange(String propertyName, Object oldValue, Object newValue) {
        propertyChangeSupport.firePropertyChange(propertyName, oldValue, newValue);
    }


}
The Controller
Between the model and view lies the controller. First, take a look at the code for the abstract controller superclass, as shown in Code Sample 3.
Code Sample 3
public abstract class AbstractController implements PropertyChangeListener {

    private ArrayList<abstractviewpanel> registeredViews;
    private ArrayList<abstractmodel> registeredModels;

    public AbstractController() {
        registeredViews = new ArrayList<abstractviewpanel>();
        registeredModels = new ArrayList<abstractmodel>();
    }


    public void addModel(AbstractModel model) {
        registeredModels.add(model);
        model.addPropertyChangeListener(this);
    }

    public void removeModel(AbstractModel model) {
        registeredModels.remove(model);
        model.removePropertyChangeListener(this);
    }

    public void addView(AbstractViewPanel view) {
        registeredViews.add(view);
    }

    public void removeView(AbstractViewPanel view) {
        registeredViews.remove(view);
    }


    //  Use this to observe property changes from registered models
    //  and propagate them on to all the views.


    public void propertyChange(PropertyChangeEvent evt) {

        for (AbstractViewPanel view: registeredViews) {
            view.modelPropertyChange(evt);
        }
    }


    /**
     * This is a convenience method that subclasses can call upon
     * to fire property changes back to the models. This method
     * uses reflection to inspect each of the model classes
     * to determine whether it is the owner of the property
     * in question. If it isn't, a NoSuchMethodException is thrown,
     * which the method ignores.
     *
     * @param propertyName = The name of the property.
     * @param newValue = An object that represents the new value
     * of the property.
     */
    protected void setModelProperty(String propertyName, Object newValue) {

        for (AbstractModel model: registeredModels) {
            try {

                Method method = model.getClass().
                    getMethod("set"+propertyName, new Class[] {
                                                      newValue.getClass()
                                                  }


                             );
                method.invoke(model, newValue);

            } catch (Exception ex) {
                //  Handle exception.
            }
        }
    }


}
The AbstractController class contains two ArrayList objects, which are used to keep track of the models and views that are registered. Note that whenever a model is registered, the controller also registers itself as a property change listener on the model. This way, whenever a model changes its state, the propertyChange() method is called and the controller will pass this event on to the appropriate views.
The final method, setModelProperty(), employs some magic to get its work done. In order to keep the models completely decoupled from the controller, the code samples in this article have employed the Java Reflection API. In this case, when this method is called with the desired property name, you hunt through the registered models to determine which one contains the appropriate method. Once you find it, you invoke the method using the new value. If the method is not called, the getMethod() will throw a NoSuchMethodException, which the exception handler ignores, allowing the for- loop to continue.
Code Sample 4 shows the source code for the default controller class. This class consists of only property constants and methods called by the GUI event listeners of the view.
Code Sample 4
public class DefaultController extends AbstractController
{

    public static final String ELEMENT_TEXT_PROPERTY = "Text";
    public static final String ELEMENT_FONT_PROPERTY = "Font";
    public static final String ELEMENT_X_PROPERTY = "X";
    public static final String ELEMENT_Y_PROPERTY = "Y";
    public static final String ELEMENT_OPACITY_PROPERTY = "Opacity";
    public static final String ELEMENT_ROTATION_PROPERTY = "Rotation";

    //  Code omitted

    public void changeElementText(String newText) {
        setModelProperty(ELEMENT_TEXT_PROPERTY, newText);
    }

    public void changeElementFont(Font newFont) {
        setModelProperty(ELEMENT_FONT_PROPERTY, newFont);
    }

    public void changeElementXPosition(int newX) {
        setModelProperty(ELEMENT_X_PROPERTY, newX);
    }

    public void changeElementYPosition(int newY) {
        setModelProperty(ELEMENT_Y_PROPERTY, newY);
    }

    public void changeElementOpacity(int newOpacity) {
        setModelProperty(ELEMENT_OPACITY_PROPERTY, newOpacity);
    }

    public void changeElementRotation(int newRotation) {
        setModelProperty(ELEMENT_ROTATION_PROPERTY, newRotation);
    }

}
The View
This example will have two views displaying the data from the model: a property-editor view and a graphical page view. Both of these are implementations of a JPanel, inserted into either a JDialog or JFrame. The dialog box allows the user to update the values of the model, and the frame panel simply reflects the changes as the final textual display. The author of this article built this example using the NetBeans Swing GUI Builder, formerly referred to as Project Matisse, to design the GUI forms.
Code Sample 5 shows the source code for the property-editor view, the more interesting of the two. The first section is simply devoted to initialization of the components, which for the most part was automatically generated by the NetBeans integrated development environment (IDE) in the initComponents() method. All of this section is omitted but is present in the downloadable code. Any other initialization that you need to perform — in this case, creating custom models for JSpinner and JSlider objects or adding DocumentListeners to the JTextField components — is handled in the localInitialization() method.
Code Sample 5
public PropertiesViewPanel(DefaultController controller) {

        this.controller = controller;

        initComponents();
        localInitialization();

    }

    // ‹editor-fold defaultstate="collapsed" desc=" Local Initialization "›

    /**
     * Used to provide local initialization of Swing components
     * outside of the NetBeans automatic code generator
     */
    public void localInitialization() {

        opacitySpinner.setModel(new SpinnerNumberModel(100, 0, 100, 1));
        opacitySlider.setModel(new DefaultBoundedRangeModel(100, 0, 0, 100));

        rotationSpinner.setModel(new SpinnerNumberModel(0, -180, 180, 1));
        rotationSlider.setModel(new DefaultBoundedRangeModel(0, 0, -180, 180));

        text.getDocument().addDocumentListener(new DocumentListener() {

            public void insertUpdate(DocumentEvent e) {
                textDocumentChanged(e);
            }

            public void removeUpdate(DocumentEvent e) {
                textDocumentChanged(e);
            }

            public void changedUpdate(DocumentEvent e) {
                textDocumentChanged(e);
            }

        });

    }

    // ‹/editor-fold›
Note that the automatically generated NetBeans IDE code folds in the source code so that the developer can collapse each of these sections when it is not needed:
// ‹editor-fold defaultstate="collapsed" desc=" Local Initialization "›
// ‹/editor-fold›
If you’re using the NetBeans IDE, this practice is highly recommended.
The second section of the PropertiesViewPanel class deals exclusively with the model. In Code Sample 6, a modelPropertyChange() method is called by the controller whenever the model reports a state change.
Code Sample 6
// ‹editor-fold defaultstate="collapsed" desc=" Model Event Handling Code "›

    public void modelPropertyChange(final PropertyChangeEvent evt) {

        if (evt.getPropertyName().equals(
                   DefaultController.ELEMENT_X_PROPERTY)) {
            String newStringValue = evt.getNewValue().toString();
            xPositionTextField.setText(newStringValue);
        } else if
           (evt.getPropertyName().equals(
                   DefaultController.ELEMENT_Y_PROPERTY)) {
            String newStringValue = evt.getNewValue().toString();
            yPositionTextField.setText(newStringValue);
        } else if
           (evt.getPropertyName().equals(
                   DefaultController.ELEMENT_OPACITY_PROPERTY)) {
            int newIntegerValue = (Integer)evt.getNewValue();
            opacitySpinner.setValue(newIntegerValue);
            opacitySlider.setValue(newIntegerValue);
        } else if
            (evt.getPropertyName().equals(
                   DefaultController.ELEMENT_ROTATION_PROPERTY)) {
            int newIntegerValue = (Integer)evt.getNewValue();
            rotationSpinner.setValue(newIntegerValue);
            rotationSlider.setValue(newIntegerValue);
        } else if
           (evt.getPropertyName().equals(
                   DefaultController.ELEMENT_TEXT_PROPERTY)) {
            String newStringValue = evt.getNewValue().toString();
            text.setText(newStringValue);
        } else if
           (evt.getPropertyName().equals(
                   DefaultController.ELEMENT_FONT_PROPERTY)) {
            Font f = (Font)evt.getNewValue();
            String fontString = f.getFontName() + " " + f.getSize();
            font.setText(fontString);
            currentFont = f;
        }

        //  Remainder of the code omitted

    }

    // ‹/editor-fold›
Again, this code sample omits portions of the code that are similar to the sections shown.
The final portion consists of the GUI event listeners. Code Sample 7 contains listeners that are called whenever GUI events occur, such as pushing the Change Font button or the Opacity spinner buttons, or resetting the text in any of the text fields. These are largely event listeners that most Swing developers are already familiar with. If you’re using the NetBeans IDE, you’ll see that the IDE can automatically generate many of these using the GUI developer.
Code Sample 7
// ‹editor-fold defaultstate="collapsed" desc=" GUI Event Handling Code "›

    //  Code omitted

    private void yPositionTextFieldFocusLost(java.awt.event.FocusEvent evt) {
        try {
            controller.changeElementYPosition(
                Integer.parseInt(yPositionTextField.getText()));
        } catch (Exception e) {
            //  Handle exception.
        }
    }

    private void yPositionTextFieldActionPerformed(java.awt.event.ActionEvent evt) {
        try {
            controller.changeElementYPosition(
                Integer.parseInt(yPositionTextField.getText()));
        } catch (Exception e) {
            //  Handle exception.
        }
    }

    //  Code omitted -- code for xPosition
    //  is nearly the same as for yPosition.

    private void changeFontButtonActionPerformed(java.awt.event.ActionEvent evt) {

        JFontChooserDialog fontChooser = new
            JFontChooserDialog((Dialog)this.getTopLevelAncestor());
        fontChooser.setSelectedFont(currentFont);
        fontChooser.setVisible(true);

        Font returnedFont = fontChooser.getSelectedFont();
        if (returnedFont != null) {
            controller.changeElementFont(returnedFont);
        }
    }

    private void opacitySliderStateChanged(javax.swing.event.ChangeEvent evt) {
        controller.changeElementOpacity((int)opacitySlider.getValue());
    }

    private void rotationSliderStateChanged(javax.swing.event.ChangeEvent evt) {
        controller.changeElementRotation((int)rotationSlider.getValue());
    }

    private void opacitySpinnerStateChanged(javax.swing.event.ChangeEvent evt) {
        controller.changeElementOpacity((Integer)opacitySpinner.getValue());
    }

    private void rotationSpinnerStateChanged(javax.swing.event.ChangeEvent evt) {
        controller.changeElementRotation((Integer)rotationSpinner.getValue());
    }

    private void textDocumentChanged(DocumentEvent evt) {

        Document document = evt.getDocument();
        try {
            controller.changeElementText(document.getText(0,
            document.getLength()));
        } catch (BadLocationException ex) {
            //  Handle exception.
        }
    }

    // ‹/editor-fold›
Issues With Application Design
Once the application is up and running, you immediately run into a problem. Consider the following chain of events:
- One of the Swing components in the view receives a change, presumably from the user action.
- The appropriate controller method is called.
- The model is updated. It notifies the controller of its property change.
- The view receives a change event from the controller and attempts to reset the value of the appropriate Swing components.
- The appropriate controller method is called, and the model is updated again.
At this point, any of three different scenarios can occur, depending on what Swing component you use and how robust your model is.
- The Swing component that prompted the initial change refuses to update itself the second time, noting that its property state cannot be updated again while it is in the process of notifying listeners of the initial state change. This primarily occurs when you use Swing text components.
- The model notes that the value of the second update matches that of the first, its current value, and refuses to send a change notification. This is always a safe programming practice, and it automatically occurs if you use the
PropertyChangeSupportclass provided in thejava.beanspackage. However, it does not keep the model from receiving a redundant update. - No safeguards are in place on either the model or the Swing component, and the program enters an infinite loop.
This issue occurs because the Swing components are autonomous. For example, what happens if the user presses the up arrow of the JSpinner component in PropertiesViewPanel, incrementing the spinner’s value by one? After the value is updated, a GUI event listener method that is listening for value changes is called, opacitySpinnerStateChanged(), which in turn calls the controller and then updates the appropriate property in the model.
With a traditional MVC design, the view would still contain the previous value, and the change in the model would update the view to the current value. However, there is no need to update the Swing component because it has already reset itself to the correct value — it did so before it even passed an event to the controller.
How do you get around this? One way is to write a mechanism that tells the model or the controller not to propagate a change notification under these circumstances, but this is not a good idea. Remember that more than one view may be listening for changes on the model. If you shut down the change notification for the model, no other listeners, including other views, will be notified of the change. In addition, other components in the same view may rely on the property change notification, with a slider and spinner combination, for example.
Ideally, each Swing component would be aware of its current value and the value that the view is trying to set it to. If they match, no change notifications will be sent. However, some Swing components include this logic, and others do not. One possible solution is to check the incoming changed value of the model against the current value stored in the Swing component. If they are identical, there is no need to reset the value of the Swing component.
Code Sample 8 shows an update of the modelPropertyChange() method to demonstrate this approach.
Code Sample 8
public void modelPropertyChange(final PropertyChangeEvent evt) {

        if (evt.getPropertyName().equals(DefaultController.ELEMENT_X_PROPERTY)) {

            String newStringValue = evt.getNewValue().toString();
            if (!xPositionTextField.getText().equals(newStringValue))
                xPositionTextField.setText(newStringValue);

        }

        //  Remaining code omitted

    }
The final example, which uses two delegate views, is shown in Figure 5. The second delegate makes use of the Java 2D libraries to display the text, which is beyond the scope of this article. However, the source code is relatively easy to follow and is included in the downloadable source code.
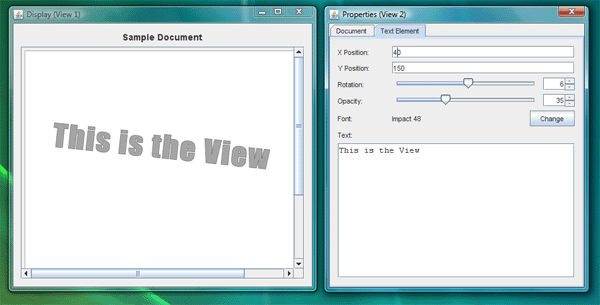
Figure 5. Both Views Attached to a Single Model
Common Swing Component Listeners
As this article has shown throughout, part of the initialization of each delegate or controller requires you to subscribe to various Swing component events. However, individual Swing components can often generate multiple event types. Table 1 presents some common listener methods.
Conclusion
MVC is one of the staples of any GUI programmer’s toolkit. This article has shown how to implement a variation of the MVC design using Java SE and the Swing libraries. In addition, it has demonstrated some common issues that programmers may face when using MVC, as well as listed common Swing component events that any Java platform programmer can use when creating a view.
For More Information
- Creating a GUI With Java Swing, also known as The Swing Tutorial, shows you how to get started using the Java Swing components.
- A Swing Architecture Overview gives the inside story on how Swing uses a variant of MVC.
- If you are curious as to how the textual portion of the Java 2D libraries work, take a look at this article.