![]()
Загрузить PDF
![]()
Загрузить PDF
Редактор звуковых файлов, известный как Audacity, может быть использован для создания любых звуковых файлов и аудиопроектов. Audacity можно даже использовать, чтобы собрать «мэшап», или композицию из нескольких песен. Для мешапов используются куски двух или более песен и композиций, используемых для создания оригинального трека – иногда с выдающимися последствиями. Начинайте читать шаг 1, чтобы сделать собственный мэшап с помощью Audacity!
Шаги
-

1
Соберите сэмплы для вашего мэшапа. Мэшапы создаются из кусочков различных песен, называемых «сэмплами». Песни, отрывки и аудио треки, которые вы намереваетесь использовать, должны иметь четкие названия и быть сохранены в виде аудиофайлов в формате, поддерживаемом Audacity, например .wav.
- Сбросьте ваши сэмплы в папке, где вы сможете найти их, когда вам нужно будет их использовать. Может помочь, если вы назовете различные наборы сэмплов или папки названиями вроде «ударные», «гитара», «разное» и т.д., чтобы быстро находить и использовать их.
-
2
Установите Audacity на ваш компьютер. Эту бесплатную программу можно без проблем установить после скачивания файла-установщика с http://audacity.sourceforge.net/ или из многих других источников. Если вы не уверены в том, как скачать и установить Audacity, то смотрите раздел ниже, чтобы узнать больше.
- Чтобы скачать Audacity, используйте проверенные сайты. Несмотря на то, что эта программа бесплатная, некоторые сайты с сомнительной репутацией могут прикреплять к загрузке вирусы или другое вредоносное ПО.
-
3
Сбросьте свои сэмплы на треки Audacity. Воспользуйтесь для импорта сэмпла элементы управления Audacity. Вы увидите, как он появится в первом треке Audacity в виде системы движущихся линий, которые представляют звуковые волны.
-
4
Отрегулируйте свои сэмплы по длине и положению. Для отражения расположения звуков в вашем аудиофайле Audacity использует графический дизайн. Когда вы увидите ваш сэмпл в треке, вы можете использовать мышь для того, чтобы двигать сэмпл по трек, удлинять и укорачивать сэмпл, или помещать его в конкретные временные рамки.
- Просмотрите ваш трек Audacity слева направо. Движение звука представляется перемещающимся слева направо треком. Вы также можете увидеть на треке маркеры времени, которые очень важны для ритмичного совмещения разных сэмплов.
-
5
Добавьте к трекам Audacity дополнительные сэмплы. Начните выкладывать слоями отрывки песен и сэмплы, поддерживая ритм. Постепенно создавайте дополнительные треки Audacity, которые будут содержать различные сэмплы звуков, которые проигрываются одновременно.
- Отредактируйте ваши треки, чтобы убедиться, что они откалиброваны по ритму. Например, если вы используете сэмплы по отношению к постоянному, статическому фоновому ритму, используйте фоновый ритм как начальный трек, и «синхронизируйте» с ним сэмплы, двигая их на места в перемещающихся треках, где они синхронизированы.
-
6
Проиграйте мэшап. Когда вы добавите все сэмплы, которые хотите, проиграйте мэшап и прислушайтесь к возможным проблемам. Ищите рассинхронизированные ритмы, диссонанс, обрезку и другие распространенные проблемы со звучанием.
- Смикшируйте ваши звуки. Вы можете изменять громкость определенного трека Audacity, чтобы лучше совместить звуки.
- Займитесь «мутным» звуком. Если у вас получился неясный звук, то вы могли смикшировать слишком много звуков. Прослушайте композицию критически и при необходимости отредактируйте ее.
-
7
Сохраните ваш проект Audacity полностью. Когда все будет готово, сохраните весь проект в форматы, которые проигрывается проигрывателями на вашем компьютере (отлично подходят .wav и .mp3). Поздравляем! Вы сделали мэшап, который можете называть своим собственным.
Реклама


-
1
Зайдите на главный сайт Audacity. Audacity можно абсолютно бесплатно скачивать и использовать – вам даже не нужно создавать аккаунт или предоставлять ваш адрес электронной почты. Чтобы скачать Audacity с сайта его создателей, зайдите на http://audacity.sourceforge.net/. На главной странице вы увидите большую синюю ссылку «Download Audacity».
-
2
Если вы не можете скачать Audacity с Sourceforge, воспользуйтесь дополнительным зеркалом загрузки. Если по какой-то причине вы не можете зайти на главный сайт Sourceforge, не волнуйтесь. Вы все еще можете скачать Audacity со многих других сайтов. Поищите «Audacity download» или подобные слова в вашем поисковике – вы должны будете получить несколько подходящих результатов. Удостоверьтесь, что вы используете безопасный сайт загрузок с хорошей репутацией – остерегайтесь рекламных и шпионских программ, а также мошенников.
- Если вы не уверены, является ли сайт, с которого вы загружаете Audacity, безопасным и заслуживающим доверия, проверьте его с помощью бесплатного Scam Adviser следующим образом:
- Зайдите на www.scamadviser.com.
- Введите URL сайта, с которого вы скачиваете Audacity (например www.fakewebsite.com)
- Получите бесплатный рейтинг надежности. Если он не находится в «зеленой» области, не используйте этот сайт.
- Если вы не уверены, является ли сайт, с которого вы загружаете Audacity, безопасным и заслуживающим доверия, проверьте его с помощью бесплатного Scam Adviser следующим образом:
-
3
Загрузите Audacity. Независимо от того, скачиваете ли вы программу с Sourceforge, или из другого места, процесс, как правило, довольно прост. Щелкните на ссылке «Download», если спросят, укажите место на жестком диске, куда вы хотите сохранить файл, и ждите, пока файл загрузится. В зависимости от вашего браузера этот процесс может немного отличаться. Смотрите далее:
- В случае Internet Explorer 9 должно открыться новое окно, на котором будут показаны ваши загрузки. Отсюда вы можете запустить файл, если не сделали этого ранее.
- В случае Firefox браузер спросит у вас, сохранять файл или нет. Если вы выберете сохранить файл, то прогресс будет отображаться в виде маленького значка в углу браузера. Когда загрузка завершится, щелкните на этом значке, и выберите файл, чтобы запустить его.
- В случае Chrome, чтобы получить доступ к вашему файлу, перейдите на панель Настроек, выберите загрузки (или нажмите Ctrl+J или Command+J для Mac) и откройте файл.
-
4
Запустите файл-установщик. Как только вы загрузите установочный файл Audacity, найдите и запустите его. Для установки Audacity следуйте инструкциям на экране!
-
5
Откройте Audacity. Когда процесс установки будет завершен, мастер установки позволит вам открыть Audacity. Если вы не хотите этого, уберите галочку с поля, в котором написано «Open Audacity». Вы также можете в любое время открыть Audacity, перейдя к месту хранения файла, куда вы установили его, и дважды щелкнув на соответствующем значке.
-
6
Делайте ремиксы как вашей душе угодно. Поздравляем! Вы загрузили и установили Audacity. Воспользуйтесь инструкциями в разделе выше, чтобы сделать ваш первый мэшап.
Реклама


Что вам понадобится
- Компьютер Audacity
- Цифровые сэмплы и звуковой материал
- Музыка, которую вы хотите свести в мэшап.
Об этой статье
Эту страницу просматривали 26 812 раз.
Была ли эта статья полезной?

В этой статье мы расскажем как соединить 2 трека в один (сделать мэшап). Где бесплатно можно соединить сразу несколько треков и скачать его себе. Сервис для качественных мешапов, который объединяет не только музыку, но и и соединяет видео, если вы дали ссылку именно на клип, например с YouTube.
Как соединить несколько песен вместе (сделать МЭШАП)
1. Открываем сайт. У нас отрылась главная страница сервиса. Нажимаем на кнопку «Create».

2. Вы можете выбирать с какого сервиса можете предоставлять ссылки на ваши композиции и клипы: «YouTube» или «Spotify».

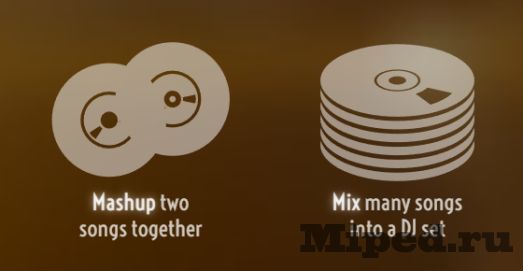
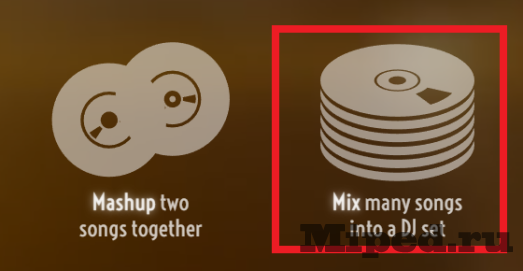
3. Определяемся сколько треков вы хотите объединить есть 2 варианта: «Mashup two songs together» (объединяем 2 песни) и «Mix many songs into a DJ set»( соединяем от 10 и больше треков)
4. Соединение 2 песен. Покажем на примере объединения 2 треков, ссылки из которых возьмем из Ютуба, чтобы у нас получился мэшап с видео.
Находим нужные нам треки в Ютубе, копируем прямую ссылку на клип и вставляем в поисковую строку на сервисе и нажимаем «Enter».
Ищем второй трек и добавляем его таким же способом. Должно получится так:

5. Нажимаем на кнопку внизу «Create Mashup», чтобы сервис начал объединять наши клипы.

6. Началось создание нашего мэшапа, просто ожидаем когда программа сделает все и наслаждаемся прослушиванием, созданного нами трека

Как создать мэшап из 10 треков
1. Переходим на главную страницу и нажимаем «Create»
2. Выбираем «Mix many songs into a DJ set» и платформу с какой будем загружать песни.
3. Находим 10 песен и вставляем копируем прямую ссылку на клип и вставляем в поисковую строку на сервисе и нажимаем «Enter».

4. Внизу страницы нажимаем кнопку «Mix 10 Tracks»

5. Ваш микс начал создаваться и поставлен в очередь, остается только ждать. Это может занять некоторое время.

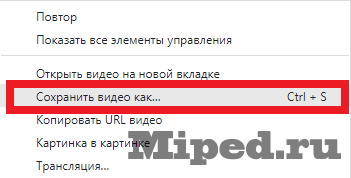
Чтобы скачать его, открываем трек на сайте и нажимаем по нему правой кнопкой мыши. Выбираем пункт «Сохранить видео как» (или сочетание клавиш «Ctrl+S») и выбираем папку на нашем ПК куда его загрузить
Надеюсь статья была полезной для вас!
![]()
Download Article
![]()
Download Article
This wikiHow teaches you how to use Audacity to create a new song (or «mash-up») which uses one song’s vocals in conjunction with another song’s instrumental. The four primary components of creating a clean mash-up include finding two songs which work well together, adjusting the pitch of the vocals to fit the beat, adjusting the tempo of the two songs to align, and synchronizing the vocals with the proper point in the instrumental.
-
1
Determine which two songs you want to mash up. To make a mash-up, you’ll need the vocals from one song and the instrumental from another. You’ll need to figure out which two songs you want to use, as well as which song you want to use for vocals and which song you want to use for the background.
-
2
Download an a cappella version of one song. Downloading MP3 files from YouTube is a good way to get an a cappella version of a song, though you should always credit any artists and YouTube creators from whom you use audio.
- Using copyrighted audio for your own music is fine but selling or using the music in any commercial sense (or any context other than personal enjoyment) is not.
Advertisement
-
3
Download an instrumental version of the other song. Again, YouTube is a good resource for song instrumentals.
- If you can’t find an instrumental version of the song in question, try looking for a «karaoke» version instead.
-
4
Open Audacity. Click or double-click the Audacity app icon, which resembles a pair of blue headphones around an orange wavelength.
-
5
Import both songs into Audacity. Once your audio files have been imported into Audacity, you can begin working on your mash-up. To import files, do the following:
- Click File
- Click Import
- Click Import Audio…
- Hold down Ctrl (or ⌘ Command) while clicking your music files.
- Click Open


Advertisement
-
1
Select the vocals-only track. Click and drag your mouse cursor from left to right across the a capella track until the whole thing is selected.
-
2
Click Effect. It’s a tab at the top of the Audacity window (or the screen on a Mac). A drop-down menu will appear.
-
3
Click Change Pitch…. This option is near the top of the drop-down menu. Clicking it opens a new window.
-
4
Click the «Semitones (half-steps)» text box. You’ll find this near the middle of the window.
-
5
Raise or lower your song’s pitch. Each octave is represented by the number «0.12», meaning that you’d type in 0.12 to raise the song’s pitch by one octave (or -0.12 to lower the song’s pitch by one octave). Using increments of 0.12 is the cleanest, most accurate way to increase or decrease pitch.[1]
- You can also use half-octaves (0.06) if you need to finesse your vocals’ pitch further, but you shouldn’t otherwise deviate from the 0.12 increment.
-
6
Click OK. It’s at the bottom of the window. This will apply your pitch adjustment to the selected audio.
-
7
Listen to the song. With both tracks unmuted, listen to the pitch of the song in conjunction with the instrumental. If the song sounds in-key with the beat, you’re all set.
- Keep in mind that the song most likely won’t synchronize with the beat just yet.
-
8
Adjust the pitch as needed. Much of creating a mash-up consists of trial-and-error, and this part is no exception. If your song is still out of key, click Edit, click Undo Change Pitch, and adjust the pitch again. Once your song’s vocals’ pitch matches your instrumental, you can proceed with synchronizing the files’ beats-per-minute.


Advertisement
-
1
Find out each track’s tempo. In order for your tracks to line up with each other, they have to have the same beats per minute (BPM) number. You can find out each track’s BPM number by doing the following:
- Go to https://songbpm.com/
- Type your song’s name and artist name into the search bar at the top of the page.
- Press ↵ Enter
- Review the «BPM» number on the right side of the page next to the correct song.
- Repeat with your other song.
-
2
Determine which track to alter. If you want to speed up your mash-up, you’ll want to bump up the BPM of the slower song to match the faster one; otherwise, you’ll need to lower the BPM of the faster song to match that of the slower one.
-
3
Select a song. Click and drag your mouse cursor across the song for which you want to alter the BPM.
-
4
Click Effect. The Effect drop-down menu will appear.
-
5
Click Change Tempo…. You’ll find this option near the top of the drop-down menu. Doing so opens the Change Tempo window.
-
6
Enter the track’s original BPM. In the «from» text box that’s on the left side of the «Beats per minute» section, type in the BPM for the track that you’re currently changing.
- For example, if the song’s current BPM is 112, you’d type that into the «from» box.
-
7
Enter the second track’s BPM. Type the second track’s BPM into the «to» text box that’s on the right side of the window.
- For example, if the other track’s BPM is 124, you’d type that into the «to» box.
-
8
Click OK. It’s at the bottom of the window. Doing so applies your BPM settings to the selected track.
-
9
Listen to the track. As always, you can undo your changes from the Edit menu and change the other track’s BPM if you aren’t satisfied with the results.
- Keep in mind that you still have to line up the vocals with the beat.


Advertisement
-
1
Select the point at which you want your vocals to start. Find the point in the instrumental’s soundwave where you want to insert the vocals, then click this point on the instrumental’s soundwave to mark it.
-
2
Click ↔. It’s in the upper-left side of the Audacity window. This tool allows you to move a track back and forth, which will help you position the track.
-
3
Drag your vocals left or right. The beginning of the vocals should align with the vertical line which represents the point that you clicked earlier.
- You can click the + magnifying glass icon near the top of the Audacity window to zoom in if you’re having trouble getting the location as precise as you want it.
-
4
Play your track. Click the green «Play» button in the upper-left side of the window. Your track should begin playing right at the point at which the vocals are supposed to come in.
-
5
Adjust the vocals’ track’s position as needed. Once your vocals are where you want them to be, you can finally move on to exporting your project to its own sound file.


Advertisement
-
1
Click File. It’s in the upper-left side of Audacity. Clicking it prompts a drop-down menu.
-
2
Click Export Audio…. This option is in the File drop-down menu. A window will appear.
-
3
Enter a file name. Type in whatever you want to name your mash-up.
-
4
Select a save location. Click a folder in which you want to save the file (e.g., Desktop).
- On Mac, you may first have to click a Where drop-down box before you can select a save location.
-
5
Click Save. It’s near the bottom of the window.
-
6
Enter any tags you wish to include. When prompted, add the artist name, album, and so on if you like.
-
7
Click OK. It’s at the bottom of the window. This will save your project in your selected location as an MP3 file, which can be played virtually anywhere.


Advertisement
Add New Question
-
Question
How can I save my songs on my computer?

Go to File -> Import. Select your extension, file name and file location on your preferred drive. Click OK.
-
Question
Would you consider this application easy to use? I want to know before I download it.
Yes. It’s much like Premiere Pro in that sense. When you start out, you can figure out the basics in a matter of minutes. Over time you learn more and more. It’s a great program, I highly recommend it.
-
Question
How can I use Audacity on my laptop and on my Mac computer?
Just download the specific versions; there are Mac, Windows and Linux versions of Audacity at the official website.
See more answers
Ask a Question
200 characters left
Include your email address to get a message when this question is answered.
Submit
Advertisement
-
Picking two songs which complement each other (e.g., songs from the same genre, artist, or even just era) will often result in a cleaner mash-up than will taking two radically different songs.
Thanks for submitting a tip for review!
Advertisement
-
Some songs may simply not be compatible with certain beats, even if you perfectly synchronize their BPM rates and pitches.
-
Sometimes, editing a track will prompt it to move forward a few millimeters. This can throw your whole track out of alignment, though you can move the track back with the ↔ tool.
-
Many songs are subject to copyright; upload your songs on the internet with caution or get the rights to use the song from the producer.
Advertisement
About This Article
Thanks to all authors for creating a page that has been read 351,953 times.
Is this article up to date?
![]()
Download Article
![]()
Download Article
This wikiHow teaches you how to use Audacity to create a new song (or «mash-up») which uses one song’s vocals in conjunction with another song’s instrumental. The four primary components of creating a clean mash-up include finding two songs which work well together, adjusting the pitch of the vocals to fit the beat, adjusting the tempo of the two songs to align, and synchronizing the vocals with the proper point in the instrumental.
-
1
Determine which two songs you want to mash up. To make a mash-up, you’ll need the vocals from one song and the instrumental from another. You’ll need to figure out which two songs you want to use, as well as which song you want to use for vocals and which song you want to use for the background.
-
2
Download an a cappella version of one song. Downloading MP3 files from YouTube is a good way to get an a cappella version of a song, though you should always credit any artists and YouTube creators from whom you use audio.
- Using copyrighted audio for your own music is fine but selling or using the music in any commercial sense (or any context other than personal enjoyment) is not.
Advertisement
-
3
Download an instrumental version of the other song. Again, YouTube is a good resource for song instrumentals.
- If you can’t find an instrumental version of the song in question, try looking for a «karaoke» version instead.
-
4
Open Audacity. Click or double-click the Audacity app icon, which resembles a pair of blue headphones around an orange wavelength.
-
5
Import both songs into Audacity. Once your audio files have been imported into Audacity, you can begin working on your mash-up. To import files, do the following:
- Click File
- Click Import
- Click Import Audio…
- Hold down Ctrl (or ⌘ Command) while clicking your music files.
- Click Open
Advertisement
-
1
Select the vocals-only track. Click and drag your mouse cursor from left to right across the a capella track until the whole thing is selected.
-
2
Click Effect. It’s a tab at the top of the Audacity window (or the screen on a Mac). A drop-down menu will appear.
-
3
Click Change Pitch…. This option is near the top of the drop-down menu. Clicking it opens a new window.
-
4
Click the «Semitones (half-steps)» text box. You’ll find this near the middle of the window.
-
5
Raise or lower your song’s pitch. Each octave is represented by the number «0.12», meaning that you’d type in 0.12 to raise the song’s pitch by one octave (or -0.12 to lower the song’s pitch by one octave). Using increments of 0.12 is the cleanest, most accurate way to increase or decrease pitch.[1]
- You can also use half-octaves (0.06) if you need to finesse your vocals’ pitch further, but you shouldn’t otherwise deviate from the 0.12 increment.
-
6
Click OK. It’s at the bottom of the window. This will apply your pitch adjustment to the selected audio.
-
7
Listen to the song. With both tracks unmuted, listen to the pitch of the song in conjunction with the instrumental. If the song sounds in-key with the beat, you’re all set.
- Keep in mind that the song most likely won’t synchronize with the beat just yet.
-
8
Adjust the pitch as needed. Much of creating a mash-up consists of trial-and-error, and this part is no exception. If your song is still out of key, click Edit, click Undo Change Pitch, and adjust the pitch again. Once your song’s vocals’ pitch matches your instrumental, you can proceed with synchronizing the files’ beats-per-minute.
Advertisement
-
1
Find out each track’s tempo. In order for your tracks to line up with each other, they have to have the same beats per minute (BPM) number. You can find out each track’s BPM number by doing the following:
- Go to https://songbpm.com/
- Type your song’s name and artist name into the search bar at the top of the page.
- Press ↵ Enter
- Review the «BPM» number on the right side of the page next to the correct song.
- Repeat with your other song.
-
2
Determine which track to alter. If you want to speed up your mash-up, you’ll want to bump up the BPM of the slower song to match the faster one; otherwise, you’ll need to lower the BPM of the faster song to match that of the slower one.
-
3
Select a song. Click and drag your mouse cursor across the song for which you want to alter the BPM.
-
4
Click Effect. The Effect drop-down menu will appear.
-
5
Click Change Tempo…. You’ll find this option near the top of the drop-down menu. Doing so opens the Change Tempo window.
-
6
Enter the track’s original BPM. In the «from» text box that’s on the left side of the «Beats per minute» section, type in the BPM for the track that you’re currently changing.
- For example, if the song’s current BPM is 112, you’d type that into the «from» box.
-
7
Enter the second track’s BPM. Type the second track’s BPM into the «to» text box that’s on the right side of the window.
- For example, if the other track’s BPM is 124, you’d type that into the «to» box.
-
8
Click OK. It’s at the bottom of the window. Doing so applies your BPM settings to the selected track.
-
9
Listen to the track. As always, you can undo your changes from the Edit menu and change the other track’s BPM if you aren’t satisfied with the results.
- Keep in mind that you still have to line up the vocals with the beat.
Advertisement
-
1
Select the point at which you want your vocals to start. Find the point in the instrumental’s soundwave where you want to insert the vocals, then click this point on the instrumental’s soundwave to mark it.
-
2
Click ↔. It’s in the upper-left side of the Audacity window. This tool allows you to move a track back and forth, which will help you position the track.
-
3
Drag your vocals left or right. The beginning of the vocals should align with the vertical line which represents the point that you clicked earlier.
- You can click the + magnifying glass icon near the top of the Audacity window to zoom in if you’re having trouble getting the location as precise as you want it.
-
4
Play your track. Click the green «Play» button in the upper-left side of the window. Your track should begin playing right at the point at which the vocals are supposed to come in.
-
5
Adjust the vocals’ track’s position as needed. Once your vocals are where you want them to be, you can finally move on to exporting your project to its own sound file.
Advertisement
-
1
Click File. It’s in the upper-left side of Audacity. Clicking it prompts a drop-down menu.
-
2
Click Export Audio…. This option is in the File drop-down menu. A window will appear.
-
3
Enter a file name. Type in whatever you want to name your mash-up.
-
4
Select a save location. Click a folder in which you want to save the file (e.g., Desktop).
- On Mac, you may first have to click a Where drop-down box before you can select a save location.
-
5
Click Save. It’s near the bottom of the window.
-
6
Enter any tags you wish to include. When prompted, add the artist name, album, and so on if you like.
-
7
Click OK. It’s at the bottom of the window. This will save your project in your selected location as an MP3 file, which can be played virtually anywhere.
Advertisement
Add New Question
-
Question
How can I save my songs on my computer?
Go to File -> Import. Select your extension, file name and file location on your preferred drive. Click OK.
-
Question
Would you consider this application easy to use? I want to know before I download it.
Yes. It’s much like Premiere Pro in that sense. When you start out, you can figure out the basics in a matter of minutes. Over time you learn more and more. It’s a great program, I highly recommend it.
-
Question
How can I use Audacity on my laptop and on my Mac computer?
Just download the specific versions; there are Mac, Windows and Linux versions of Audacity at the official website.
See more answers
Ask a Question
200 characters left
Include your email address to get a message when this question is answered.
Submit
Advertisement
-
Picking two songs which complement each other (e.g., songs from the same genre, artist, or even just era) will often result in a cleaner mash-up than will taking two radically different songs.
Thanks for submitting a tip for review!
Advertisement
-
Some songs may simply not be compatible with certain beats, even if you perfectly synchronize their BPM rates and pitches.
-
Sometimes, editing a track will prompt it to move forward a few millimeters. This can throw your whole track out of alignment, though you can move the track back with the ↔ tool.
-
Many songs are subject to copyright; upload your songs on the internet with caution or get the rights to use the song from the producer.
Advertisement
About This Article
Thanks to all authors for creating a page that has been read 351,953 times.
Is this article up to date?
A mashup is an extremely common form of song production. It’s widely used by pop, electronic, and hip-hop artists, as well as by regular folks who enjoy DIY sound creation and mixing. Anyone can take several different songs and mash them up to make a new track. However, if you want to create a good-sounding piece, you need to get your hands on high-quality acapella, instrumentals, drums, and other parts of the songs. The following instructions will guide you through the processes of stem extraction and combination, all the way to your perfect song mashup.
Fundamentals: How to Pick the Right Songs for Your Mashup
The presence of compatible elements in songs is the key to a good mashup. In order to ensure the tunes are easy to combine and the result sounds great, mind the following variables:
BPM (beats per minute) – Tempo, or the speed, of a given piece, is measured in the number of beats per minute. Songs in your mashup need to be the same or close in BPM. Usually, you can get away with a difference of up to 20 to 30 beats per minute before the pitch starts getting distorted.
Rhythm – The pattern of sound, silence, and emphasis in a song that is indicated by its time signature. It’s important to consider the rhythm of tracks for your mashup. Generally, the best results are yielded from tracks with a steady and regular 4/4 pattern.
Key – The group of pitches, or notes, that forms the basis of music composition, its harmonic foundation. If you mash together songs of wildly different keys, such as an uptempo house track and a laid-back blues song, the results are highly likely to be atrocious and even specialized key shifting software might not help. Pick songs written in the same key for a good mashup.
How to Extract Vocal, Instrumental, and Other Stems from Songs for Your Mashup
- Open LALAL.AI in your browser.
- Click the Vocal and Instrumental button to open the Stem Separation Types list.
- Select one of the options from the list, depending on the parts you want to extract for the mashup — acapella, instrumental, drums, bass, acoustic guitar, electric guitar, piano or synthesizer.
- Upload your audio or video. Click the Select Files button or just drag and drop the file.
- After the processing is complete, listen to the stem previews.
- Click Process the Entire File if you like what you hear. If you don’t, upload another version of your track or try another file.
-
Download the separated stems. Click the download icon (⤓) next to the tracks. The download links are also sent to your email.
All files are saved in the same format as the original. LALAL.AI supports both video and audio formats: MP3, OGG, WAV, FLAC, AVI, MP4, MKV, AIFF, AAC.
- Repeat the above steps for your second (third, fourth, etc.) file.
How to Extract Vocal, Instrumental, and Other Stems from Songs for Your Mashup
- Launch the Audacity application.
- Import all stems you want to mash together. Click File > Import > Audio, then select the files.
- Select the vocal track. Click and drag the cursor from left to right across the vocal track until the entire thing is selected.
- Click the Effect > Change Pitch at the menu bar.
- Raise or lower the pitch of the track. Within the Change Pitch window, click the Semitones (half-steps) box. Each octave is represented by the number «0.12», so when you enter «0.12» into the box, you raise the pitch by one octave, and when you enter «-0.12» you decrease the pitch by one octave.
- Click the OK button at the bottom of the window to save your pitch adjustments.
- Click the play button (▶) to listen to the pitch of the song in combination with the instrumental.
- Adjust the pitch if needed. Click Edit > Undo Change Pitch and change the pitch again until the vocals’ pitch matches your instrumental. Once you’re satisfied with the results, you can proceed with synchronizing the files’ BPM.
- Find the tempo of each track. Enter the name of each track’s original song to SongBPM and check the BPM number.
- Determine the track you want to alter. If you want a faster-paced mashup, adjust the slower track to the BPM of the faster one. Otherwise, you’ll want to lower the BPM of the faster track to match the slower one.
- Select the track. Click and drag the cursor across the song for which you want to change the BPM.
- Click Effect > Change Tempo. Enter the BPM of the track into the «from» Beats per minute box, then type the second track’s BPM into the «to» box.
- Click OK to save changes, then click the play button and listen to the result. If needed, you can undo the changes via the Edit menu.
- Select the point where you want the vocals to start by clicking it on the instrumental’s soundwave.
- Click the Time Shift Tool (↔) at the upper left side of the controls to position the track.
- Drag the vocals to the left or to the right. The beginning of the vocal track should align with the vertical line you’ve previously picked in step 14.
- Play the track. It should start playing right at the point at which the vocals are supposed to come in. Change the beginning position if needed.
- Export your mashup. At the menu bar, click File > Export Audio, then select the output folder and name the file.