-
Search
-
Search all Forums
-
Search this Forum
-
Search this Thread
-
-
Tools
-
Jump to Forum
-
-
#1
May 27, 2011
I NEED to know, is it possible to make Minecraft mods with C++ and how? I already know that you make them with Java, but I can’t learn Java and C++ at the same time.
-
#4
May 27, 2011
They’re really similar if you’re not too advanced with C++ yet.
I don’t know how advanced I really am. I know switches, if, else, cin, cout, variables, classes, or, and, paramenters, functions, function prototypeing, math, strings, loops and a few other things. I take thenewboston’s tutorials on Youtube- Buckys C++ Programming Tutorials. Im on his 28th video in the 73 video series. I tried learning Java from him, but I couldn’t understand it. I’m just better with C++
-
#5
May 27, 2011
No. Minecraft is programmed in Java, unless you can make a C++ to Java translator, you’re screwed.
A few questions:
How do you make/where do you get a C++ to Java translator?
How would I go about programming a mod in minecraft if all the tutorials are in Java? -
#6
May 27, 2011
SH4D0WS1N-
View User Profile
-
View Posts
-
Send Message

- Redstone Miner
- Join Date:
1/25/2011
- Posts:
617
- Minecraft:
SH4D0WS1N
- Member Details
Just look at a hello world for java and you already know all of the differences you need to know to make a simple mod.
-
-
#7
May 27, 2011
Just look at a hello world for java and you already know all of the differences you need to know to make a simple mod.
Another reason why I didn’t learn Java. In Java, Hello world is
class
HelloWorldApp {
public static void main(String[] args) {
System.out.println(«Hello World!»);
}
}BUT in C++
#include<iostream>
using namespace std;int main()
{
cout << «Hello World!» << endl;
system(«pause»); // NOTE, THIS CODE IS ONLY USED FOR ONE COMPILER AS FAR AS I KNOW
return 0; //optional, c++ assumes this code if you did not type it in
}As you can see C++ is a lot less complicated IMO and much shorter(at least the hello world program is)
-
#8
May 27, 2011
Proloe-
View User Profile
-
View Posts
-
Send Message
- Glowstone Miner
- Join Date:
4/2/2011
- Posts:
3,173
- Minecraft:
Proloe
- Member Details
As you can see C++ is a lot less complicated IMO and much shorter(at least the hello world program is)
That doesn’t change the fact that Minecraft is coded in Java. You’re not going to magically make it C++ by wishing.
-
-
#9
May 27, 2011
As you can see C++ is a lot less complicated IMO and much shorter(at least the hello world program is)
Whatever helps you sleep at night.
-
#10
May 27, 2011
menes777-
View User Profile
-
View Posts
-
Send Message
- Zombie Killer
- Join Date:
3/11/2011
- Posts:
163
- Member Details
Another reason why I didn’t learn Java. In Java, Hello world is
class
HelloWorldApp {
public static void main(String[] args) {
System.out.println(«Hello World!»);
}
}BUT in C++
#include<iostream>
using namespace std;int main()
{
cout << «Hello World!» << endl;
system(«pause»); // NOTE, THIS CODE IS ONLY USED FOR ONE COMPILER AS FAR AS I KNOW
return 0; //optional, c++ assumes this code if you did not type it in
}As you can see C++ is a lot less complicated IMO and much shorter(at least the hello world program is)
Once you get to classes in C++ it will start making sense. Java is different from C++ but once you get to learning classes the differences will seem minimal.
-
-
#11
May 27, 2011
Once you get to classes in C++ it will start making sense. Java is different from C++ but once you get to learning classes the differences will seem minimal.
I’ve learned Classes in C++, but I’ll have to watch the tutorial again.
-
#12
May 27, 2011
Vornika-
View User Profile
-
View Posts
-
Send Message
- Diamond Miner
- Location:
Australia
- Join Date:
3/24/2011
- Posts:
765
- Member Details
I watched the first 50 Java tutorials and I now understand a lot more of the minecraft code than I did, so I can now do some crazy awesome stuff with mods, although most are unreleased :biggrin.gif: just today I figured out how to add toggle-able text on-screen (Displays «Sneaking» on the screen when sneaking)
I’m also up to his 40th C++ video, if you have trouble with his java videos, watch them again and again until you understand what he’s teaching you, and make sure to follow along with what he’s doing and then try to modify it a bit each lesson :smile.gif:
-
- To post a comment, please login.


Posts Quoted:
Reply
Clear All Quotes
Время на прочтение
8 мин
Количество просмотров 26K
Я поставил перед собой задачу воссоздания с нуля Minecraft за одну неделю с помощью собственного движка на C++ и Vulkan. Меня вдохновил на это Hopson, который сделал то же самое при помощи C++ и OpenGL. В свою очередь, его вдохновил Шейн Бек, которого вдохновила Minecraft, источником вдохновения для которой была Infiniminer, при создании которой, предположительно, вдохновлялись реальными горными промыслами.
Репозиторий GitHub этого проекта находится здесь. У каждого дня есть своя git-метка.
Разумеется, я не планировал в буквальном смысле воссоздавать Minecraft. Этот проект должен был стать обучающим. Я хотел изучить использование Vulkan в чём-то более сложном, чем vulkan-tutorial.com или демо Саши Виллема. Поэтому основной упор сделан на проектирование Vulkan-движка, а не на дизайн игры.
Задачи
Разработка на Vulkan намного медленнее, чем на OpenGL, поэтому я не смог включить в игру многие функции настоящей Minecraft. Нет ни мобов, ни крафта, ни красного камня, ни физики блоков, и т.п. С самого начала цели проекта были следующими:
- Создание системы рендеринга рельефа
- Мешинг
- Освещение
- Создание системы генератора рельефа
- Рельеф
- Деревья
- Биомы
- Добавление возможности изменения рельефа и перемещения блоков
Мне нужно было найти способ реализовать всё это без добавления в игру GUI, потому что я не смог найти никаких библиотек GUI, работающих с Vulkan и простых в интеграции.
Библиотеки
Разумеется, я не собирался писать Vulkan-приложение с нуля. Для ускорения процесса разработки я по возможности буду использовать готовые библиотеки. А именно:
- VulkanWrapper — моя собственная обёртка на C++ для Vulkan API
- GLFW — для окон и ввода пользователя
- VulkanMemoryAllocator — для распределения памяти Vulkan
- GLM — для математики векторов и матриц
- entt — для сигналов/слотов и ECS
- stb — для утилит загрузки изображений
- FastNoise — для генерации 3D-шума
День 1
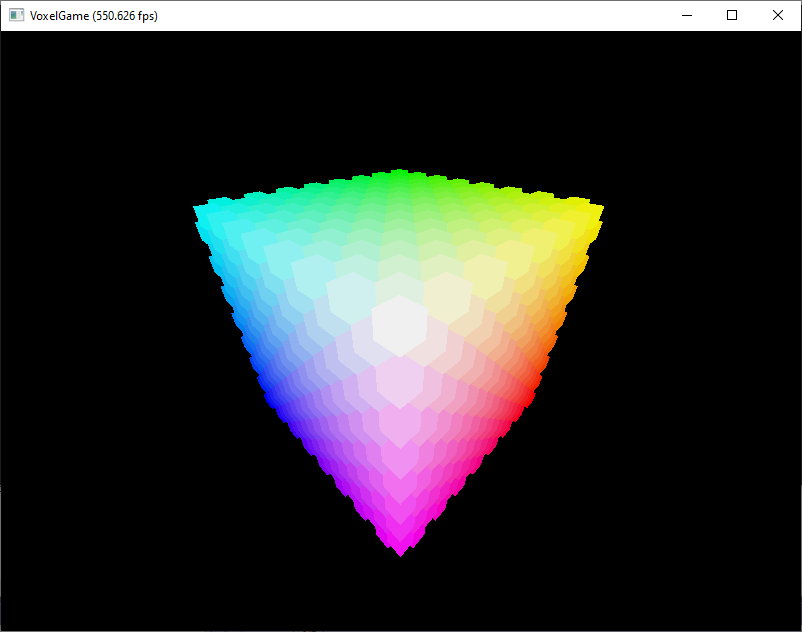
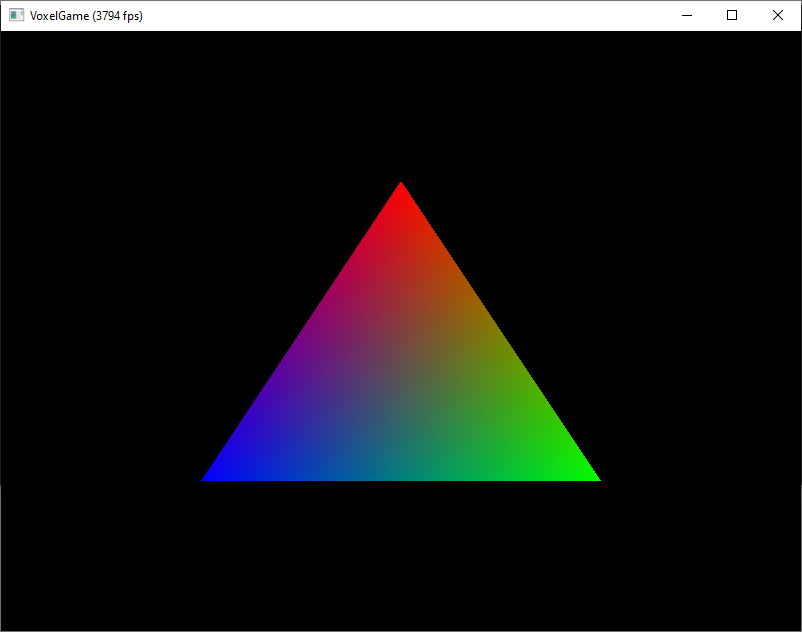
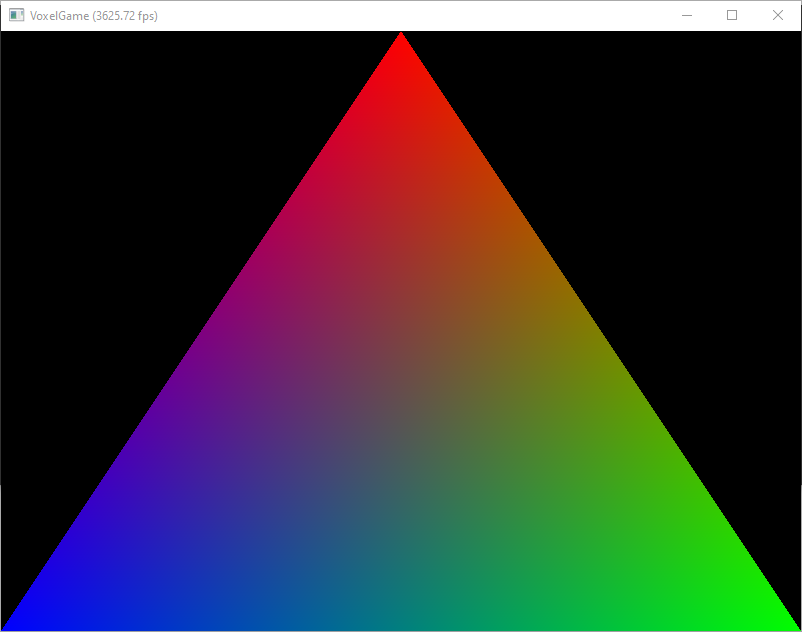
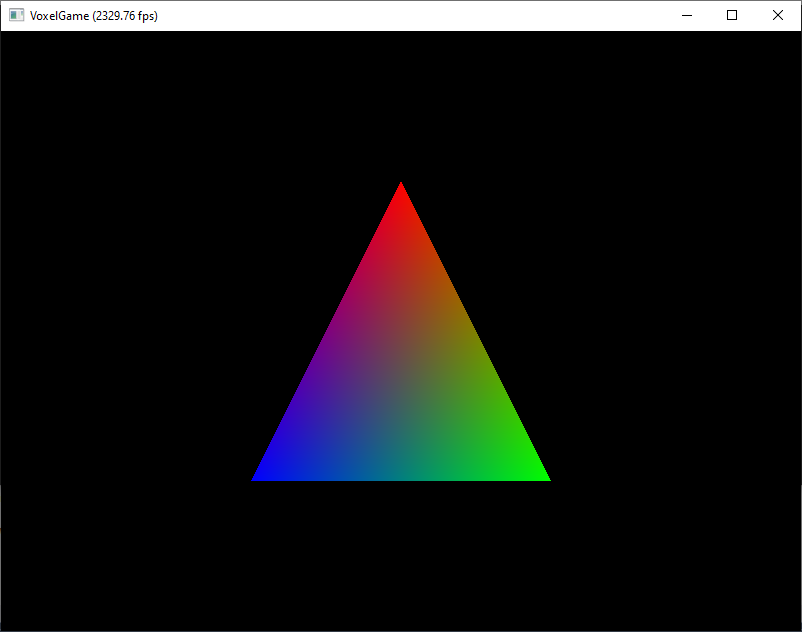
В первый день я подготовил бойлерплейт Vulkan и скелет движка. Большая часть кода была бойлерплейтом и я смог просто скопипастить его с vulkan-tutorial.com. В него вошёл и трюк с хранением данных вершин как части вершинного шейдера. Это означало, что мне даже не придётся настраивать распределение памяти. Всего лишь простой конвейер, который способен делать только одно: отрисовывать треугольник.
Движок достаточно прост, чтобы поддерживать рендерер треугольников. Он имеет одно окно и игровой цикл, к которому можно подключать системы. GUI ограничен частотой кадров, выводимой в заголовок окна.
Проект разделён на две части: VoxelEngine и VoxelGame.
День 2
Я интегрировал библиотеку Vulkan Memory Allocator. Эта библиотека берёт на себя большую часть бойлерплейта, связанного с распределением памяти Vulkan: типы памяти, кучи памяти устройств и вторичное распределение.
Теперь, когда у меня было распределение памяти, я создал классы для мешей и буферов вершин. Я изменил рендерер треугольников так, чтобы он использовал класс мешей, а не встроенные в шейдер массивы. На данный момент передача данных мешей в GPU выполняется рендерером треугольников вручную.
Изменилось немногое
День 3
Я добавил систему графов рендеринга. Для создания этого класса взят за основу данный пост, но класс очень сильно упрощён. Мой граф рендеринга содержит только самое необходимое для обработки синхронизации с Vulkan.
Граф рендеринга позволяет мне задавать узлы и рёбра. Узлы представляют собой выполняемую GPU работу. Рёбра — это зависимости данных между узлами. Каждый узел получает собственный буфер команд, в который выполняет запись. Граф занимается двойной буферизацией буферов команд и синхронизацией их с предыдущими кадрами. Рёбра используются для автоматической вставки барьеров конвейера перед и после того, как узел выполняет запись в каждый буфер команд. Барьеры конвейера синхронизируют использование всех ресурсов и переносят принадлежность между очередями. Кроме того, рёбра вставляют семафоры между узлами.
Узлы и рёбра образуют ориентированный ациклический граф. Затем граф рендеринга выполняет топологическую сортировку узлов, что приводит к созданию плоского списка узлов, отсортированных таким образом, что каждый узел идёт после всех узлов, от которых он зависит.
Движок имеет три типа узлов. AcquireNode получает образ из цепочки буферов (swapchain), TransferNode передаёт данные от CPU к GPU, а PresentNode предоставляет изображение цепочки буферов, которое нужно отобразить.
Каждый узел может реализовать preRender, render и postRender, которые выполняются в каждом кадре. AcquireNode получает изображение цепочки буферов во время preRender. PresentNode предоставляет это изображение во время postRender.
Я отрефакторил рендерер треугольников, чтобы он использовал систему графов рендеринга, а не обрабатывал всё самостоятельно. Существует ребро между AcquireNode и TriangleRenderer, а также между TriangleRenderer и PresentNode. Это гарантирует, что изображение цепочки буферов правильно синхронизировано в процессе его использования во время кадра.

Клянусь, внутри движок поменялся
День 4
Я создал камеру и систему 3D-рендеринга. Пока камера получает собственный постоянный буфер и пул дескрипторов.
В этот день я замедлился, потому что пытался найти подходящую конфигурацию для рендеринга 3D с помощью Vulkan. Большинство материалов онлайн посвящено рендерингу в помощью OpenGL, в котором используются немного отличающиеся от Vulkan системы координат. В OpenGL ось Z пространства усечения (clip space) задаётся как [-1, 1], а верхний край экрана находится в Y = 1. В Vulkan ось Z задаётся как [0, 1], а верхний край экрана находится в Y = -1. Из-за этих небольших отличий стандартные матрицы проецирования GLM не работают правильно, потому что они предназначены для OpenGL.
В GLM есть опция GLM_FORCE_DEPTH_ZERO_TO_ONE, устраняющая проблему с осью Z. После чего проблему с осью Y можно устранить простой сменой знака элемента (1, 1) матрицы проецирования (в GLM используется индексация от 0).
Если мы переворачиваем ось Y, то нужно перевернуть и данные вершин, потому что до этого отрицательное направление оси Y указывало вверх.
Теперь в 3D!
День 5
Я добавил ввод пользователя и возможность перемещения камеры при помощи мыши. Система ввода слишком переусложнена, но она устраняет странности ввода GLFW. В частности, у меня возникала проблема изменения позиции мыши при её блокировании.
Ввод с клавиатуры и кнопок мыши по сути является тонкой обёрткой поверх GLFW, открытой через обработчики сигналов entt.
Просто для сравнения — примерно то же самое Hopson сделал в день 1 своего проекта.
Your browser does not support HTML5 video.
День 6
Я начал добавлять код для генерации и рендеринга блоков вокселей. Писать код мешинга было просто, потому что я делал это раньше и знал абстракции, позволяющие совершать меньше ошибок.
Одной из абстракций был шаблонный класс ChunkData<T, chunkSize>, определяющий куб типа T размером chunkSize по каждой из сторон. Этот класс хранит данные в 1D-массиве и обрабатывает индексирование данных с 3D-координатой. Размер каждого блока составляет 16 x 16 x 16, поэтому внутренние данные представляют собой простой массив длиной 4096.
Ещё одна абстракция заключается в создании итератора позиций, генерирующего координаты от (0, 0, 0) до (15, 15, 15). Эти два класса гарантируют, что итерации с данными блоков выполняются в линейном порядке для повышения локальности кэша. 3D-координата по-прежнему доступна для других операций, которым она нужна. Например:
for (glm::ivec3 pos : Chunk::Positions()) {
    auto& data = chunkData[pos];
    glm::ivec3 offset = ...;
    auto& neighborData = chunkData[pos + offset];
}
У меня есть несколько статических массивов, задающих смещения, которые обычно используются в игре. Например, Neighbors6 задаёт 6 соседей, с которыми куб имеет общие грани.
static constexpr std::array<glm::ivec3, 6> Neighbors6 = {
        glm::ivec3(1, 0, 0),    //right
        glm::ivec3(-1, 0, 0),   //left
        glm::ivec3(0, 1, 0),    //top
        glm::ivec3(0, -1, 0),   //bottom
        glm::ivec3(0, 0, 1),    //front
        glm::ivec3(0, 0, -1)    //back
    };
Neighbors26 — это все соседи, с которыми у куба общая грань, ребро или вершина. То есть это сетка 3x3x3 без центрального куба. Также есть подобные массивы для других наборов соседей и для 2D-наборов соседей.
Существует массив, определяющий данные, необходимые для создания одной грани куба. Направления каждой грани в этом массиве соответствуют направлениям в массиве Neighbors6.
static constexpr std::array<FaceArray, 6> NeighborFaces = {
    //right face
    FaceArray {
        glm::ivec3(1, 1, 1),
        glm::ivec3(1, 1, 0),
        glm::ivec3(1, 0, 1),
        glm::ivec3(1, 0, 0),
    },
    ...
};
Благодаря этому код создания мешей очень прост. Он просто обходит данные блоков и добавляет грань, когда блок сплошной, а его сосед — нет. Код просто проверяет каждую грань каждого куба в блоке. Это аналогично «наивному» методу, описанному здесь.
for (glm::ivec3 pos : Chunk::Positions()) {
    Block block = chunk.blocks()[pos];
    if (block.type == 0) continue;

    for (size_t i = 0; i < Chunk::Neighbors6.size(); i++) {
        glm::ivec3 offset = Chunk::Neighbors6[i];
        glm::ivec3 neighborPos = pos + offset;

        //NOTE: bounds checking omitted

        if (chunk.blocks()[neighborPos].type == 0) {
            Chunk::FaceArray& faceArray = Chunk::NeighborFaces[i];
            for (size_t j = 0; j < faceArray.size(); j++) {
                m_vertexData.push_back(pos + faceArray[j]);
                m_colorData.push_back(glm::i8vec4(pos.x * 16, pos.y * 16, pos.z * 16, 0));
            }
        }
    }
}
Я заменил TriangleRenderer на ChunkRenderer. Также я добавил буфер глубин, чтобы меш блока мог рендериться правильно. Нужно было добавить ещё одно ребро в граф рендеринга между TransferNode и ChunkRenderer. Это ребро передаёт владение ресурсами семейства очередей между очередью передачи и очередью графики.
Затем я изменил движок так, чтобы он мог правильно обрабатывать события изменения окна. В OpenGL это делается просто, но довольно запутанно в Vulkan. Так как цепочка буферов должна создаваться явным образом и иметь постоянный размер, при изменении размера окна её нужно создавать заново. Необходимо создавать заново все ресурсы, зависящие от цепочки буферов.
Все команды, зависящие от цепочки буферов (а сейчас это все команды отрисовки), должны завершить выполнение перед уничтожением старой цепочки буферов. Это означает, что весь GPU будет простаивать.
Нужно изменить графический конвейер, чтобы обеспечить динамическое окно обзора и изменение размеров.
Цепочку буферов невозможно создать, если размер окна равен 0 по оси X или Y. В том числе, когда окно свёрнуто. То есть когда такое происходит, вся игра ставится на паузу и продолжается, только когда окно разворачивается.
Сейчас меш является простой трёхмерной шахматной доской. Цвета RGB меша устанавливаются в соответствии с его позицией по XYZ, умноженной на 16.
Your browser does not support HTML5 video.
День 7
Я сделал так, чтобы игра обрабатывала за раз не один, а несколько блоков. Множественные блоки и их меши управляются ECS библиотеки entt. Затем я отрефакторил ренедрер блоков так, чтобы он рендерил все блоки, находящиеся в ECS. У меня по-прежнему только один блок, но я мог бы при необходимости добавить новые.
Я отрефакторил меш, чтобы его данные можно было обновлять после его создания. Это позволит мне обновлять меш блока в будущем, когда я добавлю возможность добавления и удаления кубов.
При добавлении или удалении куба количество вершин в меше потенциально может увеличиваться или уменьшаться. Ранее выделенный буфер вершин можно использовать, только если новый меш того же размера или меньше. Но если меш больше, то необходимо создать новые буферы вершин.
Предыдущий буфер вершин невозможно удалить сразу же. Могут существовать буферы команд, выполняемые из предыдущих кадров, которые зависят от конкретного объекта VkBuffer. Движок должен хранить буфер, пока эти буферы команд не завершатся. То есть, если мы рисуем меш в кадре i, GPU может использовать этот буфер до начала кадра i + 2. Буфер нельзя удалять из ЦП, пока GPU не завершил его использовать. Поэтому я изменил граф рендеринга так, чтобы он отслеживал срок жизни ресурсов.
Если узел графа рендеринга хочет использовать ресурс (буфер или изображение), то он должен вызвать метод sync внутри метода preRender. Этот метод получает указатель shared_ptr на ресурс. Этот shared_ptr гарантирует, что ресурс не будет удалён, пока выполняются буферы команд. (С точки зрения производительности, такое решение не очень хорошее. Подробнее об этом позже.)
Теперь меш блока регенерируется в каждом кадре.
Your browser does not support HTML5 video.
Заключение
Вот и всё, что я сделал за неделю — подготовил основы рендеринга мира с множественными воксельными блоками и продолжу работу на второй неделе.

Смотрите: если я создам на java мод-API для работы с программой на C++ или другого языка, то я смогу писать моды на C++ для minecraft java edition?
Если такое возможно будет, то можно будет сделать мод-API для работы напрямую с C++ кодом и внедрение его в java код, и можно к примеру написать новый оптифайн, который изменяет исходный движок Minecraft.
Добавлено через 1 минуту
Причём я не говорю про то, чтобы работать прямо с C++, а хотя-бы с exe файлом мода (На вход одни значения, на выход те, которые нам нужны)
Добавлено через 10 минут
Хм… если всё-таки можно сделать взаимодействие java с exe файлами, то думаю можно и сделать какую-нибудь быструю графическую отрисовку (можно тогда использовать связку с C++/OpenGL, а не Java/OpenGL)
Добавлено через 4 минуты
Ещё лучше думаю будет взаимодействие java с объектными модулями
__________________
Помощь в написании контрольных, курсовых и дипломных работ, диссертаций здесь
Здесь находятся инструкции по созданию модификаций, работающие для версии 1.7+
Подготовка среды и настройка
Сначала подготовим среду для работы с кодом Minecraft.
Forge
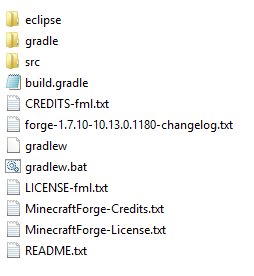
Собственно, для создания модификаций нужен Forge. Скачать его можно здесь с пометкой Mdk или с пометкой Src (для версий 1.8/1.7). Теперь создайте любую папку там, где вам удобно (в примере это D:MCModding), в ней будет находиться Forge и модификация. В эту папку распакуйте содержимое архива с Forge. Вы увидите следующее:
С 15 января 2020 года Maven больше не поддерживает протокол HTTP и требует использовать HTTPS. А с 4 ноября 2022 года сайт Amazon S3 удалил файлы версии 1.7.10, что сделало невозможным их скачивание. Поэтому для создания модификаций под версию 1.7.10 необходимо внести несколько коррекций в файлы скачанного архива.
Сначала в файле gradle/wrapper/gradle-wrapper.properties нужно изменить значение параметра distributionUrl:
distributionUrl=https://services.gradle.org/distributions/gradle-5.6.4-all.zip
Затем в файле build.gradle нужно заменить содержимое тега buildscript{} следующим образом:
buildscript {
	repositories {
		mavenCentral()
        maven {
            name = "github"
            url = "https://github.com/juanmuscaria/maven/raw/master"
        }
	}
	dependencies {
		classpath 'net.minecraftforge.gradle:ForgeGradle:[1.2-1.4.6-SNAPSHOT,)'
	}
}
Среда разработки
Теперь нам нужно установить Forge, который при установке также произведёт декомпиляцию и деобфускацию кода Minecraft, чтобы сразу можно было начать создание модификации. Для этого необходимо установить Java Development Kit (JDK), скачав с официального сайта Oracle. При этом JDK должен быть одной версии с Java (JRE). Minecraft 1.7.10 работаает на JRE версии 1.8.
При первой установке JDK проверьте, чтобы у вас в ⊞ Win+PauseBreak->Дополнительные параметры->Переменные среды: в JAVA_HOME указан путь к папке c JRE (по-умолчанию: «C:Program FilesJavajre1.8.0_241») и в Path был указан путь к bin-папке JDK после точки с запятой (по-умолчанию: «C:Program FilesJavajdk1.8.0_241bin»).
Затем необходимо выполнить одну из следующих команд (замените eclipse на idea, если вы используете IntelliJ IDEA):
gradlew.bat setupDecompWorkspace eclipseилиgradlew.bat setupDevWorkspace eclipsegradlew.bat genEclipseRuns eclipse
Первая предпочтительней, так как в отличие от второй команды, подготавливает рабочее пространство с возможностью просмотра исходного кода Minecraft во время разработки. То есть вы всегда сможете посмотреть, как работает генерация мира, анимация движений, применение эффектов и т. д. Таким образом можно создавать модификации, не опираясь на руководства, которых может и не быть на конкретную цель.
Если вы являетесь пользователем операционной системы Linux, нужно прописать следующие строки в терминале:
cd <путь>/<папка с Forge>и./gradlew setupDecompWorkspace eclipse --refresh-dependencies
Чтобы выполнить команду, можно создать в папке .bat-файл с выбранной вами командой (но обычно он там уже есть) и запустить его. Также вместо всего этого можно запустить командную строку в этой папке (например, нажать ⇧ Shift+ПКМ по этой папке и выбрать «Открыть окно команд») и выполнить выбранную команду.
Выполнение команды займёт какое-то время, после чего должно появиться сообщение рода Build Successful.
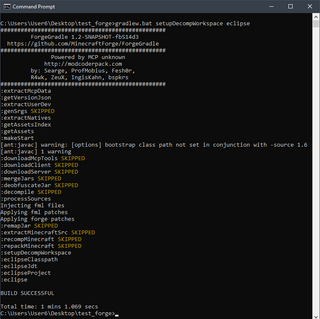
Пример результата выполнения команды:[1] gradlew.bat setupDecompWorkspace eclipse
Если же появляется какая-либо ошибка:
- Проверьте, чтобы у вас в ⊞ Win+PauseBreak->Дополнительные параметры->Переменные среды: в JAVA_HOME указан путь к папке c Java (по-умолчанию: «
C:Program FilesJavajre1.8.0_241») и в Path был указан путь к bin-папке JDK после точки с запятой(если в конце списка) (по-умолчанию: «C:Program FilesJavajdk1.8.0_241bin»). - Введите команду set JAVA_HOME=»Тут нужно вставить адрес папки с JDK без кавычек»
- Включите VPN, так как в редких случаях ссылки, необходимые скрипту, могут быть недоступны.
- Установите Java другой версии, не удаляя предыдущую.
- Смените в файле
gradle/wrapper/gradle-wrapper.propertiesпараметрdistributionUrlнаhttps://services.gradle.org/distributions/gradle-2.6-bin.zipи удалите папку.gradleв директории пользователя (ошибкаReceived status code 501 from server: HTTPS Requiredи ошибки связанные сapply plugin: 'forge').
Настройка Eclipse
Нужно настроить Eclipse для работы с Minecraft. Первым делом зайдите в него. Он предложит выбрать рабочую директорию (Workspace). Введите туда путь к папке «eclipse» в папке (Путь к папке должен содержать только английские буквы), куда вы распаковали содержимое Forge и поставьте галочку для того, чтоб окно больше не появлялось. В примере это «D:MCModdingeclipse». Если всё прошло успешно, то слева в Eclipse вы увидите раскрывающееся меню Minecraft.
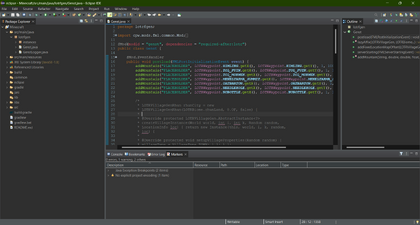
Интерфейс Eclipse после правильной установки.
Затем вы должны убедиться, что Eclipse использует правильную версию JRE для работы с исходниками. Используйте поиск (значок в виде лупы в верхнем правом углу) и введите «Installed JREs», выбирая пункт с припиской «Open the preferences dialogue». Если там стоит помеченная галочкой версия Java 1.8, то всё в порядке. Если галочкой помечена встроенная в Eclipse версия JRE (обычно она слишком новая), то добавьте свою версию Java при помощи кнопки Add справа. В открывшемся диалоге выберите «Standart VM» и укажите путь к той папке, куда у вас в системе установлена JRE 1.8. После этого подтвердите добавление виртуальной машины и пометьте её галочкой, сохранив изменения.
После всех действий остаётся настроить Compilance. По умолчанию значение Compilance равняется 1.6 и не будет препятствовать работе. Однако, если вам потребуется открыть в Eclipse скачанный с интернета исходник мода на 1.7.10, где используется Compilance 1.7-1.8, то в среде будут отображаться ошибки. Чтобы их исправить, наведите курсор на подчёркнутые строки кода с ошибкой и выберите предложенное исправление «Change project compilance to 1.7 (1.8), и подтвердите rebuild.
Для того, чтобы осуществлять сборку проекта с изменённым Compilance, отредактируйте в файле build.gradle содержимое тега minecraft{} следующим образом:
minecraft {
    version = "1.7.10-10.13.4.1614-1.7.10"
    runDir = "eclipse"
	srcCompat = JavaVersion.VERSION_1_8
    targetCompat = JavaVersion.VERSION_1_8
}
Настройка IntelliJ IDEA
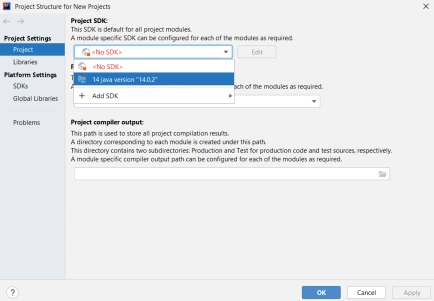
Если вместо Eclipse Вы решили использовать IntelliJ IDEA, то после того как вы установите ее, в стартовом окне в правом нижнем углу нажмите на кнопку «Configure», откройте вкладку «Project Defaults» и выберите пункт «Project Structure» или в главном меню нажмите комбинацию клавиш (Ctrl+Alt+Shift+S).
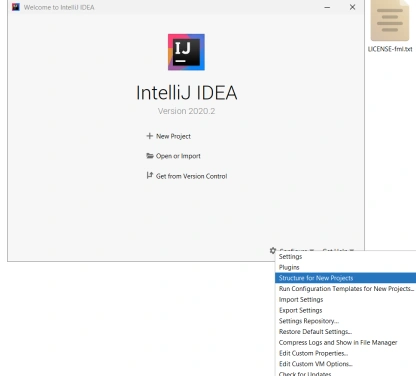
Стартовая страница IntelliJ IDEA
В открывшемся окне нажмите на красную надпись «No SDK», для контекстного меню и выберите пункт с вашей версией JDK. (Если же в меню нет вашей версии JDK нажмите «Add SDK» и укажите путь. В нашем случае это C:Program FilesJavajdk1.8.0_241)
После этого можно воспользоваться двумя способами:
Первый способ:
После того, как Forge скомпилирован и установлен, необходимо запустить IDEA, и в появившемся окне нажать ‘Import Project’. После чего выбираем в папке «D:MCModding» файл build.gradle. В появившемся окне Вам предложат выбрать способ компиляции (рекомендуется оставить значение Use default gradle wrapper.) В строчке ниже выберите Ваш JAVA_HOME. В пункте «Формат проекта» нужно обязательно выбрать «.ipr (file based)». В противном случае, придётся подключать все библиотеки и настраивать запуск самостоятельно. После всего этого нажмите OK. Ждите, пока сборка скомпилируется.
В случае, если ваша IntelliJ IDEA установлена правильно и она различает формат *.ipr, вы можете просто дважды нажать по файлу <НазваниеПроекта>.ipr в директории вашего MCP. IDEA все сделает за вас.
Второй способ:
После того, как вы распаковали файлы в «D:MCModding», сразу запускайте IntelliJ IDEA. В появившемся окне нажать ‘Import Project’. После чего выбираем в папке «D:MCModding» файл build.gradle.
Если IDEA указывает на старую версию Gradle, нужно обновить ее на более новую. Для этого запустите консоль с директорией к папке с Forge (щелкните ⇧ Shift+ПКМ по папке с Forge > Открыть консоль команд) и выполните следующую команду:
gradlew.bat wrapper --gradle-version <Нужная версия>
Список всех версий можно посмотреть на официальном сайте.
Потребуется подождать пару минут, пока среда разработки полностью все выполнит и импортирует. После завершения процесса откройте меню «View» в верхней части экрана и выберите пункты «Tools Windows > Gradle». У вас откроется окно с Gradle задачами. Переходим в раздел Tasks > forgegradle.
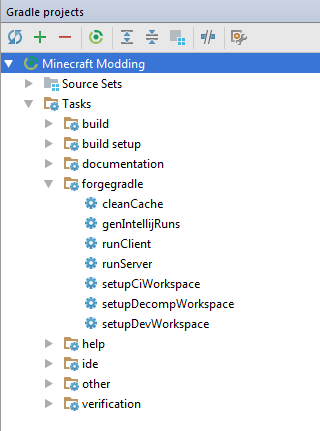
Окно Gradle
Выполните task setupDecompWorkspace. После его выполнения запустите genIntellijRuns
Готово. Мы проделали все то же самое, что и в первом способе, только без использования консоли, а это может быть большим плюсом для новичков.
Запуск
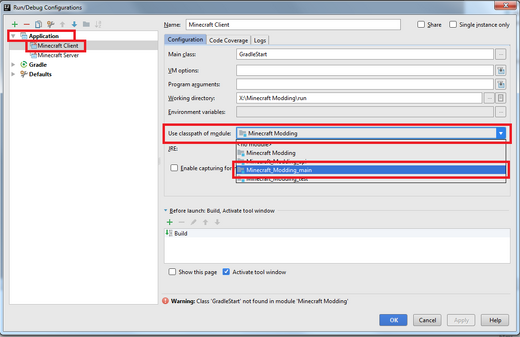
После выполнения выше перечисленных действий, в верхней части экрана перейдите в раздел «Run» и выберите пункт «Run configurations». По очереди выберите «Minecraft Client» и «Minecraft Server» и уже в правой части окна, в раскрывающемся списке «Use classpath of module» выберите тот пункт, который заканчивается на _main. Теперь вы можете запустить клиент или сервер и удостовериться, что все работает.
Настройка запуска
Поздравляем! Вы успешно настроили среду для того, чтобы начать писать модификации при помощи нее.
Основные уроки
- Директория Eclipse (Установка среды)
- Главный класс
- Блок
- Предмет
- Крафт
- Компиляция
- Генерация
- Прокси и инстанция
- Моб
Дополнительные уроки
- Локализация названий в игре
- Дроп определённого предмета при разрушении блока
- Разносторонняя текстура блока
- Собственная вкладка в Творческом режиме
- Обновление Forge
- Обновление ForgeGradle
- Свой материал для инструмента
- Создание брони
- Свой материал для брони
- Генерация предметов в контейнерах натуральных структур
- Атрибуты для моба
- Интеллект для моба
- Свой скин при моддинге
Примечания
- ↑ При первом выполнении лог может быть длиннее.
-
Search
-
Search all Forums
-
Search this Forum
-
Search this Thread
-
-
Tools
-
Jump to Forum
-
- |<<
- <
- >
- >>|
- 1
- 2
- Next
-
#1
Jun 11, 2015
DeanPDX-
View User Profile
-
View Posts
-
Send Message
- Out of the Water
- Join Date:
5/11/2015
- Posts:
8
- Member Details
Hey All, this is my first tutorial so bear with me. I am primarily a Microsoft developer and I was at Build 2015 when they announced the new Minecraft Mod project type. Since my kids and I are really in to Minecraft, I had to give it a shot. Without further ado, here’s a guide on how to build a mod using VS 2015 (which you can download for free by the way). This was originally a blog post but I wanted to post it here as well in case it helps any of you out (and I got permission to do so just to make sure I wasn’t being rude).
Getting Started
To get started, make sure you have the x64 version of Java SE Development Kit (JDK) for Windows. With that out of the way, you are ready to grab the Minecraft Mod Developer Pack extension for Visual Studio. Once installation is complete, create a new project:

IMPORTANT NOTE: You probably already know this, but, the difference between Version 1.7.10 and 1.8 is vast. If you choose to create a 1.8 mod (and you should; no sense in learning an old version), make sure the documentation you are looking at is for 1.8 and not an older version. For example, setting textures on blocks/items is totally different as of 1.8 (it is configured via JSON instead of by calling a method).
As you can see, in a fit of cleverness and originality I have named my project “Hello Minecraft”. When your project is created, Visual Studio will download a bunch of third-party packages and do a one-time provisioning build. It takes 5-20 minutes. For the curious, here is my build log. At this point we are ready to rock. Let’s hit F5 to debug the project just to make sure everything is working (since I am a skeptic at heart):

Creating a Block
Getting the mod project up and running was surprisingly easy. Next, we need to figure out something we want to modify. Since nobody else in the world is making custom TNT blocks (hah), let’s go ahead and build a custom TNT block.
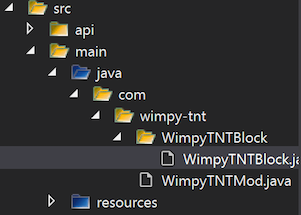
Most of the TNT mods I have seen have been focused on making a bigger, better explosion. Being a man of restraint, I am going to create a smaller, wimpy explosion. In fact, Wimpy TNT is a great name for our new block! In /src/main/java/com/wimpy-tnt/WimpyTNTBlock (you will have to create the wimpy-tnt and WimpyTNTBlock subfolders) let’s create a class called WimpyTNTBlock. In that class, we will start to define our new block:
package hellominecraft.wimpytntmod;
// I know there are a lot of imports here… we will use them later in the demo!
import net.minecraft.block.Block;
import net.minecraft.block.BlockTNT;
import net.minecraft.block.material.Material;
import net.minecraft.creativetab.CreativeTabs;
import net.minecraftforge.fml.common.registry.GameRegistry;
import net.minecraft.world.World;
import net.minecraft.world.Explosion;
import net.minecraft.util.BlockPos;
import net.minecraft.block.state.BlockState;
import net.minecraft.block.state.IBlockState;
import net.minecraft.entity.player.EntityPlayer;
import net.minecraft.item.Item;
import net.minecraft.util.EnumFacing;
import net.minecraft.init.Items;
import net.minecraft.client.Minecraft;public class WimpyTNTBlock extends Block
{
private final String name = «wimpyTNT»;public WimpyTNTBlock ()
{
super(Material.tnt);
setUnlocalizedName(name);
// We want this to show up on the «block» tab in creative mode.
setCreativeTab(CreativeTabs.tabBlock);
}public String getName()
{
return name;
}
}Disclaimer: the spacing in my code here is messed up because I couldn’t figure out how to get the forum software to not remove my whitespace (and using the pre tag makes the newlines FUBAR). Reformat it as you wish.
Next, we are going to need to set our mod up and instantiate / register our new block. In/src/main/java/com/wimpy-tnt/ create a class called WimpyTNTMod with the following content:
package hellominecraft.wimpytntmod;
import net.minecraft.init.Blocks;
import net.minecraftforge.fml.common.Mod;
import net.minecraftforge.fml.common.Mod.EventHandler;
import net.minecraftforge.fml.common.event.FMLInitializationEvent;
import net.minecraft.block.Block;
import net.minecraft.block.material.Material;
import net.minecraft.creativetab.CreativeTabs;
import net.minecraftforge.fml.common.registry.GameRegistry;
import net.minecraft.client.renderer.entity.RenderItem;
import net.minecraftforge.fml.relauncher.Side;
import net.minecraft.client.Minecraft;
import net.minecraft.item.Item;
import net.minecraft.client.resources.model.ModelResourceLocation;@Mod(modid = WimpyTNTMod.MODID, name = WimpyTNTMod.NAME, version = WimpyTNTMod.VERSION)
public class WimpyTNTMod
{
public static final String MODID = «WimpyTNT»;
public static final String VERSION = «1.0»;
public static final String NAME = «Wimpy TNT Mod»;public static Block wimpyTNT;
@EventHandler
public void init(FMLInitializationEvent event)
{
wimpyTNT = new WimpyTNTBlock();
GameRegistry.registerBlock(wimpyTNT, «wimpyTNT»);
}
}Your /src folder should now look something like this in solution explorer:

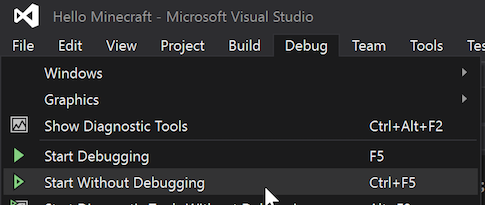
Alright — let’s fire this baby up. For testing, debugging (at least on my machine) is painfully slow. For a faster experience, let’s fire the project up without debugging (Ctrl + F5):

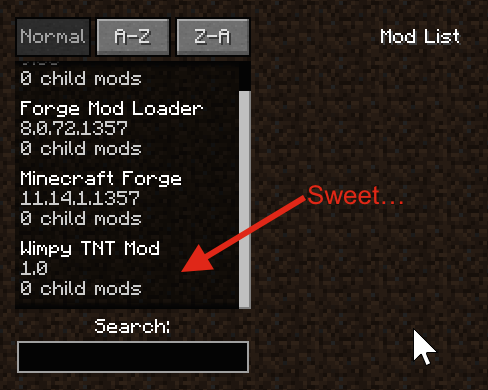
If you go to the Mod List, you should find that our new mod shows up with the correct Name and Version:

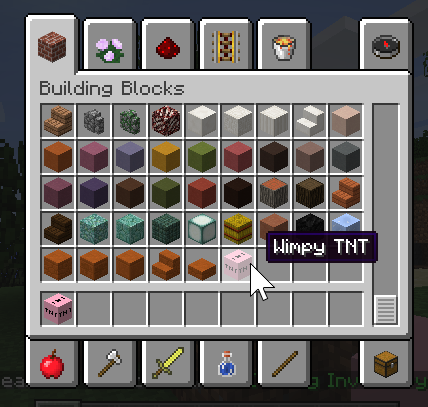
Create a new world in Creative mode and you will see our new block is available:

Custom Textures
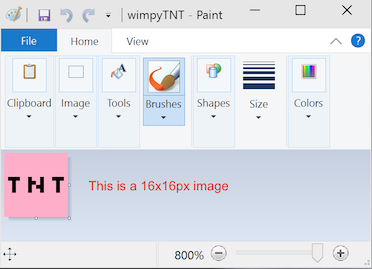
Let’s give our new block a custom texture. Using the most cutting-edge tools available (*ahem*), I created a PNG that I want to use as the texture for Wimpy TNT:

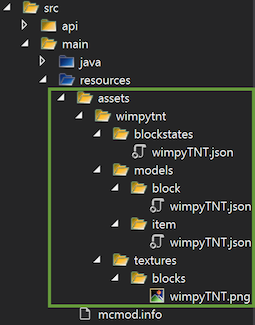
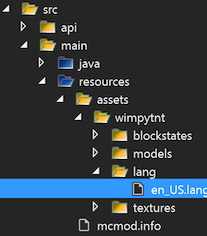
In order to set our block’s texture, we first need to add our texture image (named wimpyTNT.png) to/src/main/resources/assets/wimpytnt/textures/blocks. Next we need to create 3 JSON configuration files for our block:
- /src/main/resources/assets/wimpytnt/blockstates/wimpyTNT.json
- /src/main/resources/assets/wimpytnt/models/block/wimpyTNT.json
- /src/main/resources/assets/wimpytnt/models/item/wimpyTNT.json
To do this, I used an invaluable utility created by wuppy21. It will auto-generate the JSON files for you and all you have to do is move them in to your project. When you have all 3 JSON files and the texture image, your solution explorer should look like this:

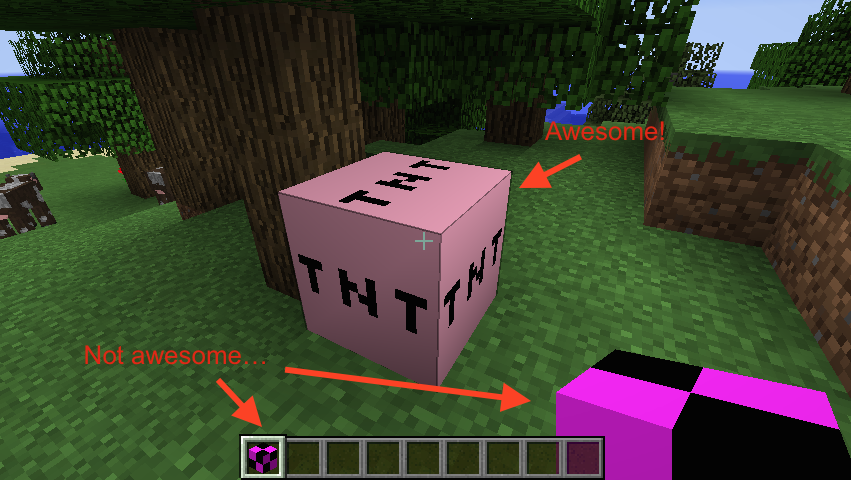
Now when you run the project you can place the block and it will have the correct texture:

To fix the texture on inventory and when holding the item in your hand, we need to register a renderer for our block. Add the following to your init method in your WimpyTNTMod class:
//register renders
if(event.getSide() == Side.CLIENT)
{
RenderItem renderItem = Minecraft.getMinecraft().getRenderItem();// Register a renderer for our wimpy TNT block
renderItem.getItemModelMesher().register(Item.getItemFromBlock(wimpyTNT), 0, new ModelResourceLocation(WimpyTNTMod.MODID + «:» + ((WimpyTNTBlock)wimpyTNT).getName(), «inventory»));
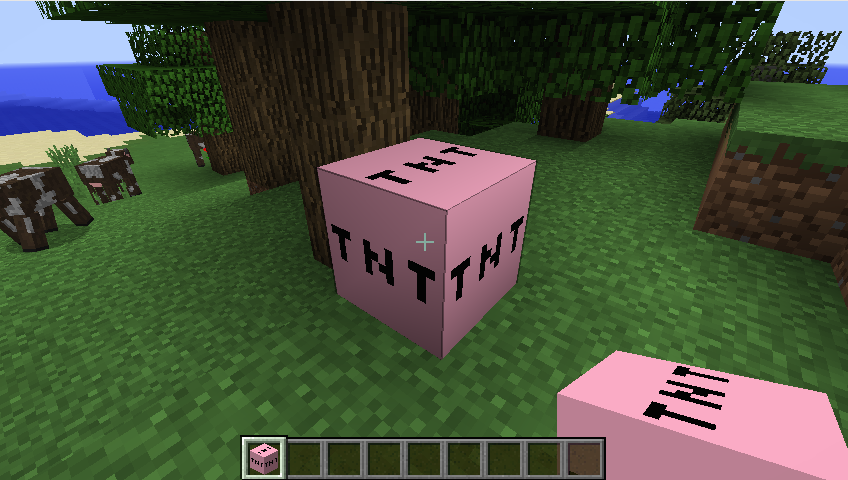
}This page was extremely helpful to me when trying to figure this out since most of the samples I found were prior to version 1.8. With this code in place, fire up the project and you will see that you are in good shape with regards to textures:

Give it a Name
Our name is still not ideal. To fix this, we need to add a lang file to/src/main/resources/assets/wimpytnt/lang/. Let’s create the lang folder and add en_US.lang to it:

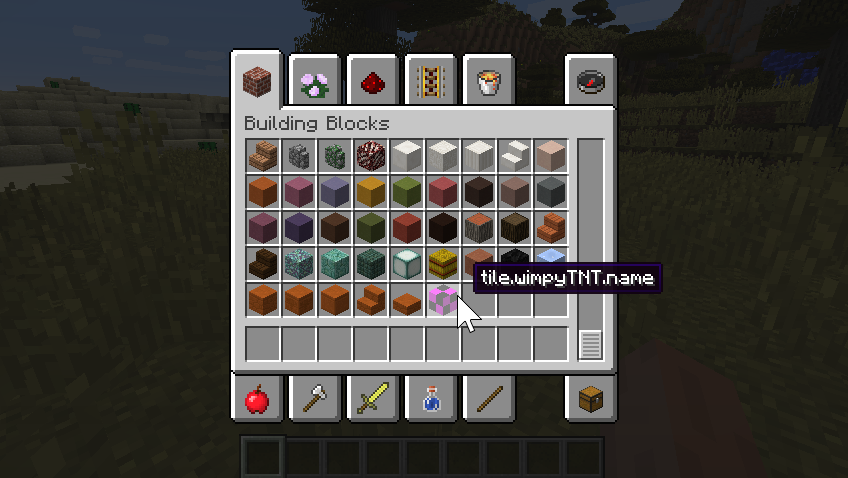
The file needs the following line to give our block a name: tile.wimpyTNT.name=Wimpy TNT (huge thanks to this thread for helping me figure this out). The next time you debug the app, when you hover over your new block, the name is displayed:

Explode!
Let’s make this block explode when you activate it with flint. I did a bit of spelunking in to the decompiled code for BlockTNT and, luckily, creating an explosion is easy. Add the following method to your WimpyTNTBlock class:
public boolean onBlockActivated(World worldIn, BlockPos pos, IBlockState state, EntityPlayer playerIn, EnumFacing side, float hitX, float hitY, float hitZ)
{
if (playerIn.getCurrentEquippedItem() != null)
{
Item item = playerIn.getCurrentEquippedItem().getItem();if (item == Items.flint_and_steel || item == Items.fire_charge)
{
// Let’s set our wimpy TNT block to air because it is exploding…
worldIn.setBlockToAir(pos);// You can bump the force up/down here if you like.
float force = .5F;// Create the explosion in our world.
worldIn.createExplosion(null, pos.getX(),
pos.getY(), pos.getZ(), force, true);return true;
}
}return super.onBlockActivated(worldIn, pos, state, playerIn, side, hitX, hitY, hitZ);
}You should now be able to hit it with flint and steel to make it explode. It’s pretty underwhelming, but, that’s why we named it Wimpy TNT. Here is a video of it in action:
… and that’s it. You can download the source for this project here. If you have any suggestions for edits, send me a pull request! Also, let me know what you think or if you have any suggestions for edits on this guide.
-
-
#2
Jun 12, 2015
I did not know that it was possible to develop using VS! What are the Minecraft templates/framework available? Is it just the three in the picture?
Other reaction; Java in VS? What kind of sorcery is this
Check out my mod, Placeable Items!
If my comment helped you or you just like me, hit the green arrow down there!
-
#3
Jun 15, 2015
ProfessorNC-
View User Profile
-
View Posts
-
Send Message
- Out of the Water
- Location:
Los Angeles
- Join Date:
8/29/2014
- Posts:
2
- Member Details
I can’t do the texture, what did you use? Also, the name won’t work, even when I put in, tile.wimpyTNT.name=Wimpy TNT what else do I have to put?
-
-
#4
Jun 16, 2015
DeanPDX-
View User Profile
-
View Posts
-
Send Message
- Out of the Water
- Join Date:
5/11/2015
- Posts:
8
- Member Details
I did not know that it was possible to develop using VS! What are the Minecraft templates/framework available? Is it just the three in the picture?
Other reaction; Java in VS? What kind of sorcery is this
Dark magic to be sure! Well, maybe not *that* dark:
- Sam Harwell’s Java Language Support VS extension is the project providing the Java project system, build system, basic editor facilities and the rich Java debugger capabilities in Visual Studio.
- Eclipse JDT is bundled together with this project as an Eclipse application and is used to provide all IntelliSense and browsing information inside the VS editor.
-
-
#6
Jun 16, 2015
DeanPDX-
View User Profile
-
View Posts
-
Send Message
- Out of the Water
- Join Date:
5/11/2015
- Posts:
8
- Member Details
Ferdz, I forgot to answer your question. Yes, at the moment it is just the three available in the picture. I would have edited my previous post but every time I edit a post with a quote my quote tags get messed up for some reason. Editing the markup doesn’t seem to fix it.
-
-
#7
Jun 16, 2015
Yeah I know the feeling, the text editor of the forums is so broken .. :/
Check out my mod, Placeable Items!
If my comment helped you or you just like me, hit the green arrow down there!
-
#9
Jun 26, 2015
R3dTest-
View User Profile
-
View Posts
-
Send Message
- Newly Spawned
- Join Date:
6/27/2015
- Posts:
1
- Member Details
Thanks for starting this, as there is not much out there to help get started yet with this path.
Just messing around with it was pretty simple and easy to understand. Some additions I uncovered as I followed the trail of some of the objects you used in your tutorial are elaborated on below. If there is a better way to do any of these things, please share feedback.
To specify block properties like hardness, resistance, and step sound:
- Edit WimpyTNTMod.java
- In the beginning of the class, add a sound:
- More examples of sounds are available if you follow the definition (F12) to the Block class
- I believe the string is for associating to existing sound files, and there are additional ways to specify dig and break sounds if different than main source
- The 2nd and 3rd arguments are for volume and frequency respectively
- At the beginning of the init method, update the setting of the wimpyTNT static block to:
- Again, the Block class is your friend here for other references on values for hardness (how long it takes to destroy a block) and resistance (how strong the block is against explosions); thanks to Creating_Blocks for the extra details on these methods
- The soundTypeStone value passed into setStepSound is what you defined earlier
public static final Block.SoundType soundTypeStone = new Block.SoundType(«stone», 1.0F, 1.5F);
wimpyTNT = (new WimpyTNTBlock()).setHardness(0.0F).setResistance(0.0F).setStepSound(soundTypeStone);
To give your block a crafting recipe:
- Edit WimpyTNTMod.java
- Add a few more imports:
- In the init method, alter the block registration line so you get the registration result block:
- And now to set the recipe during init, I added the next call after the render condition (not inside it) but still within the init method:
- This setRecipe method doesn’t exist yet, but you’re going to create that next and you’re passing into it the block that was registered
- Add the setRecipe method to the class:
- More examples of recipes are available if you follow the definition (F12) to the CraftingManager class
- I basically wanted to test it quickly in survival mode, and grabbing the first tree or two you see is about enough to try this one
- A crafting table will be needed, but could have been avoided if the recipe was more simple and fit in the 2×2 crafting area
- The recipe is sticks in the 4 corners of the 3×3 crafting area; and blocks of dirt in the left column center row and right column center row
- More examples of items and blocks … yup, again, F12 to Items class and Blocks class
import net.minecraft.item.crafting.CraftingManager;
import net.minecraft.init.Items;
import net.minecraft.item.ItemStack;Block block = GameRegistry.registerBlock(wimpyTNT, «wimpyTNT»);
// We want to craft it.
setRecipe(block);private void setRecipe(Block block)
{
CraftingManager manager = CraftingManager.getInstance();
manager.addRecipe(new ItemStack(block, 1), new Object[] {«X X», «# #», «X X», ‘X’, Items.stick, ‘#’, Blocks.dirt});
} -
-
#12
Sep 5, 2015
I got this error please help
-
#14
Sep 25, 2015
Kalzhul-
View User Profile
-
View Posts
-
Send Message
- Coal Miner
- Join Date:
6/11/2012
- Posts:
106
- Minecraft:
Kalzhul
- Member Details
Hello. I seem to be having trouble with the textures and name. Everything else seems to work fine and I appreciate your help.
I even copied and pasted from your github to make sure it was correct, and I also downloaded your json files and texture.
Here is the project zip so you can look at it in VS if you wouldn’t mind.
https://www.mediafire.com/?wftk1h78ed0xb2c
Also if you could answer another question for me as I am absolutely new to java, that would be appreciated.
When I want to set attributes such as sound or crafting recipes, where exactly do I put the code? Like a screenshot, so I know where in the class it goes would be appreciated.
Sig by Bigkaboom12. -
-
#15
Dec 3, 2015
LloydAZ-
View User Profile
-
View Posts
-
Send Message
- Redstone Miner
- Location:
Phoenix, AZ
- Join Date:
7/20/2015
- Posts:
511
- Location:
Phoenix, AZ
- Minecraft:
Desert_Rat_65
- Xbox:
Eron
- Member Details
Excellent tutorial! I was able to follow along and get it to work.
I wish that Visual Studio would include the templates for the json and lang files when you select to add a new item, but that’s outside the scope of the tutorial and just a wish on my part.
-
-
#16
Mar 25, 2016
byteoflogic-
View User Profile
-
View Posts
-
Send Message
- Tree Puncher
- Join Date:
2/7/2013
- Posts:
18
- Location:
California, United States
- Minecraft:
byteoflogic
- Member Details
Other reaction; Java in VS? What kind of sorcery is this
Try VS 2015, Microsoft added full Java support!
As far as MC modding goes, there’s actually a extension (published by microsoft) which does the entire work of setting up the project for you. (And includes Mekanism as an example mod to boot!)
So as far as I can tell, Microsoft is using it’s acquiring of Minecraft for good, not evil! : )
-
-
#17
Mar 25, 2016
Try VS 2015, Microsoft added full Java support!
As far as MC modding goes, there’s actually a extension (published by microsoft) which does the entire work of setting up the project for you. (And includes Mekanism as an example mod to boot!)
So as far as I can tell, Microsoft is using it’s acquiring of Minecraft for good, not evil! : )
Except that Minecraft 10 is in C++ D’:
Check out my mod, Placeable Items!
If my comment helped you or you just like me, hit the green arrow down there!
-
#18
Apr 16, 2016
Which version of VS2015 did you use? Express, Community, Code, Enterprise??
-
#19
Apr 26, 2016
Why did you purposely avoid sarcasm?
Mankind is the caretaker of nature, having been granted this responsibility by the Creator. Naturally, we screwed up and the Creator had to sacrifice His Son so we would not be destroyed. He is risen, as all shall be one day. Anyone who puts his trust in the Son of God will reign with Him forever; anyone who does not will be destroyed forever.
-
#20
Aug 29, 2016
DeanPDX-
View User Profile
-
View Posts
-
Send Message
- Out of the Water
- Join Date:
5/11/2015
- Posts:
8
- Member Details
Hello. I seem to be having trouble with the textures and name. Everything else seems to work fine and I appreciate your help.
I even copied and pasted from your github to make sure it was correct, and I also downloaded your json files and texture.
Here is the project zip so you can look at it in VS if you wouldn’t mind.
https://www.mediafire.com/?wftk1h78ed0xb2c
Also if you could answer another question for me as I am absolutely new to java, that would be appreciated.
When I want to set attributes such as sound or crafting recipes, where exactly do I put the code? Like a screenshot, so I know where in the class it goes would be appreciated.
I know this is *way* late (I have been really busy!) but did you get it working? If not, I will try to help you troubleshoot it.
Except that Minecraft 10 is in C++ D’:
Is it really? I guess that kind of makes sense because in terms of performance, C++ is hard to compete with. I just did some searching and it doesn’t appear as though Minecraft 10 has taken over yet. It also is purely for Windows 10 (hence them ditching previous versioning numbers) and I wonder if they abandoned that project. Completely scrapping the codebase and starting over seems like a pretty large undertaking.
Which version of VS2015 did you use? Express, Community, Code, Enterprise??
Community Edition.
-
- To post a comment, please login.


- 1
- 2
- Next
- |<<
- <
- >
- >>|
Posts Quoted:
Reply
Clear All Quotes
-
Search
-
Search all Forums
-
Search this Forum
-
Search this Thread
-
-
Tools
-
Jump to Forum
-
- |<<
- <
- >
- >>|
- 1
- 2
- Next
-
#1
Jun 11, 2015
DeanPDX-
View User Profile
-
View Posts
-
Send Message
- Out of the Water
- Join Date:
5/11/2015
- Posts:
8
- Member Details
Hey All, this is my first tutorial so bear with me. I am primarily a Microsoft developer and I was at Build 2015 when they announced the new Minecraft Mod project type. Since my kids and I are really in to Minecraft, I had to give it a shot. Without further ado, here’s a guide on how to build a mod using VS 2015 (which you can download for free by the way). This was originally a blog post but I wanted to post it here as well in case it helps any of you out (and I got permission to do so just to make sure I wasn’t being rude).
Getting Started
To get started, make sure you have the x64 version of Java SE Development Kit (JDK) for Windows. With that out of the way, you are ready to grab the Minecraft Mod Developer Pack extension for Visual Studio. Once installation is complete, create a new project:
IMPORTANT NOTE: You probably already know this, but, the difference between Version 1.7.10 and 1.8 is vast. If you choose to create a 1.8 mod (and you should; no sense in learning an old version), make sure the documentation you are looking at is for 1.8 and not an older version. For example, setting textures on blocks/items is totally different as of 1.8 (it is configured via JSON instead of by calling a method).
As you can see, in a fit of cleverness and originality I have named my project “Hello Minecraft”. When your project is created, Visual Studio will download a bunch of third-party packages and do a one-time provisioning build. It takes 5-20 minutes. For the curious, here is my build log. At this point we are ready to rock. Let’s hit F5 to debug the project just to make sure everything is working (since I am a skeptic at heart):
Creating a Block
Getting the mod project up and running was surprisingly easy. Next, we need to figure out something we want to modify. Since nobody else in the world is making custom TNT blocks (hah), let’s go ahead and build a custom TNT block.
Most of the TNT mods I have seen have been focused on making a bigger, better explosion. Being a man of restraint, I am going to create a smaller, wimpy explosion. In fact, Wimpy TNT is a great name for our new block! In /src/main/java/com/wimpy-tnt/WimpyTNTBlock (you will have to create the wimpy-tnt and WimpyTNTBlock subfolders) let’s create a class called WimpyTNTBlock. In that class, we will start to define our new block:
package hellominecraft.wimpytntmod;
// I know there are a lot of imports here… we will use them later in the demo!
import net.minecraft.block.Block;
import net.minecraft.block.BlockTNT;
import net.minecraft.block.material.Material;
import net.minecraft.creativetab.CreativeTabs;
import net.minecraftforge.fml.common.registry.GameRegistry;
import net.minecraft.world.World;
import net.minecraft.world.Explosion;
import net.minecraft.util.BlockPos;
import net.minecraft.block.state.BlockState;
import net.minecraft.block.state.IBlockState;
import net.minecraft.entity.player.EntityPlayer;
import net.minecraft.item.Item;
import net.minecraft.util.EnumFacing;
import net.minecraft.init.Items;
import net.minecraft.client.Minecraft;public class WimpyTNTBlock extends Block
{
private final String name = «wimpyTNT»;public WimpyTNTBlock ()
{
super(Material.tnt);
setUnlocalizedName(name);
// We want this to show up on the «block» tab in creative mode.
setCreativeTab(CreativeTabs.tabBlock);
}public String getName()
{
return name;
}
}Disclaimer: the spacing in my code here is messed up because I couldn’t figure out how to get the forum software to not remove my whitespace (and using the pre tag makes the newlines FUBAR). Reformat it as you wish.
Next, we are going to need to set our mod up and instantiate / register our new block. In/src/main/java/com/wimpy-tnt/ create a class called WimpyTNTMod with the following content:
package hellominecraft.wimpytntmod;
import net.minecraft.init.Blocks;
import net.minecraftforge.fml.common.Mod;
import net.minecraftforge.fml.common.Mod.EventHandler;
import net.minecraftforge.fml.common.event.FMLInitializationEvent;
import net.minecraft.block.Block;
import net.minecraft.block.material.Material;
import net.minecraft.creativetab.CreativeTabs;
import net.minecraftforge.fml.common.registry.GameRegistry;
import net.minecraft.client.renderer.entity.RenderItem;
import net.minecraftforge.fml.relauncher.Side;
import net.minecraft.client.Minecraft;
import net.minecraft.item.Item;
import net.minecraft.client.resources.model.ModelResourceLocation;@Mod(modid = WimpyTNTMod.MODID, name = WimpyTNTMod.NAME, version = WimpyTNTMod.VERSION)
public class WimpyTNTMod
{
public static final String MODID = «WimpyTNT»;
public static final String VERSION = «1.0»;
public static final String NAME = «Wimpy TNT Mod»;public static Block wimpyTNT;
@EventHandler
public void init(FMLInitializationEvent event)
{
wimpyTNT = new WimpyTNTBlock();
GameRegistry.registerBlock(wimpyTNT, «wimpyTNT»);
}
}Your /src folder should now look something like this in solution explorer:
Alright — let’s fire this baby up. For testing, debugging (at least on my machine) is painfully slow. For a faster experience, let’s fire the project up without debugging (Ctrl + F5):
If you go to the Mod List, you should find that our new mod shows up with the correct Name and Version:
Create a new world in Creative mode and you will see our new block is available:
Custom Textures
Let’s give our new block a custom texture. Using the most cutting-edge tools available (*ahem*), I created a PNG that I want to use as the texture for Wimpy TNT:
In order to set our block’s texture, we first need to add our texture image (named wimpyTNT.png) to/src/main/resources/assets/wimpytnt/textures/blocks. Next we need to create 3 JSON configuration files for our block:
- /src/main/resources/assets/wimpytnt/blockstates/wimpyTNT.json
- /src/main/resources/assets/wimpytnt/models/block/wimpyTNT.json
- /src/main/resources/assets/wimpytnt/models/item/wimpyTNT.json
To do this, I used an invaluable utility created by wuppy21. It will auto-generate the JSON files for you and all you have to do is move them in to your project. When you have all 3 JSON files and the texture image, your solution explorer should look like this:
Now when you run the project you can place the block and it will have the correct texture:
To fix the texture on inventory and when holding the item in your hand, we need to register a renderer for our block. Add the following to your init method in your WimpyTNTMod class:
//register renders
if(event.getSide() == Side.CLIENT)
{
RenderItem renderItem = Minecraft.getMinecraft().getRenderItem();// Register a renderer for our wimpy TNT block
renderItem.getItemModelMesher().register(Item.getItemFromBlock(wimpyTNT), 0, new ModelResourceLocation(WimpyTNTMod.MODID + «:» + ((WimpyTNTBlock)wimpyTNT).getName(), «inventory»));
}This page was extremely helpful to me when trying to figure this out since most of the samples I found were prior to version 1.8. With this code in place, fire up the project and you will see that you are in good shape with regards to textures:
Give it a Name
Our name is still not ideal. To fix this, we need to add a lang file to/src/main/resources/assets/wimpytnt/lang/. Let’s create the lang folder and add en_US.lang to it:
The file needs the following line to give our block a name: tile.wimpyTNT.name=Wimpy TNT (huge thanks to this thread for helping me figure this out). The next time you debug the app, when you hover over your new block, the name is displayed:
Explode!
Let’s make this block explode when you activate it with flint. I did a bit of spelunking in to the decompiled code for BlockTNT and, luckily, creating an explosion is easy. Add the following method to your WimpyTNTBlock class:
public boolean onBlockActivated(World worldIn, BlockPos pos, IBlockState state, EntityPlayer playerIn, EnumFacing side, float hitX, float hitY, float hitZ)
{
if (playerIn.getCurrentEquippedItem() != null)
{
Item item = playerIn.getCurrentEquippedItem().getItem();if (item == Items.flint_and_steel || item == Items.fire_charge)
{
// Let’s set our wimpy TNT block to air because it is exploding…
worldIn.setBlockToAir(pos);// You can bump the force up/down here if you like.
float force = .5F;// Create the explosion in our world.
worldIn.createExplosion(null, pos.getX(),
pos.getY(), pos.getZ(), force, true);return true;
}
}return super.onBlockActivated(worldIn, pos, state, playerIn, side, hitX, hitY, hitZ);
}You should now be able to hit it with flint and steel to make it explode. It’s pretty underwhelming, but, that’s why we named it Wimpy TNT. Here is a video of it in action:
… and that’s it. You can download the source for this project here. If you have any suggestions for edits, send me a pull request! Also, let me know what you think or if you have any suggestions for edits on this guide.
-
-
#2
Jun 12, 2015
I did not know that it was possible to develop using VS! What are the Minecraft templates/framework available? Is it just the three in the picture?
Other reaction; Java in VS? What kind of sorcery is this
Check out my mod, Placeable Items!
If my comment helped you or you just like me, hit the green arrow down there!
-
#3
Jun 15, 2015
ProfessorNC-
View User Profile
-
View Posts
-
Send Message
- Out of the Water
- Location:
Los Angeles
- Join Date:
8/29/2014
- Posts:
2
- Member Details
I can’t do the texture, what did you use? Also, the name won’t work, even when I put in, tile.wimpyTNT.name=Wimpy TNT what else do I have to put?
-
-
#4
Jun 16, 2015
DeanPDX-
View User Profile
-
View Posts
-
Send Message
- Out of the Water
- Join Date:
5/11/2015
- Posts:
8
- Member Details
I did not know that it was possible to develop using VS! What are the Minecraft templates/framework available? Is it just the three in the picture?
Other reaction; Java in VS? What kind of sorcery is this
Dark magic to be sure! Well, maybe not *that* dark:
- Sam Harwell’s Java Language Support VS extension is the project providing the Java project system, build system, basic editor facilities and the rich Java debugger capabilities in Visual Studio.
- Eclipse JDT is bundled together with this project as an Eclipse application and is used to provide all IntelliSense and browsing information inside the VS editor.
-
-
#6
Jun 16, 2015
DeanPDX-
View User Profile
-
View Posts
-
Send Message
- Out of the Water
- Join Date:
5/11/2015
- Posts:
8
- Member Details
Ferdz, I forgot to answer your question. Yes, at the moment it is just the three available in the picture. I would have edited my previous post but every time I edit a post with a quote my quote tags get messed up for some reason. Editing the markup doesn’t seem to fix it.
-
-
#7
Jun 16, 2015
Yeah I know the feeling, the text editor of the forums is so broken .. :/
Check out my mod, Placeable Items!
If my comment helped you or you just like me, hit the green arrow down there!
-
#9
Jun 26, 2015
R3dTest-
View User Profile
-
View Posts
-
Send Message
- Newly Spawned
- Join Date:
6/27/2015
- Posts:
1
- Member Details
Thanks for starting this, as there is not much out there to help get started yet with this path.
Just messing around with it was pretty simple and easy to understand. Some additions I uncovered as I followed the trail of some of the objects you used in your tutorial are elaborated on below. If there is a better way to do any of these things, please share feedback.
To specify block properties like hardness, resistance, and step sound:
- Edit WimpyTNTMod.java
- In the beginning of the class, add a sound:
- More examples of sounds are available if you follow the definition (F12) to the Block class
- I believe the string is for associating to existing sound files, and there are additional ways to specify dig and break sounds if different than main source
- The 2nd and 3rd arguments are for volume and frequency respectively
- At the beginning of the init method, update the setting of the wimpyTNT static block to:
- Again, the Block class is your friend here for other references on values for hardness (how long it takes to destroy a block) and resistance (how strong the block is against explosions); thanks to Creating_Blocks for the extra details on these methods
- The soundTypeStone value passed into setStepSound is what you defined earlier
public static final Block.SoundType soundTypeStone = new Block.SoundType(«stone», 1.0F, 1.5F);
wimpyTNT = (new WimpyTNTBlock()).setHardness(0.0F).setResistance(0.0F).setStepSound(soundTypeStone);
To give your block a crafting recipe:
- Edit WimpyTNTMod.java
- Add a few more imports:
- In the init method, alter the block registration line so you get the registration result block:
- And now to set the recipe during init, I added the next call after the render condition (not inside it) but still within the init method:
- This setRecipe method doesn’t exist yet, but you’re going to create that next and you’re passing into it the block that was registered
- Add the setRecipe method to the class:
- More examples of recipes are available if you follow the definition (F12) to the CraftingManager class
- I basically wanted to test it quickly in survival mode, and grabbing the first tree or two you see is about enough to try this one
- A crafting table will be needed, but could have been avoided if the recipe was more simple and fit in the 2×2 crafting area
- The recipe is sticks in the 4 corners of the 3×3 crafting area; and blocks of dirt in the left column center row and right column center row
- More examples of items and blocks … yup, again, F12 to Items class and Blocks class
import net.minecraft.item.crafting.CraftingManager;
import net.minecraft.init.Items;
import net.minecraft.item.ItemStack;Block block = GameRegistry.registerBlock(wimpyTNT, «wimpyTNT»);
// We want to craft it.
setRecipe(block);private void setRecipe(Block block)
{
CraftingManager manager = CraftingManager.getInstance();
manager.addRecipe(new ItemStack(block, 1), new Object[] {«X X», «# #», «X X», ‘X’, Items.stick, ‘#’, Blocks.dirt});
} -
-
#12
Sep 5, 2015
I got this error please help
-
#14
Sep 25, 2015
Kalzhul-
View User Profile
-
View Posts
-
Send Message
- Coal Miner
- Join Date:
6/11/2012
- Posts:
106
- Minecraft:
Kalzhul
- Member Details
Hello. I seem to be having trouble with the textures and name. Everything else seems to work fine and I appreciate your help.
I even copied and pasted from your github to make sure it was correct, and I also downloaded your json files and texture.
Here is the project zip so you can look at it in VS if you wouldn’t mind.
https://www.mediafire.com/?wftk1h78ed0xb2c
Also if you could answer another question for me as I am absolutely new to java, that would be appreciated.
When I want to set attributes such as sound or crafting recipes, where exactly do I put the code? Like a screenshot, so I know where in the class it goes would be appreciated.
Sig by Bigkaboom12. -
-
#15
Dec 3, 2015
LloydAZ-
View User Profile
-
View Posts
-
Send Message
- Redstone Miner
- Location:
Phoenix, AZ
- Join Date:
7/20/2015
- Posts:
511
- Location:
Phoenix, AZ
- Minecraft:
Desert_Rat_65
- Xbox:
Eron
- Member Details
Excellent tutorial! I was able to follow along and get it to work.
I wish that Visual Studio would include the templates for the json and lang files when you select to add a new item, but that’s outside the scope of the tutorial and just a wish on my part.
-
-
#16
Mar 25, 2016
byteoflogic-
View User Profile
-
View Posts
-
Send Message
- Tree Puncher
- Join Date:
2/7/2013
- Posts:
18
- Location:
California, United States
- Minecraft:
byteoflogic
- Member Details
Other reaction; Java in VS? What kind of sorcery is this
Try VS 2015, Microsoft added full Java support!
As far as MC modding goes, there’s actually a extension (published by microsoft) which does the entire work of setting up the project for you. (And includes Mekanism as an example mod to boot!)
So as far as I can tell, Microsoft is using it’s acquiring of Minecraft for good, not evil! : )
-
-
#17
Mar 25, 2016
Try VS 2015, Microsoft added full Java support!
As far as MC modding goes, there’s actually a extension (published by microsoft) which does the entire work of setting up the project for you. (And includes Mekanism as an example mod to boot!)
So as far as I can tell, Microsoft is using it’s acquiring of Minecraft for good, not evil! : )
Except that Minecraft 10 is in C++ D’:
Check out my mod, Placeable Items!
If my comment helped you or you just like me, hit the green arrow down there!
-
#18
Apr 16, 2016
Which version of VS2015 did you use? Express, Community, Code, Enterprise??
-
#19
Apr 26, 2016
Why did you purposely avoid sarcasm?
Mankind is the caretaker of nature, having been granted this responsibility by the Creator. Naturally, we screwed up and the Creator had to sacrifice His Son so we would not be destroyed. He is risen, as all shall be one day. Anyone who puts his trust in the Son of God will reign with Him forever; anyone who does not will be destroyed forever.
-
#20
Aug 29, 2016
DeanPDX-
View User Profile
-
View Posts
-
Send Message
- Out of the Water
- Join Date:
5/11/2015
- Posts:
8
- Member Details
Hello. I seem to be having trouble with the textures and name. Everything else seems to work fine and I appreciate your help.
I even copied and pasted from your github to make sure it was correct, and I also downloaded your json files and texture.
Here is the project zip so you can look at it in VS if you wouldn’t mind.
https://www.mediafire.com/?wftk1h78ed0xb2c
Also if you could answer another question for me as I am absolutely new to java, that would be appreciated.
When I want to set attributes such as sound or crafting recipes, where exactly do I put the code? Like a screenshot, so I know where in the class it goes would be appreciated.
I know this is *way* late (I have been really busy!) but did you get it working? If not, I will try to help you troubleshoot it.
Except that Minecraft 10 is in C++ D’:
Is it really? I guess that kind of makes sense because in terms of performance, C++ is hard to compete with. I just did some searching and it doesn’t appear as though Minecraft 10 has taken over yet. It also is purely for Windows 10 (hence them ditching previous versioning numbers) and I wonder if they abandoned that project. Completely scrapping the codebase and starting over seems like a pretty large undertaking.
Which version of VS2015 did you use? Express, Community, Code, Enterprise??
Community Edition.
-
- To post a comment, please login.
- 1
- 2
- Next
- |<<
- <
- >
- >>|
Posts Quoted:
Reply
Clear All Quotes
На чтение 10 мин. Просмотров 2.8k. Опубликовано 15.02.2021
Эта статья посвящена созданию модов для Java Edition . Информацию о надстройках Bedrock Edition см. В разделе Надстройка.

Эта функция является эксклюзивной для Java Edition .
Содержание
- Обзор
- Чего делать не следует
- Первые шаги с Forge
- Замечание о заполнителях
- 1. Создайте папку для своего проекта
- 2. Получите «исходный дистрибутив»
- 3. Скопируйте ключевые файлы в папку вашего проекта
- 4. Импортируйте проект gradle
- 5. Назначьте JDK
- 6. Настроить рабочее пространство
- 7. Настройте параметры запуска
- Создание мода для Forge
- Идентификация вашего мода
- Создание настраиваемого инструмента
- Пользовательские слои поверх ванильных текстур
- Текстуры с нуля
- Создание собственного моба
- Модели с нуля
- Создание файла конфигурации
- Дополнительная литература
Обзор
Моды (сокращение от «модификации») могут изменять или добавлять элементы, блоки, объекты и многое другое. Предположительно, вы уже есть идея для мода, который вы хотите создать. Если вы просто хотите добавить в свою игру собственные улучшения, функции, таблицы добычи, структуры, рецепты или теги, узнайте, как создать пакет данных, который не требует программирования. Или посмотрите, как создать пакет ресурсов, если вы просто хотите настроить текстуры (цвета и дизайн), модели, музыку, звуки, языки, всплески, шрифты или финальное стихотворение. Или, возможно, вы хотите «разветвить» любимый мод. для обновления до более новых версий Minecraft. В любом случае, это руководство будет охватывать ( в конечном итоге ) только самые основные элементы создания объекта и создания объекта (движущегося объекта, такого как сельский житель, овца, зомби и т. Д.), И распространение полученного пакета модов.
Моды Minecraft состоят из файлов jar (например, yournewmod.jar), которые содержат файлы классов, файлы JSON и файлы изображений, и это лишь некоторые из наиболее распространенных.
- Class файлы специфичны для языка программирования Java. Несколько учебных пособий по Java, которые стоит попробовать, включают w3schools (веб и мобильные устройства), SoloLearn (веб и мобильные устройства) и kodevelopment (веб). Для чтения или создания файлов классов вам понадобится IDE (интегрированная среда разработки), например IntelliJ или Eclipse. В этом руководстве основное внимание уделяется IntelliJ IDEA Community Edition 2019.
- JSON файлы — это средство детализации характеристик объектов, используемых файлами классов Java. JSON намного проще, чем Java. Вам понадобится текстовый редактор, такой как Notepad ++, Vim или Emacs, чтобы читать или создавать файлы JSON. У вас, вероятно, уже есть базовый текстовый редактор на вашем компьютере, но есть много преимуществ использования вместо него других.
- Файлы изображений, с которыми вы, возможно, знакомы, включают форматы .bmp и .jpg, но для Minecraft требуется .png (пример: yournewlogo.png) в квадрате, кратном 16 пикселям (пример: 16×16, 32×32, 64×64). Вам понадобится редактор изображений, такой как Paint.NET или GIMP, для редактирования или создания файлов .png. Вероятно, у вас уже есть MS Paint на вашем компьютере, но GIMP имеет гораздо больше функций, а Paint.NET довольно удобен для пользователя. Есть также несколько веб-сайтов с инструментами для создания пиксельной графики.
Если вы играли в Minecraft Java Edition , у вас, вероятно, уже есть JRE (среда выполнения Java). Чтобы разработать мод, вам нужно будет найти JDK (Java Development Kit), который включает JRE и эмулятор.. Создайте бесплатную учетную запись на oracle.com и загрузите JDK Standard Edition версии 8. Затем следуйте инструкциям по его установке и запишите место, в которое он устанавливается. Обратите особое внимание на раздел Обновление переменной среды PATH .
Установив Java Development Kit и интегрированную среду разработки IntelliJ для управления Java, вы теперь есть инструменты для разработки специального программного обеспечения, которое можно использовать в различных приложениях. Во время работы над модом продолжайте работать с руководствами по Java false. Уроки позволят вам претворить свои идеи в жизнь, а идеи сделают уроки более интересными и запоминающимися.
Еще один инструмент, который вы должны настроить перед запуском мода, — это Forge MDK (комплект для разработки модов). Forge — это набор полезных ресурсов и загрузчик модов, разработанный специально для упрощения совместимости между Minecraft Java Edition и несколькими модами, созданными сообществом. В этом руководстве основное внимание уделяется MDK версии 1.12.2 Minecraft Java Edition , хотя Forge для версии 1.14.4 существует уже некоторое время. Альтернативой Forge является Fabric, но Java все еще используется для кодирования модов в любом случае.
Чего делать не следует
Есть некоторые вещи, с которыми вам следует быть осторожными не делать при создании мода. Запомните этот список:
- Не делайте ничего, что нарушает условия использования Mojang Studios для Minecraft .
- Не выпускайте версии или модификации Minecraft , которые позволяют вам играть, не купив Minecraft в Mojang Studios.
- Ни в коем случае не выпускайте декомпилированный исходный код Minecraft .
- Не изменяйте существующие моды без разрешения автора (авторов) этого мода. ). Проверьте их лицензию, обычно доступную в репозитории автора на GitHub. Если вы не можете найти лицензию, значит, у вас нет разрешения на передачу измененной версии кому-либо. Вы можете повозиться с файлами только для личного использования .
Первые шаги с Forge
Эта статья вики направлена на чтобы обеспечить надежный обзор нескольких ключевых элементов учебника Forge: https://mcforge.readthedocs.io. Добавьте их страницу в закладки, так как она решает многие вопросы в этой статье. Более того, существует более одного действительного способа достичь желаемого результата; эта статья в вики будет сосредоточена на самом простом, который, вероятно, не самый эффективный или элегантный. Если вы будете точно следовать шагам, изложенным здесь, у вас скоро должен быть функциональный мод, с которым вы затем сможете повозиться сколько душе угодно. Если вы используете Linux, руководство Forge, вероятно, будет для вас более полезным. Если вы используете Windows, читайте дальше.
Замечание о заполнителях
В этом руководстве для обозначения профиля пользователя, с которым вы вошли в систему, будет использоваться слово «вы»; если вы копируете и вставляете пути из этого руководства, не забудьте заменить «You» своим собственным именем пользователя Windows.. В этом руководстве для обозначения разделов, которые следует заменить именем мода, выбранным для вашего проекта, будет использоваться «yournewmod».
1. Создайте папку для своего проекта
Перейдите в C:/Users/ You /Documents и создайте новую папку. Имя этой папки может быть легко изменено позже.
2. Получите «исходный дистрибутив»
Посетите https://files.minecraftforge.net и убедитесь, что выбранная версия является той версией, для которой вы хотите создать мод. В большом поле «Рекомендуемая загрузка» щелкните маленькое поле MDK. Появится диалоговое окно с вопросом, где вы хотите сохранить файл и как назвать его. Выберите любое удобное место, но оставьте название без изменений.
3. Скопируйте ключевые файлы в папку вашего проекта
Откройте папку forge-1.12.2 -…- mdk (с распаковкой или без нее сначала) и скопируйте- вставьте следующие 5 файлов из этой папки в папку проекта, которую вы создали на первом шаге:
- папку
src - папка
gradle -
gradlew -
gradlew .bat -
build.gradle
4. Импортируйте проект gradle
Откройте/запустите программу IntelliJ IDEA. На целевом экране нажмите «Импортировать проект». Появится диалоговое окно с вопросом, какой файл импортировать. Перейдите в папку своего проекта и выберите build.Gradle, затем нажмите OK.
5. Назначьте JDK
В следующем окне щелкните поле «Gradle JVM» и перейдите к файлам JDK, которые вы установили ранее. Если вы получили обновление 212 версии 8, выберите папку с именем «jdk1.8.0_212». Нажмите OK и дождитесь завершения сборки, отобразив результаты в нижнем поле.
6. Настроить рабочее пространство
Установка зависимостей не требуется. Перейдите к следующему шагу, поскольку новое обновление в Forge команда setupDecompWorkspace не требуется
7. Настройте параметры запуска
После обновления дважды щелкните запись «genIntellijRuns». Откройте окно «Изменить конфигурации» параметров запуска и посмотрите примерно на полпути вниз, чтобы найти «Использовать путь к классам модуля». Щелкните его раскрывающееся поле и выберите вариант, заканчивающийся на .main , затем нажмите Применить. Если настройки, которые вы только что закончили редактировать, относились к Minecraft Client, нажмите Minecraft Server и повторите шаги, чтобы установить путь к классам.
Теперь вы можете запустить клиент, который запустит Launcher с вашим модом включены. Когда вы попадете в меню посадки, вы можете проверить, присутствует ли ваш мод.
Создание мода для Forge
Идентификация вашего мода
Создание настраиваемого инструмента
Давайте сделаем простое копье со способностью наносить урон, подобным каменному мечу.
Итак, для начала нам нужно сделать новый каталог tools в вашем пакете com.com. Затем создайте новый класс Java с именем ModItemTier. в этом классе java вам нужно ввести один из следующих вариантов:
/* */package com.com.tools;/* *//* *//* * //* *//* */public enum ModItemTier реализует IItemTier {/* 10 */CUSTOMNAMEHERE (1, 131, 4.0F, 3.0F, 5, () -> Ingredient.fromItems (RegistryHandler.YourItem.get ()) );/* *//* */private final Supplier repairmaterial;/* *//* */private final int enchantability;/* *//* */private final float attackDamage;/* *//* */private final float efficiency;/* *//* */private final int maxUses;/* *//* */private final int gatherLevel;/* *//* */ModItemTier (int gatherLevel, int maxUses, float эффективность, float attackDamage, int enchantability, Supplier repairmaterial) {/* 25 */this.harvestLevel = gatherLevel;/* 26 */this.maxUses = maxUses;/* 27 */this.efficiency = efficiency;/* 28 */this.attackDamage = attackDamage;/* 29 */this.enchantability = enchantability;/* 30 */this.repairmaterial = repairmaterial;/* */}/* *//* *//* *//* *//* */ public int func_200926_a () {/* 37 */return this.maxUses;/* */}/* *//* *//* */public float func_200928_b () {/* 42 */return this.efficiency;/ * */}/* *//* *//* */public float func_200929_c () {/* 47 */return this.attackDamage;/* */}/* *//* *//* */public int func_200925_d () {/* 52 */return this.harvestLevel;/* */}/* *//* *//* */public int func_200927_e () {/* 57 */return this.enchantability;/* */}/* *//* *//* */public Ingredient func_200924_f () {/* 62 */return this.repairmaterial.get ();/* */} @Override public int getMaxUses () {return this .maxUses; } @Override public float getEfficiency () {return this.efficiency; } @Override public float getAttackDamage () {return this.attackDamage; } @Override public int getHarvestLevel () {return this.harvestLevel; } @Override public int getEnchantability () {return this.enchantability; } @Override public Ingredient getRepairMaterial () {return (Ingredient) this.repairmaterial; }/* */}
Затем вам нужно зарегистрировать свой элемент. Перейдите в класс реестра элементов и создайте новый элемент, подобный приведенному здесь:
public static final RegistryObject NAME_SPEAR = ITEMS.register ("name_spear", () - > новый SwordItem (ModItemTier.ITEMTIERTHATYOUPUTEARLIER, DAMAGE, COOLDOWN (float), (new Item.Properties ()). group (ItemGroup.COMBAT)));
. После этого вам нужно создать файл JSON в resources/assets/mod/models/item с именем, которое вы установили ранее, например:
{"parent": "item /handheld "," textures ": {" layer0 ":" mod: items/name_spear "}}
Затем перейдите в папку текстур и введите текстуру, которую вы создадите. следующий шаг. Если вы хотите узнать больше о долговечности, рекомендую эту страницу.
Пользовательские слои поверх ванильных текстур
Текстуры с нуля
Откройте редактор изображений, предпочтительно тот, который поддерживает прозрачность, и создайте новый изображение, размер которого кратен 16 x 16 (например, 32 x 32, 64 x 64 и т. д.)

Создание холста 32×32 пикселя в GIMP
В этом примере используется 32×32 пиксельное изображение и выполнено в GIMP.
Создайте файл, убедившись, что он указан в пикселях, а не в дюймах, миллиметрах или других единицах измерения.
Создайте новый слой и удалите исходный холст. Если вы этого не сделаете, ваше изображение будет иметь белый фон.
Используя кисть размером 1×1 пиксель, начните рисовать свой предмет. Обязательно используйте отдельные слои для отдельных частей элемента, чтобы упростить внесение изменений.
Когда вы закончите создавать свое искусство, нажмите файл для сохранения. Если вы используете GIMP или другой расширенный редактор, он не будет сохранен в формате .png. Для GIMP он сохраняется как .xcf.

С копье сделано, нажмите файл и затем сохраните. Обратите внимание на отсутствие белого цвета фона и вместо него пустой фон .png.
Перейдите в раскрывающийся список экспорта или нажмите ctrl + e в Windows или ⌘ + E для macOS. Это для экспорта файла. Убедитесь, что вы экспортируете файл в формате PNG, а не в формате JPG или с любым другим расширением. Если он не сохранен как .png, у него будет белый фон и он будет выглядеть некорректно.

Экспорт искусство каменного копья на рабочий стол. Обратите внимание, что он экспортируется как .png. Некоторые части подвергаются цензуре из соображений конфиденциальности.
Если вы следуете этому руководству и хотите использовать это изображение, вы можете загрузить этот готовый пиксель искусство здесь.
Создание собственного моба
Модели с нуля
Создание файла конфигурации
Чтобы собрать свой мод, запустите gradlew build или ./gradlew build для macOS. Это выведет файл в build/libs с именем [archivesBaseName] — [version] .jar. Этот файл можно поместить в папку модов установки Minecraft с включенной кузницей и распространить.
Дополнительная литература
https://mcforge.readthedocs.io/en /latest/gettingstarted/
Рекомендуется:
- создать учетную запись GitHub для управления версиями вашего мода и сотрудничать с другими разработчиками.
- дополнительные руководства (в виде видео, для версии 1.15.2)
- Учебники/Загрузка пакета ресурсов
- Учебники/Создание пакета ресурсов
- Учебники/ Установка пакета данных
- Учебники/Создание пакета данных