В этой статье описывается процесс создания модификаций для Minecraft с использованием API Forge и Eclipse. Для создания даже простых модификаций требуется знание основ Java. Если во время создания модификаций возникнут вопросы или проблемы, не описанные здесь, опишите их на странице обсуждения.
| Таблица готовности | ||||||
|---|---|---|---|---|---|---|
| Урок | 1.6+ | 1.7+ | 1.9+ | 1.10+ | 1.12+ | 1.14+ |
| Блок | Готов | Готов | Готов | Готов | Готов | Не планируется |
| Предмет | Готов | Готов | Готов | Готов | Приостановлено | Не планируется |
| Крафт | Готов | Готов | Готов | Готов | Приостановлено | Не планируется |
| Компиляция | Готов | Готов | Готов | Готов | Приостановлено | Не планируется |
| Генерация | Возможно | Готов | Готов | Не планируется | Приостановлено | Не планируется |
| Прокси и инстанция | Не планируется | Готов | Не планируется | Не планируется | Приостановлено | Не планируется |
| Моб | Возможно | Готов | Не планируется | Не планируется | Не планируется | Не планируется |
| Блоки с моделью | Возможно | Возможно | Не планируется | Не планируется | Приостановлено | Не планируется |
| Доп. Уроки | Всего: 3 | Всего: 12 | Всего: 10 | Всего: 0 | Всего:0 | Всего:0 |
Общие сведения
Для создания модификаций в любом случае нужны JDK и Eclipse. Первая — это комплект разработчика Java и отличается от обычной Java тем, что имеет средства для компиляции/декомпиляции, несколько дополнительных библиотек и документацию. С 2019-го года ввиду изменений в лицензировании для загрузки JDK потребуется учётная запись Oracle. Также важно то, что Minecraft 1.12 не поддерживает Java ниже 7-й и выше 9-й включительно, тогда как 1.14 поддерживает практически все версии Java выше 8-го выпуска. Eclipse — это среда разработки, которая имеет поддержку синтаксиса нужного языка программирования, а также в ней был написан сам Minecraft.
Руководства по версиям
- 1.6+
- 1.7+
- 1.9+
- 1.10+
- 1.12+
См. также
- Создание модов с помощью ModLoader
- Установка модификаций с помощью Forge
- Учебник по моддингу
- Русскоязычный форум создателей модов
- Руководства на англоязычной Wiki по Forge
A few weeks ago, YouTube recommended me a Minecraft video from Dream’s Channel in which he was trying to beat the game while his friend George attempted to stop him. That video was really fun and got me to explore more of their content.
Right now, there’s a bunch of people recording and uploading Minecraft videos to YouTube, but these two found a way to make their content different. Basically, they build their own plugins to change the rules of the game and then they record themselves attempting to beat the modified game. All I can say is that I love their content, and it’s awesome to see what you can accomplish with the power of code.
A few days later, I had an idea to develop a Minecraft mod and thought Why not? It will be fun!
Selecting the tools
Just like in Minecraft, we need some tools but in this case, they will help us in the creation process of our first mod.
Multiple tools help you build Minecraft mods, and I chose Fabric because one of the mods that I usually play with was built with it.
Minecraft uses Java and so does Fabric, which means we also need to have the Java Development Kit or JDK installed. To be more specific, we need the JDK 8 to be able to compile our mod. You can download it on this page.
Last but not least, we need to pick a code editor, in this case, I chose Visual Studio Code because it’s my favorite editor. Nevertheless, you can use whatever editor you like for this guide, as most of the steps will be performed in the CLI.
Setting up the project
For this guide, we will be using a starter to move quickly into actually building our first mod. Let’s go through the following steps:
1. Clone / Download the repository
If you use Git, just clone the repo:
$ git clone https://github.com/HorusGoul/fabric-mod-starter.git
Enter fullscreen mode
Exit fullscreen mode
Otherwise, click this link to download it.
2. Open the project folder with your code editor
Using Visual Studio Code:
$ code fabric-mod-starter
Enter fullscreen mode
Exit fullscreen mode
3. Open a terminal inside the project folder and run the client
$ cd fabric-mod-starter
$ ./gradlew runClient
Enter fullscreen mode
Exit fullscreen mode
NOTE: In Windows, you’ll need to run .gradlew.bat runClient instead.
4. Check that everything is working
A Minecraft instance should be running now on your computer, and the console should have printed these two lines alongside others:
...

[main/INFO]: [STDOUT]: Hello Fabric world!

...

[main/INFO]: [STDOUT]: This line is printed by an example mod mixin!

...
Enter fullscreen mode
Exit fullscreen mode
If that’s not the case for you, recheck everything and if nothing seems to work, leave a comment or send me a PM and I’ll try to help you.
Getting to know the project
At the moment, we can already get our hands dirty by starting to code, but let’s get familiarized with some of the files.
gradle.properties
In this file, we can configure some values that will be used when building our mod. For example, we can change the Minecraft version, the fabric loader version, the mod version and other properties that we may need to change if we want to use new features of Fabric or Minecraft.
# Done to increase the memory available to gradle.
org.gradle.jvmargs=-Xmx1G

# Fabric Properties
    # check these on https://fabricmc.net/use
    minecraft_version=1.15.1
    yarn_mappings=1.15.1+build.1
    loader_version=0.7.3+build.176

# Mod Properties
    mod_version = 1.0.0
    maven_group = starter
    archives_base_name = starter

# Dependencies
    # currently not on the main fabric site, check on the maven: https://maven.fabricmc.net/net/fabricmc/fabric-api/fabric-api
    fabric_version=0.4.25+build.282-1.15
Enter fullscreen mode
Exit fullscreen mode
src/main
Inside the src folder, we will be able to find another folder called main. That’s where the code and resources of our mod are located.
src/main/java
All the Java code is located inside this folder. There we can find a package called starter which contains two items: the StarterMod.java file and the mixin package.
We can find the file StarterMixin.java inside the mixin package.
TIP: If you’re using Visual Studio Code, I recommend you to install the Java Extension Pack. It will power your editor with a bunch of utilities to make Java development easier.
StarterMod.java
This is the main entry point of our mod, as we can see, it belongs to the starter package and implements the onInitialize() method, which simply prints Hello Fabric world! to the console.
package starter;

import net.fabricmc.api.ModInitializer;

public class StarterMod implements ModInitializer {
  @Override
  public void onInitialize() {
    // This code runs as soon as Minecraft is in a mod-load-ready state.
    // However, some things (like resources) may still be uninitialized.
    // Proceed with mild caution.

    System.out.println("Hello Fabric world!");
  }
}
Enter fullscreen mode
Exit fullscreen mode
StarterMixin.java
This class belongs to the starter.mixin package. Our mod will be really small so we shouldn’t worry a lot about the file structure of our project. Let’s just assume that all mixins will be located inside the starter.mixin package.
And what are mixins?
Mixins are in charge of injecting code into existing classes of the game. For example, in StarterMixin.java, we are injecting a method at the beginning (HEAD) of the init() method that is implemented in the TitleScreen class from Minecraft.
Now, if we load this mixin, once Minecraft calls the init() method of TitleScreen, our method that includes the System.out.println("This line is printed by an example mod mixin!"); will also be called!
That’s part of the magic of mixins, and this is just the tip of the iceberg, for now, this is all we need to build our mod. If you want more in-depth knowledge you should go check the Mixin docs.
package starter.mixin;

import net.minecraft.client.gui.screen.TitleScreen;
import org.spongepowered.asm.mixin.Mixin;
import org.spongepowered.asm.mixin.injection.At;
import org.spongepowered.asm.mixin.injection.Inject;
import org.spongepowered.asm.mixin.injection.callback.CallbackInfo;

@Mixin(TitleScreen.class)
public class StarterMixin {
  @Inject(at = @At("HEAD"), method = "init()V")
  private void init(CallbackInfo info) {
    System.out.println("This line is printed by an example mod mixin!");
  }
}
Enter fullscreen mode
Exit fullscreen mode
src/main/resources
Inside the resources folder, we can find the assets folder, which right now only contains the icon for our mod. Besides that folder, there are two JSON files:
fabric.mod.json
For this file, I recommend you to go into the Fabric docs about fabric.mod.json and read about every field defined inside the file of our project.
If you prefer to read the docs later, just take a look at the entrypoints and mixins properties.
I bet you can already see a connection here. In the entrypoints is where we are telling Fabric which one of our Java classes should act as the main entry point of our mod.
And then, there’s the mixins property, where we simply tell Fabric the location of any Mixin configuration file we want to include in our mod. In this case, we only have one, starter.mixins.json.
{
  "schemaVersion": 1,
  "id": "starter",
  "version": "${version}",

  "name": "Starter Mod",
  "description": "Describe your mod!",
  "authors": ["Your Name"],
  "contact": {
    "homepage": "https://horuslugo.com",
    "sources": "https://github.com/HorusGoul/fabric-mod-starter"
  },
  "license": "MIT",
  "icon": "assets/starter/icon.png",

  "environment": "*",

  "entrypoints": {
    "main": ["starter.StarterMod"]
  },

  "mixins": ["starter.mixins.json"],

  "depends": {
    "fabricloader": ">=0.7.3",
    "minecraft": "1.15.x"
  },

  "suggests": {
    "flamingo": "*"
  }
}
Enter fullscreen mode
Exit fullscreen mode
starter.mixins.json
Remember our StarterMixin class? This is how we can tell the toolchain the mixins that we want to include in our mod. The package property is where we define the Java package where the mixins are located, and inside the mixins array is where we can put all the mixin classes that we want to include to the game.
Alongside mixins there are two other properties that allow us to specify the environment where we want to load some mixins. Those properties are server and client, but in this case, we’re not using them.
This file follows the specification defined in the Mixin configuration files section of the Mixin Docs. Just the same as before, I recommend you to go to the docs and learn more about this file 😄
{
  "required": true,
  "package": "starter.mixin",
  "compatibilityLevel": "JAVA_8",
  "mixins": ["StarterMixin"],
  "injectors": {
    "defaultRequire": 1
  }
}
Enter fullscreen mode
Exit fullscreen mode
Let’s build our mod!
Now that we are familiar with the project, let’s gets our hands dirty and create our mod!
In this case, the mod will simply alter one mechanic of the game: receiving damage. We’ll make it so whenever a player receives damage, it will switch its position and inventory with another player in the server.
For this, we’re going to need a mixin that injects code in the PlayerEntity class, to be more specific, just before the end of the damage() method.
Detecting when players receive damage
Let’s create this new mixin in the starter.mixin package with the name SwitchPlayerEntityMixin.java:
package starter.mixin;

import org.spongepowered.asm.mixin.Mixin;
import org.spongepowered.asm.mixin.injection.At;
import org.spongepowered.asm.mixin.injection.Inject;
import org.spongepowered.asm.mixin.injection.callback.CallbackInfoReturnable;

import net.minecraft.entity.damage.DamageSource;
import net.minecraft.entity.player.PlayerEntity;

@Mixin(PlayerEntity.class)
public class SwitchPlayerEntityMixin {

  @Inject(at = @At("RETURN"), method = "damage")
  private void onDamage(DamageSource source, float amount, CallbackInfoReturnable info) {
    System.out.println("The player received damage!");
  }
}
Enter fullscreen mode
Exit fullscreen mode
Don’t forget to add it to the starter.mixins.json file:
{
  "required": true,
  "package": "starter.mixin",
  "compatibilityLevel": "JAVA_8",
  "mixins": ["StarterMixin", "SwitchPlayerEntityMixin"],
  "injectors": {
    "defaultRequire": 1
  }
}
Enter fullscreen mode
Exit fullscreen mode
Now execute the command ./gradlew runClient in the console, launch a Minecraft world in creative mode, grab some instant damage potions and try to get hurt.
Just like in the GIF, you should be able to see a new line pop up in the console every time the player gets hurt, and that means we can continue to the explanation of what is going on.
Take a look to the mixin code, our purpose was to get the method onDamage executed at the end of the method damage, that’s why we are using the string RETURN instead of HEAD. Also, we are going to need the damage source and the amount of damage inflicted. The last parameter, info is required by the Mixin framework.
Both the source and amount are parameters that the original damage method receives, and that’s the reason we can just use them in our method.
Accessing the current player
Right now, the mod is just printing a line every time a player gets hurt, our next objective is accessing the player instance.
We must first remember that the onDamage method is inside of a PlayerEntity instance. We can take advantage of that and simply use this to access the instance properties and methods. The problem comes when the compiler yells at us because it thinks that we’re an instance of SwitchPlayerEntityMixin.
We don’t have a way to tell the compiler that this method is being executed inside of another type of class, so we can use this trick:
PlayerEntity self = (PlayerEntity) (Object) this;
Enter fullscreen mode
Exit fullscreen mode
With this, we are telling the compiler that this is an Object and then, we cast the object as a PlayerEntity. And voilá! We have access to the player that is receiving damage, we can now update our printed line to display the player’s name.
...

@Mixin(PlayerEntity.class)
public class SwitchPlayerEntityMixin {

  @Inject(at = @At("RETURN"), method = "damage")
  private void onDamage(DamageSource source, float amount, CallbackInfoReturnable info) {
    PlayerEntity self = (PlayerEntity) (Object) this;

    System.out.println("The player " + self.getGameProfile().getName() + " received damage");
  }
}
Enter fullscreen mode
Exit fullscreen mode
Switching positions with another player
Now that we can access the player’s properties and methods, we can use one of those to access the whole world.
The world property references the current Minecraft World that is being played, and one of the things we can do with it is getting the list of the online players.
With that list, we can pick one of those players and later, swap their positions as you can see in the following code:
package starter.mixin;

import java.util.List;

import org.spongepowered.asm.mixin.Mixin;
import org.spongepowered.asm.mixin.injection.At;
import org.spongepowered.asm.mixin.injection.Inject;
import org.spongepowered.asm.mixin.injection.callback.CallbackInfoReturnable;

import net.minecraft.entity.damage.DamageSource;
import net.minecraft.entity.player.PlayerEntity;
import net.minecraft.util.math.BlockPos;

@Mixin(PlayerEntity.class)
public class SwitchPlayerEntityMixin {

  @Inject(at = @At("RETURN"), method = "damage")
  private void onDamage(DamageSource source, float amount, CallbackInfoReturnable info) {
    PlayerEntity self = (PlayerEntity) (Object) this;

    // Get all the players in the current minecraft world
    List<PlayerEntity> players = (List<PlayerEntity>) self.world.getPlayers();

    // The player we'll switch positions with.
    PlayerEntity otherPlayer;

    // Stop the execution if the player is playing alone.
    if (players.size() <= 1) {
      return;
    }

    // Get a random player from the players list.
    // Repeat this process until we have a player that is
    // not the player who got hurt.
    do {
      int index = (int) Math.floor(Math.random() * players.size());
      otherPlayer = players.get(index);
    } while (otherPlayer == self);

    // Get the block position of both players
    BlockPos selfPos = self.getBlockPos();
    BlockPos otherPlayerPos = otherPlayer.getBlockPos();

    // Teleport damaged player to the other player's coordinates
    // We set the Y to 300 in order to avoid a collision with the other player.
    //
    // We add 0.5 to both X and Z because that's the center point of a block
    // and the players could suffocate under certain circumstances if we didn't
    self.teleport(otherPlayerPos.getX() + 0.5, 300, otherPlayerPos.getZ() + 0.5);

    // Teleport the other player to the position of the damaged player.
    otherPlayer.teleport(selfPos.getX() + 0.5, selfPos.getY(), selfPos.getZ() + 0.5);

    // Finally change the Y to the real value and complete the teleport of both
    // players.
    self.teleport(otherPlayerPos.getX() + 0.5, otherPlayerPos.getY(), otherPlayerPos.getZ() + 0.5);
  }
}
Enter fullscreen mode
Exit fullscreen mode
After implementing this, you’ll need two Minecraft clients to be able to test it. You can do it by opening one with ./gradlew runClient and then using the official Minecraft client with your Mojang account. Then, open the test world in LAN and join it with the other client.
Swapping their inventories
And now we’ll add the last feature of the mod: swapping the inventory of the players.
To swap the inventories of two players, we have to clone each inventory and after that, we can just replace and swap them. The inventory of a player can be accessed using the inventory property.
The class PlayerInventory has two methods that we’ll use, serialize and deserialize. The first one allows us to clone the content of the inventory by putting it inside of a ListTag and then, we can use the second one to replace the content of an inventory with the content that is inside of a ListTag.
Here’s the code:
    // ... teleports ...


    // Only swap inventories if the players are alive
    if (self.getHealth() > 0.0f && otherPlayer.getHealth() > 0.0f) {

      // Get the inventories of both players
      ListTag selfInventory = self.inventory.serialize(new ListTag());
      ListTag otherPlayerInventory = otherPlayer.inventory.serialize(new ListTag());

      // Swap them
      self.inventory.deserialize(otherPlayerInventory);
      otherPlayer.inventory.deserialize(selfInventory);
    }
Enter fullscreen mode
Exit fullscreen mode
As you may have noticed, we’re only swapping the inventories if both players are alive because if we don’t include this check, one of the inventories would get lost whenever a player died.

The final code
If you reached up until this point, congrats! You’ve built your first Minecraft mod, we should now remove the files that aren’t needed, for example, StarterMixin.java and StarterMod.java. Don’t forget to remove the references to these files inside fabric.mod.json and starters.mixins.json.
I also recommend you to rename the package from starter to whatever you want, just remember to change every occurrence in the project.
You can find the latest version of the code in the branch final-code of the starter repo. Click here see the final version of the mod.
Packaging the mod
If you’re familiar with Minecraft Mods, you may already know that mods usually come packaged inside .zip or .jar files which later you drop inside the mods folder in the server or client of Minecraft.
To create a bundle of your mod, you only need to run the following command:
$ ./gradlew build
Enter fullscreen mode
Exit fullscreen mode
If everything compiles correctly, you’ll be able to find the .jar inside the ./build/libs folder of your project. In most cases, you’ll want to pick the production version without sources, but there may be cases where also shipping a development version along with the sources is better.
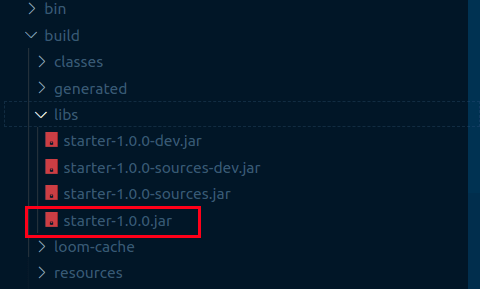
That’s it, you can now drop that .jar inside your mods folder, just don’t forget to install the Fabric API first, and for that, you can read the Installing Fabric section in their wiki if you want to learn how to do it.
Learning resources
Here are some resources that may come in handy if you want to learn more about Minecraft Modding:
-
The Fabric Wiki. This one has already been mentioned in the article, but seriously, go check it out because there’s a lot of content that I haven’t covered!
-
The Forge API. The Forge API is the most famous Minecraft API, you may want to check it out because some of the best mods out there have been built with it!
-
ScriptCraft. There seems to be a way to build mods using JavaScript, so if you have a background in web dev, you may want to try this one.
-
MCreator. As their site says, MCreator is a software used to make Minecraft mods and data packs using an intuitive easy-to-learn interface or with an integrated code editor. If you know about someone that wants to get started with programming, this may be a good way to introduce them!
Conclusion
Building my first Minecraft Mod was interesting because I got to know a bit more about how my favorite game works, and I even managed to craft something really fun to play.
Also, I took this as an opportunity to create this article because I think modding is a great way to get introduced to programming, and there are a lot of Minecraft players that may get interested and end up learning a lot about software development.
I hope you had a great time reading this article. If you decide to continue learning I invite you to share your progress with us, who knows, maybe a Minecraft Modding community can be born inside of dev.to 🔥
-

Часть 6.2 будет доступна примерно 09.11.13
Серия уроков «Программирование на Java. Знакомство с Forge и MCP.»
- Часть 1. Введение.
- Часть 2. Синтаксис Java.
- Часть 3. Hello World.
- Часть 4. Базовый уровень создания модов.
- Часть 5. Forge или Mod Loader ?
- Часть 6.1. Первый мод — вступление.
- Часть 6.2. Первый мод — основы.
- Часть 6.3. Первый мод — компиляция.
- Часть 6.4. Первый мод — добавляем Test Item.
- Часть 6.5. Первый мод — добавляем Test Block.
- Часть 6.6. Первый мод — взаимодействие.
- Часть 7.1. Продвинутый уровень — Мобы и NPC.
- Часть 7.2. Продвинутый уровень — Генерация руды.
- Часть 8.1. Высший пилотаж — GUI и HUD.
- Часть 8.1. Высший пилотаж — Red Stone схемы.
- Часть 8.1. Высший пилотаж — Изменение AI.
- Часть 9. Пара слов о написании плагинов.
- Часть 10. Подведение итогов.
Дополнения от читателей.
- Как подготовить NetBeans для аналогичных действий ?
Последнее редактирование: 17 ноя 2013 -
Часть 1. Введение.
Доброго всем времени суток. Если вы читаете это, то скорее всего вы хотите научится основам Java, и в частности изучить принцип создания модов. Я искренне надеюсь, что в дальнейшем вам помогут мои уроки и советы. Итак, всем приятного чтения, мы приступаем.
В данной серии уроков, которая будет разбита примерно на десять частей, мы познакомимся с основами синтаксиса, принципа создания модов и подтянем ваши знания Java. Внимание: Я не буду обучать вас нулевым основам Java, даже в уроке «Hello World,» я хотел бы затронуть интерфейс, так как в дальнейшем он нам поможет. От себя посоветую прочитать две книги (которые мне сильно помогли) — «Герберт Шилдт — Полный справочник по Java» и «Брюс Эккель — Философия Java.» Предупреждаю, прочитав эти книги — вас не возьмут в Mojang на должность главного программиста Minecraft, однако эти книги познакомят вас с основами синтаксиса. Хотя мы его затронем во второй части.
Что вам понадобится приносить ко мне на уроки:MCP и Исходники Forge. Когда нам это понадобится я обязательно предоставлю ссылки на загрузку.Часть 2. Синтаксис Java.
Всем привет, это второй урок не большого курса «Программирование на Java. Знакомство с Forge и MCP.» В этом уроке, я сидя за чашечкой кофе расскажу вам о основах синтаксиса.
Для начала давайте же все таки разъесним что такое синтаксис. Многие (из читателей, намек типо) знакомы со школьних лет и уроков Русского (и других) Языка с «Синтаксическим разбором.» Фактически вы разбиваете что либо на элементы, которые заранее подучиваете. Такие же элементы есть и в Java, ниже дана их перечень, со временем будем знакомится ближе.- abstract
- assert
- boolean
- break
- byte
- case
- catch
- char
- class
- const
- continue
- default
- do
- double
- else
- enum
- extends
- final
- finally
- float
- for
- goto
- if
- implements
- import
- instanceof
- int
- interface
- long
- native
- new
- package
- private
- protected
- public
- return
- short
- static
- strictfp
- super
- switch
- synchronized
- this
- throw
- throws
- transient
- try
- void
- volatile
- while
К синтаксису так же можно отнести так называемый «Порядок ввода.»
Каждое Java (+Swing) приложение начинается с открытия пакета.package ИмяПакета;
Далее идет определение класса. Импорт.
import Имя класса;
После чего идет само приложение.
Подведем итог: Этих знаний вам хватит ровно на Hello World, если вы до сих пор не прочитали те книги которые я посоветовал в первом уроке, то боюсь вас тут держит лишь гордость и уверенность в себе. Поверьте, этого не достаточно.Часть 3. Hello World.
В этом уроке мы будем знакомится со средой разработки и напишем свой первый Java апплет. Сразу скажу что я использую Net Beans IDE версии 7.3.х. На мой взгляд он гораздо удобнее и интуитивно понятней по сравнению с тем же Eclispe Juno.В данном уроке мы создадим простую программу, которая будет иметь примитивный интерфейс. Чтобы ваша жизнь не казалась медом, я не буду писать пример кода сюда. Я буду прикладывать скриншот который вы будете по желанию переписывать. Во первых есть большая вероятность что вы запомните, что написали, а во вторых это будет не тупой копипаст.
Итак. Каждое приложение начинается с имени проекта и импорта, обратите внимание на вторую строку. Здесь находится не знакомый импорт JOptionPane (Swing). Импорт данного свинга отвечает за интерфейс, который нам так знаком из загрузочного окна Forge, далее он нам понадобится для ввода определенных команд.
Смотрим дальше, видим строку (5), просто введите ее, вернемся к этому в уроке 6.1. Далее (7) стринги, нет не подумайте, не те стринги которые вы будете снимать с телочек после того как напишите супер программу которая взорвет мозги всего мира. Данную строку, на русском можно описать так:
«Я даю команду для X, слушай меня раб.» И на 8-10 строке я давал эту команду.
Восьмая строка, тот самый JOptionPane и приказ о выводе диалога. В конце строки не забудьте поставить «;». На девятой строке мы говорим «X» о том что хотим увидеть строку для ввода, и то что пользователь туда введет примем за «X.» Далее идет не понятное «+X+». Это то место куда будет вводится переменная которая кешируется на девятой строчке.Обратите внимание на фигурные скобки («{» «}») это открытие и закрытие. То что мы открыли на 4 строке мы закрыли на 12, а то что на 6 закрыли на 11, все должно четко совпадать! Будьте внимательней.
Вот и подошел к концу третий урок, надеюсь вы все поняли и вам это пригодится. Спасибо за чтение.
-
Часть 4. Базовый уровень создания модов.
Всем привет, и это четвертый урок программирования на Java, был не много занят потому и задержал. Итак мы начинаем.
Сегодня мы с вами познакомимся со способами создания модов и подготовимся к практике. Для начала давайте же обсудим, что нам понадобится. В первую очередь — свободное время, да да да! Его нам надо будет много. Второе — Исходники Minecraft и Forge. «Где же их взять» спросите вы. Отвечаю, исходники Forge всегда можно найти здесь, напротив интересующей вас версии нажав на «src» (source). Исходники Minecraft легко достать с помощью MCP (Minecraft Coder Pack). О декомпеляции можно почитать на wiki. Скачать MCP можно здесь. Так же, для декомпеляции minecraft вам понадобится не только клиент но и ванильный сервер. Последнюю версию всегда можно взять на официальном сайте, но что же делать с устаревшими ? Ответ прост, скачать утилиту Minecraft Version Changer, выбрать нужную версию и нажать кнопку «server.» Третье, что нам нужно это среда разработки, я использую Net Beans, я использую готовую сборку «Net Beans 7.3.1 with JDK Bundle» от Oracle. Вроде с основным разобрались, перед следующим советую заново прочитать мои предыдущие уроки и пойти по моим советам.
Ставьте лайк и ждите следующий урок, который будет уже совсем скоро. -

Hephest
Старожил
Пользователь- Баллы:
- 153
- Skype:
- hephest1904
Молодчина, продолжай, интересно
-
Часть 5. Forge или Mod Loader.
Всем привет. Вы читаете продолжение курса «Программирование на Java. Знакомство с Forge и MCP.» Сегодня последний урок в котором я вам буду промывать мозги, готовьтесь: уже в следующей части будет практика, будет мод и будет счастье, однако это часть я напишу далеко не сразу, и буду писать ее в текстовом редакторе, так что ждать завтра-послезавтра не стоит.
Итак, вернемся к уроку, этот урок будет особенным сегодня вы выберете для себя глобальную черту для изучения Java, в зависимости от выбора будет зависеть ваш труд и успех. Сегодня мы выбираем то, по до что мы будем «кодить.»Итак назначаю кастинг открытым. //* Музочка (Туц туц) *//
Претендент номер 1: Minecraft Coder Pack.
Плюсы:- Вас хрен кто декомпелирует.
- Вы можете менять все, вплоть до изменения названия файла, структуры и расположения на системе.
- Ваш мод будет полностью уникальным, при определенной защите.
- Ваш проект в «Среде» будет аккуратен и будет напрямую работать с Minecraft без прочих API.
- Не так часто приходится обновлять исходники minecraft.
Минусы.
- Проблемно будет поставить другой мод или лоадер.
- В начале будет много говнокода.
- Тяжелее переносить на новую ваниллу.
Претендент номер 2: Forge. FML.
Плюсы.- За пару минут обновление на новую ваниллу.
- Упрощенный принцип создания модов.
- Разработчик сам предоставляет исходники.
- Нет говнокода в исходниках.
Минусы.
- Значительно меньший функционал по сравнению с кодингом под чистый майнкрафт.
- Чтобы взять ваш мод, придется просто залезть в определенную папку и взять Jar’ник, не поможет даже изменение FML кода, однако можно вшить в клиент но получится обычный Minecraft, с копирайтами фордж и увеличенным весом.
- Кушает производительность.
Претендент номер 3: ModLoader
——кто это дерьмо юзает ?——Итак вроде все разъяснил, я как и прежде остаюсь на MCP, но уроки будут на Forge, т.к. его использовать проще. Всем спасибо, ставьте лайки и пишите супер моды. Пока.
Новая часть будет в двадцатых числах (в лучшем случае.)
Почти написал уже, ждите -
Ждем
-
Часть 6.1. Первый мод — вступление.
В предыдущей части урока мы выбирали себе платформу и среду разработки. На этом мы переходим к созданию модов. Пока не поздно, напоминаю. Без знаний Java, дальше того чего я вас научу вы не уйдете, а копировать и вставлять мой шаблон, как то по школярски на мой взгляд.
Начнем сегодня с подготовки. Для начала обновляем Java, очень рекомендую. Остальное мы загрузили в одном из предыдущих уроков.
Далее заходим в папку с исходниками Forge, и видим install.bat. Запускаем, ждем. Забыл напомнить, что теперь я перешел на Eclipse, будьте бдительны.
Когда процесс установки дойдет до конца, и без ошибок советую кричать и радоваться, я лично от счастья нажрался водяры за 20 рублей и уснул на лавке перед домом. Если нет, то попробуйте взять бубен, и запустить процесс заново, напевая шаманские мотивы и стуча в бубен, если даже так не поможет, значит не судьба, ждем билдов форджа по новее.
Итак, если у вас все же, все оказалась более чем успешно и фордж сделал всю работу на ура, заходим в Eclipse (я использую Kelper). Что мы видим ? Окошко, которое просит нас указать на workspace. Туда нам нужно указать папку eclipse, которая находится в папке forge (Forge>mcp>eclipse), ВНИМАНИЕ! Не ее содержимое, а именно папку eclipse. Теперь ждем некоторое время, пока загрузится, первый запуск может затянуться.
Теперь когда все загрузилось, слева в колонке Package Editor, появилась папка Minecraft, откройте ее и напротив JRE System Library выставите Java SE-1.7, если конечно у вас там что то другое.
Теперь с целью эксперимента можно запустить ваш Minecraft, нажав в верху на зеленую кнопку Run Client, не пугайтесь красных надписей внизу, это норма. Кстати, так можно запускать клиенты с Forge на новых версиях (Это так, к вопросу о лаунчерах.) Однако вы не будете иметь логина и пароля :c
Позже научу как это исправить.Последнее редактирование: 20 окт 2013 -
Hephest
Старожил
Пользователь- Баллы:
- 153
- Skype:
- hephest1904
Можно дописать, что даже если MCP не скачан, достаточно просто скачать src Forge и запустить батник. Установщик в командной строке сам всё скачает
-
Прекрасно что вы это знаете
-
У кого не грузит библиотеки во время установки Forge,скачайте архив по ССЫЛКЕ и распакуйте его в корень папки с mcp и в папку jars.Потом нажмите «install.bat» в папке forge
-
С чего бы ему не грузить ? Не разу не сталкивался, однако добавлю в урок.
-
Смотря какая версия,если 1.5.2-1.6.4,то все хорошо скачивает,а если до 1.5.2,то там ошибки,а если вообще 1.2.5,то там нужна библиотека fernflower + lib(Могу тоже выложить.)
-
Hephest
Старожил
Пользователь- Баллы:
- 153
- Skype:
- hephest1904
Интересно, кто под такие старые версии пишет моды/прочее?
-
Я)
Ну может кому нужно будет.У нас же урок не под одну версию.
Библиотека fernflower для корректной установки forge для версии minecraft 1.2.5Установка: mcp/runtime/bin
Где «mcp» ваша папка с mcp+forge
Жду новой части туториала!Вложения:
-
Dr.Death
Старожил
Пользователь- Баллы:
- 153
- Skype:
- asn008
- Имя в Minecraft:
- DrDeath
Я под 1.8.1 beta пишу, на новые версии майна вообще не смотрю
caNek и Dereku нравится это.
-
Плюс, правда я чуть по новее. 1.2.5 и иногда 1.4.7.
Насилую документацию к Forge чтобы донести все максимально понятно (ну или она меня, хз). -
Зачем максимально понятно? В этой теме должны обитать люди которые знают java хотя-бы на среднем уровне
-
Возможно, но тогда туториал не будет отличатся от сотен других. Но как бы то ни было, думаю в воскресенье будет новая часть.
-
Если вы хотите использовать NetBeans в качестве среды для изменения кода,вместо eclipse,то вам нужно проделать несколько шагов:
-
Заходим в вашу папку с mcp,в дальнейшем будем называть её «root»
-
Переходим по такому пути «root/eclipse/Minecraft«
-
Видим файл .project,открываем его с помощью адекватного текстового редактора(Notepad++).
-
В нем видим следующие строчки:
-
В нем ищем строчку «MCP_LOC» и после неё вставляем СВОЙ путь до вашей папки с mcp(%root%),найдите и измените все ТРИ варианта пути.
-
Открываем: NetBeans/импорт проекта/eclipse
-
Выбираем в качестве папки с проектом папку eclipse
-
Нажимаем далее и выбираем проект minecraft (он там один) и жмем финиш!
-
После если вы все сделали правильно у вас откроется проект,но радоваться еще рано.
-
Кликаем ПКМ по проекту (minecraft) выбираем «свойства»,в свойствах слева выбираем Библиотеки,потом выбираем «Выполнение«,а в нем «Скомпилированные исходные коды».Там двигаем Скомпилированные исходные коды вверх,при помощи кнопки «Переместить Вверх».
-
После этого идем во вкладку «Выполнение» (слева) и там указываем параметр для VM —xincgc -Xmx1024M -Xms1024M -Djava.library.path=«тут полный путь до вашей папки с mcp + jars/bin/natives/«
Все,теперь можно спокойно изменять код и тестировать ваш клиент (зеленая кнопка в меню кода)Последнее редактирование: 3 ноя 2013
BleaZzZ и caNek нравится это.
-


")
")


Поделиться этой страницей
Minecraft Forge New Mod Guide
Make sure you have Gradle installed and in your path, so you can run it from
command line. Otherwise, you should copy a bootstrapper and the gradle jar
into your project.
Use this template build.gradle (for the MC 1.8 unstable branch) for your
gradle script:
buildscript {
    repositories {
        mavenCentral()
        maven {
            name = "forge"
            url = "http://files.minecraftforge.net/maven"
        }
        maven {
            name = "sonatype"
            url = "https://oss.sonatype.org/content/repositories/snapshots/"
        }
    }
    dependencies {
        classpath 'net.minecraftforge.gradle:ForgeGradle:1.2-SNAPSHOT'
    }
}

apply plugin: 'forge'

version = "0.1.0"
group = "com.mydomain.mymod"
archivesBaseName = "mymod"

minecraft {
    *version = "1.8-11.14.0.1274-1.8"*
    runDir = "eclipse"
    *mappings = "snapshot_nodoc_20141130"*
}

/*
processResources {
    inputs.property "version", project.version
    inputs.property "mcversion", project.minecraft.version

    // substitute values in mcmod.info
    from(sourceSets.main.resources.srcDirs) {
        include 'mcmod.info'

        expand 'version':project.version, 'mcversion':project.minecraft.version
    }

    from(sourceSets.main.resources.srcDirs) {
        exclude 'mcmod.info'
    }
}
*/
Save this in a new directory and run gradle setupDecompWorkspace and gradle build to set everything up on your local cache. Gradle will be smart and not
have multiple copies of this cache if you are working on multiple mods with
the same target MC version.
Replace version and mappings in the minecraft block to change the MCF
version your mod targets, as well as the obfuscation mappings from MCP to use.
You do not need mappings if you are using a stable build.
You can uncomment the processResources block and extend it as necessary to
provide build-time substitution to your mcmod.info file (which should go in
src/main/resources). A template for mcmod.info is as follows:
[
{
  "modid": "mymod",
  "name": "My Mod",
  "description": "A mod that does things.",
  "version": "${version}",
  "mcversion": "${mcversion}",
  "url": "http://mydomain.com",
  "updateUrl": "",
  "authorList": ["Me", "Another person"],
  "credits": "Forge, FML, and MCP, for being incredible",
  "logoFile": "",
  "screenshots": [],
  "dependencies": []
}
]
And a hello world template MyModMain.java for your mod class:
package com.mydomain.mymod;

import net.minecraftforge.fml.common.Mod;
import net.minecraftforge.fml.common.Mod.EventHandler;

@Mod(modid="mymod", name="My Mod", version="0.1.0")
public class MyModMain {

    @EventHandler
    public void onInit(FMLInitializationEvent event) {
        System.out.println("Hello, world!");
    }

}
You can generate IDE project files with gradlew idea for IntelliJ and
gradlew eclipse for Eclipse.
Useful gradle targets:
runClient— runs the client using the «eclipse» folder as CWDrunServer— similar to the above but for the serverbuild— total build, drops jar inbuild/libs/clean— cleans the build directory (doesn’t remove IDE project files!)
Coding Details
This is a coding tutorial for experienced Java developers. It is not a fully
fledged Forge tutorial. You are expected to understand the following concepts:
- Classes and Interfaces
- Class Inheritance
- Annotations
- Reflection
- Event-handling as a design concept
- Reading javadocs and source code tirelessly scrounging up information
Declaring your mod
To declare your mod to ForgeModLoader, create a class (doesn’t have to be
anything specific, as long as it is instantiable i.e. non abstract) and give it
the @Mod class annotation.
@Mod(modid="mymodid", name="My Mod")
public class MyMod {

}
Hooking events
In Forge, the preferred way of adding functionality to Minecraft is to hook
events and register data classes. Let’s start with a simple hook. For
ForgeModLoader events (FML), they can simply be dropped into the same class that
is marked @Mod. We use the method annotation @EventHandler for this.
@Mod(modid="mymodid", name="My Mod")
public class MyMod {
    @EventHandler
    public void onModInitialized(FMLInitializationEvent event) {
        System.out.println("Hello, world!");
    }
}
On startup of minecraft or minecraft-server, the log will print this message
now.
The only thing that matters in an event registration is the argument. FML will
infer the handler on its own using the argument list. In this case, the method
onModInitialized will only be called when FMLInitializationEvent is fired.
See the documentation for net.minecraftforge.fml.common.Mod.EventHandler for
details on the different kinds of FML events.
The other kind of events are global to Forge, and pertain directly to Minecraft
functionality. To use them, we use a different annotation.
@Mod(modid="mymodid", name="My Mod")
public class MyMod {
    @EventHandler
    public void onModInitialized(FMLInitializationEvent event) {
        MinecraftForge.EVENT_BUS.register(this);
    }

    @SubscribeEvent
    public void onWorldLoad(WorldEvent.Load event) {
        System.out.println("A world was loaded. The world difficulty is: " +
                I18n.format(event.world.getDifficulty().getDifficultyResourceKey()););
    }
}
When a world loads, the world difficulty will be printed to standard out.
See the documentation for the net.minecraftforge.event package for a list of
all the events in Forge.
Proxy classes: separating Client and Server Code
In the dedicated server, client code is not available, and attempting to
reference client classes will crash the server. To avoid this, you can use the
@SidedProxy annotation on a static field in any class.
Here’s an example of how to set up a proxy:
// -- CommonProxy.java
package com.myname.mymodid;
public class CommonProxy {
    public void doThings() {
        // ... this function behaves differently if it's on minecraft-server
        System.out.println("This is common code for all environments.");
        return;
    }
}

// -- CombinedClientProxy.java
package com.myname.mymodid;

public class CombinedClientProxy extends CommonProxy {
    public void doThings() {
        super.doThings(); // common code print
        System.out.println("This is the user client! Maybe force load a post-process shader here?");
    }
}

// -- MyMod.java
package com.myname.mymodid;
@Mod(modid="mymodid", name="My Mod")
public class MyMod {

    @SidedProxy(clientSide="com.myname.mymodid.CombinedClientProxy",serverSide="com.myname.mymodid.CommonProxy")
    public static CommonProxy proxy;

    @EventHandler
    public void onModInitialized(FMLInitializationEvent event) {
        MinecraftForge.EVENT_BUS.register(this);

        proxy.doThings();
    }

    @SubscribeEvent
    public void onWorldLoad(WorldEvent.Load event) {
        System.out.println("A world was loaded. The world difficulty is: " +
                I18n.format(event.world.getDifficulty().getDifficultyResourceKey()););
    }
}
On a client (minecraft.jar) this will call both CommonProxy and
CombinedClientProxy‘s versions of the function.
Do not use @SidedProxy for network related behavior, however, there is a
different way to do that.
Doing things on the Minecraft main thread.
AKA Here’s how you do reflection as well so that it works even after
reobfuscation, fyi. THIS IS REALLY CRITICAL FOR DISTRIBUTING YOUR MOD
TODO: DO THIS RIGHT! THE ABOVE IS WRONG
Some functions need to be called on the Minecraft thread (in particular, anything related to rendering). Thankfully Forge lets us queue functions to be called on the main thread. This is useful when we want to call those functions inside event handlers. Here’s an example:
package com.myname.mymodid;
@Mod(modid="mymodid", name="My Mod")
public class MyMod {

    @SubscribeEvent
    public void onWorldLoad(WorldEvent.Load event) {
        // Force FXAA
        // We have to queue this to run on the minecraft thread because it needs
        // to refer to the GL context
        final Minecraft mc = Minecraft.getMinecraft();

        I18n.format(event.world.getDifficulty().getDifficultyResourceKey());

        mc.addScheduledTask(new Runnable() {
            public void run() {
                if (mc.entityRenderer.getShaderGroup() != null)
                    mc.entityRenderer.getShaderGroup().deleteShaderGroup();

                Method method;
                try {
                    method = EntityRenderer.class.getDeclaredMethod("loadShader", ResourceLocation.class); // loadShader
                    method.setAccessible(true);
                    method.invoke(mc.entityRenderer, new ResourceLocation("shaders/post/fxaa.json"));
                } catch (NoSuchMethodException ex) {
                    ex.printStackTrace();
                } catch (Exception ex) {
                    ex.printStackTrace();
                }
            }
        });
    }
}
Providing a Runnable or Callable will queue that code up for execution or
immediately run it if we are already on the Minecraft thread.
Registering new items/achievements/blocks
TODO
Handling networking
TODO
Sending arbitrary packets
Class for custom payloads is Packet250CustomPayload. Send them with:
PacketDispatcher.sendPackettoServer()
PacketDispatcher.sendPacketToServer()
PacketDispatcher.sendPacketToPlayer()
PacketDispatcher.sendPacketToAllAround()
PacketDispatcher.sendPacketToAllInDimension()
PacketDispatcher.sendPacketToAllPlayers()
Minecraft Shader Documentation
Shaders in Minecraft are handled through materials described in json objects. At this time, shaders can only be applied with post-process passes.
post-process descriptors go in:
shaders/post/*.json
material descriptors in:
shaders/program/*.{fsh,vsh}
shaders/program/*.json
Post-process descriptors
These describe how each pass is applied to the main framebuffer. A simple, no-frills post-process (i.e. no post-processing at all) might look like this:
{
    "targets": [ "swap" ],
    "passes": [
        {
            "name": "blit",
            "intarget": "minecraft:main",
            "outtarget": "minecraft:main"
        },
    ],
}
This post-process description uses the material program blit to draw to outtarget minecraft:main, which is in the minecraft jar but as far as I can tell, you would have to copy this into your mod from the official assets to use it because the descriptors don’t support resource locators with mod contexts. blit simply takes the intarget and blits it to the outtarget, nothing more or less. (You will see how this works in the example for material descriptors below.)
Materials
Materials are a set of properties for drawing a surface. They include GL blend function settings, the program code to use, and declarations for samplers and uniforms. The calling code that uses the material needs to set these or the render might fail.
An example one from minecraft:shaders/program/blit.json:
{
    "blend": {
        "func": "add",
        "srcrgb": "srcalpha",
        "dstrgb": "1-srcalpha"
    },
    "vertex": "blit",
    "fragment": "blit",
    "attributes": [ "Position" ],
    "samplers": [
        { "name": "DiffuseSampler" }
    ],
    "uniforms": [
        { "name": "ProjMat",       "type": "matrix4x4", "count": 16, "values": [ 1.0, 0.0, 0.0, 0.0, 0.0, 1.0, 0.0, 0.0, 0.0, 0.0, 1.0, 0.0, 0.0, 0.0, 0.0, 1.0 ] },
        { "name": "OutSize",       "type": "float",     "count": 2,  "values": [ 1.0, 1.0 ] },
        { "name": "ColorModulate", "type": "float",     "count": 4,  "values": [ 1.0, 1.0, 1.0, 1.0 ] }
    ]
}
As far as I can tell, DiffuseSampler is set to the intarget framebuffer in the post-process handling code.
Post-process in Practice
The «Super Secret Settings» simply cycles through a list of predefined post-process descriptors. Looking at this code, the process for changing the current post-process shader is as so:
// We have to queue this to run on the minecraft thread because it needs
// to refer to the GL context
final Minecraft mc = Minecraft.getMinecraft();

mc.addScheduledTask(new Runnable() {
    public void run() {
        if (mc.entityRenderer.getShaderGroup() != null)
            mc.entityRenderer.getShaderGroup().deleteShaderGroup();

        Method method;
        try {
            method = EntityRenderer.class.getDeclaredMethod("loadShader", ResourceLocation.class); // loadShader
            method.setAccessible(true);
            method.invoke(mc.entityRenderer, new ResourceLocation("shaders/post/fxaa.json"));
        } catch (NoSuchMethodException ex) {
            ex.printStackTrace();
        } catch (Exception ex) {
            ex.printStackTrace();
        }
    }
});
HOWEVER, loadShader(ResourceLocation) is currently private access which means you have to either reflect it using Java Reflection or use the Access Transformers API in Forge to force it to public access.
В разделе «Гайды» запрещено задавать вопросы по Майнкрафту.
Опрос
23 пользователя проголосовало
-
1. Есть желание учить Java для моддинга?
-
Да
18
-
Нет
4
-
не уверен
1
-
-
2. Вы смогли добраться до обучения mooc java курс?
-
Да
5
-
Нет
14
-
какие то моменты я не понял не получилось
4
-
-
3. Стоит ли продолжать это?
-
да я хочу научиться делать крутые моды
17
-
не знаю
5
-
нет это бесполезно и никому не нужно
1
-
Содержание:
- Сначала немного истории…
- Список статей о моддинге Minecraft 1.15-1.17
Сначала немного истории…
Привет всем! Одним из моих первых увлечений после начала изучения языков программирования был Minecraft. Вернее его моддинг. Поиграть тоже было круто, но иногда были шикарные идеи, которые были просто необходимы этой игре! Тем более версии 1.2.5, если кто такую помнит. Но тогда как-то вообще не понимал, что я делаю, а потому и интерес со временем угас.
Спустя время я снова столкнулся с этой игрой (спасибо младшему брату -_-) и вспомнил былые увлечения. Это был уже Minecraft 1.12 или вроде того. Конечно же новые знания позволили сделать куда больше, но по правде некоторые вещи выходили наугад (как бывает у всех прогеров :D).
Короче, как вы все, конечно же, догадались — тут то я решил и сам гайд написать. Ведь что-то таки могу, да и актуальных материалов на русском оказалось не так и много. Возьмем даже офф. вики:

Опыт может не так велик, но постараюсь расписать и описать все как можно понятнее. Так же буду рад любым подсказкам и замечаниям ^_^
Список статей о моддинге Minecraft 1.15-1.16
UPD 27.04.20: Немного меняю иерархию статей. Теперь не будет номеров вроде Первый урок, второй и т.д. С этого момента уроки будут разделены по группам. Думаю, что так будет логичнее и проще. И да, некоторые статейки теперь нужно будет поправить, чем я и займусь в ближайшие дни.
UPD 09.07.20: Начал обновлять гайды для соответствия версии 1.16.1.
UPD 14.07.21: Жду выхода Forge 1.17, а после этого обновлю все статьи!
UPD 22.08.21: Начал публиковать новые гайды по Froge 1.17.1!
- [Forge] Моддинг Minecraft Forge 1.17.1. Начало
- [Forge] Mods.toml. Настраиваем новый мод
- [Forge] Добавляем свой предмет (Item)
- [All Minecraft] Модель и Текстура для предмета (Item)
- [All Minecraft] Локализация в Minecraft
- [All Minecraft] Рецепты крафта для модов и дата паков Minecraft
- [Forge/Fabric] Новая вкладка в творческом
- [Forge 1.17.1] Добавляем свой блок (Block)
- [All Minecraft] Модель, текстура и blockstate для блока
- [Forge 1.17.1] Генерация блока в мире
- [Forge 1.17.1] Еда с эффектами и посудой
Исходный код проекта на Github
Fabric 1.17.1
- [Fabric] Создаём и настраиваем новый проект
- [Fabric] Добавляем новый предмет
- [All Minecraft] Модель и Текстура для предмета (Item)
- [All Minecraft] Локализация в Minecraft
- [All Minecraft] Рецепты крафта для модов и дата паков Minecraft
- [Forge/Fabric] Новая вкладка в творческом
- TODO New Fabric Block
- [All Minecraft] Модель, текстура и blockstate для блока
Foge 1.16 и ниже
Вступение
- Готовим все к созданию мода!
- Знакомство с модом!
- Настройка Gradle
- Настраиваем файл mods.toml
Предметы и Вкладки
- [1.16.1] Добавляем новый предмет, новую вкладку и локализацию для них
- [1.16.1] Добавляем новую еду
- [1.16.1] Новые инструменты
- [1.15.2] Добавляем новые предмет и вкладку
- [1.15.2] Добавляем еду, еду с эффектами и корм
Блоки
- [1.15.2] Добавляем свой блок
- [1.15.2] Добавляем свою плиту, ступени и стену
- [1.15.2] Рецепты. Верстак, печь, камнерез, костёр, коптильня
- [1.15.2] Дроп при добыче блоков
- Block.Properties
- Стекло
- Новая руда. Часть 1
Мобы
- [1.15.2] Добавляем своего моба (Новая корова ч. 1)
- [1.15.2] Добавляем новую модель для моба (Новая корова ч. 2)
- [1.15.2] Улучшаем интеллект своего моба (Новая корова ч. 3)
Генерация
- Новая руда. Часть 2. Генерация в мире
- [1.15.2] Добавляем постройку (особенность, feature) для биомов
- [1.15.2] Добавляем новую структуру
Полезное
- Локализация
- Выводим приветствие игроку. Моддинг Minecraft
- Анимированные текстуры
- Blockbench. Своя модель
- Меняем имя блока. Моддинг Minecraft
И будет еще!
Устаревшее для 1.15:
- Добавляем предмет!
- Текстура и модель для предмета!
- Добавляем вкладку!
- Делаем из сосиски еду
- Эффекты и блестяшка
- Добавляем свой блок
- Снова предмет, но теперь для блока
- Новые ступени
- Добавляем плиты (slab)
- Стена
- Дроп для блока и рецепт его создания
![Создание модификаций с помощью Forge/1.7+ [Урок 1]](https://minecraftonly.ru/uploads/posts/2019-09/1569688143_uzn_15358965918.png "Создание модификаций с помощью Forge/1.7+ [Урок 1]")
Доброго времени всем читателям сайта! Данная статья будет посвящена небольшому туториалу «Как создать мод для minecraft 1.7.* с помощью Forge» Будет дано несколько основных уроков, после которых можно уже делать собственные модификации!
Подготовка всех компонентов:
Сначала подготовим среду для работы с кодом Minecraft и скачаем, собственно, Forge с пометками Mdk или Src (для версий 1.8/1.7). Ссылки на скачивание необходимых файлов будут в конце статьи. После того, как мы скачали его, необходимо создать любую папку в удобном вам месте (в примере это «D:MCModding»), где будет находиться Forge и модификация. В эту папку распакуйте содержимое архива Forge. Вы увидите следующее:
![Создание модификаций с помощью Forge/1.7+ [Урок 1]](https://minecraftonly.ru/uploads/posts/2019-09/1569688611_d0a0d0b0d181d0bfd0b0d0bad0bed0b2d0b0d0bdd0bdd0bed0b5_d181d0bed0b4d0b5d180d0b6d0b0d0bdd0b8d0b5_forge.png "Создание модификаций с помощью Forge/1.7+ [Урок 1]")
Среда разработки:
Чтобы начать писать собственный мод, необходимо скачать и установить IDE (Среда разработки). Например, Eclipse или IntelliJ IDEA. Теперь нам нужно установить Forge, чтобы сразу можно было начать создание модификации. Для этого необходимо установить Java Development Kit (JDK), скачав с официального сайта Oracle.
![Создание модификаций с помощью Forge/1.7+ [Урок 1]](https://minecraftonly.ru/uploads/posts/2019-09/1569689308_featured-image-large.png "Создание модификаций с помощью Forge/1.7+ [Урок 1]")
Далее, нужно выполнить одну из следующих команд (замените eclipse на idea, в зависимости от скачанной IDE):
- gradlew.bat setupDecompWorkspace eclipse
- gradlew.bat setupDevWorkspace eclipse
Первая получше, так как предоставляет возможность просмотра исходного кода Minecraft во время разработки. То есть вы всегда сможете посмотреть, как работает генерация мира, анимация движений, применение эффектов и так далее.
Если у вас Linux, придется прописать следующее терминале:
- cd <путь>/<папка с Forge>
- ./gradlew setupDecompWorkspace eclipse —refresh-dependencies
Чтобы выполнить команду, можно в папке запустить .bat-файл. Также можно запустить командную строку в этой папке (например, нажать Shift+пкм по папке и выбрать «Открыть окно команд») и запустить выбранную команду.
Выполнение команды займёт какое-то время, после чего должно появиться сообщение рода Build Successful.
![Создание модификаций с помощью Forge/1.7+ [Урок 1]](https://minecraftonly.ru/uploads/posts/2019-09/1569688933_601px-d09ad0bed0bcd0b0d0bdd0b4d0b0_setupdecompworkspace_eclipse.png "Создание модификаций с помощью Forge/1.7+ [Урок 1]")
Если же появляется какая-либо ошибка:
- проверьте, что в JAVA_HOME указан путь к папке c JDK (по-умолчанию: «C:Program FilesJavajdk1.7.0_79») и в Path был указан путь к bin-папке JDK после точки с запятой (по-умолчанию: «
…;C:Program FilesJavajdk1.7.0_79bin»); - включите VPN, так как в редких случаях ссылки, необходимые скрипту, могут быть недоступны;
- установите Java другой версии, не удаляя предыдущую.
Настройка Среды разработки:
- Eclipse
Нужно настроить Eclipse для работы с Minecraft. Запустите Eclipse. Он предложит выбрать рабочую директорию (Workspace). Пропишите туда путь к папке «eclipse» в папке (Только английские буквы), где находится Forge и поставьте галочку для того чтоб окно больше не появлялось. В примере это «D:MCModdingeclipse». Если всё прошло успешно, то слева в Eclipse вы увидите меню Minecraft, а снизу не будет ошибок. - IntelliJ IDEA
Необходимо запустить IDEA, и в появившемся окне нажать ‘Import Project’. После чего выбираем в папке «D:MCModding» файл build.gradle. В появившемся окне оставьте значение Use default gradle wrapper.) В строчке ниже выберите Ваш JAVA_HOME. В пункте «Формат проекта» нужно обязательно выбрать «.ipr (file based)», иначе придётся подключать все библиотеки и настраивать запуск самостоятельно. После всего этого нажмите OK. И подождите.
В случае, если ваша IntelliJ IDEA установлена корректно и она различает *.ipr, вы можете дважды кликнуть по файлу .ipr в папке вашего MCP.
![Создание модификаций с помощью Forge/1.7+ [Урок 1]](https://minecraftonly.ru/uploads/posts/2019-09/1569689084_800px-eclipse_d0bfd0bed181d0bbd0b5_d183d181d182d0b0d0bdd0bed0b2d0bad0b8.png "Создание модификаций с помощью Forge/1.7+ [Урок 1]")
Поздравляем! Вы успешно настроили среду для того, чтобы писать модификации.