
В этом уроке вы узнаете, как установить необходимые программы, извлечь игровые скрипты, создать и скомпилировать собственный скрипт, чтобы сделать из него мод для Симс 4. Для редактирования файлов на языке Python будет использоваться бесплатная программа PyCharm. Предполагается, что у вас уже есть некоторые знания языка, потому что этот урок не учит программированию, а лишь показывает, как сделать мод конкретно для Симс 4.
Обратите внимание: этот урок действует только после обновления The Sims 4 от 13 ноября 2018 года.
Добавлено: декомпайлер в стартовом проекте обновлен 13.11.2018. Имейте в виду, что файл может быть обновлен и в будущем (ссылка та же).
Скачать, установить и настроить программы
Использованные программы доступны и для Mac OS, однако автор использует Windows, и если это не ваш случай, то возможны различия.
Скачайте и установите
Python 3.7
.
 Как скачать Python 3.7.
Скачайте и установите
PyCharm (Community Edition)
. Это бесплатно.
Примечание: если вы уже делали моды раньше, то заметьте, что с ноября 2018 года The Sims 4 использует современную версию Python, и теперь вам не нужна старая версия PyCharm.
 Как скачать PyCharm Community Edition
Скачайте стартовый проект (
PyCharm Starter Project)
. Извлеките его из архива в свою рабочую папку для проектов по Симс 4.
Запустите PyCharm.
 Запустите PyCharm
Нажмите Open. В проводнике найдите папку стартового проекта — Sims 4 Python Script Workspace — там, куда вы ее ранее извлекли. Нажмите ОК.
 Найдите папку стартового проекта
Когда вы впервые откроете стартовый проект, для вас будет заранее открыт settings.py. Путь к файлам игры и путь к папке Mods уже будут вписаны за вас по умолчанию. Вам остается вписать свое креаторское имя (например, тот никнейм, под которым вы выкладываете в сеть свои работы — прим. пер.). Затем нажмите Configure Python Interpreter в правом верхнем углу.
 Настройте settings.py
В окне настроек нажмите на шестеренку справа вверху. Из всплывающего списка выберите Add.
 Добавьте интерпретатор
Далее нажмите System Interpreter слева. Выбранный интерпретатор должен находиться именно в папке Python37. Если у вас несколько установленных версий Python, то может по умолчанию найтись другая папка, и тогда вам нужно будет сменить путь. Затем нажмите ОК.
 Проверьте путь к интерпретатору
Разверните проект Sims 4 Python Script Workspace в левой части PyCharm. Там будет несколько папок и файлов.
- EA — здесь будут храниться игровые скрипты после того, как вы их извлечете. Сначала попдапки будут пусты.
- My Script Mods — здесь будут храниться файлы с исходным кодом ваших модов.
- Utilities — в этой папке находятся скрипты, добавленные для вас в стартовый проект, чтобы автоматизировать некоторые процессы. Не нужно редактировать файлы из этой папки.
- decompile_all.py — это скрипт, который извлекает и декомпилирует игровые скрипты, чтобы вы могли ими пользоваться.
- settings.py — файл настроек, который вы редактировали чуть ранее в уроке. Если вам когда-нибудь понадобится сменить имя креатора или путь к игровым файлам, сделайте это здесь.
 Содержание папок стартового проекта
Прежде чем приступать к собственным скриптам, лучше извлечь игровые скрипты. Во-первых, это источник примеров написания кода для игры. Во-вторых, имея доступ к игровым скриптам, PyCharm сможет помогать вам писать свои.
Итак, нажмите правой кнопкой мыши на файл decompile_all.py и выберите Run ‘decompile_all’. Внизу экрана вы будете видеть журнал действий (лог) по каждому обрабатываемому файлу. Дождитесь окончания процесса, прежде чем переходить к следующему шагу.
 Извлеките игровые скрипты
Ваша папка EA наполнится подпапками с игровыми скриптами. Теперь рабочая площадка настроена и полностью готова к созданию модов. Предоставленный вам стартовый проект настраивает PyCharm так, что смотря в папку EA, программа будет лучше помогать вам в написании кода и обнаружении ошибок в нем.
Примечание: после установки каждого патча The Sims 4, прогоняйте скрипт decompile_all.py, чтобы файлы в подпапке EA были актуальными.
 Папка EA c игровыми скриптами
Отредактировать пробный скриптовый мод
Разверните папку My Script Mods. В этой папке вы будете хранить отдельные подпапки для каждого мода, который будете делать. Сейчас там подпапка под названием Example Mod, которая служит шаблоном. В каждой такой папке будет подпапка Scripts с файлами .py — исходниками ваших модов.
Итак, дважды щелкните по файлу example_mod.py в папке Scripts, чтобы открыть этот файл в правой части экрана.
 Отредактируйте скриптовый мод на чит-код
В этом скрипте показан пример самого простого мода для игры — новый чит-код.
import sims4.commands
@sims4.commands.Command(
‘myfirstscript’
, command_type=sims4.commands.CommandType.Live)
def
myfirstscript
(_connection=None):
output = sims4.commands.CheatOutput(_connection)
output(
«This is my first script mod»
)
- Первой строкой мы подгружаем модуль sims4.commands из скриптов EA. Этот шаг необходим, чтобы использовать sims4.commands.Command на следующей строке.
- Следующая строка определяет команду. Первый элемент в скобках — название чит-кода, которое игрок будет вписывать в консоль ввода кодов в игре. Второй — устанавливает, что чит-код будет работать в режиме жизни (бывают и другие типы команд).
- После декоратора (термин языка Python) идет функция, которая будет исполнена при вызове чит-кодом в игре. Первая строка функции получает доступ к окну вывода чит-кодов в интерфейсе (выпадающей части консоли ввода кодов).
- Последняя строка просто вписывает текст в это окно. В игре вы увидите то, что написано в кавычках.
Ради эксперимента, перепишите фразу «This is my first script mod» на что-то другое. Затем сохраните изменения: нажмите File> Save All или сочетание клавиш Ctrl+S.
Теперь, когда вы отредактировали пробный скрипт, пора научиться добавлять его в игру. Найдите файл compile.py в папке Example Mod. Исполнение этого файла скомпилирует все файлы .py из папки Scripts, сохранит в формате .ts4script в папке мода и закинет копию прямиком в вашу папку Mods. Имя файла складывается так: имя креатора_название папки.ts4script. У автора получилось: andrew_Example Mod.ts4script.
Итак, правой кнопкой мыши нажмите на файл compile.py и выберите в списке Run ‘compile’. Убедитесь, что в вашей папке Mods появился новый файл.
Запустите Симс 4 и проверьте настройки — моды для сценариев должны быть разрешены. Если нет, нажмите галочку и перезапустите игру. Создайте новую игру или загрузите сохранение. В режиме жизни нажмите Ctrl+Shift+C для вызова консоли ввода кодов. Введите слово myfirstscript и нажмите Enter. После этого вы должны увидеть текст, написанный вами ранее.
 Протестируйте мод в Симс 4
Создать свой собственный скриптовый мод
Вы настроили рабочую среду, отредактировали первый скрипт и скомпилировали его для игры. Теперь приступайте к своим собственным скриптам.
- Правой кнопкой мыши нажмите на папку Example Mod.
- Нажмите Copy.
- Правой кнопкой мыши нажмите на папку My Script Mods и нажмите Paste.
- В названии папки введите название вашего нового мода.
- В подпапке Scripts переименуйте файл .py соответственно задумке вашего мода.
- Отредактируйте этот файл или добавьте другие файлы .py в папку Scripts.
- Правой кнопкой мыши нажмите на файл compile.py в папке вашего мода и исполните его, чтобы получить на выходе .ts4script.
Теперь, когда вы знаете, как добавить мод в игру, осталось разобраться, как писать скрипты на Python, чтобы заставить их делать что-то интересное. Читайте уроки и документацию по Python и PyCharm, если вы еще не знакомы с этим.
Большое спасибо Andrew с форума Sims4Studio за написание урока и разрешение на его перевод с картинками. Если вы понимаете по-английски, у него вы найдете, что еще можно посмотреть.

Содержание
- Sims 4 Studio
- WinMerge
- TS4 XML Compare
- Notepad ++
- Установка плагина XML Tools
Как создать мод Sims 4 – Программы для моддинга – познакомит вас с теми программами, которые нужны для будущих учебников этой серии. Этот урок не покажет вам, как их использовать. «Программы для моддинга» просто расскажут вам, как настроить их, и зачем они нужны. Итак, начнем! Хотите создать сами черту характера? А изменить текст в игре? Может бафф добавить? Ок, давайте начнём.
Важно: Помните, что эти учебные пособия могут изменяться из-за изменений в самих программах. Скриншоты и даже пути действия могут измениться. Всегда обновляйте приложения, модули и пр., в противном случае у вас могут быть ошибки в самих модах и они не заработают в Sims 4.
Sims 4 Studio
Мы часто упоминаем в своих материалах это приложение. Оно действительно «всемогущее». Мы предпочитаем Sims 4 Studio, потому что в ней есть почти всё, что нужно для создания модов/CC в одной программе.
Перейдите по ссылке и скачайте новейшую версию, что есть на данный момент. После завершения установки, запустите программу.
Теперь, когда программа запущена, нажмите « Настройки» в левом верхнем углу. Введите свое собственное уникальное имя пользователя. Убедитесь, что пути к игре Sims 4 и Sims Документы установлены правильно.

После того, как вы выполнили все настройки, нажмите кнопку « Сохранить» в окне «Настройки». Закройте программу. Она уже готова к использованию в дальнейшем.
WinMerge
Вам понадобится WinMerge, чтобы проверить, совместимы ли ваши моды с новыми патчами. Она также требуется для TS4 XML Compare, который мы устанавливаем следующим.
Нажмите на ссылку выше, выберите нужную версию программы и загрузите её. Установите или раскройте архив без установки (зависит от загруженной версии) и запустите программу.

Теперь, когда программа запущена, перейдите в меню Правка -> Настройки и выберите их такими, как у нас. Это основные настройки, остальное можете оставить как есть, если не уверены в том, что их действительно нужно менять.


Нажмите Ok и закройте. WinMerge готов к работе!
TS4 XML Compare
TS4 XML Compare поможет вам обновить любые моды, которые становятся несовместимыми с патчем, сравнивая старую версию с новой версией. Это отличная экономия времени.
Нажмите на ссылку выше, затем перейдите на вкладку Files (Файлы) и загрузите архив к себе на РС. Распакуйте архив (установка не требуется) и запустите программу.

Убедитесь, что он имеет правильный путь к WinMerge (Path to WinMerge). Если нет, тогда установите правильный путь, нажав на кнопку Browse. Не беспокойтесь ни о каких других настройках.
Настройка TS4 XML Compare завершена!
Notepad ++
Notepad ++ намного превосходит обычный старый Блокнот и позволит вам с легкостью редактировать ваши XML-файлы.
Нажмите на ссылку выше, затем загрузите версию 32-bit x86 (она удобнее для работы с плагинами, т.к. x64 бывает, не имеет нужного функционала) и установите эту программу.

Теперь нам просто нужно установить один плагин.
Установка плагина XML Tools
Запустите Notepad ++ (в настройках выберите язык программы Русский) и перейдите в меню Плагины -> Управление плагинами.
Как только появится окно, убедитесь, что вы находитесь на вкладке Доступные. Затем прокрутите весь список вниз и отметьте XML Tools, затем нажмите «Установить». Программа перезапуститься.


Нажмите Плагины -> XML Tools и удостоверьтесь, что галочки параметров у вас аналогичны нашим (проверка синтаксиса, автозаркытие тегов и пр.).

Настройка Notepad ++ завершена!
«Теперь вы готовы!» (с) перейти к следующему шагу в создании своих первых модов для Sims 4.
![]()
Download Article
![]()
Download Article
Are you not satisfied with the clothing selection in the Sims 4? Do you want to add your own clothes? It’s easier than you think to make your own clothing mods. You need a copy of The Sims 4, The Sims 4 Studio, and an image editor such as Photoshop or GIMP. This wikiHow teaches you how to make your own clothing mods for The Sims 4.
-

1
Download The Sims 4. This goes without saying. You do need a copy of The Sims 4 if you want to make clothing mods for The Sims 4. You can download it from Origin.com.
- You cannot install or create mods for The Sims 4 on game consoles. You can only do this on PC or Mac.
-
2
Download The Sims 4 Studio. The Sims 4 Studio is an unofficial external program used to make mods for The Sims 4. It’s free to download, but you do need to register for the forum. Use the following steps to download The Sims 4 Studio:
- Navigate to https://sims4studio.com/board/6/download-sims-studio-open-version.
- Click Sims 4 Studio for Windows (Wishes) for Windows, or Sims 4 Studio for Mac (Apple Blossom) for Mac.
- Scroll down and click Installer (Windows) or Download from Google Drive (Mac) to download the Sims 4 Studio.
- Double-click the install file and follow the instructions to install The Sims 4 Studio.
Advertisement
-
3
Download an image editor. You need a photo editor such as Photoshop to edit clothing textures. If you don’t have a Photoshop subscription, you can download and install GIMP for free from gimp.org. It’s a free and open-source image editor that has many of the same features that Photoshop has.
-
4
Download Sim body texture templates (optional). These weird looking image textures are used to map out where your clothing textures are placed on your Sims. There are four different image templates and UV maps. One for female Sims, male Sims, toddlers, and child Sims. While we won’t be using these for this tutorial, you may decide you want to use them for more advanced options as you get better as creating clothing for your Sims. You can download these images on The Sims 4 Studio forum.


Advertisement
-
1
Open the Sims 4 Studio. It has a blue icon that says «S4S». You can find it in the Windows Start Menu, or the Applications folder on Mac.
- The first time you open Sims 4 Studio, you will be required to enter the location of your Sims 4 install, documents folder, and Blender 3D install location. Don’t worry if you don’t have Blender 3D. Just leave that field blank. The Sims 4 install location is C:Origin GamesThe Sims 4 by default, and the documents location is D:DocumentsElectronic ArtsThe Sims 4
-
2
Enter your creator name. Enter the name you want to use as your creator name in the field in the lower-right corner. You can use your real name or a nick-name. This is required.
-
3
Click the radio button next to «Create CAS Standalone». It’s below the blue button that says «CAS».
-
4
Click CAS. It’s one of the four blue buttons on the opening page of Sims 4 Studio.
-
5
Select a clothing item you want to edit and click Next. You can select any clothing item in the game. Use the drop-down menus at the top of Sims 4 Studio to filter your selection choices. Click the item you want to edit and click Next in the lower-right corner.
-
6
Type a name for the file you want to create. This is the name of the mod that you will eventually create. Type a file name for the .package file you are creating next to «File Name».
-
7
Ensure the file is saved to The Sims 4 mods folder. Check the path at the top of Windows Explorer or the Finder on Mac. Ensure the file is saving to The Sims 4 mods folder. By default, The Sims 4 mods folder is located at the following location on PC and Mac: C:DocumentsElectronic ArtsThe Sims 4Mods.
-
8
Click Save. This saves and opens a new .package file for you to edit in The Sims 4 Studio. You should see a model wearing the clothing you selected on the left.
-
9
Click Diffuse below «Texture». This displays the diffuse texture map in the lower-right corner. The diffuse texture map is the image that goes over the 3D clothing mesh in the game. The image in the lower-right corner is what the texture map looks like layed out as a flat 2D image.
-
10
Click Export. It’s the green button below «Texture» in The Sims 4 Studio.
-
11
Type a descriptive file name for the image file. Type this next to «File Name» in Windows Explorer. Think of a descriptive name such as «Plain black male T-shirt» or something similar. You may want to use this same texture map for other clothing models in the future.
-
12
Click Save. This saves the texture map image as a PNG file. Make a note of where the file was saved to as you will need to open it in Photoshop or GIMP.


Advertisement
-
1
Open Photoshop or GIMP. Open the image editor of your choice.
-
2
Click File. It’s in the menu bar at the top.
-
3
Click Open. It’s in the File menu on both Photoshop and GIMP.
-
4
Select the diffuse texture map and click Open. Navigate to the diffuse texture map and you exported from Sims 4 Studio. Click the texture map to select it and click Open to open it in Photoshop or GIMP.
-
5
Edit the image. This is where you get creative. There are lots of tools in both Photoshop and GIMP you can use to edit an image. You can use the text tool to add text to an image. You can use the adjustment panel to change the color, hue, or brightness of the clothing. You can use the brush tool to add textures or patterns to the item, or copy a logo or image and paste it on to a T-shirt.
- If you copy a logo or image to the shirt, you may want to select a piece of clothing in Sims 4 Studio with the same background color and remove the background from the image you are copying from.
- To import the Sims texture template or UV map, click File and click Open as Layers (GIMP) or Place (Photoshop) and click the checkmark icon at the top of the screen. Drag the layer with the template or UV map below the clothing texture in the Layers panel to the left.
-
6
Click File. It’s in the menu bar at the top of the screen.
-
7
Click Save As. It’s in the File menu in both Photoshop and GIMP.
-
8
Type a descriptive name for the image file. Make sure you save this file as a different file name from the original diffuse image that you loaded into Photoshop or GIMP. Type a new name for the file next to File Name in Photoshop or GIMP.
-
9
Click Save. This saves the image as a Photoshop (.psd) or GIMP (.xcf) file. It’s a good idea to save a copy of the image as a native Photoshop or GIMP file in case you need to edit the image later on.


Advertisement
-
1
Click File. It’s in the menu bar at the top of Photoshop or GIMP.
- If you have a Sim template or UV map image active on your file, be sure to click the eyeball icon next to that layer in the Layers panel to hide that layer before saving the image.
-
2
Click Save As in Photoshop or Export in GIMP. It’s in the File menu.
-
3
Select «PNG» as the file type. In Photoshop, use the drop-down menu next to «Format» to select PNG. In GIMP, click «Select file type (by extension)» and click «PNG image».
-
4
Click Save (Photoshop) or Export(GIMP). This saves the edited image in PNG format.
-
5
Click back over to Sims 4 Studio. If you still have Sims 4 Studio still open, click back over to it. If you closed Sims 4 Studio, open it again and click the project name under «Projects» to the right in the opening screen.
-
6
Click Import. It’s the blue button below «Textures» to the right.
-
7
Select the edited texture image and click Open. Locate the image file you edited and exported from Photoshop or GIMP and click it to select it. Then click Open to import the image. The model in Sims 4 Studio should now be wearing the clothing you designed.
-
8
Click Import below «Catalog Thumbnail». It’s the blue button next to the thumbnail image to the left.
-
9
Select a PNG image and click Open. This is the thumbnail image that will help you identify your clothing item in the Sims Create-a-Sim catalog. It can be any image you want. It can be the image you copy and paste to a t-shirt. You can even get a screenshot of the model wearing your clothing item.
- If the image you want to upload isn’t in PNG format, you can use Photoshop or GIMP to convert a JPEG image to PNG.
-
10
Click Save. This saves the Sims 4 Studio file as a package file that can be installed as a mod for The Sims 4.
-
11
Copy the Package file to The Sims 4 mods folder. If you didn’t save the .package file to The Sims 4 mods folder, locate the file you just saved and right-click it and copy and paste it into The Sims 4 mods folder.


Advertisement
-
1
Open the Sims 4. Click The Sims 4 icon on your Desktop, Start menu, or Applications folder.
-
2
Click …. It’s the icon with three dots in the upper-right corner of The Sims 4 title screen. This displays the menu.
-
3
Click Game Options. It’s in The Sims 4 Menu.
-
4
Click Others. It’s at the bottom of the Game Options menu.
-
5
Check «Enable Custom Content and Mods». It’s in the «Others» menu of The Sims 4. This allows you to access custom content in The Sims 4.
-
6
Click Apply Changes. It’s in the lower-right corner. This saves your changes.
-
7
Restart the game. In order for mods and custom content to take effect, you must restart your game. Exit out of the game and click The Sims 4 icon to restart your game. You can find your custom clothes in Create-a-Sim on The Sims 4.
- You will need to enable Custom Content and Mods every time The Sims 4 updates.
- To access your custom clothing, click the Manage Households icon on the map screen. Then select the household with the Sim you want to edit to edit the Sims in Create-a-Sim.


Advertisement
Add New Question
-
Question
Other than Photoshop, is there any free program that can be used instead?

SoyokoAnis
Community Answer
You can use GIMP from gimp.org. Otherwise, use any other photo editing software you come across.

Ask a Question
200 characters left
Include your email address to get a message when this question is answered.
Submit
Advertisement
Thanks for submitting a tip for review!
About This Article
Article SummaryX
1 Go to https://sims4studio.com/ and register for the forums.
2. Download and install the Sims 4 Studio from https://sims4studio.com/thread/1523/downloading-sims-4-studio.
3. Open the Sims 4 Studio and click CAS.
4. Select a clothing item you want to edit and click Next.
5. Type a name for the mod you are creating and click Save.
6. Click Diffuse under «Texture» and click Export.
7. Save the texture map from the clothing item and open it in Photoshop or GIMP.
8. Use Photoshop or GIMP to edit the texture map.
9. Save the texture map as a PNG file.
10. Click Import under «Texture» in The Sims 4 Studio.
11. Select the edited texture map image and click Open.
12. Click Save.
13. Copy the package file you created to the Sims 4 mods folder.
14. Open The Sims 4 and enable mods under «Others» in the «Game Options» menu.
15. Restart your game.
16. Load a Sims 4 game and click the «Manage households» icon in the upper-right corner of the map screen.
17. Select a household and click the pencil icon.
18. Select a Sim, and the item type you created.
19. Locate item you created in the menu to the left and click it.
Did this summary help you?
Thanks to all authors for creating a page that has been read 82,630 times.
Did this article help you?
![]()
Download Article
![]()
Download Article
Are you not satisfied with the clothing selection in the Sims 4? Do you want to add your own clothes? It’s easier than you think to make your own clothing mods. You need a copy of The Sims 4, The Sims 4 Studio, and an image editor such as Photoshop or GIMP. This wikiHow teaches you how to make your own clothing mods for The Sims 4.
-
1
Download The Sims 4. This goes without saying. You do need a copy of The Sims 4 if you want to make clothing mods for The Sims 4. You can download it from Origin.com.
- You cannot install or create mods for The Sims 4 on game consoles. You can only do this on PC or Mac.
-
2
Download The Sims 4 Studio. The Sims 4 Studio is an unofficial external program used to make mods for The Sims 4. It’s free to download, but you do need to register for the forum. Use the following steps to download The Sims 4 Studio:
- Navigate to https://sims4studio.com/board/6/download-sims-studio-open-version.
- Click Sims 4 Studio for Windows (Wishes) for Windows, or Sims 4 Studio for Mac (Apple Blossom) for Mac.
- Scroll down and click Installer (Windows) or Download from Google Drive (Mac) to download the Sims 4 Studio.
- Double-click the install file and follow the instructions to install The Sims 4 Studio.
Advertisement
-
3
Download an image editor. You need a photo editor such as Photoshop to edit clothing textures. If you don’t have a Photoshop subscription, you can download and install GIMP for free from gimp.org. It’s a free and open-source image editor that has many of the same features that Photoshop has.
-
4
Download Sim body texture templates (optional). These weird looking image textures are used to map out where your clothing textures are placed on your Sims. There are four different image templates and UV maps. One for female Sims, male Sims, toddlers, and child Sims. While we won’t be using these for this tutorial, you may decide you want to use them for more advanced options as you get better as creating clothing for your Sims. You can download these images on The Sims 4 Studio forum.
Advertisement
-
1
Open the Sims 4 Studio. It has a blue icon that says «S4S». You can find it in the Windows Start Menu, or the Applications folder on Mac.
- The first time you open Sims 4 Studio, you will be required to enter the location of your Sims 4 install, documents folder, and Blender 3D install location. Don’t worry if you don’t have Blender 3D. Just leave that field blank. The Sims 4 install location is C:Origin GamesThe Sims 4 by default, and the documents location is D:DocumentsElectronic ArtsThe Sims 4
-
2
Enter your creator name. Enter the name you want to use as your creator name in the field in the lower-right corner. You can use your real name or a nick-name. This is required.
-
3
Click the radio button next to «Create CAS Standalone». It’s below the blue button that says «CAS».
-
4
Click CAS. It’s one of the four blue buttons on the opening page of Sims 4 Studio.
-
5
Select a clothing item you want to edit and click Next. You can select any clothing item in the game. Use the drop-down menus at the top of Sims 4 Studio to filter your selection choices. Click the item you want to edit and click Next in the lower-right corner.
-
6
Type a name for the file you want to create. This is the name of the mod that you will eventually create. Type a file name for the .package file you are creating next to «File Name».
-
7
Ensure the file is saved to The Sims 4 mods folder. Check the path at the top of Windows Explorer or the Finder on Mac. Ensure the file is saving to The Sims 4 mods folder. By default, The Sims 4 mods folder is located at the following location on PC and Mac: C:DocumentsElectronic ArtsThe Sims 4Mods.
-
8
Click Save. This saves and opens a new .package file for you to edit in The Sims 4 Studio. You should see a model wearing the clothing you selected on the left.
-
9
Click Diffuse below «Texture». This displays the diffuse texture map in the lower-right corner. The diffuse texture map is the image that goes over the 3D clothing mesh in the game. The image in the lower-right corner is what the texture map looks like layed out as a flat 2D image.
-
10
Click Export. It’s the green button below «Texture» in The Sims 4 Studio.
-
11
Type a descriptive file name for the image file. Type this next to «File Name» in Windows Explorer. Think of a descriptive name such as «Plain black male T-shirt» or something similar. You may want to use this same texture map for other clothing models in the future.
-
12
Click Save. This saves the texture map image as a PNG file. Make a note of where the file was saved to as you will need to open it in Photoshop or GIMP.
Advertisement
-
1
Open Photoshop or GIMP. Open the image editor of your choice.
-
2
Click File. It’s in the menu bar at the top.
-
3
Click Open. It’s in the File menu on both Photoshop and GIMP.
-
4
Select the diffuse texture map and click Open. Navigate to the diffuse texture map and you exported from Sims 4 Studio. Click the texture map to select it and click Open to open it in Photoshop or GIMP.
-
5
Edit the image. This is where you get creative. There are lots of tools in both Photoshop and GIMP you can use to edit an image. You can use the text tool to add text to an image. You can use the adjustment panel to change the color, hue, or brightness of the clothing. You can use the brush tool to add textures or patterns to the item, or copy a logo or image and paste it on to a T-shirt.
- If you copy a logo or image to the shirt, you may want to select a piece of clothing in Sims 4 Studio with the same background color and remove the background from the image you are copying from.
- To import the Sims texture template or UV map, click File and click Open as Layers (GIMP) or Place (Photoshop) and click the checkmark icon at the top of the screen. Drag the layer with the template or UV map below the clothing texture in the Layers panel to the left.
-
6
Click File. It’s in the menu bar at the top of the screen.
-
7
Click Save As. It’s in the File menu in both Photoshop and GIMP.
-
8
Type a descriptive name for the image file. Make sure you save this file as a different file name from the original diffuse image that you loaded into Photoshop or GIMP. Type a new name for the file next to File Name in Photoshop or GIMP.
-
9
Click Save. This saves the image as a Photoshop (.psd) or GIMP (.xcf) file. It’s a good idea to save a copy of the image as a native Photoshop or GIMP file in case you need to edit the image later on.
Advertisement
-
1
Click File. It’s in the menu bar at the top of Photoshop or GIMP.
- If you have a Sim template or UV map image active on your file, be sure to click the eyeball icon next to that layer in the Layers panel to hide that layer before saving the image.
-
2
Click Save As in Photoshop or Export in GIMP. It’s in the File menu.
-
3
Select «PNG» as the file type. In Photoshop, use the drop-down menu next to «Format» to select PNG. In GIMP, click «Select file type (by extension)» and click «PNG image».
-
4
Click Save (Photoshop) or Export(GIMP). This saves the edited image in PNG format.
-
5
Click back over to Sims 4 Studio. If you still have Sims 4 Studio still open, click back over to it. If you closed Sims 4 Studio, open it again and click the project name under «Projects» to the right in the opening screen.
-
6
Click Import. It’s the blue button below «Textures» to the right.
-
7
Select the edited texture image and click Open. Locate the image file you edited and exported from Photoshop or GIMP and click it to select it. Then click Open to import the image. The model in Sims 4 Studio should now be wearing the clothing you designed.
-
8
Click Import below «Catalog Thumbnail». It’s the blue button next to the thumbnail image to the left.
-
9
Select a PNG image and click Open. This is the thumbnail image that will help you identify your clothing item in the Sims Create-a-Sim catalog. It can be any image you want. It can be the image you copy and paste to a t-shirt. You can even get a screenshot of the model wearing your clothing item.
- If the image you want to upload isn’t in PNG format, you can use Photoshop or GIMP to convert a JPEG image to PNG.
-
10
Click Save. This saves the Sims 4 Studio file as a package file that can be installed as a mod for The Sims 4.
-
11
Copy the Package file to The Sims 4 mods folder. If you didn’t save the .package file to The Sims 4 mods folder, locate the file you just saved and right-click it and copy and paste it into The Sims 4 mods folder.
Advertisement
-
1
Open the Sims 4. Click The Sims 4 icon on your Desktop, Start menu, or Applications folder.
-
2
Click …. It’s the icon with three dots in the upper-right corner of The Sims 4 title screen. This displays the menu.
-
3
Click Game Options. It’s in The Sims 4 Menu.
-
4
Click Others. It’s at the bottom of the Game Options menu.
-
5
Check «Enable Custom Content and Mods». It’s in the «Others» menu of The Sims 4. This allows you to access custom content in The Sims 4.
-
6
Click Apply Changes. It’s in the lower-right corner. This saves your changes.
-
7
Restart the game. In order for mods and custom content to take effect, you must restart your game. Exit out of the game and click The Sims 4 icon to restart your game. You can find your custom clothes in Create-a-Sim on The Sims 4.
- You will need to enable Custom Content and Mods every time The Sims 4 updates.
- To access your custom clothing, click the Manage Households icon on the map screen. Then select the household with the Sim you want to edit to edit the Sims in Create-a-Sim.
Advertisement
Add New Question
-
Question
Other than Photoshop, is there any free program that can be used instead?
SoyokoAnis
Community Answer
You can use GIMP from gimp.org. Otherwise, use any other photo editing software you come across.
Ask a Question
200 characters left
Include your email address to get a message when this question is answered.
Submit
Advertisement
Thanks for submitting a tip for review!
About This Article
Article SummaryX
1 Go to https://sims4studio.com/ and register for the forums.
2. Download and install the Sims 4 Studio from https://sims4studio.com/thread/1523/downloading-sims-4-studio.
3. Open the Sims 4 Studio and click CAS.
4. Select a clothing item you want to edit and click Next.
5. Type a name for the mod you are creating and click Save.
6. Click Diffuse under «Texture» and click Export.
7. Save the texture map from the clothing item and open it in Photoshop or GIMP.
8. Use Photoshop or GIMP to edit the texture map.
9. Save the texture map as a PNG file.
10. Click Import under «Texture» in The Sims 4 Studio.
11. Select the edited texture map image and click Open.
12. Click Save.
13. Copy the package file you created to the Sims 4 mods folder.
14. Open The Sims 4 and enable mods under «Others» in the «Game Options» menu.
15. Restart your game.
16. Load a Sims 4 game and click the «Manage households» icon in the upper-right corner of the map screen.
17. Select a household and click the pencil icon.
18. Select a Sim, and the item type you created.
19. Locate item you created in the menu to the left and click it.
Did this summary help you?
Thanks to all authors for creating a page that has been read 82,630 times.
Did this article help you?


Hey guys! Today I wanted to talk to you about mod making. I’m assuming that you’ve never made a mod so we are going to make an easy one just to get you used to the process. In a later tutorial, I’ll show you how to check your mod after an update to make sure it still works.
Tools needed:
- Sims 4 Studio (S4S) download the beta version
- Notepad ++
Step 1
Make a folder dedicated to modding. Inside this folder should be sub-folders. I’ll show you what mine looks like but set yours up in a way that makes sense to you. Below is the structure of my modding folder with the top line being the main folder:
Sims 4 Mods
–Mods WIP
—–Name of Mod
–Extracted Resources
–Patch 9_24 (this is the date of the latest patch)
–Issues
Step 2
Now you are going to extract those resources from Sims 4. Begin by launching S4S and then you will click on the tools tab and select “extract tuning”. At the bottom of the popup window, make sure the “use sub-folders” and “extract all” boxes are checked. Do not have the “use EA naming” box checked. Click on the export button and select the folder you want to extract to (the one I labeled extracted resources for example). The process takes a fair amount of time, so be patient and leave the program alone. It took almost 10 minutes for mine, so go grab something to drink or two.


Step 3
You are ready to make your first mod! I don’t know about you guys but I get really annoyed when my Sims stop an action I directed them to do so they can go get a drink….when they aren’t even hungry! So, let’s put a stop to that nonsense by making a “no auto drink” mod. Begin by making a new folder inside your “Mods WIP” folder and labeling it “No Auto Drink”. What you are going to do next is go to your “extracted resources” folder and then in the search box type in drink. You are going to get almost 500 results! It may look overwhelming; however, with time you will come to recognize what files you need and which ones you don’t. I suggest poking around in the files and just seeing what they do. Also, you can open existing mods and see what they’ve changed to help you better understand the process.
Now that I’ve scared you; let’s make this easier. Type in GrabDrink, the results are more manageable. See what a difference it makes if you have a better idea of the file you will be modifying?

Step 4
Select the fridge_GrabDrinkAutonomously.InteractionTuning and cooler_GrabDrinkAutonomously.InteractionTuning XML files. Copy them (do not cut because you don’t want to do any editing to your master files!) and then paste them into the “No Auto Drink” folder you created inside your Mods WIP folder.
Step 5
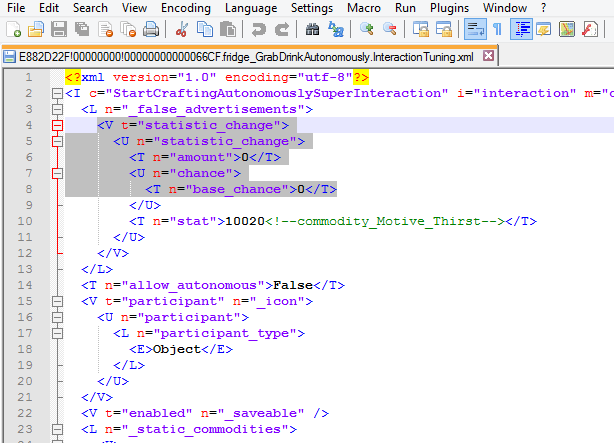
Go to your “No Auto Drink” folder and double click on the fridge_GrabDrinkAutonomously.InteractionTuning, you may need to instruct it to use notepad ++ to open this file. The very first section is what you will be modifying. Do you see where it says amount and base_change? That’s what determines your Sims need to get a drink.
<V t=”statistic_change”>
<U n=”statistic_change”>
<T n=”amount”>6.67</T>
<U n=”chance”>
<T n=”base_chance”>100</T>
Let’s change it to:
<V t=”statistic_change”>
<U n=”statistic_change”>
<T n=”amount”>0</T>
<U n=”chance”>
<T n=”base_chance”>0</T>
Now save your file and let’s move on to the other file that controls Sims need to constantly get a drink.
Step 6
Double click on the cooler_GrabDrinkAutonomously.InteractionTuning and you are going to make the same edits. You can even copy/paste what you edited on your other file to this one, if you wanted.
<V t=”statistic_change”>
<U n=”statistic_change”>
<T n=”amount”>2.5</T>
<U n=”chance”>
<T n=”base_chance”>100</T>
Let’s change it to:
<V t=”statistic_change”>
<U n=”statistic_change”>
<T n=”amount”>0</T>
<U n=”chance”>
<T n=”base_chance”>0</T>
A quick little note about coding. Do you see how each line is closed with a / something?
Example:
<U n=”chance”>
<T n=”base_chance”>100</T>
</U>
Think of those like punctuation marks or periods at the end of a sentence. You need to make sure when you are editing and adding lines that every line is properly punctuated. Failure to do so will result in errors. If you are careful and only change the amounts, then you shouldn’t run into any issues. However, if you start getting really ambitious and adding in lines from other resources? Then please pay attention to those closing lines.
Side trip into coding land over. Go ahead and save this file as well and we are now ready to move onto the final stage of making your first mod. Exciting, right? Well, it was for me when I made my “Kiss Neck” mod. I was so pleased with myself for days, still am. You will be too when you conquer this.
Step 7
Open up S4S and select “Tools” and then you will select “Empty Package”. In the popup window, name your package. I suggest naming it with your initials and then what the mod does. I labeled mine HSNoAutoDrinks. Please be mindful of using characters like _ & { ] and spaces, it takes computers longer to process these characters and therefore it could eventually slow down your game.
After saving your mod, you will click on the “batch import” button and then scroll to where you put those XML files. They should be inside that folder in your Mods WIP folder, being organized makes this process easier. Once you have selected all your resources, click on the open button. After ensuring that all your files have been placed into your package, save it. TADA! You just made your first mod. Congratulations.


Step 8 – The Most Important Step!
Test your mod if you plan on releasing it. Please don’t release untested and broken stuff into the community. A fun suggestion is to have other Simmers test it and give you screenshots so you can include them when you release your mod. After you have finished testing your mod, move the entire folder over to your folder that is labeled for the latest patch. These are mods that you know work with that patch release.
A little tip: Did you notice the green writing? That is the name of that resource item. This information comes in handy if you want to use that resource in another mod or you are trying to figure out what to modify. It’s why I suggested poking around in the resource folder and reading. The more you study the files, the clearer they become and the easier it will be for you to make your own mods or update an outdated one.
A note on updating outdated mods: Most modders don’t want you to do that. I suggest sending them a note and asking. If you have not heard back in a reasonable amount of time (weeks) then go ahead and do the update but make sure you state that it is NOT YOUR mod and that you will remove it if the original creator objects. Link to the original mod. I have many mods (40 to be exact) that I have updated for my own personal use and won’t share because I didn’t make them.
Have a question about modding? Reach out to me on Sims Community Social!
You may also like
About the author

I’m Tatiana AKA HarmonySims/Simlish and Dreams on Tumblr. I’ve always been interested in graphic design, photography, and computers. I played Sims Freeplay for years before discovering Sims 3. An obsession was born when I pushed myself to become a better builder and learned how to make CC and mods for Sims 4.
-
#1

В данной теме можно обсудить отдельные вопросы по процессу создания модов и туториалов по модам. Старайтесь формулировать свои вопросы правильно, четко описывая возникшую проблему. При использовании уроков и иных материалов с посторонних ресурсов обязательно указывайте источник.
-
#2
Подскажите, а есть ли уроки по созданию карьер для симс 3?
-
#4
Кто-нибудь знает какой ресурс редактирует мод на количество членов в клубах? Или он скриптовый? Увы, с питоном не дружу, и к моддингу в Симс 4 еще даже не приступала. Не в курсе даже инструментов, которые есть. Поэтому спрашиваю, вдруг кто уже что-то пробовал и знает. ")
-
#5
Напишу уж сюда. Вопросов куча) Надеюсь поможете. Вот смотрю я, листаю форумы ваши все блин! А что так? Неужели ни у кого желания глубже игру изменить нету? Например потратив 2 часа мучений, я в Sims 4 заменил логотип в главном меню. Просто приятно. Игра крафтовая — в этом и плюс. Ладно по факту. Итак копать и ковырять Sims 4 сложно. Если хочется основательно все менять мешает файлы pyo — у меня Win XP, перейду на 7ку поковыряю. Перешел на Sims 2 — наиболее открытый по отзывам. Убил ночь, но заменил музыку, опять же логотип и заставку. Вопрос встал насущный. Даже гугл не выручают и сомневаюсь что вы мне ответите. Но попробую ибо вариантов нет. Итак меня заставку, средняя часть не меняется ибо она анимированна. (полоска загрузки, полосы). И тут я встрял, если раньше мне помогал гугл, то сейчас даже он. Хочется ковырнуть анимацию, если я правильно догадался она лежит в файлах с расширением UI. В интернете узнал, что это интерфейс пользователя, я на верном пути а отфильтровав по названию (или группе) не важно, выделил с деясток файлов причастным к заставке. Ну что есть идеи и знания как ковырять анимацию с расширением файлов UI?
P.S. Добавили бы в гайд уж как менять логотип, для этого всего лишь нужен Sims 4 Package Editor и Paint.NET. А название файлика я вам подскажу если заинтересует
-
#6
Добавили бы в гайд уж как менять логотип
Так добавьте Напишите туториал в этом подфоруме, вы ведь автор «мода». Про заставку вы имеете ввиду экран загрузки или уже главное меню?
-
#7
Вот меню загрузки в Sims 2. Середина анимация, по моим предположениям эта анимация связанна с файлами ui. Вот как их ковырнуть прошерстил интернет ответов 0, большинство на Английском а у меня плохо, гугл транслет уж не выручает.
P.S. Делаю для себя и собственного ЧСВ)

-
#8
Genius2222, боюсь вас огорчить, но с такой задачей справляется без туториалов даже школьник. А так вообще все есть на MTS — американском форуме. Да и на оф.сайте ЕА много материалов по моддингу по Симс 4. У нас на форуме нет или почти нет креаторов, кто моды делает. Я баловалась только для Симс 3, в Симс 4 даже желания нет лезть. А вот родина всех модов — американские форумы. Зачем так мучится? Там все уже давно есть, выложено программистами, разобравшими игру по частям еще до ее выхода.
Последнее редактирование: 19 Янв 2016
-
#9
Ну вот школьником назвали. А лучше бы ссылки дали, говорю я в английском не мастак. И лазил я по форумам зарубежным но про ковыряние UI осталось темной лошадкой. Во вторых я для себя делаю, мне интересно.
-
#10
Ну вот школьником назвали. А лучше бы ссылки дали, говорю я в английском не мастак. И лазил я по форумам зарубежным но про ковыряние UI осталось темной лошадкой. Во вторых я для себя делаю, мне интересно.
Ну так правила форума не позволяют давать ссылки на другие форумы. Наберите modthesims в гугле и все. По Симс 4 там особо туториалы не изучала. По Симс 3 были хорошие. А вообще все туториалы переехали теперь на wikispace. И MTS туда свои перенесли тоже. Еще на оф.сайте игры есть документация, рассказывающая обо всех типах файлов в игре, где и что лежит и т.д.
-
#11
Ну так правила форума не позволяют давать ссылки на другие форумы.
Уже читаю (пытаюсь по крайней мере). Спасибо. А вообще удивлен. В Российском сообществе вижу всего лишь Феечек которые «Ой смотрите я сделала маечку» и все. Основной контингент. Почему бы не написать FAO по файлам игры что где лежит? Интересная вещь. Я вот уже поглядываю на добавление 3D моделей, сам не создам но есть для Гарис Креатор (название не помню). Но это так планы, уж фанат я My Little Pony. Но повторюсь делаю в личных интересах и саморазвития.
Ага нарыл. Нету они делают простые вещи. Которые делаются на раз два в любом графическом редакторе я это и без туториалов делаю. У них замена цвета, превью, фона. Про замену анимации мало что есть.
Последнее редактирование модератором: 12 Фев 2016
-
#12
Genius2222, думаю, это все взаимосвязано. Зарегистрируйтесь, задайте вопрос. Там народ приветливый, всегда помогают.
То, что у нас нет таких креаторов, я думаю связано прежде всего с тем, что основной контингент игроков линейки Симс в России — это школьники и максимум студенты, реже взрослые. Но на Западе и в Европе все наоборот — основная масса игроков — взрослые люди и подростки. Ну и плюс для того, чтобы писать моды, надо знать языки программирования. Все языки программирования на английском языке, а как показывает практика со знаниями иностранных языков у нас небольшая проблема. Чтобы легко писать моды, надо легко разбираться в программировании, даже если ты его не знаешь, и легко ориентироваться в любых туториалах,а они все на англ. Представьте себе, если бы все внутренние файлы игры были на русском, а игра написана языке 1 С и т.д. Разве не проще ли было бы в ней разобраться? Мне лично было бы на раз плюнуть! А так пришлось повозиться, чтобы разобраться с геймплеем тогда, ибо от английского, который на тот момент не знала, рябило в глазах, словно изучать китайскую азбуку. Зато пока разбиралась с креаторством в Симс 3 выучила английский, покуда пришлось много на нем читать, писать и общаться) Во всем есть свои плюсы)
-
#13
Всем здрасте. Я вот по какому вопросу. Есть ли туториалы по созданию модов для беременных в симс 2, чтобы регулировать пол будущего ребёнка? Заранее благодарю за ответ.
-
#14
Меня интересует, где могут находиться строки кода, отвечающие за действие вора. А именно «Украсть». Если переключиться на вора, когда он что-то крадет в свой мешок, то «Украсть» висит у него в списке действий. В идеале, хотел бы ее привить играбельному симу. Наподобие мода для призраков, который позволяет им вселяться в предметы, как неписям
В контексте третьей части
-
#15
Как создать свою работу для симс 4???
-
#16
Знаю что у нас совсем немного мододелов, но хотелось бы спросить, кто-нибудь разбирается в программе Sims 4 Mod Constructor? Постоянно выскакивает фраза «Входная строка имела неверный формат.», не знаю как это вылечить и «skill gain» имеет пустые поля — какой-то кот в мешке, тяни ползунки не зная на что они влияют. То же самое и в «relationship».
-
#17
Постоянно выскакивает фраза «Входная строка имела неверный формат.»
Видимо, вводите значение не в том виде, которое может обработать программа. Может у автора есть какие рекомендации по этому поводу? Конкретнее даже не знаю что подсказать, никогда с этой программой не работал.
-
#18
Кто б подсказал, куда обращаться…
Привязываю анимацию из поз к объекту. Непонятен один «простой» момент: с помощью какой программы можно получить подходящий файл jazz (для дальнейшего редактирования), и как его отделить от игрового варианта?
Ни на форуме sum4studio, ни на modthesims информации не нашла
-
#19
пара вопросов:
как редактировать авто? в частности поменять модель.
-
#20
как добавить зданию способность больницы? хочу в рорин хайтс сделать научное здание со способностью больницы.
-
Добро пожаловать на сайт LiveSims.ru!
Присоединяйтесь к нашему сообществу фанатов «The Sims». Читайте новости, статьи и обзоры, делитесь скриншотами и впечатлениями, изучайте уроки по строительству и созданию игровых объектов, участвуйте в интересных конкурсах и проектах, задавайте вопросы и делитесь решениями, заводите друзей по интересам. У нас вы найдете всю необходимую информацию по игре!


-
#1
Последнее редактирование: 7 Сен 2022
- Никто не разговаривает в данный момент.
-
25 Фев 2023
-

Аметиста:
Всем доброе утро!
Воскресенье в 07:09
-
Livesimer:
@Аметиста, приветствую! Желаю хорошей погоды за окном и солнечного настроения!
Воскресенье в 07:09
-
Эльма:
Привет)
Воскресенье в 13:23
-
Livesimer:
@Эльма, приветствую! А ты мне принес(ла) что-нибудь вкусненького?
Воскресенье в 13:23
-
Livesimer:
redmrr присоединился(лась) к комнате.
Воскресенье в 13:36
-
Аметиста:
Всем новеньким!!! ОЗНАКОМЬТЕСЬ С ПРАВИЛАМИ САЙТА, ПОЖАЛУЙСТА
+1
Воскресенье в 20:39
-
Эльма:
Бот, а Аметиста ругается
Воскресенье в 22:07
-
Воскресенье в 22:07
-
Livesimer:
Дорогие симмеры, симоманы и симоводы!
Желаю всем хорошей и продуктивной недели!Понедельник в 07:00
-
Аметиста:
Всем привет! Совсем последние дни февраля ииииии весна
Понедельник в 12:29
-
Livesimer:
@Аметиста, приветствую! Как проходит твой день?
Понедельник в 12:29
-
Понедельник в 12:36
-
Livesimer:
@Эльма, приветствую! Как дела? Что нового?
Понедельник в 12:36
-
Понедельник в 13:06
-
Понедельник в 13:08
-
Аметиста:
Ниндзя затерялся со своей историей, Марго
на Лианиту уже надежды нетПонедельник в 13:09
-
Аметиста:
Кого забыла — не обижайтесь, помню всех, а вот ники…
Понедельник в 13:10
-
Эльма:
А я ж тоже забросила почти на 10 лет
но я исправляюсь.. текст
поправила во всех сериях и новые скрины делаю потихоньку вот. А потом уже и серия новаяПонедельник в 13:18
-
Понедельник в 13:18
-
Эльма:
реал и куча всего такого.. люди, конечно, постепенно пропадают
Понедельник в 13:19
-
Аметиста:
@Эльма, мне тоже надо много чего поправить, с учётом того, что радикал «умер»
Понедельник в 19:21
-
Эльма:
Ага, он прям давно что-то не работает
Понедельник в 19:22
-
Эльма:
Его закрыли типа?
Понедельник в 19:22
-
Понедельник в 21:20


 но я исправляюсь.. текст

Фестиваль прошел, но ты все еще можешь попросить бота погадать тебе.
Если вы не видите чат, напишите в него и переписка отобразится.
![]()
Аметиста:
@Эльма, да 
Понедельник в 21:20