ru:tutorial:introduction
Table of Contents
Введение в разработку модов с помощью Fabric
Это руководство призвано объяснить и показать некоторые вещи, которые вы сможете использовать при разработке модов.
Чтобы создавать моды для Minecraft, вам часто придётся сталкиваться с написанием необычного кода, который поймёт Minecraft
Так как изменения в Minecraft превносятся достаточно быстро, он, по своей сути, не предназначен для модификаций.
В отличии от других библиотек для создания модов, Fabric не является надстройкой над игрой, чтобы дать разработчикам больше функций.
Вместо этого, код встроен с помощьюбиблиотеку Mixin.
Mixin’ы временами работают ненадёжно, нестабильно, и даже могут вызывать конфликты.
Тем не менее, некоторые базовые функции уже встроены в Fabric API.
Если нужной вам функции в Fabric API нет, зачастую для этого можно найти сторонние библиотеки.
Практически в любой ситуации рекомендуется использовать отличающиеся от Fabric API библиотеки вместо того, чтобы импортировать Mixin самостоятельно.
Однако, это может и не понадобиться вовсе.
Да, Minecraft не предназначен для разработки модов , но тем не менее, он содержит в себе достаточно много всего, с чем можно работать без каких-либо изменений извне.
Эта статья расскажет о способах взаимодействия с Minecraft, в порядке предпочтительности.
Native Minecraft APIs
Если Minecraft уже позволяет вам что-то делать, не изобретайте заново колесо.
Хорошим примером этого является класс “Registry”, который позволяет добавлять блоки и элементы без каких-либо изменений в код Minecraft.
Minecraft также использует файлы данных JSON для различных функций, управляемых данными.
Вы можете добавить JSON-файлы в свой мод, которые затем вводятся Fabric API.
Например, модели блоков реализуются с помощью JSON-файлов.
The Fabric API
Сам Fabric, установленный в клиенте, разделен на две части.
-
Fabric Loader, который загружает ваш мод и вызывает вашу точку входа.
-
Fabric API, опциональная библиотека, которая содержит некоторые общие полезные интерфейсы.
API намеренно держится относительно небольшим, чтобы ускорить перенос Fabric на более новые версии Minecraft.
Вы можете узнать, что входит в состав Fabric API, просмотрев его исходный код на GitHub.
Fabric API содержит множество общих событий и общих утилит для таких вещей, как создание сетей и рендеринг.
Сторонние API
Поскольку Fabric API намеренно остается небольшим и сфокусированным, сторонние API существуют для заполнения пробелов.
Mixins позволяют любой сторонней библиотеке влиять на код Minecraft точно так же, как это делает Fabric API.
Вы должны использовать их вместо того, чтобы писать свои собственные mixins, где это возможно, чтобы свести к минимуму возможность конфликтов.
Вы можете найти неполные списки сторонних библиотек на этой вики.
Mixins
Наконец, вы можете использовать mixins.
Mixins — это мощная функция, которая позволяет вам изменять любой код Minecraft.
Некоторые mixins могут вызвать конфликт, но при правильном использовании они являются ключом к добавлению уникального поведения в ваш мод.
Mixins бывают самых разных вкусов:
-
Добавление Интерфейсов
-
Callback Injectors
-
Redirect Injectors
-
Перезапись
Это не полный список, а скорее краткий обзор.
Добавление Интерфейсов
Это, вероятно, один из самых безопасных способов использования mixins.
Новые реализации интерфейса могут быть добавлены в любой класс Minecraft.
Затем вы можете получить доступ к интерфейсу, приведя к нему класс.
Это ничего не меняет в классе, это только добавляет новые вещи, и поэтому очень маловероятно, что они будут конфликтовать.
Одно предостережение заключается в том, что сигнатура функции (имя + типы параметров), которую вы вводите, должна быть уникальной. Поэтому, если вы используете общие типы параметров, обязательно дайте ему уникальное имя.
Callback Injectors
Callback injectors позволяет добавлять хуки обратного вызова к существующим методам, а также к конкретным вызовам методов внутри этого метода.
Они также позволяют перехватывать и изменять возвращаемое значение метода, а также возвращать его раньше.
Инъекции обратного вызова могут стекаться и поэтому вряд ли вызовут конфликты между модами.
Redirect Injectors
Redirects позволяют переносить вызовы методов или доступ к переменным в целевой метод с помощью собственного кода.
Используйте их очень экономно, целевой вызов или доступ можно перенаправить только один раз между всеми модами.
Если два мода перенаправляют одно и то же значение, это вызовет конфликт.
Перезапись
Всегда избегайте перезаписи.
Они полностью заменяют метод, удаляя весь существующий код и конфликтуя с любыми другими типами mixins в методе.
Они с большой вероятностью вступят в конфликт не только с другими модами, но и с изменениями в самом Minecraft.
Скорее всего, вам не нужна перезапись, чтобы сделать то, что вы хотите сделать, пожалуйста, используйте что-то другое.
· Last modified: 2022/02/11 07:11 by
furnygo
Структура мода#
Fabric использует автоматический сборщик Gradle, поэтому нам стоит придерживаться определенной структуры папок:
└── src
    └── main
        ├── java
        └── resources
В java хранится весь Ваш исходный код. В resources хранятся текстуры, модели, звуки, рецепты и прочее.
fabric.mod.json#
Fabric использует файл fabric.mod.json для обнаружения и загрузки Вашего мода. Он должен обязательно находится по пути src/main/resources.
Файл определяет данные Вашего мода: ModId, название, зависимости, точки входа, Mixins, авторов и так далее.
Примерный fabric.mod.json выглядит так:
{
  "schemaVersion": 1,
  "id": "fabrictut",
  "version": "1.0-SNAPSHOT",
  "name": "FabricTutorial",
  "description": "My awesome mode!",
  "authors": [
    "jjigem"
  ],
  "contact": {},
  "license": "MIT",
  "icon": "assets/fabrictut/icon.png",
  "environment": "*",
  "entrypoints": {
    "main": [
      "ru.mcmodding.fabrictut.FabricTutorial"
    ]
  },
  "mixins": [
    "fabrictut.mixins.json"
  ],
  "depends": {
    "fabricloader": ">=0.10.8",
    "fabric": "*",
    "minecraft": "1.16.3"
  }
}
Параметры name, description и authors могут содержать коды цветового форматирования.
| Параметр | Описание | Обязательный? | Пример |
|---|---|---|---|
| schemaVersion | Обозначает версию формата json-файла Тип: число |
Нет (0 если не указано) | «schemaVersion»: 1 |
| id | Обозначает идентификатор мода (MOD_ID) Тип: строка |
Да | «id»: «myawesomemod» |
| version | Версия Вашего мода Тип: строка |
Да | «version»: «1.0-SNAPSHOT» |
| name | Имя Вашего мода Тип: строка |
Нет | «name»: «More Food» |
| description | Описание Вашего мода Тип: строка |
Нет | «description»: «Супер мод на еду из медных слитков» |
| authors | Авторы мода Тип: массив строк или объектов Person |
Нет | «authors»: [«jjigem», «Notch»] |
| contributors | Внесшие вклад в мод Тип: массив строк или объектов Person |
Нет | «contributors»: [«Mumfey»] |
| license | Лицензия для Вашего мода Тип: строка |
Нет | «license»: «MIT» |
| icon | Путь к иконке для Вашего мода. Иконка должна быть в формате PNG. Тип: строка |
Нет | «icon»: «assets/myawesomemod/icon.png» |
| depends | Зависимости мода Тип: массив пар строка-строка (ID — Версия) |
Нет | «depends»: |
| recommends | Рекомендации для мода. То же, что и зависимости, но не остановят игру, а покажут предупреждение Тип: массив пар строка-строка (ID — Версия) |
Нет | «recommends:» |
| conflicts | Конфликты модификаций. При запуске Вашего мода с конфликтным будет предупреждение о несовместимости Тип: массив пар строка-строка (ID — Версия) |
Нет | «conflicts»: |
| breaks | Конфликты модификаций, которые не дадут запустить игру. Тип: массив пар строка-строка (ID — Версия) |
Нет | «breaks»: |
| entrypoints | Точки входа для мода | Да | «entrypoints»: |
| environment | Игровое окружение | Да | «environment»: «*» |
| mixins | Файлы Mixins для мода Тип: массив строк |
Нет | «mixins»: [«modid.mixins.json»] |
| accessWidener | Файл accessWidener для мода. О нем подробнее позже Тип: строка |
Нет | «accessWidener»: «modid.accesswidener» |
Это далеко не все параметры, а лишь основные из них.
Главный класс мода#
Мы знаем как правильно выглядит файл fabric.mod.json, создали его и заполнили, как нам нужно, но мод все еще не будет инициализирован.
Точки входа#
Fabric использует точки входа для разделения клиента и сервера.
Допустимые точки входа: client, server, main.
main используется для инициализации вещей, которые могут происходить как на клиенте, так и на сервере, например, регистрация предметов и существ.
client используется для всего того, что не может происходить на сервере, например, регистрация рендера существ. client ни за что не будет использован на сервере.
server используется для сервера, и не будет использоваться на клиенте.
Вы наверное спросите, зачем нужен server, если можно использовать main? Дело в том, что server используется для выделенного (Dedicated) сервера, а не для встроенного (Integrated).
Итак, как создать точку входа: создаем класс в пакете нашего мода, реализуем нужный интерфейс и переопределяем метод.
| Интерфейс | Метод | Сторона |
|---|---|---|
| ModInitializer | onInitialize() | Клиент-сервер |
| ClientModInitializer | onInitializeClient() | Клиент |
| DedicatedServerModInitializer | onInitializeServer() | Сервер |
Обычно моды содержат либо реализацию ModInitializer и ClientModInitializer, либо только ModInitializer.
Для начала мы сделаем самый простой мод, реализовав ModInitializer. В отличие от Forge, нам не нужны никакие дополнительные аннотации вроде «@Mod», достаточно лишь указать, что мы реализуем интерфейс.
Создаем класс нашего мода по пути наш_домен/никнейм/ID_мода, например ru/mcmodding/fabrictut. Конечно, можно использовать абсолютно любой путь, но это не очень правильно.
Назовем класс FabricTutorial и укажем, что мы реализуем интерфейс ModInitializer. Затем нам нужно переопределить метод onInitialize(), иначе будет ошибка.
В итоге у нас получится такой класс:
package ru.mcmodding.fabrictut;

import net.fabricmc.api.ModInitializer;

public class FabricTutorial implements ModInitializer {
    @Override
    public void onInitialize() {

    }
}
Структура файлов при этом будет выглядеть так:
└── src
    └── main
         ├── java
         │   └── ru
         │       └── mcmodding
         │            └── fabrictut
         │                 └── FaricTutorial.java
         └── resources
                 └── fabric.mod.json
Не забывайте, что указанные тут имена классов и пакетов — всего лишь пример для урока.
Привет. Я жду, и жду, и жду форжа на 1.17, а его всё нет. Так что давайте разберемся наконец, кто же этот ваш Fabric. Ведь только он и доступен для версии 1.17.

Качаем пример проекта отсюда. Через гит или архивом, тут уж как удобнее. Чистим лишние, а именно LICENSE и README. И мы готовы! Начинать готовы.
Проект открою в любимой Idea, она и станет основой у меня в статьях. Но если вы используете что-то другое, то тут можно найти инструкции для остальных IDE или даже для любителей блокнота.
В первую очередь нам нужна Java 16, так как Minecraft с 1.17 перешел именно на эту версию и некогда вечная Java 8 больше не прокатит. Устанавливаем. Проверяем в File — Project Structure, что проект использует 16 версию СДК.

Если всё сделано верно, то начнется процесс конфигурации, импорта необходимого и т.д. Ждём пока завершит.
Теперь открываем терминал и пишем это:

Для выполнения этой команды важно, чтобы в переменных средах была корректно указана JAVA_HOME. Делать это несложно, подробнее смотрите тут: Добавляем JAVA_HOME в переменные среды.
Продолжаем настройку
На очереди gradle.properties. А именно часть после # Mod Properties. Это вроде настройки проекта в целом.
mod_version = 1.0.0 это версия нашего мода, maven_group – имя пакета проекта, своего рода идентификатор. Все слова пишем через точки, у меня это dev.gs.first.
archives_base_name это имя проекта. Все слова должны быть написаны через дефиз. Пусть будет: gs-first-mod.
Остальные поля зависят от версии, для которой и будет сделан мод. Полный список можно найти тут. Выбираем свою версию заменяем эти строки на предложенные сайтом:
|
minecraft_version=1.17 yarn_mappings=1.17+build.13 loader_version=0.11.6 fabric_version=0.36.0+1.17 |
Хорошо, тут готово.
Теперь удалим всё из папки java и добавим туда соответствующие указанному ранее имени пакета: maven_group. Т.е. создаём папки: dev, в ней gs, а в ней first. В последнюю папку добавляем файл ModMain.java (или ваше имя, не принципиально). И пишем там такой текст:
|
package dev.gs.first; import net.fabricmc.api.ModInitializer; public class ModMain implements ModInitializer { @Override public void onInitialize() { } } |
Этот главный класс мода, который и будет отвечать за инициализацию компонентов. Мы уже добавили свою реализацию функции onInitiliaze, которая пока ничего не делает. Но это временно. Родителем нашего ModMain класса указан ModInitiliazer. Это класс из API Fabric.
В результате вы должны были получить что-то вроде этого:

Название, описание и другие данные мода
Теперь открываем файл в папке ресурсов: fabric.mod.json. В нём текста будет побольше. Это Json, так что надеюсь, что хоть базовое понимание его структуры у вас есть. Следите за запятыми и кавычками.
|
1 2 3 4 5 6 7 8 9 10 11 12 13 14 15 16 17 18 19 20 21 22 23 24 25 26 27 28 29 30 31 32 33 34 35 36 37 38 |
{ «schemaVersion»: 1, «id»: «modid», «version»: «${version}», «name»: «Example Mod», «description»: «This is an example description! Tell everyone what your mod is about!», «authors»: [ «Me!» ], «contact»: { «homepage»: «https://fabricmc.net/», «sources»: «https://github.com/FabricMC/fabric-example-mod» }, «license»: «CC0-1.0», «icon»: «assets/modid/icon.png», «environment»: «*», «entrypoints»: { «main»: [ «net.fabricmc.example.ExampleMod» ] }, «mixins»: [ «modid.mixins.json» ], «depends»: { «fabricloader»: «>=0.11.3», «fabric»: «*», «minecraft»: «1.17.x», «java»: «>=16» }, «suggests»: { «another-mod»: «*» } } |
Некоторые данные будут подтянуты из предыдущего файла, например версия. Но в этом файле помимо отображаемого имени мода мы также можем указать ещё и его id, описание, добавить авторов, указать лицензию и иконку.
Путь к иконке в примере указан в таком формате: «assets/modid/icon.png». Но вместо modid вы должны указать id мода, которое был выше (у меня это first_gs_mod), а саму иконку разместить тогда в папке resources/assets/ first_gs_mod/icon.png.
Замечания по id. Они будут использованы при загрузке модов, а это значит, что должны быть уникальными. Мы ведь не хотим конфликтов в будущем?
Ещё тут есть зависимости для мода (будь то сама игра или версия java) и ссылки для обратной связи, которые лучше оставить пустыми, если у вас нет сайта/странички мода на github.
А ещё внимание нужно уделить полю entrypoints, своего рода точки входа, загрузки мода. Там нужно указать путь к нашему ново созданному классу ModMain:
|
«entrypoints»: { «main»: [ «dev.gs.first.ModMain» ] } |

На поле mixins пока мы не смотрим и оставляем его пустым. О нём в другой раз.
Вот что я получил в конечном итоге:
|
1 2 3 4 5 6 7 8 9 10 11 12 13 14 15 16 17 18 19 20 21 22 23 24 25 26 27 28 29 30 31 32 33 34 35 36 |
{ «schemaVersion»: 1, «id»: «first_gs_mod», «version»: «${version}», «name»: «GS First Mod», «description»: «This is an example MOD for GS Guide!!», «authors»: [ «Astler» ], «contact»: { «homepage»: «», «sources»: «» }, «license»: «CC0-1.0», «icon»: «assets/first_gs_mod/icon.png», «environment»: «*», «entrypoints»: { «main»: [ «dev.gs.first.ModMain» ] }, «mixins»: [], «depends»: { «fabricloader»: «>=0.11.3», «fabric»: «*», «minecraft»: «1.17.x», «java»: «>=16» }, «suggests»: { «another-mod»: «*» } } |
Уже почти всё.
Настраиваем клиент с Fabric для тестирования
Ещё после импорта ресурсов студия должна была создать пару приложений:

Первое – локальный клиент Minecraft, а второе – сервер. Нажимаем Edit Configurations…

Как удачно всё подписано. В роли виртуальной машины JRE – Java 16, модуль Module — Имя_вашего_проекта.main. В остальном всё оставляем как есть. Жмём ок и зеленую иконку Play:

В результате получаем запущенную игру, которая уже загрузила наш мод (который, впрочем, не делает абсолютно ничего). Но это ведь только начало, а на этом пока всё, в следующий раз перейдем непосредственно к моддингу!
A few weeks ago, YouTube recommended me a Minecraft video from Dream’s Channel in which he was trying to beat the game while his friend George attempted to stop him. That video was really fun and got me to explore more of their content.
Right now, there’s a bunch of people recording and uploading Minecraft videos to YouTube, but these two found a way to make their content different. Basically, they build their own plugins to change the rules of the game and then they record themselves attempting to beat the modified game. All I can say is that I love their content, and it’s awesome to see what you can accomplish with the power of code.
A few days later, I had an idea to develop a Minecraft mod and thought Why not? It will be fun!
Selecting the tools
Just like in Minecraft, we need some tools but in this case, they will help us in the creation process of our first mod.
Multiple tools help you build Minecraft mods, and I chose Fabric because one of the mods that I usually play with was built with it.
Minecraft uses Java and so does Fabric, which means we also need to have the Java Development Kit or JDK installed. To be more specific, we need the JDK 8 to be able to compile our mod. You can download it on this page.
Last but not least, we need to pick a code editor, in this case, I chose Visual Studio Code because it’s my favorite editor. Nevertheless, you can use whatever editor you like for this guide, as most of the steps will be performed in the CLI.
Setting up the project
For this guide, we will be using a starter to move quickly into actually building our first mod. Let’s go through the following steps:
1. Clone / Download the repository
If you use Git, just clone the repo:
$ git clone https://github.com/HorusGoul/fabric-mod-starter.git
Enter fullscreen mode
Exit fullscreen mode
Otherwise, click this link to download it.
2. Open the project folder with your code editor
Using Visual Studio Code:
$ code fabric-mod-starter
Enter fullscreen mode
Exit fullscreen mode
3. Open a terminal inside the project folder and run the client
$ cd fabric-mod-starter
$ ./gradlew runClient
Enter fullscreen mode
Exit fullscreen mode
NOTE: In Windows, you’ll need to run .gradlew.bat runClient instead.
4. Check that everything is working
A Minecraft instance should be running now on your computer, and the console should have printed these two lines alongside others:
...

[main/INFO]: [STDOUT]: Hello Fabric world!

...

[main/INFO]: [STDOUT]: This line is printed by an example mod mixin!

...
Enter fullscreen mode
Exit fullscreen mode
If that’s not the case for you, recheck everything and if nothing seems to work, leave a comment or send me a PM and I’ll try to help you.
Getting to know the project
At the moment, we can already get our hands dirty by starting to code, but let’s get familiarized with some of the files.
gradle.properties
In this file, we can configure some values that will be used when building our mod. For example, we can change the Minecraft version, the fabric loader version, the mod version and other properties that we may need to change if we want to use new features of Fabric or Minecraft.
# Done to increase the memory available to gradle.
org.gradle.jvmargs=-Xmx1G

# Fabric Properties
    # check these on https://fabricmc.net/use
    minecraft_version=1.15.1
    yarn_mappings=1.15.1+build.1
    loader_version=0.7.3+build.176

# Mod Properties
    mod_version = 1.0.0
    maven_group = starter
    archives_base_name = starter

# Dependencies
    # currently not on the main fabric site, check on the maven: https://maven.fabricmc.net/net/fabricmc/fabric-api/fabric-api
    fabric_version=0.4.25+build.282-1.15
Enter fullscreen mode
Exit fullscreen mode
src/main
Inside the src folder, we will be able to find another folder called main. That’s where the code and resources of our mod are located.
src/main/java
All the Java code is located inside this folder. There we can find a package called starter which contains two items: the StarterMod.java file and the mixin package.
We can find the file StarterMixin.java inside the mixin package.
TIP: If you’re using Visual Studio Code, I recommend you to install the Java Extension Pack. It will power your editor with a bunch of utilities to make Java development easier.
StarterMod.java
This is the main entry point of our mod, as we can see, it belongs to the starter package and implements the onInitialize() method, which simply prints Hello Fabric world! to the console.
package starter;

import net.fabricmc.api.ModInitializer;

public class StarterMod implements ModInitializer {
  @Override
  public void onInitialize() {
    // This code runs as soon as Minecraft is in a mod-load-ready state.
    // However, some things (like resources) may still be uninitialized.
    // Proceed with mild caution.

    System.out.println("Hello Fabric world!");
  }
}
Enter fullscreen mode
Exit fullscreen mode
StarterMixin.java
This class belongs to the starter.mixin package. Our mod will be really small so we shouldn’t worry a lot about the file structure of our project. Let’s just assume that all mixins will be located inside the starter.mixin package.
And what are mixins?
Mixins are in charge of injecting code into existing classes of the game. For example, in StarterMixin.java, we are injecting a method at the beginning (HEAD) of the init() method that is implemented in the TitleScreen class from Minecraft.
Now, if we load this mixin, once Minecraft calls the init() method of TitleScreen, our method that includes the System.out.println("This line is printed by an example mod mixin!"); will also be called!
That’s part of the magic of mixins, and this is just the tip of the iceberg, for now, this is all we need to build our mod. If you want more in-depth knowledge you should go check the Mixin docs.
package starter.mixin;

import net.minecraft.client.gui.screen.TitleScreen;
import org.spongepowered.asm.mixin.Mixin;
import org.spongepowered.asm.mixin.injection.At;
import org.spongepowered.asm.mixin.injection.Inject;
import org.spongepowered.asm.mixin.injection.callback.CallbackInfo;

@Mixin(TitleScreen.class)
public class StarterMixin {
  @Inject(at = @At("HEAD"), method = "init()V")
  private void init(CallbackInfo info) {
    System.out.println("This line is printed by an example mod mixin!");
  }
}
Enter fullscreen mode
Exit fullscreen mode
src/main/resources
Inside the resources folder, we can find the assets folder, which right now only contains the icon for our mod. Besides that folder, there are two JSON files:
fabric.mod.json
For this file, I recommend you to go into the Fabric docs about fabric.mod.json and read about every field defined inside the file of our project.
If you prefer to read the docs later, just take a look at the entrypoints and mixins properties.
I bet you can already see a connection here. In the entrypoints is where we are telling Fabric which one of our Java classes should act as the main entry point of our mod.
And then, there’s the mixins property, where we simply tell Fabric the location of any Mixin configuration file we want to include in our mod. In this case, we only have one, starter.mixins.json.
{
  "schemaVersion": 1,
  "id": "starter",
  "version": "${version}",

  "name": "Starter Mod",
  "description": "Describe your mod!",
  "authors": ["Your Name"],
  "contact": {
    "homepage": "https://horuslugo.com",
    "sources": "https://github.com/HorusGoul/fabric-mod-starter"
  },
  "license": "MIT",
  "icon": "assets/starter/icon.png",

  "environment": "*",

  "entrypoints": {
    "main": ["starter.StarterMod"]
  },

  "mixins": ["starter.mixins.json"],

  "depends": {
    "fabricloader": ">=0.7.3",
    "minecraft": "1.15.x"
  },

  "suggests": {
    "flamingo": "*"
  }
}
Enter fullscreen mode
Exit fullscreen mode
starter.mixins.json
Remember our StarterMixin class? This is how we can tell the toolchain the mixins that we want to include in our mod. The package property is where we define the Java package where the mixins are located, and inside the mixins array is where we can put all the mixin classes that we want to include to the game.
Alongside mixins there are two other properties that allow us to specify the environment where we want to load some mixins. Those properties are server and client, but in this case, we’re not using them.
This file follows the specification defined in the Mixin configuration files section of the Mixin Docs. Just the same as before, I recommend you to go to the docs and learn more about this file 😄
{
  "required": true,
  "package": "starter.mixin",
  "compatibilityLevel": "JAVA_8",
  "mixins": ["StarterMixin"],
  "injectors": {
    "defaultRequire": 1
  }
}
Enter fullscreen mode
Exit fullscreen mode
Let’s build our mod!
Now that we are familiar with the project, let’s gets our hands dirty and create our mod!
In this case, the mod will simply alter one mechanic of the game: receiving damage. We’ll make it so whenever a player receives damage, it will switch its position and inventory with another player in the server.
For this, we’re going to need a mixin that injects code in the PlayerEntity class, to be more specific, just before the end of the damage() method.
Detecting when players receive damage
Let’s create this new mixin in the starter.mixin package with the name SwitchPlayerEntityMixin.java:
package starter.mixin;

import org.spongepowered.asm.mixin.Mixin;
import org.spongepowered.asm.mixin.injection.At;
import org.spongepowered.asm.mixin.injection.Inject;
import org.spongepowered.asm.mixin.injection.callback.CallbackInfoReturnable;

import net.minecraft.entity.damage.DamageSource;
import net.minecraft.entity.player.PlayerEntity;

@Mixin(PlayerEntity.class)
public class SwitchPlayerEntityMixin {

  @Inject(at = @At("RETURN"), method = "damage")
  private void onDamage(DamageSource source, float amount, CallbackInfoReturnable info) {
    System.out.println("The player received damage!");
  }
}
Enter fullscreen mode
Exit fullscreen mode
Don’t forget to add it to the starter.mixins.json file:
{
  "required": true,
  "package": "starter.mixin",
  "compatibilityLevel": "JAVA_8",
  "mixins": ["StarterMixin", "SwitchPlayerEntityMixin"],
  "injectors": {
    "defaultRequire": 1
  }
}
Enter fullscreen mode
Exit fullscreen mode
Now execute the command ./gradlew runClient in the console, launch a Minecraft world in creative mode, grab some instant damage potions and try to get hurt.
Just like in the GIF, you should be able to see a new line pop up in the console every time the player gets hurt, and that means we can continue to the explanation of what is going on.
Take a look to the mixin code, our purpose was to get the method onDamage executed at the end of the method damage, that’s why we are using the string RETURN instead of HEAD. Also, we are going to need the damage source and the amount of damage inflicted. The last parameter, info is required by the Mixin framework.
Both the source and amount are parameters that the original damage method receives, and that’s the reason we can just use them in our method.
Accessing the current player
Right now, the mod is just printing a line every time a player gets hurt, our next objective is accessing the player instance.
We must first remember that the onDamage method is inside of a PlayerEntity instance. We can take advantage of that and simply use this to access the instance properties and methods. The problem comes when the compiler yells at us because it thinks that we’re an instance of SwitchPlayerEntityMixin.
We don’t have a way to tell the compiler that this method is being executed inside of another type of class, so we can use this trick:
PlayerEntity self = (PlayerEntity) (Object) this;
Enter fullscreen mode
Exit fullscreen mode
With this, we are telling the compiler that this is an Object and then, we cast the object as a PlayerEntity. And voilá! We have access to the player that is receiving damage, we can now update our printed line to display the player’s name.
...

@Mixin(PlayerEntity.class)
public class SwitchPlayerEntityMixin {

  @Inject(at = @At("RETURN"), method = "damage")
  private void onDamage(DamageSource source, float amount, CallbackInfoReturnable info) {
    PlayerEntity self = (PlayerEntity) (Object) this;

    System.out.println("The player " + self.getGameProfile().getName() + " received damage");
  }
}
Enter fullscreen mode
Exit fullscreen mode
Switching positions with another player
Now that we can access the player’s properties and methods, we can use one of those to access the whole world.
The world property references the current Minecraft World that is being played, and one of the things we can do with it is getting the list of the online players.
With that list, we can pick one of those players and later, swap their positions as you can see in the following code:
package starter.mixin;

import java.util.List;

import org.spongepowered.asm.mixin.Mixin;
import org.spongepowered.asm.mixin.injection.At;
import org.spongepowered.asm.mixin.injection.Inject;
import org.spongepowered.asm.mixin.injection.callback.CallbackInfoReturnable;

import net.minecraft.entity.damage.DamageSource;
import net.minecraft.entity.player.PlayerEntity;
import net.minecraft.util.math.BlockPos;

@Mixin(PlayerEntity.class)
public class SwitchPlayerEntityMixin {

  @Inject(at = @At("RETURN"), method = "damage")
  private void onDamage(DamageSource source, float amount, CallbackInfoReturnable info) {
    PlayerEntity self = (PlayerEntity) (Object) this;

    // Get all the players in the current minecraft world
    List<PlayerEntity> players = (List<PlayerEntity>) self.world.getPlayers();

    // The player we'll switch positions with.
    PlayerEntity otherPlayer;

    // Stop the execution if the player is playing alone.
    if (players.size() <= 1) {
      return;
    }

    // Get a random player from the players list.
    // Repeat this process until we have a player that is
    // not the player who got hurt.
    do {
      int index = (int) Math.floor(Math.random() * players.size());
      otherPlayer = players.get(index);
    } while (otherPlayer == self);

    // Get the block position of both players
    BlockPos selfPos = self.getBlockPos();
    BlockPos otherPlayerPos = otherPlayer.getBlockPos();

    // Teleport damaged player to the other player's coordinates
    // We set the Y to 300 in order to avoid a collision with the other player.
    //
    // We add 0.5 to both X and Z because that's the center point of a block
    // and the players could suffocate under certain circumstances if we didn't
    self.teleport(otherPlayerPos.getX() + 0.5, 300, otherPlayerPos.getZ() + 0.5);

    // Teleport the other player to the position of the damaged player.
    otherPlayer.teleport(selfPos.getX() + 0.5, selfPos.getY(), selfPos.getZ() + 0.5);

    // Finally change the Y to the real value and complete the teleport of both
    // players.
    self.teleport(otherPlayerPos.getX() + 0.5, otherPlayerPos.getY(), otherPlayerPos.getZ() + 0.5);
  }
}
Enter fullscreen mode
Exit fullscreen mode
After implementing this, you’ll need two Minecraft clients to be able to test it. You can do it by opening one with ./gradlew runClient and then using the official Minecraft client with your Mojang account. Then, open the test world in LAN and join it with the other client.
Swapping their inventories
And now we’ll add the last feature of the mod: swapping the inventory of the players.
To swap the inventories of two players, we have to clone each inventory and after that, we can just replace and swap them. The inventory of a player can be accessed using the inventory property.
The class PlayerInventory has two methods that we’ll use, serialize and deserialize. The first one allows us to clone the content of the inventory by putting it inside of a ListTag and then, we can use the second one to replace the content of an inventory with the content that is inside of a ListTag.
Here’s the code:
    // ... teleports ...


    // Only swap inventories if the players are alive
    if (self.getHealth() > 0.0f && otherPlayer.getHealth() > 0.0f) {

      // Get the inventories of both players
      ListTag selfInventory = self.inventory.serialize(new ListTag());
      ListTag otherPlayerInventory = otherPlayer.inventory.serialize(new ListTag());

      // Swap them
      self.inventory.deserialize(otherPlayerInventory);
      otherPlayer.inventory.deserialize(selfInventory);
    }
Enter fullscreen mode
Exit fullscreen mode
As you may have noticed, we’re only swapping the inventories if both players are alive because if we don’t include this check, one of the inventories would get lost whenever a player died.

The final code
If you reached up until this point, congrats! You’ve built your first Minecraft mod, we should now remove the files that aren’t needed, for example, StarterMixin.java and StarterMod.java. Don’t forget to remove the references to these files inside fabric.mod.json and starters.mixins.json.
I also recommend you to rename the package from starter to whatever you want, just remember to change every occurrence in the project.
You can find the latest version of the code in the branch final-code of the starter repo. Click here see the final version of the mod.
Packaging the mod
If you’re familiar with Minecraft Mods, you may already know that mods usually come packaged inside .zip or .jar files which later you drop inside the mods folder in the server or client of Minecraft.
To create a bundle of your mod, you only need to run the following command:
$ ./gradlew build
Enter fullscreen mode
Exit fullscreen mode
If everything compiles correctly, you’ll be able to find the .jar inside the ./build/libs folder of your project. In most cases, you’ll want to pick the production version without sources, but there may be cases where also shipping a development version along with the sources is better.
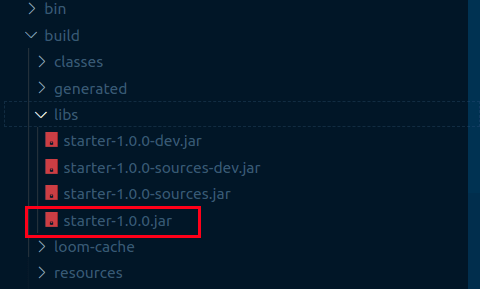
That’s it, you can now drop that .jar inside your mods folder, just don’t forget to install the Fabric API first, and for that, you can read the Installing Fabric section in their wiki if you want to learn how to do it.
Learning resources
Here are some resources that may come in handy if you want to learn more about Minecraft Modding:
-
The Fabric Wiki. This one has already been mentioned in the article, but seriously, go check it out because there’s a lot of content that I haven’t covered!
-
The Forge API. The Forge API is the most famous Minecraft API, you may want to check it out because some of the best mods out there have been built with it!
-
ScriptCraft. There seems to be a way to build mods using JavaScript, so if you have a background in web dev, you may want to try this one.
-
MCreator. As their site says, MCreator is a software used to make Minecraft mods and data packs using an intuitive easy-to-learn interface or with an integrated code editor. If you know about someone that wants to get started with programming, this may be a good way to introduce them!
Conclusion
Building my first Minecraft Mod was interesting because I got to know a bit more about how my favorite game works, and I even managed to craft something really fun to play.
Also, I took this as an opportunity to create this article because I think modding is a great way to get introduced to programming, and there are a lot of Minecraft players that may get interested and end up learning a lot about software development.
I hope you had a great time reading this article. If you decide to continue learning I invite you to share your progress with us, who knows, maybe a Minecraft Modding community can be born inside of dev.to 🔥
Api
-
Search
-
Search all Forums
-
Search this Forum
-
Search this Thread
-
-
Tools
-
Jump to Forum
-
-
#1
Dec 12, 2018
Geforce-
View User Profile
-
View Posts
-
Send Message
Moderator

- Moderating modder
- Join Date:
10/7/2011
- Posts:
2,425
- Location:
Texas
- Minecraft:
Geforce
- Discord:
Geforce#4998
- PMC:
Geforce
- Member Details
Hello everyone,
This is an unofficial guide to setting up a development workspace for Fabric, a new, open-source modloader by asiekierka. Fabric’s main selling point over more popular modloaders such as Forge is that Fabric mods are designed to work between multiple Minecraft versions. The reason for the creation of this guide is that, being Fabric is so new, there isn’t much documentation on it yet. I’ve spent quite a few hours today just trying to set up my project, so I thought that a more comprehensive guide may help other modders trying out Fabric for the first time.
I am aware that Asie already has an «official» tutorial on how to set up Fabric, found here, but I found it to be missing a few key bits of information here and there, especially those concerning mod developers.
Setting up Fabric:
When you ready to install Fabric, complete the following steps:
- Create a new, empty folder. (NOTE: Fabric versions prior to v0.2.0.64 do not support spaces in the folder’s path. If there is a space in the path to the folder, any Fabric mods you attempt to create in your IDE will fail to load properly. To fix this, update to Fabric v0.2.0.64 or above).
- Either create a fork of Asie’s sample Fabric mod repository or click «Clone or download > Download ZIP» to download the repo’s contents onto your computer.
- Place the contents in the folder you have just created.
- Open the build.gradle file in a text editor such as Notepad++. Once it’s open, you should modify the «archivesBaseName» and «version» values to the values you want.
- Open a Command Prompt window and navigate to the folder using the command «cd <path to folder>». Once there, run the «gradlew genSources idea» command to set up a workspace made for IntelliJ IDEA. If you use Eclipse, you can run the «gradlew genSources eclipse» command. If you wish to use Visual Studio as your IDE, follow this tutorial instead.
- Once Gradle is finished building the workspace, it should automatically open in IDEA. If it doesn’t, you can simply double-click on the .ipr file with the same name as the directory to open the project in IDEA.
Launching Minecraft in your development environment:
If you have followed the above steps, you should be able to launch the game right away in IDEA using the «Minecraft Client» and «Minecraft Server» run configurations.
If your mod fails to load without any errors being logged, be sure that you have updated Fabric to v0.2.0.64 or newer, and to be even more cautious, double-check that there are no spaces in the path to the project directory.
Building your mod:
Similar to building mods with Forge, when you are ready to package your mod and obtain its .jar file, navigate to your project’s folder in a Command Prompt window (using the «cd» command to change directories) and run the command «gradlew build». Once it’s completed, you should see a new «build» folder in your project directory. Find the «libs» folder inside of «build», and your packaged .jar file will be in there.
Updating the version of Fabric you’re using in your project:
Because Fabric takes advantage of Gradle, you can easily update the mapping and loader versions you are using in your project. However, the process can be confusing if you haven’t done it in a while. Open up your build.gradle file in your IDE, change the versions to the ones you want to update to, then save the file. Once it’s saved, navigate to your project directory in the Command Prompt, run the command «gradlew genSources idea» again, and simply wait for it to finish. This will update your project to use the versions of Fabric that you specified.
Launching Minecraft in MultiMC:
Currently, the only way to launch Minecraft with Fabric installed outside of an IDE is to use MultiMC. Many people already use MultiMC, but if you don’t, you can find it here. Install it before proceeding to the next step.
Once you have MultiMC installed, go the Fabric downloads page and select the mapping and loader versions that you need. Once you pick the versions you want, click on the «Copy MultiMC instance url» button to save the download link of the correct Fabric MultiMC instance to your clipboard. Open up MultiMC and select the «Add instance» button in the top-left. Click on the «Import from ZIP» option and paste the link you just saved into the textbox. Give the instance a name and click the «OK» button when you are done. Before you can start Minecraft though, you need to install the Fabric API separately. This will cause crashes to occur if you have not completed the following step with Fabric mods installed. Before starting Minecraft, click on this link to be taken to the Fabric API’s Maven page. Click on the latest version of the API and select the first .jar file listed. In my case, it would be this one:

This will download that version of the Fabric API as a .jar file. Place it in your MultiMC instance’s «mods» folder alongside any other mods before running the game. You can click on «instance folder» in MultiMC then double-click into the «.minecraft» directory for easy access to the mods folder. Once you are finished with this step, you can launch Minecraft by simply clicking the «Launch» button in MultiMC.
Video tutorial:
Here’s a video made by ScottoMotto showing the installation of Fabric:
Need more help?
If you’re like me, you probably have no idea what I just said and might have a few questions. You can join Fabric’s Discord server here, where people a lot more knowledgeable than myself can help you out.
NOTE: I do plan on adding some basic API functions to this guide once I have played around with Fabric a bit.
Feel free to leave any improvements or suggestions you have for this guide below.
-
-
#2
Dec 12, 2018
SuntannedDuck2-
View User Profile
-
View Posts
-
Send Message
- Glowstone Miner
- Location:
Down Under The Duck Pond
- Join Date:
10/23/2016
- Posts:
4,915
- Location:
A Duck Pond w/ Wifi
- Minecraft:
EvilLink14
- Xbox:
Not anymore
- PMC:
https://modwiki.miraheze.org/wiki/User:SuntannedDuck2
- Member Details
Great thread for a quick start guide.
Also a video tutorial if anyone that comes across this thread needs it to understand things better besides whats detailed above, try ScottoMotto who released one not too long ago.
Niche Community Content Finder, Youtuber, Modpack/Map Maker, Duck
Forum Thread Maintainer for APortingCore, Liteloader Download HUB, Asphodel Meadows, Fabric Project, Legacy Fabric/Cursed Fabric, Power API, Rift/Fabric/Forge 1.13 to 1.17.
Wikis I Maintain: https://modwiki.miraheze.org/wiki/User:SuntannedDuck2
-
-
#3
Dec 12, 2018
Geforce-
View User Profile
-
View Posts
-
Send Message
Moderator
- Moderating modder
- Join Date:
10/7/2011
- Posts:
2,425
- Location:
Texas
- Minecraft:
Geforce
- Discord:
Geforce#4998
- PMC:
Geforce
- Member Details
Great thread for a quick start guide.
Also a video tutorial if anyone that comes across this thread needs it to understand things better besides whats detailed above, try ScottoMotto who released one not too long ago.
Thanks! I’ll definitely add that video to the OP as well, as some people like to see visuals rather than reading a text guide.
-
-
#4
Dec 12, 2018
SuntannedDuck2-
View User Profile
-
View Posts
-
Send Message
- Glowstone Miner
- Location:
Down Under The Duck Pond
- Join Date:
10/23/2016
- Posts:
4,915
- Location:
A Duck Pond w/ Wifi
- Minecraft:
EvilLink14
- Xbox:
Not anymore
- PMC:
https://modwiki.miraheze.org/wiki/User:SuntannedDuck2
- Member Details
Your very welcome.
Niche Community Content Finder, Youtuber, Modpack/Map Maker, Duck
Forum Thread Maintainer for APortingCore, Liteloader Download HUB, Asphodel Meadows, Fabric Project, Legacy Fabric/Cursed Fabric, Power API, Rift/Fabric/Forge 1.13 to 1.17.
Wikis I Maintain: https://modwiki.miraheze.org/wiki/User:SuntannedDuck2
-
-
#5
Dec 18, 2018
Geforce-
View User Profile
-
View Posts
-
Send Message
Moderator
- Moderating modder
- Join Date:
10/7/2011
- Posts:
2,425
- Location:
Texas
- Minecraft:
Geforce
- Discord:
Geforce#4998
- PMC:
Geforce
- Member Details
I have learned that Fabric now supports the Eclipse IDE in addition to IDEA and Visual Studio. I have added the command to set up a Fabric Eclipse project in the «Setting up Fabric» section.
-
-
#6
Jan 6, 2019
SuntannedDuck2-
View User Profile
-
View Posts
-
Send Message
- Glowstone Miner
- Location:
Down Under The Duck Pond
- Join Date:
10/23/2016
- Posts:
4,915
- Location:
A Duck Pond w/ Wifi
- Minecraft:
EvilLink14
- Xbox:
Not anymore
- PMC:
https://modwiki.miraheze.org/wiki/User:SuntannedDuck2
- Member Details
Hello, I just saw that Fabric has it’s own category on Curseforge. I was wondering if a Rift or Liteloader one had been considered once 1.13 Forge comes so it’s not so complicated to find mods for those on the site.
I know this isn’t the right place to post this, but I was wondering if someone could acknowledge this as a request at least for the team that does the CurseForge site. I didn’t know where else to post this and due to Rift/Fabric only having so many places to acknowledge such information or to ask a Moderator for a request I thought I’d ask here.
(I know Liteloader has its own site for mods and no 1.13 support yet, but for the purpose of accessibility for those that host on Curseforge maybe, and Rift I don’t think hosts it’s mods anywhere else legitimately (because everywhere else I’ve seen Rift is on mod repost sites doing their thing of course, but Fabric you can’t get on mod repost sites so that’s a good thing at least, but from what I’ve seen searching for Rift generically just to see if any happened to (I never use mod repost sites but was curious how much ‘traction’ Rift has gotten since it’s been available like with Liteloader, or if they only hosted Forge mods only)), similar to Fabric hosting from what I know of only on Curseforge which works for me
.)Just an idea is all, But due to Fabric getting one, I thought modloaders that have their own would benefit a category for users looking for mods that support them with quick access once 2 or 3 are likely to be available for 1.13 and knowing where to find them (besides dependencies existing I know). Not disappointed if it isn’t to happen. I’m at least excited Fabric got a category and Datapacks have the Customization tab for 1.13/1.14 to call their own.
ATTACHMENTS
-
Fabric Category
Niche Community Content Finder, Youtuber, Modpack/Map Maker, Duck
Forum Thread Maintainer for APortingCore, Liteloader Download HUB, Asphodel Meadows, Fabric Project, Legacy Fabric/Cursed Fabric, Power API, Rift/Fabric/Forge 1.13 to 1.17.
Wikis I Maintain: https://modwiki.miraheze.org/wiki/User:SuntannedDuck2
-
-
#7
May 5, 2019
r8Rusoski-
View User Profile
-
View Posts
-
Send Message
- Out of the Water
- Location:
Aguascalientes
- Join Date:
5/5/2019
- Posts:
3
- Location:
Mexico
- Minecraft:
Rusoski
- Xbox:
Rusoski
- Nintendo:
Rusoski
- Member Details
Hello there, I nee help, because I can’t figure out what should I put instead of «archivesBaseName» and «version».
Rusoski a sus ordenes!
-
-
#8
May 6, 2019
Tunacan-
View User Profile
-
View Posts
-
Send Message
- Newbie
- Location:
nether
- Join Date:
1/17/2018
- Posts:
1
- Location:
the overworld
- Minecraft:
TunacanGamer
- Discord:
TunacanGamer#4833
- Member Details
You have to edit the gradle.properties file instead. Then change the values below the mod properties comment.
mod_version is the version of your mod. (I recommend putting something like 1.0.0)
maven_group should be (I think) the name you put for your packages (like com.example)
archives_base_name is the name your mod’s jar file will have (the version should be added automatically)
hello
-
-
#9
May 6, 2019
r8Rusoski-
View User Profile
-
View Posts
-
Send Message
- Out of the Water
- Location:
Aguascalientes
- Join Date:
5/5/2019
- Posts:
3
- Location:
Mexico
- Minecraft:
Rusoski
- Xbox:
Rusoski
- Nintendo:
Rusoski
- Member Details
Thanks dude!
Rusoski a sus ordenes!
-
-
#10
Jun 1, 2019
HI,
I just tried to follow your tutotial and faced several issues.
I cloned 3 project from the repository: fabric, fabric loom and fabric example.
I blocked at «Setting up Fabric» the step : «Open a Command Prompt window and navigate to the folder using the command «cd <path to folder>». Once there, run the «gradlew genSources idea» command to set up a workspace made for IntelliJ IDEA».
After i finished cloning, i went into the «fabric-exemple» folder and runned your command.
I got :
zsh: command not found: gradlew
I didnt know about gradle so i installed it and runned again, same result.
When i run only «gradle genSources idea» i get a build fail:
FAILURE: Build failed with an exception.
* Where:
Build file ‘/home/takima/Jeux/Minecraft/Dev/Fabric/fabric-example-mod/build.gradle’ line: 2* What went wrong:
Plugin [id: ‘fabric-loom’, version: ‘0.2.2-SNAPSHOT’] was not found in any of the following sources:— Gradle Core Plugins (not a core plugin, please see https://docs.gradle.org/4.4.1/userguide/standard_plugins.html for available core plugins)
— Plugin Repositories (snapshot plugin versions are not supported)* Try:
Run with —stacktrace option to get the stack trace. Run with —info or —debug option to get more log output. Run with —scan to get full insights.* Get more help at https://help.gradle.org
BUILD FAILED in 0s
Here is what i filled in the build.gradle:
plugins {
id ‘fabric-loom’ version ‘0.2.2-SNAPSHOT’
id ‘maven-publish’
}sourceCompatibility = JavaVersion.VERSION_1_8
targetCompatibility = JavaVersion.VERSION_1_8archivesBaseName = project.firstmod
version = 1.0
group = project.maven_groupminecraft {
}Just changed project.version by 1.0 and project.archive_name by project.firstmod.
I’m developper but very new to minecraft modding, gradle and fabric. I couldn’t find any tutorial but your to use fabric so
i really count on it
. -
#11
Jun 1, 2019
SuntannedDuck2-
View User Profile
-
View Posts
-
Send Message
- Glowstone Miner
- Location:
Down Under The Duck Pond
- Join Date:
10/23/2016
- Posts:
4,915
- Location:
A Duck Pond w/ Wifi
- Minecraft:
EvilLink14
- Xbox:
Not anymore
- PMC:
https://modwiki.miraheze.org/wiki/User:SuntannedDuck2
- Member Details
If you don’t get any responses by the Moderator in general or due to the Minecraft Forums archiving I’d say go to the Fabric Discord and they can help you out.
https://discord.gg/v6v4pMv
Niche Community Content Finder, Youtuber, Modpack/Map Maker, Duck
Forum Thread Maintainer for APortingCore, Liteloader Download HUB, Asphodel Meadows, Fabric Project, Legacy Fabric/Cursed Fabric, Power API, Rift/Fabric/Forge 1.13 to 1.17.
Wikis I Maintain: https://modwiki.miraheze.org/wiki/User:SuntannedDuck2
-
-
#12
Jun 5, 2019
mrxarnix-
View User Profile
-
View Posts
-
Send Message
- Newly Spawned
- Join Date:
6/5/2019
- Posts:
1
- Member Details
HI,
I just tried to follow your tutotial and faced several issues.
I cloned 3 project from the repository: fabric, fabric loom and fabric example.
I blocked at «Setting up Fabric» the step : «Open a Command Prompt window and navigate to the folder using the command «cd <path to folder>». Once there, run the «gradlew genSources idea» command to set up a workspace made for IntelliJ IDEA».
After i finished cloning, i went into the «fabric-exemple» folder and runned your command.
I got :
zsh: command not found: gradlew
I didnt know about gradle so i installed it and runned again, same result.
When i run only «gradle genSources idea» i get a build fail:
FAILURE: Build failed with an exception.
* Where:
Build file ‘/home/takima/Jeux/Minecraft/Dev/Fabric/fabric-example-mod/build.gradle’ line: 2* What went wrong:
Plugin [id: ‘fabric-loom’, version: ‘0.2.2-SNAPSHOT’] was not found in any of the following sources:— Gradle Core Plugins (not a core plugin, please see https://docs.gradle.org/4.4.1/userguide/standard_plugins.html for available core plugins)
— Plugin Repositories (snapshot plugin versions are not supported)* Try:
Run with —stacktrace option to get the stack trace. Run with —info or —debug option to get more log output. Run with —scan to get full insights.* Get more help at https://help.gradle.org
BUILD FAILED in 0s
Here is what i filled in the build.gradle:
plugins {
id ‘fabric-loom’ version ‘0.2.2-SNAPSHOT’
id ‘maven-publish’
}sourceCompatibility = JavaVersion.VERSION_1_8
targetCompatibility = JavaVersion.VERSION_1_8archivesBaseName = project.firstmod
version = 1.0
group = project.maven_groupminecraft {
}Just changed project.version by 1.0 and project.archive_name by project.firstmod.
I’m developper but very new to minecraft modding, gradle and fabric. I couldn’t find any tutorial but your to use fabric so
i really count on it
.that looks like when you installed gradle you may have forgotten to add the gradle dir to your environmental Path
Linux & MacOS users
Configure your PATH environment variable to include the bin directory of the unzipped distribution, e.g.:
$ export PATH=$PATH:/opt/gradle/gradle-5.4.1/binMicrosoft Windows users
In File Explorer right-click on the This PC (or Computer) icon,
then click Properties -> Advanced System Settings -> Environmental Variables.
Under System Variables select Path, then click Edit.
Add an entry for the bin forlder in your gradle installation fordler eg. «C:Gradlegradle-5.4.1bin.»
Click OK to save.
Step 4. Verify your installation[/header]
Open a console (or a Windows command prompt) and run gradle -v to run gradle and display the version, e.g.:
$ gradle -v
————————————————————
Gradle 5.4.1
———————————————————— -
- To post a comment, please login.


")


Posts Quoted:
Reply
Clear All Quotes
Api
-
Search
-
Search all Forums
-
Search this Forum
-
Search this Thread
-
-
Tools
-
Jump to Forum
-
-
#1
Dec 12, 2018
Geforce-
View User Profile
-
View Posts
-
Send Message
Moderator
- Moderating modder
- Join Date:
10/7/2011
- Posts:
2,425
- Location:
Texas
- Minecraft:
Geforce
- Discord:
Geforce#4998
- PMC:
Geforce
- Member Details
Hello everyone,
This is an unofficial guide to setting up a development workspace for Fabric, a new, open-source modloader by asiekierka. Fabric’s main selling point over more popular modloaders such as Forge is that Fabric mods are designed to work between multiple Minecraft versions. The reason for the creation of this guide is that, being Fabric is so new, there isn’t much documentation on it yet. I’ve spent quite a few hours today just trying to set up my project, so I thought that a more comprehensive guide may help other modders trying out Fabric for the first time.
I am aware that Asie already has an «official» tutorial on how to set up Fabric, found here, but I found it to be missing a few key bits of information here and there, especially those concerning mod developers.
Setting up Fabric:
When you ready to install Fabric, complete the following steps:
- Create a new, empty folder. (NOTE: Fabric versions prior to v0.2.0.64 do not support spaces in the folder’s path. If there is a space in the path to the folder, any Fabric mods you attempt to create in your IDE will fail to load properly. To fix this, update to Fabric v0.2.0.64 or above).
- Either create a fork of Asie’s sample Fabric mod repository or click «Clone or download > Download ZIP» to download the repo’s contents onto your computer.
- Place the contents in the folder you have just created.
- Open the build.gradle file in a text editor such as Notepad++. Once it’s open, you should modify the «archivesBaseName» and «version» values to the values you want.
- Open a Command Prompt window and navigate to the folder using the command «cd <path to folder>». Once there, run the «gradlew genSources idea» command to set up a workspace made for IntelliJ IDEA. If you use Eclipse, you can run the «gradlew genSources eclipse» command. If you wish to use Visual Studio as your IDE, follow this tutorial instead.
- Once Gradle is finished building the workspace, it should automatically open in IDEA. If it doesn’t, you can simply double-click on the .ipr file with the same name as the directory to open the project in IDEA.
Launching Minecraft in your development environment:
If you have followed the above steps, you should be able to launch the game right away in IDEA using the «Minecraft Client» and «Minecraft Server» run configurations.
If your mod fails to load without any errors being logged, be sure that you have updated Fabric to v0.2.0.64 or newer, and to be even more cautious, double-check that there are no spaces in the path to the project directory.
Building your mod:
Similar to building mods with Forge, when you are ready to package your mod and obtain its .jar file, navigate to your project’s folder in a Command Prompt window (using the «cd» command to change directories) and run the command «gradlew build». Once it’s completed, you should see a new «build» folder in your project directory. Find the «libs» folder inside of «build», and your packaged .jar file will be in there.
Updating the version of Fabric you’re using in your project:
Because Fabric takes advantage of Gradle, you can easily update the mapping and loader versions you are using in your project. However, the process can be confusing if you haven’t done it in a while. Open up your build.gradle file in your IDE, change the versions to the ones you want to update to, then save the file. Once it’s saved, navigate to your project directory in the Command Prompt, run the command «gradlew genSources idea» again, and simply wait for it to finish. This will update your project to use the versions of Fabric that you specified.
Launching Minecraft in MultiMC:
Currently, the only way to launch Minecraft with Fabric installed outside of an IDE is to use MultiMC. Many people already use MultiMC, but if you don’t, you can find it here. Install it before proceeding to the next step.
Once you have MultiMC installed, go the Fabric downloads page and select the mapping and loader versions that you need. Once you pick the versions you want, click on the «Copy MultiMC instance url» button to save the download link of the correct Fabric MultiMC instance to your clipboard. Open up MultiMC and select the «Add instance» button in the top-left. Click on the «Import from ZIP» option and paste the link you just saved into the textbox. Give the instance a name and click the «OK» button when you are done. Before you can start Minecraft though, you need to install the Fabric API separately. This will cause crashes to occur if you have not completed the following step with Fabric mods installed. Before starting Minecraft, click on this link to be taken to the Fabric API’s Maven page. Click on the latest version of the API and select the first .jar file listed. In my case, it would be this one:
This will download that version of the Fabric API as a .jar file. Place it in your MultiMC instance’s «mods» folder alongside any other mods before running the game. You can click on «instance folder» in MultiMC then double-click into the «.minecraft» directory for easy access to the mods folder. Once you are finished with this step, you can launch Minecraft by simply clicking the «Launch» button in MultiMC.
Video tutorial:
Here’s a video made by ScottoMotto showing the installation of Fabric:
Need more help?
If you’re like me, you probably have no idea what I just said and might have a few questions. You can join Fabric’s Discord server here, where people a lot more knowledgeable than myself can help you out.
NOTE: I do plan on adding some basic API functions to this guide once I have played around with Fabric a bit.
Feel free to leave any improvements or suggestions you have for this guide below.
-
-
#2
Dec 12, 2018
SuntannedDuck2-
View User Profile
-
View Posts
-
Send Message
- Glowstone Miner
- Location:
Down Under The Duck Pond
- Join Date:
10/23/2016
- Posts:
4,915
- Location:
A Duck Pond w/ Wifi
- Minecraft:
EvilLink14
- Xbox:
Not anymore
- PMC:
https://modwiki.miraheze.org/wiki/User:SuntannedDuck2
- Member Details
Great thread for a quick start guide.
Also a video tutorial if anyone that comes across this thread needs it to understand things better besides whats detailed above, try ScottoMotto who released one not too long ago.
Niche Community Content Finder, Youtuber, Modpack/Map Maker, Duck
Forum Thread Maintainer for APortingCore, Liteloader Download HUB, Asphodel Meadows, Fabric Project, Legacy Fabric/Cursed Fabric, Power API, Rift/Fabric/Forge 1.13 to 1.17.
Wikis I Maintain: https://modwiki.miraheze.org/wiki/User:SuntannedDuck2
-
-
#3
Dec 12, 2018
Geforce-
View User Profile
-
View Posts
-
Send Message
Moderator
- Moderating modder
- Join Date:
10/7/2011
- Posts:
2,425
- Location:
Texas
- Minecraft:
Geforce
- Discord:
Geforce#4998
- PMC:
Geforce
- Member Details
Great thread for a quick start guide.
Also a video tutorial if anyone that comes across this thread needs it to understand things better besides whats detailed above, try ScottoMotto who released one not too long ago.
Thanks! I’ll definitely add that video to the OP as well, as some people like to see visuals rather than reading a text guide.
-
-
#4
Dec 12, 2018
SuntannedDuck2-
View User Profile
-
View Posts
-
Send Message
- Glowstone Miner
- Location:
Down Under The Duck Pond
- Join Date:
10/23/2016
- Posts:
4,915
- Location:
A Duck Pond w/ Wifi
- Minecraft:
EvilLink14
- Xbox:
Not anymore
- PMC:
https://modwiki.miraheze.org/wiki/User:SuntannedDuck2
- Member Details
Your very welcome.
Niche Community Content Finder, Youtuber, Modpack/Map Maker, Duck
Forum Thread Maintainer for APortingCore, Liteloader Download HUB, Asphodel Meadows, Fabric Project, Legacy Fabric/Cursed Fabric, Power API, Rift/Fabric/Forge 1.13 to 1.17.
Wikis I Maintain: https://modwiki.miraheze.org/wiki/User:SuntannedDuck2
-
-
#5
Dec 18, 2018
Geforce-
View User Profile
-
View Posts
-
Send Message
Moderator
- Moderating modder
- Join Date:
10/7/2011
- Posts:
2,425
- Location:
Texas
- Minecraft:
Geforce
- Discord:
Geforce#4998
- PMC:
Geforce
- Member Details
I have learned that Fabric now supports the Eclipse IDE in addition to IDEA and Visual Studio. I have added the command to set up a Fabric Eclipse project in the «Setting up Fabric» section.
-
-
#6
Jan 6, 2019
SuntannedDuck2-
View User Profile
-
View Posts
-
Send Message
- Glowstone Miner
- Location:
Down Under The Duck Pond
- Join Date:
10/23/2016
- Posts:
4,915
- Location:
A Duck Pond w/ Wifi
- Minecraft:
EvilLink14
- Xbox:
Not anymore
- PMC:
https://modwiki.miraheze.org/wiki/User:SuntannedDuck2
- Member Details
Hello, I just saw that Fabric has it’s own category on Curseforge. I was wondering if a Rift or Liteloader one had been considered once 1.13 Forge comes so it’s not so complicated to find mods for those on the site.
I know this isn’t the right place to post this, but I was wondering if someone could acknowledge this as a request at least for the team that does the CurseForge site. I didn’t know where else to post this and due to Rift/Fabric only having so many places to acknowledge such information or to ask a Moderator for a request I thought I’d ask here.
(I know Liteloader has its own site for mods and no 1.13 support yet, but for the purpose of accessibility for those that host on Curseforge maybe, and Rift I don’t think hosts it’s mods anywhere else legitimately (because everywhere else I’ve seen Rift is on mod repost sites doing their thing of course, but Fabric you can’t get on mod repost sites so that’s a good thing at least, but from what I’ve seen searching for Rift generically just to see if any happened to (I never use mod repost sites but was curious how much ‘traction’ Rift has gotten since it’s been available like with Liteloader, or if they only hosted Forge mods only)), similar to Fabric hosting from what I know of only on Curseforge which works for me
.)Just an idea is all, But due to Fabric getting one, I thought modloaders that have their own would benefit a category for users looking for mods that support them with quick access once 2 or 3 are likely to be available for 1.13 and knowing where to find them (besides dependencies existing I know). Not disappointed if it isn’t to happen. I’m at least excited Fabric got a category and Datapacks have the Customization tab for 1.13/1.14 to call their own.
ATTACHMENTS
-
Fabric Category
Niche Community Content Finder, Youtuber, Modpack/Map Maker, Duck
Forum Thread Maintainer for APortingCore, Liteloader Download HUB, Asphodel Meadows, Fabric Project, Legacy Fabric/Cursed Fabric, Power API, Rift/Fabric/Forge 1.13 to 1.17.
Wikis I Maintain: https://modwiki.miraheze.org/wiki/User:SuntannedDuck2
-
-
#7
May 5, 2019
r8Rusoski-
View User Profile
-
View Posts
-
Send Message
- Out of the Water
- Location:
Aguascalientes
- Join Date:
5/5/2019
- Posts:
3
- Location:
Mexico
- Minecraft:
Rusoski
- Xbox:
Rusoski
- Nintendo:
Rusoski
- Member Details
Hello there, I nee help, because I can’t figure out what should I put instead of «archivesBaseName» and «version».
Rusoski a sus ordenes!
-
-
#8
May 6, 2019
Tunacan-
View User Profile
-
View Posts
-
Send Message
- Newbie
- Location:
nether
- Join Date:
1/17/2018
- Posts:
1
- Location:
the overworld
- Minecraft:
TunacanGamer
- Discord:
TunacanGamer#4833
- Member Details
You have to edit the gradle.properties file instead. Then change the values below the mod properties comment.
mod_version is the version of your mod. (I recommend putting something like 1.0.0)
maven_group should be (I think) the name you put for your packages (like com.example)
archives_base_name is the name your mod’s jar file will have (the version should be added automatically)
hello
-
-
#9
May 6, 2019
r8Rusoski-
View User Profile
-
View Posts
-
Send Message
- Out of the Water
- Location:
Aguascalientes
- Join Date:
5/5/2019
- Posts:
3
- Location:
Mexico
- Minecraft:
Rusoski
- Xbox:
Rusoski
- Nintendo:
Rusoski
- Member Details
Thanks dude!
Rusoski a sus ordenes!
-
-
#10
Jun 1, 2019
HI,
I just tried to follow your tutotial and faced several issues.
I cloned 3 project from the repository: fabric, fabric loom and fabric example.
I blocked at «Setting up Fabric» the step : «Open a Command Prompt window and navigate to the folder using the command «cd <path to folder>». Once there, run the «gradlew genSources idea» command to set up a workspace made for IntelliJ IDEA».
After i finished cloning, i went into the «fabric-exemple» folder and runned your command.
I got :
zsh: command not found: gradlew
I didnt know about gradle so i installed it and runned again, same result.
When i run only «gradle genSources idea» i get a build fail:
FAILURE: Build failed with an exception.
* Where:
Build file ‘/home/takima/Jeux/Minecraft/Dev/Fabric/fabric-example-mod/build.gradle’ line: 2* What went wrong:
Plugin [id: ‘fabric-loom’, version: ‘0.2.2-SNAPSHOT’] was not found in any of the following sources:— Gradle Core Plugins (not a core plugin, please see https://docs.gradle.org/4.4.1/userguide/standard_plugins.html for available core plugins)
— Plugin Repositories (snapshot plugin versions are not supported)* Try:
Run with —stacktrace option to get the stack trace. Run with —info or —debug option to get more log output. Run with —scan to get full insights.* Get more help at https://help.gradle.org
BUILD FAILED in 0s
Here is what i filled in the build.gradle:
plugins {
id ‘fabric-loom’ version ‘0.2.2-SNAPSHOT’
id ‘maven-publish’
}sourceCompatibility = JavaVersion.VERSION_1_8
targetCompatibility = JavaVersion.VERSION_1_8archivesBaseName = project.firstmod
version = 1.0
group = project.maven_groupminecraft {
}Just changed project.version by 1.0 and project.archive_name by project.firstmod.
I’m developper but very new to minecraft modding, gradle and fabric. I couldn’t find any tutorial but your to use fabric so
i really count on it
. -
#11
Jun 1, 2019
SuntannedDuck2-
View User Profile
-
View Posts
-
Send Message
- Glowstone Miner
- Location:
Down Under The Duck Pond
- Join Date:
10/23/2016
- Posts:
4,915
- Location:
A Duck Pond w/ Wifi
- Minecraft:
EvilLink14
- Xbox:
Not anymore
- PMC:
https://modwiki.miraheze.org/wiki/User:SuntannedDuck2
- Member Details
If you don’t get any responses by the Moderator in general or due to the Minecraft Forums archiving I’d say go to the Fabric Discord and they can help you out.
https://discord.gg/v6v4pMv
Niche Community Content Finder, Youtuber, Modpack/Map Maker, Duck
Forum Thread Maintainer for APortingCore, Liteloader Download HUB, Asphodel Meadows, Fabric Project, Legacy Fabric/Cursed Fabric, Power API, Rift/Fabric/Forge 1.13 to 1.17.
Wikis I Maintain: https://modwiki.miraheze.org/wiki/User:SuntannedDuck2
-
-
#12
Jun 5, 2019
mrxarnix-
View User Profile
-
View Posts
-
Send Message
- Newly Spawned
- Join Date:
6/5/2019
- Posts:
1
- Member Details
HI,
I just tried to follow your tutotial and faced several issues.
I cloned 3 project from the repository: fabric, fabric loom and fabric example.
I blocked at «Setting up Fabric» the step : «Open a Command Prompt window and navigate to the folder using the command «cd <path to folder>». Once there, run the «gradlew genSources idea» command to set up a workspace made for IntelliJ IDEA».
After i finished cloning, i went into the «fabric-exemple» folder and runned your command.
I got :
zsh: command not found: gradlew
I didnt know about gradle so i installed it and runned again, same result.
When i run only «gradle genSources idea» i get a build fail:
FAILURE: Build failed with an exception.
* Where:
Build file ‘/home/takima/Jeux/Minecraft/Dev/Fabric/fabric-example-mod/build.gradle’ line: 2* What went wrong:
Plugin [id: ‘fabric-loom’, version: ‘0.2.2-SNAPSHOT’] was not found in any of the following sources:— Gradle Core Plugins (not a core plugin, please see https://docs.gradle.org/4.4.1/userguide/standard_plugins.html for available core plugins)
— Plugin Repositories (snapshot plugin versions are not supported)* Try:
Run with —stacktrace option to get the stack trace. Run with —info or —debug option to get more log output. Run with —scan to get full insights.* Get more help at https://help.gradle.org
BUILD FAILED in 0s
Here is what i filled in the build.gradle:
plugins {
id ‘fabric-loom’ version ‘0.2.2-SNAPSHOT’
id ‘maven-publish’
}sourceCompatibility = JavaVersion.VERSION_1_8
targetCompatibility = JavaVersion.VERSION_1_8archivesBaseName = project.firstmod
version = 1.0
group = project.maven_groupminecraft {
}Just changed project.version by 1.0 and project.archive_name by project.firstmod.
I’m developper but very new to minecraft modding, gradle and fabric. I couldn’t find any tutorial but your to use fabric so
i really count on it
.that looks like when you installed gradle you may have forgotten to add the gradle dir to your environmental Path
Linux & MacOS users
Configure your PATH environment variable to include the bin directory of the unzipped distribution, e.g.:
$ export PATH=$PATH:/opt/gradle/gradle-5.4.1/binMicrosoft Windows users
In File Explorer right-click on the This PC (or Computer) icon,
then click Properties -> Advanced System Settings -> Environmental Variables.
Under System Variables select Path, then click Edit.
Add an entry for the bin forlder in your gradle installation fordler eg. «C:Gradlegradle-5.4.1bin.»
Click OK to save.
Step 4. Verify your installation[/header]
Open a console (or a Windows command prompt) and run gradle -v to run gradle and display the version, e.g.:
$ gradle -v
————————————————————
Gradle 5.4.1
———————————————————— -
- To post a comment, please login.
Posts Quoted:
Reply
Clear All Quotes
Несколько недель назад YouTube порекомендовал мне видео Minecraft с канала Dream , в котором он пытался победить в игре, в то время как его друг Джордж пытался остановить его. Это видео было действительно забавным и заставило меня изучить больше их контента.
Прямо сейчас есть куча людей, которые записывают и загружают видео Minecraft на YouTube, но эти двое нашли способ сделать свой контент другим. В принципе, они создают свои собственные плагины для изменения правил игры а затем они записывают себя, пытаясь победить в измененной игре. Все, что я могу сказать, это то, что мне нравится их контент, и это потрясающе – видеть, чего вы можете достичь с помощью кода.
Несколько дней спустя у меня появилась идея разработать мод для Майнкрафта и я подумал Почему нет? Это будет весело!
Выбор инструментов
Как и в Minecraft, нам нужны некоторые инструменты, но в этом случае они помогут нам в процессе создания нашего первого мода.
Несколько инструментов помогут вам создавать моды Minecraft, и я выбрал Fabric , потому что один из модов, с которыми я обычно играю, был создан с его помощью.
Minecraft использует Java, как и Fabric, что означает, что нам также необходимо установить набор для разработки Java или JDK. Чтобы быть более конкретным, нам нужен JDK 8, чтобы иметь возможность скомпилировать наш мод. Вы можете скачать его на этой странице .
И последнее, но не менее важное: нам нужно выбрать редактор кода, в данном случае я выбрал Код Visual Studio , потому что это мой любимый редактор. Тем не менее, вы можете использовать для этого руководства любой редактор, который вам нравится, так как большинство шагов будет выполнено в командной строке.
Настройка проекта
В этом руководстве мы будем использовать стартер, чтобы быстро перейти к созданию нашего первого мода. Давайте пройдем через следующие шаги:
1. Клонирование/Загрузка репозитория
Если вы используете Git, просто клонируйте репозиторий:
$ git clone https://github.com/HorusGoul/fabric-mod-starter.git
В противном случае нажмите на эту ссылку, чтобы загрузить его .
Хорусгул/ткань-мод-стартер
2. Откройте папку проекта с помощью редактора кода
Использование кода Visual Studio:
$ code fabric-mod-starter
3. Откройте терминал внутри папки проекта и запустите клиент
$ cd fabric-mod-starter
$ ./gradlew runClient
записка: В Windows вам нужно будет запустить .gradlew.летучая мышь вместо этого запустите Клиент .
4. Проверьте, все ли работает
Экземпляр Minecraft должен быть запущен сейчас на вашем компьютере, и консоль должна была напечатать эти две строки рядом с другими:
...

[main/INFO]: [STDOUT]: Hello Fabric world!

...

[main/INFO]: [STDOUT]: This line is printed by an example mod mixin!

...
Если это не так для вас, перепроверьте все, и если ничего не работает, оставьте комментарий или отправьте мне сообщение в личку, и я постараюсь вам помочь.
Знакомство с проектом
На данный момент мы уже можем испачкать руки, начав кодировать, но давайте ознакомимся с некоторыми файлами.
На данный момент мы уже можем испачкать руки, начав кодировать, но давайте ознакомимся с некоторыми файлами.
В этом файле мы можем настроить некоторые значения, которые будут использоваться при создании нашего мода. Например, мы можем изменить версию Minecraft, версию загрузчика ткани, версию мода и другие свойства, которые нам может потребоваться изменить, если мы хотим использовать новые функции Fabric или Minecraft.
# Done to increase the memory available to gradle.
org.gradle.jvmargs=-Xmx1G

# Fabric Properties
    # check these on https://fabricmc.net/use
    minecraft_version=1.15.1
    yarn_mappings=1.15.1+build.1
    loader_version=0.7.3+build.176

# Mod Properties
    mod_version = 1.0.0
    maven_group = starter
    archives_base_name = starter

# Dependencies
    # currently not on the main fabric site, check on the maven: https://maven.fabricmc.net/net/fabricmc/fabric-api/fabric-api
    fabric_version=0.4.25+build.282-1.15
src/главный
Внутри папки src мы сможем найти другую папку с именем main . Именно там находятся код и ресурсы нашего мода.
src/основной/java
Весь код Java находится внутри этой папки. Там мы можем найти пакет под названием starter , который содержит два элемента: StarterMod.java файл и смешивание пакет.
Мы можем найти файл Мы можем найти файл |/внутри смешивания
совет: Если вы используете код Visual Studio, я рекомендую вам установить Пакет расширений Java . Это позволит вашему редактору использовать множество утилит, чтобы упростить разработку Java.
Это позволит вашему редактору использовать множество утилит, чтобы упростить разработку Java.
Это основная точка входа в наш мод, как мы видим, он относится к пакету starter и реализует метод OnInitialize() , который просто печатает Привет, мир ткани! к консоли.
package starter;

import net.fabricmc.api.ModInitializer;

public class StarterMod implements ModInitializer {
  @Override
  public void onInitialize() {
    // This code runs as soon as Minecraft is in a mod-load-ready state.
    // However, some things (like resources) may still be uninitialized.
    // Proceed with mild caution.

    System.out.println("Hello Fabric world!");
  }
}
|| к консоли.
Этот класс относится к пакету starter.mixing . Наш мод будет действительно маленьким поэтому нам не стоит сильно беспокоиться о файловой структуре нашего проекта. Давайте просто предположим, что все миксины будут расположены внутри пакета starter.mixing .
А что такое смешивание?
Миксины отвечают за внедрение кода в существующие классы игры. Например, в StarterMixin.java , мы вводим метод в начале (НАЧАЛО) метода init() , который реализован в классе TitleScreen из Minecraft.
Теперь, если мы загрузим это смешивание, как только Minecraft вызовет init() метод |/TitleScreen , наш метод, который включает в себя System.out.println (“Эта строка напечатана с помощью примера модного миксина!”); также будет вызван!
Это часть магии миксинов, и это только верхушка айсберга, на данный момент это все, что нам нужно для создания нашего мода. Если вам нужны более глубокие знания, вам следует проверить Документы по смешиванию .
package starter.mixin;

import net.minecraft.client.gui.screen.TitleScreen;
import org.spongepowered.asm.mixin.Mixin;
import org.spongepowered.asm.mixin.injection.At;
import org.spongepowered.asm.mixin.injection.Inject;
import org.spongepowered.asm.mixin.injection.callback.CallbackInfo;

@Mixin(TitleScreen.class)
public class StarterMixin {
  @Inject(at = @At("HEAD"), method = "init()V")
  private void init(CallbackInfo info) {
    System.out.println("This line is printed by an example mod mixin!");
  }
}
src/основные/ресурсы
Внутри папки ресурсы мы можем найти папку активы , в которой сейчас находится только значок нашего мода. Помимо этой папки, есть два файла JSON:
Помимо этой папки, есть два файла JSON:
Для этого файла я рекомендую вам перейти в Документы Fabric о fabric.mod.json и прочитайте о каждом поле, определенном в файле нашего проекта.
Если вы предпочитаете прочитать документы позже, просто взгляните на свойства точки входа и миксины .
Держу пари, вы уже видите здесь связь. В точках входа мы указываем Fabric, какой из наших классов Java должен выступать в качестве основной точки входа нашего мода.
И затем, есть свойство mixins , где мы просто сообщаем Fabric местоположение любого файла конфигурации микширования, который мы хотим включить в наш мод. В этом случае у нас есть только один, starter.mixins.json .
{
  "schemaVersion": 1,
  "id": "starter",
  "version": "${version}",

  "name": "Starter Mod",
  "description": "Describe your mod!",
  "authors": ["Your Name"],
  "contact": {
    "homepage": "https://horuslugo.com",
    "sources": "https://github.com/HorusGoul/fabric-mod-starter"
  },
  "license": "MIT",
  "icon": "assets/starter/icon.png",

  "environment": "*",

  "entrypoints": {
    "main": ["starter.StarterMod"]
  },

  "mixins": ["starter.mixins.json"],

  "depends": {
    "fabricloader": ">=0.7.3",
    "minecraft": "1.15.x"
  },

  "suggests": {
    "flamingo": "*"
  }
}
В этом случае у нас есть только один, ||starter.mixins.json||.
Помнишь наш Стартовый микс в классе? Вот как мы можем сообщить цепочке инструментов миксины, которые мы хотим включить в наш мод. Свойство package – это место, где мы определяем пакет Java, в котором расположены миксины, а внутри массива mixins мы можем разместить все классы миксина, которые мы хотим включить в игру.
Наряду с mixins есть два других свойства, которые позволяют нам указать среду, в которую мы хотим загрузить некоторые миксины. Этими свойствами являются сервер и клиент , но в данном случае мы их не используем.
Этот файл соответствует спецификации, определенной в разделе Файлы конфигурации микширования Документации по микшированию. Точно так же, как и раньше, я рекомендую вам обратиться к документам и узнать больше об этом файле 😄
{
  "required": true,
  "package": "starter.mixin",
  "compatibilityLevel": "JAVA_8",
  "mixins": ["StarterMixin"],
  "injectors": {
    "defaultRequire": 1
  }
}
Давайте создадим наш мод!
Теперь, когда мы знакомы с проектом, давайте испачкаем руки и создадим наш мод!
В этом случае мод просто изменит одну механику игры: получение урона . Мы сделаем так, чтобы всякий раз, когда игрок получает урон, он менял свою позицию и инвентарь с другим игроком на сервере.
Для этого нам понадобится микширование, которое вводит код в сущность игрока класса, чтобы быть более конкретным, непосредственно перед окончанием метода damage() .
Определение того, когда игроки получают урон
Давайте создадим это новое смешивание в starter.mix в пакете с именем SwitchPlayerEntityMixin.java :
package starter.mixin;

import org.spongepowered.asm.mixin.Mixin;
import org.spongepowered.asm.mixin.injection.At;
import org.spongepowered.asm.mixin.injection.Inject;
import org.spongepowered.asm.mixin.injection.callback.CallbackInfoReturnable;

import net.minecraft.entity.damage.DamageSource;
import net.minecraft.entity.player.PlayerEntity;

@Mixin(PlayerEntity.class)
public class SwitchPlayerEntityMixin {

  @Inject(at = @At("RETURN"), method = "damage")
  private void onDamage(DamageSource source, float amount, CallbackInfoReturnable info) {
    System.out.println("The player received damage!");
  }
}
Не забудьте добавить его в файл starter.mixins.json :
{
  "required": true,
  "package": "starter.mixin",
  "compatibilityLevel": "JAVA_8",
  "mixins": ["StarterMixin", "SwitchPlayerEntityMixin"],
  "injectors": {
    "defaultRequire": 1
  }
}
Теперь выполните команду ./gradlew запустите клиент в консоли, запустите мир Minecraft в творческом режиме, возьмите несколько зелий мгновенного урона и попытайтесь получить травму.
Как и в GIF, вы должны видеть, как новая строка появляется в консоли каждый раз, когда игрок получает травму, и это означает, что мы можем продолжить объяснение происходящего.
Взгляните на код микширования, нашей целью было получить метод при повреждении выполняется в конце метода повреждение , вот почему мы используем строку вернуть вместо ГОЛОВЫ . Кроме того, нам понадобится ущерб источник и сумма нанесенного ущерба. Последний параметр, info , требуется для структуры микширования.
Оба источника и сумма – это параметры, которые получает исходный метод ущерб , и именно по этой причине мы можем просто использовать их в нашем методе.
Доступ к текущему игроку
Прямо сейчас мод просто печатает строку каждый раз, когда игрок получает травму, наша следующая цель – доступ к экземпляру игрока.
Сначала мы должны помнить, что метод onDamage находится внутри Сущность игрока экземпляр. Мы можем воспользоваться этим и просто использовать это для доступа к свойствам и методам экземпляра. Проблема возникает, когда компилятор кричит на нас, потому что он думает, что мы являемся экземпляром Переключить Игрока На Миксин Сущности .
У нас нет способа сообщить компилятору, что этот метод выполняется внутри класса другого типа, поэтому мы можем использовать этот трюк:
PlayerEntity self = (PlayerEntity) (Object) this;
При этом мы сообщаем компилятору, что это является объектом а затем мы разыгрываем объект как Сущность игрока . И виллы! У нас есть доступ к игроку, который получает урон, теперь мы можем обновить нашу печатную строку, чтобы отобразить имя игрока.
...

@Mixin(PlayerEntity.class)
public class SwitchPlayerEntityMixin {

  @Inject(at = @At("RETURN"), method = "damage")
  private void onDamage(DamageSource source, float amount, CallbackInfoReturnable info) {
    PlayerEntity self = (PlayerEntity) (Object) this;

    System.out.println("The player " + self.getGameProfile().getName() + " received damage");
  }
}
Переключение позиций с другим игроком
Теперь, когда мы можем получить доступ к свойствам и методам игрока, мы можем использовать один из них для доступа ко всему миру .
Свойство world ссылается на текущий мир Minecraft, в который играют, и одна из вещей, которые мы можем с ним сделать, – это получить список онлайн-игроков.
С помощью этого списка мы можем выбрать одного из этих игроков, а затем поменять их местами, как вы можете видеть в следующем коде:
package starter.mixin;

import java.util.List;

import org.spongepowered.asm.mixin.Mixin;
import org.spongepowered.asm.mixin.injection.At;
import org.spongepowered.asm.mixin.injection.Inject;
import org.spongepowered.asm.mixin.injection.callback.CallbackInfoReturnable;

import net.minecraft.entity.damage.DamageSource;
import net.minecraft.entity.player.PlayerEntity;
import net.minecraft.util.math.BlockPos;

@Mixin(PlayerEntity.class)
public class SwitchPlayerEntityMixin {

  @Inject(at = @At("RETURN"), method = "damage")
  private void onDamage(DamageSource source, float amount, CallbackInfoReturnable info) {
    PlayerEntity self = (PlayerEntity) (Object) this;

    // Get all the players in the current minecraft world
    List players = (List) self.world.getPlayers();

    // The player we'll switch positions with.
    PlayerEntity otherPlayer;

    // Stop the execution if the player is playing alone.
    if (players.size() <= 1) {
      return;
    }

    // Get a random player from the players list.
    // Repeat this process until we have a player that is
    // not the player who got hurt.
    do {
      int index = (int) Math.floor(Math.random() * players.size());
      otherPlayer = players.get(index);
    } while (otherPlayer == self);

    // Get the block position of both players
    BlockPos selfPos = self.getBlockPos();
    BlockPos otherPlayerPos = otherPlayer.getBlockPos();

    // Teleport damaged player to the other player's coordinates
    // We set the Y to 300 in order to avoid a collision with the other player.
    //
    // We add 0.5 to both X and Z because that's the center point of a block
    // and the players could suffocate under certain circumstances if we didn't
    self.teleport(otherPlayerPos.getX() + 0.5, 300, otherPlayerPos.getZ() + 0.5);

    // Teleport the other player to the position of the damaged player.
    otherPlayer.teleport(selfPos.getX() + 0.5, selfPos.getY(), selfPos.getZ() + 0.5);

    // Finally change the Y to the real value and complete the teleport of both
    // players.
    self.teleport(otherPlayerPos.getX() + 0.5, otherPlayerPos.getY(), otherPlayerPos.getZ() + 0.5);
  }
}
После реализации этого вам понадобятся два клиента Minecraft, чтобы иметь возможность протестировать его. Вы можете сделать это, открыв его с помощью ./gradlew runКлиент а затем используйте официальный клиент Minecraft с вашей учетной записью Mojang. Затем откройте тестовый мир в локальной сети и присоединитесь к нему с другим клиентом.
Обмениваются своими запасами
А теперь мы добавим последнюю функцию мода: замена инвентаря игроков.
Чтобы поменять местами инвентарь двух игроков, мы должны клонировать каждый инвентарь, а после этого мы можем просто заменить и поменять их местами. Доступ к инвентарю игрока можно получить с помощью свойства инвентарь .
Класс Инвентарь игрока имеет два метода, которые мы будем использовать, сериализация и десериализовать . Первый из них позволяет нам клонировать содержимое инвентаря, поместив его внутрь тега List и затем мы можем использовать второй, чтобы заменить содержимое инвентаря содержимым, которое находится внутри тега списка .
Вот код:
    // ... teleports ...


    // Only swap inventories if the players are alive
    if (self.getHealth() > 0.0f && otherPlayer.getHealth() > 0.0f) {

      // Get the inventories of both players
      ListTag selfInventory = self.inventory.serialize(new ListTag());
      ListTag otherPlayerInventory = otherPlayer.inventory.serialize(new ListTag());

      // Swap them
      self.inventory.deserialize(otherPlayerInventory);
      otherPlayer.inventory.deserialize(selfInventory);
    }
Как вы, возможно, заметили, мы меняем запасы только в том случае, если оба игрока живы, потому что, если мы не включим эту проверку, один из запасов будет потерян всякий раз, когда игрок умрет.
Окончательный код
Если вы дошли до этого момента, поздравляю! Вы создали свой первый мод для Minecraft, теперь мы должны удалить ненужные файлы, например, StarterMixin.java и StarterMod.java . Не забудьте удалить ссылки на эти файлы внутри fabric.mod.json и стартеры.mixins.json .
Я также рекомендую вам переименовать пакет из starter в то, что вы хотите, просто не забудьте изменить каждое вхождение в проекте.
Вы можете найти последнюю версию кода в ветке окончательный код начального репозитория. Нажмите здесь, чтобы увидеть окончательную версию мода .
Упаковка мода
Если вы знакомы с модами Minecraft, вы, возможно, уже знаете, что моды обычно поставляются упакованными внутри .zip или .jar файлы, которые позже вы поместите в папку mods на сервере или клиенте Minecraft.
Чтобы создать комплект вашего мода, вам нужно всего лишь выполнить следующую команду:
Если все будет скомпилировано правильно, вы сможете найти файл .jar внутри папки ./build/libs вашего проекта. В большинстве случаев вы захотите выбрать производственную версию без источников, но могут быть случаи, когда также лучше отправить версию разработки вместе с источниками.
Вот и все, теперь вы можете отбросить эту .банку внутри вашей папки mods просто не забудьте сначала установить API Fabric, и для этого вы можете прочитать раздел Установка Fabric в их вики, если хотите узнать, как это сделать.
Учебные ресурсы
Вот некоторые ресурсы, которые могут пригодиться, если вы хотите узнать больше о моддинге Minecraft:
-
Ткань Вики . Об этом уже упоминалось в статье, но серьезно, пойдите и проверьте это, потому что есть много контента, который я не охватил!
-
API-интерфейс Forge . API Forge – это самый известный API Minecraft, вы можете проверить его, потому что с его помощью были созданы некоторые из лучших модов!
-
Сценарное мастерство . Похоже, есть способ создавать моды с использованием JavaScript, поэтому, если у вас есть опыт работы в веб-разработке, вы можете попробовать этот способ.
-
Создатель . Как говорится на их сайте, MCreator – это программное обеспечение, используемое для создания модов и пакетов данных Minecraft с использованием интуитивно понятного простого в освоении интерфейса или встроенного редактора кода. Если вы знаете о ком-то, кто хочет начать заниматься программированием, это может быть хорошим способом познакомить их!
Вывод
Создание моего первого мода для Minecraft было интересно, потому что я узнал немного больше о том, как работает моя любимая игра, и мне даже удалось создать что-то действительно интересное для игры.
Кроме того, я воспользовался этой возможностью для создания этой статьи, потому что я думаю, что моддинг – отличный способ познакомиться с программированием, и есть много игроков в Minecraft, которые могут заинтересоваться и в конечном итоге узнать много нового о разработке программного обеспечения.
Я надеюсь, что вы отлично провели время, читая эту статью. Если вы решите продолжить обучение, я предлагаю вам поделиться своим прогрессом с нами, кто знает, может быть в Minecraft моддинг сообщество может родиться внутри Дев.к 🔥
Оригинал: “https://dev.to/horusgoul/creating-a-minecraft-mod-using-java-and-fabric-3bmo”