In this tutorial, we’ll make a Python Discord bot that can play music in the voice channels and send GIFs. Discord is an instant messaging and digital distribution platform designed for creating communities. Users can easily enter chat rooms, initiate video calls, and create multiple groups for messaging friends.
We’ll skip the basics and jump straight over to the music playing. Check out this Medium article to catch up on the basics of setting up your bot. In the end, our Python Discord bot will look like the cover image of this article!
Before we dive in: remember to allow Administrator permissions for the bot.
Thanks to Rohan Krishna Ullas, who wrote this guest tutorial! Make sure to check out his Medium profile for more articles from him. If you want to write for Python Land too, please contact us.
Table of Contents
- 1 Part 1: Importing all the libraries
- 2 Part 2: Using youtube_dl to download audio
- 3 Part 3: Adding commands to the Python Discord bot
- 4 Part 4: Running the Python Discord bot locally
- 5 Bonus: send GIFs on start-up and print server details
Part 1: Importing all the libraries
First, create a virtual environment and install the requirements:
discord==1.0.1
discord.py==1.6.0
python-dotenv==0.15.0
youtube-dl==2021.2.10
Next, let’s set up the .env file for our project. Create a .env file so that we can separate the environment configuration variables (these are variables whose values are set outside the program) from the main code:
discord_token = "copy_paste_your_bot_token_here"
Then use Python import to load all the needed modules in the main file app.py:
import discord
from discord.ext import commands,tasks
import os
from dotenv import load_dotenv
import youtube_dl
The module youtube_dl is an open-source download manager for video and audio content from YouTube and other video hosting websites.
Now we need to set intents for our bot. Intents allow a bot to subscribe to specific buckets of events, allowing developers to choose which events the bot listens to and to which it doesn’t. For example, sometimes we want the bot to listen to only messages and nothing else.
load_dotenv()

# Get the API token from the .env file.
DISCORD_TOKEN = os.getenv("discord_token")

intents = discord.Intents().all()
client = discord.Client(intents=intents)
bot = commands.Bot(command_prefix='!',intents=intents)
Part 2: Using youtube_dl to download audio
The next step in building our Python Discord bot is dealing with the part that actually downloads the audio file from the video link we provide. Please note that this bo is just a demonstration. It’s not illegal to download from YouTube for personal use according to this article, but it might be against the YouTube Terms Of Service. Please be sensible and use this for personal use only.
youtube_dl.utils.bug_reports_message = lambda: ''

ytdl_format_options = {
    'format': 'bestaudio/best',
    'restrictfilenames': True,
    'noplaylist': True,
    'nocheckcertificate': True,
    'ignoreerrors': False,
    'logtostderr': False,
    'quiet': True,
    'no_warnings': True,
    'default_search': 'auto',
    'source_address': '0.0.0.0' # bind to ipv4 since ipv6 addresses cause issues sometimes
}

ffmpeg_options = {
    'options': '-vn'
}

ytdl = youtube_dl.YoutubeDL(ytdl_format_options)

class YTDLSource(discord.PCMVolumeTransformer):
    def __init__(self, source, *, data, volume=0.5):
        super().__init__(source, volume)
        self.data = data
        self.title = data.get('title')
        self.url = ""

    @classmethod
    async def from_url(cls, url, *, loop=None, stream=False):
        loop = loop or asyncio.get_event_loop()
        data = await loop.run_in_executor(None, lambda: ytdl.extract_info(url, download=not stream))
        if 'entries' in data:
            # take first item from a playlist
            data = data['entries'][0]
        filename = data['title'] if stream else ytdl.prepare_filename(data)
        return filename
The from_url() method of YTDLSource class takes in the URL as a parameter and returns the filename of the audio file which gets downloaded. You can read the youtube_dl documentation at their GitHub repository.
Part 3: Adding commands to the Python Discord bot
Now let’s add the join() method to tell the bot to join the voice channel and the leave() method to tell the bot to disconnect:

@bot.command(name='join', help='Tells the bot to join the voice channel')
async def join(ctx):
    if not ctx.message.author.voice:
        await ctx.send("{} is not connected to a voice channel".format(ctx.message.author.name))
        return
    else:
        channel = ctx.message.author.voice.channel
    await channel.connect()

@bot.command(name='leave', help='To make the bot leave the voice channel')
async def leave(ctx):
    voice_client = ctx.message.guild.voice_client
    if voice_client.is_connected():
        await voice_client.disconnect()
    else:
        await ctx.send("The bot is not connected to a voice channel.")
Here we first check if the user who wants to play music has already joined the voice channel or not. If not, we tell the user to join first.
Awesome! Give yourself a pat on the back if you’ve reached this far! You’re doing great. In the next step, we’ll add the following methods:
- play()
- pause()
- resume()
- stop()
@bot.command(name='play_song', help='To play song')
async def play(ctx,url):
    try :
        server = ctx.message.guild
        voice_channel = server.voice_client

        async with ctx.typing():
            filename = await YTDLSource.from_url(url, loop=bot.loop)
            voice_channel.play(discord.FFmpegPCMAudio(executable="ffmpeg.exe", source=filename))
        await ctx.send('**Now playing:** {}'.format(filename))
    except:
        await ctx.send("The bot is not connected to a voice channel.")


@bot.command(name='pause', help='This command pauses the song')
async def pause(ctx):
    voice_client = ctx.message.guild.voice_client
    if voice_client.is_playing():
        await voice_client.pause()
    else:
        await ctx.send("The bot is not playing anything at the moment.")

@bot.command(name='resume', help='Resumes the song')
async def resume(ctx):
    voice_client = ctx.message.guild.voice_client
    if voice_client.is_paused():
        await voice_client.resume()
    else:
        await ctx.send("The bot was not playing anything before this. Use play_song command")

@bot.command(name='stop', help='Stops the song')
async def stop(ctx):
    voice_client = ctx.message.guild.voice_client
    if voice_client.is_playing():
        await voice_client.stop()
    else:
        await ctx.send("The bot is not playing anything at the moment.")
At this point, we need to have the ffmpeg binary in the base directory. It can be downloaded from https://ffmpeg.org/. In this case, I used the exe since I’m using a Windows machine.
Part 4: Running the Python Discord bot locally
Add the final piece of code to start the bot and it’s done:
if __name__ == "__main__" :
    bot.run(DISCORD_TOKEN)
To deploy the bot locally, activate the virtual environment and run the app.py file:
(venv1) C:GithubDiscord-Bot>python app.py
Bonus: send GIFs on start-up and print server details
In this bonus section, we will set up our bot to listen to events such as start-up. This example sends a previously downloaded GIF image to the text channel when the bot is activated:
@bot.event
async def on_ready():
    for guild in bot.guilds:
        for channel in guild.text_channels :
            if str(channel) == "general" :
                await channel.send('Bot Activated..')
                await channel.send(file=discord.File('add_gif_file_name_here.png'))
        print('Active in {}n Member Count : {}'.format(guild.name,guild.member_count))
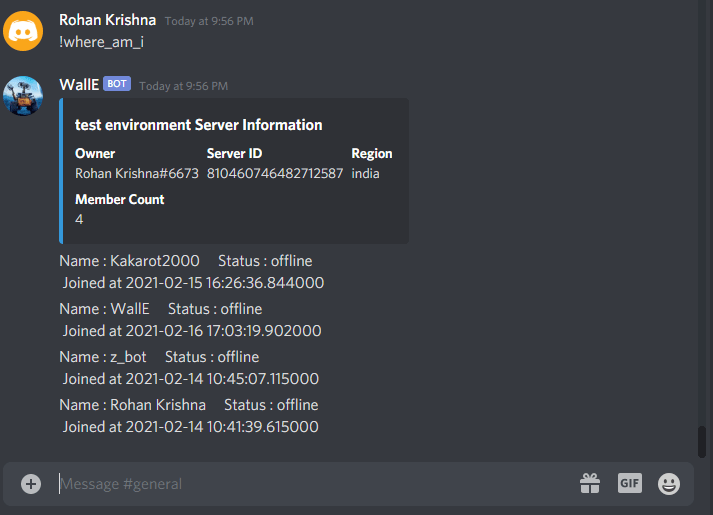
To print server details such as owner name, the number of users, and a server id, we can add a bot command ‘where_am_i’:
@bot.command(help = "Prints details of Server")
async def where_am_i(ctx):
    owner=str(ctx.guild.owner)
    region = str(ctx.guild.region)
    guild_id = str(ctx.guild.id)
    memberCount = str(ctx.guild.member_count)
    icon = str(ctx.guild.icon_url)
    desc=ctx.guild.description

    embed = discord.Embed(
        title=ctx.guild.name + " Server Information",
        description=desc,
        color=discord.Color.blue()
    )
    embed.set_thumbnail(url=icon)
    embed.add_field(name="Owner", value=owner, inline=True)
    embed.add_field(name="Server ID", value=guild_id, inline=True)
    embed.add_field(name="Region", value=region, inline=True)
    embed.add_field(name="Member Count", value=memberCount, inline=True)

    await ctx.send(embed=embed)

    members=[]
    async for member in ctx.guild.fetch_members(limit=150) :
        await ctx.send('Name : {}t Status : {}n Joined at {}'.format(member.display_name,str(member.status),str(member.joined_at)))

@bot.command()
async def tell_me_about_yourself(ctx):
    text = "My name is WallE!n I was built by Kakarot2000. At present I have limited features(find out more by typing !help)n :)"
    await ctx.send(text)
This is what this will look like:
You can view and clone the complete results from my Discord-Bot GitHub Repository.
That’s it! We made a Python Discord bot. Thank you for reading, and don’t hesitate to leave a reply or ask your questions in the comments section.
Our premium courses offer a superior user experience with small, easy-to-digest lessons, progress tracking, quizzes to test your knowledge, and practice sessions. Each course will earn you a downloadable course certificate.
Do you find it surprising that Discord has become well-known in the digital and business world? There are good reasons why it currently dominates the social media scene. It enhances social media interaction, chatting, gaming, or simply interacting with business organizations.
Millions of people use Discord daily, and a considerable percentage regularly automate tasks using bots. These bots are making Discord one of the best social messaging platforms for different industries.
Let’s dive in!
Table of Contents
- What is Discord?
- Why is Discord Popular?
- Terms Associated With Discord
- Is Discord Free?
- What is a Discord Bot?
- Benefits of Discord Bots
-
Steps to Creating a Discord Bot With Python using Nextcord.py
-
Sample Codes for Discord Bots in Python
- A. Sample Codes to make Discord Bots Respond to Greetings
- B. Sample Codes to Make a Discord Bots Send Gifs
- C. Sample Codes to make Discord Bots Play Music
-
Sample Codes for Discord Bots in Python
- Conclusion
What is Discord?
Discord is a social application that offers free phone, video, and text communication. It is one of the most well-known social networking sites used by millions of people to communicate and hang out with their friends and neighbors
People frequently use Discord to talk about a range of subjects, such as family vacations, homework assistance, NFTs, cryptocurrencies, the Metaverse, and mental health support. Any sized group of people can call it home, but the tiniest, chattiest groups use it the most regularly.
It gives public communities the platform to interact. People have complete control over who they interact with and how they use Discord because all discussions are opt-in.
It includes servers that are exclusive and private channels where communities and friendship circles can communicate and socialize and hold events.
Discord, however, swiftly gained popularity among gamers after its initial 2015 release by Jason Citron and Stanislav Vishnevskiy. The two co-founders wanted to create a better communication tool while working in the video game industry.
Why is Discord Popular?
Even though it has been seeing yearly user growth since its launch in 2015, Discord’s popularity increased in 2018 as streaming and online gaming began to expand quickly.
Discord’s connection with Xbox was the second significant action following its launch. It was a truly great experience for users to connect their Xbox Live accounts with their Discord servers. But by 2020, everyone was familiar with Discord.
Its fast popularity is due to the convenience it provides to players and streamers worldwide. Since then, Discord has become a well-liked platform for connecting with loved ones and having simple conversations.
Discord achieved quick popularity, unlike many other similar messaging applications. Because it serves as a home for all communities and friendship groups, people adore Discord. They may be themselves there while socializing with others who appreciate the same things they do.
On Discord, conversations are stimulated by common interests from people who share a similar view on a topic. Discord provides different communication options for like minds to interact in the best way they can use to understand themselves.
Terms Associated With Discord
Discord users occasionally utilize some terminology when referring to some of the activities on the platform. Below are examples of some of these terminologies.
- Channel: Text and voice channels are servers Discord relies on to transmit information. Users can exchange photographs, upload files, and publish messages in text channels at any time for other people to see. Additionally, users can go “live” in voice channels, where they can show their screen with peers and interact through voice or video chat in real-time.
- DMs and GDMs: Users can initiate voice or video calls as well as send private messages to other users as direct messages (DM). Group Direct Messages are private and accessible only by invitation from a group member.
- Server: Discord’s spaces are called servers. Particular communities and cliques create them. A new server can be set up by any user for no cost, and they can invite their friends to join.
- Nitro: Nitro is Discord’s premium subscription service. It enables users to customize Discord Tag, use custom emotes on every server, have a higher file upload cap, and discounted Server Boosts.
- Server Boosts: Dual to Nitro, Server Boosts grant servers exclusive benefits, including more personalized emotes, improved voice and video quality, and the capacity to set a personalized invite link.
- Student Hubs: Students can choose servers for study groups or classes, connect with other verified students, and share their own servers with other students using Discord Hubs for Students.
Is Discord Free?
Discord is without communication limitations. Access to communities is unrestricted, and starting your server is also cost-free.
You’ve probably heard of Discord bots if you use the platform for business purposes. With the help of these AI-powered bots, you can carry out different tasks, such as welcoming new users or people in search of your service.
It is a helpful tactic for online marketers who are learning how to use it to their advantage. Discord bots may be the way to go if you’re searching for a distinctive and interesting approach to interacting with your community.
What is a Discord Bot?
Discord bots are top A.I.s used by marketers and business owners to perform a range of automated tasks on the server. Discord bots can manage the discussion, filter material, automatically welcome new users, and ban disruptive individuals. Some bots even add music or games to your server.
They are amiable AI that supports server management or service enhancement. Discord bots are pre-made and free to download — no computer skills necessary.
You can back up your business information that the bot emulates in a database.
MongoDB is a popular database you can use for this purpose, although storing data in MongoDB is an activity among experienced programmers coding these bots. So this may require that only top programmers handle this process.
Benefits of Discord Bots
- Developing an active community is made simpler by Discord bots.
- When you’re briefly unavailable online, it takes your place. It acquaints new players with your server and moderately satisfies some of their needs.
- You can utilize them to include games, music, memes, and other fun material.
- Discord bots help to enhance your server and foster a better community, making users stay and engage with you more.
Steps to Creating a Discord Bot With Python using Nextcord.py
First, you need to enable the bot from the Discord application. Make your Python environment function going there next. Then go to your Python environment to make it functional.
To set everything up, you do need a basic understanding of programming, although the complexity of the code may vary depending on the type of bot you’re building.
Let’s look at some of the prerequisites for getting started. You must first have a Discord account, which you undoubtedly already do. If not, visit the Discord webpage to create one at no cost. The Discord client is also available for download, and you may use it on a phone or your gaming laptop.
To start with the bots creation, let’s enable it first from the server.
- Visit the official website of Discord to register; or log in if you are an old user
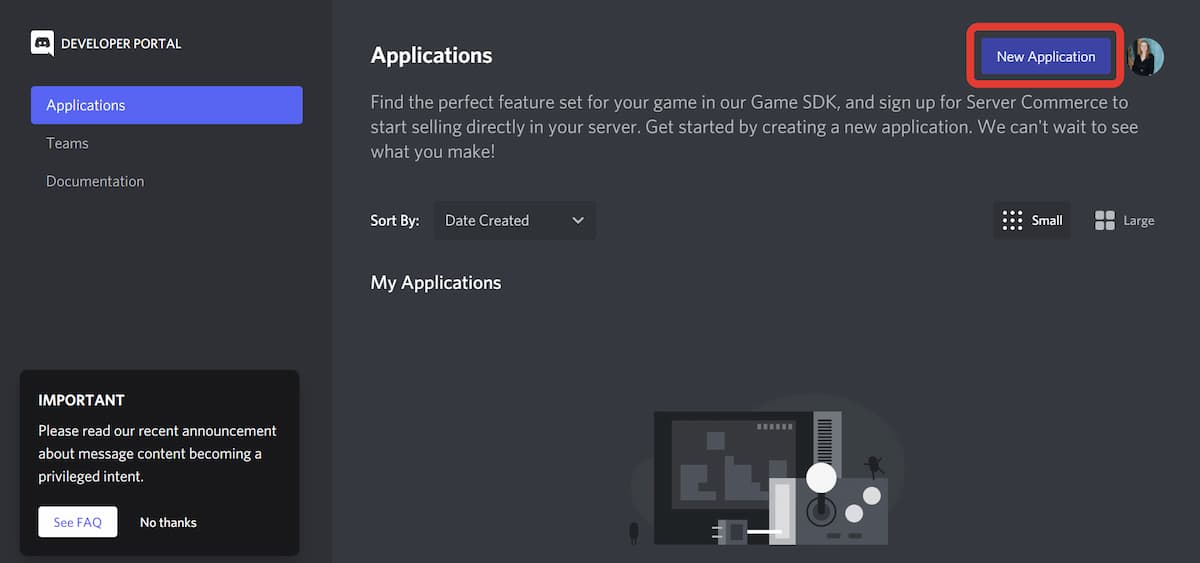
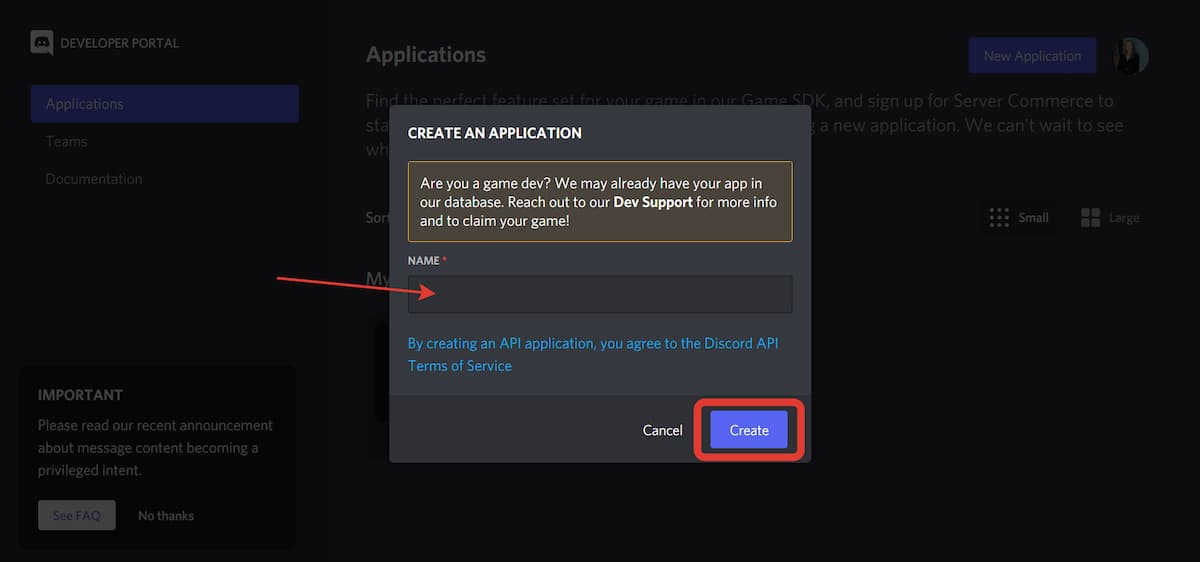
- Select “New Application” and then enter a name for the program before clicking “Create.”
- Create a Bot User by visiting the “Bot” page and clicking “Add Bot.”
- To move forward, click “Yes, go ahead!”
- Check the Public Bot button.
- Do not check the OAuth2 Code button unless you’re developing a service that requires you to. If you’re unsure of its functionality, leave it unchecked.
- If you don’t already have a token, just hit the Reset button to create one. Keep this token ID safe because we’ll need it later.
So that’s it, you can log in to your newly created bot account.
Even though you created a bot user, it isn’t truly present in any servers. We need to do one more thing.
- Visit the application page, and click on your newly created bot page
- Select the “OAuth2” tab.
- To discover your CLIENT ID, locate the OAuth2 option in the menu on the left sidebar and click on it. Ensure you copy the lengthy string of numbers and paste them into the URL.
- You’ll notice a message verifying the bot’s arrival after you add it to your server. The bot icon appears on the right-hand side of your Discord application.
It’s time to finish developing your app. To test the functionality of your bot, open the Python source code.
Sample Codes for Discord Bots in Python
A. Sample Codes to make Discord Bots Respond to Greetings
from nextcord.ext import commands


bot = commands.Bot(command_prefix="!")

# make the bot to greet the user

@bot.command(name="hi")
async def SendMsg(ctx):
  await ctx.send('Hello, Who is am i with on the best chat platform?')

  @bot.event
  async def on_ready():
    print(f"logged in as: {bot.user.name}")

    if __name__ == '__main__':
      #please paste your own special token here
      bot.run("OTYwrdgffhhHHVGYFTFgjh.YuygTY.urPO_JSSDvbHFJBVssdfdgbJ")

#run your program and go back to discord
B. Sample Codes to Make a Discord Bots Send Gifs
from nextcord.ext import commands


bot = commands.Bot(command_prefix="dog ")

#The aim is to make our bot send dog pictures whenever we enter dog pic
#We will be visiting the Dog API website to copy the APi address that returns a JSON containing the link
# we will be using a python module called request to make this request from the dog server

  @bot.command(name="pic")
  async def Dog(ctx):
    response = request.get("https://dog.ceo/api/breeds/image/random")
    Pic_link = response.json()["message"]
    await ctx.send(Pic_link)

#run your program and go back to discord to test, on discord type dog pic
C. Sample Codes to make Discord Bots Play Music
import nextcord
import asyncio
import youtube_dl
from nextcord.ext import commands

#remember to do pip install youtube_dl if you have not

youtube_dl.utils.bug_reports_message = lambda: ""


#this acts like a schema for youtube files, just copy and paste on this format
ytdl_format_options = {

  "format": "bestaudio/best",

  "outtmpl": "%(extractor)s-%(id)s-%(title)s.%(ext)s",

  "restrictfilename": True,

  "noplaylist": True,

  "nocheckcertificate": True,

  "ignoreerrors": False,

  "logtostderr": False,

  "quiet": True,

  "no_warning": True,

  "default_search": "auto",

  "source_address": "0.0.0.0",

}

ffmpeg_options = {"options": "-vn"}

ytdl = youtube_dl.YoutubeDL(ytdl_format_options)


#this function will get a download from a Url to allow the bot get youtube Url and download that and play it through the bot
class YTDLSource(nextcord.PCMVolumeTransformer):
  def__init__(self, source: *, data, volume = 0.5):
    super().__init__(source, volume)

    self.data = data
    self.title = data.get("title")
    self.url = data.get("url")

#this method is basically returning the file so it can be played through the bot
  @classmethod
  async def from_url(cls, url, *, loop=None, stream=False):
    loop = loop or asyncio.get_event_loop()
    data = await loop.run_in_executor(None, lambda: ytdl.extract_info(url, download=not stream))

    if "entries" in data:
      data = data["entries"][0]

    filename = data["url"] if stream else ytdl.prepare_filename(data)
    return cls(nextcord.FFmpegAudio(filename, **ffmpeg_options), data=data)

#this class holds all the commands for the music bot
class Music(commands.Cog):
  def __init__(self, bot):
    self.bot = bot


#this method joins the command and makes the connection to the channel(on your bot enter $join to join channel)
  @commands.command()
  async def join(self, ctx, *, channel: nextcord.VoiceChannel):
    if ctx.voice_client is not None:
      return await ctx.voice_client.move_to(channel)
    await channel.connect()

#method to automate the bot to play the file it fetches
  @commands.command()
  async def play(self, ctx, *, query):
    source = nextcord.PCMVolumeTransformer(nextcord.FFmpegPCMAudio(query))
    ctx.voice_client.play(source, after= lambda e: print(f"player error": {e}") if e else None)

    await ctx.send(f"Now playing: {query}")
#this command gets the YouTube link and makes the download before the music plays
  @commands.command()
  async def yt(self, ctx, *, url):
    player = await YTDLSource.from_url(url, loop=self.bot.loop)
    ctx.voice_client.play(
        player, after=lambda e: print(f"Player error: {e}") if e else None
    )

    await ctx.send(f"Now playing...: {player.title}")

#the stream command ensures that the bot do not make downloads before playing the songs if it receives a stream command
  @commands.command()
  async def stream(self,ctx, *, url):
    async with ctx.typing():
      player = await YTDLSource.from_url(url, loop=self.bot.loop, stream= True)
      ctx.voice_client.play(
          player, after=lambda e: print(f"player error: {e}") if e elase None
      )

    await ctx.send(f"now playing: {player.title}")

#this method stops the music
  @commands.command()
  async def stop(self, ctx):
    await ctx.voice_client.disconnect()

  @play.before_invoke
  @yt.before_invoke
  @stream.before_invoke
#check if the user gets is connected or not
  async def e_voice(self, ctx):
    if ctx.voice_client id None:
      if ctx.author.voice:
        await ctx.author.voice.channel.connect()
      else:
        await ctx.send("oppps, you are not connected to a voice channel currently")
        raise commands.CommandError("Author is absent on a voice channel")
    elif ctx.voice_client.is_playing():
      ctx.voice_client.stop()


#set up the bot so that we can actually run it
intents = nextcord.Intents.default()
intents.message_content = True

bot = commands.Bot(command_prefix = "!", intents= intents)
bot.add_cog(Music(bot))

#copy the secret keys for the hot app and paste here
bot.run("OTYwrdgffhhHHVGYFTFgjh.YuygTY.urPO_JSSDvbHFJBVssdfdgbJ")


#at the end of the code, a file will be downloaded on your visit when you run the code for the first time
Conclusion
Using Discord bots is a cutting-edge and effective digital marketing tactic. Discord bots make your discord server lively and active. Additionally, they operate round-the-clock.
Dive deeper into creating Discord Bots in Python using Discord.py.
Важное преимущество платформы Discord — возможность добавлять готовых ботов или создавать своих виртуальных помощников для решения самых разных задач: модерации чатов, настройки уведомлений, создания голосований, включения музыки и др.
В этой статье расскажем, как написать бота для дискорда, каким образом этот инструмент облегчает рабочие и повседневные дела и где учиться, чтобы создавать ботов на профессиональном уровне.
Какие бывают боты в дискорде и зачем они нужны
Виртуальные помощники или боты помогают упрощать и автоматизировать рутинные процессы и решать однотипные задачи по определённому алгоритму. Бот может напомнить о важном событии, включить музыку или ответить на стандартные вопросы новых пользователей рабочих чатов. В этой статье подробно остановимся на том, как создать написать бота специально под мессенджер Discord.
Короткая справка: что такое Discord
Discord, или дискорд — это популярный мессенджер с множеством разных функций для комфортного общения. Дискордом с удовольствием пользуются почти все геймеры в мире.
Также платформа популярна среди компании самых разных сфер и направлений, ведь возможности дискорда позволяют эффективно выстраивать удалённую работу: проводить видеоконференции и голосовые созвоны, общаться в общих и личных чатах, закреплять важные сообщения, настраивать уведомления и др.
Среди преимуществ дискорда — высокая скорость, бесплатные сервера, функция шумоподавления, возможность форматирования текста и др.
В дискорде уже есть много готовых ботов, которые можно купить и запустить. Они наделены разными возможностями и выполняет конкретный перечень действий.
Вот какие основные виды готовых ботов для дискорда можно выделить:
- музыкальные боты — необходимы для проигрывания музыки, могут воспроизводить треки в определённой последовательности, регулировать громкость или делать паузы между треками;
- боты администраторы — помогают модерировать рабочие чаты, могут поприветствовать новичков, очистить спам или напомнить о дне рождении одного из участников команды;
- боты для сбора мнений — такой помощник поможет быстро опросить участников чата и собрать результаты в небольшой отчёт;
- ролевые боты — необходимы, чтобы распределять роли в команде и наделять конкретных людей определёнными полномочиями;
- боты переводчики — помогут перевести сообщения в чатах, если переписка ведётся на нескольких языках;
- боты для определения рейтинга — такие помощники отмечают тех пользователей, которые наиболее активны;
- многофункциональные боты — такие помощники могут выполнять сразу несколько разных задач, всё чаще пользователи обращаются именно к таким ботам, чтобы упростить работу в дискорде и не тратить время на несколько разных программ.
Боты в дискороде: опыт Checkroi
Команда Checkroi тоже использует дискорд для построения рабочих процессов и общения. Создатель нашего блога, интернет-маркетолог и предприниматель Иван Буявец рассказал о возможностях использования готового виртуального помощника, которого он выбрал для упрощения работы нашей команды.
Мы пользуемся ботом mee6 — в нём есть ряд функций, которые влияют на вовлечение всех участников в общение. Бот помогает считать активность людей в чатах, позволяет получать внутреннюю валюту за активности и напоминает о днях рождения. Люди, видя свой рейтинг, чаще включаются в общение.
Ещё одна из фишек бота — воспроизведение музыки. По пятницам мы устраиваем радиоэфиры: включаем музыку, делимся тем, что любим и общаемся. Отличное чувство, когда ты на целый час делишься своим сокровенным — музыкой — и всем это нравится!
Помимо этого, мы используем дополнительные надстройки, которые делал наш программист: уведомление о трафике и лидах, оповещение о публикации новых статей и уведомление о новом отклике. Это позволяет всем быть в курсе, что происходит, видеть динамику по статьям и осознавать себя частью большего! Конечно, есть ещё куча других идей по ботам — и я уверен, мы их скоро реализуем
Если возможностей готовых ботов вам не хватает, создайте своего виртуального помощника самостоятельно, воспользовавшись языком программирования Python. Как это сделать — расскажем далее.
Ежедневные советы от диджитал-наставника Checkroi прямо в твоем телеграме!
Подписывайся на канал
Подписаться
Как создать бота в дискорде: пошаговая инструкция
На первый взгляд, создать бота — сложная задача. Отчасти это так — для реализации сложных ботов на языке Python, конечно, необходимо понимание основ программирования. Но запустить своего простого бота, который сможет выполнять элементарные функции, под силу любому. И мы вам сегодня это докажем.
Даже если вы обычный пользователь дискорда и никогда не программировали на питоне, просто следуйте нашей инструкции и у вас появится собственный бот. При этом вам не нужно ничего дополнительно устанавливать на свой компьютер или куда-то переводить деньги, чтобы бот заработал.
Шаг 1. Создаём учётную запись
Для создания бота вам потребуется библиотека Python и API Discord. Чтобы свободно работать с этими инструментами, необходимо создать учётную запись Discord Bot. Для этого войдите в Discord и откройте страницу приложения.
В правом верхнему углу нажмите на кнопку «New Application»:
 Придумайте имя приложению и нажмите кнопку «Create», чтобы создать новую учётную запись:
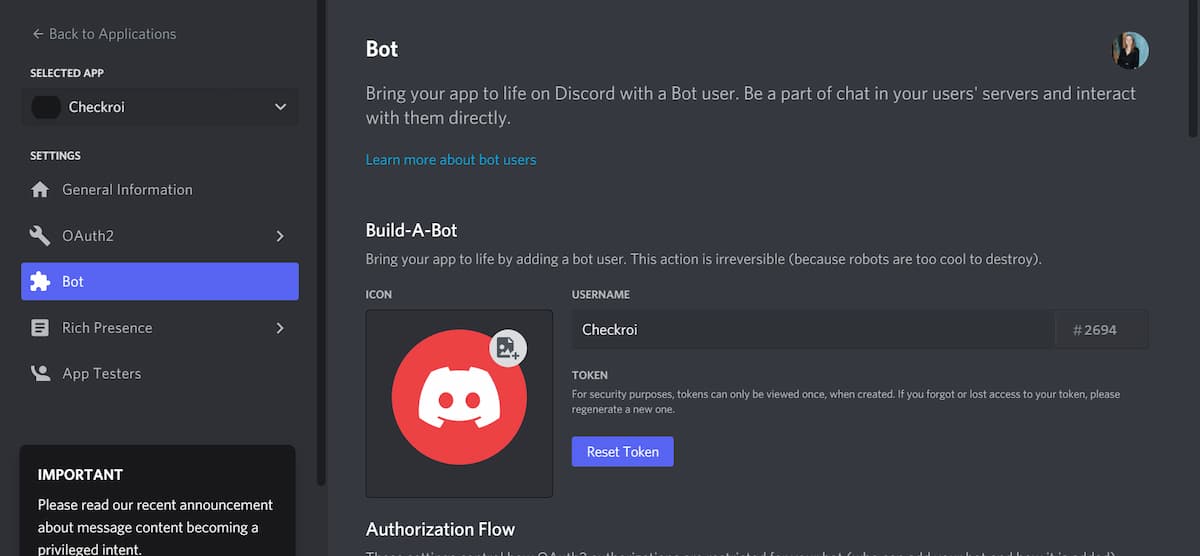
 Шаг 2. Создаём бота
 Шаг 2. Создаём бота
После того как запись создана, можете приступать к созданию бота. Для этого откройте вкладку «Bot» и нажмите кнопку «Add Bot», чтобы добавить нового бота. После этого откроется окно, которое запросит подтверждения действий, поэтому кликните на «Yes, do it!»: 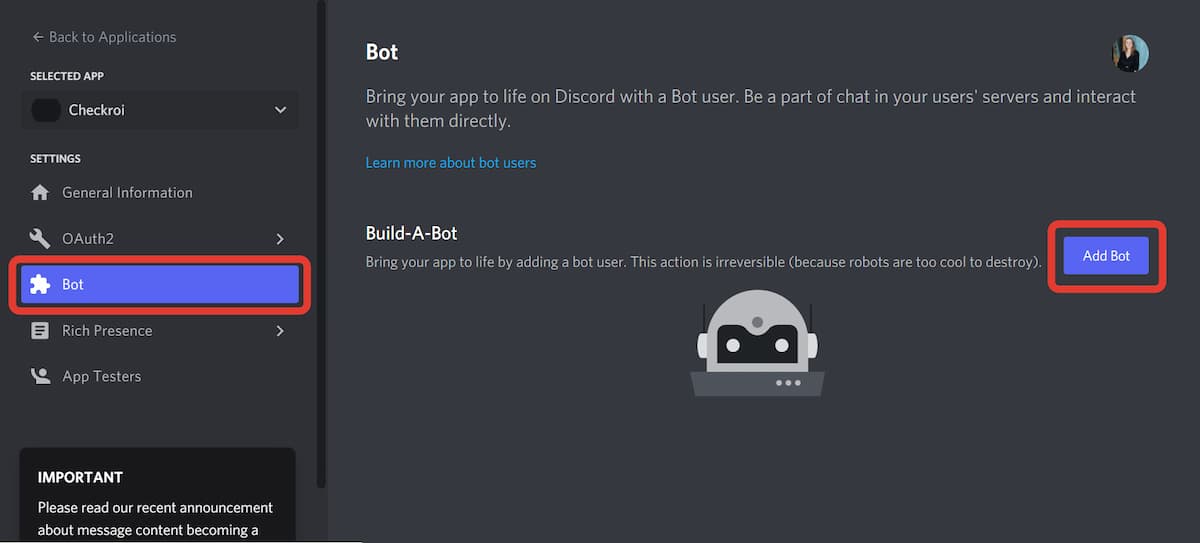
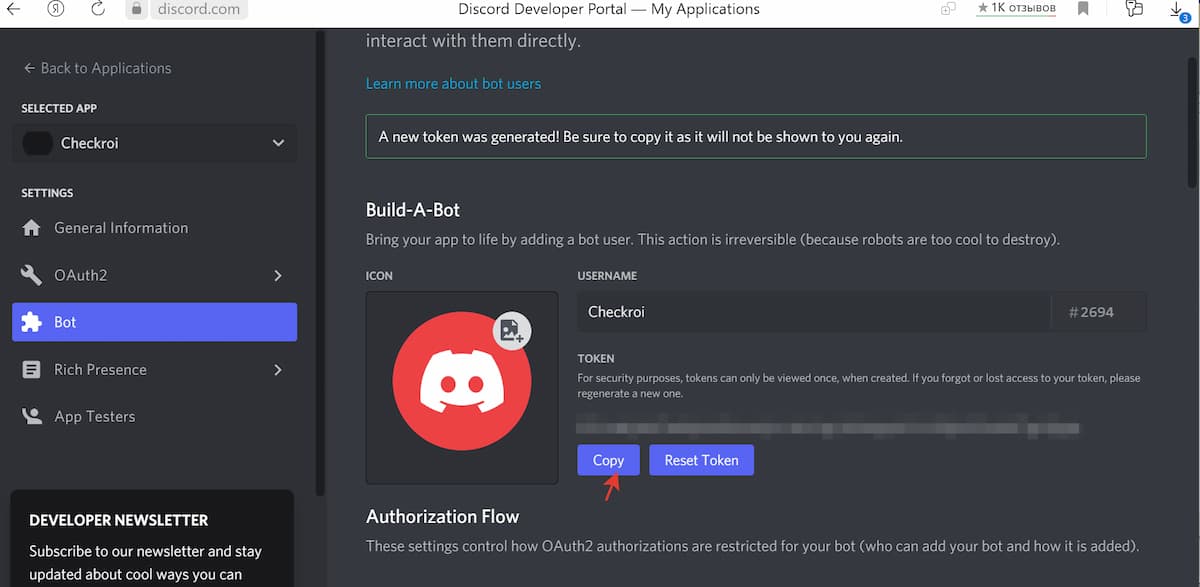
Поздравляем, вы создали бота, теперь вам нужно скопировать его токен — это своеобразный пароль, которым никто не должен завладеть. Нажмите на кнопку «Rest Token»:
 Скопируйте полученную информацию, нажав на кнопку «Copy». Сохраните токен, он вам потребуется чуть позже:
 Шаг 3. Настраиваем бота
 Шаг 3. Настраиваем бота
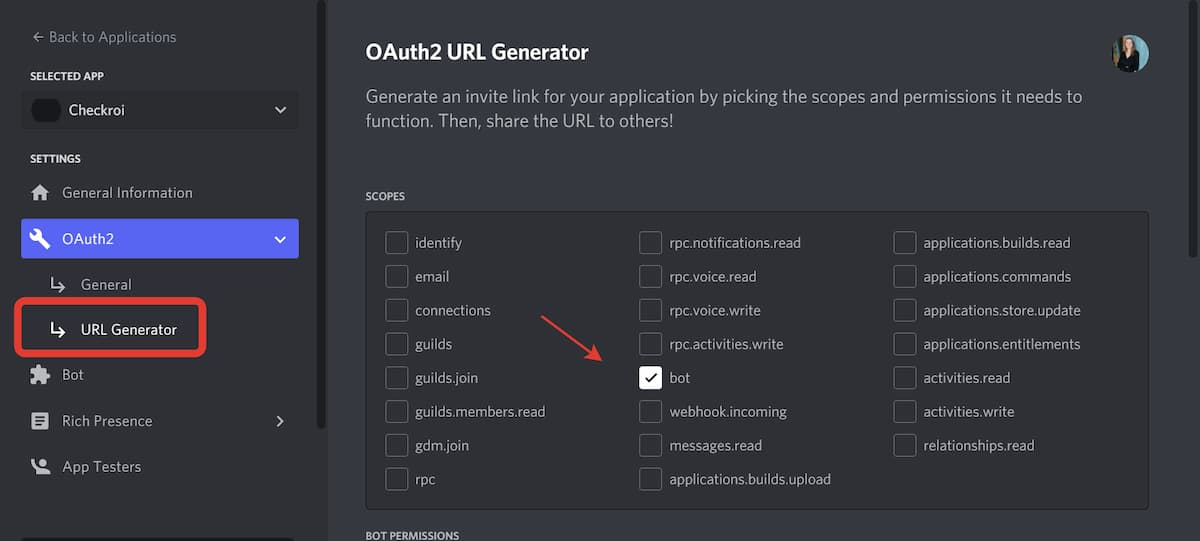
Далее вам нужно настроить вашего бота, для этого перейдите во вкладку «OAuth2». Выберите из выпадающего списка «URL Generator» и поставьте галочку рядом с «bot»:
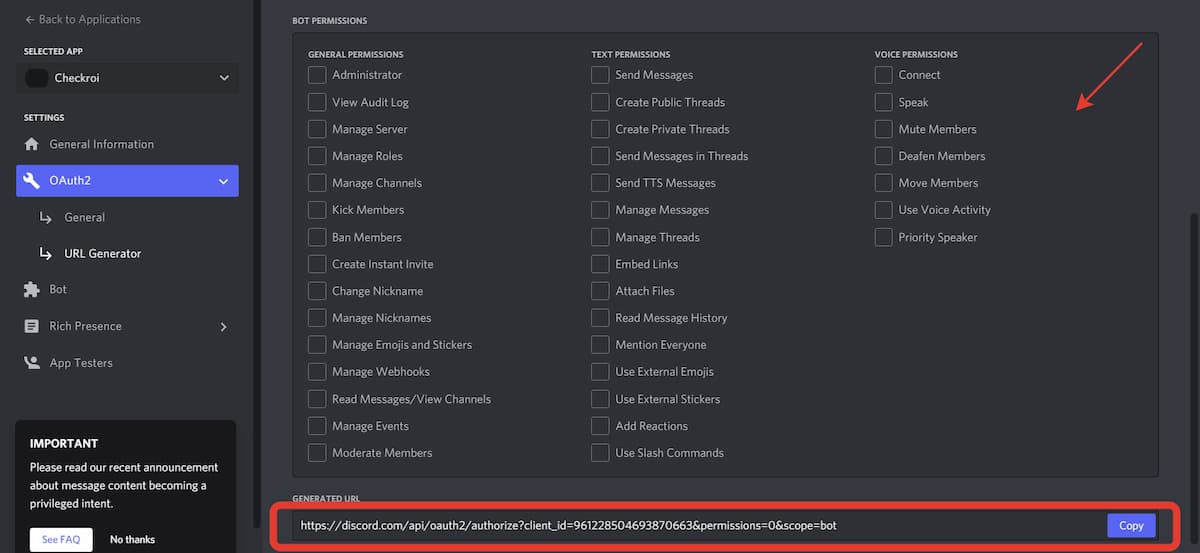
 Выберите те функции, который должен выполнять ваш бот и скопируйте полученную ссылку, нажав кнопку «Copy»:
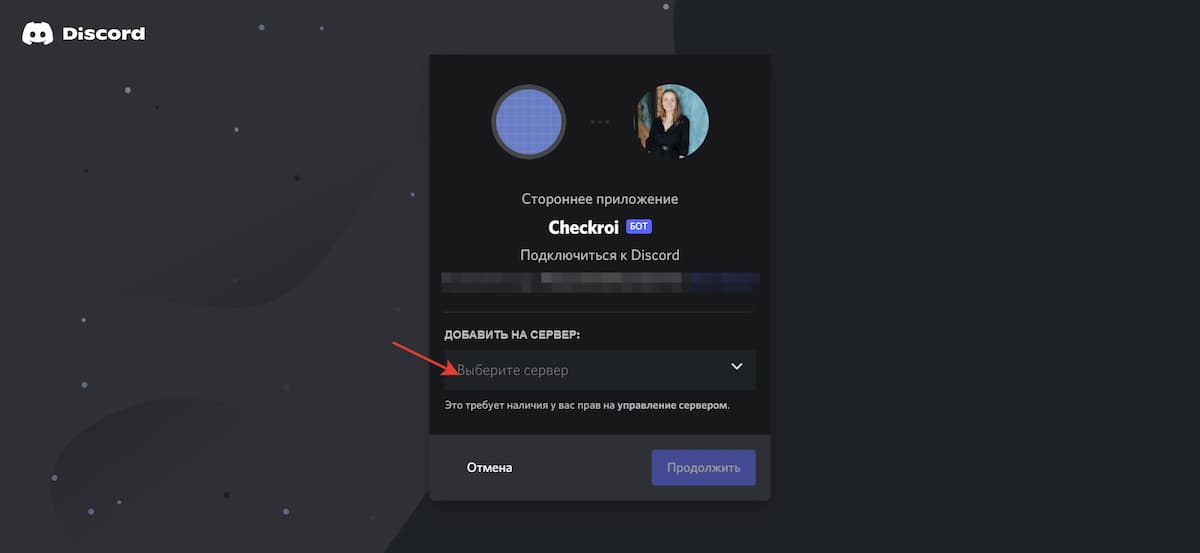
 Шаг 4. Добавляем бота на сервер
 Шаг 4. Добавляем бота на сервер
Чтобы добавить бота, вам нужно иметь разрешение на управление сервером. Сервера в дискорде — это своеобразные сообщества, которые позволяют общаться сразу нескольким пользователям друг с другом. Вступить на новый сервер можно либо создав его, либо приняв от кого-то приглашение.
Вставьте URL-адрес в браузерную строку и выберите сервер, на который нужно добавить бота:
Как написать код на Python для бота в дискорде
 Как написать код на Python для бота в дискорде
 Теперь вы знаете, как создать бота в дискорде, но это лишь первый этап. Дальше нам нужно научиться этим ботом управлять и наделять его дополнительными функциями — в этом нам поможет программный код.
Для написания кода нам понадобится специальный инструмент, благодаря которому одна компьютерная программа может взаимодействовать с другой. На языке программирования это называется оболочка API — оболочки бывают разные, нам нужна discord.py.
Для начала откройте любой редактор кода. Мы будем использовать Repl.it, регистрация в нём занимает две минуты. После того как авторизуетесь, нажмите на кнопку «Create», выберите язык Python и кликнете на «Create Repl»: 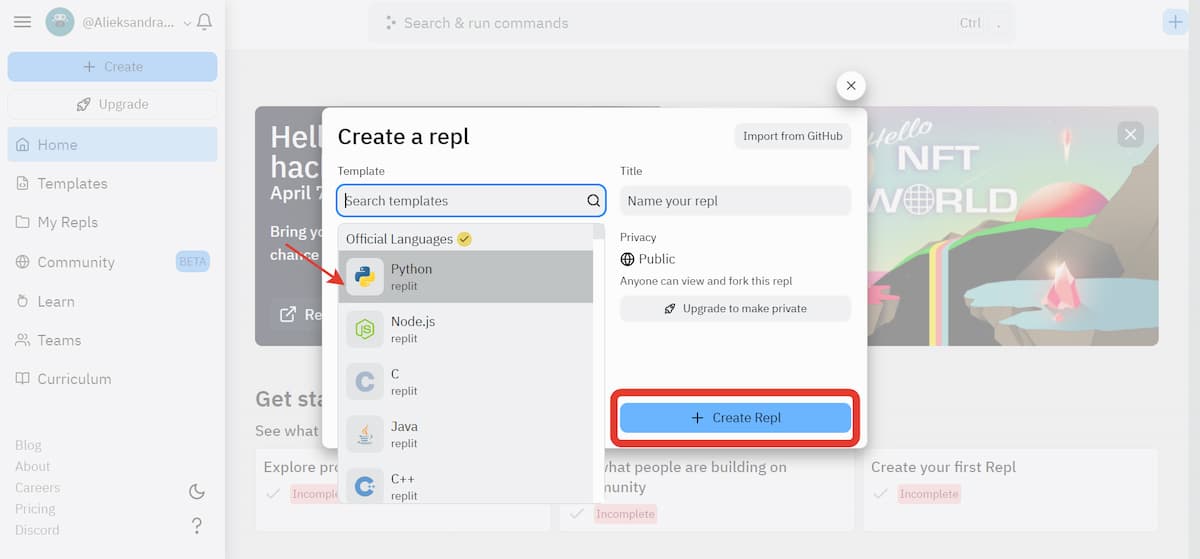
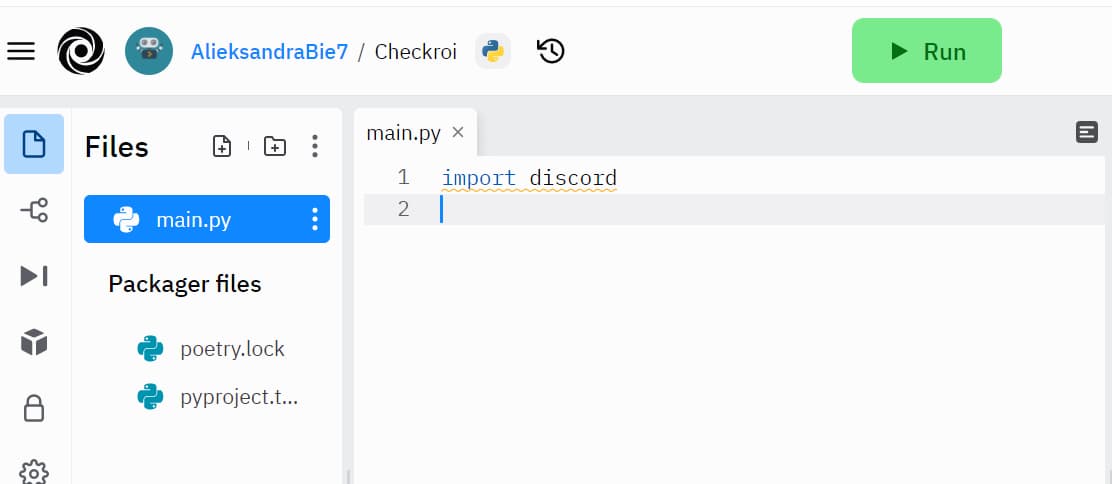
Затем свяжите редактор кода с библиотекой discord.py, записав в вверху main.py простую строчку «import discord». После того как введёте в поле «import discord», нажмите кнопку «Run»
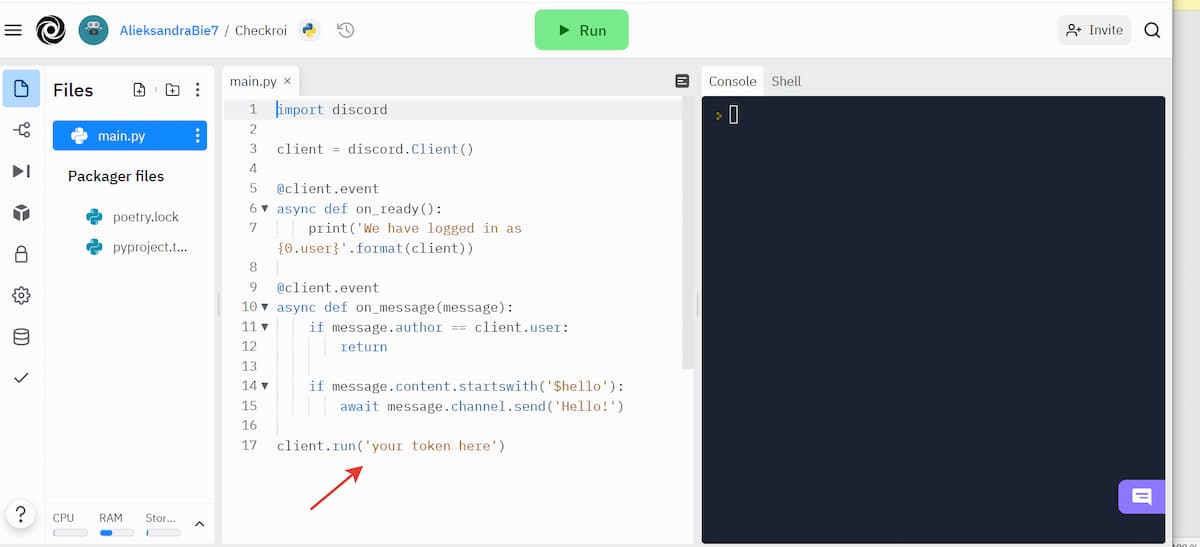
Теперь сделаем так, чтобы наш бот научился отвечать на сообщения: для этого скопируем стандартный код из документации discord.py и вставим его в mai.py. Или скопируйте его отсюда:
client = discord.Client()
@client.event
async def on_ready():
print(‘We have logged in as {0.user}‘.format(client))
@client.event
async def on_message(message):
if message.author == client.user:
return
if message.content.startswith(‘$hello’):
await message.channel.send(‘Hello!‘)
client.run(‘your token here‘)
В последней строчке замените фразу «your token here» на ваш токен, который вы скопировали, когда создавали бота и кликните по кнопке «Run»:
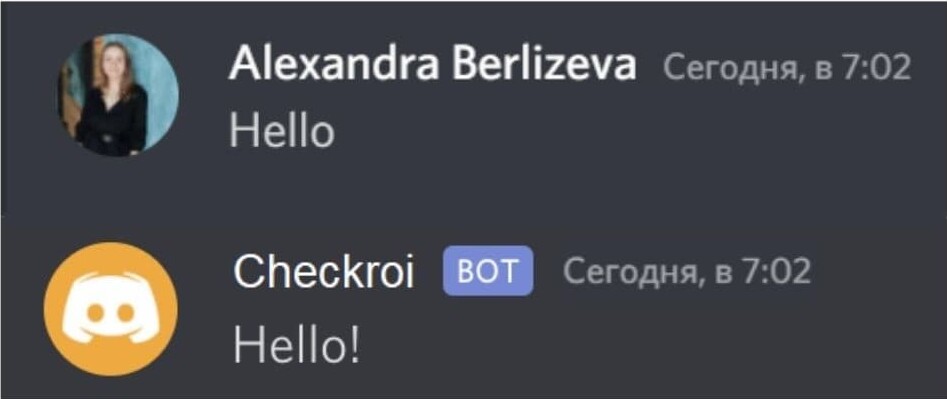
 Если вы всё сделали верно, переписка с ботом будет выглядеть примерно так:
 Теперь давайте разберёмся, из чего состоит наш код и какие команды мы задали боту.
| Строка кода | Значение |
| import discord | Импорт библиотеки discord.py |
| client = discord.Client() | Создание экземпляра клиента. Клиент — это наша связь с дискордом |
| @client.event
async def on_ready(): print(‘We have logged in as {0.user}’.format(client)) |
Используем декоратор Client.event() для регистрации события.
Мы работаем с асинхронной библиотекой, поэтому все действия выполняем по принципу «обратного вызова». В программировании «обратный вызов» — это реакция на событие: что-то произошло, значит должна включиться определённая функция. В нашем примере событие on_ready() происходит, когда бот завершает вход в систему и настройку, а событие on_message() случается, когда бот получил сообщение |
| @client.event
async def on_message(message): if message.author == client.user: return |
Используем декоратор Client.event() для уточнения события.
Триггер событий срабатываем каждый раз при получении сообщения on_message(). Но боту не нужно отвечать, если мы сами написали сообщение. Поэтому, если бот видит Message.author он понимает, что это сообщение от Client.user и совершает возврат действия |
| if message.content.startswith(‘$hello’):
await message.channel.send(‘Hello!’) |
Учим бота отвечать на сообщение.
Если бот получил в сообщении «привет», он ответит той же фразой |
| client.run(‘your token here’) | Запускаем нашего бота.
Не забудьте заменить «your token here» на ваш токен |
Мы привели лишь самый простой пример того, как написать бота для дискорда на Python. Прописывая в коде новые функции, вы сможете улучшать виртуального помощника. Если хотите ускорить работу по созданию и усовершенствованию ботов и начать делать это на профессиональном уровне, рекомендуем пройти один из онлайн-курсов.
Лучшие курсы для профессионального создания ботов на Python
Python — один из наиболее популярных на сегодняшний день языков программирования. Его ценят за широкие возможности и простую точку входа: написать базовый код на питоне сможет каждый. Изучить этот язык на более профессиональном уровне самостоятельно тоже возможно. Однако для этого потребуется время, дисциплина и усидчивость, к тому же вы должны быть готовы самостоятельно разбирать свои ошибки.
Ускорить процесс освоения питона позволят дистанционные программы обучения, где вы не только получите необходимые знания, но и отработаете их на онлайн-тренажёрах и практических заданиях под руководством опытных экспертов-программистов. В сети представлено большое количество онлайн-курсов по Python, мы расскажем про три лучших на наш взгляд.
Лучший курс по программированию на Python с гарантией трудоустройства
Курс от Skillbox для начинающих разработчиков. Вы поймёте, как устроены популярные фреймворки, библиотеки, базы данных и другие инструменты для разработки. Вы научитесь создавать программы разной сложности: от консольных скриптов до чат-ботов, упаковывать проекты, публиковать рабочую версию продукта на сервере и работать в команде.
Длительность. 12 месяцев
Какой получите результат. 3 проекта в портфолио, диплом об окончании курса, трудоустройства
Какие будут бонусы. Индивидуальные и групповые практические задания, бесплатный доступ к среде разработки IDE, бонусные курсы и рассрочка
На сайт курса
Лучший курс для освоения профессии Python-разработчик
Курс от Яндекс.Практикум подойдёт даже тем, кто никогда не программировал. Вы научитесь писать чистый код, разрабатывать сайты, программы и веб-приложения и настраивать серверы для размещения проектов. Вы освоите самые популярные инструменты разработчика и узнаете, как создаются информационные продукты в командах.
Длительность. 9 месяцев
Какой получите результат. Дипломный проект, 6 проектов в портфолио и дипломы о профессиональной переподготовке на русском и английском языке
Какие будут бонусы. Отработка полученных знаний на онлайн-тренажёрах и много практических заданий. Также вам вернут деньги, если вы передумаете учиться, а в случае необходимости оформят академический отпуск
На сайт курса
Лучший курс для знакомства с Python
Курс от Skypro поможет вам с нуля освоить популярный язык программирования. Вы поймёте, как устроен синтаксис Python и принципы объектно-ориентированного программирования. Вы узнаете, как пользоваться библиотеками Python и писать стабильный код. Вы научитесь разрабатывать архитектуру сервисов различной сложности и писать серверы для интернет-магазинов, приложений и игр.
Длительность. 10 месяцев
Какой получите результат. Диплом и помощь с трудоустройством
Какие будут бонусы. Много практических заданий в реальной среде разработки, онлайн-встречи с преподавателями и возврат денег, если передумаете учиться
На сайт курса
Лучший курс для практикующих разработчиков
Для тех, кто уже знает основы программирования на Python, но хочет повысить свой уровень и создана учебная программа образовательной платформы Otus. Вы углубитесь в «промышленную» разработку на питоне, выполните большое количество практических задач и реализуете собственный проект на любую тему. Вы не только овладеете новыми инструментами программирования, но и сформируете прагматичный подход к решению задач.
Длительность. 5 месяцев
Какой получите результат. Сильное портфолио и сертификат об окончании курса
Какие будут бонусы. Домашние работы, дополнительные материалы для углублённого изучения, пожизненный доступ к записям всех вебинаров
На сайт курса
Заключение
Популярность Python растёт: всё больше тех, кто хочет освоить этот язык программирования. Но не все знают, где практиковаться. Один из простых способов понять, насколько вам интересно программировать на питоне и «пощупать» этот язык — создать бота в дискорде. У этой платформы масса возможностей, поэтому разработчикам ботов есть где развернуться.
Умение создавать таких виртуальных помощников, упростит использование популярной платформы и автоматизирует рутинные задачи, к тому же это прямой путь в престижную профессию.
Если вы всерьёз заинтересовались разработкой на питоне, но пока не выбрали оптимальный вариант обучения, рекомендуем ознакомиться с ещё одной нашей статьёй. В материале «Как грамотно выстроить обучение Python» рассказываем про курсы, видеоуроки и профессиональные сообщества
RhinoBot: The music bot for Discord.
MusicBot is a Discord music bot written in Python. It plays requested songs and if the queue becomes empty it will play through a list of existing songs.
How do I set it up?
CLICK HERE to find the guide that suites your operating system.
Commands
Commands are listed here.
Configuration
The main configuration file is config/options.ini, but is not included. Simply make a copy of example_options.ini and rename to options.ini. See example_options.ini for more information on how to configure it.
CLICK HERE for more details.
Great, now how do I use it?
Download the bot, set the dependencies up, then run runbot.bat! (or run.sh on mac/linux) Read the tutorial if you don’t know what to do.
If you have any errors, read the FAQ. If that didn’t help, you can ask for assistance on the discord help server. Is is recommended to take screenshots so the developers can see errors.
Rhino Help Server
FAQ
Some frequently asked questions are listed on the wiki here.
I’m a beginner in Python and I have recently started making a discord bot for some friends and I. The idea is to type !startq and have the bot join the channel, play an mp3 file that is locally stored in the same folder that the bot.py is in also.
import discord, chalk
from discord.ext import commands
import time
import asyncio

bot = commands.Bot(command_prefix = "!")

@bot.event
async def on_ready():
    print("Bot is ready!")

@bot.command()
async def q5(ctx):
    await ctx.send("@here QUEUE STARTING IN 5 MINUTES")

@bot.command()
async def q3(ctx):
    await ctx.send("@here QUEUE STARTING IN 3 MINUTES")

@bot.command()
async def q1(ctx):
    await ctx.send("@here QUEUE STARTING IN 1 MINUTES")

@bot.command()
async def ping(ctx):
    ping_ = bot.latency
    ping =  round(ping_ * 1000)
    await ctx.send(f"my ping is {ping}ms")

@bot.command()
async def startq(ctx):
    voicechannel = discord.utils.get(ctx.guild.channels, name='queue')
    vc = await voicechannel.connect()
    vc.play(discord.FFmpegPCMAudio("countdown.mp3"), after=lambda e: print('done', e))
    bot.run('TOKEN')
So far my bot joins the channel fine, but it doesn’t actually play the mp3. I’ve asked countless people in the «Unofficial Discord API Discord» and a few other programming Discords, but I haven’t gotten an answer yet.
![]()
peterh
11.4k17 gold badges85 silver badges104 bronze badges
asked Dec 4, 2018 at 1:21
![]()
5
I did something similar with my discord bot, here’s some example code you can reference. If you’re playing mp3 files make sure to install ffmpeg, I followed the instructions here when I was setting up my bot https://github.com/adaptlearning/adapt_authoring/wiki/Installing-FFmpeg
@client.command(
    name='vuvuzela',
    description='Plays an awful vuvuzela in the voice channel',
    pass_context=True,
)
async def vuvuzela(context):
    # grab the user who sent the command
    user=context.message.author
    voice_channel=user.voice.voice_channel
    channel=None
    # only play music if user is in a voice channel
    if voice_channel!= None:
        # grab user's voice channel
        channel=voice_channel.name
        await client.say('User is in channel: '+ channel)
        # create StreamPlayer
        vc= await client.join_voice_channel(voice_channel)
        player = vc.create_ffmpeg_player('vuvuzela.mp3', after=lambda: print('done'))
        player.start()
        while not player.is_done():
            await asyncio.sleep(1)
        # disconnect after the player has finished
        player.stop()
        await vc.disconnect()
    else:
        await client.say('User is not in a channel.')
answered Dec 15, 2018 at 6:28
![]()
I would do something like this:
voice.play(discord.FFmpegPCMAudio(executable="C:/path/ffmpeg.exe", source="C:/songpath"))
![]()
Neuron
4,9285 gold badges36 silver badges55 bronze badges
answered May 5, 2020 at 14:21
![]()
1
This is how you would do it for the rewritten version which I use for my bot to play mp3 files. You also need opus to be loaded which is easy and also to have FFMPEG.
OPUS_LIBS = ['libopus-0.x86.dll', 'libopus-0.x64.dll', 'libopus-0.dll', 'libopus.so.0', 'libopus.0.dylib']


def load_opus_lib(opus_libs=OPUS_LIBS):
    if opus.is_loaded():
        return True

    for opus_lib in opus_libs:
        try:
            opus.load_opus(opus_lib)
            return
        except OSError:
            pass

        raise RuntimeError('Could not load an opus lib. Tried %s' % (', '.join(opus_libs)))
@bot.command(aliases=['paly', 'queue', 'que'])
async def play(ctx):
    guild = ctx.guild
    voice_client: discord.VoiceClient = discord.utils.get(bot.voice_clients, guild=guild)
    audio_source = discord.FFmpegPCMAudio('vuvuzela.mp3')
    if not voice_client.is_playing():
        voice_client.play(audio_source, after=None)
answered Mar 25, 2019 at 3:07
![]()
ElijahElijah
1,65819 silver badges25 bronze badges