Цель проекта: разработать
программу «Стандартный калькулятор»,
практическое знакомство со способами создания
программ на Delphi, изучение тем «Ветвление» и
«Циклы» в процессе написания программы.
Количество часов на выполнение проекта: 5
Введение.
- При изучении темы «Алгоритмизация и
программирование» я использую систему
программирования Delphi, так как считаю, что язык
программирования Паскаль наиболее пригоден для
использования в учебном процессе. Использование
визуальной объектно-ориентированной системы
позволяет знакомить учащихся с современными
методами создания программ и создает
положительную мотивацию в изучении информатики,
так как учащиеся создают реально работающие и
полезные программы, например калькуляторы,
музыкальные и видео — проигрыватели и др. - Проектная форма организации работы позволяет
увлечь учащихся индивидуальной и коллективной
работой над проектами. В проектной деятельности
важно самовыражение автора, его личное
творчество. Так же при использовании проектов
активизируется поисковая активность учащихся и
реализуется потребность в свободе: перемещение
по классу; возможность выбора темпа изучения,
уровня сложности материала, самого способа
решения. - В ходе выполнения проекта используется
проблемный подход: по мере появления вопросов у
учащихся «Как реализовать данную функцию?»
изучаются соответствующие темы. При работе над
проектом «Стандартный калькулятор»
рассматриваются следующие темы: «Ветвление»,
«Множественный выбор», «Циклы» - Данный проект предлагается учащимся после
изучения тем «Основы объектно-ориентированного
программирования», «Основы визуального
проектирования и программирования в среде Delphi»,
«Описание констант и переменных»,
«Арифметические операции и функции»
1 урок «Разработка интерфейса
программы»
Задание. Разработать интерфейс
программы «Стандартный калькулятор»
Необходимые объекты:
Разработка интерфейса.
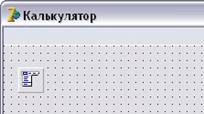
1. Создать форму.
Свойства формы.
Name: kalkul
Caption:
Калькулятор
Color:
цвет по желанию
BorderIcons: biMaximize – False, остальное True.
2. Разместить на форме объект Edit.
Свойства: Name : Edit1, Text – пустая строка.
3. Разместить на форме соответствующее число
кнопок.
– цифры от 0 до 9,
– знаки арифметических операций,
– знак «=»
– знаки функций (корень, синус, косинус и т.д.)
Объект – кнопка BitBtn.
Свойства:
Name – можно оставить по умолчанию
Caption – соответствующее выполняемой функции
название
Font – шрифт и цвет шрифта по желанию
4. Поместить на форму изображение (если нужно),
настроить цвет формы, шрифт, сделать
соответствующие надписи на форме (если нужно).
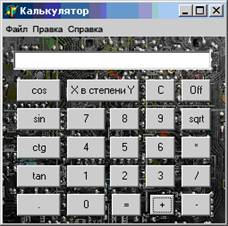
Примерный вид интерфейса программы
Домашнее задание. Повторить темы:
«Описание констант и переменных»,
«Арифметические операции и функции» по
конспекту учащегося. См. Приложение
1 и Приложение 2.
2 урок «Написание процедур выполнения
арифметических операций»
I. Написать процедуры ввода чисел. Для
этого щелкнуть два раза по кнопке «1» (объект BitBtn1)
и ввести следующий код:
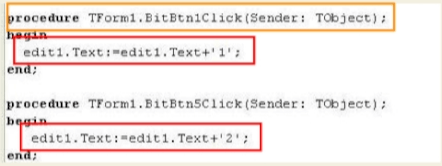
procedure TForm1.BitBtn1Click(Sender: TObject);
begin
edit1.Text:=edit1.Text+’1′
end;
Аналогично написать процедуры ввода остальных
цифр и символа «,»
II. Создать процедуру очистки поля Edit1,
кнопка «С» (объект BitBtn22)
procedure TForm1.BitBtn22Click(Sender: TObject);
begin
edit1.Clear
end;
III. Создать процедуры обработки
нажатий кнопок «+», «–», «/»,
«*» и «=». Для этого
необходимо сначала разобрать с учащимися
алгоритм работы с калькулятором:
- Ввести число в поле Edit1. При этом в поле Edit1 число
будет представлено как текстовая строка. - Нажать кнопку «+». В процедуре обработки этой
кнопки необходимо выполнить следующие действия: - преобразовать эту строку в число с помощью
функции StrToFloat; - сохранить это число в переменной X;
- сохранить в переменной, например, kod код этой
операции; - очистить поле Edit1.
- Ввести второе число в поле Edit1.
- Нажать кнопку «=».В процедуре
обработки этой кнопки необходимо выполнить
следующие действия: - преобразовать эту строку в число с помощью
функции StrToFloat; - сохранить это число в переменной Y;
- в зависимости от кода операции, сохраненной в
переменной kod, выполнить арифметическую
операцию, например, z:=x+y; - преобразовать число, находящееся в переменной Z,
в текст с помощью функции FloatToStr и вывести в
поле Edit1.
IV. Что необходимо для реализации этого
алгоритма?
1. Описать переменные X, Y, Z, kod.
Описывать переменные будем в основной программе,
модуле Unit, чтобы переменные могли действовать в
любой процедуре (глобальные переменные).
var
Form1 : TForm1;
kod : char;
x, y, z : real;
2. Создать процедуры обработки нажатий
кнопок «+», «–», «/», «*»
Например,
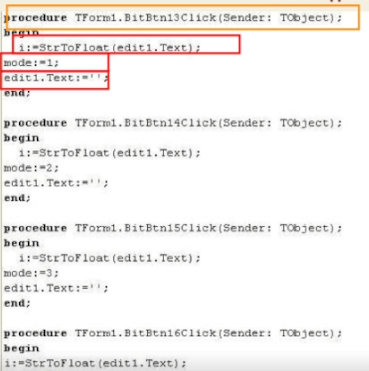
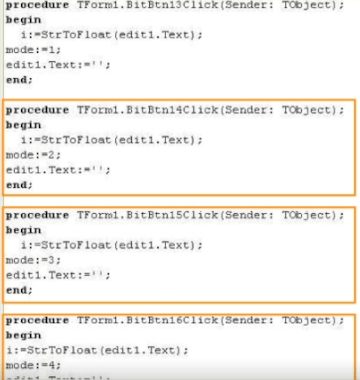
procedure TForm1.BitBtn17Click(Sender: TObject);
begin
x:= strtofloat(edit1.text);
kod := ‘+’;
edit1.Clear;
end;
Но что будет, если мы в поле Edit1 ничего не введем
и нажмем кнопку «+»? Возникнет ошибка и программа
завершится. Чтобы избежать этого надо проверить
имеется ли в поле Edit1символы? И в зависимости от
этого условия продолжить выполнять процедуру
или вернуться к вводу данных. Следовательно, мы
должны использовать алгоритмическую структуру
«Ветвление».
Изучить с учащимися правила записи
ветвления на языке Delphi.
Изменненая процедура обработки нажатия кнопки
«+»
procedureTForm1.BitBtn17Click(Sender: TObject);
begin
ifedit1.Text<>» thenx:=strtofloat(edit1.text);
kod := ‘+’;
edit1.Clear;
end;
Аналогично создатьпроцедуры обработки нажатий
кнопок «–», «/», «*»
3. Создать процедуру обработки нажатия
кнопки «=». В этой процедуре необходимо
в зависимости от значения переменной kod
выполнять четыре разных операции. Такая
структура называется «Множественное ветвление»
или «Выбор».
Изучить с учащимися правила записи
структуры «Выбор» на языке Delphi.
procedure TForm1.BitBtn19Click(Sender:
TObject);
кнопка «=»
begin
if edit1.Text<>» then
y:=strtofloat(edit1.text);
впеременную y кладем edit1.text
case kod of
‘+’: z:=x+y;
‘-‘: z:=x-y
‘*’: z:=x*y;
‘/’: z:=x/y
end ;
edit1.Text:=floattostr(z)
вывод в поле Edit1 значение переменной z
end;
3 урок «Написание процедур вычисления
основных функций»
I. Создать процедуры вычисления
функции «X в степени Y». Для этого необходимо:
1. Изучить тему «Циклы на языке Delphi».
2. Создать процедуру обработки нажатия кнопки «X
в степени Y».
procedure TForm1.BitBtn24Click(Sender: TObject);
begin
x:= strtofloat(edit1.text);
kod := ‘^’;
edit1.Clear;
end;
3. Добавить в процедуру нажатия кнопки «=»
следующий код
vark, y1:integer; /y1 – степень
в которую возводим число x/
… /k–
счетчик цикла/
‘^’: begin
y1:=strtoint(
edit1.Text);
edit1.clear;
z :=1;
for k:=1 to y1 do
begin
z:=z*x
end
end
II. Создать процедуры вычисления
остальных функций. При вычислении
тригонометрических функций учесть, что
компьютер работает с радианной мерой углов.
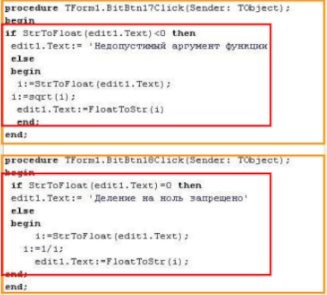
Например, процедура вычисления квадратного
корня
procedure TForm1.BitBtn26Click(Sender: TObject); кнопка
«корень»
begin
x:=strtofloat( edit1.Text);
edit1.clear;
z:=sqrt(x);
edit1.Text:=floattostr(z)
end;
Процедура вычисления функции sin
procedure TForm1.BitBtn11Click(Sender: TObject); кнопка «sin»
begin
x:=strtofloat(edit1.Text);
x:=(x*3.14)/180;
edit1.Clear;
z:=sin(x);
edit1.Text:=floattostr(z)
end;
4–5 урок. «Написание процедур
работы с меню и усовершенствование
калькулятора»
У любой программы имеется система меню, которая
позволяет выполнять разные сервисные
функции. Создадим для нашего калькулятора
меню, которое будет состоять, например, из
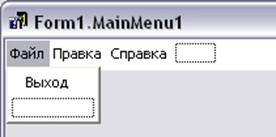
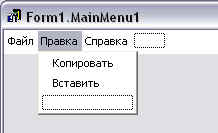
следующий пунктов: «Файл», «Правка», «Справка».
Для этого: поместить на форму объект MainMenu (в
любое место формы, этот объект будет невидим при
выполнении)
- Два раза щелкнуть левой кнопкой мыши по этому
объекту на форме. - Выделить в появившейся форме пунктирное поле и
в инспекторе объектов в свойство Caption ввести
«Файл». - Аналогично создать пункты меню «Правка» и «О
программе». - В меню «Файл» создать пункт «Выход», а в
«Правка» — пункты «Копировать» и «Вставить». - Закрыть форму создания меню.
|
|
|
| procedure TForm1.N2Click(Sender: TObject); begin close end; |
procedure TForm1.N4Click(Sender: TObject); begin Edit1.CopyToClipboard; / копироватьвбуферобмена/ end; procedure TForm1.N5Click(Sender: TObject); |
Создание меню
Для создания справки создадим еще одну форму с
именем Form2, на которой можно разместить
справочные сведения и информацию об авторах
программы. Для размещения текста можно
воспользоваться объектом Memo,
который представляет из себя почти готовый
текстовый редактор, и объектом Image для
размещения графики и фотографий. Для открытия
формы воспользуемся командой Form2.ShowModal.
Процедура открытия формы «Справка»
procedure TForm1.N8Click(Sender: TObject);
begin
Form2.ShowModal
Открытие формы «Справка»
end;
Усовершенствование калькулятора
В зависимости от желания и уровня подготовки,
каждый учащийся может по-своему модернизировать
программу. Кто-то пожелает просто улучшить
интерфейс программы, а другой захочет превратить
свой простой калькулятор в инженерный, добавив
разнообразные математические функции,
логические операции и функции, работу с 2-ми,
8-ми и 16-ми числами. В Приложении
3 приведен пример одного калькулятора.
Заключение. На уроках
информатики проектная форма организации
работы позволяет раскрыть творческий потенциал
учащихся, активизирует исследовательскую работу
и позволяет выбрать индивидуальный темп и
сложность выполнения работы.
Кроме проекта «Стандартный калькулятор» я
использую и другие работы, например «Вычисление
площади фигуры методом Монте-Карло» (см. Приложение 4),
«Нахождение корней уравнения методом
половинного деления (см. Приложение
5), «Расчет электрических цепей (см. Приложение 6) и другие.
В этой статье мы подробно рассмотрим создание простого стандартного калькулятора с помощью среды разработки Borland Delphi 7. Основные объекты калькулятора будем создавать программным способом.
Итак, меняем свойства главного окна (в окошке слева Object Inspector) Form1, в соответствии со следующей таблицей (остальные поля не трогаем):
| Свойства Form1 | Значение |
| Caption | Калькулятор |
| AutoScroll | false |
| BorderIcons | [biSystemMenu, biMinimize] |
| BorderStyle | bsSingle |
| Position | poScreenCenter |
| Height | 292 |
| Width | 286 |
Добавим на форму объект MainMenu (вверху или справа на панеле).

Кликнем на него два раза мышкой и заполним следующим образом:


Чтобы подчеркнуть букву в названии определенного пункта меню, необходимо перед ней поставить знак &. (Например, «&Справка»).
Далее переходим на создание объектов при помощи программного кода (жмем F12).
Попробуем сначала добавить текстовое поле, где будут выводиться все цифры и вычисления калькулятора (все, что записано ниже после слова «Например» — пишем в Delphi).
Для создания объекта программным способом, выполним следующие действия:
1. В uses пропишем модуль объектов.
Например: StdCtrls
2. Перед строкой implementation и после ключевого слова var создадим новую переменную, а в качестве типа переменной укажем класс объекта (класс объекта всегда начинается с буквы «Т» — вероятно, произошло от названия программы Turbo Pascal).
Например:
Edit: TMemo;

Button: array[0..22] of TButton;
3. В событии (например, при создании формы) сначала создаем новый объект (Edit:=TMemo.Create(form1);), затем отображаем его на Form1 (Edit.Parent:=form1;). А дальше, как и для обычного объекта, указываем его свойства (координаты, размеры и т.п.).
Например:
procedure TForm1.FormCreate (Sender: TObject);

begin

Edit := TMemo.Create( form1 );

Edit.Parent := form1;

Edit.Text := '0';

Edit.Width := 250;

Edit.Height := 21;

Edit.Left := 10;

Edit.Top := 20;

Edit.Alignment := taRightJustify;

end;
Свойство Alignment выравнивает текст в крайнее правое положение.
Таким же образом создадим на форме кнопки. Но создавать их не будем по-отдельности. Создадим массив кнопок, который и выведем в определенном порядке на форму. У нас будет несколько групп кнопок (для ввода цифр и для вычислений). Так как у нас используется массив, соответственно каждый объект необходимо смещать таким образом, чтобы не получилось так, что один объект лежит на другом. Так не должно быть! Поэтому обязательно используйте свойства Top и Left для расположения объекта на форме Form1 в определенных координатах. Чтобы проще было программировать, мы создали массив кнопок от 0 до 9 с соответствующими им кнопками.
Должно получиться что-то вроде этого:
unit Unit1;
interface
uses

Windows, Messages, SysUtils, Variants, Classes, Graphics, Controls, Forms,

Dialogs, Menus, StdCtrls, ComCtrls;
type

TForm1 = class(TForm)

MainMenu1: TMainMenu;

N1: TMenuItem;

N2: TMenuItem;

N3: TMenuItem;

N4: TMenuItem;

procedure FormCreate(Sender: TObject);

procedure N4Click(Sender: TObject);

private

{ Private declarations }

public

{ Public declarations }

end;
var

Form1: TForm1;

Edit: TMemo;

Button: array[0..22] of TButton;
implementation
{$R *.dfm}
procedure TForm1.FormCreate (Sender: TObject);

var i, left, width, top: integer;

begin

left:=10;

width:=40;

// Создаем объект поля ввода

Edit := TMemo.Create( form1 );

Edit.Parent := form1;

Edit.Text := '0';

Edit.Width := 244;

Edit.Height := 21;

Edit.Left := left;

Edit.Top := 20;

Edit.Alignment := taRightJustify;

// Создаем объекты кнопок для стандартного калькулятора

for i:=0 to 22 do

begin

Button[i] := TButton.Create( form1 );

Button[i].Parent := form1;

case i of

10..12:

begin

if i=10 then

left := 10;

Button[i].Left := left;

Button[i].Top := 51;

Button[i].Width := 75;

left := left+83;

end;

1..9:

begin

if i=1 then

begin

left := 10;

top := 176;

end;

left := left + width + 10;

if i mod 3 =1 then

begin

left := 10;

top := top - 30;

end;

Button[i].Width := width;

Button[i].Left := left;

Button[i].Top := top;

Button[i].Caption := inttostr(i);

end;

13..20:

begin

if i=13 then

begin

left := button[9].Left + button[9].Width + 10;

top := 206;

width := 40;

end;

left := left + width + 10;

if i mod 2 =1 then

begin

left := button[9].Left + button[9].Width + 10;

top := top - 30;

end;

Button[i].Width := width;

Button[i].Left := left;

Button[i].Top := top;

end;

0:

begin

Button[0].Width := width;

Button[0].Left := 10;

Button[0].Top := 176;

Button[i].Caption := inttostr(i);

end;

21,22:

begin

left := left + width + 10;

if i mod 2 =1 then

left := button[0].Left + button[9].Width + 10;

Button[i].Width := width;

Button[i].Left := left;

Button[i].Top := button[13].Top;

end;

end;

end;

// Даем названия каждой кнопке

button[10].Caption := 'Backspace';

button[11].Caption := 'CE';

button[12].Caption := 'C';

button[13].Caption := '+';

button[14].Caption := '=';

button[15].Caption := '-';

button[16].Caption := '1/x';

button[17].Caption := '*';

button[18].Caption := '%';

button[19].Caption := '/';

button[20].Caption := 'sqrt';

button[21].Caption := '+/-';

button[22].Caption := ',';

end;
end.
Затем, по-желанию, добавим на форму объект StatusBar (с вкладки Win32). В свойстве Panels откроем новое окно, создадим новую панель и назовем ее «Copyright @ 2013 FORTRAN NEW Company» (можно назвать по-своему).
<<Предыдущая статья Следующая статья >>
Опубликовано: 2013-02-18 23:51:43
На чтение 2 мин. Опубликовано 15.06.2021
Выполнить процесс создания калькулятора, который похож на такое приложение в операционной системе Windows можно, если знать, как правильно реализовать этот процесс посредством применения языка программирования Delphi. Сама процедура не является сложной, но имеет свои особенности.
Особенности создания калькулятора на языке Delphi
Процедура создания калькулятора на языке Delphi начинается с размещения на форме необходимых компонентов. Вместо стандартной кнопки Button можно использовать такой элемент, как BitButton. Его особенность заключается в том, что здесь на кнопках можно осуществлять смену цвета используемого шрифта. На каждой из выбранных кнопок нужно расположить необходимые записи и изменить их цвет посредством свойства Font.
Для отображения и ввода цифр нужно добавить специальное поле Edit. Посредством компонента MainMenu есть возможность создать такие опции, как «Вызов справки» и «О программе».
На следующем этапе можно приступать к процессу объявления переменных:
- i – для хранения первого числа, которое будет вводиться;
- р – для хранения второго числа, с которым будет осуществлена математическая операция;
- r – для выведения результата;
- mode – переменная предназначенная для процесса сохранности кода действия.
Для создания кнопок цифр используется следующий программный код:
С помощью этой процедуры нужно выполнить процесс описания всех кнопок с цифрами. При создании кнопок действия процедура изменения знака числа будет задаваться следующим куском программы:

Программный код для написания кнопки сложения определенных чисел будет выглядеть следующим образом:
Что же касается написания кнопок вычитания, умножения и деления, их коды будут выглядеть следующим образом:
Для извлечения арифметического квадратного корня и исчисления функции обратной пропорциональности используются команды:
Чтобы задать процедуру, которая будет вычислять синус числа, используется такой код:

Для косинуса все будет происходить аналогично, но с применением соответствующей функции.
На последующем этапе стоит приступать к созданию формы Form2, которая будет использоваться для того, чтобы вывести необходимую информацию о программе. Форма Form2 будет предназначена для создания справки.
Выполнив все вышеперечисленные действия, есть возможность создать достаточно простой, но в то же время работоспособный калькулятор, который способен выполнять элементарные математические исчисления.
Сегодня, Мы напишем простенький калькулятор на языке программирования Delphi.
Добавим четыре кнопки и три текстовых поля.
Расставьте все элементы, как вам угодно.
Я сделал вот так :

Пишем код :
Для кнопки сложения :
If (Edit1.Text <> '') And (Edit2.Text <> '') then // Проверяем не пустые ли поля
Edit3.Text := FloatToStr(StrToFloat(Edit1.Text) + StrToFloat(Edit2.Text)); // Преобразуем из строкового типа Edit1 и Edit2 в дробный, а для вывода в Edit3 преобразуем из дробного в строковой.
Для кнопки вычитания :
If (Edit1.Text <> '') And (Edit2.Text <> '') then
Edit3.Text := FloatToStr(StrToFloat(Edit1.Text) - StrToFloat(Edit2.Text));
Для кнопки умножения :
If (Edit1.Text <> '') And (Edit2.Text <> '') then
Edit3.Text := FloatToStr(StrToFloat(Edit1.Text) * StrToFloat(Edit2.Text));
Для кнопки деления :
If (Edit1.Text <> '') And (Edit2.Text <> '') then
Edit3.Text := FloatToStr(StrToFloat(Edit1.Text) / StrToFloat(Edit2.Text));
Как вы видите в коде присутствует условие If (Edit1.Text <> ‘ ‘) And (Edit2.Text <> ‘ ‘) then , которое проверяет на пустоту текстовых полей Edit1 и Edit2, если они будут пустые и мы нажмем на кнопку, то ничего не произойдет и спасет нас от ошибки.
Теперь поговорим о преобразовании.
Для того чтобы выполнять действиями с цифрами нам нужно из строкового типа сделать числовой тип.
StrToFloat(Edit1.Text) + StrToFloat(Edit2.Text) — преобразуем из строкового типа в дробный(с плавающей запятой) и производим сложение этих чисел.
Edit3.Text := FloatToStr — теперь, когда мы выполнили действие, нам нужно вывести ответ в Edit3, но опять же нужно преобразовывать, т.к Edit — хранит в себе строкой тип и с помощью FloatToStr, мы преобразуем в строкой тип.
Таблица преобразований :

Ну и наконец проверяем :

Загрузить проект
В проекте я прокомментировал почти весь код — От начала модуля до Конца модуля.
This tutorial is intended for Delphi beginners who have a somewhat steady knowledge of both the components and simple coding within Delphi. Basic processes like naming objects will not be fully described. Programming a calculator is a great way to begin learning any programming language. It offers a practical project that includes many (but not too many) elements of the language. This is just one way you could code a calculator in Delphi. There are probably many ways to this, and I fully challenge you to find new and creative methods of doing such. This specific calculator will be able to handle four mathematical functions with two numbers. Let’s begin.
This tutorial assumes knowledge in certain areas of Delphi programming, including:
- Basic Delphi unit layout. (including knowledge of procedure setups, etc.)
- Basic variable information
- Basic knowledge of the form editor windows and palettes.
- I will assume you are fairly familiar with the basic layout of Delphi; if not, I suggest you first read a few of the articles found over the internet for brand new Delphi programmers.
So the first thing we should do is open Delphi (I will be using Delphi 5, but this tutorial will likely be compatible with most versions of Delphi.) You will be presented with a new project titled «Project 1.» The project includes three detached windows: the Object Inspector, the unit windo, and the form. Now let’s build the design for the calculator.
NOTE: You will be unable to just copy and paste source code as we go along unless you name your objects the same as mine. A list of the objects used and their names are listed towards the bottom of the page. The entire source code is also provided at the bottom of the page.
The Calculator Design[]
My Calculator Layout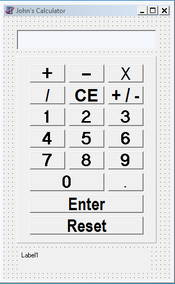
For this calculator, we will be using buttons, labels, edit boxes, and panels from the component palette. All of these components are found in the «Standard» tab of the component palette. We will want an edit box at the very top of the calculator,buttons to add numbers to this edit box, buttons to signify certain mathematical functions, a label to display our answer. You should arrange these components in any way that appeals to you, but I will offer my design for you to follow. My design can be seen to the right.
Here is a list of the components I used to create my calculator:
I suggest you use all the buttons and other components I do for coding purposes, but as said before, I also recommend you to design your calculator in any way you feel appropriate.
You can change what is displayed on the buttons and label by clicking on an individual button or the label and going to the Object Inspector. You will see a list of paramaters and one will be called «Caption.» Click on the white panel directly right of the Caption box and type in the caption you would like to see displayed. You can also change the font displayed by the buttons by changing the many options listed under the «Font» parameter or by simply selecting the white edit box right o the Font box and clicking on the small button that is labeled «…» This should bring up a font palette that will make adjusting the font much easier. You can change the font to both the label and edit box in this way, also. To change the text in the edit box, you will need to adjust the «Text» parameter. I have mine blank, and I suggest you do the same.
Let’s go ahead and compile and test our «calculator.» Do this by pressing F9 or selecting Run>Run. As you can see it looks like what we built, but it is completely useless as far as being a calculator. That’s where the coding comes in.
Coding Your Calculator[]
The Number Buttons (And the Decimal Point)[]
We will start with the most basic coding involved with this calculator: the number buttons. Their sole purpose is to make the numbers that appear on their surface to also appear in the edit box. Before we begin, let’s thoroughly plan what we want to occur when each button is pressed. We want the number to be placed into the edit box behind any numbers that already exist in the edit box. We will create a subroutine that can be called by every button when it is clicked. Creating user-generated subroutines is slightly harder than creating a regular object event, but they often lead to cleaner, more condensed code. Bring up the Unit (the window with the coding). Directly after the word implementation, begin writing your procedure. To do this, begin with the word «procedure» followed by » T(**Name of your form**).(**Name of event**) » followed by » (Sender : TObject); » You can now add code similiar to what I have shown below and read the explanation to make sure you fully understand what is happening in the code. Immediately after the code explanation, I will give you two more steps in implementing this subroutine into every number button and the decimal button.
Here is the code I used for my subroutine:
procedure TCalculatorForm.NumberButtonClick (Sender: TObject);
begin
  NumberEdit.Text := NumberEdit.Text + (Sender as TButton).Caption;
end;
Here is a breakdown of this code:
- «NumberEdit.Text» refers to the edit box we placed at the top of the form. (I renamed all of my objects, and I encourage you to do so, too, but I am only giving you exact names of all my objects in the table at the bottom of the page. To change the name of an object, go to the Object Inspector with that object selected and change the «Name» parameter.)
- The » := » indicates that NumberEdit.Text will be changed in some way.
- What comes after » := » (» NumeberEdit.Text + (Sender as TButton).Caption; «) indicates what the original «NumberEdit.Text» will be changed to.
- By placing the name of the edit box in the portion of the code that indicates what the edit box will be changed to, we insure that the numbers we may have already punched in will stay inside the edit box when we add another number. For example if we have already punched in a 3 on our calculator, we will be able to make this value will equal 31 by simply pressing the 1. Simple as that.
- The » (Sender as TButton).Caption » portion of the code gives the code its ability to add the correct number to the edit box. The » (Sender as TButton) « part refers to the exact button pressed that caused this procedure to execute. The » .Caption » refers to this button’s caption property. Overall, this complete line of code has told the program to add the-button-that-was-clicked’s caption to whatever text already exists in » NumberEdit.Text «. This means you will have to change the caption of each button to the number you want it to input when clicked. To do this, select the button on your form, go to the object inspector, and find the «Caption» property.
Now that you have entered this code block, you have to declare the procedure. This is done in the interface section of your code, beneath the word type. All of your objects are listed here, and you can just add your variation of this code underneath the last object listed. Procedure declaration:
procedure NumberButtonClick (Sender: TObject);
This code is finished, but right now, it is completely useless. This is because it is a subroutine, and nothing is «calling» it. When
I have selected «NumberButtonClick» for this button’s OnClick event.
something calls a subroutine, all of the coding in that subroutine is used by the object or other procedure that has called it. For this subroutine, we will not need to do any extra coding to call it. (Whoopee!) For our last step, we will simply call this subroutine within the Object Inspector. To do this, select one of you number buttons and go to the Object Inspector. Click on the «Events» tab and find the OnClick property. Click in the empty, gray box beside the word «OnClick». The box will turn white and a down arrow will appear to the far right of this box. Click the arrow and a list will appear. This is a list of your procedures, and you will now be able to assign one to your OnClick event. There should only be one, and it should be labeled however you named your button click procedure (I named mine «NumberButtonClick»). Select this option. That button is done. You will have to select this procedure for every number button and the decimal point button, but it’s a lot better that entering code for every single button!
Once you have called the procedure in every number button and the decimal point button, go ahead and run your project. If everything went right, it should compile, and we should be able to add numbers to the edit box by clicking each button.
Hint: You will not be able to copy and paste my code directly if you did not name your objects exactly as I did. A list of the names for each of my components can be found towards the end of this article.
The Negative Button[]
If you were able to get your number buttons running, you are ready to move on to the negative/positive button. First, create an OnClick event holder for this button. To do this, select the negative button on the form and select the Object Inspector. Find OnClick under the Events tab and double click the empty space to the right of the word «OnClick». This creates an event holder. Much of the work we did with the NumberButtonClick procedure has now been done for us. The procedure has been declared in the implementation section, and a code shell has been created. We just have to enter our code between the «begin» and «enter;» within the code shell. Now let’s think about exactly what we want this button to accomplish. It should turn the value of the edit box’s number to a negative if the value is positive. If the value is already negative, we want the returned value to be positive. While it may sound like we will need to build an if then else statement, it is actually easier than that with some simple math. When you multiply a positive times a negative, you will get a negative. When you multiply a negative times a negative, you will get a positive. With that in mind, it will be much simpler to just multiply whatever value is found within the edit box by -1.
Here’s the code for the negative button with an explanation following it:
procedure TCalculatorForm.NegativeClick(Sender: TObject);
var
     OriginalNumber: real;
     TextNumber: string;
begin
     OriginalNumber := -(StrToFloat(NumberEdit.Text));
     TextNumber := FormatFloat('0.##########', OriginalNumber);
     NumberEdit.Text := TextNumber;
end;
Explanation:
- Immediately after the declaration of the procedure, the code declares two «local» variables. These variables can only be seen by this specific procedure and would not be able to be used by any other procedure/event. We will discuss «global» variables shortly.
- «OriginalNumber» is a real variable, meaning it is a number value. Any number value can be assigned to this variable including 10 or 1.61803399.
- In contrast to this, NumberEdit.Text (all of the text that is entered into the edit box at the top of the calculator) is a string variable; however, to make our mathematical function (multiplying by -1) work, we need to use a real variable. To do this, we use the StrToFloat function. This function turns a string variable into a floating point value (real) variable. While we used this function, we also multiplied by -1 but just used a negative sign.
- As seen in the top line of the statement (the statement is everything between begin and end;), we set our NumberEdit.Text that has been turned into a real variable and multiplied by -1 equal to OriginalNumber, a real variable. We now want to put this value back into the edit box; to do such, we will need to turn the real variable back into a string variable.
- The function FomatFloat formats real variables into string variables. We have used this function in the second line of the statement, setting the function and its parameters equal to the string variable TextNumber. Inside the parentheses of FormatFloat, we have two separate items. The first is most likely the most unrecognizeable. The first item is » ‘0.##########’ .» This is an essential part of the FormatFloat function. It is an indicator of exactly how the new string variable should be formatted, giving information on how many number places should be included both before and after the decimal point. The zero before the decimal point indicates that we always want at least one number before the decimal point. If there are anymore numbers before the decimal point included when the calculation is finished, they will also be added to the string. The #s behind the decimal point indicate that those number places are optional. If a value happens to include a number in any of these place holders, they will be included in the string. The last part of the FormatFloat function is the real variable OriginalNumber. This simply means that OriginalNumber is the variable that will be formatted.
- The last line of the statement simply means that the value of the string variable «TextNumber» should become the the text of NumberEdit.
The Math Function Buttons[]
The next coding we will add to our program is the coding needed to create the mathematical functions buttons. I will give you the code and walk-through for the addition button and then give a quick overview on how to modify that code for the subtraction, multiplication, and division buttons. First, create an OnClick event holder for the addition buttonm, and then add code similiar to this:
procedure TCalculatorForm.AdditionClick(Sender: TObject);
begin
     Math := 'Add';
     FNumber := StrToFloat(NumberEdit.Text);
     NumberEdit.Text := ;
end;
Here’s an explanation:
- The first thing that you might notice is that there are two new variables that were not declared within the procedure: «Math» and «FNumber». These were not declared because they will need to be used in another procedure coming up, so we will need to be delcared with a «global scope.» This means they will be accessible to all procedures within the unit. To declare a variable with a global perspective, declare it in the same format as delcaring a variable in a procedure, but do so directly beneath the word «Implementation» found towards the top of the unit. «Math» is a string variable, «FNumber» is a real variable.
- The first line of the statement simply sets the variable Math equal to the string ‘Add’. Notice ‘Add’ is between apostrophes; this is because it is an actual string not an identifier/variable.
- The second line of the statement sets the real variable FNumber equal to the function of StrToFloat(NumberEdit.Text). This is similiar to the StrToFloat function found in the negative button explanation. We will eventually need FNumber to be a floating point value, so the conversion is done in this step. It also allows us to set FNumber equal to a value and keep that value stored in memory until it is needed again.
- The last line of this statement sets the edit box back to blank, so another number can be added.
To modify this code for any of the mathematical function buttons, change the string for what the variable Math equals. If the function is subtraction, set Math equal to ‘Subtract’. Here are the strings I used:
- Addition … Math := ‘Add’
- Subtraction … Math := ‘Subtract’
- Multiplication … Math := ‘Multiply’
- Division … Math := ‘Divide’
You will see how these strings will initiate the correct function in the next step.
The Enter Button[]
The enter button is an extremely vital part of the calculator and one of the more complicated coding structures. In this calculator, we will use if then statements to differentiate between the math functions that need to be performed in the calculation. I will give you the coding for the overall procedure and one of the if then statements and an explanation; then, I will explain how to implement if then statements for the other math functions.
Here’s the coding for an OnClick event of the Enter button:
procedure TCalculatorForm.EnterClick(Sender: TObject);
var
    Text : string;
    Answer, SNumber : real;

begin
  SNumber := StrToFloat(NumberEdit.Text);

  begin
    if Math = 'Add' then
      Answer := FNumber + SNumber;
      Text := FormatFloat('0.#####', Answer);
      Equals.Caption := '= ' + Text;
      NumberEdit.Clear;
  end;
Explanation:
- In this procedure, there are three variables declared: Text (a string variable), answer (a real variable), and SNumber (a real variable).
- At the beginning of the statement, you will find the variable SNumber is set equal to the function StrToFloat(NumberEdit.Text). By now, this process should be fairly straightforward. SNumber is now the second number that will be included in the calculation, and it is formatted as a floating-point value.
- The next line begins our first if then statement. An if then statement sets a condition that must be met for the process following it to be completed. In our if then statement, the variable Math must equal ‘Add’ (this is where our varied string values comes in). If Math does equal ‘Add’, then the four lines of code following the conditional statement will be executed by the program. If the conditional statement is not met, those four lines are skipped over.
- Assuming the condition is met, the program will first read the top line. This line sets the real variable Answer equal to FNumber + SNumber. This is the heart of the addition function. The variable Answer will be set equal to the sum of FNumber and SNumber. FNumber and SNumber were pre-determined by the values inputted into the calculator’s edit box.
- The string variable «Text» is then set equal to the function FormatFloat(‘0.#####’, Answer). This process takes a floating point value (Answer) and turns it into a string value with a defined format (‘0.#####’).
- The answer of the calculation is then displayed in the label at the bottom of the calculator (Equals.Caption) through the process on the third line. The caption paramater of the label «Equals» is set equal to both the string value ‘= ‘ and the value of the string variable Text. The edit box is blanked using the clear command.
- In the last line of the if then statement the edit box is set to blank so another calculation can be made.
To format this code for any of the mathematical functions just change the conditional statement so that «Math» equals the string you assigned to that specific mathematical function. Also, change the first line of the if then statement, so the correct mathematical process is executed. For example, here is the code for the multiplication process:
  begin
    if Math = 'Multiply' then
      Answer := FNumber * SNumber;
      Text := FormatFloat('0.#####', Answer);
      Equals.Caption := '= ' + Text;
      NumberEdit.Clear;
  end;
Just add this statement within the enter button event handler but make sure it is separate from all other if then statements.
The Clear Value Button[]
I also included a clear value button on my calculator, represented by the caption «CE». This button will simply erase what is found in the edit box at the time of clicking the button. It will not erase values assigned to any of the variables. The code is very simple. It just sets the NumberEdit.Text equal to a blank string using the edit box specific command «Clear.» Here’s the code:
procedure TCalculatorForm.ClearValueClick(Sender: TObject);
  begin
     NumberEdit.Clear;
  end;
The Reset Button[]
A reset button is included towards the bottom of my calculator with the caption «Reset». This button sets many of the variables and components included in the calculator back to a rest stage. Here’s the code:
procedure TCalculatorForm.ResetClick(Sender: TObject);
  begin
    Equals.Caption := ;
    NumberEdit.Clear;
    FNumber := 0;
    SNumber := 0;
    Math := 'Default';
  end;
Explanation:
- First line of statement sets the Equals label to a blank caption.
- Second line makes the edit box blank using the command «Clear».
- Third and fourth statments set FNumber and SNumber to zero, respectively.
- The fifth line gives the variable Math a meaningless string value.
Time to Celebrate[]
Compile the project. Did it work? If yes, go ahead and take a moment to celebrate. You deserve it. If no, look at the errors Delphi displays and try to work through the problems. Remember: unless you named all your objects the same as mine, you will be unable to just copy and paste the source code.
Now that you’re done, you can begin thinking about how to improve your calculator. There are a lot of different things you can incorporate to build your calculator even better. Maybe you could add trig functions or add blocks so that invalid strings can be entered into the edit box. Maybe you want a message displayed when the user tries to divide by zero. It’s all up to your creativity, and I fully challenge you to add original code to your calculator; it’s the best way to master Delphi!
My Component Names[]
If you would like to more closely follow my calculator setup, I have listed all the components, descriptions, and names below. To change the name of an object, go to the Object Inspector with that object selected and change the «Name» parameter.
| Component Type | General Component Descripion | Name |
| Form | The overall form for this calculator project. | CalculatorForm |
| Button | Button for the #1. | One |
| Button | Button for the #2. | Two |
| Button | Button for the #3. | Three |
| Button | Button for the #4. | Four |
| Button | Button for the #5. | Five |
| Button | Button for the #6. | Six |
| Button | Button for the #7. | Seven |
| Button | Button for the #8. | Eight |
| Button | Button for the #9. | Nine |
| Button | Button for the #0. | Zero |
| Button | Button for the decimal point. | Decimal |
| Button | Button for the addition function. | Addition |
| Button | Button for the subtraction function. | Subtraction |
| Button | Button for the multiplication function. | Multiplication |
| Button | Button for the division function. | Division |
| Button | Button for the turning the negative sign on/off. | Negative |
| Button | Button for clearing the current value displayed in the edit box (CE). | ClearValue |
| Button | Button for finishing the function inputs and starting calculations (Enter). | Enter |
| Button | Button for resetting the form to its original state. | Reset |
| Edit | Edit box for the user to input numbers that will be used in calculations. | NumberEdit |
| Label | Label used to display the result of the calculations. | Equals |
| Panel | Panel used to make the design more attractive. | Panel1 |
My Source Code[]
Here is my source code if you are interested in viewing the project in its entirety.
unit CalculatorUnit;

interface

uses
  Windows, Messages, SysUtils, Classes, Graphics, Controls, Forms, Dialogs,
  StdCtrls, ExtCtrls;

type
  TCalculatorForm = class(TForm)
    Addition: TButton;
    Subtraction: TButton;
    Multiplication: TButton;
    Division: TButton;
    One: TButton;
    Two: TButton;
    Three: TButton;
    Four: TButton;
    Five: TButton;
    Six: TButton;
    Seven: TButton;
    Eight: TButton;
    Nine: TButton;
    Zero: TButton;
    Decimal: TButton;
    Enter: TButton;
    Equals: TLabel;
    ClearValue: TButton;
    Panel1: TPanel;
    Negative: TButton;
    Reset: TButton;
    NumberEdit: TEdit;
    procedure NumberButtonClick (Sender: TObject);
    procedure NegativeClick(Sender: TObject);
    procedure AdditionClick(Sender: TObject);
    procedure SubtractionClick(Sender: TObject);
    procedure MultiplicationClick(Sender: TObject);
    procedure DivisionClick(Sender: TObject);
    procedure EnterClick(Sender: TObject);
    procedure ClearValueClick(Sender: TObject);
    procedure ResetClick(Sender: TObject);

  private
    { Private declarations }
  public
    { Public declarations }
  end;

var
  CalculatorForm: TCalculatorForm;

implementation

{$R *.DFM}

//'The variables listed below have a "global scope."

var
   FNumber : real;
   Math : string;

//The following procedure gives the number buttons their ability to add a
//numerical value to the first number's text box.

procedure TCalculatorForm.NumberButtonClick (Sender: TObject);
begin
  NumberEdit.Text := NumberEdit.Text + (Sender as TButton).Caption;
end;

//The following procedure controls the negative/positive button.  The string in
//the edit box is converted into a real number, multiplied by -1, and then
//converted back into a string to be placed back into the edit box.

procedure TCalculatorForm.NegativeClick(Sender: TObject);
var
     OriginalNumber: real;
     TextNumber: string;
begin
     OriginalNumber := -(StrToFloat(NumberEdit.Text));
     TextNumber := FormatFloat('0.##########', OriginalNumber);
     NumberEdit.Text := TextNumber
end;

//The following procedures give the mathematical function buttons their ability
//to instigate a specific math function.  When a function button is pressed,
//the string variable "Math" is assigned a specific term.  The procedures also
//turn the first string found in the edit box into a floating variable and
//clears the edit box so another value can be entered.

procedure TCalculatorForm.AdditionClick(Sender: TObject);
begin
     Math := 'Add';
     FNumber := StrToFloat(NumberEdit.Text);
     NumberEdit.Clear;
end;

procedure TCalculatorForm.SubtractionClick(Sender: TObject);
begin
     Math := 'Subtract';
     FNumber := StrToFloat(NumberEdit.Text);
     NumberEdit.Clear;
end;

procedure TCalculatorForm.MultiplicationClick(Sender: TObject);
begin
    Math := 'Multiply';
     FNumber := StrToFloat(NumberEdit.Text);
     NumberEdit.Clear;
end;

procedure TCalculatorForm.DivisionClick(Sender: TObject);
begin
    Math := 'Divide';
    FNumber := StrToFloat(NumberEdit.Text);
    NumberEdit.Clear;
end;

//The following procedure gives the enter button its ability to interpret all
//previous procedures and calculate the correct answer.  The overall procedure
//turns the second number (formatted as a string) entered into the edit box into
//a floating variable.  The procedure then breaks into if statements.
//These if statements corespond with the string value the variable "Math" was
//given in above procedures.  The if statements contain code to give the real
//variable "Answer" which is formatted to be placed in the label designated for
//answers.

procedure TCalculatorForm.EnterClick(Sender: TObject);
var
   Answer, SNumber : real;
   Text : string;

begin
    SNumber := StrToFloat(NumberEdit.Text);

  begin
    if Math = 'Add' then
      Answer := FNumber + SNumber;
      Text := FormatFloat('0.#####', Answer);
      Equals.Caption := '= ' + Text;
      NumberEdit.Clear;
  end;

  begin
    if Math = 'Subtract' then
      Answer := FNumber - SNumber;
      Text := FormatFloat('0.#####', Answer);
      Equals.Caption := '= ' + Text;
      NumberEdit.Clear;
  end;

  begin
    if Math = 'Multiply' then
      Answer := FNumber * SNumber;
      Text := FormatFloat('0.#####', Answer);
      Equals.Caption := '= ' + Text;
      NumberEdit.Clear;
  end;

  begin
    if Math = 'Divide' then
      Answer := FNumber / SNumber;
      Text := FormatFloat('0.#####', Answer);
      Equals.Caption := '= ' + Text;
      NumberEdit.Clear;

  end;

end;

//This is the procedure for the clear value button.  This button will only clear
//a value entered onto the edit box; it will not clear selected functions.

procedure TCalculatorForm.ClearValueClick(Sender: TObject);
  begin
    NumberEdit.Clear;
  end;

//This is a procedure to reset the calculator.

procedure TCalculatorForm.ResetClick(Sender: TObject);
  begin
    Equals.Caption := ;
    NumberEdit.Clear;
    FNumber := 0;
    SNumber := 0;
    Math := 'Default';
  end;

end.
JMcSub