Время на прочтение
16 мин
Количество просмотров 9.2K
One UI существует уже как 3 года (с 2018), а уроков по тому, как сделать похожий дизайн, в мире android, я так и не нашёл. Не порядок… Сегодня же, мы начнём прокладывать этот тяжёлый и тернистый путь.
Зарождение Siesta
Я думаю, разделить статьи на версии нашего домашнего One UI. Благодаря этому, я буду иметь уникальную возможность общаться и отвечать на интересующие вас вопросы. Возможно, вы знаете более оптимизированный и лучший способ реализовать что-либо и в следующей статье (версии нашего One UI — Siesta) мы можем это применить.
В результате всех наших страданий мы получим вот такое приложение на выходе. Да, это не копия Samsung оболочки (прям совсем), но наша цель – унаследовать лишь идею использования одной рукой, а не скопировать шрифты и иконки…
Идея One UI
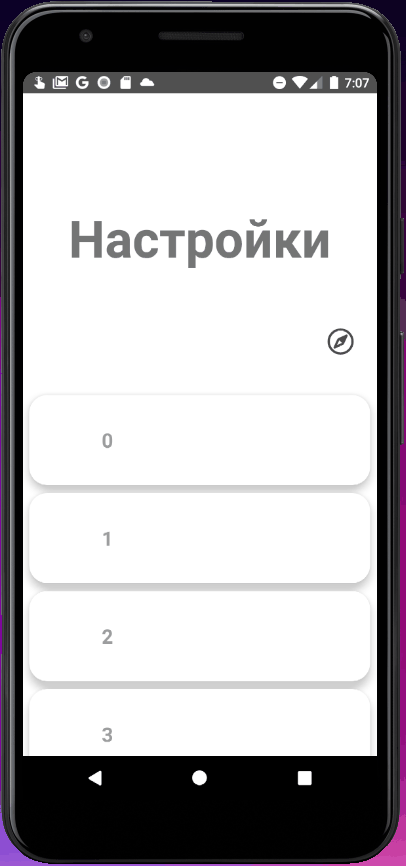
Давайте взглянем на стандартное приложение настроек в OneUI.

Весь экран можно разделить на зоны, где 1/3 экрана занимает огромный текст, показывающий на какой вкладке настроек мы находимся. Благодаря ему пользователи не должны тянуться на верхние края экрана. Затем идёт 2-ая зона, назовём её “панель управления”, эта зона прокручивается пока не достигнет верхнего края экрана, после чего будет примагничена, дабы не улететь за его края. В последнюю зону входит весь остальной контент, с которым будет взаимодействовать пользователь.
Это и есть главная идея OneUI которую мы должны повторить.
Создание и настройка проекта
Начнём с создания нового проекта, укажем минимальные требования Android 8.0, так как начиная с данной версии в TextView можно присвоить AutoSize параметр. Если вам необходимо работать с более ранними версиями Android – не беда. Существует библиотека поддержки в таких случаях.
Распространение Android
Frontend — создание зон
Итак, перед нами пустое Activity. Родительским элементом будет являться RelativeLayout, потому что нам необходимо поставить “панель управления” на ScrollView. После чего создаём сам ScrollView. В ScrollView может находится лишь один дочерний элемент, этим элементом будет являться LinearLayout, т.к. он позволяет распределять элементы последовательно. В примере я вставил часть кода, чтобы вы понимали наглядно о чём идёт речь.
<?xml version="1.0" encoding="utf-8"?>
<RelativeLayout xmlns:android="http://schemas.android.com/apk/res/android"
    xmlns:tools="http://schemas.android.com/tools"
    android:layout_width="match_parent"
    android:layout_height="match_parent"
    tools:context=".MainActivity">

<!--место 2 зоны-->
    <RelativeLayout
        android:layout_width="match_parent"
        android:layout_height="50dp">

    </RelativeLayout>

<!--здесь будут храниться 1 и 3 зона-->
    <ScrollView
        android:id="@+id/scrollView"
        android:layout_width="match_parent"
        android:layout_height="match_parent">

        <LinearLayout
            android:id="@+id/scrollLinearLayout"
            android:layout_width="match_parent"
            android:layout_height="match_parent"
            android:orientation="vertical">

        </LinearLayout>
    </ScrollView>
</RelativeLayout>
1 зона — theBigText
Теперь необходимо создать тот самый большой текст. Дадим ему id, строгую высоту в 250dp, установим параметр autoSizeTextType=”uniform” для автоматического изменения размера, gravity=”center” для центрирования, пару padding’ов для красоты и жирный шрифт.
<TextView
    android:id="@+id/theBigText"
    android:layout_width="match_parent"
    android:layout_height="250dp"
    android:autoSizeTextType="uniform"
    android:gravity="center"
    android:paddingHorizontal="50dp"
    android:paddingTop="100dp"
    android:paddingBottom="30dp"
    android:text="Настройки"
    android:textStyle="bold"/>
2 зона — «панель управления»
Теперь изменим нашу панель управления.
Добавим id, установим строгую высоту в 50dp, orientation=”horizontal” для правильного отображения элементов и layout_marginTop=”250dp” (в размер нашего главного текста, чтобы быть ровно под ним). Мы не можем установить атрибуты, обращающиеся напрямую к theBigText, т.к. он является дочерним элементом ScrollView, поэтому приходится ставить строгие значения. Заполним нашу “панель управления”. Вставим в неё TextView и установим для неё атрибуты: gravity=”center_vertical”, textSize=”30sp” и alpha=”0” (ведь текст должен быть виден только, когда панель прокручена вверх)
ImageView: установим строгий размер в 40dp, gravity=”center_vertical”, alpha=”0.7”, установим картинку компаса и присоединим к правой части экрана.
Опять же, все наглядные примеры находятся ниже.
<RelativeLayout
    android:id="@+id/panel"
    android:layout_width="match_parent"
    android:layout_height="50dp"
    android:layout_marginTop="250dp"
    android:background="@color/white"
    android:orientation="horizontal">

    <TextView
        android:id="@+id/panelText"
        android:layout_width="wrap_content"
        android:layout_height="match_parent"
        android:gravity="center_vertical"
        android:paddingStart="20dp"
        android:text="настройки"
        android:textSize="30sp"
        android:alpha="0" />

    <ImageView
        android:id="@+id/compassIcon"
        android:layout_width="40dp"
        android:layout_height="match_parent"
        android:layout_alignParentEnd="true"
        android:layout_marginEnd="20dp"
        android:gravity="center_vertical"
        android:src="@drawable/compas"
        android:alpha="0.7" />
</RelativeLayout>
Теперь мы столкнулись с проблемой. Наша “панель инструментов” занимает место, а если мы добавим любой элемент в ScrollView, то они будут пересекаться, поэтому, мы добавим пустой View, который будет съедать нужное нам под 2-ую зону место.
<View
    android:layout_width="match_parent"
    android:layout_height="80dp" />
3 зона — контент
Фронтенд главного Activity завершён. Теперь, давайте перейдём к заполнению 3-й зоны. Зоны контента. На 1-м скриншоте, можно было заметить, что зона контента состоит из “скруглённых прямоугольников”, давайте их повторим.
Для этого создадим отдельный LayoutResource под именем “block”. Он не будет иметь бэкенд, лишь xml файл.

CardView подойдёт под наш блок как никто лучше! Дадим нужные параметры CardView и заполним его картинкой и текстом. Все параметры схожи с предыдущими, поэтому повторно объяснять их не вижу смысла.
<?xml version="1.0" encoding="utf-8"?>
<androidx.cardview.widget.CardView android:id="@+id/cardView"
    android:layout_width="match_parent"
    android:layout_height="80dp"
    android:layout_margin="8dp"
    app:cardCornerRadius="20dp"
    app:cardElevation="20dp"
    xmlns:app="http://schemas.android.com/apk/res-auto"
    xmlns:android="http://schemas.android.com/apk/res/android">

    <LinearLayout
        android:layout_width="match_parent"
        android:layout_height="match_parent"
        android:orientation="horizontal"
        android:weightSum="3">

        <ImageView
            android:id="@+id/image"
            android:layout_width="60dp"
            android:layout_height="60dp"
            android:layout_gravity="center"
            android:layout_marginVertical="20dp"
            android:layout_marginStart="10dp"
            android:alpha="0.7" />

        <TextView
            android:id="@+id/text"
            android:layout_width="match_parent"
            android:layout_height="match_parent"
            android:layout_margin="10dp"
            android:textSize="22sp"
            android:textStyle="bold"
            android:alpha="0.7"
            android:gravity="left|center_vertical" />
    </LinearLayout>
</androidx.cardview.widget.CardView>
С фронтендом покончено, теперь можно переходить к самому интересному!
Backend
Перед setContentView я предлагаю внедрить несколько параметров. Все комментарии переносятся в код.
class MainActivity : AppCompatActivity() {
    override fun onCreate(savedInstanceState: Bundle?) {
        super.onCreate(savedInstanceState)
        supportActionBar?.hide()//Убирает верхний бар с названием приложения
        AppCompatDelegate.setDefaultNightMode(AppCompatDelegate.MODE_NIGHT_NO)//Ставит светлую тему по умолчанию
        window.navigationBarColor = resources.getColor(R.color.black)//Ставит чёрный цвет навигационной панели
        setContentView(R.layout.activity_main)
    }
}
Теперь же, нужно создать пару глобальных переменных
private lateinit var scrollView: ScrollView
private lateinit var panel: RelativeLayout
private lateinit var panelText: TextView
private lateinit var theBigText: TextView
private lateinit var compassIcon: ImageView
private lateinit var scrollLinearLayout: LinearLayout
После setContentView инициализируем наши переменные
scrollView = findViewById(R.id.scrollView)
panel = findViewById(R.id.panel)
panelText = findViewById(R.id.theBigText)
theBigText = findViewById(R.id.panelText)
compassIcon = findViewById(R.id.compassIcon)
scrollLinearLayout = findViewById(R.id.scrollLinearLayout)
Теперь, мы должны получить MarginTop нашей “панели управления” в пикселях, т.к. отслеживать теперь мы будем только их. Чтобы это сделать добавляем в глобальные переменные maxScroll.
private var maxScroll = 0
private var scrollY = 0
И находим сам отступ
val params =
    panel.layoutParams as ViewGroup.MarginLayoutParams//Высчитывает максимально возможный скролл для огромного текста
maxScroll = params.topMargin
Давайте заполним 3 зону контентом.
Для этого создадим функцию addCardToScroll. Все комментарии переехали в код, если вдруг что-то непонятно, отвечу в комментариях.
private fun addCardToScroll(_input: String) {
    val blockView = View.inflate(this, R.layout.block, null)//Создаём 1 block
    val blockText = blockView.findViewById<TextView>(R.id.text)//Инициализируем поле Text
    val blockImage = blockView.findViewById<ImageView>(R.id.image)//Инициализируем поле Image
    var isCheck = false
    blockText.text = _input
    blockImage.setImageResource(R.color.white)

    scrollLinearLayout.addView(blockView)//Добавляем block в scrollView

    val params =
        blockView.layoutParams as? ViewGroup.MarginLayoutParams
    params?.setMargins(20, 12, 20, 12)//Устанавливаем Margin
    blockView.layoutParams = params//Присваиваем новые параметры
    blockView.elevation = 20f//Поднимаем карточку вверх для появления тени вокруг
    blockText.setAutoSizeTextTypeUniformWithConfiguration(
        1, 22, 1, TypedValue.COMPLEX_UNIT_DIP)//С помощью кода устанавливаем атрибут AutoSize
    //Присваиваем слушатель
    blockView.setOnClickListener {
        isCheck = !isCheck
        if (isCheck)
            blockImage.setImageResource(R.drawable.checkyes)//Заменяем иконку
        else
            blockImage.setImageResource(R.drawable.checkno)

        animateView(blockImage)//Анимируем иконку
    }
}
//Анимация иконок
private fun animateView(view: ImageView) {
    when (val drawable = view.drawable) {
        is AnimatedVectorDrawable -> {
            drawable.start()
        }
    }
}
Мои картинки – анимации xml. Это позволяет добавить жизни в наше приложение. Вы же, можете заменить их на любую статичную картинку. Весь мой код, включая анимационные картинки, вы сможете найти на GitHub.
Уже хочется проверить, как работает наше приложение, не правда ли?
Для этого добавим в конце нашего onCreate() такие строчки, чтобы заполнить 3 зону контентом и запустим наше приложение.
for(index in 0..10){
    addCardToScroll(index.toString())
}
Оживляем «панель управления»
Что же, приложение работает, анимации – тоже. Хорошо. А вот наша “панель управления” стоит на своём и никуда не двигается – логично, мы ведь и не прописали в каких случаях она должна двигаться. Но сначала, я бы изменил цвета нашего статус бара. Для этого, необходимо зайти в value->colors и изменить цвета. Можете использовать мой “элегантный” набор.
<?xml version="1.0" encoding="utf-8"?>
<resources>
    <color name="purple_200">#000000</color>
    <color name="purple_500">#4E4E4E</color>
    <color name="purple_700">#505050</color>
    <color name="teal_200">#717171</color>
    <color name="teal_700">#515151</color>
    <color name="black">#FF000000</color>
    <color name="white">#FFFFFFFF</color>
</resources>
Теперь перейдём к “панели управления“.
Наша цель -> узнать когда был произведён скролл. Повесить своего рода слушатель на ScrollView. Это делается благодаря этим строчкам.
scrollView.viewTreeObserver.addOnScrollChangedListener(ViewTreeObserver.OnScrollChangedListener { //Включается когда производится скролл
    scrollEngine()
})
scrollEngine() – функция двигающая нашу “панель инструментов”, давайте напишем её.
private fun scrollEngine() {
    val upDown: Boolean = scrollView.scrollY < scrollY// true if scroll up
    val params =
        panel.layoutParams as ViewGroup.MarginLayoutParams//Параметры LinearLayout MiniMain

    val temp: Int = if (upDown) {//Считаем на сколько нужно подвинуть нашу panel
        if (scrollView.scrollY <= maxScroll) {
            params.topMargin + (scrollY - scrollView.scrollY)
        } else
            0
    } else
        params.topMargin - scrollView.scrollY + scrollY
    if ((temp < 0) && !(upDown)) {//Двигаем panel в зависимости от прокрутки
        params.topMargin = 0
    } else if ((temp > maxScroll) && (upDown)) {
        params.topMargin = maxScroll
    } else {
        params.topMargin = temp
    }

    panel.layoutParams = params//Присваиваем изменения
    scrollY = scrollView.scrollY
}
Выглядит страшно, но если посидеть 5 минут и разобраться как это работает, то всё сразу станет ясно. Исчерпывающие комментарии находятся непосредственно в коде.
Давайте запустим и проверим результат.

Как мы видим, всё работает прекрасно, не учитывая пару багов*. Ползунок, показывающий где мы находимся в ScrollView, пересекается с нашей “панелью инструментов”. И самым простым решением будет отключить его насовсем. Делается это в xml файле таким параметром в ScrollView.
android:scrollbars="none"2-й проблемой является то, что наша панель периодически сливается с зоной контента. Эту проблему можно решить динамическим добавлением тенью.
private fun alphaElevation() {
        val params =
            panel.layoutParams as ViewGroup.MarginLayoutParams
        panelText.alpha =
            (1 - (scrollY.toFloat() * 100.0 / maxScroll.toFloat() / 100.0) / 0.5).toFloat()//Плавное исчезновение/появление panelText
        theBigText.alpha = (scrollY.toFloat() * 100.0 / maxScroll.toFloat() / 100.0).toFloat()//Плавное исчезновение/появление большого текста
//Если вдруг захотите, чтобы иконка тоже появлялась плавно, раскомментируете данный участок
//        var settingsAlpha =
//            ((scrollY.toFloat() * 100.0 / maxScroll.toFloat() / 100.0)).toFloat()
//        if (settingsAlpha < 0.7f)
//            CompasIcon.alpha = settingsAlpha
//        else
//            CompasIcon.alpha = 0.7f
        //Если panel достигла верхнего края экрана -> добавить тень
        if (params.topMargin == 0)
            panel.elevation = 10f
        else
            panel.elevation = 0.1f
    }
Теперь наш слушатель ScrollView должен выглядеть так.
scrollView.viewTreeObserver.addOnScrollChangedListener(ViewTreeObserver.OnScrollChangedListener { //Включается когда производится скролл
    scrollEngine()
    alphaElevation()
})
И снова проверим результат

Магия магнитов
Потрясающе, но есть одно но. “Панель инструментов” имеет 2 стандартных положения:
-
Когда panel примагничено к верхнему краю экрана.
-
Изначальное положение.
Так вот, в настоящем OneUI ScrollView смещается, если “панель инструментов” находится между этими положениями. И смещается оно в ту сторону, к которой ближе находится. Звучит возможно не понятно, но на следующей gif анимации всё будет показано.
Дополнительная проблема в том, что нам недостаточно отслеживать, где находится “панель инструментов”, нам необходимо знать, когда пользователь перестал взаимодействовать с экраном. Проще говоря — поднял палец. И для плавности работы и более лучшего внешнего вида, нам придётся применить задержку в какое-то количество секунд, ведь ScrollView может быть ещё в движении.
Начнём решать проблему с самых низов.
Необходимо узнать, когда пользователь прикасался к экрану, а когда нет. В этом нам поможет специальный слушатель.
//Проверка нажатия на экран
@SuppressLint("ClickableViewAccessibility")
fun touchFun() {
    scrollView.setOnTouchListener { v, event ->
        val action = event.action
        when (action) {
            MotionEvent.ACTION_DOWN -> {
                false
            }

            MotionEvent.ACTION_UP -> {
                threadTimer()
                false
            }
            MotionEvent.ACTION_CANCEL -> {
                false
            }
            MotionEvent.ACTION_OUTSIDE -> {
                false
            }
            else -> false
        }
    }
}
Проверка на нажатие есть. Теперь необходимо создать функцию, которая будет плавно примагничивать и двигать наш ScrollView.
//Таймер+приведение panel в стандартное положение
private fun threadTimer() {
    var lastScrollY = 0
    //Мы не имеем права использовать заморозки в главном UI потоке, поэтому вынуждены создать новый
    Thread {
        //Пока новое положение ScrollView не сравнится со старым
        while (scrollView.scaleY.toInt() != lastScrollY) {
            lastScrollY = scrollView.scrollY
            //Пол секунды
            Thread.sleep(500)
            //Если текущее положение не равняется предыдущему
            if (scrollView.scaleY.toInt() != lastScrollY)
                lastScrollY = scrollView.scaleY.toInt()
        }
        //Если положение ScrollView меньше, чем максимальное положение panel
        if (scrollY < maxScroll) {
            //Елси ScrollView ближе к максимальному значению panel
            if (scrollY >= maxScroll / 3)//Плавный скролл
                //Так как мы не можем изменять UI не из главного потока, мы используем post
                scrollView.post { scrollView.smoothScrollTo(0, maxScroll) }
            //Если ScrollView ближе к верхнему краю экрана
            else if (scrollY < maxScroll / 3)
            //Так как мы не можем изменять UI не из главного потока, мы используем post
                scrollView.post { scrollView.smoothScrollTo(0, 0) }
        }
    }.start()
}
Итог
Вот теперь это выглядит потрясающе, ну на мой сугубо личный взгляд, и мы смогли повторить ту самую идею, которую несёт в себе оболочка OneUI. Так же ли всё работает у Samsung? Конечно же нет. Но тот способ, который я описал, позволит вам лучше понять всё происходящее здесь. Так как у нас есть свои собственные отличительные черты, я предлагаю назвать наше дизайнерское решение Siesta 1.0. Надеюсь, вам поможет данная статья, т.к. в своё время, её мне очень не хватало и во всём разбираться пришлось с 0. Комментируете, если что-то не понятно, ну и конечно делитесь своим мнением, как вам моё детище и One UI.
Данное приложение вы можете найти на GitHub. Бонусом идёт пример приложения использующее Siesta 1.0, оно спрятано в подсказке.
-
Ссылка на GitHub
-
Тестовое приложение использующее Siesta 1.0
Если очень грубо определить, что такое лаунчер, то это приложение, которое может представлять домашний экран устройства и показывать список работающих на устройстве приложений. Другими словами, лаунчер это то, что вы видите при нажатии кнопки Home на устройстве. Сейчас вы скорее всего используете стандартный лаунчер, который был установлен вместе с операционной системой. На Play Market существует множество таких программ, установив которые, вы можете видоизменить оформление своего аппарата:

Фактически каждый производитель смартфонов и планшетов имеет свой собственный лаунчер и стиль оформления (например, Samsung — TouchWiz, HTC — Sense).
В этом уроке мы научимся создавать простой лаунчер с базовым пользовательским интерфейсом. В нашем приложении будет два экрана:
— домашний экран, отображающий обои рабочего стола;
— экран, показывающий список установленных приложений и некоторую информацию о них;
Итак, начинаем. Создаем новый проект, названия традиционно оставляем по умолчанию, можете ввести какие нибудь свои. Минимальная версия для запуска приложения — Android 2.2, выбираем Blank Activity.
Сразу идем редактировать файл манифест приложения. Нам нужно добавить здесь 2 activity и задать им некоторые настройки. Открываем файл AndroidManifest.xml и добавим туда следующее:
<activity
 android:name="ah.hathi.simplelauncher.HomeActivity"
 android:label="Simple Launcher Home"
 android:theme="@android:style/Theme.Wallpaper.NoTitleBar.Fullscreen"
 android:launchMode="singleTask"
 android:stateNotNeeded="true"
 >
 <intent-filter>
 <action android:name="android.intent.action.MAIN" />
 <category android:name="android.intent.category.HOME" />
 <category android:name="android.intent.category.DEFAULT" />
 </intent-filter>
</activity>
В этот код мы добавили категории android.intent.category.HOME и android.intent.category.DEFAULT для того, чтобы наше приложение вело себя как лаунчер и отображалось при нажатии на кнопку Home устройства.
Также нужно настроить режим запуска launchMode на singleTask для того, чтобы на данный момент работает только одно нужное Activity. Для отображения пользовательской картинки на заставке, мы использовали настройку темы Theme.Wallpaper.NoTitleBar.FullScreen.
Второе activity, как уже было сказано, будет отображать установленные на устройстве приложения и немного информации о них. Для этой activity не будет использоваться никаких особенных настроек, назовем ее AppsListActivity:
<activity
 android:name="ah.hathi.simplelauncher.AppsListActivity"
 android:theme="@android:style/Theme.NoTitleBar.Fullscreen"
 >
</activity>
Создадим xml файл разметки для будущего класса HomeActivity. В папке res/layout создаем файл по имени activity_home.xml. Он будет содержать всего одну кнопку, при нажатии на которую пользователь с домашнего экрана будет попадать на экран со списком установленных приложений:
<RelativeLayout xmlns:android="schemas.android.com/apk/res/android"
 xmlns:tools="schemas.android.com/tools"
 android:layout_width="match_parent"
 android:layout_height="match_parent"
 tools:context=".HomeActivity" >
 <Button
 android:id="@+id/apps_button"
 android:layout_width="wrap_content"
 android:layout_height="wrap_content"
 android:layout_alignParentRight="true"
 android:layout_alignParentTop="true"
 android:layout_marginRight="10dp"
 android:layout_marginTop="10dp"
 android:text="Show Apps"
 android:onClick="showApps"
 />
 </RelativeLayout>
Далее создаем файл xml для AppsListActivity в той же папке, назовем его activity_apps_list.xml. Он будет содержать ListView для отображения списка приложений:
<?xml version="1.0" encoding="utf-8"?>
<LinearLayout xmlns:android="schemas.android.com/apk/res/android"
 android:layout_width="match_parent"
 android:layout_height="match_parent"
 android:orientation="vertical" >
 <ListView
 android:id="@+id/apps_list"
 android:layout_width="match_parent"
 android:layout_height="match_parent"
 >
 </ListView>
 </LinearLayout>
Создаем еще один xml файл по имени list_item.xml. Этот файл будет определять вид заданного выше ListView. Каждый пункт списка будет представлять одно установленное на устройство приложение. Здесь будет отображаться иконка, название и имя пакета приложения. Отображение иконки будет происходить через элемент ImageView, а имя приложения и пакета в TextView:
<?xml version="1.0" encoding="utf-8"?>
<RelativeLayout xmlns:android="schemas.android.com/apk/res/android"
 android:layout_width="match_parent"
 android:layout_height="match_parent"
 android:padding="10dp"
 >
 <ImageView
 android:id="@+id/item_app_icon"
 android:layout_width="wrap_content"
 android:layout_height="wrap_content"
 android:layout_alignParentLeft="true"
 android:layout_centerVertical="true"
 />
 <TextView
 android:id="@+id/item_app_label"
 android:layout_width="wrap_content"
 android:layout_height="wrap_content"
 android:layout_toRightOf="@+id/item_app_icon"
 android:paddingLeft="10dp"
 />
 <TextView
 android:id="@+id/item_app_name"
 android:layout_width="wrap_content"
 android:layout_height="wrap_content"
 android:layout_below="@+id/item_app_label"
 android:layout_toRightOf="@+id/item_app_icon"
 android:paddingLeft="10dp"
 />
 </RelativeLayout>
Теперь нужно создать необходимые java классы. Когда будете создавать классы, убедитесь, что они связаны с данными в файле манифеста, что мы выполняли в начале.
Создаем в приложении файл HomeActivity.java, задаем ему наследование от класса Activity и настраиваем переход на другой экран со списком приложений при нажатии на кнопку, созданную нами ранее (подробный урок по созданию перехода):
import android.app.Activity;
import android.content.Intent;
import android.os.Bundle;
import android.view.View;

public class HomeActivity extends Activity {

 @Override
 protected void onCreate(Bundle savedInstanceState) {
 super.onCreate(savedInstanceState);
 setContentView(R.layout.activity_home);
 }

 public void showApps(View v){
 Intent i = new Intent(this, AppsListActivity.class);
 startActivity(i);
 }
}
Создаем еще одно activity с именем AppsListActivity.java. Настроим этому классу вид интерфейса с ранее созданного файла activity_apps_list.xml:
import android.app.Activity;
import android.content.Intent;
import android.os.Bundle;
import android.view.View;

public class AppsListActivity extends Activity {

 @Override
 protected void onCreate(Bundle savedInstanceState) {
 super.onCreate(savedInstanceState);
 setContentView(R.layout.activity_apps_list);
 }
}
Уже сейчас можно попробовать протестировать приложение на эмуляторе/устройстве. Пока, что оно не обладает желаемым функционалом, но все же. Запустите приложение и нажмите кнопку Home, вы увидите окно в котором вам будет предложено выбрать лаунчер для запуска, стандартный и наш. Запускаем наш и видим примерно следующее:

Мы видим заставку рабочего стола и нашу кнопку запуска второго activity.
Полюбовались и хватит, возвращаемся к работе в Android Studio. Создаем еще один класс по имени AppDetail, который будет содержать более детальную информацию о приложении, название пакета, имя приложения и иконку. Код этого класса предельно простой и выглядит так:
import android.graphics.drawable.Drawable;

public class AppDetail {
 CharSequence label;
 CharSequence name;
 Drawable icon;
}
В методе loadApps класса AppsListActivity мы используем метод queryIntentActivities, он нужен для того, чтобы выбрать все объекты Intent, которые имеют категорию Intent.CATEGORY_LAUNCHER. Запрос будет возвращать список приложений, которые могут быть запущены нашим лаунчером. Мы запускаем цикл по результатам запроса и создаем и добавляем каждый его пункт в список по имени apps. Чтобы реализовать все сказанное, добавляем следующий код:
private PackageManager manager;
private List<AppDetail> apps;
private void loadApps(){
 manager = getPackageManager();
 apps = new ArrayList<AppDetail>();

 Intent i = new Intent(Intent.ACTION_MAIN, null);
 i.addCategory(Intent.CATEGORY_LAUNCHER);

 List<ResolveInfo> availableActivities = manager.queryIntentActivities(i, 0);
 for(ResolveInfo ri:availableActivities){
 AppDetail app = new AppDetail();
 app.label = ri.loadLabel(manager);
 app.name = ri.activityInfo.packageName;
 app.icon = ri.activityInfo.loadIcon(manager);
 apps.add(app);
 }
}
Теперь нужно настроить отображение списка приложений. В созданном списке apps мы поместили все необходимые данные о приложении, теперь их надо отобразить в созданном в начале урока ListView. Для этого мы создаем ArrayAdapter и описываем метод getView, а также связываем ArrayAdapter с ListView:
private ListView list;
private void loadListView(){
 list = (ListView)findViewById(R.id.apps_list);

 ArrayAdapter<AppDetail> adapter = new ArrayAdapter<AppDetail>(this,
 R.layout.list_item,
 apps) {
 @Override
 public View getView(int position, View convertView, ViewGroup parent) {
 if(convertView == null){
 convertView = getLayoutInflater().inflate(R.layout.list_item, null);
 }

 ImageView appIcon = (ImageView)convertView.findViewById(R.id.item_app_icon);
 appIcon.setImageDrawable(apps.get(position).icon);

 TextView appLabel = (TextView)convertView.findViewById(R.id.item_app_label);
 appLabel.setText(apps.get(position).label);

 TextView appName = (TextView)convertView.findViewById(R.id.item_app_name);
 appName.setText(apps.get(position).name);

 return convertView;
 }
 };

 list.setAdapter(adapter);
}
Когда пользователь нажимает на пункты списка с приложениями, то наш лаунчер должен запускать соответствующее приложение. Это будет выполняться благодаря методу getLaunchIntentForPackage , создающего намерение Intent, запускающее нужное приложение:
private void addClickListener(){
 list.setOnItemClickListener(new AdapterView.OnItemClickListener() {
 @Override
 public void onItemClick(AdapterView<?> av, View v, int pos,
 long id) {
 Intent i = manager.getLaunchIntentForPackage(apps.get(pos).name.toString());
 AppsListActivity.this.startActivity(i);
 }
 });
}
Осталось собрать все описанные выше методы в один рабочий механизм. В классе AppsListActivity вызываем методы loadApps, loadListView и addClickListener:
protected void onCreate(Bundle savedInstanceState) {
 super.onCreate(savedInstanceState);
 setContentView(R.layout.activity_apps_list);

 loadApps();
 loadListView();
 addClickListener();
}
Запускаем наше приложение. Теперь при нажатии на кнопку вызова второго activity «Show Apps» мы видим список из установленных приложений. При нажатии на выбранный элемент списка, мы будем запускать соответствующее приложение:

Поздравляю! Теперь в придачу до собственных калькулятора, браузера, конвертера и много другого, мы имеем еще и собственный Android Launcher. Надеюсь урок был вам интересен и полезен.
Оригинал урока.
Introduction
In its most basic form, a launcher is an application that does the following:
- it represents the home screen of a device
- it lists and launches applications that are installed on the device
In other words, it is the application that shows up when you press the home button. Unless you’ve already installed a custom launcher, you are currently using the default launcher that comes with your Android installation. A lot of device manufacturers have their own default, custom launchers that conform to their proprietary look and feel, for example, Samsung TouchWiz and HTC Sense.
In this tutorial, we are going to create a simple launcher with a basic user interface. It will have two screens:
- a home screen showing the device’s wallpaper
- a screen showing the icons and details of the applications installed on the device
By the way, if you work a lot with Android, you may want to check out one of the 1,000+ Android app templates on Envato Market. There’s a huge variety, so you’re sure to find something there to help you with your work.


1. Requirements
You need to have the following installed and configured on your development machine:
- Android SDK and platform tools
- Eclipse IDE 3.7.2 or higher with the ADT plugin
- an emulator or Android device running Android 2.2 or higher
You can download the SDK and platform tools the Android developer portal.
2. Project Setup
Launch Eclipse and create a new Android application project. I’m naming the application SimpleLauncher, but you can name it anything you want. Make sure you use a unique package. The lowest SDK version our launcher supports is Froyo and the target SDK is Jelly Bean.


Since we don’t want to create an Activity, deselect Create Activity. Click Finish to continue.


3. Project Manifest
The next step is modifying the AndroidManifest.xml file by adding two activities. The first Activity displays the home screen. Let’s name it HomeActivity as shown below.
1 |
<activity
|
2 |
android:name="ah.hathi.simplelauncher.HomeActivity" |
3 |
android:label="Simple Launcher Home" |
4 |
android:theme="@android:style/Theme.Wallpaper.NoTitleBar.Fullscreen" |
5 |
android:launchMode="singleTask" |
6 |
android:stateNotNeeded="true" |
7 |
>
|
8 |
<intent-filter>
|
9 |
<action android:name="android.intent.action.MAIN" /> |
10 |
<category android:name="android.intent.category.HOME" /> |
11 |
<category android:name="android.intent.category.DEFAULT" /> |
12 |
</intent-filter>
|
13 |
</activity>
|
By adding the categories android.intent.category.HOME and android.intent.category.DEFAULT to the intent-filter group, the associated Activity behaves like a launcher and shows up as an option when you press the device’s home button.
We also need to set the launchMode to singleTask to make sure that only one instance of this Activity is held by the system at any time. To show the user’s wallpaper, set the theme to Theme.Wallpaper.NoTitleBar.FullScreen.
The second Activity we need to add displays the applications that are installed on the user’s device. It’s also responsible for launching applications. We don’t need any special configuration for this Activity. Name it AppsListActivity.
1 |
<activity
|
2 |
android:name="ah.hathi.simplelauncher.AppsListActivity" |
3 |
android:theme="@android:style/Theme.NoTitleBar.Fullscreen" |
4 |
>
|
5 |
</activity>
|
4. Activity Layouts
Create an XML file for the HomeActivity class in the project’s res/layout folder and name it activity_home.xml. The layout has a single Button that responds to click events. Clicking the button takes the user from the home screen to the list of applications.
1 |
<RelativeLayout xmlns:android="http://schemas.android.com/apk/res/android" |
2 |
xmlns:tools="http://schemas.android.com/tools" |
3 |
android:layout_width="match_parent" |
4 |
android:layout_height="match_parent" |
5 |
tools:context=".HomeActivity" > |
6 |
|
7 |
<Button
|
8 |
android:id="@+id/apps_button" |
9 |
android:layout_width="wrap_content" |
10 |
android:layout_height="wrap_content" |
11 |
android:layout_alignParentRight="true" |
12 |
android:layout_alignParentTop="true" |
13 |
android:layout_marginRight="10dp" |
14 |
android:layout_marginTop="10dp" |
15 |
android:text="Show Apps" |
16 |
android:onClick="showApps" |
17 |
/>
|
18 |
|
19 |
</RelativeLayout>
|
Next, create an XML file for the AppsListActivity class in the project’s res/layout folder and name it activity_apps_list.xml. The layout contains a ListView that takes up the entire screen.
1 |
<?xml version="1.0" encoding="utf-8"?>
|
2 |
<LinearLayout xmlns:android="http://schemas.android.com/apk/res/android" |
3 |
android:layout_width="match_parent" |
4 |
android:layout_height="match_parent" |
5 |
android:orientation="vertical" > |
6 |
|
7 |
<ListView
|
8 |
android:id="@+id/apps_list" |
9 |
android:layout_width="match_parent" |
10 |
android:layout_height="match_parent" |
11 |
>
|
12 |
</ListView>
|
13 |
|
14 |
</LinearLayout>
|
Finally, create a third XML file in the same location and name it list_item.xml. This file defines the layout of an item in the ListView. Each list view item represents an application installed on the user’s device. It shows the application’s icon, label, and package name. We display the application icon using an ImageView instance and TextView instances for the label and package name.
1 |
<?xml version="1.0" encoding="utf-8"?>
|
2 |
<RelativeLayout xmlns:android="http://schemas.android.com/apk/res/android" |
3 |
android:layout_width="match_parent" |
4 |
android:layout_height="match_parent" |
5 |
android:padding="10dp" |
6 |
>
|
7 |
|
8 |
<ImageView
|
9 |
android:id="@+id/item_app_icon" |
10 |
android:layout_width="wrap_content" |
11 |
android:layout_height="wrap_content" |
12 |
android:layout_alignParentLeft="true" |
13 |
android:layout_centerVertical="true" |
14 |
/>
|
15 |
|
16 |
<TextView
|
17 |
android:id="@+id/item_app_label" |
18 |
android:layout_width="wrap_content" |
19 |
android:layout_height="wrap_content" |
20 |
android:layout_toRightOf="@+id/item_app_icon" |
21 |
android:paddingLeft="10dp" |
22 |
/>
|
23 |
|
24 |
<TextView
|
25 |
android:id="@+id/item_app_name" |
26 |
android:layout_width="wrap_content" |
27 |
android:layout_height="wrap_content" |
28 |
android:layout_below="@+id/item_app_label" |
29 |
android:layout_toRightOf="@+id/item_app_icon" |
30 |
android:paddingLeft="10dp" |
31 |
/>
|
32 |
|
33 |
</RelativeLayout>
|
5. Implementing the Activity Classes
HomeActivity
With the layouts of the application created, it’s time to create the two Activity classes. When creating the two classes, make sure the name of each class matches the one you specified in the project’s manifest file earlier.
Create a new class named HomeActivity and set android.app.Activity as its superclass.
1 |
package ah.hathi.simplelauncher; |
2 |
|
3 |
import android.app.Activity; |
4 |
import android.content.Intent; |
5 |
import android.os.Bundle; |
6 |
import android.view.View; |
7 |
|
8 |
public class HomeActivity extends Activity { |
9 |
|
10 |
@Override
|
11 |
protected void onCreate(Bundle savedInstanceState) { |
12 |
super.onCreate(savedInstanceState); |
13 |
setContentView(R.layout.activity_home); |
14 |
}
|
15 |
|
16 |
public void showApps(View v){ |
17 |
Intent i = new Intent(this, AppsListActivity.class); |
18 |
startActivity(i); |
19 |
}
|
20 |
}
|
In the class’s onCreate method, we invoke setContentView, passing in the layout we created earlier. You may remember that we added a button to the activity_home layout that triggers a method named showApps. We now need to implement that method in the HomeActivity class. The implementation is pretty simple, we create an Intent for the AppsListActivity class and start it.
AppsListActivity
Create another Activity class named AppsListActivity and set android.app.Activity as its superclass. In the class’s onCreate method, we invoke setContentView, passing in the activity_apps_list layout we created earlier.
1 |
package ah.hathi.simplelauncher; |
2 |
|
3 |
import android.app.Activity; |
4 |
import android.content.Intent; |
5 |
import android.os.Bundle; |
6 |
import android.view.View; |
7 |
|
8 |
public class AppsListActivity extends Activity { |
9 |
|
10 |
@Override
|
11 |
protected void onCreate(Bundle savedInstanceState) { |
12 |
super.onCreate(savedInstanceState); |
13 |
setContentView(R.layout.activity_apps_list); |
14 |
}
|
15 |
|
16 |
}
|
Even though our launcher isn’t finished yet, you can save and run your application at this point. When you press the device’s home button, you should see a pop-up asking you which launcher you’d like to use.


If you choose Simple Launcher Home, you should see your new home screen with a single button in the top right corner of the screen. You should also see your device’s current wallpaper.


Go back to Eclipse and create a class named AppDetail that will contain the details of an application, its package name, label, and application icon. The interface is pretty basic as you can see below.
1 |
package ah.hathi.simplelauncher; |
2 |
|
3 |
import android.graphics.drawable.Drawable; |
4 |
|
5 |
public class AppDetail { |
6 |
CharSequence label; |
7 |
CharSequence name; |
8 |
Drawable icon; |
9 |
}
|
6. Fetching Applications
In the loadApps method of the AppsListActivity class, we use the queryIntentActivities method of the PackageManager class to fetch all the Intents that have a category of Intent.CATEGORY_LAUNCHER. The query returns a list of the applications that can be launched by a launcher. We loop through the results of the query and add each item to a list named apps. Take a look at the following code snippet for clarification.
1 |
private PackageManager manager; |
2 |
private List<AppDetail> apps; |
3 |
private void loadApps(){ |
4 |
manager = getPackageManager(); |
5 |
apps = new ArrayList<AppDetail>(); |
6 |
|
7 |
Intent i = new Intent(Intent.ACTION_MAIN, null); |
8 |
i.addCategory(Intent.CATEGORY_LAUNCHER); |
9 |
|
10 |
List<ResolveInfo> availableActivities = manager.queryIntentActivities(i, 0); |
11 |
for(ResolveInfo ri:availableActivities){ |
12 |
AppDetail app = new AppDetail(); |
13 |
app.label = ri.loadLabel(manager); |
14 |
app.name = ri.activityInfo.packageName; |
15 |
app.icon = ri.activityInfo.loadIcon(manager); |
16 |
apps.add(app); |
17 |
}
|
18 |
}
|
7. Displaying the List of Applications
With the apps variable containing all the details we need, we can show the list of applications using the ListView class. We create a simple ArrayAdapter and override its getView method to render the list’s items. We then associate the ListView with the adapter.
1 |
private ListView list; |
2 |
private void loadListView(){ |
3 |
list = (ListView)findViewById(R.id.apps_list); |
4 |
|
5 |
ArrayAdapter<AppDetail> adapter = new ArrayAdapter<AppDetail>(this, |
6 |
R.layout.list_item, |
7 |
apps) { |
8 |
@Override
|
9 |
public View getView(int position, View convertView, ViewGroup parent) { |
10 |
if(convertView == null){ |
11 |
convertView = getLayoutInflater().inflate(R.layout.list_item, null); |
12 |
}
|
13 |
|
14 |
ImageView appIcon = (ImageView)convertView.findViewById(R.id.item_app_icon); |
15 |
appIcon.setImageDrawable(apps.get(position).icon); |
16 |
|
17 |
TextView appLabel = (TextView)convertView.findViewById(R.id.item_app_label); |
18 |
appLabel.setText(apps.get(position).label); |
19 |
|
20 |
TextView appName = (TextView)convertView.findViewById(R.id.item_app_name); |
21 |
appName.setText(apps.get(position).name); |
22 |
|
23 |
return convertView; |
24 |
}
|
25 |
};
|
26 |
|
27 |
list.setAdapter(adapter); |
28 |
}
|
8. Listening for Clicks
When the user clicks an item in the ListView, the corresponding application should be launched by our launcher. We use the getLaunchIntentForPackage method of the PackageManager class to create an Intent with which we start the application. Take a look at the following code snippet.
1 |
private void addClickListener(){ |
2 |
list.setOnItemClickListener(new AdapterView.OnItemClickListener() { |
3 |
@Override
|
4 |
public void onItemClick(AdapterView<?> av, View v, int pos, |
5 |
long id) { |
6 |
Intent i = manager.getLaunchIntentForPackage(apps.get(pos).name.toString()); |
7 |
AppsListActivity.this.startActivity(i); |
8 |
}
|
9 |
});
|
10 |
}
|
9. Putting It All Together
To make everything work together, we need to invoke loadApps, loadListView, and addClickListener in the onCreate method of the AppsListActivity class as shown below.
1 |
protected void onCreate(Bundle savedInstanceState) { |
2 |
super.onCreate(savedInstanceState); |
3 |
setContentView(R.layout.activity_apps_list); |
4 |
|
5 |
loadApps(); |
6 |
loadListView(); |
7 |
addClickListener(); |
8 |
}
|
Build and run your application once more to see the result. You should now be able to see the applications that can be launched when you click the button on the home screen of our launcher. Click on an item to launch the corresponding application.


Conclusion
You now have your own custom launcher. It’s very basic, but you can add all the customizations you want. If you want to dig deeper into custom launchers, I encourage you to take a look at the sample applications on the Android Developer Portal.

When it comes to Android customization, the launcher is the holy grail.
How might you go about creating your own Android launcher? Read this post — and the upcoming part two — that’s how!
The game plan
Creating an Android launcher is obviously a rather in-depth project with a lot of factors. It is almost always running, so it needs to be as perfectly bug-free as possible.
No pressure!
It would be too large an undertaking to do a completely start-to-finish tutorial here. Instead, I’m going to go over all the crucial features you need to turn any app into a launcher and I’ll leave it to you to put them all together and add your own personal spin. (part two will include the full source for a very basic skeleton of a launcher!)
A launcher is almost constantly running, meaning that it needs to be as perfectly bug-free as humanly possible!
What does an app need in order to become a launcher?
- It needs to be mapped to the home button and launch when your device starts up.
- It needs to display custom wallpapers.
- It needs to show and launch apps from the homescreen and from an app drawer.
- It needs multiple screens through which you can scroll.
- It needs widgets.
There’s more, but if you can get these basics down then you’ll be well on your way. Let’s dive in and get creating out homescreen launcher!
Create a new project with an empty activity and then follow these steps.
The Android manifest
The first item on our agenda is to make our app into a launcher. That means making sure the Android system identifies it as such, loads it up when the system first boots, and shows it whenever you hit the “home” button.
This is simple — you just need to add the following two lines to your Android manifest file inside the activity tag:
Code
<category android:name="android.intent.category.HOME" />
<category android:name="android.intent.category.DEFAULT" />
Now you’ll have the option to select this application as your launcher. Which technically means it is a launcher.

That was easy!
Right now, it doesn’t look like much of a launcher, and so the next thing to do is add a custom wallpaper. This is also pretty simple. You just have to add the following code to your styles.xml file in the resources folder.
Code
<item name="android:windowShowWallpaper">true</item>
 <item name="android:windowBackground">@android:color/transparent</item>
Just a couple of lines added and we’ve got something that looks and behaves like a launcher. I’d say that’s a good start!

How to launch apps
Launching apps is a simple matter of using intents. Intents allow us to launch activities, apps, functions, and more. In this case, we’re going to launch Google Chrome using its package name, which is com.android.chrome.
To do that, you simply need this code:
Code
Intent launchIntent = getPackageManager().getLaunchIntentForPackage("com.android.chrome");
startActivity(launchIntent);
Remember to import the Intent class (select it and press alt + return when it’s underlined). We could add a button instead of the TextView in our layout XML and set it to launch Chrome. We could also use this as a cool way to easily set any app as our default “home.” Place this in the onCreate method or onResume and any time you press home, you’ll launch Chrome or the app of your choosing!
But that’s probably not what most would want to do. So instead, let’s do the button thing. We’ll use an ImageView and give it the ID chromeButton. Choose any image for now. I picked a star.
Now add an onClick:
Code
public void onChromeButtonClick(View v) {
     Intent launchIntent = getPackageManager().getLaunchIntentForPackage("com.android.chrome");
     startActivity(launchIntent);
 }
Wouldn’t it be nicer if we could use the correct icon? Surprise! we can.

To do this you’ll need to reverse-engineer a handy method to grab the icon from any app and return it as a drawable:
Code
public static Drawable getActivityIcon(Context context, String packageName, String activityName) {
PackageManager pm = context.getPackageManager();
Intent intent = new Intent();
intent.setComponent(new ComponentName(packageName, activityName));
ResolveInfo resolveInfo = pm.resolveActivity(intent, 0);

    return resolveInfo.loadIcon(pm);
}
After that, we can simply set the icon as we like it in onCreate():
Code
ImageView chromeIcon = (ImageView) findViewById(R.id.chromeButton);
chromeIcon.setImageDrawable(this, getActivityIcon("com.android.chrome", "com.google.android.apps.chrome.Main"));
When using this method, you need both the package name and the activity name. I’m using an app called Package Names Viewer to get these. We’ll get to how to do this dynamically in a moment.
I’ve used a public static method so it’s accessible from other classes without creating multiple instances of our MainActivity. This method will likely prove to be a useful one.
You’ve already built enough of an app here to do something useful. You could very easily create a launcher simply showing your favorite apps in a line, for example. Most people will want to be a little more ambitious.
How to create an app drawer
Now that we can show and launch one app, we should be able to show and launch all apps. We just need to get a list of all the package names on the device, cycle through it, and load the icons into a recycler view.

Create a new activity in your project and call the java and xml files AppsDrawer.java and apps_drawer.xml respectively. Make sure you have some way for the user to launch this second activity too. I added a small menu button at the bottom of the screen.
In here, we’re going to display a list (recycler view) that will simply show all our icons and allow our user to select them in order to launch the app of their choice. Add a recycler view to apps_drawer.xml and give it the ID appsList.
Adding a recycler view is a whole other thing, so I won’t get into that now. Instead, check out this tutorial on recycler views and use the same names for my resource files and views as I did there. There is a method to this madness after all!
Create a separate XML file for the layout of the items in your row, and a new adapter class to populate the recycler view. You also need to create one more class, called appInfo and will have the simplest interface imaginable:
Code
public class AppInfo {
         CharSequence label;
         CharSequence packageName;
         Drawable icon;
}
As you might have guessed, we’ll just be using this to store information about the apps in our list.
Now create your adapter class and add the following code:
Code
public class RAdapter extends RecyclerView.Adapter<RAdapter.ViewHolder> {
     private List<AppInfo> appsList;

     public class ViewHolder extends RecyclerView.ViewHolder implements View.OnClickListener {
         public TextView textView;
         public ImageView img;


         //This is the subclass ViewHolder which simply
         //'holds the views' for us to show on each row
         public ViewHolder(View itemView) {
             super(itemView);

             //Finds the views from our row.xml
             textView = (TextView) itemView.findViewById(R.id.text);
             img = (ImageView) itemView.findViewById(R.id.img);
             itemView.setOnClickListener(this);
         }

         @Override
         public void onClick (View v) {
               int pos = getAdapterPosition();
               Context context = v.getContext();

               Intent launchIntent = context.getPackageManager().getLaunchIntentForPackage(appsList.get(pos).packageName.toString());
               context.startActivity(launchIntent);
               Toast.makeText(v.getContext(), appsList.get(pos).label.toString(), Toast.LENGTH_LONG).show();

         }
     }


     public RAdapter(Context c) {

         //This is where we build our list of app details, using the app
         //object we created to store the label, package name and icon

         PackageManager pm = c.getPackageManager();
         appsList = new ArrayList<AppInfo>();

         Intent i = new Intent(Intent.ACTION_MAIN, null);
         i.addCategory(Intent.CATEGORY_LAUNCHER);

         List<ResolveInfo> allApps = pm.queryIntentActivities(i, 0);
         for(ResolveInfo ri:allApps) {
             AppInfo app = new AppInfo();
             app.label = ri.loadLabel(pm);
             app.packageName = ri.activityInfo.packageName;
             app.icon = ri.activityInfo.loadIcon(pm);
             appsList.add(app);
         }

     }

     @Override
     public void onBindViewHolder(RAdapter.ViewHolder viewHolder, int i) {

         //Here we use the information in the list we created to define the views

         String appLabel = appsList.get(i).label.toString();
         String appPackage = appsList.get(i).packageName.toString();
         Drawable appIcon = appsList.get(i).icon;

         TextView textView = viewHolder.textView;
         textView.setText(appLabel);
         ImageView imageView = viewHolder.img;
         imageView.setImageDrawable(appIcon);
         }


     @Override
     public int getItemCount() {

         //This method needs to be overridden so that Androids knows how many items
         //will be making it into the list

         return appsList.size();
     }


     @Override
     public RAdapter.ViewHolder onCreateViewHolder(ViewGroup parent, int viewType) {

         //This is what adds the code we've written in here to our target view
         LayoutInflater inflater = LayoutInflater.from(parent.getContext());

         View view = inflater.inflate(R.layout.row, parent, false);

         ViewHolder viewHolder = new ViewHolder(view);
         return viewHolder;
     }
 }
Remember to import all classes as necessary. Check the comments for a bit more information on what everything does. I highly recommend reading through that Recycler View post if you’re not already familiar.
This is the main unique bit:
Code
        PackageManager pm = c.getPackageManager();
         appsList = new ArrayList<AppInfo>();

         Intent i = new Intent(Intent.ACTION_MAIN, null);
         i.addCategory(Intent.CATEGORY_LAUNCHER);

         List<ResolveInfo> allApps = pm.queryIntentActivities(i, 0);
         for(ResolveInfo ri:allApps) {
             AppInfo app = new AppInfo();
             app.label = ri.loadLabel(pm);
             app.packageName = ri.activityInfo.packageName;
             app.icon = ri.activityInfo.loadIcon(pm);
             appsList.add(app);
         }
This simply loops through our runnable installed apps and grabs the necessary details, icons, and more from there.
Of course, row.xml includes an image view (img) and a text view (textView) which become our icon and our app label.

Meanwhile, the onClickListener added to the view holder allows us to run the app when clicked — just like a real launcher!
The next steps
At this point the end is in sight and you’re getting close to having a fully functional launcher! But there is still a bit left to do.
In part two, we’ll be populating our recycler view in an separate thread to keep things snappy. After that, we’ll add multiple homescreens to swipe through using fragments and take a quick look at how to host widgets.

When it comes to Android customization, the launcher is the holy grail.
How might you go about creating your own Android launcher? Read this post — and the upcoming part two — that’s how!
The game plan
Creating an Android launcher is obviously a rather in-depth project with a lot of factors. It is almost always running, so it needs to be as perfectly bug-free as possible.
No pressure!
It would be too large an undertaking to do a completely start-to-finish tutorial here. Instead, I’m going to go over all the crucial features you need to turn any app into a launcher and I’ll leave it to you to put them all together and add your own personal spin. (part two will include the full source for a very basic skeleton of a launcher!)
A launcher is almost constantly running, meaning that it needs to be as perfectly bug-free as humanly possible!
What does an app need in order to become a launcher?
- It needs to be mapped to the home button and launch when your device starts up.
- It needs to display custom wallpapers.
- It needs to show and launch apps from the homescreen and from an app drawer.
- It needs multiple screens through which you can scroll.
- It needs widgets.
There’s more, but if you can get these basics down then you’ll be well on your way. Let’s dive in and get creating out homescreen launcher!
Create a new project with an empty activity and then follow these steps.
The Android manifest
The first item on our agenda is to make our app into a launcher. That means making sure the Android system identifies it as such, loads it up when the system first boots, and shows it whenever you hit the “home” button.
This is simple — you just need to add the following two lines to your Android manifest file inside the activity tag:
Code
<category android:name="android.intent.category.HOME" />
<category android:name="android.intent.category.DEFAULT" />
Now you’ll have the option to select this application as your launcher. Which technically means it is a launcher.
That was easy!
Right now, it doesn’t look like much of a launcher, and so the next thing to do is add a custom wallpaper. This is also pretty simple. You just have to add the following code to your styles.xml file in the resources folder.
Code
<item name="android:windowShowWallpaper">true</item>
 <item name="android:windowBackground">@android:color/transparent</item>
Just a couple of lines added and we’ve got something that looks and behaves like a launcher. I’d say that’s a good start!
How to launch apps
Launching apps is a simple matter of using intents. Intents allow us to launch activities, apps, functions, and more. In this case, we’re going to launch Google Chrome using its package name, which is com.android.chrome.
To do that, you simply need this code:
Code
Intent launchIntent = getPackageManager().getLaunchIntentForPackage("com.android.chrome");
startActivity(launchIntent);
Remember to import the Intent class (select it and press alt + return when it’s underlined). We could add a button instead of the TextView in our layout XML and set it to launch Chrome. We could also use this as a cool way to easily set any app as our default “home.” Place this in the onCreate method or onResume and any time you press home, you’ll launch Chrome or the app of your choosing!
But that’s probably not what most would want to do. So instead, let’s do the button thing. We’ll use an ImageView and give it the ID chromeButton. Choose any image for now. I picked a star.
Now add an onClick:
Code
public void onChromeButtonClick(View v) {
     Intent launchIntent = getPackageManager().getLaunchIntentForPackage("com.android.chrome");
     startActivity(launchIntent);
 }
Wouldn’t it be nicer if we could use the correct icon? Surprise! we can.
To do this you’ll need to reverse-engineer a handy method to grab the icon from any app and return it as a drawable:
Code
public static Drawable getActivityIcon(Context context, String packageName, String activityName) {
PackageManager pm = context.getPackageManager();
Intent intent = new Intent();
intent.setComponent(new ComponentName(packageName, activityName));
ResolveInfo resolveInfo = pm.resolveActivity(intent, 0);

    return resolveInfo.loadIcon(pm);
}
After that, we can simply set the icon as we like it in onCreate():
Code
ImageView chromeIcon = (ImageView) findViewById(R.id.chromeButton);
chromeIcon.setImageDrawable(this, getActivityIcon("com.android.chrome", "com.google.android.apps.chrome.Main"));
When using this method, you need both the package name and the activity name. I’m using an app called Package Names Viewer to get these. We’ll get to how to do this dynamically in a moment.
I’ve used a public static method so it’s accessible from other classes without creating multiple instances of our MainActivity. This method will likely prove to be a useful one.
You’ve already built enough of an app here to do something useful. You could very easily create a launcher simply showing your favorite apps in a line, for example. Most people will want to be a little more ambitious.
How to create an app drawer
Now that we can show and launch one app, we should be able to show and launch all apps. We just need to get a list of all the package names on the device, cycle through it, and load the icons into a recycler view.
Create a new activity in your project and call the java and xml files AppsDrawer.java and apps_drawer.xml respectively. Make sure you have some way for the user to launch this second activity too. I added a small menu button at the bottom of the screen.
In here, we’re going to display a list (recycler view) that will simply show all our icons and allow our user to select them in order to launch the app of their choice. Add a recycler view to apps_drawer.xml and give it the ID appsList.
Adding a recycler view is a whole other thing, so I won’t get into that now. Instead, check out this tutorial on recycler views and use the same names for my resource files and views as I did there. There is a method to this madness after all!
Create a separate XML file for the layout of the items in your row, and a new adapter class to populate the recycler view. You also need to create one more class, called appInfo and will have the simplest interface imaginable:
Code
public class AppInfo {
         CharSequence label;
         CharSequence packageName;
         Drawable icon;
}
As you might have guessed, we’ll just be using this to store information about the apps in our list.
Now create your adapter class and add the following code:
Code
public class RAdapter extends RecyclerView.Adapter<RAdapter.ViewHolder> {
     private List<AppInfo> appsList;

     public class ViewHolder extends RecyclerView.ViewHolder implements View.OnClickListener {
         public TextView textView;
         public ImageView img;


         //This is the subclass ViewHolder which simply
         //'holds the views' for us to show on each row
         public ViewHolder(View itemView) {
             super(itemView);

             //Finds the views from our row.xml
             textView = (TextView) itemView.findViewById(R.id.text);
             img = (ImageView) itemView.findViewById(R.id.img);
             itemView.setOnClickListener(this);
         }

         @Override
         public void onClick (View v) {
               int pos = getAdapterPosition();
               Context context = v.getContext();

               Intent launchIntent = context.getPackageManager().getLaunchIntentForPackage(appsList.get(pos).packageName.toString());
               context.startActivity(launchIntent);
               Toast.makeText(v.getContext(), appsList.get(pos).label.toString(), Toast.LENGTH_LONG).show();

         }
     }


     public RAdapter(Context c) {

         //This is where we build our list of app details, using the app
         //object we created to store the label, package name and icon

         PackageManager pm = c.getPackageManager();
         appsList = new ArrayList<AppInfo>();

         Intent i = new Intent(Intent.ACTION_MAIN, null);
         i.addCategory(Intent.CATEGORY_LAUNCHER);

         List<ResolveInfo> allApps = pm.queryIntentActivities(i, 0);
         for(ResolveInfo ri:allApps) {
             AppInfo app = new AppInfo();
             app.label = ri.loadLabel(pm);
             app.packageName = ri.activityInfo.packageName;
             app.icon = ri.activityInfo.loadIcon(pm);
             appsList.add(app);
         }

     }

     @Override
     public void onBindViewHolder(RAdapter.ViewHolder viewHolder, int i) {

         //Here we use the information in the list we created to define the views

         String appLabel = appsList.get(i).label.toString();
         String appPackage = appsList.get(i).packageName.toString();
         Drawable appIcon = appsList.get(i).icon;

         TextView textView = viewHolder.textView;
         textView.setText(appLabel);
         ImageView imageView = viewHolder.img;
         imageView.setImageDrawable(appIcon);
         }


     @Override
     public int getItemCount() {

         //This method needs to be overridden so that Androids knows how many items
         //will be making it into the list

         return appsList.size();
     }


     @Override
     public RAdapter.ViewHolder onCreateViewHolder(ViewGroup parent, int viewType) {

         //This is what adds the code we've written in here to our target view
         LayoutInflater inflater = LayoutInflater.from(parent.getContext());

         View view = inflater.inflate(R.layout.row, parent, false);

         ViewHolder viewHolder = new ViewHolder(view);
         return viewHolder;
     }
 }
Remember to import all classes as necessary. Check the comments for a bit more information on what everything does. I highly recommend reading through that Recycler View post if you’re not already familiar.
This is the main unique bit:
Code
        PackageManager pm = c.getPackageManager();
         appsList = new ArrayList<AppInfo>();

         Intent i = new Intent(Intent.ACTION_MAIN, null);
         i.addCategory(Intent.CATEGORY_LAUNCHER);

         List<ResolveInfo> allApps = pm.queryIntentActivities(i, 0);
         for(ResolveInfo ri:allApps) {
             AppInfo app = new AppInfo();
             app.label = ri.loadLabel(pm);
             app.packageName = ri.activityInfo.packageName;
             app.icon = ri.activityInfo.loadIcon(pm);
             appsList.add(app);
         }
This simply loops through our runnable installed apps and grabs the necessary details, icons, and more from there.
Of course, row.xml includes an image view (img) and a text view (textView) which become our icon and our app label.
Meanwhile, the onClickListener added to the view holder allows us to run the app when clicked — just like a real launcher!
The next steps
At this point the end is in sight and you’re getting close to having a fully functional launcher! But there is still a bit left to do.
In part two, we’ll be populating our recycler view in an separate thread to keep things snappy. After that, we’ll add multiple homescreens to swipe through using fragments and take a quick look at how to host widgets.
На чтение 9 мин. Просмотров 198 Опубликовано 25.04.2021

Когда дело доходит до настройки Android, средство запуска — это Святой Грааль. Вот где это. Это главный козырь, который у Android всегда был по сравнению с iOS. Это то, что делает Android наиболее настраиваемой операционной системой практически на любой платформе.
Читать далее: Лучшие разработчики приложений для Android для создания приложений и создания их с нулевым кодом
Когда дело доходит до настройки Android, средство запуска — это Святой Грааль.
Как вы могли бы создать свою собственную программу запуска Android? Прочтите этот пост и предстоящую вторую часть — вот как!
Содержание
- План игры
- Манифест Android
- Как запускать приложения
- Как создать панель приложений
- Следующие шаги
План игры
Очевидно, что создание средства запуска Android — это довольно глубокий проект с большим количеством факторы. Он почти всегда работает, поэтому в нем должно быть как можно больше ошибок.
Никакого давления!
Было бы слишком сложно сделать полное руководство здесь. Вместо этого я собираюсь рассмотреть все важные функции, необходимые для превращения любого приложения в средство запуска, и предоставлю вам возможность собрать их все вместе и добавить свой собственный вкус. (вторая часть будет включать полный исходный код для очень простого каркаса пусковой установки!)
Пусковая установка работает почти постоянно, что означает, что он должен быть максимально свободным от ошибок, насколько это возможно!
Прежде чем взяться за этот проект, вам потребуются некоторые базовые знания. С этой целью я рекомендую этот пост о создании вашего первого приложения от Гэри Симса.
Что нужно приложению, чтобы стать лаунчером?
- Он должен быть сопоставлен с кнопкой «Домой» и запускаться при запуске вашего устройства.
- Он должен отображать пользовательские обои.
- Он должен отображаться и запускаться приложений с главного экрана и из панели приложений.
- Для этого нужно несколько экранов, по которым вы можете прокручивать.
- Для этого нужны виджеты.
Есть еще кое-что, но если вы сумеете усвоить эти основы, то у вас все будет хорошо. Давайте погрузимся в процесс создания панели запуска на главном экране!
Создайте новый проект с пустым действием, а затем выполните следующие действия.
Манифест Android
Первый пункт нашей повестки дня — превратить наше приложение в средство запуска. Это означает, что система Android идентифицирует его как таковой, загружает его при первой загрузке и показывает его всякий раз, когда вы нажимаете кнопку «домой».
Это просто — вам просто нужно добавьте следующие две строки в файл манифеста Android внутри тега активности:
Теперь у вас будет возможность выбрать это приложение в качестве средства запуска. Технически это означает, что это пусковая установка.

Это было просто!
Прямо сейчас , это не похоже на большую часть средства запуска, поэтому следующее, что нужно сделать, — это добавить пользовательские обои. Это тоже довольно просто. Вам просто нужно добавить следующий код в свой styles.xml в папке ресурсов.
true @ android: color/transparent
Добавлена всего пара строк, и у нас есть что-то, что выглядит и ведет себя как средство запуска. Я бы сказал, что это хорошее начало!

Как запускать приложения
Запускать приложения очень просто. с помощью намерений. Намерения позволяют нам запускать действия, приложения, функции и т. д. В этом случае мы собираемся запустить Google Chrome, используя его имя пакета, то есть com.android.chrome .
Для этого вам просто понадобится этот код:
Intent launchIntent = getPacka geManager (). getLaunchIntentForPackage ("com.android.chrome"); startActivity (launchIntent);
Не забудьте импортировать класс Intent (выберите его и нажмите alt + return когда подчеркнуто). Мы могли бы добавить кнопку вместо TextView в наш XML-код макета и настроить его для запуска Chrome. Мы также могли бы использовать это как отличный способ легко установить любое приложение в качестве «дома» по умолчанию. Поместите это в метод onCreate или onResume , и каждый раз, когда вы нажимаете кнопку домой, вы запускаете Chrome или приложение по вашему выбору!
Но, вероятно, это не то, что хотелось бы делать большинству. Вместо этого давайте займемся кнопкой. Мы будем использовать ImageView и присвоить ему идентификатор chromeButton . Выбирайте пока любое изображение. Я выбрал звезду.
Теперь добавьте onClick :
public void onChromeButtonClick (View v) {Intent launchIntent = getPackageManager ( ) .getLaunchIntentForPackage ("com.android.chrome"); startActivity (launchIntent); }
Разве не было бы лучше, если бы мы могли использовать правильный значок? Сюрприз! мы можем.

Для этого вам нужно перепроектировать удобный метод для захвата значка из любого приложения и возврата его как доступного для рисования:
public static Drawable getActivityIcon (Context context, String packageName, String activityName) {PackageManager pm = context.getPackageManager (); Intent intent = new Intent (); intent.setComponent (новый ComponentName (packageName, activityName)); ResolveInfo resolveInfo = pm.resolveActivity (intent, 0); return resolveInfo.loadIcon (pm);}
После этого мы можем просто установить значок так, как нам нравится, в onCreate () :
ImageView chromeIcon = (ImageView) findViewById (R.id. chromeButton ); chromeIcon. setImageDrawable (this, getActivityIcon ("com.android.chrome", "com.google.android.apps.chrome.Main"));
При использовании этого метода вам потребуются оба имени пакета и название действия. Я использую приложение под названием Package Names Viewer , чтобы получить их. Мы скоро узнаем, как сделать это динамически.
Я использовал общедоступный статический метод, поэтому он доступен из других классов без создания нескольких экземпляров нашего MainActivity . Этот метод, вероятно, окажется полезным.
Вы уже создали достаточно приложения, чтобы сделать что-то полезное. Вы можете очень легко создать программу запуска, например, просто показывая ваши любимые приложения в строке. Большинство людей захотят быть немного более амбициозными.
Как создать панель приложений
Теперь, когда мы можем показать и запустить одно приложение, мы должны иметь возможность показать и запустить все приложения. Нам просто нужно получить список всех имен пакетов на устройстве, просмотреть его и загрузить значки в представление ресайклера.

Создать новое действие в ваш проект и назовите файлы java и xml AppsDrawer.java и apps_drawer.xml соответственно. Убедитесь, что у вас есть способ запустить и это второе действие. Я добавил небольшую кнопку меню внизу экрана.
Здесь мы собираемся отобразить список (представление ресайклера), который просто покажет все наши значки и позволит нашему пользователю выбрать их, чтобы запустить приложение по своему выбору. Добавьте представление ресайклера в apps_drawer.xml и присвойте ему идентификатор appsList .
Добавление представления ресайклера — совсем другое вещь, так что я не буду вдаваться в подробности. Вместо этого ознакомьтесь с этим руководством по представлениям ресайклера и используйте те же имена для моих файлов ресурсов и представлений, что и я там. В конце концов, есть способ этого безумия!
Создайте отдельный XML-файл для макета элементов в вашей строке и новый класс адаптера для заполнения представления ресайклера. Вам также необходимо создать еще один класс с именем appInfo , у которого будет самый простой интерфейс, который только можно вообразить:
public class AppInfo {CharSequence label; CharSequence packageName; Значок Drawable;}
Как вы могли догадаться, мы будем использовать его только для хранения информации о приложениях в нашем списке.
Теперь создайте свой класс адаптера и добавьте следующий код:
открытый класс RAdapter расширяет RecyclerView.Adapter {private List appsList; открытый класс ViewHolder расширяет RecyclerView.ViewHolder реализует View. OnClickListener {общедоступный TextView textView; общедоступный ImageView img; //Это подкласс ViewHolder, который просто//«содержит представления», которые мы можем показать в каждой строке public ViewHolder (View itemView) {super (itemView); //Находит представления из нашего row.xml textView = (TextView) itemView.findViewById (R.id. text ); img = (ImageView) itemView.findViewById (R.id. img ); itemView.setOnClickListener (это); } @Override public void onClick (View v) {int pos = getAdapterPosition (); Контекст context = v.getContext (); Намерение launchIntent = context.getPackageManager (). GetLaunchIntentForPackage (appsList.get (pos) .packageName.toString ()); context.startActivity (launchIntent); Toast. makeText (v.getContext (), appsList.get (pos) .label.toString (), Toast. LENGTH_LONG ) .show (); }} Public RAdapter (Context c) {//Здесь мы создаем наш список деталей приложения, используя//объект app, который мы создали для хранения метки, имени пакета и значка PackageManager pm = c.getPackageManager (); appsList = новый список массивов (); Intent i = новое намерение (Intent. ACTION_MAIN , null); i.addCategory (Intent. CATEGORY_LAUNCHER ); Список allApps = pm.queryIntentActivities (i, 0); для (ResolveInfo ri: allApps) {AppInfo app = new AppInfo (); app.label = ri.loadLabel (pm); app.packageName = ri.activityInfo.packageName; app.icon = ri.activityInfo.loadIcon (pm); appsList.add (приложение); }} @Override public void onBindViewHolder (RAdapter.ViewHolder viewHolder, int i) {//Здесь мы используем информацию из созданного нами списка для определения представлений String appLabel = appsList.get (i) .label.toString (); Строка appPackage = appsList.get (i) .packageName.toString (); Возможность рисования appIcon = appsList.get (i) .icon; TextView textView = viewHolder.textView; textView.setText (appLabel); ImageView imageView = viewHolder.img; imageView.setImageDrawable (appIcon); } @Override public int getItemCount () {//Этот метод необходимо переопределить, чтобы Android знал, сколько элементов//будет внесено в список return appsList.size (); } @Override public RAdapter.ViewHolder onCreateViewHolder (ViewGroup parent, int viewType) {//Это то, что добавляет код, который мы здесь написали, в наше целевое представление LayoutInflater inflater = LayoutInflater. from ( parent.getContext ()); Просмотр view = inflater.inflate (R.layout. строка , родительский, false); ViewHolder viewHolder = новый ViewHolder (просмотр); return viewHolder; }}
Не забудьте импортировать все классы по мере необходимости. Проверьте комментарии, чтобы получить дополнительную информацию о том, что все делает. Я настоятельно рекомендую прочитать эту публикацию Recycler View, если вы еще не знакомы.
Это основной уникальный бит:
PackageManager pm = c.getPackageManager () ; appsList = новый список массивов (); Intent i = новое намерение (Intent. ACTION_MAIN , null); i.addCategory (Intent. CATEGORY_LAUNCHER ); Список allApps = pm.queryIntentActivities (i, 0); для (ResolveInfo ri: allApps) {AppInfo app = new AppInfo (); app.label = ri.loadLabel (pm); app.packageName = ri.activityInfo.packageName; app.icon = ri.activityInfo.loadIcon (pm); appsList.add (приложение); }
Это просто перебирает наши работающие установленные приложения и берет оттуда необходимые детали, значки и многое другое.
Конечно, row. xml включает представление изображения ( img ) и текстовое представление ( textView ), которые становятся нашим значком и ярлыком нашего приложения.

Между тем, onClickListener добавлен в держатель представления позволяет нам запускать приложение при нажатии — как настоящий лаунчер!
Следующие шаги
На данный момент конец виден, и вы ‘ приближаемся к полнофункциональной пусковой установке! Но еще кое-что осталось сделать.
Во второй части мы разместим наше представление ресайклера в отдельном потоке, чтобы все работало оперативно. После этого мы добавим несколько домашних экранов для пролистывания фрагментов и быстро рассмотрим, как размещать виджеты.

Следите за обновлениями второй части и не забудьте задать свои вопросы ниже!
Обновление: Как для создания настраиваемой панели запуска в Android Studio — Часть вторая
Одно из самых успешных и загружаемых приложений для Android, несомненно, Пусковые установки или дома Это позволяет нам полностью настраивать домашние экраны наших терминалов. Настройка, которая может полностью измениться, хотя всегда придерживается параметров персонализации, которые предлагают нам эти приложения для Android.
Что бы ты сказал мне, если бы я сказал тебе это Теперь вы можете создать лаунчер с нуля, и он будет соответствовать вашим конкретным потребностям.? Это само по себе то, что это приложение в стиле Launcher предлагает нам совершенно бесплатно для Android, и которое мы можем загрузить из собственного магазина Google Play под названием Лаборатория запуска.
Что нам предлагает Launcher Lab?
Лаборатория запуска, как следует из названия, он предлагает нам большую особенность чтобы иметь возможность создать лаунчер с нуля, адаптированный к нашим конкретным потребностям или образ жизни. Launcher: если вы видели видео в заголовке этой статьи, которое я вам настоятельно рекомендую, вы сможете увидеть, как запуск с выбора собственных обоев Launcher позволяет нам изменять или создавать с нуля все, что мы хотим появляются в самом лаунчере, персонализированном нами и с комфортом нашего Android с простым запуском приложения.
В принципе при первом открытии Лаборатория запуска мы собираемся найти серию персонализированных домашних экранов, которые включены в стандартную комплектацию приложения и позволят нам получить представление о том, что предлагает нам это сенсационное приложение для Android. Кроме того, из собственных настроек приложения у нас будет доступ к Собственный магазин или Магазин, из которого мы сможем загружать больше тем, настроенных разными пользователями.
Хотя что действительно удивительно в Launcher Lab, так это возможность создания нашего лаунчера индивидуально добавление элементов, таких как те, которые я собираюсь перечислить ниже:
- Обои из однотонных или графических файлов из нашей библиотеки.
- Столько экранов, сколько мы сочтем нужным.
- Возможность добавления интерактивного текста.
- Возможность добавления геометрических фигур.
- Возможность создания собственных виджетов рабочего стола. Батарея, часы, дата и время.
- Простой и понятный интерфейс с множеством инструментов для редактирования.
- Легко использовать простыми жестами.
- В чистейшем стиле Lollipop.
Несомненно, одно из лучших приложений Launcher, которое мы сможем загрузить из собственного магазина Google Play, и многое другое, если мы хотим создать Launcher с нуля, оригинального и уникального, чтобы отличать наш терминал Android.

Приложение не было найдено в магазине. 🙁
Содержание статьи соответствует нашим принципам редакционная этика. Чтобы сообщить об ошибке, нажмите здесь.