В Python есть довольно много GUI фреймворков (graphical user interface), однако только Tkinter встроен в стандартную библиотеку языка. У Tkinter есть несколько преимуществ. Он кроссплатформенный, поэтому один и тот же код можно использовать на Windows, macOS и Linux.
Визуальные элементы отображаются через собственные элементы текущей операционной системы, поэтому приложения, созданные с помощью Tkinter, выглядят так, как будто они принадлежат той платформе, на которой они работают.
Хотя Tkinter является популярным GUI фреймворком на Python, у него есть свои недостатки. Один из них заключается в том, что графические интерфейсы, созданные с использованием Tkinter, выглядят устаревшими. Если вам нужен современный, броский интерфейс, то Tkinter может оказаться не совсем тем, для этого есть PyQt5 который развивается сильнее в данном плане.
Есть вопросы по Python?
На нашем форуме вы можете задать любой вопрос и получить ответ от всего нашего сообщества!
Telegram Чат & Канал
Вступите в наш дружный чат по Python и начните общение с единомышленниками! Станьте частью большого сообщества!
Паблик VK
Одно из самых больших сообществ по Python в социальной сети ВК. Видео уроки и книги для вас!
Тем не менее, в плане использования, Tkinter является относительно легким по сравнению с другими библиотеками. Это отличный выбор для создания GUI приложений в Python, особенно если современный облик не в приоритете для программы, а большую роль играет функциональность и кроссплатформенная скорость.
Другие статьи по Tkinter на сайте
- Создание окна по центру и кнопка выхода в Tkinter
- Разметка виджетов в Tkinter — pack, grid и place
- Виджеты Checkbutton, Label, Scale и Listbox в Tkinter
- Меню, подменю и панель инструментов в Tkinter
- Диалоговые окна в Tkinter
- Рисуем линии, прямоугольники, круг и текст в Tkinter
- Пишем игру змейка на Tkinter
Основные аспекты руководства
- Введение и создание простого приложения «Hello, World!» в Tkinter;
- Работа с виджетами вроде кнопок или текстовых боксов;
- Управление макетом приложений через геометрические менеджеры;
- Создание интерактивного приложения через связывание кнопок с функциями Python.
После освоения основных навыков в процессе изучения примеров, данных в руководстве, вы сможете создать два рабочих приложения. Одно будет конвертером температуры, а второе редактором текста. Что ж, приступим!
Создание простого GUI приложения на Tkinter
Главным элементом GUI Tkinter является окно. Окнами называют контейнеры, в которых находятся все GUI элементы. Данные GUI элементы, к числу которых относятся текстовые боксы, ярлыки и кнопки, называются виджетами. Виджеты помещаются внутри окон.
Сперва создадим окно с одним виджетом. Запустим новую сессию оболочки Python, следуя инструкции.
На заметку: Примеры кода, используемые в руководстве, были протестированы на Windows, macOS и Ubuntu Linux 18.04 через версии Python 3.6, 3.7 и 3.8.
В случае, если вы установили Python на Windows или macOS, скачав установщик c официального сайта python.org, проблем с запуском кода из примеров возникнуть не должно. Можете пропустить оставшуюся часть заметки и перейти к самому руководству.
В случае, если ввиду отсутствия официальных дистрибутивов Python для вашей системы, вы установили Python иным образом, тогда обратите внимание на следующие моменты.
Установка Python на macOS используя Homebrew:
Дистрибутив Python для macOS, доступный на Homebrew, поставляется без библиотеки Tcl/Tk с Tkinter. Вместо этого используется версия системы по умолчанию. Версия может быть устаревшей и не позволяющей импортировать модуль Tkinter в Python. Во избежание такой проблемы, используйте официальный установщик macOS.
Ubuntu Linux 16.04:
Последняя версия Python доступна на Ubuntu Linux 16.04, это 3.5. Вы можете установить последнюю версию через deadsnakes PPA. Далее даны команды для установки PPA и загрузки последней версии Python с правильной версией Tcl/Tk:
$ sudo add—apt—repository ppa:deadsnakes/ppa
$ sudo apt—get update
$ sudo apt—get install python3.8 python3—tk
Первые две команды добавляют deadsnakes PPA в ваш системный список репозитория, а последняя команда устанавливает Python 3.8 и модуль GUI Tkinter.
Ubuntu Linux 18.04:
Вы можете установить последнюю версию Python с соответствующей версией Tcl/Tk из универсального репозитория через следующую команду:
$ sudo apt—get install python3.8 python3—tk
Таким образом устанавливается Python 3.8, а также модуль Tkinter.
Прочие версии Linux:
Если на данный момент нет официального рабочего установщика Python для Linux дистрибутива, то можете поставить Python вместе с соответствующей версией Tcl/Tk через исходный код. С пошаговой инструкцией процесса можете ознакомиться на странице: Установка Python 3.8 из исходного кода на Linux
В открытой оболочке IDLE Python первым делом необходимо импортировать модуль Tkinter:
Окно, или window является экземпляром класса Tkinter. Попробуйте создать новое окно, присвоив его переменной окна window:
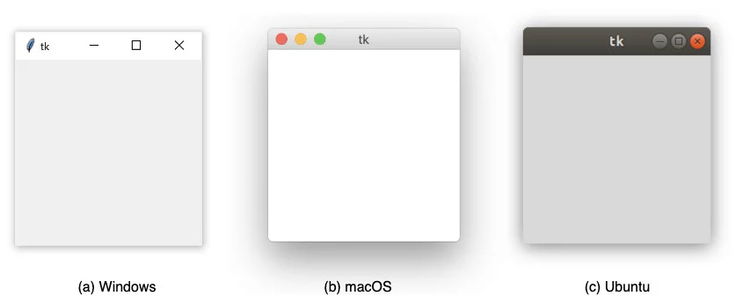
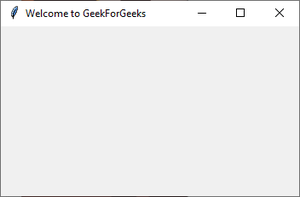
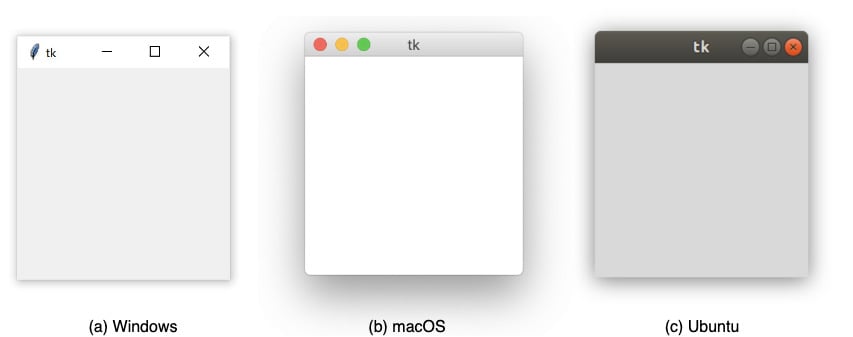
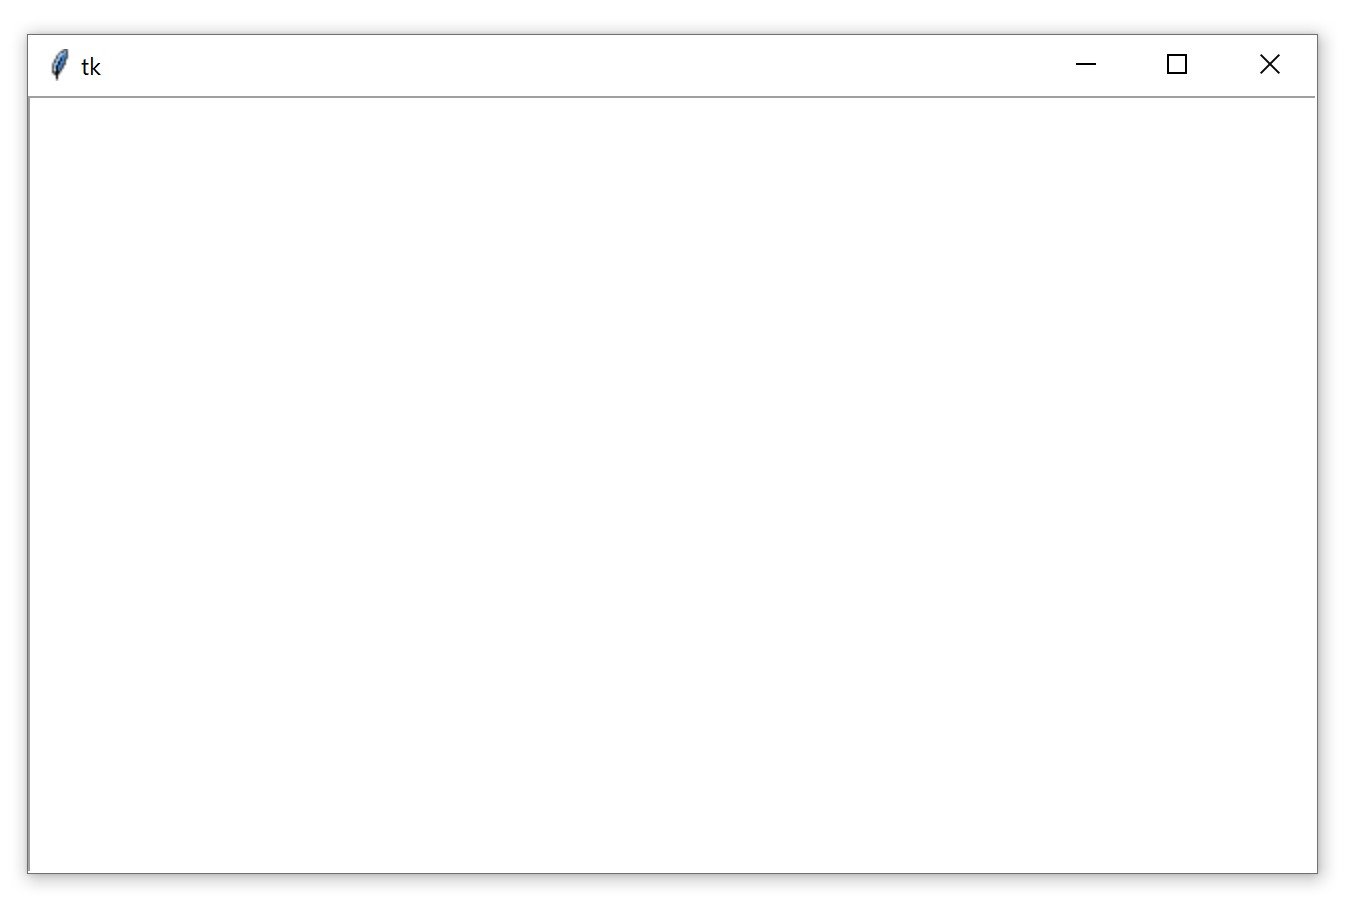
При выполнении вышеуказанного кода на экране появится новое окно. То, как оно будет выглядеть, зависит от вашей операционной системы:
Далее в руководстве будут представлены примеры из операционной системы Ubuntu и Windows.
Добавление нового виджета в приложении
Теперь, когда у вас есть окно, можно добавить на него виджет. Используем класс tk.Label и добавим какой либо текст на окно.
Создадим виджет ярлыка (label) с текстом "Привет, Tkinter!" и присвоим его переменной под названием greeting:
|
>>> greeting = tk.Label(text=«Привет, Tkinter!») |
Созданное ранее окно не меняется. Создается виджет ярлыка, однако пока не добавляется на окно. Есть несколько способов добавления виджетов на окно. Сейчас можно использовать метод .pack() от виджета ярлыка:
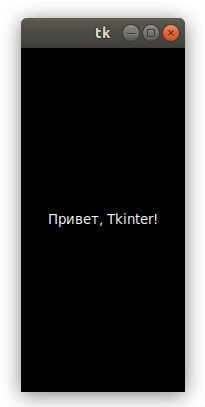
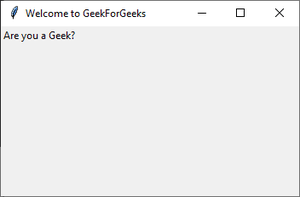
Теперь окно выглядит следующим образом:
При использовании метода .pack() для размещения виджета в окне, Tkinter устанавливает размер окна настолько маленьким, насколько возможно, пока в него не влезает виджет. Теперь выполним следующее:
Кажется, будто ничего не случилось, но это не совсем так. window.mainloop() указывает Python, что нужно запустить цикл событий Tkinter. Данный метод требуется для событий вроде нажатий на клавиши или кнопки, он также блокирует запуск любого кода, что следует после, пока окно, на котором оно было вызвано, не будет закрыто. Попробуйте закрыть созданное окно, и вы увидите появившуюся в оболочке подсказку.
Внимание: При работе с Tkinter из Python REPL окна обновляются при выполнении каждой строки. Однако, если программа Tkinter выполняется из запущенного файла, такого не происходит.
Если не добавлять
window.mainloop()в конец программы в Python файле, тогда приложение Tkinter не запустится вообще, и ничего не будет отображаться.
Для создания окна в Tkinter, нужно всего несколько строк кода. Тем не менее, в пустое окно нам ничем не поможет! В следующем разделе будут рассмотрены некоторые виджеты, доступные в Tkinter, а также способы их настройки при добавлении в приложение.
Выполните небольшое задание, чтобы проверить свои знания.
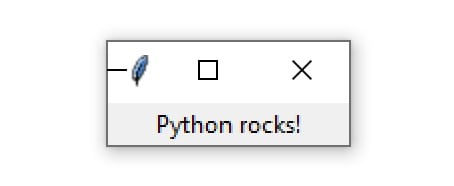
Напишите полный скрипт для создания окна в Tkinter с текстом «Python рулит!». Окно должно выглядеть следующим образом:
Попробуйте выполнить задание самостоятельно. Затем можете сравнить свой код с решением, представленным ниже. Помните, что у каждого программиста есть свой стиль, и ваша программа вовсе не обязана выглядеть точно так же, как код из следующего примера.
Код с решением
|
import tkinter as tk window = tk.Tk() label = tk.Label(text=«Python рулит!») label.pack() window.mainloop() |
Работа с виджетами в Tkinter
Виджеты являются основой GUI фреймворка Tkinter в Python. Это элементы, через которые пользователи взаимодействуют с программой. В Tkinter каждый виджет определен классом. Далее представлен список популярных виджетов из Tkinter:
| Класс виджета | Описание |
|---|---|
| Label | Используется для отображения текста или вставки изображения на окне приложения. |
| Button | Кнопка, на которой может быть текст, совершает определенные действия при нажатии на нее. |
| Entry | Виджет для ввода одной строчки текста. Эквивалент <input type="text"> в HTML. |
| Text | Виджет для ввода большого текста. Эквивалент <textarea> в HTML. |
| Frame | Прямоугольная область, что используется для группировки виджетов или для добавления расстояния между виджетами. |
В дальнейшем, мы на практике рассмотрим, как действует каждый из представленных выше виджетов. С более подробными списками виджетов Tkinter можете ознакомиться на страницах Basic Widgets и More Widgets. А пока рассмотрим подробнее виджет ярлыка Label.
Виджет Label — Отображение текста и картинок
Виджеты Label используется для отображения текста или картинок. Текст на виджете Label, не может редактироваться пользователем. Он только показывается. Как было показано в примере в начале данного руководства, виджет Label можно создать через экземпляр класса Label и передачу строки в параметр text:
|
label = tk.Label(text=«Hello, Tkinter») |
Виджеты Label отображают текст с установленным по умолчанию системным цветом и фоном. Обычно это черный и белый цвета. Следовательно, если в вашей операционной системе указаны иные цвета, именно их вы и увидите.
Изменить цвет текста и фона виджета Label можно через параметры foreground и background:
|
label = tk.Label( text=«Привет, Tkinter!», foreground=«white», # Устанавливает белый текст background=«black» # Устанавливает черный фон ) |
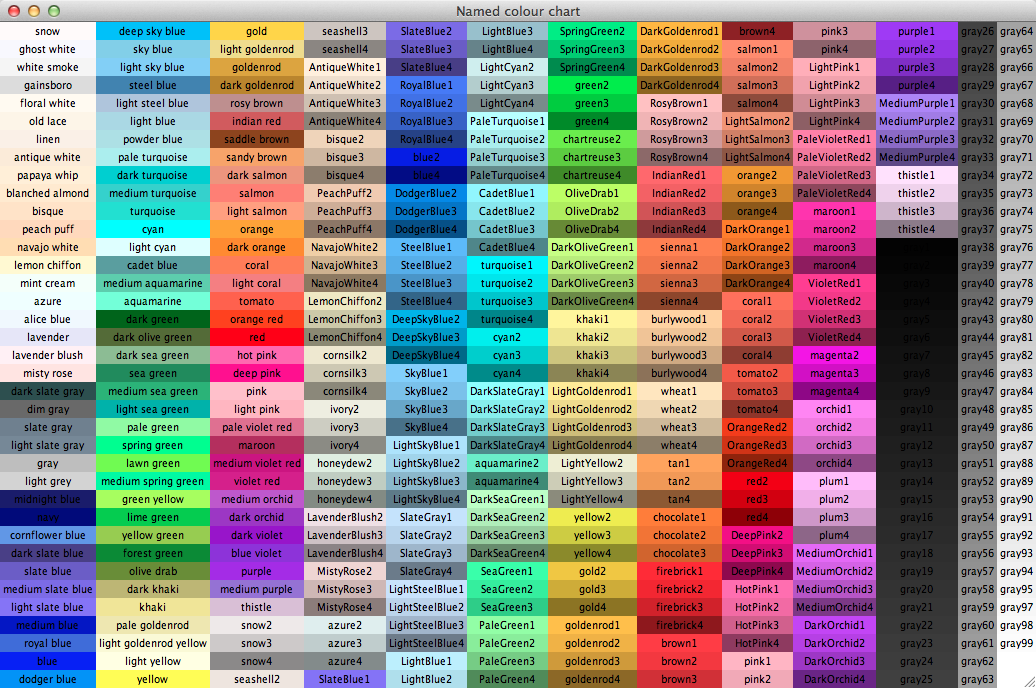
Некоторые доступные цвета:
red— красный;orange— оранжевый;yellow— желтый;green— зеленый;blue— синий;purple— сиреневый.
Многие HTML-цвета имеют такое же название в Tkinter. Со списком доступных названий цветов можете ознакомиться здесь.
Если хотите подробнее разобраться в теме, особенно в системных цветах macOS и Windows, контролируемых текущей темой ОС, ознакомьтесь со страницей значений цветов.
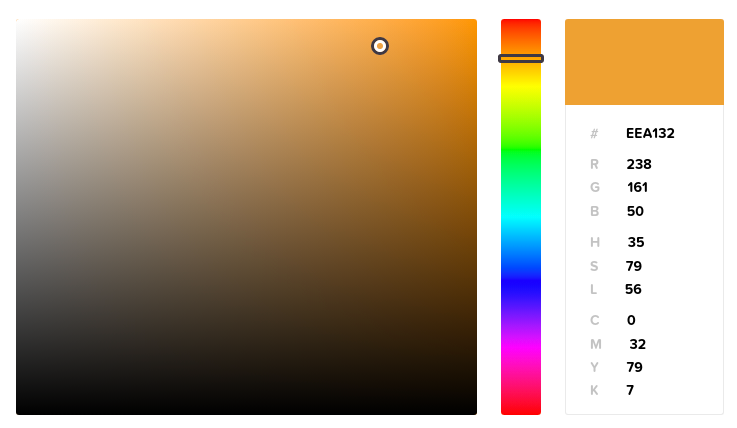
Вы также можете указать цвет, используя шестнадцатеричные значения RGB такое часто используется в CSS для стилизации сайтов:
|
label = tk.Label(text=«Привет, Tkinter!», background=«#34A2FE») |
Теперь фон стал приятного голубого цвета. Шестнадцатеричные значения RGB, в отличие от названий цветов, закодированы, но это делает их более управляемыми. К счастью, доступны инструменты для простого и быстрого получения шестнадцатеричных кодов цветов.
Если вам не хочется регулярно вводить foreground и background, можете использовать сокращенные версии параметров — fg и bg. Они точно также отвечают за установку цвета текста и цвета фона.
|
label = tk.Label(text=«Привет, Tkinter!», fg=«white», bg=«black») |
Вы также можете управлять шириной и высотой ярлыка с помощью параметров width и height:
|
import tkinter as tk window = tk.Tk() label = tk.Label( text=«Привет, Tkinter!», fg=«white», bg=«black», width=20, height=20 ) label.pack() window.mainloop() |
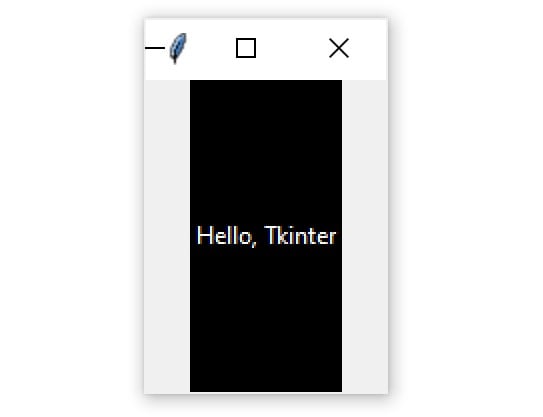
В окне, ярлык будет выглядеть следующим образом:
Может показаться странным, что ярлык в окне не является квадратным, хотя параметр как ширины, так и высоты равен 20. Все оттого, что ширина и высота измеряются в текстовых юнитах.
Горизонтальный текстовый юнит определен шириной символа "0", или цифрой ноль, в шрифте системы по умолчанию. Аналогичным образом один вертикальный текстовый юнит определен высотой символа "0".
На заметку: Tkinter использует текстовые юниты для измерения ширины и высоты вместо дюймов, сантиметров или пикселей, чтобы обеспечить согласованное поведение приложения на разных платформах.
Измерение юнитов шириной символа означает, что размер виджета относительно шрифта определяется по умолчанию на компьютере пользователя. Это обеспечивает правильное размещение текста на ярлыках и кнопках независимо от того, где запущено приложение.
Ярлыки отлично подходят для отображения текста, но через них пользователь не может вводить данные. Следующие три виджета позволяют пользователю вводить информацию.
Создание кнопки через виджет Button
Виджеты Button нужны для создания кликабельных кнопок. Их можно настроить таким образом, чтобы при нажатии вызывалась определенная функция. В следующей части урока, будет рассмотрено, как именно вызвать функцию при нажатии на кнопку. А пока займемся стилизацией виджета кнопки.
Существует много сходств между виджетами Button и Label. По сути кнопка — это просто ярлык, на который можно кликнуть. Для создания стилей виджетов ярлыка и кнопки также используются одинаковые аргументы.
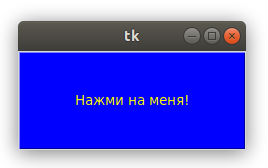
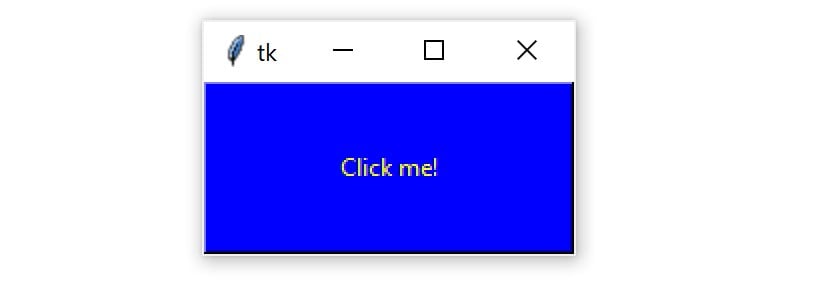
К примеру, следующий код создает кнопку с синим фоном и желтым текстом. Также устанавливается ширина и высота с показателями в 25 и 5 текстовых юнит:
|
import tkinter as tk window = tk.Tk() button = tk.Button( text=«Нажми на меня!», width=25, height=5, bg=«blue», fg=«yellow», ) button.pack() window.mainloop() |
Готовая кнопка будет выглядеть следующим образом:
Неплохо! Следующие два виджета Entry и Text используются для сбора вводных данных от пользователя.
Виджет Entry — Однострочное текстовое поле
В случаях, когда требуется получить текстовую информацию от пользователя вроде адреса электронной почты, используется виджет Entry. Он отображает небольшой текстовый бокс, куда пользователь может ввести текст.
Создание виджета Entry практически ничем не отличается от процесса создания ярлыка и кнопки. К примеру, следующий код создает виджет с синим фоном и желтым текстом длиной в 50 текстовых юнит:
|
entry = tk.Entry(fg=«yellow», bg=«blue», width=50) |
В случае виджета однострочного текстового поля (Entry) интересен не процесс создания стиля, а то, как получить эти входные данные от пользователя. Есть три основные операции, что можно провести с виджетом однострочного текстового поля (Entry):
- Получение всего текста через
.get() - Удаление текста через
.delete() - Вставка нового текста через
.insert()
Для лучшего понимания принципа работы виджетов Entry создадим один экземпляр элемента и попробуем ввести в него текст. Откройте оболочку Python и выполните следующие действия. Сначала импортируем tkinter и создаем новое окно:
|
>>> import tkinter as tk >>> window = tk.Tk() |
Теперь создаем виджеты Label и Entry:
|
>>> label = tk.Label(text=«Имя») >>> entry = tk.Entry() |
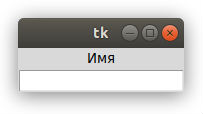
Здесь ярлык указывает, что именно пользователь должен записать в виджете Entry. Нет никаких ограничений для вводимых данных, это просто подсказка, что ввести нужно «Имя». Виджеты станут видимыми на окне после выполнения метода .pack() для каждого из них:
|
>>> label.pack() >>> entry.pack() |
Результат выглядит следующим образом:
Обратите внимание, что в окне, виджет ярлыка автоматически центрирует над виджетом текстового поля. Это особенность разметки pack, о которой будет описано в следующих разделах.
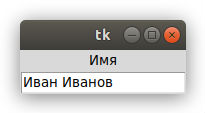
На созданном в программе виджете мы ввели текст «Иван Иванов»:
Теперь в виджете текстового поля есть текст, только он еще не был отправлен в программу. Для получения текста и присваивания его значения переменной name используется метод .get():
|
>>> name = entry.get() >>> name ‘Иван Иванов’ |
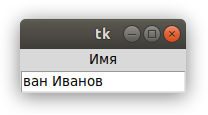
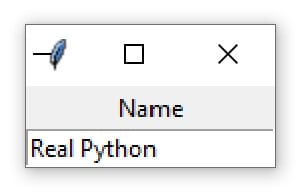
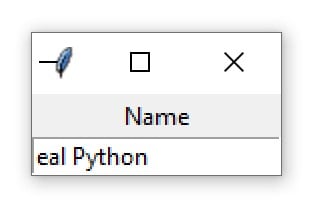
Текст также можно удалить, для этого используется метод .delete(). Данный метод принимает аргумент, который является целым числом и сообщает Python, какой символ нужно удалить. К примеру, во фрагменте кода ниже показано, как через метод .delete(0) можно удалить первый символ из текстового поля:
Теперь в виджете остался текст "ван Иванов":
Обратите внимание, что как и строки в Python, текст в виджете однострочного текстового поля индексируется, и начинается индексирование с 0.
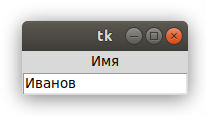
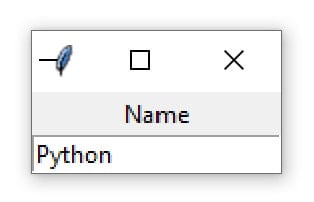
При необходимости удалить несколько символов из текстового поля нужно передать второй целочисленный аргумент в .delete(), указав индекс символа, на котором процесс удаления должен завершиться. К примеру, следующий код удаляет первые четыре буквы из текстового поля:
Теперь остался только текст "Иванов":
Метод .delete() работает по аналогии с методом строк slice() для удаления части символов из строки. Первый аргумент определяет начальный индекс удаления, последний индекс указывает где именно процесс удаления должен остановиться.
Для удаления всего текста из текстового поля во втором аргументе метода .delete() используется специальная константа tk.END:
|
>>> entry.delete(0, tk.END) |
Теперь остался пустой текстовый бокс:
Вы также можете вставить текст в виджете однострочного текстового поля с помощью метода .insert():
|
>>> entry.insert(0, «Иванов») |
Теперь окно стало таким:
Первый аргумент сообщает методу .insert(), куда вставить текст. Если в текстовом поле нет текста, новый текст будет всегда вставляться в начале виджета, и не важно, какое значение будет передано в качестве первого аргумента.
К примеру, при вызове .insert() с первым аргументом 100, а не 0, как было сделано выше, вывод будет тем же.
В том случае, если текстовое поле уже содержит какой-то текст, тогда .insert() вставить новый текст в указанную позицию и сдвинет существующий текст вправо:
|
>>> entry.insert(0, «Иван «) |
В виджете с текстом теперь значится "Иван Иванов":
Виджеты однострочного текстового поля отлично подходят для получения небольшого количества текста от пользователя, однако они отображают только одну строку текста, следовательно, для большого количества информации они не подойдут. Для таких случаев лучше использовать виджеты Text.
Виджет Text — ввод большого текста в Tkinter
Виджеты Text используются для ввода текста, как и виджеты Entry. Разница в том, что Text может содержать несколько строчек текста. С виджетом Text пользователь может вводить целые параграфы или страницы текста. Как и в случае с виджетами Entry, над виджетами Text можно провести три основные операции:
- Получение текста через метод
.get() - Удаление текста через метод
.delete() - Вставка текста через метод
.insert()
Несмотря на то, что названия методов совпадают с теми, что используются в Entry, процесс реализации несколько различен. Разберем пример создания виджета Text и посмотрим на деле, что он может делать.
На заметку: У вас все еще открыто предыдущее окно? Если это так, тогда закройте его, выполнив следующую команду:
Это также можно сделать вручную, просто нажав на кнопку «Закрыть».
В оболочке Python нужно создать новое пустое окно, а внутри нее с помощью метода .pack() разместить текстовой виджет:
|
>>> import tkinter as tk >>> window = tk.Tk() >>> text_box = tk.Text() >>> text_box.pack() |
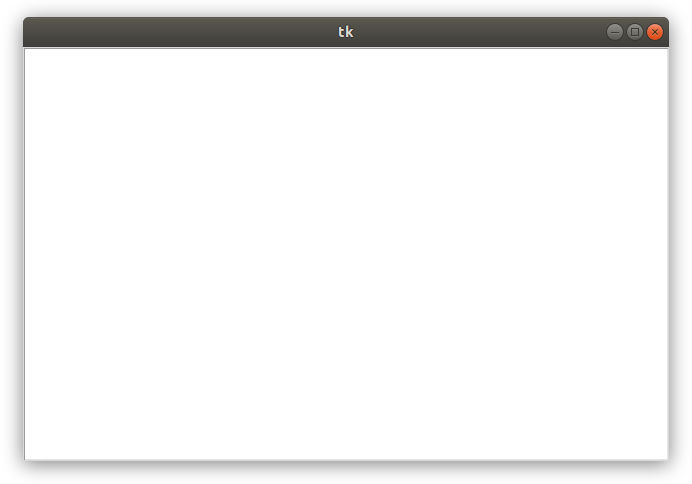
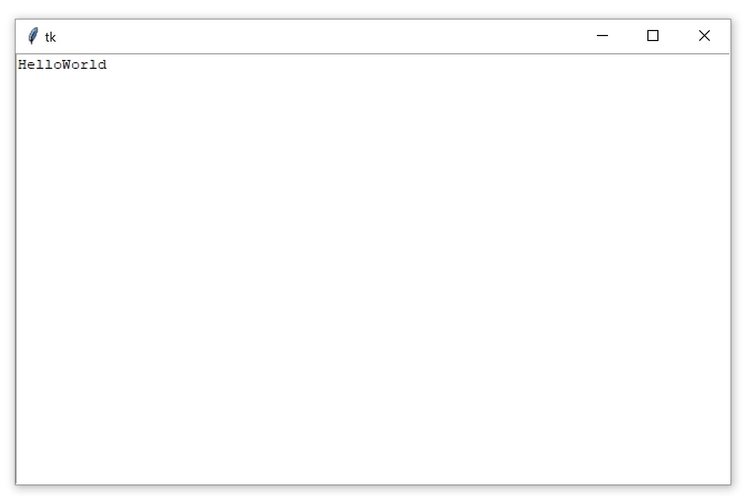
По умолчанию текстовые боксы значительно больше виджетов однострочного ввода текста Entry. Созданное с помощью кода выше окно будет выглядеть следующим образом:
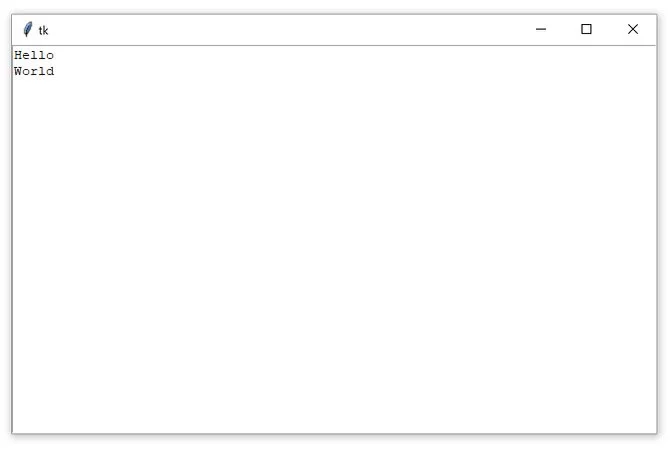
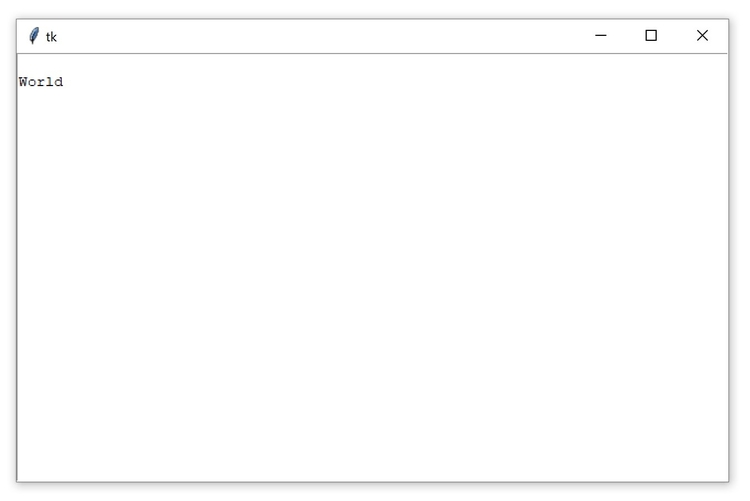
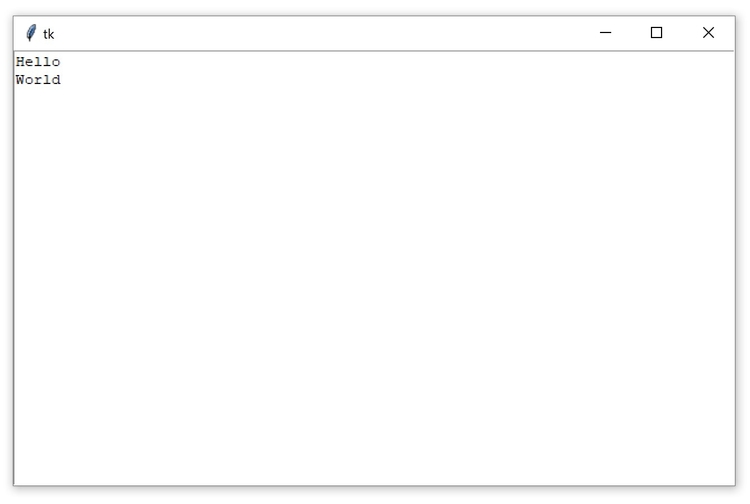
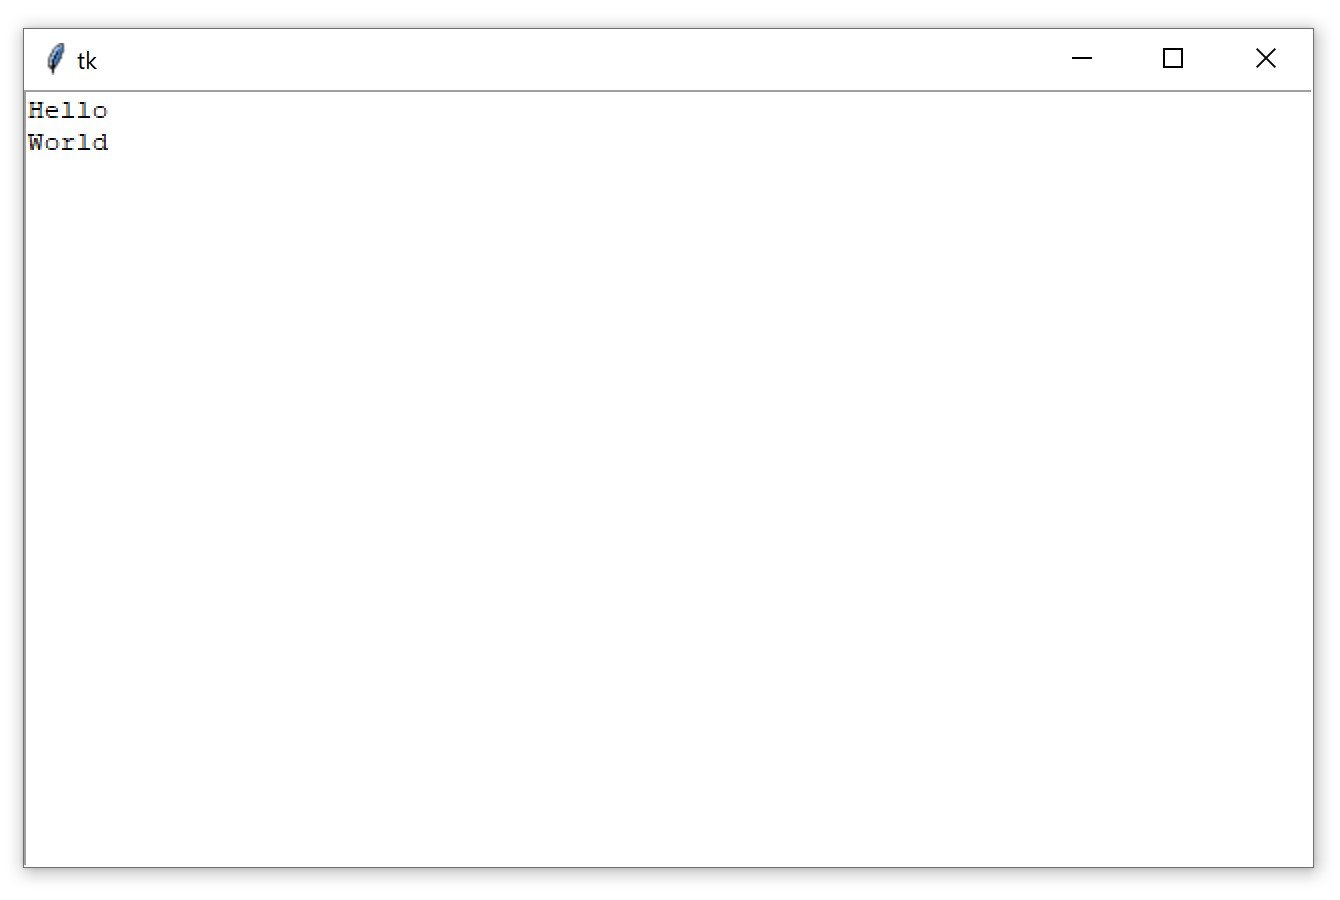
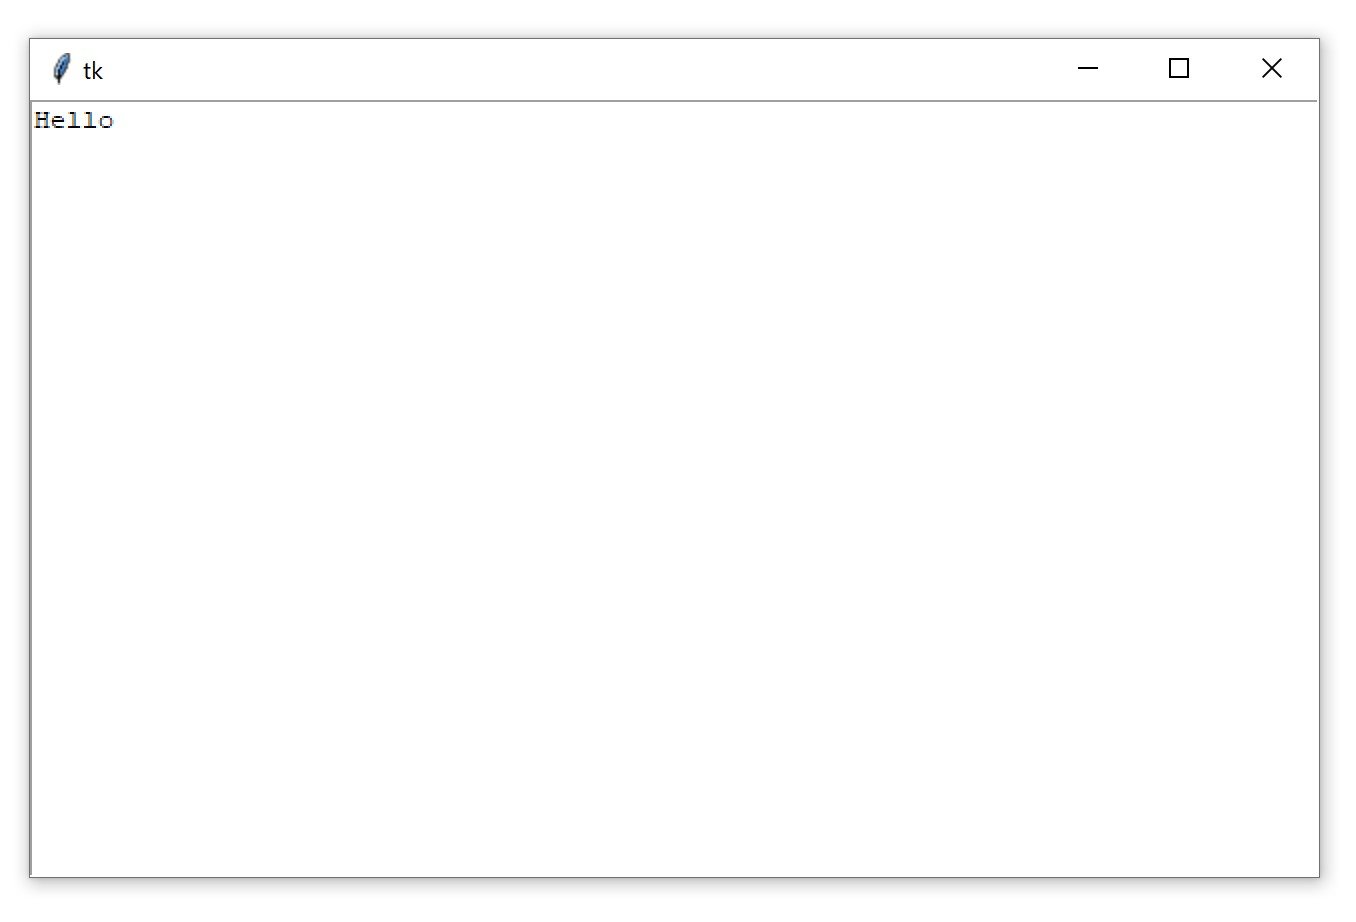
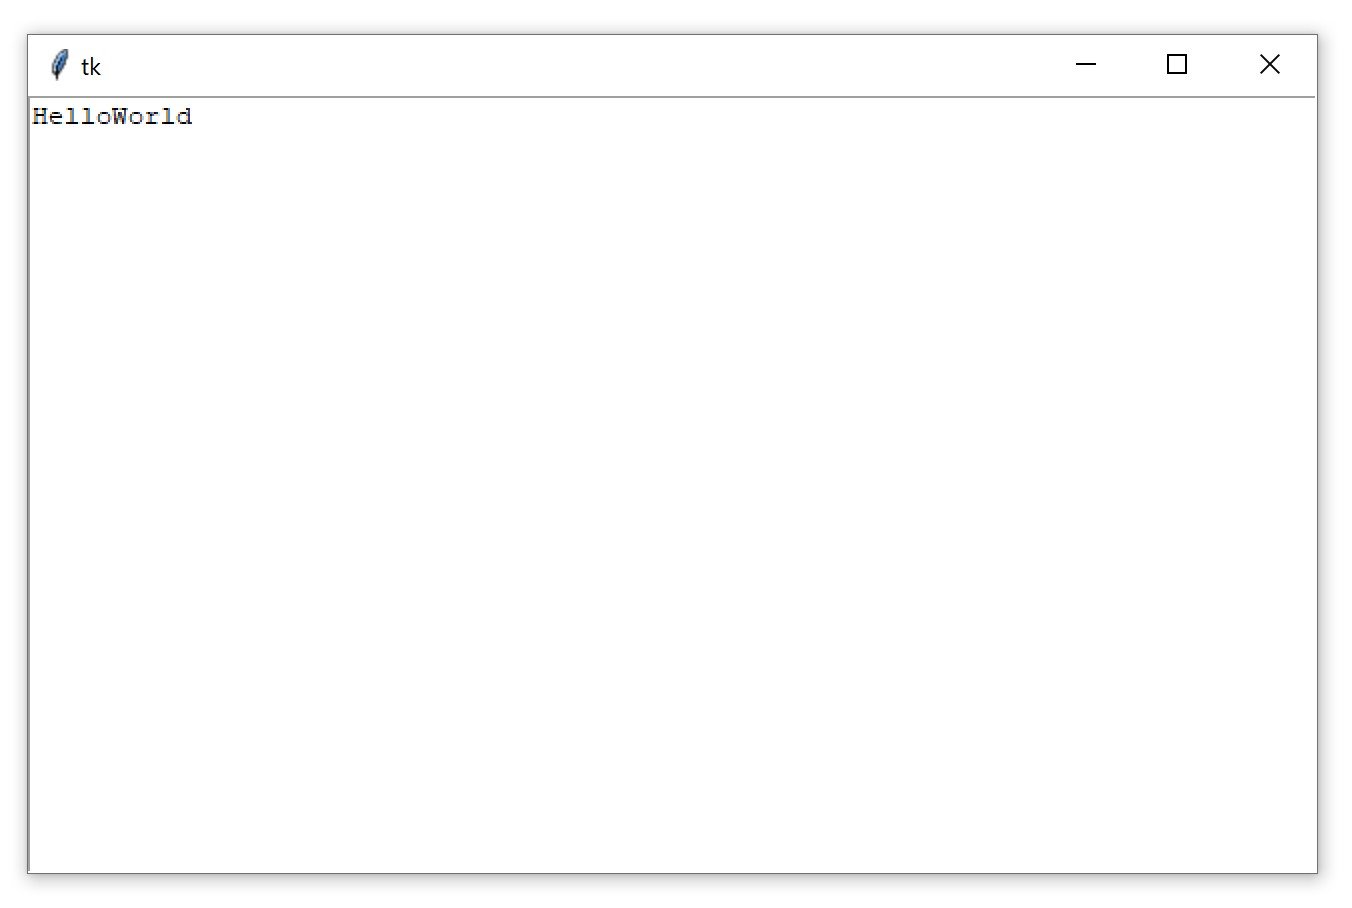
Для активации текстового бокса нажмите на любую точку внутри окна. Введите слово "Hello". Нажмите на клавиатуре кнопку Enter, после чего введите на второй строке слово "World". Окно будет выглядеть следующим образом:
Как и в случае с виджетами Entry, вы можете получить текст их виджета Text с помощью метода .get(). Однако, вызов .get() без аргументов не возвращает весь текст как это происходит с виджетами однострочного ввода текста Entry. Появится исключение TypeError:
|
>>> text_box.get() Traceback (most recent call last): File «<pyshell#4>», line 1, in <module> text_box.get() TypeError: get() missing 1 required positional argument: ‘index1’ |
Метод .get() для текстового виджета запрашивает хотя бы один аргумент. Вызов .get() с единственным индексом возвращает один символ. Для получения нескольких символов требуется передать начальный и конечный индексы.
Индексы в виджетах Text действуют иначе, чем в виджетах Entry. Так как виджеты Text могут получить несколько строк текста, индекс должен содержать следующие два пункта:
- Номер строки где находится символа;
- Позиция символа в строке.
Номера строк начинаются с 1, а позиция символа с 0. Для получения индекса создается строка формата "<line>.<char>", где <line> заменяется номером строки, а <char> номером символа. К примеру, "1.0" означает первый символ на первой строке, а "2.3" представляет четвертый символ на второй строке.
Используем индекс "1.0" для получения первой буквы созданного ранее текстового бокса:
|
>>> text_box.get(«1.0») ‘H’ |
В слове "Hello" 5 букв, буква o стоит под индексом 4, так как отсчет символов начинается с 0, и слово "Hello" начинается с первой строки в текстовом боксе.
Как при слайсинге строк в Python, для получения целого слова "Hello" из текстового бокса, конечный индекс должен быть на один больше последнего читаемого символа.
Таким образом, для получения слова "Hello" из текстового бокса используется "1.0" для первого индекса, и "1.5" для второго индекса:
|
>>> text_box.get(«1.0», «1.5») ‘Hello’ |
Для получения "World" на второй строке текстового бокса, измените номера строк каждого индекса на 2:
|
>>> text_box.get(«2.0», «2.5») ‘World’ |
Для получения всего текста из текстового виджета установите индекс на "1.0" и используйте специальную константу tk.END для второго индекса:
|
>>> text_box.get(«1.0», tk.END) ‘HellonWorldn’ |
Обратите внимание, что текст, возвращаемый через метод .get(), включает символы перехода на новую строку n. Вы также можете увидеть в данном примере, что каждая строка в виджете Text содержит в конце символ новой строки, включая последнюю строку текста в текстовом боксе.
Метод .delete() используется для удаления символов из текстового виджета. Работает точно так же, как и метод .delete() для виджетов Entry. Есть два способа использования .delete():
- С одним аргументом;
- С двумя аргументами.
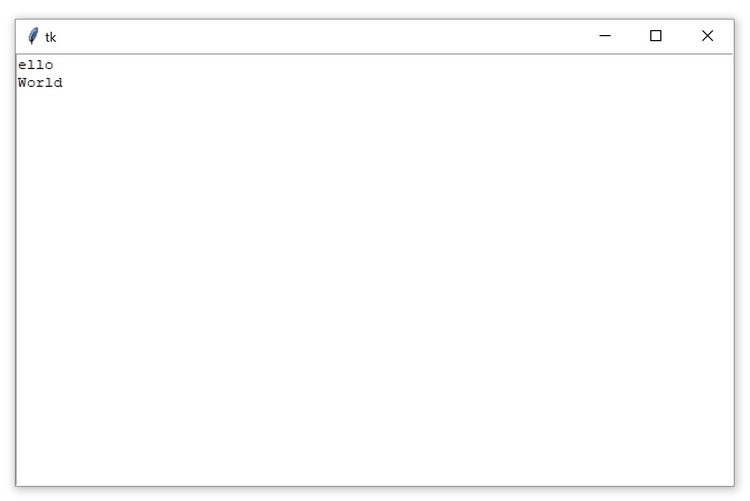
Используя вариант с одним аргументом, вы передаете индекс символа для удаления в .delete(). К примеру, следующий код удаляет первый символ H из текстового бокса:
|
>>> text_box.delete(«1.0») |
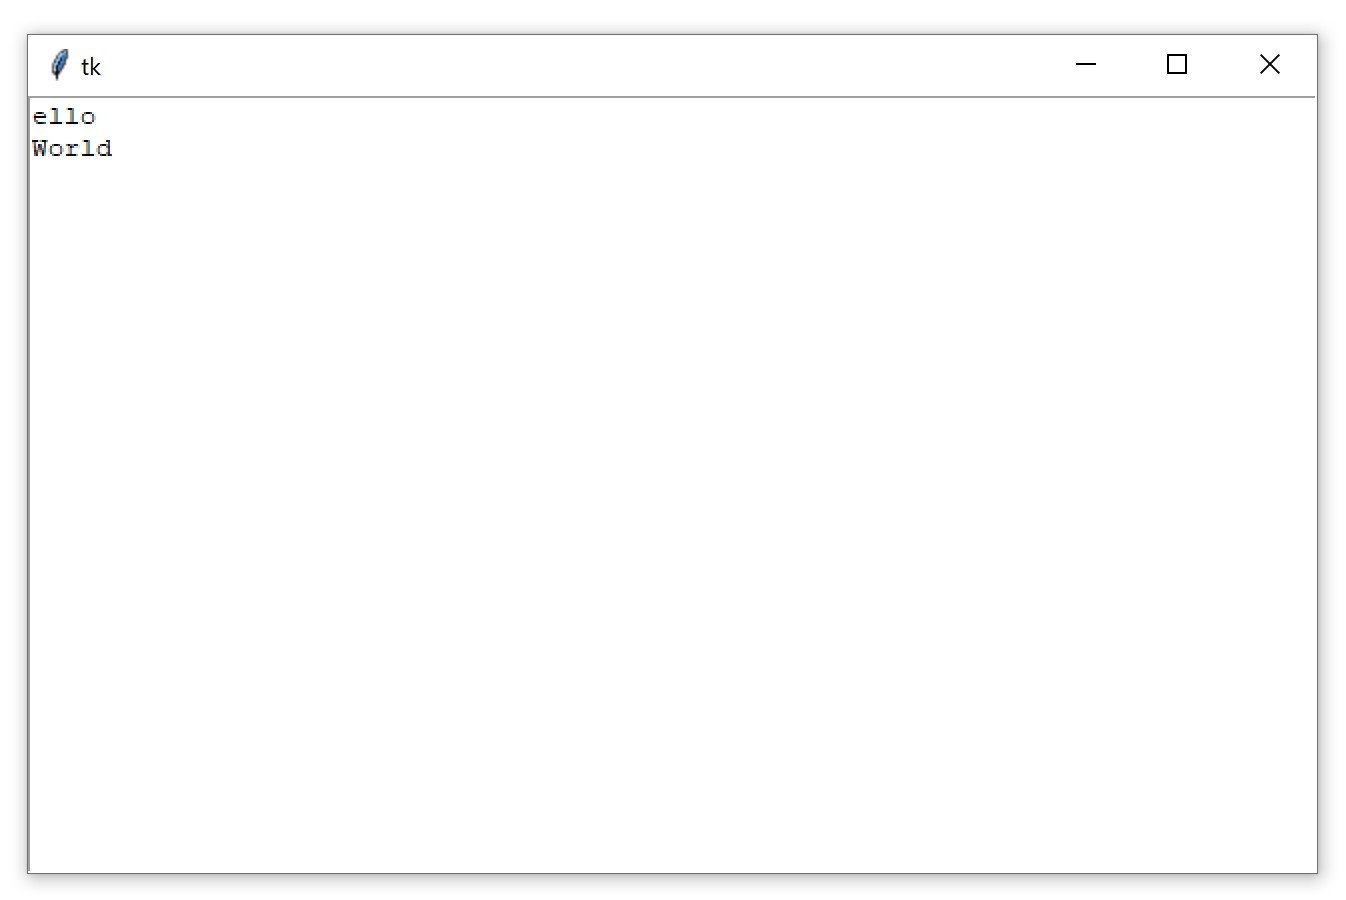
Теперь в первой строке текста значится "ello":
В версии с двумя аргументами передается два индекса для удаления группы символов, начиная с первого символа и заканчивая вторым, но не включая его.
К примеру, для удаления оставшейся части "ello" из первой строки текстового бокса используются индексы "1.0" и "1.4":
|
>>> text_box.delete(«1.0», «1.4») |
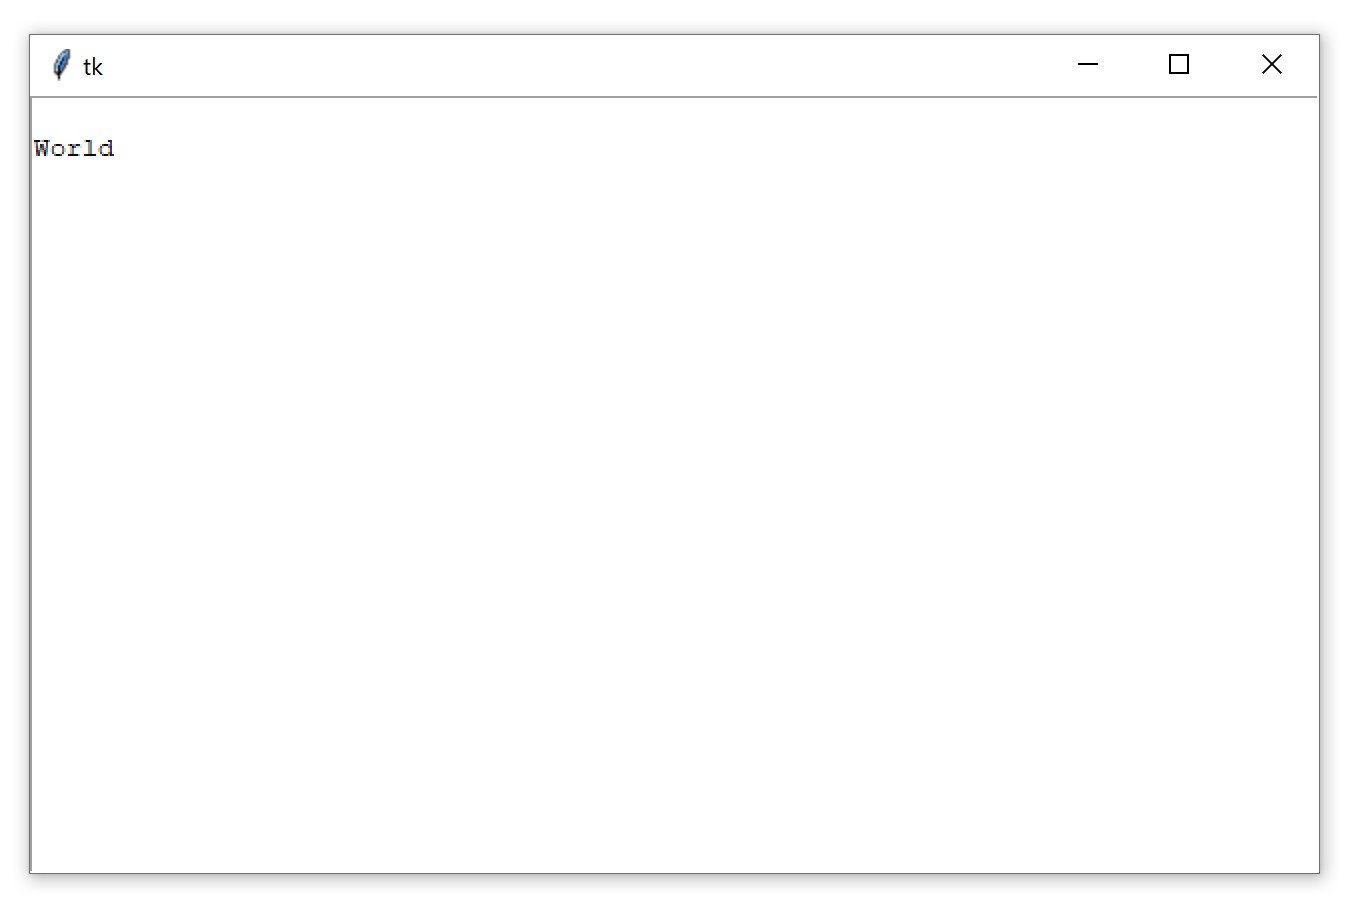
Обратите внимание, что текст из первой строки удалился, но осталась пустая строка, за которой следует слово World на второй строке:
Хотя вам этого не видно, но на первой строке остался один символ — это символ новой строки n. Вы можете сами убедиться в этом, вызвав метод .get():
|
>>> text_box.get(«1.0») ‘n’ |
При удалении данного символа оставшаяся часть содержимого текстового виджета сдвинется на строку вверх:
|
>>> text_box.delete(«1.0») |
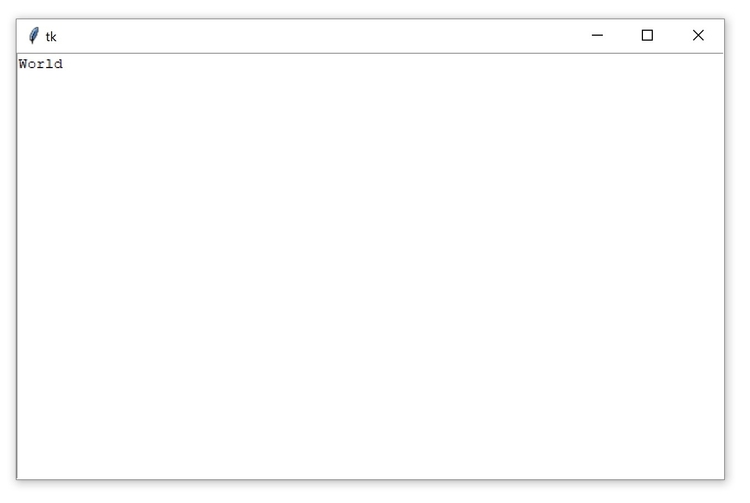
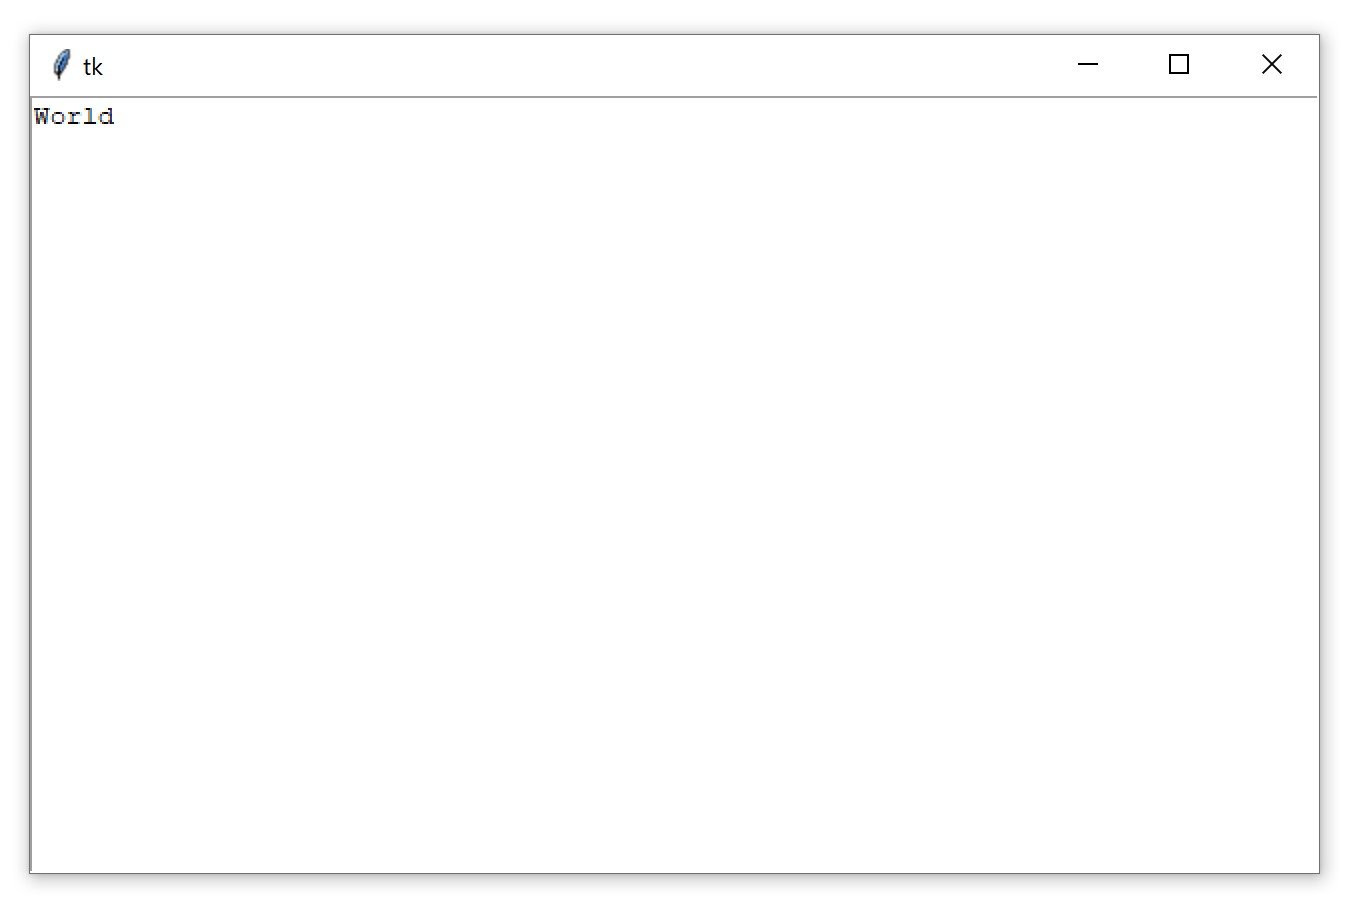
Теперь слово "World" переместилось на первую строку текстового виджета:
Попробуем очистить оставшуюся часть из текстового виджета. Установим "1.0" в качестве стартового индекса и tk.END в качестве второго индекса:
|
>>> text_box.delete(«1.0», tk.END) |
Теперь наш текстовый виджет совершенно пуст:
Вы также можете вставить текст в текстовый виджет с помощью метода .insert():
|
>>> text_box.insert(«1.0», «Hello») |
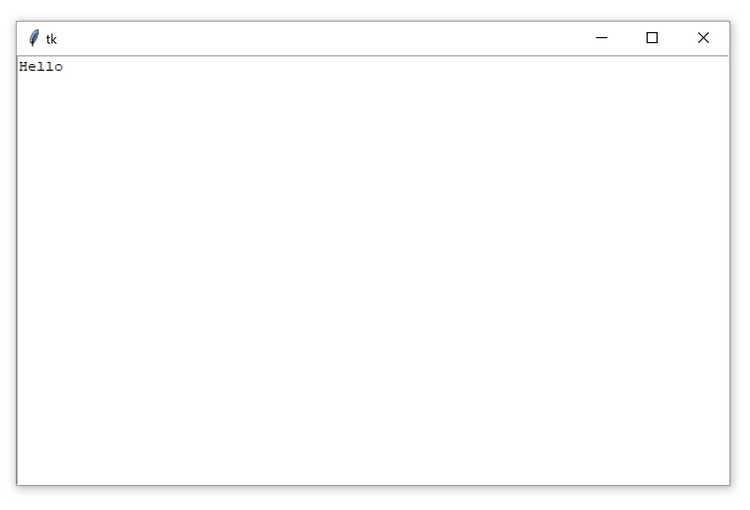
Метод вставляет слово "Hello" в начало текстового виджета. Используется уже знакомый формат "<line>.<column>" как и у метода .get() для уточнения позиции вставки текста:
Проверьте, что произойдет при попытке вставить слово "World" во вторую строчку:
|
>>> text_box.insert(«2.0», «World») |
Вместо вставки слова на вторую строку текст ставится в конце первой строки:
Если вы хотите поставить текст на новую строку, тогда понадобится вставить символ новой строки n вручную:
|
>>> text_box.insert(«2.0», «nWorld») |
Теперь слово "World" находится на второй строке текстового виджета:
Метод .insert() делает следующие две вещи:
- Вставляет текст в указанной позиции, если в этой позиции или после неё уже находится текст;
- Добавляет текст в указанную строку, если номер символа превышает индекс последнего символа в текстовом боксе.
Обычно нецелесообразно пытаться отследить индекс последнего символа. Лучший способ вставить текст в конец виджета Text — передать tk.END как первый параметр в методе .insert():
|
text_box.insert(tk.END, «Вставь меня в самом конце!») |
Не забудьте включить символ новой строки (n) в начале текста, если вы хотите расположить его на новой строке:
|
text_box.insert(tk.END, «nВставь меня в новую строку!») |
Виджеты Label, Button, Entry и Text являются только небольшой частью виджетов, доступных в Tkinter. Среди прочих виджетов есть чекбоксы, радио кнопки, скролл бары и прогресс бары.
Использование виджета Frame в Tkinter
В данном руководстве мы рассмотрим только пять виджетов. Это описанные ранее четыре виджета плюс виджет рамки Frame. Виджеты рамок важны для организации макета виджетов в приложении.
Прежде чем углубляться в детали макетов виджетов более подробно рассмотрим, как работает виджет рамки, и как вы можете вставить в них другие виджеты. Следующий скрипт создает пустой виджет рамки и добавляет его на главное окно приложения:
|
import tkinter as tk window = tk.Tk() frame = tk.Frame() frame.pack() window.mainloop() |
Метод frame.pack() помещает рамку в окно, таким образом размер окна становится таким маленьким, каким он может быть для того, чтобы поместился рамку. При запуске скрипта выше будет получен крайне скучный вывод:
Пустой виджет рамки практически невидим.
Рамки лучше всего рассматривать как контейнеры для других виджетов.
Вы можете вставить любой виджет в рамку, установив атрибут master данному виджету:
|
frame = tk.Frame() label = tk.Label(master=frame) |
Чтобы посмотреть, как это работает, напишем скрипт для создания двух виджетов Frame под названиями frame_a и frame_b. В данном скрипте frame_a содержит ярлык с текстом "I'm in Frame A", а frame_b содержит ярлык с текстом "I'm in Frame B". Вот как это можно сделать:
|
1 2 3 4 5 6 7 8 9 10 11 12 13 14 15 16 17 |
import tkinter as tk window = tk.Tk() frame_a = tk.Frame() frame_b = tk.Frame() label_a = tk.Label(master=frame_a, text=«I’m in Frame A») label_a.pack() label_b = tk.Label(master=frame_b, text=«I’m in Frame B») label_b.pack() frame_a.pack() frame_b.pack() window.mainloop() |
Обратите внимание, что рамка frame_a помещается в окно перед рамкой frame_b. Открывающееся окно показывает ярлык в рамке frame_a над ярлыком в рамке frame_b:
Теперь посмотрим, что произойдет при изменении порядка вставки frame_a.pack() и frame_b.pack():
|
1 2 3 4 5 6 7 8 9 10 11 12 13 14 15 16 17 |
import tkinter as tk window = tk.Tk() frame_a = tk.Frame() label_a = tk.Label(master=frame_a, text=«I’m in Frame A») label_a.pack() frame_b = tk.Frame() label_b = tk.Label(master=frame_b, text=«I’m in Frame B») label_b.pack() # Вставка рамок в окне поменялись местами. frame_b.pack() frame_a.pack() window.mainloop() |
Вывод выглядит следующим образом:
Теперь ярлык label_b сверху. Так как ярлык label_b назначен к рамке frame_b, он перемещается, куда позиционируется рамка frame_b.
У всех четырех рассмотренных типов виджетов — Label, Button, Entry и Text — есть атрибут master, который устанавливается при их создании. Таким образом, вы можете управлять тем, к какой именно рамки назначен виджет.
Виджеты Frame отлично подходят для логической организации других виджетов в окне приложения. Связанные виджеты могут быть назначены одной и той же рамки, так что, если рамка когда-либо перемещается в окне, связанные виджеты перемещаются вместе с ней.
В дополнение к логической группировке ваших виджетов, рамки могут немного улучшить внешний вид вашего приложения. Дальше будет показано, как менять стиль рамок.
Атрибут relief в Tkinter — Меняем стиль рамки
Рамки могут менять свой стиль с помощью атрибута relief, который создает границу вокруг рамки. Можно присвоить relief любое из следующих значений:
tk.FLAT: Никакого эффекта рамки (по умолчанию);tk.SUNKEN: Создается эффект углубления элемента;tk.RAISED: Создается эффект выпуклости элемента;tk.GROOVE: Создается эффект врезанной в текстуру рамки, своего рода выемки;tk.RIDGE: Создается эффект выпуклой выемки.
Для применения эффекта рамки нужно установить значение атрибута borderwidth выше, чем 1. Данный атрибут корректирует ширину рамки в пикселях. Лучший способ понять, как выглядит каждый эффект — проверить на практике.
Вот скрипт, который помещает пять рамок в окно, где каждая из которых имеет свое значение аргумента relief:
|
1 2 3 4 5 6 7 8 9 10 11 12 13 14 15 16 17 18 19 |
import tkinter as tk border_effects = { «flat»: tk.FLAT, «sunken»: tk.SUNKEN, «raised»: tk.RAISED, «groove»: tk.GROOVE, «ridge»: tk.RIDGE, } window = tk.Tk() for relief_name, relief in border_effects.items(): frame = tk.Frame(master=window, relief=relief, borderwidth=5) frame.pack(side=tk.LEFT) label = tk.Label(master=frame, text=relief_name) label.pack() window.mainloop() |
Разбор скрипта по строкам кода:
- Строки с 3 по 9 создают словарь, ключами которого являются названия различных эффектов от
relief, доступных в Tkinter. Значения являются соответствующими объектами Tkinter. Этот словарь назначен переменнойborder_effects - Строка 13 запускает цикл for для каждого элемента в словаре
border_effects - Строка 14 создает новый виджет
Frameи назначает его объектуwindow. Атрибутreliefустановлен на соответствующий элемент рельефа в словареborder_effects, а атрибутborderустановлен на5пикселей, чтобы эффект был видимым - Строка 15 помещает виджет рамки в окно с помощью метода
.pack(). Ключевое словоsideуказывает Tkinter, где поместить поместить рамку. Подробнее о том, как это работает, вы узнаете в следующем разделе. - Строки 16 и 17 создаем виджет текстового ярлыка для отображения названия рельефа и помещаем его в только что созданную рамку.
Окно, созданное вышеуказанным скриптом, выглядит следующим образом:
На данной картинке представлены следующие эффекты:
- tk.FLAT создает простую рамку без видимой границы;
- tk.SUNKEN добавляет границу, которая создает эффект, будто элемент провалился в окне;
- tk.RAISED создает рамке границу в виде эффекта выпуклости;
- tk.GROOVE добавляет эффект врезанной, будто утопающей в текстуру, рамки;
- tk.RIDGE создает эффект, будто врезанной с другой стороны выпуклой рамки.
Данные эффекты могут сделать ваше приложение на Tkinter более интересным с визуальной точки зрения.
Правила именования виджетов в Tkinter
При создании виджета можно дать ему любое имя при условии, что данное имя уже не зарегистрировано самим Python, вроде with, for, range и т.д.
Обычно хорошей идеей является включение имени класса виджета в имя переменной, которую вы назначаете экземпляру виджета. Например, если виджет Label используется для отображения имени пользователя, вы можете назвать виджет label_user_name. Виджет Entry, используемый для определения возраста пользователя, может называться entry_age.
Когда вы включаете имя класса виджета в имя переменной, вы помогаете себе (и всем, кому необходимо прочитать ваш код), чтобы понять, к какому типу виджетов относится имя переменной.
Однако использование полного имени класса виджета может привести к длинным именам переменных, поэтому вы можете захотеть использовать сокращение для отсылки на каждый тип виджета. В оставшейся части этого урока будем использовать следующие сокращенные префиксы для именования виджетов:
| Класс виджета | Префикс названия переменной | Пример |
|---|---|---|
| Label | lbl | lbl_name |
| Button | btn | btn_submit |
| Entry | ent | ent_age |
| Text | txt | txt_notes |
| Frame | frm | frm_address |
В этом разделе мы узнали, как создать окно, использовать виджеты и работать с рамками. На этом этапе нам удалось создать несколько простых окон, которые отображают сообщения, но это еще не полноценное приложение.
В следующем разделе мы познакомимся с управлением макетом приложений с помощью мощных менеджеров геометрии от Tkinter.
Задание #2 — Создать текстовое поле и вставить в нее текст
Попробуйте выполнить данную задачку, чтобы убедиться, что вы действительно поняли принцип работы описанных ранее виджетов.
Задание: Создать однострочное текстовое поле и вставить на нее какой-то текст.
- Напишите скрипт для отображения виджета однострочного текстового поля
Entryшириной в 40 текстовых юнитов с белым фоном и черным текстом; - Используйте метод
.insert()для вставки текста:"What is your name?".
Результат должен выглядеть следующим образом:
Попробуйте выполнить задание самостоятельно.
Ниже представлен вариант кода для выполнения данного задания. В следующем варианте для установки фона и цвета шрифта текстового виджета, используются параметры bg и fg. Помните, что ваша программа может отличаться от нашей, у каждого разработчика свой стиль программирования.
Код с решением задачи #2
|
import tkinter as tk window = tk.Tk() entry = tk.Entry(width=40, bg=«white», fg=«black») entry.pack() entry.insert(0, «What is your name?») window.mainloop() |
Это хорошее решение, цвет фона и цвет шрифта для виджета однострочного текстового поля Entry указываются довольно просто.
В большинстве систем по умолчанию цвет фона для виджета Entry — белый, а цвет содержимого — черный. Таким образом, вы можете создать то же самое окно, не уточняя при этом параметры bg и fg:
Измененный код с решением задачи #2
|
import tkinter as tk window = tk.Tk() entry = tk.Entry(width=40) entry.pack() entry.insert(0, «What is your name?») window.mainloop() |
Помните, что ваш код может выглядеть иначе. Когда будете готовы, переходите к следующим разделам руководства.
Настройка макета приложения через менеджеры геометрии
До данного момента мы добавляли виджеты на окно с помощью метода .pack(), однако что именно делает данный метод нам пока неизвестно.
Давайте все проясним. Макет приложения в Tkinter управляется через менеджеры геометрии. Одним из менеджеров геометрии является .pack(). Помимо него в Tkinter есть еще двое таких менеджеров:
.place().grid()
Каждое окно и рамка в приложении может использовать только один менеджер геометрии. Однако разные рамки могут использовать разные менеджеры геометрии, даже если они назначены окну или рамики, что использует другой менеджер геометрии. Начнем с более подробного разбора менеджера .pack().
Менеджер геометрии pack() в Tkinter
Менеджер .pack() используется для размещения виджетов на рамку или на окне приложения в определенном порядке использует алгоритм упаковки. Для заданного виджета у алгоритма упаковки есть два основных этапа:
- Расчет прямоугольной области, называемой участком. Размер области подходит для вмещения виджета, а оставшаяся ширина (или высота) окна заполняется пустым пространством;
- Центрирование виджета в участке, если не указано другое местоположение в окне.
Менеджер геометрии .pack() является мощным инструментом, но его может быть трудно визуализировать. Лучший способ понять .pack() — это разобрать примеры.
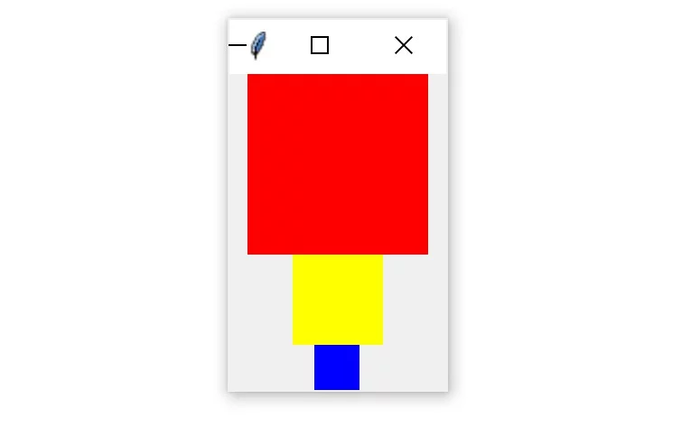
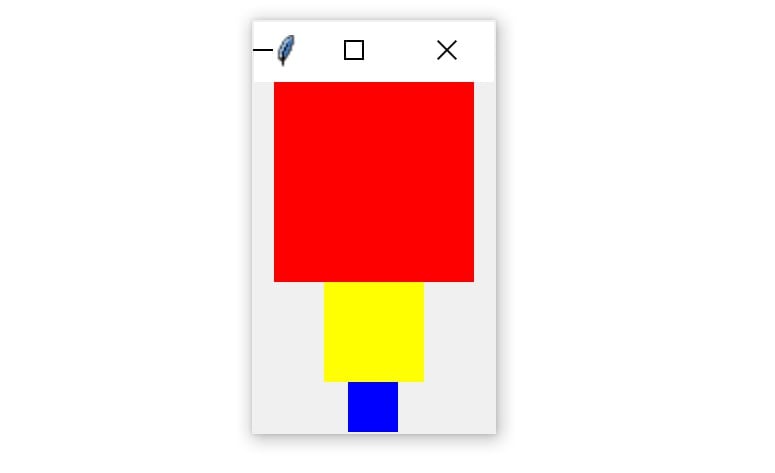
Посмотрите, что происходит при размещении трех виджетов ярлыков с текстом в рамку через менеджер .pack():
|
import tkinter as tk window = tk.Tk() frame1 = tk.Frame(master=window, width=100, height=100, bg=«red») frame1.pack() frame2 = tk.Frame(master=window, width=50, height=50, bg=«yellow») frame2.pack() frame3 = tk.Frame(master=window, width=25, height=25, bg=«blue») frame3.pack() window.mainloop() |
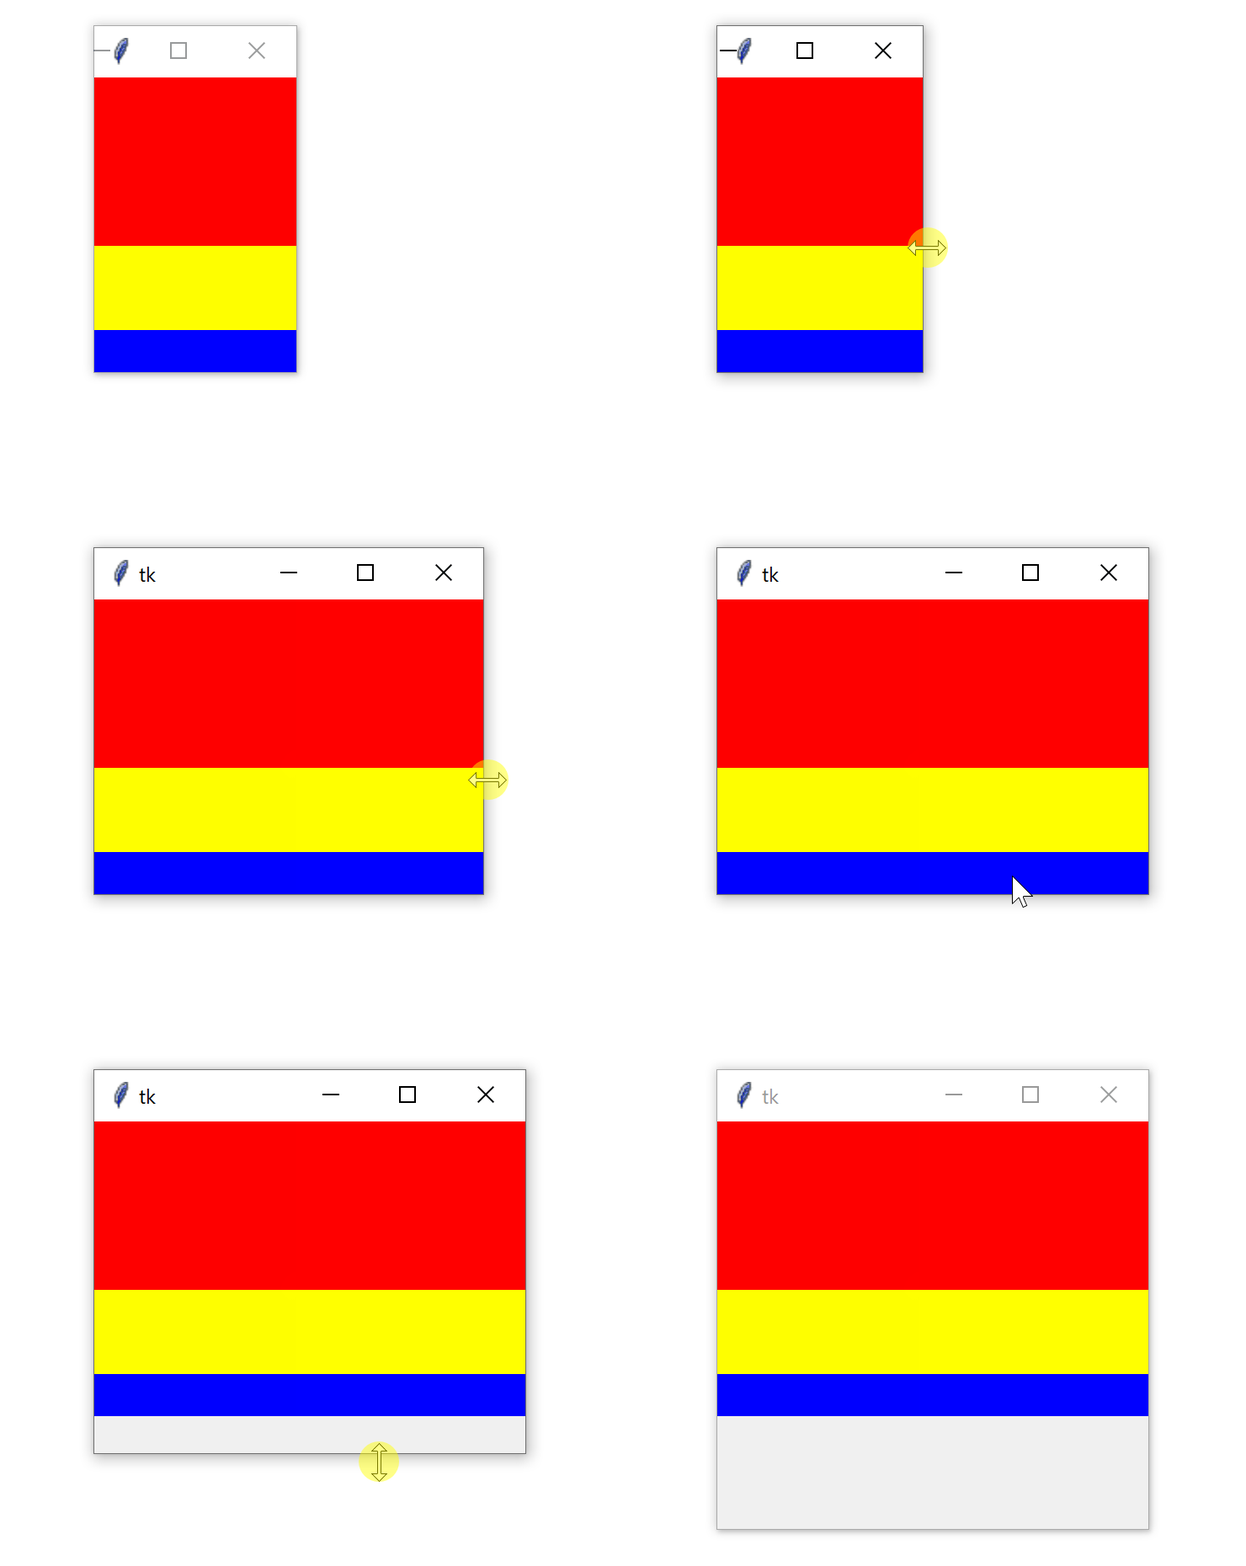
По умолчанию .pack() помещает каждую рамку друг под другом в том порядке, в котором они добавлены на окно приложения:
Каждая рамка находится на самой верхней доступной позиции. Красный в верхней части окна, желтый находится чуть ниже красного, а синий чуть ниже желтого.
Есть три невидимых участка в каждой рамки. Ширина каждого участка совпадает с шириной окна, а высота с высотой рамки внутри. Поскольку, при каждом вызове метода .pack() для каждой рамки не было указано никакой точки привязки, все они центрированы внутри своих участков. Вот почему каждая рамка находится в центре окна.
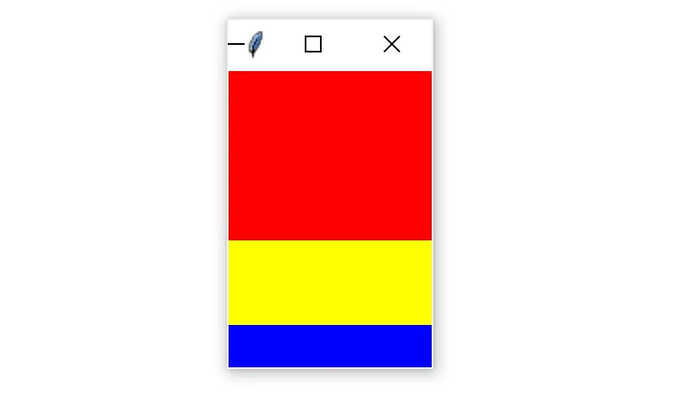
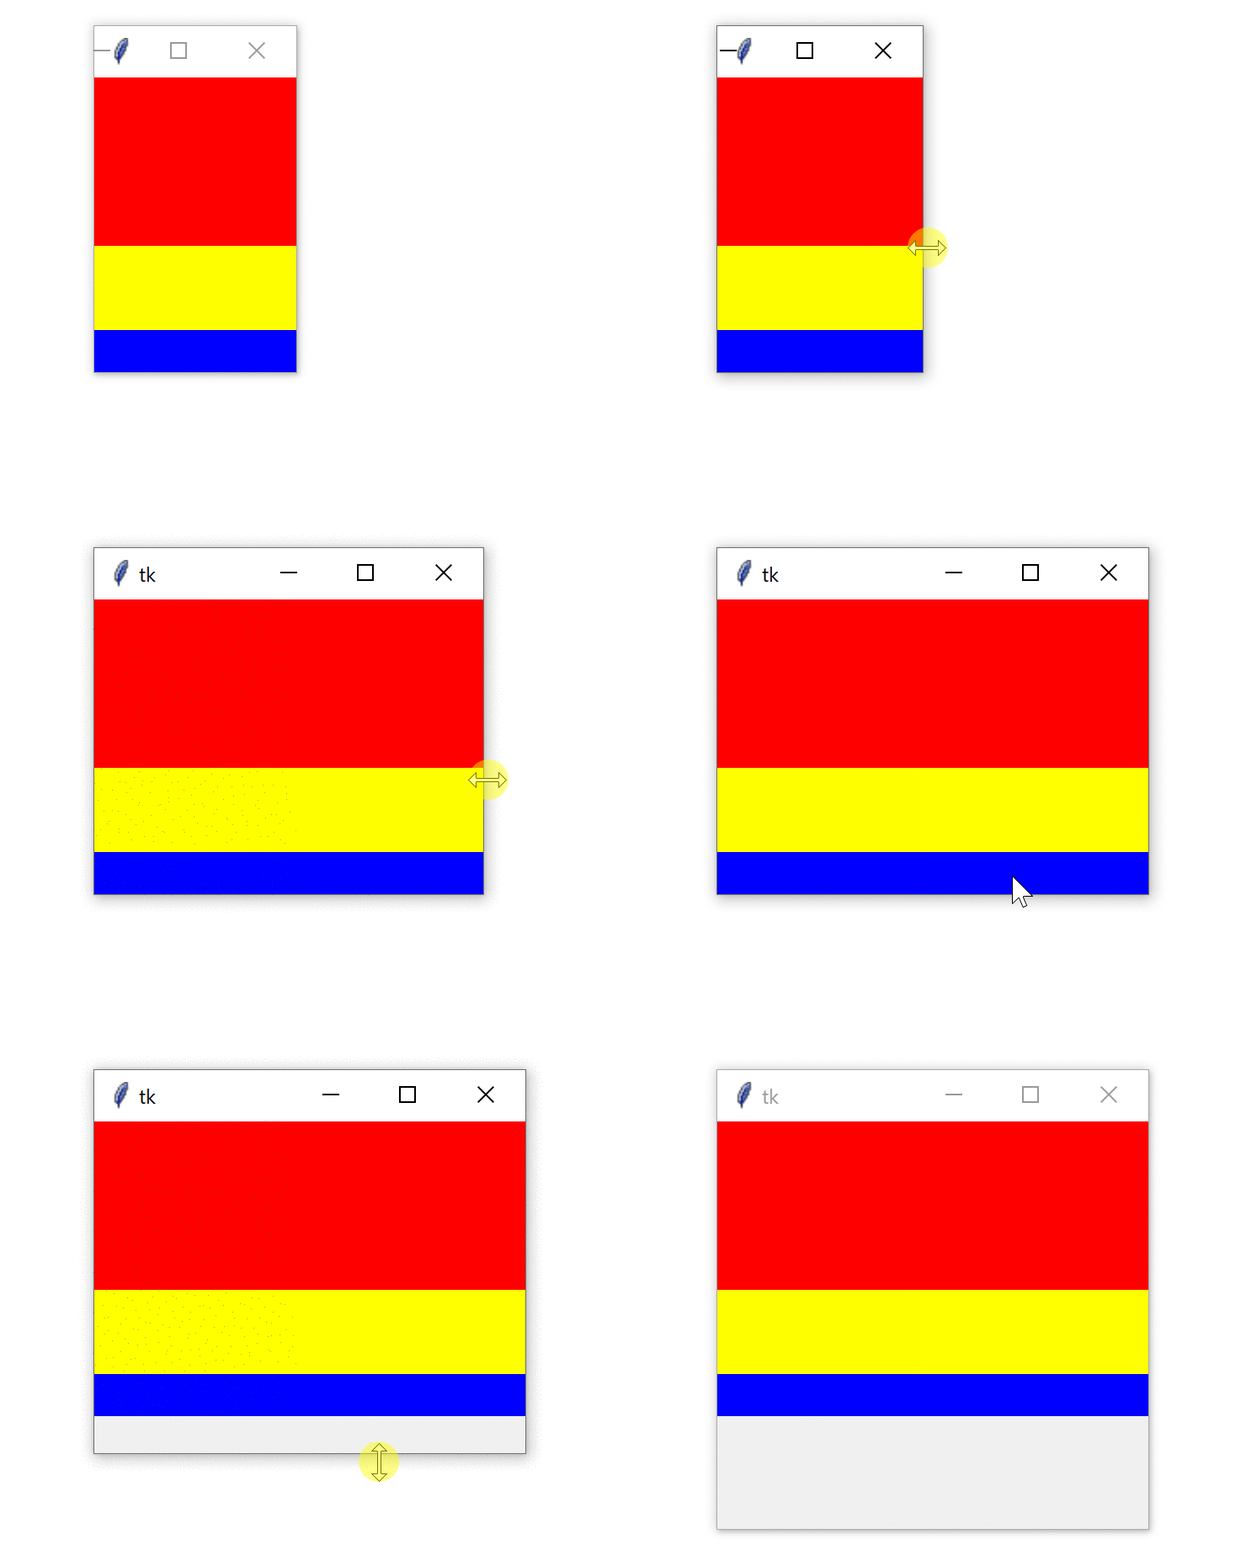
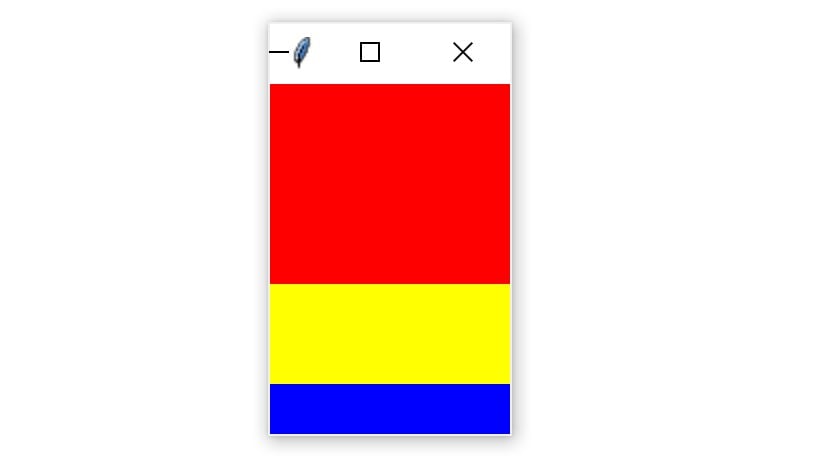
Менеджер .pack() принимает некоторые ключевые аргументы для более точной настройки размещения виджетов. К примеру, можно установить ключевой аргумент fill для уточнения в какое направление рамки будут пополняться. Доступная опция tk.X для горизонтального направления, tk.Y для вертикального направления и tk.BOTH для обоих. Далее представлен код для горизонтального заполнения окна тремя рамками:
|
import tkinter as tk window = tk.Tk() frame1 = tk.Frame(master=window, height=100, bg=«red») frame1.pack(fill=tk.X) frame2 = tk.Frame(master=window, height=50, bg=«yellow») frame2.pack(fill=tk.X) frame3 = tk.Frame(master=window, height=25, bg=«blue») frame3.pack(fill=tk.X) window.mainloop() |
Обратите внимание, что для виджета рамки ширина width не установлена. Аргумент width больше не требуется, так как каждая рамка задействует .pack() для горизонтального заполнения, переписывая любой индивидуальный параметр ширины.
Результат вышеуказанного скрипта будет выглядеть следующим образом:
Одна из приятных особенностей заполнения окна с помощью .pack() заключается в том, что содержимое реагирует на изменение размера окна. Попробуйте расширить окно, созданное предыдущим скриптом, чтобы увидеть, как это работает. Когда вы расширяете окно, ширина трех рамок внутри также увеличивается, заполняя окно:
Обратите внимание, что виджеты рамок не растягиваются в вертикальном направлении.
Аргумент side от метода .pack() уточняет, на какую сторону окна виджет должен размещаться. Доступные варианты:
tk.TOPсверху;tk.BOTTOMснизу;tk.LEFTслева;tk.RIGHTсправа.
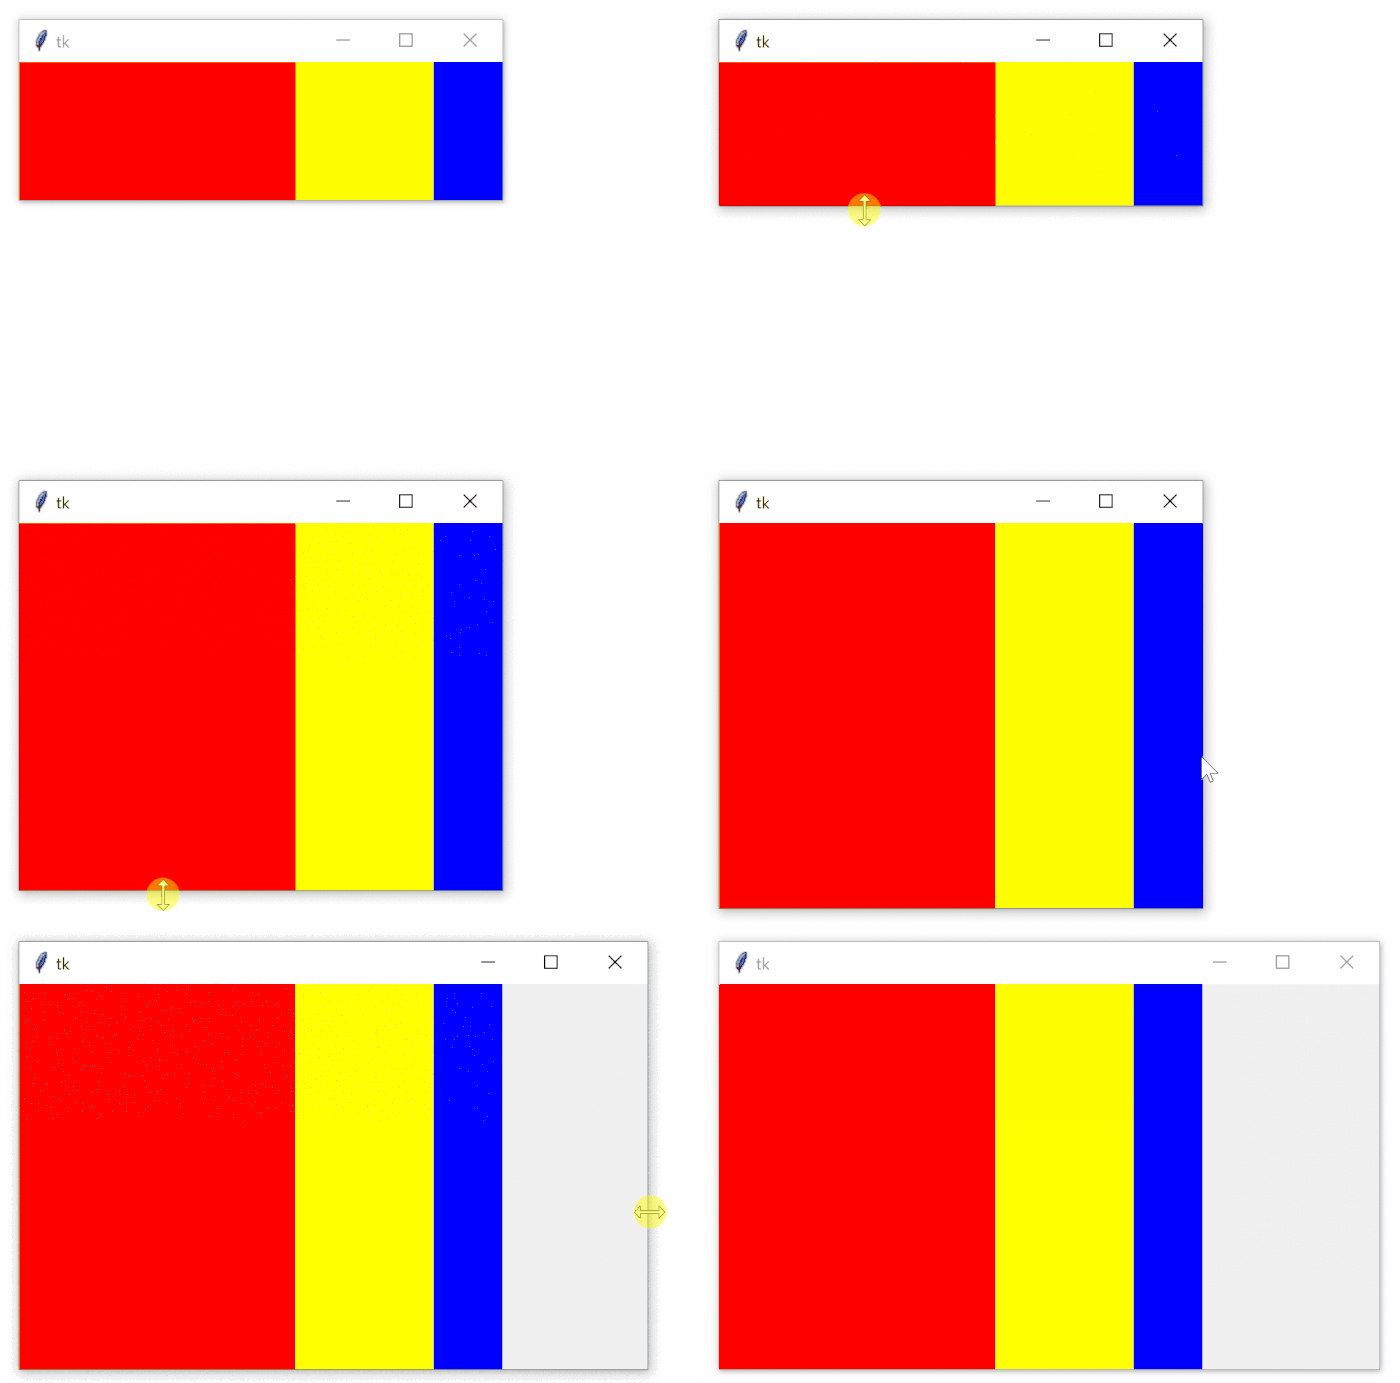
В случае, если аргумент side не указан, тогда метод .pack() автоматически использует tk.TOP и ставит новые виджеты в верхнюю часть окна, или в самую верхнюю часть окна, которая еще не занята виджетом. К примеру, следующий скрипт размещает три рамки рядом друг с другом слева направо и расширяет каждую рамку, чтобы заполнить окно по вертикали:
|
import tkinter as tk window = tk.Tk() frame1 = tk.Frame(master=window, width=200, height=100, bg=«red») frame1.pack(fill=tk.Y, side=tk.LEFT) frame2 = tk.Frame(master=window, width=100, bg=«yellow») frame2.pack(fill=tk.Y, side=tk.LEFT) frame3 = tk.Frame(master=window, width=50, bg=«blue») frame3.pack(fill=tk.Y, side=tk.LEFT) window.mainloop() |
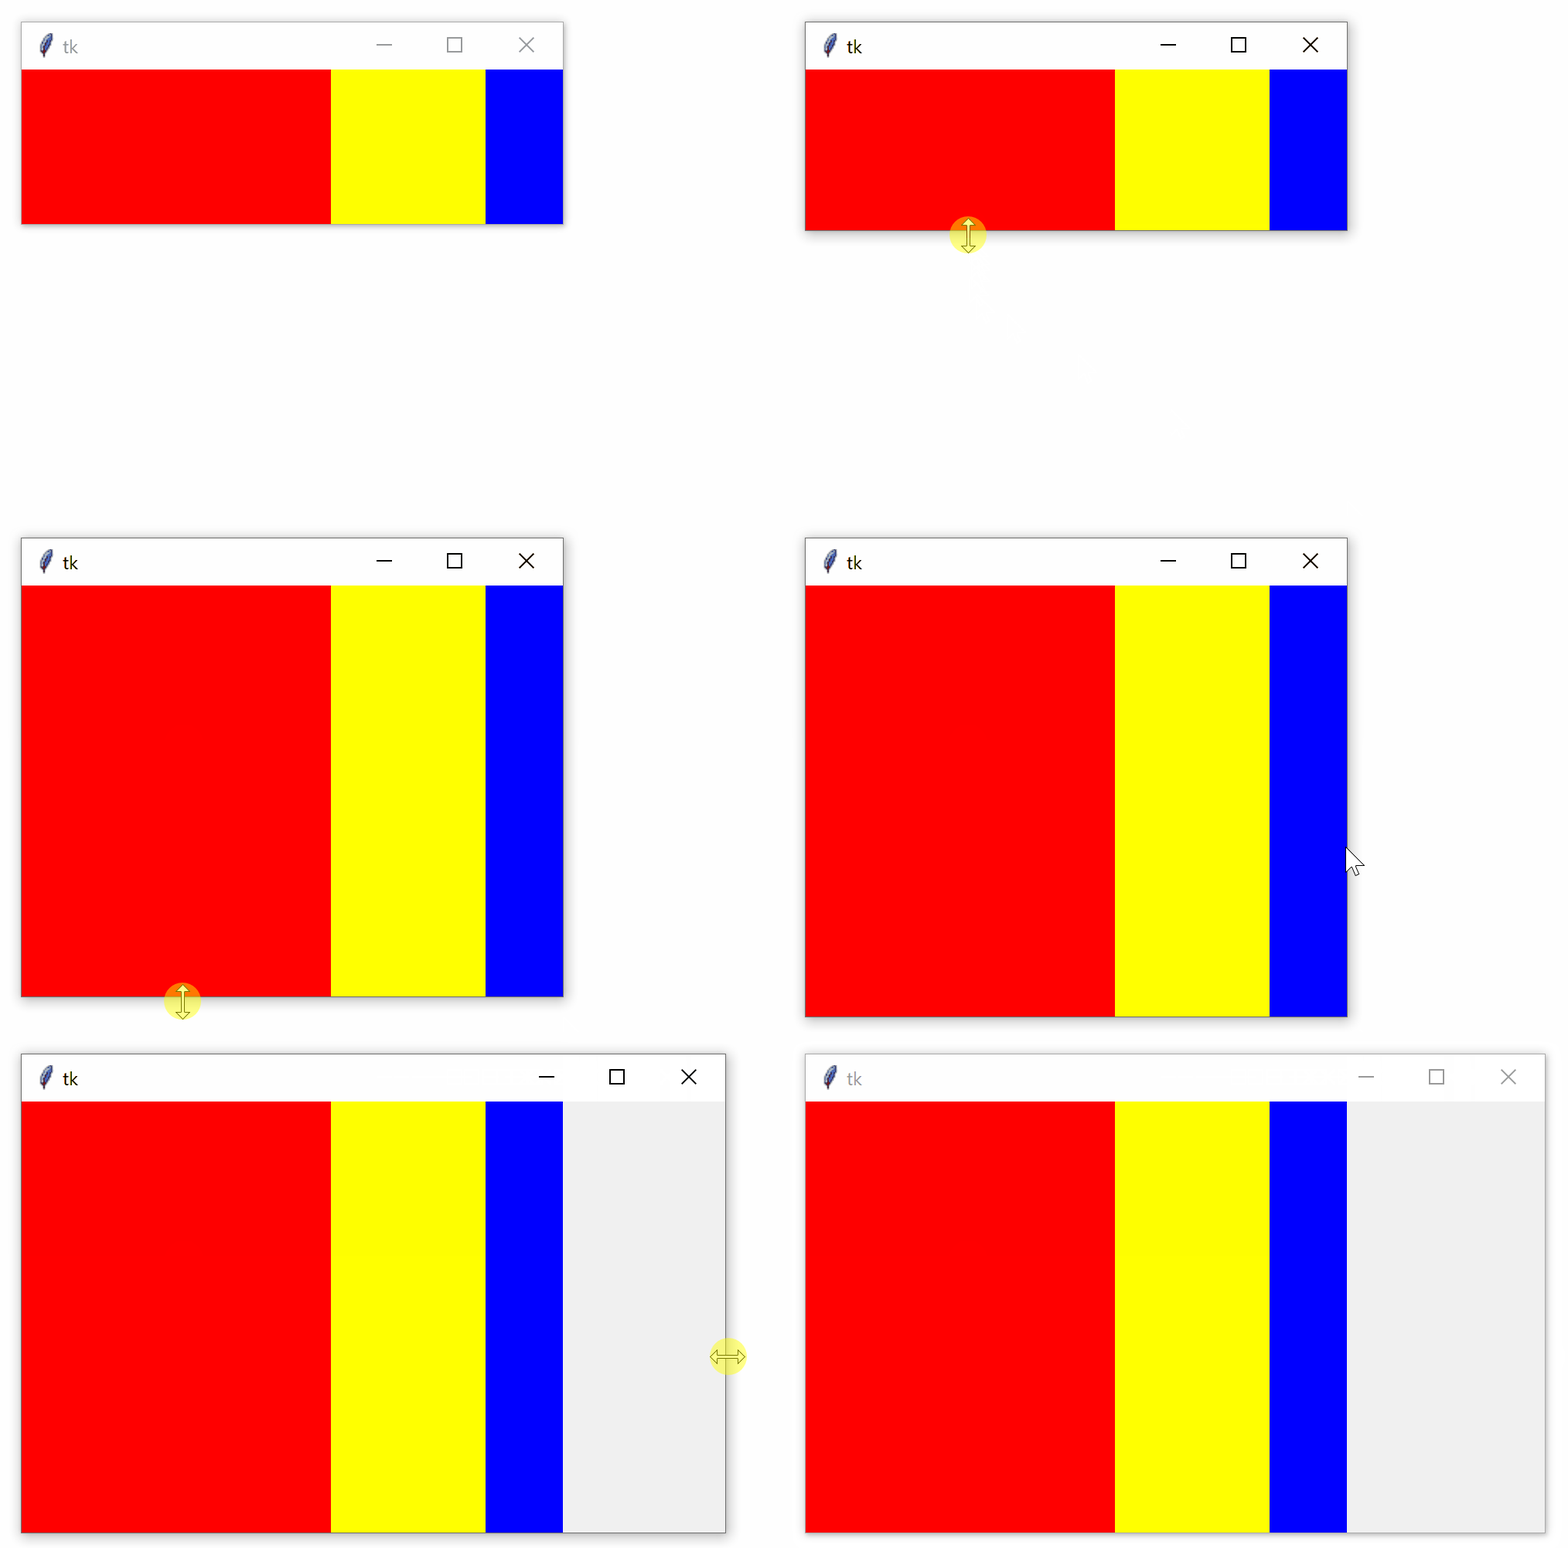
Теперь нужно указать аргумент height как минимум для одной рамки, чтобы назначить окну определенную высоту.
Полученное окно выглядит следующим образом:
При установке аргумента fill=tk.X рамки адаптируются при горизонтальном изменении размера окна, а при указании аргумента fill=tk.Y они адаптируются при изменении размера окна по вертикали:
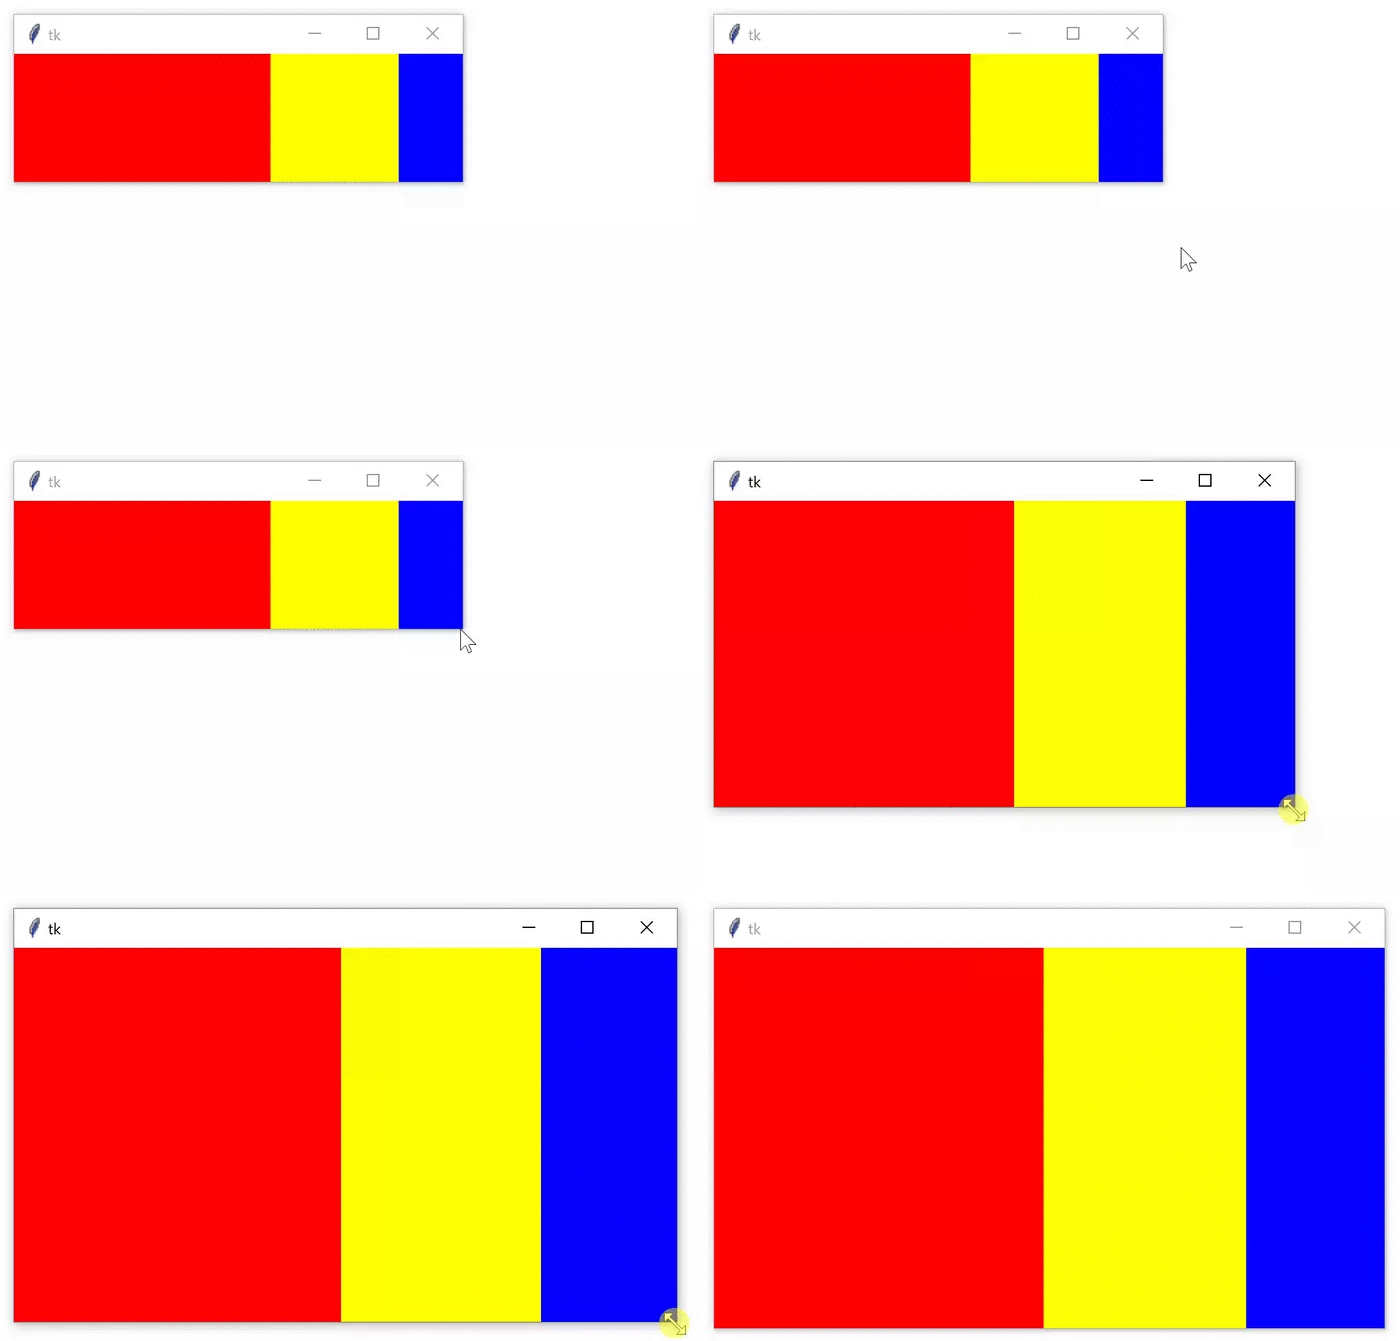
Для того чтобы сделать макет по-настоящему адаптированным, можно установить начальный размер фреймов, используя атрибуты width и height. Затем нужно установить значение аргумента fill от метода .pack() на tk.BOTH, а также установить значение аргумента expand на True:
|
import tkinter as tk window = tk.Tk() frame1 = tk.Frame(master=window, width=200, height=100, bg=«red») frame1.pack(fill=tk.BOTH, side=tk.LEFT, expand=True) frame2 = tk.Frame(master=window, width=100, bg=«yellow») frame2.pack(fill=tk.BOTH, side=tk.LEFT, expand=True) frame3 = tk.Frame(master=window, width=50, bg=«blue») frame3.pack(fill=tk.BOTH, side=tk.LEFT, expand=True) window.mainloop() |
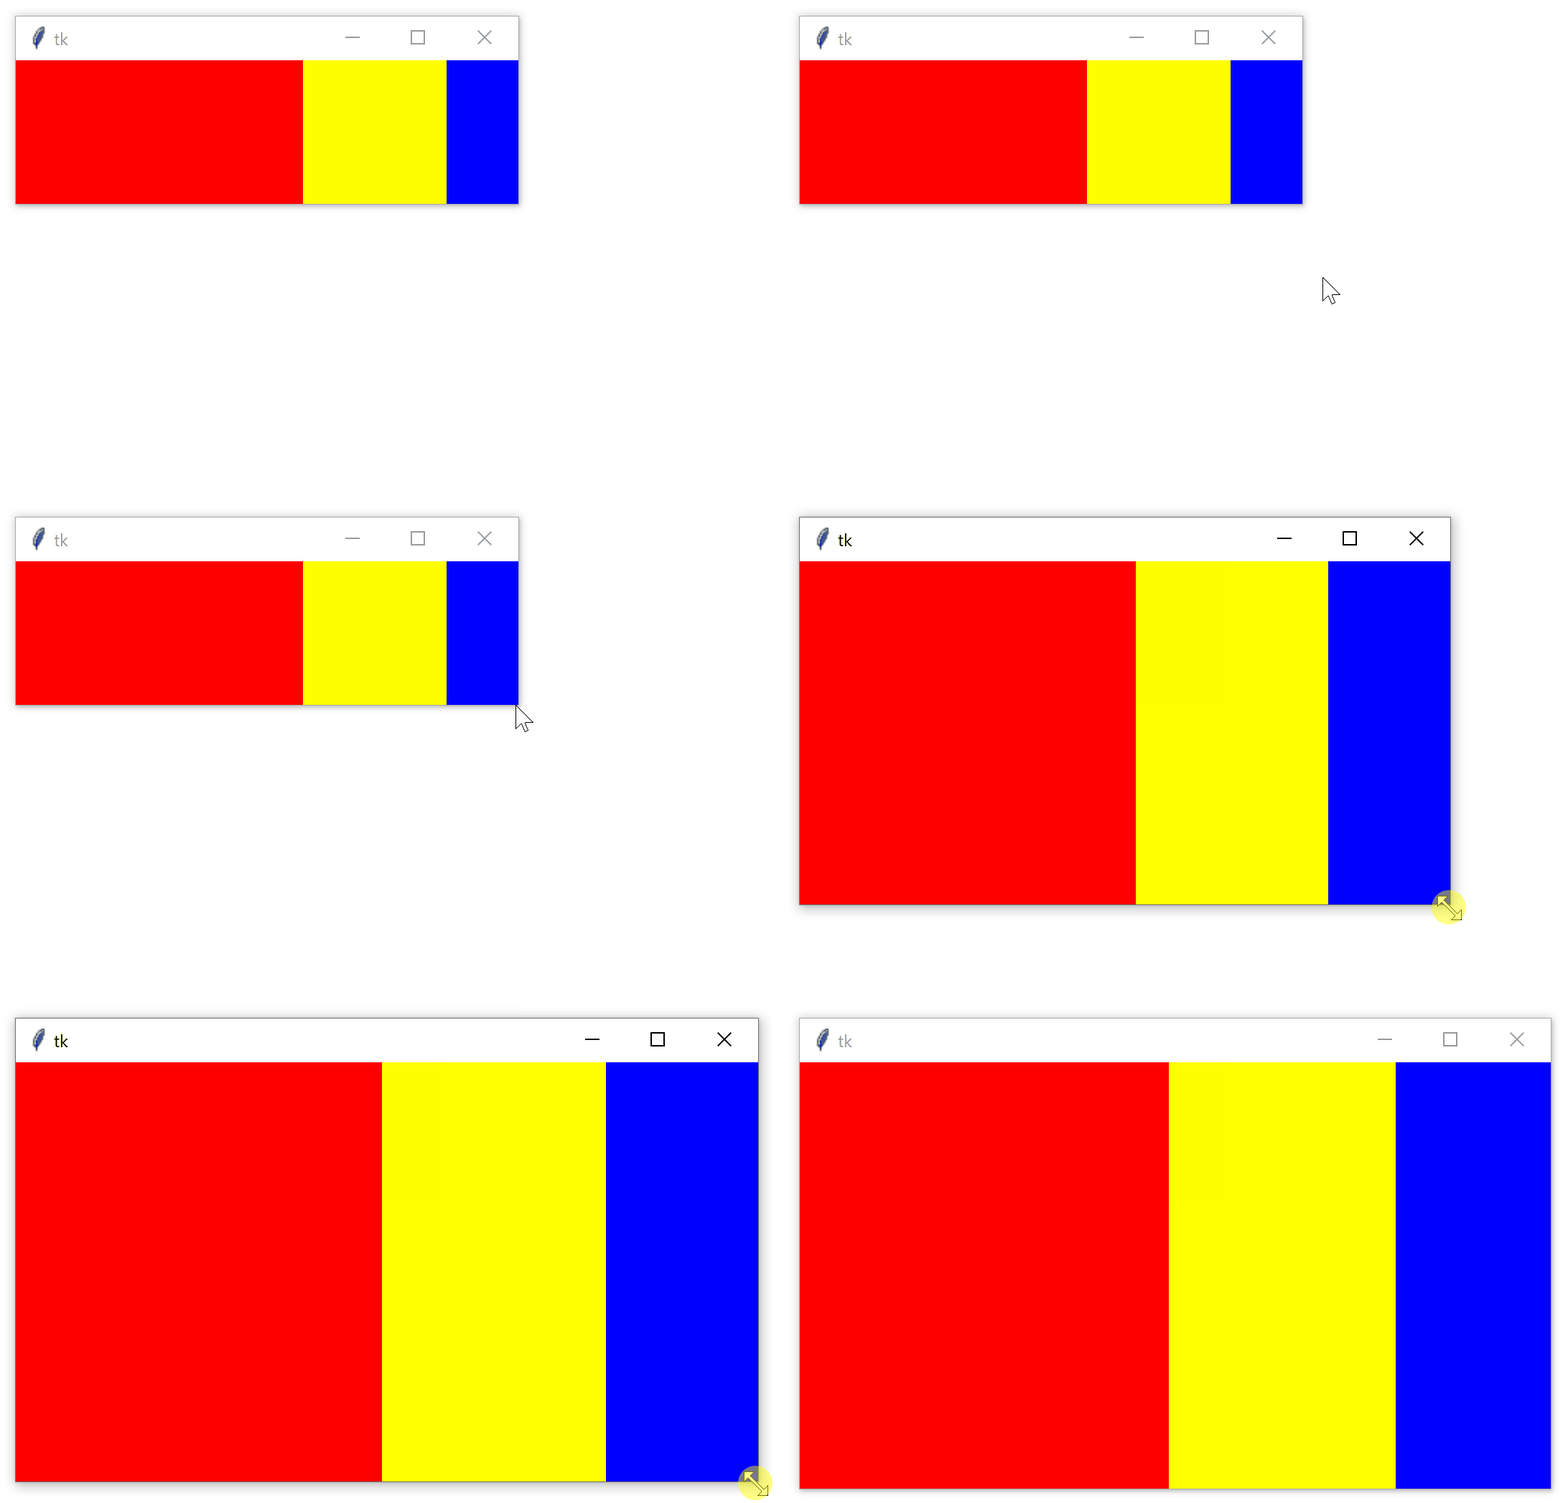
При запуске вышеуказанного кода результатом будет окно, что поначалу будет выглядеть как и предыдущий пример. Разница в том, что теперь можно менять размер окна в любом направлении, и рамки будут соответственно адаптироваться при изменении размеров окна:
Вышло неплохо!
Менеджер геометрии place() в Tkinter
Для управления точным местом расположения виджета в окне или в рамке используется менеджер .place(). Вы должны указать два ключевых аргумента x и y, которые определяют координаты x и y для верхнего левого угла виджета. Аргументы x и y измеряются в пикселях, а не в текстовых юнитах.
Имейте в виду, что начало координат (где x и y равны 0) — это верхний левый угол рамки или окна. Таким образом, вы можете рассматривать аргумент y в методе .place() как количество пикселей в верхней части окна, а аргумент x — в качестве количества пикселей в левой части окна.
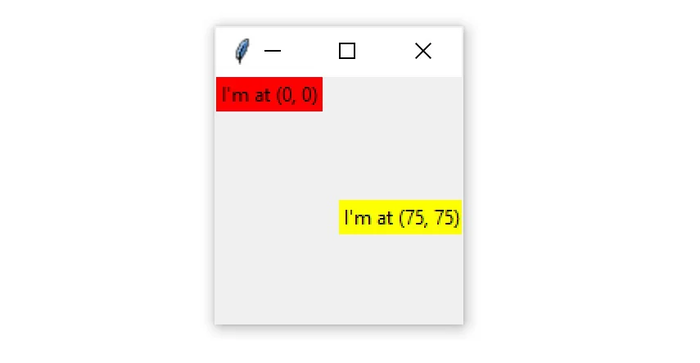
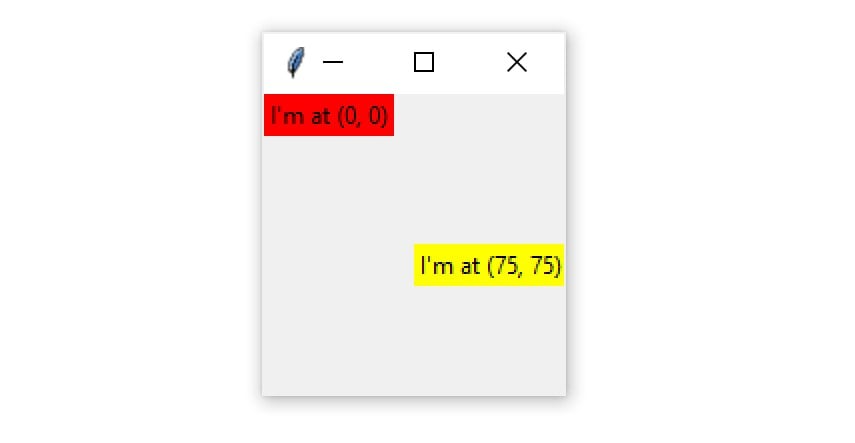
Вот пример того, как работает менеджер геометрии .place():
|
import tkinter as tk window = tk.Tk() frame = tk.Frame(master=window, width=150, height=150) frame.pack() label1 = tk.Label(master=frame, text=«I’m at (0, 0)», bg=«red») label1.place(x=0, y=0) label2 = tk.Label(master=frame, text=«I’m at (75, 75)», bg=«yellow») label2.place(x=75, y=75) window.mainloop() |
Разберем код:
- Строки 5 и 6 создают новый виджет рамки
Frameпод названиемframe1, его ширина 150 пикселей и высота также 150 пикселей, и упаковывают его в окно с помощью.pack(); - Строки 8 и 9 создают новый ярлык с текстом под названием
label1с желтым фоном и помещает его в рамкуframe1на позицию(0, 0); - Строки 11 и 12 создают второй ярлык с текстом под названием
label2на красном фоне и помещают его в рамкуframe1на позицию(75, 75).
Вот окно, которое создалась при выполнении данного кода:
Менеджер геометрии .place() используется не очень часто. У него есть два значимых недостатка:
- Через метод
.place()макет сложно настраивать, особенно в тех случаях, когда у приложений много виджетов; - Макеты, созданные при помощи менеджера
.place(), не адаптируются. Они не меняются вместе с изменением размера главного окна.
Одной из основных проблем при разработке кроссплатформенного графического интерфейса является создание макетов, которые хорошо выглядят независимо от того, на какой платформе они просматриваются.
В таком случае менеджер геометрии .place() — плохой выбор для создания адаптивных и кроссплатформенных макетов.
Однако это не значит, что нужно отказаться от использования менеджера .place()!
В некоторых случаях это оптимальный выбор. Например, если вы создаете графический интерфейс для географической карты, то .place() прекрасно подойдет. Он обеспечит размещение виджетов на правильном расстоянии друг от друга на карте.
Как правило, лучше использовать менеджер .pack(), а не .place(). Тем не менее, и у .pack() есть определенные недостатки. Расположение виджетов зависит от порядка, в котором вызывается метод .pack(), поэтому может быть сложно модифицировать существующие приложения без полного понимания кода, управляющего макетом. Менеджер геометрии .grid() решает многие из этих проблем.
Поговорим об этом в следующем разделе.
Менеджер геометрии grid() в Tkinter
Самым популярным менеджером геометрии в Tkinter является .grid(). Он обладает всей мощностью .pack(), будучи намного более простым в использовании.
Менеджер .grid() работает путем разделения окна или рамки на строки и столбцы (на сетку). Вы указываете местоположение виджета, вызывая метод .grid() и передавая индексы row и column (строки и столбца) в ключевые аргументы строки и столбца соответственно.
Индексы строк и столбцов начинаются с 0, поэтому индекс строки 1 и индекс столбца 2 указывают методу .grid(), что виджет нужно разместить в третьем столбце второй строки.
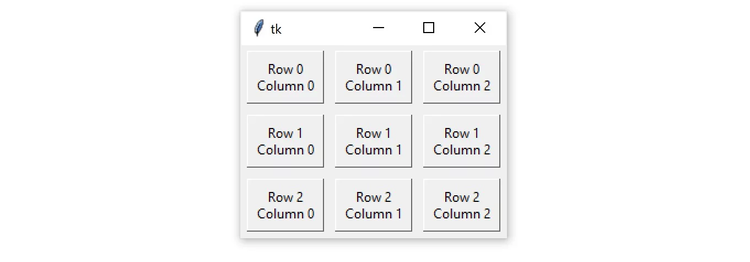
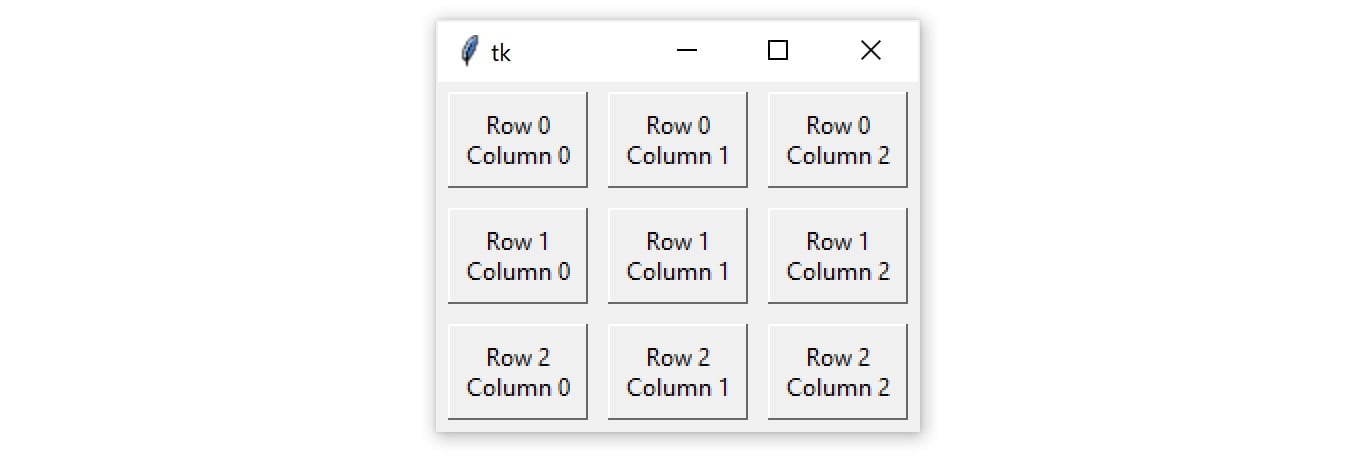
Следующий скрипт создает сетку из рамок 3 × 3 с находящимися в них ярлыками с текстом:
|
import tkinter as tk window = tk.Tk() for i in range(3): for j in range(3): frame = tk.Frame( master=window, relief=tk.RAISED, borderwidth=1 ) frame.grid(row=i, column=j) label = tk.Label(master=frame, text=f«Row {i}nColumn {j}») label.pack() window.mainloop() |
Результат выглядит следующим образом:
В данном примере использовались два менеджера геометрии. Каждая рамка привязана к определенному окну через менеджер геометрии grid():
|
import tkinter as tk window = tk.Tk() for i in range(3): for j in range(3): frame = tk.Frame( master=window, relief=tk.RAISED, borderwidth=1 ) frame.grid(row=i, column=j) label = tk.Label(master=frame, text=f«Row {i}nColumn {j}») label.pack() window.mainloop() |
Каждый ярлык с текстом привязан к определенной рамки через менеджер .pack():
|
import tkinter as tk window = tk.Tk() for i in range(3): for j in range(3): frame = tk.Frame( master=window, relief=tk.RAISED, borderwidth=1 ) frame.grid(row=i, column=j) label = tk.Label(master=frame, text=f«Row {i}nColumn {j}») label.pack() window.mainloop() |
Важно понимать, что метод .grid() вызывается для каждого объекта рамки, но менеджер геометрии применяется к окну. Аналогично, расположение каждой рамки контролируется менеджером геометрии .pack().
Рамки в предыдущем примере расположены рядом друг с другом. Чтобы добавить пространство вокруг каждой рамки, вы можете установить отступ для каждой ячейки в сетке.
Отступ, или padding — это просто пустое пространство, которое окружает виджет и визуально отделяет его от его содержимого.
Есть два вида отступов — внешние и внутренние. Внешнее отступы добавляют пространство вокруг ячейки сетки. Управление осуществляется через два ключевые аргумента метода .grid():
padxдобавляет отступ в горизонтальном направлении;padyдобавляет отступы в вертикальном направлении.
Аргументы padx и pady измеряются в пикселях, а не в текстовых юнитах, поэтому установка их обоих на одно и то же значение создаст одинаковое количество отступов в обоих направлениях. Попробуем добавить отступы вокруг рамок из предыдущего примера:
|
import tkinter as tk window = tk.Tk() for i in range(3): for j in range(3): frame = tk.Frame( master=window, relief=tk.RAISED, borderwidth=1 ) frame.grid(row=i, column=j, padx=5, pady=5) label = tk.Label(master=frame, text=f«Row {i}nColumn {j}») label.pack() window.mainloop() |
Вот результат:
У менеджера геометрии .pack() также есть параметры padx и pady. Следующий код почти идентичен предыдущему коду, за исключением того, что добавляется 5 пикселей дополнительного отступа вокруг каждого ярлыка с текстом в направлениях x и y:
|
1 2 3 4 5 6 7 8 9 10 11 12 13 14 15 16 17 |
import tkinter as tk window = tk.Tk() for i in range(3): for j in range(3): frame = tk.Frame( master=window, relief=tk.RAISED, borderwidth=1 ) frame.grid(row=i, column=j, padx=5, pady=5) label = tk.Label(master=frame, text=f«Row {i}nColumn {j}») label.pack(padx=5, pady=5) window.mainloop() |
Дополнительные отступы вокруг ярлыков с текстом немного расширяют место для каждой ячейки в сетке между рамкой Frame и текстом на ярлыке Label:
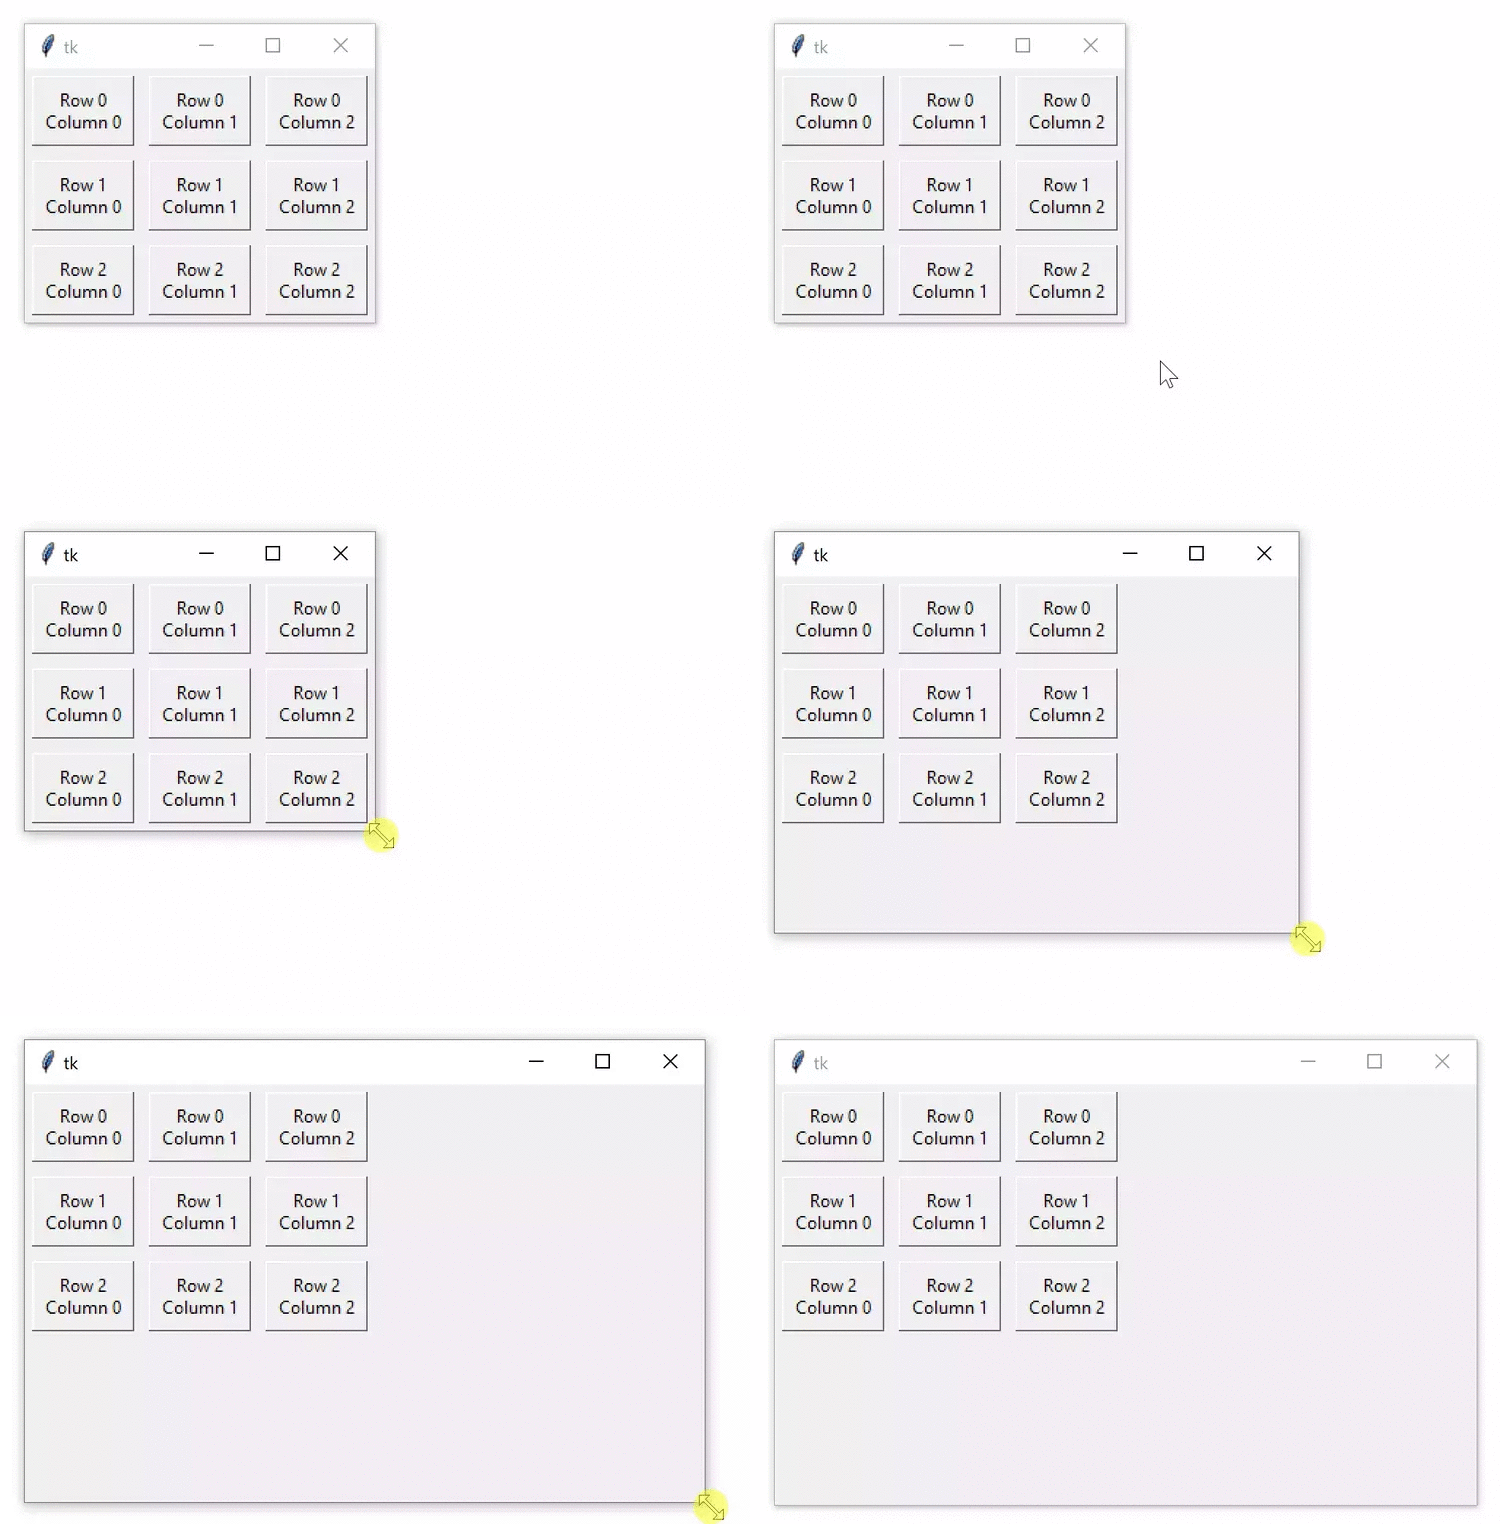
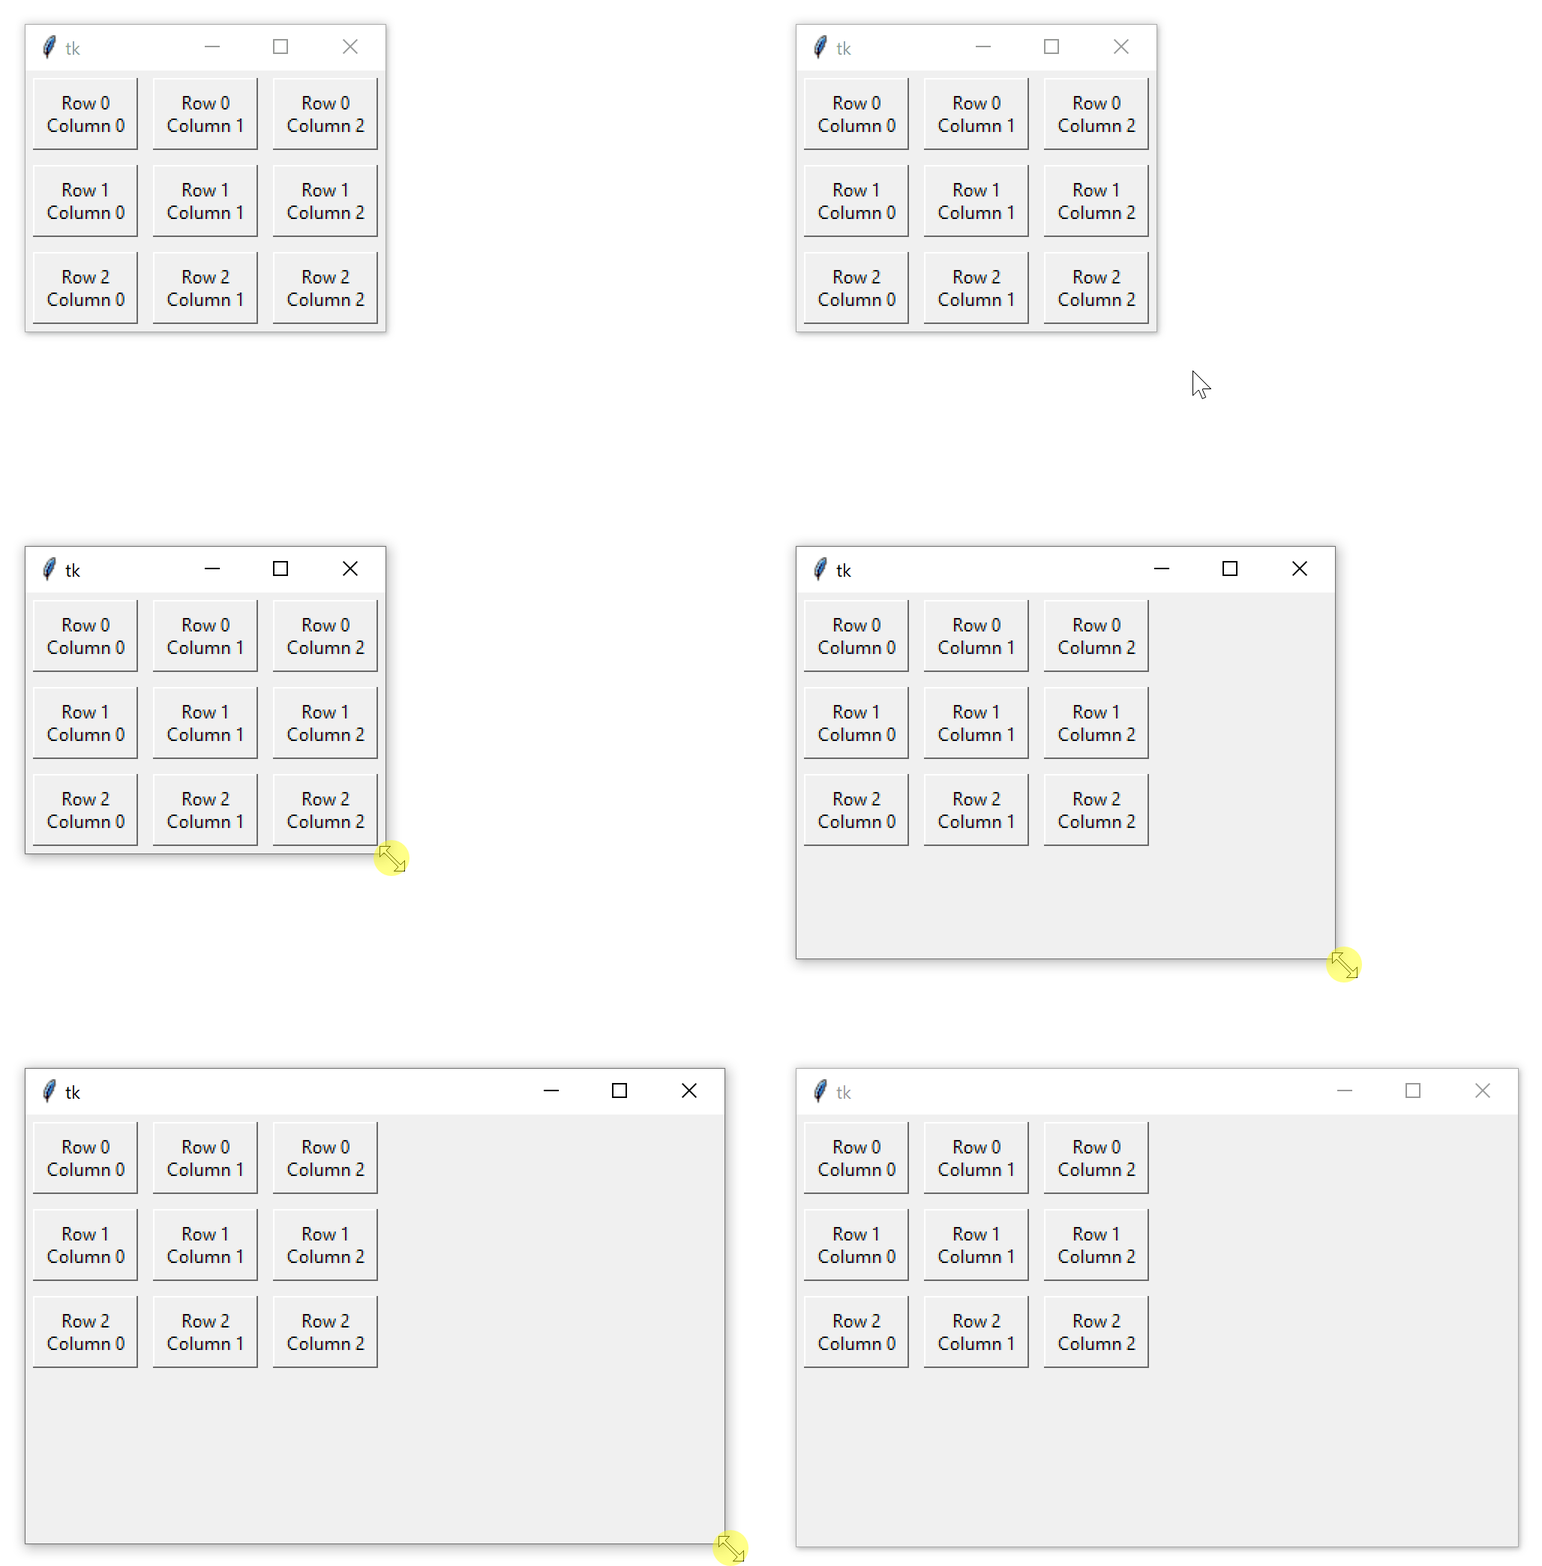
Выглядит неплохо! Однако при попытке расширить окно в каком бы то ни было направлении можно заметить, что макет не адаптируется:
При расширении окна сетка с виджетами остается в верхнем левом углу.
Можно настроить так, чтобы строки и столбы сетки будут реагировать на изменение размера окна с помощью метода .columnconfigure() и .rowconfigure() для объекта окна приложения. Помните, что сетка привязана к окну, даже если вы вызываете метод .grid() для каждой рамки. Метод .columnconfigure() и .rowconfigure() принимают три важных аргумента:
- Индекс столбца или строки сетки, которого нужно настроить (или список индексов для настройки нескольких строк или столбцов одновременно);
- Ключевой аргумент под названием
weight, который определяет, как столбец или строка должны реагировать на изменение размера окна относительно других столбцов и строк; - Ключевой аргумент под названием
minsize, который устанавливает минимальный размер высоты строки или ширины столбца в пикселях.
Аргумент weight по умолчанию равен 0 . Это означает, что столбец или строка не расширяются при изменении размера окна. Если каждому столбцу и строке присвоен weight=1, то все они будут меняться одинаково. Если вес (weight) одного столбца 1, а у другого 2, то второй столбец расширяется вдвое быстрее первого. Настроим предыдущий скрипт для лучшей обработки изменения размера окна:
|
1 2 3 4 5 6 7 8 9 10 11 12 13 14 15 16 17 18 19 20 |
import tkinter as tk window = tk.Tk() for i in range(3): window.columnconfigure(i, weight=1, minsize=75) window.rowconfigure(i, weight=1, minsize=50) for j in range(0, 3): frame = tk.Frame( master=window, relief=tk.RAISED, borderwidth=1 ) frame.grid(row=i, column=j, padx=5, pady=5) label = tk.Label(master=frame, text=f«Row {i}nColumn {j}») label.pack(padx=5, pady=5) window.mainloop() |
Метод .columnconfigure() и .rowconfigure() помещаются в тело внешнего цикла for. Можно точно настроить каждый столбец и строку за пределами цикла for, однако для этого нужно будет написать дополнительные шесть строк кода.
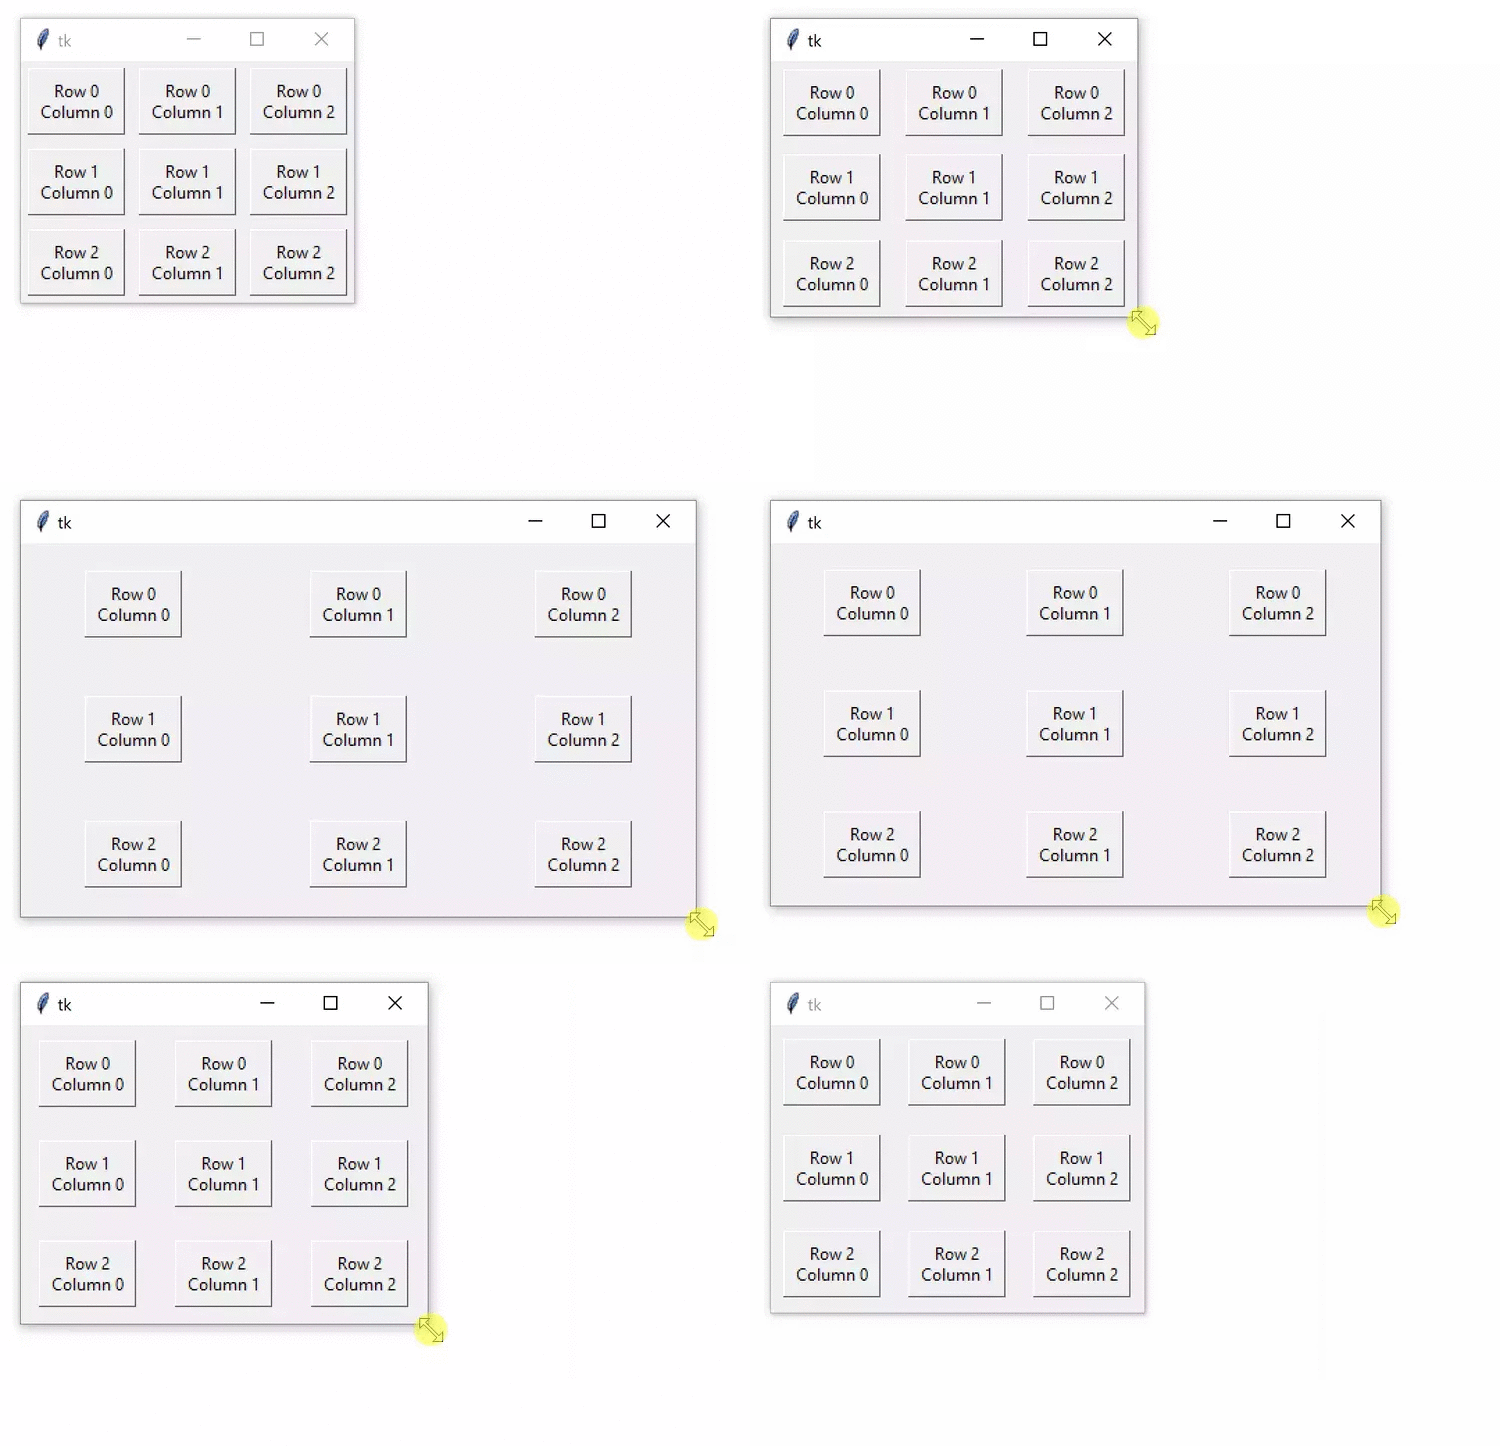
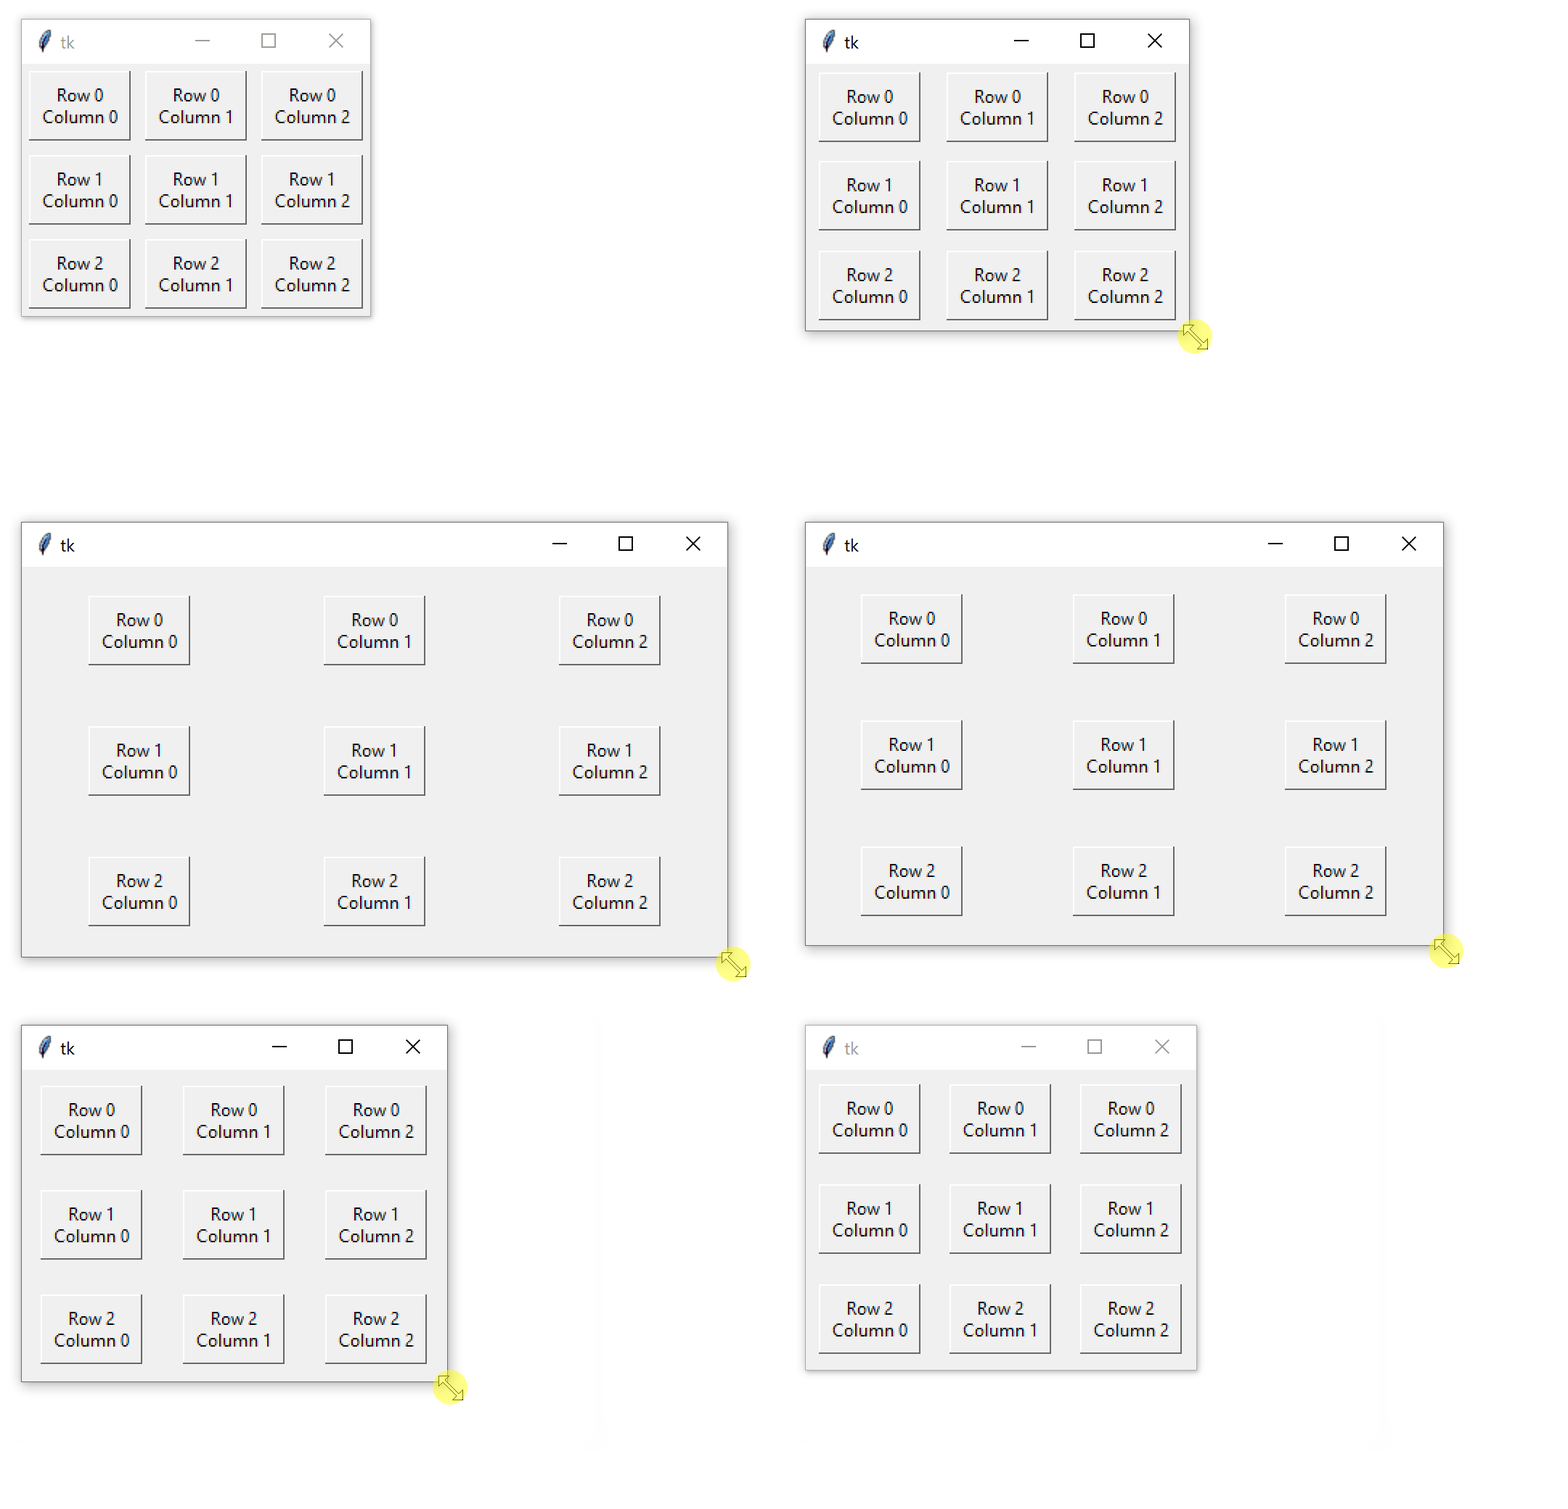
В каждой итерации цикла i-ые столбцы и строки настраиваются таким образом, чтобы значение их weight было равно 1. Это является гарантией того, что каждая строка и столбец расширяются с одинаковой скоростью при изменении размера окна. Аргумент minsize имеет значение 75 для каждого столбца и 50 для каждой строки. Это гарантирует, что ярлык с текстом всегда отображает свой текст без обрезания каких-либо символов, даже если размер окна очень мал.
Результатом является макет сетки, который плавно расширяется и сжимается при изменении размера окна:
Попробуйте самим изменить размер окна. Поэкспериментируйте с параметрами weight и minsize, чтобы посмотреть, как они влияют на сетку.
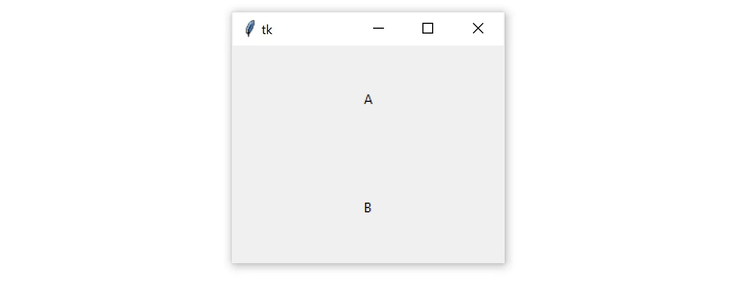
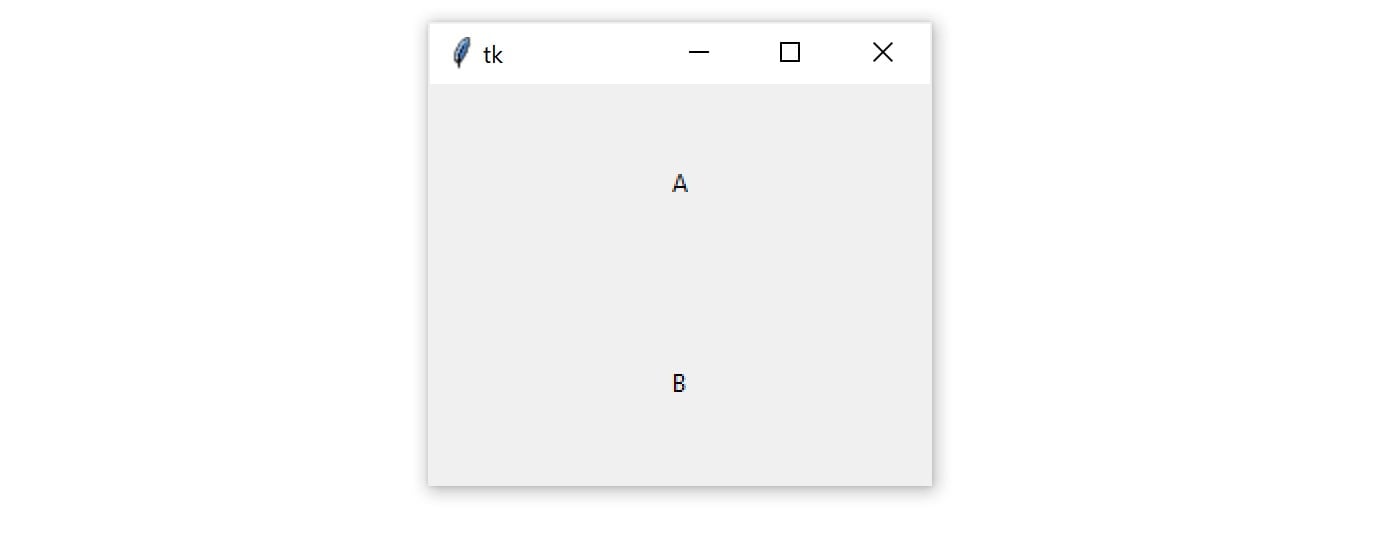
По умолчанию виджеты центрируются в своих ячейках сетки. К примеру, следующий код создает два ярлыка с текстом и помещает их в сетку с одним столбцом и двумя строками:
|
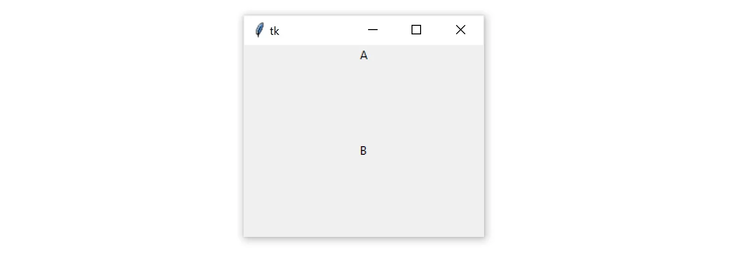
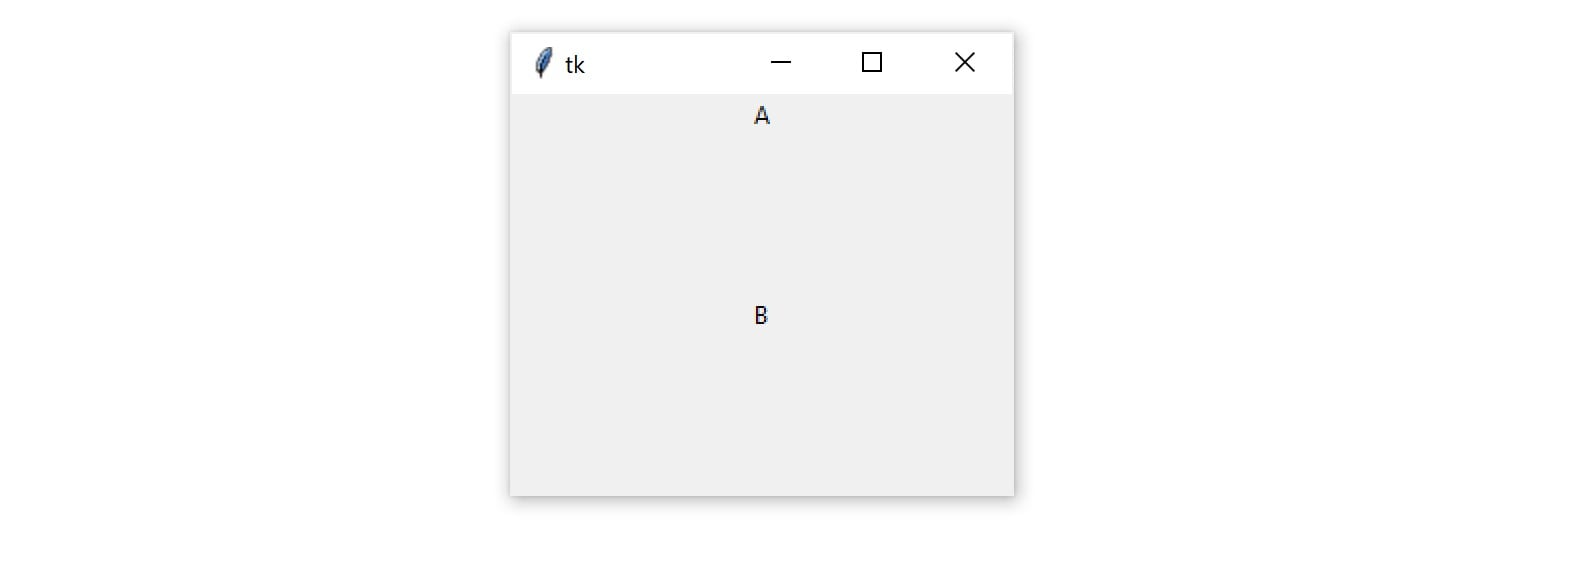
import tkinter as tk window = tk.Tk() window.columnconfigure(0, minsize=250) window.rowconfigure([0, 1], minsize=100) label1 = tk.Label(text=«A») label1.grid(row=0, column=0) label2 = tk.Label(text=«B») label2.grid(row=1, column=0) window.mainloop() |
Ширина каждой ячейка сетки 250 пикселей, высота 100 пикселей. Ярлыки с текстом помещаются в центре каждой ячейки, как показано в следующей фигуре:
Вы можете поменять расположение каждого ярлыка внутри ячейки сетки, используя параметр sticky. Параметр sticky принимает строку, что содержит одну или несколько из следующих букв:
- «n» или «N» — Север — выравнивает по верхней центральной части ячейки;
- «e» или «E» — Запад — выравнивает по правой центральной части ячейки;
- «s» или «S» — Юг — выравнивает по нижней центральной части ячейки;
- «w» или «W» — Восток — выравнивает по левой центральной части ячейки.
Буквы «n», «s», «e» и «w» идут по траектории с севера, на юг, затем восток и запад. Установка параметра sticky со значением «n» для обоих ярлыков из предыдущего кода позиционируют каждый ярлык с текстом в верхнюю центральную ячейку сетки:
|
import tkinter as tk window = tk.Tk() window.columnconfigure(0, minsize=250) window.rowconfigure([0, 1], minsize=100) label1 = tk.Label(text=«A») label1.grid(row=0, column=0, sticky=«n») label2 = tk.Label(text=«B») label2.grid(row=1, column=0, sticky=«n») window.mainloop() |
Результат:
Можно комбинировать несколько букв в одной строке для позиционирования каждого ярлыка в углу его ячейки из сетки:
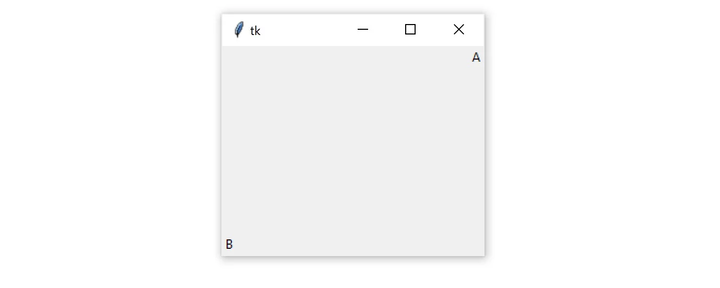
|
import tkinter as tk window = tk.Tk() window.columnconfigure(0, minsize=250) window.rowconfigure([0, 1], minsize=100) label1 = tk.Label(text=«A») label1.grid(row=0, column=0, sticky=«ne») label2 = tk.Label(text=«B») label2.grid(row=1, column=0, sticky=«sw») window.mainloop() |
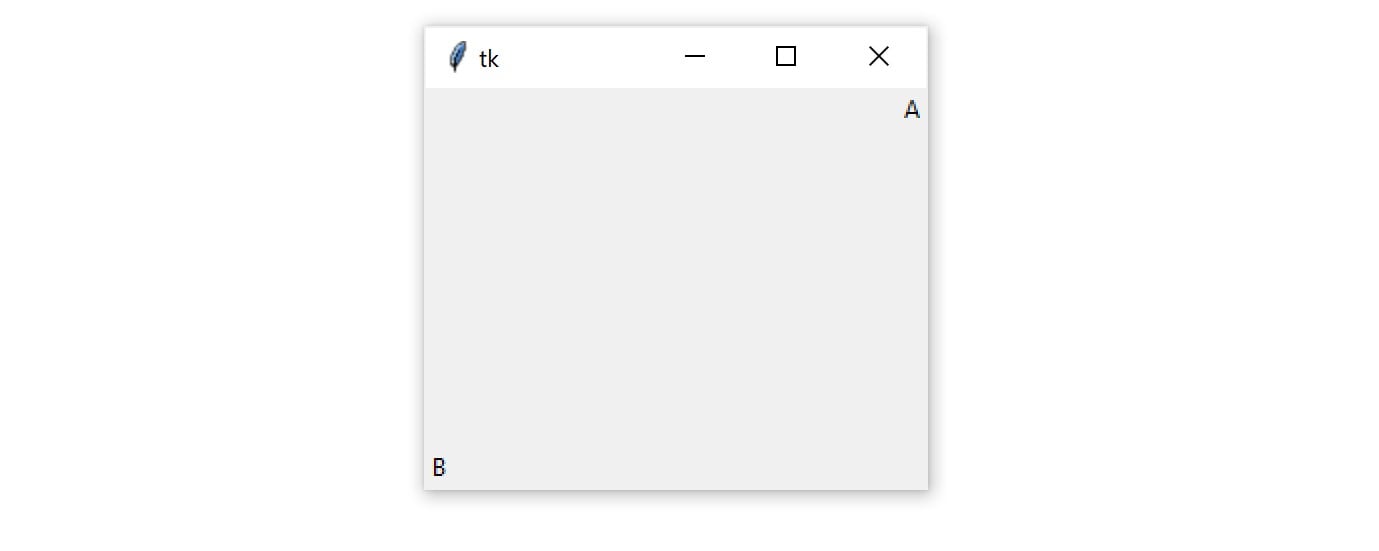
В данном примере параметр sticky ярлыка label1 настроен на "ne", который позиционируется ярлык в верхний правый угол ячейки сетки. Ярлык label2 позиционируется в нижнем левом углу, указывая "sw" в аргументе sticky.
Вот как будет выглядеть окно:
Когда виджет позиционируется через sticky, размера самого виджета достаточно для размещения любого текста и другого содержимого внутри него. Он не заполнить всю ячейку сетки. Для заполнения всей сетки можно указать "ns", заставив виджет заполнить ячейку в вертикальном направлении, или "ew" для заполнения ячейки в горизонтальном направлении. Для заполнения всей ячейки в sticky требуется указать "nsew".
|
1 2 3 4 5 6 7 8 9 10 11 12 13 14 15 16 17 18 |
import tkinter as tk window = tk.Tk() window.rowconfigure(0, minsize=50) window.columnconfigure([0, 1, 2, 3], minsize=50) label1 = tk.Label(text=«1», bg=«black», fg=«white») label2 = tk.Label(text=«2», bg=«black», fg=«white») label3 = tk.Label(text=«3», bg=«black», fg=«white») label4 = tk.Label(text=«4», bg=«black», fg=«white») label1.grid(row=0, column=0) label2.grid(row=0, column=1, sticky=«ew») label3.grid(row=0, column=2, sticky=«ns») label4.grid(row=0, column=3, sticky=«nsew») window.mainloop() |
Результат выглядит следующим образом:
Приведенный выше пример демонстрирует то, что параметр sticky от менеджера геометрии .grid() может использоваться для достижения тех же эффектов, что и параметр fill от менеджера геометрии .pack(). Параллели между параметрами sticky и fill представлены в следующей таблице:
| Метод grid() | Метод pack() |
sticky="ns" |
fill=tk.Y |
sticky="ew" |
fill=tk.X |
sticky="nsew" |
fill=tk.BOTH |
Метод .grid() является довольно мощным менеджером геометрии. Зачастую его проще понять, чем менеджер .pack(). Он также универсальнее, нежели менеджер .place(). При создании новых приложений в Tkinter, в качестве основного менеджера геометрии лучше рассматривать .grid().
На заметку:
.grid()очень гибок в плане управления. Например, вы можете настроить ячейки на несколько строк и столбцов. Для получения дополнительной информации просмотрите раздел Grid Geometry Manager.
Теперь вы обладаете основными знаниями о менеджерах геометрии и их роли при работе с графическим фреймворком Tkinter. Далее мы попробуем присвоить действия кнопкам, тем самым несколько оживив приложение.
Задание #3 Создайте анкету с контактными данными клиента
Ниже дано еще одно задание для проверки понимания всего изученного.
Задание: Создать форму для ввода полного адреса клиента.
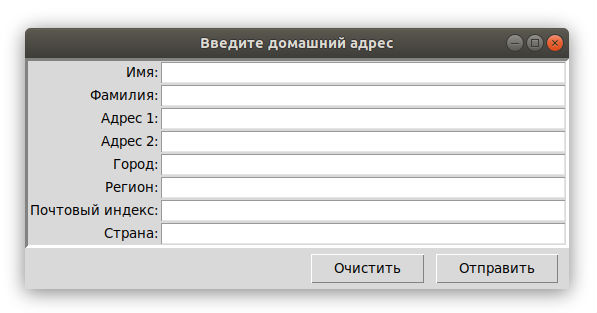
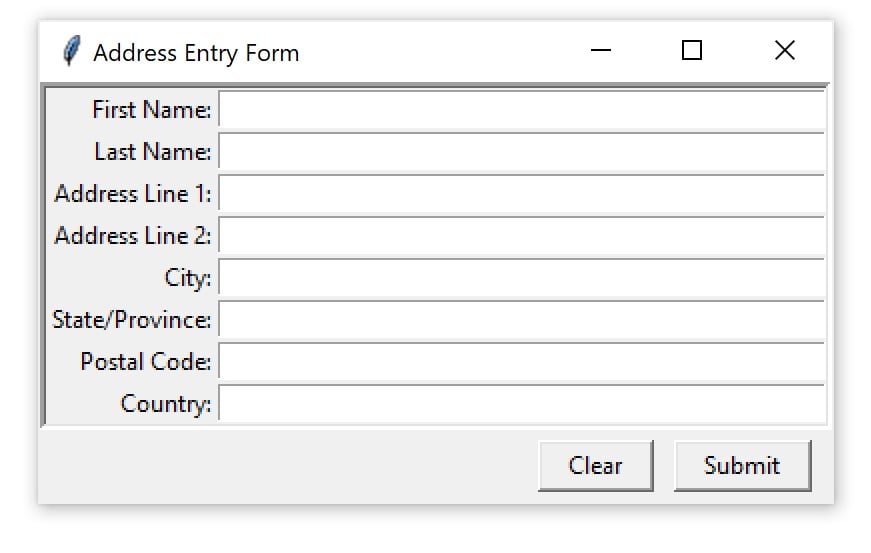
Ниже представлено изображение формы для ввода полного домашнего адреса клиента, которая была создана через Tkinter.
Вам нужно написать скрипт для создания такого же окна, что на картинке выше. Используйте любые менеджеры геометрии.
Ниже представлен наш вариант кода. Есть много разных способов выполнить данное задание. Если ваш вариант воспроизводит такое же окно как на картинке, то поздравляем! Вы справились! Ниже можете также ознакомиться с двумя вариантами кода, где используется менеджер .grid().
В следующем варианте создаются виджеты ярлыка с текстом и однострочное поле для ввода текста для каждого поля с желаемыми данными:
Полный код с решением задачи #3
|
1 2 3 4 5 6 7 8 9 10 11 12 13 14 15 16 17 18 19 20 21 22 23 24 25 26 27 28 29 30 31 32 33 34 35 36 37 38 39 40 41 42 43 44 45 46 47 48 49 50 51 52 53 54 55 56 57 58 59 60 61 62 63 64 65 66 67 68 69 70 71 72 73 74 75 76 77 78 79 80 81 82 83 84 85 86 87 88 89 |
import tkinter as tk # Создается новое окно с заголовком «Введите домашний адрес» window = tk.Tk() window.title(«Введите домашний адрес») # Создается новая рамка `frm_form` для ярлыков с текстом и # Однострочных полей для ввода информации об адресе. frm_form = tk.Frame(relief=tk.SUNKEN, borderwidth=3) # Помещает рамку в окно приложения. frm_form.pack() # Создает ярлык и текстовок поле для ввода имени. lbl_first_name = tk.Label(master=frm_form, text=«Имя:») ent_first_name = tk.Entry(master=frm_form, width=50) # Использует менеджер геометрии grid для размещения ярлыка и # однострочного поля для ввода текста в первый и второй столбец # первой строки сетки. lbl_first_name.grid(row=0, column=0, sticky=«e») ent_first_name.grid(row=0, column=1) # Создает ярлык и текстовок поле для ввода фамилии. lbl_last_name = tk.Label(master=frm_form, text=«Фамилия:») ent_last_name = tk.Entry(master=frm_form, width=50) # Размещает виджеты на вторую строку сетки lbl_last_name.grid(row=1, column=0, sticky=«e») ent_last_name.grid(row=1, column=1) # Создает ярлык и текстовок поле для ввода первого адреса. lbl_address1 = tk.Label(master=frm_form, text=«Адрес 1:») ent_address1 = tk.Entry(master=frm_form, width=50) # Размещает виджеты на третьей строке сетки. lbl_address1.grid(row=2, column=0, sticky=«e») ent_address1.grid(row=2, column=1) # Создает ярлык и текстовок поле для ввода второго адреса. lbl_address2 = tk.Label(master=frm_form, text=«Адрес 2:») ent_address2 = tk.Entry(master=frm_form, width=50) # Размещает виджеты на четвертой строке сетки. lbl_address2.grid(row=3, column=0, sticky=tk.E) ent_address2.grid(row=3, column=1) # Создает ярлык и текстовок поле для ввода города. lbl_city = tk.Label(master=frm_form, text=«Город:») ent_city = tk.Entry(master=frm_form, width=50) # Размещает виджеты на пятой строке сетки. lbl_city.grid(row=4, column=0, sticky=tk.E) ent_city.grid(row=4, column=1) # Создает ярлык и текстовок поле для ввода региона. lbl_state = tk.Label(master=frm_form, text=«Регион:») ent_state = tk.Entry(master=frm_form, width=50) # Размещает виджеты на шестой строке сетки. lbl_state.grid(row=5, column=0, sticky=tk.E) ent_state.grid(row=5, column=1) # Создает ярлык и текстовок поле для ввода почтового индекса lbl_postal_code = tk.Label(master=frm_form, text=«Почтовый индекс:») ent_postal_code = tk.Entry(master=frm_form, width=50) # Размещает виджеты на седьмой строке сетки. lbl_postal_code.grid(row=6, column=0, sticky=tk.E) ent_postal_code.grid(row=6, column=1) # Создает ярлык и текстовок поле для ввода страны. lbl_country = tk.Label(master=frm_form, text=«Страна:») ent_country = tk.Entry(master=frm_form, width=50) # Размещает виджеты на восьмой строке сетки. lbl_country.grid(row=7, column=0, sticky=tk.E) ent_country.grid(row=7, column=1) # Создает новую рамку `frm_buttons` для размещения # кнопок «Отправить» и «Очистить». Данная рамка заполняет # все окно в горизонтальном направлении с # отступами в 5 пикселей горизонтально и вертикально. frm_buttons = tk.Frame() frm_buttons.pack(fill=tk.X, ipadx=5, ipady=5) # Создает кнопку «Отправить» и размещает ее # справа от рамки `frm_buttons`. btn_submit = tk.Button(master=frm_buttons, text=«Отправить») btn_submit.pack(side=tk.RIGHT, padx=10, ipadx=10) # Создает кнопку «Очистить» и размещает ее # справа от рамки `frm_buttons`. btn_clear = tk.Button(master=frm_buttons, text=«Очистить») btn_clear.pack(side=tk.RIGHT, ipadx=10) # Запуск приложения. window.mainloop() |
Это довольно неплохое решение. Оно немного длинное, зато понятное. При желании что-то изменить сразу ясно, где это можно сделать.
Есть и более короткий вариант решения. Учитывая, что у каждого текстового поля одинаковая ширина width, понадобится только указать текст для ярлыков:
Обновленный код с решением задачи #3
|
1 2 3 4 5 6 7 8 9 10 11 12 13 14 15 16 17 18 19 20 21 22 23 24 25 26 27 28 29 30 31 32 33 34 35 36 37 38 39 40 41 42 43 44 45 46 47 48 49 50 51 52 53 54 |
import tkinter as tk # Создается новое окно с заголовком «Введите домашний адрес». window = tk.Tk() window.title(«Address Entry Form») # Создается новая рамка `frm_form` для ярлыков с текстом и # Однострочных полей для ввода информации об адресе. frm_form = tk.Frame(relief=tk.SUNKEN, borderwidth=3) # Помещает рамку на окно приложения. frm_form.pack() # Список ярлыков полей. labels = [ «Имя:», «Фамилия:», «Адрес 1:», «Адрес 2:», «Город:», «Регион:», «Почтовый индекс:», «Страна:», ] # Цикл для списка ярлыков полей. for idx, text in enumerate(labels): # Создает ярлык с текстом из списка ярлыков. label = tk.Label(master=frm_form, text=text) # Создает текстовое поле которая соответствует ярлыку. entry = tk.Entry(master=frm_form, width=50) # Использует менеджер геометрии grid для размещения ярлыков и # текстовых полей в строку, чей индекс равен idx. label.grid(row=idx, column=0, sticky=«e») entry.grid(row=idx, column=1) # Создает новую рамку `frm_buttons` для размещения в ней # кнопок «Отправить» и «Очистить». Данная рамка заполняет # все окно в горизонтальном направлении с # отступами в 5 пикселей горизонтально и вертикально. frm_buttons = tk.Frame() frm_buttons.pack(fill=tk.X, ipadx=5, ipady=5) # Создает кнопку «Отправить» и размещает ее # справа от рамки `frm_buttons`. btn_submit = tk.Button(master=frm_buttons, text=«Submit») btn_submit.pack(side=tk.RIGHT, padx=10, ipadx=10) # Создает кнопку «Очистить» и размещает ее # справа от рамки `frm_buttons`. btn_clear = tk.Button(master=frm_buttons, text=«Clear») btn_clear.pack(side=tk.RIGHT, ipadx=10) # Запуск приложения. window.mainloop() |
В данном варианте список используется для хранения текста для каждого ярлыка формы. Они хранятся в том порядке, в котором поля формы должно появляться. После этого функция enumerate() возвращает индекс и строку каждого значения из списка labels.
Разобравшись с заданием, можете переходить к следующей части урока.
Создание интерактивного приложения в Tkinter
Теперь у вас есть довольно хорошее представление о том, как создать окно с Tkinter, мы уже можем добавлять некоторые виджеты и управлять макетом приложения. Это здорово, но приложения должны не просто хорошо выглядеть — им нужно что-то делать! В этом разделе вы узнаете, как создать интерактивное приложение, которая будет выполнять какие-то действия при возникновении определенных событий.
Обработчика событий в Tkinter
При создании приложения в Tkinter, для старта цикла событий требуется вызвать метод window.mainloop(). Во время цикла событий приложение проверяет, произошло ли какое либо событие. Если это так, то в ответ может быть выполнен какой-то метод или функция.
Цикл обработки событий предоставляется в Tkinter, поэтому не нужно писать дополнительный код для проверки наличия выполнения данных событий. Однако вам все же нужно написать код, который будет выполняться в ответ на событие. В Tkinter создаются функции, называемые обработчиками событий, для событий, которые используются в приложении.
На заметку: Событие — это любое действие, которое происходит во время цикла событий. Оно может вызвать некоторое поведение в приложении. Например, при нажатии клавиши с клавиатуры или кнопки мышки.
Когда происходит событие, создается объект события. Это значит, что создается экземпляр класса, представляющего событие. Вам не нужно беспокоиться о создании этих классов самостоятельно. Tkinter автоматически создаст для вас экземпляры классов событий.
Напишем собственный цикл обработки событий, чтобы лучше понять, как работает цикл обработки событий в Tkinter. Таким образом, вы сможете увидеть, как цикл событий в Tkinter вписывается в приложение, и какие части нужно написать самостоятельно.
Предположим, что есть список с названием events_list, который содержит объекты событий. Новый объект события автоматически добавляется в список events_list каждый раз, когда в программе происходит событие. Вам не нужно реализовывать механизм обновления. Это просто происходит автоматически в этом концептуальном примере. Используя бесконечный цикл, вы можете постоянно проверять, есть ли какие-либо объекты событий в events_list:
|
# Предположим, что список автоматически обновляется events_list = [] # Запускаем цикл событий while True: # Если events_list пуст, тогда никаких событий не происходит # и можно пропустить следующую итерацию цикла. if events_list == []: continue # Если выполнение доходит до данной точки, значит, # есть по крайней мере одно событие в events_list. event = events_list[0] |
Прямо сейчас созданный цикл событий с самим событием event ничего не делает. Давайте изменим это. Предположим, приложение должно реагировать на нажатия клавиш. Вам нужно проверить, что событие event было создано пользователем при нажатии клавиши на клавиатуре, и, если это так, передать event в функцию обработчика событий для нажатия клавиш.
Предположим, что event имеет атрибут .type, установленный на строку "keypress", если событие является объектом события нажатия клавиши, а также атрибут .char, содержащий символ нажатой клавиши. Создадим новую функцию handle_keypress() и обновим код цикла событий:
|
events_list = [] # Создает обработчик событий def handle_keypress(event): «»»Выводит символ, связанный с нажатой клавишей»»» print(event.char) while True: if events_list == []: continue event = events_list[0] # Если событие event является объектом нажатия клавиши keypress if event.type == «keypress»: # Вызывает обработчик события нажатия клавиши handle_keypress(event) |
При вызове метода window.mainloop() запускается похожий цикл. Данный метод отвечает за две части цикла:
- Он поддерживает список событий, которые произошли в приложении;
- Он запускает обработчик событий каждый раз, когда новое событие добавляется в список.
Обновим цикл событий, чтобы использовать window.mainloop() вместо вашего собственного цикла событий:
|
import tkinter as tk # Создает объект окна. window = tk.Tk() # Создает обработчик событий. def handle_keypress(event): «»»Выводит символ, связанный с нажатой клавишей»»» print(event.char) # Запускает обработчик событий. window.mainloop() |
Метод .mainloop() отвечает за многое, но в вышеуказанном коде все-таки кое-что отсутствует. Как Tkinter узнает, когда использовать handle_keypress()? У виджетов в Tkinter есть метод под названием .bind(), предназначенный только для этой цели.
Метод .bind() для виджетов в Tkinter
Для вызова обработчика событий во время возникновения события, связанного с виджетом, используется метод .bind(). Обработчик событий напрямую связан с событием. Продолжим использовать предыдущий пример с нажатием клавиши и задействуем метод .bind(), чтобы связать handle_keypress() с событием нажатия клавиши:
|
import tkinter as tk window = tk.Tk() def handle_keypress(event): «»»Выводит символ, связанный с нажатой клавишей»»» print(event.char) # Связывает событие нажатия клавиши с handle_keypress() window.bind(«<Key>», handle_keypress) window.mainloop() |
Здесь обработчик событий handle_keypress() связывается с событием "<Key>", используя window.bind(). Если во время работы приложения нажата определенная клавиша, тогда программа выведет символ этой нажатой клавиши.
На заметку: Результат вышеуказанной программы не выводится в окне приложения Tkinter. Он выводится в
stdout(терминал).Если вы запускаете программу в IDLE, вывод будет в интерактивном окне. При запуске программы из терминала результат выведется в терминале.
Метод .bind() всегда принимает по крайней мере два аргумента:
- Событие, представленное строкой в форме
"<event_name>", гдеevent_nameможет быть любым событием; - Обработчик событий, что является названием функции, вызываемой во время срабатывания события.
Обработчик события связан с виджетом, для которого вызывается метод .bind(). Когда вызывается обработчик события, объект события передается в функцию обработчика события.
В приведенном выше примере обработчик событий привязан к самому окну, но вы можете привязать обработчик событий к любому виджету в приложении. Например, вы можете привязать обработчик событий к виджету кнопки Button, который будет выполнять некоторые действия при каждом нажатии на данную кнопку:
|
def handle_click(event): print(«Нажата кнопка!») button = tk.Button(text=«Кликни!») button.bind(«<Button-1>», handle_click) |
В данном примере событие "<Button-1>" над виджетом кнопки связано с обработчиком handle_click. Событие "<Button-1>", происходит когда при направлении курсора на виджет нажимается левая кнопка мыши.
Есть и другие события для кнопок мыши, включая "<Button-2>" для средней кнопки мыши (в современных мышках это нажатая колесо для скролла) и "<Button-3>" и правой кнопки мыши.
При помощи метода .bind() с виджетом можно связать любой обработчик событий. Однако есть более простой способ связать обработчики событий с нажатием кнопки при помощи использования атрибута command от виджета кнопки.
Атрибут command для виджета кнопки в Tkinter
У каждого виджета кнопки есть атрибут command, который привязывает какую либо функцию к данной кнопки. Во время нажатия кнопки функция выполняется.
Взглянем на следующий пример. Сначала создается окно с ярлыком который содержит числовое значение. Справа и слева от ярлыка помещаются кнопки. Левая кнопка будет использоваться для уменьшения значения из ярлыка, а вторая кнопка для увеличения значения. Ниже представлен код для окна:
|
1 2 3 4 5 6 7 8 9 10 11 12 13 14 15 16 17 |
import tkinter as tk window = tk.Tk() window.rowconfigure(0, minsize=50, weight=1) window.columnconfigure([0, 1, 2], minsize=50, weight=1) btn_decrease = tk.Button(master=window, text=«-«) btn_decrease.grid(row=0, column=0, sticky=«nsew») lbl_value = tk.Label(master=window, text=«0») lbl_value.grid(row=0, column=1) btn_increase = tk.Button(master=window, text=«+») btn_increase.grid(row=0, column=2, sticky=«nsew») window.mainloop() |
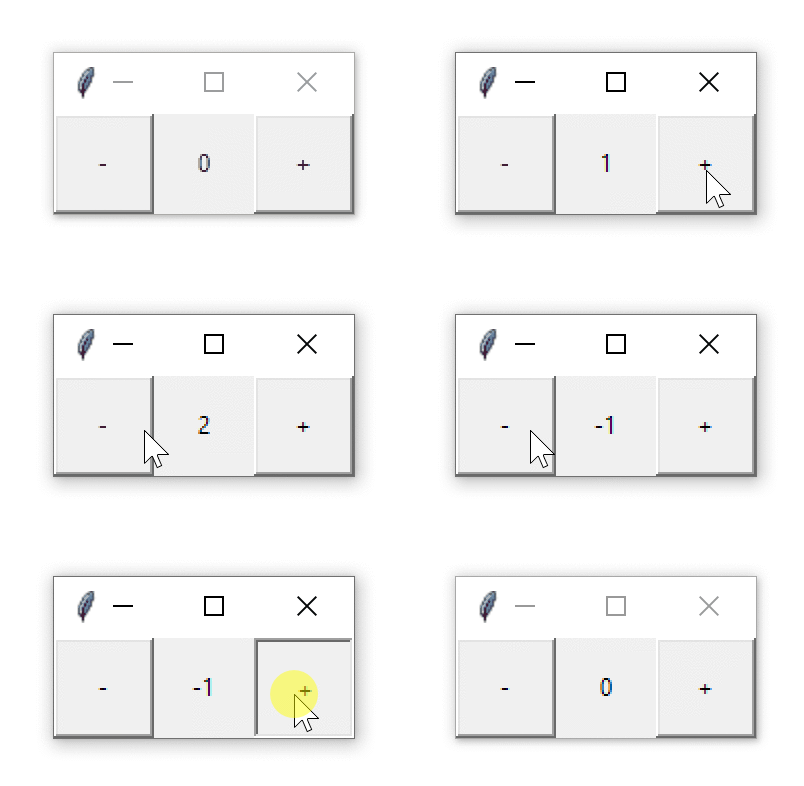
Окно выглядит следующим образом:
Макет приложения определен, можно вдохнуть в него жизнь, назначив кнопкам определенные команды. Начнем с левой кнопки. При нажатии на нее значение должно увеличиваться на 1. Для этого нам нужно знать две вещи:
- Как получить текст из ярлыка?
- Как обновить текст в ярлыке?
У виджетов ярлыка нет метода .get() в отличие от виджетов в возможностью ввода текста. Однако можно получить текста из ярлыка, через ключ text как при работе с обычным словарем:
|
label = Tk.Label(text=«Hello») # Получение текста из ярлыка text = label[«text»] # Установка нового текста для ярлыка label[«text»] = «Good bye» |
Теперь, когда мы знаем, как получить и установить текст ярлыка, напишем функцию increase(), которая увеличивает значение ярлыка lbl_value на 1:
|
def increase(): value = int(lbl_value[«text»]) lbl_value[«text»] = f«{value + 1}» |
Функция increase() получает текст из ярлыка lbl_value и конвертирует его в целое число через int(). Затем его значение увеличивает на 1, присваивая атрибуту text из ярлыка это новое значение. В примере выше, мы использовали f-строки для форматирование строки.
Функция decrease() нужна для уменьшения значения value_label на 1:
|
def decrease(): value = int(lbl_value[«text»]) lbl_value[«text»] = f«{value — 1}» |
Функции increase() и decrease() помещаются в код сразу после оператора import.
Для связи кнопки с функцией нужно назначить атрибуту command определенную функцию. Вы можете сделать это, когда создаете экземпляр этой кнопки. Например, чтобы назначить функцию increase() для кнопки increase_button, обновите код, в котором создается кнопка, следующим образом:
|
btn_increase = tk.Button( master=window, text=«+», command=increase ) |
Теперь присваиваем функцию decrease() для кнопки decrease_button:
|
btn_decrease = tk.Button( master=window, text=«-«, command=decrease ) |
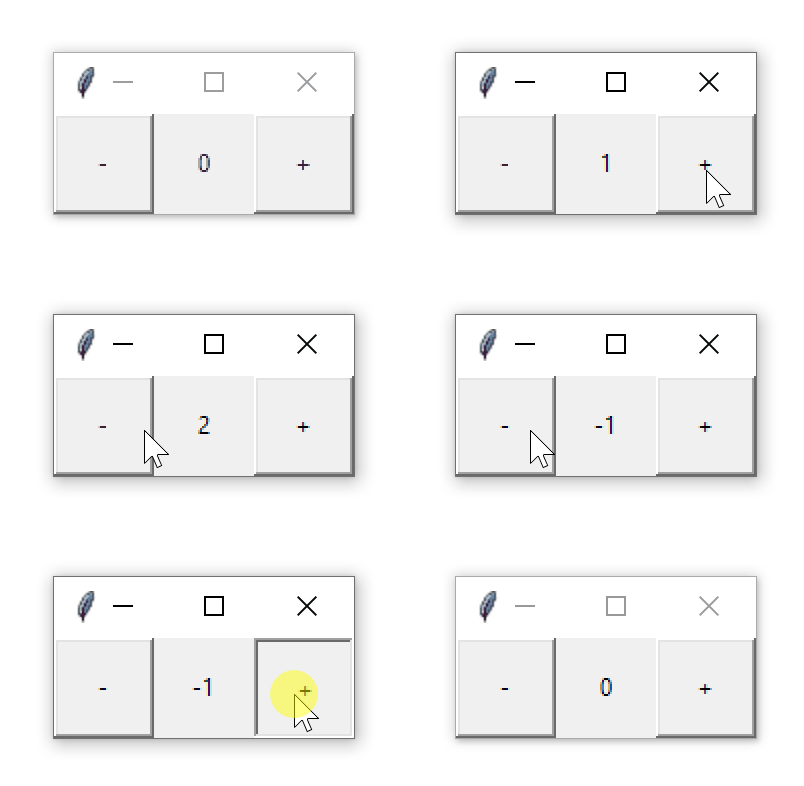
Это все, что вам нужно сделать, чтобы связать кнопки с функциями increase() и decrease() и сделать программу работоспособной. Попробуйте сохранить изменения и запустить приложение. Нажмите на кнопки, чтобы увеличить или уменьшить значение в центре окна:
Ниже представлен код данного приложения:
|
1 2 3 4 5 6 7 8 9 10 11 12 13 14 15 16 17 18 19 20 21 22 23 24 25 26 27 28 29 30 31 32 33 34 35 36 |
import tkinter as tk def increase(): value = int(lbl_value[«text»]) lbl_value[«text»] = f«{value + 1}» def decrease(): value = int(lbl_value[«text»]) lbl_value[«text»] = f«{value — 1}» window = tk.Tk() window.rowconfigure(0, minsize=50, weight=1) window.columnconfigure([0, 1, 2], minsize=50, weight=1) btn_decrease = tk.Button( master=window, text=«-«, command=decrease ) btn_decrease.grid(row=0, column=0, sticky=«nsew») lbl_value = tk.Label(master=window, text=«0») lbl_value.grid(row=0, column=1) btn_increase = tk.Button( master=window, text=«+», command=increase ) btn_increase.grid(row=0, column=2, sticky=«nsew») window.mainloop() |
Данное приложение сложно назвать полезным с практической точки зрения, но создавая его мы изучили полезные навыки для будущих проектов:
- Использование виджетов для создания компонентов пользовательского интерфейса;
- Использование менеджеров геометрии для управления макетом приложения;
- Создание функций для взаимодействия с различными компонентами для принятия и трансформирования пользовательского ввода.
В следующих двух разделах будет показано, как создать полезные приложения. Сначала сделаем конвертер температуры, которые переводит Фаренгейты в градусы Цельсия. После этого создадим текстовый редактор, который открывает, редактирует и сохраняет текстовые файлы.
Задание #4 — Бросаем игровые кости в Tkinter
Ниже дано еще одно задание для проверки понимания всего изученного.
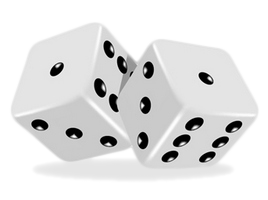
Задание: Создать симулятор броска игральных костей.
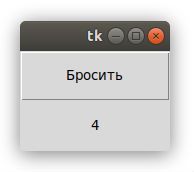
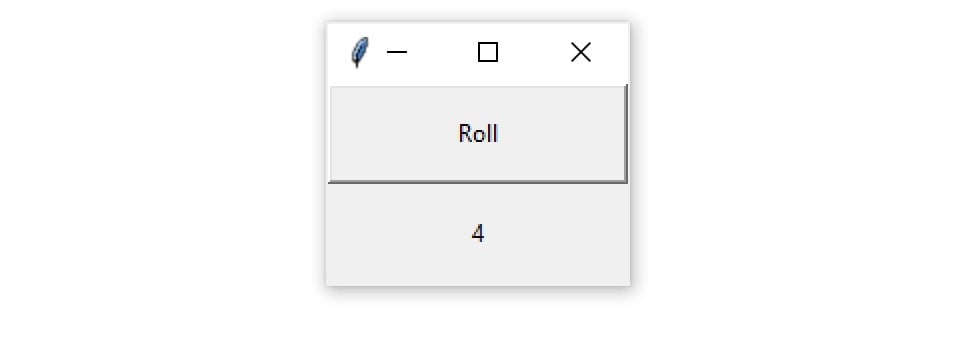
Напишите программу, которая является симулятором результата броска шестигранной игральной кости. В приложении должна быть кнопка с текстом «Бросить». При нажатии на эту кнопку должно генерироваться и выводиться на экран случайное число от 1 до 6.
Подсказка: Случайное число можно сгенерировать с помощью randint() из модуля random.
В конечном итоге, приложение должно выглядеть следующим образом:
Попробуйте сделать все сами. В конце можете ознакомиться с еще одним вариантом кода который мы приготовили. Помните, что у каждого разработчика свой стиль, и ваша программа можете выглядеть по-другому.
Решение задачи #4 — Бросаем кости
|
1 2 3 4 5 6 7 8 9 10 11 12 13 14 15 16 17 18 19 |
import random import tkinter as tk def roll(): lbl_result[«text»] = str(random.randint(1, 6)) window = tk.Tk() window.columnconfigure(0, minsize=150) window.rowconfigure([0, 1], minsize=50) btn_roll = tk.Button(text=«Бросить», command=roll) lbl_result = tk.Label() btn_roll.grid(row=0, column=0, sticky=«nsew») lbl_result.grid(row=1, column=0) window.mainloop() |
Когда разберетесь с заданием, переходите к следующей части.
Приложение по конвертированию температуры в Tkinter
В этом разделе вы создадите приложение для конвертирования температуры, которое позволит пользователю вводить температуру в градусах Фаренгейта и нажимать кнопку, чтобы преобразовать эту температуру в градусы Цельсия. Мы разберем код шаг за шагом. Полный код программы будет дан в конце раздела.
Перед написанием кода нужно задуматься о дизайне приложения. Нам потребуются следующие элементы:
- Виджет однострочного поля для ввода текста под названием
ent_temperatureдля ввода значения температуры по Фаренгейту; - Виджет ярлыка под названием
lbl_resultдля отображения итогового значения температуры по Цельсию; - Виджет кнопки под названием
btn_convert, что читает значение текстового поля и конвертирует его из Фаренгейта в Цельсий, и после нажатия помещает результат в виде текста в ярлыке.
Вы можете расположить элементы в виде сетки с одной строкой и одним столбцом для каждого виджета. Получим небольшое, но очень удобное для пользователя приложение. У всех элементов должны быть ярлыки.
Ярлык помещается справа от текстового поля ent_temperature с символом Фаренгейта (℉), чтобы пользователь знал, что значением в текстовом поле ent_temperature нужно ввести в градусы Фаренгейта. Устанавливаем для ярлыка данный текст "N{DEGREE FAHRENHEIT}", это именованный Unicode символ в Python для отображения символа Фаренгейта.
Можно вставить кнопку btn_convert немного изящества, установив для нее значение "N{RIGHTWARDS BLACK ARROW}", которое отображает черную стрелку, указывающую вправо. Также нужно, чтобы у ярлыка с результатом lbl_result был символ Цельсия (℃), ярлык будет иметь следующее значение "N{DEGREE CELSIUS}" для указания того, что результат в градусах Цельсия. Вот как будет выглядеть итоговое окно:
Теперь, когда перечень виджетов и внешний вид финального результата известны, можно приступить к делу. Для начала импортирует tkinter и создаем новое окно.
|
import tkinter as tk window = tk.Tk() window.title(«Конвертер температуры») |
Метод window.title() устанавливает заголовок для существующего окна. При запуске приложения у окна будет заголовок «Конвертер температуры». Далее создаем виджет однострочного текстового поля ent_temperature с ярлыком lbl_temp, вставляем их в рамку под названием frm_entry:
|
frm_entry = tk.Frame(master=window) ent_temperature = tk.Entry(master=frm_entry, width=10) lbl_temp = tk.Label(master=frm_entry, text=«N{DEGREE FAHRENHEIT}») |
Однострочное текстовое поле ent_temperature является местом, куда пользователь вводит значение по Фаренгейту. Перемнная lbl_temp содержит ярлык для текстового поля ent_temperature с символом Фаренгейта. Рамка frm_entry является контейнером, что группирует текстовое поле ent_temperature и ярлык lbl_temp вместе.
Нам нужно, чтобы ярлык lbl_temp находился справа от тектсового поля ent_temperature. Их можно поместить в рамку frm_entry, используя менеджер геометрии .grid() с одной строкой и двумя столбцами:
|
ent_temperature.grid(row=0, column=0, sticky=«e») lbl_temp.grid(row=0, column=1, sticky=«w») |
Мы установили параметр sticky на "e" для текстового поля ent_temperature таким образом, чтобы она всегда будет с правой стороны ячейки сетки. Также установили sticky на "w" для ярлыка lbl_temp для закрепления с левой стороны его ячейки сетки.
Теперь ярлык lbl_temp будет находиться сразу справа от текстового поля ent_temperature.
Теперь заставим кнопку btn_convert и ярлык с результатом lbl_result конвертировать введенную в текстовом поле ent_temperature температуру, после чего отобразить результат на экране:
|
btn_convert = tk.Button( master=window, text=«N{RIGHTWARDS BLACK ARROW}» ) lbl_result = tk.Label(master=window, text=«N{DEGREE CELSIUS}») |
Как и в случае с рамкой frm_entry, виджеты кнопки btn_convert и ярлык с результатом lbl_result назначаются окну.
Вместе эти три виджета являются ячейками сетки приложения. Используем метод .grid(), чтобы разместить их должным образом:
|
frm_entry.grid(row=0, column=0, padx=10) btn_convert.grid(row=0, column=1, pady=10) lbl_result.grid(row=0, column=2, padx=10) |
Теперь запускаем приложение:
Выглядит неплохо. Однако кнопки пока ничего не делают. В верхней части скрипта, прямо под строкой import, добавим функцию под названием fahrenheit_to_celsius():
|
def fahrenheit_to_celsius(): «»» Конвертирует значение Фаренгейта в Цельсий и вставляет результат в ярлык lbl_result. «»» fahrenheit = ent_temperature.get() celsius = (5/9) * (float(fahrenheit) — 32) lbl_result[«text»] = f«{round(celsius, 2)} N{DEGREE CELSIUS}» |
Данная функция читает значение из текстового поля ent_temperature, конвертирует его из Фаренгейтов в Цельсий, после чего отображает результат в ярлыке lbl_result.
Вернемся к строке создания кнопки btn_convert и назначим параметр command на функцию fahrenheit_to_celsius:
|
btn_convert = tk.Button( master=window, text=«N{RIGHTWARDS BLACK ARROW}», command=fahrenheit_to_celsius # <— Добавим его тут ) |
Вот и все! Мы создали полностью функционирующий конвертер температуры длиной всего в 26 строк кода. Неплохо, правда?
Ниже дан полный код программы конвертера температуры:
|
1 2 3 4 5 6 7 8 9 10 11 12 13 14 15 16 17 18 19 20 21 22 23 24 25 26 27 28 29 30 31 32 33 34 35 36 37 38 39 40 41 42 43 44 |
import tkinter as tk def fahrenheit_to_celsius(): «»» Конвертирует значение из градусов по Фаренгейту в градусы по Цельсию и выводит результат в ярлык lbl_result. «»» fahrenheit = ent_temperature.get() celsius = (5/9) * (float(fahrenheit) — 32) lbl_result[«text»] = f«{round(celsius, 2)} N{DEGREE CELSIUS}» # Создание окна. window = tk.Tk() window.title(«Конвертер температуры») window.resizable(width=False, height=False) # Создание рамки для ввода значения по Фаренгейту через виджет # однострочного текстового поля вместе с ярлыком. frm_entry = tk.Frame(master=window) ent_temperature = tk.Entry(master=frm_entry, width=10) lbl_temp = tk.Label(master=frm_entry, text=«N{DEGREE FAHRENHEIT}») # Макет для рамки ввода температуры и ярлыка с символом Фаренгейта # использует менеджер геометрии .grid(). ent_temperature.grid(row=0, column=0, sticky=«e») lbl_temp.grid(row=0, column=1, sticky=«w») # Создание кнопки-конвертера и ярлыка для вывода результата. btn_convert = tk.Button( master=window, text=«N{RIGHTWARDS BLACK ARROW}», command=fahrenheit_to_celsius ) lbl_result = tk.Label(master=window, text=«N{DEGREE CELSIUS}») # Настройка макета через менеджер геометрии .grid(). frm_entry.grid(row=0, column=0, padx=10) btn_convert.grid(row=0, column=1, pady=10) lbl_result.grid(row=0, column=2, padx=10) # Запуск приложения. window.mainloop() |
В следующем разделе рассмотрим процесс создания текстового редактора для файлов.
Создание текстового редактора на Tkinter
В данном разделе будет рассмотрен процесс создания текстового редактора, который может открывать, редактировать и сохранять текстовые файлы. В приложении обязательно должны быть следующие элементы:
- Виджет кнопки под названием
btn_openдля открытия файла, которого нужно отредактировать; - Виджет кнопки под названием
btn_saveдля сохранения изменений; - Виджет для ввода большого текста под названием
txt_editдля создания и редактирования текстового файла.
Три виджета будут расположены таким образом, чтобы две кнопки находились с левой стороны окна, а текстовое поле — с правой стороны.
Все окно должно быть высотой минимум в 800 пикселей, и ширина текстового поля txt_edit также должна быть минимум 800 пикселей. Весь макет должен быть адаптивным, так что если размер окна изменяется, то также изменяется размер текстового поля txt_edit. Однако ширина рамки с кнопками не должна меняться.
Вот примерный набросок того, как будет выглядеть окно:
Добиться желаемого макета можно через менеджер геометрии .grid(). В макете одна строка и два столбца:
- Узкий столбец слева от кнопок;
- Широкий столбец справа от текстового поля.
Чтобы установить минимальные размеры для окна и текстового поля txt_edit, вы можете установить параметры minsize используя методы окна .rowconfigure() и .columnconfigure() указав значение в 800 пикселей. Для обработки изменения размера окна, можно установить параметр weight для выше перечисленных методов на 1.
Для размещения обеих кнопок в один и тот же столбец нужно создать виджет рамки под названием fr_buttons. В соответствии с макетом, две кнопки должны быть расположены вертикально внутри рамки, с кнопкой btn_open сверху. Это можно сделать с помощью менеджера геометрии .grid() или .pack(). Будем использовать .grid(), так как с ним немного легче работать.
Теперь, когда у нас есть план, можно приступить к написанию приложения. Первый шаг — создать все нужные виджеты:
|
1 2 3 4 5 6 7 8 9 10 11 12 13 14 15 16 17 18 19 20 |
import tkinter as tk window = tk.Tk() window.title(«Простой текстовый редактор») window.rowconfigure(0, minsize=800, weight=1) window.columnconfigure(1, minsize=800, weight=1) txt_edit = tk.Text(window) fr_buttons = tk.Frame(window) btn_open = tk.Button(fr_buttons, text=«Открыть») btn_save = tk.Button(fr_buttons, text=«Сохранить как…») btn_open.grid(row=0, column=0, sticky=«ew», padx=5, pady=5) btn_save.grid(row=1, column=0, sticky=«ew», padx=5) fr_buttons.grid(row=0, column=0, sticky=«ns») txt_edit.grid(row=0, column=1, sticky=«nsew») window.mainloop() |
Разберем код поэтапно:
- Строка 1 импортирует библиотеку
tkinter; - Строки 3 и 4 создают новое окно с заголовком «Простой текстовый редактор»;
- Строки 6 и 7 устанавливают конфигурацию строк и столбцов;
- Строки 9 и 12 создают четыре виджета — текстовый бокс, рамку, кнопка для открытия и кнопка для сохранения файла.
Подробнее рассмотрим строку 6. Параметр minsize для метода .rowconfigure() ставится на 800 пикселей, weight имеет значение 1:
|
window.rowconfigure(0, minsize=800, weight=1) |
Первый аргумент — 0, устанавливает высоту первой строки на 800 пикселей, гарантируя, что высота строки увеличивается пропорционально высоте окна. В макете приложения только одна строка, поэтому эти параметры применяются ко всему окну.
Давайте также подробнее рассмотрим строку 7. Здесь используется метод .columnconfigure(), чтобы установить атрибуты width и weight столбца с индексами от 1 до 800 и 1 соответственно:
|
window.columnconfigure(1, minsize=800, weight=1) |
Помните, что индексы строк и столбцов начинаются с нуля, поэтому эти параметры применяются только ко второму столбцу. При настройке только второго столбца текстовое поле будет расширяться и сокращаться естественным образом при изменении размера окна, в то время как столбец, содержащий кнопки, будет оставаться на фиксированной ширине.
Теперь можно работать над макетом приложения. Сначала назначим две кнопки в рамку fr_buttons с помощью менеджера геометрии .grid():
|
btn_open.grid(row=0, column=0, sticky=«ew», padx=5, pady=5) btn_save.grid(row=1, column=0, sticky=«ew», padx=5) |
Эти две строки кода создают сетку с двумя строками и одним столбцом в рамке fr_buttons, поскольку для кнопки btn_open и кнопки btn_save атрибут master указывает на рамку fr_buttons. Кнопка btn_open помещается в первый ряд, а кнопка btn_save — во второй ряд, так что кнопка btn_open отображается над кнопкой btn_save в макете, как и было запланировано в изначальном макете.
Для кнопок btn_open и btn_save атрибуты sticky установлены на "ew", что заставляет кнопки расширяться горизонтально в обоих направлениях и заполнять всю рамку. Это гарантирует, что обе кнопки имеют одинаковый размер.
Указывается 5 пикселей отступа вокруг каждой кнопки, устанавливая параметры padx и pady на 5. Только у кнопки btn_open есть вертикальный отступ. Поскольку он находится сверху, вертикальный отступ немного смещает кнопку вниз от верхней части окна и обеспечивает небольшой зазор между ним и кнопкой btn_save.
Теперь, когда рамка fr_buttons разложена и готова к работе, вы можете настроить макет сетки для остальной части окна:
|
fr_buttons.grid(row=0, column=0, sticky=«ns») txt_edit.grid(row=0, column=1, sticky=«nsew») |
Эти две строки кода создают сетку с одной строкой и двумя столбцами для окна. Вы помещаете рамку fr_buttons в первый столбец и текстовое поле txt_edit во второй столбец, так что рамка с кнопками fr_buttons появляется слева от тектсового поля txt_edit в макете окна приложения.
Параметр sticky для рамки с кнопками fr_buttons имеет значение "ns", что заставляет всю рамку расширяться по вертикали и заполнять всю высоту его столбца. Текстовое поле txt_edit заполняет всю ячейку сетки, потому что вы установили для ее параметра sticky значение "nsew", что заставляет его расширяться во всех направлениях.
Теперь, когда макет приложения готов, добавьте метод window.mainloop() в конец программы, сохраните и запустите скрипт. Появится следующее окно:
Выглядит неплохо! Но приложение пока ничего не делает, поэтому нужно создать команды для кнопок. Кнопка btn_open должена показать диалоговое окно выбора файла и позволить пользователю выбрать файл с компьютера. Затем он должен открыть файл и вставить его содержимое в текстом поле txt_edit. Для этого используем функцию open_file():
|
def open_file(): «»»Открывает файл для редактирования»»» filepath = askopenfilename( filetypes=[(«Text Files», «*.txt»), («All Files», «*.*»)] ) if not filepath: return txt_edit.delete(«1.0», tk.END) with open(filepath, «r») as input_file: text = input_file.read() txt_edit.insert(tk.END, text) window.title(f«Simple Text Editor — {filepath}») |
Разберем данную функцию поэтапно:
- Строки с 3 по 5 используют диалоговое окно
askopenfilenameиз модуляtkinter.filedialog, чтобы отобразить диалоговое окно открытия файла и сохранить выбранный путь к файлу в переменнуюfilepath; - Строки 6 и 7 проверяют, закрывает ли пользователь диалоговое окно или нажимает кнопку отмены. Если это так, то
filepathбудет иметь значениеNone, и функция вернется без выполнения какого-либо кода для чтения содержимого файла и вставки текста в текстовом полеtxt_edit; - Строка 8 очищает текущее содержимое из текстового поля
txt_edit, используя метод.delete(); - Строки 9 и 10 открывают выбранный файл и читают через
.read()его содержимое перед сохранением текста в виде строки; - Строка 11 вставляем текст в текстовом поле
txt_edit, используя метод.insert(); - Строка 12 устанавливает заголовок окна так, чтобы он содержал путь к открытому файлу.
Теперь вы можете обновить программу так, чтобы кнопка btn_open вызывала функцию open_file() при каждом нажатии. Есть несколько вещей, которые нужно сделать, чтобы обновить программу.
Сначала импортируйте askopenfilename из модуля tkinter.filedialog, добавив следующий импорт в начало вашей программы:
|
1 2 3 4 5 6 7 8 9 10 11 12 13 14 15 16 17 18 19 20 21 22 |
import tkinter as tk from tkinter.filedialog import askopenfilename window = tk.Tk() window.title(«Простой текстовый редактор») window.rowconfigure(0, minsize=800, weight=1) window.columnconfigure(1, minsize=800, weight=1) txt_edit = tk.Text(window) fr_buttons = tk.Frame(window) btn_open = tk.Button(fr_buttons, text=«Открыть») btn_save = tk.Button(fr_buttons, text=«Сохранить как…») btn_open.grid(row=0, column=0, sticky=«ew», padx=5, pady=5) btn_save.grid(row=1, column=0, sticky=«ew», padx=5) fr_buttons.grid(row=0, column=0, sticky=«ns») txt_edit.grid(row=0, column=1, sticky=«nsew») window.mainloop() |
Затем добавляется тело функции open_file() прямо под оператором импорта:
|
1 2 3 4 5 6 7 8 9 10 11 12 13 14 15 16 17 18 19 20 21 22 23 24 25 26 27 28 29 30 31 32 33 34 35 36 |
import tkinter as tk from tkinter.filedialog import askopenfilename def open_file(): «»»Открываем файл для редактирования»»» filepath = askopenfilename( filetypes=[(«Текстовые файлы», «*.txt»), («Все файлы», «*.*»)] ) if not filepath: return txt_edit.delete(«1.0», tk.END) with open(filepath, «r») as input_file: text = input_file.read() txt_edit.insert(tk.END, text) window.title(f«Простой текстовый редактор — {filepath}») window = tk.Tk() window.title(«Простой текстовый редактор») window.rowconfigure(0, minsize=800, weight=1) window.columnconfigure(1, minsize=800, weight=1) txt_edit = tk.Text(window) fr_buttons = tk.Frame(window) btn_open = tk.Button(fr_buttons, text=«Открыть») btn_save = tk.Button(fr_buttons, text=«Сохранить как…») btn_open.grid(row=0, column=0, sticky=«ew», padx=5, pady=5) btn_save.grid(row=1, column=0, sticky=«ew», padx=5) fr_buttons.grid(row=0, column=0, sticky=«ns») txt_edit.grid(row=0, column=1, sticky=«nsew») window.mainloop() |
Теперь указываем атрибуту command от кнопки btn_open на функцию open_file:
|
1 2 3 4 5 6 7 8 9 10 11 12 13 14 15 16 17 18 19 20 21 22 23 24 25 26 27 28 29 30 31 32 33 34 35 36 |
import tkinter as tk from tkinter.filedialog import askopenfilename def open_file(): «»»Открываем файл для редактирования»»» filepath = askopenfilename( filetypes=[(«Текстовые файлы», «*.txt»), («Все файлы», «*.*»)] ) if not filepath: return txt_edit.delete(«1.0», tk.END) with open(filepath, «r») as input_file: text = input_file.read() txt_edit.insert(tk.END, text) window.title(f«Простой текстовый редактор — {filepath}») window = tk.Tk() window.title(«Простой текстовый редактор») window.rowconfigure(0, minsize=800, weight=1) window.columnconfigure(1, minsize=800, weight=1) txt_edit = tk.Text(window) fr_buttons = tk.Frame(window) btn_open = tk.Button(fr_buttons, text=«Открыть», command=open_file) btn_save = tk.Button(fr_buttons, text=«Сохранить как…») btn_open.grid(row=0, column=0, sticky=«ew», padx=5, pady=5) btn_save.grid(row=1, column=0, sticky=«ew», padx=5) fr_buttons.grid(row=0, column=0, sticky=«ns») txt_edit.grid(row=0, column=1, sticky=«nsew») window.mainloop() |
Сохраните файл и запустите его, чтобы убедиться, что все работает. Затем попробуйте открыть текстовый файл.
Теперь, наша кнопка btn_open работает и успешно открывает текстовые файлы, можно уже заняться функцией для кнопки btn_save. Для этого необходимо открыть диалоговое окно сохранения файла, чтобы пользователь мог выбрать, куда он хотел бы сохранить файл.
Для этого вы будете использовать диалог asksaveasfilename из модуля tkinter.filedialog. Эта функция также должна извлечь все содержимое из текстового поля txt_edit и записать его в файл в выбранном месте. Вот функция, которая делает именно это:
|
def save_file(): «»»Сохраняем текущий файл как новый файл.»»» filepath = asksaveasfilename( defaultextension=«txt», filetypes=[(«Текстовые файлы», «*.txt»), («Все файлы», «*.*»)], ) if not filepath: return with open(filepath, «w») as output_file: text = txt_edit.get(«1.0», tk.END) output_file.write(text) window.title(f«Простой текстовый редактор — {filepath}») |
Разберем код:
- Строки с 3 по 6 используют диалоговое окно
asksaveasfilename, чтобы выбрать желаемое место сохранения файла. Выбранный путь к файлу сохраняется в переменнуюfilepath; - Строки 7 и 8 проверяют, закрывает ли пользователь диалоговое окно или нажимает кнопку отмены. Если это так, то переменная
filepathбудет иметь значениеNone, и функция завершиться без выполнения какого-либо кода для сохранения текста в файле; - Строка 9 создает новый файл по выбранному пути;
- Строка 10 извлекает текст из текстового поля
txt_editс помощью метода.get()и присваивает его переменнойtext; - Строка 11 записывает содержимое из переменной
textв выбранном файле; - Строка 12 обновляет заголовок окна приложения, чтобы новый путь к файлу отображался в заголовке окна.
Теперь вы можете обновить программу, чтобы кнопка btn_save вызывала функцию save_file() при нажатии. Опять же, есть несколько вещей, которые вам нужно сделать, чтобы обновить программу.
Сначала импортируйте asksaveasfilename из модуля tkinter.filedialog, обновив импорт в верхней части вашего скрипта, например так:
|
1 2 3 4 5 6 7 8 9 10 11 12 13 14 15 16 17 18 19 20 21 22 23 24 25 26 27 28 29 30 31 32 33 34 35 |
import tkinter as tk from tkinter.filedialog import askopenfilename, asksaveasfilename def open_file(): «»»Открываем файл для редактирования»»» filepath = askopenfilename( filetypes=[(«Текстовые файлы», «*.txt»), («Все файлы», «*.*»)] ) if not filepath: return txt_edit.delete(«1.0», tk.END) with open(filepath, «r») as input_file: text = input_file.read() txt_edit.insert(tk.END, text) window.title(f«Простой текстовый редактор — {filepath}») window = tk.Tk() window.title(«Простой текстовый редактор») window.rowconfigure(0, minsize=800, weight=1) window.columnconfigure(1, minsize=800, weight=1) txt_edit = tk.Text(window) fr_buttons = tk.Frame(window, relief=tk.RAISED, bd=2) btn_open = tk.Button(fr_buttons, text=«Открыть», command=open_file) btn_save = tk.Button(fr_buttons, text=«Сохранить как…») btn_open.grid(row=0, column=0, sticky=«ew», padx=5, pady=5) btn_save.grid(row=1, column=0, sticky=«ew», padx=5) fr_buttons.grid(row=0, column=0, sticky=«ns») txt_edit.grid(row=0, column=1, sticky=«nsew») window.mainloop() |
Затем добавляем функцию save_file() прямо под функцию open_file():
|
1 2 3 4 5 6 7 8 9 10 11 12 13 14 15 16 17 18 19 20 21 22 23 24 25 26 27 28 29 30 31 32 33 34 35 36 37 38 39 40 41 42 43 44 45 46 47 48 |
import tkinter as tk from tkinter.filedialog import askopenfilename, asksaveasfilename def open_file(): «»»Открываем файл для редактирования»»» filepath = askopenfilename( filetypes=[(«Текстовые файлы», «*.txt»), («Все файлы», «*.*»)] ) if not filepath: return txt_edit.delete(«1.0», tk.END) with open(filepath, «r») as input_file: text = input_file.read() txt_edit.insert(tk.END, text) window.title(f«Простой текстовый редактор — {filepath}») def save_file(): «»»Сохраняем текущий файл как новый файл.»»» filepath = asksaveasfilename( defaultextension=«txt», filetypes=[(«Текстовые файлы», «*.txt»), («Все файлы», «*.*»)], ) if not filepath: return with open(filepath, «w») as output_file: text = txt_edit.get(«1.0», tk.END) output_file.write(text) window.title(f«Простой текстовый редактор — {filepath}») window = tk.Tk() window.title(«Простой текстовый редактор») window.rowconfigure(0, minsize=800, weight=1) window.columnconfigure(1, minsize=800, weight=1) txt_edit = tk.Text(window) fr_buttons = tk.Frame(window, relief=tk.RAISED, bd=2) btn_open = tk.Button(fr_buttons, text=«Открыть», command=open_file) btn_save = tk.Button(fr_buttons, text=«Сохранить как…») btn_open.grid(row=0, column=0, sticky=«ew», padx=5, pady=5) btn_save.grid(row=1, column=0, sticky=«ew», padx=5) fr_buttons.grid(row=0, column=0, sticky=«ns») txt_edit.grid(row=0, column=1, sticky=«nsew») window.mainloop() |
Наконец, указываем атрибуту command от кнопки btn_save на функцию save_file:
|
1 2 3 4 5 6 7 8 9 10 11 12 13 14 15 16 17 18 19 20 21 22 23 24 25 26 27 28 29 30 31 32 33 34 35 36 37 38 39 40 41 42 43 44 45 46 47 48 |
import tkinter as tk from tkinter.filedialog import askopenfilename, asksaveasfilename def open_file(): «»»Открываем файл для редактирования»»» filepath = askopenfilename( filetypes=[(«Текстовые файлы», «*.txt»), («Все файлы», «*.*»)] ) if not filepath: return txt_edit.delete(«1.0», tk.END) with open(filepath, «r») as input_file: text = input_file.read() txt_edit.insert(tk.END, text) window.title(f«Простой текстовый редактор — {filepath}») def save_file(): «»»Сохраняем текущий файл как новый файл.»»» filepath = asksaveasfilename( defaultextension=«txt», filetypes=[(«Текстовые файлы», «*.txt»), («Все файлы», «*.*»)], ) if not filepath: return with open(filepath, «w») as output_file: text = txt_edit.get(«1.0», tk.END) output_file.write(text) window.title(f«Простой текстовый редактор — {filepath}») window = tk.Tk() window.title(«Простой текстовый редактор») window.rowconfigure(0, minsize=800, weight=1) window.columnconfigure(1, minsize=800, weight=1) txt_edit = tk.Text(window) fr_buttons = tk.Frame(window, relief=tk.RAISED, bd=2) btn_open = tk.Button(fr_buttons, text=«Открыть», command=open_file) btn_save = tk.Button(fr_buttons, text=«Сохранить как…», command=save_file) btn_open.grid(row=0, column=0, sticky=«ew», padx=5, pady=5) btn_save.grid(row=1, column=0, sticky=«ew», padx=5) fr_buttons.grid(row=0, column=0, sticky=«ns») txt_edit.grid(row=0, column=1, sticky=«nsew») window.mainloop() |
Сохраните файл и запустите его. Теперь у вас есть небольшой, но полностью функциональный текстовый редактор написанный на Python используя библиотеку Tkinter.
Теперь вы создали два приложения с графическим интерфейсом на Python, использовав многие аспекты из текущего руководства. Это немалое достижение, можете собой гордиться. Теперь вы готовы для создания собственных приложений с графическим интерфейсом.
Заключение
Из этого урока вы узнали, как начать работу с программированием на Python используя графический интерфейс. Tkinter является хорошим выбором как GUI фреймворк, поскольку он встроен в стандартную библиотеку Python, и создание приложений с ним относительно несложно.
В этом руководстве вы узнали несколько важных концепций от Tkinter:
- Как работать с виджетами;
- Как управлять макетом приложения с помощью менеджеров геометрии;
- Как сделать ваши приложения интерактивными;
- Как использовать пять основных виджетов из Tkinter (
Label,Button,Entry,TextиFrame).
Теперь, когда вы освоили основы программирования на Python используя графический интерфейс при помощью Tkinter, следующим шагом будет создание ваших собственных приложений. Что это будет? Поделитесь идеями для своих проектов в комментариях ниже.
Дополнительные материалы для изучения Tkinter
В этом уроке вы затронули только основы создания приложений с графическим интерфейсом в Python используя Tkinter. Есть ряд дополнительных тем, которые здесь не рассматривались. В этом разделе вы найдете некоторые из лучших доступных ресурсов, которые помогут продолжить путешествие в мир Tkinter.
Вот некоторые официальные ресурсы, которые можно просмотреть:
- Официальное руководство Python Tkinter, в котором подробно описан данный модуль. Текст предназначен для более продвинутых пользователей, новичкам будет сложновато;
- Справочник по Tkinter 8.5: GUI для Python — это обширный справочник, охватывающий большинство модулей от Tkinter. Он исчерпывающий, но написан кратко и без комментариев и примеров.
- Справочник по Tk — это полное руководство по командам в библиотеке Tk. Он написан для языка Tcl, но отвечает на множество вопросов о том, почему все работает так, как они работают в Tkinter. В официальной документации по Python есть раздел, посвященный отображению базового Tk в Tkinter, который необходим при чтении документации по командам Tk.
Дополнительные виджеты
В этом руководстве вы узнали о виджетах Label, Button, Entry, Text и Frame . В Tkinter есть несколько других виджетов, каждый из которых необходим для создания реальных приложений. Вот несколько ресурсов, чтобы продолжить изучение виджетов:
- TkDocs Tkinter Tutorial — это достаточно обширное руководство для Tk, базовой библиотеки кода, используемой Tkinter. Примеры представлены на ткаих языка программирования как Python, Ruby, Perl и Tcl. Вы можете найти несколько примеров виджетов, помимо описанных в данной статье;
- Базовые виджеты включают те же виджеты, что и в этом руководстве, а также некоторые другие;
- Раздел Больше виджетов охватывает несколько дополнительных виджетов.
В официальной документации Python есть три раздела, охватывающих дополнительные виджеты:
- Тематические виджеты ttk набор тематических виджетов Tk;
- Расширение виджетов для Tk охватывает виджеты в наборе расширений интерфейса Tk;
- Виджет прокрутки текста расширяет возможности виджета
Textв сочетании с вертикальной полосой прокрутки.
Поделиться приложением на Tkinter
Создав приложение с помощью Tkinter, вы, вероятно, захотите распространить его среди своих коллег и друзей. Вот несколько уроков, которые помогут вам в этом процессе:
- Использование PyInstaller для компиляции приложений
- 4 попытки упаковки Python как исполняемого файла
- Создание автономных приложений Python с помощью PyOxidizer
Другие GUI фреймворки
Tkinter — не единственный выбор для создания GUI приложений на Python. Если Tkinter не соответствует потребностям вашего проекта, задумайтесь об использовании другого фреймворка:
- Полный курс уроков по wxPython
- Python и PyQt5: создание калькулятора на PyQt5
- Создание мобильного приложения с Kivy Python Framework
Являюсь администратором нескольких порталов по обучению языков программирования Python, Golang и Kotlin. В составе небольшой команды единомышленников, мы занимаемся популяризацией языков программирования на русскоязычную аудиторию. Большая часть статей была адаптирована нами на русский язык и распространяется бесплатно.
E-mail: vasile.buldumac@ati.utm.md
Образование
Universitatea Tehnică a Moldovei (utm.md)
- 2014 — 2018 Технический Университет Молдовы, ИТ-Инженер. Тема дипломной работы «Автоматизация покупки и продажи криптовалюты используя технический анализ»
- 2018 — 2020 Технический Университет Молдовы, Магистр, Магистерская диссертация «Идентификация человека в киберпространстве по фотографии лица»
Tkinter is a Python Package for creating GUI applications. Python has a lot of GUI frameworks, but Tkinter is the only framework that’s built into the Python standard library. Tkinter has several strengths; it’s cross-platform, so the same code works on Windows, macOS, and Linux. Tkinter is lightweight and relatively painless to use compared to other frameworks. This makes it a compelling choice for building GUI applications in Python, especially for applications where a modern shine is unnecessary, and the top priority is to build something that’s functional and cross-platform quickly.
Here are some common use cases for Tkinter in more detail:
- Creating windows and dialog boxes: Tkinter can be used to create windows and dialog boxes that allow users to interact with your program. These can be used to display information, gather input, or present options to the user. To create a window or dialog box, you can use the Tk() function to create a root window, and then use functions like Label, Button, and Entry to add widgets to the window.
- Building a GUI for a desktop application: Tkinter can be used to create the interface for a desktop application, including buttons, menus, and other interactive elements. To build a GUI for a desktop application, you can use functions like Menu, Checkbutton, and RadioButton to create menus and interactive elements, and use layout managers like pack and grid to arrange the widgets on the window.
- Adding a GUI to a command-line program: Tkinter can be used to add a GUI to a command-line program, making it easier for users to interact with the program and input arguments. To add a GUI to a command-line program, you can use functions like Entry and Button to create input fields and buttons, and use event handlers like command and bind to handle user input.
- Creating custom widgets: Tkinter includes a variety of built-in widgets, such as buttons, labels, and text boxes, but it also allows you to create your own custom widgets. To create a custom widget, you can define a class that inherits from the Widget class and overrides its methods to define the behavior and appearance of the widget.
- Prototyping a GUI: Tkinter can be used to quickly prototype a GUI, allowing you to test and iterate on different design ideas before committing to a final implementation. To prototype a GUI with Tkinter, you can use the Tk() function to create a root window, and then use functions like Label, Button, and Entry to add widgets to the window and test different layout and design ideas.
Tkinter Alternatives
There are a number of libraries that are similar to Tkinter and can be used for creating graphical user interfaces (GUIs) in Python. Some examples include:
- PyQt: PyQt is a library that allows you to create GUI applications using the Qt framework. It is a comprehensive library with a large number of widgets and features.
- wxPython: wxPython is a library that allows you to create GUI applications using the wxWidgets framework. It includes a wide range of widgets and is cross-platform, meaning it can run on multiple operating systems.
- PyGTK: PyGTK is a library that allows you to create GUI applications using the GTK+ framework. It is a cross-platform library with a wide range of widgets and features.
- Kivy: Kivy is a library that allows you to create GUI applications using a modern, responsive design. It is particularly well-suited for building mobile apps and games.
- PyForms: PyForms is a library that allows you to create GUI applications using a simple, declarative syntax. It is designed to be easy to use and has a small footprint.
In summary, there are several libraries available for creating GUI applications in Python, each with its own set of features and capabilities. Tkinter is a popular choice, but you may want to consider other options depending on your specific needs and requirements.
To understand Tkinter better, we will create a simple GUI.
Getting Started
1. Import tkinter package and all of its modules.
2. Create a root window. Give the root window a title(using title()) and dimension(using geometry()). All other widgets will be inside the root window.
3. Use mainloop() to call the endless loop of the window. If you forget to call this nothing will appear to the user. The window will wait for any user interaction till we close it.
Example:
Python3
from tkinter import *
root = Tk()
root.title("Welcome to GeekForGeeks")
root.geometry('350x200')
root.mainloop()
Output:
Root Window
4. We’ll add a label using the Label Class and change its text configuration as desired. The grid() function is a geometry manager which keeps the label in the desired location inside the window. If no parameters are mentioned by default it will place it in the empty cell; that is 0,0 as that is the first location.
Example:
Python3
from tkinter import *
root = Tk()
root.title("Welcome to GeekForGeeks")
root.geometry('350x200')
lbl = Label(root, text = "Are you a Geek?")
lbl.grid()
root.mainloop()
Output:
Label inside root window
5. Now add a button to the root window. Changing the button configurations gives us a lot of options. In this example we will make the button display a text once it is clicked and also change the color of the text inside the button.
Example:
Python3
from tkinter import *
root = Tk()
root.title("Welcome to GeekForGeeks")
root.geometry('350x200')
lbl = Label(root, text = "Are you a Geek?")
lbl.grid()
def clicked():
lbl.configure(text = "I just got clicked")
btn = Button(root, text = "Click me" ,
fg = "red", command=clicked)
btn.grid(column=1, row=0)
root.mainloop()
Output:
Button added
After clicking “Click me”
6. Using the Entry() class we will create a text box for user input. To display the user input text, we’ll make changes to the function clicked(). We can get the user entered text using the get() function. When the Button after entering of the text, a default text concatenated with the user text. Also change button grid location to column 2 as Entry() will be column 1.
Example:
Python3
from tkinter import *
root = Tk()
root.title("Welcome to GeekForGeeks")
root.geometry('350x200')
lbl = Label(root, text = "Are you a Geek?")
lbl.grid()
txt = Entry(root, width=10)
txt.grid(column =1, row =0)
def clicked():
res = "You wrote" + txt.get()
lbl.configure(text = res)
btn = Button(root, text = "Click me" ,
fg = "red", command=clicked)
btn.grid(column=2, row=0)
root.mainloop()
Output:
Entry Widget at column 2 row 0
Displaying user input text.
7. To add a menu bar, you can use Menu class. First, we create a menu, then we add our first label, and finally, we assign the menu to our window. We can add menu items under any menu by using add_cascade().
Example:
Python3
from tkinter import *
root = Tk()
root.title("Welcome to GeekForGeeks")
root.geometry('350x200')
menu = Menu(root)
item = Menu(menu)
item.add_command(label='New')
menu.add_cascade(label='File', menu=item)
root.config(menu=menu)
lbl = Label(root, text = "Are you a Geek?")
lbl.grid()
txt = Entry(root, width=10)
txt.grid(column =1, row =0)
def clicked():
res = "You wrote" + txt.get()
lbl.configure(text = res)
btn = Button(root, text = "Click me" ,
fg = "red", command=clicked)
btn.grid(column=2, row=0)
root.mainloop()
Output :
Menu bar
This simple GUI covers the basics of Tkinter package. Similarly, you can add more widgets and change their configurations as desired.
Widgets
Tkinter provides various controls, such as buttons, labels and text boxes used in a GUI application. These controls are commonly called Widgets. The list of commonly used Widgets are mentioned below –
| S No. | Widget | Description |
| 1 | Label | The Label widget is used to provide a single-line caption for other widgets. It can also contain images. |
| 2 | Button | The Button widget is used to display buttons in your application. |
| 3 | Entry | The Entry widget is used to display a single-line text field for accepting values from a user. |
| 4 | Menu | The Menu widget is used to provide various commands to a user. These commands are contained inside Menubutton. |
| 5 | Canvas | The Canvas widget is used to draw shapes, such as lines, ovals, polygons and rectangles, in your application. |
| 6 | Checkbutton | The Checkbutton widget is used to display a number of options as checkboxes. The user can select multiple options at a time. |
| 7 | Frame | The Frame widget is used as a container widget to organize other widgets. |
| 8 | Listbox | The Listbox widget is used to provide a list of options to a user. |
| 9 | Menubutton | The Menubutton widget is used to display menus in your application. |
| 10 | Message | The Message widget is used to display multiline text fields for accepting values from a user. |
| 11 | Radiobutton | The Radiobutton widget is used to display a number of options as radio buttons. The user can select only one option at a time. |
| 12 | Scale | The Scale widget is used to provide a slider widget. |
| 13 | Scrollbar | The Scrollbar widget is used to add scrolling capability to various widgets, such as list boxes. |
| 14 | Text | The Text widget is used to display text in multiple lines. |
| 15 | Toplevel | The Toplevel widget is used to provide a separate window container. |
| 16 | LabelFrame | A labelframe is a simple container widget. Its primary purpose is to act as a spacer or container for complex window layouts. |
| 17 | tkMessageBox | This module is used to display message boxes in your applications. |
| 18 | Spinbox | The Spinbox widget is a variant of the standard Tkinter Entry widget, which can be used to select from a fixed number of values. |
| 19 | PanedWindow | A PanedWindow is a container widget that may contain any number of panes, arranged horizontally or vertically. |
Geometry Management
All Tkinter widgets have access to specific geometry management methods, which have the purpose of organizing widgets throughout the parent widget area. Tkinter exposes the following geometry manager classes: pack, grid, and place. Their description is mentioned below –
| S No. | Widget | Description |
| 1 | pack() | This geometry manager organizes widgets in blocks before placing them in the parent widget. |
| 2 | grid() | This geometry manager organizes widgets in a table-like structure in the parent widget. |
| 3 | place() | This geometry manager organizes widgets by placing them in a specific position in the parent widget. |
Наверное самый лучший способ работы с предлагаемым материалом — изучать код, запускать его на компьютере и затем снова анализировать код. В комментариях разъясняется каждый новый фрагмент кода по мере его расширения. Полный работающий модуль находится в корневой директории. Для просмотра кода перейдите по ссылке, указанных ниже, в данном руководстве.
Создание окна
Первый модуль Python window_01.py создает пустое окно 200×150 с названием «myWindow», расположенное в центре экрана.
С этой строки начинается всякий исполняемый модуль Python [в Linux]. Символ # используется в Python для комментариев, так что интерпретатор строчку проигнорирует. Но в bash, базовом языке сценариев Linux, это не комментарий, и данная строка будет прочитана. В ней содержатся путь к интерпретатору python и указание исполнить код, записанный на Python. Такие инструкции называют «the pound bang» [«Pound» — «фунт» — так часто называют знак «#». «Bang» — сленговое название восклицательного знака «!»], и их ставят в каждой программе на первой строке. Можно забыть, для чего они нужны, но нельзя забывать вставлять их в код.
#импортирование модулей python
from tkinter import *
Данная строка загружает в Python весь модуль Tkinter целиком. В результате у Python появляется библиотека для построения оконного интерфейса.
#создание окна
root = Tk()
root.title('myWindow')
root.geometry('200x150+300+225')
Tk() — это функция Tkinter, открывающая главное окно любого приложения. Здесь мы создаем экземпляр с именем root. Это общая черта всех классов Tkinter — они должны быть присвоены какой-либо переменной. В следующих двух командах задаются некоторые свойства root, определяющие заголовок и размеры окна. Это другой общий факт — взаимодействие с объектами Tkinter происходит через задание свойств [и вызов методов]. ‘200×150+300+225’ означает [ширина x высота + координата_x_верхнего_левого_угла + координата_y_верхнего_левого_угла].
#запуск окна
root.mainloop()
Наконец, в этой строке происходит вызов метода Tk() под названием mainloop(), который держит окно раскрытым, пока оно не будет закрыто нажатием кнопки [x] на окне или вызовом метода Tk() destroy().
Экземпляры классов — это объекты, обладающие свойствами и методами. Объектно-ориентированные читатели уже знают об этом.
Довольно просто, не так ли? Понадобилось всего шесть строчек кода. Запустите Python; загрузите модуль Tkinter; присвойте какой-либо переменной значение Tk(); затем настройте три метода Tk() для этой переменной. Итак, запускаем window_01.py. Voila! Вы создали окно — фундаментальный элемент любого графического интерфейса пользователя Tkinter…
Создание «дочернего» окна
Следующий модуль Python — window_02.py помещает на экран еще одно пустое «дочернее» окно 200×150. В большинстве графических интерфейсов для организации диалога используют всплывающие окна. «Дочернее» окно исчезает при закрытии основного окна.
# создание дочернего окна
child = Toplevel(root)
child.title('child')
child.geometry('200x150+400+300')
Toplevel() — это класс Tkinter, с помощью которого можно создавать любое окно кроме главного. Он также присваивается переменной child. Toplevel(root) означает дочернее окно child, относящееся и зависящее от родительского окна root. Следующие две команды формируют заголовок и размеры дочернего окна аналогично случаю родительского окна. Коду дочернего окна не нужен свой метод mainloop(). Он запускается из родительского окна.
Снова довольно просто. Потребовалось лишь три дополнительные строчки кода. Присвойте Toplevel() новой переменной; свяжите его с корневым окном root с помощью Toplevel(root); затем задайте значения пары свойств Toplevel(root). Наконец, запустите window_02.py.
Мы движемся быстро. Мы умеем создавать родительское окно и любое число дочерних окон. Закрытие родительского окна вызывает закрытие и окна дочернего, но не наоборот.
Уже похоже на интерфейс…
Работа с классами
Python — это объектно-ориентированный язык программирования. Tk() и Toplevel() являются классами Tkinter, принимающими форму объектов для создания на экране графических окон. Программирование на Tkinter подразумевает комбинирование и преобразование встроенных классов Tkinter в новые классы с индивидуальными свойствами и методами.
Следующей задачей данного руководства будет воспроизведение визуального эффекта, достигнутого в последнем примере window_02.py, объектно-ориентированными средствами, заложенными в Python, т.е. путем создания классов. Приведенный выше код объявляет и определяет класс. Объект — это экземпляр класса. В данном случае мы собираемся создать простые классы родительских и дочерних окон. Позже мы будем формировать классы с их собственными (добавленными) свойствами и методами.
Модуль, который рассматривается в этой части руководства, находится по ссылке window_03.py.
# класс родительских окон
class main:
  def __init__(self):
    self.master = root
    self.master.title('parent')
    self.master.geometry('200x150+200+150')
    child()
    self.master.mainloop()
Вот обобщенная форма для создания классов. Замечание: отступы обязательны!
  class {имя-класса}:
    def __init__(self):
      self.{переменная-класса} = ...
Здесь указывается, что будет создан класс с именем имя-класса со следующими определениями [def]. Команду __init__(self) проще показать в действии, чем объяснить. __init__() — это конструктор объектов, позволяющий создавать экземпляр объекта во время исполнения программы. self — это метка экземпляра, необходимая для привязки переменных класса к данному объекту. Таким образом инструкция self.master = root создает переменную master и присваивает ей глобальное значение root [пока еще не определенное]. В оставшейся части кода вы увидите, как теперь определяется то же самое окно внутри класса main. Итак, что же такое child()?
# класс дочерних окон
class child:
  def __init__(self):
    self.slave = Toplevel(root)
    self.slave.title('child')
    self.slave.geometry('200x150+400+300')
child() — это вызов другого класса, определенного в модуле. Так класс main генерирует экземпляр дочернего окна.
# создание окна
root = Tk()

# запуск окна
main()
При запуске модуля на выполнение происходит вызов Python, загрузка Tkinter и сохранение определений классов main и child. Команды, приведенные выше, сначала задают значение переменной root, чтобы создать экземпляр Tk(), затем открывают окно, активируя main [который, в свою очередь, активирует child]. Обратите внимание, что mainloop() расположен «внутри» класса main. Запустите window_03.py. Он должен сделать то же самое, что и предыдущий пример.
Если этот пример — ваша первая встреча с классами, объектами и т.п., в голову вполне может прийти мысль: «К чему такие сложности?» Но стоит нам перейти к более сложным примерам, как тотчас станет очевидно, что инкапсуляция кода внутрь классов — это отличный способ писать лаконичные, пригодные для многократного использования программы на Python. Потерпите немного. Некоторые из нас помнят, как учились составлять «макаронные» программы [‘spaghetti’ coding — слабо структурированные программы с большим размером процедур и интенсивным использованием оператора goto; трудны для изучения и модификаций], а потом изучали «структурное» программирование. Так что «объектно-ориентированное» программирование — это еще одна новинка…
Классы и элементы управления
Запустите следующий модуль, что б ознакомится с элементами управления window_04.py.
Оставим на время разработку дочернего окна, чтобы сосредоточить все внимание на классах. Рассмотрим, как передавать классу информацию, и добавим к классу элемент управления [в данном случае кнопку (Button)], [и объект и окно].
# класс главного окна
class main:
  def __init__(self, master):
    self.master = master
...
# создание окна
root = Tk()

# запуск окна
main(root)
В последнем примере window_03.py вас, возможно, удивило, что класс main содержит ссылку на переменную root, которая в программе еще не создана. Я сделал это специально, чтобы продемонстрировать, что классы ничего не делают, пока на их базе не будут созданы экземпляры объектов. Но есть лучший путь достичь того же самого. Объекту можно передать глобальную переменную root, и именно так сделано в нашем коде. Благодаря вызову main(root) параметр root передается переменной master класса main. В последующих примерах подобным же образом мы будем передавать классам множество различных параметров.
self.button = Button(self.master, text = 'myButton')
self.button.pack(side = BOTTOM)
Ну, наконец и элемент управления. В Tkinter имеется определенное число графических элементов управления, которые можно размещать в нашем окне. В данном случае это будет кнопка (Button). Мы уже пользовались двумя элементами управления — Tk() и Toplevel(). Код self.button = Button(self.master, text = ‘myButton’) связывает элемент управления Button() с классом main [все элементы управления кроме Tk() кому-нибудь «принадлежат»], а text = ‘myButton’ задает значение свойства text [текст, который отобразится на кнопке во время исполнения программы].
Строка self.button.pack(side = BOTTOM) определяет, в какой части окна появится наша кнопка. Позже мы рассмотрим pack подробнее.
Между прочим, эта кнопка пока ничего не делает. Итак, запускаем window_04.py и нажимаем бесполезную кнопку…
Методы
Добавляем методы window_05.py.
Любая кнопка должна что-нибудь делать. В данном случае мы свяжем событие «нажатие кнопки» с открытием дочернего окна из одного из прошлых примеров. Для этого в класс main вводится метод openDialog, который создает экземпляр объекта child.
 def openDialog(self):
   child(self.master)
Для определения метода openDialog не нужна функция __init__(). Не создается экземпляра метода, — но метод создает экземпляр объекта child. Метод — это то, что класс main делает, а не то, чем класс main является…
command = self.openDialog
Обращение к openDialog содержит вездесущее self. Это означает, что метод openDialog является внутренним по отношению к main.
# класс дочерних окон
class child:
 def __init__(self, master):
   self.slave = Toplevel(master)
Toplevel() из класса child узнает о том, что относится к дочернему классу класса main, довольно мучительным путем. Tk(), связанный с root, передается классу main через параметр master [в main], а затем пересылается другому параметру master [в child]. Всякий класс имеет свою переменную master, локальную по отношению к данному классу. Их имена могут быть различными.
Ага! Метод. Запускаем window_05.py и испытываем работающую кнопку…
Модальное дочернее окно
Разбираем код window_06.py.
В некоторых программах требуется для вывода информации создать дочернее окно, продолжая в тоже время использовать главное. При этом часто бывает нужно, чтобы все процессы, происходящие в дочернем окне, завершились до того, как вы продолжите работу. Такое окно называют модальным. Это значит, что оно будет удерживать фокус пока не будет закрыто. В Python дочернее окно можно превратить в модальное с помощью трех методов Toplevel():
child перехватывает все события, происходящие в приложении.
child захватывает фокус.
child ждет, когда будет уничтожен текущий объект, не возобновляя работы [но и не оказывая влияния на основной цикл].
Итак, рецепт. Если нужно создать модальное окно, воспользуйтесь этими тремя методами. Как говорится, «Просто сделай это!» window_06.py
Отсылка сообщения от родительского элемента к дочернему
Следующий модуль window_07.py.
Модальные дочерние окна используются, главным образом, в роли диалоговых окон. Нам нужен способ передачи информации от родительского окна к дочернему и наоборот. Сперва пойдем от main к child. В данный пример внесено три добавления по сравнению с предыдущими:
Поле для ввода текста в классе main.
Текстовое окно в классе child для отображения введенной информации.
Механизм передачи информации от текстового окна в main текстовому окну в child.
self.text = Text(self.master, background = 'white')
self.text.pack(side = TOP, fill = BOTH, expand = YES)
Стоит создать один элемент управления, как все остальное становится ясно. Единственно стоит отметить, что элемент управления text имеет свойство background (фон) со значением ‘white’ (белый) и что пришло время поговорить о pack. Метод pack() размещает в окне элемент управления. Итак:
side (сторона) определяет, какой стороны окна будет «держаться» элемент управления
варианты: TOP (сверху) RIGHT (справа) LEFT (слева) BOTTOM (снизу)
по умолчанию: NONE (никак)
fill (заполнение) показывает, заполнит элемент доступное пространство или нет.
варианты: X Y BOTH (X Y оба)
по умолчанию: NONE (никак)
expand (растяжение) указывает, будет ли элемент управления менять свой размер при изменении размеров окна.
варианты: YES (да)
по умолчанию: 0
def openDialog(self):
  child(self.master, self.text.get('0.0', END))
В метод openDialog() мы ввели инструкцию self.text.get(‘0.0’, END), которая является методом элемента управления Text. Она собирает все содержимое текстового окна от строки 0 символа 0 и до конца, чтобы передать его классу/окну child [как myText].
# класс дочерних окон
class child:
  def __init__(self, master, myText = ''):
    ...
    self.text = Text(self.slave,
                     background = 'white')
    self.text.pack(side = TOP,
                   fill = BOTH,
                   expand = YES)
    self.text.insert('0.0', myText)
Как работает текстовый элемент управления child интуитивно ясно. Он заполняется текстом из главного окна посредством def __init__(self, master, myText = »). Информация из myText вставляется в элемент управления text с помощью метода self.text.insert(‘0.0’, myText), который помещает ее, начиная со строки 0 символа 0. Испытайте window_07.py, напечатав в нем какой-нибудь текст и отослав его…
Общение — хорошая штука, но оно должно быть улицей с двухсторонним движением…
Отсылка сообщений в обоих направлениях
Сначала посмотрите на код window_08.py.
Мы хотим, чтобы информация шла от родительского окна к дочернему И от дочернего к родительскому. Последнего можно добиться, добавив к дочернему окну кнопку accept и метод для регистрации всех изменений, произведенных в передаваемом тексте; также введем метод go как для создания экземпляра дочернего окна, так и для управления процессом обмена информацией. Такое применение методов [go] для открытия дочерних окон — полезный инстру.
мент, который приобретет особую важность, когда мы будем иметь дело с более сложными операциями в последующих руководствах. Сейчас же он создает пустую переменную newValue, в которую будет записан измененный текст [если он был изменен].
# класс дочернего окна
class child:
  def __init__(self, master):
    ...
    self.button = Button(self.slave,
                         text = 'accept',
                         command = self.accept)
    self.button.pack(side = BOTTOM)
    ...

  def go(self, myText = ''):
    self.text.insert('0.0', myText)
    self.newValue = None
    self.slave.grab_set()
    self.slave.focus_set()
    self.slave.wait_window()
    return self.newValue

  def accept(self):
    self.newValue = self.text.get('0.0', END)
    self.slave.destroy()
При вызове дочернего метода go введенный текст вставляется в дочернее текстовое окно. Если текст редактировался и пользователь нажимает кнопку accept, исправленный текст возвращается как newValue. Если дочернее окно просто закрывается, newValue возвращается с пустым значением.
  def openDialog(self):
    self.dialog = child(self.master)
    self.sendValue = self.text.get('0.0', END)
    self.returnValue = self.dialog.go(self.sendValue)
    if self.returnValue:
      self.text.delete('0.0', END)
      self.text.insert('0.0', self.returnValue)
При возврате метод openDialog класса main осуществляет проверку. Если возвращаемая строка не пустая, возвращаемый текст будет вставлен в текстовое окно main.
Запускаем window_08.py. Убедитесь, что вы «уловили», как работает go. Нам придется еще довольно много иметь дело с этим методом…
Усложнение диалогов
Усложняем наш код window_09.py.
Мы приближаемся к концу начала. Рассмотрим еще несколько приемов, которые будут использоваться позднее в «реальном» приложении: кнопки принятия (accept) и отмены (cancel), а также «перехват» закрытия основного окна с соответствующим диалогом.
class child:
  def __init__(self, master):
    ...
    self.frame = Frame(self.slave)
    self.frame.pack(side = BOTTOM)
    self.accept_button = Button(self.frame,
                                text = 'accept',
                                command = self.accept)
    self.accept_button.pack(side = LEFT)
    self.cancel_button = Button(self.frame,
                                text = 'cancel',
                                command = self.cancel)
    self.cancel_button.pack(side = RIGHT)
    ...

  def accept(self):
    self.newValue = self.text.get('0.0', END)
    self.slave.destroy()

  def cancel(self):
    self.slave.destroy()
Пока все просто. Размещение в дочерних диалоговых окнах кнопки отмены (cancel) — довольно стандартный прием. При этом происходит уничтожение дочернего окна без изменения newValue.
# класс главного окна
class main:
  def __init__(self, master):
    ...
    self.master.protocol('WM_DELETE_WINDOW', self.exitMethod)
    ...

  def exitMethod(self):
    self.dialog = yesno(self.master)
    self.returnValue = self.dialog.go('question', 'Do you want to exit?')
    if self.returnValue:
      self.master.destroy()

    ...

# класс диалогового окна выхода
class yesno:
  def __init__(self, master):
    self.slave = Toplevel(master)
    self.slave.title('exit dialog')
    self.slave.geometry('200x100+300+250')
    self.frame = Frame(self.slave)
    self.frame.pack(side = BOTTOM)
    self.yes_button = Button(self.frame,
                             text = 'yes',
                             command = self.yes)
    self.yes_button.pack(side = LEFT)
    self.no_button = Button(self.frame,
                            text = 'no',
                            command = self.no)
    self.no_button.pack(side = RIGHT)
    self.label = Label(self.slave)
    self.label.pack(side = TOP, fill = BOTH, expand = YES)
    self.slave.protocol('WM_DELETE_WINDOW', self.no)

  def go(self, title = '', message = ''):
    self.slave.title(title)
    self.label.configure(text = message)
    self.booleanValue = TRUE
    self.slave.grab_set()
    self.slave.focus_set()
    self.slave.wait_window()
    return self.booleanValue

  def yes(self):
    self.booleanValue = TRUE
    self.slave.destroy()

  def no(self):
    self.booleanValue = FALSE
    self.slave.destroy()
«Перехват» закрытия пользователем главного окна немного сложнее. Для чего это может потребоваться? Допустим, в случае текстового редактора нам бы хотелось фиксировать ситуации, когда не был сохранен измененный файл, чтобы предохранить пользователя от нечаянного уничтожения плодов всех его усилий из-за преждевременного закрытия окна.
Секрет спрятался в строке self.master.protocol(‘WM_DELETE_WINDOW’, self.exitMethod). WM_DELETE_WINDOW — это часть оконного протокола, которая обычно бывает связана с self.destroy(). Но в данной строке вместо этого она связывается с одним из разработанных нами методов. Итак, взгляните на def exitMethod(self): здесь вызывается message и выход происходит, только если message (сообщение) равно TRUE (ИСТИНА). message управляется целым новым классом yesno, обладающим своим собственным методом go [Я предупреждал, что go еще пригодится.].
Запустите window_09.py, чтобы увидеть нашу программу в действии.
Святой Грааль
Наша программа растет. У нас получается. И что еще более важно, ее части возможно использовать повторно. Класс yesno может быть применен еще раз в этом же приложении или даже в будущих приложениях. Итак, в коде, приводимом ниже, мы разбиваем программу на три отдельных модуля, которые будут храниться в трех отдельных автономных файлах.
Основной файл myWindow.py использует классы dialog и yesno так же, как и раньше, но, вместо того чтобы включить их в код, они импортируются из других файлов — myDialog.py и myBoolean.py.
Просмотрите завершающие части файлов myDialog.py и myBoolean.py. Там есть тестовая команда. Включать подобную команду в конец любого файла, который не выполняется напрямую, — стандартное правило. С помощью оператора if __name__ == ‘__main__’: она проверяет, запущен файл из другой программы или сам по себе. В последнем случае открывается пустое окно, которое затем убирается с экрана командой root.withdraw(). Но именно к этому фиктивному окну привязывается рабочий код, позволяющий запускать данный файл. Это очень полезный инструмент для отладки. Использование тестов приводит к тому, что все модули становятся «исполняемыми».
Итак, запустим все три файла — myWindow.py, myDialog.py, myBoolean.py — и посмотрим, что произойдет.
Мини-руководство по Tkinter
Программа, которую мы составили, не сильно впечатляет — что-то вроде импровизации на тему «Hello World!». Предыдущая страница была названа «святым граалем» по двум причинам. Прежде всего, Python никак не связан со змеей. Это название взято из известного сериала Monty Python and the Quest for the Holy Grail. Кроме того, в легенде о Граале рассказывается о том, как нечто искали повсюду, и, когда, наконец, оно было найдено, оказалось, что ищущий обладал им с самого начала.
Это учебное руководство было написано пять или шесть лет тому назад. Тогда оно не было опубликовано, поскольку я посчитал его слишком примитивным. Позднее это руководство выручило меня самого, облегчив вспоминание Tkinter. Сейчас я сознаю, что оно уже содержало все необходимые идеи, чтобы начать использовать Tkinter для интересующих меня задач. Если вы похожи на меня, то будете применять Python для написания различных утилит, которые часто бывают полезны в повседневной жизни. Это превосходный язык для таких целей [а Tkinter — почти совершенный GUI]. Но для создания коммерческих мегапрограмм, чтобы заработать много денег, ни Python, ни Tkinter не годятся. [Как, впрочем, и само программирование в целом. Лучше идите учиться на менеджера!].
Перечислим элементы управления, с которыми мы уже успели познакомиться, вместе с их свойствами и методами, использованными в примерах. Общий стиль Tkinter — это размещение свойств внутри круглых скобок:
Имя_класса(свойство1 = значение1, свойство2 = значение2)
и использование методов в роли особых «точечных» команд:
Имя_класса.метод(параметры)
| Класс | Свойства | Методы |
|---|---|---|
| Tk() | ||
| Toplevel() | parent | title(string); geometry(string); mainloop(); destroy() |
| Button() | parent; text = string; command = method | pack(side) |
| Text() | parent | pack(side, fill, expand); insert(index, string); get(index1, index2); delete(index1, index2) |
| Label() | parent | configure(text = string); pack(side, fill, expand) |
| Frame() | parent | pack(side, fill) |
Мы уже извлекли из этой демонстрационной программы всю пользу, какую только можно было. Настало время заняться созданием «настоящей программы» [более крупного «Hello World!] — на этот раз — текстового редактора. В ходе работы мы повстречаемся с новыми элементами управления: линейками прокрутки, линейками меню и кнопками меню, выпадающими списками, кнопками-флажками и т.п. Приятный сюрприз: за исключением пары ухищрений вы уже умеете пользоваться ими. Цель нового проекта — разработка работающего текстового редактора [если хотите его испытать, запустите editor.py]. Это учебное руководство посвящено только Tkinter, а не всему Python. Таким образом, хотя в предлагаемом вашему вниманию коде будут программные функции, реализованные на Python, обсуждение будет сфокусировано преимущественно на интерфейсе Tkinter. И снова вы будете удивлены. Даже если вы никогда раньше не работали с Python, подавляющая часть кода будет понятной.
Итак, пришло время переходить к следующей части руководства.
Введение в Tkinter. Первая программа
Последнее обновление: 10.09.2022
Многие программы на сегодняшний день используют графический интерфейс, который более интуитивен и удобен для пользователя, чем консоль.
И с помощью языка программирования Python также можно создавать графические программы. Для этого в Python по умолчанию применяется специальный тулкит — набор компонентов,
который называется tkinter. Тулкит tkinter доступен в виде отдельного встроенного модуля, который содержит все необходимые графические компоненты — кнопки, текстовые поля и т.д.
По сути Tkinter представляет интерфейс в Python для графической библиотеки Tk (Собственно само название
«Tkinter» является сокращением «Tk interface»). Первоначально данная библиотека разрабатывалась для языка Tcl — ее создал в 1988 году Джон Остерхаут (John Ousterhout),
профессор computer science из Беркли для создания графических приложений для своего языка Tcl. Но впоследствии Tk была адаптирована для широкого ряда динамических языков,
в частности, для Ruby, Perl и естественно для языка Python (в 1994 году). И на сегодняшний день и библиотека Tk, и сам тулкит tkinter доступны для большинства операционных систем,
в том числе для Mac OS, Linux и Windows.
Преимущества Tkinter:
-
Данный тулкит по умолчанию включен в стандартную библиотеку языка Python в виде отдельного модуля, поэтому не потребуется что-то дополнительно устанавливать
-
Tkinter — кроссплатформенный, один и тот же код будет работать одинаково на разных платформах (Mac OS, Linux и Windows)
-
Tkinter легко изучать. Сам тулкит, хотя и содержит некоторый готовый код, виджеты и графические элементы, но при этом довольно лаконичен и прост.
-
Tk распространяется по BSD-лицензии, поэтому библиотека может быть использована как в опенсорсных проектах, так и в коммерческих наработках.
Если необходимо или интересно узнать версию библиотеки Tk, которая будет использоваться, в интерпертаторе Python можно выполнить следующую инструкцию:
tkinter.Tcl().eval("info patchlevel")
C:Userseugen>python
Python 3.10.1 (tags/v3.10.1:2cd268a, Dec  6 2021, 19:10:37) [MSC v.1929 64 bit (AMD64)] on win32
Type "help", "copyright", "credits" or "license" for more information.
>>> import tkinter
>>>
>>> tkinter.Tcl().eval("info patchlevel")
'8.6.12'
>>>
В некоторых ОС на базе Linux иногда при установке python не устанавливается пакет tkinter. В этом случае мы можем доустановить thinkter командой
sudo apt-get install python3-tk
Первая программа
Создадим первую программу с использованием Tkinter. Для этого определим следующий скрипт:
from tkinter import *

root = Tk()     # создаем корневой объект - окно
root.title("Приложение на Tkinter")     # устанавливаем заголовок окна
root.geometry("300x250")    # устанавливаем размеры окна

label = Label(text="Hello METANIT.COM") # создаем текстовую метку
label.pack()    # размещаем метку в окне

root.mainloop()
Для создания графического окна применяется конструктор Tk(), который определен в модуле tkinter. Создаваемое окно
присваивается переменной root, и через эту переменную мы можем управлять атрибутами окна. В частности, с помощью метода title()
можно установить заголовок окна.
С помощью метода geometry() — размер окна. Для установки размера в метод geometry()
передается строка в формате «Ширина x Высота». Если при создании окна приложения метод geometry() не вызывается, то окно занимает то пространство,
которое необходимо для размещения внутреннего содержимого.
Создав окно, мы можем разместить в нем другие графические элементы. Эти элементы еще называются виджетами. В данном случае мы размещаем в окне текстовую метку. Для
это создаем объект класса Label, которые хранит некоторый текст. Затем для размещения элемента label в окне вызываем у него метод pack()
Для отображения окна надо вызвать у него метод mainloop(), который запускает цикл обработки событий окна для
взаимодействия с пользователем.
В результате при запуске скрипта мы увидим такое пустое окошко:
На скриншоте выше определено окно, создаваемое в ОС Windows, на каждой конкретной системе отдельные визуальные моменты, отрисовка графических компонентов может несколько отличаться.
Python has a lot of GUI frameworks, but Tkinter is the only framework that’s built into the Python standard library. Tkinter has several strengths. It’s cross-platform, so the same code works on Windows, macOS, and Linux. Visual elements are rendered using native operating system elements, so applications built with Tkinter look like they belong on the platform where they’re run.
Although Tkinter is considered the de facto Python GUI framework, it’s not without criticism. One notable criticism is that GUIs built with Tkinter look outdated. If you want a shiny, modern interface, then Tkinter may not be what you’re looking for.
However, Tkinter is lightweight and relatively painless to use compared to other frameworks. This makes it a compelling choice for building GUI applications in Python, especially for applications where a modern sheen is unnecessary, and the top priority is to quickly build something that’s functional and cross-platform.
In this tutorial, you’ll learn how to:
- Get started with Tkinter with a Hello, World application
- Work with widgets, such as buttons and text boxes
- Control your application layout with geometry managers
- Make your applications interactive by associating button clicks with Python functions
Once you’ve mastered these skills by working through the exercises at the end of each section, you’ll tie everything together by building two applications. The first is a temperature converter, and the second is a text editor. It’s time to dive right in and learn how to build an application with Tkinter!
Building Your First Python GUI Application With Tkinter
The foundational element of a Tkinter GUI is the window. Windows are the containers in which all other GUI elements live. These other GUI elements, such as text boxes, labels, and buttons, are known as widgets. Widgets are contained inside of windows.
First, create a window that contains a single widget. Start up a new Python shell session and follow along!
With your Python shell open, the first thing you need to do is import the Python GUI Tkinter module:
>>>
>>> import tkinter as tk
A window is an instance of Tkinter’s Tk class. Go ahead and create a new window and assign it to the variable window:
When you execute the above code, a new window pops up on your screen. How it looks depends on your operating system:
Throughout the rest of this tutorial, you’ll see Windows screenshots.
Adding a Widget
Now that you have a window, you can add a widget. Use the tk.Label class to add some text to a window. Create a Label widget with the text "Hello, Tkinter" and assign it to a variable called greeting:
>>>
>>> greeting = tk.Label(text="Hello, Tkinter")
The window you created earlier doesn’t change. You just created a Label widget, but you haven’t added it to the window yet. There are several ways to add widgets to a window. Right now, you can use the Label widget’s .pack() method:
The window now looks like this:
When you pack a widget into a window, Tkinter sizes the window as small as it can be while still fully encompassing the widget. Now execute the following:
Nothing seems to happen, but notice that no new prompt appears in the shell.
window.mainloop() tells Python to run the Tkinter event loop. This method listens for events, such as button clicks or keypresses, and blocks any code that comes after it from running until you close the window where you called the method. Go ahead and close the window you’ve created, and you’ll see a new prompt displayed in the shell.
Creating a window with Tkinter only takes a couple of lines of code. But blank windows aren’t very useful! In the next section, you’ll learn about some of the widgets available in Tkinter, and how you can customize them to meet your application’s needs.
Check Your Understanding
Expand the code blocks below to check your understanding:
Write a full Python script that creates a Tkinter window with the text "Python rocks!".
The window should look like this:
Try this exercise now.
You can expand the code block below to see a solution:
Here’s one possible solution:
import tkinter as tk

window = tk.Tk()
label = tk.Label(text="Python rocks!")
label.pack()

window.mainloop()
Keep in mind your code may look different.
When you’re ready, you can move on to the next section.
Working With Widgets
Widgets are the bread and butter of the Python GUI framework Tkinter. They’re the elements through which users interact with your program. Each widget in Tkinter is defined by a class. Here are some of the widgets available:
| Widget Class | Description |
|---|---|
Label |
A widget used to display text on the screen |
Button |
A button that can contain text and can perform an action when clicked |
Entry |
A text entry widget that allows only a single line of text |
Text |
A text entry widget that allows multiline text entry |
Frame |
A rectangular region used to group related widgets or provide padding between widgets |
You’ll see how to work with each of these in the following sections, but keep in mind that Tkinter has many more widgets than those listed here. The widget’s choice gets even more complicated when you account for a whole new set of themed widgets. In the remaining part of this tutorial, you’re only going to use Tkinter’s classic widgets, though.
If you’d like to learn more about the two widget types, then you can expand the collapsible section below:
It’s worth noting that there are currently two broad categories of widgets in Tkinter:
- Classic widgets: Available in the
tkinterpackage, for exampletkinter.Label - Themed widgets: Available in the
ttksubmodule, for exampletkinter.ttk.Label
Tkinter’s classic widgets are highly customizable and straightforward, but they tend to appear dated or somewhat foreign on most platforms today. If you’d like to take advantage of widgets with a native look and feel familiar to users of a given operating system, then you might want to check out the themed widgets.
Most of the themed widgets are near drop-in replacements for their legacy counterparts, but with a more modern look. You can also use a few brand-new widgets, such as the progress bar, which weren’t available in Tkinter before. At the same time, you’ll need to continue using some of the classic widgets that don’t have a themed alternative.
When working with regular and themed widgets in Tkinter, it’s customary to declare the following aliases for the Tkinter packages and modules:
>>>
>>> import tkinter as tk
>>> import tkinter.ttk as ttk
Aliases like this let you explicitly refer to either tk.Label or ttk.Label, for example, in one program depending on your needs:
>>>
>>> tk.Label()
<tkinter.Label object .!label>

>>> ttk.Label()
<tkinter.ttk.Label object .!label2>
However, you may sometimes find it more convenient to use a wildcard import (*) to automatically override all legacy widgets with the themed ones where possible, like so:
>>>
>>> from tkinter import *
>>> from tkinter.ttk import *

>>> Label()
<tkinter.ttk.Label object .!label>

>>> Text()
<tkinter.Text object .!text>
Now, you don’t have to prefix the widget’s class name with its corresponding Python module. You’ll always create a themed widget as long as it’s available, or you’ll fall back to the classic widget otherwise. The two import statements above must be placed in the specified order to have an effect. Because of that, wildcard imports are considered a bad practice, which should generally be avoided unless used consciously.
For a full list of Tkinter widgets, check out Basic Widgets and More Widgets in the TkDocs tutorial. Even though it describes themed widgets introduced in Tcl/Tk 8.5, most of the information there should also apply to the classic widgets.
For now, take a closer look at the Label widget.
Displaying Text and Images With Label Widgets
Label widgets are used to display text or images. The text displayed by a Label widget can’t be edited by the user. It’s for display purposes only. As you saw in the example at the beginning of this tutorial, you can create a Label widget by instantiating the Label class and passing a string to the text parameter:
label = tk.Label(text="Hello, Tkinter")
Label widgets display text with the default system text color and the default system text background color. These are typically black and white, respectively, but you may see different colors if you’ve changed these settings in your operating system.
You can control Label text and background colors using the foreground and background parameters:
label = tk.Label(
    text="Hello, Tkinter",
    foreground="white",  # Set the text color to white
    background="black"  # Set the background color to black
)
There are numerous valid color names, including:
"red""orange""yellow""green""blue""purple"
Many of the HTML color names work with Tkinter. For a full reference, including macOS- and Windows-specific system colors that the current system theme controls, check out the colors manual page.
You can also specify a color using hexadecimal RGB values:
label = tk.Label(text="Hello, Tkinter", background="#34A2FE")
This sets the label background to a nice, light blue color. Hexadecimal RGB values are more cryptic than named colors, but they’re also more flexible. Fortunately, there are tools available that make getting hexadecimal color codes relatively painless.
If you don’t feel like typing out foreground and background all the time, then you can use the shorthand fg and bg parameters to set the foreground and background colors:
label = tk.Label(text="Hello, Tkinter", fg="white", bg="black")
You can also control the width and height of a label with the width and height parameters:
label = tk.Label(
    text="Hello, Tkinter",
    fg="white",
    bg="black",
    width=10,
    height=10
)
Here’s what this label looks like in a window:
It may seem strange that the label in the window isn’t square even though the width and height are both set to 10. This is because the width and height are measured in text units. One horizontal text unit is determined by the width of the character 0, or the number zero, in the default system font. Similarly, one vertical text unit is determined by the height of the character 0.
Labels are great for displaying some text, but they don’t help you get input from a user. The next three widgets that you’ll learn about are all used to get user input.
Displaying Clickable Buttons With Button Widgets
Button widgets are used to display clickable buttons. You can configure them to call a function whenever they’re clicked. You’ll cover how to call functions from button clicks in the next section. For now, take a look at how to create and style a button.
There are many similarities between Button and Label widgets. In many ways, a button is just a label that you can click! The same keyword arguments that you use to create and style a Label will work with Button widgets. For example, the following code creates a button with a blue background and yellow text. It also sets the width and height to 25 and 5 text units, respectively:
button = tk.Button(
    text="Click me!",
    width=25,
    height=5,
    bg="blue",
    fg="yellow",
)
Here’s what the button looks like in a window:
Pretty nifty! You can use the next two widgets to collect text input from a user.
Getting User Input With Entry Widgets
When you need to get a little bit of text from a user, like a name or an email address, use an Entry widget. It’ll display a small text box that the user can type some text into. Creating and styling an Entry widget works pretty much exactly like with Label and Button widgets. For example, the following code creates a widget with a blue background, some yellow text, and a width of 50 text units:
entry = tk.Entry(fg="yellow", bg="blue", width=50)
The interesting bit about Entry widgets isn’t how to style them, though. It’s how to use them to get input from a user. There are three main operations that you can perform with Entry widgets:
- Retrieving text with
.get() - Deleting text with
.delete() - Inserting text with
.insert()
The best way to get an understanding of Entry widgets is to create one and interact with it. Open up a Python shell and follow along with the examples in this section. First, import tkinter and create a new window:
>>>
>>> import tkinter as tk
>>> window = tk.Tk()
Now create a Label and an Entry widget:
>>>
>>> label = tk.Label(text="Name")
>>> entry = tk.Entry()
The Label describes what sort of text should go in the Entry widget. It doesn’t enforce any sort of requirements on the Entry, but it tells the user what your program expects them to put there. You need to .pack() the widgets into the window so that they’re visible:
>>>
>>> label.pack()
>>> entry.pack()
Here’s what that looks like:
Notice that Tkinter automatically centers the label above the Entry widget in the window. This is a feature of .pack(), which you’ll learn more about in later sections.
Click inside the Entry widget with your mouse and type Real Python:
Now you’ve got some text entered into the Entry widget, but that text hasn’t been sent to your program yet. You can use .get() to retrieve the text and assign it to a variable called name:
>>>
>>> name = entry.get()
>>> name
'Real Python'
You can delete text as well. This .delete() method takes an integer argument that tells Python which character to remove. For example, the code block below shows how .delete(0) deletes the first character from Entry:
The text remaining in the widget is now eal Python:
Note that, just like Python string objects, text in an Entry widget is indexed starting with 0.
If you need to remove several characters from an Entry, then pass a second integer argument to .delete() indicating the index of the character where deletion should stop. For example, the following code deletes the first four letters in Entry:
>>>
>>> entry.delete(0, 4)
The remaining text now reads Python:
Entry.delete() works just like string slicing. The first argument determines the starting index, and the deletion continues up to but not including the index passed as the second argument. Use the special constant tk.END for the second argument of .delete() to remove all text in Entry:
>>>
>>> entry.delete(0, tk.END)
You’ll now see a blank text box:
On the opposite end of the spectrum, you can also insert text into an Entry widget:
>>>
>>> entry.insert(0, "Python")
The window now looks like this:
The first argument tells .insert() where to insert the text. If there’s no text in Entry, then the new text will always be inserted at the beginning of the widget, no matter what value you pass as the first argument. For example, calling .insert() with 100 as the first argument instead of 0, as you did above, would’ve generated the same output.
If Entry already contains some text, then .insert() will insert the new text at the specified position and shift all existing text to the right:
>>>
>>> entry.insert(0, "Real ")
The widget text now reads Real Python:
Entry widgets are great for capturing small amounts of text from a user, but because they’re only displayed on a single line, they’re not ideal for gathering large amounts of text. That’s where Text widgets come in!
Getting Multiline User Input With Text Widgets
Text widgets are used for entering text, just like Entry widgets. The difference is that Text widgets may contain multiple lines of text. With a Text widget, a user can input a whole paragraph or even several pages of text! Just like with Entry widgets, you can perform three main operations with Text widgets:
- Retrieve text with
.get() - Delete text with
.delete() - Insert text with
.insert()
Although the method names are the same as the Entry methods, they work a bit differently. It’s time to get your hands dirty by creating a Text widget and seeing what it can do.
In your Python shell, create a new blank window and pack a Text() widget into it:
>>>
>>> window = tk.Tk()
>>> text_box = tk.Text()
>>> text_box.pack()
Text boxes are much larger than Entry widgets by default. Here’s what the window created above looks like:
Click anywhere inside the window to activate the text box. Type in the word Hello. Then press Enter and type World on the second line. The window should now look like this:
Just like with Entry widgets, you can retrieve the text from a Text widget using .get(). However, calling .get() with no arguments doesn’t return the full text in the text box like it does for Entry widgets. It raises an exception:
>>>
>>> text_box.get()
Traceback (most recent call last):
  ...
TypeError: get() missing 1 required positional argument: 'index1'
Text.get() requires at least one argument. Calling .get() with a single index returns a single character. To retrieve several characters, you need to pass a start index and an end index. Indices in Text widgets work differently than in Entry widgets. Since Text widgets can have several lines of text, an index must contain two pieces of information:
- The line number of a character
- The position of a character on that line
Line numbers start with 1, and character positions start with 0. To make an index, you create a string of the form "<line>.<char>", replacing <line> with the line number and <char> with the character number. For example, "1.0" represents the first character on the first line, and "2.3" represents the fourth character on the second line.
Use the index "1.0" to get the first letter from the text box that you created earlier:
>>>
>>> text_box.get("1.0")
'H'
There are five letters in the word Hello, and the character number of o is 4, since character numbers start from 0, and the word Hello starts at the first position in the text box. Just like with Python string slices, in order to get the entire word Hello from the text box, the end index must be one more than the index of the last character to be read.
So, to get the word Hello from the text box, use "1.0" for the first index and "1.5" for the second index:
>>>
>>> text_box.get("1.0", "1.5")
'Hello'
To get the word World on the second line of the text box, change the line numbers in each index to 2:
>>>
>>> text_box.get("2.0", "2.5")
'World'
To get all of the text in a text box, set the starting index in "1.0" and use the special tk.END constant for the second index:
>>>
>>> text_box.get("1.0", tk.END)
'HellonWorldn'
Notice that text returned by .get() includes any newline characters. You can also see from this example that every line in a Text widget has a newline character at the end, including the last line of text in the text box.
.delete() is used to delete characters from a text box. It works just like .delete() for Entry widgets. There are two ways to use .delete():
- With a single argument
- With two arguments
Using the single-argument version, you pass to .delete() the index of a single character to be deleted. For example, the following deletes the first character, H, from the text box:
>>>
>>> text_box.delete("1.0")
The first line of text in the window now reads ello:
With the two-argument version, you pass two indices to delete a range of characters starting at the first index and up to, but not including, the second index.
For example, to delete the remaining ello on the first line of the text box, use the indices "1.0" and "1.4":
>>>
>>> text_box.delete("1.0", "1.4")
Notice that the text is gone from the first line. This leaves a blank line followed the word World on the second line:
Even though you can’t see it, there’s still a character on the first line. It’s a newline character! You can verify this using .get():
>>>
>>> text_box.get("1.0")
'n'
If you delete that character, then the rest of the contents of the text box will shift up a line:
>>>
>>> text_box.delete("1.0")
Now, World is on the first line of the text box:
Try to clear out the rest of the text in the text box. Set "1.0" as the start index and use tk.END for the second index:
>>>
>>> text_box.delete("1.0", tk.END)
The text box is now empty:
You can insert text into a text box using .insert():
>>>
>>> text_box.insert("1.0", "Hello")
This inserts the word Hello at the beginning of the text box, using the same "<line>.<column>" format used by .get() to specify the insertion position:
Check out what happens if you try to insert the word World on the second line:
>>>
>>> text_box.insert("2.0", "World")
Instead of inserting the text on the second line, the text is inserted at the end of the first line:
If you want to insert text onto a new line, then you need to insert a newline character manually into the string being inserted:
>>>
>>> text_box.insert("2.0", "nWorld")
Now World is on the second line of the text box:
.insert() will do one of two things:
- Insert text at the specified position if there’s already text at or after that position.
- Append text to the specified line if the character number is greater than the index of the last character in the text box.
It’s usually impractical to try and keep track of what the index of the last character is. The best way to insert text at the end of a Text widget is to pass tk.END to the first parameter of .insert():
>>>
>>> text_box.insert(tk.END, "Put me at the end!")
Don’t forget to include the newline character (n) at the beginning of the text if you want to put it on a new line:
>>>
>>> text_box.insert(tk.END, "nPut me on a new line!")
Label, Button, Entry, and Text widgets are just a few of the widgets available in Tkinter. There are several others, including widgets for checkboxes, radio buttons, scroll bars, and progress bars. For more information on all of the available widgets, see the Additional Widgets list in the Additional Resources section.
Assigning Widgets to Frames With Frame Widgets
In this tutorial, you’re going to work with only five widgets:
LabelButtonEntryTextFrame
These are the four you’ve seen so far plus the Frame widget. Frame widgets are important for organizing the layout of your widgets in an application.
Before you get into the details about laying out the visual presentation of your widgets, take a closer look at how Frame widgets work, and how you can assign other widgets to them. The following script creates a blank Frame widget and assigns it to the main application window:
import tkinter as tk

window = tk.Tk()
frame = tk.Frame()
frame.pack()

window.mainloop()
frame.pack() packs the frame into the window so that the window sizes itself as small as possible to encompass the frame. When you run the above script, you get some seriously uninteresting output:
An empty Frame widget is practically invisible. Frames are best thought of as containers for other widgets. You can assign a widget to a frame by setting the widget’s master attribute:
frame = tk.Frame()
label = tk.Label(master=frame)
To get a feel for how this works, write a script that creates two Frame widgets called frame_a and frame_b. In this script, frame_a contains a label with the text "I'm in Frame A", and frame_b contains the label "I'm in Frame B". Here’s one way to do this:
import tkinter as tk

window = tk.Tk()

frame_a = tk.Frame()
frame_b = tk.Frame()

label_a = tk.Label(master=frame_a, text="I'm in Frame A")
label_a.pack()

label_b = tk.Label(master=frame_b, text="I'm in Frame B")
label_b.pack()

frame_a.pack()
frame_b.pack()

window.mainloop()
Note that frame_a is packed into the window before frame_b. The window that opens shows the label in frame_a above the label in frame_b:
Now see what happens when you swap the order of frame_a.pack() and frame_b.pack():
import tkinter as tk

window = tk.Tk()

frame_a = tk.Frame()
label_a = tk.Label(master=frame_a, text="I'm in Frame A")
label_a.pack()

frame_b = tk.Frame()
label_b = tk.Label(master=frame_b, text="I'm in Frame B")
label_b.pack()

# Swap the order of `frame_a` and `frame_b`
frame_b.pack()
frame_a.pack()

window.mainloop()
The output looks like this:
Now label_b is on top. Since label_b is assigned to frame_b, it moves to wherever frame_b is positioned.
All four of the widget types that you’ve learned about—Label, Button, Entry, and Text—have a master attribute that’s set when you instantiate them. That way, you can control which Frame a widget is assigned to. Frame widgets are great for organizing other widgets in a logical manner. Related widgets can be assigned to the same frame so that, if the frame is ever moved in the window, then the related widgets stay together.
In addition to grouping your widgets logically, Frame widgets can add a little flare to the visual presentation of your application. Read on to see how to create various borders for Frame widgets.
Adjusting Frame Appearance With Reliefs
Frame widgets can be configured with a relief attribute that creates a border around the frame. You can set relief to be any of the following values:
tk.FLAT: Has no border effect (the default value)tk.SUNKEN: Creates a sunken effecttk.RAISED: Creates a raised effecttk.GROOVE: Creates a grooved border effecttk.RIDGE: Creates a ridged effect
To apply the border effect, you must set the borderwidth attribute to a value greater than 1. This attribute adjusts the width of the border in pixels. The best way to get a feel for what each effect looks like is to see them for yourself. Here’s a script that packs five Frame widgets into a window, each with a different value for the relief argument:
 1import tkinter as tk
 2
 3border_effects = {
 4    "flat": tk.FLAT,
 5    "sunken": tk.SUNKEN,
 6    "raised": tk.RAISED,
 7    "groove": tk.GROOVE,
 8    "ridge": tk.RIDGE,
 9}
10
11window = tk.Tk()
12
13for relief_name, relief in border_effects.items():
14    frame = tk.Frame(master=window, relief=relief, borderwidth=5)
15    frame.pack(side=tk.LEFT)
16    label = tk.Label(master=frame, text=relief_name)
17    label.pack()
18
19window.mainloop()
Here’s a breakdown of this script:
-
Lines 3 to 9 create a dictionary whose keys are the names of the different relief effects available in Tkinter. The values are the corresponding Tkinter objects. This dictionary is assigned to the
border_effectsvariable. -
Line 13 starts a
forloop to loop over each item in theborder_effectsdictionary. -
Line 14 creates a new
Framewidget and assigns it to thewindowobject. Thereliefattribute is set to the corresponding relief in theborder_effectsdictionary, and theborderattribute is set to5so that the effect is visible. -
Line 15 packs the
Frameinto the window using.pack(). Thesidekeyword argument tells Tkinter in which direction to pack theframeobjects. You’ll see more about how this works in the next section. -
Lines 16 and 17 create a
Labelwidget to display the name of the relief and pack it into theframeobject you just created.
The window produced by the above script looks like this:
In this image, you can see the following effects:
tk.FLATcreates a frame that appears to be flat.tk.SUNKENadds a border that gives the frame the appearance of being sunken into the window.tk.RAISEDgives the frame a border that makes it appear to stick out from the screen.tk.GROOVEadds a border that appears as a sunken groove around an otherwise flat frame.tk.RIDGEgives the appearance of a raised lip around the edge of the frame.
These effects give your Python GUI Tkinter application a bit of visual appeal.
Understanding Widget Naming Conventions
When you create a widget, you can give it any name you like, as long as it’s a valid Python identifier. It’s usually a good idea to include the name of the widget class in the variable name that you assign to the widget instance. For example, if a Label widget is used to display a user’s name, then you might name the widget label_user_name. An Entry widget used to collect a user’s age might be called entry_age.
When you include the widget class name in the variable name, you help yourself and anyone else who needs to read your code to understand what type of widget the variable name refers to. However, using the full name of the widget class can lead to long variable names, so you may want to adopt a shorthand for referring to each widget type. For the rest of this tutorial, you’ll use the following shorthand prefixes to name widgets:
| Widget Class | Variable Name Prefix | Example |
|---|---|---|
Label |
lbl |
lbl_name |
Button |
btn |
btn_submit |
Entry |
ent |
ent_age |
Text |
txt |
txt_notes |
Frame |
frm |
frm_address |
In this section, you learned how to create a window, use widgets, and work with frames. At this point, you can make some plain windows that display messages, but you’ve yet to create a full-blown application. In the next section, you’ll learn how to control the layout of your applications using Tkinter’s powerful geometry managers.
Check Your Understanding
Expand the code block below for an exercise to check your understanding:
Write a complete script that displays an Entry widget that’s 40 text units wide and has a white background and black text. Use .insert() to display text in the widget that reads What is your name?.
The output window should look like this:
Try this exercise now.
You can expand the code block below to see a solution:
There are a couple of ways to solve this exercise. Here’s one solution that uses the bg and fg parameters to set the Entry widget’s background and foreground colors:
import tkinter as tk

window = tk.Tk()

entry = tk.Entry(width=40, bg="white", fg="black")
entry.pack()

entry.insert(0, "What is your name?")

window.mainloop()
This solution is great because it explicitly sets the background and foreground colors for the Entry widget.
On most systems, the default background color for an Entry widget is white, and the default foreground color is black. So, you might be able to generate the same window with the bg and fg parameters left out:
import tkinter as tk

window = tk.Tk()

entry = tk.Entry(width=40)
entry.pack()

entry.insert(0, "What is your name?")

window.mainloop()
Keep in mind your code may look different.
When you’re ready, you can move on to the next section.
Controlling Layout With Geometry Managers
Up until now, you’ve been adding widgets to windows and Frame widgets using .pack(), but you haven’t learned what exactly this method does. Let’s clear things up! Application layout in Tkinter is controlled with geometry managers. While .pack() is an example of a geometry manager, it isn’t the only one. Tkinter has two others:
.place().grid()
Each window or Frame in your application can use only one geometry manager. However, different frames can use different geometry managers, even if they’re assigned to a frame or window using another geometry manager. Start by taking a closer look at .pack().
The .pack() Geometry Manager
The .pack() geometry manager uses a packing algorithm to place widgets in a Frame or window in a specified order. For a given widget, the packing algorithm has two primary steps:
- Compute a rectangular area called a parcel that’s just tall (or wide) enough to hold the widget and fills the remaining width (or height) in the window with blank space.
- Center the widget in the parcel unless a different location is specified.
.pack() is powerful, but it can be difficult to visualize. The best way to get a feel for .pack() is to look at some examples. See what happens when you .pack() three Label widgets into a Frame:
import tkinter as tk

window = tk.Tk()

frame1 = tk.Frame(master=window, width=100, height=100, bg="red")
frame1.pack()

frame2 = tk.Frame(master=window, width=50, height=50, bg="yellow")
frame2.pack()

frame3 = tk.Frame(master=window, width=25, height=25, bg="blue")
frame3.pack()

window.mainloop()
.pack() places each Frame below the previous one by default, in the order that they’re assigned to the window:
Each Frame is placed at the topmost available position. Therefore, the red Frame is placed at the top of the window. Then the yellow Frame is placed just below the red one and the blue Frame just below the yellow one.
There are three invisible parcels, each containing one of the three Frame widgets. Each parcel is as wide as the window and as tall as the Frame that it contains. Because no anchor point was specified when .pack() was called for each Frame, they’re all centered inside of their parcels. That’s why each Frame is centered in the window.
.pack() accepts some keyword arguments for more precisely configuring widget placement. For example, you can set the fill keyword argument to specify in which direction the frames should fill. The options are tk.X to fill in the horizontal direction, tk.Y to fill vertically, and tk.BOTH to fill in both directions. Here’s how you would stack the three frames so that each one fills the whole window horizontally:
import tkinter as tk

window = tk.Tk()

frame1 = tk.Frame(master=window, height=100, bg="red")
frame1.pack(fill=tk.X)

frame2 = tk.Frame(master=window, height=50, bg="yellow")
frame2.pack(fill=tk.X)

frame3 = tk.Frame(master=window, height=25, bg="blue")
frame3.pack(fill=tk.X)

window.mainloop()
Notice that the width is not set on any of the Frame widgets. width is no longer necessary because each frame sets .pack() to fill horizontally, overriding any width you may set.
The window produced by this script looks like this:
One of the nice things about filling the window with .pack() is that the fill is responsive to window resizing. Try widening the window generated by the previous script to see how this works. As you widen the window, the width of the three Frame widgets grow to fill the window:
Notice, though, that the Frame widgets don’t expand in the vertical direction.
The side keyword argument of .pack() specifies on which side of the window the widget should be placed. These are the available options:
tk.TOPtk.BOTTOMtk.LEFTtk.RIGHT
If you don’t set side, then .pack() will automatically use tk.TOP and place new widgets at the top of the window, or at the topmost portion of the window that isn’t already occupied by a widget. For example, the following script places three frames side by side from left to right and expands each frame to fill the window vertically:
import tkinter as tk

window = tk.Tk()

frame1 = tk.Frame(master=window, width=200, height=100, bg="red")
frame1.pack(fill=tk.Y, side=tk.LEFT)

frame2 = tk.Frame(master=window, width=100, bg="yellow")
frame2.pack(fill=tk.Y, side=tk.LEFT)

frame3 = tk.Frame(master=window, width=50, bg="blue")
frame3.pack(fill=tk.Y, side=tk.LEFT)

window.mainloop()
This time, you have to specify the height keyword argument on at least one of the frames to force the window to have some height.
The resulting window looks like this:
Just like when you set fill=tk.X to make the frames responsive when you resized the window horizontally, you can set fill=tk.Y to make the frames responsive when you resize the window vertically:
To make the layout truly responsive, you can set an initial size for your frames using the width and height attributes. Then, set the fill keyword argument of .pack() to tk.BOTH and set the expand keyword argument to True:
import tkinter as tk

window = tk.Tk()

frame1 = tk.Frame(master=window, width=200, height=100, bg="red")
frame1.pack(fill=tk.BOTH, side=tk.LEFT, expand=True)

frame2 = tk.Frame(master=window, width=100, bg="yellow")
frame2.pack(fill=tk.BOTH, side=tk.LEFT, expand=True)

frame3 = tk.Frame(master=window, width=50, bg="blue")
frame3.pack(fill=tk.BOTH, side=tk.LEFT, expand=True)

window.mainloop()
When you run the above script, you’ll see a window that initially looks the same as the one you generated in the previous example. The difference is that now you can resize the window however you want, and the frames will expand and fill the window responsively:
Pretty cool!
The .place() Geometry Manager
You can use .place() to control the precise location that a widget should occupy in a window or Frame. You must provide two keyword arguments, x and y, which specify the x- and y-coordinates for the top-left corner of the widget. Both x and y are measured in pixels, not text units.
Keep in mind that the origin, where x and y are both 0, is the top-left corner of the Frame or window. So, you can think of the y argument of .place() as the number of pixels from the top of the window, and the x argument as the number of pixels from the left edge of the window.
Here’s an example of how the .place() geometry manager works:
 1import tkinter as tk
 2
 3window = tk.Tk()
 4
 5frame = tk.Frame(master=window, width=150, height=150)
 6frame.pack()
 7
 8label1 = tk.Label(master=frame, text="I'm at (0, 0)", bg="red")
 9label1.place(x=0, y=0)
10
11label2 = tk.Label(master=frame, text="I'm at (75, 75)", bg="yellow")
12label2.place(x=75, y=75)
13
14window.mainloop()
Here’s how this code works:
- Lines 5 and 6 create a new
Framewidget calledframe, measuring150pixels wide and150pixels tall, and pack it into the window with.pack(). - Lines 8 and 9 create a new
Labelcalledlabel1with a red background and place it inframe1at position (0, 0). - Lines 11 and 12 create a second
Labelcalledlabel2with a yellow background and place it inframe1at position (75, 75).
Here’s the window that the code produces:
Note that if you run this code on a different operating system that uses different font sizes and styles, then the second label might become partially obscured by the window’s edge. That’s why .place() isn’t used often. In addition to this, it has two main drawbacks:
- Layout can be difficult to manage with
.place(). This is especially true if your application has lots of widgets. - Layouts created with
.place()aren’t responsive. They don’t change as the window is resized.
One of the main challenges of cross-platform GUI development is making layouts that look good no matter which platform they’re viewed on, and .place() is a poor choice for making responsive and cross-platform layouts.
That’s not to say you should never use .place()! In some cases, it might be just what you need. For example, if you’re creating a GUI interface for a map, then .place() might be the perfect choice to ensure widgets are placed at the correct distance from each other on the map.
.pack() is usually a better choice than .place(), but even .pack() has some downsides. The placement of widgets depends on the order in which .pack() is called, so it can be difficult to modify existing applications without fully understanding the code controlling the layout. The .grid() geometry manager solves a lot of these issues, as you’ll see in the next section.
The .grid() Geometry Manager
The geometry manager you’ll likely use most often is .grid(), which provides all the power of .pack() in a format that’s easier to understand and maintain.
.grid() works by splitting a window or Frame into rows and columns. You specify the location of a widget by calling .grid() and passing the row and column indices to the row and column keyword arguments, respectively. Both row and column indices start at 0, so a row index of 1 and a column index of 2 tells .grid() to place a widget in the third column of the second row.
The following script creates a 3 × 3 grid of frames with Label widgets packed into them:
import tkinter as tk

window = tk.Tk()

for i in range(3):
    for j in range(3):
        frame = tk.Frame(
            master=window,
            relief=tk.RAISED,
            borderwidth=1
        )
        frame.grid(row=i, column=j)
        label = tk.Label(master=frame, text=f"Row {i}nColumn {j}")
        label.pack()

window.mainloop()
Here’s what the resulting window looks like:
You’re using two geometry managers in this example. Each frame is attached to window with the .grid() geometry manager:
import tkinter as tk

window = tk.Tk()

for i in range(3):
    for j in range(3):
        frame = tk.Frame(
            master=window,
            relief=tk.RAISED,
            borderwidth=1
        )
        frame.grid(row=i, column=j)
        label = tk.Label(master=frame, text=f"Row {i}nColumn {j}")
        label.pack()

window.mainloop()
Each label is attached to its master Frame with .pack():
import tkinter as tk

window = tk.Tk()

for i in range(3):
    for j in range(3):
        frame = tk.Frame(
            master=window,
            relief=tk.RAISED,
            borderwidth=1
        )
        frame.grid(row=i, column=j)
        label = tk.Label(master=frame, text=f"Row {i}nColumn {j}")
        label.pack()

window.mainloop()
The important thing to realize here is that even though .grid() is called on each Frame object, the geometry manager applies to the window object. Similarly, the layout of each frame is controlled with the .pack() geometry manager.
The frames in the previous example are placed tightly next to one another. To add some space around each frame, you can set the padding of each cell in the grid. Padding is just some blank space that surrounds a widget and visually sets its content apart.
The two types of padding are external and internal padding. External padding adds some space around the outside of a grid cell. It’s controlled with two keyword arguments to .grid():
padxadds padding in the horizontal direction.padyadds padding in the vertical direction.
Both padx and pady are measured in pixels, not text units, so setting both of them to the same value will create the same amount of padding in both directions. Try to add some padding around the outside of the frames from the previous example:
import tkinter as tk

window = tk.Tk()

for i in range(3):
    for j in range(3):
        frame = tk.Frame(
            master=window,
            relief=tk.RAISED,
            borderwidth=1
        )
        frame.grid(row=i, column=j, padx=5, pady=5)
        label = tk.Label(master=frame, text=f"Row {i}nColumn {j}")
        label.pack()

window.mainloop()
Here’s the resulting window:
.pack() also has padx and pady parameters. The following code is nearly identical to the previous code, except that you add five pixels of additional padding around each label in both the x and y directions:
import tkinter as tk

window = tk.Tk()

for i in range(3):
    for j in range(3):
        frame = tk.Frame(
            master=window,
            relief=tk.RAISED,
            borderwidth=1
        )
        frame.grid(row=i, column=j, padx=5, pady=5)
        label = tk.Label(master=frame, text=f"Row {i}nColumn {j}")
        label.pack(padx=5, pady=5)

window.mainloop()
The extra padding around the Label widgets gives each cell in the grid a little bit of breathing room between the Frame border and the text in the label:
That looks pretty nice! But if you try and expand the window in any direction, then you’ll notice that the layout isn’t very responsive:
The whole grid stays at the top-left corner as the window expands.
By using .columnconfigure() and .rowconfigure() on the window object, you can adjust how the rows and columns of the grid grow as the window is resized. Remember, the grid is attached to window, even though you’re calling .grid() on each Frame widget. Both .columnconfigure() and .rowconfigure() take three essential arguments:
- Index: The index of the grid column or row that you want to configure or a list of indices to configure multiple rows or columns at the same time
- Weight: A keyword argument called
weightthat determines how the column or row should respond to window resizing, relative to the other columns and rows - Minimum Size: A keyword argument called
minsizethat sets the minimum size of the row height or column width in pixels
weight is set to 0 by default, which means that the column or row doesn’t expand as the window resizes. If every column or row is given a weight of 1, then they all grow at the same rate. If one column has a weight of 1 and another a weight of 2, then the second column expands at twice the rate of the first. Adjust the previous script to better handle window resizing:
import tkinter as tk

window = tk.Tk()

for i in range(3):
    window.columnconfigure(i, weight=1, minsize=75)
    window.rowconfigure(i, weight=1, minsize=50)

    for j in range(0, 3):
        frame = tk.Frame(
            master=window,
            relief=tk.RAISED,
            borderwidth=1
        )
        frame.grid(row=i, column=j, padx=5, pady=5)
        label = tk.Label(master=frame, text=f"Row {i}nColumn {j}")
        label.pack(padx=5, pady=5)

window.mainloop()
.columnconfigure() and .rowconfigure() are placed in the body of the outer for loop. You could explicitly configure each column and row outside of the for loop, but that would require writing an additional six lines of code.
On each iteration of the loop, the i-th column and row are configured to have a weight of 1. This ensures that the row and column expand at the same rate whenever the window is resized. The minsize argument is set to 75 for each column and 50 for each row. This ensures that the Label widget always displays its text without chopping off any characters, even if the window size is extremely small.
The result is a grid layout that expands and contracts smoothly as the window is resized:
Try it yourself to get a feel for how it works! Play around with the weight and minsize parameters to see how they affect the grid.
By default, widgets are centered in their grid cells. For example, the following code creates two Label widgets and places them in a grid with one column and two rows:
import tkinter as tk

window = tk.Tk()
window.columnconfigure(0, minsize=250)
window.rowconfigure([0, 1], minsize=100)

label1 = tk.Label(text="A")
label1.grid(row=0, column=0)

label2 = tk.Label(text="B")
label2.grid(row=1, column=0)

window.mainloop()
Each grid cell is 250 pixels wide and 100 pixels tall. The labels are placed in the center of each cell, as you can see in the following figure:
You can change the location of each label inside of the grid cell using the sticky parameter, which accepts a string containing one or more of the following letters:
"n"or"N"to align to the top-center part of the cell"e"or"E"to align to the right-center side of the cell"s"or"S"to align to the bottom-center part of the cell"w"or"W"to align to the left-center side of the cell
The letters "n", "s", "e", and "w" come from the cardinal directions north, south, east, and west. Setting sticky to "n" on both labels in the previous code positions each label at the top-center of its grid cell:
import tkinter as tk

window = tk.Tk()
window.columnconfigure(0, minsize=250)
window.rowconfigure([0, 1], minsize=100)

label1 = tk.Label(text="A")
label1.grid(row=0, column=0, sticky="n")

label2 = tk.Label(text="B")
label2.grid(row=1, column=0, sticky="n")

window.mainloop()
Here’s the output:
You can combine multiple letters in a single string to position each label in the corner of its grid cell:
import tkinter as tk

window = tk.Tk()
window.columnconfigure(0, minsize=250)
window.rowconfigure([0, 1], minsize=100)

label1 = tk.Label(text="A")
label1.grid(row=0, column=0, sticky="ne")

label2 = tk.Label(text="B")
label2.grid(row=1, column=0, sticky="sw")

window.mainloop()
In this example, the sticky parameter of label1 is set to "ne", which places the label at the top-right corner of its grid cell. label2 is positioned in the bottom-left corner by passing "sw" to sticky. Here’s what that looks like in the window:
When a widget is positioned with sticky, the size of the widget itself is just big enough to contain any text and other contents inside of it. It won’t fill the entire grid cell. In order to fill the grid, you can specify "ns" to force the widget to fill the cell in the vertical direction, or "ew" to fill the cell in the horizontal direction. To fill the entire cell, set sticky to "nsew". The following example illustrates each of these options:
import tkinter as tk

window = tk.Tk()

window.rowconfigure(0, minsize=50)
window.columnconfigure([0, 1, 2, 3], minsize=50)

label1 = tk.Label(text="1", bg="black", fg="white")
label2 = tk.Label(text="2", bg="black", fg="white")
label3 = tk.Label(text="3", bg="black", fg="white")
label4 = tk.Label(text="4", bg="black", fg="white")

label1.grid(row=0, column=0)
label2.grid(row=0, column=1, sticky="ew")
label3.grid(row=0, column=2, sticky="ns")
label4.grid(row=0, column=3, sticky="nsew")

window.mainloop()
Here’s what the output looks like:
What the above example illustrates is that the .grid() geometry manager’s sticky parameter can be used to achieve the same effects as the .pack() geometry manager’s fill parameter. The correspondence between the sticky and fill parameters is summarized in the following table:
.grid() |
.pack() |
|---|---|
sticky="ns" |
fill=tk.Y |
sticky="ew" |
fill=tk.X |
sticky="nsew" |
fill=tk.BOTH |
.grid() is a powerful geometry manager. It’s often easier to understand than .pack() and is much more flexible than .place(). When you’re creating new Tkinter applications, you should consider using .grid() as your primary geometry manager.
Now that you’ve got the fundamentals of geometry managers down for the Python GUI framework Tkinter, the next step is to assign actions to buttons to bring your applications to life.
Check Your Understanding
Expand the code block below for an exercise to check your understanding:
Below is an image of an address entry form made with Tkinter:
Write a complete script that re-creates the window. You may use any geometry manager you like.
You can expand the code block below to see a solution:
There are many different ways to solve this exercise. If your solution generates a window identical to the one in the exercise statement, then congratulations! You’ve successfully solved the exercise! Below, you can look at two solutions that use the .grid() geometry manager.
One solution creates a Label and Entry widget with the desired settings for each field:
import tkinter as tk

# Create a new window with the title "Address Entry Form"
window = tk.Tk()
window.title("Address Entry Form")

# Create a new frame `frm_form` to contain the Label
# and Entry widgets for entering address information
frm_form = tk.Frame(relief=tk.SUNKEN, borderwidth=3)
# Pack the frame into the window
frm_form.pack()

# Create the Label and Entry widgets for "First Name"
lbl_first_name = tk.Label(master=frm_form, text="First Name:")
ent_first_name = tk.Entry(master=frm_form, width=50)
# Use the grid geometry manager to place the Label and
# Entry widgets in the first and second columns of the
# first row of the grid
lbl_first_name.grid(row=0, column=0, sticky="e")
ent_first_name.grid(row=0, column=1)

# Create the Label and Entry widgets for "Last Name"
lbl_last_name = tk.Label(master=frm_form, text="Last Name:")
ent_last_name = tk.Entry(master=frm_form, width=50)
# Place the widgets in the second row of the grid
lbl_last_name.grid(row=1, column=0, sticky="e")
ent_last_name.grid(row=1, column=1)

# Create the Label and Entry widgets for "Address Line 1"
lbl_address1 = tk.Label(master=frm_form, text="Address Line 1:")
ent_address1 = tk.Entry(master=frm_form, width=50)
# Place the widgets in the third row of the grid
lbl_address1.grid(row=2, column=0, sticky="e")
ent_address1.grid(row=2, column=1)

# Create the Label and Entry widgets for "Address Line 2"
lbl_address2 = tk.Label(master=frm_form, text="Address Line 2:")
ent_address2 = tk.Entry(master=frm_form, width=50)
# Place the widgets in the fourth row of the grid
lbl_address2.grid(row=3, column=0, sticky=tk.E)
ent_address2.grid(row=3, column=1)

# Create the Label and Entry widgets for "City"
lbl_city = tk.Label(master=frm_form, text="City:")
ent_city = tk.Entry(master=frm_form, width=50)
# Place the widgets in the fifth row of the grid
lbl_city.grid(row=4, column=0, sticky=tk.E)
ent_city.grid(row=4, column=1)

# Create the Label and Entry widgets for "State/Province"
lbl_state = tk.Label(master=frm_form, text="State/Province:")
ent_state = tk.Entry(master=frm_form, width=50)
# Place the widgets in the sixth row of the grid
lbl_state.grid(row=5, column=0, sticky=tk.E)
ent_state.grid(row=5, column=1)

# Create the Label and Entry widgets for "Postal Code"
lbl_postal_code = tk.Label(master=frm_form, text="Postal Code:")
ent_postal_code = tk.Entry(master=frm_form, width=50)
# Place the widgets in the seventh row of the grid
lbl_postal_code.grid(row=6, column=0, sticky=tk.E)
ent_postal_code.grid(row=6, column=1)

# Create the Label and Entry widgets for "Country"
lbl_country = tk.Label(master=frm_form, text="Country:")
ent_country = tk.Entry(master=frm_form, width=50)
# Place the widgets in the eight row of the grid
lbl_country.grid(row=7, column=0, sticky=tk.E)
ent_country.grid(row=7, column=1)

# Create a new frame `frm_buttons` to contain the
# Submit and Clear buttons. This frame fills the
# whole window in the horizontal direction and has
# 5 pixels of horizontal and vertical padding.
frm_buttons = tk.Frame()
frm_buttons.pack(fill=tk.X, ipadx=5, ipady=5)

# Create the "Submit" button and pack it to the
# right side of `frm_buttons`
btn_submit = tk.Button(master=frm_buttons, text="Submit")
btn_submit.pack(side=tk.RIGHT, padx=10, ipadx=10)

# Create the "Clear" button and pack it to the
# right side of `frm_buttons`
btn_clear = tk.Button(master=frm_buttons, text="Clear")
btn_clear.pack(side=tk.RIGHT, ipadx=10)

# Start the application
window.mainloop()
There’s nothing wrong with this solution. It’s a bit long, but everything is very explicit. If you want to change something, then it’s clear to see exactly where to do so.
That said, the solution can be considerably shortened by recognizing that each Entry has the same width, and that all you need for each Label is the text:
import tkinter as tk

# Create a new window with the title "Address Entry Form"
window = tk.Tk()
window.title("Address Entry Form")

# Create a new frame `frm_form` to contain the Label
# and Entry widgets for entering address information
frm_form = tk.Frame(relief=tk.SUNKEN, borderwidth=3)
# Pack the frame into the window
frm_form.pack()

# List of field labels
labels = [
    "First Name:",
    "Last Name:",
    "Address Line 1:",
    "Address Line 2:",
    "City:",
    "State/Province:",
    "Postal Code:",
    "Country:",
]

# Loop over the list of field labels
for idx, text in enumerate(labels):
    # Create a Label widget with the text from the labels list
    label = tk.Label(master=frm_form, text=text)
    # Create an Entry widget
    entry = tk.Entry(master=frm_form, width=50)
    # Use the grid geometry manager to place the Label and
    # Entry widgets in the row whose index is idx
    label.grid(row=idx, column=0, sticky="e")
    entry.grid(row=idx, column=1)

# Create a new frame `frm_buttons` to contain the
# Submit and Clear buttons. This frame fills the
# whole window in the horizontal direction and has
# 5 pixels of horizontal and vertical padding.
frm_buttons = tk.Frame()
frm_buttons.pack(fill=tk.X, ipadx=5, ipady=5)

# Create the "Submit" button and pack it to the
# right side of `frm_buttons`
btn_submit = tk.Button(master=frm_buttons, text="Submit")
btn_submit.pack(side=tk.RIGHT, padx=10, ipadx=10)

# Create the "Clear" button and pack it to the
# right side of `frm_buttons`
btn_clear = tk.Button(master=frm_buttons, text="Clear")
btn_clear.pack(side=tk.RIGHT, ipadx=10)

# Start the application
window.mainloop()
In this solution, a list is used to store the strings for each label in the form. They’re stored in the order that each form field should appear. Then, enumerate() gets both the index and string from each value in the labels list.
When you’re ready, you can move on to the next section.
Making Your Applications Interactive
By now, you have a pretty good idea of how to create a window with Tkinter, add some widgets, and control the application layout. That’s great, but applications shouldn’t just look good—they actually need to do something! In this section, you’ll learn how to bring your applications to life by performing actions whenever certain events occur.
Using Events and Event Handlers
When you create a Tkinter application, you must call window.mainloop() to start the event loop. During the event loop, your application checks if an event has occurred. If so, then it’ll execute some code in response.
The event loop is provided for you with Tkinter, so you don’t have to write any code that checks for events yourself. However, you do have to write the code that will be executed in response to an event. In Tkinter, you write functions called event handlers for the events that you use in your application.
You’ll write your own event loop in order to better understand how Tkinter’s event loop works. That way, you can see how Tkinter’s event loop fits into your application, and which parts you need to write yourself.
Assume there’s a list called events that contains event objects. A new event object is automatically appended to events every time an event occurs in your program. You don’t need to implement this updating mechanism. It just automatically happens for you in this conceptual example. Using an infinite loop, you can continually check if there are any event objects in events:
# Assume that this list gets updated automatically
events = []

# Run the event loop
while True:
    # If the event list is empty, then no events have occurred
    # and you can skip to the next iteration of the loop
    if events == []:
        continue

    # If execution reaches this point, then there is at least one
    # event object in the event list
    event = events[0]
Right now, the event loop that you’ve created doesn’t do anything with event. Let’s change that. Suppose your application needs to respond to keypresses. You need to check that event was generated by a user pressing a key on their keyboard, and if so, pass event to an event handler function for keypresses.
Assume that event has a .type attribute set to the string "keypress" if the event is a keypress event object, and a .char attribute containing the character of the key that was pressed. Create a new handle_keypress() function and update your event loop code:
events = []

# Create an event handler
def handle_keypress(event):
    """Print the character associated to the key pressed"""
    print(event.char)

while True:
    if events == []:
        continue

    event = events[0]

    # If event is a keypress event object
    if event.type == "keypress":
        # Call the keypress event handler
        handle_keypress(event)
When you call window.mainloop(), something like the above loop is run for you. This method takes care of two parts of the loop for you:
- It maintains a list of events that have occurred.
- It runs an event handler any time a new event is added to that list.
Update your event loop to use window.mainloop() instead of your own event loop:
import tkinter as tk

# Create a window object
window = tk.Tk()

# Create an event handler
def handle_keypress(event):
    """Print the character associated to the key pressed"""
    print(event.char)

# Run the event loop
window.mainloop()
.mainloop() takes care of a lot for you, but there’s something missing from the above code. How does Tkinter know when to use handle_keypress()? Tkinter widgets have a method called .bind() for just this purpose.
Using .bind()
To call an event handler whenever an event occurs on a widget, use .bind(). The event handler is said to be bound to the event because it’s called every time the event occurs. You’ll continue with the keypress example from the previous section and use .bind() to bind handle_keypress() to the keypress event:
import tkinter as tk

window = tk.Tk()

def handle_keypress(event):
    """Print the character associated to the key pressed"""
    print(event.char)

# Bind keypress event to handle_keypress()
window.bind("<Key>", handle_keypress)

window.mainloop()
Here, the handle_keypress() event handler is bound to a "<Key>" event using window.bind(). Whenever a key is pressed while the application is running, your program will print the character of the key pressed.
.bind() always takes at least two arguments:
- An event that’s represented by a string of the form
"<event_name>", whereevent_namecan be any of Tkinter’s events - An event handler that’s the name of the function to be called whenever the event occurs
The event handler is bound to the widget on which .bind() is called. When the event handler is called, the event object is passed to the event handler function.
In the example above, the event handler is bound to the window itself, but you can bind an event handler to any widget in your application. For example, you can bind an event handler to a Button widget that will perform some action whenever the button is pressed:
def handle_click(event):
    print("The button was clicked!")

button = tk.Button(text="Click me!")

button.bind("<Button-1>", handle_click)
In this example, the "<Button-1>" event on the button widget is bound to the handle_click event handler. The "<Button-1>" event occurs whenever the left mouse button is pressed while the mouse is over the widget. There are other events for mouse button clicks, including "<Button-2>" for the middle mouse button and "<Button-3>" for the right mouse button.
You can bind any event handler to any kind of widget with .bind(), but there’s a more straightforward way to bind event handlers to button clicks using the Button widget’s command attribute.
Using command
Every Button widget has a command attribute that you can assign to a function. Whenever the button is pressed, the function is executed.
Take a look at an example. First, you’ll create a window with a Label widget that holds a numeric value. You’ll put buttons on the left and right side of the label. The left button will be used to decrease the value in the Label, and the right one will increase the value. Here’s the code for the window:
 1import tkinter as tk
 2
 3window = tk.Tk()
 4
 5window.rowconfigure(0, minsize=50, weight=1)
 6window.columnconfigure([0, 1, 2], minsize=50, weight=1)
 7
 8btn_decrease = tk.Button(master=window, text="-")
 9btn_decrease.grid(row=0, column=0, sticky="nsew")
10
11lbl_value = tk.Label(master=window, text="0")
12lbl_value.grid(row=0, column=1)
13
14btn_increase = tk.Button(master=window, text="+")
15btn_increase.grid(row=0, column=2, sticky="nsew")
16
17window.mainloop()
The window looks like this:
With the app layout defined, you can bring it to life by giving the buttons some commands. Start with the left button. When this button is pressed, it should decrease the value in the label by one. In order to do this, you first need to get answers to two questions:
- How do you get the text in
Label? - How do you update the text in
Label?
Label widgets don’t have .get() like Entry and Text widgets do. However, you can retrieve the text from the label by accessing the text attribute with a dictionary-style subscript notation:
label = tk.Label(text="Hello")

# Retrieve a label's text
text = label["text"]

# Set new text for the label
label["text"] = "Good bye"
Now that you know how to get and set a label’s text, write an increase() function that increases the value in lbl_value by one:
 1import tkinter as tk
 2
 3def increase():
 4    value = int(lbl_value["text"])
 5    lbl_value["text"] = f"{value + 1}"
 6
 7# ...
increase() gets the text from lbl_value and converts it to an integer with int(). Then, it increases this value by one and sets the label’s text attribute to this new value.
You’ll also need decrease() to decrease the value in value_label by one:
 5# ...
 6
 7def decrease():
 8    value = int(lbl_value["text"])
 9    lbl_value["text"] = f"{value - 1}"
10
11# ...
Put increase() and decrease() in your code just after the import statement.
To connect the buttons to the functions, assign the function to the button’s command attribute. You can do this when you instantiate the buttons. For example, update the two lines that instantiate the buttons to the following:
14# ...
15
16btn_decrease = tk.Button(master=window, text="-", command=decrease)
17btn_decrease.grid(row=0, column=0, sticky="nsew")
18
19lbl_value = tk.Label(master=window, text="0")
20lbl_value.grid(row=0, column=1)
21
22btn_increase = tk.Button(master=window, text="+", command=increase)
23btn_increase.grid(row=0, column=2, sticky="nsew")
24
25window.mainloop()
That’s all you need to do to bind the buttons to increase() and decrease() and make the program functional. Try saving your changes and running the application! Click the buttons to increase and decrease the value in the center of the window:
Here’s the full application code for your reference:
import tkinter as tk

def increase():
    value = int(lbl_value["text"])
    lbl_value["text"] = f"{value + 1}"

def decrease():
    value = int(lbl_value["text"])
    lbl_value["text"] = f"{value - 1}"

window = tk.Tk()

window.rowconfigure(0, minsize=50, weight=1)
window.columnconfigure([0, 1, 2], minsize=50, weight=1)

btn_decrease = tk.Button(master=window, text="-", command=decrease)
btn_decrease.grid(row=0, column=0, sticky="nsew")

lbl_value = tk.Label(master=window, text="0")
lbl_value.grid(row=0, column=1)

btn_increase = tk.Button(master=window, text="+", command=increase)
btn_increase.grid(row=0, column=2, sticky="nsew")

window.mainloop()
This app isn’t particularly useful, but the skills you learned here apply to every app you’ll make:
- Use widgets to create the components of the user interface.
- Use geometry managers to control the layout of the application.
- Write event handlers that interact with various components to capture and transform user input.
In the next two sections, you’ll build more useful apps. First, you’ll build a temperature converter that converts a temperature value from Fahrenheit to Celsius. After that, you’ll build a text editor that can open, edit, and save text files!
Check Your Understanding
Expand the code block below for an exercise to check your understanding:
Write a program that simulates rolling a six-sided die. There should be one button with the text Roll. When the user clicks the button, a random integer from 1 to 6 should be displayed.
The application window should look something like this:
Try this exercise now.
You can expand the code block below to see a solution:
Here’s one possible solution:
import random
import tkinter as tk

def roll():
    lbl_result["text"] = str(random.randint(1, 6))

window = tk.Tk()
window.columnconfigure(0, minsize=150)
window.rowconfigure([0, 1], minsize=50)

btn_roll = tk.Button(text="Roll", command=roll)
lbl_result = tk.Label()

btn_roll.grid(row=0, column=0, sticky="nsew")
lbl_result.grid(row=1, column=0)

window.mainloop()
Keep in mind that your code may look different.
When you’re ready, you can move on to the next section.
Building a Temperature Converter (Example App)
In this section, you’ll build a temperature converter application that allows the user to input temperature in degrees Fahrenheit and push a button to convert that temperature to degrees Celsius. You’ll walk through the code step by step. You can also find the full source code at the end of this section for your reference.
Before you start coding, you’ll first design the app. You need three elements:
Entry: A widget calledent_temperaturefor entering the Fahrenheit valueLabel: A widget calledlbl_resultto display the Celsius resultButton: A widget calledbtn_convertthat reads the value from theEntrywidget, converts it from Fahrenheit to Celsius, and sets the text of theLabelwidget to the result when clicked
You can arrange these in a grid with a single row and one column for each widget. That gets you a minimally working application, but it isn’t very user-friendly. Everything needs to have labels.
You’ll put a label directly to the right of the ent_temperature widget containing the Fahrenheit symbol (℉) so that the user knows that the value ent_temperature should be in degrees Fahrenheit. To do this, set the label text to "N{DEGREE FAHRENHEIT}", which uses Python’s named Unicode character support to display the Fahrenheit symbol.
You can give btn_convert a little flair by setting its text to the value "N{RIGHTWARDS BLACK ARROW}", which displays a black arrow pointing to the right. You’ll also make sure that lbl_result always has the Celsius symbol (℃) following the label text "N{DEGREE CELSIUS}" to indicate that the result is in degrees Celsius. Here’s what the final window will look like:
Now that you know what widgets you need and what the window is going to look like, you can start coding it up! First, import tkinter and create a new window:
 1import tkinter as tk
 2
 3window = tk.Tk()
 4window.title("Temperature Converter")
 5window.resizable(width=False, height=False)
window.title() sets the title of an existing window, while window.resizable() with both arguments set to False makes the window have a fixed size. When you finally run this application, the window will have the text Temperature Converter in its title bar. Next, create the ent_temperature widget with a label called lbl_temp and assign both to a Frame widget called frm_entry:
 5# ...
 6
 7frm_entry = tk.Frame(master=window)
 8ent_temperature = tk.Entry(master=frm_entry, width=10)
 9lbl_temp = tk.Label(master=frm_entry, text="N{DEGREE FAHRENHEIT}")
The user will enter the Fahrenheit value in ent_temperature, and lbl_temp is used to label ent_temperature with the Fahrenheit symbol. The frm_entry container groups ent_temperature and lbl_temp together.
You want lbl_temp to be placed directly to the right of ent_temperature. You can lay them out in frm_entry using the .grid() geometry manager with one row and two columns:
 9# ...
10
11ent_temperature.grid(row=0, column=0, sticky="e")
12lbl_temp.grid(row=0, column=1, sticky="w")
You’ve set the sticky parameter to "e" for ent_temperature so that it always sticks to the rightmost edge of its grid cell. You also set sticky to "w" for lbl_temp to keep it stuck to the leftmost edge of its grid cell. This ensures that lbl_temp is always located immediately to the right of ent_temperature.
Now, make the btn_convert and the lbl_result for converting the temperature entered into ent_temperature and displaying the results:
12# ...
13
14btn_convert = tk.Button(
15    master=window,
16    text="N{RIGHTWARDS BLACK ARROW}"
17)
18lbl_result = tk.Label(master=window, text="N{DEGREE CELSIUS}")
Like frm_entry, both btn_convert and lbl_result are assigned to window. Together, these three widgets make up the three cells in the main application grid. Use .grid() to go ahead and lay them out now:
18# ...
19
20frm_entry.grid(row=0, column=0, padx=10)
21btn_convert.grid(row=0, column=1, pady=10)
22lbl_result.grid(row=0, column=2, padx=10)
Finally, run the application:
22# ...
23
24window.mainloop()
That looks great! But the button doesn’t do anything just yet. At the top of your script file, just below the import line, add a function called fahrenheit_to_celsius():
 1import tkinter as tk
 2
 3def fahrenheit_to_celsius():
 4    """Convert the value for Fahrenheit to Celsius and insert the
 5    result into lbl_result.
 6    """
 7    fahrenheit = ent_temperature.get()
 8    celsius = (5 / 9) * (float(fahrenheit) - 32)
 9    lbl_result["text"] = f"{round(celsius, 2)} N{DEGREE CELSIUS}"
10
11# ...
This function reads the value from ent_temperature, converts it from Fahrenheit to Celsius, and then displays the result in lbl_result.
Now go down to the line where you define btn_convert and set its command parameter to fahrenheit_to_celsius:
20# ...
21
22btn_convert = tk.Button(
23    master=window,
24    text="N{RIGHTWARDS BLACK ARROW}",
25    command=fahrenheit_to_celsius  # <--- Add this line
26)
27
28# ...
That’s it! You’ve created a fully functional temperature converter app in just twenty-six lines of code! Pretty cool, right?
You can expand the code block below to see the full script:
Here’s the full script for your reference:
import tkinter as tk

def fahrenheit_to_celsius():
    """Convert the value for Fahrenheit to Celsius and insert the
    result into lbl_result.
    """
    fahrenheit = ent_temperature.get()
    celsius = (5 / 9) * (float(fahrenheit) - 32)
    lbl_result["text"] = f"{round(celsius, 2)} N{DEGREE CELSIUS}"

# Set up the window
window = tk.Tk()
window.title("Temperature Converter")
window.resizable(width=False, height=False)

# Create the Fahrenheit entry frame with an Entry
# widget and label in it
frm_entry = tk.Frame(master=window)
ent_temperature = tk.Entry(master=frm_entry, width=10)
lbl_temp = tk.Label(master=frm_entry, text="N{DEGREE FAHRENHEIT}")

# Layout the temperature Entry and Label in frm_entry
# using the .grid() geometry manager
ent_temperature.grid(row=0, column=0, sticky="e")
lbl_temp.grid(row=0, column=1, sticky="w")

# Create the conversion Button and result display Label
btn_convert = tk.Button(
    master=window,
    text="N{RIGHTWARDS BLACK ARROW}",
    command=fahrenheit_to_celsius
)
lbl_result = tk.Label(master=window, text="N{DEGREE CELSIUS}")

# Set up the layout using the .grid() geometry manager
frm_entry.grid(row=0, column=0, padx=10)
btn_convert.grid(row=0, column=1, pady=10)
lbl_result.grid(row=0, column=2, padx=10)

# Run the application
window.mainloop()
It’s time to kick things up a notch! Read on to learn how to build a text editor.
Building a Text Editor (Example App)
In this section, you’ll build a text editor application that can create, open, edit, and save text files. There are three essential elements in the application:
- A
Buttonwidget calledbtn_openfor opening a file for editing - A
Buttonwidget calledbtn_savefor saving a file - A
TextBoxwidget calledtxt_editfor creating and editing the text file
The three widgets will be arranged so that the two buttons are on the left-hand side of the window, and the text box is on the right-hand side. The whole window should have a minimum height of 800 pixels, and txt_edit should have a minimum width of 800 pixels. The whole layout should be responsive so that if the window is resized, then txt_edit is resized as well. The width of the frame holding the buttons should not change, however.
Here’s a sketch of how the window will look:
You can achieve the desired layout using the .grid() geometry manager. The layout contains a single row and two columns:
- A narrow column on the left for the buttons
- A wider column on the right for the text box
To set the minimum sizes for the window and txt_edit, you can set the minsize parameters of the window methods .rowconfigure() and .columnconfigure() to 800. To handle resizing, you can set the weight parameters of these methods to 1.
In order to get both buttons into the same column, you’ll need to create a Frame widget called frm_buttons. According to the sketch, the two buttons should be stacked vertically inside of this frame, with btn_open on top. You can do that with either the .grid() or .pack() geometry manager. For now, you’ll stick with .grid() since it’s a little easier to work with.
Now that you have a plan, you can start coding the application. The first step is to create all of the widgets you need:
 1import tkinter as tk
 2
 3window = tk.Tk()
 4window.title("Simple Text Editor")
 5
 6window.rowconfigure(0, minsize=800, weight=1)
 7window.columnconfigure(1, minsize=800, weight=1)
 8
 9txt_edit = tk.Text(window)
10frm_buttons = tk.Frame(window, relief=tk.RAISED, bd=2)
11btn_open = tk.Button(frm_buttons, text="Open")
12btn_save = tk.Button(frm_buttons, text="Save As...")
Here’s a breakdown of this code:
- Line 1 imports
tkinter. - Lines 3 and 4 create a new window with the title
"Simple Text Editor". - Lines 6 and 7 set the row and column configurations.
- Lines 9 to 12 create the four widgets you’ll need for the text box, the frame, and the open and save buttons.
Take a look at line 6 more closely. The minsize parameter of .rowconfigure() is set to 800, and weight is set to 1:
window.rowconfigure(0, minsize=800, weight=1)
The first argument is 0, which sets the height of the first row to 800 pixels and makes sure that the height of the row grows proportionally to the height of the window. There’s only one row in the application layout, so these settings apply to the entire window.
Let’s also take a closer look at line 7. Here, you use .columnconfigure() to set the width and weight attributes of the column with index 1 to 800 and 1, respectively:
window.columnconfigure(1, minsize=800, weight=1)
Remember, row and column indices are zero-based, so these settings apply only to the second column. By configuring just the second column, the text box will expand and contract naturally when the window is resized, while the column containing the buttons will remain at a fixed width.
Now you can work on the application layout. First, assign the two buttons to the frm_buttons frame using the .grid() geometry manager:
12# ...
13
14btn_open.grid(row=0, column=0, sticky="ew", padx=5, pady=5)
15btn_save.grid(row=1, column=0, sticky="ew", padx=5)
These two lines of code create a grid with two rows and one column in the frm_buttons frame since both btn_open and btn_save have their master attribute set to frm_buttons. btn_open is put in the first row and btn_save in the second row so that btn_open appears above btn_save in the layout, just you planned in your sketch.
Both btn_open and btn_save have their sticky attributes set to "ew", which forces the buttons to expand horizontally in both directions and fill the entire frame. This ensures that both buttons are the same size.
You place five pixels of padding around each button by setting the padx and pady parameters to 5. Only btn_open has vertical padding. Since it’s on top, the vertical padding offsets the button down from the top of the window a bit and makes sure that there’s a small gap between it and btn_save.
Now that frm_buttons is laid out and ready to go, you can set up the grid layout for the rest of the window:
15# ...
16
17frm_buttons.grid(row=0, column=0, sticky="ns")
18txt_edit.grid(row=0, column=1, sticky="nsew")
These two lines of code create a grid with one row and two columns for window. You place frm_buttons in the first column and txt_edit in the second column so that frm_buttons appears to the left of txt_edit in the window layout.
The sticky parameter for frm_buttons is set to "ns", which forces the whole frame to expand vertically and fill the entire height of its column. txt_edit fills its entire grid cell because you set its sticky parameter to "nsew", which forces it to expand in every direction.
Now that the application layout is complete, add window.mainloop() to the bottom of the program and save and run the file:
18# ...
19
20window.mainloop()
The following window is displayed:
That looks great! But it doesn’t do anything just yet, so you need to start writing the commands for the buttons. btn_open needs to show a file open dialog and allow the user to select a file. It then needs to open that file and set the text of txt_edit to the contents of the file. Here’s an open_file() function that does just this:
 1import tkinter as tk
 2
 3def open_file():
 4    """Open a file for editing."""
 5    filepath = askopenfilename(
 6        filetypes=[("Text Files", "*.txt"), ("All Files", "*.*")]
 7    )
 8    if not filepath:
 9        return
10    txt_edit.delete("1.0", tk.END)
11    with open(filepath, mode="r", encoding="utf-8") as input_file:
12        text = input_file.read()
13        txt_edit.insert(tk.END, text)
14    window.title(f"Simple Text Editor - {filepath}")
15
16# ...
Here’s a breakdown of this function:
- Lines 5 to 7 use the
askopenfilename()dialog from thetkinter.filedialogmodule to display a file open dialog and store the selected file path tofilepath. - Lines 8 and 9 check to see if the user closes the dialog box or clicks the Cancel button. If so, then
filepathwill beNone, and the function willreturnwithout executing any of the code to read the file and set the text oftxt_edit. - Line 10 clears the current contents of
txt_editusing.delete(). - Lines 11 and 12 open the selected file and
.read()its contents before storing thetextas a string. - Line 13 assigns the string
texttotxt_editusing.insert(). - Line 14 sets the title of the window so that it contains the path of the open file.
Now you can update the program so that btn_open calls open_file() whenever it’s clicked. There are a few things that you need to do to update the program. First, import askopenfilename() from tkinter.filedialog by adding the following import to the top of your program:
 1import tkinter as tk
 2from tkinter.filedialog import askopenfilename
 3
 4# ...
Next, set the command attribute of btn_opn to open_file:
 1import tkinter as tk
 2from tkinter.filedialog import askopenfilename
 3
 4def open_file():
 5    """Open a file for editing."""
 6    filepath = askopenfilename(
 7        filetypes=[("Text Files", "*.txt"), ("All Files", "*.*")]
 8    )
 9    if not filepath:
10        return
11    txt_edit.delete("1.0", tk.END)
12    with open(filepath, mode="r", encoding="utf-8") as input_file:
13        text = input_file.read()
14        txt_edit.insert(tk.END, text)
15    window.title(f"Simple Text Editor - {filepath}")
16
17window = tk.Tk()
18window.title("Simple Text Editor")
19
20window.rowconfigure(0, minsize=800, weight=1)
21window.columnconfigure(1, minsize=800, weight=1)
22
23txt_edit = tk.Text(window)
24frm_buttons = tk.Frame(window, relief=tk.RAISED, bd=2)
25btn_open = tk.Button(frm_buttons, text="Open", command=open_file)
26btn_save = tk.Button(frm_buttons, text="Save As...")
27
28# ...
Save the file and run it to check that everything is working. Then try opening a text file!
With btn_open working, it’s time to work on the function for btn_save. This needs to open a save file dialog box so that the user can choose where they would like to save the file. You’ll use the asksaveasfilename() dialog in the tkinter.filedialog module for this. This function also needs to extract the text currently in txt_edit and write this to a file at the selected location. Here’s a function that does just this:
15# ...
16
17def save_file():
18    """Save the current file as a new file."""
19    filepath = asksaveasfilename(
20        defaultextension=".txt",
21        filetypes=[("Text Files", "*.txt"), ("All Files", "*.*")],
22    )
23    if not filepath:
24        return
25    with open(filepath, mode="w", encoding="utf-8") as output_file:
26        text = txt_edit.get("1.0", tk.END)
27        output_file.write(text)
28    window.title(f"Simple Text Editor - {filepath}")
29
30# ...
Here’s how this code works:
- Lines 19 to 22 use the
asksaveasfilename()dialog box to get the desired save location from the user. The selected file path is stored in thefilepathvariable. - Lines 23 and 24 check to see if the user closes the dialog box or clicks the Cancel button. If so, then
filepathwill beNone, and the function will return without executing any of the code to save the text to a file. - Line 25 creates a new file at the selected file path.
- Line 26 extracts the text from
txt_editwith.get()method and assigns it to the variabletext. - Line 27 writes
textto the output file. - Line 28 updates the title of the window so that the new file path is displayed in the window title.
Now you can update the program so that btn_save calls save_file() when it’s clicked. Again, there are a few things you need to do in order to update the program. First, import asksaveasfilename() from tkinter.filedialog by updating the import at the top of your script, like so:
 1import tkinter as tk
 2from tkinter.filedialog import askopenfilename, asksaveasfilename
 3
 4# ...
Finally, set the command attribute of btn_save to save_file:
28# ...
29
30window = tk.Tk()
31window.title("Simple Text Editor")
32
33window.rowconfigure(0, minsize=800, weight=1)
34window.columnconfigure(1, minsize=800, weight=1)
35
36txt_edit = tk.Text(window)
37frm_buttons = tk.Frame(window, relief=tk.RAISED, bd=2)
38btn_open = tk.Button(frm_buttons, text="Open", command=open_file)
39btn_save = tk.Button(frm_buttons, text="Save As...", command=save_file)
40
41btn_open.grid(row=0, column=0, sticky="ew", padx=5, pady=5)
42btn_save.grid(row=1, column=0, sticky="ew", padx=5)
43
44frm_buttons.grid(row=0, column=0, sticky="ns")
45txt_edit.grid(row=0, column=1, sticky="nsew")
46
47window.mainloop()
Save the file and run it. You’ve now got a minimal yet fully functional text editor!
You can expand the code block below to see the full script:
Here’s the full script for your reference:
import tkinter as tk
from tkinter.filedialog import askopenfilename, asksaveasfilename

def open_file():
    """Open a file for editing."""
    filepath = askopenfilename(
        filetypes=[("Text Files", "*.txt"), ("All Files", "*.*")]
    )
    if not filepath:
        return
    txt_edit.delete("1.0", tk.END)
    with open(filepath, mode="r", encoding="utf-8") as input_file:
        text = input_file.read()
        txt_edit.insert(tk.END, text)
    window.title(f"Simple Text Editor - {filepath}")

def save_file():
    """Save the current file as a new file."""
    filepath = asksaveasfilename(
        defaultextension=".txt",
        filetypes=[("Text Files", "*.txt"), ("All Files", "*.*")],
    )
    if not filepath:
        return
    with open(filepath, mode="w", encoding="utf-8") as output_file:
        text = txt_edit.get("1.0", tk.END)
        output_file.write(text)
    window.title(f"Simple Text Editor - {filepath}")

window = tk.Tk()
window.title("Simple Text Editor")

window.rowconfigure(0, minsize=800, weight=1)
window.columnconfigure(1, minsize=800, weight=1)

txt_edit = tk.Text(window)
frm_buttons = tk.Frame(window, relief=tk.RAISED, bd=2)
btn_open = tk.Button(frm_buttons, text="Open", command=open_file)
btn_save = tk.Button(frm_buttons, text="Save As...", command=save_file)

btn_open.grid(row=0, column=0, sticky="ew", padx=5, pady=5)
btn_save.grid(row=1, column=0, sticky="ew", padx=5)

frm_buttons.grid(row=0, column=0, sticky="ns")
txt_edit.grid(row=0, column=1, sticky="nsew")

window.mainloop()
You’ve now built two GUI applications in Python and applied many of the skills that you’ve learned throughout this tutorial. That’s no small achievement, so take some time to feel good about what you’ve done. You’re now ready to tackle some applications on your own!
Conclusion
In this tutorial, you learned how to get started with Python GUI programming. Tkinter is a compelling choice for a Python GUI framework because it’s built into the Python standard library, and it’s relatively painless to make applications with this framework.
Throughout this tutorial, you’ve learned several important Tkinter concepts:
- How to work with widgets
- How to control your application layout with geometry managers
- How to make your applications interactive
- How to use five basic Tkinter widgets:
Label,Button,Entry,Text, andFrame
Now that you’ve mastered the foundations of Python GUI programming with Tkinter, the next step is to build some of your own applications. What will you create? Share your fun projects down in the comments below!
Additional Resources
In this tutorial, you touched on just the foundations of creating Python GUI applications with Tkinter. There are a number of additional topics that aren’t covered here. In this section, you’ll find some of the best resources available to help you continue on your journey.
Tkinter References
Here are some official resources to check out:
- The official Python Tkinter reference documentation covers Python’s Tkinter module in moderate depth. It’s written for more advanced Python developers and isn’t the best resource for beginners.
- Tkinter 8.5 reference: a GUI for Python is an extensive reference covering the majority of the Tkinter module. It’s exhaustive, but it’s written in the reference style without commentary or examples.
- The Tk Commands reference is the definitive guide to commands in the Tk library. It’s written for the Tcl language, but it answers a lot of questions about why things work the way they do in Tkinter.
Additional Widgets
In this tutorial, you learned about the Label, Button, Entry, Text, and Frame widgets. There are several other widgets in Tkinter, all of which are essential for building real-world applications. Here are some resources to continue learning about widgets:
- The TkDocs Tkinter Tutorial is a fairly comprehensive guide for Tk, the underlying code library used by Tkinter. Examples are presented in Python, Ruby, Perl, and Tcl. You can find several examples of widgets beyond those covered here in two sections:
- Basic Widgets covers the same widgets as this tutorial, plus a few more.
- More Widgets covers several additional widgets.
- The official Python docs cover additional widgets:
- ttk themed widgets covers the Tk themed widget set.
- Scrolled Text Widget details a
Textwidget combined with a vertical scroll bar.
Application Distribution
Once you’ve created an application with Tkinter, you probably want to distribute it to your colleagues and friends. Here are some tutorials to get you going with that process:
- Using PyInstaller to Easily Distribute Python Applications
- 4 Attempts at Packaging Python as an Executable
- Building Standalone Python Applications with PyOxidizer
Other GUI Frameworks
Tkinter isn’t your only choice for a Python GUI framework. If Tkinter doesn’t meet the needs of your project, then here are some other frameworks to consider:
- How to Build a Python GUI Application With wxPython
- Python and PyQt: Building a GUI Desktop Calculator
- Building a Mobile Application With the Kivy Python Framework
- PySimpleGUI: The Simple Way to Create a GUI With Python

