Игра «Пакман»
Запуск
Запуск файла main.py (должна быть установлена библиотека pygame).
Описание игры
Упрощённый клон известной игры.
Игрок управляет персонажем, основная цель — собрать все очки и не быть пойманным призраками.
Игрок выигрывает, если собирает все очки. Собранные очки отображаются в левом верхнем углу экрана.
Структура проекта:
- data — папка с данными
- images — папка с изображениями
- level* — файлы с картами уровней (см. раздел «Описание карты уровня»)
- main.py — файл с программой
- readme.md — описание проекта (этот файл)
- requirements.txt — описание зависимостей для сборки и запуска проекта
Описание карты уровня
Текстовый файл без расширения.
Для использования в игре положите его в папку data и добавьте его имя к списку LEVELS в начале программы.
В случае, если не отмечены место старта игрока или призраков, места для игрока и/или призраков будут определяться случайно.
В таких случаях возможны неудачные старты — призраки могут оказаться достаточно близко или заблокировать все проходы.
Условные обозначения
| Символ | Значение |
|---|---|
| # | стена |
| . | обычная клетка, очко для сбора персонажем |
| @ | место старта игрока, если не указано, игрок появляется в случайной обычной клетке |
| <пробел> | свободное место, в том числе за пределами стен |
| ! | место старта призрака, если не указано, призрак появится на случайной обычной клетке |
The Pacman In Python Code is written in python programming language, This Pacman Game In Python is an arcade game and anyone’s love this game.
A Pacman Game Code In Python concept is quite simple. Pacman eats dots in a maze to score points. Avoid the ghosts if you don’t want to game over.
Anyway if you want level up your knowledge in programming especially games in python, try this new article I’ve made for you Code For Game in Python: Python Game Projects With Source Code
This Pacman Game Python Code also includes a downloadable Pacman Game Source Code In Python, just find the downloadable source code below and click to start downloading.
To start creating a Pacman In Python Code, make sure that you have PyCharm IDE installed in your computer.
By the way if you are new to python programming and you don’t know what would be the the Python IDE to use, I have here a list of Best Python IDE for Windows, Linux, Mac OS that will suit for you. I also have here How to Download and Install Latest Version of Python on Windows.
Steps on how to create a Pacman In Python Code
Pacman In Python Code
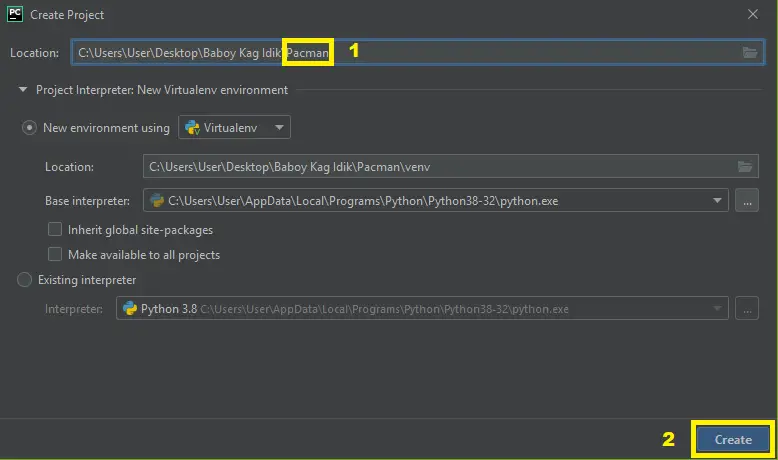
- Step 1: Create a project name.
First open Pycharm IDE and then create a “project name” after creating a project name click the “create” button.

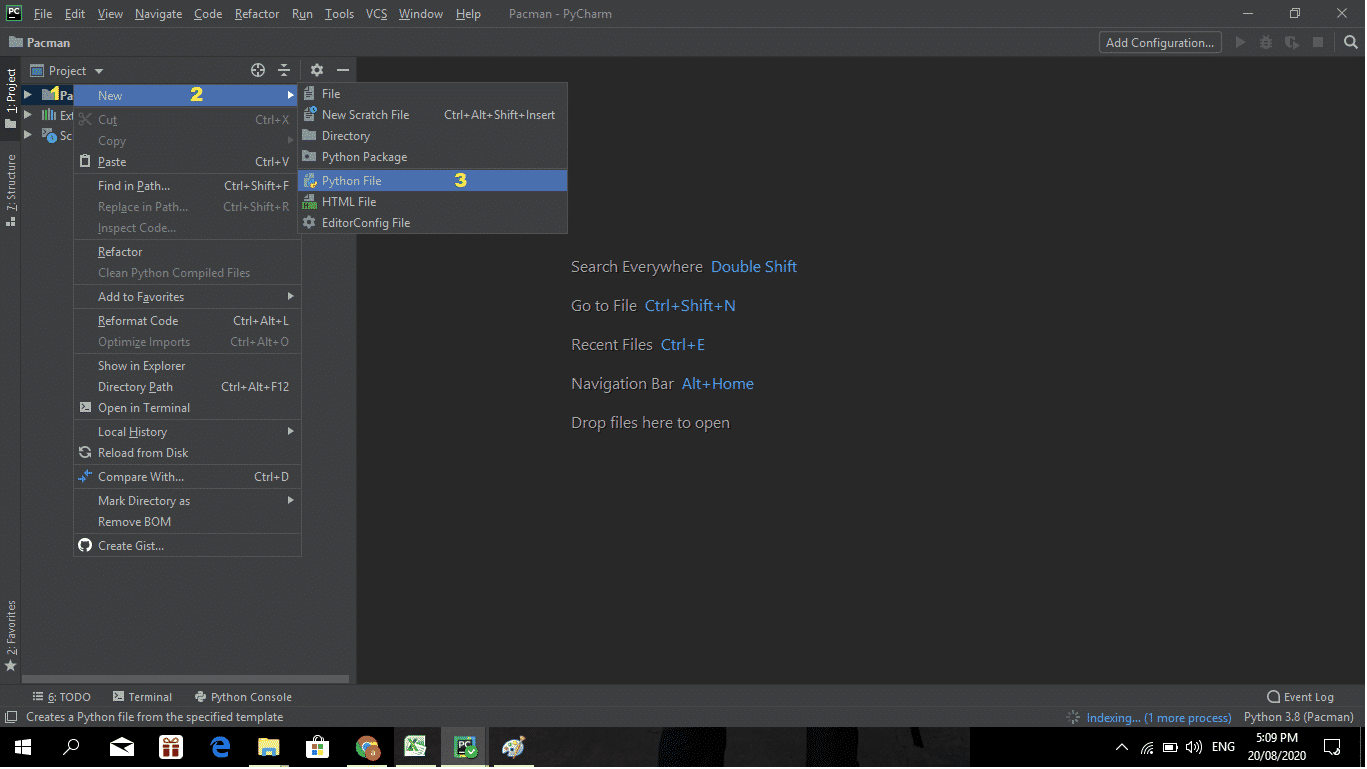
- Step 2: Create a python file.
Second after creating a project name, “right click” your project name and then click “new” after that click the “python file“.

- Step 3: Name your python file.
Third after creating a python file, Name your python file after that click “enter“.

- Step 4. The actual code.
You are free to copy the code given below and download the full source code below.
The Code Given Below Is For The Python File Enemies
import pygame
import random

SCREEN_WIDTH = 800
SCREEN_HEIGHT = 576

# Define some colors
BLACK = (0,0,0)
WHITE = (255,255,255)
BLUE = (0,0,255)
GREEN = (0,255,0)
RED = (255,0,0)

class Block(pygame.sprite.Sprite):
    def __init__(self,x,y,color,width,height):
        # Call the parent class (Sprite) constructor
        pygame.sprite.Sprite.__init__(self)
        # Set the background color and set it to be transparent
        self.image = pygame.Surface([width,height])
        self.image.fill(color)
        self.rect = self.image.get_rect()
        self.rect.topleft = (x,y)


class Ellipse(pygame.sprite.Sprite):
    def __init__(self,x,y,color,width,height):
        # Call the parent class (Sprite) constructor
        pygame.sprite.Sprite.__init__(self)
        # Set the background color and set it to be transparent
        self.image = pygame.Surface([width,height])
        self.image.fill(BLACK)
        self.image.set_colorkey(BLACK)
        # Draw the ellipse
        pygame.draw.ellipse(self.image,color,[0,0,width,height])
        self.rect = self.image.get_rect()
        self.rect.topleft = (x,y)


class Slime(pygame.sprite.Sprite):
    def __init__(self,x,y,change_x,change_y):
        # Call the parent class (Sprite) constructor
        pygame.sprite.Sprite.__init__(self)
        # Set the direction of the slime
        self.change_x = change_x
        self.change_y = change_y
        # Load image
        self.image = pygame.image.load("slime.png").convert_alpha()
        self.rect = self.image.get_rect()
        self.rect.topleft = (x,y)


    def update(self,horizontal_blocks,vertical_blocks):
        self.rect.x += self.change_x
        self.rect.y += self.change_y
        if self.rect.right < 0:
            self.rect.left = SCREEN_WIDTH
        elif self.rect.left > SCREEN_WIDTH:
            self.rect.right = 0
        if self.rect.bottom < 0:
            self.rect.top = SCREEN_HEIGHT
        elif self.rect.top > SCREEN_HEIGHT:
            self.rect.bottom = 0

        if self.rect.topleft in self.get_intersection_position():
            direction = random.choice(("left","right","up","down"))
            if direction == "left" and self.change_x == 0:
                self.change_x = -2
                self.change_y = 0
            elif direction == "right" and self.change_x == 0:
                self.change_x = 2
                self.change_y = 0
            elif direction == "up" and self.change_y == 0:
                self.change_x = 0
                self.change_y = -2
            elif direction == "down" and self.change_y == 0:
                self.change_x = 0
                self.change_y = 2


    def get_intersection_position(self):
        items = []
        for i,row in enumerate(enviroment()):
            for j,item in enumerate(row):
                if item == 3:
                    items.append((j*32,i*32))

        return items


def enviroment():
    grid = ((0,2,0,0,0,0,0,0,0,2,0,0,0,0,0,0,0,2,0,0,0,0,0,2,0),
            (0,2,0,0,0,0,0,0,0,2,0,0,0,0,0,0,0,2,0,0,0,0,0,2,0),
            (1,3,1,1,1,1,1,1,1,3,1,1,1,1,1,1,1,3,1,1,1,1,1,3,1),
            (0,2,0,0,0,0,0,0,0,2,0,0,0,0,0,0,0,2,0,0,0,0,0,2,0),
            (0,2,0,0,0,0,0,0,0,2,0,0,0,0,0,0,0,2,0,0,0,0,0,2,0),
            (0,2,0,0,0,0,0,0,0,2,0,0,0,0,0,0,0,2,0,0,0,0,0,2,0),
            (1,3,1,1,1,1,1,1,1,3,1,1,1,1,1,1,1,3,1,1,1,1,1,3,1),
            (0,2,0,0,0,0,0,0,0,2,0,0,0,0,0,0,0,2,0,0,0,0,0,2,0),
            (0,2,0,0,0,0,0,0,0,2,0,0,0,0,0,0,0,2,0,0,0,0,0,2,0),
            (0,2,0,0,0,0,0,0,0,2,0,0,0,0,0,0,0,2,0,0,0,0,0,2,0),
            (1,3,1,1,1,1,1,1,1,3,1,1,1,1,1,1,1,3,1,1,1,1,1,3,1),
            (0,2,0,0,0,0,0,0,0,2,0,0,0,0,0,0,0,2,0,0,0,0,0,2,0),
            (0,2,0,0,0,0,0,0,0,2,0,0,0,0,0,0,0,2,0,0,0,0,0,2,0),
            (0,2,0,0,0,0,0,0,0,2,0,0,0,0,0,0,0,2,0,0,0,0,0,2,0),
            (1,3,1,1,1,1,1,1,1,3,1,1,1,1,1,1,1,3,1,1,1,1,1,3,1),
            (0,2,0,0,0,0,0,0,0,2,0,0,0,0,0,0,0,2,0,0,0,0,0,2,0),
            (0,2,0,0,0,0,0,0,0,2,0,0,0,0,0,0,0,2,0,0,0,0,0,2,0),
            (0,2,0,0,0,0,0,0,0,2,0,0,0,0,0,0,0,2,0,0,0,0,0,2,0))

    return grid

def draw_enviroment(screen):
    for i,row in enumerate(enviroment()):
        for j,item in enumerate(row):
            if item == 1:
                pygame.draw.line(screen, BLUE , [j*32, i*32], [j*32+32,i*32], 3)
                pygame.draw.line(screen, BLUE , [j*32, i*32+32], [j*32+32,i*32+32], 3)
            elif item == 2:
                pygame.draw.line(screen, BLUE , [j*32, i*32], [j*32,i*32+32], 3)
                pygame.draw.line(screen, BLUE , [j*32+32, i*32], [j*32+32,i*32+32], 3)
The code given is the python file enemies which is showing the different color of ghost enemies that you want to avoid.
The Code Given Below Is For The Python File Game
import pygame
from player import Player
from enemies import *
import tkinter
from tkinter import messagebox
SCREEN_WIDTH = 800
SCREEN_HEIGHT = 576

# Define some colors
BLACK = (0,0,0)
WHITE = (255,255,255)
BLUE = (0,0,255)
RED = (255,0,0)

class Game(object):
    def __init__(self):
        self.font = pygame.font.Font(None,40)
        self.about = False
        self.game_over = True
        # Create the variable for the score
        self.score = 0
        # Create the font for displaying the score on the screen
        self.font = pygame.font.Font(None,35)
        # Create the menu of the game
        self.menu = Menu(("Start","About","Exit"),font_color = WHITE,font_size=60)
        # Create the player
        self.player = Player(32,128,"player.png")
        # Create the blocks that will set the paths where the player can go
        self.horizontal_blocks = pygame.sprite.Group()
        self.vertical_blocks = pygame.sprite.Group()
        # Create a group for the dots on the screen
        self.dots_group = pygame.sprite.Group()
        # Set the enviroment:
        for i,row in enumerate(enviroment()):
            for j,item in enumerate(row):
                if item == 1:
                    self.horizontal_blocks.add(Block(j*32+8,i*32+8,BLACK,16,16))
                elif item == 2:
                    self.vertical_blocks.add(Block(j*32+8,i*32+8,BLACK,16,16))
        # Create the enemies
        self.enemies = pygame.sprite.Group()
        self.enemies.add(Slime(288,96,0,2))
        self.enemies.add(Slime(288,320,0,-2))
        self.enemies.add(Slime(544,128,0,2))
        self.enemies.add(Slime(32,224,0,2))
        self.enemies.add(Slime(160,64,2,0))
        self.enemies.add(Slime(448,64,-2,0))
        self.enemies.add(Slime(640,448,2,0))
        self.enemies.add(Slime(448,320,2,0))
        # Add the dots inside the game
        for i, row in enumerate(enviroment()):
            for j, item in enumerate(row):
                if item != 0:
                    self.dots_group.add(Ellipse(j*32+12,i*32+12,WHITE,8,8))

        # Load the sound effects
        self.pacman_sound = pygame.mixer.Sound("pacman_sound.ogg")
        self.game_over_sound = pygame.mixer.Sound("game_over_sound.ogg")


    def process_events(self):
        for event in pygame.event.get(): # User did something
            if event.type == pygame.QUIT: # If user clicked close
                return True
            self.menu.event_handler(event)
            if event.type == pygame.KEYDOWN:
                if event.key == pygame.K_RETURN:
                    if self.game_over and not self.about:
                        if self.menu.state == 0:
                            # ---- START ------
                            self.__init__()
                            self.game_over = False
                        elif self.menu.state == 1:
                            # --- ABOUT ------
                            self.about = True
                        elif self.menu.state == 2:
                            # --- EXIT -------
                            # User clicked exit
                            return True

                elif event.key == pygame.K_RIGHT:
                    self.player.move_right()

                elif event.key == pygame.K_LEFT:
                    self.player.move_left()

                elif event.key == pygame.K_UP:
                    self.player.move_up()

                elif event.key == pygame.K_DOWN:
                    self.player.move_down()

                elif event.key == pygame.K_ESCAPE:
                    self.game_over = True
                    self.about = False

            elif event.type == pygame.KEYUP:
                if event.key == pygame.K_RIGHT:
                    self.player.stop_move_right()
                elif event.key == pygame.K_LEFT:
                    self.player.stop_move_left()
                elif event.key == pygame.K_UP:
                    self.player.stop_move_up()
                elif event.key == pygame.K_DOWN:
                    self.player.stop_move_down()

            elif event.type == pygame.MOUSEBUTTONDOWN:
                self.player.explosion = True

        return False

    def run_logic(self):
        if not self.game_over:
            self.player.update(self.horizontal_blocks,self.vertical_blocks)
            block_hit_list = pygame.sprite.spritecollide(self.player,self.dots_group,True)
            # When the block_hit_list contains one sprite that means that player hit a dot
            if len(block_hit_list) > 0:
                # Here will be the sound effect
                self.pacman_sound.play()
                self.score += 1
            block_hit_list = pygame.sprite.spritecollide(self.player,self.enemies,True)
            if len(block_hit_list) > 0:
                self.player.explosion = True
                self.game_over_sound.play()
            self.game_over = self.player.game_over
            self.enemies.update(self.horizontal_blocks,self.vertical_blocks)
           # tkMessageBox.showinfo("GAME OVER!","Final Score = "+(str)(GAME.score))

    def display_frame(self,screen):
        # First, clear the screen to white. Don't put other drawing commands
        screen.fill(BLACK)
        # --- Drawing code should go here
        if self.game_over:
            if self.about:
                self.display_message(screen,"It is an arcade Game")
                #"a maze containing various dots,n"
                #known as Pac-Dots, and four ghosts.n"
                #"The four ghosts roam the maze, trying to kill Pac-Man.n"
                #"If any of the ghosts hit Pac-Man, he loses a life;n"
                #"the game is over.n")
            else:
                self.menu.display_frame(screen)
        else:
            # --- Draw the game here ---
            self.horizontal_blocks.draw(screen)
            self.vertical_blocks.draw(screen)
            draw_enviroment(screen)
            self.dots_group.draw(screen)
            self.enemies.draw(screen)
            screen.blit(self.player.image,self.player.rect)
            #text=self.font.render("Score: "+(str)(self.score), 1,self.RED)
            #screen.blit(text, (30, 650))
            # Render the text for the score
            text = self.font.render("Score: " + str(self.score),True,GREEN)
            # Put the text on the screen
            screen.blit(text,[120,20])

        # --- Go ahead and update the screen with what we've drawn.
        pygame.display.flip()

    def display_message(self,screen,message,color=(255,0,0)):
        label = self.font.render(message,True,color)
        # Get the width and height of the label
        width = label.get_width()
        height = label.get_height()
        # Determine the position of the label
        posX = (SCREEN_WIDTH /2) - (width /2)
        posY = (SCREEN_HEIGHT /2) - (height /2)
        # Draw the label onto the screen
        screen.blit(label,(posX,posY))


class Menu(object):
    state = 0
    def __init__(self,items,font_color=(0,0,0),select_color=(255,0,0),ttf_font=None,font_size=25):
        self.font_color = font_color
        self.select_color = select_color
        self.items = items
        self.font = pygame.font.Font(ttf_font,font_size)

    def display_frame(self,screen):
        for index, item in enumerate(self.items):
            if self.state == index:
                label = self.font.render(item,True,self.select_color)
            else:
                label = self.font.render(item,True,self.font_color)

            width = label.get_width()
            height = label.get_height()

            posX = (SCREEN_WIDTH /2) - (width /2)
            # t_h: total height of text block
            t_h = len(self.items) * height
            posY = (SCREEN_HEIGHT /2) - (t_h /2) + (index * height)

            screen.blit(label,(posX,posY))

    def event_handler(self,event):
        if event.type == pygame.KEYDOWN:
            if event.key == pygame.K_UP:
                if self.state > 0:
                    self.state -= 1
            elif event.key == pygame.K_DOWN:
                if self.state < len(self.items) -1:
                    self.state += 1
The code given is the python file game which is in this python file have many function module.
The Code Given Below Is For The Python File Player
import pygame

SCREEN_WIDTH = 800
SCREEN_HEIGHT = 576

# Define some colors
BLACK = (0,0,0)
WHITE = (255,255,255)

class Player(pygame.sprite.Sprite):
    change_x = 0
    change_y = 0
    explosion = False
    game_over = False
    def __init__(self,x,y,filename):
        # Call the parent class (sprite) constructor
        pygame.sprite.Sprite.__init__(self)
        self.image = pygame.image.load(filename).convert()
        self.image.set_colorkey(BLACK)
        self.rect = self.image.get_rect()
        self.rect.topleft = (x,y)
        # Load image which will be for the animation
        img = pygame.image.load("walk.png").convert()
        # Create the animations objects
        self.move_right_animation = Animation(img,32,32)
        self.move_left_animation = Animation(pygame.transform.flip(img,True,False),32,32)
        self.move_up_animation = Animation(pygame.transform.rotate(img,90),32,32)
        self.move_down_animation = Animation(pygame.transform.rotate(img,270),32,32)
        # Load explosion image
        img = pygame.image.load("explosion.png").convert()
        self.explosion_animation = Animation(img,30,30)
        # Save the player image
        self.player_image = pygame.image.load(filename).convert()
        self.player_image.set_colorkey(BLACK)

    def update(self,horizontal_blocks,vertical_blocks):
        if not self.explosion:
            if self.rect.right < 0:
                self.rect.left = SCREEN_WIDTH
            elif self.rect.left > SCREEN_WIDTH:
                self.rect.right = 0
            if self.rect.bottom < 0:
                self.rect.top = SCREEN_HEIGHT
            elif self.rect.top > SCREEN_HEIGHT:
                self.rect.bottom = 0
            self.rect.x += self.change_x
            self.rect.y += self.change_y

            # This will stop the user for go up or down when it is inside of the box

            for block in pygame.sprite.spritecollide(self,horizontal_blocks,False):
                self.rect.centery = block.rect.centery
                self.change_y = 0
            for block in pygame.sprite.spritecollide(self,vertical_blocks,False):
                self.rect.centerx = block.rect.centerx
                self.change_x = 0

            # This will cause the animation to start

            if self.change_x > 0:
                self.move_right_animation.update(10)
                self.image = self.move_right_animation.get_current_image()
            elif self.change_x < 0:
                self.move_left_animation.update(10)
                self.image = self.move_left_animation.get_current_image()

            if self.change_y > 0:
                self.move_down_animation.update(10)
                self.image = self.move_down_animation.get_current_image()
            elif self.change_y < 0:
                self.move_up_animation.update(10)
                self.image = self.move_up_animation.get_current_image()
        else:
            if self.explosion_animation.index == self.explosion_animation.get_length() -1:
                pygame.time.wait(500)
                self.game_over = True
            self.explosion_animation.update(12)
            self.image = self.explosion_animation.get_current_image()


    def move_right(self):
        self.change_x = 3

    def move_left(self):
        self.change_x = -3

    def move_up(self):
        self.change_y = -3

    def move_down(self):
        self.change_y = 3

    def stop_move_right(self):
        if self.change_x != 0:
            self.image = self.player_image
        self.change_x = 0

    def stop_move_left(self):
        if self.change_x != 0:
            self.image = pygame.transform.flip(self.player_image,True,False)
        self.change_x = 0

    def stop_move_up(self):
        if self.change_y != 0:
            self.image = pygame.transform.rotate(self.player_image,90)
        self.change_y = 0

    def stop_move_down(self):
        if self.change_y != 0:
            self.image = pygame.transform.rotate(self.player_image,270)
        self.change_y = 0


class Animation(object):
    def __init__(self,img,width,height):
        # Load the sprite sheet
        self.sprite_sheet = img
        # Create a list to store the images
        self.image_list = []
        self.load_images(width,height)
        # Create a variable which will hold the current image of the list
        self.index = 0
        # Create a variable that will hold the time
        self.clock = 1

    def load_images(self,width,height):
        # Go through every single image in the sprite sheet
        for y in range(0,self.sprite_sheet.get_height(),height):
            for x in range(0,self.sprite_sheet.get_width(),width):
                # load images into a list
                img = self.get_image(x,y,width,height)
                self.image_list.append(img)

    def get_image(self,x,y,width,height):
        # Create a new blank image
        image = pygame.Surface([width,height]).convert()
        # Copy the sprite from the large sheet onto the smaller
        image.blit(self.sprite_sheet,(0,0),(x,y,width,height))
        # Assuming black works as the transparent color
        image.set_colorkey((0,0,0))
        # Return the image
        return image

    def get_current_image(self):
        return self.image_list[self.index]

    def get_length(self):
        return len(self.image_list)

    def update(self,fps=30):
        step = 30 // fps
        l = range(1,30,step)
        if self.clock == 30:
            self.clock = 1
        else:
            self.clock += 1

        if self.clock in l:
            # Increase index
            self.index += 1
            if self.index == len(self.image_list):
                self.index = 0
The code given is the python file player that can manage the game.
The Code Given Below Is For The Python File Main
import pygame
from game import Game

SCREEN_WIDTH = 800
SCREEN_HEIGHT = 576

def main():
    # Initialize all imported pygame modules
    pygame.init()
    # Set the width and height of the screen [width, height]
    screen = pygame.display.set_mode((SCREEN_WIDTH,SCREEN_HEIGHT))
    # Set the current window caption
    pygame.display.set_caption("PACMAN")
    #Loop until the user clicks the close button.
    done = False
    # Used to manage how fast the screen updates
    clock = pygame.time.Clock()
    # Create a game object
    game = Game()
    # -------- Main Program Loop -----------
    while not done:
        # --- Process events (keystrokes, mouse clicks, etc)
        done = game.process_events()
        # --- Game logic should go here
        game.run_logic()
        # --- Draw the current frame
        game.display_frame(screen)
        # --- Limit to 30 frames per second
        clock.tick(30)
        #tkMessageBox.showinfo("GAME OVER!","Final Score = "+(str)(GAME.score))
    # Close the window and quit.
    # If you forget this line, the program will 'hang'
    # on exit if running from IDLE.
    pygame.quit()

if __name__ == '__main__':
    main()
The code given is the python file main which is in this python file connected all the given python file.
Output

Pacman Game In Python : Project Information
| Project Name: | Pacman Game In Python |
| Language/s Used: | Python (GUI) Based |
| Python version (Recommended): | 2.x or 3.x |
| Database: | None |
| Type: | Python App |
| Developer: | IT SOURCECODE |
| Updates: | 0 |
Downloadable Source Code
I have here the list of Best Python Project with Source code free to download for free, I hope this can help you a lot.
Summary
The Pacman Code In Python is written in Python programming language, Python is very smooth to research the syntax emphasizes readability and it is able to reduces time ingesting in developing.
Also in this tutorial is the simplest way for the beginners or the student to enhance their logical skills in programming. and also in this game project is the way for the students or beginners in designing and developing games.
Related Articles
- Snakes and Ladders Game in Python with Source Code
- Code For Game in Python: Python Game Projects With Source Code
- Stickman Game in Python with Source Code
- Tank Game Python with Source Code
- Tetris In Python Code
- Mario Game In Python With Source Code
- Hangman Game In Python With Source Code
- Aircraft War Game in Python with Source Code
- Snake Game In Python Code
- How to Make Bouncing Ball Game in Python with Source Code
- How to Create Rock-Paper-Scissor Game in Python
Inquiries
If you have any questions or suggestions about Pacman Code In Python , please feel free to leave a comment below.
Want to make pacman game in python then you are in the right place today in this python tutorial I will show you how to make a pacman game in python with code so read this guide till the end.
Pacman is one of the most popular games, I used to play this game when I was a kid. It is very simple game you can still play this game if you have Google play games it comes preinstalled on it.
If you don’t have much knowledge on python game development then it is going to be difficult for you but don’t worry I will provide you with the pacman python code so let’s see how to create this game.
Making Pacman Game In Python
To create this pacman game in python, I will use the freegames python library. It has a collection of free python games, you can use this module to create games in python.
Now let’s see step by step how to make pacman game in python. I will provide you with the python code for pacman game, so read till the end.
1. Install and setup python
If you have python installed, skip this. The first step is to install python, so go to the official python website and download the latest python version.
After download start the python installer and complete the setup it will install python on your computer.
2. Install freegames python library
Now you need to install freegames python library first create a new folder for this project and open a command prompt in the project location and paste the below command
pip install freegames
It will install the freegames python module in your project, so now create a python file and go to the next step
3. Copy and paste pacman python code
from random import choice
from turtle import *

from freegames import floor, vector

state = {'score': 0}
path = Turtle(visible=False)
writer = Turtle(visible=False)
aim = vector(5, 0)
pacman = vector(-40, -80)
ghosts = [
    [vector(-180, 160), vector(5, 0)],
    [vector(-180, -160), vector(0, 5)],
    [vector(100, 160), vector(0, -5)],
    [vector(100, -160), vector(-5, 0)],
]
# fmt: off
tiles = [
    0, 0, 0, 0, 0, 0, 0, 0, 0, 0, 0, 0, 0, 0, 0, 0, 0, 0, 0, 0,
    0, 1, 1, 1, 1, 1, 1, 1, 0, 1, 1, 1, 1, 1, 1, 1, 0, 0, 0, 0,
    0, 1, 0, 0, 1, 0, 0, 1, 0, 1, 0, 0, 1, 0, 0, 1, 0, 0, 0, 0,
    0, 1, 1, 1, 1, 1, 1, 1, 1, 1, 1, 1, 1, 1, 1, 1, 0, 0, 0, 0,
    0, 1, 0, 0, 1, 0, 1, 0, 0, 0, 1, 0, 1, 0, 0, 1, 0, 0, 0, 0,
    0, 1, 1, 1, 1, 0, 1, 1, 0, 1, 1, 0, 1, 1, 1, 1, 0, 0, 0, 0,
    0, 1, 0, 0, 1, 0, 0, 1, 0, 1, 0, 0, 1, 0, 0, 0, 0, 0, 0, 0,
    0, 1, 0, 0, 1, 0, 1, 1, 1, 1, 1, 0, 1, 0, 0, 0, 0, 0, 0, 0,
    0, 1, 1, 1, 1, 1, 1, 0, 0, 0, 1, 1, 1, 1, 1, 1, 0, 0, 0, 0,
    0, 0, 0, 0, 1, 0, 1, 1, 1, 1, 1, 0, 1, 0, 0, 1, 0, 0, 0, 0,
    0, 0, 0, 0, 1, 0, 1, 0, 0, 0, 1, 0, 1, 0, 0, 1, 0, 0, 0, 0,
    0, 1, 1, 1, 1, 1, 1, 1, 0, 1, 1, 1, 1, 1, 1, 1, 0, 0, 0, 0,
    0, 1, 0, 0, 1, 0, 0, 1, 0, 1, 0, 0, 0, 0, 0, 1, 0, 0, 0, 0,
    0, 1, 1, 0, 1, 1, 1, 1, 1, 1, 1, 1, 1, 0, 1, 1, 0, 0, 0, 0,
    0, 0, 1, 0, 1, 0, 1, 0, 0, 0, 1, 0, 1, 0, 1, 0, 0, 0, 0, 0,
    0, 1, 1, 1, 1, 0, 1, 1, 0, 1, 1, 0, 1, 1, 1, 1, 0, 0, 0, 0,
    0, 1, 0, 0, 0, 0, 0, 1, 0, 1, 0, 0, 0, 0, 0, 1, 0, 0, 0, 0,
    0, 1, 1, 1, 1, 1, 1, 1, 1, 1, 1, 1, 1, 1, 1, 1, 0, 0, 0, 0,
    0, 0, 0, 0, 0, 0, 0, 0, 0, 0, 0, 0, 0, 0, 0, 0, 0, 0, 0, 0,
    0, 0, 0, 0, 0, 0, 0, 0, 0, 0, 0, 0, 0, 0, 0, 0, 0, 0, 0, 0,
]
# fmt: on


def square(x, y):
    """Draw square using path at (x, y)."""
    path.up()
    path.goto(x, y)
    path.down()
    path.begin_fill()

    for count in range(4):
        path.forward(20)
        path.left(90)

    path.end_fill()


def offset(point):
    """Return offset of point in tiles."""
    x = (floor(point.x, 20) + 200) / 20
    y = (180 - floor(point.y, 20)) / 20
    index = int(x + y * 20)
    return index


def valid(point):
    """Return True if point is valid in tiles."""
    index = offset(point)

    if tiles[index] == 0:
        return False

    index = offset(point + 19)

    if tiles[index] == 0:
        return False

    return point.x % 20 == 0 or point.y % 20 == 0


def world():
    """Draw world using path."""
    bgcolor('black')
    path.color('blue')

    for index in range(len(tiles)):
        tile = tiles[index]

        if tile > 0:
            x = (index % 20) * 20 - 200
            y = 180 - (index // 20) * 20
            square(x, y)

            if tile == 1:
                path.up()
                path.goto(x + 10, y + 10)
                path.dot(2, 'white')


def move():
    """Move pacman and all ghosts."""
    writer.undo()
    writer.write(state['score'])

    clear()

    if valid(pacman + aim):
        pacman.move(aim)

    index = offset(pacman)

    if tiles[index] == 1:
        tiles[index] = 2
        state['score'] += 1
        x = (index % 20) * 20 - 200
        y = 180 - (index // 20) * 20
        square(x, y)

    up()
    goto(pacman.x + 10, pacman.y + 10)
    dot(20, 'yellow')

    for point, course in ghosts:
        if valid(point + course):
            point.move(course)
        else:
            options = [
                vector(5, 0),
                vector(-5, 0),
                vector(0, 5),
                vector(0, -5),
            ]
            plan = choice(options)
            course.x = plan.x
            course.y = plan.y

        up()
        goto(point.x + 10, point.y + 10)
        dot(20, 'red')

    update()

    for point, course in ghosts:
        if abs(pacman - point) < 20:
            return

    ontimer(move, 100)


def change(x, y):
    """Change pacman aim if valid."""
    if valid(pacman + vector(x, y)):
        aim.x = x
        aim.y = y


setup(420, 420, 370, 0)
hideturtle()
tracer(False)
writer.goto(160, 160)
writer.color('white')
writer.write(state['score'])
listen()
onkey(lambda: change(5, 0), 'Right')
onkey(lambda: change(-5, 0), 'Left')
onkey(lambda: change(0, 5), 'Up')
onkey(lambda: change(0, -5), 'Down')
world()
move()
done()
Above is the python pacman code, copy it and paste it in your python file. Now open a terminal or command prompt at the project location and paste the below command to run it.
python filename.py
The above command will start this game in a new window. You can use an online python compiler to run this game.
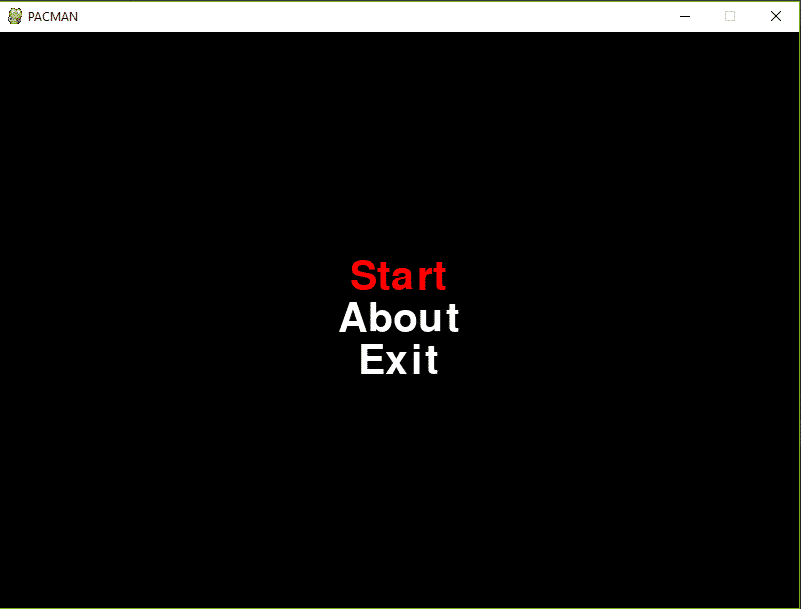
Below is the image output of how this pacman game that we made in python programming will look like.

Use the arrow keys to move the player, if you touch the enemies the game will be over. The game has some bugs.
Summary
This was the tutorial on how to make pacman game in python programming. I hope you found this tutorial helpful and useful.
Here are more python games tutorial you may find interesting:
- Making a battleship game in python.
- Making a fruit ninja game in python.
- Making minecraft game in python clone.
I hope you found what you were looking for from this tutorial and if you want more python tutorials like this, do join our Telegram channel for future updates.
Thanks for reading, have a nice day 🙂
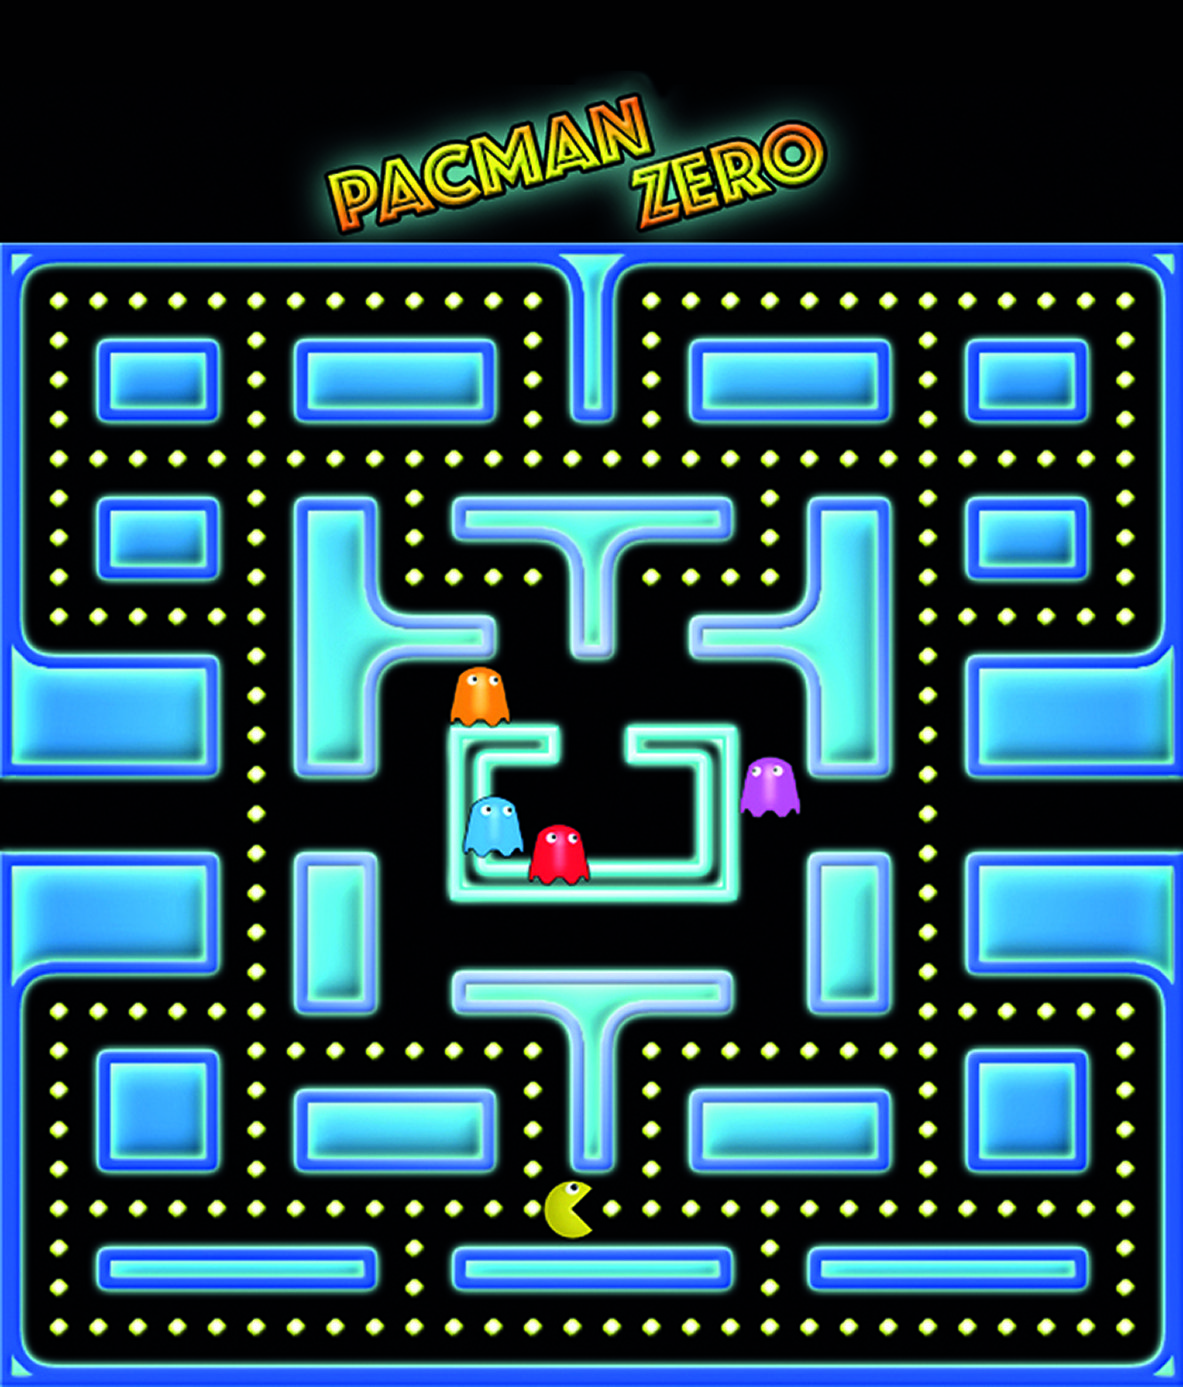
The concept of Pac-Man is quite simple. Pac-Man eats dots in a maze to score points. Avoid the ghosts unless you have just eaten a power-up, in which case ghosts are tasty. In this series we have gradually introduced new elements of Pygame Zero and also concepts around writing games. This is the first instalment in a two-part tutorial which will show you some more tricks to writing arcade games with Pygame Zero. We will also use some more advanced programming concepts to make our games even better. In this first part, we will put together the basics of the Pac-Man game and introduce the concept of adding extra Python modules to our program.
See also:
- Pygame Zero Invaders
- Pygame Zero: Space Invaders II
- Rediscover Retro Computing in The MagPi #67
- Easy retro gaming on a Raspberry Pi with Lakka and NOOBS
- The best Python websites and resources
- Learn Python with a Raspberry Pi
This article was written by Mark Vanstone and first appeared in The MagPi magazine issue #76. Sign up to our newsletter to get a free digital PDF of The MagPi every month, or click here to subscribe to our print magazine.
Code your own Pac-Man in Python
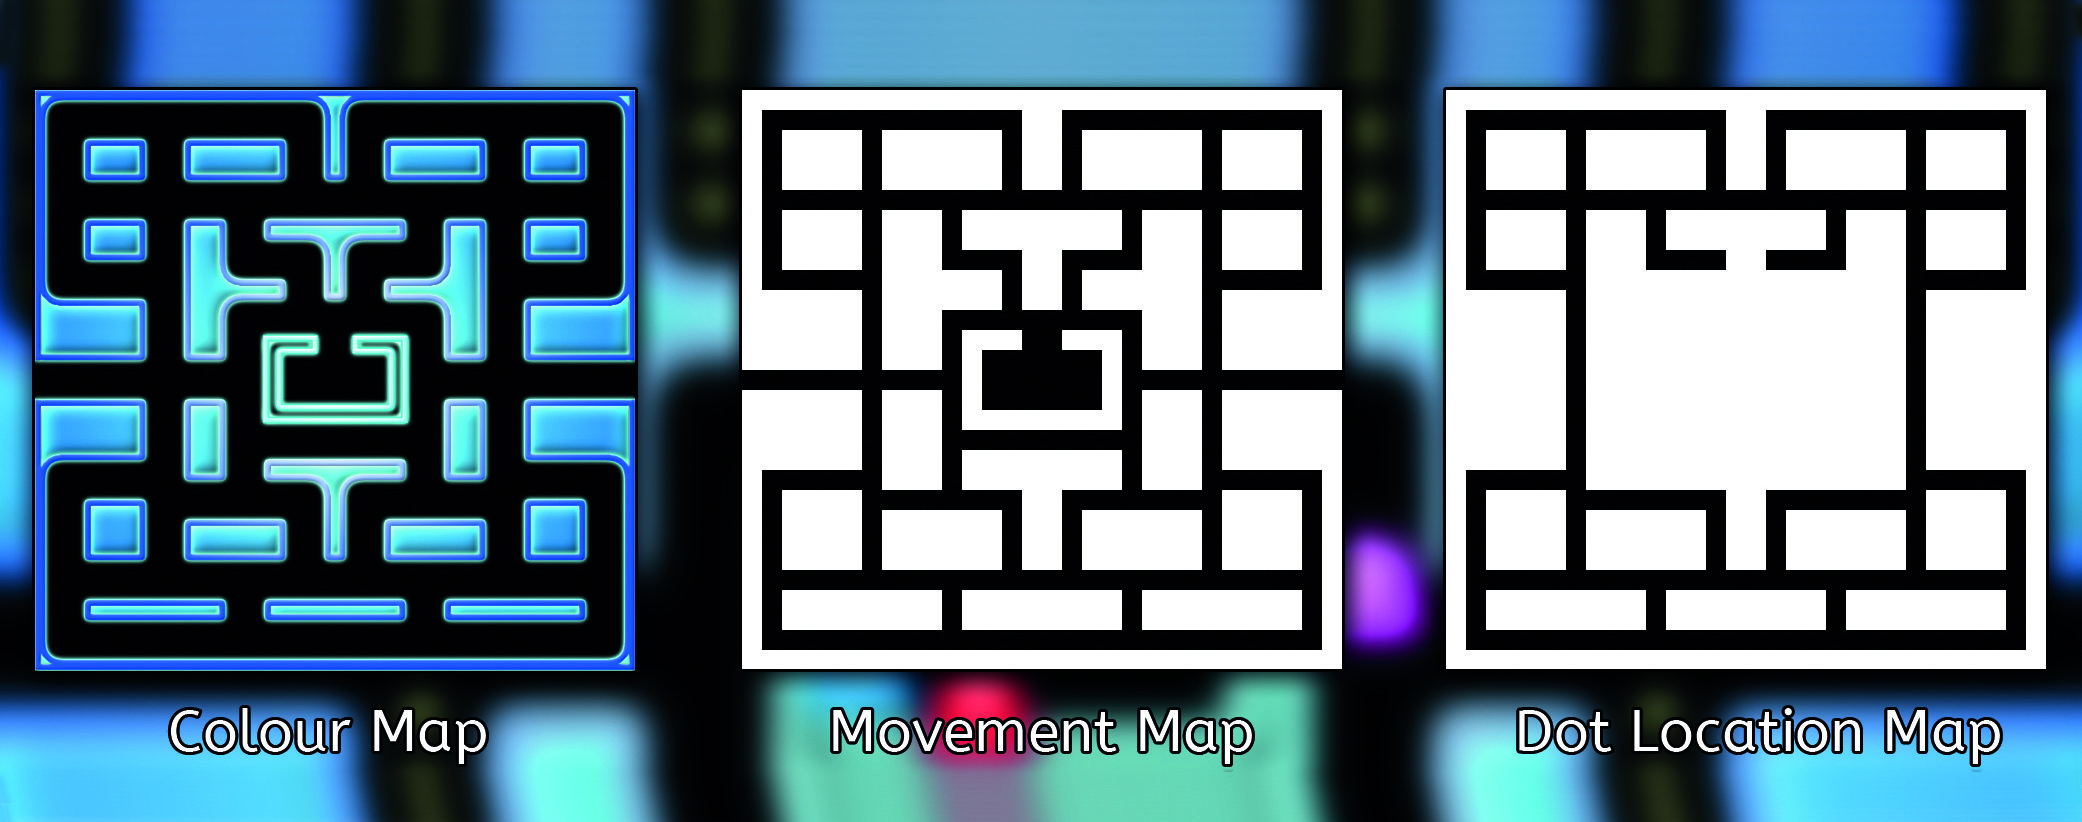
As with the more recent episodes of this series, let’s jump straight in, assuming that we have our basic Pygame Zero setup done. Let’s set our window size to WIDTH = 600 and HEIGHT = 660. This will give us room for a roughly square maze and a header area for some game information. We can get our gameplay area set up straight away by blitting two graphics – ‘header’ and ‘colourmap’ – to 0,0 and 0,80 respectively in the draw() function. You can make these graphics yourself or you can use ours, which can be found on this GitHub repository.
Pac-Man is a-mazing
The original game had a very specific layout to the maze, but many different ones have appeared in later versions. The one we will be using is very similar to the original, but you can make your own design if you want. If you make your own, you’ll also have to make two more maps (we’ll come to those in a bit) which help with the running of the game. The main things about the map is that it has a central area where the ghosts start from and it doesn’t have any other closed-in areas that the ghosts are likely to get trapped in (they can be a bit stupid sometimes).
Hmmm, pizza
Our next challenge is to get a player actor moving around the maze. For some unknown reason, the game’s creator, Toru Iwatani, decided to make the main character a pizza that ate dots. Well, the eighties were a bit strange and that seemed perfectly reasonable at the time. We’ll need two frames for our character: one with the mouth open and one with it closed. We can create our player actor near the top of the code using player = Actor(«pacman_o»). This will create the actor with the mouth-open graphic. We will then set the actor’s location in an init() function, as in previous programs.
Modulify to simplify
We can get our player onto the play area by setting player.x = 290 and player.y = 570 in the init() function and then call player.draw() in the draw() function, but to move the player character we’ll need to get some input from the player. Previously we have used keyboard and mouse input, but this time we are going to have the option of joystick or gamepad input. Pygame Zero doesn’t currently directly support gamepads, but we are going to borrow a bit of the Pygame module to get this working. We are also going to make a separate Python module for our input.

It’s a joystick.init
Setting up a new module is easy. All we need to do is make a new file, in this case gameinput.py, and in our main program at the top, write import gameinput. In this new file we can import the Pygame functions we need with from pygame import joystick, key and from pygame.locals import *. We can then initialise the Pygame joystick object (this also includes gamepads) by typing joystick.init(). We can find out how many joysticks or gamepads are connected by using joystickcount = joystick.getcount(). If we find any joysticks connected, we need to initialise them individually – see figure1.py.
# gameinput Module

from pygame import joystick, key
from pygame.locals import *

joystick.init()
joystick_count = joystick.get_count()

if(joystick_count > 0):
    joyin = joystick.Joystick(0)
    joyin.init()
    # For the purposes of this tutorial
    # we are only going to use the first
    # joystick that is connected.
Checking the input
We can now write a function in our gameinput module to check input from the player. If we define the function with def checkInput(p): we can get the x axis of a joystick using joyin.getaxis(0) and the y axis by using joyin.getaxis(1). The numbers that are returned from these calls will be between -1 and +1, with 0 being the central position. We can check to see if the values are over 0.8 or under -0.8, as, depending on the device, we may not actually see -1 or 1 being returned. You may like to test this with your gamepad or joystick to see what range of values are returned.
Up, down, left, or right
The variable p that we are passing into our checkInput() function will be the player actor. We can test each of the directions of the joystick at the same time as the keyboard and then set the player angle (so that it points in the correct direction for movement) and also how much it needs to move. We’ll set these by saying (for example, if the left arrow is pressed or the joystick is moved to the left) if key.getpressed()[KLEFT] or xaxis < -0.8: and then p.angle = 180 and p.movex = -20. See figure2.py for the full checkInput() function.
def checkInput(p):
    global joyin, joystick_count
    xaxis = yaxis = 0
    if joystick_count > 0:
        xaxis = joyin.get_axis(0)
        yaxis = joyin.get_axis(1)
    if key.get_pressed()[K_LEFT] or xaxis < -0.8:
        p.angle = 180
        p.movex = -20
    if key.get_pressed()[K_RIGHT] or xaxis > 0.8:
        p.angle = 0
        p.movex = 20
    if key.get_pressed()[K_UP] or yaxis < -0.8:
        p.angle = 90
        p.movey = -20
    if key.get_pressed()[K_DOWN] or yaxis > 0.8:
        p.angle = 270
        p.movey = 20
Get a move on!
Now we have our input function set up, we can call it from the update() function. Because this function is in a different module, we need to prefix it with the module name. In the update() function we write gameinput.checkInput(player). After this function has been called, if there has been any input, we should have some variables set in the player actor that we can use to move. We can say if player.movex or player.movey: and then use the animate() function to move by the amount specified in player.movex and player.movey.
Hold your horses
The way we have the code at the moment means that any time there is some input, we fire off a new animation. This will soon mean that layers of animation get called over the top of each other, but what we want is for the animation to run and then start looking for new input. To do this we need an input locking system. We can call an input lock function before the move and then wait for the animation to finish before unlocking to look for more input. Look at figure3.py to see how we can make this locking system.
# inside update() function

    if player.movex or player.movey:
        inputLock()
        animate(player, pos=(player.x + player.movex, player.y + player.movey), duration=1/SPEED, tween='linear', on_finished=inputUnLock)

# outside update() function

def inputLock():
    global player
    player.inputActive = False

def inputUnLock():
    global player
    player.movex = player.movey = 0
    player.inputActive = True
You can’t just move anywhere
Now, here comes the interesting bit. We want our player actor to move around the maze, but at the moment it will go though the walls and even off the screen. We need to restrict the movement only to the corridors of the maze. There are several different ways we could do this, but for this game we’re going to have an image map marking the areas that the player actor can move within. The map will be a black and white one, showing just the corridors as black and the walls as white. We will then look at the map in the direction we want to move and see if it is black; if it is, we can move.
Testing the map
To be able to test the colour of a part of an image, we need to borrow a few functions from Pygame again. We’ll also put our map functions in a separate module. So make a new Python file and call it gamemaps.py and in it we’ll write from pygame import image, Color.
# gamemaps module

from pygame import image, Color
moveimage = image.load('images/pacmanmovemap.png')
dotimage = image.load('images/pacmandotmap.png')

def checkMovePoint(p):
    global moveimage
    if p.x+p.movex < 0: p.x = p.x+600
    if p.x+p.movex > 600: p.x = p.x-600
    if moveimage.get_at((int(p.x+p.movex), int(p.y+p.movey-80))) != Color('black'):
        p.movex = p.movey = 0

def checkDotPoint(x,y):
    global dotimage
    if dotimage.get_at((int(x), int(y))) == Color('black'):
        return True
    return False

def getPossibleDirection(g):
    global moveimage
    if g.x-20 < 0:
        g.x = g.x+600
    if g.x+20 > 600:
        g.x = g.x-600
    directions = [0,0,0,0]
    if g.x+20 < 600:
        if moveimage.get_at((int(g.x+20), int(g.y-80))) == Color('black'): directions[0] = 1
    if g.x < 600 and g.x >= 0:
        if moveimage.get_at((int(g.x), int(g.y-60))) == Color('black'): directions[1] = 1
    if g.x-20 >= 0:
        if moveimage.get_at((int(g.x-20), int(g.y-80))) == Color('black'): directions[2] = 1
    if g.x < 600 and g.x >= 0:
        if moveimage.get_at((int(g.x), int(g.y-100))) == Color('black'): directions[3] = 1
    return directions
We must also load in our movement map, which we need to do in the Pygame way: moveimage = image.load(‘images/pacmanmovemap.png’). Then all we need to do is write a function to check that the direction of the player is valid. See figure4.py for this function.
# gamemaps module
from pygame import image, Color
moveimage = image.load('images/pacmanmovemap.png')

def checkMovePoint(p):
    global moveimage
    if p.x+p.movex < 0: p.x = p.x+600
    if p.x+p.movex > 600: p.x = p.x-600
    if moveimage.get_at((int(p.x+p.movex), int(p.y+p.movey-80))) != Color('black'):
        p.movex = p.movey = 0
Using the movemap
To use this new module, we need to import gamemaps at the top of our main code file and then, before we animate the player (but after we have checked for input), we can call gamemaps.checkMovePoint(player),which will zero the movex and movey variables of the player if the move is not possible. So now we should find that the player actor can only move inside the corridors. We do have one special case that you may have noticed in figure4.py, and that is because there is one corridor where the player can move from one side of the screen to the other.
You spin me round
There is one more aspect to the movement of the player actor, and that is the animation. As Pac-Man moves, the mouth opens and shuts and points in the direction of the movement. The mouth opening and closing is easy enough: we have an image for open and one for closed and alternate between the two. For pointing in the correct direction, we can rotate the player actor. Unfortunately, this has a slight problem that Pac‑Man will be upside-down when moving left. So we just need to have one version that is switched the other way round. See figure5.py for a function that sorts out all of this.
def getPlayerImage():
    global player
    # we need to import datetime at the top of our code
    dt = datetime.now()
    a = player.angle
    # this next line will give us a number between
    # 0 and 5 depending on the time and SPEED
    tc = dt.microsecond%(500000/SPEED)/(100000/SPEED)
    if tc > 2.5 and (player.movex != 0 or player.movey !=0):
        # this is for the closed mouth images
        if a != 180:
            player.image = "pacman_c"
        else:
            # reverse image if facing left
            player.image = "pacman_cr"
    else:
        # this is for the open mouth images
        if a != 180:
            player.image = "pacman_o"
        else:
            player.image = "pacman_or"
    # set the angle on the player actor
    player.angle = a
Spot on
So when we have put in a call to getPlayerImage() just before we draw the player actor, we should have Pac-Man moving around, chomping and pointing in the correct direction. Now we need something to chomp. We are going to create a set of dots at even spacings along most of the corridors. An easy way to do this is to use a similar technique that we’re using for testing where the corridors are. If we make an image map of the places the dots need to go and loop over the whole map, only placing dots where it is black, we can get the desired effect.
Tasty, tasty dots
To get our dots doing their thing, we’ll need to code a few things. We need to initialise actors for each dot, we need to draw each dot, and if the player eats the dot, we need to stop drawing it; figure6.py shows how we can do each of these jobs. We need initDots(), we need to add another function to gamemaps.py to work out where to position the dots, and we need to add some drawing code to the draw() function. In addition to the code in figure6.py, we need to add a call to initDots() in our init() function.
# This goes in the main code file.

def initDots():
    global pacDots
    pacDots = []
    a = x = 0
    while x < 30:
        y = 0
        while y < 29:
            if gamemaps.checkDotPoint(10+x*20, 10+y*20):
                pacDots.append(Actor("dot",(10+x*20, 90+y*20)))
                pacDots[a].status = 0
                a += 1
            y += 1
        x += 1

# This goes in the gamemaps module file.

dotimage = image.load('images/pacmandotmap.png')

def checkDotPoint(x,y):
    global dotimage
    if dotimage.get_at((int(x), int(y))) == Color('black'):
        return True
    return False

# This bit goes in the draw() function.

    pacDotsLeft = 0
    for a in range(len(pacDots)):
        if pacDots[a].status == 0:
            pacDots[a].draw()
            pacDotsLeft += 1
        if pacDots[a].collidepoint((player.x, player.y)):
            pacDots[a].status = 1
    # if there are no dots left, the player has won
    if pacDotsLeft == 0: player.status = 2
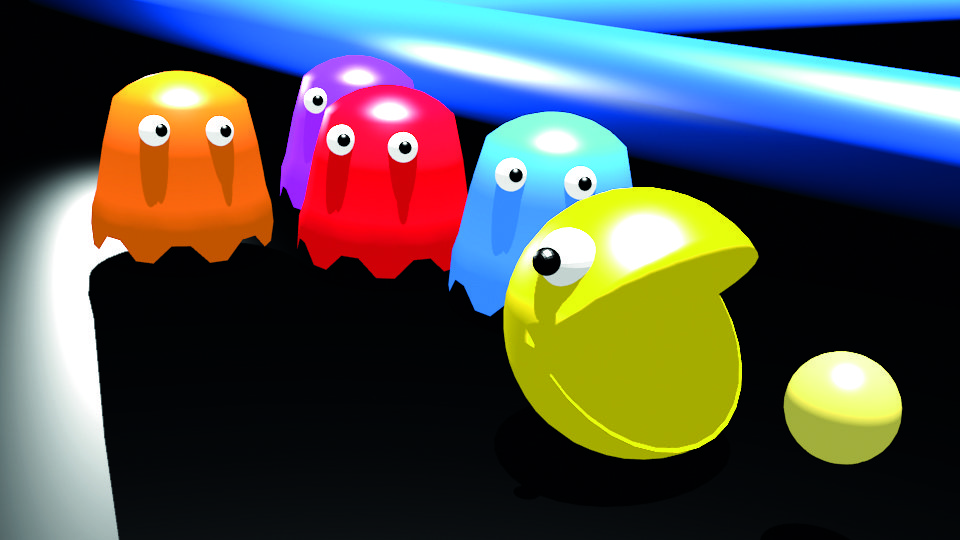
I ain’t afraid of no ghosts
Now that we have our Pac-Man happily munching dots, we must introduce our villains to the mix. In the original game, the ghosts had names; in the English version they were known as Blinky, Pinky, Inky, and Clyde. They roam the maze looking for Pac-Man, starting from an enclosure in the centre of the map. We can initialise each ghost as an actor to appear at the centre of the maze and keep them in a list called ghosts[]. To start off with, we’ll just make them move around randomly. The way we can do this is to set a random direction (ghosts[g].dir) for each and then keep them moving until they hit a wall.
Random motion
We can use the same system that we used to check player movement for the ghosts. Each time we move a ghost – moveGhosts() – we can get a list of which directions are available to it. If the current direction (ghosts[g].dir) is not available, then we randomly pick another direction until we find one that we can move in. We can also have a random occurrence of changing direction, just to make it a bit less predictable – and if the ghosts collide with each other, we could do the same. When we have moved the ghosts with the animate() function, we get it to count how many ghosts have finished moving. When they are all done, we can call the moveGhosts() function again.
Look like a ghost
The last thing to do with our ghosts is to actually draw them to the screen. We can create a function called drawGhosts() where we loop through the four ghosts and draw them to the screen. One of the details of the original game was that the eyes of the ghosts would follow the player; we can do this by setting the ghost image to reverse if the player is to the left of the ghost. We have numbered images so that ghost one is ghost1.png and ghost two is ghost2.png, etc. Have a look at the full pacman1.py program listing to see all the functions that make the ghosts work.
Game over
Of course, we need to deal with the end-of-the-game conditions and, as before, we can use a status variable. In this case we have previously set player.status = 2 if the player wins. We can check to see if a ghost collides with the player and set player.status = 1. Then we just need to display some text in the draw() function based on this variable. And that’s it for part one. In the next part we’ll be giving the ghosts more brains, adding levels, lives, and power-ups – and adding some sweet, soothing music and sound effects.
import pgzrun
import gameinput
import gamemaps
from random import randint
from datetime import datetime
WIDTH = 600
HEIGHT = 660

player = Actor("pacman_o") # Load in the player Actor image
SPEED = 3

def draw(): # Pygame Zero draw function
    global pacDots, player
    screen.blit('header', (0, 0))
    screen.blit('colourmap', (0, 80))
    pacDotsLeft = 0
    for a in range(len(pacDots)):
        if pacDots[a].status == 0:
            pacDots[a].draw()
            pacDotsLeft += 1
        if pacDots[a].collidepoint((player.x, player.y)):
            pacDots[a].status = 1
    if pacDotsLeft == 0: player.status = 2
    drawGhosts()
    getPlayerImage()
    player.draw()
    if player.status == 1: screen.draw.text("GAME OVER" , center=(300, 434), owidth=0.5, ocolor=(255,255,255), color=(255,64,0) , fontsize=40)
    if player.status == 2: screen.draw.text("YOU WIN!" , center=(300, 434), owidth=0.5, ocolor=(255,255,255), color=(255,64,0) , fontsize=40)

def update(): # Pygame Zero update function
    global player, moveGhostsFlag, ghosts
    if player.status == 0:
        if moveGhostsFlag == 4: moveGhosts()
        for g in range(len(ghosts)):
            if ghosts[g].collidepoint((player.x, player.y)):
                player.status = 1
                pass
        if player.inputActive:
            gameinput.checkInput(player)
            gamemaps.checkMovePoint(player)
            if player.movex or player.movey:
                inputLock()
                animate(player, pos=(player.x + player.movex, player.y + player.movey), duration=1/SPEED, tween='linear', on_finished=inputUnLock)

def init():
    global player
    initDots()
    initGhosts()
    player.x = 290
    player.y = 570
    player.status = 0
    inputUnLock()

def getPlayerImage():
    global player
    dt = datetime.now()
    a = player.angle
    tc = dt.microsecond%(500000/SPEED)/(100000/SPEED)
    if tc > 2.5 and (player.movex != 0 or player.movey !=0):
        if a != 180:
            player.image = "pacman_c"
        else:
            player.image = "pacman_cr"
    else:
        if a != 180:
            player.image = "pacman_o"
        else:
            player.image = "pacman_or"
    player.angle = a

def drawGhosts():
    for g in range(len(ghosts)):
        if ghosts[g].x > player.x:
            ghosts[g].image = "ghost"+str(g+1)+"r"
        else:
            ghosts[g].image = "ghost"+str(g+1)
        ghosts[g].draw()

def moveGhosts():
    global moveGhostsFlag
    dmoves = [(1,0),(0,1),(-1,0),(0,-1)]
    moveGhostsFlag = 0
    for g in range(len(ghosts)):
        dirs = gamemaps.getPossibleDirection(ghosts[g])
        if ghostCollided(ghosts[g],g) and randint(0,3) == 0: ghosts[g].dir = 3
        if dirs[ghosts[g].dir] == 0 or randint(0,50) == 0:
            d = -1
            while d == -1:
                rd = randint(0,3)
                if dirs[rd] == 1:
                    d = rd
            ghosts[g].dir = d
        animate(ghosts[g], pos=(ghosts[g].x + dmoves[ghosts[g].dir][0]*20, ghosts[g].y + dmoves[ghosts[g].dir][1]*20), duration=1/SPEED, tween='linear', on_finished=flagMoveGhosts)

def flagMoveGhosts():
    global moveGhostsFlag
    moveGhostsFlag += 1

def ghostCollided(ga,gn):
    for g in range(len(ghosts)):
        if ghosts[g].colliderect(ga) and g != gn:
            return True
    return False

def initDots():
    global pacDots
    pacDots = []
    a = x = 0
    while x < 30:
        y = 0
        while y < 29:
            if gamemaps.checkDotPoint(10+x*20, 10+y*20):
                pacDots.append(Actor("dot",(10+x*20, 90+y*20)))
                pacDots[a].status = 0
                a += 1
            y += 1
        x += 1

def initGhosts():
    global ghosts, moveGhostsFlag
    moveGhostsFlag = 4
    ghosts = []
    g = 0
    while g < 4:
        ghosts.append(Actor("ghost"+str(g+1) ,(270+(g*20), 370)))
        ghosts[g].dir = randint(0, 3)
        g += 1

def inputLock():
    global player
    player.inputActive = False

def inputUnLock():
    global player
    player.movex = player.movey = 0
    player.inputActive = True

init()
pgzrun.go()
Основа Пакмана. Создать движение и проверку. Условия
Привет, я занимаюсь питоном. Пишу сейчас основу пакмана. Моя задача — нарисовать круг, который будет «съедать» другой круг. Не совсем понимаю, как сделать так, чтобы при нажатии клавиши движение продолжалось в этом направлении, а также проверку совпадения координат, помогите понять как это сделать. Вот то, что я написал:
 Зaдача на проверку условия
http://i040.***********/1102/b3/e94810696b12.jpg Решите пожалуйста г,д. (Натуральные числа.
Сделать проверку условия
Всем хай. Кто может помочь с делфи ? Вот у меня в коде такая строчка .
Когда while проводит проверку условия
Есть поток threadX. Когда он завершится, нужно вывести месседж бокс о завершении. У потоков нет.
Условия на проверку режима таблицы
Здравствуйте, есть проблема. Пытаюсь проверить условия включена ли таблица в режиме редактирования.
Зaдача на проверку условия
http://i040.***********/1102/b3/e94810696b12.jpg Решите пожалуйста г,д. (Натуральные числа.
Сообщение было отмечено DefAster78boom как решение
Как на python запрограммировать игру пакман
Pacman in Python with PyGame
- This is a very minimal implementation of the Pacman game, having only one level and without ghosts strategy, not even with random movements (yes, the routes are programmed).
- However, we may improve this game in the future and everyone else interested can feel free to fork and contribute to this project.
Tested with [Python 2.7 in Ubuntu 14.04.3] and [Python 3.5 in Windows 10 64bit]
The MagPi issue 112 out now
Discover 40 amazing projects to make and build with Raspberry Pi Zero 2 W. We are still reeling from the brilliance of Zero 2 W, and hope all our subscribers are enjoying their new free computer. This month, we will take a look at all the incredible things you can make with Raspberry Pi Zero computers.


The concept of Pac-Man is quite simple. Pac-Man eats dots in a maze to score points. Avoid the ghosts unless you have just eaten a power-up, in which case ghosts are tasty. In this series we have gradually introduced new elements of Pygame Zero and also concepts around writing games. This is the first instalment in a two-part tutorial which will show you some more tricks to writing arcade games with Pygame Zero. We will also use some more advanced programming concepts to make our games even better. In this first part, we will put together the basics of the Pac-Man game and introduce the concept of adding extra Python modules to our program.
This article was written by Mark Vanstone and first appeared in The MagPi magazine issue #76. Sign up to our newsletter to get a free digital PDF of The MagPi every month, or click here to subscribe to our print magazine.
Code your own Pac-Man in Python
As with the more recent episodes of this series, let’s jump straight in, assuming that we have our basic Pygame Zero setup done. Let’s set our window size to WIDTH = 600 and HEIGHT = 660. This will give us room for a roughly square maze and a header area for some game information. We can get our gameplay area set up straight away by blitting two graphics – ‘header’ and ‘colourmap’ – to 0,0 and 0,80 respectively in the draw() function. You can make these graphics yourself or you can use ours, which can be found on this GitHub repository.
Pac-Man is a-mazing
The original game had a very specific layout to the maze, but many different ones have appeared in later versions. The one we will be using is very similar to the original, but you can make your own design if you want. If you make your own, you’ll also have to make two more maps (we’ll come to those in a bit) which help with the running of the game. The main things about the map is that it has a central area where the ghosts start from and it doesn’t have any other closed-in areas that the ghosts are likely to get trapped in (they can be a bit stupid sometimes).
Hmmm, pizza
Our next challenge is to get a player actor moving around the maze. For some unknown reason, the game’s creator, Toru Iwatani, decided to make the main character a pizza that ate dots. Well, the eighties were a bit strange and that seemed perfectly reasonable at the time. We’ll need two frames for our character: one with the mouth open and one with it closed. We can create our player actor near the top of the code using player = Actor(«pacman_o»). This will create the actor with the mouth-open graphic. We will then set the actor’s location in an init() function, as in previous programs.
Modulify to simplify
We can get our player onto the play area by setting player.x = 290 and player.y = 570 in the init() function and then call player.draw() in the draw() function, but to move the player character we’ll need to get some input from the player. Previously we have used keyboard and mouse input, but this time we are going to have the option of joystick or gamepad input. Pygame Zero doesn’t currently directly support gamepads, but we are going to borrow a bit of the Pygame module to get this working. We are also going to make a separate Python module for our input.
It’s a joystick.init
Setting up a new module is easy. All we need to do is make a new file, in this case gameinput.py, and in our main program at the top, write import gameinput. In this new file we can import the Pygame functions we need with from pygame import joystick, key and from pygame.locals import *. We can then initialise the Pygame joystick object (this also includes gamepads) by typing joystick.init(). We can find out how many joysticks or gamepads are connected by using joystickcount = joystick.getcount(). If we find any joysticks connected, we need to initialise them individually – see figure1.py.
Checking the input
We can now write a function in our gameinput module to check input from the player. If we define the function with def checkInput(p): we can get the x axis of a joystick using joyin.getaxis(0) and the y axis by using joyin.getaxis(1). The numbers that are returned from these calls will be between -1 and +1, with 0 being the central position. We can check to see if the values are over 0.8 or under -0.8, as, depending on the device, we may not actually see -1 or 1 being returned. You may like to test this with your gamepad or joystick to see what range of values are returned.
Up, down, left, or right
The variable p that we are passing into our checkInput() function will be the player actor. We can test each of the directions of the joystick at the same time as the keyboard and then set the player angle (so that it points in the correct direction for movement) and also how much it needs to move. We’ll set these by saying (for example, if the left arrow is pressed or the joystick is moved to the left) if key.getpressed()[KLEFT] or xaxis < -0.8: and then p.angle = 180 and p.movex = -20. See figure2.py for the full checkInput() function.
Get a move on!
Now we have our input function set up, we can call it from the update() function. Because this function is in a different module, we need to prefix it with the module name. In the update() function we write gameinput.checkInput(player). After this function has been called, if there has been any input, we should have some variables set in the player actor that we can use to move. We can say if player.movex or player.movey: and then use the animate() function to move by the amount specified in player.movex and player.movey.
Hold your horses
The way we have the code at the moment means that any time there is some input, we fire off a new animation. This will soon mean that layers of animation get called over the top of each other, but what we want is for the animation to run and then start looking for new input. To do this we need an input locking system. We can call an input lock function before the move and then wait for the animation to finish before unlocking to look for more input. Look at figure3.py to see how we can make this locking system.
You can’t just move anywhere
Testing the map
Using the movemap
You spin me round
Spot on
Tasty, tasty dots
I ain’t afraid of no ghosts
Now that we have our Pac-Man happily munching dots, we must introduce our villains to the mix. In the original game, the ghosts had names; in the English version they were known as Blinky, Pinky, Inky, and Clyde. They roam the maze looking for Pac-Man, starting from an enclosure in the centre of the map. We can initialise each ghost as an actor to appear at the centre of the maze and keep them in a list called ghosts[]. To start off with, we’ll just make them move around randomly. The way we can do this is to set a random direction (ghosts[g].dir) for each and then keep them moving until they hit a wall.
Random motion
We can use the same system that we used to check player movement for the ghosts. Each time we move a ghost – moveGhosts() – we can get a list of which directions are available to it. If the current direction (ghosts[g].dir) is not available, then we randomly pick another direction until we find one that we can move in. We can also have a random occurrence of changing direction, just to make it a bit less predictable – and if the ghosts collide with each other, we could do the same. When we have moved the ghosts with the animate() function, we get it to count how many ghosts have finished moving. When they are all done, we can call the moveGhosts() function again.
Look like a ghost
The last thing to do with our ghosts is to actually draw them to the screen. We can create a function called drawGhosts() where we loop through the four ghosts and draw them to the screen. One of the details of the original game was that the eyes of the ghosts would follow the player; we can do this by setting the ghost image to reverse if the player is to the left of the ghost. We have numbered images so that ghost one is ghost1.png and ghost two is ghost2.png, etc. Have a look at the full pacman1.py program listing to see all the functions that make the ghosts work.
Как на python запрограммировать игру пакман
Pacman in Python with PyGame
- This is a very minimal implementation of the Pacman game, having only one level and without ghosts strategy, not even with random movements (yes, the routes are programmed).
- However, we may improve this game in the future and everyone else interested can feel free to fork and contribute to this project.
Tested with [Python 2.7 in Ubuntu 14.04.3] and [Python 3.5 in Windows 10 64bit]
The MagPi issue 116 out now
Get even more from your Raspberry Pi with this incredible collection of hacks, hints and secret tips. Only in the latest edition of The MagPi magazine.


The concept of Pac-Man is quite simple. Pac-Man eats dots in a maze to score points. Avoid the ghosts unless you have just eaten a power-up, in which case ghosts are tasty. In this series we have gradually introduced new elements of Pygame Zero and also concepts around writing games. This is the first instalment in a two-part tutorial which will show you some more tricks to writing arcade games with Pygame Zero. We will also use some more advanced programming concepts to make our games even better. In this first part, we will put together the basics of the Pac-Man game and introduce the concept of adding extra Python modules to our program.
This article was written by Mark Vanstone and first appeared in The MagPi magazine issue #76. Sign up to our newsletter to get a free digital PDF of The MagPi every month, or click here to subscribe to our print magazine.
Code your own Pac-Man in Python
As with the more recent episodes of this series, let’s jump straight in, assuming that we have our basic Pygame Zero setup done. Let’s set our window size to WIDTH = 600 and HEIGHT = 660. This will give us room for a roughly square maze and a header area for some game information. We can get our gameplay area set up straight away by blitting two graphics – ‘header’ and ‘colourmap’ – to 0,0 and 0,80 respectively in the draw() function. You can make these graphics yourself or you can use ours, which can be found on this GitHub repository.
Pac-Man is a-mazing
The original game had a very specific layout to the maze, but many different ones have appeared in later versions. The one we will be using is very similar to the original, but you can make your own design if you want. If you make your own, you’ll also have to make two more maps (we’ll come to those in a bit) which help with the running of the game. The main things about the map is that it has a central area where the ghosts start from and it doesn’t have any other closed-in areas that the ghosts are likely to get trapped in (they can be a bit stupid sometimes).
Hmmm, pizza
Our next challenge is to get a player actor moving around the maze. For some unknown reason, the game’s creator, Toru Iwatani, decided to make the main character a pizza that ate dots. Well, the eighties were a bit strange and that seemed perfectly reasonable at the time. We’ll need two frames for our character: one with the mouth open and one with it closed. We can create our player actor near the top of the code using player = Actor(«pacman_o»). This will create the actor with the mouth-open graphic. We will then set the actor’s location in an init() function, as in previous programs.
Modulify to simplify
We can get our player onto the play area by setting player.x = 290 and player.y = 570 in the init() function and then call player.draw() in the draw() function, but to move the player character we’ll need to get some input from the player. Previously we have used keyboard and mouse input, but this time we are going to have the option of joystick or gamepad input. Pygame Zero doesn’t currently directly support gamepads, but we are going to borrow a bit of the Pygame module to get this working. We are also going to make a separate Python module for our input.
It’s a joystick.init
Setting up a new module is easy. All we need to do is make a new file, in this case gameinput.py, and in our main program at the top, write import gameinput. In this new file we can import the Pygame functions we need with from pygame import joystick, key and from pygame.locals import *. We can then initialise the Pygame joystick object (this also includes gamepads) by typing joystick.init(). We can find out how many joysticks or gamepads are connected by using joystickcount = joystick.getcount(). If we find any joysticks connected, we need to initialise them individually – see figure1.py.
Checking the input
We can now write a function in our gameinput module to check input from the player. If we define the function with def checkInput(p): we can get the x axis of a joystick using joyin.getaxis(0) and the y axis by using joyin.getaxis(1). The numbers that are returned from these calls will be between -1 and +1, with 0 being the central position. We can check to see if the values are over 0.8 or under -0.8, as, depending on the device, we may not actually see -1 or 1 being returned. You may like to test this with your gamepad or joystick to see what range of values are returned.
Up, down, left, or right
The variable p that we are passing into our checkInput() function will be the player actor. We can test each of the directions of the joystick at the same time as the keyboard and then set the player angle (so that it points in the correct direction for movement) and also how much it needs to move. We’ll set these by saying (for example, if the left arrow is pressed or the joystick is moved to the left) if key.getpressed()[KLEFT] or xaxis < -0.8: and then p.angle = 180 and p.movex = -20. See figure2.py for the full checkInput() function.
Get a move on!
Now we have our input function set up, we can call it from the update() function. Because this function is in a different module, we need to prefix it with the module name. In the update() function we write gameinput.checkInput(player). After this function has been called, if there has been any input, we should have some variables set in the player actor that we can use to move. We can say if player.movex or player.movey: and then use the animate() function to move by the amount specified in player.movex and player.movey.
Hold your horses
The way we have the code at the moment means that any time there is some input, we fire off a new animation. This will soon mean that layers of animation get called over the top of each other, but what we want is for the animation to run and then start looking for new input. To do this we need an input locking system. We can call an input lock function before the move and then wait for the animation to finish before unlocking to look for more input. Look at figure3.py to see how we can make this locking system.
You can’t just move anywhere
Testing the map
Using the movemap
You spin me round
Spot on
Tasty, tasty dots
I ain’t afraid of no ghosts
Now that we have our Pac-Man happily munching dots, we must introduce our villains to the mix. In the original game, the ghosts had names; in the English version they were known as Blinky, Pinky, Inky, and Clyde. They roam the maze looking for Pac-Man, starting from an enclosure in the centre of the map. We can initialise each ghost as an actor to appear at the centre of the maze and keep them in a list called ghosts[]. To start off with, we’ll just make them move around randomly. The way we can do this is to set a random direction (ghosts[g].dir) for each and then keep them moving until they hit a wall.
Random motion
We can use the same system that we used to check player movement for the ghosts. Each time we move a ghost – moveGhosts() – we can get a list of which directions are available to it. If the current direction (ghosts[g].dir) is not available, then we randomly pick another direction until we find one that we can move in. We can also have a random occurrence of changing direction, just to make it a bit less predictable – and if the ghosts collide with each other, we could do the same. When we have moved the ghosts with the animate() function, we get it to count how many ghosts have finished moving. When they are all done, we can call the moveGhosts() function again.
Look like a ghost
The last thing to do with our ghosts is to actually draw them to the screen. We can create a function called drawGhosts() where we loop through the four ghosts and draw them to the screen. One of the details of the original game was that the eyes of the ghosts would follow the player; we can do this by setting the ghost image to reverse if the player is to the left of the ghost. We have numbered images so that ghost one is ghost1.png and ghost two is ghost2.png, etc. Have a look at the full pacman1.py program listing to see all the functions that make the ghosts work.
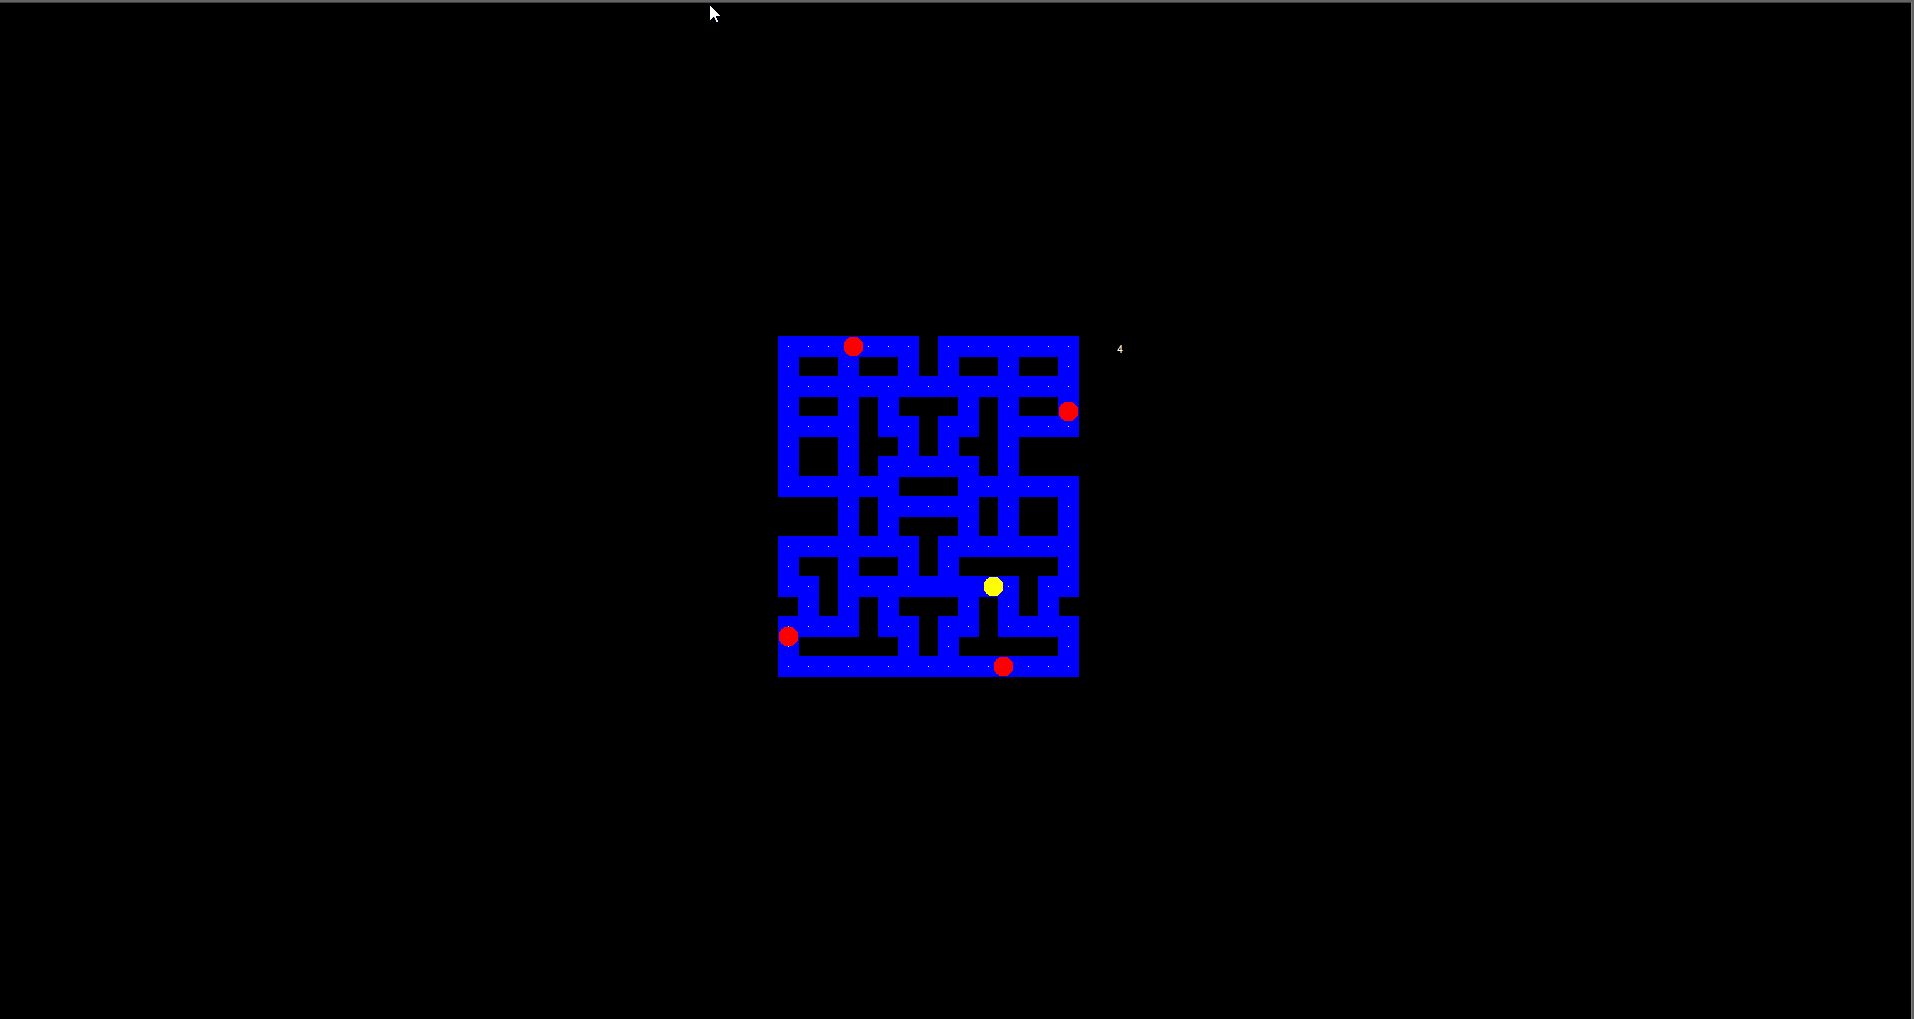
Introduction
Pac-Man is a famous video game featuring a yellow character roaming around a maze collecting different things along the way. In this workshop, you’ll learn how to create your own Pac-Man game using the Python Freegames library.
Here’s a demo of what we’ll be making. You can see both the final code and test it out on this Repl environment: https://repl.it/@YashKalbande/Easy-Level
- NOTE: If you ever get lost, feel free to open the Repl above and see where the code is being placed. All the code explained in this workshop is in order of first line to last line
 Happy hacking and good luck!
 Happy hacking and good luck!
We’re going to be coding this using a principle called modular programming. This means we’re going to be writing different functions that we will call at the end. A function is written by putting the function name, what parameters it needs, and then what happens with the parameters. Here’s an example function:
def functionName(parameter1, parameter2):
	total = parameter1 + parameter 2
  return total
Now, whenever I call functionName, I will get the sum of its two parameters. You can call a function by just filling in the parameters:
sum = functionName(5, 6)
print(sum) #prints 11
Planning
Because this is a relatively complex project, we should plan out the functions and variables we are going to need. Think about what we might use for this project. What kind of actions are possible for a Pac-Man game? You can use a flow chart or write down on a piece of paper what we will need. Here is a list of things we need to be able to do:
- Create a map to our specification that will let the user know how to navigate through the game
- Enforce the Pac-Man (the user) to stay within that map
- Let the Pac-Man move. We will probably need two functions for this:
- Choosing a direction for the Pac-Man
- Letting the Pac-Man move in the specified direction
- Add different ghosts and dots into the game to spice it up
- Making sure initial placement of the ghosts and dots are random
- Scoreboard that updates based on how many dots the Pac-Man eats
Setting up our code!
For this workshop, we’re going to be using an online code editor called Repl.it.
- Head over to Repl.it/languages/Python3
- This will create a new Python 3 Repl for you to use to code.
- Edit your new
main.pyfile with the following code:
from random import choice
from turtle import *
from freegames import floor, vector
- The code above essentially says the following:
- Import the
choicefunction from the modulerandom. This is a built-in Python module that gets a random value for us to use when spawning. - Add all the functions from the
turtlelibrary. Learn more about the Turtle library here. It is a way to implement graphics in Python projects - Get the
floorandvectorfunctions from thefreegameslibrary. The freegames library is a basic module with built-in functions that do standard game tasks like moving around and setting a playing field.
- Import the
- Next, we’ll want to declare and initialize all of our global variables:
state = {'score': 0}
path = Turtle(visible=False)
writer = Turtle(visible=False)
aim = vector(5, 0)
pacman = vector(-40, -80)
ghosts = [
    [vector(-180, 160), vector(5, 0)],
    [vector(-180, -160), vector(0, 5)],
    [vector(100, 160), vector(0, -5)],
    [vector(100, -160), vector(-5, 0)],
]
- Take a moment and try to understand what the code above is trying to say. The best way to interpret code is by turning it into plain English. Here are some helpful tips:
- The
statevariable is in a JSON object with the first key beingscore - Both
pathandwriteruse theturtlelibrary we imported earlier. Respectively, they are used to draw the game map and to update the score. - We imported
vectorearlier. This will let us choose the direction and placement of initial objects. This is assigned using a two-dimensional (x, y) axis. Think of a graph… aimsets the direction of movement for the Pac-Man as (5, 0). This means that we are setting a speed of 5 to the right on the axis.- We are also using it in an array called
ghosts, this will spawn the ghosts at each corner of our game and set their speed at a default of 5.
- The
Planning the maze
Now comes the fun part! We want to plan what the maze is going to look like for the user. We do it by drawing tiles in an array.
0represents an empty space and1represents a filled space- For the purpose of this workshop, we’ll be using a 20×20 grid. To make it easy visually, let’s code this with the same idea in mind.
You can use your own map, or use this sample. Add this code to the bottom of your main.py file:
tiles = [
    0, 0, 0, 0, 0, 0, 0, 0, 0, 0, 0, 0, 0, 0, 0, 0, 0, 0, 0, 0,
    0, 1, 1, 1, 1, 1, 1, 1, 1, 1, 1, 1, 1, 1, 1, 1, 0, 0, 0, 0,
    0, 1, 0, 0, 1, 0, 0, 1, 0, 1, 0, 0, 1, 0, 0, 1, 0, 0, 0, 0,
    0, 1, 1, 1, 1, 1, 1, 1, 1, 1, 1, 1, 1, 1, 1, 1, 0, 0, 0, 0,
    0, 1, 0, 0, 1, 0, 1, 0, 0, 0, 1, 0, 1, 0, 0, 1, 0, 0, 0, 0,
    0, 1, 1, 1, 1, 0, 1, 1, 0, 1, 1, 0, 1, 1, 1, 1, 0, 0, 0, 0,
    0, 1, 0, 0, 1, 0, 0, 1, 0, 1, 0, 0, 1, 0, 0, 1, 0, 0, 0, 0,
    0, 1, 0, 0, 1, 0, 1, 1, 1, 1, 1, 0, 1, 0, 0, 1, 0, 0, 0, 0,
    0, 1, 1, 1, 1, 1, 1, 0, 0, 0, 1, 1, 1, 1, 1, 1, 0, 0, 0, 0,
    0, 1, 0, 0, 1, 0, 1, 1, 1, 1, 1, 0, 1, 0, 0, 1, 0, 0, 0, 0,
    0, 1, 0, 0, 1, 0, 1, 0, 0, 0, 1, 0, 1, 0, 0, 1, 0, 0, 0, 0,
    0, 1, 1, 1, 1, 1, 1, 1, 0, 1, 1, 1, 1, 1, 1, 1, 0, 0, 0, 0,
    0, 1, 0, 0, 1, 0, 0, 1, 0, 1, 0, 0, 0, 0, 0, 1, 0, 0, 0, 0,
    0, 1, 1, 0, 1, 1, 1, 1, 1, 1, 1, 1, 1, 0, 1, 1, 0, 0, 0, 0,
    0, 1, 1, 0, 1, 0, 1, 0, 0, 0, 1, 0, 1, 0, 1, 1, 0, 0, 0, 0,
    0, 1, 1, 1, 1, 0, 1, 1, 0, 1, 1, 0, 1, 1, 1, 1, 0, 0, 0, 0,
    0, 1, 0, 0, 0, 0, 0, 1, 0, 1, 0, 0, 0, 0, 0, 1, 0, 0, 0, 0,
    0, 1, 1, 1, 1, 1, 1, 1, 1, 1, 1, 1, 1, 1, 1, 1, 0, 0, 0, 0,
    0, 0, 0, 0, 0, 0, 0, 0, 0, 0, 0, 0, 0, 0, 0, 0, 0, 0, 0, 0,
    0, 0, 0, 0, 0, 0, 0, 0, 0, 0, 0, 0, 0, 0, 0, 0, 0, 0, 0, 0,

]
For reference, this is what the above sample code will look like, once we implement the correct functions to draw it on:

Drawing our maze
Now just because we see what the map looks like in the code, doesn’t mean Python knows what it is. We need to use our turtle library to make bricks that follow the path we created. Add this code, which tells the library to follow the blueprint we made above.
def brick(x, y):
    path.up()
    path.goto(x, y)
    path.down()
    path.begin_fill()

    for count in range(4):
        path.forward(20)
        path.left(90)

    path.end_fill()
What to take away from this code:
- We are using the
pathfunction from theturtlelibrary. The function names are pretty standard and describe what direction it should draw in. - Take note of the parameters
(x, y). This means that we are getting a value and adding a brick in that spot.
The way that bricks work are by taking a smaller scale 20×20 grid and scaling it up. We don’t want the user to only see a 20 pixel view, we are turning each pixel into a larger square.
Adding some physics!
We’re going to add two physics principles into our code:
-
Offset — to make sure our Pac-Man returns back into the maze path, in case they run into the bricks we created.
def offset(point): "Return offset of point in tiles." x = (floor(point.x, 20) + 200) / 20 y = (180 - floor(point.y, 20)) / 20 index = int(x + y * 20) return index -
Validity — ensuring that our Pac-Man can’t do anything suspicious and run through the bricks!
def valid(point):
    "Return True if a point is valid in tiles."
    index = offset(point)

    if tiles[index] == 0:
        return False

    index = offset(point + 19)

    if tiles[index] == 0:
        return False

    return point.x % 20 == 0 or point.y % 20 == 0
Both of those code blocks can be added to the bottom of your code.
Finishing the maze
We need to put all of our functions together to make our actual world look a little nicer than just a few code blocks laying around. We’re going to make a new function called world that does the following:
- Uses the
brickfunction we coded earlier and goes along thetilesarray we coded as the blueprint. - Adds some color into our map
- You can choose any color you want, but for the purpose of the workshop, the sample will go with the standard Pac-Man colors (blue and black)
def world():
    Screen().bgcolor('black')
    path.color('blue')

    for index in range(len(tiles)):
        tile = tiles[index]

        if tile > 0:
            x = (index % 20) * 20 - 200
            y = 180 - (index // 20) * 20
            brick(x, y)

            if tile == 1:
                path.up()
                path.goto(x + 10, y + 10)
                path.dot(2, 'white')

    update()
- Notice the numbers that we use. In blueprint array we programmed earlier, we kept the dimensions 20×20 in mind. This is why you can see that we’re using different mathematically expressions to calculate which line we’re on.
- We’re using a for loop to traverse through the array to add the array items one by one.
- If the value at a specific spot is
0, we’ll add abrick(from the function we coded earlier). - If the value is
1, then we’ll fill it in for the Pac-Man to walk through.
- If the value at a specific spot is
- Remember to be very careful about the indentation of each line — for example, make sure the
path.up()is lined up exactly under theifsyntax.
Moving the Pac-Man
We want our Pac-Man to be able to move through the world we created. We’re going to create a new function called move that will allow the character to move. While coding, notice the different variables we’re using and functions that correspond.
def move():
    writer.undo()
    writer.write(state['score'])
    clear()
    if valid(pacman + aim):
        pacman.move(aim)

    index = offset(pacman)

    if tiles[index] == 1:
        tiles[index] = 2
        state['score'] += 1
        x = (index % 20) * 20 - 200
        y = 180 - (index // 20) * 20
        brick(x, y)

    up()
    goto(pacman.x + 10, pacman.y + 10)
    dot(20, 'yellow')

    for point, course in ghosts:
        if valid(point + course):
            point.move(course)
        else:
            options = [
                vector(5, 0),
                vector(-5, 0),
                vector(0, 5),
                vector(0, -5),
            ]
            plan = choice(options)
            course.x = plan.x
            course.y = plan.y

        up()
        goto(point.x + 10, point.y + 10)
        dot(20, 'red')

    update()

    for point, course in ghosts:
        if abs(pacman - point) < 20:
            return
    ontimer(move, 100)
- NOTE: Our Pac-Man has no sense of direction yet. It’s using the default
aimwe assigned earlier when we were initializing variables. At the moment, our Pac-Man is only programmed to go right, at a speed of 5. We’ll add some direction in the next step. - The
writervariable we implemented at the beginning is being used here with theundo()andwrite()functions. These are built-in functions that come withTurtle. - As we go down further the code, we’re checking if the movement is
valid. Remember those physics functions we made? This is where we’re implementing it. A move isvalidwhen it doesn’t involve touching a brick. - We’re also utilizing the
ghostsarray with vectors we initialized before. This lets us have them in the game and move them around. - We’re creating
dots(a function fromTurtle) that our Pac-Man will eat. We are ensuring they’re being created dynamically as they are attached to the Pac-Man’s moves. If the Pac-Man doesn’t move, it won’t spawn more dots. - Going a step further: If you want to take things a step further and introduce an animation, sound effect, or other prettiness factor, we would introduce it after
brick(x, y). Try addingprint(“PAC-MAN”)as an example.
Giving Direction to Pac-Man
We created a function that lets our Pac-Man move, but it doesn’t know where to go. It only followed the direction that we provided to it in the aim variable. Let’s create a function that lets our Pac-Man change that aim value, or in other terms, change it’s direction. Add this code into the bottom of your code:
def change(x, y):
    if valid(pacman + vector(x, y)):
        aim.x = x
        aim.y = y
We first check if the direction is valid (we aren’t inside of a brick or anything), then we set the aim we initialized at the start of the code.
The Final Stretch!
As we mentioned earlier, this game is coded using a principle called modular programming. This means that everything we code is in functions, now we can bring it together. We can call these functions by writing the function name and the parameters it needs in parentheses. This code block will put all the pieces together:
setup(420, 420, 370, 0)
hideturtle()
tracer(False)
writer.goto(160, 160)
writer.color('white')
writer.write(state['score'])
listen()
onkey(lambda: change(5, 0), 'Right')
onkey(lambda: change(-5, 0), 'Left')
onkey(lambda: change(0, 5), 'Up')
onkey(lambda: change(0, -5), 'Down')
world()
move()
done()
Congrats! You’ve just made your own Pacman game! 🎉
Things to note:
- These are all functions we created earlier, we are just putting the pieces together.
- The grid, as mentioned earlier, is scaled up to 420×420 (from 20×20). We use
turtle‘s built insetup()function to accomplish this. hideturtle(),listen(), andtracer(False)are all defaultturtlefunctions that will let us remove any unnecessary default items/features and enable us to listen for keystrokes.- We are picking up the user’s keystrokes by using Python’s built-in
onkey()function.
- We are picking up the user’s keystrokes by using Python’s built-in
Extending the game
Our version of Pac-Man is pretty basic. We are utilizing 2D vector graphics and Python’s turtle graphics library to draw shapes and dots on our screen.
- This art style is very much in-line with the look and feel of the original incarnation of the game in the 1980s.
- If you want to take the game a step further you could introduce graphical sprites, add more details to Pac-Man or ghosts like eyes, etc.
- You can design end numbers of levels for Pac-Man by doing changes in the
tilesvariable. Different color schemes, size, number of ghosts, etc.
You can also add other types of roadblocks into the app to make it more difficult, which usually which making the game more addictive:
- Easy Level
- Medium Level
- Hard Level
Pacman in Python with PyGame
This is a very minimal implementation of the Pacman game, having only one level and without ghosts strategy, not even with random movements (yes, the routes are programmed). However, we may improve this game in the future and everyone else interested can feel free to fork and contribute to this project.
Download installer from here: https://github.com/hbokmann/Pacman/blob/master/pacman.exe
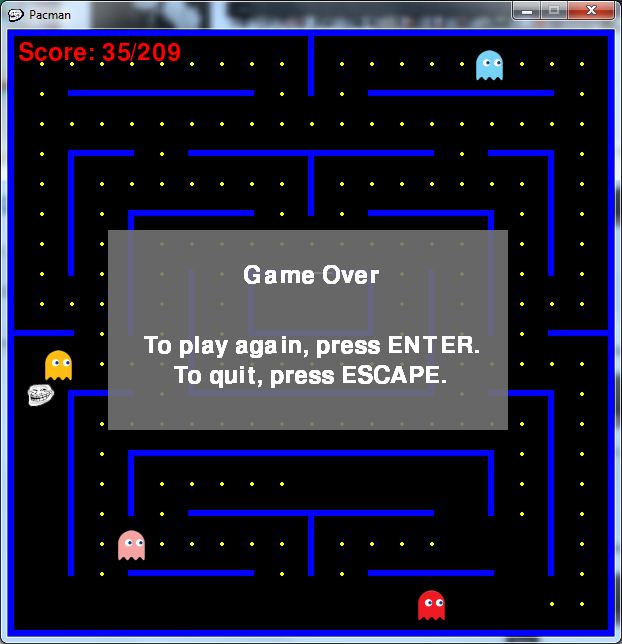
Future development
- Fix Pacman’s movement
- Ghosts moving algorithm and artificial intelligence
- Better design
- Better algorithm for the walls
- Additional levels?
Tested with PyGame 1.9 and Python 3.2 32bit
Additional resources
- Pac-Man Dossier — strategy of the ghosts movement
- HTML5 Pacman
- PyGame tutorials
- How To Write a Pacman Game in JavaScript
- Original Pacman game
Support or Contact
Blog: http://www.bokmann.com
Twitter: https://twitter.com/hbokmann
Email: hans@bokmann.com