Introduction: Python Coding for Minecraft
This Instructable shows how to install and use a mod I wrote that lets you control Minecraft with python scripts. I’ll focus on Windows, though OS X and Linux should work just as well. (If you want something simpler than python, here is a Scratch version of this project.)
Python scripts can generate neat in-world things, and there are many examples on the web. With a few lines you can draw a giant glass sphere, and with a bit more work make a giant Sierpinski triangle in the sky and even import obj files like a space shuttle. I myself made fun scripts to draw a water-filled glass donut and a gigantic Klein bottle, to turn everything around into TNT and to control Minecraft with your brain using a MindFlex EEG toy. There is a whole book introducing programming using python scripts for Minecraft, and you can even make simple Minecraft-based games. I will also show how to do simple (and sometimes more elaborate) turtle-based drawings in Minecraft, while you can ride along with the drawing as the turtle.
For a while now you could write python scripts for Minecraft on the Raspberry Pi. I wanted my kids to be able to do that, but we don’t have a Pi, plus it would be nice to do this with the full desktop Minecraft. You could run your own server with the Raspberry Juice plugin which enables most of the python scripts to work. But not everyone wants to install and configure a server.
So I wrote the Raspberry Jam Mod for Minecraft 1.8 (now ported to 1.8.8, 1.8.9 and 1.9 as well) that emulates most of the Raspberry Pi Minecraft protocol (about the same as the Raspberry Juice plugin provides) and lets Raspberry Pi python scripts run with full desktop Minecraft. (I later found out that someone wrote the mcpiapi mod for Minecraft 1.7.10 a couple of weeks earlier.) I wrote this Instructable initially for Python 2.7, but I think most of my samples will work for 3.x.
I assume that you have basic facility with creating folders and downloading, unzipping, and copying files on Windows (or your operating system of choice).
You can create Python scripts for Minecraft with a text editor, the IDLE environment which comes with Python, or with Visual Studio Python Tools on Windows. The last is actually the nicest in some ways, so I’ll have some optional steps on how to do that.
This summer I plan to teach coding and basic 3D geometry to gifted middle- and high-schoolers using Minecraft, Raspberry Jam Mod, Python and Visual Studio.
If you want to do this with Minecraft Pocket Edition on Android instead, I have an Instructable for that, too.
Step 1: Install Forge for Minecraft
The Forge manages Minecraft mods, and is needed for the Raspberry Jam Mod.
I assume you have Minecraft installed.
- You need to run Minecraft 1.12.2 (the version is very important) once. To do that, start the Minecraft Launcher, and after logging in, click on Installations, and press the «New» button to create a profile. Choose «Release 1.12.2» from the dropdown, save the profile (you can give it a name like «1.12.2»), start a world and make sure it works.
- Exit Minecraft and Minecraft Launcher.
- Download Forge installer for 1.12.2.
- Run the Forge installer. Default settings should work.
- Start Minecraft. You will now have a new Forge 1.12.2 profile.
Step 2: Windows Installer [automatic Install]
If you have Windows, once you have Forge, you can install everything using a Windows installer. This will install RaspberryJamMod, a Python interpreter, IDLE for Python and sample scripts. If you don’t have Windows, or want more control, look at the next two steps (but you’ll have to adapt them if you don’t have Windows).
Step 3: Install Python [manual Installation]
You need to decide if you want Python 2.7 or Python 3.x. The Adventures in Minecraft book uses 2.7, and most of the scripts floating around the web are for 2.7, but I have converted a lot of scripts for 3.x.
1. Download your choice of Python installed from here.
2. Run the installer.
3. Click through to the Customize Python dialog, and make sure to scroll down to «Add python.exe to path», click on it and select «Will be installed on local hard drive.» If you don’t add Python to the path, you won’t be able to launch scripts with /python from within Minecraft.
Step 4: Install Mod and Scripts
1. Create a mods folder in your Minecraft folder. (To do that, press Windows-R, type %appdata%.minecraft, press enter. You will see everything in your Minecraft folder. If you already have a mods subfolder, you don’t need to do anything. Otherwise, make one. On Windows 8, click on New folder, and then type in the name mods and press enter.)
2. Download the mods.zipfile from the latest version of the Raspberry Jam Mod. Put the contents of the zip file (currently consisting of a number of folders with names like 1.8 and 1.10.2) inside the mods folder you had just made.
3. Download the latest zip file containing sample Python scripts and the mcpi library from my Raspberry Jam Mod github release. (The scripts are supposed to work on both Python 2.7 and 3.x.)
4. Open the downloaded zip file (in Chrome, by clicking on it at the bottom of the window). It has a mcpipy folder. Copy the mcpipy folder into your Minecraft folder. (To do that, click once on the mcpipy folder in the zip file, and press ctrl-c, then navigate to the %appdata%.minecraft folder as in step 1, and press ctrl-v).
Step 5: Testing Mod
Start Minecraft, making sure that you use the Forge profile.
Create a new world (it’s too easy to mess things up with the python scripts). My daughter suggested I use Creative and Superflat.
In Minecraft, type /py donut and press enter.
If all goes well, a giant glass donut will be drawn around you, and then it will be filled with water.
If you get something like a Script not found error, this probably means that you don’t have the sample scripts installed in the %appdata%.minecraftmcpipy folder.
If you get a ‘Cannot run program «python»‘ error, you don’t have your python directory in your system path. You may want to add it manually to the path, or just reinstall python, following the directions in Step 3 of my python install step.
Running a new script with /py stops any earlier scripts running (if you don’t like that, use /apy instead of /py). You can stop a script that’s running by just typing /py without any arguments.
Step 6: Getting Started Programming Minecraft in Python
The easiest way to get started programming Minecraft in python is to start with one of the simpler sample scripts. I recommend making a shortcut on your desktop to the scripts folder (%appdata%.minecraftmcpipy).
You can load the scripts into IDLE. A fun script to modify is my water-filled donut script (donut.py). For instance, change WATER to GRASS in the second last line to make a silly grass-filled donut. You can run this with /py donut from Minecraft, or just by pressing F5 in IDLE.
Or to make a simple new script, create a helloworld.py file with your favorite text editor (even Notepad) in the scripts directory. Put at the top:
from mine import *
This imports the needed library code. It also conveniently imports all the functions from the math library as well as names for all the blocks. Connect to Minecraft with:
mc = Minecraft()
You can then send a «Hello world!» message to the user with:
mc.postToChat("Hello world!")
If you want to create a diamond block right under the player, you can also do:
playerPos = mc.player.getPos()
mc.setBlock(playerPos.x,playerPos.y-1,playerPos.z,block.DIAMOND_ORE)
The coordinates for setBlock() and getPos() are measured from the player’s spawn point (which is thus (0,0,0)).
(For a list of all the block names other than DIAMOND_ORE, see mcpiblock.py in the scripts folder. You can also directly use Minecraft block numbers.)
To run your script, save it and type /py helloworld in your Minecraft world and press enter.
It’s sometimes useful to set a whole rectangular prism of blocks at one time: use mc.setBlocks(). For instance, this excerpt from my mengersponge.py script draws an 81×81 cube at the player position (the script then recursively deletes—i.e., replaces with AIR—subblocks to form the fractal image in the screenshot):
length = 3*3*3*3
mc.setBlocks(playerPos.x,playerPos.y,playerPos.z,
             playerPos.x+length-1,playerPos.y+length-1,playerPos.z+length-1,block.WOOL_PURPLE)
Technical note: Starting with from mine import * imports a lot of stuff (Minecraft, block definitions, entity definitions, math) into our namespace. This is handy for focusing on the essentials for beginners (remember that I am going to be using this to teach coding to beginners). More advanced users may prefer being more pythonic by keeping the namespaces separate and putting in the header:
import mcpi.minecraft as minecraft
import mcpi.block as block
import mcpi.entity as entity
import math
and then starting with mc = minecraft.Minecraft() or even mc = minecraft.Minecraft.create().
Step 7: Simple Turtle-based Drawing
A particularly simple way to draw in Minecraft is to use a turtle-based system. I made a very simple Turtle class (inspired by Martin O’Hanlon’s MinecraftTurtle class) that I use to introduce middle- and high-schoolers to Minecraft python scripting.
Start up a Minecraft world in creative mode, and make your player fly (double-tap spacebar). Initialize the script with:
from mineturtle import *
t = Turtle()
(I wrapped all the Minecraft connection code inside the Turtle class and it also brings math into the namespace for convenience.) You can now do things like t.go(15) to draw a line while moving 15 blocks forward, t.right(45) to rotate 45 degrees to the right, t.down(30) to rotate 30 degrees down, and thus draw simple pictures.
You move along with the turtle as it draws, which is fun, and the turtle starts off where the player is, pointing horizontally.
For instance you can draw a horizontal square with:
t.go(50)
t.right(90)
t.go(50)
t.right(90)
t.go(50)
t.right(90)
t.go(50)
You do a 7-sided star by doing:
t.go(50)
t.right(180.-180./7)
seven times. Or just once in a loop:
for i in range(7):
    t.go(50)
    t.right(180.-180./7)
You can change materials with penblock(). For instance, a golden vertical star:
t.penblock(block.GOLD_BLOCK)
for i in range(7):
    t.go(50)
    t.right(180.-180./7)
And you can change the pen width with penwidth(x). For instance, this draws a very simple glass donut (actually, a thickened 90-gon, but who can tell the difference?):
t.penblock(block.GLASS)
radius = 20
circumference = 2 * radius * pi
t.penwidth(10)
for i in range(90):
    t.go(circumference/90)
    t.left(360/90)
Here are all the methods available:
- go(x): move x blocks forward (drawing if pen is down)
- back(x): move x blocks backward (drawing if pen is down)
- penup(): pause drawing resume drawing
- left(angle): rotate left by angle (in degrees)
- right(angle): rotate right by angle (in degrees)
- up(angle): rotate up by angle (in degrees); beginners should not mix the left/right and up/down rotations or they may get unexpected results (technical note: the same as pitch(angle))
- down(angle): rotate down by angle (in degrees) (technical note: the same as pitch(-angle))
- pendelay(x): each movement or rotation of the turtle is delayed by x seconds; default is 0.05; set to zero for much faster drawing (the player will still move with each line drawn, but instantaneously from beginning to end)
- angle(x): set horizontal angle to x (clockwise in degrees; 0 = South, 90 = West, 180 = North, 270 = East); resets roll angle
- verticalangle(x): set vertical angle to x (in degrees; upward is positive; 90 = vertically up; -90 = vertically down); resets roll angle
- angles(compass,vertical,roll): set compass, vertical and roll angles; omitted arguments are taken to be zero
- penblock(x): set material for drawing to block x; for a list of the predefined blocks, see mcpi/block.py
- goto(x,y,z): set pen position to (x,y,z); you can also access the position as t.position.x, t.position.y and t.position.z
- follow(): the player follows the turtle
- nofollow(): the player doesn’t follow the turtle
- turtle(x): if x is PLAYER, this is the same as follow(), and if x is None, this is the same as nofollow(). If you are using Raspberry Jam Mod you can also use other entities than yourself as the turtle. For instance, turtle(HORSE) spawns a horse to use as a turtle (all the entities available are listed in mcpi/entity.py, but the living ones are best as others are unable to levitate; and the Ender Dragon cannot be controlled). The entity remains once the script is finished. To make it disappear, call turtle(None) or turtle(PLAYER).
- penwidth(x): set stroke width to x (default is 1; wider strokes slow down drawing, and if follow mode is on, you may end up trapped inside the stroke, so at the end you should call penup() and back out of the drawing)
- pitch(x), yaw(x) and roll(x): rotate turtle via pitch/yaw/roll angles (see next step of Instructable)
- startface() and endface(): start and finish drawing a filled convex polygon
- push() and pop(): save and restore drawing state (heading, material, face status, thickness; but not speed or turtle type); useful for L-systems
- gridalign(): align the current position and turtle direction to the grid (the best approximation to the turtle’s current direction is chosen)
The mcpiapi mod, unlike my Raspberry Jam Mod, doesn’t support setting the player’s direction. This means that the player won’t face the same direction as the turtle. (And there is some chance of other problems with turtle scripts.)
Technical note: If you already have a Minecraft object mc, initialize with t = Turtle(mc). If you omit the Minecraft object when initializing the turtle, it’s created for you, and in either case, you can access the Minecraft object via t.mc.
You can also play with python code for controlling the turtle right from the Minecraft chat window.
In Minecraft, run the turtleconsole.py script by typing: /py turtleconsole [enter].
Then every python line you enter into chat will get executed by the python interpreter. To enter a line into chat, press T, type the line and press [enter]. To exit turtleconsole, just type /py [enter] or enter quit() [enter] into chat.
The context includes a local variable t initialized to a Turtle() object, so you don’t need to run any initialization code, just things like:
t.penblock(block.GOLD_BLOCK)
t.back(10)
There is also a console for the full non-Turtle API: console.py (which includes a pre-initialized mc local variable). (Just don’t put in any postToChat() calls, or they will confuse the interpreter.)
Step 8: Advanced Turtle-based Drawing
Using the left(), right(), up() and down() methods for the turtle is easy. But for some drawings we need more sophisticated 3D control. For instance, you might want to draw a donut tilted 45 degrees up. It’s tempting to take the glass donut script from the previous step, and add before the loop:
t.up(45)
But that produces an unexpected result—see the picture. The reason for this is that the turtle will be climbing up all the time, while the d.left() method rotates it around the vertical axis, and so you get a spiral.
Instead, what we need to do is yaw/pitch/roll rotatins of the turtle. See the picture from NASA (US government works are public domain) explaining how the three angles go, and just imagine that the airplane is your turtle. (Unfortunately, because of Minecraft limitations, the roll angle doesn’t affect how the turtle looks or the point of view from which you’re viewing.) What we need to do to draw our sideways donut is first roll our turtle by 45 degrees with t.roll(45), and then when drawing the donut use t.yaw(-angle) instead of t.left(angle). The revised code is in the screenshot.
What’s nice about the yaw/pitch/roll rotations is that they are always relative to where the turtle is pointing, while left() and right() are relative to the Minecraft world.
Finally, here is a much more advanced example. Let’s draw a tree. This involves making a recursive function. Start with this to ensure that the drawing is done as fast as possible
from mineturtle import *
t = Turtle()
t.pendelay(0)
t.turtle(None)
Now we do our recursive tree function. The basic idea behind this is that a branch is just a smaller tree. So we make a function that takes a counter and a branch length. The counter specifies how many iterations the tree will go. For instance, counter=1 means just the trunk will be drawn, and counter=1 means the trunk and one set of branches will be drawn.
def tree(counter,branchLen):
  if counter == 0:
    return
  t.go(branchLen)
  for i in range(4):
    t.pitch(30)
    tree(counter-1,branchLen*0.75)
    t.pitch(-30)
    t.roll(90)
  t.back(branchLen)
First, the code checks if our counter has run down to zero. If so, we don’t have anything to draw. Then we draw a trunk. Then we draw four branches sticking out of it with a simple loop. To design this bit of code, I just imagine myself as the turtle, having just moved up along the trunk. To draw a branch, I tilt my self up by 30 degrees (i.e., t.pitch(30)) and draw a new tree of smaller size: its counter is less by one, and its trunk will be 3/4 of the length of my current trunk. I think tilt myself back down by 30 degrees. I rotate myself by 90 degrees and repeat the exercise. Finally, once I’m done with the branches, I go back down the trunk.
Finally, I just need to invoke this code. I will make a tree with a counter of 6 and an initial branch length of 20. And for good measure, I’l make it out of wood, and of course vertically upward:
t.penblock(block.WOOD)
t.verticalangle(90)
tree(6,20)
This fractal tree doesn’t look very realistic. We should make the trunk thick and the branches get thinner and thinner as they go outward (say, get half as thick, until they reach a single block), and we should switch from WOOD to LEAVES blocks as we go out. But most of all, real trees aren’t that regular. We need some randomness. The simplest form of randomness is just to give each branch a chance of failing to grow, say a 20% chance. I implemented all of these in my fancytree.py script. The resulting tree looks surprisingly realistic for something produced by such a relatively simple piece of code. A funny side-effect of how I implemented it is that there is a 20% chance that nothing will be drawn—i.e., the tree has a chance of failing to grow, which is also realistic. And each time you run the script, you get something different.
Another useful feature of the turtle drawing class is being able to draw not just lines but polygonal surfaces. To do this, just do t.startface(), draw your surface, and then do t.endface(). Once you’re in face mode, each time you draw a line, the code actually draws a triangle: one vertex is the point the turtle was when t.startface() was called and the line is the opposite edge. This draws a pentagon tilted on its side by 45 degrees:
t.roll(45)
t.startface()
for i in range(5):
  t.go(20)
  t.yaw(360/5)
t.endface()
Step 9: L-system Fractals With Turtle Graphics
Draw a triangle. Now take each line of the triangle and replace it by a line with a triangular bump on it. Repeat. Like on the animated image (public domain, based on Wikipedia), you get a Koch snowflake.
This can be modeled by a super-simple turtle-graphics program. Imagine that F means «draw forward», and «+» and «-» turn by 60 degrees, counterclockwise and clockwise, respectively. Then the initial triangle can be drawn by:
F++F++F
I.e., go forward, turn right by 120 degrees, then go forward, turn right by 120 degrees, go forward.
The triangular bump line can be drawn by:
F-F++F-F
So here’s how we can generate a snowflake. We take the initial turtle program F++F++F to draw a triangle. Each F in it represents a line. So replace each F by F-F++F-F. If we keep on going, we generate the Koch snowflake.
This is a simple example of an L-system. The idea behind an L-system is that we start with a string of characters (in this case F++F++F), and then a bunch of rules how to change the characters (in this case, the one rule to replace F with F-F++F-F) in each iteration. We apply this a bunch of times and we get a rather complicated string. For instance, after two iterations in the snowflake case, we get:
F-F++F-F-F-F++F-F++F-F++F-F-F-F++F-F++F-F++F-F-F-F++F-F++F-F++F-F-F-F++F-F++F-F++F-F-F-F++F-F++F-F++F-F-F-F++F-F
After four, we get the image above. (To really get a fractal, the lines should shrink with each iteration, but that won’t work in Minecraft.)
There is a lot of really good information in this free PDF book.
I wrote a very simple lsystem.py module. To implement the snowflake, start with boilerplate:
import lsystem
from turtle import *
t = Turtle()
t.pendelay(0)
t.penblock(block.GOLD_BLOCK)
Now we need to define the rules. I define the rules by a python dictionary:
rules = { 'F': 'F-F++F-F' }
Next we define the axiom, or starting point:
axiom = 'F++F++F'
Finally we need to tell the system what each of the symbols in the strings mean. For different L-systems, we will assign different meanings to them (rotations by different angles, for instance). So we need a second python dictionary specifying what is done for each symbol. If you don’t specify an action for a symbol, the symbol is ignored when it is time for the turtle to draw the output (but it might be important for the generation). The meanings are given by a dictionary that specifies a function to call for each symbol. One-line functions can be specified with the lambda operator. In this case, all the functions are one-liners:
dictionary = {
  'F': lambda: t.go(2),
  '+': lambda: t.yaw(60),
  '-': lambda: t.yaw(-60)
}
Finally we invoke the L-system, specifying how many iterations (in this case 4):
lsystem.lsystem(axiom, rules, dictionary, 4)
There is one special trick for some L-systems. These L-systems are grid-aligned, with all the rotations being 90 degrees. The square curve (squarecurve.py) and dragon curve (dragoncurve.py) are nice examples. The trick is to call, somewhere near the beginning of your code:
t.gridalign()
This moves your turtle to an integer grid location, and aligns its heading to a grid direction. After this, the turtle will remain exactly grid aligned provided that you move it only by integer amounts (e.g., 7, not 7.1, and not even 7. or 7.0 as these are floating point in Python), and you rotate only by integer amounts that are multiples of 90 degrees (e.g., -180, or 90, but not 90.0 or 45). The dragon curve code also gives an example of a forward function that is a bit more complicated—instead of just a line, it draws a wall with an opening in it.
Actually, calling gridalign() can sometimes be a good idea even if not all of your angles are right angles. You will probably get some round-off problems in a large image, but it can still look better. See the spacefilling curve example (rendered in purple stained glass!).
L-systems don’t have to be two-dimensional. You can include symbols that do yaw, pitch and roll rotations. For designing trees, a useful trick is to have stack commands: ‘[‘ to save the current drawing state to a stack and ‘]’ to restore it. This will use the turtle module’s push() and pop() methods. For instance, here’s a snippet of code for drawing a simple tree (ltree.py):
t.pitch(90)
rules = { 'L':'[^FL]>[^FL]>[^FL]' }
axiom = 'FL'
dictionary = {
  'F': lambda: t.go(10),
  '^': lambda: t.pitch(20),
  '>': lambda: t.roll(120),
  '[': lambda: t.push(),
  ']': lambda: t.pop()
}
lsystem.lsystem(axiom,rules,dictionary,5)
Think of the L as a leaf (though this simple code doesn’t actually draw the leaf—that would need to be added to the dictionary). We start with FL, which is a trunk plus a leaf. Then we replace each leaf by [^FL]>[^FL]>[^FL]. This is a set of three branches, each tilted by 20 degrees from the trunk, 120 degrees apart. The brackets ensure that after each new ^FL is drawn, we’re back where we were before it. This repeats, so that the leaves on the branches are replaced by triples of branches, and so on.
A more realistic tree could have more complex code for ‘[‘. It could make the succeeding branches shorter and thinner, and change their material as we get closer to the leaves (and then restore on ‘]’). I include such a tree as the demo code in lsystem.py, based on rules (with some tweaks) from the Geeky Blogger.
You can also do grid-aligned 3D things. For instance, hilbert.py has a 3D Hilbert curve.
Finally, you might want to introduce some randomization into the L-system rules. So far our rules were deterministic: a single string was given that replaces a symbol, e.g., ‘F’: ‘F-F++F-F’. But instead of a simple replacement string, one can give a Python list of pairs (p,string), where p is a probability (from 0 to 1) and string is the string to use with that probability. The probabilities for a given source symbol had better not add up to more than 1, but they can add up to less than one—in that case, there is a chance that there will be no replacement. For instance, here’s a slightly randomized version of geeky.blogger’s tree:
rules = {'A': [(0.55,'^f[^^f>>>>>>A]>>>[^^f>>>>>>A]>>>>>[^^f>>>>>>A]'),
               (0.25,'^f>>[^^f>>>>>>A]>>>[^^f>>>>>>A]')]}
This rule has a 55% chance of replacing an A with a three-branch structure, and a 25% chance of replacing it with a two-branch structure. This isn’t very random—more randomness would make things even more lifelike. I attach a screenshot of a fairly sparse forest randomly generated using this rule (and random placement of trees, subject to a minimum distance).
Step 10: Cartesian Drawing
I also made a simple class for drawing with Cartesian coordinates. You can initialize with:
from drawing import *
d = Drawing()
(This initializes the Minecraft connection and brings math and block names into the namespace.) Then you have several convenience methods:
- d.penwidth(x): sets thickness of points/lines/faces
- d.line(x1,x2,x3,y1,y2,y3,block): draws line from (x1,x2,x3) to (y1,y2,y3) made from the block material
- d.face(vertexlist,block): draws a face with the vertices in the vertexlist made from the block material
For instance, you can do a rectangle sloped at 45 degrees made of glass at level 0 at the spawn point with:
d.face([(0,0,0),(0,10,10),(10,10,10),(10,0,0)])
For fun, I adapted Simon Tatham’s really neat polyhedron generation code to use the Minecraft drawing class. His code starts with a number of random points on a sphere, and then simulates them repelling themselves until they stabilize into a configuration that is often regular. Then he has two neat methods of making a polyhedron out of these points, a face method and a vertex method. I put this in polyhedron.py. This script takes commandline arguments. For instance, to draw an icosahedron use 12 points and the vertex construction. Directly from Minecraft:
/py polyhedron 12 vertex
For an dodecahedron, change vertex to face. You can also add one more argument for size. The polyhedron will be made of glass with stone edges and will be centered around the player.
Technical note: If you already have a Minecraft object mc, initialize with d = Drawing(mc). In either case, you can access the Minecraft object via d.mc.
Step 11: Optional: Disable Pause on Loss of Focus
Minecraft normally pauses the game and goes to the Game menu when you alt-tab out of it or otherwise lose focus. This makes it harder to see what your python scripts are doing if you’re launching them from outside of Minecraft. To do that, you can edit the options.txt file in your Minecraft directory (%appdata%.minecraft on Windows), change the
pauseOnLostFocus:true
line to
pauseOnLostFocus:false
and then save, and restart Minecraft.
This is particularly nice for running python scripts interactively. In the screenshot, I am playing with Michael O’Hanlon’s 3D turtle drawing (and, yes, that’s Deep Space Nine in the background).
Step 12: Advanced Notes 1: Drawing Objects Defined by an Inequality
There are basically two different techniques for drawing mathematically defined objects with a python script in Minecraft.
One way is to define a solid object by an inequality. For instance, a sphere centered on (x0,y0,z0) with radius r can be defined by the inequality:
(x-x0)**2 + (y-y0)**2 + (z-z0)**2 <= r**2
(I.e., the distance to (x0,y0,z0) is at most r.) So to draw a sphere, just loop through all points (x,y,z) in a cube of side-length 2*r+1 surrounding (x0,y0,z0), and draw a block if the above inequality holds.
I learned this technique from the sample nt7s_sphere.py script. Start with the standard header and init Minecraft connection code:
from mine import *
mc = Minecraft()
Then just do:
radius = 8
playerPos = mc.player.getPos()
for x in range(radius*-1,radius):
  for y in range(radius*-1, radius):
    for z in range(radius*-1,radius):
      if x**2 + y**2 + z**2 < radius**2:
        mc.setBlock(playerPos.x + x, playerPos.y + y + radius, playerPos.z - z - 10, block.GLASS)
This draws a sphere of the specified radius above the player, and a little offset in the z-direction.
I use the same technique, but with a more complicated formula, in my donut.py script (yes, this is more complicated than the turtle-based method):
for x in range(-R-r,R+r):
     for y in range(-R-r,R+r):
        xy_dist = math.sqrt(x**2 + y**2)
        if (xy_dist > 0):
           ringx = x / xy_dist * R # nearest point on major ring
           ringy = y / xy_dist * R
           ring_dist_sq = (x-ringx)**2 + (y-ringy)**2
           for z in range(-R-r,R+r):
               if (ring_dist_sq + z**2 <= r**2):
                  mc.setBlock(mcx+x, mcy+z, mcz+y, mcblock, mcmeta)
While the inequality technique works best for solid shapes, you can use it for hollow shapes in two ways. One way is to use two inequalities, for instance in the case of the sphere one to make sure that we’re within the outer radius of the center and another to make sure we’re not closer than the inner radius. The other way is just to draw another object with smaller dimensions made out of air inside the larger solid object, much as in my donut.py script, I initially draw a glass donut, and then replace the inside of it with water.
Step 13: Advanced Notes 2: Drawing an Object Defined by a Parametric Surface
One can also draw a surface by parametrizing it with two parameters, say a and b, and then looping over a range of these parameters, setting blocks where needed. In my Klein bottle and Mobius strip scripts, I have a general draw_surface() method that lets one do this. For instance, the Mobius strip (see my mobius.py script) is defined by the three formulae:
x = (3 + a * cos(b/2)) * cos(b)
y = a * sin(b/2)
z = (3 + a * cos(b/2)) * sin(b)
with a ranging from -1 to 1 and b ranging from 0 to 2*pi (yet another reason why this can be in the pi/e contest?). You can think of b as defining the angle around the circuit, and a moving one from one edge to the other.
Using scripts like this, you need to ensure that in your loops over a and b, the steps are sufficiently small that there are no gaps in the surface. Unless that’s the effect you’re after.
For details and examples see mobius.py, klein.py and klein2.py.
Step 14: Advanced Notes 3: Knots
You can find parametric equation for knots on the net. This time, we’re going to do things slightly different from before. Before, we had loops driving calls to mc.setBlock() directly. But in our surface plots, such as the Klein bottle, often the same block would get drawn multiple times, which is slow and inefficient. A better way is to keep track of the set of exact blocks that were already drawn to avoid redoing the same thing.
Let me go through an example like that (in knot.py) to draw a knot. Start with a standard header like:
from mine import *
We now need to generate our knot. I used the cinquefoil formulas from here. This requires looping a parameter t from 0 to 2*pi, with small enough steps to ensure we don’t have gaps. I used 10000 steps. Since this is done in-memory, and computers are fast, and overlapping blocks are only sent once to Minecraft, it’s easier to easier to do more steps than to think how many is enough. It’s important for the coordinates that go in the dictionary to be integers so we can tell that the same block is being drawing (a block at (1.1,1.2,1.4) and a block at (1,1,1) are the same thing in Minecraft).
We first initialize and set the position of the knot relative to the player. Note that the player position need not be an integer (you might not be standing exactly aligned with a block) and should be turned into an integer.
mc = Minecraft()
playerPos = mc.player.getPos()
scale = 12
x0 = int(playerPos.x)
y0 = int(playerPos.y + 5*scale)
z0 = int(playerPos.z)
Now we make an empty set named done to store the coordinates we’ve already drawn:
done = set()
And we draw the set:
t = 0
while t < 2*pi:
  x = x0+int( scale * cos(2*t) * (3 + cos(5*t)) )
  y = y0+int( scale * sin(2*t) * (3 + cos(5*t)) )
  z = z0+int( scale * sin(5*t) )
  if (x,y,z) not in done:
     mc.setBlock(x,y,z,block.GOLD_BLOCK)
     done.add((x,y,z))
  t += 2*pi / 10000
This only draws data that isn’t already drawn. Note that we need to round off the x, y and z coordinates with the int() function. That’s the magic behind the overlap removal: when the rounded coordinates are the same, only one block is drawn. (Note: the double parenthesis in the done.add((x,y,z)) line are due to the fact that what we’re adding to the set is the coordinate triple (x,y,z).)
The above code is in knot.py.
The knot would look better if the rope were thicker. There are many ways one can do that. An inefficient way, but easy since computers are fast these days, is just to draw a little ball instead of a point at each pixel. To do that, first I make a little utility function to draw a ball while checking in the done set to ensure there are no duplicate blocks:
def ball(x0,y0,z0,r,block,done):
  for x in range(-r,r):
    for y in range(-r,r):
      for z in range(-r,r):
         if (x**2 + y**2 + z**2 <= r**2):
            if not (x0+x,y0+y,z0+z) in done:
               mc.setBlock(x0+x,y0+y,z0+z, block)
               done.add((x0+x,y0+y,z0+z))
This uses the inequality method to fill in a ball at (x0,y0,z0), of radius r.
Then just modify our knot-making while loop to make a ball instead of just a point:
scale = 10
x0 = int(playerPos.x)
y0 = int(playerPos.y + 5*scale)
z0 = int(playerPos.z)
done = set()
t = 0
while t < 2*pi:
  x = x0+int( scale * cos(2*t) * (3 + cos(5*t)) )
  y = y0+int( scale * sin(2*t) * (3 + cos(5*t)) )
  z = z0+int( scale * sin(5*t) )
  ball(x,y,z,4,block.GOLD_BLOCK,done)
  t += 2*pi / 10000
The result is in knot2.py in the sample scripts.
Other sample knots are in trefoil.py, trefoil2.py and borromean.py. If you draw with multiple materials, you can use a dictionary in place of a set, or just go sequentially through the different materials and clear the set before each (that’s what I do in trefoil2.py and borromean.py).
Step 15: Advanced Note 4: Flying With Your Brain
In another Instructable, I describe how to hack a Mindflex EEG toy to work over Bluetooth. Using python and a modified version of the NeuroPy package, you can now control Minecraft with your brain. Here’s how to do it, either with the Mindflex or with a full Mindwave Mobile set. In my example scripts, I do this in the neurosky.py script.
Start by importing relevant packages and initializing Minecraft:
from mine import *
from NeuroPy.NeuroPy import NeuroPy
mc = Minecraft()
Then connect to the EEG headset. My hacked Mindflex EEG toy connects to my Windows laptop as COM11 and works over 57600 baud. It also needs a special initialization string to be sent to it to switch it to 57600 baud (and raw mode). This was done with:
eeg = NeuroPy("COM11",57600,True)
If you have an official Mindwave Mobile (or are using Mindflex but left it at 9600 baud), then you can omit the «,True» part.
Now we set up a simple callback routine that will move you upward (this needs Creative mode) when the «meditation» value from the eeg (which ranges from 0 to 100) goes above 60, and to move downward when it goes below 40:
up = 60
down = 40
def callback(a):
    mc.postToChat(a)
    if a > up:
       pos = mc.player.getPos()
       pos.y = pos.y + 1
       if mc.getBlock(pos.x,pos.y,pos.z) == block.AIR.id:
          mc.player.setPos(pos)
    elif a < down:
       pos = mc.player.getPos()
       pos.y = pos.y - 1
       if mc.getBlock(pos.x,pos.y,pos.z) == block.AIR.id:
          mc.player.setPos(pos)
eeg.setCallBack("meditation", callback)
For good measure, I posted the meditation value to chat. Now, all we need to do is start up the EEG and inform the user:
mc.postToChat("Connecting to EEG")
eeg.start()
mc.postToChat("To fly up, be meditative")
Finally, we need to keep the script from exiting, by starting an endless loop of sleeping:
while True:
    time.sleep(10)
(My neurosky.py script is slightly fancier by letting you select whether to work with the «meditation» or the «attention» value from the headset. By default it does attention, but /py neurosky m will start it in meditation mode.)
Then turn on the headset, and start the script with /py scriptname. To stop the script, do /py again.
Step 16: Optional: Visual Studio With Python and Minecraft: Getting Started
If you’re running on Windows, Visual Studio (I recommend free Visual Studio Express for Desktop 2015) together with the Python Tools is a nice way to develop python code for Minecraft. (But if you used my Windows installer for the mod, you’ll need a full official Python installation instead of what I bundled, or else you’ll need to use PTVS to set up a custom environment pointed to %appdata%.minecraftpythonX.)
A really useful thing is that Visual Studio’s code completion will help you with the Minecraft python api. For instance, when you type «block.» it will pop up a list of all the block types (AIR, BED, etc.).
Make sure you have installed Python, the mod, and the sample scripts.
1. Download and install Visual Studio Community Edition 2013.
2. Download and install Python Tools for Visual Studio (PTVS 2.1 VS 2013.msi).
3. Start Visual Studio.
4. Click on «Open Project», search for your sample scripts folder (%appdata%.minecraftmcpipy with Raspberry Jam Mod) and load the mcpipy.sln solution.
5. In the Solution Explorer window on the right, you can choose an existing script to modify, for instance knot2.py (or you can create a new one by clicking on the bold mcpipy in the Solution Explorer and choosing from the main menu «Project», «Add new item», and then choosing «Python» and «Empty module»).
Now you can edit the script to your heart’s content.
Step 17: Optional: Visual Studio With Python and Minecraft: Running and Debugging
Because we set up all the scripts to be part of one project, to run or debug a script, you need to tell Visual Studio which script is the one you want to run. Right click on the script in the Solution Explorer window (if you lose the Solution Explorer, go to the «Windows» menu and choose «Reset Window Layout») and «Set as Startup File».
You will also want to have Minecraft running with a world opened, or otherwise your script won’t be able to connect to Minecraft.
After setting the startup file, you can run by pulling down «Debug», and choosing «Start debugging» (or just press F5) or «Start without debugging» (ctrl-F5). If you choose «Start debugging», the script will run much more slowly, but you will have useful debug features, like the ability to pause the script at any time, step through it step-by-step (there are useful buttons on the toolbar), and examine the variables while running (see the «Autos» and «Locals» boxes).
You can also run in debug mode up to a particular line in the script by right-clicking on the line and choosing «Run to cursor». This is handy if you know that something is wrong in your script around that line, and you want to have a look at the variables at that point. For instance, if you run the knot2.py script up to around the line that invokes draw_data(), you can see the contents of the knot dictionary that stores the list of blocks to be drawn.
Step 18: Additional Resources
The best resource for programming Minecraft in python is the Adventures in Minecraft book by Martin O’Hanlon.
O’Hanlon also has a lot of good information on the stuffaboutcode.com site. In particular, he has an API reference here. The Raspberry Jam Mod (and mcpiapi mod) supports just about everything that the Raspberry Juice server plugin does.
The real-time working analog clock in the picture above is from one of the stuffaboutcode scripts (sitting above one of my donuts): /py stuffaboutcode_clock
A rather cool thing that O’Hanlon did was to write a python script to convert Wavefront mesh.obj files to Minecraft. I’ve adapted this to convert 3DS, PLY and binary STL files as well. For instance, you can draw a space shuttle with /py render shuttle (there are .txt files describing the block choices in the mcpipy/models directory; the meshes will automatically be downloaded).
10 People Made This Project!
Recommendations
Python programming with minecraft
Our goal is to learn programming while having fun in Minecraft

0 Pre-Request
0.1 Install Minecraft Java edition
Go to minecraft website download the Java Edition
- link to download Minecraft java edition
0.2 Setup mincraft server
-
How to setup a mincraft server (spigot)
-
How to enable Python on the Minecraft server by installing the RaspberryJuice plugin
0.3 Install Python
Go to Python download page, download and install Python 3.8 and up
- To the page of download ptyhon
- How to Install Python
0.4 Install mcpi Python module
Window
input below script in the command line. (from start, search «cmd»)
-
use
pip3 -
or use
pyorpython -m
Linux / MacOS
- sudo pip3 install mcpi-e
0.5 Install a Python Editor
-
Python IDLE
- IDLD is commine with Python, Open it by in Start->Search, Input «IDLE»
- For how to use IDLE
-
PyCharm
- PyCharm Edu is a python editor help you learn Python
- Click to download pyCharm Edu
-
VsCode
- VsCode is a editor for many different programming langurage.
- Click to download VsCode
- How to install VsCode for python
1. Get Start Python with Minecraft
1.1 Connect to the Minecraft server and get your position
Create a Python project folder, Download and save the sample1.py file to your python project folder
sample1.py
from mcpi_e.minecraft import Minecraft

serverAddress="127.0.0.1" # change to your minecraft server
pythonApiPort=4711 #default port for RaspberryJuice plugin is 4711, it could be changed in pluginsRaspberryJuiceconfig.yml
playerName="stoneskin" # change to your username

mc = Minecraft.create(serverAddress,pythonApiPort,playerName)
pos = mc.player.getPos()

print("pos: x:{},y:{},z:{}".format(pos.x,pos.y,pos.z))
Use your faverate python editor to open the sample1.py file.
When you install python, it come with a python editor call IDLE.j
1.2. Frequently used mcpi commands
1.2.1 Find your location
get the tile position
pos = mc.player.getTilePos()
1.2.2 Teleport
move player to north 100 block
x,y,z = pos = mc.player.getTilePos()
mc.player.setTilePos(x,y+100,z)
1.2.3 Set block
set the a stone block beside the player
x,y,z = pos = mc.player.getTilePos()
mc.setBlock(x+1, y, z, 1)
setblock with constants block.STONE.id
#setblock with constants block.STONE.id
from mcpi_e import block
(x,y,z) = pos = mc.player.getTilePos()
mc.setBlock(x+1, y, z+1, block.STONE.id)
set special block which extra properties
# set special block which extra properties
flower = 38
flowerColor = 3
mc.setBlock(x+1, y, z+1, flower, flowerColor)
1.2.4 Get block
get the block type id of the player stepping on
# get the block current player step on
x, y, z = mc.player.getTilePos()
blockId= mc.getBlock(x, y, z)
if(blockId == 0):
   print("current block is Air")
##### Check the Minecraft Item ID list
2 Learn Python With Minecraft
To use the code examples in this site, please make sure include the piece of code below before the sample codes
import mcpi_e.minecraft as minecraft
import mcpi_e.block as block
from math import *

address="127.0.0.1" # change to address of your minecraft server
name ="change you your name"
mc = minecraft.Minecraft.create(address,4711,name)
pos=mc.player.getTilePos()

#your other code below
...
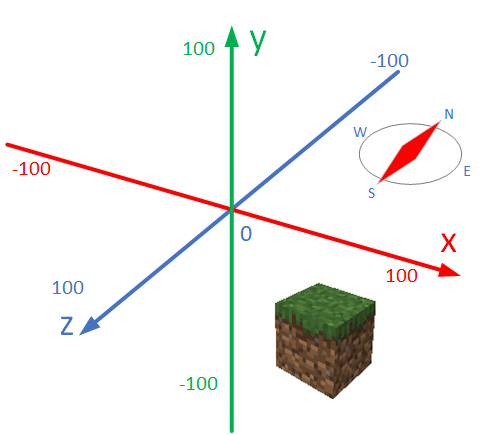
2.1 Understand the coordinates of minecraft
Minecraft coordinates are different than what we learn from geomestry. You need keep the picture below in mind when you do the minecraft coding.

For basic python syntax, pleas check Python syntax for details.
The missions/codes below will use print and command from minecraft api mcpi
 Click to view your Mincraft-Python Missions-1
 Click to view your Mincraft-Python Missions-1
2.2 Use for Loop to stack blocks
for loops are traditionally used when you have a block of code which you wnat to repeat number of times.
for x in range(0, 3):
    print("We're on time %d" % (x))
For learnning how to use for loop, please visit Python For Loops
Below mission only need using for ... range loop.
Click to view your Coding Missions -2
2.3 Value Type: String , Number
In Python any amount of text call a string, you could use string like this
print("Hello Minecraft")

name ="Steve the Miner"

print(name)
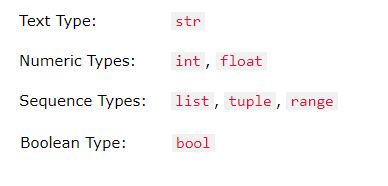
String and Intiger is different DataType, for detail please read Python Data Types.
Below is the Data Types we possible will used in our class
example of get type of a variable:
The data you got form input is a string, we need convert to number before using as number. int(str) could do this job.
blockType=input("Enter a block type:")
blockTypeId=int(blockType)
other way if you want change a int to string, you could use str(number)
value=103
print("Watermelon block id is "+str(value))
Click to view your Coding Missions -3
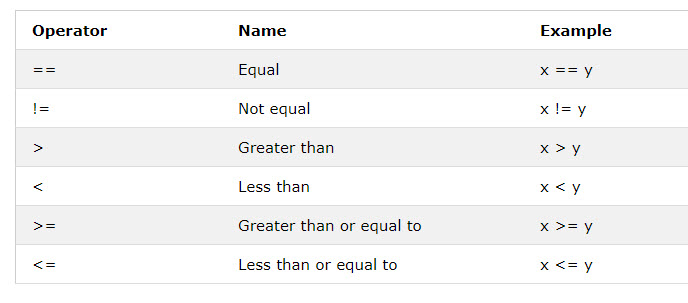
2.4 Use Condition if ... else
To learn comdition please check Python If…Else
Booleans represent one of two values: True or False
For learn more and practic Boolean, please check Python Boolean
Click to view your Coding Missions -4
3 More Code Samples
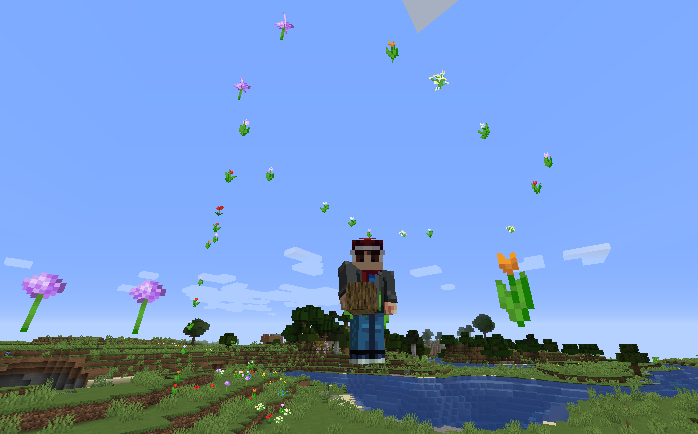
3.1 Dropping the flowers when you move
- code example 1: dropflower.py
- code example 2 : dropflower_Withsize.py
Set a random flower on where the play is standing
   flower = 38
   while True:
      x, y, z = mc.playerEn.getPos()
      blockId= mc.getBlock(x, y, z)
      print("current block:" + str(mc.getBlock(x, y, z)))
      if(blockId==0 or blockId ==78):
         mc.setBlock(x, y, z, flower,randrange(8))
      sleep(0.2)

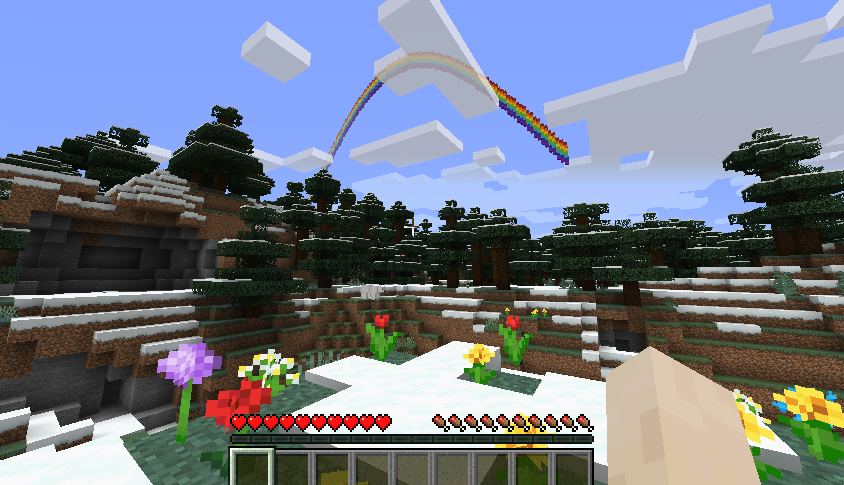
3.2 Build a rainbow in the minecraft
code example: rainbow.py
build a rainbow with colored wool on the player’s location
   import mcpi_e.minecraft as minecraft
   import mcpi_e.block as block
   from math import *

   address="127.0.0.1" # change to your minecraft server
   name ="change you your name"
   mc = minecraft.Minecraft.create(address,4711,name)
   playerPos=mc.player.getTilePos()
   colors = [14, 1, 4, 5, 3, 11, 10]
   height=50

   for x in range(0, 128):
         for colourindex in range(0, len(colors)):
                  y = playerPos.y+sin((x / 128.0) * pi) * height + colourindex
                  mc.setBlock(playerPos.x+x - 64,  int(y), playerPos.z, block.WOOL.id, colors[len(colors) - 1 - colourindex])
   print("rainbow created at x:{} y:{} z:{}".format(playerPos.x,playerPos.y,playerPos.z))

Our goal is to learn programming while having fun in Minecraft
0 Pre-Request
0.1 Install Minecraft Java edition
Go to minecraft website download the Java Edition
- link to download Minecraft java edition
0.2 Setup mincraft server
-
How to setup a mincraft server (spigot)
-
How to enable Python on the Minecraft server by installing the RaspberryJuice plugin
0.3 Install Python
Go to Python download page, download and install Python 3.8 and up
- To the page of download ptyhon
- How to Install Python
0.4 Install mcpi Python module
Window
input below script in the command line. (from start, search “cmd”)
-
use
pip3 -
or use
pyorpython -m
Linux / MacOS
- sudo pip3 install mcpi-e
0.5 Install a Python Editor
- Python IDLE
- IDLD is commine with Python, Open it by in Start->Search, Input “IDLE”
- For how to use IDLE
- PyCharm
- PyCharm Edu is a python editor help you learn Python
- Click to download pyCharm Edu
- VsCode
- VsCode is a editor for many different programming langurage.
- Click to download VsCode
- How to install VsCode for python
1. Get Start Python with Minecraft
1.1 Connect to the Minecraft server and get your position
Create a Python project folder, Download and save the sample1.py file to your python project folder
sample1.py
from mcpi_e.minecraft import Minecraft

serverAddress="127.0.0.1" # change to your minecraft server
pythonApiPort=4711 #default port for RaspberryJuice plugin is 4711, it could be changed in pluginsRaspberryJuiceconfig.yml
playerName="stoneskin" # change to your username

mc = Minecraft.create(serverAddress,pythonApiPort,playerName)
pos = mc.player.getPos()

print("pos: x:{},y:{},z:{}".format(pos.x,pos.y,pos.z))
Use your faverate python editor to open the sample1.py file.
When you install python, it come with a python editor call IDLE.j
1.2. Frequently used mcpi commands
1.2.1 Find your location
get the tile position
pos = mc.player.getTilePos()
1.2.2 Teleport
move player to north 100 block
x,y,z = pos = mc.player.getTilePos()
mc.player.setTilePos(x,y+100,z)
1.2.3 Set block
set the a stone block beside the player
x,y,z = pos = mc.player.getTilePos()
mc.setBlock(x+1, y, z, 1)
setblock with constants block.STONE.id
#setblock with constants block.STONE.id
from mcpi_e import block
(x,y,z) = pos = mc.player.getTilePos()
mc.setBlock(x+1, y, z+1, block.STONE.id)
set special block which extra properties
# set special block which extra properties
flower = 38
flowerColor = 3
mc.setBlock(x+1, y, z+1, flower, flowerColor)
1.2.4 Get block
get the block type id of the player stepping on
# get the block current player step on
x, y, z = mc.player.getTilePos()
blockId= mc.getBlock(x, y, z)
if(blockId == 0):
   print("current block is Air")
##### Check the Minecraft Item ID list
2 Learn Python With Minecraft
To use the code examples in this site, please make sure include the piece of code below before the sample codes
import mcpi_e.minecraft as minecraft
import mcpi_e.block as block
from math import *

address="127.0.0.1" # change to address of your minecraft server
name ="change you your name"
mc = minecraft.Minecraft.create(address,4711,name)
pos=mc.player.getTilePos()

#your other code below
...
2.1 Understand the coordinates of minecraft
Minecraft coordinates are different than what we learn from geomestry. You need keep the picture below in mind when you do the minecraft coding.
For basic python syntax, pleas check Python syntax for details.
The missions/codes below will use print and command from minecraft api mcpi
Click to view your Mincraft-Python Missions-1
 Click to view your Mincraft-Python Missions-1
2.2 Use for Loop to stack blocks
for loops are traditionally used when you have a block of code which you wnat to repeat number of times.
for x in range(0, 3):
    print("We're on time %d" % (x))
For learnning how to use for loop, please visit Python For Loops
Below mission only need using for ... range loop.
Click to view your Coding Missions -2
2.3 Value Type: String , Number
In Python any amount of text call a string, you could use string like this
print("Hello Minecraft")

name ="Steve the Miner"

print(name)
String and Intiger is different DataType, for detail please read Python Data Types.
Below is the Data Types we possible will used in our class
example of get type of a variable:
The data you got form input is a string, we need convert to number before using as number. int(str) could do this job.
blockType=input("Enter a block type:")
blockTypeId=int(blockType)
other way if you want change a int to string, you could use str(number)
value=103
print("Watermelon block id is "+str(value))
Click to view your Coding Missions -3
2.4 Use Condition if ... else
To learn comdition please check Python If…Else
Booleans represent one of two values: True or False
For learn more and practic Boolean, please check Python Boolean
Click to view your Coding Missions -4
3 More Code Samples
3.1 Dropping the flowers when you move
- code example 1: dropflower.py
- code example 2 : dropflower_Withsize.py
Set a random flower on where the play is standing
   flower = 38
   while True:
      x, y, z = mc.playerEn.getPos()
      blockId= mc.getBlock(x, y, z)
      print("current block:" + str(mc.getBlock(x, y, z)))
      if(blockId==0 or blockId ==78):
         mc.setBlock(x, y, z, flower,randrange(8))
      sleep(0.2)
3.2 Build a rainbow in the minecraft
code example: rainbow.py
build a rainbow with colored wool on the player’s location
   import mcpi_e.minecraft as minecraft
   import mcpi_e.block as block
   from math import *

   address="127.0.0.1" # change to your minecraft server
   name ="change you your name"
   mc = minecraft.Minecraft.create(address,4711,name)
   playerPos=mc.player.getTilePos()
   colors = [14, 1, 4, 5, 3, 11, 10]
   height=50

   for x in range(0, 128):
         for colourindex in range(0, len(colors)):
                  y = playerPos.y+sin((x / 128.0) * pi) * height + colourindex
                  mc.setBlock(playerPos.x+x - 64,  int(y), playerPos.z, block.WOOL.id, colors[len(colors) - 1 - colourindex])
   print("rainbow created at x:{} y:{} z:{}".format(playerPos.x,playerPos.y,playerPos.z))
-
И вот очередной вопрос от меня
Кому-нибудь интересна разработка плагинов на Python ?Я сейчас работаю над форком http://dev.bukkit.org/bukkit-plugins/python-plugin-loader/
Разработчик подзабил на плагин, поэтому я решил им заняться.
Что-то изменил, что-то почистил. Добавил команды для релода python плагинов не выключая сервер.
Постараюсь сделать туториал и простенькую документацию, чтобы проще начать было. -

ql_Nik_lp
Старожил
Девелопер
Пользователь- Баллы:
- 173
- Skype:
- q-nik-p
- Имя в Minecraft:
- ql_Nik_lp
Без обид, но не вижу смысла в подобных извращениях.
Если для человека сложно ООП и Java, то есть полно скриптовых аля «языков» типа ReAction(@fromgate ), VarScript(@DPOH-VAR ), Skript
А зачем такое — для меня загадка, честно -
serega6531
Старожил
Девелопер
Пользователь- Баллы:
- 173
- Skype:
- shkurovs
Я хотел плагины на C++ сделать. ( ͡° ͜ʖ ͡°)
-
Разумного смысла нет
Тем более что писать на Python Java плагины далеко не проще чем просто на Java.
Просто у каждого из нас есть любимый язык программирования. Вот serega6531 выше сказал, что хотел на c++ писать.
Мне нравится писать на Python. Он удобный, красивый, лаконичный. (Я думаю так каждый может о своем любимом языке сказать)
Просто когда я пишу на Java я особо не получаю удовольствия от программирования. А вот на Python то что надо.
Тему создал, потому что интересно, стоит ли выкладывать плагин, чтобы у желающих была возможность писать на Python или это так и останется моим личным инструментом для разработки -
SHALK97
Старожил
Пользователь- Баллы:
- 103
- Имя в Minecraft:
- SHALK97
выкладывай конечно, я питон немножко знаю, а java нет
-
jwplaster
Старожил
Пользователь- Баллы:
- 173
- Skype:
- jwplaster.smartworld
- Имя в Minecraft:
- QviNSteN
Хочу плагины на C# писать!
-
BeLkA
Старожил
Пользователь- Баллы:
- 153
- Skype:
- FayStaff
На win фоны пиши на своем сишарпе. Меня лично бесит, когда в джаву со всякими подобными вещами вмешиваются. Исключение — VarScript
-
jwplaster
Старожил
Пользователь- Баллы:
- 173
- Skype:
- jwplaster.smartworld
- Имя в Minecraft:
- QviNSteN
Ну не будь букой. Всё-равно везде только 1 и 0.
-
BeLkA
Старожил
Пользователь- Баллы:
- 153
- Skype:
- FayStaff
Ладно. Сервера же ваши, так что пишите, если хотите.
-
А правда почему VAR-SKRIPT не подходит? Поддержка же для Python (с библиотекой jython) имеется
-
http://dev.bukkit.org/bukkit-plugins/pploader/
А можно пример скрипта на python (или на любом другом языке, который поддерживает VAR-SKRIPT). Человек заходит на сервер и ему пишут в чат: «Добропожаловать, %username%» -
К моему сожалению я не знаю ни Bukkit API, ни python
Но вы можете спросить в официальной теме VarScript’а. -
Без обид, но не вижу смысла в подобных извращениях.
Если для человека сложно ООП и Java[/QUOTE]
Джава полное извращение!
Синтаксис С-подобный, а преимуществ в скорости работы — нет.
Насчет ООП — что мешает писать классы на питоне?
Питон ОО язык программирования.
В нем все является объектами — приятный синтаксис — большой плюс в сторону пайтона.
Как у любого другого языка у него есть свои плюсы и минусы — бесспорно. -
ptnk
Старожил
ПользовательЭто с чего это вдруг java полное извращение и почему тогда на этом извращении существует огромное количество библиотек и огромное число различных проектов?
Все эти дополнительные языки, с помощью которых можно брать и писать плагины — очень интересны и хороши, а с другой стороны это лишняя прослойка между сервером и конечным плагином, который будет выполняться. На обычные плагины существуют сообщества, множество вопросов и проблем уже разобраться, есть где и что посмотреть, а тут что? Со всем придётся заного столкнуться и придётся заного найти путь решения.
Так же не стоит забывать, что всё это лишь детские игрушки, вот плагин возьмёт автор и забросит, и всё наработки на питоне пойдут лесом, а оно нужно кому-то? + Ко всему в обычном способе создания плагинов порой встречаются некоторые казусы, с которыми порой можно просидеть, ну или порой взять и поглядеть в код ядра, декомпилировать ядро или поглядеть исходные коды других плагинов. А что нам это готовит? Дополнительный слой с ошибками, на который нельзя до конца положиться?
Вот авторы всех этих прослоек могут выправлять плагины неделями и месяцами, а плагин на том же питоне просто будет выполняться с ошибкой или в каком-то месте будет глючить.т.е. это должно быть достаточно:
1) Не просто так каждому что-то написать на java, для этого приходиться лезть на форумы, смотреть чужие исходники и декомпилить ядро, а с плагинами на питоне и других скриптовых языках так не получится, помощь и ресурсы ограничены и со своими проблемами можно остаться на едине.
2) Лишний слой абстракции, дополнительная прослойка между ядром и разработчиком. Мало того, что баккит может содержать в себе некоторые проблемы и неточности (была ситуации, когда на одном из билдом Player.teleport порой выбрасывал очень странные исключения, которые исправлялись через жопу), так теперь вам ещё могут добавиться дополнительные баги прослоек.
3) Ну это обобщающий пункт. Документации — кот наплакал, туториалов — копейки, автор может сбежать в любую минуту и ваши труду просто пойдут гулять, проекты и сборки неавтоматизированы.
И вот здесь получается, что подобная деятельность может быть подходящей для очень упорных людей, которые готовы тратить большое количество времени на создание плагинов. Для этого нужно создавать и поднимать целое сообщество, делать этоь полноценной экосистемой, наполнять уроками и продвигать это в массы.
В том виде, в котором это сейчас существует — в задницу, потому что для написания подобных плагинов, чтобы что-то выходило путёвое всё равно необходимо знать хорошо java.
-
gamerforEA
Старожил
Пользователь- Баллы:
- 143
- Skype:
- sk2000sk1
- Имя в Minecraft:
- gamerforEA_MCPC
Лично я считаю, что синтаксис Python отвратительный, а у C/C#/Java наоборот — приятный.
-
MLP
Участник
ПользовательВ питоне self аргумент лишний, а к переносам можно привыкнуть.
Есть еще такое, http://dev.bukkit.org/bukkit-plugins/rubybukkit/
Только с такими языками нет статической типизации и ошибки приведения типов на уровне компиляции уйдут на уровень выполнения и могут всплыть в неожиданных местах в неожиданное время, ну и предполагаю, что дебажить их будет сложнее. -
serega6531
Старожил
Девелопер
Пользователь- Баллы:
- 173
- Skype:
- shkurovs
-
Разумного смысла нет
Тем более что писать на Python Java плагины далеко не проще чем просто на Java.
Просто у каждого из нас есть любимый язык программирования.
Мне нравится писать на Python. Он удобный, красивый, лаконичный. (Я думаю так каждый может о своем любимом языке сказать)
Просто когда я пишу на Java я особо не получаю удовольствия от программирования. А вот на Python то что надо.
Я создал для себя инструмент, который позволяет мне писать плагины на python и решил поделиться им со всеми. http://www.rubukkit.org/threads/dev-pploader-v1-1-0-плагины-на-python-1-6-4-r2-0.78013/В отладке пока что я не сталкивался с проблемами. jython нормально приводит типы и с этим пока проблем тоже не было. + Так как в плагине поддержка перезагрузки python плагинов без ребута сервера так становится немного удобней и чуточку быстрей отлаживать баги.
А насчет какой язык лучше это личное мнение каждого. На нем достаточно реальных коммерческих проектов. И каждый язык имеет своё место. Иначе мы бы все писали на ассемблере.
Познакомиться с написанием python плагинов можно тут https://github.com/cyberlis/pploader/wiki/Руководство-начинающего
Последнее редактирование: 3 сен 2014 -
MrGiperCreeper
Активный участник
Пользователь- Баллы:
- 78
- Имя в Minecraft:
- Ivan_Alone
А я бы плагины на PHP писал)
")


 Но вы можете спросить в официальной теме VarScript’а.


Поделиться этой страницей
Sat 29 June 2013, by Seppe «Macuyiko» vanden Broucke
A Python interpreter for a Bukkit Minecraft server
Summary and Changes
This post describes how you can create a Python interpreter for a Bukkit Minecraft server, providing access to the full internal API. Commands are issued on a separate console window and do not require players or server administrators to be running the game itself.
Following list provides an overview of changes:
- 2013-06-29: Initial version.
- 2013-07-16: Some spelling fixes. Added feature which creates server listening for incoming connection instead of spawning a GUI based console. This allows users on servers to play with the plugin as well.
- 2013-07-18: Expanded server listening feature to allow for multi-user logins. Article updated accordingly.
Introduction
Unless you’ve been living under a rock, you probably know about Minecraft, the famous open block based 3D building/crafting/exploration/survival game.
Minecraft is a game about breaking and placing blocks. At first, people built structures to protect against nocturnal monsters, but as the game grew players worked together to create wonderful, imaginative things.
It can also be about adventuring with friends or watching the sun rise over a blocky ocean. It’s pretty. Brave players battle terrible things in The Nether, which is more scary than pretty. You can also visit a land of mushrooms if it sounds more like your cup of tea.
Minecraft has been wildly successful. Not only because of the LEGO-like main gameplay, but also thanks to the developers’ friendly stance towards modding, causing an incredible amount of modifications being released, ranging from additional creatures to custom biomes.
Lots of people have also emphasized the fact that Minecraft is a great way for parents to bond with their children. Also in the classroom, Minecraft has been used as a teaching aid to inspire children.
Combine the two aspects above (modding and teaching), and you ultimately start wondering whether Minecraft could also be used to teach programming. When the Raspberry Pi put online their announcement that a special Minecraft version would be available for their miniature, cheap computer, the answer to this question indeed seems to be: yes, since their “Minecraft: Pi Edition” would come with a programming Python API built in, as shown by the following screen shot.

Back on the PC-side, the great interest in modding Minecraft eventually led to the Bukkit project — a community-created Minecraft server with a comprehensive API to allow others to create plugins, extending the world, gameplay and rules of the vanilla Minecraft experience. Minecraft server administrators also enjoy having some sort of console available to be able to modify a Minecraft world at runtime. Banning players, erecting or destroying structures or changing the time of day without having to restart indeed comes in handy when you’re running a server. The Bukkit development API makes it very easy to create such kinds of plugins, but they often require the list of possible commands to be specified beforehand (in the Java plugin), which are then made available through the game’s chat window. For instance, issuing the command:
Would mean that you have a plugin running which is able to handle the command /weather and converts this to appropriate Bukkit API calls, e.g. setThundering.
Other than that, lots of people have started to learn Java or other languages by trying to create a Bukkit plugin or some sort of Minecraft-inspired clone. Following list provides just a tad of what is out there:
- Learning Java: Bukkit Style
- Introducing Kids to Java Programming Using Minecraft
— on Oracle’s blog - MineAssemble — not for Bukkit, but a bootable Minecraft clone written partly in x86 assembly, impressive
- https://github.com/fogleman/Minecraft — also not for Bukkit, but a clone in Python and Pyglet
- Learning Physics with Minecraft — not programming, but learning physics with Minecraft
- Minecraft in Mathematica — …and even Mathematica clones
This is all nice, but a bit too high-level for what I wanted to build. I wanted to have direct access to the Bukkit API, similar to how the Minecraft: Pi Edition provides direct access to its API.
We’re thus going to create a Bukkit plugin which gives server administrators or programming students direct access to the full Bukkit API. The actual plugin is actually very simple, thanks to the magic of Jython, a Python implementation in Java which allows for Python<->Java crosstalk and saves us from having to implement any command in the plugin itself. Commands are issued on a separate console window and do not require players or server administrators to be running the game itself.
Related Work
The basic idea behind what we’re going to do is certainly not new by any means. The Minecraft: Pi Edition, as mentioned above, implements a similar idea (see also this article). The Mag Pi magazine even featured a nice tutorial to show off what you can do with it.
Other than that, there’s ScriptCraft, providing a Javascript based programming interface for Minecraft:
ScriptCraft is a Minecraft Mod that lets you extend Minecraft using the Javascript Programming Language. ScriptCraft makes modding Minecraft easier. It includes a logo-like “Drone” object that can be used to build complex buildings, roads, villages, even entire cities. It also includes many other features that make modding Minecraft easier.
You can find more information about ScriptCraft here and here. It’s certainly a great project to teach programming, but comes with the drawback that it offers programmers its own API (implemented in a Bukkit plugin), meaning that you’ll have to program using Bukkit chat commands, for instance:
/js box("5").up(3).left(4).box("1").turn(3).fwd(5).right().box("1").move("start")
ScriptCraft also includes a “Drone” class which simplifies movement and building in Minecraft, similar to the “turtle” in the LOGO programming language (LOGO is a Lisp-like programming language which used to be popular to teach kids programming; fun fact: the first “real” programming language I learnt actually was a LOGO derivative).
This is all nice, but still too high-level. I want to be able to get direct access to all Bukkit’s API functions (not only exposed ones through a plugin), preferably not having to use the game’s chat.
ComputerCraft also inspires people to learn coding, but is even more high level. It actually provides a “console block” in the game offering a rudimentary shell which has nothing to do with the inner workings of either Bukkit or Minecraft.
Finally, plugins such as PyDevTool and RedstoneTorch come closer to what we want to achieve. For instance, PyDevTools allows to:
Execute arbitrary python code from console or ingame
Execute saved python scripts
Interactive interpreter mode
This is almost exactly what I wanted to build, but still requires to log into the game to execute /py <statement> commands. Yes, these can also be entered in the Bukkit console (offering some kind of interactive shell), but I wanted to remove the /py clutter. A simple trick indeed will allow us to do so, let’s get right to it…
Making the Plugin
We’ll be using Eclipse to make our Bukkit plugin. I’ll assume you know how this IDE works already. If you’re not familiar with Java and just want to try the plugin, you can skip this section. Otherwise, follow along.
First of all, we’re going to create a new Java project in Eclipse. I’ll call this BukkitConsole. We create a plugin.yml file in the project root with some basic information:

Next up, we create a lib folder in which we’re going to place two libraries:
jython-standalone-*.jar: to be downloaded from the Jython web sitebukkit-*.jar: the Bukkit development API, which can be downloaded from here (more information on their Wiki). I’m using the 1.5.2 branch.
Add these libraries to the build path. You’ll now have the following structure:
Next, we’ll create the plugin classes themselves. Create a package under src called com.macuyiko.bukkitconsole. We’re going to add two classes.
MainPlugin.java, this class just loads the libraries from the lib folder and spawns a PythonConsole window:
package com.macuyiko.bukkitconsole;

import java.io.File;
import org.bukkit.plugin.java.JavaPlugin;
import org.bukkit.plugin.java.PluginClassLoader;

public class MainPlugin extends JavaPlugin {
    public void onEnable(){
        getLogger().info("BukkitConsole: Loading libs");
        try {
            File dependencyDirectory = new File("lib/");
            File[] files = dependencyDirectory.listFiles();
            getLogger().info("BukkitConsole: JARs found: "+files.length);
            for (int i = 0; i < files.length; i++) {
                if (files[i].getName().endsWith(".jar")) {
                    getLogger().info("BukkitConsole:  - "+files[i].getName());
                    ((PluginClassLoader) this.getClassLoader()).addURL(
                        new File("lib/"+files[i].getName()).toURI().toURL());
                }
            }
        } catch (Exception e) {
            e.printStackTrace();
        }

        getLogger().info("BukkitConsole: Starting Jython console");
        new PythonConsole();
    }

    public void onDisable(){
        getLogger().info("BukkitConsole: Plugin was disabled");
    }
}
PythonConsole.java, this class employs Jython to execute start.py in the python directory:
package com.macuyiko.bukkitconsole;

import org.python.core.Py;
import org.python.core.PyString;
import org.python.core.PySystemState;
import org.python.util.PythonInterpreter;

public class PythonConsole {
    public PythonConsole() {
        PySystemState.initialize();

        PythonInterpreter interp = new PythonInterpreter(null,
                new PySystemState());

        PySystemState sys = Py.getSystemState();
        sys.path.append(new PyString("."));
        sys.path.append(new PyString("python/"));

        String scriptname = "python/start.py";
        interp.execfile(scriptname);
    }
}
Things’ll now look as follows:

That’s it for the Java side! Export your project to bukkitconsole.jar.
We’re now going to setup the server. Create a folder server somewhere. Next, download craftbukkit-*.jar from here (Bukkit is the development API, “CraftBukkit” is the actual server; again, more info on the Wiki) and put it in this folder.
We’re also going to create a simple run.bat in this folder:
java -Xmx1024M -jar craftbukkit-*.jar -o true
PAUSE
Execute run.bat to see whether CraftBukkit works fine and if you can connect with your Minecraft client (note: if you’re running the current snapshot, the launcher should allow you to create a profile with version 1.5.2, which is what we’re using here). Normally, you should get something like:

Enter stop to stop the server. CraftBukkit will have created some new folders in your server directory:

Next, we’re going to download a Jython console. I picked this one by Don Coleman, since it is simple and offers fairly robust code completion. Note that I had to make some changes to it which can be found on the GitHub repository I’ve created for this project. Not using these changes is okay but will lead to some error spam on the Bukkit console.
Create a folder called python in server and extract the Jython console. python should contain:
console.pyhistory.pyintrospect.pyjintrospect.pypopup.pytip.py
We’ll also create a file start.py in this location with the following content:
import console
console.main()
We also need to create a lib folder in server and put in the following JARs:
bukkit-*.jarjython-standalone-*.jar
Yes… the same ones we’ve included in our Eclipse project. It would have been possible to package these into the JAR, but loading in resources from JAR files is a bit of a pain which I didn’t want to go through. Feel free to add lib and python to the JAR and submit a pull request on GitHub if you get things working.
That’s it. Try executing run.bat again. If all goes right, Bukkit should be able to load in our console plugin and will present you with an interpreter:

We can try out some commands. Note that you’ll have to from org.bukkit.Bukkit import * to get access to the Bukkit API (or from org.bukkit import Bukkit — you’ll have to use Bukkit.* but will allow autocompletion)!
>>> from org.bukkit.Bukkit import *
>>> getWorlds()
[CraftWorld{name=world}, CraftWorld{name=world_nether}, CraftWorld{name=world_the_end}]
>>> w = getWorld("world")
>>> w.getTemperature(0,0)
0.800000011920929
>>> w.getBiome(0,0)
PLAINS
>>> w.getTime()
12557L
>>> w.getPlayers()
[]
>>>
The Bukkit API docs provide a full overview of all that is possible with the complete API. Broadcasting messages, changing inventories, changing worlds, spawning lightning, all is possible.
You can also save functions in Python scripts if you want to. For example, try creating a scripts.py in the server folder:
import random
import time
from org.bukkit.Bukkit import *

def punishPlayer(name, power):
    p = getPlayer(name)
    p.getWorld().strikeLightning(p.getLocation())
    p.getWorld().createExplosion(p.getLocation(), power)
    broadcastMessage("Player %s has been punished!" % (name))
Now, in the console, we can:
>>> import scripts
>>> scripts.punishPlayer("Macuyiko", 6)
Which will explode a player with a lightning strike to warn other outlaws. The server administrator’s “command center” now looks like this:

Adding a Remote Interpreter Server
We’ve now created a Bukkit plugin spawning a Jython interactive console which is able to use the full Bukkit API. This is a nice starting point to create administrative support scripts, in-game games, or course material for a Minecraft Python programming course.
(Added 2013-07-16) There is still “one more thing”, however, which prevents our plugin from being useful for “real” server administrators: the fact that it relies on GUI capabilities being present. It would be nice if we would be able the just spawn an interpreter on the console. Doing so, however, is not particularly trivial. One might be tempted to just start a code.interact() loop to do so, but this method comes with several drawbacks:
- The input/output of the interpreter would clash with that of Bukkit itself.
- Only the server user would be able to execute commands. It would be nice if we could allow for multi-user interaction (e.g. for students).
- Running code.interact() puts Jython in a wait forever loop, which actually causes Bukkit to postpone its further loading. We can put this in a separate thread, but it still remains a messy solution.
(Added 2013-07-18) Next, I opted to create a socket based listening server which listens for incoming connections and presents a “remote interpreter” to the user. This is great, since it also allows non-local access. Still the implementation (created as a Python script loaded by the plugin) was a bit hacky and contained some drawbacks:
- Use of blocking reads/writes can cause the server to lockup in some cases. Yes, this could be fixed, but would require expanding the code significantly.
- Only one concurrent user can be “logged in”. This is caused by (i) the absence of multi-threaded connection handling and (ii) the
stdoutredirection we’re doing to redirect output coming from the Python interpreter back to the client socket, based on a similar implementation found in RipShell by Guido Wesdorp. - Still a wait-forever loop which causes Bukkit to halt loading. Note that te GUI version manages to avoid this (the console stays open while Bukkit continues loading), due to the fact that the GUI gets put into its own thread. Adding a daemonized thread to the “console server” mode fixed this issue and at least allowed the proof of concept to work.
The real solution consists of editing the plugin code itself and once again haressing the power of Jython…
As such, we create two new Java classes. SocketServer.java handles the incoming client connections and creates a ConnectionThread.java thread per client. For each client, a new InteractiveInterpreter is spawned:
// ...

public class ConnectionThread implements Runnable {
    //...

    public ConnectionThread(Socket socket, SocketServer socketServer) {
        this.socket = socket;
        this.server = socketServer;
        this.interpreter = new InteractiveInterpreter();
        try {
            this.in = new BufferedReader(new InputStreamReader(socket.getInputStream(), "UTF-8"));
            this.out = new PrintStream(this.socket.getOutputStream());
        } catch (Exception e) {
            e.printStackTrace();
        }
        this.interpreter.setOut(this.out);
        this.interpreter.setErr(this.out);
    }

    public void run() {
        try {

            //...

            out.print(">>> ");
            while ((line = in.readLine()) != null && !line.equals("exit!")) {
                boolean result = interpreter.runsource(line);
                if (result)     out.print("... ");
                else            out.print(">>> ");
                if (line.equals("stop!")) {
                    server.getListener().close();
                    socket.close();
                    return;
                }
            }

            out.println("Bye");
            socket.close();
        } // ...
    }
}
Finally, MainPlugin.java is modified to read in config values from a config.yml file with following defaults:
bukkitconsole:
 guiconsole:
  enabled: true
 serverconsole:
  enabled: true
  password: swordfish
  port: 44444
  maxconnections: 10
Once done, the plugin is able to start both a GUI interpreter locally on the server, or bind a remote interpreter server to a chosen port, waiting for clients to connect. A session (using telnet might look as follows):
~$ telnet localhost 44444
Trying 127.0.0.1...
Connected to localhost.
Escape character is '^]'.

Python Interpreter Server
-------------------------
PASSWORD: swordfish
You're in
>>> from org.bukkit import Bukkit
>>> Bukkit.getWorlds()
[CraftWorld{name=world}, CraftWorld{name=world_nether}, CraftWorld{name=world_the_end}]
>>> Bukkit.getWorld("world").setTime(200)
>>> Bukkit.getWorld("world").setTime(1400)
>>> exit!
Bye
Connection closed by foreign host.

Two special commands exist. exit! exits the session whereas stop! will completely stop the socket server (not allowing any new connections until Bukkit is restarted). Just as with the GUI interpreter, it makes sense to from org.bukkit import Bukkit before entering other commands for convenience’ sake.
Wrapping Up
The source code for this project can be found on the following GitHub repo. The repository also hosts everything you need to get running without having to code/compile anything. Feel free to modify both the Python and Java sources and submit pull requests with improvements. I’d also love to hear about any cool or interesting things you do with this.
Note that the default configuration for the repo project will spawn both a GUI interpreter and a listening server (at port 44444, password “swordfish”). If you want to change this, simply modify config.yml which will be created in plugins/Bukkit Jython Console/ after starting the plugin for the first time.
Finally, if you’re interested, the following video shows some more tinkering. (Protip: I’m a bit awkwardly using alt-tab and the inventory screen here. If you press T to start typing in chat, you can alt-tab out of the game without pausing or having the inventory screen opened, which allows you to better see what’s going on.)
Update 3/20/2016: Thanks to one of our readers, Fabrizio Fazzino, for pointing out that a software update since these instructions were prepared makes it necessary to modify them. Specifically, we’re changing how the Spigot Server component gets installed & used. I’ve updated the instructions below accordingly.
Also, he’s prepared a more succinct set of instructions that summarizes the steps. If you’re not interested in learning as much about how and why this works, I’d recommend you check my “Quick Note About Folder Structure” (in the yellow box below) and then follow his instructions in this comment, which Fabrizio was kind enough to post here since his original blog post is no longer accessible to the public.


Recently, I picked up a copy of Learn to Program with Minecraft®: Transform Your World with the Power of Python for my daughter and I to have a fun project to work on together.
Python is a programming language that I’ve long wanted to get acquainted with, and since she loves Minecraft so much, I felt like this book would be an ideal way for my daughter to also gain some exposure to it.
The only problem? We each use the Ubuntu distribution of Linux instead of Windows or Mac OSX.
You wouldn’t think this would be a problem: Minecraft is built in Java, which runs without a problem on Ubuntu (and many other platforms). Python is readily available for Ubuntu. Seems like a no-brainer, right?
Well… not quite. After the Amazon box arrived, I spotted this note on the back cover of the book:
The code in this book will run on Windows 7 or later, OS X 10.10 or later, or the Raspberry Pi. (See the last page for detailed requirements.)
No problem! The Raspberry Pi runs a special distribution of Linux called “Raspbian,” which is a version of Debian Linux, which is the upstream version of Linux that Ubuntu is based on. In other words: Raspbian & Ubuntu are cousins.
It seems reasonable, then, that if you can get this stuff working on the Raspberry Pi, then a much more powerful laptop running Ubuntu should be great!
Even more encouraging, there’s a nifty footnote at the bottom of Page 1 of the Learn to Program With Minecraft book which reads:
For information on other platforms and updates to these instructions, visit https://www.nostarch.com/pythonwithminecraft
Since the book had already been out for a few weeks, this note gave me hope that perhaps some instructions for setting up all the tools on Ubuntu might’ve already been added. Unfortunately, this is not the case (yet, anyway).
So… I decided to try to do it anyway. Since author Craig Richardson and the No Starch Press team had prepared download packages for the Mac & Windows platforms, I figured that at the very worst, there would be some clues in those packages that might help me get going.
Getting Minecraft & Python Set Up On Ubuntu
First, here is a simple set of requirements (as I understand them) for you to be able to use the instructions in the Learn to Program With Minecraft book on Ubuntu:
- Minecraft – this is the game itself. If you don’t already have a license for the game, you’ll need to pick one up and install it. “Installing” Minecraft for Ubuntu is quite easy: simply download the .jar file from your Mojang account and launch it. We had done this long ago, so this step was already completed for us.
- Python – This is the programming language you’re learning. More on finding & installing it in a moment.
- Java – while you probably have a basic interpreter (the “runtime environment”) for Java already, you’ll need the Java Development Kit to run this next tool..
- Spigot Server – This is Minecraft “server” software, which you can run on the same computer that Minecraft will run on. You need this because the Python connection to Minecraft relies on a server plugin that you can’t just run with your plain old Minecraft installation.
- Minecraft Python API (py3minepi) – It turns out that this connection between Python and Minecraft was originally developed especially for the Raspberry Pi. The way I understand it, this tool is an API for Minecraft that works with Python. You need it.
- Raspberry Juice Some brave souls created Raspberry Juice as a way to run the Python/Minecraft connection on other platforms (not just the Raspberry Pi). When you follow the instructions in the book for Windows or Mac, this little gem is bundled in. But if you’re installing from scratch for Ubuntu, you’ll need to get it yourself. Not realizing this, I installed all the other tools and ran into a really nasty error that I couldn’t get around:
This error message was the part of the installation that was trickiest to resolve, but after a bit of digging, I was able to work it out.
The detailed instructions for each of these items follows (below). The one note I’d like to insert here is this:
I’m using Ubuntu 14.04 LTS, so your installation steps may vary somewhat if you’re using a different Ubuntu version.
Installing Python 3
You actually need 3 separate items that fall under the Python 3 heading:
- Python 3 (the programming language itself)
- IDLE (the development environment for Python, a/k/a the place where you’ll type commands and write programs)
- PIP (the “package manager” for Python). You need this to install
For packages that are developed for Ubuntu, I tend to prefer using the “Ubuntu Software Center” to install stuff like this.
The only “gotcha” with Python is that there are a number of software versions and tools and so forth. So… launch the Software Center and search “python3” (with no space).
You should see a listing that says something like, “Interactive high-level object-oriented language (default python3 version)”
That’s the one you want. Do yourself a favor and click on “more info” so you can check the box for “IDLE 3” while you’re at it.
Install those, then run a similar search for “python3-pip” so you can use the package manager.
Prefer the command line to the Software Center?
Here are the commands to get python installed if you’d rather do this than use the Software Center. You’ll need to open a terminal to run these:
sudo apt-get install python3sudo apt-get install idle3sudo apt-get install python3-pip
You’re set with Python!
Installing Java 7
With Ubuntu, as is often the case, you have options here. You definitely need the Java SE SDK version 7 (presumably something newer would work as well) for the Spigot server to run.
Details on your options for Java on Ubuntu are here.
I used openjdk-7.
From the Ubuntu Software Center, just search “openjdk-7” and look for the “headless” option (this is lighter weight because it doesn’t include a GUI).
Or from the terminal:
sudo apt-get install openjdk-7-jre-headless
Installing Spigot Server
Update 3/20/2016 As I mentioned in the update at the top of this post, Spigot Server has released a new version: 1.9. Since the other components we’re using have not yet (as of today) updated to accommodate this, you’ll need to make sure that you download Spigot 1.8.8 and use it even though it is not the most recent version available.
Spigot is one of the most popular Minecraft server options, and is a necessary component in order to get Python & Minecraft talking to each other.
Getting the server software up & running is a matter of compiling the latest version. This reference page from the Spigot wiki is the one I used, and it seems to stay up to date. However, since it contains the instructions for multiple platforms, I’ll endeavor to simplify here.
One item to install first that will make this simpler is git. You’re going to need a terminal window anyway, so I’d recommend going ahead and opening it now and running this command to install git:
sudo apt-get install git
Next, you’ll want to download the Spigot BuildTools from this location:
https://hub.spigotmc.org/jenkins/job/BuildTools/lastSuccessfulBuild/artifact/target/BuildTools.jar
A Quick Note About Folder Structure
To help make things easier on yourself, you might find it useful to use a somewhat similar folder structure to the one described in Learn to Program with Minecraft for the Windows & Mac users.
To accomplish this for myself, I opened the “Files” application and browsed to my “Documents” folder, then created a new folder called “MinecraftPython”, then inside that folder another called “MinecraftTools”.
I recommend moving the BuildTools.jar file that you just downloaded into that “MinecraftTools” folder.
To do this, you have a few options:
- You can drag and drop using 2 “Files” windows, or
- you can cut & paste if you just have one of those windows open.
- Otherwise, you can move the file from the command line in a Terminal window with something like:
mv ./Downloads/BuildTools.jar ./Documents/MinecraftPython/MinecraftTools/BuildTools.jar. Of course, you’ll need to modify that command to suit your particular situation (if you’re using a different folder structure or starting from a different location in your Terminal window than I did, for example).
Once that’s done, from your Terminal window, you’ll need to change directories to the location of your BuildTools.jar file. Depending upon where you’re starting from, that might mean a command that looks something like: cd ./Documents/MinecraftPython/MinecraftTools.
Then you’ll want to execute these 2 commands:
git config --global --unset core.autocrlf
java -jar BuildTools.jar This needs to be tweaked to make sure you use version 1.8.8 of the Spigot Server component (for now).
java -jar BuildTools.jar --rev 1.8.8
This will get the Spigot Server built. In order to finish installing, creating a startup script will be helpful. You can create one with gedit by running a command like this:
gedit start.sh
The gedit text editor will open. Copy and paste this into the editor:
#!/bin/shjava -Xms512M -Xmx1024M -XX:MaxPermSize=128M -jar spigot-1.8.8.jar
Note: the filename “spigot-1.8.8.jar” was the current filename as of this writing. You’ll need to confirm that filename based upon your build, and edit the command here if it’s different use that filename as is for now (until the other components are updated to accommodate newer versions of Spigot server). Also, the Spigot instructions specifically note that the ‘MaxPermSize’ directive is no longer needed or supported in Java 8, but since I’m using Java 7, I left it in mine.
Save the file and close gedit.
Next, you’ll need to make the script executable. From the same terminal window, type:
chmod +x start.sh
Before you launch this file, you’ll need to accept the End User License Agreement. Locate the eula.txt file in your “MinecraftTools” folder and open it for editing. You can do this from a terminal window by typing gedit eula.txt . From the “Files” application, you can right-click the eula.txt file and choose the option to edit it with gedit.
Before you change the line that reads eula=false to eula=true, you’ll want to review the Minecraft End User License Agreement and verify that you’re ready to agree to its terms. Once you are, changing the value to “true” and saving the file will allow you to launch the Spigot Server without a hiccup (assuming that it is installed correctly).
Starting Your Spigot Server
Once that’s completed, you can start the Spigot Server to ensure it’s working properly. You’ll use this same command start the server each time you need to use it:
./start.sh
If all has gone according to plan, you should see the output of the server startup process in your terminal window. The Spigot Server will create a new Minecraft world as it launches, and once it’s up and running, you’ll see a > prompt with a flashing cursor next to it. You need to keep this window open.
Testing Your Spigot Server Installation
To test your server, launch Minecraft as usual.
Click “Multiplayer” and then choose “Add Server”
Give your new local server a name. The book recommends Minecraft Python World for it. In the “Address” box, type localhost. There’s a picture at the top of page 17 of the book which you can refer to as an example.
Quick note: if you’re using a typical Minecraft installation, then your Minecraft version will have updated by now to a version newer than the Spigot Server version. If so, you’ll need to edit your “Profile” and specify the Minecraft version to run so that it matches your Spigot Server version (1.8.8 if you’re following this writing exactly). Alternatively, you can create a new profile instead (this is what I chose to do) so that your main Minecraft profile continues to use the latest Minecraft version.
You can double-click the Minecraft Python World and check out your new world.
Note: The author’s downloads for Mac & Windows operating systems are pre-configured to be in Creative Mode. This world will be in Survival Mode instead. This can be changed by editing the server.properties file in your “MinecraftTools” folder and changing the line that reads gamemode=0 to gamemode=1 . You may also find that you need to change the line that reads force-gamemode=false to force-gamemode=true .
Play as long as you like, but before proceeding: you’ll want to stop the Spigot Server. In the window with the flashing cursor, simply type stop at the > prompt, and the Spigot Server will save everything and shut itself down.
Installing the Minecraft Python API
Next, you’ll need the Minecraft Python API. There’s a Github repository here:
https://github.com/py3minepi/py3minepi
I recommend just hitting the “Download Zip” button there. The file will be saved to your “Downloads” folder. You’ll want to extract the .zip file’s contents. You’ll end up with a folder called py3minepi-master, which we need to copy into the “Documents/MinecraftPython/MinecraftTools/” folder.
Once the folder has been relocated to the “MinecraftTools” folder, we need to run a command to install it. From your terminal window (assuming your current directory is still the “MinecraftTools” folder), type:
sudo pip3 install ./py3minepi-master
Installing Raspberry Juice
The last piece, I believe, is the actual Raspberry Juice plugin for Spigot. You can find it on the project’s home page:
http://dev.bukkit.org/bukkit-plugins/raspberryjuice/
Look for the “Recent Files” link on the right. As of this writing, the latest was RaspberryJuice v1.7 for 1.8.1. Follow the links, and eventually, you’ll end up with a .jar file.
This file needs to be copied into the “plugins” folder of your Spigot Server installation. If you’re following the directions here specifically, then you’ll find that folder at “/Documents/MinecraftPython/MinecraftTools/plugins”
Put the .jar file in that folder. Your Spigot Server will automatically find it the next time it starts up.
Time to Test!
If all has gone well, you should be ready for the “Getting to Know IDLE” section of the setup instructions on Page 20 of the book. If you’re able to successfully run the tests there, you’ve got everything set up correctly!
It was at this stage that I got that nasty error I mentioned earlier:
ConnectionRefusedError: [Errno 111] Connection refused
after typing this command into IDLE:
mc = Minecraft.create()
When I got the “connection refused” error, I did a bunch of searching, but nothing seemed to fit. Ultimately, I hunted down the port number that the “minecraft.py” script was trying to connect to (port 4711). This didn’t make any sense, because the Minecraft server software defaults to port 25565. Searching around for information about what might be running (or not running, in my case) on port 4711 was what yielded the information about the Minecraft Python API.
Thankfully, author Craig Richardson left some clues for us in the pre-packaged downloads he made available for Windows & OSX. On my Ubuntu system, I opened up the download he prepared for OSX (since OSX and Linux are more or less cousins, I figured it would be worth a shot) and found Raspberry Juice. It was perhaps the least obvious component of this whole setup.
So far, this setup has been working for me. I’m not 100% certain that I haven’t missed something, but if I have, then it doesn’t appear to be affecting things so far.
I hope you find this helpful! Let me know what you run into in the comments. I’ll do my best to help!
Related Posts:
Minecraft Pi on the Raspberry Pi can be controlled using python scripts. Here we will set up a Mac, Linux or Windows PC to achieve the same functionality by using the RaspberryJuice plugin with the Spigot Minecraft server.
Requirements
- Java from https://www.java.com (Java 8 or later recommended)
- Python from https://www.python.org (Python 3 or later recommended)
- Git from https://git-scm.com
- Spigot minecraft server from https://spigotmc.org
- RaspberryJuice from https://github.com/zhuowei/RaspberryJuice
- (Optional) Minecraft from https://minecraft.net
Installation
Installation of Java, Git and Minecraft is straight forward following instructions from sites listed above. Installing Git provides a bash shell for Windows.
Python installation
When downloading python, choose Python 3 not Python 2.
When installing python, tick the check box to add python to the path. This makes it easier to run python from the command line, although you will normally run python by starting the application called IDLE. Then click on “Install Now”
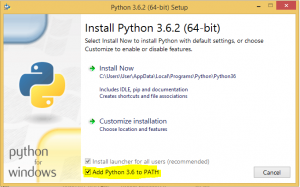
To run python on the command line, the command is python3 on Mac and Linux and python on Windows. I will use python3 in these instructions.
Windows only – python installation
To make python3 work in the bash shell on windows, start Git-Bash and type the following command:
echo "alias python3='winpty python.exe'" >> .bashrc
The winpty is required to enable python interactive interpreter to work in git-bash the same way it works in Windows command prompt, so this alias is providing two solutions in one line. Now quit git-bash (by typing exit). Restart git-bash and type python3. You should see something like the following:
$ python3
Python 3.6.2 (v3.6.2:5fd33b5, Jul  8 2017, 04:57:36) [MSC v.1900 64 bit (AMD64)] on win32
Type "help", "copyright", "credits" or "license" for more information.
>>>
If you forgot to click the check box to add python to the path when installing python then it can be added later by going to Control Panel > Uninstall a program and double clicking on the Python program which will be called Python 3.6.2 (64-bit) or similar. Select “Modify” to change your original setup. You don’t need to change the Optional Features so click “Next”. In the Advanced Options click the checkbox now called “Add Python to environment variables” and then click on “Install”.
Spigot minecraft server installation using bash shell
To install Spigot server, use the installer caller BuildTools.jar available from https://hub.spigotmc.org/jenkins/job/BuildTools/lastSuccessfulBuild/artifact/target/BuildTools.jar . Download this file and put it in a folder you want to install the Spigot minecraft folder, then run it using java.
These instructions show how to install using bash shell. You don’t have to use bash shell, but by using bash shell the same instructions work for all platforms. Bash shell is available on Mac OS X (Terminal), Linux (command line or Terminal) or Windows (Git-bash is available after you installed git above).
mkdir minecraft-spigot
mv Downloads/BuildTools.jar minecraft-spigot/
cd minecraft-spigot
java -jar BuildTools.jar
Now edit the file eula.txt and change eula=false to eula=true . This is to acknowledge that you agree with the EULA which is necessary to run the server. You can do this with a text editor from the GUI such as Windows NotePad or Mac TextEdit. Alternatively do it from the command line using vi text editor
vi eula.txt
The vi commands are cryptic. When you start vi you will be in command mode. Use the arrow keys to move the cursor to the line you want to change. Then press the [a] key which is the command to put vi in edit (append) mode. In edit mode you can move the cursor to the word false, delete it with the [delete] key and type in true. To get out of edit mode and back into command mode, press the [ESC] key. You now have to issue the command to write the changed file, and quit vi, which is pressing the following four keys [:][w][q][Enter] .
Return to original directory ready for next step.
cd ..
Install RaspberryJuice
You can get the RaspberryJuice plugin from https://github.com/zhuowei/RaspberryJuice/ using Git.
git clone https://github.com/zhuowei/RaspberryJuice.git
mkdir -p minecraft-spigot/plugins
cp RaspberryJuice/jars/RaspberryJuice-1.9.jar minecraft-spigot/plugins/
Run Spigot Server
Using Terminal or Command Prompt from the minecraft-spigot folder. Your spigot version number may be different.
cd minecraft-spigot
java -jar spigot-1.12.jar
To stop the server, type
stop
as a server command.
You should now have a configuration file in the RaspberryJuice folder in the plugins folder called config.yml. I like to edit that file and change the
location: RELATIVE
to
location: ABSOLUTE
RELATIVE makes RaspberryJuice behave the same way as Python on Minecraft Pi which uses coordinates relative to the spawn point. However on PCs it is easier to use ABSOLUTE coordinates which equate to the coordinates visible using F3 in Minecraft.
To prepare for the next section, change back up a directory to where we first started.
cd ..
Python mcpi module for RaspberryJuice
To write python scripts you need to install the mcpi module. You can choose the original one, exactly as supplied for Minecraft Pi or the modded one which adds some additional commands. I prefer the modded one. They are included in the files you cloned from github.
The following command tells you where user site-packages should be installed.
python3 -m site --user-site
Use this information to link to the module in the git repository you downloaded. This has to be done for each user on computer who will want to run python scripts.
Mac or Linux using Bash
STARTDIR=`pwd`
PKGDIR=`python3 -m site --user-site`
mkdir -p "$PKGDIR"
cd "$PKGDIR"
ln -s "${STARTDIR}/RaspberryJuice/src/main/resources/mcpi/api/python/modded/mcpi"
cd "$STARTDIR"
Windows command prompt – run as administrator
for /f %a in ('python -m site --user-site') do set PKGDIR=%a
mkdir %PKGDIR%
cd %PKGDIR%
mklink /D mcpi %HOMEPATH%RaspberryJuicesrcmainresourcesmcpiapipythonmoddedmcpi
cd %HOMEPATH%
Now start the spigot server
cd minecraft-spigot
java -jar spigot-1.12.jar
In another bash shell, create a python script to send a chat message. Here is command using vi.
vi mychat.py
import mcpi.minecraft as minecraft
mc = minecraft.Minecraft.create()
mc.postToChat("hello")
Run this script and you should see your message in the first bash shell.
python3 mychat.py
Troubleshooting for Windows
The following tests should be done in Git-Bash:
1. Type python --version. It should return “Python 3.6.2” or similar. If it says “bash: python: command not found” then you have not ticked “Add python to PATH” when installing. See Windows only python installation instructions above for remedy.
2. Type python3. It should start the python interpreter shell ending with >>>. If you not then you haven’t created the .bashrc file correctly. See Windows only python installation instructions. You can delete the existing .bashrc file in your home directory and try creating it again. Be extremely careful with spaces and using the correct type of quotation marks. It is best if you can copy and paste directly from this web site into Git-Bash. To paste in Git-Bash, right click the mouse and select “Paste”.
3. Once you are in the python interpreter shell, type import mcpi.minecraft. If there is an error then there is a problem with the link you created in “Python mcpi module for RaspberryJuice”. Try creating it again.