Время на прочтение
14 мин
Количество просмотров 20K

Полнотекстовый поиск — неотъемлемая часть нашей жизни. Разыскать нужные материалы в сервисе облачного хранения документов, найти фильм в Netflix, купить туалетную бумагу на Ozon или отыскать с помощью сервисов Google интересующую информацию в Интернете — наверняка вы сегодня уже не раз отправляли похожие запросы на поиск нужной информации в невообразимых объёмах неструктурированных данных. И что удивительнее всего — несмотря на то что вы осуществляли поиск среди миллионов (или даже миллиардов) записей, вы получали ответ за считанные миллисекунды. Специально к старту нового потока курса Fullstack-разработчик на Python в данной статье мы рассмотрим основные компоненты полнотекстовой поисковой машины и попытаемся создать систему, которая сможет за миллисекунды находить информацию в миллионах документов и ранжировать результаты по релевантности, причём всю систему можно воплотить всего в 150 строках кода на Python!
Данные
Весь код, использованный в данной статье, можно найти на Github. Здесь я приведу ссылки на фрагменты кода, и вы сами сможете попробовать с ним поработать. Весь пример можно запустить, установив файл requirements (pip install -r requirements.txt) и запустив на выполнение файл python run.py. Данная команда загрузит все данные и запустит пример поискового запроса с ранжированием и без ранжирования.
Перед тем как начать создание поисковой машины, нужно подготовить полнотекстовые неструктурированные данные, в которых будет осуществляться поиск. Искать будем в аннотациях статей из английской Википедии. Это заархивированный с помощью gzip — утилиты сжатия и восстановления файлов — XML-файл размером около 785 Мбайт, содержащий приблизительно 6,27 миллионов аннотаций [1]. Для загрузки архивированного XML-файла я написал простую функцию, но вы можете поступить проще — загрузить его вручную.
Подготовка данных
Все аннотации хранятся в одном большом XML-файле. Аннотации в таком файле отделяются друг от друга элементом <doc> и выглядят примерно так (элементы, которые нас не интересуют, я опустил):
<doc>
    <title>Wikipedia: London Beer Flood</title>
    <url>https://en.wikipedia.org/wiki/London_Beer_Flood</url>
    <abstract>The London Beer Flood was an accident at Meux & Co's Horse Shoe Brewery, London, on 17 October 1814. It took place when one of the  wooden vats of fermenting porter burst.</abstract>
    ...
</doc>
Интерес для нас представляют следующие разделы: title, url abstract (сам текст аннотации). Чтобы было удобнее обращаться к данным, представим документы как класс данных Python. Добавим свойство, конкатенирующее заголовок и содержание аннотации. Код можно взять здесь.
from dataclasses import dataclass

@dataclass
class Abstract:
    """Wikipedia abstract"""
    ID: int
    title: str
    abstract: str
    url: str

    @property
    def fulltext(self):
        return ' '.join([self.title, self.abstract])
Затем нужно извлечь данные из XML-файла, осуществить их синтаксический разбор и создать экземпляры нашего объекта Abstract. Весь заархивированный XML-файл загружать в память не нужно, будем работать с потоком данных [2]. Каждому документу присвоим собственный идентификатор (ID) согласно порядку загрузки (то есть первому документу присваивается ID=1, второму — ID=2 и т. д.). Код можно взять здесь.
import gzip
from lxml import etree

from search.documents import Abstract

def load_documents():
    # open a filehandle to the gzipped Wikipedia dump
    with gzip.open('data/enwiki.latest-abstract.xml.gz', 'rb') as f:
        doc_id = 1
        # iterparse will yield the entire `doc` element once it finds the
        # closing `</doc>` tag
        for _, element in etree.iterparse(f, events=('end',), tag='doc'):
            title = element.findtext('./title')
            url = element.findtext('./url')
            abstract = element.findtext('./abstract')

            yield Abstract(ID=doc_id, title=title, url=url, abstract=abstract)

            doc_id += 1
            # the `element.clear()` call will explicitly free up the memory
            # used to store the element
            element.clear()
Индексирование
Полученные данные сохраняем в структуре данных, называемой «обращённый указатель», или «список документов». Полученная структура напоминает алфавитный указатель, который обычно приводится в конце книги, представляющий собой перечень встречающихся в книге соответствующих слов и понятий с указанием номеров страниц, на которых такие слова и понятия встречаются.

Фактически мы создаём словарь, в котором будет проведено сопоставление всех слов нашего набора документов с идентификаторами документов, в которых встречаются эти слова. Выглядеть это будет примерно так:
{
    ...
    "london": [5245250, 2623812, 133455, 3672401, ...],
    "beer": [1921376, 4411744, 684389, 2019685, ...],
    "flood": [3772355, 2895814, 3461065, 5132238, ...],
    ...
}
Обратите внимание, что в приведённом выше примере элементы словаря записаны строчными буквами. Перед созданием указателя мы должны разбить исходный текст на отдельные слова, или лексемы, то есть проанализировать текст. Сначала разобьём текст на отдельные слова (по-научному: выделим лексемы), а затем применим к лексемам ряд фильтров, например фильтр преобразования в нижний регистр или фильтр выделения основы слова (в принципе, фильтры можно и не применять), — это поможет получать более адекватные результаты поисковых запросов.

Анализ
Применим простейший способ выделения лексем: разобьём текст в местах, в которых встречаются пробелы. Затем к каждой лексеме применим пару фильтров: переведём текст лексемы в нижний регистр, удалим любые знаки препинания, исключим 25 наиболее распространённых английских слов (а также слово «википедия», так как оно встречается во всех заголовках всех аннотаций) и к каждому слову применим фильтр выделения основы слова (после этой операции разные формы слова, например, красный и краснота будут соответствовать одной и той же основе красн [3]).
Функции выделения лексем и перевода в нижний регистр довольно просты:
import Stemmer

STEMMER = Stemmer.Stemmer('english')

def tokenize(text):
    return text.split()

def lowercase_filter(text):
    return [token.lower() for token in tokens]

def stem_filter(tokens):
    return STEMMER.stemWords(tokens)
От знаков пунктуации избавиться также просто — к набору пунктуационных знаков применяется регулярное выражение:
import re
import string

PUNCTUATION = re.compile('[%s]' % re.escape(string.punctuation))

def punctuation_filter(tokens):
    return [PUNCTUATION.sub('', token) for token in tokens]
Игнорируемые слова — это самые распространённые слова, которые, как мы полагаем, будут встречаться практически в каждом документе. Включение в указатель игнорируемых слов нежелательно, так как по поисковому запросу будет выдаваться практически каждый документ, и результат поиска станет малоинформативен (не говоря уже о том, что он займёт значительный объём памяти). Поэтому во время индексирования мы такие слова отфильтруем. В заголовках аннотаций статей Википедии содержится слово «Википедия», поэтому это слово мы также добавляем в список игнорируемых слов. В итоге мы внесли в список игнорируемых слов 25 самых распространённых слов английского языка, в том числе слово «Википедия».
# top 25 most common words in English and "wikipedia":
# https://en.wikipedia.org/wiki/Most_common_words_in_English
STOPWORDS = set(['the', 'be', 'to', 'of', 'and', 'a', 'in', 'that', 'have',
                 'I', 'it', 'for', 'not', 'on', 'with', 'he', 'as', 'you',
                 'do', 'at', 'this', 'but', 'his', 'by', 'from', 'wikipedia'])

def stopword_filter(tokens):
    return [token for token in tokens if token not in STOPWORDS]
Применяя все описанные выше фильтры, мы создаём функцию анализа (analyze), которая будет применяться к тексту каждой аннотации; данная функция разбивает текст на отдельные слова (или лексемы), а затем последовательно применяет каждый фильтр к списку лексем. Порядок применения фильтров важен, так как в списке игнорируемых слов не выделены основы слов, поэтому фильтр stopword_filter нужно применить до фильтра stem_filter.
def analyze(text):
    tokens = tokenize(text)
    tokens = lowercase_filter(tokens)
    tokens = punctuation_filter(tokens)
    tokens = stopword_filter(tokens)
    tokens = stem_filter(tokens)

    return [token for token in tokens if token]
Индексирование набора документов
Создадим класс Index, в котором будет храниться указатель (index) и документы (documents). В словаре documents будут храниться классы данных по идентификатору (ID), а ключи указателя index будут представлять собой лексемы со значениями идентификаторов документов, в которых встречаются лексемы:
class Index:
    def __init__(self):
        self.index = {}
        self.documents = {}

    def index_document(self, document):
        if document.ID not in self.documents:
            self.documents[document.ID] = document

        for token in analyze(document.fulltext):
            if token not in self.index:
                self.index[token] = set()
            self.index[token].add(document.ID)
Поиск
Теперь, когда все лексемы проиндексированы, задача выполнения поискового запроса превращается в задачу анализа текста запроса с помощью того же анализатора, который мы применили к документам; таким образом, мы получим лексемы, которые будут совпадать с лексемами, имеющимися в указателе. Для каждой лексемы осуществим поиск в словаре, выявим идентификаторы документов, в которых встречается такая лексема. Затем выявим идентификаторы документов во всех таких наборах (другими словами, чтобы документ соответствовал запросу, он должен содержать все лексемы, присутствующие в запросе). После этого возьмём итоговой список идентификаторов документов и выполним выборку данных из нашего хранилища документов [4].
def _results(self, analyzed_query):
    return [self.index.get(token, set()) for token in analyzed_query]

def search(self, query):
    """
    Boolean search; this will return documents that contain all words from the
    query, but not rank them (sets are fast, but unordered).
    """
    analyzed_query = analyze(query)
    results = self._results(analyzed_query)
    documents = [self.documents[doc_id] for doc_id in set.intersection(*results)]

    return documents


In [1]: index.search('London Beer Flood')
search took 0.16307830810546875 milliseconds
Out[1]:
[Abstract(ID=1501027, title='Wikipedia: Horse Shoe Brewery', abstract='The Horse Shoe Brewery was an English brewery in the City of Westminster that was established in 1764 and became a major producer of porter, from 1809 as Henry Meux & Co. It was the site of the London Beer Flood in 1814, which killed eight people after a porter vat burst.', url='https://en.wikipedia.org/wiki/Horse_Shoe_Brewery'),
 Abstract(ID=1828015, title='Wikipedia: London Beer Flood', abstract="The London Beer Flood was an accident at Meux & Co's Horse Shoe Brewery, London, on 17 October 1814. It took place when one of the  wooden vats of fermenting porter burst.", url='https://en.wikipedia.org/wiki/London_Beer_Flood')]
Запросы получаются очень точными, особенно если строка запроса достаточно длинная (чем больше лексем содержит запрос, тем меньше вероятность выдачи документа, содержащего все такие лексемы). Функцию поиска можно оптимизировать, отдав предпочтение полноте, а не точности поиска, то есть пользователь может указать, что результатом поискового запроса может быть документ, в котором содержится лишь одна из указанных им лексем:
def search(self, query, search_type='AND'):
    """
    Still boolean search; this will return documents that contain either all words
    from the query or just one of them, depending on the search_type specified.

    We are still not ranking the results (sets are fast, but unordered).
    """
    if search_type not in ('AND', 'OR'):
        return []

    analyzed_query = analyze(query)
    results = self._results(analyzed_query)
    if search_type == 'AND':
        # all tokens must be in the document
        documents = [self.documents[doc_id] for doc_id in set.intersection(*results)]
    if search_type == 'OR':
        # only one token has to be in the document
        documents = [self.documents[doc_id] for doc_id in set.union(*results)]

    return documents


In [2]: index.search('London Beer Flood', search_type='OR')
search took 0.02816295623779297 seconds
Out[2]:
[Abstract(ID=5505026, title='Wikipedia: Addie Pryor', abstract='| birth_place    = London, England', url='https://en.wikipedia.org/wiki/Addie_Pryor'),
 Abstract(ID=1572868, title='Wikipedia: Tim Steward', abstract='|birth_place         = London, United Kingdom', url='https://en.wikipedia.org/wiki/Tim_Steward'),
 Abstract(ID=5111814, title='Wikipedia: 1877 Birthday Honours', abstract='The 1877 Birthday Honours were appointments by Queen Victoria to various orders and honours to reward and highlight good works by citizens of the British Empire. The appointments were made to celebrate the official birthday of the Queen, and were published in The London Gazette on 30 May and 2 June 1877.', url='https://en.wikipedia.org/wiki/1877_Birthday_Honours'),
 ...
In [3]: len(index.search('London Beer Flood', search_type='OR'))
search took 0.029065370559692383 seconds
Out[3]: 49627
Релевантность
С помощью элементарных команд Python мы создали довольно быстро работающую поисковую систему, но остался один аспект, которого явно не хватает в нашей маленькой поисковой машине, а именно не учтён принцип релевантности. Сейчас программа поиска составлена таким образом, что пользователь получает неупорядоченный список документов и должен сам выбирать из полученного списка действительно нужные ему документы. Но, если результатов очень много, справиться с такой задачей не под силу никакому пользователю (в нашем примере OR программа выдала почти 50 000 результатов).
Вот тут-то и пригодится алгоритм ранжирования по релевантности, то есть алгоритм, который присваивал бы каждому документу собственный ранг — насколько точно документ соответствует запросу, и затем упорядочивал бы полученный список по таким рангам. Самый примитивный и простой способ присвоения ранга документу при выполнении запроса состоит в том, чтобы просто подсчитать, как часто в таком документе упоминается конкретное слово. Идея вроде бы логичная: чем чаще в документе упоминается термин, тем больше вероятность того, что это именно тот документ, который мы ищем!
Частота вхождения терминов
Расширим наш класс данных Abstract, чтобы можно было вычислять и сохранять частоту вхождения терминов в процессе индексирования. Соответственно, если нам потребуется ранжировать наш неупорядоченный список документов, у нас будет для этого вся нужная информация:
# in documents.py
from collections import Counter
from .analysis import analyze

@dataclass
class Abstract:
    # snip
    def analyze(self):
        # Counter will create a dictionary counting the unique values in an array:
        # {'london': 12, 'beer': 3, ...}
        self.term_frequencies = Counter(analyze(self.fulltext))

    def term_frequency(self, term):
        return self.term_frequencies.get(term, 0)
При индексировании должен осуществляется подсчёт частот вхождения терминов:
# in index.py we add `document.analyze()

def index_document(self, document):
    if document.ID not in self.documents:
        self.documents[document.ID] = document
        document.analyze()
Внесём изменения в функцию поиска таким образом, чтобы к документам результирующего набора можно было применить ранжирование. Выборку документов будем осуществлять с помощью одного и того же логического запроса из указателя и базы данных документов, а затем для каждого документа такого результирующего множества подсчитаем, сколько раз встречается в этом документе каждый термин.
def search(self, query, search_type='AND', rank=True):
    # snip
    if rank:
        return self.rank(analyzed_query, documents)
    return documents


def rank(self, analyzed_query, documents):
    results = []
    if not documents:
        return results
    for document in documents:
        score = sum([document.term_frequency(token) for token in analyzed_query])
        results.append((document, score))
    return sorted(results, key=lambda doc: doc[1], reverse=True)
Обратная частота документов
Полученная функция работает уже намного лучше, но у нее всё равно имеются определённые недостатки. Мы подразумевали, что при оценке релевантности запроса все термины запроса имеют один и тот же вес. Но, как нетрудно догадаться, при определении релевантности некоторые термины имеют либо крайне малую, либо вообще нулевую различающую способность; например, в наборе из большого количества документов, относящихся к пиву, термин «пиво» будет встречаться практически в каждом документе (ранее мы уже пытались обойти эту проблему, исключив из указателя 25 самых распространённых английских слов). Поиск слова «пиво» приведёт к тому, что мы получим лишь маловразумительный набор хаотично упорядоченных документов.
Чтобы решить проблему, добавим в наш алгоритм определения релевантности ещё один компонент, занижающий в итоговом результате вес терминов, очень часто встречающихся в указателе. В принципе, можно было бы использовать значение частоты вхождения термина (то есть насколько часто такой термин встречается во всех документах), однако на практике вместо этого значения используется значение частоты документов (то есть какое количество документов в указателе содержат данный термин). Поскольку наша задача заключается в ранжировании именно документов, формировать статистику имеет смысл на уровне документов.
Обратная частота документов для термина определяется делением количества документов (N) в указателе на количество документов, содержащих термин, и взятием логарифма полученного частного.
; формула взята из https://moz.com/blog/inverse-document-frequency-and-the-importance-of-uniqueness")
При ранжировании значение частоты термина умножается на значение обратной частоты документа, и, следовательно, документы, в которых присутствуют термины, редко встречающиеся в наборе документов, будут более релевантными [5]. Значение обратной частоты документов можно легко рассчитать по указателю:
# index.py
import math

def document_frequency(self, token):
    return len(self.index.get(token, set()))

def inverse_document_frequency(self, token):
    # Manning, Hinrich and Schütze use log10, so we do too, even though it
    # doesn't really matter which log we use anyway
    # https://nlp.stanford.edu/IR-book/html/htmledition/inverse-document-frequency-1.html
    return math.log10(len(self.documents) / self.document_frequency(token))

def rank(self, analyzed_query, documents):
    results = []
    if not documents:
        return results
    for document in documents:
        score = 0.0
        for token in analyzed_query:
            tf = document.term_frequency(token)
            idf = self.inverse_document_frequency(token)
            score += tf * idf
        results.append((document, score))
    return sorted(results, key=lambda doc: doc[1], reverse=True)
Будущая работа™
Мы создали элементарную информационно-поисковую систему всего из нескольких десятков строчек кода Python! Код целиком приведён на Github. Также я написал вспомогательную функцию, загружающую аннотации статей Википедии и создающую указатель. Установите файл requirements, запустите его в выбранной вами консоли Python и получайте удовольствие от работы со структурами данных и операциями поиска.
Данная статья написана с единственной целью — привести пример реализации концепции поиска и продемонстрировать, что поисковые запросы (даже с ранжированием) могут выполняться очень быстро (например, на своём ноутбуке с «медленным» Python я могу осуществлять поиск и ранжирование среди 6,27 миллионов документов). Статью ни в коем случае не следует рассматривать как инструкцию по созданию программного обеспечения промышленного уровня. Моя поисковая машина запускается полностью в памяти ноутбука, но такие библиотеки, как Lucene, используют сверхпроизводительные структуры данных и даже оптимизируют дисковые операции, а такие программные комплексы, как Elasticsearch и Solr, распространяют библиотеку Lucene на сотни, а иногда и тысячи машин.
Но даже наш простенький алгоритм можно существенно улучшить. Например, мы молчаливо предполагали, что каждое поле документа вносит в релевантность одинаковый вклад, но, если поразмыслить, так быть не должно — ведь термин, присутствующий в заголовке, очевидно, должен иметь больший вес, чем термин, встречающийся в содержании аннотации. Другой перспективной идеей может стать более продвинутый синтаксический анализ запроса — должны ли совпадать все термины? только один термин? или несколько? Зная ответы на эти вопросы, можно повысить качество работы поисковых запросов. Также — почему бы не исключить из запроса определённые термины? почему бы не применить операции AND и OR к отдельным терминам? Можно ли сохранить указатель на диск и вывести его, таким образом, за пределы оперативной памяти ноутбука?
Благодаря своей универсальности и распространённости, Python уже который год находится в топе языков программирования и де-факто стал основным языком для работы с данными. Если вы хотите расширить свои компетенции и освоить этот язык под руководством крутых менторов — приходите на курс Fullstack-разработчик на Python.

Узнайте, как прокачаться в других инженерных специальностях или освоить их с нуля:
-
Курс «Python для веб-разработки»
-
Профессия Data Scientist
-
Профессия Data Analyst
-
Курс по Data Engineering
Другие профессии и курсы
-
Аннотация — это, как правило, первый абзац или первая пара предложений статьи в Википедии. Полный объём заархивированного XML-файла составляет приблизительно 796 Мбайт. Если вы захотите самостоятельно поэкспериментировать с кодом, можно воспользоваться доступными архивами меньшего размера (с ограниченным количеством аннотаций); синтаксический разбор и индексирование XML-файла займут довольно большое время и потребуют значительных объёмов памяти.
-
Весь набор данных и указатель будут храниться в памяти, поэтому нет нужды также хранить в памяти необработанные данные.
-
Много ли преимуществ даёт фильтр выделения основы слова? Это тема для отдельного обсуждения. Применение такого фильтра позволит уменьшить общий размер указателя (то есть уменьшить количество уникальных слов), однако операция выделения основы слова базируется на эвристике, и мы, сами того не желая, можем отсеять потенциально ценную информацию. Например, если слова университет, универсальный, университеты и универсиада усечь до основы универс, мы потеряем способность различать значения этих слов, а это отрицательно скажется на релевантности. Более подробная информация о выделении основы слов (и лемматизации) приведена в этой отличной статье.
-
При решении задачи мы используем оперативную память ноутбука. Но на практике применяется другой способ, не связанный с хранением указателя в памяти. Поисковая система Elasticsearch хранит данные в обычном текстовом формате JSON на диске, в самой библиотеке Lucene (базовой библиотеке поиска и индексирования) хранятся только индексированные данные. Многие другие поисковые системы просто возвращают упорядоченный список идентификаторов документов, который затем используется для извлечения и выдачи пользователям данных из базы данных или другого сервиса. Особенно это актуально для крупных корпораций, в которых полное реиндексирование всех данных обходится недёшево. Как правило, в поисковой системе хранятся только данные, связанные с обеспечением релевантности (а не атрибуты, используемые только для презентационных целей).
-
Для более глубокого понимания алгоритма рекомендую ознакомиться со следующими публикациями: What is TF-IDF? и Term frequency and weighting
Время на прочтение
5 мин
Количество просмотров 32K
Просматривая ленту новостей я наткнулся на рекомендацию от Типичного Программиста на статью «Implementing a Search Engine with Ranking in Python», написанную Aakash Japi. Она меня заинтересовала, подобного материала в рунете не очень много, и я решил перевести её. Так как она довольно большая, я разделю её на 2-3 части. На этом я заканчиваю своё вступление и перехожу к переводу.
Каждый раз как я использую Quora, я в конечном итоге вижу по крайней мере вопрос вроде этого: кто-нибудь спрашивает, как работает Google и как они могли бы превзойти его по поиску информации. Большинство вопросов не настолько смелые и дезинформирующие, как этот, но все они выражают подобное чувство, и в этом они передают значительное непонимание того, как работают поисковые системы.
Но в то время как Google является невероятно сложным, основная концепция поисковой системы, которые ищут соответствия и оценивают (ранжируют) результаты относительно поискового запроса не представляет особой сложности, и это может понять любой с базовым опытом программирования. Я не думаю, что в данный момент возможно превзойти Google в поиске, но сделать поисковой движок — вполне достижимая цель, и на самом деле это довольно поучительное упражнение, которое я рекомендую попробовать.
Это то, что я буду описывать в этой статье: как сделать поисковую систему для локальных текстовых файлов, для которых можно обрабатывать стандартные запросы (по крайней мере, одно из слов в запросе есть в документе) и фразу целиком (появляется вся фраза в тексте) и может ранжировать с использованием базовой TF-IDF схемы.
Есть два основный этапа в разработке поискового движка: построение индекса, а затем, используя индекс, ответить на запрос. А затем мы можем добавить результат рейтинга (TF-IDF, PageRank и т.д.), классификацию запрос/документ, и, возможно, немного машинного обучения, чтобы отслеживать последние запросы пользователя и на основе этого выбрать результаты для повышения производительности поисковой системы.
Итак, без дальнейших церемоний, давайте начнем!
Построение индекса
Таким образом, первый шаг в построении текстового поискового движка — это сборка перевёрнутого индекса. Позвольте мне объяснить что это. Перевёрнутый индекс — это структура данных, которая сопоставляет маркеры с документами, в который они появляются. В данном контексте мы можем рассматривать маркер просто как слова, таким образом перевёрнутый индекс, в своей основе, это что-то, что берёт слово и возвращает нам список документов, где оно встречается.
Во-первых, мы, однако, должны проанализировать и отметить (маркировать, разделив на слова) наш свод документов. Мы сделаем это следующим образом: для каждого документа, который мы хотим добавить в наш индекс, мы удалим всю пунктуацию и разделить его на пробелы, создадим временную хеш-таблицу, которая соотносит имена документов к списку маркеров. Мы несколько раз преобразуем эту хеш-таблицу до тех пор, пока не достигнем окончательно перевёрнутого индекса, который я описал выше (правда, с небольшим усложнением, которое я объясню позже). Вот код, который сделает первоначальную фильтрацию текста:
def process_files(self):
	file_to_terms = {}
	for file in self.filenames:
		pattern = re.compile('[W_]+')
		file_to_terms[file] = open(file, 'r').read().lower();
		file_to_terms[file] = pattern.sub(' ',file_to_terms[file])
		re.sub(r'[W_]+','', file_to_terms[file])
		file_to_terms[file] = file_to_terms[file].split()
	return file_to_terms
Есть две вещи, которые я здесь не сделал, но рекомендую сделать. Удалите все стоп-слова («как», «и», «чтобы» и т.п., которые не добавляют релевантности документа) и преобразуйте все слова (таким образом «бег» и «бегун» превращаются в «бежать»), используя внешнюю библиотеку (хотя это будет замедлять индексирование).
Теперь я знаю, что упомянутый мною перевёрнутый индекс будет картой слова до имени документа, но мы так же хотим поддерживать запросы с фразами: запросы не только для слов, но и для слов в определённой последовательности. Для этого мы должны знать где в документе появляется каждое слово, таким образом мы сможем проверить порядок слов. Я индекс каждого слова в маркированном списке на документ в качестве позиции слова в этом документе, поэтому наш конечный перевернутый индекс будет выглядеть следующим образом:
{word: {documentID: [pos1, pos2, ...]}, ...}, ...}
вместо такого:
{word: [documentID, ...], ...}
Таким образом, наша первая задача состоит в том, чтобы создать сопоставление слов для своих позиций для каждого документа, а затем объединить их, чтобы создать наш полный перевёрнутый индекс. Это выглядит как:
#input = [word1, word2, ...]
#output = {word1: [pos1, pos2], word2: [pos2, pos434], ...}
def index_one_file(termlist):
	fileIndex = {}
	for index, word in enumerate(termlist):
		if word in fileIndex.keys():
			fileIndex[word].append(index)
		else:
			fileIndex[word] = [index]
	return fileIndex
Этот код довольно понятный: он принимает список терминов в документе, разделённые пробелом (в котором слова находятся в их первоначальном порядке), и добавляет каждое в хеш-таблицу, где значением является список позиций этого слова в документе. Мы строим этот список многократно, как мы идём по списку, до тех пор, пока не пройдём все слова, оставив нас с таблицей, снабжённую ключами по строкам и размеченными до списка позиций этих строк.
Теперь нам нужно объединить эти хеш-таблицы. Я начал это, с создания промежуточного формата индекса
{documentID: {word: [pos1, pos2, ...]}, ...}
которые мы затем преобразуем к нашему окончательному индексу. Это делается здесь:
#input = {filename: [word1, word2, ...], ...}
#res = {filename: {word: [pos1, pos2, ...]}, ...}
def make_indices(termlists):
	total = {}
	for filename in termlists.keys():
		total[filename] = index_one_file(termlists[filename])
	return total
Этот код очень прост: он просто принимает результаты функции file_to_terms, и создает новую хеш-таблицу помеченных ключом по имени файла и со значениями, которые являются результатом предыдущей функции, создавая вложенную хеш-таблицу.
Затем, мы можем на самом деле построить нашу перевернутый индекс. Вот код:
#input = {filename: {word: [pos1, pos2, ...], ... }}
#res = {word: {filename: [pos1, pos2]}, ...}, ...}
def fullIndex(regdex):
	total_index = {}
	for filename in regdex.keys():
		for word in regdex[filename].keys():
			if word in total_index.keys():
				if filename in total_index[word].keys():
					total_index[word][filename].extend(regdex[filename][word][:])
				else:
					total_index[word][filename] = regdex[filename][word]
			else:
				total_index[word] = {filename: regdex[filename][word]}
	return total_index
Итак, давайте разберём это. Во-первых, мы создаём простую хеш-таблицу (словарь Python), и мы используем два вложенных цикла для перебора каждого слова во входном (input) хеше. Затем, мы сначала проверяем, если это слово присутствует в качестве ключа в выходной (output) хеш-таблице. Если это не так, то мы добавим его, установив в качестве значения другую хеш-таблицу, которая сопоставляет документ (выявленные, в данном случае, по переменной filename) к списку позиций этого слова.
Если это ключ, то мы выполняем другую проверку: если текущий документ есть в каждой хеш-таблице слова (та, которая сопоставляет имена файлов с позицией слова). Если это ключ, то мы делаем другую чек: если текущий документ в хеш-таблицу каждого слова (тот, который сопоставляет имена файлов на должности слов). Если это так, мы расширяем список текущих позиций с этим списком позиций (обратите внимание, что этот случай оставили лишь для полноты: этого никогда не будет, потому что каждое слово будет иметь только один список позиций для каждого файла(filename)). Если это не так, то мы устанавливаем равные позиции в списке позиций для этого файла (filename).
И сейчас, у нас есть индекс. Мы можем ввести слово, и должны получить перечень документов, в которых оно встречается. В следующей статье я покажу как выполнить запрос по этому индексу.
Весь код, используемый во всех частях (вместе с реализацией) доступен на GitHub.
P.S. На этом часть заканчивается. Я надеюсь, что перевёл всё достаточно понятно, а главное — правильно. Готов принять замечания и советы по поводу оформления и перевода.
Быстрый живой поиск для сайта
Я собираюсь создать быструю поисковую систему для сайта, которая сможет поддерживать поисковые запросы с автоматическим заполнением (живым поиском) и бесплатным размещением на хостинге. Для этого буду использовать wget, Python, SQLite, Jupyter, sqlite-utils. А также открытое программное обеспечение Datasette, чтобы создать API-интерфейс.

Рабочий пример создаваемой поисковой системы.
- Шаг 1: сканирование данных
- Создание поискового каталога с помощью SQLite
- Представляем Datasette
- Публикация базы данных в интернете
- Фасетный поиск
- Используем собственный SQL для улучшения результатов поиска
- Простой интерфейс поиска на JavaScript
- Как избежать многопоточности в живом поиске
- На самом деле, здесь не так уж много кода
Сначала нужно получить копию данных, которые должны быть доступны для поиска.
Для этого можно создать копию прямо из базы данных или извлечь ее с помощью API. Но я создам простой сканер, используя wget – инструмент командной строки с мощным «рекурсивным» режимом, который идеально подходит для загрузки содержимого сайтов.
Начнем со страницы https://24ways.org/archives/. На странице представлены публикации за каждый год работы сайта. Затем дадим команду для wget провести рекурсивное сканирование сайта, используя флаг —recursive.
Нам не нужно загружать каждую страницу сайта ‒ нас интересуют только актуальные статьи. Поэтому вытянем только публикации за определенные года. Для этого используем аргумент -I следующим образом:
-I /2005,/2006,/2007,/2008,/2009,/2010,/2011,/2012,/2013,/2014,/2015,/2016,/2017
Установим время ожидания для каждого запроса продолжительностью в 2 секунды: --wait 2
Также исключим из сканирования станицы комментариев, используя команду -X "/*/*/comments".
Чтобы повторно не загружать в результатах поиска одинаковые страницы, используем параметр —no-clobber.
Код, отвечающий за запуск перечисленных выше команд:
wget --recursive --wait 2 --no-clobber
  -I /2005,/2006,/2007,/2008,/2009,/2010,/2011,/2012,/2013,/2014,/2015,/2016,/2017
  -X "/*/*/comments"
  https://24ways.org/archives/
Запустите его и через несколько минут вы получите подобную структуру:
$ find 24ways.org
24ways.org
24ways.org/2013
24ways.org/2013/why-bother-with-accessibility
24ways.org/2013/why-bother-with-accessibility/index.html
24ways.org/2013/levelling-up
24ways.org/2013/levelling-up/index.html
24ways.org/2013/project-hubs
24ways.org/2013/project-hubs/index.html
24ways.org/2013/credits-and-recognition
24ways.org/2013/credits-and-recognition/index.html
...
Для проверки работоспособности примера подсчитаем количество найденных HTML-страниц:
$ find 24ways.org | grep index.html | wc -l
328
Мы загрузили все публикации до 2017 года включительно. Но также нужно загрузить и статьи, которые опубликованы в 2018 г. Поэтому необходимо указать сканеру на публикации, размещенные на главной странице:
wget --recursive --wait 2 --no-clobber
  -I /2018
  -X "/*/*/comments"
  https://24ways.org/
Теперь в компьютере есть папка, которая содержит HTML-файлы каждой статьи, опубликованной на сайте. Используем их, чтобы создать поисковой каталог.
SQLite – это наиболее широко используемая СУБД в мире. Она используется встроенными мобильными приложениями.
SQLite имеет очень мощную функциональность полнотекстового поиска. Откройте для себя расширение FTS5.
Я создал библиотеку утилит на Python под названием sqlite-utils для того, чтобы создание баз данных SQLite было максимально простым. Библиотека предназначена для использования в веб-приложении Jupyter Notebook.
Для использования Jupyter на компьютере должен быть установлен Python 3. Можно использовать виртуальную среду Python, чтобы убедиться, что устанавливаемое программное обеспечение не конфликтует с другими установленными пакетами:
$ python3 -m venv ./jupyter-venv
$ ./jupyter-venv/bin/pip install jupyter
# ... много выводов установщика
# Установим несколько дополнительных пакетов, которые понадобятся нам позже
$ ./jupyter-venv/bin/pip install beautifulsoup4 sqlite-utils html5lib
# Запускаем веб-приложение для блокнота
$ ./jupyter-venv/bin/jupyter-notebook
# Открываем браузер в Jupyter по адресу http://localhost:8888/
Теперь вы должны оказаться в веб-приложении Jupyter. Нажмите New -> Python 3, чтобы начать новый блокнот.
Особенность блокнотов Jupyter заключается в том, что при их публикации на GitHub они будут отображаться как обычный HTML. Это делает их очень мощным способом обмена кодом с аннотациями. Я опубликовал блокнот, который использовал для построения поискового каталога, в своей учетной записи GitHub.

Вот код Python, который я использовал для очистки релевантных данных из загруженных HTML- файлов. В блокноте приводится построчное объяснение того, что делает код.
from pathlib import Path
from bs4 import BeautifulSoup as Soup
base = Path("/Users/simonw/Dropbox/Development/24ways-search")
articles = list(base.glob("*/*/*/*.html"))
# теперь статьи – это просто список путей, которые выглядят так:
# PosixPath('...24ways-search/24ways.org/2013/why-bother-with-accessibility/index.html')
docs = []
for path in articles:
    year = str(path.relative_to(base)).split("/")[1]
    url = 'https://' + str(path.relative_to(base).parent) + '/'
    soup = Soup(path.open().read(), "html5lib")
    author = soup.select_one(".c-continue")["title"].split(
        "More information about"
    )[1].strip()
    author_slug = soup.select_one(".c-continue")["href"].split(
        "/authors/"
    )[1].split("/")[0]
    published = soup.select_one(".c-meta time")["datetime"]
    contents = soup.select_one(".e-content").text.strip()
    title = soup.find("title").text.split(" ◆")[0]
    try:
        topic = soup.select_one(
            '.c-meta a[href^="/topics/"]'
        )["href"].split("/topics/")[1].split("/")[0]
    except TypeError:
        topic = None
    docs.append({
        "title": title,
        "contents": contents,
        "year": year,
        "author": author,
        "author_slug": author_slug,
        "published": published,
        "url": url,
        "topic": topic,
    })
Запустив этот код, я получил список словарей Python. Каждый из них содержит документы, которые необходимо добавить в каталог. Список выглядит примерно так:
[
  {
    "title": "Why Bother with Accessibility?",
    "contents": "Web accessibility (known in other fields as inclus...",
    "year": "2013",
    "author": "Laura Kalbag",
    "author_slug": "laurakalbag",
    "published": "2013-12-10T00:00:00+00:00",
    "url": "https://24ways.org/2013/why-bother-with-accessibility/",
    "topic": "design"
  },
  {
    "title": "Levelling Up",
    "contents": "Hello, 24 ways. Iu2019m Ashley and I sell property ins...",
    "year": "2013",
    "author": "Ashley Baxter",
    "author_slug": "ashleybaxter",
    "published": "2013-12-06T00:00:00+00:00",
    "url": "https://24ways.org/2013/levelling-up/",
    "topic": "business"
  },
  ...
Библиотека sqlite-utils может взять такой список и на его основе создать таблицу базы данных SQLite. Вот как это сделать, используя приведенный выше список словарей.
import sqlite_utils
db = sqlite_utils.Database("/tmp/24ways.db")
db["articles"].insert_all(docs)
Библиотека создаст новую базу данных и добавит в нее таблицу «articles» с необходимыми столбцами. А затем вставит все документы в эту таблицу.
Можно проверить созданную таблицу с помощью утилиты командной строки sqlite3 (изначально встроена в OS X). Это можно сделать следующим образом:
$ sqlite3 /tmp/24ways.db
sqlite> .headers on
sqlite> .mode column
sqlite> select title, author, year from articles;
title                           author        year
------------------------------  ------------  ----------
Why Bother with Accessibility?  Laura Kalbag  2013
Levelling Up                    Ashley Baxte  2013
Project Hubs: A Home Base for   Brad Frost    2013
Credits and Recognition         Geri Coady    2013
Managing a Mind                 Christopher   2013
Run Ragged                      Mark Boulton  2013
Get Started With GitHub Pages   Anna Debenha  2013
Coding Towards Accessibility    Charlie Perr  2013
...
<Ctrl+D to quit>
Вызываем метод enable_fts(), чтобы получить возможность поиска по полям заголовка, автора и содержимого:
db["articles"].enable_fts(["title", "author", "contents"])
Datasette – это открытое программное обеспечение, которое позволяет с легкостью публиковать базы данных SQLite в интернете. Мы анализировали нашу новую базу данных SQLite с помощью sqlite3 –инструмента командной строки. Возможно, стоит использовать интерфейс, который был бы удобнее для пользователей?
Если вы не хотите устанавливать Datasette прямо сейчас, можете зайти на сайт https://search-24ways.herokuapp.com/, чтобы протестировать его на данных каталога поиска, созданного для сайта 24 ways.
Если хотите установить Datasette локально, можно повторно использовать виртуальную среду, которую мы создали при разработке Jupyter:
./jupyter-venv/bin/pip install datasette
Приведенная выше команда установит Datasette в папку ./jupyter-venv/bin/. Также можно установить его для всей системы, используя команду pip install datasette.
Теперь можно запустить Datasette для файла 24ways.db, который мы создали ранее:
./jupyter-venv/bin/datasette /tmp/24ways.db
Эта команда запустит локальный сервер. Откройте в браузере адрес http://localhost:8001/, чтобы начать работу с веб-приложением Datasette.
Если вы хотите протестировать Datasette, не создавая собственный файл 24ways.db, можете загрузить мой.
Одна из целей Datasette заключается в упрощении развертывания API-интерфейсов. Для этого у Datasette есть встроенная команда – datasette publish. Если у вас есть учетная запись в Heroku или Zeit Now, то можете опубликовать базу данных в интернете с помощью одной команды. Вот как я развернул https://search-24ways.herokuapp.com/ (работает в бесплатной версии Heroku), используя команду datasette publish:
$ ./jupyter-venv/bin/datasette publish heroku /tmp/24ways.db --name search-24ways
-----> Python app detected
-----> Installing requirements with pip

-----> Running post-compile hook
-----> Discovering process types
       Procfile declares types -> web

-----> Compressing...
       Done: 47.1M
-----> Launching...
       Released v8
       https://search-24ways.herokuapp.com/ deployed to Heroku
Если решите испробовать приведенный выше код, выберите другое значение —name, потому что имя «search-24ways» уже занято.
Datasette находит таблицы с настроенным полнотекстовым поиском SQLite и добавляет поле поиска непосредственно на страницу. Взгляните сюда, чтобы увидеть его в действии.

Поиск SQLite поддерживает универсальные символы. Поэтому если вы хотите выполнять поиск с автозаполнением, нужно добавить * в конце запроса.
Особенность Datasette заключается в возможности рассчитать фасеты на основе ваших данных. Вот страница, показывающая результаты поиска с подсчетом фасетов, рассчитанных по столбцам year и topic:
Каждая страница, видимая через Datasette, имеет соответствующий JSON API, доступ к которому можно получить, добавив расширение .json к URL:
http://search-24ways.herokuapp.com/24ways-ae60295/articles.json?_search=acces%2A
Результаты поиска, которые мы получаем из ../articles?_search=svg, достаточно релевантны. Но порядок, в котором они отображаются, не идеален. Результаты размещаются так, как они были загружены в базу данных.
Базовый SQL-запрос выглядит следующим образом:
select rowid, * from articles where rowid in (
  select rowid from articles_fts where articles_fts match :search
) order by rowid limit 101
Можно добиться лучшего результата, создав собственный SQL-запрос. Мы будем использовать следующий запрос:
select
  snippet(articles_fts, -1, 'b4de2a49c8', '8c94a2ed4b', '...', 100) as snippet,
  articles_fts.rank, articles.title, articles.url, articles.author, articles.year
from articles
  join articles_fts on articles.rowid = articles_fts.rowid
where articles_fts match :search || "*"
  order by rank limit 10;
Давайте разберем код SQL построчно:
select
  snippet(articles_fts, -1, 'b4de2a49c8', '8c94a2ed4b', '...', 100) as snippet,
Мы используем snippet(), встроенную функцию SQLite, чтобы получить те слова, которые соответствуют запросу.
articles_fts.rank, articles.title, articles.url, articles.author, articles.year
Это другие поля, которые нам нужно вернуть. Большинство из них из таблицы articles. но мы извлекаем rank (демонстрирует релевантность поиска) из таблицы article_fts.
from articles
  join articles_fts on articles.rowid = articles_fts.rowid
articles – это таблица, которая содержит наши данные. article_fts – это виртуальная таблица SQLite, которая реализует полнотекстовый поиск. Нужно подключиться к ней, чтобы появилась возможность отправлять ей запросы.
where articles_fts match :search || "*"
  order by rank limit 10;
:search || «*» принимает аргумент ?search= из строки запроса страницы и добавляет * в ее конец, предоставляя поиск при помощи универсальных символов. Они нужны для автоматического заполнения.
Затем мы сопоставляем это с таблицей article_fts с помощью оператора match. После этого применяем команду order by rank, чтобы самые релевантные результаты выводились наверх (ограничиваем их количество значением «10»).
Как превратить это в API? Секрет заключается в добавлении расширения .json. Datasette поддерживает множество видов JSON. Но мы будем использовать ?_Shape=array, чтобы получить простой массив объектов:
JSON API вызывает поиск по статьям с ключевым словом SVG
Для создания интерфейса живого поиска мы будем использовать Vanilla JS. Нам нужно несколько служебных функций. Во-первых, классическая функция debounce:
function debounce(func, wait, immediate) {
  let timeout;
  return function() {
    let context = this, args = arguments;
    let later = () => {
      timeout = null;
      if (!immediate) func.apply(context, args);
    };
    let callNow = immediate && !timeout;
    clearTimeout(timeout);
    timeout = setTimeout(later, wait);
    if (callNow) func.apply(context, args);
  };
};
Она будет отправлять запросы fetch() один раз в 100 мс во время ввода пользователем своего поискового запроса. Поскольку мы отображаем данные, которые могут включать в себя теги HTML, используем функцию htmlEscape. Я очень удивлен, что браузеры все еще не поддерживают одну из следующих команд по умолчанию:
const htmlEscape = (s) => s.replace( />/g, '>' ).replace( /</g, '<' ).replace( /&/g, '&' ).replace( /"/g, '"' ).replace( /'/g, ''' );
Нам нужен HTML для формы поиска и div для отображения результатов:
<h1>Autocomplete search</h1>
<form>
  <p><input id="searchbox" type="search" placeholder="Search 24ways" style="width: 60%"></p>
</form>
<div id="results"></div>
А вот и реализация живого поиска на JavaScript:
// Встраиваем запрос SQL в строку с кавычками:
const sql = `select
  snippet(articles_fts, -1, 'b4de2a49c8', '8c94a2ed4b', '...', 100) as snippet,
  articles_fts.rank, articles.title, articles.url, articles.author, articles.year
from articles
  join articles_fts on articles.rowid = articles_fts.rowid
where articles_fts match :search || "*"
  order by rank limit 10`;

// Получаем ссылку на <input type="search">
const searchbox = document.getElementById("searchbox");

// Используем, чтобы избежать многопоточности:
let requestInFlight = null;

searchbox.onkeyup = debounce(() => {
  const q = searchbox.value;
  // Создаем URL-адрес API, используя encodeURIComponent() для параметров
  const url = (
    "https://search-24ways.herokuapp.com/24ways-866073b.json?sql=" +
    encodeURIComponent(sql) +
    `&search=${encodeURIComponent(q)}&_shape=array`
  );
  // Уникальный объект, используемый только для сравнения многопоточности
  let currentRequest = {};
  requestInFlight = currentRequest;
  fetch(url).then(r => r.json()).then(d => {
    if (requestInFlight !== currentRequest) {
      // Избегаем многопоточности, если медленный запрос следует
      // после быстрого запроса.
      return;
    }
    let results = d.map(r => `
      <div class="result">
        <h3><a href="${r.url}">${htmlEscape(r.title)}</a></h3>
        <p><small>${htmlEscape(r.author)} - ${r.year}</small></p>
        <p>${highlight(r.snippet)}</p>
      </div>
    `).join("");
    document.getElementById("results").innerHTML = results;
  });
}, 100); // опрашиваем каждые 100мс
Есть еще одна вспомогательная функция, используемая для построения HTML:
const highlight = (s) => htmlEscape(s).replace(
  /b4de2a49c8/g, '<b>'
).replace(
  /8c94a2ed4b/g, '</b>'
);
Это ужасный пользовательский опыт: пользователь увидел нужные результаты на долю секунды, а потом они вдруг исчезли и появились результаты более раннего запроса.
К счастью, есть простой способ избежать этого. Я создал переменную с именем requestInFlight, которая изначально равна нулю.
Каждый раз, когда запускается новый запрос fetch(), создается новый объект currentRequest={} и присваивается переменной requestInFlight.
Когда функция fetch() завершается, я использую requestInFlight!==currentRequest для проверки, что объект currentRequest идентичен объекту requestInFlight. Если пользователь вводит новый запрос в момент обработки текущего запроса, мы сможем это обнаружить и не допустить обновления результатов.
Код выглядит весьма неаккуратно. Но вряд ли это важно, если вся реализация поисковой системы укладывается менее чем в 70 строк JavaScript. Использование SQLite– это надежный вариант. СУБД легко масштабируется до сотен МБ (или даже ГБ) данных. А тот факт, что он основан на SQL, обеспечивает простое взаимодействие.
Если использовать Datasette для API, то можно создавать относительно сложные приложения, с минимальными усилиями.
- Download source — 12.5 KB
- Download source — 70 KB
Goals
The goal of this tutorial is to show how to build a search engine web service for non trivial information needs beyond simple keyword search with Python, Tornado and Strus.
All prerequisites you need are delivered as docker image. The tutorial will take less than an hour to complete.
Background
Strus is a set of libraries and tools to build search engines. This article presents its Python bindings in the ensemble with the Tornado web framework.
Update
5th October 2017
The documentation and the sources of this tutorial and the docker image have been updated to the latest version of Strus. Instead of Python 2.7, Python 3.4 is used now. Python 2.X is not supported anymore by the language-bindings of Strus.
Though the examples presented here work, some techniques and best practices have changed. Nevertheless, the examples provide some insight into Strus.
The query evaluation method NBLNK introduced here is not implemented in the same way in the Strus Wikipedia demo search anymore. It has been replaced by the method ‘accunear’ that relies on proximity statistics of the query terms and does not build term expressions anymore.
Prerequisites
You need docker installed.
At least for downloading the docker image for this tutorial, when you run it the first time, you need an internet connection.
Knowledge requirements
To execute and understand the steps of this tutorial some intermediate knowledge about programming Python is helpful. But the language concepts used are not very sophisticated. You can probably also understand the code if you know PHP.
To understand the rendering of the web server results, you should know the very basic constructs of HTML.
This tutorial addresses a public with some previous knowledge about basic concepts of information retrieval. You can complete this tutorial also without any knowledge, but it will hardly be convincing. There are much more mature out of the box solutions available for you in this case.
Sources
The sources introduced in this tutorial and in the tarball delivered with this article are organized in «steps» as the tutorial. So the source file strusIR.py shown in step 6 is in src/step6/strusIR.py of the source tarball or in /home/strus/src/step6/strusIR.py of the docker image.
Introduction
The artificial collection for this tutorial is a list of 201 countries and the languages spoken there. Additionally every country is assigned to a continent. First we will inspect an information retrieval query with BM25 as query evaluation scheme, searching for languages and getting a ranked list of countries. Then we will have a look at an example of weighting entities appearing in matching documents, searching for languages and getting a ranked list of continents.
Both weighting schemes introduced here not fitting to the example collection. They are a little bit like using a sledge-hammer to crack a nut. To extract entities from sentences that match to the query for example appears silly in a collection with documents consisting only of one sentence. But I did not find a suitable test collection (with entities to extract) for this tutorial, so I constructed a very simple one on by hand.
The weighting scheme extracting and weighting the entities is originating from the NBLNK weighting scheme of the Strus demo project, a search on the complete Wikipedia collection (English). The NBLNK retrieval method there ranks links that are occurring in sentences that match to the query. It does not inspect all documents for that, but the only best 300 BM25 weighted documents. The original source (PHP) can be found here.
Glossary
In this tutorial you will encounter several terms shortly explained here:
-
Posting: In information retrieval the term posting usually defines a document number with associated information like positions in the document. It is an element used to describe the occurrence of a term in the collection. In Strus a posting describes a pair (d,p) of cardinal numbers, where d refers to a document and p to a position. The sets of postings describe the domain of the functions that form the expressions we use for retrieval. This structure is the Boolean algebra of sets of pairs (d,p) with some n-ary functions on these sets added.
-
Weighting function: Function that assigns a numerical weight (double precision floating point number) to documents. Weighing functions are parameterized and use iterators on the sets of postings of query expressions and some numeric meta data to calculate the weight of a document.
-
Summarizer: A function to extract content of a document for presentation or further processing.
-
Term expression: An arbitrary complex expression represented as tree with typed terms as leaves. An expression is built from typed terms and n-ary functions on the sets of postings of term sub expressions. Although this definition for constructing expressions looks very universal at the first glance, it is restrictive.
-
Feature: A feature (or query feature) is associating some term expression with a weight and a name of a set to address it. Objects that reference features are for example weighting functions and summarizers.
-
SearchIndex: The index that maps terms to occurrencies or sets of postings. In information retrieval theory called inverted index.
-
ForwardIndex: The index that maps documents to terms. See definition here.
Step 1: Understanding the example document collection
The document structure
In this tutorial all example documents are in one file, a multipart document. It has a <list> root tag and <doc> tags for the items to insert as documents. Each item contains one sentence that relates country, continent and languages spoken together. Continent is marked as entity that can be extracted. The following example shows an example multipart document with two items in the list:
<?xml version='1.0' encoding='UTF-8'
standalone='yes'?>
<list>
<doc id='Sweden'>
In the country Sweden on the <continent
id='Europe'>Europe</continent>
are the following languages spoken: Swedish, Sami,  Finnish.
</doc>
<doc id='Switzerland'>
In the country Switzerland on the <continent id='Europe'>Europe</continent>
 are the following languages spoken: German, French, Italian, Romansch
</doc>
</list>
Step 2: Start the docker container
To start the docker image typing the following command in your shell:
docker run -p 40080:80 -t -i patrickfrey/strus-ub1604-torntuto:v0_15 /bin/bash
and you will get a prompt like this
root@8cbc7f49f3cf:/home/strus#
All following shell commands of this tutorial are executed in this shell.
Step 3: Create the storage
Initialize the storage database
We will use an utility program of Strus to create the storage. The command line utilities of Strus are programs for accessing the storage. In this tutorial we will only use them for the initial creation of the storage.
Creating the storage from the web service and thus managing different storages in the web service would make the example a lot more complicated because of synchronization issues. The command line command to create the storage we use for now looks as follows:
strusCreate -s "path=storage; metadata=doclen UINT16"
you get
storage successfully created.
The meta data element doclen was declared because it is required by the query evaluation scheme BM25 we will use.
Step 4: Define the web server skeleton with Tornado
Define the server skeleton
We design the web server top down and define the skeleton of the server with Tornado without implementing the request handlers needed yet. It looks like follows:
#!/usr/bin/python3
import tornado.ioloop
import tornado.web
import os
import sys

# [1] Request handlers:
class InsertHandler(tornado.web.RequestHandler):
    def post(self):
        pass;
        #... insert handler implementation

class QueryHandler(tornado.web.RequestHandler):
    def get(self):
        pass;
        #... query handler implementation

# [2] Dispatcher:
application = tornado.web.Application([
    # /insert in the URL triggers the handler for inserting documents:
    (r"/insert", InsertHandler),
    # /query in the URL triggers the handler for answering queries:
    (r"/query", QueryHandler),
    # /static in the URL triggers the handler for accessing static
    # files like images referenced in tornado templates:
    (r"/static/(.*)",tornado.web.StaticFileHandler,
        {"path": os.path.dirname(os.path.realpath(sys.argv[0]))},)
])

# [3] Server main:
if __name__ == "__main__":
    try:
        print( "Starting server ...n");
        application.listen(80)
        print( "Listening on port 80n");
        tornado.ioloop.IOLoop.current().start()
        print( "Terminatedn");
    except Exception as e:
        print( e);
It consists of three parts: The main program that runs the server [3]. The application dispatcher that selects a handler based on URL patterns [2] and a list or request handlers used in the application [1]. If we start this program in a source file strusServer.py with the following command:
python3 strusServer.py
the we get a listening we server:
Starting server ...

Listening on port 80
… But it does not react to any command yet, so we stop it again.
Step 5: Define the Tornado HTML templates to render the result
Tornado has a template engine with a substitution language that allows the execution of arbitrary Python commands in the template scope. It also has a concept of inheritance. We declare for our example one basic template search_base_html.tpl and three templates search_nblnk_html.tpl, search_bm25_html.tpl and search_error_html.tpl implementing the block with the result called resultblock differently:
The base template search_base_html.tpl
This is the base template with the frame of the page. All other templates are derived from this, implementing the block with the result differently.
<html>
<head>
<title>A search engine with Python, Tornado and Strus</title>
<meta http-equiv="content-type" content="text/html; charset=utf-8" />
</head>
<body>
<h1>A search engine with Python, Tornado and Strus</h1>
{% block resultblock %}
{% end %}
</body>
</html>
The template for the BM25 search search_bm25_html.tpl
This is the template used for the ordinary BM25 query. For each result document we map the document number docno, the weight, the title and the abstract.
{% extends "search_base_html.tpl" %}
{% block resultblock %}
<table border=1>
<tr>
<th align='left'>Docno</th>
<th align='left'>Weight</th>
<th align='left'>Title</th>
<th align='left'>Abstract</th>
</tr>
{% for result in results %}
<tr>
<td>{{ result['docno'] }}</td>
<td>{{ "%.4f" % result['weight'] }}</td>
<td>{{ result['title'] }}</td>
<td>{% raw result['abstract'] %}</td>
</tr>
{% end %}
</table>
{% end %}
The template for the entity weighting search_nblnk_html.tpl
This is the template used for the ranked list we get when weighting entities extracted from matching documents. For each result document, we map the weight and the title.
{% extends "search_base_html.tpl" %}
{% block resultblock %}
<table border=1>
<tr>
<th align='left'>Weight</th>
<th align='left'>Title</th>
</tr>
{% for result in results %}
<tr>
<td>{{ "%.4f" % result['weight'] }}</td>
<td>{{ result['title'] }}</td>
</tr>
{% end %}
</table>
{% end %}
The template for errors search_error_html.tpl
This is the template used for errors caught. We just map the error message here.
{% extends "search_base_html.tpl" %}
{% block resultblock %}
<p><font color="red">Error: {{message}}</font></p>
{% end %}
Step 6: Define the request handlers
The information retrieval engine backend (dummy implementation)
We try now to define a dummy version of the request handlers needed, to fill our skeleton with life. We do this in a source file strusIR.py. Later in this tutorial we will replace this module with a real information retrieval engine:
class Backend:
    # Constructor creating a local Strus context with the storage configuration
    # string passed as argument:
    def __init__(self, config):
        pass

    # Insert a multipart document as described in step 1 (doing nothing for the moment):
    def insertDocuments( self, content):
        return 0

    # Query evaluation scheme for a classical information retrieval query
    # with BM25 (returning a dummy ranked list with one element for now):
    def evaluateQueryText( self, querystr, firstrank, nofranks):
        rt = []
        rt.append( {
            'docno': 1,
            'title': "test document",
            'weight': 1.0,
            'abstract': "Neque porro quisquam est qui dolorem ipsum ..."
        })
        return rt

    # Query evaluation method that builds a ranked list from the best weighted entities
    # extracted from sentences with matches (returning an dummy list for with
    # one element now):
    def evaluateQueryEntities( self, querystr, firstrank, nofranks):
        rt = []
        rt.append( {
            'title': "test document",
            'weight': 1.0
        })
        return rt
In our skeleton we can now insert the following lines after the import directives that declare the information retrieval backend used.
#!/usr/bin/python3
import tornado.ioloop
import tornado.web
import os
import sys
import strusIR

# Declare the information retrieval engine:
backend = strusIR.Backend( "path=storage; cache=512M")
After these changes we can replace the request handlers in our skeleton.
The insert request handler
The insert request handler accepts POST requests with a multipart document as body and calls the insertDocuments method of the backend with it. It returns a plain text string with OK or ERR as header depending on the result:
# Declare the insert document handler (POST request with the multipart document as body):
class InsertHandler(tornado.web.RequestHandler):
    def post(self):
        try:
            content = self.request.body
            nofDocuments = backend.insertDocuments( content)
            self.write( "OK %un" % (nofDocuments))
        except Exception as e:
            self.write( "ERR %sn" % (e))
The query request handler
The query request handler accepts GET requests with the following parameters:
-
q: query string
-
s: query evaluation scheme (either BM25 or NBLNK)
-
i: Index of first result rank to return
-
n: Maximum number of result rank to return
It returns a HTML page with the result rendered with the Tornado template engine:
# Declare the query request handler:
class QueryHandler(tornado.web.RequestHandler):
    def get(self):
        try:
            # q = query terms:
            querystr = self.get_argument( "q", None)
            # i = first rank of the result to display (for scrolling):
            firstrank = int( self.get_argument( "i", 0))
            # n = maximum number of ranks of the result to display on one page:
            nofranks = int( self.get_argument( "n", 20))
            # c = query evaluation scheme to use:
            scheme = self.get_argument( "s", "BM25")
            if scheme == "BM25":
                # The evaluation scheme is a classical BM25 (Okapi):
                results = backend.evaluateQueryText( querystr, firstrank, nofranks)
                self.render( "search_bm25_html.tpl",
                             scheme=scheme, querystr=querystr,
                             firstrank=firstrank, nofranks=nofranks, results=results)
            elif scheme == "NBLNK":
                # The evaluation scheme is weighting the entities in the matching documents:
                results = backend.evaluateQueryEntities( querystr, firstrank, nofranks)
                self.render( "search_nblnk_html.tpl",
                             scheme=scheme, querystr=querystr,
                             firstrank=firstrank, nofranks=nofranks, results=results)
            else:
                raise Exception( "unknown query evaluation scheme", scheme)
        except Exception as e:
            self.render( "search_error_html.tpl",
                         message=e, scheme=scheme, querystr=querystr,
                         firstrank=firstrank, nofranks=nofranks)
Step 7: Call the server
Our server definition is now complete.
Now we can start the server and issue a query. We started the docker image with the port 40080 mapped to the docker image port 80. So we can issue the GET request
http:
with our favorite web browser. You get the following results from our dummy implementation of the retrieval engine:
)
or if you search with NBLNK with this query string:
http:
you get
)
Step 8: Define the real information retrieval engine with Strus
Now we take a look at the strusIR.py module and the Backend class it implements. We replace step by step the dummy implementation by a real one. First we have to import the following modules:
import strus
import itertools
import heapq
import re
The analyzer configuration
If we want to insert and retrieve documents, we have to describe the mapping of information items in the document to their normalized form. The same normalization has to be done with items in a query, so that items in the query can be matched against items in the document with help of an index.
This example analyzer configuration is kept as simple as possible. Not all steps are explained in detail, but you will find all document and query analyzer methods in the Python interface documentation of Strus: DocumentAnalyzer, QueryAnalyzer, .
The strusIR.Backend methods to create the document and the query analyzers look as follows:
# Create the document analyzer for our test collection:
def createDocumentAnalyzer(self):
    rt = self.context.createDocumentAnalyzer()
    # Define the sections that define a document (for multipart documents):
    rt.defineDocument( "doc", "/list/doc")
    # Define the terms to search for (inverted index or search index):
    rt.addSearchIndexFeature( "word", "/list/doc//()",
                              "word", ("lc",("stem","en"),("convdia","en")))
    # Define the end of sentence markers:
    rt.addSearchIndexFeature( "sent", "/list/doc//()",
                              ("punctuation","en","."), "empty")
    # Define the placeholders that are referencable by variables:
    rt.addSearchIndexFeature( "continent_var", "/list/doc/continent@id",
                              "content", "empty", "succ")
    # Define the original terms in the document used for abstraction:
    rt.addForwardIndexFeature( "orig", "/list/doc//()", "split", "orig")
    # Define the contents that extracted by variables:
    rt.addForwardIndexFeature( "continent", "/list/doc/continent@id",
                               "content", "text", "succ")
    # Define the document identifier:
    rt.defineAttribute( "docid", "/list/doc@id", "content", "text")
    # Define the doclen attribute needed by BM25:
    rt.defineAggregatedMetaData( "doclen",("count", "word"))
    return rt
# Create the query analyzer according to the document analyzer configuration:
def createQueryAnalyzer(self):
    rt = self.context.createQueryAnalyzer()
    rt.definePhraseType( "text", "word", "word", ["lc", ["stem", "en"], ["convdia", "en"]] )
    return rt
The following constructs need further explanation:
-
The document text selector expressions (2nd parameter of defineDocument, addSearchIndexFeature, addForwardIndexFeature, defineAttribute) are used to address the parts of the document to process. The syntax and semantics of selector expressions is dependent of the document segmenter you use. The default document segmenter used is an XML segmenter based on the textwolf library. It uses an expression syntax derived from abbreviated syntax of XPath. Another segmenter for another document format might define selection expressions differently.
-
Expressions describing functions for list of functions for normalizers, tokenizers, aggregators as arrays in Python. For example
("lc",("stem","en"),("convdia","en"))
describes a list of the normalizer functions: lowercase followed by stemming in English and diacritical character conversion in English, applied in this order. The notation of arrays for complex trees or lists is used for having compact initializers of the functions of the core you need. The first argument of an array is the function name and the rest are describing the arguments of the function. A similar initializer notation is also used in describing query expression, we will encounter later on in this tutorial.
-
The «succ» argument in some feature declarations. This option tells the analyzer, that this element has no own position in the document, but the same position assigned as the next element with an own position assigned. «pred» references the previous position accordingly. These options help to declare annotations in the document, that are bound to another item. Positions are very important for describing positional neighbour relationships in structured features like A is immediately followed by B.
The weighting scheme configuration for BM25
Here we declare the strusIR.Backend method to create the weighting scheme for BM25 including the summarizers to present the results. Not all steps are explained in detail, but you will find all query evaluation methods in the Python interface documentation of Strus: QueryEval. The definition of the weighting scheme configuration for BM25 in our case look as follows:
    # Create a simple BM25 query evaluation scheme with fixed
    # a,b,k1 and avg document lenght and title with abstract
    # as summarization attributes:
    def createQueryEvalBM25(self):
        rt = self.context.createQueryEval()
        # Declare the sentence marker feature needed for abstracting:
        rt.addTerm( "sentence", "sent", "")
        # Declare the feature used for selecting result candidates:
        rt.addSelectionFeature( "selfeat")
        # Query evaluation scheme:
        rt.addWeightingFunction( "BM25", {
                     "k1": 1.2, "b": 0.75, "avgdoclen": 20, "match": {'feature':"docfeat"} })
        # Summarizer for getting the document title:
        rt.addSummarizer( "attribute", { "name": "docid" }, {"result":"TITLE"})
        # Summarizer for abstracting:
        rt.addSummarizer( "matchphrase", {
                  "type": "orig", "windowsize": 40, "sentencesize":30,
                  "matchmark": '$<b>$</b>', "struct":{'feature':"sentence"},
                  "match": {'feature':"docfeat"} }, {"phrase":"CONTENT"}
        return rt
The following constructs need further explanation:
-
addTerm method: This method is used to add terms to the query, that are not part of the query itself, but used as context information by weighting functions or summarizers. A good example are structural markers like end of sentence. These markers are not part of the query but they might play a role in weighting or summarization.
-
addSelectionFeature method: In Strus the what you weight is strictly separated from the how. You always have to declare a set of features that declare, what set of documents is considered for the result. This separation is something you need in big document collections to avoid to expansive scans of result candidates.
-
Values of weighting or summarizer functions are either strings or numeric values or addressing features by the name of the feature set. Strings or numeric values are recognized by their type, features are specified as dictionary with one element. { ‘feature’: <name> }.
The weighting scheme configuration for weighting entities in matching documents
The strusIR.Backend method to create the weighting scheme for NBLNK including the summarizers to present the results look as follows:
     # Create a simple BM25 query evaluation scheme with fixed
    # a,b,k1 and avg document lenght and the weighted extracted
    # entities in the same sentence as matches as query evaluation result:
    def createQueryEvalNBLNK(self):
        rt = self.context.createQueryEval()
        # Declare the sentence marker feature needed for the
        # summarization features extracting the entities:
        rt.addTerm( "sentence", "sent", "")
        # Declare the feature used for selecting result candidates:
        rt.addSelectionFeature( "selfeat")
        # Query evaluation scheme for entity extraction candidate selection:
        rt.addWeightingFunction( "BM25", {"k1": 1.2, "b": 0.75,
                                  "avgdoclen": 20,
                                  "match": {'feature':"docfeat"} })
        # Summarizer to extract the weighted entities:
        rt.addSummarizer( "accuvar", { "match": {'feature':"sumfeat"},
                                       "var": "CONTINENT", "type": "continent",
                                       "result":"ENTITY" } )
        return rt
  # Create a simple BM25 query evaluation scheme with fixed
    # a,b,k1 and avg document lenght and the weighted extracted
    # entities in the same sentence as matches as query evaluation result:
    def createQueryEvalNBLNK(self):
        rt = self.context.createQueryEval()
        # Declare the sentence marker feature needed for the
        # summarization features extracting the entities:
        rt.addTerm( "sentence", "sent", "")
        # Declare the feature used for selecting result candidates:
        rt.addSelectionFeature( "selfeat")
        # Query evaluation scheme for entity extraction candidate selection:
        rt.addWeightingFunction( "BM25", {
                             "k1": 1.2, "b": 0.75, "avgdoclen": 500,
                             "match": {'feature': "docfeat"} })
        # Summarizer to extract the weighted entities:
        rt.addSummarizer(
            "accuvariable", {
                      "match": {'feature': "sumfeat"}, "var": "CONTINENT", "type": "continent",
                      "result":"ENTITY" })
        return rt
We have nothing more to explain here. The declarations look similar to BM25. We have a different summarizer for the entity extraction defined.
The strusIR.Backend constructor
We have now all helper methods declared we need to create a strusIR.Backend object. The constructor of strusIR.Backend looks like follows:
# Constructor. Initializes the query evaluation schemes and the query and document analyzers:
def __init__(self, config):
    if isinstance( config, ( int, long ) ):
        self.context = strus.Context( "localhost:%u" % config)
        self.storage = self.context.createStorageClient()
    else:
        self.context = strus.Context()
        self.context.addResourcePath("./resources")
        self.storage = self.context.createStorageClient( config )
    self.queryAnalyzer = self.createQueryAnalyzer()
    self.documentAnalyzer = self.createDocumentAnalyzer()
    self.queryeval = {}
    self.queryeval["BM25"] = self.createQueryEvalBM25()
    self.queryeval["NBLNK"] = self.createQueryEvalNBLNK()
The method to insert a multipart document
The method for inserting a multipart document as described in step 1 looks like follows:
# Insert a multipart document:
def insertDocuments( self, content):
    rt = 0
    transaction = self.storage.createTransaction()
    for doc in self.documentAnalyzer.analyzeMultiPart( content):
        docid = doc['attribute']['docid']
        transaction.insertDocument( docid, doc)
        rt += 1
    transaction.commit()
    return rt
The method creates a transaction and inserts all analyzed document parts.
The method evaluate a BM25 query
The method for evaluating a BM25 query looks like follows:
# Query evaluation scheme for a classical information retrieval query with BM25:
def evaluateQueryText( self, querystr, firstrank, nofranks):
    queryeval = self.queryeval[ "BM25"]
    query = queryeval.createQuery( self.storage)
    terms = self.queryAnalyzer.analyzeTermExpression( [ "text", querystr ] )
    if len( terms) == 0:
        # Return empty result for empty query:
        return []
    selexpr = ["contains", 0, 1]
    for term in terms:
        selexpr.append( term )
        query.addFeature( "docfeat", term, 1.0)
    query.addFeature( "selfeat", selexpr, 1.0 )
    query.setMaxNofRanks( nofranks)
    query.setMinRank( firstrank)
    # Evaluate the query:
    results = query.evaluate()
    # Rewrite the results:
    rt = []
    for pos,result in enumerate(results['ranks']):
        content = ""
        title = ""
        for summary in result['summary']:
            if summary['name'] == 'TITLE':
                title = summary['value']
            elif summary['name'] == 'CONTENT':
                content = summary['value']
        rt.append( { 'docno':result['docno'], 'title':title, 'weight':result['weight'], 'abstract':content })
   return rt
The method analyzes the query text and builds one query feature of each term. The selection feature is an expression, that selects only the documents, where all query terms appear in («contains»). The biggest part of this method rewrites the resulting ranked list to get to a list of flat structures for not letting implementation specific structures intrude into the presentation layer (the tornado templates).
The method evaluate a query weighting matching document entities
The method for extracting and weighting entities (continent) from our example documents is constructing expression features for the extracting summarizer from pairs of query features or from one term in case of a single term query. For the construction of expression features from pairs of query features two cases are considered: If one of the terms is immediately following the other, there is also an expression built, that is searching for the immediate sequence in document sentences. The summarizer features built from these sequence expressions get the highest weight. For all the terms whether they are neighbours in the query or not, we construct expressions searching for features in a distance of 5 or 20 (word count distance) in the same sentence. For neighbour terms in the query the features built from these expressions get a slightly higher weight.
All these summarizer feature expressions also search for an entity inside a distance of 50 (word count distance) inside the same sentence. A variable is attached to this entitiy, that is extracted by the summarizer accumulating the weights of all entities.
The expressions associating subexpressions inside a sentence are «within_struct» and «sequence_struct». Both take a structure element expression as first argument. In our case the sentence delimiter. This structure element must not be covered by the interval defined by the matching sub expression with the smallest position and the biggest position of a candidate match.
In Strus variable assignments are bound to one position of an expression match. Therefore the item extracted has to define the position of an expression match. So we build the summarizer feature expressions around the entities we want to extract. The following expression shows one example feature built from «local languages»:
sumexpr = [ "sequence_struct", 50,
              ["sent"],
              [{'variable':"CONTINENT"}, "continent_var",""],
              [ "within_struct", 20,
                  ["sent"],
                  ["word", "local"],
                  ["word", "languages"]
              ]
          ]
query.defineFeature( "sumfeat", sumexpr, 1.0 )
translated this means: We look inside a structure delimited by sentence delimiters for a ‘continent’ with a variable ‘CONTINENT’ assigned followed by a structure within a maximum distance of 50 terms delimited by sentence delimiters containing the words «local» and «languages» within a maximum distance of 20 terms.
The expression {‘variable’:»CONTINENT»} is a marker that declares the string «CONTINENT» as variable attached to the structure where it appears. You may call this a hack. But it is the last of this kind used in the Strus bindings using trees or lists as initializers of objects.
We introduce now the helper methods to build the summarizer features and finally to the weighting scheme using these features to extract the continents:
The method to create the summarization features for neighbour terms in the query
# Helper method to define the query features created from terms
# of the query string, that are following subsequently in the query:
def __defineSubsequentQueryTermFeatures( self, query, term1, term2):
    # Pairs of terms appearing subsequently in the query are
    # translated into 3 query expressions:
    #    1+2) search for sequence inside a sentence in documents,
    #        The summarizer extracts entities within
    #        a distance of 50 in the same sentence
    #    3) search for the terms in a distance smaller than 5 inside a sentence,
    #        The summarizer extracts entities within a distance
    #        of 50 in the same sentence
    #    4) search for the terms in a distance smaller than 20 inside
    #        The summarizer extracts entities within
    #        a distance of 50 in the same sentence
    expr = [
            [ "sequence_struct", 3, ["sent",''], term1, term2 ],
            [ "sequence_struct", 3, ["sent",''], term2, term1 ],
            [ "within_struct", 5, ["sent",''], term1, term2 ],
            [ "within_struct", 20, term1, term2 ]
    ]
    weight = [ 3.0, 2.0, 2.0, 1.5 ]
    ii = 0
    while ii < 4:
        # The summarization expression attaches a variable referencing an
        # the entity to extract.
        # CONTINENT terms of type 'continent_var':
        sumexpr = [ "chain_struct", 50, ["sent",''],
                      [{'variable':"CONTINENT"}, "continent_var", ""],
                      expr[ ii] ]
        query.addFeature( "sumfeat", sumexpr, weight[ ii] )
        sumexpr = [ "sequence_struct", -50, ["sent",''],
                      expr[ ii],
                      [{'variable':"CONTINENT"}, "continent_var", ""],                      ]
        query.addFeature( "sumfeat", sumexpr, weight[ ii] )
        ii += 1
The summarization feature construction looks a little bit complicated. It catches the cases of multiple entities to extract appearing in one sentence. In order to extract all entities, we have to bind the position assigned to a pattern match to the entity extracted. A simple in range search («within») instead of two sequences, one forward, one reversed, would return only one match. To understand this imagine a sequence W L1 L2, where W is a matching term and L1 and L2 are associated links. A «within» in Strus would match on W L1 and then stop matching other structures at the position of W. A backward sequence would match on the position of L1 because it finds W in front of it, and the the position of L2 for the same reason. Therefore it returns 2 matches and extracts L1 and L2. Here you see clearly the limitations of the model of Strus. But we got through this time by rearranging the expressions.
The method to create the summarization features for non neighbour terms in the query
# Helper method to define the query features created from terms
# of the query string, that are not following subsequently in the query:
def __defineNonSubsequentQueryTermFeatures( self, query, term1, term2):
    # Pairs of terms not appearing subsequently in the query are
    # translated into two query expressions:
    #    1) search for the terms in a distance smaller than 5 inside
    #        a sentence, weight 1.6,
    #        where d ist the distance of the terms in the query.
    #        The summarizer extracts entities within a distance
    #        of 50 in the same sentence
    #    2) search for the terms in a distance smaller than 20 inside
    #        a sentence, weight 1.2,
    #        where d ist the distance of the terms in the query.
    #        The summarizer extracts entities within a distance
    #        of 50 in the same sentence
    expr = [
            [ "within_struct", 5, ["sent",''], term1, term2 ],
            [ "within_struct", 20, ["sent",''], term1, term2 ]
    ]
    weight = [ 1.6, 1.2 ]
    ii = 0
    while ii < 2:
        # The summarization expression attaches a variable referencing
        # the entity to extract.
        # CONTINENT terms of type 'continent_var':
        sumexpr = [ "chain_struct", 50, ["sent",''],
                          [{'variable':"CONTINENT"}, "continent_var", ""],
                          expr[ ii] ]
        query.defineFeature( "sumfeat", sumexpr, weight[ ii] )
        sumexpr = [ "sequence_struct", -50, ["sent",''],
                          expr[ ii],
                          [{'variable':"CONTINENT"}, "continent_var", ""]
                  ]
        query.addFeature( "sumfeat", sumexpr, weight[ ii] )
        ii += 1
The method to create the summarization features for a single term query
# Helper method to define the query features created from a single
# term query:
def __defineSingleTermQueryFeatures( self, query, term):
    # Single term query:
    expr = [ term['type'], term['value'] ]
    # The summarization expression attaches a variable referencing an
    # the entity to extract.
    # CONTINENT terms of type 'continent_var':
    sumexpr = [ "chain_struct", 50, ["sent",''],
                  [{'variable':"CONTINENT"}, "continent_var", ""],
                  expr ]
    query.addFeature( "sumfeat", sumexpr, 1.0 )
    sumexpr = [ "sequence_struct", -50, ["sent",''],
                  expr,
                  [{'variable':"CONTINENT"}, "continent_var", ""]
              ]
    query.addFeature( "sumfeat", sumexpr, 1.0 )
The query evaluation method
Here we finally come to the definition of the query evaluation method based on the 3 helper methods to construct the summarization features for entity extraction introduced before:
# Query evaluation method that builds a ranked list from the best weighted entities
# extracted from sentences with matches:
def evaluateQueryEntities( self, querystr, firstrank, nofranks):
    queryeval = self.queryeval[ "NBLNK"]
    query = queryeval.createQuery( self.storage)
    terms = self.queryAnalyzer.analyzeTermExpression( [ "text", querystr ] )
    if len( terms) == 0:
         # Return empty result for empty query:
         return []
    # Build the weighting features. Queries with more than one term are building
    # the query features from pairs of terms:
    if len( terms) > 1:
        # Iterate on all permutation pairs of query features and creat
        # combined features for summarization:
        for pair in itertools.permutations(
            itertools.takewhile(
                    lambda x: x<len(terms), itertools.count()), 2):
            if pair[0] + 1 == pair[1]:
                self.__defineSubsequentQueryTermFeatures( query, terms[pair[0]], terms[pair[1]])
            elif pair[0] < pair[0]:
                self.__defineNonSubsequentQueryTermFeatures( query, terms[pair[0]], terms[pair[1]])
    else:
        self.__defineSingleTermQueryFeatures( query, terms[0] )
    # Define the selector ("selfeat") as the set of documents that contain all query terms
    # and define the single term features for weighting and candidate evaluation ("docfeat"):
    selexpr = ["contains", 0, 1]
    for term in terms:
        selexpr.append( term )
        query.addFeature( "docfeat", term, 1.0)
    query.addFeature( "selfeat", selexpr, 1.0 )
    # Evaluate the ranked list for getting the documents to inspect for entities close to matches
    query.setMaxNofRanks( 300)
    query.setMinRank( 0)
    results = query.evaluate()
    # Build the table of all entities with weight of the top ranked documents:
    entitytab = {}
    for pos,result in enumerate(results['ranks']):
        for summary in result['summary']:
            if summary['name'] == 'ENTITY':
                weight = 0.0
                if summary['value'] in entitytab:
                    weight = entitytab[ summary['value'] ]
                entitytab[ summary['value']] = weight + summary['weight']
    # Extract the top weighted documents in entitytab as result:
    heap = []
    for key, value in entitytab.items():
        heapq.heappush( heap, [value,key] )
    topEntities = heapq.nlargest( firstrank + nofranks, heap, lambda k: k[0])
    rt = []
    idx = 0
    maxrank = firstrank + nofranks
    for elem in topEntities[firstrank:maxrank]:
        rt.append({ 'weight':elem[0], 'title':elem[1] })
    return rt
<!--EndFragment-->
The complete strusIR module
Our strusIR module is now complete.
Step 9: Restart the server and insert the documents with CURL
Now as we have replaced our information retrieval module with a real implementation, we can insert the documents. First we have to restart the server, so that it loads our new strusIR module. We start it in the background, because we need the commandline afterwards to insert the documents:
python3 strusServer.py &
and we get
Starting server ...

Listening on port 80
Then we can insert the document with a CURL command:
curl -X POST -d @countries.xml localhost:80/insert --header "Content-Type:text/xml"
and we get
OK 201
Step 10: Check the query results
Now as we have a real search engine with an inserted document collection running, lets issue some queries with our favorite browser:
http:
we get:
)
This result shows the country documents weighting the occurrence of the query term ‘spanish’ with the BM25 weighting scheme.
If you search with NBLNK with this query string:
http:
you get
)
This result shows the continents ranked by a weight calculated matching the query against the sentences where the continent entity appears. In case of a single term query this is the the number of countries owhere the entity appears in the same sentence. In our example this is the number of countries where Spanish is spoken. For multiterm queries like «local language» we get, with the weighting scheme introduced, a weight that is artificial:
)
It is a trivial task to extract these entities from documents to weight them, but the weighting scheme introduced can also be applied to huge collections of data, if the number of documents inspected by summarizers can be restricted to a reasonable size.
This article, along with any associated source code and files, is licensed under The MIT License
I am a software engineer living in Zürich.
My main interests are information retrieval, document processing, compiler building, formal languages and domain specific languages.
- Download source — 12.5 KB
- Download source — 70 KB
Goals
The goal of this tutorial is to show how to build a search engine web service for non trivial information needs beyond simple keyword search with Python, Tornado and Strus.
All prerequisites you need are delivered as docker image. The tutorial will take less than an hour to complete.
Background
Strus is a set of libraries and tools to build search engines. This article presents its Python bindings in the ensemble with the Tornado web framework.
Update
5th October 2017
The documentation and the sources of this tutorial and the docker image have been updated to the latest version of Strus. Instead of Python 2.7, Python 3.4 is used now. Python 2.X is not supported anymore by the language-bindings of Strus.
Though the examples presented here work, some techniques and best practices have changed. Nevertheless, the examples provide some insight into Strus.
The query evaluation method NBLNK introduced here is not implemented in the same way in the Strus Wikipedia demo search anymore. It has been replaced by the method ‘accunear’ that relies on proximity statistics of the query terms and does not build term expressions anymore.
Prerequisites
You need docker installed.
At least for downloading the docker image for this tutorial, when you run it the first time, you need an internet connection.
Knowledge requirements
To execute and understand the steps of this tutorial some intermediate knowledge about programming Python is helpful. But the language concepts used are not very sophisticated. You can probably also understand the code if you know PHP.
To understand the rendering of the web server results, you should know the very basic constructs of HTML.
This tutorial addresses a public with some previous knowledge about basic concepts of information retrieval. You can complete this tutorial also without any knowledge, but it will hardly be convincing. There are much more mature out of the box solutions available for you in this case.
Sources
The sources introduced in this tutorial and in the tarball delivered with this article are organized in «steps» as the tutorial. So the source file strusIR.py shown in step 6 is in src/step6/strusIR.py of the source tarball or in /home/strus/src/step6/strusIR.py of the docker image.
Introduction
The artificial collection for this tutorial is a list of 201 countries and the languages spoken there. Additionally every country is assigned to a continent. First we will inspect an information retrieval query with BM25 as query evaluation scheme, searching for languages and getting a ranked list of countries. Then we will have a look at an example of weighting entities appearing in matching documents, searching for languages and getting a ranked list of continents.
Both weighting schemes introduced here not fitting to the example collection. They are a little bit like using a sledge-hammer to crack a nut. To extract entities from sentences that match to the query for example appears silly in a collection with documents consisting only of one sentence. But I did not find a suitable test collection (with entities to extract) for this tutorial, so I constructed a very simple one on by hand.
The weighting scheme extracting and weighting the entities is originating from the NBLNK weighting scheme of the Strus demo project, a search on the complete Wikipedia collection (English). The NBLNK retrieval method there ranks links that are occurring in sentences that match to the query. It does not inspect all documents for that, but the only best 300 BM25 weighted documents. The original source (PHP) can be found here.
Glossary
In this tutorial you will encounter several terms shortly explained here:
-
Posting: In information retrieval the term posting usually defines a document number with associated information like positions in the document. It is an element used to describe the occurrence of a term in the collection. In Strus a posting describes a pair (d,p) of cardinal numbers, where d refers to a document and p to a position. The sets of postings describe the domain of the functions that form the expressions we use for retrieval. This structure is the Boolean algebra of sets of pairs (d,p) with some n-ary functions on these sets added.
-
Weighting function: Function that assigns a numerical weight (double precision floating point number) to documents. Weighing functions are parameterized and use iterators on the sets of postings of query expressions and some numeric meta data to calculate the weight of a document.
-
Summarizer: A function to extract content of a document for presentation or further processing.
-
Term expression: An arbitrary complex expression represented as tree with typed terms as leaves. An expression is built from typed terms and n-ary functions on the sets of postings of term sub expressions. Although this definition for constructing expressions looks very universal at the first glance, it is restrictive.
-
Feature: A feature (or query feature) is associating some term expression with a weight and a name of a set to address it. Objects that reference features are for example weighting functions and summarizers.
-
SearchIndex: The index that maps terms to occurrencies or sets of postings. In information retrieval theory called inverted index.
-
ForwardIndex: The index that maps documents to terms. See definition here.
Step 1: Understanding the example document collection
The document structure
In this tutorial all example documents are in one file, a multipart document. It has a <list> root tag and <doc> tags for the items to insert as documents. Each item contains one sentence that relates country, continent and languages spoken together. Continent is marked as entity that can be extracted. The following example shows an example multipart document with two items in the list:
<?xml version='1.0' encoding='UTF-8'
standalone='yes'?>
<list>
<doc id='Sweden'>
In the country Sweden on the <continent
id='Europe'>Europe</continent>
are the following languages spoken: Swedish, Sami,  Finnish.
</doc>
<doc id='Switzerland'>
In the country Switzerland on the <continent id='Europe'>Europe</continent>
 are the following languages spoken: German, French, Italian, Romansch
</doc>
</list>
Step 2: Start the docker container
To start the docker image typing the following command in your shell:
docker run -p 40080:80 -t -i patrickfrey/strus-ub1604-torntuto:v0_15 /bin/bash
and you will get a prompt like this
root@8cbc7f49f3cf:/home/strus#
All following shell commands of this tutorial are executed in this shell.
Step 3: Create the storage
Initialize the storage database
We will use an utility program of Strus to create the storage. The command line utilities of Strus are programs for accessing the storage. In this tutorial we will only use them for the initial creation of the storage.
Creating the storage from the web service and thus managing different storages in the web service would make the example a lot more complicated because of synchronization issues. The command line command to create the storage we use for now looks as follows:
strusCreate -s "path=storage; metadata=doclen UINT16"
you get
storage successfully created.
The meta data element doclen was declared because it is required by the query evaluation scheme BM25 we will use.
Step 4: Define the web server skeleton with Tornado
Define the server skeleton
We design the web server top down and define the skeleton of the server with Tornado without implementing the request handlers needed yet. It looks like follows:
#!/usr/bin/python3
import tornado.ioloop
import tornado.web
import os
import sys

# [1] Request handlers:
class InsertHandler(tornado.web.RequestHandler):
    def post(self):
        pass;
        #... insert handler implementation

class QueryHandler(tornado.web.RequestHandler):
    def get(self):
        pass;
        #... query handler implementation

# [2] Dispatcher:
application = tornado.web.Application([
    # /insert in the URL triggers the handler for inserting documents:
    (r"/insert", InsertHandler),
    # /query in the URL triggers the handler for answering queries:
    (r"/query", QueryHandler),
    # /static in the URL triggers the handler for accessing static
    # files like images referenced in tornado templates:
    (r"/static/(.*)",tornado.web.StaticFileHandler,
        {"path": os.path.dirname(os.path.realpath(sys.argv[0]))},)
])

# [3] Server main:
if __name__ == "__main__":
    try:
        print( "Starting server ...n");
        application.listen(80)
        print( "Listening on port 80n");
        tornado.ioloop.IOLoop.current().start()
        print( "Terminatedn");
    except Exception as e:
        print( e);
It consists of three parts: The main program that runs the server [3]. The application dispatcher that selects a handler based on URL patterns [2] and a list or request handlers used in the application [1]. If we start this program in a source file strusServer.py with the following command:
python3 strusServer.py
the we get a listening we server:
Starting server ...

Listening on port 80
… But it does not react to any command yet, so we stop it again.
Step 5: Define the Tornado HTML templates to render the result
Tornado has a template engine with a substitution language that allows the execution of arbitrary Python commands in the template scope. It also has a concept of inheritance. We declare for our example one basic template search_base_html.tpl and three templates search_nblnk_html.tpl, search_bm25_html.tpl and search_error_html.tpl implementing the block with the result called resultblock differently:
The base template search_base_html.tpl
This is the base template with the frame of the page. All other templates are derived from this, implementing the block with the result differently.
<html>
<head>
<title>A search engine with Python, Tornado and Strus</title>
<meta http-equiv="content-type" content="text/html; charset=utf-8" />
</head>
<body>
<h1>A search engine with Python, Tornado and Strus</h1>
{% block resultblock %}
{% end %}
</body>
</html>
The template for the BM25 search search_bm25_html.tpl
This is the template used for the ordinary BM25 query. For each result document we map the document number docno, the weight, the title and the abstract.
{% extends "search_base_html.tpl" %}
{% block resultblock %}
<table border=1>
<tr>
<th align='left'>Docno</th>
<th align='left'>Weight</th>
<th align='left'>Title</th>
<th align='left'>Abstract</th>
</tr>
{% for result in results %}
<tr>
<td>{{ result['docno'] }}</td>
<td>{{ "%.4f" % result['weight'] }}</td>
<td>{{ result['title'] }}</td>
<td>{% raw result['abstract'] %}</td>
</tr>
{% end %}
</table>
{% end %}
The template for the entity weighting search_nblnk_html.tpl
This is the template used for the ranked list we get when weighting entities extracted from matching documents. For each result document, we map the weight and the title.
{% extends "search_base_html.tpl" %}
{% block resultblock %}
<table border=1>
<tr>
<th align='left'>Weight</th>
<th align='left'>Title</th>
</tr>
{% for result in results %}
<tr>
<td>{{ "%.4f" % result['weight'] }}</td>
<td>{{ result['title'] }}</td>
</tr>
{% end %}
</table>
{% end %}
The template for errors search_error_html.tpl
This is the template used for errors caught. We just map the error message here.
{% extends "search_base_html.tpl" %}
{% block resultblock %}
<p><font color="red">Error: {{message}}</font></p>
{% end %}
Step 6: Define the request handlers
The information retrieval engine backend (dummy implementation)
We try now to define a dummy version of the request handlers needed, to fill our skeleton with life. We do this in a source file strusIR.py. Later in this tutorial we will replace this module with a real information retrieval engine:
class Backend:
    # Constructor creating a local Strus context with the storage configuration
    # string passed as argument:
    def __init__(self, config):
        pass

    # Insert a multipart document as described in step 1 (doing nothing for the moment):
    def insertDocuments( self, content):
        return 0

    # Query evaluation scheme for a classical information retrieval query
    # with BM25 (returning a dummy ranked list with one element for now):
    def evaluateQueryText( self, querystr, firstrank, nofranks):
        rt = []
        rt.append( {
            'docno': 1,
            'title': "test document",
            'weight': 1.0,
            'abstract': "Neque porro quisquam est qui dolorem ipsum ..."
        })
        return rt

    # Query evaluation method that builds a ranked list from the best weighted entities
    # extracted from sentences with matches (returning an dummy list for with
    # one element now):
    def evaluateQueryEntities( self, querystr, firstrank, nofranks):
        rt = []
        rt.append( {
            'title': "test document",
            'weight': 1.0
        })
        return rt
In our skeleton we can now insert the following lines after the import directives that declare the information retrieval backend used.
#!/usr/bin/python3
import tornado.ioloop
import tornado.web
import os
import sys
import strusIR

# Declare the information retrieval engine:
backend = strusIR.Backend( "path=storage; cache=512M")
After these changes we can replace the request handlers in our skeleton.
The insert request handler
The insert request handler accepts POST requests with a multipart document as body and calls the insertDocuments method of the backend with it. It returns a plain text string with OK or ERR as header depending on the result:
# Declare the insert document handler (POST request with the multipart document as body):
class InsertHandler(tornado.web.RequestHandler):
    def post(self):
        try:
            content = self.request.body
            nofDocuments = backend.insertDocuments( content)
            self.write( "OK %un" % (nofDocuments))
        except Exception as e:
            self.write( "ERR %sn" % (e))
The query request handler
The query request handler accepts GET requests with the following parameters:
-
q: query string
-
s: query evaluation scheme (either BM25 or NBLNK)
-
i: Index of first result rank to return
-
n: Maximum number of result rank to return
It returns a HTML page with the result rendered with the Tornado template engine:
# Declare the query request handler:
class QueryHandler(tornado.web.RequestHandler):
    def get(self):
        try:
            # q = query terms:
            querystr = self.get_argument( "q", None)
            # i = first rank of the result to display (for scrolling):
            firstrank = int( self.get_argument( "i", 0))
            # n = maximum number of ranks of the result to display on one page:
            nofranks = int( self.get_argument( "n", 20))
            # c = query evaluation scheme to use:
            scheme = self.get_argument( "s", "BM25")
            if scheme == "BM25":
                # The evaluation scheme is a classical BM25 (Okapi):
                results = backend.evaluateQueryText( querystr, firstrank, nofranks)
                self.render( "search_bm25_html.tpl",
                             scheme=scheme, querystr=querystr,
                             firstrank=firstrank, nofranks=nofranks, results=results)
            elif scheme == "NBLNK":
                # The evaluation scheme is weighting the entities in the matching documents:
                results = backend.evaluateQueryEntities( querystr, firstrank, nofranks)
                self.render( "search_nblnk_html.tpl",
                             scheme=scheme, querystr=querystr,
                             firstrank=firstrank, nofranks=nofranks, results=results)
            else:
                raise Exception( "unknown query evaluation scheme", scheme)
        except Exception as e:
            self.render( "search_error_html.tpl",
                         message=e, scheme=scheme, querystr=querystr,
                         firstrank=firstrank, nofranks=nofranks)
Step 7: Call the server
Our server definition is now complete.
Now we can start the server and issue a query. We started the docker image with the port 40080 mapped to the docker image port 80. So we can issue the GET request
http:
with our favorite web browser. You get the following results from our dummy implementation of the retrieval engine:
or if you search with NBLNK with this query string:
http:
you get
Step 8: Define the real information retrieval engine with Strus
Now we take a look at the strusIR.py module and the Backend class it implements. We replace step by step the dummy implementation by a real one. First we have to import the following modules:
import strus
import itertools
import heapq
import re
The analyzer configuration
If we want to insert and retrieve documents, we have to describe the mapping of information items in the document to their normalized form. The same normalization has to be done with items in a query, so that items in the query can be matched against items in the document with help of an index.
This example analyzer configuration is kept as simple as possible. Not all steps are explained in detail, but you will find all document and query analyzer methods in the Python interface documentation of Strus: DocumentAnalyzer, QueryAnalyzer, .
The strusIR.Backend methods to create the document and the query analyzers look as follows:
# Create the document analyzer for our test collection:
def createDocumentAnalyzer(self):
    rt = self.context.createDocumentAnalyzer()
    # Define the sections that define a document (for multipart documents):
    rt.defineDocument( "doc", "/list/doc")
    # Define the terms to search for (inverted index or search index):
    rt.addSearchIndexFeature( "word", "/list/doc//()",
                              "word", ("lc",("stem","en"),("convdia","en")))
    # Define the end of sentence markers:
    rt.addSearchIndexFeature( "sent", "/list/doc//()",
                              ("punctuation","en","."), "empty")
    # Define the placeholders that are referencable by variables:
    rt.addSearchIndexFeature( "continent_var", "/list/doc/continent@id",
                              "content", "empty", "succ")
    # Define the original terms in the document used for abstraction:
    rt.addForwardIndexFeature( "orig", "/list/doc//()", "split", "orig")
    # Define the contents that extracted by variables:
    rt.addForwardIndexFeature( "continent", "/list/doc/continent@id",
                               "content", "text", "succ")
    # Define the document identifier:
    rt.defineAttribute( "docid", "/list/doc@id", "content", "text")
    # Define the doclen attribute needed by BM25:
    rt.defineAggregatedMetaData( "doclen",("count", "word"))
    return rt
# Create the query analyzer according to the document analyzer configuration:
def createQueryAnalyzer(self):
    rt = self.context.createQueryAnalyzer()
    rt.definePhraseType( "text", "word", "word", ["lc", ["stem", "en"], ["convdia", "en"]] )
    return rt
The following constructs need further explanation:
-
The document text selector expressions (2nd parameter of defineDocument, addSearchIndexFeature, addForwardIndexFeature, defineAttribute) are used to address the parts of the document to process. The syntax and semantics of selector expressions is dependent of the document segmenter you use. The default document segmenter used is an XML segmenter based on the textwolf library. It uses an expression syntax derived from abbreviated syntax of XPath. Another segmenter for another document format might define selection expressions differently.
-
Expressions describing functions for list of functions for normalizers, tokenizers, aggregators as arrays in Python. For example
("lc",("stem","en"),("convdia","en"))
describes a list of the normalizer functions: lowercase followed by stemming in English and diacritical character conversion in English, applied in this order. The notation of arrays for complex trees or lists is used for having compact initializers of the functions of the core you need. The first argument of an array is the function name and the rest are describing the arguments of the function. A similar initializer notation is also used in describing query expression, we will encounter later on in this tutorial.
-
The «succ» argument in some feature declarations. This option tells the analyzer, that this element has no own position in the document, but the same position assigned as the next element with an own position assigned. «pred» references the previous position accordingly. These options help to declare annotations in the document, that are bound to another item. Positions are very important for describing positional neighbour relationships in structured features like A is immediately followed by B.
The weighting scheme configuration for BM25
Here we declare the strusIR.Backend method to create the weighting scheme for BM25 including the summarizers to present the results. Not all steps are explained in detail, but you will find all query evaluation methods in the Python interface documentation of Strus: QueryEval. The definition of the weighting scheme configuration for BM25 in our case look as follows:
    # Create a simple BM25 query evaluation scheme with fixed
    # a,b,k1 and avg document lenght and title with abstract
    # as summarization attributes:
    def createQueryEvalBM25(self):
        rt = self.context.createQueryEval()
        # Declare the sentence marker feature needed for abstracting:
        rt.addTerm( "sentence", "sent", "")
        # Declare the feature used for selecting result candidates:
        rt.addSelectionFeature( "selfeat")
        # Query evaluation scheme:
        rt.addWeightingFunction( "BM25", {
                     "k1": 1.2, "b": 0.75, "avgdoclen": 20, "match": {'feature':"docfeat"} })
        # Summarizer for getting the document title:
        rt.addSummarizer( "attribute", { "name": "docid" }, {"result":"TITLE"})
        # Summarizer for abstracting:
        rt.addSummarizer( "matchphrase", {
                  "type": "orig", "windowsize": 40, "sentencesize":30,
                  "matchmark": '$<b>$</b>', "struct":{'feature':"sentence"},
                  "match": {'feature':"docfeat"} }, {"phrase":"CONTENT"}
        return rt
The following constructs need further explanation:
-
addTerm method: This method is used to add terms to the query, that are not part of the query itself, but used as context information by weighting functions or summarizers. A good example are structural markers like end of sentence. These markers are not part of the query but they might play a role in weighting or summarization.
-
addSelectionFeature method: In Strus the what you weight is strictly separated from the how. You always have to declare a set of features that declare, what set of documents is considered for the result. This separation is something you need in big document collections to avoid to expansive scans of result candidates.
-
Values of weighting or summarizer functions are either strings or numeric values or addressing features by the name of the feature set. Strings or numeric values are recognized by their type, features are specified as dictionary with one element. { ‘feature’: <name> }.
The weighting scheme configuration for weighting entities in matching documents
The strusIR.Backend method to create the weighting scheme for NBLNK including the summarizers to present the results look as follows:
     # Create a simple BM25 query evaluation scheme with fixed
    # a,b,k1 and avg document lenght and the weighted extracted
    # entities in the same sentence as matches as query evaluation result:
    def createQueryEvalNBLNK(self):
        rt = self.context.createQueryEval()
        # Declare the sentence marker feature needed for the
        # summarization features extracting the entities:
        rt.addTerm( "sentence", "sent", "")
        # Declare the feature used for selecting result candidates:
        rt.addSelectionFeature( "selfeat")
        # Query evaluation scheme for entity extraction candidate selection:
        rt.addWeightingFunction( "BM25", {"k1": 1.2, "b": 0.75,
                                  "avgdoclen": 20,
                                  "match": {'feature':"docfeat"} })
        # Summarizer to extract the weighted entities:
        rt.addSummarizer( "accuvar", { "match": {'feature':"sumfeat"},
                                       "var": "CONTINENT", "type": "continent",
                                       "result":"ENTITY" } )
        return rt
  # Create a simple BM25 query evaluation scheme with fixed
    # a,b,k1 and avg document lenght and the weighted extracted
    # entities in the same sentence as matches as query evaluation result:
    def createQueryEvalNBLNK(self):
        rt = self.context.createQueryEval()
        # Declare the sentence marker feature needed for the
        # summarization features extracting the entities:
        rt.addTerm( "sentence", "sent", "")
        # Declare the feature used for selecting result candidates:
        rt.addSelectionFeature( "selfeat")
        # Query evaluation scheme for entity extraction candidate selection:
        rt.addWeightingFunction( "BM25", {
                             "k1": 1.2, "b": 0.75, "avgdoclen": 500,
                             "match": {'feature': "docfeat"} })
        # Summarizer to extract the weighted entities:
        rt.addSummarizer(
            "accuvariable", {
                      "match": {'feature': "sumfeat"}, "var": "CONTINENT", "type": "continent",
                      "result":"ENTITY" })
        return rt
We have nothing more to explain here. The declarations look similar to BM25. We have a different summarizer for the entity extraction defined.
The strusIR.Backend constructor
We have now all helper methods declared we need to create a strusIR.Backend object. The constructor of strusIR.Backend looks like follows:
# Constructor. Initializes the query evaluation schemes and the query and document analyzers:
def __init__(self, config):
    if isinstance( config, ( int, long ) ):
        self.context = strus.Context( "localhost:%u" % config)
        self.storage = self.context.createStorageClient()
    else:
        self.context = strus.Context()
        self.context.addResourcePath("./resources")
        self.storage = self.context.createStorageClient( config )
    self.queryAnalyzer = self.createQueryAnalyzer()
    self.documentAnalyzer = self.createDocumentAnalyzer()
    self.queryeval = {}
    self.queryeval["BM25"] = self.createQueryEvalBM25()
    self.queryeval["NBLNK"] = self.createQueryEvalNBLNK()
The method to insert a multipart document
The method for inserting a multipart document as described in step 1 looks like follows:
# Insert a multipart document:
def insertDocuments( self, content):
    rt = 0
    transaction = self.storage.createTransaction()
    for doc in self.documentAnalyzer.analyzeMultiPart( content):
        docid = doc['attribute']['docid']
        transaction.insertDocument( docid, doc)
        rt += 1
    transaction.commit()
    return rt
The method creates a transaction and inserts all analyzed document parts.
The method evaluate a BM25 query
The method for evaluating a BM25 query looks like follows:
# Query evaluation scheme for a classical information retrieval query with BM25:
def evaluateQueryText( self, querystr, firstrank, nofranks):
    queryeval = self.queryeval[ "BM25"]
    query = queryeval.createQuery( self.storage)
    terms = self.queryAnalyzer.analyzeTermExpression( [ "text", querystr ] )
    if len( terms) == 0:
        # Return empty result for empty query:
        return []
    selexpr = ["contains", 0, 1]
    for term in terms:
        selexpr.append( term )
        query.addFeature( "docfeat", term, 1.0)
    query.addFeature( "selfeat", selexpr, 1.0 )
    query.setMaxNofRanks( nofranks)
    query.setMinRank( firstrank)
    # Evaluate the query:
    results = query.evaluate()
    # Rewrite the results:
    rt = []
    for pos,result in enumerate(results['ranks']):
        content = ""
        title = ""
        for summary in result['summary']:
            if summary['name'] == 'TITLE':
                title = summary['value']
            elif summary['name'] == 'CONTENT':
                content = summary['value']
        rt.append( { 'docno':result['docno'], 'title':title, 'weight':result['weight'], 'abstract':content })
   return rt
The method analyzes the query text and builds one query feature of each term. The selection feature is an expression, that selects only the documents, where all query terms appear in («contains»). The biggest part of this method rewrites the resulting ranked list to get to a list of flat structures for not letting implementation specific structures intrude into the presentation layer (the tornado templates).
The method evaluate a query weighting matching document entities
The method for extracting and weighting entities (continent) from our example documents is constructing expression features for the extracting summarizer from pairs of query features or from one term in case of a single term query. For the construction of expression features from pairs of query features two cases are considered: If one of the terms is immediately following the other, there is also an expression built, that is searching for the immediate sequence in document sentences. The summarizer features built from these sequence expressions get the highest weight. For all the terms whether they are neighbours in the query or not, we construct expressions searching for features in a distance of 5 or 20 (word count distance) in the same sentence. For neighbour terms in the query the features built from these expressions get a slightly higher weight.
All these summarizer feature expressions also search for an entity inside a distance of 50 (word count distance) inside the same sentence. A variable is attached to this entitiy, that is extracted by the summarizer accumulating the weights of all entities.
The expressions associating subexpressions inside a sentence are «within_struct» and «sequence_struct». Both take a structure element expression as first argument. In our case the sentence delimiter. This structure element must not be covered by the interval defined by the matching sub expression with the smallest position and the biggest position of a candidate match.
In Strus variable assignments are bound to one position of an expression match. Therefore the item extracted has to define the position of an expression match. So we build the summarizer feature expressions around the entities we want to extract. The following expression shows one example feature built from «local languages»:
sumexpr = [ "sequence_struct", 50,
              ["sent"],
              [{'variable':"CONTINENT"}, "continent_var",""],
              [ "within_struct", 20,
                  ["sent"],
                  ["word", "local"],
                  ["word", "languages"]
              ]
          ]
query.defineFeature( "sumfeat", sumexpr, 1.0 )
translated this means: We look inside a structure delimited by sentence delimiters for a ‘continent’ with a variable ‘CONTINENT’ assigned followed by a structure within a maximum distance of 50 terms delimited by sentence delimiters containing the words «local» and «languages» within a maximum distance of 20 terms.
The expression {‘variable’:»CONTINENT»} is a marker that declares the string «CONTINENT» as variable attached to the structure where it appears. You may call this a hack. But it is the last of this kind used in the Strus bindings using trees or lists as initializers of objects.
We introduce now the helper methods to build the summarizer features and finally to the weighting scheme using these features to extract the continents:
The method to create the summarization features for neighbour terms in the query
# Helper method to define the query features created from terms
# of the query string, that are following subsequently in the query:
def __defineSubsequentQueryTermFeatures( self, query, term1, term2):
    # Pairs of terms appearing subsequently in the query are
    # translated into 3 query expressions:
    #    1+2) search for sequence inside a sentence in documents,
    #        The summarizer extracts entities within
    #        a distance of 50 in the same sentence
    #    3) search for the terms in a distance smaller than 5 inside a sentence,
    #        The summarizer extracts entities within a distance
    #        of 50 in the same sentence
    #    4) search for the terms in a distance smaller than 20 inside
    #        The summarizer extracts entities within
    #        a distance of 50 in the same sentence
    expr = [
            [ "sequence_struct", 3, ["sent",''], term1, term2 ],
            [ "sequence_struct", 3, ["sent",''], term2, term1 ],
            [ "within_struct", 5, ["sent",''], term1, term2 ],
            [ "within_struct", 20, term1, term2 ]
    ]
    weight = [ 3.0, 2.0, 2.0, 1.5 ]
    ii = 0
    while ii < 4:
        # The summarization expression attaches a variable referencing an
        # the entity to extract.
        # CONTINENT terms of type 'continent_var':
        sumexpr = [ "chain_struct", 50, ["sent",''],
                      [{'variable':"CONTINENT"}, "continent_var", ""],
                      expr[ ii] ]
        query.addFeature( "sumfeat", sumexpr, weight[ ii] )
        sumexpr = [ "sequence_struct", -50, ["sent",''],
                      expr[ ii],
                      [{'variable':"CONTINENT"}, "continent_var", ""],                      ]
        query.addFeature( "sumfeat", sumexpr, weight[ ii] )
        ii += 1
The summarization feature construction looks a little bit complicated. It catches the cases of multiple entities to extract appearing in one sentence. In order to extract all entities, we have to bind the position assigned to a pattern match to the entity extracted. A simple in range search («within») instead of two sequences, one forward, one reversed, would return only one match. To understand this imagine a sequence W L1 L2, where W is a matching term and L1 and L2 are associated links. A «within» in Strus would match on W L1 and then stop matching other structures at the position of W. A backward sequence would match on the position of L1 because it finds W in front of it, and the the position of L2 for the same reason. Therefore it returns 2 matches and extracts L1 and L2. Here you see clearly the limitations of the model of Strus. But we got through this time by rearranging the expressions.
The method to create the summarization features for non neighbour terms in the query
# Helper method to define the query features created from terms
# of the query string, that are not following subsequently in the query:
def __defineNonSubsequentQueryTermFeatures( self, query, term1, term2):
    # Pairs of terms not appearing subsequently in the query are
    # translated into two query expressions:
    #    1) search for the terms in a distance smaller than 5 inside
    #        a sentence, weight 1.6,
    #        where d ist the distance of the terms in the query.
    #        The summarizer extracts entities within a distance
    #        of 50 in the same sentence
    #    2) search for the terms in a distance smaller than 20 inside
    #        a sentence, weight 1.2,
    #        where d ist the distance of the terms in the query.
    #        The summarizer extracts entities within a distance
    #        of 50 in the same sentence
    expr = [
            [ "within_struct", 5, ["sent",''], term1, term2 ],
            [ "within_struct", 20, ["sent",''], term1, term2 ]
    ]
    weight = [ 1.6, 1.2 ]
    ii = 0
    while ii < 2:
        # The summarization expression attaches a variable referencing
        # the entity to extract.
        # CONTINENT terms of type 'continent_var':
        sumexpr = [ "chain_struct", 50, ["sent",''],
                          [{'variable':"CONTINENT"}, "continent_var", ""],
                          expr[ ii] ]
        query.defineFeature( "sumfeat", sumexpr, weight[ ii] )
        sumexpr = [ "sequence_struct", -50, ["sent",''],
                          expr[ ii],
                          [{'variable':"CONTINENT"}, "continent_var", ""]
                  ]
        query.addFeature( "sumfeat", sumexpr, weight[ ii] )
        ii += 1
The method to create the summarization features for a single term query
# Helper method to define the query features created from a single
# term query:
def __defineSingleTermQueryFeatures( self, query, term):
    # Single term query:
    expr = [ term['type'], term['value'] ]
    # The summarization expression attaches a variable referencing an
    # the entity to extract.
    # CONTINENT terms of type 'continent_var':
    sumexpr = [ "chain_struct", 50, ["sent",''],
                  [{'variable':"CONTINENT"}, "continent_var", ""],
                  expr ]
    query.addFeature( "sumfeat", sumexpr, 1.0 )
    sumexpr = [ "sequence_struct", -50, ["sent",''],
                  expr,
                  [{'variable':"CONTINENT"}, "continent_var", ""]
              ]
    query.addFeature( "sumfeat", sumexpr, 1.0 )
The query evaluation method
Here we finally come to the definition of the query evaluation method based on the 3 helper methods to construct the summarization features for entity extraction introduced before:
# Query evaluation method that builds a ranked list from the best weighted entities
# extracted from sentences with matches:
def evaluateQueryEntities( self, querystr, firstrank, nofranks):
    queryeval = self.queryeval[ "NBLNK"]
    query = queryeval.createQuery( self.storage)
    terms = self.queryAnalyzer.analyzeTermExpression( [ "text", querystr ] )
    if len( terms) == 0:
         # Return empty result for empty query:
         return []
    # Build the weighting features. Queries with more than one term are building
    # the query features from pairs of terms:
    if len( terms) > 1:
        # Iterate on all permutation pairs of query features and creat
        # combined features for summarization:
        for pair in itertools.permutations(
            itertools.takewhile(
                    lambda x: x<len(terms), itertools.count()), 2):
            if pair[0] + 1 == pair[1]:
                self.__defineSubsequentQueryTermFeatures( query, terms[pair[0]], terms[pair[1]])
            elif pair[0] < pair[0]:
                self.__defineNonSubsequentQueryTermFeatures( query, terms[pair[0]], terms[pair[1]])
    else:
        self.__defineSingleTermQueryFeatures( query, terms[0] )
    # Define the selector ("selfeat") as the set of documents that contain all query terms
    # and define the single term features for weighting and candidate evaluation ("docfeat"):
    selexpr = ["contains", 0, 1]
    for term in terms:
        selexpr.append( term )
        query.addFeature( "docfeat", term, 1.0)
    query.addFeature( "selfeat", selexpr, 1.0 )
    # Evaluate the ranked list for getting the documents to inspect for entities close to matches
    query.setMaxNofRanks( 300)
    query.setMinRank( 0)
    results = query.evaluate()
    # Build the table of all entities with weight of the top ranked documents:
    entitytab = {}
    for pos,result in enumerate(results['ranks']):
        for summary in result['summary']:
            if summary['name'] == 'ENTITY':
                weight = 0.0
                if summary['value'] in entitytab:
                    weight = entitytab[ summary['value'] ]
                entitytab[ summary['value']] = weight + summary['weight']
    # Extract the top weighted documents in entitytab as result:
    heap = []
    for key, value in entitytab.items():
        heapq.heappush( heap, [value,key] )
    topEntities = heapq.nlargest( firstrank + nofranks, heap, lambda k: k[0])
    rt = []
    idx = 0
    maxrank = firstrank + nofranks
    for elem in topEntities[firstrank:maxrank]:
        rt.append({ 'weight':elem[0], 'title':elem[1] })
    return rt
<!--EndFragment-->
The complete strusIR module
Our strusIR module is now complete.
Step 9: Restart the server and insert the documents with CURL
Now as we have replaced our information retrieval module with a real implementation, we can insert the documents. First we have to restart the server, so that it loads our new strusIR module. We start it in the background, because we need the commandline afterwards to insert the documents:
python3 strusServer.py &
and we get
Starting server ...

Listening on port 80
Then we can insert the document with a CURL command:
curl -X POST -d @countries.xml localhost:80/insert --header "Content-Type:text/xml"
and we get
OK 201
Step 10: Check the query results
Now as we have a real search engine with an inserted document collection running, lets issue some queries with our favorite browser:
http:
we get:
This result shows the country documents weighting the occurrence of the query term ‘spanish’ with the BM25 weighting scheme.
If you search with NBLNK with this query string:
http:
you get
This result shows the continents ranked by a weight calculated matching the query against the sentences where the continent entity appears. In case of a single term query this is the the number of countries owhere the entity appears in the same sentence. In our example this is the number of countries where Spanish is spoken. For multiterm queries like «local language» we get, with the weighting scheme introduced, a weight that is artificial:
It is a trivial task to extract these entities from documents to weight them, but the weighting scheme introduced can also be applied to huge collections of data, if the number of documents inspected by summarizers can be restricted to a reasonable size.
This article, along with any associated source code and files, is licensed under The MIT License
I am a software engineer living in Zürich.
My main interests are information retrieval, document processing, compiler building, formal languages and domain specific languages.
Mar 24, 2021
how-tosearchfull-text searchpython
Full-text search is everywhere. From finding a book on Scribd, a movie on Netflix, toilet paper on Amazon, or anything else on the web through Google (like how to do your job as a software engineer), you’ve searched vast amounts of unstructured data multiple times today. What’s even more amazing, is that you’ve even though you searched millions (or billions) of records, you got a response in milliseconds. In this post, we are going to explore the basic components of a full-text search engine, and use them to build one that can search across millions of documents and rank them according to their relevance in milliseconds, in less than 150 lines of Python code!
Listen to this article instead

Your browser does not support the audio element
Data
All the code you in this blog post can be found on Github. I’ll provide links with the code snippets here, so you can try running this yourself. You can run the full example by installing the requirements (pip install -r requirements.txt) and run python run.py. This will download all the data and execute the example query with and without rankings.
Before we’re jumping into building a search engine, we first need some full-text, unstructured data to search. We are going to be searching abstracts of articles from the English Wikipedia, which is currently a gzipped XML file of about 785mb and contains about 6.27 million abstracts1. I’ve written a simple function to download the gzipped XML, but you can also just manually download the file.
Data preparation
The file is one large XML file that contains all abstracts. One abstract in this file is contained by a <doc> element, and looks roughly like this (I’ve omitted elements we’re not interested in):
<doc>
    <title>Wikipedia: London Beer Flood</title>
    <url>https://en.wikipedia.org/wiki/London_Beer_Flood</url>
    <abstract>The London Beer Flood was an accident at Meux & Co's Horse Shoe Brewery, London, on 17 October 1814. It took place when one of the  wooden vats of fermenting porter burst.</abstract>
    ...
</doc>
The bits were interested in are the title, the url and the abstract text itself. We’ll represent documents with a Python dataclass for convenient data access. We’ll add a property that concatenates the title and the contents of the abstract. You can find the code here.
from dataclasses import dataclass

@dataclass
class Abstract:
    """Wikipedia abstract"""
    ID: int
    title: str
    abstract: str
    url: str

    @property
    def fulltext(self):
        return ' '.join([self.title, self.abstract])
Then, we’ll want to extract the abstracts data from the XML and parse it so we can create instances of our Abstract object. We are going to stream through the gzipped XML without loading the entire file into memory first2. We’ll assign each document an ID in order of loading (ie the first document will have ID=1, the second one will have ID=2, etcetera). You can find the code here.
import gzip
from lxml import etree

from search.documents import Abstract

def load_documents():
    # open a filehandle to the gzipped Wikipedia dump
    with gzip.open('data/enwiki.latest-abstract.xml.gz', 'rb') as f:
        doc_id = 1
        # iterparse will yield the entire `doc` element once it finds the
        # closing `</doc>` tag
        for _, element in etree.iterparse(f, events=('end',), tag='doc'):
            title = element.findtext('./title')
            url = element.findtext('./url')
            abstract = element.findtext('./abstract')

            yield Abstract(ID=doc_id, title=title, url=url, abstract=abstract)

            doc_id += 1
            # the `element.clear()` call will explicitly free up the memory
            # used to store the element
            element.clear()
Indexing
We are going to store this in a data structure known as an “inverted index” or a “postings list”. Think of it as the index in the back of a book that has an alphabetized list of relevant words and concepts, and on what page number a reader can find them.
Back of the book index
Practically, what this means is that we’re going to create a dictionary where we map all the words in our corpus to the IDs of the documents they occur in. That will look something like this:
{
    ...
    "london": [5245250, 2623812, 133455, 3672401, ...],
    "beer": [1921376, 4411744, 684389, 2019685, ...],
    "flood": [3772355, 2895814, 3461065, 5132238, ...],
    ...
}
Note that in the example above the words in the dictionary are lowercased; before building the index we are going to break down or analyze the raw text into a list of words or tokens. The idea is that we first break up or tokenize the text into words, and then apply zero or more filters (such as lowercasing or stemming) on each token to improve the odds of matching queries to text.
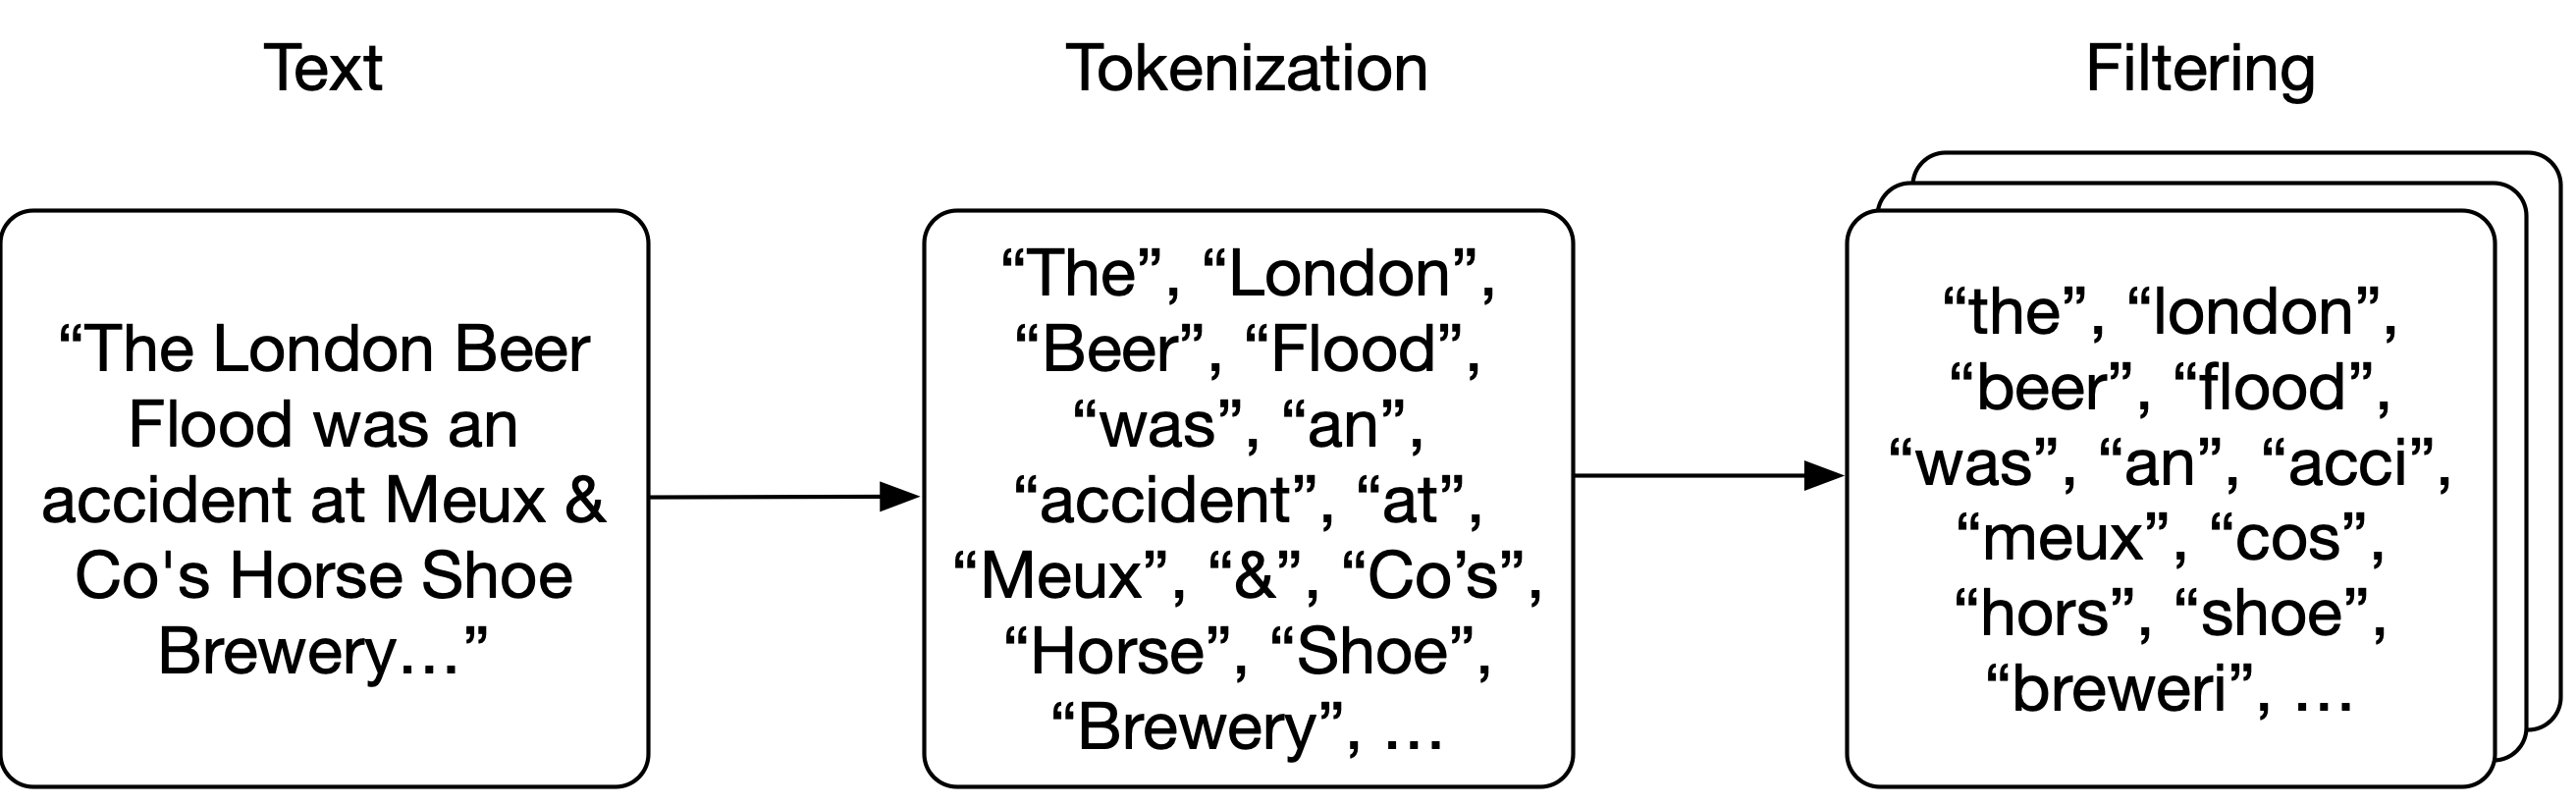
Tokenization
Analysis
We are going to apply very simple tokenization, by just splitting the text on whitespace. Then, we are going to apply a couple of filters on each of the tokens: we are going to lowercase each token, remove any punctuation, remove the 25 most common words in the English language (and the word “wikipedia” because it occurs in every title in every abstract) and apply stemming to every word (ensuring that different forms of a word map to the same stem, like brewery and breweries3).
The tokenization and lowercase filter are very simple:
import Stemmer

STEMMER = Stemmer.Stemmer('english')

def tokenize(text):
    return text.split()

def lowercase_filter(tokens):
    return [token.lower() for token in tokens]

def stem_filter(tokens):
    return STEMMER.stemWords(tokens)
Punctuation is nothing more than a regular expression on the set of punctuation:
import re
import string

PUNCTUATION = re.compile('[%s]' % re.escape(string.punctuation))

def punctuation_filter(tokens):
    return [PUNCTUATION.sub('', token) for token in tokens]
Stopwords are words that are very common and we would expect to occcur in (almost) every document in the corpus. As such, they won’t contribute much when we search for them (i.e. (almost) every document will match when we search for those terms) and will just take up space, so we will filter them out at index time. The Wikipedia abstract corpus includes the word “Wikipedia” in every title, so we’ll add that word to the stopword list as well. We drop the 25 most common words in English.
# top 25 most common words in English and "wikipedia":
# https://en.wikipedia.org/wiki/Most_common_words_in_English
STOPWORDS = set(['the', 'be', 'to', 'of', 'and', 'a', 'in', 'that', 'have',
                 'I', 'it', 'for', 'not', 'on', 'with', 'he', 'as', 'you',
                 'do', 'at', 'this', 'but', 'his', 'by', 'from', 'wikipedia'])

def stopword_filter(tokens):
    return [token for token in tokens if token not in STOPWORDS]
Bringing all these filters together, we’ll construct an analyze function that will operate on the text in each abstract; it will tokenize the text into individual words (or rather, tokens), and then apply each filter in succession to the list of tokens. The order is important, because we use a non-stemmed list of stopwords, so we should apply the stopword_filter before the stem_filter.
def analyze(text):
    tokens = tokenize(text)
    tokens = lowercase_filter(tokens)
    tokens = punctuation_filter(tokens)
    tokens = stopword_filter(tokens)
    tokens = stem_filter(tokens)

    return [token for token in tokens if token]
Indexing the corpus
We’ll create an Index class that will store the index and the documents. The documents dictionary stores the dataclasses by ID, and the index keys will be the tokens, with the values being the document IDs the token occurs in:
class Index:
    def __init__(self):
        self.index = {}
        self.documents = {}

    def index_document(self, document):
        if document.ID not in self.documents:
            self.documents[document.ID] = document

        for token in analyze(document.fulltext):
            if token not in self.index:
                self.index[token] = set()
            self.index[token].add(document.ID)
Searching
Now we have all tokens indexed, searching for a query becomes a matter of analyzing the query text with the same analyzer as we applied to the documents; this way we’ll end up with tokens that should match the tokens we have in the index. For each token, we’ll do a lookup in the dictionary, finding the document IDs that the token occurs in. We do this for every token, and then find the IDs of documents in all these sets (i.e. for a document to match the query, it needs to contain all the tokens in the query). We will then take the resulting list of document IDs, and fetch the actual data from our documents store4.
def _results(self, analyzed_query):
    return [self.index.get(token, set()) for token in analyzed_query]

def search(self, query):
    """
    Boolean search; this will return documents that contain all words from the
    query, but not rank them (sets are fast, but unordered).
    """
    analyzed_query = analyze(query)
    results = self._results(analyzed_query)
    documents = [self.documents[doc_id] for doc_id in set.intersection(*results)]

    return documents


In [1]: index.search('London Beer Flood')
search took 0.16307830810546875 milliseconds
Out[1]:
[Abstract(ID=1501027, title='Wikipedia: Horse Shoe Brewery', abstract='The Horse Shoe Brewery was an English brewery in the City of Westminster that was established in 1764 and became a major producer of porter, from 1809 as Henry Meux & Co. It was the site of the London Beer Flood in 1814, which killed eight people after a porter vat burst.', url='https://en.wikipedia.org/wiki/Horse_Shoe_Brewery'),
 Abstract(ID=1828015, title='Wikipedia: London Beer Flood', abstract="The London Beer Flood was an accident at Meux & Co's Horse Shoe Brewery, London, on 17 October 1814. It took place when one of the  wooden vats of fermenting porter burst.", url='https://en.wikipedia.org/wiki/London_Beer_Flood')]
Now, this will make our queries very precise, especially for long query strings (the more tokens our query contains, the less likely it’ll be that there will be a document that has all of these tokens). We could optimize our search function for recall rather than precision by allowing users to specify that only one occurrence of a token is enough to match our query:
def search(self, query, search_type='AND'):
    """
    Still boolean search; this will return documents that contain either all words
    from the query or just one of them, depending on the search_type specified.

    We are still not ranking the results (sets are fast, but unordered).
    """
    if search_type not in ('AND', 'OR'):
        return []

    analyzed_query = analyze(query)
    results = self._results(analyzed_query)
    if search_type == 'AND':
        # all tokens must be in the document
        documents = [self.documents[doc_id] for doc_id in set.intersection(*results)]
    if search_type == 'OR':
        # only one token has to be in the document
        documents = [self.documents[doc_id] for doc_id in set.union(*results)]

    return documents


In [2]: index.search('London Beer Flood', search_type='OR')
search took 0.02816295623779297 seconds
Out[2]:
[Abstract(ID=5505026, title='Wikipedia: Addie Pryor', abstract='| birth_place    = London, England', url='https://en.wikipedia.org/wiki/Addie_Pryor'),
 Abstract(ID=1572868, title='Wikipedia: Tim Steward', abstract='|birth_place         = London, United Kingdom', url='https://en.wikipedia.org/wiki/Tim_Steward'),
 Abstract(ID=5111814, title='Wikipedia: 1877 Birthday Honours', abstract='The 1877 Birthday Honours were appointments by Queen Victoria to various orders and honours to reward and highlight good works by citizens of the British Empire. The appointments were made to celebrate the official birthday of the Queen, and were published in The London Gazette on 30 May and 2 June 1877.', url='https://en.wikipedia.org/wiki/1877_Birthday_Honours'),
 ...
In [3]: len(index.search('London Beer Flood', search_type='OR'))
search took 0.029065370559692383 seconds
Out[3]: 49627
Relevancy
We have implemented a pretty quick search engine with just some basic Python, but there’s one aspect that’s obviously missing from our little engine, and that’s the idea of relevance. Right now we just return an unordered list of documents, and we leave it up to the user to figure out which of those (s)he is actually interested in. Especially for large result sets, that is painful or just impossible (in our OR example, there are almost 50,000 results).
This is where the idea of relevancy comes in; what if we could assign each document a score that would indicate how well it matches the query, and just order by that score? A naive and simple way of assigning a score to a document for a given query is to just count how often that document mentions that particular word. After all, the more that document mentions that term, the more likely it is that it is about our query!
Term frequency
Let’s expand our Abstract dataclass to compute and store it’s term frequencies when we index it. That way, we’ll have easy access to those numbers when we want to rank our unordered list of documents:
# in documents.py
from collections import Counter
from .analysis import analyze

@dataclass
class Abstract:
    # snip
    def analyze(self):
        # Counter will create a dictionary counting the unique values in an array:
        # {'london': 12, 'beer': 3, ...}
        self.term_frequencies = Counter(analyze(self.fulltext))

    def term_frequency(self, term):
        return self.term_frequencies.get(term, 0)
We need to make sure to generate these frequency counts when we index our data:
# in index.py we add `document.analyze()

def index_document(self, document):
    if document.ID not in self.documents:
        self.documents[document.ID] = document
        document.analyze()
We’ll modify our search function so we can apply a ranking to the documents in our result set. We’ll fetch the documents using the same Boolean query from the index and document store, and then we’ll for every document in that result set, we’ll simply sum up how often each term occurs in that document
def search(self, query, search_type='AND', rank=True):
    # snip
    if rank:
        return self.rank(analyzed_query, documents)
    return documents


def rank(self, analyzed_query, documents):
    results = []
    if not documents:
        return results
    for document in documents:
        score = sum([document.term_frequency(token) for token in analyzed_query])
        results.append((document, score))
    return sorted(results, key=lambda doc: doc[1], reverse=True)
Inverse Document Frequency
That’s already a lot better, but there are some obvious short-comings. We’re considering all query terms to be of equivalent value when assessing the relevancy for the query. However, it’s likely that certain terms have very little to no discriminating power when determining relevancy; for example, a collection with lots of documents about beer would be expected to have the term “beer” appear often in almost every document (in fact, we’re already trying to address that by dropping the 25 most common English words from the index). Searching for the word “beer” in such a case would essentially do another random sort.
In order to address that, we’ll add another component to our scoring algorithm that will reduce the contribution of terms that occur very often in the index to the final score. We could use the collection frequency of a term (i.e. how often does this term occur across all documents), but in practice the document frequency is used instead (i.e. how many documents in the index contain this term). We’re trying to rank documents after all, so it makes sense to have a document level statistic.
We’ll compute the inverse document frequency for a term by dividing the number of documents (N) in the index by the amount of documents that contain the term, and take a logarithm of that.
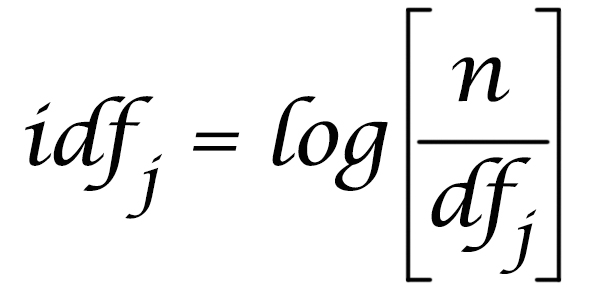
IDF; taken from https://moz.com/blog/inverse-document-frequency-and-the-importance-of-uniqueness
We’ll then simply multiple the term frequency with the inverse document frequency during our ranking, so matches on terms that are rare in the corpus will contribute more to the relevancy score5. We can easily compute the inverse document frequency from the data available in our index:
# index.py
import math

def document_frequency(self, token):
    return len(self.index.get(token, set()))

def inverse_document_frequency(self, token):
    # Manning, Hinrich and Schütze use log10, so we do too, even though it
    # doesn't really matter which log we use anyway
    # https://nlp.stanford.edu/IR-book/html/htmledition/inverse-document-frequency-1.html
    return math.log10(len(self.documents) / self.document_frequency(token))

def rank(self, analyzed_query, documents):
    results = []
    if not documents:
        return results
    for document in documents:
        score = 0.0
        for token in analyzed_query:
            tf = document.term_frequency(token)
            idf = self.inverse_document_frequency(token)
            score += tf * idf
        results.append((document, score))
    return sorted(results, key=lambda doc: doc[1], reverse=True)
Future Work™
And that’s a basic search engine in just a few lines of Python code! You can find all the code on Github, and I’ve provided a utility function that will download the Wikipedia abstracts and build an index. Install the requirements, run it in your Python console of choice and have fun messing with the data structures and searching.
Now, obviously this is a project to illustrate the concepts of search and how it can be so fast (even with ranking, I can search and rank 6.27m documents on my laptop with a “slow” language like Python) and not production grade software. It runs entirely in memory on my laptop, whereas libraries like Lucene utilize hyper-efficient data structures and even optimize disk seeks, and software like Elasticsearch and Solr scale Lucene to hundreds if not thousands of machines.
That doesn’t mean that we can’t think about fun expansions on this basic functionality though; for example, we assume that every field in the document has the same contribution to relevancy, whereas a query term match in the title should probably be weighted more strongly than a match in the description. Another fun project could be to expand the query parsing; there’s no reason why either all or just one term need to match. Why not exclude certain terms, or do AND and OR between individual terms? Can we persist the index to disk and make it scale beyond the confines of my laptop RAM?
-
An abstract is generally the first paragraph or the first couple of sentences of a Wikipedia article. The entire dataset is currently about ±796mb of gzipped XML. There’s smaller dumps with a subset of articles available if you want to experiment and mess with the code yourself; parsing XML and indexing will take a while, and require a substantial amount of memory. ↩︎
-
We’re going to have the entire dataset and index in memory as well, so we may as well skip keeping the raw data in memory. ↩︎
-
Whether or not stemming is a good idea is subject of debate. It will decrease the total size of your index (ie fewer unique words), but stemming is based on heuristics; we’re throwing away information that could very well be valuable. For example, think about the words
university,universal,universities, anduniversethat are stemmed tounivers. We are losing the ability to distinguish between the meaning of these words, which would negatively impact relevance. For a more detailed article about stemming (and lemmatization), read this excellent article. ↩︎ -
We obviously just use our laptop’s RAM for this, but it’s a pretty common practice to not store your actual data in the index. Elasticsearch stores it’s data as plain old JSON on disk, and only stores indexed data in Lucene (the underlying search and indexing library) itself, and many other search engines will simply return an ordered list of document IDs which are then used to retrieve the data to display to users from a database or other service. This is especially relevant for large corpora, where doing a full reindex of all your data is expensive, and you generally only want to store data relevant to relevancy in your search engine (and not attributes that are only relevant for presentation purposes). ↩︎
-
For a more in-depth post about the algorithm, I recommend reading https://monkeylearn.com/blog/what-is-tf-idf/ and https://nlp.stanford.edu/IR-book/html/htmledition/term-frequency-and-weighting-1.html ↩︎
python-searchengine
Simple search engine implementation in Python for illustrative purposes to go with this blog post.
Requirements
Python 3.7 or greater.
Usage
Run from the command line (this program will exit afterwards):
$ pip install -r requirements.txt
$ python run.py
Parsing XML took 701.6900851726532 seconds
index_documents took 701.6901140213013 seconds
Index contains 6274026 documents
search took 0.2980232238769531 milliseconds
search took 0.07561087608337402 seconds
search took 0.1850128173828125 milliseconds
search took 0.2769007682800293 seconds
Run from interactive console:
Python 3.8.0 (v3.8.0:fa919fdf25, Oct 14 2019, 10:23:27)
Type 'copyright', 'credits' or 'license' for more information
IPython 7.17.0 -- An enhanced Interactive Python. Type '?' for help.

In [1]: run run.py
Parsing XML took 701.6900851726532 seconds
index_documents took 701.6901140213013 seconds
Index contains 6274026 documents
search took 0.2980232238769531 milliseconds
search took 0.07561087608337402 seconds
search took 0.1850128173828125 milliseconds
search took 0.2769007682800293 seconds

In [2]: index.search('python programming LanGuAGe'', rank=True)[:5]
search took 0.4620552062988281 milliseconds
Out[2]:
[(Abstract(ID=1018719, title='Wikipedia: Python syntax and semantics', abstract='The syntax of the Python programming language is the set of rules that defines how a Python program will be written and interpreted (by both the runtime system and by human readers). The Python language has many similarities to Perl, C, and Java.', url='https://en.wikipedia.org/wiki/Python_syntax_and_semantics'),
  25.91623091682463),
 (Abstract(ID=2541116, title='Wikipedia: History of Python', abstract="The programming language Python was conceived in the late 1980s, and its implementation was started in December 1989 by Guido van Rossum at CWI in the Netherlands as a successor to ABC capable of exception handling and interfacing with the Amoeba operating system. Van Rossum is Python's principal author, and his continuing central role in deciding the direction of Python is reflected in the title given to him by the Python community, Benevolent Dictator for Life (BDFL).", url='https://en.wikipedia.org/wiki/History_of_Python'),
  25.474817047863255),
 (Abstract(ID=4723564, title='Wikipedia: Zen of Python', abstract='The Zen of Python is a collection of 19 "guiding principles" for writing computer programs that influence the design of the Python programming language. Software engineer Tim Peters wrote this set of principles and posted it on the Python mailing list in 1999.', url='https://en.wikipedia.org/wiki/Zen_of_Python'),
  23.697300894161387),
 (Abstract(ID=2906166, title='Wikipedia: Core Python Programming', abstract='Core Python Programming is a textbook on the Python programming language, written by Wesley J. Chun.', url='https://en.wikipedia.org/wiki/Core_Python_Programming'),
  21.919784740459527),
 (Abstract(ID=2131166, title='Wikipedia: Comparison of programming languages (object-oriented programming)', abstract='This comparison of programming languages compares how object-oriented programming languages such as C++, Java, Smalltalk, Object Pascal, Perl, Python, and others manipulate data structures.', url='https://en.wikipedia.org/wiki/Comparison_of_programming_languages_(object-oriented_programming)'),
  20.407894768933833)]
Using a smaller data set
The code will download the complete set of 6.7m Wikipedia abstracts. If you want to play around with a smaller data set, just pick one of the numbered gzip files from https://dumps.wikimedia.org/enwiki/latest/ and change the URL in download.py.