![]()
Download Article
![]()
Download Article
Polymerase Chain Reaction (PCR) is a technique that has various applications in research, medical, and forensic field. It amplifies the DNA fragment of interest. It is also a sensitive test for disease diagnosis and genotyping. The basic ingredients of a reaction system include a DNA template, a buffer solution, deoxyribonucleoside triphosphate (dNTPs), Taq polymerase, and a pair of primers (the forward one and the reverse one). Properly designed primers reduce the cost and time spent on experimentation. Primer-BLAST is a powerful tool to find the primers specific to a template. This tool is free to use and does not require software installation or programming skills. This article demonstrates how to design PCR primers with an example of Primer-BLAST.
-

1
Go to the Primer-BLAST website (https://www.ncbi.nlm.nih.gov/tools/primer-blast/). Notice that a RefSeq accession is the preferred template format. The Reference Sequence (RefSeq) collection is a secondary database with the non-redundant information selected from the primary database GenBank.
- Primer-BLAST is a primer designing tool developed by the National Center for Biotechnology Information (NCBI).
- NCBI, as a national resource for molecular biology information, maintains biology databases and facilitates the use of such databases.
- Since all genetic information gained by biological researches ultimately deposits to the databases maintained by NCBI, Primer-BLAST is suitable for any organism as long as the right parameters are selected.
-
2
Decide the purpose of the primers. The purpose affects the primer design. Parameters such as the PCR product length and the locations of the primers largely depend on the purpose. Whether it is to amplify the entire gene, or to check the presence of the gene, or to detect its expression level, or other purposes?
- Take an example. Let the gene of interest be the tumor suppressor gene p53 in the model organism Drosophila melanogaster (common fruit fly).
- Let the purpose be to detect expression level of this gene.
- In this case, the primers bind to the reverse transcribed complementary DNA (cDNA) from messenger RNA (mRNA), instead of the genome. The template thus narrows down to the coding sequence (CDS) of p53.
Advertisement
-
3
Know PCR template. The source of nucleotide sequences varies depending on different situation of the research. It can be generated through a sequencing result, or obtained from a database. If it is from a raw sequencing result, go to the part «Running BLAST for Raw Sequence» directly. If it is from a database, play with that database for some time.
- In the case of Drosophila melanogaster p53 gene, the annotated sequence is available in NCBI database.
- Go to NCBI homepage (https://www.ncbi.nlm.nih.gov/).
- Type the keywords in the search bar. The logical operators such as AND, OR, NOT are applicable in this bar.
- Click search and explore the information about Drosophila melanogaster p53 gene.
-
4
Get accession for sequences found in a database. Primer-BLAST identifies the template better by RefSeq accession than by raw DNA sequence. Another advantage of RefSeq accession is functions related to exon/intron are available only when inputting RefSeq mRNA sequence as the PCR template.
- If the sequence is obtained from an online database, simply search the keywords on NCBI homepage to get its RefSeq accession.
- Then skip the part «Running BLAST for Raw Sequence» and go to the part «Adjusting the Parameters» directly.


Advertisement
-
1
Access RefSeq database for the raw sequence accession. The related RefSeq accession is accessible via Basic Local Alignment Search Tool (BLAST). To find the RefSeq accession of a raw sequence means to search the NCBI database for the sequence identical to that raw sequence.
- Continue with the example. For demonstration, let’s suppose Drosophila melanogaster p53 gene is not annotated. To get its raw sequence, go to the Drosophila database (http://flybase.org). Type «p53» in Jump to Gene bar. It will navigate to that gene. Find the CDS of Drosophila melanogaster p53 gene.
- Open the BLAST website (https://blast.ncbi.nlm.nih.gov/Blast.cgi).
- Since it is aligning a DNA sequence with another DNA sequence in this case, click nucleotide BLAST button.
-
2
Copy the sequence or download FASTA from Flybase. FASTA is a standard format to store nucleotide codes in bioinformatics. Almost all text-processing tools can open and edit this file type.
-
3
Run BLAST. Paste the CDS to the query sequence box. Scroll down and click BLAST to run the local alignment.
-
4
Select the RefSeq accession that matches the target template. Pay attention to the information listed in the BLAST result. Determine the appropriate accession.
- Apparently, the alignment identity should be 100% to ensure the RefSeq accession represents the target template.
- If there is no hit with a 100% identity, this means the query sequence is poorly studied. Use the raw sequence for Primer-BLAST in this case. Deposit this new sequence to GenBank to contribute to biology database.
- Another key point is to match the description, which tells about the organism and the name of the sequence.
- In the example, both the RefSeq NM_001170223.1 and the one beneath are suitable accessions. It is fine to choose either one of them.
-
5
Run a pairwise alignment for the selected reference sequence and the target template. Keep in mind that the reference sequence with the matched accession usually does not have identical length as the target template. A pairwise alignment can find the exactly same region.
- Go to the pairwise sequence alignment tool website on EMBL-EBI (https://www.ebi.ac.uk/Tools/psa/).
- Choose a local alignment algorithm.
- In the example of Drosophila melanogaster p53 gene expression level detection, copy and paste NM_001170223.1 sequence to one of the boxes; p53-RC CDS the other box.
- Click the submit button to run the program.
-
6
Record the positions on the reference sequence where the two fragments align. The first and last number in the alignment represent the starting and ending point where the two fragments align.
- In the example, the result indicates that the CDS of p53-RC starts at 630th and ends at 1787th nucleotide of the NM_001170223.1 sequence.
- The reason to perform a local alignment lies here. The alignment tool on EMBI-EBI returns the result in a text format. It is hard to count the positions without a grid. Conveniently, local alignment result returned by it omits the unaligned regions and displays the aligned positions directly.


Advertisement
-
1
Input the PCR template information into Primer-BLAST.
- In the example, the RefSeq accession is NM_001170223.1.
- The forward primer from position is 630.
- The reverse primer to position is 1787.
- The above two parameters confines the range within the CDS region of p53-RC. They are unnecessary if the template is not a RefSeq accession obtained from raw sequence BLAST.
-
2
Adjust the Primer Parameters. In Primer-BLAST, parameter values that differ from the default are highlighted in yellow automatically by the system.
- For the purpose of gene expression level detection in the example, a relatively short PCR product is enough.
- So the minimal and maximal PCR product sizes are set to be 100 and 250 respectively.
-
3
Adjust the Exon/intron selection. This step is not necessary for genomic DNA primer design. But it is important for cDNA primer design, because it allows the researcher to check if there is genomic DNA contamination in cDNA sample in future experiments.
- In the example, since the template is a cDNA, turn on the intron inclusion option.
- The genomic DNA would have a longer PCR product than cDNA template.
-
4
Adjust the Primer Pair Specificity Checking parameters. Input the organism name so that the program can search the corresponding database. For stringency, the more mismatches there are and the larger the number of mismatches required to ignore unintended targets, the more stringent the primer specificity is.
- In the example, the organism is Drosophila melanogaster
- 6 is the highest number of mismatch allowed by Primer-BLAST
- Mismatch at the 3′ end of a primer is sensitive. It interrupts binding to unintended targets effectively.
- The limit of this program to detect unintended target is up to 35% mismatches, which means 7 mismatches for a primer with 20 nucleotides.
-
5
Expand the Advanced parameters menu.
-
6
Optimize the primer parameters. the GC content between 40-60% gives a fair melting temperature. The maximal poly-X value acceptable is 4. Consecutive nucleotides of the same base should generally be avoid. Set Max Poly-X to be 3 lessen the chance to misprime.
-
7
Reduce the max self and pair complementarity to avoid primer dimers. Because in early cycles of a PCR reaction, the template concentration is much lower than that of the primers, if primers readily bind to themselves, few primers will bind to the template to initiate nucleotide chain elongation. Limiting the number of complementary nucleotides in primers improves the efficiency.


Advertisement
-
1
Generate the designed primers. Scroll down and click Get Primers button to get primer candidates. Usually the program takes less than 2 minutes to run. Sometimes, especially during working hours, the sever is at full capacity. It will put the requests to a waiting list, and may take more than half an hour to get the result. The tip is to avoid such rush hours.
-
2
Select 2-3 pairs from these candidates. One pair is synthesized first. The remaining pairs serve as backups. When picking the backup primers from the candidates, it is better to choose distinct pairs than similar ones. If one of the primer pairs has low efficiency or specificity in the experimental test. Similar ones are likely to have the same problem.
- In the example of Drosophila melanogaster p53 gene expression level detection, the number of primer pairs to return is set to the default value of 10. The program gives 10 candidate primer pairs.
- The candidate primers are grouped in different colors for explanation purpose. The original result generated by Primer-BLAST has only one color.
- If the primers in red is synthesized first, but it fails in experiment, then the primers in green, yellow, or black can be the backups.
- But it is better not to select the primer pairs in blue as a backup, for there is overlap between the red primers and the blue ones.
-
3
Check the quality of the synthesized primers experimentally. Run a PCR using the synthesized primer pairs. Test its efficiency and specificity by analyzing an gel electrophoresis result or a high resolution melting analysis (HRMA). If the primers do not pass the test, synthesize the backup pair and repeat the check step until a suitable pair is found.
- The high brightness of the electrophoresis bind or the fluorescence of the HRMA indicates the efficiency of the tested primers.
- The single bind in electrophoresis or single melting peak in HRMA indicates the specificity of the tested primers.
- In the example, the primers are designed for quantitative PCR (qPCR). It is important to follow a qPCR efficiency determination protocol to check the quality of the primers.


Advertisement
Ask a Question
200 characters left
Include your email address to get a message when this question is answered.
Submit
Advertisement
-
Vocabulary (alphabetical order)
- alignment identity: the percentage of identical codes in two aligned sequences
- annotated sequence: a sequence with its information, such as functions and locations, being identified
- complementarity: a property between nucleotide base binding, such that guanine (G) pairs with cytosine (C) and Adenine (A) pairs with thymine (T) or Uracil (U)
- DNA: deoxyribonucleic acid, a polymer molecule of nucleotides that carries the genetic information in almost all organisms. Most DNA molecules are double-stranded. Each strand has a 5’ and a 3’ end. Two complementary strands align antiparallel to each other and coil to form a helix
- dNTP: the substrate of DNA synthesis. One dNTP molecule contains a nitrogen base, a deoxyribose, and three phosphate groups
- electrophoresis: a technique to separate different molecules based on their size and charge
- exon: any part of a gene that get expressed in the final gene product
- GC content: the percentage of guanine (G) plus cytosine (C) in a sequence
- genome: the total genetic material of an organism
- intron: any part of a gene that’s not expressed in the final gene product
- local alignment: determine similar segments of two sequence in bioinformatics. Local alignment relates to global alignment, which attempts to align the entire length of two sequences
- melting analysis: a process that plots the curve generated by the dissociation of double-stranded DNA under temperature gradient, then assesses the curve to find out the characteristics of the DNA
- mRNA: a family of RNA that serves as the intermediate player in gene expression. mRNA relays information from DNA to protein product
- nucleotide: the monomer unit of the nucleic acid polymer. One nucleotide contains a nitrogen base, a five-carbon sugar, and a phosphate group
- polymerase: an enzyme that catalyze nucleic acid polymer synthesis
- primer: a short strand of nucleic acid that serves as the starting point of DNA polymer elongation. The synthesized fragment is in between of the forward and reverse primer, because the direction of chain elongation is always from 5’ to 3’ end.
- RNA: ribonucleic acid, a polymer molecule that plays various role in gene coding, regulation, and expression. Most RNA molecules are single-stranded. Each strand has a 5’ and a 3’ end
- template: a strand of DNA which provide the original sequence to be replicated.
- transcribe: copy a DNA sequence to its complementary RNA
-
It is very useful to save search parameters once the values are optimized for a certain type of template. This helps to avoid repetitive labor next time.
__
Thanks for submitting a tip for review!
Advertisement
About This Article
Thanks to all authors for creating a page that has been read 21,977 times.
Did this article help you?
Get all the best how-tos!
Sign up for wikiHow’s weekly email newsletter
Subscribe
You’re all set!
![]()
Download Article
![]()
Download Article
Polymerase Chain Reaction (PCR) is a technique that has various applications in research, medical, and forensic field. It amplifies the DNA fragment of interest. It is also a sensitive test for disease diagnosis and genotyping. The basic ingredients of a reaction system include a DNA template, a buffer solution, deoxyribonucleoside triphosphate (dNTPs), Taq polymerase, and a pair of primers (the forward one and the reverse one). Properly designed primers reduce the cost and time spent on experimentation. Primer-BLAST is a powerful tool to find the primers specific to a template. This tool is free to use and does not require software installation or programming skills. This article demonstrates how to design PCR primers with an example of Primer-BLAST.
-
1
Go to the Primer-BLAST website (https://www.ncbi.nlm.nih.gov/tools/primer-blast/). Notice that a RefSeq accession is the preferred template format. The Reference Sequence (RefSeq) collection is a secondary database with the non-redundant information selected from the primary database GenBank.
- Primer-BLAST is a primer designing tool developed by the National Center for Biotechnology Information (NCBI).
- NCBI, as a national resource for molecular biology information, maintains biology databases and facilitates the use of such databases.
- Since all genetic information gained by biological researches ultimately deposits to the databases maintained by NCBI, Primer-BLAST is suitable for any organism as long as the right parameters are selected.
-
2
Decide the purpose of the primers. The purpose affects the primer design. Parameters such as the PCR product length and the locations of the primers largely depend on the purpose. Whether it is to amplify the entire gene, or to check the presence of the gene, or to detect its expression level, or other purposes?
- Take an example. Let the gene of interest be the tumor suppressor gene p53 in the model organism Drosophila melanogaster (common fruit fly).
- Let the purpose be to detect expression level of this gene.
- In this case, the primers bind to the reverse transcribed complementary DNA (cDNA) from messenger RNA (mRNA), instead of the genome. The template thus narrows down to the coding sequence (CDS) of p53.
Advertisement
-
3
Know PCR template. The source of nucleotide sequences varies depending on different situation of the research. It can be generated through a sequencing result, or obtained from a database. If it is from a raw sequencing result, go to the part «Running BLAST for Raw Sequence» directly. If it is from a database, play with that database for some time.
- In the case of Drosophila melanogaster p53 gene, the annotated sequence is available in NCBI database.
- Go to NCBI homepage (https://www.ncbi.nlm.nih.gov/).
- Type the keywords in the search bar. The logical operators such as AND, OR, NOT are applicable in this bar.
- Click search and explore the information about Drosophila melanogaster p53 gene.
-
4
Get accession for sequences found in a database. Primer-BLAST identifies the template better by RefSeq accession than by raw DNA sequence. Another advantage of RefSeq accession is functions related to exon/intron are available only when inputting RefSeq mRNA sequence as the PCR template.
- If the sequence is obtained from an online database, simply search the keywords on NCBI homepage to get its RefSeq accession.
- Then skip the part «Running BLAST for Raw Sequence» and go to the part «Adjusting the Parameters» directly.
Advertisement
-
1
Access RefSeq database for the raw sequence accession. The related RefSeq accession is accessible via Basic Local Alignment Search Tool (BLAST). To find the RefSeq accession of a raw sequence means to search the NCBI database for the sequence identical to that raw sequence.
- Continue with the example. For demonstration, let’s suppose Drosophila melanogaster p53 gene is not annotated. To get its raw sequence, go to the Drosophila database (http://flybase.org). Type «p53» in Jump to Gene bar. It will navigate to that gene. Find the CDS of Drosophila melanogaster p53 gene.
- Open the BLAST website (https://blast.ncbi.nlm.nih.gov/Blast.cgi).
- Since it is aligning a DNA sequence with another DNA sequence in this case, click nucleotide BLAST button.
-
2
Copy the sequence or download FASTA from Flybase. FASTA is a standard format to store nucleotide codes in bioinformatics. Almost all text-processing tools can open and edit this file type.
-
3
Run BLAST. Paste the CDS to the query sequence box. Scroll down and click BLAST to run the local alignment.
-
4
Select the RefSeq accession that matches the target template. Pay attention to the information listed in the BLAST result. Determine the appropriate accession.
- Apparently, the alignment identity should be 100% to ensure the RefSeq accession represents the target template.
- If there is no hit with a 100% identity, this means the query sequence is poorly studied. Use the raw sequence for Primer-BLAST in this case. Deposit this new sequence to GenBank to contribute to biology database.
- Another key point is to match the description, which tells about the organism and the name of the sequence.
- In the example, both the RefSeq NM_001170223.1 and the one beneath are suitable accessions. It is fine to choose either one of them.
-
5
Run a pairwise alignment for the selected reference sequence and the target template. Keep in mind that the reference sequence with the matched accession usually does not have identical length as the target template. A pairwise alignment can find the exactly same region.
- Go to the pairwise sequence alignment tool website on EMBL-EBI (https://www.ebi.ac.uk/Tools/psa/).
- Choose a local alignment algorithm.
- In the example of Drosophila melanogaster p53 gene expression level detection, copy and paste NM_001170223.1 sequence to one of the boxes; p53-RC CDS the other box.
- Click the submit button to run the program.
-
6
Record the positions on the reference sequence where the two fragments align. The first and last number in the alignment represent the starting and ending point where the two fragments align.
- In the example, the result indicates that the CDS of p53-RC starts at 630th and ends at 1787th nucleotide of the NM_001170223.1 sequence.
- The reason to perform a local alignment lies here. The alignment tool on EMBI-EBI returns the result in a text format. It is hard to count the positions without a grid. Conveniently, local alignment result returned by it omits the unaligned regions and displays the aligned positions directly.
Advertisement
-
1
Input the PCR template information into Primer-BLAST.
- In the example, the RefSeq accession is NM_001170223.1.
- The forward primer from position is 630.
- The reverse primer to position is 1787.
- The above two parameters confines the range within the CDS region of p53-RC. They are unnecessary if the template is not a RefSeq accession obtained from raw sequence BLAST.
-
2
Adjust the Primer Parameters. In Primer-BLAST, parameter values that differ from the default are highlighted in yellow automatically by the system.
- For the purpose of gene expression level detection in the example, a relatively short PCR product is enough.
- So the minimal and maximal PCR product sizes are set to be 100 and 250 respectively.
-
3
Adjust the Exon/intron selection. This step is not necessary for genomic DNA primer design. But it is important for cDNA primer design, because it allows the researcher to check if there is genomic DNA contamination in cDNA sample in future experiments.
- In the example, since the template is a cDNA, turn on the intron inclusion option.
- The genomic DNA would have a longer PCR product than cDNA template.
-
4
Adjust the Primer Pair Specificity Checking parameters. Input the organism name so that the program can search the corresponding database. For stringency, the more mismatches there are and the larger the number of mismatches required to ignore unintended targets, the more stringent the primer specificity is.
- In the example, the organism is Drosophila melanogaster
- 6 is the highest number of mismatch allowed by Primer-BLAST
- Mismatch at the 3′ end of a primer is sensitive. It interrupts binding to unintended targets effectively.
- The limit of this program to detect unintended target is up to 35% mismatches, which means 7 mismatches for a primer with 20 nucleotides.
-
5
Expand the Advanced parameters menu.
-
6
Optimize the primer parameters. the GC content between 40-60% gives a fair melting temperature. The maximal poly-X value acceptable is 4. Consecutive nucleotides of the same base should generally be avoid. Set Max Poly-X to be 3 lessen the chance to misprime.
-
7
Reduce the max self and pair complementarity to avoid primer dimers. Because in early cycles of a PCR reaction, the template concentration is much lower than that of the primers, if primers readily bind to themselves, few primers will bind to the template to initiate nucleotide chain elongation. Limiting the number of complementary nucleotides in primers improves the efficiency.
Advertisement
-
1
Generate the designed primers. Scroll down and click Get Primers button to get primer candidates. Usually the program takes less than 2 minutes to run. Sometimes, especially during working hours, the sever is at full capacity. It will put the requests to a waiting list, and may take more than half an hour to get the result. The tip is to avoid such rush hours.
-
2
Select 2-3 pairs from these candidates. One pair is synthesized first. The remaining pairs serve as backups. When picking the backup primers from the candidates, it is better to choose distinct pairs than similar ones. If one of the primer pairs has low efficiency or specificity in the experimental test. Similar ones are likely to have the same problem.
- In the example of Drosophila melanogaster p53 gene expression level detection, the number of primer pairs to return is set to the default value of 10. The program gives 10 candidate primer pairs.
- The candidate primers are grouped in different colors for explanation purpose. The original result generated by Primer-BLAST has only one color.
- If the primers in red is synthesized first, but it fails in experiment, then the primers in green, yellow, or black can be the backups.
- But it is better not to select the primer pairs in blue as a backup, for there is overlap between the red primers and the blue ones.
-
3
Check the quality of the synthesized primers experimentally. Run a PCR using the synthesized primer pairs. Test its efficiency and specificity by analyzing an gel electrophoresis result or a high resolution melting analysis (HRMA). If the primers do not pass the test, synthesize the backup pair and repeat the check step until a suitable pair is found.
- The high brightness of the electrophoresis bind or the fluorescence of the HRMA indicates the efficiency of the tested primers.
- The single bind in electrophoresis or single melting peak in HRMA indicates the specificity of the tested primers.
- In the example, the primers are designed for quantitative PCR (qPCR). It is important to follow a qPCR efficiency determination protocol to check the quality of the primers.
Advertisement
Ask a Question
200 characters left
Include your email address to get a message when this question is answered.
Submit
Advertisement
-
Vocabulary (alphabetical order)
- alignment identity: the percentage of identical codes in two aligned sequences
- annotated sequence: a sequence with its information, such as functions and locations, being identified
- complementarity: a property between nucleotide base binding, such that guanine (G) pairs with cytosine (C) and Adenine (A) pairs with thymine (T) or Uracil (U)
- DNA: deoxyribonucleic acid, a polymer molecule of nucleotides that carries the genetic information in almost all organisms. Most DNA molecules are double-stranded. Each strand has a 5’ and a 3’ end. Two complementary strands align antiparallel to each other and coil to form a helix
- dNTP: the substrate of DNA synthesis. One dNTP molecule contains a nitrogen base, a deoxyribose, and three phosphate groups
- electrophoresis: a technique to separate different molecules based on their size and charge
- exon: any part of a gene that get expressed in the final gene product
- GC content: the percentage of guanine (G) plus cytosine (C) in a sequence
- genome: the total genetic material of an organism
- intron: any part of a gene that’s not expressed in the final gene product
- local alignment: determine similar segments of two sequence in bioinformatics. Local alignment relates to global alignment, which attempts to align the entire length of two sequences
- melting analysis: a process that plots the curve generated by the dissociation of double-stranded DNA under temperature gradient, then assesses the curve to find out the characteristics of the DNA
- mRNA: a family of RNA that serves as the intermediate player in gene expression. mRNA relays information from DNA to protein product
- nucleotide: the monomer unit of the nucleic acid polymer. One nucleotide contains a nitrogen base, a five-carbon sugar, and a phosphate group
- polymerase: an enzyme that catalyze nucleic acid polymer synthesis
- primer: a short strand of nucleic acid that serves as the starting point of DNA polymer elongation. The synthesized fragment is in between of the forward and reverse primer, because the direction of chain elongation is always from 5’ to 3’ end.
- RNA: ribonucleic acid, a polymer molecule that plays various role in gene coding, regulation, and expression. Most RNA molecules are single-stranded. Each strand has a 5’ and a 3’ end
- template: a strand of DNA which provide the original sequence to be replicated.
- transcribe: copy a DNA sequence to its complementary RNA
-
It is very useful to save search parameters once the values are optimized for a certain type of template. This helps to avoid repetitive labor next time.
__
Thanks for submitting a tip for review!
Advertisement
About This Article
Thanks to all authors for creating a page that has been read 21,977 times.
Did this article help you?
Get all the best how-tos!
Sign up for wikiHow’s weekly email newsletter
Subscribe
You’re all set!
Разработка праймеров для qPCR — важный шаг при постановке анализа qPCR или обратной транскрипции-qPCR (RT-qPCR). Праймеры qPCR, которые плохо отжигаются или отжигаются более чем к одной последовательности во время амплификации, могут значительно повлиять на качество и надежность результатов.
Кроме того, если вы проводите одностадийную RT-qPCR, обратная транскриптаза будет использовать обратный праймер для запуска реакции транскрипции. В этом случае некачественный праймер приведет как к неэффективной обратной транскрипции, так и к неэффективной амплификации — проигрышная ситуация.
Учитывая вышесказанное, стоит потратить время, необходимое для разработки качественных праймеров для qPCR. В этой статье мы расскажем вам, как именно это сделать!
Хорошая новость заключается в том, что праймеры дешевы, поэтому вы можете легко протестировать несколько различных пар, чтобы выбрать лучшие для вашего эксперимента.
Плохая новость: тестирование праймеров требует времени и терпения, поэтому чем быстрее вы получите пару работающих праймеров, тем лучше.
Инструмент NCBI Primer-BLAST широко используется для дизайна праймеров для qPCR. В Интернете доступно множество других инструментов для проектирования праймеров, включая primer3, а поставщики ПЦР часто предлагают свои собственные бесплатные программы для проектирования.
Ниже описаны основные этапы проектирования праймеров для qPCR с использованием инструмента NCBI Primer-BLAST.
Этапы проектирования будут аналогичными, если вы используете другие программы проектирования праймеров, и приведенная ниже информация должна дать вам представление о параметрах, на которые следует обратить внимание.
Дизайн праймеров для qPCR: Начало работы
Зайдите в базу данных генов Pubmed и выполните поиск интересующего вас гена. В правом углу следующего экрана вы можете отфильтровать по видам.
Нажмите на интересующий вас ген и прокрутите страницу вниз, пока не найдете NCBI Reference Sequence (RefSeq) для вашего гена (например, «NM_203483»).
Нажмите здесь, и на следующем экране в правом углу экрана вы увидите ссылку «Pick primers».
Параметры праймеров для qPCR
Установите следующие параметры праймеров:
Размер продукта ПЦР/ампликона: Для эффективной амплификации подберите праймеры таким образом, чтобы длина ампликона составляла от 70 до 200 п.н.
Количество праймеров для возврата: Это зависит от вас, в зависимости от того, сколько вариантов вы хотите выбрать. Программе не потребуется много времени, чтобы разработать 10 пар праймеров, и это должно дать вам разумный шанс найти подходящую пару.
Температура плавления: Как правило, следует стремиться к минимальной температуре 60°C и максимальной 63°C; идеальная температура плавления составляет 60°C (с максимальной разницей в 3°C в температурах плавления, Tm, двух праймеров). Для определения этих температур можно использовать калькулятор Tm.
Выбор экзона/интрона
Чтобы избежать амплификации загрязняющей геномной ДНК, подберите праймеры таким образом, чтобы одна половина праймера гибридизовалась с 3′-концом одного экзона, а другая половина — с 5′-концом соседнего экзона.
Для этого просто выберите «Праймер должен охватывать стык экзона и экзона». Другие параметры изменять не нужно.
Параметры проверки специфичности пары праймеров: Используйте настройки по умолчанию. Программа будет использовать последовательность RefSeq мРНК выбранного вами организма для конструирования праймеров.
Проверка экрана вывода
Посмотрите на параметры, которые выдала программа, и обратите особое внимание на следующее:
Убедитесь, что 3′-конец праймера содержит остаток C или G, поскольку остатки T и A легче связываются с ДНК неспецифическим образом.
Стремитесь к содержанию GC около 40-60% для обеспечения максимальной стабильности продукта.
Избегайте самокомплементарности, чтобы снизить вероятность образования праймер-димеров. В идеале праймер должен иметь почти случайный набор нуклеотидов.
Теперь выберите два-три лучших праймера и протестируйте их. Удачи!
Если у вас есть другие лучшие советы по разработке праймеров для qPCR, мы будем рады услышать вас в комментариях!
Правильный выбор последовательности праймеров является ключевым моментом в разработке реактивов. Гибкость в выборе праймеров в первую очередь определяется задачей. В случае определения однонуклеотидной мутации положение праймеров, например, 3′-конца строго задано, в то время как задача определения возбудителя инфекции может допускать выбор гена и даже мишени (геномной или плазмидной ДНК, РНК). Однако, в любом случае, нуклеотидная последовательность праймеров будет определять селективность, чувствительность анализа и робастность тест-системы.
Длина, Tm, ΔG, ΔH, ΔS, CG-контент
Эффективность реакции определяется эффективностью гибридизации праймеров. Под эффективностью гибридизации праймеров понимается доля целевых молекул ДНК, на которые гибридизовались праймеры. Для обеспечения максимальной эффективности праймеры должны гибридизоваться на каждую молекулу ДНК, т.е. доля ДНК с гибридизованными на нее праймерам должна стремиться к 100%.
Методики расчета температуры гибридизации можно разделить на две группы: эмпирические зависимости, основанные на длине праймеров или содержания CG, и термодинамические подходы, основанные на расчетах свободной энергии Гиббса, энтальпии и энтропии. Так как эмпирические зависимости основаны на практических знаниях, в определенных границах применимости их результаты всегда соответствуют практике. Существенным их недостатком является то, что они не могут оценить вероятность образования димеров праймеров и гибридизацию на неполностью комплементарную последовательность. Расчет термодинамических параметров процесса гибридизации позволяет количественно оценить селективность реактивов и подобрать оптимальную последовательность праймеров и условия ПЦР.
Выбор последовательности 3′-конца
Последовательность 3′-конца праймера имеет критическое значение для селективности анализа, так как именно с этого конца происходит синтез комплементарной последовательности. С одной стороны неполная гибридизация 3′-конца приводит к значительному снижению эффективности элонгации. С другой стороны, чрезмерная стабильность 3′-конца приводит к снижению роли 5′-конца на селективность гибридизации, снижая при этом общую селективность амплификации и увеличивая вероятность образования неспецифических продуктов.
На основе анализа базы данных по праймерам, авторами предложена последовательность шагов для выбора оптимального 3′-концевого триплета:
- Отдавать предпочтения триплетам TT(C/G), (C/G)(A/T)(C/G), (A/T)GG, (A/T)CC, (A/T)GC;
- Избегать триплеты (A/T)CG, (A/T)(A/T)(A/T), CG(A/T), GGG;
- Если шаги 1 и 2 не позволяют сделать однозначный выбор, то следует выбрать триплет с C или G на конце.
Образование побочных продуктов
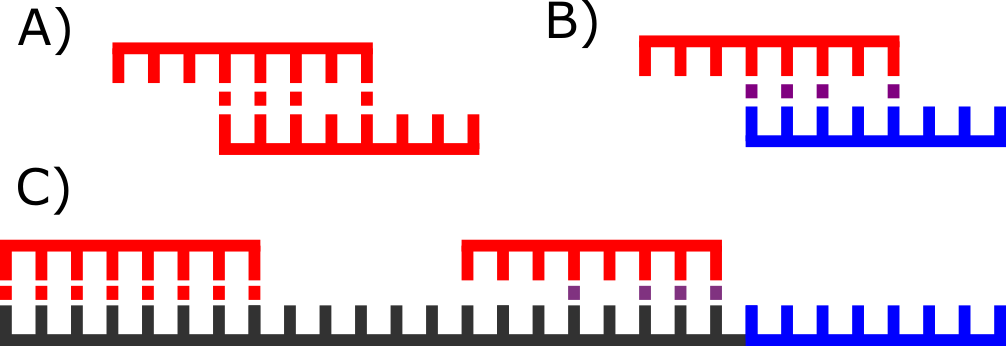
В процессе ПЦР, кроме целевого фрагмента ДНК, могут образовываться побочные продукты и их накопление приводит к снижению эффективности амплификации целевого продукта и, следовательно, к снижению чувствительности и селективности анализа. Есть несколько механизмов образования побочных продуктов:
- Образование димера между самим праймером (один праймер имеет участок самокомплементарной последовательности) (Рисунок 1. A));
- Гибридизация праймеров друг с другом (два праймера имеют комплементарный участок) (Рисунок 1. B));
- Неспецифическая гибридизация праймеров на целевой фрагмент ДНК (Рисунок 1. C)).
Полностью исключить процесс образования побочных продуктов невозможно, так как он зависит как от условий реакции (температура и длительность стадий гибридизации и элонгации), так и от самих реактивов (специфичность полимеразы, наличие вспомогательных веществ). При выборе праймеров необходимо иметь возможность ранжировать их по вероятности образования побочных продуктов. Одним из способов ранжирования является расчет свободной энергии Гиббса по методу ближайших соседей. В качестве вариации данного подхода возможно оценивать свободную энергию Гиббса не всей последовательности праймера, а 3′-конца.
Литература
Молекулярная биология. Практическое руководство — Великов В.А. 2013
ПЦР
Подбор праймеров
Праймеры — синтетические олигонуклеотиды, состоящие из 16-30 оснований. Они комплементарны участкам ДНК, между которыми находится последовательность-мишень. Праймер (англ. primer) является обязательным компонентом («затравка»), необходимым для работы ДНК-полимеразы: к его 3’-ОН концу фермент присоединяет нуклеотиды, комплементарные матрице.
Праймер к 5’-концу гена называют прямым (forward, For), к 3’-концу гена — обратным или встречным (reverse, Rev). В базах данных нуклеотидных последовательностей приведена только одна цепь ДНК — значащая, та, что транскрибируется в виде мРНК. По ней подбирают прямой праймер, т.е. тот праймер, от которого будет расти именно эта цепь. Обратный праймер подбирают для комплементарной цепи, но также в направлении 5’→3’.
В приведённой ниже работе требуется «вручную», без использования специальных программ подобрать праймеры для амплификации гена НАДН-дегидрогеназы гадюки Никольского (Vipera nikolskii) и составить режим ПЦР.
Ход работы
1. Найдите информацию о первичной структуре гена НАДН-дегидрогеназы гадюки обыкновенной, по которой можно подобрать праймеры для ПЦР- амплификации этого гена у других видов гадюк. Для этого откройте сайт US National Library of Medicine, базу GenBank (http://www.pubmed.com).
2. Введите латинское название организма и интересующий ген (Vipera berus NADH dehydrogenase).
3. Выберите вкладку «Nucleotide» и нажмите «Enter».
4. Скопируйте информацию в файл. Один из сиквенсов (англ. sequence — последовательность) для примера приведён на рис. 1.
5. Подберите праймеры для ПЦР, прямой и обратный. Для прямого праймера достаточно выбрать короткий отрезок гена вблизи его 5’-конца с оптимальной длиной около 20 нуклеотидов. Для подбора обратного праймера нужно восстанавливать комплементарную цепь ДНК. Любую нуклеотидную последовательность записывают в направлении 5’→3’ a.
6. Расчитайте температуру отжига ваших праймеров и составьте режим ПЦР.
Рис.1. Ген НАДН-дегидрогеназы гадюки обыкновенной V.berus


Правила подбора праймеров
— Размер праймера должен составлять 16-25(30) нуклеотидов.
— CG-состав должен лежать в пределах 50-60 %.
— Разница в температуре отжига обоих праймеров — не более 6°С.
— Праймеры не должны быть само- и взаимно-комплементарными.
— Нуклеотиды 3’-конца праймера должны быть строго комплементарны матрице (замены возможны на 5’-конце длинных праймеров б).
Расчёт температуры отжига праймера
Для точного расчёта оптимальной температуры существует множество программ и алгоритмов. Упрощенный расчёт можно провести по формулам:

Примечания
а Не забывайте об антипараллельности цепей ДНК при подборе обратного праймера. Если он будет иметь нужный состав, но другую полярность ПЦР-продукт получен не будет. Такой праймер (параллельный) не будет отжигаться на матрицу, т.е. образование гибридного комплекса олиго-/полинуклеотид невозможно.
Олигонуклеотид любого состава может быть по заказу синтезирован специализированной фирмой. По желанию заказчика в его состав введут флуоресцентную метку. На его 5’-конец при заказе можно добавить какие-либо нуклеотиды, к примеру, нуклеотиды сайта узнавания определённой рестриктазы. Компания примет заказ и на сиквенс полученного ПЦР-продукта: праймер для его секвенирования уже есть в наличии.
При
создании ПЦР-тест-системы одной из
основных задач является правильный
подбор праймеров, которые должны отвечать
ряду критериев:
1. Праймеры должны
быть специфичны. Особое внимание уделяют
3’-концам праймеров, т.к именно с них
начинает достраивать комплементарную
цепь ДНК Taq-полимераза. Если их специфичность
недостаточна, то, вероятно, что в пробирке
с реакционной смесью будут происходить
нежелательные процессы, а именно, синтез
неспецифической ДНК (коротких или
длинных фрагментов). Она видна на
электрофорезе в виде тяжелых или легких
дополнительных полос. Это мешает оценке
результатов реакции, т.к легко перепутать
специфический продукт амплификации с
синтезированной посторонней ДНК. Часть
праймеров и дНТФ расходуется на синтез
неспецифической ДНК, что приводит к
значительной потере чувствительности.
2. Праймеры не должны образовывать
димеры и петли, т.е. не должно образовываться
устойчивых двойных цепей в результате
отжига праймеров самих на себя или друг
с другом.
2.4 Эффект «плато»
Следует
заметить, что процесс накопления
специфических продуктов амплификации
по геометрической прогрессии идет лишь
ограниченное время, а затем его
эффективность критически падает. Это
связано с так называемым эффектом
«плато». Термин эффект “плато”
используют для описания процесса
накопления продуктов ПЦР на последних
циклах амплификации. В зависимости от
условий и количества циклов реакции
амплификации, на момент достижения
эффекта “плато” влияют утилизация
субстратов (дНТФ и праймеров), стабильность
реактантов (дНТФ и фермента), количество
ингибиторов, включая пирофосфаты и
ДНК-дуплексы, конкуренция за реактанты
неспецифическими продуктами или
праймер-димерами, концентрация
специфического продукта и неполная
денатурация при высокой концентрации
продуктов амплификации. Чем меньше
начальная концентрация ДНК-мишени, тем
выше риск выхода реакции на “плато».
Этот момент может наступить до того,
как количество специфических продуктов
амплификации будет достаточно, чтобы
их можно было проанализировать. Избежать
этого позволяют лишь хорошо оптимизированные
тест-системы.
3. Cтадии постановки пцр
3.1 Подготовка пробы биологического материала
Для
выделения ДНК используют различные
методики в зависимости от поставленных
задач. Их суть заключается в экстракции
(извлечении) ДНК из биопрепарата и
удалении или нейтрализации посторонних
примесей для получения препарата ДНК
с чистотой, пригодной для постановки
ПЦР. Стандартной и ставшей уже классической
считается методика получения чистого
препарата ДНК, описанная Мармуром. Она
включает в себя ферментативный протеолиз
с последующей депротеинизацией и
переосаждением ДНК спиртом. Этот метод
позволяет получить чистый препарат
ДНК. Однако он довольно трудоемок и
предполагает работу с такими агрессивными
и имеющими резкий запах веществами, как
фенол и хлороформ.
Одним из популярных
в настоящее время является метод
выделения ДНК, предложенный Boom с
соавторами. Этот метод основан на
использовании для лизиса клеток сильного
хаотропного агента — гуанидина тиоционата
(GuSCN), и последующей сорбции ДНК на
носителе (стеклянные бусы, диатомовая
земля, стеклянное «молоко» и. т.д.).
После отмывок в пробе остается ДНК,
сорбированная на носителе, с которого
она легко снимается с помощью элюирующего
буфера. Метод удобен, технологичен и
пригоден для подготовки образца к
амплификации. Однако возможны потери
ДНК вследствие необратимой сорбции на
носителе, а также в процессе многочисленных
отмывок. Особенно большое значение это
имеет при работе с небольшими количествами
ДНК в образце. Кроме того, даже следовые
количества GuSCN могут ингибировать ПЦР.
Поэтому при использовании этого метода
очень важен правильный выбор сорбента
и тщательное соблюдение технологических
нюансов. Другая группа методов
пробоподготовки основана на использовании
ионообменников типа Chilex, которые, в
отличие от стекла, сорбируют не ДНК, а
наоборот, примеси, мешающие реакции.
Как правило, эта технология включает
две стадии: кипячение образца и сорбция
примесей на ионообменнике. Метод
чрезвычайно привлекателен простотой
исполнения. В большинстве случаев он
пригоден для работы с клиническим
материалом. К сожалению, иногда встречаются
образцы с такими примесями, которые
невозможно удалить с помощью ионообменников.
Кроме того, некоторые микроорганизмы
не поддаются разрушению простым
кипячением. В этих случаях необходимо
введение дополнительных стадий обработки
образца. Таким образом, к выбору метода
пробоподготовки следует относиться с
пониманием целей проведения предполагаемых
анализов.
Соседние файлы в предмете [НЕСОРТИРОВАННОЕ]
- #
- #
- #
- #
- #
- #
- #
- #
- #
- #
- #
Как разработать праймеры для QPCR
Автор:
Peter Berry
Дата создания:
16 Август 2021
Дата обновления:
1 Март 2023

Содержание
- Что такое QPCR
- Как разработать праймеры для QPCR
Количественная или ПЦР в реальном времени используется в качестве рутинного анализа для мониторинга относительных изменений экспрессии генов в различных экспериментальных условиях. Разработка праймеров, а также зондов во время QPCR является одним из наиболее важных факторов, влияющих на качество и успешность анализа. Для конструирования праймеров для QPCR применимы несколько рекомендаций: содержание GC в праймерах должно составлять 35-65%; температура плавления грунтовок должна быть в пределах 60-68 ° С; следует также избегать вторичных структур, повторов G или C, которые длиннее 3 оснований, и образования праймеров-димеров.
Ключевые области покрыты
1. Что такое QPCR
— Определение, Процесс, Использование
2. Как разработать праймеры для QPCR
— Руководство по разработке учебника для начинающих для QPCR
Ключевые термины: флуоресцентные красители, содержание ГХ, температура плавления, праймеры, количественная ПЦР (QPCR)

QPCR — это тип ПЦР, который позволяет количественно оценить продукт в режиме реального времени. Флуоресцентные красители могут быть использованы для количественного определения продуктов ПЦР путем маркировки их на каждом этапе. Два метода флуоресцентного мечения могут быть использованы в анализах QPCR. Это использование флуоресцентных красителей и флуоресцентно-меченных зондов. Флуоресцентные красители связываются с продуктом ПЦР, а зонды отжигаются с продуктом ПЦР с образованием стабильной триплексной ДНК. Широко используемым флуоресцентным красителем в QPCCR является SYBR Green, а зондами — Taqman. Использование зондов при обнаружении продуктов ПЦР во время QPCR дает более точные результаты и повышает чувствительность анализа.
Рисунок 1: Механизм QPCR
Как разработать праймеры для QPCR
Разработка праймеров для QPCR имеет решающее значение для повышения надежности, точности, а также чувствительности анализа. Рекомендации по дизайну праймеров QPCR описаны ниже.
- Продукт ПЦР / Размер ампликона. Размер продукта ПЦР должен составлять 50-210 пар оснований.
- Длина праймера — длина праймера должна составлять 19-23 нуклеотида.
- Содержание GC. Содержание GC в праймерах должно составлять 35-65%.
- Температура плавления (Tm) — температура плавления грунтовки должна составлять 60-68 ° C. Температура отжига для анализа на 5 ° C меньше, чем Tm праймеров.
- Соединение экзон-экзон — при амплификации кДНК с помощью QPCR праймеры должны охватывать соединение экзон-экзон, чтобы избежать амплификации контаминирующей ДНК.
- Повторения и прогоны — следует избегать динуклеотидных повторов (TCTCTCTCTC) и повторных нуклеотидов (например, TAAAAAAAGC).
- 3 ‘комплементарность — следует избегать комплементарных областей 3’ концов прямого и обратного праймеров, чтобы предотвратить образование димеров праймеров.
- Стабильность 3 ’- остатки G или C должны быть включены на 3 ′ конце грунтовки, чтобы повысить стабильность отжига.
- GC-зажим — один или два GC-зажима на 5′-конце грунтовки увеличивают специфичность отжига.
- Специфичность — Специфичность праймеров должна быть проверена BLAST
- SNP — праймеры не должны содержать каких-либо известных вариаций SNP (однонуклеотидный полиморфизм)
При разработке учебника для начинающих в QPCR можно использовать несколько онлайн-инструментов, таких как
Рисунок 2: Образование праймеров-димеров
Праймеры должны быть сконструированы таким образом, чтобы избежать образования праймеров-димеров в QPCR. Это важно при использовании флуоресцентных красителей для обнаружения продукта ПЦР, поскольку эти красители также связываются с праймерами-димерами, давая ложноположительные результаты.
Заключение
QPCR используется для обнаружения и количественного определения продуктов ПЦР. Проектирование праймеров имеет решающее значение в QPCR для повышения точности результатов. Таким образом, важно тщательно следовать рекомендациям при разработке праймеров для QPCR.
Ссылка:
1. «Разработка и оптимизация QPCR-анализа». ЛСР | Bio-Rad,