Post Views: 75 766
Ранее мы рассказывали о том, как можно с помощью движка Unreal Engine создать свою игру на Android. В этой статье мы рассмотрим другой не менее популярный движок для разработки игр — Unity.
![]()
Unity является очень известным движком среди инди-разработчиков. По сути, это кроссплатформенный движок, который позволяет разрабатывать 3D— и 2D-игры. Особенностью, которая выделяет Unity среди остальных движков, является низкий порог вхождения для новичков при наличии богатого инструментария для профессионалов. Кроссплатформенность же позволяет разрабатывать приложения под любую платформу, начиная с десктопных игр и заканчивая мобильными.
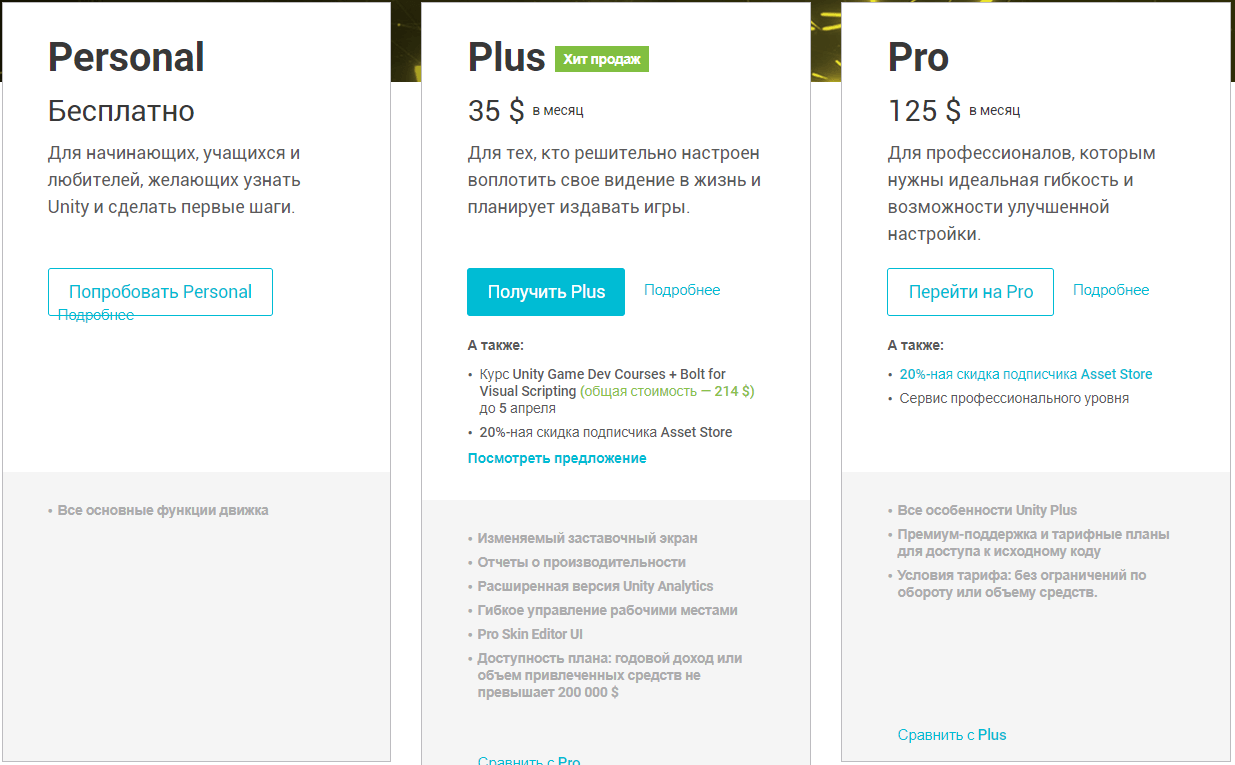
Отдельно стоит сказать про систему подписки, поскольку Unity не является полностью бесплатным продуктом. Существует несколько видов подписок:
- Personal. Бесплатная версия, которая содержит все основные функции движка. Имеет следующее ограничение: доход в год или объём привлечённых средств не должен превышать 100000$.
- Plus. За 35 долларов в месяц предоставляются различные отчёты и аналитика, а также возможность изменять заставочный экран, 20%-ая скидка на покупки в Asset Store и различные мелкие преимущества. Имеет следующее ограничение: доход за год или объём привлечённых средств не должен превышать 200000$.
- Pro. За 125 долларов в месяц включает в себя все преимущества версии Plus и дополнительно профессиональный сервис и премиум-поддержку. Без ограничений по обороту или объёму средств.
- Отдельные версии для бизнеса (используются крупными компаниями).
Таким образом, инди-разработчикам с малыми бюджетами должно быть достаточно версии Personal или Plus, в ином случае придётся оформлять подписку Pro. В данной статье воспользуемся бесплатной версией для первого запуска.
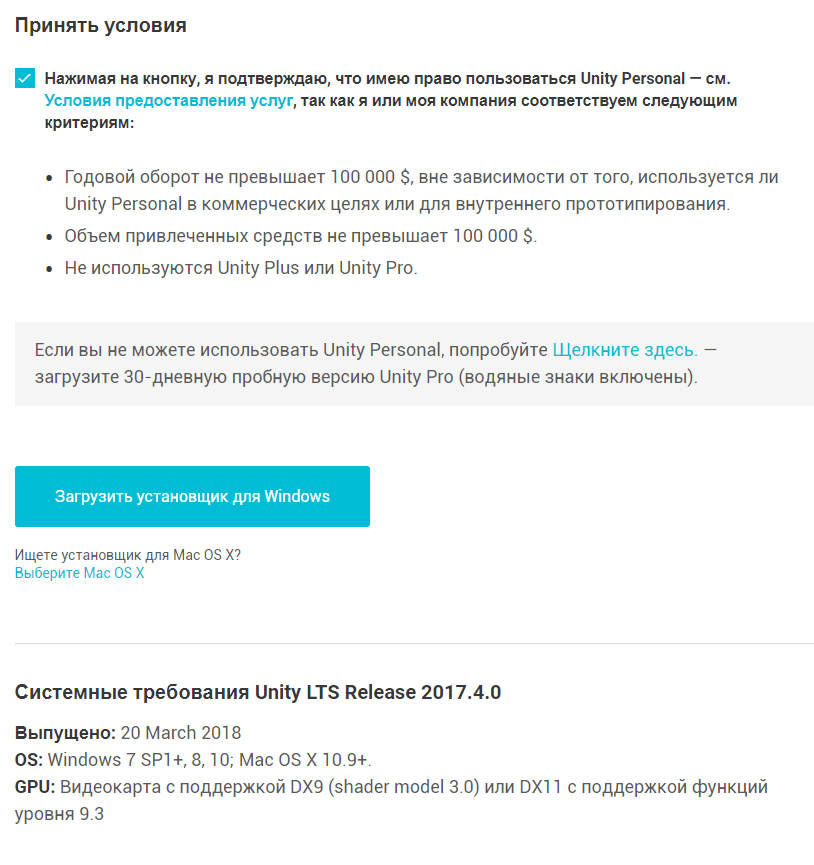
Для того, чтобы начать установку Unity, нужно перейти на сайт Unity Store, где будет предложено выбрать тип подписки. Как уже говорилось выше, выберем Personal.
Затем будет предложено принять условия использования и загрузить установщик. Также можно ознакомиться с системными требованиями для работы с Unity.
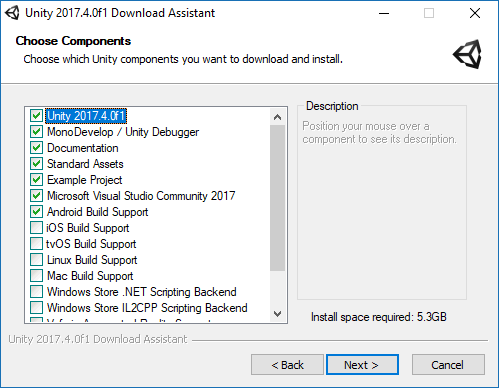
После запуска установщика, будет предложено выбрать, какие компоненты необходимо установить. Поскольку нам нужно создать приложение под Android, поставим флажок на Android Build Support. Также при желании вместо с Unity можно установить Visual Studio Community 2017 для программирования на C#.
После этого останется только выбрать путь установки и начать инсталляцию Unity.
Шаг 2. Регистрация и настройка Unity
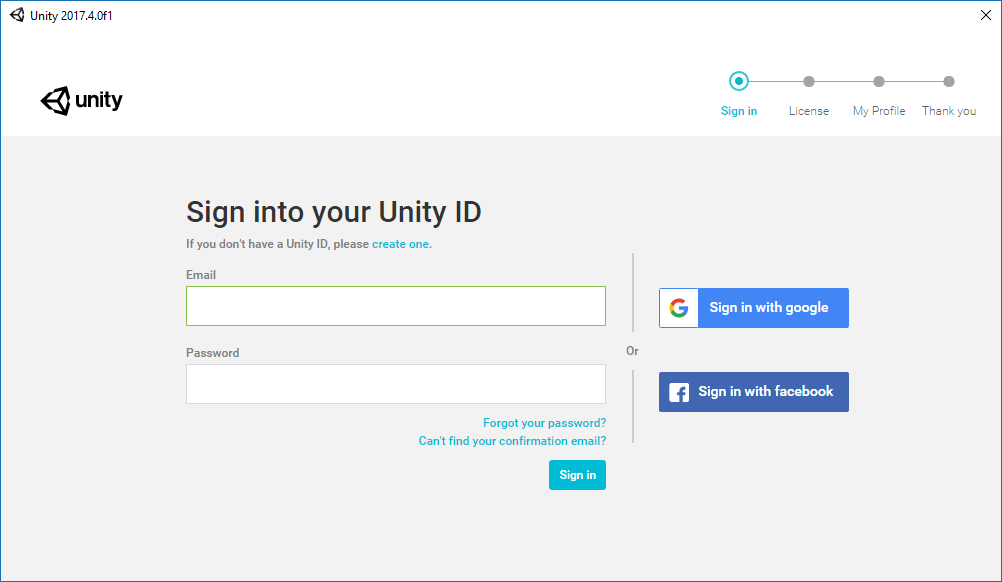
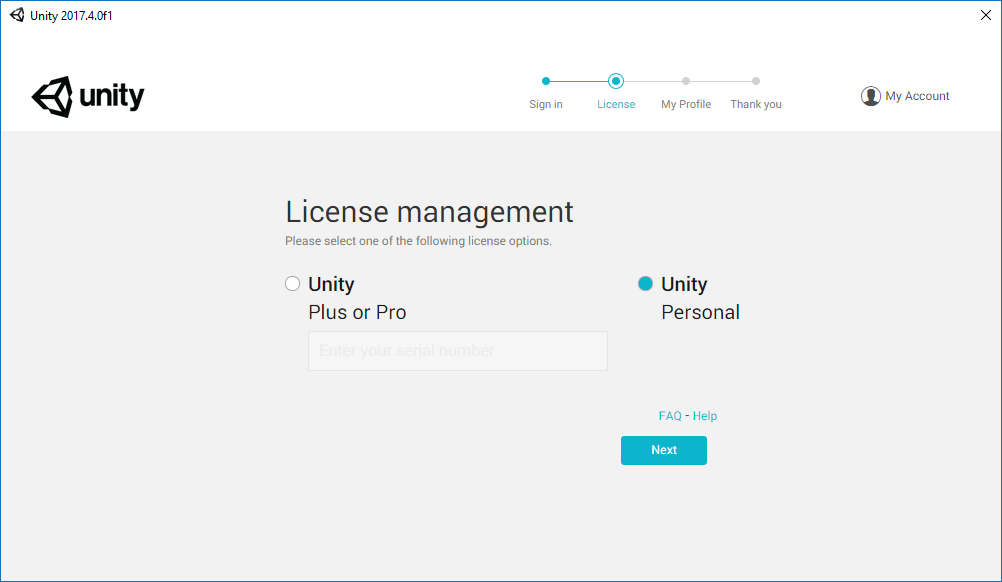
Закончив установку и запустив Unity, нам предлагается войти под своим аккаунтом.
Затем снова будет предложено выбрать подписку, всё также остановимся на Personal. В этом случае нужно будет подтвердить, что годовой доход компании составляет менее 100000$, либо что Unity используется в целях обучения.
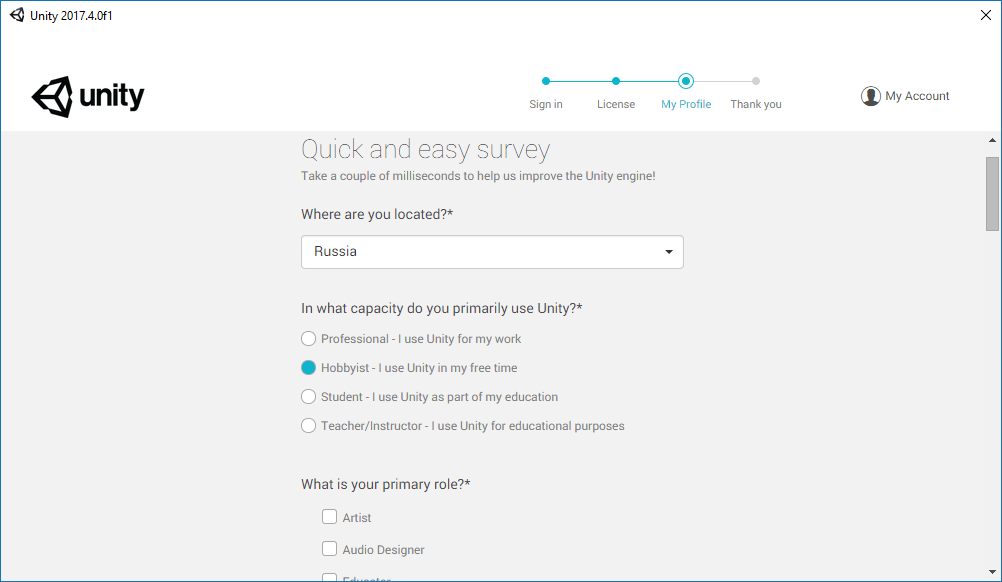
В конце предлагается пройти маленький опрос, в котором нужно ответить, чем вы занимаетесь и с какой целью устанавливаете Unity.
Шаг 3. Создание нового проекта
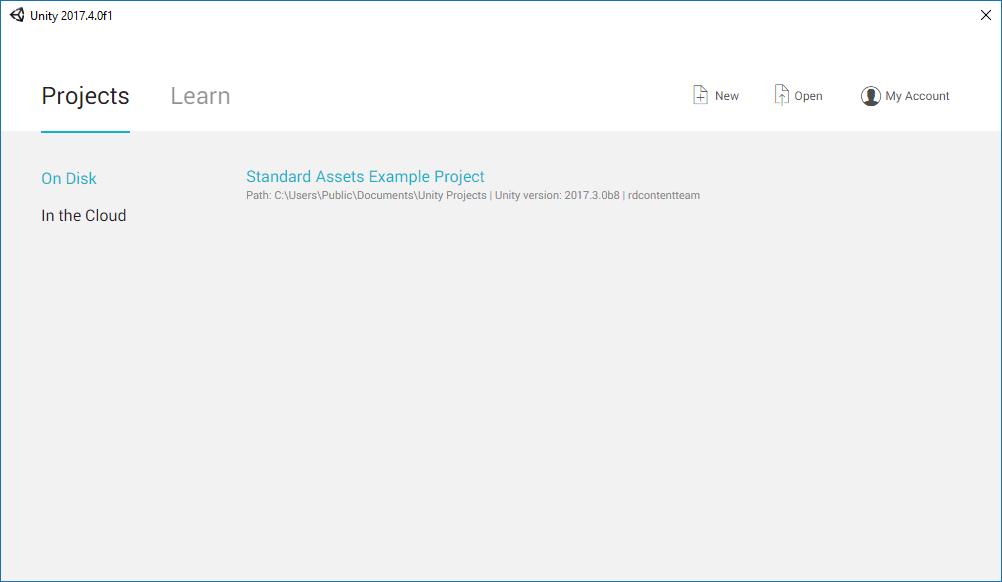
Настроив Unity, мы попадаем на экран выборасоздания проекта. Здесь нужно нажать New, чтобы создать свой новый проект.
После этого в появившемся окне предлагается ввести название проекта и директорию, где он будет расположен. Также не забудьте поставить флажок на 3D, чтобы использовать редактор в 3D-режиме.
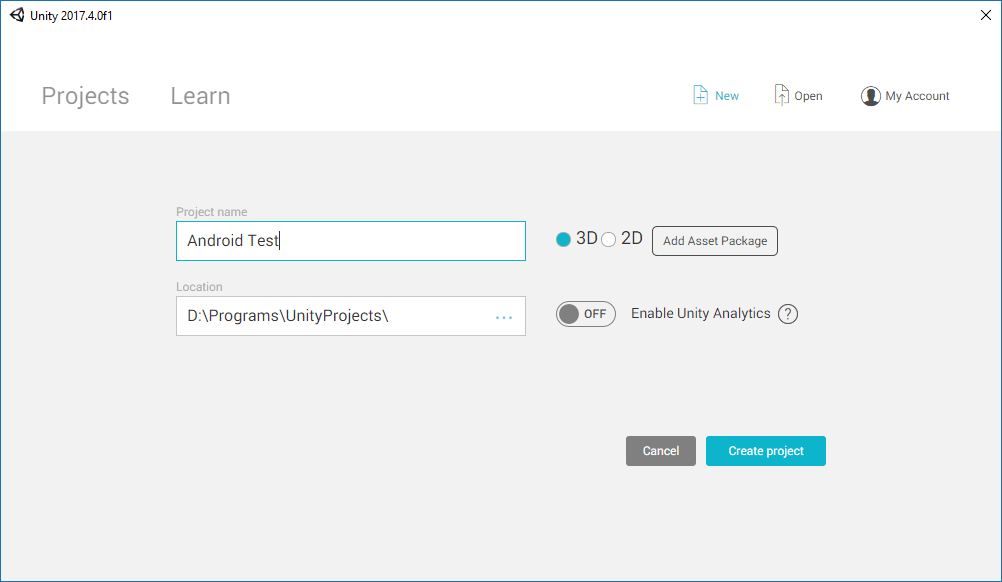
Закончив с этим, нажмите Create project, чтобы создать проект. После этого откроется окно редактора с заранее сгенерированной сценой.
Не будем пока что разбираться с тонкостями программирования и возьмём для примера готовую игру. Для этого здесь существует Asset Store, который содержит огромное количество готовых моделей, анимаций, звуков (и даже игр), как платных, так и бесплатных.
Чтобы открыть Asset Store, нужно в меню Window выбрать Asset Store (комбинация клавиш Ctrl-9).
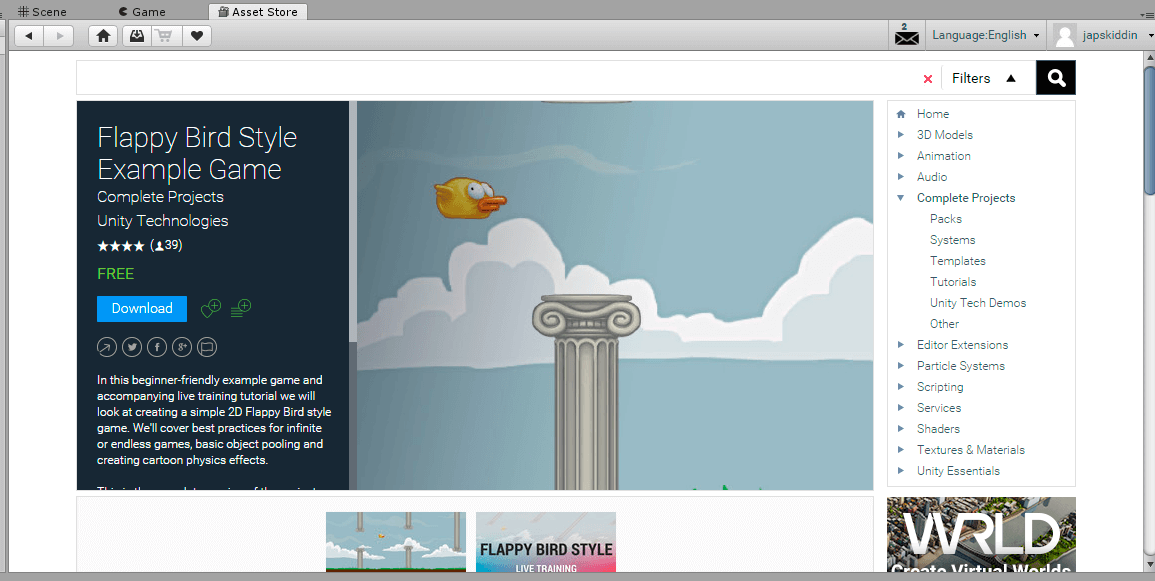
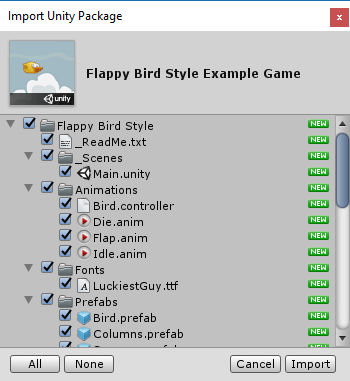
Откроется окно магазина. Введём в строке поиска «flappy bird style example game» и откроем бесплатный пример, который мы будем использовать в своём проекте.
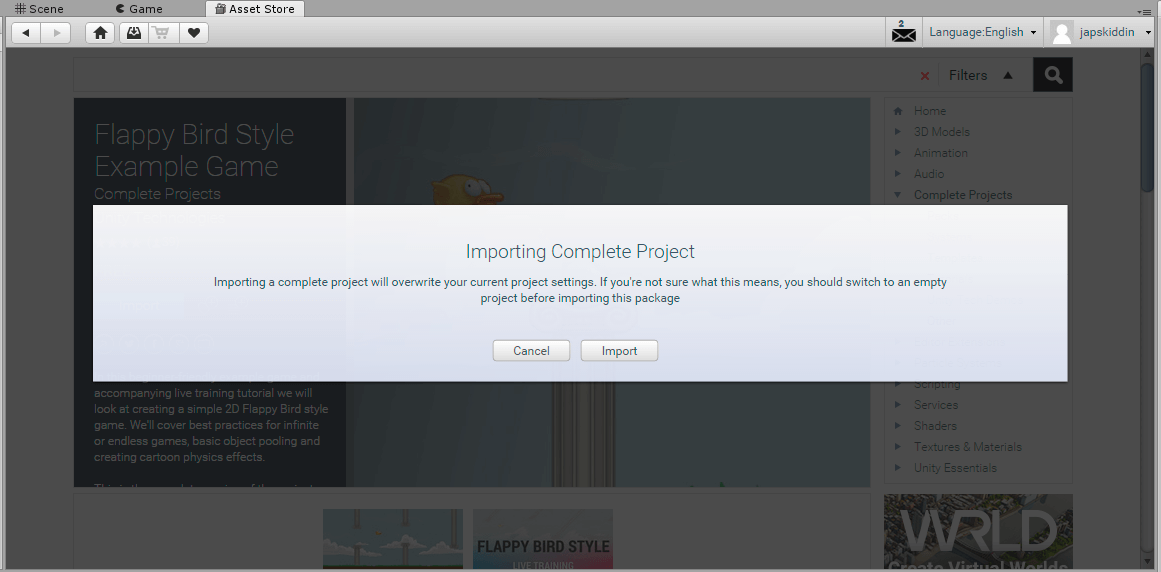
Нажав Download и тем самым скачав его, вы можете затем импортировать себе в проект. Для этого нажмите Import, после чего появится предупреждение о том, что настройки проекта после импорта будут изменены.
Согласившись на импорт, вы увидите окно, в котором нужно выбрать, какие компоненты импортировать. Выбираем все и нажимаем Import.
После завершения импорта в обозревателе проекта вы увидите новые файлы. Это и есть файлы игры. Чтобы открыть сцену в редакторе, раскройте Flappy Bird Style — Scenes и дважды кликните по Main.

В результате в окне 3D-редактора появится сцена игры.
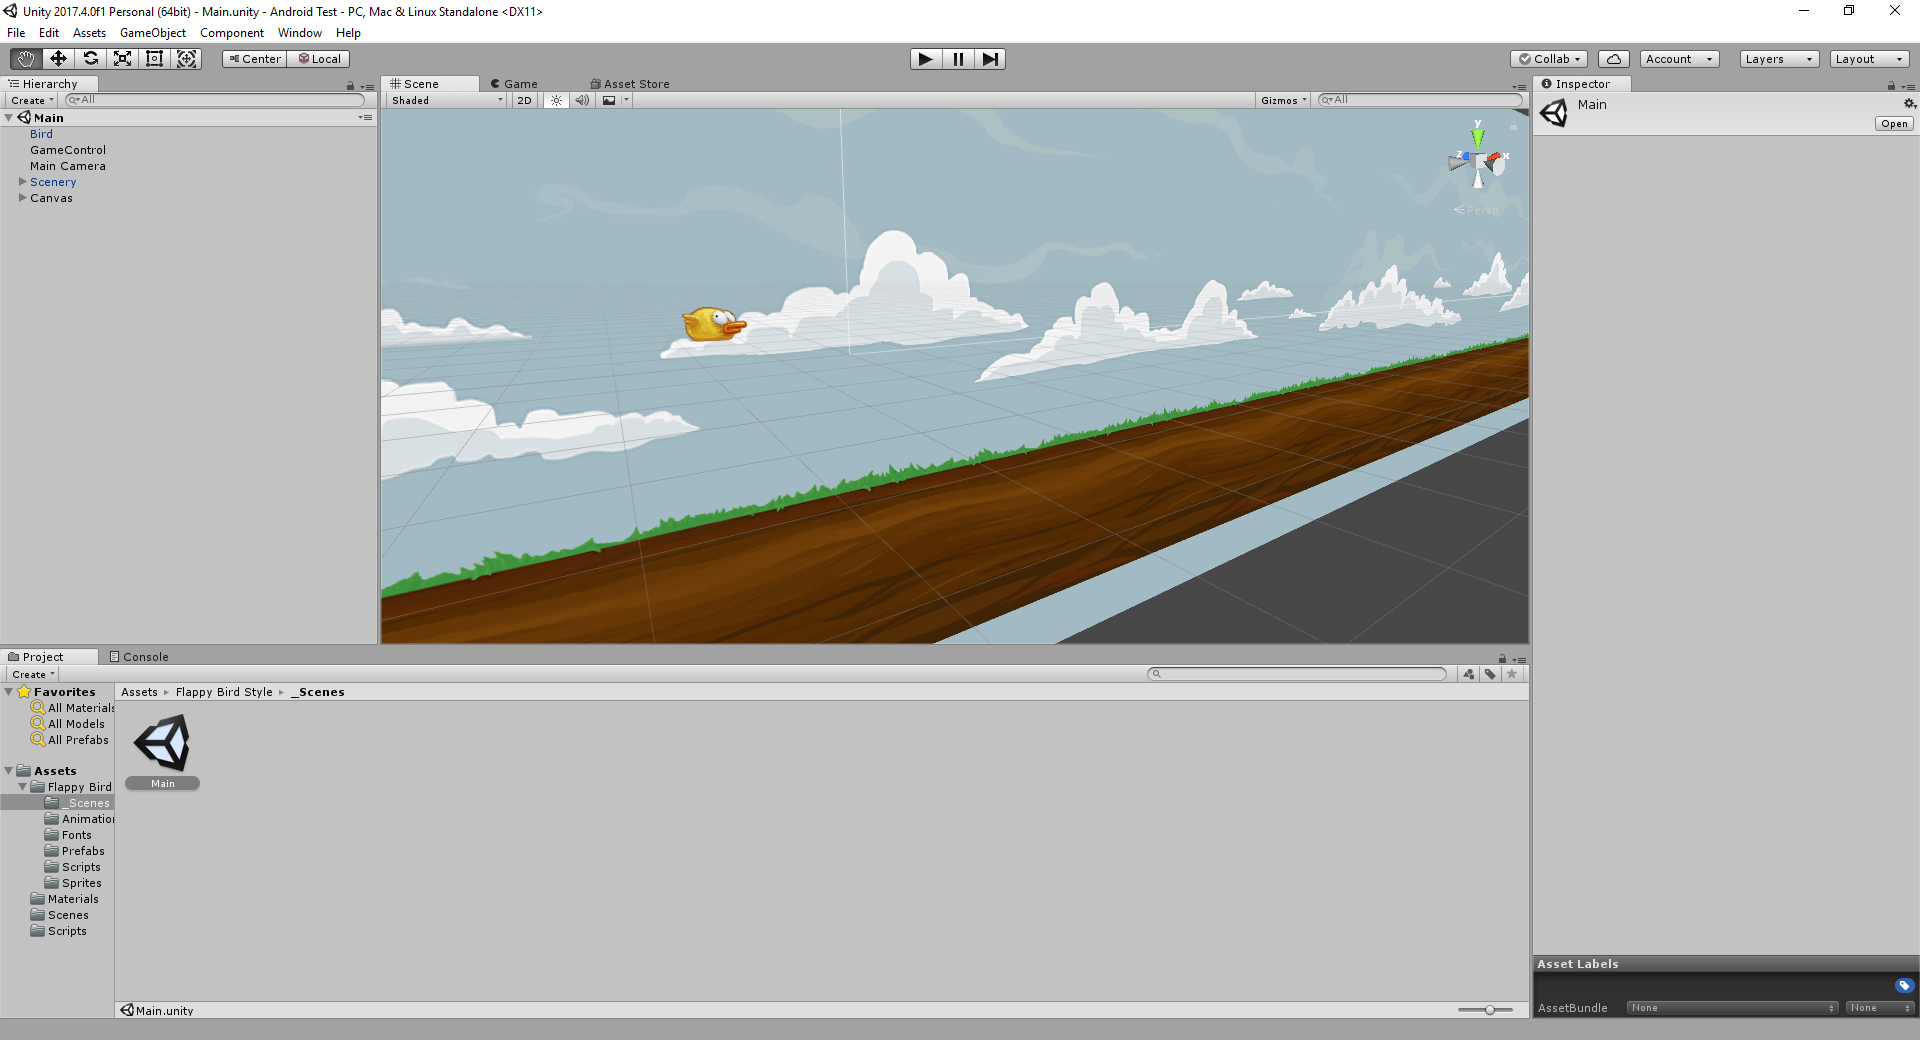
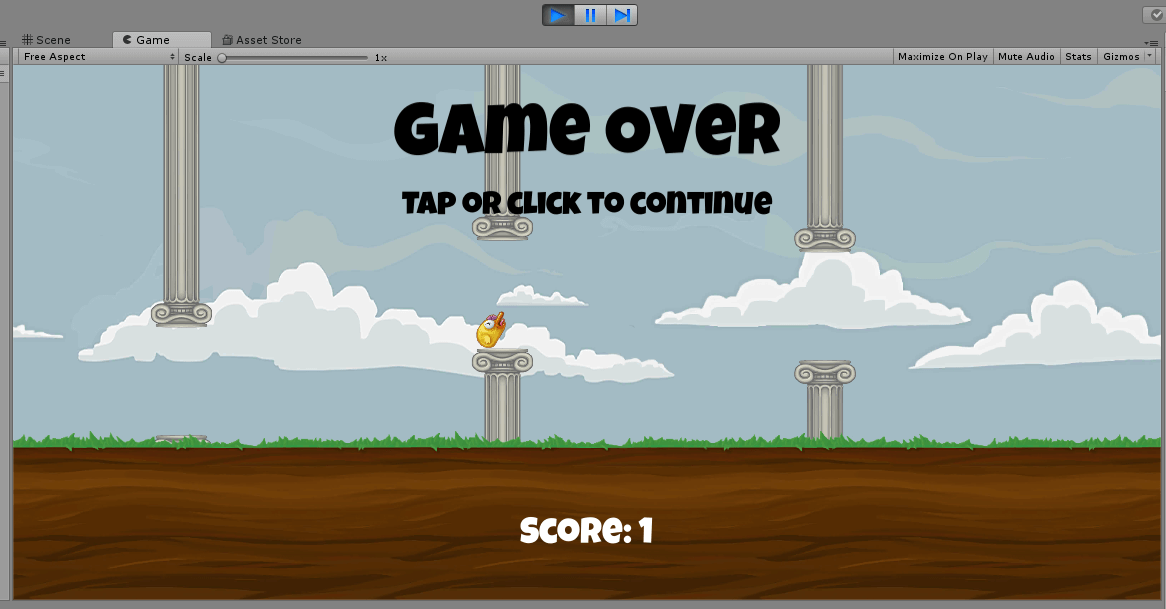
Вы можете проверить, как игра работает, прямо в Unity, нажав на кнопку Play над окном редактора.
Шаг 4. Настройка инструментов Android
Примечание: если вы пользуетесь Android Studio, то у вас уже установлены все необходимые компоненты и поэтому можно смело переходить к следующему шагу.
Для того, чтобы собрать получившуюся игру на Android, нужно установить следующие инструменты:
- Java Development Kit (JDK). Скачать его можно с сайта Java. Перейдя по ссылке, вы увидите на самом верху Java Platform (JDK), кликните по Download рядом с надписью, затем выберите вашу операционную систему и начните скачивание. После этого просто следуйте инструкциям инсталлятора.
- Android SDK. Самым простым способом установить актуальную версию является скачивание Android Studio, с которым этот SDK поставляется. Для этого нужно перейти на сайт Android Studio и нажать Download Android Studio. Инсталлятор Android Studio установить базовые компоненты Android SDK, необходимые для разработки на Android.
Шаг 5. Подготовка проекта для запуска
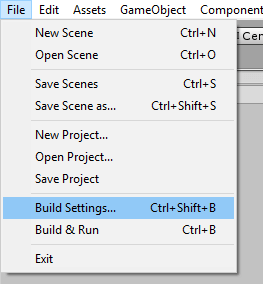
Для начала, необходимо изменить платформу разработки на Android. Для этого в Unity откройте меню File и выберите Build Settings.
В появившемся окне нужно выбрать Android и затем нажать Switch platform.
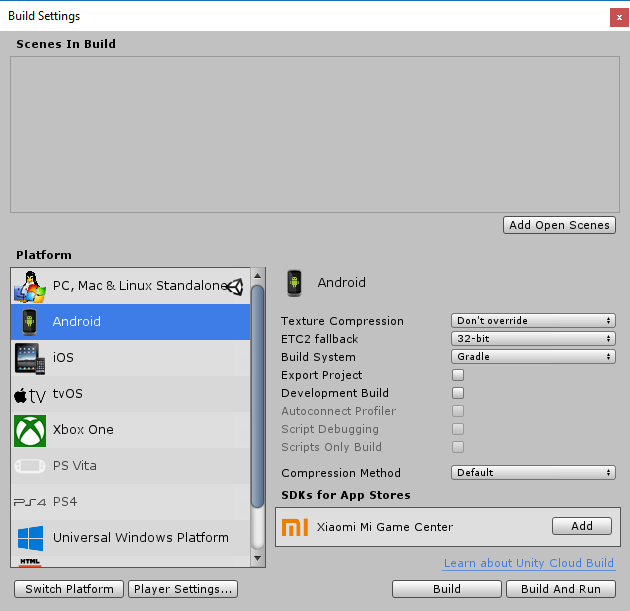
Переключение платформы сообщает, что мы будем собирать приложение для Android. Это означает, что когда мы будем собирать приложение, Unity будет создавать APK-файл. Переключение платформы также заставляет Unity импортировать все ассеты проект заново. Это не займёт много времени на небольшом проекте, но имейте ввиду, что в больших проектах эта операция может занять длительное время.
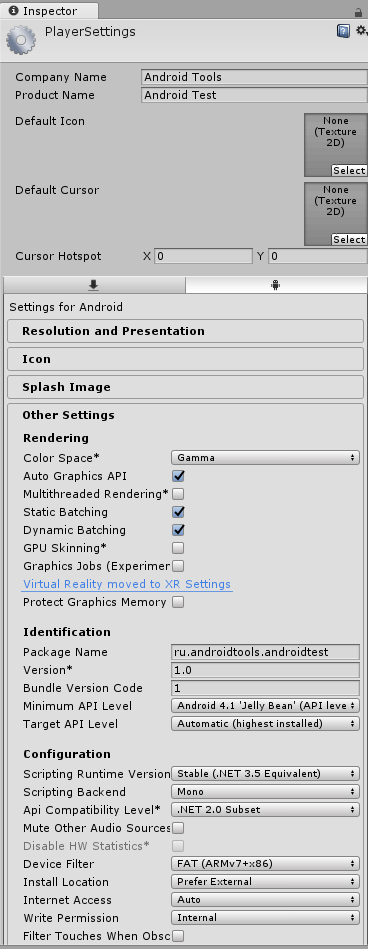
Теперь нам нужно указать имя пакета для приложения.
Примечание: Имя пакета — это уникальный идентификатор приложения, он пишется в стиле обратного DNS в формате com.CompanyName.ProductName. После публикации приложения в Google Play имя пакета уже нельзя будет изменить.
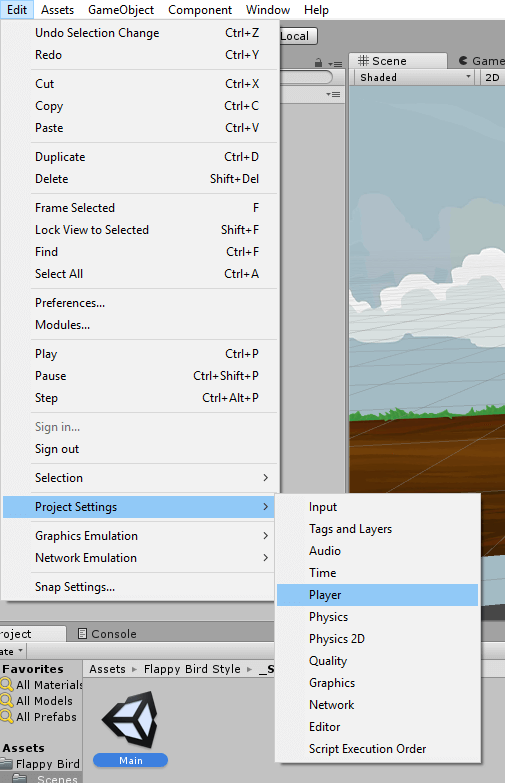
Для этого перейдём в меню Edit и выберем Project Settings — Player.
В правой части Unity откроется окно с множеством различных настроек, таких как версия приложения, целевой и минимальный SDK, выбор иконки и т.д. Здесь нам нужно в блоке Other Settings найти Identification и задать имя пакета в поле Package Name. При желании можно также изменить и другие параметры.
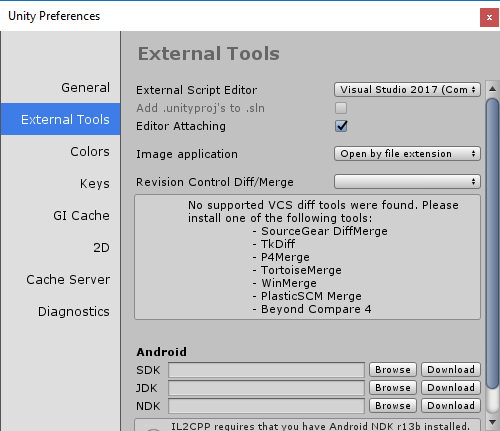
Теперь осталось только указать путь до Android SDK и JDK. Для этого перейдём в меню и выберем Edit — Preferences.
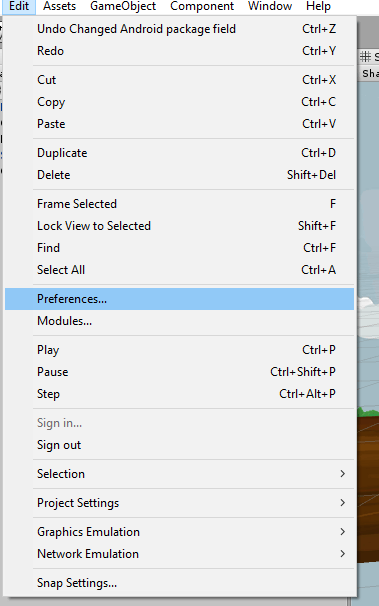
В появившемся окне нужно перейти в External Tools и в полях SDK и JDK указать соответствующие пути, после чего закрыть окно.
Шаг 6. Сборка и запуск приложения
Настало время собрать своё первое приложение на Unity. Для этого нужно в меню выбрать File — Build Settings. Откроется окно, в нём нужно будет добавить сцену, которую нужно собрать. Поскольку у нас эта сцена уже открыта в редакторе, достаточно просто нажать Add Open Scenes, чтобы добавить её в сборку, после добавления вы увидите её в списке сцен.
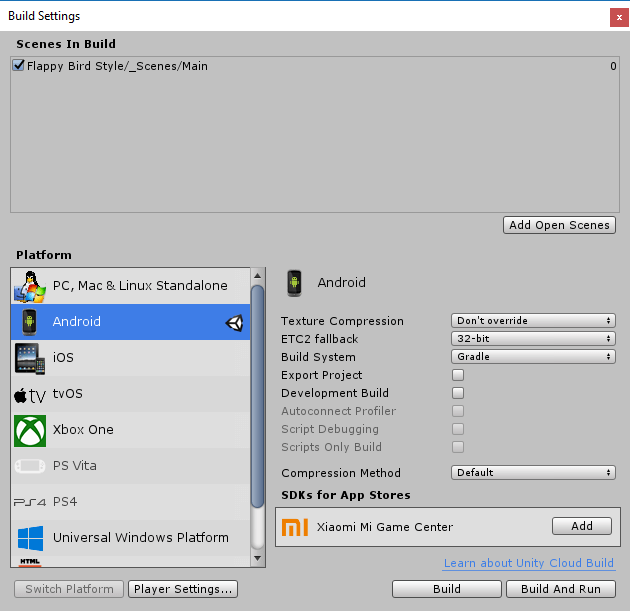
Осталось только нажать Build, после чего Unity приступит к сборке приложения. Перед этим вам может быть предложено выбрать папку, куда будут сохраняться собранные файлы приложений, а также имя APK-файла.
Примечание: на данный момент, если у вас в Android SDK установлена альфа-версия Build-Tools (версия 28.0.0-rc1), при сборке Gradle выдаст ошибку. Чтобы это исправить, просто удалите из Android SDK эту версию.
В результате в папке, которую вы указали, появится собранный APK-файл, готовый к установке на эмуляторе или на реальном устройстве.
Посмотрим, что находится внутри собранного APK. Для этого воспользуемся утилитой APK Analyzer, которая входит в состав Android Studio,
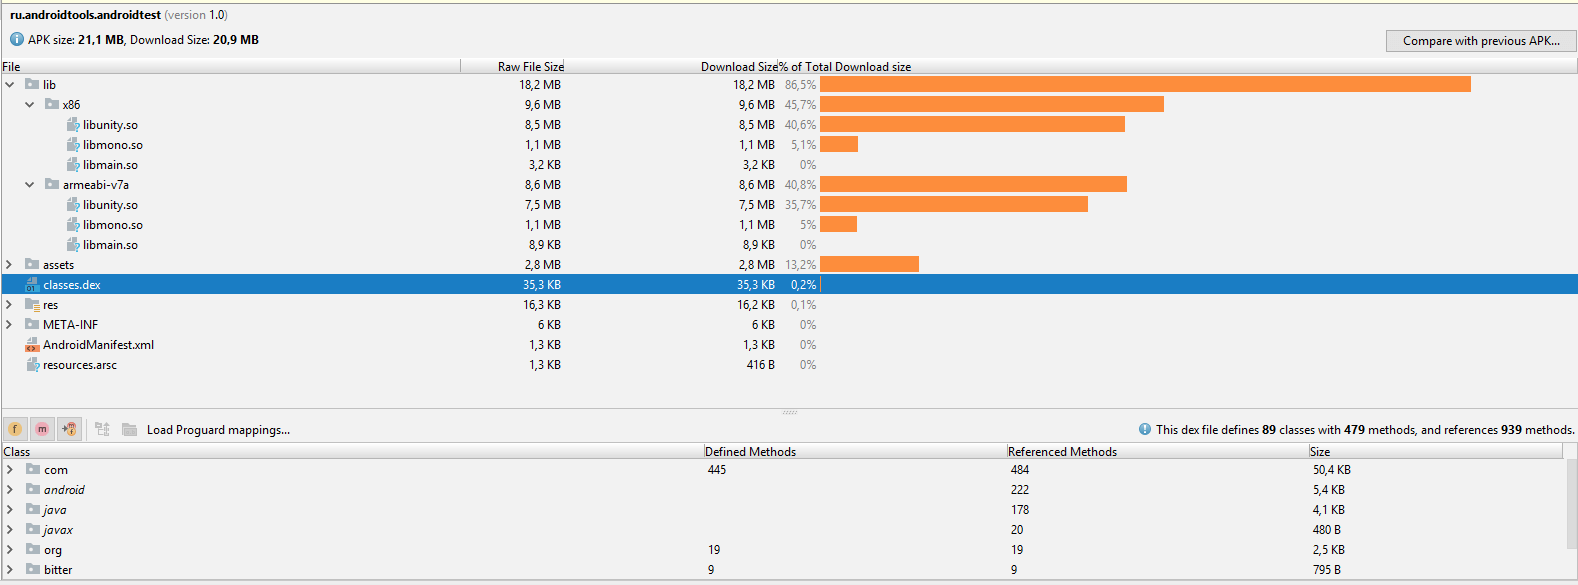
Размер APK-файла в несжатом виде составляет 21,1 MB, в сжатом же 20,9 MB. Как можно увидеть из графика, большую часть объёма занимают сторонние библиотеки, добавленные Unity. Затем в assets расположены все ресурсы, которые используются в собранной сцене. Файл classes.dex содержит всего 89 классов и 479 методов.
Кроме того, если заглянуть в AndroidManifest.xml, приложение состоит из одной активности.
<activity
    android:label="@ref/0x7f040000"
    android:name="com.unity3d.player.UnityPlayerActivity"
    android:launchMode="2"
    android:screenOrientation="10"
    android:configChanges="0x40003fff">

    <intent-filter>

        <action
            android:name="android.intent.action.MAIN" />

        <category
            android:name="android.intent.category.LAUNCHER" />

        <category
            android:name="android.intent.category.LEANBACK_LAUNCHER" />
    </intent-filter>

    <meta-data
        android:name="unityplayer.UnityActivity"
        android:value="true" />
</activity>
Заключение
На этом всё. В этой статье мы научились устанавливать и настраивать Unity, а также собрали своё первое приложение на Android.
В нынешнее время каждый может стать успешным разработчиком мобильных игр или приложений, не прилагая к этому титанических усилий. Примером такого случая является Донг Нгуен, разработавший Flappy Bird. В игре не было никакой сложной механики или графики, но это не помешало ей стать популярной и приносить своему создателю по пятьдесят тысяч долларов в день. Однако в игре не было ничего примечательного. Всё, что потребовалось для успеха, — оказаться в нужном месте в нужное время и немного удачи. Подобное может произойти и сегодня, вам просто нужна правильная идея.
Чтобы продемонстрировать, насколько легко написать что-то подобное, сегодня мы напишем свой Flappy Bird с помощью Unity всего за 10 минут.
Игровой персонаж
Сначала создайте новый проект и убедитесь, что выбрана опция 2D.

Загрузите свой спрайт птицы в сцену. Не забудьте включить фантазию!
Затем отрегулируйте размер спрайта как вам нравится, перетягивая его за угол в нужном направлении. Спрайт должен быть виден в окне иерархии (hierarchy) слева. В нём видны все объекты в сцене, и на данный момент их должно быть всего два: камера и птица.
Перетащите камеру на птицу и отпустите. Камера должна оказаться под птицей, это будет значить, что камера теперь «ребёнок» птицы. Теперь позиция камеры будет фиксироваться относительно птицы. Если птица двигается вперёд, то камера делает то же самое.

Снова выберите птицу в сцене или в окне иерархии. Вы увидите список опций и атрибутов справа в окне под названием Inspector. Здесь вы можете управлять различными переменными, привязанными к определённому объекту.
Теперь нажмите на Add Component. Выберите Physics2D > Rigidbody2D — это готовый набор инструкций для применения гравитации к нашему персонажу. Нажмите на Constraints в этой панели и затем выберите freeze rotation Z. Это позволит предотвратить вращение птицы вместе с камерой по кругу.
Таким же образом добавьте Polygon Collider, который говорит Unity, где находятся границы персонажа. Нажмите Play и увидите, как спрайт вместе с камерой бесконечно падает вниз.

Пока всё идёт хорошо!
Теперь пора заняться полётами персонажа, благо это будет несложно.
Сначала нужно создать C#-скрипт. Создайте для него папку (кликните правой кнопкой мыши где-нибудь в assets и создайте папку «Scripts»), сделайте клик правой кнопкой мыши и выберите Create > C# Script.
Назовём его «Character». Кликните по нему дважды, чтобы открыть его в вашей IDE, будь то MonoDevelop или Visual Studio. Затем добавьте следующий код:
public class Character : MonoBehaviour {

    public Rigidbody2D rb;
    public float moveSpeed;
    public float flapHeight;

    // Это нужно для инициализации
    void Start () {
        rb = GetComponent();
    }


    // Update вызывается один раз на кадр
    void Update () {
        rb.velocity = new Vector2(moveSpeed, rb.velocity.y);
        if (Input.GetMouseButtonDown(0))
        {
            rb.velocity = new Vector2(rb.velocity.x, flapHeight);
        }

        if (transform.position.y > 18 || transform.position.y < -19)
        {
            Death();
        }

    }

    public void Death()
    {
        rb.velocity = Vector3.zero;
        transform.position = new Vector2(0, 0);
    }

}
Этот код делает две вещи. Он заставляет персонажа двигаться вперёд со скоростью, которую мы определим в инспекторе, и создаёт ощущение полёта птицы. Метод Update() вызывается повторно на протяжении игры, поэтому всё, что вы сюда поместите, будет выполняться непрерывно. В данном случае мы добавляем немного скорости нашему объекту. Переменная rb является скриптом RigidBody2D, который мы применили к нашему объекту ранее, поэтому когда мы пишем rb.velocity, мы обращаемся к скорости объекта.
Тап по экрану интерпретируется Unity как клик мыши, если вы используете мобильное устройство. После нажатия мы заставляем персонажа немного подняться вверх.
Переменная moveSpeed будет отвечать за скорость движения, а переменная flapHeight — за увеличение высоты полёта птицы после каждого нажатия. Поскольку эти переменные объявлены как public, мы сможем изменить их вне скрипта.
Метод Death() тоже объявлен как public, что значит, что другие объекты и скрипты смогут его вызвать. Этот метод просто возвращает положение персонажа в начало. Также он будет использоваться каждый раз, когда персонаж будет залетать слишком высоко или низко. Скоро вы поймёте, почему он объявлен именно как public. Строка rb.velocity = Vector3.zero; нужна, чтобы убрать импульс — мы же не хотим, чтобы после каждой смерти персонаж падал всё быстрее и быстрее?
Теперь можно выходить из IDE и добавлять скрипт как компонент к персонажу. Для этого нужно выбрать нашу птицу и нажать Add Component > Scripts > Character. Теперь мы можем определять moveSpeed и flapHeight в инспекторе (для этого и нужны public-переменные). Присвоим переменным значения 3 и 5 соответственно.
И ещё: в инспекторе нужно добавить тег к персонажу. Для этого кликните там, где написано Tag: Untagged и затем выберите Player в выпадающем списке.
Препятствия
Теперь добавим препятствия: трубы. Кто-то в трубах находит грибы, а кто-то — свою смерть.
Перетащите спрайт трубы в сцену в место, где должно быть первое препятствие, и назовите его pipe_up.
Теперь создадим новый скрипт под названием Pipe:
public class Pipe : MonoBehaviour {

    private Character character;

    // Это нужно для инициализации
    void Start () {
        character = FindObjectOfType();
    }


    // Update вызывается один раз на кадр
    void Update () {
        if (character.transform.position.x - transform.position.x > 30)
        {

        }
    }

    void OnCollisionEnter2D(Collision2D other)
    {
        if (other.gameObject.tag == "Player")
        {
            character.Death();
        }
    }

}
Добавьте этот скрипт к спрайту трубы тем же образом, что и раньше. Таким образом, труба будет возвращаться на экран после выхода за его левую границу. Мы тут ещё ничего не сделали, но ещё вернёмся к этому.
Метод OnCollisionEnter2D() вызывается каждый раз при взаимодействии трубы с персонажем. После этого вызывается созданный ранее метод Death(), возвращающий игрока в начальную точку.
Итак, у нас есть одна труба, которая время от времени будет исчезать и появляться на другом конце экрана. Врежешься в неё — умрёшь.
Перевёрнутые трубы
Сейчас у нас есть только один спрайт трубы. Давайте добавим ещё один. Для этого кликните правой кнопкой мыши в окне иерархии, нажмите New 2D Object > Sprite и затем выберите спрайт, который хотите использовать. Ещё проще будет просто перетащить файл в сцену ещё раз.
Назовите этот спрайт pipe_down. В инспекторе в части Sprite Renderer выберите опцию Flip Y, чтобы перевернуть трубу вверх ногами. Добавьте такое же RigidBody2D.
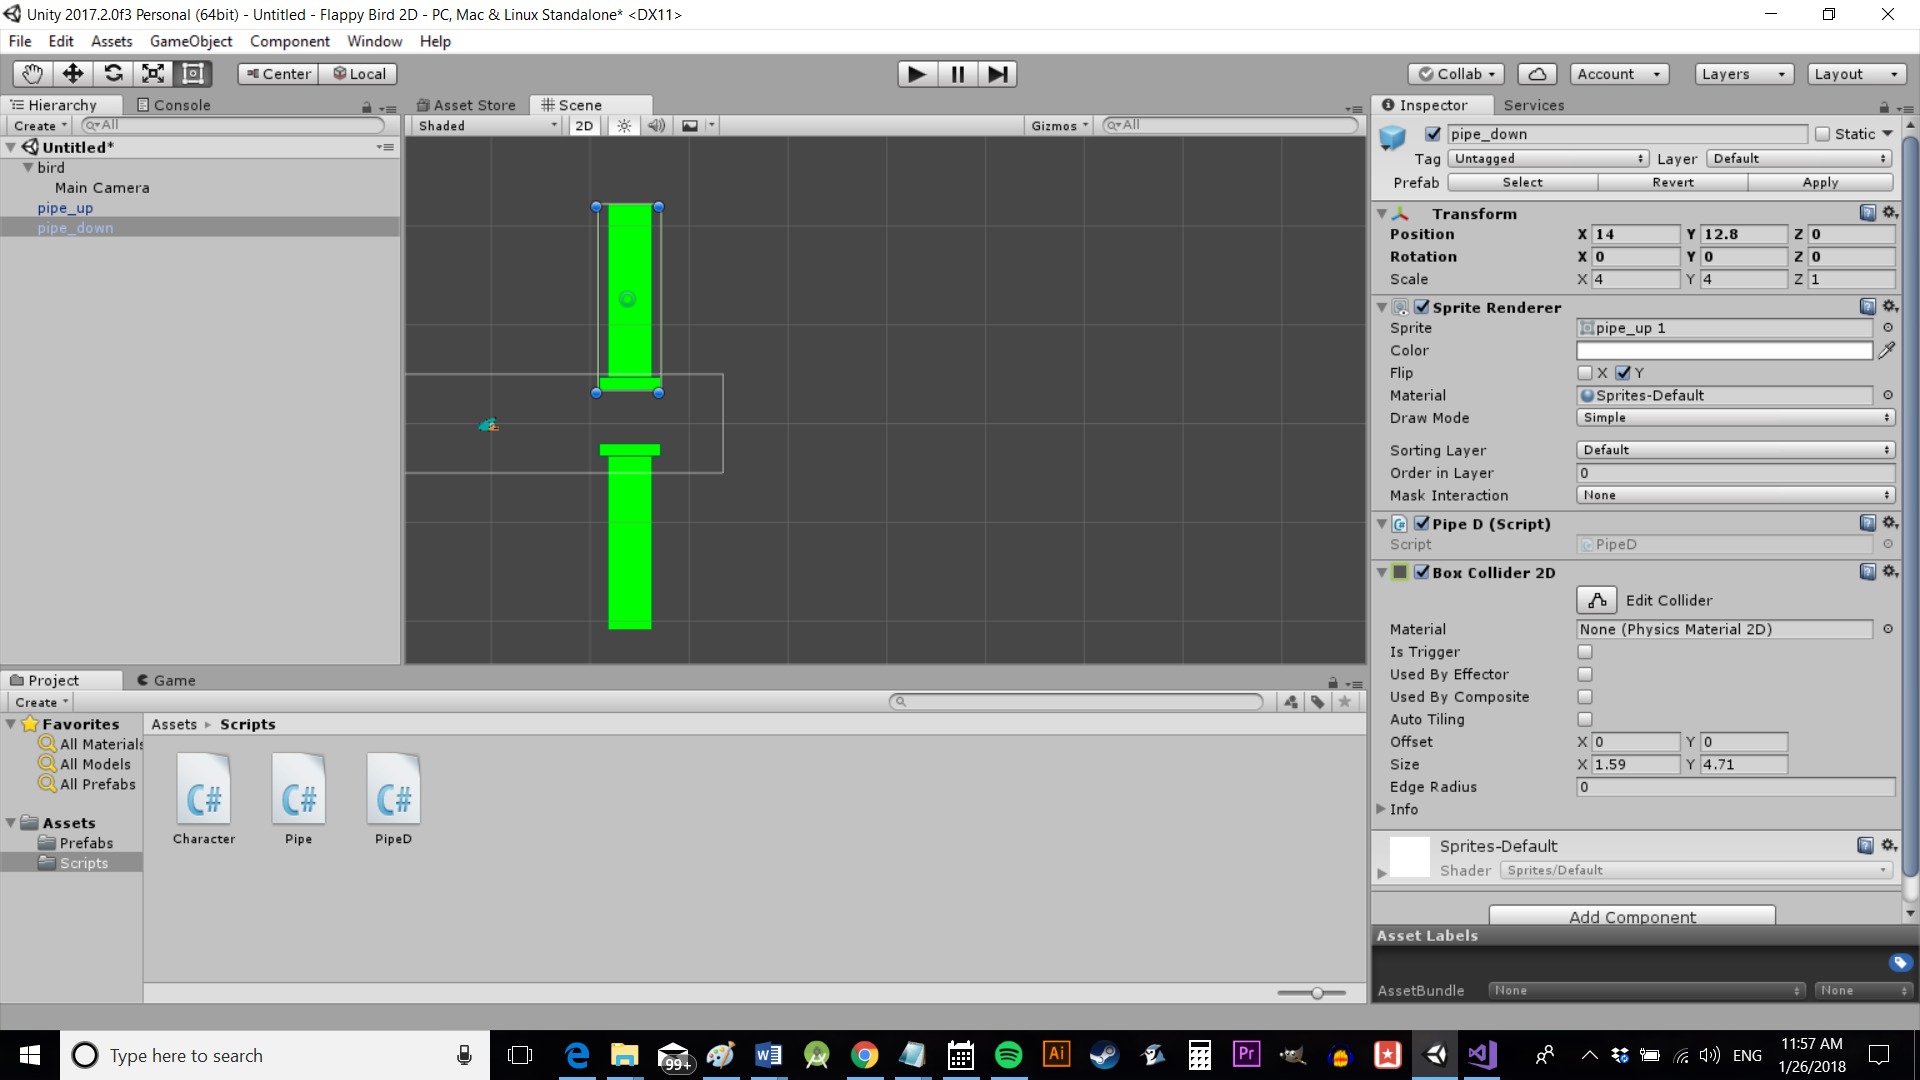
Теперь напишем новый C#-скрипт под названием PipeD. В нём будет похожий код:
public class PipeD : MonoBehaviour {

    private Character character;

    //Это нужно для инициализации
    void Start()
    {
        character = FindObjectOfType();
    }

    // Update вызывается один раз на кадр
    void Update()
    {
        if (character.transform.position.x - transform.position.x > 30)
        {
        }

    }

    void OnCollisionEnter2D(Collision2D other)
    {
        if (other.gameObject.tag == "Player")
        {
            character.Death();
        }

    }

}
Префабы
Итак, нам достаточно этого кода, чтобы сделать всю игру. Мы могли бы передвигать трубы на правую сторону экрана каждый раз, когда они исчезают, или скопировать и вставить столько труб, сколько мы хотели бы встретить на протяжении всей игры.
Если пойти первым путём, то убедиться, что трубы стоят как надо после случайной генерации, и поддерживать честный ход вещей было бы сложно. После смерти персонажа они могли бы появиться в километрах от первой трубы!
Если пойти вторым путём, то всё закончится излишним потреблением памяти, с вытекающим из этого замедлением игры, и ограниченной реиграбельностью, т.к. всё стоит на одних и тех же местах каждый раз.
Вместо этого давайте воспользуемся префабами. Если говорить просто, то мы превратим наши трубы в шаблоны, которые потом сможем использовать для эффективного создания большего количества труб по желанию. Если тут есть программисты, то считайте скрипт Pipe классом, а трубы — экземплярами этого объекта.

Для этого создайте новую папку «Prefabs». Затем перетащите pipe_up и pipe_down из окна иерархии в папку.
Каждый раз, когда вы перетаскиваете объект из этой папки в сцену, у него будут те же свойства, поэтому вам не нужно будет постоянно добавлять компоненты. Более того, если вы измените размер компонента в папке, это повлияет на все трубы в игре, и вам не придётся изменять каждую из них отдельно.
Как вы понимаете, это сильно сэкономит наши ресурсы. Также это означает, что мы можем взаимодействовать с объектами из кода. Мы можем создавать экземпляры наших труб.
Сначала добавьте этот код в условное выражение в методе Update() скрипта Pipe, которое мы оставили пустым:
void Update () {
        if (character.transform.position.x - transform.position.x > 30)
        {

            float xRan = Random.Range(0, 10);
            float yRan = Random.Range(-5, 5);

            Instantiate(gameObject, new Vector2(character.transform.position.x + 15 + xRan, -10 + yRan), transform.rotation);
            Destroy(gameObject);

        }

    }
Это нужно для создания экземпляра нашего gameObject. В результате получается новая идентичная копия. В Unity всегда, когда вы используете слово gameObject, оно ссылается на объект, к которому скрипт в данный момент привязан — в нашем случае к трубе.
Мы генерируем заново наши трубы в случайных вариациях, чтобы было повеселее.
Но вместо того, чтобы проделывать всё то же в скрипте PipeD , мы генерируем оба объекта в одном месте. Таким образом мы можем легко устанавливать положение второй трубы относительно первой. Также это значит, что нам нужно меньше кода для PipeD.
Создайте public gameObject с именем pipeDown. Затем обновите код следующим образом:
if (character.transform.position.x - transform.position.x > 30)
        {

            float xRan = Random.Range(0, 10);
            float yRan = Random.Range(-5, 5);
            float gapRan = Random.Range(0, 3);

            Instantiate(gameObject, new Vector2(character.transform.position.x + 15 + xRan, -11 + yRan), transform.rotation);
            Instantiate(pipeDown, new Vector2(character.transform.position.x + 15 + xRan, 12 + gapRan + yRan), transform.rotation);
            Destroy(gameObject);

        }
Мы добавили переменную gapRan, которая позволяет слегка менять расстояние между трубами, чтобы было интереснее играть.
Возвращаемся обратно в Unity и перетаскиваем префаб pipe_down из папки с префабами (это важно!) в место, где написано «Pipe Down» (заметьте, как наш camel case заменяется пробелом) на спрайт трубы pipe up. Если вы помните, мы определили Pipe Down как public gameObject, что даёт нам возможность определять, чем является этот объект откуда угодно – в данном случае через инспектор. Выбирая префаб для этого объекта, мы убеждаемся, что при создании экземпляра трубы он будет включать в себя все атрибуты и скрипт, которые мы добавили ранее. Мы не просто создаём спрайт, но пересоздаём объект с коллайдером, который может убить персонажа.
Всё, что мы добавим в то же место в скрипте PipeD — просто Destroy(gameObject), чтобы труба саморазрушалась при выходе за левую границу экрана.
Если вы сейчас запустите игру, то экран будет продвигаться дальше автоматически, и вы умрёте, если столкнётесь с любой из труб. Пролетите достаточно далеко, и эти трубы исчезнут и появятся снова впереди.
К сожалению, между трубами большое расстояние, и экран выглядит пустым. Мы могли бы исправить это, добавив несколько префабов в нашу сцену, чтобы создать конвейер постоянно появляющихся труб. Однако было бы лучше генерировать трубы в скрипте. Это важно, так как в противном случае после смерти персонажа трубы в начале пути уничтожатся, и снова образуется пустое пространство.
Таким образом, мы можем создавать несколько первых труб во время каждой загрузки игры и возвращать всё на свои места после смерти персонажа.
Бесконечный полёт
Теперь создадим public-переменные pipe_up и pipe_down в скрипте Character. Это даст вам возможность ссылаться на созданные объекты, перетаскивая префабы на объект персонажа, прямо как когда мы добавили pipe_down в скрипт Pipe.
Нам нужно добавить эти переменные:
public GameObject pipe_up;
public GameObject pipe_down;
Затем мы напишем такой метод:
 public void BuildLevel()
    {
        Instantiate(pipe_down, new Vector3(14, 12), transform.rotation);
        Instantiate(pipe_up, new Vector3(14, -11), transform.rotation);

        Instantiate(pipe_down, new Vector3(26, 14), transform.rotation);
        Instantiate(pipe_up, new Vector3(26, -10), transform.rotation);

        Instantiate(pipe_down, new Vector3(38, 10), transform.rotation);
        Instantiate(pipe_up, new Vector3(38, -14), transform.rotation);

        Instantiate(pipe_down, new Vector3(50, 16), transform.rotation);
        Instantiate(pipe_up, new Vector3(50, -8), transform.rotation);

        Instantiate(pipe_down, new Vector3(61, 11), transform.rotation);
        Instantiate(pipe_up, new Vector3(61, -13), transform.rotation);

    }
Мы будем вызывать его один раз в методе Update() и один раз в методе Death().
После начала игры вызывается Update(), и наши трубы ставятся согласно заданной конфигурации. За счёт этого первые несколько препятствий всегда будут стоять на одном и том же месте. После смерти игрока трубы встанут на те же самые места.
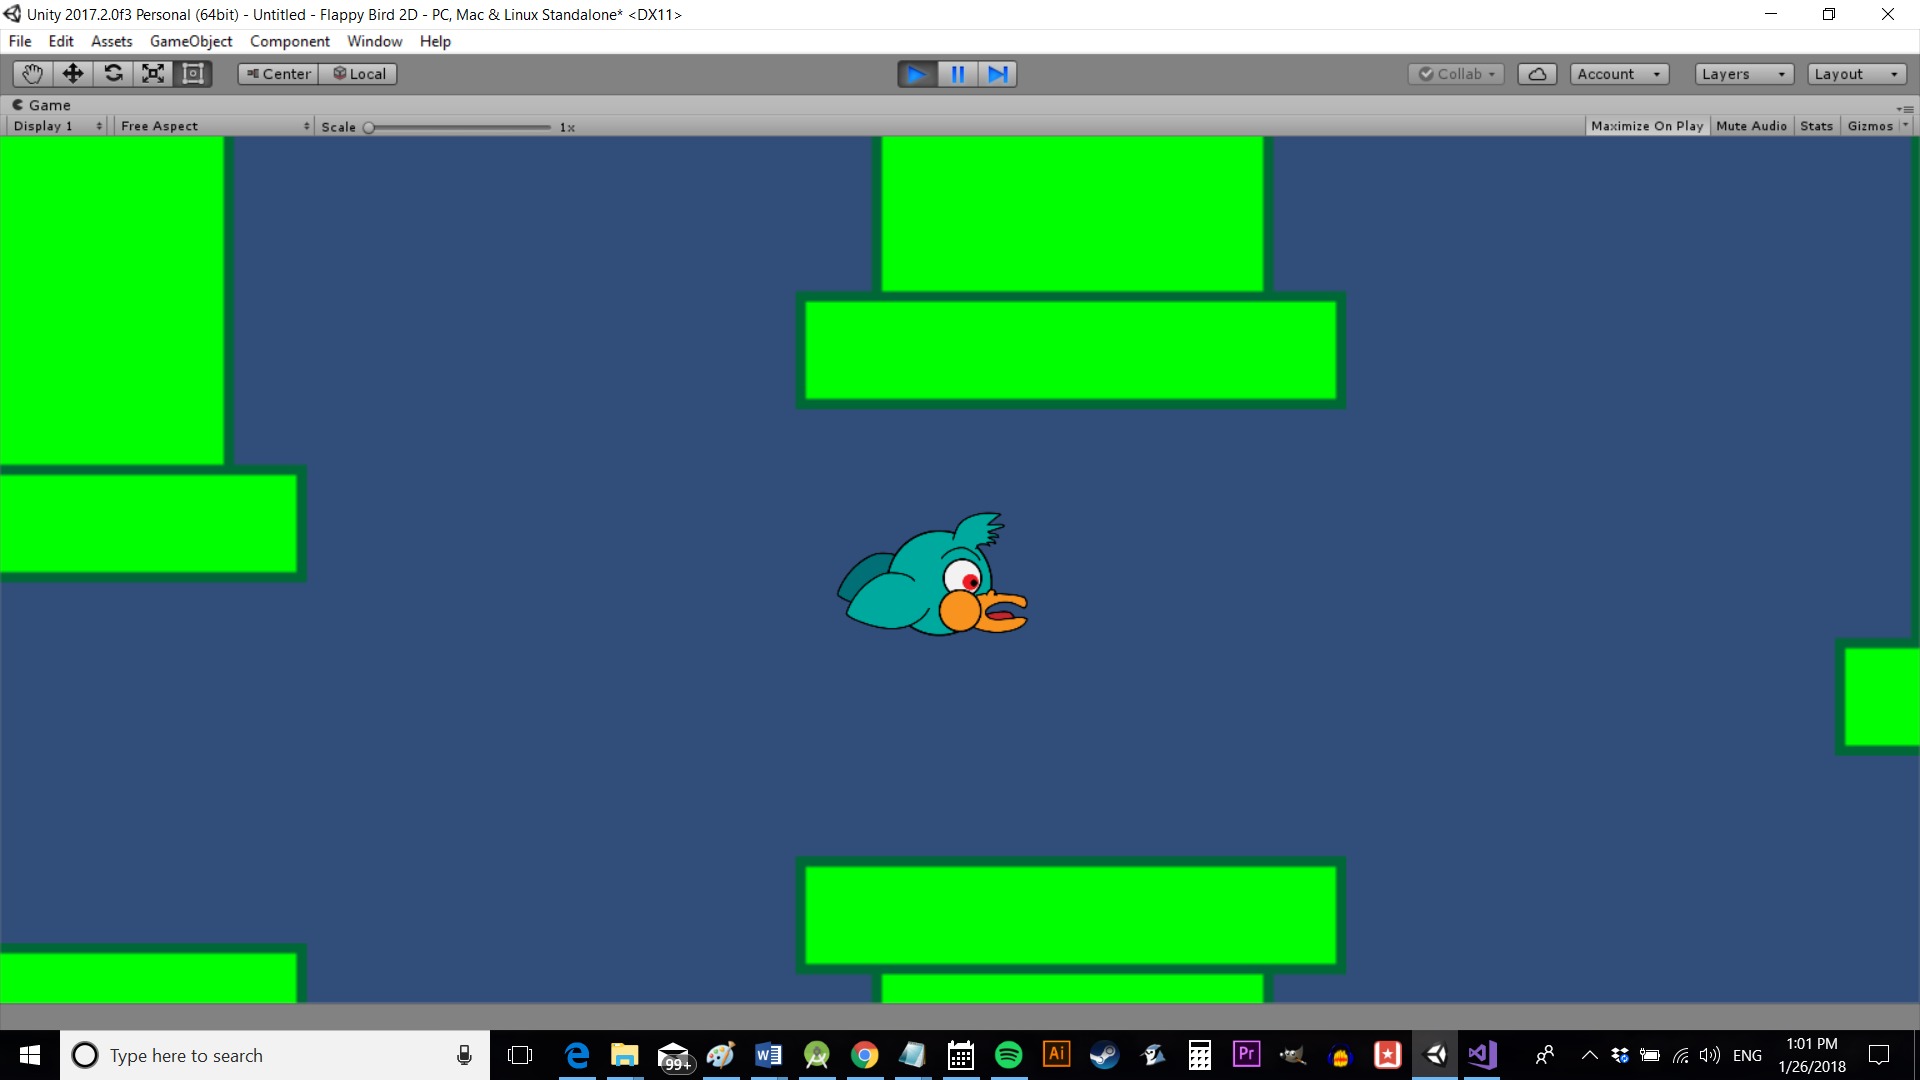
Вернитесь в сцену в Unity и удалите две трубы, которые сейчас там находятся. Ваша «игра» будет выглядеть просто как пустой экран с птицей. Нажмите Play и трубы появятся, после нескольких первых их положение будет определяться случайным образом.
В заключение
Вот мы и сделали целую игру! Добавьте счётчик очков, попробуйте сделать его более оригинальным и увеличивайте сложность игры по мере продвижения. Также не будет лишним сделать меню. Ещё хорошей идеей будет уничтожать трубы на экране после смерти персонажа. Как только вы с этим закончите — считайте, что готовая к выпуску в Play Store игра у вас в кармане! Когда-то похожая игра сделала другого разработчика очень богатым, и это доказывает, что вам не нужно быть гением-программистом или иметь за своей спиной богатого издателя, чтобы достичь успеха. Вам просто нужна хорошая идея и десять минут!
Хотите писать приложения под Android, но не знаете, с чего начать? Тогда ознакомьтесь с нашей большой подборкой ресурсов для изучения Android-разработки.
Перевод статьи «Flappy Bird Unity tutorial for Android – Full game in 10 minutes!»
Эта страница содержит инструкции о том, как создать приложение Unity для Android, а также рекомендации, которые следует учитывать при выполнении. Информацию о процессе сборки для Android и инструментах, которые использует Unity, см. в разделе Как Unity создает приложения для Android.
Вместо создания приложения вы также можете экспортировать проект Unity в виде Gradleсистемы сборки Android, которая автоматизирует несколько сборок процессы. Эта автоматизация означает, что вероятность возникновения многих распространенных ошибок сборки снижается. Подробнее
Просмотрите в проекте Словарь и импортируйте его в Android Studio. Это полезно, если вам нужен больший контроль над конвейером сборки, вы хотите просмотреть или изменить манифест приложения Android, который Unity создает для вашего приложения, или интегрировать функции Unity в другое приложение Android. Дополнительную информацию см. в разделе Экспорт проекта Android.
К некоторым службам цифрового распространения, на которых размещаются приложения для Android, предъявляются особые требования, которые могут изменить процесс сборки. Например, Google Play требует, чтобы ваше приложение было Набор приложений Android (AAB), а не APK. Если вы нацеливаете свою сборку на конкретную службу цифрового распространения, сначала ознакомьтесь с документацией для этой службы цифрового распространения, чтобы проверить, различаются ли требования.
Настройка сборки
Перед созданием сборки настройте параметры проекта, чтобы Unity собирала приложение с нужными параметрами среды выполнения и системными свойствами сборки. Существует два набора параметров, которые настраивают сборку Unity:
-
Настройки игрокаНастройки, которые позволяют вам установить различные параметры финальной игра, созданная Unity. Подробнее
См. в Словарь: настройка параметров выполнения и сборки для приложения. - Настройки сборки: настройка параметров системы сборки.
Формат публикации
Unity может создавать приложения для Android в следующих форматах публикации:
- АПК
- Набор приложений Android (AAB)
По умолчанию Unity создает приложения Android в формате публикации APK. Чтобы заставить Unity построить приложение Android как AAB:
- Выберите Файл > Настройки сборки.
- В списке платформ на панели Платформа выберите Android.
- Включите Создание набора приложений (Google Play). Если вы хотите экспортировать проект и создать его в Android Studio, включите Экспорт проекта, а затем включите Экспорт для App Bundle.
Здание
Чтобы создать приложение Unity для Android:
- Выберите Файл > Настройки сборки.
- В списке платформ на панели Платформа выберите Android.
Примечание. Если Android выделен серым цветом, настройте свой проект для разработки Android. - Отключите Экспорт проекта. Если вы хотите экспортировать свой проект для Android Studio, а не создавать его в Unity, см. раздел Экспорт вашего проекта Android.
- Нажмите либо Создать, либо Создать и запустить.
- Выберите место, куда Unity поместит приложение. Если вы выбрали Создать и запустить, Unity также установит приложение на устройство Android, подключенное к вашему компьютеру.
- Нажмите Сохранить. Начнется сборка.
Если вы выбрали Создать и запустить, когда Unity создаст сборку:
- Если параметр проигрывателя Split Application Binary включен, а параметр сборки Build App Bundle (Google Play) отключен, Unity создает Файлы расширения Android (OBB) для APK и помещает их в нужное место на вашем устройстве.
- Если разрабатываемая сборкаразрабатываемая сборка включает символы отладки и включает профилировщик. Подробнее
См. в Словарь Настройка сборки включена , Unity также создает окно Profiler, которое поможет вам оптимизировать игру. Он показывает, сколько времени вы тратите на различные области вашей игры. Например, он может сообщать о проценте времени, затраченном на рендеринг, анимацию или игровую логику. Подробнее
Просмотреть в туннеле Словарь и включить CheckJNI перед ним запускает ваше приложение.
Совет. После первого указания выходного пути можно использовать сочетание клавиш Ctrl+B (macOS: Cmd+B) для сборки и запуска приложения.
Размер дистрибутива
Некоторые службы цифрового распространения имеют ограничение на начальный размер установки вашего приложения. В Unity есть следующие методы, помогающие оптимизировать размер установки:
- Разделение APK по целевой архитектуре.
- Разделение двоичного файла приложения.
- СжатиеМетод хранения данных, уменьшающий объем требуемого дискового пространства. См. Сжатие текстур, Сжатие анимации, Сжатие звука, Сжатие компоновки.
См. в Словарь - Минификация.
Разделение APK по целевой архитектуре
Если выходное приложение использует формат APK, Разделить APK по целевой архитектуре Настройка проигрывателя оптимизирует загрузку приложения и размер установки. Вместо создания одного APK, содержащего двоичные файлы для каждой целевой архитектуры ЦП, выбранной в настройках проигрывателя Целевые архитектуры, Unity создает отдельный APK для каждой архитектуры ЦП. Вы можете загрузить этот набор APK-файлов в цифровые сервисы распространения, которые доставят APK с правильной целевой архитектурой ЦП на каждое устройство, загружающее ваше приложение.
В первую очередь это функция Google Play, которая может не работать в других службах цифрового распространения. Дополнительную информацию см. в разделе Поддержка нескольких APK.
Примечание. Google Play требует, чтобы новые приложения были AAB, а не APK. Когда вы загружаете AAB, Google Play автоматически создает и предоставляет оптимизированные APK для каждой конфигурации устройства.
Разделение двоичного файла приложения
Вы можете разделить выходное приложение, чтобы уменьшить первоначальный размер установки. Устройство может установить более легкую версию вашего приложения, а затем загрузить активы отдельно. Если ваше выходное приложение использует формат APK, Unity может разделить приложение на основной APK и файл расширения (OBB). Для получения дополнительной информации см. файлы расширения APK. Если ваше выходное приложение использует формат AAB, Unity может разделить приложение на базовый модуль и пакеты активов. Дополнительную информацию см. в разделе Доставка игровых объектов.
Чтобы разделить двоичный файл приложения:
- Выберите Изменить > Настройки проекта.
- В окне настроек проекта выберите вкладку Проигрыватель, затем откройте Настройки проигрывателя Android:

- В разделе Настройки публикации включите Разделить двоичный файл приложения.

Сжатие
Вы можете изменить метод, используемый Unity для сжатия файлов ресурсов для приложения. Это может уменьшить размер приложения, но может увеличить время загрузки, если метод требует больше времени для распаковки данных.
Дополнительную информацию см. в разделе Метод сжатия.
Минификация
Вы можете использовать минификацию ProGuard, чтобы уменьшить размер приложения и повысить производительность.
Чтобы включить минификацию ProGuard:
- Выберите Изменить > Настройки проекта.
- В окне настроек проекта выберите вкладку Проигрыватель, затем откройте Настройки проигрывателя Android:
- В разделе Настройки публикации в разделе Минимизировать включите либо Выпуск, Отладка, либо и то, и другое, в зависимости от тип сборки, которую вы хотите минимизировать.
Примечание. ProGuard может удалить важный код, от которого зависит ваше приложение, поэтому проверяйте все сборки, которые вы минимизируете.
Для большего контроля над процессом минимизации создайте собственный файл proguard.txt и настройте его, указав, что не удалять. Чтобы создать файл, выберите Пользовательский файл Proguard в разделе Настройки публикации. Это создаст файл proguard.txt в папке вашего проекта Assets/Plugins/Android. Информацию о настройке минификации ProGuard см. в документации ProGuard.
Introduction: How to Make an Android App Using Unity
Before I start, I should probably mention that this will be a lengthy tutorial. So prepare yourselves. By the end of this tutorial, you’ll be able to take on the world (in a figurative sense.)
Approximately two years ago, I delved into new territory and took a course in Game Design. I’d never attempted to make a game properly before this. I tried to get into programming but couldn’t commit to it. I wrote maybe a couple of very basic command-line programs that were a few lines long and then just gave up as I couldn’t get my head around it.
So when I started my course, I was not used to it. Over the two years, I learned a lot and made excellent progress and even designed and programmed a few games and apps, 2 of which are for Android.
Going into a bit more detail. As this was a course, I was required to learn everything related to game design and development. I learnt how to generate game ideas, how to write a story for the game, how to conceptualise characters (I haven’t designed any characters), how to create a game design document (which is very useful, it doesn’t have to be highly detailed if you’re an indie developer), how to use Unity Game Engine to create the game, how to test the game correctly and how to build a game for different platforms.
Step 1: Table of Contents
- Table Of Contents
- Things You Need To Know Before You Begin
- How To Set Up Unity & Android Studio
- Setting Up Project & Creating Particle Prefabs
- Creating & Adding Effects Script
- Creating & Adding Touch Controls
- Testing
- Creating Main Menu & HUD
- Organising Hierarchy
- Conclusion
Step 2: Things You Need to Know Before You Begin
Many people might think that game design/development is complicated and requires much prior knowledge to make one. However, this is far from the truth. Using a game engine will drastically reduce the learning curve and allow you to focus more on making the game fun. There are a variety of different game engines out there; the most popular options are:
- Unity
- Unreal Engine
- CryEngine
Unity and Unreal Engine are more popular than CryEngine. This is because they are aimed toward indie developers and AAA developers, as opposed to CryEngine, which is aimed only at AAA developers. The difference between Indie and AAA:
Indies are comprised of small teams, usually 1-20 people, and they don’t have significant funds, etc.
Some examples of Indie devs:
- Coffee Stain Studios
- Halfbrick Studios
- Mojang
- Ndmeic Creations
AAAs are comprised of much larger teams and have a lot of experience in the industry, along with a lot of funds. Some examples:
- EA
- Ubisoft
- Gameloft
- Treyarch
- Activision
A game engine is a program designed to simplify game design/development. Instead of coding every single aspect of the game yourself, you can just script the behaviour using a game engine. This is made possible by the fact that game engines do a lot of the work for you; things such as physics, lighting, rendering etc., are all done for you. All you have to do is create the game objects (these are just containers with different elements attached), set up the order and layout, assign the relevant properties to the game objects and script the behaviour.
Some game engines allow you to create a whole game without any coding required at all; the most popular one is Unreal Engine. It features a Blueprints system, which utilises a node-based structure (essentially just a system that uses boxes and arrows. These boxes and arrows are linked if they are part of the same function). Let’s say you wanted to intercept keyboard input (this means telling the program to look out for a key pressed on the keyboard) and then make the player move as long as that specific key is held down. You would create a base node, which would contain the necessary sub-functions. In that base node, you would declare the key you wanted to use and then generate another node telling the game what to do. The base node would be a box containing the function for pressing the key.
In this case, the second node would cause the player to move in a direction (forward, for example) as long as the “W” key is held down. The second node would be another box linked to the first box. This is extremely useful, not just for designers but also for programmers, as it allows them to create prototypes rapidly. Unity does also have this feature, which is known as visual scripting. However, it takes the form of an asset that you must buy.
Unity is better for beginners looking to make games as it teaches you how to script. Unreal Engine is much more advanced, even though it features visual scripting. Which means there is a more significant learning curve.
Step 3: How to Set Up Unity & Android Studio
So now you know a bit more about game engines and how they function. This tutorial will be using Unity 5.3.5, which is the latest version at this time. I will be teaching you how to create an aesthetically pleasing Android app. This tutorial assumes that you have a basic understanding of using Unity. If you’re a complete beginner and you want to follow this tutorial, then please visit this link to become acquainted with the basics of Unity: http://pixelnest.io/tutorials/2d-game-unity/
Ensure you always have the latest Unity version, as they contain bug fixes and improvements. You could potentially run into errors if you have an older version of Unity. These errors can usually be fixed by updating. I should also mention that building for any mobile platform requires the respective SDK installed on your computer (for Android, you need Android Studio. For iOS, you need a Mac with Xcode installed.) To download Android Studio, please follow this link and set it up using the instructions provided on the website: https://developer.android.com/studio/index.html
Once installed, you will need to install the drivers for your phone by opening Android Studio, clicking Configure > SDK Manager, and then clicking Launch Standalone SDK Manager. A new window will open up, scroll to the bottom and ensure that the Google USB and Web Drivers are selected. You can leave the other components chosen by default. Then click on Install Packages in the bottom right and wait for it to install. Once that is done, go to the Settings app on your phone > About/About Phone > Software Information and locate the “Build Number” header. It should be a collection of numbers with decimals and “release-keys” appended to the end. Tap the “Build Number” multiple times until it says “Congratulations, you are now a developer” or something similar. Then go back to your Main Settings page and locate “Developer Options”. Click on it and find the “USB Debugging” checkbox. Ensure this is ticked. Then plug your phone into your computer and ensure “USB Debugging Enabled” or something similar is showing in the Notification Bar; you will most likely need to expand the Bar to see the message.
Regardless of whether you want to install the drivers for your phone to use it in Unity, you will need to have Android Studio installed, as, without it, you can’t build the app for your phone. If setting up the drivers is too tedious, follow the alternative options in the Testing Section of this tutorial. Once you have installed Android Studio and set up USB Debugging, you can come back and follow this tutorial.
This tutorial was based on another tutorial; I’ll provide the link if you want to check it out. http://pixelnest.io/tutorials/unity-touch-controls…
My tutorial covers more than the original (Menu, HUD, and Testing). The programming language I will be using for this tutorial is C#. Unity also supports JavaScript; however, C# has more advanced features, albeit it is slightly harder to learn. You are free to convert the C# code into JS if you already know JS, but unfortunately, I won’t be able to account for any language-specific errors should you choose to use it. I will also teach you some tips and tricks I have learnt while making games. Let’s begin.
Step 4: Setting Up Project & Creating Particle Prefabs
Setting up Project
Once you have successfully created your project, ensure you have the following folders in your assets folder:
- Fonts
- Materials
- Menu
- Prefabs
- Scenes
- Scripts
- Textures
These are the only folders you’ll require for this project. However, if you decide to expand on it, you are free to add any other folders as you see fit (sounds, animations etc.)
Once you have created the above folders, go to File > Build Settings. In this window, click on the Android option under the header “Platforms”, then click on “Switch Platform” in the bottom left corner. This will tell Unity that you’re building for Android and will set up the project. You will need Android Studio installed for this to work. Then save the scene by either pressing Ctrl+S or choosing “Save Scene” in the File Menu. Save this scene as “Main Scene” in your “Scenes” folder.
Creating Particle Prefabs
Above is an image of a star with a black background. Save this image into your Textures folder. You will be using it for the Particle System.
Set the Texture Type to Texture by clicking on the image in your Textures folder and selecting the appropriate value in the Inspector, then click Apply. Ensure the “Alpha Is Transparency” box is ticked. This will make the background of the star transparent.
Then create a Particle System and set it up using the values shown in the screenshot above.
Feel free to modify these values if you’d like; they are just guidelines. Playing around with these values will give you a better understanding of how it works.
Ensure that the Texture of the Particle System is set to the Star Texture by expanding the Shader and selecting the Star Texture in the box on the right. Or you could drag and drop the image from your Textures folder into the box. Choose the Mobile/Particle/Alpha Blended Shader by clicking the drop-down box next to Shader, then Mobile > Particles > Alpha Blended. This will tell the particle system to make the background of the Star transparent and will optimise it for Android. Change the name at the top in the Inspector to “Explosion” and do the same in the Hierarchy. Then drag this Explosion Particle System from the Hierarchy to your Prefabs folder in the Project view. This will create a prefab of that Particle System.
Next, we will be creating a Trail Prefab, which will draw a trail as long as you drag your finger on the screen. The trail will disappear after a couple of seconds when you lift your finger.
Create a new Empty Game Object (Right Click in the Hierarchy and select “Create Empty”) and call it Trails or something similar. Then add a Trail Renderer component to it. Set it up using the values provided in the screenshot above.
Create a new Material by clicking on the Materials folder in the project view, then Right Click in the project view and click Create > Material. Name the Material as Trails Material or Trails Mat.
Then click on the Trails Game Object in the Hierarchy and drag and drop the Trails Mat from the Project view to the Inspector window. This will assign the Material to the Trails Game Object. Then drag this Trails Game Object to your Prefabs folder to make it a Prefab.
Finally, we’ll create another Particle System that will be different from the first one. This one will slowly explode outwards, won’t have any gravity, and will slowly fade away. Create another Particle System, and label it Pinch Explosion (we’ll use a pinch gesture to initialise it). Make sure the Star Material is assigned to this Particle System, then make it into a Prefab.
These are all the effects we will be using. Feel free to create more if you like or modify the existing ones; one final thing before we can move on to the programming is to click on the Main Camera in the Hierarchy. Change the Background Colour to either black or another dark colour and change the Size (underneath the Projection drop-down box) from 5 to 10. This will allow you to see more of the background. Look at the final screenshot above if you’re confused.
Step 5: Creating & Adding Effects Script
Creating the Script
Now that we have created all the prefabs, we can move on to the programming. You will have to write quite a bit of code as this is a more advanced tutorial. I actually have a document that explains the basics of programming if you’re interested. This is also another extensive read. I have uploaded it to Dropbox, here is the link:
http://bit.ly/29qhLDx
Create a new C# Script in your Scripts folder (click on Scripts folder, then Right Click in the Project Window > Create > C# Script) and label this Script as “SpecialEffects”. Open it up in your desired IDE (Integrated Development Environment) and write out the code below, word for word. The reason I’m telling you to write it word for word as opposed to copy/pasting it is because typing it will allow you to understand what the code does better. It will also get you in to the practice of checking your code for any errors. Here is the code:
{
 /* Makes this script a private static, meaning this script's functions
     can't be accessed outside of this script
     and it's values don't ever change unless you specifically tell it to */
    private static SpecialEffects instance;
    // These are the prefabs
    public ParticleSystem explosionEffect, pinchExplosionEffect;
    public GameObject trailsPrefab;
    /* This function is activated when the script is first initialised,
       before the Start function.
       The Start function requires this script to be enabled but the Awake function runs regardless of whether this script is enabled */
    void Awake()
    {
        // Assigning the value of instance to this script
        instance = this;
    }
	// Use this for initialization
	void Start ()
    {
        // Ensuring the prefabs are all activated
        if (explosionEffect == null)
            Debug.LogError("Missing Explosion Effect");
        if (pinchExplosionEffect == null)
            Debug.LogError("Missing Pinch Explosion Effect");
        if (trailsPrefab == null)
            Debug.LogError("Missing Trails Prefab");
	}
    // Explosion Effect
    public static ParticleSystem MakeExplosion(Vector3 position)
    {
        // If this script is disabled, log an error
        if (instance == null)
        {
            Debug.LogError("There is no SpecialEffects Script in the scene");
            return null;
        }
        // Creates the Explosion Effect at the given position
        ParticleSystem effect =
            Instantiate(instance.explosionEffect) as ParticleSystem;
        effect.transform.position = position;
// Destroys the Explosion Effect after Effect has completed
Destroy(effect.gameObject, effect.duration);

return effect;
}
    // Pinch Explosion Effect
    public static ParticleSystem MakePinchExplosion(Vector3 position)
    {
        // If this script is disabled, log an error
        if (instance == null)
        {
            Debug.LogError("There is no SpecialEffects Script in the scene");
            return null;
        }
        // Creates a Pinch Explosion at the specified position
        ParticleSystem effect =
            Instantiate(instance.pinchExplosionEffect) as ParticleSystem;
        effect.transform.position = position;

return effect;
 }
    //  Trail Effect
    public static GameObject MakeTrail(Vector3 position)
    {
        // If this script is disabled, log an error
        if (instance == null)
        {
            Debug.LogError("There is no SpecialEffects Script in the scene");
            return null;
        }
//Creates a new trail at the set position
GameObject trail = Instantiate(instance.trailsPrefab) as GameObject;
trail.transform.position = position;

return trail;
}
Adding the Script to the Scene
See, that wasn’t too hard, was it? Now that we have this script ready, we can add it to the scene. Create a new Empty Game Object, label it as Scripts and drag the Script from your Scripts folder on to the Scripts Game Object.
Now assign the Variables to their respective Prefabs by dragging the Prefab from the Prefabs folder in the Project View to the Scripts properties in the Inspector Window. See the screenshot above for reference.
Step 6: Creating & Adding Touch Controls Script
Creating the Script
Now it’s time to program the touch controls for this app. The primary function of this app is to trigger effects when the screen is touched. The three gestures we will be using will be a tap, a swipe and a pinch to zoom. You can also add more gestures if you wish, but you will have to do that of your own accord.
The effects we trigger will vary based on the type of touch input (tap, swipe, pinch to zoom etc.) This will allow us to ensure that the correct gesture is being recognised.
The method in which we will detect these gestures is using Unity’s “Input” class, which consolidates all the information about every type of Input in to one location. Some examples of other Inputs are keyboard, console controllers or touch.
Unity has a specific sub class called Input.touches and it contains the events for the various types of touches along with their state in a certain frame.
A Touch is a container that holds the information about the various fingers, which we will be looking at while programming the touch controls.
The first type of touch method that we’ll be implementing is a pinch, then the tap, then the swipe. A pinch is when the screen is touched with two fingers and dragged either outwards or inwards. A tap is when the screen is touched for a short amount of time (usually a second). It is similar to clicking a mouse. A swipe is when the screen is touched with one finger and dragged along the screen.
Create new Script in your Scripts folder and label it “TouchControls”. Then type in the following code under the Update function.
using UnityEngine;
using System.Collections.Generic;
public class TouchControls : MonoBehaviour
{
    private Dictionary trails = new Dictionary();
    private Touch pinchFinger1, pinchFinger2;
    private ParticleSystem pinchExplosion;
    // Use this for initialization
    void Start ()
    {

    }

	// Update is called once per frame
	void Update ()
    {
        // These are the touch controls
        // Uses a loop to search for all of the fingers
        // Controls for Pinch To Zoom, only works with 2 fingers
        // If 2 fingers are on the screen
        if (Input.touchCount == 2)
        {
            // Assign these 2 fingers to their own variables
            var finger1 = Input.GetTouch(0);
            var finger2 = Input.GetTouch(1);
            if (finger1.phase == TouchPhase.Began && finger2.phase == TouchPhase.Began)
            {
                this.pinchFinger1 = finger1;
                this.pinchFinger2 = finger2;
            }
            // When the fingers have moved, update the script to the new location
            if (finger1.phase == TouchPhase.Moved || finger2.phase == TouchPhase.Moved)
            {
                float baseDistance = Vector2.Distance(this.pinchFinger1.position, this.pinchFinger2.position);
                float currentDistance = Vector2.Distance(finger1.position, finger2.position);
                // Purcent
                float currentDistancePurcent = currentDistance / baseDistance;
                // Creates the effect between the fingers if it doesn't currently exist
                if (pinchExplosion == null)
                {
                    Vector3 finger1Position = Camera.main.ScreenToWorldPoint(this.pinchFinger1.position);
                    Vector3 finger2Position = Camera.main.ScreenToWorldPoint(this.pinchFinger2.position);
                    // Finds the centre between the 2 fingers
                    Vector3 pinchExplosionPosition = Vector3.Lerp(finger1Position, finger2Position, 0.5f);
                    pinchExplosion = SpecialEffects.MakePinchExplosion(pinchExplosionPosition);
                }
                // Takes the base scale and increase or decrease it
                pinchExplosion.transform.localScale = Vector3.one * (currentDistancePurcent * 1.5f);
            }
        }
        else
        {
            // If the pinch has been released
            if (pinchExplosion != null)
            {
                // Create Explosions
                for (int i = 0; i < 10; i++)
                {
                    var explosion = SpecialEffects.MakeExplosion(pinchExplosion.transform.position);
                    explosion.transform.localScale = pinchExplosion.transform.localScale;
                }
                // Destroy Pinch Explosion Effect
                Destroy(pinchExplosion.gameObject);
            }
            // Tap effect
            // Checks for all fingers
            for (int i = 0; i < Input.touchCount; i++)
            {
                Touch touch = Input.GetTouch(i);
                // A tap is a quick touch and release
                if (touch.phase == TouchPhase.Ended && touch.tapCount == 1)
                {
                    // Touches are screen locations, this converts them in to world locations
                    Vector3 position = Camera.main.ScreenToWorldPoint(touch.position);
                    // Creates the Explosion Effect
                    SpecialEffects.MakeExplosion((position));
                }
                else
                {
                    // Controls for the Swipe Gesture
                    if (touch.phase == TouchPhase.Began)
                    {
                        // Store this new value
                        if (trails.ContainsKey(i) == false)
                        {
                            // Touches are screen locations, this converts them in to world locations
                            Vector3 position = Camera.main.ScreenToWorldPoint(touch.position);
                            // Ensures the trail is visible
                            position.z = 0;
                            // Creates the Trails Effect
                            GameObject trail = SpecialEffects.MakeTrail(position);
                            // If the trail is still enabled
                            if (trail != null)
                            {
                                // Log the trail
                                Debug.Log(trail);
                                // Add some more Trails
                                trails.Add(i, trail);
                            }
                        }
                    }
                    else if (touch.phase == TouchPhase.Moved)
                    {
                        // Moves the trail
                        if (trails.ContainsKey(i))
                        {
                            // Array for the Trails
                            GameObject trail = trails[i];
                            // Converts touches in to world locations
                            Camera.main.ScreenToWorldPoint(touch.position);
                            Vector3 position = Camera.main.ScreenToWorldPoint(touch.position);
                            // Ensures trail is visible
                            position.z = 0;
                            // Sets position of the trails to position of the finger
                            trail.transform.position = position;
                        }
                    }
                    else if (touch.phase == TouchPhase.Ended)
                    {
                        // Clears all visible trails
                        if (trails.ContainsKey(i))
                        {
                            GameObject trail = trails[i];
                            // Fades trails out
                            Destroy(trail, trail.GetComponent<TrailRenderer>().time);
                            trails.Remove(i);
                        }
                    }
                }
            }
        }
    }
}
For the Tap function, we retrieve the location of all the fingers placed on the screen, whether it’s one finger or four and then we create an Explosion effect when the finger has been taken off the screen, in the position where it was, before the finger was taken off.
For the Drag function, a new variable was created. We need this variable to create the link between a finger and a Trail. What the code does:
If a new touch has been created, create new Trail and link it to the finger by way of the dictionary.
When the finger is moved, as long as the finger has a Trail linked to it, the position of the Trail Game Object is moved along with the finger.
When the finger is lifted off, the trail is destroyed.
For the Pinch function three more new variables were created. These variables stored the first position of the fingers, which we then used calculate the difference between the distance of the fingers. A variable for the Pinch Explosion effect was also created so that we could update and destroy it.
The Pinch function was more complicated, due to the fact that we didn’t want it being mistaken for anything else.
For the Pinch function, if two fingers are detected on the screen, a new Pinch Explosion effect is created in between the two positions. After that, the gesture is declared as a Pinch. If the fingers are moved, the Pinch Explosion Game Object is also moved and scaled along with it.
Once the Pinch Explosion has completed, or if a finger is lifted off the screen, it changes in to the normal Tap Explosion.
Adding the Script to the Scene
Now that the Controls Script is complete, add it to the scene the same way as the previous script or it won’t work.
That’s the main programming done. We will still need to do some more programming for the Menu & HUD, but it will be much less and easier to understand. But, before we get on to the Menu we need to actually test the app to see if it performs as it should.
Step 7: Testing
Testing is crucial when developing any kind of software. Without testing, you wouldn’t know if everything functions as it should.
Ideally, you should be testing as soon as you implement a new feature, however, for the purposes of this tutorial, we’re testing after we’ve implemented most of the features.
There are multiple methods of testing. The most effective one is to build and run the app on an Android phone as you go along. Unity actually allows you to manage this easily, provided you have the correct drivers installed.
Before you can actually build and test the app, you will need to set up a couple of things. Go to Edit > Project Settings > Player. At the top of the Inspector window you will see “Company Name” and “Product Name”. Change these to whatever you wish. Then expand the “Other Settings” tab if it isn’t already and go to “Bundle Identifier”. Change this to com.CompanyNameYouSet.ProductNameYouSet. In my case my company name is U and my product name is Instructables, so my Bundle Identifier is com.U.Instructables. If you don’t change this then you won’t be able to actually build the app for Android.
If you have the Drivers installed, simply go to Build Settings in the File Menu. Then click on “Add Open Scenes”. It should add the “Main Scene” to the list and give it the number “0”. Once that is done, ensure your selected platform is Android and your phone is connected to your computer then click on “Build and Run”. Unity will start to build your app, however, before it can fully complete the build it will require the location of your Android SDK. To find this location, open up Android Studio > Configure Settings > SDK Manager then look at the top for the “Android SDK Location”. This is the location you must point Unity to. Once Unity knows where the SDK is, it will continue to build your app. Once the app has finished building it will automatically run it on your phone. You are then free to play around with the app and enjoy your hard work. Try all the gestures to ensure that they all work.
Another simple method of testing would be to click on “Build” instead of “Build and Run” and then choose a location to save the .apk (Android’s file extension for its apps) to. Once this file has been saved and built, you will need to transfer it to your phone’s storage, and install it manually on your phone. This method is how you will send your app to other people if you so wish.
Another way of testing is through the Unity Editor. By pressing the Play button on the top of the screen in the middle, Unity will build and run your app/game. This saves you from having to use your phone for minor testing. However, if you want to use this method to test your game on Android, you will need to download Unity Remote 4 from the Google Play Store or iOS App Store. The Unity Remote allows you to test your game in Unity, without having to create a full build every time. It saves a lot of time. One thing to mention is that it does reduce the quality of the graphics on your phone. But this is necessary. It still does a good job of showing you how your app/game will look on your phone. If you’re building for PC (Windows) then you can test the game in the editor without any extra tools. Be sure to exit the Play mode in Unity after you have tested your game as any changes made to any components are reverted when you exit the Play mode.
These methods are the most effective when it comes to testing your game as you can actually see if your code functions the way it should. There are however, other methods that you can also use, these methods are for Microsoft Visual Studio, which is the IDE that I use, but they should be synonymous with other IDEs too.
One method is breakpoints. Let’s say you write some code, then run in to an error. You don’t know exactly where your code is going wrong, but you have a general idea. So you would add breakpoints above, below and on the faulty code. The breakpoints will stop the program when it reaches the breakpoint and give you information about the program up until that breakpoint.
To create a breakpoint, find the line where you think your code is going wrong and click on the first margin to the left. It should be a lighter colour than the main page. A red dot should appear and if you hover over the red dot, it will tell you the location of the breakpoint. See the screenshot for reference.
In the screenshot, I have used the “if (explosionEffect == null” line as the error. Once you have the breakpoint, still in Visual Studio, click Debug > Start Debugging or press F5 on the keyboard. This will run the program inside Unity and link it to VS and on the bottom of the VS window a red bar will appear saying “Ready”.
Now go to Unity and click on the Play Icon. This will run the app/game up until the breakpoint, at which point it will return you to the VS window with information about how the program runs up until the breakpoint. If your game/app runs fine up until the breakpoint, then that line isn’t the one with the error. If, however, your program throws an error before the breakpoint or doesn’t run at all, then it could be that line, or the lines above it. In order to find the erroneous line, you will need to keep adding breakpoints until you have located it. The quickest method is to add multiple breakpoints at a time instead of one. This is a very good way of testing and allows you to be more precise.
Once you have completed your testing, either press Shift + F5 to end debugging in VS or go back to the Debug menu and click “Stop Debugging”. This will then stop the Debug and allow the Unity project to play normally.
When testing, ensure that you use a combination of these methods as opposed to just one as it will allow you to locate exactly where you have gone wrong.
Also be careful with spelling and syntax, programming languages can be rather unforgiving, and C# is one of these languages. If you spell something wrong, you will get an error, and it will be challenging to locate this error as neither VS nor Unity account for spelling mistakes. I have spent hours trying to fix a bug, only to find out that I spelt a function or variable wrong. Checking your spelling and syntax as you go along is a good habit to get in to as it will save you hours in debugging. If you get to the point where you’ve quadruple checked your code and you still can’t figure out what’s wrong, get someone else to look at your code. Ideally you’d want another programmer or someone who at least has knowledge of programming, but if you don’t have anyone who knows programming then get anyone who’s with you at the time to look at it. Tell them to look specifically for spelling mistakes as they might be able to pick them out when you can’t.
Try not to get too frustrated if you make a spelling mistake and it takes you ages to find it. It happens to everyone. It’s one of the joys of being a programmer.
Now that we have covered testing, we can move on to making the Menu & HUD.
Step 8: Creating the Main Menu & HUD
Creating a Menu/HUD for your app is actually rather crucial. The Main Menu gives the player information about your app and usually allows them to control certain aspects of the app. For this tutorial, we will not be learning how to program the Menu so that the player can change the settings because there actually isn’t anything for the player to change (there’s no sound, music etc.) I am contemplating adding some sound effects and possibly music, but those will come in a later tutorial. The Main Menu we will be creating will be rather basic but still aesthetically pleasing. We will have a Title & three buttons (Play, Help & Exit.) The Play button will just take you to the Main Scene, the Help button will take you to a Panel with the Help File on it and the Exit button will simply quit the game. I’ll show you two ways to implement the Exit button, the first method will be a bit simpler.
You can use any font, background image etc. that you want, provided it fits the theme of the game. Also ensure that your assets for your game are copyright free or can be used commercially if you plan to release it on an app store otherwise you could run in to some legal issues. For this tutorial, I will be using this image of the Galactic Centre Region:
http://bit.ly/29eP2jB
And these fonts:
http://www.dafont.com/fineliner-script.font
http://www.dafont.com/post-it-penscript.font
The fonts are attached to the bottom of this step and the image is at the top if you want to use these assets for your app.
Once you have downloaded the fonts and images you want to use, import them in to your Unity project in their respective folders (Fonts go in the Fonts folder and the Image goes in the Menu Folder.)
Creating the Menu
In order to create the Menu we need to create a new Scene. Either press Ctrl + N or go to File > New Scene. Save it as Menu or Main Menu.
Now that we have our scene, we need to add a Canvas. This Canvas allows us to use all of the UI features that we require. Think of it as an overlay that is always the exact size of your screen.
To create a Canvas right click in the Hierarchy > UI > Canvas. In the Inspector window of the Canvas, ensure the Render Mode is set to Screen Space – Overlay and tick the Pixel Perfect option. Underneath the Canvas Scaler component, change the scale mode from Constant Pixel Size to Scale With Screen Size. This allow all the components of the Canvas to scale up or down if the screen resolution increases or decreases. Change the Reference Resolution to the Resolution of your phone screen in Landscape View (mine is 1920 x 1080) and change the Match value from 0 to 0.5. This will ensure that the components are scaled equally in Width and Height.
Now you need to change your Game View to match the Reference Resolution of your Canvas. To do this, click on the Game tab at the top, it should have an icon of Pacman to the left of it. If you can’t see it go to Window > Game, or press Ctrl + 2. Look to the top left of the Game window and you should see a dropdown box saying Free Aspect. Click on it. At the bottom, there should be a Plus icon, click on that and change the Type from Aspect Ratio to Fixed Resolution. Label it to whatever your phone screen resolution is (mine is 1080p) and change the Width and Height to match your desired Resolution. This will allow you to scale your components so they display correctly on your phone. If you kept it on Free Aspect, it would be difficult to scale your components appropriately.
Create a Panel (same way you created the Canvas, only this time, choose the Panel instead). If your Canvas is already selected then the Panel should automatically become a child of the Canvas.
In Unity, children and parents are extremely important. A child is a sub set of the parent, it inherits certain qualities from the parent. To differentiate between a child and parent: a parent will have an arrow to the left of their name which you can click to show or hide the children.
To create a child, you simply need to either right click on an object in the Hierarchy and then create your child object from the Menu that comes up or you can drag any one object on to another to make it a child of that object. In the screenshot above, I have created an Empty Game Object and dragged it on to the Canvas to make the Empty Game Object a child of the Canvas. This is extremely useful and in some occasions, critical. For example, if you created a panel outside of the Canvas (if the Panel was a parent) and you wanted to scale it to the same size as the Canvas, you would need to find out the dimensions of the Canvas and then manually set the dimensions of the Panel to be the same. However, if the Panel was a Child of the Canvas then you could just scale it using the Anchors (which I will explain in a bit). If you created the Panel to be, by default a child of the Canvas then the Panel would automatically be scaled to the Canvas. There is also the slight issue of any UI elements not being visible unless they are all children of the Canvas. Parents/children are also useful for organising the Hierarchy, which I will also go over soon.
Now that we have this Panel, we can set up the Background Image. Before we do that, we need to name them appropriately, change the name of the Canvas in the Hierarchy to Menu Canvas and change the name of the Panel to Background Image. Now click on the Background Image Panel and look at the Inspector window. There should be an Image (Script) component attached. Look for the Source Image. To change this Image, either drag and drop the downloaded Image from your project window to the box or click on the symbol of a circle with a small dot in the middle. That should open up another window labelled Select Sprite. From this window you can then choose your background. If you can’t see your image make sure the image type is set as a Sprite (2D & UI).
Once you have selected your Background, you will need to increase the Alpha, to do so click on the Color box and at the bottom there will be a slider box labelled A. Drag this all the way to the right until it’s at the end of the white section and its value is set to 255. You can also tint the image a certain colour from this same window if you wish.
To set up the Title, create a Text object as a child of the Background Image. Rename it to Title. Change the colour of the Text to white and ensure that any subsequent Text Game Objects you create are also white. In the Text section, change it from New Text to whatever you want your Title to be (in this case it’s Instructables) and change the font to your preferred font (I’ll be using the Postit-Penscript font). Under the Paragraph header, change the Alignment to whatever you wish, I’ll be centring my text in the Vertical and Horizontal axes. Next, click on Best Fit and change the Max Size to whatever fits your font best. My font is quite thin so I’ll be using 90 as my Max Size. Ensure you click the Best Fit option for every subsequent Text Game Object you create.
Then look to the top right under the Rect Transform header and you should see a box with lines and some text on the top and the left sides of the box. It should say center at the top and middle on the left. Click on this box, hold Alt and Shift and click on the icon above the middle/center icon. Check the screenshot for reference. Now if you close the box it should say center at the top and top on the left and your text should be centred to the top. This is the Anchor and it’s extremely useful when arranging Game Objects. Holding Alt sets the position of the Object to the new Anchor point, and holding Shift sets the pivot. It saves you from having to manually set the locations of the objects.
If you look to the right of the Rect Transform box you should see a bunch of numbers. These are the dimensions and location of the object. The ones you want to focus on are the: Pos X, Pos Y, Width & Height boxes. The Width & Height are self-explanatory. The Pos X moves the object horizontally and the Pos Y moves it vertically. However, these boxes will change based on the Anchor you use. If you use the uniform stretch Anchor, the Pos X & Y will change to Right, Left Top & Down which does the same thing, but it allows you more control. You can either drag along the label of these boxes to move the object, type the numbers in manually, or use the Unity tools to move them. Change the Pos Y from 0 to -10. This will give it 10 pixels of space from the top of the Background Image, making it look a bit cleaner.
Click on Add Component and add a Shadow and Outline. Increase the Alpha of both to 255. This will make it stand out more against the background. Ensure you add a Shadow and Outline component to every subsequent Text Game Object you create.
Now that we have our background it’s time to set up the buttons. Create an Empty Game Object as a child of the Background Image Panel and call it Buttons Layout Manager. In the Inspector window of this Empty Game Object, click on Add Component and search for Vertical Layout Group and add it to the object. This Game Object will keep the buttons’ placement consistent. Change the Anchor to Stretch Uniform (it’s on the bottom right) and change the position and pivot with it. The Buttons Layout Manager should now take up the entire screen. Drag it down from the top until it takes up 3 grid boxes and drag it from the right until it takes up two grid boxes. If you can’t see the grid, look on the top of the Scene window where it says Gizmos. Click on that and then click on Show Grid.
Now create another Text Game Object as a child of the Background Image and set it up the way you want. Label it Start. If you’re using multiple fonts, use your second font for the button and keep the first font for your Titles only. I’ll be using the Fineliner_Script font for my buttons. You can make the buttons any size you want provided they’re clearly visible. A good rule is to make the button size 10 or 20 pixels smaller than the Title, so if the Title is set to size 90, you’d set the button size to 80 or 70. I’ll be setting my button size to 70. Change the Text to Start and set up the alignment to whatever you wish. Add a Button component to it and change the Highlighted and Pressed colours to your preferred colours, ensure the Pressed Colour is darker than the Highlighted one. I’ll be setting my Highlighted to a Light Blue and the Pressed Colour to a Darker Blue. Now add a Shadow and an Outline component to it and increase the Alpha to full.
Duplicate this button twice (by right clicking on the button and selecting Duplicate or clicking on the button and pressing Ctrl + D) so you end up with three buttons in total, call one of them Help and the other Exit. Change the Text of these to reflect their labels. Make them children of the Layout Manger.
Create a Panel, call it Help Panel and set the Source Image to be the same as the Background Image. It should already be the correct size. Increase the Alpha to full. Duplicate the Title and make it a child of the Help Panel. Change the name of the Game Object to Help Panel Title and the Text to Help Panel. It should already be in the correct location.
Duplicate one of the buttons and rename it to Back. Make it a child of the Help Panel then change the Text of the button to Back. Set the anchor, position and pivot to Bottom Left and change the Pos X to 10.
Create another Text Game Object as a child of the Help Panel, label it Help Text Body and set its Anchor to Stretch Uniform. Change the Top box from 0 to 110. Change the Left, Right & Bottom boxes to 10. Set up the Font, use the same font as the Buttons. Change the Max Size to 80. Centre the Text in both axes. Then copy and paste the following text in to the Text box:
This app allows you to create various effects on your phone. Tapping the screen will create an explosion, pinching the screen will create a bigger explosion and dragging the screen will create a trail.
Or create your own help text.
Now go to File > Build Settings > Add Open Scenes. You Menu Scene should now be added. Drag your Menu Scene to the top so that its number is 0 and the Main Scene is 1. If you don’t do this, you won’t be able to actually view your Menu when you build the App, nor will you be able to load the Main Scene when clicking Start.
Now that we have set up the Menu, we can move on to programming it so it actually does something.
Programming the Menu
Create a new Script and call it Menu. Then type in the following code:
using UnityEngine;
// This namespace is required for using any UI components
using UnityEngine.UI;
//  This namespace is required to use the SceneManager
using UnityEngine.SceneManagement;
using System.Collections;
public class Menu : MonoBehaviour
{
    // These are all the buttons
    //-------------------------------
    public Button start;
    public Button help;
    public Button exit;
    public Button back;
    //-------------------------------
    // This is the Help Panel
    public GameObject helpPanel;
    //-------------------------------

// Use this for initialization
    void Start()
    {
        // Disables the panel
        helpPanel.SetActive(false);
    }
// Update is called once per frame
    void Update()
    {
    }

// Function for Start Button, loads Main Scene
    public void StartPress()
    {
        SceneManager.LoadScene(1);
    }

// Function for Help Button, enables Help Panel
    public void HelpPress()
    {
        helpPanel.SetActive(true);
    }

// Function for Exit Button, exits the application
    public void ExitPress()
    {
        Application.Quit();
    }

// Function for Back Button, disables Help Panel
    public void BackPress()
    {
        helpPanel.SetActive(false);
    }
}
Drag this Script on to the Menu Canvas then scroll down to the bottom in then Inspector Window. You should have:
Start
Help
Exit
Back
Help Panel
Drag the relevant Game Objects to their respective fields. See the screenshot above if you’re unsure.
Now Ctrl click on the Start, Help, Exit and Back buttons and scroll down to the Button (Script) component. At the bottom of this component will be an empty list that says On Click (). Click the Plus symbol. Now drag the Menu Canvas Game Object in to the field that says None (Object). The No Function drop down box should now be active.
Click on the Start button, then click on the No Function drop down and go to the bottom of the list where it says Menu. Then click on StartPress (). It should now say Menu. StartPress in the dropdown box. Do the same for the Help, Exit and Back buttons but make sure you select the correct Press function for them. The Help button should have HelpPress, the Exit button ExitPress and the Back button BackPress. Now click the Play icon and test it out, click on the Help button and see if the Help Panel Loads. Clicking the Exit button won’t actually do anything unless you’ve built the App for Android. You’ll have to test the Exit button on your phone. Clicking the Play button should take you to the Main Scene.
Now might be a good time to test your app on your phone so build and run it and ensure your Menu is fully functional.
As I mentioned before there are multiple methods of creating the Exit Function. I just showed you the easiest way. This is the second method.
Create another Panel as a child of the Background Image and call it Exit Panel. Set the Background Colour to match the Background so it appears to blend in (I chose a Dark Blue) and set the Top and Bottom to 450 and the Right and Left to 760. This will centre the box on the screen.
Duplicate the Title and make it a child of the Exit Panel. Decrease the size of the text a bit so it is visible but doesn’t take up too much room. Ensure its centred to the top.
Duplicate the Play button twice, make both of the duplicates children of the Exit Panel and change the Anchor, Position & Pivot of one of the buttons to Bottom Left. Change the other one to Bottom Right.
Change the name of the button on the Bottom Right to Yes and do the same with the text. Change the Bottom Left one to No (name and text) .
Open up your Menu Script and add 2 buttons under the back button and a GameObject under the Help Panel using the code below:
public Button yes;
public Button no ;
public GameObject exitPanel;
Add the following code in the Start Function, under the helpPanel.SetActive (false); line:
exitPanel.SetActive(false);
Change the ExitPress Function from
Application.Quit();
to
exitPanel.SetActive(true);
Then scroll all the way to the bottom of the script and under the BackPress() Function add the following code:
public void YesPress()
       {
        Application.Quit();
       }
public void NoPress()
    {
        exitPanel.SetActive(false);
    }
Finally, go back to Unity, click on the Yes button and change its Function from StartPress () to YesPress () and change the No button to NoPress(). Also ensure you assign the new public variables in the Menu Canvas script (click on Menu Canvas and drag buttons and Panel to their respective fields). Now press Play and test the Exit button, it should load the Exit Panel and close it when you press the No button. As you can see, this method is slightly longer but offers protection in case the player accidentally clicks the Exit button. Feel free to use which ever method you choose.
Now we move on to the final step, creating the HUD, which is extremely basic and consists of one button. I might add another tutorial covering a more extensive HUD (with a health slider, a score counter and an actual pause menu) but for now, this will suffice.
Creating & programming the HUD
Go back to your Main Scene and create a new Canvas. Label it HUD Canvas & set it up the same way as the Main Menu Canvas.
Add a Text Game Object as a child of the Canvas, call it Back To Main Menu and set up the fonts, size and alignment to your liking. Alternatively, you could make one of the Main Menu Buttons a Prefab, then just drag it on to your Canvas. Once you’ve set the button up, change its Anchor, position and pivot to the bottom left. Create a new Script called HUD and type in the following code:
using UnityEngine;
// This namespace is required for using any UI components
using UnityEngine.UI;
//  This namespace is required to use the SceneManager
using UnityEngine.SceneManagement;
using System.Collections;

public class HUD : MonoBehaviour
{
// Button
public Button backToMainMenu;

// Use this for initialization
    void Start()
    {
   }


// Update is called once per frame
    void Update()
    {

   }

// Function for BackToMainMenu Button, loads the Menu Scene
  public void BackToMainMenuPress()
    {
        SceneManager.LoadScene(0);
    }
}
Drag this script on to the HUD Canvas, set up the Script the same way as the Main Menu (by dragging the Back To Main Menu Game Object in the Back To Main Menu field). Then set up the button by dragging the HUD Canvas in to the On Click () field. Choose the BackToMainMenuPress function and test the button by clicking the Play icon and seeing if it takes you back to the Main Menu.
Step 9: Organising Hierarchy
Remember how I said creating Empty Game Objects will help you organise the Hierarchy? Well, you’ve already been doing that by using children and parents.
However, the Main Scene is a bit unorganised still. Go back to the Main Scene and create an Empty Game Object labelled as Effects. Drag all the Explosions and the Trails Game Objects to this Effects script. Then drag this Effects Game Object underneath the Scripts. The Main Camera & EventSystem can stay as where they are.
Use this system to organise any project you create. Anything of the same type can go under its own Empty Game Object (e.g. Multiple enemies can be children of an Enemies Game Object, multiple Cameras — Cameras Game Object and so on.) This will keep your Hierarchy looking tidy and will prevent yourself from getting confused if you create a lot of Game Objects
Step 10: Conclusion
Phew. That was quite the journey. But we’ve finally reached the end (you’re all probably glad of that.) But now you have a fully functional app that you can show off to your friends and improve upon. You should be proud, as previously mentioned, this was a more advanced tutorial. So take a moment and just enjoy your creation.
I hope this tutorial was a help. If you get stuck on anything, a good habit to get in to is searching Google for your error, then typing in Unity after it. Because Unity is so widely used, there is a lot of documentation available and there will most likely be at least one person who has had the same issue as you.
If you’re not sure about any of the programming functions (void Update, void Start, public void etc.) then search for the function along with unity c# and check the official Unity documentation.
If you can’t find an answer to your issues, you can leave a comment and i’ll do my best to help you resolve the error.
If there is something you think I could add or if you want to learn how to program an actual game, feel free to leave a comment.
Thanks for taking the time to read this tutorial. Until next time!
Be the First to Share
Recommendations

Unity — это кроссплатформенный игровой движок, используемый многими играми в Google Play Store. Модульные инструменты Unity помогают создавать и выпускать увлекательные мобильные игры в 2D или 3D.
Шаги для начала разработки игры Unity под Android
Чтобы использовать Unity для создания игрового процесса для игроков на Android, выполните следующие действия:
-
Загрузите и установите Unity Hub
-
Запустите Unity Hub. На вкладке «Установки» добавьте версию редактора Unity, поддерживающую 64-разрядные приложения . Обратите внимание, что эти версии поддерживают пакеты Android App Bundle, которые позволяют выполнять более мелкие и оптимизированные загрузки.

3. Во время установки редактора Unity не забудьте включить модуль поддержки сборки Android, установив флажок рядом с ним.
4. Разверните модуль поддержки сборки Android . Если вы используете Unity 2019 или новее, добавьте модуль Android SDK и NDK Tools .

5. Добавьте опцию Android Build Support NDK в Unity Hub

6. На вкладке » Проекты» нажмите » Создать», чтобы начать новый проект Unity.
7. Начать новый проект
Измените настройки сборки для вывода 64-битных библиотек.
Освещение — один из важнейших аспектов игры. Он может задавать настроение, вести игрока, определять угрозы, цели и многое другое. Освещение может улучшить или испортить визуальные эффекты в игре. Например, хорошее освещение может улучшить внешний вид плохой модели в игре, а плохое освещение может ухудшить внешний вид
Параметры конвейера рендеринга
Устаревший конвейер рендеринга Unity включает следующие пути рендеринга:
-
Прямой рендеринг
-
Отложенное затенение
Прямой рендеринг
При прямом рендеринге источники света в реальном времени очень дороги. Если вы уменьшите количество источников света на пиксель, вы сможете компенсировать эту стоимость.
Отложенное затенение
Для отложенного затенения требуется поддержка графического процессора. На совместимом оборудовании с помощью отложенного затенения можно визуализировать большое количество источников света в реальном времени с высоким уровнем точности освещения. К сожалению, отложенное затенение плохо работает на мобильных графических процессорах, потому что у них более низкая пропускная способность.
Когда вы создаете мобильную игру, важно, чтобы ваша игра плавно работала на как можно большем количестве устройств.
Универсальный конвейер рендеринга
Unity разработала универсальный конвейер рендеринга (URP). Мы настоятельно рекомендуем вам использовать URP для ваших мобильных игр.
Световые режимы
Различные режимы освещения используются в зависимости от того, как свет движется или используется в сцене. Типы легких режимов имеют разные рабочие характеристики. При установке освещения учитывайте следующее:
-
Используйте запекание для статического освещения. Это лучше всего подходит для объектов, которые не меняют свое освещение во время выполнения. Запекание источников света — это процесс предварительного вычисления и сохранения данных освещения в текстурных картах, называемых картами освещения.
-
Запеченное освещение нельзя изменить во время выполнения. Свет и тени на картах освещения статичны. Поскольку все освещение было предварительно обработано в Unity, нет никаких расчетов освещения во время выполнения, влияющих на производительность.
-
Невозможно создать динамические тени с помощью запеченного света. Это может выглядеть странно с динамическими или движущимися объектами.
-
Используйте смешанный для неподвижных источников света, которые вы собираетесь взаимодействовать с движущимися объектами. Например, факел, который освещает игрока и создает тень, когда игрок проходит мимо.
-
Смешанное освещение создает динамический прямой свет и тень.
-
Вы можете включить смешанное освещение в вычисления карты освещения для статических объектов.
-
Вы можете изменить интенсивность во время выполнения. Обновляется только прямой свет.
-
Дорогие.
-
Используйте в реальном времени динамические или подвижные источники света, например, свет, исходящий от огненного шара, который поднимается с земли и взрывается.
-
Свойства динамического света и тени можно изменять во время выполнения.
-
Источники света в реальном времени не запекаются в карты освещения.
-
Очень дорого.
По возможности используйте статический свет и избегайте динамического освещения.
Динамическое освещение или освещение в реальном времени рассчитывается и обновляется каждый кадр. Это отлично подходит для движущихся объектов, интерактивности и создания эмоций.
Напротив, статическая информация о освещении запекается в световых картах. Использование текстуры Lightmap позволяет объекту избежать дорогостоящих вычислений освещения для каждой вершины или пикселя. Стоимость визуализации текстуры карты освещения всегда намного дешевле динамического освещения. Мы рекомендуем использовать запеченное освещение в качестве первого варианта для внедрения в мобильную игру.
Запекание карты освещения
Предварительный расчет эффектов света известен как запекание карты освещения. Эффект света хранится в отдельной текстуре, называемой картой освещения. Карту освещения можно использовать для улучшения внешнего вида объектов. Запекание карты освещения нужно выполнять только один раз за итерацию вашей сцены. Если вы измените геометрию сцены или параметры запеченных источников света, вам нужно будет пересоздать карты освещения. За исключением накладных расходов на текстуру карты освещения, нет дополнительных затрат на производительность во время выполнения. Это лучший начальный подход к освещению на мобильной платформе.
На выжженный свет не влияют какие-либо динамические или движущиеся аспекты вашей сцены. Запеченное освещение действительно включает запеченное глобальное освещение для всех статических элементов. Это означает, что вычисления карты освещения включают в себя непрямой свет, который отражается от других статических объектов, а также запеченные источники света, которые напрямую падают на объект.

Чтобы запечь лампочки, выполните следующие три шага.
Шаг 1. Установите свет на смешанный или запеченный.
Установите огни режим либо смешанный или запекают. Для мобильных игр лучше использовать «Запеченные огни» вместо «Смешанные». Запеченный — наименее затратный способ визуализации света.

Шаг 2. Сделайте объекты статичными
Сделайте любые объекты, на которые воздействует запеченный свет, статичными . Есть много оптимизаций для объекта, помеченного как статический, но обычно лучше всего выбрать Все в раскрывающемся списке Статический. Если объект помечен как Static, Unity знает, что нужно включить его в запекание света.
Примечание. Если у вас включена статическая пакетная обработка, вы не можете перемещать или анимировать объекты, отмеченные как статические. По возможности оставьте эту оптимизацию включенной.

Шаг 3. Запекание огней
Вы можете запечь свои огни с помощью меню «Освещение», которое находится в « Окно»> «Рендеринг»> «Настройки освещения» .
Когда вы запекаете огни, сохраняемые данные основаны на том, какая сцена была активна, когда вы начали запекание. Создается папка с тем же именем, что и запеченная сцена. В этой папке хранятся все компоненты данных освещения. Если ваш проект загружает несколько сцен одновременно, вы должны запечь источники света для каждой сцены. Если вы настроите сцену, вам придется заново запечь свет.

Оптимизировать карты освещения
После того, как источники света настроены для запекания, убедитесь, что запеченные карты оптимизированы. Карты освещения различаются по размеру в зависимости от их настроек при запекании. Вы должны уменьшить использование памяти на мобильных устройствах, поэтому необходимо следить за размером карты освещения.
В следующем примере из демонстрации есть семь карт освещения 1024×1024 пикселей. В предварительном просмотре карты вы можете увидеть сетки, наложенные на карту освещения. Выбранные сетки выделяются.

В Lightmapping есть множество настроек , а также размер карт, которые определяют, сколько памяти и места для хранения использует каждая карта. В следующих разделах выделено несколько важных настроек.
Lightmappers
Unity предлагает следующие три метода запекания источников света на сцене:
-
Enlighten : поддерживается только до выпуска с долгосрочной поддержкой (LTS) 2020 года. Не используйте это для новых проектов.
-
Прогрессивный ЦП : экономит много времени, так как постепенно создает карты освещения. Если выбран параметр « Приоритет просмотра», приоритет отдается областям в представлении «Сцена». Это может сократить время итерации для настройки освещения вашей сцены.
-
Прогрессивный графический процессор : работает так же, как прогрессивный процессор, но генерирует карту освещения на графическом процессоре, а не на процессоре. На поддерживаемом оборудовании этот метод может значительно сократить время запекания по сравнению с использованием ЦП. Существуют дополнительные требования для настройки Progressive GPU. Узнайте больше о требованиях на странице Progressive GPU Lightmapper .

Texels
Тексели, или текстуры пикселей, являются индивидуальным пикселем в карте текстуры. Тексели хранят информацию о свете в карте освещения для каждой точки света, которая попадает на объект. Чем больше текселей используется на единицу пространства, тем больше зависит качество освещения, время запекания, затраты на дисковое хранилище и стоимость VRAM ваших карт освещения.
Чтобы уменьшить количество требуемых данных карты освещения, отрегулируйте количество текселей на единицу запекания в настройках Lightmapping.

В настройках Lightmapping, в Lightmap Разрешение параметр контролирует, сколько текселей используются на единицу в Lightmap. Ниже приведен пример куба с разными настройками разрешения карты освещения. Вы можете видеть, как более высокое разрешение быстро увеличивает объем необходимой работы.

Мы рекомендуем начинать с низкого разрешения карты освещения. Используйте начальную настройку между 5и 10и масштабируйте вверх или вниз в зависимости от потребностей вашей сцены.
Чтобы просмотреть, как тексели расположены в вашей сцене, выберите раскрывающийся список Draw Mode в окне Scene и выберите Baked Lightmap .
Запеченные предметы покрыты шахматной доской. Шаблон шахматной доски показывает, как распределяются ваши тексели, когда вы запекаете свет.
В следующем примере уменьшение разрешения карты освещения с 15 до 12в демонстрации Armies уменьшает количество необходимых карт освещения с семи до четырех.

Материал подготовлен в рамках курса «Unity Game Developer. Professional».
Всех желающих приглашаем на двухдневный онлайн-интенсив «Гексагональная карта, своя Цивилизация». На интенсиве:
— займемся созданием гексагональной карты, основы игры Цивилизация;
— научимся процедурно генерировать меш, проводить оптимизацию карты;
— создадим основу для механик пошаговой игры, научимся сохранять и загружать карту.
>> РЕГИСТРАЦИЯ
Как быстро и относительно просто создать несложную игру или приложение для Андроида? Об этом читайте в статье ниже, где рассматривается работа с движком Unity3D.
") Вы играете в компьютерные игры? Если да, то, наверняка, в процессе прохождения очередного игрового блокбастера у Вас иногда возникали мысли типа: «А вот здесь, я бы сделал не так!». А хотите сами побывать в роли разработчика? Тогда, предлагаю Вам небольшое, но весьма занимательное «приключение»
Вы играете в компьютерные игры? Если да, то, наверняка, в процессе прохождения очередного игрового блокбастера у Вас иногда возникали мысли типа: «А вот здесь, я бы сделал не так!». А хотите сами побывать в роли разработчика? Тогда, предлагаю Вам небольшое, но весьма занимательное «приключение» 
Что такое движок и зачем он нужен?
Раньше, еще во времена первых компьютеров, игры и программы создавались так называемым «хардкорным» методом. То есть, для полноценной разработки требовалось быть довольно опытным программистом, который досконально знает свой язык программирования и может практически всю игру (включая пиксельную графику и спецэффекты!) написать в простом Блокноте. Таких людей было немного и они очень ценились (да и сейчас ценятся)…
Сегодня же порог вхождения в тему программирования снизился в разы. И этому способствует не только доступность литературы и всевозможных обучающих материалов, но и все больше упрощающийся процесс разработки. В наши дни уже редко можно встретить настоящих «хардкорщиков», поскольку появились довольно удобные среды разработки, которые получили название «движки».
Суть движка в том, что он позволяет в упрощенном визуальном режиме импортировать все нужные игровые объекты, расставить их на виртуальной сцене и настроить все их параметры. То есть, задачей программиста остается только правильно написать игровую логику!
Однако, за удобство работы приходится платить некоторым увеличением размера проекта (иногда даже в несколько раз!) в сравнении с его аналогом, написанным старым «хардкорным» способом. Именно за это часть разработчиков движки не любит или же старается писать свои, в которых используются только необходимые им компоненты…
Но нам-то с Вами до труЪ-программистов далеко  Поэтому займемся созданием несложной игры для Android на базе популярного и мощного движка Unity3D.
Начало работы с проектом в Unity3D
Итак, почему мы решили использовать именно Unity3D:
- возможность создавать полноценные 2D и 3D игры;
- возможность скомпилировать готовую игру под любое устройство;
- относительная простота управления движком;
- хорошая расширяемость функционала за счет подключения плагинов;
- относительно небольшой размер итоговой сборки игры (в сравнении с другими движками).
Главный козырь Unity3D, естественно, его многогранность и многоплатформенность. Готовую игру (возможно, с небольшими доработками) Вы можете портировать, хоть на ПК (с Windows, Linux или MacOS), хоть на Android, хоть на PlayStation или XBox! Для этого нам потребуется скачать только сам движок, который, кстати, «весит» больше гигабайта и нужные SDK (если планируется разработка под мобильные платформы или консоли). Если Вы хотите сделать игру для Windows, то качать дополнительно ничего не нужно, но поскольку, мы собрались делать игру под Андроид, то нам понадобится скачать еще и Android SDK (Software Development Kit). Советую качать SDK в ZIP-архиве для большего удобства работы с ним.
Когда все будет загружено, можете распаковать в любую удобную для Вас папку Android SDK, а затем приступайте к установке самого Unity3D. Устанавливается он, как и любая обычная программа под Windows, поэтому проблем с установкой быть не должно. После установки движок запустится и нам для начала нужно будет создать новый проект:

Для этого нам нужно будет закрыть все приветственные и вступительные окошки, а затем в меню «File» выбрать пункт «New Project». В открывшемся окошке (см. скриншот выше) нам предложат указать папку сохранения проекта (ее название будет совпадать с названием проекта), импортировать некоторые стандартные наборы функций (они нам не нужны) и указать режим работы. В качестве режима выбираем 2D и жмем кнопку «Create». На этом подготовительная часть работ завершена
Интерфейс движка и иерархия проекта
После создания проекта он будет загружен в рабочее пространство Unity3D:

Само это рабочее пространство имеет модульную структуру и состоит из нескольких вложенных окошек, которые можно перемещать, как Вам удобно. У меня оно настроено так (слева направо и сверху вниз):
- Окно Hierarchy – отображает иерархическое положение активных и неактивных объектов на сцене. По умолчанию единственный объект, находящийся сразу в списке – Камера (Main Camera).
- Окно Scene – отображает всю игровую сцену и объекты на ней (в том числе, камеры, звуки, текстуры и т.п.).
- Окно Inspector – отображает все свойства выбранного в иерархии или на сцене объекта и позволяет их править, дополнять или удалять.
- Окно Game – отображает игровой мир, который виден в камеру и позволяет выбирать размер виртуального тестового окна игры в пикселях. Также, позволяет активировать разворачивание игрового окна в полный размер (Maximize on Play) и включать/отключать отображение различной информации для разработчика.
- Окна Project и Console. Окно Project служит для навигации по ресурсам проекта: загруженным изображениям, звукам, моделям и т.п. Также средствами данного окна (контекстное меню) Вы можете создавать новые пустые игровые объекты разных типов и скрипты. Окно же Console служит для вывода сообщений об ошибках (красным), предупреждений (желтым) и различной, запрошенной Вами отладочной информации (серым).
- Окно Assets Label – нижняя часть окна инспектора, в которой отображается превью выбранного в окне Project объекта или файла.
Кроме Всего вышеперечисленного, обратите свое внимание на три кнопки вверху по центру. Они позволяют запускать Ваш проект, ставить на паузу (иногда полезно при отладке чтобы посмотреть, что делается в Иерархии, например) и, соответственно, выключать.
Создавать мы будем симулятор музыкального инструмента: индийских народных барабанов под названием «табла», поэтому для начала работы создадим в проекте две пустые папки, в которых будут храниться звуки и картинки. Создать новую папку можно, вызвав контекстное меню в окне навигатора проекта (Project) и выбрав пункт «Folder» в списке «Create».
Здесь стоит сказать пару слов о том, как нужно называть эти папки. Для простой игры, вроде нашего симулятора, в принципе, папки можно «обозвать» как угодно, однако, имеется как минимум два названия, которые лучше не использовать, поскольку они зарезервированы движком. Это названия Resources и Plugins. В больших проектах папку Resources создают сразу и все игровые «запчасти» (картинки, звуки, модели, текстуры и префабы) складируют уже в нее (сортируя по подпапкам). В Plugins же, как следует из названия, сохраняются все дополнительные сторонние наборы функций (так называемые «ассеты» (assets)), которых имеется довольно много на Asset Store – магазине расширений для Unity3D.
Импорт файлов и создание игровых объектов
Перед созданием нового игрового проекта желательно заранее подготовить все нужные для его работы файлы. В нашем случае такими файлами являются картинки и звуки. Импортировать их в проект проще всего обычным перетаскиванием в нужную папку. Начнем с картинок…
После того, как изображения появятся в нашей папке Images их следует немного настроить:

Дело в том, что по умолчанию Unity3D все добавленные в проект картинки сжимает с потерей качества. Если такая потеря нам не нужна (особо актуально для игр с HD-графикой), то нам следует выбрать каждое изображение и в окне Инспектора изменить значение параметра «Format» с «Compressed» на «Truecolor» во вкладке «Default». Также может понадобиться изменить параметр «Max Size», если он меньше реальной ширины картинки (по умолчанию – 1024 пикселя). После всех изменений нужно не забыть нажать кнопку «Apply», чтобы применить их. Аналогичные действия при необходимости совершаем для всех остальных изображений.
Теперь, давайте создадим из наших картинок игровые объекты. Для этого достаточно просто перетащить нужное изображение в окно Hierarchy. Картинка или 3D-модель будут автоматически преобразованы в объект типа Game Object и отображены в начальной точке координат перед камерой.

Первым делом мы добавили фоновую картинку, которая должна у нас отображаться во весь экран. Проверить, так ли это, можно выделив в окне иерархии камеру и посмотрев на то, как отображается ее рамка. На скриншоте выше видно, что часть нашего фона остается вне обзора камеры, поэтому, нужно подстроить размер этого обзора при помощи перетаскивания рамки прямо на сцене или правки параметра «Size» в окне Инспектора. В нашем случае пришлось сменить значение по умолчанию (5) на 5.4.
Все, камеру больше не трогаем, а добавляем и настраиваем остальные картинки. При добавлении мы видим, что некоторые из них слишком большие для нашей игры. Уменьшить их можно либо физически в графическом редакторе, либо средствами движка. Попробуем последний способ. Для этого выделяем изображение в окне Иерархии, а в окне Инспектора изменяем значения «Scale» для координаты X и Y с 1 на 0.5 (то есть, уменьшаем вполовину). Там же желательно, во избежание накладок, присвоить всем игровым объектам (кроме фона) ненулевой порядок слоев (Order in Layer):

Последним шагом в подготовке игровых объектов из картинок будет «навешивание» на них коллайдеров (collider). В Unity3D коллайдеры используются в качестве детекторов взаимодействия между объектами. То есть, по сути, на нашу картинку надевается виртуальная оболочка, которая может регистрировать прикосновения к ней.
Чтобы добавить коллайдер на объект, выбираем его в окне Иерархии, а затем в окне Инспектора жмем кнопку «Add Component». В появившемся списке компонентов ищем Physics 2D (обычная 3D физика в нашем режиме не сработает) и там из всех вариантов нам больше всего подходит «Circle Collider 2D». Его и выбираем. Вокруг нашего объекта появится зеленая обводка, которая и отображает границы коллайдера. Осталось только отметить галочкой пункт «Is Trigger» чтобы наш коллайдер только регистрировал нажатия и больше никак не взаимодействовал с окружающим игровым пространством:

Аналогичные действия повторяем для всех оставшихся объектов. Отличаться от остальных объектов будет только наш фон. Для него мы применим Box Collider 2D и выставим Position Z больше нуля, чтобы задвинуть коллайдер и сам фон на задний план (это нам пригодится чуть позже).
Работа со звуком
Со звуком в Unity 3D на первый взгляд все обстоит несколько запутано. Но, попытаемся разобраться по порядку
Первым делом нам нужно перетащить все звуки в папку Sounds и тоже немного их настроить:

Если уровень громкости у всех звуков у Вас изначально отрегулирован, то все, что потребуется сделать, это отключить 3D-обработку звуков. В трехмерных играх эта обработка нужна для того, чтобы имитировать приближение источника звука при приближении к нему камеры. Но в 2D нам это ни к чему, поэтому выделяем по очереди каждый звук и снимаем у него галочку «3D Sound».
Теперь можем приступать к добавлению звуков к игровым объектам. Для этого нам нужно выделить по очереди каждую кнопку и добавить ей новый компонент «Audio Source» из раздела «Audio». Когда компонент будет добавлен, выбираем соответствующий кнопке «Audio Clip» и снимаем активную по умолчанию галочку «Play On Awake» (играть при появлении):

Когда все звуки будут прикреплены к нужным кнопкам, придет время для самого интересного – скриптинга…
Первый скрипт
Перед тем, как начать разбирать наш первый скрипт, наверное, стоит пару слов сказать о самой системе скриптинга в Unity 3D.
Юнити позволяет писать код сразу на трех языках: JavaScript (точнее, его немного модифицированной версии UnityScript), C# и Boo. В ряде книг и руководств можно встретить мнение, что для начинающих скриптинг в Unity проще осваивать на примере JavaScript. Однако, этот язык не настолько удобный, как остальные, и в будущем Вам, скорее всего, придется переучиваться. Поэтому, лучше сразу начать с изучения C# (Boo тоже неплох, но по нему мало обучающих материалов).
Теперь о том, где писать код. По умолчанию редактором кода в Unity 3D является IDE MonoDevelop. Преимущество этой среды разработки в том, что в ней имеются подсказки для быстрого ввода стандартных методов, классов и функций, а также система проверки синтаксиса. Однако, для меня минусом стала громоздкость и высокая ресурсоемкость. Благо, в настройках Unity можно установить в качестве текстового редактора, что угодно, поэтому я для себя «подвесил» легкий и функциональный Notepad++ (почти все примеры будут показаны в нем).
И последнее. Естественно, что без справочных материалов в освоении всех премудростей движка Вы далеко не уйдете, поэтому вот список из нескольких толковых Интернет-ресурсов по теме Unity 3D:
- http://docs.unity3d.com/ru/current/Manual/UnityManualRestructured.html – официальный мануал по движку с частичным переводом на русский язык (появился недавно и пока работает иногда нестабильно);
- http://docs.unity3d.com/ru/current/ScriptReference/index.html – официальный мануал-справочник по скриптингу на английском;
- http://unity3d.ru/distribution/index.php – русскоязычный форум разработчиков под Unity 3D;
- http://habrahabr.ru/post/141362/ – цикл уроков по созданию трехмерных игр на Хабрахабре;
- http://msdn.microsoft.com/ru-ru/library/618ayhy6.aspx – официальный справочник по C# от Microsoft на русском.
Ну и, чтобы долго не тянуть, предлагаю сразу создать первый скрипт. Под скрипты, если их много, лучше выделить отдельную папку, но у нас игра будет простенькая, поэтому мы можем создать скрипт прямо в корневой папке проекта. Для этого вызываем контекстное меню в окошке Project, выбираем список Create и жмем «C# Script». Назовем наш новый скрипт, например, Sounds и откроем его двойным щелчком мыши. Убрав стандартные методы Update и Start, а затем, прописав нужные получим следующий вид скрипта:

Если Вы не перенастраивали редактор, то наш скрипт будет открываться в MonoDevelop. Разберем его структуру…
Фактически каждый скрипт на C# состоит из трех основных частей:
- В самом верху перечисляются библиотеки, которые нужно подключить для работы скрипта (например, «using Unity.Engine» подключает работу самого движка, а «using System.Collections» – библиотеку, содержащую ряд встроенных классов для работы скрипта под разными системами).
- Объявление класса и переменных. В C# нет понятия скрипта, как такового. Вместо него используется понятие «класса», в который входит ряд методов и функций. Хотя, по сути, в контексте Unity 3D это практически одно и то же Главное помнить, что имя класса должно совпадать с именем, которое мы дали скрипту. Особенность же переменных в C# в том, что они обязательно (кроме временных, которые объявляются в самом скрипте) должны быть типизированы. На практике это означает, что для переменной должен быть указан уровень доступа (private или public) и тип (int, float, bool или, как у нас в скрипте, AudioClip. При этом имя переменной можно давать любое. А можно ей сразу и значение приписать.
- Набор методов и функций. Методом в C# называется практически любая функция, которая выполняет определенные действия. В принципе, в литературе по Unity 3D их и называют функциями, но, если мы говорим о C# как отдельном языке программирования, то это, таки, методы :). Функциями в чистом виде в Юнити являются, например, стандартные функции вывода звука, отрисовки элементов GUI и т.п., которые используются внутри методов.
Зная теперь структуру скрипта, нетрудно понять его смысл, который сводится к следующему… В классе (скрипте) Sounds мы объявляем 9 переменных типа AudioClip с нужными нам для удобства их различения именами. Делаем их обязательно публичными (приватные не будут отображаться в редакторе, а нам на них нужно будет «вешать» звуки именно через редактор). А затем в теле скрипта используем стандартный метод «void OnMouseDown()». Раньше он отвечал только за обработку клика мышью, но в новых версиях интерпретируется и как касание к сенсорному экрану. В нем пишем условия, по которым мы проверяем имена нажатых коллайдеров и, если обнаруживаем нажатие одного из них, выводим соответствующий звук (используем стандартную функцию audio.PlayOneShot();).
При написании кода внимательно следите за наличием всех открывающих и закрывающих скобок иначе будете постоянно получать отчеты об ошибках в Консоли и не сможете запустить свой проект вообще! Также обращайте внимание на использование в именах методов и функций заглавных букв. Они тоже часто бывают причинами ошибок. И, естественно, соблюдайте все знаки (точки, двоеточия и скобки), короче, синтаксис языка. Вначале будет трудно, но со временем Вы начнете писать с нуля без ошибок!
Когда скрипт будет готов, выделите его и в окне Инспектора назначьте каждой переменной свой звук. Теперь нам осталось только применить наш скрипт к объектам на сцене. Проще всего это сделать, опять же, посредством перетаскивания скрипта прямо на нужный игровой объект в списке Иерархии:

Если скрипт был перетащен правильно, то он должен появиться в окне Инспектора у того объекта, на который мы его перетащили. Соответственно, перетаскиваем скрипт на все объекты, которые должны звучать в игре и можем пробовать запускать ее. При нажатии по нашим игровым кнопкам теперь, наконец-то, будет звучать заданный звук!
Введение в GUI
В принципе, Игра у нас уже функционирует, но какая-то она слишком «лысая». Не хватает в ней чего-то… А, хотя бы, надписи с названием, что перед нами находится! Иными словами, нужно реализовать какой-нибудь внятный пользовательский интерфейс.
Собственно, GUI и есть сокращение от англ. «Graphical User Interface», то есть графический интерфейс пользователя. Традиционно он включает в себя такие компоненты, как:
- кнопки;
- окна;
- текстовые области;
- чекбоксы и/ил радиокнопки;
- слайдеры (полосы прокрутки) и т.п.
В Unity 3D Все это (и даже кое что сверх того) присутствует в полной мере. Главное, научиться им пользоваться! Рассмотрим, как средствами GUI в Юнити можно сделать простую надпись-заголовок.
Для этого создадим новый скрипт с именем Interface и изменим его следующим образом:

Рассмотрим внимательно скрипт на скриншоте. Здесь мы пишем всего одну публичную переменную нового для нас типа GUIStyle. Этот тип позволяет в визуальном режиме менять оформление элементов, к которым данный стиль приписан. Стили удобно использовать, если имеется много элементов интерфейса одного типа (например, кнопок), но у них должен быть разный вид.
В нашем примере далее мы используем стандартный метод «OnGUI()», который позволяет каждый кадр отрисовывать заданные в нем элементы интерфейса (вне метода они не работают и вызывают ошибку).
Далее мы создаем кнопку («GUI.Button»), которая имеет следующий синтаксис: условие – 4 координаты (отступ по горизонтали от левого края, отступ по вертикали от верхнего края, ширина, высота) – видимый текст в кавычках и далее, опционально, указание стиля. Внутри условия кнопки прописываются нужные функции. В нашем случае мы прописали переход на сайт разработчиков («Application.OpenURL(«»);»).
Скрипты с GUI могут работать с любых игровых объектов, но обычно их советуют «вешать» на камеру, что мы и сделаем, перетащив скрипт на объект Main Camera. Теперь, если его выделить в окне Иерархии, то в окне Инспектора мы сможем увидеть публичную переменную нашего стиля, развернув которую, получим полный доступ к настройкам этого стиля!
Мы можем указать цвет текста и текстуру для фона в любых ситуациях (для кнопки нужно прописать три ее варианта (Normal — обычный вид, Hover — при наведении и Active — при нажатии), задать отступы и настроить шрифт. По умолчанию единственным доступным в Unity 3D шрифтом является Arial, однако Вы можете вручную загрузить в проект любой другой и применить его в поле «Font», настроив все сопутствующие параметры.
Что интересно и одновременно не совсем удобно, элементы GUI не отображаются на сцене, пока мы не запустим проект, поэтому подгонка параметров каждого элемента может занять немало времени. Запустим проект и посмотрим, как будет выглядеть наша кнопка, созданная выше:

Изменение интерфейса по условию и статические переменные
Мы уже сделали многое, но улучшать всегда есть куда Поэтому предлагаю в качестве последнего примера создать окошко справки, которым обычно нормальные разработчики снабжают свои игры и приложения. Для этого добавим в папку с изображениями картинку для такой кнопки в виде знака вопроса и сделаем из нее игровой объект. Навесим на него коллайдер и напишем скрипт с именем, например, «Help» следующего содержания:

В данном скрипте у нас есть две переменные. Первая переменная определяет скин, который будет использоваться для всех элементов интерфейса, описанных в данном классе. В отличие от стилей, работу с которыми мы рассмотрели выше, скины позволяют изменять вид не только отдельного элемента, к которому они приписаны, а всех элементов определенного типа сразу. К тому же, в отличие от стилей, скины к элементам не прописываются, а объявляются сразу для всего метода и работают до тех пор, пока не будет объявлен еще один скин. Также следует помнить, что скины существуют не только в виде переменных, но и как отдельные файлы. Поэтому, перед объявлением скина нужно сразу создать его в окне «Project» из контекстного меню: «Create» – «GUI Skin».
Вторая переменная у нас логическая (или по-другому булева). Она может иметь только два значения: «истина» (true) или «ложь» (false). В силу своей бинарной природы такая переменная отлично подойдет для реализации всевозможных переключателей. В нашем случае, она будет отвечать за отображение текста с описанием нашей игры.
Однако, если посмотреть внимательно, то можно заметить, что у последней переменной есть один замечательный параметр – «static». Добавление к переменным такого параметра позволяет сделать их статическими и получать к ним доступ из других скриптов!
Но вернемся к остальному коду. Уже знакомый нам метод «void OnMouseDown()» здесь будет служить переключателем переменной «isVisible» при помощи простенького условия. Однако, после условия есть еще одна функция. Функция эта («Debug.Log();») служит для вывода «на лету» в Консоль значений нужных нам переменных (их мы вписываем без кавычек в скобках). Как видите, внутри функции можно совмещать как неизменяемый текст (пишется в кавычках), так и переменные (без кавычек). Главное, только чтобы между всеми данными был знак «+».
Далее по тексту скрипта у нас идет метод отрисовки интерфейса («void OnGUI(){}»), внутри которого мы видим объявление нового скина («GUI.skin = HelpSkin;») и нового элемента интерфейса типа GUI.Box. В отличие от кнопки, бокс является неактивным элементом и служит обычно для вывода различных текстовых или графических данных.
Обратите внимание на то, как мы задали позиционирование для бокса. Здесь все значения указаны не напрямую, а при помощи математических выражений, что, по сути, является аналогом «резиновой верстки» в веб-разработке. Проблема в том, что при указании точных размеров GUI-элементов при разных разрешениях экрана они не будут адаптироваться и могут быть либо слишком мелки ми, либо, наоборот, крупными. В следующей версии движка разработчики обещают сделать GUI адаптивными, но пока приходится извращаться 
Последним шагом на пути к успеху будет настройка нашего скина. В переменную скрипта указываем файл скина, а затем выделяем этот файл в окне проекта. Как и для других файлов, настройки скина будут отображены в окне Инспектора. Здесь ищем тот элемент, который подлежит изменению (в нашем случае Box), раскрываем его и настраиваем аналогично рассмотренному выше стилю:

Чтобы увидеть, правильно ли работает наш скрипт, запустим проект и попробуем нажать на кнопку справки:

Сейчас все работает, но не всегда удобно нажимать кнопку справки, чтобы обратно скрыть описание. Более привычно для исчезновения всяких уведомлений ткнуть в любое свободное место, чем целиться в кнопки. И вот здесь нам как раз и пригодится то, что мы сделали переменную «isVisible» статической, а также, навешенный на фоновую картинку коллайдер…
Вернемся к нашему самому первому скрипту («Sounds»), который отслеживал нажатия на кнопки для проигрывания звуков. В него (точнее, внутрь метода «void OnMouseDown()») нам достаточно будет прописать всего одну строчку:
if (this.name != «HelpButton»){Help.isVisible = false;}
Этой строчкой мы задаем условие: если имя нажатого коллайдера не равняется имени кнопки справки, то переменная «isVisible» в скрипте «Help» будет равняться «false». Только нужно чтобы переменная «isVisible» точно имела приписку «static», иначе получим ошибку.
Теперь при запуске мы увидим, что наше окно справки закрывается при нажатии не только на кнопку в правом верхнем углу, но и при касании к любой свободной части экрана. Единственное, что можно еще улучшить – сделать, чтоб окошко скрывалось и по нажатию на нем самом… Это будет Вашим «домашним заданием» Скажу только, что ГУИ-бокс нужно будет сменить на аналогично оформленную кнопку, опять же, с настройкой скина и прописыванием функции, изменяющей переменную «isVisible». Все, дальше молчу
Компиляция игры и сохранение проекта
Наконец, у нас все работает! Это означает, что пришло время сохранять нашу игру и тестировать на реальном устройстве. А для этого ее нужно скомпилировать в исполняемый файл (для Windows, например, в EXE, а для Android в APK).
Если Вы хотите скомпилировать игру для ПК, то Вам не придется производить никаких предварительных настроек. Однако, для Андроида нужно будет сначала подключить скачанный нами в самом начале Android SDK. Делается это довольно просто: идем в меню «Edit», вызываем пункт «Preferences» и в открывшемся окошке переходим на вкладку «External Tools». Здесь ищем строку «Android SDK Location» и в ней указываем путь к распакованному архиву с SDK (см. скриншот ниже). Кстати, здесь же можно сменить активный по умолчанию монструозный текстовый редактор MonoDevelop на свой любимый
И вот настал момент истины! Идем в меню «File» и ищем там пункт «Build Settings». В открывшемся окошке нам нужно будет сразу добавить сцены для сборки. Если сцена одна (как в нашем проекте), то для этого будет достаточно нажать кнопку «Add Current». Если же их несколько, то нужно будет открыть каждую из них и аналогичным образом внести в список сцен, а затем посредством перетаскивания настроить нужную их очередность:

Следующим шагом выбираем платформу сборки (мы планируем игру под Андроид, значит, его и выбираем) и жмем внизу кнопку «Player Settings». В окне Инспектора откроется ряд настроек из которых некоторые являются обязательными или очень желательными. К желательным относится указание названий компании-разработчика, программы и ее иконки (Company Name, Product Name и Default Icon, соответственно) в верхней части списка настроек.
В нижней же части в разделе «Other Settings» имеется два обязательных параметра: «Bundle Identifier» и «Bundle Version». Версия по умолчанию проставляется, как 1.0, а вот идентификатор придется создать вручную и, желательно, уникальный. Состоять он должен из трех частей, отделенных друг от друга точками: зарезервированное слово «com», затем название компании-разработчика, а в конце название самого приложения.
Остальные настройки сборки можете менять по своему усмотрению или не менять вовсе. Главное, что теперь компиляция уже сможет запуститься. Для этого достаточно нажать кнопку «Build» в окошке «Build Settings» и дождаться, пока программ выдаст нам готовое, упакованное в APK-файл приложение
Заключение
На этом наш урок-обзор по созданию простейших приложений для Андроид подходит к концу. Чтобы Вы могли повторить все, о чем мы говорили, в конце статьи я дам ссылку на архив, в котором будут храниться все ресурсы игры в виде отдельной папки (если захотите сделать все с нуля) и в виде файла с расширением unitypackage. Последний позволяет импортировать в Юнити сразу весь проект, включая зависимости и т.п.
Чтобы импортировать наш проект (и, кстати, любые плагины, скачанные из Интернета или Assets Store) нужно зайти в меню «Assets», выбрать пункт «Import Package», а в нем «Custom Packege», после чего указать путь к нашему файлу и нажать кнопку «Import». Кстати, сделать полный бекап своего проекта, с сохранением в такой unitypackage Вы можете из этого же меню («Assets») кликом по пункту «Export Package».
Вроде, все Как человек, который сам осваивал Unity 3D с нуля, в статье я постарался дать ответы на максимальное количество вопросов и осветить основные нюансы работы с движком, которые возникают на первых порах. Но, возможно, кому-то этого будет мало, поэтому, если у Вас возникнут вопросы, можете обращаться либо прямо ко мне на почту, либо на форуме: чем смогу – помогу!
Желаю всем удачи и успешной реализации всех проектов!
P.S. Разрешается свободно копировать и цитировать данную статью при условии указания открытой активной ссылки на источник и сохранения авторства Руслана Тертышного.
P.P.S. Если Вы не хотите вникать в тонкости программирования, но имеете желание создать собственную флеш-игру, советую ознакомиться с другим игровым движком – Stencyl:
https://www.bestfree.ru/soft/media/flash-games-creation.php